

Page 1

SDC3
HD Information Management System
PowerShare Package
HD INFORMA TION MANAGEMENT SYSTEM
SDC 3
Page 2

Page 3

Table of Contents
Warnings and Cautions ............................................................................................1
About Your Product ...................................................................................................2
SDC3 HD Information Management System ������������������������������������������������������������2
SDC3 Product Description ����������������������������������������������������������������������������������������2
SDC3 Intended Use �����������������������������������������������������������������������������������������������������2
SDC3 Indications ���������������������������������������������������������������������������������������������������������2
SDC3 Contraindications ��������������������������������������������������������������������������������������������3
PowerShare Integration Package (optional) �������������������������������������������������������������3
PowerShare Package Product Description �����������������������������������������������������������3
PowerShare Package Intended Use and Indications ������������������������������������������3
PowerShare Package Contraindications���������������������������������������������������������������3
Recommended Security Practices ��������������������������������������������������������������������������������4
System Overview .......................................................................................................6
Front Panel �����������������������������������������������������������������������������������������������������������������������������6
Rear Panel ������������������������������������������������������������������������������������������������������������������������������7
Setup ............................................................................................................................8
Basic Setup ������������������������������������������������������������������������������������������������������������������������� 10
Getting Started ....................................................................................................... 11
Starting the SDC3 System ��������������������������������������������������������������������������������������������� 11
Logging in as an Operator or Administrator ��������������������������������������������������������� 11
The Home Screen ������������������������������������������������������������������������������������������������������������� 11
Selecting a Surgeon Prole �����������������������������������������������������������������������������������������12
Creating Patient Cases ........................................................................................... 13
Creating a New Patient Case ���������������������������������������������������������������������������������������� 13
Accessing a Current Patient Case ������������������������������������������������������������������������������� 13
Loading Patient Information ���������������������������������������������������������������������������������������� 14
Finding ICD10 Codes ����������������������������������������������������������������������������������������������� 14
Importing ICD10 Codes ������������������������������������������������������������������������������������������ 15
Loading Patient Data with a Barcode Reader ��������������������������������������������������15
Viewing the Patient List ������������������������������������������������������������������������������������������16
Surgical Timeout Checklist Screens .................................................................... 17
Surgical Timeout Checklist Start Screen ������������������������������������������������������������������ 17
Surgical Timeout Checklist Verication Screen ����������������������������������������������������� 18
Surgical Timeout Checklist Summary Screen �������������������������������������������������������� 19
Capturing Images and Videos .............................................................................. 19
Capturing Images and Video from a Single Channel ������������������������������������������ 19
To Record Video �������������������������������������������������������������������������������������������������������� 19
Page 4

To Stream Live Video ����������������������������������������������������������������������������������������������� 20
To Capture Images ��������������������������������������������������������������������������������������������������� 20
To Print Captured Images �������������������������������������������������������������������������������������� 20
Additional Functions�����������������������������������������������������������������������������������������������20
Recording Picture-in-Picture Images and Video ���������������������������������������������������21
Synchronized Video Recording of Dual Channels ������������������������������������������������ 22
Independent Video Recording of Dual Channels �������������������������������������������������23
The Flip Screen ������������������������������������������������������������������������������������������������������������������ 24
Editing Patient Information ������������������������������������������������������������������������������������������ 24
Applying Device Presets ������������������������������������������������������������������������������������������������ 25
Device Presets Settings ......................................................................................... 27
Video Settings ......................................................................................................... 28
Video Settings: Channel 1 ��������������������������������������������������������������������������������������������� 28
Video Settings: Channel 2 ��������������������������������������������������������������������������������������������� 29
Video Settings: Picture-in-Picture ������������������������������������������������������������������������������ 30
Video Settings: Picture-By-Picture ����������������������������������������������������������������������������� 31
Video Settings: On-Screen Display ����������������������������������������������������������������������������31
Printer Settings ....................................................................................................... 32
Printer Settings: Page Layout ���������������������������������������������������������������������������������������32
Printer Settings: Advanced ������������������������������������������������������������������������������������������� 33
Saving Images and Videos .................................................................................... 34
Selecting the Save Location ����������������������������������������������������������������������������������������� 35
Connecting the iPad® to the SDC3 ����������������������������������������������������������������������� 35
To save to disc (CD or DVD) ����������������������������������������������������������������������������������� 36
To save to a USB drive or iPad ������������������������������������������������������������������������������� 36
To save to a Network location ������������������������������������������������������������������������������ 37
Other functions �������������������������������������������������������������������������������������������������������� 37
Saving to a Network ����������������������������������������������������������������������������������������������� 37
Saving to an EMR Server ���������������������������������������������������������������������������������������� 38
Saving Case Information to PowerShare ����������������������������������������������������������� 38
Save Settings ���������������������������������������������������������������������������������������������������������������������39
Advanced Save Settings ������������������������������������������������������������������������������������������������ 40
Playback of Images and Videos ........................................................................... 41
Playback of Recorded Images ��������������������������������������������������������������������������������������42
Adding Image Annotations ����������������������������������������������������������������������������������� 43
Playback of Recorded Videos ��������������������������������������������������������������������������������������� 44
Viewing Archived Information ............................................................................. 45
Viewing Information Archived on the Hard Disk ��������������������������������������������������46
Viewing Information Archived on a USB Drive ������������������������������������������������������ 47
Viewing Information Archived on a Disc ����������������������������������������������������������������� 47
Page 5

Viewing Information Archived on the Studio3 Media Server �������������������������� 48
Viewing Information Archived on the PowerShare Cloud Server ������������������48
SDC3 Settings .......................................................................................................... 49
General Settings ��������������������������������������������������������������������������������������������������������������� 49
General Application Settings ������������������������������������������������������������������������������� 49
General Miscellaneous Settings ��������������������������������������������������������������������������� 51
Setting Up Access Control ��������������������������������������������������������������������������������������52
Setting Up the Surgical Timeout Checklist ������������������������������������������������������������� 53
General Audio Settings ������������������������������������������������������������������������������������������� 54
Printer Settings �����������������������������������������������������������������������������������������������������������������55
Network Settings��������������������������������������������������������������������������������������������������������������56
Network FTP Settings ���������������������������������������������������������������������������������������������� 56
SDC3 Networking Setup ����������������������������������������������������������������������������������������� 56
Network Adapter Settings ������������������������������������������������������������������������������������� 58
WiFi Network Connection �������������������������������������������������������������������������������������� 59
Authentication ��������������������������������������������������������������������������������������������������������� 60
Wireless IP Settings �������������������������������������������������������������������������������������������������� 61
Manage Networks ��������������������������������������������������������������������������������������������������� 61
Network Streaming Settings ��������������������������������������������������������������������������������� 62
Network Share Settings ������������������������������������������������������������������������������������������ 63
Proles Settings ���������������������������������������������������������������������������������������������������������������� 64
Creating a New Surgeon Account ������������������������������������������������������������������������65
Modifying a Selected Prole ���������������������������������������������������������������������������������� 66
System Settings ���������������������������������������������������������������������������������������������������������������� 71
Date and Time Settings ������������������������������������������������������������������������������������������ 71
System Log Settings ������������������������������������������������������������������������������������������������ 72
System Language Settings ������������������������������������������������������������������������������������ 73
System Data Protection Settings ������������������������������������������������������������������������� 74
Server Settings ........................................................................................................ 75
Studio3 Server Settings ������������������������������������������������������������������������������������������������� 75
Selecting Fields for Cases Saved on the Studio3 Server ���������������������������������� 76
Studio3 Networking Setup ������������������������������������������������������������������������������������ 76
DICOM Server Settings ���������������������������������������������������������������������������������������������������77
Stryker Link Server Settings �����������������������������������������������������������������������������������������78
Cloud Settings �������������������������������������������������������������������������������������������������������������������78
PowerShare Integration ������������������������������������������������������������������������������������������������� 78
Save Settings for PowerShare �������������������������������������������������������������������������������������� 79
EMR Integration Settings ����������������������������������������������������������������������������������������������81
Troubleshooting ..................................................................................................... 82
Electromagnetic Compatibility ............................................................................ 84
Cleaning and Maintenance ................................................................................... 87
Page 6

Symbols .................................................................................................................... 88
Technical Specications ........................................................................................ 89
Page 7

1
Warnings and Cautions
Please read this manual and follow its instructions carefully� The words warning, caution,
and note carry special meanings and should be carefully reviewed:
• Warning: Indicates measures to avoid potential serious injury to the user and the
patient and/or damage to this device�
• Caution: Indicates risks to the equipment� Failure to follow cautions may result in
product damage�
• Note: Provides special information to clarify instructions or present additional useful
information�
1� Caution: Federal law (United States of America) restricts this device to use by, or on order of,
a physician�
2� Read this operating manual thoroughly and be familiar with its contents prior to setting up
or using this equipment�
3� Carefully unpack the unit and check for any damage that may have occurred during
shipment� If damage is detected, contact your Stryker representative�
4� Use of this device is restricted to qualied health care professionals who have a complete
knowledge of the use of this equipment and the devices to which it can be connected�
5� Test this equipment prior to using it in a surgical procedure� This unit was fully tested at the
factory before shipment; however, it must be tested for proper function in the environment
and setup conguration in which it will be used�
6� To avoid risk of electric shock, use only a hospital-grade power cord furnished with the
unit� Disconnect the unit from the power supply to make connections or to inspect the
equipment�
7� To avoid the risk of electric shock, this equipment must only be connected to a supply mains
with protective earth�
8� Do not position the console so that it is dicult to disconnect the power cord from the
supply mains�
9� Install this device in an operating room that complies with all applicable IEC, CEC, and NEC
requirements for safety of electrical devices� Any installation or connection with other
devices shall be evaluated for electrical safety according to the IEC 60601-1 standard�
10� Use only clean, dry, undamaged Stryker brand media� The use of damaged, wet, or
incompatible media will void the warranty and may result in the malfunctioning of this
equipment�
11� Make sure that all equipment connected to the SDC3 is properly grounded (and isolated, if
required)�
12� To avoid risk of re, do not use this device in the presence of ammable anesthetics�
13� Avoid direct exposure to the laser beam of the DVD/CD drive as it may harm the eyes�
14� Pay close attention to the care and cleaning instructions in this manual� Failure to follow
these instructions may result in product damage�
15� Do not modify this equipment without authorization of the manufacturer�
Page 8

2
16� Attempt no internal repairs or adjustments not specically detailed in this operating manual�
Refer any adjustments, modications, and/or repairs to Stryker Endoscopy or its authorized
representatives�
17� This equipment complies with FCC radiation exposure limits set forth for an uncontrolled
environment� This equipment should be installed and operated with minimum distance 20
cm between the radiator and your body�
The Stryker Standard Warranty and Return Policy (1000401175) is void if any of these warnings or
cautions are disregarded�
About Your Product
This manual covers the functionality of the SDC3 HD Information Mangagement System
(0240060100), and the optional PowerShare Integration Packages (0240060555, 0240060556,
0240060557)�
SDC3 HD Information Management System
SDC3 Product Description
The SDC3 is a computer-based unit that records, manages, and archives digital images and videos
of surgical procedures� The SDC3 simplies le management by recording surgical photos and
videos to compact digital media, such as CDs, DVDs, Compact Flash Cards, USB Hard Drive, or
USB storage devices, which can then be viewed from a personal computer, a DVD player, or from
the SDC3 itself� The SDC3 records images and videos on a built-in hard drive, where they can be
easily accessed after the surgical procedure� The media stored on the hard drive can be tagged
with patient-specic information and burned to digital media using a touchscreen control panel
located on the front of the unit� This media can also be sent at the push of a button to the Studio3
Media Server for long-term storage and browser-based accessibility�
SDC3 Intended Use
The SDC3 is intended to electronically capture, transfer, store and display medical device
data independently of the functions or parameters of any connected medical device� It is also
intended to convert medical device data from one format to another in accordance with preset
specications� The SDC3 is intended for use as a secondary display for regulated medical devices
and is not intended to calculate or modify any received data or provide primary diagnosis or
treatment decisions� It is not intended for use for active patient monitoring�
The SDC3 is a non-sterile reusable device not intended for use in the sterile eld� The SDC3 is
intended for use by qualied physicians and qualied operating room personnel who have
complete knowledge of surgical procedures�
SDC3 Indications
The SDC3 is indicated for use with compatible endoscopic and general surgery devices� The SDC3
can be used in general laparoscopy, nasopharyngoscopy, ear endoscopy, sinuscopy, and plastic
Page 9

3
surgery wherever a laparoscope/endoscope/arthroscope is indicated for use�
A few examples of the more common endoscopic surgeries are laparoscopic cholecystectomy,
laparoscopic hernia repair, laparoscopic appendectomy, laparoscopic pelvic lymph node
dissection, laparoscopically assisted hysterectomy, laparoscopic and thoracoscopic anterior spinal
fusion, anterior cruciate ligament reconstruction, knee arthroscopy, shoulder arthroscopy, small
joint arthroscopy, decompression xation, wedge resection, lung biopsy, pleural biopsy, dorsal
sympathectomy, pleurodesis, internal mammary artery dissection for coronary artery bypass,
coronary artery bypass grafting where endoscopic visualization is indicated, and examination of
the evacuated cardiac chamber during performance of valve replacement�
SDC3 users are general surgeons, gynecologists, cardiac surgeons, thoracic surgeons, plastic
surgeons, orthopedic surgeons, ENT surgeons, and urologists�
SDC3 Contraindications
There are no known contraindications�
PowerShare Integration Package (optional)
PowerShare Package Product Description
The SDC3 PowerShare Package (0240060555, 0240060556, 0240060557) is an accessory to the
SDC3 HD Information Management System (0240060100)� The PowerShare Package enables the
SDC3 to save case images to a facility’s PowerShare Network�
The SDC3 PowerShare Package is available in 3 tiers:
• Basic: (0240060555)
• Intermediate (0240060556)
• Enterprise (0240060557)
PowerShare Package Intended Use and Indications
The SDC3 Powershare package is intended to be used as an optional software accessory package
to the SDC3 HD Information Management System (SDC3)� The SDC3 PowerShare package allows
surgeons/medical personnel to save case images from SDC3 to the facility’s PowerShare Network�
PowerShare Package Contraindications
There are no known contraindications�
Page 10

4
Recommended Security Practices
The following security practices protect patient health information (PHI) archived on the device
from data security threats� Stryker strongly recommends that all customers enable the following
security practices�
Access Control Enable account access controls through the “Active Directory
Authentication” feature; assign passwords for both Administrators
and Operators (see the Setting Up Access Control section)�
If “Active Directory Authentication” is not enabled, assign
passwords for both Administrator and Operator user levels�
Limit device access to authorized users per hospital policy (e�g�
limit access to the protected health information (PHI) archived
on the device by abiding the account’s physical, technical and
administrative safeguards)�
Authentication and
Encryption (when
connecting to the
hospital’s network)
Connect the device through a secure hospital network, preferably
WPA2 AES (PEAP-MSCHAP v2 authentication), using AES
encryption� Note: this section is also repeated under Technical
Specication�
External storage devices Limit transfer of data from the device as well as the use of external
storage devices per the account’s data privacy policy� (e�g� limit
data transfer from the device to external storage devices provided
by the account with encryption and password protection levels
approved by account)�
Follow the account’s policy regarding custody and control of
external storage devices (i�e� limit controls of external transfer
devices to a designated group within the account; do not allow
employees to leave the account with external storage devices
containing PHI�)
Data Security and
Encryption options
(at rest)
Disable the “Patient Data Export” option when transferring
archived cases from the device to external media� Go to the Save
Settings screen and uncheck “External Media Options� (see the
Save Settings section)�
If “Patient Data Export” capability is activated, enable the
“Encryption” option when transferring and storing archived data to
external media� (see the Save Settings section)�
Page 11

5
Data Security During
Repair
When returning the device to Stryker for repair, remove all PHI,
per Stryker policy� See contract for terms of agreement� Contact a
Stryker sales representative to request a Stryker factory restore�
If transferring the device with archived PHI, anonymize the data
before transit� Go to Settings >System > Data Protection (see the
System Data Protection Settings)�
Saving les to the Network Always select secure transmission of data to the network� (see the
Saving to Network section)�
Log Out Always log out manually from the device once the procedure is
complete� Warning: the device does not contain an automatic log
o feature�
Software Updates Install software updates provided by Stryker as they are released�
Page 12
6
System Overview
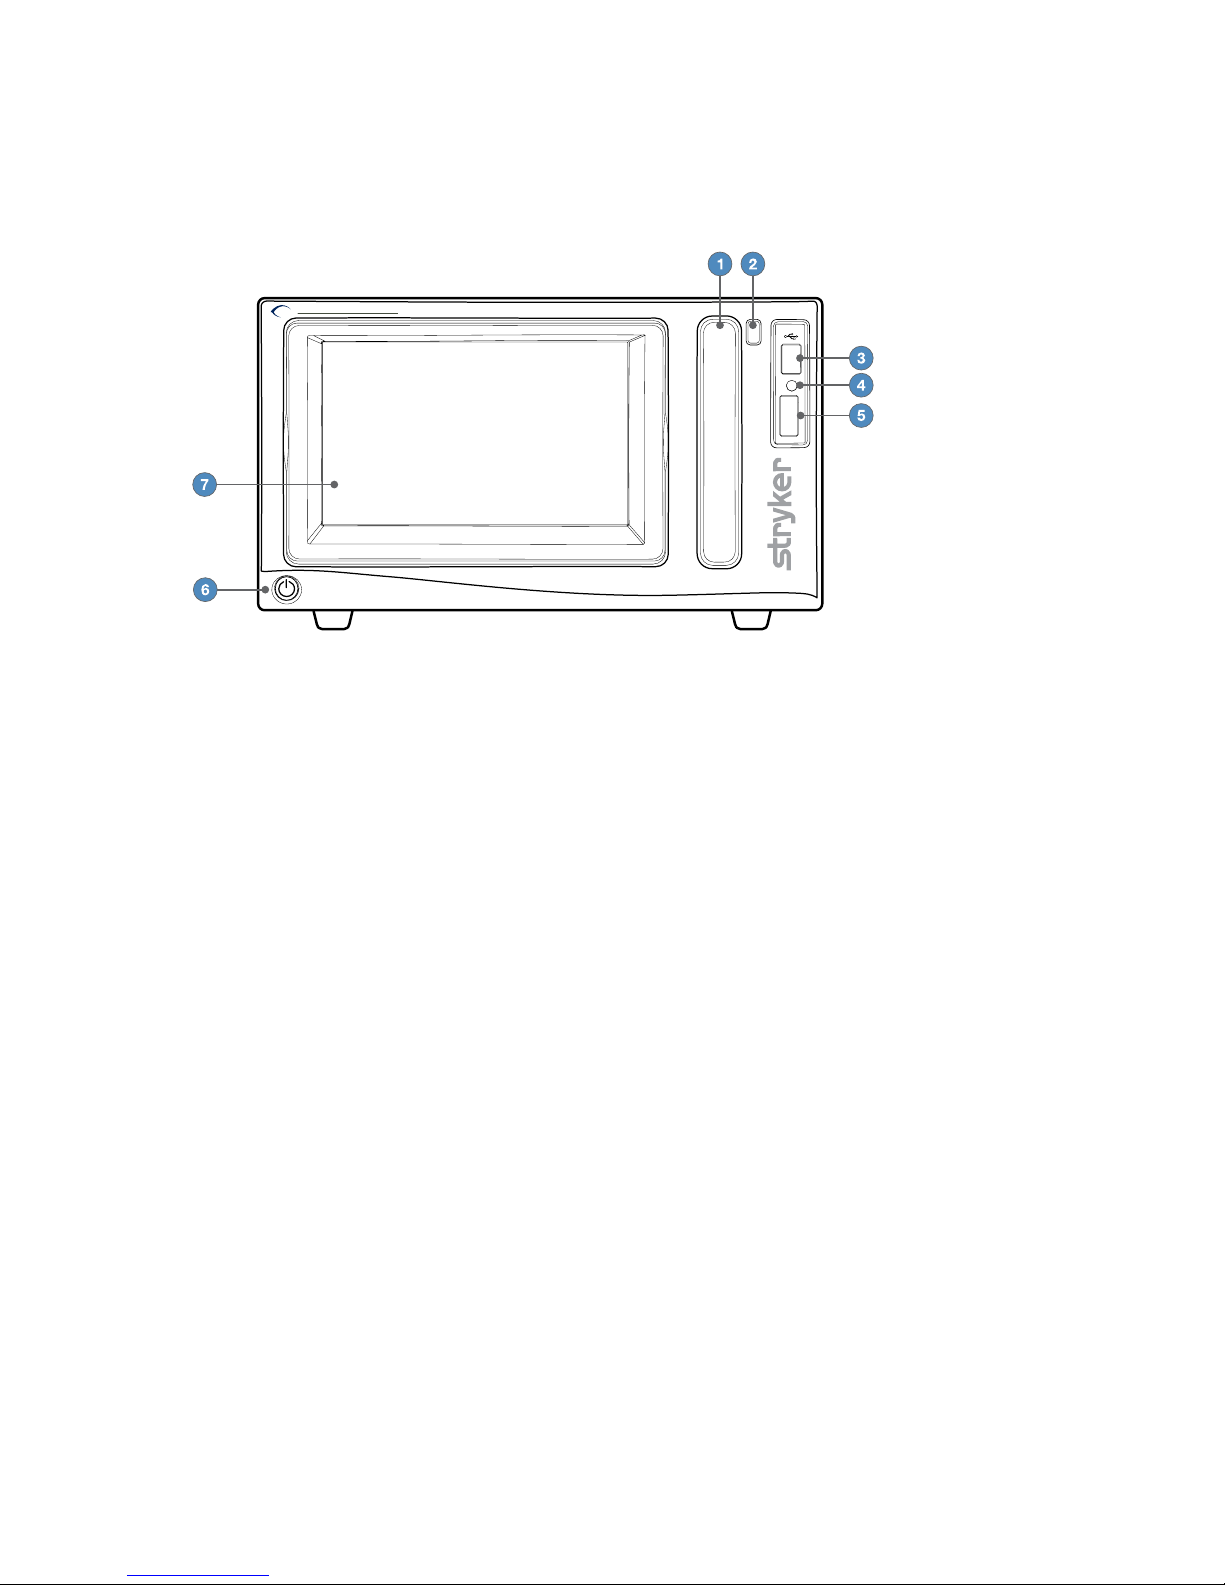
Front Panel
HD INFORMA TION MANAGEMENT SYSTEM
SDC 3
1� CD/DVD Drive
2� Eject button for CD/DVD Drive
3� USB Port
4� Token LED (for use with WiSe Receiver)
5� Token Slot (for use with WiSe Receiver)
6� Power Button
7� LCD Touchscreen
Note: SDC3 les are not readable on the SDC UItra. but SDC Ultra les can be read on SDC3.
Page 13
7
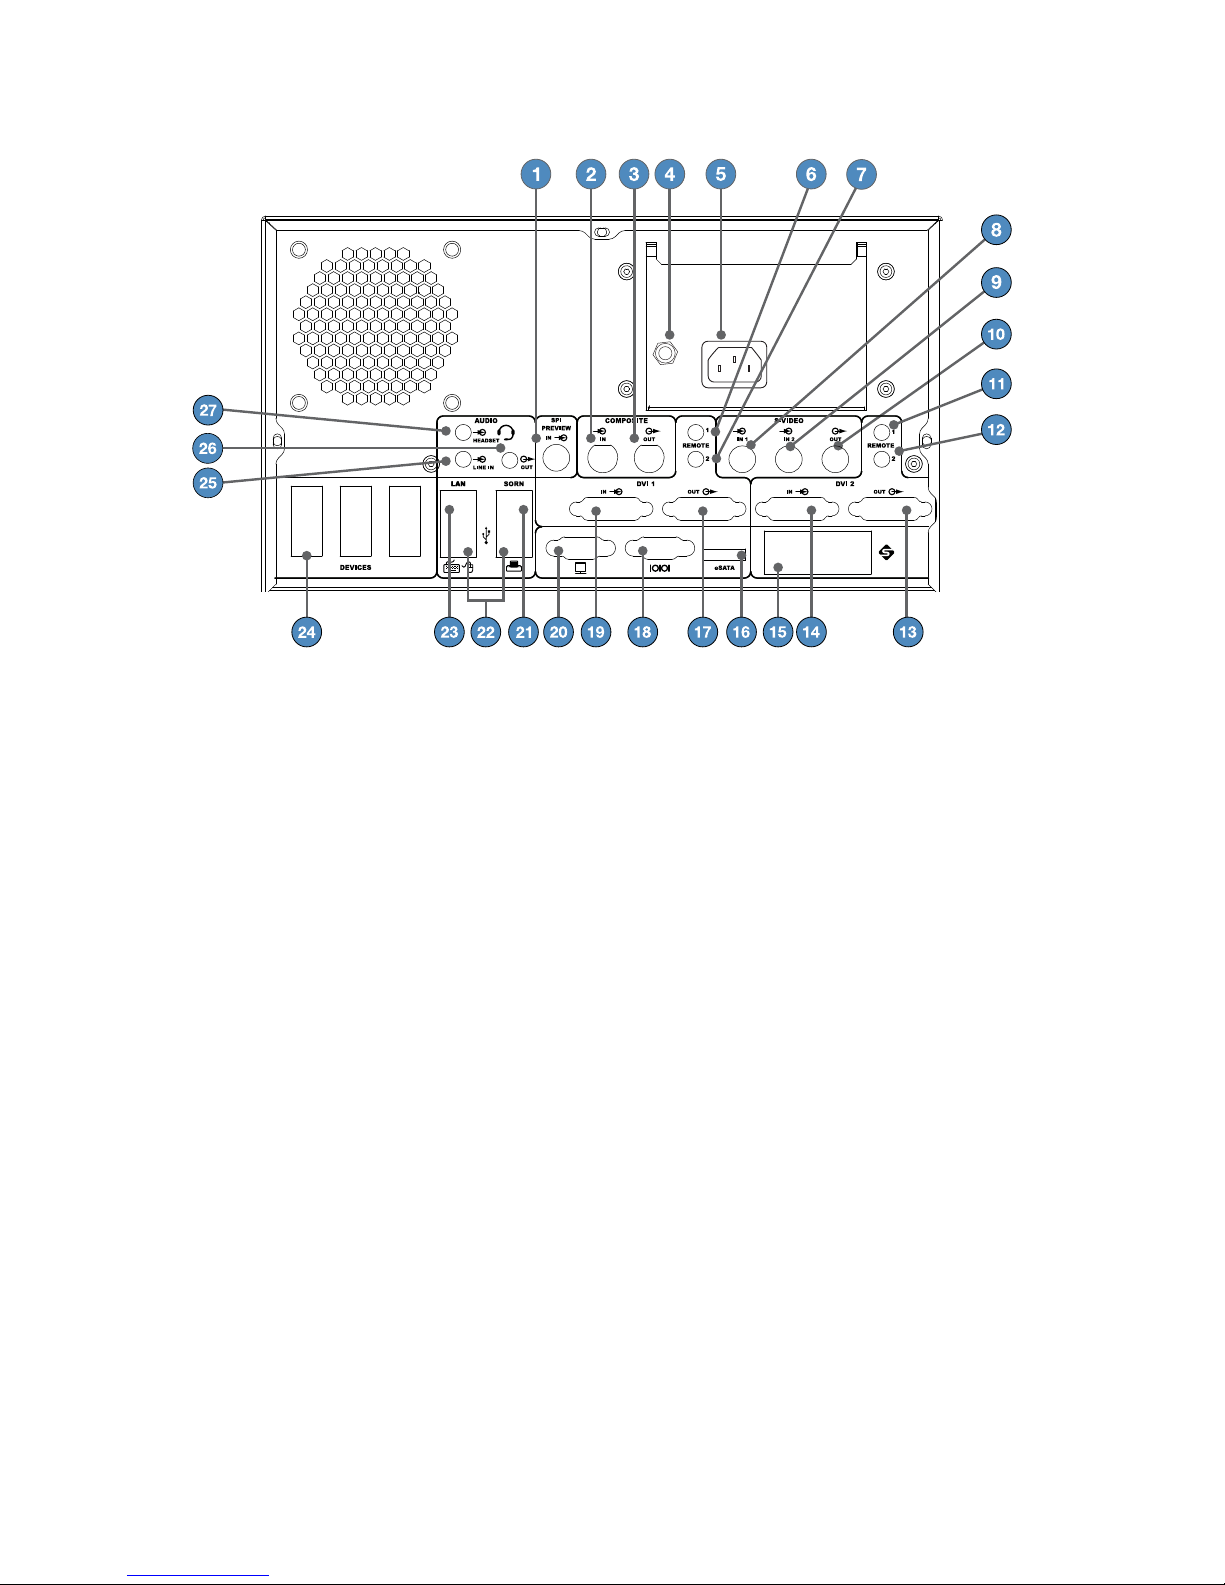
Rear Panel
1� SPI Preview – SPI Input (For future use)
2� Comp In – Composite Video Input
3� Comp Out – Composite Video Output
4� Equipotential Ground Plug – For
connection to an external protective
earthing system as described in the IEC
60601-1 Electrical Safety standard
5� AC Power Inlet
6� Primary R1 – Remote connection for
capture control on the primary channel
7� Primary R2 – Remote connection for
recording control on the primary
channel
8� S-Video IN1 – S-Video Input 1
9� S-Video IN2 – S-Video Input 2
10� S-Video Out – S-Video Output
11� Secondary R1 – Remote connection for
capture control for secondary channel
12� Secondary R2 – Remote connection for
recording control for secondary channel
13� DVI 2 Out – Secondary Channel DVI
Output
14� DVI 2 In – Secondary Channel DVI Input
15� SFB Connector Ports – Enables Firewire
connection with Stryker Firewire devices
16� eSATA – Compatible eSATA Cable Port (For
future use)
17� DVI 1 Out – Primary Channel Output
18� Serial Port
19� DVI 1 In – Primary Channel Input
20� VGA
21� SORN – RJ45 SORN Port
22� USB Ports for mouse, keyboard, printer
23� RJ45 Port – Network Port
24� Devices – Stryker Devices Port
25� Line-In – Audio Input
26� Line-Out – Audio Output
27� Headset – Audio In/Headset Out
Page 14
8
Setup
Stryker Endoscopy considers instructional training an integral part of the SDC3 system� Your
Stryker Endoscopy sales representative will perform at least one in-service at your convenience
to help you set up your equipment and instruct you and your sta on its operation and
maintenance� Please contact your local Stryker Endoscopy representative to schedule an inservice after your equipment has arrived�
1� Choose a location for the SDC3
• Place the SDC3 on a Stryker cart or other sturdy platform�
• Provide a minimum of 4 to 6 inches of space around the sides and top of the SDC3� This
allows for sucient ventilation and access to the power cord�
Warning
RF and other mobile communications equipment may aect the normal function
of the SDC3� When placing the SDC3, follow the instructions located in the
“Electromagnetic Compatibility” section of this manual�
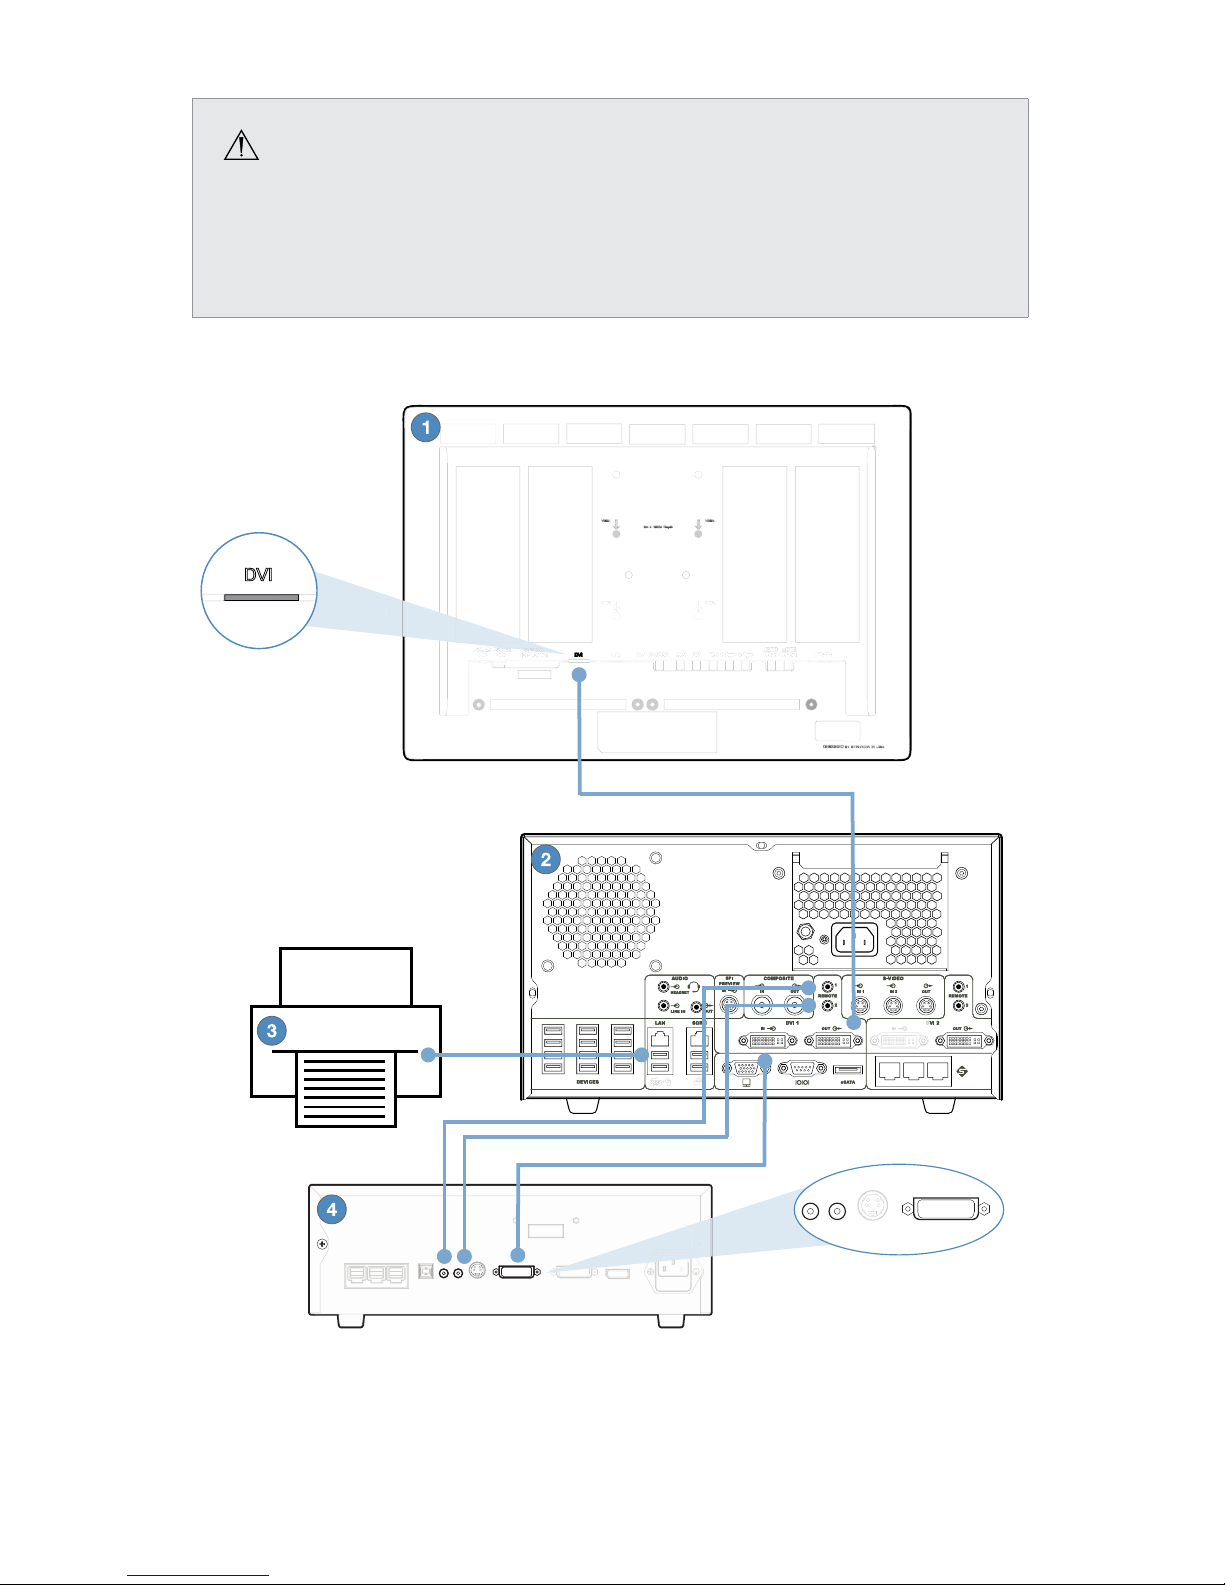
2� Connect peripheral devices according to the interconnection diagram on the following
pages�
Warnings
• Connect only devices that have been specied as part of, or compatible with, the
SDC3 system�
• When the SDC3 is interconnected with other electrical devices, leakage currents
may be additive, resulting in electromagnetic emissions that can interfere
with the normal function of electronic medical equipment� To properly control
electromagnetic emissions and avoid potential harm to the patient or user,
ensure all electrical devices are installed and interconnected according to the
requirements of IEC 60601-1 and IEC 60601-1-1�
• When installed inside the patient environment, represented by an area 1�5
meters from the patient in all directions, the printer must be connected to
an isolation transformer prior to use� Recent Stryker carts include isolation
transformers and printers can be installed without the use of an additional
transformer� Please contact your Stryker Endoscopy sales representative to
determine if your cart includes this feature�
Page 15
9
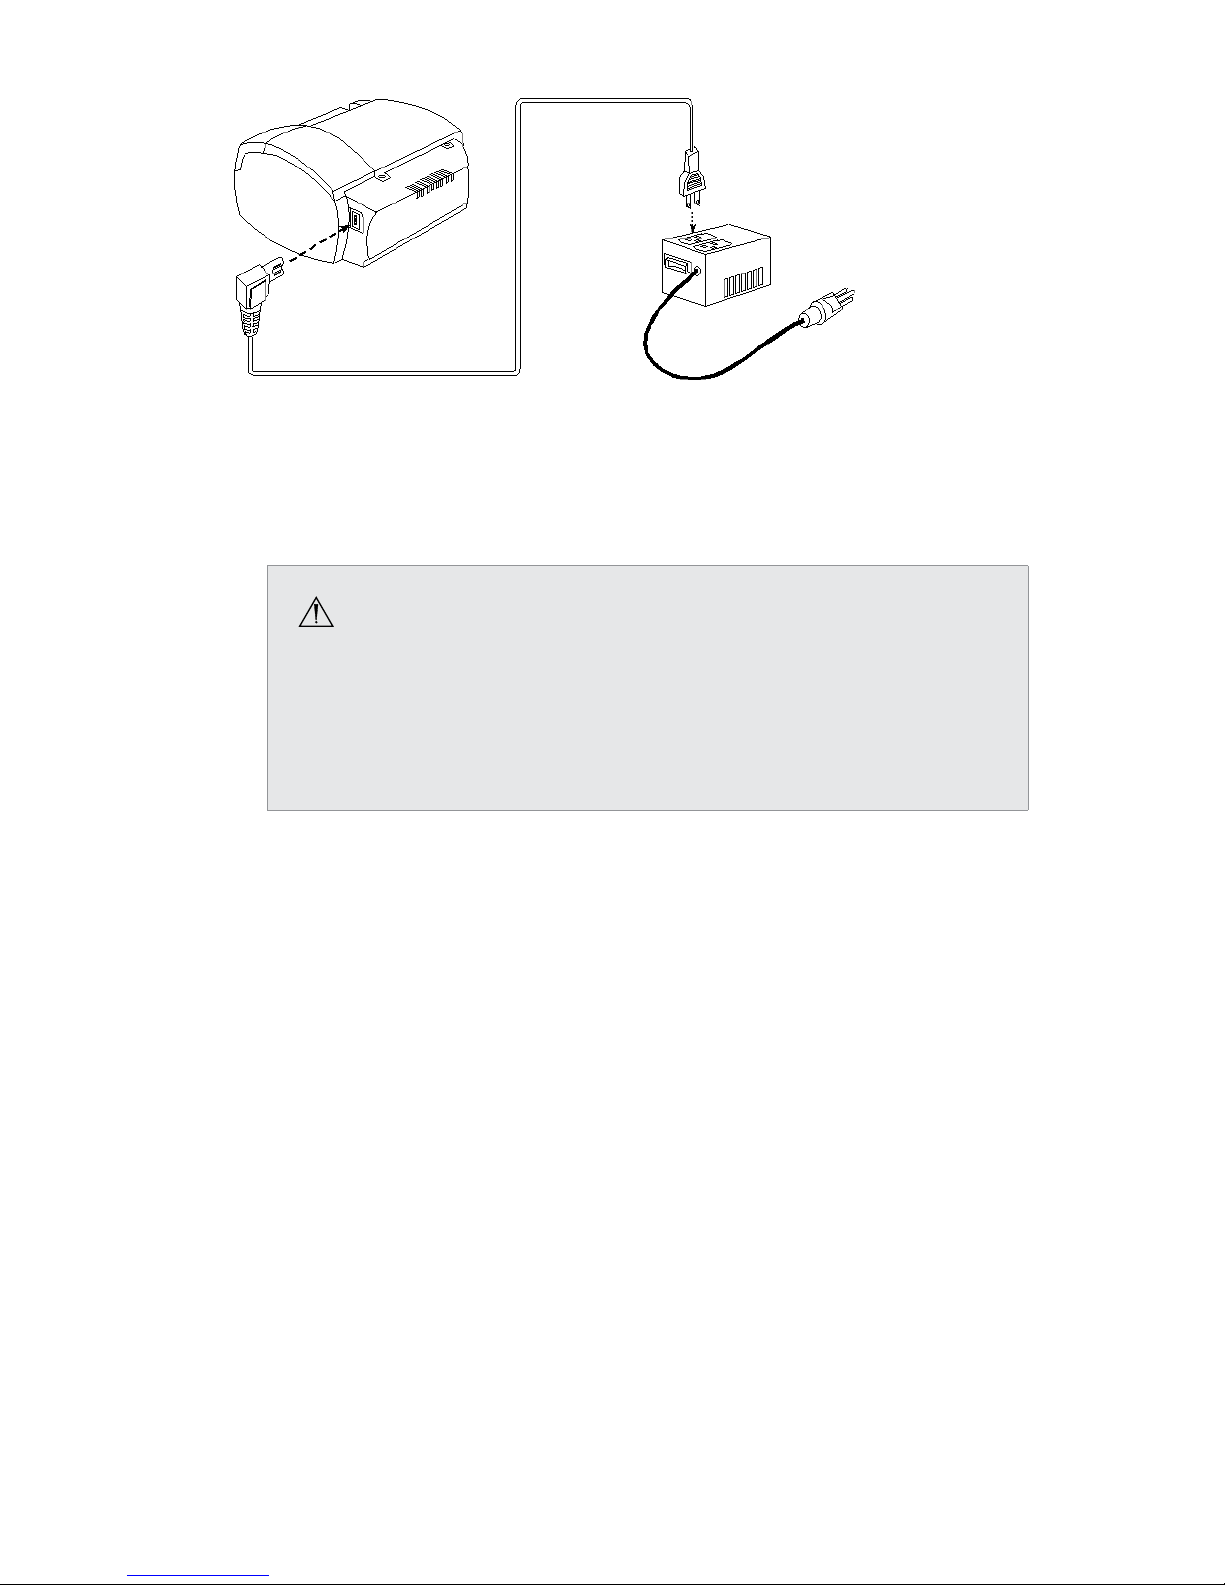
3� Connect the AC power�
• Connect the provided hospital power cord to the AC inlet on the rear console panel�
• Connect the other end to a hospital-grade power outlet�
• Use a hospital power cord, part number 0105033001 or part number 0105150027�
Warning
• Check the power cord assembly periodically for damaged insulation or
connectors�
• To avoid risk of electric shock, this equipment must only be connected to a
supply mains with protective earth�
4� (Optional) Connect the equipotential ground probe to an equipotential bus bar (if available)�
The ground probe is provided to make sure all devices installed on the cart are connected
to the same ground potential� Make sure all connections are made according to the
requirements of IEC 60601-1�
5� (Optional) Connect the SDC3 to the WiSe Receiver�
• Insert the LED token provided with the WiSe receiver into the token slot on the front of
the SDC3 console according to the sequence of steps described in the WiSe receiver user
guide�
• When the LED light is o, no link is active, and the token can be inserted to begin
synchronization�
• When the LED light is green, the link is active, and it is okay to remove the token�
• When the LED light is amber, the system is busy and the token should not be inserted or
removed�
Note: The SDC3 can only be linked to one WiSe Receiver.
6� (Optional) Connect the SDC3 to the SYNK Transmitter�
• Connect a SIDNE cable to the RS232 port at the back of the SYNK transmitter�
• Connect the other end of the SIDNE cable to one of the Devices USB ports at the back of
the SDC3�
• From the Current Case > Controls screen, go to the Transmitter tab�
• Press the Link button to link the SYNK transmitter and the SDC3� All controls for the
transmitter are now available through the SDC3 touchscreen�
Page 16
10
Warning
In the event of power loss, all DVI output signals routed from the SDC3 to the surgical
display will be lost� Analog signals (RGBHV, S-Video, Composite) will not be aected
by power loss, and can therefore be used as backup video signals if they have been
connected prior to power loss�
Basic Setup
1� Monitor 3� Printer
2� SDC3 4� Camera Control Unit
Page 17

11
Getting Started
Starting the SDC3 System
1� Press the power button located at the bottom left corner of the front panel to set the power
to ON�
2� As the system starts up, the SDC3 shows the welcome screen�
3� The version of the SDC3 software shows under the SDC3 logo�
4� Loading progress shows at the bottom of the screen�
5� To shut down the system, press the power button again�
Logging in as an Operator or Administrator
If the SDC3 has Access Control enabled, you must log in when the SDC3 starts up�
1� If you have Administrator permission, check the Administrator box�
2� Enter your name in the Operator Name eld�
3� Enter the password in password eld�
4� Press the LOGIN button� After successful log in, the system shows the Home screen�
The Home Screen
After the SDC3 starts up, the Home Screen displays� The Home Screen has links to the primary
functions of the SDC3� From the Home Screen, you can:
• Start a new patient case
• Access current patient cases
• Access archived patient information
• Load patient information into the system
• Adjust system settings
• Change surgeon proles
• Change operators (if Access Control is enabled)
1� Press the SETTINGS
button to go to the SDC3 Settings screens�
2� Press the NEW CASE
button to start a new patient case�
• If a patient case has already been started, but there is no data saved to that case,
the system asks, “Do you wish to discard the current case?”
• If a patient case has already been started, and there is data saved to that case, the
system asks, “Do you wish to create a new case?”
• Press EXIT
to go back to the Home screen� Press OK
to go to the New
Case screen�
3� Press the CURRENT CASE button to go to the Current Case screen�
4� Press the ARCHIVE button to go to the Archived Cases screen, which shows cases that
have been saved to the SDC3, a USB storage device, a disc, or the Studio3 media server�
5� Press the LOAD PATIENT INFO button to go to the Patient Info screen and preload
patient information before surgery�
Page 18
12
6� Press the LOG OFF button to change operators (if Access Control is enabled)�
7� Press the CHANGE PROFILE button to choose a dierent prole� The Prole screen
shows the available proles�
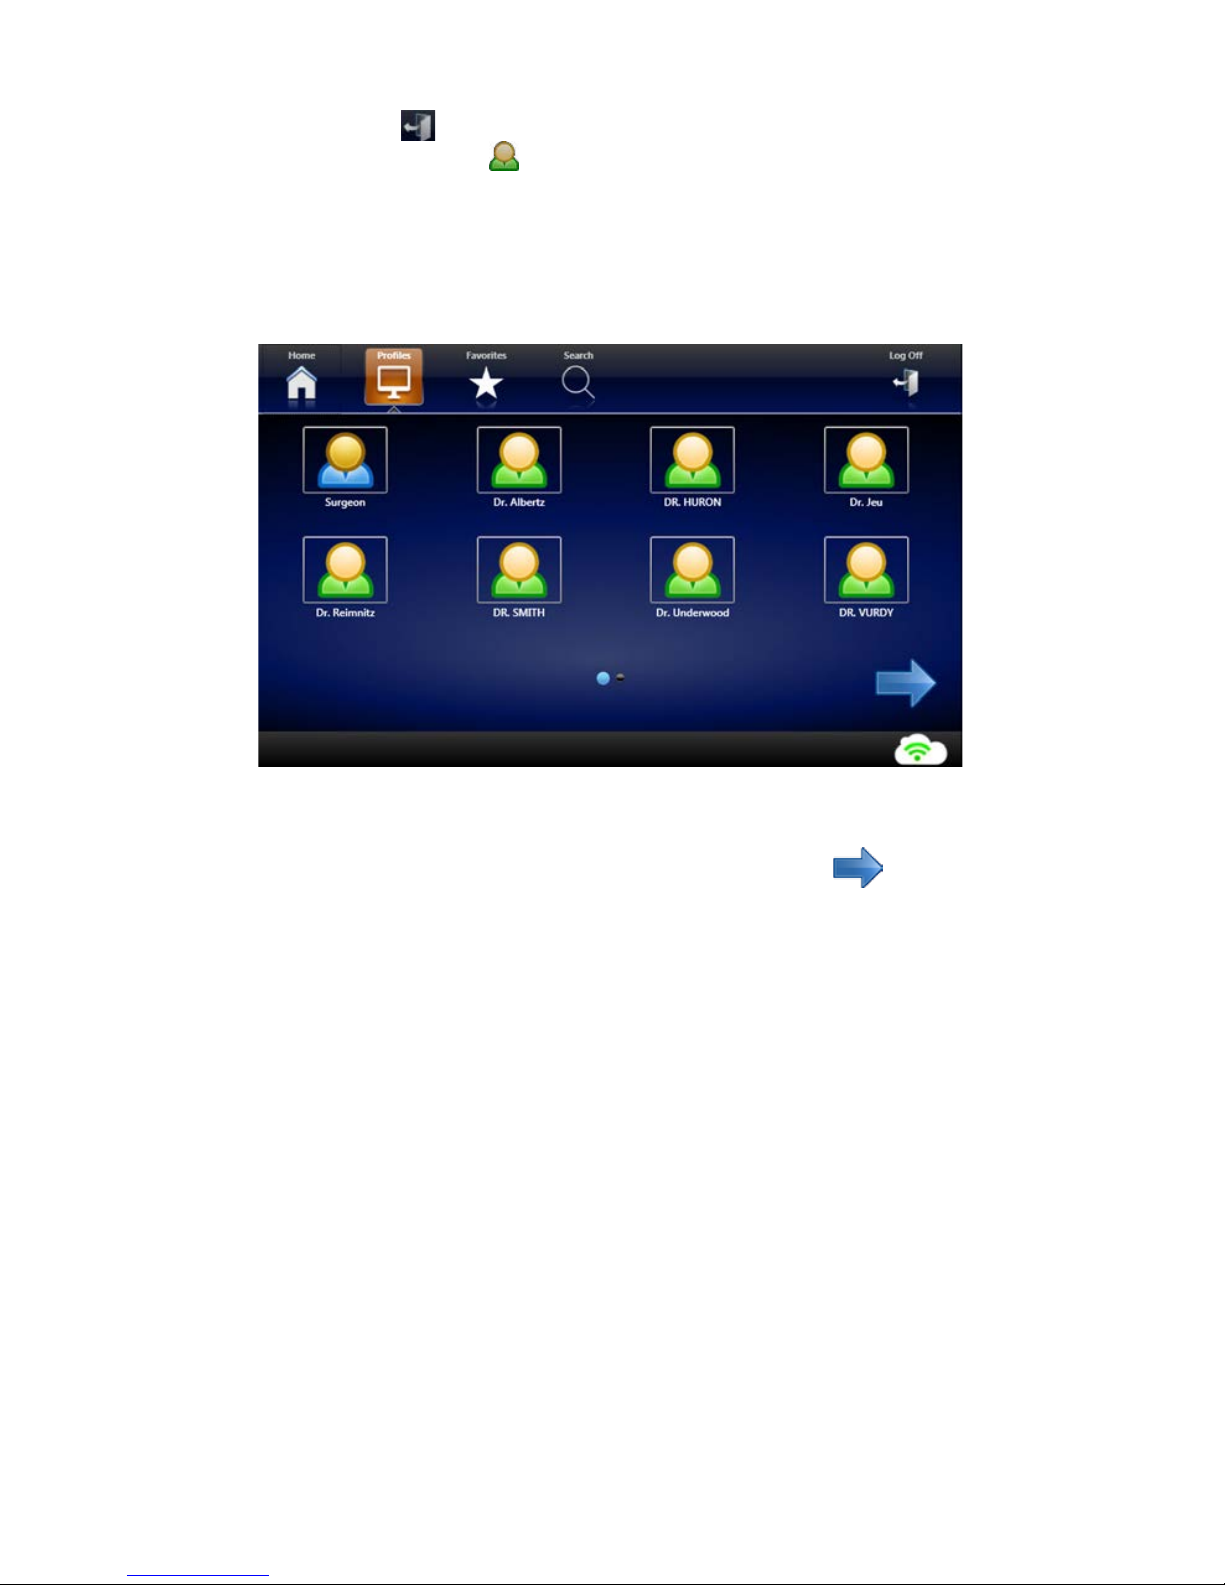
Selecting a Surgeon Prole
From the Proles screen, you can change the current surgeon prole and search proles�
1� To select a surgeon prole, touch the corresponding icon�”
2� Markers at the bottom of the screen show the current screen and total number of screens�
3� To see additional surgeon account screens, touch the RIGHT ARROW
button�
Page 19

13
Creating Patient Cases
The SDC3 organizes all the data associated with a patient into a patient “case�” Patient cases
include information about the patient, the procedure, and any pictures or video captured during
the procedure� Patient cases can be created, accessed, modied, and saved to the SDC3 hard disk
or to external media, such as USB drives, CD/DVD, or network servers�
Creating a New Patient Case
To create a new patient case:
1� On the Home screen, press the NEW CASE
button�
2� From the conrmation screen, press OK
to conrm the new case� The Surgeon Prole
screen shows�
Note: If a patient case has already been started and you have not saved any information to the
case, the SDC3 asks if you want to discard that case (the “current case”) before creating a new
case. If you do not want to discard the current case, you can access it through the CURRENT
CASE button from the Home screen.
3� Choose a Prole for the case to go to the Capture screen�
Accessing a Current Patient Case
To access a current patient case (one for which patient data, pictures, or video has already been
saved to the SDC3):
1� On the Home screen, press the CURRENT CASE button� The Capture Screen appears�
2� On the Capture Screen, select the correct patient case from the CURRENT CASE PATIENT
ID dropdown list�
Page 20
14
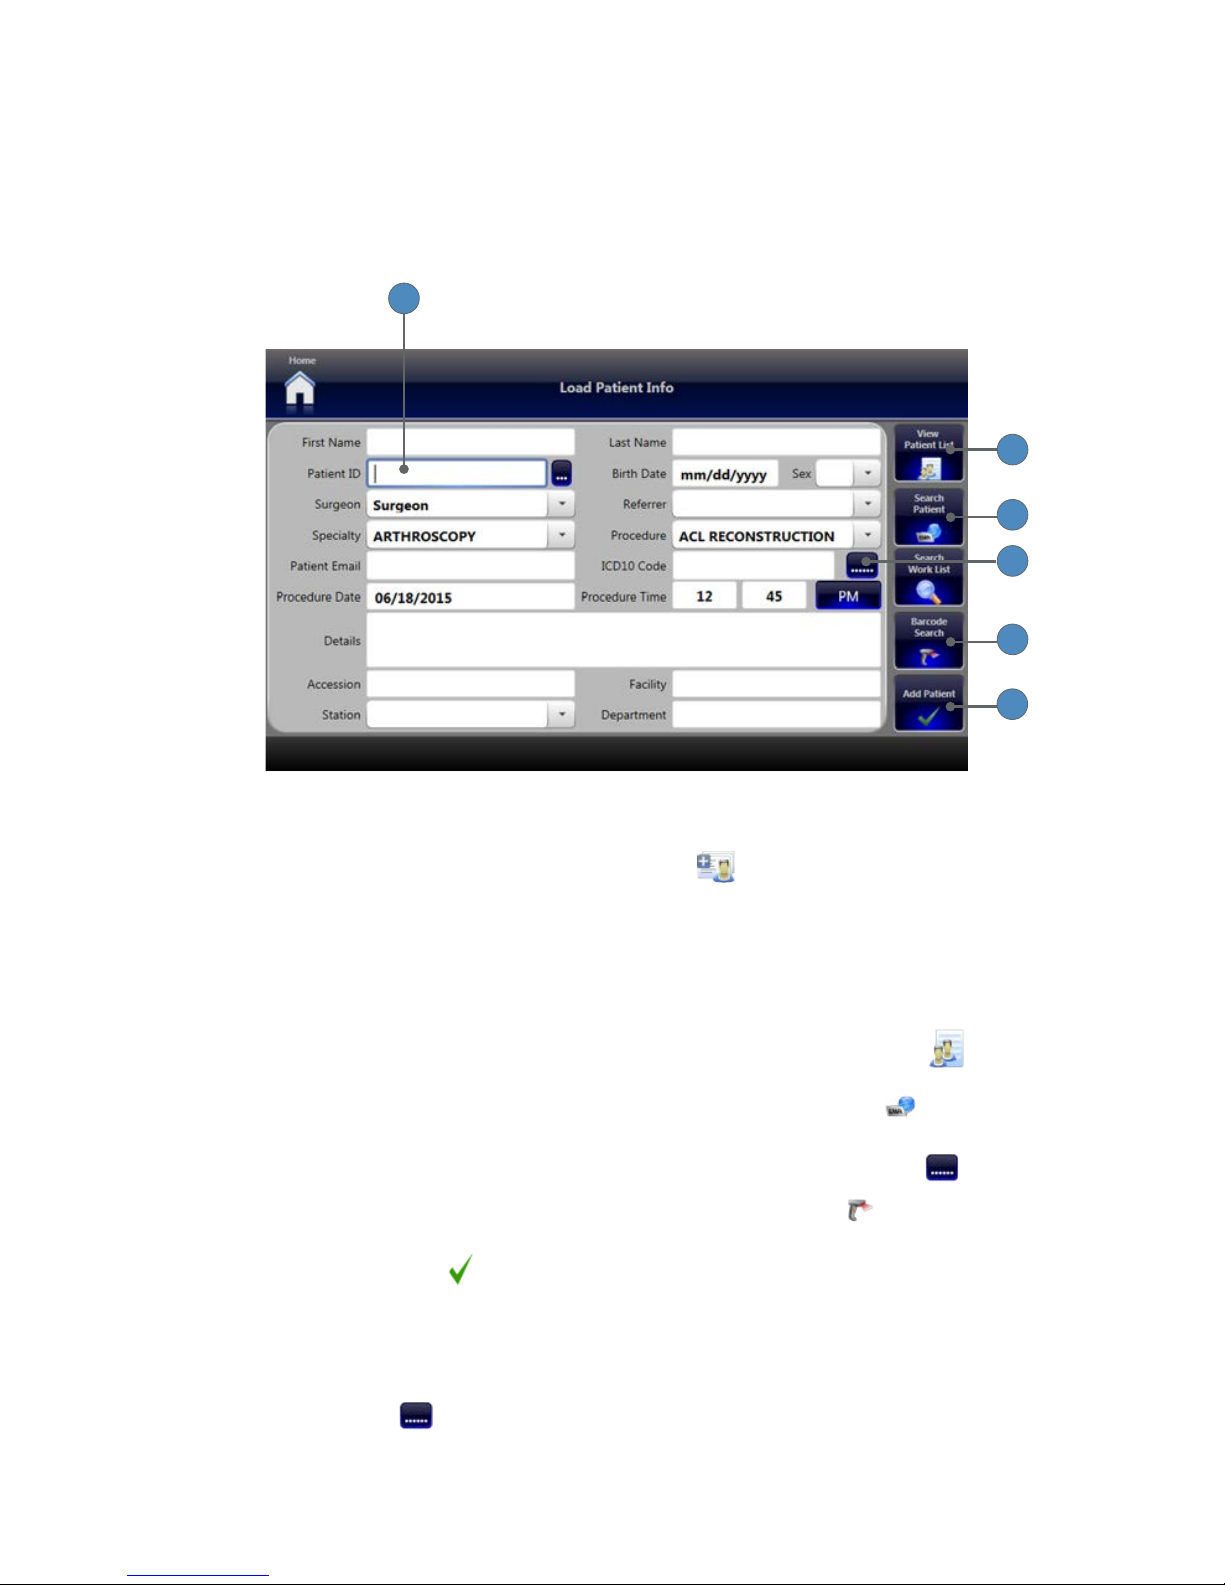
Loading Patient Information
You can enter patient information (name, ID, procedure, etc�) into the system ahead of time so
that it is available when creating new patient cases� The patient information entered and saved in
the Load Patient Info screen becomes available as a Current Case in the dropdown menu on the
Capture screen�
3
7
2
5
6
4
To load patient information into the SDC3:
1� On the Home Screen, press the LOAD PATIENT INFO button� The Load Patient Info
screen appears�
2� Fill in the data elds you need�
• Touch each eld to open a keyboard for typing in data, or
• Select a value from the dropdown list�
• At a minimum, the Patient ID eld should be lled in� All other elds are optional�
3� To view patients currently loaded into the system, press the VIEW PATIENT LIST
button�
4� To load patient data from an EMR system, press the SEARCH PATIENT EMR button
(available with the optional EMR Integration Package installed)�
5� If you have an ICD10 code, enter it in the ICD10 Code eld, or press the LOOKUP button�
6� If you have a barcode reader connected, press the BARCODE SEARCH button to
choose the source from which to load data�
7� Press the ADD PATIENT button to save the patient information and add the patient to
the current case list�
Finding ICD10 Codes
To look up the correct ICD10 code:
1� Press the LOOKUP button�
2� Choose the correct Section, Body Section, and Operation�
3� Choose the correct Body Part, Approach, Device, and Qualier�
Page 21
15
4� Press the EXIT button�
5� The ICD10 code shows on the Load Patient Info screen�
Importing ICD10 Codes
To import updated ICD10 codes:
1� Make sure the ICD10 code lename is in this format: icd10pcs_tabular_yyyy.xml, where
“yyyy” is the year that the ICD10 code was formulated�
2� Insert a USB drive with updated ICD10 code information�
3� Press the IMPORT button� The updated codes load�
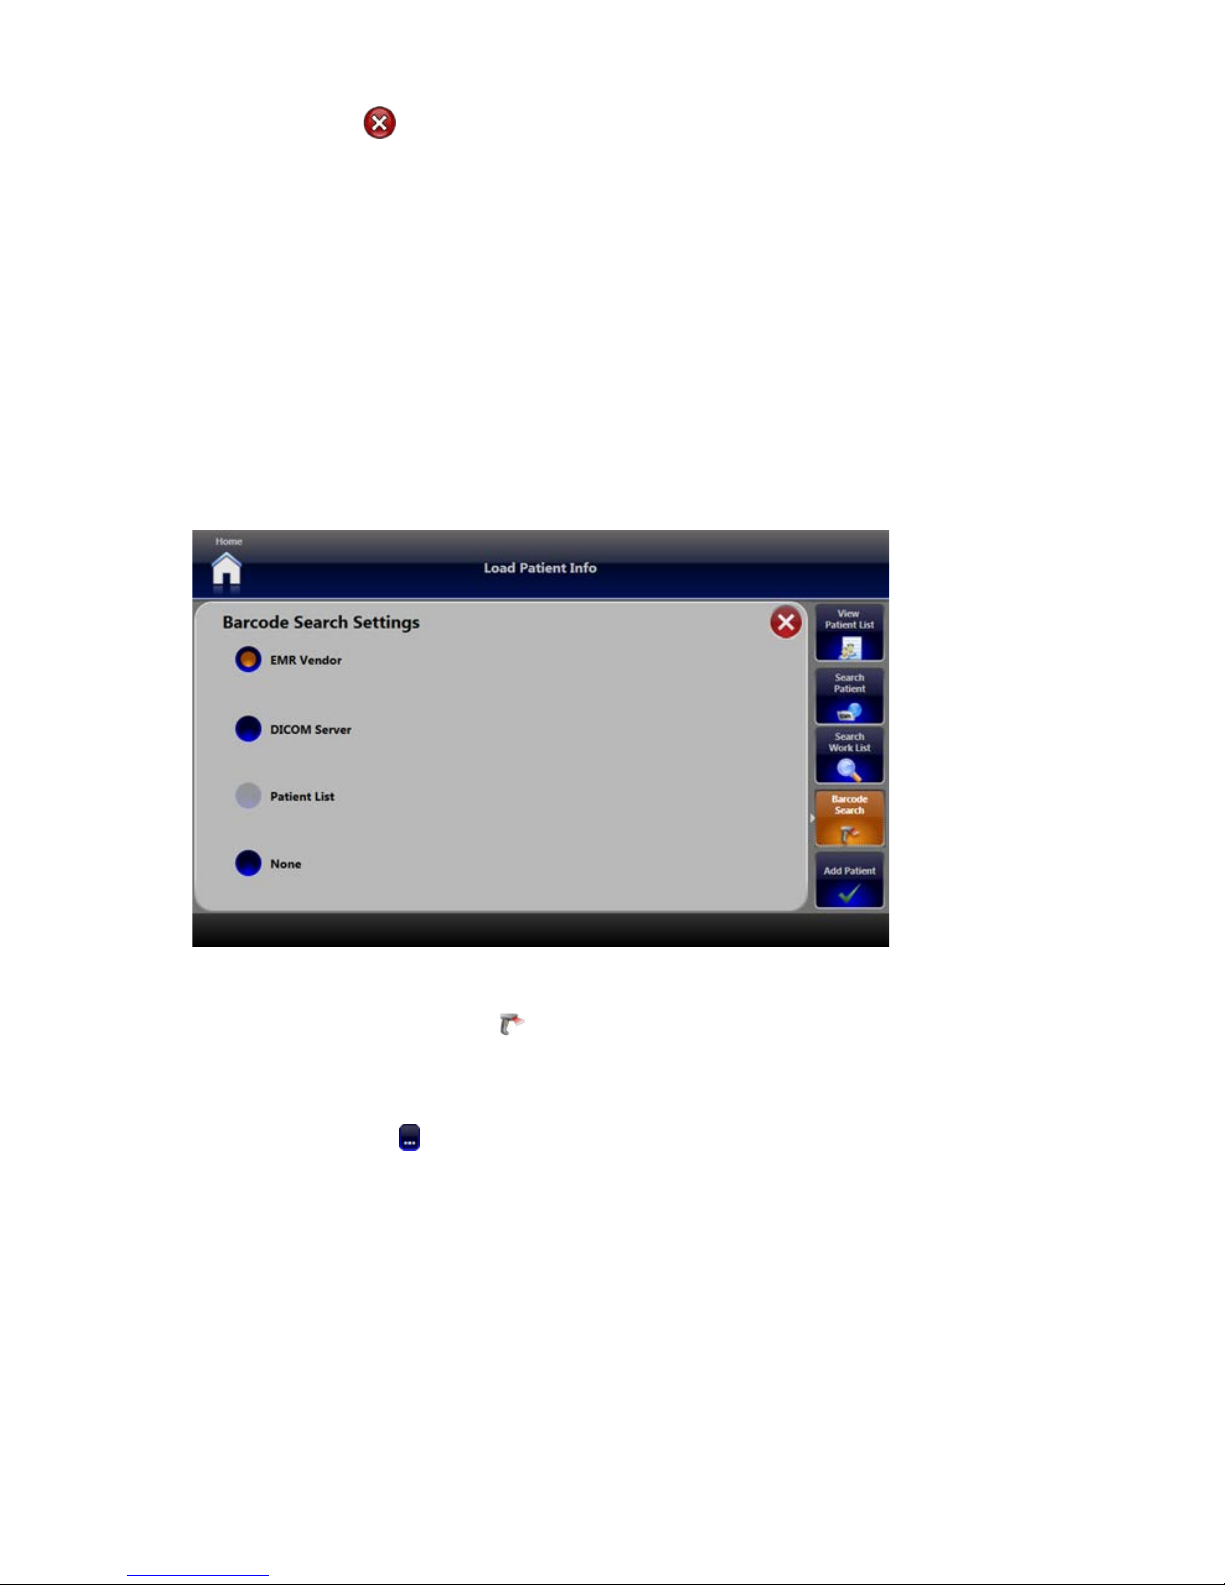
Loading Patient Data with a Barcode Reader
You can use any USB Barcode Scanner to load patient data onto the SDC3� From the Load Patient
Info screen:
1� Connect the barcode scanner’s USB adapter to one of the SDC3 USB ports�
2� Press the BARCODE SEARCH button�
3� Choose the source you want to search with the barcode data� Close the Barcode Search
Settings window�
4� Make sure the Patient ID text box is selected, and scan the barcode�
5� Press the LOOKUP button�
6� The patient data loads�
Page 22
16
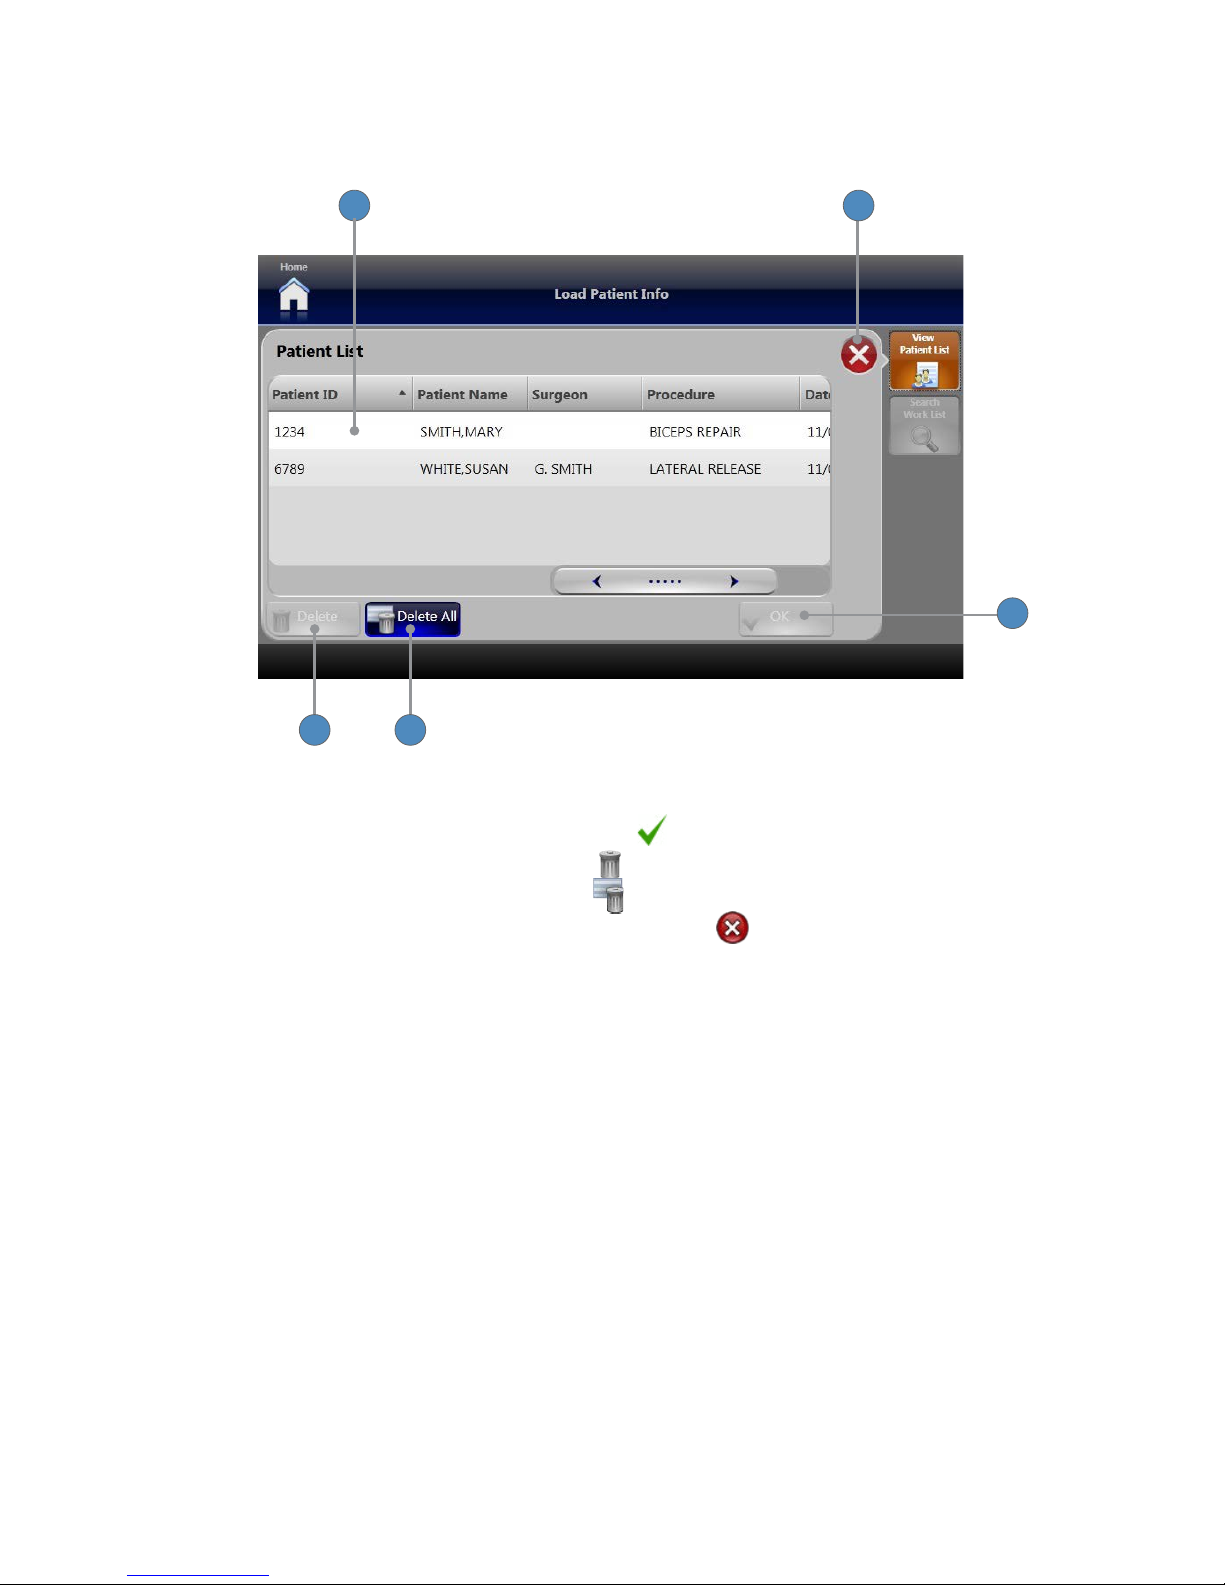
Viewing the Patient List
The Patient List screen shows patient cases that have already been loaded into the system�
1
2
3 4
5
1� To select a case for editing or deletion, touch the corresponding row�
2� To view or edit the selected case, press the OK button�
3� To delete the selected case, press DELETE button�
4� To delete all cases, press the DELETE ALL button�
5� To return to the Load Patient Info screen, press the EXIT button�
Page 23
17
Surgical Timeout Checklist Screens
To set up or activate the surgical timeout checklist, go to Settings > General > Misc� To launch the
Surgical Timeout Checklist, go to either Current Case or New Case, then go to the Edit Patient tab�
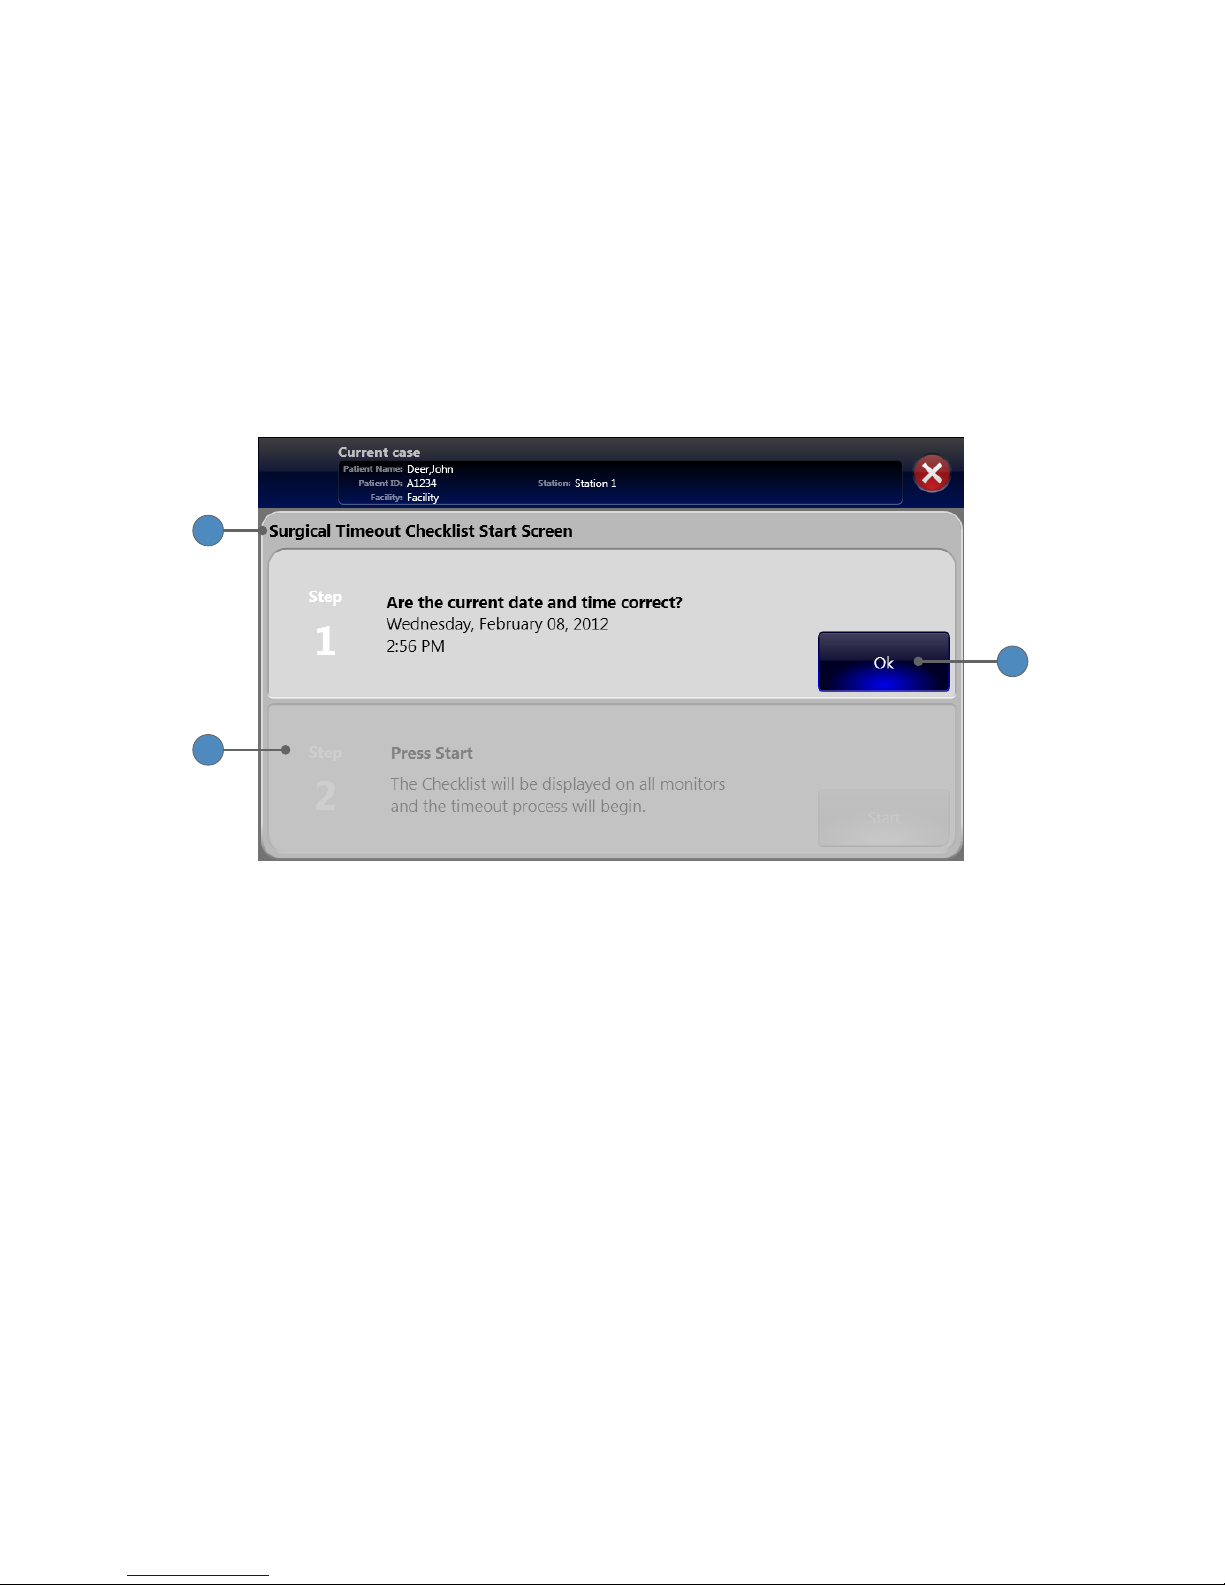
Surgical Timeout Checklist Start Screen
Note: Before the Surgical Timeout Checklist launches, you are asked to conrm the current
date and time.
1
2
3
1� The Surgical Timeout Launch Screen is activated through the Edit Patient Tab� The default
value is ON�
2� User is asked to verify correct date and time for Step 1�
3� Press OK once the correct date and time are veried and Step 2 will be activated�
4� Press the START button to start the verication process�
Page 24
18
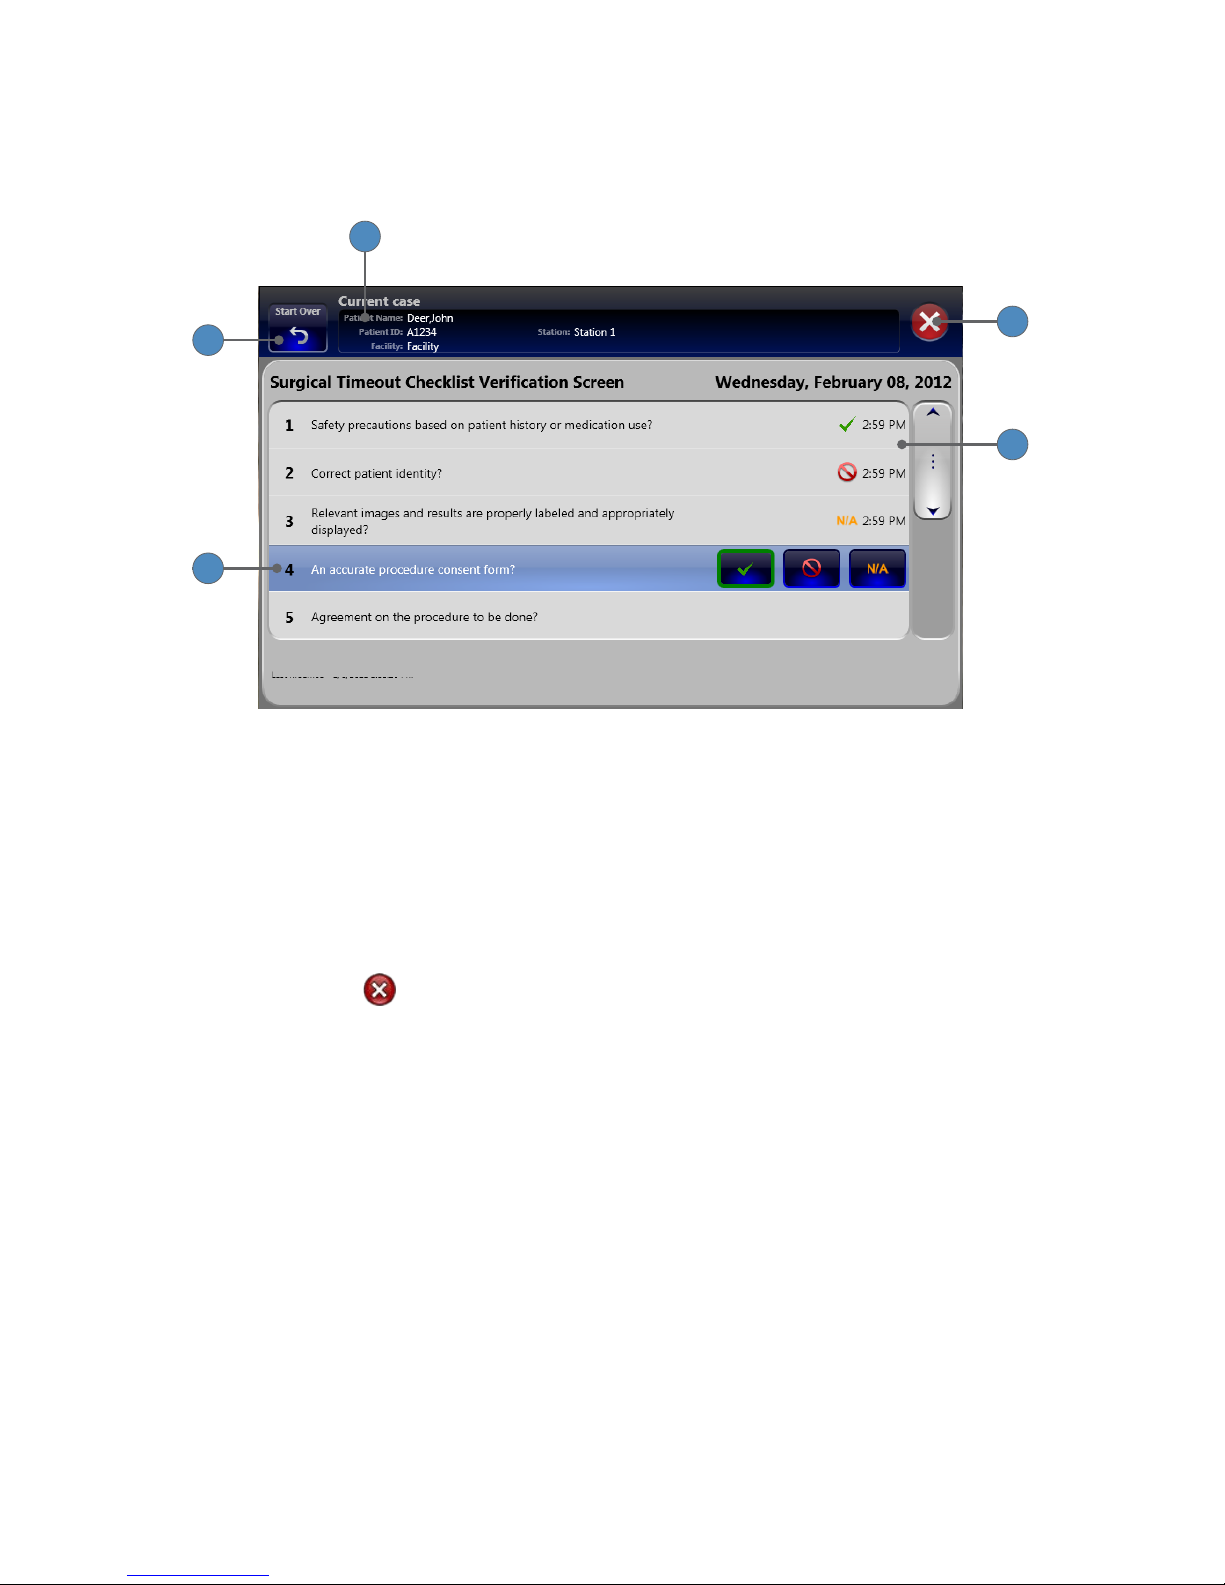
Surgical Timeout Checklist Verication Screen
When the Surgical Timeout Checklist begins, the SDC3 will present a series of questions about the
patient and the procedure that can be answered as yes, no, or not applicable�
5
4
3
2
1
1� The Surgical Timeout Checklist Verication Screen shows the patient name, the patient ID,
the facility name, and the station name on the screen�
2� Press the START OVER button to restart the verication process at any time during the
process�
3� An answer is required for each question on the checklist� Options are yes, no, and N/A�
Answers can be changed, but no question can be skipped�
4� The date and time of the last update is recorded at the end of each question�
5� Press the EXIT button to exit the verication process�
Page 25
19
Surgical Timeout Checklist Summary Screen
The Summary screen shows after all checklist questions are answered� You have the option to
view and print the checklist from archived cases�
1� Press the PRINT button to print the summary screen�
2� Press the DONE button to exit the summary screen�
Capturing Images and Videos
Within a patient case, image and video les can be captured to document a surgical procedure�
To open the Capture screen for a patient case, select a NEW CASE or CURRENT CASE
from the Home screen�
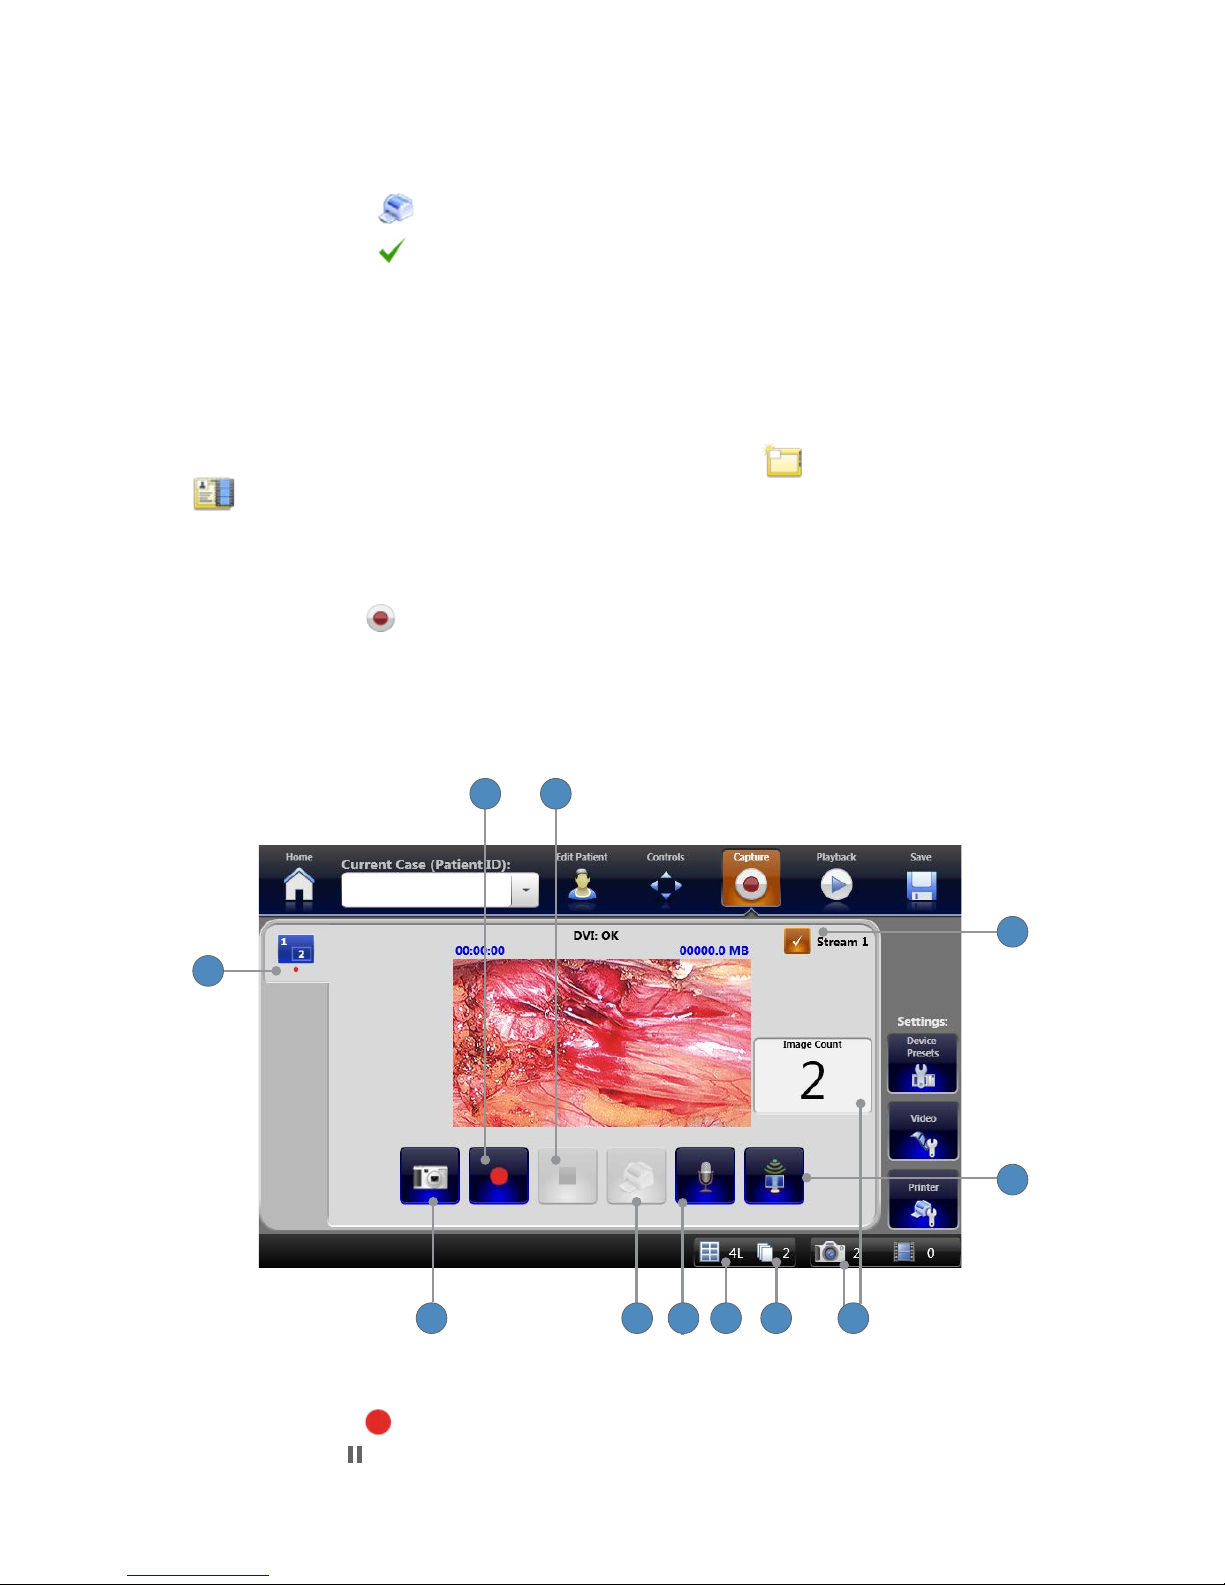
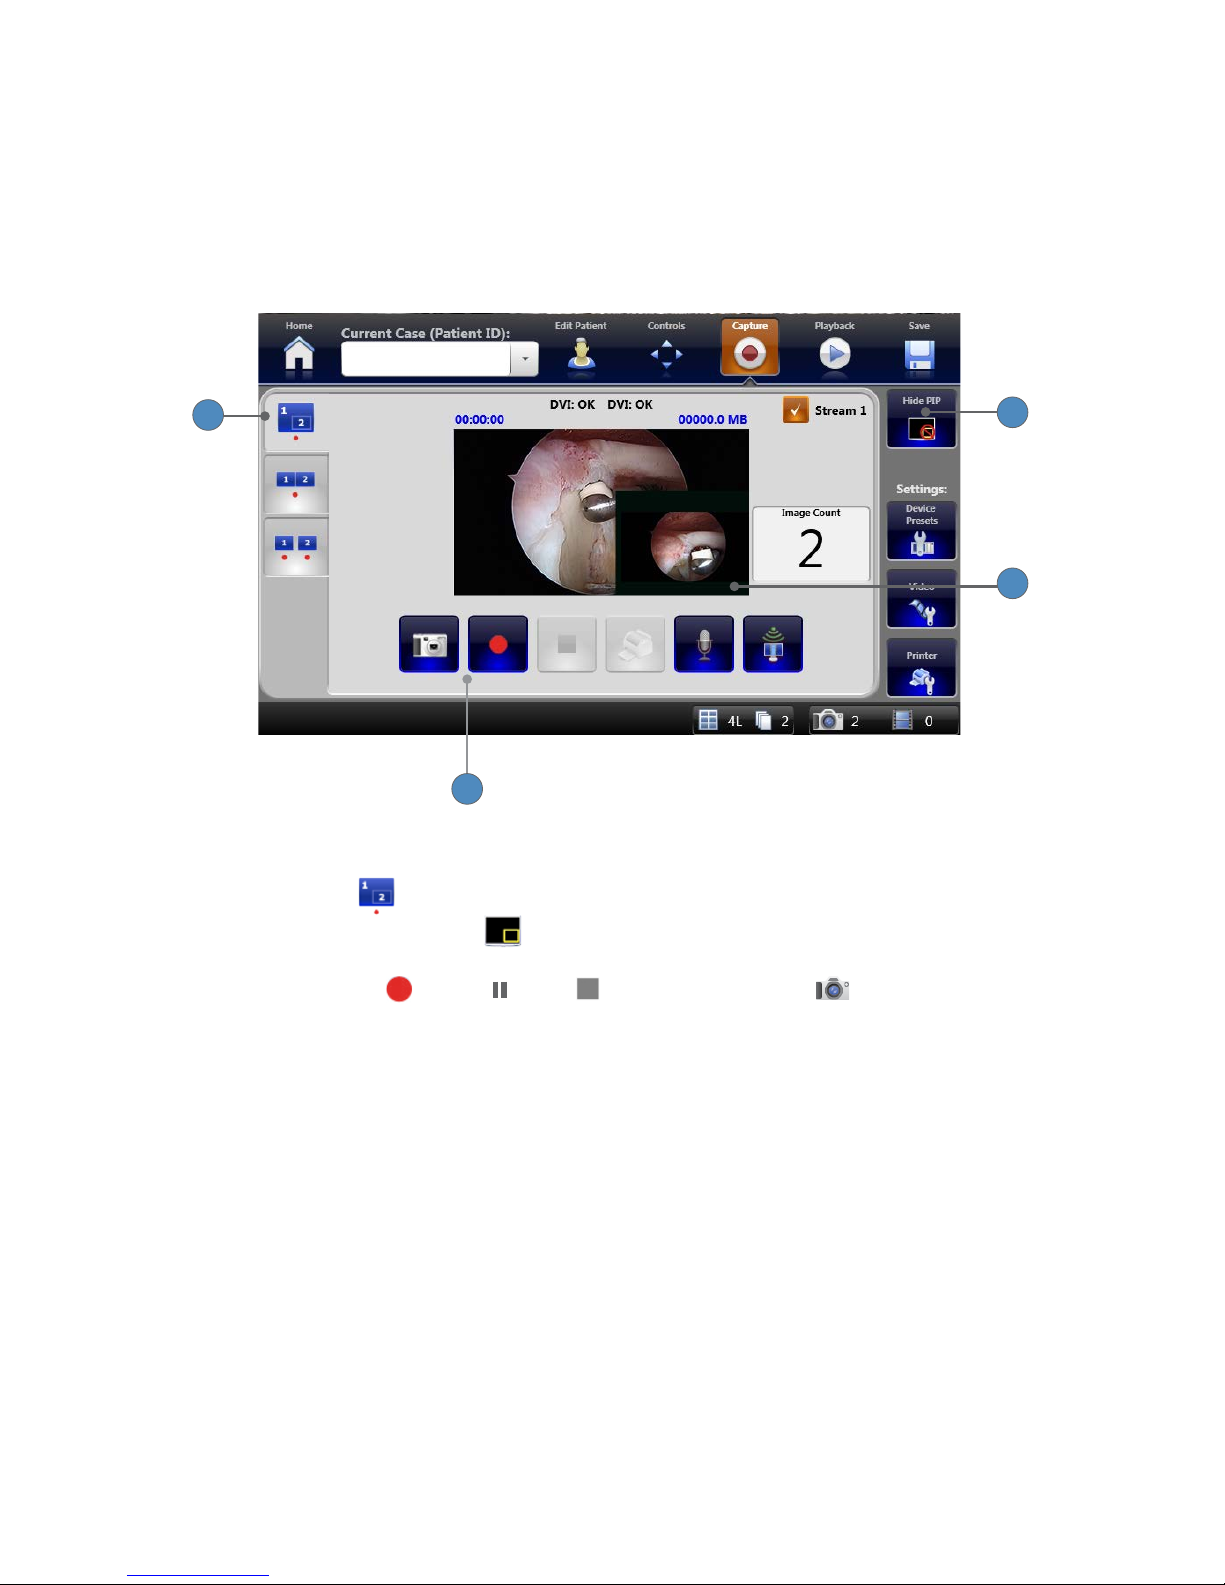
Capturing Images and Video from a Single Channel
The Capture screen shows the live image from the camera� The live image can be recorded as
video or captured as a still image�
Note: At least one video source (channel) must be connected to the SDC3 to enable video
recording and image capture.
11
107 65
4
3
1 2
9
8
To Record Video
1� Press RECORD to initiate recording�
Press PAUSE to pause recording� Video recording duration, video source signal, and video
size are shown above the preview screen�
Page 26

20
2� Press STOP to stop recording�
To Stream Live Video
3� Make sure the STREAM 1 checkbox is checked� (Streaming must be enabled/congured
in the NETWORK STREAM tab in System Settings� See the “Network Streaming Settings”
section of this manual for details�)
4� Press the STREAM button to toggle between start and stop�
To Capture Images
5� Press the IMAGE CAPTURE button�
6� The total number of captured images is shown next to the review screen and again at the
base of the Capture screen�
To Print Captured Images
7� Press the PRINT button�
8� The PAGE LAYOUT indicator shows how many images will print on each page, and the
orientation (P=portait, L=landscape)�
9� The COPIES indicator shows how many copies of each page will print�
Additional Functions
10� If a microphone is connected to the SDC3, press the MICROPHONE button while
recording to switch between muted and unmuted audio input�
11� The SINGLE CHANNEL/PIP
tab accesses the Single Channel capture screen� (Additional
tabs appear when a second video source is connected to the SDC3)�
Page 27
21
Recording Picture-in-Picture Images and Video
When 2 video sources are connected to the SDC3, the system can show Picture-in-Picture (PIP)
video� In PIP mode, video from Channel 2 appears in the lower corner of the Channel 1 screen�
The SDC3 records images and videos from both sources as one le�
Note: Choose Dual Channel mode in the General Application settings to enable this function.
1
3
2
4
To record PIP video or capture PIP images:
1� Select the PIP tab�
2� Press the HIDE/UNHIDE PIP button�
3� The picture from Channel 2 appears as a picture in the corner of the Channel 1 screen�
4� Use the RECORD , PAUSE , STOP , and IMAGE CAPTURE buttons to record
video or capture images�
Page 28

22
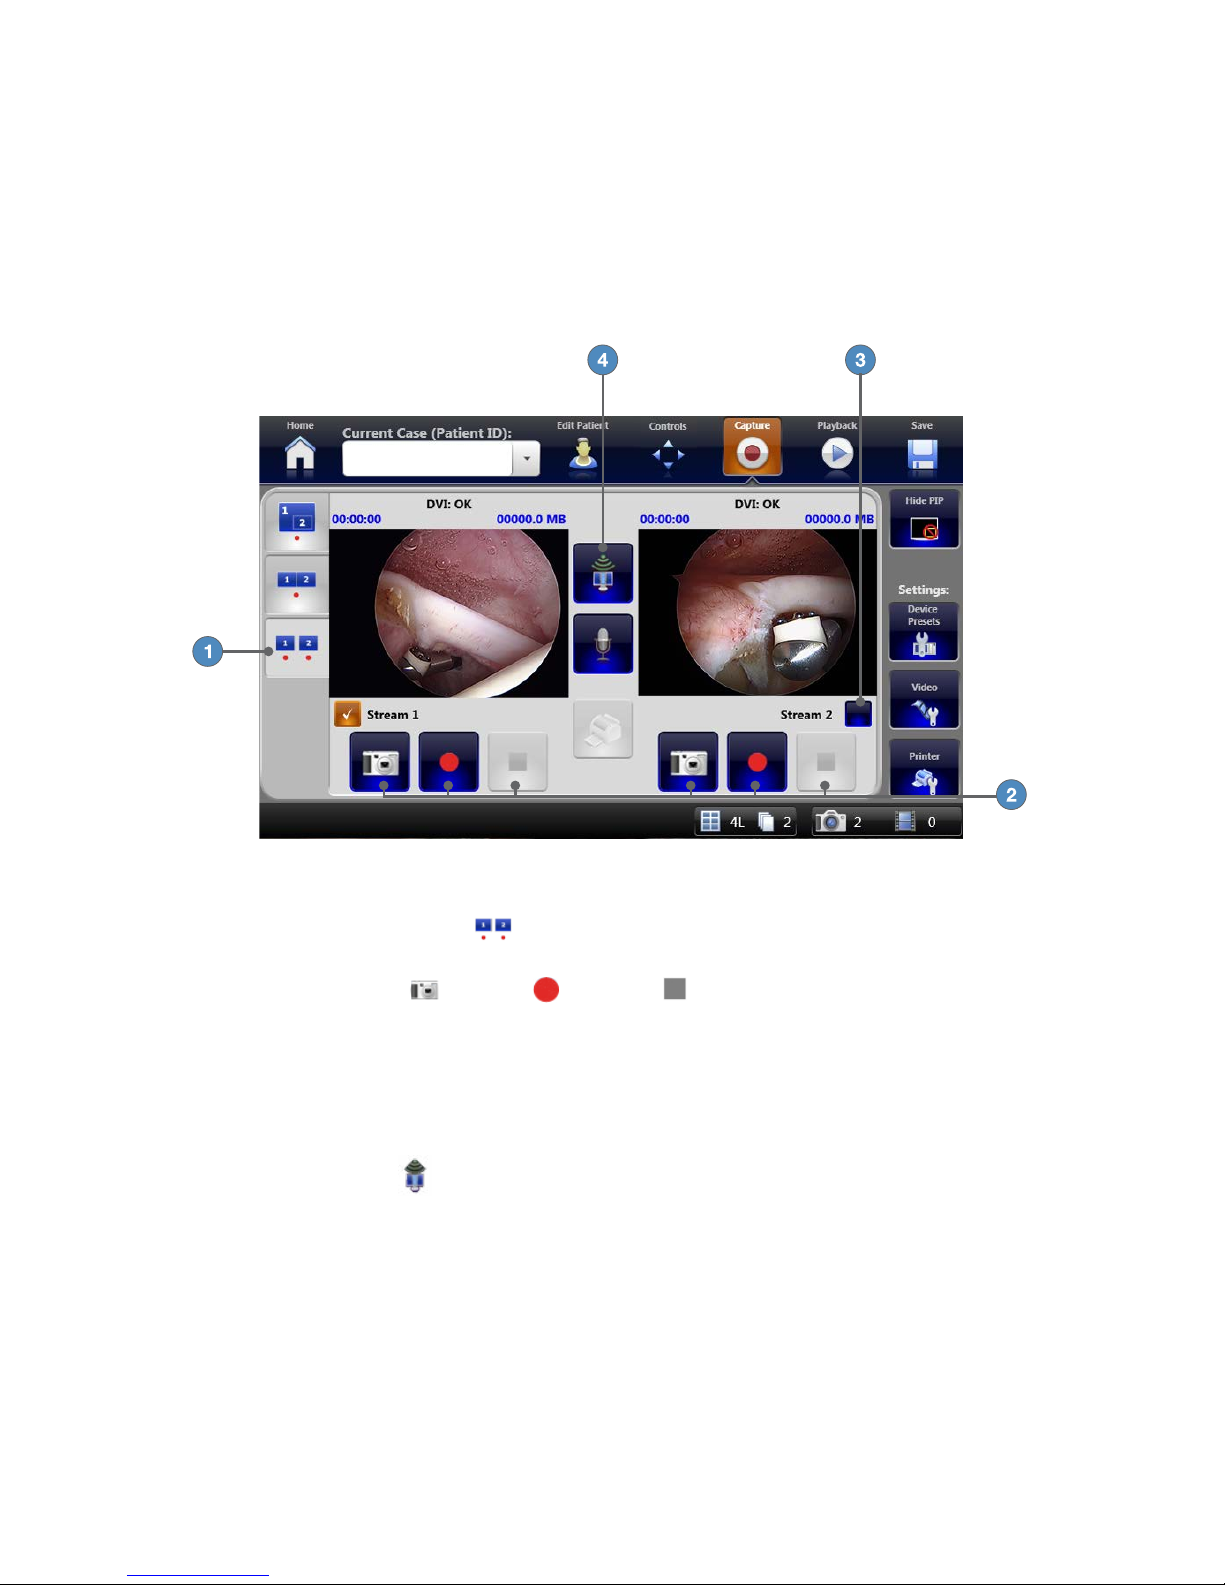
Synchronized Video Recording of Dual Channels
When 2 video sources are connected to the SDC3, the system can record synchronized video
from both video sources� In Synchronized Capture mode, images and video are captured
simultaneously from both channels, but saved as separate les�
Note: Dual Channel mode must be selected in the General Application settings screen to
enable this function.
2
5 43
1
To record synchronized video from dual channels:
1� Select the SYNCHRONIZED CAPTURE tab�
2� Press the CAPTURE , RECORD , and STOP buttons under the preview pane to
perform the corresponding function�
3� Press the PRINT
button to print images� When printing from the Synchronized Capture
screen images from Channel 1 print rst by default and images from Channel 2 print second�
To stream Dual Channel video:
4� Select the Stream 1 checkbox to stream Channel 1 video, or the Stream 2 checkbox for
Channel 2�
5� Press the STREAM button to start/stop streaming�
Page 29
23
Independent Video Recording of Dual Channels
When 2 video sources are connected to the SDC3, the system can record independent video from
both video sources� In Dual Capture mode, images or video can be captured from Channel 1 and
Channel 2 independently of each other and saved as separate les�
Note: Dual Channel mode must be selected in the General Application settings to enable this
function.
To record video or capture images from dual channels:
1� Select the DUAL CAPTURE tab to show images from both channels with independent
capture controls�
2� Press the CAPTURE , RECORD , and STOP buttons under the respective preview
pane to perform that function for the corresponding channel�
To stream dual channel video:
3� Select the Stream 1 checkbox to stream Channel 1 video, or the Stream 2 checkbox for
Channel 2�
4� Press the STREAM button to start/stop streaming�
Page 30
24
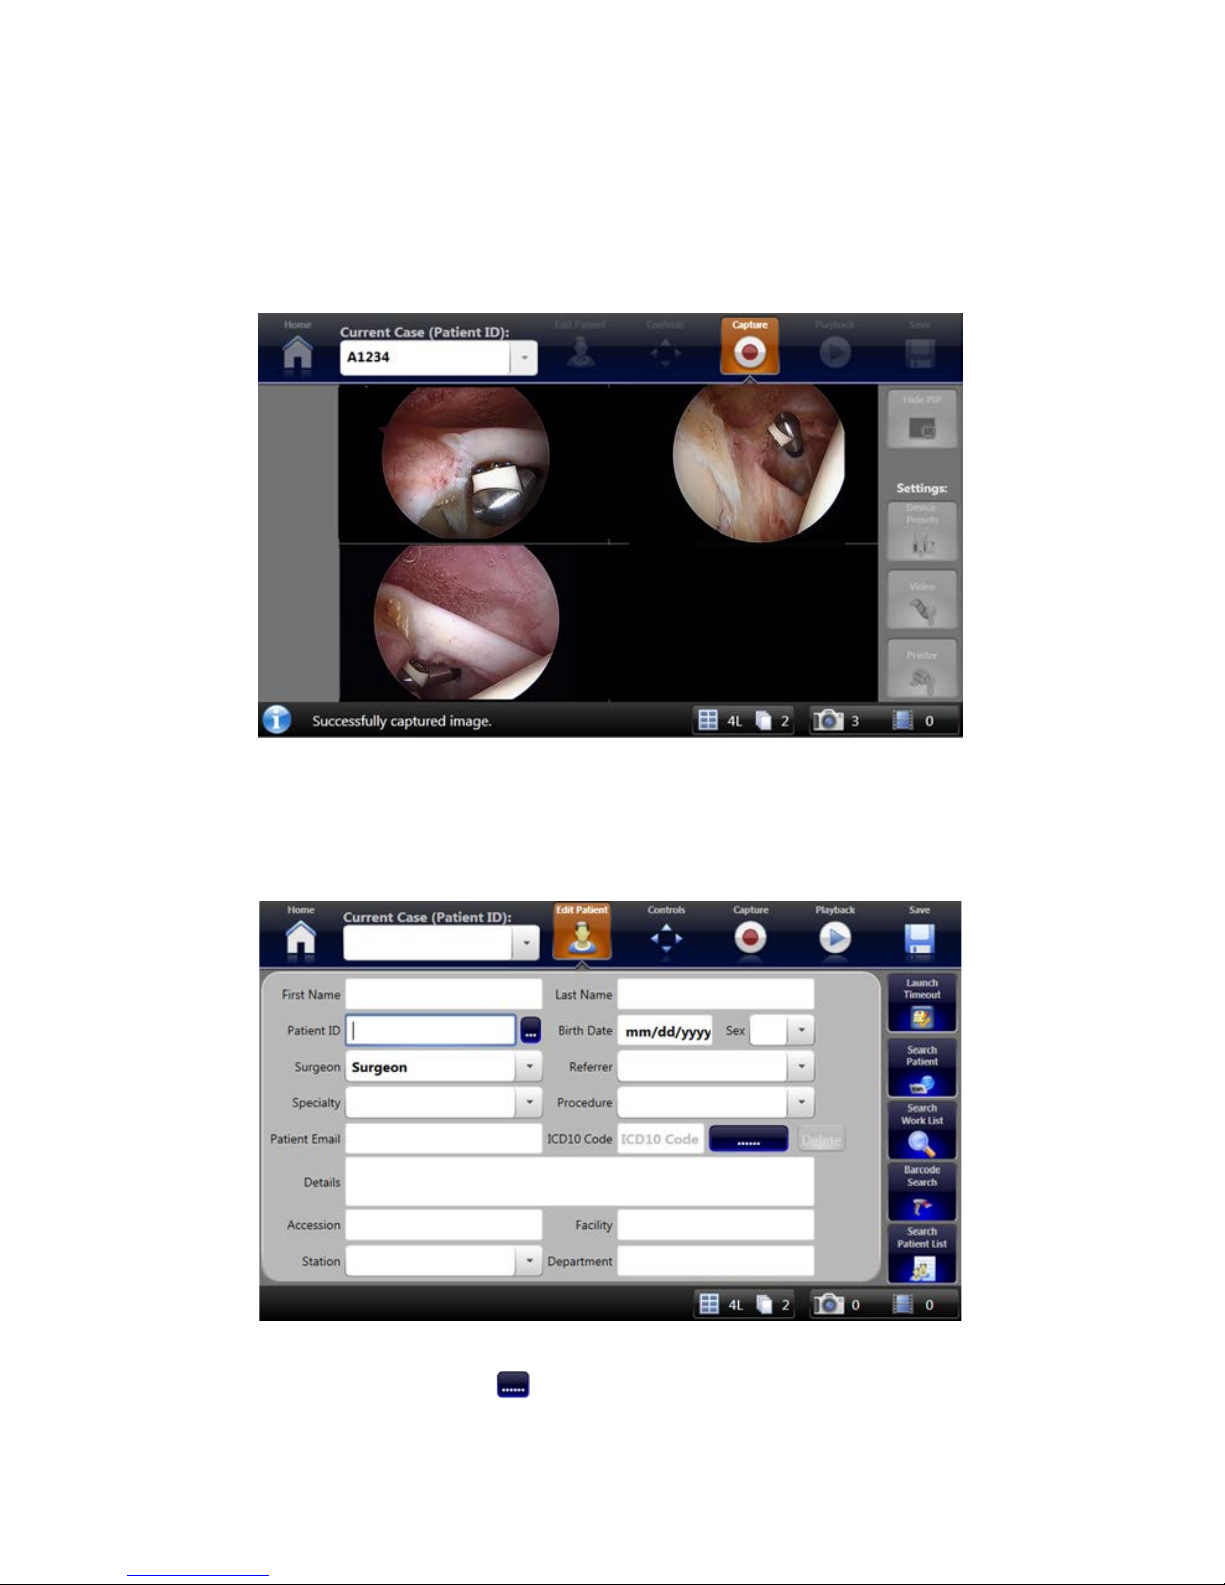
The Flip Screen
When images are captured, the SDC3 shows the most recent captured images in a “ip” screen�
The images appear on the SDC3 screen and the surgical display for several seconds before the
SDC3 “ips” back to the capture screen�
Note: To change “ip screen” settings, go to Settings>General.
Editing Patient Information
To edit patient information for the current case� go to the Edit Patient menu�
1� Enter patient information, or use EMR, Work List, or Barcode search to look up information�
2� You can also use the LOOKUP button to look up ICD10 codes for the case�
Page 31

25
Applying Device Presets
After you have selected a Specialty or Procedure with saved Device Presets on the Edit Patient
screen, you can apply the Device Presets from the Capture screen�
1
1� Press the green APPLY DEVICE PRESETS button to apply the presets�
2
3
2� The DEVICE PRESETS button is greyed out while the SDC3 applies the presets�
3� The SDC3 shows a status message: “Applying user device presets� Please wait���”
4� If there are any errors in applying the presets, the DEVICE PRESETS button will show
an alert icon�
5� Press the DEVICE PRESETS button�
Page 32

26
6� The SDC3 shows a screen explaining the error� Once you acknowledge the error, the alert
icon is cleared�
Possible error messages:
Status Solution
Device Not Connected Make sure the device is connected to the SDC3 and that
the device is turned on� Press the RETRY button�
���Preset Not Reached The value for the preset setting was not reached on the
device� Press the RETRY button�
7� Press the EXIT or OK button to close the error screen�
Page 33

27
Device Presets Settings
Access the Device Presets settings for the current surgeon from the DEVICE PRESETS screen�
Only the saved presets for the current Specialty or Procedure are displayed from this screen� To
set up Device Presets, go to Settings > Proles, and press the SPECIALTY/PROCEDURE button�
Refer to the Proles Settings section of this manual for more detailed instructions�
2
1
34 5
6
1� Select the DEVICE PRESETS button to go to the Device Presets Settings screen�
2� From the Specialty menu, choose the correct Specialty�
3� From the Procedure menu, choose the correct Procedure�
4� The saved presets are shown in the Device Presets box�
5� Press the SELECT NONE button to deselect all of the devices and settings in the Device
Presets box� Press the SELECT ALL button to select all of the devices and settings. You
can also press the individual checkboxes to select or deselect a device or a setting�
6� Press the APPLY button to apply the selected Device Presets� The Device Presets Settings
screen automatically closes�
Page 34

28
Video Settings
From the Capture screen, you can adjust the video settings according to your preference�
Note: To save video to the iPad, you must record videos in the MPEG4 format.
Video Settings: Channel 1
Channel 1 video settings are accessible from the VIDEO SETTINGS tab�
2
1
5
4
3
1� Press the CHANNEL 1 tab to show the “Video Settings: Channel 1” screen�
2� The drop-down menus show selections for Recording Format, Record Resolution, and Record
Bitrate�
3� Press the EXIT button closes the settings screen and returns to the Capture screen�
4� Recording mode and disc format settings for Channel 1 are shown here� Choose these
settings in the General Settings screen, accessible from the Home Screen�
5� The drop-down menu shows available selections for video sources, based on what is
connected to the SDC3�
Page 35

29
Video Settings: Channel 2
Channel 2 video settings are accessible from the VIDEO SETTINGS tab�
1
4
3
2
1� Press the CHANNEL 2 tab to go to the “Video Settings: Channel 2” screen� By default,
Channel 2 recording mode is ATE, and disc format is the same as selected for Channel 1�
2� The drop-down menus show selections for Recording Format, Record Resolution, and Record
Bitrate�
3� Press the EXIT button to close the settings screen and return to the Capture screen�
4� The drop-down menu shows available selections for video sources, based on what is
connected to the SDC3�
Page 36

30
Video Settings: Picture-in-Picture
Picture-in-Picture settings are accessible from the VIDEO SETTINGS tab�
5
1
4
3
2
1� Press the PIP tab to go to the “Video Settings: Picture in Picture (PIP)” screen�
2� Choose the Picture by Picture (PBP) checkbox to view video inputs adjacent to each other in
the main preview screen� The PIP Size, and Select PIP Location options are disabled if PBP is
selected�
3� Press the EXIT button to close the settings screen and return to the Capture screen�
4� Press one of the numbers to choose the quadrant of the main picture in which the PIP
appears�
5� Press the PIP SIZE button to toggle between Small, Medium and Large�
Page 37

31
Video Settings: Picture-By-Picture
1
1� When the Picture by Picture checkbox is selected, video inputs appear next to each other in
the main preview screen� The PIP Size, and Select PIP Location options are disabled�
Video Settings: On-Screen Display
On-Screen Display settings are accessible from the VIDEO SETTINGS tab�
2
1
5
4
3
1� Select the ONSCREEN DISPLAY tab from the Video Settings Screen to show the
“Video Settings: On-Screen Display” screen�
2� The Device drop-down menus show which devices’ status appears on the surgical display�
3� Press the EXIT button to close the settings screen and go back to the Capture screen�
4� The Status drop-down menus show status and command selections for the chosen devices�
Note: When viewing the status of shaver handpieces, only the status of the rst
connected handpiece appears on the surgical display.
5� Press the OSD STATUS LOCATION button to choose where device status messages appear
on the surgical display�
Page 38

32
Printer Settings
From the Capture screen, you can adjust the printer settings according to your preference�
Printer Settings: Page Layout
Page Layout settings are accessible from the PRINTER SETTINGS tab�
1
9
6 58 7
4
32
1� Select the PAGE LAYOUT tab to show the “Printer Settings: Page Layout” screen�
2� The name of the connected printer appears here�
3� Press the EXIT button to close the settings screen and return to the Capture screen�
4� The Prints Pending window shows the number of images ready to be printed� Press the
CANCEL button to cancel a pending print job�
5� Press the COLLATE COPIES button to toggle between On and O�
6� Press the CHECKLIST ORIENTATION button to choose between Portrait and Landscape
layout for the Surgical Timeout Checklist�
7� Press the IMAGE ORIENTATION to choose between Portrait and Landscape for image
printouts�
8� Press the AUTO PRINT button to toggle between On and O� When Auto Print is On, the
print job starts as soon as the required number of images is captured�
9� The +⁄− buttons change the number of copies printed, and how many images print per page�
Page 39

33
Printer Settings: Advanced
Advanced printer settings are accessible from the PRINTER SETTINGS tab�
5
4
1
3
2
1� Select the ADVANCED SETTINGS tab to go to the “Printer Settings: Advanced” screen�
2� Use the +⁄− buttons or the sliders to adjust the following settings for Channel 1 and
Channel 2: Brightness, Contrast, Phase, Chroma, Sharpness�
3� The dropdown menu lists specialty selections, which calibrate printer settings for images
from specic surgical specialties�
4� Press the PRINT button to print the selected images from the current case�
5� Press the RESET button to restore default settings�
Page 40

34
Saving Images and Videos
Save images, video and reports to:
• SDC3 built-in hard disk
• Disc (CD, DVD or Blu-ray)
• USB drive
• iPad (with the My SDC3 iPad app, or the Studio3+ iPad app)
• PowerShare cloud server (with the optional PowerShare package)
• Network locations
• EMR server (with the optional EMR Integration Package)
1� To go to the Save screen, press the SAVE button at the top of the SDC3 display�
2� All images and video are saved automatically to the SDC3 built-in hard disk�
3� To save them to external media or server, choose the appropriate destination from the Save
screen�
1
Page 41

35
Selecting the Save Location
The Save screen is divided into three columns for saving images and video to external media:
• Save to Disc
• Save to USB/iPad
• Send via Network
Images and video can be saved to dierent media simultaneously�
Connecting the iPad® to the SDC3
HD INFORMA TION MANAGEMENT SYSTEM
SDC 3
To connect an iPad to the SDC3, proceed as follows:
Notes:
• iPad is a trademark of Apple Inc�, registered in the U�S� and other countries�
• iPad devices with iOS versions 7�0 - 8�2 are compatible with the SDC3�
1� Set the SDC3 power to on�
2� Make sure that the iPad power is on and the iPad is unlocked, and that the My SDC3 or
Studio3+ app is installed�
3� Connect the iPad to the USB port on the front of the SDC3 with a standard Apple Dock to
USB cable�
Note: If the SDC3 does not recognize the iPad, unplug the USB adapter from the SDC3
and plug it back in.
4� Refer to the “Saving Images and Videos” section of this manual for instructions on
transferring images and videos to the iPad�
Page 42

36
To save to disc (CD or DVD)
1� The Save to Disc column shows the space required to save a selected image or video, the
space available on the CD or DVD, and the time elapsed in the save process�
2� Press the CD/DVD button to save the images or video to a writable disc�
3� Press the EJECT button to eject the disc when the save is complete�
4� The progress bar shows the status of the write process�
To save to a USB drive or iPad
Notes:
• Video does not save to a USB drive or an iPad unless “USB/iPad” is checked on the Save
Settings screen � See the “Save Settings” section of this manual for details�
• To save video to the iPad, you must record videos in the MPEG4 format�
• To save PDFs of surgical images and surgical timeout checklists, select “Write PDF”and “Auto
Create PDF” on the Save Settings screen�
2
13
9 10
126
11
87
1
43
5
5� The Save to USB/iPad column shows the space required to save a selected image or video,
the space available on the USB storage device or the iPad, and the time elapsed in the save
process�
6� Press the USB
button to save the images or video to a USB drive�
7� Press the iPad button to save the images or video to an iPad�
8� The progress bar shows the status of the write process�
Page 43

37
To save to a Network location
Note: Video does not save to a Network location unless “Network” is checked on the Save Settings
screen � See the “Save Settings” section of this manual for details�
9� The Send via Network drop-down menu provides names of available network addresses�
Note: In the Save Settings screen , “FTP” or “PACS” must be selected. If “FTP” is
selected, the drop-down menu is populated with IP addresses. If “PACS” is selected, it is
populated with connection names.
10� If “PACS” is selected in Save Settings, the AE Title and IP address of the selected connection is
shown�
11� Press the NETWORK SAVE button to save to the selected network� Cases can be saved
to another network after the previous save action is completed�
12� The progress bar shows the status of the write process�
Other functions
13� Select the SETTINGS tab to open the “Save Settings” screen�
Saving to a Network
When you save data to a network location, you are rst required to log in�
4
3
2
1
1� Select the type of network transmission:
• Secure—for secure transmission of data to the network� Data is encrypted� A username
and password is required�
• Password—for password-protected access to the network� A username and password is
required�
• Anonymous—for open access to the network� Username and password are not required�
2� If required (per type of network selected), enter the username and password�
3� Press OK.
4� Press the EXIT button to close the login screen�
Page 44

38
Saving to an EMR Server
To save to an EMR Server, the optional EMR Integration Package must be installed� Contact your
Stryker Representative for more information�
Saving Case Information to PowerShare
Note: Make sure that you enter the rst name and last name of the patient, and the Patient ID
before you save the case images.
1� Go to Current Case > Save�
2� Press the PowerShare button� The SDC3 sends the case data to PowerShare�
Page 45

39
Save Settings
Save settings are accessible though the SETTINGS tab on the Save screen�
5432
6
7
1
8
1� Select the SETTINGS tab to open the “Save: Settings” screen�
2� Press the IMAGE FORMAT button to set the format in which to save pictures� The available
image formats are BMP, TGA, TIFF, PNG, JPG, JPEG, and JPEG2000�
3� Press the ENCRYPTION button to enable encryption of patient information when you save
to external media� Choose between ON and OFF�
4� Press the WRITE PDF button to create a PDF document of selected images whenever you
press “Save�” Images print to PDF according to settings selected in “Printer Settings�” Choose
between ON and OFF�
5� Press the AUTO CREATE PDF button to automatically create a PDF document of images
each time the required number of “Auto Print” images is captured (as dened in the “Printer
Settings: Page Layout” screen)� Choose between ON and OFF�
6� Press the EXIT button to close the settings screen and return to the Save screen�
7� Select the checkboxes in the Save Options window to enable data to be saved to:
• CD/DVD
• USB
• iPad
• PA C S
• Studio 3
• FTP
• EMR
• PowerShare
8� Select the video icons next to each option to enable you to save videos to each of these
options�
Note: You cannot save videos to EMR or PowerShare.
Page 46

40
Advanced Save Settings
Advanced save settings are accessible though the SETTINGS tab on the Save screen�
1
4
3
2
1� Select the ADVANCED SETTINGS tab to go to the “Save: Advanced Setting” screen�
2� Use the +⁄− buttons or the sliders to adjust brightness, contrast, phase, chroma and
sharpness for images captured on Channel 1 and Channel 2�
3� Press the EXIT button to go back to the Save Settings Screen�
4� Press the RESET
button to restore default settings�
Page 47

41
Playback of Images and Videos
Captured images and videos can be viewed, played back, annotated, and printed using the
Playback screens�
1
4
3
2
1� To go to the Playback screens, press the PLAYBACK tab at the top of the SDC3 display�
2� View image playback from the IMAGES tab�
3� View video playback from the VIDEOS tab�
4� View printer settings from the PRINTER SETTINGS tab� (You can also go to the
PRINTER SETTINGS tab from the Capture screen�)
Page 48

42
Playback of Recorded Images
Within the Playback screen, the IMAGES tab on the right side of the screen allows review,
annotation, and printing of previously captured images�
1
9
8
7
5
3 62 10
4
To browse images:
1� Press the arrows on either side of the center preview screen to scroll through captured
images one at a time�
2� Press the arrows on either side of the bottom row of images to scroll through the album ve
images at a time�
3� Tap an image on the bottom panel of images 2 times to see it on the center preview
screen� Primary channel images are identied with a “P” and Secondary channel images are
identied with an “S�”
To see images on the surgical display, there are 2 options:
4� Press the CURRENT IMAGE
button to see the image from the center preview screen on
the surgical display�
5� Tap the image on the center preview screen 2 times to see the image on the surgical display�
To select images:
6� Press an image to select it� Selected images are identied by a green border� Press the image
again to deselect it�
7� Press the SELECT NONE
button to switch between Select All and Select None and select
or deselect all images in the album�
Page 49

43
To print images:
8� Press the PUSH TO PDF button to make a PDF of the selected images� An information
message box shows while the PDF is processing�
9� Press the PRINT button to print the selected images� If no printer is connected, a
warning message shows in the status bar at the bottom of the screen�
To annotate images:
10� The dropdown menu lists annotation selections� Press the EDIT
button to show the Edit
Annotation screen�
Adding Image Annotations
Add or delete annotations for images selected in the Playback screen�
1
4
3
2
1� The Edit Annotations screen shows when the EDIT
button is selected in the Images
Playback screen�
2� The drop-down menu shows selections for Annotations�
3� Press the EXIT button to close the Edit Annotations screen and return to the Images
Playback screen�
4� Press the ADD or DEL button on the keyboard to add or delete entries� The ADD and DEL
buttons are disabled when no specialties, procedures, or annotations have been selected� A
conrmation message shows before any entries are deleted�
Page 50

44
Playback of Recorded Videos
Within the Playback screen, the VIDEOS tab on the right side of the screen allows review and
annotation of previously captured videos�
7
6
54 3
2
1
To browse videos:
1� Press the PRIMARY button to choose Primary or Secondary and browse videos recorded on
Channel 1 (primary) or Channel 2 (secondary)�
2� Press the arrows on either side of the center preview screen to scroll through captured
videos one at a time� Each video is identied in the top left corner by the channel and order
in which it was captured� Primary channel videos are identied with a “P” and Secondary
channel videos are identied with an “S�”
3� Press the arrows on either side of the bottom panel of videos to scroll through the album ve
videos at a time�
4� Tap an image 2 times from the bottom panel of images to see the corresponding video on
the center preview screen�
To playback videos:
5� Press the PLAY and STOP buttons to control the video in the center preview pane�
To select videos:
6� Press any video to choose it� Selected videos are identied by a green border� Deselect a
video by pressing it again�
7� Press the SELECT NONE
button to switch between Select All and Select None to select
or deselect all images in the album�
Page 51

45
Viewing Archived Information
Patient cases are automatically saved to the SDC3 hard disk, and can be archived for future
reference or access�
1� Archived cases are accessible through the ARCHIVE button on the Home screen�
2� Within the Archive screen, cases can be accessed from or moved to external media such as
USB, Discs, Network locations, and the PowerShare cloud server (with optional PowerShare
package installed)�
2
Note: If Anonymize Data is selected in the Data Protection settings, the Patient ID and Patient
Name are anonymous.
Page 52

46
Viewing Information Archived on the Hard Disk
All patient cases archived on the hard disk appear in a list on the Archive screen�
9
8
7 6
5
2
1
1110
4
3
To browse patient cases:
1� Press the HARD DISK tab to see all cases saved to the SDC3 hard disk�
2� The patient list shows up to ve cases at a time� Use the scrollbars to scroll through the list�
3� The Navigation Bar shows categories of patient information� Choose a column in the
Navigation Bar to sort the patient list by that category�
To view patient cases:
4� Press anywhere on a row to select the patient case�
5� Press the OK button to see patient cases in read-only mode�
6� When a case is selected, press the PLAYBACK
button to see images and videos within
that case�
7� Press the PATIENT INFO
button to go to the Archived Patient List�
To move patient cases to a dierent location:
8� Press the MOVE ALL
button to move all patient cases to any of the available Save
locations� A popup message asks for conrmation of the move� Press the YES button to
move the cases�
9� When a case is selected, press the SAVE
button to open the Save screen, where you can
choose to save the case to a dierent location�
To delete patient cases from the hard disk:
10� Press the DELETE
button to delete a selected patient case�
11� Press the DELETE ALL
button to delete all archived patient cases�
Page 53

47
Viewing Information Archived on a USB Drive
2
1
1� Press the USB
tab to see patient cases stored on a USB drive connected to the SDC3�
Patient cases show in read-only mode and the SAVE
button is disabled�
2� Press anywhere on a patient case to select it� Press the OK button to see selected archived
information in un-editable mode�
Viewing Information Archived on a Disc
1� Press the ARCHIVE DISC
tab to see patient cases stored on a CD or DVD loaded into the
SDC3� Patient cases are shown in read-only mode and the SAVE
button is disabled�
2� Press anywhere on a patient case to select it� Press the OK button to see selected archived
information in un-editable mode�
Page 54

48
Viewing Information Archived on the Studio3 Media Server
1� Press the STUDIO3 tab to see patient cases stored on the Studio3 server�
2� The Archive Patient List shows the number of images, videos or PDFs saved with a particular
case on the Studio3 server�
3� The SAVE
and PLAYBACK
buttons are disabled in the STUDIO3 tab�
4� Press the PENDING
button to toggle between the list of Pending and Completed cases�
Pending patient cases are shown by default�
5� Press the DELETE ALL
button to delete all cases in the window�
6� Press the DELETE
button to delete a selected case� A conrmation window shows to
conrm the deletion�
Viewing Information Archived on the PowerShare Cloud
Server
1� Press the POWERSHARE tab to see patient cases stored on the PowerShare cloud server�
2� The Archive Patient List shows the number of images, videos or PDFs saved with a particular
case on the PowerShare server�
3� The SAVE
and PLAYBACK
buttons are disabled in the POWERSHARE tab�
4� Press the PENDING
button to toggle between the list of Pending and Completed cases�
Pending patient cases are shown by default�
5� Press the DELETE ALL
button to delete all cases in the window�
6� Press the DELETE
button to delete a selected case� A conrmation window shows to
conrm the deletion�
Page 55

49
SDC3 Settings
Change system settings for the SDC3 from the SETTINGS
button at the top left of the Home
screen� From the Settings screens, you can adjust system settings including: General, Printer,
Network, Proles, Server, and System�
General Settings
General system settings are available from the GENERAL tab in the Settings menu� They
include application, miscellaneous, audio, and video settings, each accessible by selecting the
respective tab to the right of the screen�
General Application Settings
Descriptions of general application settings are provided below�
17
16
1
11131415
8
9
2 3 4 5 6 7
12 10
1� The General Application Settings screen opens automatically when the SETTINGS
button is selected from the Home screen, or when the GENERAL tab is selected from the
right of any settings screen�
2� The AUTO CUT OFF button determines when video recording automatically stops� Press the
AUTO CUT OFF button to switch between timed options�
3� The AUTO START RECORDING button determines if video recording automatically starts at
the beginning of a case� Select between On and O�
4� The DISC FORMAT button selects how to save data to a disc� Select between Data and DVD
Video� (The DVD Video option is available only when Record Mode is set to “At the End�”)
5� The REMOTE 2 CONTROL button assigns the Remote 2 function from the camera head as
either Stop or Pause�
Page 56

50
6� The IMAGE COUNT FONT SIZE button adjusts the size of the font used for the image count
in the capture screen�
7� The CHANNEL MODE button selects between Single- or Dual-channel mode�
8� The FLIP SCREEN button selects if and where images show on the surgical display when
they are captured� Select between None (no display), One (entire display), or Side (side of
display)�
9� The REC DISPLAY button causes the words “Rec” and “Rec Stopped” to appear on the
surgical display when recording is started or stopped� Select between On and O�
10� The DEVICE PRESET button turns Device Presets On or O�
11� The VOICE ANNOTATION button activates the voice annotation screen after every image
capture� (This feature is only available for systems equipped with the SDC3 Voice Package or
SDC3 Device Control Package�) Select between On and O�
12� The EDIT ANNOTATION button opens a screen to edit global annotations� These
annotations are then available during patient cases� (See the “Editing Global Annotations”
section immediately following this section�)
13� The LIVE VIDEO TIMEOUT button sets the time that an image selected on the Playback
screen replaces the live video feed on the On Screen Display� Choose between 3 seconds, 10
seconds, and None (when set to None, the image playback will remain on the OSD until you
manually change it back to Live Video)�
14� The LIVE PREVIEW button determines what displays in the preview window of the Capture
screen� Select On for live camera image, or O for the last captured image�
15� The GUI MONITOR button allows the touchscreen interface to appear on an external
touchscreen monitor (the monitor must be connected via VGA and Serial connection to the
SDC3 console)� Select Internal for the interface to appear on the SDC3 screen, or External for
the interface to appear on the external monitor�
16� The CALIBRATE button starts calibration of the LCD screen� Use this button if touch controls
are not accurate�
17� Press the RECORD MODE button to move between “Real Time” and “At the End�”
Editing Global Annotations
1
4
3
2
Page 57

51
1� Select a specialty from the dropdown menu, or use the keyboard to enter text�
2� Select a procedure and/or annotation from the dropdown menus, or use the keyboard to
enter text� (Procedure and annotation options change according to the specialty selected�)
3� Press the ADD or DEL button on the keyboard to add or delete entries�
4� Press the EXIT button to close the Edit Annotations screen and return to the General
Application Settings screen�
General Miscellaneous Settings
1� Press the MISC
tab to show general miscellaneous settings�
2� The +/ buttons adjust the position of images projected onto the surgical display� Use the
appropriate Standard Denition or High Denition settings for your video source� The RESET
buttons restore factory default values�
3� The SURGICAL TIMEOUT CHECKLIST buttons enable or disable the surgical timeout
checklist� The SETUP button launches the Surgical Timeout Checklist Setup screen�
4� The ACCESS CONTROL buttons enable or disable access control for SDC3 operators� The
SETUP button launches the Access Control Setup screen�
Page 58

52
Setting Up Access Control
From the Access Control Setup Screen, you can turn on Active Directory Authentication, set
passwords, or both, for logging in to the SDC3�
Active Directory Setup
1� Enter the Domain Server name, and the username and password to access the active
directory�
2� Press AUTHENTICATE to make sure that the server connection is successful, and the
credentials are valid�
Operator Password Setup
3� Enter an Administrator password in the Admin Operator Password eld� The Administrator
has permission to create and edit surgeon proles, and congure server settings�
4� Enter a Normal Operator password in the Normal Operator Password eld� The Normal
Operator cannot access settings for proles or servers�
Page 59

53
Setting Up the Surgical Timeout Checklist
The Surgical Timeout Checklist Setup screen shows when the SETUP button is selected in the
General Miscellaneous Settings screen�
654321
7
1� Press the FACTORY DEFAULT button to restore the factory default checklist�
2� Press the IMPORT and EXPORT buttons to import a checklist from a USB storage device or
export a checklist to a USB storage device�
3� Press anywhere on a question or line to select it�
4� Press the ADD, EDIT, or DELETE buttons to make changes to the selected question or line�
5� Press the arrow buttons to move the selected line up or down in the checklist�
6� Press the SAVE button to save changes to the checklist�
7� Press the EXIT button to go back to the General Miscellaneous Settings screen�
Page 60

54
General Audio Settings
1
4
2 3
1� Press the AUDIO tab to see the General Audio settings screen�
2� The +⁄− buttons adjust volumes for the Headset, Speaker, and Microphone�
3� The MUTE buttons mute the Headset, Speaker, or Microphone�
4� Press the OSD AUDIO METER button to show the strength of the audio input on the
surgical display�
5� Press the OSD DEVICE CONTROL button to show or hide the Device Control menu on the
surgical display�
Note: The OSD Audio Meter and OSD Device Control buttons are only enabled when the
option Voice Control Package is installed.
Page 61

55
Printer Settings
1� Select the PRINTER tab to go to the Page Settings screen�
1
7
5
3
6
4
2
2� Select a checkbox to show that data on the printed page�
3� Press the IMPORT LOGO
button to import a logo le (�bmp le type) from a USB
storage device� This places the imported logo on the printed page when “Logo” is checked�
Note: For surgeon proles stored in the cloud, the logo stored in the cloud dowloads to
the SDC3.
4� Press the RESET
button to restore the default settings�
5� The logo preview eld shows the logo that will appear on the printed page when “Logo” is
checked�
6� The print quality is shown in the Print Quality display window� Print quality is set to “Auto” by
default and cannot be changed�
7� The paper type is shown in the Paper Type display window� Paper type is set to “Letter” by
default� If the SDP1000 printer is connected to the SDC3, the PAPER TYPE button changes
between “Letter” and “A4�”
Page 62

56
Network Settings
Network settings are located on the NETWORK tab in the Settings menu� They include FTP,
Network Adapter, WiFi, and Video Streaming settings� You can access these settings from the tabs
on the right side of the screen�
Network FTP Settings
Network FTP settings are used to set up connection to an FTP site�
2
1
3 4
1� Select the FTP
tab to show the FTP Settings screen�
2� Enter the Username, FTP Address, and Password (if password protected) in the text boxes�
The drop-down menus list saved options for username and FTP address�
3� Press the ANONYMOUS, SECURE, or PASSWORD button to select the correct type of FTP
login�
4� Press the PING button to test connection to the FTP site�
SDC3 Networking Setup
Setup Requirements
• Protocol Used: FTP (File Transfer Protocol)
• A TCP/IP network�
• A secure FTP (FTP over SSH) server may be installed and congured, if needed� SDC3 does
not support FTP over SSL�
Instructions
1� Enter the IP address of the FTP server (and not the SDC3) into the SDC3 tab in the “Cong”
menu�
Page 63

57
2� Create a folder named SDC in the default path of the FTP Server� In this folder, create a folder
for the Username� For example, if you have anonymous FTP service running on a server with
an IP address of 10�2�101�26, and you have a folder called JOHND in the SDC folder in the
default path of the anonymous login, then you should enter 10�2�101�26 in the NETWORK
tab as the ‘FTP Address’ and JOHND as the ‘Username�’
3� Press the ADD button so that SDC3 remembers the username and the FTP Address in the
list� SDC3 can remember up to 500 usernames and FTP addresses�
4� Select the Write Videos checkbox on the NETWORK tab to write videos to the network�
5� Press the SAVE TO NETWORK button from the Save menu to save images and videos� On
the conrmation screen, check the Anonymous Login checkbox�
The SDC3 checks the server for a response� If it gets a valid response, it performs an anonymous
FTP login� It then changes directory to the directory corresponding to the current Username
(JOHND, in current example)� It does not create a new directory based on the Username� This
avoids creation of multiple directories if someone accidentally enters a wrong/invalid Username�
Therefore, you have to enter a Username for the FTP to work�
For Login with Username and Password
Note: The FTP server should be setup for the users who have access� Passwords should be all caps�
1� Create a folder under the root folder of the FTP server folder�
2� Create another folder under the SDC folder with the same name as the username�
Follow steps 3 - 5 above, except in step 5, uncheck the Anonymous Login checkbox and enter the
password�
Directory Structure
• <Default FTP path>\SDC\Username\?????MMDDYYYY_HHMMSS where, ?????: First 13
characters of the Patient’s Name / ID entered
• Username: Doctor’s Username which can be the same as his/her Notematic ID MMDDYYYY_
HHMMSS: Date/Time stamp to guarantee uniqueness
Note: If there are any problems writing the data:
• Check to make sure the read/write permissions of the FTP server are set�
• Make sure that the rewall settings on the server do not block the FTP port�
Page 64

58
Network Adapter Settings
1� Select the ADAPTER
tab to show the Network Adapter Settings screen�
2� There are two options: IPV4 or IPV6� Toggle this button to set the correct network type�
6
5
4
3
1
2
3� Select the Network Adapter from the dropdown menu�
4� Check DHCP/Dynamic or Static to choose the type of IP address�
5� Select Proxy if applicable (IPV4 only), then enter proxy settings�
6� Press the SAVE button to save entered settings�
Page 65

59
WiFi Network Connection
The WiFi Network Connection screen shows a list of available wireless networks, their signal
strengths, and security status� Select a network from this screen to open an authentication screen
and log in to that network�
2
1
4
7
6
3
5
1� Press the WIFI tab to show the WiFi Network Connection screen�
2� Press the OTHER button to enter a WiFi network that is not listed�
3� Press the REFRESH button to refresh the list of available WiFi connections�
4� Press the WIFI ON/OFF button to enable or disable WiFi� WiFi is OFF by default�
5� Press the MANAGE NETWORKS button to open the Manage Networks screen�
6� Available wireless networks are shown by name, signal strength, and secure/unsecure status�
7� Press the arrow button to open the login screen for the applicable wireless network�
Page 66

60
Authentication
Depending on the type of wireless network selected, the SDC3 asks for a username and password,
or for a WiFi password�
Username and Password
3
1
2
1� Enter the Username and Password in the corresponding elds�
2� Press the JOIN button to allow users to join the network�
3� Press the EXIT button to return to the WiFi Network Connection screen�
WiFi Password
3
1
2
1� Enter the WiFi password� (The WiFi Setting Authentication screen asks for the WiFi password
when a secured WiFi connection is selected for the rst time�)
2� Press the JOIN button to allow users to join the network�
3� Press the EXIT button to return to the WiFi Network Connection screen�
Page 67

61
Wireless IP Settings
1� The WiFi Setting screens show the IP settings of the connected WiFi network �
2� Press the EXIT button to return to the WiFi Network Connection screen�
1
Manage Networks
From the Manage Networks screen, you can view the security type and prole name of each
network, and move the networks up or down in order of preference�
Page 68

62
Network Streaming Settings
The Network Streaming Settings lets you set up a destination for streaming video from the SDC3�
Start and stop video streaming from the Capture screen�
1 2 3
1
4 5 6
1� Press the STREAM
tab to see the Video Streaming Settings screen�
Note: Streaming details cannot be modied while streaming is in progress�
2� Press the STREAM MODE button to enable or disable streaming�
3� Press the STREAM BITRATE button to choose between Low, Medium, and High�
4� The PACKET TYPE button shows UDP as the only available option, and is disabled�
5� The destination of the (Client) URL, where videos will stream�
6� The destination IP address and Port number can be entered in the Destination box�
7� Press the SAVE button to save video streaming settings�
Page 69

63
Network Share Settings
The Network Share Settings screen lets you set up a saved network connection that you can use
to access external network resources, or to save data from the SDC3�
1� Enter a display name for the network connection�
2� Enter the network path, username and password for the network�
3� Press the SAVE button to save the shared network� The SDC3 tries to connect to the
network� The status message at the bottom of the screen indicates if the connection is
successful�
Page 70

64
Proles Settings
In the Proles Settings screens, you can create, modify, or delete surgeon proles�
1
5 643
2
1� Select the PROFILES tab to open the Proles screen� All available surgeon proles are
listed�
2� Select any surgeon prole to open the Account Modication screen�
3� Press the CREATE NEW ACCOUNT button to open the Surgeon Account screen�
4� Press the IMPORT USER button to import a single surgeon prole from a USB drive�
5� Press the IMPORT ALL USERS button to import all surgeon proles stored on a USB drive�
6� Press the EXPORT ALL USERS button to export all surgeon proles to a USB drive�
7� The FAVORITES button is for use by Stryker Representatives only�
Page 71

65
Creating a New Surgeon Account
New surgeon accounts can be created by an Administrator only�
321
1� Enter the new surgeon name�”
2� Press the CREATE ACCOUNT button to save the new account� The status bar conrms that a
new account has been entered successfully�
3� Press the EXIT button to return to the Surgeon Accounts screen�
Page 72

66
Modifying a Selected Prole
Surgeon proles can be modied to change Device Presets, compliments, and account picture�
2
1� Press Specialty/Procedure, Change Custom Compliments, or Change Picture to do those
tasks for the selected surgeon account�
2� Press EXPORT USER to save the surgeon prole to a USB drive�
3� DISABLE OPNOTE and PROMOTE TO CLOUD are for Stryker Representatives only�
4� Press UPDATE SURGEON NAME to change the stored name�
5� Press SYNC PROFILE to save changes made to the prole on the SDC3 to the cloud�
6� Press the EXIT button to go back to the Surgeon Accounts screen�
Page 73

67
Changing a Surgeon Annotation List
From the Select Annotation screen, you can select previously saved image and video annotations
for a surgeon account�
4
5
6
1� Select the SPECIALTY/PROCEDURE button in the Account Modication screen to go to the
Select Annotation screen�
2� Select a specialty checkbox in the Available Annotations window to see pre-dened
procedure names and annotations� Press the applicable checkbox to select the correct
procedure and annotation�
3� Press the RIGHT or LEFT arrow button to move selected annotations in or out of the
Selected Annotations window�
4� Press the CAPTURE DEVICE PRESETS button to save settings for connected devices�
5� Press the EDIT DEVICE PRESETS button to edit, remove or create device settings�
6� Press the EXIT button to go back to the Account Modication screen�
Page 74

68
Capturing Device Presets
From the Capture Device Presets screen, you can save settings for connected devices�
1
2
4
3
5
1� The Specialties/Procedures list shows the specialties and procedures saved in the surgeon
prole� You can apply presets to multiple specialties and procedures�
2� The Connected Devices list shows the devices connected to the SDC3�
3� To select all devices and their settings, press SELECT ALL. To deselect all devices and their
settings, press SELECT NONE. You can also individually select or deselect devices and
settings�
4� Press CAPTURE to save the checked device s and settings as presets�
5� Press the EXIT button to go back to the Account Modication screen�
Page 75

69
Editing Device Presets
From the Editing Device Presets screen, you can edit device settings that are saved in the
surgeon’s prole�
1
3
2
4
5
1� From the Specialties/Procedures list, select the procedure and the device you want to edit�
2� Press REMOVE PRESET to delete the saved settings�
3� Change the Specialty, Procedure, Device, Setting, and Value from the drop-down lists shown
on the right side of the screen�
4� Press UPDATE PRESET to update the settings�
5� Press theEXIT button to go back to the Account Modication screen�
Page 76

70
Setting Up Custom Compliments
The SDC3 gives the doctor a compliment when prompted� Select compliments from a predened list, or enter a custom compliment� Compliments are stored in each surgeon prole�
1
5
6
2
3 4
1� Press the CHANGE CUSTOM COMPLIMENTS button in the Account Modication screen to
go to the Custom Compliment Setup screen�
2� Press anywhere on a compliment line to select it�
3� Press the PLAY button to play a selected compliment�
4� Press ADD to add a new compliment� Press EDIT or DELETE to modify a selected
compliment� Press SAVE button to save edited text� Press the CANCEL
button to
cancel changes�
5� Press the FACTORY DEFAULT button to reset the custom compliments list to the factory
default� A conrmation screen appears�
6� Press the EXIT button to go back to the Account Modication screen�
Page 77

71
System Settings
Within the SYSTEM SETTINGS tab, you can adjust the system date and time, view the
system log, select the system language, and set data protection�
Date and Time Settings
2
1
3
4
1� Select the DATE & TIME tab from the System screen to go to the Set Date & Time Screen�
2� Use the +⁄− buttons to change the date and time values�
3� Press the SAVE button to save changes�
4� Press the DATE FORMAT button to switch between available date formats�
Page 78

72
System Log Settings
Settings for the System Log are adjusted in the “System Log Settings” screen� Here, information
about system drivers, connected devices, and system events are stored, as well as global
annotation entries� Information from this screen can be exported to a USB drive for o-site
diagnostics�
1
2
3
4 5 6 7
1� Select the LOG tab from the System screen to open the Log screen�
2� The Log screen lists each SDC3 component, along with its version, active status and type�
3� The scroll bar moves to show components not included in the initial view�
4� Press the FORMAT USB button to format a USB storage device with the NTFS format�
5� Press the LOG USB button to transfer the system log le to a USB storage device�
6� Press the IMPORT ANNOTATION button to import annotations from a USB storage device
to the system�
7� Press the EXPORT ANNOTATION button to export a master list of annotations from all
surgeon accounts on the system to a USB storage device�
Page 79

73
System Language Settings
Change the System Language on the SYSTEM LANGUAGE SETTING screen�
2
1
1� Select the LANGUAGE tab in the System screen to open the “Language Setting” screen�
2� Press any button to select the corresponding language� The system reboots before the
language change takes eect� Previously entered text elds remain in the language in which
they were entered�
Page 80

74
System Data Protection Settings
The SDC3 Data Protection Settings screen lets you anonymize the patient data stored on the
system� Always anonymize data before returning the unit to Stryker for repair�
Turning on Data Protection
1� Make sure you are using the default Surgeon Prole, and are logged in as an Administrator if
Access Control is on�
1� Select the Data Protection tab from the System screen to open the Data Protection Screen�
2� Enter a password and re-enter it to conrm�
Note: Keep the password in a safe location. This password is not stored in the system, and
cannot be recovered if it is lost.
3� Press the FACTORY DEFAULT button to change all system settings to the factory defaults�
4� Press OK�
5� The patient data stored on the system is made anonymous, and the system restarts�
Turning o Data Protection
1� Make sure you are using the default Surgeon Prole�
2� Go to Settings > System > Data Protection, or press the Archive button from the Home
screen�
3� On the Data Protection screen, re-enter the password and press OK� The system restarts
Page 81

75
Server Settings
Settings for how the SDC3 interacts with the Studio3 Server, the DICOM server, Stryker Link and
Cloud Integration are accessible from the SERVER tab�
Studio3 Server Settings
1
7
8
9
2
3 4
5
6
1� Go to the Server tab, then select the STUDIO3 tab to go to the Studio3 Server Settings
screen�
2� Enter the Studio3 server IP address in the IP Address eld�
3� Enter the Studio3 server Port number in the Port eld�
4� Press the ECHO button to test the Studio3 server connection� Valid server credentials are
conrmed by an “Echo Successful” message shown in the status bar�
5� Select the Allow Deletion of Pending Cases checkbox to allow deletion of pending cases
from the Studio3 archive list�
6� Set the amount of times the SDC3 attempts to transfer data to the Studio3 server in the
Maximum Transfer Attempts eld� The default value is ve attempts�
7� The dropdown menu lists available FTP Buer Sizes�
8� The default Max Queue Size is 1000� Alternate values can be entered in this eld�
9� Press the SAVE button to save settings�
Page 82

76
Selecting Fields for Cases Saved on the Studio3 Server
From the Specify Required Fields screen, you can select the patient information required for cases
saved on the Studio3 server�
2
1
1� Select the FIELDS tab to go to the Studio3 Fields screen�
2� Fields selected in the Specify Required Fields screen appear in the saved case on the Studio3
server� Patient ID and Patient Name elds are required by default and cannot be unchecked�
Studio3 Networking Setup
Setup Requirements
• A TCP/IP network�
• A Stryker Studio3 Media Server installed and congured�
Instructions
1� Enter the IP address of the Studio3 Media Server into the STUDIO3 tab in the Studio3 Server
Settings screen�
2� Select the Studio3 checkbox in the Save Settings screen to enable the STUDIO3 button�
3� To save the images and videos, press the STUDIO3 button from the Save menu� A
conrmation message shows to indicate that the case has been added to the Studio3
transfer queue�
4� To view the pending/completed transfer queue, press the STUDIO3 tab in the Archive
menu�
Page 83

77
DICOM Server Settings
To congure DICOM server settings, go to Current Case > Server, and conrm that the DICOM
menu is active�
2
3
5
4
1
From the DICOM menu, you can:
1� Toggle the IPV4/IPV6 button to select the connection type�
2� Select a connection name, or create a new connection�
3� Dene the Store, Q/R, and Storage Commit (SC)�
4� Congure the required elds for cases saved to DICOM
5� Congure the DICOM settings�
Note: For full instructions on conguring the DICOM server, refer to the DICOM surgeon guide
(P15650).
Page 84

78
Stryker Link Server Settings
From the STRYKER LINK Server Settings screen, you can send log les to Stryker customer
service� Contact your Stryker representative from more informati on�
Cloud Settings
From the CLOUD INTEGRATION SETTINGS screen, you can:
• Link the SDC3 to your customer account in the cloud, and download information from the
cloud to your local machine (for Stryker Representatives only)�
• Link the facility’s PowerShare account to the SDC3 and save case images to the PowerShare
Network� This option is available with the optional PowerShare package�
Contact your Stryker Representative for more information about these features�
PowerShare Integration
The PowerShare Integration Package lets the SDC3 save case images to a facility’s PowerShare
Network�
Page 85

79
To connect the SDC3 to your facility’s PowerShare network:
Note: Cloud Integration must be ON to connect to the PowerShare Network. To set up Cloud
Integration, contact your Stryker representative.
1� Go to Settings > Server > Cloud Settings�
2� Press the SETUP button under PowerShare Integration�
3� Enter your PowerShare User ID and Password�
4� To test the connection, press VALIDATE� If the connection is successful, the SDC3 shows the
message, “Authentication successful�”
5� To save the connection, press SAVE�
Save Settings for PowerShare
To enable saving case information to PowerShare:
1� Go to Current Case > Save�
Page 86

80
2� Press the SETTINGS button�
3� Select PowerShare to make PowerShare a Save option�
4� Press EXIT to close the Save Settings screen�
Page 87

81
EMR Integration Settings
From the EMR Integration screen, you can link the SDC3 to an EMR system� The SDC3 links to
four EMR systems: AGFA, Allscripts, CERNER, and EPIC� This functionality is only available with the
optional EMR Integration Package�
Page 88

82
Troubleshooting
Problem Solution
Login failure Make sure that the correct username and password are used
to log into the system�
Video limit reached Begin a new case to capture more videos�
Image limit reached Begin a new case to capture more images�
List limit reached The maximum number of cases permitted to be entered has
been reached� Delete older entries in the list�
Error printing� No image
captured/selected
Capture images and then select them to print�
Error saving settings To restore previous settings, reboot the system�
FTP connection error Make sure that the FTP server is up and the network cable is
plugged in�
Error: Media unavailable Please insert/connect a valid media to the SDC3�
USB space insucient Make sure that there is free space available on the media�
Error: Disk corrupt� Please try
again���
The media is corrupt� Insert a new disc to continue�
Error: Disc drive busy Make sure that the disc drive is not being currently used�
Reboot the machine if the error persists�
Error: locating logo�bmp Make sure that the USB cable is connected properly� Make
sure that the logo le is present on the USB drive and it is
called “logo�bmp�”
Error: upgrading software Insert the upgrade dongle in the save screen�
Application has encountered
a critical error and is shutting
down�
Please reboot the system�
No live video on preview Make sure that the camera is on and check the cable
connections�
Make sure that the proper video source is selected�
No live video on the monitor Check the cable connections
Make sure that the camera is powered on�
Make sure that the proper video source is selected�
No live video in PIP on preview Check the cable connections
Make sure that the camera is powered on�
Make sure that the proper video source is selected�
Make sure that you are in PIP mode�
No live video PIP on monitor Check the cable connections�
Make sure that the camera is powered on�
Make sure that the proper video source is selected�
Make sure that the monitor OSD PIP is enabled via the
application�
Page 89

83
Print errors Make sure there aren’t any paper jams�
Make sure the printer has enough ink�
Make sure the printer door is closed�
Make sure the printer has paper�
Make sure the printer is powered on�
Make sure the printer cable is connected��
Error saving more than 4GB les
to the USB
Make sure that the USB is formatted as NTFS� FAT 32 will not
support any le size bigger than 4GB�
Error reading archived cases
from DVD/CD
Reboot the system if you have just written the case� Check
the disc on a dierent system�
No videos written to the USB Make sure “write videos to USB” in the save settings is
selected�
No videos written to the
network
Make sure “write videos to Network” in the save settings is
selected�
Annotation list is blank Make sure that a procedure is selected in the Patient
information screen in order to enable the annotation list�
Device status overlays do not
appear on the surgical display
Make sure proper connections have been made between
devices and device ports on the SDC3�
Make sure the device is selected/added in the “Video
Settings: On-Screen Display” menu�
Touchscreen controls are not
working properly
Go to Settings > General� Press the CALIBRATE button to
calibrate the touchscreen�
The SDC3 does not recognize
the iPad
Unplug the iPad from the USB drive, then plug it back in�
Make sure to wait at least 30 seconds for the iPad to
connect�
The SDC3 does not recognize an
SFB/FireWire device�
1� Set the SDC3 power to o�
2� Connect the SFB/FireWire cable to both the device and
the SDC3�
3� Set the SDC3 power to on�
Page 90

84
Electromagnetic Compatibility
Like other electrical medical equipment, SDC3 requires special precautions to ensure electromagnetic compatibility with other
electrical medical devices� To ensure electromagnetic compatibility (EMC), SDC3 must be installed and operated according to the
EMC information provided in this manual�
The SDC3 has been designed and tested to comply with IEC 60601-1-2 requirements for EMC with other devices�
Caution: Portable and mobile RF communications equipment may aect the normal function of the SDC3�
Caution: Do not use cables or accessories other than those provided with the SDC3, as this may result in increased
electromagnetic emissions or decreased immunity to such emissions�
Caution: If the SDC3 is used adjacent to or stacked with other equipment, observe and verify normal operation of the SDC3 in the
conguration in which it will be used prior to using it in a surgical procedure� Consult the tables below for guidance in placing the
SDC3
Guidance and Manufacturer’s Declaration: Electromagnetic Immunity
SDC3 is intended for use in the electromagnetic environment specied below� The customer or the user of SDC3 should ensure
that it is used in such an environment�
(a) Field strengths from xed transmitters, such as base stations for radio (cellular/cordless) telephones and land mobile radios,
amateur radio, AM and FM radio broadcast, and TV broadcast, cannot be predicted theoretically with accuracy� To assess
the electromagnetic environment due to xed RF transmitters, an electromagnetic site survey should be considered� If the
measured eld strength in the location in which the SDC3 system is used exceeds the applicable RF compliance level above,
the SDC3 system should be observed to verify normal operation� If abnormal performance is observed, additional measures
may be necessary, such as reorienting or relocating the SDC3 unit�
(b) Over the frequency range 150 kHz to 80 MHz, eld strengths should be less than 3 V/m�
Recommended Separation Distances Between Portable and Mobile RF Communications Equipment and the SDC3 System
The SDC3 system is intended for use in an electromagnetic environment in which radiated RF disturbances are controlled� The
user of the SDC3 system can help prevent electromagnetic interference by maintaining a minimum distance between portable
and mobile RF communications equipment (transmitters) and the SDC3 system as recommended below, according to the
maximum output power of the communications equipment�
Rated maximum output power (W)
of transmitter
Separation distance (m) according to frequency of transmitter
150 kHz to 80 MHz
d = 1�17√P
80 kHz to 800 MHz
d = 1�17√P
800 kHz to 2�5 GHz
d = 1�17√P
0�01 0�12 0�12 0�23
0�1 0�37 0�37 0�74
1 1�17 1�17 2�33
10 3�70 3�70 7�37
100 11�70 11�70 23�30
For transmitters rated at a maximum output power not listed above, the recommended separation distance (d) in meters (m)
can be estimated using the equation applicable to the frequency of the transmitter, where P is the maximum output power
rating of the transmitter in watts (W) according to the transmitter manufacturer�
NOTE 1: At 80 MHz and 800 MHz, the separation distance for the higher frequency range applies�
NOTE 2: These guidelines may not apply in all situations� Electromagnetic propagation is aected by absorption and reection
from structures, objects, and people�
Page 91

85
Guidance and Manufacturer’s Declaration: Electromagnetic Emissions
SDC3 is intended for use in the electromagnetic environment specied below� The customer or the user of SDC3 should ensure
that it is used in such an environment�
Emissions test Compliance Electromagnetic Environment - guidance
RF emissions CISPR 11 Group 1
SDC3 uses RF energy only for its internal function;
therefore, its RF emissions are very low and are not
likely to cause any interference in nearby electronic
equipment�
RF emissions CISPR 11 Class B SDC3 is suitable for use in all establishments, including
domestic establishments and those directly connected
to the public low-voltage power supply network that
supplies buildings used for domestic purposes, provided
the following warning is heeded:
Warning: This system may cause radio interference
or may disrupt the operation of nearby equipment� It
may be necessary to take mitigating measures such as
reorienting or relocating the system or shielding the
location�
Harmonic emissions IEC61000-3-2 Class A
Voltage Fluctuations/ icker
emissions IEC61000-3-3
Complies
Guidance and Manufacturer’s Declaration--Electromagnetic Immunity
The SDC3 system is intended for use in the electromagnetic environment specied below� The user of the SDC3 system should
ensure that it is used in such an environment�
Immunity Test IEC 60601 Test Level Compliance Level Electromagnetic Environment--Guidance
Portable and mobile RF communications equipment should
be used no closer to any part of the SDC3 system, including
its cables, than the recommended separation distance
calculated from the equation applicable to the frequency of
the transmitter�
Conducted RF
IEC 61000-4-6
3 Vrms
150 kHz to 80 MHz
3 V
Recommended Separation Distance:
d = 1�17√P
Radiated RF
IEC 61000-4-3
3 V/m
80 MHz to 2�5 GHz
3 V/m d = 1�17√P 80 MHz to 800 MHz
d = 2�33√P 800 MHz to 2�5 GHz
where P is the maximum output power rating of the
transmitter in watts (W) according to the transmitter
manufacturer and d is the recommended separation distance
in meters (m)�
Field strengths from xed RF transmitters, as determined by
an electromagnetic site survey (a), should be less that the
compliance level in each frequency range (b)�
Interference may occur in the vicinity of equipment marked
with the following symbol:
NOTE 1: At 80 MHz and 800 MHz, the higher frequency range applies�
NOTE 2: These guidelines may not apply in all situations� Electromagnetic propagation is aected by absorption and reection
from structures, objects, and people�
(a) Field strengths from xed transmitters, such as base stations for radio (cellular/cordless) telephones and land mobile
radios, amateur radio, AM and FM radio broadcast and TV broadcast cannot be predicted theoretically with accuracy� To assess
the electromagnetic environment due to xed RF transmitters, an electromagnetic site survey should be considered� If the
measured eld strength in the location in which the SDC3 system is used exceeds the applicable RF compliance level above,
the SDC3 system should be observed to verify normal operation� If abnormal performance is observed, additional measures
may be necessary, such as reorienting or relocating the SDC3 unit�
(b) Over the frequency range 150 kHz to 80 Mhz, eld strengths should be less than 3 V/m�
Page 92

86
Guidance and Manufacturer’s Declaration: Electromagnetic Immunity
SDC3 is intended for use in the electromagnetic environment specied below� The customer or the user of SDC3 should ensure
that it is used in such an environment�
Immunity Test IEC 60601 test
level
Compliance Level Electromagnetic
Environment - guidance
Electrostatic Discharge (ESD)
IEC61000-4-2
±6kV contact
±8kV air
±2,4,6kV contact ±2,4,8kV air Floors should be wood,
concrete or ceramic tile�
If oors are covered with
synthetic material, the
relative humidity should be
at least 30%�
Electrical fast transient/burst
IEC61000-4-4
±2kV for power
supply lines
±2kV for power supply lines Mains power quality
should be that of a typical
commercial or hospital
environment
±1kV for input/
output lines
±1kV for input/output lines
Surge IEC61000-4-5 ±1kV dierential
mode
±0�5, 1kV dierential mode Mains power quality
should be that of a typical
commercial or hospital
environment
±2kV common
mode
±0�5,1, 2kV common mode
Voltage dips, short
interruptions and voltage
variations on power supply
input lines IEC61000-4-11
<5% Ut (>95% dip
in Ut) for 0�5 cycle
<5% Ut (>95% dip in Ut) for 0�5 cycle Mains power quality
should be that of a typical
commercial or hospital
environment� If the user of
SDC3 requires continued
operation during power
mains interruptions, it is
recommended that SDC3
be powered from an
uninterruptible power supply
or a battery�
40% Ut (60% dip
in Ut) for 5 cycles
40% Ut (60% dip in Ut) for 5 cycles
70% Ut (30% dip
in Ut) for 25 cycles
70% Ut (30% dip in Ut) for 25 cycles
<5% Ut (>95% dip
in Ut) for 5 sec
<5% Ut (>95% dip in Ut) for 5 sec
Power frequency (50/60Hz)
magnetic eld IEC 61000-4-8
3 A/m 3 A/m Power frequency magnetic
elds should be at levels
characteristic of a typical
location in a typical
commercial or hospital
environment�
NOTE Ut is the a�c� mains voltage prior to application of the test level�
Page 93

87
Cleaning and Maintenance
Warning
• To avoid electric shock and potentially fatal injury, unplug the SDC3 from the
electrical outlet before cleaning�
Caution
• Do not spray cleaning liquid directly onto the unit as product damage may result�
Spray cleaning liquid on the cloth before wiping the unit�
• Do not immerse the console in any liquid as product damage will result�
• Do not use corrosive cleaning solutions to clean the unit as product damage may
result�
• Do not sterilize the unit as product damage may result�
Cleaning
Should the unit need cleaning:
1� Spray cleaning liquid onto a dry, sterile cloth� Avoid excess liquid or drips�
2� Wipe the unit�
3� Take extra care when cleaning the front LCD screen� Excess liquid or drips that enter the
bottom of the screen may result in product damage�
Maintenance
SDC3 requires no preventative or periodic maintenance� However, Stryker recommends you
reboot the system daily for best performance�
Page 94

88
Symbols
Device
Mouse Speaker Keyboard
Monitor Output Network
USB Headset Serial port
Input Printer
Packaging/Labeling
Legalmanufacturer Date of manufacture
Consult Instructions for Use
Complies with the requirements of
directive 93/42/EEC
Ambient temperature range Relative humidity range
SN
Serial Number
Product number
Equipotentiality Protective Earth Ground
Authorized representative
in Europe
Made in France
Stryker Firewire Radiation Emitting
PPAA
Compliance to Electrical
Safety Standards
Complies with Australian regulatory
requirements
Warning/Caution: See
Instructions for Use
Federal law restricts this device to
sale by or on the order of a physician�
This product contains
electrical waste or
electronic equipment� It
must not be disposed of as
unsorted municipal waste
and must be collected
separately�
Complies with Federal
Communication Commission
Standards
Device recycling code
(applicable in China)
China Compulsory Certicate Mark
Page 95

89
Technical Specications
Equipment Information
Size • Control Unit: 12�5” W × 16�5” D × 7�25” H
• Total Weight: 22�5 lbs (10�2 kg)
• Display: 8” TFT LCD, with digital touchscreen
Power Consumption 100-240VAC ~ 50/60Hz, 4A/2A maximum
Recommended
Security Authentication and
Encryption (when
connecting to
Hospital network)
WPA2-Enterprise (PEAP-MSCHAP v2 authentication) with AES
encryption
Wireless Transmission • Type of modulation: OFDM and DSSS
• Maximum EIRP level: 7�83 dBm
• Operating frequency range: 2403�04 MHz to 2480�54 MHz
Electrical Safety
Classication
• Class I Equipment
• No Applied Part
• Water Ingress Protection, IPX0
• Continuous Operation
Environmental
Specications
• Operating Temperature: 10 – 40°C
• Operating Humidity: 25 – 75% RH
• Transport and Storage Temperature: -18° – 60°C
• Transport and Storage Humidity: 15 – 90% RH
FCC Compliance Contains FCC ID: RYK-WUBR170GNM
This device complies with part 15 of the FCC Rules� Operation
is subject to the following two conditions: (1) This device may
not cause harmful interference, and (2) This device must accept
any interference received, including interference that may cause
undesired operation�
Battery Recycling The Batteries Directive 2006/66/EC introduces new requirements
from September 2008 on removability of batteries from waste
equipment in EU Member States� To comply with this Directive,
this device has been designed for safe removal of the batteries at
end-of-life by a waste treatment facility� Infected units should be
decontaminated before they are sent for recycling� In the case that it
is not possible to decontaminate the unit for recycling, the hospital
should not attempt to remove the batteries from waste equipment�
Continued disposal of small amounts of portable batteries to landll
and incineration is allowed under the Batteries Directive 2006/66/EC
and Member State regulations�
Image
Page 96

90
Resolution • NTSC: 640 × 480
• PAL: 768 × 576
• XGA: 1024 × 768
• SXGA: 1280 × 1024
• High Denition 720: 1280 × 720
• High Denition 1080: 1920 × 1080
Formats Bitmap (BMP), Joint Photographic Experts Group (JPG, JPEG),
JPEG2000, Tagged Image File Format (TIFF), Truevision Targa (TGA)
and Portable Network Graphics (PNG)
Audio
Input/Output • Stereo Line and Headset Input/Output
• 1 Speaker Output
Network
Type 10/100/1000 Mbps ethernet
Video
Video Input • (2) S-Video, (1) Composite: (NTSC) 720 × 480, (PAL) 720 × 576
• (2) DVI, (2) RGBHV (via DVI-I connectors), (SXGA)1280×1024,
(XGA)1024×768, (720p)1280×720, (1080p)1920×1080
Video Outputs • 1 S-Video, 1 Composite
• 2 DVI and 2 RGBHV (via DVI-I connectors)
Encoding Format/
Resolution
• MPEG2: 720 × 480, 720 x 576
• H�264: (NTSC)720×480, (PAL)720×576, (XGA)1024×768,
(SXGA)1280×1024, (720p)1280×720, (1080p)1920×1080
Printer
Auto Printing • 1, 2, 4L, 4S, 6, 8, 12, or 18 images per page for portrait orientation
• 1, 2, 4L, 4S, 6, 9, 12, or 16 images per page for landscape orientation
Printers
Supported
• SDP1000
• Kodak ESP 7250
Storage Devices
Disc • Capacity: 100 images and 99 video les, with auto cuto for
CD (600MB), DVD (Data - 4�0 GB; Video - 3�6 GB), or none (45 GB,
maximum case size permitted)
• Time Based Auto Cuto Options: 15 sec, 30 sec, 1 min, 2 min, 5
min, and 30 min
• Recording Formats: CD-R, DVD-R, DVD+R (single session),
DVD+RW
USB Format: NTFS and FAT32 format supported (read/write), change from
FAT32 to NTFS format or NTFS to FAT32 format supported, MAC users
will only have read capabilities
Page 97

91
Page 98

Page 99

Page 100

Produced for:
Stryker Endoscopy
5900 Optical Court
San Jose, CA 95138 USA
1-408-754-2000, 1-800-624-4422
www.stryker.com
Stryker Corporation or its divisions or
other corporate aliated entities own,
use or have applied for the following
trademarks or service marks: the
Stryker logo. All other trademarks are
trademarks of their respective owners
or holders.
P15647 M
v1
2016/09
WCR: NONE
 Loading...