

Page 1
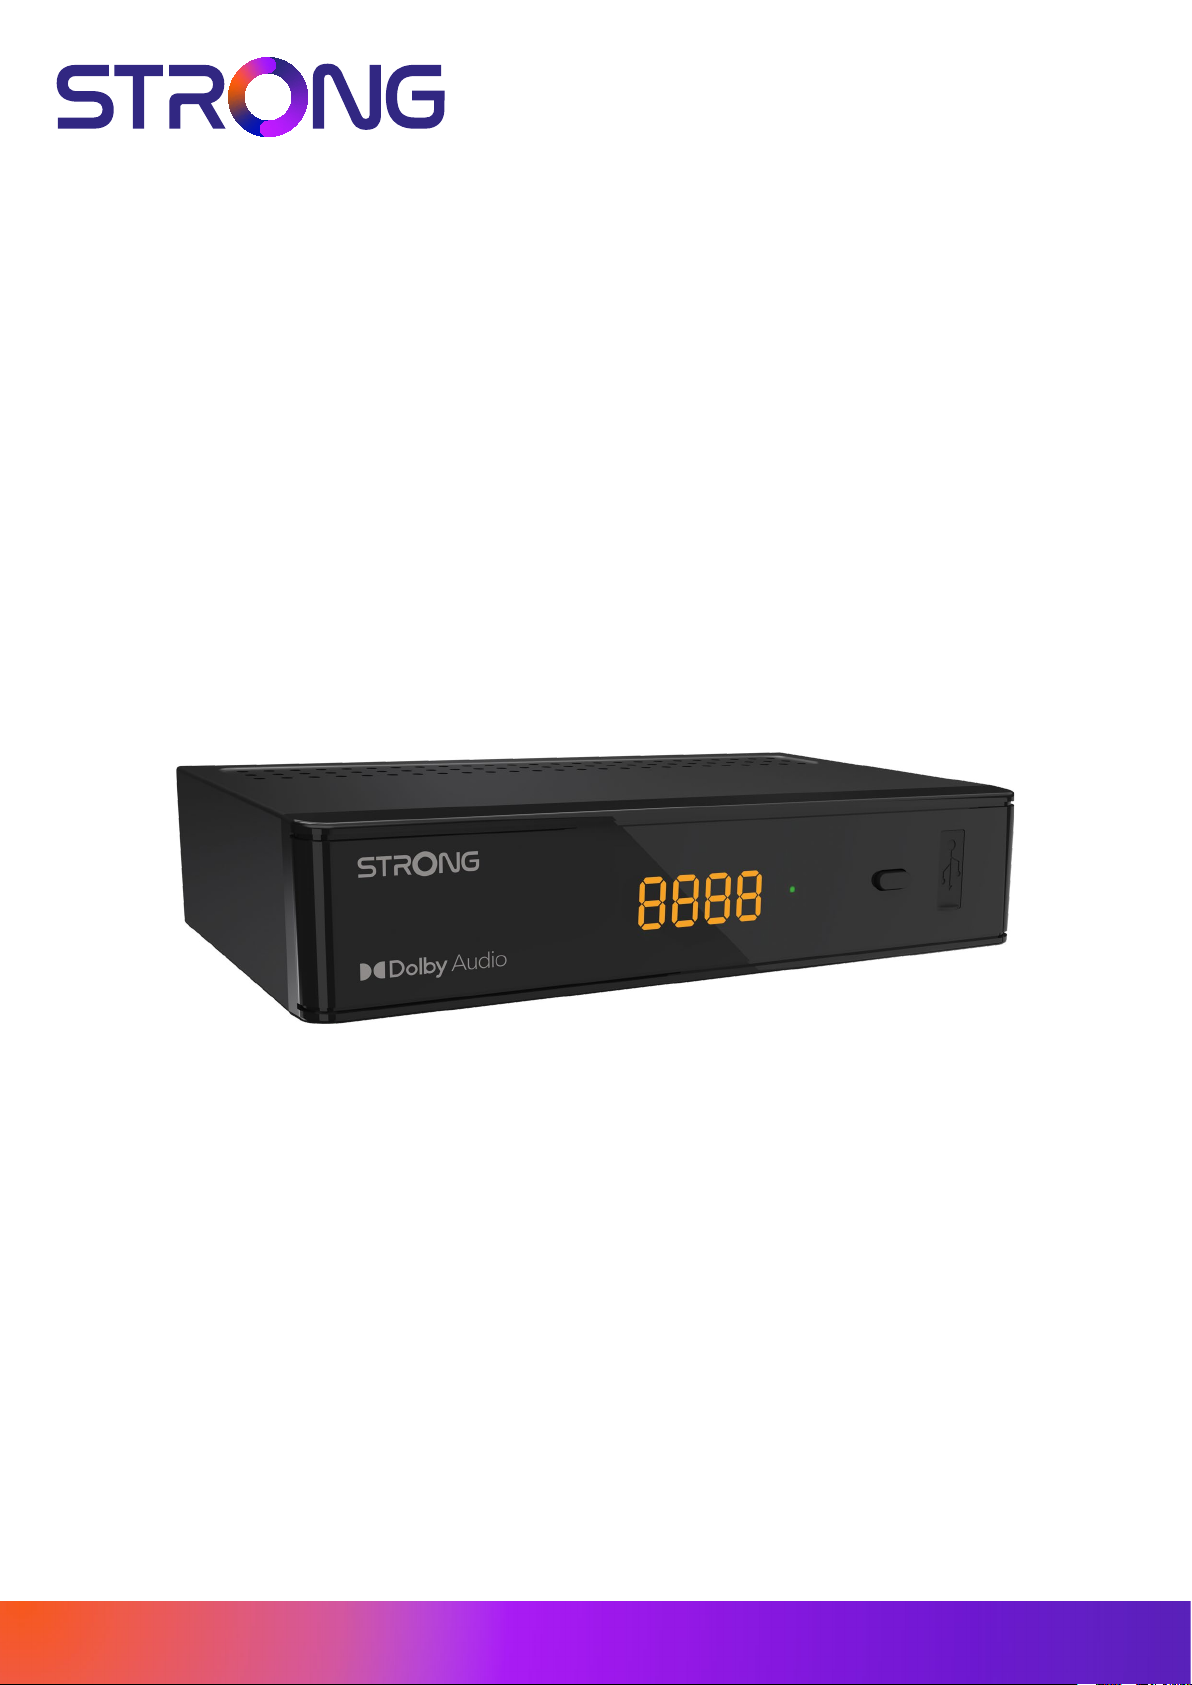
DIGITAL HD SATELLITE
RECEIVER
SRT 7030
User Manual
Bedienungsanleitung
Manuel d’utilisation
Manuale d’uso
Manuale utente
Manual del usuario
Instrucciones de instalación
Návod kobsluze
www.strong.tv
Používateľská príručka
Telepítési Utasítás
Bruksanvisning
Uživatelská příručka
Korisnički priručnik
Používateľská príručka
Εγχειρίδιο χρήστη
Page 2
Supplied by STRONG Austria
Represented by STRONG Ges.m.b.H.
Teinfaltstraße 8/4.Stock
A-1010 Vienna, Austria
Email: [email protected]
www.strong.tv
22 Mar 2023 10:37
Page 3

Licenses
This product contains one or more programs protected under international and U.S. copyright laws as unpublished works. They
are condential and proprietary to Dolby Laboratories. Their reproduction or disclosure, in whole or in part, or the production of
derivative works therefrom without the express permission of Dolby Laboratories is prohibited. Copyright 2003-2009 by Dolby
Laboratories. All rights reserved.
www.strong.tv1
Page 4

TABLE OF CONTENTS
1.0 INSTRUCTION 3
1.1 Safety Instructions 3
1.2 Storage 3
1.3 Equipment Set-up 3
1.4 Accessories 3
1.5 Usage of external USB devices 4
2.0 YOUR RECEIVER 4
2.1 PIN code default: 0000 4
2.2 Front and side panel 4
2.3 Rear panel 5
2.4 Remote Control 5
2.5 Installing the batteries 6
2.6 Using the remote control 7
3.0 CONNECTIONS 7
3.1 Basic connection using an HDMI cable 7
3.2 Basic connection using a Scart cable 8
3.3 Connecting multiple xed LNBs using a DiSEqC switch 8
3.4 Connecting to digital audio amplier 9
3.5 Connecting a USB storage device 9
4.0 FIRST TIME INSTALLATION 10
4.1 Dish setup 10
5.0 QUICK GUIDE FOR USING YOUR RECEIVER 11
6.0 OPERATION 11
6.1 Changing channels 11
6.2 Info Banner 12
6.3 Selection of audio language 12
6.4 Teletext 12
6.5 Subtitles 13
6.6 EPG (Electronic Programme Guide) 13
6.7 Favourite channels 13
7.0 MAIN MENU 13
7.1 Installation menu 13
7.2 TV Channel List and Radio Channel List 17
7.3 Multimedia 19
8.0 TROUBLESHOOTING 24
9.0 SPECIFICATIONS 25
SIMPLIFIED EU DECLARATION OF CONFORMITY
Hereby, STRONG declares that the SRT 7030 is in compliance with Directive 2014/53/EU.
The full text of the EU declaration of conformity is available at the following internet address: https://www.strong.tv/en/doc
Subject to alterations. In consequence of continuous research and development technical specications, design and appearance
of products may change. Manufactured under license from Dolby Laboratories. Dolby, Dolby Audio and the double-D symbol are
trademarks of Dolby Laboratories. The terms HDMI, HDMI High-Denition Multimedia Interface, and the HDMI Logo are trademarks
or registered trademarks of HDMI Licensing Administrator, Inc.
All product names are trademarks or registered trademarks of their respective owners. © STRONG 2023. All rights reserved.
www.strong.tv2
Page 5

1.0 INSTRUCTION
1.1 Safety Instructions
DO NOT INSTALL YOUR RECEIVER:
In a closed or poorly ventilated cabinet; directly on top of or under any other equipment; on a surface which might obstruct
the ventilation slots.
DO NOT EXPOSE THE RECEIVER OR ITS ACCESSORIES:
To direct sunlight or any other equipment that generates heat; to rain or intense moisture; to intense vibration and to any
shock which may cause permanent damage to your receiver or to any magnetic objects, such as loudspeakers, transformers,
etc.
Do not use a damaged power cord. It may cause a re or an electric shock. Do not touch a power cord with wet hands. It may
cause an electric shock.
When the receiver is not used for a long period of time, you should unplug the power cord from the wall socket.
Do not use alcohol or ammonia based liquids to clean the receiver. If you wish, you may clean your receiver with a soft lint-
free cloth slightly made damp with a mild soap solution, and only after disconnecting from the mains voltage supply. Make
sure no foreign objects fall through the ventilation slots because this could cause re or an electric shock.
Do not place any objects on top of the receiver because this might prevent proper cooling of the components inside.
Safety Precautions
Never try to open the receiver. It is dangerous to touch the inside of the receiver due to high voltages and possible electrical
hazards. Opening the receiver will void the warranty of the product. Refer all maintenance or servicing to suitably qualied
personnel.
When you are connecting cables, be sure that the receiver is disconnected from the mains supply voltage. Wait a few seconds
after switching o the receiver before you move the receiver or disconnect any equipment.
It is a necessity that you only use an approved extension and compatible wiring that is suitable for the electrical power
consumption of the installed equipment. Please ensure that the electrical power supply corresponds with the voltage on the
electrical identication plate at the back of the receiver.
If the receiver does not operate normally even after strictly following the instructions in this user manual, it is recommended to
consult your dealer.
1.2 Storage
Your receiver and its accessories are stored and delivered in a packaging designed to protect against mechanical shocks and
moisture. When unpacking it, make sure that all the parts are included and keep the packaging away from children. When
transporting the receiver from one place to another or if you are returning it under warranty conditions, make sure to repack the
receiver in its original packaging with its accessories. Failing to comply with such packaging procedures could damage the product
and void your warranty.
1.3 Equipment Set-up
We recommend you consult a professional installer to set up your equipment. Otherwise, please follow the instructions below:
Refer to the user manual of your TV and your antenna.
Make sure that the SCART/HDMI cable and outdoor components are in a good condition and the SCART/HDMI connections
are well shielded and from good quality.
This manual provides complete instructions for installing and using this receiver. The symbols serve as follows.
WARNING Indicates warning information.
NOTE Indicates any other additional important or helpful information.
MENU Represents a button on the remote control or the receiver.
(Bold characters)
Move to Represents a menu item within a window.
(Italic characters)
1.4 Accessories
1x installation instructions
1x Safety and guarantee instructions
1x remote control
2x batteries (AAA type)
www.strong.tv3
Page 6
NOTE: The batteries should not be recharged, disassembled, electrically short-circuited or be mixed or used
with other types of batteries. If rechargeable accumulators instead of batteries are going to be used, we
recommend using (e.g. NiMH) types with low self-discharge to ensure long time operation of remote control.
1.5 Usage of external USB devices
It is recommended to use USB 2.0 storage devices. If your device is not compatible to USB 2.0 specications, multimedia,
recording and Timeshift functions of the receiver might not work properly.
If you are going to use an external USB HDD (Hard Disk Drive), please consider that the power specications may exceed the
supported output of your receiver (5 V/800 mA). If so, please connect your USB HDD to an according external power adapter.
STRONG cannot guarantee compatibility with all types of USB storage devices.
It is advised not to store important information on USB storage devices used with the receiver. Always make backups of data
on your USB storage device before using it with this receiver. STRONG will not take responsibility for any loss of information
or circumstances caused by loss of information.
STRONG cannot guarantee the playback of all les although extensions are listed, as it depends on le size, codec, bit rate
and resolution.
Please ensure that either the USB device is already formatted to FAT/FAT32, or format the USB device via your receiver, refer to
chapter 7.3.6.1 PVR Storage Information
for details.
2.0 YOUR RECEIVER
2.1 PIN code default: 0000
2.2 Front and side panel
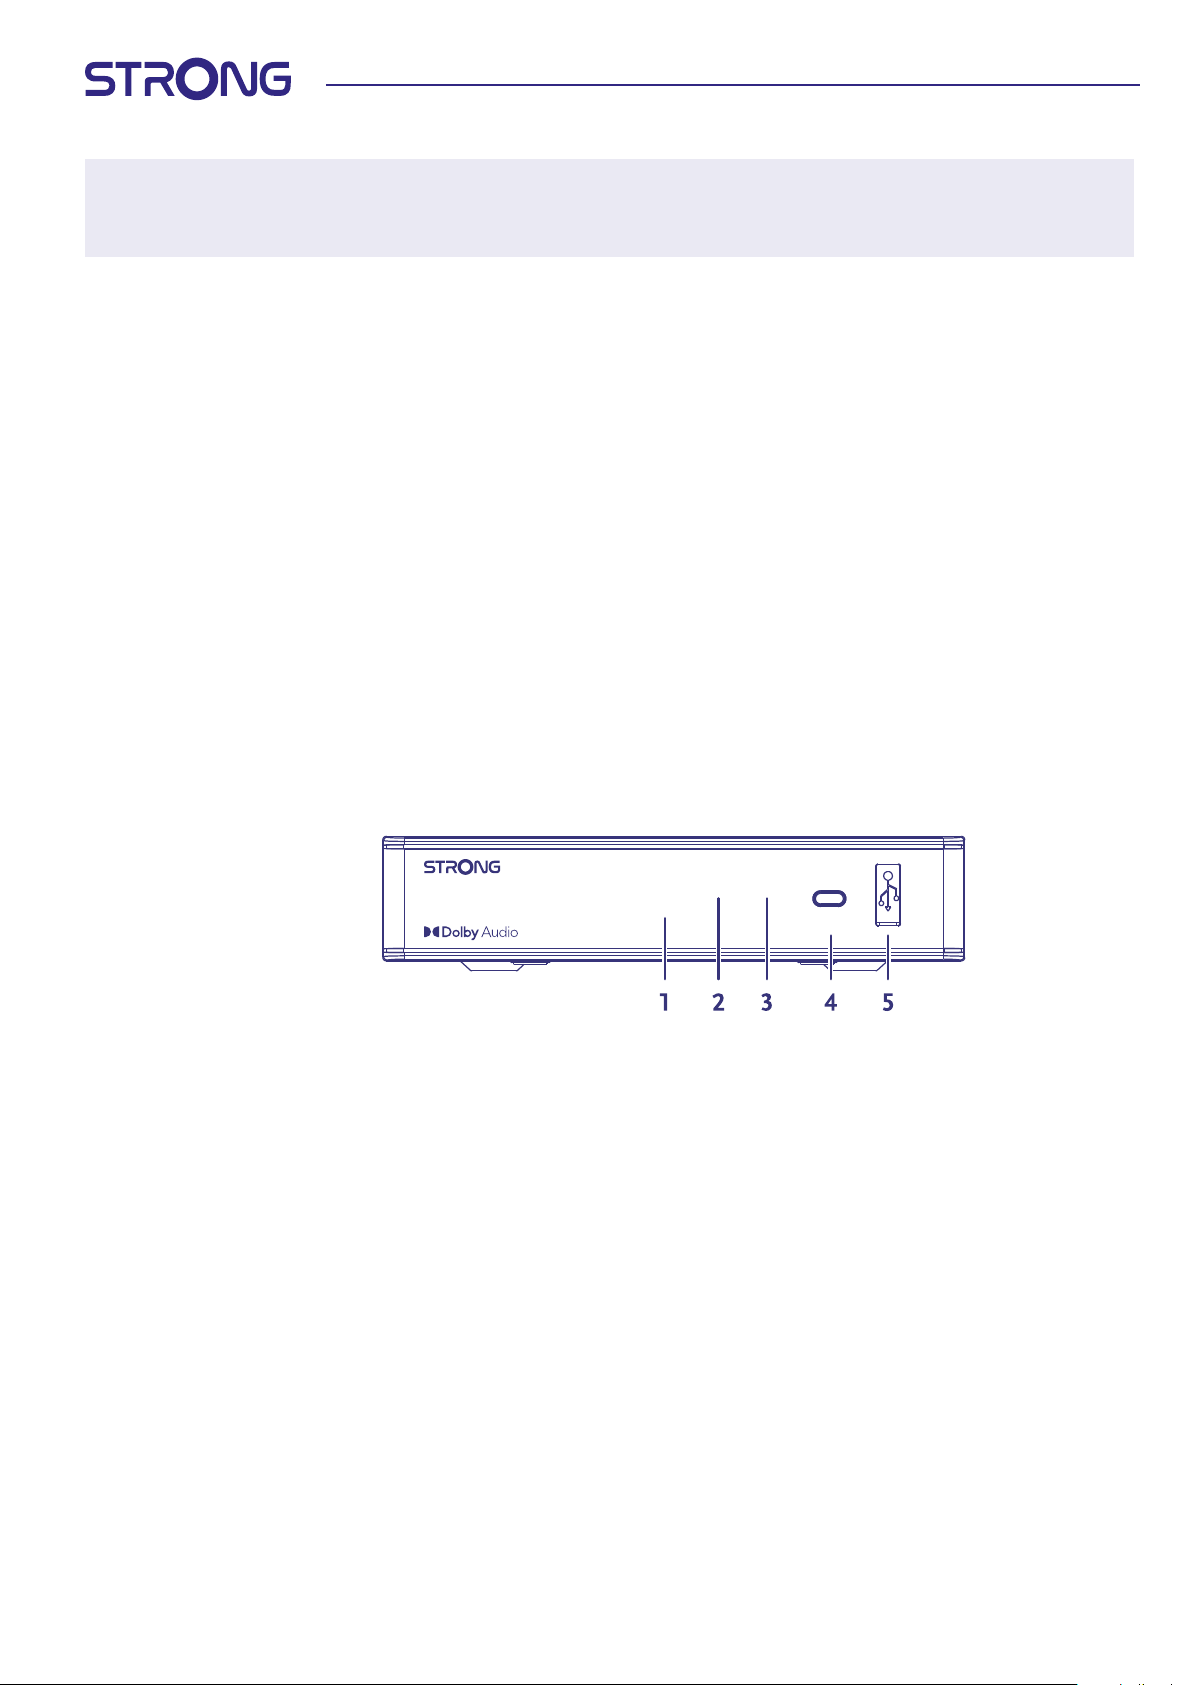
Fig. 1
1. LED display: Shows channel number in operation and time in Standby
2. Standby indicator: Shows power state of the receiver: RED LED - receiver is in standby mode
3. IR Sensor: Receives commands from the remote control
4. Power button: Switch the receiver to Standby or On.
5. USB: For connection of USB device for Multimedia use
www.strong.tv4
Page 7
2.3 Rear panel
Fig. 2
Digital HD Satellite Receiver SRT 7030
13/18 V
500 mA max.
Supplied by STRONG Austria
MANUFACTURED UNDER LICENSE FROM DOLBY LABORATORIES. DOLBY, DOLBY AUDIO
AND THE DOUBLE-D SYMBOL ARE TRADEMARKS OF DOLBY LABORATORIES.
TV SCARTSAT IN HDMI AUDIO R/L 12 V 1.5 A
COAXIAL
S/PDIF
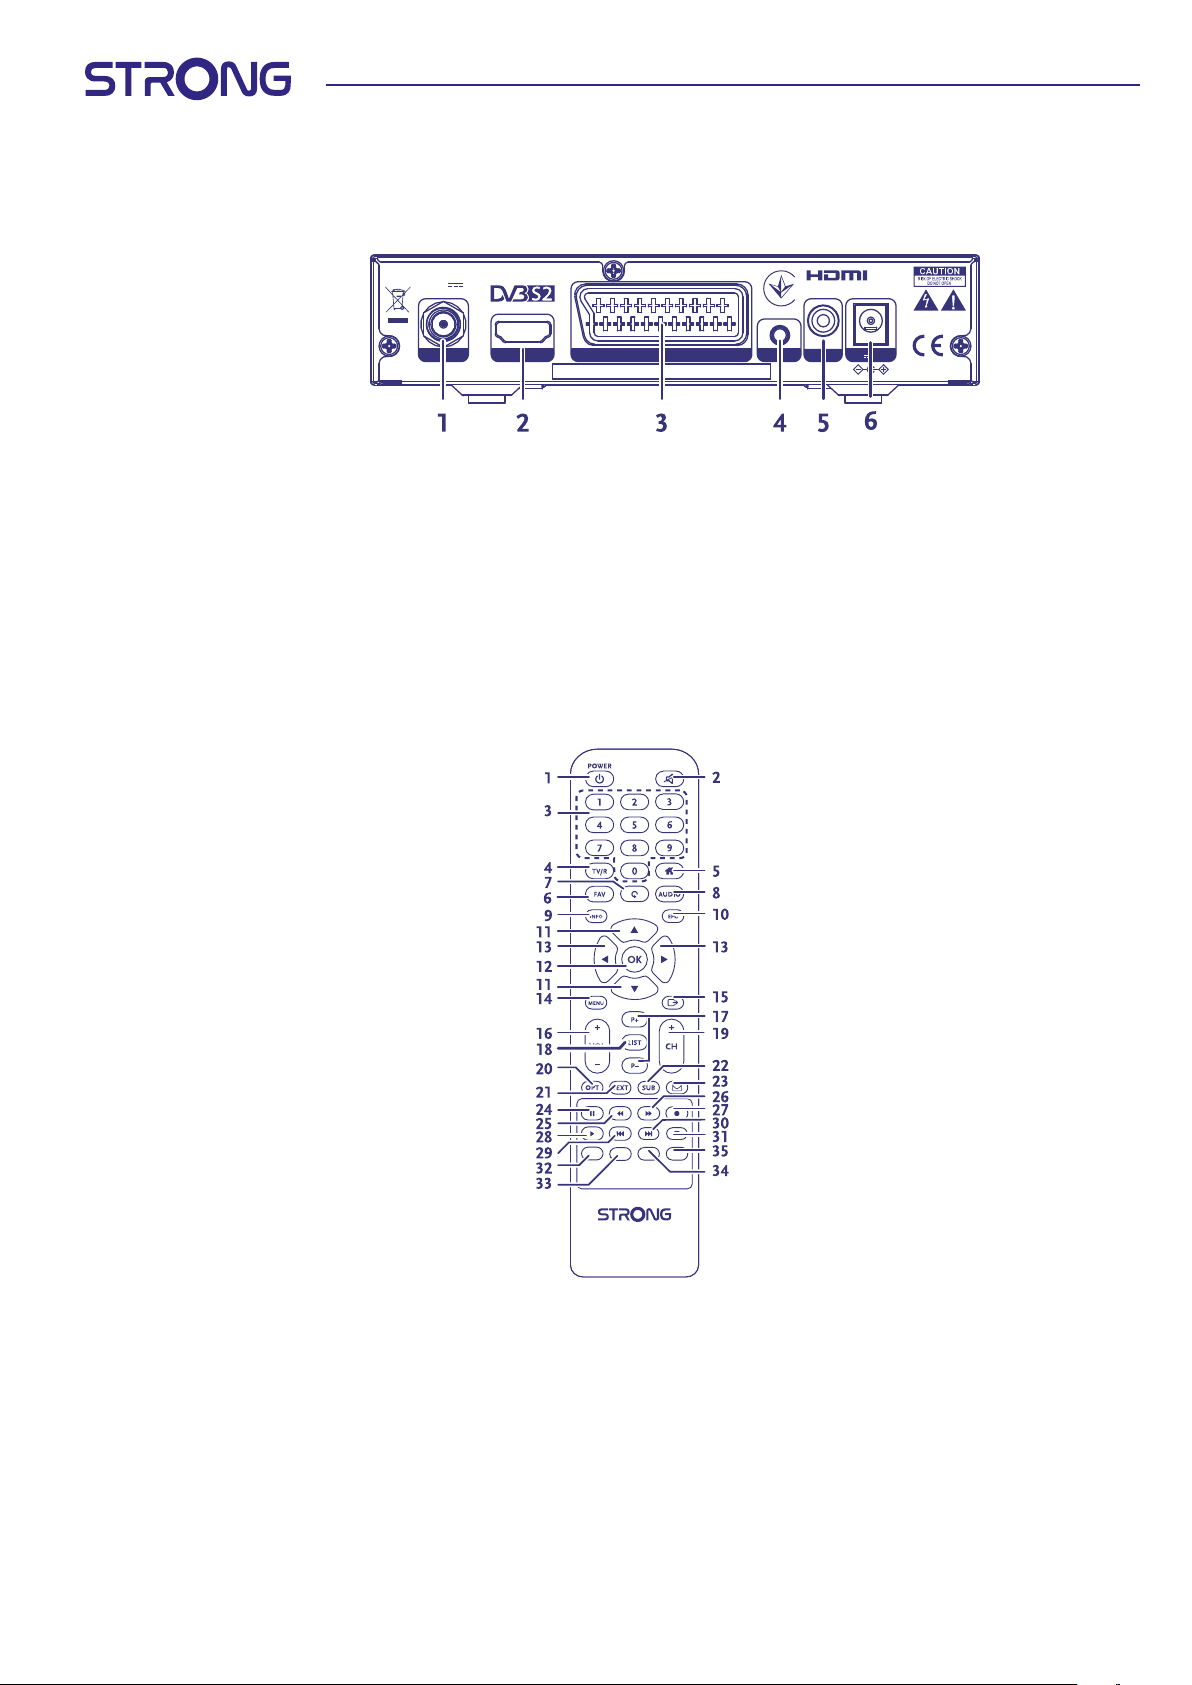
1. SAT IN To connect to the LNB of your satellite dish for reception of satellite broadcast signal
2. HDMI To connect to the HDMI input of your TV using a good quality HDMI cable
3. TV SCART To connect to TV using a SCART cable
4. Audio L/R To connect to an analogue amplier for stereo audio
5. S/PDIF coaxial To connect to a digital or home cinema audio amplier
6. Power connector The receiver requires a wall adapter, mains voltage input 100~240V AC 50~60Hz 12V, 1.5A DC output.
Please check the local power conditions before connecting the receiver to the mains supply.
2.4 Remote Control
Fig. 3
1. q Turns the receiver ON/Standby
2. ! To turn the sound on or o
3. 0-9 Channel number and numeric value input
4. TV/R Toggles between TV and radio mode
5. Same as MENU
6. FAV To access your favourite channels. Toggles between available favourite groups
7. 9 To switch between the last viewed channels
8. AUDIO Displays the audio selection menu with selections for available languages and audio modes
9. INFO Press once to display channel number/name and current/coming information. Press twice to display
detailed event information. Press again to view some technical details about the current channel.
10. EPG Viewing mode: Displays the EPG (Electronic Programme Guide)
www.strong.tv5
Page 8
11. pq Switches to the next/previous channel in viewing mode, Menu: moving the highlight up/down Teletext:
Page up or down.
12. OK Viewing mode: Displays the channel list. Menu: activation of the highlighted item
13. tu Decreasing/increasing the volume level in viewing mode/navigating through the menus/changing
values of settings in a menu. Media player: make steps in program banner. Teletext: Scroll through
subpages.
14. MENU To open the main menu in viewing mode or to go one step back in the menu
15. Cancellation of current process/exit from main menu to viewing mode
16. VOL+/ Increases/decreases the volume level in TV mode
17. P+/P Jumps 10 places up or down in channel list or any other list.
18. LIST Displays the channel list.
19. CH+/ Channel up/down
20. OPT No function.
21. TEXT To open or close Teletext if available on the current channel.
22. SUB To select subtitles language out of available ones on the current channel
23. No function
24. 2 Hold play during playback/starting Timeshift mode
25. 5 Searches backwards during playback/Timeshift. Each pressing increases the speed (x2 – x24)
26. 6 Searches forwards during playback/Timeshift. Each pressing increases the speed (x2 – x24)
27. 4 Starts recording of the currently watched programme
28. u Starts/resumes the playback/Timeshift
Shortcut to recordings list in viewing mode.
29. 7 Jumps to the previous le during playback.
30. 8 Jumps to the next le during playback.
31. 3 Stops playback of multimedia les and Timeshift.
32. RED Flexible functions in OSD menu.
33. GREEN Flexible functions in OSD menu.
Changes the picture resolution in viewing mode.
34. YELLOW Flexible functions in OSD menu.
Changes the picture Aspect Ratio in viewing mode.
35. BLUE Flexible functions in OSD menu.
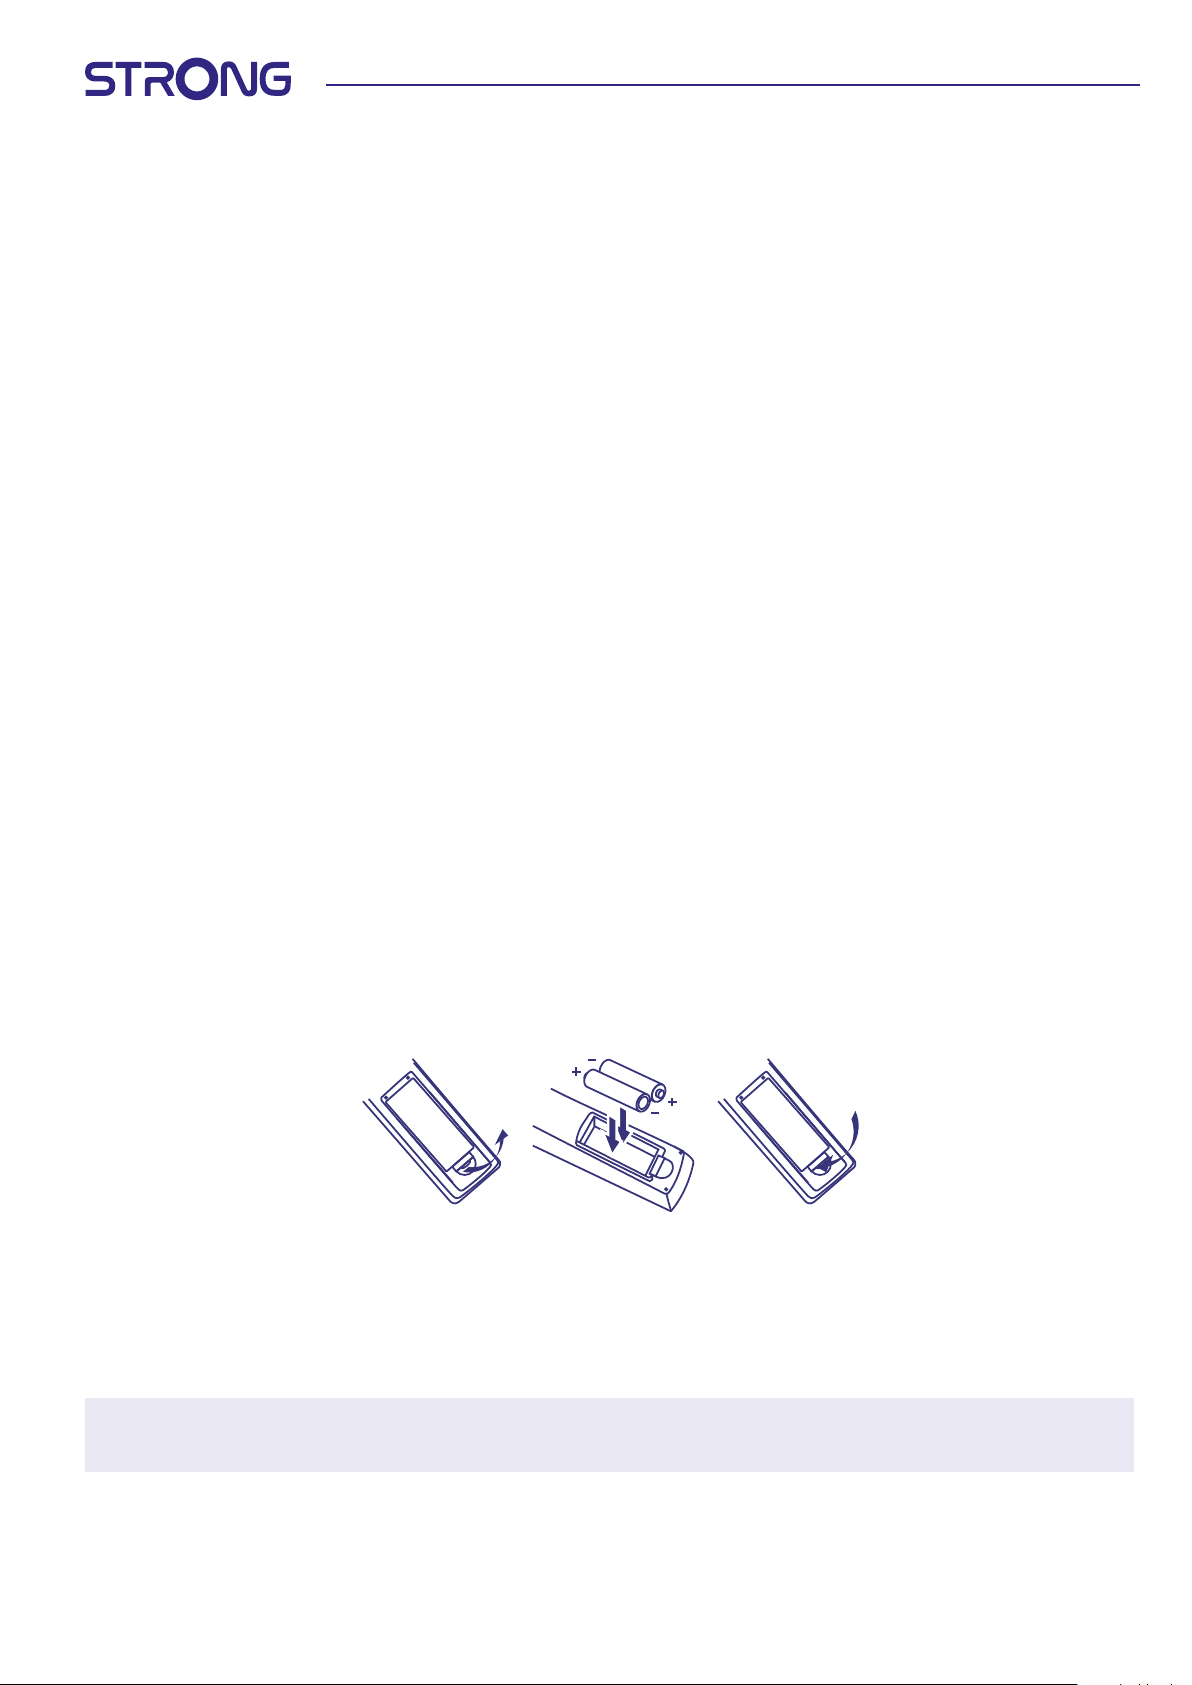
2.5 Installing the batteries
Fig. 4
Remove the battery cover from the remote control and put 2x AAA size batteries inside the compartment.
The diagram inside the battery compartment shows the correct way to install the batteries.
1. Open the cover
2. Install batteries
3. Close the cover
NOTE: The batteries should not be recharged, disassembled, electrically short-circuited, be mixed or used with other
types of batteries.
www.strong.tv6
www.strong.tv6
Page 9
2.6 Using the remote control
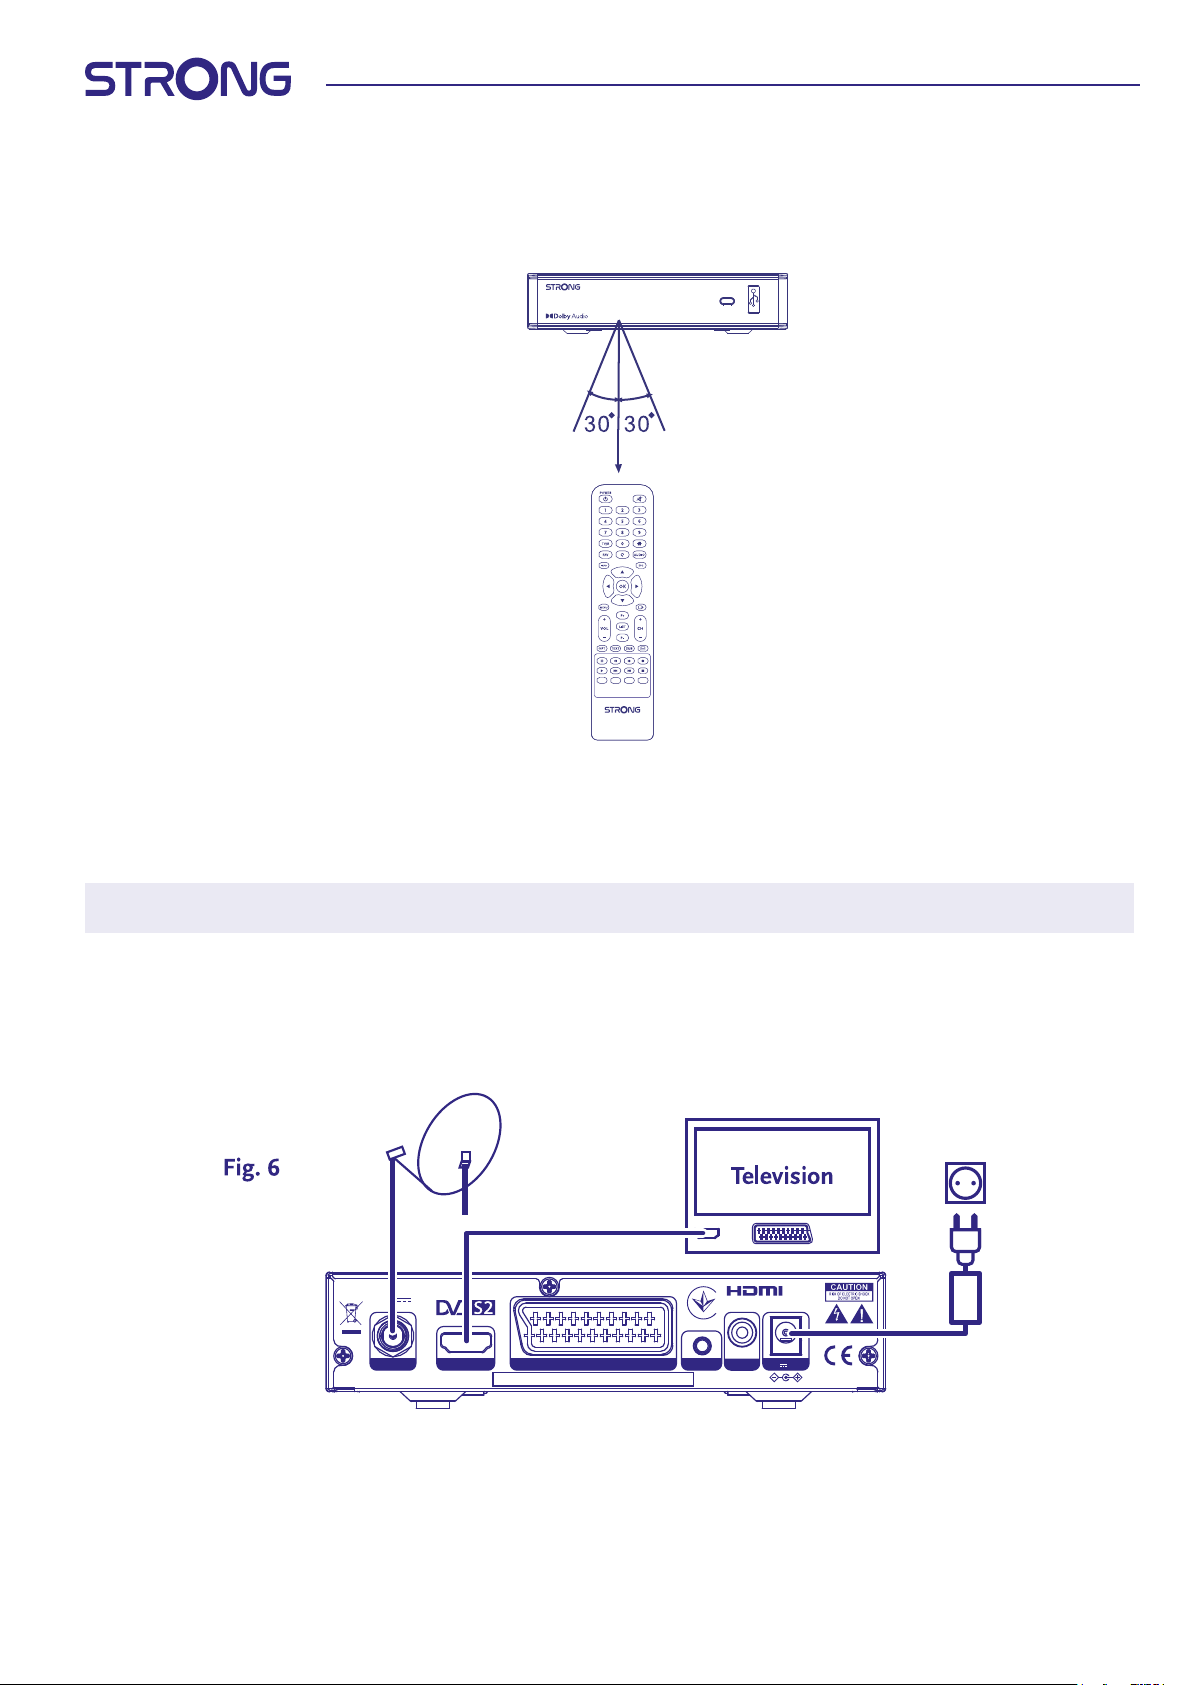
Fig. 5
To use the remote control, point it towards the front of the digital receiver. The remote control has a range of up to 7 metres from the
receiver, if properly aligned towards the IR eye on the front panel.
The remote control will not operate if its path is blocked.
NOTE: Sunlight or very bright light might decrease the sensitivity of the remote control.
3.0 CONNECTIONS
3.1 Basic connection using an HDMI cable
Digital HD Satellite Receiver SRT 7030
13/18 V
500 mA max.
MANUFACTURED UNDER LICENSE FROM DOLBY LABORATORIES. DOLBY, DOLBY AUDIO
AND THE DOUBLE-D SYMBOL ARE TRADEMARKS OF DOLBY LABORATORIES.
Supplied by STRONG Austria
TV SCARTSAT IN HDMI AUDIO R/L 12 V 1.5 A
COAXIAL
S/PDIF
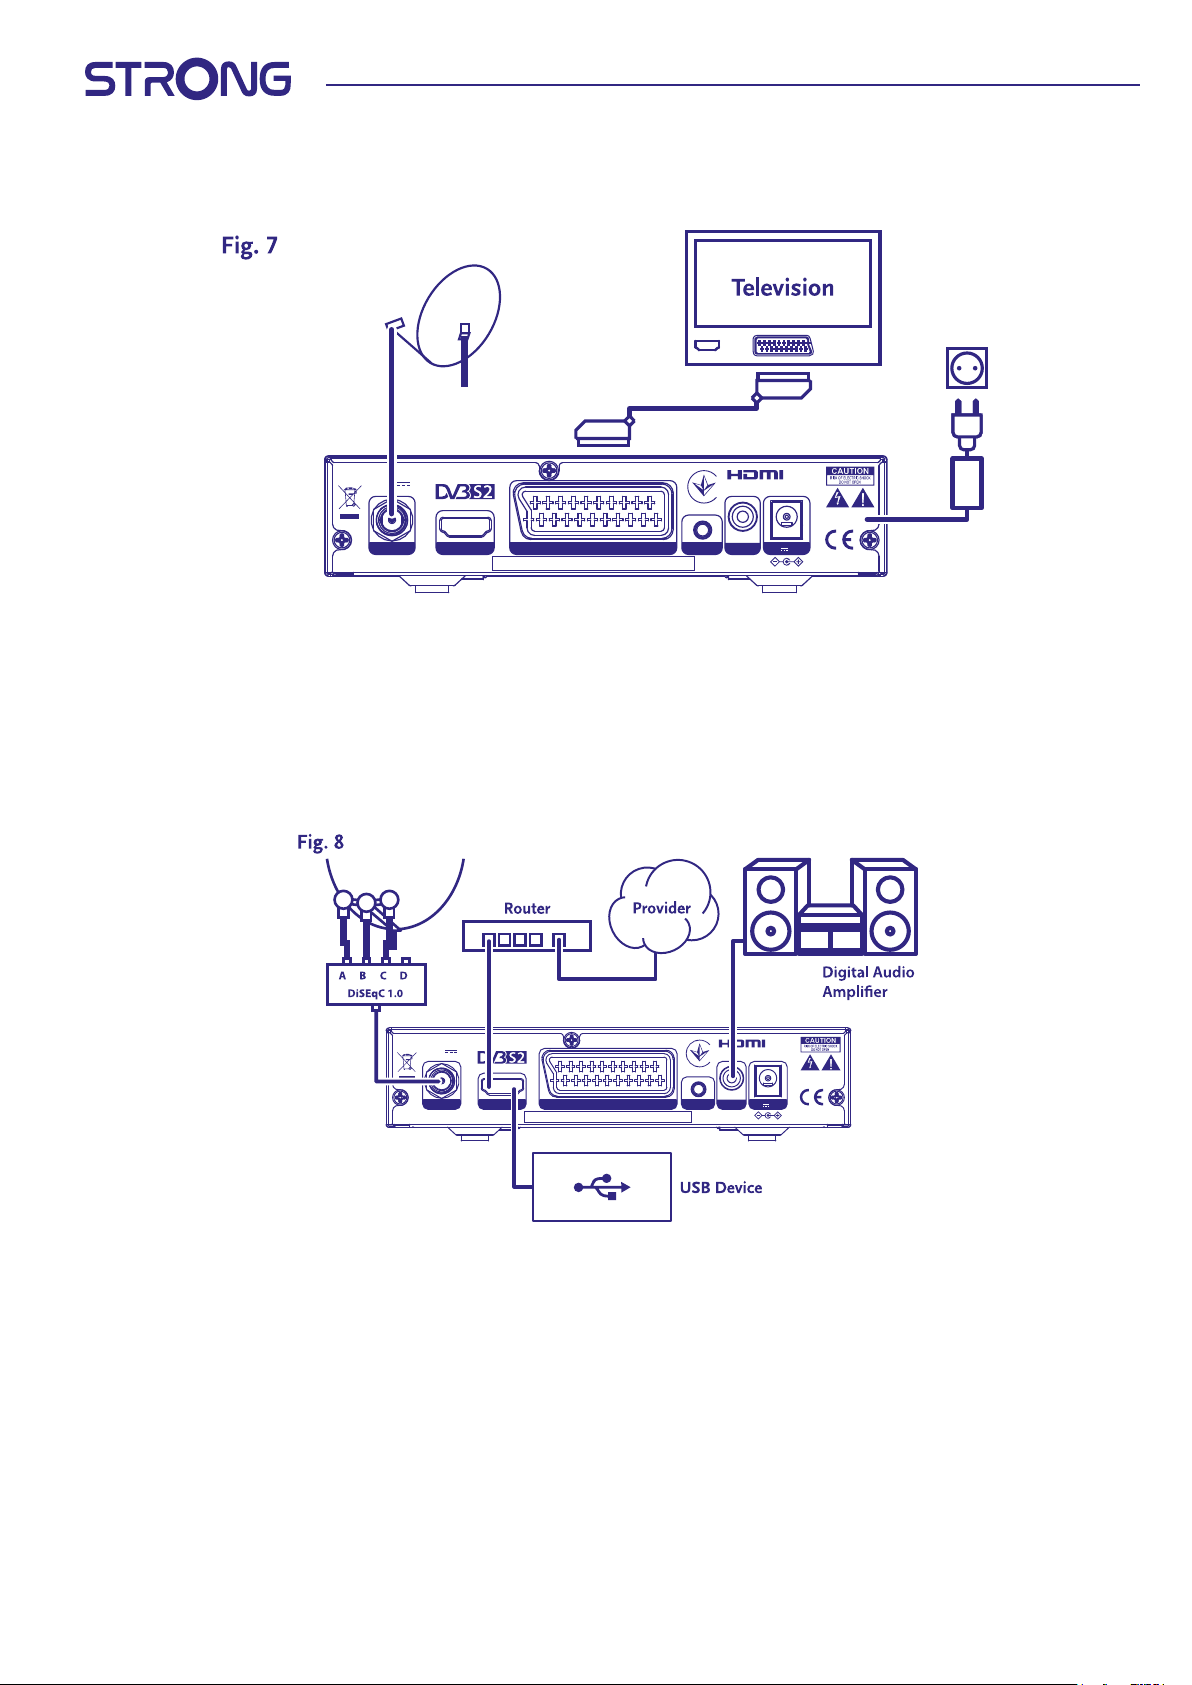
a) Connect the LNB of your satellite antenna to the SAT IN connector of your receiver using a good quality coax cable and suitable
‘F-connector' plugs.
b) Connect one end of a good quality HDMI cable to the HDMI output on your receiver and the other end to the HDMI input of
your TV.
c) Plug the power adapter to a suitable wall outlet.
www.strong.tv7
Page 10
3.2 Basic connection using a Scart cable
Digital HD Satellite Receiver SRT 7030
13/18 V
500 mA max.
MANUFACTURED UNDER LICENSE FROM DOLBY LABORATORIES. DOLBY, DOLBY AUDIO
AND THE DOUBLE-D SYMBOL ARE TRADEMARKS OF DOLBY LABORATORIES.
Supplied by STRONG Austria
TV SCARTSAT IN HDMI AUDIO R/L 12 V 1.5 A
COAXIAL
S/PDIF
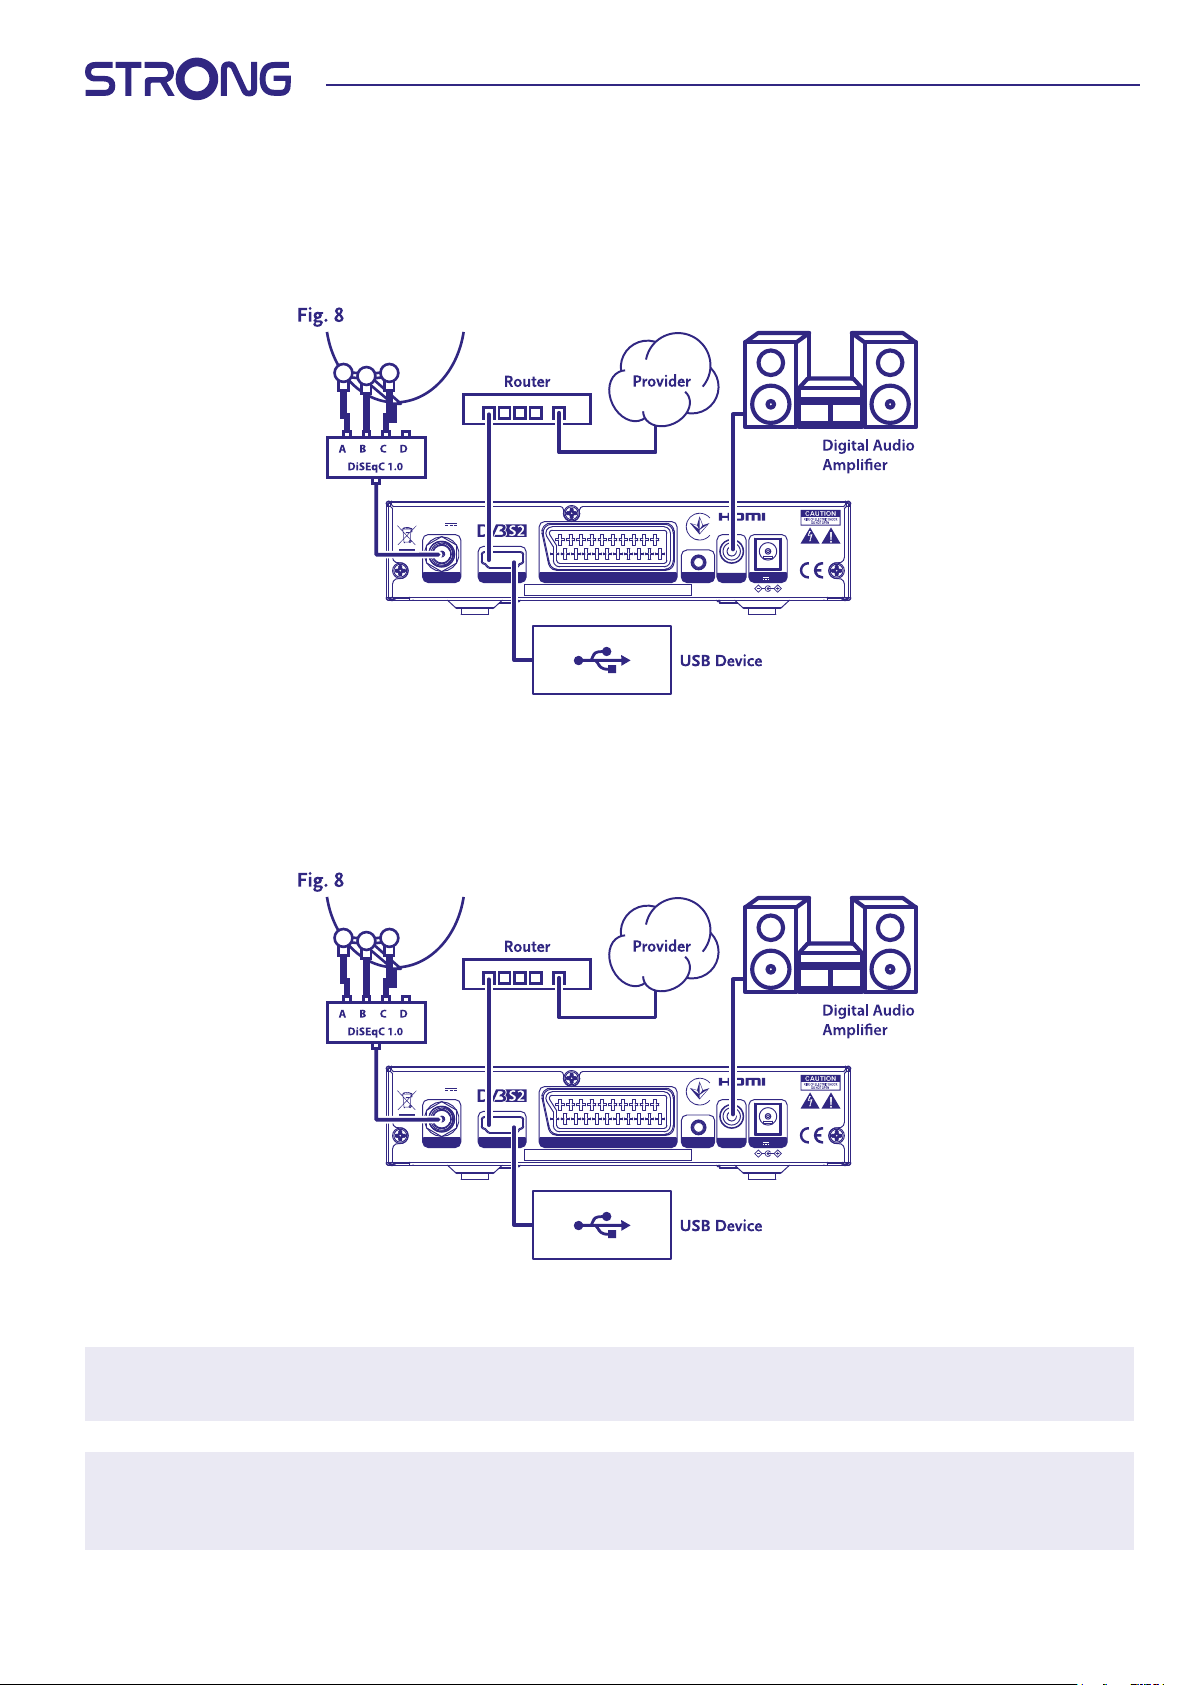
a) Connect the LNB of your satellite antenna to the SAT IN connector of your receiver using a good quality coax cable and suitable
‘F-connector' plugs.
b) Connect one end of a good quality Scart cable to the TV SCART connector on your receiver and the other end to the SCART
input of your TV.
c) Plug the power adapter to a suitable wall outlet.
3.3 Connecting multiple xed LNBs using a DiSEqC switch
Digital HD Satellite Receiver SRT 7030
13/18 V
500 mA max.
Supplied by STRONG Austria
MANUFACTURED UNDER LICENSE FROM DOLBY LABORATORIES. DOLBY, DOLBY AUDIO
TV SCARTSAT IN HDMI AUDIO R/L 12 V 1.5 A
AND THE DOUBLE-D SYMBOL ARE TRADEMARKS OF DOLBY LABORATORIES.
COAXIAL
S/PDIF
a) Connect the LNBs of your xed antenna to the inputs of a DiSEqC switch
b) Connect the output or “to receiver” connector of the DiSEqC switch to the SAT IN connector on your receiver.
c) Refer to section 3.1 or 3.2 for TV and mains connections.
www.strong.tv8
Page 11
3.4 Connecting to digital audio amplier
Digital HD Satellite Receiver SRT 7030
13/18 V
500 mA max.
MANUFACTURED UNDER LICENSE FROM DOLBY LABORATORIES. DOLBY, DOLBY AUDIO
Supplied by STRONG Austria
TV SCARTSAT IN HDMI AUDIO R/L 12 V 1.5 A
AND THE DOUBLE-D SYMBOL ARE TRADEMARKS OF DOLBY LABORATORIES.
COAXIAL
S/PDIF
Connect one end of a good quality coaxial audio cable to the S/PDIF output of your receiver and the other end to the coaxial audio
input of your home theatre, amplier or any other device supporting digital audio.
3.5 Connecting a USB storage device
Digital HD Satellite Receiver SRT 7030
13/18 V
500 mA max.
Supplied by STRONG Austria
MANUFACTURED UNDER LICENSE FROM DOLBY LABORATORIES. DOLBY, DOLBY AUDIO
TV SCARTSAT IN HDMI AUDIO R/L 12 V 1.5 A
AND THE DOUBLE-D SYMBOL ARE TRADEMARKS OF DOLBY LABORATORIES.
COAXIAL
S/PDIF
NOTE: It is recommended to use USB 2.0 storage devices for recording and play back of TV programmes or HD
movies.
NOTE: Timeshift/recording and playback only works properly when a fast USB storage device such as a USB2.0 HDD
is connected to the receiver. Timeshift/recording and playback of HD content requires a sucient read/write
speed of the used USB storage device.
www.strong.tv9
www.strong.tv9
Page 12

4.0 FIRST TIME INSTALLATION
After all connections have been made properly, switch on your TV and make sure the receiver is connected to the main power. If you
are using the receiver for the rst time or restored to factory default, the Installation guide menu will appear on your TV screen. Use
tu to select the OSD Language of your preference. Set the other options as are appropriate for your situation. HDMI output is always
available.TV format with HDMI connection is 16:9 Wide screen.
NOTE: If Germany is selected as country, a pre-installed channel list is available. German channels from ASTRA 19.2E
will be installed. A pop-up list will show for selection of the preferred regional channel.
You can continue to Channel search and install further channels assumed your dish is pointed at Astra 19° East and/or uses DiSEqC
port 1. Or go directly to viewing mode by pressing OK to start enjoying the pre-installed German channels immediately.
4.1 Dish setup
NOTE: This chapter gives an overview of the possibilities for a quick setup.
In depth explanations you will nd in Chapter 7.
4.1.1 Installation
The Installation menu provides the satellite dish setup.
The menu allows you to set up Antenna Connection, Satellite List, Antenna Setup, Single Satellite search, Multi Satellite Search and TP List.
Press the MENU button to enter main menu.
Press
pq button to highlight “Installation”, press
u button to enter the “Installation” menu.
Press
p or q button to select the desired item and
press OK button to enter the sub-menu.
Press button to exit.
4.1.2 Antenna Connection
Press
tu button to select LNB. LNB includes Fixed Antenna and Motor Antenna.
4.1.3 Satellite List
Press
p or q button to highlight satellite, press OK button select a satellite. A heart symbol will mark the selected satellite(s).
RED button: Edit satellite
GREEN button: Add satellite
BLUE button: Delete satellite
4.1.4 Antenna Setup
Motor Antenna:
If you selected Motor Antenna in Antenna Connection menu, this menu allows you to change
settings like LNB frequency, motor type, local longitude/local latitude, delete all,
motor setting and limit setup.
Fixed Antenna:
If you selected Fixed Antenna in antenna connection menu, this menu allows you to change settings like satellite, LNB frequency,
transponder, DiSEqC 1.0, DiSEqC 1.1, 22kHz, and polarity.
When settings are correct, press to return to DVBS installation menu.
4.1.5 Single Satellite Search
To scan 1 satellite:
Select Satellite, FTA only, Scan Channel, Network Search, Scan Mode and Tuner to your requirements.
Highlight Search and press OK button to start search on the selected satellite.
www.strong.tv10
Page 13

4.1.6 Multi Satellite Search
To scan more than 1 satellite:
Adjust FTA Only, Scan Channel, Network Search, Scan mode and Tuner to your requirements.
All satellites selected in the satellite list are shown in the top line.
Highlight Search and press OK button to start searching on all satellites selected in the satellite list.
4.1.7 Transponder List
If needed, transponders can be edited, added, deleted, or individually searched. Parameter of satellite transponders can be changed
by broadcasters over time.
RED button: Edit TP
GREEN button: Add TP
YELLOW button: Delete TP
BLUE button: Search Channels
Press
tu button to change satellite.
Press
p or q button to select Transponder.
Select the Search option, press OK button to enter the auto scan menu.
Press the cursor button to set FTA only Ye s or No. (FTA = Free to Air, Free to watch.)
NOTE: Scrambled channels cannot be watched with this receiver. Select if you want to store TV and radio channels,
only TV or only radio. Select network search Yes if you only want to store channels which belong to one
provider. These channels are usually scrambled.
4.1.8 Signal Adjust
The signal strength and quality bar on the bottom of the screen allows you to ne tune the alignment of your antenna for optimum
reception. Adjust your antenna for maximum possible signal strength and quality. When the signal cannot be improved anymore, x
the dish on this position, and press the BLUE button for Search options and scan.
Highlight Search, press the OK button to start channel scan automatically.
4.1.9 Search
Your receiver will now perform an automatic channel search. When the process has been completed, all found channels will be
stored and the receiver will switch to the rst found channel. You are now ready to enjoy your new receiver.
NOTE: If no channels were found during the automatic channel scan, the receiver will return to Installation guide
menu. Please select your language again and refer to chapter 7.1 for further instructions.
5.0 QUICK GUIDE FOR USING YOUR RECEIVER
We at STRONG understand that you can't wait to enjoy your new HD receiver. The following quick guide will make you familiar
with the basic operation of this device. We do, however, advice you to read the full manual to get the best performance from your
STRONG HD receiver.
To turn your receiver ON or to Standby, press q on the remote control.
Choose channels with
press OK in viewing mode to display the channel list.
The volume can be adjusted with
pq. Alternatively, you can also enter the channel number with the 0~9 buttons on the remote control or
tu or with the dedicated VOL+/VOL buttons.
6.0 OPERATION
In viewing mode, several features are available to make watching TV a true pleasure. This paragraph describes these features. Please
also read chapter 7 to get familiar with the menu of your new receiver.
6.1 Changing channels
There are dierent ways to change channels with your new receiver.
Via direct access
www.strong.tv11
Page 14

Via the channel list
Via the pq buttons
Via the 9 button
Via the CH+/CH buttons
6.1.1 Direct access
To gain direct access to a certain channel, simply enter its number with the 0~9 keys on the remote control. Channel numbers can be
up to four digits long. Entering a number with less than four digits is possible. Just wait a few seconds and your receiver will switch to
the selected channel.
6.1.2 Channel list
Press OK in viewing mode to display the channel list. Use
pq to highlight your channel of choice and press OK once to select the
highlighted channel. The channel list is equipped with a Find function to make it easier to nd channels. In the channel list, press RED
and an alphabet banner will be displayed. Use pqtu to select the rst letter (or letters) of your channel of choice and select OK to
conrm or just press . All channels beginning with the chosen letter(s) will now be displayed. Select the channel in the ltered list.
The following buttons are available in the channel list and in viewing mode:
tu If you have installed more than one satellite, toggle between their channel list. All TV will show all channels of all
satellites in one long list.
RED: Opens an alphabet banner to quickly nd a channel
TV/R: Toggles between TV and radio channels
6.1.3 Using the
p will switch to a higher channel.
q will switch a lower channel.
pq buttons
6.1.4 Using the CH+/CH buttons
CH+ will switch to a higher channel.
CH will switch a lower channel.
6.1.5 Using the 9 button
Use the 9 button for switching between the two last viewed channels
6.2 Info Banner
At any time during viewing mode you can press the INFO button to get information about the current channel as well as the current
and following programme*. Press INFO twice to view detailed info of current and following programmes and technical details about
the current channel. Press INFO again or to close the information.
You can change the on-screen duration of the info banner in the System Setup menu. Please refer to section 7.3.6.1 OSD Setting for
more details.
*Programme information is displayed when available. Availability depends on broadcast.
6.3 Selection of audio language
Some channels support a choice of dierent audio formats and/or languages. To select another audio stream, press AUDIO in
viewing mode. A list with available audio streams will now be displayed. Use pq to select a stream and conrm with OK. With the
tu buttons you can choose between Mono, Mono left, Mono right or Stereo
6.4 Teletext
Your receiver includes a fully featured Teletext. To access Teletext, press the TEXT button in viewing mode and use the 0~9 or buttons
to select the number of the page you wish to see. Subpages (if loaded and available) can be selected with the tu buttons. With Auto
selected, the pages will rotate automatically. Press TEXT again or to go back to viewing mode.
www.strong.tv12
Page 15

6.5 Subtitles
Some programmes support a choice of dierent DVB subtitle languages. Press the SUB button in viewing mode to display a list of
available subtitle languages. Use pq to select a subtitle language and conrm with OK.
6.6 EPG (Electronic Programme Guide)
The Electronic Programme Guide is a very useful function that allows you to watch programme schedules and information on
screen. Press the EPG button to activate this guide. Use pq to select a channel. In the programme list, use tu to select or scroll
through programmes to display programme information for the next/previous days. Press OK to read programme information. Press
GREEN timer to book the selected programme for a timer. To change time or day in bigger steps, press RED time and use tu to
highlight the step options and OK to speed up selection. Options are: Step one by one, Steps in hours, steps in 24 hours. pq will still
control the channels. Press to return to the main window.
NOTE: Availability of EPG data depends on broadcast.
Booking a programme from EPG
Select a programme as described above. Press GREEN when you have selected a programme. This will lead you to the Timer
(Schedule) menu. All details are already lled in for you. Save the timer by selecting Save and press OK. To display the list of booked
events got to the main menu, system setup, Timer setting. You can also edit timers here. Please refer to section 7.3.6.1 Timer Setting
for more details.
6.7 Favourite channels
Use the FAV button to access your favourite channels lists and use tu to toggle between available favourite groups and general
channel lists. Please refer to section 7.3 for details on how to create favourite lists.
7.0 MAIN MENU
Throughout the menu: Press MENU and select items by using the pq buttons. Press OK or the u button to enter the items.
7.1 Installation menu
7.1.1 Installation
Here you can setup your dish and satellite parameters. Enter the menu via the Installation In this menu setting will be automatically
stored upon exit without the need of conrming.
Antenna Connection
Enter here to select the type of satellite dish or antenna you have: Either a xed antenna or a motor antenna
Satellite List
In this menu you can select the satellites for which you have a particular interest, like if they carry programmes which are especially
aiming at your country. In the satellite search menu's, these satellites can be searched to obtain programs.
Select one or more satellite from the list to search with OK. A heart symbol will appear behind the name.
To deselect, press OK again.
In case you need to make manual changes to the satellites present in the default list:
To Edit the Satellite name and position press RED. Use the numeric buttons to enter characters. Conrm with YELLOW.
To Add a Satellite, press GREEN. Use the numeric buttons to enter characters to enter a new Satellite's name and position. Conrm
with YELLOW.
To Delete a Satellite, select the Satellite from the list and press BLUE. Conrm the pop-up screen.
Antenna Setup
In this menu you can enter the Dish parameters, depending on the selection in Antenna Connection
for Fixed Antenna or Motor Antenna and Satellites selected in the Satellite List
Satellite Shows the Satellites selected in the Satellite List
Press OK to view a pull down list with the selected satellites
LNB Press
tu or OK to show the list of LNB Types. The Universal LNB frequencies (09750/10600 MHz) are supported
– the most used on the market.
www.strong.tv13
Page 16

SatCR LNB's are used for SatCR systems, mainly in apartment blocks. Enter the IF channel number according the assigned (user
band), then the corresponding centre frequency. If the system only supports one satellite, sat position is 1. The version of SatCR is
either 1.0 or 2.0. Version 1.0 can have up to 8 dierent users, version 2.0 can have up to 32, it depends on the LNB used.
SatCR systems are usually installed by professional experts. An optional satellite splitter is required for multi-users.
NOTE: For SatCR use, DiSEqC and polarity should be disabled.
Transponder Select a known transponder to help you nd a satellite, or to check if the settings you've entered are correct.
Use the signal intensity and signal quality bars to ne tune your dish, if needed.
DiSEqC1.0: To select the correct port from up to 4 (if available) for the corresponding LNB. For committed DiSEqC switches
only.
DiSEqC1.1: To select the correct port from up to 16 (if available) for the corresponding LNB. Uncommitted DiSEqC switches
in cascade can be used with this protocol.
22KHz: Auto is the setting for a Universal LNB
Polarity Option are: Auto, H for horizontal and V for vertical.
It will switch the LNB power as required by the transponder list.
For universal and SatCR LNB's, the setting is best left on Auto
For Motor Dish only:
LNB Freq: Press
tu or OK to show the list of LNB types. Normal use for a motorized dish is the universal LNB
(09750/10600 MHz) – the most used on the market.
Select with
pq and OK the LNB you are using
Motor Type Options are DiSEqC 1.2 and GOTOX (Also known as USALS or DiSEqC 1.3).
Depending on your motor drive, select the correct setting.
7.1.2 DiSEqC 1.2
DiSEqC 1.2 is a protocol for motor-driven dishes, the dish/motor-combination itself needs to be aligned due South (North for
Southern hemisphere) at its reference position at 0°. It requires to manually search and store every satellite individually.
Refer to the manual of your motor-drive for more detailed information. Modern motor drives have usually also the capability of the
enhanced DiSEqC 1.3 protocol, which would be preferred, since it can nd satellite positions automatically, relative to a geographical
location.
Move the motor to the right position for locking the signal like explained below.
Satellite Selected the Satellite you want to search for.
Transponder Select a known transponder on the satellite to help you nd it.
Also use the signal intensity and signal quality bars to nd the satellite.
Position No.&Save Select on which memory position the found satellite should be stored.
Go to X When just setting up the dish, move the motor to its reference point, at 0 degrees. Select Reference and press
OK to move.
Select and press OK to see a list with already stored satellites.
Select a number from the list and press OK to move the dish to that position.
Save Select Save and press continuously either
t or u, to move the dish to the position where you suspect the
Satellite is. When found (for example, conrmed by a Signal on the bars), let go of the t or u button. With short
presses on the t or u buttons, you can peak the dish. Then Press OK (while still on save). Conrm the position
(already selected in Go to X to be stored.
NOTE: The movement of the Dish can be stopped by pressing OK or on the RCU.
NOTE: The dish might get misaligned over time. Move the dish to its reference point at 0 degrees and select
Recalculation. Conrm the pop-up to recalculate positions.
Limit Setup To setup the limits the dish should not exceed when moving, in case of physical obstructions. Default is disable
limit (not active). If needed, the motor can physically be brought to its 0° reference position, to align the dish
south when in the northern hemisphere (or north for southern hemisphere) rst.
www.strong.tv14
www.strong.tv14
Page 17

To set the West Limit, use tu to select West Limit, then press shortly t to move the dish West. Press t again or
OK when the limit is reached.
Press OK again. A pop-up message will conrm: West Limit is set.
To set the East Limit, use
tu to select East Limit, then press shortly u to move the dish East. Press u again or
OK when the limit is reached. Press OK again. A pop-up message will conrm: East Limit is set.
To disable the limits, select disable limit, then limit setup and press OK. A pop-up message will conrm: disable limit is set.
When all settings have been made, press to save the data and leave the window.
GotoX
(also known as DiSEqC 1.3 or USALS)
GotoX is an automated system for nding satellites with a motor driven dish. It is an enhancement of the DiSEqC 1.2 protocol, where
it was still needed to manually search and store every satellite individually. With DiSEqC 1.3 every satellite position is automatically
calculated for a dened geographical location on earth. Only this location is needed to be entered and stored in to the box, in
conjunction with a GotoX capable motor drive, all (pre-installed) satellites can easily be found. The dish/motor-combination itself
needs to be aligned due South (North for Southern hemisphere) at its reference position at 0°. Refer to the manual of your motordrive for more detailed information.
LNB Frequency Select the correct LNB which is placed in your Satellite Dish.
Motor Type Select GotoX with the
tu buttons.
Local Longitude Find out the coordinates of the location where the dish is installed. Consisting of degrees on northern or
southern hemisphere and eastern or western hemisphere.
When you rst enter, choose E or W with the
tu buttons.
Then use the 0 ~ 9 buttons to enter the coordinate.
Local Latitude When you rst enter, choose N or S with the
tu buttons.
Then use the 0 ~ 9 buttons to enter the coordinate.
NOTE: The location setting only needs to be entered once and is valid for all satellites.
Delete All Turns the entered Longitude and Latitude to 0.00
Motor Setting To make a test with the moving dish if the selected satellites in the satellite list indeed can be found.
Limit Setup To setup the limits the dish should not exceed when moving, in case of physical obstructions. Default is disable
limit (not active). If needed, the motor can physically be brought to its 0° reference position, to align the dish
South when in the northern hemisphere (or north for southern hemisphere) rst.
To set the West Limit, use
tu to select West Limit, then press shortly t to move the dish West. Press t again or
OK when the limit is reached.
Press OK again. A pop-up message will conrm: West limit is set.
To set the East Limit, use
tu to select East Limit, then press shortly u to move the dish East. Press u again or
OK when the limit is reached.
Press OK again. A pop-up message will conrm: East Limit is set.
To disable the limits, select Disable Limit, then Limit Setup and press OK. A pop-up message will conrm: Disable Limit is set.
When all settings have been made, press to save the data and leave the window.
7.1.3 SatCR
SatCR LNB's are used for SatCR systems, mainly in apartment blocks. Enter the IF channel number according the assigned (user
band), then the corresponding Centre Frequency. If the system only supports one satellite, sat position is 1. The version of SatCR is
either 1.0 or 2.0. Version 1.0 can have up to 8 dierent users, version 2.0 can have up to 32, it depends on the LNB and splitter used.
SatCR systems are usually installed by professional experts. An optional satellite splitter is required for multi-users.
For SatCR use, DiSEqC and polarity should be disabled.
If a SatCR LNB is used, please refer to the manual of that LNB to obtain the technical data about User Bands numbers and
corresponding frequencies.
NOTE: SatCR can only work in combination with an optional multi-output satellite splitter and a SatCR LNB, example
STRONG type SRT L780 (max. 4 users). Note: SatCR cannot be combined with any other DiSEqC function.
SatCR systems are mainly installed by professional experts.
www.strong.tv15
www.strong.tv15 www.strong.tv15
Page 18

IF Channel Manual select: Select the User band ID number according to the specications of your SatCR LNB. NOTE: Any
SatCR LNB user in the chain needs a dierent Channel ID number.
Centre Freq Manual select: Select the Centre Frequency according to the specications of your SatCR LNB, corresponding
with the correct IF Channel. NOTE: Any SatCR LNB user in the chain needs a dierent Centre Frequency.
Sat Position Select the number assigned to the satellite by the installer. If you only use only one SatCR LNB, (for one satellite)
then the number is 1.
Version The version of SatCR is either 1.0 or 2.0. Version 1.0 can have up to 8 dierent users, version 2.0 can have up to
32, it depends on the LNB and signal splitter used.
Select SAVE to store the settings.
7.1.4 Single satellite search
To search just one satellite, selected before in the Satellite List.
Satellite: Select a satellite with
FTA Only: Press
tu to select No to search for scrambled and free channels or Yes to search for Free to Air channels only.
tu to be scanned. You may have selected more than one satellite in the satellite list.
NOTE: Scrambled channels can not be watched with this receiver.
Scan Channel: Press
Scan Mode: Use
tu to select TV+Radio, TV Channel or Radio
tu to select mode auto scan, pre-set scan or accurate Scan}.
This the default mode and should be used rst.
Auto Scan All stored transponders in the memory will be scanned.
Pre-set Scan A few satellites carry a list with transponder parameters of all transponders on that satellite. It can be useful if
the auto scan does not nd an expected channel.
Accurate scan This is a blind scan mode, in which the scan process probes certain frequencies to nd unknow parameters of a
Satellite.
Network Search Use
tu to select Yes or No. Some providers use more than one transponder to transmit their Pay-TV
programmes. Select Yes and one of those transponders and it will nd the corresponding transponders as well.
Note: This is only applicable for scrambled channels, which can not be seen with this receiver.
Tuner Not applicable for this receiver.
After conguring, select Search and press OK to start scanning with the selected settings.
Your receiver will now perform an (automatic) channel search with the scanning progress shown on screen. During the channel
search you can quit the scan process with . When the process has been completed, all found channels will be stored. Press OK to
conrm and leave the menu by pressing with several times, or proceed to editing parameters by pressing only once.
Multi-Satellites Search:
To scan more than one satellite in one go.
These must have selected before in the Satellite List.
The procedure is the same as for Single Satellite Search, except for the Satellites mentioned in the top line. All those will be scanned
one after the other.
7.1.5 Transponder Edit Options
Scanning by transponder (Manual Scan)
Select TP List in the Installation menu.
The transponder list is shown for the in the top line selected satellite.
Search Use the
pq buttons to highlight the transponder you want to scan and press OK or BLUE for Search. A window
with scanning settings will be displayed. After conguring the settings press OK to start the scanning of the
highlighted transponder. When the scan process has been completed, all new found channels will be added to
the end of the channel list.
Options are:
FTA Only: Press
tu to select No to search for (scrambled and free) channels or {Yes to search for Free to Air channels only.
NOTE: Scrambled channels can not be watched with this receiver.
Scan Channel: Press
tu to select TV+Radio, TV Channel or Radio
www.strong.tv16 www.strong.tv16
Page 19

Network Search Use
tu to select Yes or No. Some providers use more than one transponder to transmit their Pay-TV
programmes. Select Yes and one of those transponders and it will nd the corresponding transponders as well.
Note: This is only applicable for scrambled channels, which can not be seen with this receiver.
7.1.5.1 Transponder List
Transponder Edit options
While in the TP list menu, you can use the coloured buttons to make changes.
The options below are now available.
Edit: Press RED to edit the highlighted transponder. In the pop-up banner, change the transponder´s parameters by
using the
Add: Press to add a new transponder. In the pop-up banner, enter the transponder´s parameters by using the
tu and the numeric buttons. Conrm the settings with OK or cancel with . An existing TP cannot be stored
pq tu and numeric buttons. Conrm changes with OK or cancel with .
pq
again under the same satellite. A pop-up message will inform you if the transponder already exists in the list.
Delete transponder: Press YELLOW to delete the highlighted transponder. Select Yes and press OK to conrm or to cancel.
7.1.5.2 Satellite Edit options
While in the Satellite List menu.
Edit: Press RED to edit the focused satellite.
Edit the Satellite name and/or position. Use the numeric buttons to enter characters. Conrm with YELLOW.
Add: Press GREEN to add a new satellite.
Use the numeric buttons to enter characters for a new Satellite's name and position. Conrm with YELLOW.
Delete: To Delete a Satellite, select the Satellite from the list and press BLUE. Conrm the popup pop-up screen.
To Delete a Satellite, select the Satellite from the list and press BLUE. Conrm the popup pop-up screen.
7.2 TV Channel List and Radio Channel List
The procedure in the Edit Channel menus is equal for both the TV and Radio Channel List.
The description below assumes you're in the TV Channel List. However, you can use, TV/R to toggle between TV and Radio channel
lists.
To edit your TV programme preferences (move, skip, lock, delete, sort, favourite or rename), please go to the TV Channel List menu.
Use
pq to highlight a channel and tu to select a satellite (if more than one available). Press repeatedly to leave the menu.
Set favourite programme
Your receiver allows you to store channels in up to 8 favourite lists. Due to the large number of channels available on satellite
nowadays, this can be a very useful function.
1. Highlight the preferred programme, then press the FAV button.
A Favourite Group window will pop up on screen with 8 possibilities. Please select one (or more) of them. A heart shaped
symbol will appear and the programme is marked as a favourite. Press to return to the channel list for further selection.
2. Repeat the previous steps to select more favourite programmes.
3. To conrm and exit the menu, press twice.
Disable favourite TV or radio programme
Repeat step 1 described above and deselect the channel in its Favourite List. Save upon Exit.
View favourite programme
1. In normal viewing mode (no menu mode) press the FAV button to display a list of favourite programmes. In the favourite list, use
tu to switch between available favourite lists.
2. Select your favourite programme by pq and press OK to switch to it.
3. Now in viewing mode you can select channels from the chosen favourite group only by pressing pq. If you want to change to
the main channel list, press OK in viewing mode and then press tu and select All TV.
Delete a TV or radio programme
1. To delete a programme in the TV Channel List menu press the BLUE button. A new window opens with options: Sort, Edit, Delete.
2. Select the programme you want to delete and press the BLUE button. A Cross sign will appear behind the channel selected for
deletion. Press twice to and select Yes to conrm or select No to cancel.
3. More than one channel can be deleted in one go.
Skip TV or radio programme
1. Select the programme you want to skip and press the GREEN button.
www.strong.tv17
Page 20

2. Press OK to mark the programme to skip. The receiver will skip this programme while zapping between programmes in normal
viewing mode (in channel list mode the skipped channels remain selectable).
3. Repeat the previous step to skip more programmes.
4. To conrm and exit the menu, press several times.
Disable skipping a TV or radio programme
Press the GREEN button and select the programme marked with the skip symbol, then use OK to unmark it. Conrm upon exit.
Move a TV or radio programme
1. Select the programme you want to move, then press the YELLOW button and press OK to mark the selected program. A move
symbol will appear.
2. Press
pq to move the programme to another position in the list.
3. Press OK again to conrm the new position.
4. Repeat the above steps to move more channels.
Locking programmes
You can lock selected programmes for restricted view.
1. Select the programme you want to lock, then press the RED button and press OK. The programme is now marked as locked.
2. Repeat the previous step to select more programmes
3. To conrm and exit the menu, press several times.
To view the locked programme, you need to enter either the default password ‘0000' or your last set password. We recommend
changing of the default password to one of your preferences. Please refer to chapter 7.3.6.1 Timer Setting Parental Lock for more
details.
Disable a locked TV or radio programme
Press the RED button on to select the programme marked with the lock symbol. Enter your password to enter the program. Enter
your password again to remove the lock symbol.
To store the changes and exit the menu, press several times.
Rename a TV or radio programme
1. Select the programme you want to rename and press BLUE to enter the Edit section. Then use GREEN and then select the
programme you want rename. A pop-up appears.
2. In the pop-up select a character by using the
tu buttons. Use the numeric buttons to enter characters. When you have entered
the new name press YELLOW on the remote control to conrm the new name.
3. To store the changes and exit the menu, press several times.
Sort a TV or radio programme list
1. Press the BLUE Edit button and select the list you want to sort with the
tu buttons.
2. Press RED Sort and select the option in which order the list should be sorted.
Options are:
Name A-Z Sort on alphabetical order, beginning with A.
Name Z-A Sort on alphabetical order, beginning with Z.
Free/Scrambled Sort on type of channel, Free to Air rst in list or scrambled channels rst.
Lock Put the locked channels rst in the list.
Delete All channels
To delete all stored channels, select the Delete All function.
NOTE: To obtain channels again, you must search the satellites again from the Installation menu.
Channel Play Type while zapping in normal viewing mode:
All All channels in the channel list Free and Scrambled will be accessible.
Free Only the Free channels in the channel list will be accessible, scrambled channels will be ignored (skipped).
Scrambled Only the Scrambled channels in the channel list will be accessible, free channels will be ignored.
NOTE: Scrambled channels cannot be watched with this receiver.
www.strong.tv18
www.strong.tv18
Page 21

7.3 Multimedia
7.3.1 Media Player
PVR and Timeshift
PVR, Instant recording
To directly record a programme, press the 4 button to start the recording, a 4 icon will show in the top-right corner of the screen.
Press 3 and conrm to quit. During a recording it is possible to press the
another channel on the same transponder only. It is not possible to use the 09 buttons. When you press OK, you can see a list with
the channels in one transponder, which can be watched, while recording. The channel being recorded is identied by a 4 icon in its
program banner. Only one program at a time can be recorded.
Timeshift
If you want to use the Timeshift function you only need to press 2 in viewing mode. To playback time shifted content, press PL AY.
During playback you can use the 5 6 or 2 buttons. To quit the Timeshift mode, press 3. If you haven't pressed 3 the Timeshift
mode will be kept in the background. If the channel is changed time shifted content will only be accessible from the new selected
channel.
Press MENU and select Media Player The menu provides the options for playback of Recordings in PVR, Video Music and Image. The
unit supports USB devices with FAT and FAT32 format. Make sure your USB device is formatted correctly.
NOTE: STRONG cannot guarantee compatibility (operation and/or bus power) with all USB mass storage devices and
assumes no responsibility for any loss of data that may occur when connected to this unit. With large amounts
of data, it may take longer for the system to read the contents of a USB device. Some USB devices may not be
properly recognized. Even when they are in a supported format, some les may not play or display depending
on the content.
pq buttons or the OK and pq buttons to change to
If there is no USB device plugged in, the options in the menu will be greyed-out. Only when a USB device is detected you can select
between Recordings in PVR, Video Music and Image..
Select one of them, press OK to enter the le browser and select the le you want to play.
PVR -- Shows a list of your recordings made by this unit.
{Video} – supported video les in various formats and containers (MPG, MPEG, TS, VOB, MP4, H264 (no H265) max 1080x1920...)*
Music – supported le formats are MP3 and WMA*
Picture – supported le formats are JPG and BMP*
*STRONG cannot guarantee the playback of video les although extensions are listed here, as the correct playback depends on
codec used, data bit rate and resolution as well. Please consult the STRONG Hotline in your country to get more details.
7.3.2 Playback of own recordings
After a recording has been made you will nd it in the PVR section of the Media player in a list created on your external USB storage
device.
Select with
pq the recording you want to playback.
Inside the PVR section the following functions are supported:
OK Starts playback in full screen.
3 Stop playback and return to the recordings list.
2 Pause the current playback. Press repeatedly to go into step-by-step motion.
u Start playback in the preview window, then OK to go full screen. Resume play from pause.
8 / 7 To jump to the next or previous recording, while watching full screen.
MENU or Leave the PVR section.
YELLOW Marks a recording for deletion. When all recordings you want to delete are marked, press A message appears
to conrm deleting.
GREEN A recording can be locked from viewing by the password. Enter the password to set the lock. To unlock, repeat
the procedure with the GREEN button. A locked recording is signalled with a Lock icon.
RED Opens the keyboard for entering a new name for a selected recording. In the keyboard, press
pq tu for
navigation, to enter a character press OK. After nishing your changes, select OK and press the OK button to
save the new name. If you want to discard your changes select Cancel and then press OK.
www.strong.tv19
Page 22

Video
Your receiver allows you to watch videos in the chosen folder. Choose a folder with video les for playing them. Not all video les can
be played.
During playback you can use the playback control buttons, such as 2,
ut (while progress banner on screen), 3, 5, 6, 7 and 8.
You can check the le details by pressing the INFO button in full screen mode. To close the banner, press INFO again or . Use
the YELLOW] button and select a chapter with pq you want to jump to, then press OK to conrm. With the 5 6 buttons you can
rewind or forward playback in x2, x4, x8, x16 and x24 speed. With the 7 8 buttons you can jump to the previous/next video le.
This subtitle function with the SUB button only works for movies which have embedded subtitles
During playback, press (repeatedly) SUB to select a audio track.
Press to remove the pop-up.
For external subtitle les in.srt format, select those with the GREEN button.
Music
Select a music le (or le in a folder) and press OK to start playback.
During playback, following functions are available:
tu: Change the Audio volume
OK: Start playback of the selected le.
2: To pause/resume playback
3: To stop playback
5 6: To rewind or forward playback. Press and hold the button. Release the button when you have reached the wanted
position.
7 8: Start playback of the previous/next le. Press repeatedly to step
: Press once if you want to leave the current folder. To get back to the Multimedia menu, press repeatedly
MENU: To go back to the main menu
Image
Your receiver allows you to watch a slide show with all available photos in the chosen folder. Choose a folder with photo les for the
slide show.
In the Image mode following functions are available:
2 To pause/resume slide show.
tu During the slideshow, the orientation of the image can be rotated. tTo turn the photo counter clockwise.
u To continue slideshow after 2 or rotation of image.
u To turn the photo clockwise.
To stop the slide show and return to the folder view.
To get back to the Multimedia menu. Press again if you want to leave the Multimedia menu.
MENU To go back to the Multimedia menu, to select another media type.
Use the coloured buttons to build a playlist with preferred images to show and to edit image list.
7.3.3 System Setup
Press MENU and select System Setup. The menu provides options to adjust the system settings.
Press
pq to select an option and press u or OK to adjust the setting. Press several times to exit the menu. Some menu items can
only be entered by entering the password. Default is 0000.
7.3.4 Language
Press MENU and select Option. In this menu you can adjust the Language, First Audio, Second Audio and Teletext
Select an option and press
tu to adjust the setting. Press to exit the menu.
Language: Select the preferred language for the On Screen Display.
First Audio: Select the rst preferred audio language for watching TV channels. If the language is not available, the Second
Audio language will be used
Second Audio: Select the second preferred audio language for watching TV channels. If the preferred Second Audio language
is also not available, another available language will be used
Teletext: Select the preferred Teletext letter character set.
www.strong.tv20
Page 23

7.3.5 TV System
Press MENU, then select TV System. The menu provides options to adjust the video settings. Press
pq to select an option and tu to
adjust the setting. Press to exit the menu.
Video Resolution
If the video does not appear correctly, change the setting. These settings match the most common settings for HDMI.
480i for NTSC system TV.
480p for NTSC system TV.
576i for PAL system TV.
576p for PAL system TV.
720p_50 or 60 for PAL or NTSC system TV.
1080i_25 or 30 for PAL or NTSC system TV.
1080p_50 or 60 for PAL or NTSC system TV.
NOTE: Some brands of TV's do not support 576p.
Aspect Mode
You can set the display format to available settings Auto, 16:9, 4:3PS, (Pan&Scan) and 4:3LB (Letterbox)
Auto With Auto select the TV connected with HDMI will auto-negotiate the optimal setting.
16:9 For 16:9 TV screens. All programmes will ll the full screen. Content formatted in 4:3 will be stretched.
4:3 Letterbox 4:3LB (Letterbox)
For 4:3 TV screens. The unit will display all content in its original aspect ratio. Programmes formatted in 16:9 will
be presented with black bars on the top and bottom.
4:3 Pan&Scan 4:3PS (Pan&Scan)
For 4:3 TV screens.16:9 content will have the extreme left and right portions cut o and presented full screen.
Digital Audio Output Select digital audio output mode. Settings aect both S/PDIF and HDMI outputs.
PCM – audio from any format will be converted to PCM Stereo format
RAW – audio from receiver will be send out in the original format
Using PCM mode is the best option if you do not have a TV or Digital Amplier that are not able to process Multi audio.
7.3.6 Local Time Setting
Press MENU and select Local Time Setting The menu provides options to adjust the time and date settings.
Press
pq to select an option and tu to adjust the setting. Press to exit the menu.
Region Select the region or country in which you live. This will set the time oset from UTC automatically.
UTC Usage Select By Region (the Region selection is valid), User Dene (You may select your UTC Oset yourself) or O
(Time and Date setting are free to adapt.) However, the default By Region setting and the correct Region setting
are usually sucient. In case the Daylight Saving Time should not be delivered by the broadcaster, you can
adapt it here.
UTC Oset : Select the correct Time Zone in which you live.
Summer Time You may adapt On or O for Daylight Saving Time, should it not be delivered by the broadcaster.
Date: Enter the date when UTC Usage is set to O.
Time: Enter the time when UTC Usage is set to {O.
7.3.6.1 Timer Setting
In this menu you can setup the schedule for automatic switching to the dened channels at a particular date/time.
Timers can be set directly from the EPG window or manually from this screen. Not set timers will be default O
To enter a new timer manually, select an O marked timer in the list and press OK.
Timer Mode Select Once for a onetime event, select Daily for each day, same time event. A free timer is default O.
Timer Service Select Channel to wake up the receiver to view the channel or Record for recording the channel.
Wakeup Channel Select the channel for this event. Use
tu or OK for a pull down list to select.
Wakeup Date Select the date for the event.
On Time Enter the time to start the event.
www.strong.tv21
Page 24

Duration Enter the length of the event.
After all settings have been made, select Save to store the settings. Select Cancel to discard the settings.
To edit an already existing timer entry, select the entry in the list and press OK, then select and edit the item which you wish to
change.
To delete an already existing timer entry, select the entry in the list and press OK, then select and set Timer Mode to O and select
Save to store.
Exit the screens with .
Parental Lock Set the age limit for a viewer if the viewer is underage. These only functions if a broadcaster sends an age-
signalling for the current programme. You can only enter the Parental Lock menu by entering your password.
The default password 0000
Menu Lock Select either On or O. When On many menu items can only be accessed after entering the password.
Channel Lock Set to O, channels selected as Lock in the Edit Channel menu, are all accessible without entering the password.
When selected On, these channels are blocked and need the password to be entered.
New Password To change the default password from 0000 to another password like you wish, select this option. Enter the new
password.
Conrm Password Re-enter your new password to conrm.
Make a note o the new password.
OSD Setting OSD means On Screen Display, all the graphics you will see on screen.
OSD Timeout Set the time (in seconds) the program banner will be shown on screen, when switching channels.
OSD Transparency Set the amount of transparency the OSD (banners and menu) will have, superimposed on the running
program. 40% is the most transparent option.
Favourite
Here you can rename the default names of the Favourite lists. For example: Movies or Music. Or even the names of users of the unit
with their own dedicated channels. Select the list name you want to edit and press OK. Use the pop-up keyboard to change the
name and select BLUE (OK) to conrm.
Audio Description setting
AD. For the visually impaired, a narrator can describe the actions happening on screen with a dedicated additional audio track, mixed
with the original audio track. This service is provided by some broadcasters and is therefore subject to availability.
AD Service Select On if you wish to use the service by default on all channels which may carry an AD track. `
Use AD as default Select On if you wish to use the service by default on all channels which may carry an AD track.
AD Volume Oset Set the balance of volume the AD audio track will have, mixed with the original audio track.
PVR Storage Information
This item can only be accessed when a suitable USB device is connected.
Find technical details about your USB device, like Total Size, Free Size, Record Size, Time Shift Size and File System. Use YELLOW (Format)
button to format your device in FAT (FAT32). Use BLUE (DVR Set) to set the options for recording (REC) and Timeshift (TMS). Options
are REC+TMS, Record only or Timeshift only.
Format* A (new) USB device must have been formatted before the rst use. The correct format for the receiver is FAT(32)
WARNING: The format function will delete all data and information from your USB device or selected partition. STRONG
will not take any responsibility for damaged or lost data on the USB device.
An attention banner will now be displayed. Select OK to start formatting (or to cancel it). The format procedure will take some
time, depending on the size of the used storage device. At the end of the process, the “Wait” pop-up will disappear. Press to exit
the menu.
PVR Setting
This item can only be accessed when a suitable USB device is connected.
Select the option for Timeshift.
Timeshift Default is O and can be enabled if needed.
Auto Standby This feature is implemented for power saving. The receiver will turn to Standby automatically if no command
from the remote is received for the selected time period. Default is 3 hours. It can also be turned O.NOTE: If
there are timers running, the auto standby function will be disabled for the booked time.
www.strong.tv22
Page 25

Tools
This menu provides some technical options for the working of the unit.
Information Read the technical details of your receiver, like model number, Software/Hardware version and serial number.
This information could be asked during a service call or repair request.
Factory Setting
Reset your receiver to the default factory settings.
Enter your password or the default password 0000, select Yes and press OK to conrm.
The receiver will reboot and start with the First Installation menu.
WARNING: A factory reset will permanently delete all your personal settings, timers and stored channels. Please consider
this before you perform a factory reset.
Upgrade by USB
Download the required update le for your receiver model from the support page on our website www.strong.tv or contact your
local dealer.
Unzip the le on your computer, if necessary, and copy it to root folder of your USB storage device. The USB device must have been
formatted in FAT32.
Connect the USB storage device to the USB port of the receiver. Press MENU and select Tools, then Upgrade By USB to update the
software select at Upgrade Mode the option Allcode. At Upgrade File select the correct upgrade le, the le has the extension abs.
Then select Start, and press OK to initiate the upgrade process. An attention banner will now be displayed. Press OK to conrm Yes
the update (or No to cancel it). The update process will take some time. After the update process has been completed the receiver
will restart and then how the rst channel in the TV list. You can now safely remove the USB device, and then remove update
software from the device (at the PC), to prevent accidental updating again.
WARNING: NEVER power o the receiver or remove the USB device during the software update process. Doing so might
cause irreparable damage to your receiver and will void your warranty.
NOTE: In certain instances it can be advised on the website to upgrade the unit with the Maincode option in stead of
Allcode.
The bootlogo and Radioback are for Strong internal use.
7.3.7 Dump channel list
7.3.7.1 DB Management
This menu allows you to save and reload the channel Data Base of your receiver from/to a USB-device. This very convenient feature
enables you to save your personal settings like Channel-, Favourite-, Sat- and TP-lists on an USB storage device and load them back to
the receiver later.
Write to USB Dump Channel list
Select Update Mode, then Dump channel list and Start and press OK to make a backup of the data base, including channels and user
set data. An.udf le with the current time, date (day, month, year), will be created on the USB device. When the database has been
successfully stored a message will be displayed on screen. Press to leave the menu.
7.3.7.2 Load from USB Update channel List
Select Update Mode, then Update channel list. Select the le at Upgrade File you want to restore to.
Use
tu for displaying the available database les (if any stored before). The.udf les are shown with their built time, date (day,
month, year) Select the le you want to load and then select Start to load the le. When the database has been successfully loaded
the receiver will reboot and switch automatically to the rst stored channel.
Remove USB safely Use this option to safely remove your USB device from the unit. It will prevent loss of data and prevent hardware
damage to such a device. This procedure is comparable working with a personal computer.
www.strong.tv23
Page 26

8.0 TROUBLESHOOTING
There may be various reasons for abnormal operation of the receiver. Please check the receiver according to the procedures shown
below. If the receiver does not work properly after checking it, please contact your local Service line or STRONG dealer. Alternatively,
you can send a support mail via our website: www.strong.tv. NEVER open or disassemble your receiver. This may cause a dangerous
situation and will void the warranty.
Problem Possible cause What to do
The standby indicator does
not light up
No picture The receiver can't receive signal. Check the antenna cable, replace the
No picture or sound on TV The input is not selected on your
Scrambled channel
message
No response to remote
control
Password forgotten The default password is 0000 Contact the local Service Hotline
The external USB HDD
does not start.
The receiver switches to
standby automatically.
The mains lead is unplugged/the
multipoint connector is switched
Check the mains lead/switch the
multipoint connector on.
o.
cable, or connect the cable to the receiver
tightly.
Incorrect values of some tuner
parameters.
Set the values of tuner parameters
correctly in the Installation menu.
Wrong direction of the dish. Check signal strength and adjust your
dish correctly.
Switch to the correct TV input.
TV.
The TV is not connected to the
mains.
Bad cable connection.
Check the mains lead.
Firmly plug in the cables between the
receiver and TV.
Audio muting. Press the ! button.
TV power o. Turn the TV on.
The channel is scrambled. Select an alternative channel.
The receiver is o. Plug in and turn on the plug.
The handset is not aimed
Aim the handset at the IR sensor.
correctly.
The IR sensor is obstructed. Check for obstructions.
The handset batteries are
Replace the handset batteries.
exhausted.
or send an email to our support via
www.strong.tv
The power consumption is too
high.
The Auto Standby function is
activated and has reached the
Connect an extra power supply adapter
to your USB HDD device.
Set the power down time or disable it in
the System Setup > Auto Standby menu.
set time (default 3h).
9.0 SPECIFICATIONS
Demodulator
Demodulation: QPSK, 8PSK
Input symbol rate: DVB-S QPSK: 2 ~ 45 Ms/s
DVB-S2 8PSK/QPSK: 2 ~45 Ms/s
FEC decoder: Auto, 1/2, 2/3, 3/4, 5/6, 7/8 in DVB-S mode
1/2, 3/5, 2/3, 3/4, 4/5, 5/6, 8/9, 9/10 in DVB-S2 mode
3/5, 2/3, 3/4, 5/6, 8/9, 9/10 in 8PSK mode
Video Decoder
Video Format Mpeg1/2, H264 max 1080x1920...)
www.strong.tv24
Page 27

Input rate: Max. 20Mbit/s
Aspect ratio: 16:9, 4:3 Pan&Scan, Letterbox, Auto.
Video resolution: 480i, 480p, 576i, 576p, 720, 1080i, 1080p
50/60Hz.
Audio Decoder
Audio decoding: MPEG-1/2 Layer 1 & 2, AC3, Dolby and Dolby Plus
Audio mode: Mono L/R, Stereo,
Audio Support: E-AC3, Dolby Digital, Dolby Digital Plus*
Sampling rate: 32, 44.1, 48 kHz
*Dolby Digital, Dolby Digital Plus and the double-D symbol are registered trademarks of Dolby Laboratories
Tuner
Type1: F Type, IEC169-24, Female
Input frequency range: 950 – 2150 MHz
RF impedance: 75 Ohm unbalanced
Signal level: -65 to -25 dBm
LNB power: 13/18 V DC (+/- 5%), max. 0.5 A, overload protected
Switch versions: DiSEqC 1.0, 1.1
LNB options: Universal, SatCR (max. 8 users)
Motor drive options: DiSEqC 1.2, GotoX (DiSEqC 1.3)
System & Memory
Main processor: Ali M3510G
Flash memory: 8 MB
System memory: 64 MB
Multimedia
Video playback: Supported in various formats and containers (MPG, MPEG, TS, VOB, MP4, H264 (no H265) max 1080x1920.)*
Audio playback: MP3, Flac*
Picture view: JPG, BMP*
*STRONG cannot guarantee the playback of les although extensions are listed, as it depends on codec used, data bit rate and resolution (all MPEG codec formats are
supported).
Connectors
SAT IN
USB 2.0 port: 5 V/500 mA (max.) supported
HDMI
TV SCART (CVBS, Audio L/R)
mm Audio L/R
S/PDIF (coax.)
Power adapter (12 V, 1.5 A)
General Data
Power supply: AC 100 – 240 V ~ 50/60 Hz (wall adapter)
Input voltage: DC 12 V 1.5 A
Power consumption: max. 18 W, typ. 5 W
Power consumption in standby: max. 0.65 W
Operating temperature: 0 ~ +40 °C
Storage temperature: -10 ~ +70 °C
Operating humidity range: 10 ~ 95% RH, Non-condensing
Size (W x D x H) in mm: 168x105x40 incl. feet + connectors
Weight in kg: 260g
www.strong.tv25
 Loading...