

Page 1

Operating Instructions // Instrucciones de funcionamiento
Instructions d’utilisation // Bedienungsanleitung
VANTAGE
®
II
Page 2

Page 3

Thank you for selecting the VANTAGE® II Series helmet-mounted LED ashlight.
As with any ne tool, reasonable care and maintenance of this product will provide
years of dependable service.
Please read this manual before using your VANTAGE® II, it includes important
safety and operating instructions and should be saved.
IMPORTANT WARNINGS
BATTERY
WARNING: FIRE, EXPLOSION, BURN HAZARD.
USE ONLY: Streamlight, Panasonic or Sanyo size CR123A; Duracell 123A, or Energizer 123.
Use of other batteries or mixing of used and new or different brand batteries may result in
leakage, re or explosion and serious personal injury. DO NOT recharge, misuse, short circuit,
improperly store or discard, disassemble, or heat above 212°F (100°C). Keep away from children.
USE ONLY THOSE BATTERIES SPECIFICALLY RECOMMENDED FOR USE IN THIS PRODUCT.
LED (VANTAGE® II)
Caution - LED Radiation (RG-2)
Do Not Stare Into Beam.
May be harmful to eyes.
Per IEC 62471 Ed 1.0:2006-07
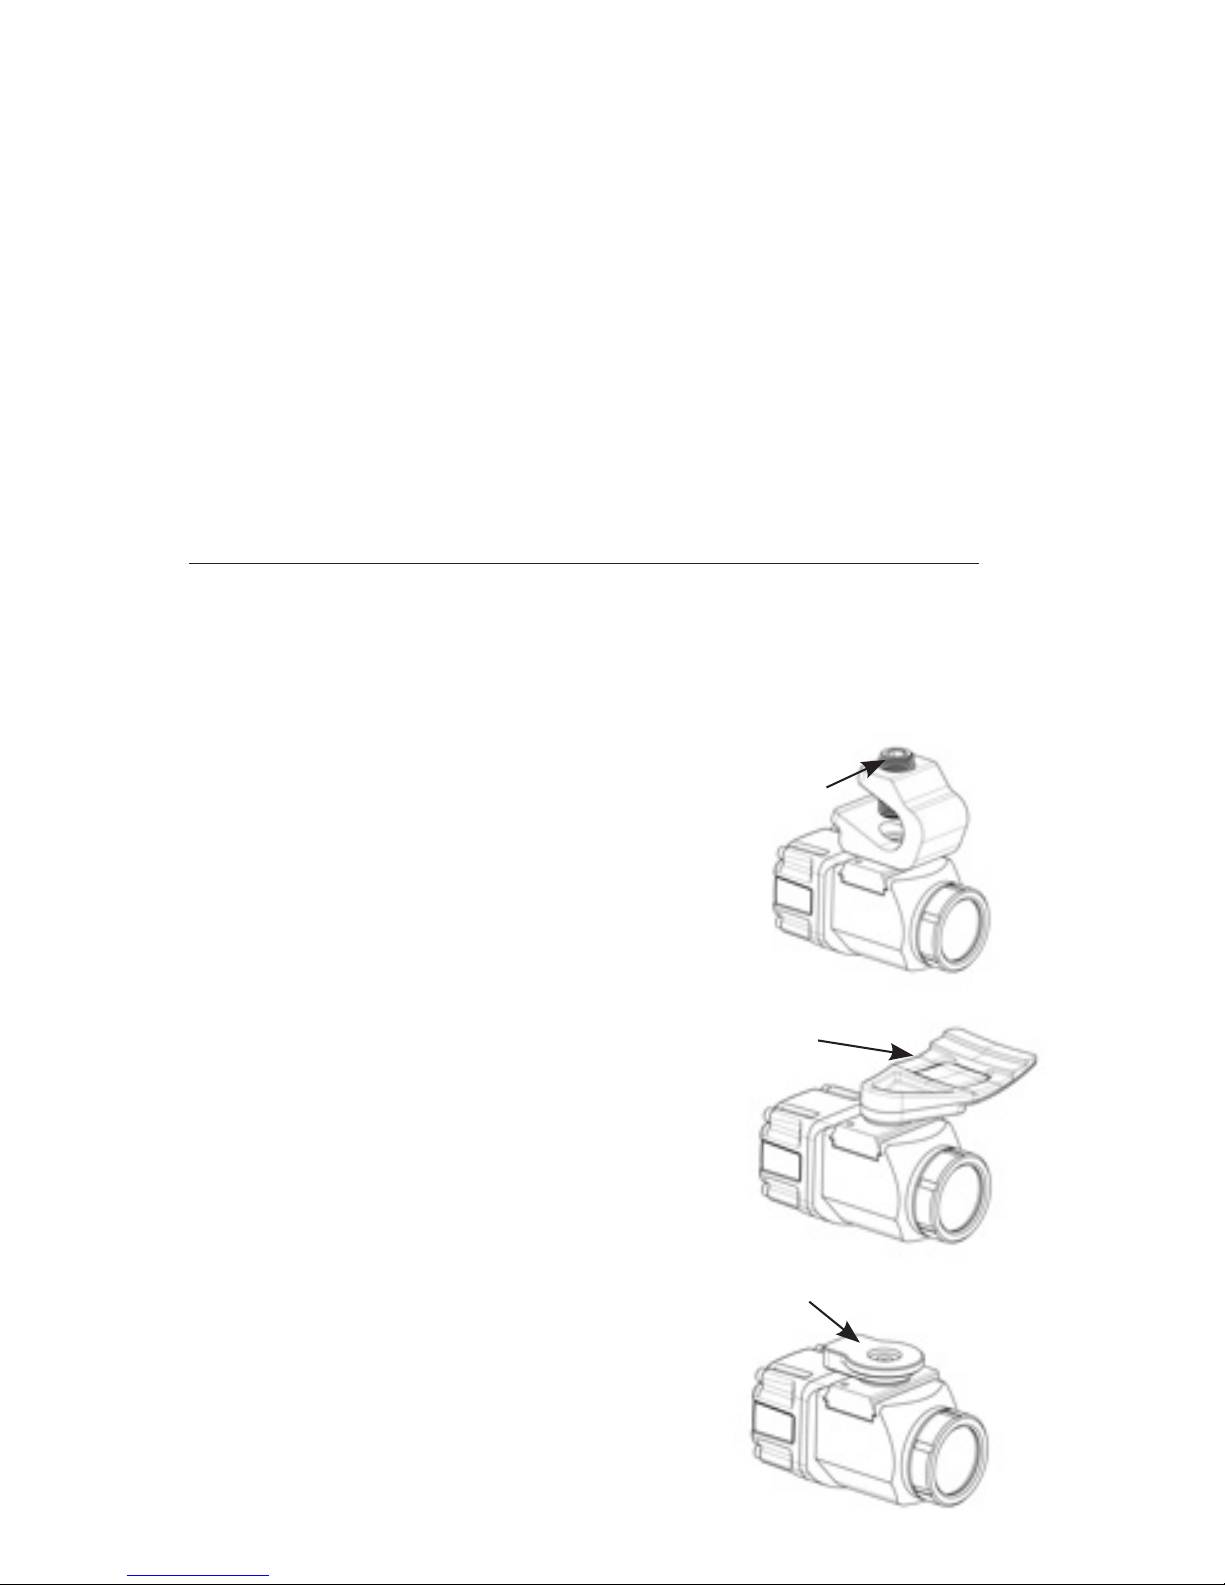
MOUNTING FIRE HELMET
1. Select the desired position above or below the helmet brim.
2. Loosen the clamp locking screw.
3. Slide the clamp assembly over the brim of
the helmet and rotate it to the desired position.
4. Tighten the locking screw until the VANTAGE® II is securely
attached to the helmet using the hex key provided.
MOUNTING INDUSTRIAL MOUNT
1. Insert locking tab into hard hat.
2. Push locating tab until assembly securely clicks.
3. To remove, depress tab and pull light from helmet.
MOUNTING GALLET HELMET
1. Insert clamp in helmet slot until securely clicks
2. To remove, depress lock tab on helmet and slide rearwards.
NOTE: It is possible to remove mount assembly from
the “dove tail” slot by unscrewing the small set screw on
the dove tail plate. (Hex key not included)
CLAMP
LOCKING
SCREW
LOCKING
TAB
GALLET
CLAMP
Page 4

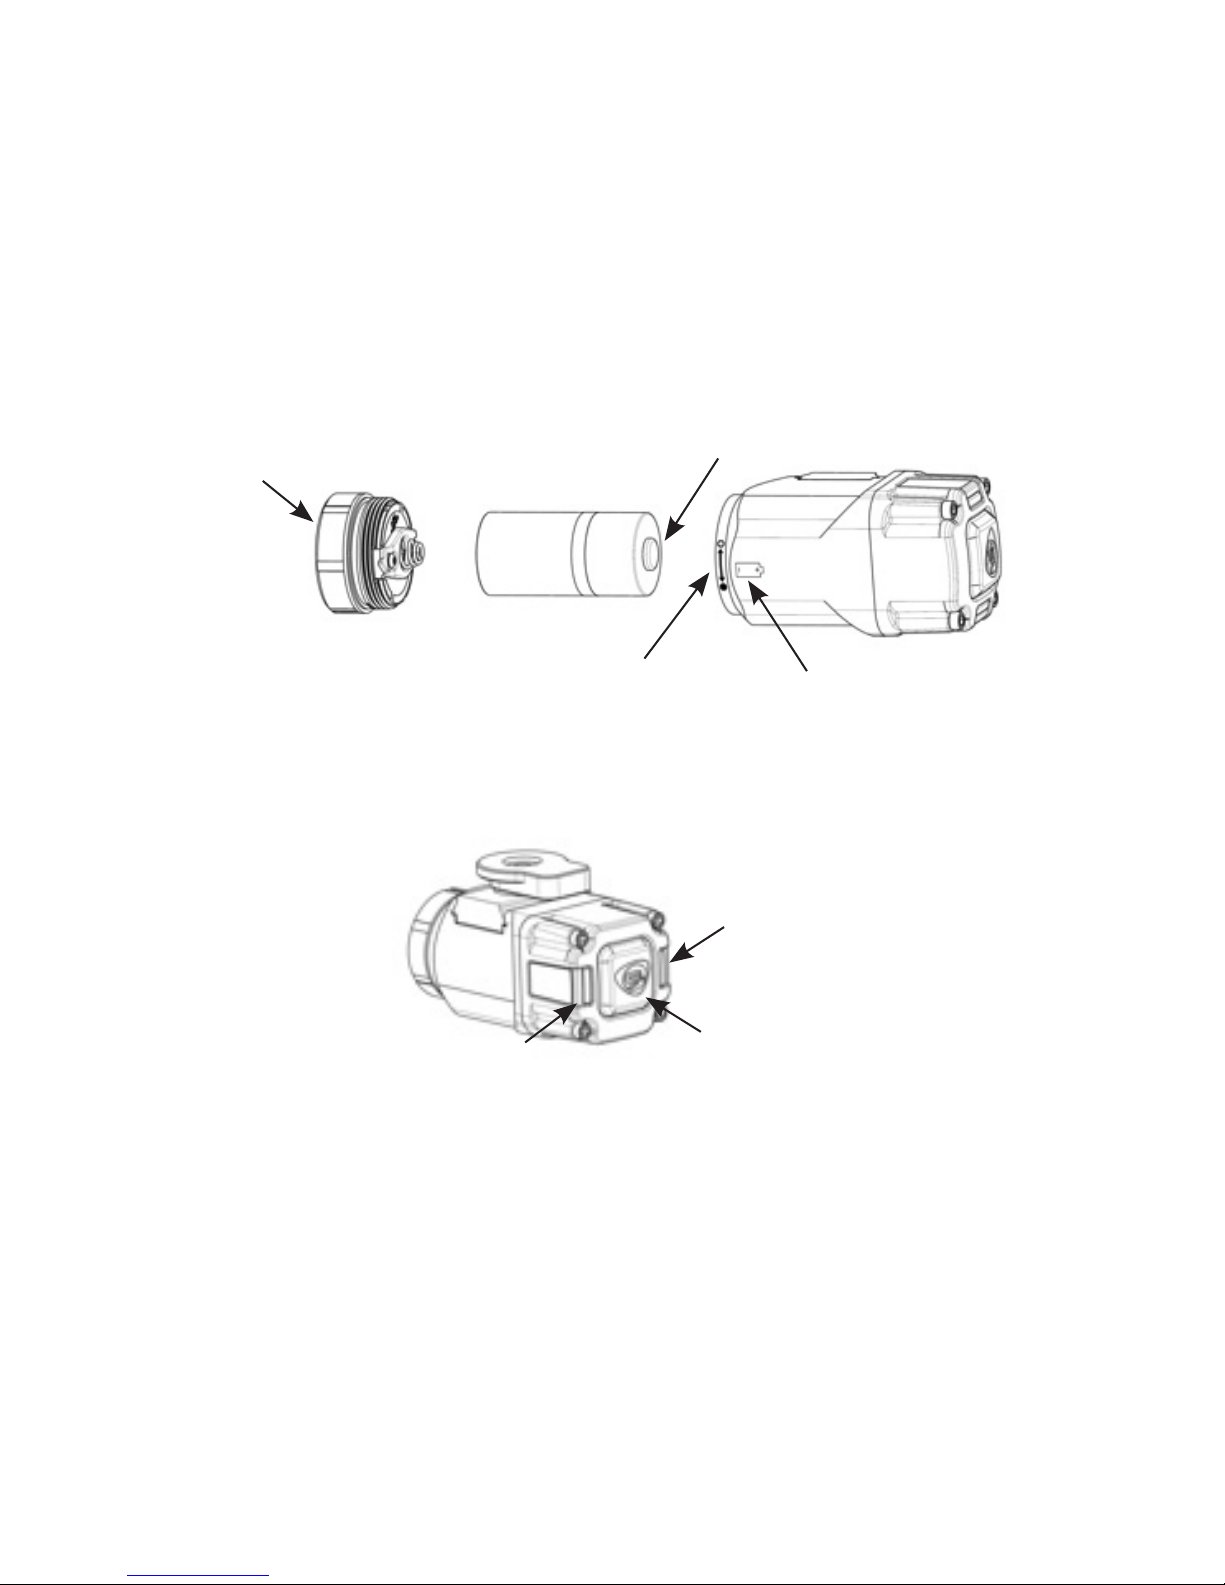
BATTERY INSTALLATION/REMOVAL
At the end of battery life, the unit may appear intermittent or non-functional.
Replacing the battery will restore normal operation.
1. Unscrew and remove the facecap assembly from the body of the VANTAGE® II.
Remove the exhausted battery from the ashlight body.
2. Insert a fresh CR123A battery, positive end rst, into the body of the VANTAGE® II.
Battery polarity is indicated on the side of the VANTAGE® II body.
3. Place the facecap assembly onto the VANTAGE® II body. Fully tighten the facecap assembly
to ensure that the battery makes complete contact with the internal electrical contacts.
4. For “safe” mode, loosen the facecap approximately ¼ turn to the detent. This will disconnect
the battery for safe storage and the light will not operate if the switch is depressed.
SWITCH OPERATION
Press switch button to turn on light in Low mode.
Double tap switch button within 1.5 seconds for High mode.
• NOTE: The VANTAGE® II will not operate if the facecap is in “safe” mode.
Tail light Enable/Disable/Flash
The VANTAGE® II ships from the factory with tail lights set to steady mode. To change the tail light
mode, press and hold the switch button for 5 seconds. After the initial 5 seconds, the mode will
cycle every 2 seconds. Release the switch button when the desired mode it reached. Modes are
“steady, tail lights off and tail lights ash”.
MAINTENANCE
Use a soft cloth and mild detergent to clean the glass LED lens and keep it free of dirt and grime.
Note: Always avoid aggressive cleaning solutions as they may damage the VANTAGE® II.
Streamlight Limited Lifetime Warranty:
Streamlight warrants this product to be free of defects for a lifetime of use except for batteries
and bulbs, abuse and normal wear. We will repair, replace or refund the purchase price of this
product should we determine it to be defective. This limited lifetime warranty also excludes
rechargeable batteries, chargers, switches and electronics which have a 2 year warranty with
proof of purchase. THIS IS THE ONLY WARRANTY, EXPRESSED OR IMPLIED, INCLUDING
ANY WARRANTY OF MERCHANTABILITY OR FITNESS FOR A PARTICULAR PURPOSE.
INCIDENTAL, CONSEQUENTIAL OR SPECIAL DAMAGES ARE EXPRESSLY DISCLAIMED
TAIL LIGHT
SWITCH
TAIL LIGHT
SAFE MODE INDICATOR BATTERY INDICATOR
FACECAP ASSEMBLY
BATTERY PLUS
Page 5

EXCEPT WHERE SUCH LIMITATION IS PROHIBITED BY LAW. You may have other specic
legal rights which vary by jurisdiction.
Go to www.streamlight.com/support for a complete copy of the warranty, and information on
product registration and the location of authorized service centers. Retain your receipt for proof
of purchase.
SERVICE OPTIONS
The VANTAGE® II contains few or no user-serviceable parts.
For service options, go to www.streamlight.com/support/service and complete the Online
Service Request for factory service or to nd the location of an authorized Streamlight
repair center near you.
Or contact:
Customer Service
STREAMLIGHT, INC.
30 Eagleville Road
Suite 100
Eagleville, PA U.S.A. 19403-3996
Phone: (800) 523-7488 Toll-Free / +1 (610) 631-0600
Fax: (800) 220-7007 / +1 (610) 631-0712
GALLET® is a trademark owned by MSA-Gallet Corporation of France.
Page 6
Le agradecemos que haya seleccionado la linterna LED para el casco de la serie
VANTAGE® II. Al igual que ocurre con toda herramienta de precisión, el
mantenimiento y cuidado razonables del producto brindarán años de servicio able.
Lea este manual antes de utilizar la VANTAGE® II, incluye instrucciones importantes
de funcionamiento y seguridad, y deberá conservarlo.
ADVERTENCIAS IMPORTANTES
PILA
ADVERTENCIA: RIESGO DE INCENDIO, EXPLOSIÓN, QUEMADURAS
UTILICE ÚNICAMENTE: Streamlight, Panasonic o Sanyo de tamaño CR123A; Duracell 123A o
Energizer 123A. El uso de otras pilas podría producir fugas, un incendio o explosión y lesiones
personales graves. NO recargue, utilice incorrectamente, cortocircuite, almacene o deseche
incorrectamente, desmonte ni caliente a una temperatura superior a 100° C. Manténgala fuera
del alcance de los niños.
UTILICE ÚNICAMENTE PILAS RECOMENDADAS PARA SU USO EN ESTE PRODUCTO.
LED (VANTAGE® II)
Precaución - Radiación LED (RG-2)
No mire directamente al haz
Podría dañar los ojos.
De conformidad con IEC 62471 Ed 1.0:2006-07
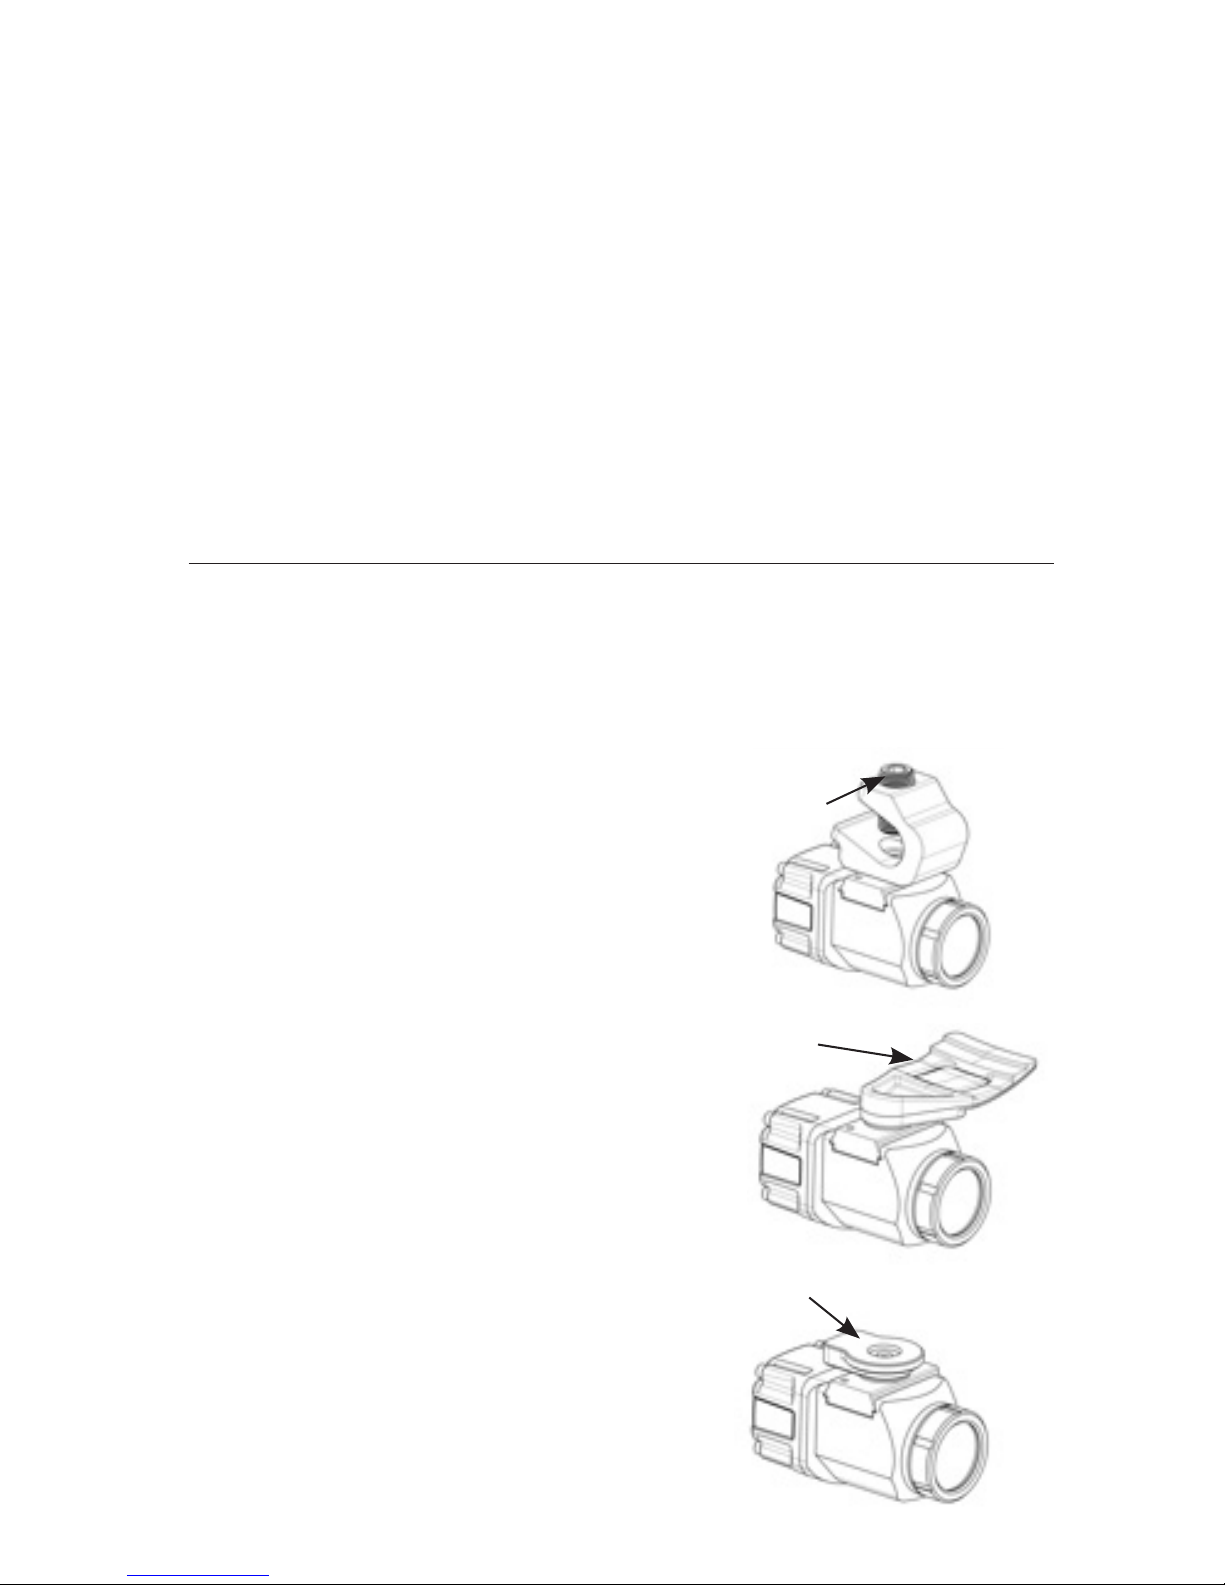
MONTAJE EN CASCO DE BOMBERO
1. Seleccione la posición deseada por encima o por
debajo del ala del casco.
2. Aoje el tornillo de bloqueo de abrazadera.
3. Deslice el conjunto de abrazadera sobre el ala del casco
y gírelo a la posición deseada.
4. Apriete el tornillo de bloqueo hasta que la VANTAGE® II esté
rmemente acoplada al casco con la llave hexagonal
que se proporciona.
MONTAJE DE SOPORTE INDUSTRIAL
1. Inserte la lengüeta de bloqueo en el casco rígido.
2. Empuje la lengüeta de ubicación hasta que el
conjunto encaje de manera segura.
3. Para extraerlo, oprima la lengüeta y extraiga
la linterna del casco.
MONTAJE DE CASCO DE ESTILO GALLET
1. Inserte la abrazadera en la ranura del casco
hasta que encaje de manera segura.
2. Para extraerlo, oprima la lengüeta de bloqueo en
el casco y deslícela hacia atrás.
NOTA: Es posible extraer el conjunto del soporte de la ranura
de cola de milano desatornillando el tornillo jo pequeño de
la placa para cola de milano. (La llave hexagonal no se incluye)
TORNILLO DE
BLOQUEO DE
ABRAZADERA
LENGÜETA
DE BLOQUEO
ABRAZADERA
TIPO GALLET
Page 7
INSTALACIÓN/EXTRACCIÓN DE LAS PILAS
Al nal de la vida útil de la batería, es posible que el funcionamiento de la unidad sea intermitente
o que no funcione. La sustitución de la pila hará que vuelva a funcionar normalmente.
1. Desenrosque y extraiga el conjunto de tapa delantera del cuerpo de la VANTAGE® II.
Extraiga la pila agotada del cuerpo de la linterna.
2. Inserte una pila CR123A nueva (extremo positivo primero) en el cuerpo de la VANTAGE® II.
La polaridad de la pila se indica en el lateral del cuerpo de la VANTAGE® II.
3. Coloque el conjunto de tapa delantera en el cuerpo de la VANTAGE® II. Apriete completamente
el conjunto de tapa delantera para asegurarse de que la pila entre en contacto por completo con
los contactos eléctricos internos.
4. Para el modo “seguro”, aoje la tapa delantera aproximadamente ¼ de vuelta hasta llegar al
tope. Esto desconectará la pila para el almacenamiento seguro y la linterna no funcionará si se
oprime el interruptor.
FUNCIONAMIENTO DEL INTERRUPTOR
Oprima el botón del interruptor para encender la linterna en modo Low (Bajo).
Toque dos veces el botón del interruptor en un plazo de 1,5 segundos para el modo High (Alto).
• NOTA: La VANTAGE® II no funcionará si la tapa delantera está en modo “seguro”.
Activación/Desactivación de la luz trasera/Intermitente
La VANTAGE® II se envía de fábrica con las luces traseras conguradas en modo constante. Para
cambiar el modo de la luz trasera, oprima y mantenga oprimido el botón del interruptor durante
5 segundos. Después de los primeros 5 segundos, el modo realizará un ciclo cada 2 segundos.
Suelte el botón del interruptor cuando haya alcanzado el modo deseado. Los modos disponibles
son: constante, luces traseras apagadas y luces traseras intermitentes.
MANTENIMIENTO
Utilice un paño suave y un detergente leve para limpiar la óptica del LED de vidrio y mantenerla
libre de suciedad y mugre. Nota: Evite siempre el uso de soluciones de limpieza agresivas ya que
podrían dañar la VANTAGE® II.
Garantía de por vida limitada de Streamlight:
Streamlight garantiza que este producto está libre de defecto durante su vida útil a excepción
de las pilas y bombillas, o por abuso y desgaste normal. Repararemos, sustituiremos o reem-
LUZ
TRASERA
INTERRUPTOR
LUZ TRASERA
INDICADOR DE
MODO SEGURO
INDICADOR DE LA PILA
CONJUNTO DE TAPA
DELANTERA
+ DE LA PILA
Page 8

bolsaremos el precio de compra de este producto si determináramos que está defectuoso. Esta
garantía limitada de por vida también excluye las pilas recargables, los cargadores, botones y
sistemas electrónicos que tengan una garantía de 2 años con prueba de compra. ESTA ES LA
ÚNICA GARANTÍA, EXPRESA O IMPLÍCITA, INCLUIDA CUALQUIER GARANTÍA DE COMERCIABILIDAD E IDONEIDAD PARA UN FIN EN PARTICULAR. SE RECHAZAN EXPRESAMENTE
LOS DAÑOS FORTUITOS, CONSECUENTES O ESPECIALES SALVO EN AQUELLOS LUGARES
DONDE DICHA LIMITACIÓN ESTÉ PROHIBIDA POR LA LEY. Podría tener otros derechos legales
especícos que varían según la jurisdicción.
Diríjase a www.streamlight.com/support para obtener una copia completa de la garantía e información sobre el registro de un producto, así como la ubicación de los centros de mantenimiento
autorizados. Conserve su recibo como prueba de compra.
OPCIONES DE MANTENIMIENTO
La VANTAGE® II incluye pocas o ninguna pieza que puedan ser reparadas por el usuario.
Para obtener opciones de mantenimiento, vaya a www.streamlight.com/support/service y
cumplimente la solicitud de servicio en línea para recibir mantenimiento de fábrica o encontrar
la ubicación de un centro de reparación Streamlight autorizado cerca de usted.
O comuníquese con:
Customer Service
STREAMLIGHT, INC.
30 Eagleville Road
Suite 100
Eagleville, PA U.S.A. 19403-3996
Teléfono: (800) 523-7488 Gratuito (si llama desde EE. UU.) / +1 (610) 631-0600
Fax: (800) 220-7007 / +1 (610) 631-0712
Page 9
BRIDE GALLET
Merci d’avoir sélectionné la lampe torche DEL montée sur casque de Série VANTAGE®
II. Comme pour tout outil de qualité, un entretien approprié vous permettra de proter
de cet article pendant des années.
Veuillez lire ce manuel avant d’utiliser votre VANTAGE® II puisqu’il contient
d’importantes instructions de sécurité et d’utilisation et doit être conservé.
AVERTISSEMENTS IMPORTANTS
PILE
AVERTISSEMENT : DANGER DE FEU, D’EXPLOSION ET DE BRÛLURE
UTILISER UNIQUEMENT : Streamlight, Panasonic, ou Sanyo taille CR123A ; Duracell 123A,
ou Energizer 123A. L’utilisation d’autres piles peut entraîner des fuites, un incendie ou une
explosion et de graves blessures corporelles. NE PAS recharger, utiliser de façon abusive,
court-circuiter, stocker ou éliminer de façon inappropriée, démonter ou chauffer au-dessus
de 100 °C. Garder hors de portée des enfants.
UTILISER UNIQUEMENT LES PILES SPÉCIFIQUEMENT RECOMMANDÉES POUR CE PRODUIT.
DEL (VANTAGE® II)
Attention - Radiation DEL (RG-2)
Ne pas regarder directement dans le rayon
Susceptible d’endommager les yeux.
Selon IEC 62471 Ed 1.0:2006-07
MONTAGE SUR CASQUE DE POMPIERS
1. Sélectionner la position désirée au-dessus
ou au-dessous du bord du casque.
2. Desserrer la vis de verrouillage de bride.
3. Faire glisser l’ensemble de bride sur le bord du
casque et le faire tourner vers la position désirée.
4. Serrer la vis de verrouillage jusqu’à ce que la VANTAGE® II
soit bien attachée au casque à l’aide de la clé
hexagonale fournie.
MONTAGE DE LA MONTURE INDUSTRIELLE
1. Insérer la languette de verrouillage dans le casque
de sécurité.
2. Appuyer sur la patte de positionnement jusqu’à ce
que l’ensemble s’enclenche bien.
3. Pour enlever, appuyer sur la patte et sortir
la lumière du casque.
MONTAGE SUR CASQUE GALLET
1. Insérer la bride dans la fente du casque jusqu’à
ce qu’elle s’enclenche bien.
2. Pour enlever, appuyer sur la languette de verrouillage
sur le casque et faire glisser vers l’arrière.
REMARQUE : Il est possible de retirer l’ensemble de monture
de la fente « en queue d’aronde » en dévissant la petite vis de
blocage sur la plaque en queue d’aronde. (La clé hexagonale
n’est pas fournie)
VIS DE
VERROUILLAGE
DE BRIDE
LANGUETTE DE
VERROUILLAGE
Page 10

MISE EN PLACE ET/OU RETRAIT DE PILES
En n de vie de pile, l’unité peut sembler intermittente ou non-opérationnelle. Remplacer la pile
pour restaurer un fonctionnement normal.
1. Dévisser et retirer l’ensemble de capuchon avant du corps de la VANTAGE® II.
Retirer la pile déchargée du corps de la lampe torche.
2. Insérer une pile neuve CR123A, extrémité positive en premier, dans le corps de la
VANTAGE® II. La polarité de la pile est indiquée sur le côté du corps de la VANTAGE® II.
3. Placer l’ensemble du capuchon avant sur le corps de la VANTAGE® II. Serrer complètement
l’ensemble de capuchon avant pour s’assurer que la pile entre en contact complet avec les
contacts électriques internes.
4. Pour un mode « safe », desserrer le capuchon avant d’environ ¼ de tour vers la détente.
Ceci déconnectera la pile pour un stockage sûr et la lumière ne fonctionnera pas si le
commutateur est appuyé.
FONCTIONNEMENT DU COMMUTATEUR
Appuyer sur le commutateur pour allumer la lumière en mode Low.
Taper deux fois sur le commutateur dans la 1,5 seconde pour mode High.
• REMARQUE: La VANTAGE® II ne fonctionnera pas si le capuchon avant est en mode « safe ».
Activer/Désactiver/Clignoter feu arrière
La VANTAGE® II est expédiée de l’usine avec les feux arrière réglés sur mode constant. Pour
changer le mode de feu arrière, appuyer sur le commutateur et le maintenir enfoncé pendant 5
secondes. Après les 5 secondes initiales, le mode se réitèrera toutes les 2 secondes. Relâcher le
commutateur lorsque le mode désiré est atteint. Les modes sont « constant, feux arrière éteints et
feux arrière clignotent ».
MAINTENANCE
Utiliser un chiffon doux et un détergent doux pour nettoyer la lentille DEL de verre et la garder
exempte de saleté et de crasse. Remarque : Éviter toujours des solutions de nettoyage agressives
car elles risquent d’endommager la VANTAGE® II.
Garantie de vie limitée de Streamlight:
Streamlight garantit ce produit, hormis les piles et les ampoules, à vie contre les défauts,
à l’exception des emplois abusifs et de l’usure normale. Nous nous engageons à réparer, à
remplacer ou à rembourser le prix d’achat de ce produit si nous déterminons qu’il est dé-
FEU ARRIÈRE
COMMUTATEUR
FEU ARRIÈRE
INDICATEUR DE
MODE SAFE
INDICATEUR DE PILE
ENSEMBLE
CAPUCHON AVANT
PILE PLUS
Page 11

fectueux. Cette garantie limitée à vie exclut également les batteries rechargeables, les chargeurs,
les commutateurs et l’électronique, qui sont couverts par une garantie de 2 ans sur présentation
d’un justicatif d’achat. IL N’EST OFFERT AUCUNE AUTRE GARANTIE, NI EXPRESSE NI
IMPLICITE, NOTAMMENT DE QUALITÉ MARCHANDE OU D’ADAPTATION À UN EMPLOI PARTICULIER. NOUS DÉCLINONS EXPRESSÉMENT TOUS DOMMAGES INDIRECTS, CONSÉCUTIFS OU SPÉCIAUX, SAUF AUX ENDROITS OÙ LA LOI INTERDIT DE TELLES RESTRICTIONS.
Il est possible que la réglementation locale vous accorde d’autres droits juridiques particuliers.
Allez à www.streamlight.com/support pour obtenir un exemplaire complet de la garantie et pour
tout renseignement sur l’enregistrement du produit et sur les centres de réparation agréés.
Conservez votre reçu en tant que justicatif d’achat.
OPTIONS DE SERVICE
La VANTAGE® II ne contiennent que peu ou pas
de pièces réparables par l’utilisateur.
Pour des options de service, allez à www.streamlight.com/support/service et
remplissez la demande de service en ligne pour un service d’usine et trouver
l’emplacement d’un centre de réparation Streamlight agréé près de chez vous.
Ou contactez :
Customer Service
STREAMLIGHT, INC.
30 Eagleville Road
Suite 100
Eagleville, PA U.S.A. 19403-3996
Téléphone : (800) 523-7488 Gratuit / +1(610) 631-0600
Télécopie : (800) 220-7007 / (610) 631-0712
Page 12

GALLET-HALTERUNG
Vielen Dank, dass Sie sich für die LED-Helmlampenreihe VANTAGE® II entschieden
haben. Wie bei jedem guten Werkzeug ist auch bei diesem Produkt eine gewisse
Pege und Wartung für eine jahrelange zuverlässige Funktion erforderlich.
Bitte lesen Sie diese Anleitung, bevor Sie Ihre VANTAGE® II in Betrieb nehmen. Sie
enthält wichtige Anweisungen für einen sicheren Betrieb und sollte aufbewahrt werden.
WICHTIGE WARNHINWEISE
BATTERIE
ACHTUNG: BRAND-, EXPLOSIONS- UND VERBRENNUNGSGEFAHR
VERWENDEN SIE AUSSCHLIESSLICH: Streamlight, Panasonic oder Sanyo Größe CR123A;
Duracell 123A oder Energizer 123A. Die Verwendung anderer Batterien kann zu Leckagen,
Bränden oder Explosionen und schweren Verletzungen führen. NICHT wiederauaden,
missbrauchen, kurzschließen, unsachgemäß lagern oder entsorgen, öffnen oder über 100°C
erhitzen. Von Kindern fernhalten.
VERWENDEN SIE NUR BATTERIEN, DIE AUSDRÜCKLICH FÜR DIESES PRODUKT EMPFOHLEN SIND.
LED (VANTAGE® II)
Achtung - LED-Strahlung (RG-2)
Nicht direkt in den Lichtstrahl schauen
Augenschädigung möglich.
Gemäß IEC 62471 Vers. 1.0:2006-07
MONTAGE AM FEUERWEHRHELM
1. Wählen Sie die gewünschten Position über oder
unter dem Helmrand.
2. Lösen Sie die Befestigungsschraube.
3. Schieben Sie die Halterung auf den Helmrand
und drehen Sie sie in die gewünschte Position.
4. Drehen Sie die Befestigungsschraube mit dem mitgelieferten
Inbusschlüssel fest, bis die VANTAGE® II fest am Helm sitzt.
MONTAGE AN EINEM INDUSTRIE-SCHUTZHELM
1. Stecken Sie die Verriegelungslasche in den Schutzhelm.
2. Drücken Sie die Passlasche ein, bis sie fest einrastet.
3. Zum Abnehmen auf die Lasche drücken und die Lampe
vom Helm abnehmen.
MONTAGE AM GALLET-SCHUTZHELM
1. Halterung in die Aussparung am Helm einführen,
bis sie fest einrastet.
2. Zum Abnehmen die Verschlusslasche am Helm
drücken und nach vorne schieben.
HINWEIS: Die Halterung kann aus der „SchwalbenschwanzAussparung“ herausgenommen werden, indem die kleine
Feststellschraube an der Platte des Schwalbenschwanzes
herausgeschraubt wird. (Inbusschlüssel nicht im Lieferumfang enthalten)
BEFESTIGUNGSSCHRAUBE
VERRIEGELUNGSLASCHE
Page 13

EINLEGEN / HERAUSNEHMEN DER BATTERIEN
Gegen Ende der Batterielebensdauer kann die Lampe diskontinuierlich oder funktionslos
erscheinen. Durch den Austausch der Batterie wird die normale Funktion wiederhergestellt.
1. Schrauben Sie den Reektor vom Gehäuse der VANTAGE® II ab und entfernen Sie ihn.
Nehmen Sie die leere Batterie aus dem Gehäuse des Strahlers.
2. Legen Sie eine frische Batterie des Typs „CR123A“ mit dem Pluspol voran in das Gehäuse der
VANTAGE® II ein. Die Polarität der Batterie ist seitlich am Gehäuse der VANTAGE® II angegeben.
3. Setzen Sie den Reektor wieder auf das Gehäuse der VANTAGE® II auf. Schrauben Sie den
Reektor ganz fest, um dafür zu sorgen, dass die Batterie ordnungsgemäß Kontakt mit den
internen elektrischen Kontakten hat.
4. Um in den „abgesicherten“ Modus zu schalten, lösen Sie den Reektor um etwa ¼ Umdrehung
bis zur Arretierung. Dadurch wird die Batterie abgeklemmt, sodass die Lampe gefahrlos gelagert
werden kann. Die Lampe funktioniert dann nicht, wenn der Schalter gedrückt wird.
BEDIENUNG DES SCHALTERS
Drücken Sie den Schalter, um das Licht im Abgeblendet-Modus einzuschalten. Drücken Sie
den Schalter innerhalb von 1,5 Sekunden noch einmal, um in den Hell-Modus zu schalten.
• HINWEIS: Die VANTAGE® II funktioniert nicht, wenn sich der Reektor im „abgesicherten“
Modus bendet.
Rücklicht ein-/ausschalten/Blinklichtbetrieb
Die VANTAGE® II wird werkseitig mit eingeschaltetem Dauer-Rücklicht ausgeliefert. Zum Ändern
des Rücklichtmodus drücken und halten Sie den Schalter 5 Sekunden lang gedrückt. Nach den
ersten 5 Sekunden schaltet der Modus alle 2 Sekunden weiter. Lassen Sie den Schalter los, wenn
die gewünschte Betriebsart erreicht ist. Die Betriebsarten sind „Dauerbetrieb“, „Rücklicht aus“
und „blinkendes Rücklicht“.
PFLEGE
Reinigen Sie die LED-Linse aus Glas mit einem weichen Lappen und einem sanften
Reinigungsmittel und halten Sie sie schmutz- und schmauchfrei. Hinweis: Vermeiden Sie
aggressive Reinigungslösungen, denn diese können die VANTAGE® II beschädigen.
Eingeschränkte lebenslange Garantie von Streamlight:
Streamlight garantiert, dass dieses Produkt während eines gesamten Verwendungslebens frei
von Mängeln ist. Ausgenommen sind Batterien und Glühbirnen, Missbrauch und normaler
RÜCKLICHT
SCHALTER
RÜCKLICHT
INDIKATOR FÜR
ABGESICHERTEN MODUS
BATTERIEANZEIGE
LAMPENKOPF
PLUSPOL
Page 14

Verschleiß. Wir werden dieses Produkt reparieren, ersetzen oder den Kaufpreis zurückerstatten, wenn wir feststellen sollten, dass es mangelhaft ist. Ebenfalls von dieser eingeschränkten
lebenslangen Garantie ausgenommen sind wiederauadbare Batterien, Ladegeräte, Schalter
und die Elektronik, für die eine zweijährige Garantie mit Kaufnachweis gilt.
DIES IST DIE EINZIGE AUSDRÜCKLICH ODER IMPLIZITE GARANTIE, EINSCHLIESSLICH
EINER ETWAIGEN GARANTIE DER MARKTÜBLICHKEIT ODER EIGNUNG FÜR EINEN
BESTIMMTEN ZWECK. ERSATZ FÜR BEILÄUFIGE SCHÄDEN ODER FOLGESCHÄDEN
UND BESONDERER SCHADENSERSATZ WERDEN AUSDRÜCKLICH AUSGESCHLOSSEN,
AUSSER IN LÄNDERN, IN DENEN EINE DERARTIGE EINSCHRÄNKUNG GESETZLICH
VERBOTEN IST. Je nach Land könnten Sie andere bestimmte gesetzliche Rechte haben.
Alle Garantieunterlagen nden Sie auf www.streamlight.com/support. Bewahren Sie Ihren
Einkaufsbeleg als Kaufnachweis auf.
REPARATUREN
Die VANTAGE® II enthält nur wenige oder keine vom Benutzer wartbaren Teile.
Bei nötigen Reparaturen besuchen Sie www.streamlight.com/support/service und füllen den
Online-Reparaturauftrag aus, um eine Reparatur im Werk zu beauftragen, oder um eine
Streamlight-Vertragswerkstatt in Ihrer Nähe zu nden.
Oder wenden Sie sich an:
Customer Service
STREAMLIGHT, INC.
30 Eagleville Road
Suite 100
Eagleville, PA U.S.A. 19403-3996
Telefon: +1 800 523-7488 gebührenfrei (nur in den USA) / +1 610 631-0600
Fax: +1 800-220-7007 / +1 610 631-0712
Page 15

Page 16

www.streamlight.com
30 Eagleville Road
Eagleville, PA 19403
Phone: (800) 523-7488
997791 Rev. A 9/18
 Loading...