


TLR-1® / TLR-2® Series
Operating Instructions // Instrucciones de funcionamiento Instructions d’utilisation // Bedienungsanleitung
997651 |
|
TLR1_TLR2 Op_Instructions Rev C.indd 1 |
|
|
|
2/1/13 11:01 AM |
|||

997651 |
|
TLR1_TLR2 Op_Instructions Rev C.indd 2 |
|
|
|
2/1/13 11:01 AM |
|||

IMPORTANT WARNINGS
WARNING: Use of light in “strobe” mode may cause seizure in persons with photosensitive epilepsy.
Night hunting with artificial light may be prohibited or restricted in your state. Please check your state’s game laws for clarification.
CAUTION: The TLR-1® HL™ and TLR-2® HL™ provide a powerful beam. When operated for a long time, it will get uncomfortably warm. This is NORMAL and is not a defect. Any LED flashlight of
similar size and performance will produce similar amounts of heat during operation. The only way to reduce operating heat is to SIGNIFICANTLY lower the output, or increase the size of the flashlight. While this heating may trigger the drop reflex if an unattended hot light is picked up, the temperature does not present
a burn hazard. When used tactically for short periods of time to clear a room, check for intruders, etc., heating will not be a problem.
FAILURE TO READ AND FOLLOW THESE OPERATING INSTRUCTIONS AND WARNINGS WHEN HANDLING A FIREARM OR THE TLR CAN BE DANGEROUS AND CAN RESULT IN SERIOUS INJURY, DAMAGE TO PROPERTY, OR DEATH.
•Use of a firearm under any circumstance may be dangerous. SERIOUS INJURY OR EVEN DEATH may result without proper training in the safe handling of firearms. Proper training should be obtained from an accredited firearms safety program conducted by competent, qualified instructors in the military, police academies or National Rifle Association affiliated instruction programs.
•Read your firearm’s manual before attaching your gun mounted light.
•Never point a firearm at something you are not willing to destroy.
•Streamlight recommends that the TLR should only be activated with the non-trigger hand while employing a two-hand grip on the firearm and with the trigger finger outside the trigger guard when possible. Failure to do so could result in an accidental discharge and serious injury, damage to property, or death.
•Thoroughly practice (employing safe training conditions) with the TLR and firearm before using the weapon in a tactical situation.
BEFORE ATTACHING, INSPECTING OR SERVICING A FIREARM-MOUNTED TLR
1.Engage the safety on the firearm if applicable.
2.Remove the magazine from the firearm if applicable.
3.Open the action and inspect the chamber to be sure it is empty.
IT IS IMPERATIVE THAT SAFETY MEASURES BE EMPLOYED AT ALL TIMES WHILE
HANDLING THE FIREARM.
BATTERIES
WARNING: FIRE, EXPLOSION, BURN HAZARD.
USE ONLY: Streamlight, Panasonic, or Sanyo size CR123A; Duracell 123A, or Energizer 123. Use of other batteries or mixing of used and new or different brand batteries may result in leakage, fire or explosion and serious personal injury. DO NOT recharge, misuse, short circuit, improperly store or discard, disassemble, or heat above 212°F (100°C). Keep away from children.
USE ONLY THOSE BATTERIES SPECIFICALLY RECOMMENDED FOR USE IN THIS PRODUCT.
997651 |
|
TLR1_TLR2 Op_Instructions Rev C.indd 3 |
|
|
|
2/1/13 11:01 AM |
|||

LED (All Models inc. TLR-1® Game Spotter™)
Caution - LED Radiation (RG-2)
Do Not Stare Into Beam.
May Be Harmful To Eyes.
Per IEC 62471 Ed 1.0:2006-07
LASER/LED (TLR-2®/2®s/TLR-2®HL™)
AVOID EXPOSURE; |
IS EMITTED FROM |
LASER RADIATION |
THIS APERTURE. |
|
|
CAUTION - LASER/LED RADIATION - CLASS 3R LASER PRODUCT
AVOID DIRECT EYE EXPOSURE
MAX OUTPUT: <5 mW
WAVELENGTH: 650 - 660 nm - LED RADIATION (RG-2):
DO NOT STARE INTO BEAM. MAY BE HARMFUL TO EYES.
COMPLIES WITH 21 CFR 1040.10 AND 1040.11 AS AMENDED BY LASER NOTICE 50., 24JUNE07.
LASER/LIGHT LIGHT LASER
Battery Installation/Removal
(TLR-2® Shown)
LASER/LED (TLR-2® G)
CAUTION: AVOID EXPOSURE-
LASER RADIATION IS
EMITTED FROM APERTURE.
I |
O |
N |
|
||
|
|
|
T |
|
|
A |
|
|
V |
||
E
L
E
NOTICE: GREEN LASER OPERATING
TEMPERATURE RANGE: 32oF - 104oF
CAUTION - LASER/LED RADIATION
- CLASS 3R LASER PRODUCT
AVOID DIRECT EYE EXPOSURE
MAX OUTPUT: <5 mW
WAVELENGTH: 522 - 542 nm - LED RADIATION (RG-2):
DO NOT STARE INTO BEAM.
MAY BE HARMFUL TO EYES.
COMPLIES WITH 21 CFR 1040.10 AND 1040.11 AS AMENDED BY LASER NOTICE 50., 24JUNE07.
LASER/LIGHT |
LIGHT |
LASER |
THE TLR MUST BE REMOVED FROM THE FIREARM BEFORE THE BATTERY COMPARTMENT CAN BE OPENED OR CLOSED.
1- Unlock
(Apply force and push latch toward key until latch touches body)
2- Swing Door Open
(After lifting door to remove tab from slot)
3- Replace Batteries
(Polarity is indicated on body of flashlight)
TLR-2® G does not use second battery.
4- Insert Tab into Slot to Close Door
997651 |
|
TLR1_TLR2 Op_Instructions Rev C.indd 4 |
|
|
|
2/1/13 11:01 AM |
|||
6- Lock
(Latch will stop against top of door)
5- Swing Door Closed
(Apply Force)
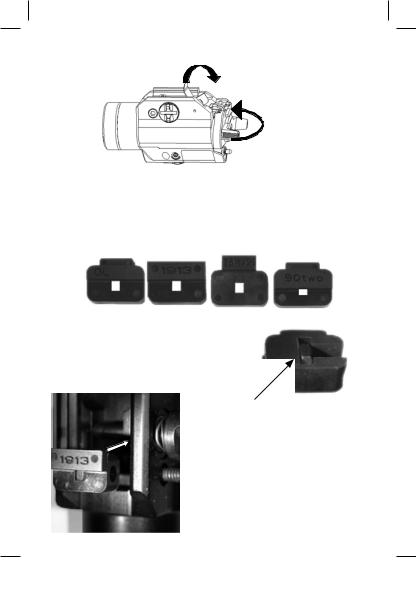
Rail Keys
Four polymer rail keys (included) allow the TLR to be attached to a variety of firearms: GL -Glock or “universal” rails; 1913 – Mil Std-1913 (Picatinny); SW - TSW & 99, and Beretta - 90two.
GL |
1913 |
TSW/99 |
90two |
Each rail key is stamped for easy identification and the keys share a common key screw and hex nut. Each key has a hex nut cavity in the base.
Hex Nut Cavity
1. Select the appropriate key and insert a hex nut into the cavity in the base of the key. Note: Adjust the hex nut so no portion protrudes from the key.
2.Hold the rail key (hex nut side up) and the TLR (key pocket side down) and align the two.
3.Insert the key into the TLR key pocket and use a 7/64” hex wrench to secure it with the key screw.
NOTE: A key MUST be used or the TLR will slide off the front of the rail under recoil.
997651 |
|
TLR1_TLR2 Op_Instructions Rev C.indd 5 |
|
|
|
2/1/13 11:01 AM |
|||
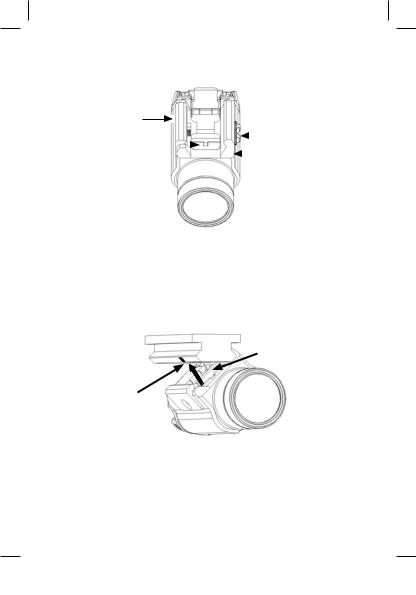
Mounting/Removal Procedure
MAKE SURE THAT THE FIREARM IS UNLOADED AND THE BREECH IS OPEN. IT IS IMPERATIVE THAT SAFETY MEASURES BE EMPLOYED AT ALL TIMES WHILE HANDLING THE FIREARM.
Adjustable Portion
of Rail Clamp
|
|
|
|
|
|
|
Rail Clamp |
Rail |
|
|
|
|
|
Tension Bolt |
|
|
|
|
|
|
|||
Key |
|
|
|
|
|
|
Fixed Portion |
|
|
|
|
|
|
||
|
|
|
|
|
|||
|
|
|
|
|
|
|
|
|
|
|
|
|
|
|
of Rail Clamp |
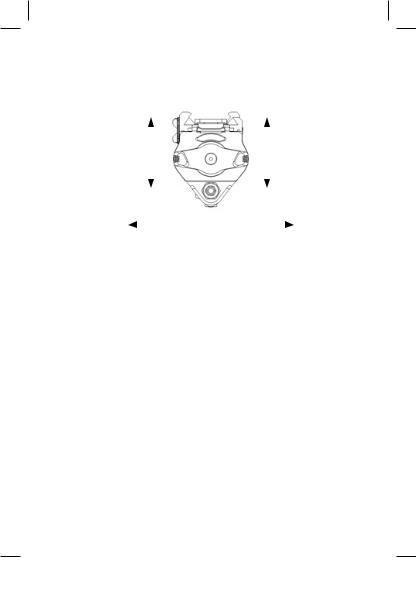
1.The TLR is designed to be quickly attached or detached from the side of the weapon or accessory rail.
2.Loosen the rail clamp tension bolt.
3.Angle the TLR, placing the fixed portion of the rail clamp against the accessory rail and align the rail key with the appropriate cross groove in the accessory rail.
4.Depress the tension bolt to open the rail clamp, rotate the TLR into place and release the pressure on the tension bolt to “snap” the light in place.
Rail |
Rail Key |
|
Rail Groove
5.Check for fit and tighten tension bolt until the TLR is securely attached to the firearm. A coin should be used to obtain sufficient tightness.
997651 |
|
TLR1_TLR2 Op_Instructions Rev C.indd 6 |
|
|
|
2/1/13 11:01 AM |
|||
Switch Operation
(TLR-2® Shown)
The TLR features a paddle switch providing momentary or constant activation.
The TLR-2® series has an additional mode selection switch located on the rear of the laser housing.
Constant |
|
|
|
Momentary |
||
OFF (PADDLE) |
|
|
|
OFF (PADDLE) |
||
|
|
|
||||
Momentary |
|
(TLR-2® MODE SWITCH) |
|
Constant |
||
|
|
|||||
|
|
|
|
|
|
|
|
|
|
|
|
|
|
Laser |
|
LED |
Laser/LED |
|||
Strobe Operation
The TLR-1®s, TLR-2®s,TLR-1®s HP, TLR-1® HL™, TLR-2® HL™ and TLR-2® G feature a Strobe Mode that can be activated by the paddle switch. Within 0.4 seconds, press the paddle switch into the momentary position, release and immediately re-press and hold for strobe.
Strobe Enable/Disable
The TLR-1®s, TLR-2®s,TLR-1®s HP, TLR-1® HL™, TLR-2® HL™ and TLR-2® G ship from the factory with the strobe mode enabled.
The light can be reprogrammed to disable strobe by tapping the momentary paddle switch very rapidly ten times and holding it down on the tenth time. Hold until the light turns off (about one second) which indicates reprogramming was successful. Repeat the procedure above to re-enable the strobe mode.
NOTE: Activation of the strobe function is NOT recommended with the remote switch.
Green Laser Operating Temperature Range
Green lasers are temperature sensitive. The green laser used in the TLR-2® G will operate within a temperature range of 32°F to 104°F. At lower temperatures, the laser output may be delayed until the TLR-2®
G warms up. At higher temperatures, the laser will appear less intense. At excessive temperatures, the laser will turn off to protect itself from damage. Operating the TLR-2® G in Laser/LED mode will contribute to increased laser temperature.
TLR-2® Models Laser Sight Zeroing
For a laser mounted below or to the side of the bore, there is only one distance where the bullet path will coincide with the laser sight line. This point is the “zero range.” Laser adjustment and the muzzle velocity of the bullet determine where this point occurs. The user must decide how high above or below the sight line the bullet can be allowed to strike and adjust the sight accordingly. At distances less than the zero range the bullet will be above the sight line. Beyond the zero range the bullet will be below the sight line. If mounted to the side, the bullet will also deviate to the side of the laser line, as well as up and down.
In practice, a TLR-2® model on a handgun can be adjusted to keep the bullet strike within about 2” high and 2” low out to about 100 feet. There are two adjustment screws mounted in brass bushings located on the laser cartridge housing (for the TLR-2® G on the side body and housing). The windage adjustment is located on the left hand side of the laser cartridge. Turn the set screw clockwise to move the laser to
997651 |
|
TLR1_TLR2 Op_Instructions Rev C.indd 7 |
|
|
|
2/1/13 11:01 AM |
|||
the left (POI right). Turn the set screw counter-clockwise to move the laser to the right (POI left). The elevation adjustment is located on the underside of the TLR-2® model laser cartridge. With the TLR-2® model pointed down range a clockwise turn of the adjustment screw will move the laser down (POI up). A counter-clockwise turn on the adjustment screw will move the laser up (POI down). Move the laser dot in the direction that the shots are hitting the target (example: If the bullets are striking low and right, move the laser dot down and right to coincide with the bullet strike).
NOTE: When making large adjustments there may be an interaction that causes the laser to move diagonally or bind. It may become necessary to rotate the opposing adjustment screw counterclockwise to allow the laser cartridge to move to the desired position.
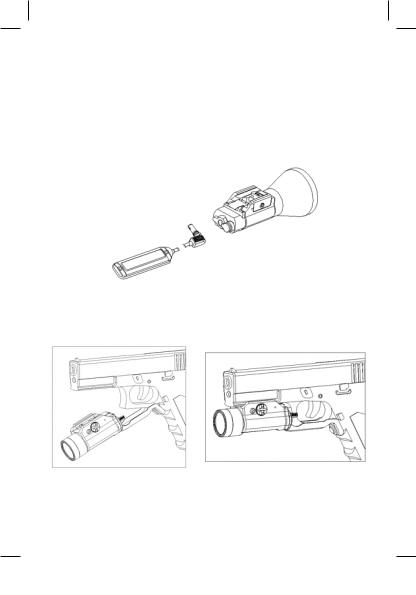
Accessories
TLR Remote Switch
(TLR-1® HP shown)
Straight or Coiled
Cord Available
TLR Contour Remote Switch
(TLR-1® Shown)
(Contour remote not recommended for use with the TLR-2® G)
Maintenance
The TLR rail clamp tensioning bolt requires an application of high quality gun oil to keep it rust free. Use a soft cloth and mild detergent to clean the glass LED lens and keep it free of dirt and grime. The laser aperture on the TLR-2® models can be cleaned with a Q-tip (or similar item) and mild detergent.
NOTE: Always avoid aggressive cleaning solutions as they may damage the TLR.
997651 |
|
TLR1_TLR2 Op_Instructions Rev C.indd 8 |
|
|
|
2/1/13 11:01 AM |
|||

Streamlight Limited Lifetime Warranty:
Streamlight warrants this product to be free of defects for a lifetime of use except for batteries and bulbs, abuse and normal wear. We will repair, replace or refund the purchase price of this product should we determine it to be defective. This limited lifetime warranty also excludes rechargeable batteries, chargers, switches and electronics which have a 2 year warranty with proof of purchase. THIS IS THE ONLY WARRANTY, EXPRESSED OR IMPLIED, INCLUDING ANY WARRANTY OF MERCHANTABILITY OR FITNESS FOR A PARTICULAR PURPOSE. INCIDENTAL, CONSEQUENTIAL OR SPECIAL DAMAGES ARE EXPRESSLY DISCLAIMED EXCEPT WHERE SUCH LIMITATION IS PROHIBITED BY LAW. You may have other specific legal rights which vary by jurisdiction.
Go to www.streamlight.com/support for a complete copy of the warranty, and information on product registration and the location of authorized service centers. Retain your receipt for proof of purchase.
Service
The TLR contains few or no user-serviceable parts.
Please Return To:
Customer Service
STREAMLIGHT, INC.
30 Eagleville Road
Suite 100
Eagleville, PA 19403-3996
Phone: (800) 523-7488 Toll-Free
Fax: (800) 220-7007
www.streamlight.com
997651 |
|
TLR1_TLR2 Op_Instructions Rev C.indd 9 |
|
|
|
2/1/13 11:01 AM |
|||

ADVERTENCIAS IMPORTANTES
ADVERTENCIA: El uso de la linterna en modo “estroboscópico” puede provocar ataques epilépticos a personas con epilepsia fotosensible.
La caza nocturna con luz artificial podría estar prohibida o limitada en su estado (o área). Compruebe las leyes de caza de su estado (área) para aclarar dicho punto.
PRECAUCIÓN: La linternas TLR-1® HL™ y TLR-2® HL™ proporcionan un potente haz. Cuando funciona durante un período prolongado, alcanzará una temperatura caliente que resulta incómoda.
Esto es NORMAL y no se trata de un defecto. Cualquier linterna LED de tamaño y rendimiento similares producirá cantidades similares de calor durante el funcionamiento. La única manera de reducir el calor de funcionamiento consiste en reducir SIGNIFICATIVAMENTE la potencia o aumentar el tamaño de la linterna. Si bien este calor podría provocar el reflejo de dejarla caer, si se recoge una linterna caliente desatendida, la temperatura no presenta riesgo de quemaduras. Cuando se utiliza tácticamente durante breves periodos de tiempo para despejar una habitación, comprobar la presencia de intrusos, etc., el calor no supondrán ningún problema.
NO LEER ESTAS INSTRUCCIONES DE FUNCIONAMIENTO Y ADVERTENCIAS, ASÍ COMO EL INCUMPLIMIENTO DE ÉSTAS AL MANIPULAR UN ARMA DE FUEGO O LA LINTERNA TLR PUEDE SER
PELIGROSO Y PUEDE PROVOCAR LESIONES GRAVES, DAÑOS A LA PROPIEDAD O LA MUERTE.
•El uso de un arma de fuego bajo cualquier circunstancia puede ser peligroso. Pueden producirse LESIONES GRAVES E INCLUSO LA MUERTE si no se ha recibido la formación necesaria en el manejo seguro de armas de fuego. Debe recibirse formación adecuada a través de un programa de seguridad sobre armas de fuego acreditado impartido por instructores competentes cualificados en el ejército, en academias de policía o en programas de formación afiliados a la Asociación Nacional del Rifle (National Rifle Association).
•Lea el manual de su arma de fuego antes de acoplar su linterna en la pistola.
•No apunte nunca un arma de fuego a algo que no esté dispuesto a destruir.
•Streamlight recomienda que la TLR sólo se active con la mano que no se utiliza para disparar mientras utiliza un agarre de dos manos en el arma de fuego con el dedo índice fuera del protector del gatillo cuando sea posible. De lo contrario, podría producirse la descarga accidental y graves lesiones, daño a la propiedad o la muerte.
•Practique exhaustivamente (bajo condiciones de formación seguras) con la TLR y el arma de fuego antes de usar el arma en una situación táctica.
ANTES DE ACOPLAR, INSPECCIONAR O PRESTAR SERVICIO A UNA TLR INSTALADA EN UN ARMA DE FUEGO
1.Acople el seguro del arma de fuego, si corresponde.
2.Retire el cargador del arma de fuego, si corresponde.
3.Abra la acción e inspeccione la cámara para asegurarse de que está vacía.
DURANTE LA MANIPULACIÓN DEL ARMA DE FUEGO ES OBLIGATORIO EL USO DE MEDIDAS DE SEGURIDAD EN TODO MOMENTO.
Pilas
ADVERTENCIA: RIESGO DE INCENDIO, EXPLOSIÓN, QUEMADURAS.
UTILICE ÚNICAMENTE: Pilas Streamlight, Panasonic o Sanyo tamaño CR123A; Duracell 123A o Energizer 123. El uso de otras pilas o la combinación de pilas usadas y nuevas, o de diferentes marcas podría producir fugas, un incendio o explosión y lesiones personales graves. NO recargue, utilice incorrectamente, cortocircuite, almacene o deseche incorrectamente, desmonte ni caliente a una temperatura superior a
100°C (212°F). Manténgase alejado de los niños.
UTILICE ÚNICAMENTE LAS PILAS RECOMENDADAS PARA SU USO EN ESTE PRODUCTO.
997651 |
|
TLR1_TLR2 Op_Instructions Rev C.indd 10 |
|
|
|
2/1/13 11:01 AM |
|||
 Loading...