

StreamLight tLR-1 Series, TLR-2 Series, TLR-2s, TLR-2g, TLR-1 Game Spotter Operating Instructions Manual
...Page 1

TLR-1
®
/ TLR-2
®
Series
Operating Instructions // Instrucciones de funcionamiento
Instructions d’utilisation // Bedienungsanleitung
Page 2

Page 3

IMPORTANT WARNINGS
WARNING: Use of light in “strobe” mode may cause seizure in persons with photosensitive epilepsy.
Night hunting with articial light may be prohibited or restricted in your state. Please check your state’s
game laws for clarication.
CAUTION: The TLR-1 HL®, TLR-2 HL®, TLR-2 HL® G and TLR-1 HPL® provide a powerful beam.
When operated for a long time, it will get uncomfortably warm. This is NORMAL and is not a defect.
Any LED ashlight of similar size and performance will produce similar amounts of heat during operation.
The only way to reduce operating heat is to SIGNIFICANTLY lower the output, or increase the size of
the ashlight. While this heating may trigger the drop reex if an unattended hot light is picked up, the
temperature does not present a burn hazard. When used tactically for short periods of time to clear a room,
check for intruders, etc., heating will not be a problem.
FAILURE TO READ AND FOLLOW THESE OPERATING INSTRUCTIONS AND WARNINGS WHEN
HANDLING A FIREARM OR THE TLR CAN BE DANGEROUS AND CAN RESULT IN SERIOUS INJURY,
DAMAGE TO PROPERTY, OR DEATH.
• Use of a rearm under any circumstance may be dangerous. SERIOUS INJURY OR EVEN DEATH may
result without proper training in the safe handling of rearms. Proper training should be obtained from an
accredited rearms safety program conducted by competent, qualied instructors in the military, police
academies or National Rie Association afliated instruction programs.
• Read your rearm’s manual before attaching your gun mounted light.
• Never point a rearm at something you are not willing to destroy.
• Streamlight recommends that the TLR should only be activated with the non-trigger hand while employ-
ing a two-hand grip on the rearm and with the trigger nger outside the trigger guard when possible.
Failure to do so could result in an accidental discharge and serious injury, damage to property, or death.
• Thoroughly practice (employing safe training conditions) with the TLR and rearm before using the
weapon in a tactical situation.
BEFORE ATTACHING, INSPECTING OR SERVICING A FIREARM-MOUNTED TLR
1. Engage the safety on the rearm if applicable.
2. Remove the magazine from the rearm if applicable.
3. Open the action and inspect the chamber to be sure it is empty.
IT IS IMPERATIVE THAT SAFETY MEASURES BE EMPLOYED AT ALL TIMES WHILE
HANDLING THE FIREARM.
BATTERIES
WARNING: FIRE, EXPLOSION, BURN HAZARD.
USE ONLY: Streamlight, Panasonic, or Sanyo size CR123A; Duracell 123A, or Energizer 123. Use of other
batteries or mixing of used and new or different brand batteries may result in leakage, re or explosion and
serious personal injury. DO NOT recharge, misuse, short circuit, improperly store or discard, disassemble,
or heat above 212°F (100°C). Keep away from children.
USE ONLY THOSE BATTERIES SPECIFICALLY RECOMMENDED FOR USE IN THIS PRODUCT.
Page 4

LED (All Models inc. TLR-1® Game Spotter®)
Caution - LED Radiation (RG-2)
Do Not Stare Into Beam.
May Be Harmful To Eyes.
Per IEC 62471 Ed 1.0:2006-07
LASER/LED (TLR-2®/2®s/TLR-2 HL®) LASER/LED (TLR-2® G and TLR-2 HL® G)
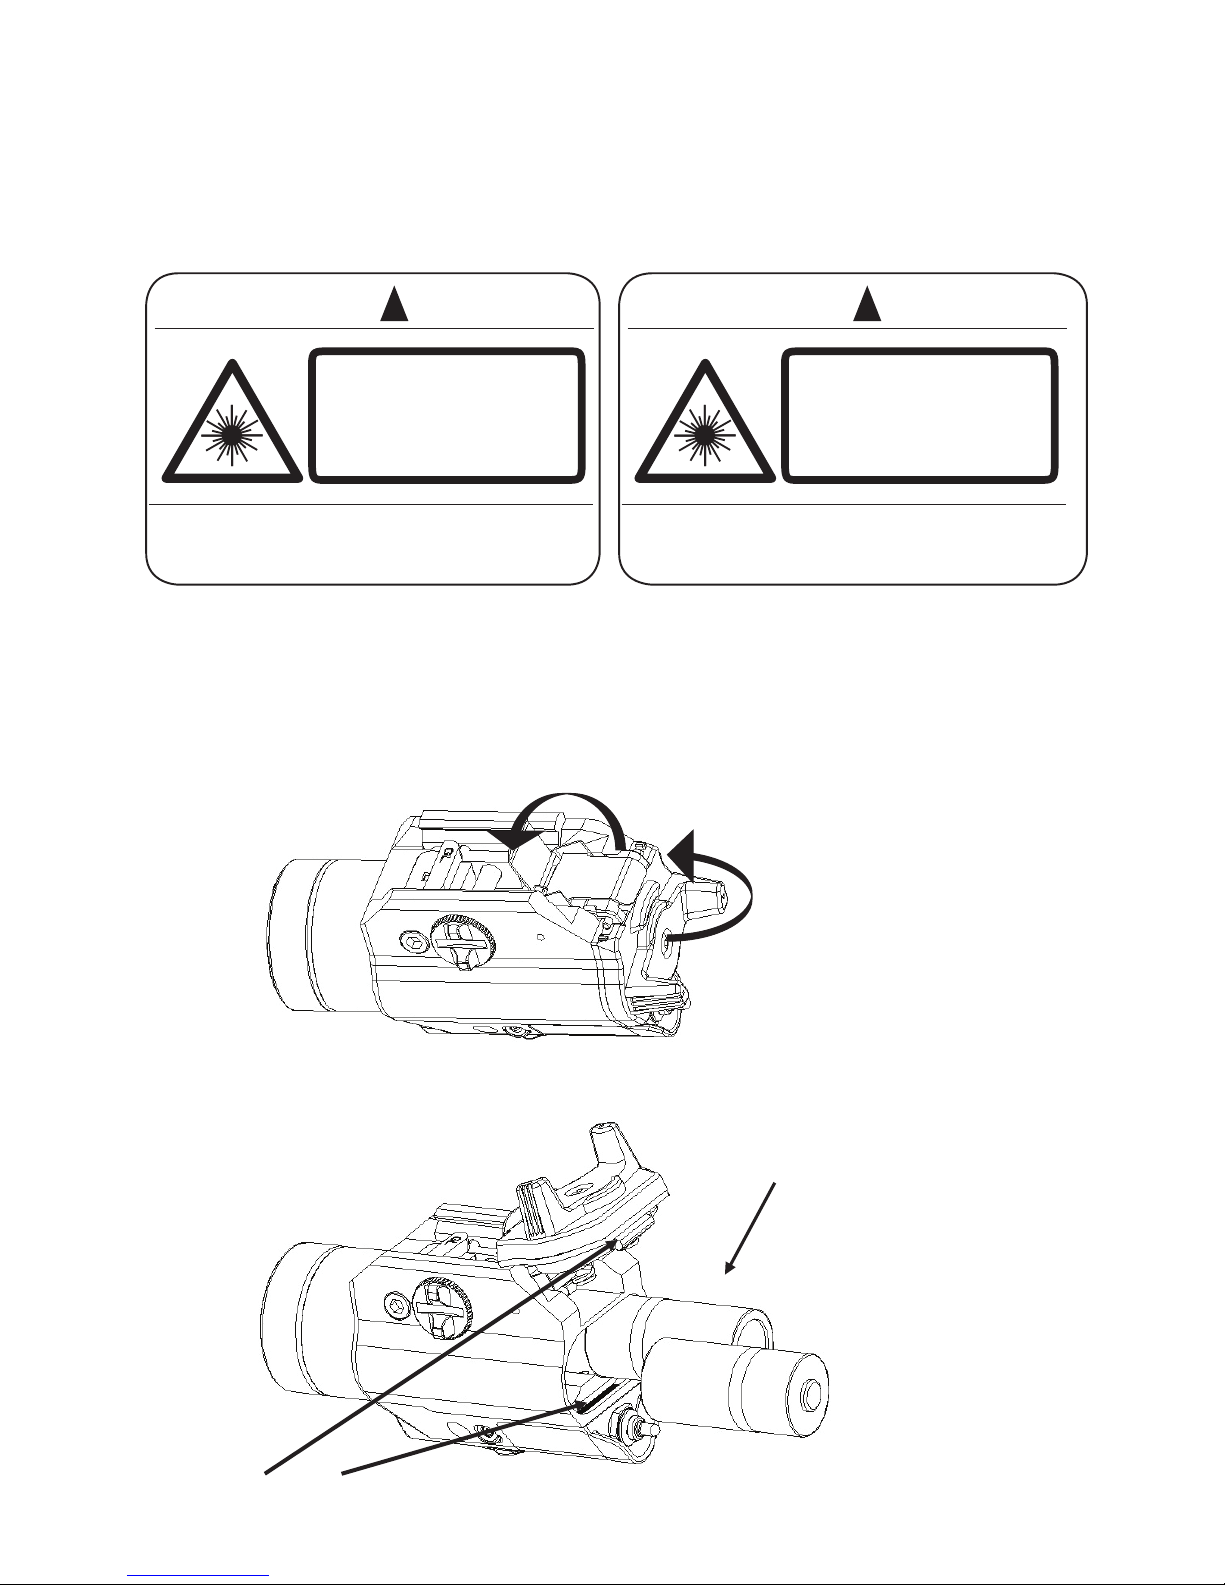
Battery Installation/Removal
(TLR-2® Shown)
THE TLR MUST BE REMOVED FROM THE FIREARM BEFORE THE BATTERY
COMPARTMENT CAN BE OPENED OR CLOSED.
1- Unlock
(Apply force and push latch toward
key until latch touches body)
2- Swing Door Open
(After lifting door to
remove tab from slot)
3- Replace Batteries
(Polarity is indicated
on body of ashlight)
4- Insert Tab into Slot to Close Door
CAUTION - LASER/LED RADIATION
- CLASS 3R LASER PRODUCT
AVOID DIRECT EYE EXPOSURE
MAX OUTPUT: <5 mW
WAVELENGTH: 650 - 660 nm
- LED RADIATION (RG-2):
DO NOT STARE INTO BEAM.
MAY BE HARMFUL TO EYES.
AVOID EXPOSURE;
LASER RADIATION
IS EMITTED FROM
THIS APERTURE.
COMPLIES WITH 21 CFR 1040.10 AND 1040.11
AS AMENDED BY LASER NOTICE 50., 24JUNE07.
LASER/LIGHT LIGHT LASER
CAUTION - LASER/LED RADIATION
- CLASS 3R LASER PRODUCT
AVOID DIRECT EYE EXPOSURE
MAX OUTPUT: <5 mW
WAVELENGTH: 510 - 530 nm
- LED RADIATION (RG-2):
DO NOT STARE INTO BEAM.
MAY BE HARMFUL TO EYES.
AVOID EXPOSURE;
LASER RADIATION
IS EMITTED FROM
THIS APERTURE.
COMPLIES WITH 21 CFR 1040.10 AND 1040.11
AS AMENDED BY LASER NOTICE 50., 24JUNE07.
LASER/LIGHT LIGHT LASER
GREEN
Page 5

5- Swing Door Closed
(Apply Force)
6- Lock
(Latch will stop against top of door)
Rail Keys
Four polymer rail keys (included) allow the TLR to be attached to a variety of rearms: GL - Glock or
“universal” rails, SW - TSW & 99, Beretta - 90two, Sig – P320, 1913 - Mil Std-1913 (Picatinny).
Each rail key is stamped for easy identication and
the keys share a common key screw and hex nut.
Each key has a hex nut cavity in the base.
1. Select the appropriate key and insert a hex
nut into the cavity in the base of the key.
Note: Adjust the hex nut so no portion
protrudes from the key.
2. Hold the rail key (hex nut side up) and the
TLR (key pocket side down) and align the two.
3. Insert the key into the TLR key pocket and
use a 7/64” hex wrench to secure it with the
key screw.
NOTE: A key MUST be used or the TLR will slide
off the front of the rail under recoil.
Hex Nut Cavity
Page 6

Mounting/Removal Procedure
MAKE SURE THAT THE FIREARM IS UNLOADED AND THE BREECH IS OPEN. IT IS IMPERATIVE THAT
SAFETY MEASURES BE EMPLOYED AT ALL TIMES WHILE HANDLING THE FIREARM.
1. The TLR is designed to be quickly attached or detached from the side of the weapon or accessory rail.
2. Loosen the rail clamp tension bolt.
3. Angle the TLR, placing the xed portion of the rail clamp against the accessory rail and align
the rail key with the appropriate cross groove in the accessory rail.
4. Depress the tension bolt to open the rail clamp, rotate the TLR into place and
release the pressure on the tension bolt to “snap” the light in place.
5. Check for t and tighten tension bolt until the TLR is securely attached to the rearm.
A coin should be used to obtain sufcient tightness.
Rail
Rail Key
Rail Groove
Rail
Key
Adjustable Portion
of Rail Clamp
Rail Clamp
Tension Bolt
Fixed Portion
of Rail Clamp
Page 7

Switch Operation
(TLR-2® Shown)
The TLR features a paddle switch providing momentary or constant activation.
The TLR-2® series has an additional mode selection switch located on the rear of the laser housing.
Strobe Operation
The TLR-1®s, TLR-2®s, TLR-1 HPL®, TLR-1 HL®, TLR-2 HL®, TLR-2® G and TLR-2 HL® G feature a strobe
mode that can be activated by the paddle switch. Within 0.4 seconds, press the paddle switch into the
momentary position, release and immediately re-press and hold for strobe.
Strobe Enable/Disable
The TLR-1®s, TLR-2®s, TLR-1 HPL®, TLR-1 HL®, TLR-2 HL®, TLR-2® G and TLR-2 HL® G ship from the
factory with the strobe mode enabled.
The light can be reprogrammed to disable strobe by tapping the momentary paddle switch very rapidly
ten times and holding it down on the tenth time. Hold until the light turns off (about one second) which
indicates reprogramming was successful. Repeat the procedure above to re-enable the strobe mode.
NOTE: Activation of the strobe function is NOT recommended with the remote switch.
Strobe should be disabled.
Green Laser Operating Temperature Range
The green laser used in the TLR-2® G and TLR-2 HL® G employs the latest direct drive technology and
is not sensitive to temperature. The TLR-2® G and TLR-2 HL® G green laser will operate over the full
temperature range of the product from -40°F to 120°F.
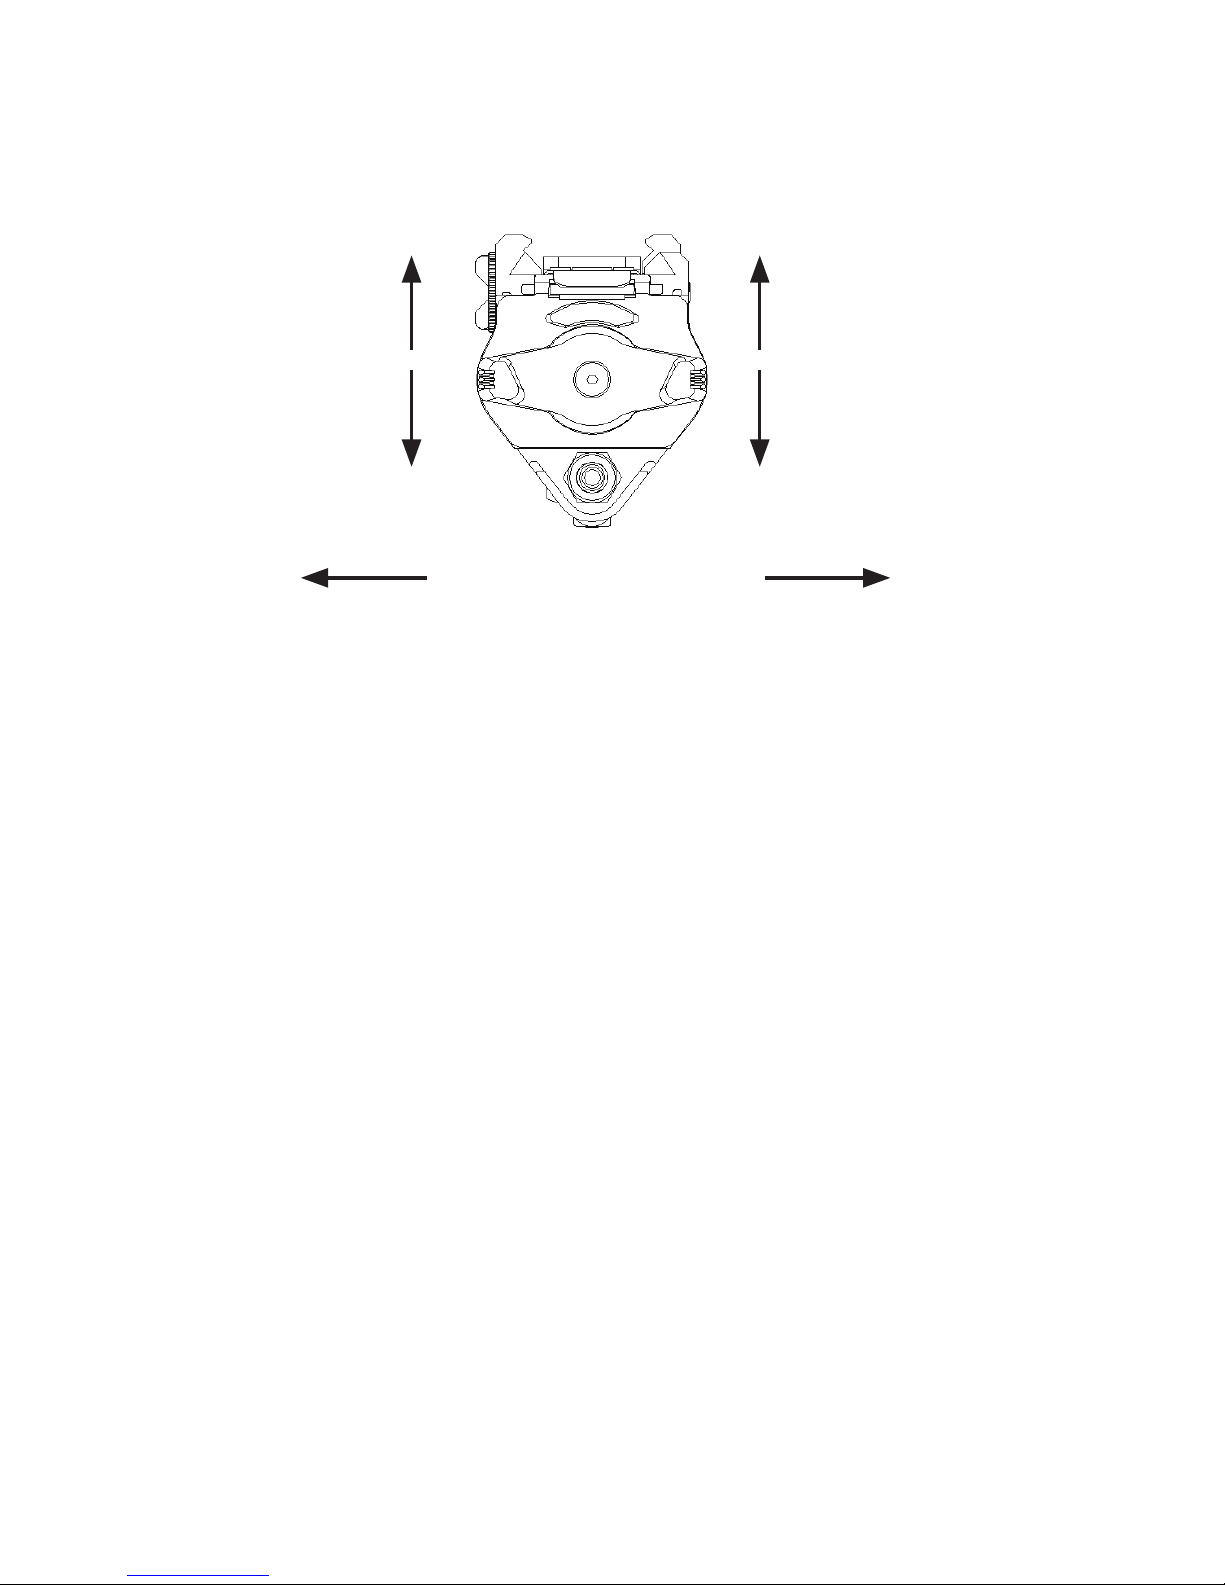
TLR-2® Models Laser Sight Zeroing
For a laser mounted below or to the side of the bore, there is only one distance where the bullet path will
coincide with the laser sight line. This point is the “zero range.” Laser adjustment and the muzzle velocity
of the bullet determine where this point occurs. The user must decide how high above or below the sight
line the bullet can be allowed to strike and adjust the sight accordingly. At distances less than the zero
range the bullet will be above the sight line. Beyond the zero range the bullet will be below the sight line.
If mounted to the side, the bullet will also deviate to the side of the laser line, as well as up and down.
In practice, a TLR-2® model on a handgun can be adjusted to keep the bullet strike within about 2” high
and 2” low out to about 100 feet. There are two adjustment screws mounted in brass bushings located on
the laser cartridge housing (for the TLR-2® G on the side body and housing). The windage adjustment is
located on the left hand side of the laser cartridge. Turn the set screw clockwise to move the laser to the
left (POI right). Turn the set screw counter-clockwise to move the laser to the right (POI left). The elevation
Constant
OFF (PADDLE)
Constant
Momentary
OFF (PADDLE)
Momentary
(TLR-2® MODE SWITCH)
Laser Laser/LED LED
Page 8

Straight or Coiled
Cord Available
adjustment is located on the underside of the TLR-2® model laser cartridge. With the TLR-2® model
pointed down range a clockwise turn of the adjustment screw will move the laser down (POI up).
A counter-clockwise turn on the adjustment screw will move the laser up (POI down). Move the laser dot in
the direction that the shots are hitting the target (example: If the bullets are striking low and right, move
the laser dot down and right to coincide with the bullet strike).
NOTE: When making large adjustments there may be an interaction that causes the laser to move diagonally or bind. It may become necessary to rotate the opposing adjustment screw counterclockwise to allow
the laser cartridge to move to the desired position.
Accessories
TLR Remote Switch
(TLR-1 HPL® shown)
TLR Contour Remote Switch
(TLR-1® Shown)
(Contour remote not recommended for use with the TLR-2 HL® G)
Maintenance
The TLR rail clamp tensioning bolt requires an application of high quality gun oil to keep it rust free. Use a soft
cloth and mild detergent to clean the glass LED lens and keep it free of dirt and grime. The laser aperture on
the TLR-2® models can be cleaned with a Q-tip (or similar item) and mild detergent.
NOTE: Always avoid aggressive cleaning solutions as they may damage the TLR.
Page 9

Streamlight Limited Lifetime Warranty:
Streamlight warrants this product to be free of defects for a lifetime of use except for batteries and
bulbs, abuse and normal wear. We will repair, replace or refund the purchase price of this product should
we determine it to be defective. This limited lifetime warranty also excludes rechargeable batteries,
chargers, switches and electronics which have a 2 year warranty with proof of purchase. THIS IS THE
ONLY WARRANTY, EXPRESSED OR IMPLIED, INCLUDING ANY WARRANTY OF MERCHANTABILITY OR
FITNESS FOR A PARTICULAR PURPOSE. INCIDENTAL, CONSEQUENTIAL OR SPECIAL DAMAGES ARE
EXPRESSLY DISCLAIMED EXCEPT WHERE SUCH LIMITATION IS PROHIBITED BY LAW. You may have
other specic legal rights which vary by jurisdiction.
Go to www.streamlight.com/support for a complete copy of the warranty, and information on product
registration and the location of authorized service centers. Retain your receipt for proof of purchase.
Service
The TLR contains few or no user-serviceable parts.
Go to www.streamlight.com for the location of an authorized Streamlight repair center near you.
For expedited service, go to www.streamlight.com/support/service and complete
the Online Service Request.
Or contact:
Customer Service
STREAMLIGHT, INC.
30 Eagleville Road
Suite 100
Eagleville, PA 19403-3996
Phone: (800) 523-7488 Toll-Free / +1 (610) 631-0600
Fax: (800) 220-7007 / +1 (610) 631-0712
Page 10

ADVERTENCIAS IMPORTANTES
ADVERTENCIA: El uso de la linterna en modo “estroboscópico” puede provocar ataques epilépticos a
personas con epilepsia fotosensible.
La caza nocturna con luz articial podría estar prohibida o limitada en su zona geográca. Compruebe las
leyes de caza de su zona para aclarar dicho punto.
PRECAUCIÓN: La linternas TLR-1 HL®, TLR-2 HL®, TLR-2 HL® G y TLR-1 HPL® proporcionan un
haz potente. Cuando funciona durante un periodo prolongado, alcanzará una temperatura caliente
que resulta incómoda. Esto es NORMAL y no se trata de un defecto. Cualquier linterna LED de tamaño y
rendimiento similares producirá cantidades similares de calor durante el funcionamiento. La única manera
de reducir el calor producido durante el funcionamiento consiste en disminuir de manera SIGNIFICATIVA
la potencia o aumentar el tamaño de la linterna. Si bien este calor podría provocar el reejo de dejarla
caer, si se recoge una linterna caliente desatendida, la temperatura no presenta un riesgo de quemaduras.
Cuando se utiliza tácticamente durante breves periodos de tiempo para despejar una habitación, comprobar la presencia de intrusos, etc., el calor no supondrá ningún problema.
NO LEER ESTAS INSTRUCCIONES DE FUNCIONAMIENTO Y ADVERTENCIAS, ASÍ COMO EL INCUMPLIMIENTO DE ÉSTAS AL MANIPULAR UN ARMA DE FUEGO O LA LINTERNA TLR PUEDE SER
PELIGROSO Y PUEDE PROVOCAR LESIONES GRAVES, DAÑOS A LA PROPIEDAD O LA MUERTE.
• El uso de un arma de fuego bajo cualquier circunstancia puede ser peligroso.
• Pueden producirse LESIONES GRAVES E INCLUSO LA MUERTE si no se ha recibido la formación
necesaria en el manejo seguro de armas de fuego. Debe recibirse formación adecuada a través de un programa de seguridad sobre armas de fuego acreditado impartido por instructores competentes cualicados
en el ejército, en academias de policía o en programas de formación aliados a la Asociación Nacional
del Rie (National Rie Association).
• Lea el manual de su arma de fuego antes de acoplar su linterna en la pistola.
• No apunte nunca un arma de fuego a algo que no esté dispuesto a destruir.
• Streamlight recomienda que la TLR sólo se active con la mano que no se utiliza para disparar mientras
utiliza un agarre de dos manos en el arma de fuego con el dedo índice fuera del protector del gatillo
cuando sea posible. De lo contrario, podría producirse la descarga accidental y graves lesiones, daño a la
propiedad o la muerte.
• Practique exhaustivamente (bajo condiciones de formación seguras) con la TLR y el arma de fuego antes
de usar el arma en una situación táctica.
ANTES DE ACOPLAR, INSPECCIONAR O PRESTAR SERVICIO A UNA TLR INSTALADA EN UN ARMA DE FUEGO
1. Acople el seguro del arma de fuego, si corresponde.
2. Retire el cargador del arma de fuego, si corresponde.
3. Abra la acción e inspeccione la cámara para asegurarse de que está vacía.
DURANTE LA MANIPULACIÓN DEL ARMA DE FUEGO ES OBLIGATORIO EL USO DE MEDIDAS DE
SEGURIDAD EN TODO MOMENTO.
Pilas
ADVERTENCIA: RIESGO DE INCENDIO, EXPLOSIÓN, QUEMADURAS.
UTILICE ÚNICAMENTE: Pilas Streamlight, Panasonic o Sanyo tamaño CR123A; Duracell 123A o Energizer 123. El uso de otras pilas o la combinación de pilas usadas y nuevas, o de diferentes marcas podría
producir fugas, un incendio o explosión y lesiones personales graves. NO recargue, utilice incorrectamente,
cortocircuite, almacene o deseche incorrectamente, desmonte ni caliente a una temperatura superior a
100°C. Manténgase alejado de los niños.
UTILICE ÚNICAMENTE LAS PILAS RECOMENDADAS PARA SU USO EN ESTE PRODUCTO.
Page 11

1- Desbloquee
(Aplique fuerza y empuje el pestillo
hacia la llave hasta que el pestillo
toque el cuerpo)
2- Abra la puerta
(Después de levantar la puerta
para extraer la lengüeta de
la ranura)
3- Sustituya las pilas
(La polaridad se indica
en el cuerpo de la linterna)
4- Inserte la lengüeta en la ranura
para cerrar la puerta
LED (todos los modelos incluido TLR-1® Game Spotter®)
Precaución - Radiación LED (RG-2)
No mire directamente al haz.
Podría dañar su vista.
De conformidad con IEC 62471 Ed 1.0:2006-07
LÁSER/LED (TLR-2®/2®s/TLR-2 HL®) LÁSER/LED (TLR-2® G y TLR-2 HL® G)
Instalación y extracción de la pila
(se muestra TLR-2®)
ANTES DE PROCEDER A LA APERTURA O EL CIERRE DEL COMPARTIMENTO DE LA PILA DEBERÁ
RETIRARSE LA TLR DEL ARMA.
EVITE LA EXPOSICIÓN;
RADIACIÓN LÁSER
EMITIDA POR
ESTA APERTURA.
CUMPLE LAS NORMAS 21 CFR 1040.10 Y 1040.11 SEGÚN EN-
MIENDA POR EL AVISO DE LÁSER 50 DEL 24 DE JUNIO DE 2007.
LÁSER/LINTERNA LINTERNA LÁSER
PRECAUCIÓN: RADIACIÓN LÁSER/LED
–PRODUCTO LÁSER DE CLASE 3R
EVITE LA EXPOSICIÓN DIRECTA A LOS OJOS
POTENCIA MÁXIMA: 0,5 mw
LONGITUD DE ONDA: 650-660 nm
-RADIACIÓN LED (RG-2)
NO MIRE DIRECTAMENTE AL HAZ.
PODRÍA DAÑAR SU VISTA.
EVITE LA EXPOSICIÓN;
RADIACIÓN LÁSER
EMITIDA POR
ESTA APERTURA.
CUMPLE LAS NORMAS 21 CFR 1040.10 Y 1040.11 SEGÚN EN-
MIENDA POR EL AVISO DE LÁSER 50 DEL 24 DE JUNIO DE 2007.
LÁSER/LINTERNA LINTERNA LÁSER
PRECAUCIÓN: RADIACIÓN LÁSER/LED
–PRODUCTO LÁSER DE CLASE 3R
EVITE LA EXPOSICIÓN DIRECTA A LOS OJOS
POTENCIA MÁXIMA: 0,5 mw
LONGITUD DE ONDA: 510 - 530 nm
-RADIACIÓN LED (RG-2)
NO MIRE DIRECTAMENTE AL HAZ.
PODRÍA DAÑAR SU VISTA.
VERDE
Page 12

Cavidad de tuerca
hexagonal
Llaves del riel
Cuatro llaves de riel de polímero (incluidas) permiten acoplar la TLR a diferentes armas de fuego: Rieles GL Glock o “universales”, SW - TSW & 99, Beretta - 90two, Sig – P320, 1913 - Mil Std-1913 (Picatinny).
Cada llave de riel está sellada para facilitar su
identicación y las llaves comparten un tornillo
de llave y una tuerca hexagonal comunes.
Cada llave tiene una cavidad de tuerca
hexagonal en la base.
1. Seleccione la llave apropiada e inserte una
tuerca hexagonal en la cavidad en la base
de la llave.
Nota: Ajuste la tuerca hexagonal de
manera que no sobresalga ninguna parte
de la llave.
2. Agarre la llave del riel (lado de la tuerca
hexagonal hacia arriba) y la TLR (bolsillo
de la llave hacia abajo) y alinee las dos.
3. Inserte la llave en el bolsillo de la llave
de la TLR y utilice una llave hexagonal de
7/64 pulg. (0,28 cm) para asegurarla con
el tornillo de la llave.
NOTA: DEBE usarse una llave o de lo con-
trario la TLR se saldrá de la parte delantera
del riel bajo el recuperador.
5- Cierre la puerta
(Ejerza fuerza)
6- Bloquee
(El pestillo se detendrá contra
la parte superior de la puerta)
Page 13

Riel
Llave del riel
Ranura del riel
Procedimiento de montaje/extracción
ASEGÚRESE DE QUE EL ARMA DE FUEGO ESTÉ DESCARGADA Y LA CULATA ABIERTA. DURANTE LA
MANIPULACIÓN DEL ARMA DE FUEGO ES OBLIGATORIO EL USO DE MEDIDAS DE SEGURIDAD EN
TODO MOMENTO.
1. La TLR ha sido diseñada para montarse o desmontarse con rapidez del lateral del arma
o del riel accesorio.
2. Aoje el perno de tensión de la abrazadera del riel.
3. Sitúe en ángulo la TLR, situando la parte ja de la abrazadera del riel contra el riel accesorio y alinee
la llave del riel con la ranura transversal apropiada en el riel accesorio.
4. Oprima el perno de tensión para abrir la abrazadera del riel, gire la TLR hasta situarla en su sitio
y elimine la presión en el perno de tensión para “encajar” la linterna en su sitio.
5. Compruebe el ajuste y apriete el perno de tensión hasta que la TLR esté rmemente acoplada al
arma de fuego. Debe usarse una moneda para obtener el apriete deseado.
Llave
del riel
Parte ajustable de
de la abrazadera
Perno de tensión de
la abrazadera del riel
Parte ja de la
abrazadera del riel
Page 14

Funcionamiento del interruptor
(se muestra TLR-2®)
La TLR dispone de un interruptor de paleta que proporciona activación momentánea o constante.
La serie TLR-2® tiene un interruptor de selección de modo adicional situado en la parte trasera del
alojamiento del láser.
Funcionamiento del estroboscopio
Las linternas TLR-1®s, TLR-2®s, TLR-1 HPL®, TLR-1 HL®, TLR-2 HL®, TLR-2® G y TLR-2 HL® G
disponen de un modo estroboscópico que puede activarse mediante un interruptor de paleta. En un
intervalo de 0,4 segundos, presione el interruptor de paleta situándolo en la posición momentánea,
suéltelo y vuelva a presionarlo inmediatamente manteniéndolo presionado para activar el estroboscopio.
Activación/desactivación del estroboscopio
Las linternas TLR-1®s, TLR-2®s, TLR-1 HPL®, TLR-1 HL®, TLR-2 HL®, TLR-2® G y TLR-2 HL® G se envían
de fábrica con el modo estroboscopio activado.
La linterna puede volver a programarse para desactivar el estroboscopio tocando el interruptor de paleta
momentáneo rápidamente diez veces y manteniéndolo pulsado la décima vez. Manténgalo apretado hasta
que la luz se apague (aproximadamente un segundo) lo que indica que la reprogramación se ha realizado
con éxito. Repita el procedimiento de arriba para volver a activar el modo estroboscópico.
NOTA: NO se recomienda activar la función de estroboscopio con el interruptor remoto. El estroboscopio
debe desactivarse.
Rango de temperatura de funcionamiento del láser verde
El láser verde usado en la TLR-2® G y en la TLR-2 HL® G utiliza la última tecnología de control directo y
no es sensible a los cambios de temperatura. El láser verde usado en la TLR-2® G y en la TLR-2 HL® G
funcionará dentro de la gama de temperatura completa del producto de de -40° C a 48,89° C.
Ajuste de los elementos de puntería de la visión láser de los modelos TLR-2
®
Para un láser instalado debajo o a un lado del ánima, sólo hay una distancia en la que el trayecto de la
bala coincidirá con la línea de visión láser. Este punto es el “rango cero”. El ajuste del láser y la velocidad
de la boca del arma de la bala determinan dónde se produce este punto. El usuario tiene que decidir a
qué distancia por encima o por debajo de la línea de visión puede permitirse que la bala impacte y ajuste
la visión en consecuencia. A distancias inferiores al rango cero, la bala estará por encima de la línea de
visión. Más allá del rango cero, la bala estará por debajo de la línea de visión. Si se instala en el lateral,
la bala también se desviará hacia el lateral de la línea láser, así como hacia arriba y hacia abajo. En la
práctica, es posible ajustar una linterna TLR-2® en una pistola para mantener el impacto de la bala dentro
de aproximadamente 5 cm (2 pulg.) por encima y 5 cm (2 pulg.) por debajo de aproximadamente 30,48
cm (100 pies). Hay dos tornillos de ajuste instalados en casquillos de latón en el alojamiento del cartucho
del láser (en la TLR-2® G en el cuerpo lateral y en el alojamiento). El ajuste en deriva está situado en
Constante
DESACTIVACIÓN
(PALETA)
Constante
Momentánea
DESACTIVACIÓN
(PALETA)
Momentánea
(INTERRUPTOR DE MODO TLR-2®)
Láser Láser/LED LED
Page 15

Hay un cable recto
de bobina disponible
el lado izquierdo del cartucho láser. Gire el tornillo de ajuste hacia la derecha para mover el láser hacia
la izquierda (punto de impacto derecho). Gire el tornillo de ajuste hacia la izquierda para mover el láser
hacia la derecha (punto de impacto izquierdo). El ajuste de elevación está situado bajo el cartucho láser
del modelo TLR-2®. Con el modelo TLR-2® orientado hacia el objetivo, un giro a la derecha del tornillo de
ajuste moverá el láser hacia abajo (punto de impacto superior). Un giro a la izquierda del tornillo de ajuste
moverá el láser hacia arriba (punto de impacto inferior). Mueva el punto del láser en la dirección en la
que los disparos alcanzan el objetivo (ejemplo: si el impacto de las balas se produce abajo y a la derecha,
mueva el punto del láser hacia abajo y hacia la derecha para que coincida con el impacto de la bala).
NOTA: Al realizar grandes ajustes es posible que se produzca una interacción que provoque que el láser
se mueva diagonalmente o se atasque. Quizás sea necesario girar el tornillo de ajuste opuesto hacia la
izquierda para permitir que el cartucho del láser se mueva a la posición deseada.
Accesorios
Interruptor remoto de la TLR
(se muestra TLR-1 HPL®)
Interruptor remoto de contorno de la TLR
(se muestra TLR-1®)
(No se recomienda usar el interruptor remoto de contorno con la TLR-2 HL® G)
Mantenimiento
Es necesario aplicar aceite para pistolas de alta calidad en el perno tensor de la abrazadera del riel de la TLR
para evitar su oxidación. Utilice un paño suave y un detergente suave para limpiar la óptica del LED de vidrio
y mantenerla libre de suciedad y mugre. La apertura del láser en los modelos TLR-2® puede limpiarse con un
bastoncillo (o artículo similar) y detergente suave.
NOTA: Evite siempre el uso de soluciones de limpieza agresivas pues podrían dañar la TLR.
Page 16

Garantía limitada de por vida de Streamlight:
Streamlight garantiza que este producto está libre de defecto durante su vida útil a excepción de las pilas y
bombillas, o por abuso y desgaste normal. Repararemos, sustituiremos o reembolsaremos el precio de compra
de este producto si determináramos que está defectuoso. Esta garantía limitada de por vida también excluye
las pilas recargables, los cargadores, botones y sistemas electrónicos que tengan una garantía de 2 años
con prueba de compra. ESTA ES LA ÚNICA GARANTÍA, EXPRESA O IMPLÍCITA, INCLUIDA CUALQUIER
GARANTÍA DE COMERCIABILIDAD E IDONEIDAD PARA UN FIN EN PARTICULAR. SE RECHAZAN
EXPRESAMENTE LOS DAÑOS FORTUITOS, CONSECUENTES O ESPECIALES SALVO EN AQUELLOS
LUGARES DONDE DICHA LIMITACIÓN ESTÉ PROHIBIDA POR LA LEY. Podría tener otros derechos legales
especícos que varían según la jurisdicción.
Diríjase a www.streamlight.com/support para obtener una copia completa de la garantía e información sobre
el registro de un producto, así como la ubicación de los centros de mantenimiento autorizados. Conserve su
recibo como prueba de compra.
Servicio
La TLR incluye pocas o ninguna pieza que pueda ser reparada por el usuario.
Vaya a www.streamlight.com para informarse sobre la ubicación de un centro de
reparación Streamlight autorizado cerca de usted.
Para un servicio rápido, vaya a www.streamlight.com/support/service y rellene
la Solicitud de servicio en línea.
O comuníquese con:
Customer Service
STREAMLIGHT, INC.
30 Eagleville Road
Suite 100
Eagleville, PA 19403-3996
Teléfono: (800) 523-7488 Gratuito (si llama desde EE. UU.)/+1 (610) 631-0600
Fax: (800) 220-7007 / +1 (610) 631-0712
Page 17

AVERTISSEMENTS IMPORTANTS
AVERTISSEMENT : L’utilisation de la lampe en mode « stroboscope » peut provoquer une crise chez les
personnes souffrant d’épilepsie photosensible.
La chasse nocturne avec un éclairage articiel risque d’être interdit ou limité dans votre département.
Veuillez vérier les lois de votre département sur la chasse pour clarication.
ATTENTION : Les TLR-1 HL®, TLR-2 HL®, TLR-2 HL® G et TLR-1 HPL® procurent un rayon puissant.
Quand utilisée pendant longtemps, elle deviendra trop chaude. Ceci est NORMAL et n’est pas un
défaut. Toute lampe DEL de taille et de performance semblables produira des quantités semblables
de chaleur pendant le fonctionnement. La seule façon de réduire la chaleur de fonctionnement est de
diminuer CONSIDÉRABLEMENT la sortie ou d’augmenter la taille de la lampe. Tandis que cette chaleur
peut déclencher le réexe de chute si une lampe chaude sans supervision est ramassée, la température ne
présente pas de danger de brûlure. Quand utilisée tactiquement pendant de courtes périodes pour vider
une pièce, repérer des intrus, etc., la chaleur ne sera pas un problème.
NE PAS LIRE NI RESPECTER CE MODE D’EMPLOI ET CES AVERTISSEMENTS LORS DE LA MANIPULATION D’UNE ARME À FEU ET DE LA TLR PEUT ÊTRE DANGEREUX ET PEUT RÉSULTER EN BLESSURES
GRAVES, DOMMAGES MATÉRIELS VOIRE LA MORT.
• L’utilisation d’une arme à feu en toute circonstance peut être dangereuse. DE GRAVES BLESSURES
VOIRE LA MORT peuvent résulter sans formation appropriée sur la manipulation sûre des armes à feu.
Une formation appropriée doit être obtenue auprès d’un programme de sécurité accrédité sur les armes
à feu dirigé par des instructeurs compétents et qualiés dans l’armée, les académies de police ou le
programmes d’instruction afliés à la National Rie Association.
• Lire le manuel de l’arme à feu avant d’attacher la lampe montée sur l’arme.
• Ne jamais diriger d’arme à feu à quelque chose que l’on ne souhaite pas détruire.
• Streamlight recommande d’activer la TLR uniquement avec la main qui n’est pas sur la gâchette tout en
employant une prise à deux mains sur l’arme à feu et avec le doigt sur la détente en-dehors du pontet
dans la mesure du possible. Ne pas le faire pourrait résulter en une décharge accidentelle et de graves
blessures, des dommages matériels voire la mort.
• Pratiquer à fond (en employant des conditions d’entraînement sûres) avec la TLR et l’arme à feu avant
d’utiliser l’arme dans une situation tactique.
AVANT D’ATTACHER, D’INSPECTER OU DE RÉPARER UNE TLR MONTÉE SUR UNE ARME À FEU
1. Enclencher la sûreté sur l’arme à feu le cas échéant.
2. Retirer le chargeur de l’arme à feu le besoin est.
3. Ouvrir le mécanisme et inspecter la chambre pour s’assurer qu’elle est vide.
IL EST IMPÉRATIF D’EMPLOYER DES MESURES DE SÉCURITÉ À TOUT MOMENT LORS DE LA
MANIPULATION DE L’ARME À FEU.
Piles
AVERTISSEMENT : DANGER DE FEU, D’EXPLOSION ET DE BRÛLURE.
UTILISER UNIQUEMENT : Streamlight, Panasonic, ou Sanyo taille CR123A; Duracell 123A, ou Energizer
123. L’emploi d’autres piles ou le mélange de piles usagées et neuves ou l’emploi de piles de marque
différente peut entraîner une fuite, un incendie ou une explosion et de graves blessures corporelles. NE PAS
recharger, utiliser de façon abusive, court-circuiter, stocker ou éliminer de façon inappropriée, démonter ou
chauffer au-dessus de 100 °C. Garder hors de portée des enfants.
UTILISER UNIQUEMENT LES PILES SPÉCIFIQUEMENT RECOMMANDÉES POUR CE PRODUIT.
Page 18
DEL (Tous les modèles inc. TLR-1® Game Spotter®)
Attention - Radiation DEL (RG-2)
Ne pas regarder directement dans le rayon
Susceptible d’endommager les yeux.
Selon IEC 62471 Ed 1.0:2006-07
LASER/DEL (TLR-2®/2®s/TLR-2 HL®) LASER/DEL (TLR-2® G et TLR-2 HL® G)
Mise en place/retrait des piles
(TLR-2® illustrée)
LA TLR DOIT ÊTRE DÉMONTÉE DE L’ARME À FEU POUR POUVOIR OUVRIR OU FERMER
LE COMPARTIMENT DES PILES.
1- Déverrouiller
(Appliquer force et enfoncer le fermoir vers la
clé jusqu’à ce que le fermoir touche le corps)
)
2- Ouvrir la porte
(Après avoir levé la porte retirer
la languette de la fente)
3- Remplacer les piles
(Polarité indiquée sur
le corps de la lampe)
4- Insérer la languette dans la fente
pour fermer la porte
ATTENTION – RAYONNEMENT LASER/DEL
– PRODUIT LASER DE CLASSE 3R
ÉVITER L’EXPOSITION DIRECTE DES YEUX
PUISSANCE MAX.: 0,5 mW
LONGUEUR D’ONDE : 650 à -660 nm
- RAYONNEMENT DEL (RG-2) :
NE PAS REGARDER LE
FAISCEAU EN FACE.
ÉVITER L’EXPOSITION ;
RAYONNEMENT LASER
ÉMIS PAR CETTE
OUVERTURE.
CONFORME À 21 CFR 1040.10 ET 1040.11 TELS QUE
MODIFIÉS PAR LA NOTICE LASER 50, 24 JUIN 07.
LASER/LUMIÈRE LUMIÈRE LASER
ATTENTION – RAYONNEMENT LASER/DEL
– PRODUIT LASER DE CLASSE 3R
ÉVITER L’EXPOSITION DIRECTE DES YEUX
PUISSANCE MAX.: 0,5 mW
LONGUEUR D’ONDE : 510 à -530 nm
- RAYONNEMENT DEL (RG-2) :
NE PAS REGARDER LE
FAISCEAU EN FACE.
ÉVITER L’EXPOSITION ;
RAYONNEMENT LASER
ÉMIS PAR CETTE
OUVERTURE.
CONFORME À 21 CFR 1040.10 ET 1040.11 TELS QUE
MODIFIÉS PAR LA NOTICE LASER 50, 24 JUIN 07.
LASER/LUMIÈRE LUMIÈRE LASER
VERT
Page 19

Cavité d’écrou
hexagonal
Clés de rail
Quatre clés de rail en polymère (incluses) permettent d’attacher la TLR à toute une gamme d’armes à feu : GL Rails Glock ou « universels », SW - TSW & 99, Beretta - 90two, Sig – P320, 1913 - Mil Std-1913 (Picatinny).
Chaque clé de rail est tamponnée pour facilité
d’identication et les clés partagent une vis et un
écrou hexagonal de clé communs. Chaque clé
comporte une cavité d’écrou hexagonal dans la base.
1. Sélectionner la clé appropriée et insérer
un écrou hexagonal dans la cavité dans la
base de la clé.
Note : Ajuster l’écrou hexagonal de sorte
qu’aucune portion ne dépasse de la clé.
2. Maintenir la clé de rail (côté écrou hexagonal vers le haut) et la TLR (côté poche de
clé vers le bas) et aligner les deux.
3. Insérer la clé dans la poche de clé TLR et
utiliser la clé hexagonale 7/64” (0,28 cm)
pour sécuriser la clé avec la vis de clé.
REMARQUE : Il FAUT utiliser une clé pour
que la TLR ne glisse pas sur le devant du
rail sous recul.
5- Fermer la porte
(Appliquer force)
6- Verrou
(Fermoir s’arrêtera contre
le haut de la porte)
Page 20

Rail
Clé de rail
Rainure de rail
Clé de rail
Portion réglable
de bride de rail
Boulon de tension
de bride de rail
Portion xe de
bride de rail
Procédure de montage/démontage
S’ASSURER QUE L’ARME À FEU EST DÉCHARGÉE ET QUE LA CULASSE EST OUVERTE. IL EST IMPÉRATIF
D’EMPLOYER DES MESURES DE SÉCURITÉ À TOUT MOMENT LORS DE LA MANIPULATION DE L’ARME À FEU.
1. La TLR est conçue pour être rapidement attachée et détachée du côté de l’arme ou du rail d’accessoire.
2. Desserrer le boulon de tension de bride de rail.
3. Incliner la TLR, en plaçant la portion xe de la bride de rail contre le rail d’accessoire et aligner la clé
de rail sur la rainure transversale appropriée dans le rail d’accessoire.
4. Appuyer sur le boulon de tension pour ouvrir la bride de rail, faire tourner la TLR en place et relâcher la
pression sur le boulon de tension pour « enclencher » la lumière en place.
5. Vérier le maintien et serrer le boulon de tension jusqu’à ce que la TLR soit attachée à l’arme à feu de
manière sécurisée. Utiliser une pièce de monnaie pour obtenir un bon serrage.
Page 21
Fonctionnement du commutateur
(TLR-2® illustrée)
La TLR est munie d’un commutateur à palette fournissant une activation momentanée ou constante.
La série TLR-2® possède un commutateur de sélection de modes additionnels situé sur l’arrière du boitier laser.
Fonctionnement du stroboscope
Les TLR-1®s, TLR-2®s, TLR-1 HPL®, TLR-1 HL®, TLR-2 HL®, TLR-2® G et TLR-2 HL® G sont munies d’un
mode stroboscopique qui peut être activé par le commutateur à palette. Dans 0,4 seconde, appuyer sur le
commutateur à palette dans la position momentanée, relâcher et appuyer de nouveau immédiatement et
maintenir pour le stroboscope.
Activation/Désactivation du stroboscope
Les TLR-1®s, TLR-2®s, TLR-1 HPL®, TLR-1 HL®, TLR-2 HL®, TLR-2® G et TLR-2 HL® G sont expédiées de
l’usine avec le mode stroboscopique activé.
La lampe peut être reprogrammée pour désactiver le stroboscope en tapant sur le commutateur à palette
momentané très rapidement à dix reprises et en le maintenant enfoncé la dixième fois. Maintenir jusqu’à
ce que la lumière s’éteigne (environ une seconde), ce qui indique que la reprogrammation a réussi.
Répéter la procédure ci-dessus pour réactiver le mode stroboscopique.
Note : L’activation de la fonction stroboscopique N’EST PAS recommandée avec le commutateur à
distance. Le stroboscope doit être désactivé.
Plage de température de fonctionnement du laser vert
Le laser vert utilisé dans la TLR-2® G et la TLR-2 HL® G emploie la technologie la plus récente à entraînement direct et n’est pas sensible à la température. Le laser vert de la TLR-2® G et de la TLR-2 HL® G
fonctionnera sur toute la plage de température du produit, de -40 °C à 49 °C.
Zérotage du viseur laser des modèles TLR-2
®
Pour un laser monté sur le dessous ou le côté de l’âme, il n’y a qu’une distance à laquelle la trajectoire de
la balle coïncide avec la ligne de visée du laser. Ce point est la « distance de zérotage ». L’éloignement de
ce point dépend du réglage du laser et de la vitesse initiale de la balle. L’utilisateur doit décider jusqu’à
quel écart admissible au-dessus ou en dessous de la ligne de visée la balle peut frapper, puis ajuster le
viseur en conséquence. En deçà de la distance de zérotage, la balle est au-dessus de la ligne de visée.
Au-delà de la distance de zérotage, la balle est en dessous de la ligne de visée. Si monté sur le côté, la
balle déviera également sur le côté de la ligne de laser, ainsi que vers le haut et vers le bas. En pratique,
un modèle TLR-2® sur un pistolet peut être ajusté pour garder la trace de balle dans les 5 cm de haut et 5
cm en bas sur environ 30,48 m.
Constante
OFF (PALETTE)
Constante
Momentanée
OFF (PALETTE)
Momentanée
(COMMUTATEUR DE MODE TLR-2®)
Laser Laser/DEL DEL
Page 22

Cordon droit ou
enroulé disponible
Le logement de cartouche laser comprend deux vis de réglage (montées dans des douilles en laiton.
Le réglage de la dérive se trouve sur le côté gauche de la cartouche laser. Tourner la vis de réglage dans
le sens des aiguilles d’une montre pour déplacer le laser vers la gauche (point d’impact vers la droite).
Tourner la vis de réglage dans le sens contraire des aiguilles d’une montre pour déplacer le laser vers la
droite (point d’impact vers la gauche). Le réglage de hauteur se trouve sur le dessous de la cartouche laser
du modèle TLR-2®. Le modèle TLR-2® étant pointé sur une cible, la rotation de la vis de réglage dans le
sens des aiguilles d’une montre déplace le laser vers le bas (point d’impact vers le haut). La rotation de
la vis de réglage dans le sens inverse déplace le laser vers le haut (point d’impact vers le bas). Déplacer
le point du laser dans la direction des impacts sur la cible (exemple : si les balles sont vers le bas et la
droite, déplacer le laser vers le bas et la droite pour coïncider avec l’impact des balles).
REMARQUE : Lors d’ajustements importants, une interaction des réglages peut causer un déplacement en
diagonale ou un coincement du laser. Il peut être nécessaire de tourner la vis de réglage opposée dans le
sens inverse des aiguilles d’une montre pour pouvoir amener la cartouche jusqu’à la position souhaitée.
Accessoires
Commutateur à distance TLR
(TLR-1 HPL® illustrée)
Commutateur à distance Contour TLR
(TLR-1® illustrée)
(Commutateur à distance Contour non recommandé pour utilisation avec la TLR-2 HL® G)
Entretien
Le boulon de tension de la bride de rail TLR requiert une application d’huile pour armes de haute qualité pour
qu’il ne se rouille pas. Utiliser un chiffon doux et un détergent doux pour nettoyer la lentille DEL de verre et
la garder exempte de saleté et de crasse. L’ouverture laser sur les modèles TLR-2® peut être nettoyée avec un
coton-tige (ou article similaire) et un détergent doux.
NOTE : Éviter toujours des solutions de nettoyage agressives car elles risquent d’endommager la TLR.
Page 23

Garantie limitée à vie de Streamlight:
Streamlight garantit ce produit à vie contre les défauts, à l’exception des batteries et des ampoules, des
emplois abusifs et de l’usure normale. Nous nous engageons à réparer, à remplacer ou à rembourser le prix
d’achat de ce produit si nous déterminons qu’il est défectueux. Cette garantie limitée à vie exclut également
les batteries rechargeables, les chargeurs, les commutateurs et l’électronique, qui sont couverts par une
garantie de 2 ans sur présentation d’un justicatif d’achat. IL N’EST OFFERT AUCUNE AUTRE GARANTIE,
EXPRESSE OU TACITE, NOTAMMENT DE QUALITÉ MARCHANDE OU D’ADAPTATION À UN EMPLOI
PARTICULIER. NOUS DÉCLINONS EXPRESSÉMENT TOUS DOMMAGES INDIRECTS, CONSÉCUTIFS OU
SPÉCIAUX, SAUF AUX ENDROITS OÙ LA LOI INTERDIT DE TELLES RESTRICTIONS. Il est possible que la
réglementation locale vous accorde d’autres droits juridiques particuliers.
Allez à www.streamlight.com/support pour obtenir un exemplaire complet de la garantie et pour tout renseignement sur l’enregistrement du produit et sur les centres de réparation agréés. Conservez votre reçu en tant
que justicatif d’achat.
Réparation
La TLR ne contient que peu ou pas de pièces réparables par l’utilisateur.
Allez à www.streamlight.com pour trouver un centre de réparation Streamlight agréé près de chez vous.
Pour une réparation accélérée, allez à www.streamlight.com/support/service et remplissez la
Demande de réparation en ligne.
Ou contactez :
Customer Service
STREAMLIGHT, INC.
30 Eagleville Road
Suite 100
Eagleville, PA 19403-3996 - États-Unis
Téléphone : (800) 523-7488 Gratuit / +1(610) 631-0600
Télécopie : (800) 220-7007 / +1 (610) 631-0712
Page 24

WICHTIGE WARNHINWEISE
WARNHINWEIS: Die Verwendung des Lichts im „Stroboskopmodus” kann bei Personen mit fotosensitiver
Epilepsie Anfälle auslösen.
Nächtliches Jagen mit künstlichem Licht könnte in Ihrem Wohnsitzland verboten oder nur unter Auagen
gestattet sein. Bitte informieren Sie sich über die Spielgesetze Ihres Wohnsitzlandes.
ACHTUNG: Das TLR-1 HL®, TLR-2 HL®, TLR-2 HL® G und TLR-1 HPL® liefern einen starken
Lichtstrahl. Beim Betrieb über längere Zeit werden sie unangenehm warm. Dies ist NORMAL und kein
Fehler. Jede LED-Taschenlampe ähnlicher Größe und Leistung produziert im Betrieb ähnliche Wärmemengen. Die einzige Möglichkeit, die während des Betriebs abgegebene Wärmemenge WESENTLICH zu
verringern, besteht darin, die Leuchtkraft der Taschenlampe zu verringern oder sie größer zu bauen.
Diese Erwärmung kann zwar dazu führen, dass eine unbeaufsichtigte, heiße Lampe nach dem Aufheben
reexartig wieder fallen gelassen wird, aber die Temperatur stellt keine Brandgefahr dar. Bei taktischer
Verwendung über kurze Zeiträume, um z. B. einen Raum auf Eindringlinge hin zu überprüfen, stellt die
Wärmeentwicklung kein Problem dar.
DIE NICHTBEACHTUNG DIESER BETRIEBSANLEITUNG UND WARNHINWEISE FÜR DEN UMGANG MIT
EINER FEUERWAFFE BZW. DAS TLR NICHT ZU LESEN UND ZU BEFOLGEN KANN GEFÄHRLICH SEIN
UND SACHSCHÄDEN SOWIE SCHWERE KÖRPERVERLETZUNGEN MIT TODESFOLGE ZUR FOLGE HABEN.
• Der Gebrauch einer Feuerwaffe kann unter allen Umständen gefährlich sein. Ohne ordnungsgemäße
Schulung im sicheren Umgang mit Feuerwaffen kann dies SCHWERE KÖRPERVERLETZUNGEN ODER
SOGAR DEN TOD zur Folge haben. Eine ordnungsgemäße Schulung sollte durch ein anerkanntes
Feuerwaffen-Sicherheitsprogramm erbracht werden, das von kompetenten, qualizierten Ausbildern in
der Armee, in Polizeischulen oder in Schulungsprogrammen durchgeführt wird, die mit der National Rie
Association verbunden sind.
• Lesen Sie die Bedienungsanleitung Ihrer Feuerwaffe, bevor Sie Ihr an einer Waffe
montierbares Lichtsystem montieren.
• Zielen Sie mit einer Feuerwaffe niemals auf etwas, das Sie nicht zerstören möchten.
• Streamlight empehlt, dass der TLR mit der Hand eingeschaltet wird, die sich nicht am Abzug bendet.
Dabei sollte ein Zweihandgriff an der Waffe verwendet werden und der Abzugsnger sollte sich wenn
möglich außerhalb der Abzugsabdeckung benden. Nichtbeachtung kann zur versehentlichem Abfeuern
und Sachschäden sowie schweren Körperverletzungen, auch mit Todesfolge, führen.
• Üben Sie umfassend mit dem TLR und der Waffe (in einem sicheren Schulungsumfeld),
bevor Sie die Waffe in einer taktischen Situation verwenden.
BEVOR SIE EIN AUF EINER FEUERWAFFE MONTIERTES TLR BEFESTIGEN, INSPIZIEREN ODER WARTEN
1. Sichern Sie die Feuerwaffe ggf.
2. Nehmen Sie ggf. das Magazin aus der Feuerwaffe.
3. Öffnen Sie den Verschluss und vergewissern Sie sich, dass die Patronenkammer leer ist.
DER UNUNTERBROCHENE EINSATZ VON SICHERHEITSVORKEHRUNGEN IST BEIM UMGANG
MIT DER FEUERWAFFE UNABDINGBAR.
Batterien
ACHTUNG: BRAND-, EXPLOSIONS-, VERBRENNUNGSGEFAHR.
VERWENDEN SIE AUSSCHLIESSLICH: Streamlight, Panasonic oder Sanyo Größe CR123A; Duracell 123A
oder Energizer 123. Die Verwendung anderer Batterien oder die gemeinsame Verwendung gebrauchter
und neuer Batterien oder Batterien anderer Marken können zu Leckagen, Bränden oder Explosionen sowie
schweren Verletzungen führen. NICHT wiederauaden, missbrauchen, kurzschließen, unsachgemäß lagern
oder entsorgen, öffnen oder über 100°C erhitzen. Von Kindern fernhalten.
VERWENDEN SIE NUR SOLCHE BATTERIEN, DIE AUSDRÜCKLICH FÜR DIESES PRODUKT
EMPFOHLEN SIND.
Page 25

LED (Alle Modelle einschl. TLR-1® Game Spotter®)
Achtung – LED-Strahlung (RG-2)
Nicht direkt in den Lichtstrahl schauen.
Augenschädigung möglich.
Gemäß IEC 62471 Vers. 1.0:2006-07
LASER/LED (TLR-2®/2®s/TLR-2 HL®) LASER/LED (TLR-2® G und TLR-2 HL® G)
Einlegen / Herausnehmen der Batterien
(gezeigt ist das TLR-2®)
DER TLR MUSS VON DER FEUERWAFFE ABGENOMMEN WERDEN, UM DAS BATTERIEFACH
ÖFFNEN ODER SCHLIESSEN ZU KÖNNEN.
1- Entriegeln
((Kräftig drücken und Verriegelung in Richtung Adapter
drücken, bis die Verriegelung das Gehäuse berührt)
2- Klappe öffnen
(Nachdem Sie die Klappe
angehoben haben, um die Zunge
aus der Aussparung zu ziehen)
3- Batterien austauschen
(Die Polarität ist auf dem
Lampengehäuse angegeben)
4- Zunge in Aussparung stecken,
um die Klappe zu schließen
VORSICHT – LASER/LED STRAHLUNG
– LASERPRODUKT DER KLASSE 3R
DIREKTEN KONTAKT MIT DEN AUGEN
VERMEIDEN
MAX. AUSGANGSLEISTUNG: 0,5 mW
WELLENLÄNGE: 650-660 nm
- LED-STRAHLUNG (RG-2):
NICHT DIREKT IN DEN LICHTSTRAHL SCHAUEN.
AUGENSCHÄDIGUNG MÖGLICH.
EXPOSITION VERMEIDEN;
LASERSTRAHLUNG
WIRD VON DER
ÖFFNUNG EMITTIERT
ENTSPRICHT 21 CFR 1040.10 UND 1040.11
EINSCHLIESSLICH LASER-ZUSATZ 50. VOM 24. JUNI 2007.
LASER/LICHT LICHT LASER
VORSICHT – LASER/LED STRAHLUNG
– LASERPRODUKT DER KLASSE 3R
DIREKTEN KONTAKT MIT DEN AUGEN
VERMEIDEN
MAX. AUSGANGSLEISTUNG: 0,5 mW
WELLENLÄNGE: 510-530 nm
- LED-STRAHLUNG (RG-2):
NICHT DIREKT IN DEN LICHTSTRAHL SCHAUEN.
AUGENSCHÄDIGUNG MÖGLICH.
EXPOSITION VERMEIDEN;
LASERSTRAHLUNG
WIRD VON DER
ÖFFNUNG EMITTIERT
ENTSPRICHT 21 CFR 1040.10 UND 1040.11
EINSCHLIESSLICH LASER-ZUSATZ 50. VOM 24. JUNI 2007.
LASER/LICHT LICHT LASER
GRÜNER
Page 26

5- Klappe schließen
(kräftig drücken)
6- Verriegeln
(Die Verriegelung schlägt a der
Oberseite der Klappe an)
Schienenadapter
Mithilfe von vier Kunststoff-Schienenadaptern (im Lieferumfang enthalten) kann das TLR an vielen
Feuerwaffen befestigt werden: GL – Glock oder „Universal“-Schienen, SW - TSW & 99, Beretta - 90two,
Sig – P320, 1913 - Mil Std-1913 (Picatinny).
Zur leichten Identikation ist jeder Schienenadapter
gestempelt. Die Adapter haben eine gemeinsame
Sechskantschraube und Sechskantmutter.
Jeder Adapter verfügt an seiner Grundseite über
eine Aussparung für die Sechskantmutter.
1. Wählen Sie den geeigneten Adapter
und stecken Sie die Sechskantmutter
in die Aussparung an der Grundseite
des Adapters. Hinweis: Drehen Sie die
Sechskantmutter so, dass kein Teil von ihr
aus dem Adapter herausragt.
2. Halten Sie den Adapter (mit der Sechskantmutterseite nach oben) und das TLR (mit
der Adapteraufnahmeseite nach unten) und
richten Sie beide aufeinander aus
3. Schieben Sie den Adapter in die Adapteraufnahme am TLR und befestigen Sie den
Adapter, indem Sie die Adapterschraube
und mit dem 7/64 (0,28 cm)-ZollInnensechskantschlüssel festziehen.
HINWEIS: Ein Adapter MUSS verwendet
werden. Andernfalls wird der TLR vom
Rückstoß von der Schiene geschoben.
Aussparung für
die Sechskantmutter
Page 27

Schienenadapter
Einstellbarer Teil der
Schienenhalterung
Spannbolzen der
Schienenhalterung
Fester Teil der
Schienenhalterung
Montage/Demontage
VERGEWISSERN SIE SICH, DASS DIE FEUERWAFFE NICHT GELADEN UND DER VERSCHLUSS OFFEN
IST. DER UNUNTERBROCHENE EINSATZ VON SICHERHEITSVORKEHRUNGEN IST BEIM UMGANG MIT
DER FEUERWAFFE UNABDINGBAR.
1. Das TLR ist so konstruiert, dass es schnell an die Seite der Waffe oder der Zubehörschiene montiert und
davon demontiert werden kann.
2. Lösen Sie den Spannbolzen der Schienenhalterung.
3. Winkeln Sie den TLR ab und setzen Sie den festen Teil der Schienenhalterung gegen
die Zubehörschiene und richten Sie den Schienenadapter auf die entsprechende Kreuznut
in der Zubehörschiene aus.
4. Drücken Sie den Spannbolzen nach unten, um die Schienenhalterung zu öffnen. Drehen Sie den TLR
dann in seine Position und lassen Sie dann den Spannbolzen los, sodass das Licht „einrastet“.
5. Prüfen Sie den Sitz und drehen Sie den Spannbolzen fest, bis der TLR fest an der Feuerwaffe sitzt.
Verwenden Sie eine Münze, um einen ausreichend festen Sitz zu erzielen.
Schiene
Schienenadapter
Schienennut
Page 28

Bedienung des Schalters
(gezeigt ist das TLR-2®)
Der TLR hat einen Kippschalter, der eine zeitweise oder dauerhafte Aktivierung erlaubt. Die Baureihe TLR-2®
hat einen weiteren Moduswahlschalter, der sich auf der Rückseite des Lasergehäuses bendet.
Stroboskopbetrieb
Die Modelle TLR-1®s, TLR-2®s, TLR-1 HPL®, TLR-1 HL®, TLR-2 HL®, TLR-2® G und TLR-2 HL® G haben
einen Stroboskopmodus, der mit dem Kippschalter aktiviert werden kann. Drücken Sie den Kippschalter in
die Taster-Position, lassen Sie ihn los und drücken und halten Sie ihn erneut innerhalb von 0,4 Sekunden,
um in den Stroboskopmodus zu schalten.
Stroboskop aktivieren/deaktivieren
Die Modelle TLR-1®s, TLR-2®s, TLR-1 HPL®, TLR-1 HL®, TLR-2 HL®, TLR-2® G und TLR-2 HL® G werden
werkseitig mit aktiviertem Stroboskopmodus ausgeliefert.
Die Stroboskopfunktion kann durch Umprogrammieren deaktiviert werden. Drücken Sie den Kippschalter
dazu neun Mal kurz hintereinander an und halten Sie ihn beim zehnten Mal gedrückt. Halten Sie ihn so
lange gedrückt, bis das Licht ausgeht (etwa nach einer Sekunde), was anzeigt, dass die Umprogrammierung erfolgreich war. Wiederholen Sie das obige Verfahren, um den Stroboskopmodus wieder zu aktivieren.
HINWEIS: Es wird empfohlen, die Stroboskopfunktion NICHT mit dem Fernschalter zu aktivieren. Die
Stroboskopfunktion sollte deaktiviert werden.
Betriebstemperaturbereich des grüner Lasers
Der im TLR-2® G und TLR-2 HL® G eingebaute grüne Laser verfügt über die neueste Direkterregungstechnologie und ist nicht temperaturempndlich. Der grüne Laser des TLR-2® G und TLR-2 HL® G funktioniert
über den gesamten Temperaturbereich des Produkts von -40 °C bis +49°C.
Nulleinstellung des Laservisiers bei TLR-2®-Modellen
Bei einem Laser, der unterhalb oder neben der Mündung montiert ist, gibt es nur eine Entfernung, bei
der der Projektilpfad mit der Laservisierlinie zusammenfällt. Dieser Punkt ist die „Nullentfernung“. Die
Einstellung des Lasers und die Mündungsgeschwindigkeit des Projektils bestimmen, wo dieser Punkt liegt.
Der Benutzer muss entscheiden, wie hoch oberhalb oder unterhalb der Visierlinie das Projektil einschlagen
darf, und das Visier entsprechend einstellen. Bei Entfernungen, die kleiner als die Nullentfernung sind,
bendet sich das Projektil oberhalb der Visierlinie. Hinter der Nullentfernung bendet sich das Projektil
unterhalb der Visierlinie. Bei seitlicher Montage wird das Projektil nicht nur nach oben und nach unten,
sondern auch seitlich zum Laserstrahl abweichen. In der Praxis kann ein TLR-2® an einer Handwaffe so
eingestellt werden, dass das Projektil bis auf eine Entfernung von etwa 30 Meter in einem Bereich von
etwa 5 cm oberhalb und 5 cm unterhalb trifft. Am Gehäuse der Laserkartusche (beim TLR-2® G am Seitengehäuse) gibt es zwei Einstellschrauben, die in Messinghülsen montiert sind. Die Windablenkungseinstellung bendet sich an der Laserkartusche links. Drehen Sie die Einstellschraube im Uhrzeigersinn, um
Dauer-Ein
AUS (KIPPSCHALTER)
Dauer-Ein
Taster
AUS (KIPPSCHALTER)
Taster
(MODUSSCHALTER AM TLR-2®)
Laser Laser/LED LED
Page 29

Gerades oder
Spiralkabel
lieferbar
den Laser nach links (den Einschlagpunkt nach rechts) zu bewegen. Drehen Sie die Einstellschraube gegen
den Uhrzeigersinn, um den Laser nach rechts (den Einschlagpunkt nach links) zu bewegen. Die Höheneinstellung bendet sich an der Unterseite der Laserkartusche des TLR-2®. Bei zielwärts zeigendem TLR-2®
bewegt eine Drehung der Einstellschraube im Uhrzeigersinn den Laser nach unten (den Einschlagpunkt
nach oben). Eine Drehung der Einstellschraube gegen den Uhrzeigersinn bewegt den Laser nach oben (den
Einschlagpunkt nach unten). Bewegen Sie den Laserpunkt in die Richtung, in der die Schüsse das Ziel
treffen (Beispiel: Wenn die Projektile unterhalb und rechts treffen, denn bewegen Sie den Laserpunkt nach
unten und nach rechts, sodass er dort liegt, wo die Projektile einschlagen).
HINWEIS: Wenn Sie große Anpassungen vornehmen, kann es eine Interaktion geben, die dazu führt, dass
der Laser sich diagonal bewegt oder verkeilt. Es könnte nötig sein, die gegenüberliegende Einstellschraube
gegen den Uhrzeigersinn zu drehen, damit die Laserkartusche die gewünschte Stellung einnehmen kann.
Zubehör
TLR-Fernschalter
(gezeigt ist der TLR-1 HPL®)
Fernschalter TLR Contour
(gezeigt ist das TLR-1®)
(Von der Verwendung des Fernschalters „Contour“ am TLR-2 HL® G wird abgeraten)
Pege
Der Spannbolzen der TLR-Schienenhalterung ist mit qualitativ hochwertigem Waffenöl zu schmieren, um ihn vor
Korrosion zu schützen. Reinigen Sie die aus Glas bestehende LED-Linse mit einem weichen Lappen und einem
sanften Reinigungsmittel und halten Sie sie schmutz- und schmauchfrei. Die Laseroptik am TLR-2® kann mit
einem Wattestäbchen (oder ähnlich) und einem sanften Reinigungsmittel gereinigt werden.
HINWEIS: Vermeiden Sie aggressive Reinigungslösungen stets, denn diese können das TLR beschädigen.
Page 30

Streamlights eingeschränkte lebenslange Garantie:
Streamlight garantiert, dass dieses Produkt während eines gesamten Verwendungslebens frei von
Mängeln ist. Ausgenommen sind Batterien und Glühbirnen, Missbrauch und normaler Verschleiß. Wir
werden dieses Produkt reparieren, ersetzen oder den Kaufpreis zurückerstatten, wenn wir feststellen
sollten, dass es mangelhaft ist. Ebenfalls von dieser eingeschränkten lebenslangen Garantie ausgenommen sind wiederauadbare Batterien, Ladegeräte, Schalter und die Elektronik, für die eine zweijährige
Garantie mit Kaufnachweis gilt. DIES IST DIE EINZIGE AUSDRÜCKLICH ODER IMPLIZITE GARANTIE,
EINSCHLIESSLICH EINER ETWAIGEN GARANTIE DER MARKTÜBLICHKEIT ODER EIGNUNG FÜR
EINEN BESTIMMTEN ZWECK. ERSATZ FÜR BEILÄUFIGE SCHÄDEN ODER FOLGESCHÄDEN UND
BESONDERER SCHADENSERSATZ WERDEN AUSDRÜCKLICH AUSGESCHLOSSEN, AUSSER IN
LÄNDERN, IN DENEN EINE DERARTIGE EINSCHRÄNKUNG GESETZLICH VERBOTEN IST.
Je nach Land könnten Sie andere bestimmte gesetzliche Rechte haben.
Alle Garantieunterlagen sowie Informationen zur Produktregistrierung und Vertragswerkstätten nden Sie
auf www.streamlight.com/support. Bewahren Sie Ihren Einkaufsbeleg als Kaufnachweis auf.
Kundendienst
Das TLR enthält nur wenige oder keine vom Benutzer wartbaren Teile.
Eine Streamlight-Vertragswerkstatt in Ihrer Nähe nden Sie auf www.streamlight.com.
Für Express-Reparaturen besuchen Sie www.streamlight.com/support/service und füllen
den Online-Reparaturauftrag aus.
Oder wenden Sie sich an:
Customer Service
STREAMLIGHT, INC.
30 Eagleville Road
Suite 100
Eagleville, PA, USA 19403-3996
Telefon: +1 800 523-7488 gebührenfrei (nur in den USA) / +1 610 631-0600
Fax: +1 800-220-7007 / +1 610 631-0712
Page 31

Page 32

www.streamlight.com
30 Eagleville Road
Eagleville, PA 19403
Phone: (800) 523-7488
997651 Rev. G 3/17
 Loading...