


STIHL TS 440
Instruction Manual
Notice d’emploi

G Instruction Manual
1 - 40
F Notice d’emploi
41 - 83

Contents
English
Guide to Using this Manual 2
Safety Precautions and Working
Techniques 2
Sample Applications 11
Cutting Wheels 14
Composite Abrasive Wheels 15
Diamond Abrasive Wheels 15
Abrasive wheel brake 18
Original Instruction ManualPrinted on chlorine-free paper
Electronic Water Control 20
Mounting an Abrasive Wheel 21
Fuel 22
Fueling 23
Starting / Stopping the Engine 24
Air Filter System 28
Engine Management 29
Adjusting the Carburetor 29
Spark Arresting Screen in Muffler 30
Spark Plug 31
Storing the Machine 32
Maintenance and Care 33
Main Parts 35
Specifications 37
Printing inks contain vegetable oils, paper can be recycled.
Maintenance and Repairs 38
Disposal 38
STIHL Limited Emission Control
Warranty Statement 38
Dear Customer,
Thank you for choosing a quality
engineered STIHL product.
It has been built using modern
production techniques and
comprehensive quality assurance.
Every effort has been made to ensure
your satisfaction and trouble-free use of
the product.
Please contact your dealer or our sales
company if you have any queries
concerning this product.
Your
Dr. Nikolas Stihl
© ANDREAS STIHL AG & Co. KG, 2021
0458-520-8221-B. VA0.J21.
0000008171_004_GB
TS 440
This instruction manual is protected by copyright. All rights reserved, especially the rights to reproduce, translate and process
with electronic systems.
1

English
Guide to Using this Manual
Pictograms
Pictograms that appear on the machine
are explained in this Instruction Manual.
Depending on the machine and
equipment version, the following
pictograms may appear on the machine.
Fuel tank; fuel mixture of
gasoline and engine oil
Actuate decompression
valve
Actuate manual fuel
pump
Pull starter grip
Actuate brake lever and
release abrasive wheel
brake
Symbols in text
WARNING
Warning where there is a risk of an
accident or personal injury or serious
damage to property.
NOTICE
Caution where there is a risk of
damaging the machine or its individual
components.
Engineering improvements
STIHL's philosophy is to continually
improve all of its products. For this
reason we may modify the design,
engineering and appearance of our
products periodically.
Therefore, some changes, modifications
and improvements may not be covered
in this manual.
Safety Precautions and
Working Techniques
Special safety precautions must be taken when
working with the cut-off
machine, due to the very
high rotational speed of
the abrasive wheel.
It is important that you
read and understand the
User Manual before commissioning and keep it in
a safe place for future reference. Non-observance
of the safety precautions
may result in serious or
even fatal injury.
Observe all applicable local safety
regulations, e.g. by trade organizations,
social insurance institutions, labor safety
authorities etc.
As for employers within the European
Community, the provision 2009/104/EC
is binding – Safety and health protection
with the use of machines and devices by
employees at work.
If you have never used a power tool
before: have your STIHL dealer or other
specialist show you how to operate the
machine – or attend one of the special
training courses.
Minors should never be allowed to use
the machine – except for apprentices
over the age of 16 when working under
supervision.
Children, animals and onlookers must
not be allowed near the machine.
2
TS 440

English
When not using the machine, it must be
laid down in such a way that it does not
endanger anyone. Ensure that the
machine cannot be used without
authorization.
The user is responsible for accidents or
risks involving third parties or their
property.
Do not lend or rent your power tool
without the User Manual. Be sure that
anyone using it understands the
information contained in this manual.
The use of machines that emit noise
may be limited to certain hours of the
day as specified by national and/or
regional or local regulations.
Anyone operating the machine must be
well rested, in good physical health and
in good mental condition.
If you have any condition that might be
aggravated by strenuous work, check
with your doctor before operating a
machine.
If you have a pacemaker: The ignition
system of your machine produces an
electromagnetic field of very low
intensity. This field may interfere with
some pacemakers. STIHL recommends
that persons with pacemakers consult
their physician and the pacemaker
manufacturer to reduce any health risk.
Anyone who has consumed alcohol or
drugs or medicines affecting their ability
to react must not operate a power tool.
Postpone the work if the weather is bad
(snow, ice, wind) – higher risk of
accidents!
The machine may only be used for
cutting. It is not suitable for cutting wood
or wooden objects.
Asbestos dust is extremely toxic - the
machine must therefore never be used
to cut asbestos!
Other uses are not permitted and may
lead to accidents or damage to the
machine.
Never attempt to modify your power tool
in any way since this may increase the
risk of personal injury. STIHL excludes
all liability for personal injury and
damage to property caused while using
unauthorized attachments.
Only use abrasive wheels or
accessories which have been approved
by STIHL for this machine or which are
technically equivalent. If you have any
questions in this respect, consult your
dealer. Only use high-quality abrasive
wheels and attachments. in order to
avoid the risk of accidents and damage
to the machine.
STIHL recommends the use of genuine
STIHL abrasive wheels and
accessories. They are specifically
designed to match the product and meet
your performance requirements.
Do not use a high-pressure washer to
clean the power tool. The solid jet of
water may damage parts of the unit.
Do not spray the power tool with water.
Never use circular saw
blades, carbide, rescue
or wood cutting attachments or saws of any
kind – these may cause
fatal injuries!Instead of
uniformly removing particles as when cutting with
an abrasive wheel, the
teeth of a circular saw
blade may snag in the
material. This causes the
machine to react in a
highly aggressive manner
with uncontrolled and
extremely dangerous
kickback.
Clothing and equipment
Wear proper protective clothing and
equipment.
Clothing must be robust
but allow complete freedom of movement. Wear
close-fitting clothes such
as a boiler suit, not a
work coat.
When cutting steel, always wear clothing
made of barely flammable material (e.g.,
leather or cotton with flame-retardant
finish) – no man made fibers – risk of fire
due to flying sparks!
Clothing must be free from flammable
deposits (chips, fuel, oil, etc.).
Do not wear clothes that may be caught
by moving parts – no scarf, no tie, no
jewelry. Tie up and confine long hair
above your shoulders.
TS 440
3

English
Wear steel-toed safety
boots with non-slip soles.
WARNING
To reduce the risk of eye
injuries, wear close-fitting safety glasses in
accordance with European Standard EN 166.
Make sure the safety
glasses are a snug fit.
Wear a safety hard hat where there is a
danger of head injuries from falling
objects.
Dust (e. g., crystalline material from the
object being cut), fumes and smoke may
be produced while cutting - health
hazard!
Always wear a dust mask if dust is
generated.
If fumes or smoke are anticipated (e. g.,
when cutting composite materials), wear
respiratory protection.
Wear "personal" hearing protection – for
example, ear defenders.
Wear sturdy protective
gloves made of a resistant material (e. g.
leather).
STIHL can supply a comprehensive
range of personal protective equipment.
Transporting the machine
Always stop the engine.
Carry the device by the handlebar only –
abrasive wheel pointing to the rear – hot
muffler away from the body.
To avoid serious burn injuries, avoid
touching hot parts of the machine,
especially the surface of the muffler.
Never transport the engine-driven
device with attached abrasive wheel –
risk of breakage!
By vehicle: When transporting in a
vehicle, properly secure your machine to
prevent turnover, damage and fuel
spillage.
Refueling
Gasoline is highly flammable – keep away from
fire or flame – do not spill
any fuel – no smoking.
Always shut off the engine before
refueling.
Do not fuel a hot engine – fuel may spill
and cause a fire.
Open the fuel cap carefully to allow any
pressure build-up in the tank to release
slowly and avoid fuel spillage.
Only refuel the machine in a well
ventilated place. If fuel has been spilled,
immediately clean the machine – do not
allow your clothes to be splashed with
fuel. If that happens, change your
clothes at once.
Dust may collect on the engine unit,
particularly around the carburetor. If dust
gets mixed with fuel – risk of fire. For this
reason, ensure that the dust is always
removed.
Check for fuel leakage!
Never start the engine if
fuel has been spilled or is
leaking – Fatal burns may
result!
Bayonet-type fuel cap
Never use a tool to open or close the
bayonet-type fuel cap. This could
damage the cap and cause fuel to leak
out.
Close the bayonet-type fuel cap
carefully after refueling.
Cut-off machine, spindle bearing
Correct spindle bearings ensure the
concentricity and axial running of the
diamond abrasive wheel – if necessary,
get it checked by an approved dealer.
Abrasive cutting wheels
Selecting the abrasive cutting wheels
Abrasive cutting wheels must be
approved for freehand cutting. Do not
use other cutting wheels and
attachments – risk of accident!
4
TS 440

English
Abrasive cutting wheels are suitable for
different materials: Observe the
identification of the abrasive cutting
wheels.
STIHL generally recommends wet
cutting.
Observe the outer diameter of the abrasive wheel.
Spindle hole diameter of
the abrasive wheel and
shaft of cut-off machine
must match.
Check the spindle hole for damage. Do
not use abrasive cutting wheels with a
damaged spindle hole – risk of accident!
The permissible speed of
the abrasive cutting
wheel must be equal to or
greater than the maximum spindle speed of the
cut-off machine. – Refer
to the chapter
"Specifications".
Before fitting a used abrasive cutting
wheel, check that it is not cracked,
chipped, undercut or uneven, and does
not display any signs of core fatigue or
overheating (discoloration); check also
the spindle hole is not damaged.
Never use cracked, chipped or bent
abrasive cutting wheels.
Substandard and/or unapproved
diamond abrasive wheels can shimmy
during cutting. This shimmying can
cause such diamond abrasive wheels to
be abruptly braked or become stuck in
the cut – Danger of kickback! Kickback
can result in fatal injuries! Diamond
abrasive wheels that shimmy constantly
or even only intermittently must be
replaced immediately.
Never straighten diamond abrasive
wheels.
Do not use an abrasive cutting wheel
which has fallen to the ground –
damaged abrasive cutting wheels may
break – risk of accident!
Observe the expiration date where
composite resin abrasive cutting wheels
are concerned.
Fitting abrasive cutting wheels
Inspect the spindle of the cut-off
machine. Do not use a cut-off machine if
the spindle is damaged – risk of
accident!
Note the arrows indicating the direction
of rotation on diamond abrasive wheels.
Position the front pressure plate –
tighten up the tensioning screw – rotate
the abrasive cutting wheel by hand and
take a sight check for concentricity and
axial running.
Storing abrasive cutting wheels
Store abrasive wheels in a dry and frost-
free place, on an even surface, at
constant temperature – risk of breakage
and splintering!
Always protect abrasive cutting wheels
against sudden impact with the floor or
objects.
Before starting
Inspect the cut-off machine for safe-tooperate state – observe the respective
chapters in the User Manual:
– Check the fuel system for leaks,
especially the visible parts, e. g.,
fuel cap, hose connections, manual
fuel pump (only in machines with a
manual fuel pump). In case of
leakage and damage, do not start
the engine – risk of fire! Have the
machine serviced by a dealer
before using it
– The abrasive wheel must be
suitable for the material to be cut. It
must be in good condition and fitted
correctly (direction of rotation,
secure).
– Inspect the abrasive wheel guard
for tight seat – if loose, contact your
specialist dealer.
– Smooth action of throttle trigger and
throttle trigger lockout – throttle
trigger must return automatically to
idle position
– Slide control / master control lever /
stop switch must move easily to
STOP or 0
– Check that the spark plug boot is
secure – a loose boot may cause
sparking that could ignite
combustible fumes and cause a fire!
– Check the correct operation of the
abrasive cutting wheel brake. When
the brake lever is activated, the
abrasive cutting wheel can be
turned by hand – when the brake
lever is released, the abrasive
TS 440
5

English
180BA022 KN
cutting wheel can no longer be
turned. It should not be possible to
turn the abrasive cutting wheel
when the brake lever is not
activated.
– Never attempt to modify the controls
or safety devices.
– Keep the handles clean, dry and
free of oil as well as dirt – important
for safe guiding of the cut-off
machine.
– For wet applications, provide
sufficient water
To reduce the risk of personal injury, do
not operate your power tool if it is
damaged or not properly assembled!
Starting the engine
Start the engine at least 3 meters from
the fueling spot, outdoors only.
On even ground, ensure a firm and
secure footing and hold the enginedriven device firmly – the abrasive
cutting wheel must not touch any objects
or the ground and must not be in cutting
action.
When starting, the abrasive cutting
wheel brake is engaged. If the abrasive
cutting wheel does not immediately turn
at machine start-up, do not work with the
cut-off machine and contact a dealer.
Arrange for the abrasive cutting wheel
brake to be repaired.
The machine is operated by a single
person only – do not allow any person to
stay within the working area – nor with
starting.
Do not drop start your machine – the
correct starting procedure is described
in the User Manual.
After releasing the throttle trigger, the
abrasive wheel keeps on running for a
while – danger of injury due to coasting
effect!
Holding and guiding the machine
Use the cut-off machine only for handheld cutting.
Hand-held cutting
Always hold the machine firmly with both
hands: Right hand on the rear handle –
even if you are left-handed. To ensure
safe control, wrap your fingers tightly
around both handles.
When a cut-off machine with an abrasive
cutting wheel rotating is moved in the
direction of the arrow, a force is
produced which causes the machine to
tip sideways.
The object to be cut off has to be firmly
supported. Always guide the machine
towards the workpiece – never the other
way round.
Deflector
002BA549 AM
002BA550 AM
Set the abrasive cutting wheel guard
correctly: Guide particles of material
away from the user and machine.
Note the direction of flight of the
removed particles of material.
6
TS 440

English
While working
If there is imminent danger or in an
emergency, immediately stop the
engine – set the slide control / master
control lever /stop switch to STOP or 0.
Check for correct idling, where the
abrasive cutting wheel is no longer
driven when the throttle trigger is
released and comes to a complete halt.
Check and correct the idle speed setting
at regular intervals. Have the machine
repaired by a STIHL dealer if the
abrasive cutting wheel continues to turn
after the abrasive cutting wheel brake
has been released.
Keep clear the working area – bear in
mind obstacles, holes and pitches.
Take special care in slippery conditions
– damp, snow, ice, on slopes or uneven
ground.
Don not work while standing on a ladder
– not on an insecure support – not over
your shoulder height – not with one hand
only – risk of accident!
Make sure you always have a firm and
secure footing.
Do not work alone – keep within calling
distance of others in case help is
needed.
Keep out further persons from the
working area – maintain sufficiently large
distance to additional persons to protect
them from noise and flying objects.
Be particularly alert and cautious when
wearing hearing protection because
your ability to hear warnings (shouts,
alarms, etc.) is restricted.
Take a break in good time before you
get tired.
Work calmly and carefully – in daylight
conditions and only when visibility is
good. Proceed with caution, do not put
others in danger.
As soon as the engine is
running, the power
machine generates toxic
exhaust gas.As soon as
the engine is running, the
power machine generates toxic exhaust gas.
These gases may be
odorless and invisible
and may contain
unburned hydrocarbons
and benzene. Never run
the engine indoors or in
poorly ventilated locations, even if your model
is equipped with a catalytic converter.
Ensure proper ventilation when working
in trenches, hollows or similar locations
– risk of fatal injury from breathing toxic
fumes!
Stop work immediately if you start
suffering from nausea, headaches,
impaired vision (e.g. your field of vision
gets smaller), impaired hearing,
dizziness, or impaired concentration –
these symptoms may possibly be the
result of too-high exhaust gas
concentration – Risk of accidents!
To reduce the risk of fire, do not smoke
while operating or standing near your
power tool.
If your power tool is subjected to
unusually high loads for which it was not
designed (e.g. heavy impact or a fall),
always check that it is in good condition
before continuing work – see also
"Before Starting". Check in particular
that the fuel system has no leaks and the
safety equipment is fully operative.
Never use a power tool that is no longer
safe to operate. In case of doubt, contact
a dealer.
Do not operate your power tool in the
starting throttle position – engine speed
cannot be controlled in this position.
Never touch a rotating abrasive cutting
wheel with your hand or any other part of
your body.
Examine the workplace. Avoid all
danger due to damaged piping or
electrical wiring.
The machine must not be used near
inflammable substances or gases.
Do not cut into pipes, metal tanks or
other containers if you are not sure that
they do not contain any volatile or
inflammable substances.
Never leave the machine unattended
with the engine running. Stop the engine
before leaving the machine unattended
(e. g. for breaks).
Stopping the engine engages the
abrasive cutting wheel brake. If the cutoff machine, with the abrasive cutting
wheel running, stands on the ground
and the engine is switched off there, the
engagement of the abrasive cutting
wheel brake may cause the cut-off
machine to tilt forward, resulting in the
abrasive cutting wheel touching the
ground – damage to the abrasive cutting
wheel!
TS 440
7

English
002BA555 AM
Before putting the cut-off machine down
on the ground:
– Shut off the engine
– Wait until the abrasive cutting wheel
has come to a standstill or brake the
abrasive cutting wheel until it comes
to a standstill by carefully touching a
hard surface (e.g., concrete slab)
Frequently inspect the
abrasive cutting wheel –
replace it right away if
there are visible cracks,
buckling or other damage
(for example, overheating) – risk of accident due
to breakage!
In the event of changes in cutting
behavior (e. g., increased vibration,
reduced cutting performance), stop work
and eliminate the causes of the
changes.
Reactive forces
The most frequently occurring reactive
forces are kickback and pull-in.
Danger of kickback –
Kickback can result in
fatal injuries.
Kickback occurs when the cut-off
machine is suddenly thrown up and back
in an uncontrolled arc towards the
operator.
Kickback occurs if, for example, the
abrasive cutting wheel
– gets jammed – primarily in its upper
quarter, or
– is abruptly braked through friction
contact with a solid object
QuickStop abrasive cutting wheel brake
When the abrasive cutting wheel brake
is engaged, the abrasive cutting wheel
will come to a standstill in a split second
–
see chapter "abrasive cutting wheel
Brake" in this User Manual.
To reduce the risk of kickback
– Work cautiously and avoid
situations which could cause
kickback.
– Hold the cut-off machine firmly with
both hands and maintain a secure
grip
002BA551 AM
– If possible, avoid using the upper
quarter of the abrasive cutting
wheel for cutting. Use extreme
caution when guiding the abrasive
cutting wheel into a cut, do not twist
or push into the cut
– Avoid any wedge effect - the
severed part must not brake the
abrasive cutting wheel
– Always be aware that the object to
be cut may move and other factors
may cause the cut to close and jam
the abrasive cutting wheel.
– The object to be cut must be
secured and supported so that the
kerf remains open during and after
cutting
– Objects to be cut must therefore be
fully supported and must be
secured against rolling away,
slipping off or vibrations
002BA552 AM
8
TS 440

English
– Support an uncovered pipe stable
and solid, if necessary, use wedges
– always bear in mind a proper
support and ground – material may
crumble away,
– Always work with water and wet
cutting when using diamond
abrasive wheels
Pull away from
The cut-off machine pulls forward, away
from the user, when the abrasive wheel
touches the object to be cut from above.
Working – cutting off
The abrasive cutting
wheel must be guided
straight in the cut, without
tilting. Never exert lateral
pressure on the abrasive
cutting wheel.
Do not use for lateral
grinding or scrubbing.
0000-GXX-4256-A0
Do not stand in line with the abrasive
wheel. Ensure sufficient freedom of
movement, especially in construction
trenches there must be sufficient space
for the user and for the part being cut to
fall.
Do not lean too far forwards and never
bend over the abrasive wheel when the
guard has been pulled back.
Do not work above shoulder height.
The cut-off machine may only be used
for cutting. It must not be used as a lever
002BA553 AM
or shovel.
Do not press down on the cut-off
machine
Always decide the cutting direction
before positioning the cut-off machine.
After that, do not change the cutting
direction. Never push or hit with the
device into the cutting gap – do not let
the concrete cutter fall into the cutting
depth – risk of breakage!
Diamond abrasive cutting wheels: If
cutting performance begins to
deteriorate, check the sharpness of the
diamond abrasive wheel, resharpen as
needed. To do this, briefly cut through
abrasive material, e. g., sandstone,
aerated concrete or asphalt.
At the end of the cut, the cut-off machine
is no longer supported by the abrasive
wheel in the cut. The user has to absorb
the weight force – risk of loss of control!
When cutting steel: glowing metal particles may
cause fires!
Keep water and sludge away from alive
002BA554 AM
electrical cables – risk of electric shock!
Drag the abrasive wheel into the
workpiece – do not push it into the
material. Do not correct severing cuts
with the cut-off machine. Do not re-cut –
remove left webs or breaking edges (for
example, with a hammer).
When applying diamond abrasive
wheels, take a wet cut – for example,
use the STIHL water connector.
Du to the reduced maximum spindle
speed, STIHL developed a special
composite resin abrasive cutting wheel
for cutting steel with this machine. This
abrasive cutting wheel is suitable for dry
cutting only. If a composite resin
abrasive cutting wheel of this type
becomes wet, its cutting performance is
reduced and it becomes dull. If a
composite resin abrasive cutting wheel
of this type becomes wet while working
(e.g., due to puddles or water in pipes),
do not increase the cutting pressure, but
continue working with the same
pressure – risk of breakage! Use up
such composite resin abrasive cutting
wheels immediately.
TS 440
9

English
Traditional composite resin abrasive
cutting wheels developed for cut-off
machines with high circumferential
speed have an inferior cutting
performance and are unsuitable.
Vibrations
Prolonged use of the power tool may
result in vibration-induced circulation
problems in the hands (whitefinger
disease).
No general recommendation can be
given for the length of usage because it
depends on several factors.
The period of usage is prolonged by:
– Hand protection (wearing warm
gloves)
– Work breaks
The period of usage is shortened by:
– Any personal tendency to suffer
from poor circulation (symptoms:
frequently cold fingers, tingling
sensations).
– Low outside temperatures.
– The force with which the handles
are held (a tight grip restricts
circulation).
Continual and regular users should
monitor closely the condition of their
hands and fingers. If any of the above
symptoms appear (e.g. tingling
sensation in fingers), seek medical
advice.
Maintenance and repairs
The machine must be serviced regularly.
Do not attempt any maintenance or
repair work not described in the
Instruction Manual. All other work should
be carried out by a servicing dealer.
STIHL recommends that maintenance
and repair work be carried out only by
authorized STIHL dealers. STIHL
dealers receive regular training and are
supplied with technical information.
Use only high-quality spare parts.
Otherwise, there may be a risk of
accidents and damage to the machine. If
you have any questions in this respect,
consult a servicing dealer.
STIHL recommends the use of genuine
STIHL spare parts. Such parts have
been optimized for the machine and the
user's requirements.
Before starting any maintenance or
repair work and before cleaning the
machine, always stop the engine and
disconnect the spark plug boot – risk of
injury if the engine starts up
inadvertently! – Exception: adjustment
of carburetor and idle speed.
To reduce the risk of fire due to ignition
outside the cylinder, move the slide
control / stop switch to STOP or 0 before
turning the engine over on the starter
with the spark plug boot removed or the
spark plug unscrewed.
Do not service or store the machine near
a naked flame – risk of fire due to the
fuel.
Check fuel cap regularly for tightness.
Use only spark plugs that are in perfect
condition and have been approved by
STIHL – see "Specifications".
Check ignition lead (insulation in good
condition, secure connection).
Check that the muffler is in perfect
working condition.
Do not use the machine if the muffler is
damaged or missing – risk of fire! –
Hearing damage!
Never touch a hot muffler – risk of burns!
Check the rubber buffers underneath
the machine – the housing must not rub
against the ground – risk of damage!
The condition of the anti-vibration
elements influences vibration behavior –
inspect anti-vibration elements
periodically.
Before starting work, check the
operation of the abrasive wheel brake.
Maintenance, replacement, or repair of
the emission control devices and
systems may be performed by any
nonroad engine repair establishment or
individual. However, if you make a
warranty claim for a component which
has not been serviced or maintained
properly, STIHL may deny coverage.
For any maintenance please refer to the
maintenance chart and to the warranty
statement near the end of the instruction
manual.
10
TS 440

English
Sample Applications
Water must always be used for wet
cutting when working with diamond
abrasive wheels
Extend service life and increase cutting
speed
Always ensure a supply of water to the
abrasive wheel.
Binding dust
The abrasive wheel must be supplied
with at least 0.6 liters of water per
minute.
Water attachment
– Water attachment on the machine
for all types of water supplies
– Pressurized water tank 10 l for
binding dust
STIHL composite resin cutting wheels
may only be used for dry cutting
During dry cutting, wear a suitable dust
mask.
If fumes or smoke are anticipated (e.g.,
when cutting composite materials), wear
respiratory protection.
Observe with diamond and composite
resin abrasive wheels
Objects to be cut
– Must be fully supported
– Must be secured so they cannot roll
or slip off
– Must be prevented from vibrating
Severed parts
With openings, recesses, etc., the
sequence of the cuts is important.
Always make the last cut so that the
abrasive wheel does not become
jammed and so that the operator is not
endangered by the severed or
separated part.
If necessary, leave small ridges that hold
the part that is to be separated in
position. Break these ridges later.
Before finally separating the part,
determine:
– how heavy the part is
– how it can move after separation
– whether it is under tension
When breaking out the part, do not
endanger assistants.
Cut in several passes
N Mark cutting line (A)
180BA027 AM
N Work along the cutting line. When
making corrections, do not tilt the
abrasive wheel, but always set the
abrasive wheel against the
workpiece anew – the cutting depth
for each operation should not
exceed 5 to 6 cm. Cut thicker
material in multiple operations
Cutting plates
N Secure the plate (e. g. on a non-slip
surface, sandbed)
TS 440
11

English
N Grind a guide groove (A) along the
line marked
N Make the cut (B) deeper
N Leave a "hinge" (C)
N First sever the plate at the cut ends
so that no material breaks away
N Break plate
Cutting pipes, round and hollow bodies
N Secure pipes, round and hollow
bodies against vibrations, slipping
and rolling away
N Note direction of fall and weight of
the severed part
N Determine and mark the cutting
line, avoid reinforcements,
especially in the direction of the
severing cut
N Determine sequence of severing
cuts
N Grind a guide groove along the line
marked
N Make cut deeper along the guide
groove – observe the recommended
180BA028 AM
cutting depth for each operation –
for small corrections of direction, do
not tilt the abrasive wheel, but
always position it anew instead – if
necessary, leave small ridges that
hold the part that is to be separated
in position. Break these ridges after
the last planned cut
Cutting concrete pipe
A
002BA557 AM
The procedure is dependent on the
outer diameter of the pipe and the
maximum possible cutting depth of the
abrasive wheel (A).
N Secure pipe against vibrations,
slipping and rolling away
N Note weight, tension and direction
of fall of the part to be severed
N Make curves in multiple operations
– make certain that the abrasive
wheel does not tilt
12
002BA528 AM
N Determine and mark direction of cut
N Determine sequence of cuts
TS 440

Outer diameter is smaller than the
0000-GXX-1780-A0
A
0000-GXX-1781-A0
B
0000-GXX-1162-A0
C
0000-GXX-1783-A0
D
0000-GXX-1784-A0
E
X
F
0000-GXX-1785-A0
maximum cutting depth
English
N Make one cut from the top to the
bottom
Outer diameter is greater than the
maximum cutting depth
Plan first, then cut. Several cuts are
needed – correct sequence is important.
N Close guard, Illustration A
N Always start cut from underneath,
Illustration A
N Open guard, Illustration B
N Insert abrasive wheel at full throttle
002BA558 AM
into the cut you have made,
Illustration B
N Continue cutting downward more
than half-way round the pipe,
Illustration B
N Close guard, Illustration C
N Cut opposite underside,
Illustration C
N Open guard, Illustration D
N Insert abrasive wheel at full throttle
into the cut you have made,
Illustration D
N Continue cutting downward more
than half-way round the pipe,
Illustration D
N Close guard, Illustration E
N First lateral cut on the top half of the
pipe, Illustration E
TS 440
N Second lateral cut in the marked
area – never cut into the area of the
last cut (X), to ensure a firm hold on
the part of pipe to be cut,
Illustration F
13

English
0000-GXX-1786-A0
G
1
2
180BA024 AM
Only make the last top cut once all
bottom and lateral cuts have been
made.
N Last cut always from the top
(approx. 15 % of the pipe
circumference), Illustration G
Concrete pipe – cut recess
Sequence of cuts (1 to 4) is important:
N First, cut hard-to-reach areas
N Use wedges and/or leave ridges
that are broken after cutting
4
3
N If the severed part remains in the
recess after cutting (due to wedges,
ridges used), do not make any
further cuts – break the severed part
Cutting Wheels
Abrasive wheels are exposed to
extremely high loads especially during
freehand cutting.
Therefore only for use of approved and
correspondingly labeled abrasive
180BA025 AM180BA026 AM
wheels with hand-held machines as per
EN 13236 (diamond) or EN 12413
(composite resin). Note maximum
permissible speed of the abrasive wheel
– risk of accident!
The abrasive wheels, which have been
developed by STIHL in cooperation with
renowned manufacturers of abrasive
wheels, are of high quality and tailored
precisely to the respective intended use
as well as the engine performance of the
cut-off machine.
They are of consistently outstanding
quality.
Transport and storage
N Always make severing cuts so that
the abrasive wheel is not pinched
14
– Do not expose abrasive wheels to
direct sunshine or other thermal
stresses during transport and
storage
– Avoid jolting and impacts
– Stack abrasive wheels flat on a level
surface in the original packaging in
a dry place where the temperature
is as constant as possible
– Do not store abrasive wheels in the
vicinity of aggressive fluids
– Store abrasive wheels in a frost-free
place
TS 440

English
0000-GXX-1234-A0
0000-GXX-1235-A0
D-B10
Composite Abrasive Wheels
Types:
– for dry applications
Because of the reduced maximum
spindle speed, STIHL has developed a
special composite resin abrasive wheel
for cutting steel. This abrasive wheel is
only suitable for dry cutting.
Do not cut any other materials – Risk of
accident!
Conventional composite resin abrasive
wheels developed for cut-off machines
with a high circumferential speed give a
poor cutting performance and are
therefore unsuitable.
Diamond Abrasive Wheels
For wet applications.
The proper selection and use of
diamond abrasive wheels ensures
economical use and avoids accelerated
wear. The product code which appears
– on the label and
– on the packaging (table with
recommendations for use) is an aid
to selection
STIHL diamond abrasive wheels are
suitable, depending on the version, for
cutting the following materials:
– Asphalt
– Concrete
– Stone (hard stone)
– Abrasive concrete
– Fresh concrete
– Clay brick
– Clay pipe
– Ductile cast iron pipe
Do not cut any other materials – Risk of
accident!
Never use diamond abrasive wheels
with side plating as they jam in the cut
and can result in extreme kickback –
Risk of accident!
Product Codes
The product code is a combination of
letters and numbers, consisting of up to
four characters:
– the letters denote the main field of
application of the abrasive wheel
– the numbers denote the
performance class of the STIHL
diamond abrasive wheel
Axial and radial run-out
A faultless spindle bearing of the cut-off
machine is necessary for a long service
life and efficient functioning of the
diamond abrasive wheel.
Using the abrasive wheel on a cut-off
machine with a faulty spindle bearing
can lead to deviations in radial and axial
run-out.
TS 440
15

English
Built-up edges, sharpen
An excessively high radial run-out
deviation (A) overloads individual
diamond segments, which overheat in
the process. This can lead to stress
cracks in the parent wheel or to
annealing of individual segments.
Deviations in axial run-out (B) result in
higher thermal loading and wider cuts.
Undercut
Do not cut into the base course
(frequently chipped stones and gravel)
when cutting roadway pavement –
cutting in chipped stones and gravel is
revealed by light-colored dust –
excessive undercut may occur as a
result – Danger of shattering!
Built-up edges take the form of a light
gray deposit on the tops of the diamond
segments. This deposit on the segments
clogs the diamonds and blunts the
segments.
Built-up edges can form:
– when cutting extremely hard
materials, e. g., granite
– with incorrect handling, e. g.,
excessive feed effort
Built-up edges increase vibration,
reduce cutting performance, and cause
formation of sparks.
At the first signs of built-up edges,
immediately "sharpen" the diamond
abrasive wheel – to do this, briefly cut
through abrasive material such as
sandstone, aerated concrete or asphalt.
Addition of water prevents the formation
of built-up edges.
If work continues with dull segments,
these may soften due to the high heat
generated – the parent wheel is
annealed and its strength is
compromised – this can lead to stresses
that are clearly recognizable by
gyrations of the abrasive wheel. Do not
continue to use the abrasive wheel –
Risk of accident!
16
TS 440

Troubleshooting
Abrasive wheel
English
Defects Cause Remedy
ragged edges or cut surfaces, crooked
Deviation in radial or axial run-out Contact a servicing dealer
1)
cut
heavy wear on the sides of the segments Abrasive wheel gyrates use a new abrasive wheel
ragged edges, crooked cut, no cutting
performance, generation of sparks
Abrasive wheel is dull; built-up edges with
abrasive wheels for stone
Sharpen abrasive wheels for stone by
briefly cutting through abrasive materials;
replace abrasive wheel for asphalt with a
new one
poor cutting performance, high segment
wear
Breakdowns or tears in the parent wheel
Abrasive wheel is turning in the wrong
direction
Mount abrasive wheel so that it turns in
the right direction
Overloading use a new abrasive wheel
and segment
Undercut Cutting in the wrong material use new abrasive wheel; observe sepa-
rating layers of various materials
1)
STIHL recommends STIHL servicing dealers
TS 440
17

English
1
0813BA003 KN
0813BA004 KN
Abrasive wheel brake
This cut-off machine is fitted with the
STIHL QuickStop cutting wheel brake.
When starting, the cutting wheel brake is
engaged. After starting, the cutting
wheel brake must be released.
The cutting wheel brake will be triggered
if there is a sufficiently forceful kickback.
When activated, the cutting wheel brake
stops the abrasive cutting wheel within a
fraction of a second.
Checking function of the cutting wheel
brake
Each time before starting work
N Operate brake lever (1) in the
direction of the handlebar and hold the abrasive cutting wheel can be
turned by hand.
N Release the brake lever (1) - the
cutting wheel brake is engaged - the
abrasive cutting wheel cannot be
turned by hand.
N If the abrasive cutting wheel can be
moved without operating the brake
lever (1): Do not use the cut-off
machine and consult your servicing
dealer. Arrange for the cutting
wheel brake to be repaired.
The brake lever must be free of dirt and
easily movable.
Releasing cutting wheel brake
N When the engine is running,
operate the brake lever in the
direction of the handlebar and
release - the cutting wheel brake is
released
NOTICE
The cutting wheel brake must be
released before opening the throttle and
before using the cut-off machine.
Increasing engine speeds with the
cutting wheel brake engaged even for a
short time results in damage to engine,
clutch and cutting wheel brake.
If the cutting wheel brake cannot be
released with the engine running
The following causes are possible:
– Note regarding required
maintenance for the cutting wheel
brake
– Note regarding required repair for
the cutting wheel brake
18
TS 440

English
2
1
370BA085 KN
3
0000-GXX-4257-A0
1
2
N Hold down button (3) on control
panel for 3 seconds with the engine
running
N Pull brake handle in the direction of
the handlebar and release
If this allows the cutting wheel brake to
be released, the cutting wheel brake
requires maintenance.
N Carry on working and consult a
STIHL servicing dealer after
finishing the work
N Arrange for the required
maintenance to be carried out on
the cutting wheel brake
This procedure should be carried out
afresh each time the engine is started.
The number of such procedures is
recorded in the control unit.
If this still does not allow the cutting
wheel brake to be released, the cutting
wheel brake requires repair.
N Stop work and consult a STIHL
servicing dealer
N Arrange for the cutting wheel brake
to be repaired
Retensioning the front V belts
The V belts belong to the cutting wheel
brake.
If the front V belt slips or squeals when
accelerating or working, the front V belt
is not tensioned correctly. The abrasive
cutting wheel can remain stuck during
cutting.
N Undo bolt (1)
N Remove guard (2)
5
N Slacken nut (3). The front V belt (4)
is tensioned
N Pull brake lever (5) in the direction
of the handlebar and hold it there
N Turn the belt pulley (6) 3 turns. The
tension is evenly distributed.
N Release the brake lever (5)
N Tighten nut (3) with a tightening
torque of 20 Nm
WARNING
To ensure correct function of the cutting
wheel brake, the nut must be tightened
with the specified torque. If it is not
3
4
6
possible to ensure that the nut can be
tightened with the correct tightening
torque, have the front V belt retensioned
by a STIHL servicing dealer.
2
1
N Fit cover (2)
N Insert and tighten bolt (1)
If a V belt continues to slip or squeal
when accelerating or working, a V belt
may be worn. The abrasive cutting
wheel can remain stuck during cutting,
and the cutting wheel brake can no
longer function correctly.
N Stop work and consult a STIHL
servicing dealer
0000-GXX-8851-A0
N Arrange for the cutting wheel brake
to be repaired
Maintain cutting wheel brake
The cutting wheel brake is subject to
wear due to friction. In order for it to fulfill
its function, it must be serviced and
maintained periodically by trained
personnel. STIHL recommends that
maintenance and repair work be carried
out only by authorized STIHL dealers.
N Note regarding necessary
maintenance and required repair of
the cutting wheel brake will be
provided to the user when starting
the engine and releasing the cutting
0000-GXX-4257-A0
TS 440
19

English
1307BA001 KN
2
1
370BA085 KN
3
wheel brake, see section “Check
function of the cutting wheel brake”
and section “Releasing cutting
wheel brake” in the chapter “Cutting
wheel brake”
Electronic Water Control
STIHL cut-off machines may be
equipped with an electronic water
control system.
The electronic water control system
makes it possible to feed the optimum
amount of water to the abrasive wheel.
No water is fed to the abrasive wheel
during idling.
Before starting work
N Familiarize yourself with the
sequence of motions while the
engine is switched off
N All of the control panel buttons can
be operated with the thumb of the
right hand – the right hand always
remains on the rear handle while
doing so
N The left hand always remains on the
handlebar
Control panel
When the engine is running, you can
activate/deactivate the electronic water
control system and adjust the water flow.
1 Button (+):
activate the electronic water control
or increase water flow to abrasive
wheel
2 Button (–):
activate the electronic water control
or decrease water flow to abrasive
wheel
3 Deactivate the electronic water
control; no water is fed to the
abrasive wheel
Using the electronic water control
N Start the engine, see
"Starting / Stopping the engine"
N Blip the (+) button or (–) button with
the thumb of your right hand – the
right hand always remains on the
rear handle while doing so, the left
hand always remains on the
handlebar – no water is fed to the
abrasive wheel yet during idling
During use, the set amount of water is
fed to the abrasive wheel.
N Adjust water flow if necessary – to
do so, blip the (+) button or (–)
button with the thumb of your right
hand until the correct water quantity
is attained – the right hand always
20
TS 440

English
2
370BA086 KN
1
0813BA002 KN
1
2
370BA053 KN
remains on the rear handle while
doing so, the left hand always
remains on the handlebar
If the cut-off machine is idling after use,
no more water will be fed to the abrasive
wheel – the electronic water control,
however, remains activated. On
resuming use, the last quantity of water
set will be fed to the abrasive wheel
again automatically.
If the engine is stopped and restarted,
the electronic water control is switched
off.
Maintenance and Care
If too little water or no water is fed to the
abrasive wheel during use although the
electronic water control has been
activated:
Mounting an Abrasive Wheel
The engine must be switched off for
fitting or replacement – set slide control
to STOP or 0.
Blocking the shaft
Removing the abrasive wheel
N Use the combination wrench to
loosen and remove the hexagon
head screw (2)
N Remove the front thrust washer (3)
from the shaft together with the
abrasive wheel
N Remove the coupling sleeve (1)
N Unscrew "water connection with
screen" (2) and rinse under running
water – the screen remains on the
water connection
If too little water or no water is fed to the
abrasive wheel even though the screen
has been cleaned, contact your
servicing dealer.
TS 440
N Slide the locking pin (1) through the
bore in the V-belt guard
N Actuate and hold the brake lever.
N Turn the shaft with the combination
wrench until the locking pin (1)
engages in the bore behind the
guard
N Release brake lever
21

English
370BA054 KN
4
Fitting the abrasive wheel
N Fit the new abrasive wheel (4)
WARNING
Note the arrows indicating the direction
of rotation on diamond abrasive wheels.
N Fit the front thrust washer (3). The
catches of the front thrust
washer (3) must engage in the shaft
grooves.
N Screw in the hexagon bolt and
tighten it with the combination
wrench – if using a torque wrench,
refer to the "Specifications" for the
tightening torque
N Draw the locking pin out of the V-
belt guard
WARNING
Never use two abrasive wheels at the
same time. The uneven wear creates a
risk of breaking and an injury hazard!
Fuel
This engine is certified to operate on
unleaded gasoline and with the mix ratio
50:1.
Your engine requires a mixture of highquality premium gasoline and highquality two-stroke air-cooled engine oil.
Use premium branded unleaded
gasoline with a minimum octane rating
of 89 (R+M)/2.
Note: Models equipped with a catalytic
converter require unleaded gasoline. A
few tankfuls of leaded gasoline can
reduce the efficiency of the catalytic
converter by more than 50%.
Fuel with a lower octane rating may
result in preignition (causing "pinging")
which is accompanied by an increase in
engine temperature. This, in turn,
increases the risk of the piston seizure
and damage to the engine.
The chemical composition of the fuel is
also important. Some fuel additives not
only detrimentally affect elastomers
(carburetor diaphragms, oil seals, fuel
lines etc.), but magnesium castings as
well. This could cause running problems
or even damage the engine. For this
reason it is essential that you use only
high-quality fuels!
Fuels with different percentages of
ethanol are being offered. Ethanol can
affect the running behaviour of the
engine and increase the risk of lean
seizure.
22
TS 440

English
1.
2.
370BA093 KN
Gasoline with an ethanol content of
more than 10% can cause running
problems and major damage in engines
with a manually adjustable carburetor
and should not be used in such engines.
Engines equipped with M-Tronic can be
run on gasoline with an ethanol content
of up to 25% (E25).
Use only STIHL two-stroke engine oil or
equivalent high-quality two-stroke aircooled engine oils for mixing.
We recommend STIHL 50:1 two-stroke
engine oil since it is specially formulated
for use in STIHL engines.
To ensure the maximum performance of
your STIHL engine, use a high quality 2cycle engine oil. To help your engine run
cleaner and reduce harmful carbon
deposits, STIHL recommends using
STIHL HP Ultra 2-cycle engine oil or ask
your dealer for an equivalent fully
synthetic 2-cycle engine oil.
To meet the requirements of EPA and
CARB we recommend to use STIHL HP
Ultra oil.
Do not use BIA or TCW (two-stroke
water cooled) mix oils!
Use only STIHL 50:1 heavy-duty engine
oil or an equivalent quality two-stroke
engine oil for the fuel mix in models
equipped with a catalytic converter.
Take care when handling gasoline.
Avoid direct contact with the skin and
avoid inhaling fuel vapour.
The canister should be kept tightly
closed in order to avoid any moisture
getting into the mixture.
The fuel tank and the canister in which
fuel mix is stored should be cleaned
from time to time.
Fuel mix ratio
Only mix sufficient fuel for a few days
work, not to exceed 30 days of storage.
Store in approved safety fuel-canisters
only. When mixing, pour oil into the
canister first, and then add gasoline.
Examples
Gasoline Oil (STIHL 50:1 or equiva-
lent high-quality oils)
liters liters (ml)
1 0.02 (20)
5 0.10 (100)
10 0.20 (200)
15 0.30 (300)
20 0.40 (400)
25 0.50 (500)
Dispose of empty mixing-oil canisters
only at authorized disposal locations.
Fueling
Preparing the machine
N Before fueling, clean the filler cap
and the area around it so that dirt
cannot fall into the tank
N Always position the machine so that
the filler cap is facing upwards
WARNING
Never use a tool to open the bayonet
filler cap. The cap can be damaged and
fuel may escape.
Opening the twist lock
N Press the filler cap down as far as
possible by hand, then turn it
counterclockwise (approx. 1/8 turn)
and remove
TS 440
23

English
370BA094 KN
1.
2.
370BA095 KN
370BA019 KN
1
0813BA003 KN
Refueling
Take care not to spill fuel while fueling
and do not overfill the tank. STIHL
recommends use of the STIHL filling
system for fuel (special accessory).
Closing the filler cap
N Fit the cap and turn it until it
engages in the bayonet catch
N Press the cap down as far as
possible with your hand and turn it
clockwise (approx. 1/8 of a turn)
until it engages properly
Checking the lock
If the cap can be removed or the
markings do not align, close the cap
again – see sections "Closing the cap"
and "Checking the lock".
Changing the fuel pickup body every
year
N Drain the fuel tank
N Pull the fuel pickup body out of the
tank with a hook and disconnect it
from the hose
N Connect a new fuel pickup body to
the hose
N Return the fuel pickup body to the
tank
Starting / Stopping the
Engine
Checking the correct operation of the
abrasive wheel brake
Each time before starting work
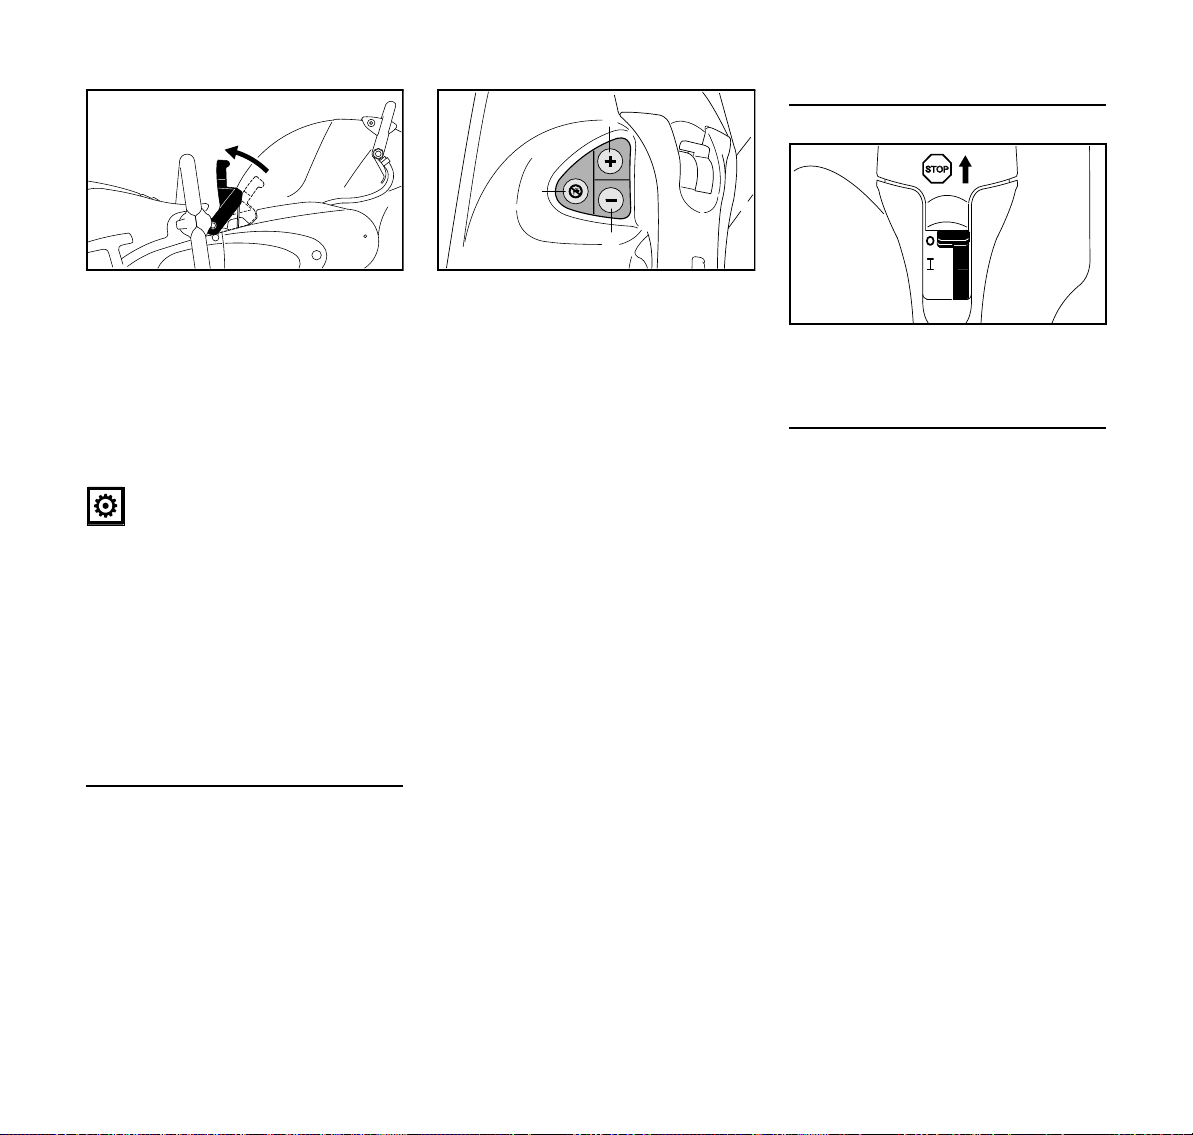
N Pull up brake lever (1) toward
handlebar and hold it there – it
should be possible to turn the
abrasive wheel by hand
N Release brake lever (1) –the
abrasive wheel brake is engaged –
the abrasive wheel cannot be
turned by hand
N If the abrasive wheel can be turned
without operating the brake
lever (1): Do not use the cut-off
machine. Consult a STIHL servicing
dealer. Have the abrasive wheel
brake repaired.
The brake lever must be free of dirt and
easily movable.
N Grip the cap – the cap is closed
properly if it cannot be removed and
the markings (arrows) on the cap
and fuel tank are aligned
24
TS 440

English
START
1
3
3
370BA020 KN
2
370BA055 KN
Choke
4
5
370BA101 KN
Starting the engine
N Press throttle trigger lockout (1) and
throttle trigger (2) simultaneously
N Hold both triggers down
N Set the slide control (3) to START
and hold it there
N Release the throttle trigger, slide
control and throttle trigger lockout in
succession – starting throttle
position
Versions with decompression valve
N Set the choke lever (4) according to
the engine temperature
c if engine is cold
e if engine is warm (even if the
engine is already running but is still
cold or if the warm engine was shut
off for less than 5 min)
f if engine is hot (if the hot engine
was switched off for longer than
5min)
N Press the button (5) of the
decompression valve before each
starting procedure
TS 440
25

English
6
370BA102 KN
0000-GXX-1580-A0
4
370BA057 KN
Choke
370BA058 KN
START
3
For all versions
N Press the bulb (6) of the manual fuel
pump 7-10 times – even if the bulb
is still filled with fuel
Starting
ground or any objects. There must
not be anyone within the swivel
range of the cut-off machine
N Make sure you have a firm footing
N Press the cut-off machine firmly
against the ground, holding the
handle with your left hand, thumb
wrapped round the handle
N Press the cut-off machine against
the ground with your right knee on
the shroud
N Pull the starter grip slowly with your
right hand until you feel it engage –
then give it a brisk strong pull – do
not pull out the starter rope all the
way
NOTICE
Do not let the starter grip snap back –
danger of breakage! Guide it back into
the housing in the opposite direction so
that it can rewind properly.
When the engine has turned over for the
first time
N Set choke lever (4) to f position
N Press the button of the
decompression valve (depending
on version)
N continue cranking
Once the engine is running
N Place the cut-off machine carefully
on the ground, ensuring that the
cutting wheel cannot touch the
26
N Blip the throttle trigger – slide
control (3) returns to the normal
position F – the engine idles
N Set choke lever to e position
TS 440
Switch off the engine
0813BA004 KN
2
1
370BA085 KN
3
370BA059 KN
START
3
English
N Move brake lever toward handlebar
and release – the abrasive wheel
brake is released
If the carburetor has been set correctly,
the cutting wheel should not rotate when
the engine is idling.
The cut-off machine is now ready for
use.
NOTICE
The abrasive wheel brake must be
released before opening the throttle and
before cutting.
Increasing the engine speed with the
abrasive wheel brake engaged will
cause damage to the engine, clutch and
abrasive wheel brake, even after only a
short time.
If the abrasive wheel brake cannot be
released with the engine running
The following causes are possible:
– Indication that the abrasive wheel
brake needs servicing
– Indication that the abrasive wheel
brake needs repair
N Hold down button (3) on control
panel for 3 seconds with the engine
running
N Pull brake handle in the direction of
the handlebar and release
If that releases the abrasive wheel
brake, the abrasive wheel brake needs
servicing.
N Carry on working and consult a
STIHL servicing dealer after
finishing the work
N Have the necessary servicing of the
abrasive wheel brake carried out
This procedure should be carried out
afresh each time the engine is started.
The number of such procedures is
recorded in the controller.
If the abrasive wheel brake still cannot
be released, the abrasive wheel brake
needs repair.
N Stop work and consult a STIHL
servicing dealer
N Have the abrasive wheel brake
repaired
N Set the slide control (3) to
STOP or 0
Additional hints on starting
If the engine does not start
The choke lever was not returned to f
in time after the engine turned over for
the first time.
N Set slide control to START =
starting throttle position
N Set choke lever to e = set warm
start – even if the engine is cold
N Pull the starter rope through 10-20
times to ventilate the combustion
chamber
N Restart the engine
If the tank has been drained completely
N Refueling
N Press the manual fuel pump bulb
7-10 times – even if it is full of fuel
N Set the choke lever in accordance
with the engine temperature
N Restart the engine
TS 440
27

English
1
2
3
4
370BA028 KN
1
1
Air Filter System
Basic information
The average filter life is more than
1 year. Do not dismantle the filter cover
or fit a new air filter unless there is a
noticeable loss of engine power.
In the long-life air filter system with the
cyclone pre-separation system, dirty air
is drawn in and deliberately rotated. The
larger and heavier particles carried in
the air are thus expelled and extracted.
Only pre-cleaned air enters the air filter
system and the result is extremely long
filter life.
Replacing the air filter
Only if there is a noticeable loss of
engine power
N Choke lever to c
N Undo the screws (1).
N Remove the filter cover (2) and
clean it
N Remove the main filter (3)
N Remove the auxiliary filter (4) –
ensuring that dirt does not enter the
intake area
N Clean the filter area
N insert new auxiliary filter and new
main filter
N Refit the filter cover
N Tighten down the screws
Only high-quality air filters should be
used, to protect the engine against
ingress of abrasive dust.
STIHL recommends the use of genuine
STIHL air filters. The high quality of
these parts will ensure troublefree
operation, a long service life for the
engine and extremely long filter life.
28
TS 440
English
370BA029 KN
370BA090 KN
Engine Management Adjusting the Carburetor
Exhaust emissions are controlled by the
design of the engine and components
(e.g. carburation, ignition, timing and
valve or port timing).
Basic information
The ignition system of this cut-off
machine is equipped with an electronic
speed limiter. The maximum speed
cannot be increased beyond a specified
limit.
The carburetor is equipped with a
factory-installed standard setting.
The carburetor has been adjusted for
optimum performance and fuel
efficiency in all operating states.
Preparing the machine
N Switch off engine
N Check the air filter – clean or replace
it if necessary
N Check the spark arresting screen in
the muffler – clean or replace it if
necessary
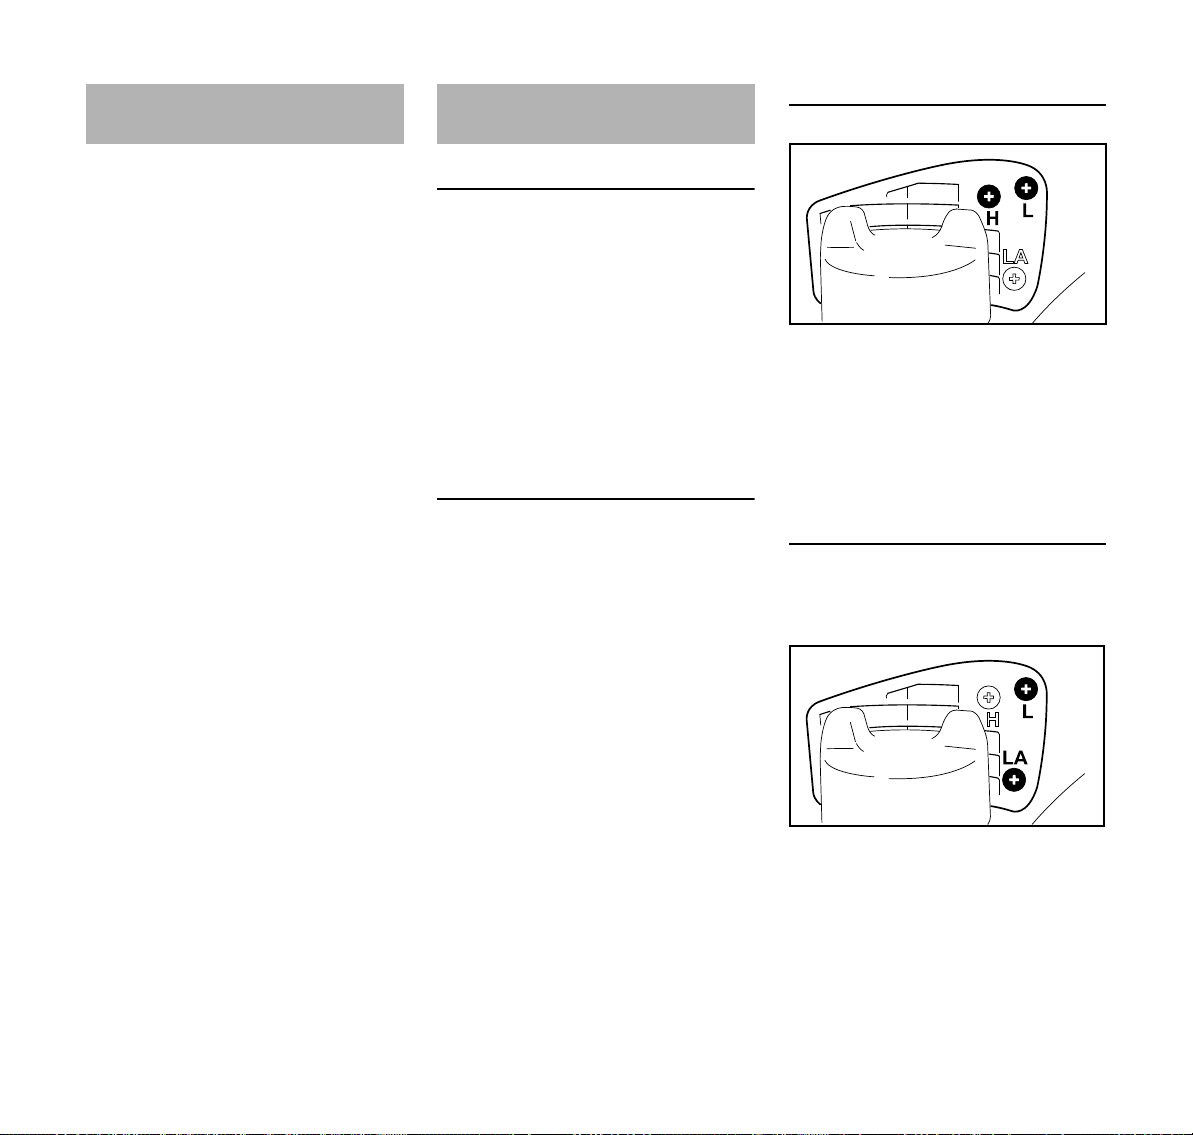
Standard setting
N Turn the high speed adjusting
screw (H) counterclockwise as far
as possible – max. 3/4 turn
N Turn the low speed adjusting
screw (L) clockwise as far as
possible – then turn it 3/4 turn
counterclockwise
Setting the idle speed
N Carry out the standard setting
N Start engine and let it warm up
TS 440
Engine stops when idling
N Turn the idle speed adjusting
screw (LA) clockwise until the
abrasive cutting wheel begins to
turn – then turn it back 1 turn
29

English
2
370BA031 KN
1
Abrasive cutting wheel rotates when
idling
N Turn the idle speed adjusting
screw (LA) counterclockwise until
the abrasive cutting wheel stops
rotating – then give the screw
another full turn in the same
direction
WARNING
If the abrasive cutting wheel continues to
rotate in idle even after adjustment, have
the cut-off machine checked by a
servicing dealer.
Speed erratic when idling; poor
acceleration (despite adjustment to LA
setting)
The idle setting is too lean.
N Turn the low speed adjusting
screw (L) approx. 1/4 turn
counterclockwise until the engine
runs and accelerates smoothly –
max. up to the stop
Idle speed cannot be increased
sufficiently via the idle speed adjusting
screw (LA), engine stops when
changing from part-load to idle speed
The idle setting is too rich.
N Turn low speed adjusting screw (L)
approx. 1/4 turn clockwise
Whenever the low speed adjusting
screw (L) has been adjusted, it is usually
also necessary to readjust the idle
speed adjusting screw (LA).
Correcting the carburetor setting for use
at high altitudes
The setting may have to be marginally
corrected if engine performance is
unsatisfactory at high altitudes:
N Carry out the standard setting
N Allow engine to warm up
N Turn the high speed adjusting
screw (H) slightly clockwise (leaner)
– max. up to the stop
NOTICE
After descending from a high altitude,
restore the carburetor setting to the
standard setting.
If you make the setting too lean it will
increase the risk of engine damage
through lack of lubrication and
overheating.
Spark Arresting Screen in
Muffler
N If engine performance deteriorates,
check the spark arresting screen in
the muffler.
WARNING
Wait until engine has cooled completely
before performing the following
operations.
N Remove screw (1)
N Pull the spark arresting screen (2)
upward out of the muffler
N Clean the soiled spark arresting
screen
N If the screen is damaged or heavily
carbonized, fit a new one
N Refit the spark arresting screen in
reverse order of steps
30
TS 440

English
1307BA030 KN
1
2
4
1307BA031 KN
3
000BA039 KN
A
1
000BA045 KN
Spark Plug
N If the engine is down on power,
difficult to start or runs poorly at idle
speed, first check the spark plug.
N Fit a new spark plug after about 100
operating hours – or sooner if the
electrodes are badly eroded. Install
only suppressed spark plugs of the
type approved by STIHL – see
"Specifications".
Removing the spark plug
N Switch off the engine – move stop
switch to STOP or 0
Checking the Spark Plug
N Clean dirty spark plug.
N Check electrode gap (A) and
readjust if necessary – see
"Specifications".
N Rectify the problems which have
caused fouling of the spark plug.
Possible causes are:
– Too much oil in fuel mix.
– Dirty air filter.
– Unfavorable running conditions.
N Use resistor type spark plugs with a
properly tightened adapter nut.
Installing the spark plug
N Fit the spark plug by hand and
screw it in
N Tighten spark plug with combination
wrench
N Press the spark plug boot firmly
onto the spark plug
N Position the cap for the spark plug
boot and screw it down
N Unscrew screw (1) and remove
cap (2) – screw (1) is secured in the
cap (2) to prevent loss
N Remove the spark plug boot (3).
N Unscrew the spark plug (4).
TS 440
WARNING
Arcing may occur if the adapter nut (1) is
loose or missing. Working in an easily
combustible or explosive atmosphere
may cause a fire or an explosion. This
can result result in serious injuries or
damage to property.
31

English
Storing the Machine
For periods of about 30 days or longer
N Drain and clean the fuel tank in a
well-ventilated area.
N Dispose of fuel properly in
accordance with local
environmental requirements.
N If a manual fuel pump is fitted: Press
the manual fuel pump at least 5
times.
N Start the engine and run it at idling
speed until it stops
N Remove cutting wheel
N Thoroughly clean the machine
N Store the machine in a dry and
secure location. Keep out of the
reach of children and other
unauthorized persons
32
TS 440

Maintenance and Care
The information applies in normal operating conditions. The specified intervals
must be shortened accordingly when working for longer than normal or under difficult cutting conditions (extensive dust, etc.).
Before starting work
At the end of work and/or
daily
Whenever tank is refilled
Weekly
Monthly
Yearly
If faulty
Complete machine
Controls Check operation XX
Cutting wheel brake, multi-rib belt
Manual fuel pump (if present)
Fuel pickup body in fuel tank
Fuel tank Clean X
Air filter (all filter components) Replace Only if there is a noticeable loss of engine power
Cooling air intake slits Clean X
Cylinder fins
Spark arresting screen in muffler
Water connection
Carburetor
Spark plug
Visual inspection (condition, leaks) XX
Clean X
Check operation X
Have them repaired by a specialist
1)
dealer
Inspect X
Have it repaired by a specialist
1)
dealer
Inspect X
Replace XXX
Have them cleaned by a specialist
1)
dealer
Inspect X
Clean or replace X
Inspect XX
Have it repaired by a specialist
1)
dealer
Check idle adjustment – abrasive cutting wheel must not rotate
Readjust idle speed X
Adjust electrode gap X
Replace after 100 hours’ operation
XX
X
X
If damaged
X
X
English
As required
TS 440
33

English
The information applies in normal operating conditions. The specified intervals
must be shortened accordingly when working for longer than normal or under difficult cutting conditions (extensive dust, etc.).
Before starting work
At the end of work and/or
daily
Whenever tank is refilled
Weekly
Monthly
Yearly
If faulty
All accessible screws, nuts and bolts (not
adjusting screws)
Antivibration elements
Abrasive cutting wheel
Supports/rubber buffers (underneath the
machine)
Safety information label Replace X
1)
STIHL recommends the STIHL servicing dealer
Tighten XX
Inspect XXX
Have them replaced by a servicing
1)
dealer
Inspect XX
Replace XX
Inspect X
Replace XX
X
If damaged
As required
34
TS 440

Main Parts
19
18
C
E
9
5
17
#
20
13
16
14
15
0000-GXX-1788-A0
10
11
8
7
4
A
B
3
1
2
6
D
English
1 Rear Handle
2 Throttle Trigger Lockout
3 Throttle Trigger
4 Slide Control
5 Starter Grip
6 Carburetor Adjusting Screws
7 Fuel Filler Cap
8 Water Attachment
9 Brake Lever
10 Adjusting Lever
11 Abrasive Cutting Wheel
12 Front Thrust Washer
13 Guard
14 Muffler
15 Spark Arresting Screen
16 Front Handle
17 Spark Plug Boot
18 Choke Lever
19 Manual Fuel Pump
20 Filter Cover
# Serial Number
A Warning Label
B Warning Label
C Warning Label
D Warning Label
E Warning Label
TS 440
35

English
Definitions
1 Rear Handle
Handle for the operator’s right hand.
2 Throttle Trigger Lockout
Must be depressed before the
throttle trigger can be activated.
3 Throttle Trigger
Controls the speed of the engine.
4 Slide Control
For starting, running and stopping
the machine. Keeps the throttle
partially open during starting and
turns off the ignition to stop the
engine.
5 Starter Grip
The grip of the pull cord for starting
the engine.
6 Carburetor Adjusting Screws
For adjusting the carburetor.
7 Fuel Filler Cap
For closing the fuel tank opening.
8 Water Attachment
For connecting the water supply
when wet cutting.
9Brake Lever
For releasing the wheel brake after
starting the engine.
10 Adjusting Lever
For adjusting the position of the
wheel guard.
11 Abrasive Cutting Wheel
The cutting attachment, either
composite or diamond.
12 Front Thrust Washer
Distributes clamping pressure of
mounting nut evenly over cutting
wheel.
13 Wheel Guard
Covers a portion of the wheel,
reducing the risk of injury from
kickback and inadvertent contact by
the operator and captures and redirects sparks, cutting debris or
wheel fragments.
14 Muffler
Reduces engine exhaust noises
and diverts exhaust gases away
from operator.
15 Spark Arresting Screen
Designed to reduce the risk of fire
from exhaust sparks.
16 Front Handle
Handle for the left hand.
17 Spark Plug Boot
Connects the spark plug to the
ignition lead.
18 Choke Lever
Eases starting by adjusting the fuel
mixture.
19 Manual Fuel Pump
Provides additional fuel feed for a
cold start.
20 Filter Cover
Covers and protects the air filter
element.
Clutch (Not illustrated)
Couples the engine to the belt
pulleys when the engine is
accelerated beyond idle speed.
Belt Pulleys (Not illustrated)
The mechanism that drives the
ribbed belts and the abrasive cutting
wheel.
Anti-Vibration System (Not
illustrated)
The anti-vibration system includes a
number of elements designed to
reduce the transmission of vibration
created by the engine and cutting
process to the operator.
36
TS 440

English
Specifications
EPA / CEPA
The Emission Compliance Period
referred to on the Emissions
Compliance Label indicates the number
of operating hours for which the engine
has been shown to meet Federal
emission requirements.
Category
A = 300 hours
B = 125 hours
C = 50 hours
Engine
STIHL single-cylinder two-stroke engine
Displacement: 66.7cm
Cylinder bore: 50 mm
Piston stroke: 34 mm
Engine power to
ISO 7293:
Idle speed: 2700 rpm
Max. spindle speed: 2750 rpm
Ignition system
Electronic magneto ignition
Spark plug
(suppressed): Bosch WSR 6 F
Electrode gap: 0.5 mm
3
3.2 kW (4.4 hp)
at 9000 1/min
This spark ignition system meets all
requirements of the Canadian
Interference-Causing Equipment
Standard CAN ICES-2/NMB-2.
Fuel system
All-position diaphragm carburetor with
integral fuel pump
3
Fuel tank capacity: 710 cm
(0.71 l)
Air filter
Main filter (paper filter) and flocked wire
mesh auxiliary filter
Weight
Without fuel, without abrasive cutting
wheel, with electronic water control:
11.1 kg
Abrasive cutting wheels
The specified maximum permitted
operating speed of the abrasive cutting
wheel must be greater than or equal to
the maximum spindle speed of the cutoff machine used.
Outside diameter: 350 mm
Max. thickness: 4.5 mm
Hole diameter/spindle
diameter: 20 mm
Tightening torque: 30 Nm
Composite resin abrasive cutting
wheels
Minimum outside diameter of
thrust washers:
1) 2)
103 mm
Maximum cutting depth: 3)125 mm
1)
For Japan, 118 mm
2)
For Australia, 118 mm
3)
When using thrust washers with an
outside diameter of 118 mm, the
maximum cutting depth is reduced
to 116 mm
Diamond abrasive cutting wheels
Minimum outside diameter of
thrust washers:
1)
103 mm
Maximum cutting depth: 3)125 mm
1)
For Japan, 118 mm
3)
When using thrust washers with an
outside diameter of 118 mm, the
maximum cutting depth is reduced
to 116 mm
TS 440
37

English
000BA073 KN
Maintenance and Repairs Disposal
Users of this machine may only carry out
the maintenance and service work
described in this user manual. All other
repairs must be carried out by a
servicing dealer.
STIHL recommends that you have
servicing and repair work carried out
exclusively by an authorized STIHL
servicing dealer. STIHL dealers are
regularly given the opportunity to attend
training courses and are supplied with
the necessary technical information.
When repairing the machine, only use
replacement parts which have been
approved by STIHL for this power tool or
are technically identical. Only use highquality replacement parts in order to
avoid the risk of accidents and damage
to the machine.
STIHL recommends the use of original
STIHL replacement parts.
Original STIHL parts can be identified by
the STIHL part number, the {
logo and the STIHL parts symbol K
(the symbol may appear alone on small
parts).
Observe all country-specific waste
disposal rules and regulations.
STIHL products must not be thrown in
the garbage can. Take the product,
accessories and packaging to an
approved disposal site for environmentfriendly recycling.
Contact your STIHL servicing dealer for
the latest information on waste disposal.
STIHL Limited Emission
Control Warranty Statement
This statement is given voluntarily,
based on the MOU (Memorandum of
Understanding) as agreed in April 1999
between Environmental Canada and
STIHL Limited
Your Warranty Rights and Obligations
STIHL Limited is pleased to explain the
Emission Control System Warranty on
your equipment type engine. In Canada
new 1999 and later model year small offroad equipment engines must be
designed, built and equipped, at the time
of sale, to meet the U.S. EPA
regulations for small non road engines.
The equipment engine must be free from
defects in materials and workmanship
which cause it to fail to conform with
U.S. EPA standards for the first two
years of engine use from the date of sale
to the ultimate purchaser.
STIHL Limited must warrant the
emission control system on your small
off-road engine for the period of time
listed below provided there has been no
abuse, neglect or improper maintenance
of your small off-road equipment engine.
Your emissions control system may
include parts such as the carburetor or
fuel-injection system, the ignition
system, and catalytic converter. Also
included may be hoses, belts,
connectors or other emission-related
assemblies.
Where a warrantable condition exists,
STIHL Limited will repair your small offroad equipment engine at no cost to you,
38
TS 440

English
including diagnosis (if the diagnostic
work is performed at an authorized
dealer), parts, and labor.
Manufacturer's Warranty Coverage
In Canada 1999 and later model year
small off-road equipment engines are
warranted for two years. If any emissionrelated part on your engine is defective,
the part will be repaired or replaced by
STIHL Limited free of charge.
Owner's Warranty Responsibilities:
As the small off-road equipment engine
owner, you are responsible for the
performance of the required
maintenance listed in your instruction
manual. STIHL Limited recommends
that you retain all receipts covering
maintenance on your small off-road
equipment engine, but STIHL Limited
cannot deny warranty solely for the lack
of receipts or for your failure to ensure
the performance of all scheduled
maintenance.
Any replacement part or service that is
equivalent in performance and durability
may be used in non-warranty
maintenance or repairs, and shall not
reduce the warranty obligations of the
engine manufacturer.
As the small off-road equipment engine
owner, you should be aware, however,
that STIHL Limited may deny you
warranty coverage if your small off-road
equipment engine or a part has failed
due to abuse, neglect, improper
maintenance or unapproved
modifications.
You are responsible for presenting your
small off-road equipment engine to a
STIHL service center as soon as a
problem exists. The warranty repairs will
be completed in a reasonable amount of
time, not to exceed 30 days.
If you have any questions regarding your
warranty rights and responsibilities,
please contact a STIHL customer
service representative at www.stihl.ca
or you can write to:
STIHL Ltd.,
1515 Sise Road
Box 5666
CA-LONDON ONTARIO; N6A 4L6
Coverage by STIHL Limited
STIHL Limited warrants to the ultimate
purchaser and each subsequent
purchaser that your small off-road
equipment engine will be designed, built
and equipped, at the time of sale, to
meet all applicable regulations. STIHL
Limited also warrants to the initial
purchaser and each subsequent
purchaser that your engine is free from
defects in materials and workmanship
which cause the engine to fail to conform
with applicable regulations for a period
of two years.
Warranty Period
The warranty period will begin on the
date the utility equipment engine is
purchased by the initial purchaser and
you have signed and sent back the
warranty card to STIHL Ltd. If any
emission-related part on your engine is
defective, the part will be replaced by
STIHL Limited at no cost to the owner.
Any warranted part which is not
scheduled for replacement as required
maintenance, or which is scheduled only
for regular inspection to the effect of
"repair or replace as necessary" will be
warranted for the warranty period. Any
warranted part which is scheduled for
replacement as required maintenance
will be warranted for the period of time
up to the first scheduled replacement
point for that part.
Diagnosis
You, as the owner, shall not be charged
for diagnostic labor which leads to the
determination that a warranted part is
defective. However, if you claim
warranty for a component and the
machine is tested as non-defective,
STIHL Limited will charge you for the
cost of the emission test. Mechanical
diagnostic work will be performed at an
authorized STIHL servicing dealer.
Emission test may be performed either
at
STIHL Incorporated,
536 Viking Drive, P.O. Box 2015,
Virginia Beach, VA 23452
or at any independent test laboratory.
Warranty Work
STIHL Limited shall remedy warranty
defects at any authorized STIHL
servicing dealer or warranty station. Any
such work shall be free of charge to the
owner if it is determined that a warranted
part is defective. Any manufacturerapproved or equivalent replacement
part may be used for any warranty
maintenance or repairs on emissionrelated parts and must be provided
without charge to the owner. STIHL
Limited is liable for damages to other
engine components caused by the
failure of a warranted part still under
warranty.
TS 440
39

English
The following list specifically defines the
emission-related warranted parts:
– Air Filter
– Carburetor (if applicable)
– Fuel Pump
– Choke (Cold Start Enrichment
System) (if applicable)
– Control Linkages
– Intake Manifold
– Magneto or Electronic Ignition
System (Ignition Module or
Electronic Control Unit)
– Fly Wheel
– Spark Plug
– Injection Valve (if applicable)
– Injection Pump (if applicable)
– Throttle Housing (if applicable)
– Cylinder
– Muffler
– Catalytic Converter (if applicable)
– Fuel Tank
– Fuel Cap
– Fuel Line
– Fuel Line Fittings
– Clamps
– Fasteners
Where to make a Claim for Warranty
Service
Bring the product to any authorized
STIHL servicing dealer and present the
signed warranty card.
Maintenance Requirements
The maintenance instructions in this
manual are based on the application of
the recommended 2-stroke fuel-oil
mixture (see also instruction "Fuel").
Deviations from this recommendation
regarding quality and mixing ratio of fuel
and oil may require shorter maintenance
intervals.
Limitations
This Emission Control Systems
Warranty shall not cover any of the
following:
1. repair or replacement required
because of misuse, neglect or lack
of required maintenance
2. repairs improperly performed or
replacements not conforming to
STIHL Limited specifications that
adversely affect performance
and/or durability, and alterations or
modifications not recommended or
approved in writing by STIHL
Limited
3. replacement of parts and other
services and adjustments
necessary for required maintenance
at and after the first scheduled
replacement point
40
TS 440

Table des matières
français
Indications concernant la présente
Notice d'emploi 42
Prescriptions de sécurité et
techniques de travail 42
Exemples d'utilisation 52
Disques à découper 56
Disques en résine synthétique 57
Disques diamantés 57
Frein de disque 60
Notice d'emploi d'origineImprimé sur papier blanchi sans chlore
Commande électronique
d'arrosage 62
Montage / remplacement du disque 63
Carburant 65
Ravitaillement en carburant 66
Mise en route / arrêt du moteur 67
Système de filtre à air 71
Gestion moteur 72
Réglage du carburateur 72
Grille pare-étincelles dans le
silencieux 74
Bougie 74
Rangement 75
L'encre d'imprimerie contient des huiles végétales, le papier
est recyclable.
Instructions pour la maintenance et
l'entretien 76
Principales pièces 78
Caractéristiques techniques 80
Instructions pour les réparations 81
Mise au rebut 81
Garantie de la Société STIHL
Limited relative au système
antipollution 81
Chère cliente, cher client,
nous vous félicitons d'avoir choisi un
produit de qualité de la société STIHL.
Ce produit a été fabriqué avec les
procédés les plus modernes et les
méthodes de surveillance de qualité les
plus évoluées. Nous mettons tout en
œuvre pour que cette machine vous
assure les meilleurs services, de telle
sorte que vous puissiez en être
parfaitement satisfait.
Pour toute question concernant cette
machine, veuillez vous adresser à votre
revendeur ou directement à
l'importateur de votre pays.
Dr. Nikolas Stihl
© ANDREAS STIHL AG & Co. KG, 2021
0458-520-8221-B. VA0.J21.
0000008171_004_F
TS 440
La présente Notice d'emploi est protégée par des droits d'auteur. Tous droits réservés, en particulier tout droit de copie, de traduction et de traitement avec des systèmes électroniques quelconques.
41

français
Indications concernant la
présente Notice d'emploi
Pictogrammes
Les pictogrammes appliqués sur la
machine sont expliqués dans la
présente Notice d'emploi.
Suivant la machine et son équipement
spécifique, les pictogrammes suivants
peuvent y être appliqués.
Réservoir à carburant ;
mélange d'essence et
d'huile moteur
Actionner la soupape de
décompression
Actionner la pompe
d'amorçage manuelle
Tirer la poignée de
lancement
Actionner le levier de
frein et desserrer le frein
de disque
Repérage des différents types de textes
AVERTISSEMENT
Avertissement contre un risque
d'accident et de blessure ainsi que de
graves dégâts matériels.
AVIS
Avertissement contre un risque de
détérioration de la machine ou de
certains composants.
Développement technique
La philosophie de STIHL consiste à
poursuivre le développement continu de
toutes ses machines et de tous ses
dispositifs ; c'est pourquoi nous devons
nous réserver tout droit de modification
de nos produits, en ce qui concerne la
forme, la technique et les équipements.
On ne pourra donc en aucun cas se
prévaloir des indications et illustrations
de la présente Notice d'emploi à l'appui
de revendications quelconques.
Prescriptions de sécurité et
techniques de travail
En travaillant avec la
découpeuse à disque, il
faut respecter des prescriptions de sécurité
particulières, parce que
le disque à découper
tourne à une très haute
vitesse.
Avant la première mise
en service, lire attentivement et intégralement la
présente Notice d'emploi.
La conserver précieusement pour pouvoir la
relire lors d'une utilisation ultérieure. Le nonrespect des consignes de
sécurité peut entraîner un
danger de mort.
Respecter les prescriptions de sécurité
nationales spécifiques publiées par ex.
par les caisses professionnelles
d'assurances mutuelles, caisses de
sécurité sociale, services pour la
protection du travail et autres
organismes compétents.
Les employeurs des pays de l'Union
Européenne doivent impérativement
respecter la directive 2009/104/CE –
Prescriptions minimales de sécurité et
de santé pour l'utilisation par les
travailleurs au travail d'équipements de
travail.
Une personne qui travaille pour la
première fois avec la machine doit
demander au vendeur ou à une autre
42
TS 440

français
personne compétente de lui montrer
comment l'utiliser en toute sécurité – ou
participer à un stage de formation.
Les jeunes encore mineurs ne sont pas
autorisés à travailler avec cette machine
– une seule exception est permise pour
des apprentis de plus de 16 ans
travaillant sous surveillance.
Veiller à ce que des spectateurs
éventuels, en particulier des enfants, ou
des animaux restent à une distance
suffisante.
Lorsque la machine n'est pas utilisée, la
ranger en veillant à ce qu'elle ne
présente aucun danger pour d'autres
personnes. Conserver la machine à un
endroit adéquat, de telle sorte qu'elle ne
puisse pas être utilisée sans
autorisation.
L'utilisateur est responsable des
blessures qui pourraient être infligées à
d'autres personnes, de même que des
dégâts matériels causés à autrui.
Ne confier la machine qu'à des
personnes familiarisées avec ce modèle
et sa manipulation – toujours y joindre la
Notice d'emploi.
L'utilisation de dispositifs à moteur
bruyants peut être soumise à des
prescriptions nationales ou locales
précisant les créneaux horaires à
respecter.
L'utilisateur de la machine doit être
reposé, en bonne santé et en bonne
condition physique.
Il est conseillé à toute personne qui ne
doit pas se fatiguer pour des raisons de
santé de consulter son médecin pour
savoir si l’utilisation d’un dispositif à
moteur ne présente aucun risque.
Uniquement pour les personnes qui
portent un stimulateur cardiaque : le
système d'allumage de cette machine
engendre un champ électromagnétique
de très faible intensité. Une influence sur
certains types de stimulateurs
cardiaques ne peut pas être totalement
exclue. Afin d'écarter tout risque pour la
santé, STIHL recommande aux
personnes portant un stimulateur
cardiaque de consulter leur médecin
traitant et le fabricant du stimulateur
cardiaque.
Il est interdit de travailler avec la
machine après avoir consommé de
l'alcool ou de la drogue ou bien après
avoir pris des médicaments qui risquent
d'affecter la réactivité.
En présence de conditions
météorologiques défavorables (pluie,
neige, gel, vent), remettre le travail à
plus tard – risque d’accident accru !
Cette machine est conçue
exclusivement pour le découpage. Elle
ne convient pas pour la coupe du bois
ou d'objets en bois.
La poussière d'amiante est
extrêmement nocive – ne jamais
découper de l'amiante !
L'utilisation de cette machine pour
d'autres travaux est interdite et pourrait
provoquer des accidents ou
endommager la machine.
N'apporter aucune modification à cette
machine – cela risquerait d'en
compromettre la sécurité. STIHL décline
toute responsabilité pour des blessures
ou des dégâts matériels occasionnés en
cas d'utilisation d'équipements
rapportés non autorisés.
Il faut exclusivement monter des
disques à découper qui sont autorisés
par STIHL pour cette machine ou alors
des pièces techniquement équivalentes.
Pour toute question à ce sujet,
s'adresser à un revendeur spécialisé.
Utiliser exclusivement des disques à
découper ou des accessoires de haute
qualité. Sinon, des accidents pourraient
survenir ou la machine risquerait d'être
endommagée.
STIHL recommande d’utiliser des
disques à découper et des accessoires
d'origine STIHL. Leurs caractéristiques
sont optimisées tout spécialement pour
ce produit, compte tenu des exigences
de l'utilisateur.
Pour le nettoyage de cette machine, ne
pas utiliser un nettoyeur haute pression.
Le puissant jet d'eau risquerait
d'endommager certaines pièces de la
machine.
Ne pas nettoyer la machine au jet d'eau.
TS 440
43
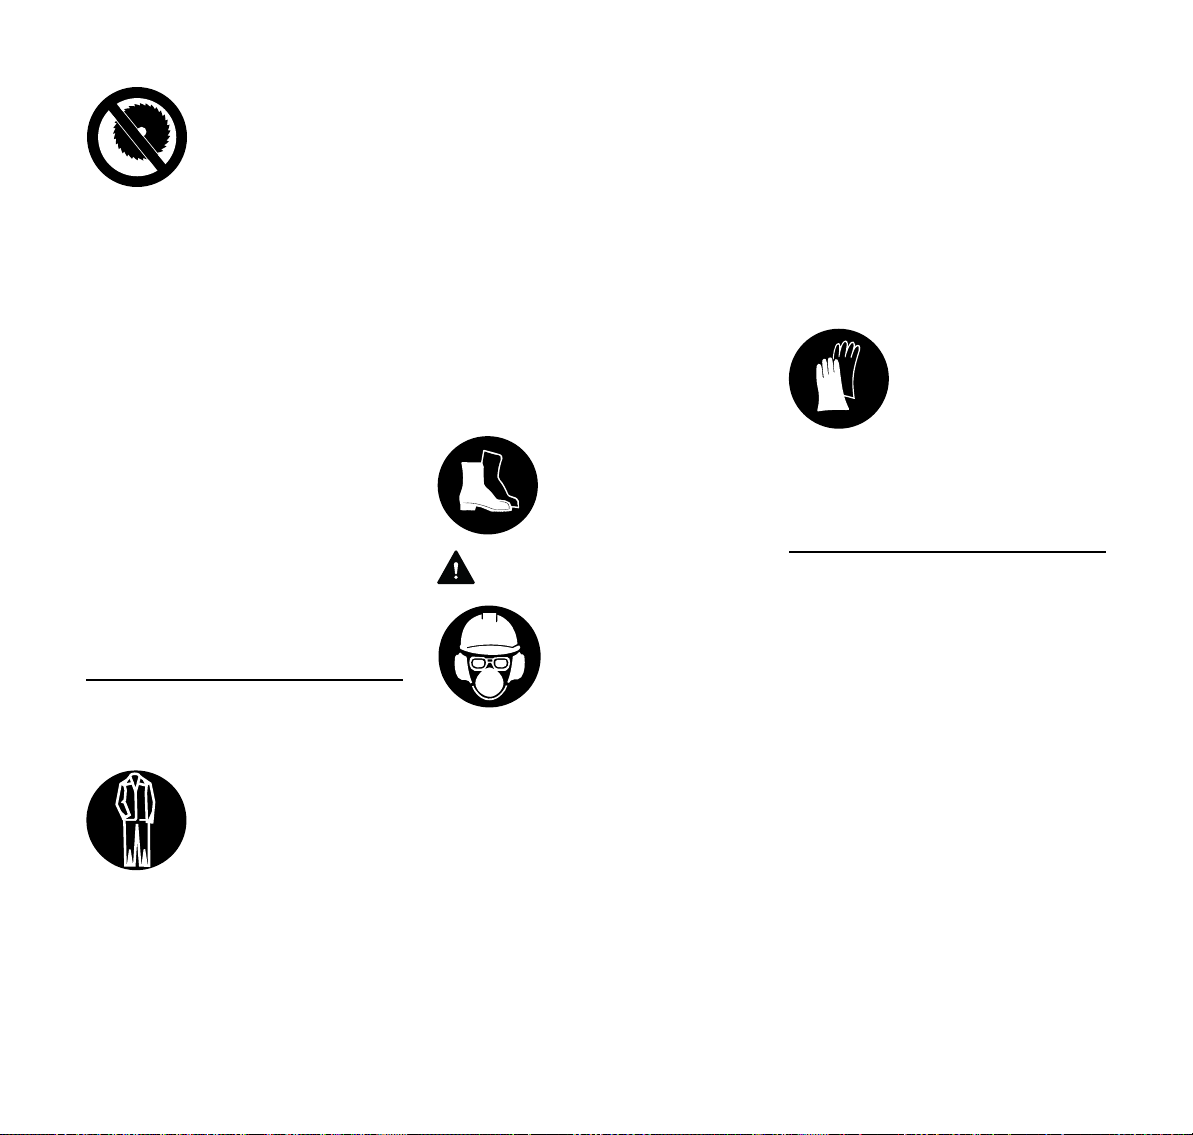
français
Ne jamais utiliser des
scies circulaires, des
outils à plaquettes de carbure, des outils de
désincarcération ou des
outils pour le sciage du
bois, ni tout autre outil
denté – risque de blessures
mortelles !Contrairement
aux disques à découper
qui tournent régulièrement en enlevant des
particules, les dents
d'une scie circulaire en
rotation peuvent s'accrocher dans la matière à
couper. Cela se manifeste par une coupe
saccadée et peut provoquer des réactions
incontrôlées de la
machine, engendrant des
forces de réaction extrêmement dangereuses
(rebond).
Vêtements et équipements
Porter des vêtements et équipements de
protection réglementaires.
Les vêtements doivent
être appropriés et ne
doivent pas être gênants.
Porter des vêtements
bien ajustés – une combinaison, mais pas une
blouse de travail.
Pour le découpage d'éléments en acier,
porter des vêtements en matières
difficilement inflammables (par ex. en
cuir ou en coton spécialement traité pour
réduire le risque d'inflammation) – ne
pas porter des tissus en fibres
synthétiques – risque d'inflammation par
les étincelles projetées !
Les vêtements ne doivent pas non plus
être enduits de matières inflammables
(copeaux, carburant, huile etc.).
Ne pas porter des vêtements flottants,
un châle, une cravate, des bijoux – qui
risqueraient de se prendre dans les
pièces mobiles de la machine. Les
personnes aux cheveux longs doivent
les nouer et les assurer de telle sorte
qu'ils soient maintenus au-dessus des
épaules.
Porter des chaussures de
sécurité avec semelle
antidérapante et coquille
d'acier.
AVERTISSEMENT
Pour réduire le risque de
blessure oculaire, porter
des lunettes de protection couvrant étroitement
les yeux et conformes à
la norme EN 166. Veiller
à ce que les lunettes de
protection soient bien
ajustées.
Porter un casque de sécurité en cas de
risque de chute d'objets.
Au cours du travail, des poussières
(par ex. des matières cristallines
provenant de l'objet à couper), des
vapeurs et des fumées peuvent être
dégagées – risque pour la santé !
En cas de dégagement de poussière,
toujours porter un masque
antipoussière.
En cas de risque de dégagement de
vapeurs ou de fumées (par ex. au
découpage de matériaux composites),
porter un masque respiratoire.
Porter un dispositif antibruit
« individuel » – par ex. des capsules
protège-oreilles.
Porter des gants de travail robustes en matériau
résistant (par ex. en cuir).
STIHL propose une gamme complète
d'équipements pour la protection
individuelle.
Transport de la machine
Toujours arrêter le moteur.
Porter la machine seulement par la
poignée tubulaire – avec le disque à
découper orienté vers l'arrière – le
silencieux très chaud se trouvant du
côté opposé au corps.
Ne pas toucher aux parties très chaudes
de la machine, tout spécialement à la
surface du silencieux – risque de
brûlure !
Ne jamais transporter la machine avec
le disque monté – le disque risquerait de
casser !
Pour le transport dans un véhicule :
assurer la machine de telle sorte qu'elle
ne risque pas de se renverser, d'être
endommagée ou de perdre du
carburant.
44
TS 440

français
Ravitaillement
L'essence est un carburant extrêmement
inflammable – rester à
une distance suffisante
de toute flamme ou
source d'inflammation –
ne pas renverser du carburant – ne pas fumer.
Arrêter le moteur avant de refaire le
plein.
Ne pas refaire le plein tant que le moteur
est très chaud – du carburant peut
déborder – risque d'incendie !
Ouvrir prudemment le bouchon du
réservoir à carburant, afin que la
surpression interne s'échappe
lentement et que du carburant ne soit
pas éjecté.
Faire le plein exclusivement à un endroit
bien aéré. Si l'on a renversé du
carburant, essuyer immédiatement la
machine. Ne pas se renverser du
carburant sur les vêtements – le cas
échéant, se changer immédiatement.
De la poussière peut s’accumuler sur le
bloc moteur, notamment dans la zone
du carburateur. Il y a risque d’incendie si
la poussière est imprégnée d’essence.
Éliminer régulièrement la poussière du
bloc moteur.
S'assurer qu'il n'y a pas
de fuites ! Si l'on constate
une fuite de carburant, ne
pas mettre le moteur en
marche – danger de mort
par suite de brûlures !
Bouchon de réservoir à baïonnette
Ne jamais utiliser un outil pour ouvrir ou
fermer le bouchon de réservoir à
baïonnette. En effet, cela pourrait
endommager le bouchon et du
carburant risquerait de s'échapper.
Après le ravitaillement, refermer
soigneusement le bouchon à baïonnette
du réservoir à carburant.
Découpeuse à disque, palier de broche
L'état impeccable du palier de broche
garantit l'absence de faux-rond et de
voile du disque diamanté – le cas
échéant, le faire contrôler par le
revendeur spécialisé.
Disques à découper
Choix des disques à découper
Les disques à découper doivent être
expressément homologués pour le
découpage à main levée. Ne pas utiliser
d'autres disques ou appareils auxiliaires
– risque d'accident !
Des disques à découper sont proposés
pour les matières les plus diverses :
tenir compte des marques
d'identification appliquées sur les
disques.
STIHL recommande de travailler
systématiquement avec arrosage.
Utiliser uniquement des
disques à découper
ayant le diamètre extérieur prescrit.
Le diamètre de l'alésage
pour broche, dans le
disque, et l'arbre de la
découpeuse doivent
coïncider.
S'assurer que l'alésage pour broche
n'est pas endommagé. Ne pas utiliser
des disques à découper dont l'alésage
pour broche est endommagé – risque
d'accident !
La vitesse de rotation
maximale admissible
pour le disque à découper doit être égale ou
supérieure au régime
maximal de la broche de
la découpeuse à disque !
– Voir chapitre
« Caractéristiques
techniques ».
Avant de monter des disques à
découper qui ont déjà servi, s'assurer
qu'ils ne présentent aucun défaut :
fissures, ébréchures, crènelures,
manque de planéité, signes de fatigue
sur le corps, endommagement ou perte
d'un segment, traces de surchauffe
(variation de teinte) ou
endommagement de l'alésage de
centrage sur la broche.
Ne jamais utiliser des disques à
découper fissurés, ébréchés ou
déformés.
TS 440
45

français
Des disques diamantés de mauvaise
qualité ou non homologués peuvent
vibrer pendant le découpage. Par suite
de ce flottement, de tels disques
diamantés risquent d'être fortement
freinés ou de se coincer dans la coupe –
risque de rebond ! Un rebond risque de
causer des blessures mortelles !
Remplacer immédiatement les disques
diamantés qui accusent un flottement
continuel, ou même seulement
sporadique.
Ne jamais redresser des disques
diamantés.
Ne pas utiliser un disque à découper
tombé sur le sol – les disques à
découper endommagés peuvent éclater
– risque d'accident !
Avec les disques en résine synthétique,
respecter la date limite d'utilisation.
Montage des disques à découper
Contrôler la broche de la découpeuse à
disque, ne pas employer une
découpeuse dont la broche est
endommagée – risque d'accident !
En cas de disques diamantés, tenir
compte des flèches indiquant le sens de
rotation prescrit.
Positionner correctement la rondelle de
pression avant – serrer fermement la vis
de serrage – faire tourner le disque à la
main, en contrôlant le faux-rond et le
voile.
Stockage des disques à découper
Entreposer les disques au sec et à l'abri
du gel, sur une surface plane, à des
températures constantes – risque de
cassure et d'éclatement !
Toujours veiller à ce que le disque ne
cogne pas sur le sol ou contre des objets
quelconques.
Avant la mise en route du moteur
S'assurer que la découpeuse à disque
se trouve en parfait état pour un
fonctionnement en toute sécurité –
conformément aux indications des
chapitres correspondants de la Notice
d'emploi :
– Contrôler l'étanchéité du système
d'alimentation en carburant, en
examinant tout particulièrement les
pièces visibles telles que le
bouchon du réservoir, les raccords
de flexibles, la pompe d'amorçage
manuelle (seulement sur les
machines munies d'une pompe
d'amorçage manuelle). Ne pas
démarrer le moteur en cas de
manque d'étanchéité ou
d'endommagement – risque
d'incendie ! Avant de remettre la
machine en service, la faire réparer
par le revendeur spécialisé.
– Disque convenant pour la matière à
découper, en parfait état et
correctement monté (sens de
rotation, bonne fixation).
– Contrôler la bonne fixation du capot
protecteur – si le capot protecteur
est desserré, consulter le revendeur
spécialisé.
– La gâchette d'accélérateur et le
blocage de gâchette doivent
fonctionner facilement – la gâchette
d'accélérateur doit faire ressort et
revenir d'elle-même en position de
ralenti.
– Le curseur combiné / levier de
commande universel / commutateur
d'arrêt doit pouvoir être facilement
amené dans la position STOP ou 0.
– Contrôler le serrage du contact de
câble d'allumage sur la bougie – un
contact desserré peut provoquer un
jaillissement d'étincelles risquant
d'enflammer le mélange carburé qui
aurait pu s'échapper – risque
d'incendie !
– Contrôler le fonctionnement du frein
de disque – lorsque le levier de frein
est actionné, on peut faire tourner le
disque à la main – après le
relâchement du levier de frein, on
ne peut plus faire tourner le disque.
Lorsque le levier de frein n'est pas
actionné, il ne doit pas être possible
de faire tourner le disque.
– N’apporter aucune modification aux
dispositifs de commande et de
sécurité.
– Les poignées doivent être propres
et sèches – sans huile ni autres
salissures – un point très important
pour que l'on puisse manier la
découpeuse en toute sécurité.
– Pour le travail avec arrosage,
prévoir une quantité d'eau
suffisante.
Il est interdit d'utiliser la machine si elle
ne se trouve pas en parfait état de
fonctionnement – risque d'accident !
Mise en route du moteur
Aller au moins à 3 mètres du lieu où l'on
a fait le plein et ne pas lancer le moteur
dans un local fermé.
46
TS 440

français
180BA022 KN
Pour lancer le moteur, il faut
impérativement se tenir bien d'aplomb,
sur une aire stable et plane – tenir
fermement la machine – le disque ne
doit toucher ni le sol, ni un objet
quelconque et il ne doit pas non plus se
trouver dans la coupe.
À la mise en route de la machine, le frein
de disque est engagé. Si le disque à
découper est immédiatement entraîné à
la mise en route, ne pas travailler avec la
découpeuse à disque – consulter le
revendeur spécialisé. Faire réparer le
frein de disque.
La machine doit être maniée par une
seule personne – ne pas tolérer la
présence d'autres personnes dans la
zone de travail – pas même à la mise en
route du moteur.
Ne pas lancer le moteur en tenant la
machine à bout de bras – pour la mise
en route du moteur, procéder comme
décrit dans la Notice d'emploi.
Après le relâchement de la gâchette
d'accélérateur, le disque tourne encore
pendant quelques instants – par inertie –
risque de blessure !
Maintien et guidage de la machine
Utiliser la découpeuse exclusivement
pour le découpage en tenant la machine
à la main.
Découpage en tenant la machine à la
main
Toujours tenir fermement la machine à
deux mains : main droite sur la poignée
arrière – ceci est également valable pour
les gauchers. Pour pouvoir guider la
machine en toute sécurité, empoigner
fermement la poignée tubulaire et la
poignée de commande en les entourant
avec les pouces.
Lorsqu'on déplace une découpeuse
dans le sens de la flèche alors que le
disque est en rotation, cela engendre
une force qui a tendance à faire basculer
la machine.
L'objet à couper doit être posé
fermement sur le sol et il faut toujours
travailler en amenant la machine vers
l'objet à découper – ne jamais procéder
à l'inverse.
Capot protecteur
002BA549 AM
Ajuster correctement le capot protecteur
qui recouvre le disque : de telle sorte
que les particules de l'objet à découper
soient déviées dans le sens opposé à
l'utilisateur et à la machine.
Surveiller l'orientation du jet de
particules projetées.
Pendant le travail
En cas d'urgence ou de danger
imminent, arrêter immédiatement le
moteur – placer le curseur combiné / le
levier de commande universel / le
commutateur d'arrêt sur la position
STOP ou 0.
Veiller à ce que le ralenti soit
correctement réglé de telle sorte
qu'après le relâchement de la gâchette
d'accélérateur le disque ne soit plus
entraîné et s'arrête.
Contrôler régulièrement et rectifier si
nécessaire le réglage du ralenti. Si, avec
le frein de disque desserré, le disque est
entraîné au ralenti, malgré un réglage
correct, faire réparer la machine par le
revendeur spécialisé.
002BA550 AM
TS 440
47

français
Dégager l'aire de travail – ne pas
trébucher sur des obstacles, dans des
trous ou des fossés.
Faire particulièrement attention sur un
sol glissant – mouillé ou couvert de
neige – de même qu'en travaillant à flanc
de coteau ou sur un sol inégal etc. –
risque de dérapage !
Ne pas travailler sur une échelle – ou sur
un échafaudage instable – jamais à bras
levés – jamais d'une seule main – risque
d'accident !
Toujours se tenir dans une position
stable et sûre.
Ne pas travailler seul – toujours rester à
portée de voix d'autres personnes, pour
pouvoir appeler quelqu'un au secours si
nécessaire.
Ne tolérer la présence d'aucune autre
personne dans la zone de travail –
garder une distance suffisante par
rapport à d'autres personnes, pour ne
pas les exposer au bruit et aux risques
dus aux particules et objets projetés.
En travaillant avec des protège-oreilles,
il faut faire tout particulièrement
attention – des bruits signalant un
danger (cris, signaux sonores etc.) sont
moins bien perceptibles.
Faire des pauses à temps.
Travailler calmement, de manière bien
réfléchie – seulement dans de bonnes
conditions de visibilité et d'éclairage.
Prendre les précautions utiles pour
exclure le risque de blesser d'autres
personnes.
Dès que le moteur est en
marche, il dégage des
gaz d'échappement
toxiques. Ces gaz
peuvent être inodores et
invisibles, et renfermer
des hydrocarbures et du
benzène imbrûlés. Ne
jamais travailler avec
cette machine dans des
locaux fermés ou mal
aérés – pas non plus si le
moteur est équipé d'un
catalyseur.
En travaillant dans des fossés, des
dépressions de terrain ou des espaces
restreints, toujours prendre soin
d'assurer une ventilation suffisante –
danger de mort par intoxication !
En cas de nausée, de maux de tête, de
troubles de la vue (par ex.
rétrécissement du champ de vision) ou
de l'ouïe, de vertige ou de manque de
concentration croissant, arrêter
immédiatement le travail – ces
symptômes peuvent, entre autres,
provenir d'une trop forte concentration
de gaz d'échappement dans l'air
ambiant – risque d'accident !
Ne pas fumer en travaillant ou à
proximité de la machine – risque
d'incendie !
Si la machine a été soumise à des
sollicitations sortant du cadre de
l'utilisation normale (par ex. si elle a été
soumise à des efforts violents, en cas de
choc ou de chute), avant de la remettre
en marche, il faut impérativement
s'assurer qu'elle se trouve en parfait état
de fonctionnement – voir également
« Avant la mise en route du moteur ».
Contrôler tout particulièrement
l'étanchéité du système de carburant et
la fiabilité des dispositifs de sécurité. Il
ne faut en aucun cas continuer d'utiliser
la machine si la sécurité de son
fonctionnement n'est pas garantie. En
cas de doute, consulter le revendeur
spécialisé.
Ne pas travailler avec la commande
d'accélérateur en position de démarrage
– dans cette position de la gâchette
d'accélérateur, la régulation du régime
du moteur n'est pas possible.
Ne jamais toucher un disque en rotation
avec la main ou toute autre partie du
corps.
Examiner l'aire de travail. Éviter tout
risque d'endommagement de conduites
ou de câbles électriques.
Il est interdit d'utiliser la machine à
proximité de matières combustibles et
de gaz inflammables.
Ne pas couper des tuyaux, des fûts
métalliques ou d'autres conteneurs sans
être certain qu'ils ne renferment pas de
substances volatiles ou inflammables.
Ne pas laisser tourner le moteur sans
surveillance. Arrêter le moteur avant de
quitter la machine (par ex. pour faire une
pause).
À l'arrêt du moteur, le frein de disque est
engagé. Si l'on pose la découpeuse sur
le sol avec le disque en rotation et que
l'on arrête le moteur dans cette position
de la machine, à l'enclenchement du
frein de disque la découpeuse peut
basculer vers l'avant et le disque peut
alors entrer en contact avec le sol – et
causer des dégâts matériels !
48
TS 440

Avant de poser la découpeuse à disque
au sol :
– Arrêter le moteur.
– Attendre que le disque soit arrêté ou
freiner le disque, jusqu'à l'arrêt, en
le maintenant prudemment en
contact avec une surface dure
(par ex. une dalle de béton).
Vérifier fréquemment le
disque à découper – le
remplacer immédiatement s'il présente des
fissures, des bombements ou d'autres
dommages (par ex. des
traces de surchauffe), car
il pourrait casser – risque
d'accident !
En cas de variation des caractéristiques
de la machine au découpage (par ex.
plus fortes vibrations, rendement de
coupe réduit), interrompre le travail et
éliminer les causes de ce changement.
Forces de réaction
Les forces de réaction les plus
fréquentes sont le rebond et la traction.
Risques découlant du
rebond – le rebond peut
causer des blessures
mortelles.
En cas de rebond (kick-back), la
découpeuse est brusquement projetée
vers l'utilisateur qui ne peut plus
contrôler la machine.
Un rebond se produit par ex. lorsque le
disque
– se coince – surtout dans le quart
supérieur ;
– est fortement freiné en frottant
contre un objet solide.
Frein de disque QuickStop
Lorsqu'il se déclenche, le frein de disque
immobilise le disque en une fraction de
seconde –
voir le chapitre « Frein de disque » de la
présente Notice d'emploi.
Pour réduire le risque de rebond :
– Travailler de façon réfléchie, en
appliquant la technique qui
convient.
– Toujours prendre la découpeuse à
deux mains et la tenir fermement.
002BA551 AM
– Dans la mesure du possible, ne pas
couper avec le quart supérieur du
disque. Faire très attention en
introduisant le disque dans une
coupe – ne pas le gauchir ou
l'introduire en frappant ou en
forçant.
– Éviter tout effet de resserrage de la
fente de coupe – la partie coupée ne
doit pas freiner le disque.
– Il faut toujours s'attendre à ce que,
par suite d'un déplacement de
l'objet à découper ou pour une autre
raison quelconque, la coupe se
resserre et coince le disque.
français
002BA552 AM
002BA555 AM
TS 440
49

français
002BA554 AM
– Fixer solidement l'objet à découper
et le soutenir de telle sorte que la
coupe reste ouverte pendant et
après le découpage.
– C'est pourquoi les objets à
découper ne doivent pas former un
pont et ils doivent être bien calés
pour qu'ils ne puissent pas rouler,
glisser ou vibrer.
– Après avoir dégagé un tuyau, le
soutenir par un moyen stable et
offrant une portance suffisante et, le
cas échéant, le caler avec des coins
– toujours faire attention aux
éléments de calage glissés sous le
tuyau et veiller également à la
stabilité du sol – les matériaux des
sous-couches peuvent s'émietter et
s'affaisser.
– Pour le découpage avec des
disques diamantés, un arrosage est
nécessaire.
Traction
Lorsque le disque touche la surface
supérieure de l'objet à découper, la
découpeuse est attirée vers l'avant,
dans le sens opposé à l'utilisateur.
Travail à la découpeuse
0000-GXX-4256-A0
Introduire le disque dans
la fente en le présentant
à la verticale, sans le
gauchir ni le soumettre à
un effort latéral.
Ne pas utiliser la machine
pour un meulage de côté
ou un dégrossissage.
Se tenir de telle sorte qu'aucune partie
du corps ne se trouve dans le
prolongement du plan de coupe du
disque. Veiller à disposer d'une liberté
de mouvement suffisante. En particulier
pour le travail dans des fosses ou des
tranchées, veiller à ce qu'il y ait toujours
un espace suffisant pour l'utilisateur et
pour la chute de la partie à couper.
Ne pas trop se pencher vers l'avant. Ne
jamais se pencher au-dessus du disque,
tout particulièrement lorsque le capot
protecteur est relevé.
Ne pas travailler à bras levés – c'est-à-
002BA553 AM
dire à une hauteur supérieure aux
épaules.
Utiliser la découpeuse exclusivement
pour le découpage. Elle ne convient pas
pour faire levier ou pour écarter ou
soulever des objets.
Ne pas exercer de pression sur la
découpeuse.
Déterminer tout d'abord la direction du
découpage avant d'attaquer la coupe
avec le disque à découper. Ne pas
changer de direction au cours de la
coupe. Ne jamais faire cogner la
machine dans la fente de coupe ou
frapper avec la machine – ne pas laisser
tomber la machine dans la fente de
coupe – cela risquerait de casser des
pièces !
Dans le cas de disques diamantés : en
cas de baisse du rendement de coupe,
contrôler le mordant du disque
diamanté. Le cas échéant, lui redonner
du mordant. À cet effet, l'aviver en
coupant brièvement des matières
abrasives telles que du grès, du béton
expansé ou de l'asphalte.
À la fin de la coupe, la découpeuse n'est
plus soutenue dans la coupe, par le
disque. L'utilisateur doit donc reprendre
tout le poids de la machine – risque de
perte de contrôle !
50
TS 440

français
Au découpage de l'acier :
la projection de particules
incandescentes présente
un risque d'incendie !
Veiller à ce que l'eau et la boue n'entrent
pas en contact avec des câbles
électriques sous tension – risque
d'électrocution !
Tirer le disque dans la pièce à découper
– ne pas pousser le disque dans la
coupe. Une fois que des coupes ont été
effectuées, ne pas les corriger avec la
découpeuse à disque. Ne pas reprendre
des coupes effectuées – casser les
barrettes non coupées (par ex. à l'aide
d'un marteau).
En cas d'utilisation de disques
diamantés, un arrosage est nécessaire –
utiliser par ex. la prise d'eau STIHL.
Compte tenu de la réduction du régime
maximal de la broche, STIHL a conçu
pour cette découpeuse un disque
spécial en résine synthétique pour la
coupe de l'acier. Ce disque à découper
ne convient que pour le découpage à
sec. Si un disque en résine synthétique
de ce type est quand même mouillé, il
perd son mordant et son rendement de
coupe baisse. Si un disque à découper
en résine synthétique de ce type est
mouillé au cours de l'utilisation (par ex.
dans une flaque d'eau ou par les résidus
d'eau venant de conduites à découper) –
ne pas augmenter la pression de coupe,
mais maintenir la pression normale – le
disque risque de casser ! Des disques
en résine synthétique dans cet état
doivent être consommés
immédiatement.
Avec des disques en résine synthétique
conventionnels conçus pour des
découpeuses à disque à haute vitesse
périphérique, le rendement de coupe
n'est pas satisfaisant et c'est pourquoi
ces disques ne conviennent pas pour
cette machine.
Vibrations
Au bout d'une assez longue durée
d'utilisation de la machine, les vibrations
peuvent provoquer une perturbation de
l'irrigation sanguine des mains
(« maladie des doigts blancs »).
Il n'est pas possible de fixer une durée
d'utilisation valable d'une manière
générale, car l'effet des vibrations
dépend de plusieurs facteurs.
Les précautions suivantes permettent
de prolonger la durée d'utilisation :
– garder les mains au chaud (porter
des gants chauds) ;
– faire des pauses.
Les facteurs suivants raccourcissent la
durée d'utilisation :
– tendance personnelle à souffrir
d'une mauvaise irrigation sanguine
(symptômes : doigts souvent froids,
fourmillements) ;
– utilisation à de basses températures
ambiantes ;
– effort exercé sur les poignées (une
prise très ferme gêne l'irrigation
sanguine).
Si l'on utilise régulièrement la machine
pendant de longues périodes et que les
symptômes indiqués ci-avant (par ex.
fourmillements dans les doigts) se
manifestent à plusieurs reprises, il est
recommandé de se faire ausculter par
un médecin.
Maintenance et réparations
La machine doit faire l'objet d'une
maintenance régulière. Effectuer
exclusivement les opérations de
maintenance et les réparations décrites
dans la Notice d'emploi. Faire exécuter
toutes les autres opérations par un
revendeur spécialisé.
STIHL recommande de faire effectuer
les opérations de maintenance et les
réparations exclusivement chez le
revendeur spécialisé STIHL. Les
revendeurs spécialisés STIHL
participent régulièrement à des stages
de perfectionnement et ont à leur
disposition les informations techniques
requises.
Utiliser exclusivement des pièces de
rechange de haute qualité. En ne
respectant pas ces prescriptions, on
risquerait de causer un accident ou
d'endommager la machine. Pour toute
question à ce sujet, s'adresser à un
revendeur spécialisé.
STIHL recommande d'utiliser des pièces
de rechange d'origine STIHL. Leurs
caractéristiques sont optimisées tout
spécialement pour cette machine, et
pour répondre aux exigences de
l'utilisateur.
Pour la réparation, la maintenance et le
nettoyage, toujours arrêter le moteur et
débrancher le câble d'allumage de la
bougie – risque de blessure en cas de
TS 440
51

français
mise en route inopinée du moteur ! –
Exception : réglage du carburateur et du
ralenti.
Lorsque le contact du câble d'allumage
est débranché de la bougie ou que la
bougie est dévissée, ne jamais faire
tourner le moteur avec le lanceur sans
avoir préalablement placé le curseur
combiné / le levier de commande
universel / le commutateur d'arrêt en
position STOP ou 0 – risque d'incendie
par suite d'un jaillissement d'étincelles
d'allumage à l'extérieur du cylindre.
Ne pas procéder à la maintenance de la
machine à proximité d'un feu et ne pas
non plus ranger la machine à proximité
d'un feu – le carburant présente un
risque d'incendie !
Contrôler régulièrement l'étanchéité du
bouchon du réservoir à carburant.
Utiliser exclusivement une bougie
autorisée par STIHL – voir
« Caractéristiques techniques » – et
dans un état impeccable.
Vérifier le câble d'allumage (isolement
dans un état impeccable, bon serrage
du raccord).
S'assurer que le silencieux est dans un
état impeccable.
Ne pas travailler avec la machine si le
silencieux est endommagé ou manque –
risque d'incendie ! – Lésions de l'ouïe !
Ne pas toucher au silencieux très chaud
– risque de brûlure !
Contrôler les butoirs en caoutchouc
placés sur la face inférieure de la
machine – le carter ne doit pas frotter
par terre – risque d'endommagement !
L'état des éléments antivibratoires AV a
une influence sur les caractéristiques du
point de vue vibrations – c'est pourquoi il
faut régulièrement contrôler les
éléments AV.
Avant d'entreprendre le travail, contrôler
le fonctionnement du frein de disque.
L'entretien, le remplacement ou la
réparation des dispositifs et systèmes
de contrôle des émissions peuvent être
effectués par tout établissement de
réparation de moteurs non routiers ou
par un particulier. Toutefois, si vous
faites une demande de garantie pour un
composant qui n’a pas été réparé ou
entretenu correctement, STIHL peut
refuser la couverture.
Pour tout entretien, veuillez vous référer
au tableau d'entretien et à la déclaration
de garantie qui se trouvent à la fin du
manuel d'instructions.
Exemples d'utilisation
Utiliser les disques diamantés
exclusivement avec arrosage
Augmentation de la longévité et de la
vitesse de coupe
Toujours arroser le disque à découper.
Lier la poussière
Arroser le disque avec un débit d'eau de
0,6 l/min au minimum.
Prise d'eau
– Prise d'eau de la machine, pour
toute sorte d'alimentation en eau
– Réservoir d'eau sous pression
d'une capacité de 10 l, pour lier la
poussière
Utiliser les disques en résine
synthétique à sec
Pour le découpage à sec, porter un
masque antipoussière approprié.
En cas de risque de dégagement de
vapeurs ou de fumées (par ex. au
découpage de matériaux composites),
porter un masque respiratoire.
52
TS 440

français
Consignes à suivre avec les disques
diamantés et les disques en résine
synthétique
Les objets à couper
– ne doivent pas être posés de telle
sorte qu'ils forment un pont.
– doivent être bien calés pour qu'ils
ne risquent pas de rouler ou de
glisser.
– doivent être calés de telle sorte
qu'ils ne vibrent pas.
Parties coupées
Pour traverser une cloison ou pour
découper des échancrures etc., il est
important de prévoir l'ordre
chronologique des coupes. Toujours
exécuter la dernière coupe de telle sorte
que le disque ne risque pas d'être coincé
et que la chute de la partie coupée ne
présente pas de risque pour l'utilisateur
de la machine.
Le cas échéant, laisser de petites
barrettes non coupées pour retenir la
partie découpée. Pour finir, casser ces
barrettes.
Avant la séparation définitive de la partie
découpée, il faut tenir compte :
– du poids de cette partie coupée.
– de son déplacement possible, après
la séparation.
– du fait qu'elle peut se trouver sous
contrainte.
En cassant les barrettes restantes pour
la séparation de la partie coupée, veiller
à ce que les aides éventuels ne
s'exposent pas à des risques d'accident.
Coupe en plusieurs passes
N Tracer la ligne de coupe (A).
N Travailler en suivant la ligne de
coupe. Pour des corrections
éventuellement nécessaires, ne pas
gauchir le disque, mais se
repositionner et attaquer une
nouvelle coupe – à chaque passe, la
profondeur de coupe devrait
atteindre au maximum 5 à 6 cm. Si
la matière est plus épaisse,
procéder en plusieurs passes.
Découpage de dalles
N Caler la dalle (par ex. sur une
surface antidérapante, un lit de
sable).
N Meuler une rainure de guidage (A)
en suivant la ligne marquée.
N Approfondir la fente de la coupe (B).
180BA027 AM
N Laisser une petite barrette (C) à
casser après la coupe.
N Aux extrémités de la coupe,
traverser complètement la dalle,
pour éviter l'éclatement des bords.
N Casser la barrette non coupée de la
dalle.
N Pour décrire une courbe, procéder
en plusieurs phases – veiller à ne
pas gauchir le disque.
180BA028 AM
TS 440
53

français
0000-GXX-1780-A0
A
Découpage de tuyaux ou de corps
cylindriques et creux
N Caler les tuyaux ou les corps
cylindriques et creux de telle sorte
qu'ils ne vibrent pas, ne glissent pas
et ne risquent pas de rouler.
N Tenir compte de la chute et du poids
de la partie à découper.
N Déterminer et marquer la ligne de
coupe, en évitant les armatures,
surtout dans le sens de la coupe.
N Déterminer l'ordre chronologique
des coupes.
N Meuler une rainure de guidage le
long de la ligne de coupe marquée.
N Approfondir la fente de coupe le
long de la rainure de guidage –
respecter la profondeur de coupe
recommandée pour chaque passe –
pour des corrections
éventuellement nécessaires, ne pas
gauchir le disque, mais se
repositionner et attaquer une
nouvelle coupe – le cas échéant,
laisser de petites barrettes pour
maintenir la partie à découper en
place. Casser ces barrettes après
avoir terminé la dernière coupe
prévue.
Découpage d'un tube en béton
A
La procédure dépend du diamètre
extérieur du tube et de la profondeur de
coupe maximale possible avec le disque
à découper (A).
N Caler le tube de telle sorte qu'il ne
vibre pas, ne glisse pas et ne risque
pas de rouler.
N Tenir compte du poids, des
contraintes et de la chute de la
partie à découper.
N Déterminer et marquer le tracé de la
coupe.
N Déterminer l'ordre chronologique
des coupes.
Si le diamètre extérieur est inférieur à la
profondeur de coupe maximale
002BA557 AM
N Exécuter une coupe de haut en bas.
Si le diamètre extérieur est supérieur à
la profondeur de coupe maximale
Bien prévoir le déroulement du travail,
avant de commencer. Il est nécessaire
d'exécuter plusieurs coupes – en
respectant l'ordre chronologique correct.
N Fermer le capot protecteur,
illustration A.
002BA528 AM
N Toujours commencer en bas,
illustration A.
N Ouvrir le capot protecteur,
illustration B.
002BA558 AM
54
TS 440

français
0000-GXX-1781-A0
B
0000-GXX-1162-A0
C
0000-GXX-1783-A0
D
0000-GXX-1784-A0
E
X
F
0000-GXX-1785-A0
0000-GXX-1786-A0
G
1
2
180BA024 AM
de la dernière coupe (X) prévue,
pour que la partie du tube à couper
reste encore bien maintenue dans
sa position, illustration F.
Il faut absolument avoir effectué toutes
les coupes inférieures et latérales avant
d'entreprendre la coupe supérieure.
N Accélérer à pleins gaz et plonger le
disque dans la coupe déjà
commencée, illustration B.
N Poursuivre la coupe vers le bas,
jusqu'au-delà du centre du tube,
illustration B.
N Fermer le capot protecteur,
illustration C.
N Couper le côté opposé,
illustration C.
N Ouvrir le capot protecteur,
illustration D.
N Accélérer à pleins gaz et plonger le
disque dans la coupe déjà
commencée, illustration D.
N Poursuivre la coupe vers le bas,
jusqu'au-delà du centre du tube,
illustration D.
N Fermer le capot protecteur,
illustration E.
N Exécuter la première coupe latérale
sur la moitié supérieure du tube,
illustration E.
N Toujours exécuter la dernière coupe
par le haut (env. 15 % de la
circonférence du tube),
illustration G.
Découpage d'une ouverture dans un
tube en béton
L'ordre chronologique des coupes
(1 à 4) est important :
N Couper tout d'abord les zones
difficilement accessibles.
TS 440
N Toujours exécuter les coupes de
telle sorte que le disque ne risque
pas d'être coincé.
N Exécuter la deuxième coupe
latérale dans la zone marquée – ne
couper en aucun cas dans la zone
55

français
N Utiliser des coins et/ou laisser de
petites barrettes non coupées, à
casser une fois que les coupes
auront été exécutées.
4
3
N Si, après l'exécution des coupes
prévues, la partie découpée reste
dans l'ouverture (en étant retenue
par les coins insérés et/ou des
barrettes non coupées), il ne faut
pas effectuer d'autres coupes –
mais dégager la partie coupée en
cassant les barrettes restantes.
Disques à découper
Les disques à découper sont soumis à
de très fortes sollicitations, tout
particulièrement lorsqu'ils sont utilisés
pour le découpage à main levée.
C'est pourquoi il faut utiliser
180BA025 AM180BA026 AM
exclusivement les disques à découper
compatibles pour l'utilisation sur des
machines tenues à la main,
conformément à la norme EN 13236
(disques diamantés) ou EN 12413
(disques en résine synthétique), et
portant les marques d'identification
pertinentes. Respecter la vitesse de
rotation maximale admissible pour le
disque à découper utilisé – risque
d'accident !
Les disques de haute qualité mis au
point par STIHL en collaboration avec
des constructeurs de disques à
découper renommés sont parfaitement
adaptés à chaque application ainsi qu'à
la puissance du moteur de la
découpeuse à disque.
Ils sont d'une excellente qualité
constante.
Transport et stockage
– empiler les disques à découper à
plat, sur une surface plane – à un
endroit sec et, dans la mesure du
possible, à des températures
constantes – en les laissant dans
leur emballage d'origine ;
– ne pas stocker les disques à
proximité de liquides corrodants ;
– conserver les disques à l'abri du gel.
56
– Lors du transport et du stockage, ne
pas exposer les disques en plein
soleil ou à une autre source de
chaleur ;
– éviter les chocs et les à-coups ;
TS 440

français
0000-GXX-1234-A0
0000-GXX-1235-A0
D-B10
Disques en résine
synthétique
Types :
– Pour l'utilisation à sec
Compte tenu de la réduction du régime
maximal de la broche, STIHL a conçu
pour cette découpeuse un disque
spécial en résine synthétique pour la
coupe de l'acier. Ce disque à découper
ne convient que pour le découpage à
sec.
Ne pas couper d'autres matériaux –
risque d'accident !
Avec des disques en résine synthétique
conventionnels conçus pour des
découpeuses à disque à haute vitesse
périphérique, le rendement de coupe
n'est pas satisfaisant et c'est pourquoi
ces disques ne conviennent pas pour
cette machine.
Disques diamantés
Pour l'utilisation avec arrosage
Le choix du disque diamanté qui
convient et son utilisation correcte
garantissent la rentabilité du travail en
évitant une usure rapide. La
dénomination abrégée indiquée sur
– l'étiquette ;
– l'emballage (tableau donnant des
recommandations pour l'utilisation)
aide à choisir le disque le mieux
approprié pour chaque travail.
Suivant leur version, les disques
diamantés STIHL conviennent pour
découper les matières suivantes :
– Asphalte
– Béton
– Pierre (roche dure)
– Béton abrasif
– Béton frais
– Briques
– Tuyaux en grès
– Tubes en fonte ductile
Ne pas couper d'autres matériaux –
risque d'accident !
Ne jamais utiliser des disques
diamantés à flancs abrasifs, car ces
disques risqueraient de se coincer dans
la coupe et de provoquer un rebond
extrême – risque d'accident !
Dénominations abrégées
La dénomination abrégée est une
combinaison de lettres et de chiffres qui
peut comporter jusqu'à quatre
caractères :
– Les lettres indiquent le domaine
d'utilisation principal du disque
considéré.
– Les chiffres précisent la classe de
performances du disque diamanté
STIHL.
Faux-rond et voile
L'état impeccable du palier de broche de
la découpeuse est une condition
essentielle pour une grande longévité et
un bon rendement du disque diamanté.
Le fait d'utiliser le disque sur une
découpeuse dont le palier de broche
présente un défaut peut causer un fauxrond ou un voile.
TS 440
57

français
Arêtes rapportées, mordant
En cas de faux-rond excessif (A), les
segments diamantés sont soumis à de
trop fortes sollicitations et deviennent
extrêmement chauds. Les contraintes
thermiques peuvent causer une
fissuration du corps de la lame et les
segments peuvent être détrempés par
une surchauffe.
En cas de voile (B), les sollicitations
thermiques augmentent et la fente de
coupe est plus large.
Usure du corps
En découpant le revêtement des routes,
ne pas pénétrer dans la sous-couche
(souvent constituée d'un lit de cailloutis)
– le fait que l'on coupe dans la souscouche en cailloutis est bien
reconnaissable au dégagement de
poussière claire – dans ces conditions,
le corps du disque peut être soumis à
une usure excessive – le disque risque
de casser !
Par arêtes rapportées on entend le
dépôt gris clair qui se forme en haut des
segments diamantés. Ce dépôt engorge
les diamants et les segments perdent
leur mordant.
Des arêtes rapportées peuvent se
former dans les situations suivantes :
– Coupe de matière extrêmement
dure (par ex. du granit).
– Utilisation incorrecte, par ex. avec
une force d'avance excessive.
Les arêtes rapportées augmentent les
vibrations, réduisent le rendement de
coupe et produisent un jaillissement
d'étincelles.
Aux premiers signes de formation
d'arêtes rapportées, il faut
immédiatement « redonner du
mordant » au disque diamanté – à cet
effet, couper brièvement une matière
abrasive telle que du grès, du béton
expansé ou de l'asphalte.
L'arrosage évite la formation d'arêtes
rapportées.
Si l'on poursuit le travail avec des
segments engorgés, manquant de
mordant, ces segments peuvent se
ramollir sous l'effet de la forte chaleur
dégagée – la solidité du corps du disque
surchauffé se dégrade – cela peut
engendrer des contraintes nettement
reconnaissables aux mouvements
oscillants du disque. Ne pas poursuivre
le travail avec ce disque – risque
d'accident !
58
TS 440

Élimination des défauts
Disque à découper
français
Défaut Cause Remède
Arêtes ou bords de coupe pas nets,
Faux-rond ou voile Consulter le revendeur spécialisé
coupe irrégulière
Forte usure sur les flancs des segments Mouvement oscillant du disque Utiliser un disque neuf
Bords de coupe pas nets, coupe irrégu-
lière, aucun rendement de coupe,
jaillissement d'étincelles
Le disque a perdu son mordant ; formation
d'arêtes rapportées sur les segments, dans
le cas de disques pour roche
Pour redonner du mordant au disque
pour roche, couper brièvement une
matière abrasive ; dans le cas d'un
disque pour asphalte, le remplacer
Manque de rendement de coupe, forte
usure des segments
Ébréchures ou fissures dans le corps du
Le disque tourne dans le mauvais sens Monter le disque de telle sorte qu'il tourne
dans le bon sens
Surcharge Utiliser un disque neuf
disque ou les segments
Usure du corps Découpage de matières pour lesquelles le
disque ne convient pas
Utiliser un disque neuf ; le cas échéant,
au découpage, tenir compte des couches
de différentes matières
1)
STIHL recommande de s'adresser au revendeur spécialisé STIHL
1)
TS 440
59

français
1
0813BA003 KN
0813BA004 KN
Frein de disque
Cette découpeuse à disque est munie
du frein de disque STIHL QuickStop.
À la mise en route de la machine, le frein
de disque est engagé. Après la mise en
route de la machine, il faut desserrer le
frein de disque.
Le frein de disque se déclenche en cas
de rebond assez violent. Lorsqu'il se
déclenche, le frein de disque immobilise
le disque en une fraction de seconde.
Contrôle du fonctionnement du frein de
disque
Chaque fois, avant de commencer le
travail
N Actionner le levier de frein (1) en
direction de la poignée tubulaire et
le maintenir – il doit être possible de
faire tourner le disque à la main.
N Relâcher le levier de frein (1) – le
frein de disque est engagé – il ne
doit pas être possible de faire
tourner le disque à la main.
N S'il est possible de faire tourner le
disque à découper sans que le
levier de frein (1) soit actionné : ne
pas travailler avec la découpeuse à
disque – consulter le revendeur
spécialisé. Faire réparer le frein de
disque.
Le frein de disque doit être propre, et il
doit pouvoir fonctionner facilement.
Desserrage du frein de disque
N Le moteur étant en marche,
actionner le levier de frein en
direction de la poignée tubulaire et
le relâcher – le frein de disque est
desserré.
AVIS
Avant d'accélérer et avant
d'entreprendre le travail avec la
découpeuse, il faut débloquer le frein de
disque.
Un régime moteur élevé avec frein de
disque engagé provoque, au bout de
quelques instants seulement, une
détérioration du moteur, de l'embrayage
et du frein de disque.
S'il n'est pas possible de desserrer le
frein de disque lorsque le moteur est en
marche
Causes possibles :
– Une maintenance du frein de disque
est nécessaire.
– Signe qu'une réparation du frein de
disque est nécessaire
60
TS 440

français
2
1
370BA085 KN
3
N Avec le moteur en marche, appuyer
sur la touche (3) du tableau de
commande pendant 3 secondes.
N Actionner le levier de frein en
direction de la poignée tubulaire et
le relâcher.
S'il est possible de desserrer le frein de
disque de cette manière, une
maintenance du frein de disque est
nécessaire.
N Poursuivre le travail et, après le
travail, consulter un revendeur
spécialisé STIHL.
N Faire effectuer la maintenance
nécessaire du frein de disque.
Cette procédure doit être répétée à
chaque mise en route du moteur. Le
nombre de répétions de cette procédure
est enregistré dans le boîtier
électronique.
S'il n'est toujours pas possible de
desserrer le frein de disque, une
réparation du frein de disque est
nécessaire.
N Arrêter le travail et consulter un
revendeur spécialisé STIHL.
N Faire réparer le frein de disque.
Tension de la courroie poly-V avant
La courroie poly-V fait partie du frein de
disque.
Si la courroie poly-V avant patine ou
couine à l'accélération ou au cours du
travail, il est probable que cette courroie
poly-V avant ne soit pas correctement
tendue. Le disque à découper risque de
s'arrêter dans la coupe.
2
1
N Dévisser la vis (1).
N Enlever le capot protecteur (2).
5
N Desserrer l'écrou (3). La courroie
poly-V avant (4) est tendue.
N Actionner le levier de frein (5) en
direction de la poignée tubulaire et
le retenir.
N Tourner la poulie (6) de 3 tours. La
tension initiale est uniformément
répartie.
3
4
6
N Relâcher le levier de frein (5).
N Serrer l'écrou (3) à un couple de
20 Nm.
AVERTISSEMENT
Pour garantir le bon fonctionnement du
frein de disque, il faut que l'écrou soit
serré au couple de serrage indiqué. Si
l'on ne peut pas garantir que l'écrou soit
serré au couple de serrage correct, faire
retendre la courroie poly-V avant par un
revendeur spécialisé STIHL.
0000-GXX-4257-A0
N Mettre le couvercle (2) en place.
N Visser et serrer la vis (1).
Si une courroie poly-V patine ou couine
à l'accélération ou au cours du travail, il
est probable qu'une courroie poly-V soit
usée. Le disque à découper risque de
s'arrêter dans la coupe et le frein de
disque risque de ne plus fonctionner
0000-GXX-8851-A0
correctement.
N Arrêter le travail et consulter un
revendeur spécialisé STIHL.
N Faire réparer le frein de disque.
Maintenance du frein de disque
Le frein de disque est soumis à l'usure,
sous l'effet de la friction. Afin qu'il puisse
assumer sa fonction, il doit faire l'objet
2
1
0000-GXX-4257-A0
TS 440
61

français
1307BA001 KN
2
1
370BA085 KN
3
d'une maintenance périodique à
effectuer par un personnel doté de la
formation requise. STIHL recommande
de faire effectuer les opérations de
maintenance et les réparations
exclusivement chez le revendeur
spécialisé STIHL.
N Si une maintenance ou une
réparation du frein de disque
s'avère nécessaire, l'utilisateur de la
machine en est averti à la mise en
route du moteur et au desserrage
du frein de disque, voir section
« Contrôle du fonctionnement du
frein de disque » et « Desserrage
du frein de disque » au chapitre
« Frein de disque ».
Commande électronique
d'arrosage
Les découpeuses à disque STIHL
peuvent être équipées d'une commande
électronique d'arrosage.
La commande électronique d'arrosage
permet de débiter la quantité d'eau
optimale pour arroser le disque à
découper. Aucun arrosage n'a lieu au
ralenti.
Avant d'entreprendre le travail
N Se familiariser avec la manipulation
des commandes avant de mettre le
moteur en marche.
1 Touche (+):
activation de la commande
électronique d'arrosage ou
augmentation du débit d'eau
d'arrosage du disque
2 Touche (–):
activation de la commande
électronique d'arrosage ou
réduction du débit d'eau d'arrosage
du disque
3 Désactivation de la commande
électronique d'arrosage – le disque
n'est plus arrosé
Travail avec la commande électronique
d'arrosage
62
N Toutes les touches du tableau de
commande peuvent être actionnées
avec le pouce de la main droite – la
main droite doit alors toujours rester
sur la poignée arrière.
N La main gauche doit toujours rester
sur la poignée tubulaire.
Tableau de commande
Une fois que le moteur est en marche, il
est possible d'activer ou de désactiver la
commande électronique d'arrosage et
de régler le débit d'eau.
N Mettre le moteur en route, voir
« Mise en route / arrêt du moteur ».
N Donner une impulsion sur la
touche (+) ou (–) avec le pouce de
la main droite – la main droite doit
alors toujours rester sur la poignée
arrière, et la main gauche doit
toujours rester sur la poignée
tubulaire – au ralenti, le disque à
découper n'est pas encore arrosé.
Durant le travail, le disque est arrosé
avec le débit d'eau réglé.
TS 440

français
2
370BA086 KN
1
0813BA002 KN
1
N Au besoin, adapter le débit d'eau –
à cet effet, appuyer sur le bouton (+)
ou sur le bouton (–) avec le pouce
de la main droite, autant de fois que
nécessaire pour obtenir le débit
d'eau requis – la main droite ne doit
alors jamais lâcher la poignée
arrière et la main gauche doit
toujours rester sur la poignée
tubulaire.
Lorsqu'à la fin d'une coupe la
découpeuse à disque tourne au ralenti,
le disque n'est plus arrosé – mais la
commande électronique d'arrosage
reste activée. Dès qu'on poursuit le
travail, l'arrosage du disque à découper
reprend automatiquement, avec le
dernier débit préalablement réglé.
Lorsqu'on arrête le moteur et qu'on le
remet en marche, la commande
électronique d'arrosage est désactivée.
Maintenance et entretien
Si au cours du travail le débit d'eau est
insuffisant ou nul, bien que la
commande électronique d'arrosage soit
activée :
Montage / remplacement du
disque
Ne monter ou remplacer le disque
qu'avec moteur à l'arrêt – curseur
combiné en position STOP ou 0.
Blocage de l'arbre
N Débrancher le raccord rapide (1).
N Dévisser la « prise d'eau avec
tamis » (2) et la nettoyer sous l'eau
courante – le tamis reste sur la prise
d'eau.
Si, bien que le tamis ait été nettoyé, le
débit d'eau n'est pas suffisant ou le
disque n'est plus arrosé, consulter le
revendeur spécialisé.
N Introduire le mandrin de blocage (1)
à travers le trou du protecteur de la
courroie ;
N actionner le levier de frein et le
maintenir actionné ;
N faire tourner l'arbre à l'aide de la clé
multiple, jusqu'à ce que le mandrin
de blocage (1) se prenne dans
l'orifice situé de l'autre côté ;
N relâcher le levier de frein.
TS 440
63

français
2
370BA053 KN
370BA054 KN
4
Démontage du disque
N À l'aide de la clé multiple, desserrer
et dévisser la vis à six pans (2) ;
N enlever de l'arbre la rondelle de
pression avant (3) et le disque.
Montage du disque
AVERTISSEMENT
Ne jamais utiliser simultanément deux
disques à découper – ils risqueraient de
casser par suite d'une usure irrégulière –
risque de blessure !
N Installer le disque (4) ;
AVERTISSEMENT
Avec les disques diamantés, tenir
compte des flèches indiquant le sens de
rotation prescrit.
N poser la rondelle de pression
avant (3) – les ergots d'arrêt de la
rondelle de pression avant (3)
doivent se prendre dans les
rainures de l'arbre ;
N visser la vis à six pans et la serrer
fermement avec la clé multiple – si
l'on utilise une clé dynamométrique,
respecter le couple de serrage
indiqué dans les « Caractéristiques
techniques » ;
N extraire le mandrin de blocage du
protecteur de la courroie.
64
TS 440

français
Carburant
Ce moteur est homologué pour
l'utilisation avec de l'essence sans
plomb et un taux de mélange de 50:1.
Votre moteur doit être alimenté avec un
mélange composé de supercarburant
(premium gasoline) de haute qualité et
d'huile de haute qualité pour moteur
deux-temps refroidi par air.
Utiliser du supercarburant de marque,
sans plomb, dont l'indice d'octane atteint
au moins 89 (R+M)/2.
Nota : Sur les machines munies d'un
catalyseur, il faut faire le plein avec de
l'essence sans plomb. Il suffirait de faire
quelques fois le plein avec de l'essence
plombée pour que l'efficacité du
catalyseur se trouve réduite de plus de
50 %.
Du carburant à indice d'octane inférieur
provoque un allumage anticipé
(produisant un « cliquetis »),
accompagné d'une élévation de la
température du moteur. Cette
surchauffe, à son tour, augmente le
risque de grippage du piston et de
détérioration du moteur.
La composition chimique du carburant
est également importante. Certains
additifs mélangés au carburant ne
présentent pas seulement l'inconvénient
de détériorer les élastomères
(membranes du carburateur, bagues
d'étanchéité, conduits de carburant
etc.), mais encore les carters en
magnésium. Cela peut perturber le
fonctionnement ou même endommager
le moteur. C'est pour cette raison qu'il
est extrêmement important d'utiliser
exclusivement des carburants de haute
qualité !
Des carburants à différentes teneurs en
éthanol sont proposés. L'éthanol peut
dégrader les caractéristiques de
fonctionnement du moteur et accroît le
risque de grippage par suite d'un
appauvrissement excessif du mélange
carburé.
De l'essence avec une teneur en
éthanol supérieure à 10 % peut causer
une dégradation des caractéristiques de
fonctionnement et de graves
endommagements sur les moteurs
munis d'un carburateur à réglage
manuel, et c'est pourquoi il n'est pas
permis d'utiliser ce carburant sur de tels
moteurs.
Les moteurs équipés du système de
gestion moteur électronique M-Tronic
peuvent fonctionner avec de l'essence
contenant jusqu'à 25 % d'éthanol (E25).
Pour la composition du mélange, utiliser
exclusivement l'huile STIHL pour moteur
deux-temps ou de l'huile de marque de
qualité équivalente pour moteur deuxtemps refroidi par air.
Nous recommandons l'utilisation de
l'huile STIHL 50:1 pour moteur deuxtemps, car c'est la seule huile
spécialement élaborée pour l'utilisation
dans les moteurs STIHL.
Pour que le moteur STIHL atteigne les
performances maximales, il faut utiliser
de l'huile de haute qualité pour moteur
deux-temps. Pour que le moteur
fonctionne plus proprement et pour
réduire la formation de dépôts de
calamine nocifs, STIHL recommande
d'utiliser de l'huile STIHL HP Ultra pour
moteur deux-temps ou de demander au
revendeur une huile équivalente,
entièrement synthétique, pour moteur
deux-temps.
Pour satisfaire aux exigences des
normes EPA et CARB, il est
recommandé d'utiliser de l'huile STIHL
HP Ultra.
Ne pas utiliser d'huiles de mélange BIA
ou TCW (pour moteurs deux-temps
refroidis par eau) !
Pour composer le mélange des modèles
à
catalyseur, utiliser exclusivement de
l'huile moteur hautes performances
STIHL 50:1 ou une huile de qualité
équivalente pour moteur deux-temps.
Manipuler le carburant avec précaution.
Éviter tout contact direct de la peau avec
le carburant et ne pas inhaler les
vapeurs de carburant.
Le bouchon du bidon doit être toujours
bien serré, pour éviter que de l'humidité
pénètre dans le mélange.
Il convient de nettoyer de temps en
temps le réservoir à carburant et les
bidons utilisés pour le stockage du
mélange.
Taux de mélange
Ne mélanger que la quantité de
carburant nécessaire pour quelques
journées de travail ; ne pas dépasser
une durée de stockage de 30 jours.
Conserver le mélange exclusivement
dans des bidons de sécurité
homologués pour le carburant. Pour la
composition du mélange, verser dans le
bidon tout d'abord l'huile, puis rajouter
l'essence.
TS 440
65

français
1.
2.
370BA093 KN
Exemples
Essence Huile (STIHL 50:1 ou
huiles de haute qualité
équivalentes)
litres litres (ml)
10,02(20)
5 0,10 (100)
10 0,20 (200)
15 0,30 (300)
20 0,40 (400)
25 0,50 (500)
Entreposer les bidons remplis de
mélange exclusivement à un endroit
autorisé pour le stockage de carburants.
Ravitaillement en carburant
Préparatifs
N Avant de faire le plein, nettoyer le
bouchon du réservoir et son
voisinage, afin qu'aucune impureté
ne risque de pénétrer dans le
réservoir ;
N positionner la machine de telle sorte
que le bouchon du réservoir soit
orienté vers le haut.
AVERTISSEMENT
Ne jamais utiliser un outil pour ouvrir le
bouchon de réservoir à baïonnette. En
effet, cela pourrait endommager le
bouchon et du carburant risquerait de
s'échapper.
Ouverture du bouchon
N À la main, enfoncer le bouchon
jusqu'en butée, tourner dans le sens
inverse des aiguilles d'une montre
(env. 1/8 de tour) et enlever le
bouchon.
Ravitaillement en carburant
En faisant le plein, ne pas renverser du
carburant et ne pas remplir le réservoir
jusqu'au bord. STIHL recommande
d'utiliser le système de remplissage
STIHL pour carburant (accessoire
optionnel).
66
TS 440

français
370BA094 KN
1.
2.
370BA095 KN
370BA019 KN
1
0813BA003 KN
Fermeture du bouchon
N Présenter le bouchon et le faire
tourner jusqu'à ce qu'il glisse dans
la prise à baïonnette ;
N à la main, pousser le bouchon
jusqu'en butée vers le bas et le faire
tourner dans le sens des aiguilles
d'une montre (env. 1/8 de tour)
jusqu'à ce qu'il s'encliquette.
Contrôle du verrouillage
N Saisir le bouchon – le bouchon est
correctement verrouillé s'il est
impossible de l'enlever et que les
marques (flèches) du bouchon et du
réservoir à carburant coïncident.
Si le bouchon s'enlève ou si les marques
ne coïncident pas, refermer le bouchon
– voir les sections « Fermeture du
bouchon » et « Contrôle du
verrouillage ».
Remplacement de la crépine
d'aspiration de carburant une fois par an
N Vider le réservoir à carburant ;
N à l'aide d'un crochet, sortir la
crépine d'aspiration du réservoir et
l'extraire du tuyau flexible ;
N enfoncer la crépine d'aspiration
neuve dans le tuyau flexible ;
N mettre la crépine d'aspiration dans
le réservoir.
Mise en route / arrêt du
moteur
Contrôle du fonctionnement du frein de
disque
Chaque fois, avant de commencer le
travail
N Actionner le levier de frein (1) en
direction de la poignée tubulaire et
le maintenir – il doit être possible de
faire tourner le disque à la main.
N Relâcher le levier de frein (1) – le
frein de disque est engagé – il ne
doit pas être possible de faire
tourner le disque à la main.
N S'il est possible de faire tourner le
disque à découper sans que le
levier de frein (1) soit actionné : ne
pas travailler avec la découpeuse à
disque – consulter le revendeur
spécialisé. Faire réparer le frein de
disque.
Le frein de disque doit être propre, et il
doit pouvoir fonctionner facilement.
TS 440
67

français
START
1
3
3
370BA020 KN
2
370BA055 KN
Choke
4
5
370BA101 KN
Mise en route du moteur
N Enfoncer le blocage de gâchette
d'accélérateur (1) et simultanément
la gâchette d'accélérateur (2).
N Maintenir ces deux commandes
enfoncées.
N Pousser le curseur combiné (3) sur
la position START et le maintenir
aussi dans cette position.
N Relâcher successivement la
gâchette d'accélérateur, le curseur
combiné et le blocage de gâchette
d'accélérateur – position de
démarrage.
N Régler le levier du volet de
starter (4) dans la position requise
en fonction de la température du
moteur.
c Si le moteur est froid
e Si le moteur est chaud (également
si le moteur a déjà tourné, mais est
encore froid ou que le moteur très
chaud a été arrêté pendant moins
de 5 min)
f Si le moteur est très chaud (si le
moteur très chaud a été arrêté pendant plus de 5 min)
Sur les versions avec soupape de
décompression
N Avant chaque lancement du
moteur, enfoncer le bouton (5) de la
soupape de décompression.
68
TS 440

français
6
370BA102 KN
0000-GXX-1580-A0
4
370BA057 KN
Choke
370BA058 KN
START
3
Sur toutes les versions
N Enfoncer 7-10 fois le soufflet (6) de
la pompe d'amorçage – même si le
soufflet est encore rempli de
carburant.
Lancement du moteur
personne ne doit se trouver dans le
rayon d'action de la découpeuse à
disque.
N Se tenir dans une position bien
stable.
N En tenant la poignée tubulaire de la
main gauche, plaquer fermement la
découpeuse à disque sur le sol –
l'empoigner fermement en passant
le pouce en dessous de la poignée
tubulaire.
N En appliquant le genou droit sur le
capot de la machine, plaquer
fermement la découpeuse à disque
sur le sol.
N De la main droite, tirer lentement la
poignée du lanceur jusqu'au point
dur – puis tirer vigoureusement d'un
coup sec – ne pas sortir le câble de
lancement sur toute sa longueur.
AVIS
Ne pas lâcher la poignée de lancement
– elle reviendrait brusquement en arrière
– risque de rupture ! La ramener à la
main dans le sens opposé à la traction,
pour que le câble de lancement
s'embobine correctement.
Après le premier coup d'allumage
N Placer le levier du volet de
starter (4) dans la position f
N Enfoncer le bouton de la soupape
de décompression (suivant
l'équipement).
N Continuer de lancer le moteur.
Dès que le moteur tourne
N Poser la découp euse à dis que sur le
sol, dans une position sûre – le
disque ne doit toucher ni le sol, ni un
objet quelconque – aucune autre
TS 440
N Donner une impulsion sur la
gâchette d'accélérateur, le curseur
combiné (3) saute dans la position
de marche normale F – le moteur
passe au ralenti.
N Placer le levier du volet de starter
dans la position e
69

français
0813BA004 KN
2
1
370BA085 KN
3
370BA059 KN
START
3
Arrêter le moteur.
N Actionner le levier de frein en
direction de la poignée tubulaire et
le relâcher – le frein de disque est
desserré.
Si le carburateur est réglé correctement,
le disque ne doit pas être entraîné
lorsque le moteur tourne au ralenti.
La découpeuse à disque est prête à
l'utilisation.
AVIS
Avant d'accélérer et avant
d'entreprendre le travail avec la
découpeuse, il faut débloquer le frein de
disque.
Un régime moteur élevé avec frein de
disque engagé provoque, au bout de
quelques instants seulement, une
détérioration du moteur, de l'embrayage
et du frein de disque.
S'il n'est pas possible de desserrer le
frein de disque lorsque le moteur est en
marche
Causes possibles :
– Une maintenance du frein de disque
est nécessaire.
– Une réparation du frein de disque
est nécessaire.
N Avec le moteur en marche, appuyer
sur la touche (3) du tableau de
commande pendant 3 secondes.
N Actionner le levier de frein en
direction de la poignée tubulaire et
le relâcher.
S'il est possible de desserrer le frein de
disque de cette manière, une
maintenance du frein de disque est
nécessaire.
N Poursuivre le travail et, après le
travail, consulter un revendeur
spécialisé STIHL.
N Faire effectuer la maintenance
nécessaire du frein de disque.
Cette procédure doit être répétée à
chaque mise en route du moteur. Le
nombre de répétions de cette procédure
est enregistré dans le boîtier
électronique.
S'il n'est toujours pas possible de
desserrer le frein de disque, une
réparation du frein de disque est
nécessaire.
N Arrêter le travail et consulter un
revendeur spécialisé STIHL.
N Faire réparer le frein de disque.
N Pousser le curseur combiné (3) sur
la position STOP ou 0
Indications complémentaires
concernant la mise en route du moteur
Si le moteur ne démarre pas
Après le premier coup d'allumage, le
levier du volet de starter n'a pas été
ramené à temps en position f
N Pousser le curseur combiné sur la
position START = position de
démarrage
N Placer le levier du volet de starter
dans la position e = démarrage à
chaud – même si le moteur est froid.
N Tirer 10-20 fois sur le câble de
lancement – pour ventiler la
chambre de combustion.
N Remettre le moteur en marche.
Si le moteur est tombé en panne sèche
N Refaire le plein de carburant.
N Enfoncer 7-10 fois le soufflet de la
pompe d'amorçage – même si le
soufflet est rempli de carburant.
70
TS 440

français
1
2
3
4
370BA028 KN
1
1
N Placer le levier du volet de starter
dans la position requise en fonction
de la température du moteur.
N Remettre le moteur en marche.
Système de filtre à air
Informations de base
En moyenne, les intervalles de
maintenance des filtres atteignent plus
d'un an. Ne pas démonter le couvercle
de filtre et ne pas remplacer le filtre à air
tant que l'on ne constate pas de perte de
puissance sensible.
Dans le système de filtre à air longue
durée, avec préséparation par cyclone,
l'air chargé de poussière est aspiré et
soumis à un mouvement de rotation –
ainsi, les particules les plus grosses et
les plus lourdes sont projetées vers
l'extérieur et évacuées. Seul de l'air
préalablement épuré pénètre dans le
système du filtre à air – ce qui permet
d'atteindre des intervalles de
maintenance extrêmement longs.
Remplacement du filtre à air
Seulement si la puissance du moteur
baisse sensiblement
N Placer le levier du volet de starter
dans la position c ;
N desserrer les vis (1) ;
N enlever le couvercle de filtre (2) et le
nettoyer ;
N enlever le filtre principal (3) ;
N extraire le filtre additionnel (4) –
veiller à ce que des saletés ne
pénètrent pas du côté d'admission ;
N nettoyer la chambre du filtre ;
N mettre en place le filtre additionnel
neuf et le filtre principal neuf ;
N monter le couvercle de filtre ;
N serrer les vis.
TS 440
71

français
Utiliser exclusivement des filtres à air de
haute qualité, pour protéger le moteur
contre la pénétration de poussière
abrasive.
STIHL recommande d'utiliser
exclusivement des filtres à air d'origine
STIHL. Le haut niveau de qualité de ces
pièces garantit un fonctionnement sans
dérangements, une grande longévité du
moteur et d'extrêmement longs
intervalles de maintenance du filtre.
Gestion moteur Réglage du carburateur
La régulation des émissions de
nuisances à l'échappement est assurée
par la définition des paramètres et la
configuration des composants du
moteur de base (par ex. carburation,
allumage, calage de l'allumage et de la
distribution),
Informations de base
Cette découpeuse à disque est équipée
d'un dispositif d'allumage avec limiteur
électronique du régime maximal. Il n'est
pas possible d'ajuster le régime maximal
au-delà d'une limite bien déterminée.
Départ usine, le carburateur est livré
avec le réglage standard.
Le carburateur est ajusté de telle sorte
que dans toutes les conditions de
fonctionnement le moteur soit alimenté
avec un mélange carburé de
composition optimale.
Préparatifs
N Arrêter le moteur.
N Contrôler le filtre à air – le nettoyer
ou le remplacer si nécessaire.
N Contrôler la grille pare-étincelles du
silencieux – la nettoyer ou la
remplacer si nécessaire.
72
TS 440

français
370BA029 KN
370BA090 KN
Réglage standard
N Tourner la vis de réglage de
richesse à haut régime (H) dans le
sens inverse des aiguilles d'une
montre, jusqu'en butée – au
maximum de 3/4 tour.
N Tourner la vis de réglage de
richesse au ralenti (L) à fond dans le
sens des aiguilles d'une montre –
puis la tourner de 3/4 de tour dans
le sens inverse des aiguilles d'une
montre.
Réglage du ralenti
N Procéder au réglage standard.
N Mettre le moteur en route et le faire
chauffer.
Si le moteur cale au ralenti
N Tourner la vis de butée de réglage
de régime de ralenti (LA) dans le
sens des aiguilles d'une montre,
jusqu'à ce que le disque à découper
commence à être entraîné – puis
revenir de 1 tour en arrière.
Si le disque est entraîné au ralenti
N Tourner la vis de butée de réglage
de régime de ralenti (LA) dans le
sens inverse des aiguilles d'une
montre, jusqu'à ce que le disque
s'arrête – puis exécuter encore
1 tour dans le même sens.
AVERTISSEMENT
Si le disque ne s'arrête pas au ralenti,
bien que le réglage correct ait été
effectué, faire réparer la découpeuse
par le revendeur spécialisé.
Si le régime de ralenti est irrégulier ; si
l'accélération n'est pas satisfaisante
(malgré la correction effectuée avec la
vis de butée de réglage de régime de
ralenti LA)
Le réglage du ralenti est trop pauvre.
N Tourner la vis de réglage de
richesse au ralenti (L) d'env. 1/4 de
tour dans le sens inverse des
aiguilles d'une montre, jusqu'à ce
que le moteur tourne rond et
accélère bien.
S'il n'est pas possible de régler le
régime de ralenti à un niveau suffisant à
l'aide de la vis de butée de réglage de
régime de ralenti (LA) ; si le moteur cale
lorsque la machine passe au ralenti
après un fonctionnement à charge
partielle
Le réglage du ralenti est trop riche.
N Tourner la vis de réglage de
richesse au ralenti (L) d'env. 1/4 de
tour dans le sens des aiguilles d'une
montre.
Après chaque correction effectuée avec
la vis de réglage de richesse au
ralenti (L), il est généralement
nécessaire de réajuster la vis de butée
de réglage de régime de ralenti (LA).
Correction du réglage du carburateur
pour travailler à haute altitude
Si le fonctionnement du moteur n'est
pas satisfaisant, il peut s'avérer
nécessaire de corriger légèrement le
réglage :
N Procéder au réglage standard.
N Faire chauffer le moteur.
N Tourner légèrement la vis de
réglage de richesse à haut
régime (H) dans le sens des
aiguilles d'une montre
(appauvrissement) – au maximum
jusqu'en butée.
TS 440
73

français
2
370BA031 KN
1
1307BA030 KN
1
2
AVIS
Après être redescendu d'une haute
altitude, rétablir le réglage standard du
carburateur.
Un réglage trop pauvre risque
d'entraîner un manque de lubrification et
une surchauffe – risque d'avarie du
moteur.
Grille pare-étincelles dans le
silencieux
N Si la puissance du moteur baisse,
contrôler la grille pare-étincelles du
silencieux.
AVERTISSEMENT
Avant d'entreprendre les travaux,
attendre que le moteur soit
complètement refroidi.
N Dévisser la vis (1).
N Extraire la grille pare-étincelles (2)
du silencieux par le haut.
N Si la grille pare-étincelles du
silencieux est encrassée, la
nettoyer.
N Si la grille pare-étincelles est
endommagée ou fortement
calaminée, la remplacer.
N Monter la grille pare-étincelles en
procédant dans l'ordre inverse.
Bougie
N En cas de manque de puissance du
moteur, de difficultés de démarrage
ou de perturbations au ralenti,
contrôler tout d'abord la bougie ;
N après env. 100 heures de
fonctionnement, remplacer la
bougie – la remplacer plus tôt si les
électrodes sont fortement usées –
utiliser exclusivement les bougies
antiparasitées autorisées par STIHL
– voir « Caractéristiques
techniques ».
Démontage de la bougie
N Arrêter le moteur – placer le
commutateur d'arrêt sur la position
STOP ou 0 ;
N dévisser la vis (1) et enlever le
capuchon (2) – la vis (1) retenue
dans le capuchon (2) est
imperdable ;
74
TS 440

N débrancher le contact de câble
4
1307BA031 KN
3
000BA039 KN
A
1
000BA045 KN
d'allumage (3) de la bougie ;
N dévisser la bougie (4).
Contrôler la bougie
N Nettoyer la bougie si elle est
encrassée ;
N contrôler l'écartement des
électrodes (A) et le rectifier si
nécessaire – pour la valeur correcte,
voir « Caractéristiques
techniques » ;
N éliminer les causes de
l'encrassement de la bougie.
Causes possibles :
– trop d'huile moteur dans le
carburant ;
– filtre à air encrassé ;
– conditions d'utilisation
défavorables.
AVERTISSEMENT
Si l'écrou de connexion (1) manque ou
n'est pas fermement serré, un
jaillissement d'étincelles peut se
produire. Si l'on travaille dans le
voisinage de matières inflammables ou
présentant des risques d'explosion, cela
peut déclencher un incendie ou une
explosion. Cela peut causer des dégâts
matériels et des personnes risquent
d'être grièvement blessées.
N Utiliser des bougies antiparasitées
avec écrou de connexion fixe.
Montage de la bougie
N Engager la bougie dans le
taraudage à la main et la visser ;
N serrer la bougie avec la clé
multiple ;
N emboîter fermement le contact de
câble d'allumage sur la bougie ;
N engager le capuchon du contact de
câble d'allumage et le visser.
français
Rangement
Pour un arrêt de travail d'env. 30 jours
ou plus,
N Vider et nettoyer le réservoir à
carburant à un endroit bien aéré.
N Éliminer le carburant conformément
à la législation et aux prescriptions
pour la protection de
l'environnement.
N Si la machine possède une pompe
d'amorçage manuelle : appuyer au
moins 5 fois sur le soufflet de la
pompe d'amorçage manuelle.
N Mettre le moteur en route et laisser
le moteur tourner au ralenti jusqu'à
ce qu'il s'arrête.
N Enlever les disques à découper.
N Nettoyer soigneusement la
machine.
N Conserver la machine à un endroit
sec et sûr. La ranger de telle sorte
qu'elle ne puisse pas être utilisée
sans autorisation (par ex. par des
enfants).
TS 440
75

français
Instructions pour la maintenance et l'entretien
Ces indications sont valables pour des conditions d'utilisation normales. Pour des
conditions plus difficiles (ambiance très poussiéreuse etc.) et des journées de travail plus longues, réduire en conséquence les intervalles indiqués.
avant de commencer le
travail
après le travail ou une fois
par jour
après chaque ravitaillement
une fois par semaine
une fois par mois
une fois par an
en cas de panne
Machine complète
Éléments de commande Contrôle du fonctionnement XX
Frein de disque, courroie poly-V
Pompe d'amorçage manuelle (si la
machine en est équipée)
Crépine d'aspiration dans le réservoir à
carburant
Réservoir à carburant Nettoyage X
Filtre à air (tous les composants du filtre) Remplacement Seulement si la puissance du moteur baisse sensiblement
Fentes d'aspiration d'air de
refroidissement
Ailettes du cylindre
Grille pare-étincelles dans le silencieux
Prise d'eau
Carburateur
Contrôle visuel (état, étanchéité) XX
Nettoyage X
Contrôle du fonctionnement X
Réparation par le revendeur
spécialisé
Contrôle X
Réparation par le revendeur
spécialisé
Contrôle X
Remplacement XXX
Nettoyage X
Nettoyage par le revendeur
spécialisé
Contrôle X
Nettoyage ou remplacement X
Contrôle XX
Réparation par le revendeur
spécialisé
Contrôle du ralenti – le disque ne doit
pas tourner au ralenti
Correction du ralenti X
1)
1)
1)
1)
XX
X
X
en cas de détérioration
au besoin
X
X
76
TS 440

Ces indications sont valables pour des conditions d'utilisation normales. Pour des
conditions plus difficiles (ambiance très poussiéreuse etc.) et des journées de travail plus longues, réduire en conséquence les intervalles indiqués.
avant de commencer le
travail
après le travail ou une fois
par jour
après chaque ravitaillement
une fois par semaine
une fois par mois
une fois par an
en cas de panne
Réglage de l'écartement des
Bougie
Vis et écrous accessibles (sauf les vis de
réglage)
Éléments antivibratoires
Disque à découper
Support/butoirs en caoutchouc (face inférieure de la machine)
Étiquettes de sécurité Remplacement X
1)
STIHL recommande de s'adresser au revendeur spécialisé STIHL
électrodes
Remplacement au bout de 100 h de
fonctionnement
Resserrage XX
Contrôle XXX
Remplacement par le revendeur
spécialisé
Contrôle XX
Remplacement XX
Contrôle X
Remplacement XX
1)
X
français
en cas de détérioration
X
au besoin
TS 440
77

français
19
18
C
E
9
5
17
#
20
13
16
14
15
0000-GXX-1788-A0
10
11
8
7
4
A
B
3
1
2
6
D
Principales pièces
1 Poignée arrière
2 Blocage de gâchette d'accélérateur
3 Gâchette d'accélérateur
4 Curseur combiné
5 Poignée de lancement
6 Vis de réglage du carburateur
7 Bouchon du réservoir à carburant
8 Prise d'eau
9 Levier de frein
10 Levier de réglage
11 Disque à découper
12 Rondelle de pression avant
13 Capot protecteur
14 Silencieux
15 Grille pare-étincelles
16 Poignée avant
17 Contact de câble d'allumage sur la
bougie
18 Levier du volet de starter
19 Pompe d'amorçage manuelle
20 Couvercle du filtre à air
# Numéro de série
A Étiquette d'avertissement
B Étiquette d'avertissement
C Étiquette d'avertissement
D Étiquette d'avertissement
E Étiquette d'avertissement
78
TS 440

français
Définitions
1 Poignée arrière
Poignée à tenir de la main droite.
2 Blocage de gâchette d'accélérateur
Il faut l'enfoncer pour pouvoir
actionner la gâchette
d'accélérateur.
3 Gâchette d'accélérateur
Contrôle le régime du moteur.
4 Curseur combiné
Avec positions pour démarrage,
marche normale et arrêt du moteur.
Maintient le papillon partiellement
ouvert au cours du lancement, et
coupe le contact d'allumage pour
arrêter le moteur.
5 Poignée de lancement
La poignée du câble de lancement
qui sert à la mise en route du
moteur.
6 Vis de réglage du carburateur
Pour le réglage du carburateur.
7 Bouchon du réservoir à carburant
Pour fermer le réservoir à carburant.
8Prise d'eau
Pour le branchement de
l'alimentation en eau, pour le
découpage avec arrosage.
9 Levier de frein
Pour desserrer le frein de disque
après la mise en route du moteur.
10 Levier de réglage
Pour ajuster la position du capot
protecteur du disque.
11 Disque à découper
L'outil de coupe, un disque en
résine synthétique ou un disque
diamanté.
12 Rondelle de pression avant
Répartit uniformément la pression
de serrage de l'écrou de fixation sur
le disque à découper.
13 Capot protecteur du disque
Recouvre une partie du disque,
réduit le risque d'être blessé par
suite d'un rebond et d'un contact
accidentel avec l'utilisateur ; retient
et fait dévier les étincelles, les
débris des matières découpées ou
les fragments du disque à
découper.
14 Silencieux
Atténue les bruits d'échappement
du moteur et dirige les gaz
d'échappement dans le sens
opposé à l'utilisateur.
15 Grille pare-étincelles
Conçue pour retenir les étincelles
des gaz d'échappement et réduire
ainsi le risque d'incendie.
16 Poignée avant
Poignée à tenir de la main gauche.
17 Contact de câble d'allumage sur la
bougie
Connecte la bougie au câble
d'allumage.
18 Levier du volet de starter
Facilite le démarrage du moteur en
adaptant la composition du
mélange carburé.
19 Pompe d'amorçage manuelle
Assure une alimentation en
carburant supplémentaire pour le
démarrage à froid.
20 Couvercle du filtre à air
Recouvre et protège le filtre à air.
Embrayage (sans illustration)
Accouple le moteur aux poulies de
la courroie, lorsque le moteur
accélère au-delà du régime de
ralenti.
Poulies de la courroie (sans
illustration)
Le mécanisme qui entraîne la
courroie poly-V et le disque à
découper.
Système antivibratoire (sans
illustration)
Système composé d'un certain
nombre d'éléments réduisant la
transmission, à l'utilisateur, des
vibrations engendrées par le moteur
et le processus de découpage.
TS 440
79

français
Caractéristiques techniques
EPA / CEPA
L'étiquette d'homologation relative aux
émissions de nuisances à
l'échappement indique le nombre
d'heures de fonctionnement durant
lequel ce moteur satisfait aux exigences
des normes antipollution fédérales.
Catégorie
A = 300 heures
B = 125 heures
C = 50 heures
Moteur
Moteur STIHL deux-temps
monocylindrique
Cylindrée : 66,7 cm
Alésage du cylindre : 50 mm
Course du piston : 34 mm
Puissance suivant
ISO 7293 :
3,2 kW (4,4 ch)
à 9000 tr/min
Régime de ralenti : 2700 tr/min
Régime max. de la
broche : 2750 tr/min
Dispositif d'allumage
Volant magnétique à commande
électronique
Bougie
(antiparasitée) : Bosch WSR 6 F
Écartement des
électrodes : 0,5 mm
3
Ce système d'allumage répond à toutes
les exigences de la norme canadienne
Interference-Causing Equipment CAN
ICES-2/NMB-2.
Système d'alimentation en carburant
Carburateur à membrane toutes
positions avec pompe à carburant
intégrée
Capacité du réservoir à carburant : 710 cm
3
(0,71 l)
Filtre à air
Filtre principal (filtre en papier) et filtre
additionnel en treillis métallique floqué
Poids
Poids à vide, sans disque à découper,
avec commande électronique
d'arrosage :
11,1 kg
Disques à découper
Le régime de fonctionnement maximal
admissible du disque à découper,
expressément indiqué, doit être
supérieur ou égal au régime maximal de
la broche de la découpeuse à disque
utilisée.
Diamètre extérieur : 350 mm
Épaisseur max. : 4,5 mm
Diamètre d'alésage / dia-
mètre de broche : 20 mm
Couple de serrage : 30 Nm
Disques en résine synthétique
Diamètre extérieur minimal
des rondelles de
pression :
Profondeur de coupe
maximale :
1)
2)
3)
1) 2)
3)
Pour le Japon 118 mm
Pour l'Australie 118 mm
En cas d'utilisation de rondelles de
pression d'un diamètre extérieur de
118 mm, la profondeur de coupe
maximale est réduite à 116 mm
Disques diamantés
Diamètre extérieur minimal
des rondelles de
pression :
Profondeur de coupe
maximale :
1)
3)
1)
3)
Pour le Japon 118 mm
En cas d'utilisation de rondelles de
pression d'un diamètre extérieur de
118 mm, la profondeur de coupe
maximale est réduite à 116 mm
103 mm
125 mm
103 mm
125 mm
80
TS 440

français
000BA073 KN
Instructions pour les
réparations
L'utilisateur de ce dispositif est autorisé
à effectuer uniquement les opérations
de maintenance et les réparations
décrites dans la présente Notice
d'emploi. Les réparations plus poussées
ne doivent être effectuées que par le
revendeur spécialisé.
STIHL recommande de faire effectuer
les opérations de maintenance et les
réparations exclusivement chez le
revendeur spécialisé STIHL. Les
revendeurs spécialisés STIHL
participent régulièrement à des stages
de perfectionnement et ont à leur
disposition les informations techniques
requises.
Pour les réparations, monter
exclusivement des pièces de rechange
autorisées par STIHL pour ce dispositif
ou des pièces similaires du point de vue
technique. Utiliser exclusivement des
pièces de rechange de haute qualité.
Sinon, des accidents pourraient survenir
et le dispositif risquerait d'être
endommagé.
STIHL recommande d'utiliser des pièces
de rechange d'origine STIHL.
Les pièces de rechange d'origine STlHL
sont reconnaissables à leur référence
de pièce de rechange STIHL, au nom
{ et, le cas échéant, au
symbole d'identification des pièces de
rechange STlHL K (les petites pièces
ne portent parfois que ce symbole).
Mise au rebut
Pour l'élimination des déchets,
respecter les prescriptions nationales
spécifiques.
Les produits STIHL ne doivent pas être
jetés à la poubelle. Le produit STIHL, la
batterie, les accessoires et leur
emballage doivent être mis au
recyclage.
Consulter le revendeur spécialisé STIHL
pour obtenir les informations d'actualité
concernant l'élimination écocompatible
des déchets.
Garantie de la Société STIHL
Limited relative au système
antipollution
Cette déclaration est fournie
volontairement et elle se base sur
l'accord conclu en avril 1999 entre
l'Office de l'Environnement du Canada
et STIHL Limited.
Vos droits et obligations dans le cadre
de la garantie
STIHL Limited expose ici la garantie
relative au système antipollution du
moteur de votre type de moteur. Au
Canada, sur le plan construction et
équipement, les moteurs neufs de petits
dispositifs à moteur non-routiers, du
millésime 1999 ou d'un millésime
ultérieur, doivent, au moment de la
vente, être conformes aux dispositions
U.S. EPA pour petits moteurs qui ne
sont pas destinés à des véhicules
routiers. Le moteur du dispositif doit être
exempt de vices de matériaux et de
fabrication qui entraîneraient une nonconformité avec les dispositions U.S.
EPA au cours des deux premières
années de service du moteur, à dater de
la vente au consommateur final.
Pour la période ci-dessus, STIHL
Limited doit assumer la garantie sur le
système antipollution du moteur de votre
petit dispositif non-routier, à condition
que votre moteur n'ait pas été utilisé de
façon inadéquate et que sa
maintenance n'ait pas été négligée ou
incorrectement effectuée.
Votre système antipollution peut
comprendre aussi des pièces telles que
le carburateur ou le système d'injection
de carburant, l'allumage et le catalyseur.
Il peut aussi englober des flexibles,
TS 440
81

français
courroies, raccords et autres
composants influant sur les émissions
de nuisances.
Dans un cas de garantie, STIHL Limited
devra réparer le moteur de votre
dispositif non-routier et ce, gratuitement
pour vous. La garantie englobe le
diagnostic (s'il est exécuté par un
revendeur autorisé) ainsi que les pièces
et la main-d'œuvre.
Durée de la garantie du fabricant
Au Canada, les moteurs de petits
dispositifs à moteur non-routiers, du
millésime 1999 ou d'un millésime
ultérieur, bénéficient d'une garantie de
deux ans. Si une pièce du système
antipollution du moteur de votre
dispositif s'avère défectueuse, elle est
réparée ou remplacée gratuitement par
STIHL Limited.
Obligations du propriétaire :
En tant que propriétaire du moteur du
petit dispositif à moteur non-routier,
vous êtes responsable de l'exécution de
la maintenance indispensable prescrite
dans la notice d'emploi de votre
dispositif. STIHL Limited recommande
de conserver toutes les quittances des
opérations de maintenance exécutées
sur le moteur de votre dispositif nonroutier. STIHL Limited ne peut toutefois
pas vous refuser une garantie sur votre
moteur pour la seule raison que des
quittances manqueraient ou que vous
auriez négligé d'assurer l'exécution de
toutes les opérations de maintenance
prévues.
Pour la maintenance ou les réparations
qui ne sont pas effectuées sous
garantie, il est permis d'employer des
pièces de rechange ou des méthodes de
travail assurant une exécution et une
longévité équivalant à celles de
l'équipement de première monte et ce,
sans que cela réduise, pour le fabricant
du moteur, l'obligation de fournir une
garantie.
En tant que propriétaire du petit
dispositif à moteur non-routier, vous
devez toutefois savoir que STIHL
Limited peut vous refuser la garantie si
le moteur ou une partie du moteur de
votre dispositif tombe en panne par suite
d'une utilisation inadéquate, d'un
manque de précaution, d'une
maintenance incorrecte ou de
modifications non autorisées.
Vous êtes tenu d'amener le moteur de
votre petit dispositif à moteur non-routier
à un centre de Service Après-Vente
STIHL dès qu'un problème survient. Les
travaux sous garantie seront exécutés
dans un délai raisonnable qui ne devra
pas dépasser 30 jours.
Si vous avez des questions concernant
vos droits et obligations dans le cadre de
la garantie, veuillez consulter un
conseiller du Service Après-Vente
STIHL (www.stihl.ca)
ou écrire à :
STIHL Ltd.,
1515 Sise Road
Box 5666
CA-LONDON ONTARIO ; N6A 4L6
Étendue de la garantie fournie par
STIHL Limited
STIHL Limited garantit à l'acheteur final,
et à tout acquéreur ultérieur, que le
moteur de votre petit dispositif nonroutier satisfait à toutes les prescriptions
en vigueur au moment de la vente, sur le
plan construction, fabrication et
équipement. STIHL Limited garantit en
outre au premier acquéreur et à tous les
acquéreurs ultérieurs, pour une période
de deux ans, que votre moteur est
exempt de tout vice de matériaux et de
tout vice de fabrication entraînant une
non-conformité avec les prescriptions
en vigueur.
Période de garantie
La période de garantie commence le
jour où le premier acheteur fait
l'acquisition du moteur du dispositif et où
vous avez retourné à STIHL Ltd. la carte
de garantie portant votre signature. Si
une pièce faisant partie du système
antipollution de votre dispositif est
défectueuse, la pièce est remplacée
gratuitement par STIHL Limited. Durant
la période de garantie, une garantie est
fournie pour toute pièce sous garantie
qui ne doit pas être remplacée à
l'occasion d'une opération de
maintenance prescrite ou pour laquelle
« la réparation ou le remplacement, si
nécessaire » n'est prévu qu'à l'occasion
de l'inspection périodique. Pour toute
pièce sous garantie qui doit être
remplacée dans le cadre d'une
opération de maintenance prescrite, la
garantie est fournie pour la période qui
précède le premier remplacement
prévu.
Diagnostic
Les coûts occasionnés pour le
diagnostic ne sont pas facturés au
propriétaire, si ce diagnostic confirme
qu'une pièce sous garantie est
défectueuse. Si, par contre, vous
revendiquez un droit à la garantie pour
une pièce et qu'une défectuosité n'est
pas constatée au diagnostic, STIHL
Limited vous facturera les coûts du test
82
TS 440

français
des émissions de nuisances. Le
diagnostic de la partie mécanique doit
être exécuté par un revendeur
spécialisé STIHL. Le test des émissions
de nuisances peut être exécuté soit par
STIHL Incorporated,
536 Viking Drive, P.O. Box 2015,
Virginia Beach, VA 23452,
soit par un laboratoire indépendant.
Travaux sous garantie
STIHL Limited doit faire éliminer les
défauts sous garantie par un revendeur
spécialisé STIHL ou par une station de
garantie. Tous les travaux seront
effectués sans facturation au
propriétaire, si l'on constate qu'une
pièce sous garantie est effectivement
défectueuse. Toute pièce autorisée par
le fabricant ou pièce de rechange
équivalente peut être utilisée pour toute
opération de maintenance ou réparation
sous garantie touchant une pièce du
système antipollution et elle doit être
mise gratuitement à la disposition du
propriétaire, si la pièce en question est
encore sous garantie. STIHL Limited
assume la responsabilité de dommages
causés à d'autres composants du
moteur par la pièce encore couverte par
la garantie.
La liste suivante précise les pièces
couvertes par la garantie antipollution :
– Filtre à air
– Carburateur (le cas échéant)
– Pompe d'amorçage manuelle
– Starter (système d'enrichissement
de démarrage à froid) (le cas
échéant)
– Tringleries de commande
– Coude d'admission
– Volant magnétique ou allumage
électronique (module d'allumage ou
boîtier électronique)
– Rotor
– Bougie
– Injecteur (le cas échéant)
– Pompe d'injection (le cas échéant)
– Boîtier de papillon (le cas échéant)
– Cylindre
– Silencieux
– Catalyseur (le cas échéant)
– Réservoir à carburant
– Bouchon du réservoir à carburant
– Conduit de carburant
– Raccords du conduit de carburant
– Colliers
– Pièces de fixation
Pour faire valoir un droit à la garantie
Présenter le dispositif à un revendeur
spécialisé STIHL, avec la carte de
garantie signée.
Prescriptions de maintenance
Les prescriptions de maintenance qui
figurent dans la présente Notice
d'emploi présument que l'on utilise le
mélange d'essence et d'huile prescrit
pour moteur deux-temps (voir aussi
chapitre « Carburant »). En cas
d'utilisation de carburants et d'huiles
d'autre qualité ou d'un taux de mélange
différent, il peut être nécessaire de
raccourcir les intervalles de
maintenance.
Restrictions
Cette garantie sur le système
antipollution ne couvre pas :
1. les réparations et remplacements
nécessaires par suite d'une
utilisation inadéquate ou bien d'une
négligence ou de l'omission des
opérations de maintenance
indispensables ;
2. les réparations exécutées
incorrectement ou les
remplacements effectués avec des
pièces non conformes aux
spécifications de STIHL Limited et
ayant un effet défavorable sur le
rendement et/ou la longévité, et les
transformations ou modifications
que STIHL Limited n'a ni
recommandées, ni autorisées par
écrit ;
3. le remplacement de pièces et
d'autres prestations de services et
réglages qui s'avèrent nécessaires
dans le cadre des travaux de
maintenance indispensables, à
l'échéance du premier
remplacement prévu, et par la suite.
TS 440
83

français
84
TS 440


0458-520-8221-B
englisch / französisch
GF
www.stihl.com
*04585208221B*
0458-520-8221-B
 Loading...