

Page 1

{
STIHL SE 122
Instruction Manual
Notice d’emploi
Page 2

G Instruction Manual
1 - 15
F Notice d’emploi
17 - 31
Page 3
Original Instruction ManualPrinted on chlorine-free paper
Printing inks contain vegetable oils, paper can be recycled.
© ANDREAS STIHL AG & Co. KG, 2010
0458-649-8221. M0-4.M10.FST.
0000004025_002_GB
SE 122, SE 122 E
English
1
{
Contents
Dear Customer,
Thank you for choosing a quality
engineered STIHL product.
This machine has been built using
modern production techniques and
comprehensive quality assurance.
Every effort has been made to ensure
your satisfaction and troublefree use
of the machine.
Please contact your dealer or our
sales company if you have any
queries concerning your machine.
Your
Hans Peter Stihl
Guide to Using this Manual 2
Safety Precautions and Working
Techniques 2
Lock the machine in position 5
Assembling the Unit 5
Connecting to Power Supply 6
Switching On 7
Working 7
Switching Off 8
After Finishing Work 8
Emptying the container 8
Cleaning the filter element 9
Replacing the filter element 9
Maintenance and Care 11
Troubleshooting 12
Main Parts 13
Specifications 14
Special Accessories 14
Maintenance and Repairs 14
Disposal 15
Page 4
SE 122, SE 122 E
English
2
Pictograms
All the pictograms attached to the
machine are shown and explained in this
manual.
Symbols in text
Engineering improvements
STIHL's philosophy is to continually
improve all of its products. For this
reason we may modify the design,
engineering and appearance of our
products periodically.
Therefore, some changes, modifications
and improvements may not be covered
in this manual.
Observe the national safety regulations
issued, for example, by the employers'
liability insurance association, social
security institutions, occupational safety
and health authorities or other
organizations.
Minors should never be allowed to use
the machine.
Children, animals and bystanders must
remain at a distance.
When not using the machine, it must be
put down in such a way that it does not
endanger anyone. Ensure that the
machine cannot be used without
authorization, unplug the power cord.
The user is responsible for accidents or
risks involving third parties or their
property.
Do not let the machine run unattended.
The machine should only be provided or
loaned to people familiar with this model
and its operation. The instruction
manual should always be handed over
with the machine.
Connect only electric power tools to the
socket outlet – see "Connecting the
machine to the power supply" and
"Operation".
Unsuitable extension cords may be
dangerous. When working outdoors,
use only extension cords that are
approved for this use and
correspondingly marked and have a
sufficient cross-section.
Never touch the power plug, power cord
and extension cord and electrical plug
connections with wet hands.
Inspect the power cord regularly for
signs of damage and aging. Never use
the machine if the power cord is
damaged – Danger of electrocution!
The machine may only be used when all
parts are in perfect working order.
Before starting any work on the
machine, e. g., cleaning, servicing,
replacement of parts – unplug the
power plug!
Do not use high-pressure cleaners to
clean the machine. The hard water jet
can damage parts of the machine.
Never spray the upper part of the
vacuum cleaner with water – Danger of
short-circuiting!
Accessories and spare parts
Only use parts or accessories which
have been approved by STIHL for this
machine or which are technically
Guide to Using this Manual
Warning where there is a risk of
an accident or personal injury or
serious damage to property.
Caution where there is a risk of
damaging the machine or its
individual components.
Safety Precautions and
Working Techniques
Special safety precau-
tions are necessary when
using this machine. The
power connection is a
particular source of
danger.
It is important that you
carefully read the entire
Instruction Manual before
using the machine for the
first time and keep it in a
safe place for future ref-
erence. Non-compliance
with the Instruction Man-
ual may cause serious or
even fatal injury.
Page 5
SE 122, SE 122 E
English
3
equivalent. Contact a dealer if in doubt.
Only use high-quality parts and
attachments. in order to avoid the risk of
accidents or damage to the machine.
STIHL recommends the use of genuine
STIHL parts and accessories. These
have been optimized for the product and
the user's requirements.
Never modify the machine in any way,
as this could be extremely dangerous.
STIHL excludes all liability for personal
injury and damage to property caused
while using unauthorized attachments.
Applications
Vacuuming of dry, non-flammable
materials (dust, dirt, broken glass, wood
or metal shavings, sand, etc.) and non-
flammable liquids (dirty water, spilled
juices, etc.)
The machine is not suitable for
vacuuming toxic dust.
Other uses are not permitted and may
lead to accidents or damage to the
machine. The machine must not be
modified in any way – this may also lead
to accidents or damage to the machine.
Transporting the machine
When transporting the machine in or on
a vehicle, it must be secured, e.g. with
straps, so that it cannot slip or tip over.
Do not tilt the machine if there is liquid in
the container.
Close all latches on the container before
transport.
Before starting work
Check the machine
The machine should only be used if it is
in good working order – risk of
accident!
– It must be possible to move the
switch to the 0 position easily.
– The switch must be in the 0 position.
Remove the filter bag and check correct
operation of the float before vacuuming
liquids or wet materials. Never work
without the filter element.
Never attempt to modify the controls or
safety devices
Electrical connection
Minimize the risk of electrical shock:
– Voltage and frequency of the
machine (see rating plate) must
match the voltage and frequency of
the mains supply
– Examine the power cord, power
plug and extension cord for
damage. Damaged cords,
couplings and plugs or power cords
that do not comply with the
regulations must not be used
– Only connect the machine to a
correctly installed power socket
– Use only extension cords that
comply with the specifications for
the respective application.
– The insulation on the power cord
and any extension cord, the plug
and the coupling must be fully intact
Route the power cord and extension
cord properly:
– Observe the minimum cross-section
of the individual cords – see
"Connecting the machine to the
power supply"
– Route and mark the power cord so
that it cannot become damaged and
no one is endangered – danger of
stumbling!
– The connector and coupling of the
extension cord must be waterproof
or routed in such a way that they
cannot come into contact with water
– the connector and coupling of the
extension cord must not lie in water
– don't let the cord rub against edges
or pointed or sharp objects
– don't squeeze the cord under doors
or windows
– if cords become snarled – unplug
the power plug and unsnarl the cord
– always unroll the power cord from
the cable drum completely to avoid
risk of fire due to overheating
Never use the machine to
vacuum hot materials
(hot ash, flammable
explosive dust, glowing
cigarette butts, etc.) or
combustible liquids
(gasoline, thinner, etc.)
as well as aggressive liq-
uids (acids, lye) –
Danger of fire or
explosion!
Page 6
SE 122, SE 122 E
English
4
During work
Ensure that the power cord is not
damaged by being driven over,
squashed or pulled, etc.
Never unplug the power plug by pulling
on the cord: always grip the plug itself.
The power cord and power plug must
never be touched with wet hands.
Never spray electrical devices with
water – Danger of short-circuiting!
In the event of imminent danger or in an
emergency – move switch to 0 .
Never let the machine run unattended.
Do not leave the machine standing in the
rain.
The machine may only be operated in an
upright position. Do not cover the
machine and ensure adequate motor
ventilation.
Ensure that the filter element is always
undamaged.
If foam develops or liquid escapes, stop
work immediately, unplug the power
cord, and empty the container.
If the machine is subjected to unusually
high loads for which it was not designed
(e.g., heavy impact or a fall), always
check that it is in good condition before
continuing work - refer also to the
chapter "Before starting work". Also
make certain that the safety
mechanisms are working properly.
Never continue using a machine that is
not in perfect working order. Consult a
servicing dealer if in doubt.
Before leaving the machine: Switch off
the machine – unplug the power cord.
After finishing work
Unplug the power plug from the socket
Never unplug the power plug by pulling
on the cord: always grip the plug itself.
Clean the machine to remove dust and
dirt – do not use degreasing agents.
Maintenance and Repairs
Service the machine regularly. Do not
attempt any maintenance or repair work
not described in the instruction manual.
Have all other work performed by a
servicing dealer.
STIHL recommends that you have
servicing and repair work carried out
exclusively by an authorized STIHL
servicing dealer. STIHL dealers are
regularly given the opportunity to attend
training courses and are supplied with
the necessary technical information.
Only use high-quality replacement parts
in order to avoid the risk of accidents
and damage to the machine. If you have
any questions in this respect, consult a
servicing dealer.
STIHL recommends the use of genuine
STIHL replacement parts. These parts
are specifically designed to match your
machine model and meet your
performance requirements.
To reduce the risk of serious injury, have
repairs to the unit (e.g. replacing the
power supply cord) performed by an
authorized electrician.
Clean plastic components with a cloth.
Do not use aggressive detergents. They
may damage the plastic.
Clean cooling air inlets in motor housing
as necessary.
If the power cord is dam-
aged, unplug it
immediately – danger of
electrocution!
Before carrying out any
work on the power tool:
Disconnect the plug from
the power supply.
Page 7
SE 122, SE 122 E
English
5
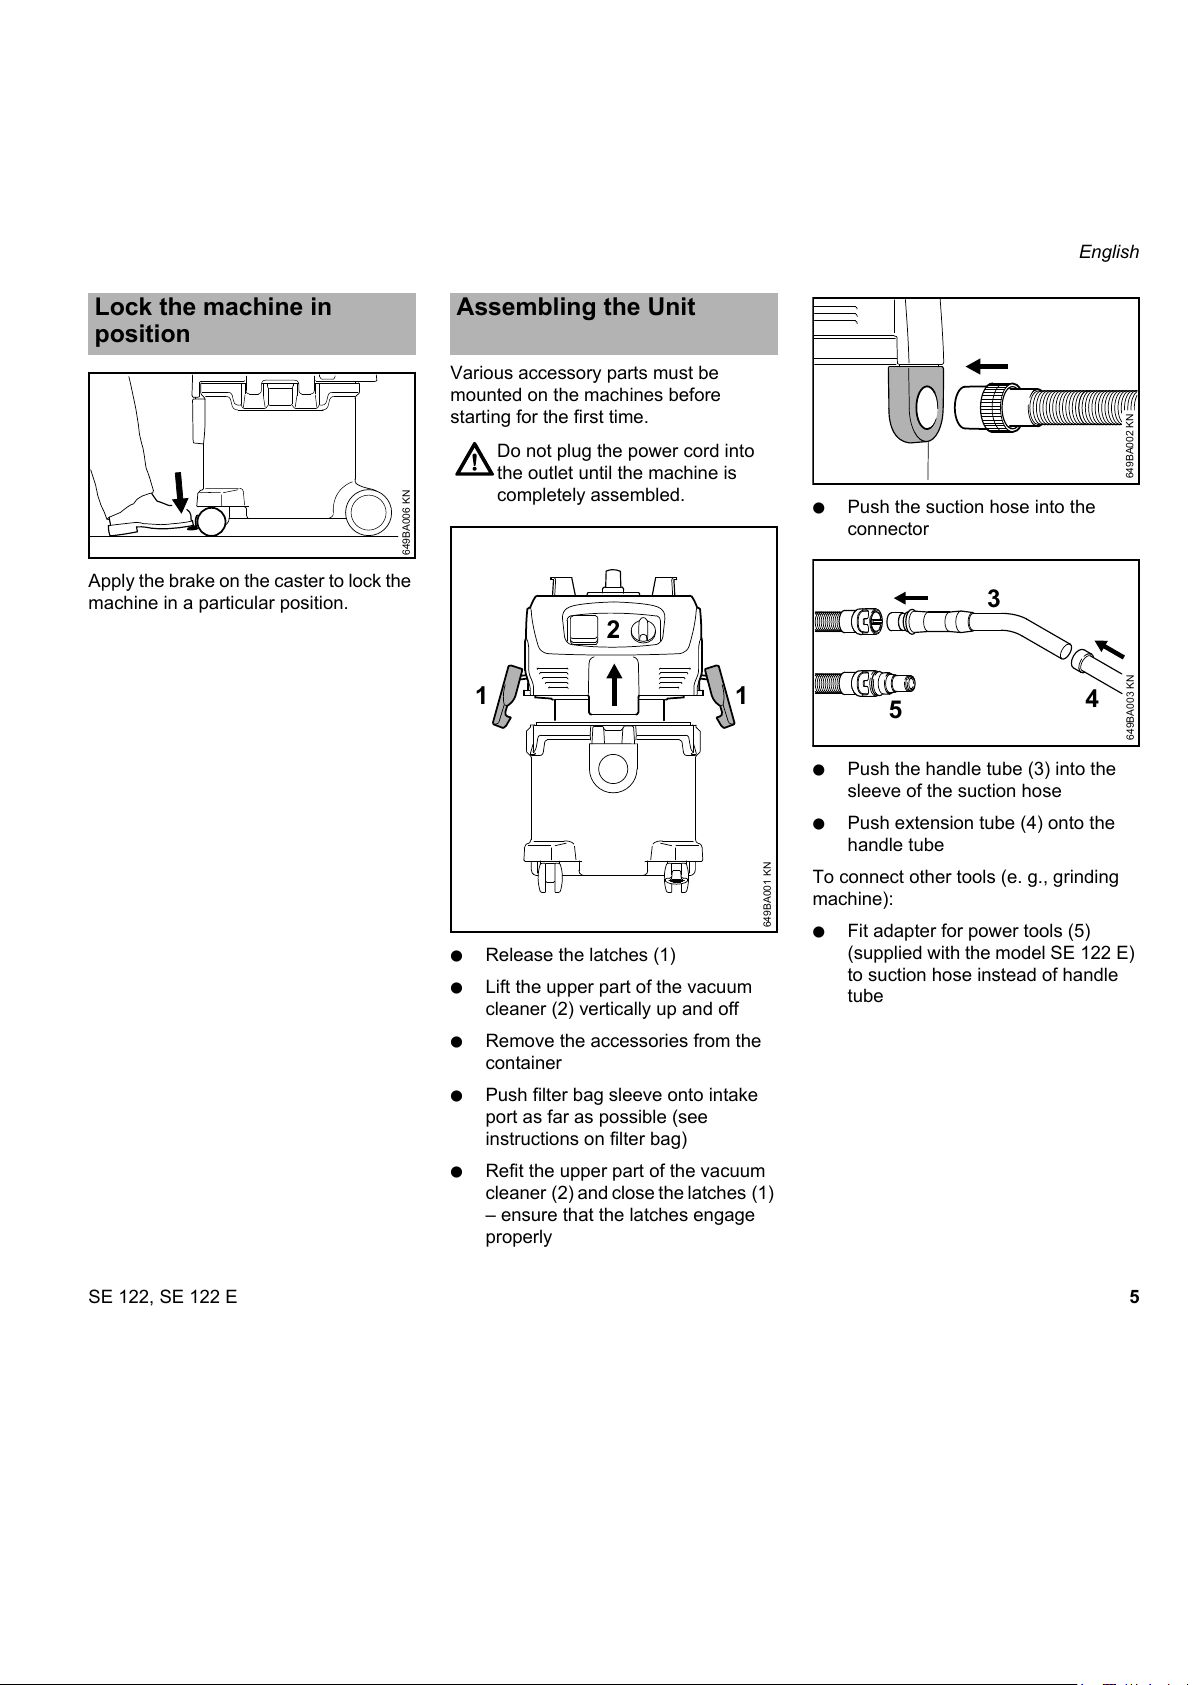
Apply the brake on the caster to lock the
machine in a particular position.
Various accessory parts must be
mounted on the machines before
starting for the first time.
N Release the latches (1)
N Lift the upper part of the vacuum
cleaner (2) vertically up and off
N Remove the accessories from the
container
N Push filter bag sleeve onto intake
port as far as possible (see
instructions on filter bag)
N Refit the upper part of the vacuum
cleaner (2) and close the latches (1)
– ensure that the latches engage
properly
N Push the suction hose into the
connector
N Push the handle tube (3) into the
sleeve of the suction hose
N Push extension tube (4) onto the
handle tube
To connect other tools (e. g., grinding
machine):
N Fit adapter for power tools (5)
(supplied with the model SE 122 E)
to suction hose instead of handle
tube
Lock the machine in
position
649BA006 KN
Assembling the Unit
Do not plug the power cord into
the outlet until the machine is
completely assembled.
649BA001 KN
1
2
1
649BA002 KN
3
649BA003 KN
4
5
Page 8
SE 122, SE 122 E
English
6
N Mount extension tube holder at a
distance (A) of approx. 20 cm from
the bottom edge of the extension
tube
N Depending on the intended use of
the vacuum, fit the crevice tool (6),
all-purpose tool (7) or floor tool (8)
onto the extension tube.
The voltage and frequency of the
machine (see rating plate) must match
the voltage and frequency of the power
connection.
The minimum fuse protection of the
power connection must comply with the
specifications – see "Specifications".
The machine must be connected to the
power supply via an earth-leakage
circuit breaker to disconnect the power
supply if the differential current to earth
exceeds 30 mA.
The power connection must correspond
to IEC 60364 and relevant national
regulations.
Extension Cords
Make sure your electrical cord set is in
good condition. When using an
extension cord, be sure to use one
heavy enough to carry the current your
product will draw. An undersized
extension cord may cause a drop in line
voltage resulting in loss of power and
overheating. The table below shows the
correct size (AWG) to use for your
machine (Cord types SJW or SJTW)
depending on cord length and
nameplate ampere rating. If in doubt,
use the next heavier gauge. The smaller
the gauge number, the heavier the cord.
Appropriate extension cords are
available in special stores for electrical
equipment or from your STIHL dealer.
Connection to the power supply
socket
Before connection to the power supply,
check that the machine is switched off –
see "Switching off the machine"
N Plug the power cord or extension
cord into a properly installed outlet
649BA004 KN
A
649BA005 KN
6
8
7
Connecting to Power
Supply
Cord length (ft) Wire gage (AWG)
50 16
100 14
150 12
Page 9
SE 122, SE 122 E
English
7
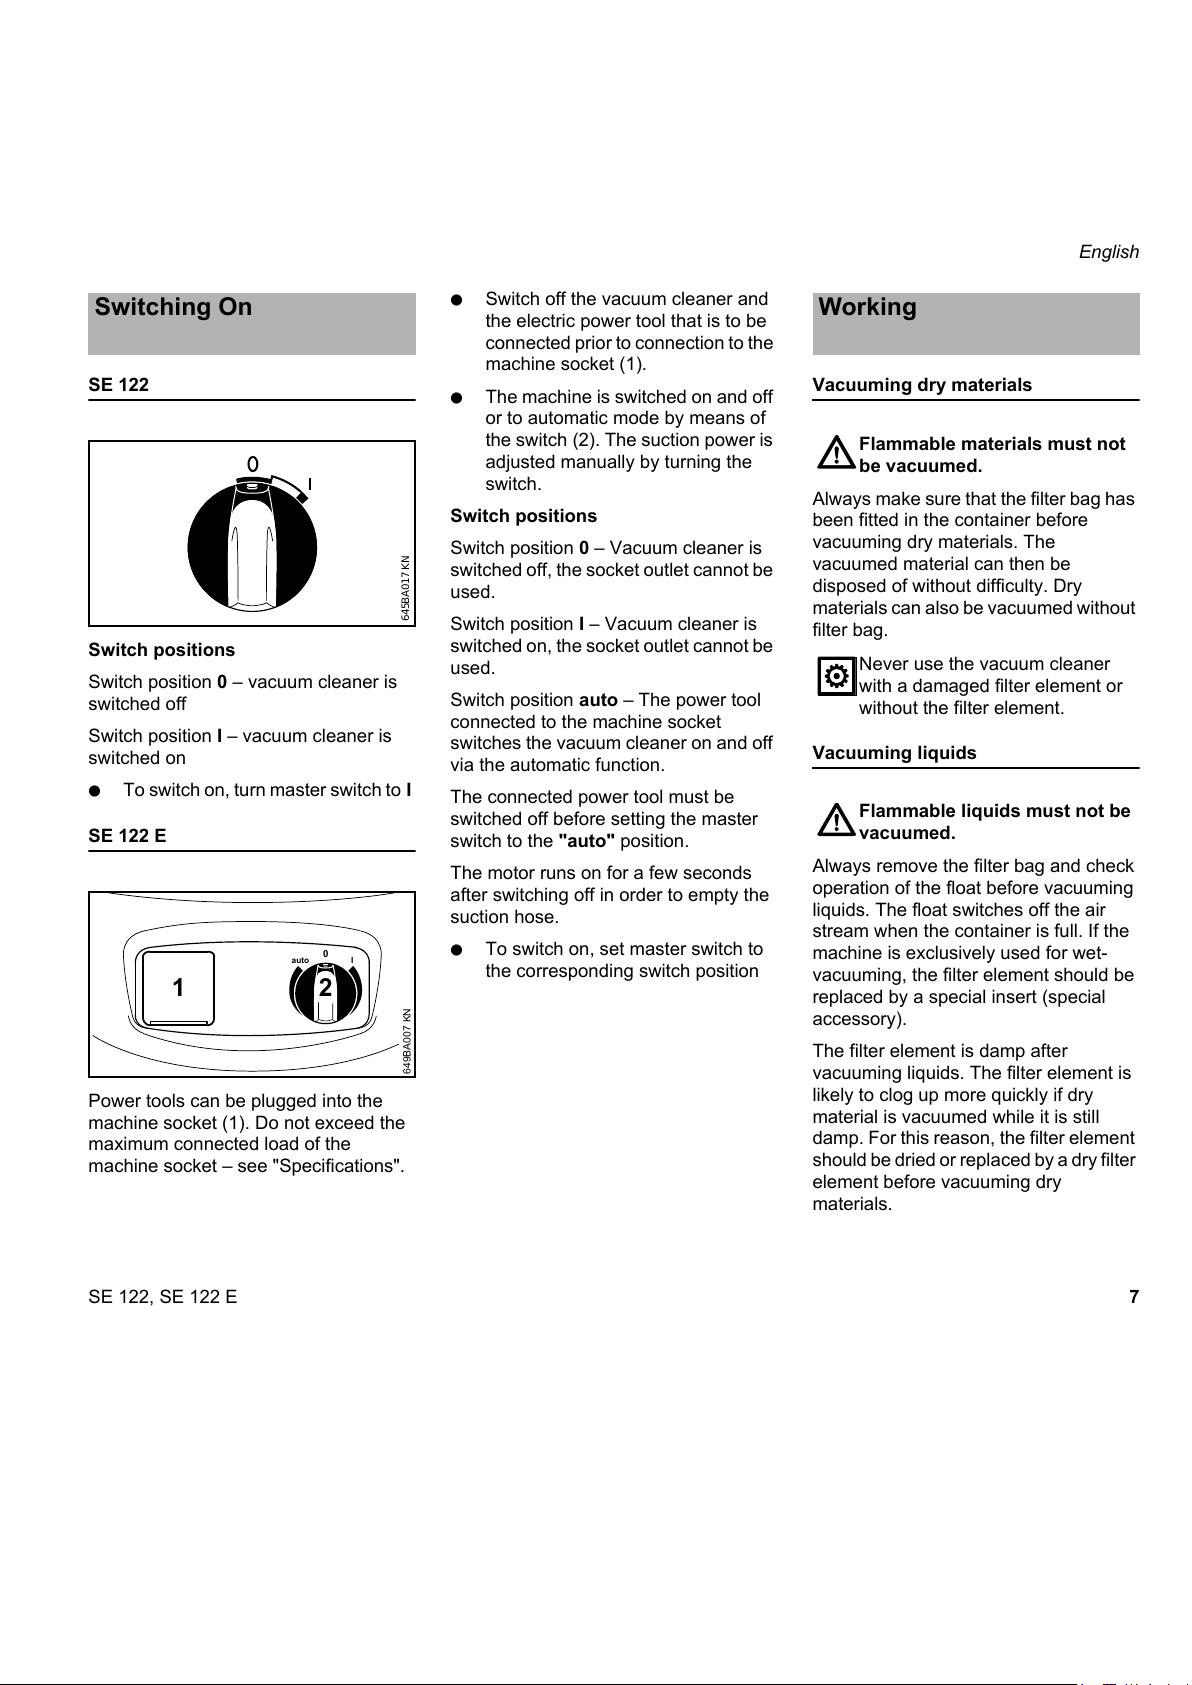
SE 122
Switch positions
Switch position 0 – vacuum cleaner is
switched off
Switch position I – vacuum cleaner is
switched on
N To switch on, turn master switch to I
SE 122 E
Power tools can be plugged into the
machine socket (1). Do not exceed the
maximum connected load of the
machine socket – see "Specifications".
N Switch off the vacuum cleaner and
the electric power tool that is to be
connected prior to connection to the
machine socket (1).
N The machine is switched on and off
or to automatic mode by means of
the switch (2). The suction power is
adjusted manually by turning the
switch.
Switch positions
Switch position 0 – Vacuum cleaner is
switched off, the socket outlet cannot be
used.
Switch position I – Vacuum cleaner is
switched on, the socket outlet cannot be
used.
Switch position auto – The power tool
connected to the machine socket
switches the vacuum cleaner on and off
via the automatic function.
The connected power tool must be
switched off before setting the master
switch to the "auto" position.
The motor runs on for a few seconds
after switching off in order to empty the
suction hose.
N To switch on, set master switch to
the corresponding switch position
Vacuuming dry materials
Always make sure that the filter bag has
been fitted in the container before
vacuuming dry materials. The
vacuumed material can then be
disposed of without difficulty. Dry
materials can also be vacuumed without
filter bag.
Vacuuming liquids
Always remove the filter bag and check
operation of the float before vacuuming
liquids. The float switches off the air
stream when the container is full. If the
machine is exclusively used for wet-
vacuuming, the filter element should be
replaced by a special insert (special
accessory).
The filter element is damp after
vacuuming liquids. The filter element is
likely to clog up more quickly if dry
material is vacuumed while it is still
damp. For this reason, the filter element
should be dried or replaced by a dry filter
element before vacuuming dry
materials.
Switching On
645BA017 KN
649BA007 KN
1
0
auto
I
2
Working
Flammable materials must not
be vacuumed.
Never use the vacuum cleaner
with a damaged filter element or
without the filter element.
Flammable liquids must not be
vacuumed.
Page 10
SE 122, SE 122 E
English
8
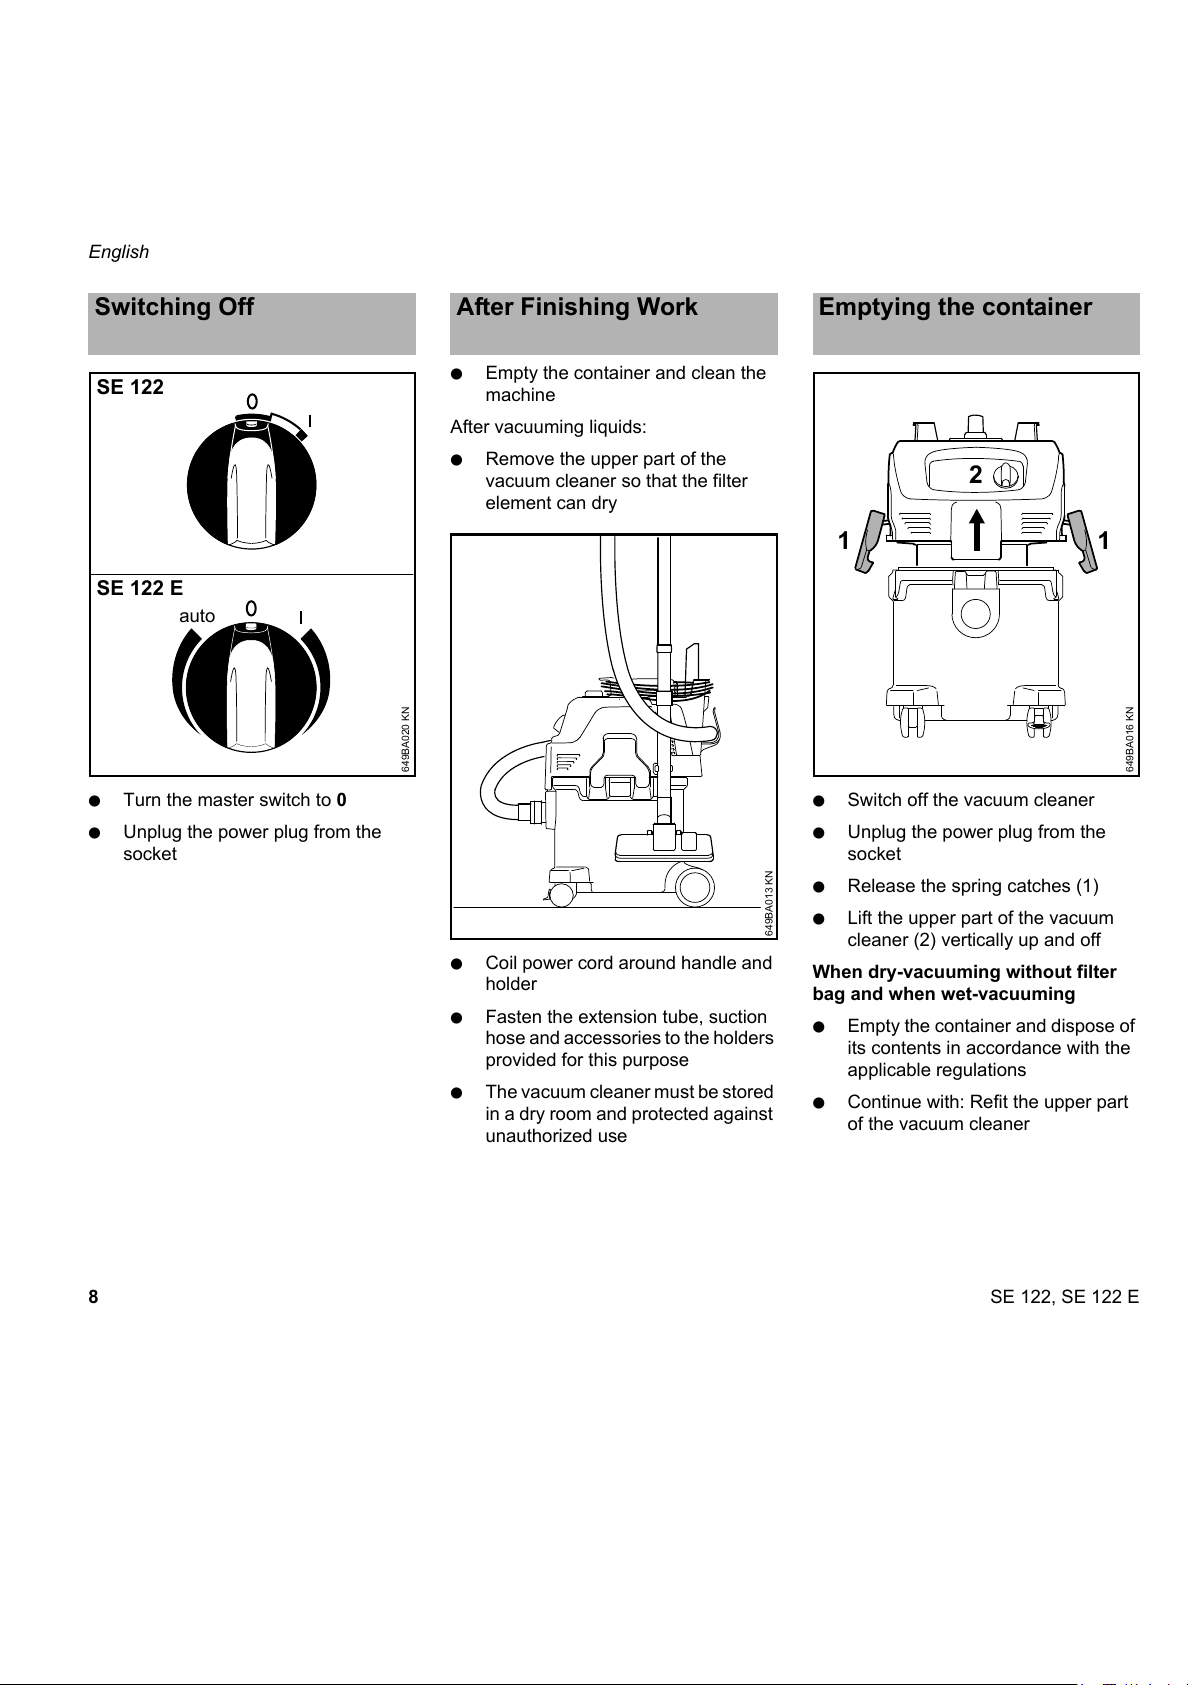
N Turn the master switch to 0
N Unplug the power plug from the
socket
N Empty the container and clean the
machine
After vacuuming liquids:
N Remove the upper part of the
vacuum cleaner so that the filter
element can dry
N Coil power cord around handle and
holder
N Fasten the extension tube, suction
hose and accessories to the holders
provided for this purpose
N The vacuum cleaner must be stored
in a dry room and protected against
unauthorized use
N Switch off the vacuum cleaner
N Unplug the power plug from the
socket
N Release the spring catches (1)
N Lift the upper part of the vacuum
cleaner (2) vertically up and off
When dry-vacuuming without filter
bag and when wet-vacuuming
N Empty the container and dispose of
its contents in accordance with the
applicable regulations
N Continue with: Refit the upper part
of the vacuum cleaner
Switching Off
auto
649BA020 KN
SE 122
SE 122 E
After Finishing Work
649BA013 KN
Emptying the container
649BA016 KN
1
2
1
Page 11

SE 122, SE 122 E
English
9
When dry-vacuuming with filter bag
N Pull filter bag sleeve (1) off intake
port and seal opening in filter bag
sleeve with slide (2)
N Carefully remove filter bag from
container and dispose of in
accordance with statutory
regulations
N Insert new filter bag (3) (instructions
on filter bag)
N Push filter bag sleeve onto intake
port as far as possible
Refit the upper part of the vacuum
cleaner
N Clean the edge of the container
N Refit the upper part of the vacuum
cleaner
N Clean the sleeve and intake port
before fitting the suction hose
N Squeeze sleeve (1) of suction hose
(arrows) together to release it
N Remove suction hose
N Switch on machine
N Seal the hose at the sleeve by firmly
pressing the sleeve against the flat
surface beside the switch (as shown
in picture)
N Press the filter cleaning button 3
times
Dust deposits are removed from the filter
element.
N Unplug the power plug from the
socket
N Remove upper part of vacuum
cleaner and turn it over
N Unscrew supporting cage for
filter (1)
N Remove filter element (2) and
dispose of it in accordance with the
statutory regulations
N Fit new filter element in the reverse
sequence of steps
N Check correct operation of the float:
the float must move easily when the
supporting cage for the filter is
turned over.
N Refit upper part of the vacuum
cleaner
1
649BA010 KN
2
649BA011 KN
3
Cleaning the filter element
1
649BA008 KN
649BA009 KN
Replacing the filter element
649BA012 KN
1
2
Page 12

SE 122, SE 122 E
English
10
Never use the vacuum cleaner
with a damaged filter element or
without the filter element.
Page 13

SE 122, SE 122 E
English
11
Maintenance and Care
The following maintenance intervals apply in normal operating conditions. The specified intervals must
be shortened accordingly when working for longer than normal or under difficult cutting conditions
(extensive dust, etc.).
before starting work
at the end of work and/or
daily
Weekly
monthly
if faulty
if damaged
as required
Complete machine
visual inspection (condition) X
clean X
Connecting cable
check X
have them replaced by a specialist dealer
1)
X
Switch
check operation X
have them replaced by a specialist dealer
1)
XX
Ventilation slots in motor housing clean X
Filter bag change X
Filter element
clean X
replace X
Container empty X
All accessible screws, nuts and bolts retighten X
Safety information sticker replace X
1)
STIHL recommends STIHL servicing dealers
Page 14

SE 122, SE 122 E
English
12
Fault: Motor does not start
Fault: Motor does not run in
automatic mode
Fault: Poor suction performance
Fault: No suction performance when
wet-vacuuming
Troubleshooting
Cause Remedy
Mains circuit-
breaker has been
tripped
Check and reset
mains circuit
breaker
Overload protection
has been tripped
Let vacuum
cleaner cool for
approx. 5 minutes
Cause Remedy
Power tool faulty or
not plugged in
correctly
Check correct
operation of power
tool and insert plug
properly
Cause Remedy
Manually set suction
power is too low
See "Operation"
Filter bag is full See "Emptying the
container"
Suction hose / tool
is clogged
Clean suction
hose / tool
Filter element is
fouled
See "Cleaning the
filter element" and
"Replacing the fil-
ter element"
Gasket between
upper part of vac-
uum cleaner and
container is fouled
or faulty
Clean or replace
gasket
Cause Remedy
Container full
(intake port is
sealed by float)
See "Emptying the
container"
Page 15

SE 122, SE 122 E
English
13
1 Suction hose
2 Handle tube
3 Sleeve for power tools
1)
4 Socket outlet
1)
5 Switch
6 Latch
7 Connector for suction hose
8 Caster with brake
9 Container
10 Extension tube holder
11 Filter cleaning button
12 Handle
13 Hose holder
14 Extension tube
15 Floor tool
16 Extension tube holder
17 Crevice tool
18 All-purpose tool
Main Parts
13
10
8
4
5
649BA014 KN
1
2
3
6
7
9
11
12
14
14
15
16
17
18
6
1)
only SE 122 E
Page 16

SE 122, SE 122 E
English
14
Motor
Performance data
Dimensions
Weight
Filter bag
Filter element
Wet pickup tool – for vacuuming liquids
from large areas
Coupling – for connecting tools directly
to the suction hose
Tool adapter
1)
– for connecting a power
tool to the suction hose
Connector – for connecting suction
hoses
Suction hose DN 27, 3.5 m
Suction hose DN 27, 3.5 m (antistatic)
Ask your STIHL dealer for current
information on this and other special
accessories.
Users of this machine may only carry out
the maintenance and service work
described in this user manual. All other
repairs must be carried out by a
servicing dealer.
STIHL recommends that you have
servicing and repair work carried out
exclusively by an authorized STIHL
servicing dealer. STIHL dealers are
regularly given the opportunity to attend
training courses and are supplied with
the necessary technical information.
When repairing the machine, only use
replacement parts which have been
approved by STIHL for this power tool or
are technically identical. Only use high-
quality replacement parts in order to
avoid the risk of accidents and damage
to the machine.
STIHL recommends the use of original
STIHL replacement parts.
Original STIHL parts can be identified by
the STIHL part number, the {
logo and the STIHL parts symbol K
(the symbol may appear alone on small
parts).
Specifications
Rated voltage: 120 V
Frequency: 60 Hz
Power consumption to
EN 60335-2-2: 1000 W
Mains fuse: 15 A
Protection class: II E
Type of protection: IP X4
Max. intake capacity, air: 3200 l/min
Max. vacuum: 230 mbar
Length approx.: 485 mm
Width approx.: 385 mm
Height approx.: 600 mm
Container capacity: 30 l
Length of suction hose: 3 m
Interior diameter of suction
hose: 36 mm
Device: 10 kg
Ready for operation: 12.1 kg
Special Accessories
1)
Supplied with the model SE 122 E
Maintenance and Repairs
Page 17

SE 122, SE 122 E
English
15
Electrical appliances must not be
disposed of as household refuse.
Machine, accessories and packaging
must be collected and recycled in an
environmentally beneficial manner.
Disposal
Page 18

SE 122, SE 122 E
English
16
Page 19

Notice d'emploi d'origineImprimé sur papier blanchi sans chlore
L'encre d'imprimerie contient des huiles végétales, le papier est
recyclable.
© ANDREAS STIHL AG & Co. KG, 2010
0458-649-8221. M0-4.M10.FST.
0000004025_002_F
SE 122, SE 122 E
français
17
{
Table des matières
Chère cliente, cher client,
nous vous félicitons d'avoir choisi un
produit de qualité de la société
STIHL.
Ce produit a été fabriqué avec les
procédés les plus modernes et les
méthodes de surveillance de qualité
les plus évoluées. Nous mettons tout
en œuvre pour que ce dispositif vous
assure les meilleurs services, de telle
sorte que vous puissiez en être
parfaitement satisfait.
Pour toute demande de
renseignements complémentaires,
veuillez vous adresser à votre
revendeur ou directement à
l'importateur de votre pays.
Hans Peter Stihl
Indications concernant la présente
Notice d'emploi 18
Prescriptions de sécurité et
techniques de travail 18
Calage de l'appareil 21
Assemblage du dispositif 21
Branchement électrique du
dispositif 22
Mise en marche du dispositif 23
Utilisation 24
Arrêt du dispositif 24
Après le travail 24
Vidage du réservoir 25
Nettoyage de l'élément filtrant 26
Remplacement de l'élément filtrant 26
Instructions pour la maintenance et
l'entretien 27
Dépannage 28
Principales pièces 29
Caractéristiques techniques 30
Accessoires optionnels 30
Instructions pour les réparations 30
Mise au rebut 31
Page 20

SE 122, SE 122 E
français
18
Pictogrammes
Tous les pictogrammes appliqués sur le
dispositif sont expliqués dans la
présente Notice d'emploi.
Repérage des différents types de
textes
Développement technique
La philosophie de STIHL consiste à
poursuivre le développement continu de
toutes ses machines et de tous ses
dispositifs ; c'est pourquoi nous devons
nous réserver tout droit de modification
de nos produits, en ce qui concerne la
forme, la technique et les équipements.
On ne pourra donc en aucun cas se
prévaloir des indications et illustrations
de la présente Notice d'emploi à l'appui
de revendications quelconques.
Respecter les consignes de sécurité
nationales spécifiques, par exemple des
caisses de prévoyance des accidents,
des caisses d’assurance maladie, des
autorités chargées de la protection du
travail, etc.
Il est interdit aux mineurs de travailler
avec l’appareil.
Les enfants, les animaux et les
spectateurs doivent être tenus à
distance.
Arrêter l'appareil lorsqu’il n’est pas
utilisé afin que personne ne soit exposé
à des risques inutiles. L'appareil doit
être inaccessible aux personnes non
autorisées, retirer la fiche secteur.
L’utilisateur est responsable des
accidents ou des risques que pourraient
subir d’autres personnes ou leurs biens.
Ne pas laisser l'appareil fonctionner
sans surveillance.
L'appareil ne doit être remis ou prêté
qu’à des personnes qui sont
familiarisées avec ce modèle et sa
manipulation et toujours accompagné
du mode d’emploi.
La prise pour appareils est
exclusivement destinée à recevoir des
outils électroportatifs – Voir
« Branchement électrique de l'appareil »
et « Mode aspiration ».
Des rallonges électriques inappropriées
peuvent s'avérer dangereuses. Lors
d'une utilisation à l'air libre, il faut
exclusivement utiliser des rallonges
homologuées à cet effet et identifiées en
conséquence qui possèdent une section
suffisante.
Ne jamais saisir la fiche secteur, le câble
de raccordement et la rallonge ainsi que
les connecteurs électriques avec des
mains mouillées.
Examiner régulièrement le câble de
raccordement pour vérifier l'absence de
signes de dommages ou de
vieillissement. Ne pas utiliser l'appareil
avec un câble de raccordement qui n'est
pas en parfait état – Danger de mort
par électrocution !
L'appareil ne doit être mis en service
que si aucun de ses composants n'est
endommagé.
Avant toute intervention sur l'appareil,
par exemple nettoyage, maintenance,
remplacement de pièces – Retirer la
fiche secteur !
Indications concernant la
présente Notice d'emploi
Avertissement contre un risque
d'accident et de blessure ainsi
que de graves dégâts matériels.
Avertissement contre un risque de
détérioration du dispositif ou de
certains composants.
Prescriptions de sécurité
et techniques de travail
Des mesures de sécurité
particulières sont néces-
saires avec cet appareil.
Le branchement électri-
que expose à des
sources de danger
spécifiques.
Lire attentivement l’inté-
gralité du mode d’emploi
avant la première mise
en service et le conserver
en lieu sûr pour pouvoir
le consulter ultérieure-
ment. Le non-respect du
mode d'emploi peut
entraîner un danger de
mort.
Page 21

SE 122, SE 122 E
français
19
Ne pas utiliser de nettoyeur haute
pression pour nettoyer l'appareil, le jet
d'eau puissant risquerait d'endommager
des parties de celui-ci.
Ne jamais nettoyer la partie supérieure
de l'aspirateur au jet d’eau – risque de
court- circuit !
Accessoires et pièces de rechange
Il faut exclusivement monter des pièces
ou des accessoires qui sont autorisés
par STIHL pour cet appareil ou qui sont
techniquement équivalents. Consulter
un distributeur agréé pour toute
question à ce sujet. N’utiliser que des
pièces ou des accessoires de haute
qualité afin de réduire au maximum tout
risque d’accident ou de dommages à
l'appareil.
STIHL recommande d’utiliser des
pièces et des accessoires originaux
STIHL. Les propriétés de ceux-ci sont
adaptées de manière optimale au
produit et aux exigences de l’utilisateur.
N'apporter aucune modification à
l'appareil – la sécurité risquerait d'en
être affectée. STIHL exclue toute
responsabilité pour les dommages
corporels et matériels qui résultent de
l'utilisation d'accessoires non
homologués.
Domaines d’applications
Aspiration de substances sèches non
inflammables (poussière, impuretés,
éclats de verre, copeaux, sable, etc.) et
de liquides non inflammables (eaux
usées, jus renversés, etc.).
L'appareil n'est pas conçu pour aspirer
des poussières nocives pour la santé.
Il est interdit d’utiliser cet appareil pour
d’autres travaux – cela pourrait causer
des accidents ou détériorer l’appareil. Il
ne faut apporter aucune modification à
l'appareil – les conséquences pourraient
là aussi être des accidents ou des
dommages à l'appareil.
Transport de l'appareil
Pour transporter l’appareil en toute
sécurité dans ou sur un véhicule, le fixer
avec des sangles de telle sorte qu’il ne
risque pas de glisser ou de se renverser.
Ne pas basculer l'appareil lorsque le
réservoir contient un liquide.
Fermer tous les dispositifs de
verrouillage sur le réservoir avant le
transport.
Avant le travail
Contrôler l'appareil
L'appareil ne doit être utilisé que s'il
présente une parfaite sécurité de
fonctionnement – risque d'accident !
– L'interrupteur doit pouvoir être
facilement amené sur 0.
– L'interrupteur doit se trouver sur 0.
Avant d'aspirer des liquides ou des
substances mouillées, retirer le sac à
poussière et contrôler le fonctionnement
du flotteur. Il faut toujours travailler avec
l'élément filtrant.
N'apporter aucune modification aux
dispositifs de commande et de sécurité
Branchement électrique
Précautions à prendre pour réduire les
risques d'électrocution :
– La tension et la fréquence de
l'appareil (voir la plaque
signalétique) doivent coïncider avec
la tension et la fréquence du réseau
électrique.
– Il faut vérifier si le câble de
raccordement, la fiche secteur et la
rallonge ne sont pas endommagés.
Il est interdit d'utiliser des câbles,
prises et fiches endommagés ou
des câbles électriques non
conformes aux instructions.
– Branchement électrique
uniquement à une prise installée
conformément à la réglementation
– N'utiliser que des rallonges
conformes aux directives et
adaptées pour l'application prévue.
– Isolation du câble de raccordement
et de la rallonge, fiches et prises en
parfait état
Le câble de raccordement et la rallonge
doivent être posés correctement :
Il ne faut aspirer ni subs-
tances chaudes (cendres
chaudes, poussières
explosives inflammables,
mégots incandescents,
etc.), ni liquides combus-
tibles (essence, diluant,
etc.), ni liquides agres-
sifs (acides, alcalins) –
risque d'incendie ou
d'explosion !
Page 22

SE 122, SE 122 E
français
20
– Il faut tenir compte des sections
minimales des différents câbles
(voir « Branchement électrique de
l'appareil »).
– Poser et identifier le câble de
raccordement de telle sorte qu'il ne
puisse pas être endommagé et ne
constitue pas un danger – risque
de trébucher !
– La fiche et la prise de la rallonge
électrique utilisée doivent être
protégées contre les projections
d'eau, ou alors il faut les poser de
telle sorte qu’elles ne risquent pas
d’entrer en contact avec de l’eau. La
fiche et la prise de la rallonge
électrique ne doivent pas reposer
dans l'eau.
– Ne pas risquer de les cisailler au
niveau des arêtes, pointes ou
autres objets acérés
– Ne pas les coincer dans les
ouvertures de porte ou de fenêtre
– Si les câbles sont emmêlés, retirer
la fiche secteur et démêler le câble
– Avant d’utiliser des câbles
électriques sur enrouleur, toujours
les débobiner complètement afin
d’écarter le risque de surchauffe et
d’incendie
Pendant le travail
Il ne faut pas rouler sur le câble
électrique, ni l’écraser, l’étirer etc. pour
ne pas l’endommager.
Ne pas tirer sur le câble électrique pour
retirer la fiche de la prise électrique,
mais tenir la fiche !
Ne saisir la fiche électrique et le câble
électrique qu’avec les mains sèches.
Ne jamais nettoyer des appareils
électriques au jet d’eau – risque de
court- circuit !
En cas de danger imminent ou
d'urgence – commutateur sur 0.
Ne jamais laisser fonctionner l'appareil
sans surveillance.
Ne pas laisser l'appareil exposé à la
pluie.
L'appareil ne doit être utilisé qu'en
position verticale. Ne pas recouvrir
l'appareil et veiller à ce que la ventilation
du moteur soit suffisante.
L'aspiration doit exclusivement
s'effectuer avec un élément filtrant non
endommagé.
Si de la mousse se forme ou du liquide
s'écoule, arrêter immédiatement le
travail, retirer la fiche secteur et vider le
réservoir.
Si l'appareil a subit des contraintes
inhabituelles (par exemple choc ou
chute), il faut impérativement vérifier
avant toute nouvelle utilisation s'il
présente une parfaite sécurité de
fonctionnement – voir aussi la section
« Avant le travail ». Il faut également
vérifier le bon fonctionnement des
dispositifs de sécurité. Il ne faut en
aucun cas continuer d'utiliser un
appareil qui ne présente pas une
parfaite sécurité de fonctionnement. En
cas de doute, prendre contact avec un
distributeur.
Avant de laisser l'appareil : Arrêter
l'appareil et retirer la fiche secteur.
Après le travail
Retirer la fiche de la prise électrique.
Ne pas tirer sur le câble électrique pour
retirer la fiche de la prise électrique,
mais tenir la fiche !
Nettoyer l'appareil pour en éliminer la
poussière et les impuretés – ne pas
utiliser de solvant pour graisse.
Maintenance et réparations
Le dispositif doit faire l'objet d'une
maintenance régulière. Exécuter
exclusivement les opérations de
maintenance et les réparations décrites
dans la Notice d'emploi. Faire exécuter
toutes les autres opérations par un
revendeur spécialisé.
STIHL recommande de faire effectuer
les opérations de maintenance et les
réparations exclusivement chez le
revendeur spécialisé STIHL. Les
revendeurs spécialisés STIHL
participent régulièrement à des stages
de perfectionnement et ont à leur
disposition les informations techniques
requises.
Retirer immédiatement la
fiche de la prise de cou-
rant si le câble de
raccordement est endom-
magé – danger de mort
par électrocution !
Avant toute intervention
sur le dispositif : retirer la
fiche de la prise de
courant !
Page 23

SE 122, SE 122 E
français
21
Utiliser exclusivement des pièces de
rechange de haute qualité. Sinon, des
accidents pourraient survenir et le
dispositif pourrait être endommagé.
Pour toute question à ce sujet,
s'adresser à un revendeur spécialisé.
STIHL recommande d'utiliser des pièces
de rechange d'origine STIHL. Leurs
caractéristiques sont optimisées tout
spécialement pour ce dispositif, compte
tenu des exigences de l'utilisateur.
Pour éviter les risques d'électrocution ou
autres, les opérations de maintenance
ou les réparations de l'appareil (par ex.
le remplacement du cordon
d'alimentation électrique) doivent être
effectuées exclusivement par un
électricien professionnel.
Nettoyer les pièces en matière
synthétique à l'aide d'un chiffon. Des
détergents agressifs risqueraient
d'endommager les pièces en matière
synthétique.
Nettoyer si nécessaire les ouïes
d'admission d'air de refroidissement du
carter du moteur.
Introduire le dispositif de blocage sur la
roulette de guidage pour immobiliser
l'appareil en un endroit.
Il faut monter différents accessoires sur
les appareils avant la première mise en
service.
N Ouvrir les agrafes (1)
N Retirer la partie supérieure de
l'aspirateur (2) en la soulevant
verticalement
N Sortir les accessoires du réservoir
Calage de l'appareil
649BA006 KN
Assemblage du dispositif
N'insérer la fiche secteur dans la
prise que lorsque l'appareil est
entièrement monté.
649BA001 KN
1
2
1
Page 24

SE 122, SE 122 E
français
22
N Emmancher le manchon du sac à
poussière sur le raccord d'aspiration
jusqu'en butée (voir les instructions
sur le sac à poussière).
N Poser la partie supérieure (2) de
l'aspirateur et fermer les agrafes (1)
en veillant à ce qu'elles soient bien
en place
N Insérer le tuyau d'aspiration dans le
raccord d'aspiration
N Insérer le tuyau chromé (3) dans le
manchon du tuyau d'aspiration
N Insérer le tube d'aspiration (4) sur le
tuyau chromé
Pour le raccordement d'autres outils
(par exemple une ponceuse) :
N Brancher l'adaptateur pour outil
électroportatif (5) (inclus avec le
modèle SE 122 E) au tuyau
d'aspiration au lieu du tuyau chromé
N Glisser le support de tube
d'aspiration à une distance (A)
d'environ 20 cm du bord inférieur
au-dessus du tube d'aspiration et le
monter
N Insérer un embout à fentes (6), un
embout universel (7) ou un embout
pour sols (8) sur le tube
d'aspiration, suivant l'utilisation de
l'aspirateur.
La tension et la fréquence de l'appareil
(voir la plaque signalétique) doivent
coïncider avec la tension et la fréquence
du réseau électrique.
La protection du branchement au
réseau doit être exécutée
conformément aux indications dans les
caractéristiques techniques – voir
« Caractéristiques techniques ».
L'appareil doit être branché au réseau
d'alimentation électrique par le biais d'un
disjoncteur différentiel à courant de fuite
qui coupe l'alimentation lorsque le
courant différentiel dépasse 30 mA.
Le branchement secteur doit être réalisé
conformément à la norme CEI 60364 et
à la réglementation nationale.
Rallonges électriques
Vérifier que la rallonge électrique est en
bon état. La rallonge électrique utilisée
doit avoir une section suffisante pour le
courant consommé par l'appareil. Une
rallonge électrique sous-dimensionnée
peut provoquer une chute de tension et
ainsi une baisse de puissance et une
surchauffe. Le tableau ci-dessous
indique la section de câble à utiliser
(rallonges SJW ou SJTW) en fonction de
la longueur de la rallonge et de l'intensité
nominale indiquée sur la plaque
signalétique. En cas de doute, utiliser la
section immédiatement supérieure. Le
câble est d'autant plus lourd que la
section est élevée.
649BA002 KN
3
649BA003 KN
4
5
649BA004 KN
A
649BA005 KN
6
8
7
Branchement électrique du
dispositif
Page 25

SE 122, SE 122 E
français
23
Les rallonges électriques appropriées
sont disponibles dans les magasins
spécialisés ou auprès de votre
distributeur STIHL.
Raccordement à la prise secteur
Vérifier que l'appareil soit éteint avant de
le brancher à l'alimentation électrique –
voir « Arrêt de l'appareil ».
N Insérer la fiche secteur de l'appareil
ou de la rallonge électrique dans
une prise posée conformément à la
réglementation
SE 122
Positions du commutateur
Position 0 – l'aspirateur est éteint
Position I – l'aspirateur est allumé
N Pour allumer l'appareil, tourner
l'interrupteur en position I
SE 122 E
Les outils électroportatifs peuvent se
brancher à la prise pour appareils (1).
Tenir compte de la puissance de
raccordement de la prise pour appareils
– voir « Caractéristiques techniques ».
N Éteindre l'aspirateur et l'outil
électroportatif à raccorder avant de
le brancher à la prise pour
appareils (1)
N Le commutateur (2) sert à allumer
ou à éteindre l'appareil et à le mettre
en mode automatique. En
poursuivant la rotation du
commutateur, la force d'aspiration
peut être réglée manuellement.
Positions du commutateur
Position 0 – l'aspirateur est éteint, la
prise pour appareils est inopérante.
Position I – l'aspirateur est allumé, la
prise pour appareils est inopérante.
Position auto – l'outil électroportatif
raccordé à la prise pour appareils allume
et éteint l'aspirateur par le biais du
dispositif de mise en marche
automatique.
Éteindre l'appareil électroportatif
raccordé avant d'amener l'interrupteur
en position «auto».
Après l'arrêt, le moteur continue de
fonctionner pendant quelques secondes
pour vider le tuyau d'aspiration.
N Pour allumer l'appareil, tourner
l'interrupteur dans la position
correspondante
Longueur du
câble (m)
Section des fils
(mm²)
15 1,5
30 2,5
45 4
Mise en marche du
dispositif
645BA017 KN
649BA007 KN
1
0
auto
I
2
Page 26

SE 122, SE 122 E
français
24
Aspiration de substances sèches
Il faut installer un sac à poussière dans
le réservoir avant d'aspirer des
substances sèches. Le matériel aspiré
est ainsi facile à éliminer. Une aspiration
à sec sans sac à poussières est
également possible.
Aspiration de liquides
Avant d'aspirer des liquides, il faut
systématiquement retirer le sac à
poussières et contrôler le
fonctionnement du flotteur. Le flotteur
interrompt le flux d'air lorsque le
réservoir est plein. Si l'aspirateur est
uniquement utilisé pour l'aspiration de
liquides, il convient de remplacer
l'élément filtrant par un modèle spécial
(accessoire optionnel).
L'élément filtrant est humide après avoir
aspiré des liquides. Un élément filtrant
humide peut s'obstruer plus rapidement
lors de l'aspiration de substances
sèches. C'est la raison pour laquelle il
convient de faire sécher l'élément filtrant
avant l'aspiration à sec ou de le
remplacer par un élément filtrant sec.
N Tourner l'interrupteur de l'appareil
en position 0
N Retirer la fiche de la prise
électrique.
N Vider le réservoir, nettoyer
l'aspirateur.
Après l'aspiration de liquides :
N Déposer séparément la partie
supérieure de l'aspirateur afin que
l'élément filtrant puisse sécher.
N Enrouler le câble autour de la
poignée et du support
N Fixer le tube d'aspiration, le tuyau
d'aspiration et les accessoires aux
supports prévus à cet effet
N Conserver l'aspirateur dans un local
sec et le protéger contre toute
utilisation non autorisée
Utilisation
Il ne faut pas aspirer de
substances inflammables.
Ne jamais aspirer sans élément
filtrant ou lorsque celui-ci est
endommagé.
Il ne faut pas aspirer de liquides
inflammables.
Arrêt du dispositif
auto
649BA020 KN
SE 122
SE 122 E
Après le travail
649BA013 KN
Page 27

SE 122, SE 122 E
français
25
N Éteindre l'aspirateur
N Retirer la fiche de la prise
électrique.
N Ouvrir les agrafes (1)
N Retirer la partie supérieure de
l'aspirateur (2) en la soulevant
verticalement
Si aspiration à sec sans sac à
poussière et si aspiration de liquide
N Vider le réservoir et mettre le
contenu au rebut conformément à la
réglementation
N Poursuivre avec la mise en place la
partie supérieure de l'aspirateur
Si aspiration à sec avec sac à
poussière
N Retirer le manchon du sac à
poussières (1) du raccord
d'aspiration et le fermer avec le
curseur (2)
N Retirer prudemment le sac à
poussière du réservoir et le mettre
au rebut conformément à la
réglementation
N Introduire un sac à poussières (3)
neuf (instructions sur le sac à
poussières)
N Emmancher le manchon du sac à
poussière sur le raccord d'aspiration
jusqu'en butée.
Mettre en place la partie supérieure
de l'aspirateur
N Nettoyer le bord du réservoir
N Mettre en place la partie supérieure
de l'aspirateur
N Nettoyer le manchon et le raccord
d'aspiration avant d'insérer le tuyau
d'aspiration
Vidage du réservoir
649BA016 KN
1
2
1
1
649BA010 KN
2
649BA011 KN
3
Page 28

SE 122, SE 122 E
français
26
N Déverrouiller le manchon (1) du
tuyau d'aspiration en le
comprimant (flèches)
N Retirer le tuyau d'aspiration
N Allumer l'aspirateur
N Fermer le tuyau d'aspiration au
niveau du manchon en appuyant
fermement ce dernier contre la
surface plane à côté du
commutateur (comme illustré)
N Appuyer 3 fois sur le bouton de
nettoyage du filtre
L'élément filtrant est ici débarrassé de la
poussière qui s'est déposée.
N Retirer la fiche de la prise
électrique.
N Retirer et retourner la partie
supérieure de l'aspirateur
N Dévisser le panier porte-filtre (1)
N Retirer l'élément filtrant (2) et le
mettre au rebut conformément à la
réglementation
N Monter l'élément filtrant neuf dans
l'ordre inverse.
N Contrôler le fonctionnement du
flotteur : le flotteur doit se déplacer
facilement lorsque le panier porte-
filtre est retourné.
N Monter la partie supérieure de
l'aspirateur
Nettoyage de l'élément
filtrant
1
649BA008 KN
649BA009 KN
Remplacement de
l'élément filtrant
649BA012 KN
1
2
Ne jamais aspirer sans élément
filtrant ou lorsque celui-ci est
endommagé.
Page 29

SE 122, SE 122 E
français
27
Instructions pour la maintenance et l'entretien
Les indications se rapportent à des conditions d'utilisation normales. Sous des conditions difficiles (pro-
duction de poussière importante, etc.), et si les temps de travail quotidiens sont plus longs, il faut
raccourcir en conséquence les intervalles indiqués.
avant de commencer le
travail
à la fin du travail ou
quotidiennement
chaque semaine
mensuellement
en cas de défaut
en cas de dommage
selon besoin
Appareil complet
Contrôle visuel (état) X
nettoyer X
Câble d'alimentation
vérifier X
à remplacer par le distributeur
1)
X
Commutateur
contrôle du fonctionnement X
à remplacer par le distributeur
1)
XX
Fentes d'aération dans le carter du moteur nettoyer X
Sac à poussière remplacer X
Élément filtrant
nettoyer X
remplacer X
Réservoir à liquide vider X
Vis et écrous accessibles resserrer X
Étiquettes de sécurité remplacer X
1)
STIHL recommande de contacter un distributeur STIHL.
Page 30

SE 122, SE 122 E
français
28
Défaut : Le moteur ne démarre pas
Défaut : Le moteur ne démarre pas en
mode automatique
Défaut : Puissance d'aspiration
réduite
Défaut : Puissance d'aspiration
inexistante lors de l'aspiration de
liquide
Dépannage
Cause Solution
Disjoncteur secteur
coupé
Contrôler ou
enclencher le
disjoncteur
La protection anti-
surcharge s'est
déclenchée
Laisser refroidir
l'aspirateur pen-
dant 5 minutes
environ
Cause Solution
Outil électroportatif
défectueux ou mal
branché
Vérifier le fonction-
nement de l'outil
électroportatif ou
bien insérer la
fiche
Cause Solution
Réglage manuel à
une faible puis-
sance d'aspiration
voir « Mode
aspiration »
Sac à poussières
plein
voir « Vidage du
réservoir »
Tuyau d'aspiration /
embout bouché
Nettoyer le tuyau
d'aspiration /
l'embout
Élément filtrant
encrassé
voir « Nettoyage
de l'élément
filtrant » ou
« Remplacement
de l'élément
filtrant »
Garniture d'étan-
chéité entre la partie
supérieur de l'aspi-
rateur et le réservoir
encrassée ou
endommagée
Nettoyer ou rem-
placer la garniture
d'étanchéité
Cause Solution
Réservoir plein (le
flotteur ferme
l'ouverture
d'aspiration)
voir « Vidage du
réservoir »
Page 31

SE 122, SE 122 E
français
29
1 Tuyau d'aspiration
2 Tuyau chromé
3 Manchon pour outils
électroportatifs
1)
4 Prise pour appareils
1)
5 Commutateur
6 Agrafe
7 Raccord pour tuyau d'aspiration
8 Roulette avec frein d'immobilisation
9 Réservoir à liquide
10 Support de tube d'aspiration
11 Bouton de nettoyage du filtre
12 Poignée
13 Support de tuyau flexible
14 Tube d'aspiration
15 Embout pour sols
16 Support de tube d'aspiration
17 Embout pour fentes
18 Embout universel
Principales pièces
13
10
8
4
5
649BA014 KN
1
2
3
6
7
9
11
12
14
14
15
16
17
18
6
1)
seulement avec SE 122 E
Page 32

SE 122, SE 122 E
français
30
Moteur
Caractéristiques de puissance
Dimensions
Poids
Sac à poussière
Élément filtrant
Buse d'aspiration à eau – pour
l'aspiration de surfaces mouillées
Coupleur – pour le raccordement direct
des buses au tuyau d'aspiration
Manchon à outil
1)
– permet de raccorder
un outil électroportatif au tuyau
d'aspiration
Élément de liaison – pour le
raccordement des tuyaux d'aspiration
Tuyau d'aspiration DN 27, 3,5 m
Tuyau d'aspiration DN 27, 3,5 m
(antistatique)
Vous trouverez des informations à jour
sur ces accessoires ainsi que d'autres
auprès de votre distributeur STIHL.
L'utilisateur de ce dispositif est autorisé
à effectuer uniquement les opérations
de maintenance et les réparations
décrites dans la présente Notice
d'emploi. Les réparations plus poussées
ne doivent être effectuées que par le
revendeur spécialisé.
STIHL recommande de faire effectuer
les opérations de maintenance et les
réparations exclusivement chez le
revendeur spécialisé STIHL. Les
revendeurs spécialisés STIHL
participent régulièrement à des stages
de perfectionnement et ont à leur
disposition les informations techniques
requises.
Pour les réparations, monter
exclusivement des pièces de rechange
autorisées par STIHL pour ce dispositif
ou des pièces similaires du point de vue
technique. Utiliser exclusivement des
pièces de rechange de haute qualité.
Sinon, des accidents pourraient survenir
et le dispositif risquerait d'être
endommagé.
STIHL recommande d'utiliser des pièces
de rechange d'origine STIHL.
Les pièces de rechange d'origine STlHL
sont reconnaissables à leur référence
de pièce de rechange STIHL, au nom
{ et, le cas échéant, au
symbole d'identification des pièces de
rechange STlHL K (les petites pièces
ne portent parfois que ce symbole).
Caractéristiques
techniques
Tension nominale : 120 V
Fréquence : 60 Hz
Consommation selon
EN 60335-2-2 : 1000 W
Fusible réseau : 15 A
Classe de protection : II E
Degré de protection : IP X4
Capacité d'aspiration d'air
maximale : 3200 l/min
Dépression maximale : 230 mbar
Longueur approx. : 485 mm
Largeur approx. : 385 mm
Hauteur approx. : 600 mm
Volume du réservoir : 30 l
Longueur du tuyau
d'aspiration : 3 m
Diamètre intérieur du
tuyau d'aspiration : 36 mm
Appareil : 10 kg
Prêt à l'emploi : 12,1 kg
Accessoires optionnels
1)
Fourni avec le modèle SE 122 E
Instructions pour les
réparations
Page 33

SE 122, SE 122 E
français
31
Les appareils électroportatifs ne doivent
pas être jetés aux ordures ménagères.
Amener l'appareil, les accessoires et
l'emballage à un centre de valorisation
respectueux de l'environnement.
Mise au rebut
Page 34

SE 122, SE 122 E
français
32
Page 35

Page 36

www.stihl.com
*04586498221*
0458-649-8221
0458-649-8221
CDN
G F
 Loading...