

Page 1
STIHL ASA 85
Instruction Manual
Skötselanvisning
Käyttöohje
Betjeningsvejledning
Bruksanvisning
사용 설명서
οδηγίες χρήσης
Page 2

G Instruction Manual
1 - 31
S Skötselanvisning
32 - 62
f Käyttöohje
63 - 93
d Betjeningsvejledning
94 - 124
N Bruksanvisning
125 - 155
r 사용 설명서
156 - 185
g οδηγίες χρήσης
186 - 218
Page 3

Contents
English
1 Introduction
2 Guide to Using this Manual
2.1 Applicable Documentation
2.2 Warning Notices in Text
2.3 Symbols in Text
3 Overview
3.1 Pruning Shears
3.2 Carrying System and Battery
3.3 Symbols
Translation of Original Instruction
Manual
4 Safety Precautions
4.1 Warning Signs
4.2 Intended Use
4.3 The Operator
4.4 Clothing and Equipment
4.5 Work Area and Surroundings
4.6 Safe Condition
4.7 Operation
4.8 Transporting
4.9 Storing
. . . . . . . . . . . . . . . . . . . . . . . . . . . . . . . . . . . . . . . . .
. . . . . . . . . . . . . . . . . . . . . . . . . .
. . . . . . . . . . . . . . . . . . . . . . . . . . .
. . . . . . . . . . . . . . . . . . . . . . . . . . . . .
. . . . . . . . . . . . . . . . . . . . . . . . . . . . . . . . . . . . .
. . . . . . . . . . . . . . . . . . . . . . . . . . . . . . . . . . . . . . . . . . . .
. . . . . . . . . . . . . . . . . . . . . . . . . . . . . . . . . . . . .
. . . . . . . . . . . . . . . . . . . . . . . .
. . . . . . . . . . . . . . . . . . . . . . . . . . . . . . . . . . . . . . . . . . . .
. . . . . . . . . . . . . . . . . . . . . . . . . . . . . . . . . .
. . . . . . . . . . . . . . . . . . . . . . . . . . . . . . . . . . . . . .
. . . . . . . . . . . . . . . . . . . . . . . . . . . . . . . . . . . . . . . .
. . . . . . . . . . . . . . . . . . . . . . . . . . . . . . . . . . . . . . . .
. . . . . . . . . . . . . . . . . . . . . . . . . . . . .
. . . . . . . . . . . . . . . . . . . . . . . .
. . . . . . . . . . . . . . . . . . . . . . . . . . . . . . . . . . . . . .
. . . . . . . . . . . . . . . . . . . . . . . . . . . . . . . . . . . . . . . . . . .
. . . . . . . . . . . . . . . . . . . . . . . . . . . . . . . . . . . . . . . .
. . . . . . . . . . . . . . . . . . . . . . . . . . . . . . . . . . . . . . . . . . . . .
4.10 Cleaning, Maintenance and Repairs
5 Preparing Pruning Shears for Operation
5.1 Preparing Pruning Shears for Operation
6 Charging the Battery, LEDs
Printed on chlorine-free paper
Printing inks contain vegetable oils, paper can be recycled.
6.1 Charging the Battery
6.2 Displaying State of Charge
6.3 LEDs on Battery
. . . . . . . . . . . . . . . . . . . . . . . . . . . . . . . . . . . .
7 Assembling the Pruning Shears
7.1 Fitting the Holster and Bag
. . . . . . . . . . . . . . . . . . . . . . . .
. . . . . . . . . . . . . . . . . . . . . . . . . . . . . . .
. . . . . . . . . . . . . . . . . . . . . . . . .
. . . . . . . . . . . . . . . . . . . .
. . . . . . . . . . . . . . . . . . . . . . . . .
7.2 Inserting and Removing Connecting Cable Plug
8 Adjusting the Pruning Shears
8.1 Adjusting Cutting Blade Opening
. . . . . . . . . . . . . . . . . . . . . . .
. . . . . . . . . . . . . . . . . . .
8.2 Activating and Deactivating the Standby Mode
8.3 Adjusting Closing Action of Cutting Blade
. . . . . . . . . . . . . . . .
. . . . . . . . . . . .
. . . . . . . . . . . .
. . . .
. . . . . .
. . . . . . . . . . .
9 Adjusting Pruning Shears for User
2
9.1 Fitting and Removing Harness
2
9.2 Positioning the Connecting Cable
2
9.3 Fitting the Controller's Connecting Cable
3
10 Removing and Fitting the Battery
3
10.1 Fitting the Battery
3
10.2 Removing the Battery
3
11 Switching On the Pruning Shears
4
11.1 Switching On the Pruning Shears
4
11.2 Switching Off the Pruning Shears
5
12 Testing the Pruning Shears and Battery
5
12.1 Testing the Pruning Shears
5
12.2 Testing the Battery
5
6
13 Operating the Pruning Shears
6
13.1 Holding and Controlling the Pruning Shears
7
13.2 Displaying Information
8
13.3 Putting the Pruning Shears in Standby Mode
9
13.4 Cutting
10
14 After Finishing Work
10
14.1 After Finishing Work
11
15 Transporting
11
15.1 Transporting the Pruning Shears and Carrying
11
11
11
11
12
12
12
12
12
13
13
System
15.2 Transporting the Battery
16 Storing
16.1 Storing the Pruning Shears
16.2 Storing the Battery
17 Cleaning
17.1 Cleaning the Pruning Shears
17.2 Cleaning the Cutting Blade and Anvil Blade
17.3 Cleaning the Carrying System
17.4 Cleaning the Battery
18 Maintenance
. . . . . . . . . . . . . . . . . . . . . . . . . . . . . . . . . . . . . . . . . . . . .
. . . . . . . . . . . . . . . . . . . . . . . . . . . . . . . . . . . . . . . . . . . .
. . . . . . . . . . . . . . . . . . . . . . . . . . . . . . . . . . . . . . . . . . . . .
. . . . . . . . . . . . . . . . . . . . . . . . . . . . . . . . . . . . . . . . . . .
. . . . . . . . . . . . . . . . . . . . . . . . . . . . . . . . . .
. . . . . . . . . . . . . . . . . . . . . . . . . . . . . .
. . . . . . . . . . . . . . . . . . . . . . . . . . . . . . . . .
. . . . . . . . . . . . . . . . . . . . . . . . . . . . .
. . . . . . . . . . . . . . . . . . . . . . . . . . . . . . .
. . . . . . . . . . . . . . . . . . . . . . . . . . . . . . .
. . . . . . . . . . . . . . . . . . . . . . . . . . . . . . . . . . . . . . .
. . . . . . . . . . . . . . . . . . . . . . . . . . . . . . . . .
. . . . . . . . . . . . . . . . . . . . . . . . . . . . . . .
. . . . . . . . . . . . . . . . . . . . . . . . . . . . . . . . . . . . . . .
. . . . . . . . . . . . . . . . . . . . .
. . . . . . . . . . . . . . . . . . . . . . . .
. . . . . . . . . . . . . . . . . . . . . .
. . . . . . . . . . . . . . . . . . . . . . . . . . .
. . . . . . . . . . . . . . . . . . . . . . . .
. . . . . . . . . . . . . . . . . . . . . . .
. . . . . . . . . . . . . . . . . . . . .
. . . . . . . . . . . . . . . . .
. . . . . . . . . . . . . . . . . .
. . . . . . . . . . .
. . . . . . . . . . . . . . . . . . .
. . . . . . . . . . . . . . . . . .
. . . . . . . . . . . . . . . . . .
. . . . . . . . . . . . . . . . . .
. . . . . . . . . . . .
. . . . . . . .
. . . . . . .
. . . . . . . .
14
14
14
14
15
15
15
15
15
16
16
16
17
17
17
17
18
19
19
19
19
19
20
20
20
20
20
20
20
21
21
21
© ANDREAS STIHL AG & Co. KG 2018
0458-285-9721-C. VA0.L18.
0000007811_009_GB
0458-285-9721-C
This instruction manual is protected by copyright. All rights reserved, especially the rights to reproduce, translate and process
with electronic systems.
1
Page 4

English
1 Introduction
18.1 Maintenance Intervals
18.2 Lubricating Cutting and Anvil Blades with Grease
Gun
. . . . . . . . . . . . . . . . . . . . . . . . . . . . . . . . . . . . . . . . . . . . . . . .
18.3 Sharpening the Cutting Blade
18.4 Adjusting Play between Cutting and Anvil Blades
18.5 Adjusting Tip Contact Point of Cutting and Anvil
Blades
. . . . . . . . . . . . . . . . . . . . . . . . . . . . . . . . . . . . . . . . . . . . .
19 Repairing
19.1 Opening and Closing the Cutting Blade Manually
19.2 Identifying Blade Assemblies
19.3 Replacing the Anvil Blade
19.4 Replacing the Cutting Blade
20 Troubleshooting
20.1 Troubleshooting Pruning Shears and Battery
21 Specifications
21.1 STIHL ASA 85 Pruning Shears
21.2 STIHL AP battery
21.3 Noise and Vibration Data
21.4 REACH
22 Spare Parts and Accessories
22.1 Spare Parts and Accessories
23 Disposal
23.1 Disposing of Pruning Shears and Battery
24 EC Declaration of Conformity
24.1 STIHL ASA 85 Pruning Shears
24.2 CE Declaration of Incorporation
. . . . . . . . . . . . . . . . . . . . . . . . . . . . . . . . . . . . . . . . . .
. . . . . . . . . . . . . . . . . . . . . . . . . . . . . . . . . . . . . .
. . . . . . . . . . . . . . . . . . . . . . . . . . . . . . . . . . . . . . . . . . . .
. . . . . . . . . . . . . . . . . . . . . . . . . . . . . . . . . . . . . . . . . . .
. . . . . . . . . . . . . . . . . . . . . . . . . . . . . .
. . . . . . . . . . . . . . . . . . . . . .
. . . . . . . . . . . . . . . . . . . . . . .
. . . . . . . . . . . . . . . . . . . . . . . . . .
. . . . . . . . . . . . . . . . . . . . . . . .
. . . . . . . . . . . . . . . . . . . . . . . . . . . . . . . . . . . .
. . . . . . .
. . . . . . . . . . . . . . . . . . . . .
. . . . . . . . . . . . . . . . . . . . . . . . . . . . . . . . . .
. . . . . . . . . . . . . . . . . . . . . . . . . . .
. . . . . . . . . . . . . . . . . . . . . . .
. . . . . . . . . . . . . . . . . . . . . . .
. . . . . . . . . . .
. . . . . . . . . . . . . . . . . . . . . . .
. . . . . . . . . . . . . . . . . . . . .
. . . . . . . . . . . . . . . . . . . .
. . .
. . .
21
1 Introduction
22
22
Dear Customer,
22
Thank you for choosing STIHL. We develop and
manufacture our quality products to meet our customers’
23
requirements. The products are designed for reliability even
23
under extreme conditions.
23
STIHL also stands for premium service quality. Our
24
specialist dealers guarantee competent advice and
24
instruction as well as comprehensive service support.
25
We thank you for your confidence in us and hope you will
27
enjoy working with your STIHL product.
27
29
29
29
29
29
Dr. Nikolas Stihl
29
29
IMPORTANT: READ BEFORE USE AND KEEP IN A SAFE
29
PLACE.
29
30
2 Guide to Using this Manual
30
30
2.1 Applicable Documentation
Local safety regulations apply.
► Read, understand and save the following documents in
addition to this instruction manual:
– Safety notes and precautions for STIHL AP battery
– Instruction manual for STIHL AL 101, 300, 500 chargers
– Safety information for STIHL batteries and products
with built-in batteries: www.stihl.com/safety-datasheets
2
0458-285-9721-C
Page 5
3 Overview
English
2.2 Warning Notices in Text
DANGER
This notice refers to risks which result in serious or fatal
injury.
► Serious or fatal injuries can be avoided by taking the
precautions mentioned.
WARNING
This notice refers to risks which can result in serious or fatal
injury.
► Serious or fatal injuries can be avoided by taking the
precautions mentioned.
NOTICE
This notice refers to risks which can result in damage to
property.
► Damage to property can be avoided by taking the
precautions mentioned.
2.3 Symbols in Text
This symbol refers to a chapter in this instruction
manual.
A video is available for this chapter
3Overview
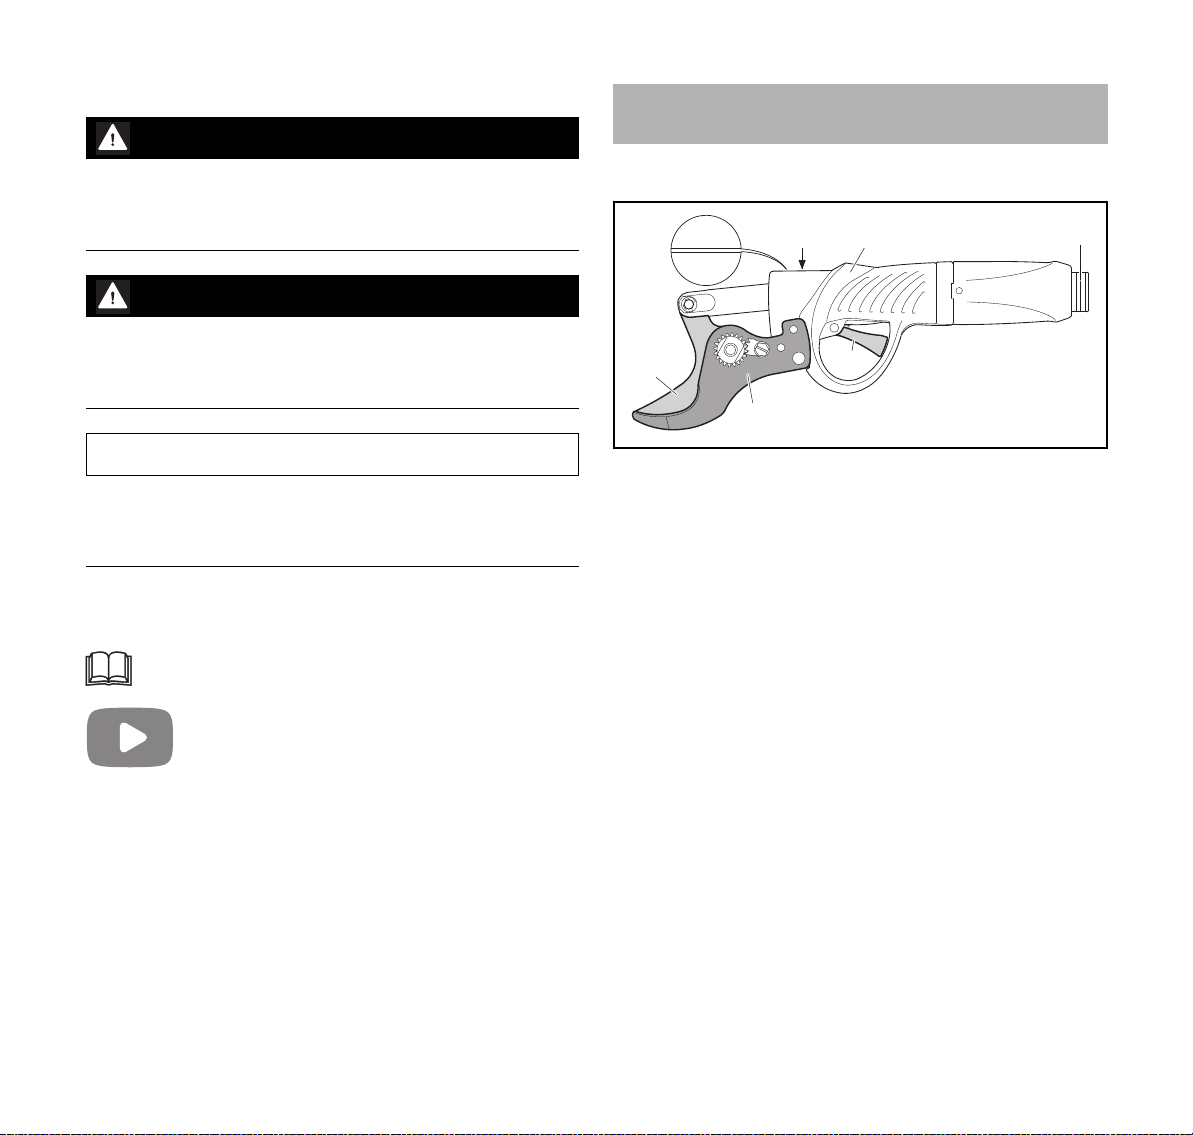
3.1 Pruning Shears
9930XXXXX
YYEHXXXXX
#
1
2
1 Cutting blade
Cuts the branch.
2 Anvil blade
Serves as support for the branch.
3 Trigger
Opens and closes the cutting blade.
4 Control handle
For operating, holding and controlling the pruning
shears.
5 Socket
Receptacle for connecting cable plug.
4
3
5
0000-GXX-4072-A0
0458-285-9721-C
# Serial number (9930xxxxx) and ID number (YYEHxxxxx)
3
Page 6
English
A
3 Overview
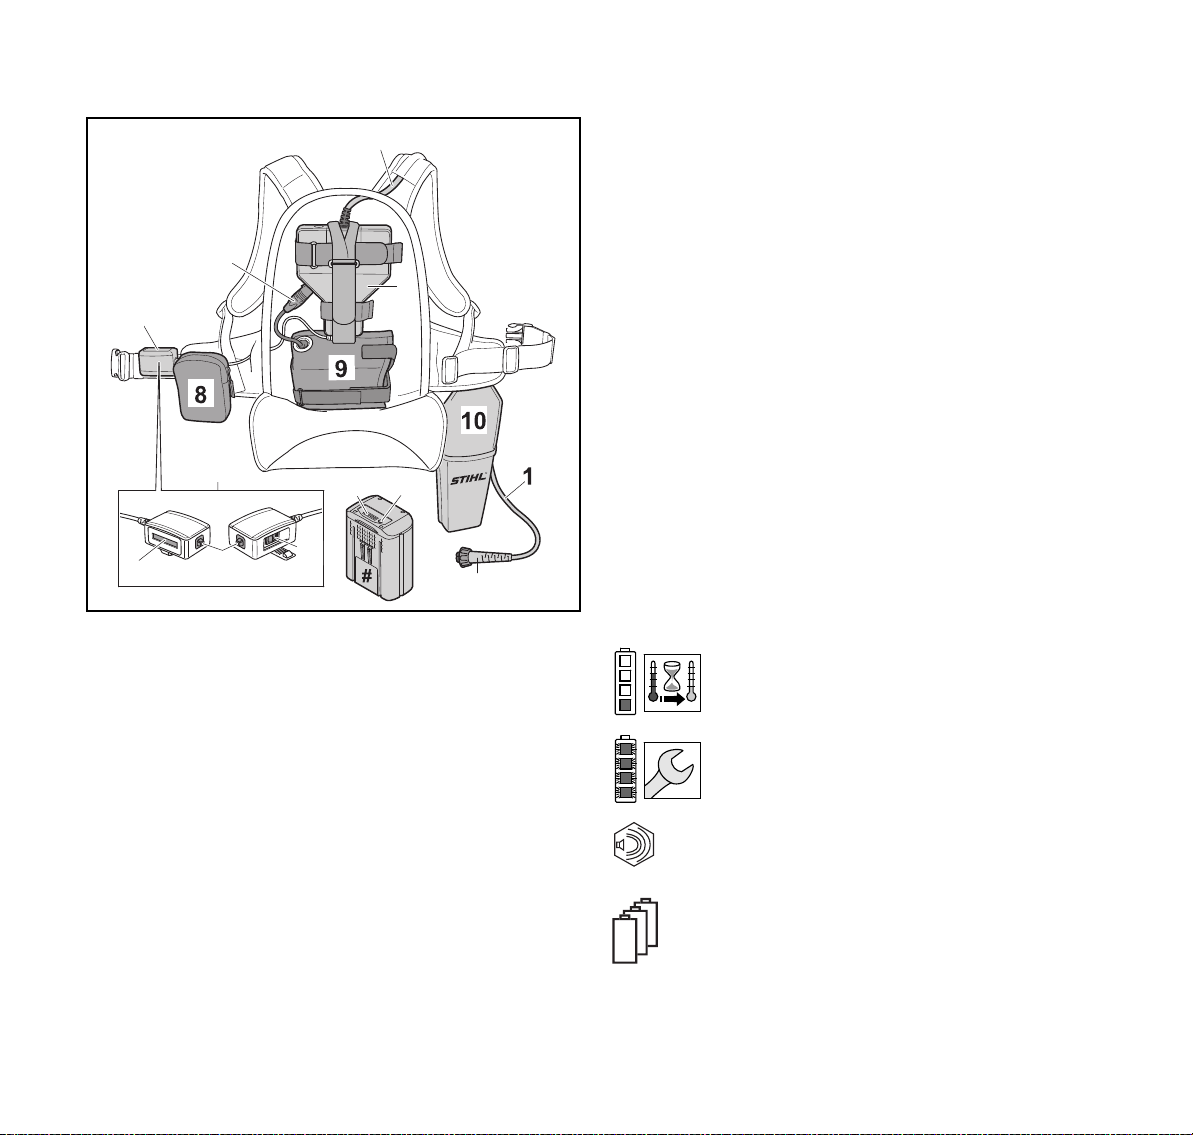
3.2 Carrying System and Battery
1
2
4
4
1312
5
1 Connecting Cable
Connects pruning shears to control unit.
2 Connecting Plug to Control Unit
Connects battery to control unit.
3 Control Unit
Controls functions of pruning shears.
4 Controller
Serves to adjust the pruning shears.
5 Display
Shows information and malfunctions.
6 Control Lever
For navigating through controller’s menu.
7 On/Off Switch
Switches the pruning shears on and off.
6
7
8Bag
Accommodates accessories.
9 Battery Bag
Accommodates the battery.
10 Holster
Accommodates pruning shears during transport and
storage.
3
11 Connecting Cable Plug
Connects pruning shears to connecting cable.
12 LEDs
Indicate battery’s state of charge and malfunctions.
13 Button
Activates the LEDs on the battery.
14 Battery
Supplies power to the pruning shears.
# Rating Label with Serial Number
14
11
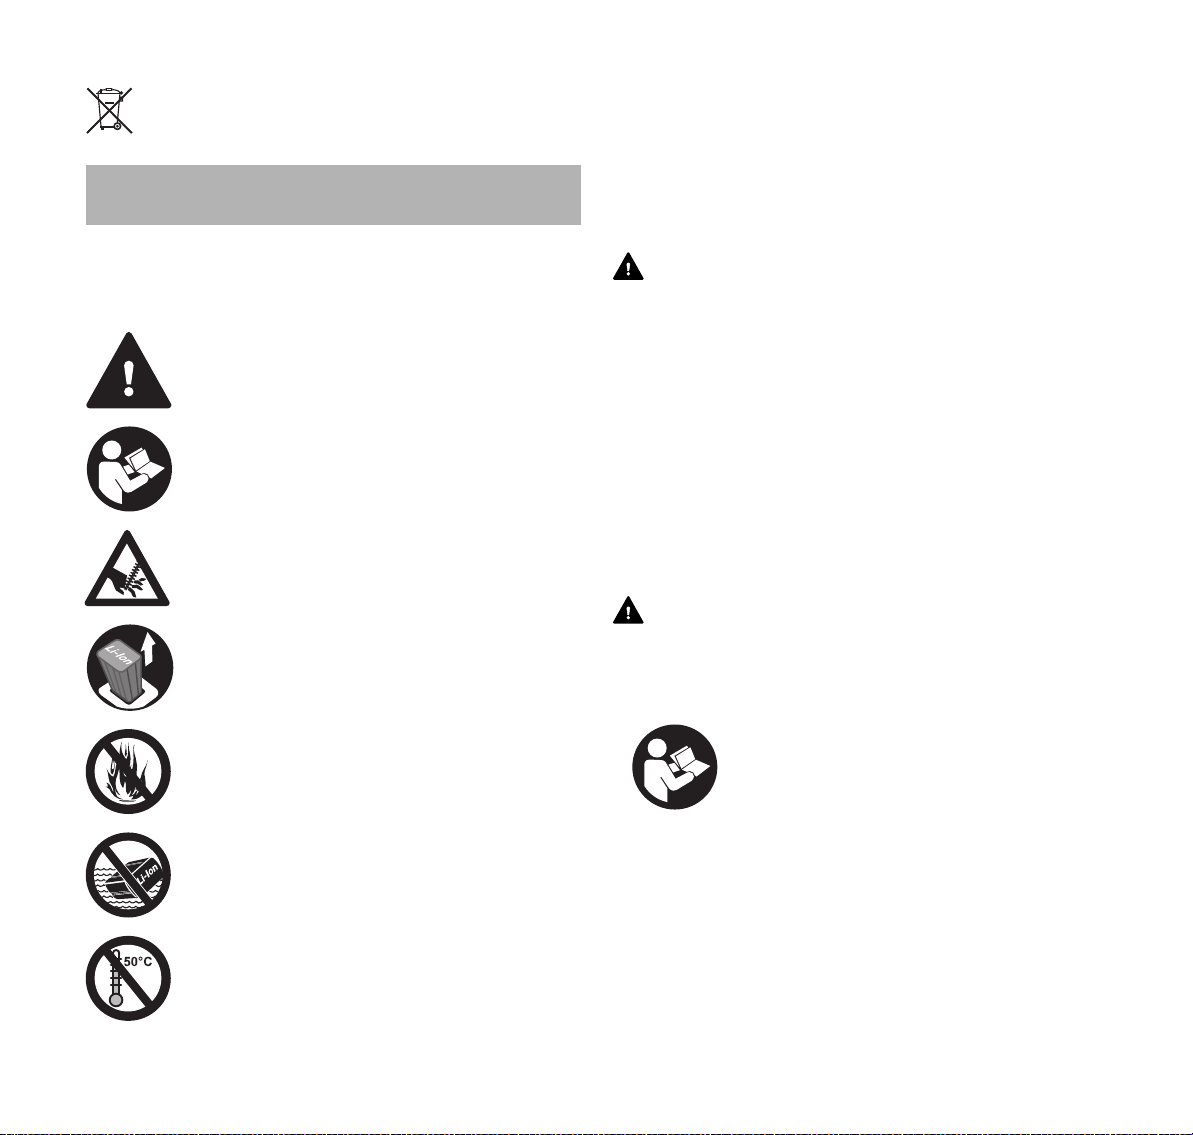
3.3 Symbols
0000-GXX-4073-A1
Meanings of symbols that may be on the pruning shears,
carrying system and battery:
1 LED glows red. Battery too hot or too cold.
4 LEDs flash red. There is a malfunction in the
battery.
Guaranteed sound power level according to
L
W
directive 2000/14/EC in dB(A) in order to make
sound emissions of products comparable.
The data next to this symbol indicates the energy
content of the battery according to the cell
manufacturer’s specification. The energy content
available during operation is lower.
4
0458-285-9721-C
Page 7
4 Safety Precautions
English
Do not dispose of the product with your household
waste.
4 Safety Precautions
4.1 Warning Signs
Meanings of warning signs on the pruning shears and
battery:
Observe safety notices and take the necessary
precautions.
Read, understand and save the instruction
manual.
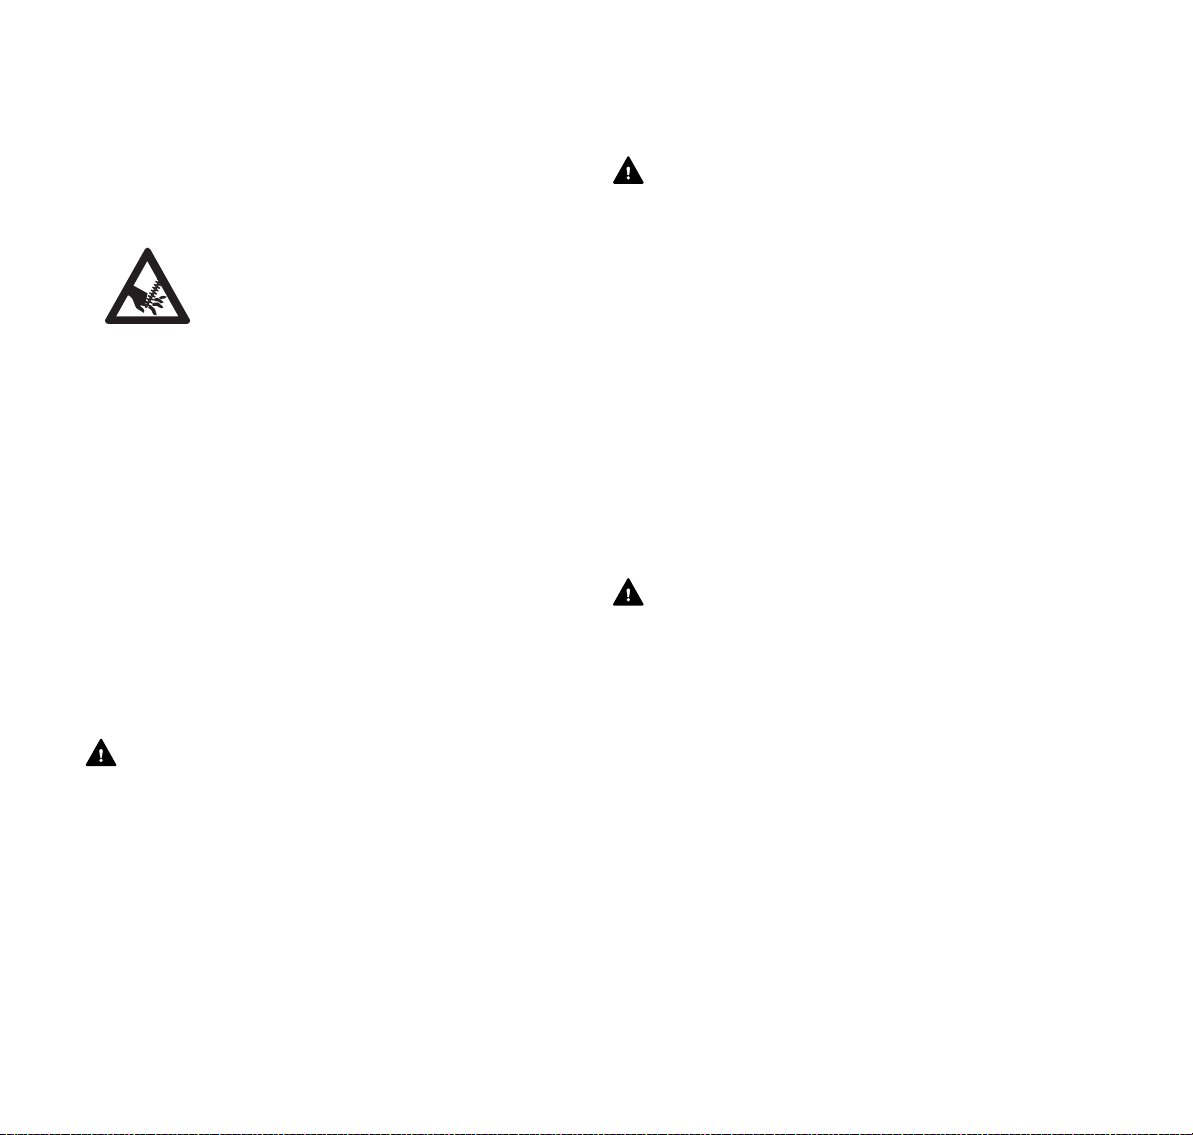
Do not touch the moving cutting blade.
Always remove the battery during work breaks,
transport, storage, maintenance or repairs.
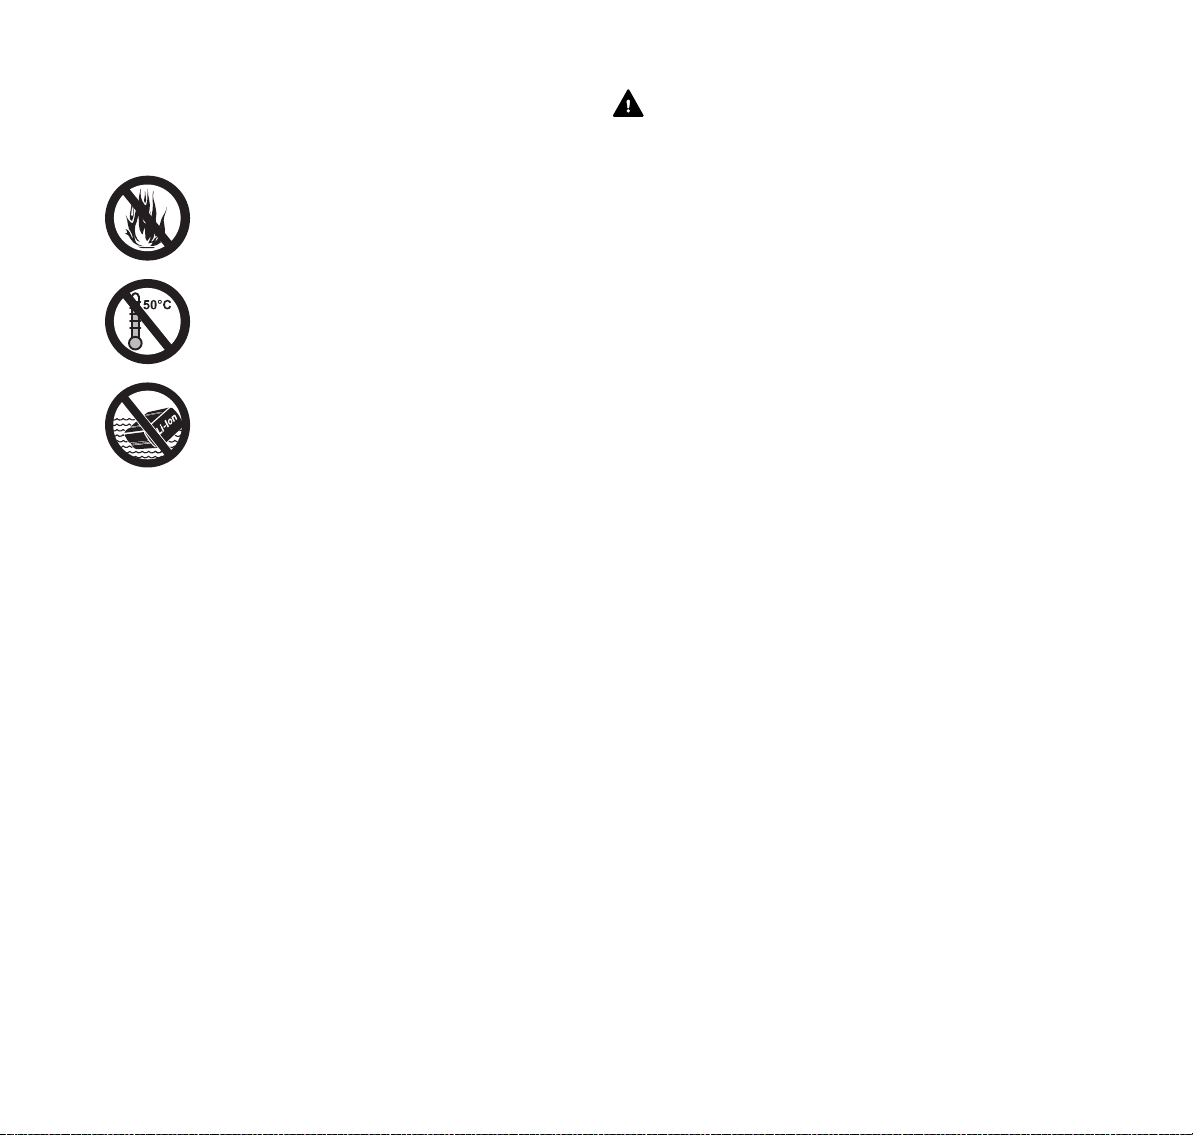
Protect battery from heat and fire.
4.2 Intended Use
STIHL ASA 85 pruning shears are designed for cutting
grapevines and similar woody shrubs with a maximum stem
diameter of 45 mm in fruit-growing and landscape care.
The pruning shears must not be used in the rain.
A STIHL AP battery supplies the pruning shears with power.
WARNING
■ Batteries not explicitly approved for the pruning shears by
STIHL may cause a fire or explosion. This can result in
serious or fatal injuries and damage to property.
► Use the pruning shears with a STIHL AP battery.
■ Using the pruning shears or the battery for purposes for
which they were not designed may result in serious or fatal
injuries and damage to property.
► Use the pruning shears as described in this instruction
manual.
► Use the battery as described in this instruction manual.
4.3 The Operator
WARNING
■ Users without adequate training or instruction cannot
recognize or assess the risks involved in using the pruning
shears and battery. The user or other persons may sustain
serious or fatal injuries.
► Read, understand and save the instruction
manual.
0458-285-9721-C
Do not immerse battery in fluids.
Observe battery’s specified temperature range.
► If the pruning shears or battery are passed on to another
person: Always give them the instruction manual.
► Make sure the user meets the following requirements:
– The user must be rested.
– The user must be in good physical condition and
mental health to operate and work with the pruning
shears and battery. If the user’s physical, sensory or
5
Page 8

English
4 Safety Precautions
mental ability is restricted, he or she may work only
under the supervision of or as instructed by a
responsible person.
– The user is able to recognize and assess the risks
involved in using the pruning shears and battery.
– The user must be of legal age or is being trained in a
trade under supervision in accordance with national
rules and regulations.
– The user has received instruction from a STIHL
servicing dealer or other experienced user before
working with the pruning shears for the first time.
– The user must not be under the influence of alcohol,
medication or drugs.
► If you have any queries: Contact your STIHL servicing
dealer for assistance.
4.4 Clothing and Equipment
WARNING
■ Long hair can become entangled in the pruning shears
during operation. This can result in serious injuries.
► Tie up and confine long hair so that it cannot be
entangled in the pruning shears.
■ Objects can be thrown through the air at high speed
during operation. This can result in personal injury.
► Wear close-fitting safety glasses. Suitable glasses that
have been tested and labeled in accordance with EN
166 or national standards are available from retailers.
► Wear a long-sleeved, snug-fitting upper garment and
long trousers.
■ Inappropriate clothing can snag on wood, brush or the
pruning shears. Not wearing personal protective
equipment may result in serious injury.
► Wear snug-fitting clothing.
► Do not wear a scarf or jewelry.
■ The user can come into contact with the cutting blade
during cleaning and maintenance work. This can result in
personal injury.
► Wear work gloves made of durable material.
■ Wearing unsuitable footwear may cause you to slip or
stumble. This can result in personal injury.
► Wear sturdy enclosed footwear with non-slip soles.
4.5 Work Area and Surroundings
4.5.1 Work Area and Surroundings
WARNING
■ Bystanders, children and animals are not aware of the
dangers of the pruning shears or thrown objects.
Bystanders, children and animals may be seriously injured
and damage to property may occur.
► Keep bystanders, children and animals away from the
work area.
► Do not leave the pruning shears unattended.
► Make sure that children cannot play with the pruning
shears.
■ Electrical components of the pruning shears can produce
sparks. Sparks may cause a fire or an explosion in an
easily combustible or explosive environment. This can
result in serious or fatal injuries and damage to property.
► Do not work in an easily combustible or explosive
environment.
4.5.2 Battery
WARNING
■ Bystanders, children and animals cannot recognize or
assess the dangers of the battery. Innocent children,
bystanders and animals may be seriously injured.
► Keep children, bystanders and animals away from the
work area.
► Do not leave the battery unattended.
► Make sure that children cannot play with the battery.
6
0458-285-9721-C
Page 9
4 Safety Precautions
English
■ The battery is not protected against all ambient
conditions. If the battery is exposed to certain ambient
conditions, it may catch fire or explode. This can result in
serious injuries and damage to property.
► Protect battery from heat and fire.
► Do not throw the battery into a fire.
► Use and store the battery at temperatures
between -10°C and +50°C.
► Do not immerse battery in fluids.
► Keep battery away from metallic objects.
► Do not expose battery to high pressure.
► Do not expose battery to microwaves.
► Protect battery from chemicals and salts.
4.6 Safe Condition
4.6.1 Pruning Shears The pruning shears are in a safe condition if the following
points are observed:
– The pruning shears are not damaged.
– The pruning shears are clean.
– The controls function properly and have not been
modified.
– The cutting blade and anvil blade are correctly fitted.
– Only original STIHL accessories designed for these
pruning shears are fitted.
– Accessories are properly mounted.
WARNING
■ If components do not comply with safety requirements,
they will no longer function properly and safety devices
may be rendered inoperative. This can result in serious or
fatal injuries.
► Work only with undamaged pruning shears.
► If the pruning shears are dirty: Clean the pruning
shears.
► Do not modify the pruning shears.
► If the controls do not function properly: Do not use your
pruning shears.
► Make sure the cutting and anvil blades are properly
mounted.
► Only fit original STIHL accessories designed for these
pruning shears.
► Mount accessories as described in this instruction
manual or the instructions supplied with the accessory.
► Never insert objects in the pruning shears’ openings.
► If you have any queries: Contact your STIHL servicing
dealer for assistance.
4.6.2 Cutting and anvil blades The cutting blade and anvil blade are in a safe condition if
the following points are observed:
– The cutting blade and anvil blade are not damaged.
– The cutting blade and anvil blade are not warped.
– The cutting blade and anvil blade move freely.
– The play between cutting and anvil blades is correct.
– The contact point between cutting and anvil blades is
correctly adjusted.
– The cutting blade is properly sharpened.
– The cutting blade is free from burrs.
0458-285-9721-C
7
Page 10

English
4 Safety Precautions
WARNING
■ Parts of the cutting blade or anvil blade may come off and
be thrown at high speed if they are in an unsafe condition.
This can result in serious injuries.
► Always work with an undamaged cutting blade and anvil
blade.
► Adjust play between cutting and anvil blades correctly.
► Adjust contact point between cutting and anvil blades
correctly.
► Make sure the cutting blade is properly sharpened and
deburred.
► If you have any queries: Contact your STIHL servicing
dealer.
4.6.3 Battery The battery is in a safe condition if the following points are
observed:
– Battery is undamaged.
– Battery is clean and dry.
– Battery functions properly and has not been modified.
WARNING
■ A battery that is not in a safe condition cannot operate
safely. This can result in serious injuries.
► Never work with a damaged battery.
► Never attempt to charge a damaged or defective
battery.
► If the battery is dirty or wet: Clean the battery and allow
it to dry.
► Never attempt to modify the battery.
► Never insert objects in the battery’s openings.
► Never bridge the battery's contacts with metallic objects
(short circuit).
► Do not open the battery.
■ Fluid may escape from a damaged battery. The fluid can
cause irritation if it contacts the skin or eyes.
► Avoid contact with the fluid.
► In case of contact with the skin: Wash affected areas
with plenty of water and soap.
► In case of contact with the eyes: Rinse eyes with plenty
of water for at least 15 minutes and seek medical
advice.
■ A damaged or defective battery may smell unusual, emit
smoke or burn. This can result in serious or fatal injuries
and damage to property.
► If the battery smells unusual or emits smoke: Do not use
the battery and keep it away from combustible
substances.
► If the battery catches fire: Attempt to extinguish the
battery with a fire extinguisher or water.
4.7 Operation
WARNING
■ The user cannot concentrate on the work in certain
situations. The user may stumble, fall and be seriously
injured.
► Work calmly and carefully.
► If light and visibility are poor: Do not use your pruning
shears.
► Operate the pruning shears alone.
► Do not work above shoulder height.
► Watch out for obstacles.
► Stand on the ground while working and keep a good
balance. If it is necessary to work at heights: Use a lift
bucket or a safe platform.
► If you begin to feel tired: Take a break.
8
0458-285-9721-C
Page 11
4 Safety Precautions
English
■ The cutting blade can be damaged if it makes contact with
a hard object.
► Before starting work, check the work area for hard
objects and remove them.
► Do not cut wire.
■ The moving cutting blade can seriously injure the user.
► Keep your free hand at least 40 cm away
from the cutting blade.
► Never touch the cutting blade.
■ If the behavior of the pruning shears changes during
operation or feels unusual, it may no longer be in a safe
condition. This can result in serious injuries and damage
to property.
► Stop work, remove the battery and contact your STIHL
servicing dealer for assistance.
■ Vibrations may occur while using the pruning shears.
► Wear gloves.
► Take regular breaks.
► If signs of circulation problems occur: Seek medical
advice.
■ In an emergency, the user may panic and not put the
carrying system down. This can result in serious injuries.
► Practice removing and putting down the carrying
system.
DANGER
■ Working near live electric cables can result in accidental
contact with the cutting blade and damage the cables.
This can result in serious or fatal injuries.
► Do not work near live electric cables.
4.8 Transporting
4.8.1 Transporting the pruning shears
WARNING
■ The cutting blade can close unintentionally if the pruning
shears remain switched on during transport. This can
result in serious injuries and damage to property.
► Move the on/off switch to ‘OFF’.
► Put the pruning shears in the holster.
■ The pruning shears may turn over or shift during transport.
This may result in personal injuries and damage to
property.
► Remove the battery.
► Put the pruning shears in the holster.
► Secure the pruning shears and carrying system with
lashing straps or a net to prevent them turning over and
moving.
4.8.2 Battery
WARNING
■ The battery is not protected against all ambient
conditions. The battery may be damaged if it is exposed to
certain ambient conditions and damage to property may
occur.
► Never transport a damaged battery.
► Store the battery in non-conductive packaging.
■ The battery may turn over or shift during transport. This
may result in personal injuries and damage to property.
► Pack the battery in packaging in such a way that it
cannot move.
► Secure the packaging so that it cannot move.
0458-285-9721-C
9
Page 12

English
4 Safety Precautions
4.9 Storing
4.9.1 Storing the pruning shears
WARNING
■ Children are not aware of and cannot assess the dangers
of pruning shears and can be seriously injured.
► Move the on/off switch to ‘OFF’.
► Pull connecting cable plug out of the socket and remove
the battery.
► Put the pruning shears in the holster.
► Store the pruning shears out of the reach of children.
■ Dampness can corrode the electrical contacts on the
pruning shears and metal components. This can damage
the pruning shears.
► Remove the battery.
► Store the pruning shears in a clean and dry condition.
4.9.2 Battery
WARNING
■ Children are not aware of and cannot assess the dangers
of the battery and can be seriously injured.
► Store the battery out of the reach of children.
■ The battery is not protected against all ambient
conditions. The battery may be damaged if it is exposed to
certain ambient conditions.
► Store the battery in a clean and dry condition.
► Store the battery in an enclosed location.
► Store the battery key separately from the pruning
shears.
► Store the battery in non-conductive packaging.
► Store the battery at temperatures between -10°C and
+50°C.
4.10 Cleaning, Maintenance and Repairs
WARNING
■ The cutting blade may close unintentionally if the pruning
shears remain switched on during cleaning, maintenance
or repairs. This can result in serious injuries and damage
to property.
► Close the cutting blade.
► Move the on/off switch to ‘OFF’.
► Pull the connecting cable plug out of the socket.
► Remove the battery.
■ Aggressive cleaning agents, a water jet or pointed objects
can damage the pruning shears, cutting blade or the anvil
blade. If the pruning shears, cutting and anvil blades are
not cleaned correctly, components may no longer function
properly or safety devices may be rendered inoperative.
This can result in serious injuries.
► Clean the pruning shears, cutting and anvil blades as
described in this instruction manual.
■ If the pruning shears, cutting and anvil blades are not are
not serviced or repaired correctly, components may no
longer function properly or safety devices may be
rendered inoperative. This can result in serious or fatal
injuries.
► Service or repair the pruning shears, cutting and anvil
blades as described in this instruction manual.
■ The user can be cut by the sharp cutting blade while
cleaning, maintaining or repairing the cutting blade or
anvil blade. This can result in personal injury.
► Wear work gloves made of durable material.
10
0458-285-9721-C
Page 13
5 Preparing Pruning Shears for Operation
1
0000-GXX-1248-A0
20-40%
40-60%
60-80%
80-100%
0-20%
BATT:
I I I I I I
0000-GXX-4088-A0
English
5 Preparing Pruning Shears for
Operation
5.1 Preparing Pruning Shears for Operation
Perform the following steps before starting work:
► Make sure the following components are in a safe
condition:
– Pruning shears, @ 4.6.1.
– Cutting and anvil blades, @ 4.6.2.
– Battery, @ 4.6.3.
► Check the battery, @ 12.2.
► Recharge the battery fully as described in the instruction
manual for the STIHL AL 101, 300, 500 chargers.
► Clean the pruning shears, @ 17.1.
► Clean the holster and bag, @ 7.1.
► Lubricate cutting and anvil blades with grease gun,
@ 18.2.
► If you cannot carry out this work: Do not use the pruning
shears and contact your STIHL dealer for assistance.
The following steps have to be performed after working 30
minutes with new pruning shears, a new cutting blade or
new anvil blade:
► Adjust play between cutting and anvil blades.
► Sharpen the cutting blade.
► Recharge the battery fully as described in the instruction
manual for the STIHL AL 101, 300, 500 chargers.
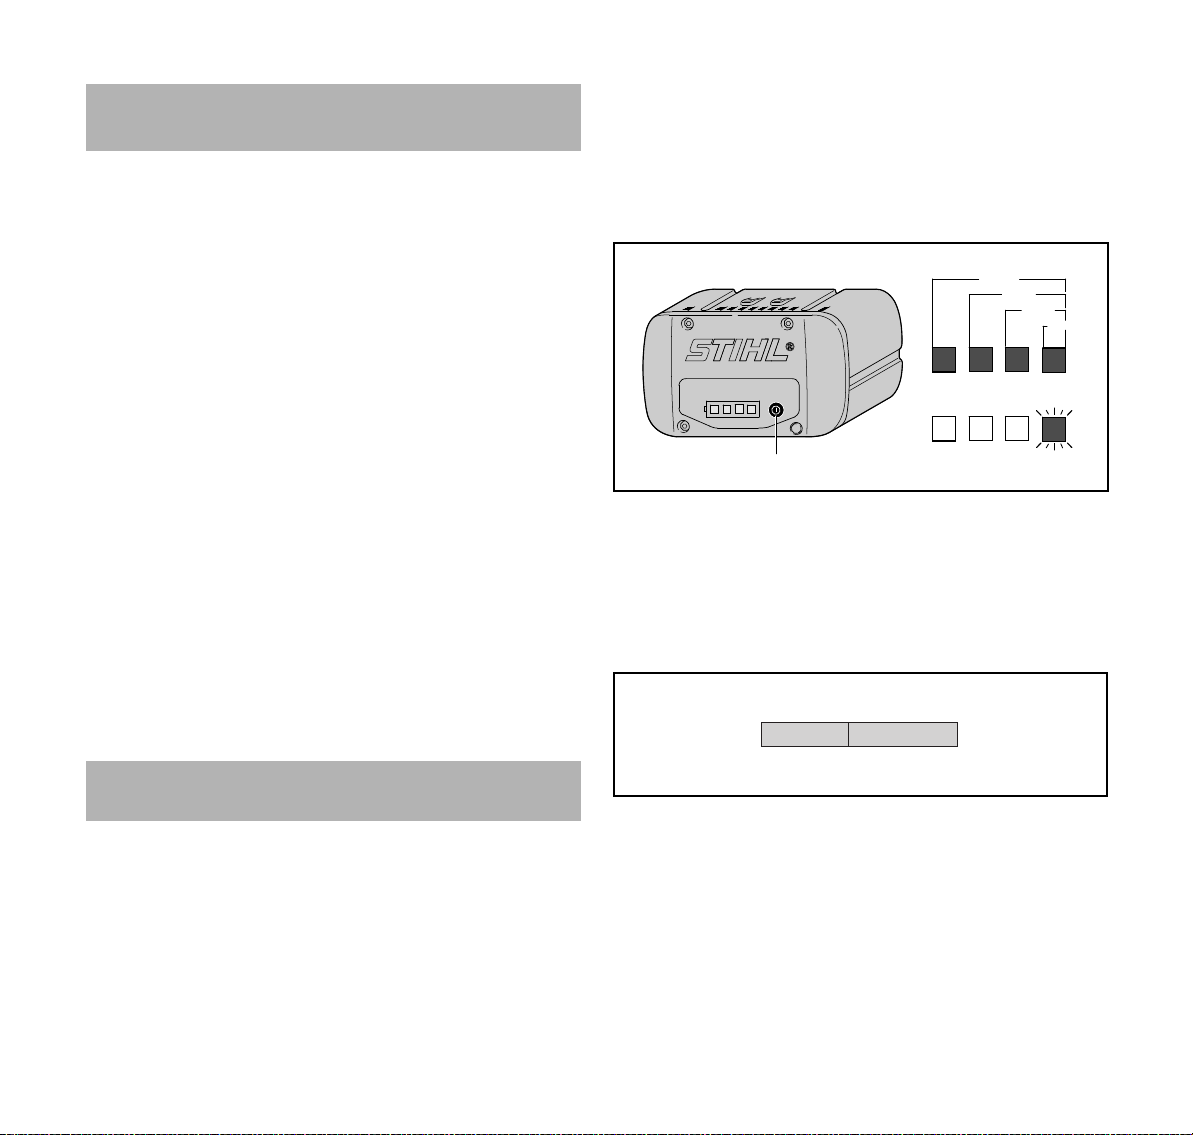
6.2 Displaying State of Charge
Showing state of charge on battery:
► Press the button (1).
The LEDs (5) glow green for about 5 seconds and indicate
the state of charge.
► If the LED on the right flashes green: Charge the battery.
Showing state of charge on control unit’s display:
► Switch on the pruning shears.
6 Charging the Battery, LEDs
6.1 Charging the Battery
The charging time depends on several factors, e.g.
temperature of the battery or the ambient temperature. The
actual charging time may differ from the specified charging
time. For specified charging times see
www.stihl.com/charging-times.
0458-285-9721-C
The display shows the battery’s state of charge after a few
seconds. Each bar represents 10% of the battery's capacity
6.3 LEDs on Battery
The LEDs can show the state of charge or malfunctions. The
LEDs can glow or flash green or red.
The state of charge is indicated when the LEDs glow or flash
green.
11
Page 14
English
7 Assembling the Pruning Shears
► If the LEDs glow or flash red: Troubleshooting, @ 20.
There is a malfunction in the battery.
7 Assembling the Pruning Shears
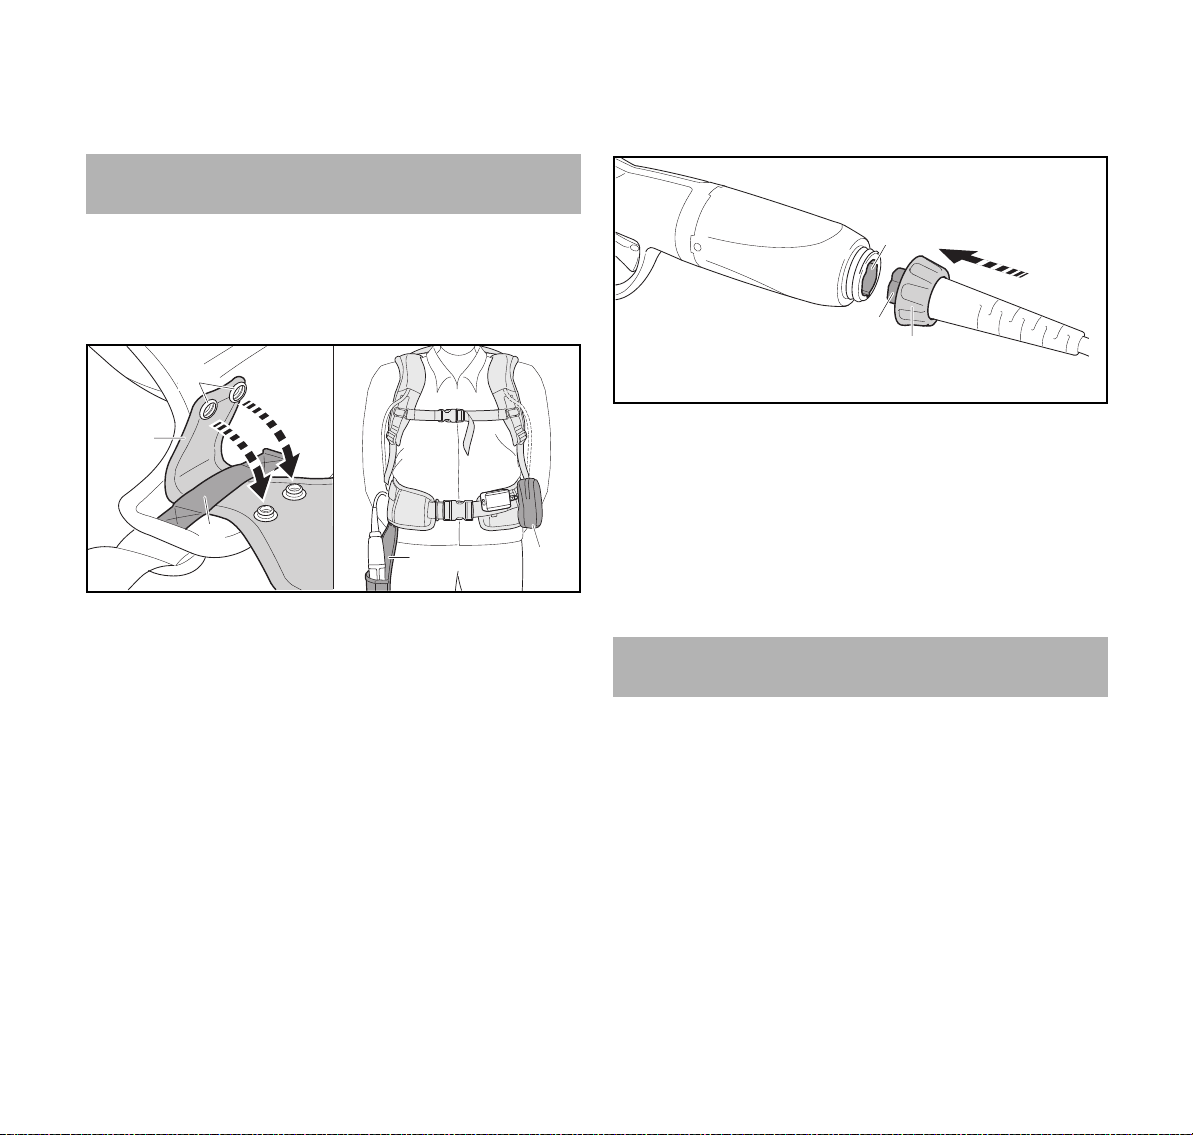
7.1 Fitting the Holster and Bag
The holster and bag can be fitted to either the left or righthand side of the waist belt. The holster must be fitted at the
side on which the user holds the pruning shears.
2
1
3
4
► Thread tongue (1) of holster (4) through the loop (3) on
the inside of the waist belt.
► Close the press studs (2).
► Secure the bag (5) to the other side of the waist belt.
5
7.2 Inserting and Removing Connecting Cable Plug
7.2.1 Inserting the Connecting Cable Plug
1
2
3
► Insert the connecting cable plug (2) in the socket (1).
► Fit the union nut (3) on the socket’s thread (1) and tighten
it down firmly by hand.
7.2.2 Removing the Connecting Cable Plug ► Unscrew the union nut.
► Grip the connecting cable plug with your hand.
0000-GXX-4077-A1
► Pull the connecting cable plug out of the socket.
8 Adjusting the Pruning Shears
0000-GXX-4082-A0
12
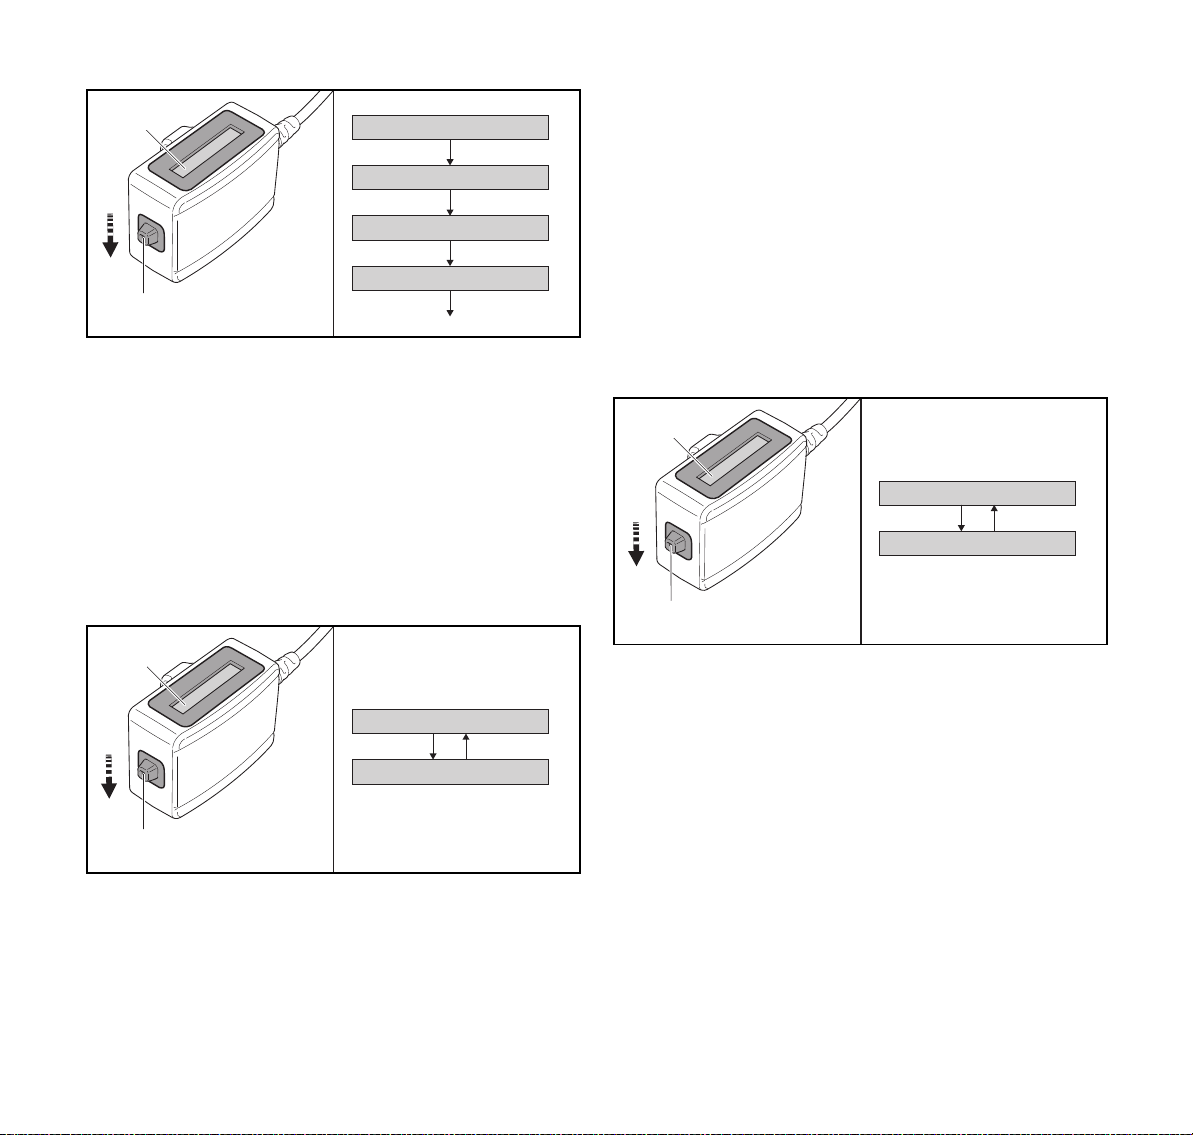
8.1 Adjusting Cutting Blade Opening
The blade opening can be adjusted to suit the application.
The following blade openings can be selected:
– 50% (ON)
– 60% (ON)
– 70% (ON)
– No limit (OFF)
► Switch on the pruning shears.
0458-285-9721-C
Page 15
8 Adjusting the Pruning Shears
1
1/2
1/2
50%
60%
ON
ON
English
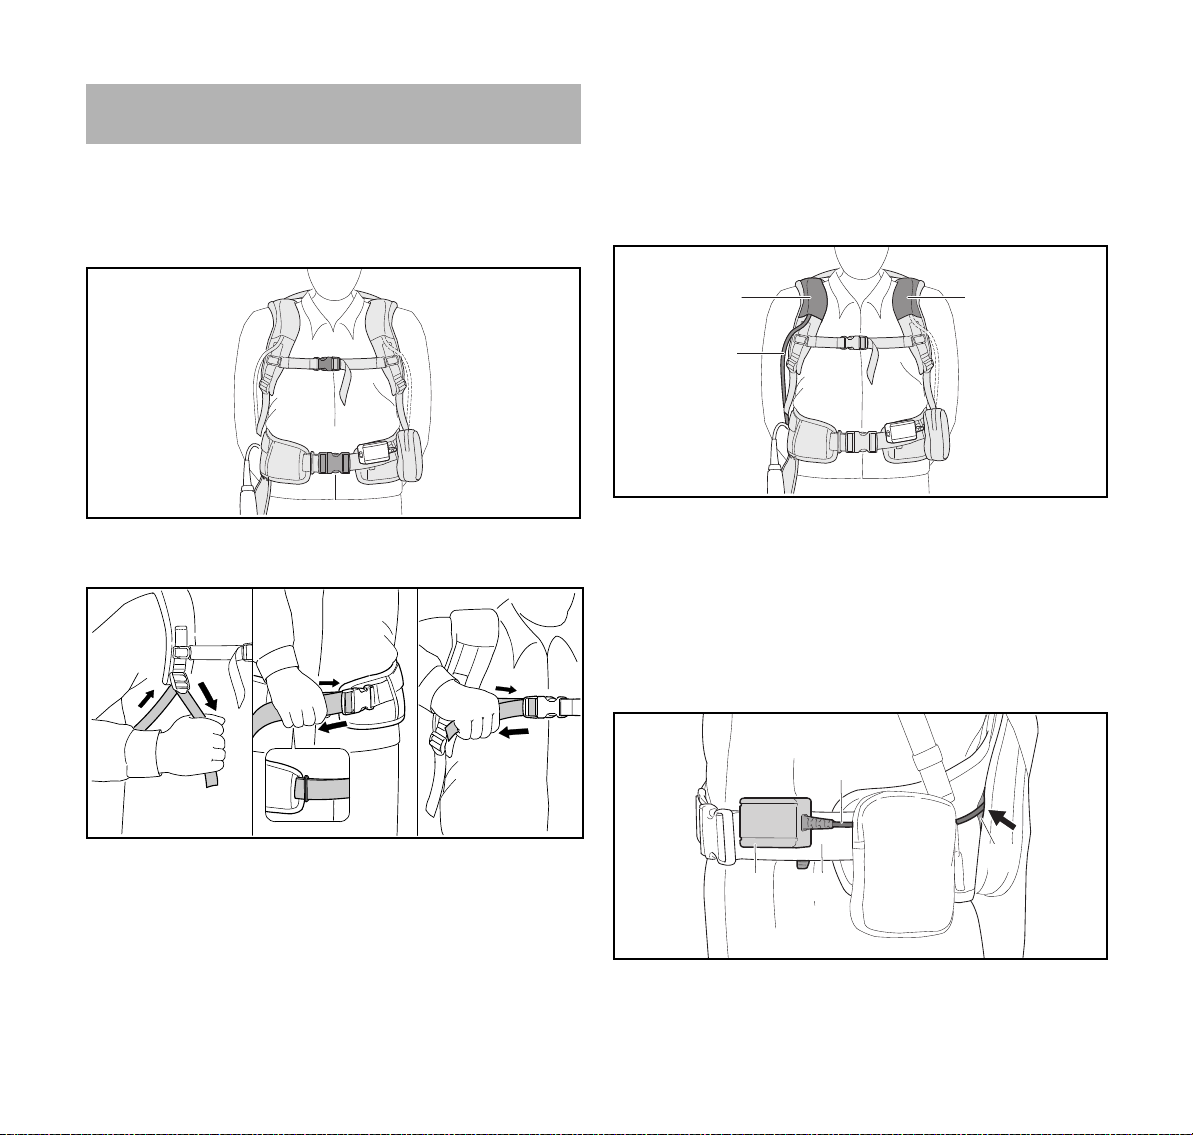
The standby mode is deactivated if the display (1) shows
‘CLICK-CLICK OFF’.
► Depress the control lever (2) as often as necessary until
the standby mode is activated or deactivated.
1/2
70%
ON
1/2 OFF
2
► Press the control lever (2) downwards as often as
necessary until the display (1) shows the current blade
opening.
► Press the control lever (2) downwards as often as
necessary until the required blade opening is shown.
8.2 Activating and Deactivating the Standby Mode
If the standby mode is activated, the cutting blade may be
permanently closed even though the pruning shears are
switched on. The standby mode can be deactivated.
► Switch on the pruning shears.
1
CLICK-CLICK ON
CLICK-CLICK OFF
2
► Press the control lever (2) downwards as often as
necessary until the display (1) shows ‘CLICK-CLICK ON’
or ‘CLICK-CLICK OFF’.
The standby mode is activated If the display (1) shows
‘CLICK-CLICK ON’.
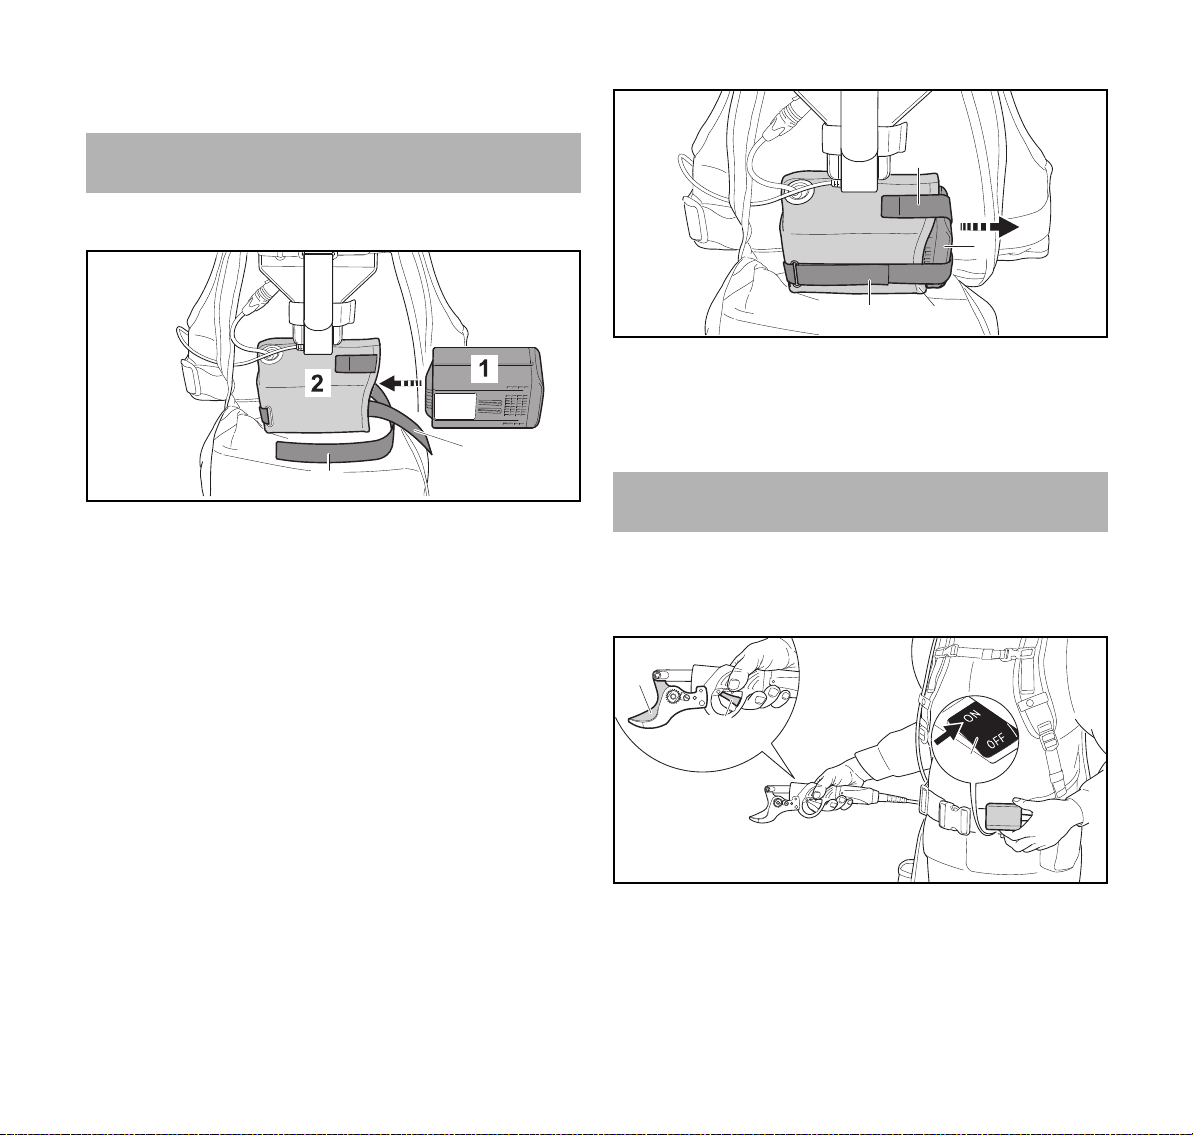
8.3 Adjusting Closing Action of Cutting Blade
When the pruning shears are switched on, the cutting blade
closes proportionally to the movement of the trigger.
The closing action of the cutting blade can be adjusted so
that it always closes completely when the trigger is
0000-GXX-4074-A0
depressed.
► Switch on the pruning shears.
1
REG ON
REG OFF
2
► Press the control lever (2) downwards as often as
necessary until the display (1) shows ‘REG ON’ or ‘REG
OFF’.
If the display (1) shows ‘REG ON’, the cutting blade closes
proportionally to the movement of the trigger.
If the display (1) shows ‘REG OFF’, the cutting blade always
closes completely when the trigger is depressed.
► Depress the control lever (2) as often as necessary until
the required function is selected.
0000-GXX-4075-A0
When the pruning shears are switched off and then on
again, the cutting blade then closes proportionally to the
movement of the trigger.
0000-GXX-4076-A0
0458-285-9721-C
13
Page 16
English
2
1
0000-GXX-4078-A1
0000-GXX-2815-A1
3
9 Adjusting Pruning Shears for User
9 Adjusting Pruning Shears for User
9.1 Fitting and Removing Harness
9.1.1 Fitting and Adjusting the Carrying System ► Put the carrying system on your back.
► Close buckle (2) on the waist belt.
► Close buckle (1) on the chest strap.
► Take the carrying system off your back.
9.2 Positioning the Connecting Cable
The connecting cable can be fitted to the left or right side of
the harness. The connecting cable must be fitted at the side
on which the user holds the pruning shears.
3
2
3
4
1
► Thread the connecting cable (1) through one of the
openings (3) in the carrying system.
► Thread the connecting cable (1) through the right-hand
loops (2) or the left-hand loops (4).
► Arrange the connecting cable (1) so that it is as short as
possible without restricting your movement.
0000-GXX-4333-A1
► Tighten the straps until the waist belt fits snugly on your
hips and the back padding is against your back.
► Thread the end of the waist belt through the loop (3).
9.1.2 Removing the Carrying System ► Loosen the straps.
► Open the buckles on the chest strap and waist belt.
14
9.3 Fitting the Controller's Connecting Cable
3
4
1 2
0000-GXX-4081-A0
► Take the controller (1) and cable (3) out of the carrying
system through the left or right opening (4).
0458-285-9721-C
Page 17
10 Removing and Fitting the Battery
3
0000-GXX-4085-A1
1
2
► Attach the controller (1) to the waist belt (2).
10 Removing and Fitting the Battery
10.1 Fitting the Battery
3
English
► Open the hook and loop fastener (1) and pull it out of the
loop.
► Open the hook and loop fastener (2).
► Remove the battery (3).
4
► Open the zipper on the carrying system.
► Push the battery (1) into the battery bag (2) as far as stop.
► Close the hook and loop fastener (3).
The battery (1) cannot move.
► Thread the hook and loop fastener (4) through the loop
and close it.
The battery bag (2) is attached to the carrying system.
► Close the zipper on the carrying system.
10.2 Removing the Battery
► Stand the carrying system on a level surface.
► Open the zipper on the carrying system.
0458-285-9721-C
0000-GXX-4084-A1
11 Switching On the Pruning Shears
11.1 Switching On the Pruning Shears
► Hold the pruning shears firmly with one hand on the
control handle - wrap your thumb around the handle.
1
2
3
► Move the on/off switch (3) to ‘ON’.
You will hear 1 long beep and 3 short beeps. The pruning
shears are ready for operation.
► Depress the trigger (2).
The cutting blade (1) opens fully.
0000-GXX-4086-A0
15
Page 18

English
BATT:
The display shows the number of cuts that can be performed
before the next recommended service is due.
The display shows the battery’s state of charge after a few
seconds. Each bar represents 10% of the battery's capacity.
The pruning shears switch off automatically if they are not
operated for more than 10 minutes. A series of 5 short beeps
sound for 20 seconds.
► Move the on/off switch (3) to ‘OFF’ and then to ‘ON’.
The pruning shears are again ready for operation.
I I I I I I
12 Testing the Pruning Shears and Battery
12 Testing the Pruning Shears and
Battery
12.1 Testing the Pruning Shears
0000-GXX-4088-A0
The following tests are performed consecutively:
– Electrical connection between battery and control unit
– Electrical connection between control unit and motor
– Electrical connection between control unit and trigger
– Control unit
► Switch on the pruning shears.
1
11.2 Switching Off the Pruning Shears
2
1
► Pull the trigger (2) and hold it there.
The cutting blade (1) closes.
NOTICE
The pruning shears can be damaged if the on/off switch is
moved to ‘OFF’ before the cutting blade is closed.
► Wait until the cutting blade is closed.
► Move the on/off switch (3) to ‘OFF’.
► Put the pruning shears in the holster.
16
3
XXXXXX Vx.xx
TESTING
2
► Press the control lever (2) downwards as often as
necessary until the display (1) shows ‘XXXXXX Vx.xx’.
► Depress the control lever (2) and hold it depressed until
the display (1) shows ‘TESTING’.
0000-GXX-4087-A0
A rapid sequence of several beeps sound and the pruning
shears are tested.
Press the control lever (2) in any direction to end the test.
Electrical connection between battery and control unit
BATT OK
BATT KO
0458-285-9721-C
0000-GXX-4089-A0
0000-GXX-4090-A0
Page 19

13 Operating the Pruning Shears
POWERLINE
POWERLINEOKKO
0000-GXX-4091-A0
English
If the display indicates ‘BATT OK’, the electrical connection
between the battery and control unit is in order.
► If the display indicates ‘BATT KO’: Troubleshooting,
@ 20.
Electrical connection between control unit and motor
If the display indicates ‘POWERLINE OK’, the electrical
connection between the control unit and motor is in order.
► If the display indicates ‘POWERLINE KO’:
Troubleshooting, @ 20.
Electrical connection between control unit and trigger
TRIGGER LINE
TRIGGER LINEOKKO
If the display indicates ‘TRIGGER LINE OK’, the electrical
connection between the control unit and trigger is in order.
► If the display indicates ‘TRIGGER LINE KO’:
Troubleshooting, @ 20.
Control unit
MAIN DRIVE
MAIN DRIVE
If the display indicates ‘MAIN DRIVE OK’, the control unit is
in order.
► If the display indicates ‘MAIN DRIVE KO’:
Troubleshooting, @ 20.
OK
KO
12.2 Testing the Battery
► Press button on battery.
The LEDs glow or flash.
► If the LEDs do not glow or flash: Do not use the battery
and contact your STIHL servicing dealer.
There is a malfunction in the battery.
13 Operating the Pruning Shears
13.1 Holding and Controlling the Pruning Shears
0000-GXX-4092-A0
► Hold the pruning shears firmly with one hand on the
control handle - wrap your thumb around the handle.
► Keep your free hand well away from the cutting blade.
13.2 Displaying Information
The following information can be displayed:
– The number of cuts that can be performed before the next
recommended service is due.
– Battery's state of charge
– Number of cuts and operating time in hours and minutes
0000-GXX-4093-A0
– Number of cuts with low, medium and high force.
– Cutting blade blockages.
The information shown refers to the last time the counter
was reset.
0000-GXX-4094-A0
0458-285-9721-C
17
Page 20
English
13 Operating the Pruning Shears
► Switch on the pruning shears.
XX xxxxxx
1
2
► Press the control lever (2) downwards as often as
necessary until the display (1) shows the required
information.
The data (A, C, D and E) can be reset.
► To reset the data displayed: Depress the control lever (2)
for 2 seconds.
The data displayed is reset.
The number of cuts that can be performed before the next
recommended service is due (A)
The display (1) shows the number of cuts that can be
performed before the next recommended service is due.
The display shows the battery’s state of charge after a few
seconds (B).
► If the number of cuts is 0: Press the control lever (2).
The display (1) shows the battery’s state of charge (B).
Battery's state of charge (B)
The display (1) shows the battery’s state of charge. Each bar
represents 10% of the battery's capacity
Number of cuts and operating time in hours and minutes (C)
The display (1) shows the number of cuts and operating time
in hours and minutes.
A
B
BATT:
C
# 123456 23h 45m
42%S
D
E
I I I I I I
37%M
xx XXL
21%L
Number of cuts with low, medium and high force (D).
The display (1) shows the number of cuts with low, medium
and high force.
The control unit allocates each cut to the following classes:
– S = Number of cuts with low force
– M = Number of cuts with medium force
– L = Number of cuts with high force
Cutting blade blockages (E)
The display (1) shows the number of cutting blade
0000-GXX-4331-A0
blockages.
13.3 Putting the Pruning Shears in Standby Mode
The pruning shears can be put in standby mode during short
work breaks.
1
2
► Pull the trigger (2) twice in quick succession and hold it
depressed on the second pull.
You will hear 3 short beeps. The cutting blade (1) closes
and remains closed.
► Release the trigger (2).
The pruning shears are in standby mode.
When you pull the trigger (2) again, the cutting blade (1)
opens and the pruning shears are ready for operation.
0000-GXX-4102-A0
18
0458-285-9721-C
Page 21
14 After Finishing Work
0000-GXX-4095-A0
English
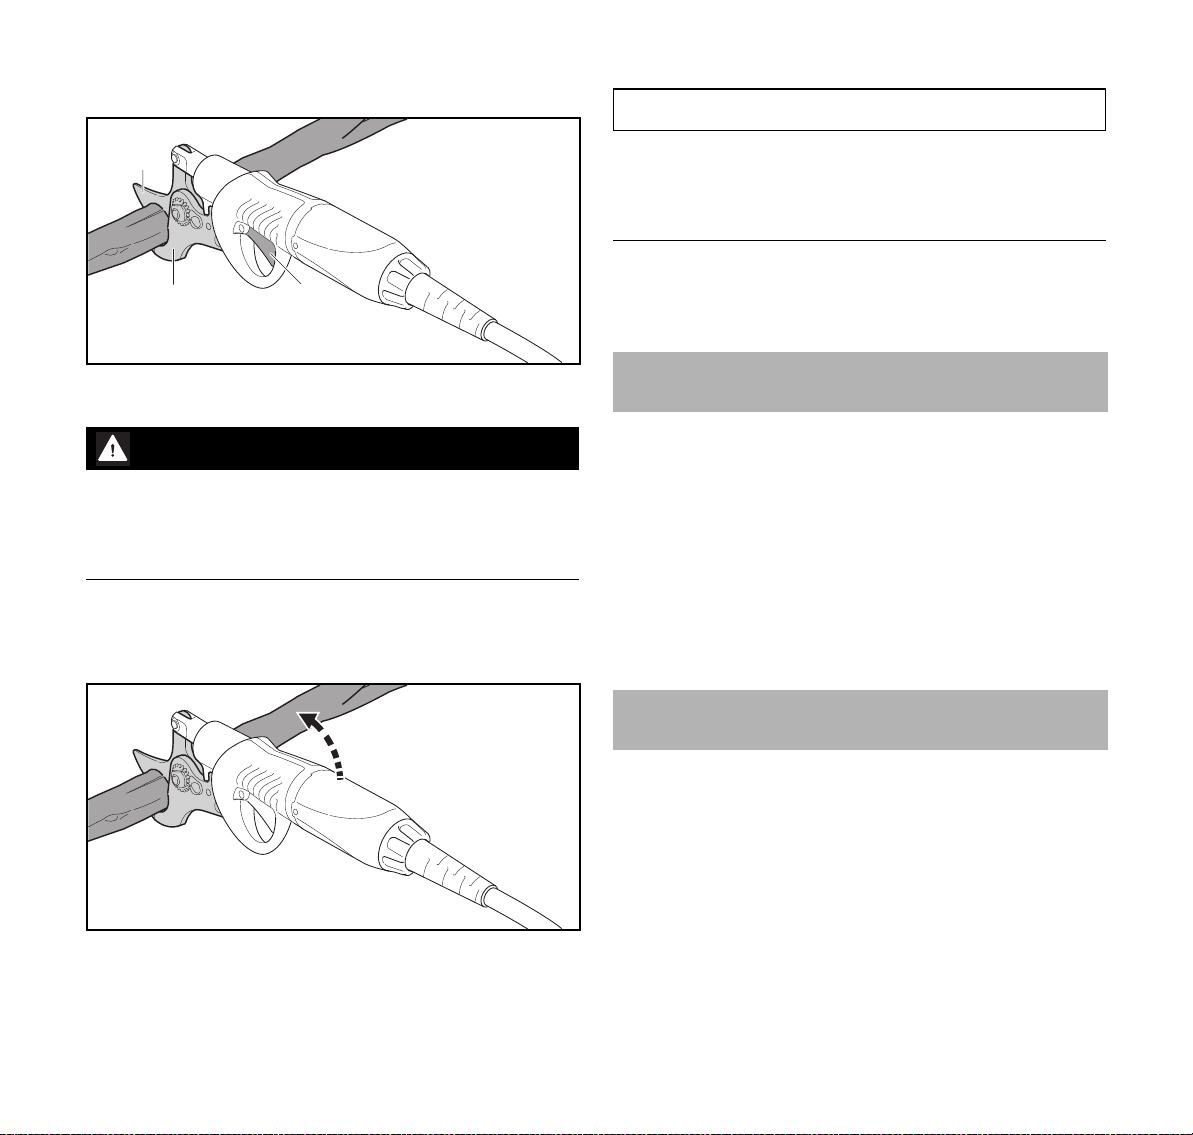
13.4 Cutting
1
2
► Position the anvil blade (2) against the underside of the
branch.
WARNING
The moving cutting blade can seriously injure the user.
► Keep your free hand at least 40 cm away from the cutting
blade.
► Never touch the cutting blade.
► Depress the trigger (3).
The cutting blade (1) closes and the branch is cut.
The cutting blade can jam during cutting work.
3
NOTICE
The pruning shears can be damaged if they are switched off
while the cutting blade is jammed.
► Do not switch off the pruning shears.
► Do not swing the pruning shears sideways or upwards.
► If the cutting blade is jammed: Swing the pruning shears
downwards and pull them out of the cut.
The cutting blade (1) opens.
0000-GXX-4101-A0
14 After Finishing Work
14.1 After Finishing Work
► Switch off the pruning shears, pull out the connecting
cable plug and remove the battery.
► If the pruning shears are wet: Allow the pruning shears to
dry.
► If the battery is wet: Allow the battery to dry.
► Clean the pruning shears.
► Clean the cutting and anvil blades.
► Clean the battery.
0458-285-9721-C
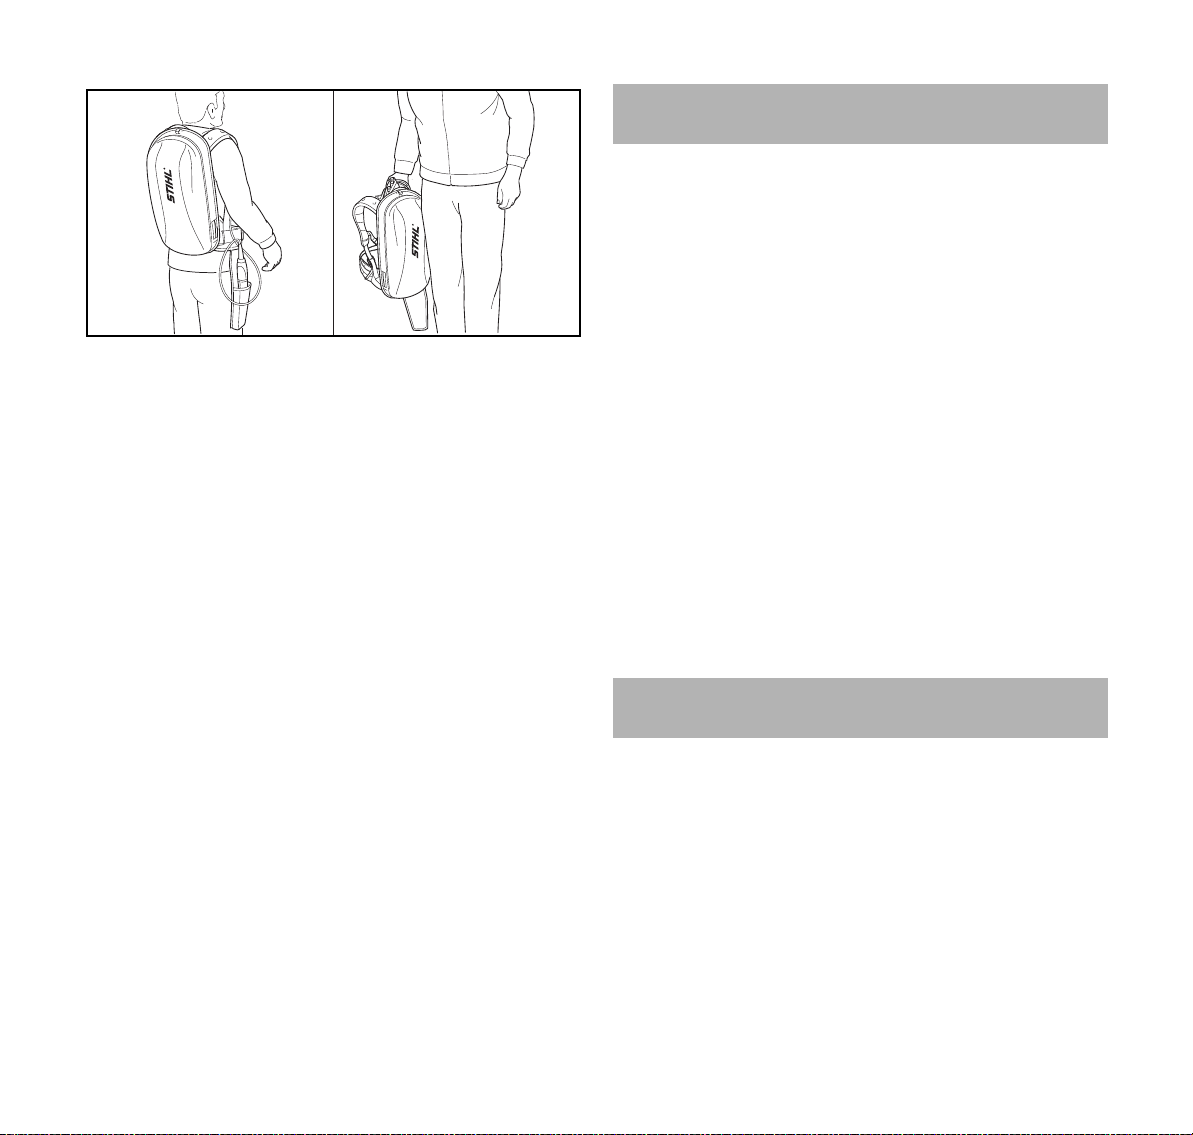
15 Transporting
15.1 Transporting the Pruning Shears and Carrying
System
► Switch off the pruning shears and pull out the connecting
cable plug.
► Put the pruning shears in the holster.
19
Page 22
English
► Transport the carrying system on your back or by the
handle.
► Transporting the pruning shears in a vehicle:
► Remove the battery.
► Put the pruning shears in the case.
► Secure the pruning shears so that they cannot turn over
or move.
15.2 Transporting the Battery
► Switch off the pruning shears, pull out the connecting
cable plug and remove the battery.
► Make sure the battery is in a safe condition.
► Observe the following points when packing the battery:
– The packaging must be non-conductive.
– Make sure the battery cannot shift inside the packaging.
► Secure the packaging so that it cannot move.
The battery is subject to the requirements for the transport
of dangerous goods. The battery is classified as UN 3480
(lithium-ion batteries) and has been tested in accordance
with UN Manual of Tests and Criteria, Part III, sub-section
38.3.
For transport regulations see www.stihl.com/safety-data-
sheets
16 Storing
16 Storing
16.1 Storing the Pruning Shears
► Switch off the pruning shears, pull out the connecting
cable plug and remove the battery.
► Store the clean and dry pruning shears and carrying
system in the case.
► Store the case out of the reach of children.
0000-GXX-4096-A1
16.2 Storing the Battery
STIHL recommends that you store the battery with a charge
between 40% and 60% (2 LEDs glow green).
► Check the following points when storing the battery:
– Battery is out of the reach of children.
– Battery is clean and dry.
– Battery is in an enclosed location.
– Battery is stored separately from the pruning shears and
charger.
– Battery is in non-conductive packaging.
– Battery is in a temperature range between -10°C and
+50°C.
17 Cleaning
17.1 Cleaning the Pruning Shears
► Switch off the pruning shears and disconnect the
connecting cable plug.
► Clean the pruning shears with a damp cloth or STIHL resin
solvent.
17.2 Cleaning the Cutting Blade and Anvil Blade
► Switch off the pruning shears and pull out the connecting
cable plug.
20
0458-285-9721-C
Page 23
18 Maintenance
English
► Cleaning and cutting and anvil blades with a damp cloth
and warm soapy water.
► Spray both sides of cutting and anvil blades with STIHL
Multispray.
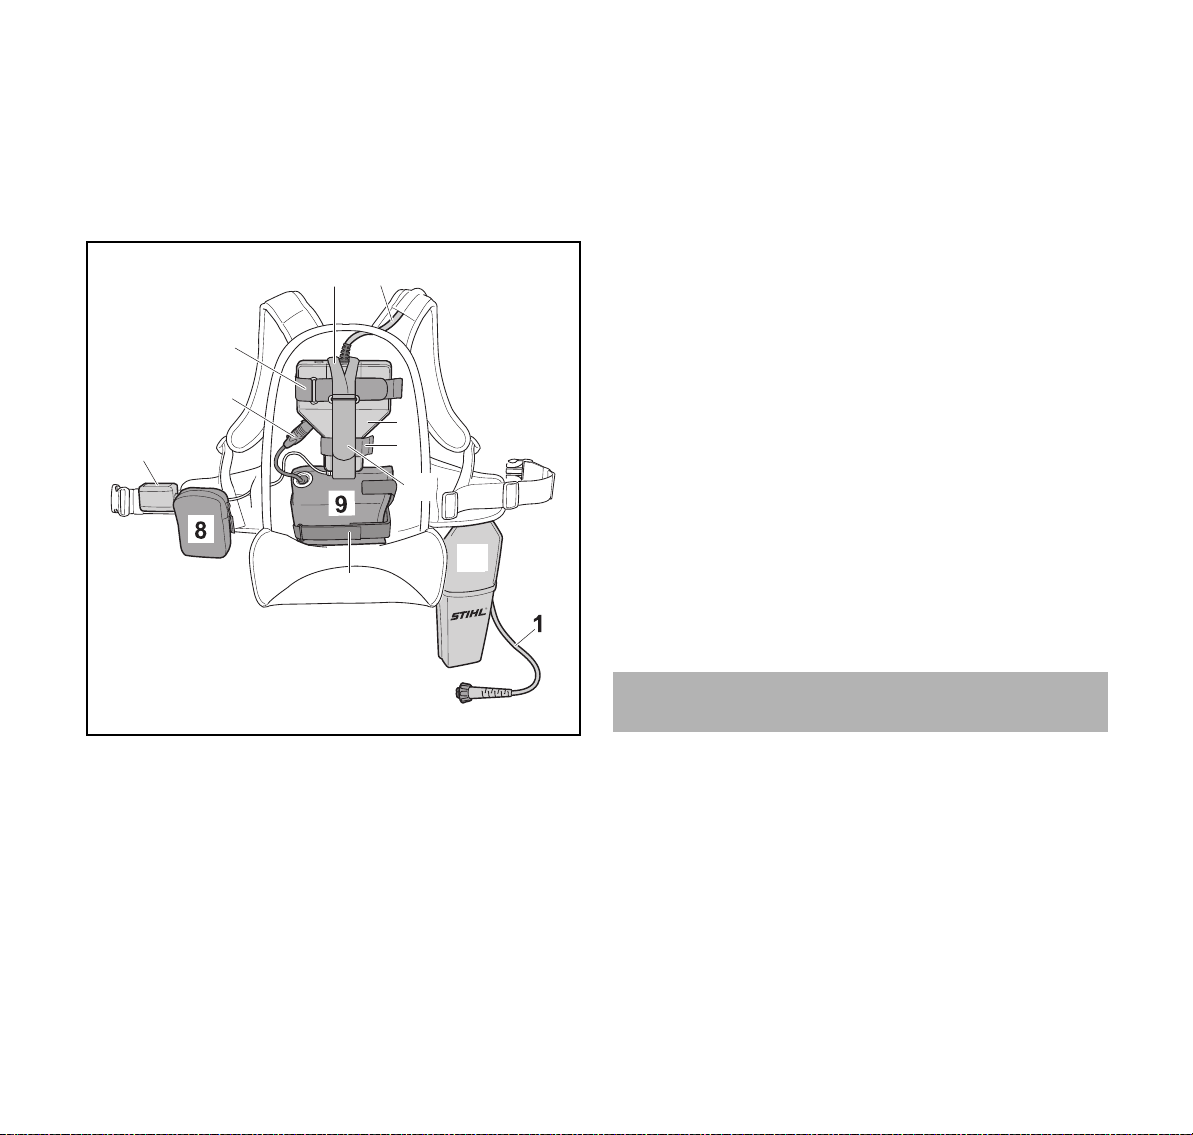
17.3 Cleaning the Carrying System
1
2
4
5
3
7
6
10
12
11
► Clean the carrying system with a damp cloth.
► If the carrying system is very dirty: Hand wash the carrying
system with a color detergent or a mild washing agent.
► Fit the battery bag (9).
► Thread the hook and loop fastener (11) through the loop
and close it.
► Thread the connecting cable (1) through the belt (2).
► Fit the control unit (3).
► Fit the connecting cable (1).
► Pass the controller (7) and cable through the carrying
system.
► Attach the controller (7) to the waist belt.
► Close the hook and loop fastener (6).
► Thread the hook and loop fastener (4) through the loop
and close it.
► Thread the hook and loop fastener (10) through the loop
and close it.
► Insert the plug (5).
► Fit the holster (12) and bag (8).
17.4 Cleaning the Battery
► Clean the battery with a damp cloth.
► Remove the holster (12) and bag (8).
► Take the controller (7) off the waist belt.
► Pass the controller (7) and cable through the carrying
system.
► Disconnect the plug (5).
► Open the hook and loop fasteners (4, 6 and 10).
► Take the connecting cable (1) out of the carrying system.
► Remove the control unit (3).
► Open the hook and loop fastener (11).
► Remove the battery bag (9).
0458-285-9721-C
18 Maintenance
0000-GXX-4488-A3
18.1 Maintenance Intervals
The maintenance intervals are dependent on the
environmental and operating conditions. STIHL
recommends the following maintenance intervals:
Every 400,000 cuts
► Have pruning shears serviced by a STIHL servicing
dealer.
Daily
► Sharpen the cutting blade.
21
Page 24
English
Every 12 months
► Have pruning shears serviced by a STIHL servicing
dealer.
18.2 Lubricating Cutting and Anvil Blades with
Grease Gun
18 Maintenance
WARNING
The blade’s cutting edge is sharp. There is a risk of cut
injuries.
► Wear work gloves made of durable material.
► Lubricate the whetstone with oil.
1
4
2
3
3
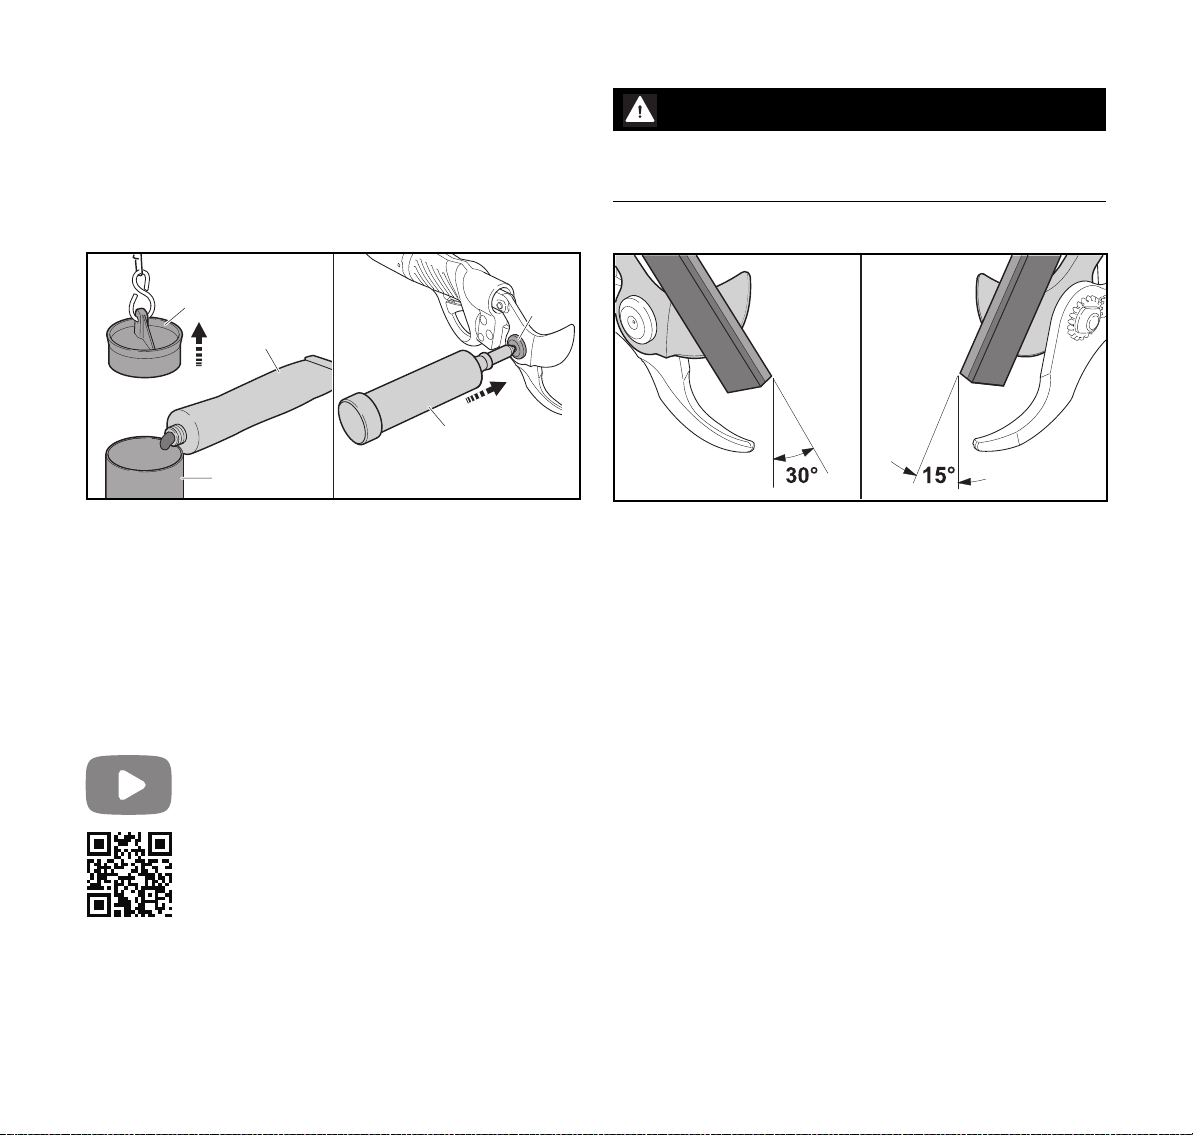
► Pull chain to remove plug (1) from grease gun (3).
► Fill grease gun (3) with STIHL multipurpose grease (2) - it
should be two thirds full.
► Press the plug (1) firmly on to the grease gun (3).
► Position grease gun (3) on grease nipple (4).
► Pump STIHL multipurpose grease through the grease
nipple (4) with one or two strokes of the grease gun (3).
18.3 Sharpening the Cutting Blade
A video is available for this chapter
www.stihl.com/sxBI5K
0000-GXX-4097-A0
► Sharpen the blade with the whetstone so that the following
points are observed:
– The red (coarse) side is used initially for grinding the
dull blade.
– The white (fine) side is used for finish grinding and
deburring the sharpened blade.
– The whetstone is applied with gentle pressure and the
sharpening strokes performed from the inside outwards.
– Sharpening angles of 30° and 15° are maintained.
► Wipe away grinding dust with a cloth.
► Spray both sides of cutting and anvil blades with STIHL
Multispray.
► If you have any queries: Contact your STIHL servicing
dealer for assistance.
0000-GXX-4098-A0
22
18.4 Adjusting Play between Cutting and Anvil
Blades
The play between the cutting blade and anvil blade must be
readjusted if the cutting blade can be moved sideways away
from the anvil blade.
0458-285-9721-C
Page 25
19 Repairing
English
3
1
2
1
4
5
► Loosen the screw (1).
► Fit setting tool (4) on adjusting nut (3).
► Tighten the adjusting nut (3) so that the cutting blade (2)
cannot be moved sideways away from the anvil blade (5)
and slips freely past the anvil blade (5) without play.
► Tighten down the screw (1) firmly.
► If you have any queries: Contact your STIHL servicing
dealer for assistance.
18.5 Adjusting Tip Contact Point of Cutting and Anvil
Blades
The contact point between the cutting blade and anvil blade
must be readjusted if the tips of the two blades no longer
touch each other.
► Pull the trigger (2) three times in quick succession and
hold it depressed on the third pull.
3 short beeps sound 4 times. The cutting blade then opens
and closes in 3 small stages of 0.8 mm at a time.
2
0000-GXX-4099-A0
► Wait until the tips of the cutting blade (1) and anvil blade
(2) are exactly on top of one another.
► Release the trigger.
The position of the cutting blade (1) is stored. The contact
point between the tips of the cutting and anvil blades is
set.
► If you have any queries: Contact your STIHL servicing
dealer for assistance.
19 Repairing
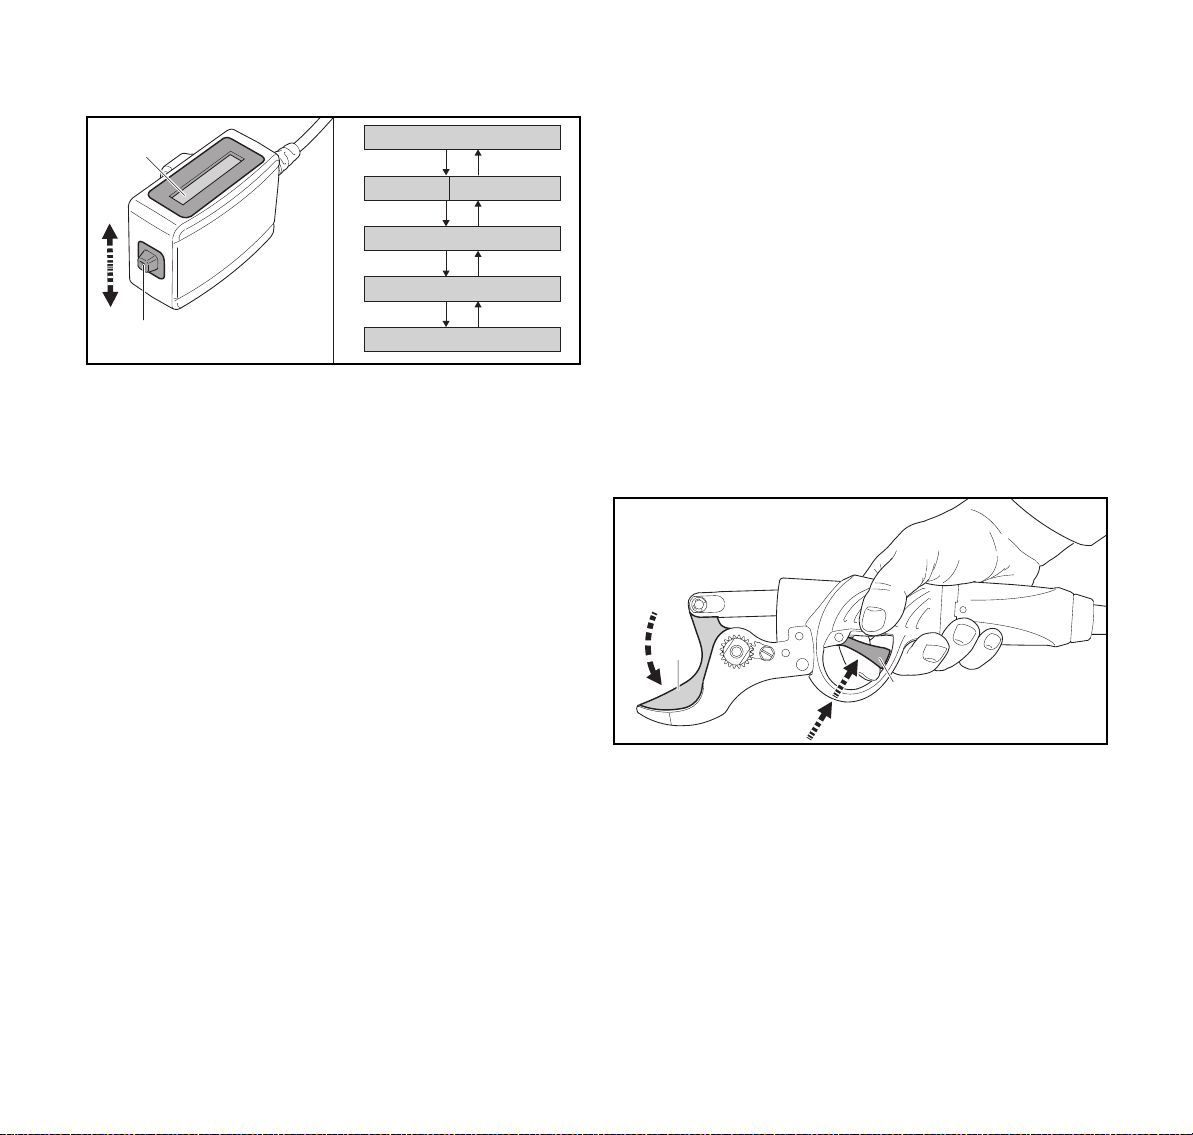
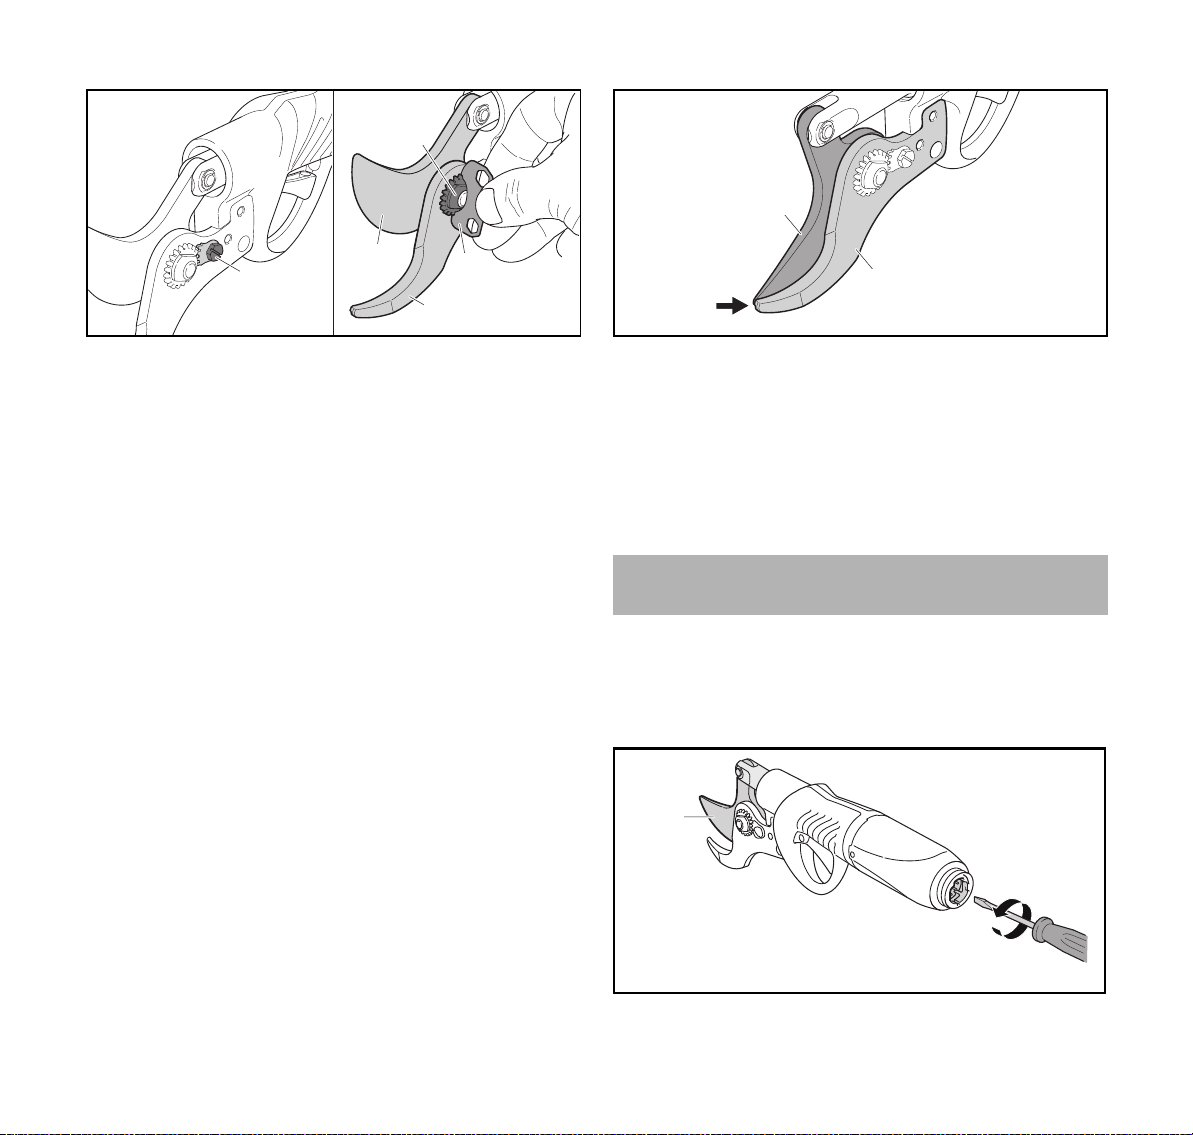
19.1 Opening and Closing the Cutting Blade Manually
► Switch off the pruning shears and pull out the connecting
cable plug.
1
0000-GXX-4100-A0
0458-285-9721-C
0000-GXX-4473-A0
23
Page 26
English
5
3
2
1
4
0000-GXX-7629-A0
► Rotate screw in the middle of the socket counterclockwise
with a flathead screwdriver.
The cutting blade (1) opens.
► Rotate screw in the middle of the socket clockwise with a
flathead screwdriver.
The cutting blade (1) closes.
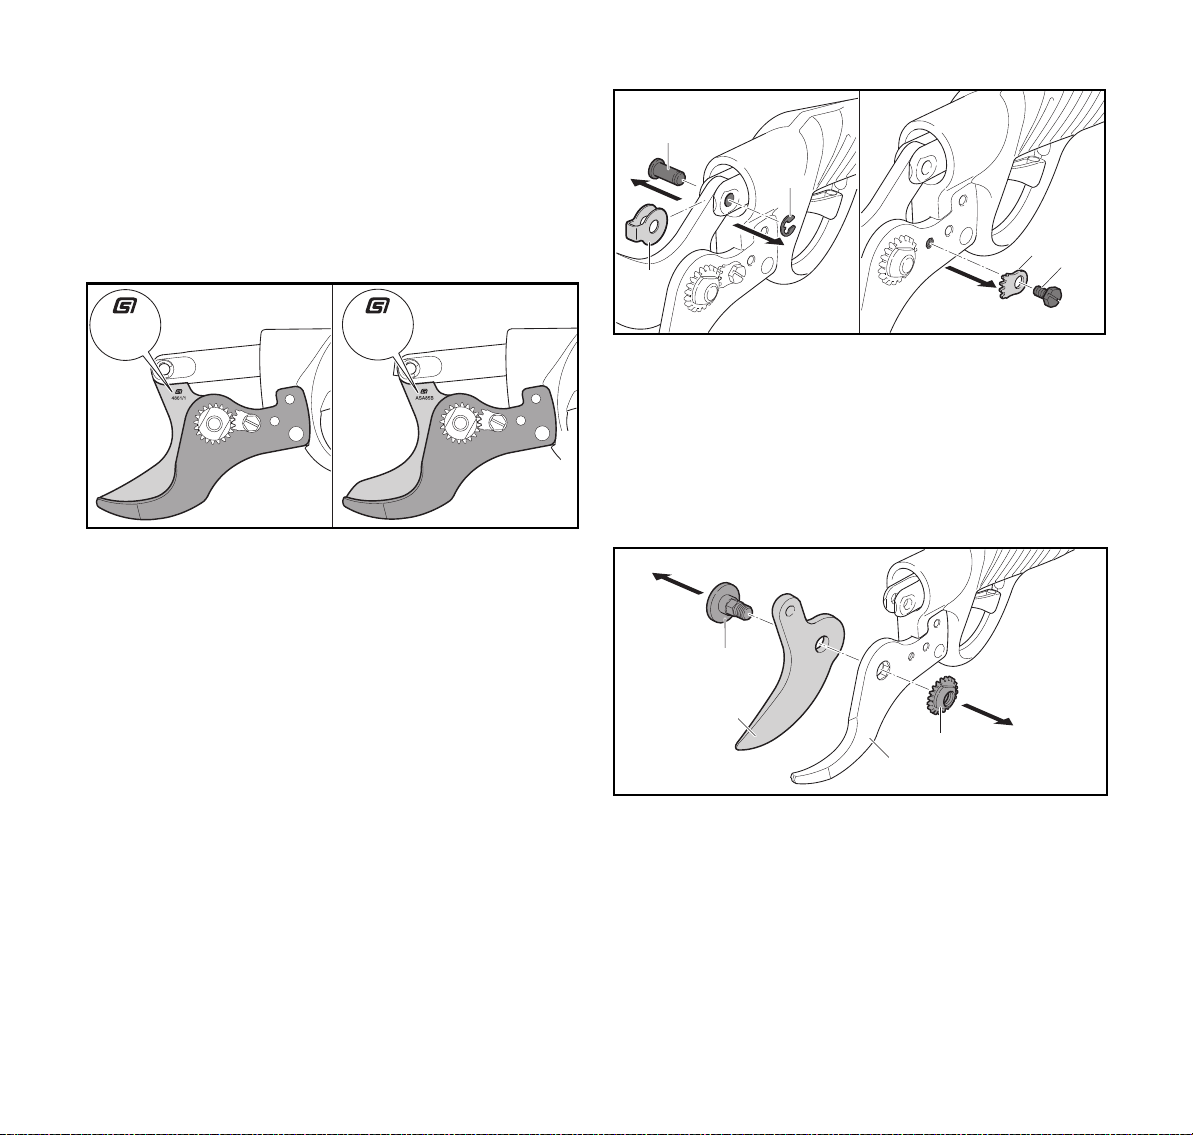
19.2 Identifying Blade Assemblies
19 Repairing
4861/1
There are two different blade assemblies for the pruning
shears:
– Blade assembly 4861/1
– Blade assembly ASA85/B
The individual blades of the two blade assemblies are not
interchangeable.
ASA85B
19.3 Replacing the Anvil Blade
► Switch off the pruning shears and pull out the connecting
cable plug.
► Remove the E-clip (3).
► Push out the pivot pin (1).
► If the pivot pin (1) is worn or damaged: Replace the pivot
pin (1).
► If an ASA85/B blade assembly is fitted: Remove the
spacer (2).
► Take out the screw (5) and remove the locking
0000-GXX-7628-A0
segment (4).
5
6
7
8
► Unscrew the adjusting nut (7).
► Remove the cutting blade (6) together with the grease
nipple (5).
► If the anvil blade (8) is smeared with grease: Clean the
anvil blade (8).
0000-GXX-4104-A1
24
0458-285-9721-C
Page 27

19 Repairing
7
5
8
6
6
8 3 4
0000-GXX-4105-A1
1
2
3
0000-GXX-7630-A0
English
9
9
8
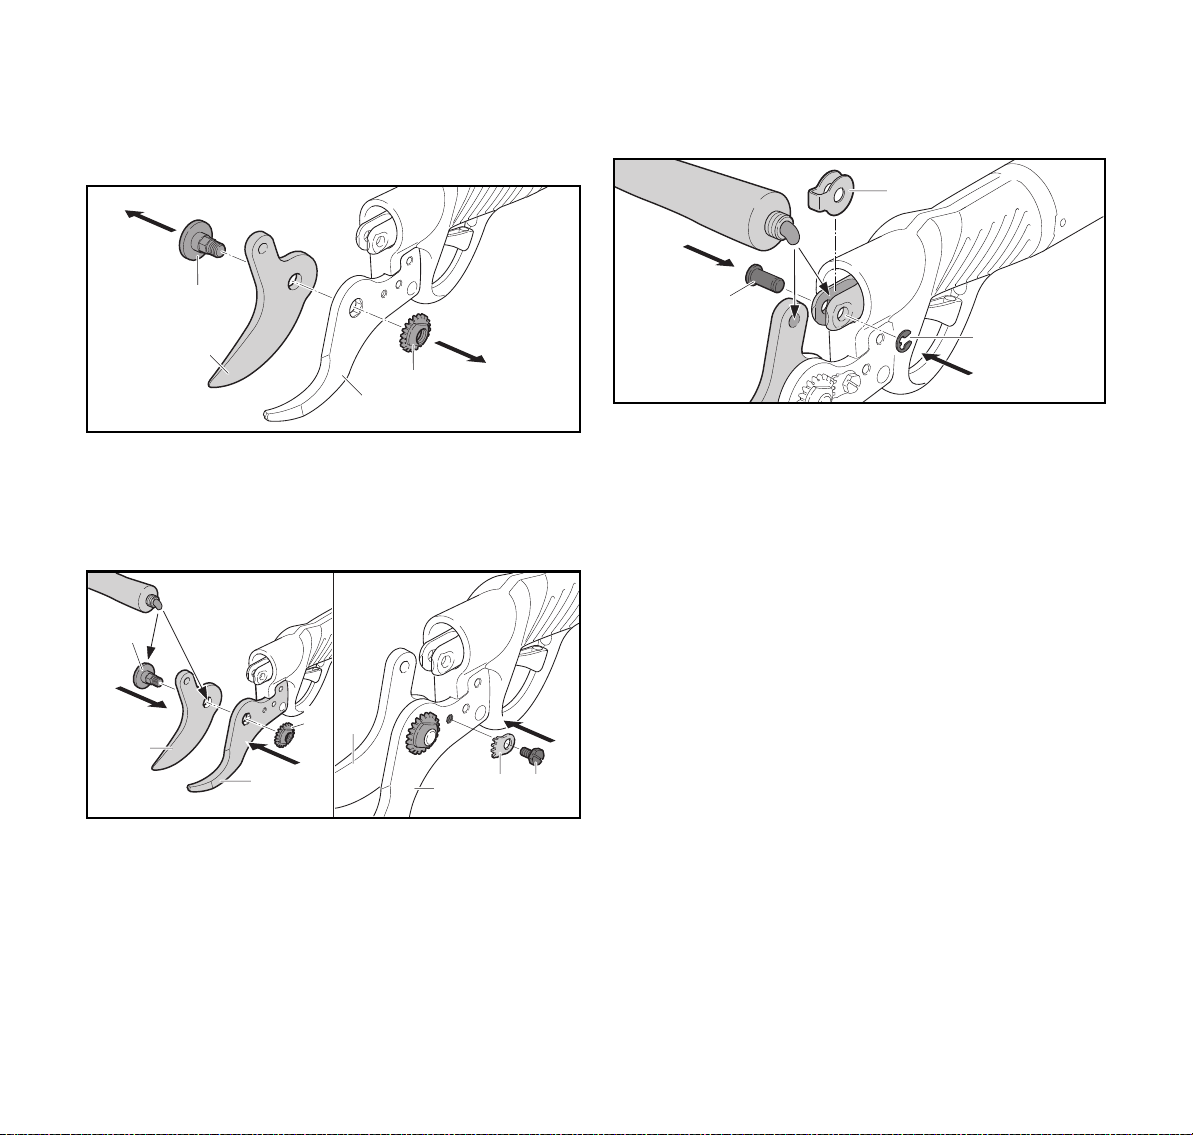
► Take out the screws (9).
► Remove and discard the anvil blade (8).
► Fit the new anvil blade (9) in position.
► Insert the screws (9) and tighten them down to a torque of
7Nm.
► Lubricate bearing point of the cutting blade (6) and the
grease nipple (5) with STIHL multipurpose grease.
► Fit grease nipple (5) in the cutting blade (6).
► Fit cutting blade (6) on the anvil blade (8).
► Fit adjusting nut (7) on thread of grease nipple (5).
► Open the cutting blade (6).
► Engage the locking segment (3) on the adjusting nut (7),
insert the screw (4) and tighten it down to a torque of 7
Nm.
0000-GXX-4083-A1
► Lubricate bores for pivot pin (1) with STIHL multipurpose
grease.
► If an ASA85/B blade assembly is fitted: Fit the spacer (2).
► Fit the pivot pin (1).
► Fit the E-clip (3).
► Lubricate cutting and anvil blades with grease gun.
► Adjust play between cutting and anvil blades.
19.4 Replacing the Cutting Blade
► Switch off the pruning shears and pull out the connecting
cable plug.
1
3
2
► Remove and discard the E-clip (3).
► Push out the pivot pin (1).
► If the pivot pin (1) is worn or damaged: Replace the pivot
pin (1).
4
5
0000-GXX-7629-A0
0458-285-9721-C
25
Page 28
English
5
6
7
8
0000-GXX-4104-A1
1
2
3
0000-GXX-7630-A0
19 Repairing
► If an ASA85/B blade assembly is fitted: Remove the
spacer (2).
► Take out the screw (5) and remove the locking
segment (4).
► Unscrew the adjusting nut (7).
► Remove the cutting blade (6) together with grease nipple
(5) and dispose of the cutting blade (6).
► If the anvil blade (8) is smeared with grease: Clean the
anvil blade (8).
5
► Engage the locking segment (3) on the adjusting nut (7),
insert the screw (4) and tighten it down to a torque of 7
Nm.
► Lubricate bores for pivot pin (1) with STIHL multipurpose
grease.
► If an ASA85/B blade assembly is fitted: Fit the spacer (2).
► Fit the pivot pin (1).
► Fit a new E-clip (3).
► Lubricate cutting and anvil blades with grease gun.
► Adjust play between cutting and anvil blades.
7
6
6
8
► Lubricate bearing point of new cutting blade (6) and the
grease nipple (5) with STIHL multipurpose grease.
► Fit grease nipple (5) in the new cutting blade (6).
► Fit new cutting blade (6) on the anvil blade (8).
► Fit adjusting nut (7) on thread of grease nipple (5).
► Open the cutting blade (6).
8 3 4
26
0000-GXX-4105-A1
0458-285-9721-C
Page 29

20 Troubleshooting
20 Troubleshooting
20.1 Troubleshooting Pruning Shears and Battery
Condition LEDs on battery or
message on
display
Pruning shears do
not operate after
switch-on or
suddenly stop
working.
1LED flashes
green.
1 LED glows red. Battery too hot or too cold. ► Remove the battery.
4 LEDs flash red There is a malfunction in
BATT KO No electrical contact
POWERLINE KO No electrical contact
TRIGGER LINE KO No electrical contact
Cause Remedy
Battery has low charge. ► Recharge the battery fully as described in the
the battery.
between battery and
control unit.
between the control unit
and motor.
between the control unit
and trigger.
No electrical contact
between the pruning
shears and battery.
Pruning shears or battery
damp.
English
instruction manual for the STIHL AL 101, 300, 500
chargers.
► Allow battery to cool down / warm up.
► Remove battery and insert it again.
► Switch on the pruning shears.
► If 4 LEDs continue to flash red: Do not use the
battery and contact your STIHL dealer for
assistance.
► Pull plug out of control unit and insert it again.
► If the display still indicates ‘BATT KO’: Do not use
the pruning shears and contact your STIHL dealer
for assistance.
► Fit the union nut of connecting cable plug on the
socket’s thread and tighten it down firmly by hand.
► If the display still indicates ‘POWERLINE KO’: Do
not use the pruning shears and contact your
STIHL dealer for assistance.
► Fit the union nut of connecting cable plug on the
socket’s thread and tighten it down firmly by hand.
► If the display still indicates ‘TRIGGER LINE KO’:
Do not use the pruning shears and contact your
STIHL dealer for assistance.
► Remove battery and insert it again.
► Pull plug out of control unit and insert it again.
► Allow the pruning shears or battery to dry.
0458-285-9721-C
27
Page 30

English
20 Troubleshooting
Condition LEDs on battery or
Cause Remedy
message on
display
Cutting performance
of pruning shears
suddenly
° C ! ° C ! ° C ! Pruning shears are too hot. ► Allow the pruning shears to dry.
► Reduce working speed or thickness of cut
deteriorates
Pruning shears
runtime is too short.
Battery not fully charged. ► Recharge the battery fully as described in the
instruction manual for the STIHL AL 101, 300, 500
chargers.
Normal battery life has
► Replace the battery.
been exceeded.
Cutting blade is dull. ► Sharpen the cutting blade.
Too much play between
► Adjust play between cutting and anvil blades.
cutting and anvil blades.
Insufficient grease
between cutting and anvil
► Lubricate cutting and anvil blades with grease
gun.
blades
Cut is not clean Cutting blade is dull. ► Sharpen the cutting blade.
Too much play between
► Adjust play between cutting and anvil blades.
cutting and anvil blades.
Cutting blade is worn or
► Replace the cutting blade.
damaged.
28
0458-285-9721-C
Page 31

21 Specifications
English
21 Specifications
21.1 STIHL ASA 85 Pruning Shears
– Approved battery: STIHL AP
– Maximum cutting blade opening: 45 mm
– Maximum stem diameter: 45 mm (depending on shrub)
– Weight without carrying system and battery: 0.98 kg
– Weight of carrying system without battery: 1.8 kg
– Length of connecting cable: 1.6 m
For battery life see www.stihl.com/battery-life.
21.2 STIHL AP battery
– Battery Technology: Lithium-ion
– Voltage: 36 V
– Capacity in Ah: see rating label
– Energy content in Wh: see rating label
– Weight in kg: see rating label
– Permissible temperature range for operation and storage:
-10°C to +50°C
21.3 Noise and Vibration Data
Noise emission according to directive 2006/42/EC and
standards ISO 3746:2010 and ISO 11202:2012.
– Sound pressure level L
ISO 4871: < 70 dB(A) K-value (uncertainty) for noise
pressure level is 2 dB(A).
measured according to
pA
The vibration values quoted above have been measured
according to a standardized test procedure and may be used
to compare electric power tools. Depending on the type of
usage, the vibrations that actually occur may differ from the
values quoted. The vibration values quoted may be used for
an initial assessment of the user's exposure to vibrations.
The actual exposure to vibrations has to be estimated. This
process may also take into account times during which the
electric power tool is switched off and times during which it
is switched on but running off load.
Information on compliance with Vibration Directive
2002/44/EC is available at www.stihl.com/vib.
21.4 REACH
REACH is an EC regulation and stands for the Registration,
Evaluation, Authorisation and Restriction of Chemical
substances.
For information on compliance with the REACH regulation
see www.stihl.com/reach.
22 Spare Parts and Accessories
22.1 Spare Parts and Accessories
These symbols identify original STIHL
replacement parts and original STIHL
accessories.
STIHL recommends the use of original STIHL replacement
parts and accessories.
Original STIHL replacement parts and original STIHL
accessories are available from STIHL servicing dealers.
– Vibration level a
– Acceleration a
according to EN 50260-1 (2005): < 2.5 m/s². K-value
(uncertainty) for vibration level is 2 m/s².
0458-285-9721-C
measured according to EN ISO 22867:
hv
, to which upper limbs are exposed,
h
23 Disposal
23.1 Disposing of Pruning Shears and Battery
Information on disposal is available from STIHL servicing
dealers.
29
Page 32

English
24 EC Declaration of Conformity
► Dispose of the pruning shears, accessories and
packaging in accordance with local regulations and
environmental requirements.
24 EC Declaration of Conformity
24.1 STIHL ASA 85 Pruning Shears
ANDREAS STIHL AG & Co. KG
Badstrasse 115
D-71336 Waiblingen
Germany
declare in exclusive responsibility that
– Category: Cordless pruning shears
–Make: STIHL
– Model: ASA 85
– Serial identification: 4861
conforms to the relevant provisions of Directives
2011/65/EU, 2006/42/EC, 2014/30/EU and 2000/14/EC and
has been developed and manufactured in compliance with
the following standards in the versions valid on the date of
production: EN 55014-1 and EN 55014-2.
Technical documents are deposited at ANDREAS STIHL AG
& Co. KG Produktzulassung (Product Licensing).
The year of manufacture, country of manufacture and serial
number are applied to the pruning shears.
Done at Waiblingen, 01.02.2017
ANDREAS STIHL AG & Co. KG
Thomas Elsner, Director Product Management and Services
24.2 CE Declaration of Incorporation
We hereby declare that the partly completed machinery
below conforms to the following requirements:
– The provisions of the machinery directive 2006/42/EC for
the essential requirements of 2006/42/EC Annex I and
with the national legislation derived from it.
– The provisions of the following European directives:
2014/30/EU, 2011/65/EU
– The provisions of the following harmonised European
standards: EN 55014-1, EN 55014-2, EN 61000-3-2,
EN 61000-3- 3
The relevant technical documentation is compiled in
accordance with 2006/42/EC Annex VII part B. We hereby
confirm to undertake to transmit, in writing, in response to a
request from the national authorities, relevant information on
the partly completed machinery.
The partly completed machinery must not be put into service
until the final machinery into which it is to be incorporated
has been declared in conformity with the relevant provisions
of the Machinery Directives.
– Description: Portable electric pruning shears without
rechargeable battery, without interface (electrical
connection for exchange of information between battery
and control unit) and without charger.
–Make: STIHL
– Model: ASA 85
– Serial number 9930XXXXX
conforms to the relevant provisions of Directives
2011/65/EU, 2006/42/EC, 2014/30/EU and 2000/14/EC and
has been developed and manufactured in compliance with
the following standards in the versions valid on the date of
production: EN 55014-1 and EN 55014-2.
Technical documents are deposited at ANDREAS STIHL AG
& Co. KG Produktzulassung (Product Licensing).
The year of manufacture, country of manufacture and serial
number are applied to the hedge trimmer.
Done at Waiblingen, 01.02.2017
30
0458-285-9721-C
Page 33

24 EC Declaration of Conformity
English
ANDREAS STIHL AG & Co. KG
Thomas Elsner, Director Product Management and Services
Person authorised to compile the technical specifications:
FELCO Deutschland GmbH, Bernd Stockburger,
Postfach 1352, D-71687 Freiberg/Neckar
Manufacturer:
FELCO Motion SA, Rue de la Rinche 3, CH-2206 Les
Geneveys-sur-Coffrane
01.02.2017
Stéphane Poggi (CEO)
Bernd Stockburger (CEO)
Christophe Nicolet (Board Member)
Christophe Winter (Head of R&D)
Authorised representative:
FELCO Deutschland GmbH, Postfach 1352,
D-71687 Freiberg/Neckar
01.02.2017
0458-285-9721-C
31
Page 34

Innehållsförteckning
svenska
1 Förord
2 Information bruksanvisningen
2.1 Kompletterande dokument
2.2 Varningar i texten
2.3 Symboler i texten
3 Översikt
3.1 Grensåg
3.2 Ryggsäck och batteri
3.3 Symboler
4 Säkerhetsanvisningar
4.1 Varningssymboler
4.2 Avsedd användning
4.3 Krav på användaren
4.4 Klädsel och utrustning
4.5 Arbetsområde och omgivning
4.6 Säker användning
4.7 Arbete
4.8 Transport
4.9 Förvaring
4.10 Rengöring, underhåll och reparation
5 Förbered sekatören
5.1 Förbered sekatören
6 Ladda batteriet och lampor
6.1 Ladda batteriet
6.2 Visa laddningsnivån
6.3 Lampor på batteriet
7 Bygg ihop sekatören
7.1 Montera hölstret och väskan
. . . . . . . . . . . . . . . . . . . . . . . . . . . . . . . . . . . . . . . . . . . . .
. . . . . . . . . . . . . . . . . . . . . .
. . . . . . . . . . . . . . . . . . . . . . . . . .
. . . . . . . . . . . . . . . . . . . . . . . . . . . . . . . . . .
. . . . . . . . . . . . . . . . . . . . . . . . . . . . . . . . . . .
. . . . . . . . . . . . . . . . . . . . . . . . . . . . . . . . . . . . . . . . . . . .
. . . . . . . . . . . . . . . . . . . . . . . . . . . . . . . . . . . . . . . . . . .
. . . . . . . . . . . . . . . . . . . . . . . . . . . . . . .
. . . . . . . . . . . . . . . . . . . . . . . . . . . . . . . . . . . . . . . . . . .
. . . . . . . . . . . . . . . . . . . . . . . . . . . . . .
. . . . . . . . . . . . . . . . . . . . . . . . . . . . . . . . . .
. . . . . . . . . . . . . . . . . . . . . . . . . . . . . . . .
. . . . . . . . . . . . . . . . . . . . . . . . . . . . . . . .
. . . . . . . . . . . . . . . . . . . . . . . . . . . . . .
. . . . . . . . . . . . . . . . . . . . . . .
. . . . . . . . . . . . . . . . . . . . . . . . . . . . . . . . . .
. . . . . . . . . . . . . . . . . . . . . . . . . . . . . . . . . . . . . . . . . . . . .
. . . . . . . . . . . . . . . . . . . . . . . . . . . . . . . . . . . . . . . . . .
. . . . . . . . . . . . . . . . . . . . . . . . . . . . . . . . . . . . . . . . . . .
. . . . . . . . . . . . . . .
. . . . . . . . . . . . . . . . . . . . . . . . . . . . . . . .
. . . . . . . . . . . . . . . . . . . . . . . . . . . . . . . .
. . . . . . . . . . . . . . . . . . . . . . . . .
. . . . . . . . . . . . . . . . . . . . . . . . . . . . . . . . . . . . .
. . . . . . . . . . . . . . . . . . . . . . . . . . . . . . . .
. . . . . . . . . . . . . . . . . . . . . . . . . . . . . . . .
. . . . . . . . . . . . . . . . . . . . . . . . . . . . . . .
. . . . . . . . . . . . . . . . . . . . . . . .
7.2 Stoppa in och dra ut anslutningskabelns kontakt
8 Ställ in sekatören
8.1 Ställ in klingans öppningsbredd
8.2 Aktivera och avaktivera standby-läget
8.3 Ställ in hur klingan stängs
. . . . . . . . . . . . . . . . . . . . . . . . . . . . . . . . . . .
. . . . . . . . . . . . . . . . . . . . .
. . . . . . . . . . . . . .
. . . . . . . . . . . . . . . . . . . . . . . . . .
. . . .
9 Ställ in sekatören för användaren
33
9.1 Ta på och av bärremmen
33
9.2 Dra anslutningskabeln
33
9.3 Dra styrenhetens kabel
34
10 Sätt in och ta ut batteriet
34
10.1 Sätt in batteriet
34
10.2 Ta ut batteriet
34
11 Starta sekatören
35
11.1 Sätt på grensågen
35
11.2 Stäng av grensågen
36
12 Kontrollera sekatören och batteriet
36
12.1 Kontrollera sekatören
36
12.2 Kontrollera batteriet
36
37
13 Arbeta med sekatören
37
13.1 Håll i och styr grensågen
38
13.2 Visa information
39
13.3 Ställ in grensågen på ”standby”-läget
40
13.4 Klippning
41
14 Efter arbetet
41
14.1 Efter arbetet
42
15 Transport
42
15.1 Transportera sekatören och ryggsäcken
42
15.2 Transportera batteriet
42
16 Förvaring
42
16.1 Förvara sekatören
42
16.2 Förvara batteriet
43
17 Rengöring
43
17.1 Rengör sekatören
43
17.2 Rengör klingan och motklingan
43
17.3 Rengör ryggsäcken
43
17.4 Rengör batteriet
44
18 Underhåll
44
. . . . . . . . . . . . . . . . . . . . . . . . . . . . . . . . . . . . . .
. . . . . . . . . . . . . . . . . . . . . . . . . . . . . . . . . . . . . . . . . .
. . . . . . . . . . . . . . . . . . . . . . . . . . . . . . . . . . . . . . .
. . . . . . . . . . . . . . . . . . . . . . . . . . . . . . . . . . . . . . .
. . . . . . . . . . . . . . . . . . . . . . . . . . . . . . . . . . . . . . . . . .
. . . . . . . . . . . . . . . . . . . . . . . . . . . . . . . . . . . . . . . . . .
. . . . . . . . . . . . . . . . . . . . . . . . . . . . . . . . . . . . . . . . . .
. . . . . . . . . . . . . . . . . . . . . . . . . . . . . . . . . . . . . . . . . .
. . . . . . . . . . . . . . . . . . . . . . . . . . . . .
. . . . . . . . . . . . . . . . . . . . . . . . . . . . .
. . . . . . . . . . . . . . . . . . . . . . . . . . . . . . . . . . . .
. . . . . . . . . . . . . . . . . . . . . . . . . . . . . . . . . . .
. . . . . . . . . . . . . . . . . . . . . . . . . . . . . . . . .
. . . . . . . . . . . . . . . . . . . . . . . . . . . . . . .
. . . . . . . . . . . . . . . . . . . . . . . . . . . . . .
. . . . . . . . . . . . . . . . . . . . . . . . . . . . . . . .
. . . . . . . . . . . . . . . . . . . . . . . . . . . . . .
. . . . . . . . . . . . . . . . . . . . . . . . . . . . . . . . . . .
. . . . . . . . . . . . . . . . . . . . . . . . . . . . . .
. . . . . . . . . . . . . . . . . . . . . . . . . . . . . . . . .
. . . . . . . . . . . . . . . . . . . . . . . . . . . . . . . . . . .
. . . . . . . . . . . . . . . . . . . . . . . . . . . . . . . . . .
. . . . . . . . . . . . . . . . . . . . . . . . . . . . . . . .
. . . . . . . . . . . . . . . . . . . . . . . . . . . . . . . . . . .
. . . . . . . . . . . . . . . . . .
. . . . . . . . . . . . . . . . . . . . . . . . . . .
. . . . . . . . . . . . . . . . . . . . . . . . . . .
. . . . . . . . . . . . . . . . .
. . . . . . . . . . . . . . . . . . . . . . . . . . .
. . . . . . . . . . . . . .
. . . . . . . . . . .
. . . . . . . . . . . . . . . . . . . .
44
44
45
45
46
46
46
46
46
47
47
47
48
48
48
48
49
50
50
50
50
50
51
51
51
51
51
51
51
52
52
52
Översättning av
originalbruksanvisningen
Tryckt på klorfritt blekt papper.
Tryckfärger innehåller vegetabiliska oljor, återvinningsbart
papper.
© ANDREAS STIHL AG & Co. KG 2018
0458-285-9721-C. VA0.L18.
0000007811_009_S
32
Denna skötselanvisning är upphovsrättsskyddad. Alla rättigheter förbehålls, i synnerhet rätten till duplicering, översättning och
bearbetning med elektroniska system.
0458-285-9721-C
Page 35

1 Förord
svenska
18.1 Underhållsintervall
18.2 Smörj klingan och motklingan med fettpistolen
18.3 Vässa klingan
18.4 Ställ in spelet mellan klingan och motklingan
18.5 Ställ in beröringspunkten mellan klingans och
motklingans spetsar
19 Reparera
19.1 Öppna och stäng klingan för hand
19.2 Särskilja klingsatser
19.3 Byt motklingan
19.4 Byt klingan
20 Felavhjälpning
20.1 Åtgärda fel på sekatören eller batteriet
21 Tekniska data
21.1 Sekatör STIHL FSA 85
21.2 Batteri STIHL AP
21.3 Buller- och vibrationsvärden
21.4 REACH
22 Reservdelar och tillbehör
22.1 Reservdelar och tillbehör
23 Kassering
23.1 Kassera sekatören och batteriet
24 EU-försäkran om överensstämmelse
24.1 Sekatör STIHL ASA 85
24.2 EG-inbyggnadsförklaring
. . . . . . . . . . . . . . . . . . . . . . . . . . . . . . . . . . . . . . . . . . .
. . . . . . . . . . . . . . . . . . . . . . . . . . . . . . . . . . . . . . . . .
. . . . . . . . . . . . . . . . . . . . . . . . . . . . . . . . . . . . . . . . . . . .
. . . . . . . . . . . . . . . . . . . . . . . . . . . . . . . . . . . . . . . . . .
. . . . . . . . . . . . . . . . . . . . . . . . . . . . . . . . .
. . . . . . . . . . . . . . . . . . . . . . . . . . . . . . . . . . . . . .
. . . . . . . . . . . . . . . . . . . . . . . . . . . . . . . .
. . . . . . . . . . . . . . . . . .
. . . . . . . . . . . . . . . . . . . . . . . . . . . . . . . .
. . . . . . . . . . . . . . . . . . . . . . . . . . . . . . . . . . . . .
. . . . . . . . . . . . . . . . . . . . . . . . . . . . . . . . . . . . .
. . . . . . . . . . . . .
. . . . . . . . . . . . . . . . . . . . . . . . . . . . . . . . . . . . . .
. . . . . . . . . . . . . . . . . . . . . . . . . . . . .
. . . . . . . . . . . . . . . . . . . . . . . . . . . . . . . . . . .
. . . . . . . . . . . . . . . . . . . . . . . .
. . . . . . . . . . . . . . . . . . . . . . . . . . .
. . . . . . . . . . . . . . . . . . . . . . . . . . .
. . . . . . . . . . . . . . . . . . . .
. . . . . . . . . . . . . . .
. . . . . . . . . . . . . . . . . . . . . . . . . . . . .
. . . . . . . . . . . . . . . . . . . . . . . . . . .
. . . . .
. . . . . . .
52
1Förord
53
53
53
Hej!
Tack för att du valt en produkt från STIHL. Vi utvecklar och
54
tillverkar produkter av mycket hög kvalitet som uppfyller våra
54
kunders behov. Därför är våra produkter mycket säkra även
när de belastas mycket.
54
54
STIHL ger även en förstklassig service. Hos våra
55
återförsäljare får du kompetent rådgivning och instruktioner
56
samt tekniska råd.
58
Vi uppskattar ditt förtroende för oss och önskar dig lycka till
58
med din STIHL-produkt.
60
60
60
60
60
Dr Nikolas Stihl
60
60
60
VIKTIGT! LÄS BRUKSANVISNINGEN INNAN DU
60
ANVÄNDER PRODUKTEN OCH SPARA DEN.
61
61
2 Information bruksanvisningen
61
0458-285-9721-C
2.1 Kompletterande dokument
Följ lokala säkerhetsföreskrifter.
► Läs följande kompletterande dokument till den här
bruksanvisningen, se till att du förstått dem och spara
dem:
– Säkerhetsföreskrifterna till STIHL AP-batteriet
– Bruksanvisningen till laddarna STIHL AL 101, 300, 500
– Säkerhetsföreskrifterna för batterier och produkter med
inbyggda batterier från STIHL: www.stihl.com/safetydata-sheets
33
Page 36

svenska
3 Översikt
2.2 Varningar i texten
FARA
Varnar för faror som leder till allvarliga skador eller dödsfall.
► Med åtgärderna kan man förhindra allvarliga skador eller
dödsfall.
VARNING
Varnar för faror som kan leda till allvarliga skador eller
dödsfall.
► Med åtgärderna kan man förhindra allvarliga skador eller
dödsfall.
OBS!
Varnar för faror som kan leda till materialskador.
► Med åtgärderna kan man förhindra materialskador.
2.3 Symboler i texten
Denna symbol hänvisar till ett kapitel i denna
bruksanvisning.
Till detta kapitel finns en video.
3Översikt
3.1 Grensåg
9930XXXXX
YYEHXXXXX
#
1
2
1 Klinga
Klingan skär grenen.
2 Motklinga
Motklingan används som uppläggning för grenen.
3 Strömbrytare
Strömbrytaren öppnar och stänger klingan.
4 Handtag
Handtaget används för att manövrera, hålla och styra
grensågen.
5Uttag
Uttaget är avsett för anslutningskabelns kontakt.
4
3
5
0000-GXX-4072-A0
34
# Maskinnummer (9930xxxxx) och identifikationsnummer
(YYEHxxxxx)
0458-285-9721-C
Page 37

3 Översikt
A
svenska
3.2 Ryggsäck och batteri
1
2
3
4
4
1312
5
6
7
14
11
1 Anslutningskabel
Anslutningskabeln förbinder sekatören med styrenheten.
2 Kontakt för styrenheten
Kontakten förbinder batteriet med styrenheten.
3 Styrenhet
Styrenheten styr sekatörens funktioner.
4 Styrenhet
Styrenheten används för att ställa in sekatören.
5 Display
Displayen visar information och fel.
6Styrspak
Styrspaken används för att navigera i styrenhetens
meny.
7 På-/avbrytare
På-/avbrytaren sätter på och stänger av sekatören.
8 Väska
Väskan används för att förvara tillbehör.
9 Batteriväska
Batteriet placeras i batteriväskan.
10 Hölster
Sekatören läggs i hölstret under transport och förvaring.
11 Anslutningskabelns kontakt
Anslutningskabelns kontakt förbinder sekatören med
anslutningskabeln.
12 Lampor
Lamporna indikerar batteriets laddning och fel.
13 Tryckknapp
Tryckknappen aktiverar lamporna på batteriet.
14 Batteri
Batteriet försörjer sekatören med ström.
# Typskylt med serienummer
0000-GXX-4073-A1
3.3 Symboler
Symbolerna kan finnas på sekatören, ryggsäcken och
batteriet och har följande innebörd:
1 lampa blinkar rött. Batteriet är för varmt eller
för kallt.
4 lampor blinkar rött. Fel på batteriet.
Garanterad ljudeffektnivå enligt direktiv
L
W
2000/14/EG i dB(A) för att jämföra buller från
produkter.
0458-285-9721-C
35
Page 38

svenska
4 Säkerhetsanvisningar
Informationen bredvid symbolen anger batteriets
energiinnehåll enligt batteritillverkarens specifikation.
Energiinnehållet som finns under användningen är
mindre.
Släng inte produkten i hushållsavfallet.
4 Säkerhetsanvisningar
4.1 Varningssymboler
Varningssymbolerna på sekatören och batteriet har följande
innebörd:
Följ säkerhetsföreskrifterna och vidta rätt
åtgärder.
Läs bruksanvisningen, se till att du har förstått
den och spara den.
Vidrör inte den rörliga klingan.
Ta ut batteriet under arbetspauser, transport,
förvaring, underhåll och reparation.
Använd inte batteriet utanför det tillåtna
temperaturområdet.
4.2 Avsedd användning
Grensågen STIHL ASA 85 används för beskärning av
vinrankor, buskar och buskage med en maximal
grendiameter på 45 mm i vinodling, fruktodling och vid
skötsel av gröna ytor.
Grensågen får inte användas när det regnar.
Denna grensåg drivs med ett uppladdningsbart batteri
STIHL AP.
VARNING
■ Uppladdningsbara batterier som inte är godkända av
STIHL för grensågen kan orsaka brand och explosion. Det
kan leda till allvarliga personskador, dödsfall eller
materialskador.
► Använd grensågen med ett uppladdningsbart batteri
STIHL AP.
■ Om grensågen eller det uppladdningsbara batteriet inte
används på avsett sätt kan det leda till allvarliga
personskador, dödsfall eller materialskador.
► Använd grensågen enligt anvisningarna i
bruksanvisningen.
► Använd batteriet enligt anvisningarna i
bruksanvisningen.
36
Skydda batteriet mot värme och eld.
Doppa inte batteriet i vätska.
4.3 Krav på användaren
VARNING
■ Användare som inte fått instruktioner om maskinen inser
inte eller kan inte förutse riskerna med sekatören och
batteriet. Användaren eller andra personer kan skadas
allvarligt eller dödas.
0458-285-9721-C
Page 39

4 Säkerhetsanvisningar
svenska
► Läs bruksanvisningen, se till att du har
förstått den och spara den.
► Om sekatören eller batteriet lämnas vidare till en annan
person ska bruksanvisningen medfölja.
► Kontrollera att användaren uppfyller följande krav:
– Användaren är utvilad.
– Användaren är skick, både fysiskt, motoriskt och
mentalt, att arbeta med och använda sekatören eller
batteriet. Om användaren är begränsad fysiskt,
motoriskt och mentalt får denne bara arbeta under
uppsikt av en ansvarig person.
– Användaren inser och kan förutse riskerna med
sekatören och batteriet.
– Användaren är myndig eller har utbildats i ett arbete i
enlighet med nationella bestämmelser under tillsyn.
– Användaren måste ha instruerats av en STIHL-
återförsäljare eller en sakkunnig person innan denne
använder sekatören för första gången.
– Användaren är inte påverkad av alkohol, läkemedel
eller droger.
► Om något är oklart: Kontakta en STIHL-återförsäljare.
4.4 Klädsel och utrustning
VARNING
■ Under arbetet kan långt hår dras in i sekatören.
Användaren kan skadas allvarligt.
► Sätt upp långt hår så att det inte kan dras in i sekatören.
■ Föremål kan slungas iväg med hög hastighet under
arbetet. Användaren kan skadas.
► Använd tätt sittande skyddsglasögon.
Skyddsglasögonen ska vara kontrollerade enligt
EN 166 eller nationella bestämmelser och vara märkta
när de säljs.
► Använd tätt sittande kläder med långa ärmar och
byxben.
■ Olämpliga kläder kan fastna i trä, buskage och i
sekatören. Du kan skadas allvarligt om olämpliga kläder
används.
► Använd tätt sittande kläder.
► Ta av halsdukar och smycken.
■ Under rengöring eller underhåll kan användaren komma i
kontakt med klingan. Användaren kan skadas.
► Använd arbetshandskar av slitstarkt material.
■ Användaren kan halka om olämpliga skor används.
Användaren kan skadas.
► Använd stabila, slutna skor med halkfria sulor.
0458-285-9721-C
4.5 Arbetsområde och omgivning
4.5.1 Arbetsområde och omgivning
VARNING
■ Utomstående personer, barn och djur kan inte uppfatta
och bedöma farorna med sekatören och föremål som
slungas iväg. Utomstående personer, barn och djur kan
skadas allvarligt och materialskador kan uppstå.
► Utomstående personer, barn och djur måste hållas på
avstånd från arbetsområdet.
► Lämna inte sekatören utan uppsikt.
37
Page 40

svenska
4 Säkerhetsanvisningar
► Se till att barn inte kan leka med sekatören.
■ Elektriska komponenter på sekatören kan orsaka gnistor.
Gnistorna kan orsaka brand eller explosion i brännbar
eller explosiv miljö. Det kan leda till allvarliga
personskador eller dödsfall och materiella skador.
► Använd inte maskinen i brandfarlig eller explosiv miljö.
4.5.2 Batteri
VARNING
■ Utomstående personer, barn och djur känner inte till
farorna med batteriet. Utomstående personer, barn och
djur kan skadas allvarligt.
► Utomstående personer, barn och djur måste hållas på
avstånd.
► Lämna inte batteriet utan uppsikt.
► Se till att barn inte kan leka med batteriet.
■ Batteriet är inte skyddat mot all påverkan från
omgivningen. Batteriet kan börja brinna eller explodera
om det utsätts för viss påverkan från omgivningen. Det
kan leda till allvarliga personskador och materialskador.
► Skydda batteriet mot värme och eld.
► Släng inte batteriet i eld.
► Använd och förvara batteriet mellan -10 °C
och +50 °C.
► Doppa inte batteriet i vätska.
4.6 Säker användning
4.6.1 Sekatör Sekatören är säker att använda när följande uppfylls:
– Sekatören är oskadad.
– Sekatören är ren.
– Manöverdonen fungerar och är oförändrade.
– Klingan och motklingan är korrekt monterade.
– Endast originaltillbehör från STIHL för denna sekatör är
monterade.
– Tillbehören är korrekt monterade.
VARNING
■ Om sekatören inte är säker att använda fungerar vissa
komponenter och säkerhetsanordningar inte längre
korrekt. Personer kan skadas svårt eller dödas.
► Använd inte sekatören om den är skadad.
► Om sekatören är smutsig: Rengör sekatören.
► Förändra inte sekatören.
► Om manöverdonen inte fungerar: Använd inte
sekatören.
► Montera klingan och motklingan korrekt.
► Montera endast originaltillbehör från STIHL för denna
sekatör.
► Montera tillbehören enligt anvisningarna i den här
bruksanvisningen eller bruksanvisningen till tillbehöret.
► Stick inte in föremål i hålen på sekatören.
► Om något är oklart: Kontakta en STIHL-återförsäljare.
► Låt inte batteriet komma i kontakt med metallföremål.
► Utsätt inte batteriet för högt tryck.
► Utsätt inte batteriet för mikrovågor.
► Skydda batteriet mot kemikalier och salt.
38
4.6.2 Klinga och motklinga Klingan och motklingan är säkra att använda när följande
uppfylls:
– Klingan och motklingan är oskadade.
– Klingan och motklingan är inte deformerade.
0458-285-9721-C
Page 41

4 Säkerhetsanvisningar
svenska
– Klingan och motklingan går lätt.
– Spelet mellan klingan och motklingan är korrekt inställt.
– Kontaktpunkten mellan klingan och motklingan är korrekt
inställd.
– Klingan är korrekt vässad.
– Klingan har inte skägg.
VARNING
■ I ett osäkert tillstånd kan delar av klingan eller motklingan
lossna och slungas iväg. Personer kan skadas allvarligt.
► Använd inte klingan och motklingan om de är skadade.
► Ställ in spelet mellan klingan och motklingan korrekt.
► Ställ in kontaktpunkten mellan klingan och motklingan
korrekt.
► Vässa och avgrada klingan korrekt.
► Om något är oklart: Kontakta en STIHL-återförsäljare.
4.6.3 Batteri Batteriet är säkert att använda när följande uppfylls:
– Batteriet är oskadat.
– Batteriet är rent och torrt.
– Batteriet fungerar och har inte modifierats.
VARNING
■ Om batteriet inte är säkert att använda fungerar det inte
längre korrekt. Personer kan skadas allvarligt.
► Arbeta bara med ett oskadat och fungerande batteri.
► Ladda inte trasiga eller skadade batterier.
► Om batteriet är smutsigt eller blött: Rengör batteriet och
låt det torka.
► Gör inga ändringar på batteriet.
► Stick inte in föremål i hålen på batteriet.
► Låt inte de elektriska kontakterna på batteriet komma i
kontakt med metallföremål eftersom det kan leda till
kortslutning.
► Öppna inte batteriet.
■ Det kan komma ut vätska ur ett trasigt batteri. Om vätskan
kommer i kontakt med huden eller ögonen kan de bli
irriterade.
► Undvik kontakt med vätskan.
► Om du fått vätska på huden: Tvätta de berörda ställena
med mycket vatten och tvål.
► Om du fått vätska i ögonen: Skölj ögonen med mycket
vatten i minst 15 minuter och kontakta en läkare.
■ Ett trasigt eller defekt batteri kan lukta konstigt, ryka eller
brinna. Det kan leda till allvarliga personskador, dödsfall
eller materialskador.
► Om batteriet luktar konstigt eller ryker: Använd inte
batteriet och håll det borta från brännbart material.
► Om batteriet brinner: Försök att släcka branden med en
brandsläckare eller vatten.
4.7 Arbete
VARNING
■ I vissa situationer kan det vara svårt att koncentrera sig.
Det kan leda till att man snubblar, ramlar och skadas
allvarligt.
► Arbeta lugnt och med eftertanke.
► Om ljusförhållandena och sikten är dåliga: Arbeta inte
med sekatören.
► Använd sekatören ensam.
► Arbeta inte över axelhöjd.
► Var uppmärksam på hinder.
► Stå på marken och ha god balans när du arbetar. Om du
måste arbeta uppe i luften: Använd en lyftplattform eller
en säker ställning.
► Om du börjar bli trött: Ta en paus i arbetet.
0458-285-9721-C
39
Page 42

svenska
4 Säkerhetsanvisningar
■ Om klingan träffar ett hårt föremål kan den skadas.
► Undersök om det finns hårda föremål i arbetsområdet
och ta bort dem innan arbetet påbörjas.
► Klipp inte i metalltrådar.
■ Klingan som är i rörelse kan skada användaren svårt.
► Den lediga handen måste hållas minst
40 cm borta från klingan.
► Rör inte vid klingan.
■ Om sekatören förändras under arbetet eller beter sig
konstigt kan det vara fel på den. Det kan leda till allvarliga
personskador och materialskador kan uppstå.
► Avsluta arbetet, ta ut batteriet och kontakta en STIHL-
återförsäljare.
■ Sekatören kan vibrera under arbetet.
► Använd handskar.
► Ta paus i arbetet.
► Om du får problem med blodcirkulationen: Uppsök en
läkare.
■ I en farlig situation kan användaren få panik och kan
eventuellt inte ta av sig ryggsäcken. Användaren kan
skadas allvarligt.
► Öva på att ta av dig ryggsäcken.
FARA
■ Om man arbetar i närheten av strömförande ledningar kan
klingan komma i kontakt med dem och skada dessa.
Användaren kan skadas allvarligt eller dödas.
► Arbeta inte i närheten av strömförande ledningar.
4.8 Transport
4.8.1 Transportera sekatören
VARNING
■ Om sekatören är på under transporten kan klingan
plötsligt stängas. Det kan leda till allvarliga personskador
och materialskador kan uppstå.
► Ställ på-/avbrytaren i läget ”OFF”.
► Stick in sekatören i hölstret.
■ Sekatören kan välta eller röra sig under transporten. Det
kan leda till personskador eller materialskador.
► Ta ut batteriet.
► Stick in sekatören i hölstret.
► Använd remmar, band eller ett nät för att se till att
sekatören och ryggsäcken inte kan välta eller röra sig.
4.8.2 Batteri
VARNING
■ Batteriet är inte skyddat mot påverkan från omgivningen.
Batteriet kan skadas om det utsätts för viss påverkan från
omgivningen.
► Transportera inte batteriet om det är trasigt.
► Transportera batteriet i en förpackning som inte leder
elektricitet.
■ Batteriet kan välta eller röra sig under transporten. Det
kan leda till personskador eller materialskador.
► Se till att batteriet inte kan röra sig i förpackningen.
► Se till att förpackningen inte kan välta eller röra sig.
40
0458-285-9721-C
Page 43

4 Säkerhetsanvisningar
svenska
4.9 Förvaring
4.9.1 Förvara sekatören
VARNING
■ Barn känner inte till farorna med sekatören. Barn kan
skadas allvarligt.
► Ställ på-/avbrytaren i läget "OFF".
► Dra ut anslutningskabelns kontakt ur uttaget och ta ut
batteriet
► Stoppa in sekatören i hölstret.
► Förvara sekatören utom räckhåll för barn.
■ De elektriska kontakterna på sekatören och
metallkomponenter kan korrodera på grund av fukt.
Sekatören kan skadas.
► Ta ut batteriet.
► Förvara sekatören på en ren och torr plats.
4.9.2 Batteri
VARNING
■ Barn känner inte till farorna med batteriet. Barn kan
skadas allvarligt.
► Förvara batteriet utom räckhåll för barn.
■ Batteriet är inte skyddat mot all påverkan från
omgivningen. Batteriet kan skadas om det utsätts för viss
påverkan från omgivningen.
► Förvara batteriet på en ren och torr plats.
► Förvara batteriet i ett stängt rum.
► Förvara inte batteriet tillsammans med sekatören.
► Förvara batteriet i en förpackning som inte leder
elektricitet.
► Förvara batteriet mellan -10 °C och +50 °C.
4.10 Rengöring, underhåll och reparation
VARNING
■ Om sekatören går under rengöring, underhåll eller
reparation kan klingan plötsligt stängas. Det kan leda till
allvarliga personskador och materialskador kan uppstå.
► Stäng klingan.
► Ställ på-/avbrytaren i läget ”OFF”.
► Dra ut anslutningskabelns kontakt ur uttaget.
► Ta ut batteriet.
■ Aggressiva rengöringsmedel, rengöring med en
vattenstråle eller vassa föremål kan skada sekatören,
klingan eller motklingan. Om sekatören, klingan eller
motklingan inte rengörs ordentligt slutar eventuellt
komponenterna och säkerhetsanordningarna att fungera.
Personer kan skadas allvarligt.
► Rengör sekatören, klingan och motklingan enligt
anvisningarna i den här bruksanvisningen.
■ Om sekatören, klingan eller motklingan inte underhålls
eller repareras ordentligt slutar eventuellt komponenterna
och säkerhetsanordningarna att fungera. Personer kan
skadas allvarligt eller förolyckas.
► Underhåll och reparera sekatören, klingan och
motklingan enligt anvisningarna i den här
bruksanvisningen.
■ Vid rengöring, underhåll eller reparation av klingan eller
motklingan kan man skära sig på den vassa klingan.
Användaren kan skadas.
► Använd arbetshandskar av slitstarkt material.
0458-285-9721-C
41
Page 44

svenska
1
0000-GXX-1248-A0
20-40%
40-60%
60-80%
80-100%
0-20%
5 Förbered sekatören
5 Förbered sekatören
5.1 Förbered sekatören
Varje gång innan maskinen används måste följande göras:
► Kontrollera att följande komponenter är säkra att använda:
– Sekatör, @ 4.6.1.
– Klinga och motklinga, @ 4.6.2.
– Batteri, @ 4.6.3.
► Kontrollera batteriet, @ 12.2.
► Ladda batteriet helt enligt anvisningarna i
bruksanvisningen Laddare STIHL AL 101, 300, 500.
► Rengör sekatören, @ 17.1.
► Montera hölstret och väskan, @ 7.1.
► Smörj klingan och motklingan med fettsprutan, @ 18.2.
► Om de här stegen inte kan utföras: Använd inte sekatören
och kontakta en STIHL-återförsäljare.
På en ny sekatör, klinga eller motklinga måste följande steg
genomföras efter 30 min arbete:
► Ställ in spelet mellan klingan och motklingan.
► Vässa klingan.
6.2 Visa laddningsnivån
Visa laddningsnivån på batteriet
► Tryck på knappen (1).
Lamporna lyser grönt i ca 5 sekunder och visar
laddningsnivån.
► Om höger lampa blinkar grönt: Ladda batteriet.
Visa laddningsnivån på styrenhetens display
► Starta sekatören.
BATT:
I I I I I I
6 Ladda batteriet och lampor
6.1 Ladda batteriet
Laddningstiden beror på olika saker som batteriets
temperatur eller omgivningstemperaturen. Den verkliga
laddningstiden kan avvika från den angivna laddningstiden.
Laddtiden finns på www.stihl.com/charging-times .
► Ladda batteriet enligt anvisningarna i bruksanvisningen till
laddaren STIHL AL 101, 300, 500.
42
0000-GXX-4088-A0
Efter några sekunder visar displayen batteriets
laddningsnivå. Varje stapel motsvarar 10 % av laddningen.
6.3 Lampor på batteriet
Lamporna indikerar batteriets laddning och fel. Lamporna
kan lysa eller blinka rött eller grönt.
Om lamporna lyser eller blinkar grönt indikeras batterinivån.
► Om lamporna lyser eller blinkar rött: Åtgärda felen, @ 20.
Fel på batteriet.
0458-285-9721-C
Page 45

7 Bygg ihop sekatören
1
2
4
5
3
0000-GXX-4077-A1
1
2
3
0000-GXX-4082-A0
2
1
1/2
50%
ON
1/2
60%
ON
1/2
70%
ON
1/2 OFF
0000-GXX-4074-A0
svenska
7 Bygg ihop sekatören
7.1 Montera hölstret och väskan
Hölstret och väskan kan monteras på höger eller vänster
sida av midjeremmen. Hölstret måste monteras på samma
sida som man håller sekatören i handen.
► Trä hölstrets (4) flik (1) genom öglan (3) på insidan av
midjeremmen.
► Stäng tryckknapparna (2).
► Fäst väskan (5) på andra sidan av midjeremmen.
► Skruva kopplingsmuttern (3) på uttagets (1) gänga för
hand och dra åt den.
7.2.2 Dra ut anslutningskabelns kontakt ► Skruva loss kopplingsmuttern.
► Fatta tag i anslutningskabelns kontakt.
► Dra ut anslutningskabelns kontakt ur uttaget.
8 Ställ in sekatören
8.1 Ställ in klingans öppningsbredd
Beroende på användningen kan klingans öppningsbredd
ställas in.
Följande öppningsbredder kan ställas in:
– 50 % (ON)
– 60 % (ON)
– 70 % (ON)
– ingen begränsning (OFF)
► Starta sekatören.
7.2 Stoppa in och dra ut anslutningskabelns kontakt
7.2.1 Stoppa in anslutningskabelns kontakt
► Stoppa in anslutningskabelns kontakt (2) i uttaget (1).
0458-285-9721-C
► Tryck styrspaken (2) nedåt flera gånger tills displayen (1)
visar den inställda öppningsbredden.
► Tryck på styrspaken (2) flera gånger tills den önskade
öppningsbredden visas.
43
Page 46

svenska
8.2 Aktivera och avaktivera standby-läget
Om standby-läget är aktiverat kan klingan stängas varaktigt
även om sekatören är på. Standby-läget kan avaktiveras.
► Starta sekatören.
9 Ställ in sekatören för användaren
1
REG ON
1
CLICK-CLICK ON
CLICK-CLICK OFF
2
► Tryck styrspaken (2) nedåt flera gånger tills displayen (1)
visar "CLICK-CLICK ON" eller "CLICK-CLICK OFF".
Om displayen (1) visar "CLICK-CLICK ON", så är standbyläget aktiverat.
Om displayen (1) visar "CLICK-CLICK OFF", så är standbyläget avaktiverat.
► Tryck på styrspaken (2) flera gånger tills standby-läget är
aktiverat eller avaktiverat
8.3 Ställ in hur klingan stängs
När sekatören är påslagen stängs klingan proportionellt mot
strömbrytarens rörelse.
Klingan kan ställas in så att den alltid stängs helt när man
trycker på strömbrytaren.
► Starta sekatören.
REG OFF
2
► Tryck styrspaken (2) nedåt flera gånger tills displayen (1)
visar "REG ON" eller "REG OFF".
Om displayen visar (1) "REG ON", så stängs klingan
proportionellt mot strömbrytarens rörelse.
0000-GXX-4075-A0
Om displayen (1) visar "REG OFF", så stängs klingan alltid
helt när man trycker på strömbrytaren.
► Tryck på styrspaken (2) flera gånger tills den önskade
funktionen har ställts in.
Om sekatören stängs av och sedan slås på igen, så stängs
klingan återigen proportionellt mot strömbrytarens rörelse.
9 Ställ in sekatören för användaren
9.1 Ta på och av bärremmen
9.1.1 Ta på och ställa in ryggsäcken ► Ta på ryggsäcken på ryggen.
0000-GXX-4076-A0
44
0458-285-9721-C
Page 47

9 Ställ in sekatören för användaren
2
1
0000-GXX-4078-A1
0000-GXX-2815-A1
3
3
3
0000-GXX-4333-A1
1
2
4
1 2
4
3
0000-GXX-4081-A0
svenska
► Stäng spännet (2) på midjeremmen.
► Stäng spännet (1) på bröstremmen.
► Spänn remmarna tills midjeremmen ligger mot höften och
ryggkudden ligger mot ryggen.
► Trä änden på midjeremmen genom öglan (3).
9.1.2 Ta av ryggsäcken ► Lossa remmarna.
► Öppna spännet på bröstremmen och midjeremmen.
► Ta av ryggsäcken från ryggen.
9.2 Dra anslutningskabeln
Anslutningskabeln kan dras till höger eller till vänster.
Anslutningskabeln måste dras på samma sida som man
håller sekatören i handen.
► För ut anslutningskabeln (1) ur ryggsäcken genom en av
öppningarna (3).
► För anslutningskabeln (1) genom den högra (2) eller den
vänstra öglan (4).
► Dra anslutningskabeln (1) så att den är så kort som möjligt
och att den inte hindrar arbetet.
9.3 Dra styrenhetens kabel
► För ut styrenheten (1) och kabeln (3) ur ryggsäcken
genom vänster eller höger öppning (4).
► Fäst styrenheten (1) på midjeremmen (2).
0458-285-9721-C
45
Page 48

svenska
10 Sätt in och ta ut batteriet
10 Sätt in och ta ut batteriet
10.1 Sätt in batteriet
3
4
► Öppna dragkedjan på ryggsäcken.
► Tryck in batteriet (1) så långt det går i batteriväskan (2).
► Stäng kardborrebandet (3).
Batteriet (1) kan inte röra sig.
► Trä kardborrebandet (4) genom öglan och stäng det.
Sätt fast batteriväskan (2) på ryggsäcken.
► Stäng dragkedjan på ryggsäcken.
10.2 Ta ut batteriet
► Placera ryggsäcken på en plan yta.
► Öppna dragkedjan på ryggsäcken.
► Öppna kardborrebandet (1) och dra ut ur öglan.
► Öppna kardborrebandet (2).
► Ta ut batteriet (3).
11 Starta sekatören
11.1 Sätt på grensågen
► Håll grensågen med en hand i handtaget så att tummen
ligger runt handtaget.
1
0000-GXX-4084-A1
► För strömbrytaren (3) till läget "ON”.
1 lång signalton och 3 korta signaltoner ljuder. Grensågen
är redo att användas.
► Tryck på strömbrytaren (2).
Klingan (1) öppnar sig helt.
2
3
0000-GXX-4086-A0
46
BATT:
I I I I I I
2
0000-GXX-4088-A0
Displayen visar antalet klipp som kan göras till nästa
3
1
rekommenderade service.
Efter några sekunder visar displayen laddningsstatusen av
det uppladdningsbara batteriet. Varje stapel som visas
motsvarar cirka 10 % av det uppladdningsbara batteriets
kapacitet.
0000-GXX-4085-A1
0458-285-9721-C
Page 49

12 Kontrollera sekatören och batteriet
svenska
Om den påslagna grensågen inte används i mer än 10
minuter, stängs grensågen av automatiskt. 5 korta
signaltoner ljuder i 20 sekunder.
► Ställ strömbrytaren (3) till läge ”OFF” och sedan till läge
”ON” igen.
Grensågen är redo att användas igen.
11.2 Stäng av grensågen
2
1
► Tryck på strömbrytaren (2) och håll kvar.
Klingan (1) stänger sig.
OBS!
Om strömbrytaren ställs till läge ”OFF” innan klingan stängs,
kan grensågen skadas.
► Vänta tills klingan är stängd.
3
– Kontroll av elanslutningen mellan styrenheten och
elmotorn
– Kontroll av elanslutningen mellan styrenheten och
strömbrytaren
– Kontroll av styrenheten
► Starta sekatören.
1
XXXXXX Vx.xx
TESTING
2
0000-GXX-4087-A0
► Tryck styrspaken (2) nedåt flera gånger tills displayen (1)
visar "XXXXXX Vx.xx".
► Tryck på styrspaken (2) och håll kvar tills displayen (1)
visar "TESTING" .
Det hörs flera signaler i snabb följd och sekatören
kontrolleras automatiskt.
När styrspaken (2) trycks åt något håll avslutas kontrollen.
Kontroll av elanslutningen mellan batteriet och styrenheten
0000-GXX-4089-A0
► Ställ strömbrytaren (3) till läget "OFF”.
► Stick in grensågen i hölstret.
12 Kontrollera sekatören och batteriet
12.1 Kontrollera sekatören
Följande kontroller genomförs efter varandra:
– Kontroll av elanslutningen mellan batteriet och
styrenheten
0458-285-9721-C
BATT OK
BATT KO
0000-GXX-4090-A0
Om displayen visar "BATT OK", så finns elanslutningen
mellan batteriet och styrenheten.
► Om displayen visar "BATT KO" : Åtgärda felet @ 20.
47
Page 50

svenska
POWERLINE
POWERLINEOKKO
0000-GXX-4091-A0
13 Arbeta med sekatören
Kontroll av elanslutningen mellan styrenheten och elmotorn
Om displayen visar "POWERLINE OK", så finns
elanslutningen mellan styrenheten och elmotorn.
► Om displayen visar "POWERLINE KO" : Åtgärda felet
@ 20.
Kontroll av elanslutningen mellan styrenheten och
strömbrytaren
TRIGGER LINE
TRIGGER LINE
Om displayen visar "TRIGGER LINE OK", så finns
elanslutningen mellan styrenheten och strömbrytaren.
► Om displayen visar "TRIGGER LINE KO" : Åtgärda felet
@ 20.
Kontroll av styrenheten
OK
KO
12.2 Kontrollera batteriet
► Tryck på tryckknappen på batteriet.
Om lamporna lyser eller blinkar.
► Om lamporna inte lyser eller blinkar: Använd inte batteriet
och uppsök en STIHL-återförsäljare.
Fel på batteriet.
13 Arbeta med sekatören
13.1 Håll i och styr grensågen
0000-GXX-4092-A0
0000-GXX-4094-A0
► Håll grensågen med en hand i handtaget så att tummen
ligger runt handtaget.
► Håll den lediga handen borta från klingan.
MAIN DRIVE
MAIN DRIVEOKKO
Om displayen visar "MAIN DRIVE OK", så fungerar
styrenheten.
► Om displayen visar "MAIN DRIVE KO" : Åtgärda felet
@ 20.
48
13.2 Visa information
Följande information kan visas:
– Antalet klipp som kan göras till nästa rekommenderade
service
0000-GXX-4093-A0
– Batterinivå
– Antalet klipp och användningstiden i timmar och minuter
– Antalet klipp med låg, medelhög och hög ansträngning
– Blockeringar av klingan
Informationen som visas gäller tidpunkten då räknaren
senast återställdes.
0458-285-9721-C
Page 51

13 Arbeta med sekatören
svenska
► Starta sekatören.
XX xxxxxx
1
2
► Tryck styrspaken (2) nedåt eller uppåt flera gånger tills
displayen (1) visar den information som behövs.
Informationen (A, C, D och E) kan återställas.
► Om en information ska återställas: Tryck på styrspaken
(2) i 2 sekunder.
Den visade informationen återställs.
Antalet klipp som kan göras till nästa rekommenderade
service (A)
Displayen (1) visar antalet klipp som kan göras till nästa
rekommenderade service.
Efter några sekunder visar displayen batterinivån, (B).
► Om antalet klipp är 0: Tryck på styrspaken (2).
Displayen (1) visar batterinivån, (B).
Batterinivå (B)
Displayen (1) visar batterinivån. Varje stapel motsvarar
10 % av laddningen.
Antalet klipp och användningstiden i timmar och minuter (C)
Displayen (1) visar antalet klipp och användningstiden i
timmar och minuter.
A
B
BATT:
C
# 123456 23h 45m
42%S
D
E
I I I I I I
37%M
xx XXL
21%L
Antalet klipp med låg, medelstor och hög ansträngning (D)
Displayen (1) visar antalet klipp med låg, medelhög och hög
ansträngning.
Styrenheten klassificerar varje klipp enligt följande:
– S = Antalet klipp med låg ansträngning
– M = Antalet klipp med medelhög ansträngning
– L = Antalet klipp med hög ansträngning
Blockeringar av klingan (E)
Displayen (1) visar antalet blockeringar av klingan.
0000-GXX-4331-A0
13.3 Ställ in grensågen på ”standby”-läget
Grensågen kan för korta arbetsavbrott ställas på ”standby”läget.
1
2
► Tryck 2 gånger snabbt på strömbrytaren (2) och håll kvar
när du trycker den andra gången.
3 korta signaltoner ljuder. Klingan (1) stängs och förblir
stängd.
► Släpp strömbrytaren (2).
Grensågen är i ”standby”-läge.
Om strömbrytaren (2) trycks igen, öppnas klingan (1) och
grensågen är redo att användas.
0000-GXX-4102-A0
0458-285-9721-C
49
Page 52

svenska
0000-GXX-4095-A0
14 Efter arbetet
13.4 Klippning
1
2
► Lägg motklingan (2) nedifrån på grenen.
VARNING
Klingan som är i rörelse kan svårt skada användaren.
► Den lediga handen måste hållas minst 40 cm borta från
klingan.
► Rör inte vid klingan.
► Tryck på strömbrytaren (3).
Klingan (1) stängs och grenen kapas.
Klingan kan blockeras under arbetet.
3
OBS!
Om klingan är blockerad och grensågen stängs av, kan
grensågen skadas.
► Stäng inte av grensågen.
► Hyvla inte med grensågen åt sidan eller nedåt.
► Om klingan är blockerad: För grensågen uppåt och dra ut
den ur snittet.
Klingan (1) öppnar sig.
0000-GXX-4101-A0
14 Efter arbetet
14.1 Efter arbetet
► Stäng av sekatören, dra ut anslutningskabelns kontakt
och ta ut batteriet.
► Om sekatören är våt: Låt sekatören torka.
► Om batteriet är vått: Låt batteriet torka.
► Rengör sekatören.
► Rengör klingan och motklingan.
► Rengör batteriet.
50
15 Transport
15.1 Transportera sekatören och ryggsäcken
► Stäng av sekatören och dra ut anslutningskabelns
kontakt.
► Stick in sekatören i hölstret.
0458-285-9721-C
Page 53

16 Förvaring
► Bär ryggsäcken på ryggen eller i handtaget.
► Om sekatören transporteras i ett fordon:
► Ta ut batteriet.
► Lägg sekatören i väskan.
► Säkra väskan så att den inte kan välta eller röra sig.
15.2 Transportera batteriet
► Stäng av sekatören, dra ut anslutningskabelns kontakt
och ta ut batteriet.
► Kontrollera att batteriet är i ett säkert skick.
► Förpacka batteriet enligt följande:
– Förpackningen leder inte elektricitet.
– Batteriet kan inte röra sig i förpackningen.
► Se till att förpackningen inte kan välta eller röra sig.
Batteriet måste transporteras som farligt gods. Batteriet är
klassat som UN 3480 (litiumjonbatterier) och har
kontrollerats enligt UN-handboken del III, avsnitt 38.3.
Transportföreskrifterna finns på www.stihl.com/safety-datasheets .
16 Förvaring
► Förvara sekatören och ryggsäcken på ett rent och torrt
sätt i väskan.
► Förvara väskan utom räckhåll för barn.
16.2 Förvara batteriet
STIHL rekommenderar att batteriet förvaras laddat mellan
40 % och 60 % (2 lampor lyser grönt).
► Förvara batteriet enligt följande:
– Förvara batteriet utom räckhåll för barn.
0000-GXX-4096-A1
– Batteriet är rent och torrt.
– Förvara batteriet i ett stängt rum.
– Förvara inte batteriet tillsammans med sekatören och
laddaren.
– Förvara batteriet i en förpackning som inte leder
elektricitet.
– Förvara batteriet mellan - 10 °C och + 50 °C.
17 Rengöring
17.1 Rengör sekatören
► Stäng av sekatören och dra ut anslutningskabelns
kontakt.
► Rengör sekatören med en fuktig trasa eller STIHL-
hartslösningsmedel.
17.2 Rengör klingan och motklingan
► Stäng av sekatören och dra ut anslutningskabelns
kontakt.
► Rengör klingan och motklingan med en fuktig trasa och
varmt såpvatten.
► Spreja klingan och motklingan med STIHL multispray på
båda sidorna.
svenska
16.1 Förvara sekatören
► Stäng av sekatören, dra ut anslutningskabelns kontakt
och ta ut batteriet.
0458-285-9721-C
51
Page 54

svenska
18 Underhåll
17.3 Rengör ryggsäcken
1
2
4
5
3
7
6
10
12
11
► Demontera hölstret (12) och väskan (8).
► Lossa styrenheten (7) på midjeremmen.
► För in styrenheten (7) och kabeln i ryggsäcken.
► Dra ut kontakten (5).
► Öppna kardborrebandet (4, 6 och 10).
► Trä anslutningskabeln (1) ur ryggsäcken.
► Ta ut styrenheten (3).
► Öppna kardborrebandet (11).
► Ta ut batteriväskan (9).
► Rengör ryggsäcken med en fuktig trasa.
► Om ryggsäcken är mycket smutsig ska den rengöras för
hand med ett tvättmedel för färgade textilier eller ett
fintvättmedel.
► Sätt in batteriväskan (9).
► Trä kardborrebandet (11) genom öglan och stäng det.
► Trä anslutningskabeln (1) genom remmen (2).
► Sätt in styrenheten (3).
► Dra anslutningskabeln (1).
► För ut styrenheten (7) och kabeln ur ryggsäcken.
► Fäst styrenheten (7) på midjeremmen.
► Stäng kardborrebandet (6).
► Trä kardborrebandet (4) genom öglan och stäng det.
► Trä kardborrebandet (10) genom öglan och stäng det.
► Sätt i kontakten (5).
► Montera hölstret (12) och väskan (8).
17.4 Rengör batteriet
► Rengör batteriet med en fuktig trasa.
18 Underhåll
18.1 Underhållsintervall
Underhållsintervallen beror på omgivningsförhållandena
0000-GXX-4488-A3
och arbetsförhållandena. STIHL rekommenderar följande
underhållsintervall:
Var 400000:e snitt
► Låt en STIHL-återförsäljare underhålla sekatören.
Dagligen
► Vässa klingan.
En gång om året
► Låt en STIHL-återförsäljare underhålla sekatören.
52
0458-285-9721-C
Page 55

18 Underhåll
1
2
3
3
4
0000-GXX-4097-A0
18.2 Smörj klingan och motklingan med fettpistolen
► Dra ut fettpistolens (3) pluggar (1) på kedjan.
► Fyll fettpistolen (3) till 2/3 med STIHL universalfett (2).
► Tryck fast pluggarna (1) på fettpistolen (3).
► Sätt fettpistolen (3) på smörjnippeln (4).
► Tryck på fettpistolen (3) och tryck STIHL universalfett med
1 till 2 slag genom smörjnippeln (4).
18.3 Vässa klingan
Till detta kapitel finns en video.
svenska
0000-GXX-4098-A0
► Slipa klingan med slipstenen enligt följande villkor:
– Den röda (grova) sidan ska användas för grundslipning
av den slöa klingan.
– Den vita (fina) sidan ska användas för finslipning och för
avgradning av den vässade klingan.
– Slipstenen ska föras inifrån och ut med ett lätt tryck.
– Slipvinkeln ska vara 30° och 15°.
► Ta bort slipdamm med en trasa.
► Spraya klingan och motklingan på båda sidor med STIHL
multispray.
► Om något är oklart: Kontakta en STIHL-återförsäljare.
www.stihl.com/sxBI5K
VARNING
Klingans skärande kant är vass. Användaren kan skära sig.
► Använd arbetshandskar av slitstarkt material.
► Smörj slipstenen med olja.
0458-285-9721-C
18.4 Ställ in spelet mellan klingan och motklingan
Om klingan kan skjutas åt sidan mot motklingan, måste
spelet mellan klingan och motklingan ställas in.
3
2
1
4
5
► Lossa skruven (1).
0000-GXX-4099-A0
53
Page 56

svenska
ASA85B
4861/1
0000-GXX-7628-A0
19 Reparera
► Placera inställningsverktyget (4) på justermuttern (3).
► Dra åt justermuttern (3) så att klingan (2) inte längre kan
skjutas åt sidan mot motklingan (5) och klingan (2) glider
enkelt förbi motklingan (5) utan spel.
► Dra åt skruven (1).
► Om något är oklart: Kontakta en STIHL-återförsäljare.
18.5 Ställ in beröringspunkten mellan klingans och
motklingans spetsar
Om klingans och motklingans spetsar inte längre rör sig,
måste beröringspunkten mellan klingan och motklingan
ställas in.
► Tryck 3 gånger snabbt på strömbrytaren och håll kvar när
du trycker den tredje gången.
3 korta signaltoner ljuder 4 gånger efter varandra. Sedan
öppnas och stängs klingan i 3 små 0,8 mm-steg.
1
19 Reparera
19.1 Öppna och stäng klingan för hand
► Stäng av grensågen och dra ut anslutningskabelns
kontakt.
1
0000-GXX-4473-A0
► Skruva skruven i mitten av hylsan med en platt
skruvmejsel moturs.
Klingan (1) öppnar sig.
► Skruva skruven i mitten av hylsan med en platt
skruvmejsel medurs.
Klingan (1) stänger sig.
2
► Vänta tills spetsarna på klingan (1) och motklingan (2) är
exakt över varandra.
► Släpp strömbrytaren.
Klingans (1) position har sparats. Beröringspunkten
mellan klingans och motklingans spetsar är inställd.
► Om något är oklart: Kontakta en STIHL-återförsäljare.
54
19.2 Särskilja klingsatser
0000-GXX-4100-A0
Det finns två olika klingsatser för sekatören:
– Klingsats 4861/1
0458-285-9721-C
Page 57

19 Reparera
8
9
9
0000-GXX-4083-A1
svenska
– Klingsats ASA85/B
En enskild klinga från en klingsats kan inte bytas mot en
klinga från den andra klingsatsen.
19.3 Byt motklingan
► Stäng av sekatören och dra ut anslutningskabelns
kontakt.
1
3
4
5
2
► Demontera låsringen (3).
► Tryck ut axeln (1).
► Om axeln (1) är sliten eller skadad: Byt axeln (1).
► Om klingsatsen ASA85/B är monterad: Ta av
distansdelen (2).
► Skruva ur skruven (5) och ta av kuggsegmentet (4).
5
6
7
8
► Skruva av justermuttern (7).
► Ta av klingan (6) med smörjnippeln (5).
► Om det finns fett på motklingan (8): Rengör
motklingan (8).
► Skruva ur skruvarna (9).
► Ta av motklingan (8) och kassera den.
► Sätt in den nya motklingan (9).
► Skruva in skruvarna (9) och dra åt med 7 Nm
åtdragningsmoment.
0000-GXX-7629-A0
5
7
6
6
8
► Smörj klingans (6) lagerplats och smörjnippeln (5) med
STIHL universalfett.
► Sätt in smörjnippeln (5) i klingans (6) lagerplats.
► Sätt in klingan (6) i den nya motklingan (8).
► Vrid justermuttern (7) på smörjnippelns (5) gänga.
► Öppna klingan (6).
0000-GXX-4104-A1
► Lägg kuggsegmentet (3) i justermuttern (7) och skruva i
skruven (4) och dra åt.
8 3 4
0000-GXX-4105-A1
0458-285-9721-C
55
Page 58

svenska
1
2
3
0000-GXX-7630-A0
7
5
8
6
6
8 3 4
0000-GXX-4105-A1
► Smörj fästet för axeln (1) med STIHL universalfett.
► Om klingsatsen ASA85/B är monterad: Sätt in
distansdelen (2).
► Sätt in axeln (1).
► Montera låsringen (3).
► Smörj klingan och motklingan med fettsprutan.
► Ställ in spelet mellan klingan och motklingan.
19.4 Byt klingan
► Stäng av sekatören och dra ut anslutningskabelns
kontakt.
19 Reparera
► Skruva ur skruven (5) och ta av kuggsegmentet (4).
5
6
7
8
► Skruva av justermuttern (7).
► Ta av klingan (6) med smörjnippeln (5) och kassera
klingan (6).
► Om det finns fett på motklingan (8): Rengör
motklingan (8).
0000-GXX-4104-A1
1
3
2
► Demontera säkringsringen (3) och kassera den.
► Tryck ut axeln (1).
► Om axeln (1) är sliten eller skadad: Byt axeln (1).
► Om klingsatsen ASA85/B är monterad: Ta av
distansdelen (2).
56
4
5
► Smörj den nya klingans (6) lagerplats och
smörjnippeln (5) med STIHL universalfett.
► Sätt in smörjnippeln (5) i den nya klingans (6) lagerplats.
► Sätt in den nya klingan (6) i motklingan (8).
0000-GXX-7629-A0
► Vrid justermuttern (7) på smörjnippelns (5) gänga.
► Öppna klingan (6).
► Lägg kuggsegmentet (3) i justermuttern (7) och skruva in
skruven (4) och dra åt med ett åtdragningsmoment på
7Nm.
0458-285-9721-C
Page 59

19 Reparera
1
2
3
0000-GXX-7630-A0
► Smörj fästet för axeln (1) med STIHL universalfett.
► Om klingsatsen ASA85/B är monterad: Sätt in
distansdelen (2).
► Sätt in axeln (1).
► Montera den nya låsringen (3).
► Smörj klingan och motklingan med fettsprutan.
► Ställ in spelet mellan klingan och motklingan.
svenska
0458-285-9721-C
57
Page 60

svenska
20 Felavhjälpning
20.1 Åtgärda fel på sekatören eller batteriet
Fel LED-lampor på
batteriet eller
indikering på
displayen
Sekatören startar
inte eller slutar
fungera under drift.
1 LED-lampa
blinkar grönt.
1 LED-lampa lyser
rött.
4 LED-lampor
blinkar rött.
BATT KO Avbrott i elanslutningen
POWERLINE KO Avbrott i elanslutningen
TRIGGERLINE KO Avbrott i elanslutningen
Orsak Åtgärd
Batteriet är inte tillräckligt
laddat.
Batteriet är för varmt eller
för kallt.
Fel på batteriet. ► Ta ut batteriet och sätt i det igen.
mellan batteriet och
styrenheten.
mellan styrenheten och
elmotorn.
mellan styrenheten och
strömbrytaren.
Avbrott i elanslutningen
mellan sekatören och
batteriet.
20 Felavhjälpning
► Ladda batteriet enligt anvisningarna i
bruksanvisningen till laddaren STIHL AL 101,
300, 500.
► Ta ut batteriet.
► Låt batteriet svalna eller värmas upp.
► Starta sekatören.
► Om de 4 LED-lamporna fortfarande blinkar rött:
Använd inte batteriet och kontakta en STIHL-
återförsäljare.
► Dra av kontakten på styrenheten och sätt i den
igen.
► Om det fortfarande står ”BATT KO” i displayen:
Använd inte sekatören och kontakta en STIHL-
återförsäljare.
► Skruva kopplingsmuttern till anslutningskabelns
kontakt för hand på uttagets gänga och dra åt
den.
► Om det fortfarande står ”POWERLINE KO” i
displayen: Använd inte sekatören och kontakta en
STIHL-återförsäljare.
► Skruva kopplingsmuttern till anslutningskabelns
kontakt för hand på uttagets gänga och dra åt
den.
► Om det fortfarande står ”TRIGGERLINE KO” i
displayen: Använd inte sekatören och kontakta en
STIHL-återförsäljare.
► Ta ut batteriet och sätt i det igen.
► Dra av kontakten på styrenheten och sätt i den
igen.
58
0458-285-9721-C
Page 61

20 Felavhjälpning
svenska
Fel LED-lampor på
Orsak Åtgärd
batteriet eller
indikering på
displayen
Fukt i sekatören eller
► Låt sekatören eller batteriet torka.
batteriet.
Sekatörens
klippeffekt avtar
plötsligt.
Sekatörens drifttid är
för kort.
° C ! ° C ! ° C ! Sekatören är överhettad. ► Låt sekatören svalna.
► Sänk arbetshastigheten eller minska
klippdiametern.
Batteriet är inte helt laddat. ► Ladda batteriet helt enligt anvisningarna i
bruksanvisningen till laddaren STIHL AL 101,
300, 500.
Batteriets livslängd är slut. ► Byt batteriet.
Klingan är slö. ► Vässa klingan.
Spelet mellan klingan och
► Ställ in spelet mellan klingan och motklingan.
motklingan är för litet.
För lite fett mellan klingan
► Smörj klingan och motklingan med fettsprutan.
och motklingan.
Snittbilden är oren. Klingan är slö. ► Vässa klingan.
Spelet mellan klingan och
► Ställ in spelet mellan klingan och motklingan.
motklingan är för stort.
Klingan är sliten eller
► Byt klingan.
skadad.
0458-285-9721-C
59
Page 62

svenska
21 Tekniska data
21 Tekniska data
21.1 Sekatör STIHL FSA 85
– Godkänt batteri:: STIHL AP
– Klingans maximala öppningslängd: 45 mm
– Maximal snittjocklek: 45 mm (beroende på träslag)
– Vikt utan bärsystem och uppladdningsbart batteri: 0,98 kg
– Bärsystemets vikt utan uppladdningsbart batteri: 1,8 kg
– Anslutningskabelns längd: 1,6 m
Körtiden är angiven under www.stihl.com/battery-life.
21.2 Batteri STIHL AP
– Batteriteknik: litiumjon
– Spänning: 36 V
– Kapacitet i Ah: se typskylten
– Energiinnehåll i Wh: se typskylten
– Vikt i kg: se typskylten
– Tillåtet temperaturområde för användning och förvaring: -
10 °C till + 50 °C
De angivna vibrationsvärdena har mätts med en
standardiserad kontrollmetod och kan användas som
referens för elektrisk utrustning. De verkliga
vibrationsvärdena kan avvika från de angivna värdena
beroende på typen av användning. De angivna
vibrationsvärdena kan användas för att preliminärt
uppskatta vibrationsbelastningen. Den verkliga
vibrationsbelastningen måste uppskattas. Här kan man
även ta hänsyn till tiderna som den elektriska utrustningen
är avstängd och när den varit på men gått utan belastning.
Information om uppfyllandet av arbetsgivardirektivet
vibration 2002/44/EG är angivna på www.stihl.com/vib.
21.4 REACH
REACH är en EG-förordning för registrering, bedömning och
godkännande av kemikalier.
Information om REACH-direktivet finns på
www.stihl.com/reach .
22 Reservdelar och tillbehör
22.1 Reservdelar och tillbehör
De här symbolerna kännetecknar STIHLoriginaldelar och STIHL-originaltillbehör.
21.3 Buller- och vibrationsvärden
Bulleremission enligt direktiv 2006/42/EG, enligt
ISO 3746:2010 och ISO 11202:2012.
– Bullernivå L
ljudtrycksnivån är 2 dB(A).
– Vibrationsvärde ahv enligt EN ISO 22867:
– acceleration a
enligt EN 50260-1 (2005): < 2,5 m/s². K-faktorn för
vibrationsvärdet är 2 m/s².
60
enligt ISO 4871: < 70 dB(A). K-faktorn för
pA
, som de övre extremiteterna utsätts för,
h
STIHL rekommenderar att du använder originaldelar och
tillbehör från STIHL.
Originaldelar och tillbehör från STIHL kan köpas hos en
STIHL-återförsäljare.
23 Kassering
23.1 Kassera sekatören och batteriet
Information om återvinning kan fås av en STIHLåterförsäljare.
0458-285-9721-C
Page 63

24 EU-försäkran om överensstämmelse
svenska
► Kassera sekatören, batteriet, tillbehören och emballaget
enligt gällande miljöbestämmelser.
24 EU-försäkran om överensstämmelse
24.1 Sekatör STIHL ASA 85
ANDREAS STIHL AG & Co. KG
Badstraße 115
D-71336 Waiblingen
Tyskland
intygar på eget ansvar att
– konstruktionstypen: Batteridriven sekatör
– fabrikat: STIHL
– typ: ASA 85
– serieidentifiering: 4861
uppfyller bestämmelserna i direktiv 2011/65/EU,
2006/42/EG, 2014/30/EU samt 2000/14/EG och har
utvecklats och tillverkats i överensstämmelse med de
versioner av följande standarder som gällde vid
produktionsdatumet: EN 55014-1 och EN 55014-2.
Den tekniska dokumentationen förvaras hos avdelningen för
produktgodkännande hos ANDREAS STIHL AG & Co. KG.
Tillverkningsår, tillverkningsland samt serienummer anges
på sekatören.
Waiblingen, 2017-02-01
ANDREAS STIHL AG & Co. KG
enligt fullmakt
Thomas ElsnerChef för produkthantering och tjänster
24.2 EG-inbyggnadsförklaring
Härmed förklarar vi att nedan angivna ofullständiga maskin
uppfyller följande bestämmelser:
– bestämmelserna i maskindirektivet 2006/42/EG avseende
grundläggande krav i bilaga I av maskindirektivet
2006/42/EG samt nationella lagar i samband med detta.
– Bestämmelserna i följande EU-direktiv: 2014/30/EU,
2011/65/EU
– Bestämmelserna i följande harmoniserande standarder:
EN 55014-1, EN 55014- 2, EN 61000-3-2, EN 61000-3-3
Den tekniska dokumentationen har sammanställts enligt
2006/42/EG bilaga VII, del B. Vi förpliktigar oss att
överlämna den skriftliga dokumentationen om den
ofullständiga maskinen till ansvarig myndighet på begäran.
Den ofullständiga maskinen får inte användas tills man
fastställt att den slutgiltiga maskinen som den ska installeras
i, uppfyller kraven i det gällande maskindirektivet.
– Beskrivning: Bärbar elektrisk sekatör utan batteri, utan
gränssnitt (elanslutning för överföring av information
mellan batteriet och styrenheten) och utan laddare
– Fabrikat: STIHL
– Typ: ASA 85
– Serienummer: 9930XXXXX
motsvarar bestämmelserna i direktiv 2011/65/EU,
2006/42/EG, 2014/30/EU samt 2000/14/EG och har
utvecklats och tillverkats i överensstämmelse med de
versioner av följande standarder som gällde vid
produktionsdatumet: EN 55014-1 och EN 55014-2.
Den tekniska dokumentationen förvaras hos avdelningen för
produktgodkännande hos ANDREAS STIHL AG & Co. KG.
Tillverkningsår, tillverkningsland samt maskinnummer
anges på grensågen.
Waiblingen, 2017-02-01
ANDREAS STIHL AG & Co. KG
0458-285-9721-C
61
Page 64

svenska
24 EU-försäkran om överensstämmelse
enligt fullmakt
Thomas ElsnerChef för produkthantering och tjänster
Namnet på den som ansvarar för sammanställningen av de
tekniska specifikationerna:
FELCO Deutschland GmbH, Bernd Stockburger, Box 1352,
D-71687 Freiberg/Neckar
Tillverkare:
FELCO Motion SA, Rue de la Rinche 3, CH-2206 Les
Geneveys-sur-Coffrane
2017-02-01
Stéphane Poggi (VD)
Bernd Stockburger (VD)
Christophe Nicolet (styrelseledamot)
Christophe Winter (chef, forskning och utveckling)
Med fullmakt:
FELCO Deutschland GmbH, Box 1352,
D-71687 Freiberg/Neckar
2017-02-01
62
0458-285-9721-C
Page 65

Sisällysluettelo
suomi
1 Alkusanat
2 Tietoja tästä käyttöohjeesta
2.1 Voimassa olevat julkaisut
. . . . . . . . . . . . . . . . . . . . . . . . . . . . . . . . . . . . . . . . . .
. . . . . . . . . . . . . . . . . . . . . . . .
. . . . . . . . . . . . . . . . . . . . . . . . . . .
2.2 Tekstin sisältämien varoitusten merkitseminen
2.3 Tekstissä käytetyt symbolit
3 Yleiskuva
3.1 Oksasakset
. . . . . . . . . . . . . . . . . . . . . . . . . . . . . . . . . . . . . . . . . .
. . . . . . . . . . . . . . . . . . . . . . . . . . . . . . . . . . . . . . . .
3.2 Akku ja kantojärjestelmä
Alkuperäisen käyttöohjeen
käännös
3.3 Symbolit
. . . . . . . . . . . . . . . . . . . . . . . . . . . . . . . . . . . . . . . . . . .
4 Turvallisuusohjeet
4.1 Varoitusmerkit
4.2 Käyttötarkoitus
. . . . . . . . . . . . . . . . . . . . . . . . . . . . . . . . . .
. . . . . . . . . . . . . . . . . . . . . . . . . . . . . . . . . . . . . .
. . . . . . . . . . . . . . . . . . . . . . . . . . . . . . . . . . . . .
. . . . . . . . . . . . . . . . . . . . . . . . .
. . . . . . . . . . . . . . . . . . . . . . . . . . .
4.3 Käyttäjälle asetettavat vaatimukset
4.4 Vaatetus ja varustus
4.5 Työskentelyalue ja ympäristö
4.6 Turvallinen toimintakunto
4.7 Työskentely
. . . . . . . . . . . . . . . . . . . . . . . . . . . . . . . . . . . . . . . .
4.8 Kuljettaminen
4.9 Säilytys
. . . . . . . . . . . . . . . . . . . . . . . . . . . . . . . . . . . . . . . . . . . .
. . . . . . . . . . . . . . . . . . . . . . . . . . . . . . .
. . . . . . . . . . . . . . . . . . . . . . .
. . . . . . . . . . . . . . . . . . . . . . . . . . .
. . . . . . . . . . . . . . . . . . . . . . . . . . . . . . . . . . . . . .
4.10 Puhdistaminen, huoltaminen ja korjaaminen
5 Oksasaksien käytön valmistelut
5.1 Oksasaksien käytön valmistelut
6 Akun lataaminen ja LED-valot
Painettu kloorittomalle paperille.
Painovärit sisältävät kasviöljyjä, paperi on kierrätyskelpoista.
6.1 Akun lataaminen
. . . . . . . . . . . . . . . . . . . . . . . . . . . . . . . . . . .
6.2 Lataustilan tarkastaminen
6.3 Akun LED-valot
. . . . . . . . . . . . . . . . . . . . . . . . . . . . . . . . . . . .
7 Oksasaksien kokoaminen
7.1 Kiinnitä kantokotelo ja laukku
. . . . . . . . . . . . . . . . . . . .
. . . . . . . . . . . . . . . . . . . .
. . . . . . . . . . . . . . . . . . . . . .
. . . . . . . . . . . . . . . . . . . . . . . . . .
. . . . . . . . . . . . . . . . . . . . . . . . . .
. . . . . . . . . . . . . . . . . . . . . . .
7.2 Liitäntäjohdon pistokkeen kytkeminen ja
irrottaminen
8 Oksasaksien säätäminen
. . . . . . . . . . . . . . . . . . . . . . . . . . . . . . . . . . . . . . . .
. . . . . . . . . . . . . . . . . . . . . . . . . . .
8.1 Terän avautumisleveyden säätäminen
8.2 Valmiustilan käynnistys ja sammutus
. . . . .
. . . . . . . . . . . . . . . . .
. . . . . . . .
. . . . . . . . . . . . . .
. . . . . . . . . . . . . . .
8.3 Terän sulkeutumisen säätäminen
64
9 Oksasaksien säätäminen käyttäjälle
64
9.1 Kantohihnan kiinnittäminen ja riisuminen
64
9.2 Sijoita liitoskaapeli paikalleen
65
9.3 Siirrä ohjauslaitteen johtoa
65
10 Akun asentaminen ja irrottaminen
65
10.1 Akun sijoittaminen laitteeseen
65
10.2 Akun poistaminen
66
11 Käynnistä oksasakset
66
11.1 Käynnistä oksasakset
67
11.2 Sammuta oksasakset
67
12 Oksasaksien ja akun tarkastus
67
12.1 Tarkasta oksasakset
68
12.2 Akun tarkastus
68
68
13 Oksasaksilla työskentely
69
13.1 Oksasaksiin tarttuminen ja niiden ohjaaminen
71
13.2 Tietojen näyttäminen
71
13.3 Kytke oksasakset valmiustilaan
72
13.4 Leikkaaminen
72
14 Työskentelyn jälkeen
73
14.1 Työskentelyn jälkeen
73
15 Kuljettaminen
73
15.1 Oksasaksien ja kantojärjestelmän kuljettaminen
73
15.2 Akun kuljettaminen
73
16 Säilytys
74
16.1 Oksasaksien säilyttäminen
74
16.2 Akun säilyttäminen
74
17 Puhdistaminen
17.1 Puhdista oksasakset
74
17.2 Puhdista terä ja vastaterä
75
17.3 Kantojärjestelmän puhdistus
75
17.4 Akun puhdistus
75
18 Huoltaminen
. . . . . . . . . . . . . . . . . . . . . . . . . . . . . . . . . . . . . . . . . . . .
. . . . . . . . . . . . . . . . . . . . . . . . . . . . . . . . . .
. . . . . . . . . . . . . . . . . . . . . . . . . . . . . .
. . . . . . . . . . . . . . . . . . . . . . . . . . . . . .
. . . . . . . . . . . . . . . . . . . . . . . . . . . . . .
. . . . . . . . . . . . . . . . . . . . . . . . . . . . . . .
. . . . . . . . . . . . . . . . . . . . . . . . . . . . . . . . . . . . .
. . . . . . . . . . . . . . . . . . . . . . . . . . . . . . .
. . . . . . . . . . . . . . . . . . . . . . . . . . . . . . . . . . . . . .
. . . . . . . . . . . . . . . . . . . . . . . . . . . . . . .
. . . . . . . . . . . . . . . . . . . . . . . . . . . . . .
. . . . . . . . . . . . . . . . . . . . . . . . . . . . . . . . . . . . . .
. . . . . . . . . . . . . . . . . . . . . . . . . . . . . . . .
. . . . . . . . . . . . . . . . . . . . . . . . . . . . . . . . .
. . . . . . . . . . . . . . . . . . . . . . . . . . . . . . . . . . . . .
. . . . . . . . . . . . . . . . . . . . . . . . . . . . . . .
. . . . . . . . . . . . . . . . . . . . . . . . . . . . . . . . . . . .
. . . . . . . . . . . . . . . . . . . . . . . . . . . . . . . . . . . . . . .
. . . . . . . . . . . . . . . . . . . . . .
. . . . . . . . . . . . . . . . . . . . . . . . .
. . . . . . . . . . . . . . . . . . . . . .
. . . . . . . . . . . . . . . . . . . . .
. . . . . . . . . . . . . . . . . . . . . . . . . . .
. . . . . . . . . . . . . . . . . . . .
. . . . . . . . . . . . . . . . . . . . . . . . .
. . . . . . . . . . . . . . . . . . . . . . . . . .
. . . . . . . . . . . . . . . . . . . . . . .
. . . . . . . . . . . . . . . . . . .
. . . . . . . . . . . . . . . .
. . . . . . . . . . .
. . . . . . . . . . . . . . . . . .
. . . . . .
. . . .
75
76
76
76
77
77
77
77
77
77
78
78
78
80
80
80
80
81
81
82
82
82
82
82
83
83
83
83
83
83
83
84
84
© ANDREAS STIHL AG & Co. KG 2018
0458-285-9721-C. VA0.L18.
0000007811_009_FIN
0458-285-9721-C
Tämä käyttöohje on tekijänoikeudellisesti suojattu. Kaikki oikeudet pidätetään, erityisesti jäljennys-, käännös- ja elektroniset
käsittelyoikeudet.
63
Page 66

suomi
1 Alkusanat
18.1 Huoltovälit
18.2 Rasvaa terä ja vastaterä rasvapainolla
18.3 Terän teroittaminen
18.4 Säädä terän ja vastaterän välys
18.5 Säädä kosketuspiste terän ja vastaterän välissä
19 Korjaaminen
19.1 Terän avaaminen ja sulkeminen käsin
19.2 Teräsarjojen erottaminen
19.3 Vastaterän vaihtaminen
19.4 Terän vaihtaminen
20 Häiriöiden poistaminen
20.1 Oksasaksien tai akun häiriöiden poistaminen
21 Tekniset tiedot
21.1 Oksasakset STIHL ASA 85
21.2 Akku STIHL AP
21.3 Meluarvot ja tärinäarvot
21.4 REACH-asetus
22 Varaosat ja varusteet
22.1 Varaosat ja varusteet
23 Hävittäminen
23.1 Oksasaksien ja akun hävittäminen
24 EU-vaatimustenmukaisuusvakuutus
24.1 Oksasakset STIHL ASA 85
24.2 EY-liittämisvakuutus
. . . . . . . . . . . . . . . . . . . . . . . . . . . . . . . . . . . . . . . . .
. . . . . . . . . . . . .
. . . . . . . . . . . . . . . . . . . . . . . . . . . . . . . .
. . . . . . . . . . . . . . . . . . . .
. . . . . . . . . . . . . . . . . . . . . . . . . . . . . . . . . . . . . . .
. . . . . . . . . . . . . .
. . . . . . . . . . . . . . . . . . . . . . . . . . .
. . . . . . . . . . . . . . . . . . . . . . . . . . . .
. . . . . . . . . . . . . . . . . . . . . . . . . . . . . . . . .
. . . . . . . . . . . . . . . . . . . . . . . . . . . . .
. . . . . . .
. . . . . . . . . . . . . . . . . . . . . . . . . . . . . . . . . . . . .
. . . . . . . . . . . . . . . . . . . . . . . . .
. . . . . . . . . . . . . . . . . . . . . . . . . . . . . . . . . . . .
. . . . . . . . . . . . . . . . . . . . . . . . . . . .
. . . . . . . . . . . . . . . . . . . . . . . . . . . . . . . . . . . . .
. . . . . . . . . . . . . . . . . . . . . . . . . . . . . . .
. . . . . . . . . . . . . . . . . . . . . . . . . . . . . .
. . . . . . . . . . . . . . . . . . . . . . . . . . . . . . . . . . . . . . .
. . . . . . . . . . . . . . . . .
. . . . . . . . . . . . . . . .
. . . . . . . . . . . . . . . . . . . . . . . . .
. . . . . . . . . . . . . . . . . . . . . . . . . . . . . . .
. . . .
84
1 Alkusanat
84
84
85
Arvoisa asiakas,
85
kiitämme sinua STIHLin tuotteen valinnasta! STIHL kehittää
86
ja valmistaa huippuluokan tuotteita pitäen suunnittelun
lähtökohtana asiakkaidensa tarpeita. Näin pystymme
86
tarjoamaan asiakkaillemme tuotteita, jotka toimivat
86
luotettavasti myös äärimmäisen vaativissa olosuhteissa.
86
88
STIHL tunnetaan myös erinomaisesta asiakaspalvelustaan.
Jälleenmyyjämme huolehtivat sekä asiantuntevasta
89
neuvonnasta ja opastuksesta että kattavien teknisten
89
palvelujen tarjoamisesta.
91
Kiitämme sinua STIHLiä kohtaan osoittamastasi
91
luottamuksesta. Toivomme, että olet tyytyväinen
91
hankkimaasi STIHL-tuotteeseen.
91
91
91
91
92
92
Dr. Nikolas Stihl
92
92
TÄRKEÄÄ! LUE OPAS ENNEN KÄYTTÖÄ JA SÄILYTÄ SE
92
VASTAISTA KÄYTTÖÄ VARTEN.
64
2 Tietoja tästä käyttöohjeesta
2.1 Voimassa olevat julkaisut
Käyttöpaikassa voimassa olevia turvallisuusohjeita on
noudatettava.
► Lue tämän käyttöohjeen lisäksi myös seuraavat oppaat ja
varmista niin ikään, että olet ymmärtänyt kyseisten
oppaiden sisällön. Säilytä myös nämä oppaat vastaisen
käytön varalle:
– STIHL AP -akun turvallisuusohjeet
– Latauslaitteiden käyttöohje STIHL AL 101, 300, 500
0458-285-9721-C
Page 67

3 Yleiskuva
suomi
– STIHLin akkuja ja kiinteästi asennetuilla akuilla
varustettuja tuotteita koskevia turvallisuustietoja:
www.stihl.com/safety-data-sheets
2.2 Tekstin sisältämien varoitusten merkitseminen
VAARA
Tämä teksti muistuttaa vaaroista, jotka johtavat vakavaan
loukkaantumiseen tai jopa kuolemaan.
► Tekstissä mainittujen toimenpiteiden avulla on
mahdollista välttää vakava loukkaantuminen tai jopa
kuolema.
VAROITUS
Tämä teksti muistuttaa vaaroista, jotka voivat johtaa
vakavaan loukkaantumiseen tai jopa kuolemaan.
► Tekstissä mainittujen toimenpiteiden avulla on
mahdollista välttää vakava loukkaantuminen tai jopa
kuolema.
HUOMAUTUS
Tämä teksti muistuttaa vaaroista, jotka voivat johtaa
esinevahinkoihin.
► Tekstissä mainittujen toimenpiteiden avulla on
mahdollista välttää esinevahingot.
2.3 Tekstissä käytetyt symbolit
Tämä merkki viittaa johonkin tämän käyttöohjeen
lukuun.
Tähän lukuun on saatavissa video.
3 Yleiskuva
3.1 Oksasakset
9930XXXXX
YYEHXXXXX
#
1
2
1Terä
Terä leikkaa oksan.
2 Vastaterä
Vastaterä toimii alustana oksalle.
3 Kytkentävipu
Kytkentävipu avaa ja sulkee terän.
4 Takakahva
Kahva on tarkoitettu oksasaksien käyttöön,
liikuttamiseen ja kantamiseen.
5Liitin
Naarasliitin on tarkoitettu liitoskaapelin urosliitintä
varten.
# Koneen numero (9930xxxxx) ja tunnistusnumero
(YYEHxxxxx)
4
3
5
0000-GXX-4072-A0
0458-285-9721-C
65
Page 68

suomi
3 Yleiskuva
3.2 Akku ja kantojärjestelmä
1
2
3
4
4
1312
5
6
7
14
11
1 Liitoskaapeli
Liitoskaapeli yhdistää oksasakset ohjausyksikköön.
2 Väliliitin ohjausyksikköön
Väliliitin yhdistää liitoskaapelin akkuun.
3 Ohjauslaite
Ohjausyksikkö ohjaa oksasaksien toimintoja.
4 Ohjauslaite
Ohjauslaitetta käytetään oksasaksien asettamiseen.
5 Näyttöruutu
Näyttö ilmoittaa tietoja ja häiriöitä.
6 Ohjausvipu
Ohjausvipua käytetään ohjauslaitteen valikossa
liikkumiseen.
7 Virtakytkin (ON/OFF)
Virtakytkimellä (ON/OFF) voi oksasakset kytkeä päälle ja
pois päältä.
8 Laukku
Laukkua käytetään lisäosien säilyttämiseen.
9 Akkulaukku
Akkulaukku toimii akun säilytystilana.
10 Kantokotelo
Kantokotelo toimii oksasaksien kuljetusvälineenä ja
säilytystilana.
11 Liitoskaapelin urosliitin
Liitoskaapelin urosliitin yhdistää oksasakset
liitoskaapeliin.
12 LED-merkkivalot
LED-merkkivalot ilmaisevat akun varaustilan ja akussa
ilmenevät häiriöt.
13 Painike
Tällä painike aktivoi akun LED-merkkivalot.
14 Akku
0000-GXX-4073-A1
Akku toimii oksasaksien energialähteenä.
# Koneen numerolla varustettu arvokilpi
3.3 Symbolit
Merkit voivat olla oksasaksilla, kantojärjestelmällä tai akulla,
ja niiden merkitykset on seuraavat:
1 punainen LED-valo palaa. Akku on liian kuuma
tai liian kylmä.
4 LED-valoa palaa punaisena. Akussa on häiriö.
66
0458-285-9721-C
Page 69

4 Turvallisuusohjeet
A
suomi
Taattu äänenpainetaso dB(A) direktiivin
L
W
2000/14/EY mukaan. Direktiivissä määriteltyä
mittausmenetelmää noudattamalla on
mahdollista vertailla keskenään erilaisten
tuotteiden melupäästöjä.
Symbolin vieressä oleva arvo ilmoittaa
kennovalmistajan määritelmän mukaisen akun
energiasisällön. Käyttötilanteessa käytettävissä
oleva energiasisältö on tätä pienempi.
Älä hävitä tuotetta talousjätteen mukana.
4 Turvallisuusohjeet
4.1 Varoitusmerkit
Oksasaksilla ja akussa olevat varoitusmerkit merkitsevät
seuraavaa:
Noudata turvallisuusohjeita ja toimi niiden
sisältämien ohjeiden mukaisesti.
Lue käyttöohje ja varmista, että olet ymmärtänyt
oppaan sisällön. Säilytä käyttöohje myöhempää
käyttöä varten.
Älä koske liikkuvaan leikkuuterään.
Poista akku työtaukojen sekä laitteen
kuljettamisen, säilyttämisen, huoltamisen ja
korjaamisen ajaksi.
Suojaa akku kuumuudelta ja avotulelta.
Älä upota akkua nesteisiin.
Huolehdi siitä, että akulle sallitun lämpötilaalueen rajat eivät ylity.
4.2 Käyttötarkoitus
Oksasakset STIHL ASA 85 soveltuvat enintään 45 mm
paksuisten viiniköynnösten, pusikoiden ja pensaiden
leikkaamiseen puutarhanhoidossa ja viiniä tai hedelmiä
viljeltäessä.
Oksasaksia ei saa käyttää sateella.
Oksasakset saavat virtansa STIHL AP akusta.
VAROITUS
■ Muiden kuin STIHL:n oksasaksia varten hyväksymien
akkujen käyttö voi aiheuttaa tulipaloja tai räjähdyksiä.
Seurauksena voi olla vakava tai jopa hengenvaarallinen
loukkaantuminen ja esinevahinkoja.
► Käytä oksasaksissa akkua STIHL AP.
■ Jos oksasaksia tai akkua käytetään laitteille määritellystä
käyttötarkoituksesta poikkeavasti, seurauksena voi olla
sekä vakava tai jopa hengenvaarallinen loukkaantuminen
että esinevahinkoja.
► Käytä oksasaksia tämän käyttöohjeen mukaisesti.
► Käytä akkua tämän käyttöohjeen mukaisesti.
0458-285-9721-C
67
Page 70

suomi
4 Turvallisuusohjeet
4.3 Käyttäjälle asetettavat vaatimukset
VAROITUS
■ Käyttäjä ei kykene tunnistamaan eikä arvioimaan
oksasaksiin ja akkuun liittyviä vaaroja, ellei hän ei ole
saanut asianmukaista perehdytystä laitteen käyttöön.
Käyttäjä itse tai sivulliset saattavat loukkaantua vakavasti
tai jopa hengenvaarallisesti.
► Lue käyttöohje ja varmista, että olet
ymmärtänyt oppaan sisällön. Säilytä
käyttöohje myöhempää käyttöä varten.
► Jos luovutat oksasakset tai akun toiselle henkilölle:
anna käyttöohjeet mukaan.
► Varmista, että käyttäjä täyttää seuraavat vaatimukset:
– Käyttäjä on levännyt.
– Käyttäjä pystyy fyysisten, aistinvaraisten ja henkisten
kykyjensä puolesta käyttämään oksasaksia tai akkua
ja siten työskentelemään laitteella. Jos käyttäjän
fyysiset, aistinvaraiset tai henkiset kyvyt rajoittavat
laitteen käyttöä, käyttäjä saa käyttää laitetta
ainoastaan vastuuhenkilön valvonnassa ja
opastuksella.
– Käyttäjä ei voi tunnistaa ja arvioida oksasaksiin ja
akkuun liittyviä vaaroja.
– Käyttäjä on täysi-ikäinen tai käyttäjä on saanut
kansallisten määräysten mukaisen valvotun
ammattiopastuksen.
– Käyttäjä on saanut STIHL-erikoisliikkeeltä tai joltakin
muulta asiantuntevalta henkilöltä perehdytyksen
oksasaksien käyttöön, ennen kuin hän työskentelee
laitteella ensimmäistä kertaa.
– Käyttäjä ei ole alkoholin, lääkkeiden tai
huumausaineiden vaikutuksen alainen.
► Jos jokin asia on jäänyt sinulle epäselväksi: ota yhteyttä
STIHL-erikoisliikkeeseen.
4.4 Vaatetus ja varustus
VAROITUS
■ Työskentelyn aikana pitkät hiukset saattavat joutua
oksasaksiin. Käyttäjä voi loukkaantua vakavasti.
► Solmi pitkät hiukset yhteen ja suojaa ne siten, että
imuvirtaus ei voi vetää hiuksia oksasaksiin.
■ Erilaiset sirut ja kappaleet saattavat sinkoutua
työskentelyn aikana ilmaan suurella nopeudella. Käyttäjä
voi loukkaantua.
► Käytä tiiviisti istuvia suojalaseja. Sopivat suojalasit on
tarkastettu normin EN 166 tai maakohtaisten
määräysten mukaan ja niitä on saatavilla vastaavalla
merkinnällä.
► Käytä pitkähihaista, tiiviisti kehoa vasten olevaa
ylävartalon vaatetusta ja pitkälahkeisia housuja.
■ Työskentelyyn sopimaton vaatetus saattaa takertua kiinni
puustoon, risuihin ja oksasaksiin. Käyttäjä saattaa
loukkaantua vakavasti, mikäli hän ei ole pukeutunut
työskentelyn kannalta sopivaan vaatetukseen.
► Käytä tiiviisti kehoa vasten olevaa vaatetusta.
► Riisu huivit ja korut yltäsi.
■ Puhdistus- tai huoltotöiden aikana käyttäjä voi joutua
kosketuksiin terän kanssa. Käyttäjä voi loukkaantua.
► Käytä kestävästä materiaalista valmistettuja
työkäsineitä.
■ Käyttäjä voi liukastua, mikäli hänellä ei ole yllään
työskentelyyn sopivia jalkineita. Käyttäjä voi loukkaantua.
► Käytä tukevia, umpinaisia ja karkeapohjaisia jalkineita.
4.5 Työskentelyalue ja ympäristö
4.5.1 Työskentelyalue ja ympäristö
VAROITUS
■ Sivulliset, lapset ja eläimet eivät pysty tunnistamaan
eivätkä arvioimaan oksasaksista sekä ilmaan
sinkoutuvista siruista ja kappaleista aiheutuvia vaaroja.
68
0458-285-9721-C
Page 71

4 Turvallisuusohjeet
suomi
Sivulliset, lapset ja eläimet saattavat loukkaantua
vakavasti, minkä lisäksi seurauksena voi olla
esinevahinkoja.
► Pidä sivulliset, lapset ja eläimet loitolla
työskentelyalueesta.
► Älä jätä oksasaksia valvomatta.
► Varmista, että lapset eivät voi leikkiä oksasaksilla.
■ Oksasaksien sähköosat voivat synnyttää kipinöitä. Kipinät
voivat aiheuttaa helposti syttyvässä tai räjähdysalttiissa
ympäristössä tulipalon ja räjähdyksen. Seurauksena voi
olla vakava tai jopa hengenvaarallinen loukkaantuminen
ja esinevahinkoja.
► Älä työskentele helposti syttyvässä tai räjähdysalttiissa
ympäristössä.
4.5.2 Akku
VAROITUS
■ Sivulliset, lapset ja eläimet eivät pysty tunnistamaan
eivätkä arvioimaan akusta aiheutuvia vaaroja. Sivulliset,
lapset ja eläimet saattavat loukkaantua vakavasti.
► Pidä sivulliset, lapset ja eläimet loitolla.
► Älä jätä akkua valvomatta.
► Varmista, että lapset eivät voi leikkiä akulla.
■ Akkua ei ole suojattu kaikilta ympäristötekijöiltä. Akku
saattaa syttyä tuleen tai räjähtää altistuttuaan eräille
ympäristötekijöille. Seurauksena voi olla vakava
loukkaantuminen samoin kuin esinevahinkoja.
► Suojaa akku kuumuudelta ja avotulelta.
► Älä heitä akkua tuleen.
► Käytä ja säilytä akkua lämpötila-alueella
- 10 °C ... + 50 °C.
► Älä upota akkua nesteisiin.
► Pidä akku erossa metalliesineistä.
► Älä altista akkua suurelle paineelle.
► Älä altista akkua mikroaalloille.
► Suojaa akku kemikaaleilta ja suoloilta.
4.6 Turvallinen toimintakunto
4.6.1 Oksasakset Oksasakset ovat turvallisessa toimintakunnossa, jos
seuraavat edellytykset täyttyvät:
– Oksasakset ovat ehjät.
– Oksasakset ovat puhtaat.
– Hallintalaitteet toimivat moitteettomasti, eikä
hallintalaitteissa ei ilmennyt muutoksia.
– Terä ja vastaterä on asennettu oikein.
– Oksasahaan on asennettu ainoastaan siihen tarkoitettuja
alkuperäisiä STIHL-varusteita.
– Varusteet on asennettu oikein.
VAROITUS
■ Jos laite ei ole turvallisessa toimintakunnossa,
komponentit saattavat toimia virheellisesti. Myös
turvalaitteet saattavat tällöin lakata toimimasta. Tämä voi
johtaa vakavaan tai jopa hengenvaaralliseen
loukkaantumiseen.
► Käytä oksasaksia vain, jos ne ovat ehjät.
► Jos oksasakset ovat likaiset: Puhdista oksasakset.
► Älä muuta oksasaksia.
► Jos hallintalaitteet eivät toimi: Älä käytä oksasaksia.
► Asenne terä ja vastaterä oikein.
0458-285-9721-C
69
Page 72

suomi
4 Turvallisuusohjeet
► Asenna oksasaksiin ainoastaan niihin tarkoitettuja
alkuperäisiä STIHL-varusteita.
► Asenna varusteet käyttöohjeen tai lisävarusteen
käyttöohjeen kuvauksen mukaisesti.
► Älä työnnä esineitä oksasaksissa oleviin aukkoihin.
► Jos jokin asia on jäänyt sinulle epäselväksi: Ota
yhteyttä STIHL jälleenmyyjään.
4.6.2 Terä ja vastaterä Terä ja vastaterä ovat turvallisessa toimintakunnossa, jos
seuraavat edellytykset täyttyvät:
– Terä ja vastaterä ovat vaurioitumattomia.
– Terä ja vastaterä ovat vääntymättömiä.
– Terä ja vastaterä ovat helppokäyttöisiä.
– Välys terän ja vastaterän välissä on asetettu oikein.
– Kosketuskohta terän ja vastaterän välissä on asetettu
oikein.
– Terä on teroitettu oikein.
– Terä on jäysteetön.
VAROITUS
■ Jos terät eivät ole turvallisessa toimintakunnossa, niiden
osat voivat irrota ja sinkoutua ympäristöön. Tästä voi olla
seurauksena vakava loukkaantuminen.
► Työskentele vaurioitumattomalla terällä ja vastaterällä.
► Säädä terän ja vastaterän välys oikein.
► Säädä terän ja vastaterän kosketuskohta oikein.
► Suorita terän puhdistus ja jäysteenpoisto oikein.
► Jos jokin asia on jäänyt sinulle epäselväksi: Ota
yhteyttä STIHL jälleenmyyjään.
4.6.3 Akku Akku on turvallisessa toimintakunnossa, jos seuraavat
edellytykset täyttyvät:
– Akku on ehjä.
– Akku on puhdas ja kuiva.
– Akku toimii moitteettomasti, eikä akussa ole ilmennyt
muutoksia.
VAROITUS
■ Akkua ei voi enää käyttää turvallisesti, mikäli akku ei ole
turvallisessa toimintakunnossa. Tästä voi olla
seurauksena vakava loukkaantuminen.
► Käytä akkua vain, jos siinä ei ole minkäänlaisia
vaurioita.
► Älä lataa vaurioitunutta tai viallista akkua.
► Jos akku on likaantunut tai märkä: Puhdista akku ja
anna sen kuivua.
► Älä tee akkuun muutoksia.
► Älä työnnä esineitä akussa oleviin aukkoihin.
► Älä yhdistä ja oikosulje akun sähkökoskettimia
metalliesineillä.
► Älä avaa akkua.
■ Vaurioituneesta akusta saattaa vuotaa nestettä. Iho tai
silmät voivat ärsyyntyä, jos neste joutuu kosketuksiin ihon
tai silmien kanssa.
► Vältä joutumista kosketuksiin nesteen kanssa.
► Jos iho on joutunut kosketuksiin nesteen kanssa: Pese
altistuneet ihoalueet käyttämällä tarkoitukseen
runsaasti vettä sekä saippuaa.
► Jos silmät ovat joutuneet kosketuksiin nesteen kanssa:
Huuhtele silmiä vähintään 15 minuutin ajan käyttämällä
tarkoitukseen runsaasti vettä. Hakeudu tämän jälkeen
lääkäriin.
■ Vaurioituneesta tai viallisesta akusta voi poistua outoja
hajuja tai savua. Tällainen akku saattaa myös syttyä
tuleen. Seurauksena voi olla vakava tai jopa
hengenvaarallinen loukkaantuminen ja esinevahinkoja.
► Jos akusta poistuu outoja hajuja tai savua: Älä käytä
akkua ja pidä se erossa palavista materiaaleista.
► Jos akku palaa: Yritä sammuttaa akku sammuttimella
tai vedellä.
70
0458-285-9721-C
Page 73

4 Turvallisuusohjeet
suomi
4.7 Työskentely
VAROITUS
■ Eräissä tilanteissa käyttäjä ei enää pysty
työskentelemään keskittyneesti. Käyttäjä voi kompastua,
kaatua ja loukkaantua vakavasti.
► Työskentele rauhallisesti ja harkitusti.
► Jos valaistus ja näkyvyys on heikko: älä työskentele
oksasaksilla.
► Käytä oksasaksia yksin.
► Älä työskentele olkapäiden korkeuden yläpuolella.
► Kiinnitä huomiota esteisiin.
► Työskentele maanpinnalla seisten ja huolehdi
tasapainosi säilymisestä. Jos sinun on työskenneltävä
korkealla: käytä nostolavaa tai tukevaa telinettä.
► Jos tunnet itsesi väsyneeksi: pidä tauko työskentelyssä.
■ Terä voi vaurioitua, jos se osuu kovaan kappaleeseen.
► Tarkasta ennen työskentelyn aloittamista, onko
työskentelyalueella kovia kappaleita. Poista tällaiset
kappaleet ennen työskentelyn aloittamista.
► Älä leikkaa vaijeria.
■ Liikkuva terä voi vahingoittaa käyttäjää vakavasti.
► Pidä vapaa käsi vähintään 40 cm
etäisyydellä terästä.
► Älä koske terään.
■ Jos oksasaksissa ilmenee käytön aikana muutoksia tai
oksasaksien käyttäytyminen poikkeaa tavanomaisesta,
oksasakset eivät ole enää turvallisessa toimintakunnossa.
Seurauksena voi olla vakava loukkaantuminen samoin
kuin esinevahinkoja.
► Lopeta työt, poista akku ja ota yhteyttä STIHL-
jälleenmyyjään.
■ Oksasakset saattavat täristä työskentelyn aikana.
► Käytä käsineitä.
► Pidä taukoja työskentelyn aikana.
► Jos havaitset merkkejä verenkiertohäiriöistä: hakeudu
lääkäriin.
■ Käyttäjä saattaa joutua vaaratilanteessa paniikin valtaan
ja jättää tällöin riisumatta kantojärjestelmän yltään.
Käyttäjä voi loukkaantua vakavasti.
► Harjoittele kantojärjestelmän riisumista.
VAARA
■ Terä voi joutua kosketuksiin jännitteisten kaapeleiden
kanssa ja vahingoittaa niitä, jos laitteella työskennellään
ympäristössä, jossa sijaitsee jännitteisiä kaapeleita.
Käyttäjä voi loukkaantua vakavasti tai jopa
hengenvaarallisesti.
► Älä työskentele ympäristössä, jossa on jännitteisiä
kaapeleita.
4.8 Kuljettaminen
4.8.1 Oksasaksien kuljettaminen
VAROITUS
■ Terä saattaa sulkeutua tahattomasti, jos oksasakset ovat
kuljetettaessa päällä. Seurauksena voi olla vakava
loukkaantuminen samoin kuin esinevahinkoja.
► Aseta ON/OFF-kytkin asentoon ”OFF” (pois päältä).
► Sijoita oksasakset kantokoteloon.
■ Oksasakset voivat kaatua tai liikkua paikaltaan
kuljetuksen aikana. Tästä voi olla seurauksena
loukkaantuminen sekä esinevahinkoja.
► Poista akku.
► Sijoita oksasakset kantokoteloon.
► Kiinnitä oksasakset ja kantojärjestelmä
kiinnityshihnoilla, vöillä tai verkolla siten, ettei se voi
kaatua eikä liikkua paikaltaan.
0458-285-9721-C
71
Page 74

suomi
4 Turvallisuusohjeet
4.8.2 Akku
VAROITUS
■ Akkua ei ole suojattu kaikilta ympäristötekijöiltä. Eräille
ympäristötekijöille altistunut akku saattaa vahingoittua.
Tästä voi olla seurauksena esinevahinkoja.
► Älä kuljeta vaurioitunutta akkua.
► Kuljeta akku pakkauksessa, joka ei johda sähköä.
■ Akku voi kaatua tai liikkua paikaltaan kuljetuksen aikana.
Tästä voi olla seurauksena loukkaantuminen sekä
esinevahinkoja.
► Pakkaa akku pakkaukseen siten, että se ei voi liikkua
paikaltaan.
► Kiinnitä pakkaus siten, että se ei voi liikkua paikaltaan.
4.9 Säilytys
4.9.1 Oksasaksien säilyttäminen
VAROITUS
■ Lapset eivät pysty tunnistamaan tai arvioimaan
oksasaksista aiheutuvia vaaroja. Lapset voivat
loukkaantua vakavasti.
► Aseta ON/OFF-kytkin asentoon ”OFF” (pois päältä).
► Vedä liitäntäkaapelin pistoke pistukasta ja poista akku
► Sijoita oksasakset kantokoteloon.
► Säilytä oksasakset poissa lasten ulottuvilta.
■ Oksasaksien sähkökoskettimet ja metalliosat voivat
syöpyä altistuessaan kosteudelle. Oksasakset voivat
vahingoittua.
► Poista akku.
► Säilytä oksasakset puhtaina ja kuivina.
4.9.2 Akku
VAROITUS
■ Lapset eivät pysty tunnistamaan eivätkä arvioimaan
akusta aiheutuvia vaaroja. Lapset voivat loukkaantua
vakavasti.
► Säilytä akku poissa lasten ulottuvilta.
■ Akkua ei ole suojattu kaikilta ympäristötekijöiltä. Eräiden
ympäristötekijöiden vaikutuksille altistunut akku saattaa
vahingoittua.
► Säilytä akku puhtaana ja kuivana.
► Säilytä akku suljetussa tilassa.
► Säilytä akku erillään oksasaksista.
► Säilytä akku pakkauksessa, joka ei johda sähköä.
► Säilytä akku lämpötila-alueella - 10 °C ... + 50 °C.
4.10 Puhdistaminen, huoltaminen ja korjaaminen
VAROITUS
■ Jos oksasakset ovat käynnissä puhdistuksen, huollon tai
korjauksen aikana, terä saattaa sulkeutua
odottamattomasti. Seurauksena voi olla vakava
loukkaantuminen samoin kuin esinevahinkoja.
► Terä sulkeutuu.
► Aseta ON/OFF-kytkin asentoon ”OFF” (pois päältä).
► Vedä liitoskaapelin urosliitin naarasliittimestä.
► Poista akku.
■ Vahvat puhdistusaineet, vesisuihkeella peseminen tai
terävät esineet voivat vaurioittaa oksasaksia, terää tai
vastaterää. Jos oksasaksia, terää tai vastaterää ei
72
0458-285-9721-C
Page 75

5 Oksasaksien käytön valmistelut
1
0000-GXX-1248-A0
20-40%
40-60%
60-80%
80-100%
0-20%
suomi
puhdisteta oikein, laitteiden osat eivät ehkä toimi oikein.
Myös turvalaitteet saattavat tällöin lakata toimimasta.
Tästä voi olla seurauksena vakava loukkaantuminen.
► Puhdista oksasakset, terä ja vastaterä tämän
käyttöohjeen kuvauksen mukaisesti.
■ Jos oksasaksia, terää tai vastaterää ei huolleta tai korjata
oikein, laitteiden osat eivät ehkä toimi oikein. Myös
turvalaitteet saattavat tällöin lakata toimimasta. Tämä voi
johtaa vakavaan tai jopa hengenvaaralliseen
loukkaantumiseen.
► Huolla ja korjaa oksasakset, terä ja vastaterä tämän
käyttöohjeen kuvauksen mukaisesti.
■ Terävät leikkuureunat voivat aiheuttaa käyttäjälle
viiltohaavoja terän tai vastaterän puhdistus-, huolto- tai
korjaustöiden aikana. Käyttäjä voi loukkaantua.
► Käytä kestävästä materiaalista valmistettuja
työkäsineitä.
5 Oksasaksien käytön valmistelut
5.1 Oksasaksien käytön valmistelut
Seuraavat toimenpiteet on suoritettava aina ennen
työskentelyn aloittamista:
► Varmista, että seuraavat laitteet ovat turvallisessa
kunnossa:
– Oksasakset, @ 4.6.1.
– Terä ja vastaterä, @ 4.6.2.
– Akku, @ 4.6.3.
► Tarkasta akku, @ 12.2.
► Lataa akku täyteen siten kuin latureiden STIHL AL 101,
300, 500 käyttöohjeessa on kuvattu.
► Puhdista oksasakset, @ 17.1.
► Kiinnitä kantokotelo ja laukku, @ 7.1.
► Rasvaa terä ja vastaterä rasvapainolla, @ 18.2.
► Jos nämä toimenpiteet eivät ole mahdollisia: Älä käytä
oksasaksia ja ota yhteys STIHL:in erikoisliikkeeseen.
30 min työn aloittamisen jälkeen tulee uusien oksasaksien,
uuden terän tai uuden vastaterän kanssa suorittaa
seuraavat toimenpiteet:
► Terän ja vastaterän välyksen säätäminen.
► Teroita terä.
6 Akun lataaminen ja LED-valot
6.1 Akun lataaminen
Latausaikaan vaikuttavat monet eri tekijät, kuten akun
lämpötila ja ympäristön lämpötila. Todellinen latausaika
saattaa poiketa valmistajan ilmoittamasta latausajasta.
Latausaika on ilmoitettu osoitteessa
www.stihl.com/charging-times .
► Lataa akku siten kuin latureiden STIHL AL 101, 300, 500
käyttöohjeessa on kuvattu.
6.2 Lataustilan tarkastaminen
Lataustila tulee näkyviin akulla
► Paina painiketta (1).
Lataustilan ilmaisevat vihreät LED-valot, jotka palavat
noin 5 sekunnin ajan.
► Jos oikeanpuoleinen vihreä LED-valo vilkkuu: Lataa akku.
0458-285-9721-C
73
Page 76

suomi
Lataustila tulee näkyviin ohjausyksikön näytöllä
► Käynnistä oksasakset.
BATT:
Muutaman sekunnin kuluttua näkyy näytössä akun
lataustila. Jokainen palkki näytössä vastaa 10% akun
kapasiteetista.
I I I I I I
6.3 Akun LED-valot
LED-valot pystyvät ilmaisemaan sekä akun varaustilan että
akussa ilmenevät häiriöt. LED-valojen väri voi olla vihreä tai
punainen, ja valot voivat joko palaa yhtäjaksoisesti tai
vilkkua.
LED-valot ilmaisevat varaustilan, jos yhtäjaksoisesti
palavien tai vilkkuvien valojen väri on vihreä.
► Jos yhtäjaksoisesti palavien tai vilkkuvien LED-valojen
väri on punainen: Poista häiriöt, @ 20.
Akussa on häiriö.
7 Oksasaksien kokoaminen
2
1
0000-GXX-4088-A0
3
4
► Pujota kantokotelon (4) iltit (1) silmukoista (3) lantiohihnan
sisäpuolelta.
► Sulje painonapit (2).
► Kiinnitä laukku (5) lantiohihnan toiselle puolelle.
7.2 Liitäntäjohdon pistokkeen kytkeminen ja
irrottaminen
7.2.1 Liitoskaapelin urosliittimen yhdistäminen
5
0000-GXX-4077-A1
7 Oksasaksien kokoaminen
7.1 Kiinnitä kantokotelo ja laukku
Kantokotelon ja laukun voi asentaa lantiohihnan
vasemmalle tai oikealle puolelle. Kantokotelo on sijoitettava
sivulle, jolla oksasaksia pidetään kädessä.
74
1
2
3
0000-GXX-4082-A0
► Yhdistä liitoskaapelin urosliitin (2) naarasliittimeen (1).
► Kierrä liitoskaapelin liittimen kiristysmutteri (3) käsin
pistorasian jengoille (1) ja vedä tiukaksi.
7.2.2 Liitoskaapelin urosliittimen irrottaminen ► Ruuvaa kiristysmutteri irti.
► Tartu käsin liitoskaapelin liittimeen.
0458-285-9721-C
Page 77

8 Oksasaksien säätäminen
► Vedä liitoskaapelin urosliitin naarasliittimestä.
8 Oksasaksien säätäminen
suomi
1
CLICK-CLICK ON
8.1 Terän avautumisleveyden säätäminen
Terän aukeamisen astetta voi säätää tarpeen mukaan.
Seuraavat kulmat ovat säädettävissä:
– 50% (ON)
– 60% (ON)
– 70% (ON)
– rajoittamaton (OFF)
► Käynnistä oksasakset.
1
1/2
1/2
1/2
50%
60%
70%
ON
ON
ON
1/2 OFF
2
► Paina ohjauskytkin (2) niin usein alas, että näyttö (1)
näyttää säädetyn kulman.
► Paina ohjauskytkintä (2) niin usein, että haluamasi kulma
on säädetty.
CLICK-CLICK OFF
2
► Paina ohjauskytkin (2) niin usein alas, että näyttö (1)
näyttää ”CLICK-CLICK ON“ tai ”CLICK-CLICK OFF“.
Jos näyttö (1) näyttää ”CLICK-CLICK ON“, on valmiustila
päällä.
Jos näyttö (1) näyttää ”CLICK-CLICK OFF“, on valmiustila
pois päältä.
► Paina ohjauskytkintä (2) kunnes valmiustila on päällä tai
pois päältä.
8.3 Terän sulkeutumisen säätäminen
Oksasaksien käynnistämisen jälkeen sulkeutuu terä
kytkentävivun liikkeen mukaan.
Terän sulkeutuminen voidaan säätää niin, että terä
sulkeutuu aina kokonaan, kun kytkentävipua painetaan.
0000-GXX-4074-A0
► Käynnistä oksasakset.
1
REG ON
0000-GXX-4075-A0
8.2 Valmiustilan käynnistys ja sammutus
Jos valmiustila on käynnissä, voi terä sulkeutua pysyvästi,
vaikka oksasakset olisivat päällä. Valmiustilan voi
sammuttaa.
► Käynnistä oksasakset.
0458-285-9721-C
REG OFF
2
0000-GXX-4076-A0
75
Page 78

suomi
0000-GXX-2815-A1
3
► Paina ohjauskytkin (2) niin usein alas, että näyttö (1)
näyttää ”REG ON“ tai ”REG OFF“.
Jos näyttö (1) näyttää ”REG ON”, sulkeutuu terä
kytkentävivun liikkeen mukaan.
Jos näyttö (1) näyttää ”REG OFF”, sulkeutuu terä aina
kokonaan, kun kytkentävipua painetaan.
► Paina ohjauskytkintä (2) niin usein, että haluamasi
toiminto on säädetty.
Kun oksasakset on sammutettu ja ne käynnistetään
uudelleen, sulkeutuu terä taas kytkentävivun liikkeen
mukaan.
9 Oksasaksien säätäminen käyttäjälle
9.1 Kantohihnan kiinnittäminen ja riisuminen
9.1.1 Kantojärjestelmän kiinnittäminen ja säätäminen ► Nosta kantojärjestelmä selkää vasten.
1
9 Oksasaksien säätäminen käyttäjälle
► Kiristä hihnoja, kunnes lantiohihna on lantiota vasten ja
selkäpehmuste puolestaan selkää vasten.
► Pujota lantiohihnan pää silmukan (3) läpi.
9.1.2 Kantojärjestelmän riisuminen ► Löysää hihnoja.
► Avaa rintahihnan ja lantiohihnan lukitsin.
► Riisu kantojärjestelmä selästä.
9.2 Sijoita liitoskaapeli paikalleen
Liitoskaapelin voi sijoittaa vasemmalle tai oikealle.
Liitoskaapeli on sijoitettava sivulle, jolla oksasaksia
pidetään kädessä.
2
► Sulje lantiohihnan lukitsin (2).
► Sulje rintahihnan lukitsin (1).
76
3
3
2
0000-GXX-4078-A1
► Vie liitoskaapeli (1) jommankumman aukon (3) läpi
kantojärjestelmässä.
1
4
0000-GXX-4333-A1
0458-285-9721-C
Page 79

10 Akun asentaminen ja irrottaminen
3
0000-GXX-4085-A1
1
2
suomi
► Vie liitoskaapeli (1) oikeanpuoleisten ilttien (2) tai
vasemmanpuoleisten ilttien (4) läpi.
► Sijoita liitoskaapeli (1) siten, että kaapeli on
mahdollisimman lyhyt eikä häiritse työskentelyä.
9.3 Siirrä ohjauslaitteen johtoa
3
4
1 2
► Vie ohjauslaite (1) ja johto (3) kantojärjestelmän
vasemmanpuoleisesta tai oikeanpuoleisesta aukosta (4).
► Kiinnitä ohjauslaite (1) lantiohihnaan (2).
10 Akun asentaminen ja irrottaminen
► Sulje hihnan (3) tarranauha.
Akku (1) ei saa liikkua.
► Kierrä hihnan tarranauha (4) silmukan läpi ja sulje.
Akkulaukku (2) kiinnitetään kantojärjestelmään.
► Sulje kantojärjestelmän vetoketju.
10.2 Akun poistaminen
► Aseta kantojärjestelmä tasaiselle pohjalle.
► Avaa kantojärjestelmän vetoketju.
0000-GXX-4081-A0
► Avaa tarranauha (1) ja vedä pois silmukasta.
► Avaa tarranauha (2).
► Poista akku (3).
10.1 Akun sijoittaminen laitteeseen
3
4
► Avaa kantojärjestelmän vetoketju.
► Paina akku (1) vasteeseen saakka akkulaukkuun (2).
0458-285-9721-C
11 Käynnistä oksasakset
11.1 Käynnistä oksasakset
► Tartu toisella kädellä oksasaksien käyttökahvaan siten,
että peukalo on käyttökahvan ympärillä.
0000-GXX-4084-A1
77
Page 80

suomi
1
12 Oksasaksien ja akun tarkastus
11.2 Sammuta oksasakset
2
3
► Kytke päällä-/pois päältä -kytkin (3) asentoon ”ON”
(päällä).
Kuuluu 1 pitkä äänimerkki ja 3 lyhyttä. Oksasakset ovat
käyttövalmiit.
► Paina kytkentävipua (2).
Terä (1) avautuu kokonaan.
BATT:
Näyttö ilmoittaa leikkauskertojen määrän, joka on
mahdollista suorittaa laitteella ennen seuraavaa
suosituksen mukaista huoltoa.
Joidenkin sekuntien kuluttua näyttö näyttää akun lataustilan.
Jokainen palkki näytössä vastaa noin 10 % akun
kapasiteetista.
Käynnistetyt oksasakset sammuvat, jo s ni itä e i kä ytet ä yl i 10
minuuttiin. 20 sekunnin ajan kuuluu aina 5 lyhyttä
äänimerkkiä.
► Kytke päällä-/pois päältä -kytkin (3) asentoon ”OFF” (pois
päältä) ja sitten taas asentoon ”ON” (päällä).
Oksasakset ovat jälleen käyttövalmiit.
I I I I I I
0000-GXX-4086-A0
1
► Paina kytkentävipua (2) yhtäjaksoisesti.
Terä (1) sulkeutuu.
HUOMAUTUS
Oksasakset saattavat vahingoittua, jos päällä/pois päältä kytkin on asennossa ”OFF” (pois päältä) ennen terän
sulkeutumista.
► Odota terän sulkeutumista.
► Kytke päällä-/pois päältä -kytkin (3) asentoon ”OFF” (pois
0000-GXX-4088-A0
päältä).
► Sijoita oksasakset kantokoteloon.
3
12 Oksasaksien ja akun tarkastus
12.1 Tarkasta oksasakset
Seuraavat tarkastukset tehdään peräkkäin:
– Akun ja ohjausyksikön välisen sähköisen yhteyden
tarkastaminen
– Sähkömoottorin ja ohjausyksikön välisen sähköisen
yhteyden tarkastaminen
– Kytkentävivun ja ohjausyksikön välisen sähköisen
yhteyden tarkastaminen
– Ohjausyksikön tarkastus
2
0000-GXX-4087-A0
78
0458-285-9721-C
Page 81

12 Oksasaksien ja akun tarkastus
MAIN DRIVE
MAIN DRIVE
OK
KO
0000-GXX-4093-A0
suomi
► Käynnistä oksasakset.
1
XXXXXX Vx.xx
TESTING
2
► Paina ohjauskytkin (2) niin usein alas, että näyttö (1)
näyttää „XXXXXX Vx.xx“.
► Paina ohjauskytkintä (2) kunnes näyttö (1) näyttää
”TESTING“ .
Nopeasti toisiaan seuraavat äänimerkit kuuluvat ja
oksasakset tarkastetaan automaattisesti.
Tarkastus päättyy, kun ohjausvipua (2) painetaan mihin vain
suuntaan.
Akun ja ohjausyksikön välisen sähköisen yhteyden
tarkastaminen
BATT OK
Sähkömoottorin ja ohjausyksikön välisen sähköisen
yhteyden tarkastaminen
POWERLINE
POWERLINE
OK
KO
Jos näyttö näyttää ”POWERLINE OK” , sitten
sähkömoottorin ja ohjausyksikön välillä on sähköinen
yhteys.
0000-GXX-4089-A0
► Jos näyttö näyttää ”POWERLINE KO” : Poista häiriöt
@ 20.
Kytkentävivun ja ohjausyksikön välisen sähköisen yhteyden
tarkastaminen
TRIGGER LINE
TRIGGER LINEOKKO
Jos näyttö näyttää ”TRIGGER LINE OK” , sitten
kytkentävivun ja ohjausyksikön välillä on sähköinen yhteys.
► Jos näyttö näyttää ”TRIGGER LINE KO” : Poista häiriöt,
@ 20.
0000-GXX-4091-A0
0000-GXX-4092-A0
BATT KO
Jos näyttö näyttää ”BATT OK“ , sitten akun ja ohjausyksikön
välillä on sähköinen yhteys.
► Jos näyttö näyttää ”BATT KO” : Poista häiriöt, @ 20.
0458-285-9721-C
Ohjausyksikön tarkastus
0000-GXX-4090-A0
Jos näyttö näyttää ”MAIN DRIVE OK” , toimii ohjausyksikkö.
► Jos näyttö näyttää ”MAIN DRIVE KO” : Poista häiriöt,
@ 20.
79
Page 82

suomi
2
1
XX xxxxxx
# 123456 23h 45m
BATT:
I I I I I I
A
B
C
D
E
42%S
37%M
21%L
xx XXL
0000-GXX-4331-A0
13 Oksasaksilla työskentely
12.2 Akun tarkastus
► Paina akussa olevaa painiketta.
LED-valot palavat tai vilkkuvat.
► Jos LED-valot eivät pala tai vilku: Älä käytä akkua ja ota
yhteyttä STIHL:in jälleenmyyjään.
Akussa on häiriö.
13 Oksasaksilla työskentely
13.1 Oksasaksiin tarttuminen ja niiden ohjaaminen
► Tartu toisella kädellä oksasaksien käyttökahvaan siten,
että peukalo on käyttökahvan ympärillä.
► Pidä vapaa käsi loitolla terästä.
13.2 Tietojen näyttäminen
Seuraavat tiedot voidaan näyttää:
– Leikkauskertojen määrä, joka on mahdollista suorittaa
laitteella ennen seuraavaa suosituksen mukaista huoltoa
– Akun varaustila
– Leikkauskertojen määrä ja käyttöaika tunteina ja
minuutteina
– Leikkauskertojen määrä pienellä, keskisuurella ja suurella
ponnistuksella
– Terän esteet
Näytetyt tiedot viittaavat ajankohtaan, jona laskuri viimeksi
nollattiin.
► Käynnistä oksasakset.
► Paina ohjauskytkin (2) niin usein alas, että näyttö (1)
näyttää tarvitut tiedot.
Seuraavat tiedot (A, C, D ja E) voidaan palauttaa.
► Jos jokin tieto tulee palauttaa: Paina ohjausvipua (2) 2
sekuntia.
Näytetty tieto palautetaan.
Leikkauskertojen määrä, joka on mahdollista suorittaa
0000-GXX-4094-A0
laitteella ennen seuraavaa suosituksen mukaista huoltoa
(A)
Näyttö (1) näyttää leikkauskertojen määrän, joka on
mahdollista suorittaa laitteella ennen seuraavaa
suosituksen mukaista huoltoa.
Muutaman sekunnin kuluttua näkyy näytössä akun
lataustila, (B).
► Jos leikkauskertojen määrä on 0: Paina ohjausvipua (2).
Näyttö (1) näyttää akun lataustilan, (B).
Akun lataustila (B)
Näyttö (1) näyttää akun lataustilan. Jokainen palkki
näytössä vastaa 10% akun kapasiteetista.
80
0458-285-9721-C
Page 83

13 Oksasaksilla työskentely
suomi
Leikkauskertojen määrä ja käyttöaika tunteina ja
minuutteina (C)
Näyttö (1) näyttää leikkauskertojen määrän ja käyttöajan
tunteina ja minuutteina.
Leikkauskertojen määrä pienellä, keskisuurella ja suurella
ponnistuksella (D)
Näyttö (1) näyttää leikkauskertojen määrän pienellä,
keskisuurella ja suurella ponnistuksella.
Ohjausyksikkö luokittelee jokaisen leikkauskerran
seuraaviin luokkiin:
– S = leikkauskertojen määrä pienellä ponnistuksella
– M = leikkauskertojen määrä keskisuurella ponnistuksella
– L = leikkauskertojen määrä suurella ponnistuksella
Terän esteet (E)
Näyttö (1) näyttää terän esteiden lukumäärän.
13.3 Kytke oksasakset valmiustilaan
Oksasakset voi kytkeä työkatkosten ajaksi valmiustilaan.
Jos kytkentävipua (2) painetaan uudelleen, terä (1) avautuu
ja oksasakset ovat käyttövalmiit.
13.4 Leikkaaminen
1
2
► Aseta vastaterä (2) alapuolelta oksalle.
VAROITUS
Liikkuva terä voi vahingoittaa käyttäjää vakavasti.
► Pidä vapaa käsi vähintään 40 cm etäisyydellä terästä.
► Älä koske terään.
► Paina kytkentävipua (3).
Terä (1) sulkeutuu ja oksa leikkautuu poikki.
Työn aikana terä voi mennä tukkoon.
3
0000-GXX-4101-A0 0000-GXX-4095-A0
1
2
► Paina kytkentävipua (2) 2 kertaa nopeasti peräkkäin ja
pidä sitä toisella painalluskerralla painettuna.
Kuuluu 3 lyhyttä äänimerkkiä. Terä (1) sulkeutuu ja pysyy
kiinni.
► Vapauta kytkentävipu (2).
Oksasakset ovat valmiustilassa.
0458-285-9721-C
0000-GXX-4102-A0
81
Page 84

suomi
HUOMAUTUS
Oksasakset voivat vaurioitua, jos terä on tukossa ja
oksasakset sammutetaan.
► Älä sammuta oksasaksia.
► Älä vipua oksasaksia sivuttain tai alaspäin.
► Jos terä on tukossa.: Heiluta oksasaksia ylöspäin ja vedä
sakset pois leikkauskohdasta.
Terä (1) avautuu.
14 Työskentelyn jälkeen
14.1 Työskentelyn jälkeen
► Sammuta oksasakset, vedä töpselin liitoskaapeli ulos ja
irrota akku.
► Jos oksasakset ovat märät: Anna oksasaksien kuivua.
► Jos akku on märkä: anna akun kuivua.
► Puhdista oksasakset.
► Puhdista terä ja vastaterä.
► Puhdista akku.
15 Kuljettaminen
15.1 Oksasaksien ja kantojärjestelmän kuljettaminen
► Sammuta oksasakset ja vedä pistoke liitoskaapelista.
► Sijoita oksasakset kantokoteloon.
14 Työskentelyn jälkeen
0000-GXX-4096-A1
► Kuljeta kantojärjestelmää selässäsi tai tarttumalla
kahvaan.
► Jos oksasaksia on tarkoitus kuljettaa ajoneuvossa:
► Poista akku.
► Aseta oksasakset laukkuun.
► Kiinnitä laukku siten, ettei laukku voi kaatua eikä liikkua
paikaltaan.
15.2 Akun kuljettaminen
► Sammuta oksasakset, vedä töpselin liitoskaapeli ulos ja
irrota akku.
► Varmista, että akku on turvallisessa kunnossa.
► Pakkaa akku siten, että seuraavat edellytykset täyttyvät:
– Pakkaus ei johda sähköä.
– Akku ei voi liikkua pakkauksen sisällä.
► Kiinnitä pakkaus siten, että se ei voi liikkua paikaltaan.
Akun kuljettamisen yhteydessä on noudatettava vaarallisten
tavaroiden kuljettamista koskevia määräyksiä. Akku kuuluu
luokkaan UN 3480 (litiumioniakut), ja se on testattu YK:n
käsikirjan "Kokeet ja kriteerit" osan III alakohdan 38.3
mukaisesti.
Kuljetusmääräykset ovat luettavissa osoitteessa
www.stihl.com/safety-data-sheets .
82
0458-285-9721-C
Page 85

16 Säilytys
suomi
16 Säilytys
16.1 Oksasaksien säilyttäminen
► Sammuta oksasakset, vedä töpselin liitoskaapeli ulos ja
irrota akku.
► Säilytä oksasaksia ja kantojärjestelmää laukussa
puhtaina ja kuivina.
► Säilytä laukkua poissa lasten ulottuvilta.
16.2 Akun säilyttäminen
STIHL suosittelee pitämään akun varaustason säilytyksen
aikana 40 %:n ja 60 %:n välillä (2 vihreää LED-valoa palaa).
► Säilytä akku siten, että seuraavat edellytykset täyttyvät:
– Akku on poissa lasten ulottuvilta.
– Akku on puhdas ja kuiva.
– Akku on suljetussa tilassa.
– Akku on erillään oksasaksista ja laturista.
– Akku on sijoitettu pakkaukseen, joka ei johda sähköä.
– Akun lämpötila on vähintään - 10 °C ja enintään
+50°C.
17 Puhdistaminen
17.1 Puhdista oksasakset
► Sammuta oksasakset ja vedä töpselin liitoskaapeli ulos.
► Puhdista oksasakset kostealla liinalla tai STIHL-
pihkanpoistoaineella.
17.2 Puhdista terä ja vastaterä
► Sammuta oksasakset ja vedä töpselin liitoskaapeli ulos.
► Puhdista terä ja vastaterä kostealla liinalla ja lämpimällä
saippuavedellä.
► Suihkuta terä ja vastaterä molemmilta puolilta STIHL
Multispraylla.
17.3 Kantojärjestelmän puhdistus
1
2
4
5
3
7
6
10
12
11
► Pura kantokotelo (12) ja laukku (8).
► Ripusta ohjauslaite (7) lantiohihnaan.
► Vie ohjauslaite (7) ja johto kantojärjestelmään.
► Vedä väliliitin (5) ulos.
► Avaa tarranauhat (4, 6 ja 10).
► Kierrä liitoskaapeli (1) kantojärjestelmässä.
► Poista ohjauslaite (3).
► Avaa tarranauha (11).
► Poista akkulaukku (9).
► Puhdista kantojärjestelmä kostealla liinalla.
► Jos kantojärjestelmä on erittäin likainen: Pese
kantojärjestelmä käsin kirjopesuaineella tai
hienopesuaineella.
► Sijoita akkulaukku (9) paikalleen.
► Kierrä hihnan tarranauha (11) silmukan läpi ja sulje.
0000-GXX-4488-A3
0458-285-9721-C
83
Page 86

suomi
1
2
3
3
4
0000-GXX-4097-A0
18 Huoltaminen
► Kierrä liitoskaapeli (1) hihnan (2) läpi.
► Aseta Ohjauslaite (3).
► Aseta liitoskaapeli (1) paikalleen.
► Vie ohjauslaite (7) ja johto ulos kantojärjestelmästä.
► Kiinnitä ohjauslaite (7) lantiohihnaan.
► Sulje hihnan (6) tarranauha.
► Kierrä hihnan tarranauha (4) silmukan läpi ja sulje.
► Kierrä hihnan tarranauha (10) silmukan läpi ja sulje.
► Liitä väliliitin (5).
► Kiinnitä kantokotelo (12) ja laukku (8).
17.4 Akun puhdistus
► Puhdista akku kostealla liinalla.
18 Huoltaminen
18.1 Huoltovälit
Huoltovälit riippuvat ympäristö- ja työskentelyolosuhteista.
STIHL suosittelee noudattamaan seuraavia huoltovälejä:
400000 leikkauksen välein
► Anna STIHL-erikoisliikkeen huoltaa oksasakset.
18.2 Rasvaa terä ja vastaterä rasvapainolla
► Vedä rasvapainon (3) tulppa (1) ulos ketujlta.
► Täytä rasvapaino (3) 2/3 asti STIHL monikäyttörasvalla
(2).
► Paina tulppa (1) tiukasti rasvapainon (3) päälle.
► Aseta rasvapaino (3) voitelunipalle (4).
► Paina rasvapainoa (3) ja STIHL monikäyttörasvaa1-2
iskulla voitelunipan (4) läpi.
18.3 Terän teroittaminen
Tähän lukuun on saatavissa video.
Päivittäin
► Teroita terä.
Kerran vuodessa
► Anna STIHL-erikoisliikkeen huoltaa oksasakset.
84
www.stihl.com/sxBI5K
VAROITUS
Terän leikkuureuna on terävä. Käyttäjä altistuu tällöin
viiltohaavoille.
► Käytä kestävästä materiaalista valmistettuja työkäsineitä.
► Kostuta hiomakivi öljyllä.
0458-285-9721-C
Page 87

18 Huoltaminen
2
1
0000-GXX-4100-A0
suomi
3
► Teroita terä hiomakivellä siten, että seuraavat edellytykset
täyttyvät:
– Punaista (karkea) puolta käytetään tylpän terän
perusteroitukseen.
– Valkoista (hienoa) puolta käytetään perusteroitetun
terän hienohiontaan ja purseenpoistoon.
– Hiomakiveä liikutetaan kevyesti painaen sisältä
ulospäin.
– Teroituskulma on 30° ja 15°.
► Poista hiomapöly liinalla.
► Ruiskuta terä ja vastaterä molemmin puolin STIHL
Multisprayllä.
► Jos jokin asia on jäänyt sinulle epäselväksi: ota yhteyttä
STIHL-erikoisliikkeeseen.
18.4 Säädä terän ja vastaterän välys
Jos terää voi siirtää sivuttain vastaterään suhteessa, tulee
välys säätää niiden välillä.
2
1
0000-GXX-4098-A0
► Avaa ruuvi (1).
► Aseta säätötyökalu (4) säätömutteria (3) vasten.
► Kiristä säätömutteri (3) niin, että terää (2) ei voi enää
siirtää sivuttain suhteessa vastaterään (5) ja terä (2)
liukuu vastaterällä (5) helposti.
► Kiristä ruuvi (1) kiinni.
► Jos jokin asia on jäänyt sinulle epäselväksi: Ota yhteyttä
STIHL jälleenmyyjään.
4
5
18.5 Säädä kosketuspiste terän ja vastaterän välissä
Jos terän ja vastaterän kärjet eivät enää koske toisiinsa,
tulee kosketuspiste niiden välissä säätää.
► Paina kytkentävipua 3 kertaa nopeasti peräkkäin ja pidä
sitä kolmannella painalluskerralla painettuna.
3 lyhyttä äänimerkkiä kuuluu 4 kertaa peräkkäin. Terä
avautuu ja sulkeutuu tämän jälkeen 3 pienen askeleen
aikana 0,8 mm kerrallaan.
0000-GXX-4099-A0
0458-285-9721-C
85
Page 88

suomi
5
3
2
1
4
0000-GXX-7629-A0
19 Korjaaminen
► Odota, kunnes terän (1) ja vastaterän (2) kärjet ovat
täsmälleen päällekkäin.
► Irrota ote kytkentävivusta.
Terän (1) asento tallennetaan. Kosketuspiste terän ja
vastaterän välissä on säädetty.
► Jos jokin asia on jäänyt sinulle epäselväksi: Ota yhteyttä
STIHL jälleenmyyjään.
19 Korjaaminen
19.1 Terän avaaminen ja sulkeminen käsin
► Sammuta oksasakset ja vedä pistoke liitoskaapelista.
1
► Käännä ruuvia pistorasian keskellä tasaisella
ruuvimeisselillä vastapäivään.
Terä (1) avautuu.
► Käännä ruuvia pistorasian keskellä tasaisella
ruuvimeisselillä myötäpäivään.
Terä (1) sulkeutuu.
19.2 Teräsarjojen erottaminen
4861/1
Oksasaksille on kaksi erilaista teräsarjaa:
– Teräsarja 4861/1
– Teräsarja ASA85/B
Yksittäiset terät eivät ole keskenään vaihdettavissa
teräsarjojen välillä.
ASA85B
19.3 Vastaterän vaihtaminen
► Sammuta oksasakset ja vedä pistoke liitoskaapelista.
0000-GXX-4473-A0
0000-GXX-7628-A0
► Irrota lukkorengas (3).
► Purista akseli (1) ulos.
86
► Jos akseli (1) on kulunut tai vaurioitunut: Vaihda
akseli (1).
► Jos teräsarja ASA85/B on asennettu:: Irrota välike (2).
► Kierrä ruuvi (5) irti ja poista hammassegmentti (4).
0458-285-9721-C
Page 89

19 Korjaaminen
8
9
9
0000-GXX-4083-A1
5
6
7
8
► Kierrä säätömutteri (7) irti.
► Poista terä (6) yhdessä voitelunipan (5) kanssa.
► Jos vastaterässä (8) on rasvaa: Puhdista
vastaterässä (8).
5
7
6
6
8
0000-GXX-4104-A1
► Rasvaa terän (6) laakerikohta ja voitelunippa (5) STIHL
monikäyttörasvalla.
► Aseta voitelunippa (5) terän (6) laakerikohtaan.
► Aseta terä (6) uuteen vastaterään (8).
► Kierrä säätömutteri (7) voitelunipan (5) jengoille.
► Avaa terä (6).
► Laita hammassegmentti (3) säätömutteriin (7) ja liitä ja
kiristä ruuvi (4) tiukaksi.
8 3 4
2
suomi
0000-GXX-4105-A1
► Kierrä auki ruuvit (9).
► Poista ja hävitä vastaterä (8).
► Aseta uusi vastaterä (9) paikalleen.
► Kierrä ruuvit (9) paikalleen ja kiristä ne 7 Nm:n kireyteen.
0458-285-9721-C
1
3
0000-GXX-7630-A0
► Rasvaa akselin pidike (1) STIHLin monikäyttörasvalla.
► Jos teräsarja ASA85/B on asennettu:: Aseta välike (2).
► Aseta akseli (1) paikalleen.
► Asenna lukkorengas (3) paikalleen.
► Rasvaa terä ja vastaterä rasvapainolla.
► Terän ja vastaterän välyksen säätäminen.
87
Page 90

suomi
19.4 Terän vaihtaminen
► Sammuta oksasakset ja vedä pistoke liitoskaapelista.
1
19 Korjaaminen
5
3
4
5
2
► Pura ja hävitä varokerengas (3).
► Purista akseli (1) ulos.
► Jos akseli (1) on kulunut tai vaurioitunut: Vaihda
akseli (1).
► Jos teräsarja ASA85/B on asennettu: Irrota välike (2).
► Kierrä ruuvi (5) irti ja poista hammassegmentti (4).
5
6
7
8
► Kierrä säätömutteri (7) irti.
► Irrota terä (6) yhdessä voitelunipan (5) kanssa ja hävitä
terä (6).
► Jos vastaterässä (8) on rasvaa: Puhdista
vastaterässä (8).
7
6
6
8
► Rasvaa uuden terän (6) laakerikohta ja voitelunippa (5)
STIHL monikäyttörasvalla.
0000-GXX-7629-A0
► Aseta voitelunippa (5) uuden terän (6) laakerikohtaan.
► Aseta uusi terä (6) vastaterään (8).
► Kierrä säätömutteri (7) voitelunipan (5) kierteille.
► Avaa terä (6).
► Aseta hammassegmentti (3) säätömutteriin (7) ja liitä
ruuvi (4) ja kiristä se 7 Nm:n kireyteen.
8 3 4
2
1
3
0000-GXX-4104-A1
► Rasvaa akselin pidike (1) STIHLin monikäyttörasvalla.
► Jos teräsarja ASA85/B on asennettu: Aseta välike (2).
► Aseta akseli (1) paikalleen.
► Asenna uusi varokerengas (3) paikalleen.
► Rasvaa terä ja vastaterä rasvapainolla.
► Terän ja vastaterän välyksen säätäminen.
0000-GXX-4105-A1
0000-GXX-7630-A0
88
0458-285-9721-C
Page 91

20 Häiriöiden poistaminen
20 Häiriöiden poistaminen
20.1 Oksasaksien tai akun häiriöiden poistaminen
Häiriö LED-valot akulla tai
ilmoitukset näytöllä
Oksasakset eivät
toimi käynnistämisen
jälkeen tai lakkaavat
käytössä yhtäkkiä
toimimasta.
1 vihreä LED-valo
vilkkuu.
1 punainen LEDvalo palaa.
4 punaista LEDvaloa vilkkuu.
BATT KO Ohjausyksikön ja akun
POWERLINE KO Ohjausyksikön ja
TRIGGERLINE KO Ohjausyksikön ja
Syy Korjaus
Akun varaus on liian pieni. ► Lataa akku täyteen siten kuin latureiden STIHL
Akku on liian kuuma tai
liian kylmä.
Akussa on häiriö. ► Ota akku laitteesta ja asenna se uudelleen.
välinen sähköinen yhteys
on poikki.
sähkömoottorin välinen
sähköinen yhteys on
poikki.
kytkentävivun välinen
sähköinen yhteys on
poikki.
Oksasaksien ja akun
välinen sähköinen yhteys
on poikki.
Oksasakset tai akku on
kostea.
suomi
AL 101, 300, 500 käyttöohjeessa on kuvattu.
► Poista akku.
► Anna akun jäähtyä tai lämmetä.
► Käynnistä oksasakset.
► Jos 4 punaista LED-valoa vilkkuu edelleen: Älä
käytä akkua ja ota yhteyttä STIHLerikoisliikkeeseen.
► Poista liitin ohjausyksiköstä ja yhdistä liitin
uudelleen.
► Jos näytössä näkyy edelleen "BATT KO": Älä
käytä oksasaksia ja ota yhteys STIHL:in
erikoisliikkeeseen.
► Kierrä liitoskaapelin liittimen kiristysmutteri käsin
pistorasian jengoille ja vedä tiukaksi.
► Jos näytössä näkyy edelleen "POWERLINE KO":
Älä käytä oksasaksia ja ota yhteys STIHLerikoisliikkeeseen.
► Kierrä liitoskaapelin liittimen kiristysmutteri käsin
pistorasian jengoille ja vedä tiukaksi.
► Jos näytössä näkyy edelleen "TRIGGERLINE
KO": Älä käytä oksasaksia ja ota yhteys STIHL:in
erikoisliikkeeseen.
► Ota akku laitteesta ja asenna se uudelleen.
► Poista liitin ohjausyksiköstä ja yhdistä liitin
uudelleen.
► Anna oksasaksien tai akun kuivua.
0458-285-9721-C
89
Page 92

suomi
20 Häiriöiden poistaminen
Häiriö LED-valot akulla tai
ilmoitukset näytöllä
Oksasaksien
° C ! ° C ! ° C ! Oksasakset ovat liian
leikkausteho
heikkenee äkillisesti.
Oksasaksien
toiminta-aika on liian
lyhyt.
Leikkuupinta on
likainen.
Syy Korjaus
► Anna oksasaksien jäähtyä.
lämpimät.
► Pienennä työskentelynopeutta tai
leikkaushalkaisijaa.
Akkua ei ole ladattu
täyteen.
Akun käyttöikä on kulunut
► Lataa akku täyteen latureiden STIHL AL 101,
300, 500 käyttöohjeessa kuvatulla tavalla.
► Vaihda akku.
umpeen.
Terä on tylsä. ► Teroita terä.
Välys terän ja vastaterän
► Terän ja vastaterän välyksen säätäminen.
välissä on liian pieni.
Terän ja vastaterän välissä
► Rasvaa terä ja vastaterä rasvapainolla.
liian vähän rasvaa.
Terä on tylsä. ► Teroita terä.
Pelivara terän ja
► Terän ja vastaterän välyksen säätäminen.
vastaterän välissä on liian
suuri.
Terä on likainen tai
► Vaihda terä.
vahingoittunut.
90
0458-285-9721-C
Page 93

21 Tekniset tiedot
suomi
21 Tekniset tiedot
21.1 Oksasakset STIHL ASA 85
– Sallittu akku: STIHL AP
– Terän suurin avautumisleveys: 45 mm
– Suurin leikkausvahvuus: 45 mm (puun mukaan)
– Paino ilman kantojärjestelmää ja akkua: 0,98 kg
– Kantojärjestelmän paino ilman akkua: 1,8 kg
– Liitoskaapelin pituus: 1,6 m
Käyttöaika annetaan kohdassa www.stihl.com/battery-life.
21.2 Akku STIHL AP
– Akkutekniikka: litium-ioni
– Jännite: 36 V
– Kapasiteetti (Ah): ks. arvokilpi
– Energiasisältö (Wh): ks. arvokilpi
– Paino (kg): ks. arvokilpi
– Sallittu lämpötila-alue käytön ja säilytyksen aikana: -
10 °C ... + 50 °C
Ilmoitetut tärinäarvot on mitattu standardoitujen
testausmenetelmien mukaisesti, ja ne ovat vertailukelpoisia
vertailtaessa sähkölaitteita keskenään. Tosiasialliset
tärinäarvot saattavat poiketa ilmoitetuista arvoista
käyttötavoissa esiintyvien erojen vuoksi. Ilmoitettuja
tärinäarvoja voi käyttää lähtökohtana arvioitaessa
alustavasti altistumista tärinärasitukselle. Tosiasiallinen
tärinärasitus on arvioitava erikseen. Tällöin voidaan ottaa
huomioon myös ajat, jolloin sähkölaite on pois käytöstä,
samoin kuin ne ajat, jolloin laite on toiminnassa altistamatta
kuitenkaan käyttäjää tärinärasitukselle.
Tietoja työnantajia koskevan tärinädirektiivin 2002/44/EY
vaatimusten täyttämisestä löytyy osoitteesta
www.stihl.com/vib.
21.4 REACH-asetus
REACH-asetuksella tarkoitetaan EY:n kemikaalien
rekisteröintiä, arviointia ja lupamenettelyjä koskevaa
asetusta.
Lisätietoja REACH-asetuksen vaatimusten täyttämisestä on
saatavissa osoitteesta www.stihl.com/reach .
22 Varaosat ja varusteet
22.1 Varaosat ja varusteet
21.3 Meluarvot ja tärinäarvot
Melupäästöt direktiivin 2006/42/EG ISO 3746:2010 ja ISO
11202:2012 mukaisia.
– Äänenpainetaso L
mukaan: < 70 dB(A). Äänenpainetason laskennassa
käytettävä korjauskerroin on 2 dB(A).
– Tärinäarvo a
– kiihtyvyys a
standardin EN 50260-1 (2005) mukaan: < 2,5 m/s².
Tärinän laskennassa käytettävä korjauskerroin on
2m/s².
0458-285-9721-C
hv
mitattu standardin ISO 4871
pA
mitattu standardin EN ISO 22867 mukaan:
, joka on altistettu ylemmille raajoille,
h
Alkuperäiset STIHL-varaosat ja alkuperäiset
STIHL-varusteet tunnistaa näistä merkeistä.
STIHL suosittelee käyttämään ainoastaan alkuperäisiä
STIHL-varaosia ja alkuperäisiä STIHL-varusteita.
Alkuperäisiä STIHL-varaosia ja alkuperäisiä STIHLvarusteita on saatavissa STIHL-jälleenmyyjältä.
91
Page 94

suomi
23 Hävittäminen
23 Hävittäminen
23.1 Oksasaksien ja akun hävittäminen
Lisätietoja hävittämisestä saat STIHL-erikoisliikkeestä.
► Hävitä oksasakset, akku, varusteet ja pakkaus
määräysten mukaisesti sekä ympäristöystävällisesti.
24 EU-vaatimustenmukaisuusvakuutus
24.1 Oksasakset STIHL ASA 85
ANDREAS STIHL AG & Co. KG
Badstraße 115
D-71336 Waiblingen
Saksa
vakuuttaa, että
– Tuote: Akkukäyttöiset oksasakset
–Merkki: STIHL
– Malli: ASA 85
– Sarjatunniste: 4861
vastaa soveltuvilta osin direktiivien 2011/65/EU,
2006/42/EY, 2014/30/EU ja 2000/14/EY säännöksiä ja että
tuote on kehitetty ja valmistettu seuraavien standardien
tuotteen valmistuspäivänä voimassa olevien versioiden
mukaisesti: EN 55014-1 ja EN 55014-2.
Teknisten asiakirjojen säilytyksestä vastaa
ANDREAS STIHL AG & Co. KG:n tuotteiden
lupamenettelyistä vastaava osasto (Produktzulassung).
Valmistusvuosi, valmistusmaa ja koneen numero on
merkitty oksasaksiin.
Waiblingen, 1.2.2017
ANDREAS STIHL AG & Co. KG
puolesta
Thomas Elsner, Leiter Produktmanagement und Services
(tuotehallinta- ja palveluasioista vastaava johtaja)
24.2 EY-liittämisvakuutus
Valmistaja vakuuttaa täten, että seuraavassa mainittu
osittain valmis kone täyttää seuraavien määräysten
vaatimukset:
– konedirektiivin 2006/42/EY säännökset konedirektiivin
2006/42/EY liitteessä I määriteltyjen olennaisten
vaatimusten osalta samoin kuin direktiiviin perustuvan
kansallisen lainsäädännön vaatimukset.
– seuraavien Euroopan unionin direktiivien säännökset:
2014/30/EU, 2011/65/EU
– seuraavien yhdenmukaistettujen eurooppalaisten
standardien vaatimukset: EN 55014-1, EN 55014-2,
EN 61000-3- 2, EN 61000-3- 3
Tekniset erityisasiakirjat on laadittu direktiivin 2006/42/EY
liitteen VII, osan B mukaisesti. Valmistaja sitoutuu täten
toimittamaan osittain valmista konetta koskevat olennaiset
asiakirjat kirjallisessa muodossa kansallisille viranomaisille.
Osittain valmiin koneen saa ottaa käyttöön vasta sen
jälkeen, kun on todettu sen lopullisen koneen, jonka osaksi
kyseinen kone on määrä liittää, täyttävän voimassa olevien
konedirektiivien säännösten vaatimukset.
– Kuvaus: Reppumalliset sähkökäyttöiset oksasakset ilman
akkua, ilman liitäntää (sähköistä tiedonsiirtoyhteyttä akun
ja ohjausyksikön välillä) ja laturia
–Merkki: STIHL
– Malli: ASA 85
– Sarjanumero: 9930XXXXX
92
0458-285-9721-C
Page 95

24 EU-vaatimustenmukaisuusvakuutus
suomi
vastaa soveltuvilta osin direktiivien 2011/65/EU,
2006/42/EY, 2014/30/EU ja 2000/14/EY säännöksiä ja että
tuote on kehitetty ja valmistettu seuraavien standardien
tuotteen valmistuspäivänä voimassa olevien versioiden
mukaisesti: EN 55014-1 ja EN 55014-2.
Teknisten asiakirjojen säilytyksestä vastaa
ANDREAS STIHL AG & Co. KG:n tuotteiden
lupamenettelyistä vastaava osasto (Produktzulassung).
Valmistusvuosi, valmistusmaa ja koneen numero on
merkitty pensassaksiin.
Waiblingen, 1.2.2017
ANDREAS STIHL AG & Co. KG
puolesta
Thomas Elsner, Leiter Produktmanagement und Services
(tuotehallinta- ja palveluasioista vastaava johtaja)
Teknisten eritelmien laatimiseen valtuutettu henkilö:
FELCO Deutschland GmbH, Bernd Stockburger,
Postfach 1352, D-71687 Freiberg/Neckar
Valmistaja:
FELCO Motion SA, Rue de la Rinche 3, CH-2206 Les
Geneveys-sur-Coffrane
1.2.2017
Christophe Winter (tutkimus- ja kehitystyöstä vastaava
johtaja)
Valtuutettu edustaja:
FELCO Deutschland GmbH, Postfach 1352,
D-71687 Freiberg/Neckar
1.2.2017
Bernd Stockburger (CEO)
Christophe Nicolet (yhtiön hallituksen jäsen)
Stéphane Poggi (CEO)
0458-285-9721-C
93
Page 96

Indholdsfortegnelse
dansk
1 Forord
2 Oplysninger om denne brugsvejledning
2.1 Gældende dokumenter
2.2 Markering af advarselshenvisninger i teksten
2.3 Symboler i teksten
3 Oversigt
3.1 Grensaks
3.2 Bæresystem og batteri
3.3 Symboler
4 Sikkerhedshenvisninger
4.1 Advarselssymboler
4.2 Formålsbestemt anvendelse
4.3 Krav til brugeren
4.4 Beklædning og udstyr
4.5 Arbejdsområde og omgivelser
4.6 Sikker tilstand
4.7 Arbejde
4.8 Transport
4.9 Opbevaring
4.10 Rengøring, vedligeholdelse og reparation
5 Gør grensaks klar til brug
5.1 Gør grensaks klar til brug
6 Opladning af batteriet og LED'er
6.1 Opladning af batteriet
6.2 Visning af ladetilstanden
6.3 LED'er på batteriet
7 Sammenbygning af grensaks
7.1 Montér hylster og taske
. . . . . . . . . . . . . . . . . . . . . . . . . . . . . . . . . . . . . . . . . . . . .
. . . . . . . . . . . . .
. . . . . . . . . . . . . . . . . . . . . . . . . . . . .
. . . . . . .
. . . . . . . . . . . . . . . . . . . . . . . . . . . . . . . . .
. . . . . . . . . . . . . . . . . . . . . . . . . . . . . . . . . . . . . . . . . . . .
. . . . . . . . . . . . . . . . . . . . . . . . . . . . . . . . . . . . . . . . . .
. . . . . . . . . . . . . . . . . . . . . . . . . . . . .
. . . . . . . . . . . . . . . . . . . . . . . . . . . . . . . . . . . . . . . . . . .
. . . . . . . . . . . . . . . . . . . . . . . . . . . .
. . . . . . . . . . . . . . . . . . . . . . . . . . . . . . . . .
. . . . . . . . . . . . . . . . . . . . . . . .
. . . . . . . . . . . . . . . . . . . . . . . . . . . . . . . . . . .
. . . . . . . . . . . . . . . . . . . . . . . . . . . . . .
. . . . . . . . . . . . . . . . . . . . .
. . . . . . . . . . . . . . . . . . . . . . . . . . . . . . . . . . . . .
. . . . . . . . . . . . . . . . . . . . . . . . . . . . . . . . . . . . . . . . . . .
. . . . . . . . . . . . . . . . . . . . . . . . . . . . . . . . . . . . . . . . .
. . . . . . . . . . . . . . . . . . . . . . . . . . . . . . . . . . . . . . .
. . . . . . . . .
. . . . . . . . . . . . . . . . . . . . . . . . .
. . . . . . . . . . . . . . . . . . . . . . . . .
. . . . . . . . . . . . . . . . . . .
. . . . . . . . . . . . . . . . . . . . . . . . . . . . .
. . . . . . . . . . . . . . . . . . . . . . . . . .
. . . . . . . . . . . . . . . . . . . . . . . . . . . . . . . .
. . . . . . . . . . . . . . . . . . . . . .
. . . . . . . . . . . . . . . . . . . . . . . . . . .
7.2 Indsættelse og udtagning af tilslutningskablets
. . . . . . . . . . . . . . . . . . . . . . . . . . . . . . . . . . . . . . . . . . . . . . . .
stik
8 Indstilling af grensaks
8.1 Indstilling af klingens åbningsvinkel
. . . . . . . . . . . . . . . . . . . . . . . . . . . . .
. . . . . . . . . . . . . . . .
8.2 Aktivering og deaktivering af ”Stand-By”-mode
. . . .
95
95
95
96
96
96
96
97
97
98
98
98
98
99
100
100
102
103
103
104
104
104
104
104
105
105
105
105
106
106
106
106
8.3 Indstilling af klingens lukkefunktion
9 Indstilling af grensaks for brugeren
. . . . . . . . . . . . . . . .
. . . . . . . . . . . . . . . .
9.1 Anlægning og aflægning af bæresele
9.2 Føring af tilslutningsledning
. . . . . . . . . . . . . . . . . . . . . . .
9.3 Installation af styreenhedens ledning
10 Isætning og udtagning af batteriet
10.1 Isætning af batteri
10.2 Udtagning af batteri
11 Tænd for grensaks
11.1 Tænd for grensaks
11.2 Sluk grensaksen
. . . . . . . . . . . . . . . . . . . . . . . . . . . . . . . .
. . . . . . . . . . . . . . . . . . . . . . . . . . . . . . .
. . . . . . . . . . . . . . . . . . . . . . . . . . . . . . . .
. . . . . . . . . . . . . . . . . . . . . . . . . . . . . . . .
. . . . . . . . . . . . . . . . . . . . . . . . . . . . . . . . . .
12 Kontrol af grensaks og batteri
12.1 Kontrollér grensaksen
12.2 Kontrollér batteriet
13 Arbejde med grensaks
. . . . . . . . . . . . . . . . . . . . . . . . . . . . .
. . . . . . . . . . . . . . . . . . . . . . . . . . . . . . . .
. . . . . . . . . . . . . . . . . . . . . . . . . . . .
. . . . . . . . . . . . . . . . .
. . . . . . . . . . . . . . . . . . . . .
13.1 Fastholdelse og føring af grensaksen
13.2 Visning af informationer
13.3 Sæt grensaksen i ”Stand-By”-mode
13.4 Klipning
14 Efter arbejdet
14.1 Efter arbejdet
15 Transport
. . . . . . . . . . . . . . . . . . . . . . . . . . . . . . . . . . . . . . . . . . .
. . . . . . . . . . . . . . . . . . . . . . . . . . . . . . . . . . . . .
. . . . . . . . . . . . . . . . . . . . . . . . . . . . . . . . . . . . .
. . . . . . . . . . . . . . . . . . . . . . . . . . . . . . . . . . . . . . . . .
. . . . . . . . . . . . . . . . . . . . . . . . . . .
. . . . . . . . . . . . . . .
15.1 Transport af grensaks og bæresystem
15.2 Transport af batteriet
16 Opbevaring
. . . . . . . . . . . . . . . . . . . . . . . . . . . . . . . . . . . . . . .
16.1 Opbevaring af grensaks
16.2 Opbevaring af batteriet
17 Rengøring
. . . . . . . . . . . . . . . . . . . . . . . . . . . . . . . . . . . . . . . .
17.1 Rengøring af grensaks
17.2 Rengør klinge og modklinge
17.3 Rengøring af bæresystem
17.4 Rengøring af batteriet
. . . . . . . . . . . . . . . . . . . . . . . . . . . . .
. . . . . . . . . . . . . . . . . . . . . . . . . . .
. . . . . . . . . . . . . . . . . . . . . . . . . . .
. . . . . . . . . . . . . . . . . . . . . . . . . . . .
. . . . . . . . . . . . . . . . . . . . . .
. . . . . . . . . . . . . . . . . . . . . . . .
. . . . . . . . . . . . . . . . . . . . . . . . . . . . .
. . . . . . . . . . . . . .
. . . . . . . . . . . . . .
. . . . . . . . . . . . .
. . . . . . . . . . . .
107
107
107
107
108
108
108
108
109
109
109
109
109
111
111
111
111
112
112
113
113
113
113
113
114
114
114
114
114
114
114
115
Oversættelse af den originale
brugsvejledning på tysk
Trykt på klorfrit bleget papir.
Trykfarverne indeholder vegetabilske olier, papiret kan
genbruges.
© ANDREAS STIHL AG & Co. KG 2018
0458-285-9721-C. VA0.L18.
0000007811_009_DK
94
Denne betjeningsvejledning er beskyttet af ophavsretten. Alle rettigheder forbeholdes, især retten til kopiering, oversættelse og
behandling med elektroniske systemer.
0458-285-9721-C
Page 97

1 Forord
dansk
18 Vedligeholdelse
18.1 Vedligeholdelsesintervaller
18.2 Smør klinge og modklinge med fedtpressen
18.3 Slibning af klingen
18.4 Indstilling af spil mellem klinge og modklinge
18.5 Indstilling af berøringspunkt mellem klingens og
modklingens spidser
19 Reparation
19.1 Åbning og lukning af klingen med hånden
19.2 Forskel på klingesæt
19.3 Udskift modklinge
19.4 Udskift klinge
20 Afhjælpning af fejl
20.1 Afhjælpning af fejl på grensaksen eller batteriet
21 Tekniske data
21.1 Grensaks STIHL ASA 85
21.2 Batteri STIHL AP
21.3 Støj- og vibrationsværdier
21.4 REACH
22 Reservedele og tilbehør
22.1 Reservedele og tilbehør
23 Bortskaffelse
23.1 Bortskaffelse af grensaks og batteri
24 EU-overensstemmelseserklæring
24.1 Grensaks STIHL ASA 85
24.2 EF- inkorporeringserklæring
. . . . . . . . . . . . . . . . . . . . . . . . . . . . . . . . . . . . . . . . . . .
. . . . . . . . . . . . . . . . . . . . . . . . . . . . . . . . . . .
. . . . . . . . . . . . . . . . . . . . . . . .
. . . . . . .
. . . . . . . . . . . . . . . . . . . . . . . . . . . . . . . .
. . . . . .
. . . . . . . . . . . . . . . . . . . . . . . . . . . . . .
. . . . . . . . . . . . . . . . . . . . . . . . . . . . . . . . . . . . . . . .
. . . . . . . . .
. . . . . . . . . . . . . . . . . . . . . . . . . . . . . .
. . . . . . . . . . . . . . . . . . . . . . . . . . . . . . . . .
. . . . . . . . . . . . . . . . . . . . . . . . . . . . . . . . . . . . .
. . . . . . . . . . . . . . . . . . . . . . . . . . . . . . . . .
. . . . . . . . . . . . . . . . . . . . . . . . . . . . . . . . . . . . .
. . . . . . . . . . . . . . . . . . . . . . . . . .
. . . . . . . . . . . . . . . . . . . . . . . . . . . . . . . . . .
. . . . . . . . . . . . . . . . . . . . . . . . .
. . . . . . . . . . . . . . . . . . . . . . . . . . .
. . . . . . . . . . . . . . . . . . . . . . . . . . .
. . . . . . . . . . . . . . . . . . . . . . . . . . . . . . . . . . . . . .
. . . . . . . . . . . . . . .
. . . . . . . . . . . . . . . . . .
. . . . . . . . . . . . . . . . . . . . . . . . . .
. . . . . . . . . . . . . . . . . . . . . . .
. . .
115
115
115
115
116
116
117
117
117
117
118
120
120
122
122
122
122
122
122
122
122
122
123
123
123
1Forord
Kære kunde
Vi er glade for, at du har valgt STIHL. Vi udvikler og
producerer vores produkter i topkvalitet efter vores kunders
behov. Dermed kan vi fremstille produkter med høj
pålidelighed, selv ved ekstrem belastning.
STIHL står også for topkvalitet ved service. Vores
forhandlere giver garanti for kompetent rådgivning og
vejledning samt omfattende teknisk service.
Vi takker for din tillid og håber, at du får stor glæde af dit
STIHL-produkt.
Dr. Nikolas Stihl
VIGTIGT! SKAL LÆSES FØR BRUG OG OPBEVARES.
2 Oplysninger om denne
brugsvejledning
2.1 Gældende dokumenter
De lokale sikkerhedsforskrifter er gældende.
► Ud over denne brugsvejledning skal følgende dokumenter
læses, forstås og opbevares:
– Sikkerhedsanvisninger til batteriet STIHL AP
– Brugsanvisning til opladere STIHL AL 101, 300, 500
– Sikkerhedsinformationer til STIHL batterier og
produkter med indbygget batteri: www.stihl.com/safetydata-sheets
0458-285-9721-C
95
Page 98

dansk
3 Oversigt
2.2 Markering af advarselshenvisninger i teksten
FARE
Henvisningen gør opmærksom på farer, som medfører
alvorlige kvæstelser eller død.
► De nævnte foranstaltninger kan medføre alvorlige
kvæstelser eller død.
ADVARSEL
Henvisningen henviser til farer, som kan medføre alvorlige
kvæstelser eller død.
► De nævnte foranstaltninger kan medføre alvorlige
kvæstelser eller død.
BEMÆRK
Henvisningen henviser til farer, som kan medføre materielle
skader.
► De nævnte foranstaltninger kan forhindre materielle
skader.
2.3 Symboler i teksten
Dette symbol henviser til et kapitel i denne
brugsvejledning.
Til dette kapitel findes en tilhørende video.
3Oversigt
3.1 Grensaks
9930XXXXX
YYEHXXXXX
#
1
2
1 Klinge
Klingen skærer grenen.
2Modklinge
Modklingen tjener som støtte for grenen.
3 Kontaktarm
Kontaktarmen åbner og lukker klingen.
4 Betjeningshåndtag
Betjeningshåndtaget anvendes til at betjene, holde og
føre grensaksen.
5 Stikkontakt
Stikkontakten bruges til at tilslutte tilslutningsledningens
stik.
4
3
5
0000-GXX-4072-A0
96
# Maskinnummer (9930xxxxx) og identifikationsnummer
(YYEHxxxxx)
0458-285-9721-C
Page 99

3 Oversigt
A
dansk
3.2 Bæresystem og batteri
1
2
3
4
4
1312
5
6
7
14
11
1 Tilslutningsledning
Tilslutningsledningen forbinder grensaksen med
styreenheden.
2 Forbindelsesstik til styreenhed
Forbindelsesstikket forbinder batteriet med
styreenheden.
3 Styreenhed
Styreenheden styrer grensaksens funktioner.
4 Styreenhed
Styreenheden er beregnet til at indstille grensaksen.
5 Display
Displayet viser informationer og fejl.
6 Styrearm
Styrearmen er beregnet til navigation i styreenhedens
menu.
7 Tænd-/sluk-kontakt
Tænd-/sluk-kontakten tænder og slukker for grensaksen.
8 Taske
Tasken er beregnet til opbevaring af tilbehør.
9 Batteritaske
Batteritasken holder batteriet.
10 Hylster
Hylsteret holder grensaksen under transport og
opbevaring.
11 Tilslutningsledningens stik
Tilslutningsledningens stik forbinder grensaksen med
tilslutningsledningen.
12 LED-lys
LED-lysene viser batteriets ladetilstand og fejl.
13 Trykknap
Trykknappen aktiverer LED-lysene på batteriet.
14 Batteri
Batteriet forsyner grensaksen med energi.
# Effektskilt med maskinnummer
0000-GXX-4073-A1
3.3 Symboler
Symbolerne, der kan være at finde på grensaks,
bæresystem og batteri, har følgende betydning:
1 LED lyser rødt. Batteriet er for varmt eller for
koldt.
4 LED'er blinker rødt. Der er en fejl i batteriet.
Garanteret lydeffektniveau iht. direktivet
L
W
2000/14/EF i dB(A) for at kunne sammenligne
lydemissioner fra produkter.
0458-285-9721-C
97
Page 100

dansk
4 Sikkerhedshenvisninger
Angivelsen ved siden af symbolet henviser til
batteriets energiindhold iht. celleproducentens
specifikation. Det energiindhold, som er til rådighed
for anvendelsen, er lavere.
Produktet må ikke bortskaffes som
husholdningsaffald.
4 Sikkerhedshenvisninger
4.1 Advarselssymboler
Advarselssymbolerne på grensaksen og batteriet betyder
følgende:
Følg sikkerhedsanvisningerne og
foranstaltningerne i disse.
Sørg for at læse, forstå og opbevare denne
brugsvejledning.
Berør ikke klingen, når den bevæger sig.
Overhold det tilladte temperaturområde for
batteriet.
4.2 Formålsbestemt anvendelse
Grensaks STIHL ASA 85 er beregnet til at klippe vinstokke
og buske med en maksimal grendiameter på 45 mm i
vingårde, frugtplantager og ved pasning af grønne områder.
Grensaksen må ikke anvendes i regnvejr.
Grensaksen forsynes med energi fra et batteri STIHL AP.
ADVARSEL
■ Batterier, som ikke er godkendt af STIHL til grensaksen,
kan forårsage brande og eksplosioner. Personer kan blive
alvorligt kvæstet eller dræbt, og der kan opstå materielle
skader.
► Anvend grensaksen med et batteri STIHL AP.
■ Hvis grensaksen eller batteriet ikke anvendes i
overensstemmelse med formålet, kan personer blive
kvæstet eller dræbt, og der kan opstå materielle skader.
► Grensaksen skal anvendes som beskrevet i denne
brugsvejledning.
► Anvend batteriet, som det er beskrevet i denne
brugsanvisning.
98
Tag batteriet ud under arbejdsafbrydelser,
transport, opbevaring, vedligeholdelse eller
reparation.
Beskyt batteriet mod varme og ild.
Batteriet må ikke nedsænkes i væsker.
4.3 Krav til brugeren
ADVARSEL
■ Brugere, der ikke er blevet instrueret, kan ikke genkende
eller vurdere de farer, grensaksen og batteriet giver
anledning til. Brugeren eller andre personer kan pådrage
sig alvorlige kvæstelser eller udsættes for livsfare.
0458-285-9721-C
 Loading...