

STIHL ADG 2
{
Gebrauchsanleitung
Instruction Manual
Notice d’emploi
Manual de instrucciones
Skötselanvisning
Käyttöohje
Istruzioni d’uso
Betjeningsvejledning
Bruksanvisning
Használati utasítás
Instruções de serviço
Handleiding
Instrukcja użytkowania

D Gebrauchsanleitung
1 - 10
G Instruction Manual
11 - 18
F Notice d’emploi
19 - 28
E Manual de instrucciones
29 - 37
S Skötselanvisning
38 - 46
f Käyttöohje
47 - 55
I Istruzioni d’uso
56 - 65
d Betjeningsvejledning
66 - 74
N Bruksanvisning
75 - 83
H Használati utasítás
84 - 92
P Instruções de serviço
93 - 101
n Handleiding
102 - 111
p Instrukcja użytkowania
112 - 121

Inhaltsverzeichnis
deutsch
1 Vorwort
. . . . . . . . . . . . . . . . . . . . . . . . . . . . . . . . . . . . . . . . . . . . .
2 Informationen zu dieser Gebrauchsanleitung
2.1 Kennzeichnung der Warnhinweise im Text
2.2 Symbole im Text
3 Übersicht
. . . . . . . . . . . . . . . . . . . . . . . . . . . . . . . . . . . . . . . . . . . .
3.1 Diagnosegerät
4 Sicherheitshinweise
4.1 Warnsymbole
Original-GebrauchsanleitungGedruckt auf chlorfrei gebleichtem Papier.
4.2 Bestimmungsgemäße Verwendung
4.3 Anforderungen an den Benutzer
4.4 Arbeitsbereich und Umgebung
4.5 Sicherheitsgerechter Zustand
4.6 Diagnostizieren
4.7 Aufbewahren
5 Diagnosegerät vorbereiten
. . . . . . . . . . . . . . . . . . . . . . . . . . . . . . . . . . . .
. . . . . . . . . . . . . . . . . . . . . . . . . . . . . . . . . . . . . .
. . . . . . . . . . . . . . . . . . . . . . . . . . . . . . . . .
. . . . . . . . . . . . . . . . . . . . . . . . . . . . . . . . . . . . . . .
. . . . . . . . . . . . . . . . . . . . .
. . . . . . . . . . . . . . . . . . . . . .
. . . . . . . . . . . . . . . . . . . . . . .
. . . . . . . . . . . . . . . . . . . . . . . . . . . . . . . . . . . . .
. . . . . . . . . . . . . . . . . . . . . . . . . . . . . . . . . . . . . . . .
. . . . . . . . . . . . . . . . . . . . . . . . . .
5.1 Diagnosegerät an eine Steckdose anschließen
5.2 Diagnosegerät an einen Computer anschließen
5.3 Anzeigesprache einstellen
5.4 Diagnosegerät aktualisieren
6 LED
. . . . . . . . . . . . . . . . . . . . . . . . . . . . . . . . . . . . . . . . . . . . . . . . .
6.1 LED am Diagnosegerät
7 Diagnose
7.1 Akku-Produkt mit dem Diagnosegerät prüfen
Druckfarben enthalten pflanzliche Öle, Papier ist recycelbar.
. . . . . . . . . . . . . . . . . . . . . . . . . . . . . . . . . . . . . . . . . . . .
8 Diagnosegerät aufbewahren
8.1 Diagnosegerät aufbewahren
9 Diagnosegerät reinigen
9.1 Diagnosegerät reinigen
. . . . . . . . . . . . . . . . . . . . . . . . . . .
. . . . . . . . . . . . . . . . . . . . . . . . .
. . . . . . . . . . . . . . . . . . . . . . . . . . . . . .
. . . . . . . . . . . . . . . . . . . . . . . . .
. . . . . . . . . . . . . . . . . . . . . . . . .
. . . . . . . . . . . . . . . . . . . . . . . . . . . . . .
. . . . . . . . . . . . . . . . . . . . . . . . . . . . . .
10 Diagnosegerät warten und reparieren
10.1 Diagnosegerät warten und reparieren
11 Störungen beheben
. . . . . . . . . . . . . . . . . . . . . . . . . . . . . . . . .
11.1 Störungen des Diagnosegeräts beheben
12 Technische Daten
. . . . . . . . . . . . . . . . . . . . . . . . . . . . . . . . . . .
. . . . . . . .
. . . . . . . . . . .
. . . . . . . . . . . . . . . . . .
. . . . . .
. . . . .
. . . . . . . .
. . . . . . . . . . . . . . .
. . . . . . . . . . . . . . .
. . . . . . . . . . . .
12.1 Diagnosegerät STIHL ADG 2
2
12.2 REACH
2
13 Ersatzteile und Zubehör
2
13.1 Ersatzteile und Zubehör
2
14 Diagnosegerät entsorgen
2
14.1 Diagnosegerät entsorgen
2
15 EU-Konformitätserklärung
3
15.1 Diagnosegerät STIHL ADG 2
3
16 Anschriften
3
16.1 STIHL Hauptverwaltung
4
16.2 STIHL Vertriebsgesellschaften
4
16.3 STIHL Importeure
5
. . . . . . . . . . . . . . . . . . . . . . . . . . . . . . . . . . . . . . . . . . . . .
. . . . . . . . . . . . . . . . . . . . . . . . . . . . . . . . . . . . . . . . . .
5
6
6
6
6
6
7
7
7
7
7
8
8
8
8
8
8
8
8
9
. . . . . . . . . . . . . . . . . . . . . . .
. . . . . . . . . . . . . . . . . . . . . . . . . . . . .
. . . . . . . . . . . . . . . . . . . . . . . . . . . . .
. . . . . . . . . . . . . . . . . . . . . . . . . . .
. . . . . . . . . . . . . . . . . . . . . . . . . . .
. . . . . . . . . . . . . . . . . . . . . . . . . . .
. . . . . . . . . . . . . . . . . . . . . . .
. . . . . . . . . . . . . . . . . . . . . . . . . . . . .
. . . . . . . . . . . . . . . . . . . . . .
. . . . . . . . . . . . . . . . . . . . . . . . . . . . . . . . . .
9
9
9
9
9
9
9
9
9
9
9
10
{
© ANDREAS STIHL AG & Co. KG 2018
0458-757-9921-B. VA9.H18.
0000007429_007_D
0458-757-9921-B
Diese Gebrauchsanleitung ist urheberrechtlich geschützt. Alle Rechte bleiben vorbehalten, besonders das Recht der Vervielfältigung, Übersetzung und der Verarbeitung mit elektronischen Systemen.
1

deutsch
1 Vorwort
1Vorwort
Liebe Kundin, lieber Kunde,
es freut uns, dass Sie sich für STIHL entschieden haben.
Wir entwickeln und fertigen unsere Produkte in
Spitzenqualität entsprechend der Bedürfnisse unserer
Kunden. So entstehen Produkte mit hoher Zuverlässigkeit
auch bei extremer Beanspruchung.
STIHL steht auch für Spitzenqualität beim Service. Unser
Fachhandel gewährleistet kompetente Beratung und
Einweisung sowie eine umfassende technische Betreuung.
Wir danken Ihnen für Ihr Vertrauen und wünschen Ihnen viel
Freude mit Ihrem STIHL Produkt.
Dr. Nikolas Stihl
WICHTIG! VOR GEBRAUCH LESEN UND
AUFBEWAHREN.
HINWEIS
Der Hinweis weist auf Gefahren hin, die zu Sachschaden
führen können.
► Die genannten Maßnahmen können Sachschaden
vermeiden.
2.2 Symbole im Text
Dieses Symbol verweist auf ein Kapitel in dieser
Gebrauchsanleitung.
3Übersicht
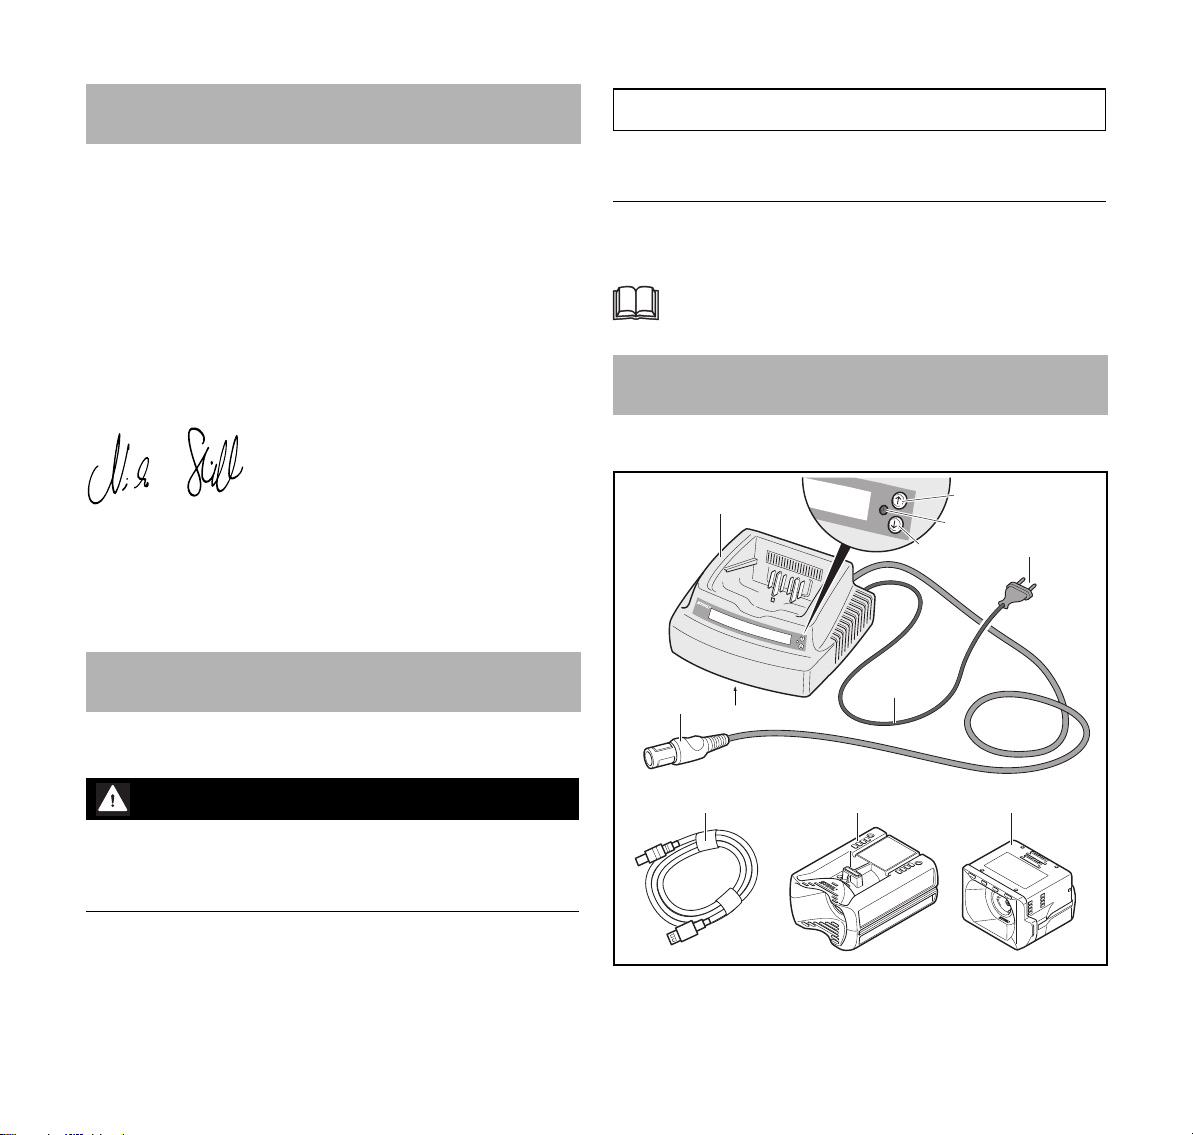
3.1 Diagnosegerät
1
2
3
4
5
6
2 Informationen zu dieser
Gebrauchsanleitung
2.1 Kennzeichnung der Warnhinweise im Text
WARNUNG
Der Hinweis weist auf Gefahren hin, die zu schweren
Verletzungen oder zum Tod führen können.
► Die genannten Maßnahmen können schwere
Verletzungen oder Tod vermeiden.
2
7
#
9
8
10 11
0000-GXX-1633-A0
0458-757-9921-B
4 Sicherheitshinweise
deutsch
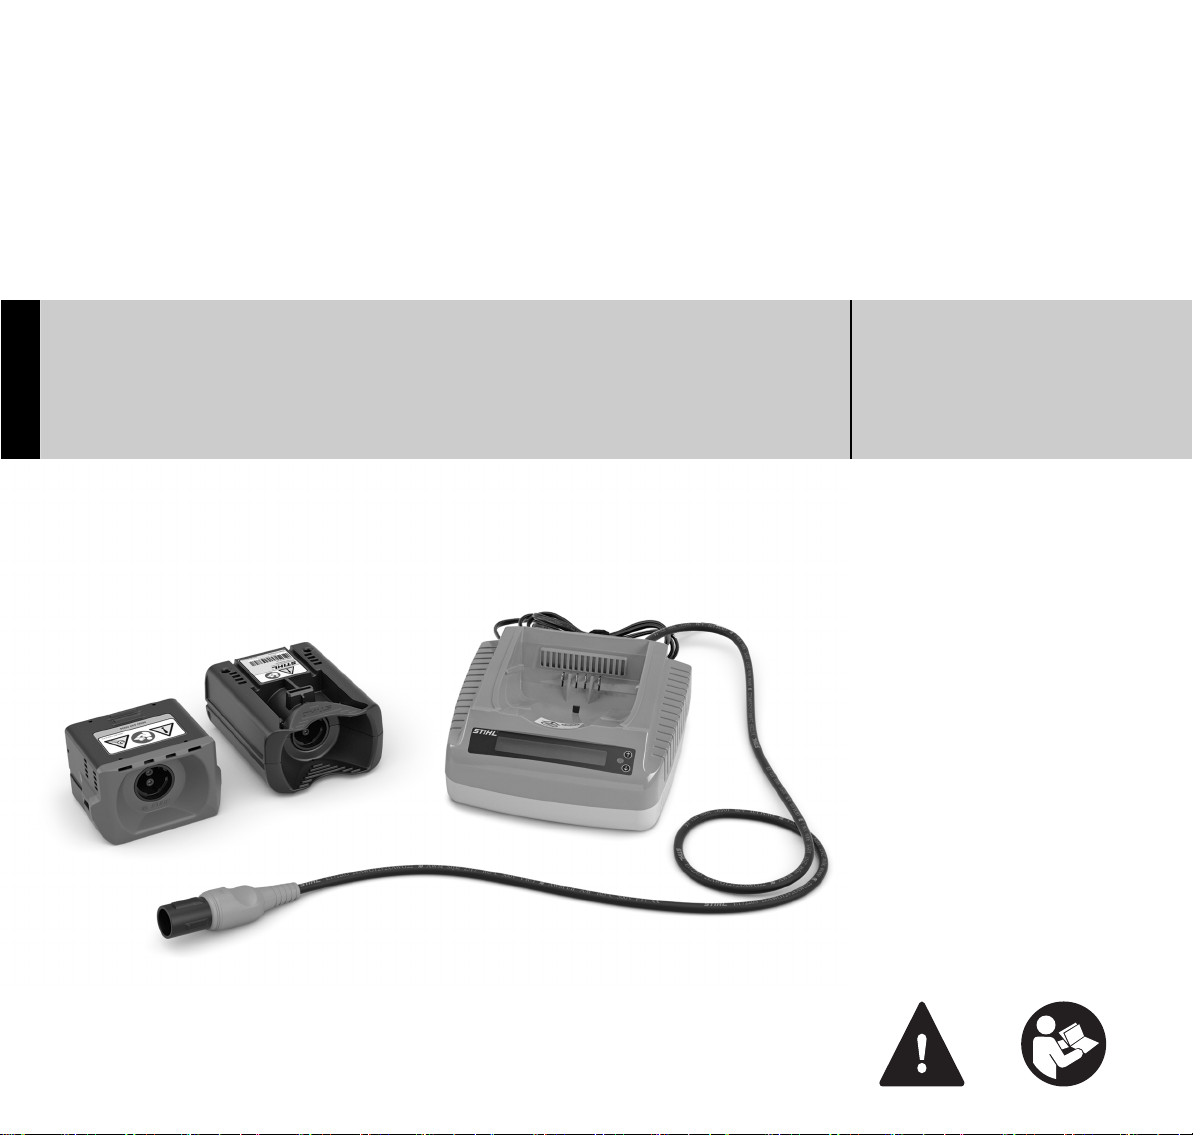
1 Diagnosegerät
Das Diagnosegerät prüft ein STIHL oder VIKING
Akku-Produkt.
2 Display
Das Display zeigt während der Diagnose Informationen
an.
3 Obere Drucktaste
Die obere Drucktaste dient zur Bedienung des
Diagnosegeräts.
4LED
Die LED zeigt den Status des Diagnosegeräts an.
5 Untere Drucktaste
Die untere Drucktaste dient zur Bedienung des
Diagnosegeräts.
6 Netzstecker
Der Netzstecker verbindet die Anschlussleit ung m it e iner
Steckdose
7 Diagnosestecker
Der Diagnosestecker verbindet das Diagnosegerät mit
einem STIHL Akku-Produkt, dem Adapter AP oder dem
Adapter AK.
8 Anschlussleitung
Die Anschlussleitung verbindet das Diagnosegerät mit
dem Netzstecker.
9 USB-Verbindungskabel
Das USB-Verbindungskabel verbindet das
Diagnosegerät mit einem Computer.
10 Adapter AP
Der Adapter AP verbindet das Diagnosegerät mit einem
STIHL Akku-Produkt mit einem Akkuschacht für Akkus
STIHL AP.
11 Adapter AK
Der Adapter AK verbindet das Diagnosegerät mit einem
STIHL Akku-Produkt mit einem Akkuschacht für Akkus
STIHL AK.
4 Sicherheitshinweise
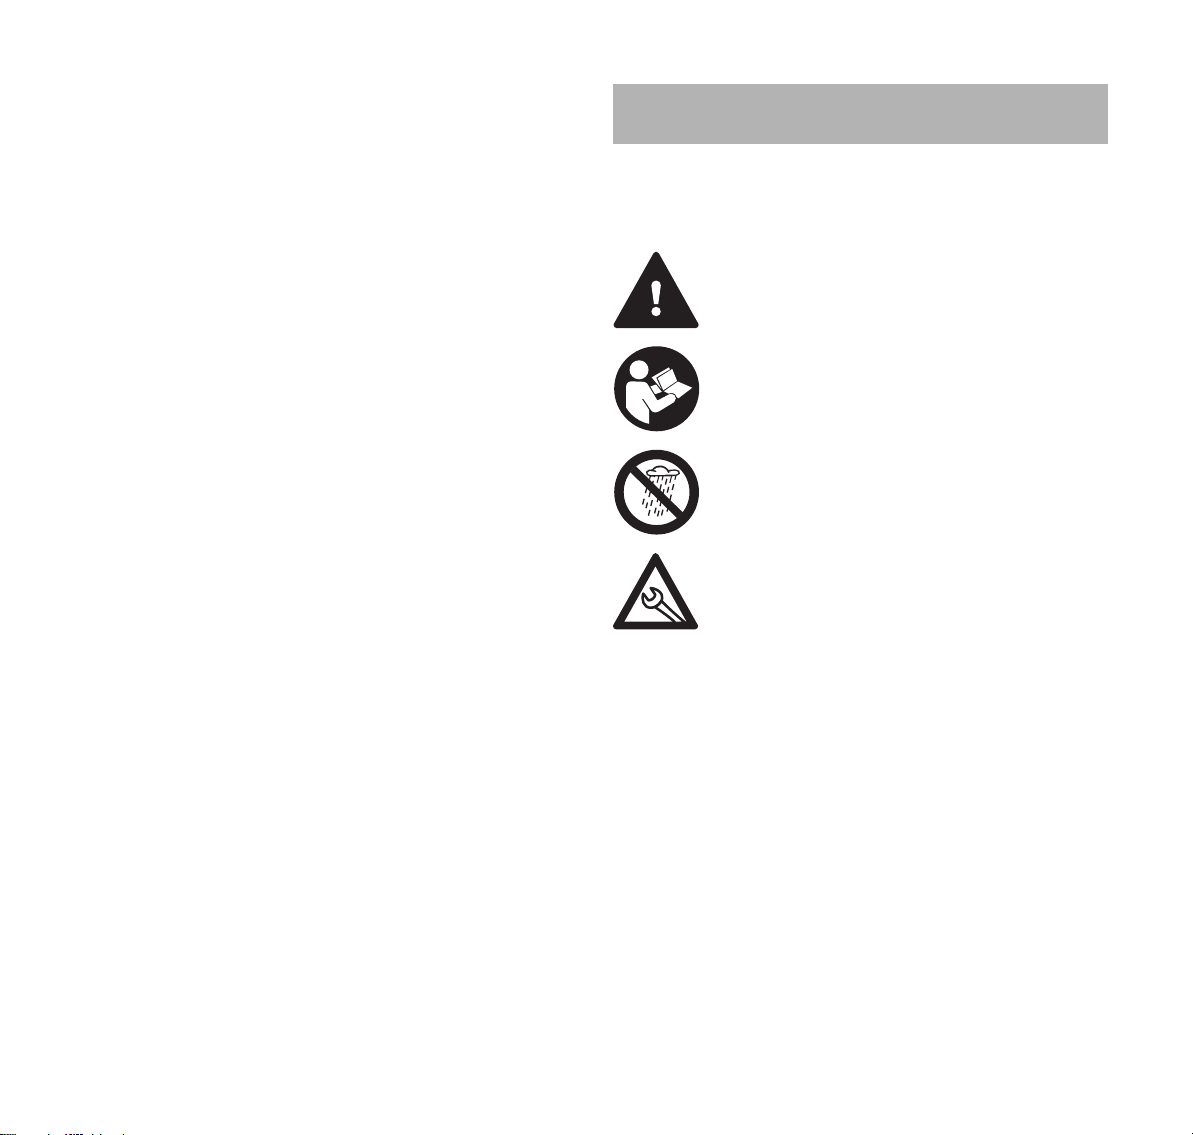
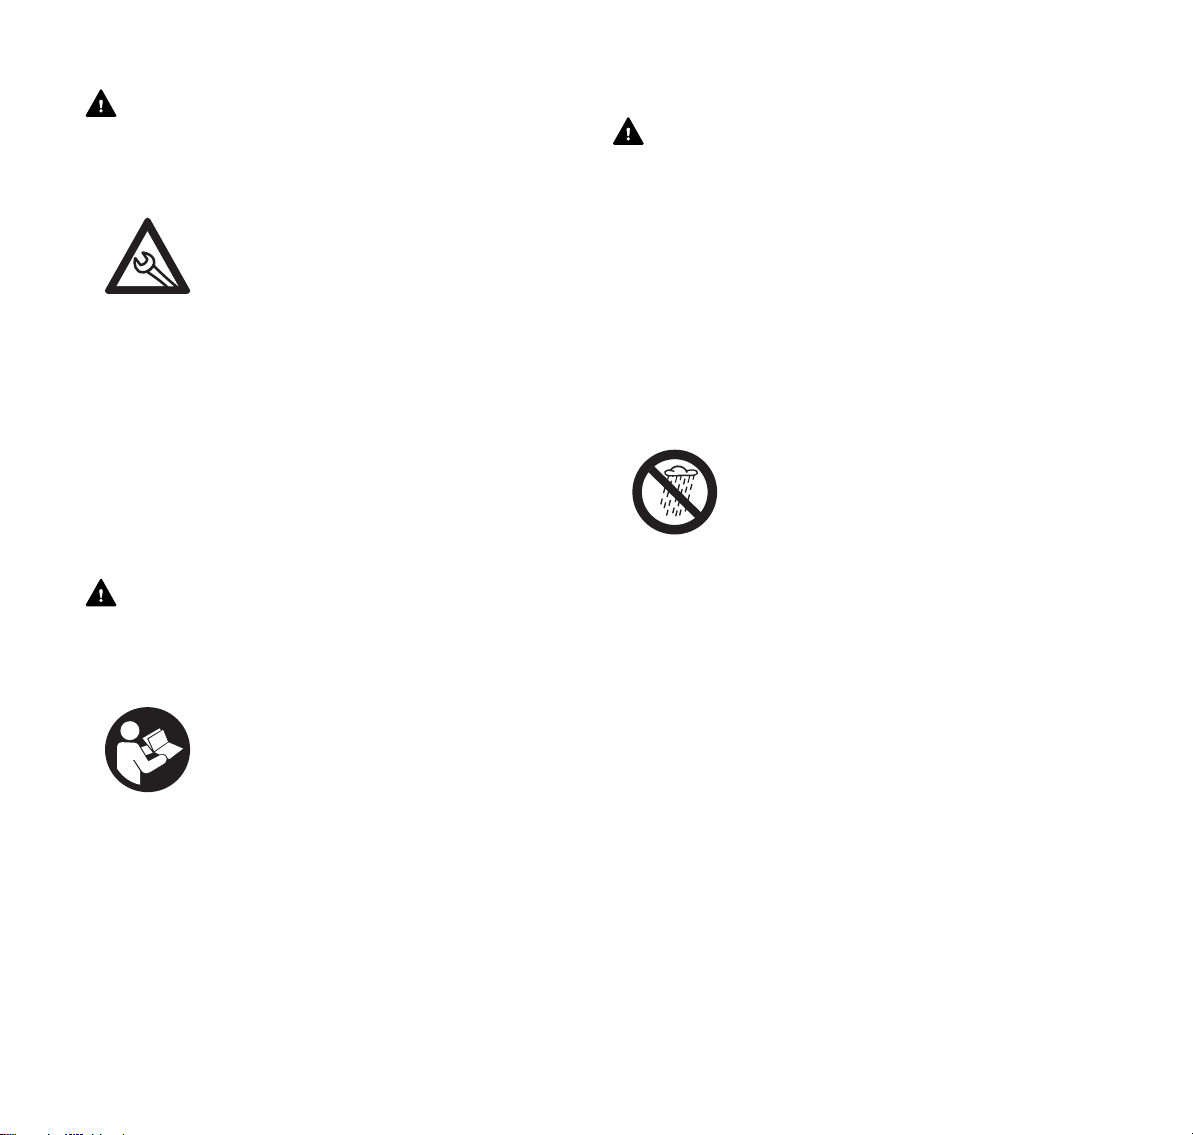
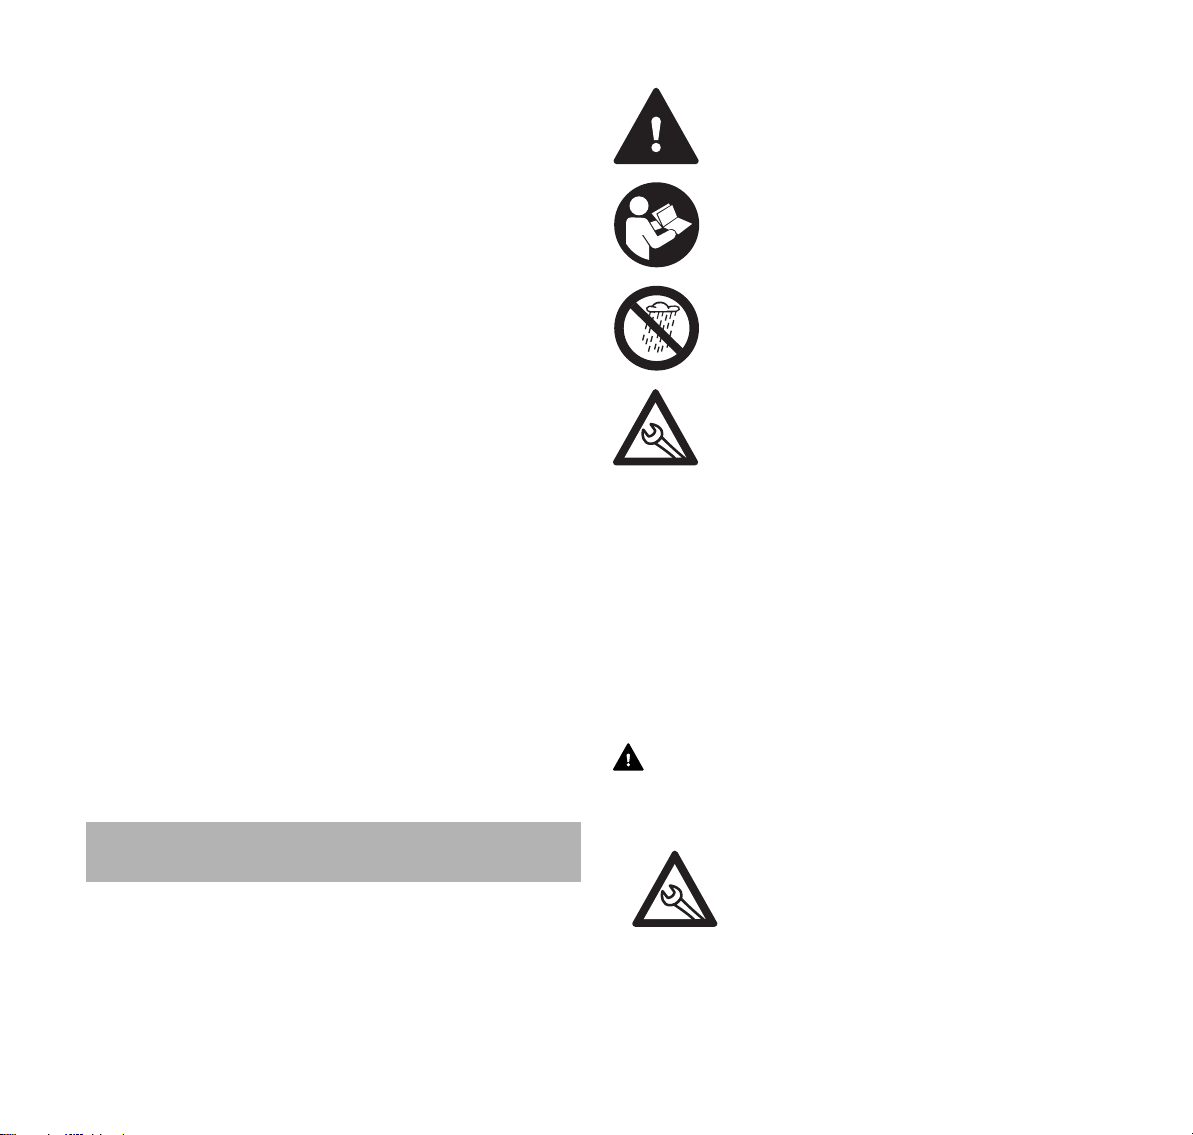
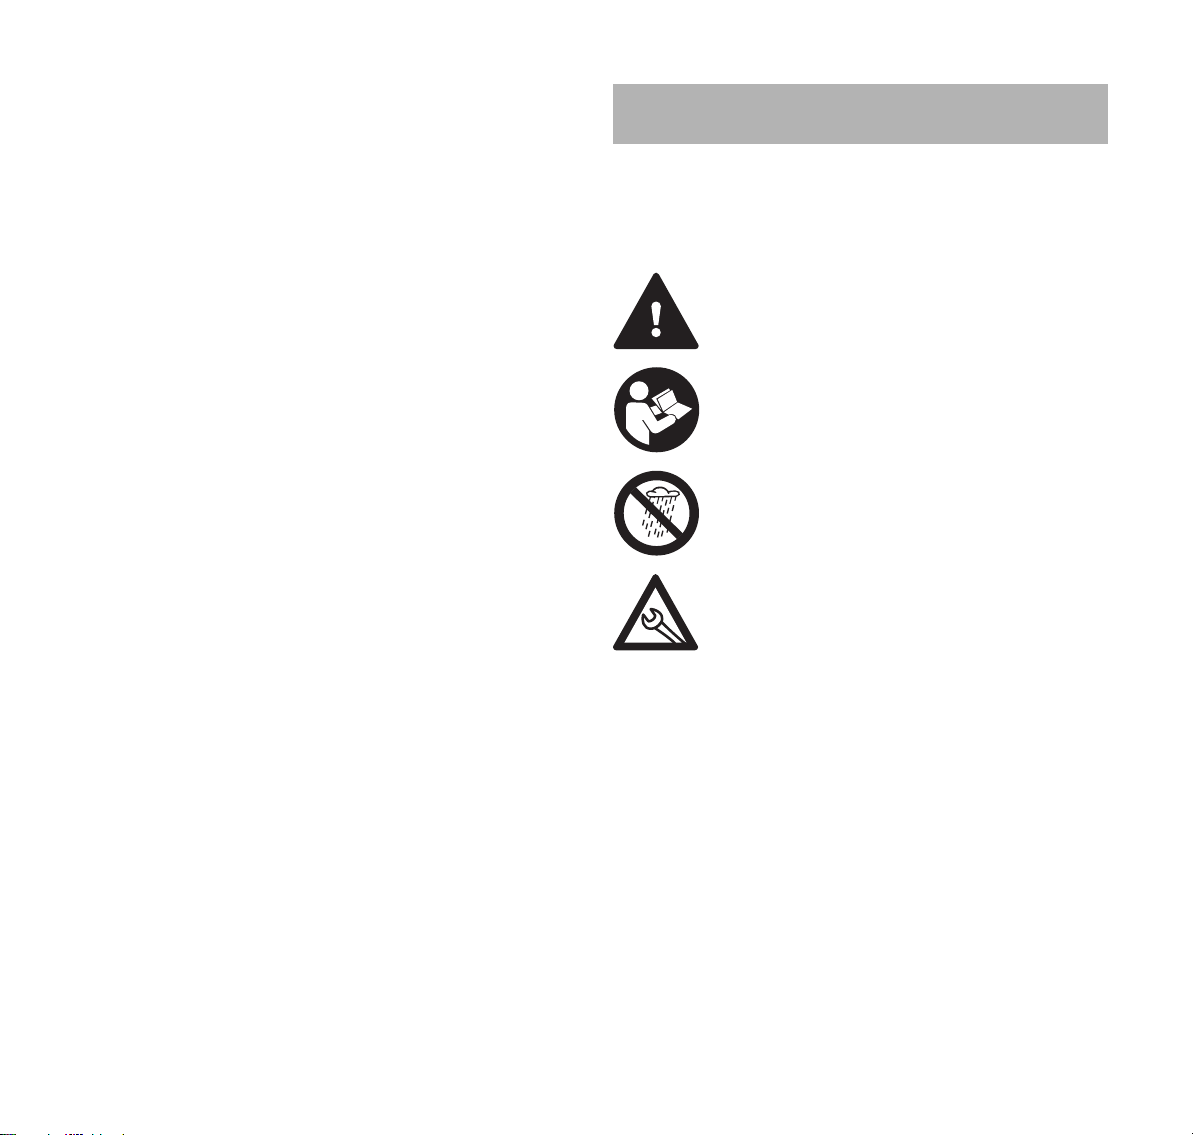
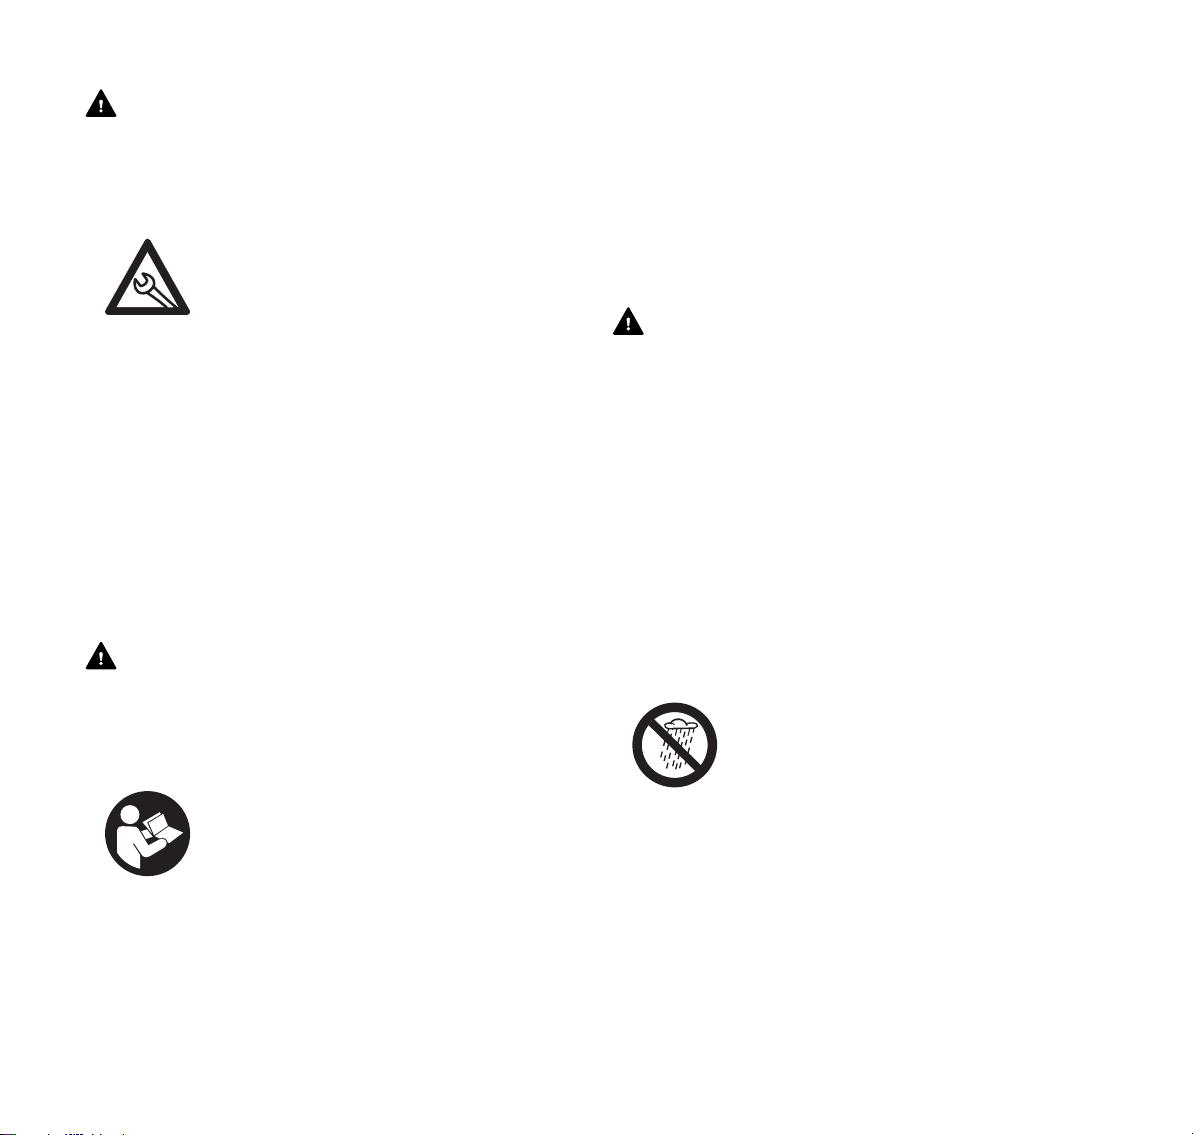
4.1 Warnsymbole
Die Warnsymbole auf dem Diagnosegerät, dem Adapter AP
und dem Adapter AK bedeuten Folgendes:
Sicherheitshinweise und deren Maßnahmen
beachten.
Gebrauchsanleitung lesen, verstehen und
aufbewahren.
Diagnosegerät vor Regen und Feuchtigkeit
schützen.
Adapter nur mit dem Diagnosegerät verwenden.
4.2 Bestimmungsgemäße Verwendung
Das Diagnosegerät STIHL ADG 2 dient zum Diagnostizieren
von STIHL und VIKING Akku-Produkten.
Das Diagnosegerät kann in Verbindung mit der STIHL
Diagnose-Software verwendet werden.
Der Adapter AP und der Adapter AK verbinden das
Diagnosegerät mit dem passenden STIHL oder VIKING
Akku-Produkt.
Der Adapter AK mit rotem Deckel darf nicht zum Betreiben
von STIHL oder VIKING Akku-Produkten verwendet werden.
# Leistungsschild mit Maschinennummer
0458-757-9921-B
3
deutsch
4 Sicherheitshinweise
WARNUNG
■ Adapter, die nicht von STIHL für dieses Diagnosegerät
freigegeben sind, können Brände und Explosionen
auslösen. Personen können schwer verletzt oder getötet
werden und Sachschaden kann entstehen.
► Diagnosegerät nur ohne Adapter oder mit
dem STIHL Adapter AP oder STIHL
Adapter AK verwenden.
■ Falls das Diagnosegerät, der Adapter AP und der
Adapter AK nicht bestimmungsgemäß verwendet werden,
können Personen schwer verletzt oder getötet werden
und Sachschaden kann entstehen.
► Diagnosegerät, Adapter AP und Adapter AK so
verwenden, wie es in dieser Gebrauchsanleitung
beschrieben ist.
► Adapter AK mit rotem Deckel nicht zum Betreiben von
STIHL oder VIKING Akku-Produkten verwenden.
4.3 Anforderungen an den Benutzer
WARNUNG
■ Benutzer ohne eine Unterweisung können die Gefahren
des Diagnosegeräts nicht erkennen oder nicht
einschätzen. Der Benutzer oder andere Personen können
schwer verletzt oder getötet werden.
► Gebrauchsanleitung lesen, verstehen und
aufbewahren.
► Falls das Diagnosegerät an eine andere Person
weitergegeben wird: Gebrauchsanleitung mitgeben.
► Sicherstellen, dass der Benutzer folgende
Anforderungen erfüllt:
– Der Benutzer ist ausgeruht.
– Der Benutzer ist volljährig.
– Der Benutzer ist nicht durch Alkohol, Medikamente
oder Drogen beeinträchtigt.
4.4 Arbeitsbereich und Umgebung
WARNUNG
■ Unbeteiligte Personen, Kinder und Tiere können die
Gefahren des Diagnosegeräts und des elektrischen
Stroms nicht erkennen und nicht einschätzen.
Unbeteiligte Personen, Kinder und Tiere können schwer
verletzt oder getötet werden.
► Unbeteiligte Personen, Kinder und Tiere aus fernhalten.
► Diagnosegerät nicht unbeaufsichtigt lassen.
► Sicherstellen, dass Kinder nicht mit dem Diagnosegerät
spielen können.
■ Das Diagnosegerät ist nicht wassergeschützt. Falls im
Regen oder in feuchter Umgebung gearbeitet wird, kann
das Diagnosegerät beschädigt werden.
► Nicht im Regen und nicht in feuchter
Umgebung betreiben.
■ Das Diagnosegerät ist nicht gegen alle
Umgebungseinflüsse geschützt. Falls das Diagnosegerät
bestimmten Umgebungseinflüssen ausgesetzt ist, kann
das Diagnosegerät in Brand geraten oder explodieren.
Personen können schwer verletzt werden und
Sachschaden kann entstehen.
► Diagnosegerät in einem geschlossenen und trockenen
Raum betreiben.
► Diagnosegerät nicht in einer leicht brennbaren und nicht
in einer explosiven Umgebung betreiben.
► Diagnosegerät nicht auf einem leicht brennbaren
Untergrund betreiben.
► Diagnosegerät im Temperaturbereich zwischen + 5 °C
und + 40 °C einsetzen und aufbewahren.
■ Personen können über die Anschlussleitung stolpern.
Personen können verletzt werden und das Diagnosegerät
kann beschädigt werden.
► Anschlussleitung flach auf dem Boden verlegen.
4
0458-757-9921-B

4 Sicherheitshinweise
deutsch
4.5 Sicherheitsgerechter Zustand
Das Diagnosegerät ist im sicherheitsgerechten Zustand,
falls folgende Bedingungen erfüllt sind:
– Das Diagnosegerät ist unbeschädigt.
– Das Diagnosegerät ist sauber und trocken.
WARNUNG
■ In einem nicht sicherheitsgerechten Zustand können
Bauteile nicht mehr richtig funktionieren und
Sicherheitseinrichtungen außer Kraft gesetzt werden.
Personen können schwer verletzt oder getötet werden.
► Ein unbeschädigtes Diagnosegerät verwenden.
► Falls das Diagnosegerät verschmutzt oder nass ist:
Diagnosegerät reinigen und trocknen lassen.
► Diagnosegerät nicht verändern.
► Gegenstände nicht in die Öffnungen des
Diagnosegeräts stecken.
► Elektrische Kontakte des Diagnosegeräts nicht mit
metallischen Gegenständen verbinden und
kurzschließen.
► Diagnosegerät nicht öffnen.
► Falls Unklarheiten bestehen: Einen STIHL Fachhändler
aufsuchen.
4.6 Diagnostizieren
Kontakt mit stromführenden Bauteilen kann durch folgende
Ursachen entstehen:
– Die Anschlussleitung ist beschädigt.
– Der Netzstecker ist beschädigt.
– Die Steckdose ist nicht richtig installiert.
WARNUNG
■ Kontakt mit stromführenden Bauteilen kann zu einem
Stromschlag führen. Der Benutzer kann schwer verletzt
oder getötet werden.
► Sicherstellen, dass die Anschlussleitung und der
Netzstecker unbeschädigt sind.
► Netzstecker in eine richtig installierte Steckdose
stecken.
■ Während des Diagnostizierens kann eine falsche
Netzspannung oder eine falsche Netzfrequenz zu einer
Überspannung im Diagnosegerät führen. Das
Diagnosegerät kann beschädigt werden.
► Sicherstellen, dass die Netzspannung und die
Netzfrequenz des Stromnetzes mit den Angaben auf
dem Leistungsschild des Diagnosegeräts
übereinstimmen.
■ Während des Diagnostizierens kann ein beschädigtes
oder ein defektes Diagnosegerät ungewöhnlich riechen
oder rauchen. Personen können verletzt werden und
Sachschaden kann entstehen.
► Netzstecker aus der Steckdose ziehen.
■ Das Diagnosegerät kann bei unzureichender
Wärmeabfuhr überhitzen und einen Brand auslösen.
Personen können schwer verletzt oder getötet werden
und Sachschaden kann entstehen.
► Diagnosegerät nicht abdecken.
0458-757-9921-B
5

deutsch
5 Diagnosegerät vorbereiten
4.7 Aufbewahren
WARNUNG
■ Kinder können die Gefahren eines Diagnosegeräts nicht
erkennen und nicht einschätzen. Kinder können schwer
verletzt oder getötet werden.
► Diagnosegerät außerhalb der Reichweite von Kindern
aufbewahren.
■ Das Diagnosegerät ist nicht gegen alle
Umgebungseinflüsse geschützt. Falls das Diagnosegerät
bestimmten Umgebungseinflüssen ausgesetzt wird, kann
das Diagnosegerät beschädigt werden.
► Falls das Diagnosegerät warm ist: Diagnosegerät
abkühlen lassen.
► Diagnosegerät sauber und trocken aufbewahren.
► Diagnosegerät in einem geschlossenen Raum
aufbewahren.
■ Die Anschlussleitung ist nicht dafür bestimmt, das
Diagnosegerät daran zu tragen oder aufzuhängen. Die
Anschlussleitung und das Diagnosegerät können
beschädigt werden.
► Diagnosegerät am Gehäuse greifen und festhalten.
5 Diagnosegerät vorbereiten
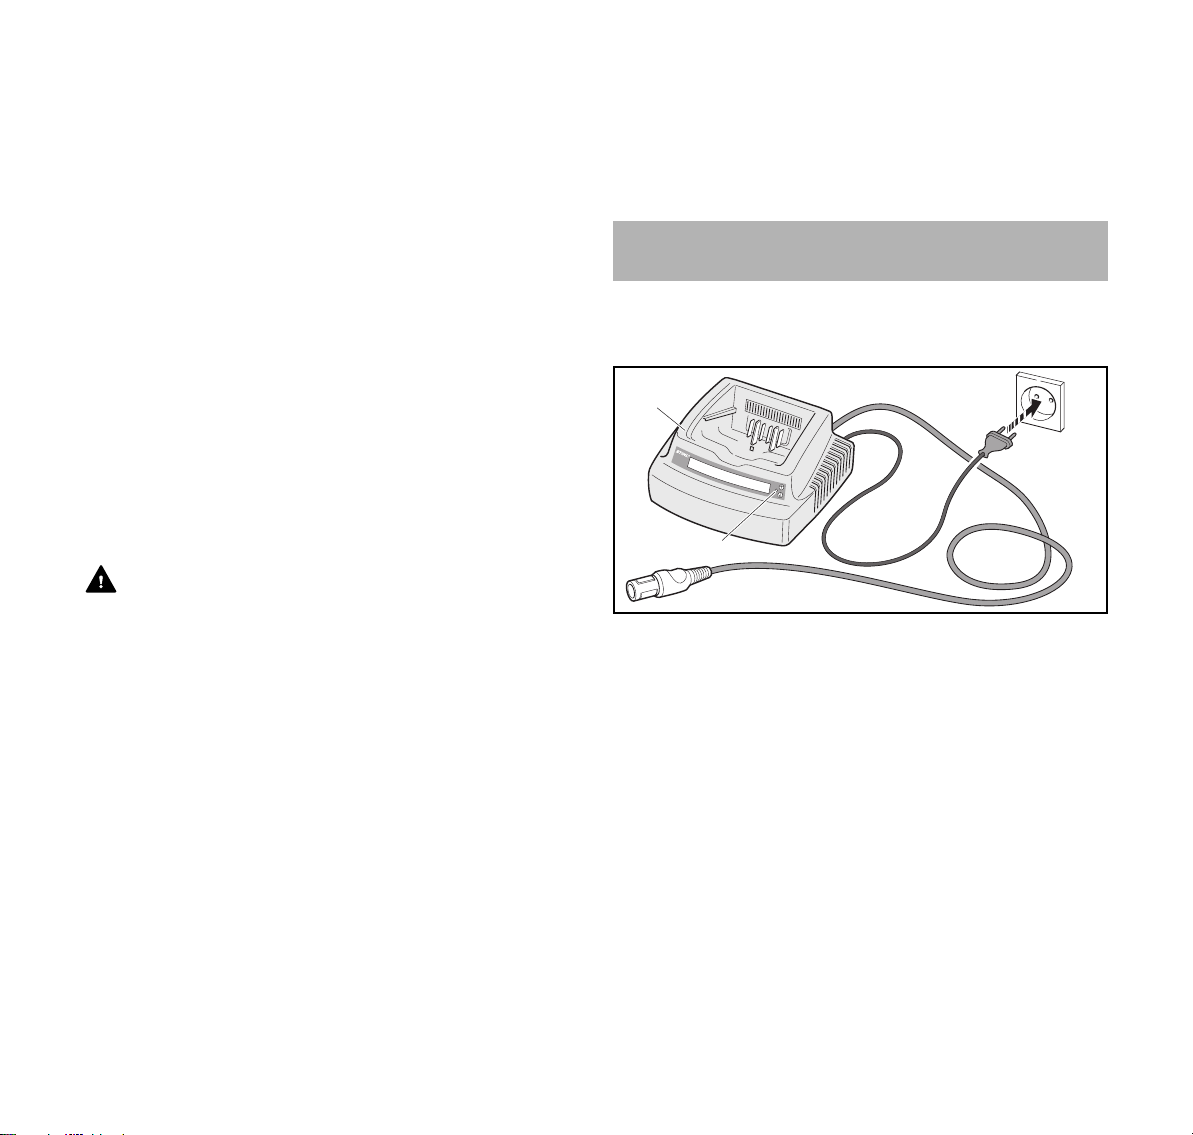
5.1 Diagnosegerät an eine Steckdose anschließen
1
2
3
5
4
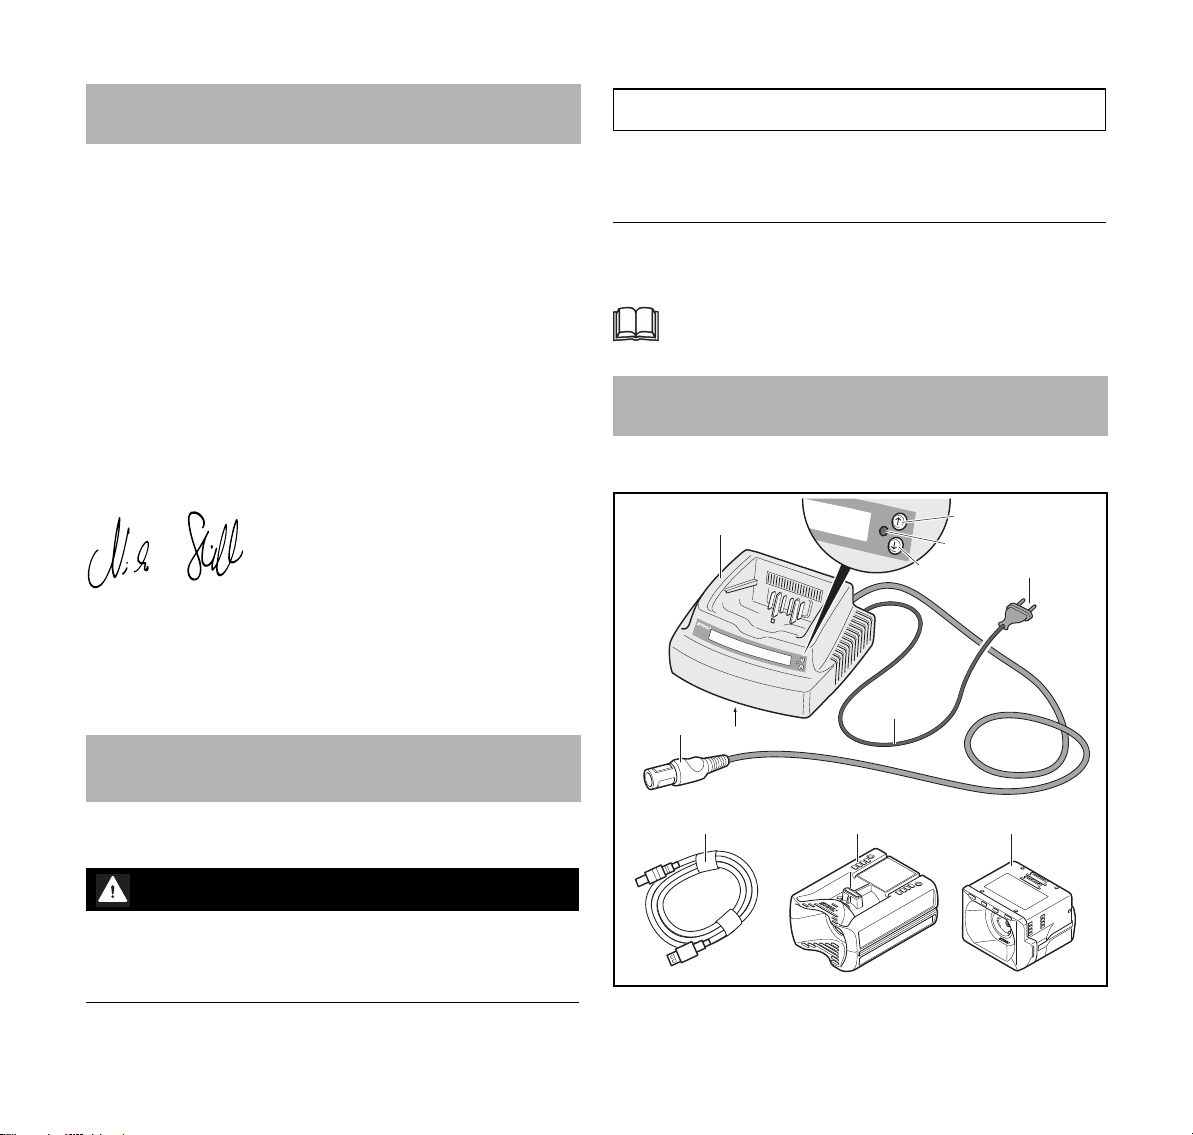
► Netzstecker (4) in eine gut zugängliche Steckdose (5)
stecken.
Das Diagnosegerät (1) führt einen Selbsttest durch. Die
LED (2) leuchtet ca. 1 Sekunde lang grün, ca. 1 Sekunde
lang gelb und dann ca. 1 Sekunde lang rot.
► Anschlussleitung (3) verlegen.
5.2 Diagnosegerät an einen Computer anschließen
Das Diagnosegerät kann in Verbindung mit der STIHL
Diagnose-Software verwendet werden. Dazu muss das
Diagnosegerät an einen Computer angeschlossen sein.
► STIHL Diagnose-Software auf dem Computer installieren.
► Diagnosegerät an eine Steckdose anschließen, @ 5.1.
► USB-Verbindungskabel an der Diagnosegerät
anschließen.
► USB-Verbindungskabel an den Computer anschließen.
Der Computer erkennt das Diagnosegerät automatisch.
► STIHL ADG 2 in der Diagnose-Software auswählen und
den Anweisungen der Diagnose-Software folgen.
5.3 Anzeigesprache einstellen
Auf dem Diagnosegerät ist im Auslieferungszustand die
Anzeigesprache Englisch verfügbar. Die gewünschte
Anzeigesprache kann in Verbindung zusammen mit der
STIHL Diagnose-Software eingestellt werden.
► Diagnosegerät an eine Steckdose anschließen, @ 5.1.
► Diagnosegerät an einen Computer anschließen, @ 5.2.
► Im Hauptbildschirm der STIHL Diagnose-Software links
oben „Firmware“, „ADG 2“ und „Aktualisierung“
auswählen.
► Das Länderkennzeichen der gewünschten
Anzeigesprache auswählen.
Die Firmware und die Anzeigesprache des
Diagnosegeräts werden automatisch aktualisiert.
Die Aktualisierung kann bis zu 20 Minuten dauern.
Wenn die Aktualisierung erfolgreich abgeschlossen ist, ist
die ausgewählte Anzeigesprache auf dem Diagnosegerät
0000-GXX-1635-A0
verfügbar.
6
0458-757-9921-B
6 LED
deutsch
5.4 Diagnosegerät aktualisieren
Neue STIHL oder VIKING Akku-Produkte und neue
Diagnose-Funktionen erfordern, dass das Diagnosegerät
aktualisiert wird. Das Diagnosegerät kann mit der STIHL
Diagnose-Software aktualisiert werden.
► Diagnosegerät an eine Steckdose anschließen, @ 5.1.
► Diagnosegerät an einen Computer anschließen, @ 5.2.
► Computer mit dem Internet verbinden.
► STIHL ADG 2 in der STIHL Diagnose-Software
auswählen und „Auf Aktualisierung prüfen“ auswählen.
Das Diagnosegerät wird automatisch aktualisiert.
Falls das Diagnosegerät nicht an einen Computer
angeschlossen ist oder der Computer nicht mit dem Internet
verbunden ist, kann das Diagnosegerät nicht automatisch
aktualisiert werden.
► Vertriebsgesellschaft oder Importeur aufsuchen.
6LED
6.1 LED am Diagnosegerät
Die LED zeigt den Status des Diagnosegeräts an:
– Die LED kann grün, gelb oder rot leuchten.
– Die LED kann gelb oder rot blinken.
Falls die LED gelb blinkt, muss der Benutzer am Produkt
eine Aktion ausführen.
Falls die LED rot blinkt, kann das folgende Bedeutungen
haben:
– Im Display wird ein Sicherheitshinweis angezeigt.
– Das Diagnosegerät muss aktualisiert werden, @ 5.4.
– Das Diagnosegerät ist defekt.
7 Diagnose
7.1 Akku-Produkt mit dem Diagnosegerät prüfen
► Diagnosegerät an eine Steckdose anschließen, @ 5.1.
► Falls das Diagnosegerät in Verbindung mit der STIHL
Diagnose-Software verwendet wird: Diagnosegerät an
einen Computer anschließen, @ 5.4.
► Akku STIHL AP oder Akku STIHL AK in das
Diagnosegerät einsetzen.
1 2
Falls die LED grün leuchtet, ist die geprüfte Funktion des
Akku-Produkts in Ordnung.
Falls die LED gelb leuchtet, ist die geprüfte Funktion des
Akku-Produkts in Ordnung. Im Fehlerspeicher des
Diagnosegeräts ist eine kurzzeitige Störung der Funktion
gespeichert.
Falls die LED rot leuchtet, ist die geprüfte Funktion des
Akku-Produkts defekt. Ein Code für die Störung wird
angezeigt.
0458-757-9921-B
0000-GXX-1638-A0
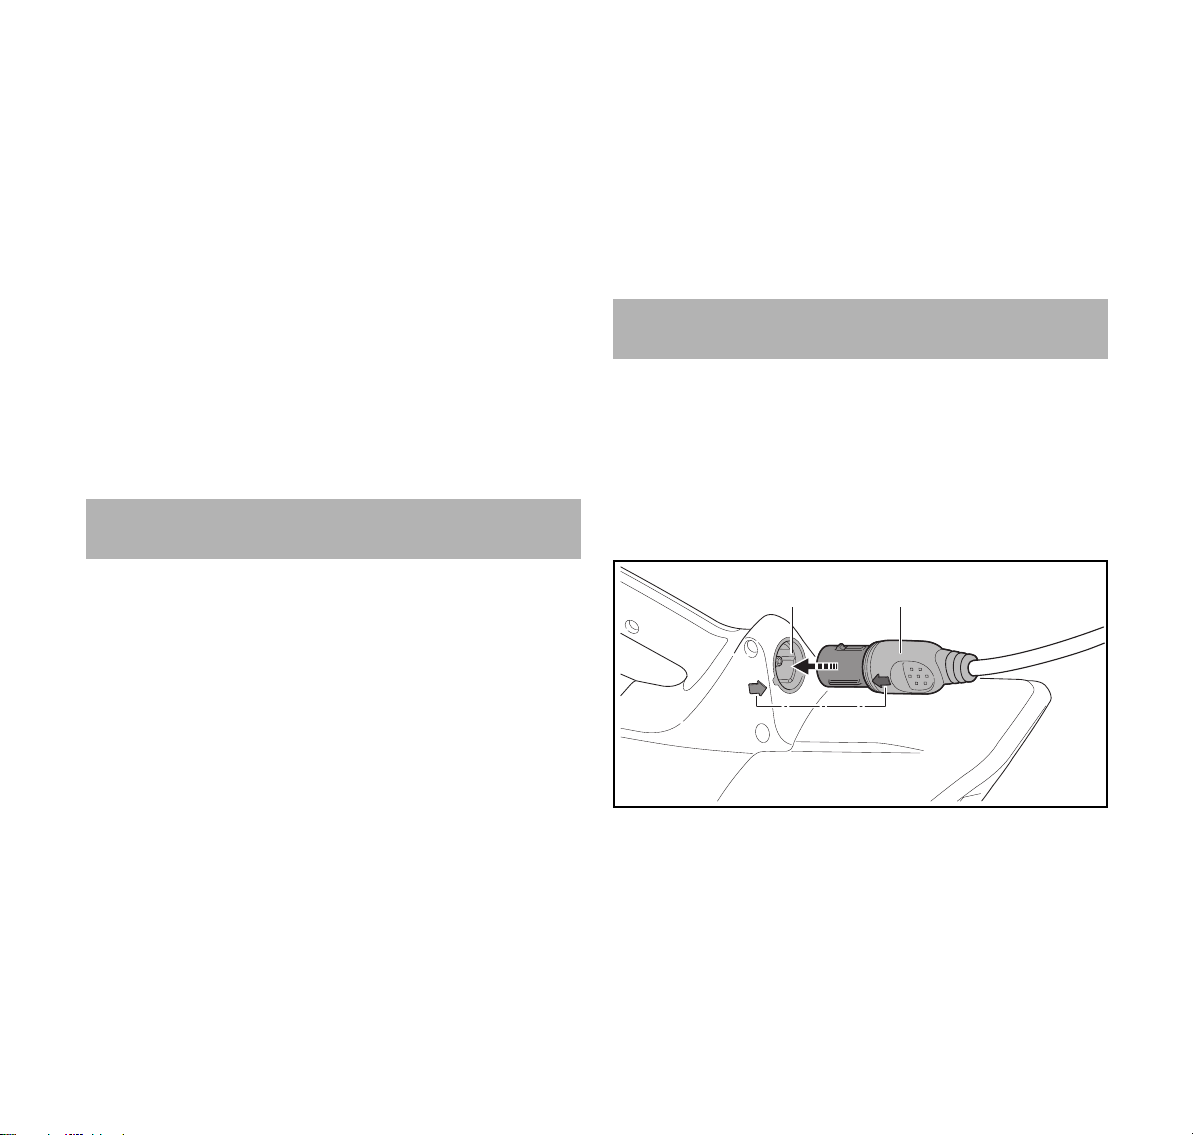
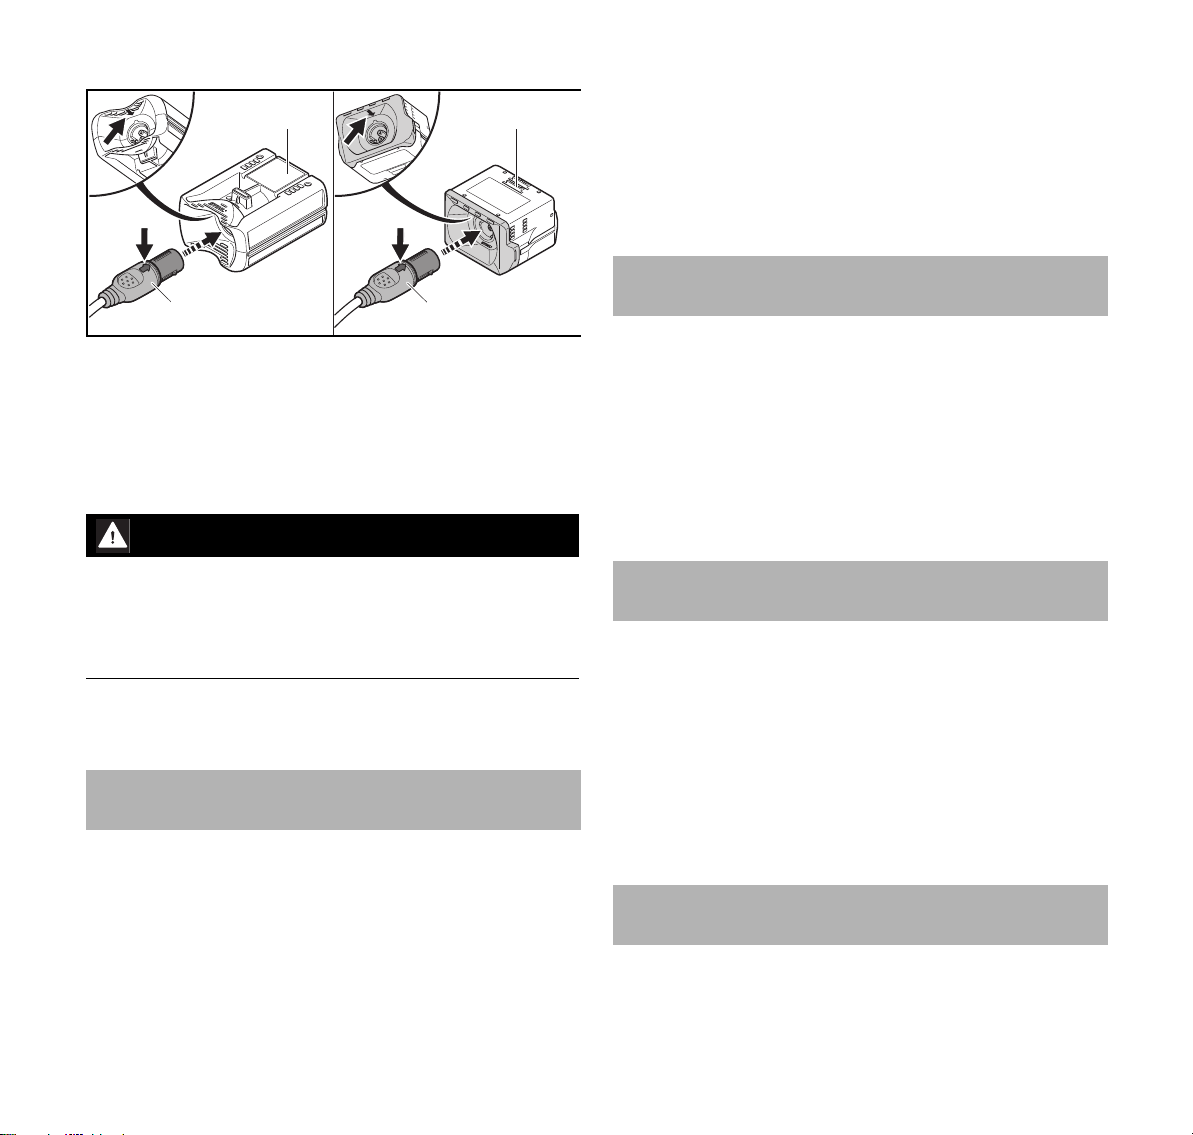
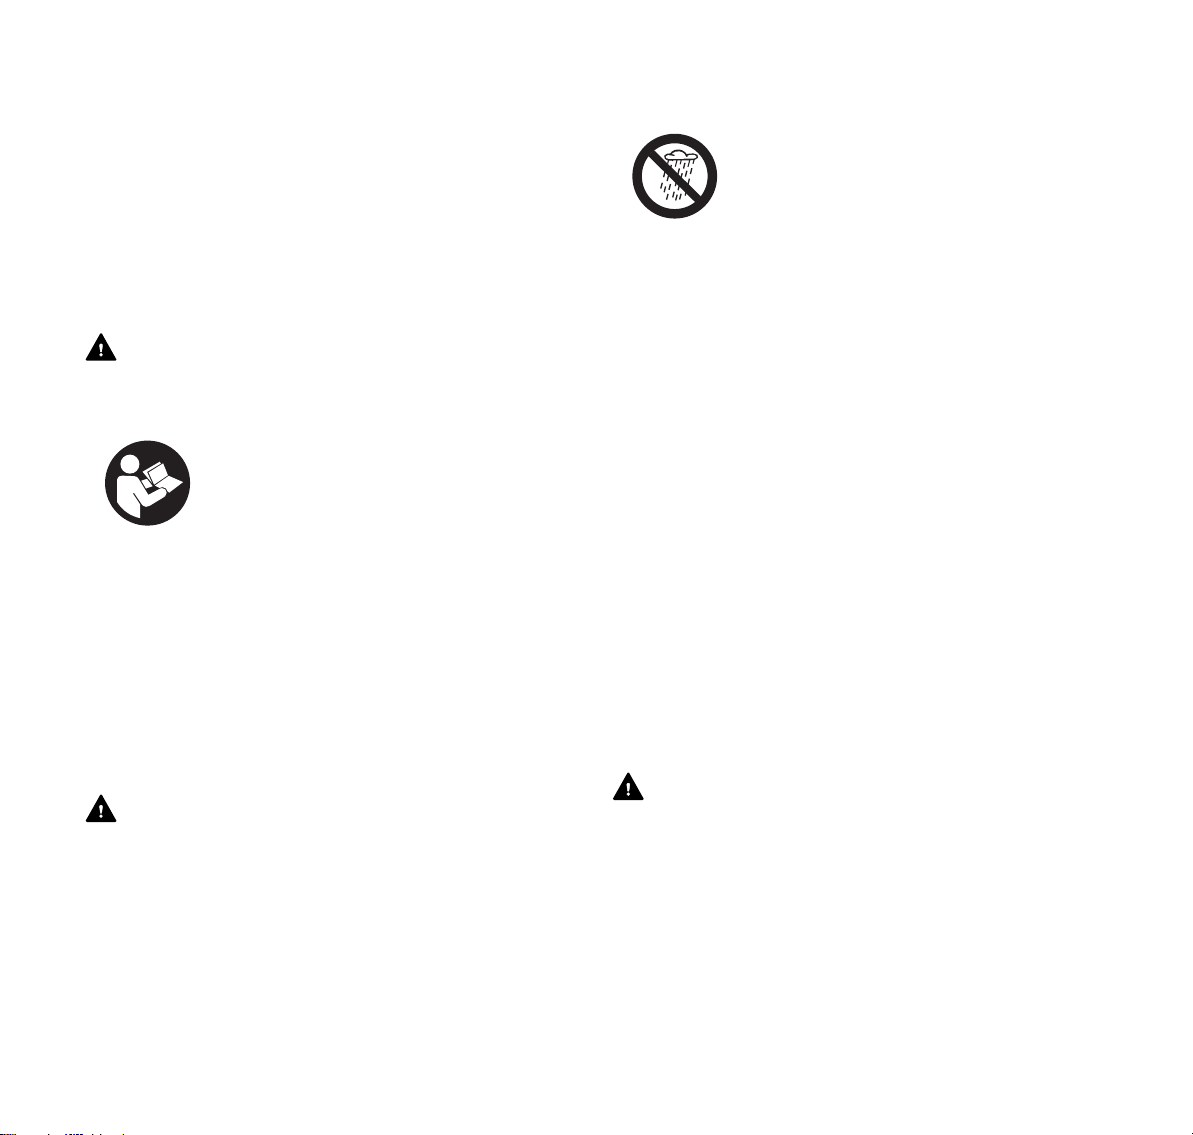
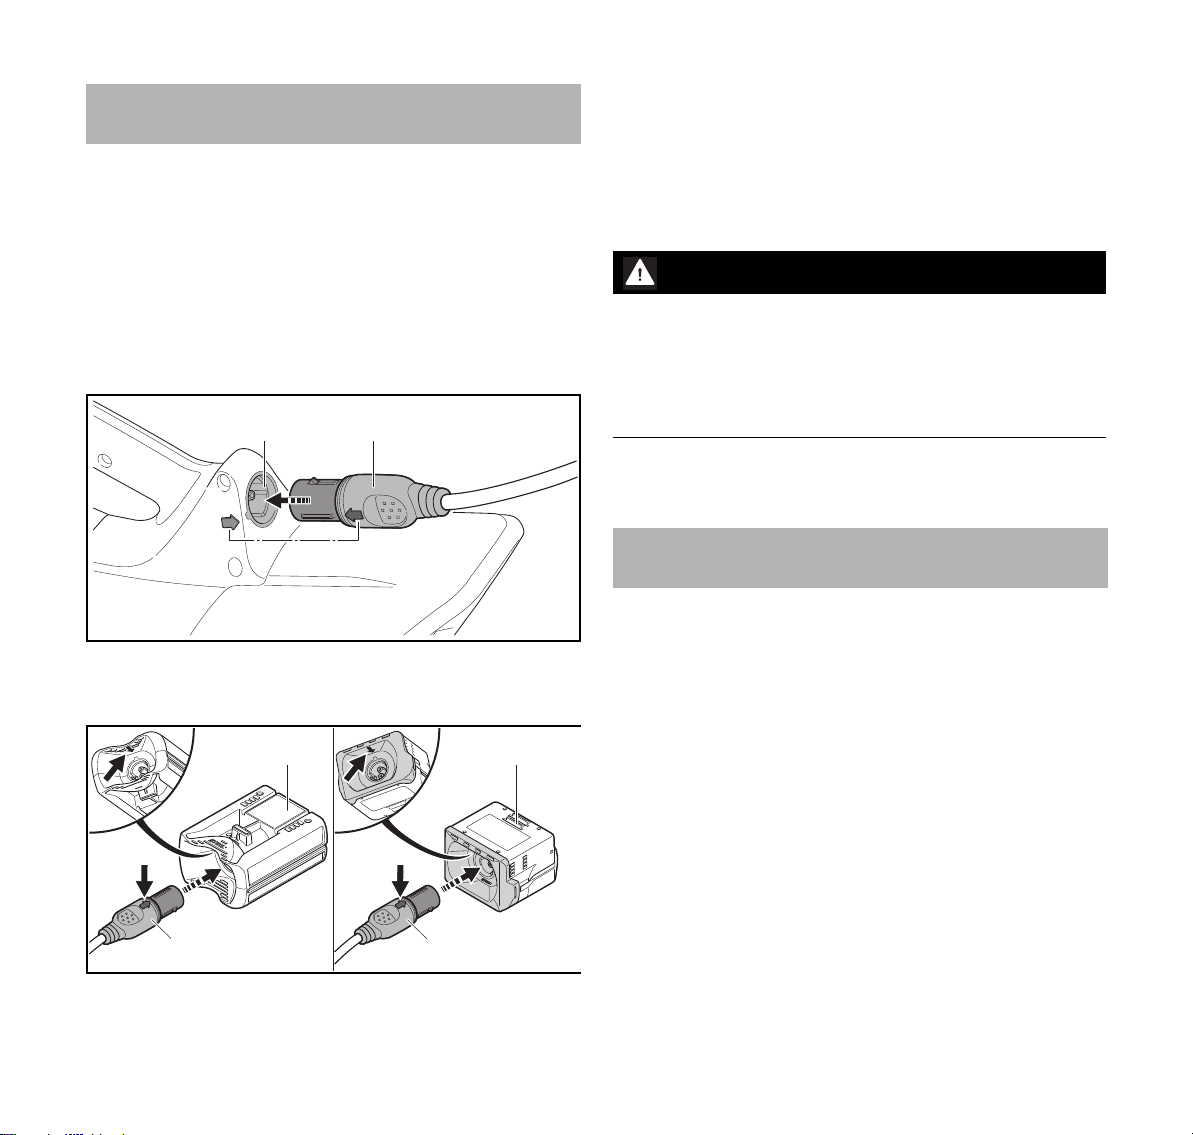
► Diagnosestecker (2) so in die Buchse (1) im Akku-Produkt
stecken, dass der Pfeil auf dem Diagnosestecker und der
Pfeil auf dem Akku-Produkt fluchten.
7
deutsch
2 3
1 1
0000-GXX-1639-A0
8 Diagnosegerät aufbewahren
– Das Diagnosegerät ist außerhalb der Reichweite von
Kindern.
– Das Diagnosegerät ist sauber und trocken.
– Das Diagnosegerät ist in einem geschlossenen Raum.
– Das Diagnosegerät ist nicht an der Anschlussleitung
aufgehängt.
9 Diagnosegerät reinigen
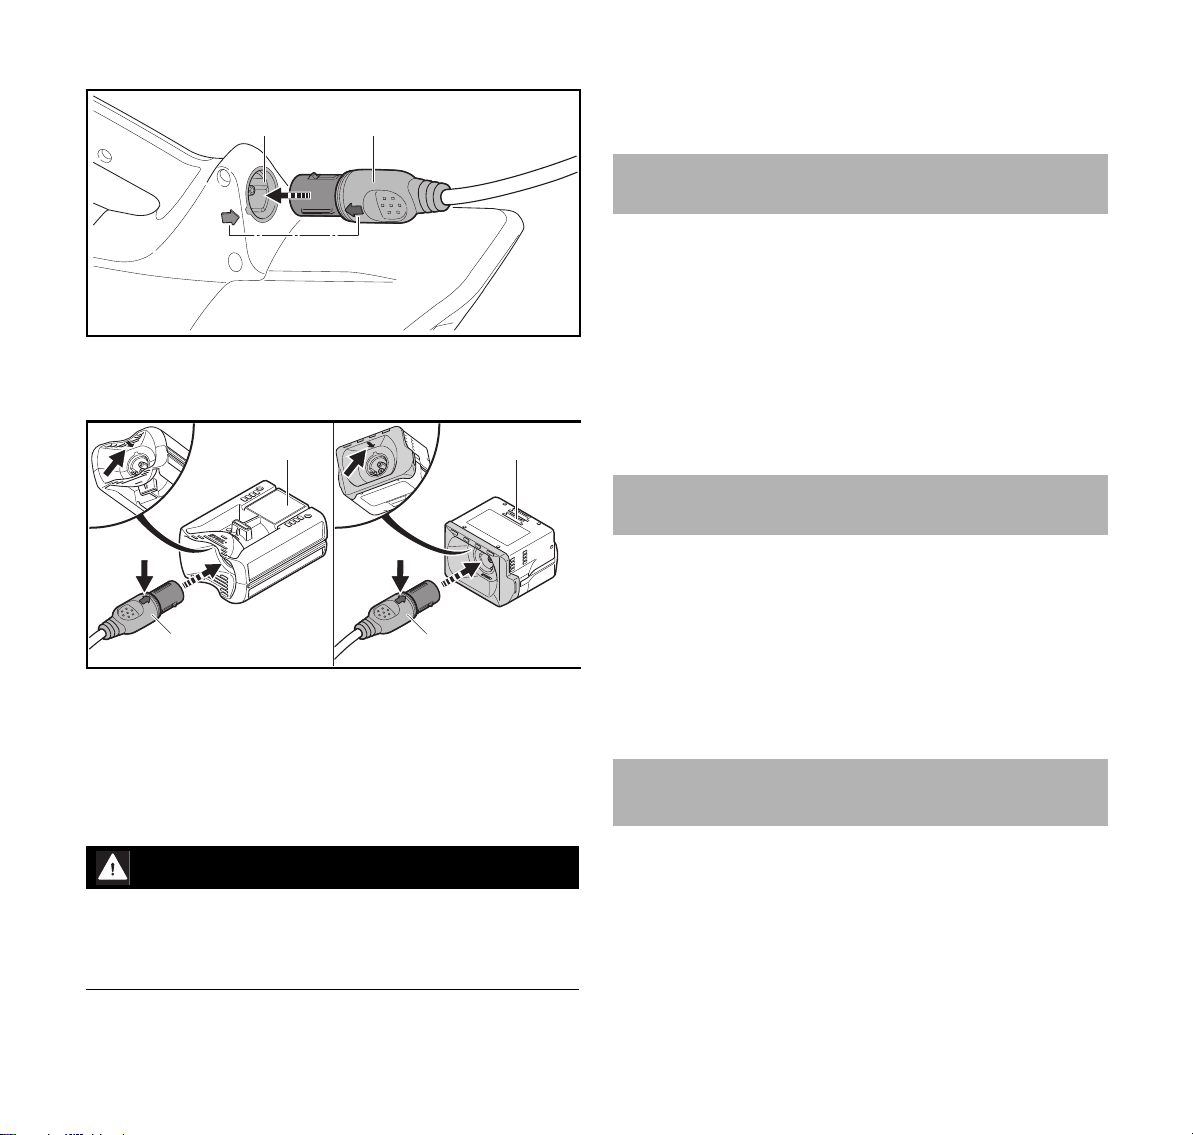
► Falls der Adapter AP (2) oder der Adapter AK (3)
verwendet werden müssen: Diagnosestecker (1) in den
Adapter AP (2) oder den Adapter AK (3) stecken.
Die Führung (Pfeil) des Diagnosesteckers (1) muss in die
Führung (Pfeil) im Adapter AP (2) oder im Adapter AK (3)
greifen.
Die Prüfung kann gestartet werden.
WARNUNG
Das Werkzeug des Akku-Produkts kann während der
Prüfung anfangen sich zu bewegen. Personen können
schwer verletzt werden.
► Keine weiteren Personen im Arbeitsbereich dulden.
► Werkzeug nicht berühren.
► Anweisungen im Display oder in der STIHL
Diagnose-Software folgen.
8 Diagnosegerät aufbewahren
8.1 Diagnosegerät aufbewahren
► Netzstecker aus der Steckdose ziehen.
► Akku herausnehmen.
► Diagnosegerät so aufbewahren, dass folgende
Bedingungen erfüllt sind:
9.1 Diagnosegerät reinigen
► Netzstecker aus der Steckdose ziehen.
► Akku herausnehmen.
► Diagnosegerät, Adapter AP und Adapter AK mit einem
feuchten Tuch reinigen.
► Elektrische Kontakte des Diagnosegeräts, des
Adapters AP und des Adapters AK mit einem Pinsel oder
einer weichen Bürste reinigen.
10 Diagnosegerät warten und reparieren
10.1 Diagnosegerät warten und reparieren
► Falls das Diagnosegerät defekt oder beschädigt ist:
Diagnosegerät mit Hilfe der Reparaturanleitung
reparieren.
Der Adapter AP und der Adapter AK müssen nicht gewartet
werden und können nicht repariert werden.
► Falls der Adapter AP oder der Adapter AK defekt oder
beschädigt sind: Adapter AP oder der Adapter AK
ersetzen.
11 Störungen beheben
11.1 Störungen des Diagnosegeräts beheben
Störungen können folgendermaßen angezeigt werden:
8
0458-757-9921-B
12 Technische Daten
deutsch
–im Display
– falls die STIHL Diagnose-Software verwendet wird, in der
STIHL Diagnose-Software
► Technische Informationen zum Diagnosegerät lesen und
Störungen beheben.
12 Technische Daten
12.1 Diagnosegerät STIHL ADG 2
– Nennspannung: siehe Leitungsschild
– Leistungsaufnahme: 5 W
– Zulässiger Temperaturbereich: + 5 °C bis + 40 °C
– Überspannungskategorie: II
12.2 REACH
REACH bezeichnet eine EG-Verordnung zur Registrierung,
Bewertung und Zulassung von Chemikalien.
Informationen zur Erfüllung der REACH Verordnung sind
unter www.stihl.com/reach angegeben.
13 Ersatzteile und Zubehör
14 Diagnosegerät entsorgen
14.1 Diagnosegerät entsorgen
► Diagnosegerät, Adapter AP, Adapter AK, Zubehör und
Verpackung vorschriftsmäßig und umweltfreundlich
entsorgen.
15 EU-Konformitätserklärung
15.1 Diagnosegerät STIHL ADG 2
Dieses Diagnosegerät ist in Übereinstimmung mit folgenden
Richtlinien gefertigt und in Verkehr gebracht worden: 2014/
35/EU, 2014/30/EU und 2011/65/EU.
Das Baujahr, das Herstellungsland und die
Maschinennummer sind auf dem Diagnosegerät
angegeben.
Die vollständige EG-Konformitätserklärung ist bei der Firma
ANDREAS STIHL AG & Co. KG, Badstraße 115,
71336 Waiblingen, Deutschland erhältlich.
16 Anschriften
13.1 Ersatzteile und Zubehör
Diese Symbole kennzeichnen original STIHL
Ersatzteile und original STIHL Zubehör.
STIHL empfiehlt, original STIHL Ersatzteile und original
STIHL Zubehör zu verwenden.
Original STIHL Ersatzteile und original STIHL Zubehör sind
bei einem STIHL Fachhändler erhältlich.
0458-757-9921-B
16.1 STIHL Hauptverwaltung
ANDREAS STIHL AG & Co. KG
Postfach 1771
D-71307 Waiblingen
16.2 STIHL Vertriebsgesellschaften
DEUTSCHLAND
STIHL Vertriebszentrale AG & Co. KG
Robert-Bosch-Straße 13
64807 Dieburg
Telefon: +49 6071 3055358
9

deutsch
ÖSTERREICH
STIHL Ges.m.b.H.
Fachmarktstraße 7
2334 Vösendorf
Telefon: +43 1 86596370
SCHWEIZ
STIHL Vertriebs AG
Isenrietstraße 4
8617 Mönchaltorf
Telefon: +41 44 9493030
TSCHECHISCHE REPUBLIK
Andreas STIHL, spol. s r.o.
Chrlická 753
664 42 Modřice
16.3 STIHL Importeure
BOSNIEN-HERZEGOWINA
UNIKOMERC d. o. o.
Bišće polje bb
88000 Mostar
Telefon: +387 36 352560
Fax: +387 36 350536
16 Anschriften
KROATIEN
UNIKOMERC - UVOZ d.o.o.
Sjedište:
Amruševa 10, 10000 Zagreb
Prodaja:
Ulica Kneza Ljudevita Posavskog 56, 10410 Velika Gorica
Telefon: +385 1 6370010
Fax: +385 1 6221569
TÜRKEI
SADAL TARIM MAKİNALARI DIŞ TİCARET A.Ş.
Alsancak Sokak, No:10 I-6 Özel Parsel
34956 Tuzla, İstanbul
Telefon: +90 216 394 00 40
Fax: +90 216 394 00 44
10
0458-757-9921-B

Contents
English
1 Introduction
2 Guide to Using this Manual
. . . . . . . . . . . . . . . . . . . . . . . . . . . . . . . . . . . . . . . .
. . . . . . . . . . . . . . . . . . . . . . . . .
2.1 Symbols used with warnings in the text
2.2 Symbols in Text
3 Overview
3.1 Digital Analyzer
4 Safety Precautions
4.1 Warning Signs
Translation of Original Instruction
Manual
4.2 Intended Use
4.3 The Operator
4.4 Work Area and Surroundings
4.5 Safe Condition
4.6 Diagnostic Testing
4.7 Storing
. . . . . . . . . . . . . . . . . . . . . . . . . . . . . . . . . . . . . . . . . . . . .
5 Preparing the Analyzer
. . . . . . . . . . . . . . . . . . . . . . . . . . . . . . . . . . . .
. . . . . . . . . . . . . . . . . . . . . . . . . . . . . . . . . . . . . . . . . . .
. . . . . . . . . . . . . . . . . . . . . . . . . . . . . . . . . . . .
. . . . . . . . . . . . . . . . . . . . . . . . . . . . . . . . .
. . . . . . . . . . . . . . . . . . . . . . . . . . . . . . . . . . . . .
. . . . . . . . . . . . . . . . . . . . . . . . . . . . . . . . . . . . . . .
. . . . . . . . . . . . . . . . . . . . . . . . . . . . . . . . . . . . . . .
. . . . . . . . . . . . . . . . . . . . . . .
. . . . . . . . . . . . . . . . . . . . . . . . . . . . . . . . . . . . .
. . . . . . . . . . . . . . . . . . . . . . . . . . . . . . . . .
. . . . . . . . . . . . . . . . . . . . . . . . . . . . .
5.1 Connecting Analyzer to Power Supply
5.2 Connecting Analyzer to a Computer
5.3 Selecting Display Language
5.4 Updating Analyzer
6 LED
. . . . . . . . . . . . . . . . . . . . . . . . . . . . . . . . . . . . . . . . . . . . . . . .
6.1 LED on Analyzer
7 Diagnosis
7.1 Testing Cordless Product with the Analyzer
Printed on chlorine-free paper
Printing inks contain vegetable oils, paper can be recycled.
. . . . . . . . . . . . . . . . . . . . . . . . . . . . . . . . . . . . . . . . . .
8 Storing the Analyzer
8.1 Storing the Analyzer
. . . . . . . . . . . . . . . . . . . . . . . . . . . . . . . . . .
. . . . . . . . . . . . . . . . . . . . . . . . . . . . . . . . . . .
. . . . . . . . . . . . . . . . . . . . . . . . . . . . . . . .
. . . . . . . . . . . . . . . . . . . . . . . . . . . . . . . .
9 Cleaning the Analyzer
9.1 Cleaning the Analyzer
. . . . . . . . . . . . . . . . . . . . . . . .
. . . . . . . . . . . . . . . . . . . . . . . . . . . . . .
. . . . . . . . . . . . . . . . . . . . . . . . . . . . . .
10 Maintaining and Repairing the Analyzer
10.1 Servicing and Repairing the Analyzer
11 Troubleshooting
11.1 Troubleshooting Analyzer
12 Specifications
. . . . . . . . . . . . . . . . . . . . . . . . . . . . . . . . . . . .
. . . . . . . . . . . . . . . . . . . . . . . . . .
. . . . . . . . . . . . . . . . . . . . . . . . . . . . . . . . . . . . . .
. . . . . . . . . . . . .
. . . . . . . . . . . . . .
. . . . . . . . . . . . . . . .
. . . . . . . . .
. . . . . . . . . . . .
. . . . . . . . . . . . . .
12.1 STIHL ADG 2 Analyzer
12
12.2 REACH
12
13 Spare Parts and Accessories
12
13.1 Spare Parts and Accessories
12
14 Disposal
12
14.1 Disposal
12
15 EC Declaration of Conformity
13
15.1 STIHL ADG 2 Analyzer
13
. . . . . . . . . . . . . . . . . . . . . . . . . . . . . . . . . . . . . . . . . . . .
. . . . . . . . . . . . . . . . . . . . . . . . . . . . . . . . . . . . . . . . . . .
. . . . . . . . . . . . . . . . . . . . . . . . . . . . . . . . . . . . . . . . . . .
13
14
14
14
15
15
15
15
16
16
16
16
16
16
16
17
17
17
17
17
17
18
18
18
. . . . . . . . . . . . . . . . . . . . . . . . . . . .
. . . . . . . . . . . . . . . . . . . . . . .
. . . . . . . . . . . . . . . . . . . . . .
. . . . . . . . . . . . . . . . . . . . . .
. . . . . . . . . . . . . . . . . . . . . . . . . . . .
18
18
18
18
18
18
18
18
{
© ANDREAS STIHL AG & Co. KG 2018
0458-757-9921-B. VA9.H18.
0000007413_009_GB
0458-757-9921-B
This instruction manual is protected by copyright. All rights reserved, especially the rights to reproduce, translate and process
with electronic systems.
11
English
1 Introduction
1Introduction
Dear Customer,
Thank you for choosing STIHL. We develop and
manufacture our quality products to meet our customers’
requirements. The products are designed for reliability even
under extreme conditions.
STIHL also stands for premium service quality. Our
specialist dealers guarantee competent advice and
instruction as well as comprehensive service support.
We thank you for your confidence in us and hope you will
enjoy working with your STIHL product.
Dr. Nikolas Stihl
IMPORTANT: READ BEFORE USE AND KEEP IN A SAFE
PLACE.
2 Guide to Using this Manual
2.1 Symbols used with warnings in the text
NOTICE
This symbol indicates dangers that can cause damage to
property.
► The measures indicated can avoid damage to property.
2.2 Symbols in Text
This symbol refers to a chapter in this instruction
manual.
3Overview
3.1 Digital Analyzer
1
7
#
2
8
3
4
5
6
WARNING
This symbol indicates dangers that can cause serious
injuries or death.
► The measures indicated can avoid serious injuries or
death.
12
9
10 11
0000-GXX-1633-A0
0458-757-9921-B
4 Safety Precautions
English
1 Digital analyzer
Tests STIHL or VIKING cordless power tools.
2 Display
Shows information during the test cycle.
3 Upper Button
Serves to operate the analyzer.
4LED
Indicates the operating status of the analyzer.
5 Lower Button
Serves to operate the analyzer.
6 Appliance Plug
Connects cable to wall outlet.
7 Diagnostic Connector
Connects analyzer to a STIHL cordless product, the AP
adapter or the AK adapter.
8 Connecting Cable
Connects analyzer to appliance plug.
9 USB Cable
Connects analyzer to a computer.
10 AP Adapter
Connects analyzer to a STIHL cordless product with a
battery compartment for STIHL AP batteries.
11 AK Adapter
Connects analyzer to a STIHL cordless product with a
battery compartment for STIHL AK batteries.
# Rating label with serial number
4 Safety Precautions
Observe safety notices and take the necessary
precautions.
Read, understand and save the instruction
manual.
Protect analyzer from rain and dampness.
Use the adapter only with the analyzer.
4.2 Intended Use
The STIHL ADG 2 analyzer is used to run diagnostic tests
on STIHL and VIKING cordless battery products.
The analyzer can be used together with STIHL diagnostics
software.
The AP and AK adapters connect the analyzer to the
appropriate STIHL or VIKING cordless product.
An AK adapter with a red cover must not be used to operate
STIHL or VIKING cordless products.
WARNING
■ Adapters not explicitly approved for this analyzer by
STIHL may cause a fire or explosion. This can result in
serious or fatal injuries and damage to property.
► Use the analyzer only without the adapter or
with the STIHL AP or AK adapters.
4.1 Warning Signs
Meanings of warning signs on the analyzer, AP adapter and
AK adapter:
0458-757-9921-B
13
English
4 Safety Precautions
■ Using the analyzer, AP adapter or AK adapter for
purposes for which they were not designed may result in
serious or fatal injuries, and damage to property may
occur.
► Use the analyzer, AP adapter or AK adapter as
described in this instruction manual.
► Do not use an AK adapter with a red cover to operate
STIHL or VIKING cordless products.
4.3 The Operator
WARNING
■ Users who have had no instruction cannot recognize or
assess the risks involved in using the analyzer. The user
or other persons may sustain serious or fatal injuries.
► Read, understand and save the instruction
manual.
► If the analyzer is passed on to another person: Always
give them the instruction manual.
► Make sure the user meets the following requirements:
– The user must be rested.
– The user must be legally recognized as an adult.
– The user must not be under the influence of alcohol,
medication or drugs.
■ The analyzer is not waterproof. The analyzer may be
damaged if it is used in the rain or a damp location.
► Do not operate it in the rain or a damp
location.
■ The analyzer is not protected against all ambient
conditions. If the analyzer is exposed to certain ambient
conditions, it may catch fire or explode. This can result in
serious injuries and damage to property.
► Operate the analyzer in an enclosed and dry location.
► Do not operate the analyzer in an easily combustible or
explosive environment.
► Do not operate the analyzer on an easily combustible
surface.
► Use and store the analyzer at a temperature
between +5°C and +40°C.
■ Persons may trip over the connecting cable. This can
result in injuries and may damage the analyzer.
► Lay the connecting cable flat on the floor.
4.5 Safe Condition
The analyzer is in a safe condition if the following points are
observed:
– Analyzer is undamaged.
– Analyzer is clean and dry.
4.4 Work Area and Surroundings
WARNING
■ Innocent bystanders, children and animals are not aware
of and cannot assess the dangers of the analyzer or
electric current. Innocent bystanders, children and
animals may be seriously or fatally injured.
► Keep bystanders, children and animals away from the
work area.
► Do not leave the analyzer unattended.
► Make sure that children cannot play with the analyzer.
14
WARNING
■ If components do not comply with safety requirements,
they will no longer function properly and safety devices
may be rendered inoperative. This can result in serious or
fatal injuries.
► Do not use a damaged analyzer.
► If the analyzer is dirty or wet: Clean the analyzer and
allow it to dry.
► Never attempt to modify the analyzer.
0458-757-9921-B

5 Preparing the Analyzer
English
► Never insert objects in the analyzer’s openings.
► Never bridge an analyzer's contacts with metallic
objects (short circuit).
► Do not open the analyzer.
► If you have any queries: Contact your STIHL servicing
dealer for assistance.
4.6 Diagnostic Testing
Contact with live components may occur for the following
reasons:
– Connecting cable is damaged.
– Plug is damaged.
– Wall outlet is not properly installed.
WARNING
■ Contact with live components can result in an electric
shock. This may result in serious or fatal injuries.
► Check that the connecting cable and plug are not
damaged.
► Insert the plug in a properly installed wall outlet.
■ Overvoltage can occur in the analyzer if the line voltage or
frequency are incorrect during diagnostic testing. The
analyzer may be damaged.
► Make sure the line voltage and frequency agree with the
data on the analyzer’s rating label.
■ A damaged or defective analyzer may produce an unusual
smell or emit smoke during diagnostic testing. This may
result in personal injuries and damage to property.
► Disconnect the plug from the wall outlet.
■ The analyzer can overheat and cause a fire if heat
dissipation is inadequate. This can result in serious or
fatal injuries and damage to property.
► Do not cover the analyzer.
4.7 Storing
WARNING
■ Children are not aware of and cannot assess the dangers
of an analyzer. Children may sustain serious or fatal
injuries.
► Store the analyzer out of the reach of children.
■ The analyzer is not protected against all ambient
conditions. The analyzer may be damaged if it is exposed
to certain ambient conditions.
► If the analyzer is hot: Allow analyzer to cool down.
► Store the analyzer in a clean and dry condition.
► Store the analyzer in a closed location.
■ The connecting cable must not be used for carrying or
hanging up the analyzer. The connecting cable and the
analyzer may be damaged.
► Hold the analyzer by the housing.
5 Preparing the Analyzer
5.1 Connecting Analyzer to Power Supply
1
2
► Insert the plug (4) in a convenient wall outlet (5).
The analyzer (1) runs a self test. The LED (2) glows green
for about 1 second and then red for about 1 second.
► Lay the connecting cable (3).
3
5
4
0000-GXX-1635-A0
0458-757-9921-B
15

English
6 LED
5.2 Connecting Analyzer to a Computer
The analyzer can be used together with STIHL diagnostics
software. The analyzer must be connected to a computer for
this purpose.
► Install STIHL diagnostics software on the computer.
► Connect the analyzer to a wall outlet, @ 5.1.
► Connect USB cable to the analyzer.
► Connect USB cable to the computer.
The computer recognizes the analyzer.
► Select STIHL ADG 2 in the diagnostics software and
follow the instructions.
5.3 Selecting Display Language
The display language on a factory-new analyzer is English.
The required display language can be selected with the aid
of the STIHL diagnostics software.
► Connect the analyzer to a wall outlet, @ 5.1.
► Connect the analyzer to a computer, @ 5.2.
► At top left on the main screen of the STIHL diagnostics
software: select “Firmware”, “ADG 2” and “Update”.
► Select country code of the required display language.
The analyzer’s firmware and display language are
updated automatically.
This update can take up to 20 minutes.
The selected display language is available on the analyzer
after successful completion of the update.
5.4 Updating Analyzer
The analyzer must be updated for new STIHL or VIKING
products and new diagnostic functions. The analyzer can be
updated with the aid of the STIHL diagnostics software.
► Connect the analyzer to a wall outlet, @ 5.1.
► Connect the analyzer to a computer, @ 5.2.
► Connect the computer to the Internet.
► Select STIHL ADG 2 in the STIHL diagnostics software
and click on “Check for updates”.
The analyzer is updated automatically.
The analyzer cannot be updated automatically if it is not
connected to a computer or the computer is not connected
to the Internet.
► Contact your sales company or importer.
6LED
6.1 LED on Analyzer
The LED indicates the operating status of the analyzer:
– It can glow green, yellow or red.
– It can flash green, yellow or red.
If the LED glows green, the product function being tested is
OK.
If the LED glows yellow, the product function being tested is
OK. A temporary malfunction is stored in the analyzer’s error
memory.
If the LED glows red, the product function being tested is
faulty. A malfunction code is displayed.
If the LED flashes yellow, the user must take action on the
product.
If the LED flashes red, it may mean:
– A safety notice is shown on the display.
– The analyzer must be updated, @ 5.4.
– The analyzer is faulty.
7 Diagnosis
7.1 Testing Cordless Product with the Analyzer
► Connect the analyzer to a wall outlet, @ 5.1.
► If the analyzer is used together with STIHL diagnostics
software: Connect the analyzer to a computer, @ 5.4.
► Insert the STIHL AP or STIHL AK battery in the analyzer.
16
0458-757-9921-B
8 Storing the Analyzer
2 3
1 1
0000-GXX-1639-A0
1 2
► Insert diagnostic connector (2) in the power tool’s socket
(1) so that the arrows on the connector and power tool line
up.
► If the AP adapter (2) or AK adapter (3) has to be used:
Insert the diagnostic connector (1) in the AP adapter (2) or
AK adapter (3).
The guide (arrow) on the diagnostic connector (1) must
engage the guide (arrow) in the AP adapter (2) or AK
adapter (3).
The test can be started.
► Follow the instructions on the display or in the STIHL
diagnostic software.
8 Storing the Analyzer
8.1 Storing the Analyzer
► Disconnect the plug from the wall outlet.
► Remove the battery.
0000-GXX-1638-A0
► Observe the following points when storing the analyzer:
– Analyzer is out of the reach of children.
– Analyzer is clean and dry.
– Analyzer is in an enclosed space.
– Analyzer is not hanging from the connecting cable.
9 Cleaning the Analyzer
9.1 Cleaning the Analyzer
► Disconnect the plug from the wall outlet.
► Remove the battery.
► Clean the analyzer, AP adapter and AK adapter with a
damp cloth.
► Clean the electrical contacts of the analyzer, AP adapter
and AK adapter with a soft brush.
10 Maintaining and Repairing the
Analyzer
English
WARNING
The cordless power tool’s attachment may begin to move
during the test. This can result in serious injuries.
► Do not allow any other persons in the work area.
► Do not touch the attachment.
0458-757-9921-B
10.1 Servicing and Repairing the Analyzer
► If the analyzer has a malfunction or is damaged: Repair
the analyzer with the aid of the service manual.
The AP and AK adapters require no servicing and cannot be
repaired.
► If the AP adapter or AK adapter is defective or damaged:
Replace the AP adapter or AK adapter.
17

English
11 Troubleshooting
11 Troubleshooting
11.1 Troubleshooting Analyzer
Malfunctions may be indicated as follows:
– On the display
– In the STIHL diagnostics software if it is being used.
► Read TI bulletins on analyzer and rectify malfunctions.
12 Specifications
12.1 STIHL ADG 2 Analyzer
– Rated voltage: see rating label
– Power consumption: 5 W
– Permissible temperature range: +5°C to +40°C
– Overvoltage category: II
12.2 REACH
REACH is an EC regulation and stands for the Registration,
Evaluation, Authorisation and Restriction of Chemical
substances.
For information on compliance with the REACH regulation
see www.stihl.com/reach.
Original STIHL replacement parts and original STIHL
accessories are available from STIHL servicing dealers.
14 Disposal
14.1 Disposal
► Dispose of the analyzer, AP adapter, AK adapter,
accessories and packaging in accordance with local
regulations and environmental requirements.
15 EC Declaration of Conformity
15.1 STIHL ADG 2 Analyzer
This analyzer is manufactured and put on the market in
accordance with the following directives: 2014/35/EU, 2014/
30/EU and 2011/65/EU.
The year of manufacture, country of manufacture and serial
number are applied to the analyzer.
The complete EC Declaration of Conformity is available from
ANDREAS STIHL AG & Co. KG, Badstrasse 115,
71336 Waiblingen, Germany.
13 Spare Parts and Accessories
13.1 Spare Parts and Accessories
These symbols identify original STIHL
replacement parts and original STIHL
accessories.
STIHL recommends the use of original STIHL replacement
parts and accessories.
18
0458-757-9921-B

Table des matières
français
1 Préface
. . . . . . . . . . . . . . . . . . . . . . . . . . . . . . . . . . . . . . . . . . . .
2 Informations concernant la présente Notice
d'emploi
. . . . . . . . . . . . . . . . . . . . . . . . . . . . . . . . . . . . . . . . . . . .
2.1 Marquage des avertissements dans le texte
2.2 Symboles employés dans le texte
3 Vue d'ensemble
. . . . . . . . . . . . . . . . . . . . . . . . . . . . . . . . . . . .
3.1 Appareil de diagnostic
4 Prescriptions de sécurité
4.1 Symboles d'avertissement
Traduction de la Notice d'emploi
d'origine
. . . . . . . . . . . . . . . . . . . . . . . . . . . . . .
. . . . . . . . . . . . . . . . . . . . . . . . . . .
. . . . . . . . . . . . . . . . . . . . . . . . . .
. . . . . . . . . . . . . . . . . .
4.2 Utilisation conforme à la destination prévue
4.3 Exigences posées à l'utilisateur
4.4 Aire de travail et voisinage
. . . . . . . . . . . . . . . . . . . .
. . . . . . . . . . . . . . . . . . . . . . . . .
4.5 Bon état pour une utilisation en toute sécurité
4.6 Diagnostic
4.7 Rangement
. . . . . . . . . . . . . . . . . . . . . . . . . . . . . . . . . . . . . . . . . .
. . . . . . . . . . . . . . . . . . . . . . . . . . . . . . . . . . . . . . . .
5 Préparation de l'appareil de diagnostic
5.1 Branchement de l'appareil de diagnostic sur une
prise de courant
. . . . . . . . . . . . . . . . . . . . . . . . . . . . . . . . . . . .
5.2 Branchement de l'appareil de diagnostic sur un
ordinateur
5.3 Réglage de la langue d'affichage
. . . . . . . . . . . . . . . . . . . . . . . . . . . . . . . . . . . . . . . . . .
. . . . . . . . . . . . . . . . . . .
5.4 Actualisation de l'appareil de diagnostic
6 DEL
Imprimé sur papier blanchi sans chlore
L'encre d'imprimerie contient des huiles végétales, le papier
est recyclable.
6.1 DEL sur l'appareil de diagnostic
7 Diagnostic
. . . . . . . . . . . . . . . . . . . . . . . . . . . . . . . . . . . . . . . . . . . . . . . .
. . . . . . . . . . . . . . . . . . . .
. . . . . . . . . . . . . . . . . . . . . . . . . . . . . . . . . . . . . . . . . .
7.1 Contrôle du produit à batterie à l'aide de l'appareil
de diagnostic
. . . . . . . . . . . . . . . . . . . . . . . . . . . . . . . . . . . . . . .
8 Rangement de l'appareil de diagnostic
8.1 Rangement de l'appareil de diagnostic
9 Nettoyage de l'appareil de diagnostic
9.1 Nettoyage de l'appareil de diagnostic
10 Maintenance et réparation de l'appareil de
diagnostic
. . . . . . . . . . . . . . . . . . . . . . . . . . . . . . . . . . . . . . . . . .
. . . . . . . .
. . . . . . . .
. . . . . .
. . . . . . . . . . . . .
. . . . . . . . . . . .
. . . . . . . . . . . . .
. . . . . . . . . . . . .
. . . . . . . . . . . . . . .
. . . . . . . . . . . . . . .
10.1 Maintenance et réparation de l'appareil de
20
20
20
20
20
20
21
21
21
22
22
23
23
diagnostic
11 Dépannage
11.1 Élimination des dérangements de l'appareil de
diagnostic
12 Caractéristiques techniques
12.1 Appareil de diagnostic STIHL ADG 2
12.2 REACH
13 Pièces de rechange et accessoires
13.1 Pièces de rechange et accessoires
14 Mise au rebut
14.1 Mise au rebut de l'appareil de diagnostic
15 Déclaration de conformité UE
15.1 Appareil de diagnostic STIHL ADG 2
. . . . . . . . . . . . . . . . . . . . . . . . . . . . . . . . . . . . . . . . . .
. . . . . . . . . . . . . . . . . . . . . . . . . . . . . . . . . . . . . . . .
. . . . . . . . . . . . . . . . . . . . . . . . . . . . . . . . . . . . . . . . . .
. . . . . . . . . . . . . . . . . . . . . . . .
. . . . . . . . . . . . . . . . . . . . . . . . . . . . . . . . . . . . . . . . . . . .
. . . . . . . . . . . . . . . . . . . . . . . . . . . . . . . . . . . . . .
. . . . . . . . . . . . . . . . . . . . . .
24
24
24
24
25
25
25
25
26
26
26
26
27
27
27
. . . . . . . . . . . . . . .
. . . . . . . . . . . . . . . . .
. . . . . . . . . . . . . . . .
. . . . . . . . . . .
. . . . . . . . . . . . . . .
27
27
27
27
27
27
27
27
28
28
28
28
{
© ANDREAS STIHL AG & Co. KG 2018
0458-757-9921-B. VA9.H18.
0000007413_009_F
0458-757-9921-B
La présente Notice d'emploi est protégée par des droits d'auteur. Tous droits réservés, en particulier tout droit de copie, de traduction et de traitement avec des systèmes électroniques quelconques.
19
français
1 Préface
1Préface
Chère cliente, cher client,
Nous sommes très heureux que vous ayez choisi un produit
STIHL. Dans le développement et la fabrication de nos
produits, nous mettons tout en œuvre pour garantir une
excellente qualité répondant aux besoins de nos clients.
Nos produits se distinguent par une grande fiabilité, même
en cas de sollicitations extrêmes.
STIHL garantit également la plus haute qualité au niveau du
service après-vente. Nos revendeurs spécialisés
fournissent des conseils compétents, aident nos clients à se
familiariser avec nos produits et assurent une assistance
technique complète.
Nous vous remercions de votre confiance et vous
souhaitons beaucoup de plaisir avec votre produit STIHL.
Dr. Nikolas Stihl
IMPORTANT ! LIRE CETTE NOTICE AVANT D'UTILISER
CE PRODUIT ET LA CONSERVER PRÉCIEUSEMENT.
2 Informations concernant la présente
Notice d'emploi
2.1 Marquage des avertissements dans le texte
AVIS
Attire l'attention sur des dangers pouvant causer des dégâts
matériels.
► Les mesures indiquées peuvent éviter des dégâts
matériels.
2.2 Symboles employés dans le texte
Ce symbole renvoie à un chapitre de la présente
Notice d'emploi.
3 Vue d'ensemble
3.1 Appareil de diagnostic
1
7
#
9
2
8
10 11
3
4
5
6
AVERTISSEMENT
Attire l'attention sur des dangers qui peuvent causer des
blessures graves, voire mortelles.
► Les mesures indiquées peuvent éviter des blessures
graves, voire mortelles.
20
0000-GXX-1633-A0
0458-757-9921-B
4 Prescriptions de sécurité
français
1 Appareil de diagnostic
L'appareil de diagnostic permet de procéder au
diagnostic d'un produit STIHL ou VIKING à batterie.
2 Afficheur
Au cours du diagnostic, l'afficheur affiche des
informations.
3 Touche supérieure
La touche supérieure permet la commande de l'appareil
de diagnostic.
4DEL
La DEL indique l'état de l'appareil de diagnostic.
5 Touche inférieure
La touche inférieure permet la commande de l'appareil
de diagnostic.
6 Fiche de branchement sur le secteur
La fiche de branchement sur le secteur relie le cordon
d'alimentation électrique avec une prise de courant.
7 Fiche de diagnostic
La fiche de diagnostic relie l'appareil de diagnostic avec
un produit STIHL à batterie, l'adaptateur AP ou
l'adaptateur AK.
8 Cordon d'alimentation électrique
Le cordon d'alimentation électrique relie l'appareil de
diagnostic avec la fiche de branchement sur le secteur.
9 Câble de raccordement USB
Le câble de raccordement USB relie l'appareil de
diagnostic avec un ordinateur.
10 Adaptateur AP
L'adaptateur AP relie l'appareil de diagnostic avec un
produit STIHL à batterie muni d'un logement pour
batterie STIHL AP.
11 Adaptateur AK
L'adaptateur AK relie l'appareil de diagnostic avec un
produit STIHL à batterie muni d'un logement pour
batterie STIHL AK.
4 Prescriptions de sécurité
4.1 Symboles d'avertissement
Les symboles d'avertissement appliqués sur l'appareil de
diagnostic, l'adaptateur AP et l'adaptateur AK ont les
significations suivantes :
Respecter les consignes de sécurité et les
mesures à prendre.
Il est nécessaire de lire, de bien comprendre et
de conserver précieusement cette Notice
d'emploi.
Préserver l'appareil de diagnostic de la pluie et
de l'humidité.
Utiliser l'adaptateur exclusivement avec
l'appareil de diagnostic STIHL.
4.2 Utilisation conforme à la destination prévue
L'appareil de diagnostic STIHL ADG 2 permet de procéder
au diagnostic de produits STIHL ou VIKING à batterie.
L'appareil de diagnostic peut être utilisé en combinaison
avec le logiciel de diagnostic STIHL.
L'adaptateur AP et l'adaptateur AK relient l'appareil de
diagnostic avec le produit STIHL ou VIKING à batterie
compatible.
Il ne faut pas utiliser l'adaptateur AK avec le capuchon rouge
pour l'alimentation électrique de produits STIHL ou VIKING
à batterie.
# Plaque signalétique avec numéro de machine
0458-757-9921-B
21
français
4 Prescriptions de sécurité
AVERTISSEMENT
■ L'utilisation d'adaptateurs qui ne sont pas autorisés par
STIHL pour cet appareil de diagnostic risque de causer
des incendies et des explosions. Cela peut causer des
dégâts matériels et des personnes risquent de subir des
blessures très graves, voire mortelles.
► Utiliser l'appareil de diagnostic seulement
sans adaptateur ou avec l'adaptateur
STIHL AP ou l'adaptateur STIHL AK.
■ Si l'appareil de diagnostic, l'adaptateur AP et
l'adaptateur AK ne sont pas utilisés conformément à la
destination prévue, cela peut causer des dégâts matériels
et des personnes risquent de subir des blessures très
graves, voire mortelles.
► Utiliser l'appareil de diagnostic, l'adaptateur AP et
l'adaptateur AK comme décrit dans la présente Notice
d'emploi.
► Il ne faut pas utiliser l'adaptateur AK avec le capuchon
rouge pour l'alimentation électrique de produits STIHL
ou VIKING à batterie.
4.3 Exigences posées à l'utilisateur
AVERTISSEMENT
■ Les personnes qui n'ont pas reçu de formation adéquate
ne peuvent pas reconnaître ou évaluer les dangers de
l'appareil de diagnostic. L'utilisateur ou d'autres
personnes risquent de subir des blessures graves, voire
mortelles.
► Il est nécessaire de lire, de bien comprendre
et de conserver précieusement cette Notice
d'emploi.
► Si l'on confie l'appareil de diagnostic à une autre
personne : il faut y joindre la Notice d'emploi.
► S'assurer que l'utilisateur remplit les conditions
suivantes :
– L'utilisateur est reposé.
– L'utilisateur est majeur.
– L'utilisateur ne se trouve pas sous l'influence de
l'alcool, de drogues ou de médicaments.
4.4 Aire de travail et voisinage
AVERTISSEMENT
■ Les passants, de même que les enfants et les animaux,
ne peuvent pas reconnaître et évaluer les dangers de
l'appareil de diagnostic et du courant électrique. Des
passants, des enfants ou des animaux risquent de subir
des blessures graves, voire mortelles.
► Veiller à ce que des passants, des enfants ou des
animaux ne s'approchent pas.
► Ne pas laisser l'appareil de diagnostic sans
surveillance.
► Veiller à ce que des enfants ne puissent pas jouer avec
l'appareil de diagnostic.
■ L'appareil de diagnostic n'est pas protégé contre l'eau. Si
l'on travaille sous la pluie ou dans une atmosphère
humide, l'appareil de diagnostic risque d'être
endommagé.
► Ne pas l'utiliser sous la pluie ou dans une
atmosphère humide.
■ L'appareil de diagnostic n'est pas protégé contre toutes
les influences de l'environnement. Si l'appareil de
diagnostic est exposé à certaines influences de
l'environnement, l'appareil de diagnostic risque de
22
0458-757-9921-B

4 Prescriptions de sécurité
français
prendre feu ou d'exploser. Cela peut causer des dégâts
matériels et des personnes risquent d'être grièvement
blessées.
► Utiliser l'appareil de diagnostic dans un local fermé et
sec.
► Ne pas faire fonctionner l'appareil de diagnostic dans un
environnement présentant des risques d'explosion ou à
proximité de matières facilement inflammables.
► Ne pas faire fonctionner l'appareil de diagnostic sur une
surface facilement inflammable.
► Utiliser et ranger l'appareil de diagnostic dans la plage
de températures de + 5 °C à + 40 °C.
■ Des personnes risquent de trébucher sur le cordon
d'alimentation électrique. Des personnes pourraient se
blesser et l'appareil de diagnostic pourrait être
endommagé.
► Poser le cordon d'alimentation électrique bien à plat sur
le sol.
4.5 Bon état pour une utilisation en toute sécurité
L'appareil de diagnostic se trouve en bon état pour une
utilisation en toute sécurité si les conditions suivantes sont
remplies :
– L'appareil de diagnostic ne présente aucun
endommagement.
– L'appareil de diagnostic est propre et sec.
AVERTISSEMENT
■ Si l'état impeccable requis pour la sécurité n'est pas
garanti, il est possible que des composants ne
fonctionnent plus correctement et que des dispositifs de
sécurité soient mis hors service. Des personnes risquent
de subir des blessures graves, voire mortelles.
► N'utiliser l'appareil de diagnostic que s'il ne présente
aucun endommagement.
► Si l'appareil de diagnostic est encrassé ou mouillé :
nettoyer l'appareil de diagnostic et le faire sécher.
► N'apporter aucune modification à l'appareil de
diagnostic.
► N'introduire aucun objet dans les orifices de l'appareil
de diagnostic.
► Ne pas court-circuiter les contacts de l'appareil de
diagnostic avec des objets métalliques.
► Ne pas ouvrir l'appareil de diagnostic.
► Au moindre doute : consulter un revendeur spécialisé
STIHL.
4.6 Diagnostic
Un contact avec des composants sous tension peut se
produire dans les cas suivants :
– Le cordon d'alimentation électrique est endommagé.
– La fiche du cordon d'alimentation électrique est
endommagée.
– La prise de courant n'est pas correctement installée.
AVERTISSEMENT
■ Un contact avec des composants sous tension peut
causer une électrocution. L'utilisateur peut alors subir des
blessures graves, voire mortelles.
► S'assurer que le cordon d'alimentation électrique et sa
fiche ne sont pas endommagés.
► Introduire la fiche dans une prise de courant installée
correctement.
0458-757-9921-B
23
français
2
1
5
4
3
0000-GXX-1635-A0
5 Préparation de l'appareil de diagnostic
■ Au cours du diagnostic, une tension ou une fréquence
incorrecte du secteur peut produire une surtension dans
l'appareil de diagnostic. Cela risquerait d'endommager
l'appareil de diagnostic.
► S'assurer que la tension et la fréquence du secteur
d'alimentation électrique correspondent aux indications
de la plaque signalétique de l'appareil de diagnostic.
■ Au cours du diagnostic, un appareil de diagnostic
endommagé ou défectueux peut dégager une odeur
inhabituelle ou de la fumée. Cela peut causer des dégâts
matériels et des personnes risquent d'être blessées.
► Débrancher la fiche de la prise de courant.
■ Une dissipation de chaleur insuffisante peut entraîner une
surchauffe de l'appareil de diagnostic et risque de causer
un incendie. Cela peut causer des dégâts matériels et des
personnes risquent de subir des blessures très graves,
voire mortelles.
► Ne pas recouvrir l'appareil de diagnostic.
■ Le cordon d'alimentation électrique n'est pas prévu pour
porter ou suspendre l'appareil de diagnostic. Le cordon
d'alimentation électrique et l'appareil de diagnostic
risqueraient d'être endommagés.
► Saisir et tenir l'appareil de diagnostic par le boîtier.
5 Préparation de l'appareil de diagnostic
5.1 Branchement de l'appareil de diagnostic sur une prise de courant
4.7 Rangement
AVERTISSEMENT
■ Les enfants ne peuvent pas reconnaître et évaluer les
dangers d'un appareil de diagnostic. Les enfants risquent
de subir des blessures graves, voire mortelles.
► Conserver l'appareil de diagnostic hors de portée des
enfants.
■ L'appareil de diagnostic n'est pas protégé contre toutes
les influences de l'environnement. Si l'appareil de
diagnostic est exposé à certaines influences de
l'environnement, l'appareil de diagnostic risque d'être
endommagé.
► Si l'appareil de diagnostic est chaud : laisser l'appareil
de diagnostic refroidir.
► Conserver l'appareil de diagnostic au propre et au sec.
► Conserver l'appareil de diagnostic dans un local fermé.
► Introduire la fiche secteur (4) dans une prise de
courant (5) aisément accessible.
L'appareil de diagnostic (1) effectue un autotest. La
DEL (2) s'allume env. 1 seconde de couleur verte,
env. 1 seconde de couleur jaune puis env. 1 seconde de
couleur rouge.
► Poser le cordon d'alimentation électrique (3).
5.2 Branchement de l'appareil de diagnostic sur un ordinateur
L'appareil de diagnostic peut être utilisé en combinaison
avec le logiciel de diagnostic STIHL. À cet effet, l'appareil de
diagnostic doit être branché sur un ordinateur.
► Installer le logiciel de diagnostic STIHL sur l'ordinateur.
► Brancher l'appareil de diagnostic sur une prise de courant,
@ 5.1.
24
0458-757-9921-B

6 DEL
français
► Brancher le câble de raccordement USB sur l'appareil de
diagnostic.
► Brancher le câble de raccordement USB sur l'ordinateur.
L'ordinateur reconnaît automatiquement l'appareil de
diagnostic.
► Sélectionner STIHL ADG 2 dans le logiciel de diagnostic
STIHL et suivre les instructions du logiciel de diagnostic
STIHL.
5.3 Réglage de la langue d'affichage
À la livraison de l'appareil de diagnostic, les affichages sont
en anglais. La langue d'affichage souhaitée peut être réglée
en combinaison avec le logiciel de diagnostic STIHL.
► Brancher l'appareil de diagnostic sur une prise de courant,
@ 5.1.
► Brancher l'appareil de diagnostic sur un ordinateur,
@ 5.2.
► Sur la page d'écran principale du logiciel de diagnostic
STIHL, sélectionner en haut à gauche « Firmware »,
« ADG 2 » et « Actualisation ».
► Sélectionner le code national de la langue d'affichage
souhaitée.
Le Firmeware et la langue d'affichage de l'appareil de
diagnostic sont automatiquement actualisés.
Le processus d'actualisation peut durer jusqu'à
20 minutes.
Une fois que l'actualisation est correctement terminée, la
langue d'affichage sélectionnée est disponible sur
l'appareil de diagnostic.
5.4 Actualisation de l'appareil de diagnostic
Le lancement de nouveaux produits à batterie STIHL ou
VIKING exige une actualisation de l'appareil de diagnostic.
L'appareil de diagnostic peut être actualisé à l'aide du
logiciel de diagnostic STIHL.
► Brancher l'appareil de diagnostic sur une prise de courant,
@ 5.1.
► Brancher l'appareil de diagnostic sur un ordinateur,
@ 5.2.
► Connecter l'ordinateur sur l'Internet.
► Sélectionner STIHL ADG 2 dans le logiciel de diagnostic
STIHL, puis sélectionner « Vérifier s'il y a une
actualisation... ».
L'appareil de diagnostic est actualisé automatiquement.
Si l'appareil de diagnostic n'est pas branché sur un
ordinateur ou si l'ordinateur n'est pas connecté sur Internet,
l'appareil de diagnostic ne peut pas être actualisé
automatiquement.
► Consulter la société de distribution ou l'importateur.
6DEL
6.1 DEL sur l'appareil de diagnostic
La DEL indique l'état de l'appareil de diagnostic :
– La DEL peut être allumée continuellement de couleur
verte, jaune ou rouge.
– La DEL peut clignoter de couleur jaune ou rouge.
Si la DEL est continuellement allumée de couleur verte, la
fonction testée du produit à batterie est O.K.
Si la DEL est continuellement allumée de couleur jaune, la
fonction testée du produit à batterie est O.K. La mémoire de
défauts de l'appareil de diagnostic a mémorisé un
dérangement temporaire de la fonction.
Si la DEL est continuellement allumée de couleur rouge, la
fonction testée du produit à batterie présente un défaut. Un
code de dérangement est affiché.
Si la DEL clignote de couleur jaune, l'utilisateur doit
effectuer une action sur le produit à batterie.
Si la DEL clignote de couleur rouge, cela peut avoir la
signification suivante :
– Une consigne de sécurité apparaît sur l'afficheur.
– L'appareil de diagnostic doit être actualisé, @ 5.4.
– L'appareil de diagnostic est défectueux.
0458-757-9921-B
25
français
2 3
1 1
0000-GXX-1639-A0
7 Diagnostic
7 Diagnostic
7.1 Contrôle du produit à batterie à l'aide de l'appareil de diagnostic
► Brancher l'appareil de diagnostic sur une prise de courant,
@ 5.1.
► Si l'on veut utiliser l'appareil de diagnostic en combinaison
avec le logiciel de diagnostic STIHL : brancher l'appareil
de diagnostic sur un ordinateur, @ 5.4.
► Mettre la batterie STIHL AP ou la batterie STIHL AK dans
l'appareil de diagnostic.
1 2
► Introduire la fiche (2) dans la prise (1) du produit à batterie
jusqu'à ce que la flèche de la fiche et la flèche du produit
à batterie coïncident.
► Si l'on doit utiliser l'adaptateur AP (2) ou
l'adaptateur AK (3) : introduire la fiche de diagnostic (1)
dans l'adaptateur AP (2) ou dans l'adaptateur AK (3).
La pièce de guidage (flèche) de la fiche de diagnostic (1)
doit se prendre dans la pièce de guidage (flèche) de
l'adaptateur AP (2) ou de l'adaptateur AK (3).
Le contrôle peut démarrer.
AVERTISSEMENT
Au cours du contrôle, l'outil du produit à batterie peut se
mettre en mouvement. Des personnes risquent d'être
grièvement blessées.
► Ne tolérer la présence d'aucune autre personne dans la
zone de travail.
► Ne pas toucher à l'outil.
► Suivre les instructions données à l'écran ou dans le
logiciel de diagnostic STIHL.
8 Rangement de l'appareil de diagnostic
8.1 Rangement de l'appareil de diagnostic
0000-GXX-1638-A0
► Débrancher la fiche de la prise de courant.
► Retirer la batterie.
► Ranger l'appareil de diagnostic de telle sorte que les
conditions suivantes soient remplies :
– L'appareil de diagnostic se trouve hors de portée des
enfants.
– L'appareil de diagnostic est propre et sec.
– L'appareil de diagnostic est conservé dans un local
fermé.
– L'appareil de diagnostic n'est pas suspendu au cordon
d'alimentation électrique.
26
0458-757-9921-B

9 Nettoyage de l'appareil de diagnostic
français
9 Nettoyage de l'appareil de diagnostic
9.1 Nettoyage de l'appareil de diagnostic
► Débrancher la fiche de la prise de courant.
► Retirer la batterie.
► Nettoyer l'appareil de diagnostic, l'adaptateur AP et
l'adaptateur AK avec un chiffon humide.
► Nettoyer les contacts électriques de l'appareil de
diagnostic, de l'adaptateur AP et de l'adaptateur AK à
l'aide d'un pinceau ou d'une brosse douce.
10 Maintenance et réparation de
l'appareil de diagnostic
10.1 Maintenance et réparation de l'appareil de diagnostic
► Si l'appareil de diagnostic est défectueux ou
endommagé : nettoyer l'appareil de diagnostic et le faire
sécher.
L'adaptateur AP et l'adaptateur AK ne nécessitent aucune
maintenance et ils ne peuvent pas être réparés.
► Si l'adaptateur AP ou l'adaptateur AK est défectueux ou
endommagé : remplacer l'adaptateur AP ou
l'adaptateur AK.
► Lire les Informations Techniques concernant l'appareil de
diagnostic et éliminer les dérangements.
12 Caractéristiques techniques
12.1 Appareil de diagnostic STIHL ADG 2
– Tension nominale : voir la fiche signalétique
– Puissance absorbée : 5 W
– Plage de températures admissibles : de + 5 °C à + 40 °C
– Catégorie de surtension : II
12.2 REACH
REACH (enRegistrement, Evaluation et Autorisation des
substances CHimiques) est le nom d'un règlement CE qui
couvre le contrôle de la fabrication, de l'importation, de la
mise sur le marché et de l'utilisation des substances
chimiques.
Pour obtenir de plus amples informations sur le respect du
règlement REACH, voir www.stihl.com/reach.
13 Pièces de rechange et accessoires
13.1 Pièces de rechange et accessoires
11 Dépannage
11.1 Élimination des dérangements de l'appareil de diagnostic
Les dérangement sont affichés de la manière suivante :
– Sur l'afficheur
– Dans le logiciel de diagnostic STIHL, si l'on utilise le
logiciel de diagnostic STIHL
0458-757-9921-B
Ces symboles identifient les pièces de rechange
d'origine STIHL et les accessoires d'origine
STIHL.
STIHL recommande d'utiliser des pièces de rechange
d'origine STIHL et des accessoires d'origine STIHL.
Pour obtenir des pièces de rechange d'origine STIHL et des
accessoires d'origine STIHL, s'adresser à un revendeur
spécialisé STIHL.
27

français
14 Mise au rebut
14.1 Mise au rebut de l'appareil de diagnostic
► L'appareil de diagnostic, l'adaptateur AP, l'adaptateur AK,
les accessoires et les emballages doivent être éliminés
conformément à la réglementation pour la protection de
l'environnement.
15 Déclaration de conformité UE
15.1 Appareil de diagnostic STIHL ADG 2
Cet appareil de diagnostic a été fabriqué et commercialisé
en conformité avec les directives suivantes : 2014/35/UE,
2014/30/UE et 2011/65/UE.
L'année de fabrication, le pays de fabrication et le numéro
de machine sont indiqués sur l'appareil de diagnostic.
La déclaration de conformité CE intégrale peut être fournie
par la société ANDREAS STIHL AG & Co. KG, Badstraße
115, 71336 Waiblingen, Allemagne.
14 Mise au rebut
28
0458-757-9921-B
 Loading...