

Page 1
Tosasiepi portatile - MANUALE DI ISTRUZIONI
IT
EN
FR
DE
ES
NL
PT
EL
TR
SV
FI
DA
NO
CS
PL
SL
RU
HR
HU
MK
LT
LV
ATTENZIONE: prima di utilizzare la macchina, leggere
attentamente il presente libretto.
Portable Hedge Trimmer - OPERATOR’S MANUAL
WARNING: read thoroughly the instruction booklet before
using this machine.
Taille-haies portable - MANUEL D’UTILISATION
ATTENTION: lire attentivement le manuel avant d'utiliser cette
machine.
Tragbare Heckenschere - GEBRAUCHSANWEISUNG
ACHTUNG: vor Inbetriebnahme des Geräts die
Gebrauchsanleitung aufmerksam lesen.
Cortadora de setos portátil - MANUAL DE INSTRUCCIONES
CUIDADO: antes de utilizar esta máquina, lea atentaemente
el manual de instrucciones.
Draagbare heggenschaar - GEBRUIKERSHANDLEIDING
LET OP: Voordat u de bosmaaier gaat gebruiken dient u eerst
deze handleiding aandachtig door te lezen.
Corta-sebes portátil - MANUAL DE INSTRUÇÕES
ATENCAO! Antes de usar a moto-roçadeira, ler com atenção
este manual de instruções.
ж·П›‰И МФЪУЩФ‡Ъ·˜ - √¢∏°π∂™ Гƒ∏™∏™
¶ЪФЫФ¯‹: ¶ЪИУ ¯ЪЛЫИМФФИ‹ЫВЩВ ЩФ ı·МУФОФЩИОfi, ‰И·‚¿ЫЩВ
ЪФЫВОЩИО¿ ЩИ˜ Ф‰ЛБ›В˜ ¯Ъ‹ЫЛ˜
Portatif Çit Budama Makinesi - KULLANIM KILAVUZU
Makineyi kullanmadan önce talimatlar içeren kılavuzu dikkatle
okuyun.
Häcksax - BRUKSANVISNING
VARNING: Läs igenom hela detta häfte innan du använder
maskinen.
Kannettava pensasleikkuri - KÄYTTÖOHJEET
VAROITUS:
lue käyttöopas huolellisesti ennen koneen käyttöä.
Bærbar hækkeklipper - BRUGSANVISNING
ADVARSEL: Læs instruktionsbogen omhyggeligt igennem,
før du tager denne maskine i brug.
Hekklipper - INSTRUKSJONSBOK
ADVARSEL: Les denne bruksanvisningen nøye før du bruker
maskinen.
Přenosný křovinořez - NÁVOD K POUŽITÍ
POZOR: Před použitím stroje si pozorně přečtěte tento návod
k použití.
Przenośna kosiarka do żywopłotów - INSTRUKCJE OBSŁUGI
UWAGA: Przed użyciem urządzenia przeczytaj uważnie
niniejsząinstrukcję.
Prenosni rezalnik za živo mejo - PRIROČNIK ZA UPORABO
POZOR: Preden uporabite stroj, pažljivo preberite priročnik
z navodili.
иВВМУТМ˚В ТВН‡ЪУ˚ - PмдйЗйСлнЗй л азлнкмдсаьеа
ЗзаеДзаЦ: иВК‰В ˜ВП ФУО¸БУ‚‡Ъ¸Тfl У·УЫ‰У‚‡МЛВП,
‚МЛП‡ЪВО¸МУ ФУ˜ЪЛЪВ БЪУ ЫНУ‚У‰ТЪ‚У ФУ БНТФОЫ‡Ъ‡ˆЛЛ.
Motorne škare za živicu - PRIRUČNIK ZA UPORABO
POZOR: Prije nego pristupite uporabi stroja, pažljivo pročitajte
upute.
Hordozható sövénynyíró - HASZNÁLATI UTASÍTÁS
Figyelem: A berendezés használata eloőtt kérjük olvassa el
figyelmesen ezt a használati utasítást!
Пренослива пила - УПАТСТВА ЗА УПОТРЕБА
ВНИМАНИЕ: пред да jа уротребите машината,
внимателно процитаjте го упатството за употреба.
Nešiojama krūmapjovė - INSTRUKCIJŲ VADOVAS
DĖMESIO: prieš naudojant prietaisą, būtina atidžiai
susipažinti su vartotojo vadovu.
Pārnesamās dzīvžoga šķēres - OPERATORA ROKASGRĀMATA
UzmanĪbu: pirms aparáta lietošanai rūpĪgi izlasiet doto
instrukciju.
Page 2

Page 3

i
ITALIANO - Istruzioni Originali .......................................................................
ENGLISH - Translation of the original instructions (Istruzioni Originali) .........
FRANÇAIS - Traduction de la notice originale (Istruzioni Originali) ...............
DEUTSCH - Übersetzung der Originalbetriebsanleitung (Istruzioni Originali)..
ESPAÑOL - Traducción del Manual Original (Istruzioni Originali) ...................
NEDERLANDS- Vertaling van de oorspronkelijke gebruiksaanwijzing (Istruzioni Originali)
..
PORTUGUÊS - Tradução do manual original (Istruzioni Originali) .................
∂§§∏¡π∫∞
- ªВЩ¿КЪ·ЫЛ ЩФ˘ ЪˆЩФЩ‡Ф˘ ЩˆУ Ф‰ЛБИТУ ¯Ъ‹ЫЛ˜ (Istruzioni Originali)
..
TÜRKÇE - Orijinal Talimatların Tercümesi (Istruzioni Originali) ......................
SVENSKA - Översättning av bruksanvisning i original (Istruzioni Originali) ....
SUOMI - Alkuperäisten ohjeiden käännös (Istruzioni Originali) .......................
DANSK - Oversættelse af den originale brugsanvisning (Istruzioni Originali)..
NORSK - Oversettelse av orginal bruksanvisning (Istruzioni Originali) ...........
ČESKY - Překlad původního návodu k používání (Istruzioni Originali) ...........
POLSKI - Tłumaczenie instrukcji oryginalnej (Istruzioni Originali)....................
SLOVENŠČINA - Prevod izvirnih navodil (Istruzioni Originali) ........................
кмллдав - иВВ‚У‰ УЛ„ЛМ‡О¸М˚ı ЛМТЪЫНˆЛИ (Istruzioni Originali) .......
HRVATSKI - Prijevod originalnih uputa (Istruzioni Originali) ............................
MAGYAR - Eredeti használati utasítás fordítása (Istruzioni Originali) .............
МАКЕДОНСКИ - Превод на оригиналните упатства (Istruzioni Originali) ..
LIETUVIŠKAI - Originalių instrukcijų vertimas (Istruzioni Originali) .................
LATVIEŠU - Instrukciju tulkojums no oriģinālvalodas (Istruzioni Originali) ......
LV
LT
MK
HU
HR
RU
SL
PL
CS
NO
DA
FI
SV
TR
EL
PT
NL
ES
DE
FR
EN
IT
Page 4
ii
2
3
« I »
1
2
3
1
1 2
3
« CHOKE »
4
4
5
« O »
2
1
1
2
1
Page 5
iii
6
9
10 12
7
0,75 mm
1
11
2
5
1
2
45°
5-10°
8
1
2
3
1
7
6
3
4
Page 6

ivITPRESENTAZIONE 1
Page 7

Gentile Cliente,
vogliamo anzitutto ringraziarla per la preferenza accordata ai nostri prodotti e ci auguriamo che l’uso
di questa sua macchina le riservi grandi soddisfazioni e risponda appieno alle aspettative. Questo
manuale è stato redatto per consentirle di conoscere bene la sua macchina e di usarla in condizioni di
sicurezza ed efficienza; non dimentichi che esso è parte integrante della macchina stessa, lo tenga a
portata di mano per consultarlo in ogni momento e lo consegni assieme alla macchina il giorno in cui
dovesse cederla o prestarla ad altri.
Questa sua nuova macchina è stata progettata e costruita secondo le normative vigenti, risulta sicura
ed affidabile se usata nel pieno rispetto delle indicazioni contenute in questo manuale (uso previsto);
qualsiasi altro impiego o l’inosservanza delle norme di sicurezza d’uso, di manutenzione e riparazione
indicate è considerato come “uso improprio” e comporta il decadimento della garanzia e il declino di
ogni responsabilità del Costruttore, riversando sull’utilizzatore gli oneri derivanti da danni o lesioni proprie o a terzi.
Nel caso dovesse riscontrare qualche leggera differenza fra quanto qui descritto e la macchina in suo
possesso, tenga presente che, dato il continuo miglioramento del prodotto, le informazioni contenute
in questo manuale sono soggette a modifiche senza preavviso o obbligo di aggiornamento, fermo
restando però le caratteristiche essenziali ai fini della sicurezza e del funzionamento. In caso di dubbio contatti il suo rivenditore. Buon lavoro!
INDICE
1. Identificazione dei componenti principali .................................. 2
2. Simboli ....................................................................................... 3
3. Prescrizioni di sicurezza ............................................................ 4
4. Preparazione al lavoro ............................................................... 6
5. Avviamento - Utilizzo - Arresto del motore ............................... 7
6. Utilizzo della macchina .............................................................. 9
7. Manutenzione e conservazione ............................................... 10
8. Localizzazione guasti .............................................................. 12
9. Dati tecnici ............................................................................... 12
10. Accessori ................................................................................. 12
Page 8
IT
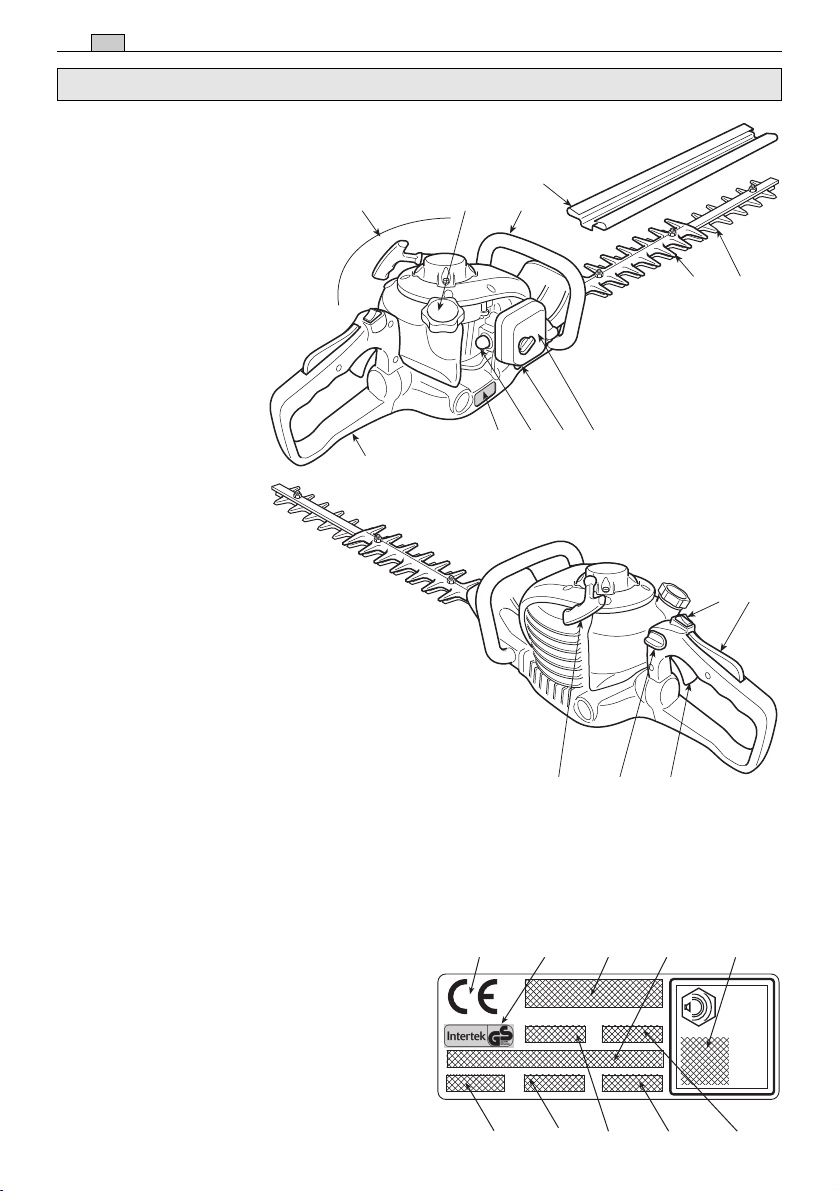
1. Motore
2. Dispositivo di taglio
(lama)
3. Piastra protezione
taglio
4. Impugnatura anteriore
5. Impugnatura
posteriore
6. Comando sblocco
impugnatura
posteriore
7. Protezione lama
10. Etichetta matricola
COMANDI
E RIFORNIMENTI
11. Interruttore arresto
motore
12. Comando della lama
(Leva acceleratore)
13. Leva sicurezza
acceleratore
14. Manopola avviamento
15. Comando arricchitore
(Starter)
16. Comando dispositivo
di adescamento
(Primer)
21. Tappo serbatoio
miscela
22. Coperchio filtro aria
2 IDENTIFICAZIONE DEI COMPONENTI PRINCIPALI
1. IDENTIFICAZIONE DEI COMPONENTI PRINCIPALI
ETICHETTA MATRICOLA
10.1) Marchio di conformità
secondo la direttiva 98/37/CE
(2006/42/CE dal 29/12/2009)
10.2) Nome ed indirizzo del costruttore
10.3) Livello di potenza acustica LWA
secondo la direttiva 2000/14/CE
10.4) Modello di riferimento del costruttore
10.5) Modello di macchina
10.6) Numero di matricola
10.7) Marchio Istituto di certificazione
10.8) Anno di costruzione
10.9) Codice Articolo
10.10) Numero emissioni
10.1
L
WA
dB
PRODUCT SERVICE
10.2
10.3
10.7
10.6
10.4
10.5
10.8
7
3 2
4
5
211
151610 22
6
11 13
1214
10.10
10.09
Page 9
IT
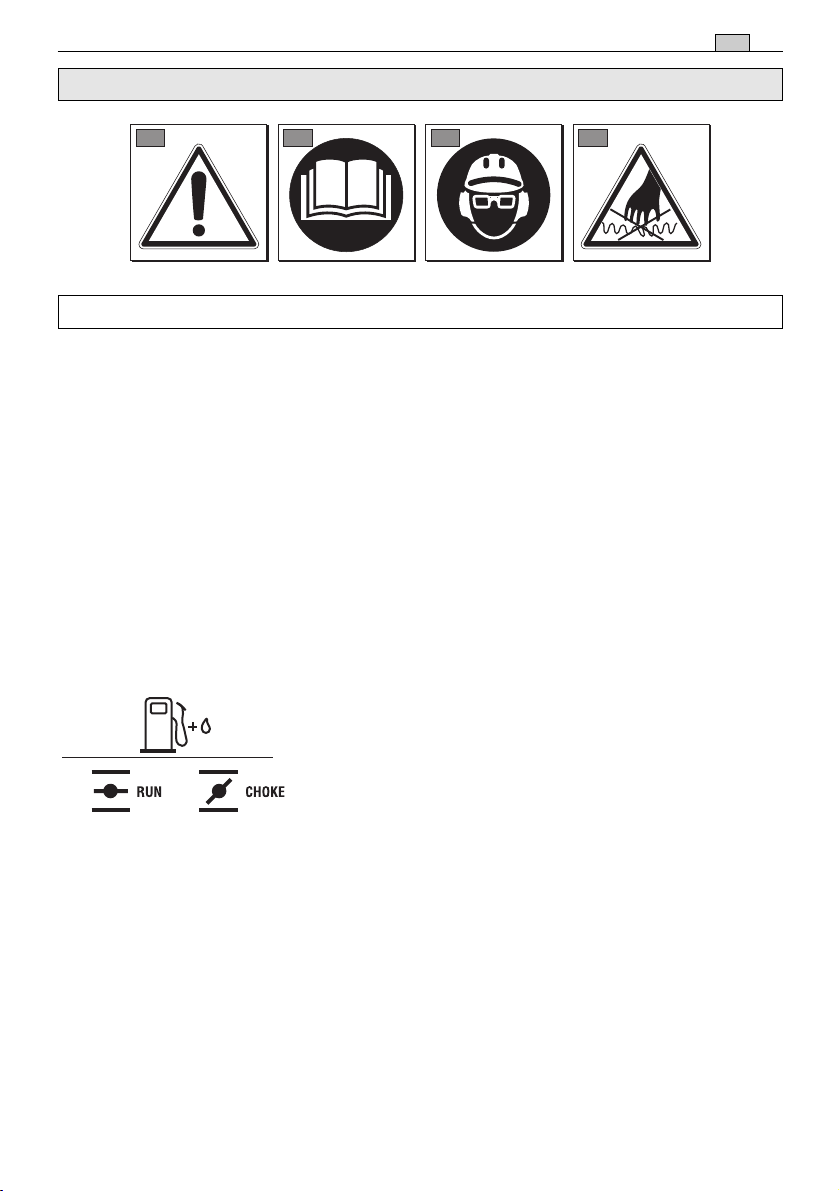
1) Attenzione! Pericolo
2) Prima di usare questa macchina leggere il li-
bretto istruzioni.
3) Il vostro apparato uditivo è in pericolo di dan-
no irreversibile.
Avvisiamo l'operatore addetto di questa macchi-
na, che usandola in condizioni normali per uso
giornaliero continuativo può venir esposto ad un
livello di rumore pari o superiore a: 85 dB (A).
È obbligatorio indossare l'equipaggiamento di
protezione individuale.
Indossare sempre gli occhiali di sicurezza (rischio di proiezioni) e protezioni acustiche come
il casco antirumore (rischio di danni all'apparato
auditivo) durante l'uso della macchina.
Nei casi in cui sia presente il rischio di caduta di
oggetti, indossare il casco di protezione.
4) La lama è molto affilata e può facilmente provocare dei tagli.
SIMBOLI 3
2. SIMBOLI
ATTENZIONE: la macchina da voi acquistata è stata costruita per un uso hobbistico.
11) Serbatoio miscela
12) Comando arricchitore (Starter)
SIMBOLI ESPLICATIVI SULLA MACCHINA (se presenti)
1 2 3 4
11
12
Page 10

IT
A) ADDESTRAMENTO
1) Leggere attentamente le istruzioni. Prendere
familiarità con i comandi e con un uso appropriato della macchina. Imparare ad arrestare
rapidamente il motore.
2) Utilizzare la macchina per lo scopo al quale è
destinata, cioè per “il taglio e la regolarizzazio-
ne di siepi, costituite da arbusti con rametti di
ridotte dimensioni”. Qualsiasi altro impiego può
rivelarsi pericoloso e causare il danneggiamento
della macchina. Rientrano nell’uso improprio
(come esempio, ma non solo):
– taglio dell’erba in generale e in particolare in
prossimità di cordoli;
– sminuzzamento di materiali per il compostag-
gio;
– lavori di potatura;
– usare la macchina per il taglio materiali di ori-
gine non vegetale;
– utilizzare la macchina in più di una persona.
3) Non permettere mai che la macchina venga
utilizzata da bambini o da persone che non
abbiano la necessaria dimestichezza con le
istruzioni. Le leggi locali possono fissare un’età
minima per l’utilizzatore.
4) La macchina non deve essere utilizzata da più
di una persona.
5) Non utilizzare mai la macchina:
– con persone, in particolare bambini, o animali
nelle vicinanze;
– se l’utilizzatore è in condizioni di stanchezza o
malessere, oppure ha assunto farmaci, dro-
ghe, alcool o sostanze nocive alle sue capaci-
tà di riflessi e attenzione;
– se l’utilizzatore non è in grado di tenere salda-
mente la macchina con due mani e/o di rima-
nere stabilmente in equilibrio sulle gambe
durante il lavoro.
6) Ricordare che l’operatore o l’utilizzatore è
responsabile di incidenti e imprevisti che si possono verificare ad altre persone o alle loro proprietà.
B) OPERAZIONI PRELIMINARI
1) Durante il lavoro, occorre indossare un abbigliamento idoneo che non costituisca un impaccio per l’utilizzatore.
– Indossare abiti protettivi aderenti, dotati di
protezioni antitaglio.
– Indossare guanti, occhiali protettivi e scarpe
antitaglio con suola antiscivolo.
– Utilizzare le cuffie per proteggere l’udito.
– Non indossare sciarpe, camici, collane e
comunque accessori pendenti o larghi che
potrebbero impigliarsi nella macchina o in
oggetti e materiali presenti sul luogo di lavoro.
– Raccogliere adeguatamente i capelli lunghi.
2) ATTENZIONE: PERICOLO! La benzina è altamente infiammabile.
– conservare il carburante in appositi contenito-
ri omologati per tale utilizzo;
– non fumare quando si maneggia il carburante;
– aprire lentamente il tappo del serbatoio
lasciando sfogare gradualmente la pressione
interna;
– rabboccare il carburante solo all’aperto, utiliz-
zando un imbuto;
– rabboccare prima di avviare il motore; non
aggiungere carburante o togliere il tappo del
serbatoio quando il motore è in funzione o è
caldo;
– se fuoriesce della benzina, non avviare il
motore, ma allontanare la macchina dall’area
nella quale il carburante è stato versato, ed
evitare di creare possibilità di incendio, fintan-
to che il carburante non sia evaporato ed i
vapori di benzina non si siano dissolti;
– pulire immediatamente ogni traccia di benzina
versata sulla macchina o sul terreno;
– non riavviare la macchina sul luogo ove è stato
operato il rifornimento;
– evitare il contatto del carburante con gli indu-
menti e, in tal caso, cambiarsi gli indumenti
prima di avviare il motore;
– rimettere sempre e serrare bene i tappi del
serbatoio e del contenitore della benzina.
3) Sostituire i silenziatori difettosi o danneggiati.
4) Prima dell’uso, procedere ad una verifica
generale della macchina ed in particolare:
– la leva acceleratore e la leva di sicurezza
devono avere un movimento libero, non forza-
to e al rilascio devono tornare automatica-
mente e rapidamente nella posizione neutra;
– la leva acceleratore deve rimanere bloccata se
non viene premuta la leva di sicurezza;
– l’interruttore di arresto motore deve spostarsi
facilmente da una posizione all’altra;
– i cavi elettrici ed in particolare del cavo della
candela devono essere integri per evitare il
generarsi di scintille e il cappuccio deve esse-
re correttamente montato sulla candela;
– le impugnature e protezioni della macchina
devono essere pulite ed asciutte e saldamen-
te fissate alla macchina;
– le lame non devono mai essere danneggiate;
5) Prima di iniziare il lavoro, assicurarsi che tutte
le protezioni siano correttamente montate.
C) DURANTE L’UTILIZZO
1) Non azionare il motore in spazi chiusi, dove
possono accumularsi pericolosi fumi di monossido di carbonio.
2) Lavorare solamente alla luce del giorno o con
buona luce artificiale.
3) Assumere una posizione ferma e stabile:
4 PRESCRIZIONI DI SICUREZZA
3. PRESCRIZIONI DI SICUREZZA
Page 11

– evitare per quanto possibile di lavorare con
suolo bagnato o scivoloso o comunque su terreni troppo accidentati o ripidi che non garantiscono la stabilità dell’operatore durante il
lavoro;
– evitare l’uso di scale e piattaforme instabili;
– non correre mai, ma camminare e prestare
attenzione alle irregolarità del terreno e alla
presenza di eventuali ostacoli.
4) Avviare il motore con la macchina saldamente bloccata a terra con la mano libera:
– avviare il motore ad almeno 3 metri dal luogo
in cui si è eseguito il rifornimento;
– verificare che altre persone non si trovino nel
raggio di azione della macchina;
– non indirizzare il silenziatore e quindi i gas di
scarico verso materiali infiammabili.
5) Non modificare le regolazioni del motore, e
non fare raggiungere al motore un regime di giri
eccessivo.
6) Controllare che il regime di minimo della macchina sia tale da non permettere il movimento
delle lame e che, dopo un’accelerata, il motore
torni rapidamente al minimo.
7) Fare attenzione a non urtare violentemente la
lama contro corpi estranei e alle possibili proiezioni di materiale causato dallo scorrimento delle
lame.
8) Fermare il motore:
– ogni qualvolta si lasci la macchina incustodita.
– prima di fare rifornimento di carburante.
9) Fermare il motore e staccare il cavo della
candela:
– prima di controllare, pulire o lavorare sulla
macchina;
– dopo aver colpito un corpo estraneo.
Verificare eventuali danni ed effettuare le
necessarie riparazioni prima di usare nuova-
mente la macchina;
– se la macchina comincia a vibrare in modo
anomalo (Ricercare immediatamente la causa
delle vibrazioni e provvedere alle verifiche
necessarie presso un Centro Specializzato).
– quando la macchina non viene utilizzata.
D) MANUTENZIONE E MAGAZZINAGGIO
1) Mantenere serrati dadi e viti, per essere certi
che la macchina sia sempre in condizioni sicure
di funzionamento. Una manutenzione regolare è
essenziale per la sicurezza e per mantenere il
livello delle prestazioni.
2) Non riporre la macchina con della benzina nel
serbatoio in un locale dove i vapori di benzina
potrebbero raggiungere una fiamma, una scintilla o una forte fonte di calore.
3) Lasciare raffreddare il motore prima di collocare la macchina in un qualsiasi ambiente.
4) Per ridurre il rischio d’incendio, mantenere il
motore, il silenziatore di scarico e la zona di
magazzinaggio della benzina liberi da residui di
rametti, foglie o grasso eccessivo; non lasciare
contenitori con i materiali di risulta del taglio
all’interno di un locale.
5) Se il serbatoio deve essere svuotato, effettuare questa operazione all’aperto e a motore
freddo.
6) Indossare guanti da lavoro per ogni inervento
sul dispositivo di taglio.
7) Curare l’affilatura delle lame. Tutte le operazioni riguardanti le lame sono lavori che richiedono una specifica competenza oltre all’impiego
di apposite attrezzature; per ragioni di sicurezza,
è bene che siano eseguiti presso un centro specializzato.
8) Per motivi di sicurezza, non usare mai la macchina con parti usurate o danneggiate. I pezzi
danneggiati devono essere sostituiti e mai riparati. Usare solo ricambi originali. I pezzi di qualità non equivalente possono danneggiare la macchina e nuocere alla sicurezza.
9) Riporre la macchina fuori dalla portata dei
bambini!
E) TRASPORTO E MOVIMENTAZIONE
1) Ogni volta che è necessario movimentare o
trasportare la macchina occorre:
– spegnere il motore, attendere l’arresto delle
lame e scollegare il cappuccio della candela;
– applicare la protezione delle lame;
– afferrare la macchina unicamente dalle impu-
gnature e orientare le lame nella direzione
contraria al senso di marcia.
2) Quando si trasporta la macchina con un automezzo, occorre posizionarla in modo da non
costituire pericolo per nessuno e bloccarla saldamente per evitarne il ribaltamento con possibile danneggiamento e fuoriuscita di carburante.
F) COME LEGGERE IL MANUALE
Nel testo del manuale, alcuni paragrafi contenenti informazioni di particolare importanza sono
contrassegnati con diversi gradi di evidenziazione, il cui significato è il seguente:
oppure
Fornisce precisazioni o altri
elementi a quanto già precedentemente indicato,
nell’intento di non danneggiare la macchina, o
causare danni.
Possibilità di lesioni personali o a terzi in caso di inosservanza.
Possibilità di gravi lesioni
personali o a terzi con pericolo di morte, in
caso di inosservanza.
PERICOLO!
ATTENZIONE!
IMPORTANTE
NOTA
PRESCRIZIONI DI SICUREZZA 5
IT
Page 12

IT
VERIFICA DELLA MACCHINA
Prima di iniziare il lavoro occorre:
– Controllare che non vi siano viti allentate sulla
macchina e sulla lama;
– controllare che le lame siano affilate e senza
segni di danneggiamento;
– controllare che il filtro aria sia pulito;
– controllare che le protezioni siano ben fissate
e efficienti;
– controllare il fissaggio delle impugnature.
PREPARAZIONE DELLA MISCELA
Questa macchina è dotata di un motore a due
tempi che richiede una miscela composta da
benzina e olio lubrificante.
L’uso della sola benzina
danneggia il motore e comporta il decadimento
della garanzia.
Usare solo carburanti e
lubrificanti di qualità per mantenere le prestazioni e garantire la durata degli organi meccanici.
• Caratteristiche della benzina
Usare solo benzina senza piombo (benzina
verde) con numero di ottano non inferiore a 90
N.O.
La benzina verde tende a
creare depositi nel contenitore se conservata per
più di 2 mesi. Utilizzare sempre benzina fresca!
• Caratteristiche dell’olio
Impiegare solo olio sintetico di ottima qualità,
specifico per motori a due tempi.
Presso il vostro Rivenditore sono disponibili olii
appositamente studiati per questo tipo di motore, in grado di garantire una elevata protezione.
L’uso di questi olii permette la composizione di
una miscela al 2%, costituita cioè da 1 parte di
olio ogni 50 parti di benzina.
IMPORTANTE
IMPORTANTE
IMPORTANTE
• Preparazione e conservazione
della miscela
La benzina e la miscela sono infiammabili!
– Conservare la benzina e la miscela in reci-
pienti omologati per carburanti, in luoghi
sicuri, lontano da fonti di calore o fiamme
libere.
– Non lasciare i contenitori alla portata dei
bambini.
– Non fumare durante la preparazione della
miscela ed evitare di inalare vapori di benzina.
La tabella indica i quantitativi di benzina e di olio
da utilizzare per la preparazione della miscela in
funzione del tipo di olio impiegato.
Per la preparazione della miscela:
– Immettere in una tanica omologata circa metà
del quantitativo di benzina.
– Aggiungere tutto l’olio, secondo la tabella.
– Immettere il resto della benzina.
– Richiudere il tappo ed agitare energicamente.
La miscela è soggetta ad
invecchiamento. Non preparare quantitativi
eccessivi di miscela per evitare che si formino
depositi.
Tenere ben distinti ed identificabili i contenitori della miscela e della benzina per evitare di scambiarli al momento dell’utilizzo.
Pulire periodicamente i
contenitori della benzina e della miscela per rimuovere eventuali depositi.
IMPORTANTE
IMPORTANTE
IMPORTANTE
PERICOLO!
6 PREPARAZIONE AL LAVORO
4. PREPARAZIONE AL LAVORO
Benzina Olio sintetico 2 Tempi
litri litri cm
3
10,0220
20,0440
30,0660
5 0,10 100
10 0,20 200
Page 13

IT
RIFORNIMENTO DEL CARBURANTE
Non fumare durante il rifornimento ed evitare di inalare vapori di benzina.
Aprire il tappo della tanica con cautela in quanto potrebbe essersi
formata una pressione all’interno.
Prima di eseguire il rifornimento:
– Scuotere energicamente la tanica della mi-
scela.
– Sistemare la macchina in piano, in posizione
stabile, con il tappo del serbatoio in alto.
ATTENZIONE!
PERICOLO!
– Pulire il tappo del serbatoio e la zona circo-
stante per evitare di immettere sporcizia
durante il rifornimento.
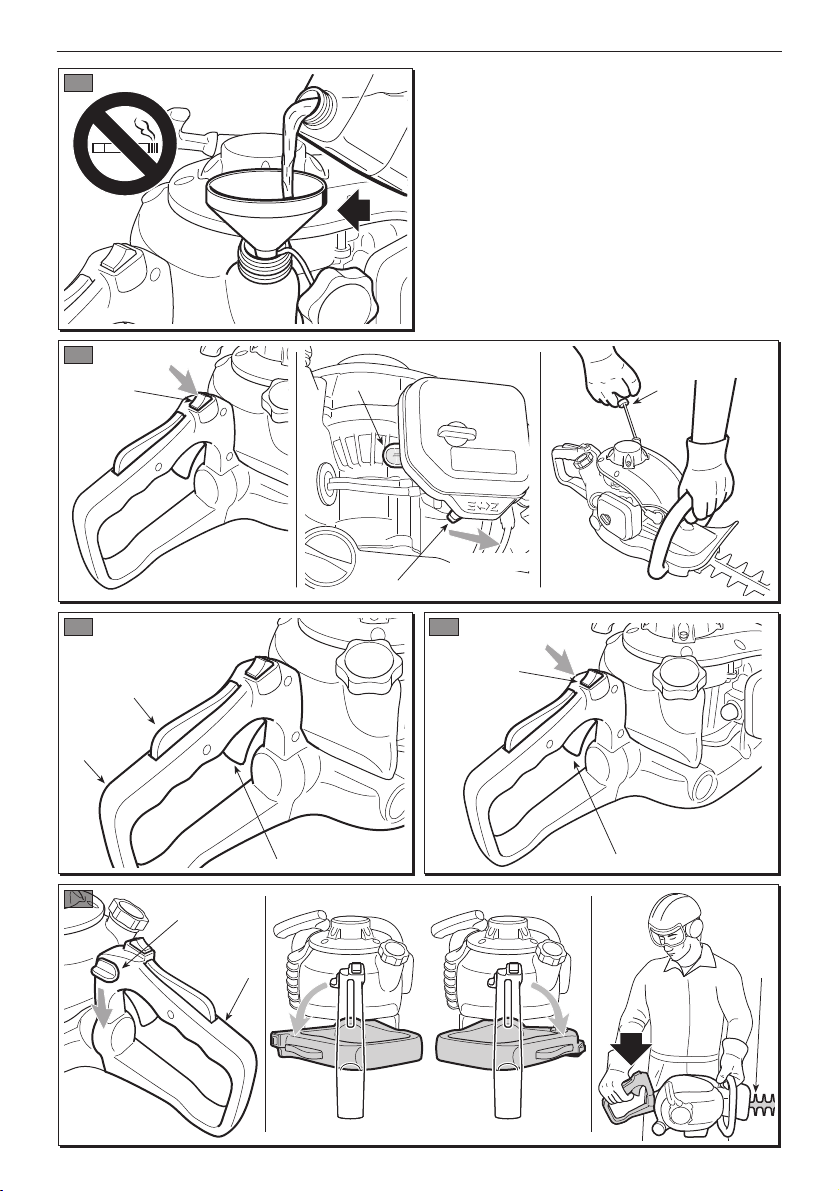
– Aprire con cautela il tappo del serbatoio per
scaricare gradualmente la pressione. Eseguire
il rifornimento mediante un imbuto, evitando di
riempire il serbatoio fino all’orlo (Fig. 1).
Richiudere sempre il tap-
po del serbatoio, serrandolo a fondo.
Ripulire subito ogni traccia di miscela eventualmente versata sulla
macchina o sul terreno e non avviare il motore fintanto che i vapori di benzina non siano
dissolti.
ATTENZIONE!
ATTENZIONE!
2. Premere dolcemente sul bulbo (2) del “pri-
mer” per 7-10 volte fino a quando il carburante esce dal tubo di sfiato.
3. Portare la leva di comando dello starter (3) in
posizione «CHOKE».
4. Tenere saldamente la macchina sul terreno
con una mano sull’impugnatura, per non perdere il controllo durante l’avviamento.
Se la macchina non viene
tenuta saldamente, la spinta del motore
potrebbe far perdere l’equilibrio all’operatore
oppure proiettare la lama contro un ostacolo
o verso l’operatore stesso.
5. Tirare lentamente la manopola di avviamento
per 10 - 15 cm, fino ad avvertire una certa
resistenza, e quindi tirare ulteriormente alcune volte fino ad avvertire i primi scoppi.
Per evitare rotture, non tirare la fune per tutta la sua lunghezza, non farla
strisciare lungo il bordo del foro guida fune e rilasciare gradualmente la manopola, evitando di
farla rientrare in modo incontrollato.
IMPORTANTE
ATTENZIONE!
AVVIAMENTO DEL MOTORE
L’avviamento del motore
deve avvenire ad una distanza di almeno 3
metri dal luogo dove si è effettuato il rifornimento di carburante.
Prima di avviare il motore:
– Sistemare la macchina in posizione stabile sul
terreno.
– Togliere i ripari della lama.
– Accertarsi che la lama non tocchi il terreno o
altri oggetti.
– Accertarsi che l’impugnatura sia bloccata in
posizione centrale.
• Avviamento a freddo
Per avviamento a “freddo”
si intende l’avviamento effettuato dopo almeno 5
minuti dall’arresto del motore o dopo un rifornimento di carburante.
Per avviare il motore (Fig. 2):
1. Spingere l’interruttore (1) in posizione «I».
NOTA
ATTENZIONE!
PREPARAZIONE AL LAVORO / AVVIAMENTO - UTILIZZO - ARRESTO DEL MOTORE 7
5. AVVIAMENTO - UTILIZZO - ARRESTO DEL MOTORE
Page 14

IT
6. Tirare di nuovo la manopola di avviamento, fi-
no ad ottenere l’accensione regolare del motore.
7. Portare la leva di comando dello starter (3) in
posizione «RUN».
8. Lasciare girare il motore al minimo per alme-
no 1 minuto prima di accelerare al massimo
dei giri.
Se la manopola (4) della
fune di avviamento viene azionata ripetutamente
con la leva di comando dello starter (3) in posizione «CHOKE» il motore può ingolfarsi e rendere difficoltoso l’avviamento.
In caso di ingolfamento del motore, smontare la
candela e tirare dolcemente la manopola (5) della
fune di avviamento per eliminare l’eccesso di
carburante; quindi asciugare gli elettrodi della
candela e rimontarla sul motore.
• Avviamento a caldo
Per l’avviamento a caldo (immediatamente dopo
l’arresto del motore), seguire i punti 1 - 4 - 5 - 6
della procedura precedente.
UTILIZZO DEL MOTORE (Fig. 3)
La velocità del dispositivo di taglio è regolata
dalla leva (1) dell’acceleratore posta sull’impugnatura posteriore (2).
L’azionamento di questa leva è possibile solo se
contemporaneamente viene premuta la leva di
sicurezza (3).
Il movimento è trasmesso dal motore alle lame
tramite una frizione a masse centrifughe che
impedisce il movimento delle lame quando il
motore è al minimo.
Non usare la macchina se
il dispositivo di taglio si muove con il motore
al minimo; in questo caso, occorre contattare
il vostro Rivenditore.
La corretta velocità di lavoro si ottiene con la
leva dell’acceleratore (1) a fondo corsa.
Durante le prime 6 - 8 ore di
esercizio della macchina, evitare di utilizzare il
motore al massimo dei giri.
IMPORTANTE
ATTENZIONE!
IMPORTANTE
ARRESTO DEL MOTORE (Fig. 4)
Per arrestare il motore:
– Rilasciare la leva dell’acceleratore (1) e lascia-
re girare il motore al minimo per qualche
secondo.
– Spingere l’interruttore (2) in posizione «O».
Dopo aver portato l’acceleratore al minimo, occorrono diversi secondi
prima che le lame si arrestino.
ATTENZIONE!
8 AVVIAMENTO - UTILIZZO - ARRESTO DEL MOTORE
Page 15

Per il rispetto degli altri e dell’ambiente:
– Evitare di essere un elemento di disturbo.
– Seguire scrupolosamente le norme locali
per lo smaltimento dei materiali di risulta
dopo il taglio.
– Seguire scrupolosamente le norme locali
per lo smaltimento di olii, benzina, parti deteriorate o qualsiasi elemento a forte impatto ambientale.
– Lo smaltimento degli imballi deve avvenire
secondo le disposizioni locali vigenti.
L’esposizione prolungata
alle vibrazioni può causare lesioni e disturbi
neurovascolari (conosciuti anche come “fenomeno di Raynaud” o “mano bianca”) specialmente a chi soffre di disturbi circolatori. I
sintomi possono riguardare le mani, i polsi e
le dita e si manifestano con perdita di sensibilità, torpore, prurito, dolore, decolorazione
o modifiche strutturali della pelle. Questi
effetti possono essere ampliati dalle basse
temperature ambientali e/o da una presa eccessiva sulle impugnature. All’insorgere dei
sintomi, occorre ridurre i tempi di utilizzo della macchina e consultare un medico.
Indossare un abbigliamento adeguato durante il lavoro. Il vostro
Rivenditore è in grado di fornirvi le informazioni sui materiali antiinfortunistici più idonei
a garantire la sicurezza sul lavoro.
REGOLAZIONE DELL’IMPUGNATURA (Fig. 5)
L’impugnatura posteriore (1) può assumere 3
diversi orientamenti rispetto al dispositivo di
taglio, per effettuare più comodamente le operazioni di rifinitura delle siepi.
La regolazione dell’impugnatura deve essere effettuata a motore
spento.
– Abbassare la leva di sblocco (2).
– Ruotare l’impugnatura posteriore (1) nella po-
sizione desiderata.
– Prima di usare la macchina accertarsi che la
leva di sblocco (2) sia completamente ritornata in posizione alta, e che l’impugnatura posteriore sia ben stabile.
ATTENZIONE!
ATTENZIONE!
ATTENZIONE!
Durante il lavoro, l’impugnatura posteriore deve essere sempre verticale, indipendentemente dalla posizione
assunta dal dispositivo di taglio (3).
MODALITÀ DI TAGLIO
Durante il taglio, la macchina deve essere sempre tenuta saldamente
a due mani.
Arrestare subito il motore
se le lame si bloccano durante il lavoro o si
impigliano nei rami della siepe.
È sempre preferibile tagliare prima i due lati verticali della siepe e poi la parte superiore.
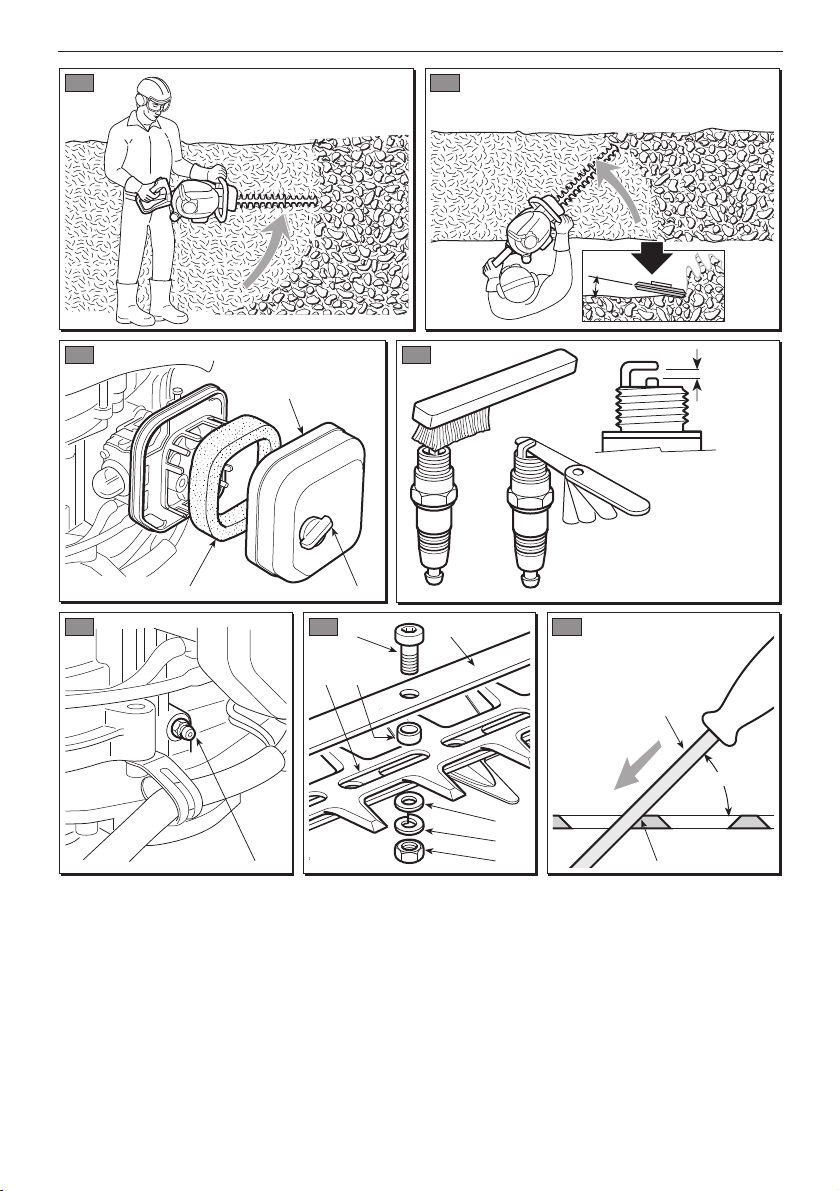
• Taglio verticale (Fig. 6)
Il taglio deve essere eseguito con un movimento
ad arco dal basso verso l’alto, tenendo la lama il
più distante possibile dal corpo.
• Taglio orizzontale (Fig. 7)
I migliori risultati si ottengono con la lama leggermente inclinata (5° - 10°) nella direzione del
taglio, concon un movimento ad arco ed un
avanzamento lento e costante, specialmente nel
caso di siepi molto folte.
LUBRIFICAZIONE DELLE LAME DURANTE
IL LAVORO
Se il dispositivo di taglio si scalda eccessivamente durante il lavoro, occorre lubrificare le
superfici interne delle lame.
Questa operazione deve
essere eseguita a motore spento e lame
ferme.
TERMINE DEL LAVORO
A lavoro terminato:
– Fermare il motore come precedentemente
indicato (Cap. 5).
– Attendere l’arresto delle lame e montare la
protezione.
ATTENZIONE!
ATTENZIONE!
ATTENZIONE!
ATTENZIONE!
UTILIZZO DELLA MACCHINA 9
IT
6. UTILIZZO DELLA MACCHINA
Page 16

Una corretta manutenzione è fondamentale per
mantenere nel tempo l’efficienza e la sicurezza di
impiego originali della macchina.
Durante le operazioni di
manutenzione:
– staccare il cappuccio della candela.
– Attendere che il motore sia adeguatamen-
te raffreddato.
– Usare guanti protettivi nelle operazioni
riguardanti le lame.
– Tenere montate le protezioni della lama,
tranne i casi di interventi sulla lama stessa.
– Non disperdere nell’ambiente olii, benzina
o altro materiale inquinante.
PULIZIA DEL MOTORE E DEL SILENZIATORE
Per ridurre il rischio di incendio, pulire frequentemente le alette del cilindro con aria compressa e
liberare la zona del silenziatore da ramoscelli,
foglie o altri detriti.
PULIZIA DEL FILTRO ARIA
La pulizia del filtro aria è
essenziale per il buon funzionamento e la durata
della macchina.
La pulizia deve essere eseguita ogni 8-10 ore di
lavoro.
Per pulire il filtro (Fig. 8):
– Svitare il pomolo (1) rimuovere il coperchio (2)
e l’elemento filtrante (3).
– Lavare l’elemento filtrante (3) con acqua e
sapone. Non usare benzina o altri solventi.
– Lasciare asciugare il filtro all’aria.
– Rimontare l’elemento filtrante (3) e il coperchio
(2) serrando a fondo il pomolo (1).
FILTRO CARBURANTE
All’interno del serbatoio è posto un filtro che
impedisce alle impurità di entrare nel motore.
Una volta all’anno, è opportuno fare sostituire il
filtro dal vostro Rivenditore.
IMPORTANTE
ATTENZIONE!
CONTROLLO DELLA CANDELA
Periodicamente, smontare e pulire la candela
rimuovendo eventuali depositi con uno spazzolino metallico.
Controllare e ripristinare la corretta distanza fra
gli elettrodi (Fig. 9).
Rimontare la candela serrandola a fondo con la
chiave in dotazione.
La candela deve essere sostituita con una di
analoghe caratteristiche nel caso di elettrodi
bruciati o isolante deteriorato, e comunque ogni
50 ore di funzionamento.
REGOLAZIONE DEL CARBURATORE
l carburatore è regolato in fabbrica in modo da
ottenere le massime prestazioni in ogni situazione di utilizzo, con la minima emissione di gas
nocivi, nel rispetto delle normative vigenti.
Nel caso di prestazioni scarse, controllare anzitutto che le lame non siano parzialmente bloccate o deformate, quindi rivolgersi al vostro
Rivenditore per una verifica della carburazione e
del motore.
• Regolazione del minimo
Il dispositivo di taglio non
deve muoversi con il motore al minimo. Se il
dispositivo di taglio si muove con il motore al
minimo, occorre contattare il vostro Rivenditore per la corretta regolazione del motore.
LUBRIFICAZIONE DEL RIDUTTORE (Fig. 10)
Ogni 20 ore di lavoro, ripristinare il livello con
grasso speciale al bisolfuro di molibdeno, iniettandolo nell’ingrassatore (1).
CONTROLLO E PULIZIA DELLE LAME
Controllare periodicamente che le lame non siano piegate o danneggiate e che le viti siano serrate adeguatamente.
ATTENZIONE!
ATTENZIONE!
10 MANUTENZIONE E CONSERVAZIONE
IT
7. MANUTENZIONE E CONSERVAZIONE
Page 17

Non è necessaria alcuna regolazione della distanza fra le lame, in quanto il gioco è predeterminato in Fabbrica.
Periodicamente, occorre provvedere alla pulizia
delle scanalature interne da detriti, che potrebbero impedire il corretto scorrimento delle lame.
Per eseguire la pulizia (Fig. 11):
– Svitare i dadi (1) e rimuovere le viti (2) e la
barra (3).
– Pulire accuratamente le asole (4) da polvere e
detriti.
– Lubrificare le superfici interne delle lame.
– Rimontare la barra (3) con le viti (2), avendo
cura di riposizionare accuratamente i distan-
ziali (5) e le rondelle (6) e (7) sotto i dadi (1).
– Serrare a fondo i dadi (1).
Controllare sempre che i
dadi (1) siano serrati a fondo prima di riprendere il lavoro.
AFFILATURA DELLE LAME
L’affilatura è necessaria quando la resa del taglio
diminuisce e i rami tendono ad incastrarsi spesso.
Un lama con i taglienti usurati non deve mai essere affilata, ma sempre sostituita.
È sempre preferibile che
l’affilatura venga eseguita dal vostro Rivenditore
che dispone delle attrezzature adeguate e della
competenza necessaria.
In caso si debbano affilare le lame, occorre usare
una lima a grana fine, attuando i seguenti accorgimenti (Fig. 12):
– Appoggiare la lima (1) sul tagliente (2) con un
angolo di 45°, e procedere con un movimento
dall’alto verso lo spigolo tagliente.
– Fare in modo che la lima agisca solo nel per-
corso di andata e sollevarla nel percorso di
ritorno.
– Asportare pochissimo materiale.
– Eliminare tutte le bave con una pietra per affi-
lare.
– Eliminare ogni traccia di limatura e ingrassare
le lame prima di rimontarle.
IMPORTANTE
ATTENZIONE!
ATTENZIONE!
INTERVENTI STRAORDINARI
Ogni operazione di manutenzione non inclusa in
questo manuale deve essere eseguita esclusivamente dal vostro Rivenditore.
Operazioni eseguite presso strutture inadeguate
o da persone non qualificate comportano il
decadimento di ogni forma di garanzia.
CONSERVAZIONE
Al termine di ogni sessione di lavoro, ripulire
accuratamente la macchina da polvere e detriti,
riparare o sostituire le parti difettose e lubrificare le lame per prevenire la ruggine.
La macchina deve essere conservata in un luogo
asciutto, al riparo dalle intemperie, con la protezione delle lame correttamente montata.
INATTIVITÀ PROLUNGATA
Se si prevede un periodo di
inattività della macchina superiore a 2 - 3 mesi
occorre attuare alcuni accorgimenti per evitare
difficoltà alla ripresa del lavoro o danni permanenti al motore.
• Immagazzinaggio
Prima di riporre la macchina:
– Svuotare il serbatoio del carburante.
– Avviare il motore e tenerlo in moto al minimo
fino all’arresto, in modo da consumare tutto il
carburante rimasto nel carburatore.
– Lasciare raffreddare il motore e smontare la
candela.
– Versare nel foro della candela un cucchiaino
d’olio (nuovo) per motori a 2 tempi.
– Tirare diverse volte la fune d’avviamento per
distribuire l’olio nel cilindro.
– Rimontare la candela con il pistone al punto
morto superiore (visibile dal foro della candela) quando il pistone è alla sua corsa massima).
• Ripresa dell’attività
Al momento di rimettere in funzione la macchina:
– Togliere la candela.
– Azionare alcune volte la fune d’avviamento per
eliminare gli eccessi d’olio.
– Controllare la candela come descritto nel
capitolo “Controllo della candela”.
– Predisporre la macchina come indicato nel
capitolo “Preparazione al lavoro”.
IMPORTANTE
MANUTENZIONE E CONSERVAZIONE 11
IT
Page 18

12 LOCALIZZAZIONE GUASTI / DATI TECNICI / ACCESSORI
IT
8. LOCALIZZAZIONE GUASTI
1) Il motore
non si avvia
o non si mantiene
in moto
2) Il motore si avvia
ma ha poca potenza
3) Il motore ha un
funzionamento
irregolare o non ha
potenza sotto carico
4) Il motore ha una
fumosità eccessiva
– Procedura di avviamento
non corretta
– Candela sporca o distanza fra gli
elettrodi non corretta
– Filtro aria otturato
– Problemi di carburazione
– Filtro aria otturato
– Problemi di carburazione
– Candela sporca o distanza
fra gli elettrodi non corretta
– Problemi di carburazione
– Errata composizione della miscela
– Problemi di carburazione
– Seguire le istruzioni (vedi cap. 5)
– Controllare la candela (vedi cap. 7)
– Pulire e/o sostituire il filtro
(vedi cap. 7)
– Contattare il vostro Rivenditore
– Pulire e/o sostituire il filtro
(vedi cap. 7)
– Contattare il vostro Rivenditore
– Controllare la candela (vedi cap. 7)
– Contattare il vostro Rivenditore
– Preparare la miscela secondo
le istruzioni (vedi cap. 4)
– Contattare il vostro Rivenditore
MODELLO ................................................................................................ HTJ 550
Cilindrata ......................................................................................... cm
3
24,5
Potenza ............................................................................................ kW 0,85
Candela ................................................................................................... NHSP LD L8RTF Y
Rapporto benzina : olio ........................................................................... 50 : 1
Capacità serbatoio ........................................................................... litri 0,33
Lunghezza taglio ............................................................................. mm 610
Livello di pressione acustica orecchio operatore (ISO 11201) .... dB(A) 102,1
incertezza di misura (2006/42/CE - EN 27574) ............................ dB(A) 3,0
Livello di potenza acustica misurato (ISO 3744) .......................... dB(A) 107,1
incertezza di misura (2006/42/CE - EN 27574) ............................ dB(A) 3,0
Livello di vibrazioni (EN 774 - EN 28662) ...................................... m/s
2
2,97
incertezza di misura (2006/42/CE - EN 12096) ............................. m/s
2
1,5
Massa ................................................................................................ kg 5,5
9. DATI TECNICI
INCONVENIENTE CAUSA PROBABILE RIMEDIO
Su questa macchina è previsto l’impiego di utensili di taglio riportanti il codice:
23305004/0
Data l’evoluzione del prodotto, gli utensili sopra
citati potrebbero essere sostituiti nel tempo da
altri, con caratteristiche analoghe di intercambiabilità e sicurezza di funzionamento.
10. ACCESSORI
Page 19

INTRODUCTION 1
EN
Dear Customer,
thank you for choosing one of our products. We hope that you will be completely satisfied with this
machine and that it fully meets your expectations. This manual has been compiled in order to provide
you with all the information you need to get acquainted with the machine and use it safely and efficiently. Don’t forget that it is an integral part of the machine, so keep it handy so that it can be consulted when necessary, and pass it on to a further user if you resell or loan the machine.
Your new machine has been designed and manufactured in pursuance of current regulations, and is
safe and reliable if used in compliance with the instructions provided in this manual (proper use). Using
the machine in any other way, or non-compliance with the safety specifications relative to use, maintenance and repair is considered "improper use" which will invalidate the warranty, relieve the manufacturer from all liabilities, and the user will consequently be liable for all and any damage or injury to
himself or others.
Since improvements are periodically made to our products, you may find slight differences between
your machine and the descriptions contained in this manual. Certain modifications can be made to the
machine without prior warning and without the obligation to update the manual, although the essential safety and function characteristics will remain unaltered. In case of any doubts, please contact your
Retailer. And now enjoy your work!
TABLE OF CONTENTS
1. Identification of the main components ...................................... 2
2. Symbols ..................................................................................... 3
3. Safety requirements .................................................................. 4
4. Preparing to work ...................................................................... 6
5. How to start - Use - Stop the engine ........................................ 7
6. Using the machine ..................................................................... 9
7. Maintenance and storage ........................................................ 10
8. Troubleshooting ....................................................................... 12
9. Technical data ......................................................................... 12
10. Accessories ............................................................................. 12
Page 20

2 IDENTIFICATION OF MAIN COMPONENTS
EN
1. Engine
2. Cutting device (blade)
3. Cutter protection
plate
4. Front handgrip
5. Rear handgrip
6. Rear handgrip release
command
7. Blade protection
10. Registration plate
CONTROLS
AND REFUELLING
11. Engine stop switch
12. Blade command
(Accelerator lever)
13. Accelerator safety
lever
14. Starter
15. Choke
16. Primer
21. Fuel tank cap
22. Air cleaner cover
1. IDENTIFICATION OF MAIN COMPONENTS
REGISTRATION PLATE
10.1) Mark of conformity
with EC 98/37 standards (2006/42/EC
from 29/12/2009)
10.2) Name and address of the manufacturer
10.3) Acoustic output level according to EC
2000/14 Standards
10.4) Manufacturer’s model of reference
10.5) Machine model
10.6) Serial number
10.7) Certification Body mark
10.8) Year of manufacture
10.9) Article Code
10.10) Emission number
7
3 2
4
5
211
151610 22
6
11 13
1214
10.1
L
WA
dB
PRODUCT SERVICE
10.2
10.3
10.7
10.6
10.4
10.5
10.8
10.10
10.09
Page 21

SYMBOLS 3
EN
1) Warning! Danger.
2) Read the instruction manual before using the
machine.
3) Irreversible damage can be caused to your
hearing.
Anyone operating this machine under normal
conditions during continuous daily use may be
exposed to a noise level equal to or exceeding
85 dB (A).
The operator must wear Personal Protective E-
quipment (PPE).
Whenever the machine is in use, safety goggles
must be worn to safeguard against flying objects, as must ear protectors, such as a soundproof helmet, in order to protect the operator’s
hearing.
If the operator is working in an area where there
is a risk of falling objects, a safety helmet must
also be worn.
4) The blade is very sharp and you could easily
cut yourself.
2. SYMBOLS
WARNING: The machine you have purchased has been manufactured for domestic use.
11) Fuel tank
12) Choke
SIMBOLI ESPLICATIVI SULLA MACCHINA (se presenti)
1 2 3 4
11
12
Page 22

4 SAFETY REQUIREMENTS
EN
A) TRAINING
1) Read the instructions carefully. Become
acquainted with the controls and the proper use
of the machine. Learn how to stop the engine
quickly.
2) Only use the machine for its intended use, that
is “the cutting and trimming of hedges, con-
sisting in plants with small sized branches”.
Any other use may be dangerous and severly damage the machine. Examples of improper use
may include, but are not limited to:
– general grass cutting and in particular, near
kerbs;
– chopping material for composts;
– pruning;
– using the machine for cutting non-plant mate-
rial;
– use of the machine by more than one person.
3) Never allow children or persons unfamiliar
with these instructions to use the machine. Local
regulations may restrict the age of the operator.
4) The machine must never be used by more
than one person.
5) Never use the machine:
– when people, especially children or pets are in
the vicinity;
– if the user is tired or unwell, or has taken medi-
cine, drugs, alcohol or any substances which
may slow his reflexes and compromise his
judgement;
– if the user is not capable of holding the ma-
chine firmly with two hands and/or of remain-
ing standing on the ground whilst working.
6) Remember that the operator or user is responsible for accidents or hazards occurring to other
people or their property.
B) PREPARATION
1) Always wear adequate clothing when using
the machine which do not hamper movements in
any manner.
– Always wear slim-fitting protective clothing,
fitted with shear-proof protection devices.
– Always wear protective gloves and eye-gog-
gles and safety anti-shear boots with non-slip
soles.
– Always wear ear and hearing protection devi-
ces.
– Never wear scarves, shirts, necklaces, or any
hanging or flapping accessory that could
catch in the machine or in any objects or ma-
terials in the work area.
– Tie your hair back if it is long.
2) WARNING: DANGER! Fuel is highly flammable:
– keep the fuel in containers which have been
specifically manufactured and homologated
for such use;
– never smoke when handling fuel;
– slowly open the fuel tank to allow the pressure
inside to decrease gradually;
– top up the tank with fuel in the open air, using
a tunnel;
– add fuel before starting the engine. Never re-
move the fuel tank cap or add fuel while the
engine is running or when the engine is hot;
– if you have split some fuel, do not attempt to
start the engine but move the machine away
from the area of spillage and avoid creating
any source of ignition until the fuel has evapo-
rated and fuel vapours have dissipated;
– immediately clean up all traces of fuel spilt on
the machine or on the ground;
– never start the machine in the same place you
refilled it with fuel;
– make sure your clothing does not come into
contact with the fuel, on the contrary, change
your clothes before starting the engine;
– always put the tank and fuel container caps
back on and tighten well.
3) Replace faulty or damaged silencers.
4) Before using the machine, check its general
condition and in particular:
– the accelerator lever and the safety lever must
move freely, they must not need forcing and
should return automatically and rapidly back
to the neutral position;
– the accelerator lever must remain locked until
the safety lever is pressed;
– the engine stop switch must easily move from
one position to the other;
– the electric cables and in particular the spark
plug cable must be in perfect condition to a-
void the generation of any sparks and the cap
must be correctly fitted on the spark plug;
– the machine handgrips and protection devices
must be clean and dry and well fastened to
the machine;
– the blades must never be damaged or in poor
condition;
5) Before starting your work, make sure that all
the protection devices are correctly fitted.
C) OPERATION
1) Do not operate the engine in a confined space
where dangerous carbon monoxide fumes can
collect.
2) Work only in daylight or good artificial light.
3. SAFETY REQUIREMENTS
Page 23

SAFETY REQUIREMENTS 5
EN
3) Take on a firm and well-balanced position:
– where possible avoid working on wet slippy
ground or in any case on uneven or ripid
ground which does not guarantee stability for
the operator;
– avoid using unstable ladders or platforms;
– never run, but walk carefully paying attention
to the lay of the land and any eventual obsta-
cles.
4) Start the engine when the machine is firmly on
the ground and hold it in place with your free
hand:
– start the motor in an area at least 3 metres
from where you refuelled;
– check that there are no persons in the vicinity
of the machine;
– do not direct the silencer and therefore the
exhaust fumes towards inflammable materials.
5) Do not change the engine tuning and do not
rev the engine excessively at maximum speed.
6) Check that when the machine is running at minimum speed and ticking over, there is no movement of the blades and, after accelerating, the
engine quickly returns to minimum speed.
7) Make sure the blades do not come into violent
contact with foreign bodies and try to prevent
any material from being hurled after trimming.
8) Stop the engine:
– whenever you leave the machine unattended.
– before refuelling.
9) Stop the engine and disconnect the spark
plug cable:
– before cleaning, checking or working on the
machine;
– after striking a foreign object. Inspect the ma-
chine for any damage and make repairs before
restarting it again;
– if the machine begins to abnormally vibrate
(Immediate look for the cause of the vibrations
and take for necessary controls at a
Specialised Centre).
– when the machine is not in use.
D) MAINTENANCE AND STORAGE
1) Keep all nuts, bolts and screws tightly fastened to be sure the equipment is in safe working
condition. Routine maintenance is essential for
safety and for maintaining a high performance
level.
2) Do not store the machine with fuel in the tank
in an area where the fuel vapors could reach an
open flame, a spark or a strong heat source
3) Allow the engine to cool before storing in any
enclosure.
4) To reduce fire hazards, keep the engine, exhaust silencer and fuel storage area free from
branches, leaves, or excessive grease; never
leave containers with the cut debris inside the
storage area.
5) If the fuel tank has to be emptied, this should
be done outdoors once the engine has cooled
down.
6) Always wear protective gloves when handling
the cutting device.
7) Make sure the blades are well sharpened. All
operations on the blades require a certain level
of experience and specialised tools. For safety
reasons, take them to a specialised centre to be
sharpened.
8) For safety reasons, never use the machine
with worn or damaged parts. Damaged parts are
to be replaced and never repaired. Only use original spare parts. Parts that are not of the same
quality can seriously damage the equipment and
compromise safety.
9) Store the machine out of the reach of children!
E) TRANSPORTATION AND HANDLING
1) Whenever the machine is to be handled or
transported you must:
– turn off the engine, wait for the blades to stop
and diconnect the spark plug cap;
– apply the protection devices to the blades;
– only hold the machine using the handgrips
and position the blades in the opposite direc-
tion to that used during operations.
2) When using a vehicle to transport the machine, position it so that it can cause no danger to
persons and fasten it firmly in place to avoid it
from tipping over, which may cause damage or
fuel spillage.
F) HOW TO READ THE MANUAL
Certain paragraphs in the manual contain particularly significant information and are marked
with various levels of highlighting with the following meaning:
or
These give details or further
information on what has already been indicated,
and aim to prevent both damage to the machine,
and the machine from causing damage.
Non-observance will result in the risk of injury to oneself or others.
Non-observance will result in the risk of serious injury or death to
oneself or others.
DANGER!
WARNING!
IMPORTANT
NOTE
Page 24

6 PREPARING TO WORK
EN
CHECKING THE MACHINE
Before starting work please:
– Check that all the screws on the machine and
the blade are tightly fastened;
– check that the blades are sharp and there are
no signs of any damage;
– check that the air filter is clean;
– check that the protection devices are well fa-
stened and working efficiently;
– check that the handgrips are well fastened
PREPARING THE FUEL
This machine is fitted with a two-stroke engine
which requires a mix of petrol and lubricating oil.
Using petrol alone will damage the motor and will cause for invalidation of
the warranty.
Only use quality fuels and
oils to maintain high performance and guarantee
the duration of the mechanical parts over time.
• Petrol characteristics
Only use unleaded petrol (green petrol) with
octane number no less than 90 N.O.
Unleaded petrol tends to
create deposits in the container if preserved for
more than 2 months. Always use fresh petrol!
• Oil characteristics
Only use top quality synthetic oil specifically for
two-stroke engines.
Your retailer can provide you with oils which have been specifically studied for this type of engine, which are capable of guaranteeing a high level of protection.
The use of these oils makes it possible to prepare a 2% mix, consisting in 1 part oil to 50 parts
petrol.
IMPORTANT
IMPORTANT
IMPORTANT
• Preparation and preservation
of the fuel mix
Petrol and the fuel mix are highly inflammable!
– Keep the petrol and fuel mix in homologat-
ed fuel containers, in safe place, away from
any flames or heat sources.
– Never leave the containers within the reach
of children.
– Never smoke whilst preparing the mix and
avoid inhaling the petrol fumes.
The chart indicates the amount of petrol and oil
to use to prepare the fuel mix according to the
type of oil used.
To prepare the fuel mix:
– Place about half the amount of petrol in a ho-
mologated tank.
– Add all the oil, according to the chart.
– Add the rest of the petrol.
– Close the top and shake well.
The fuel mix tends to age.
Do not prepare excessive amounts of the fuel
mix to avoid deposits from forming.
Keep the petrol and fuel
mix containers separate and easily identifiable to
avoid the mistake of using one in place of the
other.
Periodically clean the petrol
and fuel mix containers to remove any eventual
deposits.
IMPORTANT
IMPORTANT
IMPORTANT
DANGER!
4. PREPARING TO WORK
Petrol Synthetic oil 2-stroke
liters liters cm
3
10.0220
20.0440
30.0660
5 0.10 100
10 0.20 200
Page 25

PREPARING TO WORK / HOW TO START - USE - STOP THE ENGINE 7
EN
REFUELLING
Never smoke whilst refu-
elling and avoid inhaling the petrol fumes.
Carefully open the tank
top as pressure could have formed inside
Before refuelling:
– Shake the fuel mix container well.
– Place the machine on a flat stable surface,
with the fuel tank cap facing upwards.
WARNING!
DANGER!
– Clean the fuel tank cap and the surrounding
area to avoid any dirt from entering the tank
during refilling.
– Carefully open the fuel tank cap to allow the
pressure inside to decrease gradually. Use a
funnel to refill and avoid filling the tank to the
brim (Fig. 1).
Always close the fuel
tank cap firmly.
Immediately clean all traces of fuel which may have dripped on the
machine or the ground and do not start the
engine until the petrol fumes have dissipated.
WARNING!
WARNING!
2. Gently press the bulb (2) on the “primer” 7-10
times until the fuel flows from the exhaust
pipe.
3. Turn the starter control lever (3) to the
«CHOKE» position.
4. Hold the machine firmly on the ground with
one hand on the handgrip, in order not to lose
control of the machine during startup.
If the machine is not held
firmly, the force of the engine could cause the
user to lose his balance or direct the blade
towards an obstacle or the same user.
5. Pull the starter rope slowly for 10 - 15 cm until
you feel some resistance, then tug it a few
times until you hear the engine turn over.
To avoid breaking the
starter rope, do not pull the whole length of it or
let it slide along the edge of the cable guide hole.
Release the starter gradually, to avoid letting it fly
back uncontrollably.
IMPORTANT
WARNING!
STARTING THE ENGINE
The engine must be
started in an area at least 3 metres from
where you refilled the fuel tank.
Before starting the engine:
– Place the machine firmly on the ground.
– Remove the blade protection devices.
– Make sure the blade is not touching the
ground or any other object.
– Make sure the handgrip is locked in the centre
position.
• Cold start
A “cold” start of the engine
means starting it after at least 5 minutes from
when it was switched off or after refuelling.
To start the engine (Fig. 2):
1. Press switch (1) to position «I».
NOTE
WARNING!
5. HOW TO START - USE - STOP THE ENGINE
Page 26

6. Pull the starter rope again until the engine
starts as normal.
7. Turn the starter control lever (3) to the «RUN»
position.
8. Allow the engine to run at minimum speed for
at least one minute before accelerating to
maximum speed.
If the handle (4) on the starter wire is pulled repeatedly with the starter control lever (3) in the «CHOKE» position it can flood
the engine and make starting difficult.
If you have flooded the engine, remove the spark
plug and gently pull the handle (5) on the starter
wire to eliminate any excess fuel; then dry the
spark plug electrodes and replace it on the engine.
• Hot starting
When hot starting (immediately after stopping
the engine), follow the procedure indicated above in points 1 - 4 - 5 - 6.
USE OF THE ENGINE (Fig. 3)
The speed of the cutting device is regulated by
the accelerater lever (1) positioned on the rear
handgrip (2).
It is only possible to use this lever if the safety
lever (3) is pressed simultaneously.
The movement is transmitted from the engine to
the blade by a centrifugal mass clutch that prevents the blade from moving when the engine is
running at minimum speed.
Do not use the machine if
the cutting device moves when the engine is
running idle; in this case, contact you dealer.
The correct running speed will be achieved by
pressing the accelerator lever (1) as far as possible.
Avoid using the engine at
full power for the first 6-8 working hours.
IMPORTANT
WARNING!
IMPORTANT
STOPPING THE ENGINE (Fig. 4)
To stop the engine:
– Release the accelerator lever (1) and allow the
engine to run at minimum speed for a few seconds.
– Press the (2) switch to the «O» position.
When the engine is ticking over, it will take a few seconds for the blades to stop.
WARNING!
8 HOW TO START - USE - STOP THE ENGINE
EN
Page 27

USING THE MACHINE 9
EN
To respect persons and the environment :
– Please try not to cause any disturbance.
– Scrupolously comply with local regulations
and provision for disposal of waste materials after trimming.
– Scrupolously comply with local regulations
and provision for the disposal of oils, petrol, damaged parts or any element which
has a strong impact on the environment.
– Disposal of the packaging should be done
in accordance with the local regulations in
force.
Prolonged exposure to vibrations can cause injuries and neurovascular disorders (also called “Renaud’s syndrome” or “white hand”), especially to people
suffering from circulation disorders. The
symptoms can regard the hands, wrists and
fingers and are shown through loss of sensitivity, torpor, itching, pain and discolouring of
or structural changes to the skin. These
effects can be worsened by low ambient temperatures and/or by gripping the handgrips
excessively tightly. If the symptoms occur,
the length of time the machine is used must
be reduced and a doctor consulted.
Always wearing suitable
clothing when using the machine. Your retailer can provide you with all the information on
the most suitable accident prevention devices to guarantee your safety at work
REGULATING THE HANDGRIP (Fig. 5)
The rear handgrip (1) can be adjusted to 3 different positions in relation to the cutting device to
make trimming your hedges easier.
The handgrip must only
be adjusted when the engine is switched off.
– Lower the release lever (2).
– Rotate the rear handgrip (1) to the desired
position.
– Before using the machine check that the relea-
se lever (2) has correctly returned in the high
position, and the rear handgrip is firmly
attached.
WARNING!
WARNING!
WARNING!
When working, the rear
handgrip must always be in a vertical position, whatever the position of the cutting device (3).
CUTTING PROCEDURES
When cutting, always
hold the machine firmly with both hands.
Immediately stop the engine if the blades block while running or if
they get caught up in the hedge branches
It is recommended to trim the two vertical sides
of the hedge before trimming the top.
• Vertical trimming (Fig. 6)
Proceed to cut by using curved movements from
the bottom towards the top, keeping the blade
as far from the body as possible.
• Horizontal trimming (Fig. 7)
The best results will be obtained with the blade
slightly inclined (5° - 10°) in the direction you are
cutting, proceed with a curved movement, slowly and without interruptions, especially in the case of very thick hedges.
LUBRICATING THE BLADES DURING JOBS
If the trimming device overheats whilst working,
it is necessary to lubricate the internal surfaces
of the blades.
This operation must only
be performed when the blades have stopped
running and the engine is switched off.
END OF OPERATIONS
When you have finished your work:
– Switch off the engine as indicated above
(Chap. 5).
– Wait for the blades to stop and replace the
protection device.
WARNING!
WARNING!
WARNING!
WARNING!
6. USING THE MACHINE
Page 28

10 MAINTENANCE AND PRESERVATION
EN
Correct maintenance is essential to maintain the
original efficency and safety of the machine over
time.
During maintenance operations:
– remove the spark plug cap.
– Wait until the engine is sufficiently cold.
– Use protective gloves when handling the
blades.
– Keep the blade protection devices on,
except when intervening directly on the
blade.
– Never dispose of oils, fuel or other polluting
materials in unauthorised places
CLEANING THE ENGINE AND THE SILENCER
To reduce fire risks, periodically clean the cylinder flaps with compressed air and clear the silencer area from branches, leaves or other debris.
CLEANING THE AIR FILTER
Cleaning the air filter is essential to guarantee the efficiency and duration
of the machine.
It must be cleaned after every 8-10 working
hours.
To clean the filter (Fig. 8):
– Loosen the knob (1) remove the cover (2) and
the filter element (3).
– Wash the filter element (3) with soap and wa-
ter. Do not use petrol or other solvents.
– Leave the filter to dry in the open air.
– Replace the filter element (3) and the cover (2)
and tighten the knob (1).
FUEL FILTER
Inside the fuel tank there is a filter which prevents impurities from entering the engine.
The filter should be replaced once a year by your
Retailer.
IMPORTANT
WARNING!
CHECKING THE SPARK PLUG
Periodically, remove and clean the spark plug
from any eventual deposits using a metal brush.
Check and reset the correct distance between
the electrodes (Fig. 9).
Replace the spark plug and fasten it firmly using
the supplied key.
The spark plug must be replaced with one with
the same characteristics in the cases where the
electrodes have burnt or the insulation has worn
out, and in any case every 50 working hours.
TUNING THE CARBURETTOR
The carburettor is tuned by the manufacturer to
achieve maximum performance in all situations
of use, with a minimum emission of toxic gas in
compliance with current specifications.
In the case of poor performance, first check that
the blades are not partially blocked or deformed,
on the contrary ask your Retailer to check the
carburettor and the engine.
• Tuning minimum speed
The cutting device must
not move when the engine is running idle. If
the cutting device moves when the engine is
running idle, contact your dealer to correctly
regulate the engine.
LUBRICATING THE REDUCTION GEAR
(Fig. 10)
Every 20 working hours, top up the level with
special molybdenum bisulphur lubrication, injecting it into the lubricator (1).
BLADE CLEANING AND CHECK
Periodically check that
the blades are not bent or deformed and that
the screws are adequately tightened.
WARNING!
WARNING!
7. MAINTENANCE AND PRESERVATION
Page 29

MAINTENANCE AND PRESERVATION 11
EN
Adjustment of the distance between blades is
not necessary, as this is predetermined by the
manufacturer.
Cleaning of debris from the inner grooves must
be done regularly, as this could impede the blades from turning correctly.
Proceed with cleaning (Fig. 11):
– Loosen the nuts (1), remove the screws (2) and
the bar (3).
– Carefully remove any dust or debris from the
slots (4).
– Lubricate the internal surfaces of the blades.
– Remount the bar (3) with the screws (2), taking
care to reposition the spacers accurately (5)
and the washers (6) and (7) under the nuts (1).
– Fully tighten the nuts (1).
Always check that the
nuts (1) are tightened as far as possible before starting work.
SHARPENING THE BLADES
It is necessary to sharpen the blades when the
trimming performance decreases and the
branches tend to stick together.
Always replace and never
repair a blade which has blunt cutting edges
We recommend you take
your machine to your Retailer for sharpening as
he has the required tools and suitable experience.
In order to sharpen the blades, it is recommended to use a fine grain file and proceed as follows
(Fig. 12):
– Place the file (1) on the blade (2) at a 45° angle,
and proceed with upward strokes towards the
cutting edge.
– Make sure that you put pressure on the file
only when stroking upwards and raise it from
the blade when you move it back towards you.
– Only remove a smallest amount of material.
– Eliminate any burr with a grinding stone.
– Eliminate all grinding traces and lubricate the
blades before reassembling them.
IMPORTANT
WARNING!
WARNING!
EXTRAORDINARY INTERVENTIONS
All maintenance operations not foreseen in this
manual must be performed exclusively by your
Retailer.
All and any operations performed in unauthorised centres or by unqualified persons will totally invalidate the warranty.
PRESERVATION
After each working session, carefully clean the
machine from dust and debris, repair or replace
any faulty parts and lubricate the blades to prevent them from rusting.
The machine must be preserved in a dry area,
protected from all weather conditions and with
the blade protection device correctly fitted.
PROLONGED IDLE PERIODS
If the machine will not be
used for a period of more than 2-3 months it is
recommended to follow some advice to avoid
difficulty when you wish to use the machine and
to prevent permanent damage to the engine.
• Storage
Before storing the machine:
– Empty the fuel tank.
– Start the engine and allow it to tick over until it
comes to a halt, so that it uses all the fuel that
is left in the carburettor.
– Allow the engine to cool down and remove the
spark plug.
– Pour a a teaspoon of (new) 2-stroke engine oil
into the spark plug slot.
– Pull the starter wire a couple of times to dis-
tribuite the oil in the cylinder.
– Replace the spark plug with the piston in the
dead end upper position (visibile from the
spark plug slot when the piston is at maximum
stroke).
• Restarting work
When you wish to start using the machine again:
– Remove the spark plug.
– Pull the starter wire a couple of times to elim-
inate all excess oil.
– Check the spark plug as described in chapter
“Checking the spark plug”.
– Prepare the machine as indicated in the para-
graph entitled “Preparing for work”.
IMPORTANT
Page 30

12 IDENTIFICATION OF FAULTS / TECHNICAL SPECIFICATIONS / ACCESSORIES
EN
8. IDENTIFICATION OF FAULTS
PROBLEM LIKELY CAUSE SOLUTION
1) The engine
will not start
or will not
keep running
2) The engine starts
but is lacking
in power
3) The engine runs
irregularly and lacks
in power when
revved
4) The engine gives
off an excessive
amount of smoke
– Incorrect starting procedure
– Dirty spark plug or incorrect distance
between the electrodes
– Air filter clogged
– Carburation problems
– Air filter clogged
– Carburation problems
– Dirty spark plug or incorrect
distance between the electrodes
– Carburation problems
– Incorrect composition
of the fuel mix
– Carburation problems
– Follow the instructions
(see chap. 5)
– Check the spark plug
(see chap. 7)
– Clean and/or replace the filter
(see chap. 7)
– Contact your Retailer
– Clean and/or replace the filter
(see chap. 7)
– Contact your Retailer
– Check the spark plug
(see chap. 7)
– Contact your Retailer
– Prepare the fuel mix according to
the instructions (see chap. 4)
– Contact your Retailer
9. TECHNICAL SPECIFICATIONS
MODEL ..................................................................................................... HTJ 550
Displacement .................................................................................. cm
3
24.5
Power ............................................................................................... kW 0.85
Spark plug ............................................................................................... NHSP LD L8RTF Y
Petrol : oil ratio ......................................................................................... 50 : 1
Tank capacity ................................................................................. litres 0.33
Trimming length .............................................................................. mm 610
Operator ear noise pressure level (ISO 11201) ........................... dB(A) 102.1
Measurement uncertainty (2006/42/EC - EN 27574).................... dB(A) 3.0
Measured acoustic output level (ISO 3744)................................... dB(A) 107.1
Measurement uncertainty (2006/42/EC - EN 27574).................... dB(A) 3.0
Vibration level (EN 774 - EN 28662) ............................................... m/s
2
2.97
Measurement uncertainty (2006/42/EC - EN 12096) .................... m/s
2
1.5
Mass .................................................................................................. kg 5.5
Only cutting tools with the following codes must
be used on this machine:
23305004/0
Given the product evolution, the above mentio-
ned tools may be replaced in time by others,
with similar interchangeable and operating
safety characteristics.
10. ACCESSORIES
Page 31

PRÉSENTATION
1
FR
Cher Client,
Nous tenons avant tout à vous remercier de la préférence que vous avez accordée à nos produits, et nous souhaitons que votre nouvelle machine vous réserve de grandes satisfactions et réponde pleinement à vos attentes.
Ce manuel a été rédigé dans le but de vous permettre de bien connaître votre machine et de l’utiliser en toutes
conditions de sécurité et d’efficacité; n’oubliez pas qu’il fait partie intégrante de la machine, tenez-le à portée de
main pour le consulter à tout moment, et le jour où vous devriez céder ou prêter la machine à quelqu’un, rappelez-vous de lui donner aussi ce manuel.
Cette nouvelle machine a été conçue et fabriquée conformément aux normes en vigueur, et elle ne sera fiable et
sûre que si vous l’utilisez dans le plein respect des indications contenues dans ce manuel (usage prévu); toute
autre utilisation, ou le non respect des normes de sécurité lors de l'utilisation, de l'entretien et de la réparation qui
sont indiquées dans le manuel, sont considérés comme un "emploi impropre": dans ce cas, la garantie perd tout
effet et le fabricant décline toute responsabilité, en laissant à la charge de l'utilisateur les conséquences des dommages ou des lésions causés à lui-même ou à autrui.
Si vous deviez trouver de légères différences entre la description donnée et la machine en votre possession, tenez
compte du fait que, dans le cadre de l’amélioration continuelle du produit, les informations contenues dans ce
manuel sont sujettes à des modifications sans aucun préavis ni obligation de mise à jour, sans toutefois que soient
remises en cause les caractéristiques essentielles de sécurité et de fonctionnement. En cas de doute, contactez
votre revendeur. Bon travail!
SOMMAIRE
1. Identification des pièces principales ..................................................... 2
2. Symboles ............................................................................................... 3
3. Prescriptions de sécurité ....................................................................... 4
4. Préparation au travail ............................................................................. 6
5. Démarrage - Utilisation - Arrêt du moteur ............................................. 7
6. Utilisation de la machine ........................................................................ 9
7. Entretien et conservation ..................................................................... 10
8. Localisation de pannes ........................................................................ 12
9. Données techniques ............................................................................ 12
10. Accessorires ......................................................................................... 12
Page 32

2
IDENTIFICATION DES PIÈCES PRINCIPALES
FR
1. Moteur
2. Appareil de taille (lame)
3. Plaque de protection
taille
4. Poignée avant
5. Poignée arrière
6. Commande
de déblocage
de la poignée arrière
7. Protection lame
10. Étiquette matricule
COMMANDES ET PLEIN
DE CARBURANT
11. Interrupteur arrêt
du moteur
12. Commande
de la lame
(levier accélérateur)
13. Levier de sécurité
accélérateur
14. Lanceur
15. Commande du starter
16. Commande du dispositif
d’amorçage (Primer)
21. Bouchon du réservoir
du carburant
22. Couvercle du filtre
de l’air
1. IDENTIFICATION DES PIÈCES PRINCIPALES
ÉTIQUETTE MATRICULE
10.1) Marquage de conformité,
selon la directive 98/37/CE (2006/42/CE du
29/12/2009)
10.2) Nom et adresse du fabricant
10.3) Niveau de puissance acoustique
LWA selon la directive 2000/14/CE
10.4) Modèle de référence du fabricant
10.5) Modèle de machine
10.6) Numéro de série
10.7) Marque Institut de certification
10.8) Année de construction
10.9) Code Article
10.10) Nombre d'émissions
7
3 2
4
5
211
151610 22
6
11 13
1214
10.1
L
WA
dB
PRODUCT SERVICE
10.2
10.3
10.7
10.6
10.4
10.5
10.8
10.10
10.09
Page 33

SYMBOLES
3
FR
1) Attention! Danger
2) Lire le manuel d'instructions avant d'utiliser la
machine.
3) Votre appareil auditif pourrait être compromis pour
toujours.
Nous avertissons l’utilisateur de cette machine qu’en
l’utilisant dans des conditions normales d’usage quotidien continu, il peut être soumis à un niveau de bruit
égal ou supérieur à: 85 dB (A).
Un équipement de protection individuelle est obligatoire.
Toujours porter des lunettes de sécurité (risque de
projections) et des protections acoustiques comme le
casque anti-bruit (risque d’endommager l’appareil
auditif) pendant l’utilisation de la machine.
En présence de risque de chute d’objets, porter un
casque de protection.
4) La lame est très affûtée et peut facilement provoquer des coupures.
2. SYMBOLES
ATTENTION: la machine que vous avez achetée a été construite pour une utilisation non professionnelle.
11) Réservoir du carburant
12) Commande du starter
SYMBOLES EXPLICATIFS SUR LA MACHINE (si présents)
1 2 3 4
11
12
Page 34

4
PRESCRIPTIONS DE SÉCURITÉ
FR
A) FORMATION
1) Lire attentivement les instructions. Se familiariser
avec les commandes et avec l’utilisation appropriée
de la machine. Apprendre à arrêter le moteur rapidement.
2) Utiliser la machine pour l'usage auquel elle est des-
tinée, c’est-à-dire pour “tailler et régulariser les ha-
ies, constituées d’arbustes ayant des petites branches de dimensions réduites”. Toute autre utilisation
peut s’avérer dangereuse ou entraîner une détérioration de la machine. Font partie de l’emploi impropre (à
titre d’exemple non exclusif) :
– tonte de l’herbe en général, notamment à proximité
des bordures ;
– déchiquetage de matériaux pour le compostage ;
– travaux d’élagage ;
– utiliser la machine pour couper des matériaux d’ori-
gine non végétale ;
– utiliser la machine pour plus d’une personne.
3) Ne jamais permettre d’utiliser la machine à des
enfants ou à des personnes qui n’ont pas la connaissance nécessaire des instructions d’emploi. La réglementation locale peut fixer un âge limite pour l’utilisateur.
4) La machine ne doit pas être utilisée par plus d’une
personne.
5) Ne jamais utiliser la machine:
– si des personnes, particulièrement des enfants, ou
des animaux se trouvent à proximité;
– si l’utilisateur est en conditions de fatigue ou de ma-
laise, ou s’il a pris des médicaments, des drogues,
de l’alcool ou des substances nocives pour les ca-
pacités de réflexes et d'attention;
– si l’utilisateur n’est pas en mesure de tenir ferme-
ment la machine avec deux mains, et/ou de rester
solidement en équilibre sur ses jambes pendant le
travail.
6) Garder à l’esprit que l’opérateur ou l’utilisateur est
responsable des accidents ou des risques encourus
par les tierces personnes ou par leurs biens.
B) PRÉPARATIONS
1) Pendant le travail, il faut porter des vêtements adaptés, qui ne constituent aucune gêne pour l’utilisateur.
– Porter des habits de protection adhérents, équipés
de protections contre les coupures.
– Porter des gants, des lunettes de protection et des
grosses chaussures anti-coupe avec des semelles
antidérapantes.
– Utiliser le serre-tête pour protéger l’ouïe.
– Ne porter aucune écharpe, aucune blouse, colliers
ni accessoires pendants ou larges qui pourraient se
prendre dans la machine ou dans des objets ou des
matériaux qui se trouvent sur l'endroit où l'on tra-
vaille.
– Serrer adéquatement les cheveux longs.
2) ATTENTION: DANGER! L’essence est hautement
inflammable:
– conserver le carburant dans des récipients spécia-
lement prévus et homologués pour cet usage;
– ne jamais fumer quand on manipule le carburant;
– ouvrir lentement le bouchon du réservoir, en lais-
sant diminuer progressivement la pression interne;
– ne remplir de carburant qu'en plein air, et en utili-
sant un entonnoir;
– ajouter de l’essence avant de démarrer le moteur et
ne jamais enlever le bouchon du réservoir de car-
burant ou faire le plein lorsque le moteur est en
fonctionnement ou tant qu’il est encore chaud;
– ne pas faire démarrer le moteur si de l’essence a été
répandue; éloigner la machine de la zone où le car-
burant a été renversé, et éviter de créer toute pos-
sibilité d’incendie tant que le carburant ne s’est pas
évaporé et que les vapeurs d’essence ne se sont
pas dissipées;
– nettoyer immédiatement toute trace d'essence
éventuellement versée sur la machine ou sur le ter-
rain;
– ne jamais remettre la machine en marche à l’endroit
où l’on a fait le plein de carburant;
– éviter tout contact du carburant avec les vêtements;
si les vêtements ont été tachés il faut les changer
avant de faire démarrer le moteur;
– remettre et serrer correctement les bouchons du
réservoir et du récipient.
3) Remplacer les silencieux défectueux ou endommagés.
4) Avant l’emploi, procéder à un contrôle général de
la machine, et en particulier:
– le levier de l’accélérateur et le levier de sécurité doi-
vent bouger librement, sans besoin de forcer, et au
relâchement ils doivent retourner automatiquement
et rapidement dans la position neutre;
– le levier de l’accélérateur doit rester bloqué tant
qu’on n’appuie pas sur le levier de sécurité;
– l’interrupteur d’arrêt du moteur doit passer facile-
ment d’une position à l’autre;
– les câbles électriques, et en particulier le fil de la
bougie, doivent être intacts, pour éviter de faire des
étincelles, et le capuchon doit être monté correcte-
ment sur la bougie;
– les poignées et les protections de la machine doi-
vent être propres et sèches, et solidement fixées à
la machine;
– les lames ne doivent jamais être endommagées;
5) Avant de commencer le travail, vérifier que toutes
les protections sont montées correctement.
C) PENDANT L’UTILISATION
1) Ne pas faire fonctionner le moteur dans un endroit
confiné où les gaz nocifs contenant du monoxyde de
carbone peuvent s’accumuler.
2) Travailler uniquement à la lumière du jour ou dans
une lumière artificielle de bonne qualité.
3. PRESCRIPTIONS DE SÉCURITÉ
Page 35

PRESCRIPTIONS DE SÉCURITÉ
5
FR
3) Prendre une position ferme et stable:
– autant que possible, éviter de travailler sur le sol
mouillé ou glissant, ou de toute façon sur des terrains trop accidentés ou en pente, qui ne garantiraient pas la stabilité de l'opérateur pendant son
travail;
– éviter d’utiliser des échelles et des plates-formes
instables;
– ne jamais courir, mais marcher et faire attention aux
irrégularités du terrain ainsi qu’à la présence d’obstacles éventuels.
4) Faire démarrer le moteur en tenant avec la main
libre la machine fermement bloquée par terre:
– faire démarrer le moteur à au moins 3 mètres de
l’endroit où l’on a fait le plein d'essence;
– vérifier qu’il n’y a aucune autre personne dans le
rayon d’action de la machine;
– ne pas diriger le silencieux, et donc les gaz d’é-
chappement, vers des matières inflammables.
5) Ne jamais modifier le réglage du régulateur du
moteur, ni mettre le moteur en surrégime.
6) Contrôler que le régime de minimum de la machine
est tel qu'il ne permet aucun mouvement des lames,
et que après une accélération le moteur retourne rapidement au régime minimum.
7) Faire attention à ne pas heurter violemment la lame
contre des corps étrangers; faire attention aux projections possibles de matériel, causées par le glissement
des lames.
8) Arrêter le moteur dans les cas suivants:
– toutes les fois que la machine doit être laissée sans
surveillance.
– avant de faire le plein de carburant.
9) Arrêter le moteur et débrancher le fil de bougie dans
les cas suivants:
– avant toute opération de nettoyage, de vérification
ou de réparation de la machine;
– après avoir heurté un objet étranger. Vérifier si la
machine est endommagée, et effectuer les réparations nécessaires avant de l’utiliser à nouveau;
– si la machine commence à vibrer de manière ano-
male (Chercher immédiatement la cause des vibrations et faire procéder aux vérifications nécessaires
dans un Centre Spécialisé).
– quand on n’utilise pas la machine.
D) MAINTENANCE ET STOCKAGE
1) Maintenir tous les écrous et vis serrés afin d’assurer des conditions d’utilisation sûres. Un entretien régulier est essentiel pour la sécurité et le maintien du
niveau de performances.
2) Ne jamais entreposer la machine avec du carburant
dans le réservoir dans un local où les vapeurs d’essence pourraient atteindre une flamme, une étincelle
ou une forte source de chaleur.
3) Laisser le moteur refroidir avant de ranger la machine dans un local quelconque.
4) Pour réduire les risques d’incendie, maintenir le
moteur, le silencieux d’échappement, et la zone de
stockage de l’essence absolument propres de tous
résidus de brindilles, feuilles ou graisses en excès; ne
pas laisser les conteneurs à l’intérieur d’un local avec
les déchets de la taille.
5) Si le réservoir de carburant doit être vidangé, effectuer cette opération à l’extérieur et lorsque le moteur
est froid.
6) Pour toute opération sur le dispositif de taille, porter des gants de travail.
7) Soigner l’affûtage des lames. Toutes les opérations
sur les lames sont des travaux spécialisés qui requièrent une compétence spécifique ainsi que des outillages spéciaux; pour des raisons de sécurité, elles doivent donc être exécutées dans un centre spécialisé.
8) Ne pas utiliser la machine avec des pièces endommagées ou usées, pour des raisons de sécurité. Les
pièces endommagées doivent être remplacées, jamais réparées. N’utiliser que des pièces de rechange
d’origine. Des pièces de qualité non équivalente peuvent endommager la machine et nuire à votre sécurité.
9) Entreposer la machine hors de la portée des enfants!
E) TRANSPORT ET DÉPLACEMENT
1) Chaque fois qu’il est nécessaire de déplacer la machine ou de la transporter, il faut:
– éteindre le moteur, attendre l’arrêt des lames, et
démonter le capuchon de la bougie;
– appliquer la protection sur les lames;
– saisir la machine uniquement par les poignées, et o-
rienter les lames dans la direction contraire au sens
de la marche.
2) Quand on transporte la machine dans un camion, il
faut la positionner de façon qu’elle ne constitue aucun
danger pour personne, et la bloquer solidement pour
éviter qu’elle ne se renverse, ce qui pourrait l’abîmer
ou provoquer une fuite de carburant.
F) COMMENT LIRE LE MANUEL
Dans le texte de ce manuel, certains paragraphes qui
contiennent des renseignements particulièrement importants sont mis en évidence par différentes paroles;
voici leur signification:
ou alors
Donne des précisions ou d'autres éléments à ce qui vient d'être indiqué, dans le but
de ne pas endommager la machine ou de ne pas causer de dommages
Possibilité de lésions à l’utilisateur ou à autrui en cas de non respect des
consignes.
Possibilité de lésions graves
à l’utilisateur ou à autrui, et danger de mort, en cas
de non respect des consignes.
DANGER!
ATTENTION!
IMPORTANT
REMARQUE
Page 36

6
PRÉPARATION AU TRAVAIL
FR
VÉRIFICATION DE LA MACHINE
Avant de commencer le travail il faut:
– Contrôler qu’il n’y ait sur la machine et sur la lame
aucune vis desserrée;
– contrôler que les lames sont bien affûtées et qu’el-
les ne présentent aucun signe d’endommagement;
– contrôler que le filtre de l’air est bien propre;
– contrôler que les protections sont bien fixées et effi-
caces;
– contrôler la fixation des poignées.
PRÉPARATION DU CARBURANT
Cette machine est équipée d’un moteur à deux temps,
qui a besoin d’un mélange composé d’essence et
d’huile lubrifiante.
Utiliser seulement de l’essence abîme le moteur et entraîne la déchéance de la
garantie.
Il ne faut utiliser que des carburants et des lubrifiants de qualité, pour maintenir les
performances et pour garantir la durabilité des organes mécaniques.
• Caractéristiques de l’essence
Utiliser exclusivement de l’essence sans plomb (essence verte), ayant un nombre d’octane non inférieur
à 90 N.O.
L’essence verte a tendance à
créer des dépôts dans le réservoir si on la conserve
pendant plus de 2 mois. Utiliser toujours de l’essence
fraîche!
• Caractéristiques de l’huile
Employer uniquement de l’huile synthétique d’excellente qualité, spécifique pour les moteurs à deux
temps.
Chez votre revendeur sont disponibles des huiles spécialement étudiées pour ce type de moteur, en mesure de garantir une haute protection.
L’utilisation de ces huiles permet la composition d’un
mélange à 2%, c’est-à-dire constitué d’1 partie d’huile pour 50 parties d'essence.
IMPORTANT
IMPORTANT
IMPORTANT
• Préparation et conservation du mélange
L’essence et le mélange sont inflammables !
– Conserver l’essence et le mélange dans des
récipients homologués pour carburants, dans
des endroits sûrs, loin de toute source de chaleur ou de flammes libres.
– Ne jamais laisser les conteneurs à la portée des
enfants.
– Ne pas fumer pendant la préparation du mélan-
ge, et éviter d’inhaler des vapeurs d’essence
Le tableau suivant indique les quantités d’essence et
d’huile à utiliser pour préparer le mélange, en fonction
du type d’huile employé.
Pour la préparation du carburant:
– Verser dans un bidon homologué environ moitié de
la quantité d'essence.
– Ajouter toute l’huile, selon le tableau.
– Verser le reste de l’essence.
– Refermer le bouchon et agiter énergiquement.
Le mélange est sujet au vieillissement. Ne pas préparer de quantités excessives de
mélange, pour éviter la formation de dépôts.
Tenir bien distincts et identifiables les conteneurs du mélange et de l’essence, pour
éviter de les confondre au moment de l’emploi.
Nettoyer périodiquement les
conteneurs de l’essence et du mélange, pour enlever
les dépôts éventuels.
IMPORTANT
IMPORTANT
IMPORTANT
DANGER!
4. PRÉPARATION AU TRAVAIL
Essence Huile synthétique 2 Temps
litres litres cm
3
10,0220
20,0440
30,0660
5 0,10 100
10 0,20 200
Page 37

PRÉPARATION AU TRAVAIL / DÉMARRAGE - UTILISATION - ARRÊT DU MOTEUR
7
FR
APPROVISIONNEMENT EN CARBURANT
Ne pas fumer pendant le
plein, et éviter d’inhaler des vapeurs d’essence.
Ouvrir avec précaution le
bidon, car il pourrait s’être formé de la pression à
l’intérieur du bidon.
Avant d’exécuter le remplissage:
– Secouer énergiquement le bidon du mélange.
– Placer la machine à niveau, dans une position sta-
ble, avec le bouchon du réservoir vers le haut.
ATTENTION!
DANGER!
– Nettoyer le bouchon du réservoir et la zone autour,
pour éviter d’introduire des saletés pendant le remplissage.
– Ouvrir avec précaution le bouchon du réservoir
pour décharger progressivement la pression.
Exécuter le remplissage avec un entonnoir, en évitant de remplir le réservoir jusqu’à ras bord (Fig. 1).
Refermer toujours le bou-
chon du réservoir, en le serrant à fond.
Nettoyer tout de suite toute
trace de mélange éventuellement versé sur la
machine ou sur le terrain, et ne pas mettre en marche le moteur tant que les vapeurs d’essence ne
se sont pas dissoutes.
ATTENTION!
ATTENTION!
2. Appuyer doucement sur le bulbe (2) du “primer”
7-10 fois, jusqu’à ce que le carburant sorte par le
tuyau d’évacuation.
3. Mettre le levier de commande du starter (3) dans la
position «CHOKE».
4. Tenir fortement la machine sur le terrain avec une
main sur la poignée, pour ne pas perdre le contrôle pendant le démarrage.
Si l’on ne tient pas fermement la machine, la poussée du moteur pourrait
faire perdre l’équilibre à l’opérateur, ou bien projeter la lame contre un obstacle ou vers l’opérateur
lui-même.
5. Tirer lentement le lanceur de 10 – 15 cm, jusqu’à
ce qu’on sente une certaine résistance, et puis tirer
davantage plusieurs fois jusqu’à ce qu’on entende
les premiers éclatements.
Pour éviter des cassures, ne
pas tirer le câble sur toute sa longueur, et ne pas le faire frotter le long du bord du trou de passage du câble;
relâcher graduellement le lanceur, en évitant de le faire
rentrer de façon incontrôlée.
IMPORTANT
ATTENTION!
DÉMARRAGE DU MOTEUR
Le démarrage du moteur
doit se faire à une distance d'au moins 3 mètres de
l'endroit où l'on a effectué le remplissage de carburant.
Avant de démarrer le moteur:
– Disposer la machine en position stable sur le ter-
rain.
– Enlever les protections de la lame.
– Vérifier que la lame ne touche ni le terrain ni d’aut-
res objets.
– Vérifier que la poignée est bloquée en position cen-
trale.
• Démarrage à froid
Par démarrage à “froid” on entend le démarrage que l’on effectue au moins 5 minutes après l’arrêt du moteur, ou bien après un plein de
carburant.
Pour démarrer le moteur (Fig. 2):
1. Pousser l’interrupteur (1) dans la position «I».
REMARQUE
ATTENTION!
5. DÉMARRAGE - UTILISATION - ARRÊT DU MOTEUR
Page 38

6. Tirer à nouveau le lanceur, jusqu’à ce qu’on obtien-
ne l’allumage régulier du moteur.
7. Mettre le levier de commande du starter (3) dans la
position «RUN».
8. Laisser tourner le moteur au régime minimum pen-
dant au moins 1 minute avant d’accélérer et de
passer au régime de tours maximum.
Si l’on actionne trop de fois le
bouton (4) de la corde de démarrage avec le levier de
commande du starter (3) dans la position «CHOKE», le
moteur peut se noyer, ce qui rendra le démarrage plus
difficile.
En cas de noyage du moteur, il faut démonter la bougie et tirer doucement le bouton (5) de la corde de
démarrage, pour éliminer l’excès de carburant; puis
essuyer les électrodes de la bougie, et la remonter sur
le moteur.
• Démarrage à chaud
Pour le démarrage à chaud (tout de suite après l’arrêt
du moteur), suivre les points 1 - 4 - 5 - 6 de la procédure précédente.
UTILISATION DU MOTEUR (Fig. 3)
La vitesse du dispositif de taille est réglée par le levier
(1) de l’accélérateur qui se trouve sur la poignée arrière (2).
On ne peut actionner ce levier que si l’on appuie en
même temps sur le levier de sécurité (3).
Le mouvement est transmis du moteur aux lames
grâce à un embrayage à masses centrifuges qui
empêche le mouvement des lames quand le moteur
est au minimum.
Ne pas utiliser la machine si
le dispositif de coupe bouge quand le moteur est
au minimum; dans ce cas il faut contacter le
revendeur.
La vitesse de travail correcte s’obtient avec le levier
de l’accélérateur (1) à fond de course.
Pendant les 6-8 premières
heures de fonctionnement de la machine, il faut éviter
d’utiliser le moteur au maximum de tours.
IMPORTANT
ATTENTION!
IMPORTANT
ARRÊT DU MOTEUR (Fig. 4)
Pour arrêter le moteur:
– Relâcher le levier de l’accélérateur (1) et laisser
tourner le moteur au régime minimum pendant
quelques secondes.
– Pousser l’interrupteur (2) dans la position «O».
Après qu’on a mis l’accélérateur au minimum, quelques secondes sont
nécessaires avant que les lames ne s’arrêtent.
ATTENTION!
8
DÉMARRAGE - UTILISATION - ARRÊT DU MOTEUR
FR
Page 39

UTILISATION DE LA MACHINE
9
FR
Pour le respect des autres et de l’environnement:
– Eviter d’être une cause de nuisance.
– Suivre scrupuleusement les normes locales pour
l'élimination des déchets après la taille.
– Suivre scrupuleusement les normes locales pour
l'élimination des huiles, de l’essence, des parties
détériorées ou de tout élément ayant un fort
impact environnemental.
– Il faut éliminer les emballages conformément
aux dispositions locales en vigueur.
L’exposition prolongée aux
vibrations peut causer des lésions et des troubles
neuro-vasculaires (connus aussi comme “phénomène de Raynaud” ou “main blanche”), spécialement aux personnes qui souffrent de troubles de
la circulation. Les symptômes peuvent concerner
les mains, les poignets et les doigts, ils se manifestent par une perte de sensibilité, engourdissement, démangeaison, douleur, décoloration, ou
modifications structurelles de la peau. Ces effets
peuvent être amplifiés par les basses températures de l’environnement et/ou par une prise excessive sur les poignées. Quand ces symptômes se
présentent, il faut réduire les temps d’utilisation
de la machine et consulter un médecin.
Pendant le travail, porter
des vêtements adéquats. Votre revendeur est en
mesure de vous fournir les informations sur les
dispositifs de protection contre les accidents les
mieux adaptés à garantir votre sécurité de travail.
RÉGLAGE DE LA POIGNÉE (Fig. 5)
La poignée arrière (1) peut prendre 3 orientations différentes du dispositif de taille, pour effectuer plus
commodément les opérations de finition des haies.
Le réglage de la poignée
doit être effectué avec le moteur éteint.
– Abaisser le levier de déblocage (2).
– Tourner la poignée arrière (1) pour la mettre dans la
position désirée.
– Avant d’utiliser la machine, vérifier que le levier de
déblocage (2) est complètement retourné dans la
position supérieure, et que la poignée arrière est
bien stable.
ATTENTION!
ATTENTION!
ATTENTION!
Pendant le travail, la poignée arrière doit toujours être verticale, indépendamment de la position prise par le dispositif de
taille (3).
MODALITÉS DE TAILLE
Pendant la taille il faut toujours tenir fortement la machine, à deux mains.
Arrêter tout de suite le moteur si les lames se bloquent pendant le travail ou
se prennent dans les branches de la haie.
Il vaut toujours mieux tailler d’abord les deux côtés
verticaux de la haie, puis la partie supérieure.
• Taille verticale (Fig. 6)
La taille doit être exécutée avec un mouvement en arc
du bas vers le haut, en tenant la lame le plus loin possible du corps.
• Taille horizontale (Fig. 7)
Pour obtenir les meilleurs résultats, tenir la lame légèrement inclinée (5° - 10°) dans le sens de la taille, avec
un mouvement en arc et une progression lente et
constante, surtout dans le cas de haies très touffues.
LUBRIFICATION DES LAMES PENDANT
LE TRAVAIL
Si le dispositif de taille surchauffe trop pendant le travail, il faut lubrifier les surfaces internes des lames.
Cette opération doit être
exécutée avec le moteur éteint et les lames arrêtées.
FIN DU TRAVAIL
Lorsque le travail est terminé:
– Arrêter le moteur comme indiqué précédemment
(Chap. 5).
– Attendre l’arrêt des lames et monter la protection.
ATTENTION!
ATTENTION!
ATTENTION!
ATTENTION!
6. UTILISATION DE LA MACHINE
Page 40

10
ENTRETIEN ET CONSERVATION
FR
Il est fondamental d’effectuer correctement l’entretien
pour pouvoir maintenir pendant longtemps l’efficacité
et la sécurité d’emploi originelles de la machine.
Pendant les opérations
d’entretien:
– détacher le capuchon de la bougie.
– Attendre que le moteur se soit adéquatement
refroidi.
– Utiliser des gants de protection pour effectuer
les opérations sur les lames.
– Tenir les protections de lame montées sur la la-
me, sauf dans les cas d’interventions sur la lame
elle-même.
– Ne jamais répandre dans l’environnement les
huiles usées, l'essence, ou tout autre produit
polluant.
NETTOYAGE DU MOTEUR ET DU SILENCIEUX
Pour réduire le risque d’incendie, il faut nettoyer fréquemment les ailettes du cylindre avec de l’air comprimé, et libérer la zone du silencieux de toutes brindilles, feuilles ou autres détritus.
NETTOYAGE DU FILTRE A AIR
Il est essentiel de nettoyer le
filtre à air pour garantir le bon fonctionnement et la
durabilité de la machine.
Il faut nettoyer le filtre toutes les 8-10 heures de travail.
Pour nettoyer le filtre (Fig. 8):
– Desserrer le pommeau (1), enlever le couvercle (2)
et l’élément filtrant (3).
– Laver l’élément filtrant (3) avec de l’eau et du savon.
Ne pas utiliser d’essence ni d’autres solvants.
– Laisser sécher le filtre à l’air.
– Remonter l’élément filtrant (3) et le couvercle (2), en
serrant le pommeau à fond (1).
FILTRE DU CARBURANT
À l’intérieur du réservoir se trouve un filtre qui empêche aux impuretés d'entrer dans le moteur.
Il est bon de faire changer ce filtre une fois par an,
chez votre revendeur.
IMPORTANT
ATTENTION!
CONTRÔLE DE LA BOUGIE
Périodiquement, démonter et nettoyer la bougie en
enlevant les éventuels dépôts, avec une brosse métallique.
Contrôler et rétablir une distance correcte entre les
électrodes (Fig. 9).
Remonter la bougie et la serrer à fond avec la clé
comprise dans la fourniture.
Dans le cas d’électrodes brûlées ou d’isolant détérioré, et de toute façon toutes les 50 heures de fonctionnement, il faut remplacer la bougie par une bougie
ayant des caractéristiques analogues.
RÉGLAGE DU CARBURATEUR
Le carburateur est réglé en usine, pour obtenir les
meilleurs performances dans toutes les situations
d’emploi, et la moindre émission possible de gaz nocifs, dans le respect des réglementations en vigueur.
En cas de performances réduites, contrôler avant tout
que les lames ne soient pas partiellement bloquées ou
déformées, puis s’adresser au revendeur pour faire
vérifier la carburation et le moteur.
• Réglage du minimum
Le dispositif de coupe ne
doit pas bouger quand le moteur est au minimum.
Si le dispositif de coupe bouge quand le moteur
est au minimum, il faut contacter le revendeur
pour faire régler le moteur correctement.
LUBRIFICATION DU RÉDUCTEUR (Fig. 10)
Toutes les 20 heures de travail, rétablir le niveau, en
injectant dans le graisseur (1) une graisse spéciale au
bisulfure de molybdène.
CONTRÔLE ET NETTOYAGE DES LAMES
Contrôler périodiquement
que les lames ne sont pas pliées ni endommagées,
et que les vis sont adéquatement serrées.
ATTENTION!
ATTENTION!
7. ENTRETIEN ET CONSERVATION
Page 41

ENTRETIEN ET CONSERVATION
11
FR
Il n’y a besoin de faire aucun réglage de la distance
entre les lames, car le jeu est prédéterminé en Usine.
Il faut périodiquement procéder à nettoyer les rainures
internes de tous débris qui pourraient empêcher aux
lames de glisser correctement.
Pour exécuter le nettoyage (Fig. 11):
– Dévisser les écrous (1) et enlever les vis (2) et le gui-
de-chaîne (3).
– Nettoyer soigneusement les fentes (4) de la pous-
sière et des débris.
– Lubrifier les surfaces internes des lames.
– Remonter le guide-chaîne (3) avec les vis (2), en
ayant soin de replacer soigneusement les entretoi-
ses (5) et les rondelles (6) et (7) sous les écrous (1).
– Serrer à fond les écrous (1).
Il faut toujours contrôler que
les écrous (1) sont bien serrés à fond avant de
reprendre le travail.
AFFÛTAGE DES LAMES
Il est nécessaire de les affûter quand le rendement de
la taille diminue et que les branches tendent souvent
à s'encastrer.
Une lame avec les tranchants usés ne doit jamais être affûtée, mais toujours remplacée.
Il est toujours préférable que
l’affûtage soit exécuté par votre revendeur, qui dispose des outillages adéquats et de la compétence nécessaire.
Au cas où vous devez affûter les lames, utilisez une
lime à grain fin, en prenant les précautions suivantes
(Fig. 12):
– Mettez la lime (1) sur le tranchant (2) avec un angle
de 45°, et procédez avec un mouvement d’en haut
vers l’angle tranchant.
– Faites en sorte que la lime agisse seulement dans le
parcours d’aller, et soulevez-la dans le parcours de
retour.
– Enlevez très peu de matériel.
– Eliminez toutes les bavures avec une pierre pour
affûter.
– Eliminez toutes les traces de limage et graissez les
lames avant de les remonter.
IMPORTANT
ATTENTION!
ATTENTION!
INTERVENTIONS EXTRAORDINAIRES
Toutes les opérations d’entretien qui ne sont pas
inclues dans ce manuel doivent être exécutées exclusivement par votre revendeur.
Les opérations exécutées dans des structures inadéquates ou par des personnes non qualifiées comportent la déchéance de toutes les formes de garantie.
CONSERVATION
À la fin de chaque session de travail, nettoyer soigneusement la machine de la poussière et des débris,
réparer ou remplacer les parties défectueuses, et
lubrifier les lames pour prévenir la rouille.
La machine doit être conservée dans un endroit sec, à
l’abri des intempéries, avec la protection des lames
correctement montée.
INACTIVITÉ PROLONGEE
Si l’on prévoit une période d’inactivité de la machine de plus de 2 – 3 mois, il faut
prendre certaines précautions pour éviter des difficultés au moment de la reprise du travail, ou même des
dommages permanents au moteur.
• Emmagasinage
Avant de ranger la machine:
– Vider le réservoir du carburant.
– Faire démarrer le moteur et le tenir allumé au régi-
me minimum jusqu’à ce qu’il s’arrête, de façon à
consommer tout le carburant resté dans le carbura-
teur.
– Laisser le moteur refroidir et démonter la bougie.
– Verser dans le trou de la bougie une petite cuiller
d’huile (neuve) pour moteurs à 2 temps.
– Tirer plusieurs fois la corde de mise en marche pour
distribuer l’huile dans le cylindre.
– Remonter la bougie avec le piston au point mort
supérieur (visible du trou de la bougie quand le pis-
ton est au maximum de sa course).
• Reprise de l’activité
Au moment de remettre la machine en fonction:
– Enlever la bougie.
– Tirer plusieurs fois la corde de mise en marche pour
éliminer les excès d’huile.
– Contrôler la bougie comme décrit au chapitre
“Contrôle de la bougie”.
– Préparer la machine comme indiqué au chapitre
“Préparation pour le travail”.
IMPORTANT
Page 42

12
LOCALISATION DES PANNES / DONNÉES TECHNIQUES / ACCESSOIRES
FR
8. LOCALISATION DES PANNES
PROBLÈME CAUSE PROBABLE SOLUTION
1) Le moteur
ne démarre pas
ou ne reste pas
en mouvement
2) Le moteur démarre
mais il a peu
de puissance
3) Le moteur
a un fonctionnement
irrégulier ou il n’a pas
de puissance sous
charge
4) Le moteur fume
excessivement
– Procédure de démarrage pas correcte
– Bougie sale, ou distance entre
les électrodes pas correcte
– Filtre de l’air bouché
– Problèmes de carburation
– Filtre de l’air bouché
– Problèmes de carburation
– Bougie sale, ou distance entre
les électrodes pas correcte
– Problèmes de carburation
– Composition du mélange erronée
– Problèmes de carburation
– Suivre les instructions (voir chap. 5)
– Contrôler la bougie (voir chap. 7)
– Nettoyer et/ou remplacer le filtre
(voir chap. 7)
– Contacter votre Revendeur
– Nettoyer et/ou remplacer le filtre
(voir chap. 7)
– Contacter votre Revendeur
– Contrôler la bougie (voir chap. 7)
– Contacter votre Revendeur
– Préparer le mélange suivant
les instructions (voir chap. 4)
– Contacter votre Revendeur
9. DONNÉES TECHNIQUES
MODÈLE................................................................................................................ HTJ 550
Cylindrée ..................................................................................................... cm
3
24,5
Puissance ..................................................................................................... kW 0,85
Bougie .................................................................................................................. NHSP LD L8RTF Y
Rapport essence: huile ......................................................................................... 50 : 1
Capacité du réservoir ................................................................................. litres 0,33
Longueur de taille ........................................................................................ mm 610
Niveau de pression acoustique à l’oreille de l'opérateur (ISO 11201) ..... dB(A) 102,1
Incertitude de la mesure (2006/42/CE - EN 27574) ................................. dB(A) 3,0
Niveau de puissance acoustique mesuré (ISO 3744) ............................... dB(A) 107,1
Incertitude de la mesure (2006/42/CE - EN 27574) ................................. dB(A) 3,0
Niveau de vibrations (EN 774 - EN 28662) ................................................ m/s
2
2,97
Incertitude de la mesure (2006/42/CE - EN 12096) ................................... m/s
2
1,5
Masse ............................................................................................................. kg 5,5
Sur cette machine, il est prévu d'employer des outils
de coupe portant le code :
23305004/0
Vue l’évolution de ce produit, les outils mentionnés ci-
dessus pourraient être remplacés à l’avenir par d’autres outils ayant des caractéristiques analogues d’interchangeabilité et de sécurité de fonctionnement.
10. ACCESSOIRES
Page 43

EINFÜHRUNG
1
DE
Sehr geehrte Kundin, sehr geehrter Kunde, Heckenschere
Wir danken Ihnen, dass Sie unseren Produkten den Vorzug gegeben haben und wünschen Ihnen, dass Ihnen der
Gebrauch Ihrer neuen Maschine Freude macht und Ihren Erwartungen vollkommen entspricht. Dieses Handbuch
wurde herausgegeben, um Sie mit Ihrer Maschine vertraut zu machen und diese sicher und wirksam einsetzen zu
können. Beachten Sie, dass das Handbuch ein wesentlicher Bestandteil der Maschine ist. Halten Sie es stets
griffbereit, um es jederzeit einsehen zu können, und liefern Sie es mit, sollten Sie die Maschine eines Tages an
Dritte abtreten oder ausleihen.
Diese neue Maschine wurde nach den geltenden Bestimmungen entwickelt und hergestellt. Sie arbeitet sicher
und zuverlässig, wenn sie - unter strikter Beachtung der in diesem Handbuch enthaltenen Anweisungen verwendet wird (Bestimmungsgemäßer Gebrauch). Jede andere Verwendung oder die Nichtbeachtung der angezeigten
Sicherheitsvorschriften beim Gebrauch bzw. der Anweisungen für Wartung und Reparatur werden als ”unzweckmäßige Verwendung” der Maschine angesehen und haben den Verfall der Garantie und die Ablehnung jeder
Verantwortung seitens des Herstellers zur Folge. Dem Benutzer selbst dadurch entstandene oder Dritten zugefügte Schäden oder Verletzungen gehen zu Lasten des Benutzers.
Falls Sie kleinere Unterschiede zwischen der Beschreibung im Handbuch und der Maschine feststellen sollten,
können Sie davon ausgehen, dass die in diesem Handbuch enthaltenen Informationen auf Grund fortwährender
Verbesserungen des Erzeugnisses Änderungen unterliegen, ohne dass der Hersteller die Pflicht zur Bekanntgabe
oder zur Aktualisierung hat, unter der Voraussetzung, dass sich die wesentlichen Eigenschaften für Sicherheit und
Betriebsweise nicht verändern. Im Zweifelsfall wenden Sie sich bitte an den Händler Viel Spaß bei der Arbeit!
INHALTSVERZEICHNIS
1. Kennzeichnung der wesentlichen Bauteile ............................................ 2
2. Symbole ................................................................................................. 3
3. Sicherheitsvorschriften .......................................................................... 4
4. Arbeitsvorbereitung ................................................................................ 6
5. Motor anlassen, benutzen und ausschalten .......................................... 7
6. Maschineneinsatz .................................................................................. 9
7. Wartung und Aufbewahrung ................................................................ 10
8. Störungssuche ..................................................................................... 12
9. Technische Daten ................................................................................. 12
10. Zubehör ................................................................................................ 12
Page 44

2
KENNZEICHNUNG DER WESENTLICHEN BAUTEILE
DE
1. Motor
2. Schneidvorrichtung
(Messer)
3. Schutzplatte
4. Vorderer Handgriff
5. Hinterer Handgriff
6. Entriegelungsvorrichtung
hinterer Handgriff
7. Messerschutz
10. Typenschild
STEUERUNG
UND BETRIEBSMITTEL
11. Motorabstellschalter
12. Messersteuerung
(Gashebel)
13. Sicherheitsgashebel
14. Startgriff
15. Chokehebel
16. Primer
21. Verschluss Gemischtank
22. Luftfilterdeckel
1. KENNZEICHNUNG DER WESENTLICHEN BAUTEILE
TYPENSCHILD
10.1) Konformitätszeichen gemäß
der Richtlinie 98/37/EG (2006/42/EG ab
29/12/2009)
10.2) Name und Anschrift des Herstellers
10.3) Schalleistungspegel LWA
gemäß Richtlinie 2000/14/EG
10.4) Bezugsmodell des Herstellers
10.5) Maschinenmodell
10.6) Kennummer
10.7) Prüfzeichen des Prüfinstituts
10.8) Baujahr
10.9) Artikelnummer
10.10) Emission-Nummer
7
3 2
4
5
211
151610 22
6
11 13
1214
10.1
L
WA
dB
PRODUCT SERVICE
10.2
10.3
10.7
10.6
10.4
10.5
10.8
10.10
10.09
Page 45

SYMBOLE
3
DE
1) Achtung! Gefahr
2) Vor Inbetriebnahme des Geräts die Gebrauchsanlei-
tung aufmerksam lesen.
3) Ihr Gehör kann bleibend beschädigt werden.
Wir weisen den Bediener des Geräts darauf hin, dass er
bei normalen Arbeitsbedingungen täglich einer Geräuschbelastung von 85 dB (A) oder mehr ausgesetzt
ist.
Bei der Arbeit mit der Maschine müssen entsprechende Schutzvorrichtungen getragen werden, wie Schutzbrille (Gefahr umherfliegender Teile) und Gehörschutz
(es besteht Gefahr bleibender Gehörschäden). Sollte
während der Arbeit auch die Gefahr herabfallender
Gegenstände bestehen, so ist auch ein Schutzhelm zu
tragen.
4) Das Messer ist scharf geschliffen und kann leicht
Schnittverletzungen verursachen.
2. SYMBOLE
ACHTUNG: Das von Ihnen gekaufte Gerät ist für den Hobbygebrauch gebaut worden.
11)
Gemischtank
12)
Chokehebel
BESCHREIBENDE SYMBOLE AN DER MASCHINE (falls vorhanden)
1 2 3 4
11
12
Page 46

4
SICHERHEITSVORSCHRIFTEN
DE
A) AUSBILDUNG
1) Lesen Sie die Anweisungen aufmerksam. Machen
Sie sich mit den Bedienungsteilen und dem richtigen
Gebrauch der Maschine vertraut. Lernen Sie, den Motor schnell abzustellen.
2) Die Maschine nur zu dem, für diesen vorgesehenen
Zweck verwenden, d.h. für das Schneiden und Trim-
men von Hecken, bestehend aus Sträuchern mit
kleinen Zweiglein. Ein unzweckmäßiger Gebrauch
kann generell gefährlich sein und die Maschine beschädigen. Folgende Punkte gehören zur unzwekkmäßigen Verwendung (beispielhaft):
– Schneiden von Gras im Allgemeinen und vor allem
in der Nähe von Bordsteinen;
– Zerkleinern von Materialien für die Kompostierung;
– Beschneidearbeiten;
– Verwenden der Maschine für den Schnitt von nicht
pflanzlichen Materialien;
– Verwenden der Maschine durch mehr als eine
Person.
3) Erlauben Sie niemals Kindern oder Personen, die
nicht über die erforderlichen Kenntnisse dieser Gebrauchsanweisung verfügen, die Maschine zu benutzen. Örtliche Bestimmungen können das Mindestalter
des Benutzers festlegen.
4) Die Maschine darf nicht von mehr als einer Person
benutzt werden.
5) Maschine niemals benutzen:
– während Personen, besonders Kinder oder Tiere in
der Nähe sind.
– wenn der Benutzer müde ist oder sich nicht wohl
fühlt, oder wenn er Arzneimittel oder Drogen, Alko-
hol oder andere Stoffe zu sich genommen hat, die
seine Aufmerksamkeits- und Reaktionsfähigkeit be-
einträchtigen
– wenn der Benutzer nicht imstande ist, die Maschine
mit zwei Händen festzuhalten bzw. wenn er bei der
Arbeit nicht stabil auf den Beinen das Gleichge-
wicht halten kann
6) Beachten Sie, dass der Benutzer für Unfälle und
Schäden verantwortlich ist, die anderen Personen oder deren Eigentum widerfahren können.
B) VORBEREITENDE MASSNAHMEN
1) Bei der Arbeit, muss der Benutzer eine geeignete
Kleidung tragen, die ihn in seinen Bewegungen nicht
hindert
– Enganliegende Schutzkleidung mit schnittfesten
Schutzeinsätzen tragen
– Handschuhe, Schutzbrille und schnittfeste Sicher-
heitsschuhe mit rutschfester Sohle tragen
– Gehörschutz tragen
– Keine Schale, Hemden, Halsketten oder andere lo-
se hängende Zubehöre tragen, die sich in der Ma-
schine oder in eventuell auf dem Arbeitsplatz be-
findlichen Gegenständen verfangen könnten
– Langes Haar zusammenbinden
2) ACHTUNG: GEFAHR! Benzin ist hochgradig entflammbar:
– Kraftstoff in eigens zu diesem Zweck vorgesehe-
nen, zugelassenen Behältern aufbewahren;
– beim Umgang mit Kraftstoffen nicht rauchen;
– Tankverschluss langsam öffnen, um den darin ent-
standenen Druck langsam abzubauen.
– Kraftstoff nur im Freien mit Hilfe eines Trichters
nachfüllen
– Kraftstoff ist vor dem Starten des Motors einzufül-
len. Während der Motor läuft oder bei heißer Ma-
schine darf der Tankverschluss nicht geöffnet bzw.
Benzin nachgefüllt werden.
– Falls Benzin übergelaufen ist, darf kein Versuch
unternommen werden, den Motor zu starten. Statt
dessen ist die Maschine von der benzinverschmutz-
ten Fläche zu entfernen. Bis das Benzin nicht voll-
ständig verdampft ist und die Benzindämpfe nicht
verflüchtigt sind, vermeiden Sie alles, was einen
Brand verursachen könnte.
– Jegliche Spur von eventuell auf der Maschine oder
auf dem Boden verschüttetem Benzin sofort entfer-
nen;
– Maschine nicht am Befüllungsort starten;
– der Kontakt zwischen Kraftstoff und den Kleidern ist
zu vermeiden, und in einem solchen Fall, kleiden Sie
sich lieber um, bevor Sie den Motor starten;
– Tankverschluss und Verschluss des Benzinbehäl-
ters müssen immer gut zugeschraubt sein.
3) Fehlerhafte oder beschädigte Schalldämpfer auswechseln.
4) Vor dem Gebrauch die ganze Maschine gründlich
überprüfen und insbesondere:
– der Gashebel und der Sicherheitshebel müssen
sich leicht bewegen lassen, nicht klemmen und
wenn losgelassen, müssen sie automatisch und
schnell ihre Ausgangsposition wieder einnehmen;
– der Gashebel muss blockiert bleiben, solange der
Sicherheitshebel nicht betätigt wird;
– der Taster für die Motorausschaltung muss von ein-
er Position auf die andere leicht verstellbar sein;
– das Elektrokabel und vor allem das Zündkerzenka-
bel müssen einwandfrei sein, um eine Funken-
bildung auszuschließen und der Stecker muss vor-
schriftsmäßig an der Zündkerze angebracht sein;
– die Handgriffe und Schutzvorrichtungen der Ma-
schine müssen gereinigt und abgetrocknet, und
schließlich an die Maschine fest angebracht wer-
den;
– die Messer dürfen nie beschädigt sein;
5) Vor Arbeitsbeginn muss sichergestellt werden, dass
alle Schutzvorrichtungen richtig angebracht sind.
C) DIE MASCHINE IM EINSATZ
1) Der Verbrennungsmotor darf nicht in geschlossenen Räumen laufen, in denen sich gefährliche Kohlenmonoxydabgase sammeln können.
3. SICHERHEITSVORSCHRIFTEN
Page 47

SICHERHEITSVORSCHRIFTEN
5
DE
2) Arbeiten Sie nur bei Tageslicht oder bei gutem
Kunstlicht.
3) Eine sichere und stabile Position einnehmen
– vermeiden Sie so gut wie möglich den Einsatz der
Maschine auf nassem oder rutschigem Boden oder
jedenfalls auf unebenen oder steilen Böden, wenn
für den Benutzer bei der Arbeit keine ausreichende
Stabilität gewährleistet ist;
– vermeiden Sie Treppen und unstabile Plattformen;
– rennen Sie nicht, gehen Sie immer vorsichtig voran
und achten Sie auf die Bodenunebenheiten und auf
die Anwesenheit eventueller Hindernisse.
4) Beim Anlassen des Motors die Maschine mit der
freien Hand fest auf den Boden drücken.
– den Motor erst mindestens 3 Meter vom Befüllung-
sort entfernt starten;
– versichern Sie sich, dass sich in Maschinenreich-
weite keine anderen Personen befinden.
– Schalldämpfer und demnach auch die Abgase nie
gegen entflammbare Stoffe richten
5) Ändern Sie nicht die Grundeinstellung des Motors
oder überdrehen Sie ihn nicht.
6) Sicherstellen, dass sich die Messer nicht bewegen
solange der Motor leer läuft, und dass nach Betätigung des Gashebels der Motor dann auch schnell
wieder auf den Leerlauf gebracht wird.
7) Achten Sie darauf, dass das Messer nicht gegen
Fremdkörper hart aufprallt und auf das eventuell
durch die Reibung der Messer herumfliegende Material.
8) Der Motor ist abzustellen:
– wenn Sie die Maschine unbewacht lassen.
– bevor Sie nachtanken.
9) Schalten Sie den Motor ab und ziehen Sie das Kerzenkabel heraus:
– bevor Sie die Maschine überprüfen, reinigen oder
Arbeiten an ihr durchführen;
– nachdem ein Fremdkörper getroffen wurde. Prüfen
Sie, ob an der Maschine Schäden entstanden sind,
und führen Sie die erforderlichen Reparaturen aus,
ehe Sie die Maschine wieder benutzen.
– wenn die Maschine auf anormale Weise zu vibrieren
beginnt (Sofort die Ursachen der Vibrationen aus-
findig machen und die notwendigen
Untersuchungen in einem Fachbetrieb durchführen
lassen).
– wenn die Maschine nicht benutzt wird.
D) WARTUNG UND LAGERUNG
1) Sorgen Sie dafür, dass alle Muttern, und Schrauben
fest angezogen sind, um sicher zu sein, dass das Gerät immer unter guten Bedingungen arbeitet. Eine regelmäßige Wartung ist unentbehrlich für die Sicherheit
und die Einhaltung der Leistungsfähigkeit.
2) Bewahren Sie die Maschine mit Benzin im Tank niemals innerhalb eines Raumes auf, in dem Benzindämpfe mit offenem Feuer, einer heißen Quelle oder
Funken in Berührung kommen könnten.
3) Lassen Sie den Motor abkühlen, bevor Sie die Maschine in einem Raum abstellen.
4) Um die Brandgefahr zu vermindern, ist der Motor,
der Abgasschalldämpfer und der Lagerort für die
Kraftstoffe stets frei von Zweigresten, Blättern oder überflüssigem Fett zu halten; Behälter mit Schneidresten niemals innerhalb eines Raumes lassen.
5) Falls der Tank zu entleeren ist, muss dies im Freien
erfolgen und bei kaltem Motor.
6) Tragen Sie bei jedem Eingriff auf der Schneidvorrichtung Handschuhe.
7) Achten Sie auf das Messerschärfen. Alle an den
Messern durchzuführenden Arbeiten setzen gezielte
Kompetenzen und den Einsatz spezieller Werkzeuge
voraus; aus Sicherheitsgründen sollten diese immer
von Fachleuten ausgeführt werden.
8) Verwenden Sie, aus Sicherheitsgründen, nie die
Maschine mit abgenutzten oder beschädigten Teilen.
Die beschädigten Teile müssen ersetzt und dürfen niemals repariert werden. Nur Original-Ersatzteile verwenden. Nicht gleichwertige Ersatzteile können die
Maschine beschädigen und Ihre Sicherheit gefährden.
9) Maschine nicht in Kinderreichweite aufbewahren!
E) TRANSPORT UND HANDHABUNG
1) Folgende Hinweise müssen bei Transport und
Handhabung der Maschine beachtet werden:
– Motor ausschalten; abwarten bis die Messer voll-
ständig stillstehen, Zündkerzenstecker abtrennen;
– Messerschutz anbringen;
– Maschine ausschließlich an den Handgriffen aufhe-
ben und die Messer in die der Laufrichtung ent-
gegengesetzte Richtung positionieren;
2) Sollte der Transport der Maschine mit einem Kraftfahrzeug erfolgen, so muss sie so aufgestellt werden,
dass sie keine Gefahr darstellt und auch gut befestigt
werden, um das Umkippen mit nachfolgender Schadenentstehung und Kraftstoffauslauf zu verhindern.
F) WIE IST DAS HANDBUCH ZU LESEN
Im Text des vorliegenden Handbuchs sind einige besonders wichtige Abschnitte unterschiedlich gekennzeichnet, wobei die Bedeutung solcher Kennzeichnungen wie folgt zu verstehen ist:
oder
Liefert erläuternde Hinweise
oder andere Angaben über bereits an früherer Stelle
gemachte Aussagen, mit der Absicht, die Maschine
nicht zu beschädigen oder Schäden zu vermeiden.
Im Falle der Nichtbeachtung
besteht die Möglichkeit, sich selbst oder Dritte zu
verletzen
Im Falle der Nichtbeachtung
besteht die Möglichkeit, sich selbst oder Dritte
schwer zu verletzen, mit Todesgefahr.
GEFAHR!
ACHTUNG!
WICHTIG
ANMERKUNG
Page 48

6
ARBEITSVORBEREITUNG
DE
MASCHINENÜBERPRÜFUNG
Bevor Sie mit der Arbeit starten, muss folgendes
geprüft werden:
– dass an der Maschine und am Messer alle Schrau-
ben angezogen sind;
– dass die Messer scharf und nicht beschädigt sind;
– dass der Luftfilter sauber ist;
– dass die Schutzeinrichtungen festsitzen und ausrei-
chend sind;
– dass die Handgriffe richtig befestigt sind.
GEMISCHZUBEREITUNG
Diese Maschine ist mit einem Zweitaktmotor ausgestattet, der mit einem Benzin-Öl-Gemisch betrieben
wird.
Die Verwendung von Benzin
allein beschädigt den Motor und hat den Verfall der
Garantie zur Folge.
Verwenden Sie nur hochwertiges Benzin und Schmieröl, um die Gesamtleistungen
und die Standzeit der mechanischen Teile auch langfristig sicherzustellen.
• Benzineigenschaften
Nur bleifreies Benzin (grünes Benzin) mit einer
Oktanzahl unter 90 NO verwenden.
Grünes Benzin neigt dazu, im
Behälter Ablagerungen zu bilden, wenn es über 2
Monate aufbewahrt wird. Verwenden Sie stets frisches
Benzin!
• Öleigenschaften
Verwenden Sie nur hochwertige, für Zweit aktmotoren
spezifische Kunstöle.
Bei Ihrem Händler sind speziell für solche Motoren
entwickelte Öle erhältlich, die hohe Leistungen gewährleisten können.
Die Verwendung solcher Öle ermöglicht eine 2%-ige
Gemischzusammensetzung, d.h. bestehend aus 1 Teil
Öl für jeweils 50 Teile Benzin.
WICHTIG
WICHTIG
WICHTIG
• Gemischzubereitung und -lagerung
Benzin und Gemisch sind entflammbar!
– Benzin und Gemisch ausschließlich in eigens für
Kraftstoffe zugelassenen Behältern aufbewahren, und zwar an einem sicheren Ort, fern von
Wärmequellen und offenen Flammen
– Die Behälter niemals in Kinderreichweite aufbe-
wahren.
– Rauchen Sie während der Gemischzubereitung
nicht und versuchen Sie die Benzindämpfe nicht
einzuatmen.
Die Tabelle zeigt die, je nach eingesetztem Öl benötigten Benzin- und Ölmengen für die Gemischzubereitung.
Für die Gemischzubereitung:
– in einen zugelassenen Kanister ca. die Hälfte der
angegebenen Benzinmenge geben.
– das ganze Öl dazugeben, so wie in der Tabelle vor-
geschrieben.
– schließlich auch das restliche Benzin.
– den Behälter verschließen und energisch schütteln.
Das Gemisch ist einem ständigen Alterungsprozess ausgesetzt. Bereiten Sie nicht
zu große Mengen davon vor, um Ablagerungen zu vermeiden.
Gemisch- und Benzinbehälter
immer schön getrennt und identifizierbar aufbewahren, um eine Verwechslungsgefahr bei der Benutzung
auszuschließen.
Reinigen Sie regelmäßig die
Benzin- und Gemischbehälter, um eventuelle Ablagerungen zu entfernen.
WICHTIG
WICHTIG
WICHTIG
GEFAHR!
4. ARBEITSVORBEREITUNG
Benzin Synthetisches Öl 2-Takt
Liter Liter cm
3
10,0220
20,0440
30,0660
5 0,10 100
10 0,20 200
Page 49

ARBEITSVORBEREITUNG / MOTOR ANLASSEN, BENUTZEN UND AUSSCHALTEN
7
DE
NACHFÜLLEN VON KRAFTSTOFF
Rauchen Sie beim Nachfüllen nicht und versuchen Sie die Benzindämpfe
nicht einzuatmen.
Behälterverschluss stets
vorsichtig öffnen, da sich darin gegebenenfalls
Druck gebildet hat.
Vor dem Nachfüllen:
– Gemischbehälter gut schütteln.
– Maschine auf einer ebenen Fläche, in stabiler Posi-
tion mit nach oben gerichtetem Tankverschluss aufstellen.
ACHTUNG!
GEFAHR!
– Tankverschluss und umliegenden Bereich reinigen,
damit beim Nachfüllen kein Schmutz in den Tank
gerät.
– Verschluss vorsichtig öffnen, um den Druck lang-
sam abzulassen. Immer mit einem Trichter nachfüllen, und den Tank nicht bis zum Rand füllen
(Abb. 1).
Den Behälter immer sehr
gut verschließen.
Sofort alle eventuell auf der
Maschine oder auf dem Boden verschütteten
Gemischrückstände entfernen und den Motor
solange nicht anlassen, bis sich alle Benzindämpfe
verflüchtigt haben.
ACHTUNG!
ACHTUNG!
2. 7-10 Mal leicht auf die Primer-Kraftstoffpumpe (2)
drücken, bis der Kraftstoff aus dem Entlüfterrohr
fließt.
3. Den Bedienungshebel des Starters (3) auf Position
«CHOKE» stellen.
4. Maschine mit einer Hand auf dem Handgriff fest
auf den Boden drücken, damit Sie beim Anlassen
die Kontrolle der Maschine nicht zu verlieren.
Wenn die Maschine nicht
festgehalten wird, könnte die vom Motor entwikkelte Schubkraft den Benutzer aus dem Gleichgewicht bringen, oder das Messer gegen einen Gegenstand oder gegen denselben Benutzer schleudern.
5. Den Startgriff 10-15 cm langsam herausziehen, bis
ein gewisser Widerstand zu spüren ist, dann ein
paar Mal weiter ziehen bis die ersten Zündungen
wahrgenommen werden.
Um Beschädigungen zu vermeiden, das Seil lieber nicht ganz herausziehen und
nicht mit dem Rande der Seilführungsöffnung in Berührung bringen und den Griff loslassen, dabei aber
verhindern, dass das Seil unkontrolliert wieder eingezogen wird.
WICHTIG
ACHTUNG!
ANLASSEN DES MOTORS
Der Motor darf erst angelassen werden, wenn er mindestens 3 m vom Kraftstoff-Befüllungsort entfernt ist.
Vor dem Starten des Motors:
– Maschine stabil auf dem Boden aufstellen.
– Messerschutz beseitigen.
– Sicherstellen, dass das Messer den Boden oder
sonstige Gegenstände nicht berührt.
– Sicherstellen, dass der Handgriff in der zentralen
Position blockiert ist.
• Kaltstart
Unter Kaltstart versteht sich
das Anlassen nach mindestens 5 Min. von der Motorausschaltung oder nach der Kraftstoffnachfüllung
Um den Motor anzulassen (Abb. 2):
1. Schalter (1) auf Position «I» drücken.
ANMERKUNG
ACHTUNG!
5. MOTOR ANLASSEN, BENUTZEN UND AUSSCHALTEN
Page 50

6.
Den Startgriff erneut ziehen, bis das korrekte
Anlassen des Motors erreicht wurde.
7. Den Bedienungshebel des Starters (3) auf Position
«RUN» stellen.
8. Lassen Sie den Motor mindestens 1 Minute im
Leerlauf laufen, bevor Sie ihn auf die höchste
Drehzahl beschleunigen.
Sollte der Griff (4) des Anlasserseils mehrmals betätigt werden, solange sich der
Starterhebel (3) aber noch auf Position «CHOKE»
befindet, könnte dadurch der Motor überflutet und das
Anlassen erschwert werden.
Bei überflutetem Motor Zündkerze entfernen und
leicht am Griff (5) des Anlasserseils ziehen, um den überflüssigen Kraftstoff zu entfernen; dann die Elektroden der Zündkerze abtrocknen und wieder einsetzen.
• Warmstart
Für den Warmstart (sofort nach Motorausschaltung),
Punkte 1 - 4 - 5 - 6 des oben beschriebenen Ablaufs
befolgen.
MOTOREINSATZ (Abb. 3)
Die Geschwindigkeit der Schneidvorrichtung wird
über den auf dem hinteren Handgriff (2) positionierten
Gashebel (1) gesteuert.
Die Betätigung dieses Hebels kann nur erfolgen wenn
gleichzeitig der Sicherheitsgriff gedrückt wird (3).
Die Bewegung wird vom Motor auf die Messer übertragen, und zwar über eine Fliehkraftkupplung, mit der
die Bewegung der Messer verhindert wird, solange
der Motor im Leerlauf läuft.
Verwenden Sie die Maschine
nicht, wenn sich die Schneidvorrichtung mit dem
Motor im Leerlauf bewegt; in diesem Fall muss der
Händler zu Rate gezogen werden.
Die korrekte Arbeitsgeschwindigkeit erreicht man
wenn der Gashebel (1) bis zum Anschlag betätigt wird.
Während der ersten 6-8 Stunden Maschineneinsatz, den Motor nicht mit der Höchstdrehzahl benutzen.
WICHTIG
ACHTUNG!
WICHTIG
MOTORAUSSCHALTUNG (Abb. 4)
Um den Motor auszuschalten:
– Den Gashebel loslassen (1) und den Motor einige
Sekunden lang im Leerlauf laufen lassen.
– Den Schalter (2) auf Position «O» drücken.
Wenn der Motor auf den
Leerlauf gebracht wird, dauert es einige Sekunden
bis die Messer vollständig stillstehen.
ACHTUNG!
8
MOTOR ANLASSEN, BENUTZEN UND AUSSCHALTEN
DE
Page 51

MASCHINENEINSATZ
9
DE
Für einen rücksichtsvollen Einsatz den anderen
und der Umwelt gegenüber:
– vermeiden Sie es, ein Störelement darzustellen.
– halten Sie sich strikt an die örtlichen Vor-
schriften für die Entsorgung der Schneidreste.
– halten Sie sich strikt an die örtlichen Vorsch-
riften für die Entsorgung von Öl, Benzin, beschädigten Teilen oder sämtlichen weiteren umweltschädlichen Stoffen.
– Die Entsorgung der Verpackung muss gemäß
der örtlichen Vorschriften erfolgen.
Bei längerfristiger Arbeit mit
vibrierenden Werkzeugen können vor allem bei
Personen mit Durchblutungsstörungen Verletzungen und Gefäßerkrankungen (bekannt als “Raynaud-Syndrom” oder “Leichenfinger”) auftreten.
Die Symptome können die Hände, Handgelenke
und Finger betreffen, und stellen sich als Gefühlslosigkeit, Kribbeln, Kitzeln, Schmerzen, blasse
Haut oder strukturelle Veränderungen der Haut.
Diese Effekte können durch niedrige Umgebungstemperaturen bzw. durch besonders festes Greifen der Handgriffe verstärkt werden. Beim Auftreten der Symptome müssen die Verwendungszeiten der Maschine verkürzt, und ein Arzt aufgesucht werden.
Tragen Sie während der Arbeit eine zweckmäßige Kleidung. Ihr Händler kann
Ihnen nützliche Informationen über die besten Arbeitsschutzvorrichtungen geben, die Ihre Sicherheit während der Arbeit gewährleisten.
EINSTELLUNG DES HANDGRIFFS (Abb. 5)
Der hintere Handgriff (1) kann der Schneidvorrichtung
gegenüber 3 verschiedene Orientierungen einnehmen; dies erleichtert die Feinarbeiten an den Hecken.
Die Einstellung des Handgriffs muss mit ausgeschaltetem Motor erfolgen.
– Entriegelungshebel absenken (2).
– Den hinteren Handgriff (1) in die gewünschte
Position verstellen.
– Vor dem Maschineneinsatz sicherstellen, dass der
Entriegelungshebel (2) vollständig in die obere Lage
zurückgekehrt ist, und dass der hintere Handgriff
fest sitzt.
ACHTUNG!
ACHTUNG!
ACHTUNG!
Während der Arbeit muss
sich der hintere Handgriff immer in der vertikalen
Position befinden, und zwar unabhängig von der
jeweiligen Position der Schneidvorrichtung (3).
SCHNEIDMODUS
Beim Schneiden muss die
Maschine immer mit zwei Händen festgehalten
werden
Den Motor sofort ausschalten, sollten sich die Messer während des Einsatzes festklemmen oder in den Heckenzweigen verfangen.
Es ist immer ratsam, zuerst die vertikalen Heckenseiten, dann den oberen Bereich zu schneiden.
• Vertikaler Schnitt (Abb. 6)
Der Schnitt sollte mit einer bogenförmigen Bewegung
von unten nach oben erfolgen, wobei das Messer so
weit wie möglich vom Körper entfernt gehalten wird.
• Horizontaler Schnitt (Abb. 7)
Die besten Ergebnisse erzielt man mit einem in die
Schneidrichtung leicht (5° - 10°) geneigtem Messer,
einer Bogenbewegung und einem langsamen, gleichmäßigen Vorschub, vor allem bei sehr dichten Hecken.
MESSERSCHMIERUNG WÄHREND
DES EINSATZES
Sollte sich die Schneidvorrichtung übertrieben erhitzen, so müssen die Messerinnenflächen geschmiert
werden.
Dieser Vorgang darf ausschließlich bei ausgeschaltetem Motor und stillstehendem Messer erfolgen.
ARBEITSSCHLUSS
Wenn die Arbeit beendet ist:
– Motor wie vorangehend (Kap. 5) beschrieben aus-
schalten.
– Abwarten bis die Messer vollständig stillstehen und
Schutzvorrichtung anbringen.
ACHTUNG!
ACHTUNG!
ACHTUNG!
ACHTUNG!
6. MASCHINENEINSATZ
Page 52

10
WARTUNG UND AUFBEWAHRUNG
DE
Eine korrekte Wartung ist grundsätzlich notwendig,
um die ursprüngliche Effizienz und Einsatzsicherheit
der Maschine zu bewahren.
Während der Wartungseingriffe:
– Zündkerzenstecker abtrennen.
– abwarten bis der Motor ausreichend abgekühlt
ist.
– für Eingriffe im Messerbereich Schutzhand-
schuhe tragen.
– Messerschutzvorrichtung nicht entfernen, es sei
denn, die Eingriffe müssen auf dem Messer
selbst vorgenommen werden.
– Öle, Benzin oder andere verschmutzende Stoffe
vorschriftsmäßig entsorgen.
REINIGUNG DES MOTORS
UND DES SCHALLDÄMPFERS
Um die Brandgefahr auf ein Minimum einzuschränken,
die Zylinderrippen häufig mit Pressluft reinigen und
den Bereich des Schalldämpfers von Zweiglein, Blättern und anderen Rückständen befreien.
REINIGUNG DES LUFTFILTERS
Die Reinigung des Luftfilters ist
die Voraussetzung für einen einwandfreien Betreib
und eine lange Standzeit der Maschine.
Die Reinigung sollte alle 8-10 Stunden Maschineneinsatz erfolgen.
Für die Filterreinigung (Abb. 8):
– Das Handrad (1) lösen, Abdeckung (2) und Filterele-
ment (3) entfernen.
– Das Filterelement (3) mit Wasser und Seife wa-
schen. Kein Benzin oder andere Lösungsmittel ver-
wenden.
– Den Filter an der Luft trocknen lassen.
– Das Filterelement (3) und die Abdeckung (2) wieder
auflegen und das Handrad (1) bis zum Anschlag fest
anziehen.
KRAFTSTOFFFILTER
Im Tank befindet sich ein Filter, der die Unreinheiten
auffängt und so vermeidet, dass sie in den Motor gelangen.
Einmal im Jahr sollte der Filter von Ihrem Händler ausgewechselt werden.
WICHTIG
ACHTUNG!
ÜBERPRÜFUNG DER ZÜNDKERZE
Regelmäßig die Zündkerze entfernen und dabei eventuelle Ablagerungen mit einem Metallbürstchen entfernen.
Kontrollieren Sie den Elektrodenabstand (Abb. 9) und
stellen Sie ihn gegebenenfalls wieder her.
Zündkerze wieder einsetzen und mit dem mitgelieferten Schlüssel bis zum Anschlag festziehen.
Die Zündkerze muss mit einer gleichwertigen Zündkerze mit entsprechenden Eigenschaften ersetzt werden, falls die Elektroden abgebrannt oder die Isolierung beschädigt ist, und auf jeden Fall nach jeweils
50 Betriebsstunden.
VERGASEREINSTELLUNG
Der Vestleistungen erbracht werden, und zwar bei
einer minimalen Freisetzung von schädlichen Gasen
und in Übereinstimmung mit den geltenden Normen.
Bei schwachen Leistungen vorab sicherstellen, dass
die Messer nicht teilweise blockiert oder verformt
sind; wenden Sie sich an Ihren Händler zur Überprüfung von Vergasung und Motor.
• Leerlaufeinstellung
Die Schneidvorrichtung darf
sich bei leer laufendem Motor nicht bewegen.
Wenn sich die Schneidvorrichtung mit dem Motor
im Leerlauf bewegt, müssen Sie Ihren Händler für
die korrekte Motoreinstellung zu Rate ziehen.
GETRIEBESCHMIERUNG (Abb. 10)
Nach jeweils 20 Betriebsstunden den Füllstand mit
einem Molybdändisulfid Spezialfett wieder herstellen,
wobei letzteres in die Fettbüchse (1) eingespritzt wird.
KONTROLLE UND REINIGUNG DER MESSER
Regelmäßig prüfen, dass die
Messer nicht verbogen und die Schrauben korrekt
angezogen sind.
ACHTUNG!
ACHTUNG!
7. WARTUNG UND AUFBEWAHRUNG
Page 53

WARTUNG UND AUFBEWAHRUNG
11
DE
Der Messerabstand muss nicht eingestellt werden,
dieses Spiel ist werksseitig voreingestellt.
Die inneren Kanäle müssen regelmäßig gereinigt werden, da die Verschmutzungen eine korrekte Bewegung der Messer verhindern könnte.
Zum Reinigen wie folgt vorgehen (Abb. 11):
– Die Muttern (1) abschrauben und die Schrauben (2)
und die Strebe (3) entfernen.
– Ösen (4) sorgfältig von Staub und Rückständen
befreien.
– Innere Oberflächen der Messer reinigen.
– Die Strebe (3) wieder mit den Schrauben (2) mon-
tieren, dabei auf die korrekte Positionierung der Ab-
standshalter (5) und der Scheiben (6) und (7) unter
den Muttern (1) achten.
– Die Muttern (1) festziehen.
Versichern Sie sich immer,
dass die Muttern (1) fest angezogen sind, bevor
Sie die Arbeit wieder aufnehmen.
MESSERSCHÄRFEN
Nachschärfen ist notwendig, wenn die Schnittleistung
sinkt und sich die Zweige oft verfangen.
Ein Messer mit verschlissenen Schneiden darf nie nachgeschärft, sondern
immer ersetzt werden.
Es empfiehlt sich immer, dass
Ihr Händler das Nachschärfen übernimmt, da er über
die notwendigen Werkzeuge und die erforderlichen
Kenntnisse verfügt.
Falls die Messer nachgeschärft werden müssen, ist
eine feinkörnige Feile einzusetzen und folgendes zu
beachten (Abb. 12):
– Feile (1) mit einem 45°-Grad-Winkel auf die
Schneide (2) auflegen, und mit einer Bewegung von
oben gegen die Schneidekante arbeiten.
– Darauf achten, dass die Feile nur bei der
Vorwärtsbewegung greift, beim Zurückziehen leicht
anheben.
– Nur sehr wenig Material abtragen.
– Alle Grate mit einem Schleifstein beseitigen.
– Alle Schleifspuren beseitigen und Messer vor dem
Einbau einschmieren.
WICHTIG
ACHTUNG!
ACHTUNG!
AUSSERORDENTLICHE EINGRIFFE
Alle in diesem Handbuch nicht enthaltenen Wartungseingriffe dürfen ausschließlich von Ihrem Händler
vorgenommen werden.
Eingriffe, die nicht von einer Fachstelle oder von unqualifiziertem Personal ausgeführt werden, haben
grundsätzlich den Verfall der Garantie zur Folge.
AUFBEWAHRUNG
Nach jedem Arbeitseinsatz die Maschine sorgfältig
reinigen und Staub und Rückstände entfernen, die
beschädigten Teile reparieren oder ersetzen und die
Messer einfetten, um dem Rosten vorzubeugen.
Die Maschine muss an einem trockenen Ort aufbewahrt werden, vor Witterung geschützt und mit dem
vorschriftsgemäß angebrachten Messerschutz.
LÄNGERE STILLSTANDZEITEN
Falls die Maschine voraussichtlich über 2-3 Monate nicht eingesetzt wir, muss
folgendes gemacht werden, um Schwierigkeiten bei
der Wiederinbetriebnahme oder permanente Motorschäden zu vermeiden.
• Lagerung
Ehe die Maschine stillgelegt wird:
– Den Kraftstofftank. entleeren.
– Den Motor starten und im Leerlauf laufen lassen bis
er ausschaltet, so dass der restliche Kraftstoff vollständig aufgebraucht wird.
– Den Motor abkühlen lassen und die Zündkerze ent-
fernen.
– In die Öffnung der Zündkerze einen Löffel Öl für
Zweitakter (neues) einleeren.
– Mehrmals am Anlasserseil ziehen, damit sich das Öl
im Zylinder verteilt.
– Zündkerze schließlich wieder einsetzen wenn sich
der Kolben am oberen Totpunkt befindet (durch die
Zündkerzenöffnung ersichtlich), wenn der Kolben
seinen höchsten Hub erreicht hat.
• Wiedereinsatz
Wenn die Maschine wieder in Betrieb gesetzt wird:
– Zündkerze entfernen.
– Ein paar Mal an der Anlasserschnur ziehen, um das
überflüssige Öl zu beseitigen.
– Zündkerze überprüfen, so wie unter Kapitel “Über-
prüfung der Zündkerze” beschrieben.
– Maschine so einstellen, wie unter Kapitel “Maschi-
nenvorbereitung” beschrieben.
WICHTIG
Page 54

12
STÖRUNGSSUCHE / TECHNISCHE DATEN / ZUBEHÖR
DE
8. STÖRUNGSSUCHE
STÖRUNG MÖGLICHE URSACHE ABHILFE
1) Motor kann
entweder nicht
gestartet werden,
oder schaltet sofort
aus.
2) Motor kann gestartet
werden, erbringt aber
eine schwache
Leistung
3) Der Motor läuft
unregelmäßig oder
erbringt unter
Belastung keine
Leistung.
4) Der Motor weist
eine übertriebene
Rauchentwicklung auf
– Falscher Anlassvorgang
– Zündkerze schmutzig oder
nicht korrekter Elektrodenabstand
– Verstopfter Luftfilter
– Probleme der Gemischaufbereitung
– Verstopfter Luftfilter
– Probleme der Gemischaufbereitung
– Zündkerze schmutzig oder
nicht korrekter Elektrodenabstand
– Probleme der Gemischaufbereitung
– Falsche Gemischzusammenstellung
– Probleme der Gemischaufbereitung
– Anweisungen befolgen (siehe Kap. 5)
– Zündkerze überprüfen (siehe Kap. 7)
– Filter reinigen bzw. auswechseln
(siehe Kap.7)
– Sich mit dem Händler in Verbindung
setzen
– Filter reinigen bzw. auswechseln
(siehe Kap.7)
– Sich mit dem Händler in Verbindung
setzen
– Zündkerze überprüfen (siehe Kap. 7)
– Sich mit dem Händler in Verbindung
setzen
– Gemisch gemäß Anweisungen
zubereiten (siehe Kap. 4)
– Sich mit dem Händler in Verbindung
setzen
9. TECHNISCHE DATEN
MODELL................................................................................................................ HTJ 550
Hubraum ...................................................................................................... cm
3
24,5
Leistung ........................................................................................................ kW 0,85
Zündkerze ............................................................................................................ NHSP LD L8RTF Y
Benzin-Öl-Verhältnis ............................................................................................. 50 : 1
Tankinhalt ..................................................................................................... liter 0,33
Schnittlänge ................................................................................................. mm 610
Gewichteter Schalldruck am Ohr des Bedieners (ISO 11201) ................. dB(A) 102,1
Messungenauigkeit (2006/42/EG - EN 27574) ......................................... dB(A) 3,0
Gemessener Schallleistungspegel (ISO 3744) .......................................... dB(A) 107,1
Messungenauigkeit (2006/42/EG - EN 27574) ......................................... dB(A) 3,1
Gewichteter Vibrationspegel (EN 774 - EN 28662) .................................... m/s
2
2,97
Messungenauigkeit (2006/42/EG - EN 12096) ........................................... m/s
2
1,5
Masse ............................................................................................................. kg 5,5
Bei dieser Maschine ist der Einsatz von
Schneidewerkzeugen mit folgendem Code vorgesehen:
23305004/0
Aufgrund der Weiterentwicklung des Produkts könn-
ten die oben genannten Schneidewerkzeuge im Laufe
der Zeit durch andere ersetzt werden, die gleiche
Eigenschaften der Austauschbarkeit und
Betriebssicherheit aufweisen.
10. ZUBEHÖR
Page 55

PRESENTACIÓN
1
ES
Estimado Cliente,
ante todo queremos darle las gracias por la preferencia que nos ha acordado al elegir nuestros productos y deseamos que el uso de esta máquina le reserve grandes satisfacciones y corresponda plenamente a sus expectativas. Este manual ha sido redactado para que pueda conocer bien su máquina y utilizarla en condiciones de seguridad y eficiencia; no olvide que éste forma parte integrante con la misma máquina, guárdelo al alcance de la
mano para consultarlo en todo momento y entréguelo junto con la máquina si un día tuviera que cederla o prestarla a otras personas.
Su nueva máquina ha sido proyectada y fabricada siguiendo las normas vigentes, resulta segura y fiable si se usa
respetando plenamente las indicaciones que contiene este manual (uso previsto); cualquier otra utilización o el no
respetar las normas de seguridad de uso, de mantenimiento y reparación indicadas está considerado como “uso
impropio” y comporta la anulación de la garantía y la cancelación de toda responsabilidad del Fabricante, recayendo sobre el usuario todos los cargos responsable por daños o lesiones propias o a terceros.
En caso de que se encontrara alguna ligera diferencia entre lo que aquí se describe y la máquina en su posesión,
tiene que considerarse que, debido a la continua mejora del producto, las informaciones contenidas en este
manual están sujetas a modificaciones sin previo aviso u obligación de actualización, permaneciendo inalteradas
sin embargo las características esenciales a fines de la seguridad y del funcionamiento. En caso de dudas contacte con su revendedor. ¡Buen Trabajo!
ÍNDICE
1. Identificación de los componentes principales ..................................... 2
2. Símbolos ................................................................................................ 3
3. Prescripciones de seguridad ................................................................. 4
4. Preparación para el trabajo ................................................................... 6
5. Puesta en marcha - Uso - Parada del motor ........................................ 7
6. Uso de la máquina ................................................................................. 9
7. Mantenimiento y conservación ............................................................ 10
8. Localización averías ............................................................................. 12
9. Datos técnicos ..................................................................................... 12
10. Accesorios ........................................................................................... 12
Page 56

2
IDENTIFICACIÓN DE LA MÁQUINA Y DE LOS COMPONENTES
ES
1. Motor
2. Dispositivo de corte
(cuchilla)
3. Plancha protección corte
4. Empuñadura delantera
5. Empuñadura trasera
6. Mando desbloqueo
empuñadura posterior
7. Protección cuchilla
10. Etiqueta de matrícula
MANDOS
Y SUMINISTROS
11. Interruptor parada motor
12. Mando de la cuchilla
(Palanca acelerador)
13. Palanca seguridad
acelerador
14. Manija arranque
15. Mando estárter (Starter)
16. Mando dispositivo
de cebado (Primer)
21. Tapón depósito
mezcla
22.
Tapa filtro aire
1. IDENTIFICACIÓN DE LA MÁQUINA Y DE LOS COMPONENTES
ETIQUETA MATRÍCULA
10.1) Marca de conformidad
según la directriz 98/37/CE (2006/42/CE de
29/12/2009)
10.2) Nombre y dirección del fabricante
10.3) Nivel de potencia acústica LWA
según la directriz 2000/14/CE
10.4) Modelo de referencia del fabricante
10.5) Modelo de máquina
10.6) Número de matrícula de la máquina
10.7) Marca de certificación
10.8) Año de fabricación
10.9) Código Artículo
10.10) Número de emisiones
7
3 2
4
5
211
151610 22
6
11 13
1214
10.1
L
WA
dB
PRODUCT SERVICE
10.2
10.3
10.7
10.6
10.4
10.5
10.8
10.10
10.09
Page 57

SÍMBOLOS
3
ES
1) ¡Atención! Peligro
2) Antes de usar esta máquina lea el manual de ins-
trucciones.
3) Su aparato auditivo corre el peligro de sufrir daños
irreversibles.
Se advierte a los usuarios de esta máquina, que al uti-
lizarla en condiciones normales en condiciones normales para uso diario continuativo, su aparato auditivo puede exponerse a un nivel de ruido igual o superior a: 85 dB (A).
Es obligatorio llevar equipamiento de protección individual.
Durante el uso de la máquina póngase siempre gafas
de seguridad (contra el riesgo de lanzamiento de
objetos) y protecciones acústicas como auriculares
contra ruido (riesgo de daños al aparato auditivo).
En caso de que exista el peligro de caída de objetos,
utilice el casco de protección.
4) La cuchilla está muy afilada y puede provocar cortes fácilmente.
2. SÍMBOLOS
ATENCIÓN: la máquina que usted ha comprado ha sido fabricada para una utilización semi-profesional.
11) Depósito mezcla
12) Mando estárter (Starter)
SÍMBOLOS EXPLICATIVOS EN LA MÁQUINA (si estuvieran previstos)
1 2 3 4
11
12
Page 58

4
REQUISITOS DE SEGURIDAD
ES
A) APRENDIZAJE
1) Leer atentamente las instrucciones. Familiarizarse
con los mandos y el uso apropiado de la máquina. Aprender a parar rápidamente el motor.
2) Utilizar la máquina con la finalidad para la que ha
sido destinada, es decir, para “el corte y la regulari-
zación de setos, constituidos por arbustos con
ramas de pequeñas dimensiones”. Cualquier otro
uso puede resultar peligroso y provocar la avería de la
máquina. Es inapropiado (como ejemplo, pero no
solo):
– corte de la hierba en general y en particular cerca
de bordillos;
– desmenuzamiento de materiales para el composta-
je;
– trabajos de poda;
– usar la máquina para el corte de materiales de ori-
gen no vegetal;
– utilizar la máquina por más de una persona.
3) No permita que los niños o personas que no tengan la práctica necesaria con las instrucciones usen la
máquina. Las leyes locales pueden fijar una edad mínima para el usuario.
4) No debe utilizar la máquina más de una persona.
5) No utilice la máquina:
– con personas, especialmente niños, o animales en
las cercanías;
– si el usuario estuviera cansado o se encontrase
mal, o hubiese tomado fármacos, drogas, alcohol o
sustancias nocivas para sus capacidades de refle-
jos y atención;
– si el usuario no es capaz de sujetar firmemente la
máquina con dos manos y/o de permanecer en e-
quilibrio sobre las piernas durante el trabajo.
6) Recuerde que el usuario es el responsable de los
accidentes e imprevistos que se pudieran ocasionar a
otras personas o a sus propiedades.
B) OPERACIONES PRELIMINARES
1) Durante el trabajo, es necesario llevar ropa idónea
que no constituya molestias al usuario.
– Lleve ropa protectiva adherente, dotada de protec-
ciones anticorte.
– Lleve guantes, gafas protectivas y zapatos anticor-
te con suela antideslizante.
– Utilice los auriculares para proteger el oído.
– No lleve bufandas, camisas, collares o accesorios
colgantes o anchos que puedan engancharse en la
máquina o en objetos y materiales presentes en el
lugar de trabajo.
– Recoja el pelo largo adecuadamente.
2) ATENCIÓN: ¡PELIGRO! La gasolina es muy inflamable:
– conserve el carburante en contenedores especiales
homologados para dicho uso;
– no fume cuando se maneje el carburante;
– abrir lentamente el tapón del depósito dejando salir
gradualmente la presión interna;
– llenar el carburante solo al aire libre, utilizando un
embudo;
– llenar antes de poner en marcha el motor; no añada
carburante ni quite el tapón del depósito cuando el
motor esté funcionando o esté caliente;
– si saliera gasolina no encienda el motor, aleje la
máquina del área en la que se ha vertido el carbu-
rante y evitar provocar un incendio hasta que el car-
burante se haya evaporado y los vapores de gaso-
lina se hayan disuelto;
– limpie inmediatamente cada señal de gasolina der-
ramada en la máquina o sobre el terreno;
– no ponga en funcionamiento la máquina en un lugar
donde se haya efectuado dicha operación;
– evite el contacto del carburante con la ropa y, en tal
caso, cambie la ropa antes de poner en marcha el
motor.
– volver a colocar siempre y cerrar bien los tapones
del tanque y del contenedor de gasolina.
3) Cambiar los silenciadores defectuosos o dañados.
4) Antes del uso, proceda con un control general de la
máquina y especialmente:
– la palanca acelerador y la palanca de seguridad de-
berán tener un movimiento libre, no forzado y al sol-
tar la palanca deberán volver automática y rápida-
mente a la posición neutra;
– la palanca acelerador deberá permanecer bloquea-
da si no se presiona la palanca de seguridad;
– el interruptor de parada motor deberá desplazarse
fácilmente de una posición a la otra;
– los cables eléctricos y especialmente del cable de
la bujía deberá ser íntegros para evitar la genera-
ción de chispas y el capuchón debe estar montado
correctamente en la bujía;
– las empuñaduras y protecciones de la máquina de-
berán estar limpias y secas y firmemente fijadas en
la máquina;
– las cuchillas no deberán estar dañadas;
5) Antes de empezar el trabajo, asegúrese de que todas las protecciones estén montadas correctamente.
C) DURANTE EL CORTE
1) No accione el motor en espacios cerrados porque
pueden acumularse humos peligrosos de monóxido
de carbono.
2) Trabajar sólo a la luz del día o con una buena luz artificial.
3. REQUISITOS DE SEGURIDAD
Page 59

REQUISITOS DE SEGURIDAD
5
ES
3) Asumir una posición firme y estable.
– evitar siempre trabajar con el suelo mojado o resba-
ladizo o sobre terrenos demasiado accidentales o
abruptos que no garanticen la estabilidad del ope-
rador durante el trabajo;
– evitar el uso de escaleras y plataformas inestables;
– no corra, camine y preste atención a las irregulari-
dades del terreno y a la presencia de posibles obs-
táculos.
4) Ponga en marcha el motor con la máquina firmemente bloqueada en el suelo con la mano libre:
– poner en marcha el motor al menos metros más le-
jos desde el lugar en el que se ha efectuado la ope-
ración de llenado;
– comprobar que otras personas no se encuentren en
el radio de acción de la máquina;
– no dirija el silenciador ni los gases de descarga ha-
cia materiales inflamables.
5) No modifique la regulación del motor y no dejar que
alcance un número de revoluciones excesivo.
6) Controle que el régimen de mínimo de la máquina
sea tal que no permita el movimiento de las cuchillas
y que, después de una aceleración, el motor vuelva
rápidamente al mínimo.
7) Evite que choque violentamente la cuchilla contra
cuerpos extraños y a las posibles proyecciones de
material causado por el desplazamiento de las cuchillas.
8) Parar el motor:
– cada vez que se deje la máquina sin vigilancia.
– antes de echar gasolina.
9) Parar el motor y quitar el cable de la bujía:
– antes de controlar, limpiar o trabajar con la máqui-
na;
– después de golpear un cuerpo extraño. Verificar los
posibles daños y efectuar las reparaciones necesa-
rias antes de usar nuevamente la máquina;
– si la máquina empieza a vibrar de forma anómala
(buscar la causa de las vibraciones inmediatamen-
te y proveer a los controles necesarios en un Centro
Especializado).
– cuando la máquina no se utiliza.
D) MANTENIMIENTO Y ALMACENAJE
1) Mantener bien apretados tuercas y tornillos para asegurarse que la máquina esté siempre en condiciones de funcionamiento seguras. Una manutención
regular es esencial para la seguridad y para mantener
el nivel de prestación.
2) No coloque la máquina con gasolina en el depósito
en un local donde los vapores de gasolina pudieran
alcanzar una llama, una chispa o una fuerte fuente de
calor.
3) Dejar enfriar el motor antes de posicionar la máquina en cualquier ambiente.
4) Para reducir el riesgo de incendio, mantener el motor, el silenciador de descarga y la zona de almacenamiento de la gasolina libres de restos de ramas, hojas
o grasa excesiva; no deje contenedores con los materiales en exceso del corte en el interior de un local.
5) Si hay que vaciar el depósito de la gasolina, efectuar esta operación al aire libre y con el motor frío.
6) Póngase guantes de trabajo para cada intervención
en el dispositivo de corte.
7) Cure el afilado de las cuchillas. Todas las operaciones en relación a las cuchillas son trabajos que requieren una específica competencia además del empleo de equipos especiales; por razones de seguridad, es necesario efectuarlas en un centro especializado.
8) Por motivos de seguridad, no use nunca la máquina con partes usuradas o dañadas. Las piezas dañadas se deben sustituir, nunca reparar. Utilizar sólo recambios originales: Las piezas de calidad inferior pueden dañar la máquina y atentar contra su seguridad.
9) ¡Mantenga la máquina lejos del alcance de los
niños!
E) TRANSPORTE Y DESPLAZAMIENTO
1) Cada vez que desee maniobrar o transportar la máquina, será necesario:
– apagar el motor, esperar la parada de las cuchillas
y desconectar el capuchón de la bujía;
– aplicar la protección de las cuchillas;
– agarrar la máquina por las empuñaduras y orientar
las cuchillas a la dirección contraria al sentido de la
marcha.
2) Cuando se transporta la máquina con un vehículo,
es necesario colocarla de manera que no constituya
un peligro para nadie y bloquearla firmemente para evitar el volcado con posible daño y salida de carburante.
F) CÓMO LEER EL MANUAL
En el texto del manual, algunos parágrafos que contienen informaciones de especial importancia están
indicados con diferentes grados de evidencia, cuyo
significado es el siguiente:
ó
Suministra aclaraciones u otros detalles relativos a lo anteriormente descrito, con
la intención de no dañar la máquina o causar daños
Posibilidad de lesiones personales o a terceros en caso de incumplimiento.
Posibilidad de graves lesiones personales o a terceros con peligro de muerte, en caso de incumplimiento.
¡PELIGRO!
¡ATENCIÓN!
IMPORTANTE
NOTA
Page 60

6
PREPARACIÓN AL TRABAJO
ES
CONTROL DE LA MÁQUINA
Antes de empezar el trabajo es necesario:
– Controlar que no haya tornillos aflojados en la má-
quina y en la cuchilla;
– controlar que las cuchillas estén afiladas y sin da-
ños;
– controlar que el filtro del aire esté limpio;
– controlar que las protecciones estén bien fijadas y
eficientes;
– controlar la fijación de las empuñaduras.
PREPARACIÓN DE LA MEZCLA
Esta máquina está dotada de un motor de dos tiempos que requiere una mezcla compuestas por gasolina y aceite lubrificante.
El uso de la sola gasolina daña
el motor y conlleva el vencimiento de la garantía.
Use solo carburantes y lubrificantes de calidad para mantener las prestaciones y
garantizar la duración de los órganos mecánicos.
• Características de la gasolina
Use sólo gasolina sin plomo (gasolina verde) con número de octanos no inferior a 90 N.O.
La gasolina verde tiende a
crear depósitos en el contenedor si se conserva durante más de 2 meses. ¡Utilice siempre gasolina fresca!
• Características del aceite
Emplee solo aceite sintético de óptima calidad, específico para motores de dos tiempos.
En su distribuidor están disponibles aceites especialmente estudiados para este tipo de motor, capaz de
garantizar una elevada protección.
El uso de estos aceites permite la composición de una
mezcla al 2%, constituida por 1 parte de aceite cada
50 partes de gasolina.
IMPORTANTE
IMPORTANTE
IMPORTANTE
• Preparación y conservación de la mezcla
¡La gasolina y la mezcla son inflamables!
- Conserve la gasolina y la mezcla en recipientes
homologados para carburantes, en lugares
seguros, lejos de fuentes de calor o llamas
libres.
- No deje los contenedores al alcance de los
niños.
- No fume durante la preparación de la mezcla y
evite inhalar vapores de gasolina.
La tabla indica las cantidades de gasolina y de aceite
a utilizar para la preparación de la mezcla en función
del tipo de aceite empleado.
Para la preparación de la mezcla:
– Introducir en un bidón homologado aproximada-
mente mitad de la cantidad de gasolina.
– Añadir todo el aceite, según la tabla.
– Introducir el resto de la gasolina.
– Cerrar el tapón y agitar enérgicamente.
La mezcla está sujeta a envejecimiento. No prepare cantidades excesivas de mezcla para evitar que se formen depósitos.
Tenga bien separados e identificables los contenedores de la mezcla y de la gasolina para evitar confundirlos en el momento del uso.
Limpie periódicamente los
contenedores de la gasolina y de la mezcla para eliminar posibles depósitos.
IMPORTANTE
IMPORTANTE
IMPORTANTE
¡PELIGRO!
4. PREPARACIÓN AL TRABAJO
Gasolina Aceite sintético 2 Tiempos
litros litros cm
3
10,0220
20,0440
30,0660
5 0,10 100
10 0,20 200
Page 61

PREPARACIÓN AL TRABAJO / PUESTA EN MARCHA - USO - PARADA DEL MOTOR
7
ES
LLENADO DEL CARBURANTE
No fume durante el llenado y
evite inhalar vapores de gasolina.
Abrir el tapón del tanque
con cuidado porque podría haberse formado presión en el interior.
Antes de efectuar el llenado:
– Agitar enérgicamente el tanque de la mezcla.
– Colocar la sobre un plano, en posición estable, con
el tapón del depósito hacia arriba.
¡ATENCIÓN!
¡PELIGRO!
– Limpiar el tapón del depósito y la zona cercana pa-
ra evitar introducir suciedad durante el llenado.
– Abrir con cuidado el tapón del depósito para des-
cargar gradualmente la presión. Efectuar el llenado
mediante un embudo, evitando llenar el depósito
hasta el borde (Fig. 1).
Cerrar siempre el tapón del
depósito, cerrando a fondo
Limpiar en seguida cada resto de mezcla posiblemente vertida en la máquina
o en el terreno y no poner en marcha el motor
hasta que los vapores de gasolina no estén disueltos.
¡ATENCIÓN!
¡ATENCIÓN!
2. Presionar suavemente en el bulbo (2) del “primer”
durante 7-10 veces hasta que el carburante salga
del tubo de ventilación.
3. Llevar la palanca de mando del cebador (3) a la
posición «CHOKE».
4. Sujete firmemente la máquina sobre el terreno con
una mano en la empuñadura, para no perder el
control durante la puesta en marcha.
Si la máquina no se sujeta
firmemente, el empuje del motor podría desequilibrar al operador o proyectar la cuchilla contra un
obstáculo o hacia el mismo operador
5. Tirar lentamente de la manija de arranque unos
10 - 15 cm, hasta que advierta una cierta resistencia, tire más veces con decisión hasta advertir el
arranque.
Para evitar roturas, no tire de
toda la longitud del cable, no lo roce a lo largo del
borde del orificio guía del cable y suelte gradualmente la manija, evitando que vuelva a entrar de manera
incontrolada.
IMPORTANTE
¡ATENCIÓN!
PUESTA EN MARCHA DEL MOTOR
La puesta en marcha del
motor debe efectuarse a una distancia de al menos 3 metros del lugar donde se ha efectuado el
llenado del carburante.
Antes de poner en marcha el motor:
– Colocar la máquina en posición estable sobre el ter-
reno.
– Extraer las protecciones de la cuchilla.
– Asegúrese que la cuchilla no toque el terreno u o-
tros objetos.
– Asegúrese que la empuñadura esté bloqueada en
posición central.
• Puesta en marcha en frío
Por puesta en marcha en “frío”
se entiende la puesta en marcha efectuada después
de al menos 5 minutos de la parada del motor o después de un llenado de carburante.
Para poner en marcha el motor (Fig. 2):
1. Apagar el interruptor (1) en la posición «I».
NOTA
¡ATENCIÓN!
5. PUESTA EN MARCHA - USO - PARADA DEL MOTOR
Page 62

6.
Tire de nuevo de la manija de arranque, hasta
que se encienda el motor regularmente.
7. Llevar la palanca de mando del cebador (3) a la
posición «RUN».
8. Deje que el motor gire al mínimo durante al menos
1 minuto antes de acelerar al máximo las revoluciones.
Si la empuñadura (4) del cable
de puesta en marcha se acciona repetidamente con la
palanca de mando del cebador (3) en la posición
«CHOKE» el motor puede inundarse y hacer difícil la
puesta en marcha.
En caso de inundación del motor, desmonte la bujía y
tire suavemente de la manija (5) del cable de puesta
en marcha para eliminar el exceso de carburante; a
continuación seque los electrodos de la bujía y vuelva
a montarla en el motor.
• Puesta en marcha en caliente
Para la puesta en marcha en caliente (inmediatamente después de la parada del motor), seguir los puntos
1 - 4 - 5 - 6 del procedimiento anterior.
USO DEL MOTOR (Fig. 3)
La velocidad del dispositivo de corte está regulada
por la palanca (1) del acelerador colocada en la empuñadura posterior (2).
El accionamiento de esta palanca es posible solo si
contemporáneamente se presiona la palanca de
seguridad (3).
El movimiento lo transmite el motor a las cuchillas
mediante una fricción de masas centrífugas que impide el movimiento de las cuchillas cuando el motor
está en el mínimo.
No use la máquina si el dispositivo de corte se mueve con el motor al mínimo,
en este caso, es necesario contactar a su Vendedor.
La correcta velocidad de trabajo se obtiene con la
palanca del acelerador (1) a fondo de carrera.
Durante las primeras 6-8 horas
de ejercicio de la máquina, evitar usar el motor al
máximo de las revoluciones.
IMPORTANTE
¡ATENCIÓN!
IMPORTANTE
PARADA DEL MOTOR (Fig. 4)
Para parar el motor:
- Soltar la palanca del acelerador (1) y dejar que el
motor gire al mínimo durante algún segundo.
- Apagar el interruptor (2) en la posición «O».
Después de haber llevado el
acelerador al mínimo, son necesarios algunos
segundo antes de que las cuchillas se paren.
¡ATENCIÓN!
8
PUESTA EN MARCHA - USO - PARADA DEL MOTOR
ES
Page 63

USO DE LA MÁQUINA
9
ES
Por el respeto de los demás y del ambiente:
– Evite ser un elemento de disturbo.
– Efectuar escrupulosamente las normas locales
para la eliminación de los materiales después
del corte.
– Seguir las normas locales escrupulosamente
para la eliminación de aceites, de gasolina, partes deterioradas o cualquier elemento de fuerte
impacto ambiental
– La eliminación de los embalajes debe efectuar-
se según las disposiciones locales vigentes.
La exposición prolongada a
las vibraciones puede causar lesiones y disturbios
neurovasculares (conocido también como “fenómeno de Raynaud” o “mano blanca") especialmente a quien sufre de disturbios circulatorios.
Los síntomas pueden afectar a las manos, las muñecas y los dedos y se manifiestan con pérdida de
sensibilidad, torpor, prurito, dolor, decoloración o
cambios estructurales de la piel. Estos efectos
pueden aumentar por las bajas temperaturas ambientales y/o por una excesivo uso de las empuñaduras. Cuando sienta los síntomas es necesario
reducir los tiempos de uso de la máquina y consultar a un médico.
Llevar ropa adecuada durante el trabajo. Su Distribuidor es capaz de suministrarle informaciones sobre los materiales antiinfortunio más apropiados para garantizar la seguridad en el trabajo.
REGULACIÓN DE LA EMPUÑADURA (Fig. 5)
La empuñadura posterior (1) puede asumir 3 diferentes orientaciones con respecto al dispositivo de corte,
para efectuar más cómodamente las operaciones de
acabado de los setos.
La regulación de la empuña-
dura debe efectuarse con el motor apagado.
– Bajar la palanca de desbloqueo (2).
– Girar la empuñadura posterior (1) a la posición
deseada.
– Antes de usar la máquina asegúrese de que la pa-
lanca de desbloqueo (2) esté llevada completamente a la posición alta y que la empuñadura posterior
esté bien estable.
¡ATENCIÓN!
¡ATENCIÓN!
¡ATENCIÓN!
Durante el trabajo, la empuñadura posterior deberá ser siempre vertical, independientemente de la posición asumida por el dispositivo de corte (3).
MODALIDAD DEL CORTE
Durante el corte, la máquina
deberá estar siempre sujeta firmemente con las
dos manos.
Parar rápidamente el motor
si las cuchillas se bloquean durante el trabajo o se
enganchan en las ramas del seto.
Siempre es preferible cortar antes los dos lados verticales del seto y a continuación la parte superior.
• Corte vertical (Fig. 6)
El corte debe efectuarse con un movimiento de arco
desde abajo hacia arriba, manteniendo la cuchilla lo
más posible distante del cuerpo.
• Corte horizontal (Fig. 7)
Los mejores resultados se obtienen con la cuchilla
ligeramente inclinada (5° - 10°) en la dirección del
corte, con un movimiento y un avance lento y constante, especialmente en el caso de setos muy frondosos.
LUBRIFICACIÓN DE LAS CUCHILLAS DURANTE
EL TRABAJO
Si el dispositivo de corte se calienta excesivamente
durante el trabajo, es necesario lubrificar las superficies internas de las cuchillas.
Esta operación debe efectuarse con el motor apagado y las cuchillas paradas.
FINAL DEL TRABAJO
Con el trabajo acabado:
– Parar el motor como precedentemente se indica
(Cap. 5).
– Esperar a la parada de las cuchillas y montar la pro-
tección.
¡ATENCIÓN!
¡ATENCIÓN!
¡ATENCIÓN!
¡ATENCIÓN!
6. USO DE LA MÁQUINA
Page 64

10
MANTENIMIENTO Y CONSERVACIÓN
ES
Un correcto mantenimiento es fundamental para mantener a lo largo del tiempo la eficiencia y la seguridad
de empleo originales de la máquina.
Durante las operaciones de
mantenimiento:
– desconectar el capuchón de la bujía.
– Esperar a que el motor esté enfriado adecuada-
mente.
– Use guantes protectivos en las operaciones con
las cuchillas.
– Monte las protecciones de la cuchilla, excepto
los casos de intervención en la misma lama.
– No elimine en el ambiente aceites, gasolina u
otro material contaminante.
LIMPIEZA DEL MOTOR Y DEL SILENCIADOR
Para reducir el riesgo de incendio, limpie frecuentemente las aletas del cilindro con aire comprimido y
suelte la zona del silenciador de ramas, hojas y otros
residuos.
LIMPIEZA DEL FILTRO DE AIRE
La limpieza del filtro de aire es
esencial para el buen funcionamiento y la duración de
la máquina.
La limpieza debe efectuarse cada 8-10 horas de trabajo.
Para limpiar el filtro (Fig. 8):
– Desatornillar el pomo (1) extraer la tapa (2) y el ele-
mento filtrante (3).
– Lavar el elemento filtrante (3) con agua y jabón. No
use gasolina u otros solventes.
– Dejar secar el filtro del aire.
– Volver a montar el elemento filtrante (3) y la tapa (2)
apretando a fondo el pomo (1).
FILTRO CARBURANTE
En el interior del depósito hay un filtro que impide que
las impurezas entren en el motor.
Una vez al año, es oportuno cambiar el filtro por su
Distribuidor.
IMPORTANTE
¡ATENCIÓN!
CONTROL DE LA BUJÍA
Periódicamente, desmontar y limpiar la bujía extrayendo eventuales depósitos con un cepillo metálico.
Controlar y regular la distancia correcta entre los electrodos (Fig. 9).
Volver a montar la bujía apretándola a fondo con la
llave suministrada.
La bujía deberá sustituirse con otra de características
semejantes en el caso de electrodos quemados o
aislante deteriorado, y cada 50 horas de funcionamiento.
REGULACIÓN DEL CARBURADOR
El carburador se regula en la fábrica de manera que se
obtenga las máximas prestaciones en cada situación
de uso, con la mínima emisión de gas nocivos, respetando las normativas vigentes.
En el caso de pocas prestaciones, controlar sobre
todo que las cuchillas no estén parcialmente bloqueadas o deformadas, a continuación dirigirse a su
Distribuidor para un control de la carburación y del
motor.
• Regulación del mínimo
El dispositivo de corte no
debe moverse con el motor al mínimo. Si el dispositivo de corte se mueve con el motor al mínimo, es
necesario contactar a su Vendedor para la correcta regulación del motor.
LUBRIFICACIÓN DEL REDUCTOR (Fig. 10)
Cada 20 horas de trabajo, regular el nivel con grasa
especial de bisolfuro de molibdeno, inyectándolo en
el engrasador (1).
CONTROL Y LIMPIEZA DE LAS CUCHILLAS
Controlar periódicamente
que las cuchillas no estén plegadas o dañadas y
que los tornillos estén apretados adecuadamente.
¡ATENCIÓN!
¡ATENCIÓN!
7. MANTENIMIENTO Y CONSERVACIÓN
Page 65

MANTENIMIENTO Y CONSERVACIÓN
11
ES
No es necesario ningún ajuste de la distancia entre las
cuchillas, pues el juego está predeterminado en Fábrica.
Periódicamente es necesario limpiar las ranuras internas de residuos, que pueden impedir el correcto desplazamiento de las cuchillas.
Para efectuar la limpieza (Fig. 11):
– Desatornillar las tuercas (1) y extraer los tornillos (2)
y la barra (3).
– Limpiar cuidadosamente los orificios (4) de polvo y
residuos.
– Lubrificar las superficies internas de las cuchillas.
– Volver a montar la barra (3) con los tornillos (2), pre-
stando atención a colocar los distanciadores cuida-
dosamente (5) y las arandelas (6) y (7) debajo de las
tuercas (1).
– Apretar a fondo las tuercas (1).
Controlar siempre que las
tuercas (1) estén apretadas a fondo antes de retomar el trabajo.
AFILADO DE LAS CUCHILLAS
El afilado es necesario cuando el rendimiento del
corte disminuye y las ramas se enganchan a menudo.
Una cuchilla con los cortantes desgastados no deberá afilarse, sino cambiarse.
Es preferible que el afilado lo
efectúe su Distribuidor que dispone de equipos adecuados y de la competencia necesaria.
Si se tuvieran que afilar las cuchillas, es necesario una
lima de grano fino, llevando a cabo los siguientes
pasos (Fig. 12):
– Apoyar la lima (1) en el cortante (2) con un ángulo
de 45°, y proceder con un movimiento desde arriba
hacia el borde cortante.
– Hágase de manera que la lima actúe solo en el
recorrido de ida y levántela en el recorrido de vuel-
ta.
– Extraer poquísimo material.
– Eliminar todas las rebabas con una piedra para afi-
lar.
– Eliminar cada señal de limado y engrasar las cuchi-
llas antes de montarlas.
IMPORTANTE
¡ATENCIÓN!
¡ATENCIÓN!
INTERVENCIONES EXTRAORDINARIAS
Cada operación de mantenimiento no incluida en este
manual deberá efectuarse exclusivamente por su
Distribuidor.
Operaciones efectuadas en las estructuras inadecuadas o por personas no cualificadas conllevan el vencimiento de toda forma de garantía.
CONSERVACIÓN
Al final de cada sesión de trabajo, limpiar cuidadosamente la máquina de polvo y residuos, reparar o cambiar las partes defectuosas y lubrificar las cuchillas
para prevenir la oxidación.
La máquina deberá conservarse en un lugar seco,
protegida de la intemperie, con la protección de las
cuchillas correctamente montada.
INACTIVIDAD PROLONGADA
Si se prevé in periodo de inactividad de la máquina superior a 2-3 meses es necesario llevar a cabo algunas medidas para evitar dificultades de la continuidad del trabajo o daños permanentes en el motor..
• Almacenamiento
Antes de guardar la máquina:
– Vaciar el depósito del carburante.
– Poner en marcha el motor y mantenerlo en marcha
al mínimo hasta la parada, de manera que se consuma todo el carburante que se ha quedado en el
carburador.
– Dejar enfriar el motor y desmontar la bujía.
– Verter el orificio de la bujía una cucharada de acei-
te (nuevo) para motores de 2 tiempos.
– Tirar diferentes veces el cable de arranque para dis-
tribuir el aceite en el cilindro.
– Volver a montar la bujía con el pistón en el punto
muerto superior (visible desde el orificio de la bujía)
cuando el pistón está en su carrera máxima).
• Reanudación de la activación
En el momento de poner en funcionamiento la máquina:
– Extraer la bujía.
– Accionar algunas veces el cable de arranque para
eliminar los excesos de aceite.
– Controlar la bujía como se describe en el capítulo
“Control de la bujía”.
– Predisponer la máquina como se indica en el capí-
tulo “Preparación en el trabajo”.
IMPORTANTE
Page 66

12
LOCALIZACIÓN AVERÍAS / DATOS TÉCNICOS / ACCESORIOS
ES
8. LOCALIZACIÓN AVERÍAS
INCONVENIENTE CAUSA PROBABLE REMEDIO
1) El motor no arranca
o no se mantiene
en marcha
2) El motor arranca
pero tiene poca
potencia
3) El motor tiene
un funcionamiento
irregular o no tiene la
potencia bajo carga
4) El motor tiene una
fumosidad excesiva
– Procedimiento de arranque no correcto
– Bujía sucia o distancia entre
los electrodos no correcta
– Filtro de aire obstruido
– Problemas de carburación
– Filtro de aire obstruido
– Problemas de carburación
– Bujía sucia o distancia entre los electro-
dos no correcta
– Problemas de carburación
– Error composición de la mezcla
– Problemas de carburación
– Seguir las instrucciones (véase cap. 5)
– Controlar la bujía (véase cap. 7)
– Limpiar y/o sustituir el filtro
(véase cap. 7)
– Contactar a su Distribuidor
– Limpiar y/o sustituir el filtro
(véase cap. 7)
– Contactar a su Distribuidor
– Controlar la bujía (véase cap. 7)
– Contactar a su Distribuidor
– Preparar la mezcla según
las instrucciones (véase cap. 4)
– Contactar a su Distribuidor
9. DATOS TÉCNICOS
MODELO ............................................................................................................... HTJ 550
Cilindrada .................................................................................................... cm
3
24,5
Potencia ........................................................................................................ kW 0,85
Bujía ..................................................................................................................... NHSP LD L8RTF Y
Relación gasolina: aceite ...................................................................................... 50 : 1
Capacidad depósito ................................................................................... litros 0,33
Longitud corte ............................................................................................. mm 610
Nivel de presión acústica en el oído del operador (ISO 11201) ................ dB(A) 102,1
Incertidumbre de medida (2006/42/CE - EN 27574) ................................ dB(A) 3,0
Nivel de potencia acústica medido (ISO 3744) ....................................... dB(A) 107,1
Incertidumbre de medida (2006/42/CE - EN 27574).................................. dB(A) 3,0
Nivel de vibraciones (EN 774 - EN 28662) ................................................. m/s
2
2,97
Incertidumbre de medida (2006/42/CE - EN 12096) ................................. m/s
2
1,5
Masa .............................................................................................................. kg 5,5
En esta máquina es previsto el uso de herramientas
de corte que indican el código:
23305004/0
Dada la evolución del producto, las herramientas arri-
ba indicadas podrán ser sustituidas por otras, con
características análogas de intercambiabilidad y
seguridad de funcionamiento.
10. ACCESORIOS
Page 67

PRESENTATIE
1
NL
Geachte Klant,
wij danken u voor het feit dat u de voorkeur hebt gegeven aan onze producten en wij hopen dat het gebruik van
deze machine u zeer tevreden zal stellen en dat zij volledig aan uw verwachtingen zal voldoen. Deze handleiding
is geschreven om u vertrouwd te maken met uw machine en om u in staat te stellen haar op de beste en de meest
veilige manier te gebruiken: vergeet niet dat deze handleiding een integrerend deel van de machine is, bewaar
deze binnen handbereik zodat u haar op elk gewenst moment kunt raadplegen en zorg ervoor dat ze de machine altijd vergezelt ook als u de machine verkoopt of uitleent.
Deze nieuwe machine is ontworpen en gemaakt in overeenstemming met de geldende voorschriften en is volkomen veilig en betrouwbaar indien zij wordt gebruikt overeenkomstig de aanwijzingen in deze handleiding (vorozien gebruik) ; het gebruik voor andere doeleinden of het niet in acht nemen van de aangegeven veiligheids-,
gebruiks-, onderhouds- en reparatievoorschriften wordt als “oneigenlijk gebruik” beschouwd en brengt verval van,
zowel de garantie, als de aansprakelijkheid van de fabrikant teweeg waardoor de gebruiker zelf verantwoordelijk
is voor schade of letsel die hijzelf of anderen oplopen.
Mocht u verschillen tegenkomen tussen wat beschreven is en de machine die u bezit, denk er dan aan dat, aangezien het product continu verbeterd wordt, de in deze handleiding opgenomen gegevens zonder voorafgaande
kennisgeving en zonder dat de fabrikant verplicht is de handleiding te updaten gewijzigd kunnen worden, waarbij de essentiële kenmerken met het oog op de veiligheid en de werking evenwel onveranderd blijven. Neem ingeval van twijfel contact op met uw verkoper. Wij wensen u een prettig gebruik van de machine toe!
INHOUDSOPGAVE
1. Identificatie van de hoofdcomponenten ................................................ 2
2. Symbolen ............................................................................................... 3
3. Veiligheidsvoorschriften ......................................................................... 4
4. Voorbereiding ......................................................................................... 6
5. Starten - Gebruik - Uitschakelen motor ................................................ 7
6. Gebruik van de machine ........................................................................ 9
7. Onderhoud en opslag .......................................................................... 10
8. Opsporen van defecten ....................................................................... 12
9. Technische gegevens ........................................................................... 12
10. Accessoires .......................................................................................... 12
Page 68

2
IDENTIFICATIE VAN DE HOOFDCOMPONENTEN
NL
1. Motor
2. Snij-inrichting (mes)
3. Beschermplaat snijden
4. Voorste handgreep
5. Achterste handgreep
6. Bediening vrijgave
achterste handgreep
7. Mesbescherming
10. Typeplaatje
BEDIENINGEN
EN BIJVULLEN
VAN BRANDSTOF
11. Stopschakelaar motor
12. Bediening mes
(Versnellingshendel)
13. Veiligheidshendel
versneller
14. Startknop
15. Chokeknop (Starter)
16. Knop voorinspuiting
(Primer)
21. Dop brandstofreservoir
22. Deksel luchtfilter
1. IDENTIFICATIE VAN DE HOOFDCOMPONENTEN
7
3 2
4
5
211
151610 22
6
11 13
1214
TYPEPLAATJE
10.1) Conformiteitsmerk volgens
de richtlijn 98/37/EEG (2006/42/EG vanaf
29/12/2009)
10.2) Naam en adres van de fabrikant
10.3) Akoestische vermogen LWA
volgens de richtlijn 2000/14/EG
10.4) Referentiemodel van de fabrikant
10.5) Machinemodel
10.6) Serienummer
10.7) Certificatiemerk
10.8) Bouwjaar
10.9) Artikelcode
10.10) Aantal emissies
10.1
L
WA
dB
PRODUCT SERVICE
10.2
10.3
10.7
10.6
10.4
10.5
10.8
10.10
10.09
Page 69

SYMBOLEN
3
NL
1) Let op! Gevaar
2) Voordat u deze machine in gebruik neemt eerst de
gebruiksaanwijzingen lezen.
3) Uw gehoor kan definitieve beschadiging oplopen.
De mensen die deze machine dagelijks in normale
omstandigheden gebruiken zijn blootgesteld aan een
geluidsniveau van 85 dB (A) of hoger.
Het is verplicht de oorbeschermers te dragen.
Draag altijd een veiligheidsbril (risico voor wegspringende voorwerpen) en oorbeschermers zoals een geluidshelm (om beschadiging van het gehoor te voorkomen) tijdens het gebruik van de machine. Ingeval er
gevaar bestaat voor vallende voorwerpen, moet ook
een valhem gedragen worden.
4) Het mes is zeer scherp en kan gemakkelijk snijwonden veroorzaken.
2. SYMBOLEN
LET OP: De door u gekochte machine is bestemd voor doe-het-zelf doeleinden.
11) Brandstofreservoir
12) Chokeknop (Starter)
TOELICHTENDE SYMBOLEN OP DE MACHINE (indien aanwezig)
1 2 3 4
11
12
Page 70

4
VEILIGHEIDSVOORSCHRIFTEN
NL
A) VERTROUWD RAKEN
1) Lees de gebruiksaanwijzingen aandachtig. Zorg dat
u vertrouwd raakt met de bedieningsknoppen en in
staat bent de machine op de juiste wijze te gebruiken.
Leer de motor snel af te zetten.
2) Gebruik de machine voor het voorbestemd doel,
namelijk “het snijden en regelen van heggen be-
staande uit struikjes met kleine takken”. Elk ander
doel waarvoor de heggenschaar wordt gebruikt kan
gevaarlijk zijn en zou de machine kunnen beschadigen. De volgende situaties behoren tot het oneigenlijk
gebruik (bijvoorbeeld, maar niet uitsluitend):
– snijden van gras in het algemeen en in het bijzonder
in de nabijheid van stoepranden;
– kleinsnijden van materiaal voor compostering;
– snoeiwerken;
– gebruik van de machine voor het snijden van niet
plantaardig materiaal;
– gebruik van de machine door meer dan één per-
soon tegelijk.
3) Laat nooit toe dat de machine gebruikt wordt door
kinderen of door personen die niet vertrouwd zijn met
deze aanwijzingen. De leeftijd van de gebruiker kan
landelijk gereglementeerd zijn
4) De machine dient niet door meer dan één persoon
gebruikt te worden.
5) Gebruik de machine in geen geval:
– als er personen, in het bijzonder kinderen of dieren
in de buurt zijn;
– indien de gebruiker moe is, zich niet fit voelt of
geneesmiddelen, drugs, alcohol of schadelijke stof-
fen ingenomen heeft die zijn reactievermogen en
aandacht kunnen verminderen;
– indien de gebruiker niet in staat is om de machine
stevig vast te houden met beide handen en/of tij-
dens het werk niet in evenwicht en stevig op beide
voeten kan staan.
6) Denk eraan dat de persoon die de machine bedient
of de gebruiker aansprakelijk is voor ongevallen en
onvoorziene gebeurtenissen die personen of hun
eigendommen kunnen overkomen.
B) VÓÓR HET GEBRUIK
1) Tijdens het werken moet gepaste kledij gedragen
worden die de gebruiker niet hindert in zijn bewegingen.
– Draag aansluitende en beschermende kledij die
bestand is tegen sneden.
– Draag werkhandschoenen, een veiligheidsbril en
veiligheidsschoeisel met een antislipzool.
– Gebruik de oorbeschermers.
– Draag geen sjaal, hemd, halsketting of andere han-
gende of ruime accessoires die gegrepen kunnen
worden door de machine of voorwerpen en materi-
aal aanwezig op de werkplaats.
– Lang haar wordt zorgvuldig bijeengebonden.
2) OPGELET: GEVAAR! De benzine is bijzonder
brandbaar:
– bewaar de brandstof in gepaste recipiënten die
geschikt zijn voor dit gebruik;
– rook niet wanneer de brandstof gehanteerd wordt;
– open de dop van het reservoir langzaam om de
interne druk geleidelijk aan af te laten;
– vul benzine alleen bij in de open lucht en gebruik
hiervoor een trechter;
– giet de brandstof in het reservoir vóórdat u de
motor aanzet: als de motor aanstaat of warm is mag
u geen brandstof toevoegen of de dop van de ben-
zinetank afdraaien;
– als u benzine gemorst hebt mag u de motor niet
starten maar dient u de machine uit de buurt van de
plek waar u de benzine gemorst hebt te brengen en
voorkomen dat er brand ontstaat. U dient te wach-
ten totdat de brandstof verdampt is en de benzine-
dampen opgelost zijn;
– reinig onmiddellijk elk spoor van benzine gemorst
op de machine of op de grond;
– start de machine niet op de plaats waar de brand-
stof bijgevuld werd;
– vermijd dat de brandstof in contact komt met de
kledij en, mocht dit toch gebeuren, trek dan andere
kledij aan vooraleer de motor te starten;
– draai de dop altijd weer goed op het reservoir van
de machine en het benzinerecipiënt.
3) Vervang defecte of beschadigde geluidsdempers.
4) Ga vóór het gebruik over op een algemene controle van de machine, en in het bijzonder:
– de versnellingshendel en de veiligheidshendel moeten vrij kunnen bewegen, zonder geforceerd te worden, en bij het loslaten moeten ze automatisch en snel
terug in de neutrale stand komen;
– de versnellingshendel moet geblokkeerd blijven
indien niet op de veiligheidshendel geduwd wordt;
– de stopschakelaar van de motor moet makkelijk van
de ene stand in de andere gebracht kunnen wor-
den;
– de elektrische kabels en in het bijzonder de kabel
van de bougie moeten onbeschadigd zijn om te
voorkomen dat vonken ontstaan; de kap moet cor-
rect op de bougie gemonteerd zijn;
– de handgrepen en beschermingen van de machine
moeten schoon, droog, en stevig bevestigd zijn op
de machine;
– de messen mogen geenszins beschadigd zijn;
5) Vóór het werk te beginnen, controleer of alle
beschermingen correct gemonteerd zijn.
C) TIJDENS HET GEBRUIK
1) Start de motor niet in gesloten ruimten, waar zich
gevaarlijke koolmonoxide kan ontwikkelen.
2) Werk alleen bij daglicht of bij goed kunstlicht.
3) Blijf stil en stabiel staan:
– vermijd zoveel mogelijk te werken op een natte of
glibberige grond, of in ieder geval op te oneffen of
3. VEILIGHEIDSVOORSCHRIFTEN
Page 71

VEILIGHEIDSVOORSCHRIFTEN
5
NL
steile terreinen die de stabiliteit van de gebruiken tijdens het werken niet kunnen garanderen;
– vermijd het gebruik van ladders en onstabiele plat-
formen;
– loop niet maar ga normaal en let op oneffenheden
van het terrein en de aanwezigheid van eventuele
hindernissen.
4) Start de motor met de vrije hand terwijl de machine
stevig tegen de grond gehouden wordt:
– start de motor op een afstand van minstens 3 meter
van de plaats waar de brandstof bijgevuld werd;
– controleer of er zich andere personen in de draag-
wijdte van de machine bevinden;
– richt de geluidsdemper en dus de uitlaatgassen
nooit naar ontvlambare materialen.
5) Wijzig de afstelling van de motor niet en laat het
toerental van de motor niet buitengewoon hoog
oplopen.
6) Controleer of het laagste toerental van de machine
niet te laag is zodat de messen niet bewegen en of de
motor na een plotse versnelling iet te snel terugvalt tot
het laagste toerental.
7) Let erop dat de messen niet hevig botsen met
vreemde lichamen en let op eventueel wegspringend
materiaal veroorzaakt door het draaien van de messen.
8) Schakel de motor uit:
– telkens wanneer u de machine onbeheerd achter-
laat;
– vóórdat u benzine bijtankt.
9) Schakel de motor uit en koppel de bougiekabel los:
– voordat u de machine controleert, schoonmaakt of
eraan werkt;
– nadat er op een vreemd lichaam gestoten is.
Controleer de machine op eventuele beschadigingen en voer de nodige reparaties uit alvorens de
machine opnieuw te gebruiken;
– indien de machine op abnormale wijze begint te tril-
len (Meteen de oorzaak van de trillingen opsporen
en hem laten nakijken door een Gespecialiseerd
Servicecentrum).
– wanneer de machine niet gebruikt wordt.
D) ONDERHOUD EN OPSLAG
1) Laat de bouten en de schroeven vastgedraaid zitten
om er zeker van te zijn dat de machine altijd op een
veilige manier gebruiksklaar is. Als u regelmatig
onderhoud aan de heggenschaar pleegt zal de werking van ervan veilig blijven en zal het prestatieniveau
bewaard blijven.
2) Zet de machine niet met benzine in het reservoir in
een ruimte waar de benzinedampen met vlammen,
vonken of een warmtebron in aanraking zouden kunnen komen.
3) Laat de motor eerst afkoelen vóór het opbergen van
de machine in elke willekeurige ruimte.
4) Om het risico voor brand te beperken, worden de
motor, de geluidsdemper van de uitlaat en de opslagzone van de benzine vrij gehouden van takjes, bladeren of overtollig vet; laat geen recipiënten met snijafval in de ruimte achter.
5) Als u te reservoir moet ledigen, dient u dit in de
open lucht te doen en wanneer de motor koud is.
6) Draai werkhandschoenen voor elke ingreep aan de
snij-inrichting.
7) Curare l’affilatura delle lame. Alle handelingen die
betrekking hebben op de messen vergen een specifieke vaardigheid en het gebruik van geschikt gereedschap; uit veiligheidsoverwegingen worden deze handelingen beter uitgevoerd in een gespecialiseerd centrum.
8) Gebruik de machine, uit veiligheidsoverwegingen,
nooit met onderdelen die versleten of beschadigd zijn.
De beschadigde onderdelen moeten vernieuwd en
niet gerepareerd worden. Gebruik uitsluitend originele
reserveonderdelen. Onderdelen van een andere kwaliteit kunnen de machine beschadigen en kunnen
gevaarlijk zijn voor de gebruiker.
9) Bewaar de machine buiten het bereik van kinderen!
E) RANSPORT EN VERPLAATSING
1) Telkens wanneer de machine verplaatst of vervoerd
moet worden, is het noodzakelijk:
– de motor uit te schakelen, wachten tot de messen
tot stilstand gekomen zijn en de bougiekap loskop-
pelen;
– de mesbeschermingen aanbrengen;
– de machine alleen vastnemen aan de handgrepen
en de messen richten in de richting tegenover de
looprichting.
2) Wanneer de machine vervoerd wordt met een voertuig, moet het op dusdanige wijze geplaatst worden
dat er voor niemand gevaar ontstaat en stevig geblokkeerd worden om te voorkomen dat de machine
omvalt en beschadigd wordt of dat brandstof lekt.
F) HOE DE HANDLEIDING TE LEZEN
In de tekst van de handleiding worden enkele paragrafen, die gegevens van bijzonder belang bevatten,
gekenmerkt door diverse symbolen die de volgende
betekenis hebben:
of
Verstrekt nadere gegevens of
andere elementen ter aanvulling op hetgeen daarvoor
vermeld is, om te voorkomen dat de machine beschadigd wordt of dat er schade veroorzaakt wordt.
Gevaar voor persoonlijk letsel of letsel aan anderen in geval van niet-inachtneming.
Kans op ernstig persoonlijk
letsel of ernstig letsel aan anderen met gevaar van
dodelijke ongelukken, in geval van niet-inachtneming.
GEVAAR!
LET OP!
BELANGRIJK
OPMERKING
Page 72

6
VOORBEREIDING
NL
CONTROLE VAN DE MACHINE
Alvorens de machine te gebruiken, is het noodzakelijk:
– Te controleren of er geen schroeven loszitten aan de
machine of het mes;
– te controleren of de messen scherp zijn en niet
beschadigd zijn;
– te controleren of de luchtfilter schoon is;
– te controleren of de beschermingen goed vastzitten
en efficiënt zijn;
– te controleren of de handgrepen goed bevestigd
zijn.
BEREIDING VAN HET BRANDSTOFMENGSEL
Deze machine is uitgerust met een tweetaktmotor
waarvoor een mengsel van benzine en smeerolie gebruikt moet worden.
Het gebruik van alleen benzine
beschadigd de motor en doet de garantie vervallen.
Gebruik alleen brandstof en
smeermiddelen van goede kwaliteit, om de prestaties
in stand te houden en borg te staan voor de levensduur van de mechanische componenten.
• Eigenschappen van de benzine
Gebruik alleen loodvrije benzine (groen) met een octaangehalte van minstens 90 N.O.
Groene benzine zorgt altijd
voor wat afzettingen in het recipiënt indien het langer
dan 2 maanden bewaard wordt. Gebruik altijd verse
benzine!
• Eigenschappen van de olie
Gebruik alleen synthetische olie van uitstekende kwaliteit, specifiek voor tweetaktmotoren.
Bij uw Verkoper zijn oliën beschikbaar die speciaal
bestudeerd werden voor dit type van motor en in staat
zijn om voor een hoge bescherming te zorgen.
Het gebruik van deze oliën leidt tot een mengsel bij
2%, d.w.z. 1 deel olie voor 50 delen benzine.
BELANGRIJK
BELANGRIJK
BELANGRIJK
• Bereiding en bewaring van het mengsel
De benzine en het mengsel zijn ontvlambaar!
– Bewaar de benzine en het mengsel in speciale
recipiënten voor brandstof, op een veilige
plaats, uit de buurt van warmtebronnen of naakte vlammen.
– De recipiënten moeten buiten het bereik van
kinderen bewaard worden.
– Niet roken tijdens de bereiding van het mengsel
en de benzinedampen niet inademen.
De tabel geeft de hoeveelheden benzine en olie weer
te gebruiken voor de bereiding van het mengsel naargelang het aangewend type van olie.
Voor de bereiding van het mengsel:
– Doe ongeveer de helft van de benzine in een ge-
schikte tank.
– Voeg er alle olie aan toe, volgens de tabel.
– Voeg de rest van de benzine toe.
– Sluit de dop en schud krachtig.
Het mengsel is onderhevig aan
veroudering. Bereid niet te veel mengsel, om afzettingen te voorkomen
Zorg ervoor dat de recipiënten
van de benzine en het mengsel goed van elkaar
onderscheiden worden, om geen vergissing te begaan
op het moment van het gebruik.
Reinig de recipiënten van de
benzine en het mengsel periodiek, om eventuele afzettingen te verwijderen.
BELANGRIJK
BELANGRIJK
BELANGRIJK
GEVAAR!
4. VOORBEREIDING
Benzine Synthetische olie 2-Takt
liter liter cm
3
10,0220
20,0440
30,0660
5 0,10 100
10 0,20 200
Page 73

VOORBEREIDING / STARTEN - GEBRUIK - UITSCHAKELEN MOTOR
7
NL
BIJVULLEN VAN BRANDSTOF
Niet roken tijdens het bijvul-
len en de benzinedampen niet inademen.
Open de dop van de tank
voorzichtig omdat er druk ontstaan kan zijn aan de
binnenkant.
Vooraleer bij te vullen:
– Schud de tank van het mengsel krachtig.
– Plaats de machine effen en stabiel, met de vuldop
van het reservoir naar boven.
LET OP!
GEVAAR!
– Maak de dop van het reservoir en de zone rond de
dop schoon om te voorkomen dat tijdens het bijvullen onzuiverheden terechtkomen in het mengsel.
– Open de dop van het reservoir voorzichtig om de
druk geleidelijk aan af te laten. Vul bij gebruik
makend van een trechter en vul het reservoir niet tot
aan de rand (Fig. 1).
De dop van het reservoir
moet altijd stevig weer vastgedraaid worden.
Reinig onmiddellijk elk spoor
van mengsel dat eventueel gemorst werd op de
machine of op de grond en start de motor pas
wanneer de benzinedampen voleldig opgelost zijn.
LET OP!
LET OP!
2. Druk voorzichtig 7-10 keer op de knop (2) van de
“primer” tot de brandstof uit het aftapbuisje komt.
3. Breng de bedieningshendel van de starter (3) in de
stand «CHOKE».
4. Houd de machine stevig tegen de grond met een
hand op de handgreep, om de controle ervan niet
te verliezen tijdens het starten.
Indien machine niet stevig
vastgehouden wordt, kan de gebruiker door de
duwkracht van de motor het evenwicht verliezen
of zou het mes tegen een hindernis of de gebruiker zelf gericht kunnen worden.
5. Trek de startknop langzaam 10-15 cm aan tot u
een zekere weerstand gewaarwordt. Trek er dan
nog enkele keren aan tot de machine in gang
schiet.
Om te voorkomen dat het
touw breekt, wordt er niet over de gehele lengte aan
getrokken. Laat het touw niet langs de rand van de
opening van de touwgeleider schuren en laat de knop
geleidelijk aan los, om te voorkomen dat het touw op
ongecontroleerde wijze naar binnen schiet.
BELANGRIJK
LET OP!
STARTEN VAN DE MOTOR
De motor wordt gestart op
een afstand van minstens 3 meter van de plaats
waar de brandstof bijgevuld werd.
Alvorens de motor te starten:
– Zet de machine stabiel op de grond.
– Haal de beschermingen van het mes.
– Zorg ervoor dat het mes niet in aanraking komt met
het terrein of met andere voorwerpen
– Zorg ervoor dat de handgreep geblokkeerd is in de
centrale positie.
• Start met koude motor
Met start bij koude motor
wordt bedoeld een start na minstens 5 minuten dat de
motor uitgeschakeld is of na het bijvullen van brandstof.
Om de motor te starten (Fig. 2):
1. Duw de schakelaar (1) in de stand «I».
OPMERKING
LET OP!
5. STARTEN - GEBRUIK - UITSCHAKELEN MOTOR
Page 74

6.
Trek opnieuw aan de startknop tot de motor
normaal in gang komt.
7. Breng de bedieningshendel van de starter (3) in de
stand «RUN».
8. Laat de motor minstens 1 minuut draaien vooraleer
naar het maximaal toerental te gaan.
Indien de knop (4) van het
starttouw herhaaldelijk bediend wordt met de bedieningshendel van de starter (3) in de stand «CHOKE»,
kan de motor vastlopen en de start bemoeilijken.
Indien de motor vastloopt, de bougie demonteren en
voorzichtig aan de knop (5) van het starttouw trekken
om de overtollige brandstof te verwijderen; vervolgens
de elektrodes van de bougie afdrogen en de bougie
weer monteren op de motor.
• Start bij warme motor
Voor de start bij warme motor (onmiddellijk na de uitschakeling van de motor), volg de punten 1 - 4 - 5 - 6
van de vorige werkwijze.
GEBRUIK VAN DE MOTOR (Fig. 3)
De snelheid van de snij-inrichting wordt geregeld met
de versnellingshendel (1) op de achterste handgreep
(2).
Deze hendel kan alleen bediend worden indien gelijktijdig op de veiligheidshendel (3) geduwd wordt.
De beweging wordt van de motor overgedragen op de
messen, door middel van een koppeling met centrifugaalgewichten die de beweging van de messen verhindert wanneer de motor op het minimaal toerental
draait.
Gebruik de machine niet als
de snij-inrichting op het laagste toerental van de
motor draait; neem in dit geval contact op met uw
verkoper.
De correcte werksnelheid wordt bekomen met de versnellingshendel (1) tegen de eindaanslag.
Gedurende de eerste 6-8 werkuren van de machine, wordt vermeden de hoogste
toerentallen te gebruiken.
BELANGRIJK
LET OP!
BELANGRIJK
UITSCHAKELEN VAN DE MOTOR (Fig. 4)
Om de motor uit te schakelen:
– Laat de versnellingshendel los (1) en laat de motor
minstens enkele seconden draaien.
– Breng de schakelaar (2) in de stand «O».
Nadat de versneller in de
minimumstand gezet werd, moet enkele seconden
gewacht worden vooraleer de messen tot stilstand
komen.
LET OP!
8 VOORBEREIDING
NL
Page 75

GEBRUIK VAN DE MACHINE
9
NL
Uit respect voor de anderen en het milieu:
– Wees geen storend element.
– Volg nauwkeurig de lokale normen op voor de
afdanking van het snijafval.
– Volg nauwkeurig de lokale normen op voor de
afdanking van olie, benzine, beschadigde onderdelen of om het even welk element dat niet
milieuvriendelijk is.
– De verpakking moet volgens de plaatselijke gel-
dende bepalingen worden afgevoerd.
De langdurige blootstelling
aan trillingen kan neurovasculaire letsels en problemen veroorzaken (ook gekend onder de naam
“fenomeen van Raynaud” of “witte hand”), vooral
bij personen die circulatiestoornissen hebben . De
symptomen kunnen betrekking hebben op de handen, de polsen en de vingers, met verlies van
gevoeligheid, loomheid, jeuk, pijn, verkleuring of
structurele wijzigingen van de huid. Deze effecten
kunnen versterkt worden door een lage omgevingstemperatuur en/of een overdreven druk op de
handgreep. Wanneer deze symptomen optreden,
moet de machine minder lang gebruikt worden en
is het noodzakelijk een arts te raadplegen.
Draag tijdens het werk gepaste kledij. Uw Verkoper zal u alle nodige informatie geven over de meest geschikte veiligheidskledij, met het oog op een veilig gebruik van de
machine.
REGELING VAN DE HANDGREEP (Fig. 5)
De achterste handgreep (1) heeft 3 verschillende standen ten opzichte van de snij-inrichting, om het snoeiwerk zo goed mogelijk af te werken.
De handgreep wordt geregeld wanneer de motor uitgeschakeld is.
– Breng de vrijgavehendel omlaag (2).
– Draai de achterste handgreep (1) in de gewenste
stand.
– Alvorens de machine te gebruiken, controleer of de
vrijgavehendel (2) weer omhoog gekomen is is en of
de achterste handgreep goed stabiel is.
Tijdens het werk moet de
achterste handgreep altijd verticaal staan, ongeacht de stand van de snij-inrichting (3).
LET OP!
LET OP!
LET OP!
LET OP!
MANIEREN VAN SNIJDEN
Tijdens het snijden, moet de
machine altijd stevig vastgehouden worden met
beide handen.
Schakel de motor onmiddellijk uit indien de messen tijdens het werk vastlopen
of blijven vastzitten in de takken van de heg.
Het is altijd wenselijk eerst de twee verticale zijden
van de heg te snijden en pas dan de bovenkant.
• Verticaal snijden (Fig. 6)
Snij met een boogvormige beweging van onder naar
boven, waarbij het mes zo ver mogelijk van het
lichaam gehouden moet worden.
• Horizontaal snijden (Fig. 7)
De beste resultaten worden bekomen met het mes
licht overhellend (5° - 10°) in de snijrichting, met een
boogvormige, langzame en constante beweging,
vooral bij bijzonder dichtgegroeide heggen.
SMERING VAN DE MESSEN TIJDENS HET WERK
Indien de snij-inrichting teveel verhit tijdens het werk,
moeten de binnenoppervlakken van de messen
gesmeerd worden.
Deze handeling moet uitgevoerd worden bij uitgeschakelde motor en stille
messen..
NA HET WERKEN
Na het werken:
– Schakel de motor uit zoals eerder aangegeven
(Hoofdstuk 5).
– Wacht tot de messen tot stilstand gekomen zijn en
monteer de bescherming.
LET OP!
LET OP!
LET OP!
6. GEBRUIK VAN DE MACHINE
Page 76

10
ONDERHOUD EN OPSLAG
NL
Een correct onderhoud is fundamenteel om in de tijd
de oorspronkelijke efficiëntie en gebruiksveiligheid
van de machine in stand te houden.
Tijdens het onderhoud:
– haal de kap van de bougie.
– Wacht tot de motor voldoende afgekoeld is.
– Gebruik werkhandschoenen voor alle handelin-
gen die betrekking hebben op de messen.
– Houd de mesbeschermingen op hun plaats, ten-
zij aan het mes zelf gewerkt moet worden.
– De olie, benzine of andere vervuilende materia-
len niet in het milieu gooien.
REINIGING VAN DE MOTOR EN
DE GELUIDSDEMPER
Om brandgevaar te beperken, worden de vleugels van
de cilinder regelmatig gereinigd met perslucht en
wordt de zone van de geluidsdemper vrijgemaakt van
takjes, bladeren of ander afval.
REINIGING VAN DE LUCHTFILTER
Het is essentieel dat de luchtfilter gereinigd wordt, voor de goede werking en de
levensduur van de machine.
De reiniging wordt uitgevoerd elke 8-10 werkuren.
Om de filter te reinigen (Fig. 8):
– Draai de knop los (1), verwijder het deksel (2) en het
filterelement (3).
– Was het filterelement (3) met water en zeep.
Gebruik geen benzine of andere oplosmiddelen.
– Laat de filter drogen aan de lucht.
– Hermonteer het filterelement (3) en het deksel (2)
door de knop (1) stevig vast te draaien.
BRANDSTOFFILTER
In het reservoir werd voorzien in een filter die voorkomt dat onzuiverheden binnendringen in de motor.
Eenmaal per jaar moet de filter vervangen worden
door uw verkoper.
BELANGRIJK
LET OP!
CONTROLE VAN DE BOUGIE
Periodiek wordt de bougie gedemonteerd en gereinigd, door eventuele restjes te verwijderen met een
metalen borsteltje.
Controleer en herstel de correcte afstand tussen de
elektrodes (Fig. 9).
Hermonteer de bougie en draai hem stevig vast met
de bijgeleverde sleutel.
De bougie moet ingeval van doorgebrande elektroden
of een beschadigde isolatie, en ieder geval elke 50
werkuren, vervangen worden door een bougie met
analoge karakteristieken.
REGELING VAN DE CARBURATOR
De carburator werd in de fabriek geregeld met het oog
op de beste prestaties in alle omstandigheden, met
een minimale uitstoot van schadelijke gassen, overeenkomstig de geldende normen.
Ingeval van slechte prestaties, controleer eerst of de
messen niet gedeeltelijk geblokkeerd of vervormd zijn
en wend u tot uw Verkoper voor een controle van de
carburator en de motor.
• Regeling van het minimumtoerental
De snij-inrichting mag
niet bewegen met de motor op het minimumtoerental. Als de snij-inrichting beweegt met
de motor op zijn minimumtoerental, neem
dan contact op met uw verkoper om de motor
goed af te stellen.
SMERING VAN DE REDUCTOR (Fig. 10)
Elke 20 werkuren wordt het niveau aangevuld met
speciaal vet op basis van molybdeenbisulfide, aan de
hand van de smeerinrichting (1).
CONTROLE EN REINIGING VAN DE MESSEN
Controleer regelmatig of
de messen niet geplooid of beschadigd zijn
en of de schroeven degelijk zijn vastgedraaid.
LET OP!
LET OP!
7. ONDERHOUD EN OPSLAG
Page 77

ONDERHOUD EN OPSLAG
11
NL
Er is geen afstelling vereist van de afstand tussen de
messen, aangezien de vrije ruimte vooraf bepaald
wordt in de fabriek.
Men moet regelmatig de interne kanalen vrijmaken
van afval, dat het correct glijden van de messen zou
kunnen verhinderen.
Voor de reiniging (Afb. 11):
– Draai de moeren los (1) en verwijder de schroeven
(2) en de staaf (3).
– Maak de gaten (4) zorgvuldig vrij van stof en vuil.
– Smeer de interne oppervlakten van de messen in..
– Hermonteer de staaf (3) met de schroeven (2) en let
erop dat de afstandhouders (5) en de rondsels (6)
onder de moeren (1) weer goed geplaatst worden.
– Schroef de moeren (1) stevig vast.
Controleer altijd of de moeren (1) helemaal vastgeschroefd zijn alvorens het
werk te hervatten.
SNIJVERMOGEN VAN DE MESSEN
De messen moeten geslepen worden wanneer ze minder goed werk leveren en de takken makkelijk
geklemd raken.
Een mes dat versleten is
wordt nooit gespelen maar altijd vervangen.
Het is altijd wenselijk het slijpen
te laten uitvoeren door uw verkoper, die over de gepaste gereedschappen en de nodige bekwaamheid
beschikt.
Indien de messen geslepen moeten worden, wordt
een vijl met fijne korrel gebruikt en wordt het volgende
in acht genomen (Fig. 12):
– Plaats de vijl (1) op het snijvlak (2) in een hoek van
45° en ga te werk met een beweging van boven
naar de snijzijde toe.
– Zorg ervoor dat de vijl alleen in de heenbeweging
over het snijvlak gaat, til het op om terug naar het
begin te gaan.
– Vijl weinig materiaal weg.
– Verwijder alle oneffenheden met een slijpsteen.
– Verwijder eventuele slijpsporen en smeer het mes
alvorens het opnieuw te monteren.
BELANGRIJK
LET OP!
LET OP!
BUITENGEWONE HANDELINGEN
Elke onderhoudsbeurt die niet vermeld wordt in deze
handleiding dient alleen door uw Verkoper uitgevoerd
te worden.
Handelingen die uitgevoerd werden in niet geschikte
structuren of door onbekwame personen doen de
garantie vervallen.
OPSLAG
Na het werk wordt de machine zorgvuldig vrijgemaakt
van stof en vuil, worden defecte onderdelen gerepareerd of vervangen en worden de messen gesmeerd
om roestvorming te voorkomen.
De machine moet bewaard worden op een droge
plaats, beschermd tegen de weersomstandigheden
en met de mesbescherming gemonteerd.
LANGDURIGE PERIODE VAN INACTIVITEIT
Indien men van plan is de machine langer dan 2 - 3 maanden niet te gebruiken,
moeten een aantal voorzorgsmaatregelen getroffen
worden om problemen te vermijden bij het hervatten
van het werk of om permanente schade aan de motor
te voorkomen..
• Opberging
Alvorens de machine te op te bergen:
– Ledig de brandstoftank.
– Start de motor en laat hem op het laagste toerental
draaien tot de stilstand, zodat alle in het reservoir
overgebleven brandstof opgebruikt wordt.
– Laat de motor afkoelen en demonteer de bougie.
– Giet in de opening van de bougie een lepel (verse)
olie voor tweetaktmotoren.
– Trek verschillende keren aan het starttouw om de
olie goed te verdelen in de cilinder.
– Hermonteer de bougie met de zuiger aan het bo-
venste dood punt (zichtbaar vanuit het gat van de
bougie wanneer de zuiger aan de eindaanslag
gekomen is).
• Hervatten van de activiteit
Wanneer de machine weer gestart wordt:
– Verwijder de bougie.
– Trek enkele keren aan het starttouw om overtollige
olie te verwijderen.
– Controler de bougie zoals beschreven in het hoofd-
stuk “Controle van de bougie”.
– Bereid de machine voor zoals aangegeven in het
hoofdstuk “Vóór het gebruik”.
BELANGRIJK
Page 78

12
OPSPOREN VAN DEFECTEN / TECHNISCHE GEGEVENS / ACCESSOIRES
NL
8. OPSPOREN VAN DEFECTEN
PROBLEMEN MOGELIJKE OORZAAK OPLOSSING
1) De motor start niet
of blijft niet draaien
2) De motor start maar
heeft weinig vermogen
3) De motor werkt
onregelmatig of heeft
geen vermogen bij
belasting
4) De motor geeft
teveel rook af
– De startprocedure is niet correct
– De bougie is vuil of de afstand tussen
de elektroden is niet gepast
– Verstopte luchtfilter
– Brandstofproblemen
– Verstopte luchtfilter
– Brandstofproblemen
– De bougie is vuil of de afstand tussen
de elektroden is niet gepast
– Brandstofproblemen
– Verkeerde samenstelling van het mengsel
– Brandstofproblemen
– Volg de aanwijzingen (zie hoofdstuk 5)
– Controleer de bougie (zie hoofdstuk 7)
– Reinig en/of vervang de filter
(zie hoofdstuk 7)
– Contacteer uw Verkoper
– Reinig en/of vervang de filter
(zie hoofdstuk 7)
– Contacteer uw Verkoper
– Controleer de bougie (zie hoofdstuk 7)
– Contacteer uw Verkoper
– Bereid het mengsel volgens
de aanwijzingen (zie hoofdstuk 4)
– Contacteer uw Verkoper
9. TECHNISCHE GEGEVENS
TYPE...................................................................................................................... HTJ 550
Cilinderinhoud ............................................................................................. cm
3
24,5
Vermogen ...................................................................................................... kW 0,85
Bougie .................................................................................................................. NHSP LD L8RTF Y
Verhouding benzine : olie ..................................................................................... 50 : 1
Inhoud reservoir ........................................................................................... liter 0,33
Snijlengte ..................................................................................................... mm 610
Geluidsdrukniveau aan het oor van de bediener (ISO 11201) .................. dB(A) 102,1
Meetonzekerheid (2006/42/EG - EN 27574) ............................................. dB(A) 3,0
Gemeten geluidsniveau (ISO 3744) .......................................................... dB(A) 107,1
Meetonzekerheid (2006/42/EG - EN 27574) ............................................. dB(A) 3,0
Trillingsniveau (EN 774 - EN 28662) ............................................................ m/s
2
2,97
Meetonzekerheid (2006/42/EG - EN 12096) ............................................... m/s
2
1,5
Masse ............................................................................................................. kg 5,5
Deze machine is voorzien voor het gebruik van snijgereedschap met de code:
23305004/0
Gezien de ontwikkeling van het product, kan het
boven vermelde snijgereedschap in de loop van de
tijd vervangen worden door andere, met soortgelijke
eigenschappen voor wat betreft verwisselbaarheid en
functionele veiligheid.
10. ACCESSOIRES
Page 79

APRESENTAÇÃO
1
PT
Prezado Cliente,
queremos, antes de mais nada, agradecer pela preferência dada aos nossos produtos e esperamos que o uso
desta sua nova máquina seja muito satisfatório e corresponda plenamente às suas expectativas. Este manual foi
redigido para que o utente possa conhecer bem a máquina e usá-la de forma segura e eficiente; não esqueça
que este manual é parte integrante da máquina, conserve-o para poder consultá-lo quando necessário e o entregue juntamente com a máquina em caso de cessão ou se for emprestado a terceiros.
Esta sua máquina foi projectada e fabricada segundo as normativas vigentes, resultando segura e de confiança
se usada respeitando plenamente as instruções presentes neste manual (uso previsto); qualquer outra utilização
ou a inobservância das normas de segurança de uso, manutenção e reparação descritas é considerada como
“uso impróprio” e causa a invalidação da garantia e isenta o Fabricante de toda e qualquer responsabilidade, passando ao utente os oneres derivados de danos ou lesões próprias ou a terceiros.
Se for notada qualquer pequena diferença entre o quanto descrito e a máquina em seu poder, lembrar-se que,
visto o contínuo melhoramento do produto, as informações presentes neste manual são sujeitas a modificações
sem prévio aviso ou obrigação de actualização, mas ficando sem variação as características essenciais para a
segurança e o funcionamento. Em caso de dúvida entre em contacto com o seu revendedor. Bom trabalho!
ÍNDICE
1. Identificação dos componentes principais ............................................ 2
2. Símbolos ................................................................................................ 3
3. Disposições de segurança .................................................................... 4
4. Preparação para o trabalho ................................................................... 6
5. Arranque - Uso - Parada do motor ....................................................... 7
6. Utilização da máquina ........................................................................... 9
7. Manutenção e conservação ................................................................ 10
8. Localização de avarias ........................................................................ 12
9. Dados técnicos .................................................................................... 12
10. Acesoriós ............................................................................................. 12
Page 80

2
IDENTIFICAÇÃO DOS COMPONENTES PRINCIPAIS
PT
1. Motor
2. Dispositivo de corte
(lâmina)
3. Chapa protecção corte
4. Pega dianteira
5. Pega traseira
6. Comando
de destravamento
pega traseira
7. Protecção lâmina
10. Etiqueta matrícula
COMANDOS
E ABASTECIMENTOS
11. Interruptor paragem
do motor
12. Comando da lâmina
(Alavanca do
acelerador)
13. Alavanca segurança
do acelerador
14. Interruptor
de arranque
15. Arrancador (Starter)
16. Comando dispositivo
de escorva (Primer)
21. Tampa do depósito
de combustível
22. Tampa filtro de ar
1. IDENTIFICAÇÃO DOS COMPONENTES PRINCIPAIS
ETIQUETA MATRÍCULA
10.1) Marca de conformidade
segundo a directiva 98/37/CE (2006/42/CE a
partir de 29/12/2009)
10.2) Nome e morada do fabricante
10.3) Nível de potência acústica LWA
em conformidade com a directiva
2000/14/CE
10.4) Modelo de referência do fabricante
10.5) Modelo da máquina
10.6) Número de matrícula
10.7) Marca de Institudo de certificação
10.8) Ano de construção
10.9) Código do Artigo
10.10) Número emissões
7
3 2
4
5
211
151610 22
6
11 13
1214
10.1
L
WA
dB
PRODUCT SERVICE
10.2
10.3
10.7
10.6
10.4
10.5
10.8
10.10
10.09
Page 81

SÍMBOLOS
3
PT
1) Atenção! Perigo
2) Antes de utilizar esta máquina, ler o manual de in-
struções.
3) O seu ouvido está em perigo de dano irreversível.
Avisamos o operador encarregado desta máquina
que utilizando-a em condições normais, para uso
quotidiano continuado, pode ser exposto a um nível
de ruído igual ou superior a: 85 dB (A).
È obrigatório utilizar o equipamento de protecção individual.
Usar sempre os óculos de segurança (risco de objectos arremessados) e protectores auditivos, como capacete de protecção do ruído (risco de danos no ouvido) durante o emprego da máquina.
Se houver o risco de queda de objectos, usar o capacete de protecção.
4) A lâmina é muito afiada e pode provocar cortes
com facilidade.
2. SÍMBOLOS
ATENÇÃO: a máquina que comprou foi fabricada para uma utilização não profissional.
11) Depósito do combustível
12) Arrancador (Starter)
SÍMBOLOS EXPLICATIVOS NA MÁQUINA (se presentes)
1 2 3 4
11
12
Page 82

4
DISPOSIÇÕES DE SEGURANÇA
PT
A) TREINAMENTO
1) Ler atentamente as instruções. Familiarizar-se com
os comandos e com o uso apropriado da máquina.
Aprender a parar rapidamente o motor.
2) Utilizar a máquina para a finalidade à qual é desti-
nada, isto é para “o corte e a regularização de se-
bes, constituídas por arbustos com ramos de pequenas dimensões”. Qualquer outro uso pode vir a
ser perigoso e causar danos à máquina. Incluem-se
no uso impróprio (como por exemplo, mas não só):
– corte da relva em geral e especificamente próximo
de terminais;
– esmiuçamento de materiais para a compostagem;
– trabalhos de poda;
– usar a máquina para o corte de materiais de origem
não vegetal;
– utilizar a máquina por mais de uma pessoa.
3) Nunca permitir que a máquina seja utilizada por
crianças ou por pessoas que não tenham conhecimento das instruções. As leis locais podem estabelecer uma idade mínima para o utente.
4) A máquina não deve ser utilizada por mais de uma
pessoa.
5) Nunca utilizar a máquina:
– se houver pessoas, sobretudo crianças, ou animais
nos arredores;
– se o utilizador estiver cansado ou com mal-estar, ou
se tiver tomado remédios, drogas, álcool ou sub-
stâncias nocivas às suas capacidades de reflexos e
atenção;
– se o utilizador não for capaz de segurar firmemente
a máquina com as duas mãos e/ou de ficar estavel-
mente em equilíbrio sobre as pernas durante o tra-
balho.
6) Lembrar-se que o operador ou o utente é responsável por acidentes e imprevistos que possam ocorrer
com outras pessoas ou com a sua propriedade.
B) OPERAÇÕES PRELIMINARES
1) Durante o trabalho, é preciso usar um vestuário idóneo que não atrapalhe o utilizador.
– Usar roupas protectoras aderentes, dotadas de
protecções anti-corte.
– Usar luvas, óculos de protecção e sapatos anti-
corte com sola antiderrapante.
– Utilizar os auriculares para proteger o ouvido.
– Non indossare sciarpe, camici, collane e comunque
accessori pendenti o larghi che potrebbero impi-
gliarsi nella macchina o in oggetti e materiali pre-
senti sul luogo di lavoro.
– Raccogliere adeguatamente i capelli lunghi.
2) ATENÇÃO: PERIGO! A gasolina é altamente inflamável.
– deixar o combustível nos recipientes apropriados
homologados para essa utilização;
– não fumar quando se manuseia o combustível;
– abrir lentamente a tampa do reservatório deixando
aliviar gradualmente a pressão interna;
– abastecer o combustível somente ao ar livre, com o
uso de um funil;
– encher o tanque antes de accionar o motor, não a-
crescentar combustível e nem tirar a tampa do tanque quando o motor estiver a funcionar ou estiver
quente;
– se a gasolina transbordar, não accionar o motor,
mas afastar a máquina do local onde o combustível
foi derramado, e evitar que se crie a possibilidade
de incêndio, até quando o combustível tenha evaporado e os vapores da gasolina tenham-se dissolvido;
– limpar imediatamente qualquer vestígio de gasolina
caída na máquina ou no terreno;
– não arrancar a máquina no local onde foi efectuado
o abastecimento;
– evitar o contacto do combustível com as roupas e,
nesse caso, trocar as roupas antes de arrancar o
motor;
– vrecolocar e apertar bem as tampas do tanque e do
recipiente da gasolina.
3) Substituir os silenciadores defeituosos ou danificados.
4) Antes do uso, efectuar um controlo geral da máquina e principalmente:
– a alavanca do acelerador e a alavanca de seguran-
ça devem ter um movimento livre, não forçado e ao
soltar devem voltar automaticamente e rapidamente na posição neutra;
– a alavanca do acelerador deve ficar travada se não
for apertada a alavanca de segurança;
– o interruptor de paragem do motor deve se deslo-
car facilmente de uma posição à outra;
– os cabos eléctricos e principalmente o cabo da vela
devem estar íntegros para evitar a produção de faíscas e o capuz deve estar montado correctamente
na vela;
– as pegas e as protecções da máquina devem ser
limpas e secas e fixadas firmemente à máquina;
– as lâminas nunca devem ser danificadas;
5) Antes de iniciar a trabalhar, verificar que todas as
protecções estejam montadas correctamente.
C) DURANTE A UTILIZAÇÃO
1) Não accionar o motor em sítios fechados, onde
possam se acumular fumaças nocivas de monóxido
de carbono.
2) Trabalhar somente com a luz do dia ou com uma
boa iluminação artificial.
3) Assumir uma posição parada e estável:
– evitar na medida do possível de trabalhar com solo
molhado ou escorregadio ou de qualquer maneira
sobre terrenos muito acidentados ou ríspidos que
não garantem a estabilidade do operador durante o
trabalho;
3. DISPOSIÇÕES DE SEGURANÇA
Page 83

DISPOSIÇÕES DE SEGURANÇA
5
PT
– evitar o uso de escadas e plataformas instáveis;
– não correr, mas andar e prestar atenção às irregu-
laridades do terreno e à presença de eventuais ob-
stáculos.
4) Accionar o motor com a máquina firmemente bloqueada no chão com a mão livre:
– accionar o motor a pelo menos 3 metros do lugar
onde foi executado o abastecimento;
– verificar que não haja outras pessoas no raio de ac-
ção da máquina;
– não dirigir o silenciador e portanto os gases de de-
scarga na direcção de materiais inflamáveis.
5) Não modificar as regulações do motor, e não deixar
que o motor atinja um regime de rotações excessivas.
6) Controlar que o regime mínimo da máquina seja de
modo a não permitir o movimento das lâminas e que,
depois de uma acelerada, o motor volte rapidamente
ao mínimo.
7) Prestar atenção para não bater violentamente a lâmina contra corpos estranhos e nas saliências possíveis de material causado pelo deslizamento das lâminas.
8) Parar o motor:
– todas as vezes que se deixa a máquina sem vigi-
lância.
– antes de abastecer com combustível.
9) Parar o motor e soltar o cabo da vela:
– antes de controlar, limpar ou trabalhar na máquina;
– depois de ter batido contra um corpo estranho. Ve-
rificar eventuais danos e efectuar as reparações ne-
cessárias antes de usar novamente a máquina;
– se a máquina começar a vibrar de modo estranho
(Busque imediatamente a causa das vibrações e
execute os controlos necessários junto a um Centro
Especializado).
– quando a máquina não for utilizada.
D) MANUTENÇÃO E DEPÓSITO
1) Manter bem apertados os parafusos e as porcas,
para ter certeza que a máquina esteja sempre em
condições seguras de funcionamento. Uma manutenção regular é indispensável para a segurança e para
manter o nível do rendimento da máquina.
2) Não guardar a máquina com gasolina no tanque
dentro de um ambiente onde os vapores da gasolina
possam alcançar uma chama, uma fagulha ou uma
grande fonte de calor.
3) Deixar arrefecer o motor antes de colocar a máquina em qualquer ambiente.
4) Para reduzir o risco de incêndio, manter o motor, o
silenciador de descarga e a área de armazenagem da
gasolina livres de resíduos de ramos, folhas ou graxa
excessiva; não deixar recipientes com os materiais de
resíduo do corte dentro de um local.
5) Se o reservatóri deve ser esvaziado, efectuar esta
operação ao ar livre e com o motor frio.
6) Usar luvas de trabalho para cada intervenção no
dispositivo de corte.
7) Efectuar a afiação das lâminas. Todas as operações
referentes às lâminas são trabalhos que requerem
uma competência específica além do uso de ferramentas apropriadas; por razões de segurança, é bom
que sejam executados junto a um centro especializado.
8) Por motivos de segurança, não usar a máquina
com partes desgastadas ou danificadas. As peças
danificadas devem ser substituídas e nunca reparadas. Usar somente peças originais. As peças de qualidade não equivalente podem danificar a máquina e
prejudicar a segurança.
9) Guardar a máquina fora do alcance de crianças!
E) TRANSPORTE E MOVIMENTAÇÃO
1) Todas as vezes que for necessário movimentar ou
transportar a máquina, é preciso:
– desligar o motor, esperar que as lâminas parem e
desprender o capuz da vela;
– aplicar a protecção das lâminas;
– pegar a máquina somente pelas pegas e dirigir as
lâminas na direcção contrária ao sentido de mar-
cha.
2) Quando a máquina é transportada com um veículo
de transporte, é preciso assentá-la de modo a não
representar perigo para ninguém e travar a mesma firmemente para evitar que a mesma tombe com a possibilidade de se danificar e a saída de combustível.
F) COMO LER O MANUAL
No texto do manual, alguns parágrafos que contêm
informações de particular importância são marcados
com graus diferentes de realce, cujo significado é o
seguinte:
Ou:
Fornece esclarecimentos ou
outros elementos a quanto já indicado anteriormente,
com a intenção de não danificar a máquina, ou causar
danos.
Possibilidade de lesões pessoais ou a terceiros em caso de inobservância.
Possibilidade de graves lesões pessoais ou a terceiros com perigo de morte,
em caso de inobservância.
PERIGO!
ATENÇÃO!
IMPORTANTE
NOTA
Page 84

6
PREPARAÇÃO PARA O TRABALHO
PT
CONTROLO DA MÁQUINA
Antes de iniciar o trabalho é necessário:
– Controlar que não haja parafusos soltos na máqui-
na e na lâmina;
– controlar que as lâminas estejam afiadas e sem si-
nais de danificação;
– controlar que o filtro de ar esteja limpo;
– controlar que as protecções estejam bem fixadas e
eficientes;
– controlar a fixação das pegas.
PREPARAÇÃO DA MISTURA
Esta máquina é dotada de um motor de dois tempos
que requer uma mistura composta de gasolina e óleo
lubrificante.
O uso só de gasolina danifica
o motor e implica na anulação da garantia.
Usar somente combustíveis e
lubrificantes de qualidade para manter os desempenhos e garantir a durabilidade dos órgãos mecânicos.
• Características da gasolina
Usar somente gasolina sem chumbo (gasolina verde)
com número de octano não inferior a 90 N.O.
A gasolina verde tende a criar
depósitos no recipiente se for conservada durante
mais de 2 meses. Utilizar sempre gasolina fresca!
• Características do óleo
Utilizar somente óleo sintético de óptima qualidade,
específico para motores a dois tempos.
Junto ao seu Revendedor estão disponíveis óleos estudados especificamente para este tipo de motor,
capazes de garatir uma protecção elevada.
O uso destes óleos permite a composição de uma mistura a 2%, constituída de 1 parte de óleo a cada 50
partes de gasolina.
IMPORTANTE
IMPORTANTE
IMPORTANTE
• Preparação e conservação da mistura
A gasolina e a mistura são inflamáveis!
– Guardar a gasolina e a mistura em recipientes
homologados para combustíveis, em lugares
seguros, longe de fontes de calor ou chamas
livres.
– Não deixar os recipientes ao alcance de crian-
ças.
– Não fumar durante a preparação da mistura e
evitar de inalar vapores de gasolina.
A tabela indica as quantidades de gasolina e de óleo
a utilizar para a preparação da mistura em função do
tipo de óleo utilizado.
Para a preparação da mistura:
– Introduzir num galão homologado cerca de metado
da quantidade de gasolina.
– Acrescentar todo o óleo, segundo a tabela.
– Introduzir o resto da gasolina.
– Fechar de novo a tampa e agitar com força.
A mistura está sujeita a envelhecimento. Não preparar quantidades excessivas de
mistura para evitar que se formem depósitos.
Manter bem distintos e identificáveis os recipientes da mistura e da gasolina para
evitar de trocá-los no momento da utilização.
Limpar periodicamente os recipientes da gasolina e da mistura para remover eventuais depósitos.
IMPORTANTE
IMPORTANTE
IMPORTANTE
PERIGO!
4. PREPARAÇÃO PARA O TRABALHO
Gasolina Óleo sintético 2 Tempos
litros litros cm
3
10,0220
20,0440
30,0660
5 0,10 100
10 0,20 200
Page 85

PREPARAÇÃO PARA O TRABALHO / ARRANQUE - USO - PARADA DO MOTOR
7
PT
ABASTECIMENTO DO COMBUSTÍVEL
Não fumar durante o aba-
stecimento e evitar de inalar vapores de gasolina.
Abrir a tampa do galão com
cuidado porque poderá ter se formado uma
pressão dentro do mesmo.
Antes de executar o abastecimento:
– Bater com força o galão da mistura.
– Assentar a máquina no plano, em posição estável,
com a tampa do reservatório para cima.
ATENÇÃO!
PERIGO!
– Limpar a tampa do reservatório e a região ao redor
para evitar que entre sujeira durante o abastecimento.
– Abrir com cuidado a tampa do tanque para descar-
regar gradualmente a pressão. Efectuar o abastecimento por meio de um funil, evitando de encher o
reservatório até à boca (Fig. 1).
Fechar sempre a tampa do
tanque, apertando-a a fundo.
Limpar logo qualquer vestígio de mistura que porventura caiu na máquina ou
no terreno e não arrancar o motor enquanto os
vapores de gasolina não se dissolverem.
ATENÇÃO!
ATENÇÃO!
2. Apertar suavemente o bulbo (2) do “primer” 7-10
vezes até o combustível sair pelo tubo de alívio.
3. Colocar a alavanca de comando da ignição (3) na
posição «CHOKE».
4. Segurar a máquina firmemente sobre o terreno
com uma mão sobre a pega, para não perder o
controlo durante o arranque.
Se a máquina não for segurada firmemente, o impulso do motor poderá fazer
com que o operador perca o equilíbrio ou pode
projectar a lâmina contra um obstáculo ou na direcção do próprio operador.
5. Puxe lentamente o interruptor de arranque por
10 -15 cm, até perceber uma certa resistência e
depois puxe de novo algumas vezes até perceber
as primeiras explosões.
Para evitar quebras, não puxe
todo o comprimento do cabo, não deixe que o mesmo
se arraste ao longo da beirada do furo guia cabo e
solte gradualmente o interruptor, evitando de deixá– lo
recuar de maneira incontrolada.
IMPORTANTE
ATENÇÃO!
ARRANQUE DO MOTOR
O arranque do motor deve
ser efectuado a uma distância de pelo menos 3
metros do lugar onde foi feito o abastecimento de
combustível.
Antes de accionar o motor:
– Assentar a máquina em posição estável sobre o ter-
reno.
– Remover as protecções da lâmina.
– Certificar-se que a lâmina não toque o terreno ou
outros objectos.
– Certificar-se que a pega esteja bloqueada na posi-
ção central.
• Arranque a frio
Por arranque a “frio” entendese o arranque efectuado depois de pelo menos 5
minutos da paragem do motor ou depois de um abastecimento de combustível.
Para arrancar o motor (Fig. 2):
1. Empurrar o interruptor (1) na posição «I».
NOTA
ATENÇÃO!
5. ARRANQUE - USO - PARADA DO MOTOR
Page 86

6. Puxe de novo o interruptor de arranque, até o mo-
tor ligar normalmente.
7. Colocar a alavanca de comando da ignição (3) na
posição «RUN».
8. Deixar o motor virar no mínimo pelo menos 1 minu-
to antes de acelerar o máximo das rotações.
Se o manípulo (4) do cabo de
ignição for accionado repetidamente com a alavanca
de comando da ignição (3) na posição «CHOKE» o
motor pode afogar e assim dificulta o arranque.
No caso em que o motor afogue, desmontar a vela e
puxar devagar o manípulo (5) do cabo de ignição para
eliminar o excesso de combustível; depois secar os
electrodos da vela e remontar a mesma no motor.
• Arranque a quente
Para o arranque a quente (imediatamente depois da
paragem do motor), seguir os itens 1 - 4 - 5 - 6 do
procedimento anterior.
USO DO MOTOR (Fig. 3)
A velocidade do dispositivo de corte é regulada com
a alavanca (1) do acelerador situada na pega traseira
(2).
O accionamento desta alavanca é possível somente
se simultaneamente for apertada a alavanca de segurança (3).
O movimento é transmitido pelo motor às lâminas
através de uma fricção com massas centrífugas que
impede o movimento das lâminas quando o motor
estiver no mínimo.
Não usar a máquina se as
lâminas se movimentam com o motor no mínimo;
neste caso, regular o mínimo (ver cap. 7) e se o
problema persistir é preciso contactar o seu
Revendedor .
A velocidade correcta de trabalho é obtida com a alavanca do acelerador (1) no fundo do curso.
Durante as primeiras 6-8 horas
de exercício da máquina, evitar de utilizar o motor com
as rotações no máximo.
IMPORTANTE
ATENÇÃO!
IMPORTANTE
PARADA DO MOTOR (Fig. 4)
Para parar o motor:
– Soltar a alavanca do acelerador (1) e deixar o motor
virar no mínimo durante alguns segundos.
– Empurrar o interruptor (2) na posição «O».
Após ter colocado o acelerador no mínimo, são necessários vários segundos
antes que as lâminas parem.
ATENÇÃO!
8 ARRANQUE - USO - PARADA DO MOTOR
PT
Page 87

UTILIZAÇÃO DA MÁQUINA 9
PT
Para o respeito dos outros e do ambiente:
– Evitar de se tornar um elemento de incómodo.
– Seguir rigorosamente as normas locais para a e-
liminação dos materiais residuais depois do
corte.
– Seguir rigorosamente as normas locais para a
eliminação de óleos, gasolina, partes deterioradas ou qualquer elemento com grande impacto
ambiental.
– A eliminação das embalagens deve ocorrer
segundo as disposições locais vigentes.
A exposição prolongada às
vibrações pode causar lesões e problemas neurovasculares (conhecidos também como “fenómeno
de Raynaud” ou “síndrome da mão roxa”) sobretudo para quem sofre de problemas circulatórios. Os
sintomas podem relacionar-se com as mãos, os
pulsos e os dedos e manifestam-se com perda de
sensibilidade, torpor, coceira, dor, descoloração ou
alterações estruturais da pele. Esses efeitos podem ser ampliados pelas baixas temperaturas ambientais e/ou de uma garra excessiva nas pegas.
Ao surgir tais sintomas, é preciso reduzir os tempos de utilização da máquina e consultar um médico.
Usar uma roupa adequada
durante o trabalho. O seu Revendedor é capaz de
fornecer-lhe as informações sobre os materiais de
protecção contra acidentes mais idóneos para
garantir a segurança no trabalho.
REGULAÇÃO DA PEGA (Fig. 5)
A pega traseira (1) pode assumir 3 orientações diferentes em relação ao dispositivo de corte, para
efectuar mais confortavelmente as operações de acabamento das sebes.
A regulação da pega deve
ser efectuada com motor apagado.
– Abaixar a alavanca de destravamento (2).
– Virar a pega traseira (1) na posição desejada.
– Antes de usar a máquina verificar que a alavanca de
destravamento (2) tenha voltado totalmente na
posição alta e que a pega traseira esteja bem estável.
ATENÇÃO!
ATENÇÃO!
ATENÇÃO!
Durante o trabalho, a pega
traseira deve estar sempre na vertical, independentemente da posição assumida pelo dispositivo de corte (3).
MODO DE CORTE
Durante o corte, a máquina
deve ser segurada sempre firmemente com as
duas mãos.
Parar logo o motor se as lâminas se travam durante o trabalho ou se prendem nos ramos da sebe.
É sempre preferível cortar antes os dois lados verticais da sebe e depois a parte superior.
• Corte vertical (Fig. 6)
O corte deve ser executado com um movimento em
arco de baixo para cima, segurando a lâmina o mais
longe possível do corpo.
• Corte horizontal (Fig. 7)
Os melhores resultados são obtidos com a lâmina
ligeiramente inclinada (5° - 10°) na direcção do corte,
com um movimento em arco e um avanço lento e
constante, sobretudo no caso de sebes muito volumosas.
LUBRIFICAÇÃO DAS LMINAS DURANTE
O TRABALHO
Se o dispositivo de corte esquenta excessivamente
durante o trabalho, é preciso lubrificar as superfícies
internas das lâminas.
Esta operação deve ser executada com motor desligado e as lâminas paradas.
FIM DO TRABALHO
Depois de terminar o trabalho:
– Parar o motor como indicado anteriormente
(Cap. 5).
– Esperar a paragem das lâminas e montar a protec-
ção.
ATENÇÃO!
ATENÇÃO!
ATENÇÃO!
ATENÇÃO!
6. UTILIZAÇÃO DA MÁQUINA
Page 88

10
MANUTENÇÃO E CONSERVAÇÃO
PT
Uma manutenção correcta é fundamental para manter
ao longo do tempo a eficiência e a segurança de uso
originais da máquina.
Durante as operações de
manutenção:
– desprender o capuz da vela.
– Esperar que o motor esteja resfriado adequada-
mente.
– Usar luvas de protecção nas operações relativas
às lâminas.
– Manter as protecções da lâmina montadas,
excepto os casos de intervenções na própria
lâmina.
– Não eliminar óleos, gasolina ou outro material
poluente no ambiente.
LIMPEZA DO MOTOR E DO SILENCIADOR
Para reduzir o risco de incêndio, limpar com frequência as abas do cilindro com ar comprimido e liberar a
área do silenciador de ramos, folhas ou outros detritos.
LIMPEZA DO FILTRO DE AR
A limpeza do filtro de ar é essencial para o bom funcionamento e a durabilidade da
máquina.
A limpeza deve ser executada a cada 8-10 horas de
trabalho.
Para limpar o filtro (Fig. 8):
– Desparafusar o botão (1), remover a tampa (2) e o
elemento filtrante (3).
– Lave o elemento filtrante (3) com água e sabão. Não
use gasolina ou outros solventes.
– Deixe secar o filtro ao ar livre.
– Remontar o elemento filtrante (3) e a tampa (2)
apertando o botão (1) a fundo.
FILTRO COMBUSTIVEL
Dentro do reservatório está situado um filtro que impede às impurezas de entrar no motor.
Uma vez por ano, é oportuno mandar substituir o filtro junto ao seu Revendedor.
IMPORTANTE
ATENÇÃO!
CONTROLO DA VELA
Periodicamente, desmontar e limpar a vela removendo eventuais depósitos com uma escovinha metálica.
Controlar e restaurar a distância correcta entre os
eléctrodos (Fig. 9).
Remontar a vela apertando-a a fundo com a chave
fornecida.
A vela deve ser substituída com uma de características análogas no caso de electrodos queimados ou
isolante deteriorado, e de qualquer maneira a cada 50
horas de funcionamento.
REGULAÇÃO DO COMBUSTÍVEL
O carburador é regulado na fábrica de modo a obter
os desempenhos máximos em qualquer situação de
utilização, com a emissão mínima de gases nocivos,
no respeito das normas vigentes.
No caso de desempenhos reduzidos, controlar antes
de tudo que as lâminas não estejam parcialmente travadas ou deformadas, depois contactar o seu Revendedor para mandar verificar a carburação e o motor.
• Regulação do mínimo
Não use a máquina se o dispositivo de corte se movimenta com o motor no
mínimo; neste caso, é preciso entrar em contacto
com o próprio Revendedor.
LUBRIFICAÇÃO DO REDUTOR (Fig. 10)
Cada 20 horas de trabalho, restaurar o nível com
graxa especial de busulfureto de molibdénio, injectando-o no engraxador (1).
CONTROLO E LIMPEZA DAS LMINAS
Controlar periodicamente
que as lâminas não estejam dobradas ou danificadas e que os parafusos estejam apertados adequadamente.
ATENÇÃO!
ATENÇÃO!
7. MANUTENÇÃO E CONSERVAÇÃO
Page 89

MANUTENÇÃO E CONSERVAÇÃO
11
PT
Não é necessária nenhuma regulação entre as lâminas, pois o jogo é predeterminado na Fábrica.
Periodicamente, é preciso efectuar a limpeza das ranhuras internas para remover os detritos que poderão
impedir o escorrimento correcto das lâminas.
Para executar a limpeza (Fig. 11):
– Desparafusar as porcas (1) e remover os parafusos
(2) e a barra (3).
– Limpar cuidadosamente os ilhoses (4) eliminando
poeiras e detritos.
– Lubrificar as superfícies internas das lâminas.
– Remontar a barra (3) com os parafusos (2), toman-
do o cuidado de recolocar exactamente os espaça-
dores (3) e as anilhas (6) e (7) em baixo as porcas
(1).
– Aperte a fundo as porcas (1).
Controlar sempre que as
porcas (1) estejam apertadas a fundo antes de
retomar o trabalho.
AFIAÇÃO DAS LMINAS
A afiação é necessário quando o rendimento do corte
diminui e os ramos tendem a se prender com frequência.
Uma lâmina com as facas
gastas nunca deve ser afiada, mas sempre deve
ser substituída.
É sempre preferível que a afiação seja executada pelo seu Revendedor que possui
as ferramentas adequadas e da competência necessária.
Se for preciso afiar as lâminas, é necessário usar uma
lixa de grão fino, conforme a seguir (Fig. 12):
– poiar a lixa (1) na faca (2) com um ângulo de 45°, e
proceder com um movimento de cima para o canto
cortante.
– Fazer com que a lixa aja somente no percurso de
ida e levantá-la no percurso de volta.
– Remover muito pouco material.
– Eliminar todas as rebarbas com uma pedra de afiar.
– Eliminar todos os vestígios de lixadura e engraxar
as lâminas antes de remontar.
IMPORTANTE
ATENÇÃO!
ATENÇÃO!
INTERVENÇÕES EXTRAORDINÁRIAS
Todas as operações de manutenção não citadas
neste manual devem ser efectuadas exclusivamente
pelo seu Revendedor.
Operações exevutadas junto a estruturas não adequadas ou por pessoas não qualificadas implicam na
anulação de qualquer forma de garantia.
CONSERVAÇÃO
No fim de cada sessão de trabalho, limpar minuciosamente a máquina de poeiras e detritos, reparar ou
substituir as partes defeituosas e lubrificar as lâminas
para prevenir a ferrugem.
A máquina deve ser guardada em lugar seco, protegido das intempéries, com a protecção das lâminas
correctamente montada.
INACTIVIDADE PROLONGADA
Se for previsto um período de
inactividade da máquina superior a 2 -3 meses é preciso tomar algumas providências para evitar dificuldade no momento da retomada do trabalho ou danos
permanentes ao motor
• Armazenagem
Antes de guardar a máquina:
– Esvaziar o tanque do combustível.
– Arrancar o motor e mantê-lo em movimento no
mínimo até a paragem, de modo a consumir todo o
combustível que ficou no carburador.
– Deixar esfriar o motor e desmontar a vela.
– Colocar no furo da vela uma colher pequena de
óleo (novo) para motores de 2 tempos.
– Puxar várias vezes o cabo da ignição para distribuir
o óleo no cilindro.
– Remontar a vela com o pistão no ponto morto
superior (visível pelo furo da vela) quando o pistão
estiver no seu curso máximo.
• Retomada da actividade
No momento de recolocar a máquina em funcionamento:
– Tirar a vela.
– Accionar algumas vezes o cabo da ignição para eli-
minar o excesso de óleo.
– Controlar a vela conforme descrito no capítulo
“Controlo da vela”.
– Preparar a máquina como indicado no capítulo
“Preparação para o trabalho”.
IMPORTANTE
Page 90

12
LOCALIZAÇÃO DE AVARIAS / DADOS TÉCNICOS / ACESSÓRIOS
PT
8. LOCALIZAÇÃO DE AVARIAS
PROBLEMA CAUSA PROVÁVEL SOLUÇÃO
1) O motor não arranca
ou não se mantém em
movimento
2) O motor arranca
mas tem pouca
potência
3) O motor tem um
funcionamento irregular
ou não tem potência
sob carga
4) O motor emite
fumaça excessiva
– Procedimento de arranque incorrecto
– Vela suja ou distância entre os electro-
dos incorrecta
– Filtro de ar obstruído
– Problemas de carburação
– Filtro de ar obstruído
– Problemas de carburação
– Vela suja ou distância entre
os electrodos incorrecta
– Problemas de carburação
– Composição errada da mistura
– Problemas de carburação
– Seguir as instruções (ver cap 5)
– Controlar a vela (ver cap. 7)
– Limpar e/ou substituir o filtro
(ver cap. 7)
– Contactar o seu Revendedor
– Limpar e/ou substituir o filtro
(ver cap. 7)
– Contactar o seu Revendedor
– Controlar a vela (ver cap. 7)
– Contactar o seu Revendedor
– Preparar a mistura conforme
as instruções (ver cap. 4)
– Contactar o seu Revendedor
9. DADOS TÉCNICOS
MODELO ............................................................................................................... HTJ 550
Cilindrada .................................................................................................... cm
3
24,5
Potência ........................................................................................................ kW 0,85
Vela ...................................................................................................................... NHSP LD L8RTF Y
Proporção gasolina: óleo ...................................................................................... 50 : 1
Capacidade tanque .................................................................................... litros 0,33
Comprimento corte ..................................................................................... mm 610
Pressão acústica no ouvido do operador (ISO 11201) ............................. dB(A) 102,1
Incerteza de medição 2006/42/CE - EN 27574) ........................................ dB(A) 3,0
Nível de potência acústica medido (ISO 3744) .......................................... dB(A) 107,1
Incerteza de medição 2006/42/CE - EN 27574) ........................................ dB(A) 3,0
Nível de vibrações (EN 774 - EN 28662) ................................................... m/s
2
2,97
Incerteza de medição (2006/42/CE - EN 12096) ....................................... m/s
2
1,5
Massa ............................................................................................................. kg 5,5
Nesta máquina está previsto o uso de ferramentas de
corte com o código:
23305004/0
Devido à evolução do produto, as ferramentas acima
citadas poderão ser substituídas com o tempo por
outras com características semelhantes de intercâmbio e segurança de funcionamento.
10. ACESSÓRIOS
Page 91

¶∞ƒ√À™π∞™∏
1
EL
∞Á·ËÙ¤ ÂÏ¿ÙË,
ı¤ПФ˘МВ О·Щ·Ъ¯‹У У· ЫВ В˘¯·ЪИЫЩ‹ЫФ˘МВ БИ· ЩЛУ ЪФЩ›МЛЫЛ Ф˘ ‰В›Н·ЩВ ЫЩ· ЪФ˚fiУЩ· М·˜ О·И В˘¯fiМ·ЫЩВ Л
¯Ъ‹ЫЛ ЩФ˘ МЛ¯·У‹М·ЩФ˜ У· Ы·˜ ИО·УФФИ‹ЫВИ О·И У· ·УЩ·ФОЪИıВ› П‹Ъˆ˜ ЫЩИ˜ ··ИЩ‹ЫВИ˜ Ы·˜. ΔФ ·ЪfiУ
ВБ¯ВИЪ›‰ИФ Ы˘УЩ¿¯ıЛОВ БИ· У· Ы·˜ ВИЩЪ¤„ВИ У· БУˆЪ›ЫВЩВ О·П¿ ЩФ МЛ¯¿УЛМ¿ Ы·˜ О·И У· ЩФ ¯ЪЛЫИМФФИ‹ЫВЩВ
·ФЩВПВЫМ·ЩИО¿ О·И МВ ·ЫК¿ПВИ·. ªЛУ НВ¯У¿ЩВ fiЩИ ·ФЩВПВ› ·У·fiЫ·ЫЩФ М¤ЪФ˜ ЩФ˘ МЛ¯·У‹М·ЩФ˜, ОЪ·ЩВ›ЫЩВ
ЩФ ¿УЩ· Ъfi¯ВИЪФ БИ· У· ЩФ Ы˘М‚Ф˘ПВ‡ВЫЩВ ·У¿ ¿Ы· ЫЩИБМ‹ О·И ·Ъ·‰ТЫЩВ ЩФ М·˙› МВ ЩФ МЛ¯¿УЛМ· fiЩ·У
ıВП‹ЫВЩВ У· ЩФ Ф˘П‹ЫВЩВ ЫВ ¿ППФУ.
ΔФ МЛ¯¿УЛМ· ·˘Щfi МВПВЩ‹ıЛОВ О·И О·Щ·ЫОВ˘¿ЫЩЛОВ Ы‡МКˆУ· МВ ЩФ˘˜ ИЫ¯‡ФУЩВ˜ О·УfiУВ˜ О·И В›У·И ·fiП˘Щ·
·ЫК·П¤˜ О·И ·НИfiИЫЩФ ·У ¯ЪЛЫИМФФИЛıВ› ЩЛЪТУЩ·˜ ЩИ˜ Ф‰ЛБ›В˜ Ф˘ ВЪИП·М‚¿УФУЩ·И ЫЩФ ·ЪfiУ ВБ¯ВИЪ›‰ИФ
(ЪФ‚ПВfiМВУЛ ¯Ъ‹ЫЛ). √ФИ·‰‹ФЩВ ¿ППЛ ¯Ъ‹ЫЛ ‹ Л МЛ Щ‹ЪЛЫЛ ЩˆУ ВУ‰В‰ВИБМ¤УˆУ О·УfiУˆУ ·ЫК·ПФ‡˜
¯Ъ‹ЫЛ˜, Ы˘УЩ‹ЪЛЫЛ˜ О·И ВИЫОВ˘‹˜ ıВˆЪВ›Щ·И “·О·Щ¿ППЛПЛ ¯Ъ‹ЫЛ” ВУТ Щ·˘Щfi¯ЪФУ· ВО›ЩВИ Л ВББ‡ЛЫЛ О·И Л
˘В˘ı˘УfiЩЛЩ· ЩФ˘ О·Щ·ЫОВ˘·ЫЩ‹, О·ıИЫЩТУЩ·˜ ˘В‡ı˘УФ ЩФ ¯Ъ‹ЫЩЛ БИ· ЩИ˜ ˘Ф¯ЪВТЫВИ˜ Ф˘ ЪФО‡ЩФ˘У ·fi
˙ЛМИ¤˜ ‹ ‚П¿‚В˜ ЩФ˘ ¯Ъ‹ЫЩЛ ‹ ЩЪ›ЩˆУ.
™В ВЪ›ЩˆЫЛ Ф˘ ‰И·ИЫЩТЫВЩВ О¿ФИ· МИОЪ‹ ‰И·КФЪ¿ ·У¿МВЫ· ЫЩИ˜ ВЪИБЪ·К¤˜ ЩФ˘ ВБ¯ВИЪИ‰›Ф˘ О·И ЩФ
МЛ¯¿УЛМ· Ы·˜, ¤¯ВЩВ ˘fi„Л Ы·˜ fiЩИ, ПfiБˆ ЩЛ˜ Ы˘УВ¯Ф‡˜ ‚ВПЩ›ˆЫЛ˜ ЩФ˘ ЪФ˚fiУЩФ˜, ФИ ПЛЪФКФЪ›В˜ ЩФ˘
ВБ¯ВИЪИ‰›Ф˘ ˘К›ЫЩ·УЩ·И ·ПП·Б¤˜ ¯ˆЪ›˜ ЪФВИ‰ФФ›ЛЫЛ ‹ ˘Ф¯Ъ¤ˆЫЛ ВУЛМ¤ЪˆЫЛ˜, ‰И·ЩЛЪТУЩ·˜ fiМˆ˜
·МВЩ¿‚ПЛЩ· Щ· ‚·ЫИО¿ ¯·Ъ·ОЩЛЪИЫЩИО¿ ·ЫК·ПВ›·˜ О·И ПВИЩФ˘ЪБ›·˜. ™В ВЪ›ЩˆЫЛ ·МКИ‚ФП›·˜ ·В˘ı˘УıВ›ЩВ
ЫЩФУ ∞УЩИЪfiЫˆФ. ∫·П‹ ‰Ф˘ПВИ¿!
¶∂ƒπ∂Ã√ª∂¡∞
1. Δ·˘ÙfiÙËÙ· ÙˆÓ Î˘ÚÈfiÙÂÚˆÓ ÂÍ·ÚÙËÌ¿ÙˆÓ ............................................ 2
2. ™‡Ì‚ÔÏ· ................................................................................................. 3
3. ∫·ÓfiÓ˜ ·ÛÊ·Ï›·˜ ............................................................................... 4
4. ¶ЪФВЩФИМ·Ы›· БИ· ВЪБ·Ы›· ..................................................................... 6
5. ∂ОО›УЛЫЛ - ГЪ‹ЫЛ - ™‚‹ЫИМФ ОИУЛЩ‹Ъ· .................................................. 7
6. ÃÚ‹ÛË ÙÔ˘ Ì˯·Ó‹Ì·ÙÔ˜ ....................................................................... 9
7. ™˘ÓÙ‹ÚËÛË Î·È ·Ôı‹Î¢ÛË ................................................................. 10
8. ∂ÓÙÔÈÛÌfi˜ ‚Ï·‚ÒÓ ............................................................................. 12
9. ΔВ¯УИО¿ ¯·Ъ·ОЩЛЪИЫЩИО¿ ...................................................................... 12
10. ∞˙˜ÔÁ·Ú .............................................................................................. 12
Page 92

2
Δ∞ÀΔ√Δ∏Δ∞ Δø¡ ∫Àƒπ√Δ∂ƒø¡ ∂•∞ƒΔ∏ª∞Δø¡
EL
1. ∫ÈÓËÙ‹Ú·˜
2. ™‡ÛÙËÌ· ÎÔ‹˜
(Ì·¯·›ÚÈ)
3. ¶Ï¿Î· ÚÔÛÙ·Û›·˜
ÎÔ‹˜
4. ∂МЪfi˜ ¯ВИЪФП·‚‹
5. ¶›Ыˆ ¯ВИЪФП·‚‹
6. ªÔ¯Ïfi˜
·ВПВ˘ı¤ЪˆЫЛ˜ ›Ыˆ
¯ВИЪФП·‚‹˜
7. ¶ÚÔÛÙ·Û›· Ì·¯·ÈÚÈÔ‡
10. ∂ЩИО¤Щ· ·У·БУТЪИЫЛ˜
Ã∂πƒπ™Δ∏ƒπ∞ ∫∞π ™Δ√ªπ∞
∞¡∂º√¢π∞™ª√À
11. ¢И·ОfiЩЛ˜
Ы‚ЛЫ›М·ЩФ˜ ОИУЛЩ‹Ъ·
12. ГВИЪИЫЩ‹ЪИФ М·¯·ИЪИФ‡
(Ï‚Ȥ˜ Áη˙ÈÔ‡)
13. §Â‚Ȥ˜ ·ÛÊ·Ï›·˜
Áη˙ÈÔ‡
14. ГВИЪФП·‚‹ ВОО›УЛЫЛ˜
15. ΔÛÔÎ (Starter)
16. ∫Ô˘Ì› ·ÓÙÏ›·˜
ÚÔÏ‹ÚˆÛ˘ (Primer)
21. Δ¿· ‰Ô¯Â›Ô˘ Ì›ÁÌ·ÙÔ˜
22.
∫·¿ÎÈ Ê›ÏÙÚÔ˘ ·¤Ú·
1. Δ∞ÀΔ√Δ∏Δ∞ Δø¡ ∫Àƒπ√Δ∂ƒø¡ ∂•∞ƒΔ∏ª∞Δø¡
∂Δπ∫∂Δ∞ ∞¡∞°¡øƒπ™∏™
10.1) ™‹Ì· Û˘ÌÌfiÚʈÛ˘ Û‡Ìʈӷ
Ì ÙËÓ Ô‰ËÁ›· 98/37/∂∫ (2006/42/EK Ù˘
29/12/2009)
10.2) ∂ˆÓ˘Ì›· Î·È ‰È‡ı˘ÓÛË Î·Ù·Û΢·ÛÙ‹
10.3) ™Ù¿ıÌË ·ÎÔ˘ÛÙÈ΋˜ ÈÛ¯‡Ô˜ LWA Û‡Ìʈӷ
Ì ÙËÓ Ô‰ËÁ›· 2000/14/∂∫
10.4) ªÔÓÙ¤ÏÔ ·Ó·ÊÔÚ¿˜ ÙÔ˘ ηٷÛ΢·ÛÙ‹
10.5) ªÔÓÙ¤ÏÔ Ì˯·Ó‹Ì·ÙÔ˜
10.6) ∞ÚÈıÌfi˜ ÛÂÈÚ¿˜ Ì˯·Ó‹Ì·ÙÔ˜
10.7) ™‹М· πУЫЩИЩФ‡ЩФ˘ ИЫЩФФ›ЛЫЛ˜
10.8) ŒÙÔ˜ ηٷÛ΢‹˜
10.9) ∫ˆ‰ÈÎfi˜ ÚÔ˚fiÓÙÔ˜
10.10) ∞ÚÈıÌfi˜ ÂÎÒÓ
7
3 2
4
5
211
151610 22
6
11 13
1214
10.1
L
WA
dB
PRODUCT SERVICE
10.2
10.3
10.7
10.6
10.4
10.5
10.8
10.10
10.09
Page 93

™Àªμ√§∞
3
EL
1) ¶ÚÔÛÔ¯‹! ∫›Ó‰˘ÓÔ˜
2) ¢И·‚¿ЫЩВ ЩИ˜ Ф‰ЛБ›В˜ ¯Ъ‹ЫВˆ˜ ЪИУ ¯ЪЛЫИМФФИ-
‹ÛÂÙ ÙÔ Ì˯¿ÓËÌ·.
3) ∏ ·ÎÔ‹ Û·˜ ÂÎÙ›ıÂÙ·È Û ΛӉ˘ÓÔ ·Ó·ÓfiÚıˆÙ˘
‚П¿‚Л˜.
¶ЪФВИ‰ФФИФ‡МВ ЩФ ¯ВИЪИЫЩ‹ ·˘ЩФ‡ ЩФ˘ МЛ¯·У‹М·ЩФ˜
fiЩИ ¯ЪЛЫИМФФИТУЩ·˜ ЩФ ˘fi К˘ЫИФПФБИО¤˜ Ы˘Уı‹ОВ˜
БИ· Ы˘УВ¯‹ О·ıЛМВЪИУ‹ ¯Ъ‹ЫЛ, МФЪВ› У· ВОЩВıВ› ЫВ
ЫЩ¿ıМЛ ıФЪ‡‚Ф˘ ›ЫЛ ‹ МВБ·П‡ЩВЪЛ ·fi: 85 dB (A).
∏ ¯Ъ‹ЫЛ ·ЩФМИОТУ М¤ЫˆУ ЪФЫЩ·Ы›·˜ В›У·И ˘Ф¯ЪВˆЩИО‹. ГЪЛЫИМФФИВ›ЩВ ¿УЩ· ЪФЫЩ·ЩВ˘ЩИО¿ Б˘·ПИ¿
(О›У‰˘УФ˜ ВОЫКВУ‰ФУИЫМФ‡) О·И ЪФЫЩ·ЩВ˘ЩИО¿ ·ОФ‹˜
fiˆ˜ ˆЩФ·Ы›‰В˜ (О›У‰˘УФ˜ ‚П¿‚Л˜ ЩЛ˜ ·ОФ‹˜) fiЩ·У
ПВИЩФ˘ЪБВ› ЩФ МЛ¯¿УЛМ·.
™В ВЪИЩТЫВИ˜ Ф˘ ˘¿Ъ¯ВИ О›У‰˘УФ˜ ЩТЫЛ˜
·УЩИОВИМ¤УˆУ, ¯ЪЛЫИМФФИВ›ЩВ ЪФЫЩ·ЩВ˘ЩИОfi ОЪ¿УФ˜.
4) ΔФ М·¯·›ЪИ В›У·И ФП‡ ОФКЩВЪfi О·И МФЪВ›ЩВ
В‡ОФП· У· ОФВ›ЩВ.
2. ™Àªμ√§∞
¶ƒ√™√Ã∏: ÙÔ Ì˯¿ÓËÌ· Ô˘ ·ÁÔÚ¿Û·Ù ÚÔÔÚ›˙ÂÙ·È ÁÈ· ÂÚ·ÛÈÙ¯ÓÈ΋ ¯Ú‹ÛË.
11) ¢Ô¯Â›Ô Ì›ÁÌ·ÙÔ˜
12) §Â‚Ȥ˜ ÙÛÔÎ (Starter)
13) §Â‚Ȥ˜ Û˘ÛÙ‹Ì·ÙÔ˜ ÚÔÏ‹ÚˆÛ˘ (Primer)
∂¶∂•∏°∏ª∞Δπ∫∞ ™Àªμ√§∞ ™Δ√ ª∏Ã∞¡∏ª∞ (Â¿Ó ˘¿Ú¯Ô˘Ó)
1 2 3 4
11
12
Page 94

4
∫∞¡√¡∂™ ∞™º∞§∂π∞™
EL
∞) ∂∫¶∞π¢∂À™∏
1) ¢И·‚¿ЫЩВ ЪФЫВОЩИО¿ ЩИ˜ Ф‰ЛБ›В˜. ª¿ıВЩВ О·П¿
ЩФ˘˜ ПВ‚И¤‰В˜ О·И ЩЛ ¯Ъ‹ЫЛ ЩФ˘ МЛ¯·У‹М·ЩФ˜.
ª¿ıВЩВ У· ЫЩ·М·Щ¿ЩВ БЪ‹БФЪ· ЩФУ ОИУЛЩ‹Ъ·.
2) ГЪЛЫИМФФИВ›ЩВ ЩФ МЛ¯¿УЛМ· БИ· ЩФ ЫОФfi БИ· ЩФУ
ÔÔ›Ô ÚÔÔÚ›˙ÂÙ·È, ‰ËÏ·‰‹ ÁÈ· “ÎÔ‹ Î·È ÙÔ ÎÏ¿‰ÂÌ·
ı¿МУˆУ МВ ОП·‰И¿ МИОЪТУ ‰И·ЫЩ¿ЫВˆУ”. √ФИ·‰‹ФЩВ ¿ППЛ ¯Ъ‹ЫЛ МФЪВ› У· В›У·И ВИО›У‰˘УЛ О·И У·
ЪФНВУ‹ЫВИ ˙ЛМИ¿ ЫЩФ МЛ¯¿УЛМ·. ш˜ ·О·Щ¿ППЛПЛ
¯Ъ‹ЫЛ (Ы·У ·Ъ¿‰ВИБМ·, ·ПП¿ fi¯И МfiУФ) ıВˆЪВ›Щ·И:
– Л ОФ‹ БЪ·ЫИ‰ИФ‡ БВУИО¿ О·И ВИ‰ИО¿ ОФУЩ¿ ЫВ
ОЪ¿ЫВ‰·,
– О·Щ·ОВЪМ·ЩИЫМfi˜ ˘ПИОТУ БИ· ПИ·ЫМ·ЩФФ›ЛЫЛ,
– ВЪБ·Ы›В˜ ОП·‰¤М·ЩФ˜,
– Л ¯Ъ‹ЫЛ ЩФ˘ МЛ¯·У‹М·ЩФ˜ БИ· ЩЛУ ОФ‹ ˘ПИОТУ МЛ
К˘ЩИО‹˜ ЪФ¤ПВ˘ЫЛ˜,
– Л ¯Ъ‹ЫЛ ЩФ˘ МЛ¯·У‹М·ЩФ˜ ·fi ВЪИЫЫfiЩВЪ·
¿ÙÔÌ·.
3) ªЛУ ВИЩЪ¤ВЩВ У· ¯ВИЪ›˙ФУЩ·И ЩФ МЛ¯¿УЛМ· ·И‰И¿
‹ ¿ЩФМ· Ф˘ ‰ВУ БУˆЪ›˙Ф˘У ЩФ ¯ВИЪИЫМfi ЩФ˘
МЛ¯·У‹М·ЩФ˜. ∏ ЩФИО‹ УФМФıВЫ›· МФЪВ› У· ФЪ›˙ВИ
ЩЛУ ВП¿¯ИЫЩЛ ЛПИО›· ЩФ˘ ¯ВИЪИЫЩ‹.
4) ΔФ МЛ¯¿УЛМ· Ъ¤ВИ У· ¯ЪЛЫИМФФИВ›Щ·И ·fi ¤У·
МfiУФ ¿ЩФМФ.
5) ªЛ ¯ЪЛЫИМФФИВ›ЩВ ФЩ¤ ЩФ МЛ¯¿УЛМ·:
– МВ ¿ЩФМ·, ВИ‰ИО¿ ·И‰И¿, ‹ ˙Т· Б‡Ъˆ ·fi ·˘Щfi.
– ЫВ ВЪ›ЩˆЫЛ Ф˘ Ф ¯ВИЪИЫЩ‹˜ ‚Ъ›ЫОВЩ·И ЫВ
ηٿÛÙ·ÛË ÎfiˆÛ˘ ‹ ·‰È·ıÂÛ›·˜ ‹ Â¿Ó ¤¯ÂÈ ¿ÚÂÈ
К¿ЪМ·О·, У·ЪОˆЩИО¿ ‹ Ф˘Ы›В˜ Ф˘ МВИТУФ˘У Щ·
·ÓÙ·Ó·ÎÏ·ÛÙÈο Î·È ÙËÓ ÚÔÛÔ¯‹ ÙÔ˘.
– В¿У Ф ¯ВИЪИЫЩ‹˜ ‰ВУ В›У·И ЫВ ı¤ЫЛ У· ОЪ·Щ‹ЫВИ
ÛÙ·ıÂÚfi ÙÔ Ì˯¿ÓËÌ· Ì ٷ ‰‡Ô ¯¤ÚÈ· ‹/Î·È Ó·
·Ъ·МВ›УВИ fiЪıИФ˜ ЫВ ЫЩ·ıВЪ‹ ИЫФЪЪФ›· О·Щ¿ ЩЛ
‰È¿ÚÎÂÈ· Ù˘ ÂÚÁ·Û›·˜.
6) ¡· ı˘М¿ЫЩВ fiЩИ Ф ¯ВИЪИЫЩ‹˜ ‹ Ф ¯Ъ‹ЫЩЛ˜ В›У·И
˘В‡ı˘УФ˜ БИ· Щ· ·Щ˘¯‹М·Щ· О·И Щ· ·ЪfiФЩ· Ф˘
МФЪВ› У· Ы˘М‚Ф‡У ЫВ ¿ПП· ¿ЩФМ· ‹ ЫЩЛУ И‰ИФОЩЛЫ›·
ЩФ˘˜.
μ) ¶ƒ√∫∞Δ∞ƒ∫Δπ∫∂™ ∂¡∂ƒ°∂π∂™
1) ∫·Щ¿ ЩЛ ‰И¿ЪОВИ· ЩЛ˜ ВЪБ·Ы›·˜ Ъ¤ВИ У·
¯ЪЛЫИМФФИВ›ЩВ О·Щ¿ППЛПЛ ВУ‰˘М·Ы›· Ф˘ ‰ВУ
ВМФ‰›˙ВИ ЩФ ¯ВИЪИЫМfi ЩФ˘ МЛ¯·У‹М·ЩФ˜.
– ГЪЛЫИМФФИВ›ЩВ ВК·ЪМФЫЩ¿ ЪФЫЩ·ЩВ˘ЩИО¿ ЪФ‡¯·
МВ ЪФЫЩ·Ы›· О·Щ¿ ЩЛ˜ ОФ‹˜.
– ГЪЛЫИМФФИВ›ЩВ Б¿УЩИ·, Б˘·ПИ¿ О·И ·Ф‡ЩЫИ·
ЪФЫЩ·Ы›·˜ МВ ·УЩИФПИЫıЛЩИОФ‡˜ ¿ЩФ˘˜.
– ГЪЛЫИМФФИВ›ЩВ ˆЩФ·Ы›‰В˜ БИ· ЩЛУ ЪФЫЩ·Ы›· ЩЛ˜
·ÎÔ‹˜.
– ªЛ ¯ЪЛЫИМФФИВ›ЩВ О·ЫОfiП, Ф‰И¤˜, МВУЩ·БИfiУ О·И
ÎÔÛÌ‹Ì·Ù· Ô˘ ÎÚ¤ÌÔÓÙ·È ‹ Â›Ó·È Ê·Ú‰È¿ Î·È ÌÔ-
ЪФ‡У У· МПВ¯ЩФ‡У ЫЩФ МЛ¯¿УЛМ· ‹ ЫВ ·УЩИОВ›МВ-
Ó· Î·È ˘ÏÈο ÛÙÔ ¯ÒÚÔ ÂÚÁ·Û›·˜.
– ¢¤ÓÂÙ ٷ Ì·ÎÚÈ¿ Ì·ÏÏÈ¿.
2) ¶ƒ√™√Г∏: ∫π¡¢А¡√™! ∏ ‚ВУ˙›УЛ В›У·И ¿ОЪˆ˜
В‡КПВОЩЛ:
– К˘П¿ЫЫВЩВ ЩЛ ‚ВУ˙›УЛ ЫВ ВИ‰ИО¿ МИЩfiУИ· ВБОВО-
ÚÈ̤ӷ ÁÈ· ·˘Ù‹Ó ÙË ¯Ú‹ÛË
– ªЛУ О·У›˙ВЩВ fiЩ·У ¯ЪЛЫИМФФИВ›ЩВ ЩФ О·‡ЫИМФ
– ·УФ›БВЩВ ·ЪБ¿ ЩЛУ Щ¿· ЩФ˘ ‰Ф¯В›Ф˘ ·К‹УФУЩ·˜
У· ВОЩФУˆıВ› ЫЩ·‰И·О¿ Л ВЫˆЩВЪИО‹ ›ВЫЛ
– Ы˘МПЛЪТУВЩВ О·‡ЫИМФ МfiУФ ЫВ ·УФИ¯ЩФ‡˜ ¯Т-
ЪФ˘˜ ¯ЪЛЫИМФФИТУЩ·˜ ¯ˆУ›
– БВМ›ЫЩВ ЩФ ЪВ˙ВЪ‚Ф˘¿Ъ ЪИУ ‚¿ПВЩВ ЫВ ПВИЩФ˘ЪБ›·
ЩФУ ОИУЛЩ‹Ъ·. ªЛУ ЪФЫı¤ЩВЩВ О·‡ЫИМФ ‹
·К·ИЪВ›ЩВ ЩФ ТМ· ЩФ˘ ЪВ˙ВЪ‚Ф˘¿Ъ fiЩ·У Ф
ОИУЛЩ‹Ъ·˜ ‚Ъ›ЫОВЩ·И ЫВ ПВИЩФ˘ЪБ›· ‹ В›У·И ˙ВЫЩfi˜
– ·У Л ‚ВУ˙›УЛ НВ¯ВИП›ЫВИ, МЛУ ‚¿ПВЩВ ЩФУ ОИУЛЩ‹Ъ·
ЫВ ПВИЩФ˘ЪБ›·, ·ПП¿ ·ФМ·ОЪ‡У·ЩВ ЩФ МЛ¯¿УЛМ·
·fi ÙËÓ ÂÚÈÔ¯‹ fiÔ˘ ¯‡ıËÎÂ Ë ‚ÂÓ˙›ÓË, ηÈ
·ФК‡БВЩВ У· ‰ЛМИФ˘ЪБ‹ЫВЩВ Ы˘Уı‹ОВ˜
˘ЪО·БИ¿˜, М¤¯ЪИ˜ fiЩФ˘ Л ‚ВУ˙›УЛ ВН·ЩМИЫЩВ›
ЩВПВ›ˆ˜ О·И ФИ ·ЩМФ› ЩЛ˜ ‰И·ЫОФЪИЫЩВ›
– ηı·Ú›ÛÙ ·Ì¤Ûˆ˜ οı ›¯ÓÔ˜ ‚ÂÓ˙›Ó˘ Ô˘
¯‡ıËΠÛÙÔ Ì˯¿ÓËÌ· ‹ ÛÙÔ ¤‰·ÊÔ˜
– ÌË ‚¿˙ÂÙ ÂÌÚfi˜ ÙÔ Ì˯¿ÓËÌ· ÛÙÔ ¯ÒÚÔ fiÔ˘
¤ÁÈÓÂ Ô ·ÓÂÊԉȷÛÌfi˜
– ·ÔʇÁÂÙ ÙËÓ Â·Ê‹ ÙÔ˘ η˘Û›ÌÔ˘ Ì ÚÔ‡¯· ηÈ,
ЫВ ·˘Щ‹У ЩЛУ ВЪ›ЩˆЫЛ, ·ПП¿НЩВ ЪФ‡¯· ЪИУ
‚¿ПВЩВ ВМЪfi˜ ЩФУ ОИУЛЩ‹Ъ·
– Í·Ó·‚¿ÏÙÂ Î·È ÛÊ›ÍÙ ηϿ ÙȘ ٿ˜ ÙÔ˘
ЪВ˙ВЪ‚Ф˘¿Ъ О·И ЩФ˘ МИЩФУИФ‡ ‚ВУ˙›УЛ˜.
3) ∞УЩИО·ıИЫЩ¿ЩВ ЩЛУ ВН¿ЩМИЫЛ fiЩ·У ¤¯ВИ ‚П¿‚Л.
4) ¶ЪИУ ЩЛ ¯Ъ‹ЫЛ О¿УВЩВ ¤У·У БВУИОfi ¤ПВБ¯Ф ЩФ˘
МЛ¯·У‹М·ЩФ˜ О·И ВИ‰ИОfiЩВЪ·:
– Ф ПВ‚И¤˜ БО·˙ИФ‡ О·И Ф ПВ‚И¤˜ ·ЫК·ПВ›·˜ Ъ¤ВИ У·
ÎÈÓÔ‡ÓÙ·È ÂχıÂÚ·, ¯ˆÚ›˜ ÂÌfi‰È· Î·È fiÙ·Ó
·ÂÏ¢ıÂÚˆıÔ‡Ó Ú¤ÂÈ Ó· ·ӤگÔÓÙ·È
·˘ЩfiМ·Щ· О·И БЪ‹БФЪ· ЫЩЛ ı¤ЫЛ ЩФ˘ УВОЪФ‡
– Ô Ï‚Ȥ˜ Áη˙ÈÔ‡ Ú¤ÂÈ Ó· ̤ÓÂÈ ·ÛÊ·ÏÈṲ̂ÓÔ˜
Â¿Ó ‰ÂÓ ·ÙËı› Ô Ï‚Ȥ˜ ·ÛÊ·Ï›·˜
– Ф ‰И·ОfiЩЛ˜ Ы‚ЛЫ›М·ЩФ˜ ЩФ˘ ОИУЛЩ‹Ъ· Ъ¤ВИ У·
ÌÂÙ·ÎÈÓÂ›Ù·È Â‡ÎÔÏ· ·fi ÙË Ì›· ı¤ÛË ÛÙËÓ ¿ÏÏË
– Щ· ЛПВОЩЪИО¿ О·ПТ‰И· О·И ВИ‰ИОfiЩВЪ· ЩФ О·ПТ‰ИФ
ÁÈ· ÙÔ ÌÔ˘˙› Ú¤ÂÈ Ó· Â›Ó·È Û ηϋ ηٿÛÙ·ÛË
ÁÈ· Ó· ·ÔʇÁÔÓÙ·È ÛÈÓı‹Ú˜, ÂÓÒ Ë ›· Ú¤ÂÈ
Ó· ÂÊ·ÚÌfi˙ÂÈ ÛˆÛÙ¿ ÛÙÔ ÌÔ˘˙›
– ФИ ¯ВИЪФП·‚¤˜ О·И ФИ ЪФЫЩ·Ы›В˜ ЩФ˘ МЛ¯·У‹М·ЩФ˜
Ъ¤ВИ У· В›У·И О·ı·Ъ¤˜ О·И ЫЩВБУ¤˜ О·И ЫЩ·ıВЪ¿
ЫЩВЪВˆМ¤УВ˜ ЫЩФ МЛ¯¿УЛМ·
– Щ· М·¯·›ЪИ· Ъ¤ВИ У· ‚Ъ›ЫОФУЩ·И ¿УЩ· ЫВ О·П‹
ηٿÛÙ·ÛË
5) ¶ÚÈÓ ·Ú¯›ÛÂÙ ÙËÓ ÂÚÁ·Û›·, ‚‚·Èˆı›Ù fiÙÈ fiϘ
ÔÈ ÚÔÛٷۛ˜ ¤¯Ô˘Ó ÙÔÔıÂÙËı› ÛˆÛÙ¿.
C) ∫∞Δ∞ Δ∏ Ã∏™∏
1) ªЛ ‚¿˙ВЩВ ЫВ ПВИЩФ˘ЪБ›· ЩФУ ОИУЛЩ‹Ъ· ЫВ
ОПВИЫЩФ‡˜ ¯ТЪФ˘˜, fiФ˘ МФЪФ‡У У· Ы˘БОВУЩЪˆıФ‡У
ВИО›У‰˘УФИ О·УФ› ‰ИФНВИ‰›Ф˘ ЩФ˘ ¿УıЪ·О·.
2) ∂ÚÁ¿˙ÂÛÙ ÌfiÓÔ ÛÙÔ Êˆ˜ Ù˘ Ë̤ڷ˜ ‹ Ì ηÏfi
Ù¯ÓËÙfi ʈÙÈÛÌfi.
3) ∏ ı¤ЫЛ ЩФ˘ ЫТМ·ЩФ˜ Ъ¤ВИ У· В›У·И ЫЩ·ıВЪ‹ О·И
ИЫФЪЪФЛМ¤УЛ:
– ·ФК‡БВЩВ fiЫФ В›У·И ‰˘У·ЩfiУ ЩЛУ ВЪБ·Ы›· ЫВ
‚ЪВБМ¤УФ О·И ФПИЫıЛЪfi ¤‰·КФ˜ ‹ ЫВ ФП‡ ·fiЩФМ·
О·И ·fiОЪЛМУ· В‰¿КЛ Ф˘ ‰ВУ ВН·ЫК·П›˙Ф˘У ЩЛ
ЫЩ·ıВЪfiЩЛЩ· ЩФ˘ ¯ВИЪИЫЩ‹ О·Щ¿ ЩЛ ‰И¿ЪОВИ· ЩЛ˜
3. ∫∞¡√¡∂™ ∞™º∞§∂π∞™
Page 95

∫∞¡√¡∂™ ∞™º∞§∂π∞™
5
EL
ÂÚÁ·Û›·˜
– ÌËÓ ÂÚÁ¿˙ÂÛÙ ¿Óˆ Û ÛοϘ Î·È Û ·ÛÙ·ı›˜
Ï·ÙÊfiÚ̘
– ÌËÓ ÙÚ¤¯ÂÙ ÔÙ¤, ·ÏÏ¿ ‚·‰›˙ÂÙ ·ÔʇÁÔÓÙ·˜
ÙȘ ·ÓˆÌ·Ï›Â˜ ÙÔ˘ ‰¿ÊÔ˘˜ Î·È ÂӉ¯fiÌÂÓ·
ÂÌfi‰È·.
4) °И· У· ‚¿ПВЩВ ВМЪfi˜ ЩФУ ОИУЛЩ‹Ъ· ОЪ·Щ‹ЫЩВ ЩФ
МЛ¯¿УЛМ· ЫЩ·ıВЪ¿ ¿Уˆ ЫЩФ ¤‰·КФ˜ О·И МВ ЩФ
ВПВ‡ıВЪФ ¯¤ЪИ:
– ‚¿ПЩВ ВМЪfi˜ ЩФУ ОИУЛЩ‹Ъ· ЫВ ·fiЫЩ·ЫЛ ЩФ˘П¿-
¯ИЫЩФУ 3 М¤ЩЪˆУ ·fi ЩФ ЫЛМВ›Ф ·УВКФ‰И·ЫМФ‡ МВ
О·‡ЫИМФ
– ‚‚·Èˆı›Ù fiÙÈ ‰ÂÓ ‚Ú›ÛÎÂÙ·È Î·Ó›˜ ÛÙËÓ ·ÎÙ›Ó·
‰Ú¿Û˘ ÙÔ˘ Ì˯·Ó‹Ì·ÙÔ˜
– МЛУ О·ЩВ˘ı‡УВЩВ ЩЛУ ВН¿ЩМИЫЛ О·И Щ· О·˘Ы·¤ЪИ·
ЪФ˜ В‡КПВОЩ· ˘ПИО¿.
5) ªЛУ ·ПП¿˙ВЩВ ЩИ˜ Ъ˘ıМ›ЫВИ˜ ЩФ˘ ОИУЛЩ‹Ъ· О·И МЛУ
ЩФУ ˙ФЪ›˙ВЩВ.
6) μВ‚·ИˆıВ›ЩВ fiЩИ ЩФ ЪВП·УЩ› ЩФ˘ МЛ¯·У‹М·ЩФ˜ ‰ВУ
ВИЩЪ¤ВИ ЩЛУ О›УЛЫЛ ЩˆУ М·¯·ИЪИТУ О·И, ·КФ‡
М·ЪЫ¿ЪВЩВ, fiЩИ Ф ОИУЛЩ‹Ъ·˜ В·У¤Ъ¯ВЩ·И БЪ‹БФЪ·
ЫЩФ ЪВП·УЩ›.
7) ∞ФК‡БВЩВ Щ· ‚›·И· ¯Щ˘‹М·Щ· ЩФ˘ М·¯·ИЪИФ‡
¿Уˆ ЫВ Н¤У· ЫТМ·Щ· О·И ЩФУ ВОЫКВУ‰ФУИЫМfi ˘ПИОТУ
·fi ЩЛУ О›УЛЫЛ ЩˆУ М·¯·ИЪИТУ.
8) ™Щ·М·Щ‹ЫЩВ ЩФУ ОИУЛЩ‹Ъ·:
– О¿ıВ КФЪ¿ Ф˘ ·К‹УВЩВ ·К‡П·ОЩФ ЩФ МЛ¯¿УЛМ·.
– ЪИУ БВМ›ЫВЩВ ЩФ ЪВ˙ВЪ‚Ф˘¿Ъ.
9) ™Щ·М·Щ‹ЫЩВ ЩФУ ОИУЛЩ‹Ъ· О·И ·ФЫ˘У‰¤ЫЩВ ЩФ
О·ПТ‰ИФ ЩФ˘ МФ˘˙›:
– ЪИУ ВП¤БНВЩВ, О·ı·Ъ›ЫВЩВ ‹ ВЪБ·ЫЩВ›ЩВ В¿Уˆ
ÛÙÔ Ì˯¿ÓËÌ·.
– fiÙ·Ó ¯Ù˘‹ÛÂÙ ¤Ó· ͤÓÔ ÛÒÌ·. ∂ϤÁÍÙ ·Ó
ВУ‰В¯ФМ¤Уˆ˜ ¤¯ВИ ˘ФЫЩВ› ˙ЛМИ¤˜ О·И ВОЩВП¤ЫЩВ
ЩИ˜ ··Ъ·›ЩЛЩВ˜ ВИЫОВ˘¤˜ ЪИУ ¯ЪЛЫИМФФИ‹ЫВЩВ
О·И ¿ПИ ЩФ МЛ¯¿УЛМ·.
– В¿У ЩФ МЛ¯¿УЛМ· ·Ъ¯›ЫВИ У· ‰ФУВ›Щ·И, ПВИЩФ˘ЪБВ›
·УТМ·П· (∞У·˙ЛЩ‹ЫЩВ ·М¤Ыˆ˜ ЩЛУ ·ИЩ›· ЩˆУ
‰ФУ‹ЫВˆУ О·И ЪФ‚В›ЩВ ЫЩЛУ ·У·БО·›· ПВИЩФ˘ЪБИО‹
ВИıВТЪЛЫЛ ЫВ ¤У· ∂НВИ‰ИОВ˘М¤УФ ∫¤УЩЪФ
˘ФЫЩ‹ЪИНЛ˜).
– fiЩ·У ‰ВУ ¯ЪЛЫИМФФИВ›Щ·И ЩФ МЛ¯¿УЛМ·.
D) ™À¡Δ∏ƒ∏™∏ ∫∞π ∞¶√£∏∫∂À™∏
1) Δ· ·НИМ¿‰И· О·И ФИ ‚›‰В˜ Ъ¤ВИ У· В›У·И О·П¿
ЫКИБМ¤У·, ТЫЩВ У· В›ЫЩВ Ы›БФ˘ЪФИ fiЩИ ЩФ МЛ¯¿УЛМ·
ПВИЩФ˘ЪБВ› МВ ·ЫК¿ПВИ·. ªИ· Щ·ОЩИО‹ Ы˘УЩ‹ЪЛЫЛ
В›У·И ЫЛМ·УЩИО‹ БИ· ЩЛУ ·ЫК¿ПВИ· О·И БИ· ЩЛ
‰И·Щ‹ЪЛЫЛ ЩˆУ ВИ‰fiЫВˆУ.
2) ªЛ К˘П¿ЫЫВЩВ ЩФ МЛ¯¿УЛМ· МВ ‚ВУ˙›УЛ ЫЩФ
ЪВ˙ВЪ‚Ф˘¿Ъ ЫВ ОПВИЫЩФ‡˜ ¯ТЪФ˘˜ fiФ˘ ФИ ·ЩМФ› ЩЛ˜
‚ВУ˙›УЛ˜ МФЪВ› У· ВОЩВıФ‡У ЫВ КПfiБВ˜, ЫИУı‹ЪВ˜ ‹
МИ· ЛБ‹ ıВЪМfiЩЛЩ·˜.
3) ∞К‹ЫЩВ ЩФУ ОИУЛЩ‹Ъ· У· ОЪ˘ТЫВИ ЪИУ ЩФФıВЩ‹ЫВЩВ ЩФ МЛ¯¿УЛМ· ЫВ ФФИФ‰‹ФЩВ ВЪИ‚¿ППФУ.
4) °И· У· МВИˆıВ› Ф О›У‰˘УФ˜ ˘ЪО·БИ¿˜, ‰И·ЩЛЪВ›ЩВ
ЩФУ ОИУЛЩ‹Ъ·, ЩЛУ ВН¿ЩМИЫЛ О·И ЩЛ ˙ТУЛ ·Фı‹ОВ˘ЫЛ˜
О·ı·Ъ¿ ·fi ОП·‰И¿, К‡ПП· ‹ ˘ВЪ‚ФПИОfi БЪ¿ЫФ. ªЛУ
·К‹УВЩВ ‰Ф¯В›· МВ ˘ПИОfi ·fi ЩЛУ ОФ‹ ЫВ
ВЫˆЩВЪИОФ‡˜ ¯ТЪФ˘˜.
5) ∞‰ВИ¿˙ВЩВ ЩФ ЪВ˙ВЪ‚Ф˘¿Ъ ЫВ ·УФИОЩФ‡˜ ¯ТЪФ˘˜
О·И МВ ОЪ‡Ф ОИУЛЩ‹Ъ·.
6) °È· οı ¤̂·ÛË ÛÙÔ Û‡ÛÙËÌ· ÎÔ‹˜ Ú¤ÂÈ Ó·
ÊÔÚ¿ÙÂ Á¿ÓÙÈ· ÂÚÁ·Û›·˜.
7) ∂П¤Б¯ВЩВ ЩФ ЩЪfi¯ИЫМ· ЩˆУ М·¯·ИЪИТУ. ŸПВ˜ ФИ
ВУ¤ЪБВИВ˜ Ф˘ ·КФЪФ‡У Щ· М·¯·›ЪИ· В›У·И ВЪБ·Ы›В˜
Ф˘ ··ИЩФ‡У ВИ‰ИО¤˜ БУТЫВИ˜ О·ıТ˜ О·И ЩЛ ¯Ъ‹ЫЛ
ВИ‰ИОФ‡ ВНФПИЫМФ‡. °И· ПfiБФ˘˜ ·ЫК·ПВ›·˜ В›У·И ЫОfiИМФ У· ВОЩВПФ‡УЩ·И ·fi ВНВИ‰ИОВ˘М¤УФ Ы˘УВЪБВ›Ф.
8) °И· ПfiБФ˘˜ ·ЫК·ПВ›·˜, ФЩ¤ МЛ ¯ЪЛЫИМФФИВ›ЩВ ЩФ
МЛ¯¿УЛМ· МВ ВН·ЪЩ‹М·Щ· Ф˘ ¤¯Ф˘У Кı·ЪВ› ‹
˘ФЫЩВ› ˙ЛМИ¿. Δ· ВН·ЪЩ‹М·Щ· Ф˘ ¤¯Ф˘У ¿ıВИ ˙ЛМИ¿
‰ВУ Ъ¤ВИ У· ВИЫОВ˘¿˙ФУЩ·И ·ПП¿ У· ·УЩИО·ıИЫЩТУЩ·И. ГЪЛЫИМФФИВ›ЩВ МfiУФ БУ‹ЫИ· ·УЩ·ПП·ОЩИО¿. ∞УЩ·ПП·ОЩИО¿ О·О‹˜ ФИfiЩЛЩ·˜ МФЪФ‡У У·
ЪФНВУ‹ЫФ˘У ˙ЛМИ¿ ЫЩФ МЛ¯¿УЛМ· О·И У· ı¤ЫФ˘У ЫВ
О›У‰˘УФ ЩЛУ ·ЫК¿ПВИ¿ Ы·˜.
9) ΔÔ Ì˯¿ÓËÌ· Ú¤ÂÈ Ó· Ê˘Ï¿ÛÛÂÙ·È Ì·ÎÚÈ¿ ·fi
·È‰È¿!
E) ª∂Δ∞º√ƒ∞ ∫∞π ª∂Δ∞∫π¡∏™∏
1) ∫¿ıВ КФЪ¿ Ф˘ В›У·И ·У·БО·›Ф У· МВЩ·ОИУ‹ЫВЩВ ‹
У· МВЩ·К¤ЪВЩВ ЩФ МЛ¯¿УЛМ·:
– Ы‚‹ЫЩВ ЩФУ ОИУЛЩ‹Ъ·, ВЪИМ¤УВЩВ У· ·ОИУЛЩФ-
ÔÈËıÔ‡Ó Ù· Ì·¯·›ÚÈ· Î·È ·ÔÛ˘Ó‰¤ÛÙ ÙËÓ ›·
·fi ЩФ МФ˘˙›
– ЩФФıВЩ‹ЫЩВ ЩЛУ ЪФЫЩ·Ы›· М·¯·ИЪИТУ
– И¿ЫЩВ ЩФ МЛ¯¿УЛМ· МfiУФ ·fi ЩИ˜ ¯ВИЪФП·‚¤˜ О·И
Á˘Ú›ÛÙ ٷ Ì·¯·›ÚÈ· Û ηÙ‡ı˘ÓÛË ·ÓÙ›ıÂÙË ÚÔ˜
ÙË ÊÔÚ¿ ΛÓËÛ˘.
2) ŸЩ·У МВЩ·К¤ЪВЩВ ЩФ МЛ¯¿УЛМ· МВ О¿ФИФ fi¯ЛМ·,
Ъ¤ВИ У· ЩФФıВЩВ›Щ·И ¤ЩЫИ ТЫЩВ У· МЛУ ЪФНВУВ›
О›У‰˘УФ БИ· О·У¤У·У О·И У· ·ЫК·П›˙ВЩ·И ЫЩ·ıВЪ¿ БИ·
У· ·ФКВ˘¯ıВ› Л ·У·ЩЪФ‹ МВ Иı·У‹ ‚П¿‚Л О·И
‰И·ЪЪФ‹ О·˘Ы›МФ˘.
F) ¶ø™ ¡∞ ™Àªμ√À§∂À£∂πΔ∂ Δ√ ∂°Ã∂πƒπ¢π√
™ЩФ ОВ›МВУФ ЩФ˘ ВБ¯ВИЪИ‰›Ф˘, МВЪИО¤˜ ·Ъ¿БЪ·КФИ
Ф˘ ВЪИ¤¯Ф˘У ЫЛМ·УЩИО¤˜ ПЛЪФКФЪ›В˜ ВИЫЛМ·›УФУЩ·И МВ ‰И·КФЪВЩИОФ‡˜ ЩЪfiФ˘˜ ВИЫ‹М·УЫЛ˜, Л
ЫЛМ·Ы›· ЩˆУ ФФ›ˆУ В›У·И:
‹
¶ÂÚȤ¯ÂÈ ÂÂÍËÁ‹ÛÂȘ ‹ ¿ÏÏ·
ЫЩФИ¯В›· Ы¯ВЩИО¿ МВ ЪФЛБФ‡МВУВ˜ Ф‰ЛБ›В˜, БИ· ЩЛУ
·ФК˘Б‹ ‚П·‚ТУ ЫЩФ МЛ¯¿УЛМ· О·И БИ· У· МЛУ
ЪФОПЛıФ‡У ˙ЛМИ¤˜.
¶Иı·УfiЩЛЩ· ЪfiОПЛЫЛ˜ Ыˆ-
М·ЩИОТУ ‚П·‚ТУ ЫВ ВЪ›ЩˆЫЛ МЛ Щ‹ЪЛЫЛ˜.
¶Иı·УfiЩЛЩ· ЪfiОПЛЫЛ˜ ЫФ‚·ЪТУ ЫˆМ·ЩИОТУ ‚П·‚ТУ МВ О›У‰˘УФ ı·У¿ЩФ˘ ЫВ
ВЪ›ЩˆЫЛ МЛ Щ‹ЪЛЫЛ˜.
∫π¡¢À¡√™!
¶ƒ√™√Ã∏!
™∏ª∞¡Δπ∫√
™∏ª∂πø™∏
Page 96

6
¶ƒ√∂Δ√πª∞™π∞ °π∞ ∂ƒ°∞™π∞
EL
∂§∂°Ã√™ Δ√À ª∏Ã∞¡∏ª∞Δ√™
¶ЪИУ НВОИУ‹ЫВЩВ ЩЛУ ВЪБ·Ы›·:
– μ‚·Èˆı›Ù fiÙÈ ‰ÂÓ ˘¿Ú¯Ô˘Ó Ï·ÛηÚÈṲ̂Ó˜
‚›‰Â˜ ÛÙÔ Ì˯¿ÓËÌ· Î·È ÛÙÔ Ì·¯·›ÚÈ
– ‚‚·Èˆı›Ù fiÙÈ Ù· Ì·¯·›ÚÈ· Â›Ó·È ÙÚÔ¯ÈṲ̂ӷ ηÈ
‰ÂÓ ·ÚÔ˘ÛÈ¿˙Ô˘Ó ›¯ÓË ÊıÔÚ¿˜
– ‚‚·Èˆı›Ù fiÙÈ ÙÔ Ê›ÏÙÚÔ ·¤Ú· Â›Ó·È Î·ı·Úfi
– ‚‚·Èˆı›Ù fiÙÈ ÔÈ ÚÔÛٷۛ˜ Â›Ó·È ÛˆÛÙ¿
ЫЩВЪВˆМ¤УВ˜ О·И ЫВ О·П‹ О·Щ¿ЫЩ·ЫЛ
– ВП¤БНЩВ ЩЛ ЫЩВЪ¤ˆЫЛ ЩˆУ ¯ВИЪФП·‚ТУ..
¶ƒ√∂Δ√πª∞™π∞ Δ√À ªπ°ª∞Δ√™
ΔФ МЛ¯¿УЛМ· ‰И·ı¤ЩВИ ‰›¯ЪФУФ ОИУЛЩ‹Ъ· Ф˘ ПВИЩФ˘ЪБВ› МВ М›БМ· ‚ВУ˙›УЛ˜ О·И П·‰ИФ‡ П›·УЫЛ˜.
∏ ¯Ú‹ÛË ÛΤÙ˘ ‚ÂÓ˙›Ó˘ η-
Щ·ЫЩЪ¤КВИ ЩФУ ОИУЛЩ‹Ъ· О·И ¤¯ВИ ˆ˜ ·ФЩ¤ПВЫМ· ЩЛУ
·Î‡ÚˆÛË Ù˘ ÂÁÁ‡ËÛ˘.
ГЪЛЫИМФФИВ›ЩВ МfiУФУ О·‡ЫИМ· О·И ПИ·УЩИО¿ ФИfiЩЛЩ·˜ БИ· У· ‰И·ЩЛЪВ›ЩВ ЩИ˜
ВИ‰fiЫВИ˜ О·И У· ВН·ЫК·П›˙ВЩВ ЩЛ ‰И¿ЪОВИ· ЩˆУ
МЛ¯·УИОТУ ФЪБ¿УˆУ.
- Г·Ъ·ОЩЛЪИЫЩИО¿ ЩЛ˜ ‚ВУ˙›УЛ˜
ГЪЛЫИМФФИВ›ЩВ МfiУФУ ·МfiП˘‚‰Л ‚ВУ˙›УЛ (Ъ¿ЫИУЛ)
МВ ·ЪИıМfi ФОЩ·У›ˆУ ЩФ˘П¿¯ИЫЩФУ 90 N.O.
∏ ·МfiП˘‚‰Л ‚ВУ˙›УЛ ‰ЛМИФ˘ЪБВ› О·Щ·О¿ıИ· В¿У ·Ъ·МВ›УВИ ¿Уˆ ·fi 2 М‹УВ˜ ЫЩФ
МИЩfiУИ. ГЪЛЫИМФФИВ›ЩВ ¿УЩ· О·ИУФ‡ЪБИ· ‚ВУ˙›УЛ!
- Г·Ъ·ОЩЛЪИЫЩИО¿ П·‰ИФ‡
ГЪЛЫИМФФИВ›ЩВ МfiУФ Ы˘УıВЩИОfi П¿‰И ·Ъ›ЫЩЛ˜
ФИfiЩЛЩ·˜, ВИ‰ИОfi БИ· ‰›¯ЪФУФ˘˜ ОИУЛЩ‹ЪВ˜.
√ ЩФИОfi˜ ∞УЩИЪfiЫˆФ˜ ‰И·ı¤ЩВИ П¿‰И· ВИ‰ИО¿
МВПВЩЛМ¤У· БИ· ОИУЛЩ‹ЪВ˜ ·˘ЩФ‡ ЩФ˘ Щ‡Ф˘, Щ· ФФ›·
ВН·ЫК·П›˙Ф˘У ˘„ЛПfi ‚·ıМfi˜ ЪФЫЩ·Ы›·˜.
∏ ¯Ъ‹ЫЛ ЩˆУ П·‰ИТУ ·˘ЩТУ ВИЩЪ¤ВИ ЩЛ Ы‡УıВЫЛ
М›БМ·ЩФ˜ 2%, ЩФ ФФ›Ф ·ФЩВПВ›Щ·И ·fi 1 М¤ЪФ˜
П·‰ИФ‡ БИ· О¿ıВ 50 М¤ЪЛ ‚ВУ˙›УЛ˜.
™∏ª∞¡Δπ∫√
™∏ª∞¡Δπ∫√
™∏ª∞¡Δπ∫√
- ¶ЪФВЩФИМ·Ы›· О·И ‰И·Щ‹ЪЛЫЛ ЩФ˘ М›БМ·ЩФ˜
∏ ‚ВУ˙›УЛ О·И ЩФ М›БМ· В›У·И ¿ОЪˆ˜ В‡КПВОЩ·!
– ∏ ‚ВУ˙›УЛ О·И ЩФ М›БМ· Ъ¤ВИ У· К˘П¿ЫЫФУЩ·И ЫВ
ВБОВОЪИМ¤У· МИЩfiУИ· БИ· О·‡ЫИМ·, ЫВ ·ЫК·П‹
¯ТЪФ, М·ОЪИ¿ ·fi ВЫЩ›В˜ ıВЪМfiЩЛЩ·˜ ‹ ВПВ‡ıВЪВ˜
КПfiБВ˜.
– Δ· МИЩfiУИ· ЩЛ˜ ‚ВУ˙›УЛ˜ Ъ¤ВИ У· К˘П¿ЫЫФУЩ·И
Ì·ÎÚÈ¿ ·fi ·È‰È¿.
– ªЛУ О·У›˙ВЩВ О·Щ¿ ЩЛУ ЪФВЩФИМ·Ы›· ЩФ˘
Ì›ÁÌ·ÙÔ˜ Î·È ·ÔʇÁÂÙ ÙËÓ ÂÈÛÓÔ‹ ÙˆÓ
·Ó·ı˘ÌÈ¿ÛÂˆÓ Ù˘ ‚ÂÓ˙›Ó˘.
™ЩФУ ›У·О· ·ЪФ˘ЫИ¿˙ФУЩ·И ФИ ФЫfiЩЛЩВ˜ ‚ВУ˙›УЛ˜
О·И П·‰ИФ‡ Ф˘ Ъ¤ВИ У· ¯ЪЛЫИМФФИФ‡УЩ·И БИ· ЩЛУ
ЪФВЩФИМ·Ы›· ЩФ˘ М›БМ·ЩФ˜ ·У·ПfiБˆ˜ МВ ЩФУ Щ‡Ф
ЩФ˘ ¯ЪЛЫИМФФИФ‡МВУФ˘ П·‰ИФ‡.
°И· ЩЛУ ЪФВЩФИМ·Ы›· ЩФ˘ М›БМ·ЩФ˜:
– ∞‰ВИ¿ЫЩВ ЫВ ВБОВОЪИМ¤УФ МИЩfiУИ ВЪ›Ф˘ ЩЛ МИЫ‹
ÔÛfiÙËÙ·˜ ‚ÂÓ˙›Ó˘.
– ¶ÚÔÛı¤ÛÙ fiÏÔ ÙÔ Ï¿‰È Ô˘ ˘Ô‰ÂÈÎÓ‡ÂÙ·È ÛÙÔÓ
›Ó·Î·.
– ¶ÚÔÛı¤ÛÙ ÙËÓ ˘fiÏÔÈË ‚ÂÓ˙›ÓË.
– ∫Ï›ÛÙ ÙËÓ Ù¿· Î·È ·Ó·ÎÈÓ‹ÛÙ ‰˘Ó·Ù¿.
ΔФ М›БМ· ·ПИТУВИ. ªЛУ ·ФıЛОВ‡ВЩВ МВБ¿ПВ˜ ФЫfiЩЛЩВ˜ М›БМ·ЩФ˜ БИ· У· МЛ Ы¯ЛМ·ЩИЫЩФ‡У О·Щ·О¿ıИ·.
Δ· МИЩfiУИ· ЩФ˘ М›БМ·ЩФ˜ О·И
ЩЛ˜ ‚ВУ˙›УЛ˜ Ъ¤ВИ У· В›У·И ‰И·КФЪВЩИО¿ О·И
·Ó·ÁÓˆÚ›ÛÈÌ· ÁÈ· Ó· ·ÔʇÁÂÙÂ Ë Û‡Á¯˘ÛË Î·Ù¿ ÙË
¯Ú‹ÛË ÙÔ˘˜.
∫·ı·Ú›˙ÂÙ ηٿ ÂÚÈfi‰Ô˘˜
Ù· ÌÈÙfiÓÈ· Ù˘ ‚ÂÓ˙›Ó˘ Î·È ÙÔ˘ Ì›ÁÌ·ÙÔ˜ ÁÈ· Ó·
·Ê·ÈÚ¤ÛÂÙÂ Ù˘¯fiÓ Î·Ù·Î¿ıÈ·.
™∏ª∞¡Δπ∫√
™∏ª∞¡Δπ∫√
™∏ª∞¡Δπ∫√
∫π¡¢À¡√™!
4. ¶ƒ√∂Δ√πª∞™π∞ °π∞ ∂ƒ°∞™π∞
μÂÓ˙›ÓË ™˘ÓıÂÙÈÎfi Ï¿‰È ‰›¯ÚÔÓÔ˜
Ï›ÙÚ· Ï›ÙÚ·
cm
3
1 0,02 20
2 0,04 40
3 0,06 60
5 0,10 100
10 0,20 200
Page 97

¶ƒ√∂Δ√πª∞™π∞ °π∞ ∂ƒ°∞™π∞ / ∂∫∫π¡∏™∏ - Ã∏™∏ - ™μ∏™πª√ ∫π¡∏Δ∏ƒ∞
7
EL
∞¡∂º√¢π∞™ª√™ ∫∞À™πª√À
ªËÓ Î·Ó›˙ÂÙ ηٿ ÙÔÓ ·ÓÂÊԉȷÛÌfi Î·È ·ÔʇÁÂÙ ÙËÓ ÂÈÛÓÔ‹ ÙˆÓ ·Ó·ı˘ÌÈ¿ÛÂˆÓ Ù˘ ‚ÂÓ˙›Ó˘.
∞УФ›НЩВ ЩЛУ Щ¿· ЩФ˘ МИЩФУИФ‡ ЪФЫВОЩИО¿ О·ıТ˜ ЫЩФ ВЫˆЩВЪИОfi МФЪВ› У·
¤¯ВИ Ы¯ЛМ·ЩИЫЩВ› ›ВЫЛ.
¶ÚÈÓ ÙÔÓ ·ÓÂÊԉȷÛÌfi:
– ∞Ó·ÎÈÓ‹ÛÙ ‰˘Ó·Ù¿ ÙÔ ÌÈÙfiÓÈ Ì ÙÔ Ì›ÁÌ·.
– ΔÔÔıÂÙ‹ÛÙ ÙÔ Ì˯¿ÓËÌ· Û ÔÚÈ˙fiÓÙÈ· ÂÈÊ¿ÓÂÈ·
Î·È Û ÛÙ·ıÂÚ‹ ı¤ÛË Ì ÙËÓ Ù¿· ÙÔ˘ ÚÂ˙ÂÚ‚Ô˘¿Ú
ÚÔ˜ Ù· ¿Óˆ.
¶ƒ√™√Ã∏!
∫π¡¢À¡√™!
– ∫·ı·Ú›ÛÙ ÙËÓ Ù¿· ÙÔ˘ ÚÂ˙ÂÚ‚Ô˘¿Ú Î·È ÙË Á‡Úˆ
ВЪИФ¯‹ БИ· У· ·ФК‡БВЩВ ЩЛУ В›ЫФ‰Ф ·О·ı·ЪЫИТУ
О·Щ¿ ЩФУ ·УВКФ‰И·ЫМfi.
– ∞УФ›НЩВ ЪФЫВОЩИО¿ ЩЛУ Щ¿· ЩФ˘ ЪВ˙ВЪ‚Ф˘¿Ъ БИ·
У· ВОЩФУˆıВ› ЫЩ·‰И·О¿ Л ›ВЫЛ. °И· ЩФУ ·УВКФ‰И·ЫМfi ¯ЪЛЫИМФФИ‹ЫЩВ ¤У· ¯ˆУ›, ·ФКВ‡БФУЩ·˜
ЩЛУ П‹ЪˆЫЛ ЩФ˘ ЪВ˙ВЪ‚Ф˘¿Ъ ¤ˆ˜ ЩФ ¯В›ПФ˜
(∂ИО 1).
∫Ï›ÓÂÙ ¿ÓÙ· ÙËÓ Ù¿·
ЫК›ББФУЩ·˜ О·П¿.
∫·ı·Ъ›˙ВЩВ ·М¤Ыˆ˜ О¿ıВ
›¯УФ˜ М›БМ·ЩФ˜ Ф˘ МФЪВ› У· ¯˘ıВ› ЫЩФ МЛ¯¿УЛМ· ‹
ЫЩФ ¤‰·КФ˜ О·И МЛ ‚¿˙ВЩВ ВМЪfi˜ ЩФУ ОИУЛЩ‹Ъ· В¿У
‰ВУ ‰И·П˘ıФ‡У ФИ ·У·ı˘МИ¿ЫВИ˜ ЩЛ˜ ‚ВУ˙›УЛ˜.
¶ƒ√™√Ã∏!
¶ƒ√™√Ã∏!
2. ¶È¤ÛÙ ··Ï¿ ÙËÓ ·ÓÙÏ›· ÚÔÏ‹ÚˆÛ˘ (2) 7-10
ÊÔÚ¤˜ ¤ˆ˜ fiÙÔ˘ ÙÚ¤ÍÂÈ Î·‡ÛÈÌÔ ·fi ÙÔ ÛˆÏ‹Ó·
ÂÍ·¤ÚˆÛ˘.
3. ªÂÙ·ÎÈÓ‹ÛÙ ÙÔ Ï‚Ȥ ÙÔ˘ ÙÛÔÎ (3) ÛÙË ı¤ÛË
«CHOKE».
4. ∫Ú·Ù‹ÛÙ ÛÙ·ıÂÚ¿ ÙÔ Ì˯¿ÓËÌ· ÛÙÔ ¤‰·ÊÔ˜ ÌÂ
ЩФ ¤У· ¯¤ЪИ ЫЩЛ ¯ВИЪФП·‚‹ БИ· У· МЛ ¯¿ЫВЩВ ЩФУ
¤ПВБ¯Ф О·Щ¿ ЩЛУ ВОО›УЛЫЛ.
∂¿У ‰ВУ ОЪ·Щ¿ЩВ ЫЩ·ıВЪ¿ ЩФ
МЛ¯¿УЛМ·, Л ТıЛЫЛ ЩФ˘ ОИУЛЩ‹Ъ· МФЪВ› У·
ЪФО·П¤ЫВИ ·ТПВИ· ИЫФЪЪФ›·˜ ЩФ˘ ¯ВИЪИЫЩ‹ ‹ У·
ЩИУ¿НВИ ЩФ М·¯·›ЪИ ¿Уˆ ЫВ ВМfi‰ИФ ‹ ЫЩФУ ›‰ИФ ЩФ
¯ВИЪИЫЩ‹.
5. ΔЪ·‚‹НЩВ ·ЪБ¿ ЩЛ ¯ВИЪФП·‚‹ ВОО›УЛЫЛ˜ О·Щ¿
10 – 15 cm, ¤ˆ˜ fiЩФ˘ ·УЩИПЛКıВ›ЩВ ·УЩ›ЫЩ·ЫЛ О·И
ЫЩЛ Ы˘У¤¯ВИ· ЩЪ·‚‹НЩВ ·ОfiМ· МВЪИО¤˜ КФЪ¤˜ ¤ˆ˜
fiЩФ˘ ·Ъ¯›ЫФ˘У ФИ ЪТЩВ˜ ВОЪ‹НВИ˜ ·У¿КПВНЛ˜.
°И· У· ·ФК‡БВЩВ ЩФ Ы¿ЫИМФ
ЩФ˘ Ы¯ФИУИФ‡, МЛУ ЩФ ЩЪ·‚¿ЩВ ЫВ fiПФ ЩФ˘ ЩФ М‹ОФ˜,
МЛУ ЩФ ·К‹УВЩВ У· ЩЪ›‚ВЩ·И ¿Уˆ ЫЩ· ¯В›ПЛ ЩФ˘
·УФ›БМ·ЩФ˜ Ф‰‹БЛЫЛ˜ ЩФ˘ Ы¯ФИУИФ‡ О·И ·К‹УВЩВ ЫЩ·‰И·О¿ ЩФ Ы¯ФИУ› БИ· У· ·ФК‡БВЩВ ЩЛУ ·УВН¤ПВБОЩЛ
ВИЫЩЪФК‹ ЩФ˘.
™∏ª∞¡Δπ∫√
¶ƒ√™√Ã∏!
∂∫∫π¡∏™∏
∏ ВОО›УЛЫЛ ЩФ˘ ОИУЛЩ‹Ъ·
Ъ¤ВИ У· Б›УВИ ЫВ ·fiЫЩ·ЫЛ ЩФ˘П¿¯ИЫЩФУ 3 М¤ЩЪˆУ
·fi ÙÔ ÛËÌÂ›Ô ÙÔ˘ ·ÓÂÊԉȷÛÌÔ‡ η˘Û›ÌˆÓ.
¶ЪИУ ‚¿ПВЩВ ВМЪfi˜ ЩФУ ОИУЛЩ‹Ъ·:
– ΔÔÔıÂÙ‹ÛÙ ÙÔ Ì˯¿ÓËÌ· Û ÛÙ·ıÂÚ‹ ı¤ÛË ¿Óˆ
ÛÙÔ ¤‰·ÊÔ˜.
– μÁ¿ÏÙ Ù˘ ÚÔÛٷۛ˜ ÙÔ˘ Ì·¯·ÈÚÈÔ‡.
– μ‚·Èˆı›Ù fiÙÈ ÙÔ Ì·¯·›ÚÈ ‰ÂÓ ¤Ú¯ÂÙ·È Û ·ʋ
МВ ЩФ ¤‰·КФ˜ ‹ ¿ПП· ·УЩИОВ›МВУ·.
– μВ‚·ИˆıВ›ЩВ fiЩИ Л ¯ВИЪФП·‚‹ В›У·И ·ЫК·ПИЫМ¤УЛ
ЫЩЛУ ОВУЩЪИО‹ ı¤ЫЛ.
- ∂ОО›УЛЫЛ МВ ОЪ‡Ф ОИУЛЩ‹Ъ·
ш˜ ВОО›УЛЫЛ МВ ОЪ‡Ф ОИУЛЩ‹Ъ·
ВУУФВ›Щ·И Л ВОО›УЛЫЛ ЩФ˘П¿¯ИЫЩФУ 5 ПВЩ¿ МВЩ¿ ЩФ
Ы‚‹ЫИМФ ЩФ˘ ОИУЛЩ‹Ъ· ‹ МВЩ¿ ·fi ·УВКФ‰И·ЫМfi
О·˘Ы›МФ˘.
°И· У· ı¤ЫВЩВ ЫВ ПВИЩФ˘ЪБ›· ЩФУ ОИУЛЩ‹Ъ· (∂ИО. 2):
1. ªÂÙ·ÎÈÓ‹ÛÙ ÙÔ ‰È·ÎfiÙË (1) ÛÙË ı¤ÛË «I».
™∏ª∂πø™∏
¶ƒ√™√Ã∏!
5. ∂∫∫π¡∏™∏ - Ã∏™∏ - ™μ∏™πª√ ∫π¡∏Δ∏ƒ∞
Page 98

6. ΔЪ·‚‹НЩВ ¿ПИ ЩЛ ¯ВИЪФП·‚‹ ВОО›УЛЫЛ˜ БИ· У·
¿ЪВИ О·УФУИО¿ ВМЪfi˜ Ф ОИУЛЩ‹Ъ·˜.
7. ªÂÙ·ÎÈÓ‹ÛÙ ÙÔ Ï‚Ȥ ÙÔ˘ ÙÛÔÎ (3) ÛÙË ı¤ÛË
«RUN».
8. ∞К‹ЫЩВ ЩФУ ОИУЛЩ‹Ъ· У· ПВИЩФ˘ЪБ‹ЫВИ ЫЩФ ЪВП·У-
Щ› ЩФ˘П¿¯ИЫЩФУ В› 1 ПВЩfi ЪИУ ВИЩ·¯‡УВЩВ ¤ˆ˜
ЩФ М¤БИЫЩФ ·ЪИıМfi ЫЩЪФКТУ.
∂¿У Л ¯ВИЪФП·‚‹ (4) ЩФ˘ Ы¯ФИУИФ‡ ВОО›УЛЫЛ˜ ЩЪ·‚Л¯ЩВ› В·УВИПЛММ¤У· МВ ЩФ ПВ‚И¤
ЩФ˘ ЩЫФО (3) ЫЩЛ ı¤ЫЛ «CHOKE», Ф ОИУЛЩ‹Ъ·˜ МФЪВ›
У· МФ˘ОТЫВИ О·ıИЫЩТУЩ·˜ ‰‡ЫОФПЛ ЩЛУ ВОО›УЛЫЛ.
™ÙËÓ ÂÚ›ÙˆÛË ·˘Ù‹ ‚Á¿ÏÙÂ ÙÔ ÌÔ˘˙›, ÙÚ·‚‹ÍÙÂ
··П¿ ЩЛ ¯ВИЪФП·‚‹ (5) ЩФ˘ Ы¯ФИУИФ‡ ВОО›УЛЫЛ˜ БИ·
У· К‡БВИ ЩФ ПВfiУ·ЫМ· О·˘Ы›МФ˘, ЫОФ˘›ЫЩВ Щ·
ЛПВОЩЪfi‰И· ЫЩФ МФ˘˙› О·И ЩФФıВЩ‹ЫЩВ ЩФ ¿ПИ ЫЩФУ
ОИУЛЩ‹Ъ·.
- ∂ОО›УЛЫЛ МВ ˙ВЫЩfi ОИУЛЩ‹Ъ·
°И· ВОО›УЛЫЛ МВ ЩФУ ОИУЛЩ‹Ъ· ˙ВЫЩfi (·М¤Ыˆ˜ МВЩ¿ ЩФ
Ы‚‹ЫИМФ ЩФ˘ ОИУЛЩ‹Ъ·), В·У·П¿‚ВЩВ ЩИ˜ ВУ¤ЪБВИВ˜
1 - 4 - 5 - 6 ЩЛ˜ ЪФЛБФ‡МВУЛ˜ ‰И·‰ИО·Ы›·˜.
Ã∏™∏ Δ√À ∫π¡∏Δ∏ƒ∞ (∂ÈÎ. 3)
∏ Щ·¯‡ЩЛЩ· ЩФ˘ Ы˘ЫЩ‹М·ЩФ˜ ОФ‹˜ Ъ˘ıМ›˙ВЩ·И ·fi ЩФ
ПВ‚И¤ (1) ЩФ˘ БО·˙ИФ‡ Ф˘ ‚Ъ›ЫОВЩ·И ЫЩЛУ ›Ыˆ
¯ВИЪФП·‚‹ (2).
∏ МВЩ·О›УЛЫЛ ·˘ЩФ‡ ЩФ˘ ПВ‚И¤ ВИЩЪ¤ВЩ·И МfiУФУ В¿У
И¤˙ВЩ·И Щ·˘ЩФ¯ЪfiУˆ˜ Ф ПВ‚И¤˜ ·ЫК·ПВ›·˜ (3).
∏ О›УЛЫЛ МВЩ·‰›‰ВЩ·И ·fi ЩФУ ОИУЛЩ‹Ъ· ЫЩ· М·¯·›ЪИ·
М¤Ыˆ ВУfi˜ Ы˘МП¤ОЩЛ МВ К˘БfiОВУЩЪВ˜ М¿˙В˜ Ф˘
‰ВУ ВИЩЪ¤ВИ ЩЛУ О›УЛЫЛ ЩˆУ М·¯·ИЪИТУ МВ ЩФУ
ОИУЛЩ‹Ъ· ЫЩФ ЪВП·УЩ›.
ªЛ ¯ЪЛЫИМФФИВ›ЩВ ЩФ МЛ¯¿УЛМ· ·У ЩФ Ы‡ЫЩЛМ· ОФ‹˜ ОИУВ›Щ·И МВ ЩФУ ОИУЛЩ‹Ъ·
ЫЩФ ЪВП·УЩ›. ™ЩЛУ ВЪ›ЩˆЫЛ ·˘Щ‹ ·В˘ı˘УıВ›ЩВ
ЫЩЛУ ∞УЩИЪФЫˆВ›·.
∏ ЫˆЫЩ‹ Щ·¯‡ЩЛЩ· ВЪБ·Ы›·˜ ВИЩ˘Б¯¿УВЩ·И МВ ЩФ
ПВ‚И¤ БО·˙ИФ‡ (1) ЫЩФ М¤БИЫЩФ.
∫·Щ¿ ЩИ˜ ЪТЩВ˜ 6-8 ТЪВ˜
¯Ъ‹ЫЛ˜ ЩФ˘ МЛ¯·У‹М·ЩФ˜, ·ФК‡БВЩВ ЩЛ ¯Ъ‹ЫЛ ЩФ˘
ОИУЛЩ‹Ъ· ЫЩФ М¤БИЫЩФ ·ЪИıМfi ЫЩЪФКТУ.
™∏ª∞¡Δπ∫√
¶ƒ√™√Ã∏!
™∏ª∞¡Δπ∫√
™μ∏™πª√ ∫π¡∏Δ∏ƒ∞ (∂ÈÎ. 4)
°И· У· Ы‚‹ЫВЩВ ЩФУ ОИУЛЩ‹Ъ·:
– ∂ПВ˘ıВЪТЫЩВ ЩФ ПВ‚И¤ БО·˙ИФ‡ (1) О·И ·К‹ЫЩВ ЩФУ
ОИУЛЩ‹Ъ· У· ПВИЩФ˘ЪБ‹ЫВИ ЫЩФ ЪВП·УЩ› БИ· П›Б·
‰В˘ЩВЪfiПВЩ·.
– ªÂÙ·ÎÈÓ‹ÛÙ ÙÔ ‰È·ÎfiÙË (2) ÛÙË ı¤ÛË «O».
°И· У· ·ОИУЛЩФФИЛıФ‡У Щ·
М·¯·›ЪИ· МВЩ¿ ЩЛ МВЩ·О›УЛЫЛ ЩФ˘ БО·˙ИФ‡ ЫЩФ
ЪВП·УЩ› Ъ¤ВИ У· ВЪ¿ЫФ˘У П›Б· ‰В˘ЩВЪfiПВЩ·.
¶ƒ√™√Ã∏!
8
∂∫∫π¡∏™∏ - Ã∏™∏ - ™μ∏™πª√ ∫π¡∏Δ∏ƒ∞
EL
Page 99

Ã∏™∏ Δ√À ª∏Ã∞¡∏ª∞Δ√™
9
EL
°È· Ó· Û¤‚ÂÛÙ ÙÔ˘˜ ¿ÏÏÔ˘˜ Î·È ÙÔ ÂÚÈ‚¿ÏÏÔÓ:
– ∞ФК‡БВЩВ ЩЛУ ЪfiОПЛЫЛ ВУФ¯П‹ЫВˆУ.
– ΔЛЪВ›ЩВ ·˘ЫЩЛЪ¿ ЩЛУ ЩФИО‹ УФМФıВЫ›· БИ· ЩЛ
‰И¿ıВЫЛ ЩˆУ ˘ПИОТУ ·fi ЩЛУ ОФ‹.
– ΔËÚ›Ù ·˘ÛÙËÚ¿ ÙËÓ ÙÔÈ΋ ÓÔÌÔıÂÛ›· ÁÈ· ÙË
‰И¿ıВЫЛ П·‰ИТУ, ‚ВУ˙›УЛ˜, ВП·ЩЩˆМ·ЩИОТУ
ВН·ЪЩЛМ¿ЩˆУ О·И ФФИФ˘‰‹ФЩВ ЫЩФИ¯В›Ф˘ МФЪВ›
У· МФП‡УВИ ЩФ ВЪИ‚¿ППФУ.
– ∏ ·fiЪЪИ„Л ЩˆУ ˘ПИОТУ Ы˘ЫОВ˘·Ы›·˜ Ъ¤ВИ У·
Á›ÓÂÙ·È Û‡Ìʈӷ Ì ÙËÓ ÈÛ¯‡Ô˘Û· ÓÔÌÔıÂÛ›·.
∏ ·Ъ·ЩВЩ·М¤УЛ ¤ОıВЫЛ
ЫЩФ˘˜ ОЪ·‰·ЫМФ‡˜ МФЪВ› У· ЪФО·П¤ЫВИ ‚П¿‚В˜
О·И УВ˘ЪФ·ББВИ·О¤˜ ‰И·Щ·Ъ·¯¤˜ (БУˆЫЩ¤˜ О·И ˆ˜
“К·ИУfiМВУФ ЩФ˘ Raynaud”) И‰›ˆ˜ ЫВ fiЫФ˘˜ ˘ФК¤ЪФ˘У ·fi ‰И·Щ·Ъ·¯¤˜ ЩФ˘ О˘ОПФКФЪИ·ОФ‡. Δ· Ы˘МЩТМ·Щ· МФЪФ‡У У· ·КФЪФ‡У Щ· ¯¤ЪИ·, ЩФ˘˜ О·ЪФ‡˜ ‹ Щ· ‰¿¯Щ˘П· О·И ВО‰ЛПТУФУЩ·И МВ ·ТПВИ· В˘·ИЫıЛЫ›·˜, МФ‡‰И·ЫМ·, ОУЛЫМfi, fiУФ, ·Ф¯ЪˆМ·ЩИЫМfi ‹ ‰ФМИО¤˜ МВЩ·‚ФП¤˜ ЩФ˘ ‰¤ЪМ·ЩФ˜. Δ· Ы˘МЩТМ·Щ· ·˘Щ¿ МФЪФ‡У У· ВУЩ·ıФ‡У ·fi ЩИ˜ ¯·МЛП¤˜
ıВЪМФОЪ·Ы›В˜ ВЪИ‚¿ППФУЩФ˜ ‹/О·И Щ ˘ВЪ‚ФПИОfi
ЫК›НИМФ ЩˆУ ¯ВЪИТУ ЫЩИ˜ ¯ВИЪФП·‚¤˜. ªfiПИ˜ ВМК·УИЫЩФ‡У Щ· Ы˘МЩТМ·Щ· Ъ¤ВИ У· МВИТЫВЩВ ЩФ˘˜
¯ЪfiУФ˘˜ ¯Ъ‹ЫЛ˜ ЩФ˘ МЛ¯·У‹М·ЩФ˜ О·И У· ˙ЛЩ‹ЫВЩВ
И·ЩЪИО‹ Ы˘М‚Ф˘П‹.
ГЪЛЫИМФФИВ›ЩВ О·Щ¿ППЛПЛ
ВУ‰˘М·Ы›· О·Щ¿ ЩЛ ‰И¿ЪОВИ· ЩЛ˜ ВЪБ·Ы›·˜. ∏ ∞УЩИЪФЫˆВ›· МФЪВ› У· Ы·˜ ·Ъ¿Ы¯ВИ ПЛЪФКФЪ›В˜
Ы¯ВЩИО¿ МВ Щ· О·Щ·ППЛПfiЩВЪ· ˘ПИО¿ ЪfiПЛ„Л˜ ЩˆУ
·Ù˘¯ËÌ¿ÙˆÓ ÁÈ· ·ÛÊ·Ï‹ ÂÚÁ·Û›·.
ƒÀ£ªπ™∏ Ã∂πƒ√§∞μ∏™ (∂ÈÎ. 5)
∏ ›Ыˆ ¯ВИЪФП·‚‹ (1) МФЪВ› У· П¿‚ВИ 3 ‰И·КФЪВЩИО¤˜
ı¤ЫВИ˜ ˆ˜ ЪФ˜ ЩФ Ы‡ЫЩЛМ· ОФ‹˜, ЪФОВИМ¤УФ˘ У·
‰ИВ˘ОФП‡УФУЩ·И ФИ ВЪБ·Ы›В˜ КИУИЪ›ЫМ·ЩФ˜ ЩˆУ
ı¿МУˆУ.
∏ Ъ‡ıМИЫЛ ЩЛ˜ ¯ВИЪФП·‚‹˜
Ъ¤ВИ У· Б›УВИ МВ ЩФУ ОИУЛЩ‹Ъ· Ы‚ЛЫЩfi.
– ∫·ЩВ‚¿ЫЩВ ЩФ МФ¯Пfi ·ВПВ˘ı¤ЪˆЫЛ˜ (2).
– °˘Ъ›ЫЩВ ЩЛУ ›Ыˆ ¯ВИЪФП·‚‹ (1) ЫЩЛУ ВИı˘МЛЩ‹
ı¤ÛË.
– ¶ЪИУ ¯ЪЛЫИМФФИ‹ЫВЩВ ЩФ МЛ¯¿УЛМ·, ‚В‚·ИˆıВ›ЩВ
fiЩИ Ф МФ¯Пfi˜ ·ВПВ˘ı¤ЪˆЫЛ˜ (2) ¤¯ВИ ВУЩВПТ˜
ВИЫЩЪ¤„ВИ ЫЩЛУ ¿Уˆ ı¤ЫЛ О·И fiЩИ Л ›Ыˆ
¯ВИЪФП·‚‹ В›У·И ЫЩ·ıВЪ‹.
¶ƒ√™√Ã∏!
¶ƒ√™√Ã∏!
¶ƒ√™√Ã∏!
∫·Щ¿ ЩЛ ‰И¿ЪОВИ· ЩЛ˜ ВЪБ·Ы›·˜ Л ›Ыˆ ¯ВИЪФП·‚‹ Ъ¤ВИ У· В›У·И ¿УЩФЩВ О¿ıВЩЛ, ·УВН¿ЪЩЛЩ· ·fi ЩЛ ı¤ЫЛ ЩФ˘ Ы˘ЫЩ‹М·ЩФ˜
ОФ‹˜ (3).
Δƒ√¶√™ ∫√¶∏™
∫·Ù¿ ÙË ‰È¿ÚÎÂÈ· Ù˘ ÎÔ‹˜
Ú¤ÂÈ Ó· Îڷٿ٠¿ÓÙ· ÛÙ·ıÂÚ¿ ÙÔ Ì˯¿ÓËÌ· ÌÂ
Ù· ‰‡Ô ¯¤ÚÈ·.
™‚‹ЫЩВ ·М¤Ыˆ˜ ЩФУ ОИУЛЩ‹Ъ·
·Ó Ù· Ì·¯·›ÚÈ· ÌÏÔοÚÔ˘Ó Î·Ù¿ ÙË ‰È¿ÚÎÂÈ· Ù˘
ÂÚÁ·Û›·˜ ‹ ·Ó ÌÂډ¢ÙÔ‡Ó ÛÙ· ÎÏ·‰È¿ ÙÔ˘ ı¿ÌÓÔ˘.
∂›У·И ¿УЩФЩВ ЪФЩИМfiЩВЪФ У· Оfi‚ВЩВ ЪТЩ· ЩИ˜ ‰‡Ф
О¿ıВЩВ˜ ПВ˘Ъ¤˜ ЩФ˘ ı¿МУФ˘ О·И ЫЩЛ Ы˘У¤¯ВИ· ЩФ
¿Уˆ М¤ЪФ˜.
- ∫¿ıÂÙË ÎÔ‹ (∂ÈÎ. 6)
∏ ÎÔ‹ Ú¤ÂÈ Ó· Á›ÓÂÙ·È Ì ÙÔً͈ ΛÓËÛË ·fi οو
ÚÔ˜ Ù· ¿Óˆ, ÎÚ·ÙÒÓÙ·˜ ÙÔ Ì·¯·›ÚÈ fiÛÔ ÙÔ ‰˘Ó·ÙfiÓ
ÈÔ Ì·ÎÚÈ¿ ·fi ÙÔ ÛÒÌ·.
- √ÚÈ˙fiÓÙÈ· ÎÔ‹ (∂ÈÎ. 7)
Δ· О·П‡ЩВЪ· ·ФЩВП¤ЫМ·Щ· ВИЩ˘Б¯¿УФУЩ·И М· ЩФ
М·¯·›ЪИ ВП·КЪ¿ ОВОПИМ¤УФ (5Ж – 10Ж) ЪФ˜ ЩЛУ
О·ЩВ‡ı˘УЫЛ ОФ‹˜, МВ ЩФНˆЩ‹ О›УЛЫЛ О·И ·ЪБ‹ О·И
ЫЩ·ıВЪ‹ МВЩ·О›УЛЫЛ, И‰›ˆ˜ ЫВ ВЪ›ЩˆЫЛ ФП‡
˘ОУТУ ı¿МУˆУ.
§π¶∞¡™∏ Δø¡ ª∞Ã∞πƒπø¡ ∫∞Δ∞ Δ∏¡ ∂ƒ°∞™π∞
∂¿У ЩФ Ы‡ЫЩЛМ· ОФ‹˜ ıВЪМ·›УВЩ·И ˘ВЪ‚ФПИО¿ О·Щ¿
ЩЛУ ВЪБ·Ы›·, Ъ¤ВИ У· ПИ¿УВЩВ ЩИ˜ ВЫˆЩВЪИО¤˜
ВИК¿УВИВ˜ ЩˆУ М·¯·ИЪИТУ.
∏ В¤М‚·ЫЛ ·˘Щ‹ Ъ¤ВИ У·
Б›УВЩ·И МВ ЩФУ ОИУЛЩ‹Ъ· Ы‚ЛЫЩfi О·И Щ· М·¯·›ЪИ·
·ОИУЛЩФФИЛМ¤У·.
Δ∂§√™ ∂ƒ°∞™π∞™
ªÂÙ¿ ÙÔ Ù¤ÏÔ˜ Ù˘ ÂÚÁ·Û›·˜:
– ™‚‹ЫЩВ ЩФУ ОИУЛЩ‹Ъ· ВК·ЪМfi˙ФУЩ·˜ ЩИ˜ Ф‰ЛБ›В˜
(ÎÂÊ. 5).
– ¶ВЪИМ¤УВЩВ ¤ˆ˜ fiЩФ˘ ·ОИУЛЩФФИЛıФ‡У Щ· М·¯·›ЪИ·
Î·È ÙÔÔıÂÙ‹ÛÙ ÙËÓ ÚÔÛÙ·Û›·.
¶ƒ√™√Ã∏!
¶ƒ√™√Ã∏!
¶ƒ√™√Ã∏!
¶ƒ√™√Ã∏!
6. Ã∏™∏ Δ√À ª∏Ã∞¡∏ª∞Δ√™
Page 100

10
™À¡Δ∏ƒ∏™∏ ∫∞π ∞¶√£∏∫∂À™∏
EL
∏ ÛˆÛÙ‹ Û˘ÓÙ‹ÚËÛË Â›Ó·È ··Ú·›ÙËÙË ÁÈ· Ó·
‰È·ÙËÚÔ‡ÓÙ·È ÔÈ ·Ú¯ÈΤ˜ ÂȉfiÛÂȘ Î·È ÙÔ Â›Â‰Ô
·ÛÊ·Ï›·˜ ÙÔ˘ Ì˯·Ó‹Ì·ÙÔ˜ Ì ÙËÓ ¿ÚÔ‰Ô ÙÔ˘
¯ÚfiÓÔ˘.
∫·Щ¿ ЩЛ ‰И¿ЪОВИ· ЩˆУ ВВМ‚¿ЫВˆУ Ы˘УЩ‹ЪЛЫЛ˜:
– ∞ФЫ˘У‰¤ЫЩВ ЩЛУ ›· ·fi ЩФ МФ˘˙›
– ¶ВЪИМ¤УВЩВ ¤ˆ˜ fiЩФ˘ ОЪ˘ТЫВИ Ф ОИУЛЩ‹Ъ·˜.
– ГЪЛЫИМФФИВ›ЩВ ЪФЫЩ·ЩВ˘ЩИО¿ Б¿УЩИ· БИ· ЩИ˜
ÂÂÌ‚¿ÛÂȘ ÛÙ· Ì·¯·›ÚÈ·.
– Ê‹ÛÙ ÙÔÔıÂÙË̤Ó˜ ÙȘ ÚÔÛٷۛ˜ ÙÔ˘
Ì·¯·ÈÚÈÔ‡, ÂÎÙfi˜ Î·È ·Ó ÚfiÎÂÈÙ·È Ó· ¤̂ÂÙÂ
ÛÙÔ Ì·¯·›ÚÈ.
– ¶ÔÙ¤ ÌËÓ ÛÎÔÚ›˙ÂÙ ÛÙÔ ÂÚÈ‚¿ÏÏÔÓ Ï¿‰È·,
‚ÂÓ˙›ÓË ‹ ¿ÏÏ· ÚÔ˚fiÓÙ· Ô˘ Ú˘·›ÓÔ˘Ó!
∫∞£∞ƒπ™ª√™ Δ√À ∫π¡∏Δ∏ƒ∞ ∫∞π Δ∏™ ∂•∞Δªπ™∏™
°И· У· МВИТЫВЩВ ЩФУ О›У‰˘УФ ˘ЪО·БИ¿˜, О·ı·Ъ›˙ВЩВ
Щ·ОЩИО¿ Щ· ЩВЪ‡БИ· ЩФ˘ О˘П›У‰ЪФ˘ МВ ВИВЫМ¤УФ
·¤Ъ· О·И О·ı·Ъ›˙ВЩВ ЩЛУ ВЪИФ¯‹ ЩЛ˜ ВН¿ЩМИЫЛ˜ ·fi
ОП·‰И¿, К‡ПП· ‹ ¿ПП· ˘ФПВ›ММ·Щ·.
∫∞£∞ƒπ™ª√™ ºπ§Δƒ√À ∞∂ƒ∞
√ ηı·ÚÈÛÌfi˜ ÙÔ˘ Ê›ÏÙÚÔ˘
·¤Ъ· В›У·И ··Ъ·›ЩЛЩФ˜ БИ· ЩЛУ О·П‹ ПВИЩФ˘ЪБ›· О·И
ЩЛ ‰И¿ЪОВИ· ˙ˆ‹˜ ЩФ˘ МЛ¯·У‹М·ЩФ˜.
√ О·ı·ЪИЫМfi˜ Ъ¤ВИ У· ВОЩВПВ›Щ·И О¿ıВ 8-10 ТЪВ˜
ВЪБ·Ы›·˜.
°È· Ó· ηı·Ú›ÛÂÙ ÙÔ Ê›ÏÙÚÔ (∂ÈÎ. 8):
– •Â‚ȉÒÛÙ ÙË Ï·‚‹ (1) ‚Á¿ÏÙ ÙÔ Î·¿ÎÈ (2) Î·È ÙÔ
ÛÙÔÈ¯Â›Ô Ê›ÏÙÚÔ˘ (3).
– ¶Ï‡ÓÂÙ ÙÔ ÛÙÔÈ¯Â›Ô Ê›ÏÙÚÔ˘ (3) Ì ÓÂÚfi ηÈ
Ы·Ф‡УИ. ªЛ ¯ЪЛЫИМФФИВ›ЩВ ‚ВУ˙›УЛ ‹ ¿ППФ˘˜
‰И·П‡ЩВ˜.
– ∞К‹ЫЩВ У· ЫЩВБУТЫВИ ЩФ К›ПЩЪФ ·¤Ъ·.
– ΔФФıВЩ‹ЫЩВ ЩФ ЫЩФИ¯В›Ф К›ПЩЪФ˘ (3) О·И ЩФ О·¿ОИ
(2) ЫК›ББФУЩ·˜ О·П¿ ЩЛ П·‚‹ (1).
ºπ§Δƒ√ ∫∞À™πª√À
™ЩФ ВЫˆЩВЪИОfi ЩФ˘ ЪВ˙ВЪ‚Ф˘¿Ъ ˘¿Ъ¯ВИ К›ПЩЪФ Ф˘
‰ВУ ВИЩЪ¤ВИ ЫЩИ˜ ·О·ı·ЪЫ›В˜ У· ВИЫ¤ПıФ˘У ЫЩФУ
ОИУЛЩ‹Ъ·.
ΔÔ Ê›ÏÙÚÔ Ú¤ÂÈ Ó· ·ÓÙÈηı›ÛÙ·Ù·È ÌÈ· ÊÔÚ¿ ÙÔ
¯ÚfiÓÔ ·fi ÙËÓ ∞ÓÙÈÚÔۈ›·.
™∏ª∞¡Δπ∫√
¶ƒ√™√Ã∏!
∂§∂°Ã√™ ª¶√À∑π
μÁ¿˙ÂÙÂ Î·È Î·ı·Ú›˙ÂÙ ηٿ ÂÚÈfi‰Ô˘˜ ÙÔ ÌÔ˘˙›
·К·ИЪТУЩ·˜ Щ˘¯fiУ ˘ФПВ›ММ·Щ· МВ МВЩ·ППИО‹
‚Ф‡ЪЩЫ·.
∂П¤Б¯ВЩВ ЩЛУ О·ı·ЪИfiЩЛЩ· О·И ЩЛ ЫˆЫЩ‹ ·fiЫЩ·ЫЛ
МВЩ·Н‡ ЩˆУ ЛПВОЩЪФ‰›ˆУ (∂ИО. 9).
ΔФФıВЩ‹ЫЩВ ЩФ МФ˘˙› О·И ЫК›НЩВ ЩФ О·П¿ МВ ЩФ
МФ˘˙fiОПВИ‰Ф ЩФ˘ ВНФПИЫМФ‡.
ΔÔ ÌÔ˘˙› Ú¤ÂÈ Ó· ·ÓÙÈηı›ÛÙ·Ù·È Ì ·ÓÙ·ÏÏ·ÎÙÈο
·У¿ПФБˆУ ¯·Ъ·ОЩЛЪИЫЩИОТУ ЫВ ВЪ›ЩˆЫЛ Ф˘ ¤¯Ф˘У
О·В› Щ· ЛПВОЩЪfi‰И· ‹ ¤¯ВИ Кı·ЪВ› Л МfiУˆЫЛ О·И
ФˆЫ‰‹ФЩВ О¿ıВ 50 ТЪВ˜ ПВИЩФ˘ЪБ›·˜
ƒÀ£ªπ™∏™ ∫∞ƒª¶Àƒ∞Δ∂ƒ
ΔФ О·ЪМ˘Ъ·Щ¤Ъ В›У·И Ъ˘ıМИЫМ¤УФ ·fi ЩФ
ВЪБФЫЩ¿ЫИФ ¤ЩЫИ ТЫЩВ У· ВИЩ˘Б¯¿УФУЩ·И ФИ М¤БИЫЩВ˜
ВИ‰fiЫВИ˜ ЫВ О¿ıВ О·Щ¿ЫЩ·ЫЛ ¯Ъ‹ЫЛ˜ МВ ЩЛУ
ВП¿¯ИЫЩЛ ВОФМ‹ ВИ‚П·‚ТУ О·˘Ы·ВЪ›ˆУ Ы‡МКˆУ·
МВ ЩЛУ ИЫ¯‡Ф˘Ы· УФМФıВЫ›·.
™В ВЪ›ЩˆЫЛ МВ›ˆЫЛ˜ ЩˆУ ВИ‰fiЫВˆУ, ВП¤БНЩВ
О·Щ·Ъ¯¿˜ ·У Щ· М·¯·›ЪИ· ¤¯Ф˘У МПФО¿ЪВИ ‹
·Ъ·МФЪКˆıВ› О·И ·В˘ı˘УıВ›ЩВ ЫЩЛУ ∞УЩИЪФЫˆВ›· БИ· ¤ПВБ¯Ф ЩЛ˜ ЩЪФКФ‰ФЫ›·˜ О·И ЩФ˘ ОИУЛЩ‹Ъ·.
ñ ƒ‡ıÌÈÛË ÚÂÏ·ÓÙ›
ΔФ Ы‡ЫЩЛМ· ОФ‹˜ ‰ВУ Ъ¤ВИ У· ОИУВ›Щ·И МВ ЩФУ ОИУЛЩ‹Ъ· ЫЩФ ЪВП·УЩ›. ∂¿У ЩФ
Ы‡ЫЩЛМ· ОФ‹˜ ОИУВ›Щ·И МВ ЩФУ ОИУЛЩ‹Ъ· ЫЩФ ЪВП·УЩ›, Ъ¤ВИ У· ·В˘ı˘УıВ›ЩВ ЫЩЛУ ∞УЩИЪФЫˆВ›· БИ·
У· Ъ˘ıМ›ЫВИ ЫˆЫЩ¿ ЩФУ ОИУЛЩ‹Ъ·.
§π¶∞¡™∏ Δ√À ª∂πøΔ∏ƒ∞ (∂ÈÎ. 10)
∫¿ıВ 20 ТЪВ˜ ПВИЩФ˘ЪБ›·˜ Ъ¤ВИ У· ·ФО·ıИЫЩ¿ЩВ
ЩЛ ЫЩ¿ıМЛ ЩФ˘ ВИ‰ИОФ‡ БЪ¿ЫФ˘ ‰ИıВИТ‰Ф˘˜ МФП˘‚‰ВУ›Ф˘ ЪФЫı¤ЩФУЩ·˜ БЪ¿ЫФ ·fi ЩФ БЪ·Ы·‰fiЪФ (1).
∂§∂°Ã√™ ∫∞π ∫∞£∞ƒπ™ª√™ Δø¡ ª∞Ã∞πƒπø¡
∂П¤Б¯ВЩВ ВЪИФ‰ИО¿ Щ· М·¯·›ЪИ· ТЫЩВ У· ‚В‚·ИˆıВ›ЩВ fiЩИ ‰ВУ В›У·И ЫЩЪ·‚ˆМ¤У· ‹
О·ЩВЫЩЪ·ММ¤У· О·И fiЩИ ФИ ‚›‰В˜ В›У·И О·П¿
ЫКИБМ¤УВ˜.
¶ƒ√™√Ã∏!
¶ƒ√™√Ã∏!
7. ™À¡Δ∏ƒ∏™∏ ∫∞π ∞¶√£∏∫∂À™∏
 Loading...