

Page 1

B
Instruction manual
ł
SH 60
8219-3218-01
Page 2
1
2
3
5
4
8 mm
6
Page 3
7
Page 4
9
S
1+2 Handtag(1) + Bygelhandtag(2)
& Strömbrytare
3 Skyddskåppa
4 Elektrisk sladd med kontakt
5 Skyddskena för knivbladen
6 Skyddskåpa
SF
1+2 Kahva(1) + Lenkki kahva(2)
& Strömbrytare
3 Skyddskåppa
4 Elektrisk sladd med kontakt
5 Skyddskena för knivbladen
6 Skyddskåpa
NL
1+2 Bedrijfschakelaar
(2-hand bediening)
3 Beschermschild
4 Netleiding met stekker
5 Veiligheidsmesbalk
6 Aanstootbeveiliging
GB
1+2 Operating Switches
(two-hand operation)
3 Hand Guard
4 Power Cord
5 Blade Safety Rail
6 Impact Protector
N
1+2 Håndtak(1) + Bøylehåndtag(2)
& Bryter
3 Skjerm
4 Hoveledning med støpsel
5 Sikkerhetsskinne for knivblad
6 Beskyttelse mot støt
DK
1+2 Håndtag(1) + Bøjiehåndtag(2)
& Afbryder
3 Værn
4 El-ledning med stik
5 Klingeværn
6 Støddæmper
D
1+2 Griff (1) und Bügelgriff (2)
mit Sicherheitsschalter
3 Schutzschild
4 Netzleitung mit Stecker
5 Sicherheitsmesserbalken
6 Anstoßschutz
F
1+2 Interrupteur
(maniement à 2 mains)
3 Bouclier de protection
4 Câble de secteur avec connecteur
5 Couteaux de sécurité
6 Butée de protection
CZ
1+2 Rukojet s okrouhlou ochranou (1) +
Oblouková rukojet (2) s bezpecnostním
spínacem
3 Ochranný štít
4 Prívodní kabel se zástrckou
5 Bezpecnostní nosníky nozu
6 Ochrana proti nárazu
PL
1+2 Uchwyt z przelacznikiem (1)+ Uchwyt
kablakowy z przelacznikiem (2) bezpieczenstwa
3 Tarcza ochronna
4 Kabel przylaczeniowy z wtyczka
5 Belka z nozami
6 Ochrona przed uderzaniem
Page 5

Illustrasjon og forklaring av symboler
Piktogramillustration og forklaring
Illustration och förklaring av piktogramen
Symbolien selitykset
Afbeelding en toelichting van de pictogrammen
Abbildung und Erklärung der Piktogramme
Pictogram illustration and explanation
Représentation et explication des pictogrammes
Vyobrazení a vysvìtlivky k typovému štitku
Ilustracja i objaœnienia piktogramów
1 2 3 4 5
S
1 Bär alltid ögon- och hörselskydd!
2 Varning!
3 Läs bruksanvisningen före användning!
4 Använd inte detta eldrivna redskap i fuktig
väderlek!
5 Ta genast bort kontakten om sladden skadas
eller går av!
SF
1 Käytä alna allmä- ja kuulosuojajmia!
2 Varoitus!
3 Lue käyttöohjeet ennen käyttöä!
4 Älä käytä tätä sähkökäyttösistä työvälinettä
märällä ilmalla!
5 Irrota pistoke välittömästi, jos verkkojohto on
vauriotunut tai katkennut!
NL
1 Gehoor- en oogbeveiliging dragen!
2 Waarschuwing!
3 Leest U de gebruiksaanwijzing, a.u.b.
4 Dit elektrowerktuig niet aan de regen
onderwerpen!
5 Bij beschadiging of doorsnijden van de aan-
sluitingsleiding dadelijk de stekker uittrekken!
GB
1 Wear eye and ear protection!
2 Warning!
3 Read the instruction manual !
4 Do not use tool in under wet weather
conditions!
5 Unplug immediately if the power cord or
plug becomes damaged !
CZ
1 Používejte ochranu zraku a sluchu!
2 POZOR!
3 Čtěte návod k pouzitíu !
4 Nepoužívejte zařízení ve vihku!
5 Okamžitě odpojte zařízení od sítě v případě,
že je přívodní kable poškozen nebo přerušen!
N
1 Bruk alltid øye- og hørselsvern!
2 Advarsel!
3 Les bruksanvisningen før bruk!
4 Ikke bruk dette elektriske redskapet i fuktig
vær!
5 Trekk øyeblikkelig støpselet ut hvis ledningen
er skadet!
DK
1 Brug altid beskyttelsesbriller og høreværn !
2 Advarsel!
3 Læs instruktionerne, inden maskinen tages i
brug!
4 Brug ikke dette elektriske apparat i fugtigt vejr!
5 Tag stikket ud, hvis ledningen bliver beskadiget
eller klippet over!
D
1 Augen- und Gehörschutz tragen!
2 Warnung!
3 Gebrauchsanweisung lesen!
4 Dieses Elektrowerkzeug nicht dem Regen
aussetzen
5 Bei Beschädigung oder Durchschneiden der
Anschlußleitung sofort Stecker ziehen!
F
1 Porter des protections des yeux et des oreilles!
2 Attention!
3 Lisez l’instruction de service!
4 Ne pas laisser cet outil électrique sous la
pluie!
5 En cas de détérioration ou section du câble
retirer immédiatement la prise!
PL
1 Nosić ochronniki słuchu i okulary ochronne.
2 Uwaga!
3 Przed użyciem przeczytać instrukcję obsługi.
4 Nie dopuszczać do kontaktu z wilgocią.
5 Odlączyć z sieci jeśli przewód polączoniowy
jest uszkodzony lub przecięty
Page 6

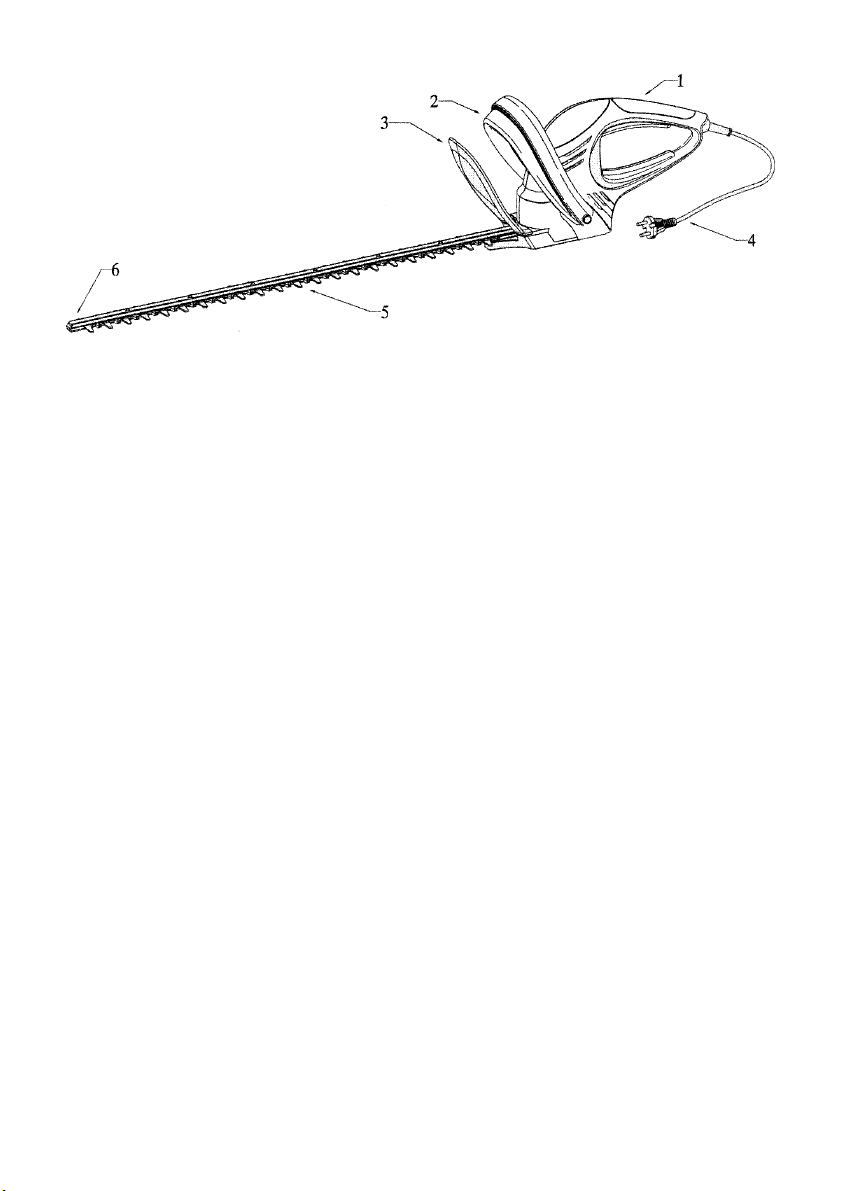
Hedge Trimmer
1. Introducing the hedgetrimmer
Technical data SH 60
Operating Voltage V~ 230
Nominal Frequency Hz 50
Nominal Consumption W 600
Mains Safety Fuse A 16
Cutting movements min
Shear length mm 600
Cutting Thickness mm 27
Weight (without flex) kg 3,6
Noise Pressure Level: L
Vibration: <2,5 m/s
-1
89 dB (A) according to EN 50144
pA
2400
2
according to EN 50144
ENGLISH
2. General safety instructions
Machine noise information regulation 3, GSGV:
the noise pressure level at the place of work can
exceed 85 dB(A). In such cases the operator will
require noise protection (e.g. wearing of ear
protectors).Attention: Noise protection ! Please
observe the local regulations when operating
your device.
Interference suppressed in accordance with
EN 55014, EN 61000-3-2:95, EN 61000-3-3:95 .
We reserve the right to make changes to the
technical specifications.The hedge trimmers are
constructed in line with the latest regulations in
accordance with DIN-EN 50144-1and DIN-EN
50144-2-15 and conform fully to equipment safety
law regulations.
General safety instruction
Usage of hedge trimmer always involves a
risk of accidents, therefore please observe
the relevant accident prevention instructions.
The machine has been constructed according to the latest technology and in
accordance with the recognised technical
safety regulations. Nevertheless, use of
the machine can involve risks to the user or
third persons, and can cause damage to the
machine or other objects.
Attention: Using electric power tools, you
must observe following fundamental
safety instructions to protect yourself
against electric shock, against danger of
injuries and danger of fire. Read all these
instructions before using the hedge
trimmer and observe them. Keep these
safety instructions at a safe place.
Use the machine in a safety conscious
manner for suitable applications in a
technically perfect condition only and with
due regard to the operating instructions!
Immediately rectify or have rectified any
faults which could adversely affect safety!
This machine may cause serious injuries.
Please read the instruction manual carefully as to the correct handling, the preparations, the maintenance and the proper
use of the hedgetrimmer. Familiarize yourself with the machine before the first use
and also have yourself introduced to
practical use of the machine.
3. Application
The machine is only intended for trimming
hedges. Use for any other purpose constitutes inappropriate use. The manufacturer
/ supplier is not liable for any injury and/or
damage arising from inappropriate use.
This risk is the sole responsibility of the
user. Appropriate use of the machine also includes adherence to the operating instructions and compliance with the servicing
and maintenance instructions.
Always keep the operating instructions
close at hand during operation!
4. Safety instruction
1. Always disconnect the plug from the
mains socket before carrying out any
work on the equipment, before cleaning
and before moving the equipment.
Page 7

2. The use of hedge trimmers involves
certain risks. Attention: Danger!
Rotating machinery.
3. The hedge trimmer should always be
held with both hands.
4. Before using the equipment clear the
working area of any foreign objects and
be aware of foreign objects during
operation of the machine! If the
machine becomes jammed e.g. by thick
branches, switch off and disconnect the
machine from the mains socket before
investigating and rectifying the cause of
the jam. Take special care when switching the machine on again.
5. Check the flex and all connections for
any visible faults before using the
machine (plug disconnected). Do not
use a faulty flex.
6. Keep the flex away from the cutting area.
7. Do not use the trimmer in wet weather
and do not use it to cut wet hedges.Do
not wash down the device with water. Do
not use any high-pressure cleaning devices or steam jet devices for cleaning
8. Carry the trimmer by the handles
provided and keep hands away from
the cutting blades.
9. In line with agricultural Trade Association Regulations only persons over
the age of 17 may work on their own
with electric hedge trimmers. Use is
permitted for persons over 16 years if
the work is carried out under the
supervision of adults.
10.We would recommend that safety
clothing is worn during the work and
that eyes, ears, hair, hands and feet are
fully protected. Protective gloves should
also be worn.
11.Ensure that the motor of your hedge
shears can not be switched on by
mistake when you put it down after
work or when you are going to clean the
device. Never forget to unplug the
mains supply!
12.Check the cutting unit regularly for
damage and if damage is discovered,
the cutting unit should be properly
repaired.
13.Be aware of your responsibility as user
towards third parties in the working
area.
14.The trimmer must be properly checked
and serviced. If the blades get damaged
they should only be exchanged in pairs.
In the event of damage from impact,
specialist’s inspection is essential.
15.Only use extension leads which have
been authorised for outside use. These
flexes must not be lighter than PVC
covered flex conforming to 227 IEC 53.
They must be water spray protected.
Damaged cables of this unit are only to
be replaced by a service station designated by the manufacturer as special
tools are necessary. Equipment which
will be used in different outside locations should be connected via residualcurrent - operated current breakers.
16.Ensure that the equipment is stored
safely after use in such a way that the
blade cannot be touched.
17.When using the equipment, hold it
securely with both hands, stand firmly
and ensure that you have sufficient
working space. There should be no
people, animals or objects within the
working area. Select the cutting height
so that the blade does not make contact
with the ground and you can operate the
equipment from a secure position.
18.Take care when transporting the equipment (only with blade cover!).
19.For initial use of the hedge trimmer we
would recommend that in addition to
reading the operating instructions, you
also seek a practical demonstration
from an expert.
20.Always ensure that all protective
devices and handles are properly fitted.
Never attempt to use an incomplete
machine.
21.The use of the hedgetrimmer is to be
avoided if other persons, above all
children, are within the working area.
22.Familiarize yourself with the working
area and pay attention to possible
dangers which you might not be able to
hear due to the noise of the machine.
5. Before use
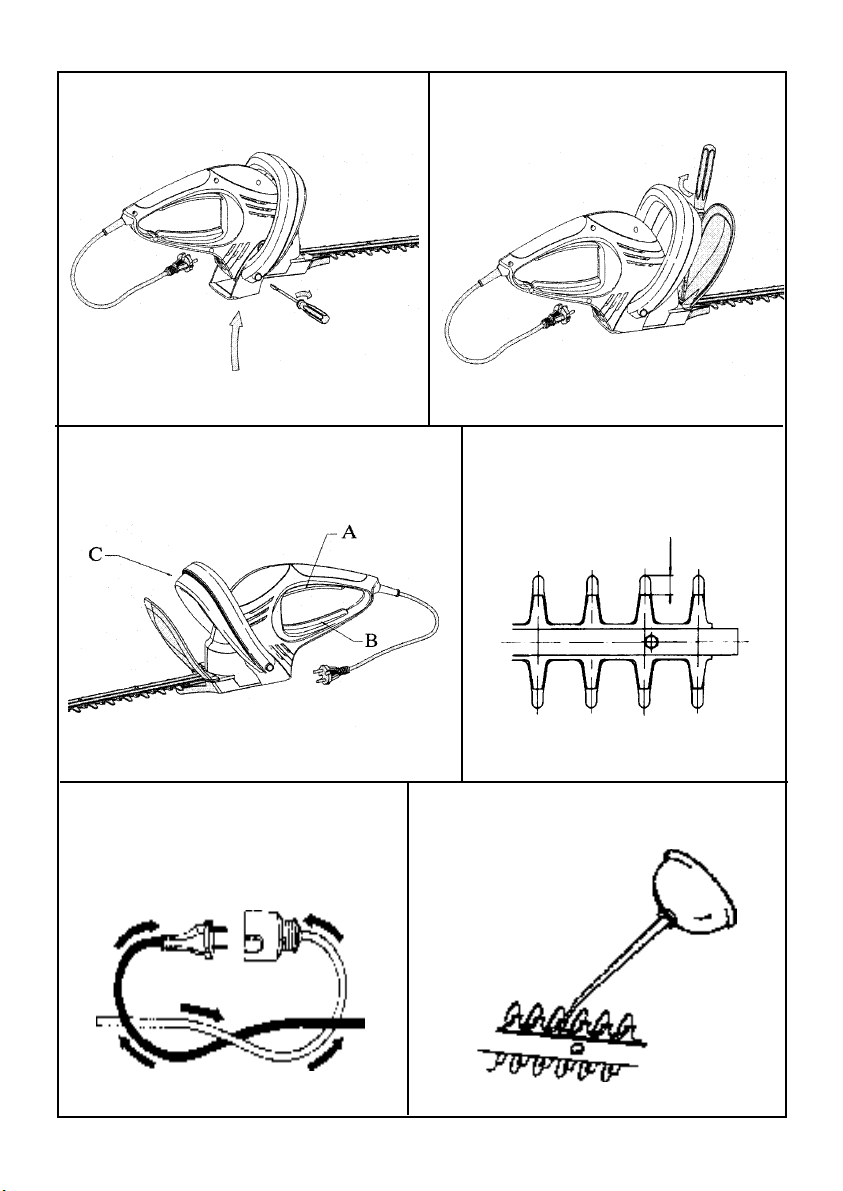
Mounting the bow-type handle (Fig. 1)
If there are screws fixed to the mounting points,
remove these first.Then, remove the shear protector and put the bow-type handle from the front
(as shown in Fig. 1) over the shearing system,
and put it into the relief of the hedge shears’ hou-
Page 8

sing. (If necessary, pull the lower ends of the
handle slightly apart.) Take care that you do not
squeeze the two parts of the bow-type handle.
To fasten the bow-type handle screw the two
included screws through the openings in the
handle into the threaded holes of the housing and
fasten them tightly. After fastening the handle,
remove the transportation protection (scotch
tape).
Protection shield (Fig. 2)
If screws are fastened to the bottom plate, remove
these.Fasten the hand protector with the two included screws to the bottom plate.
Power connection
The machine can only be connected to a singlephase a.c. current connection. The machine is
protectively insulated in accordance with classification II of VDE 0740 and can therefore be
connected to sockets without earth connections.
Before using the machine ensure that the mains
current agrees with the operating voltage data on
the machine’s identification plate.
Power circuit breaker:
Machines which will be used in different
outside locations must be connected to a
Power circuit breaker.
Securing the extension lead (Fig. 5)
Only use extension leads suitable for outside use.
The cross section of the wire (max. length of
extension cord: 75m) must be at least 1,5 mm2.
Secure the equipment flex to the extension lead
by means of a loop (Fig. 5).
Extension leads longer than 30 m will reduce the
performance of the machine.
6. Instructions for use of the equipment
Do not use the trimmer in rain or for cutting
wet hedges!
Check the hedge trimmer flex and its
connections before each and every use for
visible signs of damage (disconnect the
power plug)! Do not use a faulty flex.
Gloves:
Protective gloves must be worn when using
the hedge trimmer.
.7. Maintenance
Always disconnect the plug from the
power socket before commencing any
work on the machine.
Important: Always clean and oil the blades after
prolonged use of the hedge trimmer. This will
greatly affect the life of the equipment. Damaged
cutting units must be properly repaired
immediately.Clean the shearing blades with a dry
cloth or – in case of heavier dirt – with a brush.
Attention: Danger of injury!Oiling of the
blades should ideally be carried out using an
environmentally friendly lubricant (Fig. 6).
Sharpening of the blades
The blades generally do not need servicing and
do not require resharpening if used correctly. In
order to prevent injuries caused by the blades
when not in use, the sharpened cutting blade
should be covered by the blade cover (Fig. 4).
The blades cannot be sharpened by the user
without opening the equipment and the safety
mechanism. Resharpening of the blades can
therefore only be carried out at a specialist
workshop.
Changing the blades
Only correct installation of the blades will
guarantee problem-free operation and function of
the above mentioned safety feature of the
blades. Changing of the blades should therefore
only be carried out at a specialist workshop.
8. Holding the hedge trimmer when in use
( Fig. 7)
This equipment will enable you to cut or trim
bushes and hedges easily and comfortably.
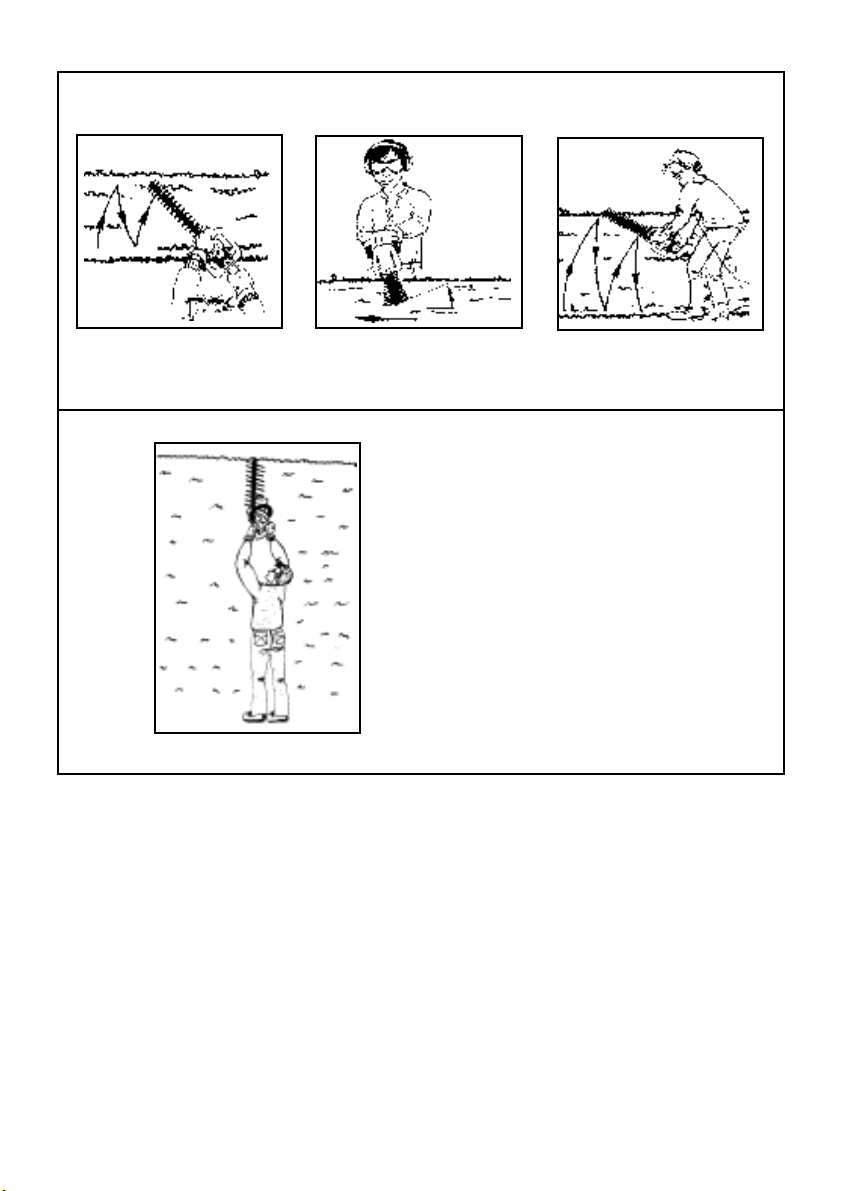
Trimming of hedges
- Young shoots are best cut in a scythe movement.
- Older and stronger hedges are best cut in a
sawing movement.
- Branches, which are too thick for the hedge
trimmer, should be cut with a saw.
- Sides of hedges should be cut upwards in a
taper.
In order to achieve an even height
- Fix a guide line at the required height.
- Cut evenly over this guide line.
9. Optimum safety
The 5 special features two-hand safety
switch, quick blade stop, protective cover,
blade safety rail and impact protector are
fitted to provide the hedge trimmer with
optimum safety features.
Page 9

Two-hand safety switch (Fig. 3)
To switch on the hedge shears one of the switch
bars on the hand grip (A or B) and the switch
on the bow-type handle (C) must be held down.
If one of the switches is released, the shearingblades will stop after ca. 0.2 seconds.
Expanded working height:If you want to reach
higher or if you to above your head’s height
( see Fig. 8 ), you should take care of the following:
Attention: Take care to have a secure and
safe standing position when working with
your hedge shears in order to avoid slipping
and injury. Always keep the shearing blades
away from your body.
Quick blade stop
In order to avoid injuries through cuts, the blade
will stop in max. 0.2 sec. when one of the two
switches is released.
Blade safety rail (Fig. 4)
The cutting blade set back from the blade housing
reduces the risk of injuries due to unintentional
body contact. As soon as the hedge trimmer is
switched off, the sharp cutting blades will stop due to safety reasons - exactly under the cover
rail in order to reduce the risk of injuries during
transport.
Impact protector (Fig. 9)
The extended guide rail prevents unpleasant
shocks (blade recoil) being transmitted to the
operator due to impact with solid objects (wall,
ground etc.).
Gear protection feature
If solid objecst are caught in the cutting blade and
jam the motor, switch off the machine at once,
disconnect the power plug from the power
socket, remove the object and continue with the
work.
The equipment is also fitted with an overload cutout, which protects the gears against mechanical
damage in the event of blade jams.
that is not harmful to the environment , e. g. our
service spray. Then put the shears in their case
with the cutting blades first.
11.Repair service
Repairs to electric power tools should only be
carried out by specialist electrical personnnel.
10. Storing the trimmer after use
The hedge shears must be stored such
that there is no danger of injuries being
caused to persons by the cutting blades!
Important note: The shearing blades should be
cleaned after each use.(see also Section 7.
Maintenance).This will considerably increase the
service life of the device. Please use a lubricator
Page 10

NL
Wij,
STIGA AB, SE-57328 - TRANÅS / SWEDEN,
SH 60 (EHT 600 Profi),
fundamentele veiligheids en gezondheidseisen van de Richtlijn
(EMV-Richtlijn) , 73/23/EEG (neerspanningsrichtlijn)
tenuitvoerlegging van de in de Richtlijnen genoemde veiligheids- en gesondheidseisen is rekening gehouden
met de volgende normen en/of technische spezificaties:
EN 55014-2, EN 61000-3-2, EN 61000-3-3.
Gemeten geluidsvermogensniveau * 96 db (A) * De bevoegde dienst: DPLF, D-34114 Kassel
Gegarandeerd geluidsvermogensniveau * 98 db (A)
Tranås, 22.03.2002 Åke Winbladh, Teknisk Direktör.
waarop deze verklaring betrekking heeft, beantwoordt aan de van toepassing zijnde
EG-Conformiteitsverklaring
overeenkomstig EG-machinerichtlijn
verklaren enig in verantwoording, dat het produkt
98/37/EG
en 2000/14/EG (geluidsrichtlijn).
EN 774, EN 50144-1, EN 50144-2-15, EN 55014-1,
98/37/EG
Heggeschaar
(EG-machinerichtlijn), 89/336/EEG
Voor de desbetreffende
D
Wir,STIGA AB, SE-57328 - TRANÅS / SWEDEN, erklären in alleiniger Verantwortung, daß das Produkt
Heckenschere SH 60 (EHT 600 Profi), auf das sich diese Erklärung bezieht, den einschlägigen Sicherheitsund Gesundheitsanforderungen der EG-Richtlinie 89/336/EWG (EMV-Richtlinie), 73/23/EWG (Niederspannungsrichtlinie), 98/37/EG (EG-Maschinenrichtlinie) und 2000/14/EG (Geräuschrichtlinie) entspricht.
Zur sachgerechten Umsetzung der in den EG-Richtlinien genannten Sicherheits- und Gesundheitsanforderungen
wurden folgende Normen und/oder technische Spezifikation(en) herangezogen: EN 774, EN 50144-1, EN
50144-2-15, EN 55014-1, EN 55014-2, EN 61000-3-2, EN 61000-3-3.
gemessener Schalleistungspegel * 96 dB (A) * Benannte Stelle: DPLF, D-34114 Kassel
garantierter Schalleistungspegel * 98 dB (A)
Tranås, 22.03.2002 Åke Winbladh, Teknisk Direktör.
GB
We, STIGA AB, SE-57328 - TRANÅS / SWEDEN, declare under our sole responsibility that the product Hedge
Trimmer SH 60 (EHT 600 Profi), to which this declaration relates correspond to the relevant basic safety and
health requirements of Directives 98/37/EG (Guideline of Machines) 89/336/EEC (EMV-Guideline), 73/23/EEC
(Low Voltage Guideline) and 2000/14/EC (Noise Directive). incl. modifications. For the relevant implementation
of the safety and health requirements mentioned in the Directives, the following standards and/or technical
specification(s) have been respected: EN 774, EN 50144-1, EN 50144-2-15, EN 55014-1, EN 55014-2, EN
61000-3-2, EN 61000-3-3.
measured acoustic capacity level * 96 dB(A) * Competent institution: DPLF, D-34114 Kassel
guaranteed acoustic capacity level * 98 dB(A)
Tranås, 22.03.2002 Åke Winbladh, Teknisk Direktör.
F
Nous, STIGA AB, SE-57328 - TRANÅS / SWEDEN, déclarons sous notre seule responsabilité que les produits TailleHaie SH 60 (EHT 600 Profi), faisant l’objet de la déclaration sont conformes aux prescriptions fondamentales en
matière de sécurité et de santé stipulées dans les Directives de la CEE 98/37/EG (directive CE sur les machines), 89/
336/CEE (directive EMV), 73/23/CEE (directive de basse tension) 2000/14/C.E. (directives en matière de bruit). Pour
mettre en pratique dans les règles de l’art les prescriptions en matière de sécurité et de santé stipulées dans les
Directives de la CEE, il a été tenu compte des normes et/ou des spéci-fications techniques suivantes: EN 774, EN 50144-
1, EN 50144-2-15, EN 55014-1, EN 55014-2, EN 61000-3-2, EN 61000-3-3.
Niveau sonore mesuré * 96 dB (A) * Service compétent: DPLF, D-34114 Kassel
Niveau sonore garanti * 98 dB (A)
Tranås, 22.03.2002 Åke Winbladh, Teknisk Direktör.
entsprechend der EG-Maschinenrichtlinie 98/37/EG
according to EU Guideline of Machines 98/37/EG
conforme à la directive CE sur les machines 98/37/EG
EG-Konformitätserklärung
EC Declaration of Conformity
Déclaration de Conformité pour la CE
Page 11

NL
Voor dit elektrisch apparaat geven wij onafhankelijk van de verplichtingen die de handelaar volgens de
koopovereenkomst ten opzichte van de eindafnemer heeft, als volgt garantie:
De garantieperiode bedraagt 24 maanden en begint bij de overdracht, welke door een originele koopbon
bewezen moet kunnen worden. Bij commerciële toepassing alsook bij verhuur is de garantie beperkt tot
6 maanden. Uitgezonderd van de garantie zijn de slijtbare onderdelen en de schades die ontstaan zijn
door het gebruik van verkeerde accessoires, door reparaties met onderdelen die niet origineel bij dit
apparaat horen, door gebruik van geweld, door slag en breuk, alsook door opzettelijke overbelasting van
de motor. Inruil op basis van de garantie heeft enkel betrekking op de defecte onderdelen, niet op
complete apparaten. Reparaties die met de garantie samenhangen, mogen alleen worden verricht door
goedgekeurde werkplaatsen of door de klantenservice van de fabriek. Bij reparaties door anderen vervalt
de garantie.
Portokosten, verzendkosten en bijkomende kosten komen ten laste van de koper.
Garantievoorwaarden
D
Für dieses Elektrowerkzeug leisten wir unabhängig von den Verpflichtungen des Händlers aus dem
Kaufvertrag gegenüber dem Endabnehmer wie folgt Garantie:
Die Garantiezeit beträgt 24 Monate und beginnt mit der Übergabe die durch Originalkaufbeleg nachzuweisen
ist. Bei kommerziellem Einsatz sowie Verleih reduziert sich die Garantiezeit auf 6 Monate. Ausgenommen
von der Garantie sind Verschleißteile und Schäden die durch Verwendung falscher Zubehörteile, Reparaturen
mit Nichtoriginalteilen, Gewaltanwendungen, Schlag und Bruch sowie mutwillige Motorüberlastung entstanden
sind. Garantieaustausch erstreckt sich nur auf defekte Teile, nicht auf komplette Geräte. Garantiereparaturen
dürfen nur von autorisierten Werkstätten oder vom Werkskundendienst durchgeführt werden. Bei Fremdeingriff
erlischt die Garantie.
Porto, Versand- und Nachfolgekosten gehen zu Lasten des Käufers.
GB
For this electric tool, the company provides the end user - independently from the retailer's obligations
resulting from the purchasing contract - with the following warranties:
The warranty period is 24 months beginning from the hand-over of the device which has to be proved by
the original purchasing document. For commercial use and use for rent, the warranty period is reduced
to 6 months. Wearing parts and defects caused by the use of not fitting accessories, repair with parts that
are no original parts of the manufacturer, use of force, strokes and breaking as well as mischievous
overloading of the motor are excluded from this warranty. Warranty replacement does only include
defective parts, not complete devices. Warranty repair shall exclusively be carried out by authorized
service partners or by the company's customer service. In the case of any intervention of not authorized
personnel, the warranty will be held void.
All postage or delivery costs as well as any other subsequent expenses will be borne by the customer.
F
Indépendamment des obligations ressortant du contrat de vente conclu par le fournisseur avec le
consommateur final, nous accordons pour cet appareil électrique la garantie suivante :
La période de garantie est de 24 mois et entre en vigueur à la remise de l'outil qui sera justifiée par
présentation du bon d'achat original. En cas d'utilisation commerciale ou de location, la période de
garantie se limite à 6 mois. Les pièces d'usure et les dommages dus à l'utilisation de pièces non
conformes, à des réparations effectuées avec des pièces non originales, à l'exercice de la force, à des
coups, une destruction ou une surcharge intentionnelle du moteur sont exclus de la garantie. Les échanges
sous garantie ne concernent que les pièces défectueuses et non les appareils complets. Les réparations
sous garantie ne peuvent être effectuées que par des ateliers autorisés ou par le service après-vente de l'usine.
La garantie s'éteint en cas d'intervention étrangère au fournisseur agréé.
Les frais de port, d'expédition et autres frais annexes sont à la charge du client.
Garantiebedingungen
Warranty
Conditions de garantie
 Loading...