

Page 1
STEINEL Vertrieb GmbH
RUS CN BG LV LT EST HR SLO RO PL SK CZ H TR GR N FIN DK S P E I NL F GB D
PT
F.Fonseca S.A.
Rua Joao Francisco do Casal, 87/89
Esgueira, 3800-266 Aveiro - Portugal
Tel. +351 234 303 900
ffonseca@ffonseca.com
www.ffonseca.com
SE
KARL H STRÖM AB
Verktygsvägen 4
SE-553 02 Jönköping
Tel.: +46 36 550 33 00
info@khs.se
www.khs.se
DK
Roliba A/S
Hvidkærvej 52
DK-5250 Odense SV
Tel.: +45 6593 0357
www.roliba.dk
FI
Oy Hedtec Ab
Lauttasaarentie 50
FI-00200 Helsinki
Puh.: +358/207 638 000
valaistus@hedtec.fi
www.hedtec.fi/valaistus
NO
Vilan AS
Olaf Helsetsvei 8
NO-0694 Oslo
Tel.: +47/22725000
post@vilan.no
www.vilan.no
GR
PANOS Lingonis + Sons O. E.
Aristofanous 8 Str.
GR-10554 Athens
Tel.: +30/210/3212021
lygonis@otenet.gr
TR
SAOS Teknoloji Elektrik Sanayi ve
Ticaret Limited Şirketi
Halil Rıfat Paşa mahallesi
Yüzerhavuz Sokak
PERPA Ticaret Merkezi A Blok
Kat 5 No.313
Şişli / İSTANBUL
Tel.: +90 212 220 09 20
iletisim@saosteknoloji.com.tr
www.saosteknoloji.com.tr
LT
KVARCAS
Neries krantine 32
LT-48463, Kaunas
Tel.: +370/37/408030
info@kvarcas.lt
EE
Fortronic AS
Tööstuse tee 10,
EE-61715, Tõrvandi,
Ülenurme vald, Tartumaa
Tel.: +372/7/475208
info@fortronic.ee
www.fortronic.ee
SI
ELEKTRO – PROJEKT PLUS D.O.O.
Suha pri Predosljah 12
SI-4000 Kranj
PE GRENC 2
4220 Škofja Loka
Tel.: 00386-4-2521645
GSM: 00386-40-856555
info@elektroprojektplus.si
www.priporocam.si
SK
NECO SK, A.S.
Ružová ul. 111
SK-01901 Ilava
Tel.: +421/42/4 45 67 10
neco@neco.sk
www.neco.sk
RO
Steinel Distribution SRL
505400 Rasnov, jud. Brasov
Str. Campului, nr.1
FSR Hala Scularie Birourile 4-7
Tel.: +40(0)268 53 00 00
www.steinel.ro
HR
Daljinsko upravljanje d.o.o.
Bedricha Smetane 10
HR-10000 Zagreb
t/ 00385 1 388 66 77
daljinsko-upravljanje@inet.hr
www.daljinsko-upravljanje.hr
LV
Ambergs SIA
Brīvības gatve 195-16
LV-1039 Rīga
Tel.: 00371 67550740
www.ambergs.lv
BG
ТАШЕВ-ГАЛВИНГ ООД
Бул. Климент Охридски № 68
1756 София, България
Тел.: +359 2 700 45 45 4
info@tashev-galving.com
www.tashev-galving.com
RU
REAL.Electro
LT
KVARCAS
Neries krantine 32
LT-48463, Kaunas
Tel.: +370/37/408030
info@kvarcas.lt
EE
Fortronic AS
Tööstuse tee 10,
EE-61715, Tõrvandi,
Ülenurme vald, Tartumaa
Tel.: +372/7/475208
info@fortronic.ee
www.fortronic.ee
SI
ELEKTRO – PROJEKT PLUS D.O.O.
Suha pri Predosljah 12
SI-4000 Kranj
PE GRENC 2
4220 Škofja Loka
Tel.: 00386-4-2521645
GSM: 00386-40-856555
info@elektroprojektplus.si
www.priporocam.si
SK
NECO SK, A.S.
Ružová ul. 111
SK-01901 Ilava
Tel.: +421/42/4 45 67 10
neco@neco.sk
www.neco.sk
RO
Steinel Distribution SRL
505400 Rasnov, jud. Brasov
Str. Campului, nr.1
FSR Hala Scularie Birourile 4-7
Tel.: +40(0)268 53 00 00
www.steinel.ro
HR
Daljinsko upravljanje d.o.o.
Bedricha Smetane 10
HR-10000 Zagreb
t/ 00385 1 388 66 77
daljinsko-upravljanje@inet.hr
www.daljinsko-upravljanje.hr
LV
Ambergs SIA
Brīvības gatve 195-16
LV-1039 Rīga
Tel.: 00371 67550740
www.ambergs.lv
BG
ТАШЕВ-ГАЛВИНГ ООД
Бул. Климент Охридски № 68
1756 София, България
Тел.: +359 2 700 45 45 4
info@tashev-galving.com
www.tashev-galving.com
DE
Dieselstraße 80-84
33442 Herzebrock-Clarholz
Tel: +49/5245/448-188
www.steinel.de
AT
Steinel Austria GmbH
Hirschstettner Strasse 19/A/2/2
A-1220 Wien
Tel.: +43/1/2023470
info@steinel.at
CH
PUAG AG
Oberebenestrasse 51
CH-5620 Bremgarten
Tel.: +41/56/6488888
info@puag.ch
GB
STEINEL U.K. LTD.
25, Manasty Road · Axis Park
Orton Southgate
GB-Peterborough Cambs PE2 6UP
Tel.: +44/1733/366-700
steinel@steinel.co.uk
IE
Socket Tool Company Ltd
Unit 714 Northwest Business Park
Kilshane Drive · Ballycoolin · Dublin 15
Tel.: 00353 1 8809120
info@sockettool.ie
FR
STEINEL FRANCE SAS
ACTICENTRE - CRT 2
Rue des Famards - Bât. M - Lot 3
F-59818 Lesquin Cedex
Tél.: +33/3/20 30 34 00
info@steinelfrance.com
NL
Van Spijk B.V.
Postbus 2
5688 HP OIRSCHOT
De Scheper 402
5688 HP OIRSCHOT
Tel. +31 499 571810
info@vanspijk.nl
www.vanspijk.nl
BE
VSA Belgium
Hagelberg 29
B-2440 Geel
Tel.: +32/14/256050
info@vsabelgium.be
www.vsabelgium.be
LU
Minusines S.A.
8, rue de Hogenberg
L-1022 Luxembourg
Tél. : (00 352) 49 58 58 1
www.minusines.lu
ES
SAET-94 S.L.
C/ Trepadella, n° 10
Pol. Ind. Castellbisbal Sud
E-08755 Castellbisbal (Barcelona)
Tel.: +34/93/772 28 49
saet94@saet94.com
IT
STEINEL Italia S.r.l.
Largo Donegani 2
I-20121 Milano
Tel.: +39/02/96457231
info@steinel.it
www.steinel.it
F.Fonseca S.A.
PT
Rua Joao Francisco do Casal, 87/89
Esgueira, 3800-266 Aveiro - Portugal
Tel. +351 234 303 900
ffonseca@ffonseca.com
www.ffonseca.com
KARL H STRÖM AB
SE
Verktygsvägen 4
SE-553 02 Jönköping
Tel.: +46 36 550 33 00
info@khs.se
www.khs.se
Roliba A/S
DK
Hvidkærvej 52
DK-5250 Odense SV
Tel.: +45 6593 0357
www.roliba.dk
Oy Hedtec Ab
FI
Lauttasaarentie 50
FI-00200 Helsinki
Puh.: +358/207 638 000
valaistus@hedtec.fi
www.hedtec.fi/valaistus
Vilan AS
NO
Olaf Helsetsvei 8
N-0694 Oslo
Tel.: +47/22725000
post@vilan.no
www.vilan.no
PANOS Lingonis + Sons O. E.
GR
Aristofanous 8 Str.
GR-10554 Athens
Tel.: +30/210/3212021
lygonis@otenet.gr
SAOS Teknoloji Elektrik Sanayi ve
TR
Ticaret Limited Şirketi
Halil Rıfat Paşa mahallesi
Yüzerhavuz Sokak
PERPA Ticaret Merkezi A Blok
Kat 5 No.313
Şişli / İSTANBUL
Tel.: +90 212 220 09 20
iletisim@saosteknoloji.com.tr
www.saosteknoloji.com.tr
NECO SK, A.S.
ELNAS s.r.o.
CZ
CZ
Oblekovice 394
Ružová ul. 111 · SK-01901 Ilava
CZ-67181 Znojmo
Tel.: +421/42/4 45 67 10
Tel.: +420/515/220126
neco@neco.sk
info@elnas.cz · www.elnas.cz
www.neco.sk
„LŁ“ Spółka z ograniczoną
PL
odpowiedzialnością sp.k.
Byków, ul. Wrocławska 43
PL-55-095 Mirków
Tel.: +48 71 3980818
handlowy@langelukaszuk.pl
www.langelukaszuk.pl
DINOCOOP Kft
HU
Radvány u. 24
H-1118 Budapest
Tel.: +36/1/3193064
dinocoop@dinocoop.hu
KVARCAS
LT
Neries krantine 32
LT-48463, Kaunas
Tel.: +370/37/408030
info@kvarcas.lt
Fortronic AS
EE
Tööstuse tee 10,
EST-61715, Tõrvandi,
Ülenurme vald, Tartumaa
Tel.: +372/7/475208
info@fortronic.ee
www.fortronic.ee
ELEKTRO – PROJEKT PLUS D.O.O.
SI
Suha pri Predosljah 12
SLO-4000 Kranj
PE GRENC 2
4220 Škofja Loka
Tel.: 00386-4-2521645
GSM: 00386-40-856555
info@elektroprojektplus.si
www.priporocam.si
NECO SK, A.S.
SK
Ružová ul. 111
SK-01901 Ilava
Tel.: +421/42/4 45 67 10
neco@neco.sk
www.neco.sk
Steinel Distribution SRL
RO
505400 Rasnov, jud. Brasov
Str. Campului, nr.1
FSR Hala Scularie Birourile 4-7
Tel.: +40(0)268 53 00 00
www.steinel.ro
Daljinsko upravljanje d.o.o.
HR
Bedricha Smetane 10
HR-10000 Zagreb
t/ 00385 1 388 66 77
daljinsko-upravljanje@inet.hr
www.daljinsko-upravljanje.hr
Ambergs SIA
LV
Brīvības gatve 195-16
LV-1039 Rīga
Tel.: 00371 67550740
www.ambergs.lv
ТАШЕВ-ГАЛВИНГ ООД
BG
Бул. Климент Охридски № 68
1756 София, България
Тел.: +359 2 700 45 45 4
info@tashev-galving.com
www.tashev-galving.com
REAL.Electro
Best - Snab
RU
RU
ул.1812 года, дом 12
109029, Москва · ул. Средняя
121127 Москва · Россия
Калитниковская, д.26/27
Tel: +7 (495) 280-35-53
Tel:+7(495) 230 31 32
info@steinel.su
info@steinel-russland.ru
www.steinel.su
www.steinel-russland.ru
STEINEL China
CN
Representative Office
Shanghai Rm. 25 A,
Huadu Mansion No. 838
Zhangyang Road Shanghai 200122
Tel: +86 21 5820 4486
james.chai@steinel.cn
info@steinel.cn
www.steinel.cn
DEENFRNLITESPTSEDKFINOGRTRHUCZSKPLROSIHREELTLVRUBGCN
Information
L 16 LED
L 160 LED
110060620 01/2018_L Technische Änderungen vorbehalten. / Subject to technical modification without notice.
Page 2
5.4 4.1
L 16 LED /
L 160 LED
RS 16 LED /
RS 160 LED
L 16 LED /
L 160 LED
5.1
5.2
5.3
Ø 6
5.5
5.6
3.1
3.2
Glass: L 16 LED 95 mm
L 160 LED 125 mm
Glass: L 16 LED: 275 mm
L 160 LED: 310 mm
Ø 246 mm
3.3
A
B
C
...
DE � � � � � � 5
EN � � � � � � 8
FR � � � � � 10
NL � � � � � 12
IT � � � � � � 14
ES � � � � � 16
PT � � � � � � 18
SE � � � � � 20
DK � � � � � 22
FI � � � � � � 24
NO � � � � � 26
GR � � � � � 28
TR � � � � � 30
HU � � � � � 32
CZ � � � � � 34
SK � � � � � 36
PL � � � � � � 38
RO � � � � � 40
SI � � � � � � 42
HR � � � � � 44
EE � � � � � � 46
LT � � � � � � 48
LV � � � � � � 50
RU � � � � � 52
BG � � � � � 54
CN � � � � � 56
Textteil beachten!
Follow written instructions!
Suivre les instructions ci-après !
Tekstpassage in acht nemen!
Osservare il testo!
¡Obsérvese la información textual!
Siga as instruções escritas
Följ den skriftliga montageinstruktionen�
Følg de skriftlige instruktioner!
Huomioi tekstiosa!
Se tekstdelen!
Τηρείτε γραπτές οδηγίες!
Yazılı talimatlara uyunuz!
A szöveges utasításokat tartsa meg!
Dodržujte písemné pokyny!
Dodržiavajte písomné informácie!
Postępować zgodnie zinstrukcją!
Respectați instrucțiunile următoare!
Upoštevajte besedilo!
Pridržavajte se uputa!
Järgige tekstiosa!
Atsižvelgti į rašytines instrukcijas!
Pievērsiet uzmanību teksta daļai!
Соблюдать текстовую инструкцию!
Прочетете инструкциите!
遵守文字说明要求!
- 2 - - 3 -
Page 3
!
5.7
N
L
N
L
5.8
I
O
6
DE
DE
1. Zu diesem Dokument
Bitte sorgfältig lesen und aufbewahren!
– Urheberrechtlich geschützt. Nachdruck, auch auszugs-
weise, nur mit unserer Genehmigung.
– Änderungen, die dem technischen Fortschritt dienen,
vorbehalten.
Symbolerklärung
Warnung vor Gefahren!
Verweis auf Textstellen im Dokument.
...
2. Allgemeine Sicherheitshinweise
Vor allen Arbeiten am Gerät
!
die Spannungszufuhr unterbrechen!
• Bei der Montage muss die anzuschließende elektrische
Leitung spannungsfrei sein. Daher als Erstes Strom
abschalten und Spannungsfreiheit mit einem Spannungsprüfer überprüfen.
• Bei der Installation der LED-Leuchte handelt es sich um
eine Arbeit an der Netzspannung.
Sie muss daher fachgerecht nach den landesüblichen
Installationsvorschriften und Anschlussbedingungen
durchgeführt werden. (z. B. DE- VDE 0100,
AT- ÖVE / ÖNORM E8001-1, CH- SEV 1000)
• Nur Original-Ersatzteile verwenden.
• Reparaturen dürfen nur durch Fachwerkstätten durchgeführt werden.
3. L 16 LED / L 160 LED
Bestimmungsgemäßer Gebrauch
– Leuchte mit LED als Leuchtmittel
– Geeignet für Wand- und Deckenmontage. Im Außenbe-
reich wegen sensibler Erfassung nur bedingt einsetzbar
– Als Einzelleuchte oder vernetzt mit der Masterversion
mit Sensoren
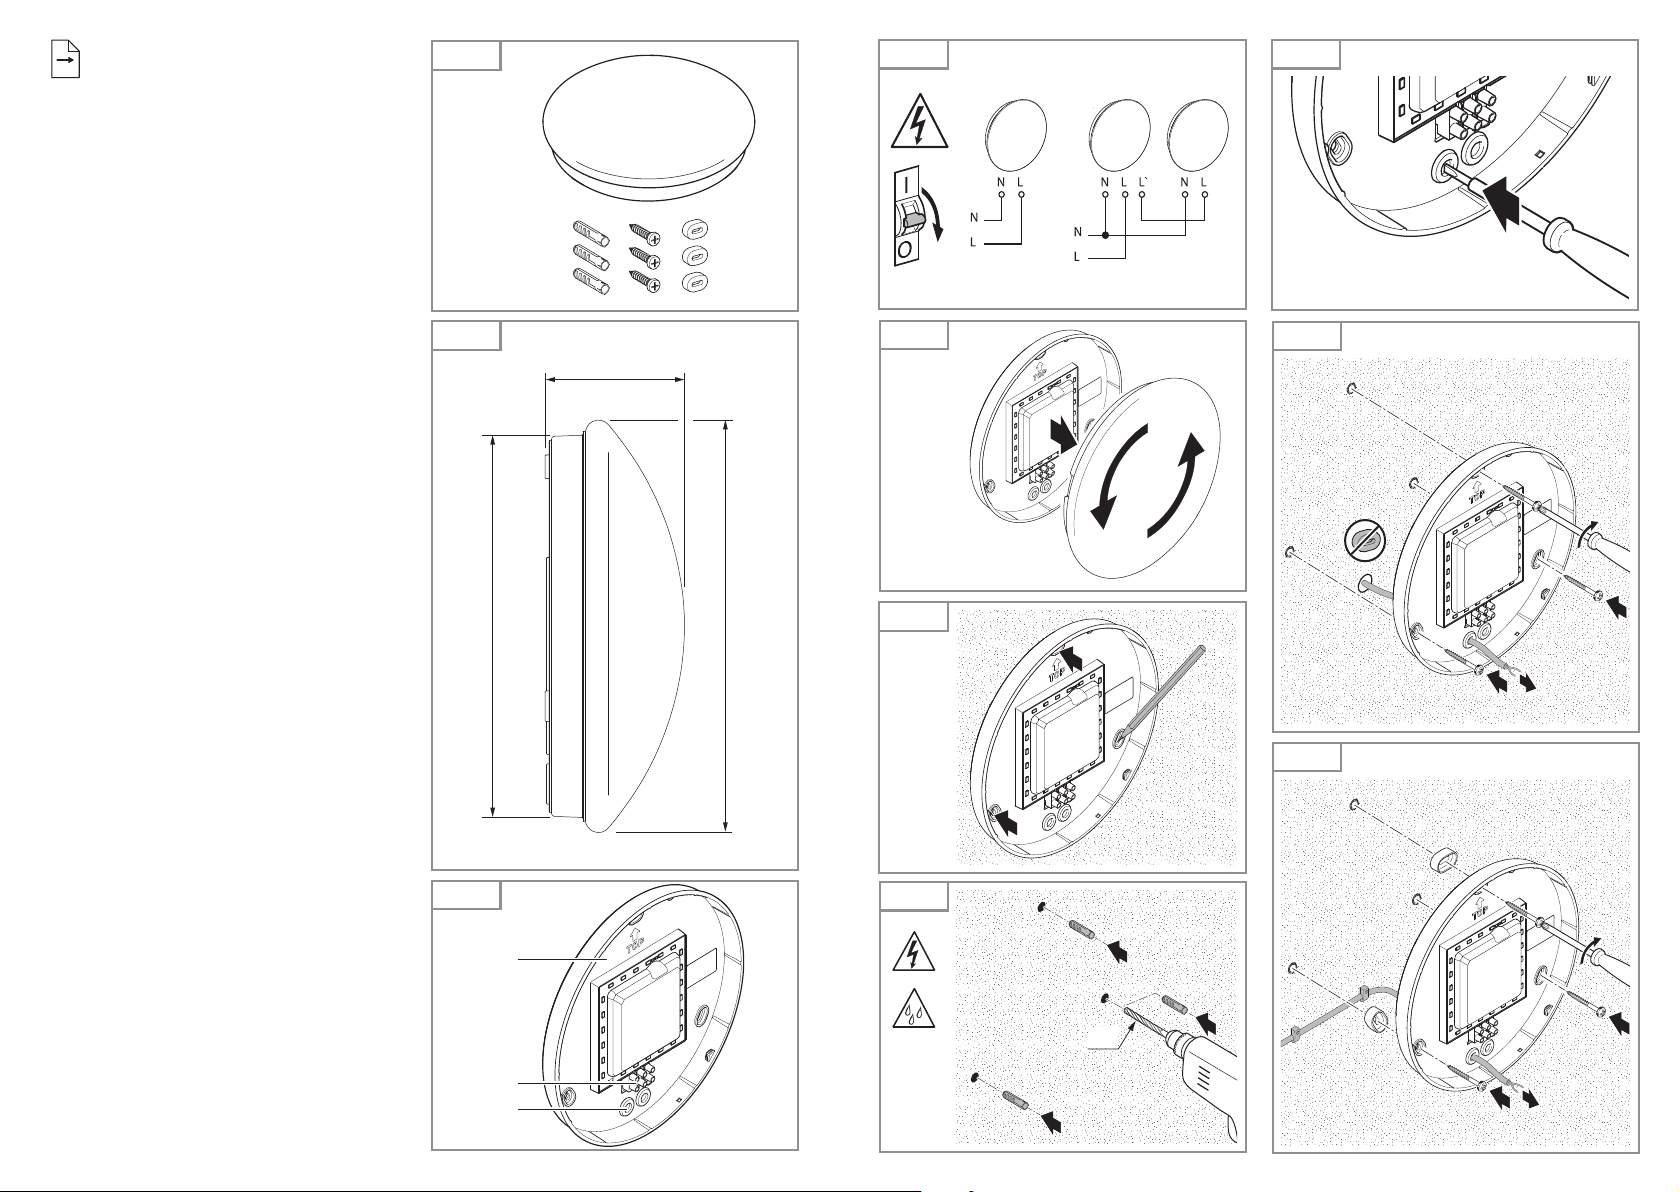
Lieferumfang (Abb� 3�1)
– Leuchte
– drei Schrauben
– drei Dübel
– drei Abstandhalter
Produktmaße (Abb. 3.2)
Geräteübersicht (Abb. 3.3)
A Gehäuse
B Anschlussklemme
C Dichtstopfen
4. Elektrischer Anschluss
• Stromversorgung abschalten (Abb.4.1)
Schaltplan (Abb.4.1)
Die Netzzuleitung besteht aus einem 3-adrigen Kabel:
L = Phase (meistens schwarz, braun oder grau)
N = Neutralleiter (meistens blau)
PE = Schutzleiter (grün/gelb)
Im Zweifel müssen Sie die Leitungen mit einem Spannungsprüfer identifizieren; anschließend wieder spannungsfrei schalten. Phase (L), sowie der Neutralleiter (N) werden
an der Anschlussklemme angeschlossen.
Wichtig:
Ein Vertauschen der Anschlüsse führt im Gerät oder Ihrem
Siche rungskasten später zum Kurzschluss. In diesem Fall
müssen nochmals die einzelnen Leitungen identifiziert und
neu verbunden werden. In die Netzzuleitung kann selbstverständlich ein Netz schalter zum Ein- und Aus schalten
installiert sein.
Die Lichtquelle dieser Leuchte ist nicht ersetzbar; falls
die Lichtquelle ersetzt werden muss (z.B. am Ende ihrer
Lebensdauer), ist die komplette Leuchte zu ersetzen.
Hinweis:
Die LED nicht direkt berühren.
5. Montage
• Alle Bauteile auf Beschädigung prüfen.
• Bei Schäden das Produkt nicht in Betrieb nehmen.
• Bei der Montage der LED-Leuchte ist darauf zu
achten, dass sie erschütterungsfrei befestigt wird.
Montageschritte
• Abdeckhaube vom Gehäuse trennen (Abb.5.1)
• Bohrlöcher anzeichnen (Abb.5.2)
• Löcher bohren und Dübel einsetzen (Abb.5.3)
• Dichtstopfen für Netzzuleitung durchstoßen (Abb.5.4)
• Unterputzzuleitung (Abb.5.5)
• Mit Abstandhaltern bei Aufputzmontage (Abb.5.6)
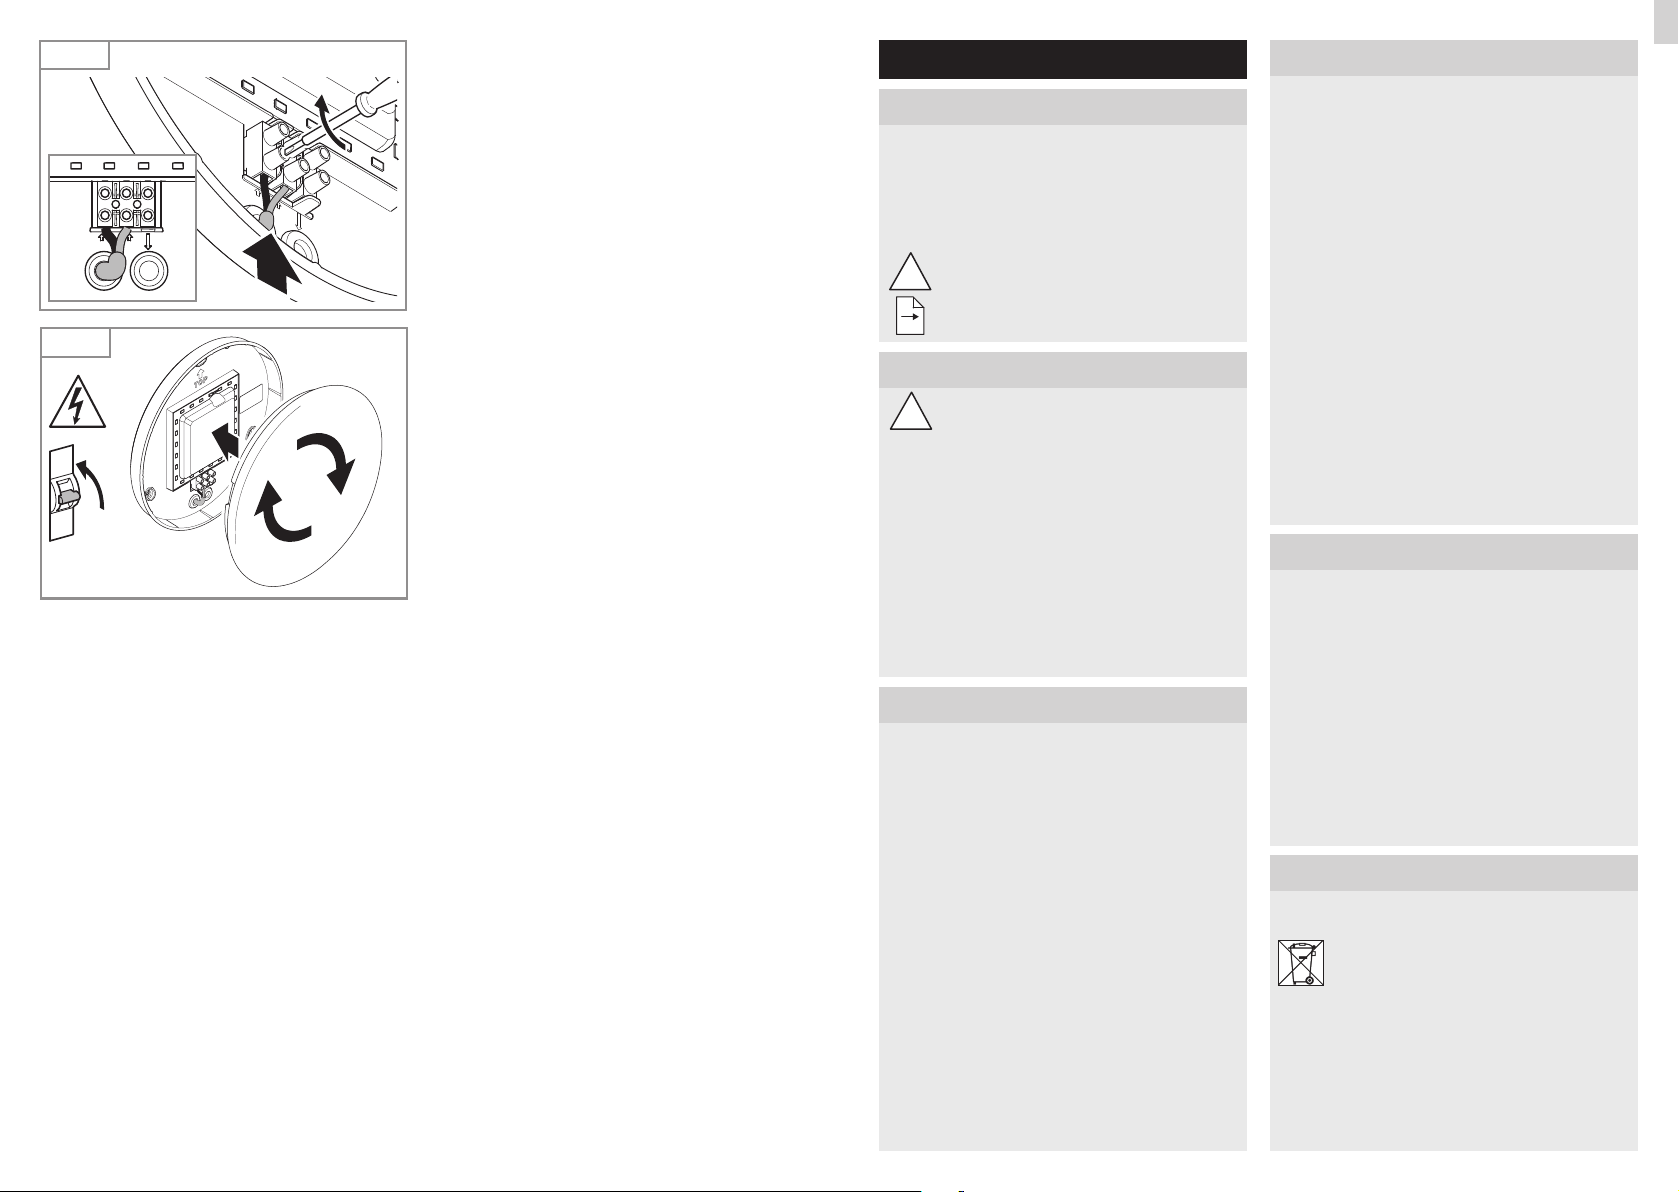
• Anschlusskabel anschließen (Abb.5.7)
• Stromversorgung einschalten (Abb.5.8)
• Abdeckhaube aufsetzen (Abb.5.8)
6. Entsorgung
Elektrogeräte, Zubehör und Verpackungen sollen einer
umweltgerechten Wiederverwertung zugeführt werden.
Werfen Sie Elektrogeräte nicht
in den Hausmüll!
Nur für EU-Länder:
Gemäß der geltenden Europäischen Richtlinie über Elektround Elektronik-Altgeräte und ihrer Umsetzung in nationales
Recht müssen nicht mehr gebrauchsfähige Elektrogeräte
getrennt gesammelt und einer umweltgerechten Wiederverwertung zugeführt werden.
- 5 -- 4 -
Page 4
7. Garantie
3
5
HERSTELLER
GARANTIE
Herstellergarantie der STEINEL Vertrieb GmbH,
Dieselstraße 80-84, 33442 Herzebrock-Clarholz
Wir beglückwünschen Sie zum Kauf Ihres STEINELProdukts, das höchste Qualitätsansprüche erfüllt. Aus
diesem Grund leisten wir als Hersteller Ihnen als Endkunde gerne eine unentgeltliche Garantie gemäß den nachstehenden Bedingungen: Wir leisten Garantie durch kostenlose Behebung der Mängel (nach unserer Wahl: Reparatur,
Austausch ggf. durch ein Nachfolgemodell oder Rückerstattung des Kaufpreises), die innerhalb der Garantiezeit auf einem Material- oder Herstellungsfehler beruhen.
Die Garantiezeit für Ihr erworbenes STEINEL-Produkt beträgt 3Jahre und beginnt mit dem Kaufdatum Ihres Produktes. Diese Herstellergarantie lässt gesetzliche Gewährleistungsansprüche, die Ihnen als Verbraucher gegenüber
dem Verkäufer nach geltendem Recht einschließlich besonderer Schutzbestimmungen für Verbraucher zustehen können, unberührt. Die hier beschriebenen Leistungen gelten
zusätzlich zu den gesetzlichen Gewährleistungsansprüchen
und beschränken oder ersetzen diese nicht.
Ausdrücklich ausgenommen von dieser Garantie sind alle
auswechselbaren Leuchtmittel. Darüber hinaus ist die
Garantie ausgeschlossen:
• bei einem gebrauchsbedingten oder sonstigen natürlichen
Verschleiß von Produktteilen oder Mängeln am STEINELProdukt, die auf gebrauchsbedingtem oder sonstigem
natürlichem Verschleiß zurückzuführen sind,
• bei nicht bestimmungs- oder unsachgemäßem Gebrauch
des Produkts oder Missachtung der Bedienungshinweise,
• wenn An- und Umbauten bzw. sonstige Modifikationen
an dem Produkt eigenmächtig vorgenommen wurden
oder Mängel auf die Verwendung von Zubehör-, Ergänzungs- oder Ersatzteilen zurückzuführen sind, die keine
STEINEL-Originalteile sind,
• wenn Wartung und Pflege der Produkte nicht entsprechend der Bedienungsanleitung erfolgt sind,
• wenn Anbau und Installation nicht gemäß den Installationsvorschriften von STEINEL ausgeführt wurden,
• bei Transportschäden oder -verlusten.
Die Garantie gilt für sämtliche STEINEL-Produkte, die in
Deutschland gekauft und verwendet werden. Es gilt deutsches Recht unter Ausschluss des Übereinkommens der
Vereinten Nationen über Verträge über den internationalen
Warenkauf (CISG).
Geltendmachung
Wenn Sie Ihr Produkt reklamieren wollen, senden Sie es
bitte vollständig und frachtfrei mit dem Original-Kaufbeleg,
der die Angabe des Kaufdatums und der Produktbezeichnung enthalten muss, an Ihren Händler oder direkt an uns,
die STEINEL Vertrieb GmbH - Reklamationsabteilung -,
Dieselstraße 80-84, 33442 Herzebrock-Clarholz.
Wir empfehlen Ihnen daher, Ihren Kaufbeleg bis zum Ablauf
der Garantiezeit sorgfältig aufzubewahren. Für Transportkosten und -risiken im Rahmen der Rücksendung übernehmen wir keine Haftung.
HERSTELLER
GARANTIE
9. Betriebsstörungen
Störung Ursache Abhilfe
LED-Leuchte ohne Spannung
LED-Leuchte schaltet nicht ein
■ Sicherung hat ausgelöst,
nicht eingeschaltet,
Leitung unterbrochen
■ Kurzschluss in der Netzzuleitung
■ Eventuell vorhandener Netzschalter aus
■ Dämmerungseinstellung falsch gewählt
■ Netzschalter AUS
■ Sicherung hat ausgelöst
■ Sicherung einschalten, tauschen,
Netz schalter einschalten,
Lei tung überprüfen mit Spannungsprüfer
■ Anschlüsse überprüfen
■ Netzschalter einschalten
■ neu einstellen
■ einschalten
■ Sicherung einschalten, tauschen,
evtl. Anschluss überprüfen
DE
8. Technische Daten
Abmessungen (Ø × T) L 16 LED: Ø 275 x 95
Material Glas
Netzanschluss 220-240 V, 50/60 Hz
Leistungsaufnahme 8,5 W
Netzstrom 41 mA AC
Leistungsfaktor 0,92
Lichtstrom mit Haube 840 Im
Effizienz mit Haube 100 lm/W
Lichtfarbe 3000 K / warmweiß / SDCM 3
LED Lebensdauer 50.000 h (L70B10 nach LM80)
Schutzart IP 44
Schutzklasse II
Temperaturbereich -10 bis +40°C
L 160 LED: Ø 310 x 125
- 7 -- 6 -
Page 5

EN
!
3
5
YEAR
MANUFACTURER'S
YEAR
WARRANTY
1. About this document
Please read carefully and keep in a safe place.
– Under copyright. Reproduction either in whole or in part
only with our consent.
– Subject to change in the interest of technical progress.
Symbols
Hazard warning!
Reference to other information in the
...
document.
2. General safety precautions
Disconnect the power supply before
!
performing any work on the unit.
• During installation, the electric power cable being connected must not be live. Therefore, switch o the power
first and use a voltage tester to make sure the wiring is
o-circuit.
• Installing the LED light involves work on the mains
voltage supply.
This work must therefore be carried out professionally in
accordance with national wiring regulations and electrical operating conditions. (e.g. DE- VDE 0100, AT- ÖVE /
ÖNORM E8001-1, CH- SEV 1000)
• Only use genuine replacement parts.
• Repairs may only be made by specialist workshops.
3. L 16 LED / L 160 LED
Proper use
– Light with LED as the source of light
– Suitable for wall and ceiling mounting. Limited suitability
for outdoor use as a result of detection sensitivity
– As single light or for interconnection with the master
version with sensors
Package contents (Fig� 3�1)
– Luminaire
– Three screws
– Three wall plugs
– Three spacers
Product dimensions (Fig. 3.2)
Product components (Fig. 3.3)
A Enclosure
B Connecting terminal
C Sealing plug
4. Electrical connection
• Switch OFF power supply (Fig. 4.1)
Wiring diagram (Fig. 4.1)
The mains power supply lead is a 3-core cable:
L = phase conductor (usually black, brown or grey)
N = neutral conductor (usually blue)
PE = protective-earth conductor (green/yellow)
If you are in any doubt, identify the conductors using a
voltage tester; then disconnect from the power supply
again. Connect phase (L) as well as the neutral conductor
(N) to the terminal.
Important:
Incorrectly wired connections will produce a short circuit
later on in the product or your fuse box. In this case, you
must identify the individual conductors once again and
reconnect them. A mains power switch for turning the
unit ON and OFF may of course be installed in the mains
supply lead.
The light source of this luminaire cannot be replaced. If the
light source needs to be replaced (e.g. at the end of its
service life), the complete luminaire must be replaced.
Note:
Do not make direct contact with the LED.
5. Mounting
• Check all components for damage.
• Do not use the product if it is damaged.
• When installing the LED luminaire, make sure the
installation site is not subject to vibration.
Installation procedure
• Detach shade from enclosure (Fig.5.1)
• Mark drill holes (Fig.5.2)
• Drill holes and insert wall plugs (Fig.5.3)
• Pierce sealing plug for power supply lead (Fig.5.4)
• Concealed wiring (Fig.5.5)
• With spacers for surface mounting (Fig.5.6)
• Connect conductors (Fig.5.7)
• Switch ON power supply (Fig.5.8)
• Fit shade (Fig.5.8)
6. Disposal
Electrical and electronic equipment, accessories and
packaging must be recycled in an environmentally
compatible manner.
Do not dispose of electrical and electronic
equipment as domestic waste.
EU countries only:
Under the current European Directive on Waste Electrical and Electronic Equipment and its implementation in
national law, electrical and electronic equipment no longer
suitable for use must be collected separately and recycled
in an environmentally compatible manner.
7. Manufacturer’s warranty
This STEINEL product has been manufactured with great
care, tested for proper operation and safety in accordance
with applicable regulations and then subjected to random
sample inspection. STEINEL guarantees that it is in perfect
condition and proper working order. The warranty period
is 36 months, starting from the date of sale to the consumer. We will remedy defects caused by material flaws or
manufacturing faults. The warranty will be met by repair or
replacement of defective parts at our own discretion. The
warranty shall not cover damage to wear parts, damage
or defects caused by improper treatment or maintenance.
Further consequential damage to other objects shall be
excluded.
Claims under warranty shall only be accepted if the product is sent fully assembled and well packed complete with
receipt or invoice (date of purchase and dealer’s stamp) to
the appropriate service centre or handed in to the dealer
within the first 6 months.
Repair service:
Please ask your nearest service centre how to proceed
for repairing faults not covered by the warranty or
occurring after the warranty expires.
MANUFACTURER'S
WARRANTY
8. Technical specifications
Dimensions (Ø x D) L 16 LED: Ø 275 x 95
Material Glass
Power supply 220 - 240 V, 50 / 60 Hz
Power consumption 8.5 W
Mains current 41 mA AC
Power factor 0.92
Luminous flux with shade 840 Im
Efficiency with shade 100 lm/W
Colour temperature 3000 K / warm white / SDCM 3
LED life expectancy 50,000 h (L70B10 to LM80)
IP rating IP44
Protection class II
Temperature range -10°C to +40°C
L 160 LED: Ø 310 x 125
9. Troubleshooting
Malfunction Cause Remedy
LED light without power
LED light does not switch ON
■ Fuse has tripped,
not switched ON,
break in wiring
■ Short circuit in mains power
supply lead
■ Mains switch OFF
■ Incorrect twilight setting selected
■ Mains switch OFF
■ Fuse has tripped
■ Activate, change fuse,
turn ON mains switch,
check wiring with voltage tester
■ Check connections
■ Switch on mains switch
■ Readjust
■ Switch ON
■ Activate, change fuse,
check connection if necessary
EN
- 8 - - 9 -
Page 6

FR
!
!
3
5
ANS
DE GARANTIE
ANS
FABRICANT
1. À propos de ce document
Veuillez le lire attentivement et le conserver en lieu sûr !
– Il est protégé par la loi sur les droits d'auteur.
Une réimpression même partielle n'est autorisée
qu'après notre accord préalable.
– Sous réserve de modifications techniques.
Explication des symboles
Attention danger !
Renvoi à des passages dans le document.
...
2. Consignes de sécurité générales
Avant toute intervention sur l'appareil, couper
l'alimentation électrique !
• Pendant le montage, les conducteurs à raccorder
doivent être hors tension. Il faut donc d'abord couper
l'alimentation électrique et s'assurer de l'absence de
tension à l'aide d'un testeur de tension.
• L'installation du hublot à LED implique une intervention
sur le réseau électrique et doit donc être eectuée
correctement et conformément à la norme NF C-15100.
(Par ex. DE- VDE 0100, AT- ÖVE / ÖNORM E8001-1,
CH- SEV 1000)
• Utiliser uniquement des pièces de rechange d'origine.
• Les réparations ne doivent être eectuées que par des
ateliers spécialisés.
3. L 16 LED / L 160 LED
Utilisation conforme aux prescriptions
– Hublot à LED comme source
– Convient au montage mural et au montage au plafond.
Sa détection sensible fait qu'il ne peut être utilisé que
dans certaines limites à l'extérieur
– Il est possible de l'utiliser sous forme de hublot isolé
ou, sous forme de hublot mis en réseau avec la version
maître à détecteurs
Contenu de la livraison (fig� 3�1)
– Hublot
– Trois vis
– Trois chevilles
– Trois pièces d'écartement
Dimensions du produit (fig. 3.2)
Vue d'ensemble de l'appareil (fig. 3.3)
A Boîtier
B Borne de raccord
C Bouchon
4. Branchement électrique
• Couper l'alimentation électrique (fig.4.1)
Schéma des connexions (fig. 4.1)
Le câble secteur est composé d'un câble à 3 conducteurs :
L = phase (généralement noir, marron ou gris)
N = neutre (généralement bleu)
PE = conducteur de terre (vert/jaune)
En cas de doute, il faut identifier les lignes avec un testeur
de tension, puis les remettre hors tension. La phase(L) et
le neutre(N) sont branchés au domino.
Important :
Une inversion des branchements entraînera plus tard un
court-circuit dans l'appareil ou dans le boîtier à fusibles.
Dans ce cas, il faut à nouveau identifier les lignes et les raccorder en conséquence. Il est bien sûr possible de poser
un interrupteur secteur sur le câble d'alimentation secteur
permettant la mise en ou hors circuit de l'appareil.
Il n'est pas possible de remplacer la source lumineuse
de ce luminaire. S'il fallait la remplacer (par ex. si elle est
brûlée), il faut remplacer le luminaire en entier.
Remarque :
Ne pas toucher directement la LED.
5. Montage
• Contrôler l'absence de dommages sur toutes les pièces.
• Ne pas mettre le produit en service en cas de dommage.
• Lors du montage du hublot à LED, veillez à ce qu'il soit
fixé sans être soumis à des vibrations.
Étapes de montage
• Retirer le diuseur du boîtier (fig.5.1)
• Marquer l'emplacement des trous (fig. 5.2)
• Percer les trous, puis introduire les chevilles (fig. 5.3)
• Percer le bouchon pour faire passer le câble secteur
(fig. 5.4)
• Câble encastré (fig. 5.5)
• Avec des pièces d'écartement pour les câbles en saillie
(fig. 5.6)
• Brancher les câbles de raccordement (fig. 5.7)
• Mettre l'appareil sous tension (fig. 5.8)
• Mettre le diuseur en place (fig. 5.8)
6. Élimination
Les appareils électriques, lesaccessoireset les emballages doivent êtresoumis à un recyclage respectueux de
l'environnement.
Ne jetez pas les appareils électriques avec les
ordures ménagères !
Uniquement pour les pays de l'UE :
conformément à la directive européenne en vigueur relative
aux appareils électriques et électroniques usagés et à son
application dans le droit national, les appareilsélectriques
qui ne fonctionnent plus doiventêtrecollectés séparément
des ordures ménagères et doiventfairel'objetd'un
recyclage écologique.
- 10 - - 11 -
7. Garantie du fabricant
Ce produit STEINEL a été fabriqué avec le plus grand soin.
Son fonctionnement et sa sécurité ont été contrôlés suivant
des procédures fiables et il a été soumis à un contrôle final
par sondage. STEINEL garantit un état et un fonctionnement irréprochables. La durée de garantie est de 36 mois
et débute au jour de la vente au consommateur. Nous
remédions aux défauts provenant d’un vice de matière ou
de construction. La garantie sera assurée à notre discrétion
par réparation ou échange des pièces défectueuses. La
garantie ne s’applique ni aux pièces d’usure, ni aux dommages et défauts dus à une utilisation ou maintenance
incorrectes. Les dommages consécutifs causés à d’autres
objets sont exclus de la garantie.
La garantie ne s’applique que si l’appareil non démonté est
retourné à la station de service après-vente la plus proche,
dans un emballage adéquat, accompagné d’une facture ou
d’un ticket de caisse portant la date d’achat et le cachet
du vendeur ou s’il est remis au vendeur dans les 6 premiers mois de la garantie.
8. Caractéristiques techniques
Dimensions (Ø x P) L 16 LED : Ø 275 x 95
Matériau verre
Raccordement au secteur 220 - 240 V, 50/60 Hz
Puissance absorbée 8,5 W
Courant absorbé 41 mA CA
Facteur de puissance 0,92
Flux lumineux avec diffuseur 840 Im
Efficacité avec diffuseur 100 lm/W
Couleur de la lumière 3000 K / blanc chaud / SDCM 3
Longévité des LED 50 000 h (L70B10 selon LM80)
Indice de protection IP 44
Classe II
Plage de température de -10 à +40 °C
L 160 LED : Ø 310 x 125
9. Dysfonctionnements
Problème Cause Solution
Le hublot à LED n'est pas sous
tension
Le hublot à LED ne s’allume pas
■ Fusible a sauté, appareil hors circuit,
câble coupé
■ Court-circuit dans le câble secteur
■ Interrupteur éventuellement présent en
position arrêt
■ Mauvais choix du réglage du seuil
de déclenchement
■ Interrupteur en position ARRÊT
■ Fusible a sauté
Service de réparation :
Une fois la garantie expirée ou en cas de vices non couverts par la garantie, veuillez contacter la station de service après-vente la plus proche pour savoir si une remise
en état est possible.
DE GARANTIE
FABRICANT
■ Enclencher le fusible, le remplacer ;
mettre l'interrupteur principal en circuit,
vérifier le câble à l'aide d'un testeur de
tension
■ Vérifier le branchement
■ Mettre l'interrupteur en circuit
■ Régler à nouveau
■ Mettre en circuit
■ Enclencher le fusible, le remplacer ;
éventuellement vérifier le branchement
FR
Page 7
NL
!
3
5
FABRIEKS
JAAR
GARANTIE
1. Over dit document
Zorgvuldig doorlezen en bewaren a.u.b.!
– Rechten uit het auteursrecht voorbehouden. Vermenig-
vuldiging, ook van delen van deze handleiding, is alleen
met onze toestemming geoorloofd.
– Wijzigingen in het kader van de technische vooruitgang
voorbehouden.
Toelichting van de symbolen
Waarschuwing voor gevaar!
Verwijzing naar tekstpassages in het
...
document.
2� Algemene veiligheidsvoorschriften
Voordat werkzaamheden aan het apparaat
worden uitgevoerd, dient eerst de span-
!
ningstoevoer te worden onderbroken!
• Bij de montage moet de aan te sluiten elektrische kabel
spanningsvrij zijn. Daarom eerst de stroom uitschakelen
en op spanningsloosheid testen met een spanningstester.
• Bij de installatie van de led-lamp werkt u met netspanning.
Dit moet vakkundig en volgens de gebruikelijke installatievoorschriften en aansluitingsvoorwaarden worden
uitgevoerd (bijv. DE- VDE 0100, AT- ÖVE / ÖNORM
E8001-1, CH- SEV 1000)
• Gebruik uitsluitend originele reserveonderdelen.
• Reparaties mogen uitsluitend door een vakbedrijf
worden uitgevoerd.
3. L 16 LED / L 160 LED
Gebruik volgens de voorschriften
– Sensorlamp met led-verlichting
– Geschikt voor wand- en plafondmontage. In verband
met de gevoelige registratie slechts beperkt geschikt
voor gebruik buiten
– Als losse lamp of gekoppeld met de mastervariant met
sensoren
Bij de levering inbegrepen (afb� 3�1)
– lamp
– drie schroeven
– drie pluggen
– drie afstandhouders
Productafmetingen (afb. 3.2)
Overzicht lamp (afb. 3.3)
A Behuizing
B Aansluitklem
C Afdichtstopje
4. Elektrische aansluiting
• Stroomtoevoer uitschakelen (afb.4.1)
Schakelschema (afb. 4.1)
De stroomtoevoer bestaat uit een 3-polige kabel:
L = fase (meestal zwart, bruin of grijs)
N = nuldraad (meestal blauw)
PE = aarde (groen/geel)
In geval van twijfel moeten de leidingen met een spanningstester worden geïdentificeerd; vervolgens weer spanningsvrij maken. De fase (L) en de nuldraad (N) worden op het
kroontsteentje aangesloten.
Belangrijk:
Het verwisselen van de aansluitingen leidt in het apparaat
of in uw meterkast later tot kortsluiting. In dit geval moeten
de afzonderlijke leidingen nogmaals geïdentificeerd en
opnieuw verbonden worden. In de stroomtoevoerkabel
kan natuurlijk een netschakelaar voor in- en uitschakelen
geïnstalleerd zijn.
De lichtbron van deze lamp kan niet worden vervangen.
Mocht het noodzakelijk worden om die te vervangen (bijv.
aan het einde van zijn levensduur), dan moet de complete
lamp worden vervangen.
Opmerking:
De led-lamp niet aanraken.
5. Montage
• Alle onderdelen controleren op beschadigingen.
• Neem het product bij beschadigingen niet in gebruik.
• Bij de montage van de led-lamp moet erop worden
gelet, dat deze trillingsvrij wordt bevestigd.
Montagestappen
• Afdekkap van de behuizing halen (afb. 5.1)
• Boorgaten aftekenen (afb. 5.2)
• Gaten boren en pluggen inbrengen (afb. 5.3)
• Afdichtstopje voor de stroomtoevoer doordrukken
(afb. 5.4)
• Kabels in de muur (afb.5.5)
• Met afstandhouders bij kabels op de muur (afb.5.6)
• Aansluitkabel aansluiten (afb. 5.7)
• Stroomtoevoer inschakelen (afb. 5.8)
• Afdekkap plaatsen (afb.5.8)
6. Verwijderen
Elektrische apparaten, toebehoren en verpakkingen dienen
milieuvriendelijk gerecycled te worden.
Doe elektrische apparaten
niet bij het huisvuil!
Alleen voor EU-landen:
Conform de geldende Europese richtlijn voor verbruikte
elektrische en elektronische apparatuur en hun implementatie in nationaal recht, dienen niet langer bruikbare elektrische apparaten gescheiden ingezameld en milieuvriendelijk
gerecycled te worden.
- 12 - - 13 -
7. Fabrieksgarantie
Dit STEINEL-product is met grote zorgvuldigheid gefabriceerd, getest op goede werking en veiligheid volgens de
geldende voorschriften, en aansluitend steekproefsgewijs
gecontroleerd. STEINEL verleent garantie op de storingsvrije werking. De garantietermijn bedraagt 36 maanden
en gaat in op de datum van aanschaf door de klant. Alle
klachten, die berusten op materiaal- of fabricagefouten,
worden door ons opgelost. De garantie bestaat uit vervangen van de defecte onderdelen, door ons te beoordelen.
Garantie vervalt bij schade aan onderdelen, die aan slijtage
onderhevig zijn en bij schade of gebreken, die door ondeskundig gebruik of onderhoud ontstaan. Schade aan andere
voorwerpen is uitgesloten van garantie. De garantie wordt
alleen verleend, als het niet-gedemonteerde apparaat met
kassabon of rekening (aankoopdatum en winkeliersstempel), goed verpakt aan het betreende service-adres wordt
opgestuurd of naar de winkelier wordt teruggebracht.
8. Technische gegevens
Afmetingen (Ø x D) L 16 LED: Ø 275 x 95
Materiaal glas
Netaansluiting 220-240 V, 50/60 Hz
Opgenomen vermogen 8,5 W
Netstroom 41 mA AC
Vermogensfactor 0,92
Lichtstroom met afdekkap 840 Im
Efficiëntie met afdekkap 100 lm/W
Lichtkleur 3000 K / warm wit / SDCM 3
Levensduur led-lampen 50.000 h (L70B10 volgens LM80)
Bescherming IP 44
Veiligheidsklasse II
Temperatuurbereik -10 tot +40 °C
L 160 LED: Ø 310 x 125
9. Storingen
Storing Oorzaak Oplossing
Led-lamp zonder spanning
Led-lamp schakelt niet in
■ Zekering gesprongen,
niet ingeschakeld,
leiding onderbroken
■ Kortsluiting in de stroomtoevoer
■ Eventueel aanwezige netschakelaar uit
■ Schemerinstelling verkeerd gekozen
■ Netschakelaar UIT
■ Zekering gesprongen
Reparatie-service:
Informeer na afloop van de garantietermijn of bij gebreken
die niet onder de garantie vallen bij het dichtstbijzijnde
serviceadres naar de reparatiemogelijkheden.
JAAR
FABRIEKS
GARANTIE
■ Zekering inschakelen, vervangen,
netschakelaar inschakelen,
kabel met spanningzoeker controleren
■ Aansluitingen controleren
■ Netschakelaar inschakelen
■ Opnieuw instellen
■ Inschakelen
■ Zekering inschakelen, vervangen,
evt. aansluiting controleren
NL
Page 8
IT
!
3
5
ANNI
DI GARANZIA
ANNI
DEL PRODUTTORE
1. Riguardo a questo documento
Si prega di leggerlo attentamente e di conservarlo!
– Tutelato dai diritti d'autore. La ristampa, anche solo di
estratti, è consentita solo previa nostra approvazione.
– Con riserva di modifiche legate al progresso della
tecnica.
Spiegazione dei simboli
Avvertimento contro pericoli!
Rimando a passaggi nel documento.
...
2� Avvertenze generali relative alla
sicurezza
Prima di eettuare qualsiasi lavoro sull'appa-
!
recchio, togliere sempre la corrente!
• Durante il montaggio non deve esserci presenza di tensione nel cavo di allacciamento alla rete. Prima del lavoro,
occorre pertanto togliere la tensione e accertarne l'assenza
mediante uno strumento di misurazione della tensione.
• Per l'installazione della lampada LED si deve lavorare
sulla tensione di rete. Deve pertanto venire eseguita a regola d'arte in conformità alle norme d'installazione e alle
condizioni di allacciamento nazionali. (per es. DE- VDE
0100, AT- ÖVE / ÖNORM E8001-1, CH- SEV 1000)
• Utilizzare esclusivamente pezzi di ricambio originali.
• Le riparazioni devono venire eettuate esclusivamente
da ocine specializzate.
3. L 16 LED / L 160 LED
Utilizzo adeguato allo scopo
– Lampada con LED utilizzato come lampadina
– Adatto per montaggio a muro e a soffitto.
– Come lampada singola o collegata in rete alla versione
Master con sensori
Volume di fornitura (Fig� 3�1)
– lampada
– tre viti
– tre tasselli
– tre distanziatori
Dimensioni dell'apparecchio (Fig. 3.2)
Panoramica degli apparecchi (Fig. 3.3)
A Involucro
B Morsetto di allacciamento
C Tappo di tenuta
4. Allacciamento elettrico
• Staccare l'alimentazione di corrente (Fig.4.1)
Schema elettrico (Fig.4.1)
Il cavo di collegamento alla rete ha 3 fili.
L = filo di fase (di prevalenza nero, marrone o grigio)
N = filo neutro (di prevalenza blu)
PE = conduttore di terra (verde/giallo)
In caso di dubbio occorre identificare le linee di alimentazione elettrica con un indicatore di tensione e poi disinserire
nuovamente la tensione. Il filo di fase (L) nonché il filo
neutro (N) vengono collegati al morsetto di allacciamento.
Importante:
Uno scambio dei collegamenti provoca un successivo corto
circuito nell'apparecchio o nella scatola dei fusibili. In questo
caso le singole linee di alimentazione elettrica devono essere
reidentificate e quindi collegate a nuovo. Ovviamente nella
linea di alimentazione della rete può essere installato un
interruttore di rete per accendere e spegnere.
La sorgente luminosa di questa lampada non è sostituibile;
in caso ciò fosse necessario, per es. alla fine della sua
durata utile, occorre cambiare l'intera lampada.
Avvertenze:
Non toccare direttamente il LED.
5. Montaggio
• Controllare tutti i componenti per verificare se presentano
danneggiamenti.
• In caso di danni non mettere in funzione il prodotto.
• Nel montaggio della lampada LED si deve provvedere a
fissarla in modo tale che non si generino vibrazioni.
Fasi di montaggio
• Staccare la calotta di copertura dall'involucro (Fig.5.1)
• Segnare i punti in cui si eettueranno i fori (Fig. 5.2)
• Eettuare i fori e inserire i tasselli (Fig. 5.3)
• Perforare il tappo di tenuta per la linea di allacciamento
alla rete (Fig.5.4)
• Cavo sotto intonaco (Fig. 5.5)
• Con distanziatori in csao di montaggio sopra intonaco
(Fig. 5.6)
• Collegare il cavo di allacciamento (Fig. 5.7)
• Attivare l'alimentazione di corrente (Fig. 5.8)
• Applicazione della calotta di copertura (Fig. 5.8)
6. Smaltimento
Apparecchi elettrici, accessori e materiali d'imballaggio devono essere consegnati a un centro di riciclaggio riconosciuto.
Non gettate gli apparecchi elettrici assieme ai
rifiuti domestici!
Solo per paesi UE:
conformemente alla Direttiva Europea vigente in materia di
rifiuti di apparecchi elettrici ed elettronici e alla sua attuazione nel diritto nazionale, gli apparecchi elettrici ed elettronici
non più idonei all'uso devono essere separati dagli altri
rifiuti e consegnati a un centro di riciclaggio riconosciuto.
- 14 - - 15 -
7. Garanzia del produttore
Questo prodotto STEINEL viene prodotto con la massima
cura, con controlli di funzionamento e del grado di sicurezza in conformità alle norme vigenti in materia; vengono poi
eettuati collaudi con prove di campionamento. STEINEL
garantisce la perfetta qualità ed il funzionamento. La
garanzia si estende a 36 mesi ed inizia il giorno d‘acquisto
dall‘utilizzatore. Noi eliminiamo vizi dovuti a difetti del
materiale o ad errori di fabbricazione, la prestazione della
garanzia consiste a nostra discrezione nella riparazione o
nella sostituzione di pezzi difettosi. Il diritto alla prestazione di garanzia viene a decadere in caso di danni a parti
soggette al logorio nonchè in caso di danni o difetti che
sono da ricondurre ad un trattamento inadeguato o ad una
cattiva manutenzione. Sono esclusi dal diritto di garanzia gli
ulteriori danni conseguenti su oggetti estranei. La garanzia
viene prestata solo se l‘apparecchio viene riconsegnato
al centro di assistenza responsabile o, nei primi 6 mesi, al
rivenditore non smontato, ben confezionato e munito di
scontrino di cassa o di fattura (con indicazione della data
dell‘acquisto e timbro del rivenditore).
8. Dati tecnici
Dimensioni (Ø x P) L 16 LED: Ø 275 x 95
Materiale Vetro
Allacciamento alla rete 220-240 V, 50/60 Hz
Potenza assorbita 8,5 W
Corrente di rete 41 mA AC
Fattore potenza 0,92
Flusso luminoso con calotta 840 Im
Efficienza con calotta 100 lm/W
Colore della luce 3000 K / bianco caldo / SDCM 3
Durata utile LED 50.000 h (L70B10 secondo LM80)
Grado di protezione IP 44
Classe di protezione II
Intervallo di temperatura da -10 a +40 °C
L 160 LED: Ø 310 x 125
9. Disturbi di funzionamento
Guasto Causa Rimedio
Lampada LED senza tensione
La lampada LED non si accende
■ Il fusibile è intervenuto, interruttore non
acceso, cavo di alimentazione interrotto
■ Corto circuito nel cavo di collegamento
alla rete
■ Eventuale interruttore di rete spento
■ La regolazione di luce crepuscolare
scelta è sbagliata
■ Interruttore principale su OFF
■ Il fusibile è intervenuto
Centro assistenza tecnica:
In caso di periodo di garanzia scaduto o di difetti che non
danno diritto a prestazioni di garanzia, siete pregati di
informarvi presso il centro di assistenza più vicino riguardo
alla possibilità di riparazione.
DI GARANZIA
DEL PRODUTTORE
■ Attivare o sostituire il fusibile; accendere
l'interruttore di rete; controllare la linea di
alimentazione con un voltmetro
■ Controllare gli allacciamenti
■ Accendere l'interruttore di rete
■ Eseguire una nuova impostazione
■ Accendere
■ Attivare o sostituire il fusibile; all'occor-
renza controllare l'allacciamento
IT
Page 9

ES
!
3
5
AÑOS
DE GARANTÍA
AÑOS
DE FABRICANTE
1. Acerca de este documento
¡Leer detenidamente y conservar para futuras consultas!
– Protegido por derechos de autor. Queda terminantemen-
te prohibida la reimpresión, ya sea total o parcial, salvo
con autorización expresa.
– Sujeto a modificaciones en función del progreso técnico.
Explicación de los símbolos
¡Advertencia de peligros!
Referencia a partes de texto en el documento.
...
2� Indicaciones generales de
seguridad
¡Antes de comenzar cualquier trabajo en
el aparato, interrúmpase la alimentación
!
de tensión!
• Para el montaje, el cable eléctrico a conectar deberá estar sin tensión. Por eso, desconecte primero la corriente y
compruebe la ausencia de tensión con un comprobador
de tensión.
• La instalación de la lámpara LED supone un trabajo en
la red eléctrica. Debe realizarse, por tanto, profesionalmente, de acuerdo con las normativas de instalación y
los requisitos de acometida específicos de cada país.
(p. ej., DE- VDE 0100, AT- ÖVE / ÖNORM E8001-1,
CH- SEV 1000)
• Utilice solo piezas de repuesto originales.
• Las reparaciones solo pueden realizarse en talleres
especializados.
3. L 16 LED / L 160 LED
Uso previsto
– Lámpara con LED como bombilla
– Indicado para el montaje en la pared y en el techo.
Uso restringido en el exterior por detección sensible
– Como lámpara sola o interconectada con la versión
master de sensores
Volumen de suministro (fig� 3�1)
– Lámpara
– Tres tornillos
– Tres espigas
– Tres distanciadores
Dimensiones del producto (fig. 3.2)
Visión general del equipo (fig. 3.3)
A Carcasa
B Borne de conexión
C Tapón obturador
4. Conexión eléctrica
• Desconectar la alimentación eléctrica (fig. 4.1)
Diagrama electrónico (fig.4.1)
El cable de alimentación de red consta de un conductor
trifilar:
L = fase (generalmente negro, marrón o gris)
N = neutro (generalmente azul)
PE = toma de tierra (verde/amarillo)
En caso de dudas, hay que identificar los conductores con
un comprobador de tensión; a continuación, volver a desconectar la tensión. La fase (L), y el neutro (N) se conectan
al borne.
Importante:
La inversión de las conexiones podrá provocar más tarde
un cortocircuito en el aparato o en su caja de fusibles. En
tal caso, habrá que identificar una vez más cada uno de los
conductores y conectarlos de nuevo. Naturalmente, el cable
de alimentación de red puede integrar un interruptor para
conectar y desconectar la tensión.
La bombilla de esta lámpara no se puede reemplazar, para
reemplazar la bombilla (p. ej. al fin de su vida útil), hay que
cambiar toda la lámpara.
Observación:
No tocar el LED directamente.
5. Montaje
• Asegurarse de que todos los componentes se encuentran en perfecto estado.
• No se pongan en servicio en caso de estar deteriorados.
• Al montar la lámpara LED, hay que fijarse en que la sujeción no esté expuesta a vibraciones.
Pasos de montaje
• Separar la cubierta de la carcasa (fig. 5.1)
• Marcar los taladros (fig.5.2)
• Hacer los agujeros e introducir los tacos (fig.5.3)
• Perforar tapón obturador para el cable de alimentación
(fig.5.4).
• Cable de alimentación empotrado (fig.5.5)
• Con distanciadores para montaje sobre revoque (fig.5.6)
• Conectar los cables (fig.5.7)
• Conectar la alimentación eléctrica (fig. 5.8)
• Colocar la cubierta (fig.5.8)
7. Garantía de fabricante
Este producto STEINEL ha sido elaborado con el máximo
esmero, habiendo pasado los controles de funcionamiento y
seguridad previstos por las disposiciones vigentes, así como
un control adicional de muestreo al azar. Steinel garantiza el
perfecto estado y funcionamiento. El período de garantía es
de 36 meses comenzando el día de la venta al consumidor.
Reparamos defectos por vicios de material o de fabricación,
la garantía se aplicará a base de la reparación o el cambio
de piezas defectuosas, según nuestro criterio. La prestación
de garantía queda anulada para daños producidos en piezas
de desgaste y daños y defectos originados por uso o mantenimiento inadecuados. Quedan excluidos de la garantía los
daños consecuenciales causados en objetos ajenos.
8. Datos técnicos
Dimensiones (Ø x prof.) L 16 LED: Ø 275 x 95
Material cristal
Conexión a la red 220-240 V, 50/60 Hz
Consumo de potencia 8,5 W
Corriente eléctrica 41 mA AC
Factor de potencia 0,92
Flujo luminoso con cubierta 840 Im
Eficiencia con cubierta 100 lm/W
Color de luz 3000 K / blanco cálido / SDCM 3
Duración de los LED 50.000 h (L70B10 según LM80)
Índice de protección IP 44
Clase de protección II
Campo de temperatura -10 a +40 °C
L 160 LED: Ø 310 x 125
9. Fallos de funcionamiento
Fallo Causa Remedio
Lámpara LED sin tensión
■ Fusible a saltado, desconectado,
línea interrumpida
6. Eliminación
Aparatos eléctricos, accesorios y embalajes han de someterse a un reciclamiento respetuoso con el medio ambiente.
¡No eche los aparatos eléctricos a la basura
doméstica!
Solo para países de la UE:
Según la Directiva europea vigente sobre residuos de
aparatos eléctricos y electrónicos y su transposición al
derecho nacional, aparatos eléctricos fuera de uso han de
ser recogidos por separado y sometidos a un reciclamiento
respetuoso con el medio ambiente.
- 16 - - 17 -
La lámpara LED no se enciende
■ Cortocircuito en el cable de alimentación
■ Posible interruptor de red desconectado
■ Regulación crepuscular incorrecta
■ Interruptor de alimentación OFF
■ Fusible a saltado
La garantía solo se aplicará enviando el aparato entero no
desmontado junto con el tíquet de compra o la factura
(fecha de compra y sello del vendedor), bien empaquetado,
a la correspondiente estación de servicio o bien entregándoselo, en los primeros 6 meses, al vendedor.
Servicio de reparación:
Una vez transcurrido el período de garantía o en caso de
defectos no cubiertos por la misma, consulte una posible
reparación con su estación de asistencia técnica más
próxima.
DE GARANTÍA
DE FABRICANTE
■ Conectar, cambiar el fusible;
conectar el interruptor de alimentación,
comprobar el cable con un comprobador
de tensión
■ Comprobar las conexiones
■ Poner interruptor en ON
■ Reajustar
■ Conectar
■ Conectar, cambiar el fusible, en caso
dado, comprobar la conexión
ES
Page 10

PT
!
3
5
ANOS
GARANTIA
ANOS
DO FABRICANTE
1. Sobre este documento
Por favor, leia-o com atenção e guarde-o num local
seguro!
– Protegido pela lei sobre direitos de autor. Qualquer
reimpressão, mesmo que apenas parcial, só é permitida
com o nosso consentimento.
– Reservado o direito a alterações que visem o progresso
técnico.
Explicação de símbolos
Aviso de perigo!
Remete para referências do texto no documento.
...
2� Instruções de segurança gerais
Antes de executar qualquer trabalho no
aparelho, desligue-o da corrente de
!
alimentação!
• Durante a montagem, o cabo elétrico a conectar deve estar isento de tensão. Para tal, desligue primeiro a corrente
e verifique se não há tensão, usando um busca-polos.
• A instalação do candeeiro LED consiste essencialmente
em lidar com tensão de rede. Por esse motivo, terá de
ser realizada de forma profissional segundo as respetivas
prescrições de instalação e condições de conexão
habituais nos diversos países. (porex., DE- VDE 0100,
AT- ÖVE / ÖNORM E8001-1, CH- SEV 1000)
• Use exclusivamente peças de origem.
• Reparações só podem ser efetuadas por oficinas
especializadas.
3. L 16 LED / L 160 LED
Utilização prevista
– Candeeiro com lâmpada de LEDs.
– Apropriado para montagem na parede e no teto. Devido
à sensibilidade de deteção, a utilização no exterior é
sujeita a limitações.
– Disponível como candeeiro individual ou para ligação em
rede com a versão Master com sensores
Itens fornecidos (fig� 3�1)
– Candeeiro
– Três parafusos
– Três buchas
– Três distanciadores
Dimensões do produto (fig. 3.2)
Vista geral do aparelho (fig. 3.3)
A Corpo
B Barra de junção
C Bujão vedante
4. Ligação elétrica
• Desligue a fonte de alimentação elétrica (fig.4.1)
Esquema de circuitos elétricos (fig.4.1)
O cabo proveniente da rede é formado por um cabo de
3 condutores:
L = Fase (geralmente preto, castanho ou cinzento)
N = Neutro (geralmente azul)
PE = Condutor terra (verde/amarelo)
Em caso de dúvida, procure identificar os cabos com um
busca-polos; a seguir, volte a desligar a tensão. A fase (L)
e o neutro (N) são conectados na barra de junção.
Importante:
Se as ligações forem trocadas, poderá ocorrer mais tarde
um curto-circuito no aparelho ou na caixa de fusíveis. Nesse
caso, os diversos condutores terão de ser identificados e ligados de novo. Naturalmente que no cabo de rede pode estar
montado um interruptor de rede do tipo "liga - desliga".
A fonte de luz deste candeeiro não pode ser substituída,
caso seja necessário substituí-la (por ex. no fim da sua vida
útil), terá de ser substituído todo o candeeiro.
Nota:
Não toque diretamente no LED.
5. Montagem
• Verifique todos os componentes para detetar eventuais
danos.
• Se detetar qualquer dano, não coloque o produto em
funcionamento.
• Ao montar o candeeiro LED, certifique-se de que é
montado à prova de trepidações.
Passos de montagem
• Separe a tampa da base do candeeiro (fig. 5.1)
• Marque os furos (fig.5.2)
• Faça os furos e coloque as buchas (fig.5.3)
• Perfure o bujão vedante para passar o cabo de ligação à
rede.(fig.5.4)
• Cabo embutido (fig. 5.5)
• No caso de montagem saliente, com distanciadores (fig. 5.6)
• Ligue o cabo de conexão (fig. 5.7)
• Ligue a fonte de alimentação elétrica (fig. 5.8)
• Coloque a tampa (fig. 5.8).
6. Reciclagem
Equipamentos elétricos, acessórios e embalagens devem
ser entregues num posto de reciclagem ecológica.
Nunca deite equipamentos elétricos para o lixo
doméstico!
Apenas para estados membros da U.E.:
Segundo a diretiva europeia relativa aos resíduos de equipamentos elétricos e eletrónicos, e a respetiva transposição
para o direito nacional, todos os equipamentos elétricos e
eletrónicos em fim de vida útil devem ser recolhidos separadamente e entregues nos pontos de recolha previstos para
fins de reutilização ecológica.
- 18 - - 19 -
7. Garantia do fabricante
Este produto Steinel foi fabricado com todo o zelo e o seu
funcionamento e segurança verificados, de acordo com as
normas em vigor, e sujeito a um controlo por amostragem
aleatória. A Steinel garante o bom estado e o bom funcionamento do aparelho. O prazo de garantia é de 36meses a
contar da data de compra. Eliminamos falhas relacionadas
com defeitos de material ou de fabrico. A garantia inclui a reparação ou a substituição das peças com defeito, de acordo com o nosso critério, estando excluídas as peças sujeitas a desgaste, os danos e as falhas originados por uma
utilização ou manutenção incorreta. Excluem-se igualmente os danos provocados noutros objetos estranhos ao aparelho. Os serviços previstos na garantia só serão prestados
caso o aparelho seja apresentado bem embalado no respetivo serviço de assistência técnica ou, nos primeiros 6meses, junto do revendedor, devidamente montado e acompanhado do talão da caixa ou da fatura (data da compra e
carimbo do revendedor).
8. Dados técnicos
Dimensões (Ø x p) L 16 LED: Ø 275 x 95
Material Vidro
Ligação à rede 220-240 V, 50/60 Hz
Potência absorvida 8,5 W
Corrente elétrica 41 mA AC
Fator de potência 0,92
Fluxo luminoso com cobertura 840 Im
Eficiência com cobertura 100 lm/W
Cor da luz 3000 K / branco quente / SDCM 3
Vida útil dos LEDs 50 000 h (L70B10 conforme LM80)
Grau de proteção IP 44
Classe de proteção II
Intervalo de temperatura -10 a +40 °C
L 160 LED: Ø 310 x 125
9. Falhas de funcionamento
Falha Causa Solução
O candeeiro LED não tem tensão
O candeeiro LED não se acende
■ Proteção disparou, não ligado,
ligação interrompida
■ Curto-circuito no cabo proveniente
da rede
■ Interruptor de rede eventualmente
existente está desligado
■ Foi escolhida a regulação crepuscular
errada
■ Interruptor de rede DESLIGADO
■ Fusível disparou
Serviço de reparação:
depois de expirado o prazo de garantia ou em caso de
falha não abrangida pela garantia, contacte o serviço de
assistência técnica mais perto de si para saber quais são
as possibilidades de reparação.
GARANTIA
DO FABRICANTE
■ Rearme ou substitua o fusível,
ligue o interruptor de rede, verifique
o condutor com um medidor de tensão
■ Verifique as conexões
■ Ligue o interruptor de rede
■ Reajuste
■ Ligue
■ Rearme ou substitua o fusível;
se necessário, verifique a ligação
PT
Page 11

SE
!
5
ÅRS
TILLVERKAR
ÅRS
GARANTI
1. Om detta dokument
Läs noga igenom dokumentet och förvara det väl!
– Upphovsrättsligt skyddat. Eftertryck, även delar av
texten, bara med vårt samtycke.
– Ändringar som görs pga den tekniska utvecklingen,
förbehålles.
Symbolförklaring
Varning för fara!
Hänvisning till textställen i dokumentet.
...
2. Allmänna säkerhetsanvisningar
Bryt spänningen före alla arbeten på produk-
!
ten!
• Inkoppling måste utföras i spänningsfritt tillstånd. Bryt
strömmen och kontrollera med spänningsprovare att alla
parter är spänningslösa.
• Eftersom LED-armaturen installeras till nätspänningen,
måste arbetet utföras på ett fackmannamässigt sätt
enligt gällande installationsföreskrifter och anslutningskrav i respektive land. (t. ex. DE- VDE 0100, AT- ÖVE /
ÖNORM E8001-1, CH- SEV 1000)
• Använd endast originalreservdelar.
• Reparationer får bara genomföras i en auktoriserad
verkstad.
3. L 16 LED / L 160 LED
Ändamålsenlig användning
– Armatur med LED-lampa som ljuskälla
– Avsedd för vägg- och takmontage. På grund av sin
känsliga uppfattningsförmåga bara delvis användbar
utomhus.
– Som enskild armatur eller sammankopplad med master-
versionen med sensorer
Innehåll (bild 3�1)
– armatur
– tre skruvar
– tre pluggar
– tre avståndshållare
Produktmått (bild 3.2)
Översikt över enheter (bild 3.3)
A Kåpa
B Anslutningsplint
C Packning
4. Elektrisk anslutning
• Bryt spänningen (bild 4.1)
Kopplingsschema (bild4.1)
Nätledningen består av en 3-ledarkabel:
L = fas (oftast svart, brun eller grå)
N = Nolledare
PE = Skyddsledare
Vid osäkerhet, måste ledningarna identifieras med en
spänningsprovare; gör dem därefter spänningsfri igen.
Fas (L), samt nolledaren (N) ansluts till anslutningsplinten.
Viktigt:
En förväxling av anslutningarna leder till kortslutning i armaturen eller i säkringsskåpet. I ett sådant fall måste de
enskilda ledningarna identifieras igen och anslutas på nytt.
På nätkabeln kan naturligtvis en ström ställare för till- och
frånkoppling installeras.
Armaturens ljuskälla kan inte bytas ut; om ljuskällan ändå
måste bytas ut (t.ex. när den är uttjänt), så måste hela
armaturen bytas ut.
Hinweis:
Ta inte direkt på LED.
5. Montage
• Kontrollera samtliga delar med avseende på skador.
• Är produkten skadad får den inte tas i bruk.
• LED-armaturen måste monteras vibrationsfritt.
Monteringssteg
• Ta av skyddet från kåpan (bild 5.1)
• Markera borrhålen (bild 5.2)
• Borra hål och sätt i pluggar (bild 5.3)
• Tryck igenom packningen till nätkabeln (bild5.4)
• Nätkabel infällt montage (bild 5.5)
• Med distanser vid utanpåliggande montage (bild 5.6)
• Anslut nätkabeln (bild 5.7)
• Slå till spänningen (bild5.8)
• Sätt på skyddet (bild 5.8)
6. Avfallshantering
Elapparater, tillbehör och förpackning måste lämnas in till
miljövänlig återvinning.
Kasta inte elapparater i hushållssoporna!
Gäller endast EU-länder:
Enligt det gällande europeiska direktivet om uttjänta
elektriska och elektroniska apparater och dess omsättning
i nationell lagstiftning, måste uttjänta elapparater lämnas in
till miljövänlig återvinning.
7. Tillverkargaranti
Denna STEINEL produkt är tillverkad med största noggrannhet. Den är funktions- och säkerhetstestad enligt gällande
föreskrifter och har därefter genomgått en stickprovskontroll.
Steinel garanterar felfri funktion. Garantin gäller i 36 månader
från inköpsdagen. Vi återgärdar fel som beror på material-
eller tillverkningsfel. Garantin innebär att varan repareras
eller att defekt del byts ut enligt vårt val. Garantin omfattar
inte slitage och skador orsakade av felaktig hanterande eller
av bristande underhåll och skötsel av produkten. Följskador
på främmande föremål ersätts ej. Garantin gäller endast då
produkten, som inte får vara isärtagen, sändes väl förpackad
med fakturakopia eller kvitto (inköpsdatum och stämpel) till
vår representant eller lämnas in till inköpsstället för åtgärd
inom 6månader.
Reparationsservice:
Efter garantins utgång eller vid fel som inte omfattas av
garantin kan produkten ev. repareras på vår verkstad.
Vänligen kontakta oss innan ni sänder tillbaka produkten.
TILLVERKAR
GARANTI
8. Tekniska data
Mått (Ø x D) L 16 LED: Ø 275 x 95
Material Glas
Spänning 220-240 V, 50/60 Hz
Systemeffekt 8,5 W
El från nätet 41 mA AC
Effektfaktor 0,92
Ljusflöde med kupa 840 Im
Effektivitet med kupa 100 lm/W
Ljusfärg 3000 K / varmvit / SDCM 3
LED livslängd 50.000 h (L70B10 enligt LM80)
Skyddsklass IP 44
Isolationsklass II
Temperaturområde -10 till +40°C
L 160 LED: Ø 310 x 125
9. Driftstörningar
Störning Orsak Åtgärd
LED-armatur utan spänning
LED-armaturen tänds inte
■ Säkring har utlöst, inte påkopplad,
strömförsörjning avbruten
■ Kortslutning i nätanslutningens
matarledning
■ Eventuellt befintlig nätströmbrytare
FRÅN
■ Felaktig skymningsinställning
■ Nätströmbrytare FRÅN
■ Säkring har utlöst
■ Slå till säkringen, byt ut, slå till spännin-
gen, testa med spänningsprovare
■ Kontrollera anslutningarna
■ Slå till nätströmbrytaren
■ Ställ in på nytt
■ Slå till
■ Slå till säkringen, byt
ut, kontrollera evtl. anslutningen
SE
- 20 - - 21 -
Page 12

DK
!
3
5
ÅRS
PRODUCENT
ÅRS
GARANTI
1. Om dette dokument
Læs det omhyggeligt, og gem det!
– Ophavsretligt beskyttet. Eftertryk, også i uddrag, kun
med vores tilladelse.
– Vi forbeholder os ret til ændringer af hensyn til den
tekniske udvikling.
Symbolforklaring
Advarsel mod farer!
Henvisning til tekststeder i dokumentet.
...
2. Generelle sikkerhedsanvisninger
Afbryd spændingstilførslen,
før der arbejdes på enheden!
!
• Ved montering skal spændingen til den el-ledning, der
skal tilsluttes, være afbrudt. Sluk derfor først strømmen,
og kontrollér med en spændingstester, at spændingen
er afbrudt.
• Når LED-lampen installeres, arbejdes der med
netspænding.
Derfor skal arbejdet udføres fagligt korrekt i overensstemmelse med det pågældende lands normale installationsforskrifter og tilslutningsforhold. (f.eks. DE - VDE
0100, AT - ÖVE / ÖNORM E8001-1, CH - SEV 1000)
• Brug kun originale reservedele.
• Reparationer må kun udføres på autoriserede værksteder.
3. L 16 LED / L 160 LED
Korrekt anvendelse
– Lampe med LED som lyskilde
– Velegnet til væg- og loftmontering. Er kun begrænset
egnet til udendørs brug pga. sensibel overvågning
– Som enkeltlampe eller til netværk med masterversionen
med sensorer
Leveringsomfang (fig� 3�1)
– Lampe
– Tre skruer
– Tre dyvler
– Tre afstandsholdere
Produktmål (fig. 3.2)
Oversigt over enheden (fig. 3.3)
A Hus
B Tilslutningsklemme
C Lukkepropper
4. Elektrisk tilslutning
• Afbryd strømforsyningen (fig. 4.1)
Ledningsdiagram (fig.4.1)
Nettilførslen består af en ledning med 3 ledere:
L = fase (oftest sort, brun eller grå)
N = nulleder (oftest blå)
PE = jordledning (grøn/gul)
Hvis du er i tvivl, skal du identificere ledningerne med en
spændingstester og derefter afbryde spændingen igen.
Fasen (L) samt nullederen (N) tilsluttes tilslutningsklemmen.
Vigtigt:
Ombytning af tilslutningerne fører senere til kortslutning i enheden eller i sikringsboksen. Hvis dette sker, skal de enkelte
ledninger identificeres og monteres igen. Der kan naturligvis
installeres en tænd- og sluk-kontakt i netledningen.
Lyskilden i denne lampe kan ikke udskiftes. Hvis lyskilden
skal udskiftes (f.eks. når den ikke fungerer længere), skal
hele lampen udskiftes
Henvisning:
Berør ikke LED'en direkte.
5. Montering
• Kontrollér alle komponenter for beskadigelser.
• Er produktet beskadiget, må det ikke tages i brug.
• Sørg ved montering af LED-lampen for, at den fastgøres
et sted uden vibrationer.
Monteringstrin
• Adskil skærmen fra huset (fig.5.1)
• Afmærk borehuller (fig.5.2)
• Bor huller, og sæt dyvler i (fig.5.3)
• Gennembryd lukkeproppen til netledningen (fig.5.4)
• Skjult ledningsføring (fig.5.5)
• Med afstandsholdere ved synlig montering (fig. 5.6)
• Tilslut tilslutningskablet (fig. 5.7)
• Slå strømforsyningen til (fig.5.8)
• Sæt skærmen på (fig.5.8)
6. Bortskaelse
Elapparater, tilbehør og emballage skal bortskaes til
miljøvenlig genvinding.
Smid ikke elapparater ud sammen med
husholdningsaaldet!
Kun for EU-lande:
I henhold til det europæiske direktiv om kasserede el- og
elektronikapparater skal kasserede elapparater indsamles
separat og bortskaes til miljøvenlig genvinding.
7. Producentgaranti
Dette STEINEL-produkt er fremstillet med største omhu,
afprøvet iht. de gældende forskrifter samt underlagt stikprøvekontrol. STEINEL garanterer for upåklagelig beskaenhed
og funktion. Garantien gælder i 36 måneder fra den dag,
apparatet er solgt til forbrugeren. Ved materiale- og fabrikationsfejl ydes garantien gennem reparation eller ombytning
efter vort valg . Der ydes ikke garanti ved skader på sliddele, ej heller ved skader og mangler, der er opstået pga. ukorrekt behandling og vedligeholdelse. Garantien omfatter ikke
følgeskader på fremmede genstande. Der ydes kun garanti mod forevisning af bon eller kvittering (med dato og stempel). Derudover skal apparatet være intakt og indpakket forsvarligt, når det fremsendes til serviceværkstedet eller inden
for de første 6 måneder afleveres til forhandleren.
Reparationsservice:
Når garantiperioden er udløbet, eller der opstår mangler,
der ikke er dækket af garantien, skal du kontakte nærmeste
serviceafdeling og spørge om mulighederne for reparation.
PRODUCENT
GARANTI
8. Tekniske data
Mål (Ø × D) L 16 LED: Ø 275 x 95
Materiale Glas
Nettilslutning 220-240 V, 50/60 Hz
Effektforbrug 8,5 W
Netstrøm 41 mA AC
Effektfaktor 0,92
Lysstrøm med skærm 840 Im
Effektivitet med skærm 100 lm/W
Lysfarve 3000 K / varm hvid / SDCM 3
LED levetid 50.000 h (L70B10 efter LM80)
Kapslingsklasse IP 44
Beskyttelsesklasse II
Temperaturområde -10 til +40°C
L 160 LED: Ø 310 x 125
9. Driftsforstyrrelser
Fejl Årsag Afhjælpning
LED-lampe uden spænding
LED-lampen tænder ikke
■ Sikring udløst, ikke slået til,
ledning afbrudt
■ Kortslutning i nettilførslen
■ En eventuel netafbryder er slået fra
■ Der er valgt en forkert skumrings-
indstilling
■ Netkontakt SLUKKET
■ Sikring udløst
■ Slå sikring til, udskift, tænd tænd/
sluk-kontakt, kontrollér ledning med en
spændingstester
■ Kontrollér tilslutninger
■ Tænd tænd/sluk-kontakten
■ Indstil på ny
■ Tænd
■ Slå sikring til, udskift,
kontrollér evt. tilslutning
DK
- 22 - - 23 -
Page 13

FI
!
3
5
VALMISTAJAN
VUODEN
TAKUU
1. Tämä asiakirja
Lue huolellisesti ja säilytä tulevaa tarvetta varten!
– Tekijänoikeudellisesti suojattu. Jälkipainatus (myös osit-
tainen) sallittu vain, mikäli annamme siihen luvan.
– Oikeudet teknistä kehitystä palveleviin muutoksiin
pidätetään.
Symbolit
Vaaroista ilmoittava varoitus!
Viite asiakirjan tekstin kohtiin.
...
2. Yleiset turvaohjeet
Katkaise virta, ennen kuin suoritat laitteelle
!
mitään toimenpiteitä!
• Asennus on tehtävä jännitteettömänä. Katkaise siksi ensin virta ja tarkista jännitteettömyys jännitteenkoettimella.
• LED-valaisin kytketään verkkojännitteeseen.
Asennus on suoritettava asiantuntevasti. Voimassa
olevia asennus- ja liitäntäohjeita on noudatettava.
(esim. SFS0100)
• Käytä ainoastaan alkuperäisiä varaosia.
• Ainoastaan ammattikorjaamo saa korjata laitteen.
3. L 16 LED / L 160 LED
Käyttötarkoituksen mukainen käyttö
– Valaisin, jossa käytetään LED-lamppuja
– Soveltuu seinä- ja kattoasennukseen. Herkän tunnis-
tuksen vuoksi soveltuu ulkokäyttöön vain rajoituksin
– Saatavana yksittäisenä valaisimena tai tunnistimilla
varustetun master-valaisimen kanssa ryhmäksi kytkettävänä mallina
Toimituslaajuus (kuva 3�1)
– Valaisin
– Kolme ruuvia
– Kolme tulppaa
– Kolme välikettä
Tuotteen mitat (kuva 3.2)
Laitteen yleiskuva (kuva 3.2)
A Runko
B Kytkentäliitin
C Tiivistystulppa
4. Sähköliitäntä
• Katkaise virta (kuva.4.1)
Kytkentäkaavio (kuva.4.1)
Verkkojohtona käytetään 3-johtimista kaapelia:
L = vaihe (useimmiten musta, ruskea tai harmaa)
N = nollajohdin (useimmiten sininen)
PE = suojamaajohdin (vihreä/keltainen)
Epäselvissä tapauksissa johdot on tunnistettava jännitteenkoettimella; katkaise sen jälkeen jälleen virta. Vaihe (L) ja
nollajohdin (N) liitetään kytkentäliittimeen.
Tärkeää:
Liitäntöjen vaihtuminen keskenään johtaa oikosulkuun laitteessa tai sulakekotelossa. Tässä tapauksessa yksittäiset
johdot on tunnistettava ja yhdistettävä uudelleen. Verkkojohtoon voidaan asentaa virtakytkin virran kytkemiseksi ja
katkaisemiseksi.
Tämän valaisimen valonlähdettä ei voi vaihtaa; koko valaisin
joudutaan vaihtamaan uuteen, jos valonlähde ei enää toimi
(esim. sen käyttöiän päätyttyä).
Huomautus:
Älä kosketa LEDiä.
5. Asennus
• Tarkista, että missään komponentissa ei ole vaurioita.
• Älä ota tuotetta käyttöön, jos siinä on vikoja.
• LED-valaisimen asennuksessa on huomioitava, että
valaisin on kiinnitettävä tärinättömään paikkaan.
Asennuksen vaiheet
• Irrota kupu rungosta (kuva5.1)
• Merkitse reiät (kuva5.2)
• Poraa reiät ja aseta tulpat (kuva5.3)
• Lävistä tiivistystulpat verkkojohtoa varten (kuva5.4)
• Johdon uppoasennus (kuva5.5)
• Välikkeillä pinta-asennuksessa (kuva5.6)
• Liitä liitäntäkaapeli (kuva5.7)
• Kytke virta päälle (kuva5.8)
• Aseta kupu paikoilleen (kuva5.8)
6. Hävittäminen
Sähkölaitteet, tarvikkeet ja pakkaukset tulee toimittaa
ympäristöystävälliseen kierrätykseen.
Älä heitä sähkölaitteita talousjätteiden sekaan!
Koskee vain EU-maita:
Voimassa olevan eurooppalaisen sähkö- ja elektroniikkaromua koskevan direktiivin ja sen kansalliseen lainsäädäntöön
saattamisen mukaisesti käyttökelvottomat sähkölaitteet on
koottava erikseen ja toimitettava ympäristöystävälliseen
kierrätykseen.
7. Valmistajan takuu
Tämä STEINEL-tuote on valmistettu suurella tarkkuudella
ja sen toiminta ja turvallisuus on testattu voimassa olevien
määräysten mukaisesti. Tuotantoa valvotaan pistokokein.
STEINEL myöntää takuun tuotteen moitteettomalle toiminnalle ja rakenteelle. Takuuaika on 36kuukautta ostopäivästä
alkaen. Tänä aikana vastaamme kaikista aine- ja valmistusvioista valintamme mukaan joko korjaamalla tai vaihtamalla
vialliset osat uusiin. Takuun piiriin eivät kuulu kuluvat osat
eivätkä vahingot, jotka ovat aiheutuneet väärästä huollosta
tai käsittelystä tai laitteen putoamisesta. Takuu ei koske
laitteen muille esineille mahdollisesti aiheuttamia vahinkoja.
Takuu on voimassa vain, jos laitetta ei ole avattu itse ja se
toimitetaan yhdessä ostokuitin kanssa (ostopäivämäärä
ja myyjäliikkeen leima) hyvin pakattuna lähimpään huoltopisteeseen tai ensimmäisten 6 kuukauden aikana myyjäliikkeeseen.
Korjauspalvelu:
Takuuajan jälkeen tai takuun piiriin kuulumattoman vian
ollessa kyseessä kysy korjausmahdollisuuksia lähimmästä
huoltopisteestä.
VUODEN
VALMISTAJAN
TAKUU
8. Tekniset tiedot
Mitat (Ø × S) L 16 LED: Ø 275 x 95
Materiaali Lasi
Verkkoliitäntä 220–240 V, 50/60 Hz
Ottoteho 8,5 W
Verkkovirta 41 mA AC
Tehokerroin 0,92
Valovirta (ilman kupua) 840 Im
Hyötysuhde (kuvun kanssa) 100 lm/W
Valon väri 3000 K / lämmin valkoinen / SDCM 3
LEDin käyttöikä 50 000 h (L70B10, LM80:n muk.)
Kotelointiluokka IP 44
Suojausluokka II
Lämpötila-alue -10 ... +40 °C
L 160 LED: Ø 310 x 125
9. Käyttöhäiriöt
Häiriö Syy Häiriön poisto
LED-valaisimelle ei tule virtaa
LED-valaisin ei kytkeydy
■ sulake on lauennut,
ei kytketty päälle,
katkos johdossa
■ oikosulku verkkojohdossa
■ verkkokytkin mahdollisesti sammutettu
■ väärä hämäryystason asetus
■ verkkokytkin pois päältä
■ sulake on lauennut
■ kytke sulake päälle, vaihda sulake,
kytke verkkokytkin päälle,
tarkista johto jännitteenkoettimella
■ tarkasta liitännät
■ kytke verkkokytkin päälle
■ säädä uudelleen
■ kytke päälle
■ kytke sulake päälle, vaihda sulake,
tarkista liitäntä tarvittaessa
FI
- 24 - - 25 -
Page 14

NO
!
5
ÅRS
PRODUSENT
ÅRS
GARANTI
1. Om dette dokumentet
Les dokumentet nøye og ta vare på det!
– Med opphavsrett. Ettertrykk, også i utdrag, kun med vår
tillatelse.
– Det tas forbehold om endringer som tjener tekniske
fremskritt.
Symbolforklaring
Advarsel om fare!
Henvisning til tekststeder i dokumentet.
...
2. Generelle sikkerhetsinstrukser
Koble fra strømtilførselen før du foretar
!
arbeider på apparatet!
• Ved montering må strømledningen som skal tilkobles,
være uten spenning. Slå derfor først av strømmen og
bruk en spenningstester til å kontrollere at strømtilførselen er stanset.
• Under installasjonen av LED-lampen kommer man i
berøring med strømnettet. Arbeidet skal derfor utføres
av fagfolk i henhold til lokale elektroinstallasjonsforskrifter
og tilkoblingskrav, (f.eks. DE- VDE 0100, AT- ÖVE /
ÖNORM E8001-1, CH- SEV 1000)
• Bruk kun originale reservedeler.
• Reparasjoner skal kun utføres på autoriserte verksteder.
3. L 16 LED / L 160 LED
Forskriftsmessig bruk
– Lampe med LED-lyselementer.
– Egnet til montering på vegg og i tak. På grunn av
følsom registrering er lampen kun under visse forutsetninger egnet til bruk utendørs.
– Som enkeltlampe eller sammenkoblet med masterver-
sjonen med sensorer
Leveringsomfang (ill� 3�1)
– lampe
– tre skruer
– tre skrueinnsatser
– tre avstandsstykker
Produktmål (ill. 3.2)
Apparatoversikt (ill. 3.3)
A Hus
B Koblingsklemme
C Plugg
4. Elektrisk tilkobling
• Slå av strømtilførselen (ill. 4.1)
Koblingsskjema (ill.4.1)
Nettledningen består av en 3-ledet kabel:
L = fase (som regel svart, brun eller grå)
N = fase (som regel blå)
PE = jordleder (grønn/gul)
I tvilstilfeller må ledningene kontrolleres med en spenningstester. Deretter slås strømtilførselen av igjen. Fase (L) og
fase (N) kobles til kroneklemmen.
OBS:
Forveksles koblingene, fører dette senere til kortslutning i
apparatet eller i sikringsskapet. I så tilfelle må de enkelte
ledningene identifiseres og kobles til på nytt. Det kan selvsagt monteres en bryter på nettledningen til å slå AV og PÅ.
Lyskilden i denne lampen kan ikke skiftes ut. Dersom
lyskilden skal erstattes (f.eks. mot slutten av levetiden),
må hele lampen skiftes ut.
NB:
Ikke berør LED-en.
5. Montering
• Kontroller alle komponenter for skader.
• Ikke ta produktet i bruk dersom det er skadet.
• Påse at LED-lampen monteres slik at den ikke kan vibrere.
Fremgangsmåte ved montering
• Ta dekslet av huset (ill.5.1)
• Tegn borehull (ill.5.2)
• Bor hull og sett inn plugger (ill.5.3).
• Trykk ut tetningspluggene for å koble til nettledningen
(ill.5.4)
• Skjult ledningsføring (ill.5.5)
• Med avstandsstykker for åpen ledningsføring (ill. 5.6)
• Koble til ledningen (ill.5.7)
• Slå på strømtilførselen (ill.5.8)
• Sett på dekslet (ill.5.8)
6. Avfallsbehandling
Elektriske apparater, tilbehør og emballasje må resirkuleres
på en miljøvennlig måte.
Ikke kast elektriske apparater i
husholdningsavfallet.
Gjelder kun EU-land:
I henhold til gjeldende europeiske retningslinjer for elektriske apparater og brukte elektriske apparater, og i samsvar
med nasjonal lovgivning, skal elektriske apparater som ikke
lenger kan benyttes, samles opp atskilt fra annet søppel og
gjenvinnes på en miljøvennlig måte.
7. Produsentgaranti
Dette STEINEL-produktet er fremstilt med største nøyaktighet. Det er prøvet mht. funksjon og sikkerhet i henhold til
gjeldende forskrifter og deretter underkastet en stikkprøvekontroll. STEINEL gir full garanti for kvalitet og funksjon.
Garantitiden utgjør 36 måneder, regnet fra dagen apparatet
ble solgt til forbrukeren.
Vi erstatter mangler som kan føres tilbake til fabrikasjonsfeil
eller feil ved materialene. Garantien ytes ved reparasjon eller
ved at deler med feil byttes ut. Garantien bortfaller ved skader på slitasjedeler eller for skader eller mangler som oppstår som følge av ufagmessig bruk eller vedlikehold. Følgeskader ved bruk (skader på andre gjenstander) dekkes ikke
av garantien. Garantien ytes bare hvis det kan fremlegges
kvittering (påført kjøpsdato og forhandlers stempel). Apparatet skal pakkes godt inn og sendes til distributøren eller
leveres til forhandler innen de første 6 månedene.
Reparasjonsservice:
Etter garantitidens utløp, eller ved mangler uten garantikrav,
ta kontakt med forhandler el. importør for forespørsler om
reparasjon.
PRODUSENT
GARANTI
8. Tekniske spesifikasjoner
Mål (Ø x D) L 16 LED: Ø 275 x 95
Materiale glass
Spenning 220-240 V, 50/60 Hz
Effektopptak 8,5 W
Strømtilførsel 41 mA AC
Effektfaktor 0,92
Lysstrøm med deksel 840 Im
Effekt med deksel 100 lm/W
Lysfarge 3000 K / varmhvit / SDCM 3
LED levetid 50 000 t (L70B10 iht. LM80)
Kapslingsgrad IP 44
Kapslingsklasse II
Temperaturområde -10 til +40°C
L 160 LED: Ø 310 x 125
9. Driftsfeil
Feil Årsak Tiltak
LED-lampen har ikke spenning
LED-lampen tennes ikke
■ Sikringen er gått, ikke slått på,
brudd på ledningen
■ Kortslutning i nettledningen
■ En eventuell ledningsbryter er slått av
■ Det er valgt feil skumringsinnstilling
■ Nettbryter er AV
■ Sikringen har reagert
■ Aktiver sikringen, sett i ny,
slå på ledningsbryteren,
kontroller ledningen med spenningstester
■ Kontroller koblingene
■ Slå på nettbryter
■ Still inn på nytt
■ Slå på
■ Aktiver sikringen, sett i ny,
kontroller ev. koblingene
NO
- 26 - - 27 -
Page 15

GR
!
3
5
ΕΤΗ
ΚΑΤΑ ΣΚ ΕΥΑΣ ΤΗ
ΕΤΗ
ΕΓΓΥΗΣΗ
1. Σχετικά ε αυτό το έγγραφο
Παρακαλούε διαβάζετε προσεκτικά και διαφυλάγετε!
– Κατοχυρωένη τεχνογνωσία. Ανατύπωση, ακόα και
αποσπασατικά, όνο κατόπιν δικής ας έγκρισης.
– Με επιφύλαξη τροποποιήσεων, οι οποίες εξυπηρετούν
στην τεχνολογική πρόοδο.
Εξήγηση συβόλων
Προειδοποίηση ενώπιον κινδύνων!
Παραποπή σε σηεία κειένου στο έγγραφο.
...
2. Γενικές υποδείξεις ασφάλειας
Πριν από την εκτέλεση κάθε εργασίας
στη συσκευή διακόπτετε την τροφοδοσία
!
ηλεκτρικής τάσης!
• Κατά την εγκατάσταση πρέπει ο προς σύνδεση ηλεκτρικός αγωγός να είναι ελεύθερος ηλεκτρικής τάσης. Συνεπώς πρέπει πρώτα να διακόπτετε το ηλεκτρικό ρεύα
και να ελέγχετε ε δοκιαστικό τάσης αν πράγατι έχει
διακοπεί η παροχή ηλεκτρικής τάσης.
• Κατά την εγκατάσταση του λαπτήρα LED πρόκειται
για εργασία στο δίκτυο ηλεκτρικής τάσης.
Για το λόγο αυτό πρέπει να εκτελείται εξειδικευένα και
σύφωνα ε τις σχετικές προδιαγραφές εγκατάστασης
της εκάστοτε χώρας και τους κανονισούς σύνδεσης.
(π. χ. DE- VDE 0100, AT- ÖVE / ÖNORM E8001-1,
CH- SEV 1000)
• Χρησιοποιείτε όνο γνήσια ανταλλακτικά.
• Επισκευές επιτρέπεται να εκτελούνται όνο από
εξειδικευένα συνεργεία.
3. L 16 LED / L 160 LED
Χρήση σύφωνα ε τους κανονισούς
– Λαπτήρας ε LED ως φωτιστικό έσο
– Κατάλληλος για τοποθέτηση σε οροφή και τοίχο.
Η χρήση σε εξωτερικούς χώρους είναι εφικτή όνο
υπό όρους εξαιτίας ευαίσθητης ανίχνευσης.
– ς εονωένος λαπτήρας ή δικτυωένος ε την
έκδοση Master ε αισθητήρες
Περιεχόενο συσκευασίας (εικ.3.1)
– Λαπτήρας
– τρεις βίδες
– τρία τακάκια
– τρία διαστάρια
ιαστάσεις προϊόντος (εικ. 3.2)
Επισκόπηση συσκευής (εικ. 3.3)
A Πλαίσιο
B Ακροδέκτης σύνδεσης
C Στεγανοποιητική τάπα
4. Ηλεκτρική σύνδεση
• ιακόπτετε τροφοδοσία ρεύατος (εικ. 4.1)
ιάγραα συνδεσολογίας (εικ. 4.1)
Ο αγωγός τροφοδοσίας αποτελείται από καλώδιο
3 συράτων:
L = Φάση (συνήθως αύρο, καφέ ή γκρι)
N = Ουδέτερος αγωγός (συνήθως πλε)
PE = Αγωγός γείωσης (πράσινο/κίτρινο)
Σε περίπτωση αφιβολιών πρέπει να προβείτε σε αναγνώριση των αγωγών ε δοκιαστικό τάσης. Κατόπιν αποσυνδέετε πάλι από την ηλεκτρική τάση. Φάση (L), και ουδέτερος
αγωγός (N) συνδέονται στον ακροδέκτη σύνδεσης.
Σηαντικό:
Το πέρδεα των συνδέσεων θα προκαλέσει αργότερα
στη συσκευή ή στον πίνακα ασφαλειών βραχυκύκλωα.
Στην περίπτωση αυτή πρέπει να γίνει εκ νέου αναγνώριση
των εονωένων αγωγών και επανασύνδεση. Στον αγωγό
τροφοδοσίας πορεί φυσικά να υπάρχει διακόπτης δικτύου τροφοδοσίας για ενεργοποίηση και απενεργοποίηση.
Η πηγή φωτός αυτού του λαπτήρα δεν είναι αντικαταστάσιη, σε περίπτωση που πρέπει να αντικατασταθεί η πηγή
φωτός (π.χ. ε τη λήξη της διάρκειας ζωής της), πρέπει να
αντικατασταθεί ολόκληρος ο λαπτήρας.
Υπόδειξη:
Μην αγγίζετε άεσα το λαπτήρα LED.
εφαρογή της σε εθνικό δίκαιο πρέπει οι άχρηστες πλέον
ηλεκτρικές συσκευές να αποσύρονται ξεχωριστά και να
οδηγούνται σε ανακύκλωση φιλική προς το περιβάλλον.
7. Εγγύηση κατασκευαστή
Αυτό το προϊόν της εταιρίας STEINEL κατασκευάστηκε
ε εγάλη προσοχή, ελέγχθηκε σχετικά ε τη λειτουργία
του και την τεχνική του ασφάλεια σύφωνα ε τους ισχύοντες κανονισούς και κατόπιν υποβλήθηκε σε δειγατοληπτικό έλεγχο. Η εταιρία Steinel αναλαβάνει την εγγύηση
για άψογη κατάσταση και λειτουργία. Ο χρόνος εγγύησης
ανέρχεται σε 36 ήνες και αρχίζει ε την ηέρα πώλησης
στον καταναλωτή. Επιδιορθώνουε ελαττώατα, τα οποία
οφείλονται σε σφάλατα υλικού ή εργοστασίου, η εγγυητική απαίτηση εκπληρώνεται ε επισκευή ή αντικατάσταση
ελαττωατικών εξαρτηάτων σύφωνα ε δική ας επιλογή. Η εγγυητική απαίτηση εκπίπτει για βλάβες σε φθειρόενα εξαρτήατα όπως επίσης για βλάβες και ελαττώατα
που οφείλονται σε ακατάλληλο χειρισό ή ακατάλληλη
συντήρηση. Περαιτέρω επακόλουθες βλάβες σε ξένα αντικείενα αποκλείονται. Η εγγύηση παρέχεται όνο εφόσον
η η αποσυναρολογηένη συσκευή αποσταλεί ε απόδειξη ταείου ή τιολόγιο (ηεροηνία αγοράς και σφραγίδα επόρου), καλά συσκευασένη στην αρόδια υπηρεσία
σέρβις ή αν παραδοθεί κατά τους 6 πρώτους ήνες στον
αντιπρόσωπο.
8. Tεχνικά δεδοένα
5. Εγκατάσταση
• Ελέγχετε όλα τα εξαρτήατα σχετικά ε βλάβες.
• Σε περίπτωση βλαβών δεν επιτρέπεται η λειτουργία του
προϊόντος.
• Κατά την εγκατάσταση του λαπτήρα LED πρέπει να
προσέξετε ώστε η στερέωσή του να γίνει χωρίς να
επιδέχεται κραδασούς.
Βήατα εγκατάστασης
• Αποσπάτε καπάκι από πλαίσιο (εικ.5.1)
• Σηαδεύετε σηεία για τρύπες (εικ. 5.2)
• Ανοίγετε τρύπες και τοποθετείτε ούπατ (εικ. 5.3)
• ιατρήστε τάπα στεγανότητας για αγωγό τροφοδοσίας
(εικ.5.4)
• Ενδοτοίχιος αγωγός (εικ. 5.5)
• Με διαστάρια σε εξωτοίχια εγκατάσταση (εικ. 5.6)
• Συνδέετε καλώδιο σύνδεσης (εικ. 5.7)
• Ενεργοποιείτε τροφοδοσία ρεύατος (εικ. 5.8)
• Προσαρόζετε καπάκι (εικ. 5.8)
ιαστάσεις (Ø x Β) L 16 LED: Ø 275 x 95
L 160 LED: Ø 310 x 125
Υλικό Γυαλί
Σύνδεση δικτύου 220-240 V, 50/60 Hz
Ισχύς εισόδου 8,5 W
Ρεύα δικτύου 41 mA AC
Συντελεστής απόδοσης 0,92
Φωτεινή ροή ε καπάκι 840 Im
Αποδοτικότητα ε καπάκι 100 lm/W
Χρώα φωτός 3000 K / θερό λευκό / SDCM 3
ιάρκεια ζωής LED 50.000 ώρες (L70B10 σύφωνα ε LM80)
Είδος προστασίας IP 44
Κλάση προστασίας II
Όρια θεροκρασίας -10 έως +40°C
9. ιαταραχές λειτουργίας
6. Απόσυρση
Ηλεκτρικές συσκευές, εξαρτήατα και συσκευασίες θα
πρέπει να αποσύρονται ε τρόπο φιλικό προς το περιβάλλον και να ανακυκλώνονται.
εν επιτρέπεται να πετάτε ηλεκτρικές συσκευές
στα οικιακά απορρίατα!
Μόνο για χώρες ΕΕ:
Σύφωνα ε την ισχύουσα Ευρωπαϊκή Οδηγία σχετικά ε
άχρηστες ηλεκτρικές και ηλεκτρονικές συσκευές και την
- 28 - - 29 -
Βλάβη Αιτία Βοήθεια
Λαπτήρας LED χωρίς τάση
Λαπτήρας LED δεν ανάβει
■ Ασφάλεια αντέδρασε, η ενεργοποιηένη, διακοπή κυκλώατος
■ Βραχυκύκλωα στο δίκτυο τροφοδοσίας
■ Ενδεχόενος διακόπτης δικτύου ΕΚΤΟΣ
■ Λανθασένη επιλογή ρύθισης
ευαισθησίας
■ ιακόπτης δικτύου ΕΚΤΟΣ
■ Ασφάλεια αντέδρασε
Σέρβις επισκευής:
Για επισκευές ετά την πάροδο του χρόνου εγγύησης ή
επισκευές ελαττωάτων χωρίς εγγυητική απαίτηση απευθυνθείτε στο πλησιέστερο σέρβις για να πληροφορηθείτε
τη δυνατότητα επισκευής.
ΚΑΤΑ ΣΚ ΕΥΑΣ ΤΗ
ΕΓΓΥΗΣΗ
■ Ενεργοποίηση ασφάλειας, αντικατάσταση,
ενεργοποίηση διακόπτη δικτύου, έλεγχος
κυκλώατος ε δοκιαστικό τάσης
■ Ελέγχετε συνδέσεις
■ Ενεργοποιείτε διακόπτη δικτύου
■ Νέα ρύθιση
■ Ενεργοποιείτε
■ Ενεργοποίηση ασφάλειας, αντικατάστα-
ση, εν ανάγκη έλεγχος σύνδεσης
GR
Page 16

TR
!
3
5
YIL
ÜRETİCİ
YIL
GARANTİSİ
1. Bu doküman hakkında
Lütfen itinayla okuyun ve saklayın!
– Telif hakları korunmaktadır. Kısmen de olsa basılması,
ancak onayımız alınarak mümkündür.
– Teknik gelişmelere hizmet eden değişiklikler yapma hakkı
saklıdır.
Sembol açıklaması
Tehlikelere karşı uyarı!
Dokümandaki metin kısımlarına gönderme.
...
2. Genel güvenlik uyarıları
Cihaz üzerindeki tüm çalışmalardan önce,
!
elektrik beslemesini kesin!
• Montaj sırasında, bağlanacak olan elektrik tesisatında
enerji kesik olmalıdır. Bu nedenle ilk olarak elektriği kapatın
ve bir kontrol kalemiyle enerjinin kesildiğini kontrol edin.
• LED lambanın kurulumunda, elektrik şebekesiyle ilgili bir
çalışma söz konusudur. Bu yüzden, geleneksel kurulum
yönergeleri ile bağlantı koşullarına uygun bir uygulama
yapılmalıdır. (örn. DE- VDE 0100, AT- ÖVE / ÖNORM
E8001-1, CH- SEV 1000)
• Sadece orijinal yedek parçalar kullanın.
• Onarımlar sadece, uzman atölyeler tarafından gerçekleştirilebilir.
3. L 16 LED / L 160 LED
Amacına uygun kullanım
– Ampul olarak LED kullanılan lamba
– Duvara ve tavana montaj için uygundur. Dış mekanda,
hassas algılama nedeniyle ancak koşullu olarak kullanılabilir
– Müstakil lamba veya sensörlü Master sürümü ile bağ-
lantılı olarak
Teslimat kapsamı (Şek� 3�1)
– Lamba
– üç vida
– üç dübel
– üç ara parçası
Ürünün boyutları (Şek. 3.2)
Cihazın genel görünümü (Şek. 3.3)
A Gövde
B Bağlantı terminali
C Tapa
4. Elektrik bağlantısı
• Elektrik beslemesini kapatın (Şek.4.1)
Devre şeması (Şek.4.1)
Elektrik kablosu, 3 iletkenli bir kablodur:
L = Faz (genellikle siyah, kahverengi veya gri)
N = Nötr hattı (genellikle mavi)
PE = Topraklama hattı (yeşil/sarı)
Çelişkiye düşülmesi halinde, kabloları bir avometre cihazıyla
tanımlayın; ardından tekrar elektriksiz hale getirin. Faz (L) ve
nötr (N) kablosu, avize terminaline bağlanmalıdır.
Önemli:
Bağlantıların karıştırılması, daha sonra cihazda veya sigorta
kutunuzda kısa devreye neden olur. Bu durumda, kabloların
hepsini tekrar tanımlamak ve yeniden birleştirmek zorundasınız. Elektrik besleme kablosuna, açma ve kapama için
uygun bir elektrik anahtarı tesis edilebilir.
Bu lambanın ışık kaynağı değiştirilemez; ışık kaynağının değiştirilmesi gerektiğinde (örn. çalışma ömrü sona erdiğinde),
komple lambanın yenilenmesi gerekir.
Not:
LED'e doğrudan temas etmeyin.
5. Montaj
• Bütün yapı parçalarında hasar kontrolü yapın.
• Hasarlar olduğunda, ürünü işletime almayın.
• LED lambanın montajı sırasında, titreşime maruz kalmayacak şekilde sabitlenmesine dikkat edilmelidir.
Montaj adımları
• Kapağı gövdeden ayırın (Şek.5.1)
• Delik yerlerini işaretleyin (Şek. 5.2)
• Delikleri delin ve dübelleri yerleştirin (Şek. 5.3)
• Elektrik kablosu için tapayı delin (Şek.5.4)
• Sıva altı kablo (Şek. 5.5)
• Sıva üstü montajda ara parçalarla (Şek.5.6)
• Bağlantı kablosunu bağlayın (Şek.5.7)
• Elektrik beslemesini açın (Şek.5.8)
• Kapağı oturtun (Şek.5.8)
6. Tasfiye
Elektrikli cihazlar, aksesuar ve ambalajlar, çevre dostu bir
dönüşüme gönderilmelidir.
Elektrikli cihazları evsel atıkların içine atmayın!
Sadece AB ülkeleri için:
Atık Elektrikli ve Elektronik Cihazlar Avrupa yönergesine ve
bunun dönüştüğü ulusal yasaya göre, artık kullanılamayacak haldeki elektrikli cihazların ayrı toplanıp çevre dostu geri
dönüşüm için gönderilmesi zorunludur.
7. Üretici garantisi
Bu Steinel ürünü, büyük bir itinayla üretilmiş, fonksiyon ve
güvenlik kontrolleri geçerli talimatlar uyarınca yapılmış ve
ardından bir numune kontrolüne tabi tutulmuştur. Steinel,
kusursuz nitelik ve fonksiyon garantisi vermektedir. Garanti
süresi 36 ay olup, kullanıcıya satış tarihi itibariyle başlar.
Malzeme ve fabrikasyon hatalarından kaynaklanan kusurlar
tarafımızca giderilmektedir; garanti hizmeti, tercihimize bağlı
olarak kusurlu parçaların onarımı veya değişimi şeklinde
gerçekleşir. Garanti hizmeti, aşınma parçalarındaki hasarları,
usulüne aykırı uygulama veya bakım sonucunda meydana
gelen hasar ve kusurları kapsamaz. Yabancı cisimlere yansıyan dolaylı zararlar, garanti kapsamı dışındadır. Garanti
yükümlülüğü ancak, cihazın açılmamış halde kasa fişi veya
faturasıyla (satış tarihi ve satıcı kaşesi) birlikte, tam ambalajlanmış şekilde ilgili servis istasyonuna gönderilmesi veya ilk
6 ay içinde satıcıya verilmesi durumunda geçerlidir.
Onarım servisi:
Garanti süresinin dolması veya garanti kapsamına girmeyen
kusurlar halinde, onarım olanağı konusunda lütfen en yakın
servis istasyonuna danışınız.
ÜRETİCİ
GARANTİSİ
8. Teknik özellikler
Boyutlar (Ø × D) L 16 LED: Ø 275 x 95
Malzeme Cam
Elektrik bağlantısı 220-240 V, 50/60 Hz
Çekilen güç 8,5 W
Elektrik gücü 41 mA AC
Güç katsayısı 0,92
Işık hüzmesi, kapaklı 840 Im
Verim, kapaklı 100 lm/W
Işık rengi 3000 K / sıcak beyaz / SDCM 3
LED kullanım ömrü 50.000 saat (LM80 uyarınca L70B10)
Koruma türü IP 44
Koruma sınıfı II
Sıcaklık aralığı -10 ila +40°C
L 160 LED: Ø 310 x 125
9. İşletim arızaları
Arıza Nedeni Giderilmesi
LED lambada elektrik yok
LED lamba çalışmıyor
■ Sigorta atmış, çalıştırılmamış,
kablo kopuk
■ Elektrik kablosunda kısa devre
■ Muhtemelen, mevcut elektrik anahtarı
kapalı
■ Alacakaranlık ayarı yanlış seçilmiş
■ Elektrik anahtarı KAPALI
■ Sigorta atmış
■ Sigortayı çalıştırın, değiştirin,
elektrik şalterini çalıştırın, kabloyu
avometre ile gözden geçirin
■ Bağlantıları gözden geçirin
■ Elektrik anahtarını çalıştırın
■ Yeniden ayarlayın
■ Çalıştırın
■ Sigortayı çalıştırın, değiştirin;
gerekt. bağlantıyı kontrol edin
TR
- 30 - - 31 -
Page 17

HU
!
3
5
ÉV
GYÁRTÓI
ÉV
GARANCIA
1� Tudnivaló a dokumentummal
kapcsolatban
Kérjük, olvassa el figyelmesen és őrizze meg!
– Szerzői jogvédelem alatt áll. Sokszorosítani, kivonatosan
is, csak az engedélyünkkel szabad.
– A műszaki fejlődést szolgáló változtatások jogát fenntartjuk.
Jelmagyarázat
Figyelmeztetés veszélyekre!
A dokumentum szöveghelyeire utal.
...
2. Általános biztonsági útmutatások
Mielőtt dolgozni kezdene a készüléken,
szakítsa meg a ráadott feszültséget!
!
• Szereléskor a csatlakoztatni kívánt vezetéknek feszültségmentesnek kell lennie. Ezért a szerelés megkezdése
előtt kapcsolja le az áramot, és feszültségjelzővel
ellenőrizze a feszültségmentességet.
• A LED-lámpák felszerelésekor hálózati feszültséggel
dolgozik. Ezért azt szakszerű módon, a saját országában szokásos bekötési előírások betartásával, és a
csatlakoztatási feltételek figyelembe vételével kell elvégezni. (pl. DE- VDE 0100, AT- ÖVE / ÖNORM E8001-1,
CH- SEV 1000)
• Csak eredeti pótalkatrészeket használjon.
• Javításokat csak szakszerviz végezhet.
3. L 16 LED / L 160 LED
Rendeltetésszerű használat
– Lámpa LED világítótesttel.
– Falra és mennyezetre történő felszerelésre alkalmas.
Kültérben a mozgásérzékelő érzékenyége miatt csak
korlátozottan alkalmazható
– önálló világításként, vagy mesterváltozattal hálózatba
kapcsolva érzékelőkkel
A csomag tartalma (3�1� ábra)
– lámpa
– három csavar
– három tipli
– három távtartó
Termékméretek (3.2. ábra)
A készülék áttekintése (3.3. ábra)
A Készülékház
B Csatlakozókapocs
C Tömítődugó
4. Elektromos csatlakozás
• Az áramellátás lekapcsolása (4.1. ábra)
Kapcsolási rajz (4.1. ábra)
A hálózati betápvezeték 3-erű kábelből áll:
L = fázis (többnyire fekete, barna vagy szürke)
N = nulla vezető (többnyire kék)
PE = védővezető (zöld/sárga)
Kétség esetén a vezetékeket feszültségjelző segítségével
azonosítania kell; majd le kell róluk kapcsolni a feszültséget.
Csatlakoztassa a fázist (L), illetve a nullavezetőt (N) a
csatlakozókapocsra.
Fontos:
A csatlakozások felcserélése később zárlathoz vezet a
készülékben vagy a bizto sítékdobozban. Ebben az esetben
ismét azonosítani kell az egyes vezetékeket, és újból
össze kell kötni őket. A hálózati betápvezetékbe a ki- és
bekapcsolás céljából természetesen hálózati kapcsoló is
szerelhető.
A lámpa fényforrását nem lehet cserélni; amennyiben a
fényforrást cserélni kell (pl. ha élettartamának végére ért),
a teljes lámpát le kell cserélni.
Megjegyzés:
Ne érintse meg a LED-et közvetlenül.
5. Szerelés
• Minden alkatrészt ellenőrizzen sérülés szempontjából.
• Sérülések esetén ne vegye használatba a terméket.
• A LED-lámpa felszerelésekor ügyelnie kell arra, hogy
felerősítés után ne tudjon rázkódni.
A szerelés lépései
• Vegye le a készülékház búráját (5.1. ábra)
• Jelölje be a furatok helyét (5.2. ábra)
• A furatokat fúrja ki, és rakjon beléjük tiplit (5.3. ábra)
• Szúrja át a hálózati vezeték tömítődugóját (5.4. ábra)
• Vakolat alatti betápvezeték (5.5. ábra)
• Vakolat feletti szereléskor távtartókkal (5.6. ábra)
• Csatlakoztassa rá a csatlakozókábelt (5.7. ábra)
• Kapcsolja be az áramellátást (5.8. ábra)
• Rakja fel a takaróbúrát (5.8. ábra)
6. Ártalmatlanítás
Gondoskodjon az elektromos készülékek, a tartozékok és a
csomagolás környezetbarát újra hasznosításáról.
Ne dobjon elektromos készülékeket a háztartási
szemétbe!
Csak az EU-országok esetében:
Az elektromos és elektronikus berendezések hulladékainak
kezelésére vonatkozó hatályos európai irányelvek, és azok
nemzeti szintre történő konvertálása szerint a használható
állapotban lévő elektromos készülékeket már nem kell
külön gyűjteni, és környezetbarát újra hasznosításukról
gondoskodni.
- 32 - - 33 -
7. Gyári garancia
Ezt a Steinel-terméket a legnagyobb gondossággal gyártották, működését és biztonságosságát az érvényes előírások
szerint bevizsgálták, majd szúrópróba szerűen ellenőrizték.
A Steinel garanciát vállal a kifogástalan minőségre és működésre. A garancia ideje 36 hónap, ami a vásárlás napján
kezdődik. Minden olyan hiányosságot kiküszöbölünk, amely
anyag- vagy gyártási hibákra vezethető vissza. A garancia
teljesítésének módját mi választjuk meg: ez lehet a hibás
alkatrészek megjavítása, vagy kicserélése. A garancia nem
vonatkozik a kopóalkatrészeken bekövetkező károkra, valamint az olyan károkra és hiányosságokra, amelyek a szakszerűtlen kezelés vagy karbantartás miatt következnek be.
Más tárgyakra következményként átterjedő károk a garanciából ki vannak zárva. Garanciát csak akkor tudunk vállalni,
ha a készüléket szétszereletlen állapotban szakszerűen becsomagolják, mellékelik (a vásárlás időpontjával és a kereskedő pecsétjével ellátott) pénztári bizonylatot vagy számlát,
és elküldik az illetékes szerviznek, vagy az első 6 hónapban
átadják a kereskedőnek.
8. Műszaki adatok
Méretek (átm. x mé) L 16 LED: Ø 275 x 95
Anyag Üveg
Hálózati csatlakozás 220-240 V, 50/60 Hz
Teljesítményfelvétel 8,5 W
Hálózati áram 41 mA AC
Teljesítménytényező 0,92
Fényáram búrával 840 Im
Hatásfok búrával 100 lm/W
Színhőmérséklet 3000 K / melegfehér / SDCM 3
LED élettartam 50 000 ó (L70B10 LM80 szerint)
Védettségi mód IP 44
Védettségi osztály II
Hőmérséklettartomány -10 és +40°C között
L 160 LED: Ø 310 x 125
9. Üzemzavarok
Zavar Oka Elhárítása
A LED-lámpa nem kap
feszültséget
A LED-lámpa nem kapcsol be
■ kioldott a biztosíték, nincs bekapcsolva,
megtört a vezeték
■ rövidzárlat a hálózati betápvezetékben
■ az esetleg beépített hálózati kapcsoló ki
van kapcsolva
■ szürkületi beállítás helytelenül
megválasztva
■ a hálózati kapcsoló KI van kapcsolva
■ kioldott a biztosíték
Javító szolgálat:
A garanciaidő lejárta után, vagy a garancia hatálya alá nem
tartozó hiányosságok esetén tudakolja meg az Önhöz legközelebb eső szervizünkben, hogy milyen lehetőségei vannak
a helyreállításra.
GYÁRTÓI
GARANCIA
■ kapcsolja be a biztosítékot, cserélje ki,
kapcsolja be a hálózati kapcsolót,
ellenőrizze a vezetéket a feszültségellenőrzővel
■ csatlakozásokat átvizsgálni
■ a hálózati kapcsolót kapcsolja be
■ állítsa be újra
■ kapcsolja be
■ kapcsolja be a biztosítékot, cserélje,
esetleg ellenőrizze a csatlakozásokat
HU
Page 18

CZ
!
5
LETÁ
ZÁRUKA
LETÁ
VÝROBCE
1. Ktomuto dokumentu
Pozorně si jej přečtěte auschovejte!
– Chráněno autorským právem. Dotisk, ičástečný, jen
snaším souhlasem.
– Změny, které slouží technickému pokroku, vyhrazeny.
Vysvětlení symbolů
Varování před nebezpečím!
Odkaz na text vdokumentu.
...
2. Všeobecné bezpečnostní pokyny
Před zahájením jakýchkoli prací na přístroji
!
přerušit přívod napětí!
• Připojované elektrické vedení nesmí být během montáže
pod napětím. Proto je nejprve třeba vypnout proud
apoté pomocí zkoušečky napětí zkontrolovat, zda je
vedení bez napětí.
• Při instalaci svítidla LED se jedná o práci na síťovém napětí.
Musí proto být provedena odborně podle obvyklých
předpisů pro instalaci elektrických zařízení apodmínek
jejich připojení dle ČSN. (např. DE- VDE 0100,
AT- ÖVE / ÖNORM E8001-1, CH- SEV 1000)
• Používejte jen originální náhradní díly.
• Opravy může provést jen odborný servis.
3. L 16 LED / L 160 LED
Používání vsouladu surčením
– Svítidlo s LED jako osvětlovací prostředek
– Vhodný k montáži na stěnu a strop. Ve venkovní oblasti
je kvůli citlivému záchytu použitelné jen podmíněně
– Jako samostatné svítidlo nebo propojené do sítě
s master verzí se senzory
Rozsah dodávky (obr� 3�1)
– Svítidlo
– Tři šrouby
– Tři hmoždinky
– Tři distanční držáky
Rozměry výrobku (obr.3.2)
Přehled zařízení (obr.3.3)
A Těleso
B Připojovací svorka
C Utěsňovací zátka
4. Elektrické připojení
• Vypnout napájení elektrickým proudem (obr.4.1)
Schéma zapojení (obr.4.1)
Kpřipojení kelektrické síti použijte třípólový kabel:
L = fázový vodič (většinou černý, hnědý nebo šedý)
N = neutrální vodič (většinou modrý)
PE = ochranný vodič (zelenožlutý)
Vpřípadě pochybností je nutno identifikovat jednotlivé vodiče
pomocí zkoušečky napětí; zda jsou zase bez napětí. Fázový
(L), i neutrální vodič (N) se připojí k připojovací svorce.
Důležité:
Případná záměna přívodů způsobí po zapnutí zkrat
vpřístroji nebo ve vaší pojistkové krabici. Vtomto případě
je nutno jednotlivé vodiče opakovaně identifikovat apoté
znovu zapojit. Vpřívodním síťovém vedení může být samozřejmě instalován běžný síťový vypínač.
Světelný zdroj tohoto svítidla nelze vyměnit, jestliže musí
být světelný zdroj vyměněn (např. na konci své životnosti),
je třeba vyměnit celé svítidlo.
Upozornění:
Nedotýkat se přímo LED.
5. Montáž
• Zkontrolovat poškození uvšech konstrukčních dílů.
• Při poškození výrobek nepoužívat.
• Při montáži svítidla LED dbát, aby bylo upevněno bez
otřesů.
Postup při montáži
• Ztělesa sejmout ochranný kryt (obr.5.1)
• Vyznačit otvory kvrtání (obr.5.2)
• Vyvrtat otvory avložit hmoždinky (obr.5.3)
• Prorazit utěsňovací zátku pro síťové přívodní vedení
(obr.5.4)
• Vedení instalované pod omítku (obr.5.5)
• Sdistančními držáky při montáži na omítku (obr.5.6)
• Připojit připojovací kabel (obr.5.7)
• Zapnout napájení elektrickým proudem (obr.5.8)
• Nasadit ochranný kryt (obr.5.8)
6. Likvidace
Elektrická zařízení, příslušenství a obaly by měly být odvezeny k ekologickému opětovnému zhodnocení.
Nevyhazujte elektrická zařízení do domovního
odpadu!
Jen pro země EU:
V souladu splatnou evropskou směrnicí oodpadních elektrických a elektronických zařízeních a jejím převedení do
národního práva musí být nepoužitelná elektrická zařízení
separována a odevzdána kekologickému opětovnému
zhodnocení.
7. Záruka výrobce
Tento výrobek firmy Steinel je vyráběn s maximální pozorností věnovanou jeho funkčnosti a bezpečnosti, které byly vyzkoušeny podle platných předpisů, přičemž se výrobek
rovněž podrobil namátkové výstupní kontrole. Firma Steinel
přebírá záruku za bezvadné provedení a funkčnost. Záruka se poskytuje v délce 36 měsíců a začíná dnem prodeje
výrobku spotřebiteli. Odstraněny vám budou výrobní vady
a závady zapříčiněné vadným materiálem, přičemž záruka spočívá v opravě nebo výměně výrobku dle našeho výběru. Záruka se nevztahuje na vady a škody na dílech podléhajících opotřebení, na škody zapříčiněné nesprávným
zacházením nebo údržbou. Uplatňování dalších nároků následných škod na cizích věcech je vyloučeno. Záruka bude uznána jen tehdy, bude-li nedemontovaný přístroj dobře
zabalen, přiložena pokladní stvrzenka nebo faktura (datum
prodeje a razítko prodejny), poslán na adresu příslušného
servisu nebo během prvních 6 měsíců předán prodejně.
Servisní opravny:
Po uplynutí záruční doby nebo v případě závad bez nároku
na záruku se ve vašem nejbližším servisu zeptejte na možnost opravy.
ZÁRUKA
VÝROBCE
8. Technické parametry
Rozměry (Ø × h) L 16 LED: Ø 275 x 95
Materiál sklo
Připojení ksíti 220−240V, 50/60Hz
Příkon 8,5 W
Síťový proud 41 mA AC
Účiník 0,92
Světelný tok s krytem 840 Im
Efektivnost s krytem 100lm/W
Barva světla 3000 K / teplá bílá / SDCM 3
Životnost LED 50 000hod. (L70B10 po LM80)
Krytí IP 44
Třída ochrany II
Teplotní rozmezí -10 až +40°C
L 160 LED: Ø 310 x 125
9. Provozní poruchy
Porucha Příčina Náprava
Svítidlo LED bez napětí
Svítidlo LED nezapíná
■ Pojistka zareagovala, svítidlo není
zapnuté, přerušené vedení
■ Zkrat vpřívodním síťovém vedení
■ Eventuálně vypnutý stávající síťový
vypínač
■ Zvoleno nesprávné soumrakové
nastavení
■ Síťový vypínač vpoloze VYPNUTO
■ Pojistka zareagovala
■ Zapnout, vyměnit pojistku;
zapnout síťový vypínač, zkontrolovat
vedení pomocí zkoušečky napětí
■ Zkontrolovat připojení
■ Zapnout síťový vypínač
■ Znovu nastavit
■ Zapnout
■ Zapnout, vyměnit pojistku;
popř. zkontrolovat připojení
CZ
- 34 - - 35 -
Page 19

SK
!
3
5
ROKY
ZÁRUKA
ROKOV
VÝROBCU
1. O tomto dokumente
Pozorne si ho prečítajte a uschovajte!
– Chránené autorským právom. Dotlač, aj keď iba v skrá-
tenej verzii, je povolená iba snaším súhlasom.
– Vyhradzujeme si právo na zmeny slúžiace technickému
pokroku.
Vysvetlenie symbolov
Varovanie pred nebezpečenstvami!
Odkaz na textové pasáže vdokumente.
...
2. Všeobecné bezpečnostné pokyny
Pred všetkými prácami na prístroji prerušte
!
prívod napätia!
• Pri montáži musí byť pripájané elektrické vedenie bez
napätia. Preto je potrebné najskôr vypnúť elektrický
prúd a skontrolovať beznapäťovosť pomocou skúšačky
napätia.
• Pri inštalácii LED svietidla ide o prácu na sieťovom napätí.
Inštalácia sa preto musí vykonať podľa inštalačných
predpisov a podmienok pripojenia platných v danej krajine. (napr. DE- VDE 0100, AT- ÖVE / ÖNORM E8001-1,
CH- SEV 1000)
• Používajte iba originálne náhradné diely.
• Opravy smú vykonávať iba autorizované servisné dielne.
3. L 16 LED / L 160 LED
Správne používanie
– Svietidlo so svetelným zdrojom v podobe LED diódy.
– Vhodné na nástennú a stropnú montáž. V exteriéroch
použiteľné iba za určitých podmienok z dôvodu citlivého
snímania.
– Ako samostatné svietidlo alebo zosieťované s verziou
Master so senzormi.
Rozsah dodávky (obr� 3�1)
– svietidlo
– tri skrutky
– tri hmoždinky
– tri dištančné držiaky
Rozmery výrobku (obr. 3.2)
Prehľad dielov výrobku (obr. 3.3)
A kryt
B pripojovacia svorka
C tesniaca zátka
4. Elektrické pripojenie
• Vypnite napájanie elektrickým prúdom (obr. 4.1).
Schéma zapojenia (obr. 4.1)
Napájacie vedenie pozostáva z jedného 3-žilového kábla:
L = fáza (zvyčajne čierna, hnedá alebo sivá)
N = nulový vodič (väčšinou modrý)
PE = ochranný vodič (zeleno-žltý)
V prípade pochybností identifikujte vodiče pomocou skúšačky napätia; potom ich znova odpojte od napätia. Fáza (L),
ako aj neutrálny vodič (N) sa pripoja na pripojovaciu svorku.
Dôležité:
Zámena vodičov neskôr vedie kskratu vprístroji alebo
vskrinke spoistkami. V tomto prípade jednotlivé vodiče ešte
raz identifikujte a nanovo zapojte. Na sieťové vedenie sa
môže nainštalovať sieťový spínač na zapínanie a vy pínanie.
Svetelný zdroj tohto svietidla sa nedá nahradiť. V prípade
nutnosti výmeny svetelného zdroja (napr. na konci jeho
životnosti) sa musí vymeniť celé svietidlo.
Upozornenie:
Nedotýkajte sa priamo LED diódy.
5. Montáž
• Všetky diely skontrolujte vzhľadom na poškodenie.
• Pri poškodeniach výrobok neuvádzajte do prevádzky.
• Pri montáži LED svietidla dbajte na to, aby bolo upevnené na mieste bez otrasov.
Montážny postup
• Kryt odpojte od telesa (obr. 5.1).
• Naznačte otvory na vŕtanie (obr. 5.2).
• Vyvŕtajte otvory a vložte hmoždinky (obr. 5.3).
• Prerazte tesniace zátky pre sieťový prívod (obr. 5.4).
• Podomietkové prípojné vedenie (obr. 5.5).
• Pomocou dištančných podložiek pri nadomietkovej
montáži (obr. 5.6).
• Pripojte prípojný kábel (obr. 5.7).
• Zapnite napájanie elektrickým prúdom (obr. 5.8).
• Nasaďte kryt (obr. 5.8).
6. Likvidácia
Elektrické zariadenia, príslušenstvo a obaly odovzdajte na
ekologickú recykláciu.
Elektrické zariadenia nevyhadzujte do komunálneho odpadu!
Iba pre krajiny EÚ:
Podľa platnej európskej smernice oodpade zelektrických
a elektronických zariadení a jej implementácie do národnej
legislatívy sa musia nepoužívané elektrické a elektronické
zariadenia zbierať separovane a odovzdať na ekologickú
recykláciu.
7. Záruka výrobcu
Tento výrobok značky Steinel bol vyrobený s maximálnou
dôslednosťou, skontrolovaný z hľadiska funkčnosti a bezpečnosti podľa platných predpisov a následne podrobený
náhodnej kontrole. Spoločnosť Steinel preberá záruku za
bezchybný stav a funkčnosť. Záručná doba je 36 mesiacov
a začína plynúť dňom predaja spotrebiteľovi. Odstránime
nedostatky, ktoré vyplývajú z chyby materiálu alebo výrobnej chyby, záručné plnenie sa uskutočňuje opravou alebo
výmenou chybných dielov podľa nášho uváženia. Záručné
plnenie sa nevzťahuje na poškodenie opotrebovateľných
dielov ani na škody a nedostatky, ktoré vzniknú nesprávnym zaobchádzaním alebo údržbou. Ďalšie následné škody
na cudzích predmetoch sú zo záruky vylúčené. Záruka je
platná len vtedy, ak sa nerozobraný prístroj spolu s pokladničným blokom alebo faktúrou (dátum kúpy a pečiatka
predajcu) zašle dôkladne zabalený do príslušnej servisnej
stanice alebo sa počas prvých 6 mesiacov odovzdá predajcovi.
Servis pre opravy:
Po uplynutí záručnej doby alebo vprípade chýb, na ktoré
sa nevzťahuje záruka, sa o možnosti opravy informujte na
najbližšej servisnej stanici.
ZÁRUKA
VÝROBCU
8. Technické údaje
Rozmery (Ø x H) L 16 LED: Ø 275 x 95
Materiál Sklo
Sieťové pripojenie 220 – 240 V, 50/60 Hz
Príkon 8,5 W
Sieťový prúd 41 mA AC
Faktor výkonu 0,92
Svetelný prúd s krytom 840 Im
Efektívnosť s krytom 100 lm/W
Farba svetla 3000 K / teplá biela / SDCM 3
Životnosť LED 50 000 h (L70B10 podľa LM80)
Krytie IP 44
Trieda ochrany II
Teplotný rozsah -10 až +40 °C
L 160 LED: Ø 310 x 125
9. Prevádzkové poruchy
Porucha Príčina Riešenie
LED svietidlo je bez napätia
LED svietidlo sa nezapne
■ aktivovala sa poistka, nezapnuté,
vedenie prerušené
■ skrat na sieťovom prívodnom vedení
■ prípadne zabudovaný sieťový spínač
je vypnutý
■ nastavenie stmievanie je nesprávne
zvolené
■ sieťový spínač je vypnutý
■ aktivovala sa poistka
■ zapnúť poistku, vymeniť,
zapnúť sieťový spínač, skontrolovať
ve denie pomocou skúšačky napätia
■ skontrolovať prípojky
■ zapnúť sieťový spínač
■ znovu nastaviť
■ zapnúť
■ zapnúť poistku, vymeniť,
príp. skontrolovať pripojenie
SK
- 36 - - 37 -
Page 20

PL
!
3
5
LATA
GWARANCJI
LAT
PRODUCENTA
1. Informacje o tym dokumencie
Zapoznać się dokładnie izostawić do przechowania!
– Dokument chroniony prawem autorskim. Przedruk, także
wczęściach, wyłącznie po uzyskaniu naszej zgody.
– Zmiany, wynikające zpostępu technicznego, zastrzeżone.
Objaśnienie symboli
Ostrzeżenie przed zagrożeniami!
Odsyłacz do tekstu wdokumencie.
...
2. Ogólne zasady bezpieczeństwa
Przed rozpoczęciem wszelkich prac przy
!
urządzeniu odłączyć napięcie zasilające!
• Przewód zasilający, który należy podłączyć podczas
montażu, nie może być pod napięciem. Dlatego najpierw
należy wyłączyć prąd i sprawdzić brak napięcia za
pomocą próbnika.
• Podczas instalacji lampy LED wykonywana jest praca
przy obecności napięcia sieciowego. Dlatego należy ją
wykonać fachowo, zgodnie zobowiązującymi przepisami dotyczącymi instalacji ipodłączania do zasilania
elektrycznego. (np. DE- VDE 0100, AT- ÖVE / ÖNORM
E8001-1, CH- SEV 1000)
• Stosować tylko oryginalne części zamienne.
• Naprawy mogą wykonywać jedynie autoryzowane
punkty serwisowe.
3. L 16 LED / L 160 LED
Zastosowanie zgodne zprzeznaczeniem
– Lampa z żarówką LED
– Do montażu na ścianie i suficie. Na zewnątrz, ze wzglę-
du na czułe wykrywanie, znajduje zastosowanie jedynie
warunkowo
– Dostępne w wersji lampy pojedynczej lub w połączeniu
z wersją Master i czujnikami
Zakres dostawy (rys� 3�1)
– lampa
– trzy śruby
– trzy kołki
– trzy podkładki dystansowe
Wymiary produktu (rys� 3�2)
Przegląd urządzenia (rys� 3�3)
A Obudowa
B Zacisk przyłączeniowy
C Zaślepka uszczelniająca
4. Przyłącze elektryczne
• Wyłączyć zasilanie (rys.4.1)
Schemat połączeń (rys. 4.1)
Przewód zasilający jest kablem 3-żyłowym:
L = przewód fazowy (najczęściej czarny,
brązowy lub szary)
N = przewód zerowy (najczęściej niebieski)
PE = przewód ochronny (zielono-żółty)
Wrazie wątpliwości należy zidentyfikować przewody próbnikiem napięcia, anastępnie ponownie wyłączyć napięcie.
Fazę (L) iprzewód neutralny (N) podłącza się do zacisku
przyłączeniowego,
Ważne:
Pomylenie przewodów jest przyczyną późniejszego zwarcia
wurządzeniu lub wskrzynce bezpieczników. W takim
przypadku należy jeszcze raz zidentyfikować poszczególne
przewody iponownie je podłączyć. Wprzewodzie zasilającym można oczywiście zainstalować wyłącznik sieciowy do
ręcznego włączania iwyłączania oświetlenia. Źródło światła
tej lampy nie jest wymienne; jeżeli zajdzie konieczność
wymiany źródła światła (np. po upłynięciu jego żywotności),
należy wymienić całą lampę.
Wskazówka:
Nie dotykać bezpośrednio diody LED.
5. Montaż
• Sprawdzić wszystkie elementy pod kątem uszkodzenia.
• Wprzypadku uszkodzeń nie uruchamiać produktu.
• Przy montażu lampy LED należy zwrócić na to uwagę,
aby zamontować ją w miejscu nie podlegającym wstrząsom i drganiom.
Czynności montażowe
• Zdjąć osłonę z obudowy (rys. 5.1)
• Zaznaczyć otwory do wywiercenia (rys. 5.2)
• Wywiercić otwory iwłożyć kołki (rys. 5.3)
• Przebić zaślepkę uszczelniającą przewodu zasilania
sieciowego (rys. 5.4)
• Podtynkowy przewód zasilający (rys. 5.5)
• Przy użyciu uchwytów dystansowych w przypadku
montażu natynkowego (rys. 5.6)
• Podłączyć kabel przyłączeniowy (rys. 5.7)
• Włączyć zasilanie (rys. 5.8).
• Założyć osłonę (rys. 5.8).
6. Utylizacja
Urządzenia elektryczne, akcesoria iopakowania należy
oddać do recyklingu przyjaznego środowisku.
Nie wyrzucać urządzeń elektrycznych wraz
zodpadami zgospodarstw domowych!
Tylko dla krajów UE:
Zgodnie zobowiązującymi dyrektywami europejskimi
wsprawie zużytych urządzeń elektrycznych ielektronicznych
oraz ich wdrażania do prawa krajowego nienadające się
do użytkowania urządzenia elektryczne należy poddawać
segregacji irecyklingowi wsposób przyjazny środowisku.
- 38 - - 39 -
7. Gwarancja producenta
Niniejszy produkt firmy Steinel został wykonany z dużą starannością. Prawidłowe działanie i bezpieczeństwa użytkowania potwierdzają przeprowadzone losowo kontrole jakości oraz zgodność z obowiązującymi przepisami. Firma
Steinel nie ponosi odpowiedzialności za prawidłowe właściwości idziałanie. Okres gwarancji wynosi 36miesięcy irozpoczyna się zdniem sprzedaży użytkownikowi. Wramach
gwarancji usuwamy braki wynikłe zwad materiałowych lub
wykonawczych, świadczenie gwarancyjne nastąpi według
naszej decyzji przez naprawę lub wymianę wadliwych części.
Gwarancja nie obejmuje uszkodzenia części ulegających
zużyciu eksploatacyjnemu, uszkodzeń iusterek spowodowanych przez nieprawidłową obsługę lub konserwację.
Gwarancja nie obejmuje odpowiedzialności za szkody
wtórne powstałe na przedmiotach trzecich.
8. Dane techniczne
Wymiary (Ø x gł.) L 16 LED: Ø 275 x 95
Materiał Szkło
Zasilanie sieciowe 220–240 V, 50/60 Hz
Pobór mocy 8,5 W
Prąd sieciowy 41 mA AC
Współczynnik mocy 0,92
Strumień świetlny zosłoną 840 Im
Wydajność z osłoną 100 lm/W
Barwa światła 3000 K / ciepłe białe światło /SDCM 3
Żywotność LED 50.000 h (L70B10 zgodnie z LM80)
Stopień ochrony IP 44
Klasa ochronności II
Zakres temperatury -10 do +40° C
L 160 LED: Ø 310 x 125
9. Usterki
Usterka Przyczyna Usuwanie
lampa LED bez napięcia
lampa LED nie włącza się
■ zadziałał bezpiecznik,
niewłączony wyłącznik sieciowy,
przerwany przewód
■ zwarcie w przewodzie zasilającym
■ ewentualnie zainstalowany wyłącznik
sieciowy jest wyłączony
■ nieprawidłowo ustawiona czułość
zmierzchowa czujnika
■ wyłączony wyłącznik sieciowy
■ zadziałał bezpiecznik
Gwarancja jest udzielana tylko wtedy, gdy prawidłowo
zapakowane urządzenie (nierozłożone na części) zostanie
odesłane wciągu pierwszych 6miesięcy od daty zakupu
wraz zoryginalną kartą gwarancyjną, paragonem lub
rachunkiem zakupu (opatrzonym datą zakupu ipieczęcią
sklepu) do właściwego punktu serwisowego.
Serwis naprawczy:
Po upływie okresu gwarancji lub wrazie usterek nieobjętych gwarancją informacji omożliwości naprawy udziela
najbliższy punkt serwisowy.
GWARANCJI
PRODUCENTA
■ włączyć, wymienić bezpiecznik;
włączyć wyłącznik sieciowy, sprawdzić
przewód próbnikiem napięcia
■ sprawdzić podłączenia elektryczne
■ włączyć wyłącznik sieciowy
■ ustawić na nowo
■ włączyć
■ włączyć, wymienić bezpiecznik,
ewentualnie sprawdzić podłączenie
PL
Page 21

RO
!
3
5
ANI
PRODUCĂTORULUI
ANI
GARANŢIA
1. Despre acest document
Vă rugăm să citiţi cu atenţie documentul și să-l păstraţi!
– Protejat prin Legea drepturilor de autor. Reproducerea,
inclusiv în extras, este permisă numai cu aprobarea
noastră.
– Ne rezervăm dreptul de a face modificări care servesc
progresului tehnic.
Explicaţia simbolurilor
Atenţie, pericole!
Trimitere la texte din document.
...
2. Instrucţiuni generale de securitate
Înainte de efectuarea oricăror lucrări la
aparat, întrerupeţi alimentarea cu
!
energie electrică!
• La montare, cablul electric care urmează să fie conectat
nu trebuie să fie sub tensiune. Opriţi așadar curentul
și verificaţi cu un testor de tensiune, să nu mai existe
curent pe cablu.
• Instalarea lămpii cu LED presupune o intervenţie la
reţeaua electrică.
Prin urmare, aceasta trebuie efectuată corect, conform
instrucţiunilor de instalare și condiţiilor de conectare uzuale în ţara respectivă. (de ex. DE- VDE 0100, AT- ÖVE /
ÖNORM E8001-1, CH- SEV 1000)
• Folosiţi numai piese de schimb originale.
• Reparaţiile se vor executa numai în ateliere specializate.
3. L 16 LED / L 160 LED
Utilizare conform destinaţiei
– Lampă care folosește LED drept corp de iluminat
– Adecvată pentru montarea pe perete și plafon. În exte-
rior se poate utiliza numai în anumite condiţii, având în
vedere sistemul sensibil de detecţie
– Disponibilă ca lampă singură sau interconectată cu
versiunea master cu senzori
Volumul livrării (fig� 3�1)
– lampă
– trei șuruburi
– trei dibluri
– trei distanţiere
Dimensiunile produsului (fig. 3.2)
Prezentare generală a aparatului (fig. 3.3)
A Carcasă
B Bornă de conexiune
C Bușon de etanșare
4. Conexiune electrică
• Opriţi alimentarea cu curent (fig. 4.1)
Schemă de conexiuni (fig. 4.1)
Circuitul de alimentare este format dintr-un cablu cu 3 fire:
L = conductor de fază (de obicei negru, maro sau gri)
N = conductor neutru (de obicei albastru)
PE = conductor de protecţie (verde / galben)
Dacă aveţi îndoieli, trebuie să identificaţi conductorii cu ajutorul unui creion de tensiune. După aceea ei trebuie scoși
din nou de sub tensiune. Faza (L), precum și conductorul
neutru (N) se conectează la blocul terminal.
Important:
Inversarea conexiunilor poate duce la scurtcircuit la aparat
sau la tabloul de siguranţe. În acest caz trebuie identificat
din nou fiecare cablu și ulterior refăcute conexiunile corecte. Pe cablul de alimentare se poate monta, bineînţeles, un
întrerupător de reţea, pentru activare și dezactivare.
Sursa de lumină a acestei lămpi nu se poate înlocui; în
cazul în care sursa de lumină trebuie înlocuită (de ex. la
finalul duratei de viaţă), trebuie înlocuită întreaga lampă.
Indicaţie:
Nu atingeţi direct LED-ul.
5. Montaj
• Verificaţi toate componentele pentru a constata dacă
prezintă deteriorări.
• Nu puneţi în funcţiune produsul dacă prezintă deteriorări.
• La montarea lămpii cu LED trebuie avut grijă să nu fie
supusă trepidaiilor.
Etapele montării
• Decuplaţi capacul de carcasă (fig.5.1)
• Marcaţi locul unde vor fi găurile (fig.5.2)
• Faceţi găurile și introduceţi diblurile (fig.5.3)
• Străpungeţi bușonul de etanșare al cablului de
alimentare (fig.5.4)
• Cablu plasat sub tencuială (fig.5.5)
• Cu distanţiere la montarea pe tencuială (fig.5.6)
• Racordaţi cablul de conexiune (fig.5.7)
• Porniţi alimentarea cu curent (fig.5.8)
• Montaţi capacul (fig.5.8)
6. Evacuarea ca deșeu
Aparatele electrice, accesoriile și ambalajele trebuie să facă
obiectul unei reciclări ecologice.
Nu aruncaţi aparatele electrice
la gunoiul menajer!
Numai pentru ţările UE:
În conformitate cu directiva europeană privind eliminarea
deșeurilor electrice și electronice în vigoare și transpunerii
ei în legislaţia naţională, aparatele electrice care nu mai pot
fi utilizate trebuie să fie colectate separat și să facă obiectul
unei reciclări ecologice.
7. Garanţia de producător
Acest produs STEINEL a fost fabricat cu maximă atenţie,
verificat din punctul de vedere al funcţionării și al siguranţei
conform normelor în vigoare și supus ulterior unor controale prin sondaj. Steinel garantează structura și funcţionarea
ireproșabilă a acestui produs. Termenul de garanţie este
de 36 de luni și începe de la data vânzării produsului către
consumator. Garanţia acoperă deficienţele bazate pe
defecte de material și fabricaţie, iar îndeplinirea garanţiei se
realizează prin repararea sau înlocuirea pieselor defecte,
conform opţiunii noastre. Garanţia nu acoperă consumabilele și nici stricăciunile sau defecţiunile cauzate de manipularea ori întreţinerea incorectă a produsului. Este exclusă
compensarea daunelor provocate altor obiecte. Garanţia se
asigură numai dacă se expediază aparatul nedemontat și
bine ambalat, împreună cu bonul de casă sau factura (data
de cumpărare și ștampila distribuitorului), către centrul de
service competent sau dacă este returnat distribuitorului în
primele 6 luni după vânzare.
Reparaţii și post-garanţie:
După ieșirea din termenul de garanţie sau în cazul defecţiunilor pentru care nu beneficiaţi de reparaţii în garanţie,
informaţi-vă cu privire la posibilitatea reparaţiei la staţia de
service cea mai apropiată.
GARANŢIA
PRODUCĂTORULUI
8. Date tehnice
Dimensiuni (Ø × T) L 16 LED: Ø 275 x 95
Material Sticlă
Conexiune la reţeaua electrică 220-240 V, 50/60 Hz
Consum de putere 8,5 W
Curent de la reţea 41 mA AC
Factor de putere 0,92
Flux de lumină cu capac 840 Im
Eficienţă cu capac 100 lm/W
Culoare lumină 3000 K / alb cald / SDCM 3
Durată de viaţă LED 50.000 h (L70B10 conform LM80)
Grad de protecţie IP 44
Clasă de protecţie II
Domeniu de temperatură -10 până la +40°C
L 160 LED: Ø 310 x 125
9. Defecţiuni în funcţionare
Defecţiune Cauză Remediu
Lampă cu LED fără tensiune
Lampa cu LED nu se aprinde
■ Siguranţa a declanşat,
aparat neconectat, cablu întrerupt
■ Scurtcircuit în cablul de reţea
■ Întrerupătorul de reţea eventual existent
este decuplat
■ Reglarea luminozităţii de comutare
este incorectă
■ Întrerupător de reţea OPRIT
■ Siguranţa a declanşat
■ Cuplaţi siguranţa, înlocuiţi-o,
cuplaţi întrerupătorul de reţea, verificaţi
cablul cu ajutorul unui creion de tensiune
■ Verificaţi conexiunile
■ Cuplaţi întrerupătorul de reţea
■ Reglaţi din nou
■ Porniţi
■ Cuplaţi siguranţa, înlocuiţi-o,
eventual verificaţi legătura
RO
- 40 - - 41 -
Page 22

SI
!
3
5
LETNA
PROIZVAJALCA
GARANCIJA
LETNA
1. O tem dokumentu
Natančno preberite in shranite!
– Zaščiteno z avtorskimi pravicami. Ponatis v celoti ali po
delih je dovoljen le z našim soglasjem.
– Spremembe zaradi tehničnega napredka so pridržane.
Razlaga simbolov
Opozorilo pred nevarnostmi!
Napotek na mesta besedila v dokumentu.
...
2. Splošna varnostna navodila
Pred izvajanjem dela na napravi prekinite
!
dovod električne napetosti!
• Ob montaži mora biti električni vodnik, ki ga boste priključili na aparat, brez napetosti. Zato najprej odklopite
tok in preverite s preizkuševalcem električne napetosti,
če res ni več napetosti.
• Pri inštalaciji LED-svetila imate opravka z delom pod
električno napetostjo. Zato mora biti strokovno izvedeno
po veljavnih krajevnih predpisih za namestitev in pogojih
za priključitev. (npr. DE- VDE 0100, AT - ÖVE / ÖNORM
E8001-1, CH- SEV 1000)
• Uporabljajte le originalne nadomestne dele.
• Popravila lahko izvajajo le strokovne delavnice.
3. L 16 LED / L 160 LED
Namenska uporaba
– Luč z LED-svetilko
– Za stensko in stropno montažo. V zunanjosti uporabna
samo pogojno zaradi visoke občutljivosti zajemanja
– Na voljo kot posamezna luč ali povezana v mrežo
z nadrejeno različico s senzorji
Obseg dobave (sl� 3�1)
– svetilka
– trije vijaki
– trije vložki
– trije distančniki
Mere izdelka (sl. 3.2)
Pregled delov naprave (sl. 3.3)
A Ohišje
B Priključna spončnica
C Tesnilni čepki
4. Električni priključek
• Izklopite oskrbo z energijo (sl. 4.1)
Vezalni načrt (sl. 4.1)
Električna napeljava je sestavljena iz 3-žilnega kabla:
L = faza (praviloma črn, rjav ali siv)
N = nevtralni vodnik (praviloma moder)
PE = varnostni vod (zeleno/rumen)
V primeru dvoma morate napeljave identificirati z indikatorjem napetosti; nato ga ponovno preklopite na stanje brez
napetosti. Fazo (L) in nevtralnik vodnik (N) priključite na
spončnico.
Pomembno:
Pomešanje priključkov lahko privede do kratkega stika
v napravi ali v vaši električni omarici. V tem primeru morate
vse napeljave znova identificirati in na novo povezati. Na
omrežni kabel lahko inštalirate omrežno stikalo za vklop in
izklop.
Vira svetlobe v tej svetilki ne morete zamenjati, če je treba
zamenjati vir svetlobe (npr. ob koncu uporabne dobe),
morate zamenjati celo svetilko.
Opozorilo:
LED-svetilke se ne dotikajte neposredno.
5. Montaža
• Preverite vse sklope, ali so poškodovani.
• Poškodovanega izdelka ne uporabljajte.
• Pri montaži LED-svetilke pazite, da je pritrjena brez
pretresanja.
Navodila za montažo
• Ločite pokrov od stenskega držala (sl. 5.1)
• Zarišite luknje za vrtanje (sl. 5.2)
• Izvrtajte luknje in vstavite moznike (sl. 5.3)
• Tesnilni čepki za omrežne napeljave, prebiti (sl. 5.4)
• Podometna napeljava (sl. 5.5)
• Z distančniki pri nadometni montaži (sl. 5.6)
• Priključite priključni kabel (sl. 5.7)
• Vklopite oskrbo z energijo (sl. 5.8)
• Nataknite pokrov (sl. 5.8)
6. Odstranjevanje
Električne aparate, opremo in embalažo oddajte v okolju
prijazno ponovno obdelavo.
Električnih aparatov ne odstranjujte s hišnimi
odpadki!
Samo za države članice EU:
V skladu z veljavno Evropsko direktivo o izrabljenih električnih in elektronskih aparatih in njenim prenosom v nacionalno zakonodajo je električne aparate, ki niso več uporabni,
treba zbirati ločeno in jih oddati v okolju prijazno ponovno
obdelavo.
7. Garancija proizvajalca
Ta proizvod podjetja Steinel je bil izdelan z veliko
skrbnostjo, preverjen glede delovanja in varnosti po veljavnih predpisih ter končno podvržen naključni kontroli. Steinel
daje garancijo za brezhibno stanje in funkcionalnost proizvoda. Garancija velja 36 mesecev od dneva nakupa in se
začne z dnem prodaje izdelka stranki. Odstranjujemo motnje zaradi napake v materialu ali izdelavi. Garancijska storitev obsega popravilo ali zamenjavo okvarjenih delov po
naši izbiri. Garancija ne velja pri poškodbah obrabnih delov in za škode in pomanjkljivosti, do katerih je prišlo zaradi nepravilne uporabe ali vzdrževanja. Nadaljnje poškodbe
na drugih predmetih so izključene. Garancija velja le, če se
nerazstavljen, dobro zapakiran aparat skupaj s potrdilom o
nakupu ali računom (datum nakupa in žig prodajalca) pošlje
ustreznemu servisu ali v prvih 6 mesecih preda prodajalcu.
Servis za popravila:
Po poteku garancijske dobe ali pri napakah brez garancijske pravice se posvetujte z našim servisnim obratom glede popravila.
PROIZVAJALCA
GARANCIJA
8. Tehnični podatki
Mere (Ø x G) L 16 LED: Ø 275 x 95
Material steklo
Omrežni priključek 220-240 V, 50/60 Hz
Poraba energije 8,5 W
Omrežni tok 41 mA AC
Faktor moči 0,92
Svetlobni tok s pokrovom 840 Im
Učinkovitost s pokrovom 100 lm/W
Barva svetlobe 3000 K / topla bela / SDCM 3
LED - življenjska doba: 50.000 h (L70B10 po LM80)
Vrsta zaščite IP 44
Razred zaščite II
Temperaturno območje -10 do +40°C
L 160 LED: Ø 310 x 125
9. Motnje delovanja
Motnja Vzrok Pomoč
LED-svetilka brez napetosti
LED-svetilka se ne vklopi
■ varovalka se je sprožila,
ni vklopljena,
povezava je prekinjena
■ kratki stik v električnem omrežju
■ morebitno prisotno omrežno stikalo
je izklopljeno
■ nastavitev zatemnitve je napačno
izbrana
■ omrežno stikalo je izklopljeno
■ varovalka se je sprožila
■ vklopite, zamenjajte varovalko,
vklopite omrežno stikalo,
preverite vod z indikatorjem napetost
■ preverite priključke
■ vklopite omrežno stikalo
■ ponovno ga nastavite
■ vklopite
■ vklopite, zamenjajte varovalko,
po potrebi preverite priključek
SI
- 42 - - 43 -
Page 23

HR
!
3
5
PROIZVOĐAČA
GODINA
JAMSTVA
1. Uz ovaj dokument
Pažljivo pročitajte i sačuvajte!
– Zaštićeno autorskim pravima. Pretisak, čak i djelomičan,
dopušten je samo uz naše odobrenje.
– Zadržavamo pravo na izmjene koje služe tehničkom
napretku.
Tumačenje simbola
Upozorenje na opasnosti!
Uputa na tekst u dokumentu.
...
2. Opće sigurnosne napomene
Prije svih radova na uređaju prekinite
• Prilikom montaže električni vod koji treba priključiti ne
• Kod instalacije LED svjetiljke radi se o radovima na
• Koristite samo originalne rezervne dijelove.
• Popravke smiju obavljati samo stručne radionice.
Namjenska uporaba
Sadržaj isporuke (sl� 3�1)
Dimenzije proizvoda (sl. 3.2)
Pregled proizvoda (sl. 3.3)
A kućište
B priključna stezaljka
C brtveni čep
naponsko napajanje!
!
smije biti pod naponom. Zbog toga kao prvo morate
isključiti struju i pomoću ispitivača napona provjeriti je
li uspostavljeno beznaponsko stanje.
mrežnom naponu.
Stoga se ona mora provoditi stručno i u skladu s uobičajenim državnim propisima o instalacijama i uvjetima
priključivanja (npr. DE- VDE 0100, AT- ÖVE / ÖNORM
E8001-1, CH- SEV 1000).
3. L 16 LED / L 160 LED
– Svjetiljka s LED-om kao rasvjetnim tijelom
– Prikladna za zidnu i stropnu montažu. Zbog osjetljivog
detektiranja u vanjskom se području može koristi samo
uvjetno.
– Kao pojedinačna svjetiljka ili umreženo s master verzijom
sa senzorima
– svjetiljka
– tri vijka
– tri učvrsnice
– tri distance
4. Električni priključak
• Isključite strujno napajanje (sl.4.1)
Shema priključivanja (sl.4.1)
Mrežni vod sastoji se od trožilnog kabela:
L = faza (većinom crna, smeđa ili siva)
N = neutralni vodič (većinom plavi)
PE = zaštitni vodič (zeleno/žuti)
U slučaju dvojbe morate identificirati vodove pomoću
ispitivača napona i zatim ponovno uspostaviti beznaponsko
stanje. Faza (L) kao i neutralni vodič (N) priključuju se na
stezaljke svjetiljke.
Važno:
Slučajna zamjena priključaka u uređaju ili Vašem ormariću
s osiguračima kasnije će uzrokovati kratki spoj. U tom
slučaju morate još jednom identificirati pojedinačne vodove
i ponovno ih spojiti. U vodu, naravno, može biti montirana
mrežna sklopka za uključivanje i isključivanje.
Izvor svjetlosti ove svjetiljke nije zamjenjiv; ako bi se morao
zamijeniti (npr. na kraju njegovog vijeka trajanja), mora se
zamijeniti cijela svjetiljka.
Napomena:
Ne dodirujte LED izravno.
5. Montaža
• Provjeriti sve sastavne dijelove na oštećenja.
• U slučaju oštećenja ne koristiti proizvod.
• Prilikom montaže LED svjetiljke treba paziti na to da se
pričvrsti stabilno.
Montaža
• Skinite poklopac s kućišta (sl.5.1)
• Označite rupe (sl. 5.2)
• Izbušite rupe i stavite učvrsnice (sl. 5.3)
• Probijte brtveni čep za mrežni priključak (sl.5.4)
• Podžbukni vod (sl.5.5)
• S distancama pri nadžbuknoj montaži (sl.5.6)
• Priključite kabel (sl. 5.7)
• Uključite naponsko napajanje (sl. 5.8)
• Stavite poklopac (sl.5.8)
6. Zbrinjavanje
Električne uređaje, pribor i ambalažu treba zbrinuti na
ekološki način odvozom na reciklažu.
Ne bacajte električne uređaje
u kućni otpad!
Samo za zemlje EU:
Prema važećoj europskoj direktivi za stare električne i
elektroničke uređaje i njezinoj implementaciji u nacionalno
pravo, električni uređaji koji se više ne mogu koristiti moraju
se posebno sakupiti i zbrinuti na ekološki način odvozom
na reciklažu.
7. Jamstvo proizvođača
Ovaj Steinel proizvod izrađen je s najvećom pažnjom, njegovo funkcioniranje i sigurnost ispitani su prema važećim
propisima i na kraju je proizvod podvrgnut kontroli uzorka.
Steinel preuzima jamstvo za besprijekornu kakvoću i funkcionalnost. Jamstveni rok iznosi 36 mjeseci i započinje s danom prodaje potrošaču. Uklanjamo nedostatke koji su posljedica grešaka na materijalu ili tvorničke greške, realizacija
jamstva izvršava se popravkom ili zamjenom dijela s greškom po našem izboru. Jamstvo ne dajemo u slučaju oštećenja na potrošnim dijelovima, kao i šteta i nedostataka koji
nastanu zbog nestručnog rukovanja ili održavanja. Posljedične štete na drugim predmetima su isključene. Jamstvo
se priznaje samo ako nerastavljeni, dobro zapakiran uređaj
pošaljete zajedno s računom (datum kupnje i pečat trgovine), nadležnoj servisnoj službi ili ga tijekom prvih 6 mjeseci predate trgovcu.
Služba za popravke:
Nakon isteka jamstvenog roka ili kad se utvrdi nedostatak
bez jamstva, raspitajte se u najbližoj servisnoj službi o mogućnosti popravka.
GODINE
PROIZVOĐAČA
JAMSTVA
8. Tehnički podaci
Dimenzije (Ø x D) L 16 LED: Ø 275 x 95
Materijal staklo
Mrežni priključak 220-240 V, 50/60 Hz
Potrošnja snage 8,5 W
Struja mreže 41 mA AC
Koeficijent snage 0,92
Svjetlosni tok s poklopcem 840 Im
Učinkovitost s poklopcem 100 lm/W
Boja svjetlosti 3000 K / topla bijela / SDCM 3
LED - vijek trajanja 50.000 sati (L70B10 prema LM80)
Vrsta zaštite IP 44
Klasa zaštite II
Temperaturno područje -10 do +40°C
L 160 LED: Ø 310 x 125
9. Smetnje u pogonu
Smetnja Uzrok Pomoć
LED svjetiljka bez napona
LED svjetiljka se ne uključuje
■ reagirao je osigurač, nije uključena,
prekinut vod
■ kratki spoj u mrežnom vodu
■ eventualno postojeća mrežna sklopka
je isključena
■ pogrešno odabrana podešenost
svjetlosnog praga
■ mrežna sklopka je ISKLJUČENA
■ reagirao je osigurač
■ uključiti osigurač, zamijeniti,
uključiti mrežnu sklopku, provjeriti
vod ispitivačem napona
■ provjeriti priključke
■ uključiti mrežnu sklopku
■ iznova podesiti
■ uključiti
■ uključiti osigurač, zamijeniti,
event. provjeriti priključak
HR
- 44 - - 45 -
Page 24

EE
!
3
5
AASTAT
TOOTJA
AASTAT
GARANTIID
1. Käesoleva dokumendi kohta
Palun lugege hoolikalt läbi ja hoidke alles!
– Autoriõigusega kaitstud. Järeltrükk, ka väljavõtteliselt,
ainult meie nõusolekul.
– Õigus muudatusteks tehnilise täiustamise eesmärgil
reserveeritud.
Sümbolite selgitus
Hoiatus ohtude eest!
Viide tekstikohtadele dokumendis.
...
2. Üldised ohutusjuhised
Katkestage enne igasuguseid töid seadme
!
kallal pingetoide!
• Monteerimisel peab külgeühendatav elektrijuhe olema
pingevaba. Selleks lülitage esmalt elektrivool välja ja
kontrollige pingetestri abil pingevabadust.
• LED-tulede paigaldamisel tuleb töötada võrgupingega.
Seda tuleb teostada seetõttu asjatundlikult vastavalt
riigisisestele eeskirjadele. (DE- VDE 0100, AT- ÖVE /
ÖNORM E8001-1, CH- SEV 1000)
• Kasutage ainult originaalvaruosi.
• Remonti tohivad teha üksnes oskustöökojad.
3. L 16 LED / L 160 LED
Nõuetekohane kasutus
– LED-lambiga valgusti
– Sobib siseruumides seintele ja lagedele. Välistingimustes
on tundliku tuvastamise tõttu ainult teatud tingimustel
kasutatav.
– Kasutatav kas üksikvalgustina või sensoritega master-
mudeliga ühendatult.
Tarnekomplekt (joon� 3�1)
– Valgusti
– 3 kruvi
– 3 tüüblit
– 3 distantsihoidikut
Toote mõõdud (joon. 3.2)
Seadme ülevaade (joon. 3.3)
A Korpus
B Ühendusklemm
C Tihenduskork
4. Elektriline ühendus
• Lülitage voolutoide välja (joon. 4.1)
Lülitite plaan (joon. 4.1)
Võrgutoitejuhe koosneb 3-soonelisest kaablist:
L = faas (enamasti must, pruun või hall)
N = neutraaljuht (enamasti sinine)
PE = kaitsejuht (roheline/kollane)
Kahtluse korral peate kaablid tuvastama pingetestriga ning
lõpuks uuesti pinge alt vabastama. Faasid (L) ja, aga ka
neutraaljuht (N) ühendatakse ühendusklemmile.
Tähtis!
Ühenduste omavaheline äravahetamine põhjustab seadmes või kaitsmekarbis hiljem lühise. Sellisel juhul tuleb
üksikud kaablid uuesti tuvastada ning ühendada. Võrgutoitejuhtmesse võib olla iseenesestmõistetavalt installeeritud
sisse ja välja lülitamiseks võrgulüliti.
Selle valgusti valgusallikat ei saa vahetada; juhul kui valgusallikas tuleb välja vahetada (nt selle eluea lõppemisel),
tuleb asendada kogu valgusti.
Viide:
LEDi ei tohi vahetult puutuda.
5. Montaaž
• Kontrollige kõiki koostedetaile kahjustuste suhtes.
• Ärge võtke toodet kahjustuste korral käiku.
• LED-valgusti paigaldamisel tuleb vältida mehaanilisi
vibratsioone.
Montaažisammud
• Eemaldage kattepaneel korpuse küljest (joon. 5.1)
• Märkige puuravad (joon. 5.2)
• Puurige avad ja pange tüüblid sisse (joon. 5.3)
• Torgake võrgutoitejuhtme tihenduskork läbi (joon. 5.1)
• Süvistatud sisendjuhe (joon. 5.5)
• Koos pindpaigalduse vahehoidikutega (joon. 5.6)
• Ühendage ühenduskaabel külge (joon. 5.7)
• Lülitage voolutoide sisse (joon. 5.8)
• Kattepaneeli pealepanemine (joon. 5.8)
6. Utiliseerimine
Elektriseadmed, lisatarvikud ja pakendid tuleb suunata
keskkonnateadlikku taaskasutusse.
Ärge visake elektriseadmeid
olmejäätmete hulka!
Ainult ELi riikidele:
Vastavalt vanu elektri- ja elektroonikaseadmeid puudutavale
kehtivale Euroopa määrusele ja selle rakendamisele rahvusvahelises õiguses tuleb kasutuskõlbmatud elektriseadmed
koguda eraldi ning suunata keskkonnateadlikku taaskasutusse.
7. Tootja garantii
Steineli toode on valmistatud suurima hoolikusega, on talitluslikult ja ohutusalaselt kehtivate eeskirjade alusel kontrollitud ning seejärel läbinud pistelise kontrolli. Steinel annab
garantii toote laitmatu kvaliteedi ja töökorras oleku kohta.
Garantiiaeg on 36 kuud ja see algab tarbijale toote ostmise
päevast. Meie remondime materjalist või tootmisvigadest
tulenevad puudused, garantiijuhtumi korral seade kas remonditakse või puudulik osa asendatakse uuega, valiku üle
otsustame meie. Garantii ei kehti kuluvate osade ning kahju
ja puuduste kohta, mis on tekkinud oskamatu käsitsemise
või hooletuse tagajärjel. Edasised võõresemetele põhjustatud järgkahjud on välistatud. Garantiiremonti tehakse ainult
siis, kui lahtivõtmata seade saadetakse koos kassatšeki või
arvega (ostmise kuupäev ja kaupluse tempel), ja korralikult
pakituna vastavasse teeninduspunkti või tagastatakse esimese 6 kuu jooksul kauplusse.
Remonditeenindus
Pärast garantiiaja lõppu või puuduste korral, millele garantii
ei kehti, küsige parandamisvõimaluste kohta lähimast teenindusjaamast järele.
TOOTJA
GARANTIID
8. Tehnilised andmed
Mõõtmed (Ø × P) L 16 LED: Ø 275 x 95
materjal Klaas
Võrguühendus 220–240 V, 50/60 Hz
Võimsustarve 8,5 W
Võrgupinge 41 mA AC
Jõudlustegur 0,92
Valgusvoog (kupliga) 840 Im
Tõhusus (kupliga) 100 lm/W
Valgusvärvus 3000 K / soe-valge / SDCM 3
LEDi eluiga 50 000 h (L70B10), vastavalt LM80
Kaitseliik IP 44
Kaitseklass II
Temperatuurivahemik -10 kuni +40 °C
L 160 LED: Ø 310 x 125
9. Käitusrikked
Rike Põhjus Abi
LED-valgusti toiteühendus puudub
LED-valgusti ei lülitu sisse
■ Kaitse on vallandunud, pole sisse
lülitatud, juhe on katki
■ Lühis võrgutoitejuhtmes
■ Võimalik olemasolev võrgulüliti väljas
■ Hämaruseseadistus valesti valitud
■ Võrgulüliti VÄLJAS
■ Kaitse on vallandunud
■ Lülitage kaitse sisse või vahetage välja;
■ Kontrollige ühendusi
■ Lülitage võrgulüliti sisse
■ Seadistage uuesti
■ Lülitage sisse
■ Lülitage kaitse sisse või vahetage välja;
lülitage võrgulüliti sisse; kontrollige juhet
pingetestriga
vajaduse korral kontrollige ühendust
EE
- 46 - - 47 -
Page 25

LT
!
3
5
METŲ
GAMINTOJO
METŲ
GARANTIJA
1. Apie šį dokumentą
Prašom įdėmiai perskaityti ir išsaugoti!
– Autorių teisės saugomos. Perspausdinti, taip pat ir atski-
ras ištraukas, leidžiama tik gavus mūsų sutikimą.
– Pasiliekama teisė daryti pakeitimus techninio tobulinimo
tikslais.
Simbolių paaiškinimas
Įspėjimas apie pavojus!
Nuoroda į atskiras dokumento teksto dalis.
...
2. Bendrieji saugos nurodymai
Prieš pradėdami dirbti su prietaisu atjunkite
!
elektros energijos tiekimą!
• Montuojant prijungiamajame elektros laide neturi būti
įtampos. Todėl visų pirma atjunkite elektros srovę ir
įtampos rodytuvu patikrinkite, ar nėra įtampos.
• Šviesos diodų šviestuvo įrengimas – tai darbas, susijęs
su elektros maitinimo tinklo įtampa.
Todėl jį reikia prijungti tinkamai, vadovaujantis šalyje galiojančiomis instaliacijos normomis ir jungimo taisyklėmis.
(DE- VDE 0100, AT- ÖVE / ÖNORM E8001-1,
CH- SEV 1000)
• Naudokite tik originalias atsargines dalis.
• Remonto darbus galima atlikti tik specializuotose
remonto dirbtuvėse.
3. L 16 LED / L 160 LED
Naudojimas pagal paskirtį
– Šviestuvas su šviesos diodais
– Skirtas montuoti ant sienos ir lubų. Dėl jautraus judesių
fiksavimo naudojimo galimybės lauke yra ribotos
– Kaip atskiras šviestuvas arba sujungtas su pagrindine
versija su sensoriais
Tiekiama įranga (3�1 pav�)
– Šviestuvas
– 3 varžtai
– 3 mūrvinės
– 3 distanciniai laikikliai
Gaminio matmenys (3.2 pav.)
Prietaiso apžvalga (3.3 pav.)
A Korpusas
B Gnybtai
C Sandarinimo kamštis
4. Elektros jungtis
• Išjunkite elektros energijos tiekimą (4.1 pav.)
Sujungimo schema (4.1 pav.)
Įvadą sudaro trijų laidų kabelis:
L = fazė (dažniausiai juodas arba rudas laidas)
N = nulinis laidas (dažniausiai mėlynas)
PE = apsauginis laidas (žalias / geltonas)
Kilus dvejonių turite patikrinti laidus įtampos tikrikliu; po to
įtampą reikia vėl išjungti. Fazės (L) ir neutralus laidas (N)
jungiami prie jungiamojo gnybto.
Svarbu!
Neteisingai sujungti laidai sukelia trumpąjį jungimą prietaise
arba paskirstymo spintoje. Tokiu atveju atskirus laidus reikia
patikrinti ir iš naujo sujungti dar kartą. Tinklo įvade galima
įrengti įjungimo ir išjungimo jungiklius.
Šio šviestuvo šviesos elementas yra nekeičiamas, todėl
prireikus jį pakeisti (pvz., pasibaigus tarnavimo laikui), reikia
keisti visą šviestuvą.
Pastaba:
LED liesti negalima.
5. Montavimas
• Patikrinkite visas dalis, ar nėra pažeidimų.
• Esant pažeidimams gaminio nenaudokite.
• Montuodami šviesos diodų šviestuvą pasirinkite nuo
vibracijos apsaugotą vietą.
Montavimo eiga
• Atskirkite dangtelį nuo korpuso (5.1 pav.)
• Pažymėkite gręžimo skyles (5.2 pav.)
• Išgręžkite skyles ir įkiškite kaiščius (5.3 pav.)
• Pradurkite sandarinimo kaištį tinklo įvadui (5.4 pav.)
• Potinkinis įvadas (5.5 pav.)
• Su distanciniais laikikliais įrengiant virštinkiniu būdu
(5.6 pav.)
• Prijunkite jungiamuosius laidus (5.7 pav.)
• Įjunkite elektros energijos tiekimą (5.8 pav.)
• Uždėkite dangtelį (5.8 pav.)
6. Šalinimas
Elektros prietaisai, priedai ir pakuotės turi būti perdirbami
aplinkai nekenksmingu būdu.
Neišmeskite elektros prietaisų kartu su buitinėmis
atliekomis!
Tik ES šalims
Remiantis galiojančia Europos Sąjungos Direktyva dėl
elektros ir elektronikos įrangos atliekų ir jos perkėlimo į nacionalinę teisę, nebetinkami naudoti elektros prietaisai turi būti
renkami atskirai ir perdirbami aplinkai nekenksmingu būdu.
7. Gamintojo garantija
Šis „Steinel“ produktas pagamintas itin kruopščiai, pagal
galiojančias normas patikrintos jo funkcijos ir saugumas bei
papildomai atlikta pasirinktų prietaisų patikra. „Steinel“ suteikia prietaisui garantiją. Garantinis laikotarpis – 36 mėnesiai. Jis skaičiuojamas nuo prietaiso pardavimo vartotojui
dienos. Mes pašalinsime defektus, susijusius su medžiagų
arba gamybos broku; garantiniu laikotarpiu, mūsų nuožiūra, prietaisas nemokamai remontuojamas arba keičiamos
sugedusios dalys. Garantija netaikoma susidėvinčioms dalims, taip pat jei prietaisas sugenda dėl netinkamo naudojimo arba netinkamos priežiūros. Kitiems daiktams padaryta
žala neatlyginama. Garantija taikoma tik tokiu atveju, jei neišardytas prietaisas kartu su kasos čekiu arba sąskaita (pirkimo data ir pardavėjo spaudu) gerai supakuotas atsiunčiamas į atitinkamą techninės priežiūros tarnybos vietą arba
per pirmuosius 6 mėnesius pateikiamas pardavėjui.
Remontas
Pasibaigus garantinio aptarnavimo laikotarpiui arba esant
gedimams, kuriems garantinė priežiūra negalioja, dėl remonto galimybių teiraukitės artimiausiame aptarnavimo
centre.
GAMINTOJO
GARANTIJA
8. Techniniai duomenys
Matmenys (Ø × G) L 16 LED: Ø 275 x 95
Medžiaga Stiklas
Prijungimas prie elektros tinklo 220–240 V, 50/60 Hz
Suvartojama galia 8,5 W
Tinklo srovė 41 mA AC
Galios koeficientas 0,92
Šviesos srautas (su gaubtu) 840 Im
Efektyvumas (su gaubtu) 100 lm
Šviesos spalva 3000 K / šiltai balta spalva / SDCM 3
LED tarnavimo trukmė 50 000 val. (L70B10), pagal LM80
Saugos klasė IP 44
Apsaugos klasė II
Temperatūros diapazonas Nuo -10 iki +40 °C
L 160 LED: Ø 310 x 125
9. Veikimo sutrikimai
Sutrikimas Priežastis Ištaisymas
Šviesos diodų šviestuve nėra
įtampos
Šviesos diodų šviestuvas neįsijungia
■ Suveikė saugiklis, neįjungta, nutrauktas
laidas
■ Tinklo įvade įvyko trumpasis jungimas
■ Išsijungė tinklo jungiklis (jei yra)
■ Neteisingai nustatytas prieblandos lygis
■ Tinklo jungiklis IŠJUNGTAS
■ Suveikė saugiklis
■ Įjunkite, pakeiskite saugiklį;
įjunkite tinklo jungiklį; įtampos
tikrinimo prietaisu patikrinkite laidą
■ Patikrinkite jungtis
■ Įjunkite tinklo jungiklį
■ Nustatykite iš naujo
■ Įjunkite
■ Įjunkite, pakeiskite saugiklį; jeigu reikia,
patikrinkite jungtį
LT
- 48 - - 49 -
Page 26

LV
!
3
5
GADU
RAŽOTĀJA
GADU
GARANTIJA
1. Par šo dokumentu
Lūdzu, izlasiet to uzmanīgi un saglabājiet!
– Autortiesības ir aizsargātas. Pārpublicēšana, arī atseviš-
ķu izvilkumu veidā, tikai ar mūsu atļauju.
– Paturam tiesības veikt izmaiņas, kas saistītas ar tehnikas
attīstību.
Simbolu skaidrojums
Brīdinājums par bīstamību!
Norāde uz tekstu dokomentā.
...
2. Vispārēji drošības norādījumi
Pirms jebkādiem darbiem ar ierīci ir
!
jāpārtrauc strāvas padeve tai!
• Montāžas laikā pievienojamais elektrības vads nedrīkst
atrasties zem sprieguma. Tādēļ vispirms jāatslēdz elektrība un ar sprieguma testeri jāpārbauda, vai sprieguma
vairs nav.
• Uzstādot LED gaismekli, jāstrādā ar elektrotīkla spriegumu.
Tādēļ tas jāveic lietpratīgi un saskaņā ar vietējo instalēšanas un pieslēgšanas tehnisko priekšrakstu prasībām.
(piem., DE- VDE 0100, AT- ÖVE / ÖNORM E8001-1,
CH- SEV 1000)
• Izmantojiet tikai oriģinālās detaļas.
• Remontdarbus drīkst veikt tikai profesionālas darbnīcas.
3. L 16 LED / L 160 LED
Pareiza lietošana
– Gaismeklis ar LED kā gaismas avotu
– Ppiemērots montāžai pie sienas un griestiem. Jutīgās
uztveres dēļ ārā izmantojams tikai ierobežoti
– Piedāvājumā kā atsevišķs gaismeklis vai saslēgts tīklā
ar vadošo versiju ar sensoru
Piegādes apjoms (3�1� att�)
– Gaismeklis
– trīs skrūves
– trīs dībeļi
– trīs starplikas
Produkta izmēri (3�2� att�)
Ierīces komplektācija (3�3� att�)
A Korpuss
B Pieslēguma aizspiednis
C Blīvaizbāznis
4. Elektriskais pieslēgums
• Atslēdziet elektrības apgādi (4.1. att.)
Slēgumu plāns (4.1. att.)
Tīkla pievadvadu veido 3 dzīslu kabelis:
L = fāze (parasti melns, brūns vai pelēks)
N = nulles vads (parasti zils)
PE = zemējums (zaļš/dzeltens)
Šaubu gadījumā ar sprieguma mērītāju ir jānosaka kabeļa
dzīslas; pēc tam kabelis atkārtoti ir jāatslēdz no strāvas tīkla.
Fāze (L), kā arī nulles vads (N) tiek pieslēgti savienotājkopnei.
Svarīgi!
Pieslēgumu sajaukšana vēlāk var izraisīt īssavienojumu
ierīcē vai Jūsu sadales skapī. Šādā gadījumā ir atkārtoti
jāveic atsevišķu kabeļu noteikšana un savienošana. Tīkla
pievadvadā var iemontēt tīkla slēdzi, kas paredzēts ieslēgšanai un izslēgšanai.
Šī gaismekļa gaismas avots nav nomaināms, ja gaismas
avotu ir jānomaina (piem., tā darba mūža beigās), ir jānomaina viss gaismeklis.
Norāde:
Nepieskarieties LED.
5. Montāža
• Pārbaudiet visas detaļas, vai tās nav bojātas.
• Bojājumu gadījumā nelietojiet produktu.
• Montējot LED gaismekli jāpievērš uzmanība, lai tas tiktu
piestiprināts stabili.
Montāžas soļi
• Atvienojiet nosedzošo haubi no korpusa (5.1. att.)
• Atzīmējiet urbuma vietas (5.2. att.)
• Izurbiet caurumus un ievietojiet dībeļus (5.3. att.)
• Izduriet blīvbāzni tīkla vadam (5.4. att.)
• Zemapmetuma kabelis (5.5. att.)
• Ar starplikām virsapmetuma montāžai (5.6. att.)
• Pievienojiet pieslēguma kabeli (5.7. att.)
• Ieslēdziet elektrības apgādi (5.8. att.)
• Uzlieciet nosedzošo haubi (5.8. att.)
6. Utilizācija
Elektroierīces, piederumi un iepakojumi jānodod dabai
draudzīgai atkārtotai pārstrādei.
Nemetiet elektroierīces parastajos atkritumos!
Tikai ES valstīm:
Atbilstoši Eiropas vadlīnijām par vecām elektroierīcēm un
elektroniskām ierīcēm, un to lietojumam nacionālās tiesībās, nefunkcējošas elektroierīces jāsavāc atsevišķi un tās
jānodod dabai draudzīgai atkārtotai pārstrādei.
7. Ražotāja garantija
Šis Steinel produkts ir izgatavots ar vislielāko rūpību, tā darbība un drošība ir pārbaudīta saskaņā ar spēkā esošajiem
priekšrakstiem, un noslēgumā tas ticis pakļauts izlases veida pārbaudei. Steinel garantē nevainojamas produkta īpašības un darbību. Garantijas termiņš ir 36 mēneši no dienas,
kad preci iegādājies gala patērētājs. Garantijas saistības
paredz bojāto detaļu remontu vai maiņu pēc ražotāja izvēles, ja bojājums radies materiāla vai ražošanas procesa dēļ.
Garantijas serviss neattiecas uz nodilumam pakļauto daļu
bojājumiem, kā arī uz bojājumiem un trūkumiem, kuri radušies nelietpratīgas lietošanas vai apkopes, kā arī kritiena rezultātā. Garantijas saistības neattiecas uz citiem objektiem,
kas varētu tikt bojāti ierīces darbības rezultātā. Garantija ir
spēkā tikai tad, ja ierīce neizjauktā veidā kopā ar rēķinu vai
kases čeku (pirkuma datums un pārdevēja zīmogs), kārtīgi
iesaiņota tiek nosūtīta attiecīgajai servisa daļai vai pirmo
6 mēnešu laikā nodota atpakaļ pārdevējam.
Remonta serviss:
Pēc garantijas laika beigām vai tādu bojājumu gadījumā,
uz kuriem neattiecas garantijas tiesības, vērsieties tuvākajā
klientu apkalpošanas centrā, lai novērstu bojājumus.
RAŽOTĀJA
GARANTIJA
8. Tehniskie dati
Izmēri (Ø x Dz) L 16 LED: Ø 275 x 95
Materiāls Stikls
Tīkla pieslēgums 220-240 V, 50/60 Hz
Jaudas patēriņš 8,5 W
Elektroenerģija 41 mA AC
Jaudas faktors 0,92
Gaismas plūsma ar haubi 840 Im
Efektivitāte ar haubi 100 lm/W
Gaismas krāsa 3000 K / silti balta gaisma / SDCM 3
LED mūža ilgums 50 000 h (L70B10 pēc LM80)
Aizsardzības veids IP 44
Aizsargklase II
Temperatūras amplitūda -10 līdz +40°C
L 160 LED: Ø 310 x 125
9. Darbības traucējumi
Traucējumi Cēlonis Risinājums
LED gaismeklis bez sprieguma
LED gaismeklis neieslēdzas
■ Drošinātājs ir izslēdzies, nav ieslēgts,
bojāts vads
■ Īssavienojums tīkla pievadvadā
■ Iespējams izslēgts tīkla slēdzis,
ja tāds ir ierīkots
■ Krēslas sliekšņa iestatījums izvēlēts
nepareizi
■ IZSLĒGTS tīkla slēdzis
■ Drošinātājs ir izslēdzies
■ Ieslēdziet drošinātāju, nomainiet,
ieslēdziet tīkla slēdzi; pārbaudiet vadu
ar sprieguma testeri
■ Jāpārbauda pieslēgumi
■ Jāieslēdz tīkla slēdzis
■ Iestatiet no jauna
■ jāieslēdz
■ Ieslēdziet drošinātāju, nomainiet,
pēc vajadzības pārbaudiet pieslēgumu
LV
- 50 - - 51 -
Page 27

RU
!
3
5
ГОДА
ГАРАНТИИ
ПРОИЗВОДИТЕЛЯ
ЛЕТ
1. Об этом документе
Просим тщательно прочесть и сохранить!
– Защищено авторскими правами. Перепечатка, так-
же выдержками, только с нашего согласия.
– Мы сохраняем за собой право на изменения, кото-
рые служат техническому прогрессу.
Разъяснение символов
Предупреждение об опасностях!
Указание на текст в документе.
...
2. Общие указания по технике
безопасности
Перед началом любых работ,
• При проведении монтажа подключаемый электро-
• Монтажные работы по подключению светодиодного
• Использовать только оригинальные запасные части.
• Ремонт разрешается выполнять только в специали-
Применение по назначению
Объем поставки (рис. 3.1)
Размеры продукта (рис. 3.2)
Обзор приборов (рис. 3.3)
А Корпус
B Клемма подключения
C Уплотнитель
проводимых на приборе, следует
!
отключить напряжение!
провод должен быть обесточен. Поэтому в первую
очередь следует отключить подачу тока и проверить
отсутствие напряжения с помощью индикатора
напряжения.
светильника относятся к категории работ с сетевым
напряжением. Поэтому при монтаже светильников
следует соблюдать указания и условия, приведенные
в инструкции по подключению. (например, DE- VDE
0100, AT- ÖVE / ÖNORM E8001-1, CH- SEV 1000)
зированных мастерских.
3. L 16 LED / L 160 LED
– Светильник со светодиодами в качестве
осветительного средства
– Предназначается для настенного и потолочного
монтажа. Возможность использования на открытом
воздухе возможна только условно из-за чувствительной регистрации.
– В качестве отдельного светильника или в версии
"мастер" с датчиками
– светильник
– три винта
– три дюбеля
– три проставки
4. Электрическое подключение
• Отключить электропитание (рис. 4.1)
Схема соединений (рис. 4.1)
Сетевой провод состоит из 3 жил:
L = фаза (обычно черного, коричневого или
серого цвета)
N = нулевой провод (чаще всего синий)
PE = провод заземления (зеленый/желтый)
В случае сомнения идентифицировать провода
с помощью индикатора, затем снова отключить
напряжение. Присоединить фазный (L) и нулевой
провод (N) к соответствующим клеммам светильника.
Важно:
Вследствие неправильного присоединения проводов
в приборе или в распределительном ящике с предохранителями может произойти короткое замыкание.
В таком случае рекомендуется еще раз проверить
провода и заново подключить их. При необходимости
в сетевой провод может быть вмонтирован выключатель для включения и выключения сетевого тока.
Источник света этого прожектора не подлежит замене.
При необходимости замены источника света (напри-
мер, в конце его срока службы), необходимо заменить
весь прожектор.
УКАЗАНИЕ:
Не прикасаться к самому СИД.
5. Монтаж
• Проверить все конструктивные детали на предмет
повреждения.
• При повреждениях не включать продукт.
• При монтаже светодиодного светильника следить за
тем, чтобы он крепился без вибраций.
Порядок монтажа
• Снять плафон с корпуса (рис.5.1)
• Наметить отверстия для сверления (рис. 5.2)
• Просверлить отверстия и вставить дюбели (рис. 5.3)
• Проткнуть уплотнитель для сетевого провода.
(рис. 5.4)
• Провод скрытой проводки (рис. 5.5)
• С проставками при монтаже открытой проводкой
(рис. 5.6)
• Подключить соединительный кабель (рис. 5.7)
• Включить электропитание (рис. 5.8)
• Установить плафон (рис. 5.8)
6. Утилизация
Электроприборы, комплектующие и упаковку следует
направлять на экологичную вторичную переработку.
Не выбрасывать электроприборы в бытовые
отходы!
Только для стран ЕС:
Согласно действующей Европейской директиве по
отработанному электрическому и электронному обо-
- 52 - - 53 -
рудованию и ее реализации в национальных законодательствах отработанные электроприборы должны
собираться отдельно и направляться на экологичную
вторичную переработку.
7. Гарантия производителя
Данное изделие производства Steinel было с особым
вниманием изготовлено и испытано на работоспособность и безопасность эксплуатации соответственно
действующим инструкциям, а потом подвергнуто выборочному контролю качества. Фирма Steinel гарантирует
высокое качество и надежную работу изделия.
Гарантийный срок эксплуатации составляет 36 месяцев
со дня продажи изделия. Фирма обязуется устранить
недостатки, которые возникли в результате недоброка-
чественности материала или вследствие дефектов конструкции. Дефекты устраняются путем ремонта изделия либо заменой неисправных деталей по усмотрению
фирмы. Гарантийный срок эксплуатации не рас-
8. Технические данные
Габариты (Ø x Г) L 16 LED: Ø 275 x 95
Материал Стекло
Сетевое подключение 220-240 В / 50/60 Гц
Потребляемая мощность 8,5 Вт
Сетевой ток 41 мА AC
Коэффициент мощности 0,92
Световой поток с плафоном 840 лм
Эффективность с плафоном 100 лм/Вт
Цвет света 3000 K / теплый белый / SDCM 3
Срок службы СИД 50 000 ч (L70B10 по LM80)
Вид защиты IP 44
Класс защиты II
Температурный диапазон -10° - +40° C
L 160 LED: Ø 310 x 125
9. Неполадки при эксплуатации
Нарушение Причина Устранение
На светодиодном светильнике
нет напряжения
Светодиодный светильник не
включается
■ Предохранитель сработал, не
включен, неисправность провода
■ Короткое замыкание в сетевом
кабеле
■ Выключен возможно имеющийся
сетевой выключатель
■ Неправильно выбрана установка
сумеречного включения
■ Выключен сетевой выключатель
■ Сработал предохранитель
пространяется на повреждения и дефекты, возникшие
в результате износа деталей, ненадлежащей эксплуатации и ухода. Фирма не несет ответственности за по-
вреждения предметов третьих лиц, вызванных эксплуатацией изделия. Гарантия предоставляется только в
том случае, если изделие в собранном и упакованном
виде было отправлено вместе с приложенным кассовым чеком или квитанцией (с датой продажи и печатью
торгового предприятия) по адресу сервисной мастер-
ской или в течение 6 месяцев сдано в магазин.
Ремонтный сервис:
По истечении гарантийного срока или при наличии
неполадок, исключающих гарантию, обратитесь в
ближайшее сервисное предприятие, чтобы получить
информацию о возможности ремонта.
ГАРАНТИИ
ПРОИЗВОДИТЕЛЯ
■ Включить, заменить предохранитель,
включить сетевой выключатель,
проверить провод индикатором
напряжения
■ Проверить подключения
■ Включить сетевой выключатель
■ Отрегулировать заново
■ Включить
■ Включить, заменить предохранитель;
при необходимости проверить
соединение
RU
Page 28

BG
!
3
5
ГОДИНИ
ГАРАНЦИЯ
ОТ ПРОИЗВОДИТЕЛ
ГОДИНИ
1. За този документ
Моля прочетете го внимателно и го пазете!
– Всички права запазени. Препечатване, дори откъ-
слечно, само с наше разрешение.
– Запазваме си правото за промени, които служат на
техническото развитие.
Обяснение на символите
Предупреждение за опасности!
Препратка към части от текста в документа.
...
2. Общи указания за безопасност
Преди да предприемете каквито
и да е работи по уреда, прекъснете
!
електрическото захранване!
• При монтаж електрическата система трябва да е
без напрежение. Първо спрете електрическия ток,
след което проверете системата с уред за проверка
на напрежението.
• Монтажът на LED-лампата изисква работа с елек-
тричество.
Затова трябва да се извърши професионално,
според съответните държавни предписания и
изисквания. (напр. DE- VDE 0100, AT- ÖVE / ÖNORM
E8001-1, CH- SEV 1000)
• Използвайте само оригинални резервни части!
• Ремонтите трябва да се извършват само от специа-
лизирани сервизи.
3. L 16 LED / L 160 LED
Употреба по предназначение
– Лампа с LED-осветително тяло
– Подходяща за монтаж на стена или таван. Поради
чувствително засичане по-слабо подходяща за
външно използване
– Като самостоятелна лампа или в мрежа със сензори
и Master-версия
Съдържание на комплекта (рис. 3.1)
– Лампа
– три винта
– три дюбела
– три подложки
Размери (рис. 3.2)
Преглед на уреда (рис. 3.3)
A Корпус
B Клема за свързване
C Уплътнител
4. Електрическо свързване
• Да се изключи електрозахранването (рис. 4.1)
Схема на свързване (рис. 4.1)
Кабелът съдържа 3 проводника:
L = фаза (обикновено черен, кафяв или сив)
N = нула (обикновено син)
PE = заземяващ проводник (зелен/жълт)
При съмнение, проводниците трябва да бъдат идентифи-
цирани с уред за проверка на напрежението, след което
отново да бъдат свързани, без напрежение. Фазата (L),
както и нулата (N) се свързват към лустер клемата.
Важно:
Размяна на проводниците води до късо съединение в
уреда или таблото с предпазители. При такъв случай
всеки проводник трябва още веднъж да бъде иденти-
фициран и наново свързан. Към системата, разбира
се, може да бъде добавен прекъсвач, за включване и
изключване.
Светлинният източник на тази лампа е незаменяем; ако
се наложи замяната му (напр. след края на живота му),
цялата лампа трябва да се замени.
Сведение:
LED да не се докосва директно.
5. Монтаж
• Всички части да се проверят за щети.
• При повреди продуктът да не се пуска в експлоатация.
• При монтаж на LED-лампата да се следи за стабилното й закрепване.
Последователност за монтаж
• Покриващият капак да се отдели от корпуса (рис.5.1)
• Да се маркират местата за пробиване (рис. 5.2)
• Да се пробият дупките и да се поставят дюбелите
(рис.5.3)
• Пробийте уплътненията за кабелите (рис.5.4)
• Скрити кабели (рис.5.5)
• С подложки при открити кабели (рис. 5.6)
• Кабелите да се свържат (рис. 5.7)
• Електрозахранването да се включи (рис. 5.8)
• Да се постави абажура (рис. 5.8)
6. Отстраняване
Електроуреди, принадлежности и опаковки трябва да
бъдат рециклирани, с цел опазване на околната среда.
Не изхвърляйте електроуреди с общите
домашни отпадъци!
Само за страни от ЕС:
Според действащата Директива на ЕС за стари елек-
тронни и електроуреди и транспонирането й в национално право, електроуреди, които повече не могат да бъдат
употребявани, трябва да бъдат разделно събирани и
рециклирани, с цел опазване на околната среда.
- 54 - - 55 -
7. Гаранция от производителя
Този продукт на Steinel е произведен с най-голямо ста-
рание, проверен е за функционалност и безопасност,
според действащите разпоредби, след което е подложен на качествен контрол, на принципа на случайния избор. Steinel гарантира перфектна изработка и
функции. Гаранцията е с продължителност 36месе-
ца и започва от деня на покупката. Ние отстраняваме
дефекти, причинени от грешки в производството или
качеството на материала, ремонтирайки или заменяйки дефектните части, по наш избор. Гаранцията не ва-
жи за щети по износващи се части, както и за щети и
дефекти, получени в резултат на неправилна употреба
или поддръжка. Последващи щети на чужди предмети
са изключени от гаранцията. Гаранцията е валидна са-
мо, ако неразглобеният уред бъде изпратен на съответния сервиз, добре опакован и придружен от кратко
описание на дефекта, касова бележка или фактура (дата на покупка и печат на търговец), или бъде предаден
на търговеца в първите 6месеца.
8. Технически данни
Размери (Ø x Д) L 16 LED: Ø 275 x 95
Материал Стъкло
Връзка с мрежата 220-240 V, 50/60 Hz
Консумирана мощност 8,5 W
Мрежов ток 41 mA AC
Мощностен фактор 0,92
Светлинен поток с капак 840 Im
Ефективност с капак 100 lm/W
Цвят на светлината 3000 K / топло бяло / SDCM 3
Живот на LED 50.000 часа (L70B10 според LM80)
Вид защита IP 44
Клас защита II
Температурен диапазон -10 до +40°C
L 160 LED: Ø 310 x 125
9. Проблеми при експлоатация
Проблем Причина Решение
LED-лампата е без напрежение
LED-лампата не се включва
■ Задействал се е предпазител,
не е включен, прекъснат кабел
■ Късо съединение
■ Евентуален прекъсвач да се изключи
■ Настройката на светлочувствител-
ността е погрешно направена
■ Прекъсвачът е изключен
■ Предпазителят се е задействал
Ремонтен сервиз:
След изтичане на гаранцията или при дефекти, непокрити от гаранцията, попитайте в най-близкия заводски
сервиз за възможностите за ремонт.
ГАРАНЦИЯ
ОТ ПРОИЗВОДИТЕЛ
■ Предпазителят да се включи или
замени, шалтерът да се включи,
проводниците да се проверят с уред
за напрежение
■ Да се проверят връзките
■ Прекъсвачът да се включи
■ Настройката да се направи наново
■ Включване
■ Предпазителят да се включи, замени;
евентуално да се провери връзката
BG
Page 29

CN
!
3
5
厂商
质保
厂商
质保
年
1.关于本文件
请仔细阅读并妥善保管!
– 版权所有。未经我方批准禁止翻印或摘录。
– 保留技术更改的权利。
符号说明
危险警示!
文件中文本位置的提示说明。
...
2.一般安全性提示
在设备上进行任何作业前均须断开电源!
!
•安装时必须确保连接的电线无应力。因此,首先切断电
源,并使用试电笔检查是否存在电压。
•在安装LED灯时涉及到对电源电压的操作。
因此必须根据国内通用的安装规定和连接条件执行专
业安装工作。(例如DE- VDE 0100, AT- ÖVE / ÖNORM
E8001-1, CH- SEV 1000)
•只能使用原装备件。
•只允许由专业修理厂进行维修。
3.L16LED/L160LED
按规定使用
– LED灯作为光源
– 适用于墙壁和天花板安装。因探测能力较灵敏仅限在外
部区域使用
– 可以作为单灯或与主版本通过传感器连接
供货范围(图3.1)
– 灯
– 3个螺栓
– 3个膨胀螺钉
– 3个垫圈
产品尺寸(图3.2)
设备概况(图3.3)
A 壳体
B 连接端子
C 密封塞
4.电气连接
•切断供电(图4.1)
电路图(图4.1)
电源供电线由一根三芯电缆构成:
L =-火线(通常是黑色,棕色或灰色)
N =零线(大多为蓝色)
PE =保护线(绿色/黄色)
不确定时,必须使用试电笔识别导线;然后重新切断电
源。火线(L),以及零线(N)连接在接线端子上。
重要事项:
一旦混淆接线,以后则将在仪器中或在保险箱中导致短
路。这种情况下,必须再次识别各条导线,并重新连接。
电源供电线上自然可以安装一个电源开关,以便送电和
断电。
该灯的光源不能更换;如须更换光源(如在其使用寿命结
束时),更换整个灯。
提示:
不要直接接触LED灯。
5.安装
•检查所有构件是否受损。
•如有损坏,则禁止使用产品。
•在安装LED灯时要注意将其进行无振动固定。
安装步骤
•从机壳上取下盖罩(图5.1)
•标记钻孔(图5.2)
•钻孔和放入膨胀螺栓(图5.3)
•打开馈电线的密封塞(图5.4)
•暗装线路(图5.5)
•当电缆明装时采用间隔支架(图5.6)
•连接接线电缆(图5.7)
•启动供电(图5.8)
•更换盖罩(图5.8)
6.废弃物处理
电子设备、附件和包装应根据环保要求寻求再次利用。
不得将电子设备投入生活垃圾!
仅针对欧盟国家:
根据适用的关于废旧电子设备和电子元件欧盟指令及其在
国家法律中的实施规则,必须将无法再使用的电子设备断
开、收集在一起并根据环保要求寻求再次利用。
7.制造商担保
该产品系施特朗-精心研发制造,已根据有效规定通过了
功能性及安全性审核,并进行了抽样检查。施特朗保证其
产品性能和功能完好。质保期为36个月,自消费者购买
日起计算。材料或生产错误导致的产品缺陷由我方负责排
除,质保服务(通过维修或是更换缺陷部件解决)将由我
方决定。耗材损失、未正确使用及保养造成的损失和损坏
未包含在质保范围内。此外,外购物品的间接损坏亦不属
于质保范畴。只有将未拆卸的设备与收银条或账单(含购
买日期和经销商印章)妥善包装好,并在购买后的6个月
内寄至相关维修点或交给经销商
维修服务:
质保期已经到期或缺陷不在质保范围内的产品,可向就近
服务站咨询维修事宜。
年
8.技术参数
尺寸(Ø×T) L16LED:Ø275x95
材质 玻璃
电源连接 220-240V,50/60Hz
功率消耗 8.5W
电源电流 41mAAC
功率系数 0.92
包括盖罩的光流 840Im
包括盖罩的效率 100lm/W
光色 3000K/暖白色/SDCM3
LED使用寿命 50.000h(L70B10根据LM80)
保护形式 IP44
防护等级 II
温度范围 -10至+40°C
L160LED:Ø310x125
9.运行故障
故障 原因 补救办法
无电压的LED灯 ■保险丝已熔断,未接通,断线
■电源供电线上短路
■关断可能存在的电源开关
LED灯未接通电源 ■亮度设置选择错误
■电源开关断开
■保险丝已熔断
■接通、更换保险丝;打开电源开关;
使用试电笔检查电线
■检查接头
■接通电源开关
■重新设置
■接通
■接通、更换保险丝;必要时检查接头
- 56 - - 57 -
CN
 Loading...