

Page 1

D STEINEL Vertrieb GmbH
Dieselstraße 80-84 · 33442 Herzebrock-Clarholz
Tel: +49/5245/448-188 · Fax: +49/5245/448-197 · www.steinel.de
A Steinel Austria GmbH
Hirschstettner Strasse 19/A/2/2 · A-1220 Wien
Tel.: +43/1/2023470 · Fax: +43/1/2020189 · info@steinel.at
CH PUAG AG
Oberebenestrasse 51 · CH-5620 Bremgarten
Tel.: +41/56/6488888 · Fax: +41/56/6488880 · info@puag.ch
GB STEINEL U.K. LTD.
25, Manasty Road · Axis Park · Orton Southgate
GB-Peterborough Cambs PE2 6UP
Tel.: +44/1733/366-700 · Fax: +44/1733/366-701
steinel@steinel.co.uk
IRL Socket Tool Company Ltd
Unit 714 Northwest Business Park
Kilshane Drive · Ballycoolin Dublin 15
Tel.: 00353 1 8809120 · Fax: 00353 1 8612061
info@sockettool.ie
F STEINEL FRANCE SAS
ACTICENTRE - CRT 2 · Rue des Famards - Bât. M - Lot 3
F-59818 Lesquin Cedex · Tél.: +33/3/20 30 34 00
Fax: +33/3/20 30 34 20 · info@steinelfrance.com
NL Van Spijk B.V.
Postbus 2 · 5688 HP OIRSCHOT · De Scheper 402
5688 HP OIRSCHOT · Tel. +31 499 571810
Fax. +31 499 575795 · info@vanspijk.nl · www.vanspijk.nl
B VSA Belgium
Hagelberg 29 · B-2440 Geel
Tel.: +32/14/256050 · Fax: +32/14/256059
info@vsabelgium.be · www.vsahandel.be
L Minusines S.A.
8, rue de Hogenberg · L-1022 Luxembourg
Tél. : (00 352) 49 58 58 1 · Fax : (00 352) 49 58 66/67
www.minusines.lu
E SAET-94 S.L.
C/ Trepadella, n° 10 · Pol. Ind. Castellbisbal Sud
E-08755 Castellbisbal (Barcelona)
Tel.: +34/93/772 28 49 · Fax: +34/93/772 01 80
saet94@saet94.com
I STEINEL Italia S.r.l.
Largo Donegani 2 · I-20121 Milano
Tel.: +39/02/96457231 · Fax: +39/02/96459295
info@steinel.it · www.steinel.it
P Pronodis - Soluções Tecnológicas, Lda.
Zona Industrial Vila Verde Sul, Rua D, n.º 11
P-3770-305 Oliveira do Bairro
Tel.: +351 234 484 031 · Fax: +351 234 484 033
pronodis@pronodis.pt · www.pronodis.pt
S KARL H STRÖM AB
Verktygsvägen 4 · S-55302 Jönköping
Tel.: +46/36/31 42 40 · Fax: +46/36/31 42 49 · www.khs.se
DK Roliba A/S
Hvidkærvej 52 · DK-5250 Odense SV
Tel.: +45 6593 0357 · Fax: +45 6593 2757 · www.roliba.dk
FI Oy Hedtec Ab
Lauttasaarentie 50 · FI-00200 Helsinki
Tel.: +358/207 638 000 · Fax: +358/9/673 813
lighting@hedtec.fi · www.hedtec.fi/valaistus
N Vilan AS
Olaf Helsetsvei 8 · N-0694 Oslo
Tel.: +47/22725000 · post@vilan.no · www.vilan.no
GR PANOS Lingonis + Sons O. E.
Aristofanous 8 Str. · GR-10554 Athens
Tel.: +30/210/3212021 · Fax: +30/210/3218630
lygonis@otenet.gr
PL "LŁ" Spółka z ograniczoną odpowiedzialnością sp.k.
Byków, ul. Wrocławska 43 · PL-55-095 Mirków
Tel.: +48 71 3980818 · Fax: +48 71 3980819
handlowy@langelukaszuk.pl
CZ ELNAS s.r.o.
Oblekovice 394 · CZ-67181 Znojmo · Tel.: +420/515/220126
Fax: +420/515/244347 · info@elnas.cz · www.elnas.cz
TR SAOS Teknoloji Elektrik Sanayi ve Ticaret Limited Şirketi
Halil Rıfat Paşa mahallesi Yüzerhavuz Sokak
PERPA Ticaret Merkezi A Blok Kat 5 No.313 · Şişli / İSTANBUL
Tel.: +90 212 220 09 20 · Fax: +90 212 220 09 21
iletisim@saosteknoji.com · www.saosteknoloji.com.tr
H DINOCOOP Kft
Radvány u. 24 · H-1118 Budapest
Tel.: +36/1/3193064 · Fax: +36/1/3193066
dinocoop@dinocoop.hu
LT KVARCAS
Neries krantine 32 · LT-48463, Kaunas
Tel.: +370/37/408030 · Fax: +370/37/408031 · info@kvarcas.lt
EST Fortronic AS
Tööstuse tee 10 · EST-61715, Tõrvandi, Tartumaa
Tel.: +372/7/475208 · Fax: +372/7/367229
info@fortronic.ee · www.fortronic.ee
SLO Elektro-Projekt Plus D.O.O.
Suha pri predosljah 12 · SLO-4000 Kranj
Tel.: +386 42 521 645 · GSM: +386 40-856555
info@elektroprojektplus.si · www.log.si
SK NECO SK, a.s.
Ružová ul. 111 · SK-01901 Ilava
Tel.: +421/42/4 45 67 10 · Fax: +421/42/4 45 67 11
neco@neco.sk · www.neco.sk
RO Steinel Distribution SRL
Parc Industrial Metrom · RO - 500269 Brasov · Str. Carpatilor nr. 60
Tel.: +40(0)268 53 00 00 · Fax: +40(0)268 53 11 11
www.steinel.ro
HR Daljinsko upravljanje d.o.o.
Bedricha Smetane 10 · HR-10000 Zagreb
t/ 00385 1 388 66 77 · f/ 00385 1 388 02 47
daljinsko-upravljanje@inet.hr · www.daljinsko-upravljanje.hr
LV Ambergs SIA
Brivibas gatve 195-16 · LV-1039 Riga
Tel.: 00371 67550740 · Fax: 00371 67552850 · www.ambergs.lv
BG ТАШЕВ-ГАЛВИНГ ООД
Бул. Климент Охридски № 68 · 1756 София, България
Тел.: +359 2 700 45 45 4 · Факс: +359 2 439 21 12
info@tashev-galving.com · www.tashev-galving.com
RUS Best - Snab
ул.1812 года, дом 12 · 121127 Москва · Россия
Tel: +7 (495) 280-35-53 · info@steinel.su · www.steinel.su
CN STEINEL China
Representative Office · Shanghai Rm. 25 A,
Huadu Mansion No. 838
Zhangyang Road Shanghai 200122
Tel: +86 21 5820 4486 · Fax: +86 21 5820 4212
info@steinel.net · www.steinel.cn
08/2015 SENSOREN Version "I"
110040575 03/2016_I Technische Änderungen vorbehalten. / Subject to technical modification without notice.
RUS CN BG LV LT EST HR SLO RO PL SK CZ H TR GR N FIN DK S P E I NL F GB D
iHF 3D KNX
Information
PL
S
E
NL F GB
D
Page 2

2 3
D � � � � � � � � � � 10
GB � � � � � � � � � 14
F � � � � � � � � � � 18
NL � � � � � � � � � 22
E � � � � � � � � � � 26
S � � � � � � � � � � 30
PL � � � � � � � � � 34
Textteil beachten!
Follow written instructions!
Se référer à la partie texte !
Let op de tekst!
¡Téngase en cuenta el texto!
Iaktta texten!
Postępować zgodnie z instrukcją!
...
3�1
3�2
3�3
Page 3
4 5
A
B
E
F
D
3�4
4�1
4�2
4�3
4�4
4�5
C
Page 4

6 7
4�9
6�1
4�7
4�8
4�6
Page 5

8 9
7�16�2
6�3
4h ON/
INSTALL
1
2
5
6
7
8
4
9
3
E-1 E-2 E-3
Page 6

14 15
GB
1� About this document
Please read carefully and keep in a
safe place�
– Under copyright. Reproduction either in
whole or in part only with our consent.
– Subject to change in the interest of technical
progress.
Symbols
!
Hazard warning!
...
Reference to other information in
the document�
2� General safety notification
• This product must only be installed by a
qualified electrician in accordance with
national wiring regulations as defined in
VDE 08 29 (DIN EN 5000 90).
• Installed improperly, low-voltage products
can cause extremely serious personal injury
or damage to property.
• This product must never be connected to
the mains supply voltage (240 V AC) as it
is intended for connection to an extra-low
voltage power supply.
3� iHF 3D KNX
Suitable for wall mounting, the iHF 3D KNX is
an active motion detector for outdoors. The
iHF 3D KNX emits high-frequency electromagnetic waves (5.8 GHz) and receives their echo.
Any movement by persons in the detection
zone is noticed by the sensor as a change in
echo and triggers a switching signal. Analysing
the signal, the iHF 3D KNX distinguishes
between moving persons and moving objects,
such as bushes or small animals. The 3D
antenna system permits precision adjustment
in three directions. This rules out any inadvertent triggering by small animals as well as
!
interference from extreme temperatures. All
function settings can also be made via the
RC9 remote control
(➔ "7� Accessories")
Note:
The high-frequency output of the iHF sensor
is approx. 1 mW – that's 1000 times less than
the transmission power of a mobile phone or
the output of a microwave oven.
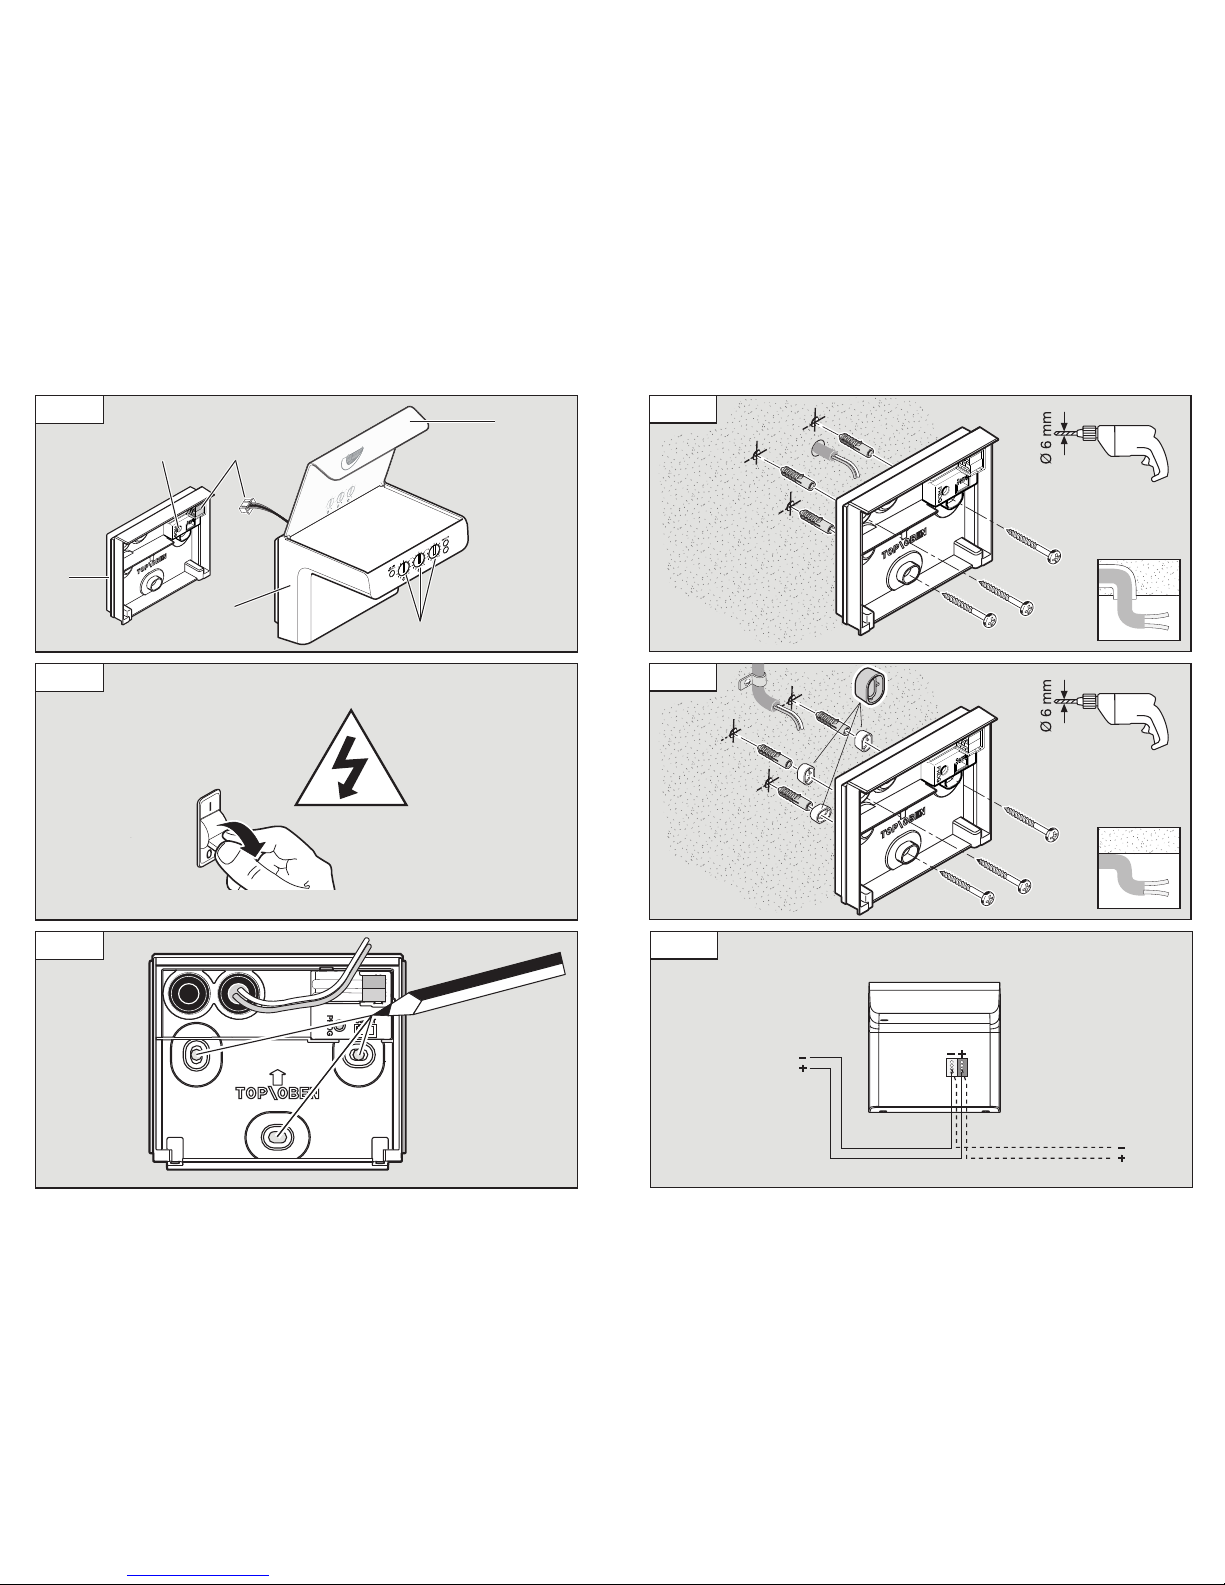
Package contents (Fig� 3�1)
Product dimensions (Fig� 3�2)
Reach / mounting height (Fig� 3�3)
Product components (Fig� 3�4)
A Wall mount
B Programming button
C KNX bus plug connection
D Designer trim
E 3D reach setting
F Sensor unit
4� Mounting / installation
• Check all components for damage.
• Do not use the product if it is damaged.
Mounting procedure
• Select an appropriate mounting location,
taking the reach and motion detection into
consideration (Fig� 3�3)
• Switch OFF power supply (Fig� 4�1)
• Mark drill holes (Fig� 4�2)
• Drill holes and fit wall plugs
– Concealed wiring (Fig� 4�3)
– With spacers for surface-mounted cables
(Fig� 4�4)
Wiring diagram (Fig� 4�5)
When selecting the wiring leads (Fig� 4�6), it is
important to meet the installation regulations
specified in VDE 08 29 (DIN EN 500090).
• Make plug connection (C) (Fig� 4�7)
• Screw sensor unit (F) into place (Fig� 4�8)
• Switch ON power supply (Fig� 4�9)
• Make settings
➔ "6� Operation"
5� Commissioning
Note: to calibrate the presence detector,
please go to www.knx.steinel.de
1. Issue physical address and generate
calibration program in the ETS.
2. Load the physical address and calibration
program into the presence detector. When
you are prompted, press programming
button B.
3. The white LED goes out once programming
has been successfully completed.
6� Operation
Note:
After connecting, the white status LED flashes
for 10 seconds. The sensor is then ready for
operation.
Factory settings
Time setting: install
Reach setting: 3 x 7 m
Light-level setting: 200 lux
Functions
Reach setting (Fig� 6�2 / E 1-3)
The reach can be infinitely adjusted from
1-7 m in three directions (independently of
each other) via 3 control dials. The maximum
detection reach is selected using the control
dials.
Detection diagram (Fig� 6�3)
Note: if the distance to a wall or similar struc-
ture is less than 7 m in any of these directions,
the reach in that direction must still be set to
the maximum reach or detection errors may
occur. The reach settings should only be used
to mask out areas in which you do not want
movement to result in light being switched ON.
7� Accessories
Remote control RC9 (Fig� 7�1)
(EAN 4007841007638)
Any number of iHF 3D KNX sensors can be
controlled via the RC9 remote control. The
status LED on the sensor flashes (once) to
indicate each valid press of the button. The
status LED flashes (twice) to indicate each
invalid press of the button.
Functions:
1
Light-level setting
The chosen response threshold can
be set from approx. 2-2000 lux.
2
Daylight operation
3
Night-time operation
4
Light-level setting via the memory
button / teach mode. This button
must be pressed at the level of light
at which you want the sensor to
respond to movement from now on.
The current value is stored.
5
Time setting
The period of time you want the
light to stay ON for after the last
detected movement can be set to
10 s, 1 min, 5 min or 15 min by
pressing these buttons.
6
Setting the light to stay ON for a
time of your own choice. Each
press of the button increments
the current time setting by 1 min
(up to 30 min).
7
Pressing this button switches the
light ON for 4 hours (status LED
on). The light then returns to sensor
mode automatically. Pressing the
button for a second time (before
the 4 h period expires) returns the
light to sensor mode.
GB
Page 7

16 17
SmartRemote (optional)
(EAN 4007841 009151)
– Control via smartphone or tablet
– Replaces the remote control
– Load appropriate app and connect via
Bluetooth
8� EC Declaration of Conformity
This product complies with the requirements
defined in the following standards, legislation
and directives:
– EMC Directive 2014/30/EU
– RoHS Directive 2011/65/EU
– WEEE Directive 2012/19/EU
9� Warranty
As purchaser, you are entitled to your statutory
rights against the vendor. If these rights exist
in your country, they are neither curtailed nor
restricted by our Warranty Declaration. We
guarantee that your STEINEL Professional sensor product will remain in perfect condition and
proper working order for a period of 5years.
We guarantee that this product is free from
material-, manufacturing- and design flaws.
In addition, we guarantee that all electronic
components and cables function in the proper
manner and that all materials used and their
surfaces are without defects.
Making Claims
If you wish to make a claim, please send your
product complete and carriage paid with the
original receipt of purchase, which must show
the date of purchase and product designation,
either to your retailer or contact us at STEINEL
(UK) Limited, 25 Manasty Road, Axis Park,
Orton Southgate, Peterborough, PE2 6UP,
for a returns number. For this reason, we
recommend that you keep your receipt of
purchase in a safe place until the warranty period expires. STEINEL shall assume no liability
for the costs or risks involved in returning a
product.
For information on making claims under
the terms of the warranty, please go to
www�steinel-professional�de/garantie
If you have a warranty claim or would like to
ask any question regarding your product,
you are welcome to call us at any time on our
Service Hotline 01733 366700.
10� Technical specifications
Dimensions (H x W x D): 118.3 x 117 x 120 mm
Power supply: KNX bus voltage
Angle of coverage: 160°
Sensor technology: 5.8 GHz
Reach: 1-7 m, in 3 directions
Time setting: 1-255 s or 0-255 min
Recommended mounting height: 2 m
Twilight setting: 2 - 2000 lux
Max. area covered: approx. 68 m²
IP rating: IP 54
Temperature range: -20° to +50°C
8
Install mode (test mode)
Install mode has the purpose of
checking for proper working order as
well for testing the detection zone.
Irrespective of light level, the light
switches ON for 10 s in response to
movement. (Status LED flashes).
Install mode has priority over all
other settings. Install mode ends
automatically after 10 minutes.
Install mode ends immediately after
pressing reset.
Note: Teach mode and Install mode
cannot be used at the same time.
9
Reset
Resets all settings to the values
selected on the light manually or to
the factory settings.
11� Troubleshooting
Malfunction Cause Remedy
No power at the sensor
n Fuse faulty, not switched
ON, break in wiring
n Short circuit
n New fuse, turn ON power
switch, check wiring with
voltage tester
n Check connections
Sensor will not switch ON
n Twilight setting in night mode
during daytime operation
n Bulb faulty
n KNX configuration
n Detection zone not properly
targeted
n Adjust setting
n Change bulb
n Check KNX configuration
n Readjust
Sensor will not switch OFF
n Continuous movement in
the detection zone
n Check zone, adjust or fit
shrouds if necessary
n Change zone, or fit shrouds
n Deactivate 4 h manual
override
Sensor keeps switching ON/OFF
n Light being operated is
located in detection zone
n Change zone or fit shrouds,
increase distance
GB
Page 8

30 31
S
1� Om detta dokument
Läs noga igenom dokumentet och förvara
det väl!
– Upphovsrättsligt skyddat. Eftertryck, även
delar av texten, bara med vårt samtycke.
– Ändringar som görs pga den tekniska
utvecklingen, förbehålles.
Symbolförklaring
!
Varning för fara!
...
Hänvisning till textställen i
dokumentet�
2� Allmänna säkerhetsanvisningar
• Installationen får bara utföras av en fackman
enligt gällande installationsföreskrifter VDE
08 29 (DIN EN 5000 90).
• I en miljö med lågspänningsprodukter kan
ett osakkunnigt montage orsaka allvarliga
personskador eller svåra materiella skador.
• Sensorn får aldrig anslutas till lågspänning
(230 V AC), då den är avsedd för anslutning
till klenspänningskretsar.
3� iHF 3D KNX
iHF 3D KNX är en aktiv rörelsevakt för utomhusbruk, lämplig för väggmontage. iHF 3D
KNX sänder högfrekventa elektromagnetiska
vågor (5,8 GHz) och mottar deras eko. Vid
rörelser från personer i bevakningsområdet
registreras ekoförändringen av sensorn och en
kopplingssignal utlöses. iHF 3D KNX utför en
signalanalys och skiljer på så vis mellan rörelser
från personer och rörelser från smådjur eller
objekt som buskar. 3D-antenntekniken möjliggör en exakt, individuell inställning i tre axlar.
Därmed utesluts feltändningar genom smådjur
samt störningar pga extrema temperaturer.
!
Alla funktionsinställningar kan även göras via
fjärrkontrollen RC9 (➔ "7� Tillbehör")
Anmärkning:
iHF-sensorns högfrekvenseekt är ca 1 mW –
det är bara en tusendel av sändareekten
från en mobiltelefon eller en mikrovågsugn.
Innehåll (bild 3�1)
Produktmått (bild 3�2)
Räckvidd/montagehöjd (bild 3�3)
Översikt över enheter (bild 3�4)
A Väggfäste
B Knapp för programmering
C Anslutningsplintar KNX Bus
D Dekorram
E 3D inställning av räckvidd
F Sensorenhet
4� Montage/Installation
• Kontrollera samtliga delar med avseende
på skador.
• Produkten får inte tas i drift om den är
skadad.
Montage-ordning
• Välj en lämplig montageplats med hänsyn
till räckvidden och rörelsedetekteringen
(bild 3�3)
• Bryt spänningen (bild 4�1)
• Markera borrhålen (bild 4�2)
• Borra hål och sätt i dymlingar
– nätkabel infällt montage (bild 4�3)
– med distanser vid utanpåliggande kablar
(bild 4�4)
Anslutningsdiagram (bild 4�5)
Vid val av anslutningskablar (bild 4�6) måste
principiellt installationsbestämmelserna enligt
(VDE 08 29 (DIN EN 500090) följas.
• Anslut anslutningsplintarna (C) (bild 4�7)
• Skruva fast sensorenheten (F) (bild 4�8)
• Slå till spänningen (bild 4�9)
• Företa inställningarna
➔ „6� Funktion“
5� Idrifttagning
Anmärkning: Applikationsbeskrivningen finns
på www.knx.steinel.de
1. Ange en fysikalisk adress och skapa
applikationsprogrammet i ETS.
2. Ladda den fysikaliska adressen och applikationsprogrammet i närvarovakten. Tryck
på programmeringsknappen B när
du uppmanas att göra det.
3. Efter framgångsrik programmering slocknar
den vita LED-lampan.
6� Funktion
Anmärkning:
Efter anslutningen blinkar den vita status-LED
i 10 sek. Därefter är sensorn funktionsklar.
Fabriksinställningar
Efterlystid: Install
Inställning av räckvidd: 3 x 7 m
Inställning av ljusstyrka 200 lux
Funktioner
Inställning av räckvidden (bild 6�2 / E 1-3)
Räckvidden kan steglöst ställas in via 3
vridreglage 1-7 m i tre riktningar, oberoende av
varandra. Med reglagen ställs den maximala
räckvidden för bevakningen in.
Bevakningsdiagram (bild 6�3)
Anmärkning: Finns det en vägg e.d. i en av
dessa riktningar på ett avstånd under 7 m,
måste räckvidden i denna riktning ändå ställas
in på max. värde, för att undvika feldetekteringar. Inställningen av räckvidden bör endast
användas för att utesluta områden, där inget
ljus ska tändas vid rörelse.
7� Tillbehör
FB RC9 (bild 7�1) (EAN 4007841007638)
Med fjärrkontrollen RC9 kan ett valfritt antal
iHF 3D KNX sensorer styras. Status-LED på
sensorn blinkar (1x) vid varje giltigt knapptryck.
Status-LED blinkar (2x) vid varje ogiltigt
knapptryck.
Funktioner:
1
Inställning av ljusstyrka
Önskad skymningsnivå kan
ställas in mellan ca 2-2000 lux.
2
Dagsljusdrift
3
Nattdrift
4
Inställning av ljusnivån via
minnesknappen/Teach-läge.
Denna knapp ska tryckas för
de ljusförhållanden där sensorn
sedan ska reagera på rörelser.
Det aktuella värdet sparas.
5
Efterlystid
Genom att trycka på knapparna
kan önskad efterlystid efter den
sista rörelsedetekteringen ställas
in på 10 sek., 1 min., 5 min.,
15 min.
6
Inställning av efterlystiden till
önskad, individuell tid. Varje
knapptryck förlänger den aktuella
tidsinställningen med 1 minut
(max. 30 min.).
7
Med ett knapptryck ställs lampan
in på fast sken under 4 timmar
(status LED TILL). Därefter övergår
den automatiskt till sensordrift.
Trycker du på knappen innan
de 4 timmarna har gått ut, återgår
lampan till sensordrift.
S
Page 9

32 33
SmartRemote (tillval)
(EAN 4007841009151)
– Styrning via smartphone eller surfplatta
– Ersätter fjärrkontrollen
– Ladda ner den passande appen och anslut
via Bluetooth
8� CE-deklaration
Denna produkt uppfyller kraven enligt följande
normer, lagar och direktiv:
– EMC-direktivet 2014/30/EU
– RoHS-direktivet 2011/65/EU
– WEEE direktivet 2012/19/EU
9� Garanti
Som köpare har du rätt till gällande garantirättigheter enligt konsumentlagen alt. ALEM 09.
Dessa rättigheter varken förkortas eller begränsas genom vår garantiförklaring. Utöver den
rättsliga garanti-fristen, ger vi 5års garanti på
att din STEINEL-Professional-Sensor-produkt
är i oklanderligt tillstånd och fungerar korrekt.
Vi garanterar, att denna produkt är helt utan
material-, produktions- eller konstruktionsfel.
Vi garanterar, att alla elektroniska element
och kablar är fullt funktionsdugliga samt att
allt använt råmaterial jämte dess ytor, är helt
utan brister.
Göra gällande
Om du vill reklamera din produkt, så kontakter
du inköpsstället dvs din återförsäljare. Om
återförsälja-ren av olika anledningar ej kan
kotnaktas kan du vända dig direkt till Steinels
generalagent i Sverige; Karl H Ström AB,
Verktygsvägen 4, 553 02 Jönköping,
036 - 314240. Vi rekommenderar att du
sparar kvittot väl tills garantitiden har gått ut.
För transportkostnader och -risker vid retursändningar lämnar STEINEL ingen garanti.
Information om hur du kan göra ditt
garantifall gällande hittar du på vår
hemsida www�steinel�se
Om du har frågor beträande produkten eller
frågor om garantins omfattning, kan du alltid
nå oss på 036 – 314240.
11� Driftstörningar
Störning Orsak Åtgärd
Sensor utan spänning
n Säkring defekt, inte på-
kopplad, strömförsörjning
avbruten
n Kortslutning
n Byt säkring, slå till
spänningen, testa med
spänningsprovare
n Kontrollera anslutningarna
Sensorn tänder inte ljuset
n Vid dagdrift, skymningsinställ-
ningen står på nattdrift
n Glödlampa defekt
n KNX konfiguartion
n Bevakningsområdet felinställt
n Justera inställningen
n Byt ut glödlampan
n Testa KNX konfigurationen
n Justera inställningen
Sensorn släcker inte ljuset
n Ständig rörelse i
bevakningsområdet
n Kontrollera området och ställ
in på nytt vid behov eller
använd avskärmningar
n Ändra området eller använd
avskärmningar
n Avaktivera driften för perma-
nent ljus 4 h
Sensorn TÄNDER/SLÄCKER
ljuset ständigt
n Den anslutna lampan
befinner sig inom
bevakningsområdet
n Ändra området eller använd
avskärmningar, förstora
avståndet
10� Tekniska data
Mått (HxBxD): 118,3 x 117 x 120 mm
Matarspänning: KNX-busspänning
Bevakningsvinkel: 160°
Sensorik: 5,8 GHz
Räckvidd: 1-7 m, i 3 axlar
Efterlystid: 1-255 sek eller 0-255 min
Rekommenderad montagehöjd: 2 m
Skymningsinställning: 2-2000 lux
Max. bevakningsområde: ca 68 m²
Skyddsklass: IP 54
Temperaturområde: -20 till +50 °C
8
Install-läge (test-läge)
Install-läget används för att kontrollera
funktionen och bevakningsområdet.
Oberoende av ljusnivån tänds lampan
i 10 sek. vid rörelse. (status LED
blinkar).
Install-läget prioriteras framför alla
andra inställningar. Efter 10 min.
lämnas install-läget automatiskt.
Efter ett tryck på knappen Reset
lämnas install-läget direkt.
Observera: teach-läget och installläget kan inte användas samtidigt.
9
Reset
Återställer samtliga inställningar
till de manuellt inställda värdena
på lampan resp. till fabriksinställningarna.
S
 Loading...