

Page 1

Operation Manual
Page 2

Cristina Bachmann, Heiko Bischoff, Christina Kaboth, Insa Mingers, Matthias Obrecht, Sabine Pfeifer, Benjamin
Schütte, Marita Sladek
This PDF provides improved access for vision-impaired users. Please note that due to the complexity and number
of images in this document, it is not possible to include text descriptions of images.
The information in this document is subject to change without notice and does not represent a commitment on
the part of Steinberg Media Technologies GmbH. The software described by this document is subject to a License
Agreement and may not be copied to other media except as specifically allowed in the License Agreement. No
part of this publication may be copied, reproduced, or otherwise transmitted or recorded, for any purpose,
without prior written permission by Steinberg Media Technologies GmbH. Registered licensees of the product
described herein may print one copy of this document for their personal use.
All product and company names are ™ or ® trademarks of their respective owners. For more information, please
visit www.steinberg.net/trademarks.
©
Steinberg Media Technologies GmbH, 2018.
All rights reserved.
Cubase_9.5.20_en-US_2018-01-19
Page 3

Table of Contents
8 Introduction
8 Platform-Independent Documentation
8 About the Documentation
9 Conventions
10 Key Commands
11 Setting Up Your System
11 Setting Up Audio
18 Setting Up MIDI
21 Connecting a Synchronizer
22 Audio Connections
22 Audio Connections Window
27 Renaming the Hardware Inputs and Outputs
29 Adding Input and Output Busses
29 Adding Child Busses(Cubase Pro only)
29 Presets for Input and Output Busses
30 Adding Group and FX Channels(Cubase Pro
only)
31 About Monitoring
31 External Instruments and Effects(Cubase Pro
only)
37 Editing the Bus Configurations
39 Project Window
40 Showing/Hiding Zones
40 Project Zone
52 Left Zone
62 Lower Zone
68 Right Zone
74 Keyboard Focus in the Project Window
75 Zooming in the Project Window
79 Snap Function
82 Cross-Hair Cursor
82 Edit History Dialog
84 Project Handling
84 Creating New Projects
85 Hub
86 Project Assistant
86 About Project Files
87 About Template Files
88 Project Setup Dialog
91 Opening Project Files
92 Saving Project Files
93 Reverting to the Last Saved Version
93 Choosing a Project Location
93 Creating Self-Contained Projects
96 Tracks
96 Track Inspector Settings
97 Track Control Settings
99 Audio Tracks
106 Instrument Tracks
113 MIDI Tracks
120 Sampler Tracks
125 Arranger Track
127 Chord Track
130 FX Channel Tracks
135 Folder Tracks
137 Group Channel Tracks
142 Marker Track
143 Ruler Track
144 Signature Track
146 Tempo Track
147 Transpose Track
148 VCA Fader Track(Cubase Pro only)
150 Video Track
152 Track Handling
152 Adding Tracks
154 Importing Tracks(Cubase Pro only)
157 Exporting Tracks as Track Archive(Cubase Pro
only)
158 Exporting MIDI Tracks as Standard MIDI File
160 Removing Tracks
160 Moving Tracks in the Track List
161 Renaming Tracks
161 Coloring Tracks
162 Showing Track Pictures
163 Setting the Track Height
164 Selecting Tracks
165 Duplicating Tracks
165 Disabling Tracks
165 Organizing Tracks in Folder Tracks
166 Handling Overlapping Audio
167 Track Folding
168 How Events are Displayed on Folder Tracks
168 Modifying Event Display on Folder Tracks
168 Working with Lanes
171 Defining the Track Time Base
172 TrackVersions
179 Track Presets
186 Parts and Events
186 Events
189 Parts
191 Editing Techniques for Parts and Events
204 Range Editing
204 Creating a Selection Range
205 Editing Selection Ranges
208 Playback and Transport
208 Transport Panel
210 Transport Menu
3
Page 4

Table of Contents
215 Transport
217 Transport Pop-Up Window
218 Time Display Window
219 Left and Right Locators
220 Setting the Project Cursor Position
221 Auto-Scroll
221 Time Formats
222 Pre-Roll and Post-Roll
223 Punch In and Punch Out
224 Metronome Click
232 Chase
234 On-Screen Keyboard
234 Recording MIDI With the On-Screen Keyboard
235 On-Screen Keyboard Options
236 Recording
236 Basic Recording Methods
239 Monitoring
242 Audio Recording Specifics
246 MIDI Recording Specifics
252 Remaining Record Time
252 Lock Record
254 Importing Audio and MIDI Files
254 Importing Audio Files
261 Importing MIDI Files
264 Quantizing MIDI and Audio
264 Quantize Functions
265 Quantizing MIDI Event Starts
266 Quantizing MIDI Event Lengths
266 Quantizing MIDI Event Ends
266 Quantizing Audio Event Starts
267 Quantizing Audio Event Lengths (AudioWarp
Quantizing)(Cubase Pro only)
267 Quantizing Multiple Audio Tracks(Cubase Pro
only)
269 Quantize Panel
277 Fades, Crossfades, and Envelopes
277 Event-Based Fades
281 Creating Clip-Based Fades
282 Crossfades
284 Auto Fades and Crossfades
287 Event Envelopes
289 Arranger Track
289 Adding Arranger Events on the Arranger Track
290 Arranger Editor
293 Setting up an Arranger Chain and Adding
Events
295 Jump Mode
297 Arranging Music to Video
298 Transpose Functions
298 Project Root Key
301 Transpose Track
303 Keep Transpose in Octave Range
304 Transpose on the Info Line
305 Excluding Individual Parts or Events from
Global Transpose
306 Markers
306 Position Markers
306 Cycle Markers
307 Markers Window
311 Marker Track
314 Importing and Exporting Markers
316 MixConsole
316 MixConsole in Lower Zone
319 MixConsole Window
364 VCA Faders(Cubase Pro only)
364 VCA Fader Settings
366 Creating VCA Faders
367 Assigning VCA Faders to Link Groups
367 Removing VCA Faders from Link Groups
368 Nested VCA Faders
368 VCA Fader Automation
371 Control Room(Cubase Pro only)
371 Adding Channels to the Control Room
372 Output Routing
372 Exclusive Assignment of Monitor Channels
372 Control Room Channels
373 Control Room - Main Tab
379 Control Room - Inserts Tab
381 Setting Up a Cue Mix
382 Adjusting the Overall Cue Send Level
384 Metering and Loudness (Cubase Pro only)
384 Metering
385 Loudness Measurement
390 Audio Effects
390 Insert Effects and Send Effects
392 Insert Effects
399 Send Effects
404 Side-Chain Input
406 Dither Effects
407 External Effects(Cubase Pro only)
407 Effect Control Panel
408 Effect Presets
413 System Component Information Window
416 Direct Offline Processing
417 Direct Offline Processing Workflow
418 Direct Offline Processing Window
425 Built-In Audio Processes
433 Applying Direct Offline Processing Using Key
Commands
435 Time Stretch and Pitch Shift Algorithms
435 élastique
436 MPEX
436 Standard
437 Limitations
438 Audio Functions
438 Detect Silence
440 Spectrum Analyzer
443 Statistics
445 Sample Editor
447 Toolbar
451 Info Line
452 Overview Line
452 Sample Editor Inspector
455 Ruler
456 Waveform Display
457 Range Editing
461 Regions List
463 Snap Point
4
Page 5

Table of Contents
466 Hitpoints
466 Calculating Hitpoints
469 Locating to Hitpoints in the Project Window
469 Slices
471 Creating a Groove Quantize Map
471 Creating Markers
472 Creating Regions
472 Creating Events
472 Creating Warp Markers
473 Creating MIDI Notes
475 Tempo Matching Audio
475 Algorithm Presets
476 Stretching Audio Events to the Project Tempo
476 Musical Mode
478 Auto Adjust
478 Manual Adjust
480 Free Warp
482 Flattening Realtime Processing
482 Unstretching Audio Files
484 VariAudio(Cubase Pro only)
484 VariAudio and Offline Processes
485 Segmenting Monophonic Audio
486 Segments and Gaps
486 Manual Editing of Segments
492 Pitch Changes
494 Micro-Pitch Changes
498 Timing Modifications
499 Reset Functions
500 Extracting MIDI from Audio
502 Flattening Realtime Processing
503 Harmony Voices for Audio
504 Audio Part Editor
506 Toolbar
510 Info Line
510 The Ruler
511 About Lanes
511 Operations
515 Controlling Sample Playback with Sampler
Tracks
515 Loading Audio Samples into Sampler Control
515 Loading MIDI Parts into Sampler Control
516 Creating Sampler Tracks
516 Sampler Control
525 Sample Editing and Playback Functions
527 Transferring Samples from Sampler Control to
VST Instruments
528 Pool
528 Pool Window
532 Working with the Pool
546 MediaBay
546 Media Rack in Right Zone
552 MediaBay Window
577 Working with MediaBay-Related Windows
579 Working with Volume Databases
581 MediaBay Settings
582 MediaBay Key Commands
583 Surround Sound(Cubase Pro only)
583 Deliverables
584 Available Surround Channel Configurations
585 Preparations for Surround Mixing
588 VST MultiPanner
600 MixConvert V6
601 Surround Mix Export
602 Automation
602 Automation Curves
602 Static Value Line
602 Write/Read Automation
603 Writing Automation Data
605 Editing Automation Events
610 Automation Tracks
611 Virgin Territory vs. Initial Value(Cubase Pro
only)
612 Automation Panel(Cubase Pro only)
621 MIDI Controller Automation
624 VST Instruments
624 Adding VST Instruments
625 Creating Instrument Tracks
625 VST Instruments in the Right Zone
626 VST Instruments Window
626 VST Instruments Toolbar
627 VST Instrument Controls
628 Presets for Instruments
630 Playing Back VST Instruments
631 Latency
632 Import and Export Options
634 VST Quick Controls
635 Side-Chain Input for VST Instruments
637 External Instruments(Cubase Pro only)
638 Installing and Managing Plug-Ins
638 Installing VST Plug-Ins
638 VST Plug-In Manager
641 Compiling a New Effects Collection
642 Track Quick Controls
642 Assigning Parameters to Quick Controls
646 Connecting Quick Controls with Remote
Controllers
646 Activating Pick-up Mode for Hardware Controls
647 Quick Controls and Automatable Parameters
649 Remote Controlling Cubase
649 Setting Up
651 Operations
653 The Generic Remote Device
656 Track Quick Controls
657 The Remote Control Editor
662 Joysticks
663 Apple Remote (macOS only)
665 MIDI Realtime Parameters and MIDI Effects
665 MIDI Track Parameters
667 MIDI Modifiers
672 MIDI Effects
675 Transpose and Velocity on the Info Line
676 Using MIDI devices
676 MIDI devices – general settings and patch
handling
684 About Device panels(Cubase Pro only)
687 MIDI Functions
687 Transpose Setup
688 Merging MIDI Events into a New Part
689 Dissolve Part
691 Bouncing MIDI Parts
5
Page 6

Table of Contents
692 Repeating MIDI Events of Independent Track
Loops
692 Extending MIDI Notes
693 Fixing MIDI Note Lengths
693 Fixing MIDI Note Velocities
693 Rendering Sustain Pedal Data to Note Lengths
694 Deleting Overlaps
694 Editing Velocity
695 Deleting Double Notes
695 Deleting Controller Data
695 Deleting Continuous Controller Data
696 Restricting Polyphonic Voices
696 Thinning Out Controller Data
696 Extracting MIDI Automation
697 Reversing the Playback Order of MIDI Events
697 Inverting the Order of Selected MIDI Events
697 Creating a Tempo Track from Tapping(Cubase
Pro only)
699 MIDI Editors
699 Common MIDI Editor Functions
706 Key Editor
717 Key Editor Operations
735 Basic Score Editor(Cubase Artist only)
741 Score Editor Operations(Cubase Artist only)
748 Drum Editor
762 Drum Editor Operations
765 Drum Maps
770 List Editor
779 List Editor Operations
784 In-Place Editor
787 Expression Maps(Cubase Pro only)
788 Articulations
788 Expression Map Setup
789 Creating and Editing Expression Maps
796 Inserting Articulations
799 Note Expression
799 Introduction
801 Setting up the Note Expression Inspector
Section
803 Mapping controllers
804 Recording
807 Editing Note Expression data
812 Note Expression and MIDI
815 HALion Sonic SE
816 Chord Functions
816 Chord Track
817 Chord Events
824 Scale Events
825 Voicings
827 Converting Chord Events to MIDI
828 Controlling MIDI or Audio Playback Using the
Chord Track
831 Assigning Voices to Notes
831 Extracting Chord Events from MIDI
832 Recording Chord Events with a MIDI Keyboard
834 Chord Pads
834 Chord Pads
837 Functions Menu
837 Preparations
838 Chord Assistant
840 Assigning Chords to Chord Pads
843 Moving and Copying Chord Pads
844 Playing Back and Recording Chords
845 Chord Pad Settings – Remote Control
849 Chord Pad Settings – Players
854 Chord Pad Settings – Pad Layout
855 Chord Pads Presets
856 Creating Events from Chord Pads
857 Logical Editor
857 Window overview
858 Filter Conditions
867 Selecting a function
868 Specifying actions
871 Applying the Defined Actions
871 Presets
873 Project Logical Editor(Cubase Pro only)
873 Window Overview
874 Filter Conditions
884 Specifying Actions
887 Selecting a Function
887 Applying Macros
887 Applying the Defined Actions
888 Presets
890 Editing Tempo and Time Signature
890 Project Tempo Modes
890 Track Time Base
891 Tempo Track Editor
892 Tempo Track
894 Setting up Tempo Changes for Projects
898 Setting up a Fixed Project Tempo
900 Beat Calculator
901 Tempo Detection(Cubase Pro only)
902 Exporting a Tempo Track(Cubase Pro only)
902 Importing a Tempo Track(Cubase Pro only)
903 Process Tempo(Cubase Pro only)
904 Process Bars(Cubase Pro only)
904 Time Warp(Cubase Pro only)
906 Set Definition From Tempo
906 Time Signature Events
909 Project Browser(Cubase Pro only)
909 Window Overview
911 Editing tracks
919 Rendering Audio and MIDI
919 Render Tracks
921 Render Selection
924 Export Audio Mixdown
925 Mixing Down to Audio Files
926 Available Channels for Export
927 File Location
930 File Format
936 Audio Engine Output
938 Import Into Project
939 Post Process
940 Synchronization
940 Background
941 Timecode (positional references)
943 Clock sources (speed references)
943 The Project Synchronization Setup dialog
948 Synchronized operation
948 Example Scenarios(Cubase Pro only)
949 Working with VST System Link
953 Activating VST System Link
6
Page 7

Table of Contents
960 Video
960 Video File Compatibility
961 Frame Rates
962 Video Output Devices
962 Preparations for Creating Video Projects
964 Preparations for Video Playback
966 Editing Video
968 Exchanging Files with Other Applications
968 OMF Files(Cubase Pro only)
972 ReWire
972 Introduction
972 Launching and quitting
973 Activating ReWire channels
973 Using the transport and tempo controls
974 How the ReWire channels are handled
974 Routing MIDI via ReWire
975 Considerations and limitations
976 Key Commands
976 Adding Key Commands
977 Searching for Key Commands
977 Removing Key Commands
977 Setting Up Macros
978 Saving Key Commands Presets
978 Loading Key Command Presets
979 Importing Key Command Settings
979 Resetting Key Commands
980 The Default Key Commands
991 Setting Up Tool Modifier Keys
993 Customizing
993 Workspaces
996 Using the Setup Options
998 Customizing the Meter Colors
999 Customizing the User Interface Colors
1000 Color Selector Pane
1001 Coloring Tracks, Parts, or Events Manually
1001 Auto Track Color Mode
1002 Colorizing Track Controls
1003 Project Colors Dialog
1004 Profiles(Cubase Pro only)
1008 Where are the Settings Stored?
1010 Optimizing
1010 Optimizing Audio Performance
1014 Preferences
1014 Preferences Dialog
1016 Editing
1023 Editors
1024 Event Display
1027 General
1028 MIDI
1033 MediaBay
1033 Metering
1034 Record
1036 Scores(Cubase Pro only)
1038 Transport
1039 User Interface
1040 VST
1043 VariAudio(Cubase Pro only)
1044 Video
1045 Index
7
Page 8

Introduction
The documentation covers the following Steinberg products: Cubase Pro and Cubase Artist.
Functions that are only available in Cubase Pro and not in Cubase Artist are clearly indicated. The
screenshots are taken from Cubase Pro.
Platform-Independent Documentation
The documentation applies to the operating systems Windows and macOS.
Features and settings that are specific to one of these platforms are clearly indicated. In all other
cases, the descriptions and procedures in the documentation are valid for Windows and macOS.
Some points to consider:
●
The screenshots are taken from Windows.
●
Some functions that are available on the File menu on Windows can be found in the
program name menu on macOS.
About the Documentation
The documentation consists of several documents. You can read them online or download them
from steinberg.help. To visit steinberg.help, do one of the following:
●
Enter www.steinberg.help in the address bar of your web browser.
●
In the program, select Help> Cubase Help.
Quick Start Guide
Covers the following areas without going into details:
●
System requirements, installation procedure, and license activation.
●
Setting up your system for audio and MIDI work.
Operation Manual
The main Cubase reference documentation, with detailed descriptions of operations,
parameters, functions, and techniques.
Score Layout and Printing(Cubase Pro only)
Describes the professional music notation, score editing, and printing features
included in the Score Editor.
Remote Control Devices
Lists the supported MIDI remote control devices.
Plug-in Reference
Describes the features and parameters of the included VST plug-ins, VST
instruments, and MIDI effects.
8
Page 9

Introduction
Conventions
HALion Sonic SE
Groove Agent SE
Retrologue
MIDI Devices
VST Connect SE (Cubase Pro only)
Conventions
In our documentation, we use typographical and markup elements to structure information.
Describes the features and parameters of the included VST instrument HALion Sonic
SE.
Describes the features and parameters of the included VST instrument Groove Agent
SE.
Describes the features and parameters of the included VST instrument Retrologue.
Describes how to manage MIDI Devices and device panels.
Describes how to work with the VST Connect SE features.
Typographical Elements
The following typographical elements mark the following purposes.
PREREQUISITE
Requires you to complete an action or to fulfill a condition before starting a
procedure.
PROCEDURE
Lists the steps that you must take to achieve a specific result.
IMPORTANT
Informs you about issues that might affect the system, the connected hardware, or
that might bring a risk of data loss.
NOTE
Informs you about issues that you should consider.
EXAMPLE
Provides you with an example.
RESULT
Shows the result of the procedure.
AFTER COMPLETING THIS TASK
Informs you about actions or tasks that you can perform after completing the
procedure.
Markup
RELATED LINKS
Lists related topics that you can find in this documentation.
Bold text indicates the name of a menu, option, function, dialog, window, etc.
EXAMPLE
To open the Functions menu, click Functions Menu in the top right corner of the MixConsole.
9
Page 10

Introduction
Key Commands
If bold text is separated by a greater-than symbol, this indicates a sequence of different menus
to open.
EXAMPLE
Select Project> Add Track.
Key Commands
Many of the default key commands, also known as keyboard shortcuts, use modifier keys, some
of which are different depending on the operating system.
When key commands with modifier keys are described in this manual, they are shown with the
Windows modifier key first followed by the macOS and the key:
●
Windows modifier key/macOS modifier key-Z
EXAMPLE
Ctrl/Cmd-Z means: press Ctrl on Windows or Cmd on macOS, then press Z.
10
Page 11
Setting Up Your System
To use Cubase, you must set up your audio, and if required, your MIDI system.
Setting Up Audio
IMPORTANT
Make sure that all equipment is turned off before making any connections.
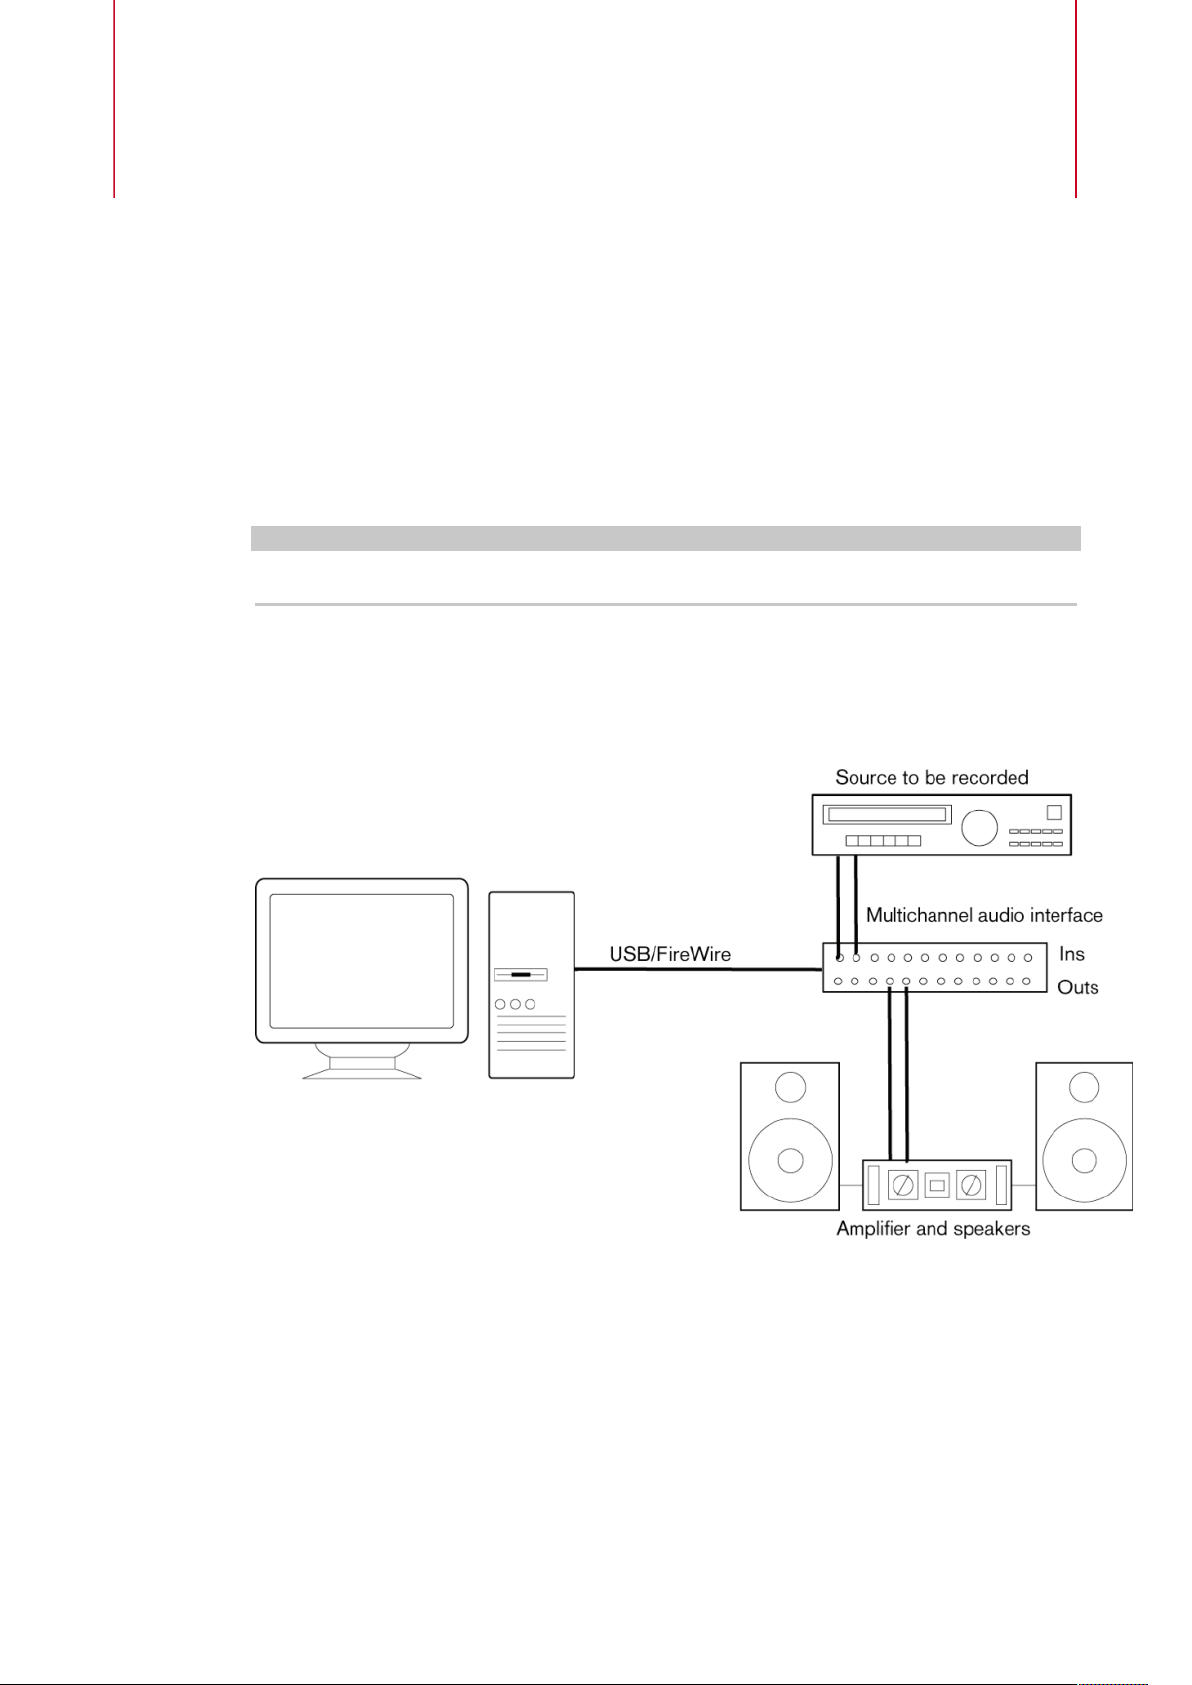
Simple Stereo Input and Output Setup
If you only use a stereo input and output from Cubase, you can connect your audio hardware, for
example, the inputs of your audio card or your audio interface, directly to the input source and
the outputs to a power amplifier and speaker.
Audio Connections
Your system setup depends on many different factors, for example, on the kind of project
that you want to create, on the external equipment that you want to use, or on the computer
hardware that is available to you. Therefore, the following sections can only serve as examples.
How to connect your equipment, that is, whether to use digital or analog connections also
depends on your setup.
11
Page 12

Setting Up Your System
Setting Up Audio
About Recording Levels and Inputs
When you connect your equipment, make sure that the impedance and levels of the audio
sources and inputs are matched. Using the correct type of input is important to avoid distortion
or noisy recordings. For microphones, for example, different inputs can be used, such as
consumer line level (-10 dBV) or professional line level (+4 dBu).
Sometimes, you can adjust input characteristics on the audio interface or on its control panel. For
details, refer to the documentation that came with the audio hardware.
IMPORTANT
Cubase does not provide any input level adjustments for the signals that are coming into your
audio hardware, since these are handled differently for each card. Adjusting input levels is either
done in a special application that is included with the hardware or its control panel.
Word Clock Connections
If you are using a digital audio connection, you may also need a word clock connection between
the audio hardware and external devices. For details, refer to the documentation that came with
the audio hardware.
IMPORTANT
Set up word clock synchronization correctly, or you may experience clicks and crackles in your
recordings.
Selecting an Audio Driver
By selecting an audio driver, you allow Cubase to communicate with the audio hardware.
Normally, when you start Cubase, a dialog opens that prompts you to select a driver, but you can
also select your audio hardware driver as described below.
NOTE
On Windows operating systems, we recommend that you access your hardware via an ASIO
driver developed specifically for the hardware. If no ASIO driver is installed, contact the
manufacturer of your audio hardware for information on available ASIO drivers. If no specific
ASIO driver is available, you can use the Generic Low Latency ASIO driver.
PROCEDURE
1. Select Studio> Studio Setup.
2. In the Devices list, select VST Audio System.
3. Open the ASIO Driver pop-up menu and select your audio hardware driver.
4. Click OK.
Setting Up Audio Hardware
PREREQUISITE
You have selected a driver for your audio hardware.
PROCEDURE
1. Select Studio> Studio Setup.
2. In the Devices list, select your audio hardware driver.
12
Page 13
Setting Up Your System
Setting Up Audio
3. Do one of the following to open the control panel for your audio hardware:
4. Set up your audio hardware as recommended by the manufacturer.
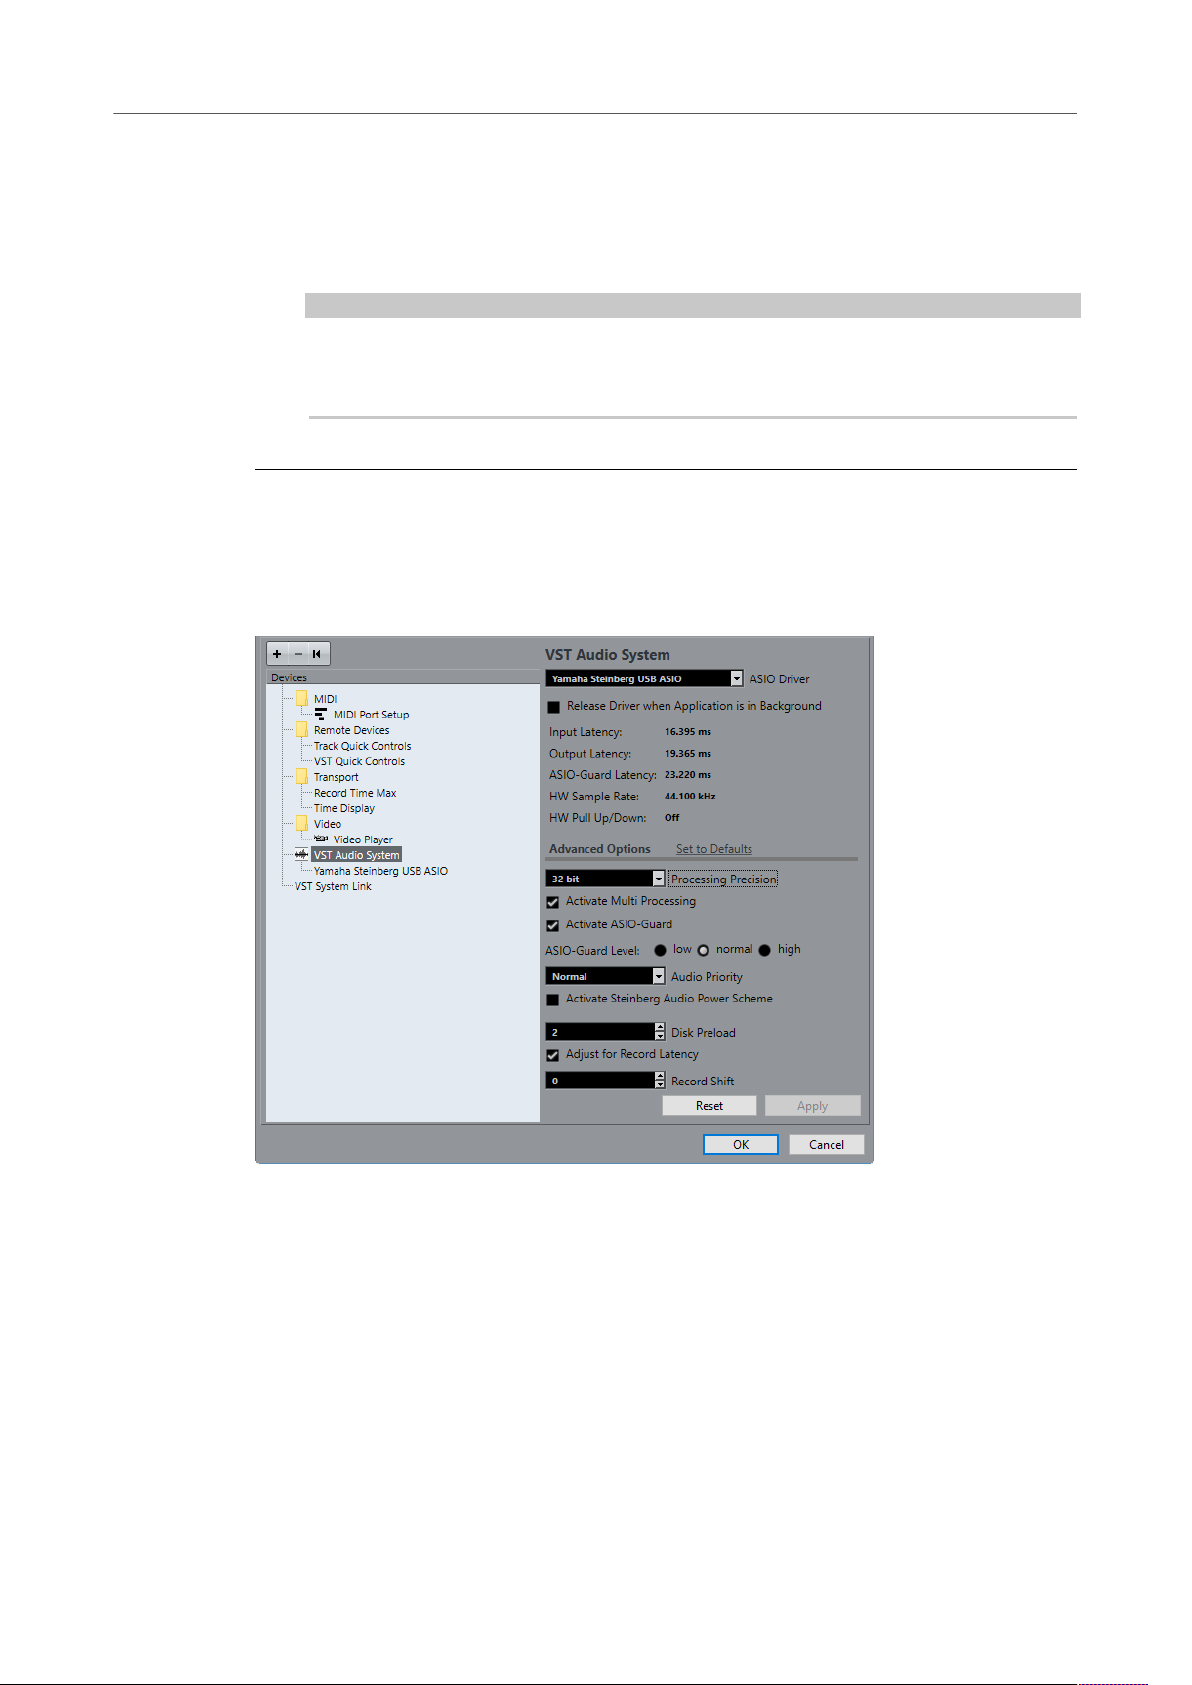
VST Audio System
In the VST Audio System section you can select an ASIO driver for your audio hardware.
● To open the VST Audio System section, select Studio> Studio Setup and select VST Audio
●
On Windows, click Control Panel.
●
On macOS, click Open Config App.
This button is available only for some hardware products. If it is not available in your
setup, refer to the documentation of your audio hardware.
NOTE
The control panel is provided by the manufacturer of your audio hardware and is different
for each audio interface brand and model. However, control panels for the Generic Low
Latency ASIO Driver (Windows only) are provided by Steinberg.
System in the Devices list.
The following options are available:
ASIO Driver
Allows you to select a driver.
Release Driver when Application is in Background
Releases the driver and allows other applications to play back via your audio
hardware even though Cubase is running.
Input Latency
Shows the input latency of the audio hardware.
Output Latency
Shows the output latency of the audio hardware.
13
Page 14

Setting Up Your System
Setting Up Audio
ASIO-Guard Latency
HW Sample Rate
HW Pull Up/Down
Set to Defaults
Processing Precision
Shows the ASIO-Guard latency.
Shows the sample rate of your audio hardware.
Shows the pull up/down status of the audio hardware.
Allows you to restore the default settings.
Allows you to set the audio processing precision to 64 bit. This way, all channels are
processed and mixed in 64-bit floating point.
NOTE
A processing precision of 64 bit can increase CPU load and memory consumption.
VST2 plug-ins and instruments are always processed with 32-bit precision.
To show all plug-ins that support 64-bit processing, open the VST Plug-in Manager
and activate Show Plug-ins That Support 64-Bit Processing in the Display Options
pop-up menu.
Activate Multi Processing
Allows you to distribute the processing load evenly to all available CPUs. This way,
Cubase can make full use of the combined power of multiple processors.
Activate ASIO-Guard
Activates the ASIO-Guard. This is only available if Activate Multi Processing is
activated too.
ASIO-Guard Level
Allows you to set the ASIO-Guard level. The higher the level, the higher the
processing stability and audio processing performance. However, higher levels also
lead to an increased ASIO-Guard latency and memory usage.
Audio Priority (Windows only)
This setting should be set to Normal if you work with audio and MIDI. If you do not
use MIDI at all, you can set this to Boost.
Activate Steinberg Audio Power Scheme
If this option is activated, all power safe modes that have an impact on realtime
processing are deactivated. Note that this is only effective for very low latencies, and
that it increases the power consumption.
Disk Preload
Allows you to specify how many seconds of audio are preloaded into RAM prior to
starting playback. This allows for smooth playback.
Adjust for Record Latency
If this is activated, the plug-in latencies are taken to account during recording.
Record Shift
Allows you to shift the recordings by the specified value.
RELATED LINKS
VST Plug-In Manager Window on page 638
14
Page 15
Setting Up Your System
Setting Up Audio
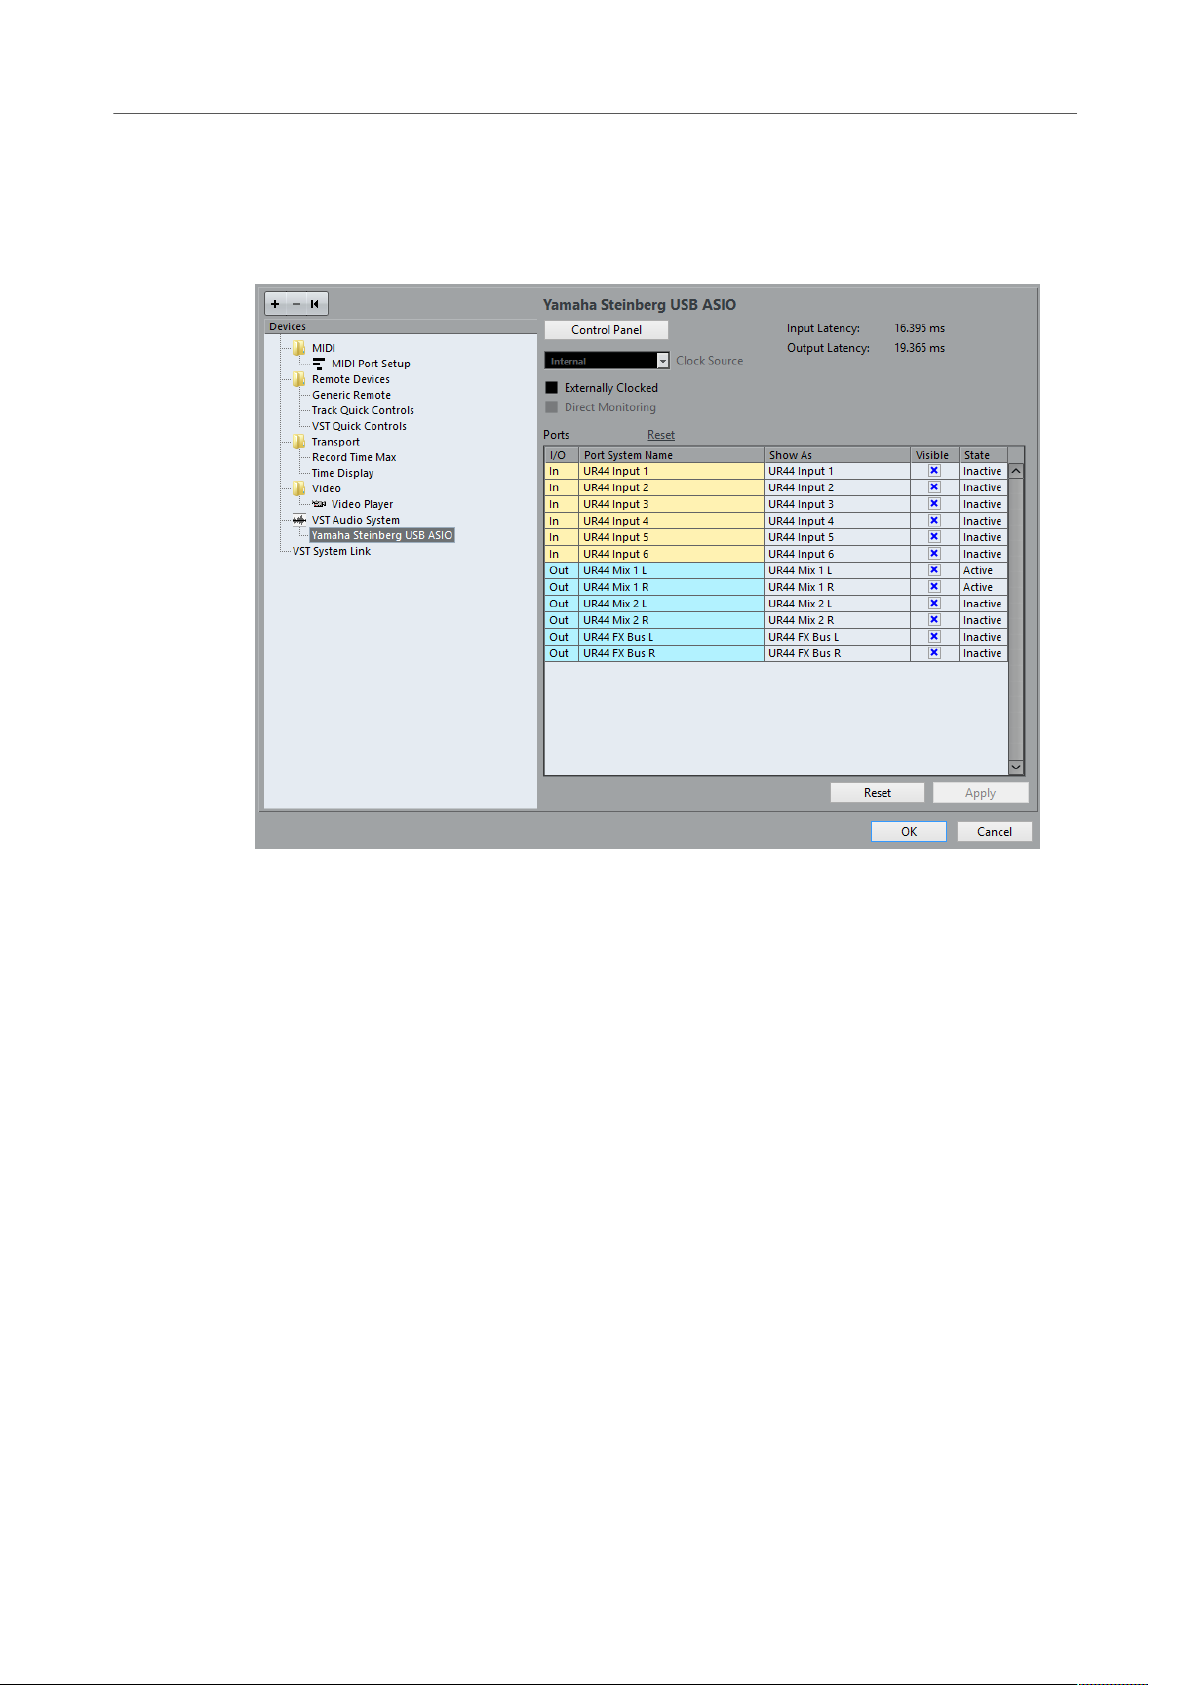
ASIO Driver Setup
This section allows you to set up your ASIO driver.
● To open the section where you can set up the ASIO driver, select Studio> Studio Setup
and select the audio driver in the Devices list.
The following options are available:
Control Panel
Opens the control panel for the audio hardware.
Input Latency
Shows the input latency of the audio driver.
Output Latency
Shows the output latency of the audio driver.
Clock Source
Allows you to select a clock source.
Externally Clocked
Activate this option if you use an external clock source.
Direct Monitoring
Activate this option to monitor via your audio hardware and to control it from
Cubase.
Ports Reset
Allows you to reset all port names and visibilities.
I/O
The port input/output status.
15
Page 16

Setting Up Your System
Setting Up Audio
Port System Name
The system name of the port.
Show As
Allows you to rename the port. This name is used in the Input Routing and Output
Routing pop-up menus.
Visible
Allows you to activate/deactivate audio ports.
State
The state of the audio port.
Using External Clock Sources
If you are using an external clock source, Cubase must be notified that it receives external clock
signals and derives its speed from that source.
PROCEDURE
1. Select Studio> Studio Setup.
2. In the Devices list, select your audio hardware driver.
3. Activate Externally clocked.
RESULT
Cubase now derives its speed from the external source.
NOTE
For proper audio playback and recording, you must set the sample rate of the project to the
sample rate of the incoming clock signals.
When a sample rate mismatch occurs, the Record Format field on the status line is highlighted
in a different color. Cubase accepts a sample rate mismatch, and playback is therefore faster or
slower.
Using Several Audio Applications Simultaneously
You can allow other applications to play back via your audio hardware even though Cubase is
running.
PREREQUISITE
Other audio applications accessing the audio hardware are set to release the audio driver.
PROCEDURE
1. Select Studio> Studio Setup.
2. In the Devices list, select VST Audio System.
3. Activate Release Driver when Application is in Background.
RESULT
The application that has the focus gets access to the audio hardware.
16
Page 17

Setting Up Your System
Setting Up Audio
Audio Hardware Configuration
Most audio cards provide one or more small applications that allow you to customize your
hardware.
The settings are normally gathered on a control panel that can be opened from within Cubase or
separately, when Cubase is not running. For details, refer to the audio hardware documentation.
Settings include:
●
Selecting which inputs/outputs are active.
●
Setting up word clock synchronization.
●
Turning on/off monitoring via the hardware.
●
Setting levels for each input.
●
Setting levels for the outputs so that they match the equipment that you use for
monitoring.
●
Selecting digital input and output formats.
●
Making settings for the audio buffers.
Plug and Play Support for ASIO Devices
The Steinberg UR hardware series supports plug and play in Cubase. These devices can be
plugged in and switched on while the application is running. Cubase automatically uses the
driver of the UR series and re-maps the Audio Connections accordingly.
Steinberg cannot guarantee that this works with other hardware. If you are unsure of whether
your device supports plug and play, refer to the documentation of your device.
IMPORTANT
If a device that does not support plug and play is connected or disconnected while the computer
is running, it can get damaged.
Setting Up Input and Output Ports
Once you have selected the driver for your audio hardware and have set it up, you must specify
which inputs and outputs to use.
PREREQUISITE
You have selected a driver for your audio hardware.
PROCEDURE
1. Select Studio> Studio Setup.
2. In the Devices list, select your audio hardware driver.
3. Make your settings.
4. Click OK.
RELATED LINKS
ASIO Driver Setup on page 15
17
Page 18

Setting Up Your System
Setting Up MIDI
Audio Bus Setup
Cubase uses a system of input and output busses to transfer audio between the program and
the audio hardware.
●
Input busses let you route audio from the inputs of your audio hardware into Cubase. This
means that audio is always recorded through one or several input busses.
●
Output busses let you route audio from Cubase to the outputs of your audio hardware.
This means that audio is always played back through one or several output busses.
Once you have set up the internal input and output busses, you can connect your audio source,
for example a microphone, to your audio interface and start recording, playing back, and mixing.
RELATED LINKS
Audio Connections on page 22
Monitoring
In Cubase, monitoring means listening to the input signal while recording.
The following ways of monitoring are available.
●
Externally by listening to the signal before it reaches Cubase.
●
Via Cubase.
●
By using ASIO Direct Monitoring.
This is a combination of the other methods.
RELATED LINKS
External Monitoring on page 240
Monitoring via Cubase on page 240
ASIO Direct Monitoring on page 240
Setting Up MIDI
IMPORTANT
Turn off all equipment before making any connections.
PROCEDURE
1. Connect your MIDI equipment (keyboard, MIDI interface, etc.) to your computer.
2. Install the drivers for your MIDI equipment.
RESULT
You can use your MIDI equipment in Cubase.
MIDI Connections
To play back and record MIDI data from your MIDI device, for example, a MIDI keyboard, you
need to connect the MIDI ports.
Connect the MIDI output port of your MIDI device to the MIDI input port of your audio hardware.
This way, the MIDI device sends MIDI data to be played back or recorded inside your computer.
Connect the MIDI input port of your MIDI device to the MIDI output port of your audio hardware.
This way, you can send MIDI data from Cubase to the MIDI device. For example, you can record
18
Page 19

Setting Up Your System
Setting Up MIDI
your own playing, edit the MIDI data in Cubase, and then play it back on the keyboard and record
the audio that is coming out of the keyboard for a better edited performance.
Showing or Hiding MIDI Ports
You can specify if a MIDI port is listed on the MIDI pop-up menus in the program.
PROCEDURE
1. Select Studio> Studio Setup.
2. In the Devices list, select MIDI Port Setup.
3. To hide a MIDI port, deactivate its Visible column.
4. Click OK.
Setting Up All MIDI Inputs
When you record MIDI, you can specify which MIDI input each recording MIDI track should use.
However, you can also record any MIDI data from any MIDI input. You can specify which inputs
are included when you select All MIDI Inputs for a MIDI track.
PROCEDURE
1. Select Studio> Studio Setup.
2. In the Devices list, select MIDI Port Setup.
3. Activate In ‘All MIDI Inputs’ for a port.
4. Click OK.
RESULT
When you select All MIDI Inputs on the Input Routing menu of a MIDI track in the Inspector,
the MIDI track uses all MIDI inputs that you specified in the MIDI Port Setup.
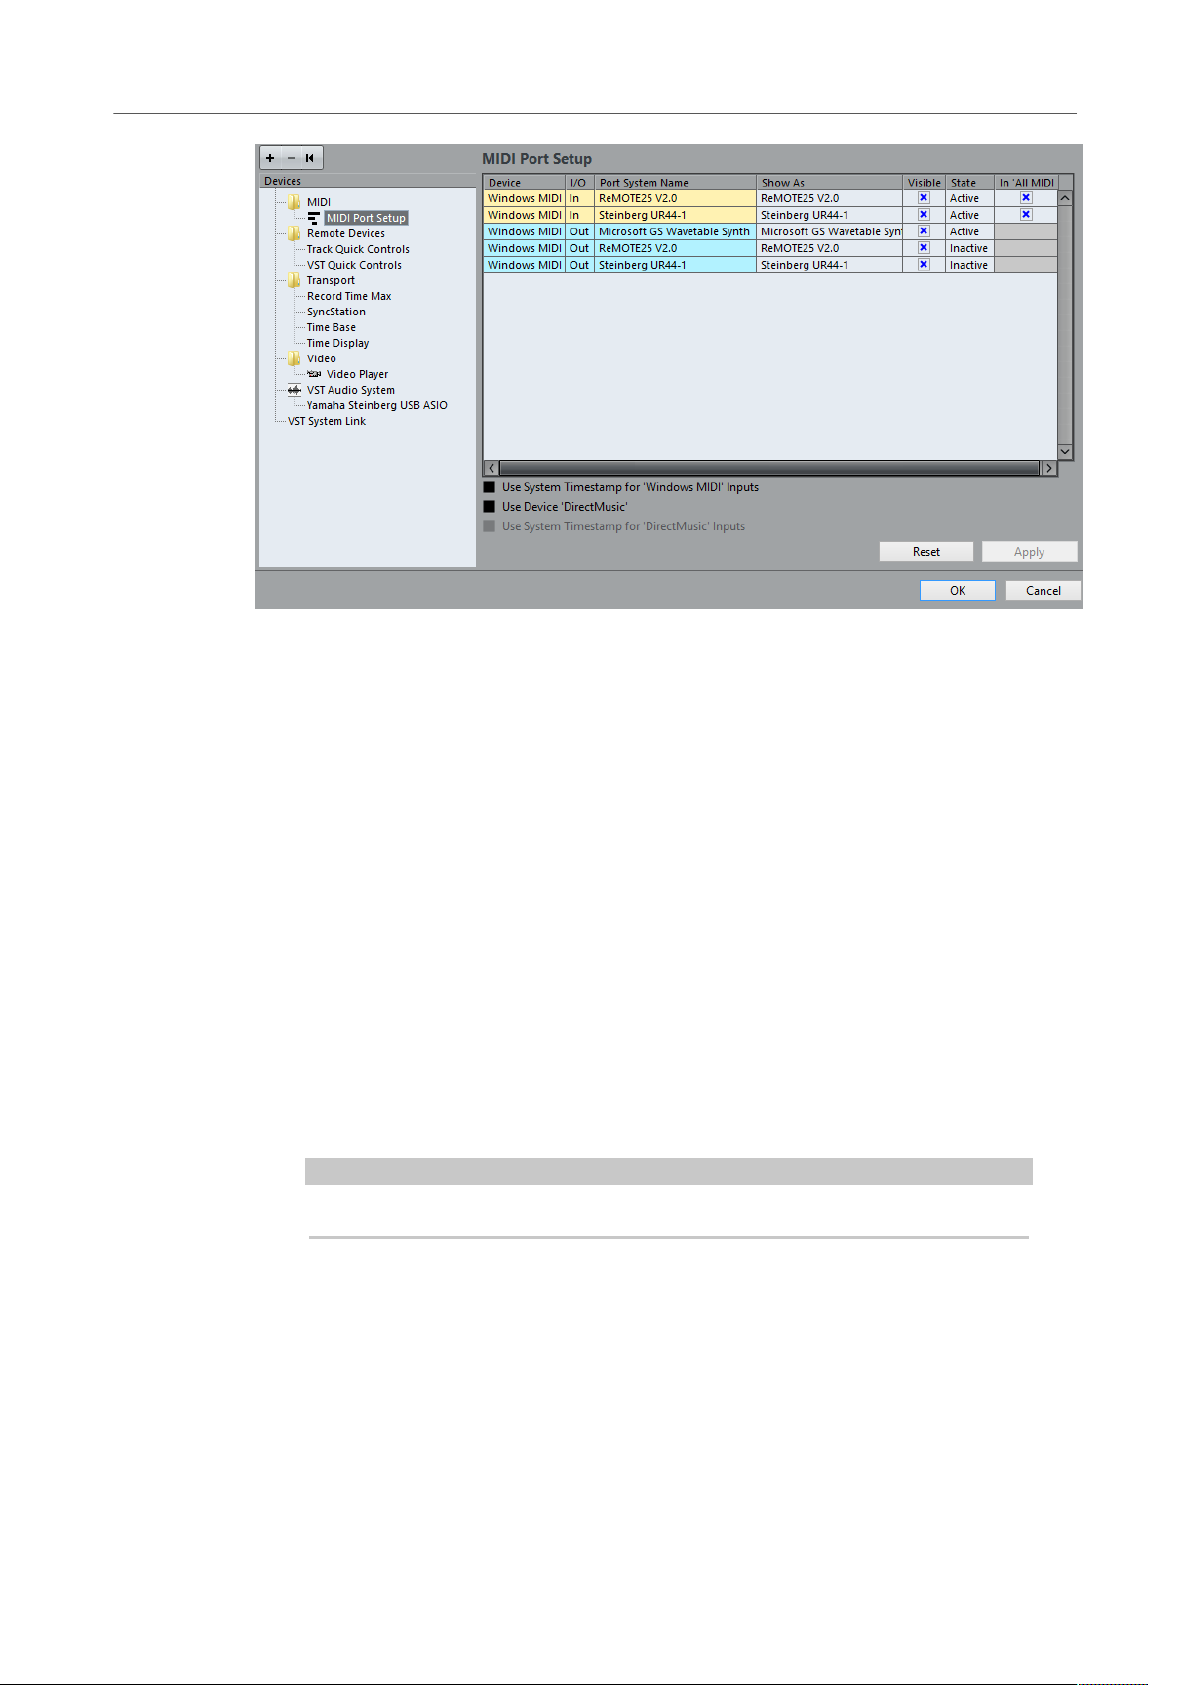
MIDI Port Setup
The MIDI Port Setup page in the Studio Setup dialog displays the connected MIDI devices and
allows you to set up their ports.
● To open the MIDI Port Setup page, select Studio> Studio Setup and activate MIDI Port
NOTE
If you have a MIDI remote control unit connected, make sure to deactivate the In ‘All
MIDI Inputs’ option for that MIDI input. This avoids accidental recording of data from the
remote control when All MIDI Inputs is selected as input for a MIDI track.
Setup in the Devices list.
19
Page 20
Setting Up Your System
Setting Up MIDI
The following colums are displayed:
Device
The connected MIDI devices.
I/O
The port input/output status.
Port System Name
The system name of the port.
Show As
Allows you to rename the port. This name is used in the Input Routing and Output
Routing pop-up menus.
Visible
Allows you to activate/deactivate MIDI ports.
State
The state of the MIDI port.
In 'All MIDI Inputs'
Allows you to record MIDI data from all MIDI inputs.
NOTE
Deactivate this option if you use remote control devices.
The following options are available:
Use System Timestamp for 'Windows MIDI' Inputs
Activate this option if you have persistent timing problems such as shifted notes. If
this is activated, the system timestamp is used as a time reference.
Use Device 'DirectMusic'
If you do not use a device with a DirectMusic device driver, you can leave this option
deactivated. This enhances the system performance.
20
Page 21

Setting Up Your System
Connecting a Synchronizer
Use System Timestamp for 'DirectMusic' Inputs
Activate this option if you have persistent timing problems such as shifted notes. If
this is activated, the system timestamp is used as a time reference.
Plug and Play Support for USB MIDI Devices
Cubase supports plug and play of USB MIDI devices. These devices can be plugged in and
switched on while the application is running.
Connecting a Synchronizer
When using Cubase with external tape transports, you most likely must add a synchronizer to
your system.
IMPORTANT
Make sure that all equipment is turned off before making any connections.
For information on how to connect and set up your synchronizer, refer to the documentation of
your synchronizer.
RELATED LINKS
Synchronization on page 940
21
Page 22
Audio Connections
To play back and record in Cubase, you must set up input and output busses in the Audio
Connections window. Here, you can also set up group and FX channels, external effects, external
instruments, and the Control Room(Cubase Pro only).
The bus types that you need depend on your audio hardware, on your general audio setup, for
example your surround speaker setup, and on the projects that you use.
Audio Connections Window
The Audio Connections window allows you to set up input and output busses, group and FX
channels, external effects, and external instruments. Furthermore, you can use this window to
access and configure the Control Room(Cubase Pro only).
● To open the Audio Connections window, select Studio> Audio Connections.
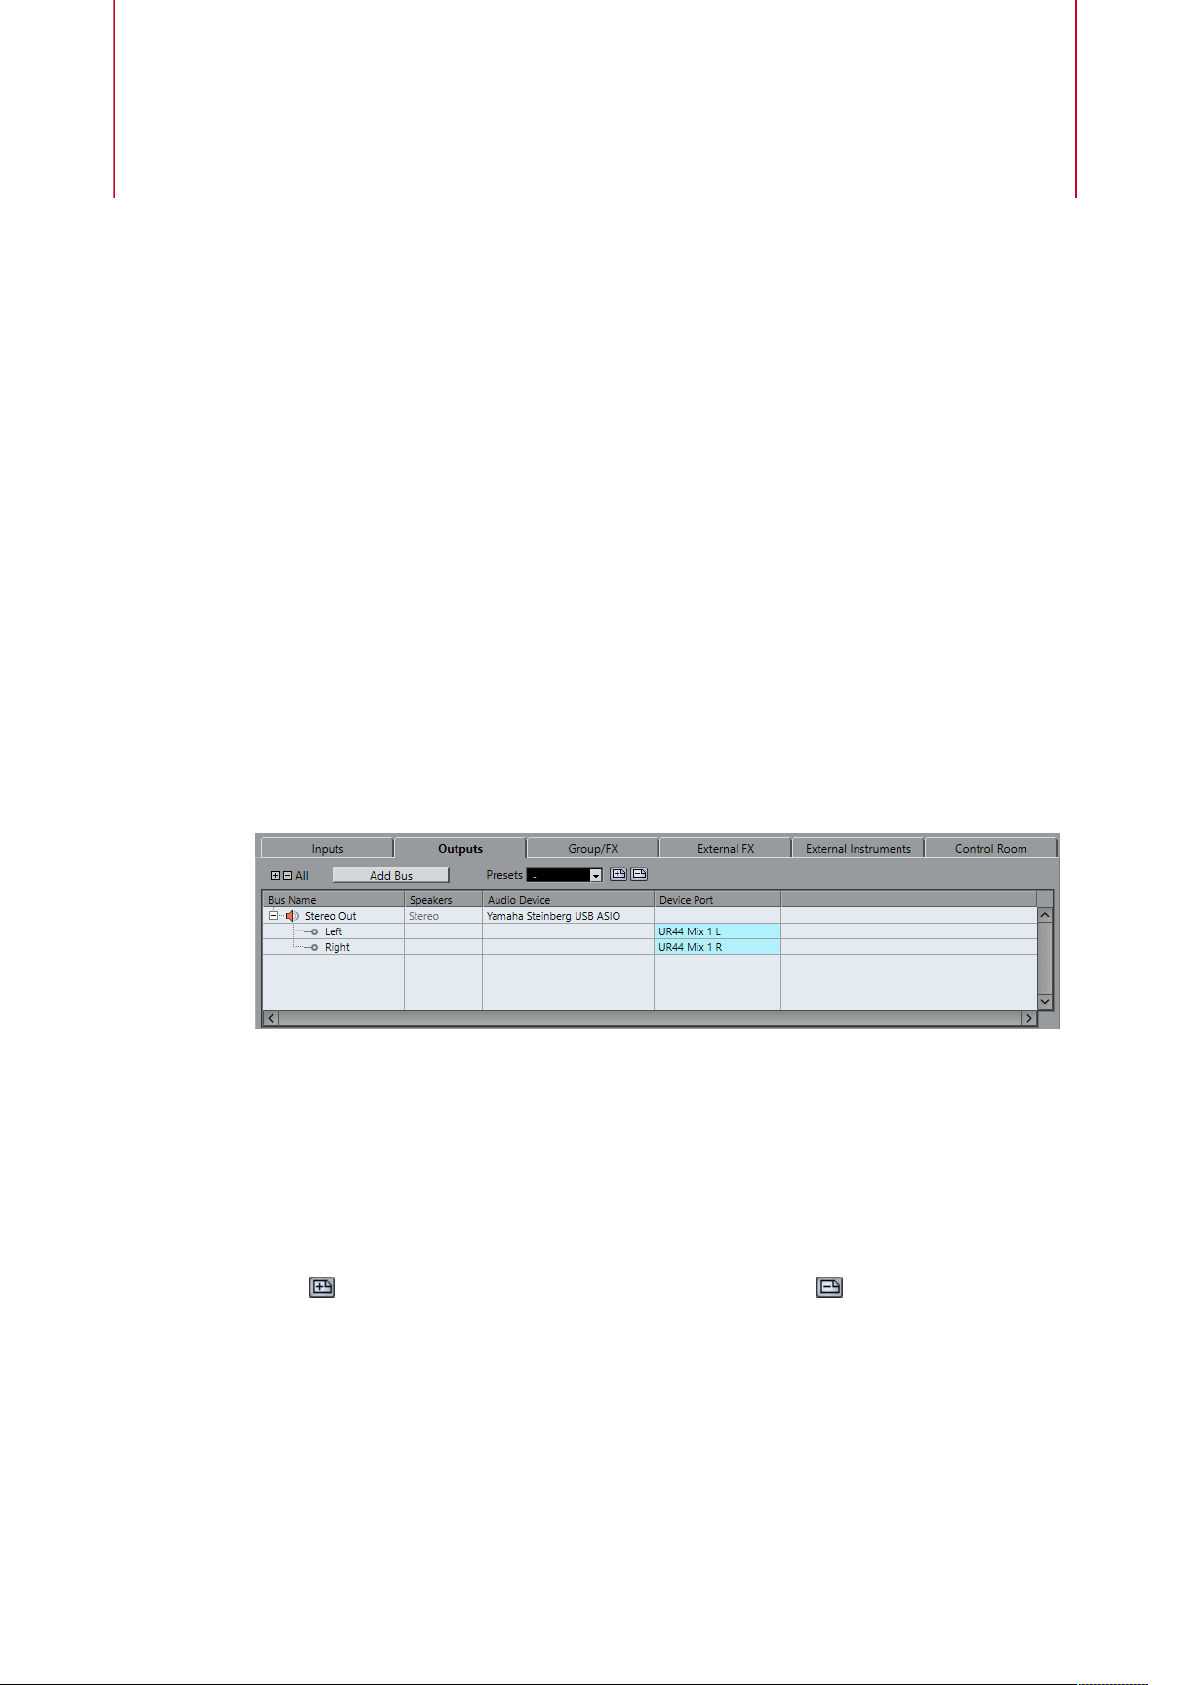
Inputs/Outputs Tab
The Input and Output tabs allow you to set up and configure input and output busses.
The following options are available above the bus list:
+- All
Expands/Collapses all busses in the bus list.
Add Bus
Opens the Add Input Bus dialog, where you can create a new bus configuration.
Presets
Opens the Presets menu, where you can select bus configuration presets. Store
allows you to save a bus configuration as preset. Delete deletes the selected
preset.
The following columns are available for the bus list:
Bus Name
Lists the busses. Click the name of a bus to select or rename it.
22
Page 23
Audio Connections
Audio Connections Window
Speakers
Indicates the speaker configuration (mono, stereo, surround formats(Cubase Pro
only)) of each bus.
Audio Device
Shows the selected ASIO driver.
Device Port
Shows which physical inputs/outputs on your audio hardware are used by the bus.
Expand the bus entry to show all speaker channels. If the bus entry is collapsed, only
the first port that is used by this bus is visible.
The Device Port pop-up menu displays how many busses are connected to a given
port. The busses are shown in square brackets next to the port name.
Up to 3 bus assignments can be displayed in this way. If more connections have been
made, this is indicated by a number at the end of the port name.
For example, “Adat 1 [Stereo1] [Stereo2] [Stereo3] (+2)” means that the Adat1 port is
already assigned to 3 stereo busses plus 2 additional busses.
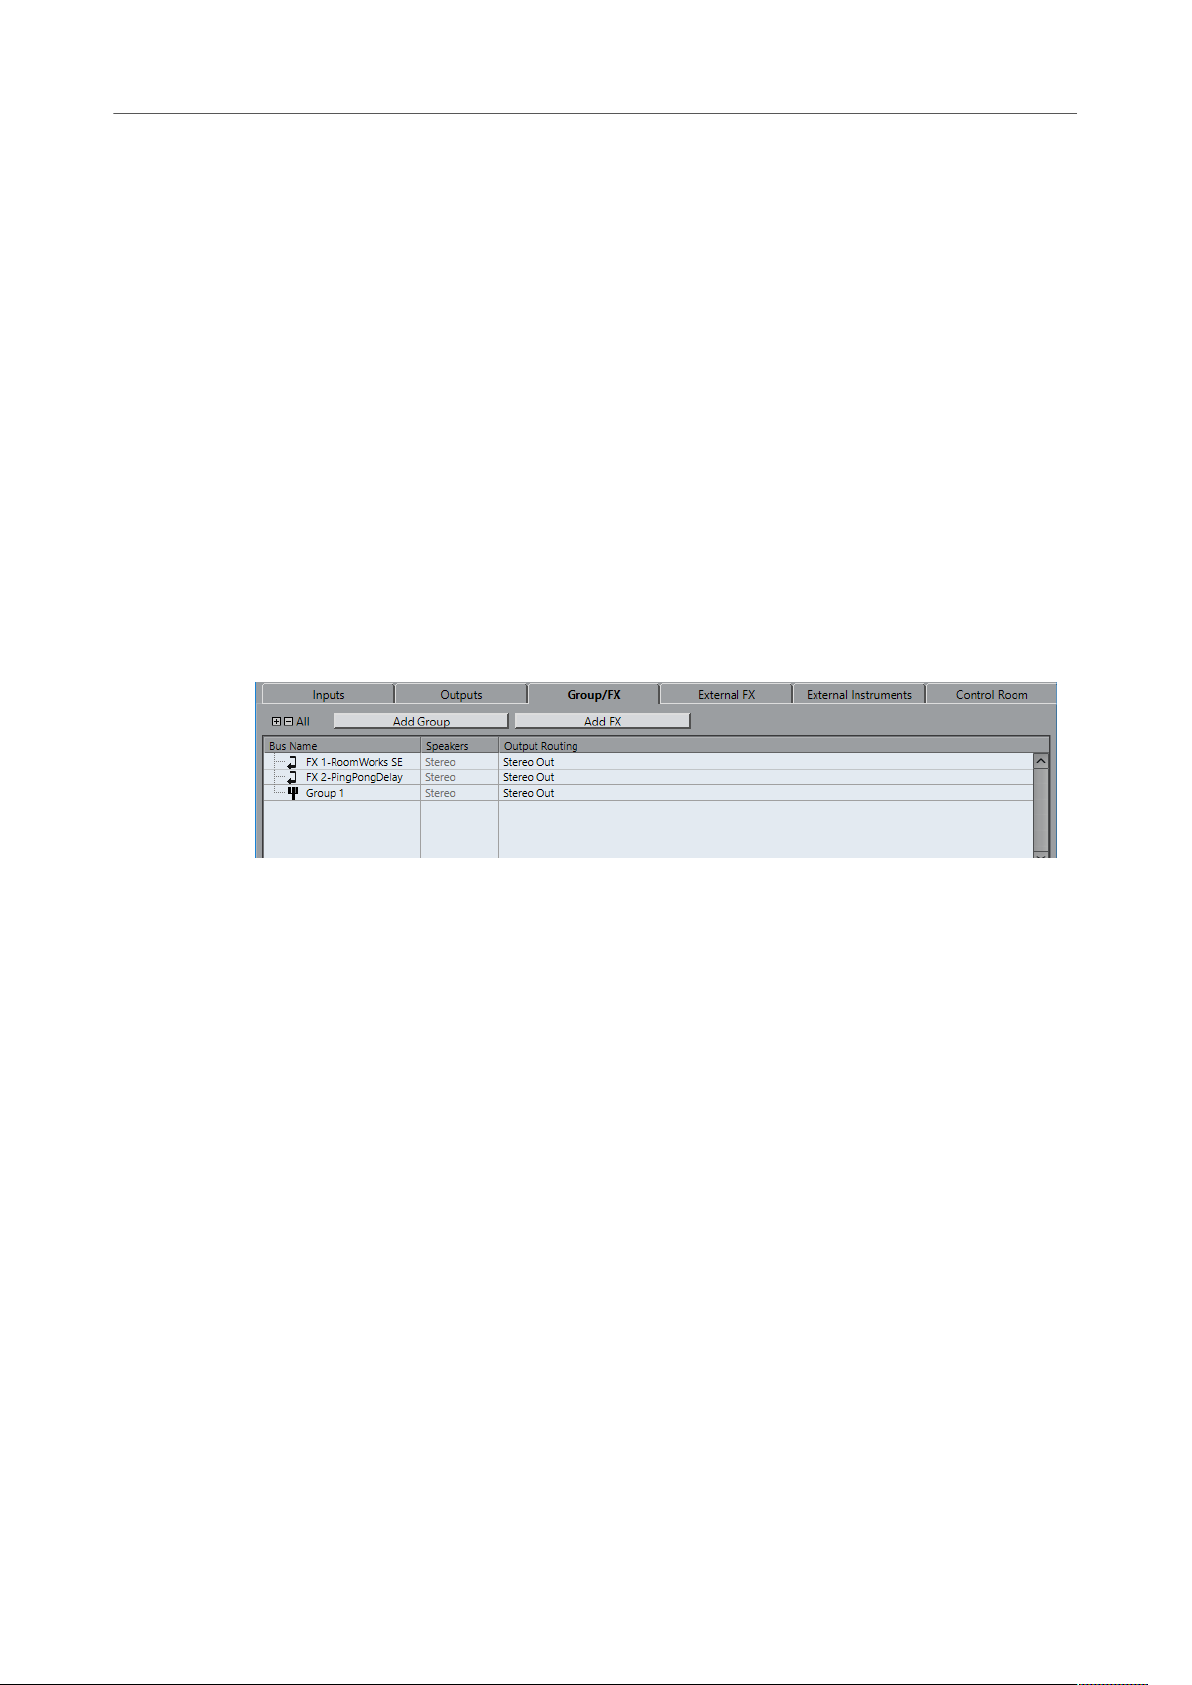
Group/FX Tab(Cubase Pro only)
This tab allows you to create group and FX channels/tracks and to make output assignments for
these.
The following options are available above the bus list:
+- All
Expands/Collapses all busses in the bus list.
Add Group
Opens the Add Group Channel Track dialog, where you can create a new group
channel track.
Add FX
Opens the Add FX Channel Track dialog, where you can create a new FX channel
track.
The following columns are available for the bus list:
Bus Name
Lists the busses. Click the name of a bus to select or rename it.
Speakers
Indicates the speaker configuration (mono, stereo, surround formats(Cubase Pro
only)) of each bus.
Output Routing
Lets you select the output routing for the corresponding bus.
23
Page 24
Audio Connections
Audio Connections Window
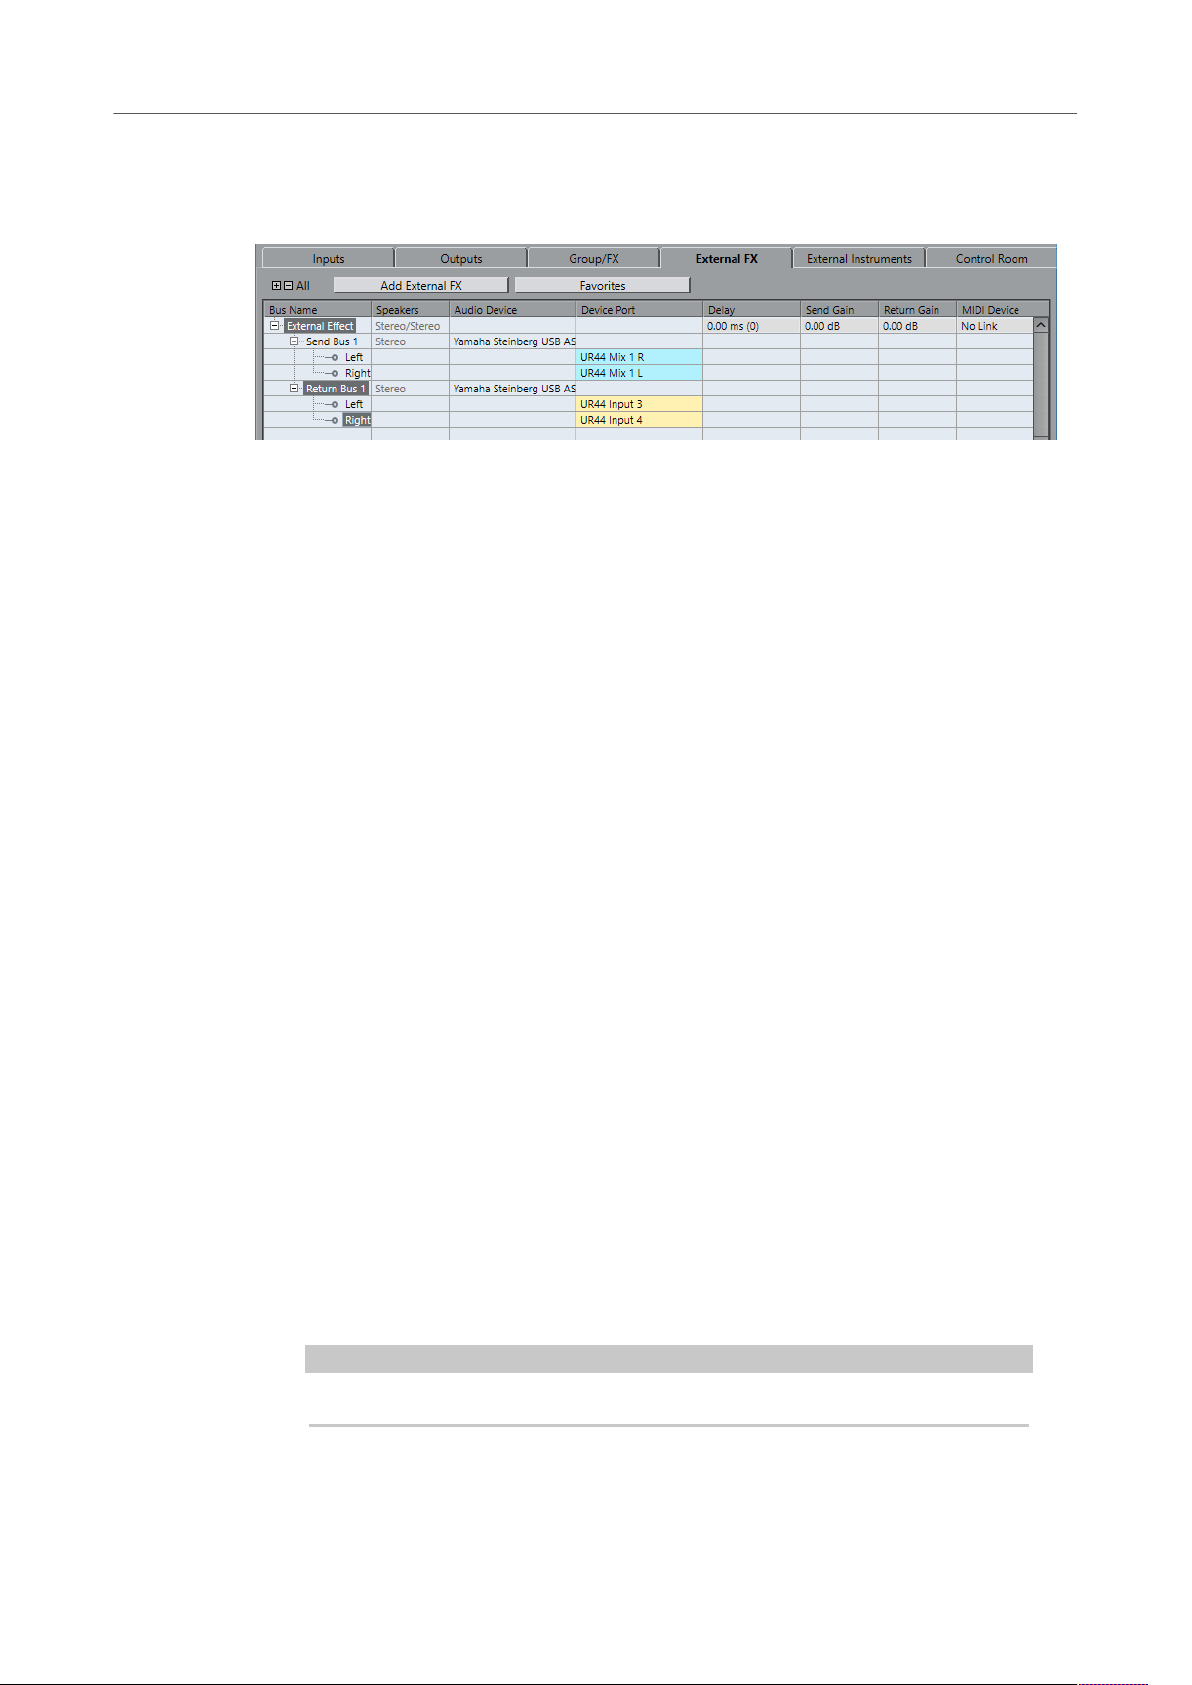
External FX Tab(Cubase Pro only)
This tab allows you to create send effect or return busses. You can use these to connect external
effects which can then be selected via the effect pop-up menus from inside the program.
The following options are available above the bus list:
+- All
Expands/Collapses all busses in the bus list.
Add External FX
Opens the Add External FX dialog, where you can configure a new external FX.
Favorites
Lets you store external effect configurations as favorites that you can recall.
The following columns are available for the bus list:
Bus Name
Lists the busses. Click the name of a bus to select or rename it.
Speakers
Indicates the speaker configuration (mono, stereo, surround formats(Cubase Pro
only)) of each bus.
Audio Device
Shows the selected ASIO driver.
Device Port
Shows which physical inputs/outputs on your audio hardware are used by the bus.
Expand the bus entry to show all speaker channels. If the bus entry is collapsed, only
the first port that is used by this bus is visible.
The Device Port pop-up menu displays how many busses are connected to a given
port. The busses are shown in square brackets next to the port name.
Up to 3 bus assignments can be displayed in this way. If more connections have been
made, this is indicated by a number at the end of the port name.
For example, “Adat 1 [Stereo1] [Stereo2] [Stereo3] (+2)” means that the Adat1 port is
already assigned to 3 stereo busses plus 2 additional busses.
Delay
Allows you to enter a value to compensate for an inherent delay (latency) of your
hardware effect device during playback. You can right-click the Delay column for the
effect and select Check User Delay to automatically determine the delay value.
NOTE
The latency of the audio hardware is handled automatically by Cubase.
Send Gain
Allows you to adjust the level of the signal that is sent to the external effect.
24
Page 25
Audio Connections
Audio Connections Window
Return Gain
Allows you to adjust the level of the signal that the external effect sends.
NOTE
Excessive output levels from an external effect device can cause clipping in the audio
hardware. You cannot use the Return Gain setting to compensate for this. You must
lower the output level on the effect device instead.
MIDI Device
When you click in this column, a pop-up menu opens where you can disconnect the
effect from the associated MIDI device, select a MIDI device, create a new device, or
open the MIDI Device Manager to edit the MIDI device.
Used
Whenever you insert an external effect into an audio track, this column shows a
checkmark (x) to indicate that the effect is being used.
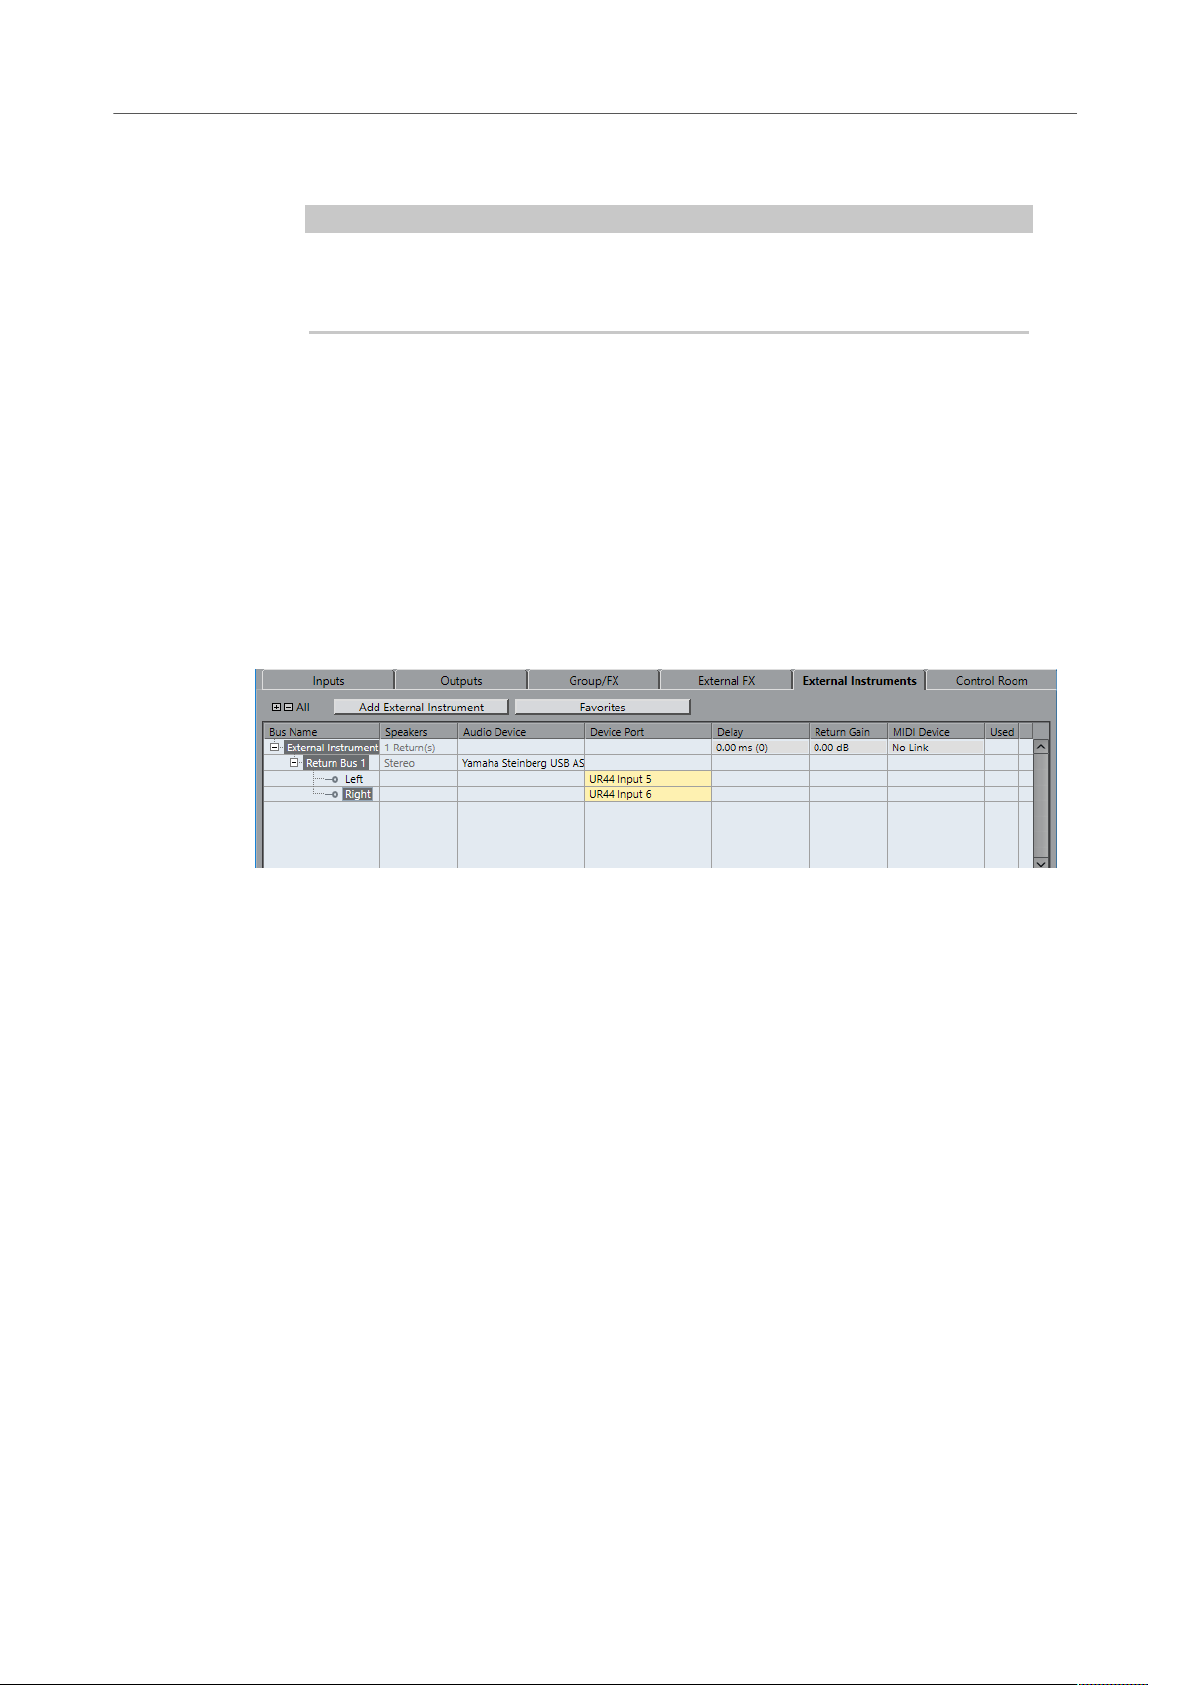
External Instruments Tab(Cubase Pro only)
This tab allows you to create input/output busses that can be used to connect external
instruments.
The following options are available above the bus list:
+- All
Expands/Collapses all busses in the bus list.
Add External Instrument
Opens the Add External Instrument dialog, where you can configure a new external
instrument.
Favorites
Lets you store external instrument configurations as favorites that you can recall.
The following columns are available for the bus list:
Bus Name
Lists the busses. Click the name of a bus to select or rename it.
Speakers
Indicates the speaker configuration (mono, stereo, surround formats(Cubase Pro
only)) of each bus.
Audio Device
Shows the selected ASIO driver.
Device Port
Shows which physical inputs/outputs on your audio hardware are used by the bus.
Expand the bus entry to show all speaker channels. If the bus entry is collapsed, only
the first port that is used by this bus is visible.
25
Page 26
Audio Connections
Audio Connections Window
The Device Port pop-up menu displays how many busses are connected to a given
port. The busses are shown in square brackets next to the port name.
Up to 3 bus assignments can be displayed in this way. If more connections have been
made, this is indicated by a number at the end of the port name.
For example, “Adat 1 [Stereo1] [Stereo2] [Stereo3] (+2)” means that the Adat1 port is
already assigned to 3 stereo busses plus 2 additional busses.
Delay
Allows you to enter a value to compensate for an inherent delay (latency) of your
hardware effect device during playback. You can right-click the Delay column for the
instrument and select Check User Delay to automatically determine the delay value
that is used for delay compensation.
NOTE
The latency of the audio hardware is handled automatically by Cubase.
Return Gain
Allows you to adjust the level of the signal coming in from the external instrument.
NOTE
Excessive output levels from an external effect device can cause clipping in the audio
hardware. The Return Gain setting cannot be used to compensate for this. You must
lower the output level on the effect device instead.
MIDI Device
When you click in this column, a pop-up menu opens where you can disconnect
the instrument from the associated MIDI device, select a MIDI device, create a new
device, or open the MIDI Device Manager to edit the MIDI device.
Used
Whenever you insert the external instrument into a VST instrument slot, this column
shows a checkmark (x) to indicate that the instrument is being used.
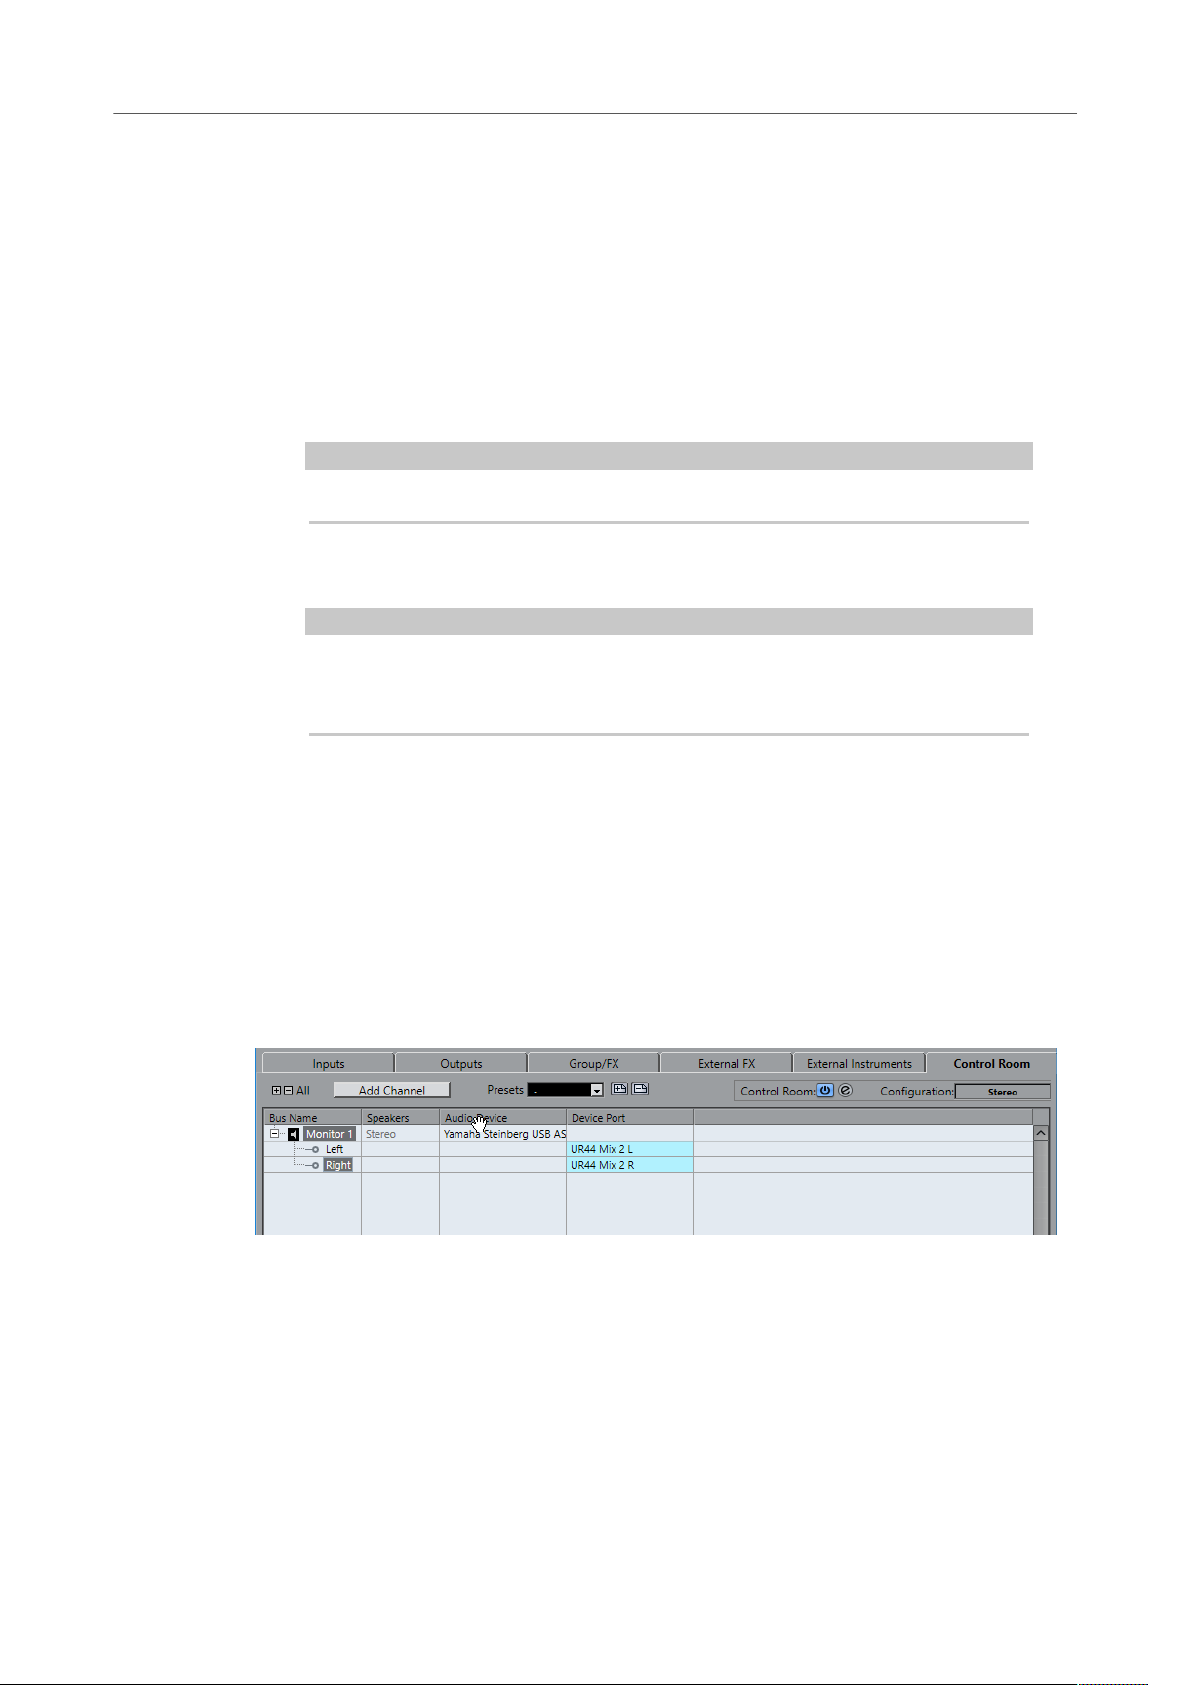
Control Room Tab(Cubase Pro only)
This tab allows you to enable and configure the Control Room.
The following options are available above the bus list:
+- All
Expands/Collapses all busses in the bus list.
Add Channel
Opens a menu where you can select the type of channel that you want to add. You
can add the following channels:
● External Input
● Talkback
26
Page 27

Audio Connections
Renaming the Hardware Inputs and Outputs
● Cue
● Headphone
● Monitor
Presets
Opens the Presets menu, where you can select bus configuration presets. Store
allows you to save a bus configuration as preset. Delete deletes the selected
preset.
Enable/Disable Control Room
Enables/Disables the Control Room.
Open Control Room
Opens the Control Room window.
Configuration
Displays the selected channel configuration.
The following columns are available for the bus list:
Bus Name
Lists the busses. Click the name of a bus to select or rename it.
Speakers
Indicates the speaker configuration (mono, stereo, surround formats(Cubase Pro
only)) of each bus.
Audio Device
Shows the selected ASIO driver.
Device Port
Shows which physical inputs/outputs on your audio hardware are used by the bus.
Expand the bus entry to show all speaker channels. If the bus entry is collapsed, only
the first port that is used by this bus is visible.
The Device Port pop-up menu displays how many busses are connected to a given
port. The busses are shown in square brackets next to the port name.
Up to 3 bus assignments can be displayed in this way. If more connections have been
made, this is indicated by a number at the end of the port name.
For example, “Adat 1 [Stereo1] [Stereo2] [Stereo3] (+2)” means that the Adat1 port is
already assigned to 3 stereo busses plus 2 additional busses.
RELATED LINKS
Control Room(Cubase Pro only) on page 371
Renaming the Hardware Inputs and Outputs
Before you set up busses, you should rename the default inputs and outputs of your audio
hardware. This allows transferring projects between different computers and setups.
For example, if you move your project to another studio, the audio hardware may be of a
different model. But if you and the other studio owner have agreed on identical names for your
inputs and outputs, Cubase corrects inputs and outputs for your busses.
27
Page 28

Audio Connections
Renaming the Hardware Inputs and Outputs
NOTE
If you open a project that was created on another computer and the port names do not match
or the port configuration is not the same, the Missing Ports dialog appears. This allows you to
manually re-route ports that are used in the project to ports that are available on your computer.
PROCEDURE
1. Select Studio> Studio Setup.
2. In the Devices list, select VST Audio System.
3. Open the ASIO Driver pop-up menu and select your audio hardware driver.
4. In the Devices list, select your audio hardware driver.
5. In the Show As column, click on a port name and enter a new name.
6. Repeat the previous step until you have renamed all required ports.
7. Click OK.
RELATED LINKS
Re-Routing Missing Ports on page 92
Hiding Ports
You can hide ports that you are not using. Hidden ports are not displayed in the Audio
Connections window.
PROCEDURE
1. Select Studio> Studio Setup.
2. In the Devices list, select your audio hardware driver.
3. In the Visible column, deactivate the ports that you want to hide.
4. Click OK.
Activating and Deactivating Ports (macOS only)
On macOS you can specify which input and output ports are active. This allows you to use the
microphone input instead of the line input or to deactivate the audio card input or output.
NOTE
This function is only available for built-in audio, standard USB audio devices, and a certain
number of other audio cards.
PROCEDURE
1. Select Studio> Studio Setup.
2. In the Devices list, select your audio hardware driver.
3. Click Control Panel.
4. Activate/Deactivate ports.
5. Click OK.
28
Page 29

Audio Connections
Adding Input and Output Busses
Adding Input and Output Busses
PROCEDURE
1. In the Audio Connections dialog, click the Inputs or Outputs tab.
2. Click Add Bus.
3. In the Add Input Bus dialog, configure the bus.
4. Optional: Enter a name for the bus.
If you do not specify a name, the bus is named according to the channel configuration.
5. Click Add Bus.
The new bus is added to the bus list.
6. For each of the speaker channels in the bus, click in the Device Port column and select a
port of your audio hardware.
Setting the Default Output Bus (Main Mix)
The Main Mix is the default output bus to which each new audio, group, or FX channel is
automatically routed. If only one bus is available, this bus is automatically used as the default
output bus.
PREREQUISITE
Add an output bus.
PROCEDURE
1. In the Audio Connections dialog, right-click the output bus that you want to use as default
output bus.
2. Select Set <bus name> as Main Mix.
RESULT
The selected bus is used as default bus. The Main Mix is indicated by a speaker icon next to its
name.
Adding Child Busses(Cubase Pro only)
Child busses allow you to route tracks to particular channels within a bus.
For example, you can route a stereo track to a stereo channel pair within a surround bus. Or you
can record a stereo channel pair in the surround bus to a separate stereo track.
PROCEDURE
1. On the Inputs tab, Outputs tab, or Group/FX tab, right-click a surround bus.
2. Click Add Child Bus and select a channel configuration.
RESULT
The child bus is created and can be used for routing.
Presets for Input and Output Busses
For input and output bus configurations, you can use different kinds of presets.
●
A number of standard bus configurations.
29
Page 30
Audio Connections
Adding Group and FX Channels(Cubase Pro only)
●
Automatically created presets tailored to your specific hardware configuration.
On startup, Cubase analyzes the physical inputs and outputs that are provided by your
audio hardware and creates a number of hardware-dependent presets.
●
Your own presets.
NOTE
You can create default presets for input and output bus configurations. If you create a new
empty project, these default presets are applied. To create default presets, save your preferred
input and output bus configurations under the name Default. If you have not defined default
presets, the last used input and output bus configuration is applied when creating a new empty
project.
Saving a Bus Configuration Preset
You can save your own input and output bus configuration and the studio configuration as
presets.
PROCEDURE
1. Select Studio> Audio Connections.
2. Set up your bus configuration.
3. Click Store .
4. In the Type in Preset Name dialog, enter a name.
5. Click OK.
RESULT
The preset is available in the Presets menu.
Deleting a Bus Configuration Preset
PROCEDURE
1. Select Studio> Audio Connections.
2. From the Presets menu, select the preset that you want to delete.
3. Click Delete .
RESULT
The preset is deleted.
Adding Group and FX Channels(Cubase Pro only)
Group channels and FX channels allow you to group bus configurations.
Adding group and FX channels in the Audio Connections window is identical to creating group
channel tracks or FX channel tracks in the Project window.
PROCEDURE
1. In the Audio Connections dialog, click the Group/FX tab.
2. Do one of the following:
●
To create a group channel, click Add Group.
●
To create an FX channel, click Add FX.
30
Page 31

Audio Connections
About Monitoring
3. Configure the channel.
4. Optional: Enter a name for the group channel track.
5. Click Add Track.
The group channel or FX channel is added to the bus list.
6. For each of the speaker channels in the bus, click in the Output Routing column and
select a port of your audio hardware.
RELATED LINKS
Audio Effects on page 390
About Monitoring
In the Audio Connections window, you can set up the busses that are used for monitoring,
activate/deactivate and open the Control Room.
When the Control Room is disabled on the Control Room tab of the Audio Connections
window, the Main Mix bus is used for monitoring. In this case, you can adjust the monitoring
level in the MixConsole.
In Cubase Artist, the Main Mix bus is always used for monitoring.
RELATED LINKS
Control Room(Cubase Pro only) on page 371
MixConsole on page 316
External Instruments and Effects(Cubase Pro only)
You can integrate external effect devices and external instruments, for example, hardware
synthesizers, into the sequencer signal flow.
Requirements
● To use external effects, you need audio hardware with multiple inputs and outputs.
An external effect requires at least one input and one output or input/output pairs
for stereo effects in addition to the input/output ports that you use for recording and
monitoring.
● To use external instruments, a MIDI interface must be connected to your computer.
● Audio hardware with low-latency drivers.
Cubase compensates for the input/output latency and ensures that the audio that is
processed through external effects is not shifted in time.
Connecting an External Instrument/Effect
PREREQUISITE
The hardware device has stereo inputs and outputs.
PROCEDURE
1. Connect an unused output pair on your audio hardware to the input pair on your external
hardware device.
2. Connect an unused input pair on your audio hardware to the output pair on your
hardware device.
31
Page 32

Audio Connections
External Instruments and Effects(Cubase Pro only)
IMPORTANT
If you select input/output ports for external instruments/effects that are already used, the
existing port assignment breaks without warning.
AFTER COMPLETING THIS TASK
Once the external device is connected to the audio hardware of your computer, you must set up
the input/output busses in Cubase.
Setting Up External Effects
PROCEDURE
1. In the Audio Connections window, click the External FX tab.
2. Click Add External FX.
3. In the Add External FX dialog, enter a name for the external effect and specify the send
and return configurations.
Depending on the type of effect, you can specify mono, stereo, or surround configurations.
4. Click Associate MIDI Device and select a MIDI device.
You can also select MIDI Devices> Create Device and create a new MIDI device
association.
NOTE
Delay compensation is only applied for the effect when you use MIDI devices.
5. Click OK.
This adds a new external FX bus.
6. Click in the Device Port column for the left and right ports of the send bus and select the
outputs of your audio hardware that you want to use.
7. Click in the Device Port column for the left and right ports of the return bus and select the
inputs of your audio hardware that you want to use.
8. Make additional settings for the bus.
You can also adjust the settings while using the external effect. This allows you to hear the
result.
RELATED LINKS
Using MIDI devices on page 676
Delay Compensation on page 632
32
Page 33

Audio Connections
External Instruments and Effects(Cubase Pro only)
Adding External Effects
You can use the external FX bus as an insert effect or as a send effect, which is an insert effect on
an FX channel track.
PREREQUISITE
Set up your external effects in the Audio Connections window.
PROCEDURE
1. In the Inspector, open the Inserts panel.
2. Open the Select Insert menu.
3. Select an external effect from the External Plug-ins submenu.
External effects are indicated by an x icon in the list next to their names in the Select
Insert pop-up menu.
RESULT
The external FX bus is loaded into the effect slot.
A parameter window opens, showing the Delay, Send Gain, and Return Gain settings for the
external FX bus. You can adjust these settings while playing back.
The audio signal from the channel is sent to the outputs on the audio hardware, through your
external effect device, and back to the program via the inputs on the audio hardware.
RELATED LINKS
Setting Up External Effects on page 32
External Effect Parameter Window
This window allows you to make delay and gain settings for the selected external effect.
When you select an external effect from the Select Insert menu in the Inspector, the External
Effect Parameter window opens.
Activate Effect
Activates/Deactivates the external effect.
Bypass Effect
Allows you to bypass the external effect.
33
Page 34

Audio Connections
External Instruments and Effects(Cubase Pro only)
Measure Effect’s Loop Delay for Delay Compensation
If this option is activated, Cubase automatically determines the delay value that is
used for delay compensation. This is the same function as the Check User Delay
option in the Audio Connections window.
When you have defined a MIDI device for the effect, the corresponding device
window opens.
Delay
Allows you to adjust the delay for the external effect.
Send Gain
Allows you to adjust the send gain for the external effect.
Return Gain
Allows you to adjust the return gain for the external effect.
Setting Up External Instruments
PROCEDURE
1. In the Audio Connections window, click the External Instruments tab.
2. Click Add External Instrument.
3. In the Add External Instrument dialog, enter a name for the external instrument and
specify the number of required mono and/or stereo returns.
Depending on the type of instrument, a specific number of mono and/or stereo return
channels is required.
4. Click Associate MIDI Device and select a MIDI device.
5. Click OK.
This adds a new external instrument bus.
6. Click in the Device Port column for the left and right ports of the return bus and select the
inputs of your audio hardware to which you connected the external instrument.
7. Make additional settings for the bus.
You can also adjust the settings while using the external instrument. This allows you to
hear the result.
RELATED LINKS
Using MIDI devices on page 676
Adding External Instruments
PREREQUISITE
Set up your external instruments in the Audio Connections window.
PROCEDURE
1. Select Studio> VST Instruments.
The VST Instruments window opens.
2. Click Add Track Instrument .
The Add Instrument Track window opens.
3. Select an external instrument from the Instrument pop-up menu.
External instruments are indicated by an x icon in the list next to their names in the
Instrument pop-up menu.
34
Page 35

Audio Connections
External Instruments and Effects(Cubase Pro only)
4. Click Add Track.
RESULT
The external instrument is added to the VST instruments list.
A parameter window for the external instrument opens. This can either be the device window
that allows you to create a generic device panel, an OPT editor window, or a default editor.
External Instruments Parameter Window
This window allows you to make delay and gain settings for the selected external instrument.
When you select an external instrument in the VST Instruments window, the External
Instrument Parameter Window opens.
Activate External Instrument
Activates/Deactivates the external instrument.
Bypass External Instrument
Allows you to bypass the external instrument.
Delay
Allows you to adjust the delay for the external instrument.
Return Gain
Allows you to adjust the return gain for the external instrument.
Sending MIDI Notes to External Instruments
PREREQUISITE
Set up your external instruments in the Audio Connections window and add a MIDI track.
PROCEDURE
1. In the Inspector, open the Output Routing pop-up menu for the corresponding MIDI
track.
2. Select the MIDI device to which the external instrument is connected.
RESULT
The instrument plays any MIDI notes that it receives from the track and returns them to Cubase
through the return channels that you have set up. Delay compensation is used.
The external instrument behaves like any other VST instrument in Cubase.
35
Page 36

Audio Connections
External Instruments and Effects(Cubase Pro only)
RELATED LINKS
Delay Compensation on page 632
Saving External Instrument and Effect Configurations as Favorites
You can save external instruments and external effects as favorites. Favorites are device
configurations that you can recall. They also allow you to save different configurations for the
same device, for example, a multi-effect board or an effect that provides both a mono and a
stereo mode.
You can save and restore the favorites in the External Instruments and External FX tabs of the
Audio Connections window.
●
To save an external instrument or effect configuration as a favorite, select the Bus Name,
click Favorites, and select Add Selected Effect <effect name> to Favorites.
●
To recall a favorite, click Favorites and select the configuration that you want to recall.
Freezing External Instruments/Effects
You can freeze external instruments and effects to save processing power.
NOTE
You must perform the freeze function in realtime. Otherwise external effects are not taken into
account.
When freezing external instruments or effects, you can adjust the corresponding Tail Size value
in the Freeze Channel Options dialog.
When the Tail Size is set to 0 s, freezing only takes into account the data within the part
boundaries.
RELATED LINKS
VST Instruments on page 624
Audio Effects on page 390
Freezing Instruments on page 630
Freezing Insert Effects on page 396
Missing Plug-ins
The “Plug-in could not be found” message appears in the following situations:
●
When you remove an external device from the Audio Connections window although it is
used in a saved project.
●
When you transfer a project to another computer on which the external device is not
defined.
●
When you open a project that is created with an earlier version of Cubase.
In the Audio Connections window, the broken connection to the external device is indicated by
an icon in the Bus Name column.
●
To reestablish the broken connection to the external device, right-click the entry for the
device in the Bus Name column and select Connect External Effect.
36
Page 37

Audio Connections
Editing the Bus Configurations
NOTE
Busses that are set up for external instruments or external effects are saved globally, that is, for
your particular computer setup.
Editing the Bus Configurations
After you have set up all the required busses for a project you can edit the names and change
port assignments. The bus configuration is saved with the project.
Removing Busses
PROCEDURE
● In the Audio Connections window, right-click a bus in the list and select Remove Bus.
You can also select the bus and press Backspace.
Changing Port Assignments
You can change the port assignment of busses in the Audio Connections window.
●
To change a port assignment, click in the Device Port column of a bus and select a new
port.
●
To assign different ports to the selected busses, open the Device Port pop-up menu for
the first selected entry, press Shift, and select a device port.
All subsequent busses are automatically connected to the next available port.
NOTE
Cubase Pro only:Exclusive ports, for example, ports that are already assigned to Control
Room channels, are skipped.
●
To assign the same port to all selected busses, open the Device Port pop-up menu for the
first selected entry, press Shift-Alt, and select a device port.
Renaming Multiple Busses
You can rename all the selected busses at once using incrementing numbers or letters.
●
To use incrementing numbers, select the busses that you want to rename and enter a new
name for one of the busses, followed by a number.
For example, if you have 8 inputs that you want to be named “In 1, In 2, …, In 8”, you
select all the busses and enter the name In 1 for the first bus. All other busses are then
renamed automatically.
●
To use letters from the alphabet, select the busses that you want to rename and enter a
new name for one of the busses, followed by a space and a capital letter.
For example, if you have 3 FX channels that you want to be named “FX A, FX B, and FX C”,
you select all the channels and enter the name FX A for the first. All other channels are
renamed automatically. The last letter that can be used is Z. If you have more selected
entries than there are letters available, the remaining entries are skipped.
NOTE
You can begin renaming from any position in the list. The renaming starts from the bus where
you edit the name, goes down the list to the bottom, and then continues from the top until all
selected busses have been renamed.
37
Page 38

Audio Connections
Editing the Bus Configurations
Identifying Exclusive Port Assignments
For certain channel types, the port assignment is exclusive.
Once a port has been assigned to such a bus or channel, it must not be assigned to another bus,
otherwise the connection to the first bus will be broken.
The corresponding ports are marked in the Audio Connections window on the Device Port popup menu.
38
Page 39

Project Window
The Project window provides an overview of the project, and allows you to navigate and perform
large scale editing.
Each project has one Project window. The Project window is displayed whenever you open or
create a new project.
● To open a project, select File> Open.
● To create a new project, select File> New Project.
The Project window is divided into several zones:
1 Left Zone
The left zone shows the Track Inspector for the selected track or the Editor Inspector for
the editor in the lower zone.
The Visibility Inspector allows you to show or hide individual tracks from the track list.
2 Project Zone
The project zone shows the toolbar, the track list with the tracks, the event display with the
parts and events of the project, and the Project window ruler.
39
Page 40

Project Window
Showing/Hiding Zones
On the toolbar, you can activate/deactivate the status line, the info line, the overview line,
and the transport.
3 Lower Zone
The lower zone shows the Chord Pads, the Editor, the Sampler Control, and the
MixConsole.
4 Right Zone
The right zone shows the VSTi rack, the Media rack, the Control Room rack(Cubase Pro
only), and the Meter rack(Cubase Pro only).
RELATED LINKS
Project Zone on page 40
Left Zone on page 52
Lower Zone on page 62
Right Zone on page 68
Toolbar on page 41
Showing/Hiding Zones
You can show/hide the zones in the Project window according to your needs.
PROCEDURE
● Do one of the following:
Project Zone
The project zone is the heart of the Project window and cannot be hidden.
The project zone features the track list and the event display with the ruler. Furthermore, you
can activate/deactivate the status line, the info line, the overview line, and the transport for the
project zone.
●
To show/hide the left zone, click Show/Hide Left Zone on the Project window
toolbar.
●
To show/hide the lower zone, click Show/Hide Lower Zone on the Project
window toolbar.
●
To show/hide the right zone, click Show/Hide Right Zone on the Project window
toolbar.
NOTE
The project zone is always shown.
40
Page 41

Project Window
Project Zone
RELATED LINKS
Track List on page 45
Event Display on page 46
Global Track Controls on page 46
Ruler on page 47
Status Line on page 49
Info Line on page 49
Overview Line on page 50
Transport on page 50
Toolbar
The toolbar contains tools and shortcuts for opening other windows and various project settings
and functions.
● To show/hide tools, open the toolbar context menu by right-clicking in an empty area of
the toolbar and activate the tools that you want to display. To show all tools, select Show
All.
NOTE
The number of elements that are shown also depends on the size of the Project window
and the screen resolution.
The following options are available:
Activate Project
NOTE
This button is only available if more than one project is open.
Allows you to activate a project.
Project History
Allows you to undo/redo actions in the Project window.
41
Page 42

Project Window
Project Zone
Constrain Delay Compensation
Allows you to minimize the latency effects of the delay compensation.
Left Divider
Allows you to use the left divider. Tools that are placed to the left of the divider are
always shown.
Media & MixConsole Windows
These buttons allow you to open or close the MediaBay, the Pool, the MixConsole,
the Control Room(Cubase Pro only), and the Direct Offline Processing(Cubase Pro
only).
Track Visibility Configurations
Allows you to create configurations that are useful for switching between different
visibility setups.
State Buttons
These buttons show the mute, solo, listen, and automation states.
Automation Mode(Cubase Pro only)
Shows the automation mode and allows you to open the Automation Panel.
Activate Automation Follows Events if you want your automation events to follow
automatically when you move an event or part on a track.
Auto-Scroll
Allows you to keep the project cursor visible during playback.
Locators
Allows you to go to the left or right locator position, and to set the left and right
locator position numerically.
Shows the left and right locator positions.
Transport Buttons
Shows the main transport controls.
External Sync State
Allows you to activate/deactivate external synchronization and to open the Project
Synchronization Setup dialog.
Arranger Controls
Shows the controls for the arranger track.
42
Page 43

Project Window
Project Zone
Time Display
Shows the position of the project cursor in the selected time format.
Markers
Allows you to set and locate marker positions.
Tool Buttons
Shows the buttons for editing in the project zone.
Color Menu
Allows you to define the project colors.
Nudge Palette
Allows you to nudge or trim events or parts.
Project Root Key
Allows you to change the root key of the project.
Snap to Zero Crossing
If this option is activated, it finds zero crossings when you split and size audio events.
Snap On/Off
Allows you to activate/deactivate snap to restrict horizontal movement and
positioning to certain positions.
Snap Type
Allows you to specify to what positions you want events to snap.
Grid Type
Allows you to specify a grid type for the snap function. This setting only has effect if
Snap Type is set to one of the grid options.
Quantize
Allows you to move recorded audio or MIDI to musical relevant positions.
System Performance Meter
Shows the meters for ASIO time usage and hard disk transfer load.
43
Page 44

Project Window
Project Zone
Right Divider
Allows you to use the right divider. Tools that are placed to the right of the divider
are always shown.
Window Zone Controls
Allows you to show or hide the left zone, the lower zone, and the right zone of the
Project window. The Setup Window Layout pop-up menu allows you to show or
hide the status line, the info line, the overview line, and the Transport.
Set Up Toolbar
Opens a pop-up menu where you can set up which toolbar elements are visible.
RELATED LINKS
Left/Right Toolbar Divider on page 44
Snap Types on page 80
Arranger Track on page 289
Markers on page 306
Automation on page 602
Synchronization on page 940
Left/Right Toolbar Divider
The left and right toolbar dividers allow you to lock the position of specific tools at the left or at
the right side of the toolbar, so that they are always shown.
All other items are shown in the center of the toolbar. When you reduce the width of the Project
window, these toolbar items are hidden successively. When you increase the width, they are
shown again.
Toolbox
The toolbox makes the editing tools from the toolbar available at the mouse pointer position. It
can be opened instead of the standard context menus in the event display and editors.
● To activate the toolbox function, activate Pop-up Toolbox on Right-Click in the
Preferences dialog (Editing—Tools page).
● To open the toolbox, right-click in the event display or editor.
If Pop-up Toolbox on Right-Click is deactivated, the context menu opens.
● To open the context menu instead of the toolbox, press any modifier key and right-click in
the event display or editor.
If Pop-up Toolbox on Right-Click is deactivated, press any modifier key to open the
toolbox instead of the context menu.
● To change the number of rows in which the tools are arranged on the toolbox, keep the
right mouse button pressed on the toolbox until the mouse pointer changes to a double
arrow, and drag to the bottom or right.
44
Page 45

Project Window
Project Zone
Track List
The track list shows the tracks that are used in the project. When a track is added and selected, it
contains name fields and settings for this track.
●
To decide which controls are visible for each track type, right-click the track list and open
the Track Controls Settings dialog.
RELATED LINKS
Track Control Settings on page 97
Dividing the Track List
You can divide the track list into an upper track list and a lower track list. These track lists can
have independent zoom and scroll controls.
Dividing the track list is useful if you are working with a video track and multi-track audio, for
example. It allows you to place the video track in the upper track list and to scroll the audio tracks
separately in the lower track list, so that they can be arranged with the video.
●
To divide the track list, select Project> Divide Track List.
You can also click Divide Track List in the top right corner of the Project window below
the ruler.
Video, marker, or arranger tracks are automatically moved to the upper track list. All other track
types are moved to the lower track list.
●
To move any type of track from the lower track list to the upper and vice versa, right-click it
in the track list and select Toggle Track List from the context menu.
●
To resize the upper part of the track list, click and drag the divider between the track list
sections.
●
To revert to a single track list, click Divide Track List again.
45
Page 46

Project Window
Project Zone
Event Display
The event display shows the parts and events that are used in the project. They are positioned
along the timeline.
Global Track Controls
The global track controls above the track list allows you to manage the tracks in the track list.
1 Filter Track Types
Allows you to determine which track types are shown in the track list.
2 Number of Visible Tracks
Displays how many tracks are hidden. Click this, to show all tracks that are filtered out with
the Track Visibility.
NOTE
If the track was outside the view or hidden, it is now shown. Tracks that are hidden using
Filter Track Types are not shown.
3 Add Track
Allows you to add tracks to the track list.
4 Find Tracks
Allows you to find and select a specific track in the track list.
46
Page 47

Project Window
Project Zone
RELATED LINKS
Opening the Track Visibility on page 59
Filtering Track Types
PROCEDURE
1. Click Filter Track Types above the track list.
This opens the track types filter.
2. Uncheck a track type to hide it.
RESULT
Tracks of the filtered type are removed from the track list and the color of the Filter Track Types
button changes to indicate that a track type is hidden.
Finding Tracks
The Find Tracks function allows you to find specific tracks. This is useful if you have a large
project with many tracks or if you have hidden tracks using the track visibility features.
PROCEDURE
1. Click Find Tracks above the track list, to open a selector that lists all tracks.
2. In the search field, enter the name of the track.
3. In the selector, select the track and press Return.
RESULT
The selector closes and the track is selected in the track list.
NOTE
If the track was outside the view or hidden, it is now shown. Tracks that are hidden using Filter
Track Types are not shown.
As you type, the selector updates automatically.
Ruler
The ruler shows the timeline and the display format of the project.
Initially, the Project window ruler uses the display format that is specified in the Project Setup
dialog.
47
Page 48

Project Window
Project Zone
●
To select an independent display format for the ruler, click the arrow button to the right of
the ruler and select an option from the pop-up menu.
●
To set the display format globally for all windows, use the primary display format pop-up
on the Transport panel, or hold down Ctrl/Cmd and select a display format in any ruler.
RELATED LINKS
Project Setup Dialog on page 88
Ruler Display Formats
You can select a display format for the ruler.
● To select a new display format for the ruler, click the arrow button to the right of the ruler
and select an option from the pop-up menu.
The selection that you make affects the time display formats in the following areas:
● Ruler
● Info line
● Tooltip position values
The following options are available:
Bars+Beats
Bars, beats, sixteenth notes, and ticks. By default, there are 120 ticks per sixteenth
note. To change this, adjust the MIDI Display Resolution setting in the Preferences
dialog (MIDI page).
Seconds
Hours, minutes, seconds, and milliseconds.
Timecode
Hours, minutes, seconds, and frames. The number of frames per second (fps) is
set in the Project Setup dialog with the Frame Rate pop-up menu. To display
subframes, activate Show Timecode Subframes in the Preferences dialog
(Transport page).
Samples
Samples.
fps (User)
Hours, minutes, seconds, and frames, with a user-definable number of frames
per second. To display subframes, activate Show Timecode Subframes in the
Preferences dialog (Transport page). You can also set the number of fps.
Time Linear
Sets the ruler linear to time.
Bars+Beats Linear
Sets the ruler linear to bars and beats.
48
Page 49

Project Window
Project Zone
Status Line
The status line shows the most important project settings.
To activate the status line, click Set up Window Layout on the toolbar and activate Status Line.
The following information is shown on the status line:
Audio Inputs/Audio Outputs
These fields are shown if the audio device ports are not connected. Click to open the
Audio Connections dialog and connect the ports.
Max. Record Time
Displays the remaining time for recording, depending on your project settings and
the available hard disk space. Click in this field to display the remaining record time
in a separate window.
Info Line
Record Format
Displays the sample rate and the bit resolution used for recording. Click in this field
to open the Project Setup dialog.
Project Frame Rate
Displays the frame rate used in the project. Click in this field to open the Project
Setup dialog.
Project Pan Law
Displays the current pan law setting. Click in this field to open the Project Setup
dialog.
The info line shows information about the event or part that you selected in the project zone.
To activate the info line, click Set up Window Layout on the toolbar and activate Info Line.
Editing on the Info Line
You can edit almost all event or part data on the info line using regular value editing.
If you select several events or parts, the info line is shown in another color and only the
information about the first item in the selection is displayed. The following rules apply:
●
Value changes are applied to all selected elements, relatively to the current values.
49
Page 50

Project Window
Project Zone
●
Overview Line
The overview line allows you to zoom and navigate to other sections in the project.
To activate the overview line, click Set up Window Layout on the toolbar and activate Overview
Line.
For example, you have selected two audio events. The first event has a length of 1 bar, the
second of 2 bars. If you change the info line value to 3, the first event is resized to 3 bars
and the second event to 4 bars.
Value changes are applied absolutely to the current values if you press Ctrl/Cmd while
modifying the value on the info line.
In the example above, both events are resized to 3 bars.
NOTE
To change the modifier, select a new modifier in the Info Line category of the Preferences
dialog (Editing—Tool Modifiers page).
Transport
In the overview line, events and parts are displayed as boxes. A rectangle indicates the section of
the project that is displayed in the event display.
●
To zoom the event display in or out horizontally, resize the rectangle by dragging the
edges.
●
To navigate to another section of the event display, drag the rectangle to the left or right,
or click in the upper part of the overview.
The Transport allows display the transport functions in an integrated and fixed zone of the
Project window.
● To activate the Transport, click Set up Window Layout on the Project window toolbar
and activate Transport.
● To show/hide tools, open the Transport context menu by right-clicking in an empty area
of the Transport and activate the tools that you want to display. To show all tools, select
Show All.
The following options are available:
Constrain Delay Compensation
Allows you to minimize the latency effects of the delay compensation.
50
Page 51

Project Window
Project Zone
Common Record Modes
Allow you to determine what happens if you click Record during an audio or MIDI
recording.
Audio Record Modes
Allow you to select what happens when you record over existing audio events.
MIDI Record Modes
Allow you to select what happens when you record over existing MIDI parts.
Left Divider
Allows you to use the left divider. Tools that are placed to the left of the divider are
always shown.
System Performance Meter
Shows the meters for ASIO time usage and hard disk transfer load.
Locators
Allows you to go to the left or right locator position, and to set the left and right
locator position numerically.
Punch Points
Allows you to activate/deactivate Punch In and Punch Out. These points determine
the record start and stop positions.
The section to the right of the punch buttons allows you to set up the punch
positions numerically. For this to work, Lock Punch Points to Locators must be
deactivated. You can hide/show that section by clicking the points on the divider.
Main Transport
Shows the main transport controls.
Time Displays
Shows the time display options.
Pre-roll & Post-roll
Allows you to activate/deactivate pre-roll and post-roll, and to set the values
numerically.
Tempo & Time Signature
51
Page 52

Project Window
Left Zone
Allows you to activate/deactivate the tempo track, and to set the tempo value and
the first time signature value numerically.
External Sync State
Allows you to activate/deactivate external synchronization and to open the Project
Synchronization Setup dialog.
Click & Count-In & Click Pattern
Allows you to activate/deactivate the metronome click, the metronome click in countin, and the click pattern.
Right Divider
Allows you to use the right divider. Tools that are placed to the right of the divider
are always shown.
Input/Output Activity
Left Zone
Allows you to monitor the MIDI input/output signals, the audio input/output signals,
and allows you to control the output level.
RELATED LINKS
Common Record Modes on page 239
Audio Record Modes on page 244
MIDI Record Modes on page 250
Left/Right Toolbar Divider on page 44
The left zone of the Project window allows you to display the Inspector and the Visibility.
To show/hide the left zone, click Show/Hide Left Zone on the Project window toolbar.
The top of the left zone features two tabs: Inspector and Visibility.
52
Page 53

Project Window
Left Zone
Inspector
RELATED LINKS
Inspector on page 53
Visibility on page 59
The Inspector allows you to show controls and parameters for either the selected track in the
track list or the event or part that is shown in the editor in the lower zone.
If the Inspector tab is activated at the top of the left zone, the bottom of the left zone features
two tabs: Track and Editor.
●
Click the Track tab to open the Track Inspector for the selected track.
●
Click the Editor tab to open the Editor Inspector for the event or part that is shown in the
editor in the lower zone.
53
Page 54

Project Window
Left Zone
RELATED LINKS
Opening the Track Inspector on page 54
Opening the Editor Inspector on page 55
Opening the Editor in the Lower Zone on page 65
Opening the Track Inspector
The Track Inspector shows controls and parameters for the selected track in the track list.
PROCEDURE
1. Click Show/Hide Left Zone on the Project window toolbar to activate the Left Zone.
2. At the bottom of the left zone, click the Track tab.
54
Page 55

Project Window
Left Zone
RESULT
The Track Inspector for the selected track in the track list is opened. If more than one track is
selected, the controls and parameters for the topmost selected track are shown.
Opening the Editor Inspector
The Editor Inspector shows controls and parameters for the event or part that is shown in the
editor in the lower zone.
PREREQUISITE
The Sample Editor, the Key Editor, the Drum Editor or the Score Editor is shown in the lower
zone.
PROCEDURE
1. Click Show/Hide Left Zone on the Project window toolbar to activate the Left Zone.
2. At the bottom of the left zone, click the Editor tab.
55
Page 56

Project Window
Left Zone
RESULT
The Editor Inspector for the event or part that is shown in the editor in the lower zone is
opened.
NOTE
The Editor Inspector only contains information if the lower zone shows an editor. Otherwise, it is
empty.
RELATED LINKS
Opening the Editor in the Lower Zone on page 65
Selecting a different Inspector for the Score Editor(Cubase Pro only)
The Score Editor Inspector allows you to select the following tabs: Inspector and Symbols.
PREREQUISITE
The Score Editor is shown in the lower zone.
PROCEDURE
1. At the bottom of the left zone, click the Editor tab.
2. Select an option from the Switch Score Editor Inspector Content pop-up menu.
56
Page 57

Project Window
Left Zone
RESULT
The selected Inspector is shown.
RELATED LINKS
Key Editor Inspector on page 715
Inspector Sections
The Track Inspector and the Editor Inspector are divided into a number of sections that each
contain different controls for the track, event or part.
Not all Inspector sections are shown by default. The available sections depend on the type
of the selected track, event, or part, and on the settings in the setup dialog for the Track
Inspector/Editor Inspector.
●
To open/close sections, click their names.
Opening one section closes the other sections.
●
To open a section without closing the other sections, Ctrl/Cmd-click the section name.
RELATED LINKS
Inspector Settings Dialog on page 57
Audio Track Inspector on page 99
Instrument Track Inspector on page 106
MIDI Track Inspector on page 113
Sampler Track Inspector on page 120
Arranger Track Inspector on page 126
Marker Track Inspector on page 142
Signature Track Inspector on page 144
Tempo Track Inspector on page 146
Transpose Track Inspector on page 147
VCA Fader Track Inspector on page 148
Video Track Inspector on page 150
Key Editor Inspector on page 715
Drum Editor Inspector on page 758
Sample Editor Inspector on page 452
Inspector Settings Dialog
The Inspector settings dialogs allow you to set up the sections that are available in the Track
Inspector and the Editor Inspector.
●
To open the Setup dialog for the Track Inspector settings, click Setup Inspector in the
Track Inspector, and from the pop-up menu select Setup.
57
Page 58

Project Window
Left Zone
●
To open the Setup dialog for the Editor Inspector settings, click Setup Inspector in
the Editor Inspector, and from the pop-up menu select Setup.
NOTE
This is only available for the Key Editor, the Drum Editor and the Score Editor.
Hidden Items
Displays sections that are hidden in the Inspector.
Visible Items
Displays sections that are visible in the Inspector.
Pin
If you activate Pin by clicking the column for a section the open/close status of the
selected Inspector section is pinned.
Add
Allows you to move an item selected in the hidden sections list to the list of visible
sections.
58
Page 59

Project Window
Left Zone
Visibility
Remove
Allows you to move an item selected in the visible sections list to the list of hidden
sections.
Move Up/Move Down
Allows you to change the order of an item in the list of visible sections.
Presets
Allows you to save Inspector section settings as presets.
Reset All
Allows you to restore the default Inspector section settings.
The Visibility Inspector allows you to show or hide individual tracks from the track list and to
determine the position of certain MixConsole channels in the lower zone.
If the Visibility tab is activated at the top of the left zone, the bottom of the left zone features
two tabs: Track and Zones.
●
Activate the Track tab to open the Track Visibility that allows you to show or hide
individual tracks from the track list.
●
Activate the Zones tab to open the Zones Visibility that allows you to determine and lock
the position of certain MixConsole channels in the lower zone.
RELATED LINKS
Opening MixConsole in the Lower Zone on page 64
Opening the Track Visibility
The Track Visibility allows you to show or hide individual tracks from the track list.
PROCEDURE
1. Click Show/Hide Left Zone on the Project window toolbar to activate the Left Zone.
2. At the top of the left zone, click the Visibility tab.
3. At the bottom of the left zone, click the Track tab.
59
Page 60

Project Window
Left Zone
RESULT
The Track Visibility for your project is shown.
RELATED LINKS
Showing/Hiding Individual Tracks on page 60
Showing/Hiding Individual Tracks
The Track Visibility shows a list of all tracks of your project. This list allows you to show and hide
individual tracks.
●
To show/hide a track in the track list, check/uncheck it by clicking to the left of the track
name.
●
To activate/deactivate several tracks at the same time, select them and press Return.
●
To show a hidden track exclusively, check it by Shift-clicking to the left of the track name.
●
To expand or collapse a folder, click the triangle to the left of a folder track.
NOTE
●
The channels of the MixConsole in the lower zone are updated accordingly. This means
that if you hide a track with the Track Visibility, the channel corresponding to that track is
also hidden in the MixConsole in the lower zone.
●
If you want to synchronize the track and the channel visibility in a separate MixConsole
window, you must use the Sync Track/Channel Visibility function.
RELATED LINKS
Synchronizing Track and Channel Visibility on page 61
60
Page 61

Project Window
Left Zone
Synchronizing Track and Channel Visibility
You can synchronize the track visibility in the Project window with the channel visibility in a
separate MixConsole window.
PROCEDURE
1. At the top of the left zone, open the Visibility tab.
2. At the bottom of the left zone, open the Track tab.
3. Click the equals sign to open the Sync Visibility of Project and MixConsole: On/Off
menu.
4. Select Sync Project and MixConsole to synchronize the track visibility with the channel
visibility.
RESULT
The track and channel visibility are synchronized.
NOTE
● You can only synchronize the track visibility in the Project window with the channel
visibility of one MixConsole. If you enable Sync Visibility of Project and MixConsole: On/
Off for a second MixConsole, the first link is lost.
● If you divide the track list, the top part of the list is not affected. Likewise, channels in the
left or right zones of the MixConsole are not synchronized.
RELATED LINKS
Synchronizing Channel and Track Visibility on page 322
Opening the Zones Visibility
The Zones Visibility allows to determine and lock the position of certain MixConsole channels in
the lower zone.
PROCEDURE
1. At the top of the left zone, click the Visibility tab.
2. At the bottom of the left zone, click the Zones tab.
61
Page 62

Project Window
Lower Zone
RESULT
The MixConsole is opened in the lower zone, and the Zones Visibility for the MixConsole in the
lower zone is shown in the left zone.
RELATED LINKS
Opening MixConsole in the Lower Zone on page 64
Lower Zone
The lower zone of the Project window allows you to display specific windows and editors in an
integrated and fixed zone of the Project window. This is useful if you work on single screen
systems and notebooks, for example.
To show/hide the lower zone, click Show/Hide Lower Zone on the Project window toolbar.
The lower zone features the following tabs: Chord Pads, MixConsole, Sampler Control, and
Editor.
To close the lower zone, click Close Lower Zone to the left of the tabs.
62
Page 63

Project Window
Lower Zone
RELATED LINKS
Opening Chord Pads on page 63
Opening MixConsole in the Lower Zone on page 64
Opening Sampler Control on page 65
Opening the Editor in the Lower Zone on page 65
Setting up the Lower Zone
In the lower zone, the tabs MixConsole, Editor, Sampler Control, and Chord Pads are shown.
You can change the order of these tabs, and you can hide tabs that you do not need.
PROCEDURE
1. Click Set up Lower Zone in the bottom right of the lower zone.
2. Do one of the following:
●
Activate/Deactivate the options in the pop-up menu to show/hide tabs from the
lower zone.
●
Select Setup to open a dialog where you can activate/deactivate the tabs and
change their position.
NOTE
In the Presets section of this dialog you can also save a preset of your tab
configuration.
RESULT
The tabs in the lower zone are shown according to your configuration.
Opening Chord Pads
Chord Pads allow you to play with chords, and to change their voicings and tensions.
PREREQUISITE
The Chord Pads tab is activated in the Lower Zone Setup.
PROCEDURE
1. Click Show/Hide Lower Zone on the Project window toolbar to activate the lower zone.
2. At the bottom of the lower zone, click the Chord Pads tab.
63
Page 64

Project Window
Lower Zone
RESULT
The Chord Pads are opened.
RELATED LINKS
Chord Pads on page 834
Setting up the Lower Zone on page 63
Opening MixConsole in the Lower Zone
The MixConsole in the lower zone allows you to perform all basic mixing procedures from within
the lower zone of the Project window, and at the same time to see the context of your tracks and
events.
PROCEDURE
1. Click Show/Hide Lower Zone on the Project window toolbar to activate the lower zone.
2. At the bottom of the lower zone, click the MixConsole tab.
64
Page 65

Project Window
Lower Zone
RESULT
The MixConsole is opened in the lower zone.
RELATED LINKS
MixConsole in Lower Zone on page 316
Opening Sampler Control
Sampler Control allows you display and edit the waveform of an audio sample on a sampler
track.
PROCEDURE
1. Click Show/Hide Lower Zone on the Project window toolbar to activate the lower zone.
2. At the bottom of the lower zone, click the Sampler Control tab.
RESULT
Sampler Control is opened.
RELATED LINKS
Controlling Sample Playback with Sampler Tracks on page 515
Opening the Editor in the Lower Zone
The Editor in the lower zone allows you to perform event editing procedures from within the
lower zone of the Project window, and at the same time to see the context of your tracks and
events.
NOTE
By default, double-clicking an audio event/part or a MIDI part in the event display or selecting
it and pressing Return opens the corresponding editor in the lower zone of the Project
window. Using a menu command opens a separate editor window. You can change this in the
Preferences dialog (Editors page).
PROCEDURE
1. Click Show/Hide Lower Zone on the Project window toolbar to activate the lower zone.
2. At the bottom of the lower zone, click the Editor tab.
3. In the event display, do one of the following:
●
Select a MIDI part.
●
Select an audio event.
●
Select an audio part.
65
Page 66

Project Window
Lower Zone
RESULT
Depending on your event or part selection the lower zone shows either the Audio Part Editor,
the Sample Editor or one of the MIDI Editors.
NOTE
To change the default MIDI editor, select MIDI> Set up Editor Preferences, and select an option
from the Default MIDI Editor pop-up menu.
NOTE
If you open the editor and no event or part is selected, the editor in the lower zone is empty.
RELATED LINKS
Selecting a different MIDI Editor on page 66
Selecting a different MIDI Editor
You can display the MIDI part that is opened in the editor in the lower zone in a different MIDI
editor. To do this, you do not necessarily need to change the default MIDI editor.
PROCEDURE
1. On the Editor tab in the editor in the lower zone, click Select MIDI Editor.
2. Select an editor from the pop-up menu.
66
Page 67

Project Window
Lower Zone
RESULT
The MIDI part is displayed in the selected editor.
NOTE
This selection is temporary. Next time you open the MIDI part, the default MIDI editor is used.
Link Project and Lower Zone Editor Cursors
You can link cursors and zoom factors of the project zone and the Key Editor, Drum Editor, and
the Audio Part Editor in the lower zone.
NOTE
The ruler display format setting is not affected by this function. You can still select different ruler
display formats for the project zone and the editor in the lower zone.
67
Page 68

Project Window
Right Zone
If you activate Link Project and Lower Zone Editor Cursors, the cursors and zoom factors are
linked in the event displays of the project zone and the lower zone. This is useful if you edit in
both zones and you want to keep the same position in view.
NOTE
In the Key Commands dialog in the Edit category, you can assign a key command for this.
RELATED LINKS
Ruler on page 47
Ruler Display Formats on page 48
Zooming in the Project Window on page 75
Right Zone
The right zone of the Project window allows you to display the VSTi rack, the Media rack, the
Control Room rack(Cubase Pro only), and the Meter rack(Cubase Pro only).
To show/hide the right zone, click Show/Hide Right Zone on the Project window toolbar.
The top of the right zone features the following tabs: VSTi, Media, CR(Cubase Pro only), and
Meter(Cubase Pro only).
68
Page 69

Project Window
Right Zone
NOTE
You can show/hide specific tabs from the right zone by right-clicking a tab header and activating/
deactivating the options in the context menu.
RELATED LINKS
VSTi Rack in the Right Zone on page 70
Media Rack in the Right Zone on page 72
Opening the VSTi Rack in the Right Zone
You can show the VSTi rack in the right zone of the Project window. This allows you to add and
edit VST instruments, and at the same time to see the context of your tracks and events.
PROCEDURE
1. Click Show/Hide Right Zone on the Project window toolbar to activate the Right Zone.
2. At the top of the right zone, click the VSTi tab.
RESULT
The VSTi rack is opened in the right zone of the Project window.
RELATED LINKS
VSTi Rack in the Right Zone on page 70
69
Page 70

Project Window
Right Zone
VST Instruments on page 624
VSTi Rack in the Right Zone
The VSTi rack in the right zone of the Project window allow you to add and edit VST instruments
in the context of the Project window.
The following sections are available:
● Track
Shows the associated VST instrument for an instrument track.
● Rack
Shows a VST instrument.
The following controls are available:
1 Add Track Instrument
Opens the Add Instrument Track dialog that allows you to select an instrument and add
an instrument track that is associated to this instrument.
2 Find Instruments
Opens a selector that allows you to find a loaded instrument.
3 Set Remote-Control Focus for VST Quick Controls to Previous/Next Instrument
Allows you to set the remote-control focus to the next/previous instrument.
4 Show/Hide all VST Quick Controls
Shows/Hides the default quick controls for all loaded instruments.
5 Settings
Opens the Settings menu where you can activate/deactivate the following modes:
● Show VST Quick Controls for One Slot Only shows the VST Quick Controls
exclusively for the selected instrument.
● MIDI Channel follows track selection ensures that the Channel selector follows
the MIDI track selection in the Project window. Use this mode if you work with
multitimbral instruments.
● Remote-Control Focus for VST Quick Controls follows track selection ensures
that the VST Quick Control remote-control focus follows the track selection.
RELATED LINKS
VST Instruments Window on page 626
70
Page 71

Project Window
Right Zone
Opening the Media Rack in the Right Zone
You can show the Media rack in the right zone of the Project window. This allows you to see
the context of your tracks and events when you drag audio events, MIDI parts, presets, or
instruments into the Project window.
PROCEDURE
1. Click Show/Hide Right Zone on the Project window toolbar to activate the Right Zone.
2. At the top of the right zone, click the Media tab.
RESULT
The Media rack is opened in the right zone of the Project window.
RELATED LINKS
Media Rack in the Right Zone on page 72
MediaBay on page 546
71
Page 72

Project Window
Right Zone
Media Rack in the Right Zone
The Media rack in the right zone of the Project window allows you to drag audio events, MIDI
parts, or instrument presets into the event display. It lists Steinberg factory content and any
installed Steinberg content sets.
The Media rack Home page is divided into several sections:
Search
Allows you to search media files by name or by attribute.
Navigation Controls
Allow you to go back to the previous page, to the Home page , or to any subpage.
Show All Items
Shows the Results page for a selected tile. If no tile is selected, all media files are
shown.
Instruments Tile
Shows all included VST instruments.
Loops & Samples Tile
Shows audio loops, MIDI loops, or instrument sounds ordered by content set.
Presets Tile
Shows track presets, strip presets, pattern banks, FX chain presets, and VST FX
presets.
User Presets Tile
Shows track presets, strip presets, pattern banks, FX chain presets, VST FX presets,
and instrument presets that are listed in the User Content folder.
Favorites Tile
Shows your favorite folders and allows you to add new favorites. The folder content
is automatically added to the MediaBay database.
72
Page 73

Project Window
Right Zone
File Browser Tile
Shows your file system and the pre-defined folders Favorites, This Computer, VST
Sound, Factory Content, and User Content where you can search for media files
and access them immediately.
RELATED LINKS
Favorites Section on page 555
Media Rack in Right Zone on page 546
MediaBay on page 546
Opening the Control Room in the Right Zone(Cubase Pro only)
You can show the Control Room in the right zone of the Project window.
PROCEDURE
1. Click Show/Hide Right Zone on the Project window toolbar to activate the Right Zone.
2. At the top of the right zone, click the CR tab.
RESULT
The Control Room is opened in the right zone of the Project window. It has exactly the same
features as the Control Room that you open from the Studio menu as a separate window.
RELATED LINKS
Control Room(Cubase Pro only) on page 371
Opening the Meter in the Right Zone(Cubase Pro only)
You can show the Meter in the right zone of the Project window.
PROCEDURE
1. Click Show/Hide Right Zone on the Project window toolbar to activate the Right Zone.
2. At the top of the right zone, click the Meter tab.
73
Page 74

Project Window
Keyboard Focus in the Project Window
RESULT
The Meter is opened in the right zone of the Project window. It has exactly the same features as
the Meter that you open in the right zone of the MixConsole.
RELATED LINKS
Metering and Loudness (Cubase Pro only) on page 384
Keyboard Focus in the Project Window
The different zones in the Project window can be controlled by using key commands. To make
sure that a key command has effect on a specific zone, you must make sure that this zone has
the keyboard focus.
The following Project window zones can have the keyboard focus:
●
Project zone
●
Left zone
●
Lower zone
●
Right zone
If a zone has the keyboard focus, the border that surrounds it is highlighted in a specific color.
NOTE
You can change the focus color in the Preferences dialog (User Interface—Custom Colors
page).
RELATED LINKS
Project Zone on page 40
Left Zone on page 52
74
Page 75

Project Window
Zooming in the Project Window
Lower Zone on page 62
Right Zone on page 68
Project Window on page 39
Activating Keyboard Focus for a Zone
You can activate the keyboard focus for a zone by clicking with the mouse and by using key
commands.
PROCEDURE
● Do one of the following:
●
To activate any zone, click in it.
●
To activate the next zone, press Tab. This allows you to cycle forward through the
zones.
●
To activate the previous zone, press Shift-Tab.
NOTE
The editor in the lower zone automatically gets the keyboard focus if you double-click an
event or part in the event display, if you select an event or part and press Return, or if you
use key commands to open the zone.
RESULT
The keyboard focus is activated for this zone and the border of the zone is highlighted.
NOTE
The project zone and the lower zone have separate toolbars and info lines. If you use the toolbar
or the info line for one of these zones, the corresponding zone automatically gets the focus.
RELATED LINKS
Customizing the User Interface Colors on page 999
Zooming in the Project Window
You can zoom in the Project window according to the standard zoom techniques.
NOTE
If screen redraws are slow on your system, consider activating Quick Zoom in the Preferences
dialog (Editing page).
Zooming Horizontally
● Select the Zoom tool and click in the event display to zoom in. To zoom out, hold down Alt
and click.
● Use the horizontal zoom sliders to zoom in and out.
● Click the lower half of the ruler and drag down to zoom in horizontally. Click the lower half
of the ruler and drag up to zoom out horizontally.
● Click H to zoom in horizontally. Click G to zoom out horizontally.
75
Page 76

Project Window
Zooming in the Project Window
NOTE
If the Grid Type in the Project window toolbar is set to Adapt to Zoom, the horizontal zoom
level affects the grid and snap resolution in the event display.
Zooming Vertically
● Select the Zoom tool, click in the event display, and drag a selection rectangle to zoom in
vertically and horizontally.
NOTE
For this to work, you must deactivate the Zoom Tool Standard Mode: Horizontal
Zooming Only option in the Preferences dialog (Editing—Tools page).
● Use the vertical zoom sliders to zoom in and out. If you have made any individual track
height adjustments, the relative height differences are maintained.
● Click Shift-H to zoom in vertically. Click Shift-G to zoom out vertically.
RELATED LINKS
Zoom Submenu on page 76
Zoom Presets on page 77
Zooming In On Cycle Markers on page 78
Zoom History on page 79
Link Project and Lower Zone Editor Cursors on page 67
Grid Types on page 81
Zooming in on Audio Contents
You can zoom in vertically on the contents of audio parts and events. This is useful when viewing
quiet audio passages.
PROCEDURE
● Click the waveform zoom slider in the top right corner of the event display and drag up.
RESULT
The contents of audio parts and events in your project are zoomed in vertically.
AFTER COMPLETING THIS TASK
To get an approximate reading on the level of the audio events by viewing the waveforms, zoom
out by dragging the slider is all the way down again. Otherwise, zoomed waveforms may be
mistaken for clipped audio.
Zoom Submenu
The Zoom submenu contains options for zooming in the Project window.
● To open the Zoom submenu, select Edit> Zoom.
The following options are available:
76
Page 77

Project Window
Zooming in the Project Window
Zoom In/Out
Zooms in/out one step, centering on the project cursor.
Zoom Full
Zooms out so that the whole project is visible. The whole project means the timeline
from the project start to the length set in the Project Setup dialog.
Zoom to Selection
Zooms in horizontally and vertically so that the current selection fills the screen.
Zoom to Selection (Horiz.)
Zooms in horizontally so that the current selection fills the screen.
Zoom to Event
This option is available in the Sample Editor and in some MIDI editors.
Zoom In/Out Vertically
Zooms in/out one step vertically.
Zoom In/Out Tracks
Zooms the selected tracks in/out one step vertically.
Zoom Selected Tracks
Undo/Redo Zoom
RELATED LINKS
Zoom Submenu on page 457
Zoom Presets
You can create zoom presets that allow you to set up different zoom settings. For example, one
where the whole project is displayed in the Project window and another with a high zoom factor
for detailed editing. The Zoom Presets pop-up menu allows you to select, create, and organize
zoom presets.
●
This zooms in vertically on the selected tracks and minimizes the height of all other
tracks.
These options allow you to undo/redo the last zoom operation.
To open the Zoom Presets pop-up menu, click the button to the left of the horizontal
zoom control.
The upper part of the menu lists the zoom presets.
77
Page 78

Project Window
Zooming in the Project Window
●
To save the current zoom setting as a preset, open the Zoom Presets pop-up menu and
select Add. In the Type In Preset Name dialog that opens, type in a name for the preset
and click OK.
●
To select and apply a preset, select it from the Zoom Presets pop-up menu.
●
To zoom out so that the whole project is visible, open the Zoom Presets pop-up menu and
select Zoom Full.
This displays the project from the project start to the length that is set in the Project Setup
dialog.
●
To delete a preset, open the Zoom Presets pop-up menu and select Organize. In the
dialog that opens, select the preset in the list and click Delete.
●
To rename a preset, open the Zoom Presets pop-up menu and select Organize. In the
dialog that opens, select a preset in the list and click Rename. In the dialog that opens,
type in a new name for the preset. Click OK to close the dialogs.
IMPORTANT
Zoom presets are global for all projects. They are available in all projects that you open or create.
Zooming In On Cycle Markers
You can zoom in on the area between cycle markers in the project.
●
To zoom in on a cycle marker, click the button to the left of the horizontal zoom control to
open the Zoom Presets pop-up menu and select a cycle marker.
The middle part of the Zoom Presets pop-up menu lists any cycle markers that you have added
to the project.
NOTE
Only the cycle markers that you create in the current project are available on the menu.
If you select a cycle marker, the event display is zoomed in to encompass the marker area.
You cannot edit the cycle markers in the Zoom Presets pop-up menu.
RELATED LINKS
Markers Window on page 307
78
Page 79

Project Window
Snap Function
Zoom History
You can undo and redo zoom operations. This way you can zoom in several steps and then easily
go back to the zoom stage at which you started.
You can undo and redo zoom operations in the following ways:
●
To undo zoom, select Edit> Zoom> Undo Zoom or double-click with the zoom tool.
●
To redo zoom, select Edit> Zoom> Redo Zoom or press Alt and double-click with the
zoom tool.
Snap Function
The Snap function helps you to find exact positions when editing in the Project window. It does
this by restricting horizontal movement and positioning to certain positions. Operations affected
by Snap include moving, copying, drawing, sizing, splitting, range selection, etc.
●
To activate/deactivate Snap, activate/deactivate the Snap icon on the toolbar.
Setting the Snap Point
You can set the snap point at any position of the audio event.
PROCEDURE
1. Select an event.
2. Place the project cursor at a position within the selected audio event.
3. Select Audio> Snap Point To Cursor.
RESULT
The snap point is set at the cursor position. The snap point for an event is displayed as a vertical
line in the Project window.
NOTE
You can also set the snap point in the Sample Editor.
RELATED LINKS
Adjusting the Snap Point on page 464
Snap to Zero Crossing
When splitting and sizing audio events, sudden amplitude changes can cause pops and clicks. To
avoid this, you can activate Snap to Zero Crossing to snap to points where the amplitude is zero.
●
To activate Snap to Zero Crossing, activate Snap to Zero Crossing on the toolbar.
79
Page 80

Project Window
Snap Function
Snap Types
You can select between different snap types to determine the snap point.
● To select a snap type, open the Snap Type pop-up menu.
The following snap types are available:
Grid
If this option is activated, the snap points are set with the Grid Type pop-up menu.
The options depend on the display format that is selected for the ruler.
If you select Seconds as ruler format, time-based grid options are available.
If you select Bars+Beats as a ruler format, musical grid options are available.
Grid Relative
If this option is activated, events and parts are not magnetic to the grid. Rather, the
grid determines the step size for moving the events. This means that a moved event
keeps its original position relative to the grid.
For example, if an event starts at the position 3.04.01, snap is set to Grid Relative
and the Grid Type pop-up menu is set to Bar, you can move the event in steps of one
bar to the positions 4.04.01, 5.04.01, and so on.
NOTE
This only applies when dragging existing events or parts. When you create new
events or parts this snap type works like Grid.
Events
If this option is activated, the start and end positions of other events and parts
become magnetic. This means that if you drag an event to a position near the start
or end of another event, it is automatically aligned with the start or end of the other
event.
For audio events, the position of the snap point is also magnetic. This includes
marker events on the marker track.
Shuffle
Shuffle is useful when you want to change the order of adjacent events. If you have
two adjacent events and drag the first one to the right, past the second event, the
two events will change places.
80
Page 81

Project Window
Snap Function
The same principle works when changing the order of more than two events.
Magnetic Cursor
This grid type lets the project cursor become magnetic. Dragging an event near the
cursor causes the event to be aligned with the cursor position.
Grid + Cursor
This is a combination of Grid and Magnetic Cursor.
Events + Cursor
This is a combination of Events and Magnetic Cursor.
Events + Grid + Cursor
This is a combination of Events, Grid, and Magnetic Cursor.
Grid Types
Allows you to specify a grid type that determines the grid and snap resolution in the event
display.
NOTE
This setting only has an effect if Snap Type is set to one of the grid options.
● To select a grid type, open the Grid Type pop-up menu.
The following grid types are available:
Bar
Sets the grid and snap resolution to bars.
Beat
Sets the grid and snap resolution to beats.
Use Quantize
Sets the grid and snap resolution to the value that is activated in the Quantize
Preset pop-up menu.
Adapt to Zoom
Sets the grid and snap resolution to the horizontal zoom level. The more you zoom in
on the event display, the finer the resolution. High zoom levels allow you to snap to
64th notes, low zoom levels allow you to snap to bars.
NOTE
Adapt to Zoom is only available if Bars+Beats is set as a ruler display format.
81
Page 82

Project Window
Cross-Hair Cursor
If you activate Time Linear in the ruler context menu, the distances between the grid
lines are still constant but based on musical values such as bars and beats.
RELATED LINKS
Snap Types on page 80
Zooming in the Project Window on page 75
Ruler Display Formats on page 48
Cross-Hair Cursor
The cross-hair cursor is displayed when working in the Project window and in the editors,
facilitating navigation and editing, especially when arranging large projects.
●
You can set up the cross-hair cursor in the Preferences dialog (Editing—Tools page).
You can set up the colors for the line and the mask of the cross-hair cursor, and define its
width.
The cross-hair cursor works as follows:
●
When the Object Selection tool or one of its subtools is selected, the cross-hair cursor
appears when you start moving/copying a part/event, or when using the event trim
handles.
Cross-hair cursor when moving an event.
●
When the Object Selection tool, the Cut tool, or any other tool that makes use of this
function is selected, the cross-hair cursor appears as soon as you move the mouse over
the event display.
●
The cross-hair cursor is only available for tools where such a function is of any use. The
Mute tool, for example, does not use a cross-hair cursor, as you have to click directly on an
event to mute it.
NOTE
If the Key Editor, Drum Editor or the Audio Part Editor is open in the lower zone of the Project
window and Link Project and Lower Zone Cursors is activated, the cross-hair cursor is shown in
the editor in the lower zone and in the Project window.
Edit History Dialog
The Edit History dialog contains a list of all your edits. This allows you to undo all actions in the
Project window as well as in the editors.
● To open the Edit History dialog, select Edit> History.
82
Page 83

Project Window
Edit History Dialog
The Action column displays the name of the action while the Time column tells you when this
action was performed. In the Details column further details are shown. Here you can enter new
text by double-clicking in the column.
● To undo your actions, move the horizontal, colored line upwards to the desired position.
● To redo an action that was undone previously, move the line down the list again.
You can only undo your actions in reverse order, for example, the last performed action is
the first action to be undone.
NOTE
● You can also undo applied plug-in effects (Cubase Pro only) or audio processes. However,
we recommend to modify or delete these using the Direct Offline Processing window.
● All offline processing that you have applied permanently to the audio using the Make
Direct Offline Processing Permanent function cannot be undone. Therefore, it is not
shown in the Edit History dialog.
RELATED LINKS
Direct Offline Processing on page 416
Applying Offline Processing Permanently on page 424
Setting the Number of Maximum Undo Steps
You can limit the number of maximum undo steps. This is useful if you run out of memory, for
example.
PROCEDURE
1. In the Preferences dialog, select General.
2. Set the number in the Maximum Undo Steps field.
83
Page 84

In Cubase, projects are the central documents. You must create and set up a project to work with
the program.
Creating New Projects
You can create empty projects or projects that are based on a template.
PROCEDURE
1. Select File> New Project.
Depending on your settings, either the Hub or the Project Assistant dialog opens.
2. In the location options section, select where to store the new project.
●
To use the default location, select Use default location.
●
To choose another location, select Prompt for project location.
3. Do one of the following:
●
To create an empty new project, click Create Empty.
●
To create a new project from a template, select a template and click Create.
Project Handling
RESULT
A new, untitled project is created. If you selected a template, the new project is based on this
template and includes the corresponding tracks, events, and settings.
NOTE
If you create an empty project, your default presets for the input and output bus configurations
are applied. If you have not defined default presets, the last used configurations are applied.
RELATED LINKS
Presets for Input and Output Busses on page 29
84
Page 85

Project Handling
Hub
Hub
When you start Cubase or create new projects using the File menu, the Hub opens. The Hub
keeps you up to date with the latest information and assists you with organizing your projects. It
consists of the News and Tutorials section and the Projects section.
News and Tutorials section
The News and Tutorials section displays Steinberg news, tutorial videos as well as links to the
user forum, downloads, and the Help Center.
NOTE
Ensure that you have an active Internet connection to access this material.
Projects section
The Projects section lets you create new projects, which can either be empty or based on a
template. It lets you specify where to save the projects. It also allows you to access recently
opened projects or projects that are stored in other locations. This section offers the same
functionality as the Project Assistant dialog.
Category bar
In this section, the available factory templates are sorted into the predefined
categories Recording, Scoring, Production, and Mastering.
The Recent category contains a list of the recently opened projects.
The More category contains the default project template and all templates that are
not assigned to any of the other categories.
Template list
When you click on one of the category items, the list below the category bar shows
the available templates for this category. Any new templates that you create are
added at the top of the corresponding list.
Location options
This section allows you to specify where the project is stored.
Open other
This button allows you to open any project file on your system. This is identical to
using the Open command on the File menu.
85
Page 86

Project Handling
Project Assistant
RELATED LINKS
Project Assistant on page 86
Deactivating the Hub
To start Cubase or to create new projects without the Hub, you can deactivate it.
PROCEDURE
1. In the Preferences dialog, select General.
2. Deactivate Use Hub.
RESULT
Cubase starts without opening a project and opens the Project Assistant dialog when you create
a new project using the File menu. However, you can still open the Hub through the Hub menu.
Project Assistant
When you deactivate the Hub and create new projects, the Project Assistant dialog opens. This
dialog offers the same functions as the Projects section in the Hub.
Category bar
In this section, the available factory templates are sorted into the predefined
categories Recording, Production, Scoring, and Mastering.
The Recent category contains a list of the recently opened projects.
The More category contains the default project template and all templates that are
not assigned to any of the other categories.
Template list
When you click on one of the category items, the list below the category bar shows
the available factory templates for this category. Any new templates that you create
are added at the top of the corresponding list.
Location options
This section allows you to specify where the project is stored.
Open other
This button allows you to open any project file on your system. This is identical to
using the Open command from the File menu.
About Project Files
A project file (extension *.cpr) is the central document in Cubase. A project file contains
references to media data that can be saved in the project folder.
NOTE
We recommend to save files only in the project folder, even though you can save them in any
other location to which you have access.
The project folder contains the project file and the following folders that Cubase automatically
creates when necessary:
●
Audio
●
Edits
●
Images
86
Page 87

Project Handling
About Template Files
●
Track Pictures
About Template Files
Templates can be a good starting point for new projects. Templates are projects where you can
save all settings that you regularly use, such as bus configurations, sample rates, record formats,
basic track layouts, VSTi setups, drum map setups, etc.
The following template types are available from within the Hub:
●
Factory templates for specific scenarios. These are listed in the Recording, Scoring,
Production, or Mastering categories.
●
The default template. This is listed in the More category.
●
Any new user templates that you create and save. These are listed in the More category.
Template projects are not saved in project folders and therefore contain no subfolders and no
media files.
●
To open the location of a specific template, right-click a template in the template list and
select Show in Explorer (Windows only) or Reveal in Finder (macOS only).
Saving a Project Template File
You can save the current project as a template. When you create a new project, you can select
this template as a starting point for your new project.
PREREQUISITE
Remove all clips from the Pool before you save the project as a template. This ensures that
references to media data from the original project folder are deleted.
PROCEDURE
1. Set up a project.
2. Select File> Save as Template.
3. In the New Preset section of the Save as Template dialog, enter a name for the new
project template.
4. In the Attribute Inspector section, double-click the Value field of the Content Summary
attribute to enter a description for the template.
87
Page 88

Project Handling
Project Setup Dialog
5. Click the Value field of the Template Category attribute and select a template category
from the pop-up menu.
If you do not select a category, the new template will be listed in the Hub in the More
category.
6. Click OK to save the template.
Renaming Templates
PROCEDURE
1. In the Hub or the Project Assistant, right-click a template and select Rename.
2. In the Rename dialog, enter a new name and click OK.
Project Setup Dialog
You can perform general settings for your project in the Project Setup dialog.
● To open the Project Setup dialog, select Project> Project Setup.
● To open the Project Setup dialog automatically when you create a new project, activate
the Run Setup on Create New Project option in the Preferences dialog (General page).
IMPORTANT
While most Project Setup settings can be changed at any time, you must set the sample rate
directly after creating a new project. If you change the sample rate at a later stage, you must
convert all audio files in the project to the new sample rate to make them play back properly.
The following options are available:
Author
Allows you to specify a project author that is written into the file, when you export
audio files and activate the Insert iXML chunk option. You can specify a default
88
Page 89

Project Handling
Project Setup Dialog
Company
Start
Length
Frame Rate
Get From Video
author in the Default Author Name field in the Preferences dialog (General—
Personalization page).
Allows you to specify a company name that is written into the file, when you export
audio files and activate the Insert iXML chunk option. You can specify a default
company in the Default Company Name field in the Preferences dialog (General—
Personalization page).
Allows you to specify the start time of the project in timecode format. This also
determines the sync start position when synchronizing to external devices.
Allows you to specify the length of the project.
Allows you to specify the timecode standard and frame rate for the project. When
synchronizing to an external device, this setting must correspond to the frame rate
of any incoming timecode.
Allows you to set the project frame rate to the frame rate of an imported video file.
Display Format
Allows you to specify the global display format that is used for all rulers and
position displays in the program, except the ruler tracks. However, you can make
independent display format selections for the individual rulers and displays.
Display Offset
Allows you to specify an offset for the time positions that are displayed in the rulers
and position displays to compensate for the Start position setting.
Bar Offset
This setting is only used, when you select the Bars+Beats display format. Allows you
to specify an offset for the time positions that are displayed in the rulers and position
displays to compensate for the Start position setting.
Sample Rate
Allows you to specify the sample rate at which records and plays back audio.
● If your audio hardware generates the sample rate internally and you select
a non-supported sample rate, this is indicated by a different color. In this
case, you must set a different sample rate to make your audio files play back
properly.
● If you select a sample rate that your audio hardware supports, but that differs
from its current sample rate setting, it is automatically changed to the project
sample rate.
● If your audio hardware is externally clocked and receives external clock
signals, sample rate mismatches are accepted.
Bit Resolution
Allows you to specify the resolution of the audio files that you record in Cubase.
Select the record format according to the bit resolution that is delivered by your
audio hardware. The available options are 16 Bit, 24 Bit, and 32 Bit float.
NOTE
● When you record with effects, consider setting the bit resolution to 32 Bit
Float. This prevents from clipping (digital distortion) in the recorded files and
89
Page 90

Project Handling
Project Setup Dialog
Record File Type
keeps the audio quality absolutely pristine. Effect processing and level or EQ
changes in the input channel are done in 32 Bit Float format. If you record
at 16 or 24 Bit, the audio will be converted to this lower resolution when it is
written to a file. As a result, the signal may degrade. This is independent of
the actual resolution of your audio hardware. Even if the signal from the audio
hardware has a resolution of 16 Bit, the signal will be 32 Bit Float after the
effects are added to the input channel.
● The higher the bit resolution, the larger the files and the more strain is put on
the disk system. If this is an issue, you can lower the record format setting.
Allows you to specify the file type of the audio files that you record in Cubase. The
following file types are available:
● Wave File
This is the most common file format on the PC platform. Wave files have the
extension .wav.
● Wave 64 File
This is a proprietary format developed by Sonic Foundry Inc. Wave 64 files
offer the same quality as Wave files, but they can be considerably larger than
standard Wave files. They are especially suited for long recordings with file
sizes over 2 GB. The files have the extension .w64.
● Broadcast Wave Files
This format is, in terms of audio content, identical with regular Wave files.
Broadcast Wave files can contain embedded text strings. The files have the
extension .wav.
● AIFF Files
This is an audio file format standard defined by Apple Inc. AIFF files are used
on most computer platforms. The files can contain embedded text strings.
AIFF files have the extension .aif.
● FLAC File
This is an open source format that reduces the size of audio files by 50 to 60 %
compared to regular Wave files. The files have the extension .flac.
NOTE
● For wave file recordings larger than 4 GB, the EBU RIFF standard is used. If a
FAT 32 disk is used (not recommended), audio files are split automatically. In
the Preferences dialog, you can specify what happens, when your recorded
Wave file is larger than 4 GB.
● You can set up embedded strings in the Preferences dialog.
Stereo Pan Law
If you pan a channel left or right, the sum of the left and right side is higher (louder),
than if this channel is panned center. These modes allow you to attenuate signals
panned center. 0 dB turns off constant-power panning. Equal Power means that the
power of the signal remains the same regardless of the pan setting.
Volume Max
Allows you to specify the maximum fader level. By default, this is set to +12 dB. If you
load projects that were created with Cubase versions older than 5.5, this value is set
to the old default value of +6 dB.
HMT Type (MIDI only)
Allows you to specify a mode for Hermode tuning of MIDI notes.
90
Page 91

Project Handling
Opening Project Files
HMT Depth (MIDI only)
Allows you to specify the overall degree of retuning.
RELATED LINKS
Record - Audio on page 1034
Opening Project Files
You can open one or several saved project files at the same time.
IMPORTANT
If you open a project saved with a different program version that contains data for functions
that are not available in your version, this data may be lost when you save the project with your
version.
NOTE
● If you open an external project, the last used view that was saved on your computer is
used. You can change this setting in the Preferences dialog (General page).
● External projects are automatically connected to the input and output busses. If you open
a project that was created on a computer with an ASIO port configuration different from
the configuration of your computer, this can result in unwanted audio connections. You
can deactivate the automatic connection of input and output busses in the Preferences
dialog (VST page).
PROCEDURE
1. Select File> Open.
2. In the file dialog that opens, select the project that you want to open and click Open.
3. If there already is an open project, you are asked if you want to activate the new project.
Do one of the following:
●
●
RELATED LINKS
Workspaces for External Projects on page 994
Do not Connect Input/Output Busses When Loading External Projects on page 1041
Activating Projects
If you have several projects opened at the same time in Cubase, only one project can be active.
The active project is indicated by the lit Activate Project button in the upper left corner of the
Project window. If you want to work on another project, you have to activate the other project.
PROCEDURE
● To activate a project, click Activate Project .
To activate the project, click Activate.
To open the project without activating it, click No.
This reduces load times for projects.
Opening Recent Projects
To open a recently opened project, do one of the following:
91
Page 92

Project Handling
Saving Project Files
●
In the category bar of the Hub or the Project Assistant dialog, click Recent, select a
project from the projects list, and click Open.
●
Select File> Recent Projects and select a recently opened project.
Re-Routing Missing Ports
If you open a Cubase project that was created on a different system with other audio hardware,
Cubase tries to find matching audio inputs and outputs for the input/output busses. If Cubase
cannot resolve all audio/MIDI inputs and outputs that are used in the project, the Missing Ports
dialog opens.
This allows you to manually re-route any ports specified in the project to ports that are available
in your system.
NOTE
To improve the search for matching audio inputs and outputs for the input/output busses, you
should use descriptive, generic names for your input and output ports.
RELATED LINKS
Renaming the Hardware Inputs and Outputs on page 27
Saving Project Files
You can save the active project as a project file. To keep your projects as manageable as possible,
make sure that you save project files and all related files in the respective project folders.
●
To save the project and specify a file name and location, open the File menu and select
Save As.
●
To save the project with its current name and location, open the File menu and select
Save.
About the Auto Save Option
Cubase can automatically save backup copies of all open project files with unsaved changes.
NOTE
Only the project files are backed up. If you want to include the files from the Pool and save your
project in a different location, you must use the Back up Project function.
Cubase can automatically save backup copies of all open projects with unsaved changes. To set
this up, activate the Auto Save option in the Preferences dialog (General page). The backup
copies are named “<project name>-xx.bak” where xx is an incremental number. Unsaved projects
are backed up in a similar way as “UntitledX-xx.bak”, with X being the incremental number for
unsaved projects. All backup files are saved in the project folder.
●
To specify the time intervals in which a backup copy is created, use the Auto Save Interval
setting.
●
To specify how many backup files are created with the Auto Save function, use the
Maximum Backup Files option. When the maximum number of backup files is reached,
the existing files are overwritten, starting with the oldest file.
92
Page 93

Project Handling
Reverting to the Last Saved Version
Saving Project Files As a New Version
You can create and activate a new version of an active project file. This is useful if you are
experimenting with edits and arrangements and want to be able to go back to a previous version
at any time.
To save a new version of the active project, do one of the following:
●
Select File> Save New Version.
●
Press Ctrl/Cmd-Alt-S.
The new file is saved with the same name as the original project and an attached incremental
number. For example, if your project is called “My Project,” new versions are called “My
Project-01”, “My Project-02”, and so on.
Reverting to the Last Saved Version
You can return to the last saved version and discard all changes that have been introduced.
PROCEDURE
1. Select File> Revert.
2. In the warning message, click Revert.
If you have recorded or created new audio files since the last version was saved, you are
prompted to delete or keep the files.
Choosing a Project Location
In the Hub and in the Project Assistant, you can specify where to save a project.
●
To create a project in the default project location, select Use default location.
In the Project folder field, you can specify a name for the project folder. If you do not
specify a project folder here, the project is saved in a folder named Untitled.
●
To change the default project location, click in the path field.
A file dialog opens that allows you to specify a new default location.
●
To create the project in a different location, select Prompt for project location.
In the dialog that opens, specify a location and a project folder.
Creating Self-Contained Projects
If you want to share your work or transfer it to another computer, your project must be selfcontained.
The following functions facilitate this task:
●
Select Media> Prepare Archive to verify that every clip that is referenced in the project is
located in the project folder, and to take actions if that is not the case.
●
Select File> Back up Project to create a new project folder where you can save the project
file and the necessary work data. The original project remains unchanged.
93
Page 94

Project Handling
Creating Self-Contained Projects
Preparing Archives
The Prepare Archive function allows you to gather all files that are referenced by your project
to ensure that these are in the project folder. This is useful if you want to move or archive your
project.
PROCEDURE
1. Select Media> Prepare Archive.
If your project references external files, you are prompted if you want to copy them to
your working directory. If any processing has been applied, you must decide if you want to
flatten edits.
2. Click Proceed.
RESULT
Your project is ready to be archived. You can move or copy the project folder to another location.
AFTER COMPLETING THIS TASK
You must copy audio files that reside within the project folder to the Audio folder or save them
separately. You must also move your video clips manually, as videos are only referenced and not
saved in the project folder.
Backing Up Projects
You can create a backup copy of your project. Backups only contain the necessary work data. All
media files except the files from VST Sound archives are included as a copy.
PROCEDURE
1. Select File> Back up Project.
2. Select an empty folder or create a new one.
3. Make your settings in the Back up Project Options dialog and click OK.
RESULT
A copy of the project is saved in the new folder. The original project remains unaffected.
NOTE
VST Sound content provided by Steinberg is copy-protected and will not be included in the
backup project. If you want to use a backup copy that uses VST Sound content on a different
computer, make sure that the corresponding content is also available on that computer.
Back up Project Options Dialog
This dialog allows you to create a backup copy of your project.
● To open the Back up Project Options dialog, select File> Back up Project.
Project Name
Allows you to change the name of the backed up project.
Keep Current Project Active
Allows you to keep the current project active after clicking OK.
Minimize Audio Files
Allows you to include only the audio file portions that are actually used in the project.
This can significantly reduce the size of the project folder if you are using small
94
Page 95

Project Handling
Creating Self-Contained Projects
sections of large files. It also means that you cannot use other parts of the audio files
if you continue working with the project in its new folder.
Freeze Direct Offline Processing
Allows you to flatten all edits and make all processing and applied effects permanent
to each clip in the Pool.
Remove Unused Files
Allows you to remove unused files and to back up only the files that are actually
used.
Do Not Back up Video
Allows you to exclude video clips on the video track or in the Pool of the current
project.
95
Page 96

Tracks
Tracks are the building blocks of your project. They allow you to import, add, record, and
edit data (parts and events). Tracks are listed from top to bottom in the Track list and extend
horizontally across the Project window. Each track is assigned to a particular channel strip in the
MixConsole.
If you select a track in the Project window, the controls, settings, and parameters displayed in
the Inspector and the track list allow you to control the track.
Track Inspector Settings
For each track type you can configure which Inspector sections are shown. You can also specify
the order of the sections.
● To open the Track Inspector Settings dialog, click Setup Inspector, and select Setup
from the pop-up menu.
●
96
Page 97

Tracks
Track Control Settings
Hidden Items
Visible Items
Displays sections that are hidden in the Inspector.
Displays sections that are visible in the Inspector.
Pin
If you activate Pin by clicking the column for a section the open/close status of the
selected Inspector section is pinned.
Add
Allows you to move an item selected in the hidden sections list to the list of visible
sections.
Remove
Allows you to move an item selected in the visible sections list to the list of hidden
sections.
Move Up/Move Down
Allows you to change the order of an item in the list of visible sections.
Presets
Allows you to save Inspector section settings as presets.
Reset All
Allows you to restore the default Inspector section settings.
Track Control Settings
For each track type you can configure which track controls are shown in the track list. You can
also specify the order of controls and group controls so that they are always shown adjacent to
each other.
● To open the Track Controls Settings dialog, right-click a track in the track list and select
Track Controls Settings from the context menu, or click Open Track Controls Settings
Dialog in the bottom right corner of the track list.
97
Page 98

Tracks
Track Control Settings
Track Type
Allows you to select the track type to which your settings are applied.
Hidden Controls
Displays controls that are hidden in the track list.
Visible Controls
Displays controls that are visible in the track list.
Width
If you click in this column, you can set the maximum length for the track name.
Group
Displays the group number.
Add
Allows you to move an item selected in the hidden controls list to the list of visible
controls.
Remove
Allows you to move an item selected in the visible controls list to the list of hidden
controls. All controls can be removed except Mute and Solo.
Move Up/Move Down
Allows you to change the order of an item in the list of visible controls.
Group
Allows you to group two or more controls selected in the visible controls list that are
adjacent to each other. This ensures that they are always positioned side by side in
the track list.
Ungroup
Allows you to ungroup grouped controls in the visible controls list. To remove an
entire group, select the first (topmost) element belonging to this group and click
Ungroup.
98
Page 99

Tracks
Audio Tracks
Reset
Allows you to restore all default track controls settings for the selected track type.
Controls Area Preview
Shows a preview of the customized track controls.
Controls Area Width
Allows you to determine the width of the track control area for the selected track
type. In the Controls Area Preview, this area is shown with a frame.
Presets
Allows you to save track controls settings as presets. To recall a preset, click Switch
Presets in the bottom right corner of the track list. The name of the selected preset
is shown in the left corner.
Track Name Width (global)
Allows you to determine the global name width for all track types.
Apply
Applies your settings.
Reset All
Allows you to restore all default track controls settings for all track types.
Audio Tracks
You can use audio tracks for recording and playing back audio events and audio parts. Each
audio track has a corresponding audio channel in the MixConsole. An audio track can have any
number of automation tracks for automating channel parameters, effect settings, etc.
●
To add an audio track to your project, select Project> Add Track> Audio.
RELATED LINKS
Adding Tracks on page 152
Audio Track Inspector
The Inspector for audio tracks contains controls and parameters that allow you to edit your
audio track.
The top section of the audio track Inspector contains the following basic track settings:
Track name
Click once to show/hide the basic track settings section. Double-click to rename the
track.
99
Page 100

Tracks
Audio Tracks
Edit
Opens the Channel Settings window for the track.
Mute
Mutes the track.
Solo
Solos the track.
Read Automation
Allows you to read track automation.
Write Automation
Allows you to write track automation.
Open Device Panels(Cubase Pro only)
Allows you to create a device panel for the plug-in and device parameters of your
track.
Auto Fades Settings
Opens a dialog where you can make separate audio fade settings for the track.
Record enable
Activates the track for recording.
Monitor
Routes incoming signals to the selected output.
Toggle Time Base
Switches between musical (tempo related) and linear (time related) time base for the
track.
Lock
Disables all editing of all events on the track.
Show Lanes
Divides the tracks in lanes.
Freeze Audio Channel
Allows you to freeze the audio channel.
Volume
100
 Loading...