

Page 1
Page 2

English
Page 3

Cristina Bachmann, Heiko Bischoff, Christina Kaboth, Insa Mingers,
Matthias Obrecht, Sabine Pfeifer, Benjamin Schütte, Marita Sladek
This PDF provides improved access for vision-impaired users. Please note
that due to the complexity and number of images in this document, it is not
possible to include text descriptions of images.
The information in this document is subject to change without notice
and does not represent a commitment on the part of Steinberg Media
Technologies GmbH. The software described by this document is subject
to a License Agreement and may not be copied to other media except as
specifically allowed in the License Agreement. No part of this publication
may be copied, reproduced, or otherwise transmitted or recorded,
for any purpose, without prior written permission by Steinberg Media
Technologies GmbH. Registered licensees of the product described herein
may print one copy of this document for their personal use.
All product and company names are ™ or ® trademarks of their respective
owners. For more information, please visit www.steinberg.net/trademarks.
©
Steinberg Media Technologies GmbH, 2016.
All rights reserved.
Page 4

Table of Contents
5 Introduction
5 About the Documentation
5 Key Commands
5 Conventions
6 How You Can Reach Us
7 System Requirements and Installation
7 System Requirements
8 Installing the Program
9 Activating Your License
10 Registering Your Software
10 Hardware Installation
13 System Setup
4
Page 5

Introduction
About the Documentation
•
The documentation for this product is provided at
www.steinberg.help.
Key Commands
Many of the default key commands, also known as keyboard shortcuts,
use modifier keys, some of which are different depending on the operating
system.
For example, the default key command for Undo is Ctrl-Z on Windows and
Cmd-Z on Mac OS. When key commands with modifier keys are described
in this manual, they are shown with the Windows modifier key first, in the
following way:
•
Windows modifier key/Mac OS modifier key-key
EXAMPLE
Ctrl/Cmd-Z means: press Ctrl on Windows or Cmd on Mac OS, then press
Z.
Conventions
In our documentation, we use typographical and markup elements to
structure information.
5
Page 6

Introduction
How You Can Reach Us
How You Can Reach Us
On the Steinberg Hub menu in Cubase you find items linking to additional
information.
The menu contains links to various Steinberg web pages. Selecting a
menu item automatically launches your browser and opens the page.
On these pages you can find support and compatibility information,
answers to frequently asked questions, information about updates and
other Steinberg products, etc. This requires that you have a web browser
installed on your computer, and a working internet connection.
6
Page 7

System Requirements and
Installation
System Requirements
Your computer must meet the following minimum requirements for the
Windows and Mac OS versions of Cubase:
64-bit Windows 7/8.x/10— OS X 10.11/macOS Sierra
•
64-bit Intel or AMD multi-core CPU (Intel i5 or faster recommended)
•
4 GB RAM (8 GB or more recommended)
•
18 GB free HD space
•
1366 x 768 display resolution (1920 x 1080 recommended)
•
Graphics card with DirectX 10 and WDDM 1.1 support (Windows only)
•
USB port for USB-eLicenser
•
OS compatible audio hardware (ASIO compatible audio hardware
recommended for low latency performance)
•
DVD ROM dual-layer drive (if you do not use the download version)
•
Internet connection required for activation, account setup, and
personal/product registration. Additional downloads may be required
for the installation.
For recommended systems and support of future operating systems,
please refer to the Support section on our website www.steinberg.net.
7
Page 8
System Requirements and Installation
Installing the Program
NOTE
United States only: This software can be activated and is officially
supported only within the US.
Installing the Program
Launching Installation
PROCEDURE
1. Double-click Start Installation.
2. Follow the instructions on screen.
USB-eLicenser
Operation of Steinberg software often requires a USB-eLicenser, a
hardware copy protection device.
The USB-eLicenser is a USB device on which your Steinberg software
licenses are stored. All hardware-protected Steinberg products use the
same type of device, and you can store several licenses on one device.
Also, licenses can – within certain limits – be transferred between USBeLicensers.
If your Steinberg software product does not include a USB-eLicenser, you
can purchase one through the Steinberg online shop.
In the eLicenser Control Center, you can activate new licenses and check
which licenses are installed on your USB-eLicenser. After installation of
8
Page 9

System Requirements and Installation
Activating Your License
your Steinberg application, the eLicenser Control Center can be opened via
the Start menu on Windows systems or the Applications folder on Mac OS
systems.
NOTE
If you are using other copy-protected Steinberg products, you may want
to transfer all licenses for your applications to one USB-eLicenser, thus
using up only one USB port of your computer. See the eLicenser Control
Center Help for information on how to transfer licenses between USBeLicensers.
Activating Your License
You must activate your license.
PREREQUISITE
You have a working Internet connection and an activation code to download
your license to your eLicenser.
NOTE
You can find the license activation code in an e-mail, if you purchased
your product via the Steinberg online shop or on the Essential Product
License Information sheet, if your product was delivered on an installation
medium.
PROCEDURE
1. Go to www.steinberg.net/activate for information about
activation.
2. Follow the instructions on screen.
9
Page 10

System Requirements and Installation
Registering Your Software
RESULT
The license is downloaded to your eLicenser and activated.
Registering Your Software
Register your product at the MySteinberg online customer portal. As a
registered user, you are entitled to technical support, you gain access to
exclusive offers such as software updates and upgrades, and more.
PREREQUISITE
Make sure that you have a working internet connection.
PROCEDURE
1. Start your software.
2. Select Steinberg Hub> Register now.
An online registration form opens in your web browser.
3. Follow the instructions on screen to register at MySteinberg.
Hardware Installation
Installing the Audio Hardware and its Driver
PROCEDURE
1. Install the audio hardware and related equipment on the computer, as
described in the hardware documentation.
2. Install the driver for the audio hardware.
A driver is a piece of software that allows a program to communicate
with a certain piece of hardware. In this case, the driver allows Cubase
10
Page 11

System Requirements and Installation
Hardware Installation
to use the audio hardware. Depending on the operating system of your
computer, there are different types of drivers that can be used.
Dedicated ASIO Drivers
Professional audio hardware often comes with an ASIO driver written
especially for the device. This allows for direct communication between
Cubase and the audio hardware. As a result, the devices with specific ASIO
drivers can provide lower latency (input-output delay), which is crucial
when monitoring audio via Cubase or using VST instruments. The ASIO
driver may also provide special support for multiple inputs and outputs,
routing, synchronization, etc.
ASIO drivers are provided by the audio hardware manufacturers. Make
sure to check the manufacturer’s web site for the latest driver versions.
IMPORTANT
If your audio hardware comes with a specific ASIO driver, we strongly
recommend that you use this.
Generic Low Latency ASIO Driver (Windows Only)
On Windows systems, you can use the Generic Low Latency ASIO driver.
This driver provides ASIO support for any audio hardware supported
by Windows, thus allowing for low latency. The Generic Low Latency
ASIO driver provides the Windows Core Audio technology in Cubase. No
additional driver is needed. This driver is included with Cubase and does
not require any special installation.
NOTE
This driver should be used if no specific ASIO driver is available. Although
the Generic Low Latency ASIO driver supports all audio devices, you might
11
Page 12

System Requirements and Installation
Hardware Installation
get better results with on-board audio cards than with external USB audio
interfaces.
macOS Drivers (macOS only)
If you are using a Macintosh computer, make sure that you are using the
latest macOS drivers for your audio hardware. Follow the instructions of
the manufacturer to install the driver.
Testing the Audio Hardware
To make sure that the audio device works as expected, perform the
following tests.
•
Use any software included with the hardware to make sure that you
can record and play back audio without problems.
•
If the hardware is accessed via a standard operating system driver,
try playing back audio using the standard audio application of the
computer, for example, Windows Media Player or Apple iTunes.
Installing a MIDI Interface or USB MIDI Keyboard
Although many USB MIDI keyboards and MIDI interfaces are plug&play
devices, you may have to install a dedicated device driver. Follow the
installation procedure described in the documentation that came with the
device.
NOTE
You should also check the web site of the manufacturer for the latest
driver updates.
12
Page 13

System Requirements and Installation
System Setup
System Setup
Selecting the Driver for Your Audio Device
Before you can set up the routing for your audio signals and start
recording, you need to make sure that the correct ASIO driver is selected.
PROCEDURE
1. Select Devices> Device Setup.
2. In the Device Setup dialog, click the VST Audio System entry on the
left.
The VST Audio System page is shown on the right.
3. On the ASIO Driver pop-up menu, select the driver that you want to
use.
4. Click OK.
Setting Up the VST Connections
The VST Connections dialog allows you to set up the routing of input
and output signals between Cubase and your audio hardware. These
connections are called busses. In this section you learn how to set up the
busses for playback and recording.
Removing Busses
Before you add busses, it is recommended to remove any outputs that
were automatically added by Cubase.
PROCEDURE
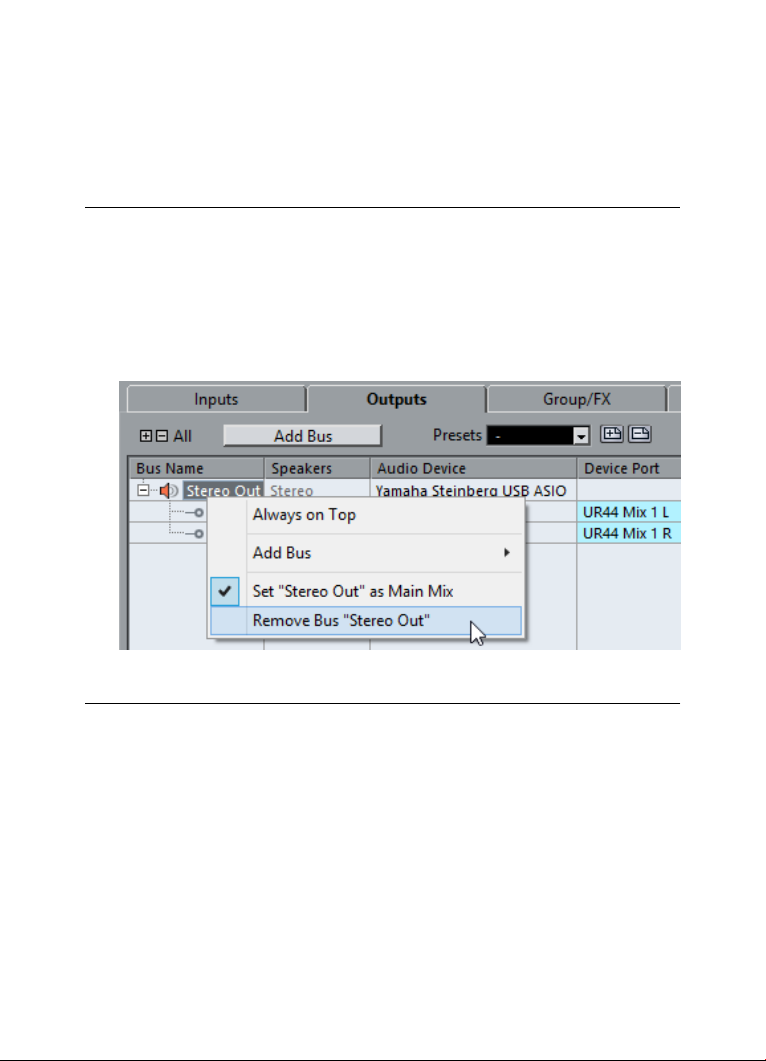
1. Select Devices> VST Connections.
2. In the VST Connections dialog, select the Outputs tab.
13
Page 14
System Requirements and Installation
System Setup
3. In the Bus Name column, right-click the top entry and select Remove
Bus from the context menu.
If necessary, repeat this step for any further busses.
Adding Outputs
You must set up the outputs for playing back audio in Cubase.
PREREQUISITE
Remove the busses that were automatically added by Cubase.
PROCEDURE
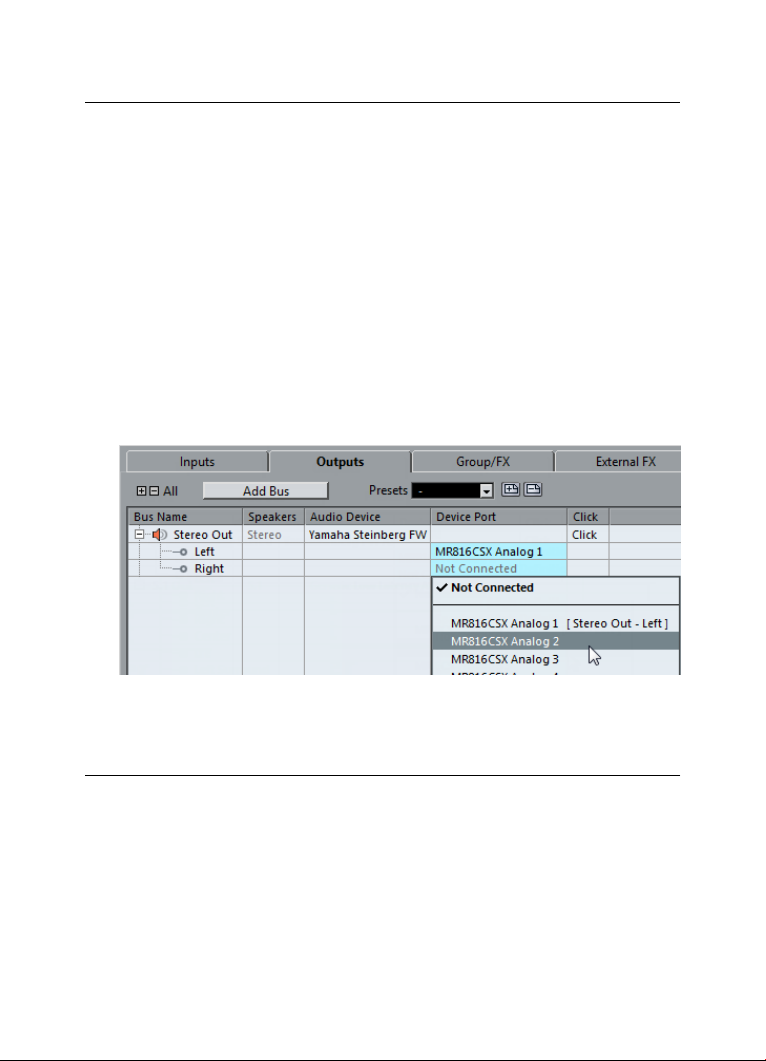
1. Select Devices> VST Connections.
2. In the VST Connections dialog, select the Outputs tab.
3. Click Add Bus.
4. In the Add Output Bus dialog, make your settings.
5. Click Add Bus.
The new bus is added, allowing you to have audio in Cubase routed to
your audio hardware.
14
Page 15
System Requirements and Installation
System Setup
6. Optional: If you want to change the output ports that were selected
automatically, open the Device Port pop-up menu and select different
ports.
Depending on your audio hardware, more than two output ports might
be available. For most cases we recommend to use the main stereo
outputs.
RELATED LINKS
Removing Busses on page 13
Adding Inputs
You must set up the inputs for recording into Cubase.
PROCEDURE
1. Select Devices> VST Connections.
2. In the VST Connections dialog, select the Inputs tab.
3. In the Bus Name column, right-click the top entry and select Remove
Bus from the context menu.
If necessary, repeat this step for any further busses.
4. Click Add Bus.
5. In the Add Input Bus dialog, make your settings.
15
Page 16

System Requirements and Installation
System Setup
6. Click Add Bus.
The new bus is added, allowing you to have audio from the input of
your audio device routed to Cubase for recording.
7. Optional: If you want to change the input ports that were selected
automatically, open the Device Port pop-up menu and select different
ports.
RESULT
You are now ready to record audio in Cubase and play it back.
NOTE
To get started with Cubase, we recommend watching the video tutorials
on the Steinberg YouTube Channel including a demonstration of the new
features of Cubase.
16
Page 17

Deutsch
Page 18

Cristina Bachmann, Heiko Bischoff, Christina Kaboth, Insa Mingers,
Matthias Obrecht, Sabine Pfeifer, Benjamin Schütte, Marita Sladek
Übersetzung: Boris Rogowski
Diese PDF wurde für die Verwendung von Screenreader-Software
optimiert. Beachten Sie, dass es aufgrund der Komplexität und großen
Anzahl von Bildern in diesem Dokument nicht möglich ist, alternative
Bildbeschreibungen einzufügen.
Die in diesem Dokument enthaltenen Informationen können ohne
Vorankündigung geändert werden und stellen keine Verpflichtung seitens
der Steinberg Media Technologies GmbH dar. Die hier beschriebene
Software wird unter einer Lizenzvereinbarung zur Verfügung gestellt und
darf ausschließlich nach Maßgabe der Bedingungen der Vereinbarung
(Sicherheitskopie) kopiert werden. Ohne ausdrückliche schriftliche
Erlaubnis durch die Steinberg Media Technologies GmbH darf kein Teil
dieses Handbuchs für irgendwelche Zwecke oder in irgendeiner Form mit
irgendwelchen Mitteln reproduziert oder übertragen werden. Registrierte
Lizenznehmer des Produkts dürfen eine Kopie dieses Dokuments zur
persönlichen Nutzung ausdrucken.
Alle Produkt- und Firmennamen sind ™ oder ® Marken der
entsprechenden Firmen. Weitere Informationen hierzu finden Sie auf der
Steinberg-Website unter www.steinberg.net/trademarks.
©
Steinberg Media Technologies GmbH, 2016.
Alle Rechte vorbehalten.
Page 19

Inhaltsverzeichnis
20 Einleitung
20 Über diese Dokumentation
20 Tastaturbefehle
21 Konventionen
21 So können Sie uns erreichen
22 Systemanforderungen und Installation
22 Systemanforderungen
23 Programm installieren
24 Lizenzaktivierung
25 Software-Registrierung
25 Hardware-Installation
28 Systemeinrichtung
19
Page 20

Einleitung
Über diese Dokumentation
•
Die Dokumentation für dieses Produkt findet sich auf
www.steinberg.help.
Tastaturbefehle
Bei vielen Standardtastaturbefehlen werden Sondertasten verwendet, von
denen einige je nach Betriebssystem abweichen können.
Der Standardtastaturbefehl für Rückgängig ist z. B. unter Windows [Strg][Z] und unter Mac OS X [Befehlstaste]-[Z]. Wenn in diesem Handbuch
Tastaturbefehle mit Sondertasten beschrieben werden, stehen die
Windows-Sondertasten an erster Stelle:
• [Windows-Sondertaste]/[Mac-Sondertaste]-[Taste]
BEISPIEL
[Strg]-Taste/[Befehlstaste]-[Z] bedeutet: Drücken Sie [Strg] unter
Windows oder [Befehlstaste] unter Mac OS X, und drücken Sie dann [Z].
Entsprechend bedeutet [Alt]-Taste-[X]: Drücken Sie [Alt] unter Windows
oder [Wahltaste] unter Mac OS X, und drücken Sie dann [X].
20
Page 21

Einleitung
Konventionen
Konventionen
In unserer Dokumentation verwenden wir typografische Elemente und
Kennzeichnungen, um Informationen zu strukturieren.
So können Sie uns erreichen
Im Menü »Steinberg Hub« von Cubase finden Sie Optionen, über die Sie
auf weitere Informationen zugreifen können.
Das Menü enthält Links zu diversen Steinberg-Seiten im Internet. Beim
Auswählen einer Menüoption wird automatisch Ihr Browser gestartet
und die entsprechende Seite geöffnet. Hier erhalten Sie technische
Unterstützung und Informationen zur Kompatibilität, Antworten auf häufig
gestellte Fragen, Informationen über Updates und andere SteinbergProdukte usw. Um auf sie zuzugreifen, ist auf Ihrem Computer ein
Webbrowser und eine funktionierende Internetverbindung erforderlich.
21
Page 22

Systemanforderungen und
Installation
Systemanforderungen
Ihr Computer muss die folgenden Mindestanforderungen für die Windowsbzw. Mac OS-Version von Cubase erfüllen:
64-Bit Windows 7/8.x/10 – OS X 10.11/macOS Sierra
•
64-Bit Intel- oder AMD-Mehrkern-CPU (Intel i5 oder schneller
empfohlen)
•
4 GB RAM (8 GB oder mehr empfohlen)
•
18 GB freier Speicherplatz
•
Bildschirmauflösung von 1366 x 768 Pixeln (1920 x 1080 empfohlen)
•
Grafikkarte mit DirectX 10- und WDDM 1.1-Unterstützung (Nur
Windows)
•
USB-Anschluss für USB-eLicenser
•
OS-kompatible Audio-Hardware (ASIO-kompatible Audio-Hardware für
geringe Latenz empfohlen)
•
DVD-ROM Double-Layer-Laufwerk (falls Sie nicht die DownloadVersion verwenden)
•
Internetverbindung für die Aktivierung und Einrichtung eines
Benutzerkontos sowie die persönliche und die Produktregistrierung.
Die Installation kann zusätzliche Downloads erfordern.
Informationen zu den empfohlenen Systemen und der Unterstützung
zukünftiger Betriebssysteme finden Sie im Support-Bereich unter
www.steinberg.net.
22
Page 23
Systemanforderungen und Installation
Programm installieren
Programm installieren
Installation starten
VORGEHENSWEISE
1. Doppelklicken Sie auf Installation starten.
2. Befolgen Sie die Anweisungen auf dem Bildschirm.
USB-eLicenser
Für viele Steinberg-Produkte wird ein Hardware-Kopierschutz in Form des
USB-eLicensers verwendet.
Der USB-eLicenser ist ein USB-Gerät, auf dem Ihre Steinberg-SoftwareLizenzen gespeichert werden. Alle Steinberg-Produkte mit HardwareKopierschutz verwenden den gleichen USB-eLicenser und es ist möglich,
mehrere Lizenzen auf einem eLicenser zu speichern. Außerdem können
Lizenzen – innerhalb bestimmter Grenzen – von einem USB-eLicenser auf
einen anderen übertragen werden.
Wenn Ihre Steinberg-Software nicht mit einem USB-eLicenser
ausgeliefert wurde, können Sie diesen über den Online-Shop von
Steinberg erstehen.
Im eLicenser Control Center können Sie neue Lizenzen aktivieren und
prüfen, welche Lizenzen sich auf Ihrem USB-eLicenser befinden. Nach der
Installation Ihrer Steinberg-Software können Sie das eLicenser Control
Center unter Windows über das Start-Menü und unter Mac OS über den
Programme-Ordner öffnen.
23
Page 24

Systemanforderungen und Installation
Lizenzaktivierung
HINWEIS
Wenn Sie andere kopiergeschützte Steinberg-Produkte besitzen, können
Sie die Lizenzen für Ihre Anwendungen auf einen einzigen USB-eLicenser
übertragen, so dass nur ein USB-Anschluss Ihres Computers belegt
wird. Informationen zum Übertragen von Lizenzen zwischen zwei USBeLicensern finden Sie in der Hilfe des eLicenser Control Centers.
Lizenzaktivierung
Sie müssen die Lizenz für Ihr Steinberg-Produkt aktivieren.
VORAUSSETZUNGEN
Sie haben eine funktionierende Internetverbindung und einen
Aktivierungscode, um Ihre Lizenz auf Ihren eLicenser herunterzuladen.
HINWEIS
Wenn Sie Ihr Produkt im Online-Shop von Steinberg gekauft haben, haben
Sie den Lizenzaktivierungscode in einer E-Mail erhalten. Wenn Sie Ihr
Produkt auf einem Installationsmedium erhalten haben, finden Sie den
Code auf dem Beiblatt »Essential Product License Information«.
VORGEHENSWEISE
1. Auf www.steinberg.net/activate finden Sie Informationen zur
Aktivierung.
2. Befolgen Sie die Anweisungen auf dem Bildschirm.
ERGEBNIS
Die Lizenz wird auf Ihren eLicenser heruntergeladen und aktiviert.
24
Page 25

Systemanforderungen und Installation
Software-Registrierung
Software-Registrierung
Registrieren Sie Ihre Software beim Online-Kundenportal MySteinberg.
Als registrierter Benutzer haben Sie Anspruch auf technischen Support,
erhalten exklusive Angebote wie Updates und Upgrades und vieles mehr.
VORAUSSETZUNGEN
Beachten Sie, dass Sie hierzu eine aktive Internetverbindung benötigen.
VORGEHENSWEISE
1. Starten Sie Ihre Software.
2. Wählen Sie Steinberg Hub> Jetzt registrieren.
Ein Online-Registrierungsformular wird in Ihrem Web-Browser
geöffnet.
3. Befolgen Sie die Anweisungen auf dem Bildschirm, um sich bei
MySteinberg zu registrieren.
Hardware-Installation
Audio-Hardware und Treiber installieren
VORGEHENSWEISE
1. Installieren Sie die Audiokarte und die dazugehörige Software wie in
der Bedienungsanleitung für die Karte beschrieben.
2. Installieren Sie den Treiber für die Audio-Hardware.
Mit Hilfe von Treiber-Software kann das Programm mit einer
bestimmten Hardware kommunizieren. In diesem Fall ermöglicht
der Treiber Cubase den Zugriff auf die Audio-Hardware. Je nach
25
Page 26

Systemanforderungen und Installation
Hardware-Installation
Betriebssystem Ihres Computers können Sie unterschiedliche
Treiberarten verwenden.
Spezielle ASIO-Treiber
Professionelle Audio-Hardware wird oft mit einem ASIO-Treiber
geliefert, der speziell für diese Hardware ausgelegt ist. So kann Cubase
direkt mit der Audio-Hardware kommunizieren. Daher kann AudioHardware mit speziellen ASIO-Treibern die Latenzzeiten (Eingangs-/
Ausgangsverzögerung) verkürzen, was beim Mithören von Audiomaterial
über Cubase oder beim Verwenden von VST-Instrumenten entscheidend
ist. Der ASIO-Treiber bietet eventuell auch spezielle Unterstützung für
Karten mit mehreren Ein- und Ausgängen, Routing, Synchronisation usw.
ASIO-Treiber werden vom Hersteller der Audio-Hardware geliefert.
Informieren Sie sich auf der Website des Herstellers über die neuesten
Treiberversionen.
WICHTIG
Wenn es für Ihre Audiokarte einen eigenen ASIO-Treiber gibt, sollten Sie
diesen verwenden.
Generischer ASIO Treiber für geringe Latenz (nur Windows)
Auf Windows-Systemen können Sie den generischen ASIO-Treiber für
geringe Latenz verwenden. Dabei handelt es sich um einen generischen
ASIO-Treiber, der ASIO-Unterstützung für jegliche von Windows
unterstützte Audio-Hardware bereitstellt und für kurze Latenzzeiten
sorgt. Über diesen Treiber kann in Cubase die Core-Audio-Technologie
von Windows genutzt werden. Sie benötigen keinen zusätzlichen Treiber.
Dieser Treiber wird mit Cubase mitgeliefert und muss nicht extra
installiert werden.
26
Page 27

Systemanforderungen und Installation
Hardware-Installation
HINWEIS
Verwenden Sie diesen Treiber, wenn kein spezieller ASIO-Treiber zur
Verfügung steht. Obwohl der generische ASIO-Treiber für geringe
Latenz jegliche Audio-Hardware unterstützt, erzielen Sie mit OnboardAudiokarten möglicherweise bessere Ergebnisse als mit externen USBAudioschnittstellen.
Mac OS X Treiber (nur Mac)
Wenn Sie einen Macintosh-Computer verwenden, stellen Sie sicher, dass
Sie den aktuellen Mac OS X Treiber für Ihre Audio-Hardware verwenden.
Beachten Sie die Anleitungen des Herstellers zur Treiber-Installation.
Audio-Hardware überprüfen
Führen Sie folgende Tests durch, um sicherzustellen, dass Ihre AudioHardware wie gewünscht funktioniert.
•
Verwenden Sie die mit der Audio-Hardware gelieferte Software, um
zu überprüfen, ob Sie problemlos Audiomaterial aufnehmen und
wiedergeben können.
•
Wenn Sie mit einem Betriebssystem-Treiber auf die Karte zugreifen,
geben Sie Audiomaterial mit der Standard-Audioanwendung wieder (z.
B. Windows Media Player oder Apple iTunes).
MIDI-Schnittstelle oder USB-MIDI-Keyboard installieren
Auch wenn es sich bei vielen USB-MIDI-Keyboards und MIDISchnittstellen um Plug&Play-Geräte handelt, müssen Sie eventuell
einen speziellen Gerätetreiber installieren. Befolgen Sie die
Installationsanweisung in der Dokumentation zu Ihrem Gerät.
27
Page 28

Systemanforderungen und Installation
Systemeinrichtung
HINWEIS
Informieren Sie sich auf der Website des Herstellers über die neuesten
Treiberversionen.
Systemeinrichtung
Treiber für Ihr Audiogerät auswählen
Bevor Sie das Routing für Ihre Audiosignale festlegen und mit der
Aufnahme beginnen, sollten Sie sicherstellen, dass der richtige ASIOTreiber ausgewählt ist.
VORGEHENSWEISE
1. Wählen Sie Geräte> Geräte konfigurieren.
2. Klicken Sie im Dialog Geräte konfigurieren in der Liste links auf die
Option VST-Audiosystem.
Die Seite VST-Audiosystem wird rechts angezeigt.
3. Wählen Sie im Einblendmenü ASIO-Treiber den Treiber, den Sie
verwenden möchten.
4. Klicken Sie auf OK.
VST-Verbindungen einrichten
Im Dialog VST-Verbindungen können Sie Einstellungen zum Routing von
Eingangs- und Ausgangssignalen zwischen Cubase und Ihrer AudioHardware vornehmen. Diese Verbindungen werden Busse genannt. Im
folgenden Abschnitt lernen Sie, wie Sie die Eingangs- und Ausgangsbusse
zum Aufnehmen bzw. zur Wiedergabe einrichten.
28
Page 29
Systemanforderungen und Installation
Systemeinrichtung
Busse entfernen
Bevor Sie Busse hinzufügen, sollten Sie zunächst alle automatisch von
Cubase erzeugten Busse löschen.
VORGEHENSWEISE
1. Wählen Sie Geräte> VST-Verbindungen.
2. Wählen Sie im Dialog VST-Verbindungen die Ausgänge-Registerkarte.
3. Klicken Sie in der Spalte Bus-Name mit der rechten Maustaste auf
den obersten Eintrag und wählen Sie im Kontextmenü den Befehl Bus
entfernen.
Wiederholen Sie den Schritt ggf. für alle weiteren angezeigten Busse.
Ausgänge hinzufügen
Sie müssen die Ausgänge für die Wiedergabe von Audiomaterial in Cubase
einrichten.
VORAUSSETZUNGEN
Löschen Sie die automatisch von Cubase hinzugefügten Busse.
29
Page 30
Systemanforderungen und Installation
Systemeinrichtung
VORGEHENSWEISE
1. Wählen Sie Geräte> VST-Verbindungen.
2. Wählen Sie im Dialog VST-Verbindungen die Ausgänge-Registerkarte.
3. Klicken Sie auf Bus hinzufügen.
4. Nehmen Sie im Dialog Ausgangsbus hinzufügen Ihre Einstellungen
vor.
5. Klicken Sie auf Bus hinzufügen.
Der neue Bus wird hinzugefügt, so dass Audiomaterial von Cubase an
ihre Audio-Hardware geleitet wird.
6. Optional: Wenn Sie die automatisch ausgewählten Ausgangs-Ports
ändern möchten, öffnen Sie das Einblendmenü Geräte-Port und
wählen Sie andere Ports aus.
Je nachdem, welche Audio-Hardware Sie verwenden, können mehr
als zwei Ausgänge verfügbar sein. In den meisten Fällen werden die
Haupt-Stereo-Ausgänge benötigt.
WEITERFÜHRENDE LINKS
Busse entfernen auf Seite 29
30
Page 31

Systemanforderungen und Installation
Systemeinrichtung
Eingänge hinzufügen
Im folgenden Abschnitt lernen Sie, wie Sie die Eingänge zum Aufnehmen
in Cubase einrichten.
VORGEHENSWEISE
1. Wählen Sie Geräte> VST-Verbindungen.
2. Wählen Sie im Dialog VST-Verbindungen die Eingänge-Registerkarte.
3. Klicken Sie in der Spalte Bus-Name mit der rechten Maustaste auf
den obersten Eintrag und wählen Sie im Kontextmenü den Befehl Bus
entfernen.
Wiederholen Sie den Schritt ggf. für alle weiteren angezeigten Busse.
4. Klicken Sie auf Bus hinzufügen.
5. Nehmen Sie im Dialog Eingangsbus hinzufügen Ihre Einstellungen
vor.
6. Klicken Sie auf Bus hinzufügen.
Der neue Bus wird hinzugefügt, so dass Sie über den Eingang Ihres
Audiogeräts empfangene Audiosignale in Cubase aufnehmen können.
7. Optional: Wenn Sie die automatisch ausgewählten Eingangs-Ports
ändern möchten, öffnen Sie das Einblendmenü Geräte-Port und
wählen Sie andere Ports aus.
ERGEBNIS
Sie können jetzt in Cubase Audiomaterial aufnehmen und wiedergeben.
HINWEIS
Für einen schnellen Einstieg in die Arbeit mit Cubase empfehlen wir
Ihnen, sich im Steinberg-Kanal auf YouTube die Video-Lehrgänge und die
Demos der neuen Funktionen in Cubase anzuschauen.
31
Page 32

Français
Page 33

Cristina Bachmann, Heiko Bischoff, Christina Kaboth, Insa Mingers,
Matthias Obrecht, Sabine Pfeifer, Benjamin Schütte, Marita Sladek
Traduction: Gaël Vigouroux
Ce document PDF a été amélioré pour être plus facile d’accès aux
personnes malvoyantes. En raison du grand nombre d’images qu’il
contient et de leur complexité, veuillez noter qu’il n’a pas été possible
d’intégrer de descriptions textuelles des images.
Les informations contenues dans ce document sont sujettes à modification
sans préavis et n’engagent aucunement la responsabilité de Steinberg
Media Technologies GmbH. Le logiciel décrit dans ce document fait l’objet
d’un Accord de Licence et ne peut être copié sur un autre support sauf si
cela est autorisé spécifiquement par l’Accord de Licence. Aucune partie
de cette publication ne peut être copiée, reproduite ni même transmise
ou enregistrée, sans la permission écrite préalable de Steinberg Media
Technologies GmbH. Les détenteurs enregistrés de la licence du produit
décrit ci-après sont autorisés à imprimer une copie du présent document
pour leur usage personnel.
Tous les noms de produits et de sociétés sont des marques déposées
™
ou ® de leurs propriétaires respectifs. Pour de plus amples informations,
rendez-vous sur le site www.steinberg.net/trademarks.
©
Steinberg Media Technologies GmbH, 2016.
Tous droits réservés.
Page 34

Table des Matières
35 Introduction
35 À propos de la documentation
35 Raccourcis clavier
35 Conventions
36 Comment nous contacter
37 Système requis et installation
37 Configuration minimale
38 Installation du programme
39 Activation de votre licence
40 Enregistrement de votre logiciel
40 Installation du matériel
43 Configuration système
34
Page 35

Introduction
À propos de la documentation
•
La documentation de ce produit peut être téléchargée sur le site
www.steinberg.help.
Raccourcis clavier
De nombreux raccourcis clavier par défaut utilisent des touches mortes
dont certaines changent en fonction du système d’exploitation utilisé.
Par exemple, le raccourci clavier par défaut de la fonction Annuler est
Ctrl-Z sous Windows et Cmd-Z sous Mac OS. Lorsque des raccourcis
clavier employant des touches mortes sont mentionnés dans ce manuel,
ils sont d’abord indiqués avec la touche morte de Windows, selon la
formule suivante:
•
touche morte Windows / touche morte Mac OS - touche
EXEMPLE
Ctrl/Cmd-Z signifie: appuyez sur Ctrl sous Windows ou Cmd sous Mac OS,
puis appuyez sur Z.
Conventions
Nous avons utilisé des éléments typographiques et des balises pour
structurer les informations contenues dans cette documentation.
35
Page 36

Introduction
Comment nous contacter
Comment nous contacter
Dans le menu Steinberg Hub de Cubase, plusieurs options vous
permettent d’accéder à des informations supplémentaires.
Ce menu contient des liens vers diverses pages du site Web de Steinberg.
Quand vous sélectionnez un élément du menu, votre navigateur s’ouvre
automatiquement à la page correspondante. Dans ces pages, vous
trouverez de l'assistance technique, des informations sur la compatibilité,
des réponses aux questions fréquemment posées, des informations sur
les mises à jour et les autres produits de Steinberg, etc. Pour y accéder,
vous devez avoir un navigateur installé sur votre ordinateur et disposer
d'une connexion Internet.
36
Page 37

Système requis et installation
Configuration minimale
Les caractéristiques de votre ordinateur doivent être supérieures ou
égales aux suivantes pour que les versions Windows et Mac OS de Cubase
soient prises en charge:
64bits Windows 7/8.x/10— OS X 10.11/macOS Sierra
•
Processeur multi-cœur 64bits Intel ou AMD (Intel i5 ou supérieur
recommandé)
•
4 Go de RAM (8 Go ou plus recommandés)
•
18 Go d'espace libre sur le disque dur
•
Une résolution d'affichage de 1366 x 768 (1920 x 1080 recommandé)
•
Une carte graphique compatible DirectX 10 et WDDM 1.1 (Windows
uniquement)
•
Un port USB pour la clé USB-eLicenser
•
Une interface audio compatible avec le système d'exploitation
(interface audio compatible ASIO recommandée pour moins de
latence)
•
Un lecteur de DVD ROM double couche (si vous n'utilisez pas la
version téléchargée)
•
Une connexion internet pour l’activation, la configuration du compte et
l’enregistrement personnel/du produit. Il peut s'avérer nécessaire de
télécharger des fichiers supplémentaires pour l'installation.
37
Page 38

Système requis et installation
Installation du programme
Pour en savoir plus sur les systèmes recommandés et la prise en charge
des prochains systèmes d'exploitation, veuillez vous référer à la section
Support de notre site www.steinberg.net.
Installation du programme
Lancement de l'installation
PROCÉDER AINSI
1. Double-cliquez sur Commencer l'installation.
2. Suivez les instructions à l’écran.
Clé USB-eLicenser
Pour que les logiciels de Steinberg puissent fonctionner, il est souvent
nécessaire d'utiliser une clé USB-eLicenser. Il s’agit d’un périphérique
matériel de protection contre la copie.
La clé USB-eLicenser est un périphérique USB sur lequel sont stockées
vos licences logicielles Steinberg. Tous les produits Steinberg protégés de
cette manière utilisent le même type de périphérique et il est possible de
stocker plusieurs licences sur une seule clé. Les licences peuvent – dans
certaines limites – être transférées d’une clé USB-eLicenser à une autre.
Si votre logiciel Steinberg n’est pas fourni avec une clé USB-eLicenser,
vous pouvez en acheter une sur la boutique en ligne Steinberg.
Le eLicenser Control Center vous permet d’activer les nouvelles licences
et de voir quelles licences sont installées sur votre clé USB-eLicenser.
38
Page 39

Système requis et installation
Activation de votre licence
Une fois votre application Steinberg installée, le eLicenser Control
Center s’ouvre via le menu Démarrer sous Windows et à partir du dossier
Applications sous Mac OS.
À NOTER
Si vous utilisez d’autres produits Steinberg protégés contre la copie,
vous souhaiterez probablement transférer toutes les licences de vos
applications sur une même clé USB-eLicenser, afin de n’utiliser qu’un
seul port USB de votre ordinateur. Consultez l’Aide du eLicenser Control
Center pour obtenir de plus amples informations sur le transfert des
licences d’une clé USB-eLicenser à une autre.
Activation de votre licence
Il est obligatoire d’activer la licence.
CONDITION PRÉALABLE
Vous disposez d'une connexion internet et d'un code d'activation vous
permettant de télécharger la licence sur votre eLicenser.
À NOTER
Le code d'activation de licence vous a été envoyé par e-mail si vous avez
acheté votre produit sur la boutique en ligne Steinberg, ou sur la feuille
Essential Product License Information, si le produit vous a été fourni sur
un support d'installation.
PROCÉDER AINSI
1. Rendez-vous sur www.steinberg.net/activate pour de plus
amples informations sur l'activation.
2. Suivez les instructions à l’écran.
39
Page 40

Système requis et installation
Enregistrement de votre logiciel
RÉSULTAT
La licence est alors téléchargée sur votre eLicenser, puis activée.
Enregistrement de votre logiciel
Enregistrez votre produit sur le portail client en ligne MySteinberg. En
tant qu’utilisateur enregistré, vous avez accès à un service d’assistance
technique, à des offres exclusives telles que des mises à niveau ou des
mises à jour logicielles, et à bien plus encore.
CONDITION PRÉALABLE
Assurez-vous de bien être connecté à Internet.
PROCÉDER AINSI
1. Démarrez votre logiciel.
2. Sélectionnez Steinberg Hub> S’inscrire maintenant.
Un formulaire d’enregistrement en ligne s’ouvre dans votre navigateur
Web.
3. Suivez les instructions à l’écran pour enregistrer votre produit sur
MySteinberg.
Installation du matériel
Installation de l’interface audio et de son pilote
PROCÉDER AINSI
1. Installez l’interface audio et ses accessoires sur l’ordinateur en
procédant comme indiqué dans la documentation du matériel.
2. Installez le pilote de l’interface audio.
40
Page 41

Système requis et installation
Installation du matériel
Un pilote est un élément logiciel qui permettant au programme de
communiquer avec un périphérique en particulier. Ici, le pilote permet
à Cubase d’utiliser l'interface audio. Selon le système d’exploitation
de votre ordinateur, il est possible que vous ayez le choix entre
plusieurs types de pilotes.
Pilotes ASIO dédiés
Les interfaces audio professionnelles sont souvent livrées avec un pilote
ASIO spécialement conçu pour le périphérique. Ce pilote assure la
communication directe entre Cubase et l’interface audio. Par conséquent,
les interfaces dotées de pilotes ASIO spécifiques bénéficient d’une latence
(retard entre entrée et sortie) moins élevée, ce qui est essentiel pour
pouvoir écouter un signal audio via Cubase ou utiliser des instruments
VST. D’autre part, le pilote ASIO prend parfois en charge les entrées et
sorties multiples, le routage, la synchronisation, etc.
Les pilotes ASIO sont fournis par le fabricant de l’interface audio. Vérifiez
sur le site Web du fabricant que vous possédez bien la dernière version du
pilote.
IMPORTANT
Si votre interface audio est livrée avec un pilote ASIO spécifique, nous vous
recommandons fortement d’utiliser celui-ci.
Pilote ASIO générique à faible latence (Windows uniquement)
Sur les systèmes Windows, vous pouvez utiliser le pilote ASIO générique
à faible latence. Ce pilote ASIO assure la compatibilité ASIO avec toutes
les interfaces audio prises en charge par Windows, ce qui permet de
bénéficier d’une latence plus faible. Le pilote ASIO générique à faible
latence intègre la technologie Windows Core Audio à Cubase. Aucun autre
41
Page 42

Système requis et installation
Installation du matériel
pilote n’est nécessaire. Ce pilote est fourni avec Cubase et ne nécessite
aucune installation particulière.
À NOTER
En l’absence de pilote ASIO spécifique, il est recommandé d’utiliser ce
pilote. Bien que le pilote ASIO générique à faible latence prenne en charge
toutes les interfaces audio, il se peut que vous obteniez de meilleurs
résultats avec une carte audio intégrée qu’avec une interface audio USB
externe.
Pilotes Mac OS X (Mac uniquement)
Si vous utilisez un ordinateur Macintosh, veillez à installer les tout
derniers pilotes Mac OS X pour votre interface audio. Suivez les
instructions d’installation fournies par le fabricant pour installer le pilote.
Test de l’interface audio
Pour vérifier si votre interface audio fonctionne correctement, effectuez
les tests suivants.
•
Utilisez l’un des logiciels fournis avec votre matériel pour vous
assurer que la lecture et l’enregistrement audio fonctionnent sans
problèmes.
•
Si l’accès à l’interface se fait via un pilote standard du système
d’exploitation, essayez de lire les données audio en utilisant
l’application audio standard du système (par ex. Windows Media
Player ou Apple iTunes).
Installation d’une interface MIDI ou d’un clavier MIDI USB
Bien que la plupart des claviers MIDI USB et des interfaces MIDI
fonctionnent en plug&play, vous devrez peut-être installer un pilote dédié
42
Page 43

Système requis et installation
Configuration système
à votre périphérique. Veillez alors à bien suivre la procédure d’installation
décrite dans la documentation fournie avec le périphérique.
À NOTER
Veuillez aussi vérifier sur le site Web du fabricant que vous disposez bien
de la dernière version du pilote.
Configuration système
Sélection du pilote de votre interface audio
Avant de configurer le routage de vos signaux audio et de commencer
à enregistrer, il vous faut vérifier si le pilote ASIO approprié est bien
sélectionné.
PROCÉDER AINSI
1. Sélectionnez Périphériques> Configuration des périphériques.
2. Dans la boîte de dialogue Configuration des périphériques, cliquez
sur l’entrée Système audio VST à gauche.
La page Système audio VST se trouve à droite.
3. Dans le menu local Pilote ASIO, sélectionnez le pilote que vous
souhaitez utiliser.
4. Cliquez sur OK.
Configuration des connexions VST
La boîte de dialogue VST Connexions vous permet de configurer le
routage des signaux d’entrée et de sortie entre Cubase et votre interface
audio. Ces connexions sont appelées bus. Dans cette section, vous allez
découvrir comment configurer les bus pour la lecture et l’enregistrement.
43
Page 44

Système requis et installation
Configuration système
Supprimer des bus
Avant de créer des bus, il est recommandé de supprimer les sorties
automatiquement créées par Cubase.
PROCÉDER AINSI
1. Sélectionnez Périphériques> VST Connexions.
2. Dans la boîte de dialogue VST Connexions, sélectionnez l’onglet
Sorties.
3. Dans la colonne Nom de bus, faites un clic droit sur la première
entrée et sélectionnez Supprimer bus dans le menu contextuel.
Si nécessaire répétez la procédure pour tous les autres bus.
Ajouter des sorties
Il vous faut configurer les sorties qui seront utilisées pour la lecture audio
dans Cubase.
CONDITION PRÉALABLE
Supprimez les bus qui ont été ajoutés automatiquement par Cubase.
44
Page 45

Système requis et installation
Configuration système
PROCÉDER AINSI
1. Sélectionnez Périphériques> VST Connexions.
2. Dans la boîte de dialogue VST Connexions, sélectionnez l’onglet
Sorties.
3. Cliquez sur Ajouter bus.
4. Dans la boîte de dialogue Ajouter bus de sortie, configurez les
paramètres à votre convenance.
5. Cliquez sur Ajouter bus.
Le bus qui est créé vous permet de router le signal audio de Cubase
vers votre interface audio.
6. Facultatif: Si vous désirez changer les ports de sortie qui ont
été sélectionnés automatiquement, ouvrez le menu local Port
périphérique et sélectionnez d’autres ports.
Selon votre interface audio, plus de deux ports de sortie peuvent
être disponibles. Dans la plupart des cas nous vous recommandons
d’utiliser les sorties stéréo générales.
LIENS ASSOCIÉS
Supprimer des bus à la page 44
45
Page 46

Système requis et installation
Configuration système
Ajouter des entrées
Vous devez configurer les entrées pour l’enregistrement dans Cubase.
PROCÉDER AINSI
1. Sélectionnez Périphériques> VST Connexions.
2. Dans la boîte de dialogue VST Connexions, sélectionnez l’onglet
Entrées.
3. Dans la colonne Nom de bus, faites un clic droit sur la première
entrée et sélectionnez Supprimer bus dans le menu contextuel.
Si nécessaire répétez ce pas pour tous les autres bus.
4. Cliquez sur Ajouter bus.
5. Dans la boîte de dialogue Ajouter bus d’entrée, configurez les
paramètres à votre convenance.
6. Cliquez sur Ajouter bus.
Le nouveau bus qui est ajouté vous permet de router le signal
audio de l’entrée de votre périphérique audio vers Cubase pour
l’enregistrement.
7. Facultatif: Si vous désirez changer les ports d’entrée qui ont
été sélectionnés automatiquement, ouvrez le menu local Port
périphérique et sélectionnez d’autres ports.
RÉSULTAT
Vous êtes maintenant prêt à enregistrer et lire des données audio dans
Cubase.
À NOTER
Pour vous familiariser avec Cubase, nous vous recommandons de
visionner les didacticiels vidéo sur la chaîne Youtube de Steinberg. Ces
46
Page 47

Système requis et installation
Configuration système
didacticiels vous permettront de découvrir les nouvelles fonctions de
Cubase.
47
Page 48

Italiano
Page 49

Cristina Bachmann, Heiko Bischoff, Christina Kaboth, Insa Mingers,
Matthias Obrecht, Sabine Pfeifer, Benjamin Schütte, Marita Sladek
Traduzione: Filippo Manfredi
Il presente PDF offre un accesso facilitato per utenti portatori di handicap
visivi. Si noti che a causa della complessità del documento e dell’elevato
numero di immagini in esso presenti non è stato possibile includere delle
descrizioni testuali delle stesse.
Le informazioni contenute in questo manuale sono soggette a variazioni
senza preavviso e non rappresentano un obbligo da parte di Steinberg
Media Technologies GmbH. Il software descritto in questo manuale
è soggetto ad un Contratto di Licenza e non può essere copiato su
altri supporti multimediali, tranne quelli specificamente consentiti
dal Contratto di Licenza. Nessuna parte di questa pubblicazione può
essere copiata, riprodotta o in altro modo trasmessa o registrata, per
qualsiasi motivo, senza un consenso scritto da parte di Steinberg Media
Technologies GmbH. I licenziatari registrati del prodotto descritto di
seguito, hanno diritto a stampare una copia del presente documento per
uso personale.
Tutti i nomi dei prodotti e delle case costruttrici sono marchi registrati (™ o
®
) dei rispettivi proprietari. Per maggiori informazioni, visitare il sito web
www.steinberg.net/trademarks.
©
Steinberg Media Technologies GmbH, 2016.
Tutti i diritti riservati.
Page 50

51 Introduzione
51 Informazioni sulla documentazione
51 Comandi da tastiera
52 Convenzioni
52 Come contattare Steinberg
53 Requisiti di sistema e installazione
53 Requisiti di sistema
54 Installazione del programma
55 Attivazione delle licenze
56 Registrazione del software
56 Installazione dell’hardware
59 Configurazione del sistema
Indice
50
Page 51

Introduzione
Informazioni sulla documentazione
•
La documentazione relativa al presente prodotto è disponibile
all’indirizzo web www.steinberg.help.
Comandi da tastiera
Molti dei comandi da tastiera di default fanno uso dei cosiddetti tasti
modificatori, alcuni dei quali differiscono a seconda del sistema operativo
utilizzato.
Ad esempio, il comando da tastiera predefinito per la funzione Annulla
è Ctrl-Z in Windows e Cmd-Z in Mac OS. Quando nel presente manuale
vengono descritti dei comandi da tastiera con i tasti modificatori, questi
vengono visualizzati con davanti i tasti modificatori per Windows, nella
maniera seguente:
•
Tasto modificatore di Mac OS/ Tasto modificatore di Windowscomando da tastiera
ESEMPIO
Ctrl/Cmd-Z significa: premere Ctrl in Windows o Cmd in Mac OS, quindi
premere Z.
51
Page 52

Introduzione
Convenzioni
Convenzioni
Nella documentazione fornita si fa ampio utilizzo degli elementi tipografici
e dei mark-up per strutturare meglio e rendere più accessibili le
informazioni.
Come contattare Steinberg
Nel menu Steinberg Hub in Cubase sono disponibili delle voci di
collegamento a una serie di informazioni aggiuntive.
Questo menu contiene dei link a diverse pagine del sito web di Steinberg.
La selezione di una voce del menu lancia automaticamente il browser
web e apre la rispettiva pagina. In queste pagine sono disponibili varie
informazioni di supporto e compatibilità, risposte a FAQs (frequently asked
questions), informazioni riguardo ad aggiornamenti e ad altri prodotti di
Steinberg, ecc. Per poter utilizzare questa funzione è necessario che sul
proprio computer sia installato un browser web e che si disponga di una
connessione internet funzionante.
52
Page 53

Requisiti di sistema e installazione
Requisiti di sistema
Il computer utilizzato deve soddisfare i seguenti requisiti minimi per le
versioni Windows e Mac OS di Cubase:
Windows 7/8.x/10 a 64-bit — OS X 10.11/macOS Sierra
•
CPU Intel o AMD multi-core a 64-bit (Intel i5 o superiore consigliato)
•
4 GB di RAM (8 GB o superiore consigliato)
•
18 GB di spazio libero su hard disk
•
Risoluzione dello schermo di almeno 1366 x 768 (risoluzione
consigliata: 1920 x 1080)
•
Scheda grafica con supporto per DirectX 10 e WDDM 1.1 (solo
Windows)
•
Porta USB per collegare i dispositivi USB-eLicenser
•
Hardware audio compatibile con OS (si consiglia l’utilizzo di
periferiche compatibili con il formato ASIO per una operatività a bassa
latenza)
•
Lettore DVD dual-layer (nel caso non si utilizzi la versione download)
•
Connessione internet necessaria per le operazioni di attivazione,
configurazione dell’account e per la registrazione personale/del
prodotto. Per completare il processo di installazione potrebbero
essere necessari dei download aggiuntivi.
53
Page 54

Requisiti di sistema e installazione
Installazione del programma
Per ottenere informazioni sui sistemi consigliati e sul supporto per i
sistemi operativi futuri, fare riferimento alla sezione Support del nostro
sito web all'indirizzo www.steinberg.net.
Installazione del programma
Lanciare l’installazione
PROCEDIMENTO
1. Fare doppio-clic su Avvia l’installazione
2. Seguire le istruzioni a schermo.
USB-eLicenser
Per l’utilizzo dei software Steinberg è spesso necessario un USBeLicenser, un dispositivo hardware di protezione dalla copia.
L’USB-eLicenser è un dispositivo USB sul quale sono archiviate le
proprie licenze relative ai software Steinberg. Tutti i prodotti Steinberg
protetti via hardware utilizzano lo stesso tipo di dispositivo ed è possibile
memorizzare più licenze sullo stesso supporto. Inoltre, le licenze – entro
determinati limiti – possono essere trasferite da un USB-eLicenser
all’altro.
Se il prodotto Steinberg che avete acquistato non include un USBeLicenser, è possibile acquistarne uno dallo shop online di Steinberg.
Nell’applicazione eLicenser Control Center è possibile attivare delle nuove
licenze e verificare quali licenze sono installate sul proprio USB-eLicenser.
54
Page 55

Requisiti di sistema e installazione
Attivazione delle licenze
Dopo avere eseguito l’installazione della propria applicazione Steinberg,
l’eLicenser Control Center può essere aperto tramite il menu Start nei
sistemi Windows, oppure tramite la cartella Applicazioni nei sistemi Mac
OS.
NOTA
Se si stanno utilizzando altri prodotti Steinberg protetti dalla copia, si
consiglia di trasferire tutte le licenze su un unico USB-eLicenser, andando
così ad occupare solamente una porta USB del computer. Consultare la
sezione di Aiuto dell’applicativo eLicenser Control Center per maggiori
informazioni sulle modalità di trasferimento delle licenze da un USBeLicenser a un altro.
Attivazione delle licenze
È necessario attivare la propria licenza.
PREREQUISITI
Si dispone di una connessione a internet funzionante e di un codice di
attivazione per scaricare la licenza sul proprio eLicenser.
NOTA
Il codice di attivazione della licenza viene generalmente ricevuto via mail
nel caso in cui il prodotto sia stato acquistato tramite lo shop online
di Steinberg. Se invece avete ricevuto il prodotto su un supporto di
installazione, la licenza si trova nel foglio chiamato Essential Product
License Information che trovate nella confezione d’acquisto.
PROCEDIMENTO
1. Visitate la pagina web www.steinberg.net/activate per
maggiori informazioni sul processo di attivazione della licenza.
55
Page 56

Requisiti di sistema e installazione
Registrazione del software
2. Seguite le istruzioni a schermo.
RISULTATO
La licenza viene scaricata nella memoria dell’USB-eLicenser e attivata.
Registrazione del software
Potete registrare il vostro prodotto sul portale online MySteinberg
riservato ai nostri clienti. Come utenti registrati, avete diritto al servizio
di supporto tecnico e potrete beneficiare di esclusive offerte come
aggiornamenti software e molto altro.
PREREQUISITI
Assicuratevi di disporre di una connessione internet funzionante.
PROCEDIMENTO
1. Avviate il vostro software.
2. Selezionate Steinberg Hub> Registra ora.
Nel browser web si apre un form di registrazione online.
3. Seguite le istruzioni a schermo per registrarvi su MySteinberg.
Installazione dell’hardware
Installazione dell’hardware audio e dei relativi driver
PROCEDIMENTO
1. Installare nel computer l’hardware audio e le apparecchiature ad esso
connesse, come indicato nella documentazione fornita dai rispettivi
produttori.
56
Page 57

Requisiti di sistema e installazione
Installazione dell’hardware
2. Installare il driver della periferica hardware audio.
Un driver è un componente software che consente ad un programma
di comunicare con uno specifico dispositivo hardware. In questo caso,
il driver permette a Cubase di utilizzare l’hardware audio. A seconda
del sistema operativo installato sul proprio computer, possono essere
utilizzati diversi tipi di driver.
Driver ASIO dedicati
Le apparecchiature audio professionali dispongono spesso di un driver
ASIO dedicato, progettato in maniera specifica per le singole periferiche.
Questo rende possibile una comunicazione diretta tra Cubase e l’hardware
audio. Di conseguenza, le periferiche dotate di driver ASIO specifici
sono in grado di offrire un livello ridotto di latenza (ritardo ingressouscita), caratteristica di fondamentale importanza quando si esegue
il monitoraggio dell’audio in Cubase o quando si utilizzano dei VST
Instrument. I driver ASIO possono inoltre fornire un supporto speciale per
ingressi e uscite multipli, per le assegnazioni, per la sincronizzazione, ecc.
I driver ASIO vengono forniti direttamente dalle case produttrici delle
periferiche audio. Si consiglia di visitare periodicamente il sito web dei
relativi produttori per scaricare le ultime versioni dei driver.
IMPORTANTE
Se la propria periferica audio è dotata di un driver ASIO specifico, si
raccomanda sempre di utilizzarlo.
Driver ASIO generico a bassa latenza (solo Windows)
Su sistemi Windows, è anche possibile utilizzare il Driver ASIO generico
a bassa latenza. Questo driver offre il supporto allo standard ASIO per
tutte le periferiche hardware audio supportate da Windows, garantendo
un’operatività a bassa latenza. Il driver ASIO generico a bassa latenza
57
Page 58

Requisiti di sistema e installazione
Installazione dell’hardware
mette a disposizione la tecnologia Core Audio di Windows all’interno di
Cubase. Non sono necessari ulteriori driver. Questo driver è incluso in
Cubase e non richiede alcuna procedura di installazione particolare.
NOTA
Questo driver andrebbe utilizzato nel caso in cui non fosse disponibile un
driver ASIO specifico. Sebbene il Driver ASIO generico a bassa latenza
supporti qualsiasi tipo e modello di periferiche audio, si potrebbero
ottenere dei risultati migliori se usato con schede audio integrate piuttosto
che con interfacce audio USB esterne.
Driver Mac OS X (solo Mac)
Se si usa un computer Macintosh, assicurarsi di utilizzare per l’hardware
audio i driver Mac OS X più recenti. Per installare i driver seguire le
istruzioni del costruttore.
Testare l’hardware audio
Per assicurarsi che la periferica audio funzioni correttamente, occorre
eseguire i seguenti test.
•
Utilizzare il software di controllo fornito con la periferica audio per
assicurarsi di riuscire a registrare e riprodurre l’audio senza problemi.
•
Se si esegue l’accesso all’hardware audio tramite un driver standard
del sistema operativo, provare a riprodurre l’audio con l’applicazione
audio standard del computer (ad esempio Windows Media Player o
iTunes di Apple).
Installare un’interfaccia MIDI o una tastiera MIDI USB
Sebbene molti modelli di tastiere MIDI USB e interfacce MIDI siano
plug and play, potrebbe essere necessario installare un driver dedicato.
58
Page 59

Requisiti di sistema e installazione
Configurazione del sistema
Si prega di seguire le procedure di installazione descritte nella
documentazione fornita con la periferica.
NOTA
Si raccomanda di consultare il sito web del costruttore per verificare la
disponibilità di driver più aggiornati.
Configurazione del sistema
Selezionare il driver per la propria periferica audio
Prima di poter configurare le assegnazioni dei segnali audio e iniziare
a registrare, è necessario assicurarsi che sia selezionato il driver ASIO
corretto.
PROCEDIMENTO
1. Selezionare Periferiche> Impostazioni periferiche.
2. Nella finestra di dialogo Impostazioni periferiche, fare clic sulla voce
VST Audio System sulla sinistra.
A destra viene visualizzata la pagina VST Audio System.
3. Dal menu a tendina Driver ASIO, selezionare il driver che si desidera
utilizzare.
4. Fare clic su OK.
Configurare le connessioni VST
La finestra di dialogo Connessioni VST consente di configurare
l’assegnazione dei segnali di ingresso e uscita tra Cubase e il proprio
hardware audio. Queste connessioni sono chiamate bus. In questa
59
Page 60

Requisiti di sistema e installazione
Configurazione del sistema
sezione vengono descritte le modalità di configurazione dei bus per la
registrazione e per la riproduzione audio.
Rimuovere i bus
Prima di aggiungere dei bus, si raccomanda di rimuovere qualsiasi uscita
che era stata aggiunta automaticamente da parte di Cubase.
PROCEDIMENTO
1. Selezionare Periferiche> Connessioni VST.
2. Nella finestra di dialogo Connessioni VST, selezionare la scheda
Uscite.
3. Nella colonna Nome bus, fare clic destro sulla prima voce in alto e
selezionare Elimina bus dal menu contestuale.
Se necessario, ripetere questo passaggio per qualsiasi ulteriore bus.
60
Page 61

Requisiti di sistema e installazione
Configurazione del sistema
Aggiunta delle uscite
Per poter riprodurre l’audio in Cubase è necessario configurare le uscite.
PREREQUISITI
Rimuovere i bus che erano stati automaticamente aggiunti da parte di
Cubase.
PROCEDIMENTO
1. Selezionare Periferiche> Connessioni VST.
2. Nella finestra di dialogo Connessioni VST, selezionare la scheda
Uscite.
3. Fare clic su Aggiungi bus.
4. Nella finestra di dialogo Aggiungi bus di uscita definire le impostazioni
desiderate.
5. Fare clic su Aggiungi bus.
Viene aggiunto il nuovo bus, grazie al quale è possibile inviare l’audio
da Cubase alla propria periferica hardware.
6. Opzionale: Se si desidera modificare le porte di uscita che erano
state selezionate automaticamente, aprire il menu a tendina Porta
periferica e selezionare delle porte differenti.
61
Page 62

Requisiti di sistema e installazione
Configurazione del sistema
A seconda della periferica audio utilizzata, potrebbero essere
disponibili più di due porte di uscita. Nella maggior parte dei casi, si
raccomanda di utilizzare le uscite stereo principali.
LINK CORRELATI
Rimuovere i bus a pag. 60
Aggiunta degli ingressi
È necessario configurare gli ingressi per poter eseguire una registrazione
in Cubase.
PROCEDIMENTO
1. Selezionare Periferiche> Connessioni VST.
2. Nella finestra di dialogo Connessioni VST, selezionare la scheda
Ingressi.
3. Nella colonna Nome bus, fare clic destro sulla prima voce in alto e
selezionare Elimina bus dal menu contestuale.
Se necessario, ripetere questo passaggio per qualsiasi ulteriore bus.
4. Fare clic su Aggiungi bus.
5. Nella finestra di dialogo Aggiungi bus di ingresso definire le
impostazioni desiderate.
6. Fare clic su Aggiungi bus.
Viene aggiunto il nuovo bus, tramite il quale è possibile inviare a
Cubase l’audio proveniente dall’ingresso della propria periferica audio
per la registrazione.
7. Opzionale: Se si desidera modificare le porte di ingresso che erano
state selezionate automaticamente, aprire il menu a tendina Porta
periferica e selezionare le porte desiderate.
62
Page 63

Requisiti di sistema e installazione
Configurazione del sistema
RISULTATO
Siete ora pronti per registrare e riprodurre l’audio in Cubase.
NOTA
Per muovere i primi passi con Cubase, si raccomanda di visionare i video
tutorial di introduzione alle nuove funzioni di Cubase, disponibili sul canale
Steinberg di YouTube.
63
Page 64

Español
Page 65

Cristina Bachmann, Heiko Bischoff, Christina Kaboth, Insa Mingers,
Matthias Obrecht, Sabine Pfeifer, Benjamin Schütte, Marita Sladek
Traducción por Josep Llodrá
Este PDF ofrece un acceso mejorado para usuarios con problemas de
visión. Por favor, tenga en cuenta que debido a la complejidad y al número
de imágenes en este documento, no es posible incluir textos descriptivos a
las imágenes.
La información en este documento está sujeta a cambios sin notificación
previa y no representa un compromiso por parte de Steinberg Media
Technologies GmbH. El software descrito en este documento está sujeto
al Acuerdo de Licencia y no se puede copiar a otros medios excepto que
esté permitido específicamente en el Acuerdo de Licencia. Ninguna parte
de esta publicación se puede copiar, reproducir, retransmitir o grabar,
bajo ningún propósito, sin previo permiso escrito de Steinberg Media
Technologies GmbH. Los titulares de una licencia registrada del producto
descrito aquí pueden imprimir una copia de este documento para su uso
personal.
Todos los nombres de productos y compañías son marcas registradas ™ o
®
por sus respectivos propietarios. Para más información, visite por favor
www.steinberg.net/trademarks.
©
Steinberg Media Technologies GmbH, 2016.
Todos los derechos reservados.
Page 66

Tabla de Contenidos
67 Introducción
67 Acerca de la documentación
67 Comandos de teclado
67 Convenciones
68 Cómo puede contactar con nosotros
69 Requisitos del sistema e instalación
69 Requisitos de sistema
70 Instalar el programa
71 Activar su licencia
72 Registrar su programa
72 Instalación del hardware
75 Configuración de sistema
66
Page 67

Introducción
Acerca de la documentación
•
La documentación de este producto se encuentra en
www.steinberg.help.
Comandos de teclado
Muchos de los comandos de teclado usan teclas modificadoras, algunas
de ellas son diferentes dependiendo del sistema operativo.
Por ejemplo, el comando de teclado por defecto para Deshacer es Ctrl-Z
en Windows y Cmd-Z en Mac OS. Cuando se describen en este manual los
comandos de teclado con teclas modificadoras, se muestran primero con
la tecla modificadora de Windows, de la siguiente manera:
•
Tecla modificadora de Windows/tecla modificadora de Mac OS-tecla
EJEMPLO
Ctrl/Cmd-Z significa: pulsar Ctrl en Windows o Cmd en Mac OS, luego
pulsar Z.
Convenciones
En nuestra documentación usamos elementos tipográficos y marcas para
estructurar la información.
67
Page 68

Introducción
Cómo puede contactar con nosotros
Cómo puede contactar con nosotros
En el menú Steinberg Hub de Cubase encontrará elementos que enlazan a
información adicional.
El menú contiene enlaces a varias páginas web de Steinberg. El hecho de
seleccionar un elemento del menú abre automáticamente su navegador
web y carga la página. En estas páginas puede encontrar información de
soporte y compatibilidad, respuestas a preguntas frecuentes, información
acerca de actualizaciones y otros productos de Steinberg, etc. Es
necesario que tenga instalado un navegador web en su ordenador, y
también una conexión a internet que funcione.
68
Page 69

Requisitos del sistema e instalación
Requisitos de sistema
Su ordenador debe cumplir con los siguientes requisitos mínimos para las
versiones Windows y Mac OS de Cubase:
Windows 7/8.x/10 de 64 bits— OS X10.11/macOS Sierra
•
Procesador multinúcleo Intel o AMD de 64 bits (Intel i5 o más rápido
recomendado)
•
4 GB de RAM (8 GB o más recomendado)
•
18 GB de espacio libre en el disco duro
•
Resolución de pantalla de 1366 x 768 (1920 x 1080 recomendado)
•
Tarjeta gráfica con soporte para DirectX 10 y WDDM 1.1 (solo
Windows)
•
Puerto USB para el USB-eLicenser (gestor de licencias)
•
Tarjeta de audio compatible con el sistema operativo (se recomienda
una tarjeta de audio compatible con ASIO para un rendimiento de baja
latencia)
•
Unidad DVD ROM de doble capa (si no usa la versión descargable)
•
Se requiere conexión a internet para la activación, configuración de la
cuenta y registro personal/del producto. Es posible que se necesiten
descargas adicionales para la instalación.
Para recomendaciones de sistemas y soporte para futuros
sistemas operativos, vea la sección de Soporte en nuestro sitio web
www.steinberg.net por favor.
69
Page 70

Requisitos del sistema e instalación
Instalar el programa
Instalar el programa
Arrancar instalación
PROCEDIMIENTO
1. Haga doble clic en Empezar instalación.
2. Siga las instrucciones en la pantalla.
USB-eLicenser
El uso de los programas de Steinberg a menudo requiere un USBeLicenser, un dispositivo de protección anticopia por hardware.
El USB-eLicenser es un dispositivo USB en el que se guardan sus
licencias de los programas de Steinberg. Todos los productos de Steinberg
protegidos por hardware usan el mismo tipo de dispositivo, y usted puede
almacenar varias licencias en un único dispositivo. También se pueden
transferir – dentro de ciertos límites – licencias entre USB-eLicensers.
Si su producto de Steinberg no incluye un USB-eLicenser, puede comprar
uno a través de la tienda online de Steinberg.
En el eLicenser Control Center puede activar nuevas licencias y
comprobar qué licencias están instaladas en su USB-eLicenser. Después
de la instalación de su aplicación de Steinberg, puede abrir el eLicenser
Control Center a través del menú de Inicio en sistemas Windows o en la
carpeta Aplicaciones en sistemas Mac OS.
70
Page 71

Requisitos del sistema e instalación
Activar su licencia
NOTA
Si está usando otros productos de Steinberg protegidos con anticopia,
puede querer transferir todas las licencias de sus aplicaciones a un USBeLicenser, para así usar solamente un único puerto USB de su ordenador.
Vea la ayuda del eLicenser Control Center para información sobre cómo
transferir licencias entre USB-eLicensers.
Activar su licencia
Debe activar su licencia.
PREREQUISITO
Usted dispone de una conexión a internet y de un código de activación para
descargar su licencia a su eLicenser.
NOTA
Puede encontrar el código de activación de la licencia en un correo
electrónico si compró su producto a través de la tienda en línea de
Steinberg, o en la hoja de información esencial de la licencia del producto
si su producto le fue entregado en un medio de instalación.
PROCEDIMIENTO
1. Visite la página www.steinberg.net/activate para información
acerca de la activación.
2. Siga las instrucciones en la pantalla.
RESULTADO
La licencia se descarga a su eLicenser y se activa.
71
Page 72

Requisitos del sistema e instalación
Registrar su programa
Registrar su programa
Registre su producto en el portal online del cliente MySteinberg. Como
usuario registrado tiene derecho a soporte técnico, y acceso a ofertas
exclusivas tales como actualizaciones y mejoras de programas, y más.
PREREQUISITO
Asegúrese de que su conexión a internet esté activa.
PROCEDIMIENTO
1. Inicie su software.
2. Seleccione Steinberg Hub> Registrarse ahora.
Se abre un formulario online de registro en su navegador web.
3. Siga las instrucciones en la pantalla para registrarse en MySteinberg.
Instalación del hardware
Instalar el hardware de audio y sus controladores
PROCEDIMIENTO
1. Instale la tarjeta de audio y el hardware relacionado en el ordenador,
tal como se describe en la documentación de la tarjeta.
2. Instale el controlador para la tarjeta de audio.
Un controlador es un componente de software que permite a un
programa comunicarse con un determinado hardware. En este
caso, el controlador permite que Cubase utilice la tarjeta de sonido.
Dependiendo del sistema operativo de su ordenador, hay diferentes
tipos de controladores que se pueden usar.
72
Page 73

Requisitos del sistema e instalación
Instalación del hardware
Controladores ASIO dedicados
Las tarjetas de audio profesionales vienen a menudo con un controlador
ASIO diseñado especialmente para el dispositivo. Esto permite la
comunicación directa entre Cubase y la tarjeta de sonido. Como resultado,
los dispositivos con controladores ASIO específicos pueden proporcionar
una latencia menor (retardo de entrada-salida), lo que es fundamental
al monitorizar audio a través de Cubase o al usar instrumentos VST.
El controlador ASIO también puede ofrecer un soporte especial para
múltiples entradas y salidas, enrutamiento, sincronización, etc.
Los controladores ASIO los proporcionan los fabricantes de tarjetas de
audio. Asegúrese de comprobar el sitio web del fabricante para obtener
las versiones más recientes del controlador.
IMPORTANTE
Si su hardware de audio viene con un controlador ASIO específico, le
recomendamos que lo utilice.
Controlador Generic Low Latency ASIO (solo Windows)
En sistemas Windows, puede usar el controlador Generic Low Latency
ASIO (controlador de ASIO genérico de baja latencia). Este controlador
ASIO proporciona soporte ASIO para cualquier tarjeta de audio soportada
por Windows, permitiendo por tanto una baja latencia. El controlador
Generic Low Latency ASIO Driver proporciona la tecnología Core Audio
de Windows a Cubase. No se requiere ningún controlador adicional. Este
controlador se incluye con Cubase y no requiere ninguna instalación
especial.
NOTA
Use este controlador si no hay ningún controlador ASIO específico
disponible. Aunque el controlador Generic Low Latency ASIO soporta todos
73
Page 74

Requisitos del sistema e instalación
Instalación del hardware
los dispositivos de audio, quizás obtenga mejores resultados con tarjetas
internas que con interfaces de audio USB externas.
Controladores Mac OS X (solo Mac)
Si está usando un ordenador Macintosh, asegúrese de que está usando la
última versión de los controladores Mac OS X con su tarjeta de audio. Siga
las instrucciones del fabricante para instalar el controlador.
Probar la tarjeta de audio
Para asegurarse de que el dispositivo de audio funciona perfectamente,
realice las siguientes pruebas.
•
Utilice cualquier software incluido junto con la tarjeta para asegurarse
de que es posible grabar y reproducir audio sin problemas.
•
Si el acceso a la tarjeta se realiza a través de un controlador estándar
del sistema operativo, intente reproducir la señal de audio usando la
aplicación de sonido estándar del sistema operativo, Windows Media
Player o Apple iTunes, por ejemplo.
Instalar una interfaz MIDI o un teclado MIDI USB
Aunque muchos teclados MIDI USB e interfaces MIDI son dispositivos
plug&play, puede que tenga que instalar un controlador dedicado
para el dispositivo. Siga el procedimiento de instalación descrito en la
documentación que vino con su dispositivo.
NOTA
También debería comprobar el sitio web del fabricante para ver si hay
actualizaciones más recientes de los controladores.
74
Page 75

Requisitos del sistema e instalación
Configuración de sistema
Configuración de sistema
Seleccionar el controlador para su tarjeta de audio
Antes de poder configurar el enrutamiento de sus señales de audio y
comenzar a grabar, es necesario que se asegure de que está seleccionado
el controlador ASIO correcto.
PROCEDIMIENTO
1. Seleccione Dispositivos> Configuración de dispositivos.
2. En el diálogo Configuración de dispositivos, haga clic en la entrada
Sistema de audio VST a la izquierda.
La página Sistema de audio VST se muestra a la derecha.
3. En el menú emergente Controlador ASIO, seleccione el controlador
que quiera usar.
4. Haga clic en Aceptar.
Configurar las conexiones VST
El diálogo Conexiones VST le permite configurar el enrutamiento de las
señales de entrada y de salida entre Cubase y su tarjeta de audio. Estas
conexiones se llaman buses. En esta sección aprende a cómo configurar
los buses para la reproducción y la grabación.
Eliminar buses
Antes de añadir buses, se le recomienda eliminar cualquier salida que
Cubase hubiera añadido automáticamente.
PROCEDIMIENTO
1. Seleccione Dispositivos> Conexiones VST.
75
Page 76

Requisitos del sistema e instalación
Configuración de sistema
2. En el diálogo Conexiones VST, seleccione la pestaña Salidas.
3. En la columna Nombre de bus, haga clic derecho en la primera
entrada y seleccione Eliminar bus en el menú contextual.
Si fuese necesario repita esta acción para los demás buses.
Añadir salidas
Debe configurar las salidas para reproducir audio en Cubase.
PREREQUISITO
Elimine los buses que Cubase añadió automáticamente.
PROCEDIMIENTO
1. Seleccione Dispositivos> Conexiones VST.
2. En el diálogo Conexiones VST, seleccione la pestaña Salidas.
3. Haga clic en Añadir bus.
4. En el diálogo Añadir bus de salida, haga sus ajustes.
5. Haga clic en Añadir bus.
76
Page 77

Requisitos del sistema e instalación
Configuración de sistema
Se añade el nuevo bus, permitiéndole tener audio en Cubase enrutado
a su tarjeta de audio.
6. Opcional: Si quiere cambiar los puertos de salida que se
seleccionaron automáticamente, abra el menú emergente Puerto del
dispositivo y seleccione puertos diferentes.
Dependiendo de su tarjeta de audio, puede tener disponibles más de
dos puertos de salida. En la mayoría de los casos recomendamos que
use las salidas estéreo principales.
VÍNCULOS RELACIONADOS
Eliminar buses en la página 75
Añadir entradas
Debe configurar las entradas para grabar en Cubase.
PROCEDIMIENTO
1. Seleccione Dispositivos> Conexiones VST.
2. En el diálogo Conexiones VST, seleccione la pestaña Entradas.
3. En la columna Nombre de bus, haga clic derecho en la primera
entrada y seleccione Eliminar bus en el menú contextual.
Si fuese necesario repita esta acción para los demás buses.
77
Page 78

Requisitos del sistema e instalación
Configuración de sistema
4. Haga clic en Añadir bus.
5. En el diálogo Añadir bus de entrada, haga sus ajustes.
6. Haga clic en Añadir bus.
Se añade el nuevo bus, permitiéndole enrutar audio de la entrada de
su dispositivo de audio a Cubase para su grabación.
7. Opcional: Si quiere cambiar los puertos de entrada que se
seleccionaron automáticamente, abra el menú emergente Puerto del
dispositivo y seleccione puertos diferentes.
RESULTADO
Ahora está preparado para grabar audio en Cubase y reproducirlo.
NOTA
Para empezar con Cubase, le recomendamos vea los tutoriales de video
del canal YouTube de Steinberg que incluyen una demostración de las
nuevas características de Cubase.
78
Page 79

⽇本語
Page 80

Cristina Bachmann, Heiko Bischoff, Christina Kaboth, Insa Mingers,
Matthias Obrecht, Sabine Pfeifer, Benjamin Schütte, Marita Sladek
この PDF マニュアルでは、⽬の不⾃由な⽅のための⾼度なアクセシビリ
ティ機能を提供しています。このマニュアルは複雑かつ多くの 図が使⽤
されているため、図の説明は省略されていることをご了承ください。
本書の記載事項は、Steinberg Media Technologies GmbH 社によって予
告なしに変更されることがあり、同社は記載内容に対する責任を 負い
ません。 本書に掲載されている画⾯は、すべて操作説明のためのもの
で、実際の画⾯と異なる場合があります。本書で取扱われているソフト
ウェアは、ライセンス契約に基づいて供与されるもので、ソフトウェア
の複製は、ライセンス契約の範囲内でのみ許可されます (バックアッ プコ
ピー)。 Steinberg Media Technologies GmbH 社の書⾯による承諾がない
限り、⽬的や形式の如何にかかわらず、本書のいかなる部分も記録、複
製、翻訳することは禁じられています。本製品のライセンス所有者は、個
⼈利⽤⽬的に限り、本書を 1 部複製することができます。
本書に記載されている製品名および会社名は、すべて各社の商標、および
登録商標です。
©
Steinberg Media Technologies GmbH, 2016.
All rights reserved.
Page 81

⽬次
82
82
82
82
83
84
84
85
86
87
88
91
はじめに
マニュアルについて
キーボードショートカット
表記規則
Steinberg 社の Web サイトへのアクセス⽅法
システム要件とインストール
最⼩システム要件
プログラムのインストール
ライセンスのアクティベート
ソフトウェアの登録
ハードウェアの取り付け
システム設定
81
Page 82

はじめに
マニュアルについて
•
本製品のマニュアルはwww.steinberg.helpで⼊⼿できます。
キーボードショートカット
初期設定のキーボードショートカットの多くは修飾キーを使⽤しますが、
修飾キーの⼀部はオペレーティングシステムによって異なります。
たとえば、取り消し操作のデフォルトキーボードショートカットは
Windows の場合、[Ctrl]+[Z] ですが、Mac OS では [command]+[Z] です
([command] はアップルマークのついたキー)。本書では、修飾キーを伴う
キーボードショートカットを記述する場合、まず Windows の修飾キーを
挙げ、次のように記載します。
•
[Windows 修飾キー]/[Mac OS 修飾キー]+[キー]
例
[Ctrl]/[command]+[Z] と記載されている場合、Windows では [Ctrl]
キー、Mac OS では [command] キーを押したままで、[Z] キーを押すこと
を指しています。
表記規則
本書では、表記上の要素およびマークアップを使⽤して説明しています。
82
Page 83

はじめに
Steinberg 社の Web サイトへのアクセス⽅法
Steinberg 社の Web サイトへのアクセス⽅法
Cubase の「Hub」メニューから追加情報にアクセスできます。
このメニューには、Steinberg 社のさまざまな Web サイトへのリンクが
表⽰されます。いずれかのメニューを選択すると、ブラウザーが⾃動的
に起動し、該当のページが開きます。製品に関するサポートや互換性の
情報、FAQ、更新情報、他の Steinberg 製品の情報などにアクセスできま
す。Web サイトにアクセスするには、コンピューターに Web ブラウザー
がインストールされ、インターネットに接続されている必要があります。
83
Page 84

システム要件とインストール
最⼩システム要件
Windows/Mac OS 版の Cubase をインストールするには、コンピューター
が以下の最⼩システム要件を満たす必要があります。
64 ビット版 Windows 7/8.x/10 — OS X 10.11/Mac Sierra
•
64 ビット Intel/AMD マルチコア CPU (Intel Core i5 以上推奨)
•
4 GB の RAM (8 GB 以上推奨)
•
18 GB の HD 空き容量
•
1366 x 768 のディスプレイ解像度 (1920 x 1080 推奨)
•
DirectX 10 および WDDM 1.1 に対応するグラフィックスカード
(Windows のみ)
•
USB-eLicenser ⽤の USB ポート
•
OS 互換のオーディオデバイス (低レイテンシーのパフォーマンスには
ASIO 準拠のオーディオデバイス推奨)
•
デュアルレイヤー対応 DVD-ROM ドライブ (ダウンロード版を使⽤し
ない場合)
•
インターネット接続環境 (アクティベーション、アカウント設定、お
よびユーザー/製品登録⽤)。インストール時に、追加のダウンロード
が必要になる場合があります。
84
Page 85

システム要件とインストール
プログラムのインストール
推奨システムおよび今後のオペレーティングシステムのサポートにつ
いては、Steinberg 社の Web サイト (www.steinberg.net) の「サポート
(Support)」セクションを参照してください。
補⾜
⽶国ユーザーのみ: このソフトウェアは、⽶国のみでアクティベート可能
で、⽶国内でのみ公式にサポートされます。
プログラムのインストール
インストール
⼿順
1.
「インストール (Start Installation)」をダブルクリックします。
2.
画⾯に表⽰される指⽰に従って操作します。
USB-eLicenser
Steinberg ソフトウェアを使⽤するには、ハードウェアコピープロテク
ションデバイスの USB-eLicenser が必要な場合があります。
USB-eLicenser は、Steinberg ソフトウェアのライセンスデータを格納
する USB デバイスです。ハードウェアプロテクトされた Steinberg 製
品には、同じタイプの USB-eLicenser が使⽤されており、1 つの USB-
eLicenser に複数のライセンスを格納できます。また、(⼀定の制限内で)
USB-eLicenser 間でライセンスを転送できます。
85
Page 86

システム要件とインストール
ライセンスのアクティベート
Steinberg ソフトウェア製品に USB-eLicenser が付属していない場合は
Steinberg Online Shop で購⼊できます。
eLicenser Control Center では、新しいライセンスをアクティベート
したり、USB-eLicenser に格納されたライセンスを確認したりできま
す。Steinberg アプリケーションをインストールすると、「スタート」メ
ニュー (Windows) または「アプリケーション」フォルダー (Mac OS) から
eLicenser Control Center を起動できます。
補⾜
コピープロテクトされた複数の Steinberg 製品を使⽤している場合、それ
らのライセンスを 1 つの USB-eLicenser に転送することもできます。こ
れによって、使⽤する USB ポートが 1 つだけで済みます。ライセンスの
転送⽅法の詳細については、eLicenser Control Center のヘルプを参照し
てください。
ライセンスのアクティベート
ライセンスをアクティベートする必要があります。
前提
インターネットに接続できることを確認し、eLicenser にライセンスをダ
ウンロードするためのアクティベーションコードを準備します。
補⾜
アクティベーションコードは、Steinberg Online Shop で製品を購⼊した
場合、Steinberg 社から送られた電⼦メールに記載されています。イン
ストールメディアで購⼊した場合は、同梱の「Essential Product License
Information」シートに記載されています。
86
Page 87

システム要件とインストール
ソフトウェアの登録
⼿順
1.
アクティベートの詳細についてはwww.steinberg.net/
activateにアクセスしてください。
2.
画⾯に表⽰される指⽰に従って操作します。
結果
ライセンスが eLicenser にダウンロードされ、アクティベートされます。
ソフトウェアの登録
MySteinberg オンラインカスタマーポータルに製品を登録します。製品を
登録すると、テクニカルサポートを利⽤したり、ソフトウェアの更新や
アップグレードなどの限定キャンペーンを利⽤したりできます。
前提
登録には、インターネット接続が必要です。
⼿順
1.
ソフトウェアを起動します。
2.
「Hub」> 「今すぐ登録 (Register Now)」を選択します。
Web ブラウザーでオンライン登録フォームが開きます。
3.
画⾯に表⽰される指⽰に従って MySteinberg に登録します。
87
Page 88

システム要件とインストール
ハードウェアの取り付け
ハードウェアの取り付け
オーディオデバイスの取り付けとドライバーのインストール
⼿順
1.
各ハードウェアのマニュアルを参照して、オーディオデバイスと関連
機器をコンピューターに取り付けます。
2.
オーディオデバイスのドライバーをインストールします。
ドライバーは、プログラムが特定のハードウェアと通信するのに必
要なソフトウェアです。Cubase では、オーディオデバイスを使⽤す
るのにドライバーが必要です。ご使⽤のオペレーティングシステムに
よって、使⽤できるドライバーの種類が異なります。ハードウェアに
よっては、ドライバーをインストールしてからコンピューターに接続
するものもあります。詳しくは、各ハードウェアのマニュアルをご参
照ください。
専⽤の ASIO ドライバー
プロ⽤オーディオデバイスの多くには、デバイス専⽤に作成された ASIO
ドライバーが付属しています。このドライバーによって、Cubase がオー
ディオデバイスと直接通信できます。そのため、専⽤の ASIO ドライバー
を使⽤するデバイスは、レイテンシー (⼊出⼒の遅れ) が低くなります。
これは、Cubase でオーディオをモニタリングしたり、VST インストゥル
メントを使⽤したりするのに⾮常に重要です。ASIO ドライバーは、複数
の⼊出⼒、ルーティング、同期などの特別なサポートを提供する場合もあ
ります。
ASIO ドライバーは、オーディオデバイスのメーカーが提供します。メー
カーの Web サイトでドライバーの最新バージョンを確認してください。
88
Page 89

システム要件とインストール
ハードウェアの取り付け
重要
オーディオデバイスに専⽤の ASIO ドライバーが付属している場合、それ
を使⽤してください。
Generic Low Latency ASIO Driver (Windows のみ)
Windows システムでは、Generic Low Latency ASIO Driver を使⽤できま
す。このドライバーでは、Windows でサポートされているすべてのオー
ディオデバイスの ASIO サポートが提供され、低レイテンシーを実現で
きます。Generic Low Latency ASIO Driver は、Cubase に Windows Core
Audio テクノロジーを提供します。追加のドライバーは不要です。このド
ライバーは Cubase に付属しており、ほかに特別なソフトウェアをインス
トールする必要はありません。
補⾜
このドライバーは、専⽤の ASIO ドライバーがない場合に使⽤しま
す。Generic Low Latency ASIO Driver ではすべてのオーディオデバイスが
サポートされていますが、内蔵型オーディオカードの⽅が外付けの USB
オーディオインターフェースよりパフォーマンスが⾼くなります。
Mac ドライバー (macOS のみ)
Mac コンピューターを使⽤している場合、オーディオデバイス⽤の最新
の Mac ドライバーを使⽤していることを確認してください。ドライバー
89
Page 90

システム要件とインストール
ハードウェアの取り付け
のインストール⽅法については、メーカーのマニュアルを参照してくださ
い。
オーディオデバイスのテスト
オーディオデバイスが適切に動作しているかどうかを確認するには、以下
のテストを⾏ないます。
•
デバイスに付属するソフトウェアを使⽤して、オーディオの録⾳およ
び再⽣が問題なくできることを確認します。
•
オペレーティングシステム標準のドライバーでデバイスにアクセス
している場合、Windows Media Player や Apple iTunes などのコン
ピューターの標準オーディオアプリケーションを使⽤して、オーディ
オを再⽣してみます。
MIDI インターフェースまたは USB MIDI キーボードの接続
多くの USB MIDI キーボードや MIDI インターフェースはプラグアンドプ
レイに対応していますが、専⽤のデバイスドライバーのインストールが
必要な場合があります。インストール⼿順については、そのデバイスのマ
ニュアルを参照してください。
補⾜
メーカーの Web サイトでドライバーの最新バージョンを確認してくださ
い。
90
Page 91

システム要件とインストール
システム設定
システム設定
オーディオデバイス⽤ドライバーの選択
オーディオ信号のルーティングを設定して録⾳を開始する前に、正しい
ASIO ドライバーが選択されていることを確認する必要があります。
⼿順
1.
「デバイス (Devices)」> 「デバイス設定 (Device Setup)」を選択しま
す。
2.
「デバイス設定 (Device Setup)」ダイアログで、左側にある「VST
オーディオシステム (VST Audio System)」エントリーをクリックしま
す。
右側に、「VST オーディオシステム (VST Audio System)」ページが表
⽰されます。
3.
「ASIO ドライバー (ASIO Driver)」ポップアップメニューから、使⽤
するドライバーを選択します。
4.
「OK」をクリックします。
VST コネクションの設定
「VST コネクション (VST Connections)」ダイアログでは、Cubase とオー
ディオデバイス間の⼊出⼒信号のルーティングを設定できます。このよう
91
Page 92

システム要件とインストール
システム設定
なオーディオ信号の流れる経路を「バス」といいます。この項では、再⽣
と録⾳⽤のバスを設定する⽅法を説明します。
バスの削除
バスを追加する前に、Cubase.によって⾃動的に追加されたすべての出⼒
バスを削除しておくことをおすすめします。
⼿順
1.
「デバイス (Devices)」> 「VST コネクション (VST Connections)」を
選択します。
2.
「VST コネクション (VST Connections)」ダイアログで、「出⼒
(Outputs)」タブを選択します。
3.
「バス名 (Bus Name)」コラムで最上位エントリーを右クリックし、
コンテキストメニューから「バスを削除 (Remove Bus)」を選択しま
す。
必要に応じて、その他のバスにもこの⼿順を繰り返します。
92
Page 93

システム要件とインストール
システム設定
出⼒バスの追加
Cubase でオーディオを再⽣するための出⼒バスを設定する必要がありま
す。
前提
Cubase によって⾃動的に追加されたバスを削除します。
⼿順
1.
「デバイス (Devices)」> 「VST コネクション (VST Connections)」を
選択します。
2.
「VST コネクション (VST Connections)」ダイアログで、「出⼒
(Outputs)」タブを選択します。
3.
「バスを追加 (Add Bus)」をクリックします。
4.
「出⼒バスを追加 (Add Output Bus)」ダイアログで、設定を⾏ないま
す。
5.
「バスを追加 (Add Bus)」をクリックします。
新しいバスが追加され、Cubase のオーディオをオーディオデバイス
にルーティングできます。
6.
⾃動的に選択された出⼒ポートを変更したい場合は、「デバイスポー
ト (Device Port)」ポップアップメニューを開き、別のポートを選択し
ます。
93
Page 94

システム要件とインストール
システム設定
オーディオデバイスによっては、3 つ以上の出⼒ポートを使⽤できる
場合があります。ほとんどの場合、メインのステレオ出⼒を使⽤する
ことをおすすめします。
関連リンク
バスの削除 (92 ページ)
⼊⼒バスの追加
Cubase.に録⾳するための⼊⼒バスを設定する必要があります。
⼿順
1.
「デバイス (Devices)」> 「VST コネクション (VST Connections)」を
選択します。
2.
「VST コネクション (VST Connections)」ダイアログで、「⼊⼒
(Inputs)」タブを選択します。
3.
「バス名 (Bus Name)」コラムで最上位エントリーを右クリックし、
コンテキストメニューから「バスを削除 (Remove Bus)」を選択しま
す。
必要に応じて、その他のバスにもこの⼿順を繰り返します。
4.
「バスを追加 (Add Bus)」をクリックします。
94
Page 95

システム要件とインストール
システム設定
5.
「⼊⼒バスを追加 (Add Input Bus)」ダイアログで、設定を⾏ないま
す。
6.
「バスを追加 (Add Bus)」をクリックします。
新しいバスが追加され、オーディオデバイスから⼊⼒したオーディオ
を、録⾳⽤に Cubase にルーティングできます。
7.
⾃動的に選択された⼊⼒ポートを変更したい場合は、「デバイスポー
ト (Device Port)」ポップアップメニューを開き、別のポートを選択し
ます。
結果
これで、Cubase でオーディオを録⾳および再⽣する準備ができました。
補⾜
Cubase を使⽤する前に、YouTube の Steinberg チャンネルでチュートリ
アル動画を観ることをおすすめします。このチャンネルでは、Cubase の
新機能のデモなども観られます。
95
Page 96

Português
Page 97

Cristina Bachmann, Heiko Bischoff, Christina Kaboth, Insa Mingers,
Matthias Obrecht, Sabine Pfeifer, Benjamin Schütte, Marita Sladek
Rosa Freitag
Este PDF fornece acesso melhorado para usuários com dificuldade de
visão. Observe que, devido à complexidade e ao número de imagens neste
documento, não é possível incluir descrições em texto das imagens.
As informações neste documento estão sujeitas a alterações sem aviso
prévio e não representam um compromisso por parte da Steinberg Media
Technologies GmbH. O software descrito por este documento está sujeito
a um Acordo de Licença e não pode ser copiado para outras mídias, salvo
se especificamente permitido no Acordo de Licença. Nenhuma parte desta
publicação pode ser copiada, reproduzida, transmitida ou gravada, para
qualquer finalidade, sem a permissão prévia por escrito da Steinberg
Media Technologies GmbH. Os licenciados registrados do produto aqui
descrito podem imprimir uma cópia deste documento para uso pessoal.
Todos os nomes de produtos e empresas são marcas comerciais
™
ou ® de seus respectivos proprietários. Para mais informações, visite
www.steinberg.net/trademarks.
©
Steinberg Media Technologies GmbH, 2016.
Todos os direitos reservados.
Page 98

99 Introdução
99 Sobre a documentação
99 Comandos de teclas
99 Convenções
100 Como entrar em contato conosco
101 Requisitos de sistema e instalação
101 Requisitos de sistema
102 Instalando o programa
103 Ativando sua licença
104 Registro do software
104 Instalação de hardware
107 Configuração do sistema
Sumário
98
Page 99

Introdução
Sobre a documentação
•
A documentação para este produto é fornecida
emwww.steinberg.help.
Comandos de teclas
Vários comandos de teclas padrão usam teclas modificadoras, algumas
delas diferentes de acordo com o sistema operacional.
Por exemplo, o comando de tecla padrão para Desfazer éCtrl-Z
noWindows e Cmd-Z noMac OS. Quando comandos de teclas com teclas
modificadoras são descritos neste manual, eles são mostrados primeiro
com a tecla modificadora do Windows, da seguinte maneira:
•
Windows tecla modificadora/Mac OS modificador tecla-tecla
EXEMPLO
Ctrl/Cmd-Z significa: pressione Ctrl noWindows ou Cmd no Mac OS,
depois pressione Z.
Convenções
Em nossa documentação, usamos elementos tipográficos e marcações
para estruturar informações.
99
Page 100

Introdução
Como entrar em contato conosco
Como entrar em contato conosco
No menu Steinberg Hub no Cubase há itens com links para informações
adicionais.
O menu contém links para várias páginas do site da Steinberg. Ao
selecionar um item do menu, o navegador automaticamente é iniciado e
abre a página. Nessas páginas você encontra informações de suporte e
compatibilidade, respostas a perguntas frequentes, informações sobre
atualizações e outros produtos Steinberg, etc. Isso requer um navegador
da Web instalado no computador e uma conexão ativa com a Internet.
100
 Loading...