


ARCTIS PRO
+ GameDAC
PRODUCT INFORMATION GUIDE

CONTENTS
WELCOME TO
Welcome 2
SteelSeries Engine 3
Product Overview 5 – 8
GameDAC Operation 9 – 10
Setup PS4 Pro/Original 11 – 12
Setup PS4 Slim 13 – 16
Setup PC 17 – 18
Ski Goggle Headband 19
Speakerplate 20
Translations
Español 21
简体中文 25
繁體中文 28
日本語 30
한국어 34
Deutsch 38
Русский 40
Français 44
Italiano 48
Português 52
Regulatory
ARCTIS PRO + GAMEDAC
History showed us that gaming headsets rarely looked good and sounded
worse, so we made Arctis and put all other headsets on notice. Next, the
audiophiles said that a gaming headset could never stand up to dedicated
headphones, so we made Arctis Pro and changed the game.
Like you, we are esports pros, pubstars, 5am raiders, 1hp heroes, streamers
and dreamers. Your Arctis Pro was forged out of our belief that gaming isn’t
your way to escape reality, it’s your path to rewrite it.
2

find help at support.steelseries.com
STEELSERIES ENGINE
Download SteelSeries Engine to customize
illumination on your headset, control the
GameDAC from PC, and to integrate with Engine
Apps (like displaying Discord info on the OLED
screen). steelseries.com/engine
SOFTWARE REQUIREMENTS
Platforms
Windows 7 +
Mac OS X 10.8 +
120 MB of free hard drive space for installation
*
DTS Headphone:X 7.1 Surround available on
Windows only. Software installation required.
3 4
PACKAGE CONTENTS
Headset
GameDAC
Main Cable
Mobile Adapter
USB Audio Cable
Optical Audio Cable
Product Information Guide
SYSTEM REQUIREMENTS //
COMPATIBILITY
PC
PS4 (Pro / Original / Slim)
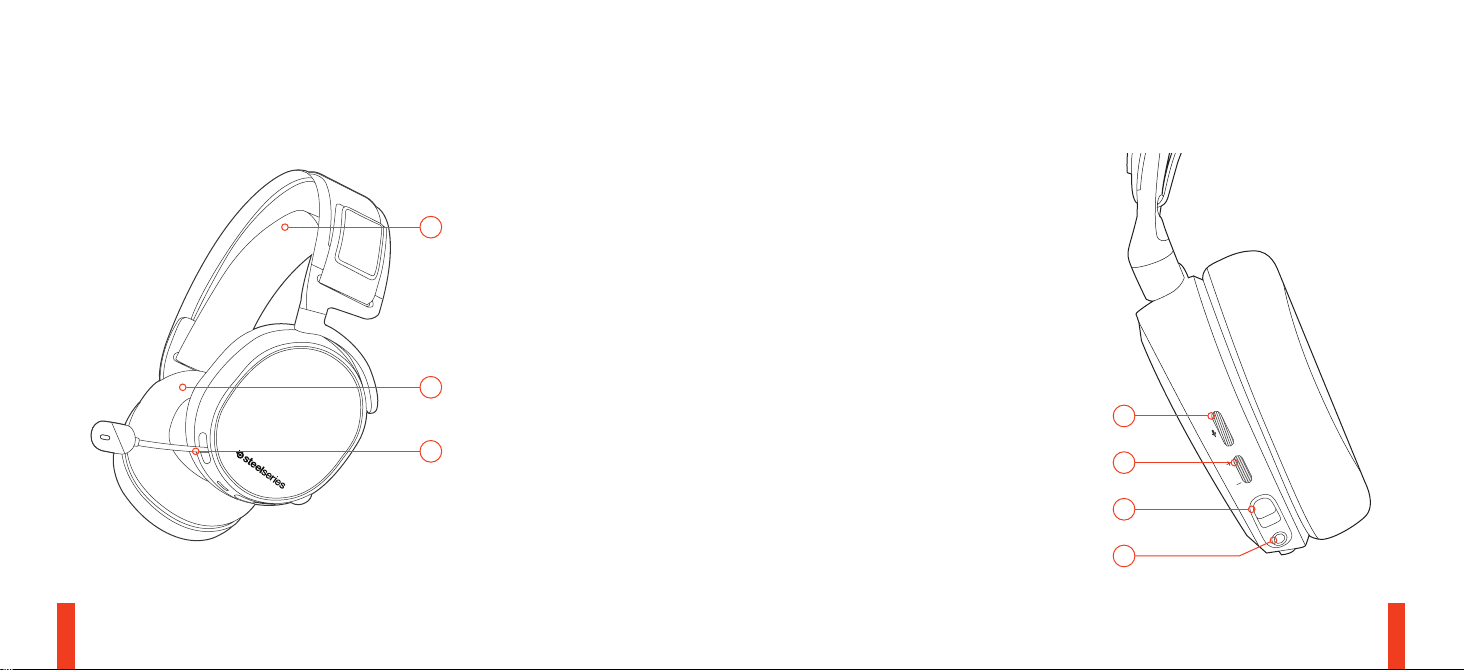
PRODUCT OVERVIEW
*
Find accessories and replacement parts at steelseries.com/gaming-accessories
01 Ski Goggle Headband
01
02
03
5 6
02 Airweave Ear Cushions
03 Clearcast Microphone
*
*
04 Microphone Mute Button
05 Volume Control
06 Main Cable Jack
07 Headphone Share Jack
04
05
06
07
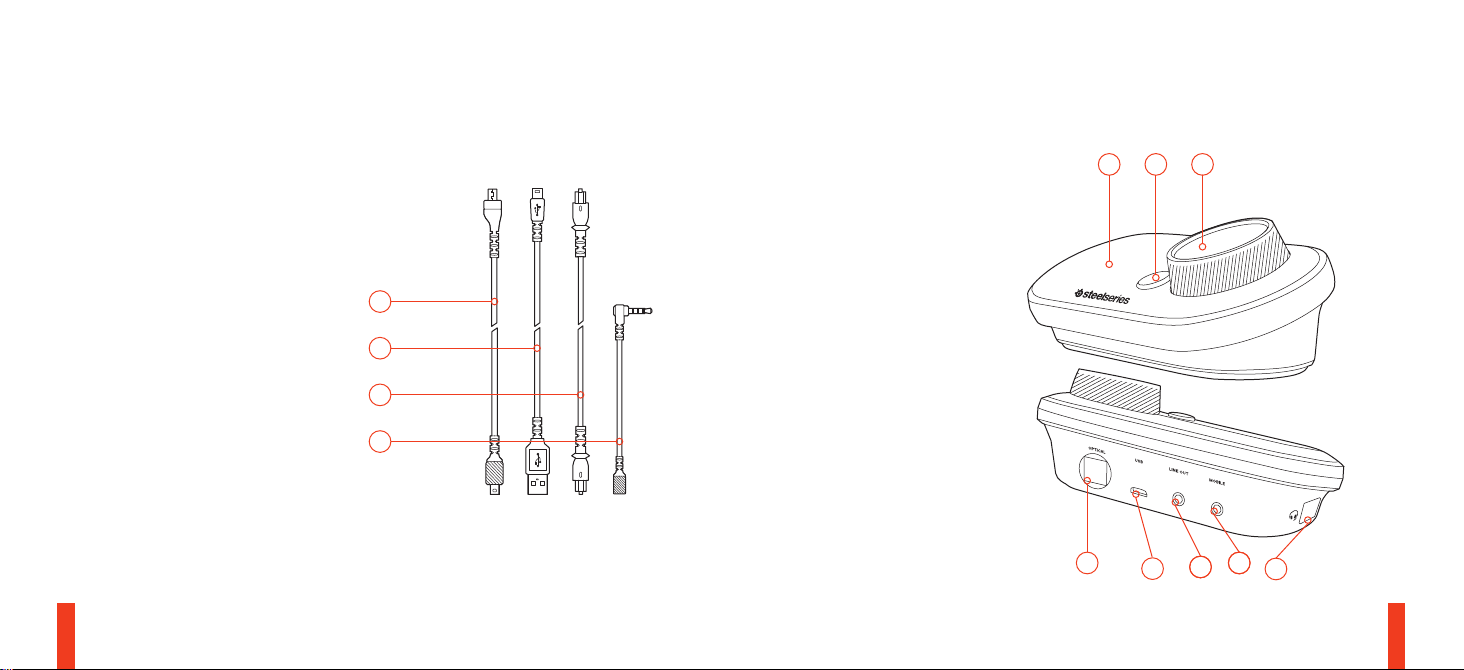
08 Main Headset Cable
09 USB Audio Cable
10 Optical Audio Cable
11 Mobile Adapter
*
*
08
09
10
11
12 OLED Screen
13 Secondary Button
14 Control Wheel
15 Line Out Jack
16 Mobile Jack
17 USB Jack
18 Optical Jack
19 Headset Connection Jack
13
12
14
18
7 8
17
16
15
19
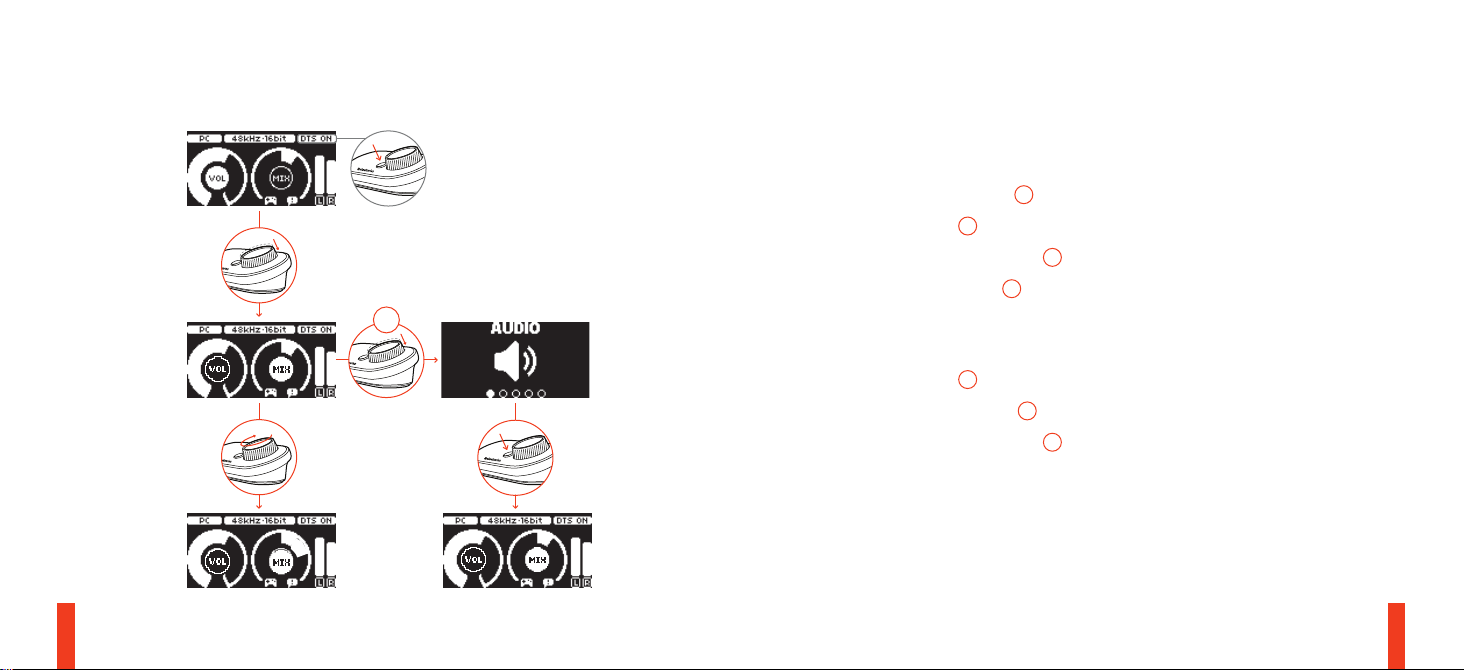
GameDAC OPERATION
HOME SCREEN
• Press and release the control wheel 14 to toggle between volume and ChatMix
• Rotate the control wheel
• Press and release the Secondary Button
• Press and hold the control wheel
2s
MAIN MENU
• Rotate the control wheel 14 to cycle menu items
• Press and release the control wheel
• Press and release the Secondary Button
9 10
to adjust the selected parameter
14
to toggle DTS Headphone:X on and off
13
to bring up the main menu
14
to select
14
to move back in the menu
13
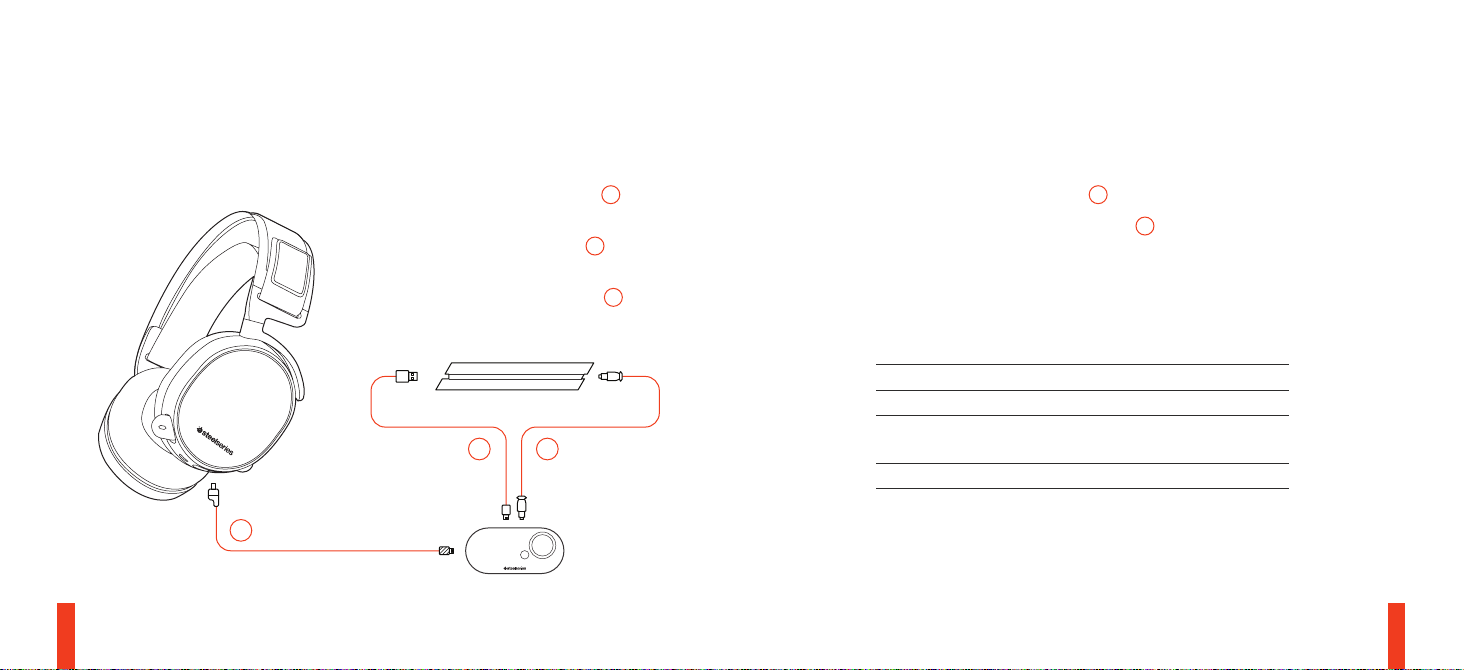
SETUP PS4 PRO AND ORIGINAL
HARDWARE INSTALLATION
01 Connect the main headset cable 08 from
the headset to the GameDAC
02 Connect the USB audio cable
GameDAC to the front of the PS4
03 Connect the Optical Audio Cable
the GameDAC to the back of the PS4
1009
08
11 12
09
from the
from
10
GameDAC SETTINGS
01 Press and hold the control wheel
02 Select Input, then click the control wheel
03 Choose the PS4 mode
to enter the main menu
14
to edit
14
PS4 AUDIO SETTINGS
SOUND AND SCREEN > AUDIO OUTPUT SETTINGS
Primary Output Port Digital Out (Optical)
Audio Format (Priority) Bitstream (Dolby)
DEVICES > AUDIO DEVICES
Output to Headphones Chat Audio
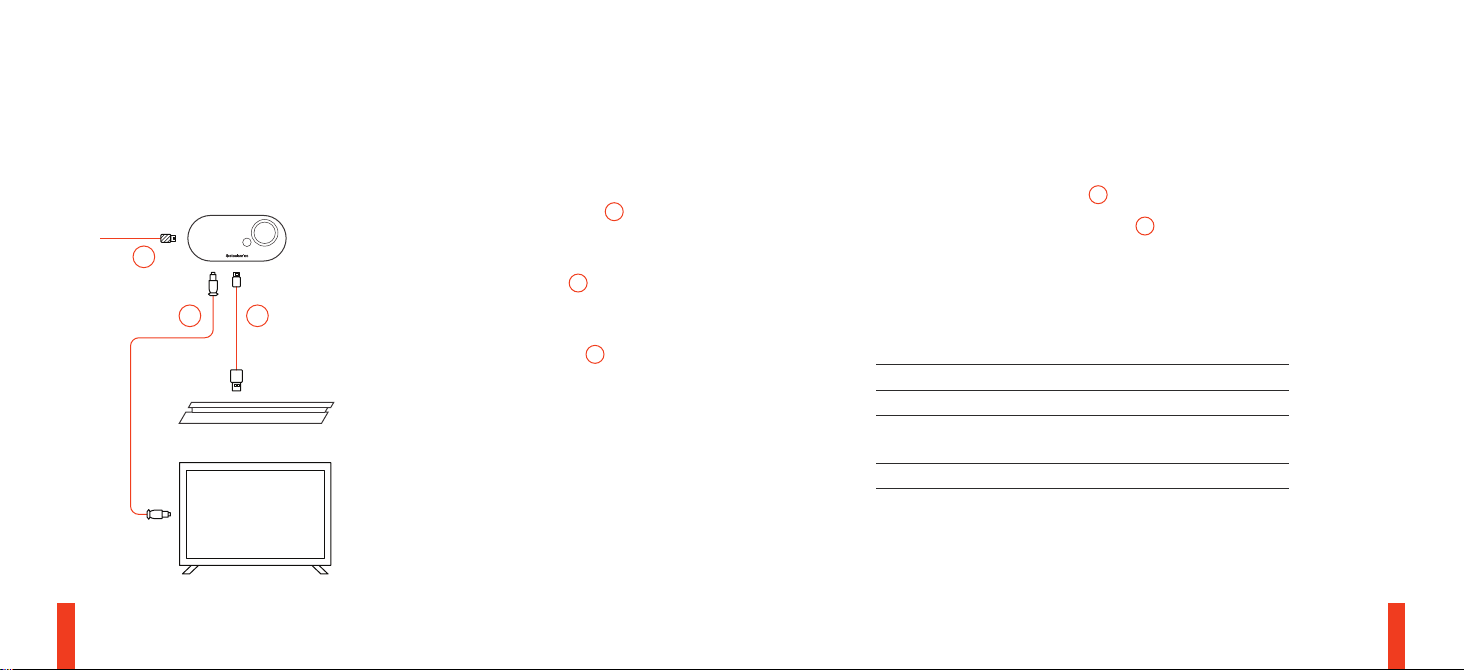
SETUP PS4 SLIM
HARDWARE INSTALLATION GameDAC SETTINGS
HARDWARE INSTALLATION
WITH OPTICAL AUDIO
01 Connect the main headset cable 08
from the headset to the left side of the
08
10 09
13 14
GameDAC
02 Connect the optical cable
GameDAC to the optical output of your TV
or HDMI adapter
03 Connect the USB audio cable
GameDAC to the USB port on the front of
the PS4
* The PS4 Slim does not have an optical
output. For full functionality you will need
to connect the GameDAC to the optical
output of a TV or an HDMI adapter.
If no optical is available proceed to the
next page.
from the
10
09
from the
01 Press and hold the control wheel 14 to enter the main menu
02 Select Input, then click the control wheel
03 Choose the PS4 mode
14
to edit
PS4 AUDIO SETTINGS
SOUND AND SCREEN > AUDIO OUTPUT SETTINGS
Audio Format (Priority) Bitstream (Dolby)
HDMI Audio Output 5.1 ch
DEVICES > AUDIO DEVICES
Output to Headphones Chat Audio

SETUP PS4 SLIM
HARDWARE INSTALLATION GameDAC SETTINGS
HARDWARE INSTALLATION
WITHOUT OPTICAL AUDIO
01 Connect the main headset cable 08
from the headset to the left side of the
08
09
15 16
GameDAC
02 Connect the USB audio cable
GameDAC to the USB port on the front of
the PS4
* Without optical audio, surround sound
and ChatMix features will be unavailable.
from the
09
01 Press and hold the control wheel 14 to enter the main menu
02 Select Input, then click the control wheel
03 Choose the PS4 mode
14
to edit
PS4 AUDIO SETTINGS
DEVICES > AUDIO DEVICES > OUTPUT TO HEADPHONES > ALL AUDIO
Audio Format (Priority) Bitstream (Dolby)
HDMI Audio Output 5.1 ch
DEVICES > AUDIO DEVICES
Output to Headphones Chat Audio
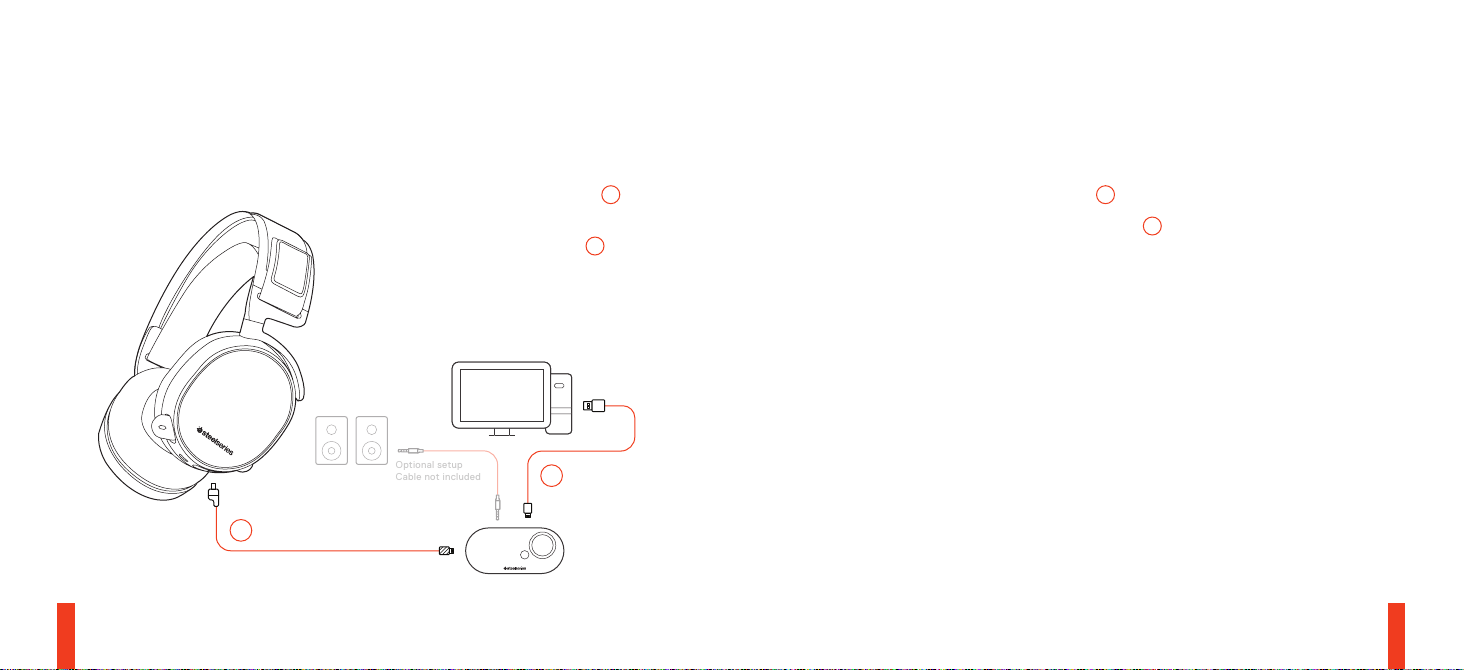
SETUP PC find help at support.steelseries.com
Optional setup
Cable not included
HARDWARE INSTALLATION
09
from
08
from the
01 Connect the main headset cable
the headset to the GameDAC
02 Connect the USB audio cable
GameDAC to the PC
03 (Optional) Connect a 3.5mm cable from
the GameDAC Line Out to a pair of
powered speakers
09
08
17 18
GameDAC SETTINGS
01 Press and hold the control wheel
02 Select Input, then click the control wheel
03 Choose the PC or Hi-Res mode (Note: Hi Res enables
96k/24bit audio, but surround sound and ChatMix are unavailable)
to enter the main menu
14
to edit
14
WINDOWS SOUND SETTINGS
01 Under "Playback" highlight GameDAC Game Audio and select "Set
Default"
02 Under “Playback” select GameDAC Chat Audio and select "Set
Default Communications Device"
03 Under "Recording" highlight GameDAC Chat Audio and select "Set
Default"
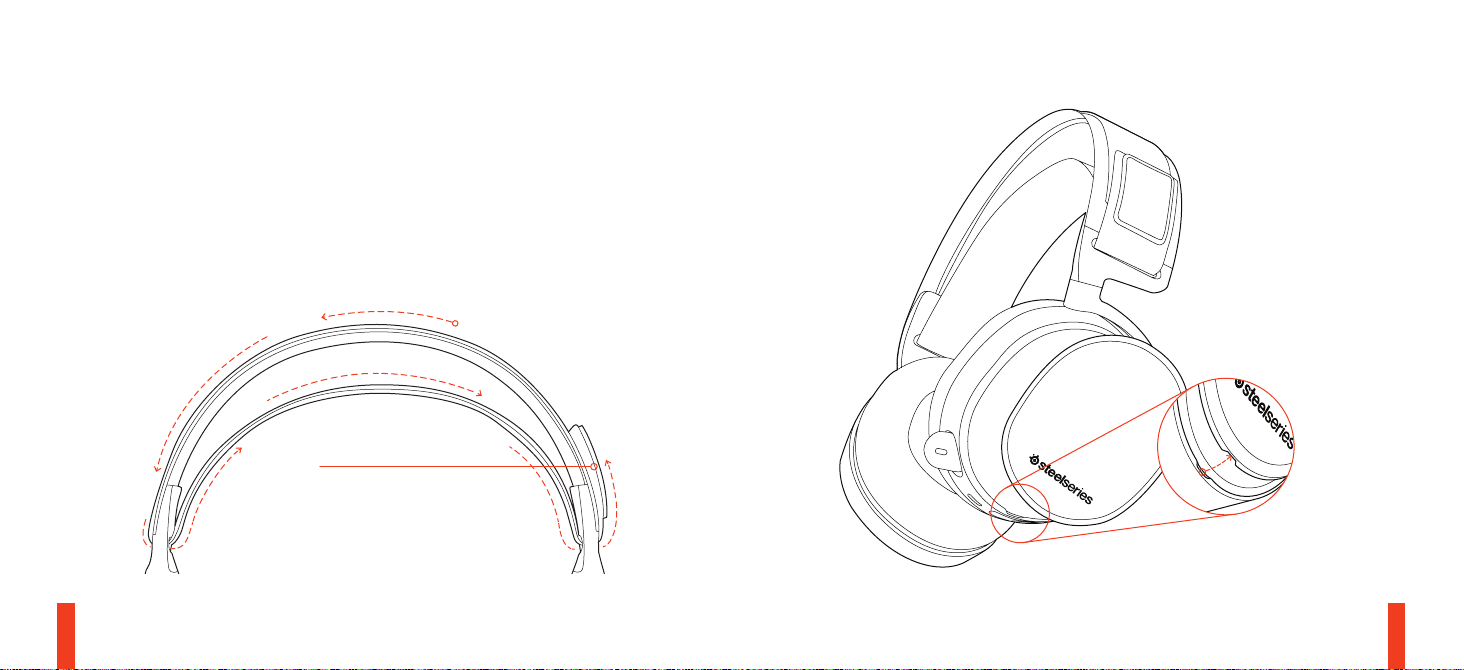
SKI GOGGLE HEADBAND SPEAKER PLATEaccessory headbands available at steelseries.com accessories available at steelseries.com
Install
Direction of headband
installation
Velcro
Tighten or loosen the Velcro straps
on the sides of the headband to
achieve the desired fit
19 20

ESPAÑOL
SteelSeries Engine
Descarga SteelSeries Engine para personalizar la
iluminación de los auriculares, controlar GameDAC
desde la PC e integrar con Engine Apps (como
mostrar información Discord en la pantalla OLED).
steelseries.com/engine
Requisitos del software SteelSeries Engine
Plataformas:
Windows 7 – Windows 10
Mac OS X 10.8 – 10.11
120 MB de espacio libre en el disco duro para la
instalación
* SteelSeries 7.1 Surround disponible solo en Windows
solicite ayuda en support.steelseries.com
Contenido del paquete
Auriculares
GameDAC
Cable principal
Adaptador móvil
Cable de audio USB
21 22
Cable de audio óptico
Guía de información del producto
Requisitos del sistema // Compatibilidad
PC
PS4 (Pro / Slim / Original)
DESCRIPCIÓN GENERAL DEL PRODUCTO
01 Vincha de gafas de ski *
02 Almohadillas AirWeave *
03 Micrófono ClearCast
04 Botón para silenciar micrófono
05 Control de volumen
06 Conector del cable principal
07 Conector para compartir auriculares
08 Cable principal de los auriculares*
09 Cable de audio USB
10 Cable de audio óptico
11 Adaptador para teléfonos móviles*
12 Pantalla OLED
13 Botón secundario
14 Rueda de control
15 Conector de línea de salida
16 Conector para teléfonos móviles
17 Conector USB
18 Conector óptico
19 Conector de auriculares
* Encuentre accesorios y repuestos en
steelseries.com
ACCIONAMIENTO DE GAMEDAC
Pantalla de inicio
01 Presiona y suelta la rueda de control para alternar
entre volumen y ChatMix
02 Gira la rueda de control para ajustar el parámetro
seleccionado
03 Presiona y suelta el botón secundario para activar
y desactivar DTS Headphone:X
04 Presiona y mantén presionada la rueda de control
para abrir el menú principal
Menú principal
01 Gira la rueda de control para seleccionar artículos
del menú
02 Presiona y suelta la rueda de control para
seleccionar
03 Presiona y suelta el botón secundario para volver
un paso”
CONFIGURACIÓN DE PS4 PRO Y ORIGINAL
Instalación de hardware
01 Conecta el cable principal de los auriculares a
GameDAC
02 Conecta el cable de audio USB de GameDAC
a la parte frontal de la PS4
03 Conecta el cable de audio óptico de GameDAC
a la parte trasera de la PS4
Configuración de GameDAC
01 Presiona y mantén presionada la rueda de control
para ingresar al menú principal
02 Selecciona Modo y haz clic en la rueda de control
para editar
03 Elige el modo PS4

Configuración de audio de PS4
Sonido Y Pantalla > Configuración De Salida
De Audio
Puerto de salida principal > Salida digital (óptica)
Formato de audio (prioridad) > Flujo de bits (Dolby)
Dispositivos > Dispositivos de audio
Salida a auriculares > Audio de chat
CONFIGURACIÓN DE PS4 SLIM
CON AUDIO ÓPTICO
01 Conecta el cable principal de los auriculares al lado
izquierdo de GameDAC
02 Conecta el cable óptico de GameDAC a la salida
óptica del TV o el adaptador HDMI
03 Conecta el cable de audio USB de GameDAC al
puerto USB de la parte frontal de la PS4
* La PS4 Slim no tiene salida óptica. Para obtener
una funcionalidad completa, deberás conectar
GameDAC a la salida óptica del TV o un adaptador
HDMI. Si no está disponible, continúa en la página
siguiente.
23 24
Configuración de audio de PS4
Dispositivos > Dispositivos de audio > Salida a
auriculares > Todo el audio
Formato de audio (prioridad) > Flujo de bits (Dolby)
Salida de audio HDMI > 5,1 ch
Dispositivos > Dispositivos de audio
Salida a auriculares > Audio de chat
CONFIGURACIÓN DE PS4 SLIM
SIN AUDIO ÓPTICO
01 Conecta el cable principal de los auriculares al lado
izquierdo de GameDAC
02 Conecta el cable de audio USB de GameDAC al
puerto USB de la parte frontal de la PS4
* Sin audio óptico, no están disponibles las funciones
de sonido envolvente y ChatMix.
Configuración de GameDAC
01 Presiona y mantén presionada la rueda de control
para ingresar al menú principal
02 Selecciona Modo y haz clic en la rueda de control
para editar
03 Elige el modo PS4
Configuración de audio de PS4
Dispositivos > Dispositivos de audio > Salida a
auriculares > Todo el audio
Formato de audio (prioridad) > Flujo de bits (Dolby)
Salida de audio HDMI > 5,1 ch
Dispositivos > Dispositivos de audio
Salida a auriculares > Audio de chat
CONFIGURACIÓN DE PC
01 Conecta el cable principal de los auriculares a
GameDAC
02 Conecta el cable de audio USB de GameDAC
a la PC
03 (Opcional) Conecta un cable de 3,5 mm de la línea
de salida de GameDAC a un par de altavoces
encendidos
Configuración de GameDAC
01 Presiona y mantén presionada la rueda de control
para ingresar al menú principal
02 Selecciona Modo y haz clic en la rueda de control
para editar
03 Elige el modo PC o PC Hi-Res (nota: PC-Hi Res
activa el audio de 96k/24bit, pero el sonido
envolvente y ChatMix no están disponibles)
Configuración de sonido de Windows
01 En Playback, resalta GameDAC Game Audio y
selecciona Congurar como predeterminado
02 En Reproducción, selecciona GameDAC Chat
Audio y luego Congurar dispositivo de
comunicación como predeterminado
03 En Grabación, resalta GameDAC Chat Audio y
selecciona Congurar como predeterminado”
CINTA PARA EL CABELLO CON
GAFAS DE ESQUÍ
Velcro
Apriete o aoje las tiras de velcro de los laterales de la
cinta para lograr el ajuste deseado
Cintas para cabello complementarias disponibles en
steelseries.com

简体中文
SteelSeries Engine
到 steelseries.com/engine 下载SteelSeries
Engine来自定义头戴式耳机上的灯光、在PC上控
制 GameDAC、以及与Engine应用交, (如在OLED
屏幕上显示Discord信息)
SteelSeries Engine 系統需求
適用平台:
Windows 7 – Windows 10
Mac OS X 10.8 – 10.11
安装需要120 MB磁盘空间
* SteelSeries 7.1 Surround仅在Windows上可用
请在support.steelseries.com上寻求帮助
包装内容
耳机
GameDAC
主耳机线缆
手机转接头
USB音频线
光纤音频线
产品信息指南
25 26
系統需求 // 相容性
PC
PS4 (Pro / Slim / Original)
产品概述
01 滑雪镜头带 *
02 AirWeave耳垫 *
03 ClearCast麦克风
04 麦克风静音按钮
05 音量控制
06 主线缆插孔
07 耳机共享插孔
08 主耳机线缆 *
09 USB音频线
10 光纤音频线
11 手机转接头 *
12 OLED屏幕
13 辅助按钮
14 控制旋钮
15 Line Out插孔
16 移动设备插孔
17 USB插孔
18 光纤插孔
19 头戴式耳机连接插孔
* 勾选商品可在steelseries.com购買
GAMEDAC操作
主屏幕
01 按下然后松开控制轮来在音量和
ChatMix之间切换。
02 旋转控制轮调整选定的参数
03 按下然后松开辅助按钮来切换
DTS Headphone:X开关
04 按住控制轮调出主菜单
主菜单
01 旋转控制轮循环菜单项
02 按下然后松开控制轮来选择
03 按下然后松开辅助按钮在菜单中返回
设置PS4 PRO 及原版PS4
硬件安装
01 将头戴式耳机的主耳机电缆连接到GameDAC
02 将GameDAC的USB音频线连接到PS4前面
03 将GameDAC的光线音频线连接到PS4后面
GameDAC设置
01 按住控制轮进入主菜单
02 选择模式,然后单击控制轮进行编辑
03 选择PS4模式
PS4音频设置
声音和画面 > 音频输出设置
主输出端口 > 数字输出(光纤)
音频格式(优先) > 杜比数码(Dolby)
设备>音频设备
输出到耳机 > 聊天音频

设置PS4 SLIM // 带光纤音频
01 将头戴式耳机的主耳机电缆连接到
GameDAC左侧
02 将GameDAC的光纤线缆连接到电视的
光纤输出或HDMI适配器
03 将GameDAC的USB音频线连接到PS4前面
USB接口
*PS4 Slim没有光纤输出。要获得全部功能,您需
要将GameDAC连接到电视的光纤输出或HDMI适
配器如无光纤,请继续到下一页。
设置PS4 SLIM // 无光纤音频
01 将头戴式耳机的主耳机电缆连接到
GameDAC左侧
02 将GameDAC的USB音频线连接到PS4前面
USB接口
*如没有光纤音频,环绕声和CHATMIX功能将不
可用。
GameDAC设置
01 按住控制轮进入主菜单
27 28
02 选择模式,然后单击控制轮进行编辑
03 选择PS4模式
PS4音频设置
设备>音频设备>输出到耳机>所有音频
音频格式(优先) > 杜比数位音頻(Dolby)
HDMI音频输出。 > 5.1 ch
设备>音频设备
输出到耳机 > 聊天音频
滑雪镜头带
魔鬼沾
拉紧或拉松头带两侧的魔鬼沾,以获得理想的
松紧度
頭帶附件可在steelseries.com購買
繁體中文
SteelSeries Engine
到 steelseries.com/engine 下載SteelSeries Engine
來自定義耳機燈效、在PC上控制 GameDAC、以及
與Engine應用 (如在OLED螢幕上顯示Discord信息)
SteelSeries Engine 軟體需求
適用平台:
Windows 7 – Windows 10
Mac OS X 10.8 – 10.11
安裝需要120 MB 的硬碟空間
*
SteelSeries 7.1聲道環繞音效僅能於Windows平
台使用
您可在support.steelseries.com獲得更多協助
內容物
耳機
GameDAC
主耳機線 (1.5 m)
手機轉接頭
USB音源線
光纖音源線
產品資訊指南
系統需求 // 相容性
PC
PS4 (Pro / Slim / Original)
產品概覽
01 滑雪鏡頭帶 *
02 AirWeave耳罩 *
03 ClearCast麥克風
04 麥克風靜音鈕
05 音量控制
06 主線接頭
07 耳機共享接頭
08 主耳機線 *
09 USB音源線
10 光纖音源線
11 手機轉接頭 *
12 OLED螢幕
13 輔助按鈕
14 控制旋鈕
15 Line Out插槽

16 手機插槽
17 USB 插槽
18 光纖插槽
19 耳機插槽
*
可在 steelseries.com購買配件與替換品
GAMEDAC操作
主頁
01 按下控制旋鈕来切換音量和ChatMix。
02 旋轉控制旋鈕選取
03 按下輔助鈕来開關DTS Headphone:X
04 按住控制旋鈕進入主選單
主選單
01 旋轉控制旋鈕循環選單
02 按下控制旋鈕選擇
03 按下輔助鈕返回上一頁
設置PS4 PRO 及原版PS4
硬體安装
01 將耳機的主線連接到GameDAC
02 將GameDAC的USB音源線連接到PS4前方
03 將GameDAC的光纖音源線連接到PS4後方
GameDAC設置
01 按住控制旋鈕進入主選單
02 選擇模式,單按控制旋鈕選取
03 選擇PS4
PS4音效設置
音效和畫面 > 音效輸出裝置
主輸出端口 > 數字輸出(光纖)
音源格式(優先) > 杜比數位音源(Dolby)
設備 > 音源設備
輸出到耳機 > 聊天語音
設置PS4 SLIM // 帶光纖音源
01 將耳機主線連接到GameDAC左側
02 將GameDAC的光纖線連接到電視的
光纖輸出或HDMI轉接器
03 將GameDAC的USB音源線連接到PS4前面
USB接頭
*PS4 Slim没有光纖輸出。要使用全部功能,您需
要將GameDAC連接到電視的光纖輸出或HDMI轉
接器。如無光纖,請閱讀以下。
設置PS4 SLIM // 無光纖音源
01 將耳機主線連接到GameDAC左側
02 將GameDAC的USB線連接到PS4前方
USB接頭
*無光纖音源環繞音效和CHATMIX功能將不可用。
GameDAC設置
01 按住控制轉輪進入主選單
02 選擇Mode,單按控制轉輪選取
03 選擇PS4
PS4音效設置
設備 > 音效設備 > 輸出至耳機 > 所有音效
音頻格式(優先) > 杜比數位音源(Dolby)
HDMI音源輸出。 > 5.1 ch
設備 > 音源設備
輸出至耳機 > 聊天語音
滑雪鏡頭帶
魔鬼氈
請將頭帶兩邊魔鬼氈的鬆緊度調整至適合您的鬆
緊度。
其他款式頭帶可於 steelseries.com 購買
日本語
SteelSeries Engine
SteelSeries Engineをダウンロードすると、ヘッ
ドセットのイルミネーションをカスタマイズ
したり、PCからGameDACを制御できます。ま
29 30
た、Engineアプリとの統合(OLED 画面にDiscord
情報を表示するなど)も可能になります。詳しく
はsteelseries.com/engineをご覧ください

SteelSeries Engine ソフトウェア要件
プラットフォーム:
Windows 7 – Windows 10
Mac OS X 10.8 – 10.11
インストールに120 MBの空き容量が必要
* SteelSeries 7.1 Surround は Windows でのみご利用
いただけます
ご不明な点は support.steelseries.com のヘルプを
ご覧ください
パッケージの内容
ヘッドセット
GameDAC
メインケーブル
モバイルアダプター
USBオーディオケーブル
光学式オーディオケーブル
製品情報ガイド
システム要件 // 互換性
PC
PS4 (Pro / Slim / Original)
31 32
製品概要
01 スキーゴーグルヘッドバンド *
02 AirWeaveイヤークッション *
03 ClearCastマイク
04 マイク消音ボタン
05 音量コントロール
06 メインケーブルジャック
07 ヘッドフォン共有ジャック
08 メインケーブル *
09 USBオーディオケーブル
10 光学式オーディオケーブル
11 モバイルアダプター *
12 OLED画面
13 副ボタン
14 コントロールホイール
15 Line Outジャック
16 モバイルジャック
17 USBジャック
18 光学ジャック
19 ヘッドセット接続ジャック
*
steelseries.com でアクセサリおよび交換用の部
品をお求めいただけます
GAMEDACの操作
ホーム画面
01 コントロールホイールを押して離すと音量と
ChatMixを切り替えます
02 コントロールホイールを回して選択したパラ
メータを調節します
03 副ボタンを押して離すと DTS Headphone:Xの
オンとオフを切り替えます
04 コントロールホイールを長押しするとメイン
メニューを表示します
メインメニュー
01 コントロールホイールを回してメニューを移
動します
02 コントロールホイールを押して離すとその項
目を選択します
03 副ボタンを押して離すと1つ前のメニューに戻
ります”
PS4 PROと通常版PS4の設定
ハードウェアの取り付け
01 ヘッドセットのメインケーブルをGameDACに
接続します
02 GameDACのUSBオーディオケーブルをPS4の前
面に接続します
03 GameDACの光学式オーディオケーブルをPS4
の背面に接続します
GameDACの設定
01 コントロールホイールを長押ししてメインメ
ニューを開きます
02 モード(Mode)を選択し、コントロールホイ
ールをクリックして編集します
03 PS4のモードを選びます
PS4オーディオ設定
サウンドとスクリーン > 音声出力設定
主に使用する出力端子 > デジタル出力(光)
音声フォーマット(優先)> ビットストリーム
(Dolby)
周辺機器 > オーディオ機器
ヘッドホンへの出力 > チャット音声

02 GameDAC のUSBオーディオケーブルをPCに接
PS4 SLIMの設定 // 光オーディオあり
01 ヘッドセットのメインケーブルをGameDACの
左側に接続します
02 GameDACの光学ケーブルを、ご利用のテレビ
の光出力端子またはHDMIアダプタに接続しま
す
03 GameDACのUSBオーディオケーブルを、PS4の
前面にあるUSBポートに挿します
* PS4 Slimには光出力端子がありません。完全な
機能をお楽しみいただくには、GameDACをご
利用のテレビの光出力端子かHDMIアダプタに
接続していただく必要があります。光オーディ
オをご利用いただけない場合は、次のページを
ご覧ください。
PS4 SLIMの設定 // 光オーディオなし
01 ヘッドセットのメインケーブルをGameDACの
左側に接続します
02 GameDACのUSBオーディオケーブルをPS4の前
面にあるUSBポートに挿します
*光オーディオがない場合、サラウンドサウンド
と ChatMixの機能はご利用いただけません。
33 34
GAMEDACの設定
01 コントロールホイールを長押ししてメインメニ
ューを開きます
02 モード(Mode)を選択し、コントロールホイ
ールをクリックして編集します
03 PS4 モードを選びます
PS4オーディオ設定
周辺機器 > オーディオ機器 > ヘッドホンへの出
力 > すべてのオーディオ
音声フォーマット(優先) > ビットストリーム
(Dolby)
HDMI音声出力 > 5.1 ch
周辺機器 > オーディオ機器
ヘッドホンへの出力 > チャット音声
PCの設定
01 ヘッドセットのメインケーブルをGameDACに
接続します
続します
03 (任意)GameDACのLine Outジャックの
3.5mmケーブルを、電源の入ったスピーカー
に接続します
GameDACの設定
01 コントロールホイールを長押ししてメインメニ
ューを開きます
02 モード(Mode)を選択し、コントロールホイ
ールをクリックして編集します
03 PCまたはPCハイレゾモードを選びます(注:
PCハイレゾモードでは 96k/24bit音声が有効に
なりますが、サラウンドサウンドとChatMixを
ご利用いただけなくなります)
한국어
SteelSeries Engine
SteelSeries Engine을 다운로드하면 헤드셋의
조명을 사용자 지정하고, PC에서 GameDAC
를 제어하고, Engine 앱을 연동할(OLED 화면에
Windowsの音声設定
01 [再生]タブでGameDAC Game Audioをハイライ
トし、[規定のデバイスに設定]を選択します
02 [再生]タブでGameDAC Chat Audioを選択し、[
既定の通信デバイスに設定]を選択します
03 [録音]タブでGameDAC Chat Audio をハイライ
トし、[規定のデバイスに設定]を選択します”
スキーゴーグル ヘッドバンド
面ファスナー
ヘッドバンド両側のストラップの面ファスナーを
調整し、きつすぎず緩すぎない、丁度いい装着感
になるようにしてください。
インストール
ヘッドバンドの取り付け方法の説明です
アクセサリヘッドバンドをお求めの場合は
steelseries.com をご覧ください
Discord 정보 표시 등) 수 있습니다. steelseries.
com/engine
SteelSeries Engine 소프트웨어 필요 사용
플랫폼:

Windows 7 – Windows 10
Mac OS X 10.8 – 10.11
설치를 위해 120MB의 하드 드라이브 공간 필요
* SteelSeries 7.1 Surround는 Windows만 지원
고객 지원은 support.steelseries.com을 방문하세요
패키지 구성
헤드셋
GameDAC
메인 케이블
모바일 어댑터
USB 오디오 케이블
광 오디오 케이블
제품 정보 가이드
필요 시스템 사양 // 호환 시스템
PC
PS4 ( Pro / Slim / Original )
35 36
제품 개요
01 스키 고글 헤드밴드 *
02 AirWeave 이어 쿠션 *
03 ClearCast 마이크
04 마이크 음소거 버튼
05 볼륨 조절
06 메인 케이블 잭
07 헤드폰 공유 잭
08 메인 헤드셋 케이블 *
09 USB 오디오 케이블
10 광 오디오 케이블
11 모바일 어댑터 *
12 OLED 화면
13 보조 버튼
14 제어 휠
15 Line Out 잭
16 모바일 잭
17 USB 잭
18 광 잭
19 헤드셋 연결 잭
* 보조장치와 교체용 부품은 steelseries.com
에서 구할 수 있습니다
GameDAC 조작
홈 화면
01 제어 휠을 눌렀다가 손을 떼면 볼륨 또는
ChatMix로 전환합니다
02 제어 휠을 돌려 선택 항목을 조절합니다
03 보조 버튼을 눌렀다가 손을 떼면 DTS
Headphone:X를 켜고 끕니다
04 제어 휠을 길게 누르면 메인 메뉴가 나타납니다
메인 메뉴
01 제어 휠을 돌려 메뉴를 스크롤할 수 있습니다
02 제어 휠을 눌렀다가 손을 떼면 메뉴 항목을
선택합니다
03 보조 버튼을 눌렀다가 손을 떼면 한 단계 뒤로
돌아갑니다
PS4 SLIM 구성 // 광 오디오 사용
01 헤드셋의 메인 헤드셋 케이블을 GameDAC
왼쪽에 연결합니다
02 광 케이블을 사용해 GameDAC를 TV 또는 HDMI
어댑터의 광 출력 단자에 연결합니다
03 USB 오디오 케이블을 사용해 GameDAC를 PS4
전면의 USB 포트에 연결합니다
* PS4 Slim에는 광 출력 단자가 없습니다. 모든
기능을 제대로 활용하려면 GameDAC를 TV나
HDMI 어댑터의 광 출력 단자에 연결해야 합니다.
광 출력 단자를 사용할 수 없다면 다음 페이지로
넘어가십시오.
PS4 SLIM 구성 // 광 오디오 미사용
01 헤드셋의 메인 헤드셋 케이블을 GameDAC
왼쪽에 연결합니다
02 USB 오디오 케이블을 사용해 GameDAC를 PS4
전면의 USB 단자에 연결합니다
* 광 오디오가 없으면 서라운드 사운드와 ChatMix
기능을 사용할 수 없습니다.
GameDAC 설정
01 제어 휠을 눌렀다가 손을 떼어 메인 메뉴에
들어갑니다
02 모드를 선택한 후, 제어 휠을 클릭해서 편집합니다

03 PS4 모드를 선택합니다
PS4 오디오 설정
주변기기 > 오디오 기기 > 헤드폰으로 출력 > 모든
오디오
오디오 포맷(우선) > 비트스트림(Dolby)
HDMI 오디오 출력. > 5.1 ch
주변기기 > 오디오 기기
헤드셋으로 출력 > 채팅 오디오
스키 고글 헤드밴드
벨크로
헤드셋 측면의 벨크로 띠의 부착을 조절하여 적절히
착용
보조 헤드밴드는 steelseries.com에서 구하실 수
있습니다
PC 구성
01 헤드셋의 메인 헤드셋 케이블을 GameDAC에
연결합니다
37 38
02 USB 오디오 케이블을 사용해 GameDAC를 PC에
연결합니다
03 (선택) 3.5mm 케이블을 사용해 GameDAC의
Line Out 단자를 앰프 내장 스피커에 연결합니다
GameDAC 설정
01 제어 휠을 눌렀다가 손을 떼어 메인 메뉴에
들어갑니다
02 모드를 선택한 후, 제어 휠을 클릭해서 편집합니다
03 PC 또는 PC Hi-Res 모드를 선택합니다 (참고:
PC-Hi Res 선택 시 96k/24비트 오디오를 사용할
수 있으나, 서라운드 사운드와 ChatMix는 사용할
수 없습니다)
Windows 사운드 설정
01 “재생”에서 GameDAC Game Audio를 선택한
후 “기본값으로 설정”을 선택합니다
02 “재생”에서 GameDAC Chat Audio를 선택한 후
“기본 통신 장치로 설정”을 선택합니다
03 “녹음/녹화”에서 GameDAC Chat Audio를
선택한 후 “기본값으로 설정”을 선택합니다
DEUTSCH
STEELSERIES ENGINE
Lade SteelSeries Engine herunter, um die
Beleuchtung deines Headsets anzupassen, den
GameDAC vom PC aus zu steuern und Engine-Apps
zu integrieren (wie die Anzeige von Discord-Infos auf
dem OLED Bildschirm). steelseries.com/engine
Softwareanforderungen für die SteelSeries
Engine
Plattformen:
Windows 7 – Windows 10
Mac OS X 10.8 – 10.11
120 MB freier Speicherplatz für die Installation
* SteelSeries 7.1 Surround ist nur für Windows
erhältlich
Hilfe unter support.steelseries.com
Paketinhalt
Headset
GameDAC
Headset-Kabel
Adapter für Mobilgerät
USB-Audiokabel
Optisches Audiokabel
Produktinformationen
SYSTEMANFORDERUNGEN
// KOMPATIBILITÄT
PC
PS4 PS4 ( Pro / Slim / Original )
PRODUKTÜBERSICHT
01 Skibrillen-Kopfbügel *
02 AirWeave-Ohrmuschel *
03 ClearCast-Mikrofon
04 Mikrofon-Stummtaste
05 Lautstärkeregler
06 Headset-Kabel-Buchse
07 Kopfhörer-Share-Anschluss
08 Headset-Kabel *
09 USB-Audiokabel
10 Optisches Audiokabel
11 Adapter für Mobilgerät *
12 OLED-Bildschirm
13 Sekundärtaste
14 Steuerrad
15 Line-Out-Buchse

16 Anschluss für Mobilgerät
17 USB-Anschluss
18 Optischer Anschluss
19 Anschluss für Headset
* Accessoires und Ersatzteile ndest du unter
steelseries.com
GAMEDAC BEDIENUNG
Startbildschirm
01 Drücke das Steuerrad, um zwischen Lautstärke
und ChatMix zu wechseln
02 Drehe das Steuerrad, um die jeweilige Einstellung
anzupassen
03 Drücke die Sekundärtaste, um DTS Headphone:X
ein- oder auszuschalten
04 Halte das Steuerrad gedrückt, um das
Hauptmenü aufzurufen
Hauptmenü
01 Drehe das Steuerrad, um durch Menü-Elemente
zu scrollen
02 Drücke das Steuerrad, um ein Menü-Element
auszuwählen
39 40
03 Drücke die Sekundärtaste, um einen Schritt
zurückzugehen
EINRICHTUNG PS4 PRO UND PS4
Hardware-Installation
01 Schließe das Headset-Kabel an Headset und
GameDAC an
02 Schließe das USB-Audiokabel an GameDAC und
die Vorderseite der PS4 an
03 Schließe das optische Audiokabel an GameDAC
und die Rückseite der PS4 an
GameDAC-Einstellungen
01 Halte das Steuerrad gedrückt, um das Hauptmenü
aufzurufen
02 Wähle „Modus“ aus und klicke das Steuerrad zum
Bearbeiten
03 Wähle den PS4-Modus
PS4-Audioeinstellungen
Sound Und Bildschirm > AudioausgabeEinstellungen
Primärer Ausgabeport > Digital Out (Optical)
Audioformat (Priorität) > Bitstream (Dolby)
Geräte > Audiogeräte
Ausgabe über Kopfhörer > Chat-Audio
РУССКИЙ
SteelSeries Engine
Загрузите SteelSeries Engine для установки
персональных параметров освещения,
управления GameDAC с компьютера и
интеграции с приложениями Engine (например,
для отображения информации Discord на
светодиодном экране). steelseries.com/engine
Содержимое упаковки
Наушники
GameDAC
Основной кабель
Переходник для мобильных устройств
Звуковой USB-кабель
Оптический аудиокабель
Инструкция по эксплуатации
SKIBRILLEN-KOPFBÜGEL
Klettverschluss
Ziehe die Klettbänder an den Seiten des Kopfbügels
fest oder lockere sie, um eine optimale Passform zu
erreichen.
Zusatzklettbänder erhältlich unter steelseries.com
Системные требования ПО SteelSeries
Engine
Платформы:
Windows 7 – Windows 10
Mac OS X 10.8 – 10.11
120 МБ свободного места на жёстком диске
для установки
* Функция SteelSeries 7.1 Surround работает
только на ОС Windows
За помощью обращайтесь по адресу support.
steelseries.com

Системные требования // Совместимость
ПК
PS4 ( Pro / Slim / Original )
ОБ ИЗДЕЛИИ
01 Лыжное оголовье *
02 Амбушюры AirWeave *
03 Микрофон ClearCast
04 Кнопка отключения микрофона
05 Регулятор громкости
06 Разъём для основного кабеля
07 Разветвитель для наушников
08 Основной кабель наушников *
09 Звуковой USB-кабель
10 Оптический аудиокабель
11 Переходник для мобильных устройств *
12 Светодиодный экран
13 Дополнительная кнопка
14 Колёсико управления
15 Разъём линейного выхода
41 42
16 Разъём для мобильных устройств
17 USB-разъём
18 Разъём для оптического кабеля
19 Разъём для подключения наушников
* Аксессуары и запчасти можно купить на сайте
steelseries.com
УПРАВЛЕНИЕ GAMEDAC
ГЛАВНЫЙ ЭКРАН
01 Нажмите и отпустите колёсико управления,
чтобы перейти от управления громкостью к
ChatMix
02 Вращайте колёсико управления, чтобы
настроить выбранный параметр
03 Нажмите и отпустите дополнительную
кнопку, чтобы включить или выключить
DTS Headphone:X
04 Нажмите и удерживайте колёсико
управления, чтобы открыть главное меню
ГЛАВНОЕ МЕНЮ
01 Вращайте колёсико управления для
перемещения по пунктам меню
02 Нажмите и отпустите колёсико управления
для выбора
03 Нажмите и отпустите дополнительную
кнопку для возврата назад в меню
УСТАНОВКА PS4 PRO И ОРИГИНАЛЬНОГО
ОБОРУДОВАНИЯ
01 Подключите основной кабель наушников к
GameDAC
02 Подключите звуковой USB-кабель
GameDAC к передней панели PS4
03 Подключите оптический аудиокабель
GameDAC к задней панели PS4
Настройка GameDAC
01 Чтобы войти в главное меню, нажмите и
удерживайте колёсико управления
02 Выберите режим, затем нажмите на
колёсико управления для изменения
03 Выберите режим PS4
Настройки звука PS4
Звук И Экран > Параметры Звукового
Выхода
Порт основного выхода > Цифровой выход
(оптический)
Аудиоформат (приоритет) > Битовый поток
(Dolby)
Устройства > Звуковые устройства
Выход к наушникам > Звук чата
УСТАНОВКА НА PS4 SLIM //
С ОПТИЧЕСКИМ АУДИОКАБЕЛЕМ
01 Подключите основной кабель наушников
с левой стороны GameDAC
02 Подключите оптический кабель от
GameDAC к оптическому выходу
телевизора или HDMI-адаптера
03 Подключите звуковой USB-кабель от
GameDAC к USB-порту на передней панели
PS4
* Система PS4 Slim не оснащена оптическим
выходом. Для доступа к полному функционалу
необходимо подключить GameDAC к
оптическому выходу телевизора или
HDMI-адаптера. Если оптический кабель

отсутствует, перейдите к следующей
странице.
Установка на PS4 Slim // БЕЗ
ОПТИЧЕСКОГО КАБЕЛЯ
01 Подключите основной кабель наушников
с левой стороны GameDAC
02 Подключите звуковой USB-кабель от
GameDAC к USB-порту на передней
панели PS4
* Без оптического аудиокабеля функции
«звук вокруг» и ChatMix недоступны.
Настройка GameDAC
01 Чтобы войти в главное меню, нажмите и
удерживайте колёсико управления
02 Выберите режим, затем нажмите на
колёсико управления для изменения
03 Выберите режим PS4
Настройки звука PS4
43 44
Устройства > Звуковые устройства > Выход к
наушникам > Все настройки звука
Аудиоформат (приоритет) > Битовый поток
(Dolby)
Аудиовыход HDMI. > 5.1 кн.
Устройства > Звуковые устройства
Выход к наушникам > Звук чата
УСТАНОВКА НА КОМПЬЮТЕРЕ
01 Подключите основной кабель наушников к
GameDAC
02 Подключите звуковой USB-кабель от
GameDAC к компьютеру
03 (необязательно) Подключите 3,5мм кабель
от разъёма линейного выхода GameDAC к
паре колонок
Настройка GameDAC
01 Чтобы войти в главное меню, нажмите и
удерживайте колёсико управления
02 Выберите режим, затем нажмите на
колёсико управления для изменения
03 Выберите обычный или
высококачественный компьютерный режим
(примечание: режим высокого качества
поддерживает звук 96k/24bit, но функции
«звук вокруг» и ChatMix недоступны)
Настройка звука для Windows
01 В разделе «Воспроизведение» выделите
GameDAC Game Audio и выберите
«Использовать по умолчанию»
02 В разделе «Воспроизведение» выберите
GameDAC Chat Audio, затем «Использовать
в качестве устройства связи по
FRANÇAIS
SteelSeries Engine
Téléchargez SteelSeries Engine pour personnaliser
l’éclairage sur votre casque, contrôler le GameDAC
du PC et pour l’intégrer avec les applications Engine
(pour acher les infos Discord sur l’écran OLED, par
exemple). steelseries.com/engine
умолчанию»
03 В разделе «Запись» выделите GameDAC
Chat Audio и выберите «Использовать по
умолчанию»
ЛЫЖНОЕ ОГОЛОВЬЕ НАУШНИКОВ
Липучка
С помощью липучек по бокам можно изменить
размер оголовья
Присоединение
Направление присоединения наушников
Дополнительные оголовья можно купить на
сайте steelseries.com
Configuration requise pour le
logiciel SteelSeries Engine
Plateformes:
Windows 7 – Windows 10
Mac OS X 10.8 – 10.11
120Mo d’espace libre sur le disque dur pour
l’installation
* SteelSeries 7.1 Surround disponible uniquement pour

Windows
aide disponible à l’adresse support.steelseries.com
Contenu de l’emballage
Casque
GameDAC
Câble principal
Adaptateur mobile
Câble audio USB
Câble audio optique
Guide d’informations produit
Configuration requise // Compatibilité
PC
PS4 (Pro / Slim / Original)
VUE D’ENSEMBLE DU PRODUIT
01 Serre-tête de masque de ski *
02 Coussinets d’oreille AirWeave *
03 Microphone ClearCast
04 Bouton de mise en sourdine du microphone
45 46
05 Contrôle du volume
06 Prise du câble principal
07 Prise de partage du casque
08 Câble principal du casque *
09 Câble audio USB
10 Câble audio optique
11 Adaptateur mobile *
12 Écran OLED
13 Bouton secondaire
14 Molette de contrôle
15 Prise de sortie
16 Prise mobile
17 Prise USB
18 Prise optique
19 Prise de connexion au casque
* Accessoires et pièces de rechange disponibles à
l’adresse steelseries.com
UTILISATION DE GAMEDAC
Écran d’accueil
01 Appuyez sur la molette de contrôle puis relâchez
pour passer du volume à ChatMix
02 Tournez la molette de contrôle pour ajuster le
paramètre sélectionné
03 Appuyez sur le bouton secondaire puis relâchez
pour activer/désactiver DTS Headphone:X
04 Maintenez la molette de contrôle appuyée pour
acher le menu principal
Menu principal
01 Tournez la molette de contrôle pour passer d’un
élément du menu à l’autre
02 Appuyez sur la molette de contrôle puis relâchez
pour sélectionner
03 Appuyez sur le bouton secondaire puis relâchez
pour retourner en arrière dans le menu
CONFIGURATION PS4 PRO ET ORIGINALE
Installation du matériel
01 Reliez le câble principal du casque au GameDAC
02 Reliez le câble audio USB du GameDAC à l’avant
de la PS4
03 Reliez le câble audio optique du GameDAC à
l’arrière de la PS4
Paramètres GameDAC
01 Maintenez le molette de contrôle appuyée pour
accéder au menu principal
02 Sélectionnez le mode, puis cliquez sur la molette
de contrôle pour modier
03 Choisissez le mode PS4
Paramètres audio PS4
Son Et Écran > Paramètres De Sortie Audio
Port de sortie principal > Sortie digitale (optique)
Format audio (Priorité) > Bitstream (Dolby)
Périphériques > Périphériques audio
Sortie vers le casque > Audio du Chat

CONFIGURATION PS4 SLIM // AVEC AUDIO
OPTIQUE
01 Reliez le câble principal du casque au côté gauche
du GameDAC
02 Reliez le câble optique du GameDAC à la sortie
optique de votre téléviseur ou à l’adaptateur
HDMI
03 Reliez le câble audio USB du GameDAC au port
USB situé à l’avant de la PS4
* La PS4 Slim n’est pas dotée de sortie optique.
Pour une fonctionnalité optimale, il vous faudra relier
le GameDAC à la sortie optique d’un téléviseur ou
d’un adaptateur HDMI. Si aucune sortie optique n’est
disponible, passez à la page suivante.
01 Maintenez le molette de contrôle appuyée pour
accéder au menu principal
02 Sélectionnez le mode, puis cliquez sur la molette
de contrôle pour modier
03 Choisissez le mode PS4
CONFIGURATION PC
01 Reliez le câble principal du casque au GameDAC
02 Reliez le câble audio USB du GameDAC au PC
03 (Facultatif) Reliez un câble 3,5mm de la sortie du
GameDAC à une paire de hauts-parleurs alimentés
Audio, puis sélectionnez «Dénir par défaut»
02 Sous «Lecture», sélectionnez GameDAC Chat
Audio, puis sélectionnez «Dénir le périphérique
de communication par défaut»
03 Sous «Enregistrement», sélectionnez GameDAC
Chat Audio, puis sélectionnez «Dénir par
défaut»
Paramètres audio PS4
Périphériques > Périphériques audio > Sortie
vers le casque > Tout audio
Format audio (Priorité) > Bitstream (Dolby)
Sortie audio HDMI. > 5.1 ch
Périphériques > Périphériques audio
Sortie vers le casque > Audio du Chat
SERRE-TÊTE DE MASQUE DE SKI
Velcro
Serrez ou desserrez les lanières en Velcro sur les
côtés du serre-tête pour un ajustement optimal
Serre-tête accessoires disponibles à l’adresse
steelseries.com
CONFIGURATION PS4 SLIM // SANS AUDIO
OPTIQUE
01 Reliez le câble principal du casque au côté gauche
du GameDAC
02 Reliez le câble audio USB du GameDAC au port
USB situé à l’avant de la PS4
*Sans audio optique, les fonctionnalités de son
surround et ChatMix ne seront pas disponibles.
Paramètres GameDAC
47 48
Paramètres GameDAC
01 Maintenez le molette de contrôle appuyée pour
accéder au menu principal
02 Sélectionnez le mode, puis cliquez sur la molette
de contrôle pour modier
03 Choisissez le mode PC ou PC Haute résolution
(Remarque: PC Haute résolution active l’audio
96k/24bit, mais le son surround et ChatMix ne
sont pas disponibles)
Paramètres son Windows
01 Sous «Lecture», sélectionnez GameDAC Game
ITALIANO
SteelSeries Engine
Scarica SteelSeries Engine per personalizzare
l’illuminazione delle cue, controllare il GameDAC
dal PC e integrare con le app Engine (come la
visualizzazione delle informazioni di Discord sullo
schermo OLED). steelseries.com/engine
Requisiti del software SteelSeries Engine
Piattaforme:
Windows 7 – Windows 10
Mac OS X 10.8 – 10.11
120 MB di spazio libero sul disco sso per
l’installazione
* SteelSeries 7.1 Surround disponibile solo su Windows
per ricevere assistenza, visita support.steelseries.com
Contenuto del pacchetto
Cue
GameDAC
Cavo principale

Adattatore per dispositivi mobili
Cavo audio USB
Cavo audio ottico
Guida informazioni sul prodotto
Requisiti di sistema // Compatibilità
PC
PS4 ( Pro / Slim / Original )
PANORAMICA DEL PRODOTTO
01 Archetto stile occhiali da sci *
02 Cuscinetti AirWeave *
03 Microfono ClearCast
04 Pulsante per la disattivazione del microfono
05 Regolazione del volume
06 Ingresso cavo principale
07 Splitter per cue
08 Cavo principale delle cue *
09 Cavo audio USB
10 Cavo audio ottico
49 50
11 Adattatore per dispositivi mobili *
12 Schermo OLED
13 Pulsante secondario
14 Ghiera di comando
15 Presa line-out
16 Presa per dispositivi mobili
17 Presa USB
18 Presa ottica
19 Presa collegamento cue
* Puoi trovare accessori e parti di ricambio su
steelseries.com
FUNZIONAMENTO GAMEDAC
Schermata iniziale
01 Premi e rilascia la ghiera di comando per passare
dal volume a ChatMix
02 Ruota la ghiera di comando per regolare il
parametro selezionato
03 Premi e rilascia il pulsante secondario per
accendere e spegnere il DTS Headphone:X
04 Premi e tieni premuta la ghiera di comando per
visualizzare il menu principale
Menu principale
01 Ruota la ghiera di comando per passare in
rassegna le voci del menu
02 Premi e rilascia la ghiera di comando per
selezionare
03 Premi e rilascia il pulsante secondario per tornare
al menu
IMPOSTAZIONI DEL SISTEMA PS4 PRO
E ORIGINALE
Installazione dell’hardware
01 Collega il cavo principale delle cue da queste
ultime al GameDAC
02 Collega il cavo audio USB dal GameDAC alla parte
frontale del sistema PS4
03 Collega il cavo audio ottico dal GameDAC alla
parte retrostante del sistema PS4
Impostazioni GameDAC
01 Premi e mantieni premuta la ghiera di comando
per accedere al menu principale
02 Seleziona la modalità quindi clicca sulla ghiera di
comando per modicare
03 Scegli la modalità per sistema PS4
Impostazioni audio del sistema PS4
Suoni E Schermo > Impostazioni Uscita Audio
Porta di uscita primaria > Uscita digitale (ottica)
Formato audio (priorità) > Flusso di bit ad alta
velocità (Dolby)
Dispositivi > Dispositivi audio
Uscita in cua > Audio chat
IMPOSTAZIONI DEL SISTEMA PS4 SLIM //
CON USCITA AUDIO OTTICA
01 Collega il cavo principale delle cue da queste
ultime al lato sinistro del GameDAC
02 Collega il cavo ottico dal GameDAC all’uscita
ottica della TV o all’adattatore HDMI
03 Collega il cavo audio USB dal GameDAC alla porta
USB frontale del sistema PS4
* Il sistema PS4 Slim non è provvisto di uscita
ottica. Per usufruire della piena funzionalità dovrai
collegare il GameDAC all’uscita ottica di una TV o

a un adattatore HDMI. In caso non sia disponibile
un’uscita ottica, prosegui alla pagina successiva.
IMPOSTAZIONI DEL SISTEMA PS4 SLIM //
SENZA USCITA AUDIO OTTICA
01 Collega il cavo principale delle cue da queste
ultime al lato sinistro del GameDAC
02 Collega il cavo audio USB dal GameDAC alla porta
USB frontale del sistema PS4
* Senza l’uscita audio ottica, le funzionalità ChatMix
e l’audio surround non saranno disponibili.
Impostazioni GameDAC
01 Premi e mantieni premuta la ghiera di comando
per accedere al menu principale
02 Seleziona la modalità quindi clicca sulla ghiera di
comando per modicare
03 Scegli la modalità per sistema PS4
Impostazioni audio del sistema PS4
Dispositivi > Dispositivi audio > Uscita in cuffia
51 52
> Tutto l’audio
Formato audio (priorità) > Flusso di bit ad alta
velocità (Dolby)
Uscita audio HDMI. > Canale 5.1
Dispositivi > Dispositivi audio
Uscita in cua > Audio chat
IMPOSTAZIONI DEL PC
01 Collega il cavo principale delle cue da queste
ultime al GameDAC
02 Collega il cavo audio USB dal GameDAC al PC
03 (facoltativo) Collega un cavo da 3,5 mm dal
line-out del GameDAC a due altoparlanti
amplicati
Impostazioni GameDAC
01 Premi e mantieni premuta la ghiera di comando
per accedere al menu principale
02 Seleziona la modalità quindi clicca sulla ghiera di
comando per modicare
03 Scegli la modalità per PC o per PC alta risoluzione
(Nota: con PC alta risoluzione viene attivato
l’audio a 24bit/96k, ma audio surround e ChatMix
non sono disponibili)
Impostazioni audio di Windows
01 In “Riproduzione” evidenzia GameDAC Game
Audio e seleziona “Imposta predenito”
02 In ”Riproduzione” seleziona GameDAC Chat Audio
e poi seleziona “Imposta dispositivo di
PORTUGUÊS
SteelSeries Engine
Baixe o SteelSeries Engine para personalizar a
iluminação no seu headset, controlar o GameDAC do
PC e para integrar com apps do Engine (como exibir
informações Discord na tela OLED.). steelseries.
com/engine
Requisitos do software SteelSeries Engine
Plataformas:
Windows 7 – Windows 10
Mac OS X 10.8 – 10.11
120 MB de espaço livre no disco rígido para a
comunicazione predenito”
03 In “Registrazione” evidenzia GameDAC Chat
Audio e seleziona “Imposta predenito”
ARCHETTO STILE OCCHIALI DA SCI
Velcro
Stringi o allenta le cinghie di velcro sull’archetto per
ottenere la misura desiderata.
Accessori disponibili su steelseries.com
instalação
* SteelSeries 7.1 Surround disponível somente no
Windows
obtenha ajuda em support.steelseries.com
Conteúdo da embalagem
Headset
GameDAC
Cabo Principal
Adaptador Móvel

Cabo de áudio USB
Cabo de Áudio Ótico
Guia de Informações do Produto
Requisitos do sistema // Compatibilidade
PC
PS4 ( Pro / Slim / Original )
VISÃO GERAL DO PRODUTO
01 Faixa de Óculos de Ski *
02 Almofadas de orelha AirWeave *
03 Microfone ClearCast
04 Botão de Mudo do Microfone
05 Controle de Volume
06 Plugue do Cabo Principal
07 Plugue de Compartilhar Fone
08 Cabo Principal do Headset *
09 Cabo de Áudio USB
10 Cabo de Áudio Ótico
53 54
11 Adaptador Móvel *
12 Tela OLED
13 Botão Secundário
14 Roda de Controle
15 Plugue de Saída
16 Plugue Móvel
17 Plugue USB
18 Plugue Ótico
19 Plugue de Conexão do Headset
* Encontre acessórios e peças de reposição em
steelseries.com
OPERAÇÃO DO GAMEDAC
Tela Inicial
01 Pressione e solte a roda de controle para alternar
entre o volume e o ChatMix
02 Gire a roda de controle para ajustar o parâmetro
selecionado
03 Pressione e solte o botão secundário para ligar e
desligar o DTS Headphone:X
04 Pressione e segure a roda de controle para abrir o
menu principal
Menu Principal
01 Gire a roda de controle para circular pelos itens do
menu
02 Pressione e solte a roda de controle para
selecionar
03 Pressione e solte o botão secundário para voltar
ao menu
CONFIGURAÇÃO PS4 PRO E ORIGINAL
Instalação de Hardware
01 Conecte o cabo principal do headset ao GameDAC
02 Conecte o cabo de áudio USB do GameDAC na
frente do PS4
03 Conecte o cabo de áudio ótico do GameDAC à
traseira do PS4
Configurações do GameDAC
01 Pressione e segure a roda de controle para entrar
no menu principal
02 Selecione Modo e então clique na roda de
controle para editar
03 Selecione o modo PS4
Configurações de Áudio do PS4
Som E Tela > Configurações De Saída De Som
Porta de saída Principal > Saída Digital (Ótica)
Formato de Áudio (Prioridade) > Bitstream (Dolby)
Dispositivos > Dispositivos de Áudio
Saída de Fones > Áudio de Chat
Configuração PS4 Slim
Com Áudio Ótico
01 Conecte o cabo principal do headset ao lado
esquerdo do GameDAC
02 Conecte o cabo ótico do GameDAC à saída ótica
da sua TV ou adaptador HDMI
03 Conecte o cabo de áudio USB do GameDAC à
porta USB na frente do PS4

* O PS4 Slim não tem saída de áudio ótica. Para
total funcionalidade, você precisará conectar o
GameDAC à saída ótica de uma TV ou adaptador
HDMI. Se não houver saída ótica disponível, siga para
a próxima página.
Configuração PS4 Slim
Sem Áudio Ótico
01 Conecte o cabo principal do headset ao lado
esquerdo do GameDAC
02 Conecte o cabo de áudio USB do GameDAC à
porta USB na frente do PS4
* Sem áudio ótico, som surround e ChatMix
estarão indisponíveis
Configurações do GameDAC
01 Pressione e segure a roda de controle para entrar
no menu principal
02 Selecione Modo e então clique na roda de
controle para editar
03 Selecione o modo PS4
Configurações de Áudio do PS4
Dispositivos > Dispositivos de Áudio > Saídas de
Fones > Todo Áudio
Formato de Áudio (Prioridade) Bitstream (Dolby)
Saída de Áudio HDMI > 5.1 canais
Dispositivos > Dispositivos de Áudio
Saída de Fones > Áudio de Chat”
Velcro
Aperte ou solte as faixas de velcro nos lados da faixa
para chegar no ponto desejado
Faixas disponíveis em steelseries.com
REGULATORY
Federal Communication Commission Interference Statement
This device complies with Part 15 of the FCC Rules. Operation is subject to the following two conditions: (1)
This device may not cause harmful interference, and (2) this device must accept any interference received,
including interference that may cause undesired operation.
This equipment has been tested and found to comply with the limits for a Class B digital device, pursuant to
Part 15 of the FCC Rules. These limits are designed to provide reasonable protection against harmful interference in a residential installation. This equipment generates, uses and can radiate radio frequency energy
and, if not installed and used in accordance with the instructions, may cause harmful interference to radio
communications. However, there is no guarantee that interference will not occur in a particular installation.
If this equipment does cause harmful interference to radio or television reception, which can be determined
by turning the equipment off and on, the user is encouraged to try to correct the interference by one of the
following measures:
- Reorient or relocate the receiving antenna.
- Increase the separation between the equipment and receiver.
- Connect the equipment into an outlet on a circuit different from that to which the receiver is connected.
- Consult the dealer or an experienced radio/TV technician for help.
FCC Caution: Any changes or modifications not expressly approved by the party responsible for compliance
could void the user’s authority to operate this equipment.
This Class B digital apparatus complies with Canadian ICES-003.
Cet appareil numérique de la classe B est conforme à la norme NMB-003 du Canada.
This Class B digital apparatus complies with Canadian ICES-003.
Cet appareil numérique de la classe B est conforme à la norme NMB-003 du Canada.
Europe – EU Declaration of Conformity
Hereby, SteelSeries ApS. declares that the equipment which is compliance with directive RoHS 2.0
(2015/863/EU), R.E.D (2014/53/EU), EMC Directive (2014/30/EU), and LVD (2014/35/EU) which are issued by
the Commission of the European Community.
55 56

The full text of the EU declaration of conformity is available at the following internet address: https://
steelseries.com/
SteelSeries ApS. hereby confirms, to date, based on the feedback from our suppliers indicates that our products shipping to the EU territory comply with REACH (Registration, Evaluation, Authorization, and Restriction
of Chemicals - (EC) 1907/2006) compliance program. We are fully committed to offering REACH compliance
on the products and posting accurate REACH compliance status for the all of products.
WEEE
This product must not be disposed of with your other household waste or treat them in compliance with the
local regulations or contact your local city office, your household waste disposal service or the shop where
you purchased the product.
Türkiye Cumhuriyeti: EEE Yönetmeliğine Uygundur
Ukraine RoHS:
Обладнання відповідає вимогам Технічного регламенту щодо обмеження використання деяких
небезпечних речовин в електричному та електронному обладнанні, затвердженого постановою
Кабінету Міністрів України від 3 грудня 2008 № 1057
This product is compliant with requirements of Circular No. 30/2011/TT-BCT Regulations “STIPULATING
TEMPORARILY THE PERMISSIBLE CONTENT LIMITATION OF SOME TOXIC CHEMICALS IN THE ELECTRONIC, ELECTRICAL PRODUCTS”
《废弃电器电子产品回收处理管理条例》提示性说明
为了更好地关爱及保护地球,当用户不再需要此产品或产品寿命终止时,请遵守国家废弃电器电子产品回收处
理相关法律法规,将其交给当地具有国家认可的回收处理资质的厂商进行回收处理。
この装置は、情報処理装置等電波障害自主規制協議会(VCCI)の基準に基づくクラス B 情報技術装置です。
この装置、家庭環境で使用することを目的としていますが、この装置がラジオやテレビジョン受信機に近
接して使用されると、受信障害を引き起こすことがあります。取扱説明書に従って正しい取り扱いをして
ください。
该电子电气产品含有某些有害物质,在环
保使用期限内可以放心使用,
超过环保使用期限之后则应该进入回收
循环系统。
Custom Union Compliance.
(Russia / Belarus / Kazakhstan)
Direct Current
ACMA Compliance (Australia/
New-Zealand)
根据中国大陆《电子电气产品有害物质限制使用标识要求》,以下部分列出了产品中可能包含的有害物质的名称
零部件名称
电路板组件
其他线材
(Pb)
铅
(Hg)
汞
和含量:
镉
(Cd)
有害物质
六价铬
(Cr(VI))
多溴联苯
(PBB)
*:电路板组件包括印刷电路板及其构成的零部件,如电阻、电容、集成电路、连接器等。
本表格依据SJ/T 11364的规定编制。
O:表示该有害物质在该部件所有均质材料中的含量均在 GB/T 26572规定的限量要求以下。
X:表示该有害物质至少在该部件的某一均质材料中的含量超出GB/T 26572规定的限量要求;
上表中打“X”的部件,应功能需要,部分有害物质含量超出GB/T 26572规定的限量要求,
但是符合欧盟RoHS法规要求(属于豁免部分)。
Regions Contact Information
丹麥商賽睿有限公司台灣分
亞洲
公司23511 新北市中和區建一
路150號16樓
SteelSeries ApS. Taiwan
Branch
16F, No.150, Jian-Yi Rd.,
Asia
Chung Ho Dist., New Taipei
City Taiwan
656 W Randolph St, Suite 3E
USA
Chicago, IL 60661, USA
Europe
Dirch Passers Allé 27, 5.Sal
2000 Frederiksberg, Denmark
+886 2 8226 3858
+886 2 8226 3858
+1 312 258 9467
+45 702 500 75
Product Name (產品名稱/产品名称):
Headset (耳機/耳机)
Model No. (型號/型号): HS-00012
Rated (規格/规格): 5V , 500mA
Accessories information (配件資訊/配件信息)
Product Name (產品名稱/产品名称):
GameDAC (遊戲音效卡/游戏声卡)
Model No. (型號/型号): SC-00005
Made in China 中國製造/中国制造
Operating Temperature: 0 to + 40 °C.
More information and support from https://steelseries.com/
多溴二苯醚
(PBDE)

learn more at steelseries.com
 Loading...