

ARCTIS 7
PRODUCT INFORMATION GUIDE
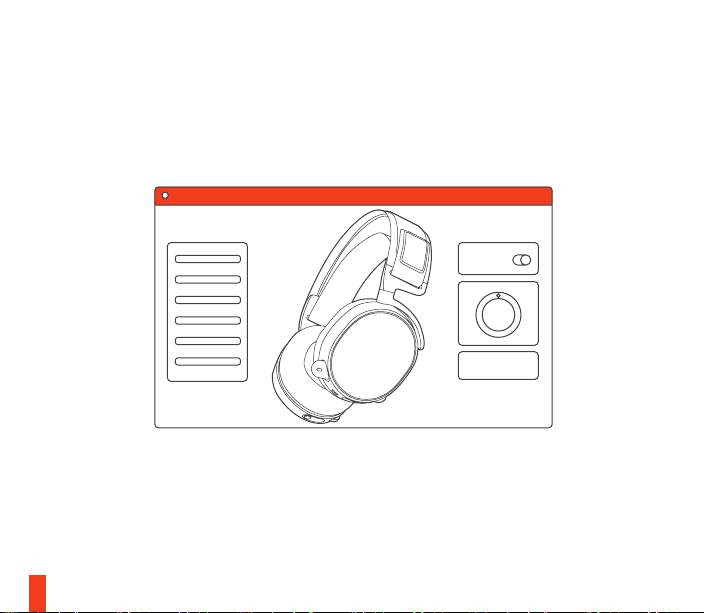
STEELSERIES ENGINE
STEELSERIES ENGINE
To enjoy DTS Headphone:X v2.0, and custom audio effects
on your new Arctis 7 headset, download SteelSeries Engine
at steelseries.com/engine
1
WELCOME TO ARCTIS.
Your new headset is the result of more than 15 years of
gaming expertise and our unyielding pursuit of perfection.
We poured our hearts into making your new Arctis, giving
it the best gaming mic available, 7.1 surround sound and
comfort and style unlike anything you’ve experienced before.
Y
E
A
R
S
2

find help at support.steelseries.com
a.
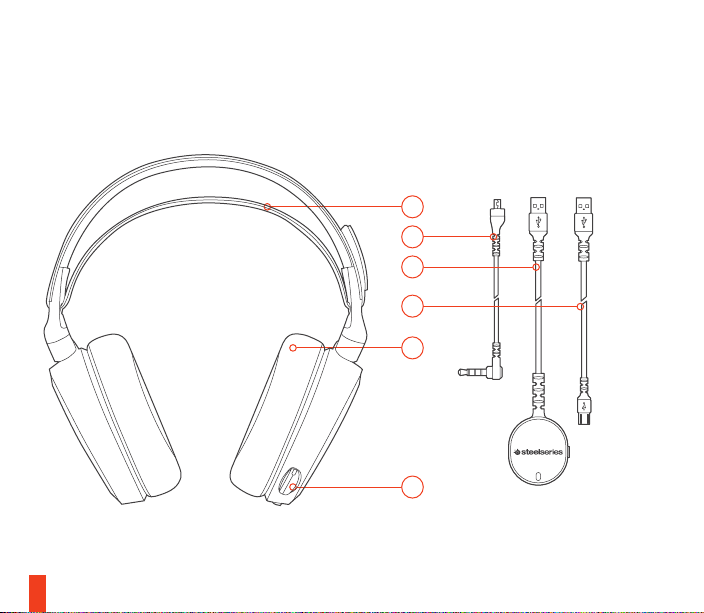
PACKAGE CONTENTS
Product Information Guide
Headset
Wireless Transmitter
Mobile / Console Cable
Micro-USB Charging Cable
3
SOFTWARE REQUIREMENTS
Platforms:
Windows 7 +
Mac OS X 10.8 +
120 MB of free hard drive space
for installation
SYSTEM COMPATIBILITY
PC / MAC
DTS Headphone: X v2.0 is available
for Windows 7-10 only. Software
installation required

CONTENTS
SteelSeries Engine
Welcome
Info and Table of Contents
a.
Product Overview
b.
Setup
Charging
c.
Power on/ off
d.
Pairing
e.
Line in / Line out
f.
Microphone
g.
Ski Goggle Headband
h.
System Setting: Windows
i.
System Setting: Mac
j.
3-4
5-6
1
2
7
8
9
10
11
12
13
14
15
Translations
Español
简体中文
繁體中文
日本語
한국어
Deutsch
Русский
Français
Italiano
Português
Regulatory
16
18
21
24
27
29
32
35
38
41
4
b.
PRODUCT OVERVIEW
5
*selected accessories available at steelseries.com
01
02
03
04
05
06
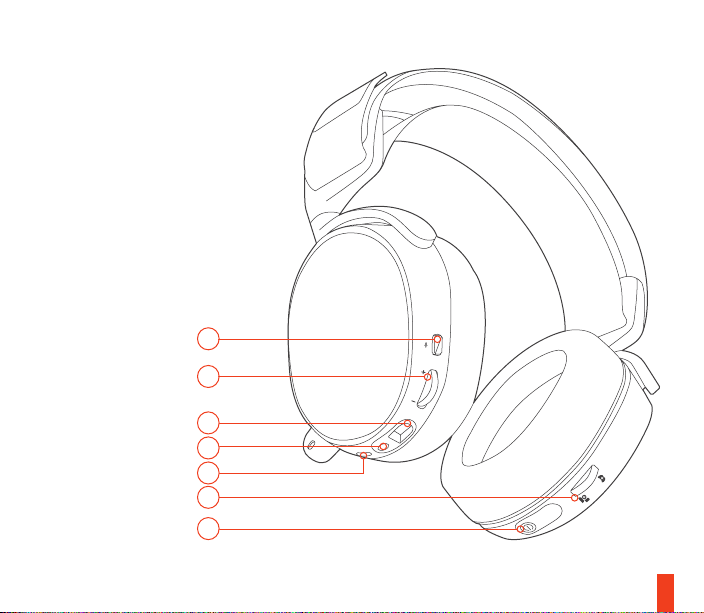
01 Ski Goggle Headband*
02 Mobile / Console Cable*
03 Wireless Transmitter
04 Micro-USB Charging Cable
05 Airweave Ear Cushion*
06 Retractable Microphone
07 Microphone Mute Button
08 Volume Control
09 Mobile Cable Jack
10 Headphone Share Jack
11 Micro-USB Charging Jack
12 ChatMix Dial
13 Power Button
07
08
09
10
11
12
13
66

7
SETUP
find help at support.steelseries.com
03
02
c.
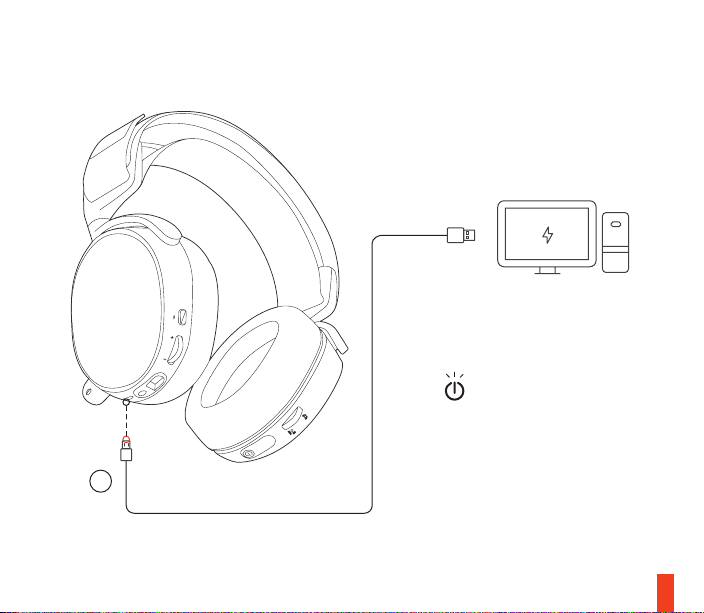
CHARGING
04
To charge the headset connect the
micro-USB cable to the charging port
on the headset, and plug the other
end into any USB power source.
The color of the power button
indicates the battery level.
Green = 100-50%
Yellow = 49-20%
Red = 19-10%
Red (fast blink) = 9-1%
8
d.
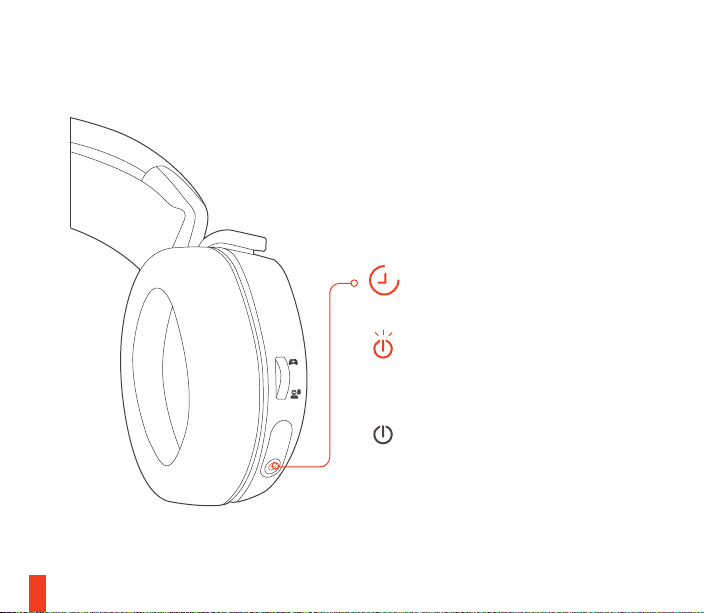
POWER ON / OFF
9
find help at support.steelseries.com
3s
To power on the headset press and
hold the power button for at least 3
ON
seconds. You will hear a tone, and
the power button will illuminate.
To power off the headset press
and hold the power button for at
OFF
least 3 seconds
e.
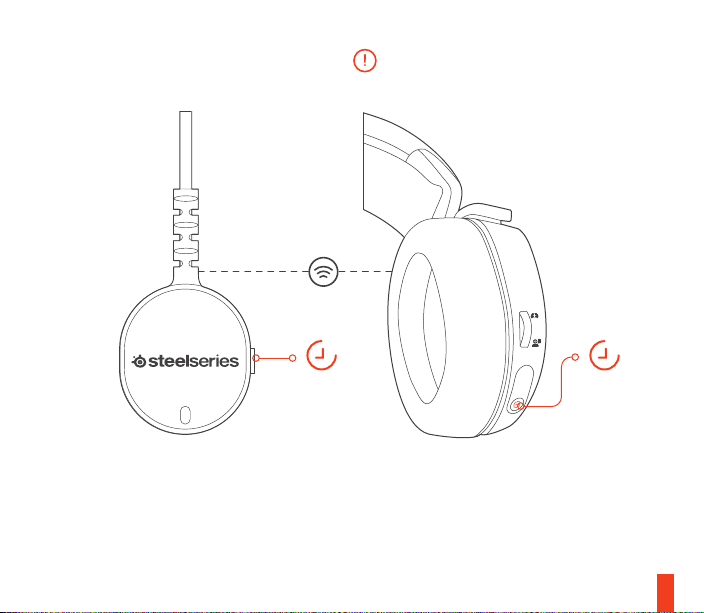
PAIRING
The headset is already paired
to the transmitter when it arrives.
5s
e-1 e-2
Press and hold the transmitter
pairing button for 5 seconds until
the LED begins blinking rapidly
With the headset off, press and hold
the power button for 6 seconds.
6s
10
f.
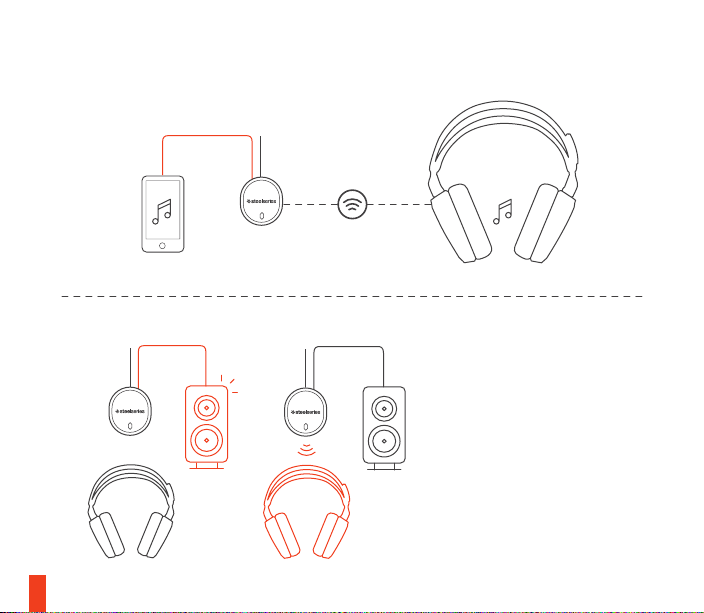
LINE IN / LINE OUT
LINE IN
LINE OUT
OFF
11
ON
find help at support.steelseries.com
When headset is off, audio can be
sent to speakers via Line Out. When
headset is powered on Line Out is
automatically muted.
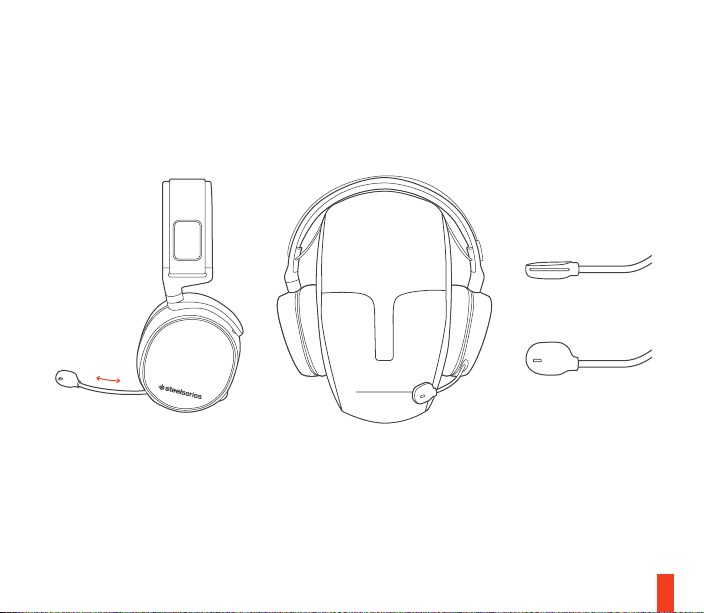
g.
MICROPHONE
Retractable microphone
Positioning
Position the microphone close to the
corner of your mouth with the flat
surface facing you
g-1
top view
front view
12

h.
SKI GOGGLE HEADBAND
13
accessory headbands available at steelseries.com
Install
1
2
3
Direction of headband
installation.
Velcro
Tighten or loosen the Velcro strap
on top of the headband to achieve
the desired fit.
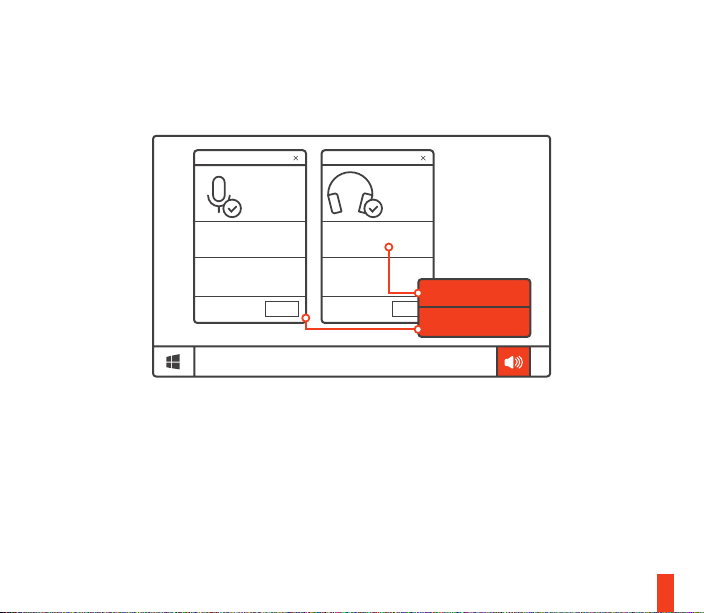
i.
SYSTEM SETTING: WINDOWS
Arctis 7
Microphone
Arctis 7
Game Audio
OK
playback devices
OK
recording devices
01 Go to Sound Settings
02 Under ‘Playback’ highlight Arctis 7
Game Audio and select ‘Set Default’
03 Under ’Recording’ highlight Arctis 7
Microphone and select ‘Set Default’
04 In your VoIP (chat) application select Arctis
7 Chat Audio as the default audio device
14

j.
SYSTEM SETTING: MAC
sound sound
Output Input
Arctis 7 Arctis 7USB USB
15
find help at support.steelseries.com
01 Go to System Preferences > Sound
02 Under ‘Output’ select Arctis 7 Game Audio
03 Under ‘Input’ select Arctis 7 Microphone
04 In your VoIP (chat) application select Arctis
7 Chat Audio as the default audio device

ESPAÑOL
Contenido Del Paquete
a.
Guía de Información del Producto
Auriculares
Transmisor inalámbrico
Cable de móvil / consola
Cable de carga con micro USB
Plataformas:
Windows 7 +
Mac OS X 10.8 +
Se requieren 120 MB de espacio libre
en el disco duro para la instalación
Compatibilidad del sistema
PC / MAC
DTS Headphone: X v2.0 solamente
está disponible para Windows 7-10.
Se requiere la instalación de software
Descarga de SteelSeries Engine en
steelseries.com/engine
Descripción general del producto
b.
01 Banda con gafas Ski*
02 Cable de móvil / consola *
03 Transmisor inalámbrico
04 Cable de carga con micro USB
05 Almohadillas Airweave*
06 Micrófono retráctil
07 Botón para silenciar micrófono
08 Control de volumen
09 Salida para cable de móvil
10 Salida para compartir audífonos
11 Salida para cargar microUSB
12 Disco para ChatMix,
13 Botón de encendido,
* Los accesorios seleccionados están
disponibles en steelseries.com
c.
Cómo cargar
Para cargar los audífonos conecte
el cable microUSB al puerto de
carga en los audífonos y enchufe el
otro extremo a cualquier fuente de
energía con entrada para USB.
16

El color del botón de encendido
indica el nivel de carga.
Verde = 100-50 %
Amarillo = 49-20 %
Rojo = 19-10 %
Rojo (destello rápido) = 9-1 %
d.
Cómo encender / Apagar
Para encender los audífonos
presione sin soltar el botón de
encendido durante al menos 3
segundos. Escuchará un sonido y
el botón de encendido se iluminará.
e.
Cómo Aparear
Los audífonos ya están apareados
con el transmisor cuando llegan
e-1
Presione sin soltar el botón de
apareamiento del transmisor durante
5 segundos hasta que la luz con LED
comience a destellar rápido.
e-2
Con los audífonos apagados, presione sin soltar el botón de encendido
durante 6 segundos.
17
f.
Línea de entrada / Línea de salida
Cuando los audífonos estén apagados,
se puede enviar el audio a los parlantes
a través de la línea de salida. Cuando
los audífonos estén encendidos la línea
de salida se silencia automáticamente.
g.
Micrófono
Micrófono retráctil
Posicionamiento
Coloque el micrófono cerca de la
esquina de su boca con la superficie
plana hacia su rostro
g-1 Vista superior
Vista frontal
Cinta para el cabello con
h.
gafas de esquí
Velcro
Apriete o afloje la tira de Velcro
sobre la banda para lograr el
calce deseado.

Instalación
Instrucción para instalar la cinta
para cabello
Más cintas para cabello disponibles
env steelseries.com
Ajustes de sistema: Windows
i.
i- 1 Dispositivos de reproducción
Audio para juegos Arctis 7
Dispositivos de grabación
Micrófono Arctis 7
i-2 01 Ir a ajustes de sonido
02 En "Reproducción", marca
Audio para juegos Arctis 7
y selecciona "Establecer
como predeterminado"
03 En “Grabación”, marca Chat
Arctis 7 y selecciona “Establecer como predeterminado”
04 En tu aplicación de VoIP
(chat), selecciona Audio de
chat Arctis 7 como dispositivo de audio predeterminado
Ajustes de sistema: Mac
j.
j- 1 Sonido
Salida: Arctis 7 Game Audio
j-2 Sonido
Entrada: Arctis 7 Game Audio
j-3 01 Ve a Preferencias del
sistema > Sonido
02 En "Salida", selecciona
Audio para juegos Arctis 7
03 En “Entrada”, selecciona
Chat Arctis 7
04 En tu aplicación de VoIP
(chat), selecciona Audio de
chat Arctis 7 como dispositivo de audio predeterminado
Solicite ayuda en
support.steelseries.com
简体中文
包装内含
a.
产品信息指南
耳机
无线发射器
手机/手柄控制线
Micro-USB充电线
18

适用平台
Windows 7 +
Mac OS X 10.8 +
安装需要120MB磁盘空间
10 耳机分享接口
11 Micro-USB充电线接口
12 ChatMix拨号
13 电源按键
系统兼容性
PC / MAC
SteelSeries v2.0环绕音效只兼容
Windows 7-10。需要安装软件。
访问 steelseries.com/engine 下载
b.
产品概览
01 滑雪镜头带 *
02 手机音频线*
03 无线发射器
04 Micro-USB充电线
05 Airweave耳罩*
06 伸缩式麦克风
07 麦克风静音按钮
08 音量控制
09 主线接口
19
* 勾选商品可在 steelseries.com 购买
充电
c.
如需为耳机充电,将micro-USB线
连接至耳机上的充电接口,然后将另
一端接入USB电源。
电源按键颜色示意电量
绿色=100-50%
黄色=49-20%
红色=19-10%
红色(快速闪烁)=9-1%
电源开/关
d.
如需打开耳机,长按电源开关至少
3秒。您会听到提示音,电源按键
会亮起。
如需关闭耳机,长按电源开关至少3秒

配对
e.
收到产品时,耳机已经和发射器配对
e -1
长按发射器配对按钮5秒,直至LED
灯快速闪烁
e -2
先关闭耳机电源,再长按电源键6
秒。
线路输入/线路输出
f.
当耳机关闭时,声音可以通过线入输
出发送到扩音器。当耳机打开时,线
入输出功能自动静音。
麦克风
g.
伸縮式麦克风
麦克风位置
將麦克风放置於靠近您嘴角处,
宽平面朝向您自己。
g-1 鸟瞰图
正面图
h. 滑雪镜头带
尼龙搭扣
调整头带两侧的尼龙搭扣至适宜松紧度
安装
头帶安装方法
更多头带样式请参考官网
steelseries.com
系统设定: Windows
i.
i- 1 播放设备
Arctis 7 游戏耳机
录音设备
Arctis 7 麦克风
i-2 01 打开声音设定
02 在播放设备的视窗里选取
Arctis 7 游戏耳机并右键选择
设置为默认设备
03 在記錄設備窗口中選擇Arctis
7聊天,然後右鍵單擊以選擇
設為默認設備
20

04 在您的VoIP (chat)应用程式
里将Arctis 7 游戏耳机设为默
认设备
系统设定: Mac
j.
j- 1 声音
输出:Arctis 7 游戏耳机
j-2 输入:Arctis 7 游戏耳机
j-3 01 打开偏好设定 > 声音
02 在播放设备的视窗里选取
Arctis 7 游戏耳机并右键选择
设置为默认设备
03 在录音设备的视窗里选取
Arctis 7 麦克风并右键选择设
置为默认设备
04 在您的VoIP (chat)应用程式
里将Arctis 7 游戏耳机设为
默认设备
繁體中文
包裝內容
a.
產品信息指南
Arctis卡
耳機
無線發射器
手機音源線
Micro-USB充電線
適用系統
Windows 7 +
Mac OS X 10.8 +
安裝需要120MB 硬體空間
系统相容性
PC / MAC / 手機 /
PS4 / XBOX ONE / VR
只有Windows系统可設定DTS Headphone: X7.1 環繞音效。使用前需先
安裝軟體以及註冊帳號
訪問 support.steelseries.com 寻求帮助
21
訪問 steelseries.com/engine 下載

b.
產品概覽
01 滑雪鏡頭帶*
02 手機音源線*
03 無線發射器
04 Micro-USB充電線
05 Airweave耳罩*
06 伸縮式麥克風
07 麥克風靜音按鈕
08 音量控制
09 主線接口
10 耳機分享接口
11 Micro-USB充電線接口
12 ChatMix 旋鈕
13 電源按鍵
* 勾選商品可在 steelseries.com 購買
充電
c.
如需為耳機充電,將micro-USB線
連接至耳機上的充電接口,然後將另
一端接入USB電源。
電源按鍵顏色示意電量
綠色=100-50%
黃色=49-20%
紅色=19-10%
紅色(快速閃爍)=9-1%
d.
電源開/關
如需打開耳機,長按電源開關至少3秒。
聽到提示音,電源按鍵會亮起。
如需關閉耳機,長按電源開關至少3秒。
配對
e.
收到產品時,耳機已經和發射器配對
e -1
長按發射器配對按鈕5秒,直至
LED燈快速閃爍。
e -2
先關閉耳機電源,再長按電源鍵6
秒。
線性輸入/線性輸出
f.
當耳機關閉時,聲音可以透過線性輸
出發送到音響。當耳機打開時,線性
輸出功能會自動靜音。
22

麥克風
g.
伸縮式麥克風
麥克風位置
將麥克風放置於靠近您嘴角處,
寬平面朝向您自己。
g-1 鳥瞰圖
正面圖
h. 滑雪鏡頭帶
魔鬼氈
調整頭帶兩側的魔鬼氈至適宜鬆緊度
安裝
頭帶安裝方法
更多頭帶樣式請參考官網
steelseries.com
系统設定: Windows
i.
i-1 播放設備
Arctis 7
錄音設備
Arctis 7 麥克風
23
i-2 01 打開聲音設定
02 在播放設備的視窗裡選取
Arctis 7 遊戲耳機按右鍵選擇
設定為預設設備
03 在錄音設備的視窗裡選取
Arctis 7 麥克風按右鍵選擇設
定為預設設備
04 在您的VoIP (chat)應用程式
裡將Arctis 7 遊戲耳機設定為
預設設備
系统設定: Mac
j.
j-1 聲 音
輸出:Arctis 7 遊戲耳機
j-2 輸入:Arctis 7 遊戲耳機
j-3 01 打開偏好設定 > 聲音
02 在播放設備的視窗裡選取
Arctis 7 遊戲耳機按右鍵選擇
設定為預設設備

03 在錄音設備的視窗裡選取
Arctis 7 麥克風按右鍵選擇設
定為預設設備
04 在您的VoIP (chat)應用程式
裡將Arctis 7遊戲耳機設定為
預設設備
訪問 support.steelseries.com 尋求幫助
日本語
a.
パッケージの内容
製品情報ガイド
ヘッドセット
ワイヤレス・トランスミッター
モバイル / コンソールケーブル
マイクロ USB 充電ケーブル
プラットフォーム
Windows 7 +
Mac OS X 10.8 +
インストールに120MB以上の空き
容量が必要 。
システム互換性
PC / MAC
SteelSeries v2.0サラウンドは
Windows 7-10のみに対応していま
す。ソフトウェアのインストールが
必要です。
ダウンロードは steelseries.com/
engine から
b.
製品概要
01 スキーゴーグルヘッドバンド*
02 モバイル / コンソールケーブル*
03 ワイヤレス・トランスミッター
04 マイクロUSB充電ケーブル
05 エアウイーヴイヤークッション*
06 格納式マイク
07 マイクミュートボタン
08 ボリュームコントロール
09 モバイルケーブルジャック
10 ヘッドホンシェアジャック
11 マイクロUSB充電ジャック
12 ChatMixダイヤル
13 電源ボタン
* steelseries.com で厳選されたア
クセサリをお求めいただけます
24

充電
c.
ヘッドセットを充電するには、マ
イクロUSBケーブルをヘッドセット
の充電ポートに接続し、 反対側の
ケーブルを他のUSB電源に接続して
ください。
電源ボタンの色はバッテリー残量を
示しています。
緑 = 100-50%
黄 = 49-20%
赤 = 19-10%
赤(素早い点滅) = 9-1%
電源 オン / オフ
d.
ヘッドセットをオンにするには、
電源ボタンを3秒以上押し続けてく
ださい。電源が入ると音が鳴り、電
源ボタンが
光ります。
ヘッドセットをオンにするには電
源ボタンを3秒以上押し続けてく
ださい。
ペアリング
e.
25
トランスミッターが繋がればヘッド
セットのペアリングは完了です。
e -1
ペアリングのトランスミッターボタ
ンを5秒長押す,LEDランプがピカ
ピカ光るまで。
e -2
ヘットセットオフには電源ボタンを
6秒長押す。
ラインイン / ラインアウト
f.
ヘッドセットがオフのとき、ライン
アウトを通してオーディオをスピー
カーから出力することができます。
ヘッドセットがオンのときには、ラ
インアウトは自動的にミュート状態
になります。
マイク
g.
リトラクタブルマイク
ポジショニング
マイクの位置は、平らな面が口の端
に来るように調節してください。
g-1 トップビュー
フロントビュー

h.
スキーゴーグルヘッドバンド
ベルクロ
ヘッドバンドの上部にあるベルク
ロテープでフィット感の調節がで
きます。
インストール
ヘッドバンドの取り付け方法の
説明です。
他のヘッドバンドをお求めの場合は
steelseries.com をご覧ください
システム設定: Windows
i.
i- 1 再生機器
Arctis 7 ゲームオーディオ
記録機器
Arctis 7 マイク
i-2 01 サウンド設定に進む
02 [再生] から [ Arctis 7 ゲームオ
ーディオ] をハイライトし、
[デフォルトに設定] を選択
03 [録音] から [Arctis 7 チャッ
ト] をハイライトし、[デフォ
ルトに設定] を選択
04 ご利用のVoIP(チャット)
アプリケーションで [Arctis 7 チャ
ットオーディオ] をデフォルトのオ
ーディオ機器として選択します
システム設定: Mac
j.
j- 1 サウンド
出力:Arctis 7 ゲームオーディオ
j-2 サウンド
入力:Arctis 7 ゲームオーディオ
j-3 01 [システム設定] > [サウンド]
と進みます
02 [出力] から [Arctis 7 ゲームオ
ーディオ] を選択
03 [入力] から [Arctis 7 マイク]
を選択
04 ご利用のVoIP(チャット)
アプリケーションで [Arctis 7
チャットオーディオ] をデフ
ォルトのオーディオ機器とし
て選択します
26

한국인
a.
패키지 구성
제품 정보 가이드
헤드셋
무선 송신기
모바일 / 콘솔 케이블
Micro-USB 충전 케이블
플랫폼
Windows 7 +
Mac OS X 10.8 +
시스템 호환
PC / MAC
DTS Headphone: X v2.0는Windows
7-10만 지원합니다.소프트웨어 설치가
필요합니다
steelseries.com/engine
에서 다운로드할 수 있습니다
27
제품 개요
b.
01 스키 고글 헤드밴드*
02 모바일 / 콘솔 케이블*
03 무선 송신기
04 Micro-USB 충전 케이블
05 Airweave 이어패드*
06 접이식 마이크
07 마이크 음소거 버튼
08 볼륨 조절
09 모바일 케이블 잭
10 헤드폰 공유 잭
11 Micro-USB 충전 잭
12 ChatMix 다이얼
13 전원 버튼
* 선택된 액세서리는 steelseries.
com에서 구할 수 있습니다
충전
c.
헤드셋을 충전하려면 micro-USB 케
이블을 헤드셋의 충전 포트에 연결한
다음, 반대쪽 끝을 아무 USB 전원에
꽂으시면 됩니다.

전원 버튼의 색깔을 보면 배터리
충전도를 알 수 있습니다.
초록색 = 100-50%
노란색 = 49-20%
빨간색 = 19-10%
(빠르게 깜박이는) 빨간색 = 9-1%
전원 켜기 / 끄기
d.
헤드셋의 전원을 켜려면 전원 버튼을
최소한 3초 동안 길게 누르십시오. 톤
이 들리며 전원 버튼에 불이 켜질 것
입니다.
헤드셋의 전원을 끄려면전원 버튼을
최소한 3초 동안 길게 누르십시오.
페어링
e.
헤드셋은 배송 시에 이미 송신기와 페
어링된 상태입니다
e -1
송신기 페어링 버튼을 LED 빛이 빠르
게 깜박일 때까지 5초 동안 길게 누
르십시오
e -2
헤드셋이 꺼진 상태에서 전원 버튼을
6초 동안 길게 누르십시오.
Line In / Line Out
f.
헤드셋이 꺼진 상태에서 Line Out
을 통해 스피커로 오디오를 전달할 수
있습니다. 헤드셋의 전원이 켜진 상
태에서는 Line Out이 자동으로 음소
거됩니다.
g.
마이크
접이식 마이크
위치 조절
평평한 쪽이 얼굴을 향하도록 하여 마
이크를 입가 근처에 고정시키십시오
g-1 평면 시점
정면 시점
h. 스키고글 헤드밴드
벨크로
헤드셋 상부의 벨크로 띠의 부착을
조절하여 적절히 착용하십시오.
설치
헤드밴드 설치 방향
steelseries.com 의 다른 헤드밴드 보기
28

시스템 설정: Windows
i.
i- 1 재생 장치
Arctis 7 게임 오디오
녹음 장치
Arctis 7 마이크
i-2 01 소리 설정으로 이동하십시오
02 ‘재생’ 탭에서 Arctis 7 게임 오
디오를선택하고 ‘기본 장치로
설정’ 을 체크하십시오
03 ‘녹음’ 탭에서 Arctis 7 잡담 선
택하고기본 장치로 설정’을 체
크하십시오
04 사용하는 VoIP(채팅) 응용프로
그램에서 Arctis 7 Chat Audio
를 기본 오디오 장치로 선택하
십시오
시스템 설정: Mac
j.
j- 1 소리
출력:Arctis 7 게임 오디오
j-2 소리
입력:Arctis 7 게임 오디오
29
DEUTSCH
j-3 01 시스템 환경설정 > 사운드로 이
동하십시오
02 ‘출력’ 탭에서 Arctis 7 게임 오
디오를 선택하십시오
03 ‘출력’ 탭에서 Arctis 7 게임 오
디오를 선택하십시오
04 사용하는 VoIP(채팅) 응용프로
그램에서 Arctis 7 Chat Audio
를 기본 오디오 장치로 선택하
십시오
도움말은 support.steelseries.com
에서 보실 수 있습니다
Packungsinhalt
a.
Produktinformationen
Headset
Drahtlossender
Telefon-/Konsolenkabel
Micro-USB Ladekabel

Plattformen :
Windows 7 +
Mac OS X 10.8 +
120 MB freien Platz auf der
Festplatte für die Installation
Compatibilité du système
PC / MAC
DTS Headphone:X v2.0 ist nur für
Windows 7-10 verfügbar.
Software-Installation erforderlich
Download bei steelseries.com/engine
b.
Produktüberblick
01 Skibrillen-Kopfband*
02 Telefon-/Konsolenkabel*
03 Drahtlossender
04 Micro-USB Ladekabel
05 Airweave-Ohrmuschel*
06 Ausziehbares Mikrofon
07 Mikrofon-Stummtaste
08 Lautstärkeregler
09 Telefonkabel-Anschluss
10 Kopfhörer-Share-Anschluss
11 Micro-USB Ladeanschluss
12 ChatMix Stellrad
13 Power-Taste
* Ausgewähltes Zubehör bei
steelseries.com
c.
Laden
Zum Laden verbinden Sie das MicroUSB-Kabel mit dem Ladeanschluss
des Headsets und einer beliebigen
USB-Stromquelle.
Die Farbe der Power-Taste zeigt den
Ladezustand der Batterie an:
Grün = 100-50 %
Gelb = 49-20 %
Rot = 19-10 %
Rot (schnell blinkend) = 9-1 %
30

f.
d.
Power ein / aus
Zum Einschalten des Headsets
drücken und halten Sie mindestens
3 Sekunden lang die Power-Taste.
Sie hören einen Ton und die
Power-Taste leuchtet auf.
Zum Ausschalten des Headsets
drücken und halten Sie mindestens
3 Sekunden lang die Power-Taste.
e.
Verbinden (Pairing)
Im Auslieferungszustand ist das
Headset bereits mit dem Sender
verbunden.
e-1
Drücken und Halten Sie 5 Sekunden
lang die Sender-Verbindungstaste
bis die LED schnell blinken.
e-2
Am ausgeschalteten Headset drücken und halten Sie nun mindestens 6
Sekunden lang die Power-Taste.
31
Audioeingang / Audioausgang
Bei ausgeschaltetem Headset können
Audiosignale über den Audioausgang
zu den Lautsprechern geleitet werden.
Bei eingeschaltetem Headset wird der
Ausgang automatisch stumm geschaltet.
g.
Mikrofon
Einklappbares Mikrofon
Platzierung
Platziere das Mikrofon in die Nähe
deines Mundwinkels, wobei die
flache Oberfläche in deine Richtung
deuten soll.
g-1 Ansicht von oben
Seitenansicht
h.
Skibrillen-Kopfband
Klettverschluss
Stellen Sie das Klettband so weit
oder eng ein, dass Ihnen das Kopfband bequem ist.
Installieren
Richtung der Stirnband-Installation
Weitere Stirnbänder bei steelseries.com

Systemeinstellungen: Windows
i.
i- 1 Wiedergabegeräte
Arctis 7 Game Audio
Aufnahmegeräte
Arctis 7 Mikrofon
i-2 01 Zu Sound-Einstellungen
02 Wähle bei ‘Playback’ Arctis
7 Game Audio und dann
‘Standard’
03 Wähle bei 'Aufnahme'
Arctis 7 Chat und
dann 'Standard'
04 Wähle in deiner VoIP
(Chat) Anwendung Arctis
7 Chat Audio als das Standard-Tongerät
Systemeinstellungen: Mac
j.
j- 1 Sound
Ausgabe: Arctis 7 Game Audio
j-2 Sound
Eingabe: Arctis 7 Game Audio
j-3 01 Gehe zu Systemeinstellun-
gen > Sound
02 Wähle unter 'Ausgabe'
Arctis 7 Game Audio
03 Wähle unter 'Eingabe'
Arctis 7 Chat
04 Wähle in deiner VoIP(Chat)
Anwendung Arctis 7 Chat
Audio als das StadardTongerät
Solicite ayuda en
support.steelseries.com
РУССКИЙ
a.
Содержимое упаковки
Сведения об изделии
Наушники
Беспроводной передатчик
Кабель д/моб. устройства или
консоли
Зарядный кабель микро-USB
32

Платформы:
Windows 7 +
Mac OS X 10.8 +
Для установки нужно 120 МБ
свободного места на жёстком
диске.
Системная совместимость
ПК / MAC
Система DTS Headphone:X v2.0
Surround. (только для Windows)
Требуется установка
программного обеспечения
и регистрация аккаунта
Загрузить steelseries.com/engine
b.
Обзор изделия
01 Оголовье как у лыжных очков*
02 Кабель д/моб. устройства или
консоли*
03 Беспроводной передатчик
04 Зарядный кабель микро-USB
05 Амбушюры из ткани Airweave*
33
06 Выдвижной микрофон
07 Кнопка отключения
микрофона
08 Регулятор громкости
09 Переходник д/моб. кабеля
10 Переходник д/доп. наушников
11 Зарядный переходник
микро-USB
12 Колёсико ChatMix
13 Кнопка включения
* Аксессуары steelseries.com
c.
Зарядка
Чтобы зарядить наушники,
подключите к их зарядному порту
кабель микро-USB, а другой
конец кабеля — к источнику
питания с USB-разъёмом.
Цвет кнопки включения означает
уровень заряда:
Зелёный = 100-50%
Жёлтый = 49-20%
Красный = 19-10%
Красное мигание = 9-1%

d.
Включение и выключение
Чтобы включить наушники,
зажмите кнопку включения
на 3 секунды или дольше.
Включённые наушники должны
подать звуковой сигнал, а кнопка
включения — загореться.
Чтобы выключить наушники,
зажмите кнопку включения на 3
секунды или дольше.3 Sekunden
lang die Power-Taste.
e.
Подключение
При включении передатчика
наушники подключатся к
нему сами.
e-1
Зажмите кнопку передатчика на 5
секунд, пока светодиод не начнёт
быстро мигать.
e-2
Если наушники выключены,
зажмите кнопку включения на
6 секунд.
f.
Линейный вход/выход
При выключенных наушниках звук
можно подать на колонки через
линейный выход. При включении
наушников линейный выход
автоматически выключается.
g.
микрофон
Выдвижной микрофон
Platzierung
Расположите микрофон около
уголка рта, плоской стороной
к себе.
c-1 Вид сверху
Вид спереди
h.
Оголовье как у лыжных очков
Велкро
Затяните или ослабьте полосы
Велкро по бокам оголовья, чтобы
оно лучше сидело
Установка
Инструкция по установке оголовья
Другие модели steelseries.com
34

i.
Системные настройки: Windows
i- 1 Воспроизведение звука
Игровой звук Arctis 7
Запись звука
Микрофон Arctis 7
i-2 01 Перейдите к настройкам
звука.
02 В разделе
«Воспроизведение»
выберите «Игровой звук
Arctis 7», а затем — «По
умолчанию».
03 В разделе «Запись»
выберите «чат Arctis 7», а
затем —
«По умолчанию».
04 В приложении VoIP (чате)
установите «звук чата
Arctis 7» по умолчанию.
j.
Системные настройки: Mac
j- 1 Звук
вход: Игровой звук Arctis 7
j-2 Звук
выход: Игровой звук Arctis 7
35
j-3 01 Перейдите в раздел
«Системные настройки >
Звук».
02 В разделе «Вход»
выберите «Игровой звук
Arctis 7».
03 В разделе «Выход»
выберите «чат Arctis 7».
04 В приложении VoIP (чате)
установите «звук чата
Arctis 7» по умолчанию.
Техподдержка
support.steelseries.com
FRANÇAIS
Contenu de l’emballage
a.
Guide d’informations produit
Casque audio
Émetteur sans fil
Câble pour mobile/console
Câble de chargement micro-USB

Plateformes :
Windows 7 +
Mac OS X 10.8 +
120 Mo d’espace disque dur
disponible pour l’installation
Compatibilité du système
PC / MAC
Casque DTS X v2.0 Surround
est disponible uniquement pour
Windows 7-10.
Installation de logiciel requise
Téléchargements ici
steelseries.com/engine
Présentation du produit
b.
01 Serre-tête de masque de ski*
02 Câble pour mobile/console*
03 Émetteur sans fil
04 Câble de chargement micro-USB
05 Coussinet d’oreille Airweave*
06 Microphone rétractable
07 Bouton Muet du microphone
08 Contrôle du volume
09 Prise câble mobile
10 Prise partage casque audio
11 Prise chargement micro-USB
12 Bouton de réglage ChatMix
13 Bouton d’alimentation
* Sélection d’accessoires
disponibles ici steelseries.com
c.
Chargement
Pour charger le casque, connectez le câble micro-USB au port de
chargement sur le casque, et bran-
chez l’autre extrémité dans n’importe
quelle source d’alimentation USB.
La couleur du bouton d’alimentation
indique le niveau actuel de la batterie.
Vert = 100-50 %
Jaune = 49-20 %
Rouge = 19-10 %
Rouge (clignotement rapide) = 9-1 %
36

d.
Marche / arrêt
Pour allumer le casque, appuyez
sur le bouton d’alimentation et maintenez-le appuyé pendant au moins
3 secondes. Vous entendrez une
tonalité, et le bouton d’alimentation
s’illuminera.
Pour éteindre le casque, appuyez
sur le bouton d’alimentation et maintenez-le appuyé pendant au moins
3 secondes.
e.
Appairage
Le casque est déjà appairé à
l’émetteur lorsque vous le recevez
e-1
Appuyez sur le bouton d’appairage
de l’émetteur et maintenez-le
appuyé pendant 5 secondes jusqu’à
ce que le voyant LED clignote
rapidement
e-2
Assurez-vous que le casque est
éteint et appuyez sur le bouton
d’alimentation et maintenez-le
appuyé pendant 6 secondes.
37
f.
Ligne d’entrée / de sortie
Lorsque le casque est éteint, l’audio
peut être envoyé aux haut-parleurs
via la ligne de sortie (Line Out).
Lorsque le casque est allumé, la
ligne de sortie est automatiquement
coupée.
Microphone
g.
Microphone rétractable
Positionnement
Placez le microphone près du coin
de votre bouche, la surface plate
vous faisant face
g-1 Vue du haut
Vue avant
h.
Serre-tête de masque de ski
Velcro
Serrez ou desserrez la lanière en Velcro
sur le haut du serre-tête pour un confort
optimal.
Instalación
Instruction de l’installation du serre-tête.
Plus de serre-têtes ici steelseries.com

i.
Configuration système: Windows
i- 1 Périphériques de lecture
Audio de jeu Arctis 7
Périphériques d’enregistrement
Microphone Arctis 7
i-2 01 Ouvrir la configuration
sonore .
02 Sous « Lecture », activez
«Audio de jeu Arctis 7» et
sélectionnez « Par défaut ».
03 Sous « Enregistrement »,
activez « Chat Arctis 7» et
sélectionnez
«Par défaut» .
04 Dans votre application VoIP
(de chat), sélectionnez
«Audio chat Arctis 7» en
tant que périphérique audio
par défaut.
j.
Configuration système: Mac
j- 1 Son
Sortie: Audio de jeu Arctis 7
j-2 Son
Entrée: Microphone Arctis 7
j-3 01 Ouvrez «Préférences
02 Sous « Sortie» , sélection-
03 Sous « Entrée», sélection-
04 Dans votre application VoIP
ITALIANO
Contenuti della confezione
a.
Guida informazioni sul prodotto
Cuffie
Trasmettitore wireless
Cavo dispositivi mobili/console
Cavo micro USB per ricarica
système > Son »
nez « Audio de jeu Arctis 7»
nez « Chat Arctis 7»
(de chat), sélectionnez «
Audio chat Arctis 7 » en tant
que périphérique audio par
défaut.
38

Piattaforma:
Windows 7 +
Mac OS X 10.8 +
120 MB di spazio libero sull’hard
drive per l’installazione
Compatibilità di sistema
PC / MAC
DTS Headphone:X v2.0 Surround è disponibilesolamente per Windows 7-10.
Richiede l’installazione del software
scarica da steelseries.com/engine
Generalità sul prodotto
b.
01 Archetto stile occhiali da sci*
02 Cavo dispositivi mobili/console*
03 Trasmettitore wireless
04 Cavo micro USB per ricarica
05 Cuscinetti Airweave*
06 Microfono retrattile
07 Pulsante microfono muto
08 Controllo del volume
09 Cavo jack per dispositivi mobili
10 Splitter per cuffie
39
11 Porta micro USB per ricarica
12 Barra ChatMix
13 Tasto Power
* accessori selezionati disponibili
su steelseries.com
c.
Ricarica
Per ricaricare le cuffie collega il
cavo micro USB alla presa di ricarica
posta sulle cuffie quindi collega
l’altra estremità a qualsiasi fonte di
alimentazione USB.
Il colore del tasto Power indica
il livello della batteria.
Verde = 100-50%
Giallo = 49-20%
Rosso = 19-10%
Rosso (lampeggio rapido) = 9-1%
d.
Accensione / Spegnimento
Per accendere le cuffie mantieni
premuto il tasto Power per almeno 3
secondi, poi udirai un segnale acus-
tico e il tasto Power si illuminerà.

Per spegnere le cuffie tieni premuto
il tasto Power per almento 3 secondi
e.
Accoppiamento
Le cuffie vengono fornite già
accoppiate col trasmettitore
e-1
Tieni premuto il tasto di accoppiamento del trasmettitore per 5
secondi fin quando il LED inizia a
lampeggiare rapidamente
e-2
A cuffie spente, tieni premuto
il tasto Power per 6 secondi.
f.
Ingresso/Uscita
Quando le cuffie sono spente, l’audio può essere inviato agli speaker
attraverso l’uscita. Quando le cuffie
sono accese l’uscita viene automati-
camente disattivata.
g.
Microfono
Microfono retrattile
Posizionamento
Sistema il microfono vicino all’angolo
della bocca con la superficie piatta
rivolta verso di te
g-1 Vista dall’alto
Vista frontale
h.
Archetto stile occhiali da sci
Velcro
Stringi o allenta la cinghia di velcro
sull’archetto per ottenere la misura
desiderata.
Montaggio
Senso di montaggio dell’archetto.
Trova altri archetti su steelseries.com
i.
Impostazioni di sistema: Windows
i- 1 Periferica di riproduzione
Audio del gioco Arctis 7
Periferica di registrazione
Microfono Arctis 7
40

i-2 01 Vai a Impostazioni audio.
02 In "Riproduzione" evidenzia
audio del gioco Arctis 7
quindi seleziona "Impostazioni predefinite"
03 In "Registrazione" evidenzia
il chat Arctis 7 quindi
seleziona "Impostazioni
predefinite"
04 Seleziona Arctis 7 Chat
Audio come periferica
audio predefinita per la tua
applicazione VoIP (chat).
j.
Impostazioni di sistema: Mac
j- 1 Audio
Uscita: Audio del gioco Arctis 7
j-2 Audio
Entrée: Microfono Arctis 7
j-3 01 apri preferenze di sistema
> Audio
02 In “Uscita” seleziona Audio
del gioco Arctis 7
03 In “Ingresso” seleziona chat
Arctis 7
41
PORTUGUÊS
04 Seleziona Arctis 7 Chat
Audio come periferica
audio predefinita per la tua
applicazione VoIP (chat)
Per assistenza vai su
support.steelseries.com
a.
Conteúdo do pacote
Guia de informação de produto
Headset
Transmissor sem fio
Cabo móvel / console
Cabo de energia micro USB
Plataformas:
Windows 7 +
Mac OS X 10.8 +
120 MB de espaço livre em disco
para a instalação

Compatibilidade do sistema
ПК / MAC
Fone de ouvido DTS:X v2.0
Surround disponível apenas no Windows 7-10. Instalação de software
necessária
faça download em steelseries.com/engine
Visão geral do produto
b.
01 Faixa de óculos de esqui*
02 Cabo móvel / console*
03 Transmissor sem fio
04 Cabo de energia micro USB
05 Almofada de orelha Airweave*
06 Microfone retrátil
07 Botão de silenciar microfone
08 Controle de volume
09 Entrada do cabo móvel
10 Entrada de compartilhar fone
11 Entrada de energia micro USB
12 Teclado do ChatMix
13 Botão de ligar
* acessórios selecionados disponíveis
em steelseries.com
c.
Carregando
Para carregar o headset, conecte
o cabo micro USB à entrada de
energia no headset e conecte a
outra ponta em qualquer fonte de
energia USB.
A cor do botão de ligar indica
o nível da bateria.
Verde = 100-50%
Amarelo = 49-20%
Vermelho = 19-10%
Vermelho (piscando rápido) = 9-1%
d.
Ligado / Desligado
Para ligar o headset, aperte e
segure o botão de ligar por pelo
menos 3 segundos. Você ouvirá um
som e o botão de ligar se iluminará.
Para desligar o headset, aperte
e segure o botão de ligar por pelo
menos 3 segundos.
42

e.
Pareando
O headset já chega parado
ao transmissor
e-1
Aperte e segure o botão de parear
do transmissor por 5 segundos
até que o LED comece a piscar
rapidamente
e-2
Com o headset desligado, aperte
e segure o botão de ligar por 6
segundos.
f.
Entrada / Saída
Quando o headset está desligado, o
áudio pode ser enviado às caixas de
som pela saída. Quando o headset
estiver pareado, a saída é automaticamente silenciada.
g.
Microfone
Microfone retrátil
43
Posicionamento
Posicione o microfone perto do
canto da sua boca com a superfície
lisa virada para você
g-1 Visão de cima
Visão frontal
h.
Faixa de óculos de esqui
Velcro
Aperte ou afrouxe as tiras de velcro
nos lados da faixa para chegar no
ponto desejado
Instalação
Direção da instalação da faixa.
mais faixas em steelseries.com
i.
Configurações de sistema:
Windows
i- 1 Dispositivos de reprodução
Áudio de jogo Arctis 7
Dispositivos de gravação
Microfone Arctis 7

i-2 01 Ir para configurações
de som.
02 Sob "Reprodução" selecione
áudio de jogo Arctis 7
e escolha "Definir padrão"
03 Sob "Gravação" selecione
chat Arctis 7 e escolha
"Definir padrão"
04 No seu aplicativo de VoIP
(chat) selecione áudio de
chat Arctis 7 como o
dispositivo de áudio padrão.
j.
Impostazioni di sistema: Mac
j- 1 Som
Saída: Áudio de jogo Arctis 7
j-2 Som
Entrada: Microfone Arctis 7
j-3 01 vá para Preferências do
sistema > Som
02 Sob “Saída”, selecione
áudio de jogo Arctis7
03 Sob “Entrada”, selecione
chat Arctis 7
04 No seu aplicativo de VoIP
(chat) selecione áudio
de chat Arctis 7 como o
dispositivo de áudio padrão.
encontre ajuda em
support.steelseries.com
44

Europe – EU Declaration of Conformity
Hereby, SteelSeries ApS. declares that the equipment which is compliance with directive RoHS 2.0
(2015/863/EU), R.E.D (2014/53/EU), EMC Directive (2014/30/EU), and LVD (2014/35/EU) which are issued
by the Commission of the European Community.
The full text of the EU declaration of conformity is available at the following internet address: https://
steelseries.com/
SteelSeries ApS. hereby confirms, to date, based on the feedback from our suppliers indicates that our products shipping to the EU territory comply with REACH (Registration, Evaluation, Authorization, and Restriction
of Chemicals - (EC) 1907/2006) compliance program. We are fully committed to offering REACH compliance
on the products and posting accurate REACH compliance status for the all of products.
Frequency bands and Powers (Headset and Transceiver)
a. Frequency band(s) in which the radio equipment operates:
•WIFI: 2.400 - 2.4835 GHz
b. Maximum radio-frequency power transmitted in the
frequency band(s) in which the radio equipment operates:
•WIFI:9.57 dBm +2 dBm
c. Software Version: V1.16
WEEE
This product must not be disposed of with your other household waste or treat them in compliance with the
local regulations or contact your local city office, your household waste disposal service or the shop where
you purchased the product.
Safety Guideline for Lithium Battery
Please keep follow all listed important warnings and cautions below while using this battery pack to avoid
any damage or hazard.
This product must not be disposed of with your other household waste or treat them in compliance with the
local regulations or contact your local city office, your household waste disposal service or the shop where
you purchased the product.
“CAUTION!” Risk of explosion if battery pack is not replace by same type as specified by the manufacturer.
The battery polarity (+) and (-) shall not be connected and charged reversely. Risk of explosion if the battery
polarity (+) and (-) is reversed.
Please keep this battery pack away from fire and high heat sources due to explosion might happen. Do not
place your battery pack close to any heater or hot location.
This battery pack shall not be hit or impacted. This battery pack shall not be dealt with any sharp or keen
objects either.
This battery pack shall not be exposed to moisture, dripping or splashing.
If any electrolyte flow out of this battery pack when touch the user’s eyes and skin, please seek medical
advice immediately.
Federal Communication Commission Interference Statement
This device complies with Part 15 of the FCC Rules. Operation is subject to the following two conditions: (1)
This device may not cause harmful interference, and (2) this device must accept any interference received,
including interference that may cause undesired operation.
This equipment has been tested and found to comply with the limits for a Class B digital device, pursuant to
Part 15 of the FCC Rules. These limits are designed to provide reasonable protection against harmful interference in a residential installation. This equipment generates, uses and can radiate radio frequency energy
and, if not installed and used in accordance with the instructions, may cause harmful interference to radio
communications. However, there is no guarantee that interference will not occur in a particular installation.
If this equipment does cause harmful interference to radio or television reception, which can be determined
by turning the equipment off and on, the user is encouraged to try to correct the interference by one of the
following measures:
- Reorient or relocate the receiving antenna.
- Increase the separation between the equipment and receiver.
- Connect the equipment into an outlet on a circuit different from that to which the
receiver is connected.
- Consult the dealer or an experienced radio/TV technician for help.
FCC Caution: Any changes or modifications not expressly approved by the party responsible for compliance
could void the user’s authority to operate this equipment.
This transmitter must not be co-located or operating in conjunction with any other antenna or transmitter.
Note: The country code selection is for non-US model only and is not available to all US model. Per FCC
regulation, all WiFi product marketed in US must fixed to US operation channels only.
Headset FCC ID: ZHK-HS00013
Transceiver FCC ID: ZHK-HS00013TX
Regions Contact Information
USA
More information and support from https://steelseries.com/
656 W Randolph St, Suite 3E
Chicago, IL 60661, USA
+1 312 258 9467

Industry Canada Statement:
This device complies with RSS standards of the Industry Canada Rules. Operation is subject to the following
two conditions: (1) This device may not cause harmful interference, and (2) this device must accept any
interference received, including interference that may cause undesired operation.
Ce dispositif est conforme à la norme CNR d’Industrie Canada applicable aux appareils radio exempts de
licence. Son fonctionnement est sujet aux deux conditions suivantes: (1) le dispositif ne doit pas produire
de brouillage préjudiciable, et (2) ce dispositif doit accepter tout brouillage reçu, y compris un brouillage
susceptible de provoquer un fonctionnement indésirable.
Radiation Exposure Statement:
This equipment complies with FCC/IC radiation exposure limits set forth for an uncontrolled environment.
Déclaration d’exposition aux radiations:
Cet équipement est conforme aux limites d’exposition aux rayonnements FCC/IC établies pour un environnement non contrôlé.
This Class B digital apparatus complies with Canadian ICES-003.
Cet appareil numérique de la classe B est conforme à la norme NMB-003 du Canada.
Headset IC: 9638A-HS00013
Transceiver IC: 9638A-HS00013TX
해당 무선설비는 운용 중 전파혼신 가능성이 있음
해당 무선설비는 전파혼신 가능성이 있으므로 인명안전과 관련된 서비스는 할 수 없음
이 기기는 가정용(B급) 전자파적합기기로서 주로 가정에서 사용하는 것을 목적으로 하며, 모든 지역에서 사
용할 수 있습니다
1. 상호명: SteelSeries ApS.
2. 기기명칭: Headset and Transceiver
3. 모델명: HS-00013/ HS-00013TX
4. 인증번호:R-CMM-SS4-HS-00013
R-CMM-SS4-HS-00013TX
5. 제조사/제조국: SteelSeries ApS./China
この装置は、情報処理装置等電波障害自主規制協議会(VCCI)の基準に基づくクラス B 情報技術装置です。この装
置、家庭環境で使用することを目的としていますが、この装置がラジオやテレビジョン受信機に近接して使用される
と、受信障害を引き起こすことがあります。取扱説明書に従って正しい取り扱いをしてください。
この機器の使用周波数帯では、電子レンジ等の産業・科学・医療用機器のほか工場の製造ライン等で使用されてい
る移動体識別用の構内無線局(免許を要する無線局)及び特定小電力無線局(免許を要しない無線局)並びにアマ

チュア無線局(免許を要する無線局)が運用されています。
1 この機器を使用する前に、近くで移動体識別用の構内無線局及び特定小電力無線局並びにアマチュア無線局が
運用されていないことを確認して下さい。
2 万一、この機器から移動体識別用の構内無線局に対して有害な電波干渉の事例が発生した場合には、速やかに
使用周波数を変更するか又は電波の発射を停止した上、下記連絡先にご連絡頂き、混信回避のための処置等(例
えば、パーティションの設置など)についてご相談して下さい。
3 その他、この機器から移動体識別用の特定小電力無線局あるいはアマチュア無線局に対して有害な電波干渉の
事例が発生した場合など何かお困りのことが起きたときは、次の連絡先へお問い合わせ下さい。
低功率電波輻射性電機管理辦法
第十二條 經型式認證合格之低功率射頻電機,非經許可,公司、商號或使用者均不得擅自變更頻率、加
大功率或變更原設計之特性及功能。
第十四條 低功率射頻電機之使用不得影響飛航安全及干擾合法通信;經發現有干擾現象時,應立即停
用,並改善至無干擾時方得繼續使用。
前項合法通信,指依電信法規定作業之無線電通信。
低功率射頻電機須忍受合法通信或工業、科學及醫療用電波輻射性電機設備之干擾。
廢電池請回收
*報廢電池請按照廢棄物管理辦法回收處理
鋰電池安全使用指南
注意: 電池若未正確更換,可能會爆炸,請用原廠建議之同款的電池來更換。
電池不可當作一般的家庭廢棄物棄置,請依據當地法規使用公共回收系統退回、回收或處理電池。
電池極性(+)和( - )不得相反連接,充電電池極性如果電池極性反轉,則有爆炸危險。
請勿將此電池放在靠近火源或任何高溫的地方,否則可能會因高熱源而發生爆炸。
電池組不得受撞擊,也不能用任何尖銳的物體去穿刺。
該電池組無防水功能,不得暴露於潮濕場所避免受潮導致兩電池極性短路導致爆炸危險。
该电子电气产品含有某些有害物质,在环保使用期限内可以放心使用,超过环保使用期限之后则应该
进入回收循环系统。

《废弃电器电子产品回收处理管理条例》提示性说明
为了更好地关爱及保护地球,当用户不再需要此产品或产品寿命终止时,请遵守国家废弃电器电子产
品回收处理相关法律法规,将其交给当地具有国家认可的回收处理资质的厂商进行回收处理。
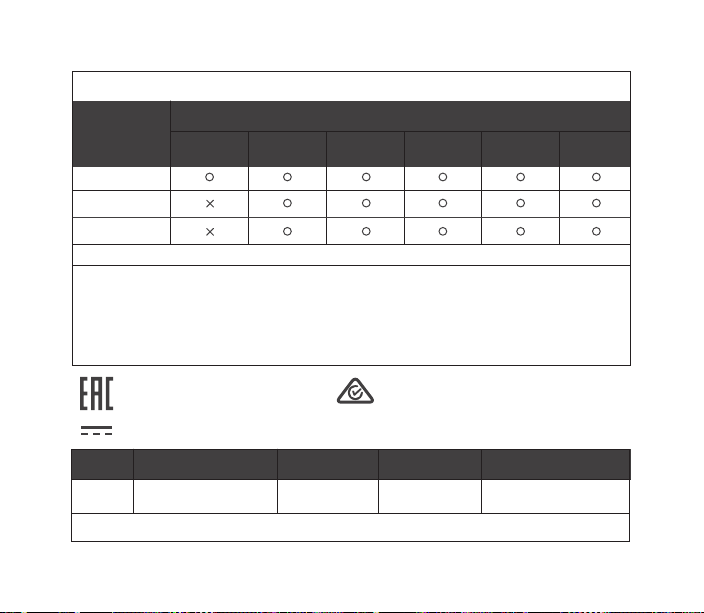
The RoHS test method is based on the standards JIS C 0950 and CNS 15663
設備名稱:
Equipment name
單元
Unit
塑膠部件/Plastic
電路板及元件/PCBA
線材/Cables
金屬部件/Metal
備考1.〝超出0.1 wt %〞及〝超出0.01 wt %〞係指限用物質之百分比含量超出百分比含量基準值。
Note 1:“Exceeding 0.1 wt %” and “exceeding 0.01 wt %” indicate that the percentage content of the
restricted substance exceeds the reference percentage value of presence condition.
備考2.〝○〞係指該項限用物質之百分比含量未超出百分比含量基準值。
Note 2:“○” indicates that the percentage content of the restricted substance does not exceed the
percentage of reference value of presence.
備考3.〝-〞係指該項限用物質為排除項目。
Note 3:The “−” indicates that the restricted substance corresponds to the exemption
耳機/Headset HS-00013
鉛 Lead
(Pb)
汞Mercury
(Hg)
型號(型式):
Type designation
Restricted substances and its chemical symbols
限用物質及其化學符號
鎘Cadmium
(Cd)
六價鉻
Hexavalent
chromium
(Cr+6)
Polybrominated
多溴聯苯
biphenyls
(PBB)
多溴二苯醚
Polybrominated
diphenyl ethers
(PBDE)
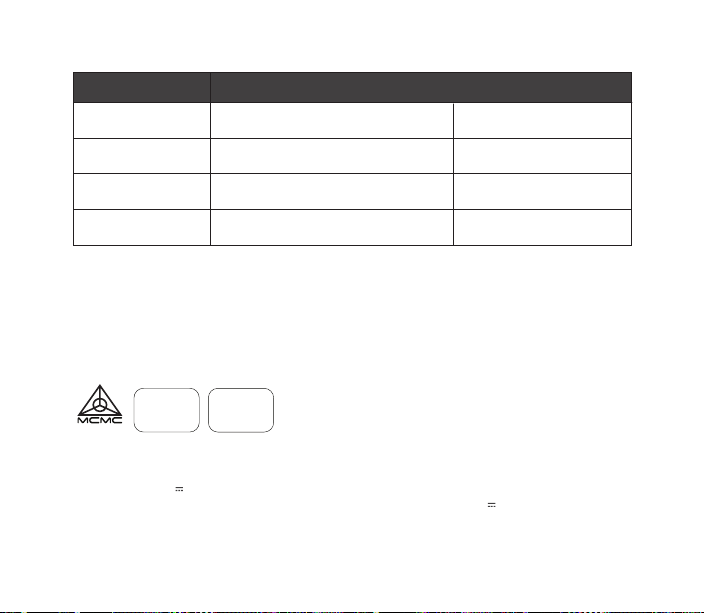
根据中国大陆《电子电气产品有害物质限制使用标识要求》,以下部分列出了产品中可能包含的有害物质的名称和含量:
零部件名称
塑料
电路板组件
其他线材
*:电路板组件包括印刷电路板及其构成的零部件,如电阻、电容、集成电路、连接器等。
本表格依据SJ/T 11364的规定编制。
O:表示该有害物质在该部件所有均质材料中的含量均在 GB/T 26572规定的限量要求以下。
X:表示该有害物质至少在该部件的某一均质材料中的含量超出GB/T 26572规定的限量要求;
上表中打“X”的部件,应功能需要,部分有害物质含量超出GB/T 26572规定的限量要求,
但是符合欧盟RoHS法规要求(属于豁免部分)。
Custom Union Compliance.
(Russia / Belarus / Kazakhstan)
(Pb)
铅
(Hg)
汞
有害物质
(Cd)
镉
六价铬
(Cr(VI))
ACMA Compliance (Australia/ New-Zealand)
多溴联苯
(PBB)
Direct Current
Parts EC Number CAS Number Contained (PPM)Substance Name
LED
Hexahydromethylphthalic 247-094-1 25550-51-0 181125
‧ Please do not open the product and touch LED directly.
多溴二苯醚
(PBDE)

锂电池安全使用指南
注意: 电池若未正确更换,可能会爆炸,请用原厂建议之同款的电池来更换。
电池不可当作一般的家庭废弃物弃置,请依据当地法规使用公共回收系统退回、回收或处理电池。
1.电池极性(+)和( - )不得相反连接,充电电池极性如果电池极性反转,则有爆炸危险。
2.请勿将此电池放在靠近火源或任何高温的地方,否则可能会因高热源而发生爆炸。
3.电池组不得受撞击,也不能用任何尖锐的物体去穿刺。
4.该电池组无防水功能,不得暴露于潮湿场所避免受潮导致两电池极性短路导致爆炸危险。
HS-00013:
Подтверждение соответствия Минкомсвязи России:
Декларация соответствия № 2016-E569 от 16.09.2016 года, действительна до 16.09.2022 года,
зарегистрирована в Федеральном агентстве связи 15.09.2016 года
HS-00013TX:
l Подтверждение соответствия Минкомсвязи России:
Декларация соответствия№ 2016-E570 от 16.09.2016года, действительна до16.09.2022года, зарегистрирована в
Федеральном агентстве связи 15.09.2016 года
Regions Contact Information
23511 新北市中和區建一路150號16樓亞洲
Asia
USA
Europe
16F, No.150, Jian-Yi Rd., Chung-Ho Dist.,
New Taipei City, Taiwan, R.O.C (235)
656 W Randolph St, Suite 3E
Chicago, IL 60661, USA
Dirch Passers Allé 27, 5.Sal 2000
Frederiksberg, Denmark
More information and support from https://steelseries.com/
+886 2 8226 3858
+886 2 8226 3858
+1 312 258 9467
+45 702 500 75
HIDF16000265
TRA
REGISTERED No:
ER58215/17
DEALER No:
0014005/08
TRA
REGISTERED No:
ER58217/17
DEALER No:
0014005/08
Product(產品名稱/产品名称): Headset (耳機/耳机)
Model No. (型號/型号): HS-00013
Rated (規格/规格): 5V , 500mA
Operating Temperature: 0 to + 40 °C.
Made in China 中國製造/中国制造
Accessories Information(配件資訊/配件信息):
Product(產品名稱/产品名称): Transceiver (收發器/收发器)
Model No. (型號/型号): HS-00013TX
Rated (額定值/额定值): 5V , 200mA

learn more at steelseries.com
 Loading...