

Page 1
Stealth Cam
STC-AD2 / STC-AD2RT
User’s Manual
Toll Free Customer Support 1-877-269-8490
www.stealthcam.net
Version 1.0 April/05
Page 2

STC-AD2 / STC-AD2RT
For Customer Service or Warranty Information Call Toll Free
877-269-8490
Stealth Cam, LLC
P.O. Box 211662
Bedford, Texas 76095
www.steatlhcam.net
Stealth Cam Limited Warranty
Your Stealth Cam is covered by a One Year Limited Warranty on parts
& labor from the date of purchase. The warranty covers defects in
workmanship & materials. The warranty does not apply to unit s, which
have been damaged or abused intentionally or unintentionally.
Tampering with or altering the unit will void the warranty. Any
unauthorized service will void warranty. Original sales receipt must be
produced for any warranty service. Questions call 877-269-8490
www.stealthcam.net Toll Free 877-269-8490
2
Page 3

STC-AD2 / STC-AD2RT
Manual Contents
Camera overview 4
Camera kit contents 8
Battery and memory Installation 9
Set up and programming 13
Camera use 23
Manual shooting mode 31
Viewing & Deleting images 33
Using external Power 42
Memory compatibility chart 43
Technical Specs 44
General Information 47
www.stealthcam.net Toll Free 877-269-8490
3
Page 4
STC-AD2 / STC-AD2RT
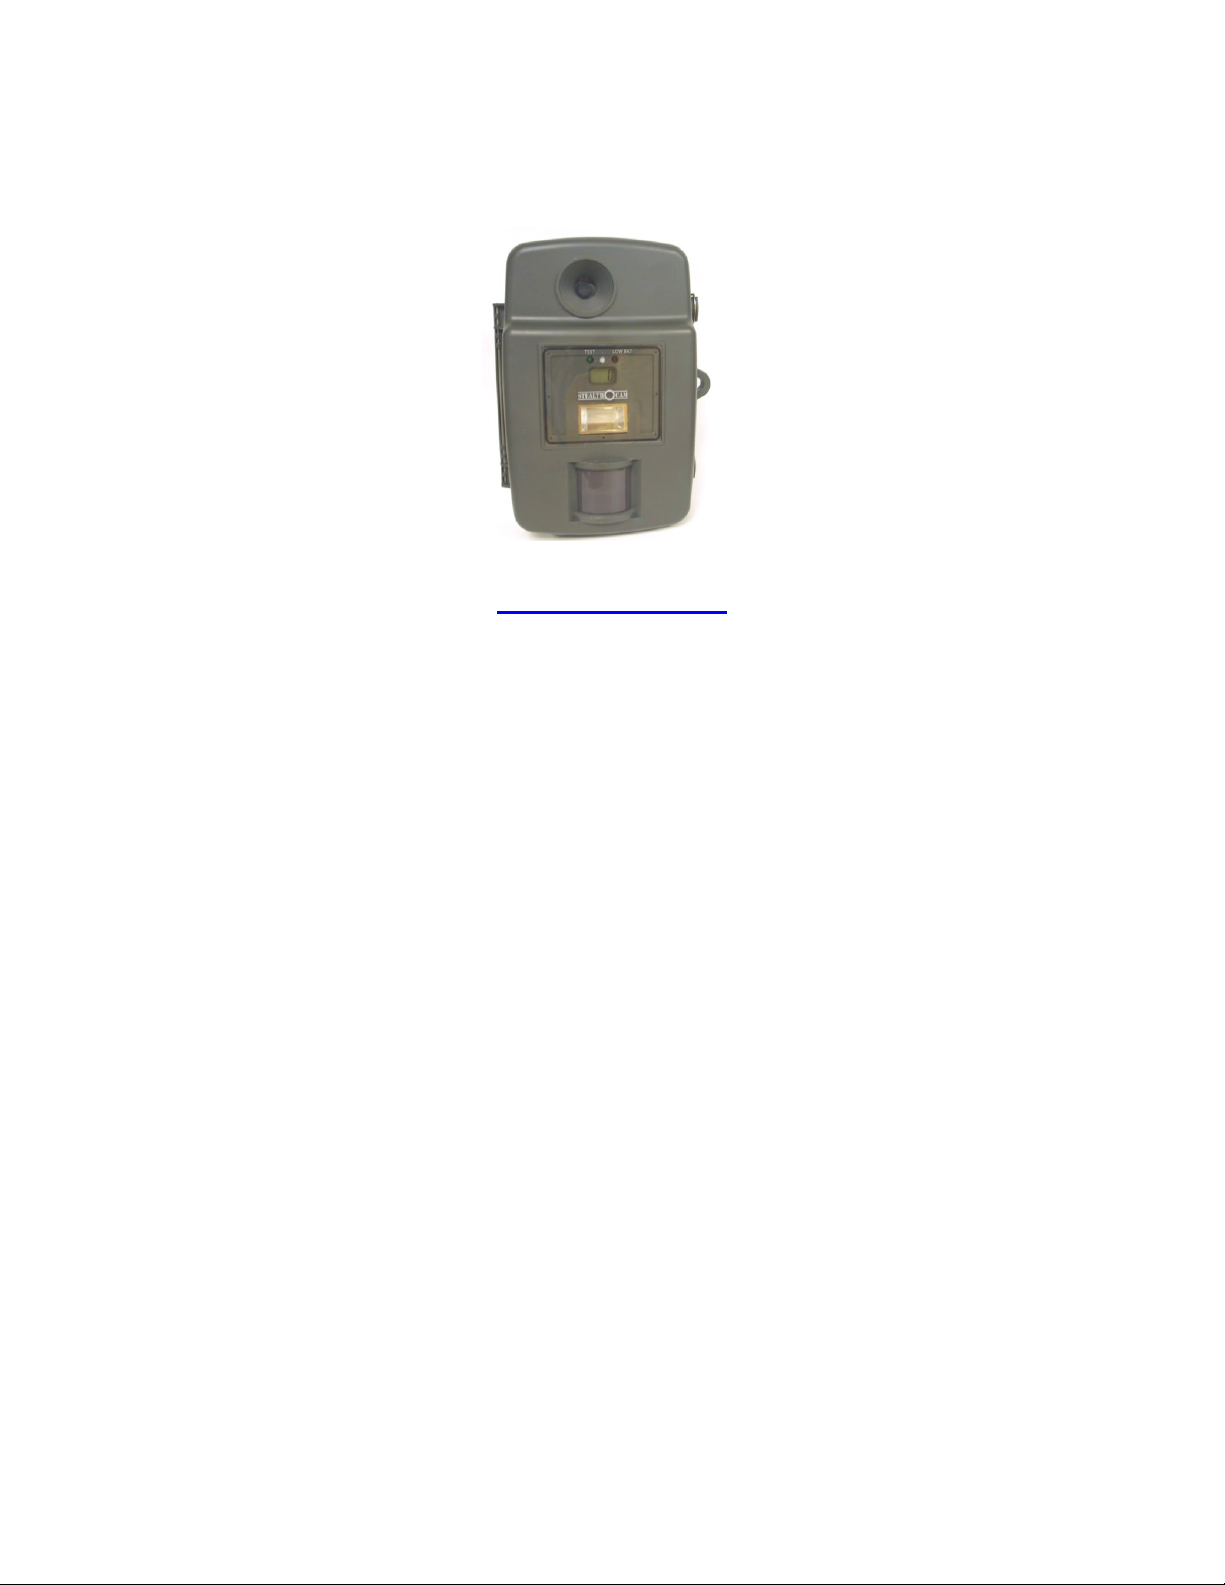
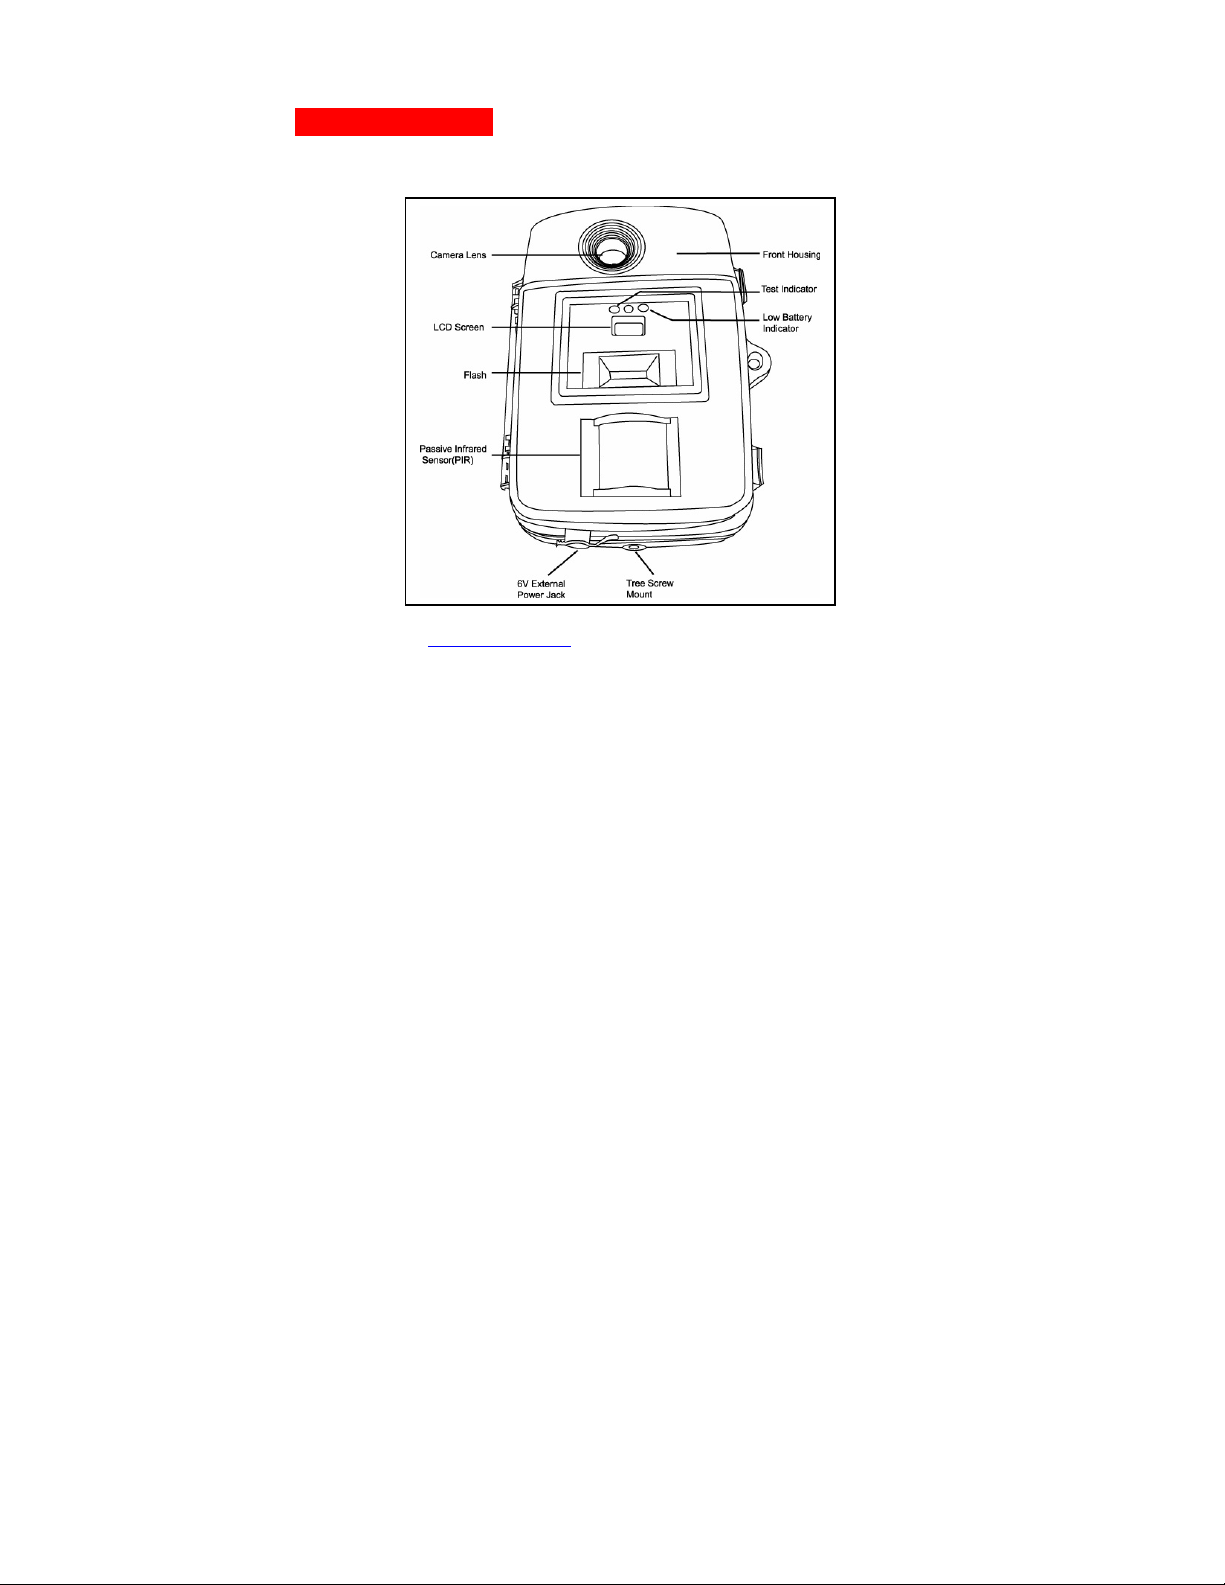
Camera overview
Front housing image with major parts indication.
www.stealthcam.net Toll Free 877-269-8490
4
Page 5

STC-AD2 / STC-AD2RT
Open view image with major parts indication
www.stealthcam.net Toll Free 877-269-8490
5
Page 6

STC-AD2 / STC-AD2RT
Side view with major parts indication
www.stealthcam.net Toll Free 877-269-8490
6
Page 7

STC-AD2 / STC-AD2RT
Picture / Image Capacity
CF card High Low AVI
16MB 45 180 20
32MB 90 360 40
64MB 180 720 80
128MB 360 1440 160
256MB 720 2048 320
512MB 1440 2048 640
NOTE: Picture / Image Capacity Chart provides approximate number of
images or AVI movies based on resolution setting and the size of
memory card. These figures may vary depending on the amount of
detail in the image.
www.stealthcam.net Toll Free 877-269-8490
7
Page 8

STC-AD2 / STC-AD2RT
Camera kit contents
• Model STC-AD2 or STC-AD2RT Digital Scouting Camera
• CDROM (Contains Lover’s Eye image editing software and
camera driver)
• User Manual.
• 1.2M USB cable.
• 1.5M TV out cable for TV (RCA Jack).
• 1.5M TV out cable for handheld TV (Mini Jack).
• Strap.
• Tree screw with nut.
• Washer x 2.
• Lock plate
www.stealthcam.net Toll Free 877-269-8490
8
Page 9

STC-AD2 / STC-AD2RT
Battery & memory installation
The Stealth Cam STC-AD2 or STC-AD2RT Advanced Digital
Scouting Camera is designed to operate using two different types
of battery power options.
NOTE: Always have camera in OFF position when installing or
removing batteries.
Batteries “D” cell
The internal battery compartment accepts 8 “D” cell batteries. Be
sure to use high quality brand name alkaline batteries. Install
batteries in correct polarity (+/-) as noted inside battery
compartment.
www.stealthcam.net Toll Free 877-269-8490
9
Page 10

STC-AD2 / STC-AD2RT
6V Lead Acid external battery
The STC-AD2 is equipped with an external power jack designed to
accept a barrel plug cable to attach to a sealed lead acid battery.
(sold separately). Battery cable and complete 6V Lead Acid battery
kits are available wherever Stealth Cam scouting cameras are sold
or call toll free 877-269-8490. Only Stealth Cam external battery
accessories are recommended.
• Make sure the camera power switch is OFF.
• Insert the battery pack plug into the DC 6V jack of the bottom
of camera housing
• Turn the camera power on.
Please make sure the voltage and polarity (+/-) are correct
before connection. Incorrect voltage or polarity (+/-) will
damage the camera.
www.stealthcam.net Toll Free 877-269-8490
10
Page 11

STC-AD2 / STC-AD2RT
Memory Options
Your STC-AD2 camera is equipped with 16MB built in flash
memory, (32MB for STC-AD2RT model). The camera is also
equipped with an expandable media card slot capable accepting
up to 512MB Compact Flash card (sold separately). With no
memory card inserted into the slot, the camera will use the built
in 16MB memory (32MB for the STC-AD2RT model). If a
Compact Flash card is inserted into the slot then the camera will
bypass the built in memory and utilize the compact flash memory.
The front counter display will show the number of images on the
built in memory unless the expansion card is inserted at which
point the counter will only show the number of images in the
expansion card.
www.stealthcam.net Toll Free 877-269-8490
11
Page 12

STC-AD2 / STC-AD2RT
Inserting CF card
Make sure camera is in the OFF position when ever adding or
removing memory.
• Insert CF memory card in to the CF card slot completely and in
the correct direction as shown by the sticker located at the top
of the housing.
• To remove the CF memory card by press the eject button which
is on the upper of the card.
Compact flash cards must be clean (no images from other
sources), if you are using the CF card from other cameras,
please make sure to format the CF card prior use in the
camera. New cards are good to use straight from the
package.
www.stealthcam.net Toll Free 877-269-8490
12
Page 13

STC-AD2 / STC-AD2RT
Set up and Programming
Internal LCD screen displays the camera program status as you
go through each program setting.
• Time out: To set the amount of time in minutes the camera will
sleep between PIR triggering.
• Auto Flash: In low light conditions the flash will automatically
activate.
• Capture mode: The capture mode that you have selected.
o 1P: Single image capturing per PIR triggering.
o 2P: Two images continuous capturing per PIR triggering.
o 3P: Three images continuous capturing per PIR triggering.
www.stealthcam.net Toll Free 877-269-8490
13
Page 14

STC-AD2 / STC-AD2RT
o Video: Taking 10 seconds video per PIR triggering.
o Manual: Manual capturing by pressing shutter button to
operate. (use as point and shoot camera or video camera
under Test Mode)
• Image Resolution: The resolution selection that you have
selected.
o 1600 x 1200: Select this option to capture a high image
resolution.
o 800 x 600: Select this option to capture a low image
resolution.
o 320 x 240 Video resolution: This is the resolution during
video capturing.
• Image Quality: The quality selection that you have selected.
o One star = Low Quality
o Two stars = Normal Quality
www.stealthcam.net Toll Free 877-269-8490
14
Page 15

STC-AD2 / STC-AD2RT
o Three stars = Fine Quality
•
Batteries Status: It shows the battery status.
o Full: It shows the batteries are full.
o Half: It shows the batteries are half.
o Low: It shows the batteries are low an front battery
d
indicator will be on also.
h ed low batteries, (Both set of
W en the camera has detec
ba +/-0.2Volts) the camera unit
tteries are lower then 4.5
t
will power off within 30 seconds automatically. Please
replace with new batteries; otherwise the camera will no
work properly.
Pre
caution: When replacing batteries, replace the upper 4
batteries in the battery compartment with new ones first. After that
replace the lower 4 butteries. Removing all 8 batteries at on
will result in the loss of date / time setting.
• Date and Time: It shows the date and
www.stealthcam.net Toll Free 877-269-8490
time that you have set.
t
e time
15
Page 16

STC-AD2 / STC-AD2RT
Pro m
gra ming the Stealth Cam STC-AD2 / STC-AD2RT
Slide the power switch to TEST position. You will hear one
Wait for the 2
hear the 2
nd
beep before you press the MENU button. Once you
nd
beep, you are ready to program the camera. Press MENU
button once to start your programming sequence.
Manual Capture Mode
To capture images using
manual shutter button
The camera or movie icon will be blinking
Press Left/Rig ton to sele ween manual Cameract bet
ht but capture
mode or manual Movie capture mode
Press OK to confirm setting and the icon will be freeze
Press Menu to exit setting (see page 31 for manual mo
operating instruction)
Press Up button to change the last setting or Down button to
continue with the next setting.
www.stealthcam.net Toll Free 877-269-8490
initial beep.
de
16
Page 17

STC-AD2 / STC-AD2RT
Format Memory
To erase images store
asket icon will be blinking
B
Press OK to confirm format the me
Press OK again to start formatting proces
format the memory will only take a few seconds)
Once you hear the beep sound, it indicates forma
complete.
Press Men
Press Down button and scro
resolution setting and continue with the next setting.
u to exit Setting
d in internal memory or to format a CF card.
mory
s (the time it requires to
tting process is
ll through the program icon to
Resolution
he Resolution T
Press Left/Right b ton to select high resut
low resolution (800 x 600)
Press OK to confirm setting
icon will be blinking
olution (1600 x 1200 or
and the icon will be freeze
www.stealthcam.net Toll Free 877-269-8490
17
Page 18

STC-AD2 / STC-AD2RT
Press Menu to exit setting
Or press Up button to chan
continue with the next setting.
Quality
he QualiT
Press Left/Right button to select betw
quality
Pres icon will be freeze
Press Menu to exit setting
Or press Up button to chan
continue with the next setting.
ty icon will be blinking
e star = Low quality
On
Two star = Normal quali
Three Star = Fine quality
s OK to confirm setting, the
ge the last setting or Down button to
een Fine – Normal – Low
ty
ge the last setting or Down button to
www.stealthcam.net Toll Free 877-269-8490
18
Page 19

STC-AD2 / STC-AD2RT
TV (NTSC/PAL)
he PAL or NTSC will be blinking
T
Press Left/Right button to select PAL or NT
(NTSC is the correct setting for all North Ame
SC.
rica. Your
Stealth Cam STC-AD2 / STC-AD2RT comes pre-programm
for NTSC.)
Press OK to
confirm setting and icon will freeze
Press Menu to Exit
Or press Up button t
o change the previous setting or Down button
to continue with the next setting.
Date Tim
e setting
his camera uses the 24hr military time format.
T
Press O.K. button to enter into setting mode.
Set date and time
ed
The date will be sho
blinking.
www.stealthcam.net Toll Free 877-269-8490
wn on the LCD with the setting digit
19
Page 20

STC-AD2 / STC-AD2RT
Month - Day - Year ÅÆ Hour - Minute - Second
1. Press U
p/Down button to select the appropriate month
2. Press Right button to select the day setting
3. Press Up/Down button to select the appropriate date
4. Press Right button to select the year setting
5. Press Up/Down button to select the appropriate year
Press Right button to enter the time setting
1. Press Up/Down button to select the appropriate hour
2. Press Right button to select minute setti
ng
3. Press Up/Down button to select the appropriate minute
4. Press Right button to select the second sett
ing
5. Press Up/Down button to select the appropriate second
At t ng
he end of time setting, press OK to confirm the date/time setti
and exit the setting menu.
www.stealthcam.net Toll Free 877-269-8490
20
Page 21

STC-AD2 / STC-AD2RT
NOTE: If you press Menu before pressing the OK button, you will
exit the setting menu withou
t confirm the date time setting
Set
the Capturing sequence. The Stealth Cam STC-AD2 / STC-
AD ring or
2RT can be programmed to shoot 1-3 pictures per trigge
0 seconds of video.
1
Stealth Cam Setting
Press Menu button to scroll through the program setting icon until
the setting with numbe
ress Left/Right to set the number of photo to be taken each times
P
r of photo digit blinking.
as sequence 1P – 2P – 3P – AVI. If you do not wish to change the
picture setting, press Down button to proceed to Time Out Setting.
AVI will display “Au”; it will record a 10 sec AVI movie
Press OK to confirm the number of Photo setting
www.stealthcam.net Toll Free 877-269-8490
21
Page 22

STC-AD2 / STC-AD2RT
After setting the number of photo each time, press Dow
select time interval in minute (1-60 min) to active P
n button to
IR detection for
ON. Time digit will be blinking.
Press Right button to increase the time interval by one min
Press Left button to decrease th
ress OK to confirm
P
e time interval by one min
Onc tton to
e all settings have been completed press the MENU bu
retu US screen.
rn to CAMERA STAT
www.stealthcam.net Toll Free 877-269-8490
22
Page 23

STC-AD2 / STC-AD2RT
Using the camera
nce all program setting has been completed your Stealth Cam is
O
re
ady for field use. Slide the power toggle switch from Test setting
mode to Off position if y
On position if you are ready to begin scouting.
ou are not ready to use the camera or slide to
Please note that when you power off the camera, the front
LCD counter and internal LDC screen
is normal. Do not be alarmed.
will remain on. This
Gettin
g started
Moun
ting the Camera. It is recommended to mount the camera
4-5 ft off the ground with the camera pointed at a slight
downward angle.
east or west as the rising and setting of the sun could produce
Be sure to avoid mounting the camera facing
www.stealthcam.net Toll Free 877-269-8490
23
Page 24

STC-AD2 / STC-AD2RT
other debris away from the front of the camera so as not to
block the camera lens or PIR sensor.
PIR Cover Area
Diagram
and false triggers and overexposed images. Clear branches
www.stealthcam.net Toll Free 877-269-8490
24
Page 25

STC-AD2 / STC-AD2RT
Mounting
the camera with the supplied Tree Screw
• Hand twist the screw into the tree or post at the desired
position.
• Attached the camera to the screw by turning the camera onto
www.stealthcam.net Toll Free 877-269-8490
25
Page 26

STC-AD2 / STC-AD2RT
the mounting screw to the desired position.
Tighten th• e stabilizer nut.
er tighten as this
Attached camera to tree screw. Do not ov
Mounti
may cause damage to ca
nut and washer, tighten to the bottom of camera for
greater stability.
ng the camera with the supplied strap
mera housing. Using the supplied
www.stealthcam.net Toll Free 877-269-8490
26
Page 27

STC-AD2 / STC-AD2RT
• Insert the strap through the slots on the rear housing.
strap
• Wrap the strap around the mounting surface. Secure the strap
and tighten the buckle in order to secure the camera.
Stealth
with thi ree
Cam offers a Security Lock Bracket for uses exclusively
s camera. See included accessory card or call toll f
877-269-8490.
In order to obtain proper weather resistance, please ma
sure that bo
th door latches are securely locked in place.
Adj
ust the PIR coverage distance.
• This
• The PIR dial has a near to far des
Stealth Cam offers the user a variable PIR distance.
ignation.
• NEAR is approximately 15ft and FAR is approximately 30ft.
www.stealthcam.net Toll Free 877-269-8490
ke
27
Page 28

STC-AD2 / STC-AD2RT
• Select the desired coverage distance. (see
PIR Coverage Diagram
on page 24 for reference.)
ting the camera coverage
Tes area
One of STC-AD2 / STC-AD2RT Cam’s many features is the
ability to test the coverage area
• e
After mounting the camera, open front housing and slide th
.
power toggle switch to TEST.
• Close the front housing.
• camera to see if you have
Walk around in the front of the
mounted camera in the p
roper position. A green indicator light
on the front will blink on when you have intruded the cover
area.
•
Adjust the camera position as needed and repeat testing until
the des
ired coverage area is achieved.
www.stealthcam.net Toll Free 877-269-8490
age
28
Page 29

STC-AD2 / STC-AD2RT
• When you have completed the testing the coverage area, open
the front housing and slide the power tog
gle switch from TEST
to ON position. This will exit the test mode. The camera will
then enter count down mode for 1 minute and front green
indicator will start continuous blinking giving you one minute t
leave the coverage area. Then the camera will enter PIR
detection mode.
Using t detection mode
he camera in PIR
• Mount the camera to tree or other sturdy object using either
two supplied tree screw or mounting
strap (Please refer to the
mounting suggestions section in this manual)
Open the front housing and move the switch to the ON position
• .
The camera’s green test light will begin blinking
• and enter
count down mode. This is your indication to leave the coverage
www.stealthcam.net Toll Free 877-269-8490
o
29
Page 30

STC-AD2 / STC-AD2RT
area within one minute.
After one minute the camera will take between 1~3 pictures or
•
a 10 seconds AVI video b
ased on your program setting. The
camera will then time out between 1 ~ 60 minutes also based
on your setting.
The time between motion detection and the camera taking
the pictures ma
y vary due to lighting conditions, charging
of the flash, program setting and battery power level.
The flash light will only activate in low light conditions.
s
When the camera is set to AVI capturing, the 10 second
clips will only turn out well in good daytime lighting
conditions.
the
When using the AVI function, the camera cannot use
flash. Time/D
ate stamp will not appear on the AVI video
clips.
www.stealthcam.net Toll Free 877-269-8490
30
Page 31

STC-AD2 / STC-AD2RT
Manua
l shooting mode
Using al shoot option for Camera mode
manu
• Slide the power toggle
beeps. Icon will show as default on LCD
Camera mode.
Once you hear the 2
•
direction where
SHUTTER button once. You will hear two fast beeps after you
press the SHUTTER button. This indicates the image has
been captured and the LCD counter on the front of the housing
will update the number of images in memory.
•
When taking night time pictures allow approximately 7 seconds
between shots to allow the flash to charge. In
battery power, it will take longer to charge the flash between
pictures.
www.stealthcam.net Toll Free 877-269-8490
you want to capture the image and press
switch to TEST position. Wait for 2
nd
beep, you may point the camera in the
screen to indicate
case of low
31
Page 32

STC-AD2 / STC-AD2RT
Using
manual shoot option for AVI mode
• ower toggle switch to TEST position. Wait for 2
Slide the p
beeps.
• Once you hear the 2
nd
beep press the MENU button. The
Camera
icon will flash.
• Press RIGHT button to select manual Movie capture mode.
LCD screen to indicate AVI mode.
Icon will show on
• Press OK to confirm setting and the icon will freeze.
• Press
• You may now point the camera in the direction where
MENU to exit setting.
to capture the video and pres
you want
s SHUTTER button to start the
video recording.
•
Press the SHUTTER button the 2
(No o press the SHUTTER button the 2
te: if you forget t
nd
time to stop video recordi
nd
time
to stop video recording, it will record the video indefinitely
www.stealthcam.net Toll Free 877-269-8490
ng.
32
Page 33

STC-AD2 / STC-AD2RT
until the memory capacity is full or until you power off the
camera.)
Vie deleting the images
wing and
The STC-AD2 / STC-AD2RT cam offers the user three diff erent
options for viewing the images. The e
on the front housing will show the number of images in memory
The instructions below are based on starting from a camera that
turned off.
is
wing the imag
Vie e on a handheld LCD TV video monitor (cable
included)
• Attach the appropriate cable to the video out jack on the
came
ra. Insert the other end into the video in jack on handheld
www.stealthcam.net Toll Free 877-269-8490
xternal LCD display screen
33
Page 34

STC-AD2 / STC-AD2RT
LCD TV monitor. Turn on the TV monitor and slide the ca
power toggle switch to TEST. Wait for Camera image to show
up on monitor.
•
Press the OK button on the camera. This will display the last
image captured
.
• Using the LEFT and RIGHT buttons to select the image you
wish to view. Ima
ge number and total number of image in the
memory will display on the center bottom of the screen.
•
Once you have selected the image you wish to view , press the
UP button. This will magnify the image on the screen.
• Using LEFT/RIGHT/UP/DOWN button, you can move the
image to display different area of the image.
• To return to the image selection view from the magnified im
screen press the OK button.
www.stealthcam.net Toll Free 877-269-8490
mera
age
34
Page 35

STC-AD2 / STC-AD2RT
Viewing the images on your home TV equipped with an RCA
input jack. (cable included)
• Attach the appropriate cable to the video out jack on the
camera. Insert the other
TV. Turn on the TV and slide the camera power toggle sw
end into the RCA video in jack on the
itch to
TEST. Wait for Camera image to show up on monitor. Make
sure to switch to VIDEO IN mode on your TV. (See your TV
owner’s manual for directions.
•
Press the OK button on the camera. This will display the last
image captured.
• Using the LEFT and RIGHT buttons to select the image you
wish to view. Ima
ge number and total number of image in the
memory will display on the center bottom of the screen.
•
Once you have selected the image you wish to view , press the
www.stealthcam.net Toll Free 877-269-8490
35
Page 36

STC-AD2 / STC-AD2RT
UP button. This will magnify the image on the screen.
Using LEFT/RIGHT/UP/DOWN button, you can move th
• e
image to display different area of the image.
• magnified image
To return to the image selection view from the
screen press the OK button.
Viewing AVI Clip on hand held TV monitor or home TV
• Follow the cable attaching instruction listed in hand held
TV
monitor or home TV described in previous section.
• y the last
Press the OK button on the camera. This will displa
image captured.
• HT button to scroll through the images in
Press LEFT / RIG
memory. An AVI motion clip image will h ave a move icon
showing on the upper left hand corner of the image.
• lip
Press SHUTTER button to play back the AVI motion c
www.stealthcam.net Toll Free 877-269-8490
36
Page 37

STC-AD2 / STC-AD2RT
• To return to image selection view, press LEFT / RIGTH bu
at the end of the AVI clip.
iewing images by computer download
V
The Stealth Cam STC-AD2 / STC-AD2 RT ad
Camera is a plug and play USB storage device. This means users of
Windows 2000 / ME / and XP operating system need not install the
camera driver. This camera is not MAC compatible. The disc include
in this package contains the camera driver for older operating systems
as well as Lover’s Eye photo imaging software for image enhancement
and manipulation.
vanced Digital Scouting
tton
d
Attention:
ackaged with the camera is designed for PC’s The software CD-ROM p
only (not MAC compatible). Playing this CD-ROM on a stereo or CD
www.stealthcam.net Toll Free 877-269-8490
37
Page 38

STC-AD2 / STC-AD2RT
player may cause damage to it.
oftware installation
S
• Unplug the USB
• Insert the CDROM in CD driver o
cable from PC.
f your PC.
• The auto-run program will execute.
• Follow the instructions shown on scr
een from your PC to
completely install the driver and application program.
•
Restart windows.
• Successful installatio
n will create “Lover’s Eye” photo imaging
icon on you desktop.
• to the PC using the USB cable provided,
Connect your camera
the PC will recognize the new device and set UP the
configuration of the PC automatically.
www.stealthcam.net Toll Free 877-269-8490
38
Page 39

STC-AD2 / STC-AD2RT
• NOTE: Users of Windows 98SE or earlier must install
camera driver prior to connecting the USB cable.
If your computer doesn’t run automatically, please click “Start”
•
button and choose “Run”, and then browse the CD drive and cl
“Setup”.
• manual of Lover’s Eye Photo Imaging software is
Operation
contained on the provided CDROM.
www.stealthcam.net Toll Free 877-269-8490
ick
39
Page 40

STC-AD2 / STC-AD2RT
Viewing the images on your computer using the provided software
Please refer to Installation section on above to install the
software and application program properly.
• Slide the power switch to test location.
• To view the images simply plug one end of the USB cable into
an available USB port on your computer.
• Plug the other end of USB cable into the camera. The camera
will automatically power ON and display a USB icon on the
LCD screen.
• At the same time, your computer will recognize the camera as
mass storage device and found under MY COMPUTER.
www.stealthcam.net Toll Free 877-269-8490
40
Page 41

STC-AD2 / STC-AD2RT
Deleting images
At any time while viewing images on the Handheld TV or Home TV you
may delete images one at a time or all at once.
• While viewing images in normal view press MENU to enter the
DELETE menu.
• Using the LEFT and RIGHT buttons to choose desired function.
Delete 1 or Delete ALL.
• Press OK to enter delete mode.
• Press OK again to confirm deleting image or MENU to exit without
deleting images.
After selection has been made the screen will go back to image view
mode.
www.stealthcam.net Toll Free 877-269-8490
41
Page 42

STC-AD2 / STC-AD2RT
Using the external power
This Stealth Cam is designed to be used with an optional external
6V lead acid battery kit. (sold separately)
• Make sure the camera is turned to OFF.
• Insert the barrel plug cable to the external power jack at the
bottom of the camera.
Make sure to install the cables in correct polarity (+/-) for
the lead acid battery. Incorrect voltage or polarity (+/-) will
result in damaging the camera.
www.stealthcam.net Toll Free 877-269-8490
42
Page 43

STC-AD2 / STC-AD2RT
CF Card Compatibility Chart
The following cards have been tested and approved for use in the STCAD2 / STC-AD2RT model.
Digital Media 256 MB
Viking 256 MB, 512 MB
PNY 256 MB, 512 MB
San Disk 64 MB, 128 MB, 256 MB, 512 MB
Kingston 512 MB
MUSE 64 MB, 128 MB
www.stealthcam.net Toll Free 877-269-8490
43
Page 44

STC-AD2 / STC-AD2RT
Technical Specifications
System Requirements and Compatibility
• Windows 98SE (with driver), 2000/NT, Me, XP.
• Pentium 200MHz or above.
• 64MB SDRAM or above.
• VGA Video Card with 32MB RAM for minimum, Color 16 bit or
higher.
• An available CDROM driver and an available USB Port.
• 300 MB free hard disc space.
• Optional: Windows compatible sound card, Microphone and
speaker.
If you have any questions regarding your PC
specifications please call your PC manufacturer.
www.stealthcam.net Toll Free 877-269-8490
44
Page 45

STC-AD2 / STC-AD2RT
Camera Features and Specification.
• Image sensor: 2.0 mega-pixels RGB color.
• Built in 1.8” B&W LCD display.
• Built in 16M flash memories for image storage or 32MB for
STC-AD2RT.
• External memory support: CF memory card up to 512MB
• Resolution Options: High, Low
• Quality Options: Low, No rmal, Fine
• 4 Capturing Options:
- Manual : Single or Video (AVI)
- PIR activate : 1,2,3 Continuous or Video (AVI)
• Image performance for video stream: 10fps in 320 x 240 pixels,
approx 10 seconds per section.
• Auto white balance and auto expose.
www.stealthcam.net Toll Free 877-269-8490
45
Page 46

STC-AD2 / STC-AD2RT
• Auto Flash light strobe control.
• Real time clock for date and time stamping.
• 4 digits LCD Image counter.
• Battery low indicator.
• Green Test LED indicator
• TV out support for NTSC and P A L system.
• Focusing: 3M to Infinity.
• High precision 3P glass lens with IR coating.
• Effective viewing Angle: 52 deg.
• PIR detection angle 45 deg.
• Adjustable PIR detection range up to 9 meter.
• Low power consumption:
Standby current: < 5 mA
Capture current <250 mA
www.stealthcam.net Toll Free 877-269-8490
46
Page 47

STC-AD2 / STC-AD2RT
• Interface type: USB 1.1.
• Power: D size alkaline Batteries x 8. (not included)
• Ext power: 6 volts battery pack. (not included)
• Image format: Standard JEPG. And Motion JEPG (AVI)
General Information
Storing conditions
• Operating Environment: 14 to 104 deg F (-10 to 40 deg C). 20-
85% relative humidity, non-condensing.
Special care instructions!!
• The camera is designed to be weather resistant. Never attempt
to immerse the unit to water or any other liquid. This will
damage the unit and void the warranty.
• Use a soft lens cloth for cleaning lens. Avoid touching lens with
fingers.
www.stealthcam.net Toll Free 877-269-8490
47
Page 48

STC-AD2 / STC-AD2RT
• Remove dirt or stains with a soft cloth dampen ed with water or
neutral detergent. Keep the camera in a dry and cool dust-free
environment or container when it is NOT used.
• Take the batteries out, when the camera is NOT to be used
over a long period.
• Avoid dropping the camera on to hard surfaces. Do no t
disassemble the camera.
• Do not mix new and old batteries.
• Do not open the camera for unauthorized service. This could
cause serious damage to the unit and will void the warranty.
This camera is a precision electronic device. Do not attempt to service
this camera yourself, as opening or removing covers may expose you
to dangerous voltage points or other risks.
www.stealthcam.net Toll Free 877-269-8490
48
 Loading...