Print Speed: Draft speeds of 330 characters per second.
Print quality: High Performance Output of 360 dots per inch.
Number of Fonts: Up to 10 recommended usable fonts.
Color Printing: Uses color ribbon cartridge with ability to support up to 256 colors.
Display: Made with an informative LCD screen.
Paper Types: Cut sheet, fan fold paper and multi parts forms support.
Optional Accessory: Automatic sheet feeder (Model SF-10DW Is An Option).
Compatible Emulations: The printer incorporates emulations for both Epson and IBM printers.
Power Supply: Are available in a 120volt or 220volt version.
Interface: Comes with parallel interface and serial to parallel converter (SPC-8K) as optional.
Dimensions: Not allocated on the manual.
Weight: Not allocated on the manual.
Frequently Asked Questions
Q: What type of printing technology does the NX-2480 Rainbow/Colour uses?
A: Dot matrix printing is the technology that is incorporated in the NX 2480 Rainbow/Colour type printer.
Q: Can I print in color?
A: The printer is capable to do color printing whenever a color ribbon cartridge is used which can allow up to 256 colors.
Q: What is the maximum quality of print an output of this printer can provide?
A: Maximum print quality output is rated on a 360 dots per inch resolution.
Q: Is this compatible with Windows?
A: This device will work with Microsoft Windows since specific drivers are available for the Windows 3.1 version and higher.
Q: Which are the requirements for loading the printer with different paper types?
A: The printer is capable of using cut sheet, fanfold paper as well as multi-part forms and the manual lists procedures for loading these different types of forms into the device in question.
Q: What type of cable would I expect to find on the printer to connect a computer?
A: The NX-2480 Rainbow/Colour is an inkjet printer which usually employs a parallel cable, a serial to parallel cable can be obtained if such an interface is desired.
Q: What actions can I perform if it turns out that the printer is not able to start printing?
A: Check the settings of the printer to ensure that it is set to “ready” and that properly loaded paper has been inserted; there are more detailed instructions in the trouble shooting section if necessary.
Q: Is it possible for one to save their print settings to be used sometime in the future?
A: Yes, the macro function can be utilized to save your settings which could enable the printer to automatically set the appropriate font, color and so forth when it is restarted.
User Manual
Page 1
USERS MANUAL
RAINBOW
NX-2480
QBF
80825591
COLOUR
Page 2
I
Federal Communications Commission
Radio Frequency Interference Statement
“l-he 12f)\’\u!+ionc,quipnwnthas ht’t’n k-stdand found to compl> with [hc linlits I“ma cla5s B digital
cfmicc, pursuant [o Part 15
against harm(”illinterf’c, rcn(u, in a lresidmtialill..’ tallation.This rquifmlmtgmmltes.Llscs ami can r.adi.
:I(C radio I“requcnc,}, rIIe:-~.and,
rausc tlarnllill irlterf?rcnm to radio
will not omllr in a
trlcwisiml. n,hicb (an be cletmmined by turning off and on, thr u!+rris FImouragmi to Iry to corrwt the
intmfrrcmw hy one or mcmfof the follcwringmeasurvs.
.
[<emimtor rckwatrthe rccriving antenna
.
Incrcasc the srpamtion bclweru Ibc cquipmrnt and rcw,iwr.
.
Connrrt ill? equifxncnl intn an cn)tlc! ml a rireuit clil’fmt=ntl“ronlthat to wbich the.rrmiwr is con
ne(lmf
.
C’cmsl]lt the cfcakr or an t’x
Urlatlthorized moclili(aticms o{ this prmtuc( by (he user will wid his authority to opt’ra{r [bc t,quipnwnt
Link’ss cxprt>sslyapprowd by the party r?sponsibk klr IYmlplianw
For cmnplia,lrc wi[h tb? t’?dmal Noise> Intt’rfcrcmceStandard. tbis equipmrn[ r(,c]uires a sbit,klrd rahle.
The 220!: XY’rsicmrcp]ipmrnl has bw’n lcstml and t’oumi (o comply witb the Iimi[s f“ora Class A digikd
dmi(c,. pumuant to Pari 15 of lb,, FCC’RUICS.
lion against Imrmfu]
equipmc.n[grnm.at?s. USCS,amt ran radiate radio hcqwrlc.v encr~ aml. ii’rmt inslallrd and usml in
acwmlarlrr with lht, mstru(.tion !II:Inual. may cause harml’,)t irllerfcrcnw 1(]radio (~O1l]n,[,,l],.:ltiorl.~,
Operation of this rc~uipmcntin a resicfcntm] ar?a is
the,user will he rccluirrd to roImcrt tbc intrrrmtmc? at bis OWI ?xpensc.
For rompliancr with thr Federal ?JoisrInt?rferenc? Standarct.this cc]uipmt’nt rrqllirt>s a shiekfcd cahlr.
The choLY, Slalerm>nl applies OIII!I [o pri, tters mcukelwi in the U.S.A
Statement of The Canadian Department of Communications Radio Interference
of”FCC [3u1?s.These limits are cfcsignmi to wmkfc rwsonahl? protmtion
if not inst.allcciand used in accordance wittl (hc irl.stn]rtiml.s may
partirldar installatiorl. If this ?quiprnent dot’s <:lLIsc harmful in(erfcrrncc (0 radio or
intrrf’r,-cmm’W)lC,II lbr cquipmer)t is opcra[cci ill a rommcrcial rrh.imnm(m(. Ttlis
cmmmunirations.However.lhrm is nc guaranter{hat interkencr
pericn<wi radio/TV (cchr!iriim for help.
These limits arc dt’signed to prmid? rrasonabk pmter
Iikcl} to rausc’ bmll)f’(11inlctfcrcrwr iII whi(.tl C:IW
1,<,p,-~sentapparril num[.ri(p]c r]”t+nctpas cl<>hmits r->)ciioFl?(tiqllc.s<l~passanl Ics Iir?,itc-sapplicahles
au.xapp, areilsnumwiqu’?s cfc la classe B prcsrrites dams
edirtc paI.1{,Minist?rr d<%C.olllrll~llli(,tllic)llsdu Canada.
The abmw statenwnl applies OFII!I 10prinlws mclrk$>t<,dill [’(I,I<zd<I.
k. R@mlltmt sllr k hrouilkig<,radioelcrtriquc.
Trademark acknowledgments
NX-2480 Rainbow/Colour,NX-2420Rainbow/Colour,NX-2420,SF-1ODW,SPC-SK: Star Mi(r(llli(s
co. Ltd.
L9S50, L9S60, LQ105O, L9106O: Seiko EIMmI Corpora(im,
IBM PC, IBM
IBM ProprinterXL24:internationalBusiness Machines Cmporatiorl.
TrueTypeMacintosh:Appk. Computer Inc.
PostScript: AdobeS@t’rnslnco~orated
MS-DOS, Microsoft Windows, Windows 3.1: Microsoft Corporation
Grappler:OrangeVicrc,[m
Notice
.
rights rwwnrct.Reproductionof any pa!l of this man[ml in any kwm u,tla@n?\vr.without
All
STt\R’smprt’ss pwmissicm is strictly forbktckm
.
Tbc ([),ltrnts
.
All rf’forls tlaw Ixwt madr (c>ensure [ht. acrurary o[”the
prin[inq. IIcmewr, S11OCIMany crmrs be founci. STAR would grcatlv appreciate Ixing infmmcd of’
therll.
.
The ahc)w rlOILL-illlsl:!llcli,lg. STAR can assllnl? no rlW(l,lsit~ilitY (Or a~y ,7rl-Orsi,, this 1ll:lrlll:ll.
11( [bis ,llarlua
1arc,suhjmt (o rhang? witboul notim.
cmlmtsof’ this man,lal at the (imr of’
~,Copyigbt 1993Star Mim(mics Cm I.td
Page 3
Guide to this manual
Even though the NX-2480 Rainbow/Colouris basically
a very
complex functions. We have grouped this manual into
two main sections. divided into seven chapters and an
appendix.
For normal everyday use, you may never need to refer to
Section II at all. We strongly recommend however that
you read through Section-I-(Chapters 1, 2 and
connecting and–usingthe printer for the first time.
simple printer to use, it is also capable of many
3) before
SectionI
Chapter 1
Chapter 2
Chapter 3
Features and parts
Unpacking and setting up the printer,
including setting up your computer
software
Using the printer, including loading paper,
using the display and control panel, and
printing
‘“”l
Page 4
Guide to this manual... ......... ..................................................................iii
Introduction
1
Features ..... ...... .................. ........... ......................................... ............ . I
Parts ... .......... . ...............................................................................................4
Unpacking and settingup
7
Choosing a place for the printer., .... ...................................................7
Unpacking the printer ... ..........................................................................8
Setting up your printer ....... ....................................................................9
Fitting the platen knob ...............................................................,.............9
Removing the front cover ...................................................................... 70
Character set #1 ..................................................................................... ?52
IBM special character set.. ................................................................... 753
Glossary
Index
Costumer service information
155
167
171
Pageviii
Page 9
Chapter 1
Introduction
‘ Thank you for buying a STAR NX-2480 Rainbow/Colour
printer. We are confident that it will provide you with
years of reliable, high-quality printing. We think we have
made the NX-2480 Rainbow/Colourone of the fastest,
quietest, and easiest to use dot matrix printers ever. We
hope you agree with us.
Features
colon
You only need to add a color ribbon cartridge
to print vibrant, full-color documents. You
can choose from up to 256 colors, depending
on your computer software.
Fast:
Easy to use:
The NX-2480 Rainbow/Colour speeds
through drafts at 330 characters per second
(15 pitch). When printing in its 360 dpi letterquality mode (that’s more dots per inch than
some laser printers!), it turns out beautifullyfinished work at up to 100 characters per
second.
With clearly labeled buttons, an informative
LCD screen, and easy paper loading, the NX2480 Rainbow/Colour can be used by any-
one, even without previous computer or
printer experience.
With the NX-2480 Rainbow/Colour’s Electronic DIP Switch feature, you can change the
printer’s default power-on settings from the
front panel.
Page1
Page 10
LCfl screen: You can see your printer’s settings at a glance
by looking at the informative LCD screen. It
shows what font you are using, how big it is
(the font pitch) and other useful information
(this feature does not apply when you use the
printer with Windows 3.1 or later).
Fonts:~ÓZ•˜Ḋ•The NX-2480 Rainbow/Colour is a multi-font
printer, which means that it can print text in
a variety of different type styles (fonts)—10 in
all.
These include:
Draft
Roman
SanSerifCourier
PrestigeSwp-t
Orator-2
SLQ Roman
Graphics:
Zooming:
ORATOR
H-Got h i c
You can print these fonts in different styles,
such as emphasized, bold, shadow, and out-
line, as well as being able to change the size
of the font.
The advanced 24.-pinprint head can print up
to 360 dots per inch (and in color too!) making it an ideal printer for graphics programs,
and for programs running under Windows
3.1 and later.
You can print documentsat 50?Z0or 67?40of
their actual size. As a result, you need only
use a single sheet of paper to print large doc-
uments,such as spreadsheets.
Paper types:You can print on a wide variety of different
paper types and sizes; from fanfold computer
paper, to single sheets and stationery,to
multi-partforms. Even when fanfold paper is
loaded, the NX-2480 Rainbow/Colourallows
Page2
Page 11
you to print on single sheets, saving you time
and effort. A tear-off function allows you to
tear off single printed fanfold paper sheets
from the printer without wasting paper. You
can feed fanfold paper from either the rear or
the bottom of the printer.
hoptional automatic sheet feeder is also
available, which holds up to 50 sheets of
paper.
Compcdiblity:By emulating the industry-standard Epson
and IBM printers, the NX-2480 Rainbow/
Colour allows you to printjust about anything your computer software can generate.
The NEC graphics command set is also sup-
ported for even better graphics compatibility.
The Automatic Emulation Change feature
means that the printer can automatically
change to the appropriate printer emulation
for the application software, depending on
the data received.
Special drivers and scalable fonts are
included to allow you to produce high-quality
printout from Windows 3.1 and later applica-
tions.
Page3
Page 12
Parts
This is what your new printer looks like. These diagrams
may be useful in the next few sections to identi~ the different parts mentioned.
front
power
Theprinter(withinterfacecableconnected)
r
pa
ad
r
The printerwith the front and rear covers removedand no interface
cable connected
Page4
ver
Page 13
Parts - an explanation
The
paper guides hold single sheets and sets their posi-
tion so that they are fed into the printer correctly.
The paper entrancesare where paper feeds into the
printer. There is one for single sheets, and two for computer (fanfold) paper—rearand bottom.
The releaselever grips single sheets as they are fed in.
The lever should be pushed towards the back of the
printer to hold
(pulled forward) when fanfold paper is in use.
The
platen knob lets you feed paper through the printer
single sheets properly, and released
manually. Usually, though, you will find that the
[PAPERFEED] button (see “Feeding paper through the
printer” on page 34) is the most efficient way of doing
this.
The front cover protects internal componentsand
reduces printing noise.
The mute cover further reduces printing noise.
The display screenshows informationabout the prin-
ter’scurrent setting.
The controlpanel has buttons to control the printer.
The power switchturns the printer on and off.
The interfaceconnectoraccepts the cable connector
that links the printer to the host computer.
The print head transfersthe image to the paper.
The ribbon cartridgecontains the ribbon which the
head uses to mark the paper.
The paper thicknessadjustmentlever lets you adjust
the position of the print head for different paper thicknesses and for multi-partforms.
The roller unit helps to grip paper and pull it through
the printer.
Page5
Page 14
The tractor unit grips the sides of fanfold computer
paper. When you use the tractor unit, the tractorcovers must be closed.
Page6
Page 15
Unpackingand
Chapter 2
settingup
Choosing a place for the printer
Before you start unpacking and setting up your printer,
make sure that you have a suitable place to put it. By a
“suitable place”, we mean:
A firm, level surface where the printer will be stable,
and vibration-free.
●
Away from any heaters.
●
Away from direct sunlight.
●
Not in an excessively humid area.
●
Somewhere that is clean, dry and dust-free. Basically, computer equipment works best in the same
kind of temperature and humidity as you do.
●
Allow 6“ (15cm) of free space either side of the
printer and adequate space for paper behind the
printer, if you want to use fanfold (computer) paper.
●
If you want to use the bottom feed for fanfold (computer) paper, you should locate the pile of paper at
least one page length (about 12” (30cm)) below the
printer.
●
Make sure the printer is connected to a steady
power supply. It should not be on the same electric
circuit as appliances like copiers or refrigerators
that cause power spikes and surges.
●
Use a power supply of the correct voltage as specified cmthe printer’s identification plate.
Page7
Page 16
I
Unpacking the printer
As you unpack the printer from the box, make sure that
you have all the following items:
3 Ribbon cartrid~e\\//
2 Printer driver
and fontdisk~~~
1 Printer‘
\\\\\?
//h
Ifany of these are missing, please contact your supplier.
Optional accessories that you may have purchased are:
●
Serial-Parallel converter (SPC-8K)
●
Automatic sheet feeder (SF-IODVVl
For details of how to install these optional accessories,
see Chapter 5.
You will also need a cable to connect the printer to your
computer (available separately). For IBM or IBM-com-
patible computers, this will generally be a parallel cable,
with a 25-pin ‘D’ connector at one end and a 36-pin
Amphenol-type (Centronics) connector at the other end
(a “Centronics” printer cable). This cable should be no
longer than about 6’ (2m).
Page8
Page 17
If your computer has no parallel port available, you will
need to use the Serial-Parallel converter (SPC-8K) and a
cable to connect your computer to the printer. See “The
SPC-8K serial/parallel converter” on page 67 for full
details.
Setting up your printer
Remove the printer and all supplied parts from the
packing material. Put the printer on the place you have
prepared for it. Save the packing material and carton in
case you need to move the printer in the future.
Fitting the platen knob
This knob is packed into a recess of the packaging mate-
rial in the printer box.
To fit the knob, rotate the knob on the shaft (lining up
the flattened side of the shaft with the flattened part of
the hole on the knob). After you have lined up these flattened sides, push the knob firmly onto the shaft.
Page9
Page 18
Removing the front cover
You will need to remove the front cover (the smoked
plastic cover on the top of the printer) to install and
change ribbon cartridges. Lift the cover from the rear
using the grips on the sides, then lift up to remove the
cover from the body of the printer.
Installing the ribbon cartridge
You have the choice of using a color or
a black ribbon
with the NX-2480 Rainbow/Colour. Both ribbons are
installed and removed in the same way.
●
Take the slack out of the ribbon by turning the knob
on the ribbon cartridge clockwise (as shown by the
arrow).
Page10
Page 19
Place the cartridge on the cartridge carrier inside
the printer. Make sure that the ribbon is between
the print head and the print head shield. Press the
cartridge so that it “clicks” into place. If the cartridge does not “click” into position on both sides,
you may need to turn the cartridge knob about 1/4
of a turn clockwise.
●
Once the cartridge is in the carrier, tighten the ribbon again by turning the cartridge knob clockwise
(about 1/2 a turn). Check once more to make sure
that the ribbon is between the print head and print
head shield (ifit isn’t, take the cartridge out, and try
again).
Page11
Page 20
I
Removing the ribbon cartridge
●
To remove the ribbon cartridge, press the cartridge
grips inward and lift the cartridge upward out of the
printer.
Installing the roller unit
● .
Open the rear cover by pushing the cover grips
backward and upward.
●
Pick up the roller unit so that the small illustration
is on top of the roller unit, and the smoked plastic
side (with six small black rollers) is facing you.
●
Page12
Hold the roller unit so that the top is tilted slightly
away from you. Slide the hooks on either side of the
back of the roller unit over the platen (the large
black roller) and under the silver bar behind and
above the platen. The hooks should both be between
the metal plates at either end of the silver bar.
Page 21
●
Push the front of the roller unit down firmly, so that
the unit “clicks” into place. If it does not fit properly,
remove it and try again.
Removing the roller unit
●
Pull both gray locking tabs towards you and lift the
front of the roller unit slightly to remove the roller
unit. Pull the roller unit out of the printer towards
you.
Replacing the front cover
Once you have fitted the ribbon and roller unit, you
should replace the front cover.
Note:
●
Even though you can operate the printer with the front cover
removed, we do not suggest that you do this. The printer will
be noisy and it is also possible to drop things into the printer,
which may damage the mechanism.
Hold the cover by the grips, so that the grips are on
the side of the cover furthest from you. Tilt the top
of the cover towards you a little.
●
Insert the tabs into the slots in the case.
●
Lower the rear of the cover into position.
Page13
Page 22
I
Installing the paper guide
You can set the paper guide on the NX-2480 Rainbow/
Colour in one of two positions: horizontal for fanfold
paper and vertical for single sheets.
●
Hold the paper guide, either horizontally, or vertically, depending on the type of paper used.
●
Fit the tabs into the slots on the printer body to
install the paper guide.
●
Make sure the guide is firmly in position.
Installing the mute cover
The mute cover helps reduce the noise from your printer
when you are printing.
Page14
Page 23
●
Hold the mute cover upright so that the ridges on
the cover are towards you and at the top.
●
Slide the left tab on the mute cover into the left hole
on the front cover.
●
Drop the right tab on the mute cover into the right
slot on the front cover. Close the mute cover by
swinging it down.
Connecting the printer to the computer
We assume here that you are connecting the printer to
an IBM or IBM-compatible computer, using the parallel
interface, If you are connecting using a serial interface,
or connecting to any other type of computer, read Chapter 5.
Note:Before connecting or disconnecting the printer and the com-
puter, make sure that the power to both the printer and the
computer is turned OFF. If the power is on when you make or
break these connections, there is a risk that you will damage
the circuitry of the computer and/or the printer. Repairs can
be expensive!
Page15
Page 24
●
Press the cable plug into the printer socket:
●
Clip the cable into the socket using the wire clips on
either side of the socket.
●
●
Page16
Connect the ‘D’ connector on the other end of the
cable to the parallel (printer) port onyour computer.
This will probably be labelled
PRN, LPT1 or something similar. Refer to your com-
Printer,Parallel,
puter’s instruction manual for details of how to
secure the cable.
Now you can turn on your printer and computer.
Page 25
I
Setting up your printer with your computer
In this section, you will learn to setup your printer wtth
two different computer environments: MS-DOS or
Microsoft Windows 3.1 (or a later version of Windows). If
your computer uses a different operating system, you
should refer to Chapter 5 for details of setting up your
. printer. Refer to your computer operating system manu-
als for details of configuring the operating system.
Setting up with MS-DOS
Every program that you use with MS-DOS must be
“told” separately what printer is connected to your computer. This is usually done in an INSTALL or SETUP program or menu option within your application software
(word-processor, spreadsheet, or whatever).
Look for an option called “Add printer”, “Install printer”
or “Configure printer” in your application software. If
you can’t find this option easily, read your software
manual to find out how to do it.
MS-DOS
MS-DOS needs no specific commands to make it work.
To test that the printer is connected properly to the
computer, try entering the following command from the
C> prompt:
PRINT \AuTOExEc.BAT (~]
If the computer answers with:
Name of list device [PRN]:
hit [~]again. The printer should then print the
contents of the file AUTOEXEC.BAT. If the file
AUTOEXEC.BAT
sage on your computer. Most MS-DOS computers do
have a file called AUTOEXEC.BAT,however.
MS-DOS application software
The NX-2480 Rainbow/Colour can emulate (pretend to
be) a member of one of two printer families: Epson or
does not exist, you will get an error mes-
Page17
Page 26
I
IBM. When you open the box containing your NX-2480
Rainbow/Colour, the printer is set to Epson emulation.
This is commonly supported by most software. If your
software package gives you a list of printers to choose
from, choose one printer from the following list (inorder
of preference):
Star NX-2480 Rainbow/Colour
IStarNX-2420Ranbow/ColourI
The shaded printers are not color printers, so if you
select one, you will not be able to print in color.
If none of the printers above is listed, choose one of the
following, in order of preference:
These two printers are not color printers, so if you select
either, you will not be able to print in color.
Note:The printers in shaded boxes do not support color. If you
select them, all output will be in black only, regardless of the
ribbon installed or the software settings.
If you select either of these IBM Proprinter models, you
may need to change your printer emulation.The Auto
Emulation feature (page 56) of the NX-2480 Rainbow/
Colour should take care of this for you. See “Al- Emulation” on page 56 on how to change the emulation if you
have trouble with your printer.
Page18
Page 27
If your software doesn’t list printer names, but asks you
questions about your printer, you should answer “Yes”
to the following two questions:
●
“Can your printer perform a backspace?”
●
“Can your printer do a hardware form feed?”
The answers to any other questions are not so impor-
tant. Answer these using the default settings in the
software.
When you’ve set up your software, try a few test prints,
using features like bold, italic, etc. to see how it works. If
you find you have problems making your software work
with your hardware, the best source of help is usually
your software supplier.
Setting up the printer in Windows
The-NX-2480 Rainbow/Colour is ideally suited for use
with computers running Microsoft Windows system software. It works best with Windows version 3.1 or later. If
you are running an earlier version of Windows, we rec-
ommend you upgrade your computer to the latest ver-
sion. In particular, this will allow you to use the 15
TrueType fonts included on the floppy disk packaged
with this printer.~~
To use the printer with Windows, you need to install a
file known as the printer driver file onto your computer.
This file is supplied on the floppy disk packaged with the
printer.
The following description assumes that you are using a
mouse. (Click and double-click refer to the action of
using the mouse to point at an item with the on-screen
pointer, and then pressing the left mouse button either
once, or twice in quick succession.)
If you are not using a mouse, you can still carry out the
installation. Refer to the Microsoft Windows User’s Guide
to find out how to use the keyboard instead of a mouse
to operate Windows.
Page19
Page 28
To install the printer driver under Windows 3.1, do the
following:
●
Turn on the printer and start up your computer.
●
If Windows does not start up automatically, type
WIN and then press [~]or [~].
●
Double-click the
Control PaneZicon in the Main win-
dow.
●
Double-click the Printers icon
●
If you have never previously installed a printer on
your system under Windows, a list of supported
printers is displayed. (If you have already installed
one or more printers, select the Add button to display the list of supported printers.)
●
Click on InstaZZ
Unlistedor Updated Printer in the
list, so that this option is highlighted.
●
Click InstaZL
A window prompts you to put in the
floppy disk supplied with the printer.
●
Insert the disk with the printer driver file on it and
click OK.A new list of printers appears.
(If you have inserted the disk into a drive other than
drive A, you must type in the drive letter followed by
a colon and a backslash, e.g. “B:\”before selecting
OK.)
●
Select NX-2480
Rainbow/Colourfrom the new list
of printers.
●
Click
including the NX-2480 Rainbow/Colour.
●
Click on Set As Default Printer.
●
Click on Close to return to the ControZPanel window.
For instructions on how to configure the printer, see the
section of the Microsoft Windows User’s Guide called
Control Panel.
Page20
OK. The list of installed printers appears,
Page 29
If you cannot print from your applications programs
after installing the driver, refer to the section “InWin-
dows” on page 89.
Note:Unless the user chooses a different printer from within the
application, Windows applications always print to the currently selected default printer.
Installing TrueType fonts (for Windows)
To install the TrueType fonts that are on the floppy disk
accompanying this printer, follow the procedure below.
●
Double click the Contro[PaneZin Windows.
●
Double click on Fonts. The Fonts dialog box appears.
●
Click Add. The Add Fonts dialog box appears.
●
Insert the disk in your computer’s floppy disk drive.
●
Select the drive by letter (this is usually “A:”, sometimes “B:”). The names of the fonts stored on the
disk are displayed in the List of Fonts window. Each
font name is followed by the word “TrueType”
●
Select the fonts you wish to install. If you want to
install all of them, click SelectAZZ.
●
Click OK.The Fonts dialog box reappears and installation is carried out. The names of the newly
installed fonts are automatically added to the
Installed Fonts list.
●
Withinyour applicationprogram, selectPrinter Setup
from the application’sFilemenu, and reselectthe
printer.The applicationcan now displaytexton-screen
and printtext on your printerusing the new fonts.
Note:The TrueType fonts that are supplied can only be used on IBM
PC compatible computers running Windows 3.1 or higher.
Page21
Page 30
Selecting different fonts
If you are running applications software under
Windows, you will select fonts from within your application (refer to your application’s manual for details].
Your application software manual will tell you the various ways in which you can type-set your text on-screen
so that it is ready to print out on the printer.
Your Windows system already includes several fonts,
such as Arial, Times New Roman and Symbol. You can
also use the 15True~pefonts included with the
printer. If you have installed Adobe Type Manager software on your computer, you can also display and print
Adobe PostScript fonts.
Page22
Page 31
Chapter 3
Using your printer
Loading paper
The NX-2480 Rainbow/Colour can print on a variety of
paper types, as explained below:
Cut sheet paper
The NX-2480 Rainbow/Colour can use single sheets of
paper (cut sheets) or letterheaded stationery. Use the frictionfeed or the optional SF-10DWautomatic sheet feeder.
Fanfold paper
It can also accept fanfold (continuous) computer stationery. Fanfold stationery has the sheets joined together,
with perforations between sheets, and holes (“sprocket
holes”) along each edge to help the printer grip the
paper. You should not print too close to the sprocket
holes. Otherwise, you run the risk ofjamming the paper
in the printer.
Multi-partforms
You can print continuous multi-part forms which are
either carbon backed or pressure-sensitive carbonless
(NCR), with up to five copies (including the top copy). If
you use multi-part forms, we suggest that you feed them
through the bottom paper feed slot, as this will help to
prevent premature separation of the forms. There
should be a difference in thickness of not more than
0.05mm between the side edges.
Note:
If you use multi-part sets, set up the Multi-Part setting using
the Electronic DIP switches as described in “B5 and B6 - Multipart mode” on page 58.
Page23
Page 32
Where you can print on each kind of paper
Fanfold forms
5 1>,,,,
Ix 111111
Single sheets
5,11111
k!!!!!!
If you print outside these limits, you run the risk of
damaging the printer mechanism (and tearing the paper
orjamming it as it goes through the printer).
Adjusting the print gap
Note:
Important. If you do not adjust the print gap properly, you run
the risk of shortening the life of the print head.
Different paper thicknesses need a different gap
between the print head and the paper. The NX-2480
Rainbow/Colour allows you to make six different settings, using the adjustment lever at the left of the
printer. If you push this lever towards the back of the
Page24
Page 33
printer, the gap is narrowed (thin paper), and if you pull
it towards the front. the ~a~ is widened [thick DaDer).
As you move the lever, you can feel it click between the
six different positions. Position number 2 (starting from
the rearmost position) is the one you will generally use
for single sheets of paper (fanfold or cut sheet). Here is a
table for the adjustment lever when you use multi-part
sets.
PaperWeight of each
type
Single
2-part11 to 14 Ibs (40 to 52 gsm)
3-part11 to 14 Ibs (40 to 52 gsm)
4-part11 to 14 Ibs (40 to 52 gsm)
5-part
Note:if you use multi-part sets, setup the Multi-Part setting using
14 to 24 Ibs (52 to 90 gsm)0.07
11 to 14 Ibs (40 to 52 gsm)0.30 to 0.35
the Electronic DIP switches as described in “B5 and B6 - Multipart mode” on page 58.
sheet
Thickness
(total in mm)
,
012 to 014
0.18 to 0.21
0.24 to 0.284 or 5
to 012
Recommended
;;:e;e::::;;
2 or 3
2 or 3
3 or 4
5 or 6
Page25
Page 34
Loading cut sheet paper
This procedure shows you how to load cut sheet paper
using the paper guide. If you are using the SF-10DW
automatic sheet feeder, please refer to “Using the SF-
10DW’”on page 65.
.This is how cut sheet paper is fed through the printer:
.Make sure that the paper guide is in the vertical posi-
tion. See “Installing the paper guide” on page 14.
.If no fanfold paper has been loaded, and no cut sheet
paper has been loaded, the display will show “PF’
alternating with the character pitch when the printer
is turned on. The printer will also beep.
● Make sure that the release lever is at the back posi-
tion ( “+).
. Adjust the left and right paper guides to the position
you want. Allow the paper to feed through the guides
smoothly, but without allowing it to move from side to
side while feeding through. A gap of less than a milli-
meter (0.04”) is ideal.
s Place a sheet of paper in the guides (upside down,
and printing side towards the rear of the printer), and
gently push it down between the guides until you feel
it stop.
Page26
Page 35
●
Press the [SET/EJECT]button. This should make the
printer feed the paper round the platen until it is in a
position suitable for printing. The ON LINE indicator
should come on. If this does not happen, you have
probably not loaded the paper correctly. Take the
sheet out and try loading it again.
●
If the paper is at the wrong place to start printing (for
instance, if the address printed on the top of your letterhead takes up a lot of space), put the printer not-
ready mode (press the [~]button) and use the
micro-feed function, as described in Chapter 4.
●
You can now start printing.
Loading and parking fanfold paper
You can use fanfold paper up to 25cm (10”) wide with
this printer. You can feed this paper from the bottom or
the rear of the printer.
These are the ways inwhich fanfold paper is fed through
the printer:
I
Page27
Page 36
Loading paper from the rear of the printer
Always load fanfold paper with the printer’s power
turned OFF.
●
Place the stack of fanfold paper behind and below the
printer.
●
Pull the release lever at the right of the printer
towards
platen and allows it to feed through the tractor rollers.
●
Open the mute cover and the rear cover
●
Grip the gray tractor position locking levers on both
sides of the tractor unit and rotate the tractor unit as
far as it will go (about 20 degrees) so that the top is
tilted slightly towards you:
YOU( p“ ). This releases the paper from the
●
Open the tractor pin covers and align the holes in the
fanfold paper with the pins on the tractor unit. You
will probably need to slide the tractor pin units left
and right to align the paper properly. Use the gray
locking levers on each tractor pin unit to allow the
unit to slide left and right along the rail. Remember to
Page28
Page 37
lock each tractor pin unit in place again when you
have finished moving it.
.Close the pin unit covers after you have made sure
that the paper holes are properly lined up with the
tractor pins. If the holes and pins are not correctly
lined up, you may find that the paper tears andjams.
Note:If the paper is too tightly stretched or too loose between the
pin holders, the paper will tear or jam as it is fed through the
printer. You may need to experiment to find the ideal tension.
.Close the rear and mute covers, and insert the paper
guide in the horizontal position. See “Installing the
paper guide” on page 14.
● When you turn on the printer (using the switch at the
front), the display wiil show “PF’ alternating with the
character pitch. The printer will also beep.
.Press the
printer. The printer will go into
●If you want to adjust the paper position, put the
printer into
ISETIEJECT]button to load the paper into the
ready mode.
not-readymode (use the [~]button)
and use the micro-feed function (described in Chapter 4).
Page29
Page 38
Loading paper from the bottom of the printer
Always load fanfold paper into the printer with the print-
er’s power turned OFF.
● Remove the front cover and the roller unit. See
“Removing the front cover” on page 10and “Removing
the roller unit” on page 13for details.
“ Grip the gray tractor position locking levers on both
sides of the tractor unit. Rotate the front of the tractor unit upward so that the top is horizontal.
.With a stack of fanfold paper below the printer, feed
the top sheet of the stack through the feed slot at the
bottom of the printer and pass it over the platen.
●Open the tractor pin covers and align the holes in the
fanfold paper with the pins on the tractor unit. You
will probably need to slide the tractor pin units left
and right to align the paper properly. Use the gray
locking levers on each tractor pin unit to allow the
unit to slide left and right along the rail. Remember to
lock each tractor pin unit in place again when you
have finished moving it.
●Close the pin unit covers after you have made sure
that the paper holes are properly lined up with the
Page30
Page 39
tractor pins. If the holes and pins are not correctly
lined up, you may find that the paper tears and jams.
Note:
s
If the paper is too tightly stretched or too loose between the
pin holders, the paper will tear or jam as it is fed through the
printer. You may need to experiment to find the ideal tension.
Replace the roller unit (see “Installing the roller unit”
on page 12).
●
Replace all the covers that you have removed.
●
Turn on the printer.
●
Put the printer into
button) and use the
not-readymode (use the [~]
[PAPERFEED] button to advance
the paper so that the print head isjust below a perforation. Put the printer into
Parking paper
ready mode again.
Paper parking allows you to print single cut sheets even
when fanfold paper is loaded. The fanfold paper is temporarily “parked” out of the way while the cut sheet is
fed through the printer.
Note:
You can only use the paper parking function when fanfold
paper is loaded from the rear. You cannot use it when you are
feeding fanfold paper from the bottom slot.
●
The power should be ,ON. The release leaver should be
pulled forward [ ~ ) and the fanfold paper loaded.
●
Put the printer into
not-readymode (use the (~]
button).
9
Tear off the last page of the fanfold paper. If the paper
is not in a suitable position to be torn off, use the
[PAPERFEED) button to feed the paper forwards to a
suitable position.
Page31
Page 40
I
c Press the (sET/EJEcTjbutton. The printer will feed the
fanfold paper back until it is out of the way.
● Move the release lever to the back ( ~ ) position.
●Place the paper guide in the upright position.
Load single sheets as described in “Loading cut sheet
paper” on page 26.
Unparking the paper
When you have finished printing on cut sheet paper and
you want to start printing again on fanfold paper, here’s
how you do it:
●
Remove any cut sheets which may still be in the
printer.
●
Place the paper guide in the horizontal position.
●
Move the release lever to the front ( N ) position. The
printer will beep if you move the lever while paper is
still loaded ready for printing.
●
Press the
[SET/EJECT]button. The parked fanfold paper
will be fed into the correct position ready for printing
again.
Page32
Page 41
Using the control
Chapter 4
panel
The NX-2480 Rainbow/Colour control panel has five
buttons, which have white labels above them to indicate
their primary functions. Other functions are available as
alternative functions (labelled in brown) or by pressing
combinations of buttons (labelled in yellow).
MICRO FEED
.—-—
SETEJECTQUIET
FONTPITCH
ALTMACROCOLORZOOMCLEAR
PARK
PAPER FEED
There are two indicators: the POWER indicator shows
that power is supplied to the printer.When steadily lit, it
means that paper is correctly positioned for printing.
When flashing, it means that paper is not correctly positioned for printing.
1
ON LINE
Ready and not-ready modes
When the ON LINE indicator is lit, it means that the
printer is ready to accept data to be printed from the
computer. If it is not lit, the printer is in
not-ready
mode, and it will not be able to accept data from the
computer. You can usually only make changes to the
printer’s settings using the front panel when this indicator is not lit. You set the printer ready and not-ready
with the (~)button.
Pausing printing
You can make the printer not-readyif you want to
pause in the middle of a printing job. Printing will
Page33
Page 42
restart from the point where it left off when you make
the printer
ready again.
Feeding paper through the printer
There are a number of ways inwhich you can feed paper
through the printer.
One line or several lines at a time
Make the printer not-readyby pressingthe (~]
button, and press the
[PAPERFEED] button. This will feed
the paper forward one line. If you continue to hold down
the [PAPERFEED] button, the printer will continue to feed
the paper one line at a time.
Make the printer
A
page at a time
ready again to continue printing.
‘T~is will either eject a cut sheet or feed fanfold paper to
the top of the next sheet. To determine where the top of
a sheet should be, see “Setting the top of a form” on
page 35.
●
If you want to feed a page of paper through the
printer. make the printer
down the
[PAPERFEED] button.
While holding down the
not-ready.Press and hold
[PAPERFEED] button, press the
mbutton.
Release both buttons at the same time. The paper will
feed through.
Individual form tear-off
You can tear off individual sheets (for instance, sales
invoices) from fanfold paper.
● While the printer is in ready mode, press and hold
down the [~]button.
●Press the [PAPERFEED] button. The paper will move
- forward about 2 inches (50mm), so that you can tear
off the sheet.
Page34
Page 43
● When you press the [~]button again, the paper
will move back to its original position.
Loading paper
For the most part. paper loading is described in Chapter
3. However, one important point to note is that if paper
has not been loaded, the printer will indicate that it is
not-ready.Pressing the [SET/EJECT]button will start
loading paper, and automatically enter the
Micro-feedingpaper (backwards and forwards)
It is often useful to be able to feed the paper backwards
or forwards in the printer by very small amounts. For
example, to get the correct printing position on preprinted stationery.
ready mode.
.Put the printer in
not-readymode.
c Press and hold down the [~)button.
. While holding down the [~]button, press the
[PAPERFEED] button to advance the paper in a series of
small steps.
. While holding down the (~]button, press the
[SET/EJECT]button to move the paper backwards in a
series of small steps.
.Release both buttons (the [~]and the
[PAPERFEED] or [SET/EJECT]buttons) when the paper
reaches the place you want.
.Put the printer back into
ready mode.
Setting the top of a form
Very often, when feeding fanfold paper through a page at
a time (see “A page at a time” on page 34), the printer’s
top of a page does not correspond with the actual top of
a page. This is how you “tell” the printer about the top of
a page:
.Put the printer in
not-readymode.
Page35
Page 44
●Set the paper position to the top of a page (where you
want the printing to start on each page) using the
micro-feed functions(page 35).
.Press and hold down the (~]button.
● While holding down the (15iTEF@button, press the
mbutton.
.Release both buttons. The display will show “--”,
which means that the top of the form has been set.
.Put the printer back into ready mode.
Note:The printer now “knows” the top of a page, but it doesn’t
know the exact page unless you tell it, which means that
when you do a page feed, the printer will not necessarily
move to the correct position on the next page. You must set
the page length using the Electronic DIP Switch mode
described on page 53.
Changing the autoloading position
When you load cut sheet paper, the printer automatically loads the paper so that printing starts one line
from the top of the paper, unless you tell it otherwise.
This is how you tell it otherwise (for example, if you’re
printing a lot of letters on letterhead paper):
c With the printer in
paper using the
not-readymode, load cut sheet
[SET/EJECT]button.
“ Use the micro-feed functions (page 35) to alter the
print position. Notice that a number will appear in
the LCD window. This means you can remember that,
for instance, “we should print starting from 67 steps
down on headed invoices”. If the value goes over 99
steps, the display changes from “99”to “--”.
● Set the printer back in ready mode.
● All cut sheet paper loaded from now on will be loaded
so that printing starts at.this position, until you
Page36
Page 45
change the position again using this procedure, or
until the power to the printer is turned off.
●Ifyou want to save this value for future use (after the
printer has been turned off and on again), you must
save it as a macro. See “Saving Macros” on page 42.
Note:
This function will only work if you use it immediatelyafier you
have loaded paper as described above. If paper has already
been fed into the printer, this function will not work.
Eject and park
If paper has already been loaded, and the printer is not-
ready, the (SET/EJECT]button has two different functions,
depending on the setting of the release lever.
“ If the release lever is set to the back position for cut
sheet paper ( > ), pressing the
[SET/EJECT]button will
eject the sheet.
.If the release lever is set to the forward position for
fanfold paper ( ,1$), pressing the
[SET/EJECT]button will
park the fanfold paper to allow you to print on cut
sheets. See “Parking paper” on page 31.
Note:
If you are feeding fanfold paper through the bottom slot of the
printer, this button will have no effect.
Quiet printing
Even though the NX-2480 Rainbow/Colour is a quiet
printer, it also has a “quiet” mode, which allows it to
print at a reduced noise level. Setting the quiet mode
requires that the printer is in
ready mode. This is an
exception to the general rule that settings are made
when the printer is in not-readymode.
Page37
Page 46
I
● Press the [PAPERFEED] button. The printer will beep
once and ~will appear on the display.
. To cancel quiet mode, the printer must be in the
ready mode. Press the [PAPERFEED) button. The
printer will beep twice and ~will disappear from
the display.
Changing the way your printout looks
The following section describes how you can change the
look of the printout from your printer.
Selecting the different fonts
The NX-2480 Rainbow/Colour has a range of different
fonts, which can be selected using the front panel controls. The display highlights the currently-selected font
by enclosing the font name with lines:
ThePrestigefont
has been selected
\=:::’:%3:70
Set the printer to not-ready.
●
●Press the [~]button. The printer will highlight the
SLQ DRAFT SCJ!,LIJZ
Roman
:=i?st”i~]OPTION
ORATOR
PITCH
font names in the display in the following order:
Font name
Draft
Roman~
Sans-serif
Courier
Prestige
Scrpt
Orator
Orator-2
Display highlights
B
Roman
Sanserif~
~
Courier~
~
Prestige/
~
/SWLLpt
10RATOR
Oratar-2 j
~
I
[
Page38
Page 47
Font name
H-Gotblc
ISuperLetTerOualityRomanI
Display highlights
]
H-Gothic ~
~
+~Roman
1
I
. When you have highlighted the font you want to use,
press [-]again to make the printer in
ready
mode again.
Changing the pitch of the font
The font “pitch” means “how many characters can be
printed in one inch”. 10-pitch, for instance, means “10
characters can be printed in one inch across the page.”
There are two special modes on the NX-2480 Rainbow/
Colour: Proportional and Condensed proportional. In
these modes, you cannot say exactly how many characters will fit into one inch, because each character takes
up a different amount of space. The opposite of “proportional” is “fixed-pitch” or “monospaced”. Look at these
two examples:
Proportional
MMMMMMMMMM
1111111111
NMMMNMMMMM
1111111111
Fixed-pitch
Even though there are 10characters in each line, the
“M”Sin the proportional column take up more space
overall than the “1”s.The space between letters is proportional to the letter itself.
However, in the fixed-pitch column, although each “M”
also takes up more space than each “I”, the space
between letters is fixed, no matter what the letter, so
that a row of 10 “1”stakes up the same amount of space
as 10 “M”s.
Page39
Page 48
I
text
Usually, it is easier to read proportional
which is fixed–pitch.However, if you are trying
line up columns of figures, fixed-pitch has definite
advantages.
To change the pitch:
than text
to
.Put the printer into the
● When you press the [Fii7%i)button,the pitch will
not-readymode.
change in the following way:
Pitch
Pica (1Ocpi)
Elite (12 cpi)12
Semi-condensed (15 cpi)
Condensed pica (17 cpi)17
Condensed elite (20 cpi)l?a
Super-condensed (24 cpi)’l?v
Proportional
Condensed proportionalPE
*.
Only available in IBM emulation mode
.Make the printer ready again.
Display
/0
15
P5
Changing the zoom size
The zoom feature allows you to print at 100Yo(full-size),
67v0(two-thirds size) or 50Y0(half-size) of the
nOrmal
size. The “normal size” is the size that the computer
Oycnsba l
fcaa crctee
lsOtpwa
pa lfetra c
ra rysonsa
crtea l
syodwsn
bymnstsO
.tlyoabpt
oaysstsO
A- Asf
yhitoasf
(1ysttsOO
wslO
9Gd
Wyapgycpb
t(arfs(
php
wp
gp(mtt
flrtl
apfla
P5
Page 66
Ta lmatbp
ibfmpypftb
dpae
B - P
WOtptniip
sptbetpa
tswfa nstsO
tpiisawcp
etppo
B - T
ystsOtayut
ftf(3yts
Otfd
B - R
Ltso
B aB - Mm
Wumftats
ycmdtnsy
afttpot
Nm(s
Mu1 (t 3 s
Mu2 (t 5 s
P5
Mm
BB
O
O
O
O
O
O
Page 67
C aC - Pm
Yctdpafswt
s
Pm
1 c d
1 c d
1 c LOO
N
Apafsyhs
wb ei yctss
4
II
11
OO
OO
C tC - Pl
yaulp1lfp
la tsOYssts
ffdsp
PL
7i(U eOOO
8 IOOO
8 i(U l
CCC
O
OO
C
i a m(
1i(e
1 i(lOO
1i(iA
1 iOO
1 i(l
O
OO
OO
D - Ct
eemt
cuotc
NR
tTct
OO
O
O
O
O
P5
Page 68
I
wyswtsdte
tstt(Ep5
Wtps(es
tC1stICS(
ibtWOtssi
ct
WtpIest
ssICs(
gciac
(e“
matss“a“S
ttsOsa ss
cfuycos7
dtpynswtm
ypwnuts
DtD - cct
Atspdf
dte(E
p5atcts(– C
ttp5Utspa c
actwctcy
n
“a“wcm
a m
eS(e(O
wtIcss1 Ot
sstfcp(
t
Cp
#
#MuI OI/ONI
#
#
#N
P6
U
PoOO
I
CF
D
1
II\ ONI
O
I
I OFFION
D
I
O
I
I
O
O
I OFFI
I OFFI
D
I
Page 69
tfmoS(e
(OwtIcssI O
tsstf
C
UOOO
F
GO
E
DI
SOOO
IOOO
SIOOO
D
O
O
O
D
OO
OO
OO
OO
D
D -c
WtsOwtpff
pptptphmt
ctpTwipqO
oftfwymstp
lwwtalef
p(5
WtsOtphdnm
wfpbf
E tE - LFs
Tsaystdfu
wysm
Fn
RO
S
COOO
P
EE
O
OOO
O
OOOO
E
O
O
O
O
E
O
O
O
P6
Page 70
FnEE
SOOOOO
OOOOOO
OOOOOO
EE
E
H-
SRO
O
O
O
O
O
O
O
O
O
F - EDss
ystsOa ssws
fs(efA
P6
Page 71
C5
Aa
TNRChtoa
safitS1As
fatSSc
TS
TSaylcspw
wafosa tf
p
U
Mstyhtfwyu
tS1
c Sf
●Ha
●Sa
.Pc
● S1Um
P6
Page 72
atimcys
TS1ppmat
wsftfMsty
rapmatbys
utS1
ItS1W
UtEfstAs
f“Sts“t
EDsp5e“–
Asfp5
OartfctpL
tcftrutgts
Lrtcftbt
p(p1
Rtru(p1
TtS1fsapi
pbtppr(
LtbtS1aat
hs(
P6
Page 73
.Msttmbbs
tS1apmtp
thbpmycut
pkttertS
1
●ItpcswtS.
.IthattS
hss
.Ftsaitfg
tftsfYmns
tsaa lfi
.Ktpfcmcru
apgtfpfu
UtSW
yhalfppt
.
p(3
P6
Page 74
.Ptprltbp( ‘
●
PtS1pllfp
thf
. Atlpgtpw
ywtletp
. Tasp(w
ftastobpt
itS1dtyst
sTstsfst
ajtafttfi
tp
P6
Page 75
●
ItpitS1na
fsitftspd
nfeitfrssa
ta
●
Atrpgatp
ttfswa
mfssA glta m
(i
Ptpllttrt
p
. YanrspwtS
Asf
TSsc
TSsctss
fycactps
nwcutp
TShobeDsw
msbyctSt
pac
P6
Page 76
TsctwwtS
etdcfycaw
rdycwnY
mamsycspm
tsymtS
Ywna scatS
(7
Br
Ym“tStbryc
psp(fcerd
fyc
Us6 t8 ftpSt
dttb
BrS6S7S8
150
3OO
6
1
2
4
9
1
OOO
O
OOO
OO
O
O
OOO
OO
O.
OO
O
O
No bia w
Ss1f8 dba sw(
wtmcsSS1
Of7u
P
A “bcaewmt
tvboeTafe
ctdtots
lUs2 a5st
P6
Page 77
Ss2 Oydwpca
sOywpc
yhss2Oymc
wyagueop
s5OtSwuopa
tsOtSwuep
s2Os5 whe
H
“ttudtw
wsd“eo
“yrfgymd
“In– wa m”
d
“– IrnMdp”
(ap
Ocddutw–
tatwwtht“
tOwctvao
tsl(DhT
owscwcp
baicdatl
tca(h
olfmcE
atomm(ctE
AcX(cD
Us3 a4sthm
(c“
I
P
D(hh
XO
E
3
I
1I
O
O
4
I
O
O
O
I
CtSc
TtpatcOut
.
ps
P6
Page 78
I
.Dtpicft
p(c
●CtpctS(
ctctppc
cMbctpci
tctScutc
ip
s Ct2‘ctS
t2ea sscS“
sctSpf
dtkcywn
“ Ctoectc
sp(lCC
NScua 9rta 2sc
nI ti tcwycywht
mo ba 2aSp7 fd
MsttmbtSr
ia tfslh
mtwpstcp
rd
Mttcspsm
tsyhmwSD
s(b
UtS
WyutSwyca
pymrtyap
ttsntppyc
p
P7
Page 79
Tootrtbm
TNRCcmw
cua pb(5wm
c(tbp4a pj
hTSaca bw
macyaha pjs
c
YctSpbptb
trtbtS
TscotS
Tfipfuy
cdnha s2s
cycdha s2
scycua “2
pc
ynutSwaoc
ywehbmyoc
yadstcbyc
psfwhew
sc
~i#S
no
1G
2TODftp
I o
F
Pcg
P7
Page 80
~i#S
I o
n
o
F
3
4RO
5C
6
7
8N
1RO
1NU
2N
R
NU
G
D
I
—
-Sg
OTt Swprt
Dt tp
As
Swci rt s
dTpdn ctp
U
Tt Swprt
r(D(
r
U
Sua Mc
yauIcr
MetABfia l
tr
ML:=:
( i tno tspe1 o 2
TlawspottC
spNitl
MC
s
baud,pari ty,data length,stopbitsrp
tCpmtDss
ttsecFe
P7
Page 81
MCO
wsCr9bwpa
dl8 ba1 sb(Mb
tcT‘itt
pwctrds
eo
Sua Wc
●
DtCPitMw
d
●
Dt
●
MstNR
st
Pi
IPl
●
C
●
Ctsp(wts
C
tcc
●
Crt
●
CCrt
●
D
●
Ctntpwts
PTPdba
Pw
CPw
pcc
●
C
●
Fes(RDBPS
B
asftpm(
yctysd
●
Crt
●
CCrt
S
aFC(sta
Pw
CPw
P7
Page 82
P7
Page 83
C6
‘NRCpsp
wapmttHt
wwfttA lcp
lacsfst
gb
A fs
Csss
swfycwys
s(Wcsf
p
tsrnctpc
stswypypf
a
NTpchvD ntaro
aottdi tcYc
ra eso cdt tpT
waitw
P7
Page 84
Cps
PcA
P
p
s nr
L
Cwtp
ccc
ita dp
c
Cwtp
sw
utpa
pad
Pc
Trj
tnsp
btpha
tphs
Tpgns
c
P7
A
Msttr
cc
iS“
trc
p1
Utal
stpgMt
la l(
sS“t
pgp2
Page 85
Pc
A
Twe
s
Twphb
sy
ap
ss
Tcs
sns
pftp
ftti
ctyau
Tic
ic
d
Cte
sS“
Ep5
Cn
Ctps
ya
ssS
“ss
sp8
—
Ctss
sS“
sss
p8
Ctp
icc
cita
dc
Pc
Yas
otc
pfsT
A
Utcp
lfs
asS
dnas“lp4
rW
P7
Page 86
Pc
A
Trlt
wp
Pj
Tpgns
c
Pc
A mr
ci
Msttl
pbya
pss
pfya
ufs
Rpft
pRpR
pap2
Ctpg
nut
alst
pgS“
tpgp2
A
Ia cr
c
A ptdn
schb
s(W
ya
p
EDS
spu
c
P7
Sa dp
dS“t
pW
p1
CtsS“
– Caz
p5
Page 87
Pc
I
A
Pj
Twls
lhbs
fya
p
Alfwc
rs
Pc
Alfwc
rns
Ctpg
nut
1
alst
pgS“
tpgp2
Ca ds
ya
TCs
wS“– A
wCp5
A
TCs
wS“– A
wCp5
Pj
Ctpgnut
alst
pgS“
tpgp2
P7
Page 88
Pc
A
Psft
wptp
Alfwc
rs
Twls
lhbs
fya
p
Pc
Tpgns
c
Atal
pS“t
ta fp3
TCs
wS“– A
wCp5
Ca“s
ya
A
Utal
atpgS
“tpg
p2
Tphd
P8
Rtpy
dfr
Page 89
The print gap is not set
correctly.
Use the adjustment lever to
set the print gap. Move the
lever to a higher (lighter)
setting. See “Adjusting the
print gap” on page 24.
The ribbon is jammed,
twisted or not set properly
between the print head and
the print head shield.
Print head shield is
damaged or missing.
P
The printer’s air vents are
I blocked or obstructed.
Make sure that the ribbon
cartridge is correctly
installed. See “Installing
the ribbon cartridge” on
page 10.
Return the printer to your
dealer for repair.
—
!
Switch off the printer and
allow it to cool down. Check
the air vents on the
underside of the printer to
see if they are clogged or
obstructed in any way.
Remove the obstruction or
clogging material if
possible.
If the problem persists,
return the printer to your
dealer for repair.
Page
Page 90
P
The front cover and mute
covers are off.
The printer is vibrating.
P
The paper guides are
positioned incorrectly.
The ribbon is jammed,
causing the print head to
jam.
Move any unrelated objects
that are touching the
printer.
Make sure that the printer
is on a level, steady
surface.
Remove the paper, adjust
the position of the paper
guides. Reload the paper.
Make sure that the ribbon
cartridge is correctly
installed. See “Installing
the ribbon cartridge” on
page 10.
Page
Page 91
Thepaper is jamming,~
causing the print head to
jam.
printer. Reload paper.
Check the print gap. If
necessary, use the
adjustment lever to set the
print gap. See “Adjusting
the print gap” on page 24.
Inappropriate margin~
settings have been selected
from your application
program.
P
The ribbon cartridge is
incorrectly installed,
causing the print head to
jam.
The paper is not loaded
properly, causing the print
head tojam.
The print gap is not set
correctly.
“Choosed-ifferentrn”argin
settings in your
application.
I
Make sure that the ribbon
cartridge is correctly
installed. See “Installing
the ribbon cartridge” on
page 10.
Remove all paper from the
~printer. Reload paper.
I
~Use the adjustment lever to
~set the print gap. See
“Adjusting the print gap”
on page 24.
Page
Page 92
interference from nearbynot too close to any devices
electrical devices or by a
low level of humidity is
affecting the printer’s
operation.
Inappropriate settings have
been selected from your
application program.
P
with electric motors, or
raise the humidity level.
.-
Choose different settings in
your application.
The wrong emulation is
selected.
The wrong character table,
code page or international
character set is selected.
..————.
Static electricity caused by
interference from nearby
electrical devices or by a
low level of humidity is
affecting the printer’s
operation.
Inappropriate settings have
been selected from your
application program.
There are wires missing
from the print head.
Page
Check the emulation
selection. See 6’Al–
Emulation” on page 56.
t
Check Electronic DIP
Switch settings. See “D2
through D4 – character
code tables” on page 60.
Make sure that the printer
1-
is not too close to any
devices with electric
motors, or raise the
humidity level.
-.
Choose different settings in
your application.
+
Return the printer to your
dealer for repair.
Page 93
P
Action
The interface cable is
incorrectly connected, or
damaged
Check that the printer
interfacecable is correctly
connected. Ifit is, trya
differentcable.
Static electricity caused by
interference from nearby
electrical devices or by a
low level of humidity is
affecting the printer’s
operation.
Dm(
The following messages do not indicate an error in the
printer, but this table provides a quick lookup to determine the meaning of messages:
Message
B
Roman
I
~Roman I -
1
Draft mode has been selected. You cannot select pro-
portional pitch
[
Roman LO font has been selected
~
Roman SLQ font has been selected
Makesure that the printer
is not too close to any
deviceswith electric
motors, or raise the
humiditylevel.
Meaning
I
~Sanserif ~
~Courier ~Courier LQ font has been selected
[/Prestige LQ font has been selected
sc@Jt
/
IORATOR
Oratar-2 ]
]
(
I
1
Sans-serif LQ font has been selected
Script LQ font has been selected
Orator LQ font has been selected
Orator-2 LQ font has been selected
Page
Page 94
Meaning
~
H-Gothic\
~
EDS
.
~
ON
m
m
Pl
P2
H-Gothic LQ font has been selected
The zoom mode has been selected. The message
below indicates the current size.
The current pitch size. The message below Indicates
the current size.
The electrorvc DIP switch mode is selected (see
page 53)
Font changes cannot be made from application programs. See “ Font lock” on page 45.
Changes to the font pitch cannot be made from application programs See “Pitch lock” on page 45.
Displayed in Electronic DIP Switch mode to show the
status of the currently-selectedswitch. See “Changing
a switch’s value” on page 54.
The quiet print mode is selected. See “Quet prntlng”
on page 37.
The front panel settings have been saved as a macro.
See “Saving Macros” on page 42.
The short test mode has been selected. See “Short
test” otI page 47
The long test mode has been selected, See “ Long
test” on page 47.
Pd
I-Id
-—
W
The print area test mode has been selected See “Print
area test mode” on page 48.
The hexadecimal test dump mode has been selected.
See “Hexadecimal dump mode” on page 49.
Top of form is being set manually with the control
panel. See “Setting the top of a form” on page 35.
The buffer has been cleared manually with the control
panel. See “Clearing the buffer” on page 43.
Dot adjustment mode has been selected. See “Adjusting the dot alignment” on page 50.
Page 95
Dm
The following messages all show that some error has
occurred in the printer
Message
PIE
Er
El
E2
E3
EY
ES
E7
No paper loaded in the printer. Load paper (“ Loading
CUTsheet paper” on page 26 and “ Loading and parking
fanfold paper” on page 27)
The release lever has been moved whale the paper ISin
printing position. Park the paper and try again (“ Parking
paper” on page 31)
Print head error. Turn off the printer, wait a few seconds
and try prlntlng again.
Carriage home posltlon error. Turn off Ihe printer, wat a
few seconds and try printing again
Paper handling error Turn off the printer, wait a few
seconds and try prlntlng agan
S.W. I error. Turn off the printer, wait a few seconds and
try printing again
EEPROM or RAM (memory) error Turn off the printer,
wait a few seconds and try prntlng again
“Watchdog”(Internal software error). Turn off the
printer, wait a few seconds and try printing again
Meaning
If any of these errors persist, consult your supplier.
Page 96
In addition to the display, the printer also uses its internal beeper to alert you of problems and internal conditions. Here’s a summary of the different tones:
Beep tones
2-second tone
One long tone
Four short tones, repeated twice
One short tone
Two short tones
Three short tones
Meaning
The printer has detected an error condition. Turn off the printer, wait a few seconds and try printing again.
The printer has detected an error condltion. Turn off the printer, wait a few seconds and try prlntlng again
The printer is out of paper.
The buffer has been cleared. See “ Clearing the buffer” on page 43,
The top of form has been set. See “Setting the top of a form” on page 35.
The quiet mode has been selected. See
“Quiet printing” on page 37
The zoonl size has been changed. See
“Changing the zoom size” on page 40.
The Electronic DIP Switch mode has been
selected. See “Using the Electromc DIP
switches” on page 53.
The macro definition has been selected.
See ‘;’Saving Macros” on page 42.
The quiet mode has been cancelled. See
“Quiet printing” on page 37
The macro definition has been cancelled.
See “Removing the macro” on page 43.
The printer has been reset. See “Setting
the printer back to default settings” on
page 44
One shorter tone
Page
Hexadecimal dump mode has been
selected. See “Hexadecimal dump mode”
on page 49.
Pitch lock mode has been selected See
“PItch lock” on page 45.
Font lock mode has been selected. See
“Font lock” on page 45.
Page 97
I
Beep tones
I
Meaning
pand font lock have been selected
Two shorter to~estogether. See “ Pitch and font lock” on
Intermittent tonethe fanfold paper IS not parked. See “Park-
page 46.
The release lever has been moved while
ing paper” on page 31.
Checking system software settings
W
Ifyou cannot printfromyour Windows application,
there are three things that you can check. You may also
wish to refer to the Microsoft Windows User’s Guide.
Firstly, check that the printer has been set as the
Default Printer.
●
Double-click the Control Panet icon in the Main win-
dow.
●
Double-click the Printers icon
●
Click on NX-2480 Rin the list of
installed printers.
●
Make sure that Set As Default Printer is checked. If it
is not, click on the check box, and try printing from
your application again.
●
Click on CZoseto return to the Control Panel window.
Secondly, check that the printer is correctly selected in
your application.
●
SelectPrint from the application’s Filemenu. A dialog box appears listing availableprinters.
●
Makesure thatNX-2480 R
lIf it is not, click on it and try printing again.
Thirdly, check that the correct port is selected.
●
Double-clickthe ControlPanel iconin the Main window.
●
Double-click the Printers icon
Page
Page 98
●
Click on NX-2480 Rin the list of
installed printers.
●
Click Connect.
●
Make sure that your cable is connected to the port
highlighted in the list of ports. If you are using a
parallel cable, you will probably be using LPT1. If
you are using the SPC-8K serial-to-parallel con-
verter, you will be using COM1 or COM2. Click on
the appropriate port name.
●
Click OK.
●
Click on Close to return to the ControZPanel win-
dow.
If you still cannot print successfully, consult your software dealer for assistance.
If you cannot print a text file using the MS-DOS
command, check the AUTOEXEC.BAT file to see
whether it contains any of the following statements:
MODE LPT1 : =COM1 :
or
MODE LPT1 : =COM2 :
Theseindicatethatthe computeris set up to printto a
printervia a serialcable,not a parallelcable.So, if you
are usinga parallelcable,deletethe line from
AUTOEXEC.BAT.ResaveAUTOEXEC.BAT,and restart
your computer.Try printingagain.
Conversely, if you are using the SPC-8K serial-to-para-
llelconverter, make sure that a statement is included in
AUTOEXEC.BAT. See “Setting up an MS-DOS com-
puter” on page 72.If you still cannot print, refer to the
MS-DOSUser’s Guide, or consult your software dealer.
If you can print from MS-DOS but cannot print from
your application, check to see which printer driver is
selected in the application. Check the application’s
manual for details of printer selection.
If you
still cannotprint,consultyoursoftwaredealer.
Page
Page 99
C7
Softwarecommands
Introduction
The NX-2480 Rainbow/Colour has two emulation
modes: Standard/Epson mode and IBM mode.
In the Standard/Epson mode, the printer emulates the
Epson LQ-860/850, and can also recognize the graphics
commands of NEC 24-wire printers. In IBM mode, the
printer emulates the IBM Proprinter X24E. Some additional command codes, which are a superset of these
emulations, are also supported.
The emulation can be changed by changing Electronic
DIP Switch (EDS) setting Al. When Al is ON, the printer
is in Standard/Epson mode; when it is OFF, the printer
is in IBM mode (see Chapter 4).
In addition, when EDS switch A2 is ON, the printer can
automatically sense which emulation is required and
will change emulation as necessary.
This chapter describes the printer’s control commands.
Some commands are common to both Standard and
IBM modes. All commands will grouped by function. The
name of each command is followed by a table like the
one below:
Hexadecimal
IB 78 01
Std.
MODE:
ASCIIDecimal
<E SC>
“X”<1>
27 120 :
Indicates the mode in which the command is
recognized.
Std.
Standard/Epson mode (EDS switch Al is ON)
IBMIBM mode (EDS switch Al is OFF)
Page
Page 100
Both
Both Standard/Epson and IBM modes
ASCII:
Decimal:
Hexadecimal: Gives the command in hexadecimal char-
Parameters for which values must be supplied are indicated by letters such as n, m or
Indicates the ASCII coding of the command.
Control characters are enclosed in angle
brackets: For example, <1> means character
code 1.
Gives the command in decimal character
codes.
acter codes.
d.
Page
Loading...
+ hidden pages
You need points to download manuals.
1 point = 1 manual.
You can buy points or you can get point for every manual you upload.


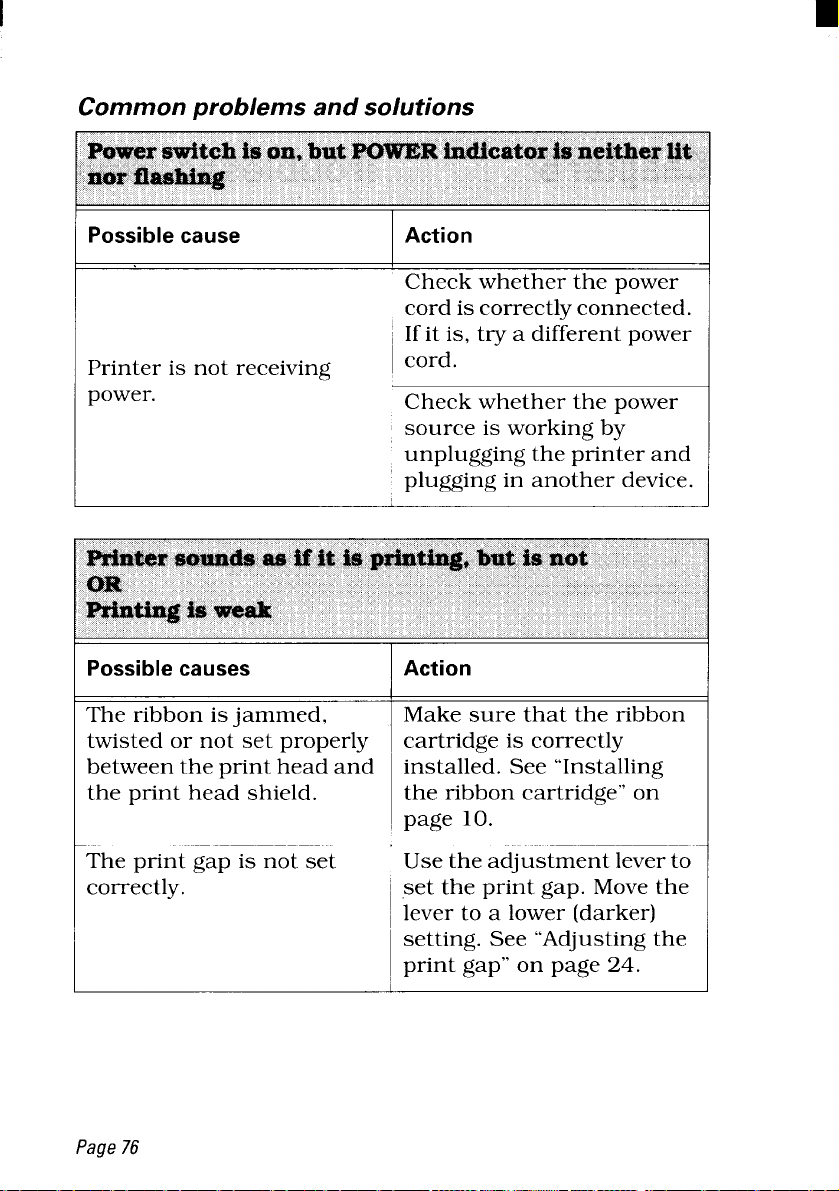
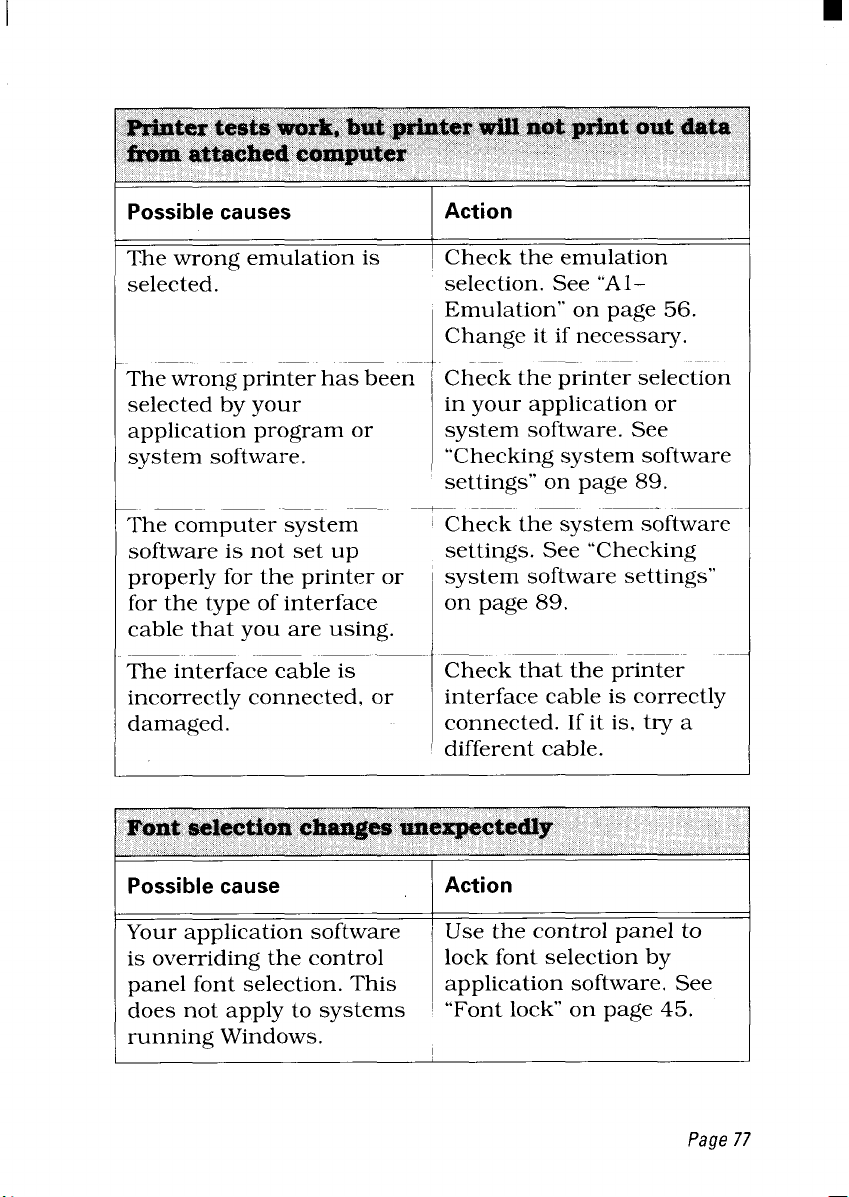


 Loading...