

Stairmaster 4600 CL, 4400 PT, 4600 PT, 4400 CL User Manual
FREECLIMBER
4200 PT, 4400 PT/CL,
AND 4600 PT/CL
O
WNER’S MANUAL
®

Printed in the United States.
© 2001 StairMaster® Health & Fitness Products, Inc.
All rights reserved.
Corporate Headquarters
12421 Willows Road N.E., Suite 100
Kirkland, WA 98034
(800) 635-2936
(425) 823-1825
Fax (425) 823-9490
www.stairmaster.com
P/N 22867-A
© 2001 StairMaster Health & Fitness Products, Inc. StairMaster and FreeClimber are
registered trademarks or trademarks of StairMaster Health & Fitness Products, Inc. in the United States
and/or other countries. All other trademarks are trademarks of their respective companies.
StairMaster is a Rutledge Capital Company
Page iii

WARRANTY
This is to certify that the StairMaster
by StairMaster Health & Fitness Products, Inc. to be free of all defects in materials
and workmanship. This warranty does not apply to any defect caused by negligence,
misuse, accident, alteration, improper maintenance, or an “act of God.” This warranty
is non-transferable from the original owner .
If, within three years from the date of purchase, any part of the StairMaster
FreeClimber exercise system should fail to operate properly (except any accessories or the
battery on the 4600 CL and the 4400 CL), contact our Customer Service Department to
report the problem. When calling, please be prepared to provide the customer service
representative with the following information:
• Your name, customer number, shipping address, and telephone number
• The model and serial number of the inoperable machine
• The date(s) of purchase for the inoperable machine(s)
• Your billing address
This information will ensure that you are the only one ordering parts under your
warranty protection. If warranty replacement parts are shipped to you, you may be
required to return the inoperable parts. To facilitate this process, the following policy
has been established:
• Please call our Customer Service Department to receive a Return
Material Authorization (RMA) prior to shipment.
• StairMaster Health & Fitness Products, Inc. will incur all freight
charges for warranty parts ordered for a machine that is less than 45
days old. The parts will be shipped to you via an overnight courier.*
• You are responsible for freight charges on warranty parts for
machines that are more than 45 days old. You will not be responsible
for the return shipment of the inoperable parts.
• Some inoperable warranty parts must be promptly returned to our
Customer Service Department. We will pay the shipping cost for the
inoperable warranty parts. Detailed instructions are included with
each warranty replacement part.
®
FreeClimber® exercise system is warranted
StairMaster Health & Fitness Products, Inc. neither makes, assumes, nor
authorizes any representative or other person to make or assume for us, any other
warranty whatsoever, whether expressed or implied, in connection with the sale,
service, or shipment of our products. We reserve the right to make changes and
improvements in our products without incurring any obligation to similarly alter products
previously purchased. In order to maintain your product warranty and to ensure the safe
and efficient operation of your machine, only authorized replacement parts can be used.
This warranty is void if parts other than those provided by StairMaster Health & Fitness
Products, Inc. are used.
* Note: Aerosol products cannot be transported via air .
Page iv

PREFACE
Regular use of the StairMaster® FreeClimber® exercise system is a safe and
effective way to develop aerobic fitness while conditioning the major muscles
of the lower body. To get the best results, and to keep your machine in peak
operating condition, you should carefully read and follow the guidelines
presented in this manual.
WHAT IS IN THIS MANUAL?
The first part of this manual includes sections on safety, installation, operating
instructions, and preventive maintenance. The second part contains detailed
information on problem troubleshooting and repair procedures. An Appendix at
the end of the manual provides additional information for the owner.
Throughout this manual, console keypad keystrokes are enclosed in [ ].
The names of the keys and special console operational modes are shown in
capital letters. For example, your machine is ready to use when the console
displays "SELECT WORKOUT." Press [MANUAL] to start the MANUAL exercise
program.
WHAT IS THE STAIRMASTER FREECLIMBER EXERCISE SYSTEM?
The StairMaster FreeClimber exercise systems are vertical climbing machines
with an independent step action. The independent step action, combined with
the patented pedal geometry featured on all StairMaster steppers, provides an
aerobic workout equivalent to uphill running or climbing stairs, but without the
high-impact pounding to the joints and muscles.
There are five FreeClimber models: the 4600 PT (Personal Trainer),
the 4600 CL (Cordless), the 4400 PT, the 4400 CL, and the 4200 PT. All
FreeClimbers feature the Quiet Drive transmission. The 4600 PT and the
4600 CL have an adjustable tilting, full-featured Liquid Crystal Display (LCD)
console. The 4400 PT and the 4400 CL have an upright, rail-less design. The
4600 PT and the 4400 PT use an external power supply that is plugged into an
AC wall outlet. The 4600 CL and the 4400 CL use power generated during a
workout to run the electronics. The 4600 PT and 4600 CL have contact heart
rate and telemetry (Polar
feature telemetry heart rate monitoring. The 4200 PT uses an external power
supply and the console has less feedback and fewer workout programs than
the 4600 PT/CL and the 4400 PT/CL.
®
) heart rate monitoring. The 4400 PT and the 4400 CL
Page v

CONTENTS
SAFFETY GUIDELINES ........................................................................................ 1
INTRODUCTION ................................................................................................... 3
INSTALLATION INSTRUCTIONS........................................................................ 6
BASIC OPERATING INSTRUCTIONS ................................................................ 9
General Guidelines for Safe Operation........................................................... 9
Your First Workout......................................................................................... 10
Begin Exercising................................................................................... 1 0
Rest Periods .......................................................................................... 1 1
Cool Down .............................................................................................11
HEART RATE MONITORING ............................................................................ 1 3
Heart Rate Input ........................................................................................... 13
Locked/Non-locked Option..........................................................................13
Error Messages ............................................................................................14
TELEMETRY HEART RATE (4400/4600 PT/CL ONLY) .................................. 1 5
Using the Transmitter Belt ........................................................................... 1 5
Maintaining the Transmitter Belt ................................................................ 1 6
CONTACT HEART RATE .................................................................................... 1 7
Using Contact Heart Rate ............................................................................ 1 7
FREECLIMBER 4400/4600 PT/CL CONSOLE .................................................. 1 8
Display Window ...........................................................................................1 8
Numeric Keypad ........................................................................................... 19
Entertainment Keypad................................................................................. 19
Intensity Level Keys ..................................................................................... 1 9
Stop Key ....................................................................................................... 1 9
Workout Statistics ........................................................................................ 2 0
Exercise Program Keypad ............................................................................ 2 1
The Quick Start Program ...................................................................... 2 1
The Manual Program ........................................................................... 2 1
The Fat Burner Program ....................................................................... 2 2
The Aerobic Training Program ............................................................. 2 2
The Speed Intervals Program .............................................................. 2 2
The Constant Heart Rate Program ...................................................... 2 3
Page vi

CONTENTS
The Fitness Test Programs ................................................................... 2 4
Understanding Submaximal Exercise Testing .................................... 24
Pretest Screening ................................................................................. 26
The StairMaster® Submaximal Fit Test............................................... 2 6
The Firefighter's Stair Climb Tests....................................................... 2 9
Turning on the C.P.A.T. Test ........................................................... 3 0
Turning on the NYCFD Test........................................................... 3 0
Console Codes .............................................................................................31
Custom Codes ...................................................................................... 31
Quick Scan Programming .............................................................. 32
Machine Status Codes ........................................................................ 3 3
Quick Scan Programming .............................................................. 34
Configuration Code .............................................................................. 34
FREECLIMBER 4200 PT CONSOLE ................................................................. 3 5
Top Window ..................................................................................................3 5
Workout S etup...................................................................................... 3 5
Timer...................................................................................................... 36
Bottom Window ...........................................................................................3 7
Keypad.................................................................................................. 37
Quick Start Option ........................................................................................ 38
MAINTENANCE INSTRUCTIONS .................................................................. 3 9
Helpful Hints ................................................................................................. 3 9
Tool List .........................................................................................................3 9
Maintenance Records ................................................................................. 39
Initial Service ................................................................................................ 4 0
Preventive Maintenance ............................................................................. 40
Cleaning................................................................................................ 40
Inspecting ............................................................................................. 40
Lubrication ............................................................................................41
Battery Charge ......................................................................................42
Battery Disposal ................................................................................... 4 2
TROUBLESHOOTING ........................................................................................ 44
General Troubleshooting Guidelines........................................................... 4 4
Electrical Troubleshooting ...........................................................................4 4
4600/4400 PT: ......................................................................................44
Alternator Test ............................................................................... 4 5
Page vii

CONTENTS
Diode Test ....................................................................................... 4 6
Resistor Test ................................................................................... 46
4600/4400 CL: ...................................................................................... 46
Battery Test .................................................................................... 4 6
Alternator Test ............................................................................... 4 7
Resistor Test ................................................................................... 47
Display Test........................................................................................... 4 8
Keypad Test .......................................................................................... 48
Serial Port Test ...................................................................................... 4 9
Alternator Test ...................................................................................... 4 9
Tach Te st ............................................................................................... 5 0
Error Reporting ...................................................................................... 5 0
Contact Heart Rate Test....................................................................... 5 1
Telemetry
Mechanical Troubleshooting ....................................................................... 53
PARTS REMOVAL AND REPLACEMENT ....................................................... 5 6
Covers........................................................................................................... 56
Mid Cover ............................................................................................. 5 6
Top Cover .............................................................................................. 56
Shield (4600 PT/CL )............................................................................. 5 7
Bottom Cover ........................................................................................ 5 7
Console......................................................................................................... 58
Console Adjustment (4600 PT/CL) .............................................................. 5 8
Poly-V and HTD Belt ..................................................................................... 5 8
Step Chain Retainer ..................................................................................... 59
Pedal Arm Return Spring ............................................................................. 5 9
Step Chain.................................................................................................... 60
Spring Pulley ................................................................................................. 6 1
Drive Chain ................................................................................................... 6 1
Drive Shaft Assembly................................................................................... 6 2
Pedal ............................................................................................................. 64
Leveling Arm................................................................................................. 6 4
Pedal Arm ...................................................................................................... 65
Pedal Pad ...................................................................................................... 65
Eccentric Hub Assembly ............................................................................... 6 6
Heart Rate Test.................................................................... 5 1
Page viii

CONTENTS
First Reduction Shaft Assembly .................................................................. 66
Handlebar (4400 PT/CL, 4200 PT) ............................................................... 6 6
Upper Handles (4600 PT/CL) ........................................................................6 7
Side Handrails (4600 PT/CL)........................................................................6 7
Alternator...................................................................................................... 68
GROUNDING INSTRUCTIONS......................................................................... 6 9
FCC COMPLIANCE............................................................................................. 7 0
APPENDICES
Canadian Doc Class B Compliance ............................................................. 7 0
Important Phone Numbers ........................................................................... 7 1
Battery Recycling Centers ........................................................................... 7 2
Figures 10-27 ................................................................................................ 7 4
LIST OF TABLES
Table 1. Dimensions and Specifications for the
StairMaster® FreeClimber® Exercise Systems .................................. 5
Table 2. Fitness Rating Norms (VO
Table 3. Recommended Preventive Maintenance Schedule .................... 43
)........................................................ 29
2max
LIST OF ILLUSTRATIONS
Figure 1: Major Parts - 4600 PT/CL ................................................................. 3
Figure 2: Major Parts - 4200 PT and 4400 PT/CL ......................................... 4
Figure 3: Level Adjusting End Caps............................................................... 6
Figure 4: DC Power Connector ....................................................................... 7
Figure 5: Correct Exercise Postion ............................................................... 12
Figure 6: Transmitter Belt............................................................................. 1 6
Figure 7: FreeClimber 4400/4600 PT/CL Systems Console .......................1 8
Figure 8: StairMaster Fitness Protocol ........................................................ 2 8
Figure 9: 4200 PT Console Diagram............................................................ 3 5
Figure 10: Grounding System ...................................................................... 69
Figure 11: Parts Needing Periodic Maintenance ....................................... 7 4
Page ix

CONTENTS
Figure 12: Final Assembly - Left, 4600 PT ................................................... 7 5
Figure 13: Final Assembly - Right, 4600 PT................................................. 7 6
Figure 14: Final Assembly - Left, 4600 CL ................................................... 7 7
Figure 15: Final Assembly - Right, 4600 CL................................................. 7 8
Figure 16: Covers - 4600 PT/CL................................................................... 7 9
Figure 17: Pedal Arm Assembly & First Reduction Shaft Assembly
(4600/4400 PT/CL, 4200 PT) ........................................................ 8 0
Figure 18: Drive Shaft Assembly & Eccentric Hub Assembly
(4600/4400 PT/CL, 4200 PT) ........................................................ 8 1
Figure 19: Final Assembly - Left, 4400/4200 PT......................................... 8 2
Figure 20: Final Assembly - Right, 4400/4200 PT ....................................... 83
Figure 21: Final Assembly - Left, 4400 CL ................................................... 8 4
Figure 22: Final Assembly - Right, 4400 CL................................................. 8 5
Figure 23: Covers - 4400 PT/CL, 4200 PT ................................................... 8 6
Figure 24: Cover Removal ............................................................................ 8 7
Figure 25: Cover Fasteners .......................................................................... 88
Figure 26: Drive Chain Tensioning.............................................................. 8 9
Figure 27: Belt Tension................................................................................ 90
Page x

SAFETY GUIDELINES
WHEN USING ELECTRICAL EQUIPMENT, ALWAYS FOLLOW THESE BASIC PRECAUTIONS:
IMPORTANT SAFETY INSTRUCTIONS
!
The following definitions apply to the words “Danger” and “Warning”
found throughout this manual:
This symbol appearing throughout this manual means
Attention! Be Alert! Your safety is involved.
DANGER - Used to call attention to IMMEDIATE hazards which, if not
avoided, will result in immediate, serious personal injury or loss of life.
WARNING - Used to call attention to POTENTIAL hazards that could
result in personal injury or loss of life.
READ ALL INSTRUCTIONS BEFORE USING THE MACHINE.
!
DANGER
!
WARNING
To reduce the risk of electrical shock, always unplug
the external power supply from the AC wall outlet
before cleaning, maintaining, or repairing.
To reduce the risk of burns, electric shock, or injury
to persons:
1. The external power supply should always be unplugged from the AC wall
outlet before removing or installing parts. Never make adjustments or
repairs while an exercise program is in progress.
2. Close supervision is necessary whenever the machine is used by or near
children, invalids, or disabled persons.
3. Keep your hands away from all moving parts and keep your feet on the
pedals while exercising. Do not operate the machine with the side covers
removed.
Page 1

SAFETY GUIDELINES
4. Use this machine only for its intended use as described in this Manual. Do
not use parts, attachments, or accessories other than those provided by
StairMaster® Health & Fitness Products, Inc.
5. Do not use the external power supply if it has a damaged cord or plug, or if
it is not working properly, if it has been dropped or damaged, or dropped
into water. Contact our Customer Service Department at 1-800-3313578 to arrange for the return of damaged parts.
6. Connect the external power supply to a properly grounded AC wall
outlet; refer to the “Grounding Instructions” section. Keep all cords
away from heated surfaces.
7. To disconnect the external power supply, remove the plug from the AC
wall outlet.
8. Never drop or insert any object into any opening on the machine.
9. Do not operate where aerosol (spray) products are being used.
10. Always wear insulated gloves when handling batteries.
11. Do not crush, incinerate, or dismantle the battery. The electrolyte contains
sulfuric acid which can cause serious damage to eyes and skin. Should
this occur, flush profusely with water and seek medical attention.
12. Do not use the machine outdoors.
The safety level given by the design of this equipment can only be
maintained when the equipment is regularly examined for damage and wear.
Inoperable components shall be replaced immediately or the equipment shall
be put out of use until it is repaired. Failure to follow all guidelines may compromise the effectiveness of the exercise experience, expose yourself (and
possibly others) to injury, and reduce the longevity of the machine. Follow all
training instructions listed in the manual and/or on the machine. Physical injury
may result from incorrect or excessive training.
SA VE THESE INSTRUCTIONS
Page 2
INTRODUCTION
Before leaving the manufacturing facility in Tulsa, Oklahoma, your
StairMaster® FreeClimber® exercise system was thoroughly inspected and
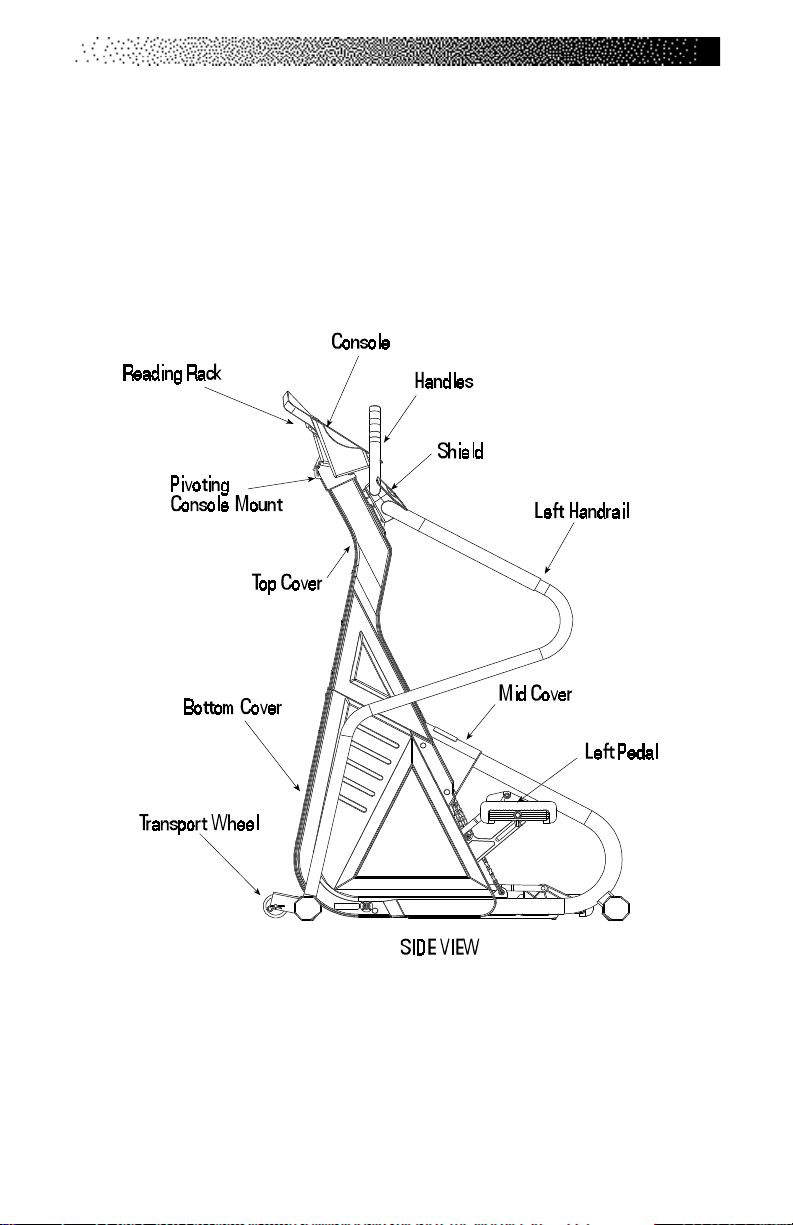
tested to ensure proper operation. The major parts of the machine are shown
in Figures 1 and 2.
Figure 1: Major Parts - 4600 PT/CL
Page 3
INTRODUCTION
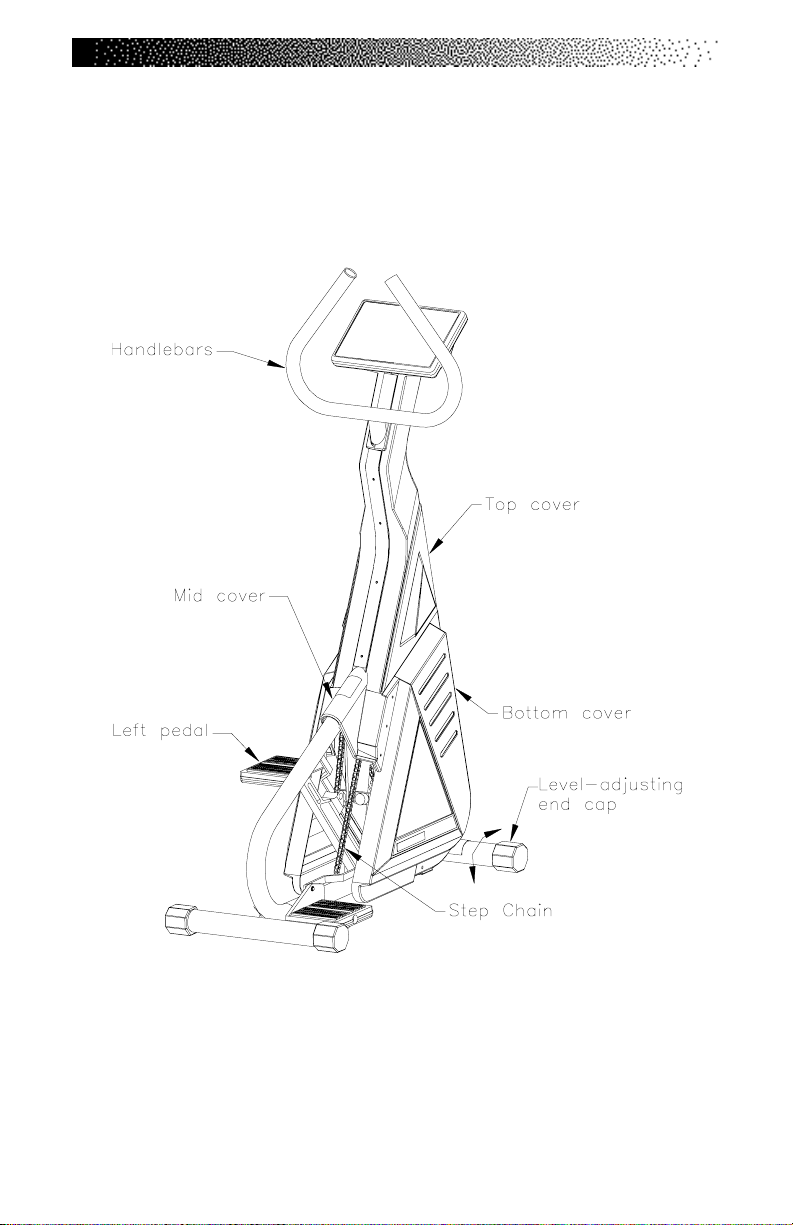
Page 4
Figure 2: Major Parts - 4200 PT and 4400 PT/CL

INTRODUCTION
Throughout this Manual, all references to the left or right side and to the
front or back are made as if you were on the machine, ready to exercise. For
example, the console is located on the front of the machine. The dimensions
and general specifications of the machines are listed in Table 1.
Table 1. Dimensions and Specifications for the
StairMaster® FreeClimber® Exercise Systems
Physical Dimensions:
Length 44 inches (104 cm)
Width at Front Leg (4400 PT/CL, 4200 PT) 22 inches (56 cm)
Width at Front Leg (4600 PT/CL) 32 inches (82 cm)
Height 69 inches (176 cm)
Weight
4400 PT/CL, 4200 PT 126 pounds (55 kg)
4600 PT/CL 155 pounds (70 kg)
Power Supply Specifications:
4600/4400/4200 PT (U.S., Canada, Japan) 120 VAC, 50/60 Hz, 2.5 Amp
4600/4400/4200 PT (International) 230 VAC, 50/60 Hz, 2.5 Amp
Battery Charger Specifications:
4600/4400 CL (U.S., Canada, Japan) 120 VAC, 50/60 Hz, 1 Amp
4600/4400 CL (International) 230 VAC, 50/60 Hz, 1 Amp
Internal Battery
6 volt, 1 Ah Lead-Acid battery
Page 5
INSTALLATION INSTRUCTIONS
Assemble your machine before use. Machines shipped outside the United
States need to be uncrated before they can be assembled; refer to the
“Uncrating Instructions” included with your machine for the details.
1. Remove all shipping material from your machine once it is in place.
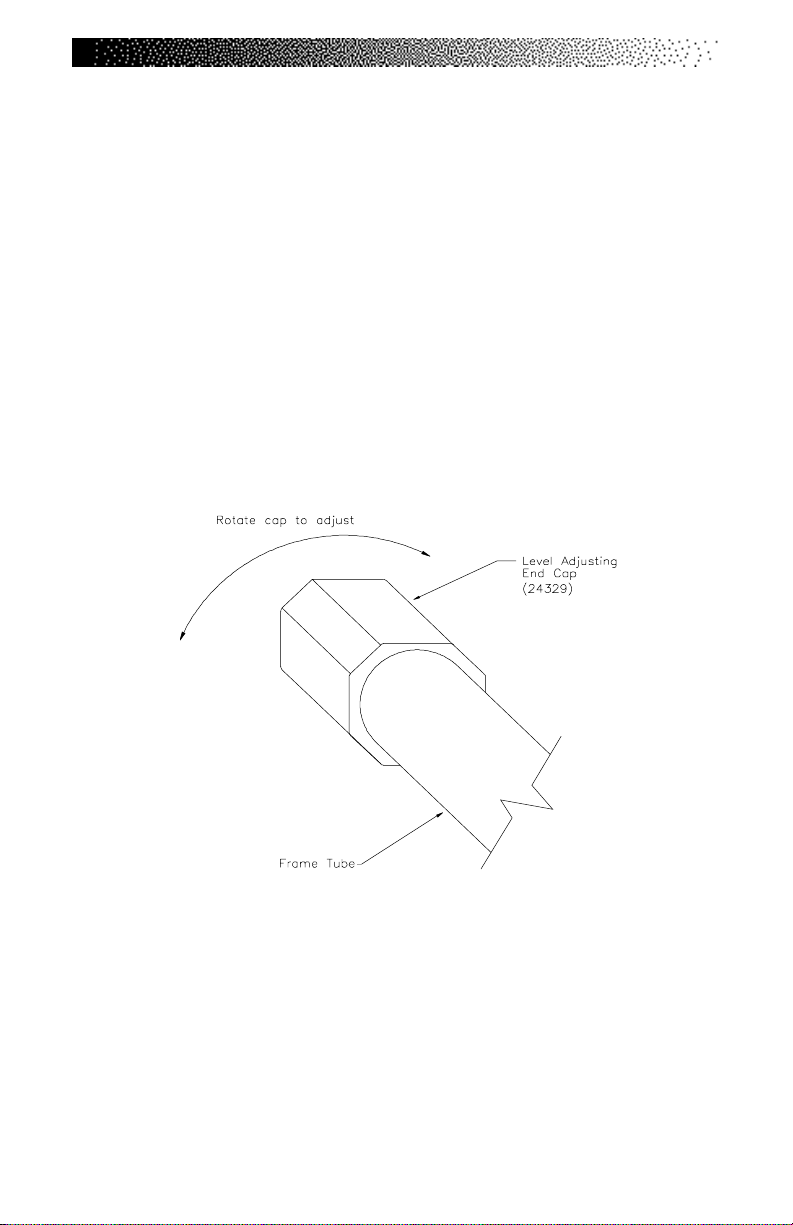
2. Make sure the machine is level before you use it for the first time. The
four rubber end caps (see Figure 3) are designed to compensate for
uneven floors. Each face of the caps is a different thickness. Twist the
caps to stabilize the machine.
Figure 3: Level Adjusting End Caps
3. Open the box you removed from the pedals. The box contains either
an external power supply (4600/4400/4200 PT only) or a wall-pack
battery charger (4600/4400 CL only).
used to recharge a low battery.
The battery charger is only
Page 6
INSTALLATION INSTRUCTIONS
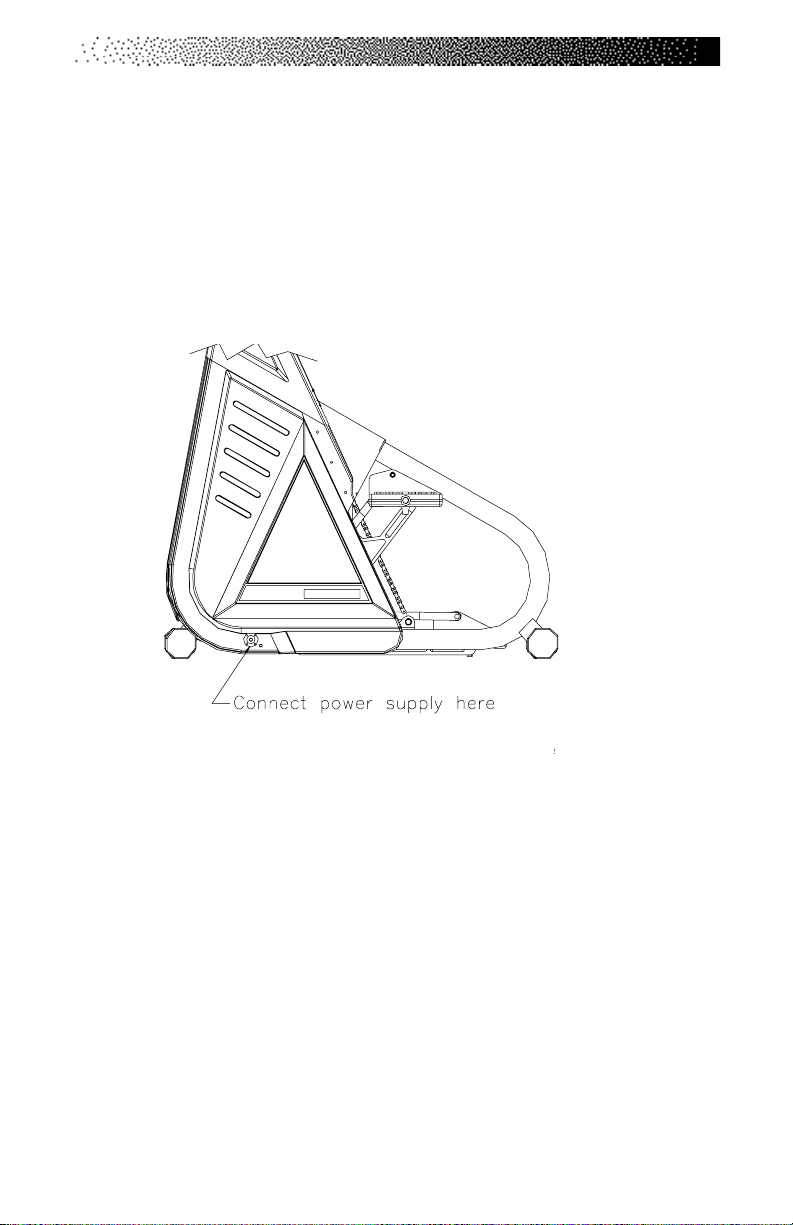
4. If you have a 4600/4400 CL, skip to step 9. If you have a 4600/4400/
4200 PT, connect the DC cable of the power supply to the connector
near the bottom of the left side cover (see Figure 4).
Figure 4: DC Power Connector
5. Place the power supply on the floor near an AC wall outlet. To reduce
the hazard of electrical shock, place the power supply in a location
away from the machine and away from exposure to perspiration. You
should not place your power supply on a carpet because it may over
heat.
Page 7
INSTALLATION INSTRUCTIONS
6. Check to be sure that the input AC power rating marked on the power
supply matches the available power. If it does not, obtain the matching power supply from StairMaster® Health & Fitness Products, Inc.
before proceeding any further.
WARNING
!
TO REDUCE THE RISK OF ELECTRICAL SHOCK AND FIRE AND TO
PREVENT SEVERE DAMAGE TO THE MACHINE, USE ONLY THE POWER SUPPLY
APPROVED FOR USE WITH THIS EQUIPMENT . IN ADDITION,
YOUR MACHINE MUST BE PROPERLY GROUNDED.
7. Connect the AC power cord to the AC wall outlet. Refer to the
“Grounding Instructions” section if the AC wall outlet does not
accept athree-prong plug.
8. Watch the console. The 4600/4400 PT should display a software
revision code and then show “SELECT WORKOUT.” The 4200 PT
console should run through a self test and then display a moving line
in the upper LCD window. If the console does not, unplug the power
supply and then plug it back in. If the console still does not power up
correctly, contact our Customer Service Department. Refer to the
Appendix for the appropriate phone number.
9. If you have a 4600/4400 CL, step on the pedals to check for proper
operation. Once you step on the pedals, the console should display a
software revision code and then show “SELECT WORKOUT.” If it
does not, connect the battery charger to the connector on the lower
left side. If the console still does not power up contact our Customer
Service Department. Refer to the Appendix for the appropriate phone
number.
10. The display “SELECT WORKOUT” tells you the machine is ready to
use. The 4600/4400 PT/CL console displays this message and the
4200 PT displays a moving line in the upper LCD window when the
console is ready to use.
Page 8

BASIC OPERATING INSTRUCTIONS
GENERAL GUIDELINES FOR SAFE OPERATION
WARNING
!
THESE GUIDELINES ARE DIRECTED TO YOU, AS THE OWNER OF THE MACHINE.
YOU SHOULD INSIST THA T ALL USERS FOLLOW THE SAME GUIDELINES.
YOU SHOULD MAKE THIS MANUAL AVAILABLE TO ALL USERS.
1. Obtain a complete physical examination from your medical doctor and
enlist a health/fitness professional’s aid in developing an exercise
program suitable for your current health status.
2. When working out for the first time, use the MANUAL exercise
program at the lower speeds until you feel comfortable and capable
of faster speeds.
3. The speed and duration of your exercise program should always be
subject to how you feel. Never permit peer pressure to override your
personal judgment while exercising.
4. Overweight or severely deconditioned individuals should be particu-
larly cautious when using the machine for the first time. Even though
such individuals may not have histories of serious physical problems,
they may perceive the exercise to be far less intense than it really is,
resulting in the possibility of overexertion or injury.
5. Although all equipment manufactured by StairMaster
Fitness Products, Inc. has been thoroughly inspected by the manufacturing facility prior to shipment, proper installation and regular maintenance are required to ensure safety. Maintenance is the sole responsibility of the owner.
®
Health &
Page 9
BASIC OPERATING INSTRUCTIONS
YOUR FIRST WORKOUT ON THE STAIRMASTER® FREECLIMBER
EXERCISE SYSTEM
1. Warm up with light calisthenics and easy stretching exercises for at
least five minutes before beginning your exercise program.
WARNING
!
IF A T ANY TIME DURING YOUR WORKOUT YOU FEEL CHEST PAIN,
EXPERIENCE SEVERE MUSCULAR DISCOMFORT, FEEL FAINT, OR ARE SHORT OF
BREATH, STOP EXERCISING IMMEDIATELY. IF THE CONDITION PERSISTS, YOU
SHOULD CONSUL T YOUR MEDICAL DOCTOR IMMEDIA TEL Y.
2. Hold onto the handlebars and step up onto the pedals. Stand up
straight. The pedals will sink slowly toward the floor.
3. Select the MANUAL exercise program so you can control the pace of
your first workout and get used to the exercise motion. Press
[MANUAL] and then press [ENTER]. The console will return to
the start screen if you do not press [ENTER] within 60 seconds.
4. The console will prompt you to enter your body weight. Enter your
weight in pounds (or kilograms if the console is set up for metric
units). Correct entry errors by pressing [CLEAR] before you press
[ENTER].
®
5. The console will prompt you to enter your intensity level. Enter your
desired intensity level. Correct entry errors by pressing [CLEAR] before
you press [ENTER].
6. The console will prompt you to enter the workout time in one minute
increments between 5 and 99 minutes. Press [1], [0], [ENTER] to
exercise for ten minutes. If you do not start exercising within 60
seconds, the console will return to the start screen.
Begin Exercising
7. Take deep, comfortable steps. Do not let the pedals touch the floor or
contact the upper stop. When you begin to exercise, the MANUAL
Page 10

BASIC OPERATING INSTRUCTIONS
program starts at level three.
8. As you become comfortable with exercise motion, press
[LEVEL: ∧] and [LEVEL: ∨] to adjust your climbing speed.
9. Relax and stand up straight while exercising. Use the
handlebars for balance (see Figure 5).
10. Select an intensity level that allows you to stay in the middle
of the pedal range of motion. Faster is not always better.
Exercise at a level that is consistent with your fitness level.
Rest Periods
11. You can stop and rest as many times as necessary for up to one
minute for each rest period during all programs. To stop, either press
[STOP] or step off the machine.The 4400/4600 PT console returns to
the start screen if you rest longer than the allotted rest period. The
4400/4600 CL console will shut off if you rest longer than the allotted
rest period. Follow the onscreen prompt to continue your work out
after a rest period.
Cool Down
12. When you are finished with your workout, the machine will slow
down and the message “GOAL AT TAINED” will be displayed. You can
cool down on the machine by continuing to step. The console timer
will continue to count up from the selected time, and the intensity
level will default to level 3. If there is a time limit set on the console,
the timer will last only until the maximum time has been met. For
example, if the time limit was set for 30 minutes and you worked out
for 25 minutes, the cool down period would last for 5 minutes, or until
you stepped off the machine.
13. You can also cool down by getting off the machine walking or
stretching for at least five minutes. Lift one foot slowly until the pedal
arm contacts the upper stop. Place that foot on the floor. Repeat for
the other foot. Do not let the pedals slam into the upper stops, since
this may cause unnecessary wear and tear.
Page 11
BASIC OPERATING INSTRUCTIONS
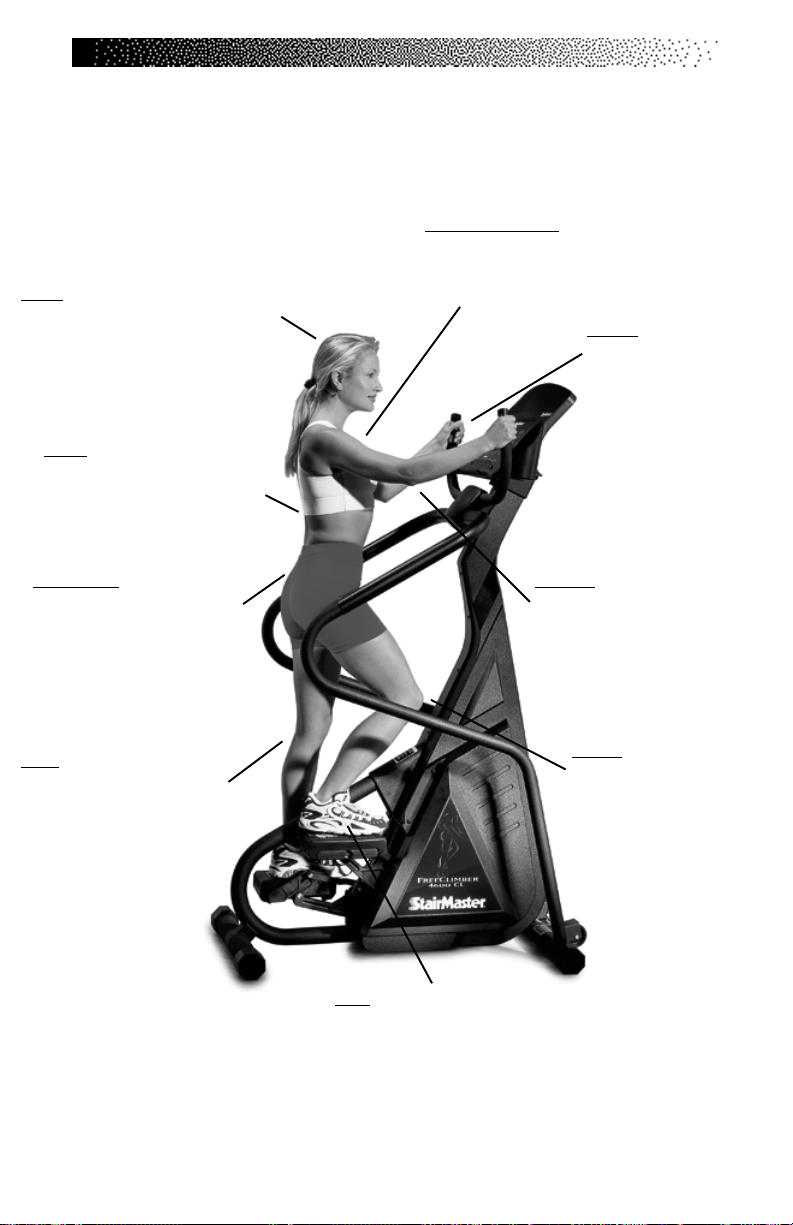
Figure 5: Correct Exercise Position
Head - Keep your chin parallel
to the floor. Avoid staring at your
feet or the computer console. This
posture will also enhance your
breathing.
Back - Although the whole
body is in a slightly forward
slant, keep your back straight
and avoid bending at the waist.
Chest/Shoulders - Keep your
shoulders square and centered
over your hips with your chest
lifted.
Hands - Rest your
hands lightly on the
side rails or front
handlebars.
Excessive leaning on
the side rails can reduce calorie burn by
up to 20%.
Hips/Torso - Keep your hips
directly under you with the
buttocks slightly contracted.
Avoid letting your hips rock
from side to side with each step.
Legs - Use a full, pain-free
range of motion with each
step, straightening your legs
as far as possible without
causing discomfort or letting
your knees lock out.
Elbows - Keep both elbows
slightly bent. If you have good
balance and want to burn more
calories, you can pump your arms
back and forth as if you were
running.
Knees - Keep your knees
aligned with your toes.
Avoid training with your
knees too far past your
toes and keep your feet
pointing forward. Do not
hyperextend your knees.
Feet - Place 3/4 of each foot on the pedals, heels slightly off the edge with your
toes facing forward.
Page 12

HEART RATE MONITORING
HEART RATE INPUT
Contact heart rate and telemetry (e.g., Polar®) heart rate signal detection is
available. There is no default priority of heart rate input. If a telemetry signal
is detected first, contact heart rate signals are inhibited from being detected
throughout the rest of the workout session and vice-versa. There is also a
short “lock out” period at the beginning of each workout session during which
the console first detects a signal and then validates the signal type. The
duration of this shorter, initial “lock out” period differs between telemetry and
contact heart rate.
• Telemetry heart rate - after the initial belt signal is detected, the
console will enter a validation phase in which four good heart
beat signals within four seconds are required before
locking on telemetry heart rate signals for the duration of the
workout session. During the validation phase the console will not
recognize contact heart rate signals.
• Contact heart rate - after the initial contact sensor signal is
detected, the console will enter a validation phase requiring a
good heart beat signal within 10 to 15 seconds, or until the
system acquires a valid signal. During the validation phase, the
console will not recognize telemetry heart rate signals. The
console will display a beating double heart iconthat has the
inner heart colored in while searching for a valid signal.
Locked/Non-locked Option
When the “not locked” option is selected the heart rate source signal is not
fixed during the exercise (if the signal is lost, either input will be valid). If the
“locked” option is selected, then the heart rate source signal is locked on the
first detected signal during the workout. To set a heart rate signal input, or to
turn off the heart rate option all together, perform the following steps:
1. On the console keypad, press [LEVEL: ∧], [3], [2]. At this point the
screen will display “HR INPUTS.” Press [ENTER] to select this
option.
Page 13

HEART RATE MONITORING
2. There are four options to handle heart rate input signals.
Press the [SELECT] key to scroll through the options until you
find the one option that suits your needs. Press the [ENTER]
key to select that option.
“ BOTH HR ON “ - allows either telemetry or contact heart rate
signals to be detected. Once the console has detected a valid
input signal it will lock out the opposite type of signal for the
duration of the workout session. For example, if you start out
using contact heart rate then you are limited to using only contact
heart rate during your workout session, even if the signal is lost
while performing the workout, and vice-versa.
“ BOTH NOT LOCKED” - allows either telemetry or contact
heart rate signals to be detected. Does not lock out a particular
input signal for the entire workout. This option will detect either
input signal during a workout session, but only one at a time, and
only until the other signal terminates.
“ TELEMETRY ONLY “ - locks out contact heart rate signals
and will only detect telemetry signals.
“ HAND ONLY “ - locks out telemetry signals and will only detect
contact heart rate signals.
“ BOTH HR OFF “ - turns off the ability to detect any signal at all.
Used in rare situations where there is excessive interference with
the heart rate signals. *This option disables theConstant HR
program and the Fitness Test program.
Error Messages
Text line messages are only seen in the Constant Heart Rate and Fitness Test
programs due to the design of the program that necessitates a valid heart rate
signal during the program. For these programs, ensure that neither the “BOTH
HR OFF” or the “HAND ONLY” option is set as a default option.
“
CHECK HR BELT
seconds in telemetry signal detection.
“HR BELT NEEDED” - No telemetry belt signal has been sensed during the
initial setup time.
” -
The heart rate signal has been missing for the last 30
Page 14
TELEMETRY HEART RATE
“HOLD HR SENSORS” - In contact heart rate signal situations this message
will come every 30 seconds to prompt the user to hold the sensors.
“HR MODE DISABLED” - No heart rate signal is allowed due to the set up
option that was chosen. Heart rate monitoring is not possible.
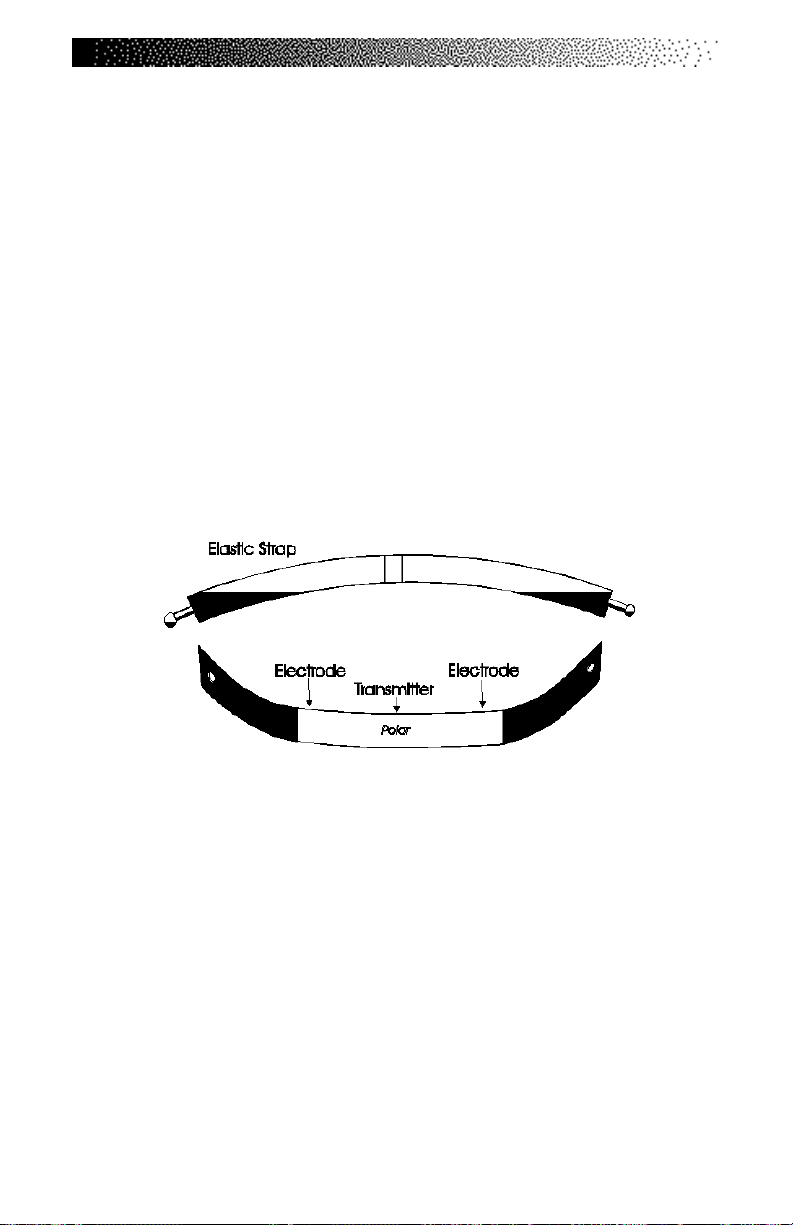
TELEMETRY HEART RATE (4600/4400 PT/CL ONLY)
The StairMaster® FreeClimber® 4600/4400 PT/CL features telemetry (Polar®)
heart rate monitoring. The system consists of the receiver, located on the stepper, and a transmitter belt (purchased separately) worn across your chest. The
monitoring function is activated as soon as you strap on the chest belt and
step within range of the receiver in the machine. Two electrodes on the underside of the chest belt sense the heart rate signal and send it to the receiver.
The heart symbol on the console pulses to indicate that the console is receiving a valid signal. A microprocessor in the console calculates the heart rate
and displays it, in beats per minute, on the console.
Using the Transmitter Belt
WARNING
!
PACEMAKER USERS SHOULD NOT USE THE POLAR
TRANMITTER BEFORE CONSULTING THEIR DOCTOR.
Before you put the transmitter belt on, wet the two electrode patches
(the grooved rectangles on the reverse side of the belt). Secure the transmitter
belt as high under the pectoral muscles (chest) as is comfortable. The transmitter belt should fit snugly and comfortably, and allow normal breathing. When
the console detects a heart rate signal, heart rate is shown in the display automatically. Your heart rate in beats per minute and a pulsing heart icon are displayed on the console.
After the initial belt signal is detected, the console will enter a validation phase in which four good heart beat signals lasting four seconds are
required before locking on telemetry heart rate signals for the duration of the
workout session. During the validation phase the console will not recognize
Page 15
TELEMETRY HEART RATE
contact heart rate signals. If you do not see a heart rate on the console, try one
of the following:
• Move closer to the console.
• Tighten the elastic part of the chest belt.
• Adjust the belt higher or lower on your chest.
• Remoisten the electrodes.
• Test your chest strap with a machine that you know is working, or
with a heart rate watch that you know is working.
• If possible, replace or exchange your console with a console
(from the same type of machine) that you know is working and
retest the machine.
• Verify that the console software has been set up properly for
heart rate detection (see pg. 13-14).
Figure 6: Transmitter Belt
Maintaining the Transmitter Belt
Clean the chest belt regularly with mild soap and water, then dry thoroughly residual sweat and moisture keep the transmitter active and drain the battery
in the transmitter. Do not use abrasives or chemicals such as steel wool or
alcohol for cleaning, as they can damage the electrodes permanently. You can
order replacement belts from StairMaster, Polar Electro, Inc., or your local
fitness store:
StairMaster 800-331-3578 P/N 64000
Polar Electro, Inc. 800-227-1314
Page 16

CONTACT HEART RATE
CONTACT HEART RATE
The StairMaster® FreeClimber® 4600 PT/CL features a digitized contact heart
rate monitoring system. Through the use of stainless steel sensors built into
the upper handles and sophisticated software, heart rate can be checked at
any time during a workout. The heart rate is displayed on the console. Contact
heart monitoring is standard on the 4600 PT/CL and optional on the 4400
PT/CL.
The contact heart rate system is very accurate (within 3% of the
medical standard), but its ability to detect a heart rate signal is influenced by
several factors. Movement of the muscles of the upper body produces an
electrical signal (muscle artifact) that will interfere with the detection of the
heart rate signal by the sensors. Movement of the hands while they are in
contact with the sensors also produces interference. Calluses and hand lotion
act as an insulating layer to reduce the signal strength. Also, the EKG signal
generated by some individuals is not strong enough to be detected by the
sensors. Typically, these individuals account for 5 - 7% of the population.
These individuals should opt for the Polar® chest strap method of heart rate
monitoring. Most people (between 93 – 95%) will not have a problem with the
system provided interference from movement is minimal.
Using Contact Heart Rate
Contact heart rate input signals are acquired only during contact
between your hands and the stainless steel sensors on the handrails. To use
the contact heart rate feature, place your hands around the handles so that
your hands touch both the top and the bottom of the sensors. After the initial
contact heart rate signal is detected, the console will enter a validation phase
requiring a good heart beat signal within 10 to 15 seconds, or until the system
acquires a valid signal. During the validation phase the console will not recognize telemetry heart rate signals. The console will display a beating double
heart icon that has the inner heart colored in while searching for a valid signal.
If, during exercise, the heart rate displayed is erratic, it may be helpful to
remove your hands from the handles, wipe them and place them back on the
handles. In all programs, the heart rate is shown automatically in the display
window the first time the sensors are touched.
Page 17
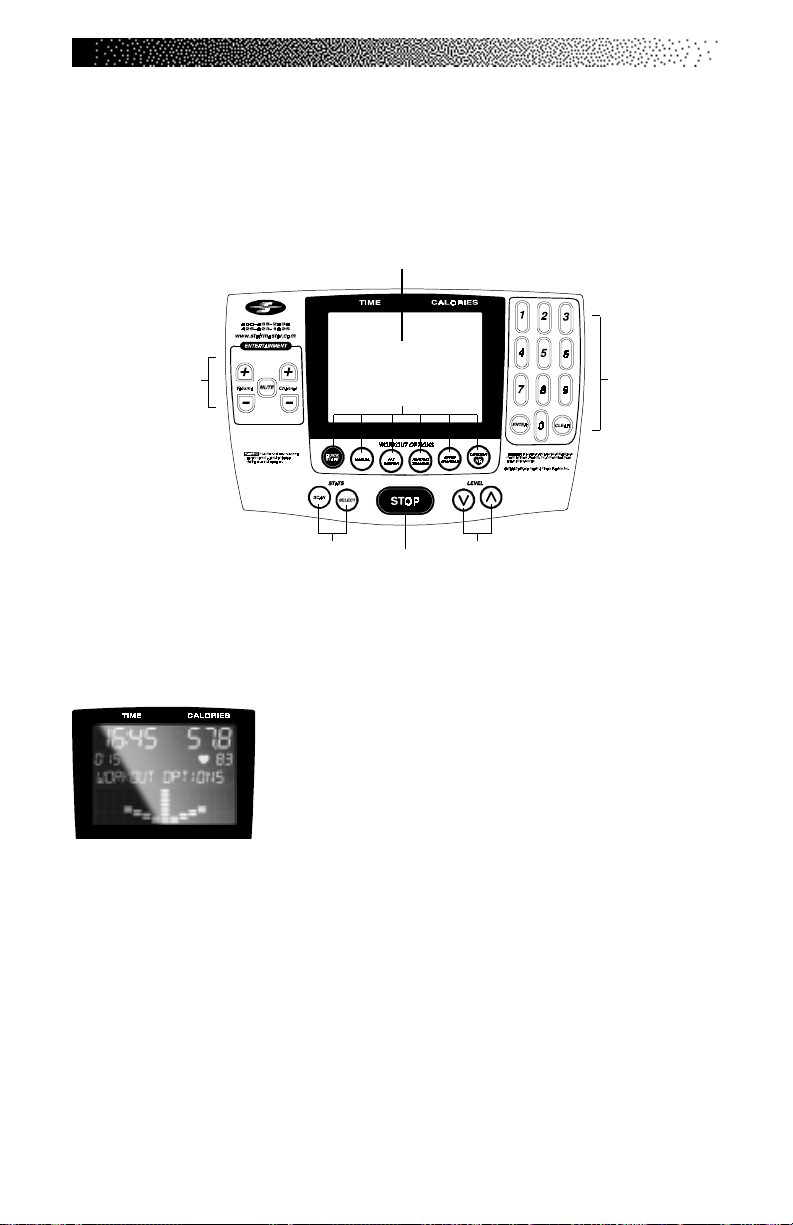
FREECLIMBER 4400/4600 PT/CL CONSOLE
The StairMaster® FreeClimber 4400/4600 PT/CL systems console is divided
into seven sections: the display window, the workout options, the numeric keypad, the entertainment keypad, the workout statistics, the stop key, and the
intensity level keys (see Figure 7).
Display Window
Entertainment
Keypad
Workout Statistics
Figure 7: FreeClimber 4400/4600 PT/CL Systems Console
DISPLAY WINDOW
• Calories
and displayed in the upper right section of the display window.
• Interval Timer
timer counts down time left within each interval.
• Heart Rate
heart icon.
- The real-time amount of calories burned is continually updated
- The interval timer is displayed below the Time. The interval
- Current heart rate is displayed below the Calories, next to the
• Workout Option Profile
pears in the lower section of the display window during a workout. The taller
the column, the higher the intensity (watts) for that interval. The flashing column shows your current interval. The flashing column moves from left to right
across the display as you complete each interval.
Workout Options
Stop
• Time
the upper left section of the display window. Once
the time is entered, the timer will count down, in minutes and seconds, until the workout is finished or
stopped. If [0] is entered in the MANUAL or CONSTANT HEART RATE program, the timer will count up.
- The selected workout time is displayed in
- A profile of the selected exercise program ap-
Intensity Level
Numeric
Keypad
Page 18
FREECLIMBER 4400/4600 PT/CL CONSOLE
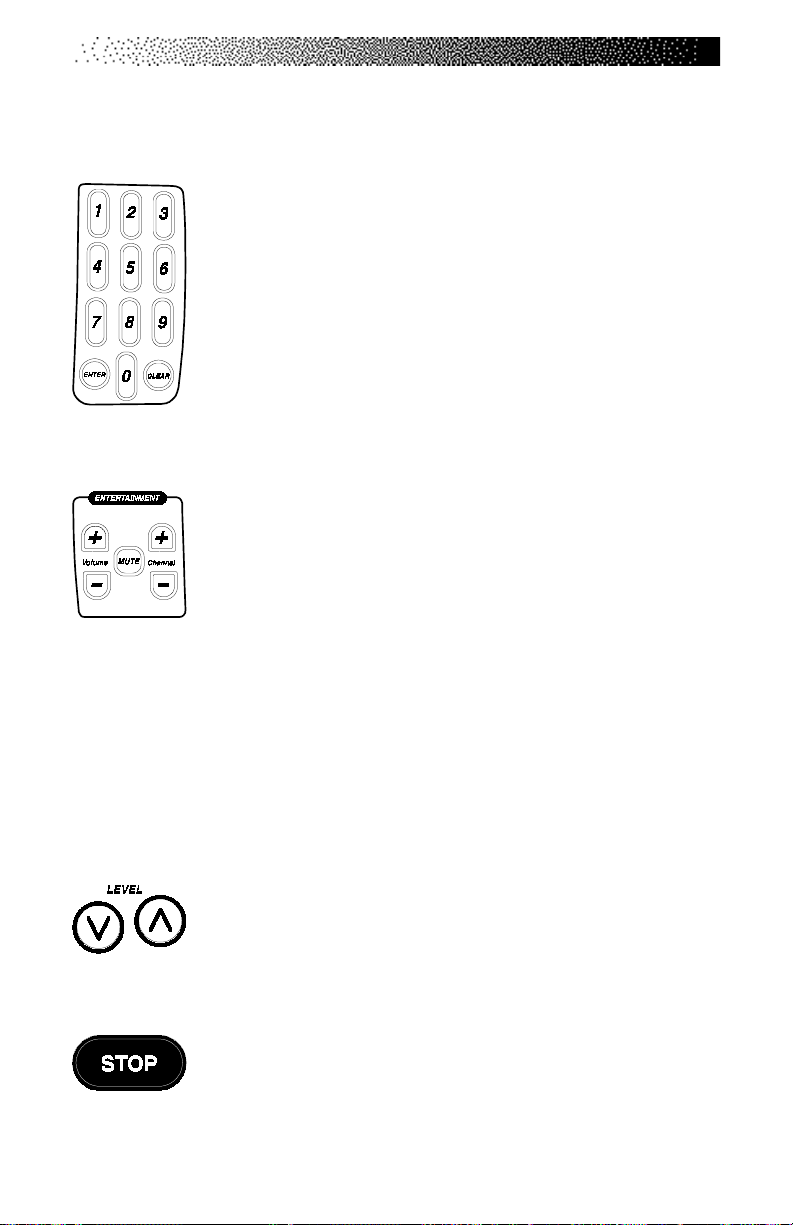
NUMERIC KEYPAD
The numeric keypad is located on the right side of the console. Before the exercise program begins, the numbers are
used to enter data in response to the console prompts.
• Enter
tion used by the console to calculate workout statistics.
• Clear
pressed before [ENTER].
ENTERTAINMENT KEYPAD
The FreeClimber comes equipped to facilitate the use of commercial entertainment systems. Using any of these keys will
send an output signal through the Communication Specification for Fitness Equipment (C.S.A.F.E.) port to a connected
C.S.A.F.E. or compatible system. If a system is not connected,
pressing these keys will have no effect.
• Volume Up/Down
source.
• Mute
- Removes the audio sound from the headphones.
• Channel Up/Down
system.
- Confirms workout selections and stores the informa-
- Erases information from the console memory if
- Increases or decreases the volume level of the audio
- Changes the channel of the commercial entertainment
INTENSITY LEVEL KEYS
The exercise intensity level may be changed at any time during a workout. Pressing the [
and pressing the [ ∧ ] key increases the intensity.
STOP KEY
Press the [STOP] key any time you want to pause the exercise
program for up to one minute. Press [STOP] a second time, or
[1], and The console will return to the "SELECT WORKOUT"
Prompt.
∨ ] key decreases the intensity
Page 19

FREECLIMBER 4400/4600 PT/CL CONSOLE
WORKOUT STATISTICS
During the exercise program, the Stats keys are used to track workout statistics which are then shown in the display window. Pressing the [SELECT] key
turns off the scanning feature and shows the statistic of choice in the display
window. Continue to press the [SELECT] key until you reach the desired
statistic. Pressing the [SCAN] key will prompt the console to cycle through the
following statistics:
Distance
•
or kilometers), you would have traveled while riding a bicycle outdoors at the
same relative intensity.
•
Calories/Hour
during a workout.
•
Rate -
•
Floors
step. There are 16 steps per floor, and 48 floors per mile.
•
Level
hardest).
•
Watts
•
METs
tiples of the resting metabolic rate. While you are sitting quietly, your body
consumes oxygen at the rate of about 3.5 milliliters per kilogram of body mass
per minute. When you exercise, your body needs more oxygen in order to function. For example, exercising at 10 METs requires ten times the resting rate of
oxygen consumption, or about 35 milliliters per kilogram per minute. During a
workout, this key shows the current MET level. During the workout summary,
the average MET level is displayed.
•
Target Heart Rate
gram. Shows the selected target heart rate.
- Provides a cumulative total of the equivalent distance (in miles
- Provides a running total of the number of calories burned
Displays the current steps per minute.
- Displays the equivalent number of floors climbed with an 8-inch
- Shows the current intensity level between 1 (the easiest) and 20 (the
- Displays the exercise intensity in watts (746 watts = 1 horsepower).
- Gives you the relative energy cost of exercise. MET stands for mul-
- Available only during the Constant Heart Rate pro-
At the completion of a workout, the statistic averages are calculated
based on the accumulation of data during the workout program, and not not
including the cool down period.
Page 20

FREECLIMBER 4400/4600 PT/CL CONSOLE
EXERCISE PROGRAM KEYPAD
The exercise keypad is located below the display and to the left of the function
keypad. While the console is in the “SELECT WORKOUT” mode, press one of
the exercise program keys to preview the desired workout. There are six
workout programs with the following standard defaults (pressing [ENTER]
without inputting data first will prompt the console to enter these values):
• Weight - 175 lbs.
• Intensity Level - 3
• Workout Time - The default time in the programmed workouts
and Quick Start is 20 minutes. The Manual and Constant Heart
Rate programs do not have a specified default time. In these
programs, the console timer will count up to the maximum time of
99 minutes, and then return to 0.
• Age (Constant Heart Rate program only) - 40 years
Once you have selected a program, the prompts are:
•“ENTER BODY WEIGHT” - type in your body weight in
pounds (or kilograms if your console is set to metric units).
•“ENTER LEVEL 1 - 20” - select your intensity level with
level 1 being the easiest and level 20 the hardest.
•“ENTER TIME 5 - 99” - select the workout duration in one
minute increments from 5 to 99. Press 0 in the MANUAL and
CONSTANT HEART RATE program to workout for an unspecified
amount of time.
The Quick Start Program
Provides an immediate start, without having to enter any user information. This
program uses the standard default settings for derivation of calories burned.
The Manual Program
After pressing the [MANUAL] key, enter user and workout information. Begin
exercising at the selected level. If desired, adjust the workout manually by
using the intensity level arrow keys. The profile in the display window is
divided into 15 equal intervals within the workout time. The profile is based
Page 21
 Loading...