


StairMaster ®
ClubTrack® Treadmills
User’s Guide
for the
2100 LE Treadmill
2100 LC Treadmill
THE RESULTS YOU WANT ™

StairMaster is a division of Nautilus Health & Fitness Group Corporate Headquarters
1886 Prairie Way Louisville, CO 80027
(800) 864-1270
(303) 939-0100 Fax (800) 898-9410
www.stairmaster.com
Printed in the United States.
© 2003 StairMaster® Health & Fitness Products, Inc. All rights reserved.
P/N 27483 Rev A
© 2003 StairMaster Health & Fitness Products, Inc. StairMaster and ClubTrack are registered trademarks or trademarks of Nautilus, Inc. in the United States and/or other countries. All other trademarks are trademarks of their respective companies.
2
TABLE OF CONTENTS: |
|
SAFETY REQUIREMENTS ............................................................................................... |
5 |
UNPACKING and INSTALLATION INSTRUCTIONS...................................... |
7 |
Accessories and Options .............................................................................................................. |
7 |
How to Reach Us .............................................................................................................................. |
7 |
Guidelines For Getting ON and OFF the Treadmill....................................... |
8 |
LIMITED-ACCESS CONTROL ....................................................................................... |
9 |
Activation ............................................................................................................................................. |
9 |
Deactivation........................................................................................................................................ |
9 |
Magnetic Key as an Emergency Stop .................................................................................... |
9 |
HEART RATE MONITORING....................................................................................... |
10 |
Telemetry Heart Rate .................................................................................................................. |
10 |
Contact Heart Rate........................................................................................................................ |
11 |
EXERCISE INTENSITY, FREQUENCY, & DURATION.................................. |
12 |
Intensity ............................................................................................................................................. |
12 |
Frequency and Duration............................................................................................................. |
12 |
OPERATING THE CLUBTRACK 2100LE/2100LC TREADMILL.............. |
14 |
Turning on the Power.................................................................................................................. |
14 |
Understanding the Controller.................................................................................................. |
14 |
Controller Displays and Keys................................................................................................... |
15 |
ClubTrack 2100 LC Display Windows...................................................................................... |
15 |
ClubTrack 2100 LE Display Windows ...................................................................................... |
15 |
Numeric keypad ...................................................................................................................................... |
17 |
Incline UP [Ý] / DOWN [ß] Keys ................................................................................................. |
17 |
Speed FASTER [+] / SLOWER [-] Keys.................................................................................. |
18 |
Start Key....................................................................................................................................................... |
18 |
Cool Down Key ......................................................................................................................................... |
18 |
Stop Key........................................................................................................................................................ |
18 |
Display LOCK / UNLOCK - Statistics Key .............................................................................. |
19 |
Remote Operation Controls (ROC)............................................................................................ |
20 |
Workout Program Keypad ............................................................................................................... |
20 |
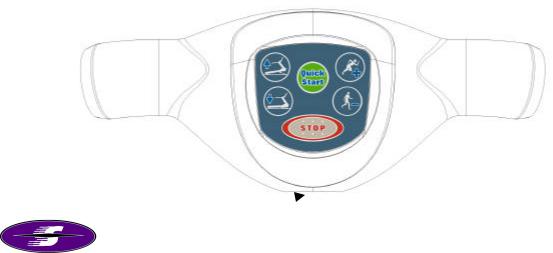
The Quick Start Program ........................................................................................................... |
21 |
The Manual Program.................................................................................................................... |
22 |
The Fat Burner Program............................................................................................................. |
23 |
The Calorie Burner Program..................................................................................................... |
24 |
3
The Speed Intervals Program ................................................................................................. |
26 |
Heart Rate (HR) Zone Trainer Program............................................................................. |
28 |
The Advanced Programs............................................................................................................. |
30 |
StairMaster Fit Test .............................................................................................................................. |
32 |
FireFighter Fitness Test..................................................................................................................... |
34 |
Custom Speed Interval Program ................................................................................................ |
36 |
HR Control Interval Program ........................................................................................................ |
38 |
5K Fun Run Program............................................................................................................................ |
41 |
10K Bolder Boulder Run Program.............................................................................................. |
42 |
Custom Calorie Burn Program...................................................................................................... |
43 |
9-Hole Walk Program.......................................................................................................................... |
44 |
Options During a Workout ........................................................................................................ |
45 |
Changing Speed, Incline or Target Heart Rate During a Workout .................... |
45 |
Pausing Your Workout ....................................................................................................................... |
46 |
COOL DOWN ..................................................................................................................................... |
46 |
Console Key Functions in Cool Down State ........................................................................ |
47 |
End of Your Workout.................................................................................................................... |
47 |
Auto Reset ......................................................................................................................................... |
47 |
Instruction Page ............................................................................................................... |
48 |
Using the ClubTrack® 2100 Treadmill .............................................................................. |
48 |
Heart Rate Priority on ClubTrack 2100 Treadmills ................................... |
49 |
Error Codes ........................................................................................................................... |
50 |
Viewing Maintenance Information ...................................................................... |
50 |
Changing the Workout Default Values .............................................................. |
51 |
Customizing the Treadmill......................................................................................... |
52 |
Maintenance ........................................................................................................................ |
53 |
Cleaning .............................................................................................................................................. |
53 |
Treadmill Interior .......................................................................................................................... |
53 |
Treadmill Belt Adjustments...................................................................................................... |
54 |
Belt Tension.................................................................................................................................................. |
54 |
Belt Tracking ................................................................................................................................................ |
55 |
Belt Replacement ...................................................................................................................................... |
55 |
Moving and Storing the Treadmill......................................................................................... |
56 |
Troubleshooting ................................................................................................................ |
56 |
IMPORTANT PHONE NUMBERS .............................................................................. |
57 |
4

SAFETY REQUIREMENTS
WHEN USING ELECTRICAL EQUIPMENT, ALWAYS FOLLOW THESE BASIC
PRECAUTIONS:
IMPORTANT SAFETY INSTRUCTIONS
The following definitions apply to the words “Danger” and “Warning” found throughout this manual:
DANGER - Used to call attention to IMMEDIATE hazards which, if not avoided, will result in immediate, serious personal injury or loss of life.
WARNING - Used to call attention to POTENTIAL hazards that could result in personal injury or loss of life.
READ ALL INSTRUCTIONS BEFORE USING THE MACHINE.
DANGER
To reduce the risk of electrical shock, always unplug the external power supply from the electrical outlet before cleaning, maintaining, or repairing.
WARNING To reduce the risk of burns, electric shock, or injury to persons:
Read this manual in full before operating the treadmill. Failure to follow these guidelines can produce a serious or possibly fatal electrical shock hazard or other serious injury. Consult a qualified electrician as required.
1.The controller Power key does not turn off the electrical current to the treadmill. The treadmill continues to draw power, even when the controller is off. To avoid electric shock, do not remove treadmill hood or place hands beneath the treadmill while the treadmill is plugged into a power source.
2.Do not start the treadmill when someone else is standing on the belt.
3.Keep speed and incline at the lowest settings when someone is getting on and off the treadmill.
4.Keep the area underneath and around the treadmill clear.
5.Before each use of this equipment, check the power receptacle for signs of damage. Do not operate the equipment if the integrity of this item is in question.
5
SAFETY REQUIREMENTS (continued)
6.To avoid potential safety and electrical problems, replace with manufacturer’s specified parts only.
∙IMPORTANT: Replace the drive belt with a StairMaster specified drive belt (P/N 27458). Failure to do so could create hazardous leakage currents without the correct part.
7.This equipment is classified Class I, Type B, ordinary equipment. Not protected against fluid ingress. Rated for continuous operation. Do not operate this equipment in the presence of flammable anesthetic mixtures.
8.Do not let liquid enter the controller. If it does, the controller must be inspected and tested for safety by an approved technician before it can be used again.
9.Increased risk due to leakage current can result if this equipment is not grounded properly.
10.The treadmill must be on an appropriate, dedicated electrical circuit. Nothing else should be connected to the circuit.
11.Incorrect installation by unauthorized personnel can lead to equipment damage and may void the warranty.
12.Do not stand on treadmill hood or front trim cover.
13.Close supervision is necessary whenever the machine is used by or near children, invalids, or disabled persons.
Failure to follow the conditions set forth below shall limit, to the extent allowed by law, StairMaster Health & Fitness Products, Inc. responsibility for the safety, reliability, and performance of this equipment.
•The operator manual must be read in full by each owner and trainer before the product is first used. Each user must be instructed in the proper use of the treadmill and its accessories.
•Assembly operations, extensions, readjustments, modifications, or repairs must be carried out only by StairMaster-trained or StairMaster-authorized personnel.
∙Do not remove the treadmill hood: dangerous voltages are present. Components are serviceable only by qualified service personnel.
•The electrical wiring within the treadmill setting and the electrical installation of the treadmill must comply with the applicable local or provincial requirements.
•The equipment must be used in accordance with the instructions for use.
SAVE THESE INSTRUCTIONS
6

UNPACKING and INSTALLATION INSTRUCTIONS
Please refer to the Treadmill Unpacking & Installation Instructions that shipped with the treadmill. These instructions provide information regarding receiving your order, site requirements, unpacking and installation steps, and testing the treadmill and controller.
The treadmill and controller must be installed correctly before being used. StairMaster® recommends that you contact your treadmill dealer or sales representative when your equipment arrives. The representative will help unpack, install, and demonstrate it, to ensure that:
•The equipment is free from shipping damage.
•The treadmill is connected correctly to the appropriate AC power source.
•Installation and operation are in accordance with StairMaster standards.
Incorrect installation by unauthorized personnel can lead to equipment damage and may void the warranty.
WARNING
THE TREADMILL MUST BE ON A DEDICATED BRANCH CIRCUIT. NO OTHER DEVICE SHOULD BE CONNECTED TO THAT CIRCUIT.
EXCESSIVE RISK CURRENT (LEAKAGE) CAN RESULT IF THE EQUIPMENT IS NOT
PROPERLY GROUNDED.
FAILURE TO FOLLOW THESE GUIDELINES WILL PRODUCE A SERIOUS OR POSSIBLY
FATAL ELECTRICAL SHOCK HAZARD.
CONSULT A QUALIFIED ELECTRICIAN AS REQUIRED.
Accessories and Options
An operator manual (P/N 27483) is shipped with each treadmill. The following options are available:
Part No. |
Description |
36147-001 |
Left Handrail Kit |
36147-002 |
Right Handrail Kit |
36147-003 |
Left and Right Handrails |
34198-003 |
Transmitter Belt with strap (HRM) |
•To avoid potential safety and electrical problems, use parts and accessories that meet StairMaster specifications.
How to Reach Us
For Technical Assistance / Parts:
North America: |
800-331-3578 |
International: |
800-864-1270 x1603 |
See addresses and phone numbers listed at the end of this manual.
7
Guidelines For Getting ON and OFF the Treadmill
Instruct each user in the following guidelines for getting on and off the treadmill.
•The walking belt should be moving at minimum speed before the user steps onto the treadmill.
1.Stand next to the treadmill and place both hands on the front handrail.
2.Straddle the walking belt or step onto the side of the deck. Step onto the moving belt and begin walking.
3.(Optional) To get the feel of the moving belt, place the foot nearest the treadmill on the walking belt and let it move backwards. Lift it and repeat several times until comfortable with the treadmill speed.
4.When walking comfortably on the treadmill, let go of the handrail.
5.While walking on the treadmill:
•Face forward. Avoid looking down at the walk belt.
•Maintain speed by keeping a consistent distance from the handrail.
•Adjust the speed and incline as required. Hold the handrail as the speed and incline change.
6.Before stepping off the treadmill, place one hand on the handrail, wait for the belt to stop, then step off.
8
LIMITED-ACCESS CONTROL
Limited-access control lets you restrict treadmill use to authorized personnel. It also lets you stop the treadmill in an emergency. The magnetically-activated control is located on the front of the handrail, just below the STOP key. The limited-access control is deactivated on machines shipped from the factory.
Activation
To activate the limited-access control and restrict access, place the magnetic key supplied with the treadmill in the designated area in the front handrail so that the StairMaster trademark “S” logo on the key faces the user.
Magnetic Key
The magnet will activate the control. If you remove the key, the treadmill belt will stop and the controller will not respond to any key presses. Accumulated values will remain on the display until you turn off the power, or press [CLEAR].
The console will display a message, “REPLACE MAGNET” when you remove the magnetic key from its designated area. You must replace the key or deactivate the control to start the walk belt.
Deactivation
To deactivate the limited-access control and permit unlimited access of the treadmill:
1.Remove the magnet key and press [CLEAR], [3], [8], [ENTER].
2.Press [Speed: +] or [Speed: -] to toggle between “ON” and “OFF.” With “OFF” displayed, press [ENTER] to select “OFF.”
3.The display will show “CUSTOMIZE.” Press [CLEAR] or [ENTER] and the display will return to the “SELECT WORKOUT” screen.
4.The limited access control remains inactive, granting unrestricted access, until you turn the magnetic key option back on, or place the magnet back in its designated area.
Magnetic Key as an Emergency Stop
The magnetic key has a string with a clip that you can attach to the user’s wrist or belt during exercise. If the user moves too far from the front handrail, the cord will pull the key off and stop the walk belt.
9

HEART RATE MONITORING
Heart rate monitoring helps users monitor their levels of exertion by displaying the heart rate during exercise. There are two methods of monitoring heart rate on Clubtrack treadmills:
•Telemetry (e.g., Polar®) belt. A Polar-compatible heart rate chest belt transmits the heart beat signal to the receiver in the controller. The controller displays the heart rate in beats per minute and uses the heart rate value in heart rate control mode.
•Contact heart rate (handgrip). Sensors on the handgrip detect heart rate and display it on the controller.
Telemetry Heart Rate
The telemetry heart rate monitoring system consists of the receiver, located in the controller, and a transmitter belt (purchased separately) worn across your chest. The monitoring function is activated as soon as you strap on the chest belt and step within range of the receiver in the machine. Two electrodes on the underside of the chest belt sense the heart rate signal and send it to the receiver. The heart symbol on the controller pulses to indicate that the controller is receiving a valid signal. A microprocessor in the controller calculates the heart rate and displays it, in beats per minute, on the controller.
WARNING
PACEMAKER USERS SHOULD NOT USE THE TELEMETRY TRANSMITTER
BEFORE CONSULTING WITH THEIR DOCTOR.
Before you put the transmitter belt on, wet the two electrode patches (the grooved rectangles on the reverse side of the belt). Secure the transmitter belt as high under the pectoral muscles (chest) as is comfortable (at the level of the xyphoid process). The transmitter belt should fit snugly and comfortably, and allow normal breathing. When the controller detects a heart rate signal, heart rate is shown in the display automatically. Your heart rate in beats per minute and a pulsing heart icon are displayed on the controller.
After the initial belt signal is detected, the controller will enter a validation phase in which four good heart beat signals lasting four seconds are required before locking on telemetry heart rate signals for the duration of the workout session. During the validation phase the controller will not recognize contact heart rate signals. If you do not see a heart rate on the controller, try one of the following:
•Move closer to the controller.
•Tighten the elastic part of the chest belt.
•Adjust the belt higher or lower on your chest.
•Remoisten the electrodes.
•Test your chest strap with a machine that you know is working, or with a heart rate watch that you know is working.
•Check the heart rate priority setting for the ClubTrack 2100.
10
HEART RATE MONITORING (cont.)
Maintaining the Transmitter Belt
Clean the chest belt regularly with mild soap and water, then dry thoroughly — residual sweat and moisture keeps the transmitter active and will drain the battery in the transmitter. Do not use abrasives or chemicals such as steel wool or alcohol for cleaning, as they can damage the electrodes permanently. You can order replacement belts from StairMaster or your local fitness store.
Contact Heart Rate
The StairMaster® Treadmill exercise system features a digitized contact heart rate monitoring system. Through the use of stainless steel sensors built into the handle bar and using sophisticated software, heart rate can be checked at any time during a workout. The heart rate is displayed on the controller.
The contact heart rate system’s ability to detect a heart rate signal is influenced by several factors. Movement of the muscles of the upper body produces an electrical signal (muscle artifact) that will interfere with the detection of the heart rate signal by the sensors. Movement of the hands while they are in contact with the sensors also produces interference. Calluses and hand lotion act as an insulating layer to reduce the signal strength. Also, the EKG signal generated by some individuals is not strong enough to be detected by the sensors. These individuals should opt for the telemetry method of heart rate monitoring.
Contact heart rate input signals are acquired only during contact between your hands and the stainless steel sensors on the handrails. To use the contact heart rate feature, place your hands around the handles so that your hands touch both the top and the bottom of the sensors. After the initial contact heart rate signal is detected, the controller will enter a validation phase requiring a good heart beat signal within 10 to 15 seconds, or until the system acquires a valid signal. During the validation phase the controller will not recognize telemetry heart rate signals. The controller will display a heart icon. If, during exercise, the heart rate displayed is erratic, it may be helpful to remove your hands from the handles, wipe them and place them back on the handles. In all programs, the heart rate is shown automatically in the display window the first time the sensors are touched.
11

EXERCISE INTENSITY, FREQUENCY, & DURATION
No single fitness program is suitable for all. All fitness programs should be designed by fitness professionals who are trained to tailor the program to the individual goals and fitness levels of each client. The following information on exercise intensity, duration, and frequency is based on averages and is included here only as a guideline for use by fitness professionals. Programs should be altered for comfort and safety when necessary.
WARNING
DO NOT BEGIN AN EXERCISE PROGRAM
WITHOUT CONSULTING A PHYSICIAN.
Intensity
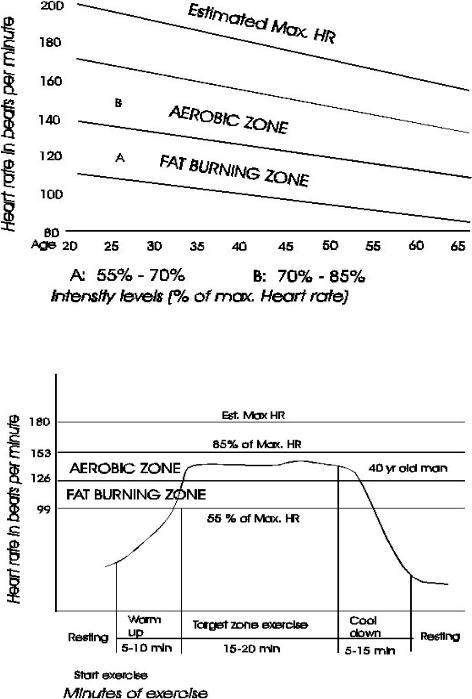
Exercise intensity depends upon the capacity of the individual to do the specific type of exercise. The exercise should exceed mild demand, but should not produce fatigue, breathlessness, or mental confusion. Choose a target zone according to personal fitness goals.
•A typical conditioning intensity for a healthy adult is from 50 to 80 percent of functional capacity, which is equivalent to 55 to 85 percent of maximal heart rate. For clients wanting to reduce body fat, who have been sedentary, who are in poor physical condition, or who are just starting an exercise program, an exercise intensity at 50 to 65 percent of functional capacity or 55 to 70 percent of maximal heart rate is recommended. For healthy, active clients wanting to improve their cardiovascular condition, and intensity from 65 to 80 percent of functional capacity or 70 to 85 percent maximal heart rate is recommended. Begin exercise at low intensity, especially for sedentary persons. As fitness improves, vary the exercise within the target zone. 1
Frequency and Duration
Fitness experts recommend that exercise be done at least three times a week and should last between 15 and 60 minutes. Spread workouts throughout the week to let the body recover properly. Begin each workout slowly and let the body warm up for at least five minutes below the target zone. Gradually increase the intensity until the client is in the target zone. Maintain the target zone for 15 to 20 minutes (15 to 60 minutes as fitness increase). Gradually reduce the intensity to let the heart rate fall below the target zone with a five minute cool-down period (see graph below). 1
12
EXERCISE INTENSITY, FREQUENCY, & DURATION (continued)
Intensity Levels (% of max. heart rate)
1. |
The American College of Sports Medicine, Guidelines for Exercise Testing and |
|
|
|
Prescription, 4th Edition, Lea & Febiger, Philadelphia, PA, 1991, pp. 93-120. |
13
OPERATING THE CLUBTRACK 2100LE/2100LC TREADMILL
Follow the safety guidelines for using the treadmill given in the Safety Requirements section.
Turning on the Power
Turn on the circuit breaker switch on the bottom front panel of the treadmill to power on the treadmill controller. If the limited-access control is on, place the magnetic key in the designated area at the front of the handrail. Attach the cord of the key to the user’s wrist or belt if desired. The screen displays “SELECT WORKOUT” after the system runs a self-test.
Understanding the Controller
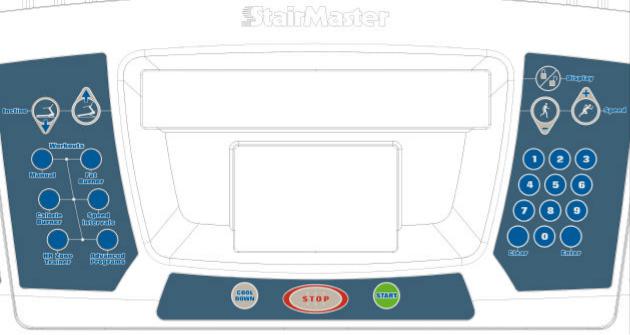
The treadmill controller, which is mounted above the front handrail, is a computerized panel used to operate the treadmill. All commands are entered by pressing a soft-touch key on the panel. Visual indicators and displays show the operational status and exercise results. The controller is divided into the following sections: the display windows, the workout options, the Incline keys, the Start Belt key, the Cool Down key, the Stop key, the Display Lock / Unlock key, the Speed keys, and the numeric keypad.
ClubTrack 2100 LE / 2100 LC Control Panel
14

Controller Displays and Keys
ClubTrack 2100 LC Display Windows
Text Line
Incline |
Time |
Speed |
Interval Timer |
|
Heart Rate |
Workout Profile
ClubTrack 2100 LE Display Windows
Text Line
Incline |
Time |
Heart Rate |
Speed |
Workout Profile
15
The following describes the displays, controller keys and their function on the ClubTrack 2100 LE and ClubTrack 2100 LC treadmills:
Text Line - Message prompts and statistics are displayed in the text line that is located on the top line of the upper display.
Incline – The treadmill incline is displayed in percent elevation in the left display area on the second line of the upper display. The ClubTrack 2100 LE / 2100 LC has an incline range of 0 to 15% (optional incline range is –3 to 12%).
Time - The selected workout time is displayed in the upper left section of the display window. In most of the workouts, the timer will count down, in minutes and seconds, until the workout is finished or stopped. In [MANUAL] workout or if [QUICK START] is entered, the timer will count up. The timer will also count up if [START] is pressed without selecting a workout program.
Speed - The treadmill speed is displayed in miles per hour (or kilometers per hour). The ClubTrack 2100 LE / LC has a speed range of 0.5 to 12.0 mph (0.8 to 19.2 kmh).
Heart Rate - Current heart rate is displayed next to the heart icon. On the ClubTrack 2100 LC the heart rate is displayed to the upper right in the lower display area. On the ClubTrack 2100 LE the heart rate is displayed on the second line in the upper display between the Time and Speed displays.
Interval Timer – On the ClubTrack 2100 LC only, the interval timer is displayed to the upper left in the lower display area. The interval timer counts down the remaining time within each interval. In heart rate control programs, the user’s heart rate zone is displayed in terms of % of maximum predicted heart rate.
Workout Profile - A profile of the selected exercise program appears in the lower section of the display window during a workout. The taller the column, the higher the intensity (METs) for that interval. The flashing column shows your current interval. The flashing column moves from left to right across the display as you complete each interval.
16
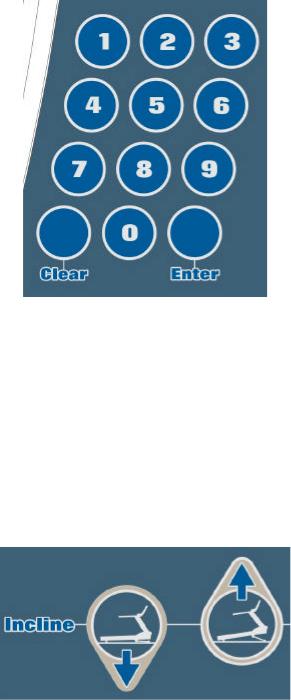
Numeric keypad
The numeric keypad is located on the right side of the controller. Before the exercise program begins, the numbers are used to enter data in response to the controller prompts. After the workout starts, the numbers are used to enter the desired speed or target heart rate.
•Enter - Confirms workout selections and stores the information used by the controller to calculate workout statistics.
•Clear - During data entry, erases information from the controller memory and backs up to the previous data entry prompt.
Incline UP [Ý] / DOWN [ß] Keys
The treadmill incline may be changed at any time during a workout. Pressing the [Incline: Ý] key increases the incline and pressing the [Incline: ß] key decreases the incline. After the first press of an Incline key, the text line will show the target incline. Further presses will increase or decrease the deck angle by one increment, or 0.5%, depending on the workout option selected.
17
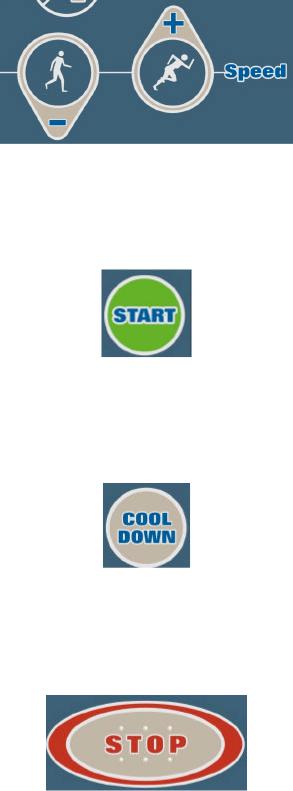
Speed FASTER [+] / SLOWER [−] Keys
The treadmill belt speed may be changed at any time during a workout. Pressing the [Speed: -] key decreases the belt speed and pressing the [Speed: +] key increases the belt speed. The belt speed increases or decreases by 0.1 MPH (0.15 KM/H).
Start Key
The start belt key starts the walk belt with a gradual increase to the default start speed of the workout selected. You can also use this key for an immediate start to a quick-start workout session. The timer will count up from 0:00 to 99:59, then repeat from 0.
Cool Down Key
The cool down key will cause the workout program to end. The treadmill incline returns to 0% and the speed decreases to 1.0 MPH if prior speed is less than 2.0 MPH. If the prior speed was greater than 2.0 MPH the speed decreases to 2.0 MPH. You can adjust the incline and speed at any time during the cool down.
Stop Key
Press the [STOP] key any time you want to pause the workout program for up to one minute. If the [STOP] key is pressed a second time, the workout statistics will be displayed, then the controller will return to the "SELECT WORKOUT" prompt.
18
 Loading...