

Page 1

Page 2

Page 3

FOREWORD
This manual has been prepared to acquaint you with the operation and maintenance of
your new REXTON and to provide important safety information. We urge you to read it
carefully and follow the recommendations to help assure the most enjoyable, safe, and
trouble-free operation of your vehicle.
When it comes to service, remember that your SSANGYONG dealer knows your ve-
hicle best and is interested in your complete satisfaction.
We would like to take this opportunity to thank you for choosing REXTON and assure
you of our continuing interest in your motoring pleasure and satisfaction.
This manual should be considered as a permanent part of your vehicle, and must remain with the vehicle at the time of resale.
PYUNGTAEK, KOREA
Page 4
IMPORTANT NOTICE
Please read this manual and follow the
instructions carefully.
: This is the safety alert symbol used
to alert you to potential hazards
including injuries or damage to your
vehicle or other property. Obey all
safety messages that follow this
symbol.
Throughout this manual, you will find special
notations:
• Warning
• Caution
• Note
WARNING
WARNING indicates a potentially
hazardous situation which, if not
avoided, could result in serious
injury or death.
CAUTION
CAUTION indicates a potentially
hazardous situation which, if not
avoided, may result in minor or
moderate injuries, or damage to
your vehicle or other property.
NOTE
NOTE indicates information which
will assist you with maintenance or
other instructions concerning your
vehicle.
: The asterisk in this manual signi-
*
fies an item of equipment that is not
included on all vehicles. Such items
include engine options, model
variations specific to one country,
and optional equipment.
All information, illustrations, and specifications in this manual are based on the latest
product information available at the time of
publication.
Ssangyong reserves the right to change
specifications or designs at any time without
notice and without incurring obligation.
This vehicle may not comply with the
standards or regulations of other countries.
Before attempting to register this vehicle in
any other country, check all applicable
regulations and make any necessary
modifications.
This manual describes options and trim
available at the time of publication. Some of
the items covered may not apply to your
vehicle. Contact your Ssangyong dealer for
information on option and trim availability.
Non-Ssangyong Genuine parts and
accessories have not been examined or
approved by Ssangyong. We can not certify
the suitability or safety of non-Ssangyong
Genuine parts and accessories and are not
liable for damage caused by their use.
Page 5

TABLE OF CONTENTS
1. BEFORE DRIVING YOUR CAR ................................................................................................................ 1-1
2. STARTING AND OPERATING................................................................................................................... 2-1
3. INSTRUMENTS AND CONTROLS .......................................................................................................... 3-1
4. SEAT AND RESTRAINT ............................................................................................................................. 4-1
5. VENTILATION, HEATING AND AIR CONDITIONING ............................................................................. 5-1
6. TURBO CHARGER SYSTEM ................................................................................................................... 6-1
7. IN CASE OF EMERGENCY ...................................................................................................................... 7-1
8. SERVICE AND MAINTENANCE ............................................................................................................... 8-1
9. VEHICLE CARE ......................................................................................................................................... 9-1
10. SPECIFICATION AND SERVICE DATA .................................................................................................. 10-1
11. INDEX ........................................................................................................................................................ 11-1
Page 6

Page 7

1
BEFORE DRIVING YOUR CAR
Page 8

1–2 BEFORE DRIVING YOUR CAR
RUNNING-IN PERIOD
There are no particular brake-in rules for
your new Rexton. However, following a few
simple precautions for the first few hundred
kilometers can add to the good future performance, economy and long life of your
Rexton.
• Do not race the engine.
• While driving, keep your engine speed
(RPM) below the red zone.
• Avoid full-throttle starts.
• Avoid hard stops, except in emergencies.
This will allow the breaks to bed in properly.
• Drive at varying speeds, trying not to
“strain” the engine.
• Refrain from towing a trailer or an other
vehicle.
• Avoid harsh operations such as abrupt
start, sudden acceleration and prolonged
high speed driving.
These operations not only have a detrimental effect on the engine but also
cause excessive fuel and oil consumption, which could result in the malfunction of the engine components.
Especially, avoid full-throttle acceleration
in low gear.
BEFORE ENTERING THE CAR
• Ensure that windows, outside rear view
mirrors and lights are clean, undamaged
and unobstructed.
• Visually note inflation condition of tyres.
• Check that all lights, switches and controls work properly.
• Check the area behind the vehicle if you
are about to reverse.
• Check under the vehicle for leaks.
• Check the engine oil level and other fluid/
oil levels in engine compartment.
BEFORE DRIVING OFF
• Be sure you understand your car and
its equipment and how to operate it
safely.
• Adjust your seating position.
• Adjust inside and outside mirrors.
• Ensure that all occupants of the car
have fastened their seat belts.
• Check the operation of the warning
lights when the ignition key is turned to
“ON” position.
• Check all gauges.
• Release the parking brake and ensure
that the brake warning light goes out.
WARNING
Check to ensure that all light, signaling systems and warning indicators
are in working order.
Page 9
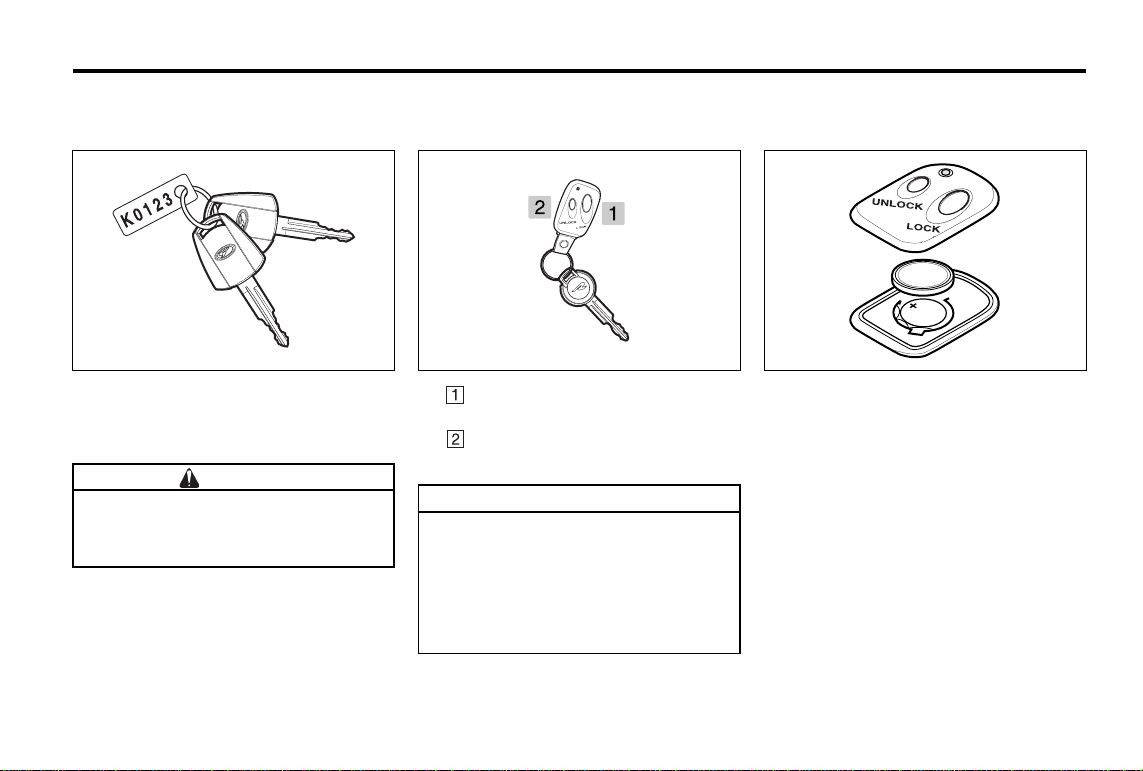
KEY
BEFORE DRIVING YOUR CAR 1–3
REMOTE KEYLESS ENTRY
SYSTEM (REKES)*
Two keys are provided which fit all key cylinders. Keep one of the two keys as a
spare.
WARNING
Do not leave the key with the vehicle.
• Lock the vehicle.
• Take the key with you.
1. LOCK button: Locks all doors.
Tail lamps will flash twice.
2.
UNLOCK button: Unlocks all doors.
Tail lamps will flash once.
NOTE
Do not get the transmitter wet.
Avoid shock to the transmitter.
If you lost the transmitter and replaced with new, the correct code
must be newly programmed for the
operation.
Battery replacement
If the LED fails to illuminate, the transmitter
can still be used for a while. However, it is
an indication that a new battery is needed.
Use a CR 2025 battery for replacement and
adopt the following replacement procedure:
1. Unscrew the screw from the rear cover.
2. Remove the battery, taking care to avoid
touching the circuit board or other components.
Page 10
1–4 BEFORE DRIVING YOUR CAR
3. Fit the new battery, ensuring that correct polarity is maintained (positive (+)
side facing down towards the base).
Finger marks will adversely affect battery life ; if possible, avoid touching the
flat surfaces of the battery and wipe
them clean before fitting.
4. Reassemble the cover of the transmitter.
5. Check the transmitter operation.
CAUTION
Used lithium battery can be a hazard to health and the environment.
• Do not dispose of used battery with
household waste.
• Check with local authority or
Ssangyong Dealer for safe disposal facilities.
CAUTION
Transmitter can be damaged.
• Do not reverse the polarity.
• Avoid dropping.
• Do not place heavy objects on it.
• Keep transmitter away from water
and direct sun light.
NOTE
If transmitter gets wet, wipe it with
soft cloth.
Operational distance of REKES is
about 5 m to the vehicle.
Use only designated battery.
When the REKES is replaced with
new, reprogram the code from our
service networks.
The life of battery will be reduced a
lot if you use very frequently or replaced with poor battery.
Operate the REKES when all the
doors are closed. If a door is opened,
the telltale lamps will not flash when
the button is pressed.
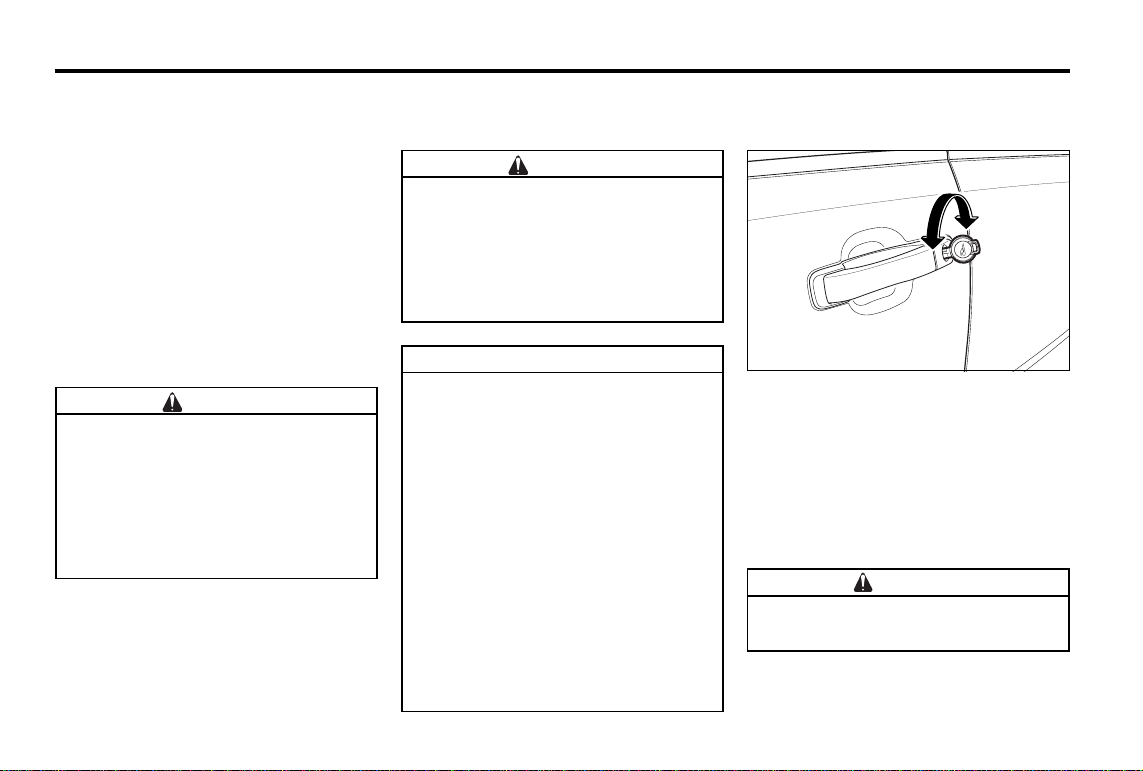
LOCKING/UNLOCKING DOORS
WITH KEY (DRIVER’S DOOR)
Close
Open
Front doors can be locked or unlocked
from outside by using the key.
To lock all doors, turn the key towards the
rear of the vehicle.
To unlock all doors, turn the key towards the
front of the vehicle.
To open the door, pull the door handle while
the door is not unlocked.
CAUTION
Lock all doors and tailgate when
leaving the vehicle unattended.
Page 11
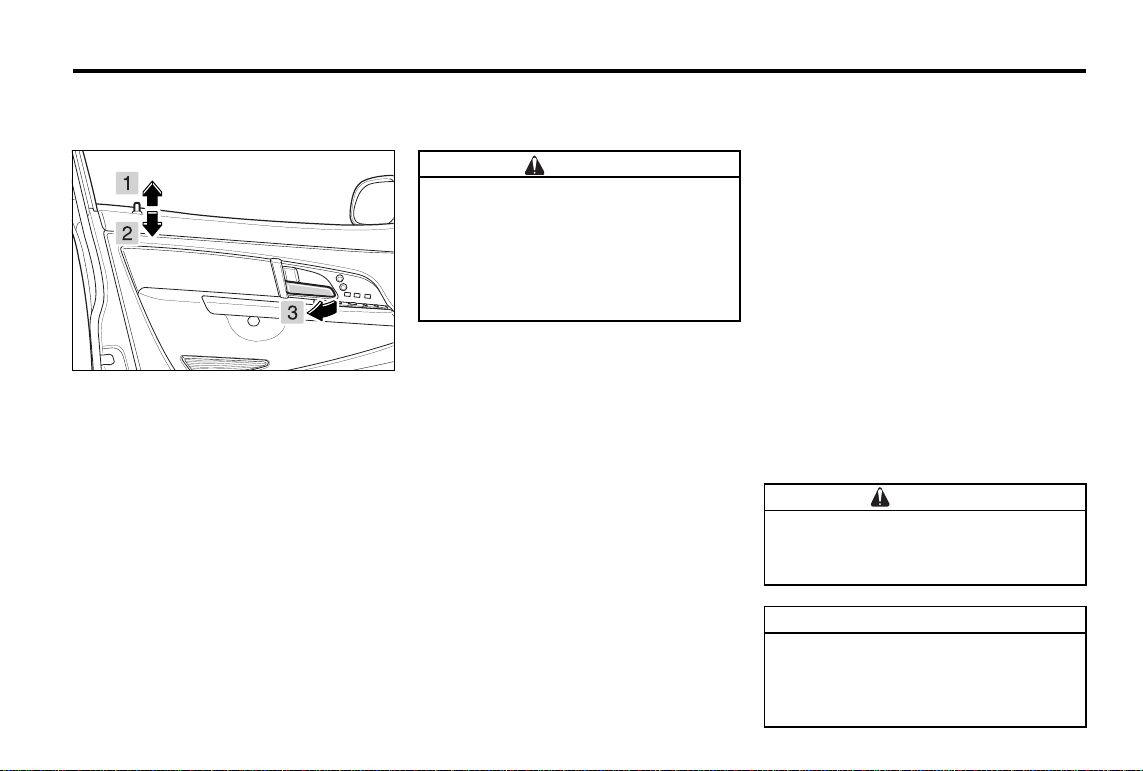
DOOR LOCK BUTTON
Each door can be locked or unlocked from
the inside by pushing or pulling the door lock
button.
1. Unlocking
2. Locking
When you press the button on the
driver’s or passenger’s door, buttons on
all doors will be positioned to the lock
(Door lock buttons can be positioned to
the lock only when all doors are closed).
3. To open the door from the inside, lift the
door lock button and pull the inside
handle.
WARNING
Never leave children or animals unattended in the vehicle.
• They can move the vehicle unexpectedly.
• They can be suffocated in especially hot weather.
BEFORE DRIVING YOUR CAR 1–5
AUTOMATIC DOOR LOCKING
SYSTEM
Automatic door locking
All the doors will be automatically locked
when you drive over 50 km/h while the doors
are unlocked.
Door unlocking
If you press the door unlock switch or pull
the inside door handle, all the doors will be
unlocked automatically (Available from
driver’s seat).
The doors locked by automatic door locking
system will be automatically unlocked when
the vehicle is over a certain speed and at
the event of collision.
CAUTION
Automatic door locking system may
not function when the door or/and
body is deformed by collision.
NOTE
All doors will be automatically
locked again if you drive over 50km/
h when auto door locking system is
released.
Page 12
1–6 BEFORE DRIVING YOUR CAR
UNLOCKING SWITCH ON
DRIVER’S DOOR
To unlock all doors in driver’s seat, press the
inner side of the switch.
UNLOCKING SWITCH ON
PASSENGER’S DOOR
To unlock all doors in passenger’s seat,
press the outer side of the switch.
TAILGATE LOCK BUTTON
Tailgate can be locked or unlocked from the
inside by pushing or pulling the tailgate lock
button.
NOTE
Tailgate and tailgate window will be
locked or unlocked simultaneously.
Page 13
IMMOBILIZER SYSTEM*
The Immobilizer System provides an additional theft deterrent to the vehicle in which
it is installed and prevents it from being
started by unauthorized persons.
When the ignition key with integrated transponder is turned to the ON position, ECU
(Engine Control Unit) checks the crypto code
of key and, if correct, allow your Rexton to
start the engine.
If you can not start the engine, have the
system checked by Ssangyong Dealer.
The valid key for a vehicle equipped with a
Immobilizer System is a mechanical ignition
key with integrated transponder, which is
electronically coded. The transponder is
placed invisibly in the ignition key.
Only valid ignition keys can be used to start
the engine.
The immobilizer system isolates fuel injection
control system in ECU (electric control unit)
when invalid keys are used.
Transponder code
The 2 keys have respectively coded
transponders.
When lost the keys
When lost the keys, you have to erase the
transponder key from the engine control unit.
To prevent the vehicle from being stolen by
lost keys, contact our service networks.
When the transponder has damaged
When the transponder has damaged, you
must replace it with new one and register
new code on engine control unit at our service network. Otherwise, the engine cannot
be started.
BEFORE DRIVING YOUR CAR 1–7
Immobilizer indicator*
This indicator indicates the operating conditions of immobilizer system.
If this indicator flickers, it may indicate that
there is something wrong in the immobilizer
system.
CAUTION
Brief lighting of this indicator means
that the communication between ignition key and engine control unit is
in normal condition.
If the indicator remains flickering,
have the immobilizer system checked
by Ssangyong Dealer or Ssangyong
Authorized Service Operation.
Page 14
1–8 BEFORE DRIVING YOUR CAR
WARNING
In any cases, the immobilizer system
can not be removed from the vehicle.
If you attempt to remove it and damage the system, starting will be
impossible, so never attempt to
remove, damage or modify it.
And, remote engine starter can not
start the vehicle equipped with immobilizer system. So never install a remote engine starter.
CAUTION
• Do not drop or shock to the transponder in the key, or it could be
damaged.
• If the transponder has damaged,
replace the key from Ssangyong
Dealer and register the code to the
engine control unit to be started.
• Be careful not to lose your key, or
the vehicle could be stolen. When
you lost the key, erase the lost
key’s transponder code from the
engine control unit in Ssangyong
Dealer to prevent the vehicle from
being stolen by lost key.
• When you have to replace the engine control unit, replace all transponders at the same time.
• Immobilizer system could be
inspected, replaced, serviced, and
coded only in Ssangyong Dealer. And
the only authorized personnel in
Ssangyong Dealer could work on it.
• When you erase the code or register
an extra key, please attend on the site.
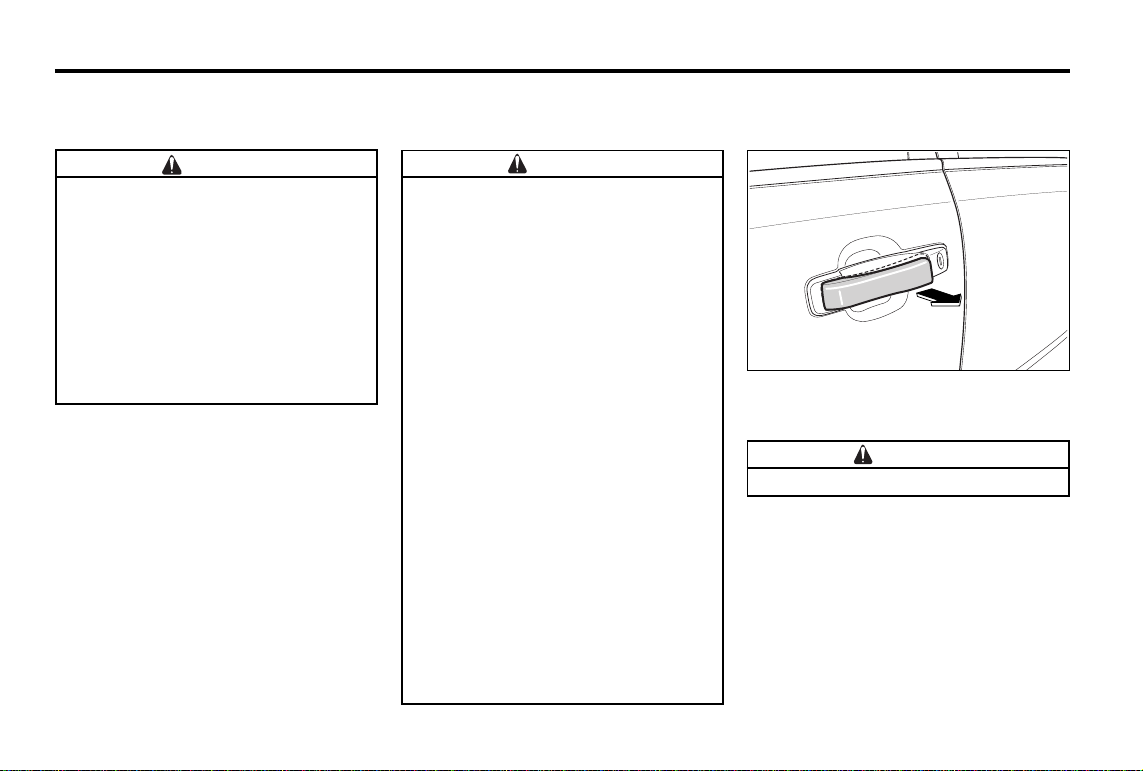
OPENING THE DOOR FROM
OUTSIDE
To open the door, pull the outside door handle
outward.
CAUTION
The door should be already unlocked.
Page 15
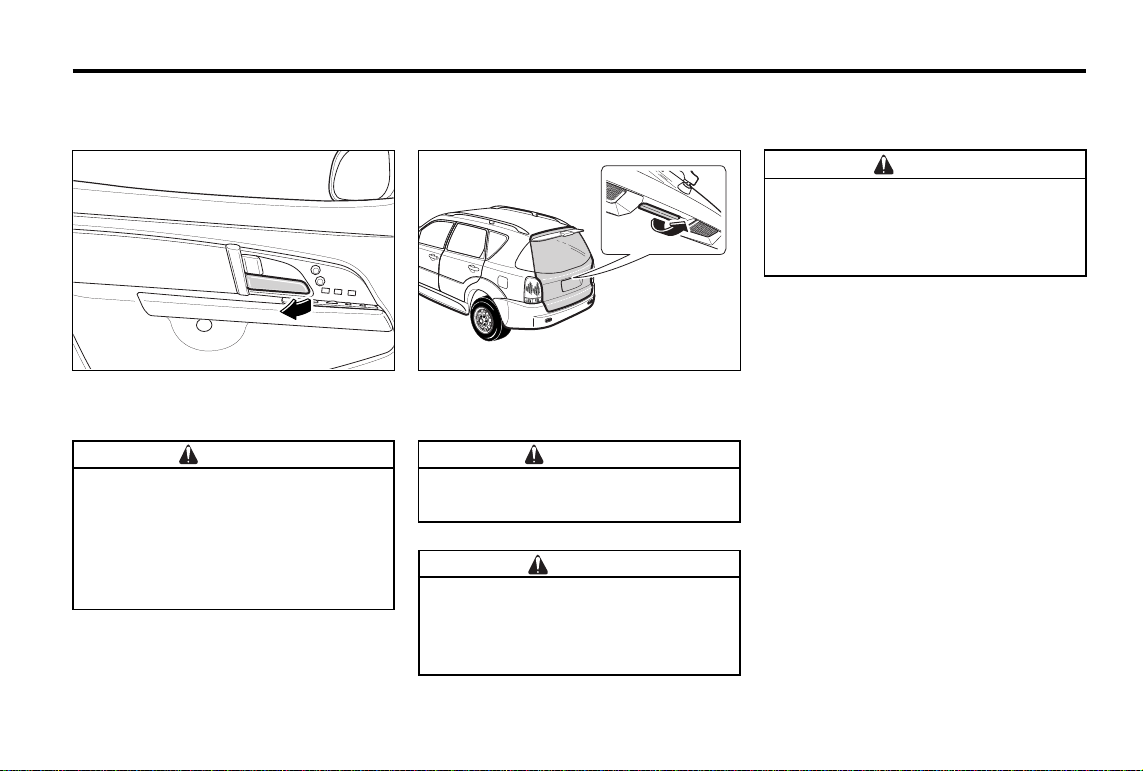
OPENING THE DOOR FROM
INSIDE
BEFORE DRIVING YOUR CAR 1–9
OPENING THE TAILGATE
WARNING
Exhaust gases are poisonous.
Do not drive with the tailgate open
to avoid exhaust gas in passenger
compartment.
To open the door, pull the inside door handle
inward.
CAUTION
The door should be already unlocked.
However, even though the doors are
locked, door opening is available
from driver’s side and all doors will
be unlocked.
To open the tailgate, lift the tailgate handle
upward.
CAUTION
The door and tailgate should be already unlocked.
WARNING
An open tailgate while vehicle is in
motion could obscure rearward vision, resulting in an accident.
Do not travel with the tailgate open.
Page 16
1–10 BEFORE DRIVING YOUR CAR
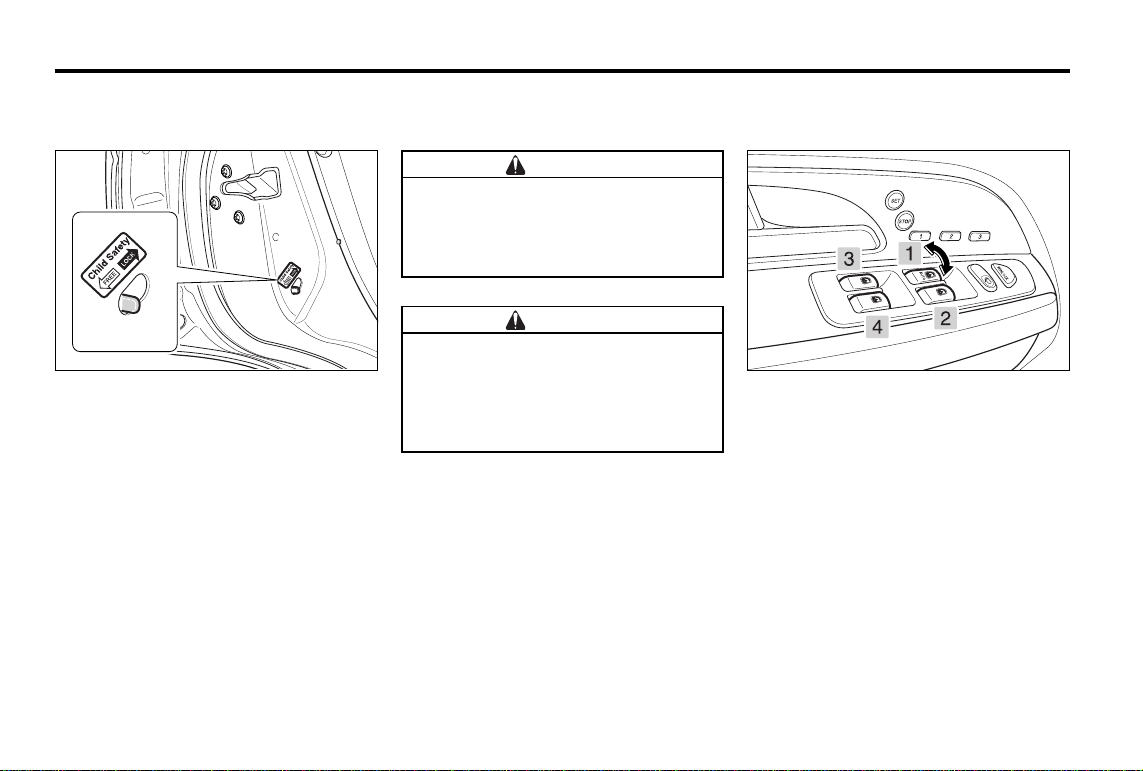
CHILD SECURITY DOOR LOCKS
Child security locking helps prevent rear
doors from being accidentally opened by
children in the car.
Child security door locks are provided with
both rear doors.
When the child-safe lever is in “LOCK” position, the door can not be opened from the
inside.
Moreover, the inside door catch will be fixed
at the locking position and can not be pulled.
Rear doors locked with the child safe mechanism can still be opened from the outside if
the door button is in the unlock position.
WARNING
Children in rear seats can open rear
doors.
• Move child security door lock
latch to lock position.
CAUTION
Inside door handle could be damaged.
• Do not pull inside door handle
when using child security door
locks.
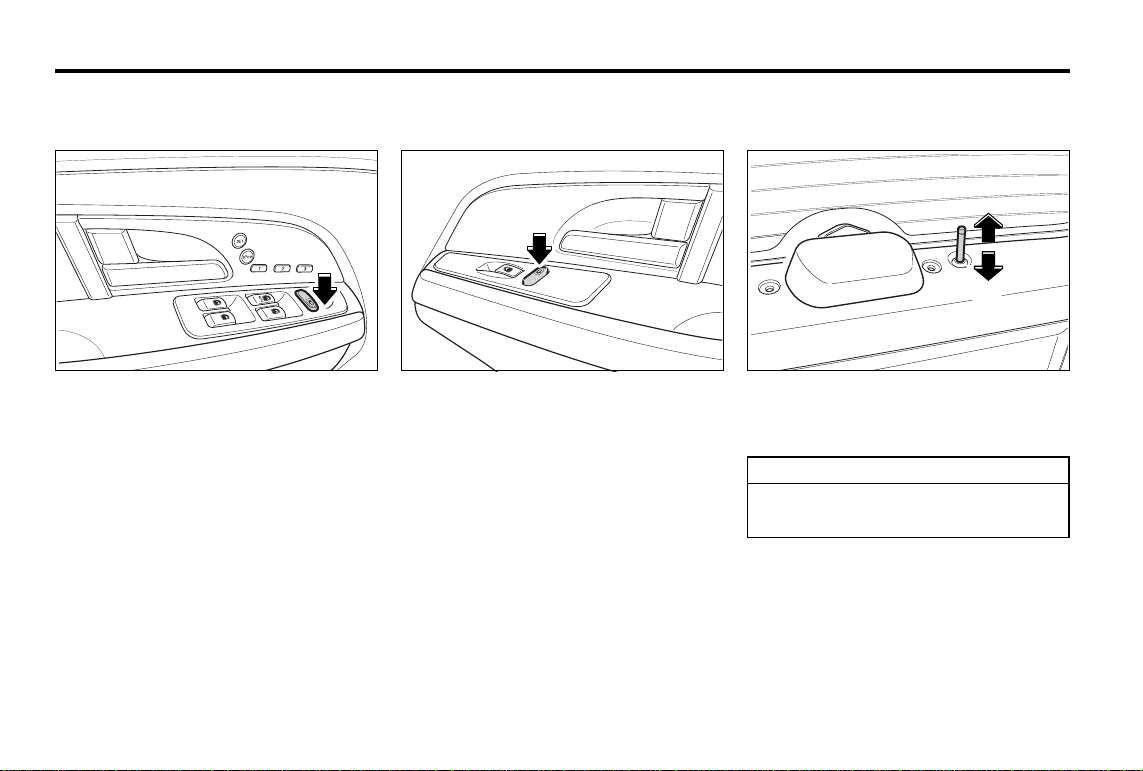
WINDOW SWITCH (DRIVER’S
SEAT)
1. Driver’s window
2. Passenger’s window
3. Rear left window
4. Rear right window
You may operate the power windows when
the ignition switch is ON by using the power
window switches on each door panel.
• To lower the window, press down the
front area of the switch.
• To raise the window, pull up the front
area of the switch.
Page 17

BEFORE DRIVING YOUR CAR 1–11
Driver’s window
The driver’s window switch operates in two
stages.
When the front of the switch is lightly
pressed (stage 1), the window will be lowered while the switch is pressed. When
pressed to its end (stage 2), the window
will open automatically until it is fully open.
If you want to stop the window while automatic lowering, lightly press the switch
(stage 1) again or pull up the switch.
Operating time lag
The operation of power window can be
continued for 30 seconds even after turning the ignition switch off.
POWER WINDOW LOCK SWITCH
(ON DRIVER’S DOOR PANEL)
If this switch is pressed, all door windows
are operated only by driver’s door window
switches. To deactivate, press the switch
again. The driver’s window operates without relations to window lock switch.
NOTE
The rear door window does not open
fully.
WINDOW SWITCH (EXCEPT
DRIVER’S SEAT)
Passenger’s and rear door window
switches are located on each door to operate the corresponding door window.
To lower the window press down on the
switch.
To raise the window lift up on the switch.
Release the switch when the window
reaches the desired position.
Page 18
1–12 BEFORE DRIVING YOUR CAR
WARNING
Accidental closing of the power window can result in serious injury.
• When carrying children on the
rear seat, press the rear door window lock switch to make the rear
door switches inoperative.
• Do not allow children to play with
the power window switch and rear
door window switches.
• When closing the passenger’s and
rear windows from driver’s seat,
make sure of safety conditions
before operation.
WARNING
Parts of the body can be trapped in
power window and struck by passing
objects.
• Keep a close watch on the windows
when closing them.
• Do not stick hands, head or anything else out of the opening.
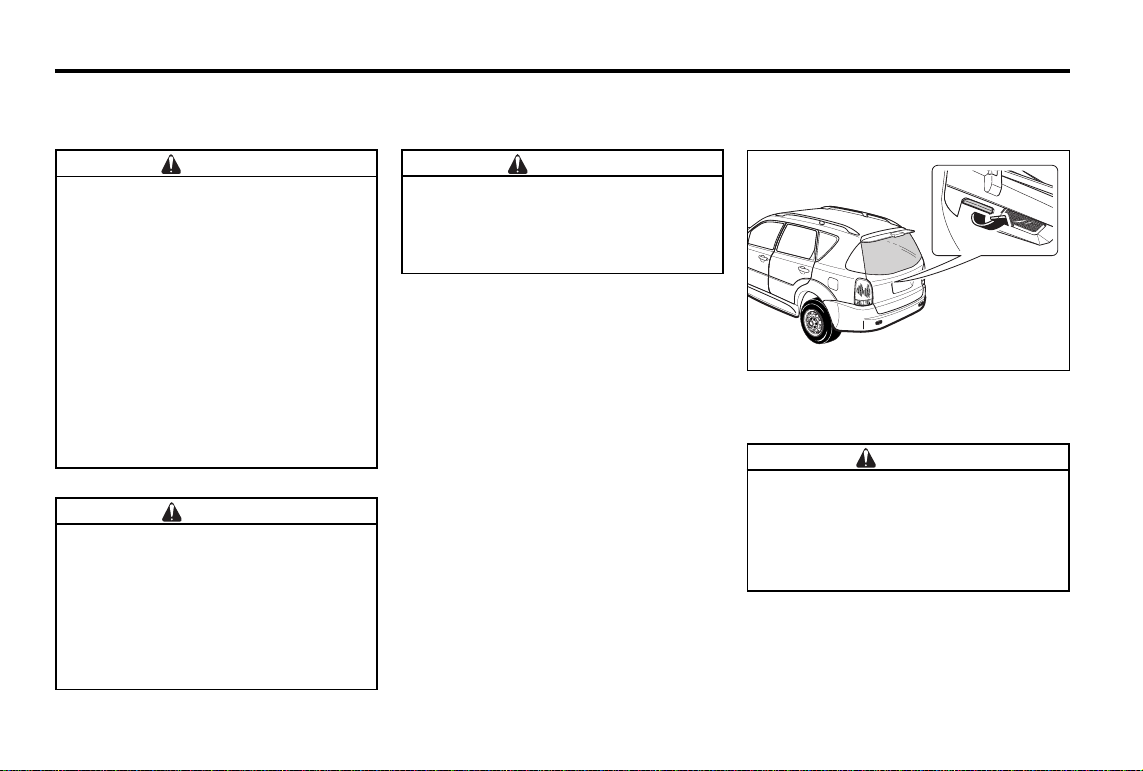
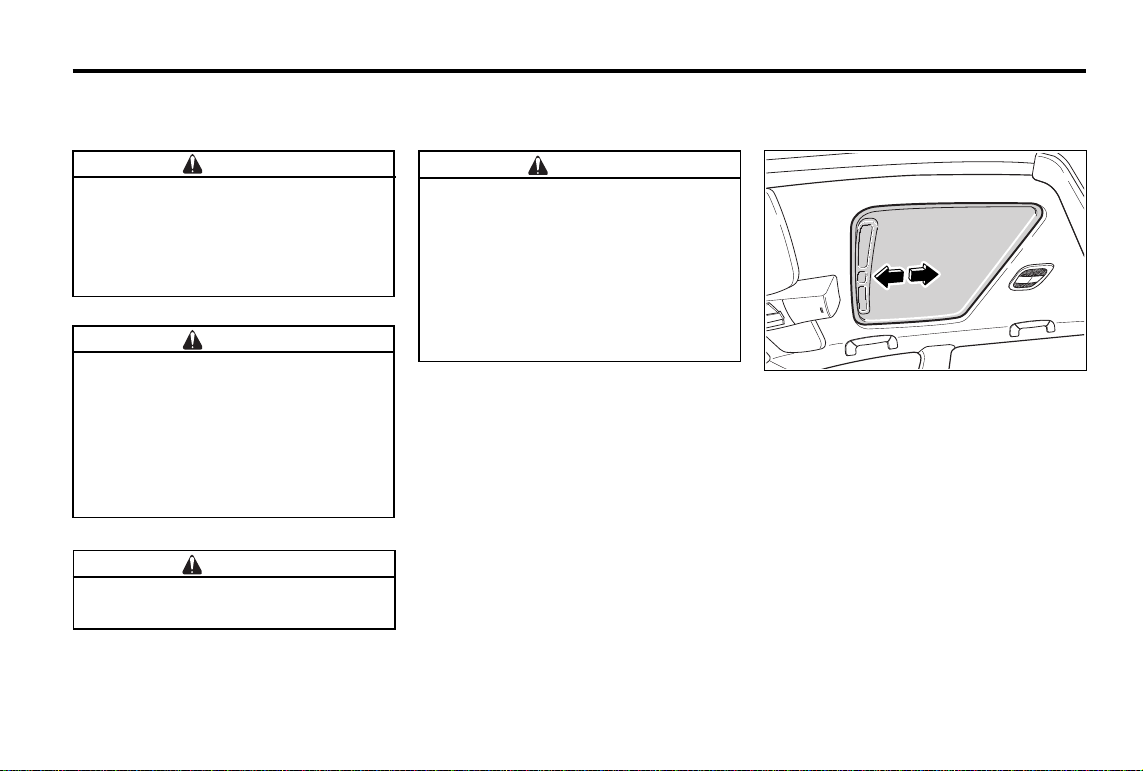
TAILGATE WINDOW*
WARNING
Always remove the ignition key when
leaving the car to avert the risk of
injury arising from unattended children operating the windows.
To unlock the tailgate window, pull the left
tailgate lever with tailgate unlocked.
WARNING
When the tailgate window is opened,
emission gas could be flowed into
the interior and harmful to passengers,
so completely close the window if engine is running.
Page 19
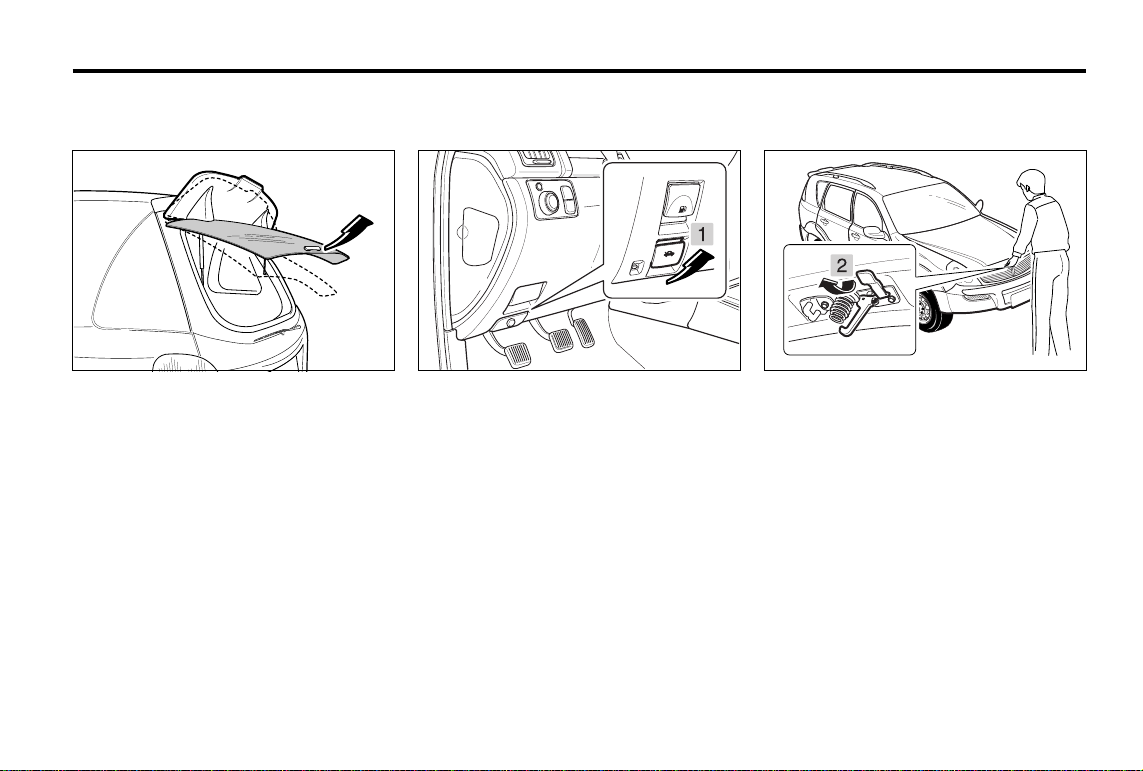
ENGINE HOOD
BEFORE DRIVING YOUR CAR 1–13
To open the tailgate window, hold the outer
tailgate window handle and lift up the window.
1. To open the engine hood, pull the release
knob located on left lower side of instrument panel to unlatch the engine hood.
The engine hood will then be unlocked
and partially open.
2. Pull the safety catch lever located under the hood and lift the engine hood.
Page 20
1–14 BEFORE DRIVING YOUR CAR
WARNING
An open engine hood with engine
running exposes moving parts which
can crush, cut or entangle.
• Do not wear loose clothing.
• Keep hands and hair away from
moving parts.
WARNING
If it is necessary to check beneath the
engine hood with engine running;
• For manual transmission place
gearshift in neutral.
• For automatic transmission place
gearshift in P (park).
• Set parking brake fully.
• Do not wear any clothing such as
ties and handkerchiefs.
• Do not wear loose clothing.
• Keep hands and hair away from
moving parts.
WARNING
The vehicle can still move from an
stationary position while the engine
hood is open. Before releasing the
engine hood latch;
• Remove ignition key.
• For manual transmission place
gearshift in 1st or reverse.
• For automatic transmission place
gearshift in P (Park).
• Apply parking brake fully.
WARNING
An open engine hood while the vehicle is in motion obscures forward
vision, resulting in an accident.
• Check that the engine hood is fully
latched in position by pulling at
it’s front edge before driving.
• Do not operate the engine hood release handle while vehicle is in
motion.
• Do not move the vehicle with engine hood in raised position.
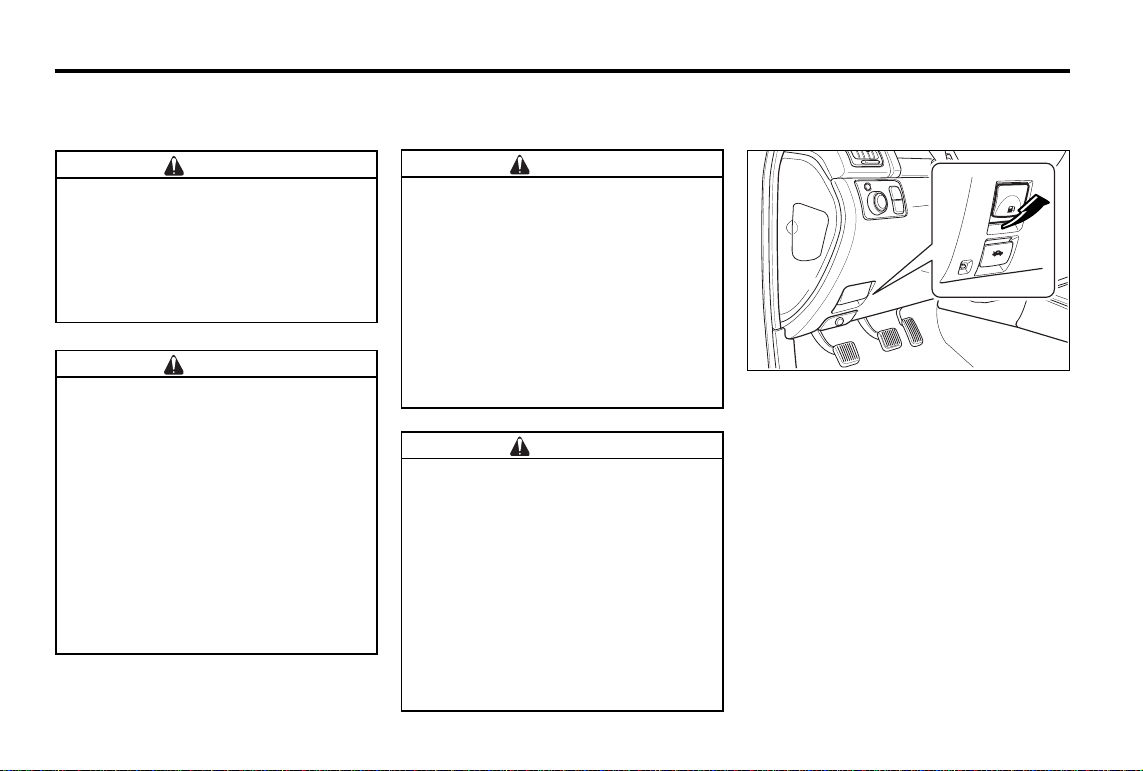
FUEL FILLER DOOR RELEASE
LEVER
Fill Fuel Tank
1. Stop the engine
2. Open the fuel filler door by pulling the
release lever located on left upper side
of instrument panel.
Page 21
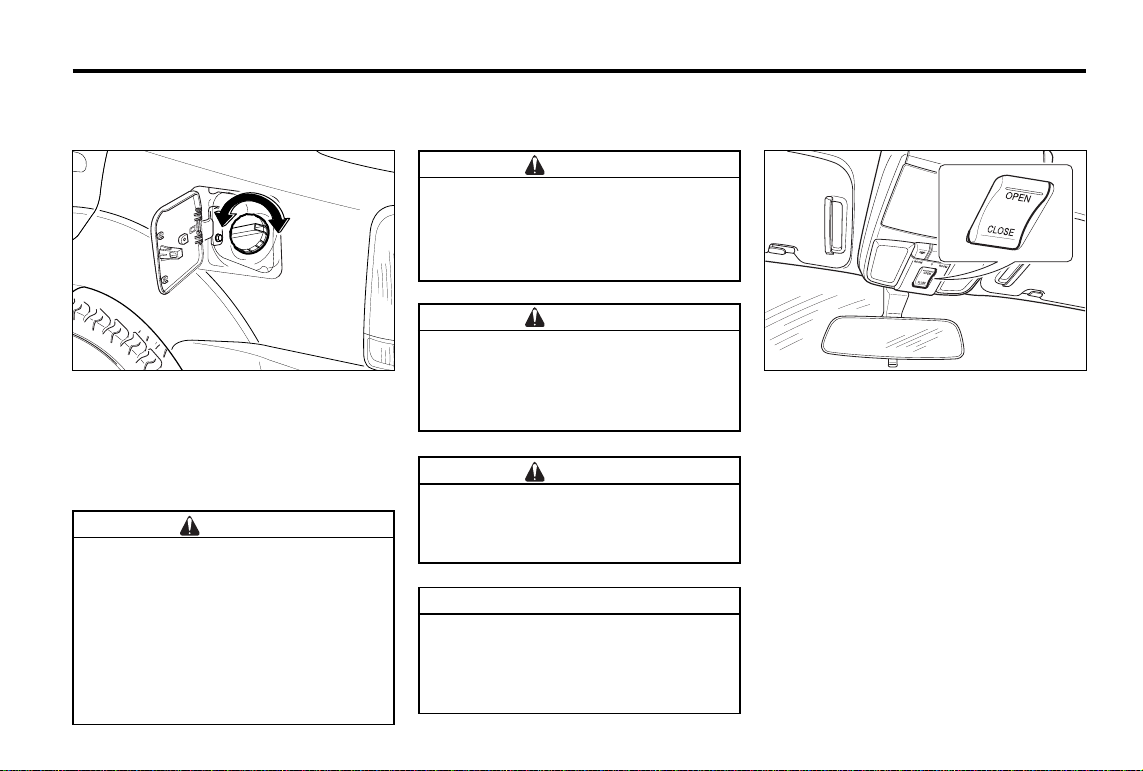
3. Open the fuel filler cap by turning it counterclockwise.
4. After refueling, tighten the fuel filler cap
by turning it clockwise and push the fuel
filler door properly until it latches.
WARNING
Gasoline vapor is highly flammable.
It burns violently and that can cause
very bad injuries.
When refueling,
• Switch off engine.
• No smoking.
• No naked flame.
• No sparking material.
WARNING
Fuel may be under pressure.
• Unscrew fuel filler cap slowly.
• Wait for “hiss” noise to stop.
• Unscrew cap completely.
CAUTION
Engine and exhaust system will be
damaged.
Make sure to use designated fuel to
the vehicle.
CAUTION
Gasoline damages paintwork.
If gasoline spills onto paintwork
wash with cold water immediately.
NOTE
The fuel filler door may not open in
cold weather.
Push or tap fuel filler door lightly to
open.
BEFORE DRIVING YOUR CAR 1–15
POWER SUN ROOF*
Before operating the sun roof you first have
to open the blind panel by pushing rearward.
Page 22

1–16 BEFORE DRIVING YOUR CAR
Sliding the Sun Roof
1. To open the sun roof automatically,
press OPEN on the switch for 0.5
second.
2. If you press the switch again during the
sliding operation, sun roof will be
stopped.
3. To close the sun roof, press CLOSE on
the switch. Release the switch when
sun roof reaches the desired position.
Open Open Open
Close Close Close
•Open •Stop • Close
Tilting Up the Sun Roof
To tilt up (vent position) the sun roof, press
CLOSE on the switch with the sun roof
closed.
To return closed position, press OPEN on the
switch.
Open Open Open
Vent Vent Vent
•Vent •Stop • Close
CAUTION
• The sunroof will operate when
the ignition key is ON position
(engine is not running), however
operation under engine running
is recommended.
• For the driving safety, operate the
sunroof while the vehicle is
stopped.
• When the sunroof operation is
completed, release the switch. If
keeps pressing the switch, could
be a cause of malfunction. Especially in winter, never operate
the sunroof if operation areas are
iced and wait for deicing.
• During charging after battery discharge, press the switch for 5 seconds respectively when the sunroof
is completely opened, closed, tilted
down and tilted up to reset the
each position.
Page 23
BEFORE DRIVING YOUR CAR 1–17
WARNING
Parts of the body protruding from
the vehicle can be struck by passing
objects.
Do not stick hands, head, or anything
else out of the sun roof opening.
WARNING
Care must be taken when operating
the power sun roof. There is a risk of
injury, particularly for children, and
a danger that limbs or articles could
become trapped in sun roof.
Ensure the sun roof opening is clear
before closing it.
WARNING
When leaving the vehicle unattended,
close the sun roof fully.
WARNING
Debris on the sun roof can damage
operation.
• Clean the sun roof before opening.
• Remove water drops, snow, ice or
sand from on top of the sun roof
before opening.
• Do not place heavy objects on the
sun roof or surrounding area.
Opening/Closing the Blind Panel
To open the blind panel, push it rearward.
Page 24

Page 25

2
STARTING AND OPERATING
Page 26
2–2 STARTING AND OPERATING
FUEL RECOMMENDATION
Commercially available high-quality fuels
are suitable. Fuel quality has a decisive influence on the power output, driveability
and life of the engine. The additives contained in the fuel play an important role in
this connection. You should therefore use
only high-quality fuels.
Diesel Engine
Use diesel fuel at 50 cetane rating or higher.
Gasoline Engine
Fuel with too low an octane number can
cause pre-ignition (detonation). Ssangyong
can not be held liable for resultant damage.
CAUTION
For correct octane rating setting and
other use of gasoline (ex. Leaded),
consult your Ssangyong Dealer.
CAUTION
Engine and exhaust system will be
damaged.
• Do not use leaded fuel to the vehicle for unleaded fuel.
• Use the fuel with specified or
higher Research Octane Number
recommended for your country by
Ssangyong.
It is not covered by warranty.
Do not Use Methanol
Fuels containing methanol (wood alcohol)
should not be used in your Rexton. This type
of fuel can reduce vehicle performance and
damage components of the fuel system.
NOTE
The warranty policy will not cover
damage of the fuel system and any
performance problems that are
caused by the use of methanol or
fuel containing methanol.
Operation in Foreign Countries
If you are going to drive your Rexton in another country, be sure to:
• Observe all regulations regarding registration and insurance.
• Check that a suitable fuel is available.
Vehicle Fueling from Drums or Storage
Containers
For safety reasons (particularly when using noncommercial fueling systems) fuel
containers, pumps and hoses must be properly earthed.
Static electricity build up can occur under
certain atmospheric and fuel flow conditions
if unearthed hoses, particularly plastic, are
fitted to the fuel dispensing pump.
It is therefore recommended that earthed
pumps with integrally earthed hoses be
used, and that storage containers be properly earthed during all noncommercial fueling operations.
Page 27
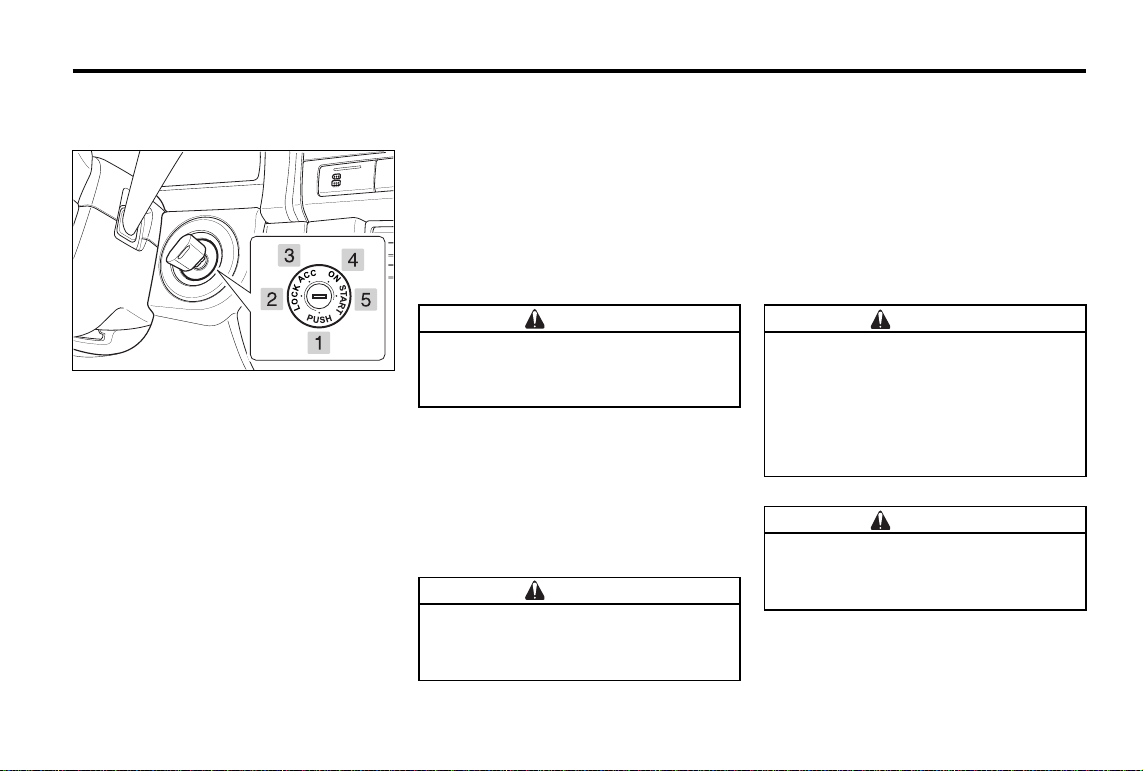
IGNITION SWITCH
3. ACC Position
The engine can be turned off without locking the steering wheel.
Some electrical accessories such as the
radio and cigarette lighter can be operated
in this position.
STARTING AND OPERATING 2–3
5. START Position
This position activates the starter motor,
starting the engine.
Release the key when the engine starts, and
it will be returned to the “ON” position
automatically.
1. PUSH
To turn the key from “ACC” to “LOCK” position, you must push it in.
2. LOCK Position
The steering is locked by removing the key.
Rotate the steering wheel until lock is
engaged.
For easier key operation when unlocking,
move the steering gently from right to left
and turn the key to the “ACC” position.
CAUTION
Battery can discharge.
Do not leave key at “ACC” position
for periods.
4. ON Position
This position turns on the ignition system
and the electrical accessories such as
power window, sun roof, heater, and air
conditioner.
CAUTION
Battery will discharge.
Do not leave key at “ON” position
without running the engine for long.
WARNING
Never remove or turn the key off
while driving.
• This can cause the driver to lose
control of vehicle.
• This can result in serious vehicle
damage or personal injury.
WARNING
Steering wheel can suddenly turn.
Never reach for the ignition switch
key through the steering wheel.
Page 28

2–4 STARTING AND OPERATING
BEFORE STARTING THE
ENGINE
• Make sure the area around the vehicle
is clear.
• The maintenance items in this manual
should be checked periodically, e.g.,
each time you check the engine oil.
• Check that all the windows and lights are
clean.
• Visually inspect the tyres for their appearance and condition. Also check the
tyre pressures for proper inflation.
• Position seat and adjust head restraints.
• Adjust inside and outside mirrors.
• Fasten your seat belts and ask all passengers to do likewise.
• Check the operation of the warning
lights when the key is turned to the “ON”
position.
STARTING THE ENGINE
1. Apply the parking brake.
2. Manual transmission:
Move the gearshift lever to Neutral position and depress the clutch pedal to the
floor while cranking the engine.
Automatic transmission*:
Move the selector lever to “P” (Park) or
“N” (Neutral), although “P” is preferred.
The starter is designed not to operate if
the selector lever is in one of the driving positions.
Diesel engine model:
The glow indicator light will come on and
go out when the glow plugs are sufficiently heated for cold engine starting.
As soon as the glow indicator light goes
out, start the engine.
3. Crank the engine without touching the
accelerator pedal by turning the igniting
key to the “START” position.
Release the key when the engine starts.
If the engine starts, but fails to run, repeat the above procedure.
CAUTION
To help prevent the start motor damage;
• Do not operate the starter for more
than 15 seconds at a time.
• If the engine does not start, wait 10
seconds before trying again.
CAUTION
Excessive temperature can damage
the exhaust system.
Do not idle at high speed for more
than 5 minutes.
Fully depress the clutch pedal, or the
engine will not start.
Do not depress the accelerator pedal
while starting the engine.
Depress the brake pedal when you
start the engine.
Page 29
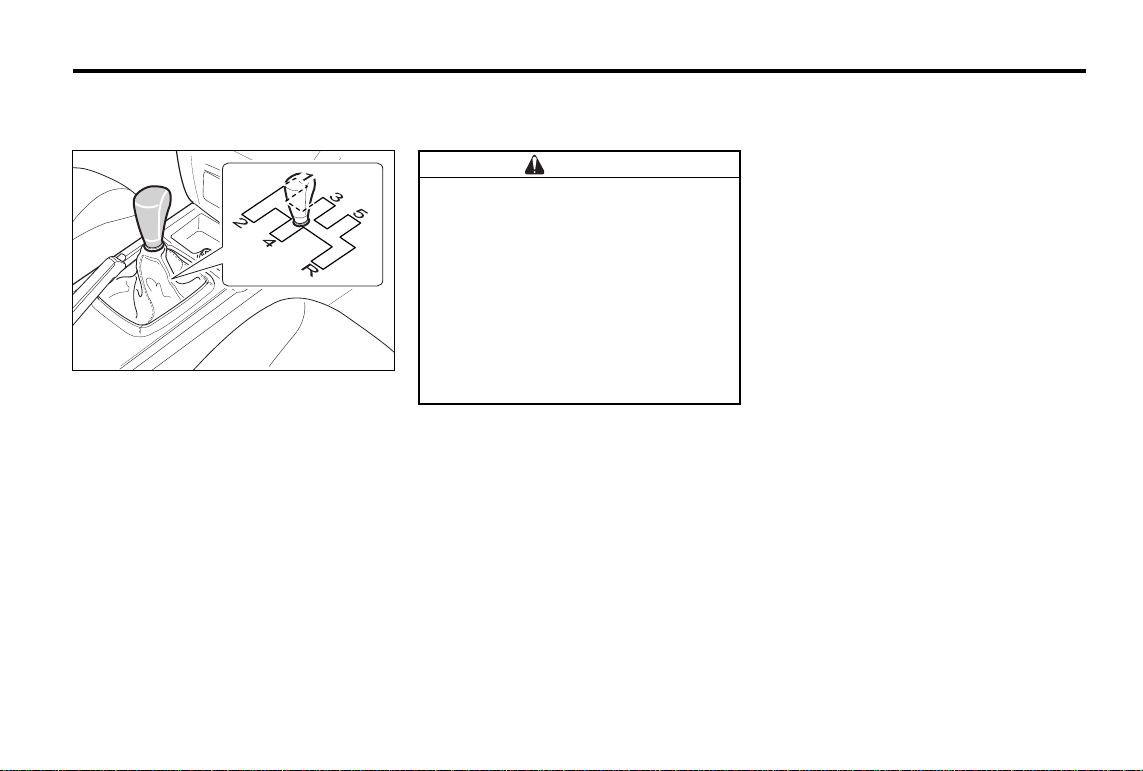
DRIVING WITH A MANUAL
TRANSMISSION
The manual transmission in your Rexton has
5 forward speeds and 1 reverse speed.
To change gears, fully depress the clutch
pedal. Then, move the gearshift lever.
After shifting, release the clutch slowly.
STARTING AND OPERATING 2–5
CAUTION
Shifting to reverse gear while vehicle
is moving forward could damage the
transmission.
Stop your vehicle completely before
shifting into reverse.
To help prevent clutch damage, do
not rest your foot on the clutch pedal
while driving.
Never take the vehicle out of gear
and coast down a hill.
Page 30
2–6 STARTING AND OPERATING
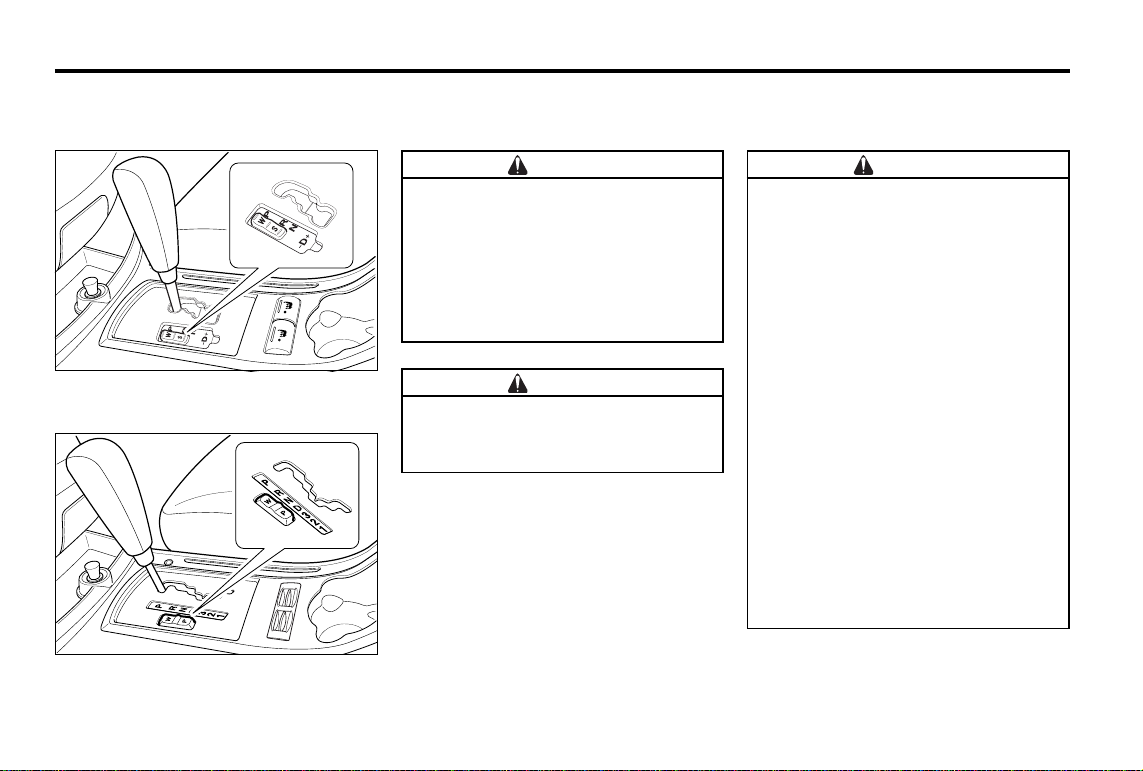
DRIVING WITH AN AUTOMATIC
TRANSMISSION*
5-speed automatic transmission
WARNING
The vehicle could move unexpectedly
when shifting. You could lose control
and hit people or objects.
Always depress brake pedal firmly
while shifting from “P” (Park) or “N”
(Neutral) to a forward or reverse
gear.
CAUTION
Always use the parking brake.
Do not depend on “P” position to
keep the vehicle from moving.
WARNING
To help prevent transmission
damage;
• Do not depress the accelerator
pedal while shifting from “P” or
“N” to “R”, “D”, “3”, “2”, or “1”.
Always depress the brake pedal
until shifting is completed.
• Never shift to “P (Park)” or “R (Reverse)” while the vehicle is in motion.
Shift to “P” or “R” only after vehicle is stopped completely.
• When stopping the vehicle on an
uphill gradient, do not hold the
vehicle by depressing the accelerator pedal. The foot brake should
be used for this purpose.
• To drive on a slope, set the lever
to “3”, “2” or “1” position according to road condition.
4-speed automatic transmission
Page 31

Starting the Car
• After starting the engine, fully depress
the foot brake pedal before shifting the
selector lever to the “R”, “D”, “3”, “2” or
“1” position. Be sure the vehicle has
completely stopped before attempting to
shift the selector lever into “R” or “P”.
1. Keep the foot brake pedal depressed
and shift into a driving gear.
2. Release the parking brake and foot
brake. Depressing the accelerator pedal
slowly will gradually set the vehicle in
motion.
SELECTOR LEVER POSITIONS
P: Park
Use this position when the vehicle is parking,
starting the engine or stationing the vehicle.
To shift into any other position, depress the
brake pedal(ignition switch “ON”)
To shift into P position, you have to completely stop the vehicle.
R: Reverse
Use this position to reverse the vehicle. To
shift into R position from P or N position,
completely stop the vehicle and depress the
brake pedal.
STARTING AND OPERATING 2–7
N: Neutral
It indicates neutral position and use this position for temporarily parking.
CAUTION
Never shift into N position while
driving, or the transmission will be
damaged.
When you stopping the vehicle on the
uphill or downhill roads in N
position, depress the brake pedal.
To shift into D or R from N position
after stopping the vehicle, you have
to depress the brake pedal.
Page 32

2–8 STARTING AND OPERATING
- D + : Drive
(5-speed automatic transmission equipped
vehicle)
• Use this position in normal driving
conditions.
• The gear is changed from 1st to 5th according to the vehicle speed and the acceleration with accelerator pedal.
• The shift indicator in instrument panel
shows the selected gear as shown ablve.
CAUTION
Please note that the vehicle may
slowly move forward when the selector lever is at “- D +” position.
WARNING
If you touch the selector lever unexpectedly while driving, the shiftable
gear may be changed. It can make
the vehicle unstable. Be carefule not
to touch the selector lever while
driving.
Adjustment for the shiftable gear in
“- D +” position
(5-speed automatic transmission
equipped vehicle)
The shiftable gear is down/up by one step
as the lever is moved to left(-)/right(+)
direction.
: when moving the lever to left (-) direction
: when moving the lever to left (+) direction
Page 33

• The gear is automatically downshifted to
lower gear according to the vehicle speed
and the accelerator pedal position while
pushing and holding the lever to (-) direction.
• The gear is change to “D” position that can
be shifted to all forward gears while pushing and holding the lever to (+) direction.
The drive position for driving conditions in
first, second, third and fourth gear.
The drive position for driving conditions in
first, second and third gear.
The drive position prevents the transmission
from shifting into third or fourth gear.
Select drive range 2 for more power when
climbing hills, for engine braking effects
when driving down steep hills.
The drive position for maximum braking
effect, e.g. when driving down severe gradients; the transmission does not shift beyond first gear.
CAUTION
• When pushing and holding the lever
to left (-)/right (+), the gear may be
shifted through several steps in series.
Make sure to shift one step at a time.
• If you apply excessive force when
moving the lever to left (-)/right (+),
the gear may not be shifted to
other gears. Soft and smooth operation is recommended.
WARNING
If you touch the selector lever unexpectedly while driving, the shiftable
gear may be changed. It can make the
vehicle unstable. Be carefule not to
touch the selector lever while driving.
STARTING AND OPERATING 2–9
D: Drive (4-speed)
The drive position for normal driving conditions in first to fourth gear.
3: 3rd Gear (4-speed)
The drive position for driving conditions in
first, second and third gear.
You might choose 3 instead of D under the
following condition:
• When driving on long hilly roads
• When driving in heavy city traffic
• When going down a steep hill
Page 34

2–10 STARTING AND OPERATING
2: 2nd Gear (4-speed)
The drive position prevents the transmission
from shifting into third or fourth gear.
Select drive range 2 for more power when
climbing hills, for engine braking effects
when driving down steep hills.
WARNING
The vehicle can move suddenly when
unattended.
• Turn off the engine, apply the parking brake fully and remove the ignition key when leaving the
vehicle.
• Do not use “P” (Park) position in
place of the parking brake.
• Never leave the vehicle unattended
while the engine is running.
Shift Lever Operation
(5-speed automatic transmission)
1: 1st Gear (4-speed)
The drive position for maximum braking
effect, e.g. when driving down severe gradients; the transmission does not shift beyond first gear.
CAUTION
Even the gear is in D position, your
vehicle can be moved back on the
uphill according to gradients, so you
have to depress the brake pedal.
Page 35

(4-speed automatic transmission)
Shift lever moves without
depressing the brake
pedal.
Shift lever moves when
the brake pedal is
depressed.
Shift lever moves without
depressing the brake
pedal, however for safety
reasons, the brake pedal
should be depressed.
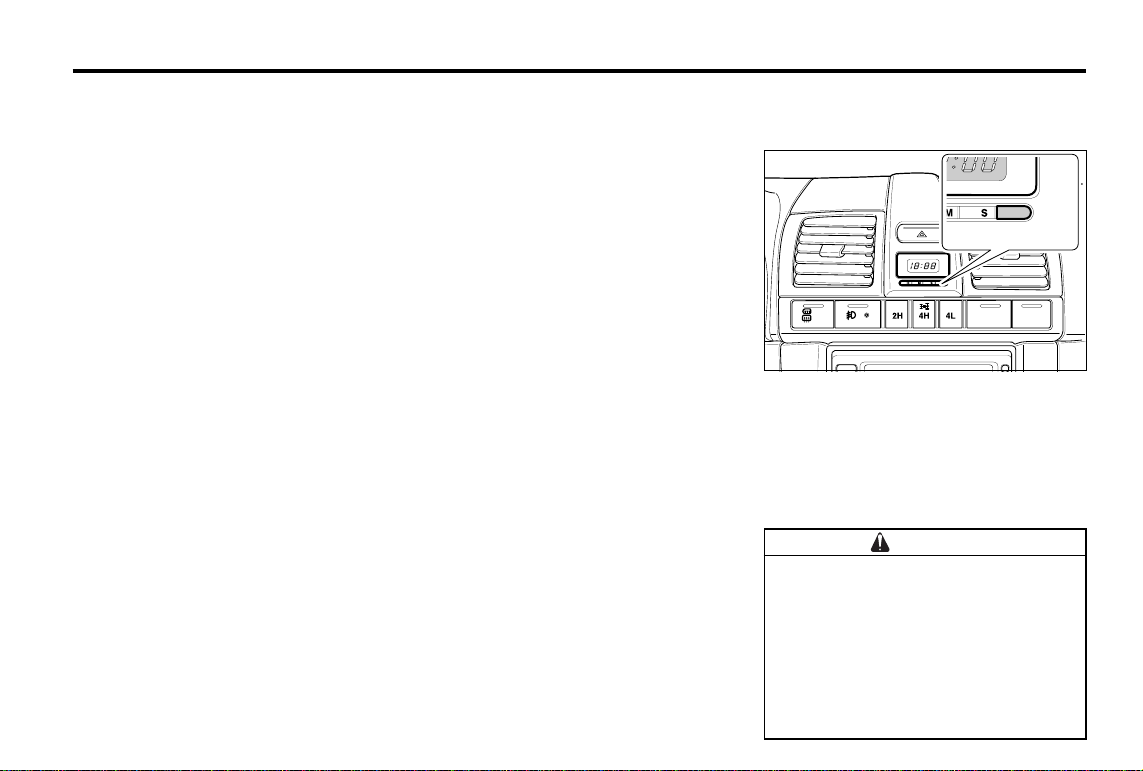
MODE SWITCH
5-speed automatic transmission
• 5-speed automatic transmission has
STANDARD (S) mode and WINTER (W)
mode.
• Use the STANDARD mode in normal driving conditions and use the WINTER mode
on slippery road.
STARTING AND OPERATING 2–11
S: Standard mode
• Press the “S” portion of the mode switch
to select “STANDARD” driving mode.
• Use the STANDARD mode for your normal driving.
W: Winter Mode
In this mode, the vehicle starts from 2nd gear.
Press the “W” portion of the mode switch to
select “WINTER” driving mode and “WINTER”
indicator lamp will be displayed on the instrument panel.
Use this mode in the event of starting-off or
driving difficulties on slippery roads.
Page 36

2–12 STARTING AND OPERATING
• 2nd reverse gear starting off in
WINTER mode
If you start off the vehicle with 2nd reverse
gear, the slipping between tire and road surface on the slippery road can be eliminated.
• How to start off the vehicle with
2nd reverse gear
1. Press the “W” portion of the mode
switch to select “WINTER” driving mode.
2. Place the selector lever to “D” position
and check if the shift lever indicator
shows “D2”.
3. Place the selector lever to “R” position
to start off the vehicle with 2nd reverse
gear.
CAUTION
• Do not use WINTER mode on normal driving condition.
• When started off with WINTER
mode, stop the WINTER mode after the vehicle speed is reached at
a certain level.
4-speed
Winter Mode
In this mode, the vehicle starts from 2nd
gear.
Press the “W” portion of the mode switch to
select “WINTER” driving mode and “WINTER”
indicator lamp will be displayed on the instrument panel.
Use this mode in the event of starting-off or
driving difficulties on slippery roads.
Power Mode
For increased power, improved acceleration
or driving up long slopes, press the “P” portion of the mode switch.
The transmission will shift into the power
driving pattern. The transmission will shift at
higher engine revolutions, allowing more
powerful acceleration.
NORMAL
Use this mode for your normal driving.
This driving mode can be selected when both
“W” and “P” portions are not pressed.
Page 37

KICKDOWN FUNCTION
Kickdown switch is located under the accelerator pedal. Use it for rapid or uphill
acceleration.
When the accelerator pedal is depressed
fully, there will be contacting sound or feeling and kickdown function starts.
When the kickdown switch is operated, the
POWER light in the meter cluster comes ON.
NOTE
Kickdown?
If you need to accelerate rapidly,
depress the accelerator pedal completely to the floor to push the
kickdown switch on the floor. Then,
the kickdown will be operated and
the transmission shift to a lower
gear automatically.
5-speed automatic transmission
The electronic pedal installed on 5-speed
automatic transmission provides kick-down
function according to the level of accelerator pedal movement without kick-down
switch.
STARTING AND OPERATING 2–13
SAFETY MODE (5-SPEED
AUTOMATIC TRANSMISSION)
When the transmission has electric or mechanical fault, the transmission operates in
safety mode to maintain minimum driving
cinditions and to prevent the transmission
from being damaged.
When the transmission is defective, the
symptoms that can be occurred are as
follows:
• Heavy shock when moving the selector
lever
• Decreased driving force while driving at
high speed
• Fixed gear position during driving
• Fixed at 3rd gear
• Fixed at a gear other than 3rd gear when
the 3rd gear is defective
Page 38

2–14 STARTING AND OPERATING
If the shifting is not available, reset the
safety mode.
• How to reset the safety mode
1. Park the vehicle and place the selector
lever to “P” position.
2. Stop the engine and wait for over 10
seconds.
3. Start the engine.
• Symptoms after resetting the
safety mode
- If the vehicle is normally operational after resetting, the troubles are corrected.
- The gear may be fixed at 2nd forward
gear in “D” position or 2nd reverse gear
in “R” position.
CAUTION
• If you find any symptom caused by
mechanical or electrical defective
in transmission, stop the vehicle
immediately and reset the safety
mode.
• If abnormal operation of the transmission (fixed at 2nd forward gear
in “D” position or 2nd reverse gear
in “R” position) is still present,
have the transmission checked as
soon as possible at the nearest
Ssangyong Dealer or Ssangyong
Authorized Service Operation.
AUTOMATIC TRANSMISSION
EMERGENCY SHIFTING
PROCEDURE
Your vehicle has a shift lever lock control
system. Before you can shift from park (P),
the ignition must be ON and you must depress the brake pedal.
If you cannot shift out of P with the ignition
ON and the brake pedal depressed:
1. Turn ignition off.
2. Push the shift lock release lever by inserting a proper stick. Then, with the
brake pedal depressed, move the selector lever to N (neutral).
3. Start engine and shift into the gear you
want.
4. Have your vehicle repaired by
Ssangyong dealer or authorized service
operation as soon as possible.
Page 39

DRIVING TIPS FOR AUTOMATIC
TRANSMISSION*
Starting the Car
After starting the engine and before shifting
into a drive range, depress the brake pedal
since the vehicle will otherwise start to
“creep”. Never use accelerator and brake
pedals simultaneously.
For normal driving conditions the “D” should
be selected.
If the accelerator pedal is depressed gently and evenly the transmission will shift
into the fuel-saving higher gears at an early
stage. The drive range needs to be
changed manually only in exceptional
cases. Select “3”, “2” and “1” only when
automatic shifting up is to be avoided or if
additional use is to be made of the engine
braking effect.
Return to “D” as soon as conditions permit.
Engine Braking
In order to utilize the engine braking effect
when driving downhill, select drive range
“3”, “2” or, if necessary, “1”.
The braking action is most effective in drive
range “1”. If drive range “1” is selected at
too high a speed, the transmission remains
in second gear until the shift point for first
gear is reached, e.g. as a result of deceleration.
Stopping the Car
The selector lever can be left in the chosen
drive range with the engine running. When
stopping on gradients engage the parking
brake or depress the brake pedal. Do not
increase the engine revolutions to ensure
smooth idling while standing if a drive range
has been selected.
Before leaving the vehicle, apply parking
brake, then place selector lever in position
“P” and remove ignition key.
STARTING AND OPERATING 2–15
Maneuvering the Car
To maneuver the car back and forth during
attempts to park or in garage entrances utilize the creeping effect. Regulate your speed
by lightly releasing the brake pedal. Never
press the accelerator and brake pedals
simultaneously.
NOTE
•
CREEP effect
The vehicle will move slowly
without acceleration when the
engine is running if you select
“R”, “D”, “3”, “2”, “1” positions
and it is called “CREEP” effect.
It is very unique characteristics of
automatic transmission system in
which weak power is continuously delivered to the transmission in order to rotate the torque
converter.
Page 40

2–16 STARTING AND OPERATING
4-WHEEL DRIVE SWITCH PART-TIME*
DRIVING POSITION
The 4WD indicator light illuminates when the
4WD switch is in ‘4H’ or ‘4L’.
1. ‘2H’ (2-Wheel drive)
This is rear wheel drive with high speed. Use
this for normal driving. This position gives
greater economy, quieter ride and least drive
train wear.
2. ‘4H’ (4-Wheel Drive, High)
Use this for driving on wet or slippery roads
such as roads with snow, mud or sand.
This position provides greater traction than
2-wheel drive. The front hubs will be locked
automatically.
3. ‘4L’ (4-Wheel Drive, Low)
Use this for maximum power and traction.
Use ‘4L’ for climbing or descending steep
hills, hard pulling in sand, mud or deep snow.
4-WHEEL DRIVE SWITCH FULL-TIME (TOD)*
DRIVING POSITION
The 4WD LOW indicator light illuminates
when the 4WD switch is in 4L.
1. ‘4H’ (4-Wheel Drive, High)
Use this for normal driving. This position
gives greater economy, quieter ride and least
drive train wear.
2. ‘4L’ (4-Wheel Drive, Low)
Use this for maximum traction in slippery
roads, steep hills and rough roads.
Page 41

4-WHEEL DRIVE OPERATION
↔↔
↔
↔↔
‘2H’
‘4H’ (Part-time only)
Depending on the road conditions, select the
4WD switch to ‘4H’ by pushing before driving off or during driving. Shifting is possible
while driving at the speed of 70km/h or less.
The 4WD HIGH (‘4H’) indicator light may
come on.
When 4WD is in no longer needed, select
the 4WD switch from ‘4H’ to ‘2H’. This will
avoid unnecessary heavy steering, tyre
wear and fuel consumption.
NOTE
Perform this operation when driving
straight.
Shifts between high-speed modes
↔↔
↔
↔↔
(2H
4H) do not require clutch operation and available while the vehicle speed is less than 70Km/h, however recommend you to shift when
the vehicle speed is low.
↔↔
↔
‘2H’ or ‘4H’
To shift from ‘2H’ or ‘4H’ to ‘4L’, the vehicle
should be stopped.
Depressing the clutch pedal (with manual
transmission) or moving the selector lever
to ‘N’ position (with automatic transmission),
select the 4WD switch to ‘4L’ by pushing it.
The 4WD LOW (‘4L’) indicator light may come
on.
When ‘4L’ operation is no longer needed,
select the 4WD switch from ‘4L’ to ‘2H’ or
‘4H’. To shift from ‘4L’ to ‘2H’ or ‘4H’, stop
the vehicle and depress the clutch pedal (on
manual transmission) or move the selector
lever to ‘N’ position (on automatic transmission) and select the 4WD switch to ‘2H’ or
‘4H’.
↔↔
‘4L’
STARTING AND OPERATING 2–17
WARNING
In case of part-time 4WD, do not use
4WD for normal driving on dry pavement. It will cause unnecessary noise,
wear and fuel economy.
WARNING
To shift ‘4L’ position, completely stop
the vehicle and always depress the
clutch pedal, for manual transmission,
or position the selector lever to “N”,
for automatic transmission, and select
the 4WD switch to ‘4L’.
NOTE
→→
When shifting ‘4L’
→
‘4H’ in automatic
→→
transmission, foot brake and shift the
→→
selector lever to “N
→
→→
R
→→
→
→→
N” after
4WD LOW indicator OFF for smooth
shifting.
In case of TOD 4WD, the 4L indicator in instrument panel will blink
during mode changes, then will come
out or come on after completion.
Page 42

2–18 STARTING AND OPERATING
CAUTIONS IN 4-WHEEL DRIVE
OPERATION
• Changing from high speed modes (2H,
4H) to low speed mode (4L) during driving is very dangerous, so the self control system controls not to happen (available when the vehicle speed is less than
3km/h).
• When the 4H or 4L mode is selected, the
relevant indicator in the instrument panel
will come on (4L only for TOD).
If the indicator continues to blink or two
indicators are come on simultaneously,
there might be malfunction in 4-wheel
drive system to be inspected.
• If you operate the switch, there could
be mechanical noises and shocks in
shift, however it is normal conditions occurring in mode changes.
• Select the proper 4-wheel drive mode
according to road conditions (slippery,
steep hills, roughness, etc.)
• Never use 4-wheel drive operations as
engine brake while descending hills.
• 4-Wheel Drive doesn’t mean the perfect
protection for any conditions. Please rely
on safety driving habits other than
system.
ESP OFF SWITCH*
If you press the ESP OFF switch, the ESP
function stops and the indicator lamp in instrument panel comes on.
Press this switch again to resume the ESP
function. At this time, the indicator lamp goes
out.
If the ESP function operates while driving,
the indicator lamp flickers and the alarm
sounds.
ESP SYSTEM*
The ESP system is an electronic vehicle stability control system and driving safety
supplementary system that helps to avoid
dangerous situations by applying brakes on
the wheels or the engine torque to compensate vehicle stability when it is extremely
unstable under conditions such as sharp
cornering. This system also includes brake
assist function for the handicapped persons
because they depress the brake pedal softly
even when hard braking is required. If the
system recognizes that it is an emergency
case requires hard braking, it delivers high
braking pressure to the wheels. The ESP
function works when vehicle stability is very
unstable. The ESP system does not work
under normal driving conditions.
Page 43

STARTING AND OPERATING 2–19
Stopping ESP Function With ESP OFF
Switch*
If the driving wheels are slipping on the
snowy or icy road, the engine rpm may not
be increased even when you depress the
accelerator pedal, and accordingly, you may
not start off your vehicle. In this case, stop
the ESP function by pressing the ESP OFF
switch. When the ESP switch is pressed,
the ESP function stops and the vehicle is
driven independently from the sensor
outputs.
Driving impression when ESP is working
The ESP system may transfer noise and vibration to the driver due to the pressure
changes caused by the motor and valve
operations in a very short period of time.
Extreme cornering will trigger the ESP operation and this will make the driver feel
noise and vibration due to strong braking
operation. Also, the ESP system controls the
engine output. So, the driver may notice the
engine output decrease even when the accelerator pedal is being depressed.
ESP & ABS*
The ESP system is activated unless you
press the ESP OFF switch. However, the
ABS system operates only when the tyres
are slipping on the road surface due to sudden braking. Basically, the ESP system is
advanced vehicle control system that integrates the ABS system and vehicle stability
control system.
CAUTION
•
The ESP system deactivates when
stopping the engine. It will be resumed when the engine is started
again.
•
If the vehicle is controlled by ESP
during driving, the ESP OFF
switch will not work.
•
The ESP system does not operate
during reverse driving.
•
If the ESP function operates while
driving, the indicator lamp flickers and the alarm sounds.
Page 44

2–20 STARTING AND OPERATING
WARNING
•
If the ESP warning light comes on,
the ESP related system is defective.
At this moment, the ABS works in
a basic way. However, make sure
to check the vehicle at the nearest
Ssangyong Dealer or Ssangyong
Authorized Service Operation.
•
If the ESP warning light and the
ABS warning light come on
simultaneously, both ESP and ABS
system are not working. Do not
over speed your vehicle and be
sure to check or repair the vehicle
at the nearest Ssangyong Dealer or
Ssangyong Authorized Service
Operation.
•
If the ESP warning light flickers
and the alarm sounds, it means
that the vehicle stability is controlled by the ESP function when
vehicle stability is extremely
unstable. In this situation, drive
the vehicle with maximum safety.
WARNING
•
The ESP system is only a supplementary device for the vehicle.
When the vehicle exceeds its physical limits, it cannot be controlled.
Do not rely on the system. Keen on
the safe driving.
BRAKE
• If one brake circuit should fail, the vehicle can still be stopped with the second remaining circuit. If this happens, the
brake pedal must be fully depressed
with greater pedal pressure. The braking distance is increased. Have the braking system checked and repaired by a
Ssangyong Dealer or Ssangyong Authorized Service Operation before continuing your journey.
• After being parked, check to be sure the
parking brake is not engaged and that
the parking brake indicator light is out
before driving away.
• Do not coast down hills with the vehicle
out of gear. This may be extremely hazardous. Keep the vehicle in gear at all
times, use the brakes to slow down.
• If a tyre goes flat while driving, apply the
brakes gently and keep the vehicle
pointed straight ahead while you slow
down. When you are moving slowly
enough for it to be safe to do so, pull
off the road and stop in a safe place.
Page 45

WARNING
Brakes can have temporary loss of
performance due to overheating.
• On descents shift to a low gear.
• Do not continually apply brakes.
WARNING
Do not drive with your foot resting
on the brake pedal. This could result
in the brakes overheating and losing
their effectiveness, wear out the
brake pads.
WARNING
Brakes can have temporary loss of
performance due to wet brake
components.
• After checking the rear for other
vehicles, lightly apply brakes for
performance loss.
• Keep safe forward speed.
• Keep plenty of space ahead, to the
rear and to the sides.
• Lightly apply brakes until performance is normal.
• Always apply this procedure after
driving through water deep
enough to wet brake components
or having the vehicle washed, to
help reduce the risk of personal
injury.
STARTING AND OPERATING 2–21
ANTI-LOCK BRAKE SYSTEM*
(ABS)
Anti-lock brake system is an advanced electronic braking system that will help prevent
a braking skid.
The anti-lock brake system prevents the
wheels from locking up during sudden braking or braking on a slippery road to help the
vehicle remain steerable and stable.
This system becomes operative only when
it senses differences in rotational speed of
the wheels, and that they are about to lock
up. The system detects the wheel speed
and electronically controls the pressure applied to the brake.
When the ignition is switched on, the ABS
warning light comes on. It goes out after
about 2 seconds. If it does not go out, or if
it comes on during driving, there is a defect in the ABS. In this case the brake system performs its regular function but without the anti-locking capability.
In the event of a defect in ABS, the traction control system (TCS) is shut off as well.
Have the ABS checked by Ssangyong
Dealer or Ssangyong Authorized Service
Operation as soon as possible.
Page 46

2–22 STARTING AND OPERATING
CAUTION
Driving too fast, particularly in corners, aquaplaning and driving too
close to the vehicle in front increases the risk of an accident. This
risk can not be reduced by the ABS
system.
Braking with ABS
Don’t pump the brakes. Press the brake pedal
hard down regardless of the road surface
(dry, wet, slippery, etc.), hold it down and
let ABS work for you.
The ABS modulates the braking pressure to
the respective wheels to maintain the maximum braking effect on the vehicle, reducing
the loss of directional stability or steering
control.
Slight vibration accompanied by noise usually occurs while ABS is operating. Such
vibration and noise simply indicates that the
ABS is functioning normally.
In an emergency, apply full force on the
brake and clutch pedal simultaneously.
The anti-lock brake system will be activated
immediately, thus allowing you to retain full
steering control of your vehicle.
We recommend that you familiarize yourself
with this braking technique. However, avoid
taking unnecessary risks.
WARNING
Stopping distances can vary greatly
depending on the road surface and
conditions.
• Maintain safe distance to the vehicle in front.
• Drive slowly on wet or slippery
road.
WARNING
ABS cannot prevent accidents resulting from careless or dangerous driving techniques.
• Drive carefully.
• Slow down when cornering.
• Press brake pedal hard and hold.
Page 47

WARNING
Brake system and ABS warning light
illuminating at the same time indicates a failure in the base brake system due to malfunction of ABS.
• Stop the vehicle and consult your
Ssangyong Dealer.
• Have the system checked and repaired before continuing your
journey.
PARKING BRAKE
The parking brake acts on the rear wheels.
It engages automatically when applied. The
parking brake lever is located between the
front seats.
To apply the parking brake, depress the
brake pedal and pull the lever up fully.
To release, depress the brake pedal, pull the
lever up slightly and push the button in the
tip of the lever. Then lower the lever while
holding the button in.
Ensure the parking brake is fully released
before driving off.
See your Ssangyong Dealer if adjustment of
the parking brake is required.
STARTING AND OPERATING 2–23
When Parking Your Vehicle
1. Hold the brake pedal down and firmly
apply the parking brake.
2. Manual transmission models:
When parking on level ground, place the
gearshift lever in the “NEUTRAL”
position.
When parking on a downhill gradient,
place the gearshift lever in the “REVERSE” position.
When parking on an uphill gradient,
place the gearshift lever in the “1st”
position.
Automatic transmission models:
Move the selector lever to the “P” (PARK)
position.
3. Close all windows and sun roof*.
4. Turn the ignition key to the “LOCK” position and remove the key.
5. Lock all doors and tailgate.
6. Be sure the vehicle is not moving.
Page 48

2–24 STARTING AND OPERATING
Parking brake warning light and buzzer
If the vehicle is driven for over 2 seconds
(over 10 km/h) while the parking brake is
applied, the parking brake warning light
comes on and warning buzzer sounds.
If it occurs, immediately stop the vehicle and
release the parking brake.
CAUTION
Things that can burn could touch hot
exhaust parts under your vehicle and
ignite.
Do not park or operate vehicle over
combustible materials.
CAUTION
The vehicle can move when parked.
• Always apply parking brake fully.
• Park on firm, level ground.
• When hill parking, do not leave
front wheels in straight ahead materials.
CAUTION
Driving with parking brake applied
could damage rear brake system.
• Before driving, fully release parking brake.
• Check brake system warning light
off.
CAUTION
Under cold weather conditions, the
parking brake can freeze in the engaged position.
This is most likely to happen if the
brakes are wet.
If there is a risk that the parking
brake may freeze after driving
through water deep enough to wet
brake components or having the vehicle washed;
• Apply the parking brake only temporarily while you put the gear selector lever in “P” (automatic
transmission) or in first or reverse
gear (manual transmission), and
• Block the rear wheels.
• Then release the parking brake.
Page 49

PARKING AID SYSTEM*
The parking aid system will be activated
when the automatic transmission selector
lever is shifted into “R” position and the reverse lamps are turned on when ignition
switch is in ON or engine is running. At this
time, you can figure out the distance between your vehicle and obstacles with the
alarming sound.
• Each end side sensor and two center
portion sensors will activate the alarm
when the distance between your vehicle
and the obstacle is around 120~80cm
and 100~80cm respectively.
: Intermittent alarm
Beep
“ON”
Beep
“OFF”
• When the distance is between 80~50cm
: Regular alarming
Beep
“ON”
Beep
“OFF”
• When the distance is between 50cm
: Alarm stays on
STARTING AND OPERATING 2–25
Tips on Parking Aid System
The alarm will not work or improperly work
under following cases:
A. Certain obstacles that sensors can
not detect
1. Wires, ropes, chains.
2. Cotton, sponge, clothes, snow that absorb ultrasonic waves.
3. Obstacles lower than the bumper.
B. The sensors can not detect
1. When they are frozen.
2. When they are blocked by snow or mud.
3. When they are receiving other ultrasonic
signals (metal sounds and air-braking
noises from heavy commercial vehicles).
4. When a high-power radio is turned on.
Beep
“ON”
Beep
“OFF”
Page 50

2–26 STARTING AND OPERATING
C. Narrowed sensing scopes
1. When the sensing scope is narrowed
due to partially blocked by snow or mud
on the surface of the sensors (it will
work again after cleaning).
2. When the ambient temperature is too
high (approx. over 80°C).
3. When the ambient temperature is too low
(approx. lower than -30°C).
D. Not defective but improperly work-
ing
1. When driving on the rough roads, gravel
road, hill and grass.
2. When the bumper height is changed due
to the heavy load.
3. When the sensing portion is frozen.
4. When the sensing portion is covered by
rain, water drops, snow or mud.
5. When receiving other ultrasonic signals
(metal sound or air braking noises from
heavy commercial vehicles).
6. When the sensor is hindered by improperly fitted accessories.
7. When a high-power radio is turned on.
CAUTION
•
The parking aid system is a parking aid system. You should continue to utilize the mirrors or turning your head. Normal precautions when reversing should be
maintained.
•
Do not press or shock the sensors
by hitting or high-pressure water
gun while washing, or the sensors
will be damaged.
•
When the parking aid system is not
activated but the alarm sounds for
3 seconds, check and repair your
vehicle at Ssangyong Dealer or
Ssangyong Auyhorized Service
operation.
However, do not confuse with the
sounds that continue when the obstacles are within 50cm.
NOTE
•
In the parking lot as shown above,
the upper portion of the vehicle
can be hit before the sensor operation, so check with outside rearview mirrors or by turning your
head during parking.
•
Please note the ‘Tips on parking
aid system’.
•
The parking aid system will operate correctly flat vertical surfaces.
Page 51

STARTING AND OPERATING 2–27
SUGGESTIONS FOR MORE
ECONOMICAL OPERATION
Your car’s fuel economy is mainly dependent
on your style of driving.
How you drive, where you drive, and when
you drive has an effect on how many kilometers you can get from a liter of fuel.
To obtain maximum fuel economy from your
car:
• Start gradually and accelerate gently.
• Avoid excessive and unnecessary
idling.
• Keep your engine properly tuned.
• Do not race the engine.
• Use the air conditioning only when necessary.
• Slow down when driving on rough
roads.
• Always keep your tyres inflated to the
recommended pressure for longer tyre
life and optimum fuel economy.
• Keep your distance from other vehicles
to avoid sudden stops. This will reduce
wear on brake linings and improve
economy as extra fuel is required to
accelerate back up to driving speed.
• Do not carry unnecessary weight in the
vehicle.
• Do not rest your foot on the brake pedal
while driving. This can cause needless
wear, possible damage to the brakes
and poor fuel economy.
• Always ensure your vehicle is maintained
to the manufacturer’s specification.
ENGINE EXHAUST GAS
CAUTION (CARBON MONOXIDE)
• Avoid inhaling engine exhaust gases.
Engine exhaust gases contains carbon
monoxide, which has no color or odor.
Carbon monoxide is a dangerous gas.
• It can cause unconsciousness and can
be lethal if inhaled.
• If at any time you suspect that exhaust
gases are entering the vehicle, have the
vehicle inspected and repaired immediately by a Ssangyong Dealer or
Ssangyong Authorized Service
Operation. If it is necessary to drive
under such conditions, do so only with
all windows fully open.
• To protect against exhaust gases entering the vehicle, the exhaust system and
body should be inspected:
- each time the vehicle is raised for an
oil change.
- whenever a change is noticed in the
sound of the exhaust system.
- whenever the exhaust system, under
body or rear of the vehicle is damaged
or becomes corroded.
Page 52

2–28 STARTING AND OPERATING
• Do not operate the engine in confined areas such as garages or other closed
areas any more than needed to move
the vehicle in or out of the area.
• When the vehicle is stopped in an unconfined area for more than a short time
with the engine running, place the air
intake lever to the fresh air mode to
draw the outside air into the vehicle and
set the fan switch to high speed.
• Never sit (or leave the children) in a
parked or stopped vehicle for any extended period of time with the engine
running.
• Avoid driving with tailgate open, as exhaust gases could enter the vehicle. If
you must drive with the tailgate open,
close all windows, place the air intake
lever to the fresh air mode to draw the
outside air into the vehicle, and set the
fan switch to high speed.
HAZARDOUS DRIVING
When hazardous driving is encountered
because of water, snow, ice, mud, sand or
similar hazard, follow these suggestions.
• Drive cautiously and allow extra distance for braking.
• Avoid sudden movements in braking or
steering.
• When braking depress the brake pedal
with a light up-and-down motion until the
vehicle is stopped.
• If stalled in snow, mud or sand, use 2nd
gear for manual transmission or “WINTER” mode for automatic transmission
and accelerate slowly. Accelerate
slowly to avoid spinning.
• Use sand, rock salt, tyre chains, or
other nonslip material under the rear
wheels to provide traction when stalled
in ice snow or mud.
Page 53

3
INSTRUMENTS AND CONTROLS
Page 54

3–2 INSTRUMENTS AND CONTROLS
GASOLINE ENGINE EQUIPPED VEHICLE*
(BLACK-FACE TYPE)
1. Speedometer
2. Auto shift indicator (A/T)
3. Odometer/Trip odometer
4. Engine oil pressure warning light
5. Battery charge warning light
6. Seatbelt reminder
7. Engine CHECK indicator
8. 4WD LOW indicator
9. 4WD CHECK indicator
10. Defogger indicator
11. Low fuel level warning light
12. Fuel gauge
13. Temperature gauge
14. WINTER mode indicator (A/T)
15. High beam indicator
16. Turn signal indicator (right)
17. Turn signal indicator (left)
18. ESP warning light
19. Tachometer
20. EBD waring light
21. SSPS warning light
22. Brake system warning light
23. ABS warning light
24. Aigbag warning light
25. Door open warning light
26. Trip odo meter reset button/Rheostat button
27. CRUISE contor indicator*
Page 55

DIRECT INJECTION DIESEL ENGINE EQUIPPED VEHICLE*
(BLACK-FACE TYPE)
INSTRUMENTS AND CONTROLS 3–3
1. Speedometer
2. Auto shift indicator (A/T)
3. Odometer/Trip odometer
4. Engine oil pressure warning lightt
5. Battery charge warning light
6. Seatbelt reminder
7. Engine CHECK indicator
8. 4WD LOW indicator
9. 4WD HIGH indicator
10. 4WD CHECK indicator
11. Glow indicator
12. Water separator warning light
13. Defogger indicator
14. Low fuel level warning light
15. Fuel gauge
16. Temperature gauge
17. WINTER mode indicator (A/T)
18. High beam indicator
19. Turn signal indicator (right)
20. Turn signal indicator (left)
21. ESP warning light*
22. Tachometer
23. EBD waring light
24. SSPS warning light
25. Brake system warning light
26. ABS warning light
27. Aigbag warning light
28. Door open warning light
29. Trip odo meter reset button/Rheostat button
Page 56

3–4 INSTRUMENTS AND CONTROLS
DIRECT INJECTION DIESEL ENGINE EQUIPPED VEHICLE
(GENERAL TYPE)
x1000r/min
1. Speedometer
2. Auto shift indicator
3. Odometer/Trip odometert
4. Glow indicator
5. Engine oil pressure warning light
6. Battery charge warning light
7. Seatbelt reminder
8. Engine CHECK indicator
9. 4WD CHECK indicator*
10. 4WD LOW indicator*
11. WINTER mode indicator (A/T)
12. 4WD HIGH indicator*
13. Temperature gauge
14. Turn signal indicator (left)
15. High beam indicator
16. Turn signal indicator (right)
17. Brake system warning light
18. Tachometer
19. ESP warning light*
20. EBD waring light
21. ABS warning light*
22. Aigbag warning light*
23. Fuel gauge
24. Low fuel level warning light
25. Water separator warning light
26. Defogger indicator
27. Door open warning light
28. Trip odo meter reset button
Page 57

INDIRECT INJECTION DIESEL ENGINE EQUIPPED VEHICLE
(GENERAL TYPE)
x1000r/min
INSTRUMENTS AND CONTROLS 3–5
1. Speedometer
2. Auto shift indicator
3. Odometer/Trip odometer
4. Glow indicator
5. Engine oil pressure warning light
6. Battery charge warning light
7. Seatbelt reminder
8. 4WD CHECK indicator*
9. 4WD LOW indicator*
10. WINTER mode indicator (A/T)
11. 4WD HIGH indicator*
12. Temperature gauge
13. Turn signal indicator (left)
14. High beam indicator
15. Turn signal indicator (right)
16. Brake system warning light
17. Tachometer
18. EBD waring light*
19. ABS warning light*
20. Aigbag warning light*
21. Fuel gauge
22. Low fuel level warning light
23. Defogger indicator
24. Door open warning light
25. Trip odo meter reset button
Page 58

3–6 INSTRUMENTS AND CONTROLS
SPEEDOMETER ODOMETER/TRIP ODOMETER
Black-Face Type
General Type
The speedometer indicates the vehicle
speed in kilometers per hour (km/h) or mile
per hour (m/h).
When the reset button located in the right
and lower area of odometer is pressed
once, the first driving distance (TRIP A) will
be indicated and pressed again, the second
driving distance (TRIP B) will be indicated.
When the button is pressed once more, total distance (ODO) will be indicated.
If you press and hold the reset button for over 3 seconds in TRIP A or
TRIP B mode, the trip odo meter resets to zero.
Black-Face Type
General Type
NOTE
RHEOSTAT (BLACK-FACE TYPE)*
Press and hold the Trip odo meter reset
button/Rheostat button to adjust the instrument panel illumination. Release the button
when the illumination reaches the brightness
you want.
Page 59

INSTRUMENTS AND CONTROLS 3–7
TACHOMETER
General Type
Black-Face Type(Diesel)
The tachometer indicates engine speed in
revolutions per minute.
Multiply 1,000 to the current number, then it
will be the current number of engine
revolutions.
Ideal engine idle speed
Diesel
Gasoline
Excessive speed can damage engine.
Do not let engine reach excessive
speed, indicated by pointer being in
red zone.
Black-Face Type(Gasoline)
700 ~ 800 rpm
650 ~ 750 rpm
WARNING
TEMPERATURE GAUGE FUEL GAUGE
Black-Face Type
General Type
The temperature gauge indicates the temperature of engine coolant when the ignition
switch is in the “ON” position.
• H : hot
• C : cool
CAUTION
The engine can overheat.
• If the pointer reaches the red zone,
stop the vehicle.
• Allow engine to cool.
This gauge indicates the level of fuel remaining in the fuel tank. This gauge operates only
when the ignition switch is in “ON” position.
When the fuel is added, the gauge slowly
changes to the new fuel level after the ignition is turned on. The needle moves when
braking, accelerating or making turns. This
is caused by the movement of the fuel in the
tank.
• F : Full
• E : Empty
Fill up fuel tank before the needle
reaches “E”.
Black-Face Type
General Type
NOTE
Page 60

3–8 INSTRUMENTS AND CONTROLS
ENGINE OIL PRESSURE
WARNING LIGHT
This warning light comes on when the ignition is switched on (as a check of bulb operation) and should go out after the engine
is started. If the light comes on while driving,
it indicates that the oil pressure is dangerously low. Stop the engine immediately and
check the engine oil level.
If the oil level is low, add the specified engine oil to the proper level.
If the oil level is normal, have the lubricating
system checked at the nearest Ssangyong
Dealer.
BATTERY CHARGE WARNING
LIGHT
CAUTION
Severe engine damage could result.
• Do not run the engine with the engine oil pressure warning light illuminated.
• If oil level is normal, take vehicle
to Ssangyong Dealer or Ssangyong
Authorized Service Operation.
This warning light indicates that the battery
is being discharged.
When the ignition is switched on, this warning light comes on and should go out when
the engine is started.
If the light illuminates while driving,
• Pull off the road and stop your car.
• Check the alternator drive belt for looseness or breakage.
• If the belt is OK, there is a problem somewhere in the charging system. The problem should be located and corrected as
soon as possible. Have the system
checked and repaired immediately by
your nearest Ssangyong Dealer.
Page 61

CAUTION
Do not continue driving if the belt is
loose or broken.
Engine can overheat, damaging engine.
SEAT BELT REMINDER
INSTRUMENTS AND CONTROLS 3–9
ENGINE CHECK INDICATOR
(DIRECT INJECTION DIESEL AND
GASOLINE ENGINE EQUIPPED)
The seat belt warning light comes on whenever the ignition switch is placed in the “ON”
position unless the driver’s seat belt is securely fastened. Also the seat belt warning
chime will sound for about 6 seconds when
the ignition switch is in the “ON” position
unless the driver’s seat belt is secured fastened.
Attention should be paid to ensure that the
seat belts are fastened before driving off.
This warning light comes on when the ignition switch is turned to ON and goes out if
the engine is in normal condition.
If the light stays ON, inspect your vehicle by
Ssangyong Dealer or Ssangyong Authorized
Service Operation.
Page 62

3–10 INSTRUMENTS AND CONTROLS
CAUTION
Do not drive with the engine check
indicator lamp on.
The indicator lamp signals that your
vehicle has a problem that requires
attention.
Driving with the engine check indicator lamp on can damage the emissions control system and can affect
the fuel economy and drivability or
your vehicle.
Consult a Ssangyong Dealer or a
Ssangyong Authorized Service Operation to repair the problem as soon
as possible.
Your vehicle was designed in compliance
with European On Board Diagnostic (EOBD)
requirements which were specified by European Economic Community Directive.
The engine check indicator will illuminate if
a fault exists in the emission related components or related sub systems.
It will stay on as long as the Engine Control
Unit (ECU) detects the fault.
If a severe misfire is detected, fuel is cut
automatically to avoid catalytic converter
damage.
Your vehicle’s electronic system will switch
to an emergency running program so you
may continue to drive.
However, you should consult a Ssangyong
Distributor or Ssangyong Authorized Service
Operation to repair the problem as soon as
possible.
POWER MODE INDICATOR
(FOR AUTOMATIC TRANSMISSION)
The indicator will come on when the Power
mode (P) switch near the gear selector lever is selected.
Use this mode if you need more power during abrupt acceleration, driving on steep hills.
At this time, gear shifting time delays than
normal to get more traction power.
Page 63

INSTRUMENTS AND CONTROLS 3–11
WINTER MODE INDICATOR
(FOR AUTOMATIC TRANSMISSION)
The indicator will come on when the Winter
mode (W) switch near the gear selector lever is selected.
Use this mode to drive off smoothly under
icy and slippery road.
NOTE
In winter mode, vehicle starts with
2nd gear so the power could be a
little bit reduced.
AUTO SHIFT INDICATOR
(FOR AUTOMATIC TRANSMISSION)
5-Speed
4-Speed
The indicator comes on when the ignition
switch is ON and the indicator shows the
automatic transmission selector lever
position.
4WD CHECK WARNING LIGHT
IDI engine equipped vehicle
DI engine or gasoline engine equipped vehicle
These indicators come on when the ignition
switch is turned to ON and should go out if
the system is normal. If the “4WD LOW” and
“4WD HIGH” warning light come on or blink
(IDI Engine), or “4WD CHECK” warning light
stays on, have the 4WD system checked at
Ssangyong Dealer or Ssangyong Authorized
Service Operation.
Page 64

3–12 INSTRUMENTS AND CONTROLS
4WD LOW INDICATOR
4WD HIGH INDICATOR
(FOR PART-TIME 4WD)
DEFOGGER INDICATOR
This indicator comes on when the 4WD LOW
mode is selected by pushing 4L switch.
CAUTION
To shift ‘4L’ position, completely stop
the vehicle and always depress the
clutch pedal, for manual transmission,
or position the selector lever to “N”,
for automatic transmission, and select
the 4WD switch to ‘4L’.
When the switch is selected and the
mode is shifting into 4L, the indicator blinks for a moment.
This indicator comes on when the 4WD HIGH
mode is selected by pushing 4H switch.
Shift the driving mode from 2WD to 4WD
HIGH only when the vehicle speed is under
70 km/h.
NOTE
When shifting the driving mode from
4WD LOW to 4WD HIGH, this indicator will blinks until the shift is
completed. After completion of shift,
the indicator stays on.
The indicator comes on without
blinking when shifting from 2WD to
4WD HIGH.
The indicator comes on when the tailgate
glass defogger is switched “ON”.
It goes out after specified time.
Page 65

INSTRUMENTS AND CONTROLS 3–13
DOOR OPEN WARNING LIGHT
This light comes on when a door or tailgate
is either opened or not closed completely.
If you drive not closing the door, the warning light blinks.
WARNING
Driving with door open can cause injury to people inside and outside the
vehicle.
• Before driving off, close all doors.
• Check warning light is off.
LOW FUEL LEVEL WARNING
LIGHT
This warning light indicates that the fuel will
soon be exhausted.
Fill up the fuel tank as soon as possible if
this warning light comes on.
CAUTION
Running out of fuel could causes
damage to the catalytic converter.
Fill up fuel tank as soon as possible
when warning light comes on.
NOTE
During driving on steep hill or rough
roads, this warning light may come
on if the remaining fuel is low.
GLOW INDICATOR
(FOR DIESEL ENGINE)
This indicator comes on when the ignition
switch is turned on and stays on for a short
time or may go off right away. The waiting
time will vary according to the engine coolant temperature. When the glow plugs are
sufficiently heated for cold starting, the light
will go out. Then, the engine should be
started.
Page 66

3–14 INSTRUMENTS AND CONTROLS
ESP WARNING LIGHT*
If you press the ESP OFF switch, the ESP
function stops and the indicator lamp in instrument panel comes on.
Press this switch again to resume the ESP
function. At this time, the indicator lamp goes out.
If the ESP function operates while driving, the
indicator lamp flickers and the alarm sounds.
CAUTION
If the ESP warning light comes on, the
ESP related system is defective. At
this moment, the ABS works in a
basic way. However, make sure to
check the vehicle at the nearest
Ssangyong Dealer or Ssangyong
Authorized Service Operation.
SSPS WARNING LIGHT*
IThis warning light comes on when the SSPS
system is defective. When this warning light
comes on, the steerability becomes heavy.
CAUTION
If this light comes on, have the SSPS
system checked by Ssangyong Dealer
or Ssangyong Authorized Service
Operation.
SSPS?*
In traditional constant power assist steering
system, the steerability gets lighter as vehicle speed rises, and this may cause dangerous situation.
SSPS, by providing appropriate steerability to
driver according to the changes of vehicle
speed, gives steering stability. In other words,
the steering wheel gets lighter by adjusting
steerability in stop or low speed and provides
steering stability by adjusting steering wheel
to become heavier in high speed.
Page 67

INSTRUMENTS AND CONTROLS 3–15
EBD WARNING LIGHT*
When the ignition is switched on, this warning light comes on and should go out after 2
seconds.
If the EBD system is abnormal, the warning
light comes on and when the relative ABS
system is also abnormal, it comes on with
ABS warning light.
CAUTION
If this warning light fails to go out
or comes on, have the system
checked and repaired immediately
by your nearest Ssangyong Dealer.
NOTE
EBD (Electronic Brake-force Distribution)?
When the brake pedal is applied, it
controls the braking pressure electronically to effectively distribute the
braking forces to the front wheels
and rear wheels. EBD operates when
the speed differences between the
most fast front wheel and the rear
wheel are over 6km/h and if ABS is
engaged, it does not operate.
ABS WARNING LIGHT*
This warning light illuminates when the ignition is switched on and should go out after
about 2 seconds.
If this light doesn’t come on when the ignition is switched on or if this light doesn’t go
out, contact your nearest Ssangyong Dealer
or Ssangyong Authorized Service Operation.
If this light illuminates while driving, a malfunction of ABS is indicated. In this case the
brake system performs its regular function
but without the anti-locking capability. Have
the system checked by Ssangyong Dealer
as soon as possible if this condition occurs.
Page 68

3–16 INSTRUMENTS AND CONTROLS
WARNING
If the brake system warning light and
ABS warning light illuminate at the
same time while driving, it may indicate a failure in the base brake
system due to the malfunction of
ABS.
• Stop the vehicle and consult your
Ssangyong Dealer.
• Have the system checked and repaired immediately before continuing your journey.
CAUTION
Even though your vehicle is equipped
with ABS, your vehicle may need
normal braking distances like conventional brake vehicles or could be
longer according to road conditions,
so keep the safety distance.
ABS is auxiliary system for safety.
Do not over rely on the system and
keep on safety driving.
NOTE
ABS (Anti-Lock Brake System)?
When you brake abruptly or on the
slippery road, the vehicle keeps going on ahead but the wheels are
locking not to rotate. At this time,
your vehicle will not be steered or
rotate and could be resulted in accident. ABS controls the wheels properly not to be locked and allows
steering to increase the vehicle’s
stability.
AIR BAG WARNING LIGHT*
When the ignition is switched on, this warning light illuminates and then should go out,
to confirm that the air bag is operational.
If it does not come on, or if it does not go
out, or if it flashes or illuminates continuously
while driving, it means that there is malfunction in the system. The air bag system would
therefore not be triggered in the event of an
accident. Have the air bag system checked
without delay by a Ssangyong Dealer or
Ssangyong Authorized Service Operation.
Page 69

BRAKE SYSTEM WARNING LIGHT
This warning light comes on when the parking brake is applied with the ignition on and
goes out when the parking brake is released.
(But, if the parking brake is applied, this
warning light still remains on until the parking brake released.)
Make sure the parking brake is fully released
before driving.
If this warning light comes on even when
the parking brake is completely released, it
may indicate that the brake fluid in the reservoir is low. Then;
1. Pull off the road and stop carefully.
2. Check the brake fluid and add the recommended brake fluid up to the MAX
mark.
3. If the brake operates normally and you
judge it to be safe, drive carefully at a
safe speed to the nearest Ssangyong
Dealer for inspection immediately.
4. If leaks are found, if the warning remains
on, or if the brakes do not operate properly, have the vehicle towed to nearest
Ssangyong Dealer for inspection and
repairs.
WARNING
Driving the vehicle with the brake
fluid warning light on is dangerous.
Have the brake system checked and
repaired immediately by nearest
Ssangyong Dealer.
INSTRUMENTS AND CONTROLS 3–17
CAUTION
The brake system warning light may
not come on with parking brake applied and ignition on, indicating
brake system fault.
• Check for bulb failure.
• If bulb is working properly, have
brake system checked.
NOTE
Low brake fuel level may increase
the stopping distance and require
greater pedal effort as well as
greater pedal travel.
Page 70

3–18 INSTRUMENTS AND CONTROLS
TURN SIGNAL/HAZARD
FLASHER INDICATOR
When the turn signal switch is turned on,
this indicator flashes to indicate operation of
the external turn signal.
Shorter flashes indicate the failure of a turn
signal lamp bulb.
Both right and left lights flash when the
hazard warning switch is turned on.
NOTE
If a bulb is burned out, replace it immediately to help avoid an accident.
If the indicating arrows don’t go on
at all when you signal a turn, check
the fuse and for burned-out bulbs.
HIGH BEAM INDICATOR
This indicator illuminates when the headlight
high beam is switched on.
WATER SEPARATOR WARNING
LIGHT (DIRECT INJECTION
DIESEL ENGINE EQUIPPED)
When the water level inside water separator in fuel filter exceeds a certain level, this
warning light comes on and buzzer sounds.
Also, the driving force of the vehicle
decreases. If these conditions occur, immediately drain the water from fuel filter.
For the draining procedures, please refr to
“How to drain the water from fuel filter” on
next page.
This warning light goes out when the draining is completed.
Page 71

CAUTION
• Drain the water from fuel filter immediately after the warning light
comes on. If you cannot do that by
yourself, visit nearest Ssangyong
Dealer or Ssangyong Authorized
Service Operation.
• For the draining procedures,
please refer to “How to drain the
water from fuel filter” on next
page. After draining the water,
press the primimg pump until it
becomes rigid.
WARNING
• The fuel system in engine may get
serious damage if you keep driving while the warning light is coming on. Prompt correction should
be necessary.
INSTRUMENTS AND CONTROLS 3–19
HOW TO DRAIN THE WATER FROM FUEL FILTER
(DIRECT INJECTION DIESEL ENGINE EQUIPPED)
Fuel filter
Drain plug
1. Locate the fuel filter in engine
compartment.
2. Place the water container under the fuel
filter.
3. Disconnect the connector under the drain
plug.
4. Turn the drain plug to “A” direction to
drain the water.
5. Wait until a certain amount of fuel gets
out from the port, then turn the drain
plug to “B” direction to tighten it.
CAUTION
• Be carefule not to be injured by
surrounding equipment during the
working procedures.
Priming
pump
Page 72

3–20 INSTRUMENTS AND CONTROLS
CRUISE CONTROL INDICATOR*
(FOR GASOLINE ENGINE)
6. Engage the connector under the drain
plug and press the primimg pump until it
becomes rigid.
7. Close the engine hood and start the
engine.
WARNING
• If the priming pump is not properly operated, air may get into the
fuel line. It may cause starting
problem or fuel system problem.
Make sure to perform the job in
step 6.
This indicator illuminates when the cruise
control is switched on.
Page 73

MULTI-METER*
The multi-meter indicates the vehicle’s current direction, atmospheric pressure and
altitude.
INSTRUMENTS AND CONTROLS 3–21
1. Barometer
2. Electronic compass
3. Speed sensing indicator
4. Relative altimeter
5. Altimeter
6. Adjustment switch
7. Down switch
8. Power switch
9. Up switch
10. Mode switch
Page 74

3–22 INSTRUMENTS AND CONTROLS
Electronic Compass
NOTE
• You can turn to any direction, left
or right.
• When the calibration is completed,
the compass does not flash
anymore.
• If the compass continues to flash,
turn again slowly until it goes off.
1. It indicates 16-direction by intervals of
22.5° according to the vehicle’s driving
direction.
• When the first equipped to the vehicle
or the battery is exchanged, you have
to perform calibration by circulating your
vehicle. If not, there will be misreading
in direction.
NOTE
The direction will be indicated while
driving.
Turning calibration
1. If you press the adjustment switch for
0.5 ~ 5 seconds, the current direction
flashes.
2. Turn the vehicle over 1 complete circle
within 128 seconds slowly, then the
calibration will be accomplished.
3. When the calibration is finished, the
vehicle’s new direction will be indicated.
Page 75

Release conditions for turning calibration
• When the adjustment switch is pressed
over 0.6 second.
• When the vehicle is not turned within 128
seconds after calibration mode started.
Warning for turning
When the vehicle has been turned out of the
specification due to external elements, direction indicator flashes to inform you that there
are abnormal signals.
CAUTION
• Warning for turning occurs if the
abnormal signals has been received more than 5 minutes
continuously, however, it is not the
malfunction of the vehicle and returns to normal condition if the external magnetic field becomes to
normal.
• The direction indicator may be delayed when you drive on sharp
corner, however it is normal, not
malfunction.
• On the place where the terrestrial
magnetism is dispersed, the compass may not indicate the correct
direction, however, when you leave
the place, it returns to normal.
(Examples: in the tunnel, parking
lot in a building, underground
parking lot, building complex,
above the subway lines, near to
substation, under the power lines
of the electric railways, etc.)
INSTRUMENTS AND CONTROLS 3–23
SPEED SENSING INDICATOR
The flashing interval of the road signs
changes gradually according to the vehicle
speed.
Flashing intervals by speed ranges
Speed range
Less than 1.8 km/h
Less than 40 km/h
Less than 60 km/h
Less than 80 km/h
Less than 100 km/h
-
Flashing interval
All “ON”
per 1 second
per 0.8 second
per 0.5 second
per 0.3 second
per 0.2 second
Page 76

3–24 INSTRUMENTS AND CONTROLS
BAROMETER
It indicates the current atmospheric pressure
up to 600 hpa~1100 hpa by 1 hpa.
ALTIMETER (ABSOLUTE ALTIMETER)
It operates by atmospheric pressure. 0m
above the sea level is equivalent to 1013.25
hpa and the altimeter convert the difference
between this pressure and atmospheric
pressure to altitude and shows by every
20m. (however, if less than 20m, it indicates
as 0m)
How to calibrate the altitude
Switch
Up “1”
Down “2”
Time to press
ON (less than 0.5 sec.)
ON (more than 0.5 sec.)
ON (less than 0.5 sec.)
ON (more than 0.5 sec.)
How to erase the calibrated altitude value
Press the UP and DOWN switches simultaneously for more than 1 second then the
calibrated altitude value will be erased and
the current altitude will be indicated after
showing –0000 for 2 seconds.
Altitude calibration ranges
The difference between minimum value and
maximum value is 3000m: the calibration is
available within the altitude range of –200 ~
+2800m.
Indication
Increase by 20m
Automatic increase by 20m (per 0.2 sec.)
Decrease by 20m
Automatic decrease by 20m (per 0.2 sec.)
Page 77

RELATIVE ALTIMETER
INSTRUMENTS AND CONTROLS 3–25
Use this to see the specific area’s altitude;
it shows the specific area’s relative altitude
based on the current altitude of the vehicle.
Mode setting of the relative altimeter
1. Press the MODE switch over 1 second.
Indication type
• To see the difference of the altitude
Set the vehicle’s altitude to 0 by pressing UP and DOWN switches simultaneously over 1 second. read the indicated altitude after arrival.
• To see the destination’s altitude
1. Enter the altitude of the point where
you know the altitude from the sea
level.
2. The indicated value on the destination
is the altitude from the sea level.
CAUTION
The altimeter operates by using
changes of atmospheric pressure.
So, sometimes, the indicated altitude
may different due to changing atmospheric pressure in the same place,
however, it is normal, not malfunctions.
Page 78

3–26 INSTRUMENTS AND CONTROLS
Coming out order of the road signs
• If the vehicle stops, the currently turned
off area of the signs will remain as it is.
• If the vehicle drives off again, the next
area from the turned off signs will start
to flash.
LIGHT SWITCH
CAUTION
• Fog lamps will turn on according
to lights switch positions when the
fog lamps switch is ON.
• Do not lay anything on the auto
light sensor located in passenger
side instrument panel. AUTO light
may operate incorrectly, if covered.
To turn the lights on or off, twist the knob
on the end of the combination switch lever.
OFF position
All lights are off.
Position
Position, tail, license plate, fog and instrument panel lights are illuminated.
Position
Headlight (low beam) and all the above lights
are illuminated.
AUTO Position (optional)
Turn on and off all lights automatically.
Page 79

INSTRUMENTS AND CONTROLS 3–27
AUTO Light
Headlamp and tail lamp will automatically
come on or off according to the ambient illumination intensity when the light switch is
at “AUTO”.
Battery Saver (Automatically turns off
the lights)
To prevent the battery from discharging, the
tail lamp will be go out automatically when
the driver get off (open and close the
driver's door) with the tail lamp ON.
• You may turn the tail lamp on by positioning the ignition switch on or turning
the light switch off then turn on again.
CAUTION
•
Do not place any objects blocking
the sensor. Do not clean the sensor with detergent or wax.
•
In a foggy, snowy, rainy, or cloudy
day, be sure to use manual mode.
The turning on or off time of the
lamps varies depending on the
climate, season, or circumstances.
•
The sun proof coating that can affect the illumination intensiry inside the vehicle may cause the malfunction of the lighting system.
•
Ssangyong recommends you to use
this device restrictively in only a
sunrise or sunset. For the normal
operation of the lamps, turn on or
off manually.
•
To prevent the battery from
discharging, do not leave the light
on while engine is off.
LIGHT SWITCH WARNING CHIME
The chime sounds to remind you to turn off
the lights if the driver’sdoor is opened with
them switched on when the ignition key is
removed
Page 80

3–28 INSTRUMENTS AND CONTROLS
HIGH BEAM SWITCH
To turn on the high beam headlights push the
lever towards the instrument panel with the
low beam headlights on.
The headlight high beam indicator light in the
instrument panel comes on when the headlights are on high beam.
For low beam headlights, pull the lever back
towards the steering wheel to the normal
position.
NOTE
The light switch must already be in
the position.
PASSING LIGHT SWITCH
To flash the high beam, pull the lever towards the steering wheel and release it.
The lever will return to the normal position
when released.
The high beam headlights stay on as long
as you hold the lever.
TURN SIGNAL SWITCH
Move this lever up to the stop position to
signal a right turn.
Move this lever down to the stop position to
signal a left turn.
When the turn is completed, the signal will
cancel and the lever will return to the normal position. When changing lanes, move the
switch part way and hold it there. When released, the switch will spring back to the
normal position.
CAUTION
Battery will discharge.
Do not leave the lights on while engine is off.
Page 81

INSTRUMENTS AND CONTROLS 3–29
HEADLIGHT LEVELLING SWITCH*
With the low beam switched on, adjust the
aiming angle of headlights to suit the vehicle
load.
• To lower the aiming angle, push the
switch downward.
• To raise the aiming angle, push the
switch upward.
NOTE
According to load condition, adjust
the aiming angle of headlights.
WINDSHIELD WIPER SWITCH
To operate the windshield wipers, move the
lever in 3 downwards steps with the ignition on.
OFF = O ff
AUTO = Operates automatically according to
the vehicle speed or amount of rain
(rain sensor equipped vehicle)
LO = Continuous wipe, slow speed
HI = Continuous wipe, fast speed
CAUTION
Wiper operation on dry windshield
can scratch glass and wear the
blades prematurely.
Do not operate wipers when windshield is dry.
CAUTION
Wiper operation with obstructions,
such as snow, can damage wiper
motor.
Clear obstruction before operating.
CAUTION
Wiper blades can freeze to windshield in cold weather.
Wiper operation while the blades are
frozen can damage the wiper motor.
Check blades are not frozen to windshield before operating.
Page 82

3–30 INSTRUMENTS AND CONTROLS
AUTOMATIC WIPER CONTROL
SWITCH
The interval of wiper swings can be adjusted by twisting the control knob upward
or downward when the windshield wiper
switch is in AUTO position.
F : Fast interval
S : Slow interval
AUTO Position Recognition Function
• When you start the engine with the wiper
switch “AUTO” position, the wiper will
operate once to remind you that the
wiper switch is in “AUTO” position.
• When you move the wiper switch to
“AUTO” from “OFF” position, the wiper
will operate once.
CAUTION
If the wiper switch is at “AUTO”
position, place turn it to “OFF” position before stopping the engine.
CAUTION
•
Auto position recognition, especially in winter, may reduce the
life span of the wiper blade. Make
sure the wiper switch is at “OFF”
position unless it rains.
•
During winter time, the wiper
blade can be frozen to windshield.
Wiper operation while blade is frozen can damage wiper motor. Be
sure to check the blade before
operation.
•
The wiper operation on dry windshield can scratch glass and wear the
blade prematurely. Do not operate
wiper when the windshield is dry.
•
When you clean the windshield
over the sensor with damp cloth,
the wiper may operate suddenly. It
could cause serious injury. Make
sure to place the wiper switch and
ignition switch to “OFF” position
when not in use.
•
Make sure to place the wiper
switch to “OFF” position before
wash-ing the vehicle.
Page 83

WINDSHIELD WASHER SWITCH
To spray washer fluid on the windshield, pull
the lever towards the steering wheel with
the ignition on.
When you pull the lever for less than about
0.6 seconds, the washer fluid is sprayed
onto the windshield, but the windows wipers are not operated.
When you pull the lever for more than about
0.6 second, the washer fluid is sprayed onto
the windshield while you pull the lever and
then the windshield wipers are operated for
several cycles. When you release the lever,
the wipers automatically returns to the rest
position.
CAUTION
In freezing weather, washer fluid can
form ice on windshield, blocking forward vision.
Warm windshield before operating
washer.
CAUTION
The washer motor can be overheated and damaged.
• Do not operate the washer when
washer fluid tank is empty.
• Do not operate the washer continuously for more than 10
seconds.
INSTRUMENTS AND CONTROLS 3–31
TAILGATE WINDOW WIPER
SWITCH
The tailgate window wiper and washer
switches are located on the instrument
panel separately.
To operate the tailgate window wiper, push
the switch. To cancel the operation of the
window wiper, push the switch again.
Page 84

3–32 INSTRUMENTS AND CONTROLS
CAUTION
Replace the blade when it is worn or
when it no longer wipers properly, to
avoid loss of vision when in use.
TAILGATE WINDOW WASHER
SWITCH
CAUTION
In cold weather, washer fluid can
form ice on rear window, blocking
your vision. Warm rear window before operating washer.
CAUTION
Tailgate window can be scratched
or wiper blade can be worn prematurely.
Do not operate the wiper when the
window is dry.
CAUTION
Wiper blades can freeze to rear window in cold weather.
Wiper operation while blade is frozen can damage wiper motor.
Check that blade is not frozen before
operating.
To spray the washer fluid, push the tailgate
washer switch.
When you press the switch for more than
about 0.6 second, the washer fluid is
sprayed onto the tailgate window and the
rear wiper is operated.
CAUTION
Washer motor will be overheated and
damaged.
Do not operate the washer when
washer fluid tank is empty or continuously for more than 10 seconds.
Page 85

FRONT FOG LAMP SWITCH
REAR FOG LAMP SWITCH*
INSTRUMENTS AND CONTROLS 3–33
OUTSIDE REAR VIEW MIRROR
CONTROL SWITCH
To turn on the front fog lamp, push this
switch while the light switch is placed in
position.
Pushing this switch again will turn off the
front fog lamps.
CAUTION
Do not use the fog lamp as a substitute for the headlight.
To turn on the rear fog lamp, push this
switch while the light switch is placed in
position.
Pushing this switch again will turn off the
rear fog lamps.
Rear fog lamps can dazzle people behind.
Use rear fog lamps in severe weather conditions.
Adjust the outside rear view mirrors with the
adjusting switches so that you can see not
only each side of the road behind you but
also each side of your vehicle. This helps
you determine the location of objects seen
in the mirror.
You may adjust the outside rearview mirrors
up or down and left or right using the mirror
switch located on the driver's door panel.
The ignition switch must be ON to adjust the
mirrors.
Page 86

3–34 INSTRUMENTS AND CONTROLS
1. Select the mirror as you want to adjust
by using the left/right switch located inside the mirror adjustment pad, to the left
for left mirror or to the right for right
mirror.
2. Adjust the selected mirror up, down, left,
or right using the corresponding edges
of the mirror adjustment pad.
CAUTION
When the selection switch is in neutral position, you can not adjust the
outside rearview mirrors.
CAUTION
Do not force mirror to adjust if ice
should restrict movement of mirror.
Use deicer, spray, or blower to remove ice.
CAUTION
Adjust mirror angles before driving.
CAUTION
All round vision can be impaired,
increasing potential for accidents.
• Adjust mirror angles before
driving.
• Check glass surface for damage.
• Use deicer, spray or blower to remove ice.
CAUTION
Glass surface may be damaged.
Do not scrape ice from mirror face.
OUTSIDE REARVIEW MIRROR
The outside rearview mirror on the
passenger’s side is convex if it says “OBJECTS IN MIRROR ARE CLOSER THAN
THEY APPEAR”. Use this mirror to get a
wider view of the road behind.
WARNING
Side convex mirrors make objects appear smaller and farther away than
when viewed in a flat mirror.
• Use the inside mirror to determine
the size and distance of objects
seen in the side mirror.
• Maintain rearward vision from
driver’s seating position.
Page 87

INSTRUMENTS AND CONTROLS 3–35
FOLDABLE OUTSIDE REAR
VIEW MIRROR
If necessary, the outside rearview mirror can
be folded flat to the rear by pushing them
rearward when driving on narrow roads or
washing the vehicle, etc..
OUTSIDE REAR VIEW MIRROR
FOLDING SWITCH*
To fold the outside rearview mirrors, press
the switch for more than 0.5 second. To
unfold the mirrors, press again.
OUTSIDE REARVIEW MIRROR & TAILGATE GLASS DEFOGGER SWITCH
To demist or defrost the tailgate window or
side rear view mirror, push the defogger
switch when the ignition switch is in the “ON”
position.
The defogger indicator in the cluster illuminates when the defroster is operating.
Pushing it again will turn off the demister
operating.
If you operate this function again within 10
minutes after completion of first operation,
it will operate for about 6 minutes.
Page 88

3–36 INSTRUMENTS AND CONTROLS
CAUTION
When cleaning the inside of tailgate
window, be careful not to scratch or
damage the defogger wires.
Do not clean inside of tailgate window with sharp instruments or window cleaners containing abrasives.
NOTE
In snowy condition, use this defogger switch only after removing any
snow from the tailgate window.
NOTE
The defogger uses a lot of power and
can discharge the battery.
• Do not use the defogger when
starting the vehicle or the engine
is not running.
• Switch off defogger when tailgate
window is clear.
CRUISE CONTROL*
Cruise control is an automatic speed control
system that maintains a desired driving speed
without using the accelerator pedal.
The vehicle speed must be greater than 36 km/h
to engage cruise control. This feature is especially useful for motorway driving.
CAUTION
Improper use of cruise control could
be dangerous.
• Do not use on winding roads.
• Do not use in heavy traffic.
• Do not use on slippery, wet roads.
This could result in a loss of control,
collision, and/or personal injuries.
Setting a Desired Speed
1. To operate the cruise control, accelerate to your desired speed using the
acceleration pedal more over 36 km/h.
2. When the desired speed is reached,
push up the ACCEL.SET. switch of a
cruise control lever or push down the
DECEL.SET. switch for 1 second per one
switching and then release the acceleration pedal, slowly.
3. Now, the vehicle is cruised by this system with set speed.
4. And you can set to other vehicle speed
again with above steps after acceleration pedal intervention during cruise control running.
Page 89

INSTRUMENTS AND CONTROLS 3–37
Accelerating with Cruise Control System
• While cruise control system is running
1. Push up the ACCEL.SET. switch of a
cruise control lever and hold it until the
desired speed is reached without an
acceleration pedal intervention.
2. When the desired speed is reached,
release the lever.
• While cruise control system is not running
1. Accelerate using the acceleration pedal
more over 36 km/h.
2. Push up the ACCEL.SET switch of a
cruise control lever and hold it.
3. And then release the acceleration pedal,
slowly.
4. When the desired speed is reached,
release the lever.
• Tap up while cruise control system is
running
1. Push up the ACCEL.SET. switch of a
cruise control lever less than 0.5 second per one switching while the cruise
control system is running. This is a tap
up switching.
2. When you operate a tap-up switching,
the vehicle is accelerated for 1.3 km/h
over the previous set speed.
3. If you want to accelerate for 13 km/h,
operate the tap-up switching ten times
without accelerating with cruise control
system.
Decelerating with Cruise Control System
• While Cruise control system is running
1. Push down the DECEL.SET. Switch of a
cruise control lever and hold it until the
desired speed is reached without a
brake pedal intervention. But the cruise
control system cannot maintain the
cruise function at less than 34 km/h.
2. When the desired speed is reached,
release the lever.
• When Cruise control system is not running
1. Push down the DECEL.SET. Switch of a
cruise control lever and hold it.
2. And then release the acceleration pedal,
slowly.
3. When the desired speed is reached,
release the lever. But the cruise control
system cannot maintain the cruise function at less than 34 km/h.
Page 90

3–38 INSTRUMENTS AND CONTROLS
• Tap down while cruise control system
is running
1. Push down the DECEL.SET. Switch of a
cruise control lever less than 0.5 second per one switching while the cruise
control system is running. This is a tap
down switching.
2. When you operate a tap-down switching,
the vehicle is decelerated for 1 km/h below the previous set speed.
3. If you want to decelerate for 10 km/h,
operate the tap-down switching ten
times without brake pedal intervention.
Recovery of Set Speed
Even if the cruise control is canceled, the
previous set cruise speed can be recovered
by pushing toward the RSM (resume) switch
of a cruise control lever when the current
vehicle speed is higher than 36 km/h without acceleration intervention. But if you turn
off the ignition switch, the memorized set
speed is cleared and you cannot recover the
previous set speed.
CAUTION
The resume position should only be
used if the driver is fully aware of
this speed and wishes to resume this
particular speed.
Normal Cancellation of Cruise Control
The cruise control system will be canceled
when one or more items of the following
conditions is applied;
1. When the brake pedal is depressed.
2. When the cruising speed is downed less
than 34 km/h.
3. When the off switch is operated by
pulling rearward the cruise control lever.
4. When ABD is activated.
And the cruise control system can be operated again in driving state.
CAUTION
Keep the main cruise control switch
as neutral position when not using
the cruise control.
Page 91

INSTRUMENTS AND CONTROLS 3–39
Abnormal Cancellation of Cruise Control
1. When the rapid deceleration is applied
without braking.
2. When the rapid acceleration is applied
without acceleration pedal intervention.
3. When the cruise control lever is failed.
4. When the brake switch and brake light
switch input signal is unplausible.
And the cruise control system cannot be
operated again in driving state. In this case,
you should stop the vehicle, and turn off the
ignition switch and then turn it on again.
After you do that, you can use the cruise
control system again. But if the cruise control system isn’t recovered, you should contact Ssangyong Dealer for diagnosis of the
cruise control system.
CAUTION
Abnormal changes of the selector
lever can damage the engine.
Do not move the shift lever to Neural while driving at the set speed.
Automatic transmission damage
may result.
CAUTION
• The speed that has been set may
not be maintained on uphill or
downhill slopes.
• The speed may drop to less than
the set speed on a steep uphill
grade. The accelerator must be
used if you want to maintain that
speed.
• The speed may increase to more
than the set speed on a steep
downhill grade. When the speed
increases too much, turn off the
cruise control.
Using Cruise Control on Hills
How well cruise control works on hills depends on the speed, load, and the steepness of the hill.
When going up steep hills, you may have to
press the accelerator pedal to maintain your
speed. When going downhill, you may have
to brake or shift to a lower gear to keep your
speed down.
Applying the brake takes you out of cruise
control.
Page 92

3–40 INSTRUMENTS AND CONTROLS
SEAT POSITION MEMORY
SETTING AND OPERATION*
1. “SET” switch
2. “STOP” switch
3. Position switch
Up to 3 different drivers, the memory setting of seat position is available. Each driver
can set his/her own driver’s seat and outside rearview mirrors positions and it will be
stored in the computer. Even if someone
have moved your seat and outside rearview
mirrors, the memory positions will be recalled
automatically by pressing the position button.
Storing Memory Settings
1. Place the selector lever in “P” (automatic
transmission) or “N” (manual transmission)
position, and apply the parking brake with
the ignition switch “ON”.
2. Adjust the driver’s seat and outside rearview mirrors.
3. Press the “SET” button. Indicating light
on the button will come on and beep
sounds.
4. Within five seconds, press button you
want among 1, 2 or 3 of the position
buttons. Adjusted positions will be stored
in the computer with “Beep” sound.
CAUTION
• Never operate the driver’s seat and
outside rearview mirror switch
during memory settings, or
memory setting will be cancelled.
• If you do not press the position
button within 5 seconds after
pressing the “SET” button, memory
setting will be cancelled.
• Memory settings are possible up to
3 different drivers.
Operating Memory Settings
1. Place the selector lever in “P” (automatic
transmission) or “N” (manual transmission)
position, and apply the parking brake with
the ignition switch “ON”.
2. Keep the position button pushed (for
more than 1.5 second) until driver’s seat
and outside rearview mirrors start to
move.
3. If you press the button, driver’s seat and
outside rearview mirrors will be recalled
automatically to the memory positions.
CAUTION
• To recall the memory positions,
press the position button for more
than 1.5 second.
• If you press “STOP” button or operate only one switch among the
switches in order to adjust the
driver’s seat outside rearview mirrors, recalling of the memory positions will be stopped.
Page 93

WARNING
•
Never adjust the seat and side rear
veiw mirror positions while the vehicle is moving.
•
Set and operate the seat and side
rear view mirror position memory
function only when the vehicle is
stationary.
HAZARD WARNING FLASHER
SWITCH
INSTRUMENTS AND CONTROLS 3–41
DIGITAL CLOCK
To turn on the hazard warning flashers,
push the hazard warning flasher switch. All
turn signal lamps will flash simultaneously
with the hazard warning indicators.
Push this switch again to turn them off.
The switch can be operated with the ignition on or off.
Use the hazard warning flasher to warn
other drivers when you stop or park under
emergency conditions, or when your vehicle
becomes a traffic hazard. Avoid stopping on
the road if possible.
When the ignition is on, the time is displayed
in the digital clock.
There are three adjusting buttons for the digital clock.
1. H : Hour Adjusting Button
To go forward one hour, press H button
once using a pointer, such as ball-point
pen, with the ignition on.
To go forward continuously, keep this
button depressed.
Page 94

3–42 INSTRUMENTS AND CONTROLS
2. M : Minute Adjusting Button
To go forward one minute, press MIN
button once using a pointer, such as
ball-point pen, with the ignition on.
To go forward continuously, keep this
button depressed.
3. S : Setting Button
To reset the time by the time signal, press
the SET button using a pointer, such as
ball-point pen, with the ignition on.
For example, if this button is pressed
while the time is between 8:00 and 8:29
the display is set to 8:00. If this button
is pressed while the time is between 8:
30 and 8:59, the display is set to 9:00.
8:00 ~ 8:29 → 8:00
8:30 ~ 8:59 → 9:00
NOTE
When disconnecting the battery or
replacing the fuse, the clock should
be adjusted again.
FRONT CIGARETTE LIGHTER
To operate the cigarette lighter, press it in
all the way when the ignition switch is in
the “ACC” or “ON” position.
When it becomes heated, it automatically
pops out ready for use.
CAUTION
The barrel of the lighter becomes hot
during use and can cause burns.
• Do not touch barrel of lighter.
• Do not allow children to operate
or play with cigarette lighter.
CAUTION
The lighter can be overheated and
this can cause a fire hazard.
• Do not hold the lighter pressed in
by hand while heating.
• If the lighter does not pop out
within 30 seconds, pull it out and
have the problem corrected by
Ssangyong Dealer.
NOTE
Use of the lighter socket for plug-in
accessories can cause damage or
electrical damage.
Page 95

INSTRUMENTS AND CONTROLS 3–43
REAR CIGARETTE LIGHTER
To operate the cigarette lighter, press it in
all the way when the ignition switch is in
the “ACC” or “ON” position.
When it becomes heated, it automatically
pops out ready for use.
CAUTION
The barrel of the lighter becomes hot
during use and can cause burns.
• Do not touch barrel of lighter.
• Do not allow children to operate
or play with cigarette lighter.
CAUTION
The lighter can be overheated and
this can cause a fire hazard.
• Do not hold the lighter pressed in
by hand while heating.
• If the lighter does not pop out
within 30 seconds, pull it out and
have the problem corrected by
Ssangyong Dealer.
NOTE
Use of the lighter socket for plug-in
accessories can cause damage or
electrical damage.
TILTABLE STEERING WHEEL
The steering wheel can be adjusted up or
down to the desired position. To adjust the
steering wheel, push the control lever to
right, adjust the wheel up or down to the
proper position, release the control lever to
lock the wheel in place.
WARNING
Control of vehicle can be lost.
Do not adjust steering wheel position
while vehicle is moving.
Page 96

3–44 INSTRUMENTS AND CONTROLS
INSIDE REARVIEW MIRROR
AUTOMATIC DIMMIING INSIDE
REARVIEW MIRROR*
CAUTION
Maintain rearward vision from
driver’s seating position.
• Select day position and adjust to
obtain best view.
• Select night position to reduce
night glare.
• Selecting night position may reduce rearward clarity.
The inside rearview mirror can be adjusted
up, down or side ways to obtain the best
view. The inside mirror has day and night
positions.
Make adjustment while the adjusting lever
is in the daytime position.
Move the adjusting lever to the night position to reduce glare from the headlights of
vehicles behind you.
NOTE
Remember that you lose some rearview clarity in the night position.
At night, when the glare is too high, the mirror automatically responds to variations in
light, changing from no antiglare to antiglare
as required. The sensor under the mirror
automatically detect the glare from headlights behind you and reduce the glare.
NOTE
When the vehicle is reversing, automatic dimming function will be canceled to provide you clear view.
Page 97

INSTRUMENTS AND CONTROLS 3–45
HORN SWITCH
To sound the horn, press the center of the
steering wheel (without driver’s air bag), or
far right or left of the steering wheel(with
driver’s air bag).
The horn sounds with the ignition switch in
any position.
Keep use of the horn to a minimum.
SEAT WARMER SWITCH*
Warm your seat in the cold weather for your
comfortable driving.
Press the button to warm the seat, and
press it again to stop the operation.
Front seat
Second seat
Page 98

3–46 INSTRUMENTS AND CONTROLS
FRONT ROOM LAMP
REAR ROOM/LUGGAGE ROOM
LAMP
COURTESY LIGHT
1. ROOM Position
The left lamp comes on if you depress this
switch. To turn off the light, press the switch
again.
2. DOOR Position
The lamps come on when either of the
doors is opened. When the DOOR switch is
on, it begins to dim for several seconds after closing the door.
3. ROOM Position
The right lamp comes on if you depress this
switch. To turn off the light, press the switch
again.
1. OFF Position
The lamps will not come on if you place the
switch in this position.
2. DOOR Position
The lamps come on when either of the
doors and tailgate is opened.
3. ROOM Position
The lamps come on if you place the switch
in this position.
The courtesy light is located on the driver’s
and passenger’s door to illuminate the space
around the feet.
The courtesy light turns on when the door
is opened regardless of the ignition switch
position.
Page 99

INSTRUMENTS AND CONTROLS 3–47
P
R
GLOVE BOX
Open the glove box by pulling the release
lever and the indicator lamp comes on for
your usage at night when the ignition switch
is in the ACC or ON position.
Close it with a firm push.
WARNING
Driving with glove box lid open can
cause injury in case of an accident
or a sudden stop.
Keep glove box lid closed when driving.
FRONT CUP HOLDER
Use this for holding cups or beverage cans.
If you press the front of the cover, the cup
holder comes out.
Press the cup holder until you hear a clicking sound when you close it.
CAUTION
When vehicle is in motion, the liquid
may spill out.
Spilled liquid can damage the vehicle and cause burns if it is hot.
Do not use cup holder while vehicle
is in motion.
REAR CUP HOLDER
Use this for holding cups or beverage cans.
If you press and pull the knob located in the
upper area of the cover, the cover opens.
Then, pull out the cup holder to use.
Press the cup holder until you hear a clicking sound when you close it.
CAUTION
When vehicle is in motion, the liquid
may spill out.
Spilled liquid can damage the vehicle and cause burns if it is hot.
Do not use cup holder while vehicle
is in motion.
Page 100

3–48 INSTRUMENTS AND CONTROLS
REAR CONSOLE BOX
Insert your finger into the cover hole and pull
out the console box to store some goods.
CENTER ARMREST CONSOLE
You can use it as an armrest or a console
box to store some goods.
Automatic Transmission (two levers)
Pull the right side lever to open the upper
auxiliary console box.
Pull the left side lever to open the console
box.
Manual Transmission (one lever)
Pull the lever to open the console box.
SUN VISORS
To block out glare, the main sunvisor and
auxiliary sunvisor can be swung down or
to the left (right), if necessary.
The vanity mirror and illumination are provided to the rear face of the sunvisors.
CAUTION
Do not place the sunvisor in such a
manner that it obscures visibility of
the roadway, traffic or other objects.
 Loading...