


USER MANUAL
XCELTM ACTION CAMERAS
XCEL HD |
XCEL HD2 |
v2.2

THANK YOU FOR CHOOSING A XCEL PRODUCT.
This manual will guide you through all the features of your device so that you will get optimal use out of your product.
Our priority is to provide outstanding customer service. If you need support for your product, please contact the XCEL technical service or visit our website.
CONTACT
1-888-779-7646
tech@xcelcam.com
xcelcam.com
JOIN THE XCEL COMMUNITY
ABOUT US
 For 10 years, GG Telecom, makers of XCEL products and SPYPOINT surveillance cameras, has the mission to offer products that are easy to use, innovative, affordable and of exceptional quality. We promote family values and the involvement of our employees in all stages of development, manufacturing and product promotion. Our priority is to provide outstanding multilin-
gual customer service.
Prosperous and respected, GG Telecom is a company that keeps abreast of new technologies and listens to its customers. Our XCEL products are constantly being developed. Our research and development team works tirelessly to offer high performance action cameras and a full range of innovative accessories that will follow you everywhere and let you capture your best moments.
More than a dozen accessories are included with the XCEL camera. Just install your camera to discover a world of possibilities.
XCEL | Show your skills
2

Table of contents
Package contents.............................................................. |
4 |
Components...................................................................... |
5 |
Getting started.................................................................. |
6 |
Installation of the accessories included............................ |
7 |
Operation modes............................................................... |
8 |
Configuration modes....................................................... |
11 |
Operation of the LED lights and screen depending on selected |
|
options............................................................................ |
12 |
Remote control |
|
XCEL HD........................................................................... |
14 |
XCEL HD2......................................................................... |
15 |
Charging the battery....................................................... |
17 |
Memory card................................................................... |
18 |
Transferring files to a computer...................................... |
18 |
Maintenance of the camera............................................. |
19 |
Troubleshooting.............................................................. |
20 |
Error messages............................................................... |
20 |
Available accessories...................................................... |
21 |
Specifications |
|
XCEL HD........................................................................... |
23 |
XCEL HD2......................................................................... |
24 |
Regulation (XCEL HD)....................................................... |
25 |
Limited warranty............................................................. |
26 |
Repair service................................................................. |
26 |
3
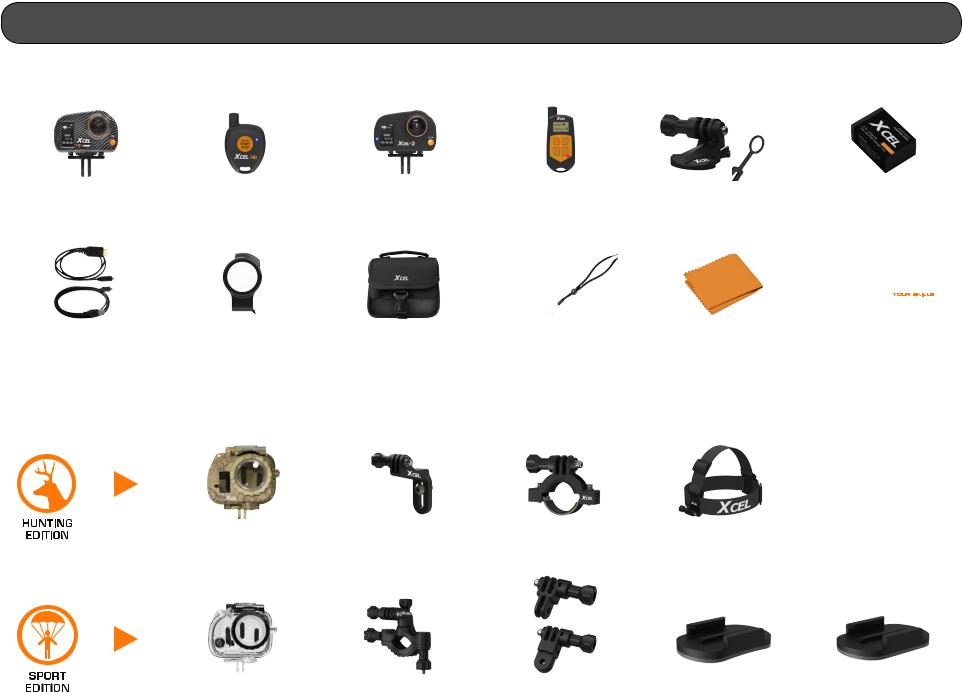
Package contents
ACCESSORIES INCLUDED:
Camera with |
1 button |
Camera with |
slide adaptor |
remote control |
slide adaptor |
(XCEL HD) |
(XCEL HD) |
(XCEL HD2) |
HDMI and |
Lens |
Carrying |
USB cables |
protector |
case |
MOUNTING ACCESSORIES INCLUDED:
Camo waterproof |
Bow |
housing |
mount |
Clear waterproof |
360° Roll |
housing |
bar mount |
2-way remote control
(XCEL HD2)
Wrist strap
Scope mount
Straight and 90° extender
Quick release stands |
Lithium-ion |
with safety ring (2) |
Polymer battery |
|
|
|
|
|
|
|
|
Lens cleaning |
XCEL |
cloth |
stickers (3) |
Head strap mount
Curved adhesive |
Flat adhesive |
mount |
mount |
4

Components
FRONT VIEW |
|
BOTTOM VIEW |
|
ON/OFF & |
|
|
|
START/STOP |
|
MICROSD |
|
BUTTON |
WIDE ANGLE LENS |
SLOT |
|
|
|
||
|
MODE |
MIC |
|
|
|
||
BACK |
BUTTON |
|
|
|
HEAT |
||
BUTTON |
MICRO |
||
SINK |
|||
|
|||
|
USB PORT |
|
|
MICRO |
|
MOUNT |
|
MIC IN |
SYSTEM |
||
HDMI PORT |
|
|
|
|
OK |
|
|
|
BUTTON |
|
|
MICROSD |
SLIDE ADAPTOR |
|
|
SLOT |
ANCHORAGE |
|
5
Getting started
INSERTING THE MICROSD CARD
Insert a microSD memory card in the card slot, gold contacts facing up. The card is inserted correctly when a click is heard.
REMOVING THE MICROSD CARD
Lightly press the memory card into the camera once to pop it out of the slot and remove it.
Note: The camera is compatible with microSD memory cards with capacity up to 32 GB, class 4 or higher (not included). See AVAILABLE ACCESSORIES section (p.22).
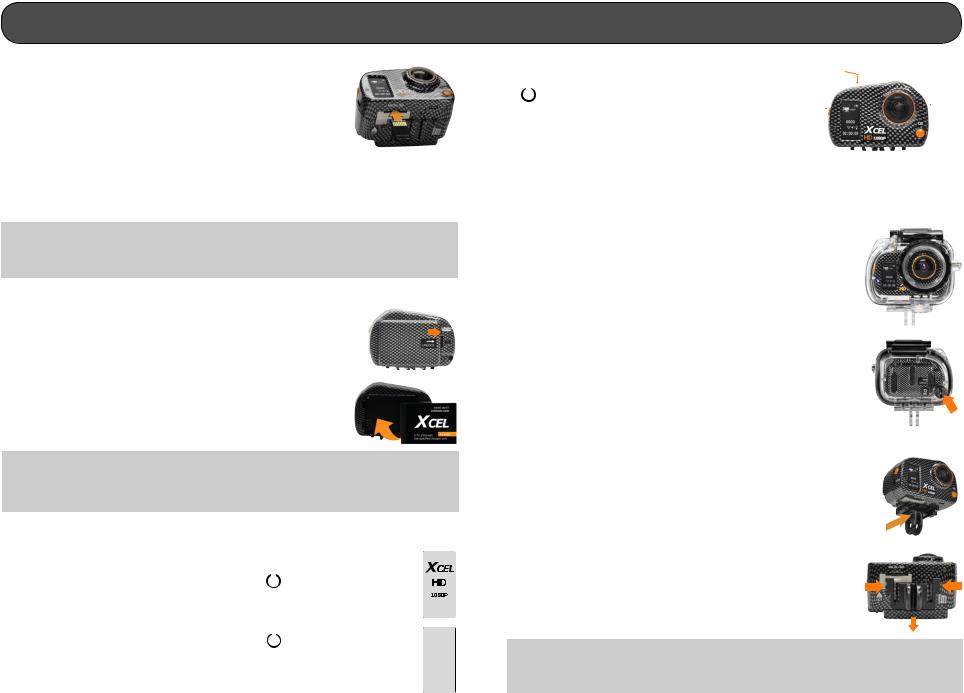
BATTERY INSTALLATION
Unlock the battery compartment cover by moving the lock button to the right and remove the cover.
Insert the lithium-ion polymer battery (included) into the battery compartment.
Note: The battery included with the camera is partially charged. It is possible to use the camera as is, but for best results, recharge the battery (see CHARGING THE BATTERY section p.17).
TURNING ON THE CAMERA |
|
|
|
To turn on the camera, press and hold the |
|
|
button a few seconds |
|
|
||
|
|||
until the welcome screen appears. |
|
|
|
|
|
|
v1.0 |
To turn off the camera, press and hold the |
|
|
button a few seconds |
|
|
||
|
|
||
until the shutdown screen appears. |
|
|
SHUTTING |
|
|
|
DOWN |
BUTTON FUNCTION |
1 |
|
1. |
|
: ON-OFF/ START-STOP |
4 |
|
|
|
|
2 |
|
|
|
|
|
|
|||||
2. |
M: Changes mode/ Next |
|
|
|
|
||||
|
|
|
|
||||||
|
|
|
|
|
|
||||
3. |
OK: Confirm entries/ Zoom (+)* |
|
|
|
|
|
|
3 |
|
4. |
BACK: Exit the menu/ Previous/ Zoom (-)* |
|
|
|
|
|
|||
|
|
|
|
|
|||||
|
|
|
|
|
|
|
|||
*XCEL HD2 only
USING THE CAMERA WITH THE WATERPROOF HOUSING
(XHD-OHT or XHD-OHC)
Insert the camera into the housing and close it tightly. The housing can then be installed on any mount compatible with XCEL action cameras. It protects the camera and allows to use for underwater use. The housing is waterproof
up to 160 ft. (image: camera with XHD-OHT housing)
An access screw for the microphone is located at the back of the housing. Remove the screw completely to improve sound recording. Note that the housing isno longer waterproof if the screw is loosened or removed, the water
will infiltrate into the housing.
USING THE CAMERA WITHOUT THE WATERPROOF HOUSING
To use the camera without the housing, it is necessary to use the slide adaptor. This allows you to attach the camera on any mount compatible with XCEL action cameras. Install the slide adaptor by sliding it in the anchorage system located under the camera.
To remove the slide adaptor from the camera, press the ends and slide the adaptor toward the back of the camera.
Note: The slide adaptor has been designed to attach securely and adequately to the anchorage system of the camera and resist to activities with impact.
6

Installation of the accessories included
WATERPROOF HOUSING |
QUICK RELEASE STAND WITH SAFETY RING |
SPORT EDITION |
HUNTING EDITION |
360° ROLL BAR MOUNT |
BOW MOUNT |
90° & STRAIGHT EXTENDERS |
SCOPE MOUNT |
CURVED & FLAT ADHESIVE MOUNTS |
HEAD STRAP MOUNT |
7
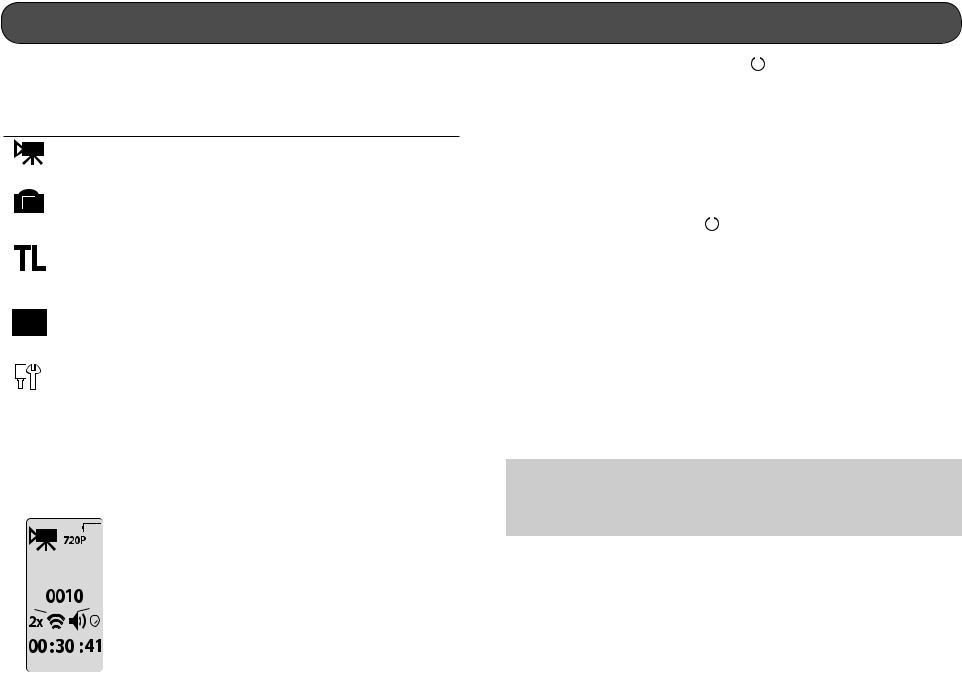
Operation modes
DESCRIPTION OF ICONS
Turn on the device and switch from one mode to another by pressing the M button. It is possible to see on the configuration screen 5 different modes.
|
|
VIDEO |
HD video recording |
|
|
(480p, 720p or 1080p) |
|
|
|
|
|
|
|
|
Taking photos |
|
|
PHOTO |
• XCEL HD: 1mp, 3mp or 5 mp |
|
|
XCEL HD2: 5mp, 8mp or 12mp |
|
|
|
|
|
|
|
|
• 1 to 6 consecutive photos |
|
|
|
Taking photos at predefined regular |
|
|
TIME LAPSE |
intervals |
|
|
|
(0.5, 2, 5, 10, 30 or 60 seconds) |
|
|
|
• Allows the user to see the number of |
|
|
|
recorded files. |
|
|
VIEW |
• Allows the user to view videos and |
|
|
|
photos when the camera is connected |
|
|
|
to a television using the HDMI cable. |
|
|
SETTINGS |
Allows the user to set the advanced set- |
|
|
||
|
|
tings of the camera. |
|
|
|
|
|
|
|
|
|
See CONFIGURATION MODES section (p.11) for more details.
 VIDEO MODE
•Allows the user to see the current configuration of the VIDEO mode.
2 |
|
|
|
|
|
|
|
|
|
|
1 |
1) |
Battery level |
|
|
|
|
|
|
|
|
|
|||||||
|
|
|
|
|
|
|
|
|
|
|
3 |
|||
|
|
|
|
|
|
|
|
|
|
|||||
|
|
|
|
|
|
|
|
|
2) |
Video mode |
||||
|
|
|
|
|
|
|
|
|
|
|
|
|
||
|
|
|
|
|
|
|
|
|
|
|
|
|
3) |
Video resolution |
|
|
|
|
|
|
|
|
|
|
|
|
|
4) |
Number of recorded videos |
|
|
|
|
|
|
|
4 |
5) Remote control (wireless) |
||||||
5 |
|
|
|
|
|
|
|
|
7 |
6) Zoom 1x to 4x (XCEL HD2 only) |
||||
|
|
|
|
|
|
|
||||||||
6 |
|
|
|
|
|
|
|
|
|
8 |
7) |
Sound signal |
||
|
||||||||||||||
|
|
|
|
|
|
|
||||||||
|
|
|
|
|
|
|
|
|
|
|
|
|
8) |
LED lights |
|
|
|
|
|
|
|
|
|
|
|
|
|
||
|
|
|
|
|
|
|
|
|
9 |
9) |
Estimated remaining recording time |
|||
|
|
|
|
|
|
|
|
|||||||
•To start recording a video, press the  button. The camera beeps if the sound signal option is enabled. The recording time is displayed on the screen and the LED lights flash while recording. See OPERATION OF THE LED LIGHTS AND SCREEN DEPENDING ON SELECTED OPTIONS section (p.12).
•To increase the zoom (XCEL HD2 only), press OK and to decrease, press BACK. Refer to the subject distance table in the REMOTE CONTROL section (p.15) to find which zoom level to use. The zoom adjustment can be done while recording a video.
•To stop recording, press the  button. The camera beeps if the sound signal option is enabled. The remaining recording time on the memory card will reappear on the screen.
When the microSD card is full, the camera automatically stops recording and the current video will be saved.
When the battery is empty, the camera automatically stops recording and the current video will be saved before the camera turns off.
It is possible to record a video with a maximum duration of approximately
45 minutes (3.66 GB) for the XCEL HD and approximately 30 minutes (3.66
GB) for the XCEL HD2. When this maximum is reached, the camera stops recording and automatically starts a new video. The first video will be identified XCEL0001 and the second XC010001.
Note: It is possible to take videos with the camera installed upside down. The camera automatically displays the video in the right direction when viewing on a computer or a TV. To do this, the camera must be installed upside down before recording the video.
8
 Loading...