


Digital Surveillance Camera Système de surveillance photographique Fotografisches Überwachungs system
SPYP
 INT
INT
TINY-HD/TINY-7 model
Modèle TINY-HD/TINY-7
Modell TINY-HD/TINY-7
TINY-HD |
TINY-7 |
User manual /Manuel d'utilisation / Bedienungsanleitung
www.spypoint.com

3 English
English
Thank you for choosing the SPYPOINT® TINY-HD/TINY-7 monitoring system. This manual will help you get the most out of your new device. For the latest version of this user manual or for additional information, visit our website at www.spypoint.com.
v.1.7

4 English
FEATURES
Photo recording:
Photo resolution |
7 MP (TINY-7) |
|
8 MP (TINY-HD) |
|
|
File format |
JPG |
|
|
Time Lapse |
Predefined intervals from |
|
30sec to 1h |
Multi-shot |
Up to 6 pictures per detection |
|
|
Stamp |
Date, time, temperature |
|
and moon phase printed |
|
on pictures |
Capture mode |
Color by day, |
|
black and white by night |
Video recording: |
|
|
|
Video resolution |
640 x 480 (TINY-7) |
|
1280 x 720 (720p) (TINY-HD) |
|
|
File format |
AVI |
|
|
Sequence length |
Adjustable from 10 to 90sec |
|
|
Capture mode |
Color by day, black |
|
and white by night |
Sound recording: |
Automatically recorded |
|
in video mode |
|
|
Memory storage: |
|
SD/SDHC card up to 32 GB |
|
|
(No internal memory) |
|
|
|
Configuration/Viewing: |
|
|
Built-in LCD screen |
|
2.4'' configuration screen |
|
|
(TINY-7) |
|
|
2.4'' viewing screen |
|
|
(TINY-HD) |
TV output |
|
Composite video (PAL/NTSC) |
|
|
|
Computer output |
|
USB 2.0 |
|
|
|
Power supply:
(accessories sold separately, see "Options")
Alkaline or lithium |
6x AA |
batteries |
|
|
|
Lithium battery pack |
Rechargeable battery pack |
|
(LIT-09/LIT-C-8) |
External (12V jack) |
12-volt battery |
|
(KIT-12V/BATT-12V) |
|
12-volt adapter (AD-12V) |
|
|
5 English

6 English
Solar panel (12V jack) |
Solar panel (SP-12V) |
|
combined with rechargeable |
|
battery pack (LIT-09/ |
|
LIT-C-8) |
|
|
Detection system: |
|
Motion sensor |
PIR |
|
|
Detection angle of the |
30° |
main sensor |
|
|
|
Detection angle of the |
70° |
side sensors |
|
Detection range |
Adjustable from 5 to 50ft |
|
|
Delay between each |
Adjustable from 1 to 30min |
detection |
*Additional 10 sec. setting |
|
(see DELAY) |
Electricity mode |
Instant trigger time |
(Connected to a 12V DC |
|
Main source only) |
|
External trigger |
1/8" jack for normally |
|
open contact |
|
|
Night time illumination system: |
|
|
|
LEDs |
38 LEDs |
|
|
Type |
Invisible Black LEDs (TINY-7) |
|
Infrared LEDs (TINY-HD) |
|
|
Exposure |
Automatic infrared level |
|
adjustment |
Optical field of view: |
40° |
|
|
Recommendations: |
|
|
|
Operating temperature |
(-20 °C to + 50 °C) |
|
(-4 °F to +122 °F) |
Storage temperature |
(-30 °C to + 75 °C) |
|
(-22 °F to +167 °F) |
|
|
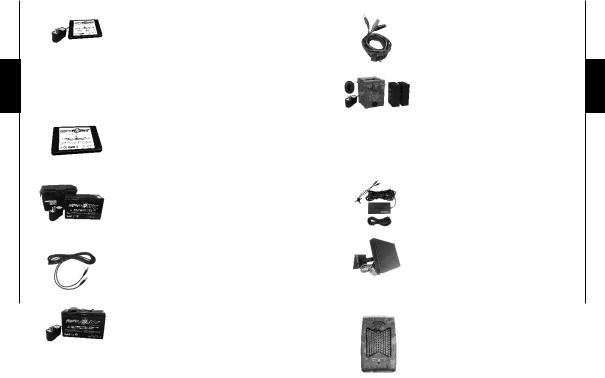
KIT INCLUDES
•SPYPOINT® TINY-HD/TINY-7
•Installation strap
•USB Cable
•Audio/video Cable
•User manual
REAR VIEW
|
BUSY |
|
2. |
|
|
|
|
|
|
|
3. |
1. |
|
|
4. |
|
OK |
5. |
|
|
|
|
6. |
7 English

8 English
BOTTOM VIEW
8. 9. 10.
11.
7. 


 12. 13.
1.Power button
2.LED recording indicator
3.UP button
4.BACK button
5.OK button
6.DOWN button
7.ALK / RECH (switch for battery)
8.SD card slot
9.USB port
10.12-volt jack
11.External trigger jack
12.TV OUT
13.Removable battery case
POWER
The battery level is shown in the REPORT mode. (4/4 = full, 1/4= low) When the battery level shows 2/4, the camera will continue to take pictures but we strongly recommend changing the batteries before they are empty.
AA batteries
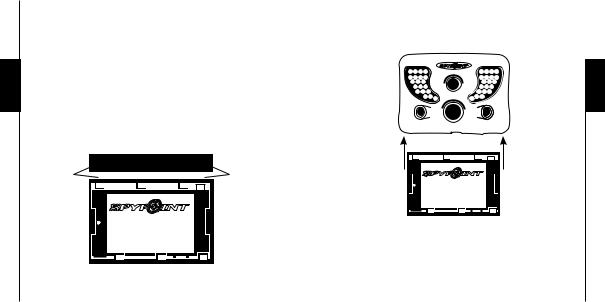
This camera requires the use of 6 AA batteries (1.5V). The use of alkaline or lithium batteries is strongly recommended. During the installation of the AA batteries, slide the switch inside the battery case to ALK. Insert the batteries in the battery case as indicated and insert it inside the camera (see figure below). Exact polarity must be followed. We also recommend the use of new batteries to ensure maximum performance of your camera.
|
Top |
Connector |
Connector |
9 English
10
English
Lithium battery pack
This camera SPYPOINT® can be powered by a rechargeable lithium battery pack LIT-09/LIT-C-8 (sold separately, refer to the section OPTIONS). This type of battery is less affected by cold temperatures and lasts up to 3 times longer than an alkaline battery. During the installation of the lithium battery pack, slide the switch inside the battery case to RECH. Insert the battery in the case as indicated and insert it inside the camera (see figure below)
|
Top |
Connector |
Connector |
TO INSERT THE BATTERY CASE INSIDE |
11 |
|
|
THE CAMERA |
|
|
|
English
Connector |
Connector |
|
SPYP INT |
External (12V)
This camera can also be powered from an external 12-volt DC input such as a 12-volt battery (KIT-12V/BATT-12V, sold separately) or a 12-volt adapter (AD-12V, sold separately). During the installation of a 12-volt connection, slide the switch inside the battery case to ALK (the AA batteries can remain safely inside the camera). If combined with a lithium battery pack, slide the switch to RECH. For the accessories available, refer to the section OPTIONS.

12
English
Solar panel
This model also offers the possibility of a connection to a solar panel SP-12V (sold separately, refer to the section OPTIONS) to maintain the charge of the lithium battery (sold separately, refer to the section OPTIONS). During the installation of the rechargeable lithium battery pack, slide the switch inside the battery case to RECH to activate the charging system of the solar panel.
Power source |
Switch position |
|
|
|
|
• 6AA |
|
|
• 12V |
|
ALK |
• 12V |
+ 6AA |
|
• LIT-09 |
|
|
• 12V |
+ LIT-09 |
RECH |
• Solar panel + LIT-09 |
|
|
|
|
|
MEMORY CARD
Using a memory card (sold separately, refer to the section OPTIONS) is required to operate the camera. When the camera is turned on, the screen displays "Insert memory card" in PHOTO, VIDEO or TEST mode if no memory card is used, the camera also beeps. The camera is compatible with SD/SDHC memory card, up to 32 GB capacity. Before inserting or removing the memory card, the camera must be turned off. Failing to do so may cause loss of or damage the pictures already recorded from the memory card. When the SD card is full, the viewing screen indicates "Disk full" when PHOTO, VIDEO or TEST mode are selected. The following data shows an approximate quantity of photos or video length that can be taken by the camera depending on the memory card capacity.
RESOLUTION |
2.0 GB |
4.0 GB |
8.0 GB |
32 GB |
|
|
|
|
|
3 MP |
2000 |
4100 |
8200 |
32800 |
5 MP |
1700 |
3400 |
6800 |
27300 |
7 MP |
1400 |
2700 |
5500 |
21800 |
8 MP |
1200 |
2400 |
4800 |
19000 |
VIDEO |
2.0Go |
4.0Go |
8.0Go |
32Go |
RESOLUTION |
|
|
|
|
|
|
|
|
|
640 x 480 |
65 min |
2h10 |
4h10 |
16h40 |
1280 x 720 (720p) |
20 min |
40 min |
1h20 |
5h20 |
"BUSY" LED
The "BUSY" light, located beside the LCD screen, lights up when the camera records a file.
13
English

14
English
PROGRAMMING
Turn on the camera to navigate in the interface by pressing or and press OK for selection. To modify the selection, press and again and press OK to confirm. To return to the previous menu press .
PHOTO
To take pictures. The PHOTO mode must be selected by pressing OK; the test light in front of the camera will flash for 60 seconds to allow the operator to walk away from the camera without being photographed.
TINY-W2s
Test light
VIDEO
To take videos. The VIDEO mode must be selected by pressing OK; the test light in the front of the camera will flash for 60 seconds to allow the operator to walk away from the camera without being recorded.
TEST
To set the camera or the distance. When TEST mode is selected, no picture or video is recorded. Walk perpendicularly in front of the camera. When the camera detects movement, the light winks to indicate that normally, a photo or video would have been recorded. If the system does not detect the movement, increase the distance detection using the "Settings" menu (the option "Sensitivity" allows the user to set the sensitivity to "High", "Medium" or "Low"). You can also realign the camera differently. Once you understand how the device responds to detections, you can better adjust the direction or the height of the camera.
In TEST mode, it is possible to take a picture by pressing the OK button. The photo is saved and appears in the VIEW mode.
How to properly install your camera using the supplied installation strap:
(Recommended installation height: about 3 feet).
15
English

16
English
SETTINGS
To define the options of the camera. To set the system in English, hold the button until "Language" is highlighted. Press OK, select "English" and confirm your choice with OK. The system will than change all the menus to English.
Time Start / |
Allow the user to set the period of |
Time Stop: |
operation of the camera. The start and stop |
|
time are the hours during the camera is |
|
in action and records pictures or videos. |
|
Example: if the user selects a start time |
|
"7:00 am" and a stop time "11:00 am", |
|
the camera will only detect for that period |
|
of time and will stay inactive for the |
|
remaining hours. Press OK and use or |
|
to adjust the hour. Press again OK to set |
|
the minutes. When the time is properly set, |
|
press OK once more to go back. |
|
For an activation of 24 hours, the same |
|
start and stop time must be entered |
|
(example: 00:00 as start time and 00:00 |
|
as stop time. These hours are the basic |
|
settings of your camera) |
|
Note: The hours can be recorded over a |
|
12 or 24 hours period. Refer to "Setting"/ |
|
"Time format" (00:00 means midnight). |
|
|
Delay: Select the time interval between photos or
(10s/1m/3m/5m/ videos. 10m/15m/30m)
Additional setting: It is possible to decrease the delay between detections to 10 seconds (instead of 1 minute) by using the following procedure. Note that the battery life will be affected.
Turn OFF the camera. Press and hold the button and turn the camera ON . "10sec enabled" appears on the screen meaning the minimum delay is now 10 seconds. If this option is used, the 30 minute delay disappears. To reset the camera to 1 minute delay, follow the same procedure. "10sec disabled" appears on the screen (see figure below)
10SEC ENABLED |
10SEC DISABLED |
|
10 sec delay |
1 min delay |
|
|
|
||
Multi-shot: |
Take up to 6 consecutive shots at each |
||
(1/2/3/4/5/6 |
detection, with a 10 second delay between |
||
consecutive |
each photo. This option allows up to 6 |
||
shots) |
|||
pictures from different angles when the |
|||
|
|||
|
camera is in PHOTO mode. |
||
17
English

18
English
Video |
Allow the user to select the recording time |
length: |
when the camera is set in VIDEO mode. |
(10s/30s/60s/90s) |
|
Language: |
Select a language for the camera menus. |
(English/Français/ |
|
Deutsch/Italiano) |
|
|
|
Sensitivity: |
Allow the user to choose between three |
(High/Medium/ |
different levels of sensitivity: "High", |
Low) |
"Medium" or "Low". The camera will |
|
|
|
only detect sources of heat in movement. |
|
Make sure to have the least possible |
|
objects in front of the camera during the |
|
positioning. This prevents picture taken |
|
by the camera when oriented towards the |
|
sun while an object moves in front of the |
|
camera (e.g. a branch) |
|
|
Date: |
Set the date as Month/Day/Year |
|
|
Time |
Allow the user to choose between a 12 |
format: |
or 24 hours period time displays on the |
(12h/24h) |
photos (eg. 6:00 pm or 18:00) |
|
|
Time: |
Set the time as Hour/Minute |
Stamp: |
Select or cancel printing the date, time, |
(Yes/No) |
temperature and moon phases on photos. |
|
New moon: |
|
Waxing Crescent: |
|
First Quarter: |
|
Waxing Gibbous: |
|
Full moon: |
|
Waning Gibbous: |
|
Last Quarter: |
|
Waning crescent: |
|
|
Resolution: |
Set the photo resolution. |
(High/Medium/ |
|
Low) |
High: 7 MP (TINY-7) |
|
|
|
8 MP (TINY-HD) |
|
Medium: 5 MP |
|
Low: 3 MP |
Temperature: |
Select the temperature display in °F or °C. |
(°C/°F) |
|
Continuous: |
Allow the user to take pictures or videos |
(Yes/No) |
even if the memory card is full. The |
|
camera will continue to record photos or |
|
videos by deleting the first recorded files. |
|
|
19
English
20 |
|
|
|
|
|
Power: |
Allow the user to select the battery power |
|
|
(Batteries/ |
or the electricity power. |
|
|
Electricity) |
|
|
|
|
Choose «Electricity» if the camera is |
|
|
|
|
English |
|
|
powered by a main electric supply. |
|
|
(using a 12-volt DC adapter AD-12V, |
|
|
|
|
|
|
|
|
sold separately). Main electric supply is |
|
|
|
recommended for security purposes. It |
|
|
|
|
|
|
|
provides an instant trigger time when a |
|
|
|
movement is detected. The lithium battery |
|
|
|
pack and the AA batteries can remain |
|
|
|
safely inside the camera and it is ideal in |
|
|
|
case of a blackout. A 12-volt DC adapter |
|
|
|
that can provide a minimum of 800 mA is |
|
|
|
required (See OPTIONS for accessories). |
|
|
|
Note: When using the electricity power, |
|
|
|
the «Multi-shot» mode and the «Delay» |
|
|
|
between photos are disabled as the camera |
|
|
|
starts instantly every time it detects |
|
|
|
motion. Also, the imprinting temperature |
|
|
|
on each picture is disabled. |
|
|
|
|
|
|
|
|
Infrared:
(On/One LED/
Off)
Allow the user to choose how many LEDs will be turned on.
On: Every LEDs work when taking photos or videos at night.
One LED: Only a single LED works (see figure). This option can be useful when using an IR-Booster/Black LEDs IR-Booster (sold separately, refer to the section OPTIONS).
LED for infrared sensor
Off: LEDs are deactivated so your night photos or videos are pitch black.
21
English

22 |
|
|
|
|
|
|
|
|
|
|
|
|
Side |
When the side sensors are activated, a |
|||||||
|
|
Sensors: |
total of 7 zones is covered. The central |
|||||||
|
|
(On/Off) |
sensor covers 5 zones. The side detectors |
|||||||
|
|
|
are mainly used to prepare the camera |
|||||||
|
|
|
||||||||
English |
|
|
so when your target passes through the |
|||||||
|
|
central sensor, the system is already pre |
||||||||
|
|
|
||||||||
|
|
|
triggered, increasing greatly the reaction |
|||||||
|
|
|
time of your camera. |
|
|
|
|
|||
|
|
|
|
|
|
|
||||
|
|
|
Note: The side sensors require more |
|||||||
|
|
|
battery power. |
|
|
|
|
|
|
|
|
|
|
s: side sensors |
|
|
|
|
|
|
|
|
|
|
c: central sensor |
|
|
|
|
|
|
|
|
|
|
|
Viewing angle |
|
|
|
|
|
|
|
|
|
6 |
|
|
|
|
|
|
26’ |
|
|
|
& |
30° 40° |
70° |
|
|
|
||
|
|
|
|
|
|
(8m) |
||||
|
|
|
6 |
|
|
|
|
|
|
|
|
|
|
Camera |
|
|
|
|
|
|
|
|
|
|
|
Detection angles |
|
|
|
|
|
|
|
|
|
|
|
|
|
|
|
||
|
|
|
|
|
|
50’ |
Detection distance |
|||
|
|
|
|
|
|
(15m) |
(central) |
|||
|
|
|
|
|
|
|
|
|||
|
|
|
|
30’ |
Detection distance |
|||||
|
|
|
|
(9m) |
of the side sensors |
|||||
|
|
|
|
|
|
|
|
|
|
|
Time Lapse:
(Off/30s/1m/3m/
5m/15m/30m/1h)
Allow the user to set the frequency at which time the camera takes a picture, without detection. For example, if the option "5 minutes" is selected in the "Time Lapse" mode, the camera takes a picture every 5 minutes during that period of operation (start time and stop time) even if there is no detection.
This option allows the user to obtain pictures of game outside the detection range of the camera.
Note: The "Time Lapse" mode only applies in PHOTO mode, not in VIDEO mode. When "Time Lapse" mode is selected, the "Delay" mode and the "Multi-shot" mode are disabled. The photo resolution remains the same except for the low resolution which are reduced to 800 x 600.
REPORT
The report mode keeps a record of the last period of use of the camera. The beginning date corresponds with the moment the camera is set to either PHOTO or VIDEO mode. Thus, the report is reset when changing modes.
23
English

24
English
1.
2.
3.
4.
5.
6.
7.
8.
9.
1.Beginning and end date of the report
2.Number of photos or videos taken during the day
3.Number of photos or videos taken at night
4.Total of photos or videos taken
5.Current time of the camera
6.Current date of the camera
7.Battery level (1/4 = low, 4/4 = full)
8.Remaining space on the SD card estimated by a number of photos
9.Used space on the SD card (total number of files, only includes photos and videos taken by a SPYPOINT® camera)
EXTERNAL TRIGGERING
Input which triggers the taking of photos or videos using a normally open contact. (Example: using a magnetic door switch connected to an alarm system).
DOWNLOAD TO A COMPUTER
To transfer or view photos and videos on a PC, you must first turn off the camera and connect the USB cable (supplied) from the camera to your computer. The computer will recognize the camera and will install the software itself. Click on "My Computer" and select "Removable Disk". Then click "DCIM" and "100DSCIM" to find all your photos and videos.
Taking the SD card out of the camera and inserting it into the computer port will achieve the same results. If no SD slot is built into the computer, a multi-card reader RD25-1 (sold separately, refer to the section OPTIONS).
VIEW
To view recorded photos or videos on TFT 2.4" viewing camera screen or on a TV set at home.
• Viewing with the 2.4" screen (TINY-HD only):
When camera is set to VIEW, the latest photo or video recorded appears on the screen automatically. Press or to view next or previous images.
25
English

26
English
Press OK to view the different options available in VIEW mode.
View Date/ To increase the view of the date and Time: time imprinted on the picture.
Protect: To protect the photo or video on the screen.
Erase one: To erase the photo or the video on the screen.
Format: To format memory card and to erase all protected photos and videos.
Erase All: To erase all stored photos and videos, with the exception of protected photos and videos.
Exit: To return to the viewing screen.
Note: The number of yellow stars that appear to the right of the screen corresponds to the resolution of the photos. =Low (3 MP)
=Medium (5 MP)
=High (7 or 8 MP)
• Watching on TV: You can view the photos or videos directly from a TV. Connect the yellow end of the cable supplied into the VIDEO IN of the TV and the other end into the TV OUT of the camera. The last photo or video recorded appears on the screen automatically. Press or to view next or previous images. The options are the same as when viewing on the 2.4" screen (see above).
SOUND RECORDING
This SPYPOINT® camera offers the possibility to record the sound in "Video" mode. When the VIDEO mode is selected, the camera automatically records the sound. On the bottom the camera, you can find a rubber cap with the inscription MIC. If the user does not want to record the sound, the rubber cap needs to stay in place. If the sound recording is required, the user must lift the rubber cap and turned it slightly so that the microphone receiver is completely cleared (See figure below).
27
English

28
English
TROUBLESHOOTING
No person/animal on photos
1.Rising sun or sunset can trigger the sensor. Camera must be re-orientated.
2.At night, motion detector may detect beyond range of the IR illumination. Reduce the distance setting of the camera ("Settings" / "Sensitivity").
3.Small animals may trigger the unit. Reduce the distance setting and/or raise height of camera.
4.Motion detector may sense animals through foliage.
5.If person/animal moves quickly, it may move out of the camera’s field of view before photo is taken. Move camera further back or redirect camera.
6.Camera must be set on a stable and motionless object e.g. large tree.
Red light in front of camera that blinks
•Camera is set in TEST mode.
•Camera is set in PHOTO or VIDEO mode. The red light in front of the camera flashes for 60 seconds to allow the user to leave without being photographed or recorded.
The camera screen turns off
•The camera may be set to PHOTO or VIDEO mode and the screen turns off in order to preserve battery life.
•The camera is left inactive for more than 2 minutes on the main menu, it automatically resets itself to PHOTO mode and the screen turns off.
•To return to the main screen, turn off the camera and turn in on again.
OPTIONS
To obtain more information on the available options, go to www.spypoint.com. The following items are options which can be added to a SPYPOINT® TINY-HD/TINY-7 camera.
SD Memory card, SD-8GB
SDHC memory card 8GB High speed
Class 6.
Multi-card reader RD25-1
USB Multi-card reader all-in-one.
Compatible with most memory cards (SD,
CF, MS, MMC, MS, XD...)
Picture viewer, PV-2.4
Digital camera with 2.4" viewing screen, 2GB internal memory and compatible with SD cards. MP4 video and JPG picture viewer. FM radio and MP3 music player. Headphones, USB and RCA cables, rechargeable lithium battery, AC charger and carrying case included.
Photo and video viewer, PV-9
Photo and video viewer. 2.5" viewing screen.
29
English
30
English
Rechargeable lithium battery pack including charger, LIT-C-8
Rechargeable lithium battery and AC charger with charge indicator light. This type of battery is less affected by cold temperatures and lasts up to 3 times longer than alkaline batteries. Compatible with most SPYPOINT® products.
Additional lithium battery pack, LIT-09
An additional lithium battery pack is a handy spare.
Water-Resistant battery box, KIT-12V
12 volt 7.0Ah rechargeable battery and AC charger in a water resistant ABS plastic housing. 12ft power cable (#PW12FT) and carrying strap included.
12ft power cable, PW-12FT
Spare 12 ft power cable, fits with KIT12V.
12-volt rechargeable battery and charger, BATT-12V
12-volt 7.0Ah rechargeable battery and AC charger.
12-volt power cable, CB-12FT
Power cable with alligator clips at one end to connect a 12 volt battery to a camera,12ft .
Water resistant battery box, KIT6V-12V
Universal kit with two 6V rechargeable batteries (2.8Ah), with 6V (5.6Ah) and 12V (2.8Ah) output configuration, AC charger with water resistant ABS plastic case. 12ft power cable and strap included. Camo pattern.
12-volt adapter, AD-12V
AC adaptor (6V to 12V) to power the camera from electrical supply.
Solar Panel, SP-12V
Solar panel with adjustable steel mounting kit. Can be used to maintain recharged lithium battery directly into compatible devices. Can also be combined with any 12-volt battery.
IR-Booster, IRB-W
100 LED wireless infrared module that allows the user to amplify the infrared lights at night for clearer shots.
31
English
 Loading...