

Digital Surveillance Camera
Système de surveillance photographique
Fotografisches Überwachungs system
P INTSPY INTPSPY
BF-8/S-BF-8/M8 model
Modèle BF-8/S-BF-8/M8
Modell BF-8/S-BF-8/M8
S-BF-8
BF-8 M8
User manual / Manuel d'utilisation /
Bedienungsanleitung
www.spypoint.com

2 3
English
English
Thank you for choosing one of our excellent
SPYPOINT® products. You can now enjoy many benefits of
a full feature and easy to use digital surveillance camera. This
8 MP digital camera was developed and designed by our team
of highly qualified engineers and can take sharp and clean
photos or videos either day or night without using any flash.
English
v1.4
4 5
FEATURES
Photo recording:
Photo resolution 8 MP
File format JPG
Multi-shot Up to 4 pictures per detection
English
Stamp Date, time, temperature and moon
Capture mode Color by day, black and white by
Video recording:
Video resolution 640 x 480
File format AVI
Sequence length Adjustable from 10 to 90sec
Capture mode Color by day, black and white
Sound recording:
Memory storage:
Viewing:
TV output Composite video (PAL/NTSC)
Computer output USB 2.0
Power supply: (accessories sold separately, see «Options»)
Alkaline or lithium
batteries
Lithium battery pack Rechargeable battery pack
External (12V jack) 12-volt battery
Solar panel Solar panel (SP-12V) combined
phase
night
by night
Automatically recorded
in video mode
SD/SDHC card up to 32 GB
(No internal memory)
6x AA
(LIT-09/LIT-C-8)
(KIT-12V/BATT-12V) /
12-volt adapter (AD-12V)
with rechargeable battery pack
(LIT-09)
Detection system:
Motion sensor PIR
Detection angle 30°
Detection range Adjustable from 5 to 50ft
Delay between each
detection
Night time illumination system:
LEDs 46 LEDs
Type Invisible Black LEDs
Optical field of view:
Recommendations:
Operating temperature (-20 °C to + 50 °C)
Storage temperature (-30 °C to + 75 °C)
Adjustable from 1 to 15min
*Additional 10 sec. setting
(see DELAY)
50°
(-4 °F to +122 °F)
(-22 °F to +167 °F)
CONTENTS
• SPYPOINT® BF-8/S-BF-8/M8
• Installation strap
• USB cable
• Video cable
• User manual
English
6 7
POWER
Solar panel
This model also offers the possibility of a connection to a
The battery level is shown on the LCD screen. When a single
line remains, the camera will continue to take pictures but we
strongly recommend changing the batteries before they are
empty. (See figure below)
English
solar panel SP-12V (sold separately, refer to the OPTIONS
section) to maintain the charge of the lithium battery pack
(sold separately, refer to the OPTIONS section) or the 12-volt
battery (sold separately, refer to the OPTIONS section). During
the installation of the rechargeable lithium battery or 12-volt
battery, slide the switch inside the battery case to LIT-09 to
activate the charging system of the solar panel.
English
AA batteries
This camera requires the use of 6 AA batteries (1.5V). The
use of alkaline or lithium batteries is strongly recommended.
Also note that the voltage of rechargeable AA batteries
(1.2V) is insufficient to power your SPYPOINT
®
camera.
During the installation of the AA batteries, slide the switch
inside the battery case to ALK. Insert the batteries as indicated
inside the battery case. Exact polarity must be followed. We
also recommend the use of new batteries to ensure maximum
performance of your camera.
Lithium battery pack
This camera SPYPOINT® can be powered by a rechargeable
lithium battery pack LIT-09/LIT-C-8 (sold separately, refer to
the OPTIONS section ). This type of battery is less affected by
cold temperatures and lasts up to 3 times longer then an alkaline
battery. During the installation of the lithium battery pack, slide
the switch inside the battery case to LIT-09.
External (12V)
The camera can also be powered from an external 12-volt
DC input such as a 12-volt battery (KIT-12V/BATT-12V, sold
separately) or a 12-volt adapter (AD-12V , sold separately). When
using a 12-volt connection, we recommend removing the AA
batteries to prevent surcharges. During the installation of a 12volt connection, slide the switch inside the battery case to ALK.
If combined with a lithium battery pack, slide the switch to LIT-
09. For the accessories available, refer to the OPTIONS section.
Power source Switch Position
• 6AA
• 12V
ALK
• 12V + 6AA
• LIT-09
• 12V + LIT-09
LIT-09
• Solar panel + LIT-09
MEMORY CARD
Using a memory card is required to operate this camera
SPYPOINT®. When the camera is ON and no memory card is
used, the LCD screen displays «CArd» meaning to insert one.
The camera can accept memory cards up to 32 GB capacity.
Before inserting or removing the memory card, the camera must
be turned OFF. Failing to do so may cause loss of or damage the
pictures already recorded from the memory card. When the SD
card is full, the screen indicates FUL. The following data shows
an approximate quantity of photos which can be recorded by
the camera depending on the memory card capacity.
RESOLUTION 2.0 GB 4.0 GB 8.0 GB 32 GB
3 MP
8 MP
VIDEO RESOLUTION
320 x 240
640 x 480
2000
1200
2h
65 min
4100
2400
4h
2h10
8200
4800
8h
4h10
32800
19000
32h
16h40
8 9
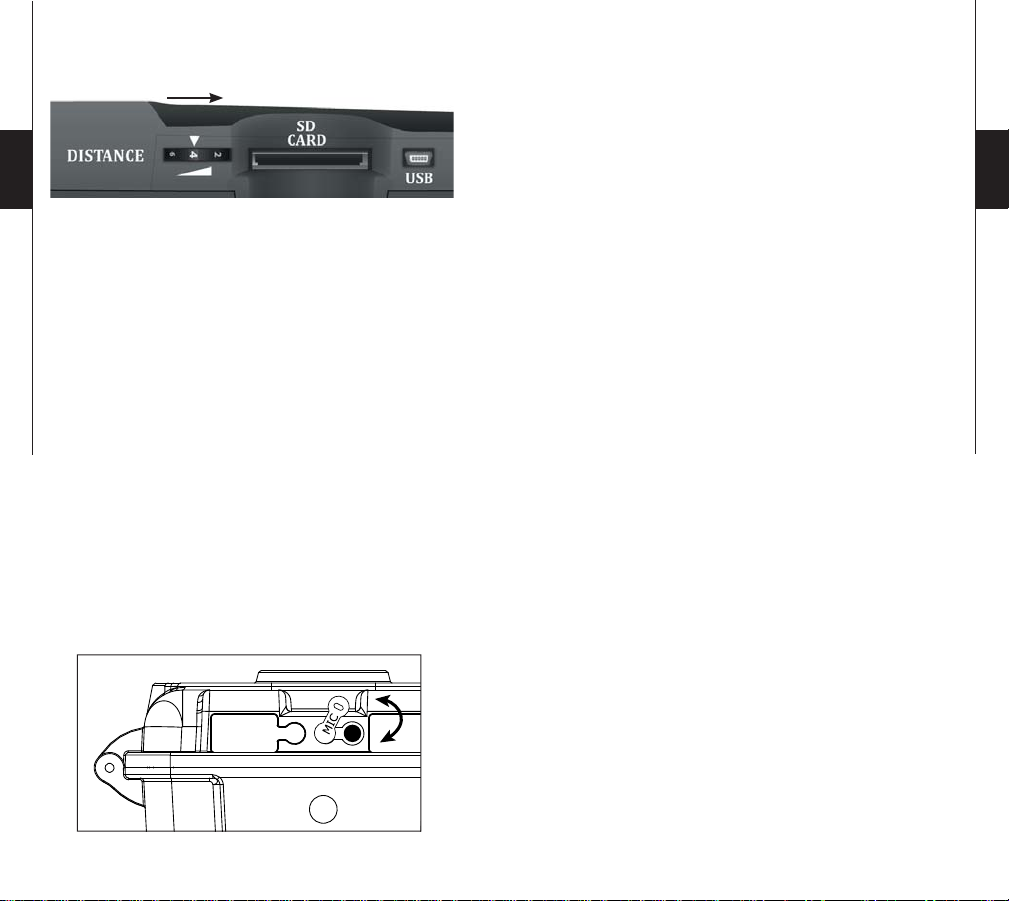
«BUSY »LED
The «BUSY» light, located next to the screen, lights up when
the camera is recording.
How to properly install your camera
using the supplied installation strap:
SETTINGS
English
Date, Time, Temperature and Picture Quality
Turn OFF your camera; set switch MODE to SET/TEST and
turn ON the camera. Press MENU/OK. An «H» will flash on
the screen indicating that the camera is in High Resolution
(8 MP). Use the DOWN button if you want to reduce the
resolution to «L» (3 MP). Press MENU/OK » to set the date and
time (mm/dd/yy, hh/mm). Use UP and DOWN to change the
blinking digit. Choose «F» or «C» to display the temperature in
Fahrenheit (°F) or Celsius (°C). Press MENU/OK to go to the
next option. Once finished, press MENU/OK and turn OFF the
system to save the changes.
MODE
When the PHOTO or VIDEO mode is selected, the test light in
front of the camera flashes for 60 seconds to allow the user to
leave without being photographed or recorded.
Test light
When the SET/TEST mode is selected, no picture or video
is recorded.
the camera detects movement, the light winks to indicate that
normally, a photo or video would be recorded.
not detect the movement, increase the distance detection using the
wheel
understand how the device responds to detections, you can better
adjust the direction or the height of the installation.
switch is set to VIEW, you can view the recorded pictures or
videos on television.
Walk perpendicularly in front of the camera.
DISTANCE
or realign the system differently. When you
If the system does
When the
When
English
(Recommended installation height: about 3 feet).
DELAY
To select the time interval before the camera records another
photo or video.
Additional setting: it is possible to decrease the delay between
detections to 10 seconds (instead of 1 minute) by using the
following procedure. Note that the battery life will be
affected.
Turn OFF the camera. Press and hold the « UP » button, turn
the camera on. « 10_S » appears on the screen meaning the
1 minute delay has been replaced by a 10 second delay. To
reset the camera to 1 minute delay, follow the same procedure.
« 1_M » appears on the screen (see figure below).
10_5
10 sec. delay 1 min. delay
MULTI-SHOT
To take up to 4 consecutive shots at each detection, with a 10
second delay between each photo. This option is available in
PHOTO mode.
VIDEO LENGTH
Allows you to select the recording duration when the camera is
set in VIDEO mode.
10 11
DISTANCE
DOWNLOAD TO A COMPUTER
Turn the dial to the right to increase distance.
To transfer or view photos and videos on a PC, you must first
turn the camera OFF and connect the USB cable (supplied)
from the camera to your computer. The computer will recognize
the camera and install the software itself. Click on «My
English
The
DISTANCE dial (placed on the side of the camera) can
adjust the sensitivity of the detector. The camera is equipped
with a detector sensitive to infrared. The system detects only heat
source in motion. The greater the mass of heat, more sensitive is the
system. Range of detector is between 5 and 50 feet. The best way
to adjust the distance is to set the camera in SET/TEST mode (see
above). Make sure to have the least possible objects in front of the
camera during the positioning. This prevents pictures being taken
by the camera when oriented towards the sun while an object moves
in front of the camera (eg. a branch)
SOUND RECORDING
This camera SPYPOINT® offers the possibility to record the
sound in VIDEO mode. When the VIDEO mode is selected,
Computer» and select «Removable Disk». Then click «DCIM»
and «100DSCIM» to find all your photos and videos.
Taking the SD card out of the camera and inserting it into the
computer port will achieve same results. If no SD slot is built
into the computer, a multi-card reader RD25-1 (sold separately)
must be used.
TELEVISION
To see photos and videos directly on a TV screen, turn
your camera and select VIEW.
cable (supplied) into the VIDEO IN of the TV and the other end
into the TV OUT of the camera
Connect the yellow end of the
the camera. You will
ON
. Turn
see the last picture or video recorded. To change the picture or
the video, use the key UP or DOWN. If you press MENU/OK,
the following options will appear:
OFF
the camera automatically records the sound. On the bottom the
camera, you can find a rubber cap with the inscription MIC. If
the user does not want to record the sound, the rubber cap needs
to stay in place. If the sound recording is required, the user must
lift the rubber cap and turned it slightly so that the microphone
receiver is completely cleared (See figure below).
View Date/Time:
Erase one:
Erase All:
To view the date and time printed on
the picture.
To erase the photo or the video on the
screen.
To erase all stored photos and videos,
with the exception of protected photos
and videos.
Format:
To format memory card and to erase all
protected photos and videos.
Protect:
To protect the photo or video on the
screen.
Language:
To select language.
English
12 13
OPTIONS
See your local dealer or visit www.spypoint.com to find
available products. The following items are popular options
that can be added to this SPYPOINT® camera:
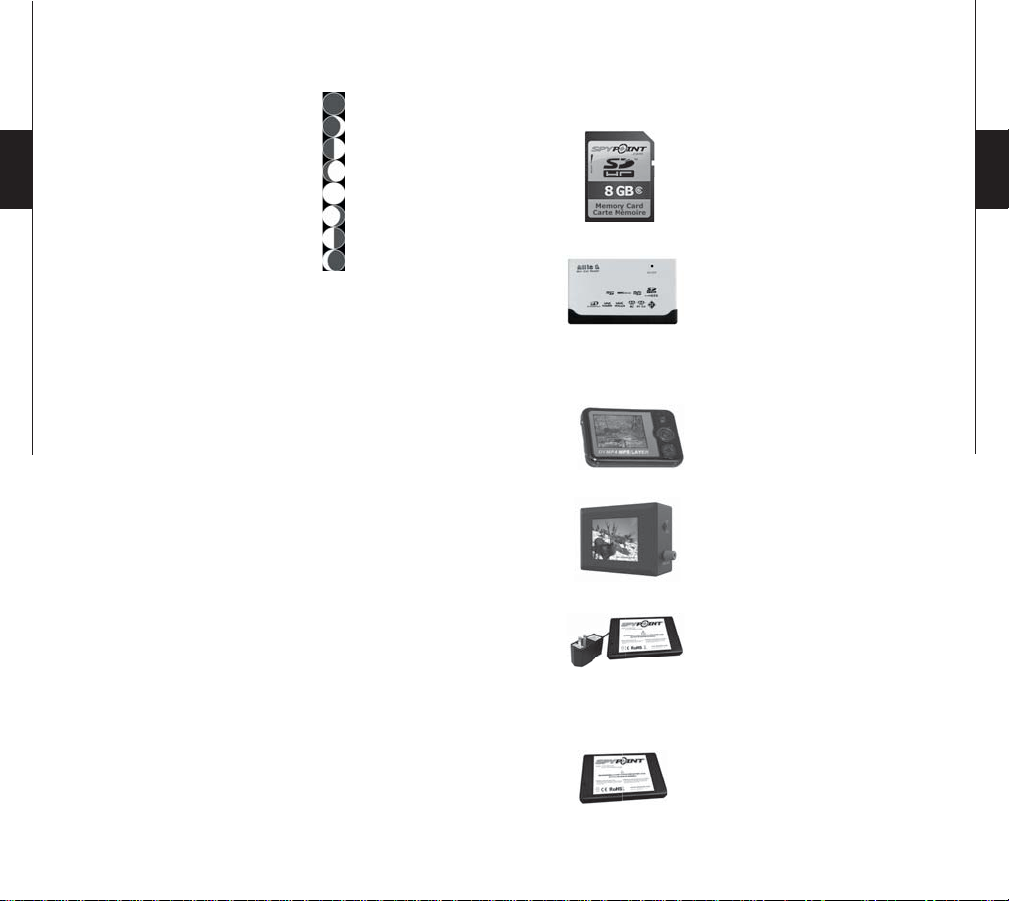
SD Memory card, SD-8GB
Allows the user to record photos and
videos.
English
Exit:
To return to the viewing screen.
New moon:
Waxing Crescent:
First Quarter:
Waxing Gibbous:
Full moon:
Waning Gibbous:
Last Quarter:
Waning crescent:
TROUBLESHOOTING
No person / animal on photos
1. Rising sun or sunset can trigger the sensor. Camera
must be re-orientated.
2. At night, motion detector may detect beyond range
of the IR illumination. Reduce distance setting.
3. Small animal may trigger the unit. Reduce distance
setting and/or raise height of camera.
4. Motion detector may sense animals through foliage.
5. If person/animal moves quickly, it may move out
of the camera’s field of view before photo is taken.
Move camera further back or redirect camera.
6. Camera must be set on a stable and motionless
object i.e. large tree.
Red light in front of camera winks
1. MODE switch is in SET/TEST.
2. MODE switch is in PHOTO or VIDEO . Red light
on the front of the camera flashes for 60 seconds to
allow the user to leave without being photographed
or recorded.
Multi-card reader RD25-1
Allows the download of photos and videos
directly into a personal computer, without
using the SPYPOINT
®
camera. This reader
works with 25 different types of memory
cards and is compatible with SD card.
Picture viewer, PV-2.4
Digital camera. Picture viewer, SD card
slot, 2.4" viewing screen, 2GB internal
memory, MP3, radio, headphone, leather
transport pocket, rechargeable lithium
battery, charger and USB cable included.
Photo and video viewer, PV-9
Photo and video viewer. 2.5" viewing
screen.
Rechargeable lithium battery pack
including charger, LIT-C-8
Rechargeable lithium battery pack for
camera, to replace alkaline batteries. This
type of battery is much less affected by
cold temperatures and lasts up to 3 times
the alkaline batteries.
Additional lithium battery pack,
The camera screen turns off
The camera may be set to PHOTO or VIDEO mode and the
screen turns off after a period of 60 seconds in order to preserve
LIT-09
An additional lithium battery pack is a
handy spare.
battery life.
English
14 15
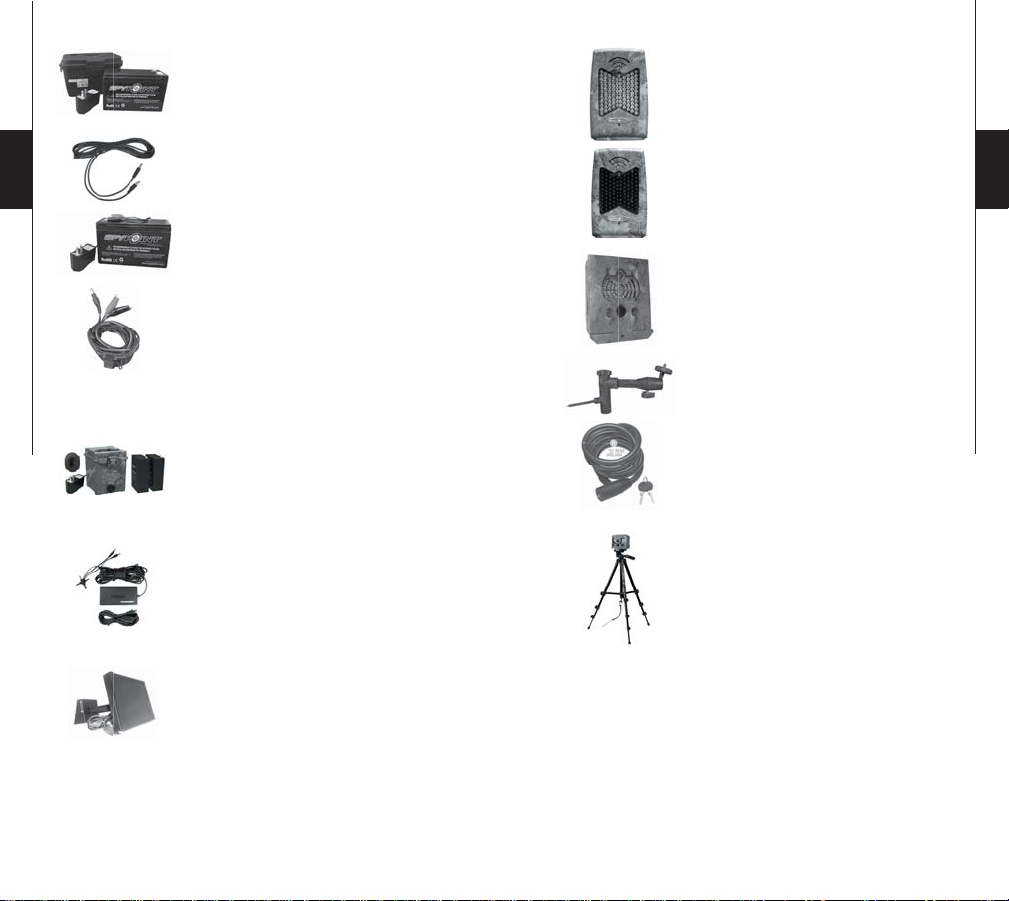
IR-Booster, IRB-W
100 LED wireless infrared module that
allows the user to amplify the infrared
lights at night for clearer shots.
Black LEDs IR-Booster, IRB-W-B
100 invisible LEDs (completely invisible to
the naked eye) wireless infrared module that
English
Water resistant battery box, KIT-12V
Water resistant battery box. Includes a 12volt rechargeable battery, charger, 12 feet
power cable and carrying strap.
12ft power cable, PW-12FT
Spare 12 ft power cable, fits with KIT12V.
allows the user to amplify the infrared lights
12-volt rechargeable battery and
at night for clearer shots.
charger, BATT-12V
To allow using external rechargeable
battery to power the camera.
Secure Metal Box, SB-91
Metal Box to secure the camera against
theft. It also protects it from breakage that
12-volt power cable, CB-12FT
can be caused by bears or other animals.
A 12 ft. cable allows connecting the
camera to an external 12-volt DC power.
Mouting arm, MA-360
Adjustable mounting arm, compatible
Water resistant battery box,
with standard ¼-20" tripod mount screw.
KIT6V-12V
Universal kit with two 6V rechargeable
batteries (2.8Ah), with 6V (5.6Ah) and
12V (2.8Ah) output configuration, AC
Cable lock, CL-6ft
6 feet long locking cable with key used for
maximum theft protection.
charger with water resistant ABS plastic
case. 12ft power cable and strap included.
Camo pattern.
Aluminum Tripod, TP-CAM
Lightweight tripod, aluminum, black
color, with unique anchor system. Max
12-volt adapter, AD-12V
12-volt adapter for wall outlet,
fits all SPYPOINT
®
cameras.
height: 4.9ft (1.5m), Min height: 1.7ft
(0.5m). Max load weight: 5kg (11 lbs).
With removable quick release plate. Fits
with most SPYPOINT® product.
Solar Panel, SP-12V
Solar panel with adjustable steel mounting
kit. Can be used to maintain recharged
lithium battery directly into compatible
devices. Can also be combined with any
12-volt battery.
English

16 17
English
English
LIMITED WARRANTY
SPYPOINT® BF-8/S-BF-8/M8 designed by GG Telecom, is
covered by a one (1) year warranty on material and workmanship
starting from its original date of purchase. The sales receipt is
your proof of purchase and must be presented if warranty
service is needed.
This warranty does not cover any GG Telecom product which
has been subjected to misuse, neglect and accidents or has been
improperly used or maintained. Any modification or tampering
of the product will affect its operation, performance, durability
and void this warranty.
REPAIR SERVICE
Repairs for damages not covered by the warranty will be
subject to a reasonable charge. For technical assistance, write
to tech@spypoint.com. Give a description of the problem with
a phone number where you can be reached.
IMPORTANT: Under no circumstances will GG Telecom
accept returned products without a Return Material
Authorization number (RMA).
WWW.SPYPOINT.COM
Note: For the latest update of the user manual, refer to our website.
The version number of this manual is on page 2.

18 19
Français
Français
Merci d’avoir choisi un excellent produit
SPYPOINTMD. Vous pouvez maintenant bénéficier d’un
appareil de surveillance photographique complet et facile
d’utilisation. Cet appareil de 8 MP a été conçu et développé par
notre équipe d’ingénieurs hautement qualifiés et permet la prise
de photos et de vidéos de jour et de nuit sans aucun flash.
Français

20 21
SPÉCIFICATIONS
Enregistrement Photo:
Résolution photo 8 MP
Format de fichier photo JPG
Option Multi-photos Jusqu’à 4 photos par détection
Informations imprimées
sur photo
Mode de capture Couleur de jour, noir et blanc
Français
Enregistrement Vidéo:
Résolution vidéo 640 x 480
Format de fichier vidéo AVI
Durée des séquences Réglable de 10 à 90 secondes
Mode de capture Couleur de jour, noir et blanc
Enregistrement du son:
Mémoire de stockage:
Visionnement:
Sortie TV Vidéo Composite (PAL/NTSC)
Sortie Ordinateur USB 2.0
Alimentation: (accessoires vendus séparément, voir section
«Options disponibles»)
Piles alcalines ou au
lithium
Bloc pile lithium Bloc pile rechargeable
Externe (Prise 12V) Batterie 12 volts
Date, heure, température
et phase de lune
de nuit
de nuit
Automatiquement enregistré
en mode vidéo
Carte SD/SDHC jusqu’à 32Go
(Pas de mémoire interne)
6x AA
/LIT-C-8)
(LIT-09
(KIT-12V/BATT-12V)
/ Adaptateur 12 volts (AD-12V)
Panneau solaire Panneau solaire (SP-12V)
Système de détection:
Détecteur de mouvement PIR
Angle de détection 30°
Distance de détection Réglable de 2 à 15 mètres
Délai entre chaque
détection
Système d’éclairage de nuit:
DEL 46 DEL
Type
Exposition Ajustement automatique de
Angle de champ de
vision optique:
Recommandations:
Température de
fonctionnement
Température de remisage (-30 °C à + 75 °C)
combiné avec bloc pile lithium
(LIT-09)
Réglable de 1 à 15 minutes
*Réglage additionnel de 10 sec.
(voir section DELAY)
DEL noires invisibles
la puissance de l’éclairage
infrarouge
50°
(-20 °C à + 50 °C)
(-4 °F à +122 °F)
(-22 °F à +167 °F)
CONTENU DE L’EMBALLAGE
• SPYPOINTMD modèle BF-8/S-BF-8/M8
• Courroie d'installation
• Câble USB
• Câble vidéo
• Manuel d'utilisation
Français

22 23
ALIMENTATION
Panneau solaire
Ce modèle offre la possibilité d’un branchement à un panneau
Le niveau des piles est indiqué sur l’écran ACL. Lorsqu’il ne
reste qu’une seule ligne, la caméra continue de prendre des
photos mais nous suggérons fortement de changer les piles
avant qu’elles ne soient vides. (Voir figure plus bas)
solaire SP-12V (vendu séparément, se référer à la section
OPTIONS DISPONIBLES) permettant de maintenir la charge
de la pile lithium ou de la pile 12 volts (vendue séparément,
se référer à la section OPTIONS DISPONIBLES). Lors de
l’installation de la pile au lithium rechargeable ou de la pile
12 volts, glisser le commutateur à l’intérieur du compartiment
des piles à LIT-09 pour activer le système de recharge avec le
panneau solaire.
Piles AA
Le système requiert l’utilisation de 6 piles AA (1.5V). L’emploi
Français
de piles alcalines ou au lithium est fortement recommandé. À
noter que la tension des piles AA rechargeables (1.2V) est
insuffisante pour alimenter votre caméra SPYPOINTMD.
Lors de l’installation de piles AA, glisser le commutateur au
fond du compartiment à ALK. Insérer les piles dans le sens
indiqué au fond du compartiment. La polarité des piles doit être
respectée. Nous recommandons d’utiliser des piles neuves pour
Source d'alimentation Position du commutateur
• 6AA
• 12V
ALK
• 12V + 6AA
• LIT-09
• 12V + LIT-09
LIT-09
• Panneau solaire + LIT-09
assurer le rendement maximal de votre caméra.
Français
Bloc pile lithium
Cette caméra SPYPOINTMD peut être alimentée au moyen
d’un bloc pile au lithium rechargeable LIT-09/LIT-C-8 (vendu
séparément, se référer à la section OPTIONS DISPONIBLES).
Ce type de pile est moins affecté par le froid et offre un
rendement jusqu’à 3 fois supérieur aux piles alcalines. Lors de
l’installation d’un bloc pile lithium, glisser le commutateur au
fond du compartiment à LIT-09.
Externe (12V)
La caméra peut être alimentée au moyen d’une source externe
de 12 volts telle qu'une batterie 12 volts (KIT-12V/BATT-12V,
vendu séparément) ou un adaptateur 12 volts (AD-12V, vendu
séparément). Lors d’un branchement 12 volts, il est suggéré
de retirer les piles AA pour éviter une surcharge. Lors d’un
branchement 12 volts, glisser le commutateur du compartiment
des piles à ALK. Si ce branchement est combiné à un bloc pile
lithium, glisser le commutateur à LIT09. Pour connaître les
accessoires disponibles pour l’alimentation 12 volts, se référer
à la section OPTIONS DISPONIBLES.
CARTE MÉMOIRE
L’utilisation d’une carte mémoire est nécessaire au
fonctionnement de cette caméra SPYPOINTMD. Lorsque
l’appareil est à ON et qu’aucune carte mémoire n’est utilisée,
l’écran ACL affiche «CArd» pour signifier d’en insérer une.
La caméra accepte les cartes mémoire jusqu’à une capacité de
32Go. Avant d’insérer ou de retirer une carte mémoire, mettre
l’appareil à OFF pour éviter que les images présentes sur la
carte soient supprimées ou endommagées. Lorsque la carte
mémoire est pleine, l’écran affiche «FUL». Voici un tableau de
la quantité approximative de photos pouvant être enregistrées
avec différentes capacités de cartes mémoire.
RÉSOLUTION 2.0Go 4.0Go 8.0Go 32Go
3 MP
8 MP
RÉSOLUTION
VIDÉO
320 x 240
640 x 480
2000
1200
2.0Go 4.0Go 8.0Go 32Go
2h
65 min
4100
2400
4h
2h10
8200
4800
8h
4h10
32800
19000
32h
16h40

24 25
DEL «BUSY»
La lumière «BUSY», située à la droite de l’écran, s’allume
lorsque la caméra enregistre un fichier.
PROGRAMMATION
Date, Heure, Température et Qualité des photos
Mettre la caméra à OFF, positionner le commutateur MODE
à SET/TEST et remettre à ON. Appuyer sur MENU/OK. Un
«H» clignote à l’écran indiquant que la caméra est en Haute
Français
Résolution (8 MP). Utiliser la touche DOWN si vous désirez
réduire la résolution à «L» (3 MP). Appuyer sur MENU/OK
pour configurer la date et l’heure. (mm/jj/aa, hh/mm) Utiliser
les touches UP et DOWN pour modifier le chiffre clignotant.
Appuyer sur MENU/OK pour passer à l’option suivante. Le
«C» ou le «F» clignotant permet de choisir l’affichage de la
température en degrés Celsius (°C) ou Fahrenheit (°F). Une
fois terminé, appuyer sur MENU/OK et remettre à OFF pour
enregistrer les modifications.
MODE
Lorsque le mode PHOTO ou VIDEO est choisi, la lumière de
test sur le devant de l’appareil clignote durant 60 secondes
pour permettre à l’utilisateur de quitter les lieux sans être
photographié ou filmé.
Lorsque le mode SET/TEST est sélectionné, aucune photo
ou vidéo n’est enregistrée. Passer devant l’appareil de façon
perpendiculaire. Lorsque l’appareil détecte un mouvement,
la lumière de test clignote pour indiquer que l’appareil aurait
normalement enregistré une photo ou une vidéo. Si le système
ne détecte pas la présence, augmenter la distance de détection
à l’aide de la roulette «DISTANCE» ou réaligner le système de
façon différente. Lorsque vous comprenez comment l’appareil
réagit aux détections, vous pouvez mieux ajuster la direction
ou la hauteur de l’installation. Le mode VIEW vous permet de
visionner vos photos ou vidéos sur un téléviseur.
Comment installer correctement votre caméra
à l'aide de la courroie d'installation fournie:
(hauteur d’installation recommandée: environ 1 mètre).
DELAY
Permet de choisir l’intervalle de temps avant que la caméra
n’enregistre une autre photo ou vidéo.
Français
Lumière de test
Réglage additionnel: Il est possible de réduire le délai
minimum entre les détections à 10 secondes (au lieu de
1 minute) en suivant la procédure suivante. À noter que la
durée de vie des piles sera affectée.

26 27
Éteindre la caméra. Maintenir enfoncé le bouton UP et remettre
la caméra à ON. «10_S» apparait à l’écran, signifiant que le
délai de 1 minute est remplacé par le délai de 10 secondes.
Pour remettre le délai minimum à 1 minute, refaire la même
procédure. «1_M» apparaît alors à l’écran (voir image plus
bas).
10_5
Délai de 10 sec. Délai de 1 min.
Français
MULTI-SHOT
Permet de prendre jusqu’à 4 photos consécutives à chaque
détection, avec un délai de 10 secondes entre chaque photo.
Cette option est disponible lorsque la caméra est programmée
en mode PHOTO.
VIDEO LENGTH
Permet de configurer la durée d’enregistrement des séquences
vidéo lorsque la caméra est programmée en mode VIDEO.
ENREGISTREMENT DU SON
Cette caméra SPYPOINTMD offre la possibilité d’enregistrer le
son en mode VIDEO. Lorsque le mode VIDEO est sélectionné,
la caméra enregistre le son automatiquement. Sous la caméra
se trouve un capuchon en caoutchouc avec l’inscription MIC.
Si l’utilisateur ne souhaite pas enregistrer le son, le capuchon
de caoutchouc doit demeurer en place. Si l’enregistrement
du son est nécessaire, l’utilisateur doit soulever le capuchon
et le tourner légèrement pour que le trou du microphone soit
complètement dégagé (Voir figure plus bas).
Français
DISTANCE
Tourner la roulette vers la droite pour augmenter la sensibilité.
La roulette DISTANCE (placée sur le côté de la caméra)
permet de régler la sensibilité du détecteur. La caméra est
munie d’un détecteur sensible à l’infrarouge. Le système
détecte seulement une source de chaleur en mouvement. Plus
la masse de chaleur est grande, plus le système est sensible.
La distance de détection varie de 2 à 15 mètres. La meilleure
façon de configurer la distance est de mettre l’appareil en mode
SET/TEST (voir plus haut). Faire en sorte d’avoir le moins
d’objets possible devant la caméra lors du positionnement de
cette dernière. Ceci évite qu’elle se déclenche lorsque le soleil
pointe en sa direction au même moment qu’un objet est en
mouvement devant l’appareil (par exemple: une branche).
TRANSFERT VERS L’ORDINATEUR
Pour transférer ou visionner les photos ou les vidéos à un
ordinateur, mettre la caméra à OFF et connecter le câble USB
(fourni) de la caméra à l’ordinateur. L’ordinateur reconnaîtra la
caméra et installera le logiciel de lui-même. Cliquer sur «Poste
de travail» et choisir «Disque amovible». Cliquer ensuite sur
«DCIM» et «100DSCIM» pour y retrouver les photos et les
vidéos emmagasinées.
Une autre façon de procéder est de retirer la carte mémoire
(vendue séparément) de la caméra et de l’insérer dans la fente
SD de l’ordinateur. Si aucune fente SD n’est présente sur
l’ordinateur, utiliser un lecteur de cartes mémoire RD25-1
(vendu séparément).

28 29
TÉLÉVISION («TV OUT»)
DÉPANNAGE
Permet de visionner les photos et les vidéos directement sur
un téléviseur. Mettre la caméra à OFF et sélectionner le mode
VIEW. Connecter l’extrémité jaune du câble à la prise VIDEO
IN du téléviseur et l’autre extrémité à la prise TV OUT de
la caméra. Mettre la caméra à ON. Vous verrez apparaître la
dernière photo ou vidéo enregistrée. Pour changer les photos
ou les vidéos, utiliser les touches UP et DOWN. Lorsque
vous appuyez sur MENU/OK, voici les différentes options
disponibles:
Français
Date et heure:
Effacer:
Effacer tout:
Formater: Permet d’effacer tout le contenu de la
Protéger:
Langue:
Sortie:
Permet de visualiser la date et l’heure
imprimées sur la photo.
Permet d’effacer la photo ou la vidéo affichée
à l’écran.
Permet d’effacer toutes les photos et
toutes les vidéos enregistrées qui n’ont
pas été protégées.
mémoire, incluant les fichiers protégés.
Permet de protéger une photo ou une
vidéo pour éviter qu’elle ne soit effacée
en sélectionnant « Effacer tout ».
Permet de modifier la langue d’affichage.
Permet de quitter le menu.
Nouvelle lune:
Premier croissant:
Premier quartier:
Lune gibbeuse:
Pleine lune:
Lune gibbeuse:
Dernier quartier:
Dernier croissant:
Aucune personne ou aucun animal sur les images
1. Vérifier si l’appareil est pointé vers le lever ou le
coucher du soleil, ce qui peut faire déclencher
l’appareil.
2. La nuit, le détecteur de mouvement peut détecter audelà de la portée des DEL infrarouges. Réduire la
sensibilité avec la roulette « DISTANCE ».
3. Les petits animaux peuvent faire déclencher l’unité.
Réduire la distance et/ou augmenter la hauteur de
la caméra.
4. Le détecteur de mouvement peut détecter les
animaux à travers le feuillage.
5. Si la personne ou l’animal se déplace rapidement,
il peut sortir du champ de vision de la caméra avant
que la photo ne soit prise. Déplacer l’appareil vers
l’arrière ou le réorienter.
6. S’assurer que l’arbre sur lequel est installée la
caméra est stable et sans mouvement.
La lumière rouge clignote devant l’appareil
1. Vérifier si l’appareil est configuré en mode
SET/TEST.
2. L ’appareil est peut-être en mode PHOTO ou VIDEO
et la lumière de test clignote durant 60 secondes
pour permettre à l’utilisateur de quitter les lieux
sans être photographié ou filmé.
L'écran de l'appareil s'éteint
L'appareil est peut-être en mode PHOTO ou VIDEO et l'écran
s'éteint après une durée de 60 secondes dans le but de préserver
la vie des piles.
Français

30 31
OPTIONS DISPONIBLES
Pour connaître et avoir plus d’informations sur les options
disponibles, visiter www.spypoint.com. Voici les principales
options disponibles pour cette caméra SPYPOINTMD:
Pile lithium supplémentaire, LIT-09
Pile permettant d’avoir en sa possession,
une pile de rechange en tout temps en
combinaison de l’achat de l’ensemble
LIT-C-8.
Carte Mémoire SD, SD-8GB
Carte mémoire permettant d’enregistrer
des photos ou des vidéos.
Boîtier d’alimentation 12 volts,
KIT-12V
Boîtier d’alimentation 12 volts résistant à
l’eau. Inclus une pile 12 volts, un chargeur,
un câble d’alimentation de 12 pieds et une
courroie de transport.
Câble d’alimentation, PW-12FT
Câble d’alimentation de rechange de 3.6m
pour branchement de la caméra au KIT12V.
Pile 12 volts rechargeable et chargeur,
BATT-12V
Pile de 12 volts rechargeable permettant
d’alimenter la caméra.
Câble 12 volts, CB-12FT
Câble de 12 pieds permettant de brancher
l’appareil à une pile 12 volts.
Boîtier d’alimentation 6V-12V,
KIT6V-12V
Ensemble universel avec 2 piles 6V
(2.8Ah) rech., sortie 6V (5.6Ah) et 12V
(2.8Ah), chargeur AC avec boîtier en
plastique ABS résistant à l’eau, câble
d’alimentation de 3,6m et courroie
incluse, style camo.
Adaptateur 12 volts, AD-12V
Adaptateur 12 volts pour prise murale,
compatible avec toutes caméras
SPYPOINT
MD
.
Français
Lecteur de cartes portatif, RD25-1
Lecteur permettant le branchement d’une
carte mémoire directement à l’ordinateur,
sans déplacer la caméra SPYPOINT
MD
.
Compatible avec 25 types de cartes
différentes incluant les cartes SD.
Lecteur de photos, PV-2.4
Caméra numérique, lecteur de photos
compatible avec carte SD. Écran de
2.4", mémoire interne 2Go, MP3, radio,
écouteurs, pochette de transport en cuir,
pile rechargeable au lithium, chargeur et
câble USB inclus.
Lecteur de photos et vidéos, PV-9
Lecteur de photos et vidéos. Écran de
visionnement de 2.5".
Bloc pile lithium rechargeable avec
chargeur, LIT-C-8
Bloc pile lithium rechargeable permettant
d’alimenter l’appareil, en remplacement
de piles alcalines. Ce type de pile est
moins influencé par les variations de
température. La capacité de la pile au
lithium atteint jusqu’à 3 fois la capacité
des piles alcalines.
Français

32 33
Panneau solaire 12 volts, SP-12V
Panneau solaire avec support d’installation
ajustable en métal. Maintient la charge
de la pile lithium directement dans
Support pour caméras, MA-360
Support ajustable pour caméras,
compatible avec fixations pour trépied
standard de ¼-20".
les appareils compatibles. Peut aussi
recharger une pile 12 volts.
Cadenas, CL-6FT
Cadenas d’une longueur de 6 pieds
Français
IR-Booster, IRB-W
Module infrarouge de 100 DEL, à
transmission sans fil, permettant d’amplifier
la puissance de l’éclairage infrarouge la nuit.
Black LEDs IR-Booster, IRB-W-B
Module infrarouge de 100 DEL invisibles à
l’œil nu, à transmission sans fil, permettant
d’amplifier la puissance de l’éclairage
infrarouge la nuit.
réduisant les risques de vol de la caméra.
Trépied en aluminium, TP-CAM
Trépied ultraléger SPYPOINTMD, en
aluminium, noir, avec système d’ancrage
unique. Hauteur maximale: 1.5m,
Hauteur minimale: 0.5m, poids de charge
maximum: 11lbs (5kg) Avec plaque de
fixation amovible. Fonctionne avec la
plupart des produits SPYPOINTMD.
Boîtier de sécurité en métal, SB-91
Boîtier permettant de sécuriser la caméra
contre le vol. De plus, il la protège des
bris pouvant être engendrés par les ours
ou autres animaux.
Français

34 35
Français
Français
GARANTIE LIMITÉE
Le système SPYPOINTMD BF-8/S-BF-8/M8, conçu par GG
Telecom, est couvert d’une garantie d’un (1) an incluant les
pièces et la main d’œuvre à compter de la date d’achat. Le
coupon de caisse est la preuve d’achat et devra être présenté
si la garantie est applicable.
La garantie ne couvre pas les produits de GG Telecom ayant
subi des abus, de la négligence, des accidents ou de mauvaises
utilisations ou entretiens. Toutes modifications ou utilisations
non conformes du produit affecteront son fonctionnement, ses
performances, sa durabilité et annuleront la garantie.
SERVICE DE RÉPARATION
Les réparations pour bris ou défectuosités non couverts par la
garantie seront facturées à prix raisonnables. Pour le soutien
technique, s.v.p. écrire un courriel à tech@spypoint.com.
Décrire le problème rencontré et indiquer un numéro de
téléphone pour vous rejoindre.
IMPORTANT: En aucune circonstance, GG Telecom
n’acceptera de réparation sans un numéro d’autorisation.
WWW.SPYPOINT.COM
Note: Pour la plus récente mise à jour du manuel d’utilisateur,
référez-vous à notre site Web. Le numéro de version de ce
manuel se trouve à la page 2.

36 37
Deutsch
Deutsch
Vielen Dank, dass Sie sich für eines der
hochwertigen Produkte von SPYPOINT® entschieden haben.
Zu den vielen Vorzügen dieser digitalen Überwachungskamera
gehören die vielfältigen Einsatzmöglichkeiten und die
benutzerfreundliche Bedienung. Diese 8-Megapixel-Kamera
wurde von Spitzeningenieuren entworfen und entwickelt. Sie
kann bei Tag und Nacht ohne Blitzlicht scharfe und qualitativ
herausragende Bild- und Videoaufnahmen machen.
Deutsch

38 39
EIGENSCHAFTEN
Bild Aufnahme:
• Auflösung Bilder 8 MP
• Speicherformat JPG
• Mehrfachaufnahme Bis zu 4 Bilder pro Erfassung
• Bildinformationen Datum, Uhrzeit, Temperatur
• Aufnahmen in Farbe bei Tag, Schwarz/Weiß
Video-Aufnahme:
• Auflösung Videos 640 x 480
Deutsch
• Speicherformat AVI
• Videolänge Einstellbar von 10 bis
• Aufnahmen in Farbe bei Tag, Schwarz/Weiß
• T on-Aufnahme: Automatisch eingeschaltet
• Speicherplatz:
Betrachten von Aufnahmen:
• TV -Ausgang P AL/NTSC
• Computer-Ausgang USB 2.0
Stromversorgung:
(Zubehör separat erhältlich, siehe „Zubehörteile“)
• Alkaline-oder LithiumBatterien
• Lithium-Akku Wiederaufladbarer Lithium-
• Extern (12V-Anschluss) 12-Volt-Batterie
und Mondphase
bei Nacht
90 Sekunden
bei Nacht
im Video-Modus
SD/ SDHC Karten bis zu 32
GB (kein interner Speicher)
6x AA
Akku (LIT-09/LIT-C-8)
(KIT-12V/BATT-12) /
12-Volt-Umwandler
(AD-12V)
• Solar-Panel Solar-Panel (SP-12V)
Erfassungssystem:
• Bewegungsmelder PIR
• Erfassungswinkel 30°
• Erfassungsbereich Einstellbar von 1,5m bis 15m
• Verzögerung zwischen
jeder Erfassung:
Nächtliches Beleuchtungssystem:
• LEDs 46 LEDs-
• Typ Unsichtbare Black-LEDs
• Optisches Sichtfeld: 50°
Temperaturbereich:
Betriebstemperatur (-20 °C bis + 50 °C)
Lagertemperatur (-30 °C bis + 75 °C)
kombiniert mit einem
wiederaufladbaren
Lithium-Akku (LIT-09)
Einstellbar von 1 bis
15 Minuten *Zusätzlich
10-Sekunden-Option ( Siehe
Verzögerung / DELAY)
(-4 °F bis +122 °F)
(-22 °F bis +167 °F)
LIEFERUMFANG
• SPYPOINT® BF-8/S-BF-8/M8
• Befestigungsgurt
• USB-Kabel
• Video-Kabel
• Bedienungsanleitung
Deutsch

40 41
STROMVERSORGUNG
Solar-Panel
Das Solarpanel, (separat erhältlich, mehr im Abschnitt
Die Ladekapazität wird auf dem Display angezeigt.
Erscheint nur noch ein Balken, nimmt die Kamera
zwar weiterhin auf, wir empfehlen jedoch dringend,
rechtzeitig neue Batterien einzusetzen.
(siehe Abbildung unten)
„Zubehörteile“) hält den Ladezustand des Lithium-Akkus
oder der 12V-Batterie (separat erhältlich, mehr im Abschnitt
„Zubehörteile“) aufrecht. Beim Gebrauch des Lithium-Akkus
oder der 12V -Batterie, den Schalter im Batteriefach auf LIT-09
stellen, um das Ladesystem des Solar-Panels zu aktivieren.
Stromversorgung Schalterstellung
AA-Batterien
Für diese Kamera werden 6 AA-Batterien benötigt (1,5V). Wir
empfehlen den Einsatz von Alkali-Batterien. Die Spannung von
wiederaufladbaren AA-Akkus (1,2V) ist nicht ausreichend,
um Ihre SPYPOINT
Deutsch
von Alkali-Batterien, den Schalter im Batteriefach auf ALK
®
-Kamera zu betreiben. Beim Gebrauch
• 6AA
• 12V
• 12V + 6AA
• LIT-09
• 12V + LIT-09
• Solar-Panel + LIT-09
ALK
LIT-09
stellen. Legen Sie die Batterien ein, wie im Batteriefach
angegeben. Beachten Sie dabei die Polarität. Wir empfehlen
weiterhin, das Benutzen von neuen Batterien, um die maximale
SPEICHERKARTE
Leistung Ihrer Kamera zu garantieren.
Für diese SPYPOINT® ist eine Speicherkarte erforderlich. Ist
Lithium-Akkupack mit Ladegerät
Diese SPYPOINT® kan mit einem wiederaufladbaren LithiumAkkupack LIT-09/LIT-C-8 (separat erhältlich, siehe Abschnitt
„Zubehörteile“) betrieben werden. Diese Akkus sind sehr viel
kälteresistenter als Alkalibatterien und haben eine dreimal so
lange Lebensdauer. Über das Solarmodul SP-12V (separat
erhältlich) können die Lithium-Akkus dauerhaft mit Strom
versorgt werden. Beim Gebrauch des Lithium Akkus, den
Schalter im Batteriefach auf LIT-09 stellen.
die Kamera eingeschaltet („ON“) erhalten Sie bei fehlender
Speicherkarte auf dem Display die Anzeige „Karte“. Setzen
Sie in diesem Falle bitte eine SD-Karte ein. Der SD-Slot
eignet sich für Karten mit einer Speicherkapazität von bis zu
32GB. Bevor Sie eine Karte einsetzen oder entnehmen, muss
die Kamera aus („OFF”) geschaltet werden. Andernfalls kann
es zu Datenverlust oder Zerstörung der bereits auf der Karte
gespeicherten Bilder kommen. Sobald die Speicherkarte voll
ist, erscheint auf dem LCD-Display die Anzeige „SPEICHER
VOLL”. Der folgenden Tabelle können Sie die ungefähre
Extern (12V-Anschluss)
Optional kann diese SPYPOINT® auch über die externe
Anzahl an Bildern entnehmen, die je nach Leistung der
Speicherkarte von der Kamera gespeichert werden kann.
12V -DC-Buchse betrieben werden. Bitte nehmen Sie in diesem
Fall zur Vermeidung von Überspannung die Alkali-Batterien
aus dem Gerät. Zubehör für den 12V-Anschluss finden Sie im
Abschnitt „Zubehörteile“.
BILD-AUFLÖSUNG 2.0 GB 4.0 GB 8.0 GB 32 GB
3 MP
8 MP
VIDEO-AUFLÖSUNG
320 x 240
640 x 480
2000
1200
2h
65 min
4100
2400
4h
2h10
8200
4800
8h
4h10
32800
19000
32h
16h40
Deutsch

42 43
„BUSY“ LED
Die „BUSY“ -LED, befindet sich neben dem LCD-Bildschirm,
und leuchtet auf, wenn die Kamera eine Datei aufnimmt.
Im SET/TEST-Modus werden keine Bilder oder Videos
aufgenommen. Bewegen Sie sich geradwinklig vor der Kamera.
Sobald die Kamera eine Bewegung erkennt blinkt das Licht und
zeigt damit an, dass im normalen Einsatz an dieser Stelle eine
Aufnahme erfolgt wäre. Erkennt das Gerät keine Bewegung, müssen
EINSTELLUNGEN
Datum, Uhrzeit, Temperatur und Qualität der Bilder.
Stellen Sie die Kamera aus OFF; wählen Sie in MODUS
die Option SET/TEST aus und schalten Sie die Kamera
wieder an ON. Wählen Sie MENÜ/OK Auf dem Display
blinkt die Anzeige („H“), d.h. die Kamera arbeitet mit Hoher
Bildauflösung (8 MP). Über die „AB“-Taste können Sie die
Auflösung auch auf niedrig („L“) einstellen (3 MP). Drücken
Sie MENÜ/OK, um Datum und Uhrzeit einzustellen. Mit
Deutsch
den AUF und AB-Tasten können Sie die blinkenden Ziffern
Sie die Entfernungserkennung am Rädchen DISTANCE“neu
einstellen oder das Gerät neu ausrichten. Sie können Ausrichtung
bzw. Montagehöhe der Kamera besser einschätzen, wenn Sie sich
mit der Bewegungserkennung des Geräts vertraut gemacht haben.
Sie können die Aufnahmen im Fernseher betrachten, wenn Sie
„WIEDERGABE“ ausgewählt haben.
Wie Sie Ihre Kamera mit dem mitgelieferten
Installations-Befestigungsgurt richtig installieren:
einstellen. Wählen Sie die Temperatur durch „C“ oder „F“ für
Celsius (°C) oder Fahrenheit (°F). Über MENÜ/OK gelangen
Sie zur nächsten Auswahl. Drücken Sie MENU/OK, sobald alle
Einstellungen abgeschlossen sind, und schalten Sie das Gerät
aus OFF, um die Einstellungen zu speichern.
MODUS
Bei Auswahl des Bildaufnahmemodus FOTO blinkt das Licht
an der Vorderseite der Kamera für 60 Sekunden. In der Zeit
kann sich der Gerätebediener von der Kamera entfernen, ohne
aufgenommen zu werden.
(Empfohlene Anbringungshöhe: niedriger als 1,5m)
VERZÖGERUNG
Verzögerungszeit (DELAY): Hier wird der Zeitintervall
zwischen den einzelnen Bildern oder Videos festgelegt, bis die
Kamera wieder eine neue Aufnahme tätigen kann.
Deutsch
Testlicht
Zusätzliche Einstellung: Es ist möglich mit folgenden Schritten
die Verzögerungszeit zwischen einzelnen Auslösungen auf 10
Sekunden zu senken (anstelle von 1 Minute). Achtung, dies
verringert die Batterielaufzeit.

44 45
Die Kamera ausschalten. Drücken und halten Sie die „UP”
Taste und schalten Sie die Kamera gleichzeitig ein. „10_SEC”
erscheint auf dem Bildschirm und bedeutet, dass die 1-MinutenVerzögerung durch eine 10-Sekunden-Verzögerung ersetzt
wurde (siehe Bild unten). Zum Zurückstellen der Kamera auf
eine 1-Minuten-Verzögerung wiederholen Sie die Prozedur.
„1_M” erscheint auf dem Bildschirm (siehe Bild unten).
10_5
1 Minute Verzögerung10 Sekunden Verzögerung
SERIENAUFNAHME
Aufnahme von bis zu 4 Bildern in Serie im 10-SekundenAbstand bei jeder erkannten Bewegung. Im FOTO-Modus
ist die Aufnahme von bis zu 4 Bildern aus unterschiedlichen
Deutsch
Winkeln möglich.
VIDEOLÄNGE
Für den VIDEO-Modus können Sie hier die Länge der
Videoaufzeichnung bei jeder erkannten Bewegung einstellen.
ENTFERNUNG
TONAUFNAHMEN
Diese SPYPOINT® ermöglicht es Ihnen, im Videomodus
Geräusche aufzunehmen. Sobald die Kamera im Videomodus
ist, werden Geräusche automatisch mit aufgezeichnet.
Das Mikrofon ist am unteren Ende der Kamera mit einer
Gummidichtung verschlossen. Dieses Mikrofon ist auf
dem Gehäuse mit MIC gekennzeichnet. Wenn Sie keine
Tonaufnahme wünschen, lassen Sie die Gummidichtung
einfach auf dem Mikrofon. Wenn Sie eine Tonaufnahme
wünschen, entfernen Sie die Gummidichtung (siehe Abbildung
unten).
Deutsch
Drehen Sie den Regler nach rechts, um den Abstand zu erhöhen.
Mit dem „
Erkennungsempfindlichkeit eingestellt werden. Das Gerät ist
mir einem Infrarot-Sensor ausgestattet. Dieser erkennt nur bewegte
Wärmequellen. Je größer die Wärmequelle ist umso intensiver
reagiert das System. Die Reichweite des Sensors kann von 1,5m
bis 15m eingestellt werden. Dies geht am besten, wenn Sie den
„SET/TEST“-Modus wählen (siehe oben). Achten Sie darauf, dass
sich beim Justieren der Kamera kein störendes Objekt in der Nähe
befindet. So verhindern Sie, dass die Kamera bei Ausrichtung auf
die Sonne ein sich vor der Linse bewegendes Objekt aufnimmt
(z.B. einen Ast).
DISTANCE“-Rädchen (an der Geräteseite) kann die
HERUNTERLADEN AUF EINEN PC
Um Bilder oder Videos auf einen PC herunterzuladen, muss
die Kamera erst ausgestellt OFF werden. Schließen Sie das
mitgelieferte USB-Kabel der Kamera an den Computer an.
Der Computer erkennt die Kamera automatisch und installiert
die Software selbsttätig. Klicken Sie auf „Mein Computer“
und wählen Sie „Wechseldatenträger“. Wenn Sie nun auf
„DCIM“ und „100DSCIM“ klicken, finden Sie alle Bild- und
Videoaufnahmen.
Alternativ können Sie die SD-Karte aus Ihrer Kamera nehmen
und in das Lesegerät des Computers einlegen. Sollte Ihr
Computer über kein integriertes Kartenlesegerät verfügen,
können Sie den (separat erhältlichen) Multi-Card Reader
RD25-1 verwenden.

46 47
BETRACHTEN
Um Ihre Aufnahmen direkt im Fernseher betrachten zu
können, schalten Sie die Kamera aus OFF und wählen Sie
„WIEDERGABE“. Schließen Sie das gelbe Ende des Kabels
(mitgeliefert) an den Eingang VIDEO IN am Fernseher an, und das
andere Ende an den Ausgang TV OUT an der Kamera. Schalten
Sie die Kamera an ON. Es erscheint die letzte Bild- oder
Videoaufnahme. Um zu einer anderen Aufnahme zu gelangen,
drücken Sie die AUF oder AB-Taste. Betätigen Sie MENÜ/OK
für die folgenden Optionen:
Ansicht Datum/
Uhrzeit:
Einzeln löschen:
Deutsch
Alle Löschen:
Formatierung:
Schutz:
Sprache:
Ausgang:
Zur Vergrößerung der Datums- und
Uhrzeitangabe auf dem Bild.
Löschen von Bildern oder Videos auf dem
Display.
Zum Löschen aller gespeicherter Bilder
und Videos außer den geschützten
Aufnahmen.
Zu Formatierung von Speicherkarten
und Löschen aller geschützter
Aufnahmen.
Zur geschützten Anzeige von
Aufnahmen auf dem Display.
Zur Auswahl der Kamera-Menüsprache.
Um zum Display zurückzukehren.
Neumond:
Zunehmender Halbmond:
Zunehmender Mond:
Zunehmender Dreiviertelmond:
Vollmond:
Abnehmender Dreiviertelmond:
Abnehmender Mond:
Abnehmender Halbmond:
PROBLEME UND LÖSUNGEN
Kein Mensch / Tier auf den Bildern
1. Die auf- oder untergehende Sonne kann den Sensor
aktivieren. Richten Sie die Kamera neu aus.
2. Bei Nacht kann der Bewegungssensor weiter
reichen als die Infrarot-Beleuchtung. Verringern
Sie die Entfernungseinstellungen.
3. Ein kleines Tier kann für die Aufnahme
verantwortlich sein. Verringern Sie die
Entfernungseinstellungen und/oder Höhe
der Kamera.
4. Der Bewegungssensor kann ein Tier durch das Laub
hindurch erfasst haben.
5. Bewegen sich eine Person/ein sehr rasch können Sie
sich wieder außerhalb des Kamerafeldes befinden,
wenn diese auslöst. Positionieren Sie die Kamera
in größerer Entfernung oder richten Sie diese
neu aus. Die Kamera muss an einem stabilen und
unbeweglichen Objekt montiert werden, z.B. an
einem großen Baum.
6. Überzeugen Sie sich davon, dass der gewählte Baum
oder Pfosten tatsächlich stabil und unbeweglich ist.
Rotes Blinklicht an der Kameravorderseite
1. Die Kamera ist im SET/TEST-MODUS
2. Die Kamera ist im FOTO oder VIDEO -MODUS.
Das rote Licht an der Kamerafront blinkt 60
Sekunden lang. In dieser Zeit können Sie sich von
der Kamera entfernen, ohne dass Sie aufgenommen
werden.
Die Kamera Bildschirm wird ausgeschaltet
Die Kamera kann auf FOTO oder VIDEO-Modus und der
Bildschirm schaltet sich nach einer Zeit von 60 Sekunden, um
die Batterie zu schonen.
Deutsch

48 49
ZUBEHÖRTEILE
Fragen Sie Ihren Fachhändler oder besuchen Sie
www.spypoint.com, um Zubehörartikel zu finden. Die
folgenden Zubehörteile sind die ideale Ergänzung für das
Kameramodell von SPYPOINT®.
Wasserabweisende Batteriekassette,
KIT -12V
Wasserdichte Batteriekassette. Umfasst
einen 12V-Akku, ein Ladegerät, ein 3,5m
Stromkabel und einen Tragegurt.
Deutsch
SD-Speicherkarte, SD-8GB
Zum Speichern von Bildern und Videos.
Multi-Card Reader RD25-1
Über das Kartenlesegerät können Sie die
Aufnahmen ohne die SPYPOINT®-Kamera
direkt auf Ihren PC laden. Dieses Gerät
erkennt 25 verschiedene Kartenformate und
ist mit der SD-Karte kompatibel.
Bildbetrachter, PV-2.4
Digitalkamera, Bildbetrachter, SDKartensteckplatz, 2.4"-Gerätedisplay,
2GB interner Speicher, MP3, Radio mit
Kopfhörer, Lederhülle, Lithium-Akku,
Ladegerät und USB-Kabel.
Foto- und Videobetrachter, PV-9
Foto- und Videobetrachter, 2.5"
Gerätedisplay.
Lithium-Akkupack mit Ladegerät,
LIT-C-8
Lithium-Akkupack für die Kamera
anstelle von Alkali-Batterien. Diese Akkus
sind sehr viel weniger kälteempfindlich
als die Alkalibatterien und haben eine
dreimal so lange Lebensdauer.
Ersatz Lithium-Akkupack, LIT-09
Praktische Ersatzakkus.
3.6m langes Stromkabel, PW-12FT
3.6m langes Ersatzstromkabel, passend
für KIT-12V.
12V-Akku und Ladegerät, BATT-12V
Zum Betreiben der Kamera mit einem
externen Akku.
12V-Stromkabel, CB-12FT
Mit dem 3.5m-Kabel können Sie die
Kamera an einen externen 12V DCAuslass anschließen.
Wasserdicht Akku-Box, KIT6V-12V
Universal-Kit mit zwei 6V Akkus
(2.8Ah), mit 6V (5.6Ah) und 12V (2.8Ah)
Ausgangs-Konfiguration, AC-Ladegerät
mit wasserabweisendem ABS-Kunststoff.
12ft Netzkabel und Trageschlaufe
mitgeliefert. Camo Muster.
12V-adapter, AD-12V
12V Adapter für die Steckdose, passend
für alle SPYPOINT® Kameras.
Solar-Panel SP-12V
Solarmodul mit Aluminium-Halterung.
Zum aufrechterhalten des Ladezustands
des Lithium-Akkus in der Kamera. Mit
dem Solarmodul können außerdem alle
12V-Akkus sowie das KIT-12V (separat
erhältlich) geladen werden.
Deutsch

50 51
IR-Booster, IRB-W
Der IR-BOOSTER ist eine kabelloses
Gerät, das für zusätzliche Ausleuchtung
sorgt und somit Bilder und V ideos während
Wand-und Baumbefestigung, MA-360
Beweglicher Befestigungsarm,
kompatibel mit der Standard-StativBefestigungsschraube.
der Nacht erheblich verbessert.
Sicherungskabel, CL-6ft
Black LEDs IR-Booster, IRB-W-B
Der IR-BOOSTER ist eine kabelloses
Abschließbares 1,8m-Sicherungskabel für
maximalen Diebstahlschutz.
Gerät, das für zusätzliche Ausleuchtung
sorgt und somit Bilder und V ideos während
der Nacht erheblich verbessert. Das Licht
des IRB-W-B ist für das bloße Auge in der
Dunkelheit komplett unsichtbar.
Aluminium-Stativ, TP-CAM
Leichtes Stativ, Aluminium, Farbe
schwarz, mit einzigartigen Anker-System.
Max. Höhe: 4.9ft (1.5m), Min. Höhe: 1.7ft
(0.5m). Max. Belastung: 5kg (11 lbs).
Deutsch
Sicherungsgehäuse aus Metall, SB-91
Zum Schutz der Kamera vor Diebstahl.
Verhindert gleichfalls Beschädigungen
Mit abnehmbarer Schnellwechselplatte.
Passend zu den meisten SPYPOINT
®
Produkt.
durch Menschen oder Tiere.
Deutsch

52 53
GARANTIEBEDINGUNGEN
Für SPYPOINT® BF-8/S-BF-8/M8 von GG Telecom gilt
Deutsch
eine Herstellergarantie von einem (1) Jahr ab Kaufdatum auf
Material- und Herstellungsfehler. Der Kaufbeleg ist zugleich
Kaufnachweis und ist bei der Inanspruchnahme von
Garantieleistungen vorzulegen.
Es gilt keine Garantie für GG Telecom-Produkte, die
missbräuchlich oder nachlässig verwendet wurden, einen
Unfall erlitten haben oder unsachgemäß eingesetzt oder
behandelt wurden. Eingriffe oder Änderungen am Gerät führen
zu eingeschränkter Funktionstüchtigkeit und Lebensdauer, in
diesen Fällen erlischt die Garantie.
REPARATURDIENSTE
Leistungen für Schäden, die nicht von der Gerätegarantie
abgedeckt sind, werden in Rechnung gestellt. Für technische
Unterstützung wenden Sie sich bitte an info@eurohunt.de.
Beschreiben Sie Ihr Problem und hinterlassen Sie eine
Telefonnummer, unter der Sie erreichbar sind.
WICHTIG: EUROHUNT akzeptiert keine Rücksendungen
ohne Warenrücksendungsnummer, bitte melden Sie sich vorher
Telefonisch oder per E-Mail.
Imported by :
EUROHUNT GmbH
Harzblick 25
99768 Harztor OT Ilfeld/ Germany
Tel. +49 (0) 36331-50540
Fax +49 (0) 36331-505422
info@eurohunt.de
WWW.SPYPOINT.COM
Hinweis: Für das neueste Update von der Bedienungsanleitung, Sie
auf unserer Website. Die Versionsnummer dieser Anleitung ist auf
Seite 2.
Deutsch
 Loading...