

Spypoint Link-evo, Link-evo-v User Manual
• TRAIL CAMERAS
• HUNTING TABLET
• ACTION CAMERAS
& ACCESSORIES
QUICK START GUIDE
LINK-EVO
LINK-EVO-V
User manual, latest rmware
& FAQ available at:
www.support.spypoint.com
support@spypoint.com
1-888-779-7646
( US ONLY )
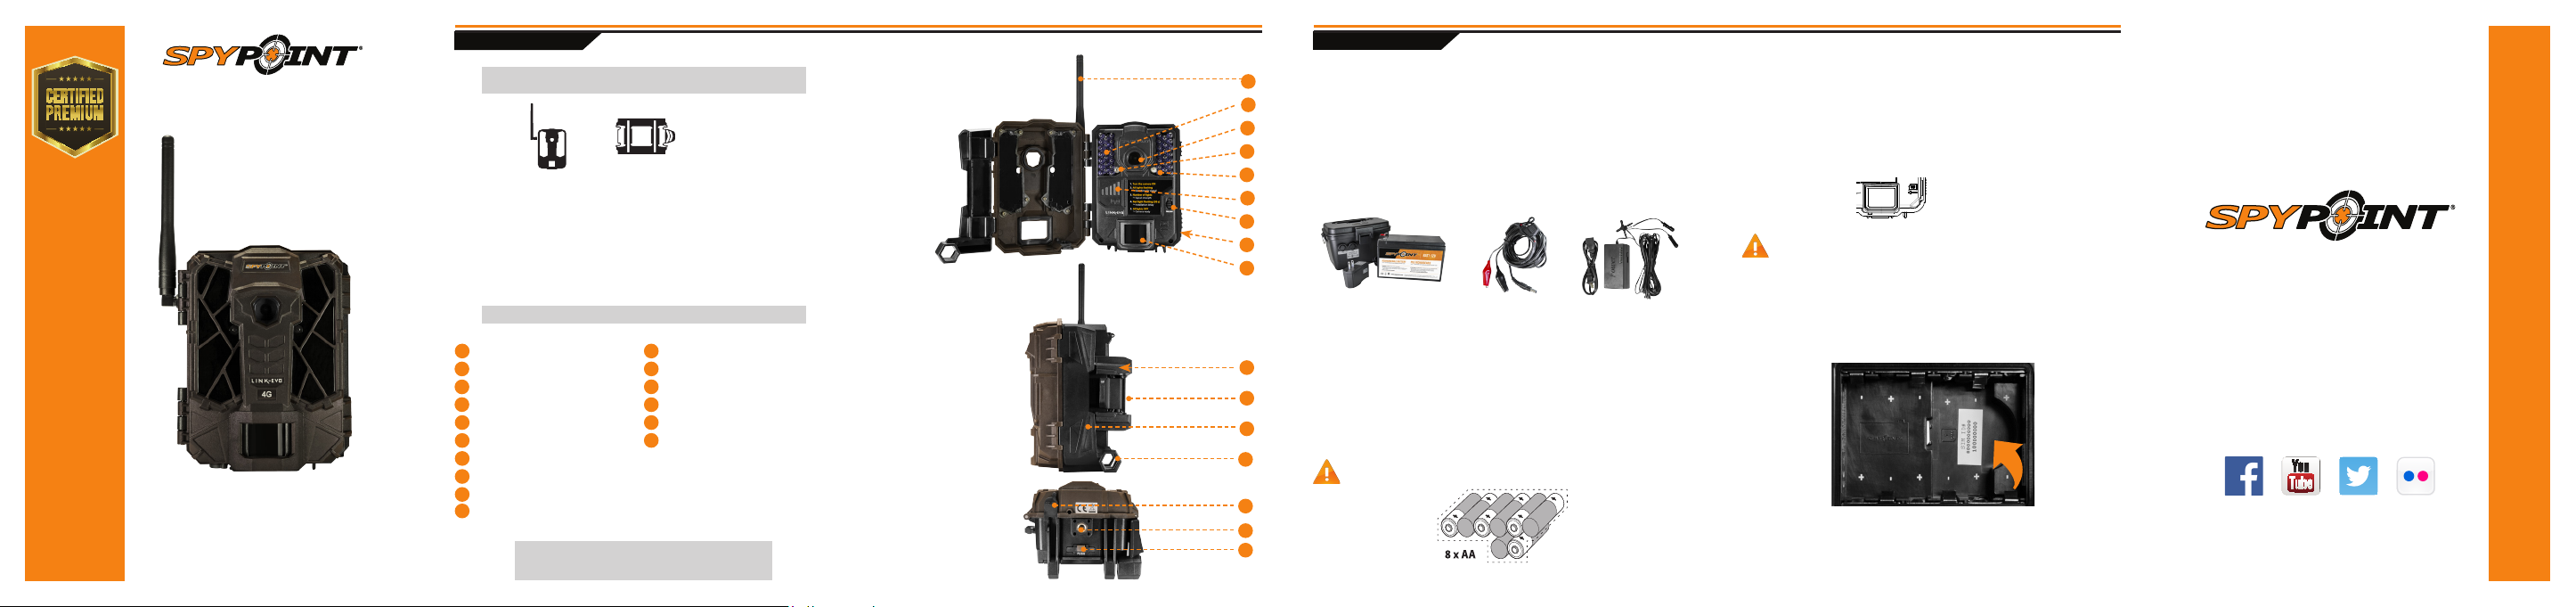
IN THE BOX & COMPONENTS
Note: Memory card and batteries are sold separately.
Camera
Micro
SIM card*
*Micro SIM card is preactivated and inserted in the camera
Antenna
1
LEDs
2
Photo lens
3
Light sensor
4
Test light
5
Signal meter
6
ON / OFF Switch
7
SD card slot
8
Detection lens
9
10
Battery case &
Micro SIM card reader
Steel security boxes may reduce the
wireless functionalities of the product.
v1.3
Mounting
bracket
Installation
strap
11
Slot for installation strap
12
Locking latch
13
Cable lock hole
14
12V jack
15
Tripod mount
16
Battery door push button
Quick start
guide
1
2
3
4
5
6
7
8
9
10
11
12
13
14
15
16
CAMERA BASICS
REMOVE CAMERA FROM THE MOUNTING BRACKET
• Push the tab to release the camera from the mounting bracket.
• Remove the camera.
CHOOSE A POWER SOURCE
You can use either 8 alkaline or lithium AA batteries; our LIT-09/
LIT-C-8 lithium battery pack; an external 12V power source. In order
to get best results and longer battery life, we recommend the use of an
external 12V source like the ones below.
Rechargeable 12V
battery, charger
& housing kit
To open the battery compartment door for the AA batteries or our
lithium battery pack, push the button under the camera. To ensure
maximum performance of the camera with AA batteries and prevent
battery leak, we recommend the use of 8 new batteries. Make sure
to insert each AA battery with the correct polarity. Do not mix battery
type - use ALL alkaline or ALL lithium. Rechargeable AA batteries are not
recommended as the lower voltage they produce can cause operational
issues.
Observe the proper battery polarity orientation according
to the (+) and (-) marks when installing AA batteries.
12V DC
Power cable
12-volt
AC Adaptor
INSERT THE MEMORY CARD
Before inserting or removing a memory card, always turn o the camera
to prevent loss or damage of the photos already recorded. Also make
sure that the switch on the side of the card is not in the LOCK position.
Insert an SD/SDHC memory card (up to 32 GB capacity) in the card
slot, gold contacts facing down as shown on the camera. The card is
inserted correctly when a click is heard.
We suggest to format your SD card if it's been in another electronic
device to make sure you will have the maximum capacity of your
memory card.
FINDING THE SIM ID
The SIM ID number can be found in the battery case. You will need
this number to complete the registration of the LINK-EVO camera and
connect to the application.
THANK YOU
for choosing
Our goal is to design & manufacture
innovative, premium products for the
hunting industry and to cater to all hunters
passionate about the lifestyle that is
hunting. We strive on oering all customers
a positive, user friendly experience that will
have a lasting impression.
Join the community
GETTING STARTED
illumination modes comparison* (Night modes)
INSTALL THE FREE
SPYPOINT LINK APP
The SPYPOINT LINK App lets you connect and control your camera
remotely using a smartphone or tablet. Features include viewing your
camera status, pictures, full camera control and more.
Note: If you don’t have a smartphone or a tablet, please contact
our customer service to activate your camera.
Call us at our toll free number: 1-888-779-7646
Install the free App
1. Make sure you have a data package with either your smartphone
or tablet or a Wi connection.
2. To install the App, you can either:
● Get it on Google PlayTM (Google Play is a trademark of Google Inc)
● Download on the App StoreTM (App Store is a trademarks of Apple Inc.)
3. Search for the SPYPOINT LINK App from SPYPOINT.
4. Install the App on your smartphone or tablet.
Run the SPYPOINT LINK APP
Start the app and it will walk you through a few questions. Press the
button at the bottom of the screen once you have nished. You will
then receive an email conrming the activation.
Once in the app, you will have the following 4 options at the bottom:
Account
Select the data plan and modify your prole informations.
Status
See general informations like the cellular signal strengh, battery
level or percentage of space used on your SD card.
Settings
Modify the mode of the picture settings, the synchronisation
frequency & all others
Photos
Let you see your pictures by date, month and years. Also let
you share or download the photo.
Note: If you have more than one camera, it will let you select the
camera name with the white bar with a scrolling menu at the top
of the screen
SETTING THE APP
The SPYPOINT App lets you congure all your settings of the camera.
Theses new settings will take eect the next time the camera connects
to update it’s status.
BASIC SETTINGS
Mode - PHOTO
Delay: Sets the time interval between each detection before
the camera records the next photo.
Multi-shot: Takes up to 2 consecutive shots at each detection, with
a 5 second delay between each photo.
Mode - TIME LAPSE
Interval: This option allows the camera to take photos at regular
preset intervals without detection.
Mode - VIDEO
(A photo is taken automatically before each video.)
Delay: Allows the user to choose the time interval between each
detection before the camera can record the next video.
Video lenght: Allows the user to select the duration of the recording.
SYNCHRONISATION SETTINGS
Cellular: Turn the transmission of pictures ON or OFF.
First sync time: Allows the user to choose at what time of the day the
camera communicates for the rst time.
Sync frequency: Allows the user to choose the number of synchronizations
that the camera performs daily.
ADVANCED OPTIONS
Date format: Allows the user to set the date format as
Month/Day/Year or as Day/Month/Year.
Temp. unit: Allows the user to select the temperature display.
Night mode: Allows the user to set the best option for photos.
Battery life
Flash range
Blur reduction
optimal
MODE
IR-boost
MODE
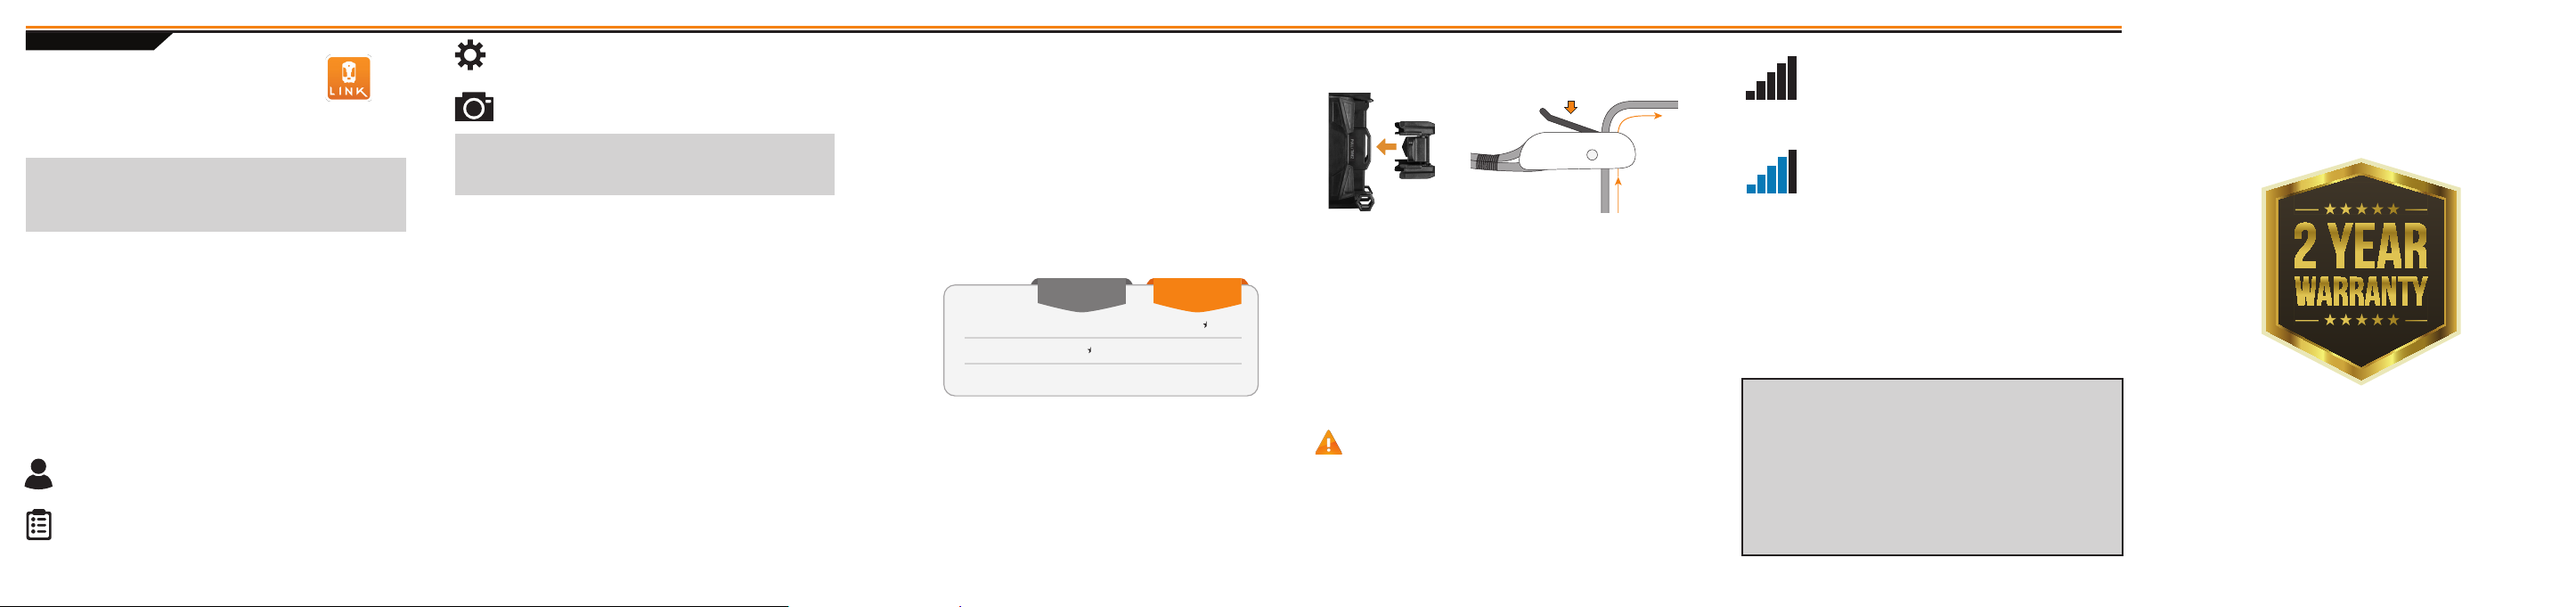
INSTALLATION OF THE CAMERA
Install the camera with or without the mounting bracket:
Recommended installation height:
The camera should be installed at the same height as the animal’s
mid-body.
Ideal installation for quality pictures & videos:
The targeted animal should be 25 feet / 7.5m away from the camera for
a better eld of view.
To get brighter pictures at night , you should have elements in the
background to reect back the IR ash to the camera.
Note that the camera should not directly be facing the sun to avoid
back lighting and false detection.
START THE CAMERA
We suggest to format your SD card if it’s been in another electronic
device to make sure you will have the maximum capacity of your
memory card.
1. Turn the camera ON
Use the ON/OFF switch to turn the camera ON.
2. All lights ashing - Searching for signal
The signal search can take a few minutes. If you only see
1 bar ashing, the network test was unsuccessful. Move
outside or get near a window and re-start the camera a few
times if need be to connect to the cell network.
3. Number of lights - signal strength
Once the network test is completed, you will see the
signal strength in signal bars. Note that the signal bars on a
LINK-EVO might not be equal to your other cellular devices
as there’s no industry standard and practice to label dBm
values to a specic number of bars.
4. Red light ashing (30 s) - Installation delay
The test light in front of the camera will ash for 30 seconds to allow
the user to leave the area without being photographed or recorded.
5. All lights OFF - Camera ready
The camera has updated it’s status in the LINK app with it’s latest
informations. The camera is now ready to take pictures and transmit
them to your LINK app upon the next synch. Synchs are set by default
to every 4 hours from midnight.
BEFORE THE END OF THE 30-DAY FREE TRIAL
In the LINK app, go activate your plan under the Account tab. For
more details about the available plans, look at the Account tab in
the App or follow the link below. If you choose not to activate a
plan, note that you’ll still be able to transmit/receive pictures with
our FREE monthly plan. It will allow you to transmit/receive up
to 100 photos per month with a photo history of the last 7 days.
IMPORTANT TO DO
WWW.SPYPOINT.COM/PLANS
Sit back, relax &
know you’re covered
All 2017 SPYPOINT trail cameras
are now covered by the
“ Know you’re covered ”
2 year warranty.
 Loading...