

Page 1
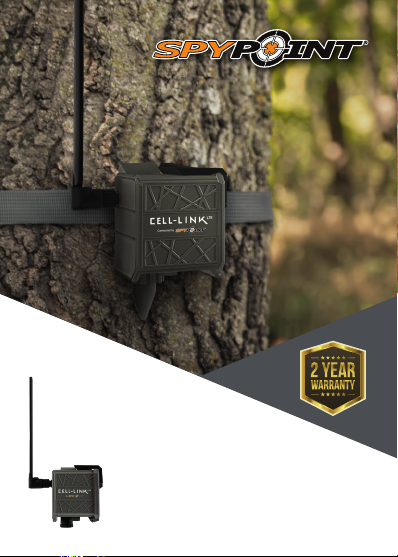
CELL-LINK
QUICKSTART GUIDE
v.1.2
Page 2

ENGLISH
In the box
1x CELL-LINK cellular module
1x Memory card adapter cable
1x Mounting strap
1x Quickstart guide
1x MicroSIM card (preactivated and inserted into the CELL-LINK)
Memory card and batteries are sold separately.
NOTE:
User manual, latest rmware, and FAQ available at:
SPYPOINT.COM/SUPPORT
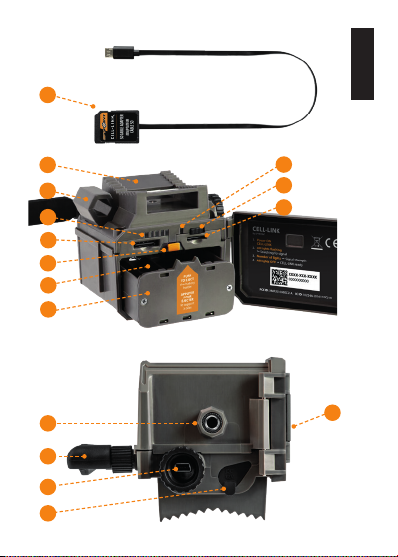
Components
Memory card adapter cable
1
Slot for mounting strap
2
Cable lock hole
3
5 signal strength LEDs
4
SIM card slot
5
Battery ‘‘PUSH’’ eject button
6
Battery compartment
7
AA battery holder
8
2
STATUS LED
9
ON/OFF switch
10
11
MicroSD card slot
12
¼"-20 tripod mount
13
Antenna
14
Memory card adapter cable port
15
12V jack
Locking latch
16
Page 3
1
ENGLISH
2
3
4
5
6
7
8
12
13
14
15
9
10
11
16
3
Page 4

ENGLISH
PREPARATION
SELECT A POWER SOURCE
• Lithium or alkaline AA batteries
• 12V rechargeable battery (#KIT-12V)
• 3.7V rechargeable battery pack (#LIT-10)
NOTE:
FOR BEST RESULTS AND NO LEAKAGE:
• Use only new lithium or alkaline batteries.
• Do not mix old and new batteries.
• Do not use rechargeable AA batteries
(their lower voltage can generate operational issues).
HOW TO INSTALL AA BATTERIES PROPERLY
• Unlock and open the CELL-LINK door.
• Take the battery holder out
battery holder following polarity (+) and (-) indications.
• Place the battery holder back into the battery compartment,
an audible click should be heard.
FORMATTING YOUR MicroSD CARD
Before inserting the MicroSD card into your CELL-LINK, it must be
reformatted via a computer to ensure proper functionality.
Memory card is sold separately. Whether you choose to use a
MicroSD card you previously used in another device or a brand
new one you've just bought, its capacity must not exceed 32 GB
and it must be reformatted. Do not use the "Quick format" option.
We recommend using the SPYPOINT #LIT-10
rechargeable lithium battery pack, sold separately.
and insert the AA batteries into the
INSERTING A MicroSD CARD
• Ensure the CELL-LINK is turned o and open its door.
• Insert a MicroSD memory card (up to 32 GB capacity) into
the MicroSD card slot with the label facing up.
• The card is inserted correctly when a click is heard.
4
Page 5
ACTIVATING YOUR CELL-LINK
You must activate your CELL-LINK via the free "SPYPOINT
app" or by logging on to the SPYPOINT.COM website.
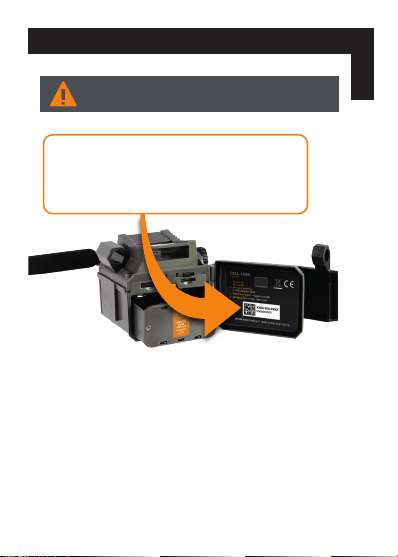
FINDING THE ACTIVATION CODE
The activation code is located inside the CELL-LINK
battery compartment door. You will need this
unique code to activate the CELL-LINK.
SPYPOINT APP
Follow these steps:
1. On Google Play
TM
or the App StoreTM, search for "SPYPOINT".
2. Download and install the app on your smartphone or tablet.
3. Start the app. Select "ACTIVATE A DEVICE". In the list, select
"CELL-LINK" then follow the steps.
4. When complete, a conrmation email with instructions on
how to nalize the creation of your account will be sent to you.
5. Log in to the SPYPOINT app using your email and password.
ENGLISH
5
Page 6

ENGLISH
ACTIVATING YOUR CELL-LINK
SPYPOINT website
Follow these steps:
1. On the SPYPOINT website, select "LOGIN" in the top
navigation menu. On the displayed page, select "Register",
ll out the required elds, then log in.
2. Select the + sign on the far right of the page;
in the list, select "CELL-LINK" then follow the steps.
3. When complete, a conrmation email with instructions on how
to nalize the creation of your account will be sent to you.
4. On the website, log in to your account using your email and password.
You can activate additional CELL-LINK’s for other cameras
and switch between them in the SPYPOINT app or the
NOTE:
"MY ACCOUNT" section of the SPYPOINT website.
CHOOSING A PHOTO TRANSMISSION PLAN
Go to
https://www.spypoint.com/en/spypoint-experience/plans
to read the latest oers and choose the plan that suits you.
CONFIGURING YOUR CELL-LINK
New settings take eect every time the CELL-LINK connects with
the SPYPOINT app or website
First transfer time: Allows you to choose the time
when the CELL-LINK makes its rst transfer of the day.
Transfer frequency: Allows you to choose the number of daily transfers.
NOTE:
Photo transfers are set by default to every 4 hours from midnight.
6
.
Page 7

STARTING YOUR CELL-LINK
1. Open the CELL-LINK door
2. Turn the CELL-LINK ON (ON/OFF switch)
3. All lights ashing – Searching for signal
The signal search can take a few minutes to process. If only 1 bar is ashing, the network test is unsuccessful. Try moving the CELL-LINK (along with
your camera) to another spot in order to maximize signal strength, then
restart the cellular module. This operation might need to be repeated as
the SPYPOINT SIM card and services are powered by multiple providers.
The network modem will maneuver to ensure the strongest signal
strength by searching for the best tower available (cellular network).
4. Solid bars – Signal strength
Once the network test is completed, bars will stabilize showing the signal
strength. Note that signal bars displayed on the CELL-LINK can dier from
those shown on other cellular devices as there is no industry standard or
practice to label DBM values to a specic number of bars.
5. All lights OFF – CELL-LINK ready
Shut the CELL-LINK door. The CELL-LINK has updated its status
SPYPOINT app and website with its latest information. The
is now ready to grab the pictures taken by your trail camera and transmit
them to you via the SPYPOINT app or website upon its next transmission.
Before starting the CELL-LINK, ensure you have successfully
congured your trail camera according to your preferences and
NOTE:
that you have done this by following your camera’s user manual.
HERE ARE THE RECOMMENDED CAMERA SETTINGS FOR
ENSURING OPTIMAL PERFORMANCE OF YOUR CELLLINK:
• A low-resolution photo format.
• Precisely adjusted date and time
• A delay no shorter than 1 minute between each detection.
• In time lapse mode, a delay no shorter than 1 minute.
The CELL-LINK doesn’t support video transfers. However, if you congure
your camera for having a photo taken before each video, this photo will be
NOTE:
sent out to you from the CELL-LINK.
in the
CELL-LINK
ENGLISH
7
Page 8
ENGLISH
INSTALLING AND CONNECTING THE CELL-LINK
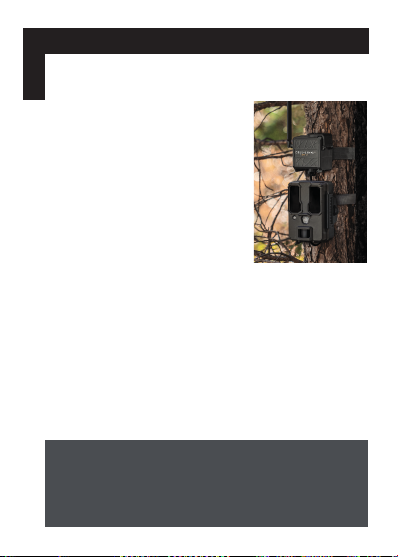
To connect the SPYPOINT CELL-LINK to your trail camera from any
brand, follow these steps (or view our video in the Help section):
1. Open your camera door.
2. Take the CELL-LINK memory card
adapter cable and insert the
end with the SD card into your
camera’s SD card slot.
3. Keeping the SD memor y card
adapter cable held tightly against
the case, direct the adapter cable
so that it exits from the bottom of
the camera case. The cable should
hang loosely below the camera.
(Avoid bringing the cable over any
critical components).
4. Shut the camera door and lock the latch.
5. Flip the SD cable upward, sliding it up behind the camera, so
that the CELL-LINK connector sticks out from behind the top
of your camera.
6. Mount your camera to the tree. (The CELL-LINK SD adapter
cable should now be found between the tree and camera)
7. Mount the CELL-LINK cellular module as close to your camera as possible.*
8. Connect the SD card cable connector to the CELL-LINK.
You can now access CELL-LINK photos, congurations, and statuses
either via the SPYPOINT app or the SPYPOINT website.
It is strongly recommended to mount your CELL-LINK cellular
module directly above your camera leaving as little space as
possible between the two. Doing so will reduce the risk of
NOTE:
having animals cause damage to the cable.
If your cable memory card adapter gets damaged,
replacement cables can be ordered separately.
8
Page 9
DISPOSAL
ONLY USE ORIGINAL SPARE PARTS AND ACCESSORIES.
If one day your camera has been used so intensively that it has to be replaced, or if you
no longer have any use for it, you are obliged to dispose of it at a recycling center.
Information on return points for your electrical appliance can be obtained from
your local waste disposal company or from your local administrative offices.
Electrical appliances not only contain valuable recyclable raw materials,
but also substances which, if disposed of improperly, can affect public
health and the environment. Help ensure that valuable raw materials are
recycled when you return your old appliance to a central collection point.
The WEEE (Waste Electrical and Electronic Equipment Directive ) symbol represents
the obligation that the labeled camera to be sent to a separate center for the proper
recycling of electrical and electronic equipment.
FREQUENCY
FREQUENCY RANGE:
800/ 850/ 900/ 1900/ 2100MHz
MAXIMUM TRANSMISSION POWER:
FREQUENCY
GSM850
EGSM900
DCS1800
PCS1900
GSM850 (8-PSK)
EGSM900 (8-PSK)
DCS1800 (8-PSK)
PCS1900 (8-PSK)
UMTS 2100
UMTS 1900
UMTS 900
UMTS 850
UMTS 800
MAX.
33DBM±2DB
33DBM±2DB
30DBM±2DB
30DBM±2DB
27DBM±3DB
27DBM±3DB
26DBM±3DB
26DBM±3DB
24DBM+1.7/3.7DB
24DBM+1.7/3.7DB
24DBM+1.7/3.7DB
24DBM+1.7/3.7DB
24DBM+1.7/3.7DB
ENGLISH
9
Page 10
ENGLISH
FCC
THIS DEVICE COMPLIES WITH PART 15 OF THE FCC RULES.
Operation is subject to the following two conditions:
1. This device must not cause harmful interference.
2. This device must accept any interference received,
including interference that may cause undesired operation.
THANK YOU FOR CHOOSING
rmware available at:
Live chat support at
www.spypoint.com
FAQ, user manual & latest
SPYPOINT.COM/SUPPORT
Join the community
Sit back and relax as this device is covered by the "Know you’re
covered" 2-year warranty. We strive to provide our customers
with a positive experience and an outstanding service.
10
 Loading...