


Splendide
Washer-Dryer
Installation Instructions and Use & Care Guide
Lave-linge séchant
Mode d’installation et d’emploi
Lavasecadora
Instrucciones para la instalación y el uso
Quick Reference Guide
WDC5200
Comb-o-matic 5200
Technical Data . . . . . . . . . . . . . . . . . . . . . . |
2 |
Installation Instructions |
|
Installation Requirements . . . . . . . . . . . . . . . . . |
3 |
Installation/Removal . . . . . . . . . . . . . . . . . . . . |
4 |
Introduction . . . . . . . . . . . . . . . . . . . . . . . . |
6 |
Getting Started |
|
About Your Washer-Dryer . . . . . . . . . . . . . . . . . |
7 |
Understanding the Control Panel . . . . . . . . . . . . . . |
8 |
Guide to the Wash Programs . . . . . . . . . . . . . . . . |
9 |
Preparing Laundry / About Laundry Aids . . . . . . . . . . . . |
10 |
Fabric Care Labels / Stain Removal Chart . . . . . . . . . . . |
11 |
Operation Instructions |
|
Choosing a Load . . . . . . . . . . . . . . . . . . . . . |
12 |
About the Dispenser Drawer . . . . . . . . . . . . . . . . |
13 |
How to Wash . . . . . . . . . . . . . . . . . . . . . . . |
14 |
How to Dry . . . . . . . . . . . . . . . . . . . . . . . . |
15 |
Easy Care and Maintenance |
|
Regular Maintenance. . . . . . . . . . . . . . . . . . . . |
16 |
Monthly/Yearly Maintenance . . . . . . . . . . . . . . . . . |
17 |
Troubleshooting |
|
Avoid Service Checklist . . . . . . . . . . . . . . . . . . |
18 |
If You Need Service. . . . . . . . . . . . . . . . . . . . . |
19 |
Read All Instructions Before Using
1
© C o p y r i g h t 2 0 0 4 , W e s t l a n d S a l e s , C l a c k a m a s , O R 9 7 0 1 5
!
DO NOT DISCARD!
THIS INFORMATION
SUPERSEDES THE
INFORMATION FOUND IN YOUR OWNERS MANUAL
KEEP THIS PAGE WITH YOUR OWNERS MANUAL FOR FUTURE REFERENCE
Splendide®
WA S H E R D R Y E R
Front-Loading Washer-Dryer
Addendum to Owners Manual
M O D E L S
WD2000S (Splendide 2000S)
WD2100 (Splendide 2100)
WDC6200 CEE (Comb-o-matic 6200)
WDC5200 (Comb-o-matic 5200)
Q U E S T I O N S?
Splendide Service HQ:
Westland Sales
15650 SE 102nd Ave. (PO BOX 427)
Clackamas, OR 97015
Telephone: Toll Free: 800-356-0766 (Local: 503-655-2563)
Service Fax: (503) 722-9202 E-mail: service@splendide.com Website: www.splendide.com
DO O R LO C K S U P P L E M E N T
Follow these steps if you need to open the door to your washer-dryer after a cycle has already begun
To Open the Door During a Wash Cycle: |
To Open the Door During a Dry Cycle: |
1.Advance the Program Selector to‘Reset’ and wait 5 seconds.
2.Advance the Program Selector to‘Drain’ (8 o’clock) and allow the machine to drain completely.
3.Advance the Program Selector to‘Reset’ (The‘Status/ Door Lock’ LED will blink quickly to indicate that the cycle has stopped, but the door is STILL LOCKED)
4.When the‘Status/Door Lock’ LED blinks SLOWLY (takes 1-2 minutes), you can open the door
1.Advance the Program Selector to‘Reset’ (The‘Status/ Door Lock’ LED will blink quickly to indicate the cycle has stopped, but the door is STILL LOCKED)
2.When the‘Status/Door Lock’ LED blinks SLOWLY (takes 1-2 minutes), you can open the door
! IMPORTANT !
Once a wash or dry cycle is underway, the washer-dryer door will LOCK for the duration of the cycle and will STAY LOCKED for up to 2 minutes after the cycle ends. DO NOT attempt to open the door unless the ‘STATUS/DOOR LOCK’LED is BLINKING SLOWLY!
WI N T E R I Z A T I O N S U P P L E M E N T
Follow theses steps if you need to winterized your washer-dryer that’s installed in a boat or RV
To winterize your washer-dryer:
1.With the machine power OFF, pour ½ quart of RVtype antifreeze into the washer drum
2.Close the door. Advance the Program Selector knob to a SPIN position
3.Press ON/OFF Button (IN). Wait 1-2 minutes
4.Press ON/OFF Button (OUT). Unplug the washer-dryer from the electrical outlet (or disconnect power)
5.Turn the water supply faucets OFF. Disconnect the inlet hoses from the faucets. Drain any remaining water from the hoses. Finished!
Optional RV Winterization - If you’re currently pumping antifreeze through the fresh water system, follow these steps to winterize:
1.With the machine power OFF, turn the WASH TEMP knob to HOT
2.Advance the Program Selector knob to REGULAR in Cotton Heavy Duty
3.Press the ON/OFF button (IN) and let the machine fi ll until antifreeze is in the drum
4.Advance Program Selector to a RESET. Wait 5 seconds (Status/Door Lock LED will blink)
5.Advance Program Selector to a SPIN position. Let the antifreeze drain from the drum
6.Advance Program Selector to RESET. Wait 5 seconds (Status/Door Lock LED will blink)
7.Turn the WASH TEMP knob to COLD
8.Advance the Program Selector knob to REGULAR in Cotton Heavy Duty
9.Let the machine fi ll until you see antifreeze in the drum
10.Advance the Program Selector knob to RESET. Wait 5 seconds (Status/Door Lock LED will blink)
11.Advance the Program Selector knob to SPIN. Let the antifreeze drain from the drum
12.Press the ON/OFF button (OUT). Finished!
To use again, flush the water pipes, then:
1.Reconnect the water inlet hoses to the corresponding HOT/COLD faucets. Turn the faucets ON. (NOTE: Check the water inlet hoses and pump periodically. Refer to the“Use & Care Guide” that came with the machine)
2.Plug the washer-dryer into an appropriate electrical outlet (or reconnect power supply)
3.With the ON/OFF button in the o (OUT) position, pour 1/2 TBSP. of powder detergent (or liquid equiv.) into the‘Detergent’ compartment inside the Dispenser Drawer
4.Advance the Program Selector knob to an EXPRESS cycle
5.Press the ON/OFF button (IN) and allow the machine to run through the complete cycle to clean out any remaining antifreeze. Finished!
Technical Data
Technical Data
Models |
Comb-o-matic 5200 |
||
|
by Splendide (WDC5200) |
||
Dimensions |
Width: |
23.4" (59.5 cm) |
|
Height: 33.25"-33.75" (84.5-85.7 cm) |
|||
|
|||
|
Depth: |
18.25" (46.4 cm) |
|
|
|
||
Capacity |
Drum Size: 1.6 CF |
||
Washing: 2-10 lbs. |
|||
|
|||
|
Drying: |
2- 6 lbs. |
|
|
|
||
Electrical Conn. |
Voltage: 120 Volts, 13 Amp, 60 Hz |
||
Max. Absorbed Power: 1300 Watts |
|||
|
|||
|
|
|
|
Water Conn. |
Max. Pressure: .69 MPa (6.9 bar), 100 PSI |
||
|
|||
|
Min. Pressure: 0.05 MPa (0.5 bar), 7.5 PSI |
||
|
|
|
|
Spin Speed |
Up to 1200 RPM |
||
|
|||
|
|
|
|
|
|
|
|
NOTE: The manufacturer reserves the right to make any improvements to its appliances without giving prior notice.
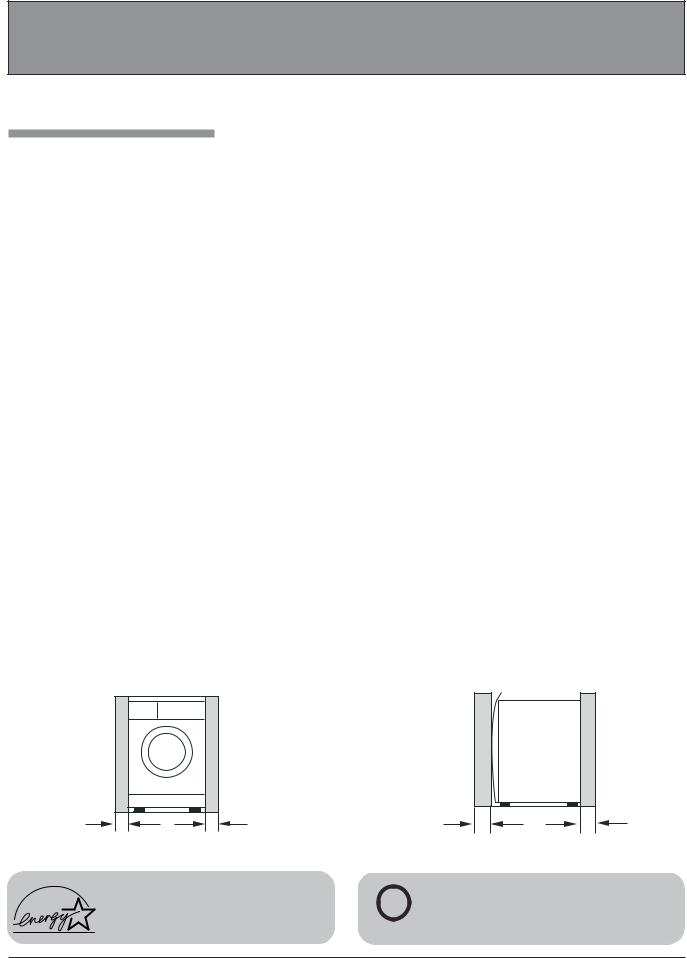
nMinimum Installation Spacing
This appliance may be installed in a recessed area, closet or alcove. The installation spacing is in inches and is the minimum acceptable. Additional spacing should be considered for easy installation, servicing and compliance with local codes and ordinances. Installations must conform with the minimum dimensions indicated.
Recessed Front View
0" * |
0" * |
Side View
1" |
1" |
* Additional clearances for wall, door/floor moldings may be required.
As an Energy Star Partner, Splendide Division |
|
U |
This appliance was tested by UL and |
Westland Sales has determined that Energy Star |
|
conforms with both Canadian and U.S. UL |
|
labeled models meet the Energy Star guidelines for |
C |
® L US LISTED |
safety requirements and displays their mark. |
energy efficiency. |
|
|
|
2
Installation Instructions
Installation Requirements
GROUNDING INSTRUCTIONS
This appliance must be grounded. In the event of malfunction, or breakdown, grounding will reduce the risk of electric shock by providing a path of least resistance for electric current. This appliance is equipped with a cord having an equipment grounding conductor and grounding plug. The plug must be plugged into an appropriate outlet that is properly installed and grounded in accordance with all local codes and ordinances. DO NOT modify the plug provided with the appliance. If it will not fit the outlet, have a proper outlet installed by a qualified electrician.
WARNING: Improper connection of the equipmentgrounding conductor can result in a risk of electric shock. Check with a qualified electrician or serviceman if you are in doubt as to whether the appliance is properly grounded.
Attention! !
For your own protection and to prevent accidents, injury, and fire, please read the following carefully before installing the washerdryer.
•Installation and grounding must be done in accordance with local codes and by a qualified installer. Installation Instructions provided in this booklet are for the installers’ reference.
•Washer-dryer MUST be installed on a strong, level floor and in a protected dry and well-ventilated area close to a power supply and drain outlet of sufficient capacity. DO NOT install on carpet.
IMPORTANT: Installation on carpet floors will cause the ! machine to vibrate and may result in excessive machine vibration during the spin cycles and loss of performance.
• The washer-dryer should be plugged into a properly grounded (3) prong electrical outlet capable of 120 Volt, 60 Hz, 1300 W, and 13 Amp. It shouldn’t be controlled by a wall switch or pull cord which could be turned off accidentally. For your safety, the third or round grounding prong must never be removed. DO NOT USE AN EXTENSION CORD.
• DO NOT install or store this appliance where it will be exposed to weather or in an area where gasoline or other flammables are stored.
nElectrical
•Machine Voltage/Amperage - 120V, 60 Hz, 1300 W, 13 Amp.
•Connection - 3-prong plug with 6' cord is provided with the machine.
•Circuit/Protector - 3-wire single phase, 120V, 60 Hz, AC, on a separate 15 Amp circuit.
nLocation
This machine may be installed free standing as well as in a recessed area, closet, or alcove.
•Minimum Installation Spacing - 0" on sides and 1" in front and back.
NOTE: Additional installation spacing needs to be considered for easy installation, servicing, and compliance with state and federal codes.
•Floor - Must support at least 280 lbs. and be a solid, level surface. DO NOT install on carpet.
•RV/Marine Applications - When locating the appliance in a towable trailer or watercraft, position the machine over the axles or mid-ship where movement is at a minimum. Block the machine to prevent extreme movement.
•No Dryer Vent Requirements For This Machine - This machine uses an internal condenser for drying. All humidity stays within the unit and is drained as water. No heated or conditioned air is exhausted outside; no exhaust vent is needed.
nDrainage
•Standpipe Diameter/Capacity - Needs a 1 ¼” minimum diameter standpipe with a minimum carry-away capacity of 7 gallons per minute.
•Top of Standpipe - Must be between 25" - 34" high from the bottom of the machine.
•Outlet End of Drain Hose (provided with the unit) - Must be at least 20" above the bottom of the washer-dryer. An air break must be available at the standpipe to avoid siphoning. No more than 6" of the drain hose should be inserted into the drain pipe to prevent siphoning.
nSplendide Accessories (Available Separately)
•Faucet Adapter Kit allows for a direct faucet connection.
•Optional Drain-A-Way Pans designed to be drain plumbed.
WARNING: Splendide denies all liability if these instructions are not followed correctly.
3
Installation Instructions
Installation / Removal
n1. Unpacking Your Washer-Dryer
•Carefully remove the packing materials with care not to damage the drain hose and power cord that are shipped installed on the machine. Check that the machine is intact. Report any damage immediately.
•Position the washer-dryer near the desired installation position.
WARNING: Plastic bags, Styrofoam, nails and other packaging
!parts are not children’s toys and can be potentially dangerous. Destroy the carton and plastic bags after the washer-dryer has been unpacked.
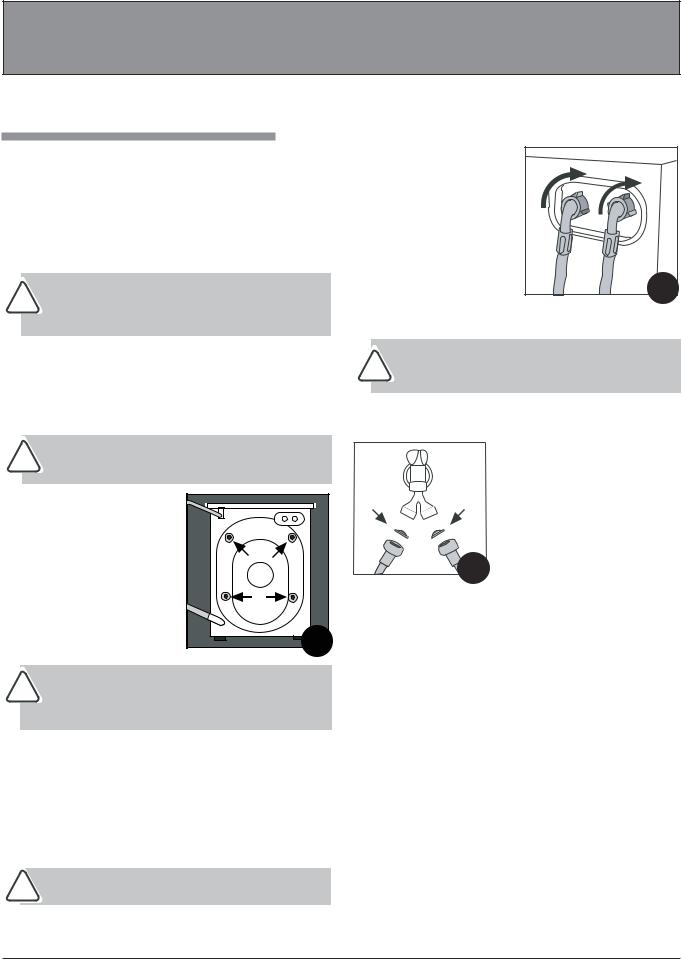
n2. Remove the Transit Screws/Spacers
•For transportation, the inside of the machine is supported by screws, rubber grommets and spacers on the back panel. Before using the washer-dryer, these items MUST be removed.
IMPORTANT: Transit screws and spacers must be removed
!before operating the machine to allow proper operation of the machine and to prevent damage to the appliance.
• After positioning the washer-dryer near the installation location, remove the four screws (Fig.1), with the rubber grommets and plastic spacers that are attached to them.
• Use the plastic plugs (provided in the accessories bag) to fill in the holes.
Fig. 1
IMPORTANT: Retain the transit screws, spacers and rubber
!tubes. These items should be reinstalled to prevent damage if or when you transport the machine in the future.
n3. Connecting Water Inlet
•If the water pipes you will be connecting to are new or unused, run the water until clear to remove any debris that could clog the water valve screens or valves before connecting the machine. NOTE: Supply shut-off valves should be easily accessible.
IMPORTANT: Water pressure MUST range within the values ! indicated on the “Technical Data” chart (p. 1).
•Included in the accessories supplied with your machine are 2 inlet hoses with 4 rubber washers preinstalled. Check that the rubber washers are installed in the ends of the inlet
hoses to make a water tight seal
at each connection point.
• Connect the straight ends of the water inlet hoses to the supply taps that have ¾” BSP thread (standard hose bib).
•Connect the 90º angled ends (20 mm thread) of these hoses to the
inlet valves on the back of the machine (Fig. 2). NOTE: Water Inlet valves are color coded: Red (Hot) & White (Cold).
IMPORTANT: Do not use excessive force. Damage to the
!couplings can result. The couplings should be tightened by hand; a tool should only be used if a leak occurs.
Optional Single Faucet Hook-Up
It is possible to run the machine on cold water only, but a water supply must be connected to each inlet
valve. To do this, we suggest you use a “Y” connector (contact Splendide).
Connect the “Y” connector to a tap.
After checking that the 4 rubber
washers (provided) are installed in the ends of the inlet hoses, connect the straight ends of the hoses to the “Y” connector (Fig. 3). Then connect the
90º angled ends of these hoses to the inlet valves on the back of the machine (Fig. 2). NOTE: When the machine is connected to a single faucet, the water temp. for the wash/rinse settings is regulated by the temperature YOU set at the faucet. If hot or warm water is used for washing, it is important to turn the faucet to COLD after the wash cycle. Cold water is essential to your machines’ condensation drying process.
n4. Water Drainage
•It is possible for the water to be discharged into a sink, standpipe or drainpipe, but an air break must be available at a min. 20" height to prevent the machine from siphoning (Fig. 6).
Standpipe Drain System - Installations require a minimum 1 ¼” (3.2 cm) diameter standpipe with a minimum carry away capacity of 7 gallons (26 liters) per minute.
Wall or Floor Standpipe Drain System - The top of the standpipe must be between 25" (62 cm) - 34" (86 cm) from the bottom of the washer (Fig. 4).
Continued on next page
WARNING: Splendide denies all liability if these instructions are not followed correctly.
4

Installation Instructions
Floor Standpipe |
Wall Standpipe |
A |
|
|
B |
A & B = 25" (62 cm) min. / 34" (86 cm) max. |
|
|
Fig. 4 |
Sink Drainpipe System - Entry into the sink drain system must be above the trap (Fig. 5). When routing the drain hose through cabinets or walls, use a protective material such as electrical or duct tape to cover sharp edges that could damage the drain hose. Use a suitable clamp to secure the drain hose to the “Y” branch or the disposer. With a sink drainpipe system, you may connect directly: 1) to a disposer by following the manufacturers attachment method. 2) directly to a “Y” branch tail piece (available at most hardware stores). 3) Through the floor to a separate trap. The trap must be vented to prevent siphoning. To provide proper venting, install an Air Gap Kit (available at most hardware stores). 4) To the to the faucet using a Faucet Adapter Kit (available separately). It will supply water from your faucet and discharge water directly into your sink drain.
Sink Drain W/ "Y" Branch Tailpiece |
Laundry Sink Drain |
25" (62 cm) min. |
|
with an air break |
|
|
Fig. 5 |
IMPORTANT: Make sure that the drain hose is not kinked
!and that water flow is not restricted.
•Use a U-Clamp (provided in your accessories packet) or suitable item to secure the outlet end of the drain hose (pre-installed on the back of your machine).
•Insert the outlet end of the drain hose into the standpipe, wall or floor drain (Fig. 6). NOTE: The outlet end of the drain hose MUST be at least 20" (50 cm) above the base of the machine. No more than 6" of the drain hose should be inserted into the drain pipe to prevent siphoning.
•Use a strap, cable tie, or similar item to hold the hose or the U-Clamp in place.
Floor Standpipe
U-Clamp
|
6" max. |
|
|
25" (62 cm) min. |
|
|
34" (86 cm) max. |
|
Standpipe |
20" (50 cm) min. |
|
with an air break |
||
|
Fig. 6
Floor Standpipe w/ "Y" Branch Tail Piece
Cable tie |
|
|
|
|
|
|
|
|
|
|
|
|
|
||
"Y" Tail Piece |
|
|
|
|
|
|
|
|
|
20" |
(62 cm) min. |
||||
|
|
|
|
||||
This connection MUST be |
|
|
34" |
(86 cm) max. |
|||
before drain trap and at |
Standpipe |
|
|
|
|
|
|
least 20" (50.8 cm) above |
|
|
|
||||
the floor where washer will |
|
|
|
|
|
|
|
be installed. |
|
|
|
|
|
|
|
|
|
|
|
|
|
|
|
Fig. 7
n5. Leveling
•To access the front leveling legs, tilt the machine backwards, leaning it against a wall or other stable structure.
•Adjust the legs up or down (Fig. 8) to ensure the washer is resting solid and does not rock side-to-side or front-to-back when the machine is
upright.
• Check that the angle of inclination, Fig. 8 measured according to the worktop,
does not exceed 2°.
IMPORTANT: The machine must rest solid on a sturdy floor
!for optimum performance and minimum vibration.
n6. Electrical Connection
•Plug the power cord into a grounded outlet. See “Grounding Instructions” (p. 2) for complete details. NOTE: Check to ensure the power is OFF at a circuit breaker/fuse box before plugging the power cord into the outlet. Turn power on at the circuit breaker/fuse box.
n7. Before Using Your Washer-Dryer
•Read manual thoroughly. Keep these instructions for future reference.
•Run the empty washer-dryer through a complete wash cycle to check for water leaks and proper operation.
•Wipe the inside and outside of the appliance with a damp cloth to remove any dust that has accumulated during transit.
WARNING: Splendide denies all liability if these instructions are not followed correctly.
5
Introduction
Congratulations!
Thank you for choosing Splendide - North America’s #1 selling combination laundry center since 1984. Your new Splendide washerdryer is designed to give you maximum washing and drying performance while using less energy/resources and taking up less space. The performance levels, safety features, sturdiness and all its functions are the result of ongoing technological innovation. The ultimate purpose? To offer you the best performance with the utmost simplicity.
nRead This Manual
Inside this book you will find many helpful hints on how to install, use and maintain your new washer-dryer properly. Please read this manual carefully. Just a little preventative care on your part can save you a great deal of time and money over the life of your washer-dryer. If you need further assistance, please contact Splendide Laundry Centers at 1-800-356-0766.
nFor Your Records
Write model and serial numbers here. You can find them on the front of the machine and inside of the door opening.
Model #:
Serial #:
CAUTION
RISK OF ELECTRIC SHOCK |
! |
DO NOT OPEN |
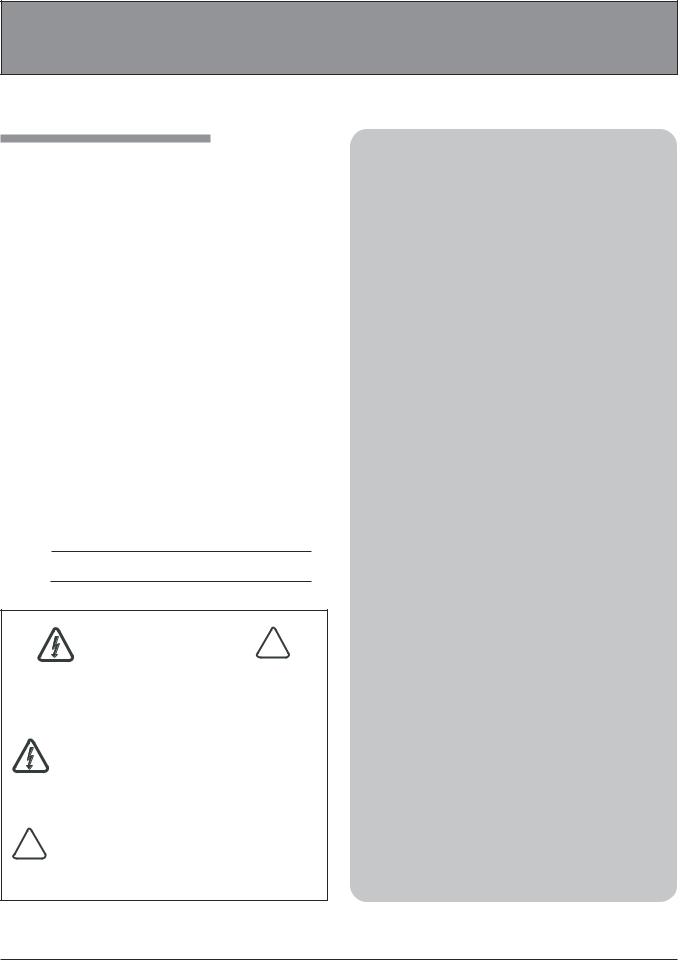
CAUTION: To reduce the risk of electric shock, DO NOT remove cover (or back)/No user servicable parts inside. Refer servicing to qualified services personnel.
The lightning flash with arrowhead symbol, with-in an equilateral triangle, is intended to alert the user to the presence of uninsulated “dangerous voltage” within the product’s enclosure that may be of sufficient magnitude to constitute a risk of electric shock to persons.
The exclamation point within an equilateral triangle is
!intended to alert the user to the presence of important operating and maintenance (servicing) instructions in the literature accompanying the appliance.
Save these instructions For Your Safety
Your washer-dryer has been built in compliance with the strictest international safety regulations. However, for your safety, the information in this manual must be followed to minimize the risk of fire or explosion, electric shock, or to prevent property damage, personal injury, or loss of life.
•Read all instructions before using any appliance.
•Do not wash or dry articles that have been previously cleaned in, washed in, or spotted in gasoline, dry cleaning solvents, other flammable/explosive substances as they emit vapors that could ignite or explode.
•Before the appliance is removed from service or discarded, remove the door to the washing/drying compartment.
•Do not repair or replace any part of the appliance or attempt any servicing unless specifically recommended in the user-maintenance instructions or in published user-repair instructions that you understand and have the skills to carry out.
•Do not allow children to play on or in the appliance.
•Do not add gasoline, dry cleaning solvents, items contaminated with cooking oil or other flammable or explosive substances to the wash water. These substances give off vapors that could ignite or explode.
•Do not place flammable substances around your washer-dryer during operation.
•Under certain conditions, Hydrogen gas may be produced in a hot water system that has not been used for 2 weeks or more. HYDROGEN GAS IS EXPLOSIVE. If the hot water system has not been used for such a period, before using the appliance, turn on all hot water faucets and let the water flow from each for several min. This will release any accumulated hydrogen.
•Do not use heat to dry articles containing foam rubber or similar textured rubber-like materials.
•Turn off water faucets to relieve pressure on hoses and valves and to minimize leakage if a break or rupture occurs.
•Do not reach into the appliance if the drum is moving.
•Do not tamper with controls.
•Repair or replacement of a part should be made only by a qualified service technician to prevent personal injury or damage to the machine. Contact Splendide to locate an authorized repair service company near you.
•Qualified service personnel should clean the interior of the machine periodically.
•Disconnect power to the washer at the circuit breaker or fuse box, or unplug the machine in an emergency or when servicing is required. Have the installer show you and label the proper switch or fuse at the electrical disconnect box.
•Good, safe practices and caution MUST be applied when installing, operating, and maintaining any appliance. Follow basic precaution.
•Save these instructions.
•Before loading - Before loading the washer, make sure the drum is empty.
6
 Loading...