


SDGSXRGS113TW01
Table of contents
 Loading...
Clothes Dryer
D677I_SVG
Nonmetered and metered
Electric and Gas Models
Installation/Operation
Original Instructions
Keep These Instructions for Future Reference.
CAUTION: Read the instructions before using the machine.
(If this machine changes ownership, this manual must accompany machine.)
www.alliancelaundry.com
Part No. D516119ENR2
July 2018

WARNING
WARNING
Risk of fire. Highly flammable material.
IMPORTANT: Purchaser must consult the local gas
supplier for suggested instructions to be followed if
the dryer user smells gas. The gas utility instructions
plus the SAFETY and WARNING note directly above
must be posted in a prominent location near the dryer
for customer use.
W881
Read all instructions before using unit.
WARNING
FOR YOUR SAFETY, the information in this manual
must be followed to minimize the risk of fire or explosion or to prevent property damage, personal injury or death.
W033
WARNING
• Do not store or use gasoline or other flammable
vapors and liquids in the vicinity of this or any
other appliance.
• WHAT TO DO IF YOU SMELL GAS:
• Do not try to light any appliance.
• Do not touch any electrical switch; do not use
any phone in your building.
• Clear the room, building or area of all occu-
pants.
• Immediately call your gas supplier from a
neighbor’s phone. Follow the gas supplier’s instructions.
• If you cannot reach your gas supplier, call the
fire department.
• Installation and service must be performed by a
qualified installer, service agency or the gas supplier.
WARNING
• Installation of unit must be performed by a qualified installer.
• Install clothes dryer according to manufacturer’s
instructions and local codes.
• DO NOT install a clothes dryer with flexible plastic venting materials. If flexible metal (foil type)
duct is installed, it must be of a specific type
identified by the appliance manufacturer as suitable for use with clothes dryers. Refer to section
on connecting exhaust system. Flexible venting
materials are known to collapse, be easily crushed, and trap lint. These conditions will obstruct
clothes dryer airflow and increase the risk of fire.
W729R1
WARNING
To reduce the risk of severe injury or death, follow all
installation instructions. Save these instructions.
W894
WARNING
FOR YOUR SAFETY
Do not store or use gasoline or other flammable vapors and liquids in the vicinity of this or any other
appliance.
W053
©
Copyright, Alliance Laundry Systems LLC -
DO NOT COPY or TRANSMIT
W052
This product uses FreeRTOS V7.2.0 (www.freertos.org).
3 Part No. D516119ENR2

The following information applies to the state of Massachusetts,
USA.
• This appliance can only be installed by a Massachusetts licensed plumber or gas fitter.
• This appliance must be installed with a 36 inch [910 mm]
long flexible gas connector.
• A “T-Handle” type gas shut-off valve must be installed in the
gas supply line to this appliance.
• This appliance must not be installed in a bedroom or bathroom.
©
Copyright, Alliance Laundry Systems LLC -
DO NOT COPY or TRANSMIT
4 Part No. D516119ENR2

Table of Contents
Safety Information..................................................................................7
Explanation of Safety Messages....................................................................... 7
Important Safety Instructions........................................................................... 7
Dimensions............................................................................................. 9
Installation........................................................................................... 14
Before You Start........................................................................................... 14
Tools........................................................................................................ 14
Card Reader Models.................................................................................. 14
Order of Installation Steps..........................................................................14
Position and Level the Dryer..........................................................................15
Connect Dryer Exhaust System...................................................................... 17
Exhaust Direction......................................................................................18
Exhaust System.........................................................................................19
Multi-Dryer Installation Exhaust Requirements............................................19
Gas Dryers - Connect Gas Supply Pipe........................................................... 22
Electric Dryer Only - Connect Electrical Plug..................................................24
Earth/Ground Information.......................................................................... 24
Connecting Power Cord with Three-Wire Plug.............................................26
Connecting Power Cord with Four-Wire Plug.............................................. 28
Reverse Door, if Desired................................................................................29
Wipe Out Inside of Dryer...............................................................................31
Plug In the Dryer.......................................................................................... 31
Electric Dryer........................................................................................... 31
Gas Dryer................................................................................................. 31
Recheck Steps.............................................................................................. 32
Check Heat Source........................................................................................32
Electric Dryers.......................................................................................... 32
Gas Dryers................................................................................................33
Vending....................................................................................................... 33
Meter Case............................................................................................... 33
Coin Slide Control.....................................................................................33
Setting Dry Time Dipswitches.................................................................... 34
Dipswitch Settings.....................................................................................35
Test Setting............................................................................................... 38
Slide Extension Assembly..........................................................................38
Additional Security....................................................................................40
Operation............................................................................................. 42
Operation Instructions for Nonmetered and Coin Slide Dryers.......................... 42
©
Copyright 2018, Alliance Laundry Systems LLC
All rights reserved. No part of the contents of this book may be reproduced or transmitted in any form or by any means without the expressed
written consent of the publisher.
©
Copyright, Alliance Laundry Systems LLC -
DO NOT COPY or TRANSMIT
5 Part No. D516119ENR2

Clean Lint Filter........................................................................................42
Load Laundry........................................................................................... 42
Close Loading Door...................................................................................42
Set Fabric Selector.....................................................................................42
Start Dryer................................................................................................42
Operation Instructions for MDC Dryers.......................................................... 43
Clean Lint Filter........................................................................................43
Load Laundry........................................................................................... 43
Close Loading Door...................................................................................44
Set Fabric Selector.....................................................................................44
Insert Coins or Card...................................................................................44
Start Dryer................................................................................................44
Indicator Lights.........................................................................................45
Maintenance......................................................................................... 46
Lubrication...................................................................................................46
Care of Your Dryer........................................................................................46
Dryer Interior............................................................................................46
Cabinet.....................................................................................................46
Control Panel............................................................................................ 46
Exhaust System.........................................................................................46
Lint Filter.....................................................................................................46
Motor Overload Protector.............................................................................. 47
For Energy Conservation............................................................................... 47
Troubleshooting.................................................................................... 48
Contact Information............................................................................. 50
Installer Checklist.................................................................................51
©
Copyright, Alliance Laundry Systems LLC -
DO NOT COPY or TRANSMIT
6 Part No. D516119ENR2
Safety Information
Safety Information
Explanation of Safety Messages
Precautionary statements (“DANGER,” “WARNING,” and
“CAUTION”), followed by specific instructions, are found in this
manual and on machine decals. These precautions are intended
for the personal safety of the operator, user, servicer, and those
maintaining the machine.
DANGER
Indicates an imminently hazardous situation that, if
not avoided, will cause severe personal injury or
death.
WARNING
Indicates a hazardous situation that, if not avoided,
could cause severe personal injury or death.
CAUTION
Indicates a hazardous situation that, if not avoided,
may cause minor or moderate personal injury or
property damage.
Additional precautionary statements (“IMPORTANT” and
“NOTE”) are followed by specific instructions.
IMPORTANT: The word “IMPORTANT” is used to inform the reader of specific procedures where minor
machine damage will occur if the procedure is not followed.
NOTE: The word “NOTE” is used to communicate installation, operation, maintenance or servicing information that is important but not hazard related.
Important Safety Instructions
Save These Instructions
WARNING
To reduce the risk of fire, electric shock, serious injury or death to persons when using your dryer, follow these basic precautions:
W130
• Read all instructions before using the dryer.
• Install this dryer according to the INSTALLATION INSTRUCTIONS. Refer to the EARTH/GROUND INSTRUCTIONS in the INSTALLATION manual for the proper earth/
ground connection of the dryer. All connections for electrical
power, earth/ground and gas supply must comply with local
codes and be made by licensed personnel when required. Do
not do it yourself.
• Do not install or store the dryer where it will be exposed to
water and/or weather.
• Do not dry articles that have been previously cleaned in,
washed in, soaked in, or spotted with gasoline or machine
oils, vegetable or cooking oils, cleaning waxes or chemicals,
dry-cleaning solvents, thinner, anything containing chemicals
such as in mops and cleaning cloths, or other flammable or
explosive substances as they give off vapors that could ignite,
explode or cause fabric to catch on fire by itself.
• Items that have been soiled with substances such as cooking
oil, acetone, alcohol, petrol, kerosene, spot removers, turpentine, waxes and wax removers, should be washed in hot water
with an extra amount of detergent before being dried in the
tumble dryer.
• To reduce the risk of fire, DO NOT DRY plastics or articles
containing foam or latex rubber or similarly textured rubberlike materials, such as shower caps, water proof textiles, rubber-backed articles, and clothes or pillows filled with foam
rubber pads.
• Do not tumble fiberglass curtains and draperies unless the label says it can be done. If they are dried, wipe out the cylinder
with a damp cloth to remove particles of fiberglass.
• Do not allow children to play on or in the dryer. Close supervision of children is necessary when the dryer is used near
children. This appliance is not intended for use by persons
(including children) with reduced physical, sensory or mental
capabilities, or lack of experience and knowledge, unless they
have been given supervision or instruction concerning the use
of the appliance by a person responsible for their safety. This
is a safety rule for all appliances.
• Cleaning and user maintenance shall not be made by children
without supervision.
• Children less than three years should be kept away unless
continuously supervised.
• Do not reach into the dryer if the cylinder is revolving.
• Use the dryer only for its intended purpose, drying clothes.
ALWAYS follow the fabric care instructions supplied by the
garment manufacturer and only use the dryer drum to dry textiles that have been washed in water.
• Always read and follow manufacturer’s instructions on packages of laundry and cleaning aids. Heed all warnings or precautions. To reduce the risk of poisoning or chemical burns,
keep them out of reach of children at all times (preferably in a
locked cabinet).
• Remove laundry immediately after the dryer stops.
©
Copyright, Alliance Laundry Systems LLC -
DO NOT COPY or TRANSMIT
7 Part No. D516119ENR2

Safety Information
• DO NOT operate the dryer if it is smoking, grinding or has
missing or broken parts or removed guards and/or panels. DO
NOT tamper with the controls or bypass any safety devices.
• DO NOT operate individual units if they have been separated
from a stack unit.
• Dryer will not operate with the loading door open. DO NOT
bypass the door safety switch by permitting the dryer to operate with the door open. The dryer will stop tumbling when the
door is opened. Do not use the dryer if it does not stop tumbling when the door is opened or starts tumbling without
pressing the START mechanism. Remove the dryer from use
and call the service person.
• ALWAYS clean the lint filter after every load. A layer of lint
in the filter reduces drying efficiency and prolongs drying
time. Keep area around the exhaust opening and adjacent surrounding area free from the accumulation of lint, dust and
dirt. The interior of the dryer and the exhaust duct should be
cleaned periodically by qualified service personnel.
• Do not repair or replace any part of the dryer, or attempt any
servicing unless specifically recommended in the user-maintenance instructions or in published user-repair instructions that
you understand and have the skills to carry out. ALWAYS disconnect the electrical power to the dryer before attempting
service. Disconnect the power cord by grasping the plug, not
the cord.
• Electric Models: If supply cord is damaged, it must be replaced by a special cord or assembly available from the manufacturer or its service agent.
• Gas Models: If supply cord is damaged, it must be replaced
by the manufacturer, its service agent or similarly qualified
persons in order to avoid a hazard.
• Before the dryer is removed from service or discarded, remove the door to the drying compartment.
• Failure to install, maintain, and/or operate this machine according to the manufacturer’s instructions may result in conditions which can produce bodily injury and/or property damage.
NOTE: The WARNING and IMPORTANT SAFETY INSTRUCTIONS appearing in this manual are not meant
to cover all possible conditions and situations that may
occur. Observe and be aware of other labels and precautions that are located on the machine. They are intended to provide instruction for safe use of the machine. Common sense, caution and care must be exercised when installing, maintaining, or operating the
dryer.
Always contact your dealer, distributor, service agent or the manufacturer about any problems or conditions you do not understand.
©
Copyright, Alliance Laundry Systems LLC -
DO NOT COPY or TRANSMIT
8 Part No. D516119ENR2
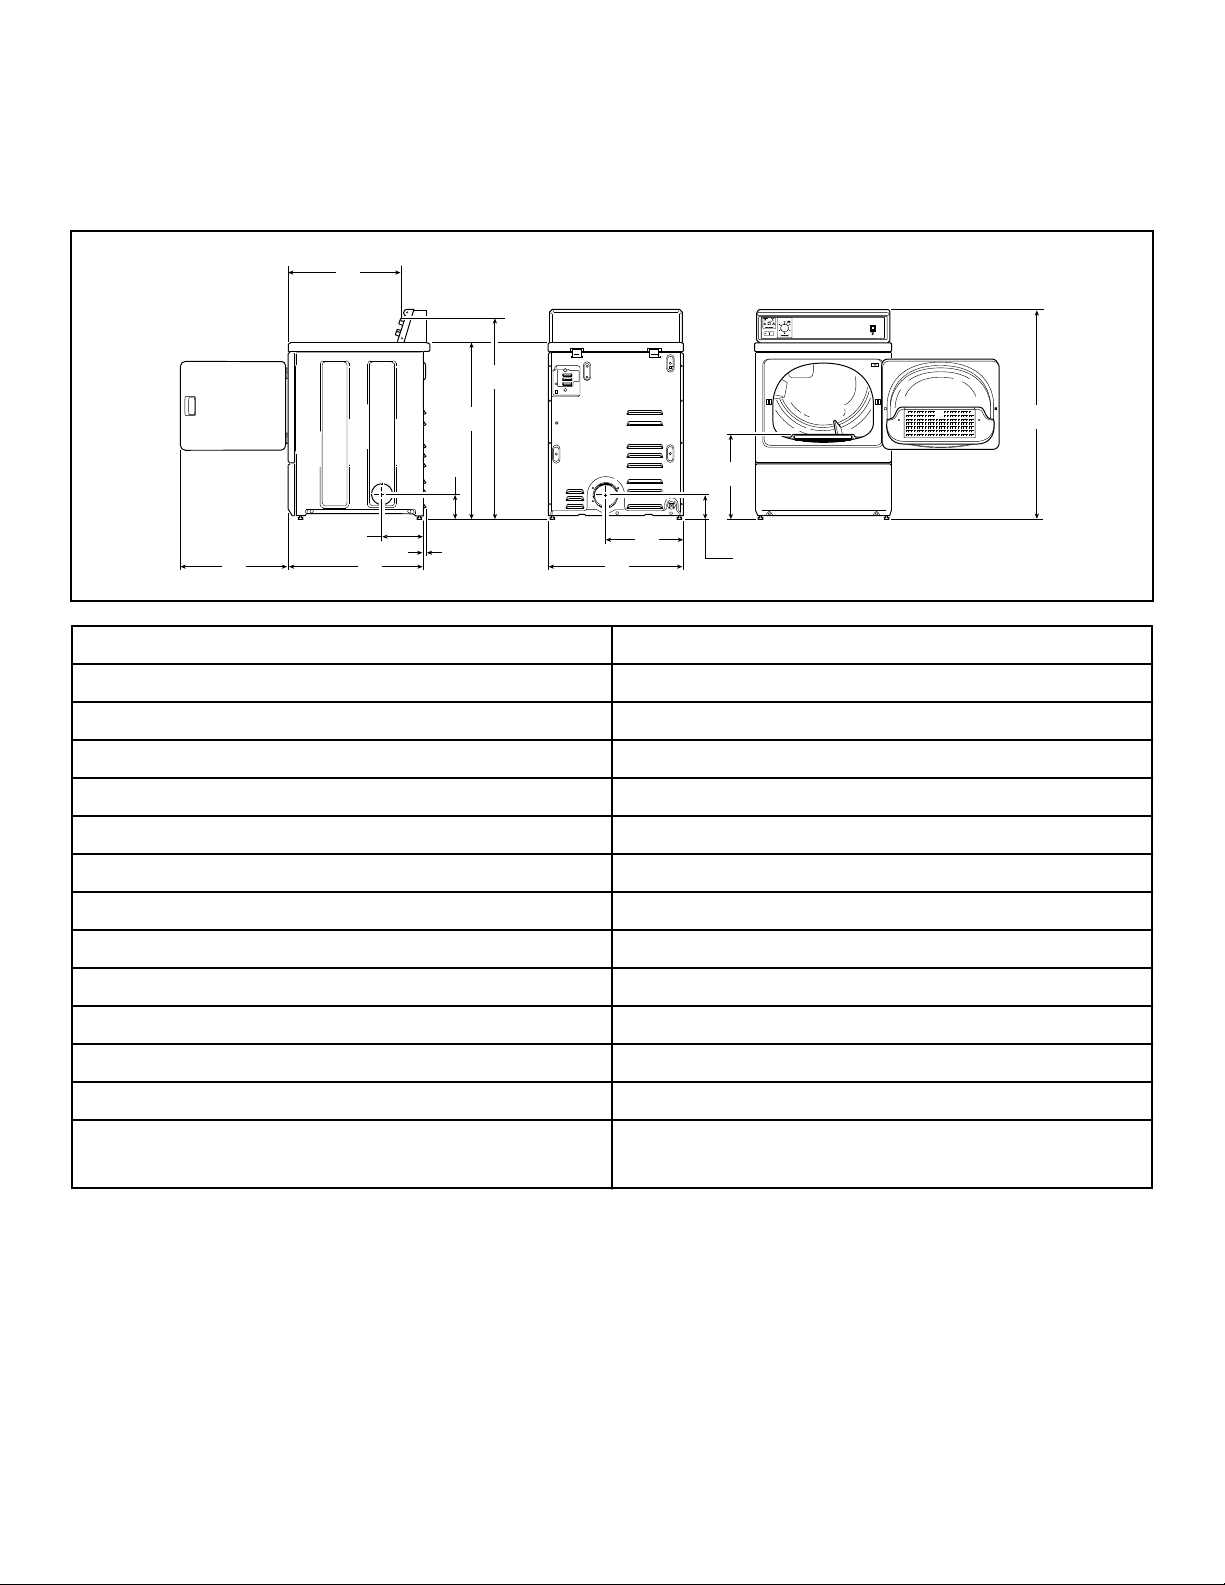
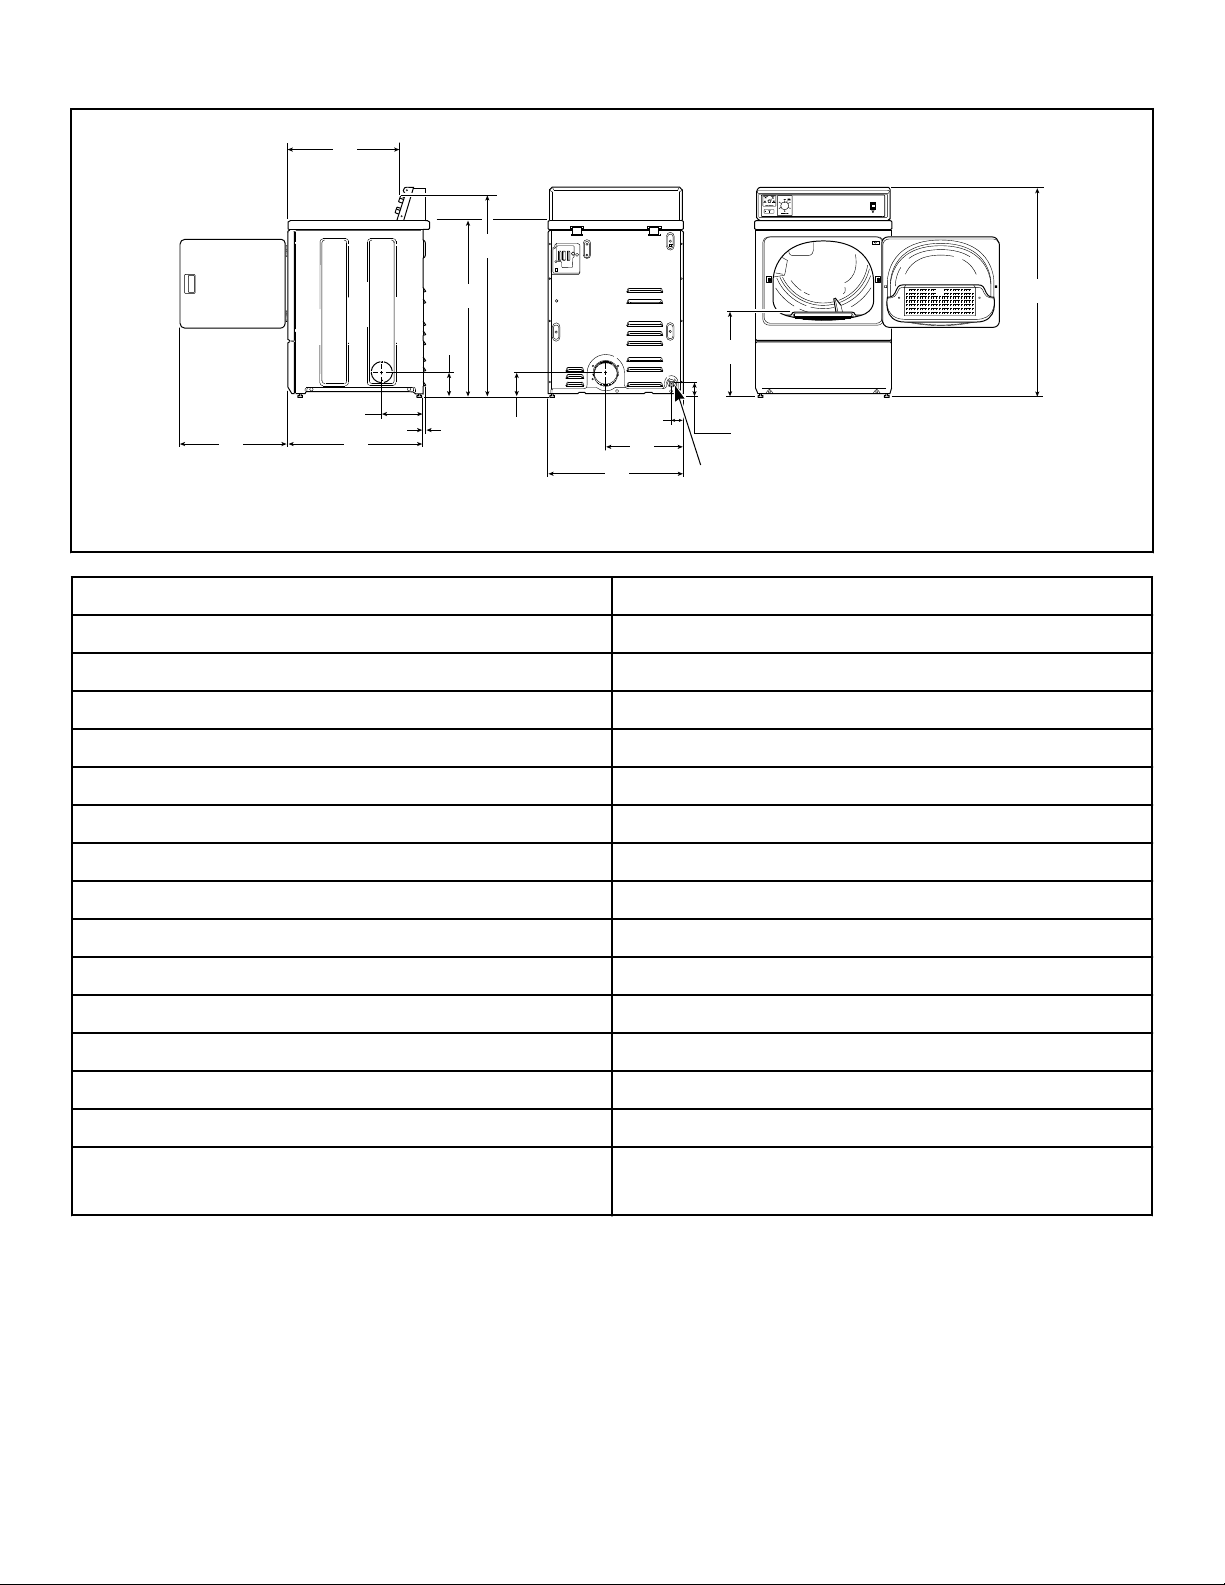
Dimensions
DRY2471N_SVG
M
L
K
J
I
H
G
F
E
D
C
B
A
Nonmetered Models
Electric Models
A 21.56 in. [548 mm]
Dimensions
B *4.5 in. [114 mm]
C *36 in. [914 mm]
D *40.19 in. [1020 mm]
E *15.44 in. [392 mm]
F *43 in. [1092 mm]
G 4.0 in. [102 mm]
H 15.4 in. [391 mm]
I 26.875 in. [683 mm]
J 0.4 in. [10 mm]
K 8 in. [203 mm]
L 28 in. [711 mm]
M 23.5 in. [597 mm]
NOTE: Exhaust openings are 4 inch [102 mm] metal
* With leveling legs turned into base.
ducting.
©
Copyright, Alliance Laundry Systems LLC -
DO NOT COPY or TRANSMIT
9 Part No. D516119ENR2
DRY2472N_SVG
O
N
M
L K
J
I
H
G
F
E
D
C
B
A
1
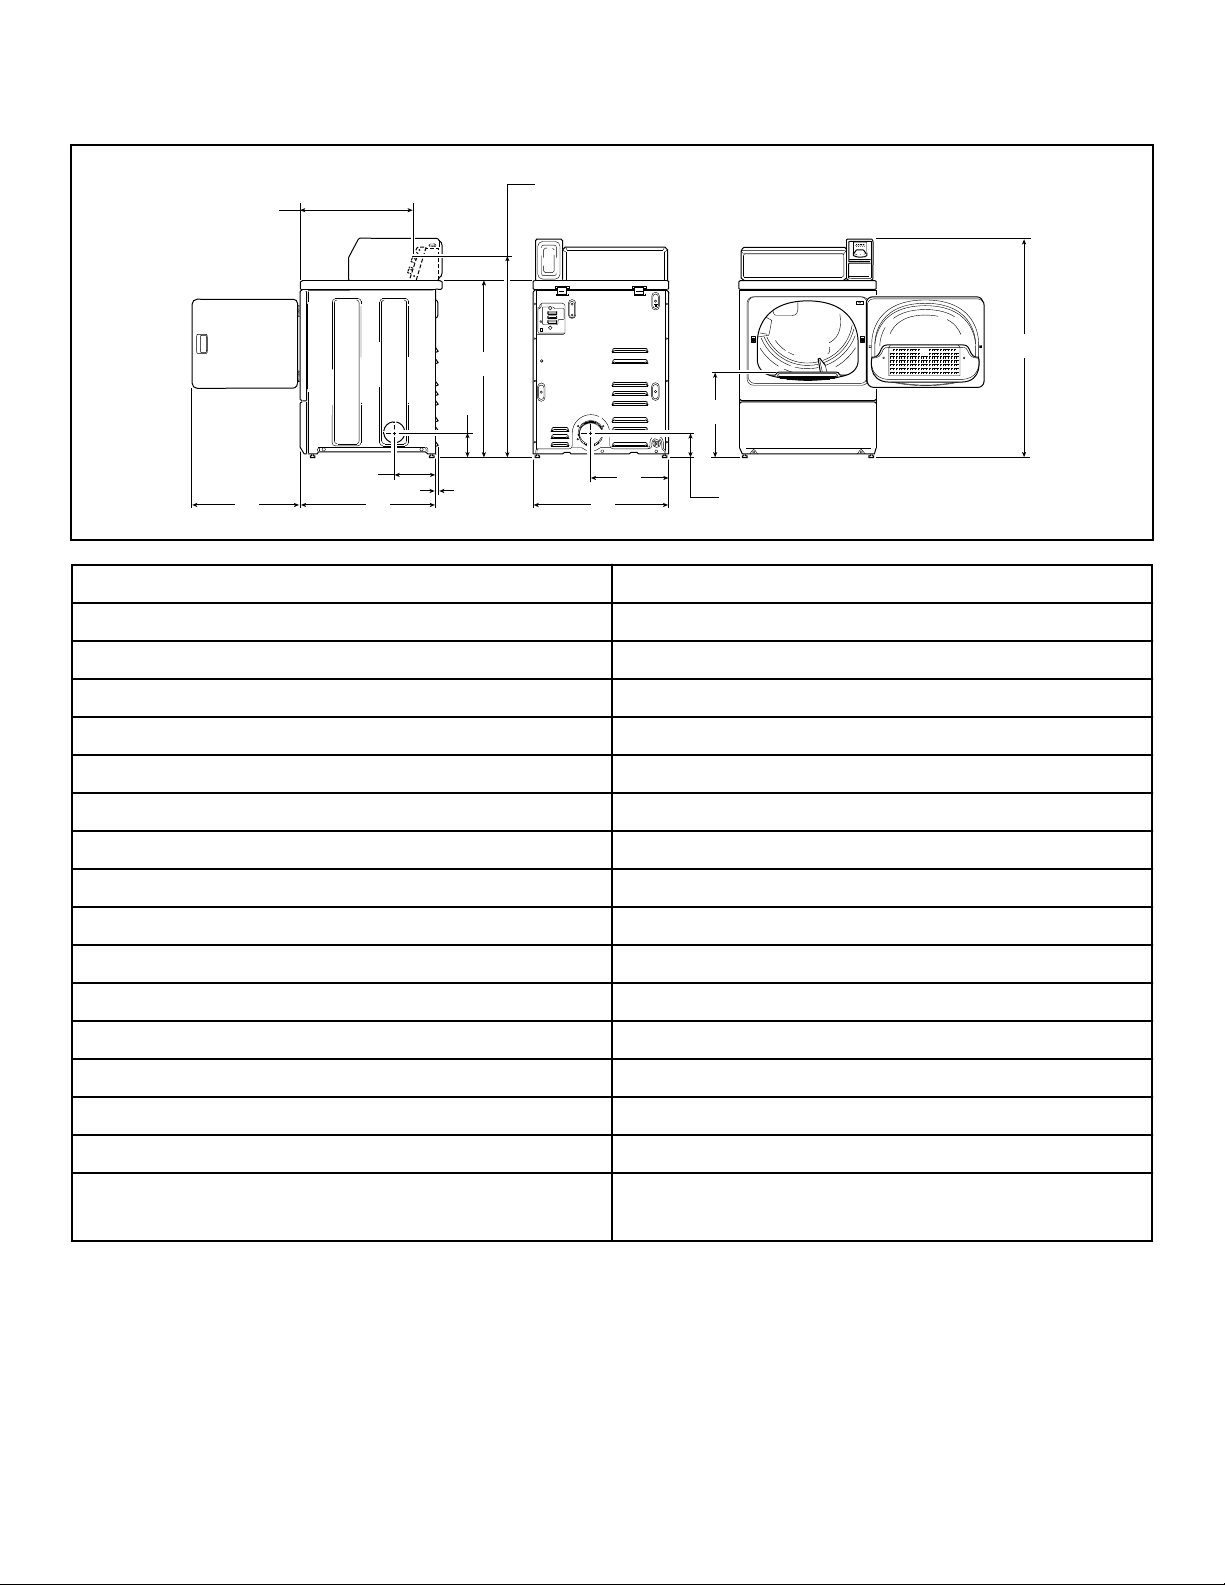
Dimensions
Gas Models
1. 3/8 in. N.P.T. Gas Connection
A 21.56 in. [548 mm]
B *4.5 in. [114 mm]
C *36 in. [914 mm]
D *40.19 in. [1020 mm]
E *15.44 in. [392 mm]
F *43 in. [1092 mm]
G *2.8 in. [70 mm]
H 2.3 in. [60 mm]
I 15.4 in. [391 mm]
J 26.875 in. [683 mm]
K 4 in. [102 mm]
L 0.4 in. [10 mm]
M 8 in. [203 mm]
N 28 in. [711 mm]
O 23.5 in. [597 mm]
NOTE: Exhaust openings are 4 inch [102 mm] metal
* With leveling legs turned into base.
ducting.
©
Copyright, Alliance Laundry Systems LLC -
DO NOT COPY or TRANSMIT
10 Part No. D516119ENR2
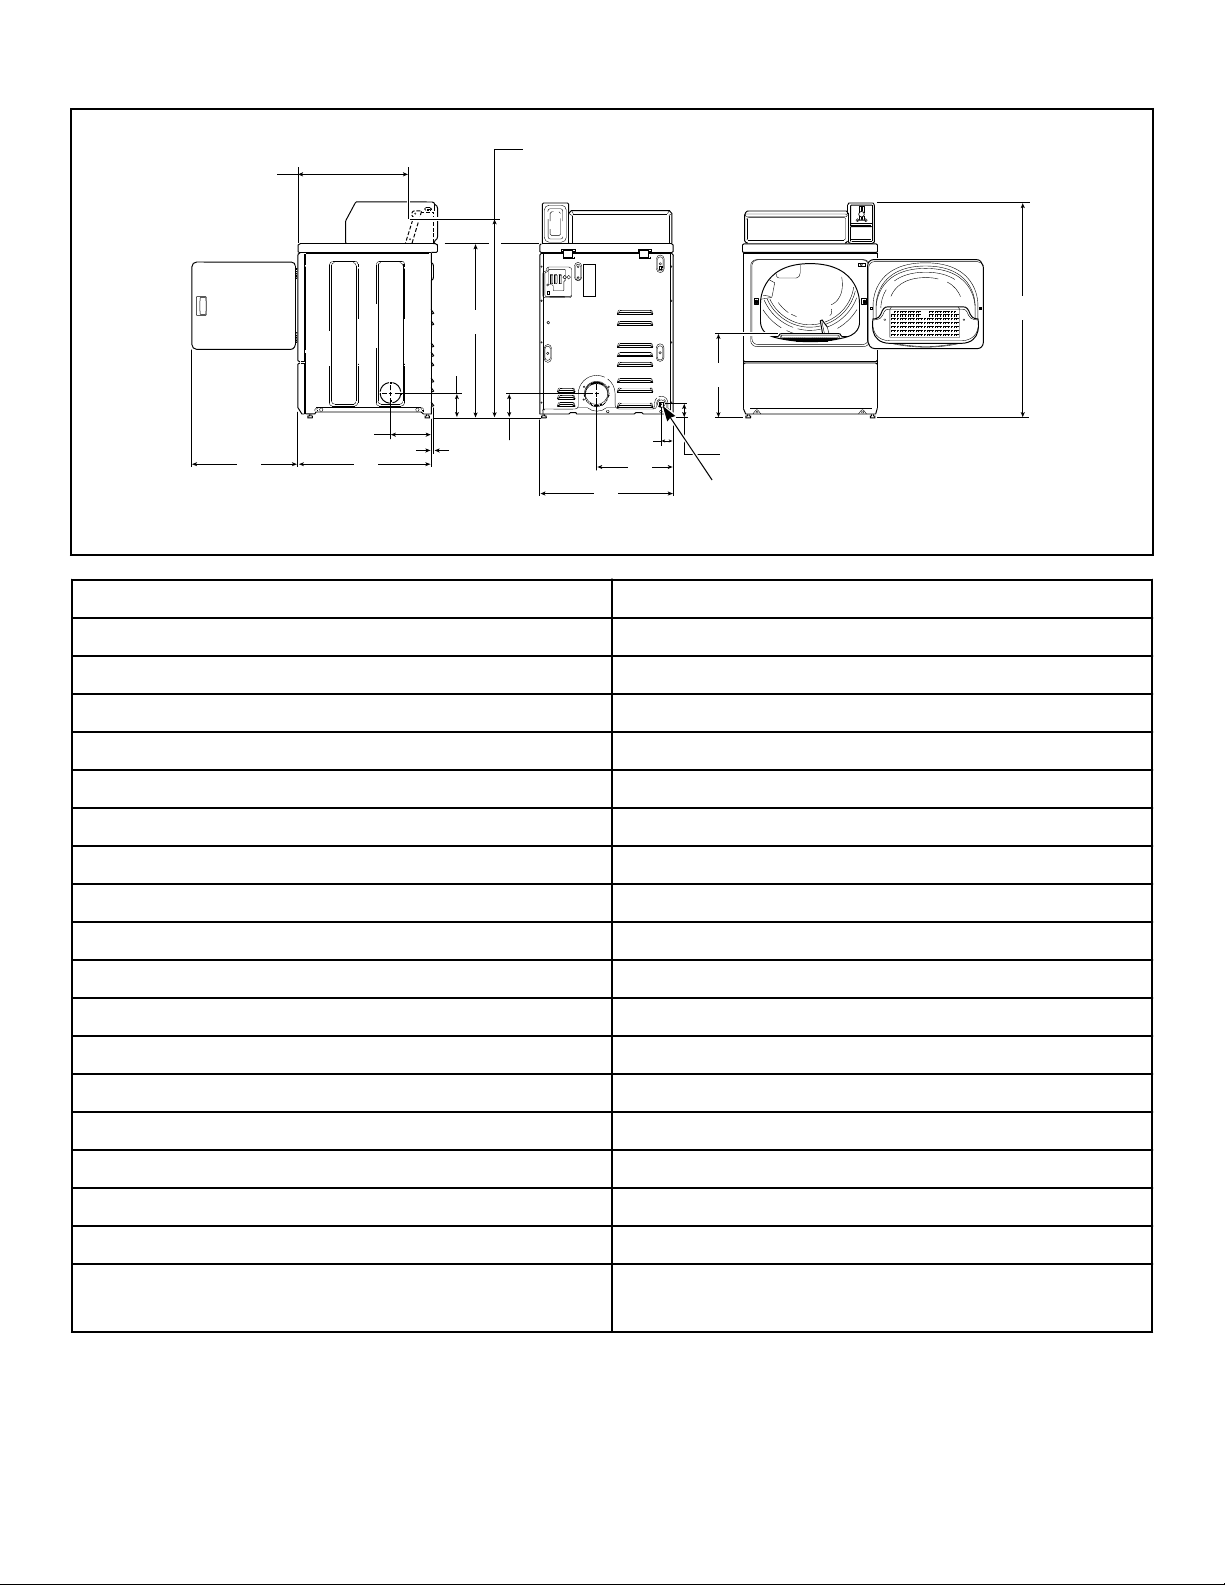
Metered Models
DRY2096N_SVG
M L
K
J
I
H
G
F
E
D
C
B
A
Electric Models
A - Coin Slide Models 21.56 in. [548 mm]
A - Electronic Control Models 22.06 in. [560 mm]
B - Coin Slide Models *40.19 in. [1020 mm]
Dimensions
B - Electronic Control Models 38.19 in. [970 mm]
C - Standard Capacity Metercase *43 in. [1092 mm]
C - High Capacity Metercase 43.875 in. [1114 mm]
D *15.44 in. [392 mm]
E 4.0 in. [102 mm]
F 15.4 in. [391 mm]
G 26.875 in. [683 mm]
H *36 in. [914 mm]
I *4.5 in. [114 mm]
J 0.4 in. [10 mm]
K 8.0 in. [203 mm]
L 28 in. [711 mm]
M 23.5 in. [597 mm]
NOTE: Exhaust openings are 4 inch [102 mm] metal
* With leveling legs turned into base.
ducting.
©
Copyright, Alliance Laundry Systems LLC -
DO NOT COPY or TRANSMIT
11 Part No. D516119ENR2
DRY2585N_SVG
K
N
M
L
G
F
E
D
J
B
A
C
H
O
I
1
Dimensions
Gas Models
1. 3/8 in. N.P.T. Gas Connection
A - Coin Slide Models 21.56 in. [548 mm]
A - Electronic Control Models 22.06 in. [560 mm]
B - Coin Slide Models *40.19 in. [1020 mm]
B - Electronic Control Models 38.19 in. [970 mm]
C - Standard Capacity Meter Case *43 in. [1092 mm]
C - High Capacity Meter Case *43.875 in. [1114 mm]
D *15.44 in. [392 mm]
E *2.8 in. [70 mm]
F 2.3 in. [60 mm]
G 15.4 in. [391 mm]
H 26.875 in. [683 mm]
I *4.0 in. [102 mm]
J *36 in. [914 mm]
K *4.5 in. [114 mm]
L 0.4 in. [10 mm]
M 8 in. [203 mm]
N 28 in. [711 mm]
O 23.5 in. [597 mm]
NOTE: Exhaust openings are 4 inch [102 mm] metal
* With leveling legs turned into base.
ducting.
NOTE: Gas models cannot be vented out left side of cabinet because of burner housing.
©
Copyright, Alliance Laundry Systems LLC -
DO NOT COPY or TRANSMIT
12 Part No. D516119ENR2

Dimensions
NOTE: The dryer should have sufficient clearance around it for needed ventilation and for the ease of installation
and servicing. For maximum drying performance, we recommend that more clearance be allowed around the dryer than the clearances that are listed thorughout this manual.
©
Copyright, Alliance Laundry Systems LLC -
DO NOT COPY or TRANSMIT
13 Part No. D516119ENR2
Installation
DRY2586N_SVG
8
7
6
5
4
3
2
1
FLW6R_SVG
1
Installation
Before You Start
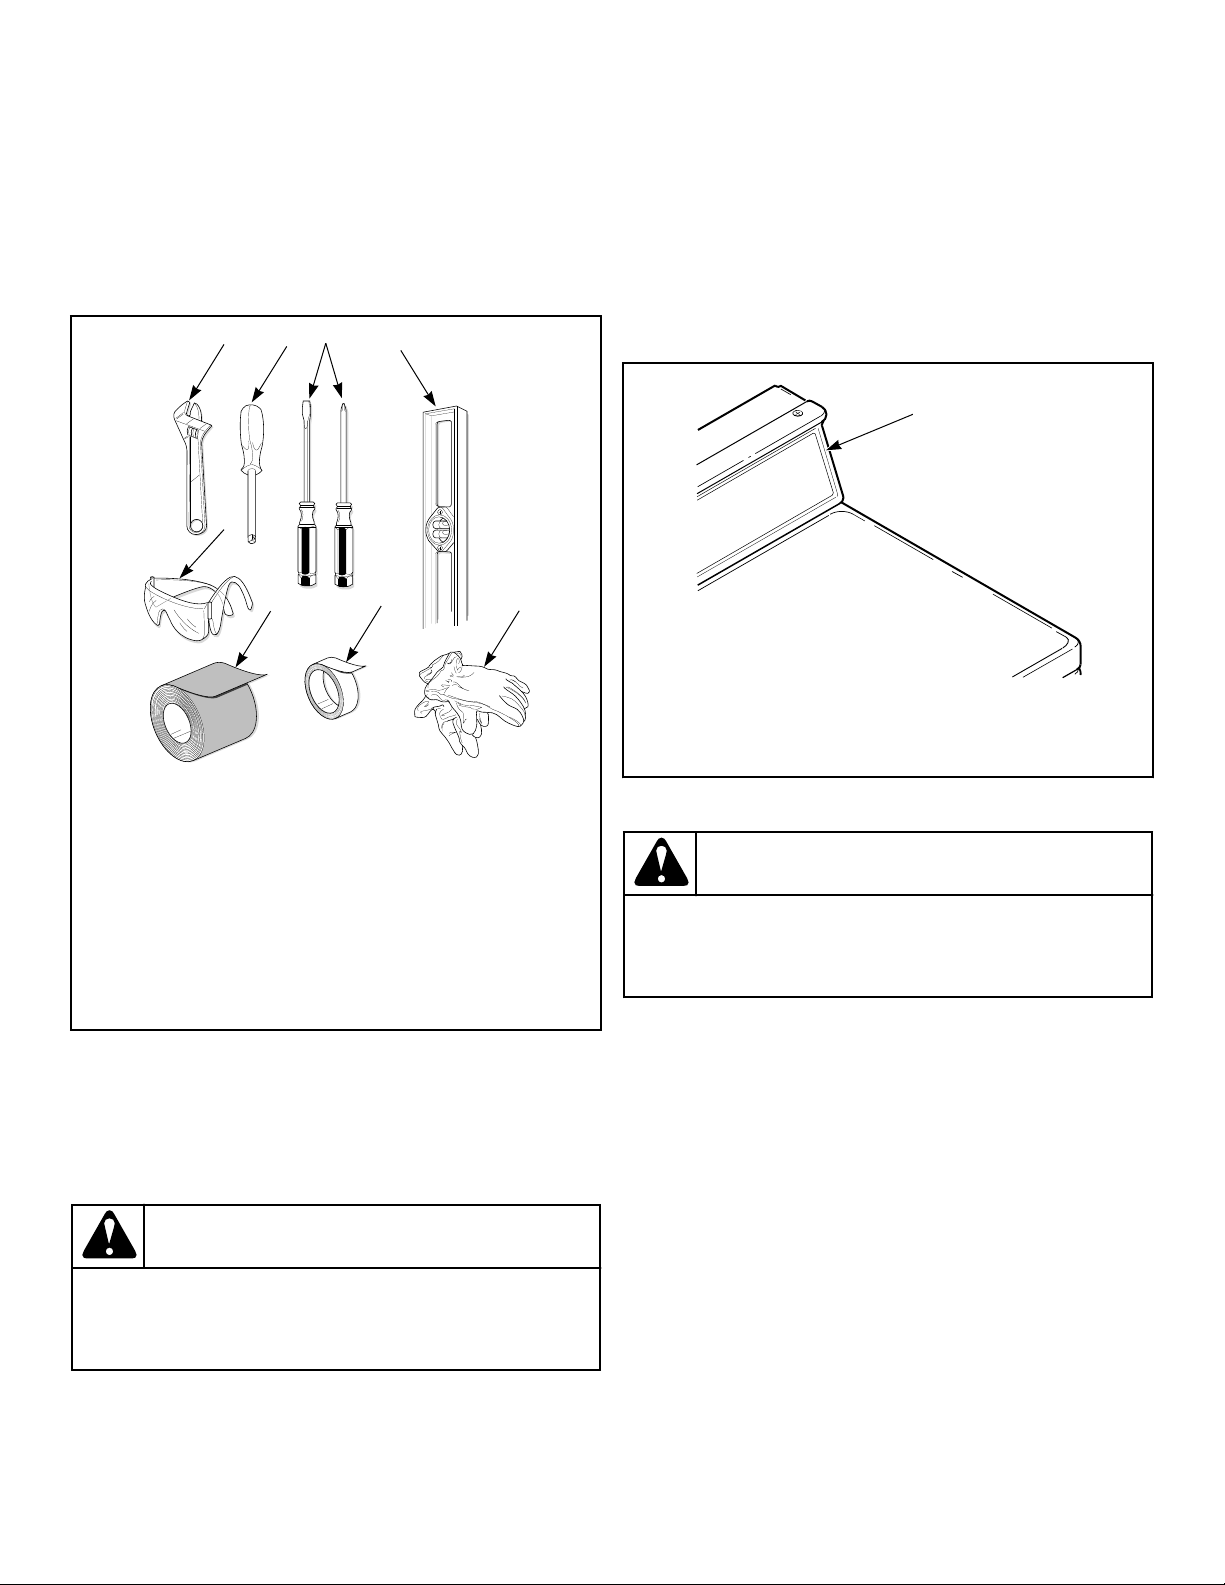
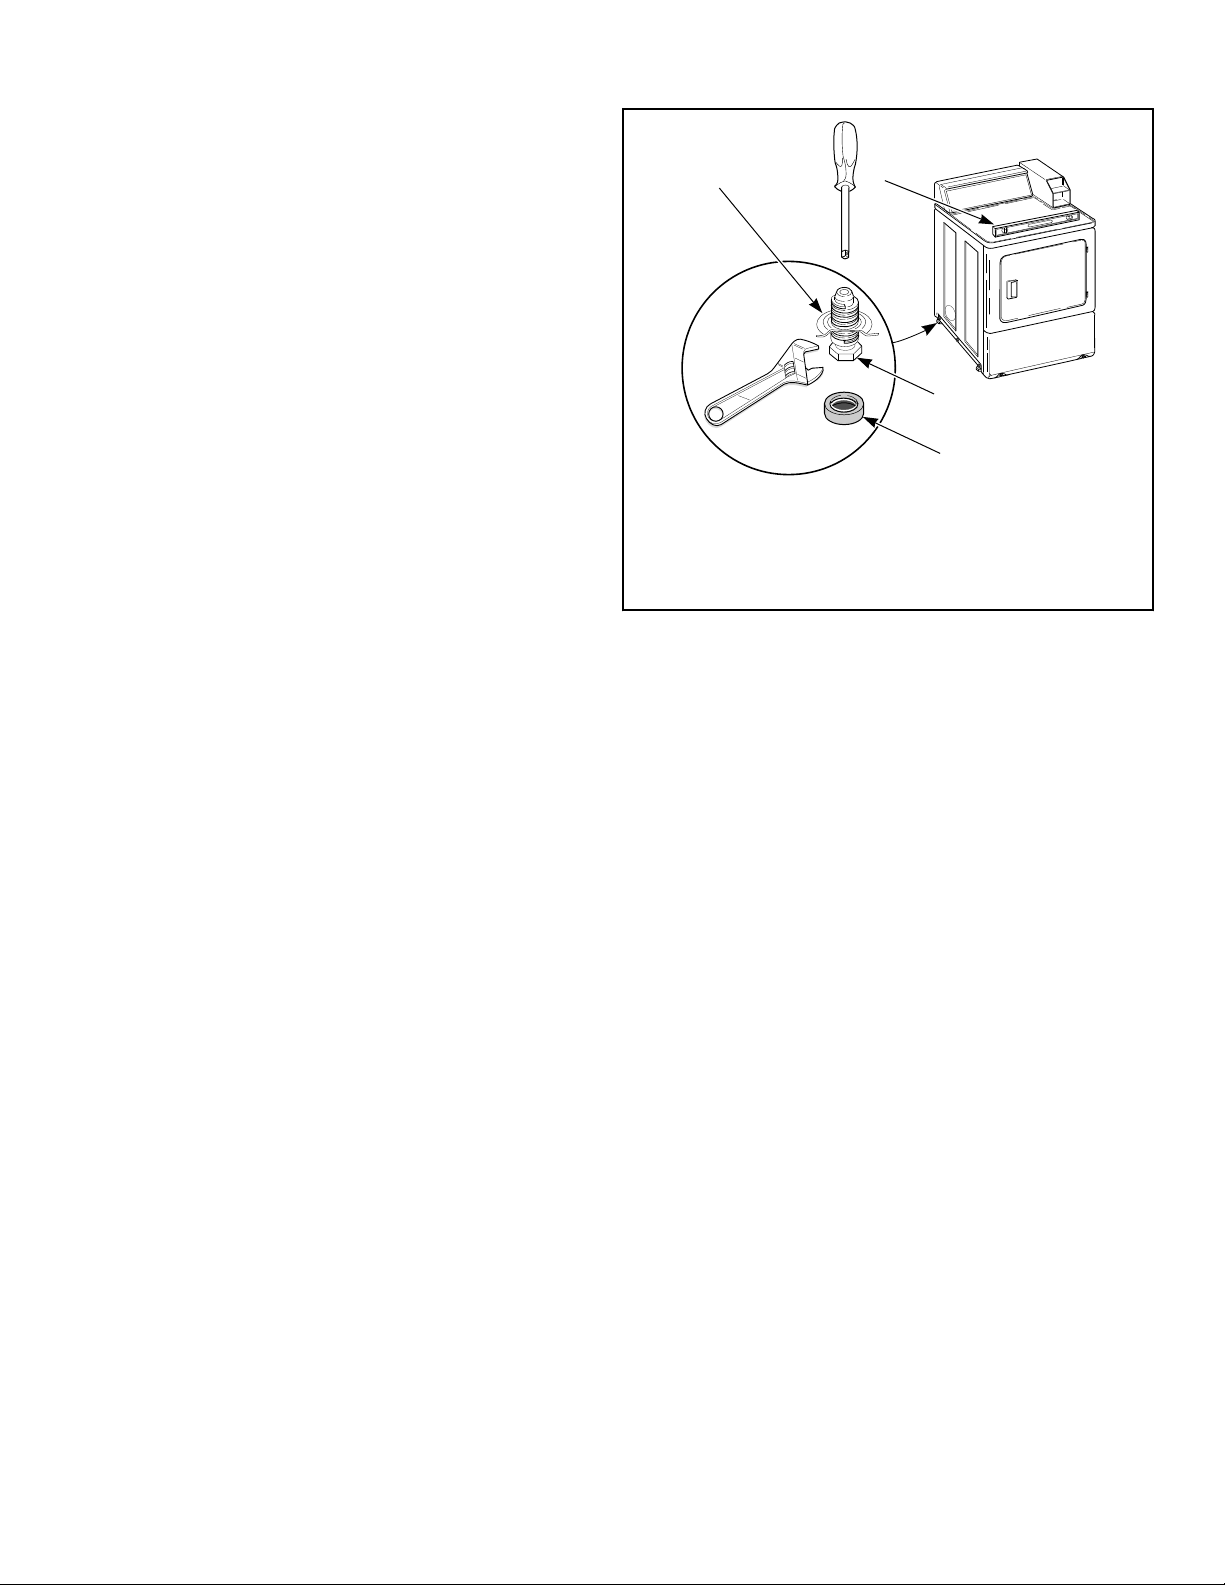
Tools
For most installations, the basic tools you will need are:
ized manual programming or vending, perform the following
steps.
1. Open service door. Refer to Figure 2 .
2. Locate diagnostic harness on electronic control.
3. Plug connectors for “white/black” wire and “red/blue” wire
together.
1. Service Door
1. Wrench
2. 1/4 inch Driver
3. Screwdrivers
4. Level
5. Gloves
6. Teflon Tape
7. Duct Tape
8. Safety Glasses
Figure 1
NOTE: An 8 in. [203 mm] coin drawer is required for
coin drop operated models.
NOTE: This appliance is suitable for use in countries
having a warm, damp climate.
WARNING
Any disassembly requiring the use of tools must be
performed by a suitably qualified service person.
W299
Figure 2
WARNING
Any disassembly requiring the use of tools must be
performed by a suitably qualified service person.
W299
Order of Installation Steps
1. Position and level the dryer.
2. Connect dryer to exhaust system.
3. For gas models only, connect the gas supply pipe. Check for
gas leaks.
4. For electric models only, connect the electrical cord.
5. Reverse the door, if desired.
6. Wipe out the inside of the dryer.
7. Plug in the dryer.
8. Recheck steps.
9. Start and run the dryer in a heat setting to verify dryer is heating.
Card Reader Models
The machine is shipped from the factory with the Electronic Control Diagnostic Harness Assembly unplugged. To avoid unauthor-
©
Copyright, Alliance Laundry Systems LLC -
DO NOT COPY or TRANSMIT
14 Part No. D516119ENR2
Position and Level the Dryer
DRY2607N_SVG
4
3
2
1
1. Install dryer before washer. This allows room for attaching
exhaust duct.
2. Install the four rubber feet (in accessories bag).
3. Select a location with a solid floor. Dryers installed in residential garages must be elevated 18 inches [457 mm] above
the floor.
No other fuel burning appliance should be installed in the same
closet with the dryer.
The dryer must not be installed or stored in an area where it will
be exposed to water and/or weather.
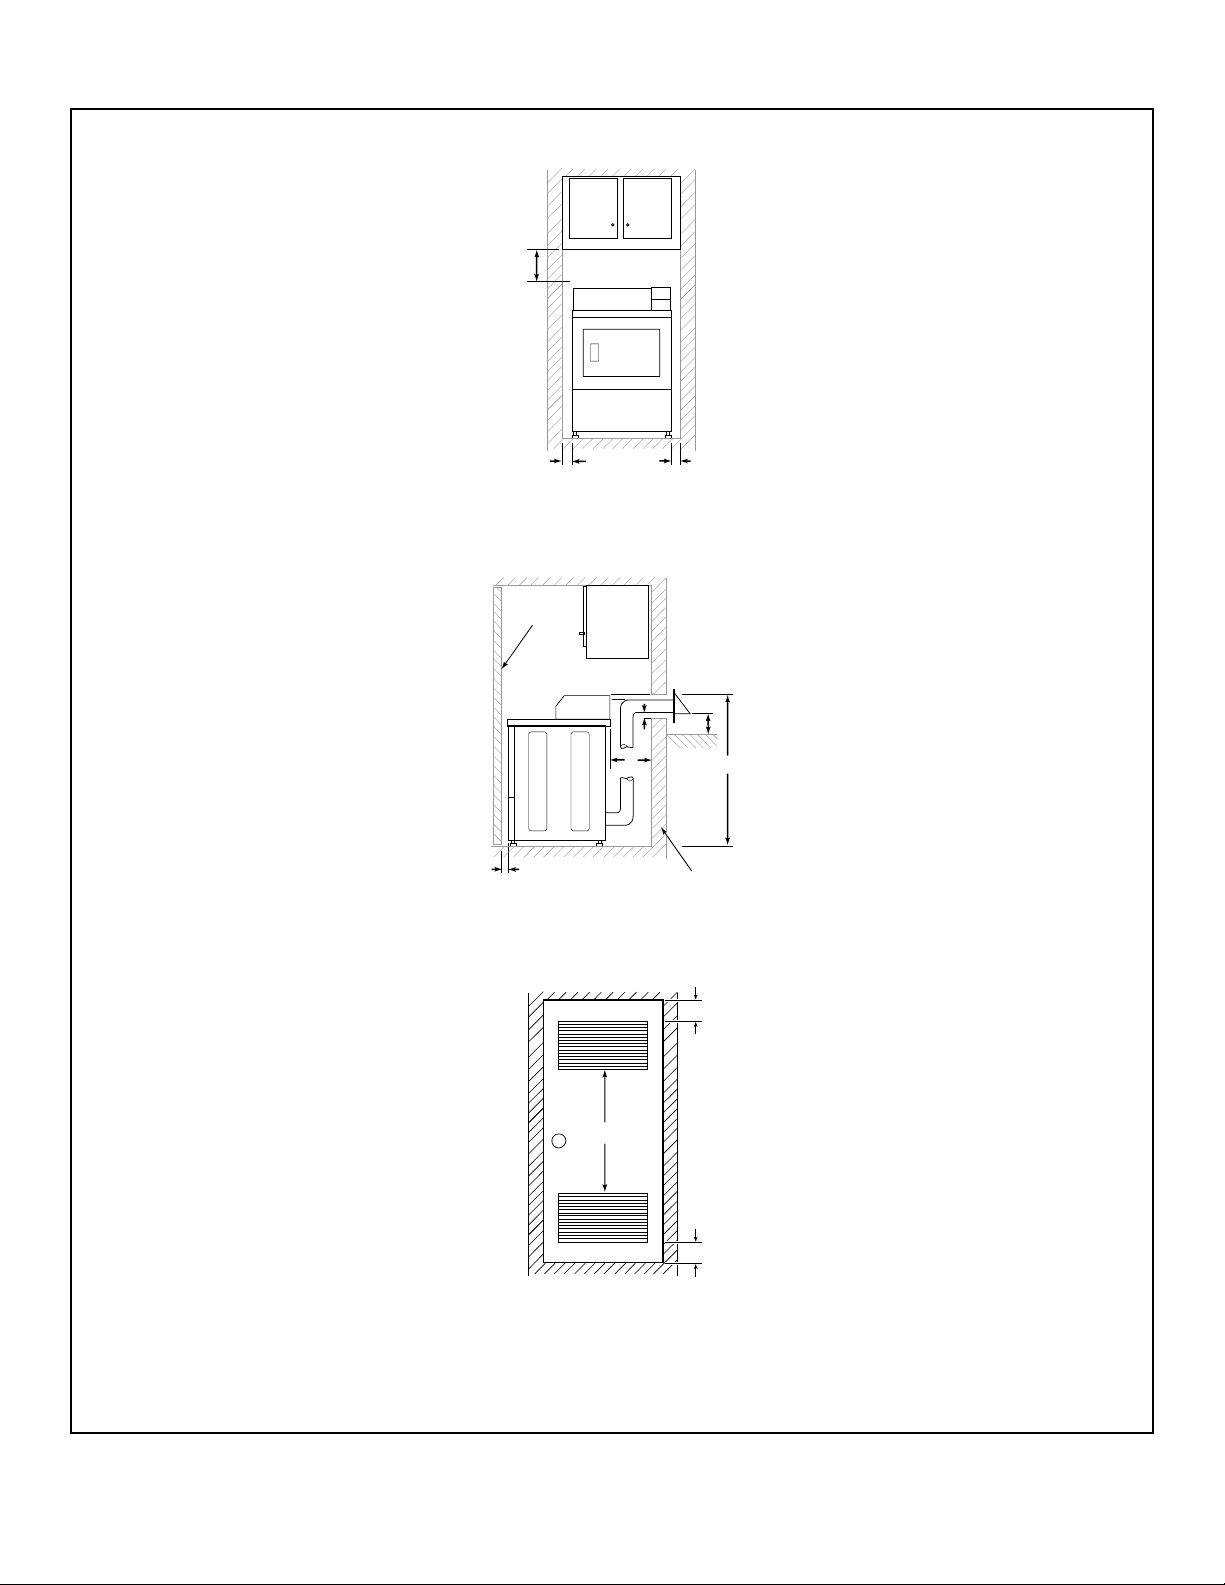
The dryer needs sufficient clearance and an adequate air supply
for proper operation and ventilation, and for easier installation
and servicing. (Minimum clearances are shown in Figure 4 ).
4. Place the dryer in position, and adjust the legs until the dryer
is level from side to side and front to back. Leveling legs can
be adjusted from inside the dryer with a 1/4 in. driver.
5. All four legs must rest firmly on the floor so the weight of the
dryer is evenly distributed. The dryer must not rock.
Installation
1. Dryer Base
2. Level
3. Leveling Leg
4. Rubber Foot
Figure 3
©
Copyright, Alliance Laundry Systems LLC -
DO NOT COPY or TRANSMIT
15 Part No. D516119ENR2
DRY2651N_SVG
B
A A
DRY2652N_SVG
E
H
D
A
C
3
1
DRY2637N_SVG
F
F
2 (G)
Installation
Front View (Without Closet Door)
Side View (Closet Door)
Front View (Closet Door)
1. Closet Door
2. Centered Air Openings (G) (2 Openings minimum)
3. Outer Wall of Enclosure
Figure 4
©
Copyright, Alliance Laundry Systems LLC -
DO NOT COPY or TRANSMIT
16 Part No. D516119ENR2
Loading...