

Page 1

Autofocus Webcam
Instructions
SL-6846-SBK
Page 2
2
DE
DK
IT
ES
FR
EN
Wichtig!
Bevor Sie dieses Produkt verwenden, lesen Sie bitte die Sicherheits-
und Warnhinweise im Handbuch.
Bewahren Sie dieses Handbuch auf, um zu einem
späteren Zeitpunkt darauf zurückgreifen zu können.
Haftungsausschluss
Die Jöllenbeck GmbH übernimmt keine Haftung
für Schäden am Produkt oder Verletzungen von
Personen aufgrund von unachtsamer, unsachgemäßer, falscher oder dem Herstellerzweck nicht
entsprechender Verwendung des Produkts.
Fehlerbeseitigung/Reparatur
Versuchen Sie nicht, das Gerät selbst zu warten
oder zu reparieren. Überlassen Sie jegliche Reparatur dem zuständigen Fachpersonal. Nehmen
Sie keine Veränderungen am Gerät vor. Dadurch
verlieren Sie jegliche Garantieansprüche.
Feuchtigkeit/Wärmequellen
Verwenden Sie das Gerät nicht in der Nähe von
Wasser (z. B. Waschbecken, Badewannen etc.),
und halten Sie es von Feuchtigkeit, tropfenden
oder spritzenden Flüssigkeiten sowie Regen fern.
Setzen Sie das Gerät keinen hohen Temperaturen,
hoher Luftfeuchtigkeit oder direktem Sonnenlicht
aus.
Reinigung
Verwenden Sie zum Reinigen des Gerätes bitte ein
weiches, trockenes Tuch. Lassen Sie das Gerät
nie mit Benzol, Verdünner oder anderen Chemikalien in Berührung kommen.
Bestimmungsgemäßer Gebrauch
Dieses Gerät dient allein der Übertragung von
bewegten und unbewegten Bildern an einem
handelsüblichen Computer. Das Gerät darf nur mit
den dafür vorgesehenen Originalteilen verwendet
werden. Das Produkt darf nur in geschlossenen
und trockenen Räumen verwendet werden. Die
bestimmungsgemäße Verwendung beinhaltet das
Vorgehen gemäß der Installationsanleitung.
CE-Konformität
Dieses Produkt entspricht den relevanten CERIchtlinien der Europäischen Union. Unter http://
www.speed-link.com können Sie die gesamte
Konformitätserklärung anfordern.
Page 3
3
DE
DK
IT
ES
FR
EN
Entsorgung
Die Kennzeichnung auf dem Produkt bzw. auf der
dazugehörigen Literatur gibt an, dass es nach
seiner Lebensdauer nicht zusammen mit dem
normalen Haushaltsmüll entsorgt werden darf. Entsorgen Sie dieses Gerät bitte getrennt von anderen
Abfällen, um der Umwelt bzw. der menschlichen
Gesundheit nicht durch unkontrollierte
Müllbeseitigung zu schaden.
Recyceln Sie das Gerät, um die nach-
haltige Wiederverwertung von stofflichen
Ressourcen zu fördern.
Private Nutzer sollten den Händler, bei dem das
Produkt gekauft wurde, oder die zuständigen
Behörden kontaktieren, um in Erfahrung zu bringen,
wie sie das Gerät auf umweltfreundliche Weise
recyceln können.
Gewerbliche Nutzer sollten sich an Ihren
Lieferanten wenden und die Bedingungen des
Verkaufsvertrags konsultieren. Dieses Produkt
darf nicht zusammen mit anderem Gewerbemüll
entsorgt werden.
Software
Die Jöllenbeck GmbH behält die vollen Eigentumsrechte an der mitgelieferten Software. Direkte
oder indirekte Veränderung, dekompilierung oder
Rückentwicklung der Software ist nicht gestattet.
Jegliche Vervielfältigung und Weitergabe der
Software an Dritte ist nicht gestattet.
Garantie
Auf dieses Produkt gewährleisten wir eine Herstellergarantie von 2 (zwei) Jahren auf Verarbeitung
und alle eingebauten Teile.
Technischer Support
Bei Fragen oder Problemen steht Ihnen unser
Technischer Support per E-Mail zur Verfügung:
E-Mail: support@speed-link.com
Page 4
4
DE
DK
IT
ES
FR
EN
1
6
5
432
Page 5

5
DE
DK
IT
ES
FR
EN
Lieferumfang
• Autofocus Webcam
• Software-CD
• Bedienungsanleitung
Systemvoraussetzungen
• Pentium VI Prozessor oder höher
• Windows XP mit SP2 oder Windows Vista
• CD-ROM-Laufwerk
• 256 MB Arbeitsspeicher
• freie USB 2.0 Schnittstelle
• 500 MB freier Festplattenspeicher für Software
• Internetverbindung für Videochats
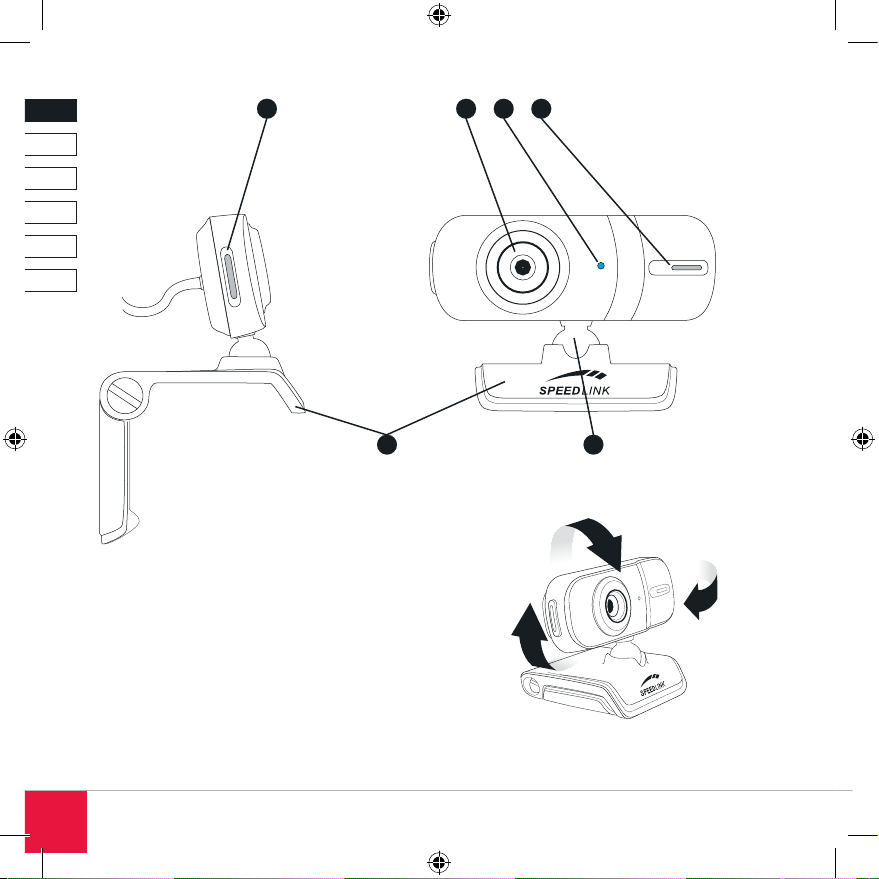
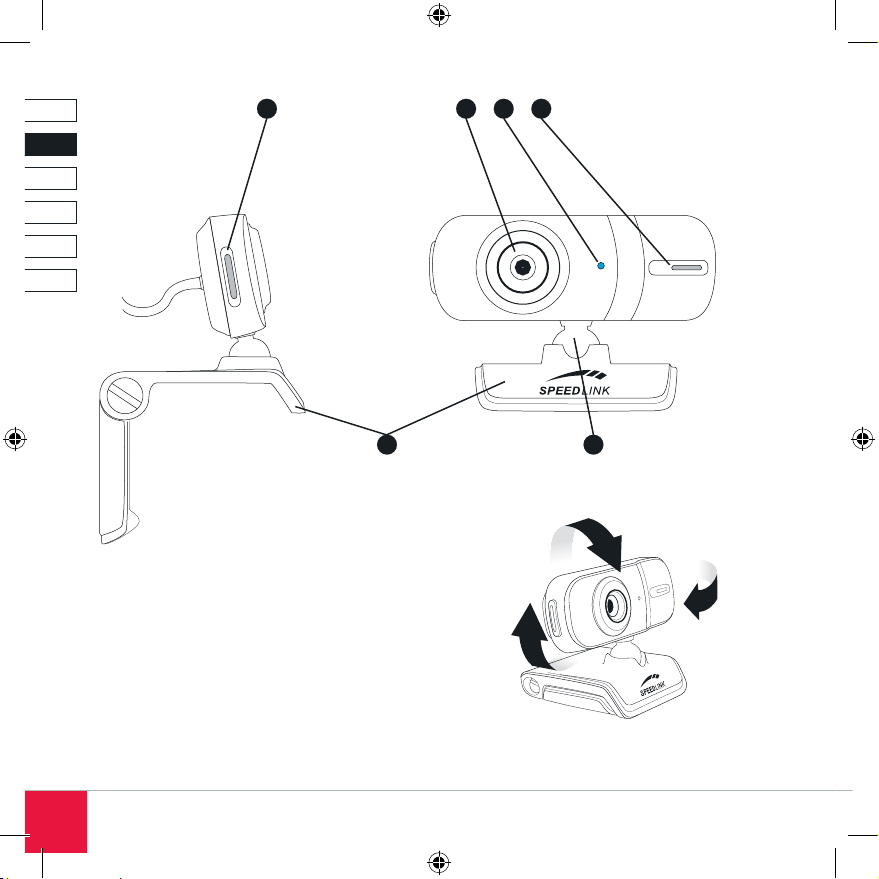
Bedienelemente
(1) Autofokuslinse
(2) Status-LED
(3) Mikrofon
(4) Schnappschusstaste
(5) Drehgelenk
(6) Klammer
Anschließen der Webcam
u Befestigen Sie die Webcam mit Hilfe der
Klammer (6) am Rahmen Ihres TFT-Monitors
oder Notebookbildschirms oder stellen Sie die
Webcam auf Ihren Schreibtisch.
u Verbinden Sie den USB-Stecker mit einer freien
USB-Schnittstelle Ihres Notebooks.
HINWEIS: Die Webcam benötigt eine USB
2.0 Schnittstelle, damit die volle Funktionalität
gewährleistet werden kann. Schließen Sie die
Webcam daher nicht an USB 1.1 Schnittstellen
oder Hubs an.
Wenn Sie die Webcam an einen USB 2.0 Hub
anschließen, sollte dieser über eine zusätzliche
Stromversorgung verfügen.
Windows erkennt automatisch, dass ein neues
Gerät angeschlossen wurde und installiert die
notwendigen Treiber selbstständig. Sie müssen
keine zusätzlichen Treiber installieren.
Bilder erstellen unter Windows
u Klicken Sie auf „Arbeitsplatz“ und doppelklicken
Sie auf „USB-Videogerät“. Nachdem das Gerät
initialisiert wurde, sehen Sie nun Live-Bilder der
Webcam.
u Um ein Bild aufzunehmen, klicken Sie auf
„Neues Bild aufnehmen“ oben links im Fenster.
Das aufgenommene Bild erscheint nun unten in
der Dateileiste als Miniaturvorschau. Dieses Bild
können Sie nun Kopieren und in ein Verzeichnis
Ihrer Wahl einfügen.
Installieren der Foto- und Videosoftware
Auf der mitgelieferten CD befindet sich Software
zur Aufnahme und Bearbeitung von Fotos und
Videos. Um diese Software zu installieren,
legen Sie die CD in Ihr CD-ROM-Laufwerk. Das
Installationsmenü sollte automatisch starten. Sollte
dies nicht der Fall sein, öffnen Sie den Windows
Explorer, doppelklicken Sie auf das Symbol Ihres
CD-ROM-Laufwerks und doppelklicken Sie auf die
Datei setup.exe.
Page 6
6
DE
DK
IT
ES
FR
EN
Installation von Webcam Companion
u Klicken Sie im Installationsmenü auf die
Schaltfläche „Webcam Companion“.
u Wählen Sie die Sprache aus und klicken Sie
auf „Weiter“.
u Lesen Sie sich die Lizenzvereinbarung durch.
Durch klicken auf „Ja“ stimmen Sie zu. Wenn
Sie nicht zustimmen möchten, klicken Sie
auf „Nein“. Die Installation wird dann nicht
ausgeführt.
u Wählen Sie ein Verzeichnis, in das „Webcam
Companion“ installiert werden soll. Sie
können durch Klicken auf die Schaltfläche
„Durchsuchen“ ein eigenes Verzeichnis
auswählen.
u Wählen Sie einen Programmordner für das
Startmenü und klicken Sie auf „Weiter“.
Das Programm wird nun auf Ihrem Computer
installiert.
u Klicken Sie auf „Fertigstellen“, um die Installation
abzuschließen.
Verwenden von Webcam Companion
Mit dem Webcam Companion können Sie Fotos
oder Videos erstellen, speichern und bearbeiten
oder eine Überwachung mit Bewegungsmelder
starten. Näheres zur Bedienung des Programms
finden Sie in der Hilfefunktion.
u Starten Sie den Webcam Companion.
u Klicken Sie in der Menüleiste auf Hilfe |
Anwendungs-Hilfe oder drücken Sie F1.
Installation von Arcsoft PhotoImpression
u Klicken Sie im Installationsmenü auf die
Schaltfläche „Arcsoft PhotoImpression“.
u Wählen Sie die Sprache aus und klicken Sie
auf „Weiter“.
u Lesen Sie sich die Lizenzvereinbarung durch.
Durch klicken auf „Ja“ stimmen Sie zu. Wenn
Sie nicht zustimmen möchten, klicken Sie
auf „Nein“. Die Installation wird dann nicht
ausgeführt.
u Wählen Sie ein Verzeichnis, in das „Arcsoft
PhotoImpression“ installiert werden soll. Sie
können durch Klicken auf die Schaltfläche
„Durchsuchen“ ein eigenes Verzeichnis
auswählen.
u Wählen Sie einen Programmordner für das
Startmenü und klicken Sie auf „Weiter“.
Das Programm wird nun auf Ihrem Computer
installiert.
u Klicken Sie auf „Fertigstellen“, um die Installation
abzuschließen.
Verwenden von Arcsoft PhotoImpression
Mit Arcsoft PhotoImpression können Sie aufgenommene Fotos nachbearbeiten. Näheres zur
Bedienung des Programms finden Sie in der
Hilfefunktion.
Page 7
7
DE
DK
IT
ES
FR
EN
u Starten Sie Arcsoft PhotoImpression.
u Klicken Sie in der Menüleiste auf Hilfe | Hilfe
oder drücken Sie F1.
Installation von Arcsoft VideoImpression
u Klicken Sie im Installationsmenü auf die
Schaltfläche „Arcsoft VideoImpression“.
u Wählen Sie die Sprache aus und klicken Sie
auf „Weiter“.
u Lesen Sie sich die Lizenzvereinbarung durch.
Durch klicken auf „Ja“ stimmen Sie zu. Wenn
Sie nicht zustimmen möchten, klicken Sie
auf „Nein“. Die Installation wird dann nicht
ausgeführt.
u Wählen Sie ein Verzeichnis, in das „Arcsoft
VideoImpression“ installiert werden soll. Sie
können durch Klicken auf die Schaltfläche
„Durchsuchen“ ein eigenes Verzeichnis
auswählen.
u Wählen Sie einen Programmordner für das
Startmenü und klicken Sie auf „Weiter“.
Das Programm wird nun auf Ihrem Computer
installiert.
u Klicken Sie auf „Fertigstellen“, um die Installation
abzuschließen.
Verwenden von Arcsoft VideoImpression
Mit Arcsoft VideoImpression können Sie Videos
erstellen und Einblendeffekte, Text und Sprache in
das Video integrieren. Näheres zur Bedienung des
Programms finden Sie in der Hilfefunktion.
u Starten Sie Arcsoft VideoImpression.
u Klicken Sie in der Menüleiste auf Hilfe | Hilfe
oder drücken Sie F1.
Deinstallation der Programme
Öffnen Sie die Systemsteuerung und doppelklicken
Sie auf „Software“ (unter Windows Vista
„Programme und Funktionen“). Klicken Sie auf das
Programm, das Sie deinstallieren möchten und
klicken Sie anschließend auf „Deinstallieren“.
Problembehebung
Wenn Ihre Kamera nicht erkannt wird, verbinden
Sie die Kamera erneut und versuchen es
gegebenenfalls an einem anderen USB-Anschluss.
Stellen Sie sicher, dass die Kamera nicht an
einem USB-Hub ohne eigene Stromversorgung
angeschlossen ist.
Sollte Ihr Messenger-Programm die Kamera nicht
anzeigen, stellen Sie sicher, dass Sie die Kamera
als Videoquelle angegeben haben. Gehen Sie
dazu in die Optionen des Messenger-Programms
und stellen Sie als Videoquelle „USB-Videogerät“
ein.
Page 8
DE
DK
IT
ES
FR
EN
8
Important!
Before using this product please
read all the safety and warning
notices given in the manual. Please
also keep this manual in a handy place for future
reference.
Disclaimer of Liability
Jöllenbeck GmbH accepts no liability whatsoever
for any product deficiencies or injuries caused to
people due to careless, improper or incorrect use
of the product or use of the product for purposes
not recommended by the manufacturer.
Troubleshooting/Repairs
Do not attempt to service or repair the product
yourself; leave any repairs to qualified personnel.
Do not attempt to modify the product in any way as
doing so will invalidate the warranty.
Moisture/Heat
Do not use the product near water (e.g. sinks, bath
tubs etc.), and keep it away from damp conditions;
areas where liquids are likely to drip, splash or
be sprayed; as well as rain. Do not expose the
product to high temperatures, high humidity or
direct sunlight.
Cleaning
Use a soft, dry cloth to clean the product. Do not
allow the product to come into contact with benzene, paint thinners or other such chemicals.
Intended Use
This product is intended solely for transmitting
moving and static images on a standard computer.
The product must only be used in conjunction with
the original parts intended for it. The product must
only be used in dry, interior rooms. Intended use
includes adherence to the specified installation
instructions.
CE Conformity
This product meets the relevant CE guidelines of
the European Union. You can request a copy of the
conformity declaration in its entirety at http://www.
speed-link.com.
Page 9
DE
DK
IT
ES
FR
EN
9
Disposal
The markings on the product and on the associated literature show that this product must not be
disposed of together with normal household waste
at the end of its useful life. Please dispose of this
device separately from other waste in order not to
cause harm to the environment or human health
through uncontrolled refuse disposal.
Recycle the device to facilitate the sustainable recycling of material resources.
Private users should contact the
dealer from whom the product was bought, or the
authorities responsible for recycling, to find out
how to recycle the device in an environmentally
friendly way.
Commercial users should ask their suppliers and
consult the sales contract terms. This product
must not be disposed of together with other
commercial waste.
Software
Jöllenbeck GmbH retains full intellectual property
rights to the supplied software. Direct or indirect
reworking, decompiling or reverse engineering of
the software is not permitted. Any form of copying
or distribution of the software to third parties is also
not permitted.
Warranty
We provide a manufacturer’s guarantee of 2 (two)
years on this product in respect of workmanship
and all built-in components.
Technical Support
Our Technical Support team is there for you in the
event of any questions or problems and can be
contacted e-mail:
E-mail: support@speed-link.com
Page 10
DE
DK
IT
ES
FR
EN
10
1
6
5
432
Page 11
DE
DK
IT
ES
FR
EN
11
What’s Included
• Autofocus Webcam
• Software CD
• User manual
System Requirements
• Pentium VI processor or higher
• Windows XP with SP2 or Windows Vista
• CD-ROM drive
• 256MB RAM
• Free USB 2.0 port
• 500MB free hard disk space for software
• Internet connection for video chat
Controls
(1) Autofocus lens
(2) Status LED
(3) Microphone
(4) Snapshot button
(5) Swivel joint
(6) Clamp
Connecting the Webcam
u Using the clamp (6), mount the webcam on the
frame of your TFT monitor or notebook screen or
position the webcam on your desktop.
u Plug the USB receiver into a free USB port on
your notebook.
NOTE: The webcam must be plugged into a
USB 2.0 port to provide full functionality. For that
reason, do not plug the webcam into a USB 1.1
port or hub.
If you plug the webcam into a USB 2.0 hub,
make sure that this has its own additional
independent power supply.
Windows will automatically detect that a new
device has been connected and will install the
necessary driver itself. You do not need to install
any additional drivers.
Taking pictures on Windows
u Click on “My Computer” and double click on
“USB Video Device”. After the device has been
initialised you will now see live images from the
webcam.
u To take a picture, click on “Take new picture”
in the upper left of the window. A miniature
preview of the picture that has been taken will
now appear below in the file bar. You can now
copy this image and paste it into any directory
of your choice.
Installing the photo and video software
Software for taking and editing photos and video is
provided on the accompanying CD. To install this
software, insert the CD into your CD-ROM drive.
The installation menu will launch automatically. If
this does not happen then open Windows Explorer
and double click on the symbol for your CD-ROM
drive and then double click on the file setup.exe.
Page 12

DE
DK
IT
ES
FR
EN
12
Installing Webcam Companion
u On the installation menu, click on the button
“Webcam Companion”.
u Select the language and click on “Next”.
u Read through the licensing agreement. Clicking
on “Yes” means you agree to the terms of the
agreement. If you do not agree, click on “No”.
Installation will not proceed.
u Select a directory where “Webcam Companion”
is to be installed. You can select your own
directory by clicking the “Browse” button.
u Select a program folder for the Start menu and
click on “Next”.
The program will now be installed on your
computer.
u Click on “Finish” to complete the installation.
Using Webcam Companion
Webcam Companion allows you to take photos
and videos, save and edit them or to launch a
monitoring program with motion detection. You can
find more information on using the program in the
help pages.
u Launch Webcam Companion.
u Click on Help | Application Help from the menu
bar or press F1.
Installing Arcsoft PhotoImpression
u Click on “Arcsoft PhotoImpression” in the
installation menu.
u Select “Install the software automatically” and
click on “Next”.
u Read through the licensing agreement. Clicking
on “Yes” means you agree to the terms of the
agreement. If you do not agree, click on “No”.
Installation will not proceed.
u Select a directory where “Arcsoft
PhotoImpression” is to be installed. You can
select your own directory by clicking the
“Browse” button.
u Select a program folder for the Start menu and
click on “Next”.
The program will now be installed on your
computer.
u Click on “Finish” to complete the installation.
Using Arcsoft PhotoImpression
Arcsoft PhotoImpression allows you to edit photos
you have taken. You can find more information on
using the program in the help pages.
u Launch Arcsoft PhotoImpression.
u Click on Help | Help from the menu bar or press
F1.
Page 13

DE
DK
IT
ES
FR
EN
13
Installing Arcsoft VideoImpression
u Click on “Arcsoft VideoImpression” in the
installation menu.
u Select the language and click on “Next”.
u Read through the licensing agreement. Clicking
on “Yes” means you agree to the terms of the
agreement. If you do not agree, click on “No”.
Installation will not proceed.
u Select a directory where “Arcsoft
VideoImpression” is to be installed. You can
select your own directory by clicking the
“Browse” button.
u Select a program folder for the Start menu and
click on “Next”.
The program will now be installed on your
computer.
u Click on “Finish” to complete the installation.
Using Arcsoft VideoImpression
Arcsoft VideoImpression allows you to create
videos and blending effects and to incorporate
text and speech into videos. You can find more
information on using the program in the help
pages.
u Launch Arcsoft VideoImpression.
u Click on Help | Help from the menu bar or press
F1.
Uninstalling the programs
Open the Windows Control Panel and double click
on “Add or Remove Programs” (“Programs and
Functions” under Windows Vista). Click on the
program that you would like to uninstall and then
click on “Remove”.
Troubleshooting
If your webcam is not detected then reconnect it
and, if necessary, try a different USB port. Make
sure that the webcam is not connected to a USB
hub without its own separate power supply.
If your messenger program does not display
the webcam output then check to see that you
have set it as the video source. To do that, go to
Options in the messenger program and set the
video source to “USB Video Device”.
Page 14

DE
DK
IT
ES
FR
EN
14
Important !
Avant d’utiliser le produit, veuillez lire
attentivement les instructions de sé-
curité et les mises en garde dans le
mode d’emploi. Conservez ce mode d’emploi pour
pouvoir le consulter à nouveau ultérieurement.
Clause d’exclusion de responsabilité
La société Jöllenbeck GmbH décline toute
responsabilité en cas de dégradations du produit
ou de blessures corporelles dues à une utilisation
du produit inconsidérée, incorrecte, erronée ou
contraire aux instructions données par le fabricant.
Élimination des erreurs/Réparations
N’essayez pas de réparer ou d’entretenir vousmême l’appareil. Confiez tous les travaux de
maintenance à un technicien qualifié. N’apportez
aucune modification à l’appareil. Cela annulerait
toute possibilité de recours en garantie.
Humidité/Sources de chaleur
N’utilisez pas l’appareil à proximité d’eau (par
exemple auprès d’un lavabo, d’une baignoire, etc.)
et gardez-le à l’abri de l’humidité (éclaboussures,
égouttement, pluie). N’exposez pas l’appareil à des
températures élevées, à un air très humide ou au
rayonnement direct du soleil.
Nettoyage
Nettoyez l’appareil avec un chiffon doux et sec. Ne
mettez jamais l’appareil en contact avec du benzol,
du dissolvant ou d’autres produits chimiques.
Utilisation de l’appareil conforme à sa destination
Cet appareil sert à transférer des images animées
et non animées sur un ordinateur classique.
L’appareil ne doit être utilisé qu’avec les pièces
originales prévues à cet effet. Le produit ne doit
être utilisé que dans des locaux fermés et secs.
L’utilisation conforme implique de respecter les
instructions d’installation.
Conformité CE
Ce produit est conforme aux directives CE
applicables de l’Union européenne. Vous pouvez
demander à recevoir l’ensemble des déclarations
de conformité sur le site http://www.speed-link.
com.
Page 15

DE
DK
IT
ES
FR
EN
15
Élimination
Le marquage figurant sur ce produit et sur les documents correspondants indique qu’il ne doit pas
être placé avec les ordures ménagères courantes
à l’issue de sa durée de vie. Veuillez séparer cet
appareil des autres déchets pour ne pas nuire
à l’environnement et à la santé des personnes
par une élimination non contrôlée des
déchets.
Recyclez l’appareil pour encourager la
récupération durable des ressources
matérielles.
Les utilisateurs privés peuvent contacter le vendeur
auprès duquel ils ont acheté le produit ou les
autorités compétentes pour savoir comment
recycler l’appareil de manière respectueuse de
l’environnement.
Les utilisateurs professionnels doivent s’adresser à
leurs fournisseurs et consulter les conditions qui figurent dans le contrat de vente. Ce produit ne doit
pas être placé avec d’autres déchets industriels.
Logiciel
La société Jöllenbeck GmbH conserve l’intégralité
des droits de propriété sur le logiciel fourni. Toute
modification directe ou indirecte, décompilation
ou rétro-conception du logiciel est interdite. Toute
reproduction ou remise du logiciel à de tierces
personnes est interdite.
Garantie
Nous accordons pour ce produit une garantie
constructeur de 2 (deux) ans sur la fabrication et
sur tous les composants.
Assistance technique
En cas de questions ou de problèmes, notre
service d’assistance technique se tient à votre
disposition par e-mail :
e-mail : support@speed-link.com
Page 16

DE
DK
IT
ES
FR
EN
16
1
6
5
432
Page 17

DE
DK
IT
ES
FR
EN
17
Éléments fournis
• Webcam autofocus
• CD avec logiciels
• Mode d’emploi
Configuration système requise
• Processeur Pentium VI ou plus
• Windows XP avec SP2 ou Windows Vista
• Lecteur de CD-ROM
• 256 Mo de mémoire vive
• Port USB 2.0 libre
• 500 Mo libres sur le disque dur pour le logiciel
• Liaison Internet pour les chats vidéo
Éléments de commande
(1) Lentille autofocus
(2) Voyant d’état
(3) Microphone
(4) Touche Image arrêtée
(5) Articulation pivotante
(6) Pince
Raccordement de la webcam
u Fixez la webcam à l’aide de la pince (6) sur le
cadre de votre moniteur TFT ou de votre écran
d’ordinateur portable ou bien placez la webcam
sur votre bureau.
u Reliez la fiche USB à une prise USB libre de
votre ordinateur portable.
REMARQUE : la webcam nécessite une
prise USB 2.0 afin de garantir une parfaite
fonctionnalité. Ne raccordez donc pas la webcam
à des prises USB 1.1 ou à des hubs.
Si vous raccordez la webcam à un hub USB 2.0,
celui-ci doit disposer d’une source d’alimentation
électrique supplémentaire.
Windows détecte automatiquement qu’un nouveau
périphérique a été raccordé et installe de luimême les pilotes requis. Vous n’avez pas besoin
d’installer d’autre pilote.
Prendre des photos avec Windows
u Cliquez sur « Poste de travail » et double-cliquez
sur « Périphérique vidéo USB ». Une fois que le
périphérique est initialisé, vous voyez les images
filmées en live par la webcam.
u Pour prendre une photo, cliquez sur « Prendre
une nouvelle photo » en haut à gauche dans la
fenêtre. La photo apparaît alors en bas dans la
liste de fichiers sous forme de vignette miniature.
Vous pouvez copier cette photo et la coller dans
le répertoire de votre choix.
Installation des logiciels pour photos et
vidéos
Vous trouverez sur le CD fourni des logiciels
d’enregistrement et de retouche des photos et
vidéos. Pour installer ces logiciels, insérez le
CD dans votre lecteur de CD-ROM. Le menu
d’installation démarre automatiquement. Si ce
n’est pas le cas, ouvrez l‘Explorateur de Windows,
double-cliquez sur le symbole de votre lecteur de
CD-ROM et double-cliquez sur le fichier setup.exe.
Page 18

DE
DK
IT
ES
FR
EN
18
Installation de Webcam Companion
u Cliquez dans le menu d’installation sur le bouton
« Webcam Companion ».
u Sélectionnez la langue, puis cliquez sur «
Suivant ».
u Lisez les conditions de la licence. Cliquez sur
« Oui » pour indiquer que vous acceptez les
conditions. Si vous n’êtes pas d’accord, cliquez
sur « Non ». L’installation n’a alors pas lieu.
u Sélectionnez un répertoire dans lequel le
programme « Webcam Companion » doit être
installé. Vous pouvez sélectionner le répertoire
de votre choix en cliquant sur le bouton «
Parcourir ».
u Sélectionnez un répertoire pour le menu de
démarrage, puis cliquez sur « Suivant ».
Le programme est alors installé sur votre
ordinateur.
u Cliquez sur « Terminer » pour conclure
l’installation.
Utilisation de Webcam Companion
Le programme Webcam Companion vous
permet de créer des photos ou des vidéos, de
les sauvegarder, de les éditer ou de lancer une
surveillance avec détecteur de mouvements. Pour
plus d’informations sur le programme, veuillez vous
reporter à la fonction d’aide.
u Lancez la Webcam Companion.
u Cliquez dans la barre de menu sur Aide | Aide
du logiciel ou bien appuyez sur la touche F1.
Installation d‘Arcsoft PhotoImpression
u Cliquez dans le menu d‘installation sur le bouton
« Arcsoft PhotoImpression ».
u Sélectionnez la langue, puis cliquez sur «
Suivant ».
u Lisez les conditions de la licence. Cliquez sur
« Oui » pour indiquer que vous acceptez les
conditions. Si vous n’êtes pas d’accord, cliquez
sur « Non ». L’installation n’a alors pas lieu.
u Sélectionnez un répertoire dans lequel le
programme « Arcsoft PhotoImpression » doit
être installé. Vous pouvez sélectionner le
répertoire de votre choix en cliquant sur le
bouton « Parcourir ».
u Sélectionnez un répertoire pour le menu de
démarrage, puis cliquez sur « Suivant ».
Le programme est alors installé sur votre
ordinateur.
u Cliquez sur « Terminer » pour conclure
l’installation.
Utilisation d‘Arcsoft PhotoImpression
Arcsoft PhotoImpression vous permet de retoucher
les photos que vous avez faites. Pour plus
d’informations sur le programme, veuillez vous
reporter à la fonction d’aide.
u Lancez Arcsoft PhotoImpression.
u Cliquez dans la barre de menu sur Aide | Aide
ou bien appuyez sur la touche F1.
Page 19

DE
DK
IT
ES
FR
EN
19
Installation d‘Arcsoft VideoImpression
u Cliquez dans le menu d‘installation sur le bouton
« Arcsoft VideoImpression ».
u Sélectionnez la langue, puis cliquez sur «
Suivant ».
u Lisez les conditions de la licence. Cliquez sur
« Oui » pour indiquer que vous acceptez les
conditions. Si vous n’êtes pas d’accord, cliquez
sur « Non ». L’installation n’a alors pas lieu.
u Sélectionnez un répertoire dans lequel le
programme « Arcsoft VideoImpression » doit être
installé. Vous pouvez sélectionner le répertoire
de votre choix en cliquant sur le bouton «
Parcourir ».
u Sélectionnez un répertoire pour le menu de
démarrage, puis cliquez sur « Suivant ».
Le programme est alors installé sur votre
ordinateur.
u Cliquez sur « Terminer » pour conclure
l’installation.
Utilisation d‘Arcsoft VideoImpression
Arcsoft VideoImpression vous permet de créer des
vidéos et d’y intégrer des effets en surimpression,
des textes et des éléments vocaux. Pour plus
d’informations sur le programme, veuillez vous
reporter à la fonction d’aide.
u Lancez Arcsoft VideoImpression.
u Cliquez dans la barre de menu sur Aide | Aide
ou bien appuyez sur la touche F1.
Désinstallation des programmes
Ouvrez le Panneau de configuration et
double-cliquez sur « Ajouter ou supprimer
des programmes » (dans Windows Vista : «
Programmes et fonctions »). Cliquez sur le
programme que vous souhaitez désinstaller, puis
cliquez sur « Désinstaller ».
En cas de problème
Si votre caméra n’est pas détectée, connectez
à nouveau la caméra et faites le cas échéant un
essai sur une autre prise USB. Assurez-vous que
la caméra n’est pas raccordée à un hub USB
ne disposant pas de sa propre alimentation en
courant.
Si la caméra n’apparaît pas dans votre programme
Messenger, assurez-vous que vous avez
sélectionné la caméra comme source vidéo.
Pour cela, allez dans les options du programme
Messenger et réglez la source vidéo sur «
Périphérique vidéo USB ».
Page 20

DE
DK
IT
ES
FR
EN
20
¡Importante!
Antes de utilizar este producto, lee
con atención las instrucciones de
seguridad y avisos de este manual.
Guarda este manual para que puedas servirte de
él y consultarlo posteriormente cuando tengas
alguna duda.
Restricciones a la garantía
Jöllenbeck GmbH no asume la garantía por daños
causados al producto o lesiones de personas debidas a una utilización inadecuada o impropia del
producto, diferente a la especificada en el manual,
o utilización contraria a la recomendada.
Eliminación de anomalías/Reparación
No intentes en ningún caso la reparación o
mantenimiento de este dispositivo. Deja cualquier
reparación en manos de personal especializado.
No hagas cambios en el aparato. De lo contrario
perderás la garantía que te ampara.
Humedad/Fuentes caloríficas
Mantén el producto alejado del agua. (por ej. lavabos, bañeras, etc.), y lejos de humedades, líquidos
que goteen o salpiquen y de la lluvia. No expongas
el aparato a altas temperaturas, elevada humedad
relativa del aire o la luz directa del sol.
Limpieza
Para limpiar el aparato utiliza un paño suave y
seco. No dejes nunca que entre en contacto con
benceno, disolventes u otros productos químicos.
Uso según instrucciones
El dispositivo sólo se puede usar con las piezas
originales correspondientes. El producto se utilizará
siempre en espacios cerrados y secos. El uso
según instrucciones incluye un procedimiento de
instalación según estas mismas instrucciones.
Declaración de conformidad CE
Este producto cumple las directivas CE más relevantes con vigor en la Unión Europea. Entrando en
http://www.speed-link.com puede bajar de la red
la declaración de conformidad completa.
Page 21

DE
DK
IT
ES
FR
EN
21
Reciclaje
En las características del producto o en las
instrucciones anexas se indica que esté producto
tras su vida útil, no debe arrojarse a la basura
común doméstica. Deposítalo en los contenedores
destinados para ello con el fin de no agredir al medio ambiente ni atentar contra la salud, eliminando
residuos de forma incontrolada.
Recicla este dispositivo para mejorar la
recuperación de materiales valiosos y de
recursos útiles para todos.
Los usuarios particulares deberían contactar con el
establecimiento en el que han adquirido el aparato
o con las autoridades locales para saber cómo reciclar este producto de la manera menos agresiva
para el medio ambiente.
Los comerciales se pondrán en contacto con sus
proveedores y deberán consultar las condiciones
generales del contrato de compra-venta. Este
producto no debe arrojarse a la basura común ni
con otros productos industriales de desecho.
Software
Jöllenbeck GmbH detenta todos los derechos de
propiedad del software incluido. Cambios que se
realicen directa o indirectamente, descompilación
o retrogresión del software no están autorizados.
Tampoco se autoriza la reproducción o entrega de
software a terceros.
Garantía
Este producto tiene una garantía de dos años (2),
tanto para defectos de fabricación como de sus
componentes.
SOPORTE TECNICO
Si surgen problemas o tienes cualquier sugestión,
no dudes en ponerte en contacto con nuestro
servicio técnico, bien por e-mail.
E-mail: support@speed-link.com
Page 22

DE
DK
IT
ES
FR
EN
22
1
6
5
432
Page 23

DE
DK
IT
ES
FR
EN
23
Esta caja contiene
• Webcam autofocus
• CD software
• Instrucciones de uso
Requerimientos del sistema
• Procesador Pentium VI o superior
• Windows XP con SP2 o Windows Vista
• Unidad de CD-ROM:
• 256 MB de memoria RAM
• Puerto libre USB 2.0
• 500 MB libres en disco duro para el software
• Conexión a Internet para videochats
Elementos de manejo
(1) Lente autofocus
(2) LED de estado
(3) Micrófono
(4) botón disparo instantáneo
(5) Articulación giratoria
(6) Pinza
Conectar la Webcam
u Sujeta con la pinza (6) la Webcam al marco de
tu monitor TFT, pantalla del portátil o colócala
sobre la mesa de trabajo.
u Conecta el cable USB a un puerto USB que
esté libre en tu ordenador o portátil.
AVISO: La Webcam sólo funciona con un
USB 2.0 con el fin de asegurar su pleno
funcionamiento. No conectes la Webcam a un
puerto USB 1.1 o a hubs (concentradores).
Si conectas la webcam a un hub USB 2.0, éste
debe disponer de alimentación adicional de
corriente.
Windows detecta automáticamente que se ha
conectado un nuevo dispositivo y se encarga de
instalar los controladores que necesita para operar.
No hace falta que instales un controlador adicional.
Crear imágenes en Windows
u Haz clic en „Escritorio“ y luego doble clic
en „Aparato de vídeo USB“. Tras haberse
inicializado el aparato, verás imágenes en vivo
de la webcam.
u Para la toma de una foto, haz clic en „hacer foto
nueva“, parte superior izquierda de la ventana.
La foto que se ha hecho aparece ahora abajo
en la barra de archivos en forma miniaturizada.
Esta foto la puedes copiar o guardar en una
carpeta que selecciones.
Instalación del software de fotos y vídeos
En el CD que viene adjunto encontrarás software
para la grabación y edición de fotos y vídeos.
Para instalar este software, coloca el CD en la
unidad de CD-ROM. El menú de instalación se
inicia automáticamente. Si no fuese así, abre
el Explorador de Windows y haz doble clic en
el icono de tu unidad de CDs y doble clic en el
archivo setup.exe.
Page 24

DE
DK
IT
ES
FR
EN
24
Instalación de Webcam Companion
u Haz clic en el menú de instalación en el botón
„Webcam Companion“.
u Selecciona idioma y haz clic en „continuar“.
u Lee los acuerdos de licencia. Haciendo clic
en „Sí“ aceptas las condiciones. Si no quieres
aceptar las condiciones, haz clic en „No“. La
instalación no continúa y se cancela.
u Selecciona la carpeta en la que quieres instalar
la „Webcam Companion“. Haciendo clic en el
botón „Examinar“ puedes elegir el directorio que
prefieres para el dispositivo.
u Selecciona una carpeta de programa para el
menú de inicio y haz clic en „continuar“.
El programa se instala a continuación en el
ordenador.
u Haz clic en „Finalizar“ para concluir la instalación.
Utilización de Webcam Companion
Puedes hacer fotos, crear vídeos, guardarlos o
editarlos o establecer un control de alarma de
movimientos. Más sobre el manejo del programa lo
encuentras en la función de ayuda.
u Inicia Webcam Companion.
u En la barra de menús haz clic en ayuda | Ayuda
aplicaciones o pulsa F1.
Instalación de Arcsoft PhotoImpression
u En el menú de instalación haz clic en „Arcsoft
PhotoImpression“.
u Selecciona idioma y haz clic en „continuar“.
u Lee las condiciones de licencia y haz clic en
„Sí“ si las aceptas. Si no quieres aceptar las
condiciones, haz clic en „No“. La instalación no
continúa y se cancela.
u Selecciona el directorio en el que quieres
instalar la „Arcsoft PhotoImpression“. Haciendo
clic en el botón „Examinar“ puedes elegir el
directorio que prefieres para el dispositivo.
u Selecciona una carpeta de programa para el
menú de inicio y haz clic en „continuar“.
El programa se instala a continuación en el
ordenador.
u Haz clic en „Finalizar“ para concluir la instalación.
Aplicaciones de Arcsoft PhotoImpression
Con Arcsoft PhotoImpression puedes editar y
retocar las fotos que hayas sacado. Más sobre el
manejo del programa lo encuentras en la función
de ayuda.
u Iniciar Arcsoft PhotoImpression.
u En la barra de menús haz clic en ayuda | Ayuda
o pulsa F1.
Page 25

DE
DK
IT
ES
FR
EN
25
Instalación de Arcsoft VideoImpression
u En el menú de instalación haz clic en „Arcsoft
VideoImpression“.
u Selecciona idioma y haz clic en „continuar“.
u Lee las condiciones de licencia y haz clic en
„Sí“ si las aceptas. Si no quieres aceptar las
condiciones, haz clic en „No“. La instalación no
continúa y se cancela.
u Selecciona el directorio en el que quieres
instalar „Arcsoft VideoImpression“. Haciendo
clic en el botón „Examinar“ puedes elegir el
directorio que prefieres para el dispositivo.
u Selecciona una carpeta de programa para el
menú de inicio y haz clic en „continuar“.
El programa se instala a continuación en el
ordenador.
u Haz clic en „Finalizar“ para concluir la instalación.
Aplicaciones de Arcsoft VideoImpression
Con Arcsoft VideoImpression puedes crear vídeos
e integrar efectos especiales, textos e idioma en
el vídeo que preparas. Más sobre el manejo del
programa lo encuentras en la función de ayuda.
u Iniciar Arcsoft VideoImpression.
u En la barra de menús haz clic en ayuda | Ayuda
o pulsa F1.
Desinstalación de los programas
Abre el Panel de control y haz doble clic en
„Software“ (en Windows Vista „Programas y
funciones“). Haz clic sobre el programa que
quieres desinstalar y a continuación en „Quitar
programa“.
Resolución de problemas
Si ves que el ordenador no detecta tu cámara,
vuelve a realizar todas las conexiones y enchufa
el conector en otro puerto USB. Asegúrate que la
cámara no se encuentra conectada a un hub USB
sin corriente propia de alimentación.
Si ves que el Messenger no indica la presencia
de tu cámara, comprueba si la cámara está
indicada entre las fuentes de vídeo. Para ello,
vete a opciones del programa del Messenger e
introduces como fuente de vídeo „Dispositivo de
Vídeo USB“.
Page 26

DE
DK
IT
ES
FR
EN
26
Importante!
Prima di utilizzare questo prodotto
leggere attentamente le avvertenze di
sicurezza. Conservare questo manu-
ale per poterlo consultare in un secondo tempo.
Esclusione di responsabilità
La Jöllenbeck GmbH non risponde per danni sul
prodotto o per lesioni di persone causate da un
utilizzo del prodotto sbadato, inappropriato, errato
o non indicato dal produttore.
Eliminazione guasti/riparazione
Non cercare di effettuare la manutenzione o la
riparazione del dispositivo da soli. Affidare qualsiasi
riparazione a personale qualificato. Non apportare
alcune modifiche al dispositivo. Questo farà perdere qualsiasi diritto di garanzia.
Umidità/fonti di calore
Non utilizzare l’apparecchio vicino ad acqua (p.e.
lavandini, vasche da bagno ecc.) e tenerlo lontano
da umidità, da spruzzi o gocce d‘acqua nonché
dalla pioggia. Non esporre il dispositivo ad alte
temperature, ad alta umidità d‘aria o direttamente
al sole.
Pulizia
Pulire l‘apparecchio utilizzando un panno morbido
e asciutto. Non usare mai benzolo, diluenti o altri
prodotti chimici.
Impiego conforme alle prescrizioni
Questo dispositivo serve esclusivamente a
trasmettere immagini fisse e in movimento ad
un computer comune. Il dispositivo deve essere
impiegato soltanto con gli appositi pezzi originali. Il
prodotto deve essere impiegato soltanto in locali
chiusi ed asciutti. L’impiego conforme alle prescrizioni comprende il procedimento in base al manuale
d’installazione.
Conformità CE
Questo prodotto è conforme alle direttive CE
dell‘Unione Europea. Sotto http://www.speed-link.
com può essere richiesta la dichiarazione di
conformità completa.
Page 27

DE
DK
IT
ES
FR
EN
27
Smaltimento
Il contrassegno sul prodotto o sulla letteratura
relativa indica che a termine della sua durata
non deve essere smaltito insieme ai normali rifiuti
domestici. Smaltire il dispositivo separatamente da
altri rifiuti per non danneggiare l’ambiente o la salute
dell’uomo a causa di uno smaltimento incontrollato
dei rifiuti.
Riciclare il dispositivo per favorire il ricic-
laggio sostenibile di risorse materiali.
Si consiglia agli utenti privati di contattare
il rivenditore presso il quale è stato acquistato il
prodotto, o le autorità competenti, per informarsi
come riciclare il dispositivo in maniera ecologica.
Si consiglia agli utenti commerciali di rivolgersi
al loro fornitore e di consultare le condizioni contrattuali di vendita. Questo prodotto non deve essere
smaltito insieme ad altri rifiuti commerciali.
Software
La Jöllenbeck GmbH si riserva tutti i diritti di
proprietà sul software in dotazione. Non sono consentite modifiche dirette o indirette, decompilazione
o reverse engineering del software. È vietata la
riproduzione o la cessione a terzi del software.
Garanzia
Per questo prodotto concediamo una garanzia
della durata di 2 (due) anni a partire dalla data di
acquisto. La garanzia copre i difetti di fabbricazione, nonché quelli dei componenti integrati.
Supporto tecnico
In caso di domande o problemi rivolgersi al nostro
centro di supporto tecnico via e-mail:
E-mail: support@speed-link.com
Page 28

DE
DK
IT
ES
FR
EN
28
1
6
5
432
Page 29

DE
DK
IT
ES
FR
EN
29
Contenuto della confezione
• Webcam con messa a fuoco automatica
• CD del software
• Istruzioni per l‘uso
Requisiti di sistema
• processore Pentium VI o superiore
• Windows XP con SP2 o Windows Vista
• unità CD-Rom
• 256 MB memoria RAM
• porta USB 2.0 libera
• 500 MB di memoria libera sul disco fisso per il
software
• connessione Internet per videochat
Controlli
(1) Lente con messa a fuoco automatica
(2) LED di stato
(3) Microfono
(4) Tasto per istantanee
(5) Snodo
(6) Morsetto
Collegamento della webcam
u Fissare la webcam tramite il morsetto (6) sul te-
laio del monitor TFT o del notebook o collocare
la webcam sul tavolo.
u Collegare il connettore USB ad una porta USB
libera del notebook.
NOTA BENE: la webcam deve disporre di
un‘interfaccia USB 2.0, per garantire la massima
funzionalità. Quindi non collegare la webcam ad
una porta USB 1.1 o ad hub.
Quando la webcam viene collegata ad un hub
USB 2.0, è preferibile che questo sia dotato di
un‘alimentazione propria.
Windows riconosce automaticamente che è
stata collegata una nuova periferica ed installa
autonomamente i driver necessari. Non occorre
installare ulteriori driver.
Creare immagini sotto Windows
u Fare clic su „Risorse del computer“ e fare
doppio clic su „Dispositivo video USB“ Dopo
l‘inizializzazione del dispositivo si vedono le
immagini dal vivo della webcam.
u Per poter scattare una foto, fare clic su „Scatta
nuova foto“ in alto a sinistra nella finestra. La foto
scattata appare ora in basso nella lista dei file
come miniatura di anteprima. Questa foto ora
può essere copiata ed inserita in una cartella
a scelta.
Installare il software per foto e video
Sul CD in dotazione si trova il software per
riprendere ed elaborare foto e video. Per installare
questo software, inserire il CD nell‘unità CD-ROM. Il
menu di installazione dovrebbe partire automaticamente. In caso contrario, aprire il Windows Explorer, fare doppio clic prima sul simbolo dell‘unità
CD-ROM e poi sul file setup.exe.
Page 30

DE
DK
IT
ES
FR
EN
30
Installare Webcam Companion
u Nel menu di installazione fare clic sul pulsante
„Webcam Companion“.
u Selezionare la lingua e cliccare su „Avanti“.
u Leggere il contratto di licenza. Cliccare su
„Sì“ per accettare il contratto di licenza. Se
non si desidera accettarlo, cliccare su „No“.
L‘installazione non verrà effettuata.
u Selezionare la directory in cui si desidera
installare „Webcam Companion“. Cliccando sul
pulsante „Sfoglia“ è possibile selezionare una
directory a scelta.
u Selezionare una cartella di programma per il
menu di avvio e cliccare su „Avanti“.
Il programma verrà ora installato sul computer.
u Cliccare su „Esci“ per completare l‘installazione.
Usare Webcam Companion
Con Webcam Companion possono essere creati,
memorizzati ed elaborati foto o video oppure avviata una sorveglianza con il rivelatore di movimento.
Informazioni più precise sul programma si trovano
nella guida in linea.
u Avviare Webcam Companion.
u Nella barra dei menu fare clic su Aiuto | Guida in
linea o premere F1.
Installare Arcsoft PhotoImpression
u Fare clic sul pulsante „Arcsoft PhotoImpression“
nel menu di installazione.
u Selezionare la lingua e cliccare su „Avanti“.
u Leggere il contratto di licenza. Cliccare su
„Sì“ per accettare il contratto di licenza. Se
non si desidera accettarlo, cliccare su „No“.
L‘installazione non verrà effettuata.
u Selezionare la directory in cui si desidera
installare „Arcsoft PhotoImpression“. Cliccando
sul pulsante „Sfoglia“ è possibile selezionare una
directory a scelta.
u Selezionare una cartella di programma per il
menu di avvio e cliccare su „Avanti“.
Il programma verrà ora installato sul computer.
u Cliccare su „Esci“ per completare l‘installazione.
Usare Arcsoft PhotoImpression
Con Arcsoft PhotoImpression possono essere
elaborate le foto scattate. Informazioni più precise
sul programma si trovano nella guida in linea.
u Avviare Arcsoft PhotoImpression.
u Nella barra dei menu fare clic su Aiuto | Guida in
linea o premere F1.
Page 31

DE
DK
IT
ES
FR
EN
31
Installare Arcsoft VideoImpression
u Fare clic sul pulsante „Arcsoft VideoImpression“
nel menu di installazione.
u Selezionare la lingua e cliccare su „Avanti“.
u Leggere il contratto di licenza. Cliccare su
„Sì“ per accettare il contratto di licenza. Se
non si desidera accettarlo, cliccare su „No“.
L‘installazione non verrà effettuata.
u Selezionare la directory in cui si desidera
installare „Arcsoft VideoImpression“. Cliccando
sul pulsante „Sfoglia“ è possibile selezionare una
directory a scelta.
u Selezionare una cartella di programma per il
menu di avvio e cliccare su „Avanti“.
Il programma verrà ora installato sul computer.
u Cliccare su „Esci“ per completare l‘installazione.
Usare Arcsoft VideoImpression
Con Arcsoft VideoImpression è possibile creare
video ed effetti di transizione, ed aggiungere
testo e voce al video. Informazioni più precise sul
programma si trovano nella guida in linea.
u Avviare Arcsoft VideoImpression.
u Nella barra dei menu fare clic su Aiuto | Guida in
linea o premere F1.
Disinstallazione dei programmi
Aprire il Pannello di controllo e fare doppio clic su
„Software“ (sotto Windows Vista „Programmi e
Funzioni“). Fare clic sul programma che si vuole
disinstallare e cliccare poi su „Disinstalla“.
Ricerca guasti e possibili soluzioni
Nel caso in cui la camera non venga riconosciuta, collegare nuovamente la camera usando
eventualmente un‘altra porta USB. Accertarsi che
la camera non sia collegata ad un hub USB senza
alimentazione propria.
Nel caso in cui il programma di messenger non visualizzi la camera, accertarsi di aver indicato la camera come fonte video. A tale scopo andare nelle
opzioni del programma di messenger ed impostare
il „Dispositivo video USB“ come fonte video.
Page 32

DE
DK
IT
ES
FR
EN
32
Vigtigt!
Inden du bruger produktet, bedes
du om at læse sikkerhedsanvisningerne og advarslerne i håndbogen.
Opbevar håndbogen, for senere reference.
Fritagelse for ansvar
Jöllenbeck GmbH overtager intet ansvar for
materialeskader eller personskader, som opstår
på grund af uforsigtig, uhensigtsmæssig, ukorrekt
brug eller hvis produktet bruges til andre end de
påtænkte formål.
Afhjælp af fejl/reparationer
Du må ikke selv vedligeholde eller reparere
Enheden. Alle vedligeholdelsesarbejder skal
gennemføres af specialister. Enheden må ikke
forandres. På den måde bortfalder garantien.
Fugtighed/varmekilder
Enheden må ikke bruges i nærheden af vand
(f.eks. vaskekummer, badekar eller svømmebassiner), og apparatet skal holdes fjern fra fugtighed,
dryppende eller sprøjtende væsker som også regn.
Enheden må ikke udsættes for høje temperaturer,
høj luftfugtighed eller direkte sollys.
Rengøring
Brug en blød, tør klud til rengøring af enheden.
Enheden må aldrig komme i kontakt med benzen,
fortyndervæske eller andre kemikalier.
Tilsigtet brug
Enheden er kun beregnet til at overføre billeder
(med og uden bevægelse) til en normal computer.
Enheden må kun bruges med de påtænkte
originalkomponenter Produktet må kun bruges i
lukkede og tørre rum. Tilsigtet brug inkluderer fremgangsmåden ifølge installeringsvejledningen.
CE-overensstemmelse
Enheder svarer til de relevante CE-direktiver fra den
Europæiske Union. Under http://www.speed-link.
com kan du anmode om hele overensstemmelseserklæringen.
Page 33

DE
DK
IT
ES
FR
EN
33
Bortskaffelse
Mærkningen på produktet, hhv. på den tilsvarende
dokumentation angiver, at produktet ikke må
bortskaffes sammen med den almindelige husholdningsaffald. Bortskaf enheden venligst separat
fra andet affald for ikke at skade miljøet, hhv.
menneskernes sundhed på grund af en ukontrolle-
ret bortskaffelse af affald.
Aflever enheden på en genbrugsstation
for at fremme genbrugen af materielle
ressourcer.
Private brugere bør kontakte forhandleren eller
de vedkommende myndigheder og finde ud af,
hvordan enheden kan genbruges miljørigtigt.
Industrielle brugere bør kontakte leverandøren og
læse betingelserne i købekontrakten. Dette produkt
må ikke bortskaffes med andet industrielt affald.
Software
Ejendomsretten til den medleverede software
forbliver i fuldt omfang hos Jöllenbeck GmbH .
Direkte eller indirekte forandring, dekompilering
eller regression af softwaren er ikke tilladt. Enhver
duplikering eller videregivelse af softwaren til tredje
personer er forbudt.
Garanti
Dette produkt kommer med en producentgaranti
på 3 (to) år for forarbejdelse og alle integrerede
komponenter.
Teknisk support
Ved spørgsmål eller problemer står vores tekniske
support til rådighed for hjælp via e-mail:
E-mail: support@speed-link.com
Page 34

DE
DK
IT
ES
FR
EN
34
1
6
5
432
Page 35

DE
DK
IT
ES
FR
EN
35
Leveringsomfang
• Autofocus webcam
• Software-CD
• Betjeningsvejledning
Systemforudsætninger
• Pentium VI processor eller højere
• Windows XP med SP2 eller Windows Vista
• CD-ROM-drev
• 256 MB arbejdslager
• ledigt USB 2.0 interface
• 500 MB ledig harddisk-lager til Software
• Internetforbindelse til videochats
Betjeningselementer
(1) Autofokuslinse
(2) Status-LED
(3) Mikrofon
(4) Snapskudknap
(5) Drejeled
(6) Clips
Tilslutning af webcam
u Fastgør dit webcam ved hjælp af clipsen (6) på
rammen af din TFT-monitor eller notebookbilledskærm eller stil det på dit skrivebord.
u Forbind USB-stikket med et ledigt USB-interface
på din notebook.
Bemærk: For at garantere den fuldstændige
funktionalitet skal dit webcam tilsluttes til et USB
2.0 interface. Tilslut derfor dit webcam ikke til et
USB 1.1 interface eller en Hub.
Hvis du tilslutter dit webcam til et USB 2.0
interface skal dette interface have en egen
strømforsyning.
Windows erkender automatisk den nye enhed og
installerer selvstændigt alle nødvendige drivere. Du
skal ikke installere yderligere drivere.
Generere billeder under Windows
Klik på die „Skrivebord“ og dobbeltklik på „USBvideoenhed“. Efter enheden blev initialiseret, ser du
live-billeder fra dit webcam.
For at optage et billede, klikker du på „Optage nyt
billede“ i det øverste venstre hjørne i vinduet. Det
optagede billede vises nu forneden i fillisten som
miniaturevisning. Du kan nu kopiere billedet og
indføje det i den ønskede mappe.
Installering af foto- videosoftwaren
Software til optagelse og redigering af fotoer og videos findes på det medleverede CD. Til installering
af softwaren lægger du CD’en ind i dit CD-ROMdrev. Installationsmenuen starter automatisk. Hvis
det ikke er tilfældet åbner du Windows Explorer,
dobbeltklik på symbolet for dit CD-ROM-drev og
dobbeltklik på filen setup.exe.
Page 36

DE
DK
IT
ES
FR
EN
36
Installering af Webcam Companion
u Klick i installationsmenuen på knappen „Web-
cam Companion“.
u Udvælg dit sprog og klik på ”Næste”.
u Læs licensaftalen. Hvis du klikker på „Ja“
er du enig med aftalen. Hvis du ikke er enig
med aftalen klikker du på „Nej“. Installeringen
gennemføres ikke.
u Vælg det bibliotek i hvilket „Webcam Compani-
on“ skal installeres. Hvis du klikker på knappen
„Browse” kan du selv udvælge et bibliotek.
u Udvælg en programmappe til startmenuen og
klik på „Næste“.
Programmeret installeres nu på din computer.
u Klik på „Afslut“ for at afslutte installationen.
Brug af Webcam Companion
Med Webcam Companion kan du oprette fotoer
og videos, gemme og redigere dem eller gennemføre en overvågning med bevægelsesdetektor.
Nærmere oplysninger om programmets betjening
finder du i hjælpefunktionen.
u Start Webcam Companion.
u Klik i menulinjen på Hjælp | Programhjælp eller
tryk på F1.
Installering af Arcsoft PhotoImpression
u Klik i installationsmenuen på knappen „Arcsoft
PhotoImpression“.
u Udvælg dit sprog og klik på ”Næste”.
u Læs licensaftalen igennem. Hvis du klikker på
„Ja“ er du enig med aftalen. Hvis du ikke er enig
med aftalen klikker du på „Nej“. Installeringen
gennemføres ikke.
u Vælg det bibliotek i hvilket „Arcsoft PhotoImpres-
sion“ skal installeres. Hvis du klikker på knappen
„Browse” kan du selv udvælge et bibliotek.
u Udvælg en programmappe til startmenuen og
klik på „Næste“.
Programmeret installeres nu på din computer.
u Klik på „Afslut“ for at afslutte installationen.
Brug af Arcsoft PhotoImpression
Med Arcsoft PhotoImpression kan du redigere
optagede fotoer. Nærmere oplysninger om programmets betjening finder du i hjælpefunktionen.
u Start Arcsoft PhotoImpression.
u Klik i menulinjen på Hjælp | Hjælp eller tryk på
F1.
Page 37

DE
DK
IT
ES
FR
EN
37
Installering af Arcsoft VideoImpression
u Klick i installationsmenuen på knappen „Arcsoft
VideoImpression“.
u Udvælg dit sprog og klik på ”Næste”.
u Læs licensaftalen igennem. Hvis du klikker på
„Ja“ er du enig med aftalen. Hvis du ikke er enig
med aftalen klikker du på „Nej“. Installeringen
gennemføres ikke.
u Vælg det bibliotek i hvilket „Arcsoft VideoImpres-
sion“ skal installeres. Hvis du klikker på knappen
„Browse” kan du selv udvælge et bibliotek.
u Udvælg en programmappe til startmenuen og
klik på „Næste“.
Programmeret installeres nu på din computer.
u Klik på „Afslut“ for at afslutte installationen.
Brug af Arcsoft VideoImpression
Med Arcsoft VideoImpression kan du generere
videos og integrere „fade ind“ effekter, tekst og
sprog i dit video. Nærmere oplysninger om programmets betjening finder du i hjælpefunktionen.
u Start Arcsoft VideoImpression.
u Klik i menulinjen på Hjælp | Hjælp eller tryk på
F1.
Afinstallering af programmerne.
Åbn systemstyringen og dobbeltklik på „Software“
(under Windows Vista „Programmer og funktioner“).
Klik på det program som du ønsker at afinstallere
og klik derefter på ”Afinstallere”.
Fejlafhjælpning
Hvis kameraet ikke konstateres, tilslutter du
kameraet igen og prøver det evt. på et en anden
USB-plads. Sørg for at kameraet ikke er tilsluttet til
en USB-hub uden egen strømforsyning.
Hvis dine messenger-programmer ikke viser kameraet, sørger du for at angive kameraet som videokilde Gå hertil til „Optioner“ i messenger-programmet
og indstil „USB-videoenhed“ som videokilde.
Page 38

Page 39

Page 40

© Jöllenbeck GmbH.
This publication or parts of it may not be published or copied without the express consent of the
publisher. Jöllenbeck GmbH reserves the right to make changes without prior notice.
This product comlies with the relevant European regulations. You may request a compete declaration
of conformity via our website at http://www-speed-link.com.
Jöllenbeck GmbH
Kreuzberg 2
27404 Weertzen
GERMANY
support@speed-link.com
+49 (0) 4287 92 44 690
 Loading...