

Page 1
SCELUS
GAMING MOUSE
QUICK INSTALL GUIDE
QUICK INSTALL GUIDE
SCELUS – GAMING MOUSE
1
3
2
DOWNLOAD DRIVER:
www.speedlink.com/support
http://www.speedlink.com/support
DOWNLOAD
EL
1. Εισάγετε το καλώδιο σε μια ελεύθερη
υποδοχή USB του υπολογιστή σας. Το
ποντίκι αναγνωρίζεται αυτόματα και μετά
από λίγο είναι έτοιμο για χρήση.
2. Κατεβάστε τον οδηγό για να εγκαταστήσετε
το λογισμικό για το SCELUS Gaming Mouse.
Παρακαλούμε χρησιμοποιείτε πάντα την
τρέχουσα έκδοση του οδηγού, η οποία
διατίθεται online προς μεταφόρτωση στη
διεύθυνση www.speedlink.com/support.
Σε αυτή τη διεύθυνση διαδικτύου θα βρείτε
επίσης λεπτομερείς πληροφορίες σχετικά
με τη χρήση του οδηγού με το SCELUS
Gaming Mouse.
3. Για μια λεπτομερή ρύθμιση ανοίξτε το
μενού οδηγού κάνοντας διπλό κλικ στο
σύμβολο SPEEDLINK δεξιά κάτω στη γραμμή
εργασιών των Windows*. Μέσω του μενού
μπορείτε να διεξάγετε εκτενείς ρυθμίσεις.
CZ
1. Zapojte kabel do volného USB portu
na počítači. Systém myš automaticky
detekuje, a krátce poté bude připravena k
použití.
2. Stáhněte si řídicí program pro instalaci
software pro SCELUS Gaming Mouse.
Prosím, použijte vždy nejaktuálnější verzi
budicího programu, který je k dispozici
online na webových stránkách
www.speedlink.com/support. Na této
internetové adrese také najdete podrobné
informace o používání budicího programus
s vaší SCELUS Gaming Mouse.
3. Podrobnou nabídku umožňující
konfigurovat ovladače otevřete tak, že
dvakrát kliknete na ikonu SPEEDLINK
v pravé části hlavního panelu systému
Windows*. V nabídce můžete provádět
rozsáhlá nastavení.
PT
1. Ligue o cabo na porta USB do seu
computador. O rato é detetado
automaticamente e de seguida está pronto
para utilizar.
2. Descarregue o controlador para instalar o
software do rato SCELUS Gaming Mouse.
Utilize sempre a última versão
do controlador que está disponível
para descarregar no website
www.speedlink.com/support. Neste
mesmo endereço de Internet poderá
encontrar informações pormenorizadas
sobre a utilização do controlador para o
seu rato SCELUS Gaming Mouse.
3. Para obter uma configuração
pormenorizada abra o menu do controlador
com clique duplo sobre o símbolo
SPEEDLINK no lado inferior à direita da
barra de tarefas do Windows*. Neste menu
poderá realizar numerosos ajustes de
configurações.
DK
1. Sæt kablet i en ledig USB-tilslutning på din
PC. Musen registreres automatisk og er så
klar til brug.
2. Download driveren for at installere
softwaren til SCELUS Gaming Mouse.
Anvend altid den seneste version af
driveren, som kan downloades online på
www.speedlink.com/support. På denne
internet-adresse finder du desuden
udførlige oplysninger om hvordan du
anvender driveren med dit SCELUS Gaming
Mouse.
3. Åbn drivermenuen for en detaljeret
konfiguration via et dobbeltklik på
SPEEDLINK-symbolet, need til højre i
Windows*-opgavelinjen. Via menuen kan
du foretage omfattende indstillinger.
SE
1. Koppla sladden till en ledig USB-port på
din dator. Musen upptäcks automatiskt och
kan användas efter en kort stund.
2. Ladda ned drivrutinen för att installera
mjukvaran till SCELUS Gaming Mouse.
Använd alltid den senaste versionen av
drivrutin som kan laddas ner på Internet
från www.speedlink.com/support. På den
här webbadressen hittar du också utförlig
information om hur drivrutinen används
tillsammans med SCELUS Gaming Mouse.
3. För en detaljerad konfiguration öppnar du
drivrutinmenyn genom att dubbelklicka
på SPEEDLINK-symbolen nere till höger i
Windows* aktivitetsfält. I den här menyn
kan ett stort antal inställningar göras.
FI
1. Liitä johto tietokoneesi vapaaseen
USB-liitäntään. Hiiri tunnistetaan
automaattisesti ja se on käyttövalmis pian
tämän jälkeen.
2. Lataa ajuri koneellesi asentaaksesi
ohjelmiston varten SCELUS Gaming Mouse.
Käytä aina ajurin ajankohtaisinta versiota,
jonka voi ladata online osoitteesta www.
speedlink.com/support. Tästä Internetosoitteesta löydät myös kattavia tietoja
ajurin käytöstä SCELUS Gaming Mouse
kanssa.
3. Suorita yksityiskohtaiset
asetukset avaamalla ajurivalikko
kaksoisnapsauttamalla SPEEDLINKsymbolia alaoikealla Windows*tehtäväpalkissa. Valikon kautta voidaan
suorittaa kattavia asetuksia.
VER. 1.0
SL-680004-BKRD
BUTTONS
Assign new functions to the mouse
buttons using the respective dropdown
menu. The colour of the mouse wheel
is allocated by the related prole. Each
of the ve proles can be assigned its
own colour, whereas the illumination
of the LED indicator remains blue.
SENSOR
Set the dpi resolution of each default
setting and the Windows* mouse
settings. It‘s also possible to set the
resolution of the X and the Y axis
independently of one another.
CONFIGURATOR APP FOR TABLETS AND SMARTPHONES
To activate the SPEEDLINK Mouse Congurator, please download the app
(Android* 4.0 or later/iOS* 7 or later required), install it on your device
and enter the App-Code provided in the Settings tab.
For more information please visit www.speedlink.com
MACRO EDITOR
With the exception of the prole
switch button, all buttons are macrocompatible and can be assigned
macros as well as additional key
commands such as mouse and
keyboard functions and advanced
functions, whereas the key cycle tab
allows you to assign frequently used
commands to the second mouse wheel
and to customise them.
SETTINGS
Customize general settings and
back up, restore, or reset the driver
settings. All changes made are saved
immediately.
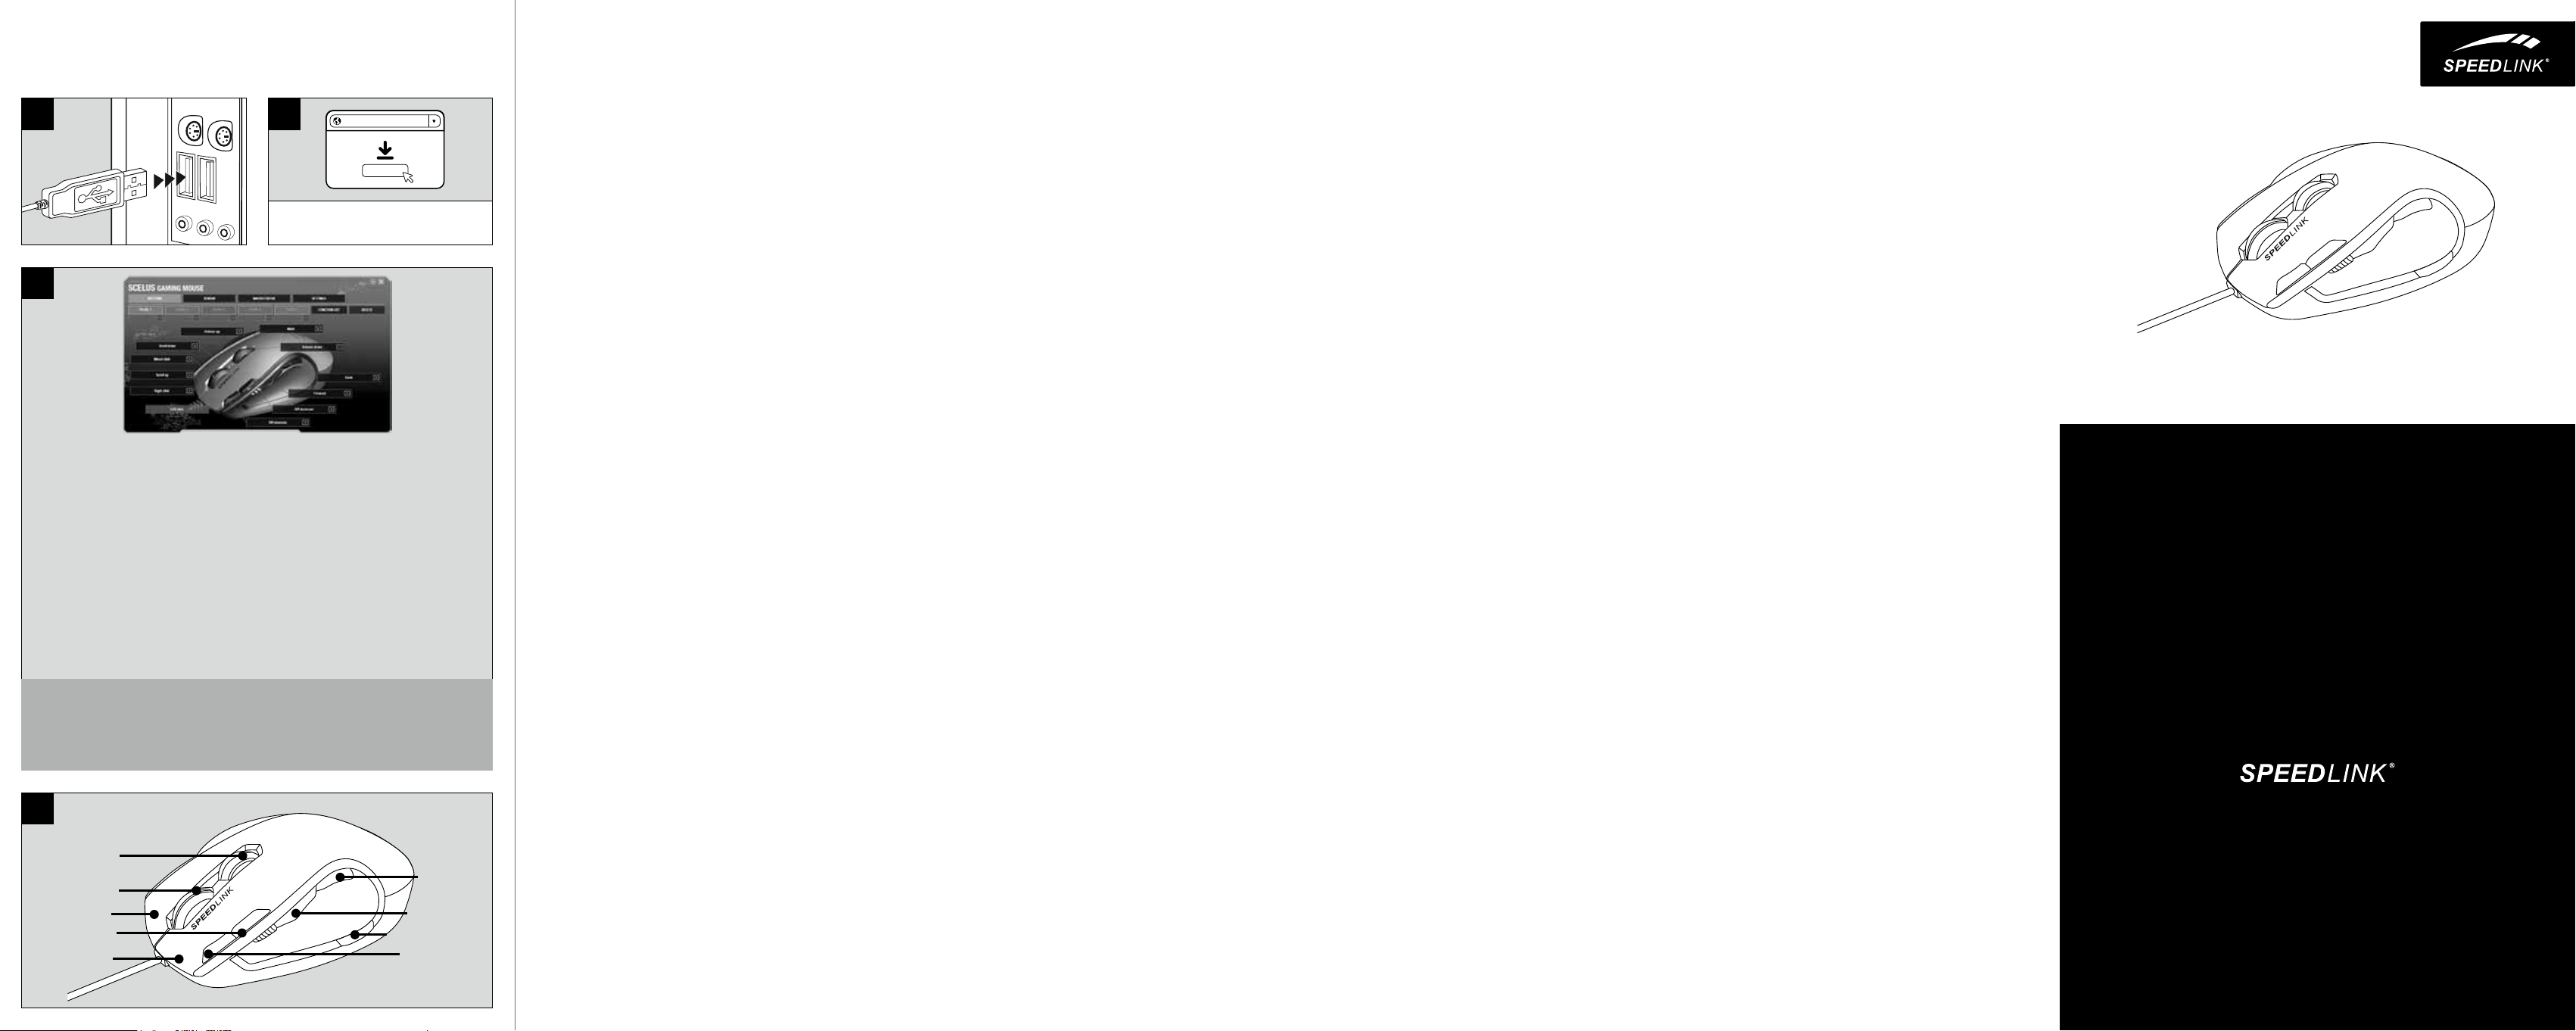
i
Mute/volume
up and down
Mouse wheel
click/scroll
Right click
Dpi down
Left click
Prole switch
Back
Forward
Dpi up
NO
1. Koble kabelen til en ledig USB-port på
datamaskinen din. Musen blir automatisk
gjenkjent og er straks klar til bruk.
2. Last ned driveren for å installere
programvaren for SCELUS Gaming Mouse.
Bruk alltid den nyeste versjonen av
driveren. Du finner den online under
www.speedlink.com/support for
nedlasting. På denne Internett-adressen
finner du også utførlig informasjon om
bruk av driveren med ditt
SCELUS Gaming Mouse.
3. For en detaljert konfigurasjon må du
åpne drivermenyen ved å dobbeltklikke
på SPEEDLINKsymbolet nede til høyre i
Windows* taskbar. Via menyen kan du
foreta omfangsrike innstillinger.
RO
1. Conectați cablul la un port USB liber de la
PC. Mouse-ul este recunoscut automat și
peste câteva momente poate fi folosit.
2. Descărcați driverul pentru a instala
software-ul pentru mouse-ul de gaming
SCELUS. Vă rugăm să folosiți întotdeauna
cea mai recentă versiune a driverului,
care poate fi descărcată de pe www.
speedlink.com/support. La această adresă
din Internet găsiți și informații detaliate
referitoare la folosirea driverului împreună
cu mouse-ul de gaming
SCELUS.
3. Pentru setarea detaliată deschideți meniul
driverului dând dublu click pe pictograma
SPEEDLINK situată în partea de jos-dreapta
de pe bara de activități Windows*. Prin
intermediul acestui meniu puteți efectua
numeroase setări.
HR
1. Utaknite kabel u slobodan USB priključak
računala. Računalo će automatski
prepoznati miša i isti će ubrzo zatim biti
spreman za rad.
2. Preuzmite pogonski program kako biste
instalirali softver za SCELUS Gaming
Mouse. Uvijek koristite najnoviju verziju
pogonskog programa dostupnog na
www.speedlink.com/support. Na ovoj
internetskoj adresi pronaći ćete i opsežne
informacije o uporabi pogonskog programa
s Vašim mišem SCELUS Gaming Mouse.
3. Otvorite detaljnu konfiguraciju izbornika
pogonskog programa dvostrukim klikom na
simbol SPEEDLINK desno dolje u Windows*
traci sa zadacima. Pomoću izbornika
možete obaviti opsežne preinake.
RS
1. Umetnite kabl u USB priključak vašeg
računara. Miš će automatski biti prepoznat
i kratko potom spreman za upotrebu.
2. Preuzmite upravljački program kako biste
instalirali softver za SCELUS Gaming
Mouse. Molimo da uvek koristite aktuelnu
izvedbu upravljačkog programa koji je
dostupan na adresi
www.speedlink.com/support. Na ovoj
internet adresi takođe ćete naći opširne
informacije o korišćenju upravljačkog
programa putem miša SCELUS Gaming
Mouse.
3. Za detaljnu konfiguraciju otvorite meni
upravljačkog programa dvostrukim klikom
na znak SPEEDLINK u donjem desnom
uglu trake zadataka „Windows“. U meniju
možete uraditi opsežna podešavanja.
SL
1. Vtaknite kabel na prosti USB-priključek
svojega računalnika. Naprava miško
samodejno prepozna in miško lahko kmalu
zatem uporabite.
2. Prenesite si gonilnik, da si namestite
programsko opremo za miško
SCELUS Gaming Mouse. Vedno uporabljajte
zadnjo veljavno različico gonilnika, ki vam
je na voljo na spletu na
www.speedlink.com/support za prenos.
Na tem spletnem naslovu najdete tudi
podrobne informacije o uporabi gonilnika
za vašo miško SCELUS Gaming Mouse.
3. Za podrobno konfiguracijo odprite
meni gonilnika z dvoklikom na simbol
SPEEDLINK desno spodaj v opravilni vrstici
sistema Windows*. V meniju lahko izvedete
obsežne nastavitve.
Page 2

QUICK INSTALL GUIDE
SCELUS – GAMING MOUSE
1
3
BUTTONS
Assign new functions to the mouse
buttons using the respective dropdown
menu. The colour of the mouse wheel
is allocated by the related prole. Each
of the ve proles can be assigned its
own colour, whereas the illumination
of the LED indicator remains blue.
SENSOR
Set the dpi resolution of each default
setting and the Windows* mouse
settings. It‘s also possible to set the
resolution of the X and the Y axis
independently of one another.
CONFIGURATOR APP FOR TABLETS AND SMARTPHONES
To activate the SPEEDLINK Mouse Congurator, please download the app
(Android* 4.0 or later/iOS* 7 or later required), install it on your device
and enter the App-Code provided in the Settings tab.
For more information please visit www.speedlink.com
i
2
DOWNLOAD DRIVER:
www.speedlink.com/support
MACRO EDITOR
With the exception of the prole
switch button, all buttons are macrocompatible and can be assigned
macros as well as additional key
commands such as mouse and
keyboard functions and advanced
functions, whereas the key cycle tab
allows you to assign frequently used
commands to the second mouse wheel
and to customise them.
SETTINGS
Customize general settings and
back up, restore, or reset the driver
settings. All changes made are saved
immediately.
http://www.speedlink.com/support
DOWNLOAD
EN
1. Plug the cable into any free USB port on your
computer. The mouse will be detected automatically
and ready to use shortly after that.
2. To install the software for the SCELUS Gaming Mouse
please download the corresponding driver. Always
use the latest driver version. To download it, visit:
www.speedlink.com/support. You will also find
detailed information there on how to use the driver
with your SCELUS Gaming Mouse.
3. To fully customise your mouse, open the driver menu
by double-clicking the SPEEDLINK symbol on the
bottom right in the Windows* taskbar. The menu lets
you make extensive configuration changes.
RU
1. Вставьте кабель в свободный USB-порт
компьютера. Мышка автоматически распознается
и поле этого немедленно готова к работе.
2. Загрузите драйвер, чтобы установить ПО для
SCELUS Gaming Mouse. Всегда пользуйтесь самой
свежей версией драйвера, которую можно
загрузить с сайта www.speedlink.com/support. По
этому адресу можно ознакомиться с подробной
информацией по использованию драйвера с
SCELUS Gaming Mouse.
3. Для детального конфигурирования откройте
меню драйверов, для этого щелкните двойным
щелчком символ SPEEDLINK справа внизу на
панели задач Windows*.
DE
1. Stecken Sie das Kabel an einen freien USBAnschluss Ihres Rechners. Die Maus wird
automatisch erkannt und ist kurz darauf
einsatzbereit.
2. Laden Sie den Treiber herunter, um die Software für
die SCELUS Gaming Mouse zu installieren.
Bitte verwenden Sie stets die aktuelle Version
des Treibers, der online unter
www.speedlink.com/support zum Download zur
Verfügung steht. Unter dieser Internet-Adresse
finden Sie ebenfalls ausführliche Informationen zur
Verwendung des Treibers mit Ihrer
SCELUS Gaming Mouse.
3. Önen Sie für eine detaillierte Konfiguration das
Treibermenü durch einen Doppelklick auf das
SPEEDLINK-Symbol rechts unten in der Windows*Taskleiste. Über das Menü können Sie umfangreiche
Einstellungen vornehmen.
NL
1. Sluit de kabel aan op een vrije USB-poort van uw
computer. De muis wordt automatisch herkend en is
meteen gereed voor gebruik.
2. Download het stuurprogramma om de software voor
het SCELUS Gaming Mouse te installeren. Gebruik
altijd de nieuwste versie van het stuurprogramma,
die u van
www.speedlink.com/support kunt downloaden. Op
dit internetadres vindt u ook uitgebreide informatie
over het gebruik van het stuurprogramma met uw
SCELUS Gaming Mouse.
3. Dubbelklik op het pictogram SPEEDLINK rechts onder
op de Taakbalk van Windows* om het menu van
het stuurprogramma te openen en gedetailleerde
configuratie-instellingen op te geven. In het menu
staan opties voor een groot aantal instellingen.
IT
1. Inserire il cavo in una porta USB libera del computer.
Il mouse viene riconosciuto automaticamente e poco
dopo è pronto per l‘uso.
2. Scaricare il driver per installare il software della
SCELUS Gaming Mouse. Utilizzare sempre una
versione aggiornata del driver, disponibile per il
download dal sito www.speedlink.com/support. Al
medesimo indirizzo internet sono disponibili anche
informazioni dettagliate per l‘uso del driver con la
SCELUS Gaming Mouse.
3. Per una configurazione dettagliata fare doppio clic
sul simbolo SPEEDLINK in basso a destra nella barra
delle applicazioni Windows*. Con il menu si possono
configurare numerose impostazioni.
PL
1. Podłącz przewód USB do wolnego złącza USB
komputera. Mysz zostanie automatycznie
zainstalowana i za chwilę będzie gotowa do pracy.
2. Pobierz sterowniki, by zainstalować oprogramowanie
do SCELUS Gaming Mouse. Zawsze korzystaj z
aktualnej wersji sterowników, które są dostępne do
pobrania na stronie www.speedlink.com/support.
Pod tym adresem internetowym można także znaleźć
wyczerpujące informacje na temat stosowania
sterowników w SCELUS Gaming Mouse.
3. Otwórz menu szczegółów konfiguracji sterownika
podwójnym kliknięciem symbolu SPEEDLINK u dołu
po prawej stronie ekranu, na pasku zadań Windows*.
Za pomocą tego menu można wykonać wiele
ustawień .
FR
1. Raccordez le câble à une prise USB libre sur votre
ordinateur. La souris est automatiquement reconnue
et utilisable quasi immédiatement.
2. Téléchargez le pilote pour installer le logiciel de
la SCELUS Gaming Mouse. Veuillez toujours
utiliser la version actuelle du pilote disponible
en téléchargement à l’adresse
www.speedlink.com/support. Vous trouverez
également à cette adresse des informations
détaillées sur l’utilisation du pilote avec votre
SCELUS Gaming Mouse.
3. Double-cliquez sur le symbole SPEEDLINK en bas à
droite dans la barre des tâches Windows* pour ouvrir
le menu du pilote et configurer en détail la souris.
Vous pouvez procéder dans le menu à de nombreux
réglages .
TR
1. Kabloyu bilgisayarınızın boş bir USB girişine takın.
Fare otomatik olarak tanınır ve kısa süre sonra
kullanıma hazır duruma gelir.
2. SCELUS Gaming Mouse için yazılımı
kurmak için sürüyücü indirin. Lütfen her zaman
www.speedlink.com/support adresinde online olarak
mevcut olan en güncel sürücü versiyonunu kullanın.
Bu İnternet adresinde de ayrıca SCELUS Gaming
Mouse ile sürücünün kullanımı hakkında detaylı bilgi
bulabilirsiniz.
3. Ayrıntılı yapılandırmak yapmak için sağ altta buluna
Windows* görev çubuğundaki SPEEDLINK sembolüne
çift tıklayarak sürücü menüsünü açın. Menü üzerinde
kapsamlı ayarlamalar yapabilirsiniz.
ES
1. Enchufa el cable a un puerto USB libre de tu
ordenador. El ratón se instala automáticamente y
puedes utilizarlo en el momento.
2. Descarga el controlador para poder instalar el
software para el SCELUS Gaming Mouse. Utiliza
siempre la última versión de controlador la cual
puedes descargarte de la página web www.
speedlink.com/support. En esta página web
también encontrarás información detallada sobre
la utilización del controlador con el SCELUS Gaming
Mouse.
3. Para conseguir la configuración más detallada abre
el menú del controlador, haciendo doble clic en el
icono SPEEDLINK, abajo, a la derecha en la barra de
tareas de Windows*.
HU
1. Dugja be a kábelt számítógépe szabad USB portjába.
A gép egyből felismeri az egeret és nemsokára
használható.
2. Az SCELUS Gaming Mouse billentyűzet telepítéséhez
töltse le a meghajtót. Használja a telepítő program
aktuális változatát, mely az interneten a www.
speedlink.com/support oldalon tölthető le. Ezen az
internetcímen részletes információkat találhat arra
vonatkozóan, hogy a meghajtót hogy használhatja a
SCELUS Gaming Mouse.
3. A részletes konfigurációhoz a SPEEDLINK
szimbólumra duplán kattintva nyissa meg a
meghajtó menüjét a jobb alsó sarokban található
Windows* menülécben.
A menün keresztül számos beállítást tehet meg.
TECHNICAL SUPPORT
EN
Having technical problems with this product? Get in touch with our Support team – the
quickest way is via our website: www.speedlink.com
DE
Bei technischen Schwierigkeiten mit diesem Produkt wenden Sie sich bitte an unseren
Support, den Sie am schnellsten über unsere Webseite www.speedlink.com erreichen.
IT
In caso di dicoltà tecniche con questo prodotto rivolgetevi al nostro supporto che è
facilmente reperibile attraverso il nostro sito www.speedlink.com.
SCELUS
SL-680004-BKRD
© 2016 Jöllenbeck GmbH. All rights reserved. SPEEDLINK, the SPEEDLINK word mark and
the SPEEDLINK swoosh are registered trademarks of Jöllenbeck GmbH.
* Windows is a registered trademark of Microsoft Corporation in the United States and
other countries. Android is a registered trademark of Google Inc. iOS is a registered
trademark of Cisco. All trademarks are the property of their respective owner.
Jöllenbeck GmbH shall not be made liable for any errors that may appear
in this manual. Information contained herein is subject to change without
prior notice. Please keep this information for later reference.
JÖLLENBECK GmbH, Kreuzberg 2, 27404 Weertzen, GERMANY
GET TO KNOW IT:
Mute/volume
up and down
Mouse wheel
click/scroll
Right click
Dpi down
Left click
Back
Forward
Prole switch
Dpi up
IOVIA Gaming Keyboard
Time for a change! Transform your keyboard and swap the standard black keycaps on
your IOVIA Gaming Keyboard in a flash – for fire-red gaming keys. They make those
critical WASD and arrow keys really stand out, plus guide you so you always hit the
right key when things get tense in the heat of battle. Its radical looks – especially the
red backlit features – and its user-friendly design make the IOVIA Gaming Keyboard the
perfect keyboard both for advanced and newbie gamers.
 Loading...