


214949B
1
05/03 P/N 214949B
WRITE IN YOUR
MODEL NUMBER:___________
Customer Service Center
N53 W24700 South Corporate Circle
Sussex, WI 53089
U.S.A.
A Huffy Company
Portable Basketball System with Elevator
Owner’s Manual
IMPORTANT
In U.S. and Canada only:
Have questions?...don’t go back to
the store!
We appreciate your purchasing one of our
many fine products. We are sure that you will
be very satisfied with your selection. Although
great care and effort have been taken,
occasionally problems may occur. To ensure
prompt and correct handling of any problems,
or to answer any questions, please contact our
Toll-Free Customer Service Number listed
below. Service will be quicker if you have
your Model Number (found on carton) and
assembly instructions ready when calling.
PLEASE WRITE YOUR MODEL NUMBER IN
THE SPACE PROVIDED ABOVE.
WARNING
FAILURE TO FOLLOW THESE WARNINGS MAY RESULT
IN SERIOUS INJURY AND/OR PROPERTY DAMAGE.
Owner must ensure that all players know and follow
these rules for safe operation of the system.
• DO NOT HANG on the rim or any part of the system
including backboard, support braces or net.
• During play, especially when performing dunk type
activities, keep player's face away from the backboard, rim
and net. Serious injury could occur if teeth/face come in
contact with backboard, rim or net.
• Do not slide, climb, shake or play on base and/or pole.
• After assembly is complete, fill system completely with
water or sand and stake to the ground. Never leave system
in an upright position without filling base with weight, as
system may tip over causing injuries.
• When adjusting height or moving system, keep hands and
fingers away from moving parts.
• Do not allow children to move or adjust system.
• During play, do not wear jewelry (rings, watches, necklaces,
etc.). Objects may entangle in net.
• Surface beneath the base must be smooth and free of
gravel or other sharp objects. Punctures cause leakage and
could cause system to tip over.
• Keep organic material away from pole base. Grass, litter,
etc. could cause corrosion and/or deterioration.
• Check pole system for signs of corrosion (rust, pitting,
chipping) and repaint with exterior enamel paint. If rust has
penetrated through the steel anywhere, replace pole
immediately.
• Check system before each use for proper ballast, loose
hardware, excessive wear and signs corrosion and repair
before use.
• Check system before each use for instability.
• Do not use system during windy and/or severe weather
conditions; system may tip over. Place system in the
storage position and/or in an area protected from the wind
and free from personal property and/or overhead wires.
•
Never play on damaged equipment.
• See instruction manual for proper installation and
maintenance.
• When moving system, use caution to keep mechanism from
shifting.
• Keep pole top covered with cap at all times.
• Do not allow water in tank to freeze. During sub-freezing
weather add non-toxic antifreeze, sand or empty tank
completely and store. (Do not use salt.)
•
While moving system, Do not allow anyone to stand or sit
on base or have added ballasting on base.
• Do not leave system unsupervised or play on system when
wheels are engaged for moving.
• Use Caution when moving system across uneven surfaces.
System may tip over.
• Use extreme caution if placing system on sloped surface.
System may tip over more easily.
201246 2/99
In the U.S.:1-800-558-5234 and Canada: 1-800-284-8339
2
2
1
3
201253 2/99
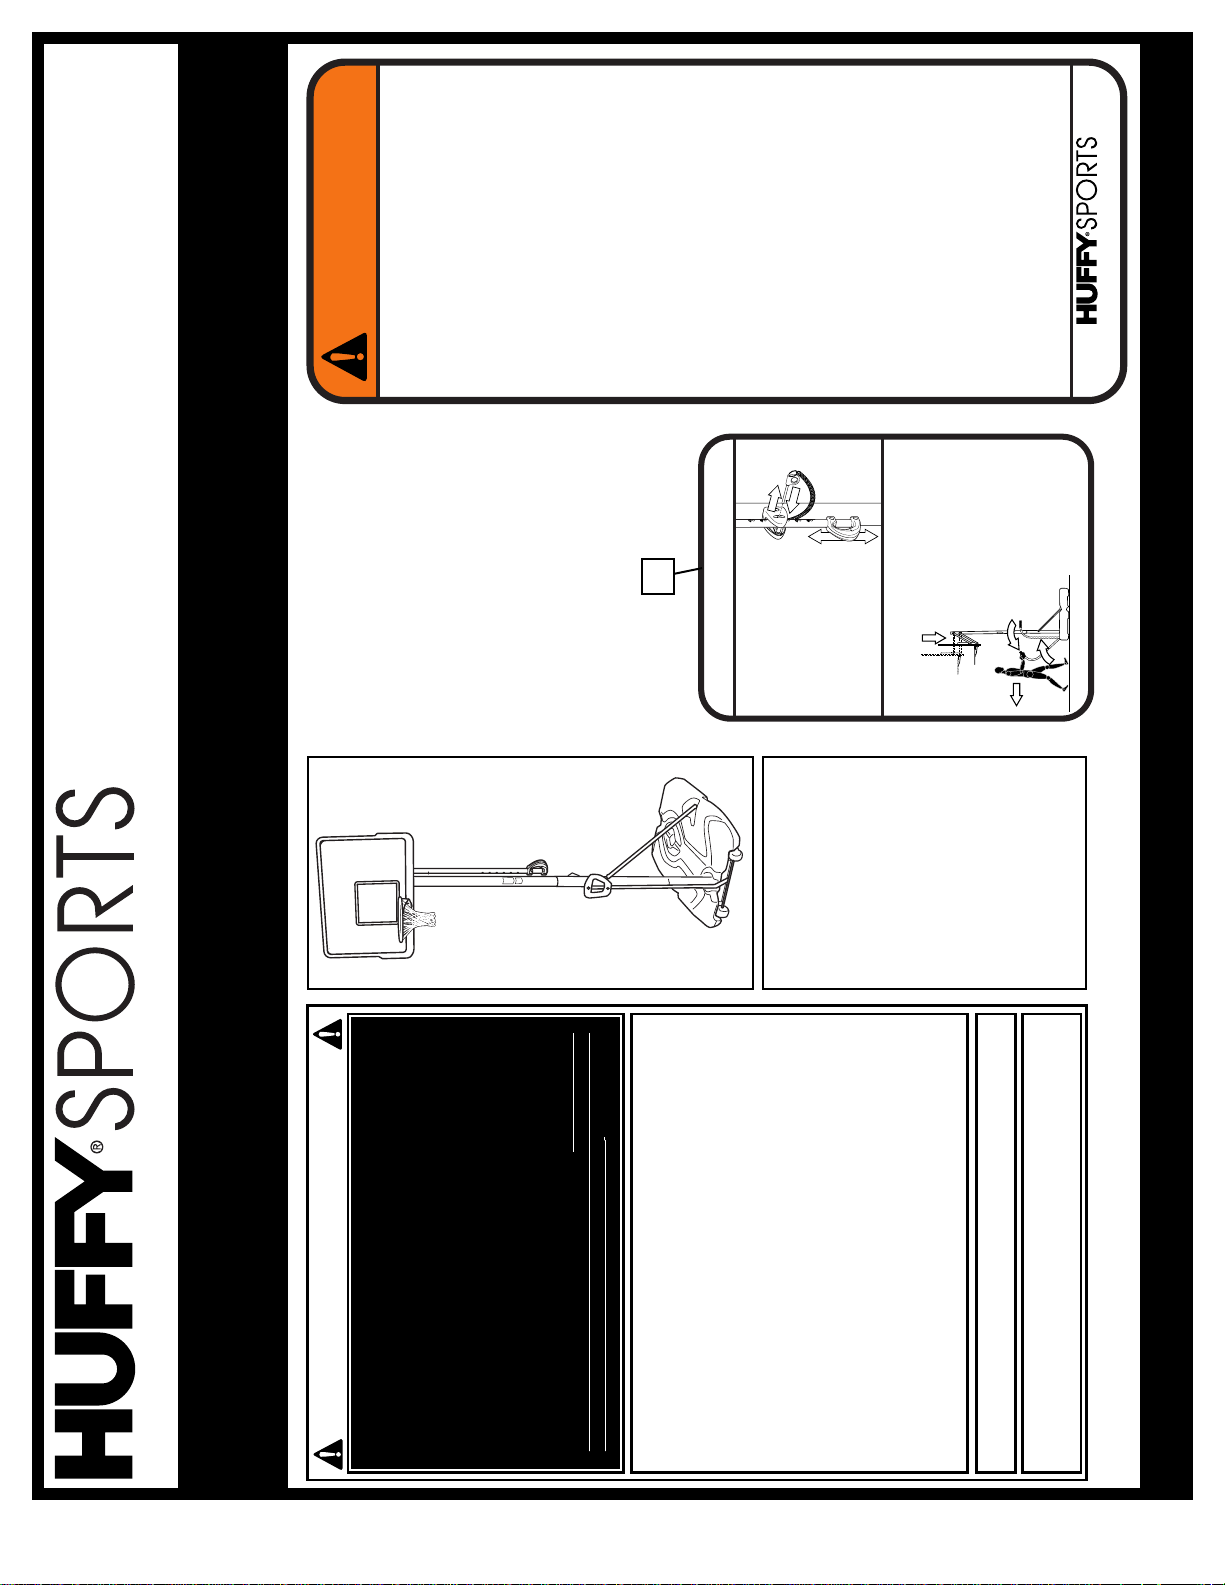
TO ADJUST BACKBOARD:
1. While holding handle, remove pin.
2. Move elevator up or down to
desired height.
3. Replace pin full length to lock
system at desired height.
MOVING SYSTEM
1
3
2
4
1. Adjust basketball backboard
height to lowest position.
2. Rotate handles forward until
wheels engage ground.
3. Move basketball system to
desired location.
4. Rotate handle back to original
position.
5. Reattach ground restraint and
check system for stability.
HEIGHT ADJUSTMENT
Toll-Free Customer Service Number for U.S: 1-800-558-5234, For Canada: 1-800-284-8339, For Europe: 00 800 855 85234 (Sweden: 009 555 85234),
For Australia: 1-800-333 061 - Internet Address: http://www.huffysports.com
Most injuries are caused by misuse and/or not following instructions.
Use caution when using this system.
• If using a ladder during assembly, use extreme caution.
• Two (2) people are recommended for this operation.
• Check base regularly for leakage. Slow leaks could cause system to
tip over unexpectedly.
• Seat the pole sections properly (if applicable). Failure to do so could
allow the pole sections to separate during play and/or transport of the
system.
• Climate, corrosion or misuse could result in system failure.
• Minimum operational height is 6' 6" (1.98 m) to the bottom of
backboard.
• This equipment is intended for home recreational use only and NOT
excessive competitive play.
• Read and understand the warning label affixed to pole. Label is
shown on page 1.
• The life of your basketball pole depends on many conditions. The
climate, placement of the pole, the location of the pole, exposure to
corrosives such as pesticides, herbicides or salts are all important.
• If technical assistance is required, contact Huffy Sports.
• Adult supervision is recommended when adjusting height.
FAILURE TO FOLLOW THESE SAFETY INSTRUCTIONS MAY
RESULT IN SERIOUS INJURY, PROPERTY DAMAGE AND WILL
VOID WARRANTY.
Owner must ensure that all players know and
follow these rules for safe operation of the system.
To ensure safety, do not attempt to assemble this system without
following the instructions carefully. Proper and complete assembly,
use and supervision is essential for proper operation and to reduce
the risk of accident or injury. A high probability of serious injury
exists if this system is not installed, maintained, and operated
properly. Check entire box and inside all packing material for parts
and/or additional instructional material. Before beginning
assembly, read the instructions and identify parts using the
hardware identifier and parts list in this document.
For more information on assembly, placement, proper use and
maintenance, visit The American Basketball Council website at
http://www.smarthoops.com.
SAFETY INSTRUCTIONS
47
REQUIRED TOOLS AND
MATERIALS:
• Two People
• Tape Measure
• Wood Board (Scrap)
• Wrenches: (One) 3/8”, 5/16”,
(Two) 7/16”, 1/2”, 9/16”,
3/4”, or Large and Small
Adjustable Wrenches
• Sawhorse or Support Table
• Step Ladder 8 ft. (2.4 m)
• Garden Hose or
Sand, 225 lb. (102 kg)
• Hammer
• Tape
• Phillips Screwdriver
• Safety Goggles
© COPYRIGHT 2003 by HUFFY SPORTS
2
P/N 214949B 05/03
00 800 555 85234
ESPAÑOL
INSTRUCCIONES DE SEGURIDAD
La mayoría de las lesiones son ocasionadas por el mal uso y/o por no seguir las
instrucciones. Tenga cuidado cuando use esta unidad.
• Tenga mucho cuidado si utiliza una escalera durante el montaje.
• Se recomienda que dos (2) personas realicen esta operación.
• Revise regularmente la base para detectar si tiene fugas. Las fugas lentas podrían
causar que el sistema se ladeara inesperadamente.
• Ajuste adecuadamente las secciones del poste (si es aplicable). Si no lo hace, las
secciones del poste se podrían separar durante el juego y/o el transporte del
sistema.
• El clima, la corrosión y el uso inadecuado podrían ocasionar la falla del sistema.
• La altura mínima de operación es de 1.98 m (6’6”) hasta la parte inferior del
respaldo.
• Este equipo está diseñado solamente para uso recreativo en el hogar, NO para
juego competitivo excesivo.
• Lea y entienda la etiqueta de advertencia adherida en el poste. La etiqueta se
muestra en la página 8.
• La vida útil de su poste de baloncesto depende de muchas condiciones. El clima,
la colocación del poste, la ubicación del poste y la exposición a sustancias
corrosivas tales como pesticidas, herbicidas o sales son todas condiciones
importantes.
• Si requiere asistencia técnica, comuníquese con Huffy Sports.
• Se recomienda la supervisión de un adulto cuando se ajuste la altura.
SI NO SE SIGUEN ESTAS INSTRUCCIONES DE SEGURIDAD SE PUEDE
OCASIONAR UNA LESIÓN GRAVE, DAÑOS A LA PROPIEDAD Y ANULACIÓN DE
LA GARANTÍA.
El propietario debe asegurarse que todos los jugadores sepan y obedezcan estas
reglas para la operación segura de la unidad.
Para asegurar su seguridad, no intente montar este sistema sin seguir las
instrucciones cuidadosamente. Revise toda la caja y el interior del material de
embalaje para ver si hay partes. Antes de comenzar el montaje, lea las
instrucciones e identifique las partes usando el identificador de la tornillería y la
lista de partes que vienen en este documento. El montaje completo y el uso y la
supervisión adecuados son esenciales para la operación correcta y para reducir el
riesgo de sufrir accidentes o lesiones. Existe una alta probabilidad de sufrir
lesiones graves si este sistema no se instala, mantiene y opera adecuadamente.
Para obtener más información sobre el montaje, ubicación, uso y mantenimiento
adecuados visite el sitio en la red de The American Basketball Council en
http://www.smarthoops.com
HERRAMIENTAS NECESARIAS
PARA LA INSTALACIÓN:
• Dos personas
• Tablero de madera (sobrante)
• Cinta para medir
• Escalera de 2.4 m (8 pies)
• Cinta
• Manguera de jardín o163 kg.
(360 libras) de arena
• Martillo
• Llaves: (dos) 1/2” (Una) 9/16”, o
llaves ajustables grandes y
pequeñas (Se recomienda un
receptáculo profundo de 9/16”
con extensión)
• Caballete o mesa de apoyo
SI NO SE OBSERVAN ESTAS ADVERTENCIAS SE
PUEDEN OCASIONAR LESIONES GRAVES Y/O DAÑOS
MATERIALES
El propietario debe asegurarse de que todos los
jugadores onozcan y sigan estas reglas para la
operación segura del istema.
• NO SE CUELGUE del borde ni de ninguna parte del
sistema, inclusive el respaldo, abrazaderas de soporte o
red.
• Durante el juego, especialmente cuando se realizan
actividades de disparo de pelota, el jugador debe
mantener la cara alejada del respaldo, borde y red. Si los
dientes o la cara entran en contacto con el respaldo, el
borde o la red se podría ocasionar una lesión grave.
• No se deslice, suba, mueva ni juegue sobre la base y/o
en el poste.
• Después de terminar el montaje, llene completamente el
sistema con agua o arena y fíjelo al piso. Nunca deje el
sistema en una posición vertical con la base vacía, ya
que se podría ladear y causar lesiones.
• Cuando ajuste la altura o mueva el sistema, mantenga las
manos y los dedos alejados de las partes movibles.
• No permita que los niños muevan o ajusten el sistema.
• Durante el juego no use bisutería (anillos, relojes,
collares, etc.) Los objetos pueden enredarse en la red.
• La superficie debajo de la base debe estar lisa y no tener
grava ni otros objetos filosos. Las perforaciones
ocasionan fugas y éstas podrían ocasionar que el
sistema se ladee.
• Mantenga el material orgánico alejado de la base del
poste. El césped, desperdicios, etc. podrían causar
corrosión y/o deterioro.
• Verifique que el sistema del poste no esté corroído
(oxidación, corrosión, astillamiento) y si es así vuélvalo a
pintar con pintura de esmalte para exteriores. Si la
oxidación penetró en el acero en algún punto, reemplace
inmediatamente el poste.
• Antes de usar el sistema verifique que tenga el balasto
adecuado, que la tornillería no esté floja y que no esté
excesivamente desgastado ni tenga signos de corrosión.
Si presenta alguna de estas condiciones repárelo antes
de usarlo.
• Revise la estabilidad del sistema antes de usarlo.
• No use el sistema durante condiciones de mucho viento
y/o condiciones climáticas severas, el sistema se puede
ladear. Coloque el sistema en posición de
almacenamiento y/o en un área protegida del viento y
alejado de la propiedad personal o cables suspendidos.
• Nunca juegue en equipo dañado.
• Consulte el manual de instrucciones para ver la
instalación y mantenimiento adecuados.
• Cuando mueva el sistema tenga cuidado de que el
mecanismo no se desplace.
• Siempre mantenga tapada la sección superior del poste.
• No permita que el agua del tanque se congele. En
condiciones climáticas bajo cero añada un
anticongelante no tóxico, arena, o vacíe completamente
el tanque y almacene el sistema. (No use sal.)
• Tenga mucho cuidado si coloca el sistema en una
superficie con pendiente. El sistema se puede ladear más
fácilmente.
ADVERTENCIA
201241 2/99
MOVIMIENTO DEL SISTEMA
1. Mientras sujeta el poste, gire el sistema de
baloncesto hacia adelante hasta que las
ruedas toquen el piso.
2. Mueva el sistema de baloncesto hasta la
ubicación deseada.
3. Con cuidado gire el sistema de baloncesto
hasta que quede en posición vertical.
4. Vuelva a colocar el sujetador del sistema al
piso y verifique la estabilidad del sistema.
Las identificaciones de la NBA y de los equipos individuales miembros de la NBA que se reproducen en
este producto, son marcas comerciales y diseños protegidos por derechos de autor y/u otras formas de
propiedad intelectual. Estas identificaciones son propiedad exclusiva de NBA Properties, Inc. y de los
equipos respectivos miembros de la NBA, y no se pueden usar, total ni parcialmente, sin el
consentimiento por escrito de NBA Properties, Inc.
ESCRIBA SU NÚMERO DE MODELO:___________
Customer Service Center • N53 W24700 South Corporate Circle • Sussex, WI 53089 • U.S.A.
Una Compañía Huffy
Manual del propietario del sistema portátil de baloncesto
!Usted es importante para Huffy!
Agradecemos que haya comprado uno de nuestros muchos productos de calidad. Estamos seguros que quedará muy satisfecho con su selección. Aunque hemos tenido un gran cuidado y puesto un gran esfuerzo
en la fabricación de cada uno de nuestros productos, pueden ocurrir problemas. Para asegurar la resolución rápida y adecuada de cualquier problema, o para recibir respuesta a cualquier pregunta, por favor
póngase en contacto con el Centro de Servicio al Cliente. El servicio será más rápido si proporciona su número de modelo (se encuentra en la caja).
Por favor escriba su número de modelo en el espacio que se encuentra arriba.
AVISO PARA LAS
PERSONAS QUE VAN A
MONTAR EL SISTEMA
TODOS los sistemas de baloncesto de
Huffy Sports, inclusive los que se usan
para EXHIBICIÓN, SE DEBEN montar y
estabilizar con arena y o agua de
acuerdo con las instrucciones. Si no se
siguen las instrucciones se podría
ocasionar una LESIÓN SERIA. NO es
aceptable improvisar un sistema de
compensación de peso.
TUFF STUFF® y las marcas comerciales asociadas son propiedad de Mattel, Inc. y se usan con su permiso. Mattel, Inc. y
todas sus compañías afiliadas o subsidiarias de ninguna forma patrocinan, aprueban ni autorizan los productos Huffy.
3
05/03 P/N 214949B
SUIVEZ CES AVERTISSEMENTS SOUS PEINE
DE PROVOQUER DES BLESSURES GRAVES ET/OU DES DEGATS
MATERIELS.
Le propriétaire du système doit s’assurer que tous les joueurs
connaissent et suivent ces
consignes d’utilisation sûre du système.
• NE VOUS SUSPENDEZ PAS sur le cerceau ou sur toute autre partie du
système, y compris le panneau, les supports ou le filet.
• Durant le jeu, en particulier lorsque vous faites des smash, gardez le visage
à l’écart du panneau, du cerceau et du filet. Des blessures graves sont
possibles si les dents ou le visage venaient à entrer en contact avec le
panneau, le cerceau ou le filet.
• Ne glissez et ne montez pas sur le socle et/ou le poteau, ne les secouez pas
et ne jouez pas dessus.
• Une fois le montage terminé, remplissez complètement le système de sable
et fixez-le au sol à l’aide du piquet. Ne laissez jamais le système à la
verticale sans avoir lesté le socle, car il risquerait de se renverser et de
causer des blessures.
• Lorsque vous réglez la hauteur ou que vous déplacez le système, gardez
les mains et les doigts à l’écart des pièces en mouvement.
• Ne laissez pas des enfants déplacer ou régler le système.
• Avant le jeu, retirez vos bijoux (bagues, montres, colliers, etc.). Ces objets
risquent de se prendre dans le filet.
• La surface sous le socle doit être lisse et sans gravier ou autres objets
pointus. Les perforations causeront des fuites et risquent de faire basculer
le système.
• Maintenez les substances organiques à l’écart du socle du poteau. L’herbe,
les déchets, etc. risquent de causer la corrosion et/ou la détérioration du
système.
• Vérifiez l’état du système (signes de corrosion comme rouille, piqûres,
écaillage) et repeignez avec de la peinture émail pour extérieur. Si la rouille
a pénétré en tout point de l’acier, remplacez immédiatement le poteau.
• Vérifiez le système avant chaque utilisation (lest, visserie mal serrée, usure
excessive et signes de corrosion) et réparez avant utilisation.
• Vérifiez la stabilité du système avant chaque utilisation.
• N’utilisez pas le système les jours de vent fort et/ou de tempête ; il risque
de se renverser. Placez le système en position de stockage et/ou dans un
endroit protégé du vent et à l’écart de biens personnels et/ou de fils
suspendus.
• Ne jouez jamais sur du matériel abîmé.
• Pour les instructions d’installation et d’entretien, reportez-vous au guide
fourni.
• Lorsque vous déplacez le système, soyez prudent pour empêcher le
mécanisme de se déséquilibrer.
• Maintenez le poteau bouché à tout moment.
• Soyez extrêmement prudent si vous placez le système sur une déclivité. Le
système risque de se renverser plus facilement.
AVERTISSEMENT
In the U.S.: 1-800-558-5234 and Canada: 1-800-284-8339
201243 2/99
NOTEZ ICI VOTRE NUMÉRO DE
MODÈLE:
___________
Customer Service Center
N53 W24700 South Corporate Circle
Sussex, WI 53089
U.S.A.
Une Entreprise Huffy
Equipement de basketball portable avec système d'élévation -
Manuel de l'utilisateur
Numéro d’appel gratuit du service après-vente. Etats-Unis et Canada uniquement: 1-800-284-8339
Numéro vert international (France, Suisse) : 00 800 555 85234
FRANÇAIS
Aux Etats-Unis et au Canada
uniquement:
IMPORTANT!
En cas de questions... pas besoin
de retourner au magasin!Nous vous
remercions d’avoir fait l’achat d’un de
nos articles. Nous sommes certains
qu’il vous apportera satisfaction.
Malgré l’attention que nous portons
aux détails, il se peut qu’un problème
surgisse de temps à autre. En cas de
questions ou pour rectifier tout
problème, veuillez contacter notre
service après-vente au numéro vert ci-
dessous. Pour faciliter le service
après-vente, veuillez avoir le
numéro de modèle (se trouvant sur
la boîte) et la notice de mode
d’emploi sous la main lorsque vous
nous contactez. Ecrire le numéro
du modèle dans la case prévue à
cet effet ci-dessus
.
OUTILS ET MATERIEL REQUIS:
• Deux personnes
• Clés : (une) 3/8”, 5/16”,
(deux) 7/16", 1/2", 9/16", 3/4"
ou clés réglables grande et
petite
• Banc de sciage ou table de
soutien
• Echelle de 2,4 m (8 ft.)
• Tuyau d'arrosage ou sable
(102 kg) (225 lb.)
• Marteau
• Ruban adhésif
• Tournevis cruciforme
• Mètre
• Planche en bois (chute)
• Lunettes de sécurité
CONSIGNES DE SÉCURITÉ
La plupart des blessures sont provoquées par une mauvaise utilisation et/ou le
non respect des instructions. Faire preuve de prudence lors de l'utilisation de ce
matériel.
• Si vous utilisez une échelle en cours de montage, soyez extrêmement
prudent.
• Pour cette opération, il est recommandé de s’y prendre à deux (2).
• Vérifiez régulièrement le socle pour vous assurer qu’il ne fuit pas. Les
petites fuites risquent d’entraîner le basculement intempestif du système.
• Emboîtez correctement les sections de poteau (le cas échéant). Elles
risquent sinon de se déboîter en cours de jeu et/ou de transport du
système.
• Le climat, la corrosion ou une mauvaise utilisation risquent de provoquer
la panne du système.
• La hauteur minimale d’utilisation est de 1,98 m (6’ 6”) jusqu’à la base du
panneau.
• L’équipement est prévu pour une utilisation ludique à domicile
seulement et NON PAS pour un jeu extrêmement compétitif.
• Lisez et comprenez l’étiquette d’avertissement fixée au poteau.
L’étiquette se trouve à la page 9.
• La durée de vie de votre poteau de basket-ball dépend de bien des
facteurs. Le climat, la position du poteau, son emplacement, son
exposition à des agents corrosifs tels que des pesticides, des herbicides
ou des sels sont tous importants.
• Pour toute assistance technique, contactez Huffy Sports.
• La supervision d’un adulte est recommandée pour le réglage de la
hauteur.
LE NON RESPECT DE CES CONSIGNES DE SÉCURITÉ RISQUE DE
PROVOQUER DE GRAVES BLESSURES ET DES DÉGÂTS MATÉRIELS, ET
ANNULE EN OUTRE LA GARANTIE.
Le propriétaire du matériel doit veiller à ce que les joueurs connaissent et
respectent les règles de sécurité concernant ce matériel.
Pour garantir votre sécurité, n'essayez pas de monter ce système sans
suivre scrupuleusement les instructions. Vérifiez la boîte dans son
intégralité, ainsi que l'intérieur des emballages pour localiser toutes les
pièces. Avant de commencer le montage, lisez les instructions et identifiez
les pièces à l'aide de l'identificateur du matériel et de la liste des pièces se
trouvant dans ce document. Un montage complet et correct, ainsi qu'une
utilisation adéquate, sous supervision, sont indispensables à un
fonctionnement correct et permettent de diminuer les risques d'accident ou
de blessures. Des blessures graves sont à prévoir si ce système n'est pas
correctement installé, entretenu ou utilisé.
Pour des informations complémentaires sur le montage, la position,
l’utilisation et l’entretien corrects, rendez-vous au site Web de l’American
Basketball Council au http://www.smarthoops.com.
POUR REGLER LE PANNEAU :
1. Tout en tenant la poignée, retirez
la broche.
2. Montez ou abaissez le système
élévateur jusqu’à la hauteur de
votre choix.
3. Remettez la goupille à sa place en
l’enfonçant à fond, pour bloquer le
système à la hauteur désirée.
DEPLACEMENT DU SYSTEME
1. Réglez le panneau de basket-ball
à la hauteur la plus basse.
2. Tournez les poignées vers l’avant
jusqu’à ce que les roues
s’enclenchent sur le sol.
3. Amenez le système à l’endroit
désiré.
4. Ramenez la poignée à sa position
de départ.
5. Rattachez la fixation au sol et
vérifiez la stabilité du système.

4
P/N 214949B 05/03
Universelle gebührenfreie Telefonnummer
(Deutschland, Schweiz): 00 800 555 85234
DEUTSCH
SICHERHEITSHINWEISE
Die meisten Verletzungen werden durch einen unvorschriftsmäßigen Gebrauch und/oder ein
Mißachten der Sicherheitshinweise verursacht. Beim Gebrauch dieser Vorrichtung Vorsicht
walten lassen.
• Bei Gebrauch einer Leiter während des Zusammenbaus extrem vorsichtig
vorgehen.
• Diese Arbeit sollte von zwei (2) Personen ausgeführt werden.
• Den Sockel regelmäßig auf Leckstellen untersuchen. Langsam austretende
Füllmittel können ein unerwartetes Umkippen des Systems verursachen.
• Die einzelnen Stangenteile richtig zusammenfügen (falls anwendbar). Andernfalls
können sich die Stangenteile beim Spielbetrieb und/oder während des Transports
des Systems voneinander lösen.
• Klimatische Bedingungen, Korrosion oder Fehlgebrauch kann zu Systemdefekten
führen.
• Die Mindestspielhöhe beträgt 1,98 m (6,6 Fuß) bis zum unteren Rand der
Korbwand.
• Diese Vorrichtung ist nur für den Freizeitgebrauch zu Hause, NICHT aber für ein
übermäßig wettkampfbetontes Spiel vorgesehen.
• Den an der Stange angebrachten Warnaufkleber gründlich lesen. Eine Abbildung
dieses Aufklebers befindet sich auf Seite 10.
• Die Lebensdauer Ihrer Basketballstange hängt von zahlreichen äußeren
Umständen ab. Klimabedingungen, Plazierung und Aufstellort der Stange,
Angriffe durch korrodierende Substanzen wie Ungeziefer- und
Pflanzenvernichtungsmittel oder Salz – all das sind wichtige Faktoren.
• Technische Unterstützung kann direkt von Huffy Sports angefordert werden.
• Höhenverstellungen sollten von Erwachsenen beaufsichtigt werden.
EIN MIßACHTEN DIESER SICHERHEITSHINWEISE KANN SCHWERE
VERLETZUNGEN ODER SACHSCHÄDEN ZUR FOLGE HABEN UND MACHT DIE
GARANTIEERKLÄRUNG UNWIRKSAM.
Der Besitzer muß gewährleisten, daß alle Spieler mit den Vorschriften für eine
sichere Bedienung dieser Vorrichtung vertraut sind und diese beachten.
Aus Sicherheitsgründen sollte nicht versucht werden, dieses System ohne
sorgfältige Beachtung der Anleitung zusammenzubauen. Dn ganzen Karton und alle
Verpackungsmaterialien nach Teilen überprüfen. Vor Beginn der Montage die
Anleitung durchlesen und die einzelnen Teile anhand des Teileschlüssels und der
Teileliste in diesem Dokument bestimmen. Eine vorschriftsmäßige und vollständige
Montage, Benutzung und Aufsicht sind für den richtigen Betrieb und zur
Reduzierung des Unfall- oder Verletzungsrisikos absolut notwendig. Bei
unsachgemäßer Installation und Instandhaltung und bei einem nicht
ordnungsgemäßen Betrieb besteht eine hohe Wahrscheinlichkeit schwerer
Verletzungen.
Weitere Informationen über Zusammenbau, Aufstellung, richtige Verwendung und
Wartung sind von der Webseite des „American Basketball Council” unter der
Adresse http://www.smarthoops.com zu beziehen.
EIN MISSACHTEN DIESER WARNUNG KANN ZU
SCHWEREN VERLETZUNGEN UND/ODER SACHSCHÄDEN
FÜHREN UND MACHT DIE GARANTIE UNWIRKSAM
Der Eigentümer muß sicherstellen, daß alle Spieler diese Regeln für
einen sicheren Betrieb des Systems kennen und befolgen.
• NICHT am Korbrand oder irgendeinem anderen Teil des Systems,
einschl. Korbwand, Stützstreben oder Netz HÄNGEN.
• Während des Spielbetriebs, besonders bei Slam-Dunk-Manövern,
müssen die Spieler ihr Gesicht von Korbwand, Korbrand und Netz
fernhalten. Der Kontakt von Zähnen/Gesicht mit der Korbwand, dem
Korbrand oder dem Netz kann schwere Verletzungen zur Folge haben.
• Nicht auf dem Sockel und/oder der Stange herumrutschen, klettern,
daran rütteln oder damit spielen.
• Nach dem Zusammenbau das System ganz mit Wasser oder Sand füllen
und im Boden verankern. Das System niemals in aufrechter Position
stehen lassen, ohne den Sockel zu beschweren, da es andernfalls
umkippen und Verletzungen verursachen kann.
• Beim Einstellen der Höhe oder beim Transport des Systems Hände und
Finger von beweglichen Teilen fernhalten.
• Kindern sollte das Verschieben oder Einstellen des Systems nicht
gestattet werden.
• Beim Spielen keinen Schmuck (Ringe, Armbanduhren, Halsketten usw.)
tragen. Gegenstände dieser Art können sich im Netz verfangen.
• Die Oberfläche unter dem Sockel muß glatt und frei von Kies oder
anderen scharfkantigen Gegenständen sein. Löcher können zu Lecks
und somit zu einem Umkippen des Systems führen.
• Organische Materialien vom Stangensockel fernhalten. Gras, Abfälle,
usw. können Korrosion und/oder Abbauerscheinungen verursachen.
• Das Stangensystem auf Anzeichen von Korrosion (Rost, Narbenbildung,
Abblättern) untersuchen und mit Emailaußenfarbe neu lackieren. Wenn
sich Rost an irgendeiner Stelle durch den Stahl durchgefressen hat, ist
die Stange sofort auszutauschen.
• Das System vor jeder Benutzung auf den richtigen Ballast, lose
Befestigungsteile, übermäßige Abnutzungserscheinungen und
Anzeichen von Korrosion untersuchen; vor jedem Einsatz
entsprechende Korrekturmaßnahmen bzw. Reparaturen durchführen.
• Die Stabilität des System vor jedem Gebrauch überprüfen.
• Das System nicht bei windigen und/oder unwirtlichen
Witterungsverhältnissen benutzen, da es unter diesen Umständen
umkippen kann. Das System in die Lagerposition versetzen und/oder in
einen windgeschützten Bereich bringen, an dem es keine Sachschäden
verursachen kann bzw. wo keine Oberleitungen vorhanden sind.
• Niemals an bzw. mit einer beschädigten Ausrüstung spielen.
• Die ordnungsgemäße Installation und Wartung ist dem
Gebrauchshandbuch zu entnehmen.
• Beim Transport des Systems darauf achten, daß sich der Mechanismus
nicht verschiebt.
• Das obere Stangenende muß jederzeit mit einer Kappe abgedeckt sein.
• Das Wasser im Tank darf keinesfalls gefrieren. Bei Temperaturen unter
dem Nullpunkt ungiftiges Gefrierschutzmittel oder Sand hinzufügen oder
den Tank völlig entleeren und lagern. (Kein Salz verwenden.)
• Beim Aufstellen des Systems auf einer geneigten Fläche mit großer
Vorsicht vorgehen. Das System kann unter diesen Umständen leichter
umkippen.
WARNUNG
201241 2/99
TRANSPORT DES SYSTEMS
1. Die Stange festhalten; zur selben
Zeit das Basketballsystem nach
vorne drehen, bis die Räder den
Boden berühren.
2. Das Basketballsystem zum
gewünschten Aufstellort fahren.
3. Das Basketballsystem vorsichtig in
eine aufrechte Position drehen.
4. Die Bodensperre wieder anbringen,
und eine Stabilitätsprüfung für das
System durchführen.
ZUR INSTALLATION
ERFORDERLICHE WERKZEUGE:
• Zwei Personen
• Holzbrett (Ausschuß)
• Maßband
• Stufenleiter, 2,4 m (8 Fuß)
• Klebeband
• Gartenschlauch oder Sand (163
kg) (360 US-Pfd.)
• Hammer
• Schraubenschlüssel: (Zwei) 1/2
Zoll, (Ein), 9/16 oder verstellbare
große und kleine
Schraubenschlüssel (9/16-Zoll-
Einsatz mit Verlängerung
empfohlen)
• Sägebock oder Stützsch
NOTIEREN SIE SICH IHRE MODELL NUMMER:_______
Customer Service Center • N53 W24700 South Corporate Circle • Sussex, WI 53089 • U.S.A.
A Huffy Company
Tragbares Basketball-System Benutzerhandbuch
Huffy steht zur Qualität seiner Produkte!
Wir freuen uns, daß Sie eines unserer ausgezeichneten Produkte gewählt haben und sind zuversichtlich, daß Sie mit diesem Kauf sehr zufrieden sein werden. Obwohl unsere Produkte mit der größten
Sorgfalt hergestellt werden, können bisweilen Probleme auftreten. Bitte wenden Sie sich in diesen Fällen an unser Kundendienstzentrum, damit wir Ihr Problem schnell und richtig beheben oder Ihre
Fragen beantworten können. Wir können Ihnen schneller helfen, wenn Sie die Modellnummer griffbereit haben (siehe Kartonaufdruck). Bitte tragen Sie diese Nummer im dafür vorgesehenen Feld weiter
oben ein.
HINWEIS AN DAS
MONTAGEPERSONAL
ALLE Basketballsysteme
von Huffy Sports, einschließlich der
zu Demonstrationszwecken
benutzten Systeme, müssen gemäß
den Montageanleitungen
zusammengebaut und mit Sand oder
Wasser beschwert werden. Ein
Mißachten dieser Anleitungen kann
SCHWERE VERLETZUNGEN zur
Folge haben. Zum Beschweren darf
NICHT zu irgendwelchen
Notbehelfsmaßnahmen gegriffen
werden.
Die auf diesem Produkt reproduzierten Erkennungszeichen der NBA und der einzelnen NBA-
Mitgliedsmannschaften sind Warenzeichen und urheberrechtlich geschützte Designs und/oder
andere Formen geistigen Eigentums, die ausschließliches Eigentum von NBA Properties, Inc.
und der jeweiligen NBA-Mitgliedsmannschaften sind, und die weder als Ganzes noch zum Teil
ohne die schriftliche Einwilligung von NBA Properties, Inc., verwendet werden dürfen.
TUFF STUFF® und die damit verbundenen Warenzeichen sind Eigentum von Mattel, Inc., und werden
mit deren Genehmigung verwendet. Huffy-Produkte werden von Mattel oder deren verbundene oder
Tochtergesellschaften in keiner Weise gesponsort, unterstützt oder autorisiert.
5
05/03 P/N 214949B
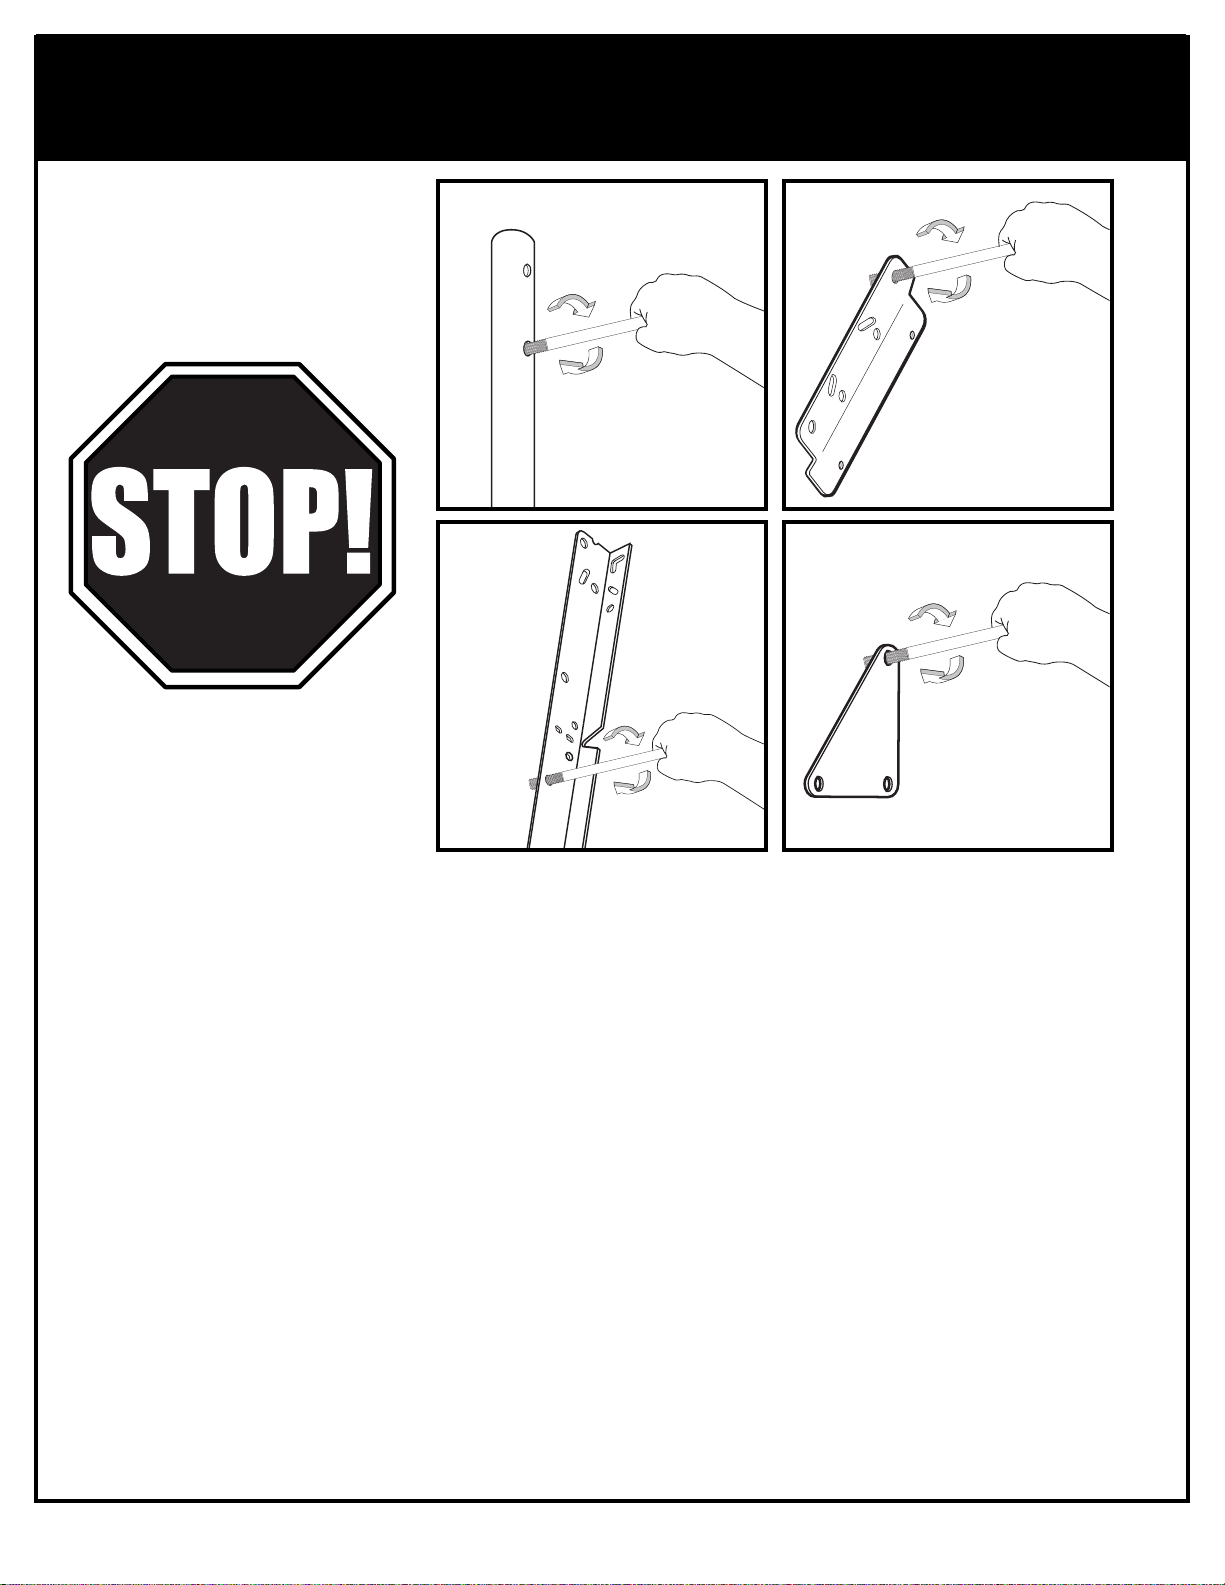
BEFORE YOU START!
To ensure optimal playability of backboard system, a close tolerance fit between the elevator
components and hardware is required. Test fit large bolts into large holes of elevator tubes,
backboard brackets and triangle plates. Carefully rock them in a circular motion to ream out
any excess paint from holes if necessary.
AVANT DE COMMENCER !
Pour garantir l'utilisation optimale du panneau, les composants du système élévateur et la visserie doivent être bien
ajustés (serrés). À titre d'essai, insérez les gros boulons dans les gros trous des tubes du système élévateur, des supports
du panneau et des plaques triangulaires. Basculez-les avec précaution en imprimant un mouvement circulaire pour
éliminer l'excédent de peinture, si nécessaire.
¡ANTES DE COMENZAR!
Para asegurar el óptimo rendimiento del sistema del respaldo en el juego, se requiere un ajuste de tolerancia estrecha
entre los componentes del elevador y el herraje. Pruebe el ajuste de los pernos grandes en los orificios grandes de los
tubos elevadores, soportes del respaldo y placas triangulares. Cuidadosamente muévalos en círculos para eliminar
cualquier exceso de pintura, si es necesario.
VORBEREITENDE MASSNAHMEN
Um sicherzustellen, dass das Korbwandsystem optimal für den Spielbetrieb geeignet ist, müssen die Komponenten der
Verlängerungsvorrichtung und die verschiedenen Befestigungsteile fest miteinander verschraubt werden. Große Schrauben
zur Probe in die großen Löcher der Verlängerungsrohre, Korbwandklammern und Dreiecksplatte stecken und diese
vorsichtig in einer Kreisbewegung hin- und herbewegen, um eventuelle Farbrückstände aus den Bohrungen zu entfernen.
6
P/N 214949B 05/03
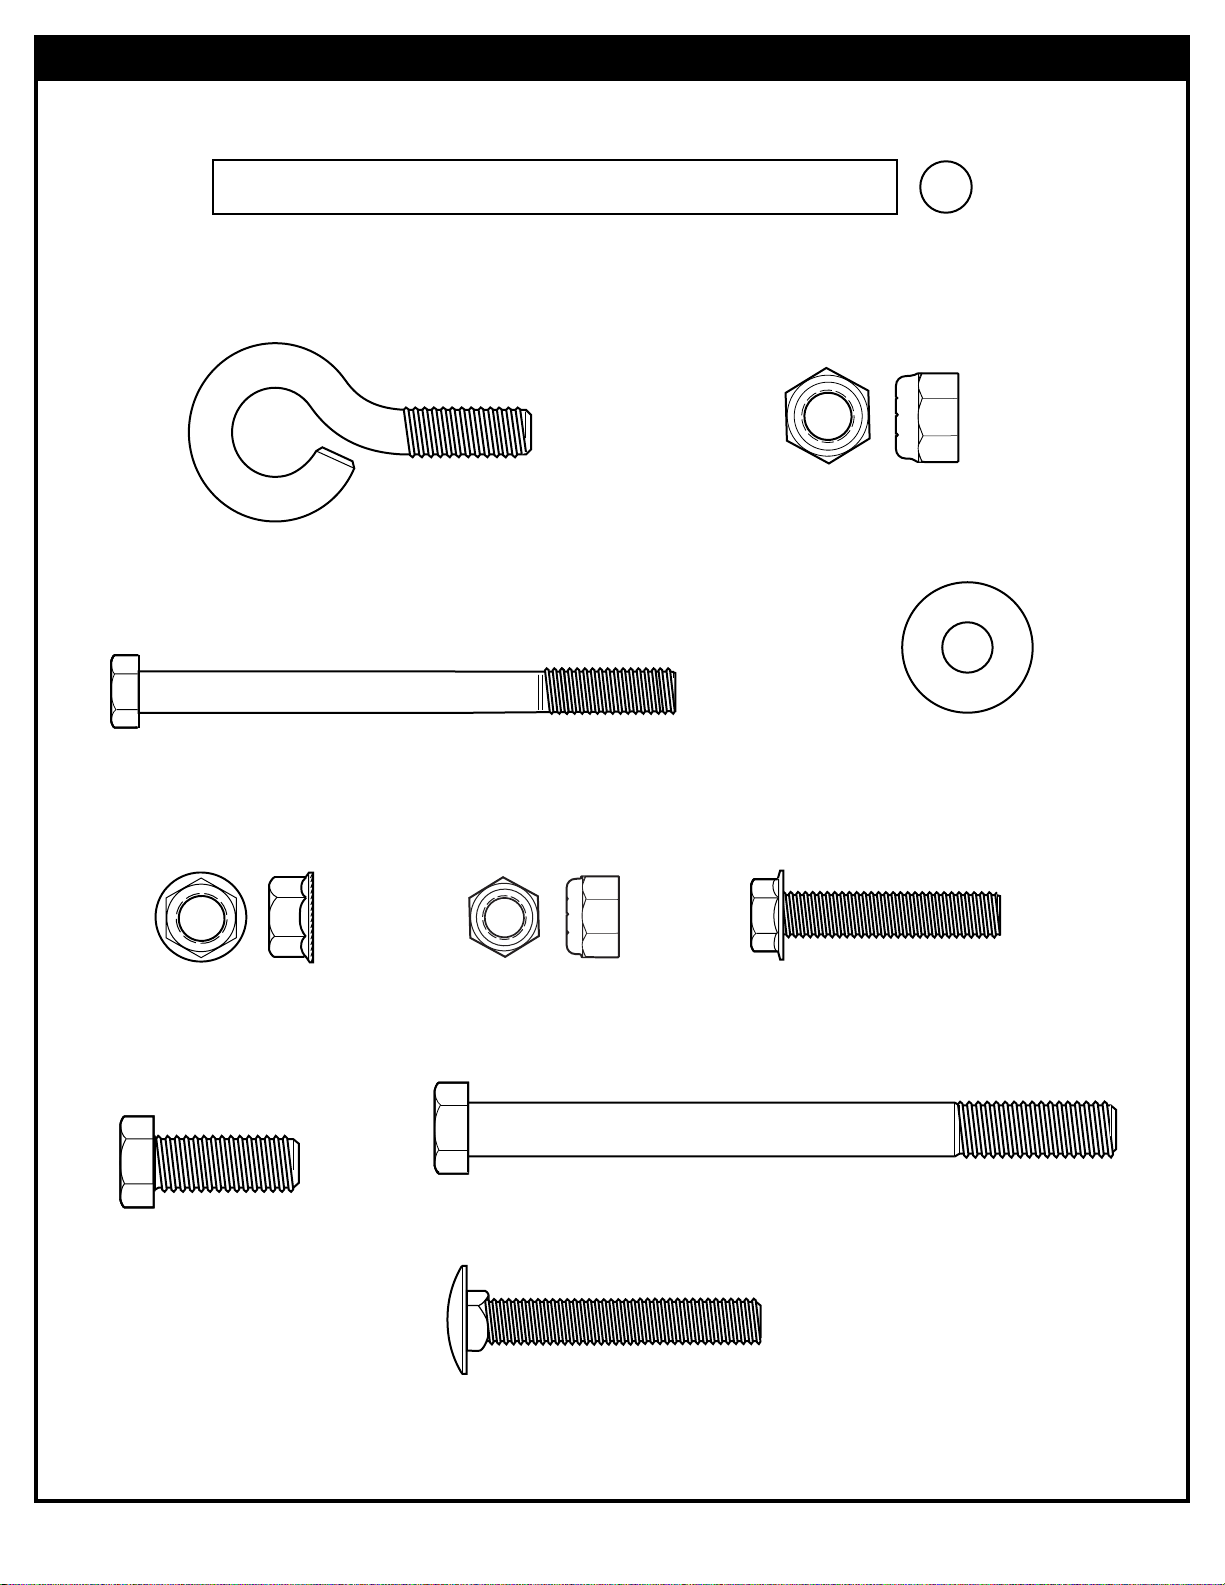
Item #13 (10)*
Item #10 (3)
Item #12 (1)
Item #14 (13)*
Item #15 (1)
Item #16 (2)
Item #8 (1)
Item #7 (1)
Item #19 (1)
Item #18 (2)
Item #22 (4)
HARDWARE IDENTIFIER (CONTINUED)
* You may have extra parts with this model.
HARDWARE IDENTIFIER (CONTINUED)
7
05/03 P/N 214949B
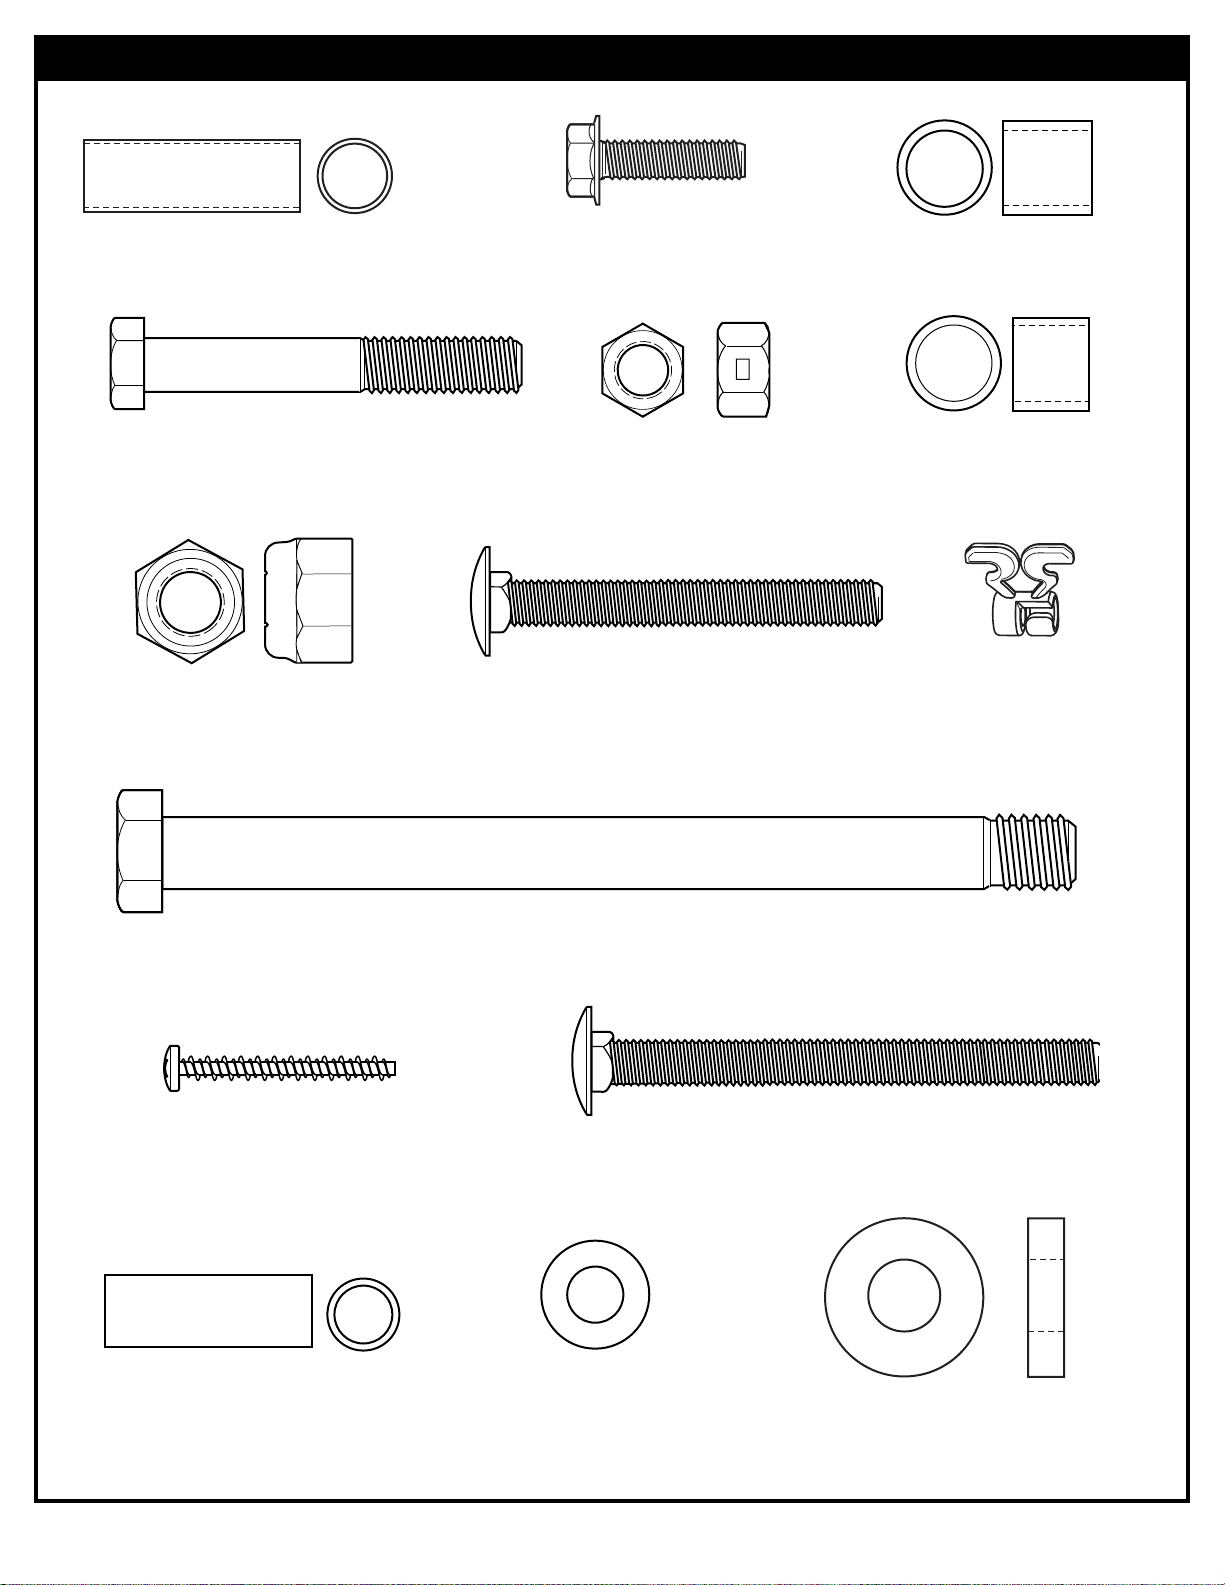
* You may have extra parts with this model.
HARDWARE IDENTIFIER
Item #30 (2)
Item #31 (4)
Item #32 (4)
Item #34 (5)
Item #37 (4)
Item #38 (6)
Item #39 (1)
Item #54 (2)
Item #50 (1)
Item #55 (2)
Item #57 (4)
Item #33 (4)
Item #36 (6)
Item #64 (2)
Item #43 (12)
8
P/N 214949B 05/03
INSTRUCTIONS
IMPORTANT! WRITE MODEL NUMBER FROM BOX ONTO PAGE 1
OF THIS OWNERS MANUAL
1. Install wheel axle (6) through wheel carriage (63) and install wheels
(5) onto wheel axle (6) with spacers (64) as shown. Secure wheel
bracket as shown, a deep socket is recommended.
IMPORTANT! DO NOT OVER TIGHTEN.
2. Mark pole sections with tape as shown.
3. IMPORTANT! Center alignment slot of middle pole section (2)
in a lower hole of top pole section (1) as shown. While
maintaining alignment, bounce pole top (1) and middle section (2)
together as shown until they no longer move toward taped reference
mark. Upright assembly. NOTE: Pole sections should have a 3-1/2”
(9 cm) minimum overlap.
4. IMPORTANT! Center alignment slot of lower pole section (3) in
a lower hole of middle pole section (2) as in step 3. While
maintaining alignment, bounce assembly and lower section (3)
together as shown until they no longer move toward taped reference
mark. NOTE: Pole sections should have a 3-1/2” (9 cm) minimum
overlap.
5. Install rod (7) through holes in bottom pole section (3) and
eyebolt (8).
6. Insert pole assembly into tank assembly as shown. Secure pole
assembly with upper pivot bracket (9) and lock nut (10).
IMPORTANT! Two people recommended for this step.
7. Secure base struts (11) to pole using bolt (12) washers (13) and nut
(15) as shown.
WARNING: TIGHTEN BOLT (12) IN LOCK NUT (15) UNTIL
FLUSH (EVEN) WITH LOCK NUT’S OUTER EDGE.
Rotate the non-secured ends of base struts (11) as shown.
8. Secure base struts (11) to base using bolt (16) washers (13)
and nut (14).
9. Insert carriage bolts (18) into middle set of holes on wheel bracket
(21) as shown. Attach lower pivot bracket (17) to wheel bracket
using bolt (18), washers (13), disc (28), and nut (10) as shown.
Tighten completely.
10. Attach handle bar (20) to wheel bracket assembly using nuts (14) as
shown.
11. Install wheels (3) onto axle (24) and wheel bracket assembly with
push caps (25) as shown.
12. Attach wheel bracket assembly to base assembly using bolt (19),
washers (13), and nut (10) as shown.
13. Carefully reposition entire assembly as shown.
14. Attach front of plastic handle (26) to back of plastic handle (23)
around handle bar (20) using self- tapping screws (27) as shown.
IMPORTANT! Front of plastic handle (26) should face outward,
away from pole assembly.
15. Insert bolts (66) through plastic handle assembly, handle bar (20),
and attach nuts (14) as shown. Tighten completely.
IMPORTANT! Two people recommended for this step.
16. Install pole mount bracket (53) with carriage bolts (54) as shown.
Tighten flange nuts (14) completely.
17. Attach spacers (55, 56) to pole mount bracket (53) with bolts (33),
washers (57), and nuts (34) as shown. IMPORTANT! Tighten until
washers (57) no longer move.
18. Attach covers (58) onto pole mount bracket (53) with carriage
bolt (39) and nut (14) as shown. IMPORTANT! Loop end of pin
lanyard (59) over carriage bolt (39) during this assembly.
NOTE: Assemble lanyard (27) to locking pin (28) as shown.
19. Apply logo and height indicator labels (52) to adjustment rod (51) as
shown. Attach handle parts (48, 49) to adjustment rod (51) with
screw (50), carriage bolts (22), and flange nuts (14) as shown.
NOTE: Holes in adjustment rod allow for either rear access or side
access.
20. Insert handle assembly through pole mount assembly as shown.
Lock pole assembly in place at the 10’ (3.05 m) mark with
pin (60).
21. Attach backboard support brackets (29) to the backboard frame
using bolts (33), spacers (30), and nuts (34) as shown.
22. Attach lower elevator tubes (35) and spring (42) to backboard
support brackets (29) using spacers (32), bolt (36), and nut (38) as
shown. NOTE: Rim mounting nuts and bolts (31) supplied with rim
hardware.
23. Attach upper elevator tubes (40) to backboard support
brackets (29) using spacers (32), bolt (36), and nut (38) as shown.
24. Support pole on sawhorse. Attach backboard assembly to top pole
section (1). Install pole cap (41).
IMPORTANT! Two people recommended for this step.
Use caution; elevator assembly is heavy.
25. Install handle assembly to lower elevator tubes (35) using
bolt (36), spacers (37) and nut (38). NOTE: Before going onto the
next step, set adjustment system to the 10’ (3.05m) setting.
26. Insert bolt (36) through the left side upper elevator tube (40), then
stretch spring (42) onto bolt (36). Insert bolt (36) through the right
side upper elevator tube (40) and secure with nut (38).
WARNING: USE EYE PROTECTION WHEN INSTALLING
SPRINGS.
27. Roll completed assembly to desired playing area. Secure assembly
to ground using T-Strap (45) and tie down stake (46). Fill tank with
34 gallons of water. IMPORTANT! Add two gallons (7.6 Liters) of
non-toxic antifreeze in sub-freezing climates.
WARNING: DO NOT LEAVE ASSEMBLY UNATTENDED WHEN
EMPTY, MAY TIP OVER.
28. While holding handle, remove pin (60).
29. Move elevator up or down to desired height.
30. Replace pin full length to lock system at desired height.
WARNING: DO NOT ALLOW CHILDREN TO ADJUST HEIGHT.
31. Apply height and moving label (47) to front of pole as shown.
WARNING: USE OF THIS PRODUCT WITHOUT PROPER
INSTALLATION OF SMART CLIPS, OR WHEN ALL SMART
CLIPS ARE NOT PRESENT COULD RESULT IN BODILY HARM.
BE SURE TO FOLLOW DIRECTIONS CAREFULLY.
32. Install net clips as shown. (See illustration)
33. Install net as shown. (See illustration)
 Loading...