


INSTALLATION AND OPERATION INSTRUCTIONS
OWNER / INSTALLER: For your safety this manual must be carefully and thoroughly read and understood before installing, operating or servicing this heater.
INFRARED RADIANT TUBE HEATER
Two Stage Pull Through System (Negative Pressure)
|
Models: |
LTU SERIES: |
(80, 90, 100, 110, 120, 125, 130, 140, 150, 160, |
|
175, 180, 200, 225, 250) – N7/L7 |
LTS SERIES: |
(40, 50, 60, 75, 80, 90, 100, 110, 120, 125, 130, |
|
140, 150, 160, 175, 180, 200, 225, 250) – N7/L7 |
!INSTALLER: This manual is the property of the owner. Please present this manual to the owner when you leave the job site.
▲WARNING: Improper installation, adjustment, alteration, service, or maintenance can cause property damage, injury or death. Read the installation, operation and maintenance instructions thoroughly before installing or servicing this equipment.
IF YOU SMELL GAS: |
FOR YOUR SAFETY |
|
|
!DO NOT try to light any appliance.
!DO NOT touch any electrical switch; DO NOT use any telephone in your building.
!IMMEDIATELY call your gas supplier from a neighbor's telephone. Follow the gas supplier's instructions. If you cannot reach your gas supplier, call the fire department.
DO NOT store oruse gasoline or other flammable vapors and liquids in the vicinity of this orany other appliance.
!IMPORTANT: SAVE THIS MANUAL FOR FUTURE REFERENCE.
SPACE-RAY
Post Office Box 36485 (28236) • 305 Doggett Street (28203) • Charlotte, North Carolina Phone (704) 372-6391 • Fax (704) 332-5843 • www.spaceray.com • email: info@spaceray.com
Form #43155040
May 2013
TABLE OF CONTENTS
SECTION |
DESCRIPTION |
PAGE |
1.0) |
Safety................................................................................................................................................... |
2 |
2.0) |
Installer Responsibility...................................................................................................................... |
2 |
3.0) |
General Information........................................................................................................................... |
2 |
4.0) |
Minimum Clearances to Combustibles........................................................................................... |
4 |
5.0) |
Typical Suspension Methods............................................................................................................ |
5 |
6.0) |
LTU Series Specifications.................................................................................................................. |
6 |
7.0) |
LTU Series Packing List..................................................................................................................... |
6 |
8.0) |
LTU Series Typical Layouts................................................................................................................ |
8 |
8.1) |
LTU Series Dimensions...................................................................................................................... |
8 |
8.2) |
LTU 80-175 Series Heater Assembly Overview........................................................................... |
10 |
8.3) |
LTU 180-250 Series Heater Assembly Overview......................................................................... |
11 |
8.4) |
LTU Series 15’ Body Package Opening......................................................................................... |
11 |
8.5) |
LTU 80-130 Series Heater Assembly............................................................................................ |
12 |
8.6) |
LTU 125-250 Series – Joining of 5’ and 10’ Body Sections...................................................... |
15 |
9.0) |
LTS Series Specifications................................................................................................................ |
16 |
10.0) |
LTS Series Packing List................................................................................................................... |
16 |
11.0) |
LTS Series Typical Layouts.............................................................................................................. |
19 |
11.1) |
LTS Series Dimensions.................................................................................................................... |
20 |
11.2) |
LTS 40-175 Series Heater Assembly Overview........................................................................... |
21 |
11.3) |
LTS 180-250 Series Heater Assembly Overview......................................................................... |
22 |
11.4) |
LTS Series Heater Assembly........................................................................................................... |
22 |
11.5) |
LTS Series - Adding Optional 90º Elbow....................................................................................... |
26 |
11.6) |
LTS Series - Adding Optional Corner Reflector............................................................................ |
26 |
11.7) |
LTS Series - Attaching Control Box Assembly.............................................................................. |
26 |
11.8) |
LTS Series - Attaching Draft Inducer Assembly........................................................................... |
27 |
11.9) |
LTS Series - Inclined Mounting Instructions................................................................................. |
28 |
12.0) |
Accessory Packages........................................................................................................................ |
30 |
13.0) |
Multiple Hanging & Draft Inducer Positions ................................................................................ |
30 |
14.0) |
Gas Connections and Regulations................................................................................................. |
32 |
15.0) |
Instructions for Pressure Test Gauge Connection....................................................................... |
34 |
16.0) |
Electrical Connections..................................................................................................................... |
35 |
17.0) |
Venting............................................................................................................................................... |
39 |
18.0) |
Air for Combustion........................................................................................................................... |
43 |
18.1) |
Direct Outside Air for Combustion................................................................................................. |
43 |
19.0) |
Lighting and Shutdown Instructions.............................................................................................. |
45 |
20.0) |
Sequence of Operation.................................................................................................................... |
45 |
21.0) |
Control Component Location.......................................................................................................... |
46 |
22.0) |
Cleaning and Annual Maintenance............................................................................................... |
47 |
23.0) |
Troubleshooting Guide..................................................................................................................... |
48 |
24.0) |
Replacing Parts................................................................................................................................ |
52 |
24.1) |
Removing Spark Electrode............................................................................................................. |
52 |
24.2) |
Removing Main Burner and Gas Valve......................................................................................... |
53 |
24.3) |
Air Switch Pressure Check.............................................................................................................. |
54 |
24.4) |
Ignition System Checks................................................................................................................... |
54 |
24.5) |
Motor and Blower Wheel Check..................................................................................................... |
55 |
25.0) |
Installation Data............................................................................................................................... |
55 |
26.0) |
Replacement Parts Guide............................................................................................................... |
56 |
27.0) |
Warnings Card.................................................................................................................................. |
62 |
This heater complies with ANSI Z83.20 (current standard) and CSA 2.34. Copies of the National Fuel Gas Code (ANSI Z223.1-latest edition) are available from the CSA at 8501 East Pleasant Valley Road, Cleveland, Ohio 44131 or 55 Scarsdale Road, Don Mills, Ontario M3B 2R3. All NFPA codes are available from the National Fire Protection Association, Batterymarch Park, Quincy, Massachusetts 02269.
Form #43155040 |
|
May 2013 |
-1- |
1.0) SAFETY
This heater is a self-contained infrared radiant tube heater. Safety information required during installation and operation of this heater is provided in this manual and the labels on the product. The installation, service and maintenance of this heater must be performed by a contractor qualified in the installation and service of gas fired heating equipment.
All personnel in contact with the heater must read and understand all safety information, instructions and labels before operation. The following symbols will be used in this manual to indicate important safety information.
Warning instructions must be followed to prevent or avoid hazards which may cause serious injury, property damage or death.
Caution instructions must be followed to prevent incorrect operation or installation of the heater which may cause minor injury or property damage.
2.0) INSTALLER RESPONSIBILITY
The installer is responsible for the following:
•The heater and venting, as well as electrical and gas supplies must be installed in accordance with these installation instructions and any applicable codes and regulations.
•Every heater shall be located with respect to building construction and other equipment so as to permit access to the heater.
•Each installer must follow the clearances to combustible materials for the heaters.
•Install the heater so that the supports and hangers are correctly spaced in accordance with these instructions. The heater must be supported by materials having a working load limit of at least 115lbs.
•Supply the owner with a copy of these Installation and Operation Instructions.
•Where unvented heaters are used, gravity or mechanical means shall be provided to supply and exhaust at least 4 CFM per 1,000 Btu/hr input of installed heaters.
•Never use the heater as a support for a ladder or other access equipment. Do not hang anything from the heater.
•Supply all installation materials necessary that are not included with the heater.
•Check the nameplate to make sure that the burner is correct for the gas type in the building and the installation altitude.
3.0) GENERAL INFORMATION
This heater is a self-contained infrared radiant tube heater for use in locations where flammable gases or vapors are not generally present (as defined by OSHA acceptable limits) and is intended for the heating of nonresidential spaces.
INSTALLATION REQUIREMENTS
The installation must conform to local building codes or in the absence of local codes, with the National Fuel Gas Code ANSI Z223.1/NFPA54 or the Natural Gas and Propane Installation Code CSA B149.1. Heaters shall be installed by a licensed contractor or licensed installer. Clearances to combustibles as outlined in this manual should always be observed. In areas used for storage of combustible materials where they may be stacked below the heater, NFPA54 requires that the installer must post signs that will “specify the maximum permissible stacking height to maintain the required clearances from the heater to combustibles.”
The higher capacity LTS/LTU 180–250 models generate intense radiant heat. Therefore, the minimum recommended mounting height is 18 ft. above floor level for the LTS/LTU 180-200 models and 20ft. above floor level for the LTS/LTU 225-250 models. Heaters may be mounted at various heights and angles depending on the application. If you have any questions, pleaseconsult your local Space-Ray representative.
Every heater shall be located with respect to building construction and other equipment so as to permit access to the heater. Each installer shall use quality installation practices when locating the heater and must give consideration to clearances to combustible materials, vehicles parked below, lights, overhead doors, storage areas with stacked materials, sprinkler heads, gas and electrical lines and any other possible obstructions or hazards. Consideration also must be given to service accessibility.
|
Form #43155040 |
-2- |
May 2013 |
The heater, when installed in aircraft hangars and public garages, must be installed in accordance with ANSI/NFPA 409-latest edition (Standard for Aircraft Hangars), ANSI/NFPA 88a-latest edition (Standard for Parking Structures), and ANSI/NFPA 88b-latest edition (Standard for Repair Garages) with the following clearances:
a.At least 10 feet above the upper surfaces of wings or engine enclosures of the highest aircraft that may be housed in the hangar and at least 8 feet above the floor in shops, offices, and other sections of hangars communicating with aircraft storage or service areas.
b.At least 8 feet above the floor in public garages. ▲WARNING: Minimum clearances marked on the heater must be maintained from vehicles parked below the heater.
(FOR CANADA ONLY)
a.Installation of this appliance is to be in accordance with latest edition of CSA B149.1 (Natural Gas and Propane Installation Code).
b.For installation in public garages or aircraft hangars, the minimum clearances from the bottom of the infrared heater to the upper surface of the highest aircraft or vehicle shall be 50 percent greater than the certified minimum clearance, but the clearance shall not be less than 8 feet.
Although these heaters may be used in many applications other than space heating (e.g., process heating), Space-Ray will not recognize the warranty for any use other than space heating.
For indoor installation only. Not for use in residential dwellings.
This heater is for Indoor Installation and Covered Patio Installation only and can be used in either Vented or Unvented mode. The term Unvented actually means Indirect Vented. While the products of combustion are expelled into the building, national codes require ventilation in the building to dilute these products of combustion. This ventilation may be provided by gravity or mechanical means.
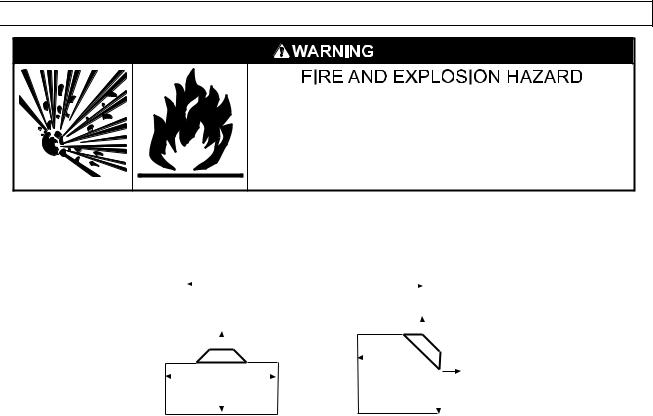
This heater is not an explosion proof heater. Where the possibility of exposure to volatile and low flash point materials exists, it could result in property damage or death. This heater must not be installed in a spray booth where the heater can operate during the spraying process. Consult your local fire marshal or insurance company.
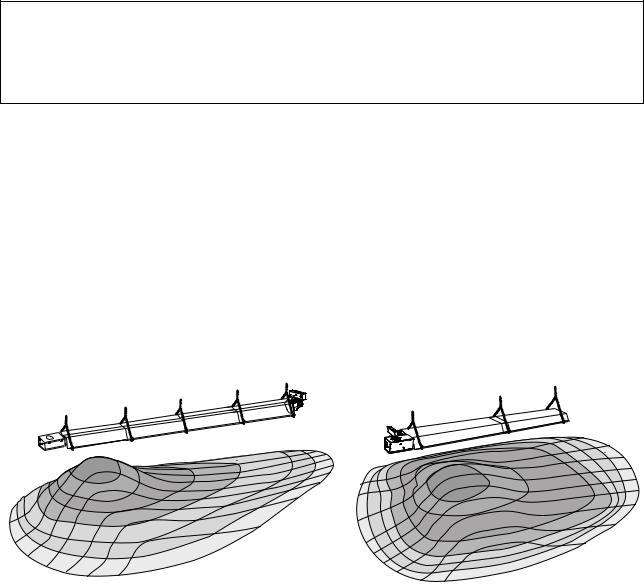
LTS Series Only: Since straight tube heaters are always hotter at the control end than at the flue terminal end, always observe the minimum recommended mounting heights shown on the specification sheets in Section 9.0) of this manual. Use U-tube configuration instead of straight tubes for spot or area heating (e.g., where a single heater is utilized for space heating).
HOT |
WARM |
WARM |
|
||
|
|
HOT |
WARM |
|
WARM |
|
|
High Altitude:
Appliances are supplied as standard for altitudes of O to 2,000 feet (0-610 m). High-altitude ratings are obtained by a change in the orifice size. When ordered for high altitude installations, burners are supplied by the factory ready for high altitude installation. Check the nameplate for altitude before proceeding with the installation. In Canada the adjustment for altitude is made in accordance with Standard CGA 2.17, Gas-Fired Appliances for Use at High Altitudes.
Form #43155040 |
|
May 2013 |
-3- |
4.0) MINIMUM CLEARANCES TO COMBUSTIBLES
Combustible material must be located outside the clearance dimensions listed.
Failure to do so may result in death, serious injury or property damage.
Follow the instructions packaged with the kit for installation. Install the warnings card (ordered separately) and complete the blank spaces using the clearances from combustibles table below. See Section 27 for a printed copy of the warnings card.
Minimum clearances to combustibles shall be measured from the outer surfaces as shown in the following diagram:
|
End |
|
|
|
|
|
|
|
|
|
|
|
|
|
|
|
|
|
|
|
End |
|
|
|
|
|||
|
|
|
|
|
|
|
|
|
|
|
|
|
|
|
|
|
||||||||||||
|
|
|
|
|
|
|
|
|
|
|
|
|
|
|
|
|
|
|
|
|
|
|
|
|
||||
|
|
|
|
|
|
|
|
|
|
|
|
|
|
|
|
|
|
Ceiling |
|
|
|
|
||||||
|
|
|
|
* Ceiling |
|
|
|
|
|
|
|
|
|
|
|
|
|
|
|
|
|
|
|
|||||
|
|
|
|
|
|
|
|
|
|
|
|
|
|
|
|
|
|
|
|
|
|
|
||||||
|
|
|
|
|
|
|
|
|
|
|
|
|
|
|
|
|
|
|
|
|
|
|
|
|
||||
|
|
|
|
|
|
|
|
|
|
|
|
|
|
|
|
|
|
|
|
|
|
|
|
|
|
|
|
|
|
|
|
|
|
|
|
|
|
|
|
|
|
|
|
|
|
|
|
|
|
|
|
|
|
|
|
|
|
|
|
|
|
|
|
|
|
|
|
|
|
|
|
|
Front |
|
|
|
Rear |
|
|
|||||||
|
|
|
|
|
|
|
|
|
|
|
|
|
|
|
|
|
|
|
|
|
|
|
|
|
|
|
|
|
|
Side |
|
|
|
|
Side |
|
|
|
|
|
|
|
|
|
|
|
|
|
|
|
|
|
|||||
|
|
|
|
|
|
Below |
|
|
|
|
|
|
|
|
|
|
|
|
|
Below |
|
|
|
|
||||
|
|
|
|
|
|
|
|
|
|
|
|
|
|
|
|
|
|
|
|
|
|
|
|
|
|
|||
|
|
|
Horizontal |
|
|
|
45° Angle (Maximum) |
|
|
|
|
|||||||||||||||||
|
|
|
|
|
|
|
|
|
|
|
||||||||||||||||||
|
|
MINIMUM CLEARANCES TO COMBUSTIBLES |
|
|
|
|
||||||||||||||||||||||
|
|
|
|
|
|
|
|
|
|
|
|
|
|
|
|
|
|
|
|
|
|
|
|
|
|
|
|
|
|
|
|
|
|
|
|
|
|
|
|
|
|
|
|
|
|
|
|
|
|
|
|
|
|
|
|
Angle Mounted at |
|
|
|
|
|
|
|
|
|
|
|
|
|
Mounted Horizontally |
|
|
45º |
|||||||||||||
Model No. |
|
Sides |
Ceiling* |
|
|
Below |
|
Ends |
45º Front |
45º Rear |
||||||||||||||||||
LTS 40, 50 |
|
24” |
6” |
|
|
|
40” |
|
15” |
40” |
12” |
|||||||||||||||||
LTS 60, 75 |
|
|
24” |
6” |
|
|
|
60” |
|
|
15” |
52” |
12” |
|||||||||||||||
LTS/LTU 80, 90 |
|
|
26” |
6” |
|
|
|
66” |
|
|
15” |
52” |
12” |
|||||||||||||||
LTS/LTU 100 |
|
|
28” |
6” |
|
|
|
76” ** |
|
|
15” |
60” |
12” |
|||||||||||||||
LTS/LTU 110, 120, 125, 130 |
|
|
32” |
6” |
|
|
82” ** |
|
|
20” |
66” |
12” |
||||||||||||||||
LTS/LTU 140, 150 |
|
|
36” |
6” |
|
|
87” ** |
|
|
20” |
70” |
12” |
||||||||||||||||
LTS/LTU 160, 175 |
|
|
42” |
6” |
|
|
93” ** |
|
|
20” |
77” |
12” |
||||||||||||||||
LTS/LTU 180, 200 |
|
|
44” |
6” |
|
|
106” ** |
|
|
20” |
84” |
12” |
||||||||||||||||
LTS/LTU 225, 250 |
|
|
56” |
6” |
|
|
112” ** |
|
|
20” |
90” |
18” |
||||||||||||||||
* When used indirect vented, minimum clearance for CEILING must be: 12” for LTS 40-75 and 18” for LTS/LTU 80-250. If optional corner and U-bend reflectors are not used, the clearance must be 18”.
** Maximum clearance below reduces by 50% once you are 25 ft. downstream from the burner box.
▲WARNING: Certain materials or objects, when stored under the heater, will be subjected to radiant heat and could be seriously damaged. Observe the Minimum Clearances to Combustibles listed in the manual and on the heater at all times.
NOTE:
1.The clearances specified above must be maintained to combustibles and other materials that may be damaged by temperatures 90ºF above ambient temperature. Clearances to combustibles are posted on the control box. In areas used for storage of combustible materials where they may be stacked below the heater, NFPA54 requires that the installer must post signs that will “specify the maximum permissible stacking height to maintain the required clearances from the heater to combustibles.” Space-Ray recommends posting these signs adjacent to the heater thermostat or other suitablelocationthat will provide enhanced visibility.
2.The stated clearance to combustibles represents a surface temperature of 90 ºF (32 ºC) above room temperature. Building materials with a low heat tolerance (such as plastics, vinyle siding, canvas, tri-ply, etc.) may be subject to degradation at lower temperatures. It is the installer’s responsibility to assure that adjacent materials areprotected fromdegradation.
|
Form #43155040 |
-4- |
May 2013 |
5.0) TYPICAL SUSPENSION METHODS
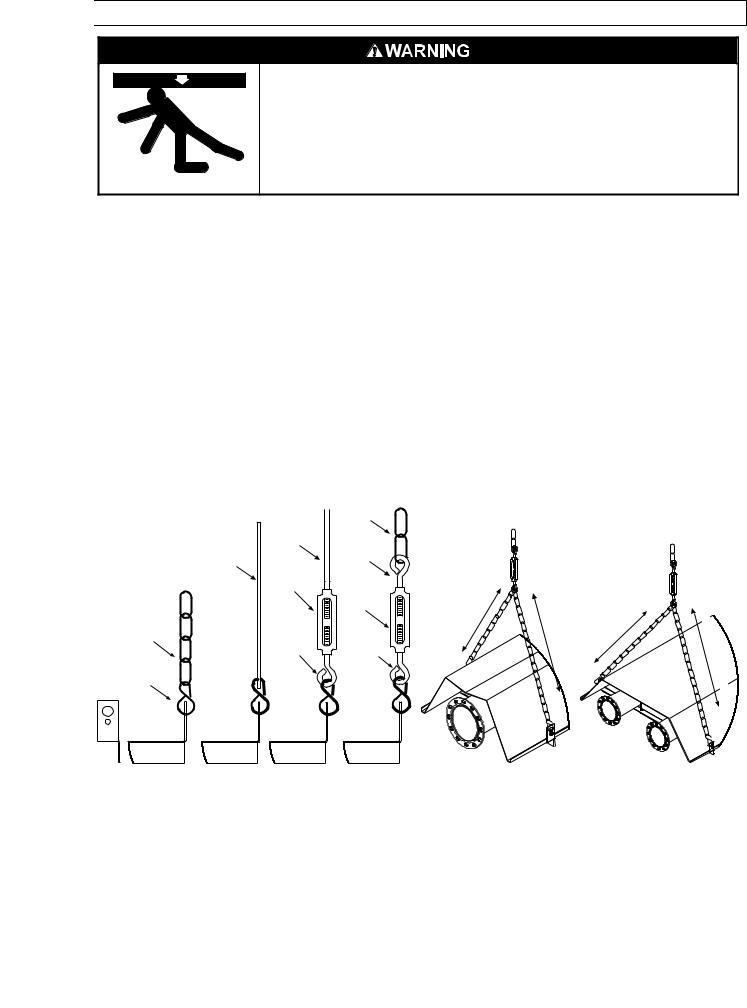
SUSPENSION HAZARD
Burner must be secured to the mounting flange with nuts.
All materials used to suspend the heater must have a minimum working load of 115 lbs.
All “S” Hooks must be crimped closed.
Never use the heater to support a ladder or other access equipment. Failure to do so may result in death, serious injury or property damage.
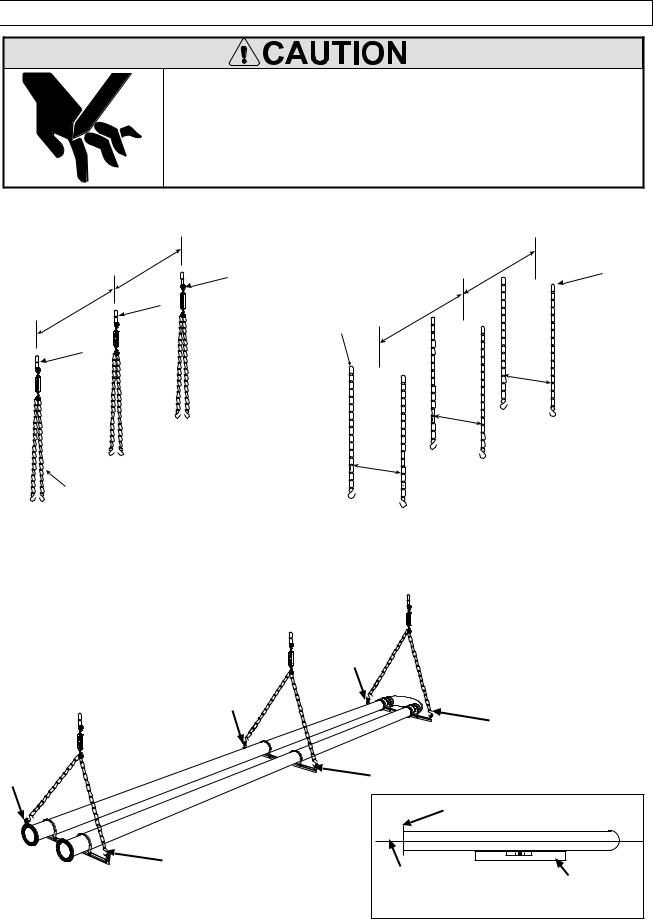
Various means of suspending the heater can be used. See the following drawings for typical examples.
1.Use only noncombustible materials for suspending hangers and brackets.
2.A minimum No. 2 chain with a working load limit of 115 lbs. is required.
3.Turnbuckles can be used with chains to allow leveling of the heater. All “S” hooks and eye bolts must be manually crimped closed by the installer.
4.When using rigid means for heater suspension (rod, flat bar, etc.) provide sufficient lengths or swing joints to compensate for expansion. See Figures b and c.
5.Heaters subject to vibration must be provided with vibration isolating hangers.
6.Heaters must not be supported by gas or electric supply lines and must be suspended from a permanent structure with adequate load capacity.
Space-Ray recommends that the body sections be suspended using chains with turnbuckles. This will allow slight adjustments after assembly and heater expansion/ contraction during operation.
If a “trapeze” method is used for tube support/hanger brackets (shown below), the minimum chain length for the two connecting chains is 36” to minimize any vibration that might be generated by the draft inducer assembly. If these chains must be less than 36”, then do not use the trapeze method and, instead, use individual chains on each tube support/hanger bracket.
|
Minimum |
|
No. 2 Chain |
Threaded |
|
Rod |
|
3/16” x 1” wide |
Eyebolt |
|
|
Flat Bar |
|
Turnbuckle |
|
|
Turnbuckle |
Minimum |
|
No. 2 Chain |
|
Eyebolt |
Eyebolt |
S-Hook (typical)
|
(91cm) |
Minimum |
36” |
|
|
|
|
36” (91cm) Minimum
|
(91cm) |
Minimum |
36” |
|
|
|
|
36” (91cm) Minimum
a. |
b. |
c. |
d. |
Form #43155040 |
|
May 2013 |
-5- |
|
6.0) |
LTU SERIES SPECIFICATIONS |
|
|
|
|
|
|
|||
|
|
|
|
|
|
|
|
|
|
|
|
|
|
|
|
|
|
|
|
|
|
|
|
|
|
Input, |
|
|
|
|
|
|
Minimum * |
||
|
|
Btu/hr |
|
|
|
Orifice Size |
|
Mounting Height |
|||
|
Model |
|
|
Flue Restrictor Plate |
|
|
|
|
@ |
@ |
|
|
No. |
High |
Low |
I.D. & Part # |
Natural Gas |
Propane Gas |
Horizontal |
45º Angle |
|||
LTU 80 |
80,000 |
50,500 |
1-1/2” |
#42741050 |
#19 |
(0.166) |
#38 |
(0.102) |
13 ft. |
12 ft. |
|
LTU 90 |
90,000 |
57,000 |
1-1/2” |
#42741050 |
#16 |
(0.177) |
#36 |
(0.106) |
13 ft. |
12 ft. |
|
LTU 100 |
100,000 |
63,000 |
1-5/8” |
#42741060 |
#14 |
(0.182) |
#33 |
(0.113) |
13 ft. |
12 ft. |
|
|
|
|
|
|
|
|
|
|
|
|
|
LTU 110 |
110,000 |
69,500 |
1-3/4” |
#42741070 |
#10 |
(0.194) |
#31 |
(0.120) |
14 ft. |
13 ft. |
|
|
|
|
|
|
|
|
|
|
|
|
|
LTU 120 |
120,000 |
76,000 |
1-3/4” |
#42741070 |
13/64 |
(0.203) |
1/8 |
(0.125) |
14 ft. |
13 ft. |
|
|
|
|
|
|
|
|
|
|
|
|
|
LTU 125 |
125,000 |
80,000 |
1-7/8” |
#42741080 |
#5 |
(0.206) |
#30 |
(0.129) |
14 ft. |
13 ft. |
|
|
|
|
|
|
|
|
|
|
|
|
|
LTU 130 |
130,000 |
82,000 |
1-7/8” |
#42741080 |
#4 |
(0.209) |
3.3mm |
(0.130) |
14 ft. |
13 ft. |
|
|
|
|
|
|
|
|
|
|
|
|
|
LTU 140 |
140,000 |
88,500 |
2-1/32” |
#42741090 |
5.5mm |
(0.216) |
#29 |
(0.136) |
15 ft. |
14 ft. |
|
LTU 150 |
150,000 |
95,000 |
2-1/32” |
#42741090 |
5.7mm |
(0.224) |
#28 |
(0.140) |
15 ft. |
14 ft. |
|
LTU 160 |
160,000 |
100,000 |
2-1/4” |
#42741100 |
5.8mm |
(0.228) |
#27 |
(0.144) |
15 ft. |
14 ft. |
|
|
|
|
|
|
|
|
|
|
|
|
|
LTU 175 |
175,000 |
110,000 |
2-1/4” |
#42741100 |
“C” |
(0.242) |
3.8mm |
(0.150) |
15 ft. |
14 ft. |
|
LTU 180 |
180,000 |
114,000 |
2-1/4” |
#42741100 |
“C” |
(0.242) |
#24 |
(0.152) |
18 ft. |
17 ft. |
|
LTU 200 |
200,000 |
125,000 |
2-3/8” |
#42741130 |
“F” |
(0.257) |
#21 |
(0.159) |
18 ft. |
17 ft. |
|
LTU 225 |
225,000 |
146,000 |
2-1/2” |
#42741140 |
6.9mm |
(0.272) |
#18 |
(0.170) |
20 ft. |
19 ft. |
|
LTU 250 |
250,000 |
162,000 |
2-3/4” |
#42741150 |
“K” |
(0.281) |
4.5mm |
(0.177) |
20 ft. |
19 ft. |
|
* MOUNT HEATERS AS HIGH AS POSSIBLE. Minimums are shown as a guideline for human comfort and uniform energy distribution for complete building heating applications. Consult your Space-Ray representative for the particulars of your installation requirements.
Type |
Gas Pipe |
Tube |
Flue |
Fresh Air |
Electrical |
Current |
Gas |
Connection |
Diameter |
Connection1 |
Connection |
Supply |
Rating |
Natural |
½” MPT |
|
|
|
120 Volt, 60Hz, |
|
or Propane |
(Male) |
4” |
4” Round |
6” Round |
1 Phase |
2.6 Amp |
1 LTU 180-250: 6” round. See Section 17.0) for vent sizes and limitations.
Fuse Rating: |
Ignition System (direct spark): |
|
In-line: 2 Amp 250V |
30 second pre-purge period |
|
(for 24V Circuit) |
||
|
||
|
|
7.0) |
LTU SERIES PACKING LIST |
|
|
|
|
A. Control/Draft Inducer Package |
|
|
|
Part Description |
QTY |
|
Control Box Assembly .............................................................................................................................. |
1 |
|
Draft Inducer & Junction Box Assembly ................................................................................................ |
1 |
|
Flue Restrictor Plate (See Section 6.0) for plate I.D. and part no.) ................................................... |
1 |
|
4” x 6” Starting Collar1 (#42892009) Supplied with LTU 180-250................................................. |
1 |
|
Control Fastener Kit (#42907010) ....................................................................................................... |
1 |
|
Containing: #8-32 Screws & Nuts (#02166010 & #02127030) .......................................... |
2 |
|
¼ - 20 Locknuts (#02167010) .............................................................................. |
6 |
|
Tube Flange Gasket (#42921000) ...................................................................................................... |
2 |
|
Installation & Operation Instructions (#43155040) .......................................................................... |
1 |
|
Gas connector, 5/8” OD x 36” 2 (#30302360) .................................................................................... |
1 |
1 4-inch Starting Collar (#40504020) supplied with LTU 80-175 models.
2 LTU 225 and 250 models using Gas Connector, 1” OD x 36” (#30302361).
|
Form #43155040 |
-6- |
May 2013 |

LTU 80-250 CONTROL/DRAFT INDUCER PACKAGE NUMBERS
NATURAL GAS
MODEL NO. |
PART NO. |
MODEL NO. |
PART NO. |
LTU 80-N7................. |
#42883510 |
LTU 150-N7 .............. |
#42883670 |
LTU 90-N7................. |
#42883530 |
LTU 160-N7 .............. |
#42883690 |
LTU 100-N7.............. |
#42883550 |
LTU 175-N7 .............. |
#42883710 |
LTU 110-N7.............. |
#42883570 |
LTU 180-N7 .............. |
#42883730 |
LTU 120-N7.............. |
#42883590 |
LTU 200-N7 .............. |
#42883750 |
LTU 125-N7.............. |
#42883610 |
LTU 225-N7 .............. |
#42883770 |
LTU 130-N7.............. |
#42883630 |
LTU 250-N7 .............. |
#42883790 |
LTU 140-N7.............. |
#42883650 |
|
|
PROPANE GAS
MODEL NO. |
PART NO. |
MODEL NO. |
PART NO. |
LTU 80-L7................. |
#42883520 |
LTU 150-L7 .............. |
#42883680 |
LTU 90-L7................. |
#42883540 |
LTU 160-L7 .............. |
#42883700 |
LTU 100-L7.............. |
#42883560 |
LTU 175-L7 .............. |
#42883720 |
LTU 110-L7.............. |
#42883580 |
LTU 180-L7 .............. |
#42883740 |
LTU 120-L7.............. |
#42883600 |
LTU 200-L7 .............. |
#42883760 |
LTU 125-L7.............. |
#42883620 |
LTU 225-L7 .............. |
#42883780 |
LTU 130-L7.............. |
#42883640 |
LTU 250-L7 .............. |
#42883800 |
LTU 140-L7.............. |
#42883660 |
|
|
B.LTU 80-250 Body Package Descriptions
(PACKAGE PART NUMBER IS INDICATED ON THE OUTSIDE OF EACH CORRESPONDING CARTON.)
System Lengths |
15’ Body Pkg. 42881000 |
5’ Body Pkg. 42882000 |
10’ Body Pkg. 42882020 |
|
|
|
|
Ft. |
Qty. |
Qty. |
Qty. |
30’ |
1 |
- |
- |
40’ |
1 |
1 |
- |
50’ |
1 |
- |
1 |
|
|
15’ Pkg. |
5’ Pkg. |
10’ Pkg. |
|
|
LTU Body Package Components |
42881000 |
42882000 |
42882020 |
|
Part # |
Component Description |
Qty. |
Qty. |
Qty. |
|
42914000 |
Pre-assembled 15’ ALC Steel U-Tube |
1 |
- |
- |
|
|
(two 12-radial hole flanges) with reflector |
|
|
|
|
42915000 |
Pre-assembled 5’ ALC Steel Tube |
- |
1 |
- |
|
(two 12-radial hole flanges) with reflector |
|||||
42915020 |
Pre-assembled 10’ ALC Steel Tube |
- |
- |
1 |
|
|
(12-radial hole flanges) with reflector |
|
|
|
|
42895000 |
Control End Reflector |
1 |
- |
- |
|
|
|
|
|
|
|
42896000 |
Foot End Reflector |
1 |
- |
- |
|
|
|
|
|
|
|
|
Body Fastener Kit, Containing: |
|
|
|
|
|
#02167010, ¼-20 Locknuts (QTY = 12) |
|
|
|
|
|
#02259000, ¼-20 Machine Screws (QTY = 12) |
|
|
|
|
42907020 |
#02125130, #10-24x1/2” Screws (QTY = 4 |
- |
1 |
1 |
|
#02189020, #10-16x1/2” Screws (QTY = 2) |
|||||
|
|
|
|
||
|
#02266010, Speed Clips (QTY = 2) |
|
|
|
|
|
#42769010, Sliding Clamps (QTY = 4) |
|
|
|
|
|
#42921000, Tube Flange Gaskets (QTY = 2) |
|
|
|
|
|
Body Fastener Kit, Containing: |
|
|
|
|
42907030 |
#02125130, #10-24x1/2” Screws (QTY = 6 |
1 |
- |
- |
|
#02189020, #10-16x1/2” Screws (QTY = 2) |
|||||
|
#02266010, Speed Clips (QTY = 20) |
|
|
|
|
|
#42769010, Sliding Clamps (QTY = 6) |
|
|
|
Form #43155040 |
|
May 2013 |
-7- |

8.0) LTU SERIES TYPICAL LAYOUTS
|
|
|
|
|
|
|
|
|
|
|
|
|
|
|
|
|
|
|
|
|
|
|
|
|
|
|
|
|
|
30 FT. |
40 FT. |
|
|
|
50 FT. |
||||||
|
|
SYSTEM |
SYSTEM |
|
|
|
SYSTEM |
||||||
|
|
|
|
|
|
|
|
|
|
|
|
|
|
|
|
|
|
|
LEGEND |
|
|
|
|
|
|||
|
|
|
Control Unit |
|
|
|
|
|
|
10 Ft. Body Section |
|||
|
|
|
|
|
|
||||||||
|
|
|
Draft Inducer Unit |
|
|
5 FT. Body Section |
|||||||
|
|||||||||||||
|
|
|
15 FT. Body Section |
|
|
180 Deg. U-Bend |
|||||||
|
|
|
|
|
|||||||||
|
|
|
|
|
|
|
|
|
|
|
|
|
|
EMITTER |
MODEL |
|
LENGTH |
||
|
||
|
|
|
30’ |
LTU 80, 90, 100, 110, 120, 125, 130 |
|
|
|
|
40’ |
LTU 125, 130, 140, 150, 160, 175 |
|
|
|
|
50’ |
LTU 180, 200, 225, 250 |
|
|
|
NOTES:
1.In all configurations, the control unit must be connected directly to either a) the 12-radial hole flange of the aluminized steel body section (for LTU 80-200 models) or b) the 6-hole flange of the 10 ft. alumitherm steel body section (for LTU 225 and 250 models).
2.Failure to attach the control box to the 6-hole flange for LTU 225-250 as indicated above will void the manufacturer’s warranty.
8.1) |
LTU SERIES DIMENSIONS |
|
|
|
|
||
|
|
|
210 1/2” |
|
|
|
|
|
5 1/2” |
|
(535cm) |
|
|
|
|
|
(14cm) |
|
|
|
|
|
|
18” |
|
92” |
|
84” |
|
11” |
|
(46cm) |
|
(234cm) |
|
(213cm) |
|
(28cm) |
|
Control |
|
|
|
|
|
|
|
Box |
|
|
|
|
|
12” |
28” |
|
|
|
|
|
|
||
Bottom View |
|
|
|
|
(30cm) |
(71cm) |
|
|
|
|
|
|
|
||
Draft Inducer |
Emitter Tube |
Tube Support / |
Reflector |
|
|
||
Hanger Bracket (QTY-3) |
|
|
|||||
|
|
|
|
|
|
||
|
|
|
15 Ft. Body Section |
|
|
|
|
|
|
|
Models: LTU 80-130 |
|
|
|
|
|
|
|
270 1/2” |
|
|
|
|
|
5 1/2” |
12” |
(687cm) |
|
|
|
|
|
|
|
|
|
|
||
|
(14cm) |
(30cm) |
|
|
|
|
11” |
18” |
|
48” |
92” |
84” |
|
|
|
(46cm) |
|
(122cm) |
(234cm) |
(213cm) |
|
(28cm) |
|
Control |
|
|
|
|
|
|
28” |
Box |
|
|
|
|
|
|
|
Bottom View |
|
|
|
|
|
|
(71cm) |
|
|
|
|
|
|
|
|
Draft Inducer |
Emitter Tube |
Tube Support/Hanger Bracket |
|
Reflector |
12” |
|
|
|
|
|
(QTY-5) |
|
|
|
|
|
5 Ft. Body Section |
15 Ft. Body Section |
|
(30cm) |
|||
|
|
|
|
||||
Models: LTU 125-175
|
Form #43155040 |
-8- |
May 2013 |

|
|
330 1/2” |
|
|
5 1/2” |
12” |
(839cm) |
|
|
(14cm) |
(30cm) |
|
|
11” |
18” |
108” |
92” |
84” |
(28cm) |
(46cm) |
(275cm) |
(234cm) |
(213cm) |
|
Control |
|
|
|
|
Box |
|
|
|
28” |
Bottom View |
|
|
|
(71cm) |
|
|
|
|
|
Draft Inducer |
Emitter Tube |
Tube Support/Hanger Bracket |
Reflector |
12” |
|
(QTY-5) |
|
||
|
|
|
(30cm) |
|
|
10 Ft. Body Section |
15 Ft. Body Section |
||
|
|
|||
Models: LTU 180-250
|
10-9/16” |
Optional |
|
Junction Box |
Fresh Air Inlet |
||
(27cm) |
|||
(electric supply) |
Sight |
||
|
|||
|
|
||
|
15-5/8” |
Glass |
|
|
(40cm) |
1/2” MPT Gas |
|
|
|
||
|
|
Connection |
10-7/8” (28cm)
7” |
|
|
8-1/2” |
(18cm) |
|
|
(22cm) |
Draft |
|
8-1/2” |
Control |
Inducer |
End View |
(22cm) |
Box |
|
|
|
Form #43155040 |
|
May 2013 |
-9- |
Typical Assembly Overview
(LTU175-40 Shown)
Control End
Reflector
Restrictor
Plate
- |
|
|
28” Tube Support Brk. |
Draft Inducer |
|
with U-Bolt Clamp |
|
-10 |
|
||
Assembly |
|
& 5/16" Hex Nuts |
|
|
|
||
|
Gasket |
Tube Flange |
|
|
12 |
Radial Hole for 80-200M BTU units only |
|
|
Control Box |
6 |
Hole for 225-250M BTU units only |
|
|
|
|
92”
12”
48”
5-1/2” (control box to chain)

 2” overlap
Form |
3” |
#43155040 2013 May |
(control box to reflector) |
|
Typical |
Reflector |
Overlap |
|
11” 
84”

 1” overlap
Foot End
Reflector
U-Bend
OVERVIEW ASSEMBLY HEATER SERIES 175-80 LTU 2).8

8.3) LTU 180-250 SERIES HEATER ASSEMBLY OVERVIEW
Draft Inducer 10 FT. BODY PACKAGE |
|
|
15 FT. BODY PACKAGE |
U-Bend |
||||||
|
|
|
Part No. 42882020 |
|
|
Part No. 42881000 |
|
|||
|
|
|||||||||
|
|
|
|
|
|
|
|
|
|
|
|
|
|
|
|
|
|
|
|
|
|
|
|
|
|
|
|
|
|
|
|
|
|
|
|
|
|
|
|
|
|
|
|
|
|
|
|
|
|
|
|
|
|
|
|
|
|
|
|
|
|
|
|
|
|
|
|
|
|
|
|
|
|
|
|
|
|
|
|
|
|
|
|
|
|
|
|
|
|
|
|
|
|
|
|
|
|
|
|
|
|
Aluminized Calorized Steel Tube (ALC) |
Aluminized Calorized Steel Tube (ALC) |
||||
|
|
|
||||||
|
|
|
(with two 12 radial hole Flanges) |
(with one 12 radial hole Flange) |
||||
Control Box |
||||||||
|
|
|
|
|
||||
|
|
|
|
|
|
Models: LTU 180-200 |
||
Draft Inducer 10FT. BODY PACKAGE |
15 FT. BODY PACKAGE |
|||||||
|
|
|
|
Part No. 42882030 |
Part No. 42881000 |
|||
|
|
|
||||||
|
|
|
|
|
|
|
|
|
|
|
|
|
|
|
|
|
|
|
|
|
|
|
|
|
|
|
|
|
|
|
|
|
|
|
|
|
|
|
|
|
|
|
|
|
|
|
|
|
|
|
|
|
|
|
|
|
|
|
|
|
|
|
|
|
|
|
|
|
|
|
|
Tube Support/
Hanger Bracke
Aluminized Calorized Steel Tube (ALC) (with two 12 radial hole Flanges)
*Control Box Alumi-Therm Calorized Steel Tube (ATC) (with two 6-hole Flanges)
*IMPORTANT
FOR MODELS LTU 225-250. THE CONTROL BOX MUST BE ATTACHED TO AN ALUMI-THERM STEEL TUBE HAVING 6-HOLE FLANGES.
Models: LTU 225-250
8.4) LTU SERIES 15’ BODY PACKAGE OPENING
Follow the procedure below to open the 15’ body package.
1.Remove end reflectors from packaging.
2.Lift the tube at the flange end, then slide tube support/hanger bracket between marks on tubes and tighten the “U” bolt hex nuts. Follow instructions in Sections 8.5) and 8.6) for the field assembly of the heater.
Remove end reflectors |
Slide tube support/hanger bracket between |
Lift this end. |
1 from packaging. |
2 marks on tubes and tighten the “U” bolt |
|
|
hex nuts. |
|
84” reference |
92” reference |
6” |
|
|
reference |
Form #43155040 |
|
May 2013 |
-11- |
8.5) LTU 80-130 SERIES HEATER ASSEMBLY
CUT HAZARD
Sheet metal parts, particularly reflectors and vent have sharp edges. Always use gloves when handling.
Failure to do so may result in death, serious injury or property damage.
During field assembly of the heater, the recommended procedure is as follows:
1. Install the suspension (according to Section 8.1) using proper suspension method (see Section 5.0).
84” |
|
|
|
84” |
|
|
1 |
|
1 |
|
|
|
|
|
92” |
1 |
|
Suspension |
92” |
|
|
|
||
|
|
|
|
|
|
|
|
Chain |
|
1 |
|
|
|
|
|
|
|
|
28” |
|
|
|
|
28” |
28”
chains for suspension on the control box end
Trapeze Method |
Individual Suspension Method |
2.Lift the body section and suspend it into place. When lifting, caution should be used to avoid damaging the assembly. Make sure that the long axis of heater is level.
|
2 |
|
|
2 |
|
|
|
|
|
|
2 |
2 |
2 |
|
|
|
|
Tube Flange |
|
2 |
The long axis |
|
|
|
Level indicator |
||
|
of heater |
|
|
|
Side View |
||
|
|
|
Form #43155040 |
-12- |
|
|
May 2013 |

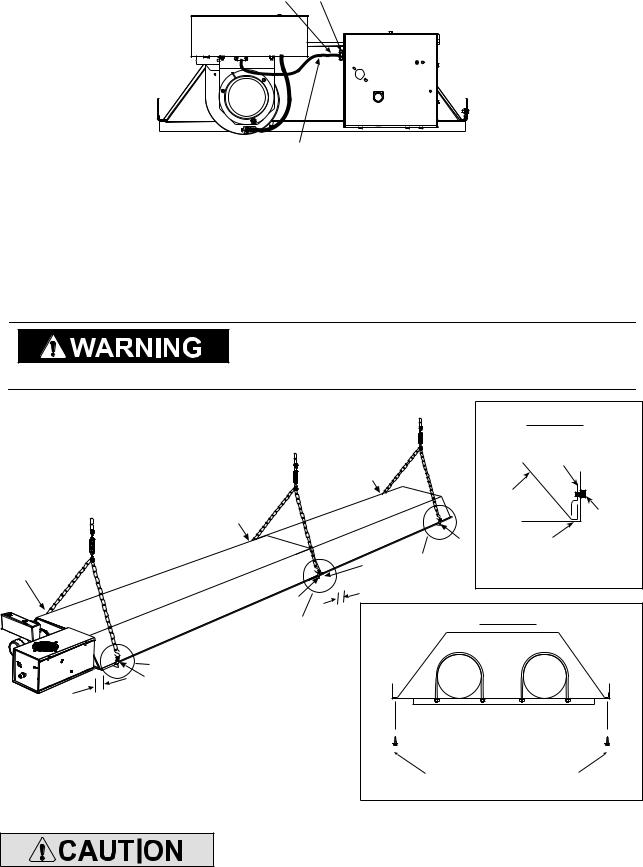
3.Assembly the reflectors onto the body section. Leave 3” space between the tube flange and the first reflector for later mounting of control box and draft inducer.
4.Place the flanges of the control end reflector flush with the end of the first reflector. Secure by sliding speed clips onto reflector edges. Evenly space 6 speed clips on sides and top of reflectors to provide a snug fit. Place foot end reflector on the opposite end of the reflector and secure as above.
4
 3
3
Speed |
3 |
|
Clip |
3” |
Suspension |
|
Tube Flange |
chain |
|
4 |
|
|
3” |
reflector |
|
Side View |
|
5.Attach the control box to the right-hand control tube flange and secure with 1/4-20 locknuts. The control box must be mounted with the perforated fresh air plate on top, facing the ceiling.
6.Attach the draft inducer assembly to the left-hand draft inducer tube flange and secure with 1/4-20 locknuts. A flue restrictor plate is attached to the draft inducer weld studs. DO NOT DISCARD RESTRICTOR PLATE and make sure this remains in place while the draft inducer is being attached to the heater body.
|
6 |
Flue Restrictor |
Gasket |
Plate |
|
Do Not Discard. |
Tube Flange |
|
|
|
(draft inducer) |
1/4-20 Locknuts
Draft Inducer (vertical position)
|
|
|
|
Tube Flange |
|
|
|
Gasket |
(control) |
|
|
|
|
|
|
Control Box |
Access |
5 |
|
|
|
|
||
|
|
Panel |
|
|
Form #43155040 |
|
|
|
|
May 2013 |
|
-13- |
|
|
7.Insert SJO cable through the strain relief bushing of the control box and connect to appropriate terminal blocks. Refer to the wiring diagram in Section16.0) for the connection.
73/8” Connector
SJO Cable
(wire leads to appropriate terminal blocks, refer to the wiring diagram in Section 16.0)
8.Reflectors should overlap 1” to 3” and must be secured by sliding speed clips on the reflector edges. One speed clip is required for each side of the reflector.
9.Fasten the first reflector to the tube support/hanger bracket with (2) #10 sheet metal screws according to Detail “A”. Mount the sliding reflector clamps (#42769010) per Reflector Clamp Installation (Detail “B”) on all tube support/hanger brackets. Make sure the reflector can slide under the clamp during heater operation.
The reflector clamps MUST be installed per reflector clamp installation detail which allows the reflector to slide under the clamp during heater operation.
LTU(80-130) - 30 FT System Shown
9
9
See Detail “A” & “B” 9
3”
(control box to reflector)
|
|
DETAIL “B” |
|
|
Reflector |
|
|
Clamp |
9 |
|
|
|
|
Reflector |
|
|
Clamp |
|
|
Screw |
|
|
9 Tube Support & |
8 |
See Detail “B” |
Hanger Bracket |
|
||
|
|
|
2” overlap |
Reflector Clamp Installation |
|
|
||
9 |
|
|
See Detail “B” |
|
DETAIL “A” |
|
|
|
 Fasten screws to tube
  hanger/support bracket and reflector
(only the tube support/hanger bracket closest to the control end)
#10 x 1/2” SHEET METAL SCREWS (QTY - 2)
Do not relocate the tube support/hanger bracket at the control box end of the heater. This will increase the weight on the emitter tube and can result in premature tube failure.
|
Form #43155040 |
-14- |
May 2013 |
LTU(125-175) - 40 FT System Shown |
9 |
|
9 |
See Detail “B” |
9 |
9 |
|
9 |
|
See Detail “B” |
9 |
9 |
|
8 |
|
1” overlap |
9 |
9 |
8 |
9 |
|
|
|
|||
|
|
2” overlap |
|
|
|
|
|
|
|
3” |
|
See Detail “A” & “B” |
|
|
(control box to reflector) |
|
|
|
|
LTU(180-250) - 50 FT System Shown |
9 |
|||
9
9 |
See Detail “B” |
|
|
|
|
9 |
|
|
9 |
|
|
9 |
8 |
9 |
|
||
|
|
2” overlap |
9 |
|
|
See Detail “A” & “B” |
DETAIL “B” |
|
|
|
|
3” |
Reflector |
|
(control box to reflector) |
Clamp |
|
Reflector |
Clamp |
|
|
|
|
|
|
Screw |
Tube Support & |
|
|
Hanger Bracket |
|
|
Reflector Clamp Installation |
||
9
See Detail “B”
9
8
 1” overlap
DETAIL “A”
 Fasten screws to tube
  hanger/support bracket and reflector
(only the tube support/hanger bracket closest to the control end)
#10 x 1/2” SHEET METAL SCREWS (QTY - 2)
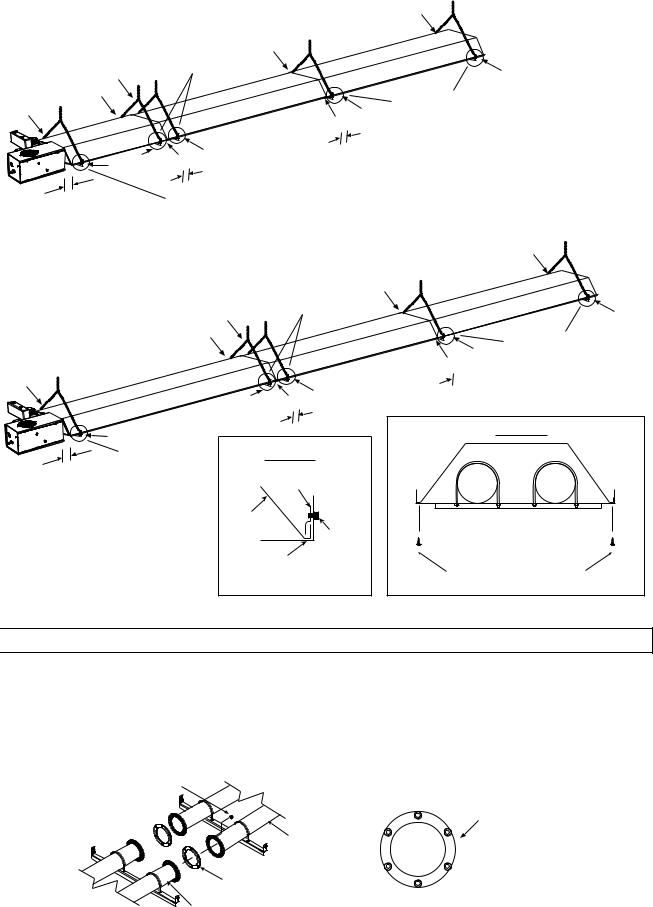
8.6) LTU 125-250 SERIES – JOINING OF 5’ AND 10’ BODY SECTIONS
These models require the use of an additional 5’ body section for LTU 125-175 and 10’ body section for LTU 180250, as shown in Section 8.1). Follow the instruction below for joining these sections.
1.Join the tube flanges of the body sections together with gaskets in between. Secure the flanges with the ¼-20 screws and locknuts provided.
2.Assemble the control box, draft inducer, and other components as previously described in the heater assembly instructions.
1/4-20 Screw & Locknut |
|
|
|
|
(QTY-3 per flange) |
|
|
1 |
|
|
|
|
Tube Flange |
|
|
|
|
|
|
|
|
3 |
|
5 (tightening sequence) |
|
15FT Main |
|
|
|
|
Body Section |
|
|
|
|
Tube Flange Gasket |
6 |
|
4 |
|
(QTY-1 per flange) |
|
2 |
|
|
|
|
|
|
|
5FT Body Section LTU (125-175)-40 |
|
|
|
|
10FT Body Section LTU (180-250)-50 |
|
|
|
Form #43155040 |
|
|
|
|
May 2013 |
-15- |
|
|
|
|
9.0) |
LTS SERIES SPECIFICATIONS |
|
|
|
|
|
|
|||
|
|
|
|
|
|
|
|
|
|
|
|
|
|
|
|
|
|
|
|
|
|
|
|
|
|
Input, |
|
|
|
|
|
|
Minimum * |
||
|
|
Btu/hr |
|
|
|
Orifice Size |
|
Mounting Height |
|||
|
Model |
|
|
Flue Restrictor Plate |
|
|
|
|
@ |
@ |
|
|
No. |
High |
Low |
I.D. & Part # |
Natural Gas |
Propane Gas |
Horizontal |
45º Angle |
|||
LTS 40 |
40,000 |
25,000 |
1” |
#42741040 |
#31 |
(0.120) |
#49 |
(0.073) |
10 ft. |
9 ft. |
|
LTS 50 |
50,000 |
31,500 |
1-1/8” |
#42741030 |
3.3mm |
(0.130) |
#46 |
(0.081) |
11 ft. |
10 ft. |
|
LTS 60 |
60,000 |
38,000 |
1-7/32” |
#42741020 |
#27 |
(0.144) |
#43 |
(0.089) |
12 ft. |
11 ft. |
|
LTS 75 |
75,000 |
50,000 |
1-7/16” |
#42741010 |
#20 |
(0.161) |
#39 |
(0.099) |
13 ft. |
12 ft. |
|
LTS 80 |
80,000 |
50,500 |
1-1/2” |
#42741050 |
#19 |
(0.166) |
#38 |
(0.102) |
13 ft. |
12 ft. |
|
LTS 90 |
90,000 |
57,000 |
1-1/2” |
#42741050 |
#16 |
(0.177) |
#36 |
(0.106) |
13 ft. |
12 ft. |
|
LTS 100 |
100,000 |
63,000 |
1-5/8” |
#42741060 |
#14 |
(0.182) |
#33 |
(0.113) |
13 ft. |
12 ft. |
|
|
|
|
|
|
|
|
|
|
|
|
|
LTS 110 |
110,000 |
69,500 |
1-3/4” |
#42741070 |
#10 |
(0.194) |
#31 |
(0.120) |
14 ft. |
13 ft. |
|
|
|
|
|
|
|
|
|
|
|
|
|
LTS 120 |
120,000 |
76,000 |
1-3/4” |
#42741070 |
13/64 |
(0.203) |
1/8 |
(0.125) |
14 ft. |
13 ft. |
|
|
|
|
|
|
|
|
|
|
|
|
|
LTS 125 |
125,000 |
80,000 |
1-7/8” |
#42741080 |
#5 |
(0.206) |
#30 |
(0.129) |
14 ft. |
13 ft. |
|
LTS 130 |
130,000 |
82,000 |
1-7/8” |
#42741080 |
#4 |
(0.209) |
3.3mm |
(0.130) |
14 ft. |
13 ft. |
|
|
|
|
|
|
|
|
|
|
|
|
|
LTS 140 |
140,000 |
88,500 |
2-1/32” |
#42741090 |
5.5mm |
(0.216) |
#29 |
(0.136) |
15 ft. |
14 ft. |
|
LTS 150 |
150,000 |
95,000 |
2-1/32” |
#42741090 |
5.7mm |
(0.224) |
#28 |
(0.140) |
15 ft. |
14 ft. |
|
|
|
|
|
|
|
|
|
|
|
|
|
LTS 160 |
160,000 |
100,000 |
2-1/4” |
#42741100 |
5.8mm |
(0.228) |
#27 |
(0.144) |
15 ft. |
14 ft. |
|
|
|
|
|
|
|
|
|
|
|
|
|
LTS 175 |
175,000 |
110,000 |
2-1/4” |
#42741100 |
“C” |
(0.242) |
3.8mm |
(0.150) |
15 ft. |
14 ft. |
|
LTS 180 |
180,000 |
114,000 |
2-1/4” |
#42741100 |
“C” |
(0.242) |
#24 |
(0.152) |
18 ft. |
17 ft. |
|
LTS 200 |
200,000 |
125,000 |
2-3/8” |
#42741130 |
“F” |
(0.257) |
#21 |
(0.159) |
18 ft. |
17 ft. |
|
LTS 225 |
225,000 |
146,000 |
2-1/2” |
#42741140 |
6.9mm |
(0.272) |
#18 |
(0.170) |
20 ft. |
19 ft. |
|
LTS 250 |
250,000 |
162,000 |
2-3/4” |
#42741150 |
“K” |
(0.281) |
4.5mm |
(0.177) |
20 ft. |
19 ft. |
|
* MOUNT HEATERS AS HIGH AS POSSIBLE. Minimums are shown as a guideline for human comfort and uniform energy distribution for complete building heating applications. Consult your Space-Ray representative for the particulars of your installation requirements.
Type |
Gas Pipe |
Tube |
Flue |
Fresh Air |
Electrical |
Current |
Gas |
Connection |
Diameter |
Connection1 |
Connection |
Supply |
Rating |
Natural |
½” MPT |
|
|
|
120 Volt, 60Hz, |
|
or Propane |
(Male) |
4” |
4” Round |
6” Round |
1 Phase |
2.6 Amp |
1 LTS 180-250: 6” round. See Section 17.0) for vent sizes and limitations.
Fuse Rating: |
Ignition System (direct spark): |
|
In-line: 2 Amp 250V |
30 second pre-purge period |
|
(for 24V Circuit) |
||
|
||
|
|
10.0) |
LTS SERIES PACKING LIST |
|
|
|
|
A. Control/Draft Inducer Package |
|
|
|
Part Description |
QTY |
|
Control Box Assembly .............................................................................................................................. |
1 |
|
Draft Inducer & Junction Box Assembly ................................................................................................ |
1 |
|
Flue Restrictor Plate (See Section 9.0) for plate I.D. and part no.) ................................................... |
1 |
|
4” x 6” Starting Collar1 (#42892009) Supplied with LTS 180-250................................................. |
1 |
|
Control Fastener Kit (#42907010) ....................................................................................................... |
1 |
|
Containing: #8-32 Screws & Nuts (#02166010 & #02127030) .......................................... |
2 |
|
¼ - 20 Locknuts (#02167010) .............................................................................. |
6 |
|
Tube Flange Gasket (#42921000) ...................................................................................................... |
2 |
|
Installation & Operation Instructions (#43155040) .......................................................................... |
1 |
|
Gas connector, 5/8” OD x 36” 2 (#30302360) ................................................................................... |
1 |
1 4-inch Starting Collar (#40504020) supplied with LTS 40-175 models. |
|
|
2 LTS 225 and 250 models using Gas Connector, 1” OD x 36” (#30302361) |
|
|
|
|
Form #43155040 |
|
-16- |
May 2013 |

LTS SERIES CONTROL/DRAFT INDUCER PACKAGE NUMBERS
|
NATURAL GAS |
|
|
|
PROPANE GAS |
|
||
MODEL NO. |
PART NO. |
MODEL NO. |
PART NO. |
|
MODEL NO. |
PART NO. |
MODEL NO. |
PART NO. |
LTS 40-N7................. |
#43187510 |
LTS 130-N7 .............. |
#42883630 |
|
LTS 40-L7................. |
#43187520 |
LTS 130-L7 .............. |
#42883640 |
LTS 50-N7................. |
#43187530 |
LTS 140-N7 .............. |
#42883650 |
|
LTS 50-L7................. |
#43187540 |
LTS 140-L7 .............. |
#42883660 |
LTS 60-N7................. |
#43187550 |
LTS 150-N7 .............. |
#42883670 |
|
LTS 60-L7................. |
#43187560 |
LTS 150-L7 .............. |
#42883680 |
LTS 75-N7................. |
#43187570 |
LTS 160-N7 .............. |
#42883690 |
|
LTS 75-L7................. |
#43187580 |
LTS 160-L7 .............. |
#42883700 |
LTS 80-N7................. |
#42883510 |
LTS 175-N7 .............. |
#42883710 |
|
LTS 80-L7................. |
#42883520 |
LTS 175-L7 .............. |
#42883720 |
LTS 90-N7................. |
#42883530 |
LTS 180-N7 .............. |
#42883730 |
|
LTS 90-L7................. |
#42883540 |
LTS 180-L7 .............. |
#42883740 |
LTS 100-N7.............. |
#42883550 |
LTS 200-N7 .............. |
#42883750 |
|
LTS 100-L7.............. |
#42883560 |
LTS 200-L7 .............. |
#42883760 |
LTS 110-N7.............. |
#42883570 |
LTS 225-N7 .............. |
#42883770 |
|
LTS 110-L7.............. |
#42883580 |
LTS 225-L7 .............. |
#42883780 |
LTS 120-N7.............. |
#42883590 |
LTS 250-N7 |
#42883790 |
|
LTS 120-L7.............. |
#42883600 |
LTS 250-L7 |
#42883800 |
LTS 125-N7 |
#42883610 |
|
LTS 125-L7 |
#42883620 |
||||
|
|
|
|
|
||||
|
|
|
|
|
|
|
|
|
B.LTS 40-200 Body Package Descriptions
(PACKAGE PART NUMBER IS INDICATED ON THE OUTSIDE OF EACH CORRESPONDING CARTON.)
|
10’ Body Pkg. |
10’ Extension Body Pkg. |
5’ Ending Body Pkg. |
|
43337040 |
43337010 |
43336030 |
System Lengths |
Qty. |
Qty. |
Qty. |
15’ |
1 |
- |
1 |
20’ |
2 |
- |
- |
25’ |
1 |
1 |
1 |
30’ |
2 |
1 |
- |
35’ |
1 |
2 |
1 |
40’ |
2 |
2 |
- |
45’ |
1 |
3 |
1 |
50’ |
2 |
3 |
- |
55’ |
1 |
4 |
1 |
60’ |
2 |
4 |
- |
65’ |
1 |
5 |
1 |
70’ |
2 |
5 |
- |
75’ |
1 |
6 |
1 |
80’ |
2 |
6 |
- |
Form #43155040 |
|
May 2013 |
-17- |
C.LTS 225-250 Body Package Descriptions
(PACKAGE PART NUMBER IS INDICATED ON THE OUTSIDE OF EACH CORRESPONDING CARTON.)
|
10’ Starting Body Pkg. |
10’ Start/End Body Pkg. |
10’ Extension Body Pkg. |
5’ Ending Body Pkg. |
|
43337050 |
43337040 |
43337010 |
43336030 |
System |
|
|
|
|
Lengths |
Qty. |
Qty. |
Qty. |
Qty. |
50’ |
1 |
2 |
2 |
- |
55’ |
1 |
1 |
3 |
1 |
60’ |
1 |
2 |
3 |
- |
65’ |
1 |
1 |
4 |
1 |
70’ |
1 |
2 |
4 |
- |
75’ |
1 |
1 |
5 |
1 |
80’ |
1 |
2 |
5 |
- |
Components of LTS body packages are listed as follows.
|
|
10’ Pkg. |
10’ Pkg. |
5’ Pkg. |
10’ Pkg. |
|
|
LTS Body Package Components |
43337040 |
43337010 |
43336030 |
43337050 |
|
Part # |
Component Description |
Qty. |
Qty. |
Qty. |
Qty. |
|
43182060 |
Pre-assembled 10’ ALC Steel Tube |
1 |
- |
- |
- |
|
(one 12-radial hole flange) with reflector |
||||||
|
|
|
|
|
|
|
43182040 |
Pre-assembled 10’ ALC Steel Tube |
- |
1 |
- |
- |
|
(no flange) with reflector |
||||||
|
|
|
|
|
|
|
43181050 |
Pre-assembled 5’ ALC Steel Tube |
- |
- |
1 |
- |
|
(one 12-radial hole flange) with reflector |
||||||
|
|
|
|
|
|
|
43182023 |
Pre-assembled 10’ ATC Steel Tube |
- |
- |
- |
1 |
|
(two 6-hole flanges) with reflector |
||||||
|
|
|
|
|
|
|
30462980 |
Tube Coupling |
1 |
1 |
1 |
- |
|
|
|
|
|
|
|
|
43320000 |
End Reflector |
1 |
- |
1 |
1 |
|
|
|
|
|
|
|
|
|
Reflector/Coupling Fastener Kit, Containing: |
|
|
|
|
|
42907140 |
#02189020, #10-16x1/2” Screws (QTY = 4) |
1 |
1 |
1 |
- |
|
#02266010, Speed Clips (QTY = 6) |
||||||
|
#02125130, #10-24x1/2” Screws (QTY = 4) |
|
|
|
|
|
|
#42769010, Sliding Clamps (QTY = 4) |
|
|
|
|
|
|
Body Fastener Kit, Containing: |
|
|
|
|
|
|
#02189020, #10-16x1/2” Screws (QTY = 2) |
|
|
|
|
|
|
#02266010, Speed Clips (QTY = 4) |
|
|
|
|
|
42907180 |
#02125130, #10-24x1/2” Screws (QTY = 4) |
- |
- |
- |
1 |
|
#42769010, Sliding Clamps (QTY = 4) |
||||||
|
|
|
|
|
||
|
#02167010, ¼-20 Locknut (QTY = 6) |
|
|
|
|
|
|
#02259000, ¼-20x5/8” Screws (QTY = 6) |
|
|
|
|
|
|
#42921000, Tube Flange Gasket (QTY = 1) |
|
|
|
|
|
Form #43155040 |
-18- |
May 2013 |
 Loading...