

Page 1

XPREZZON™ and qube™
91390, 91393, 94267
070-2112-01 Rev. F | www.spacelabshealthcare.com July 2015
OPERATIONS MANUAL
Page 2

XPREZZON AND QUBE
©2015 Spacelabs Healthcare
All rights reserved. Contents of this publication may not be reproduced in any form without the written permission of
Spacelabs Healthcare. Products of Spacelabs Healthcare are covered by U.S. and foreign patents and/or pending patents.
Printed in U.S.A. Specifications and price change privileges are reserved.
Spacelabs Healthcare considers itself responsible for the effects on safety, reliability and performance of the equipment only
if:
• assembly operations, re-adjustments, modifications or repairs are carried out by persons authorized by Spacelabs
Healthcare, and
• the electrical installation of the relevant room complies with the requirements of the standard in force, and
• the equipment is used in accordance with the operations manual.
Spacelabs Healthcare will make available, on request, such circuit diagrams, component part lists, descriptions, calibration
instructions or other information which will assist appropriately qualified technical personnel to repair those parts of the
equipment which are classified by Spacelabs Healthcare as field repairable.
Spacelabs Healthcare is committed to providing comprehensive customer support beginning with your initial inquiry through
purchase, training, and service for the life of your Spacelabs Healthcare equipment.
CORPORATE OFFICES
Corporate Headquarters
Spacelabs Healthcare, Inc.
35301 SE Center Street
Snoqualmie, WA 98065
U.S.A.
Telephone: (1) 800-287-7108
Telephone: (1) 425-396-3300
Authorized EC Representative
Spacelabs Healthcare, Ltd.
43 Moray Place
Edinburgh, EH3 6BT
Scotland
Telephone: 44 (0) 131 240 6481
Fax: 44 (0) 131 240 6459
Please refer to http://www.spacelabshealthcare.com/en/company/trademarks for a full listing of Spacelabs Healthcare
trademarks. Other brands and product names used herein are trademarks of their respective owners.
• Rx Only U.S. Federal law restricts the devices documented herein to sale by or on the order of a
physician.
• Before use, carefully read the instructions, including all warnings and cautions.
www.spacelabshealthcare.com
Page 3

Table of Contents
1Introduction
About this Manual ............................................................................................................ 1-1
Conventions used in this manual ........................................................................ 1-2
Indications for Use .......................................................................................................... 1-2
Flexport System Interface ...........................................................................................1-4
Parameter Modules.........................................................................................................1-4
To install a module ...................................................................................................1-4
To remove a module ............................................................................................... 1-4
Parameter keys ......................................................................................................... 1-5
Patient Preparation......................................................................................................... 1-5
2 XPREZZON Monitor
XPREZZON ........................................................................................................................2-1
Touchscreen Display..................................................................................................... 2-2
Network Connection Indicator ............................................................................ 2-2
Basic Monitor Components ........................................................................................ 2-3
Optional Integrated Recorder ............................................................................. 2-5
3 qube™ Monitor
qube...................................................................................................................................... 3-1
Basic Components......................................................................................................... 3-2
Feature Options.............................................................................................................. 3-6
Integrated Alarm Light* ....................................................................................... 3-6
To enable or disable the display alarm lights ............................................... 3-7
Energy Saving Mode (Battery) ........................................................................... 3-7
Wireless Option Enabled ...................................................................................... 3-7
Signal Strength Indicator ...................................................................................... 3-7
Network Connection Indicator ............................................................................ 3-7
Battery Management*................................................................................................... 3-8
Battery Power Level .............................................................................................. 3-9
Docking Station*............................................................................................................. 3-9
To dock the qube monitor ................................................................................. 3-10
To undock the qube monitor .............................................................................. 3-11
4 Display Options
Displays Overview........................................................................................................... 4-1
XPREZZON Display options........................................................................................ 4-1
qube™ Secondary Display (94267-L15) .................................................................4-3
Display Adjustments .....................................................................................................4-4
User Control Buttons ............................................................................................. 4-4
Onscreen Display (OSD) Menu .......................................................................... 4-5
To power ON the display...................................................................................... 4-5
To power OFF the display....................................................................................4-5
To reset the display to factory default settings .......................................... 4-5
Display Alarm Light ............................................................................................... 4-6
To enable or disable the display alarm lights ...............................................4-6
Connectors and Mounting .......................................................................................... 4-7
Connectors .................................................................................................................. 4-7
Mounting .......................................................................................................................4-8
5 Basic Operations
Home Screen and Taskbar Icons.............................................................................. 5-2
Main Taskbar ............................................................................................................ 5-3
Large Numeric Displays ....................................................................................... 5-4
To show a large numeric parameter’s waveform........................................ 5-4
To return to the normal display ......................................................................... 5-4
www.spacelabshealthcare.com
I-I
Page 4

XPREZZON AND QUBE
O
PERATIONS MANUAL
Admit, Discharge, and Edit......................................................................................... 5-4
To admit a patient ................................................................................................... 5-5
To admit a patient (using barcode scanner) ................................................ 5-5
To edit patient data ................................................................................................ 5-6
To discharge a patient........................................................................................... 5-6
Alarms................................................................................................................................. 5-6
Trends................................................................................................................................. 5-6
To view and print the patient’s vital signs ..................................................... 5-7
To change the Trend view ................................................................................... 5-7
To view patient’s vital signs from different days or time periods ........ 5-7
Recording/Printing........................................................................................................ 5-8
Alarm Recordings ................................................................................................... 5-8
Waveform Recordings .......................................................................................... 5-8
To make a recording of selected patient parameters............................... 5-8
To make a recording of all currently shown patient parameters .........5-9
To start a continuous recording ........................................................................ 5-9
To stop a continuous recording......................................................................... 5-9
How to load paper in the printer ....................................................................... 5-9
To identify the printer destination.................................................................... 5-9
Group Recordings .................................................................................................. 5-9
To print a preconfigured recording set ........................................................ 5-10
Remote Access ...............................................................................................................5-11
To use Alarm Watch to view remote alarms on
other beds on the network ..................................................................................5-11
To use Remote View to view remote parameters on other beds on the
network........................................................................................................................5-11
To use Full Bed Review (FBR)...........................................................................5-12
Monitor Screen Saver ..................................................................................................5-12
To activate the screensaver ...............................................................................5-12
To deactivate the screensaver ..........................................................................5-12
Standby Mode ................................................................................................................5-13
To enable Standby Mode.....................................................................................5-13
To exit Standby Mode...........................................................................................5-13
Perioperative.................................................................................................................. 5-14
Start Case/End Case ............................................................................................ 5-15
To start a case..........................................................................................................5-15
To end a case ...........................................................................................................5-15
Calculations .....................................................................................................................5-16
To open the Calculations window....................................................................5-16
To access the Drug Calculator from the Calculations Window............5-16
Data Shuttle.....................................................................................................................5-17
Data Transfer ........................................................................................................... 5-17
Data Retrieval ......................................................................................................... 5-17
To transfer patient data from a monitor to the Command module ...5-17
To update transferred data before you remove module ........................5-17
To retrieve patient data at the destination monitor .................................5-18
Help.....................................................................................................................................5-18
Using Help .................................................................................................................5-18
6 Remote Access
Overview............................................................................................................................. 6-1
Network Basics ........................................................................................................ 6-2
To select a subnet and bed for remote functions....................................... 6-2
Remote View ............................................................................................................ 6-3
To use Remote View to view remote parameters on other beds on the
network........................................................................................................................ 6-3
To turn off Remote View ...................................................................................... 6-3
Full Bed Review ....................................................................................................... 6-4
I-II
www.spacelabshealthcare.com
Page 5

XPREZZON AND QUBE OPERATIONS MANUAL
Alarm Watch ............................................................................................................ 6-5
Remote Trends ........................................................................................................ 6-6
Remote Calcs ........................................................................................................... 6-6
7Alarms
Alarm Limits ..................................................................................................................... 7-3
Alarm Levels..................................................................................................................... 7-3
Bedside Alarms ........................................................................................................ 7-4
Alarm Watch and Remote View Alarms ......................................................... 7-4
Alarm Icons....................................................................................................................... 7-5
Audio Pause...................................................................................................................... 7-6
Alarm Pause .....................................................................................................................7-7
Alarm History...................................................................................................................7-7
Alarm Acknowledge...................................................................................................... 7-9
Alarm Acknowledge Reminder............................................................................... 7-10
Alarm Audio .....................................................................................................................7-11
Audio Off Reminder ..................................................................................................... 7-12
Alarm Watch ...................................................................................................................7-13
Alarm Recording............................................................................................................7-14
8 Recording/Printing
Printing Configurations ......................................................................................... 8-1
Printing Priorities .................................................................................................... 8-3
Selecting Recording Duration ............................................................................ 8-4
Selecting Recording Destination ....................................................................... 8-4
Alarm Recordings ................................................................................................... 8-4
Continuous Recordings ........................................................................................ 8-4
To use Full Bed Review (FBR)............................................................................6-4
To use Full Bed Review (FBR) when a remote
parameter is not shown.........................................................................................6-4
To turn off Full Bed Review (FBR).................................................................... 6-5
To use Alarm Watch to view remote alarms on
other beds on the network ..................................................................................6-6
To turn off Alarm Watch....................................................................................... 6-6
To view the Remote Trends window ...............................................................6-6
To access Remote Calculations window....................................................... 6-7
To set alarm limits ................................................................................................... 7-3
To pause the audio for an active alarm .......................................................... 7-6
To pause all alarms.................................................................................................. 7-7
To open the Alarm History window ................................................................. 7-8
To close the Alarm History window ................................................................. 7-8
To refresh the Alarm History window.............................................................. 7-8
To select alarms based on alarm priority....................................................... 7-8
To view a waveform in the Alarm History window (for ECG and invasive
pressure alarms only)............................................................................................. 7-9
To acknowledge an alarm .................................................................................. 7-10
To cancel an alarm acknowledge .................................................................... 7-10
To adjust the volume levels for High, Medium, Low Priority Alarms, Re-
mote Alarm, Alarm Watch, and Key tones ...................................................7-12
To disable an audio tone .....................................................................................7-12
Configuration 1 ............................................................................................................ 8-1
Configuration 2 .......................................................................................................... 8-2
Configuration 3 .......................................................................................................... 8-2
Recording Buffer and Printer Transitions ........................................................ 8-3
Waveform Data ..........................................................................................................8-4
To make a recording of selected patient parameters...............................8-4
To make a recording of all currently shown patient parameters .........8-5
To start a continuous recording ........................................................................ 8-5
www.spacelabshealthcare.com
I-III
Page 6

XPREZZON AND QUBE
O
PERATIONS MANUAL
To stop a continuous recording......................................................................... 8-5
To print Vital Signs.................................................................................................. 8-5
Group Recordings .................................................................................................. 8-5
To print a preconfigured recording set .......................................................... 8-5
Printer Controls............................................................................................................... 8-6
9Trends
Trends View....................................................................................................................... 9-1
Trends toolbar ......................................................................................................... 9-3
To open the Trends window ............................................................................... 9-4
To resize the Trends window..............................................................................9-4
View Controls .................................................................................................................. 9-4
To select a view to be shown .............................................................................9-4
To set the interval for tabular trends in the current view........................ 9-5
To set the duration for graphical trends in the current view ................. 9-5
To expand and collapse tabular categories and measurement lists... 9-5
To show, move, or remove the Flag cursor................................................... 9-5
Trends Setup....................................................................................................................9-6
Trends Setup Window .......................................................................................... 9-6
To open the Trends Setup window .................................................................. 9-7
Tabular Trends Setup ............................................................................................ 9-8
To add a category ...................................................................................................9-8
To rename a category............................................................................................ 9-8
To move a measurement or a category within the tabular list.............. 9-8
To delete a category or measurement............................................................ 9-8
To add measurements to a category............................................................... 9-9
Graphical Trends Setup ........................................................................................ 9-9
To rename a graph................................................................................................ 9-10
To add measurements to a graph................................................................... 9-10
To delete measurements from a graph......................................................... 9-10
To change the color used to show a measurement................................. 9-10
To set the scale for a measurement .................................................................9-11
To add reference lines for a measurement....................................................9-11
10 Calculations
Types of Calculations ............................................................................................ 10-1
Calculations Window ............................................................................................. 10-1
To open the Calculations window................................................................... 10-2
To select a calculation type to view or edit ................................................ 10-3
To edit an entry ...................................................................................................... 10-3
To add a new column........................................................................................... 10-3
To delete a column ............................................................................................... 10-3
To refresh calculations data .............................................................................. 10-4
To save edits............................................................................................................ 10-4
To print the shown calculations....................................................................... 10-4
Hemodynamic Calculations ............................................................................... 10-4
Input Values for Hemodynamic Calculations ............................................... 10-5
Output Values for Hemodynamic Calculations ........................................... 10-5
Oxygenation Calculations ................................................................................... 10-6
Input Values for Oxygenation Calculations .................................................. 10-6
Output Values for Oxygenation Calculations .............................................. 10-7
Drug Calculator ...................................................................................................... 10-7
Rate and Dose Values ........................................................................................... 10-8
To access the Drug Calculator from the Calculations Window........... 10-9
To enter values for drug calculation .............................................................. 10-9
11 Dynamic Network Access (DNA)
DNA Application Window............................................................................................11-1
To open the DNA application window ............................................................11-2
I-IV
www.spacelabshealthcare.com
Page 7

XPREZZON AND QUBE OPERATIONS MANUAL
DNA Session Window...................................................................................................11-3
12 Monitor Setup
Alarm Audio ....................................................................................................................12-2
Audio Off Reminder .....................................................................................................12-4
Alarm Limit Review ...................................................................................................... 12-5
Local Config ....................................................................................................................12-6
Printer ................................................................................................................................12-9
Setup ................................................................................................................................ 12-12
Numerics......................................................................................................................... 12-15
Remote Config (XPREZZON only) ....................................................................... 12-17
To connect to a Citrix Server ..............................................................................11-2
To connect to a published application............................................................11-2
To refresh the list of applications......................................................................11-3
To minimize a DNA session .................................................................................11-3
To restore a DNA session ..................................................................................... 11-3
To reconnect to a disconnected session........................................................11-4
To disconnect from or log off a DNA session ..............................................11-4
To enable and adjust volume levels for High, Medium, Low Priority
Alarms, Remote Alarm, Alarm Watch, and Key tones .............................12-3
To see current alarm settings ............................................................................12-5
To print current alarm settings ......................................................................... 12-5
To change the position of a parameter .........................................................12-8
To show numeric values only for a parameter............................................12-8
To change the color of a parameter waveform..........................................12-8
To restore the previous configuration............................................................12-8
To restore the factory defaults for a configuration ..................................12-9
To rename a configuration..................................................................................12-9
To set print duration............................................................................................12-10
To change the number of channels for a printer module .....................12-10
To set the print destination for alarm recordings.................................... 12-10
To set the print destination for non-alarm recordings ..........................12-10
To setup Print Vital Signs ................................................................................... 12-11
To enable or disable the clock display......................................................... 12-13
To display the clock as a stopwatch or timer............................................ 12-13
To select the number of parameter zones ................................................. 12-13
To enable or disable the display alarm lights ............................................ 12-13
To set minimum alarm level that activates the alarm light .................. 12-14
To enable and adjust minor graticule lines................................................. 12-14
To enable or disable PDL (Optional) ............................................................ 12-14
To select a large numerics format ................................................................. 12-15
To turn off the large numerics......................................................................... 12-16
To configure the large numerics format...................................................... 12-16
To select a subset of parameters ................................................................... 12-17
To change the position of a parameter ....................................................... 12-18
To change the color of a parameter waveform........................................ 12-18
To restore the previous configuration.......................................................... 12-18
To restore the factory defaults for a configuration ................................ 12-18
To rename a configuration................................................................................ 12-19
To establish communication with the remote monitor ......................... 12-19
To enable or disable the clock display......................................................... 12-19
To copy local parameter settings to the remote monitor ...................12-20
To copy local parameter attributes to the remote monitor ...............12-20
To set Track or Lock mode.............................................................................. 12-20
To enable and adjust minor graticule lines................................................ 12-20
www.spacelabshealthcare.com
I-V
Page 8

XPREZZON AND QUBE
O
PERATIONS MANUAL
13 Cleaning, Disinfecting, and Sterilization
Cleaning Products Not Recommended for Use .................................................13-1
Touchscreen Cleaning ..................................................................................................13-1
Monitors, Modules, Cables, Printers, and Docking Station............................13-2
Cleaning/Disinfecting ........................................................................................... 13-2
Use only the following recommended cleaning solutions: ...................... 13-2
To clean the exterior of displays, monitors, modules, and cables.......13-3
To clean and sterilize the docking station ....................................................13-3
Accessories .................................................................................................................13-3
Noninvasive Blood Pressure Cuffs ................................................................... 13-4
TruLink Reusable and Disposable Cuffs ......................................................... 13-4
Cuff Cleaning and Disinfection Materials ....................................................... 13-4
Cleaning Procedure .............................................................................................. 13-4
ABP Cuffs ................................................................................................................... 13-4
A Appendix A — Symbols
I-VI
www.spacelabshealthcare.com
Page 9

XPREZZON AND QUBE
O
PERATIONS MANUAL
Introduction
Spacelabs Healthcare patient monitoring systems demonstrate an ongoing
commitment to innovation that supports decision-making and enhances patient
care. Spacelabs monitors are flexible enough to be set for any level of acuity, and
they can be precisely and easily adjusted using touchscreen technology.
About this Manual
Spacelabs Healthcare networking features support seamless data acquisition and
data exchange across the medical enterprise, addressing the need for continuous
information management. These powerful tools help you care for patients more
efficiently by providing both local and remote access to patient data.
This manual provides instruction for specific features for the XPREZZON™ and qube™
monitors. This manual should be used with the following documents. These
manuals are included on the Spacelabs Healthcare Patient Monitoring Operations
CD-ROM.
• XPREZZON™ and qube™ System Administration Manual
In this Operations Manual, we refer the user to the System Administrator for
configuration which is covered in the XPREZZON™ and qube™ System
Administration Manual.
• Clinical Parameters Operations Manual
• Module Configuration Manager System Administration Guide
www.spacelabshealthcare.com
1-1
Page 10

XPREZZON
O
PERATIONS MANUAL
AND QUBE
Conventions used in this manual
Spacelabs uses specific types of indications to draw your attention to how to use
the monitor.
• Reference links are in blue. Place the mouse over the blue text and click the
text, and the topic will be shown. The links are located throughout the manual
and in the
• Bold lettering indicates words, buttons, keys, tabs, and titles that can be found
on the touchscreen. For example: a Home icon is located on the taskbar on the
right of the touchscreen.
• Italicized words are references or links to other information. If it is a link to
additional information in the manual, place your cursor over the reference and
click once to bring up that information. It may also be a reference to other
documents available on the CD-ROM.
• There are specific steps to accomplish a task that are presented in numbered
steps, possibly followed by the results of the step. The step results are
additional information which may follow the task steps and are shown in gray
typeface. To see an example for the steps, move your cursor to click the
following reference: To install a module on page 1-4.
I NTRODUCTION
Table of Contents on page I-I.
• This Operations Manual is divided into multiple sections. The first section titled
Basic Operations on page 5-1 is a quick reference for basic tasks. The other
sections describe the features in more detail. If the configuration of a feature is
required, it is covered in the XPREZZON™ and qube™ System Administration
Manual.
• Quick Start sections are the steps that explain how to use the various features
and parameters. The Basic Operations on page 5-1 has mostly Quick Start
sections for easy access to doing the basic tasks. The other chapters have
detailed information on the specific features.
• Warnings, Cautions and Notes are listed in the priority of the information and
formatted specifically as shown below. Warnings are of the highest priority and
notes are not as serious as the warnings and cautions.
Warning:
Warnings indicate potentially harmful conditions that may lead to injury or
death.
Caution:
Cautions indicate conditions that may lead to damage to or malfunction of the
device.
Note:
Notes alert the user to relevant facts and conditions.
Indications for Use
1-2
Spacelabs Healthcare patient monitors, functioning as bedside monitors passively
display data generated by Spacelabs Healthcare parameter modules, Flexports
interfaces, and other SDLC based products in the form of waveform, numeric
displays, trends, and alarms. Key monitored parameters, when employing the
www.spacelabshealthcare.com
Page 11

XPREZZON AND QUBE
PERATIONS MANUAL
O
I NTRODUCTION
Spacelabs Command Module, consist of ECG, respiration, invasive and noninvasive
blood pressure, SpO
, temperature and cardiac output. Additional parameters and
2
interfaces to other systems are also available depending on the parameter modules
employed.
Spacelabs Healthcare patient monitors are intended to alert the user to alarm
conditions that are reported by Spacelabs Healthcare parameter modules and/or
other physiologic monitors via Flexport interfaces. These devices determine a)
when an alarm condition is violated; b) the alarm priority (i.e. high, medium or low);
c) alarm limits; and d) when to initiate and terminate alarm notifications. The
patient monitors are also capable of displaying alarm conditions on other monitors
that are on the network through the Alarm Watch feature.
Spacelabs Healthcare patient monitors may also function as a generic display or
computer terminal. As a generic display or terminal, the patient monitors allow
network-based applications to open windows and display information on other
networked monitors.
Spacelabs Healthcare patient monitors are also designed to communicate with a
variety of external devices such as displays, network devices, serial devices, user
input devices, audio systems, and local/remote recorders.
Spacelabs Healthcare patient monitors are intended for use under the direct
supervision of a licensed healthcare practitioner, or by personnel trained in proper
use of the equipment in a hospital environment.
Your system configuration, including the options ordered, may be different from
the configurations described in this manual. Refer to the notes in this manual
describing the features affected by system configuration.
Warnings:
• Do not use wet or damaged equipment, cables, or sensors.
• A qualified service or biomedical engineer must verify that the unit is
working correctly (if the monitor or module is damaged, dropped, or wet)
and that all safety features are intact before placing the device back in
service.
• If you do not properly configure this device before you connect to a network,
it can alter network time, or corrupt patient data.
• XPREZZON monitors will stop monitoring if AC wall power is disrupted.
Make sure that the monitor is connected to an un-interruptible power
supply (UPS) or institutional stand-by generator.
• Monitors require AC outlet with Protective Earth (Safety Ground)
connection.
• Only connect patient monitors to other medical equipment suitable for use
in the patient vicinity.
• Check earth (ground) leakage currents after installing interconnecting
cables between equipment.
• No modification of this equipment is allowed.
• Only use the designated external medical-grade power supply (010-1840-
00).
www.spacelabshealthcare.com
1-3
Page 12

XPREZZON
O
PERATIONS MANUAL
AND QUBE
Flexport System Interface
The Flexport system interfaces integrate data from compatible third-party
peripheral devices (such as ventilators, hemodynamic monitors, and pulse
oximeters) into Spacelabs Healthcare monitors.
Flexport interfaces provide current numeric data, alarm information, and selected
waveforms. All of the data communicated to the Spacelabs Healthcare monitor is
available at network locations, providing alarms and centralized displays. Contact
your Spacelabs Healthcare sales representative for additional information.
Parameter Modules
Use parameter modules with a Spacelabs Healthcare monitor to monitor clinical
parameters such as electrocardiography (ECG) and noninvasive blood pressure
(NIBP). Each module ships with default settings for alarms and various other
operational settings, which can be adjusted to meet the needs of your patients or
comply with your hospital’s protocol.
I NTRODUCTION
Note:
Do not operate electronic devices (for example, portable communication
transmitters, cellular telephones, personal computers, electronic toys, and other
medical devices) within one meter (3.5 feet) of the patient, patient leads, or
associated monitoring equipment until evaluated by the biomedical engineering
staff. Electromagnetic interference may occur when using these devices.
Caution:
• Use of the monitor is restricted to one patient at a time.
• Using multiple instances of parameters such as ECG is not supported.
To install a module
1 Make sure that the locking lever on the module is closed and that the module
is oriented correctly.
2 Insert the module into any open slot in the monitor or module housing.
3 Slide the module into the monitor or module housing until the front of the
module is even with the front of the monitor.
Note:
A soft “click” indicates that the module is locked in place.
To remove a module
1-4
1 Disconnect any cable(s) from the front of the module, if necessary.
2 Push the left side of the locking lever.
3 Hook your finger through the open locking lever.
4 Pull the module out of the slot.
www.spacelabshealthcare.com
Page 13

XPREZZON AND QUBE
PERATIONS MANUAL
O
Parameter keys
Patient Preparation
I NTRODUCTION
For details on using individual parameter modules, parameter keys and menu keys,
refer to the Clinical Parameters Operations Manual. Parameter keys are located to
the right of the parameter zones on the home screen. Refer to Figure 5-1 on page 5-
2.
To prepare a patient for monitoring, attach the lead wires and sensors to the
patient and connect the sensor cables to the module. Touch a parameter key, and
then touch menu options as needed to set up monitoring for a specific parameter.
Refer to Clinical Parameters Operations Manual, and the Module Configuration
Manager System Administration Guide for detailed information on patient
preparation for each module and parameter.
Warnings:
• Use only Spacelabs Healthcare parts and accessories with your Spacelabs
Healthcare products. Other parts and accessories may degrade performance
or damage the components. Refer to the Spacelabs Healthcare Supplies and
Accessories Catalog for the part numbers and descriptions of additional
parts and accessories.
• Do not rely solely on the monitor for critically ill patients.
• Keep patients under close surveillance. Do not rely entirely on the monitor
for patient assessment.
Refer to Basic Operations on page 5-1 for quick reference of basic tasks.
www.spacelabshealthcare.com
1-5
Page 14

XPREZZON
O
PERATIONS MANUAL
AND QUBE
I NTRODUCTION
1-6
www.spacelabshealthcare.com
Page 15

XPREZZON AND QUBE
O
PERATIONS MANUAL
XPREZZON Monitor
XPREZZON
With its superior performance and next-generation design, XPREZZON connects
innovation with care in a flexible and efficient solution. It provides an intuitive
graphical interface for all monitor-specific functions, information-rich graphic and
tabular trends, and interactive networking.
XPREZZON allows for a number of different mounting options and accommodates
two single-high parameter modules. Included with each monitor is a DC power
supply that provides power for the monitor and up to three Flexport interfaces. The
monitor supports single-display configurations and dual-display configurations,
depending on options.
This chapter should be used with the following chapters as well as the following
manuals included on the Spacelabs Healthcare Patient Monitoring Operations CD-
ROM.
• XPREZZON™ and qube™ System Administration Manual
In this Operations Manual, we refer the user to the System Administrator for
configuration which is covered in the XPREZZON™ and qube™ System
Administration Manual.
• Clinical Parameters Operations Manual
• Module Configuration Manager System Administration Guide
• XPREZZON™ Monitor and Display 91393/94267 Service Manual
Warnings:
• To fully disengage the power to the unit, disconnect the power cord from the
AC outlet.
• To avoid risk of electric shock, this equipment must only be connected to a
supply mains with protective earth.
www.spacelabshealthcare.com
2-1
Page 16

XPREZZON
O
PERATIONS MANUAL
AND QUBE
• The XPREZZON should be plugged into AC power when not in use to charge
Touchscreen Display
The XPREZZON includes several display options:
• 17-inch display (94267-L17)
• 19-inch display (94267-L19)
• 19-inch display (94267-19)
• For more information on the displays and the display functions, refer to Display
Options on page 4-1.
Network Connection Indicator
XPREZZON MONITOR
the internal NiMH battery used to retain alarm settings in modules if power
loss occurs. If the XPREZZON is planned to be stored for 30 days or more
without connection to AC power, the battery must be removed and reinstalled upon next use.
The network connectivity icon shows whenever the
monitor is communicating over a wired network. If no
network connection is detected, the icon shows with a red
X across it.
When connectivity is lost, the message NETWORK SIGNAL
LOST shows. The message opens every 60 seconds until
the network connection is restored or until the user touches OK to dismiss the
message.
2-2
www.spacelabshealthcare.com
Page 17
XPREZZON AND QUBE
1
2
3
1
2
3
5
7
8
9
10
11
13
14
15
4
6
12
16
PERATIONS MANUAL
O
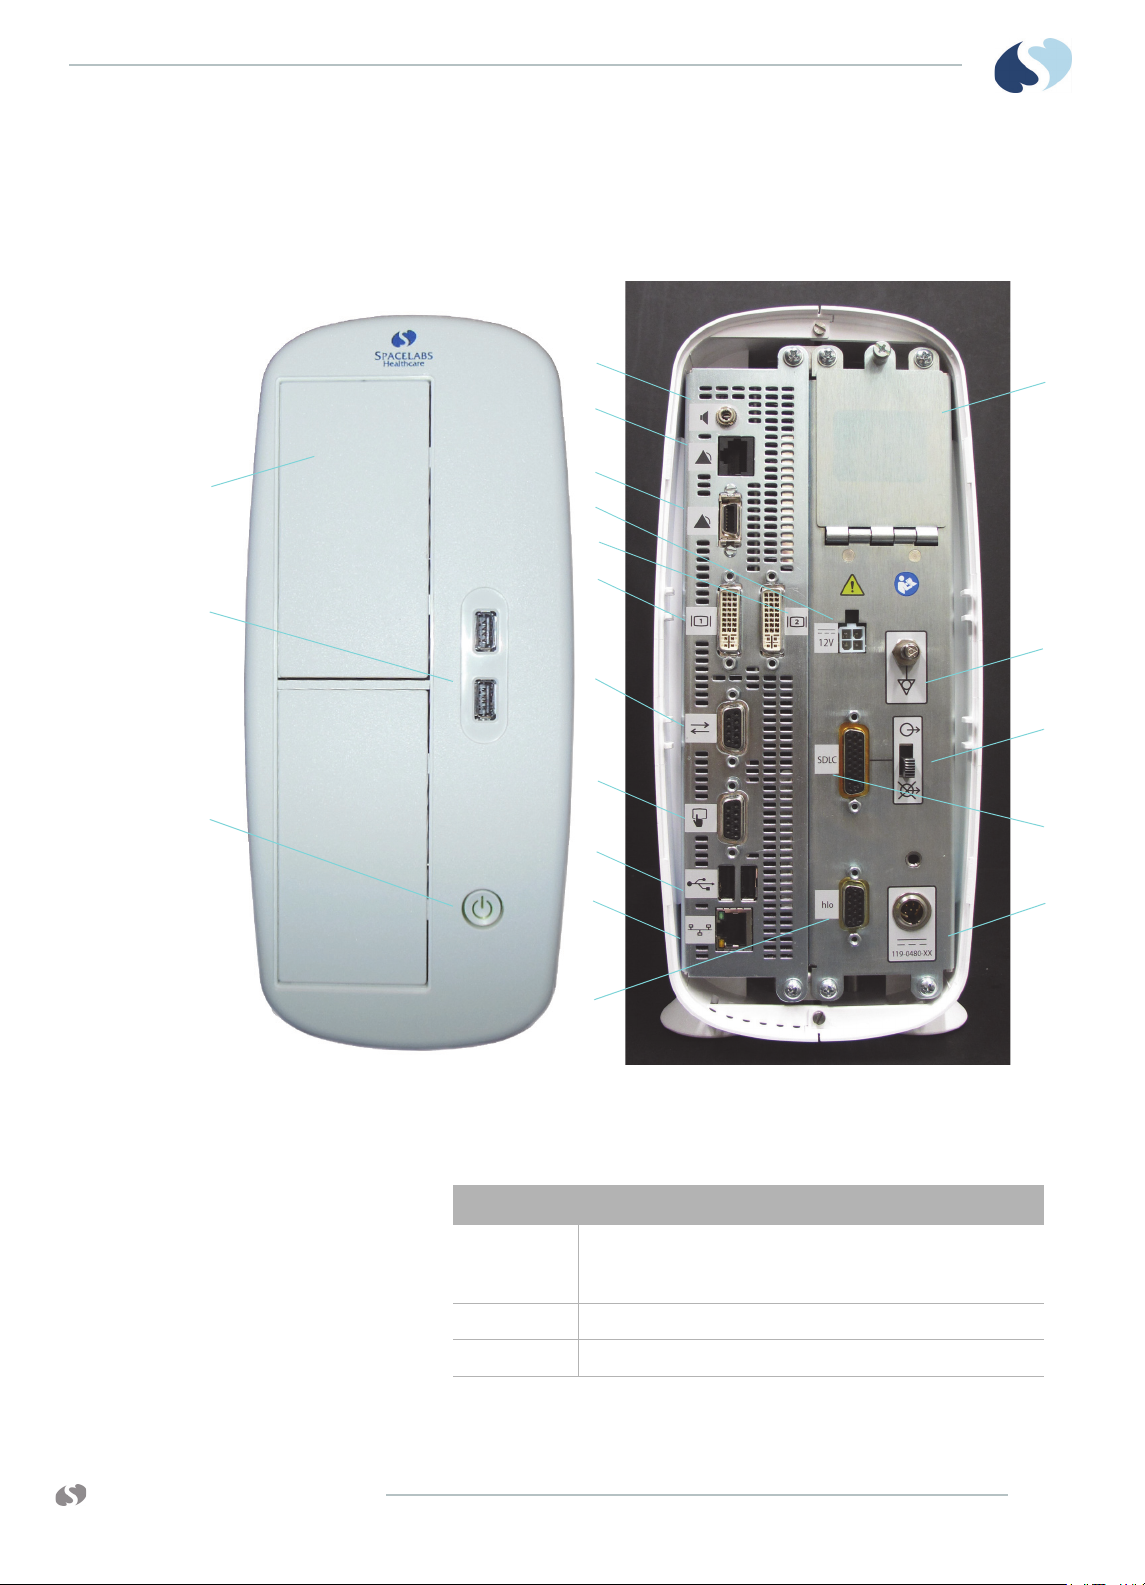
Basic Monitor Components
The connectors for the monitor include the following:
XPREZZON MONITOR
Figure 2-1 Front and back (XPREZZON)
Table 2-1 Front (XPREZZON)
Description
1
2 USB Ports (qty=2)
3 Parameter Module Slots (qty=2)
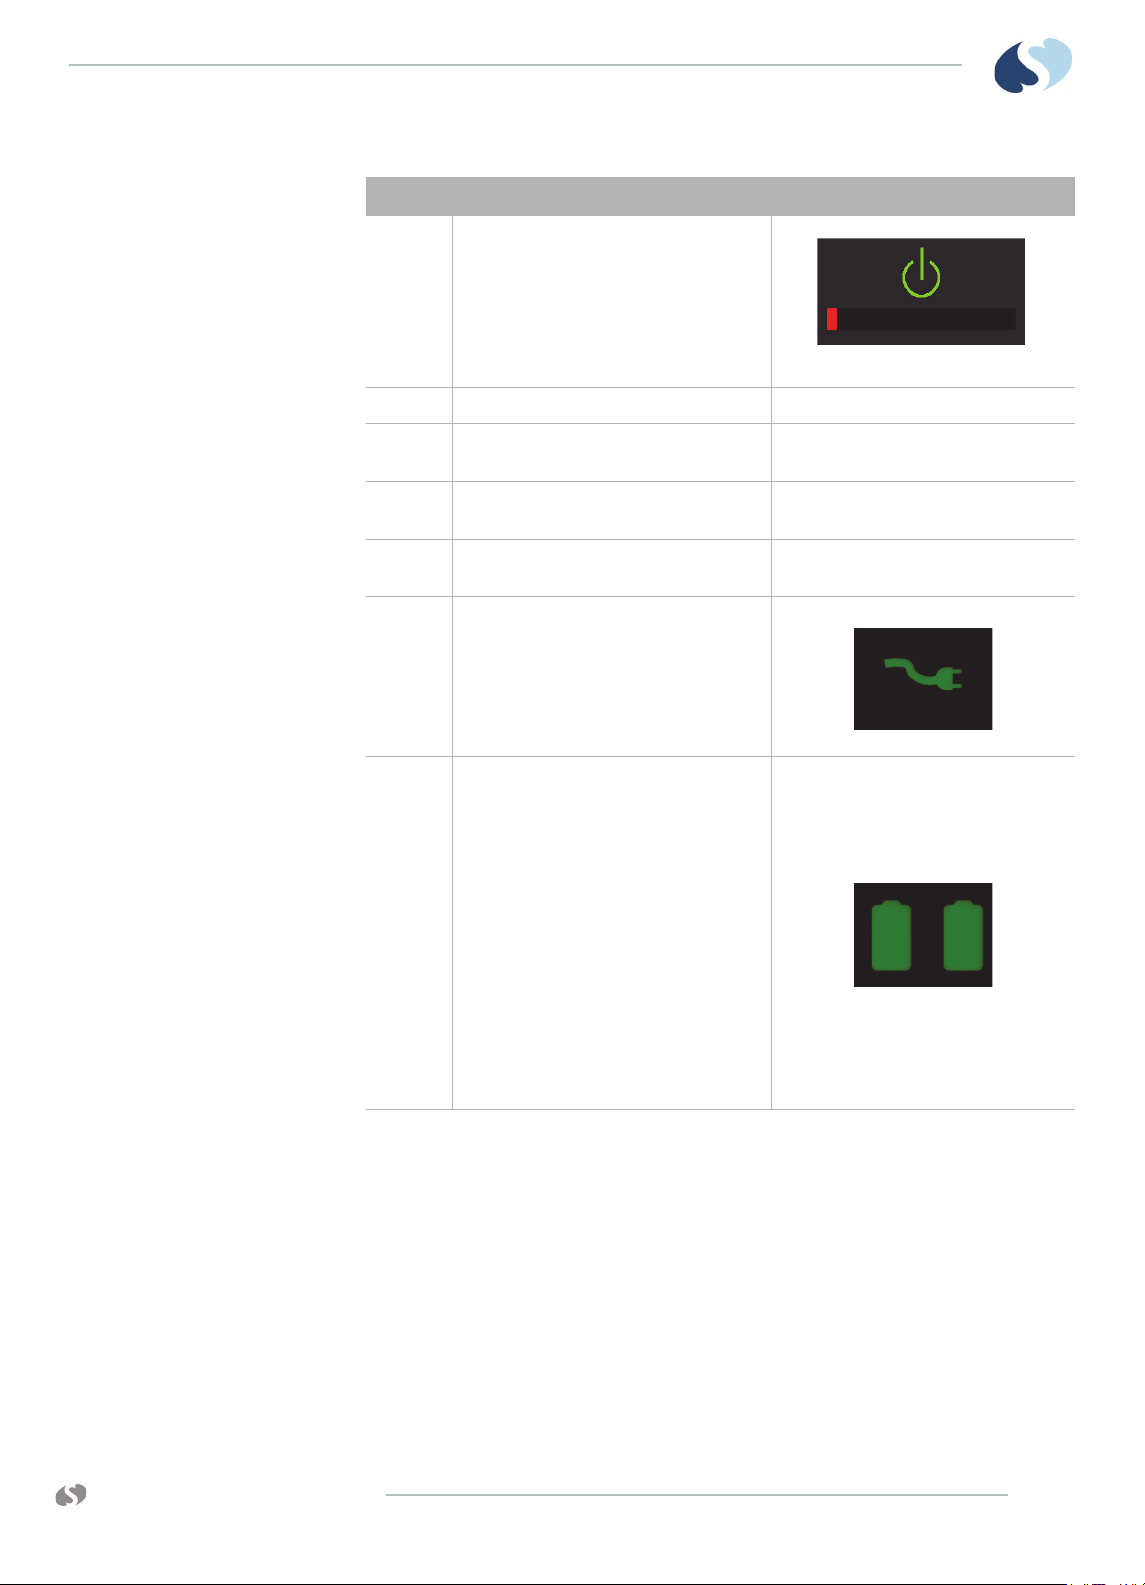
Power On/Off button- Press and hold the Power button for five
seconds to turn the monitor off. The monitor shows a five second
shut down graphic. Refer to
Figure 3-2 on page 3-3.
www.spacelabshealthcare.com
2-3
Page 18
XPREZZON
O
PERATIONS MANUAL
AND QUBE
XPREZZON MONITOR
Table 2-2 Back Panel (XPREZZON)
Description Symbol on panel
1
Battery backup cover
2 Equipotential Terminal used for grounding
the monitor
3 SDLC Bus Termination switch (up is not
terminated, down is terminated)
4 SDLC Ports used to connect Flexports and
module housings to the monitor
5 DC Power Input
119-0480-00 (XPREZZON)
6 High-level analog output
7 Ethernet 10/100 Base T Connection
8 USB Ports (qty=2)
9 Serial Port 2 (external touchscreen primary
display only)
10 Serial Port
11 Video Output, DVI
12 Video Output, DVI
2-4
www.spacelabshealthcare.com
Page 19
XPREZZON AND QUBE
PERATIONS MANUAL
O
XPREZZON MONITOR
Table 2-2 Back Panel (XPREZZON) (Continued)
Description Symbol on panel
13 Alarm Relay Output
(customer designed)
14 RJ50 connection for alarm lights and audio
to 94267 display
15 Audio output
(Independent of 94267 display)
16 Power Output, 12 volt
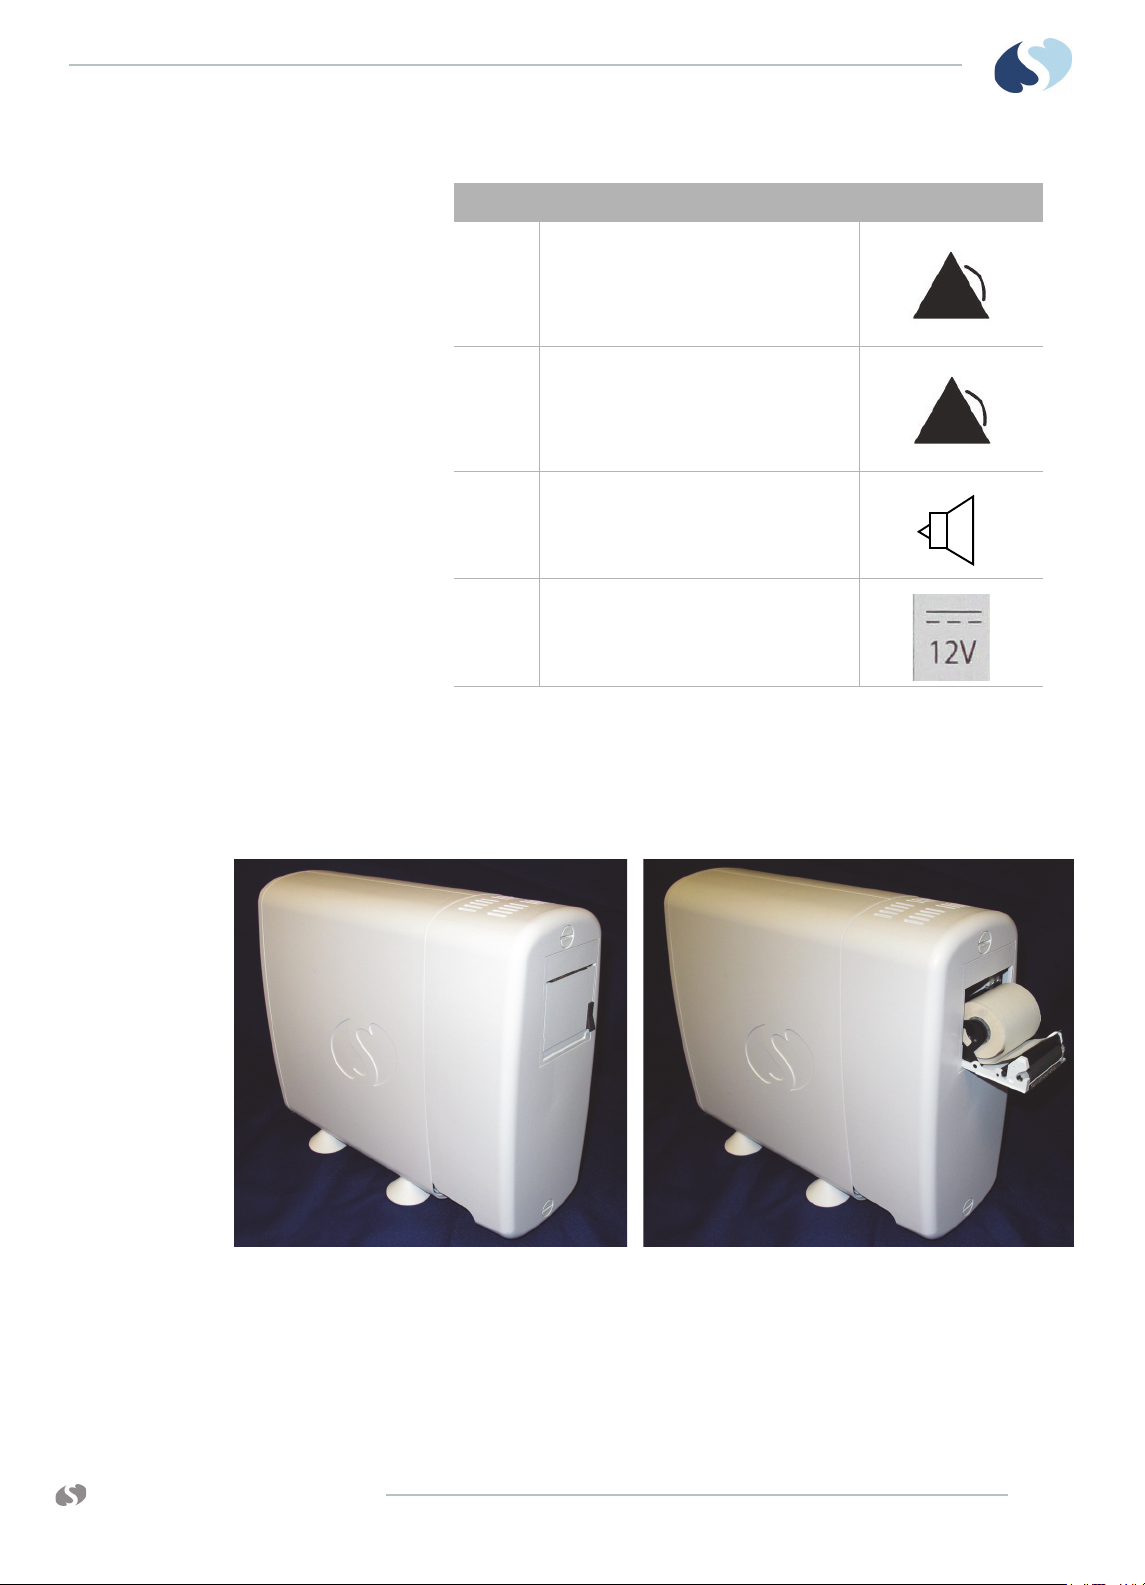
Optional Integrated Recorder
Using the 12-volt power output on the back of the monitor, XPREZZON has an
optional integrated recorder that requires no additional power. For more
information on the printing functions, refer to Recording/Printing.
Figure 2-2 Optional Integrated Recorder
www.spacelabshealthcare.com
2-5
Page 20

XPREZZON
O
PERATIONS MANUAL
AND QUBE
XPREZZON MONITOR
2-6
www.spacelabshealthcare.com
Page 21

XPREZZON AND QUBE
O
PERATIONS MANUAL
qube™ Monitor
qube
The qube monitor has a 30.7 cm (12.1 inches) LCD with 1024 x 768 resolution. The
monitor includes a single module slot; additional modules connect using the 90499
Module Housing. Additionally, the monitor supports up to three Flexport® devices.
It has four USB ports for use with mouse, keyboard, or barcode scanners. Available
options include an integrated recorder and wireless networking. Dual-battery slots
allow this monitor to be used in transport, as well as at the bedside. Some of its
specialized features are:
• Wireless. Refer to Signal Strength Indicator on page 3-7 for details. Refer to the
XPREZZON™ and qube™ System Administration Manual to setup the wireless
connection.
• Battery operation. Refer to Battery Management* on page 3-8 for details.
• Energy Saving Mode. Refer to Energy Saving Mode (Battery) on page 3-7 for
more details.
The qube monitors have various options. Options include:
• recorder
• interchangeable batteries
• integrated alarm lights
• POD connection
•Docking Station
• Secondary 15-inch display (94267-L15) (Refer to qube™ Secondary Display
(94267-L15) on page 4-3.)
www.spacelabshealthcare.com
Note:
The options have an * asterisk next to them in this chapter. For more details on
the options, refer to Feature Options on page 3-6.
3-1
Page 22
XPREZZON
1
2b*
2a*
3*
3*
4*
5a
5b
O
PERATIONS MANUAL
AND QUBE
Basic Components
™ MONITOR
QUBE
Note:
This chapter should be used with the following chapters as well as the following
manuals included on the Spacelabs Healthcare Bedside, Central, and Telemetry
Systems CD-ROM.
• XPREZZON™ and qube™ System Administration Manual
• In this Operations Manual, we refer the user to the System Administrator for
configuration which is covered in the XPREZZON™ and qube™ System
Administration Manual.
• Clinical Parameters Operations Manual
• Module Configuration Manager System Administration Guide
• qube™ 91390 Service Manual
3-2
Figure 3-1 Front and right side (qube)
Note:
The options have an * asterisk next to them in this chapter. For more details on
the options, refer to Feature Options on page 3-6.
www.spacelabshealthcare.com
Page 23
XPREZZON AND QUBE
PERATIONS MANUAL
O
™ MONITOR
QUBE
Description Symbol
1 Power On/Off button- Press and hold the
power button for at least three seconds to
turn the monitor off. System shutdown
progress is shown below the green power
symbol.
Figure 3-2 System shutdown progress
2a Integrated Battery slot closed* Refer to on page 3-8 for details.
2b Hot Swappable Battery slot open with
Refer to on page 3-8 for details.
battery partially pulled out.*
3 Internal Recorder slot* Refer to Recording/Printing on page 5-8
for details on loading paper.
4 Front Integrated Alarm Light* Refer to Feature Options on page 3-6 for
setup details.
5a AC/DC power indicator - External
power supply is connected to the
monitor.
5b Battery change status indicator-
Shown if a battery is present. The left light
shows if the top battery is installed. The
right light shows if the bottom battery is
installed.
Flashing (rate of 1 second on and 1 second
off) shows the battery is charging.
Steady ON shows the battery is charged.
Flashing, rapid or erratic shows the battery
is faulty and must be replaced.
www.spacelabshealthcare.com
For more details, refer to Battery
Management* on page 3-8.
3-3
Page 24
XPREZZON
1
11
2*
10
98 7 66 5 4 3
O
PERATIONS MANUAL
AND QUBE
Figure 3-3 Back Panel (qube)
™ MONITOR
QUBE
Description Symbol on panel
1 Integrated Alarm Light Refer to Feature Options on
page 3-6 for setup details.
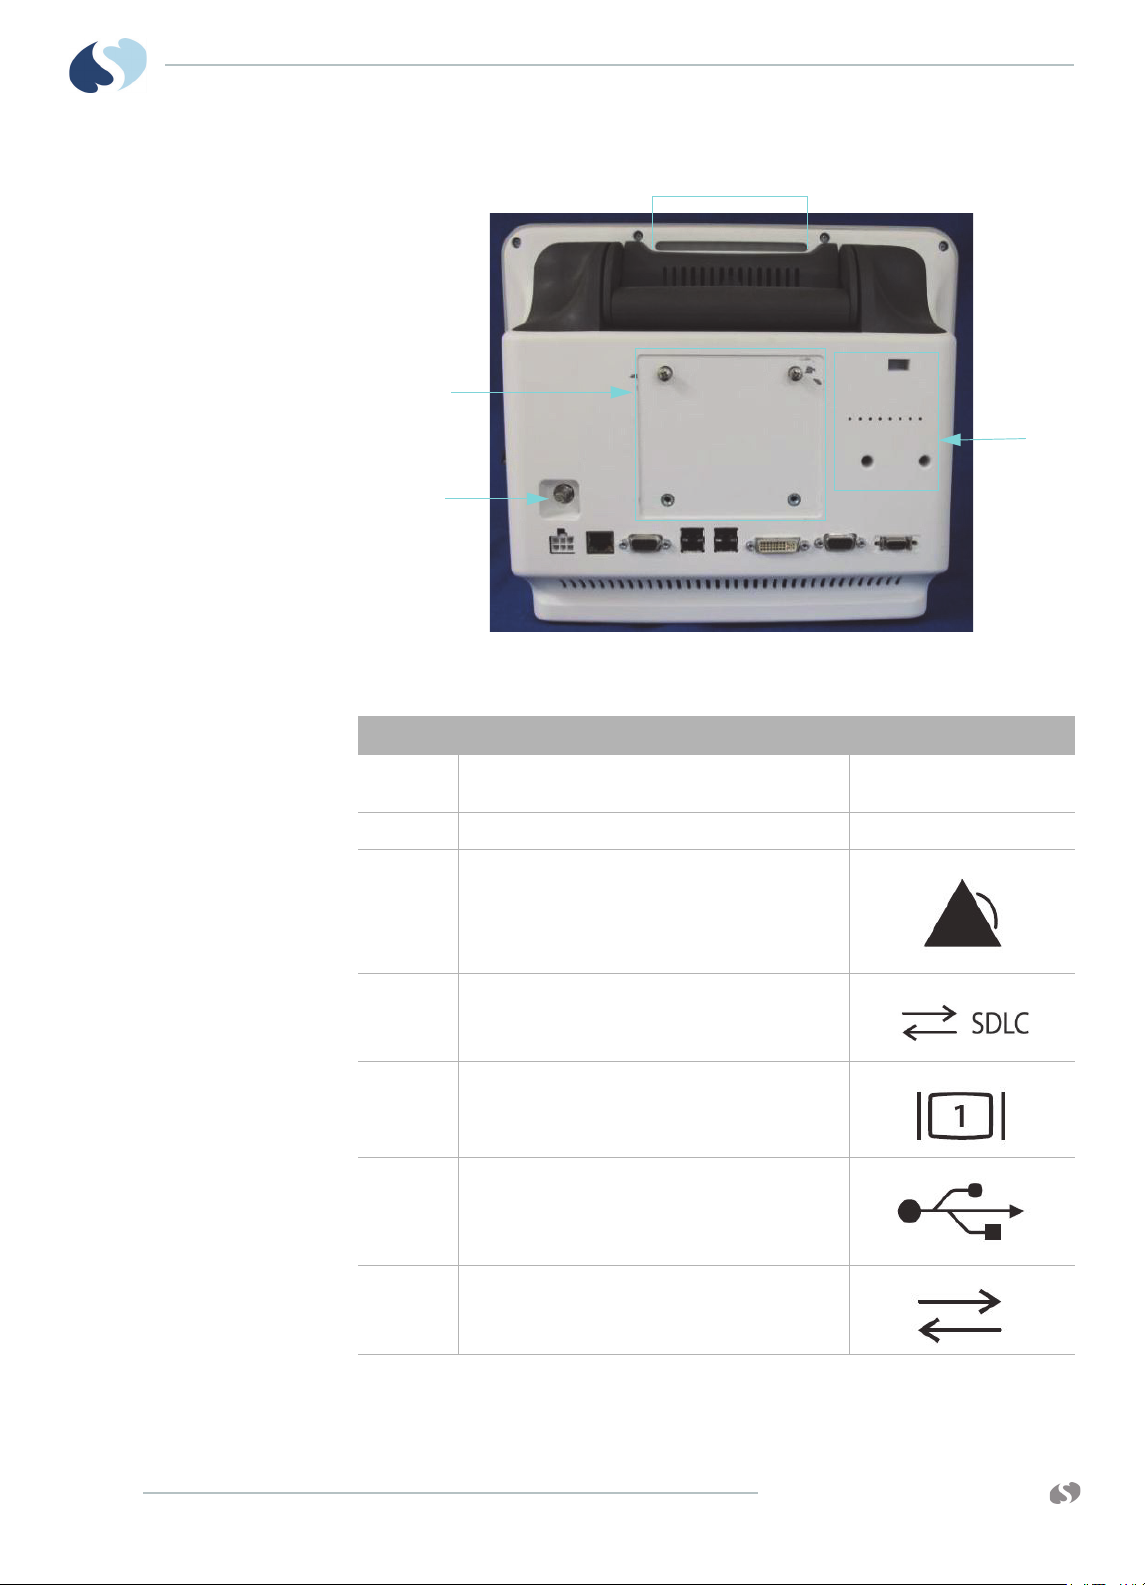
2 POD Connection*
3 Remote Alarm Output*
4 SDLC Ports used to connect Flexports and module
housings to the monitor
5 Video Output, DVI-D
Digital only
6 USB Ports (qty=4)
3-4
7 Serial Port
www.spacelabshealthcare.com
Page 25
XPREZZON AND QUBE
PERATIONS MANUAL
O
™ MONITOR
QUBE
Description Symbol on panel
8 Ethernet 10/100 Base T Connection
9 DC Power Input
119-0552-00
(qube)
10 Equipotential Terminal used for grounding the
monitor
11 75 mm VESA Mounting Pattern* See Back Panel (qube) on
page 3-4.
www.spacelabshealthcare.com
3-5
Page 26

XPREZZON
O
PERATIONS MANUAL
AND QUBE
Feature Options
Feature Option A Option B Option C
Wavefo rms Up to 6 waveforms Up to 6 waveforms Up to 6 waveforms
Table 3-1 qube Feature Options
™ MONITOR
QUBE
Perioperative Software (D)
Vital Signs Calculations (N)
Patient Data Logger (R)
Full View ECG (V)
Full Bed Review (W)
Data Shuttle (Q)
DNA (S)
Internal Recorder (U)
Wireless (X)
91449 USB Recorder
Docking Station
Remote Control Support
Remote Alarm Output
Integrated Battery
N/A
optional optional
N/A N/A
N/A N/A
N/A N/A
N/A
Hot Swappable Battery
Integrated Alarm Light
USB Ports
DVI-D Video Output
Capno pod
Integrated Alarm Light*
3-6
N/A N/A
N/A
The integrated alarm lights on the display help you identify which monitor is in
alarm. The light is on top, in the front, and the back of the display. You can choose
whether the alarm light flashes during alarms. For example, you may want to
disable the alarm light flash at night or while the patient has visitors.
You can also choose the minimum priority level of alarms that activate the display
alarm lights.
www.spacelabshealthcare.com
N/A
Page 27
XPREZZON AND QUBE
PERATIONS MANUAL
O
To enable or disable the display alarm lights
1 Touch Monitor Setup.
2 Touch the Setup tab.
3 Under Alarm Light, touch On or Off.
Energy Saving Mode (Battery)
The qube, while operating on battery(s), has an energy saving mode. If enabled, the
monitor display dims after 30 seconds of no interaction. If a mouse is used with the
monitor, or an alarm event shows, the monitor does not dim. Refer to the
XPREZZON
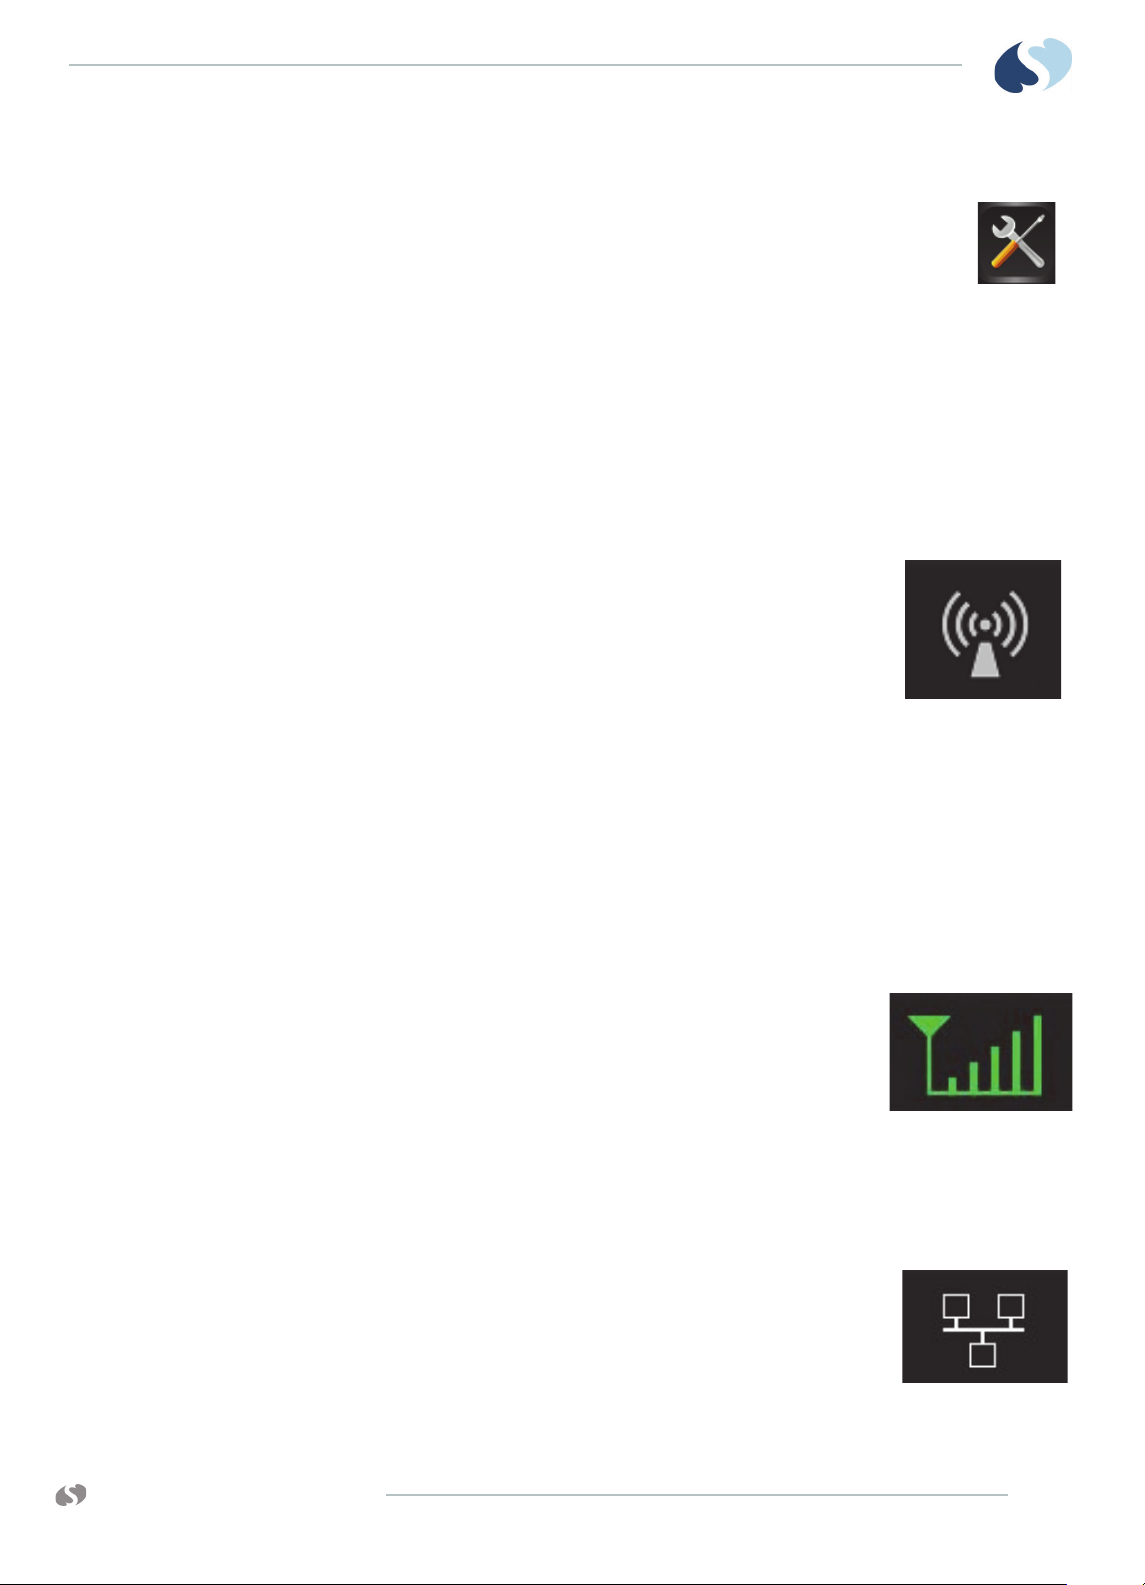
Wireless Option Enabled
Monitors with 802.11 a/b/g wireless capability can be
identified by the symbol shown to the right. When
disconnected from the ethernet network, the wireless
signal strength indicator replaces this symbol.
™ MONITOR
QUBE
™
and qube™ System Administration Manual for more details.
Signal Strength Indicator
Monitors with 802.11 a/b/g wireless network communication show a wireless signal
strength indicator while communicating over the wireless network. Disconnect the
wired network connector to use the wireless feature.
Caution:
Environmental factors can contribute to waveform gaps over the wireless
network. If this issue continues, consult with a biomed technician or a
Spacelabs Healthcare field service representative.
The wireless signal strength shows between the Admit
Patient button and alarm buttons. The signal strength
shows a green antenna with vertical bars on a black
background. The number of bars show the strength level.
The strongest signal is five bars. One bar is low strength.
The signal changes to yellow if the signal is low strength
or the network connection is lost. Refer to the System Administration Manual for
setup instructions.
Network Connection Indicator
The network connectivity icon shows next to the wireless
signal strength indicator and the battery icon (if
applicable). The network connectivity icon shows
whenever the monitor is communicating over a wired
network. If no network connection is detected, the icon
shows with a red X across it.
www.spacelabshealthcare.com
3-7
Page 28
XPREZZON
O
PERATIONS MANUAL
AND QUBE
When connectivity is lost, the message NETWORK SIGNAL LOST shows. The message
opens every 60 seconds until the network connection is restored or until the user
touches OK to dismiss the message.
Battery Management*
Warnings:
The monitor operates for up to eight hours with two fully-charged batteries and
standard configuration. With a single fully-charged battery and standard
configuration, the monitor operates for up to four hours. One battery should always
be installed in the monitor; if the AC power cord is unplugged from the electrical
outlet, the monitor automatically switches to battery operation for continuous
operation.
Batteries charge when the monitor is connected to the AC power. Remove the
battery(s) if the monitor is not likely to be used for some time and prior to storage.
™ MONITOR
QUBE
• If the monitor is currently in use or connected to a patient, do not replace
the batteries if the monitor is not plugged into an AC power source.
• Do not allow the batteries to fully discharge.
While on battery power, the battery icon shows if the batteries are inserted and
their charge state. As the battery power decreases, the color of the battery icon
changes from green to yellow to red. At critically low levels, warning messages and
tones are shown. The icon updates every six seconds and is to the left of theaudio
icon which can be seen in the lower right section of the monitor.
Note:
On some qube monitors, only one battery icon shows on the main screen.
The options have an * asterisk next to them in this chapter. For more details on
the options, refer to Feature Options on page 3-6.
Tab le 3 - 2 B at t er y I co n
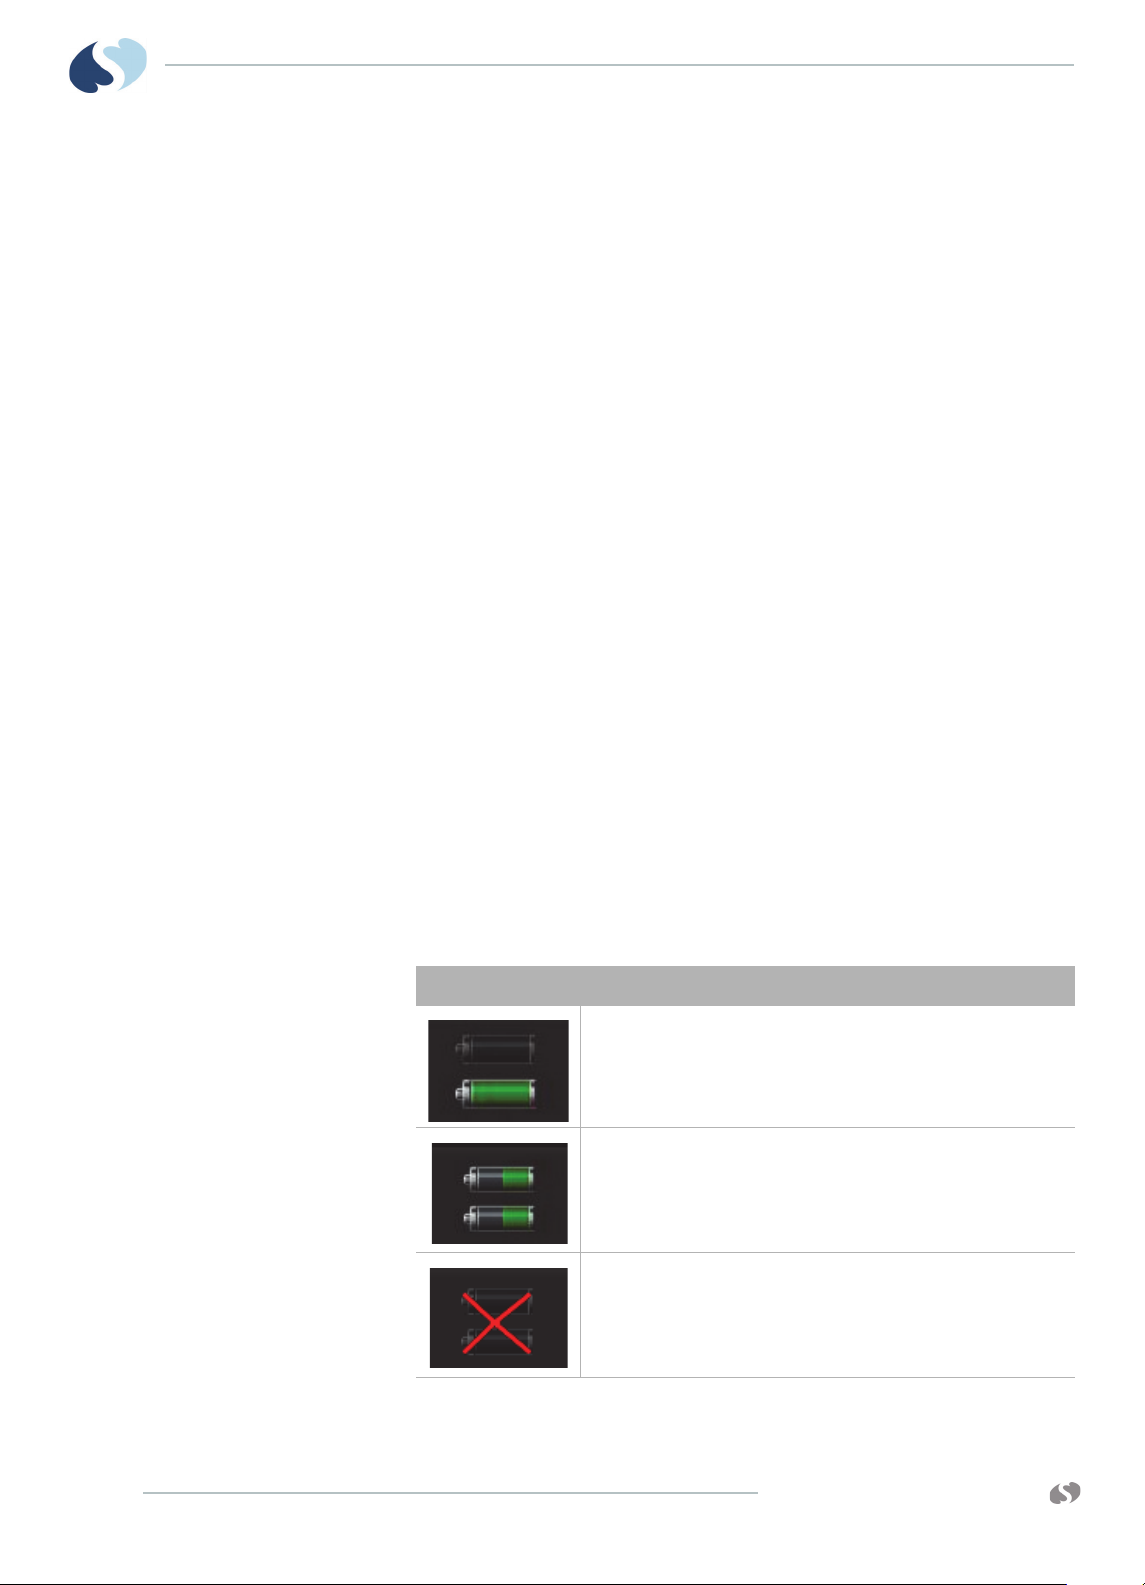
Icon Description
The gray battery outline shows if a battery is not in a slot.
The white battery outline shows if a battery is in the slot.
Each battery’s power level is indicated as green, yellow, or red. Refer
Battery power level messages and tones on page 3-9 for details.
to
3-8
This icon shows when the qube monitor is plugged into A/C power
and batteries are not used.
www.spacelabshealthcare.com
Page 29
XPREZZON AND QUBE
PERATIONS MANUAL
O
Battery Power Level
™ MONITOR
QUBE
Extended use of the batteries depletes the battery power. The qube monitor
watches the battery power level remaining in order to help prevent patient data
loss. As power gets low, the monitor warns the user about low battery and will stop
use of the internal thermal recorder to extend run time.
The monitor makes a high-pitched sound if:
• the monitor is not plugged into an AC power source and there are no batteries
installed
• an unrecoverable error occurs
To optimize the notification, configure the power loss alarm delay according to the
XPREZZON™ and qube™ System Administration Manual.
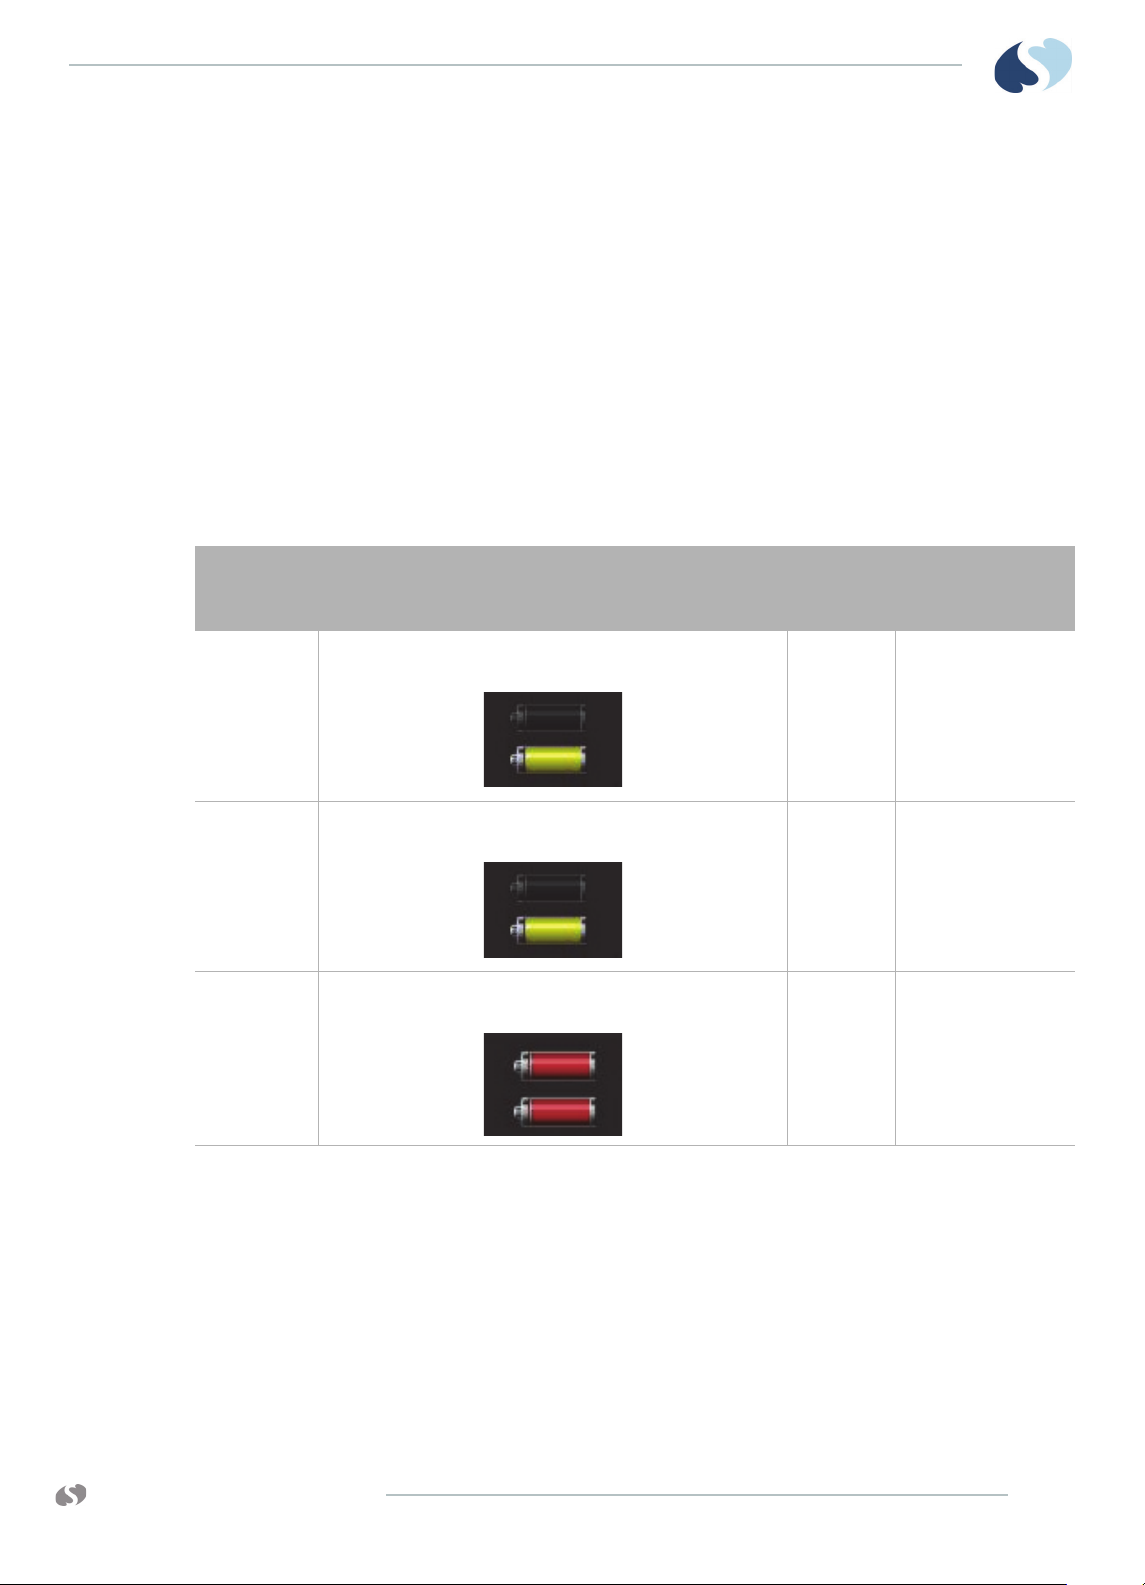
Table 3-3 Battery power level messages and tones
Recorder
attached
Yes Yellow flashing battery icon shows. The message that shows lets
Yes Yellow flashing battery icon shows. The message that shows lets
With or without
recorder
Warning description
the user know the recorder is about to be disabled.
the user know the recorder is disabled.
Red flashing battery icon shows. The message shown is low
battery(s).
Audible
tones
Yes 30 minutes
Yes 15 minutes
Yes 10 minutes
**Approximate time
before device shuts
down
Docking Station*
www.spacelabshealthcare.com
** Time can be shorter or longer depending on the battery performance.
Note:
The Docking Station is a qube monitor option.
The options have an * asterisk next to them in this chapter. For more details on
the options, refer to Feature Options on page 3-6.
3-9
Page 30

XPREZZON
O
PERATIONS MANUAL
AND QUBE
™ MONITOR
QUBE
The Docking Station lets the qube monitor change from a bedside monitor to a
transport monitor quickly and simply.
To prepare the qube for transport, press the release button on the front of the
Docking Station. No disconnection of cables is required.
If your monitor is configured for wireless operation, the transition from docked
(wired network) to undocked (wireless) is seamless. Network functions such as
Alarm Watch, Remote View, and ICS data collection are unaffected (as long as the
wireless signal is adequate).
If your monitor is not configured for wireless operation, network functions such as
Alarm Watch, Remote View, and ICS data collection will not be available while the
monitor is undocked.
To prepare the qube for bedside monitoring, set the monitor down into its docking
station. No disconnection of cables is required.
When you transition the qube from undocked (wireless) to docked (wired network),
there will be a few minutes delay before network functions are active again. Local
monitoring and local alarms are unaffected during the transition period.
3-10
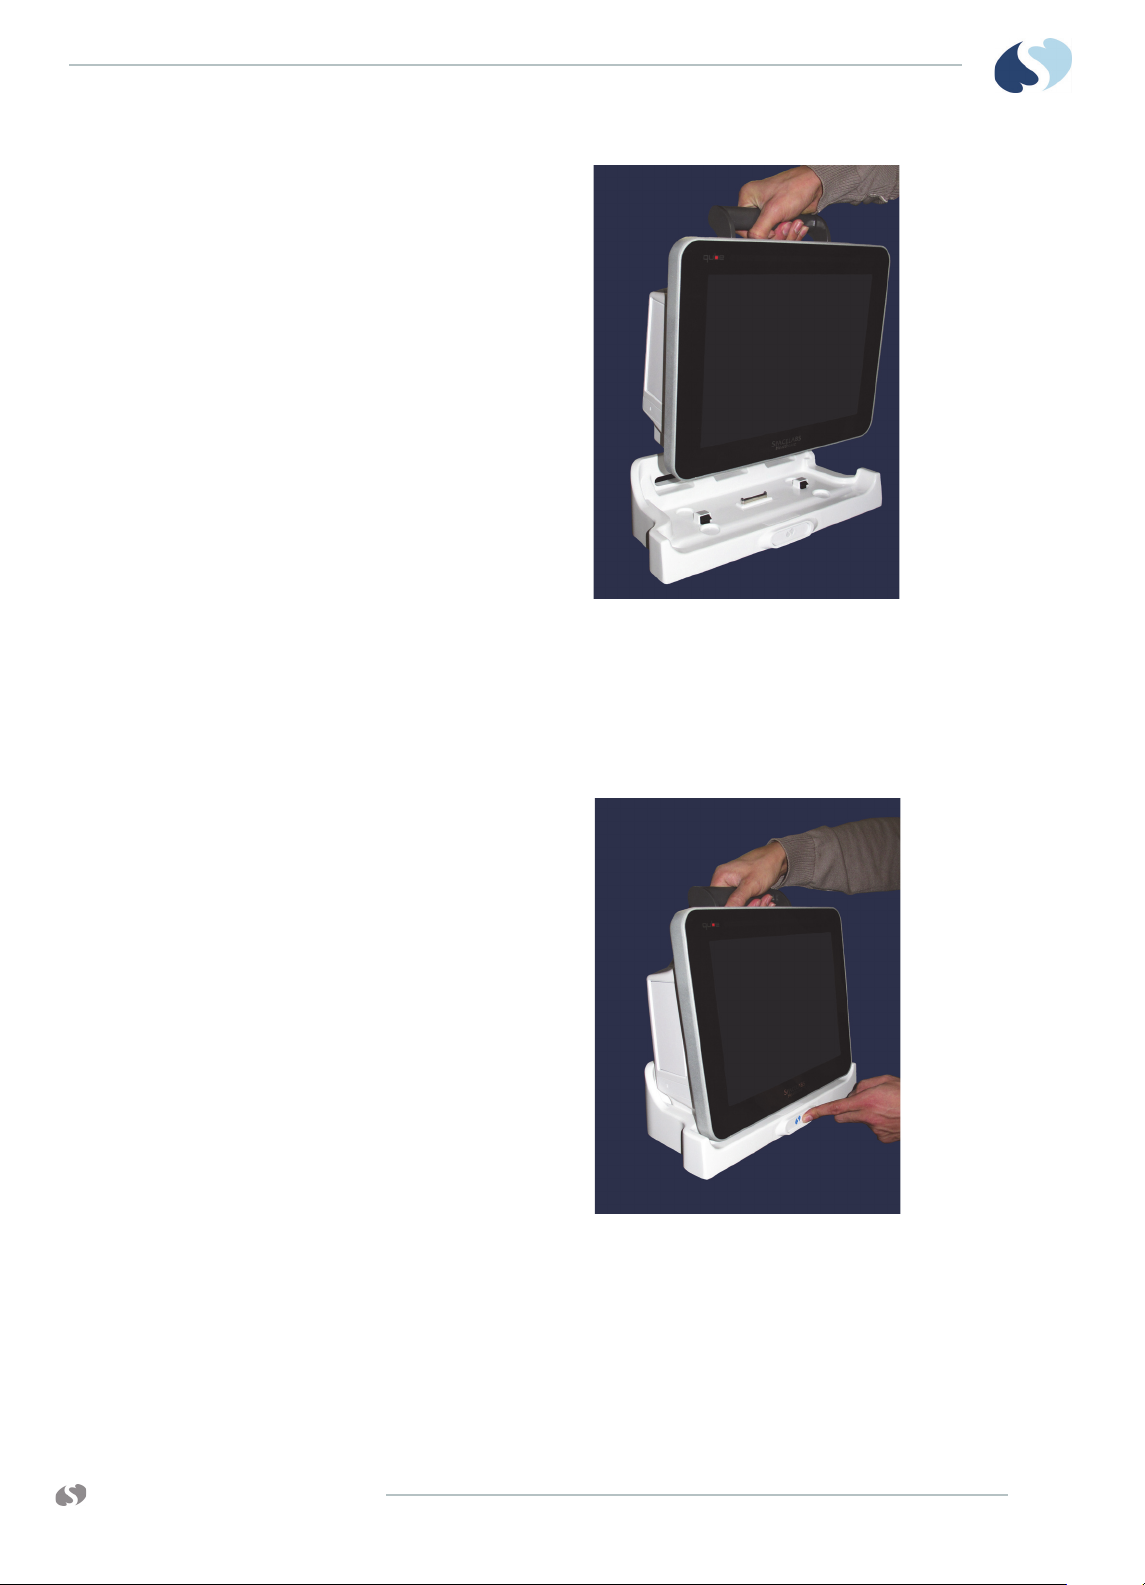
Figure 3-4 qube monitor in docking station
To dock the qube monitor
Note:
Disconnect any cables or connectors from the rear of the monitor before placing
on the docking station. A Capnography Pod can be connected when docking the
qube monitor.
1 Lift the qube monitor by its handle and set it down into the docking station.
The release button clicks and illuminates when the monitor is connected.
www.spacelabshealthcare.com
Page 31
XPREZZON AND QUBE
PERATIONS MANUAL
O
™ MONITOR
QUBE
.
Figure 3-5 Docking the qube monitor
To undock the qube monitor
1 Hold the qube monitor by its handle and press the release button located in
the front center of the docking station.
2 Lift the qube monitor up out of the docking station.
Figure 3-6 Releasing the qube monitor from the docking station
.
www.spacelabshealthcare.com
3-11
Page 32

XPREZZON
O
PERATIONS MANUAL
AND QUBE
™ MONITOR
QUBE
3-12
www.spacelabshealthcare.com
Page 33

XPREZZON AND QUBE
O
PERATIONS MANUAL
Display Options
Displays Overview
The XPREZZON™ and the qube have display options described in this chapter.
The XPREZZON has three display options. The display features are listed in the table
on page 4-2.
The qube™ is a portable monitor and has an option to have a secondary display
attached. For information on the secondary display, refer to section qube™
Secondary Display (94267-L15) on page 4-3
XPREZZON Display options
• 17-inch display (94267-L17)
• 19-inch display (94267-L19)
• 19-inch display (94267-19)
The displays combine the efficiency of touchscreen technology with the latest
advances in liquid crystal display (LCD) design. All of the displays can be used as
primary or secondary displays.
Table shows the features included in the different XPREZZON displays.
Table 4-1 Display Features
94267-L17
17-inch Display
94267-L19
19-inch Display
94267-19
19-inch Display
www.spacelabshealthcare.com
Display alarm lights
(optional)
Auto dimming feature;
ambient light sensor
(optional)
4-1
Page 34

XPREZZON
O
PERATIONS MANUAL
AND QUBE
D ISPLAY OPTIONS
Table 4-1 Display Features (Continued)
Touchscreen
Built-in custom audio
speakers
1280 x 1024 resolution
Auto adjustment
capability
High-resolution LCD
Low cost
94267-L17
17-inch Display
94267-L19
19-inch Display
94267-19
19-inch Display
4-2
Figure 4-1 19-inch Display (94267-19)
www.spacelabshealthcare.com
Page 35

XPREZZON AND QUBE
PERATIONS MANUAL
O
qube™ Secondary Display (94267-L15)
The qube monitor has the option for a secondary display: 15-inch display (94267L15). The 15-inch (38.1 cm) features include:
• Built-in integrated audio speakers
• 1024 x 768 resolution
•High-resolution LCD
The display is the latest advances in liquid crystal display (LCD) design. All the
functions of the display are described in section, Display Adjustments on page 4-4.
D ISPLAY OPTIONS
Display Features
Built-in custom audio Speaker
1024 × 768 resolution
Low cost
Display alarm lights
Auto lights dimming feature
Ambient light sensor
Tou c hs c re e n
Not available
Not available
Not available
Not available
www.spacelabshealthcare.com
4-3
Page 36

XPREZZON
O
PERATIONS MANUAL
AND QUBE
Display Adjustments
User Control Buttons
D ISPLAY OPTIONS
Variations in video output and application can require adjustments to the
touchscreen display to optimize the quality of the output. These adjustments are
accomplished using the onscreen display (OSD) menu.
All adjustments you make to the controls when you use the OSD menu
automatically save. This feature prevents you from having to reset your choices
every time you unplug or power the display OFF and ON. In the event of a power
failure, the display settings return to the most recent settings saved by the user
instead of to the factory default settings.
If power fails during a power outage or prolonged generator test, or an
unrecoverable error occurs, the monitor makes a high-pitched sound. To optimize
the notification, configure the power loss alarm delay according to the XPREZZON™
and qube™ System Administration Manual.
Use the buttons on the side bezel of the display to select all menu items.
4-4
1 Menu / Select: Shows the OSD menu.
2 Up: Increases the value of the item selected or moves through the OSD
menu options when the menu is visible.
3 Down: Decreases the value of the item selected or moves through the
OSD menu options when the menu is visible.
4 Auto / Exit: Shortcut to Auto-Adjust. Exit the adjustment item from the
appropriate OSD menu.
5 Auto Dim: Enables or disables dimming of display and alarm lights.
Press this button to toggle the current state and also show the current
state on the screen. If ON, the display will dim alarm lights and show in
low light. If OFF, this feature is disabled.
Dimming feature is not available on the supported on 94267-L19,
94267-L17, or 94267-L15.
6 Power: Power the display ON and OFF. To power ON, press once. To
power OFF, press and hold until the counting bar exceeds maximum. If
no light shows, it means the display is OFF. If an amber light shows,
there is no video. If a green light shows, there is a video signal present.
www.spacelabshealthcare.com
Page 37

XPREZZON AND QUBE
PERATIONS MANUAL
O
Onscreen Display (OSD) Menu
D ISPLAY OPTIONS
7 Menu + Up at the same time: Press Menu and Up buttons at the same
time and hold for five (5) seconds to enable or disable the Key Lock.
The Key Lock is disabled by default.
8 Menu + Down at the same time: Press Menu and Down buttons at the
same time and hold for five (5) seconds to enable or disable the Power
Key Lock. The Power Key Lock is disabled by default. When the Power
Key Lock is enabled, the user cannot turn the display OFF.
Figure 4-2 Menu / Select button on the display’s side bezel
When you press and hold the top button (seen above) (Menu / Select) on the
display’s side bezel, the onscreen display (OSD) menu shows. There are six
categories of menu items: Color, Image, Setting, Position, OSD Menu, Language, and
Miscellaneous.
Use the arrow keys to cycle through the options. You also use these keys to increase
or decrease the value of the item currently selected.
To power ON the display
1 Press the Power button, located on the side of the display.
The display powers on.
2 If you need to make adjustments to the display, press the Menu button to
display the on-screen display (OSD) menu.
3 If you need to adjust the display position, press the Auto/Exit button.
The display position adjusts automatically.
To power OFF the display
1 Press and hold the Power button, located on the side of the display.
2 Hold the button for three seconds.
If the button is not held, the display will quit the power off process.
To reset the display to factory default settings
www.spacelabshealthcare.com
1 Press and hold the Menu button on the side of the display.
The Onscreen Display (OSD) menu shows.
2 Press the Up or Down buttons to highlight the MISC option. Press the Menu
button.
4-5
Page 38

XPREZZON
O
PERATIONS MANUAL
AND QUBE
Display Alarm Light
D ISPLAY OPTIONS
3 Press the Up and Down buttons in the MISC menu to highlight the RESET
option. Press the Menu button.
The display returns to factory default settings.
The alarm lights on the display help you identify which monitor is in alarm. You can
choose whether the alarm light flashes during alarms. For example, you may want
to disable the alarm light flash at night or while the patient has visitors.
Note:
Your display and monitor may not have this feature.
You can also choose the minimum priority level of alarms that activate the display
alarm lights.
To enable or disable the display alarm lights
1 Touch Monitor Setup.
2 Touch the Setup tab.
3 Under Alarm Light, touch On or Off.
4-6
www.spacelabshealthcare.com
Page 39

XPREZZON AND QUBE
PERATIONS MANUAL
O
Connectors and Mounting
The setup and maintenance information is contained in the XPREZZON (P/N 0702155-xx) or qube (P/N 070-2451-xx) service manuals on the Service CD (P/N 0840700-xx)
Equipment connected to the analog or digital interfaces must comply with
the respective IEC standards (e.g. IEC 60950 for data processing equipment
and IEC 60601-1 for medical equipment). Furthermore, all configurations
shall comply with the current version of the standard for SYSTEMS IEC 606011-1. Everybody who connects additional equipment to the signal input part
or signal output part configure a medical system, and is therefore
responsible that the system complies with current version of the
requirements of the system standard IEC 60601-1-1. If in doubt, consult the
technical service department or your local representative.
Connectors
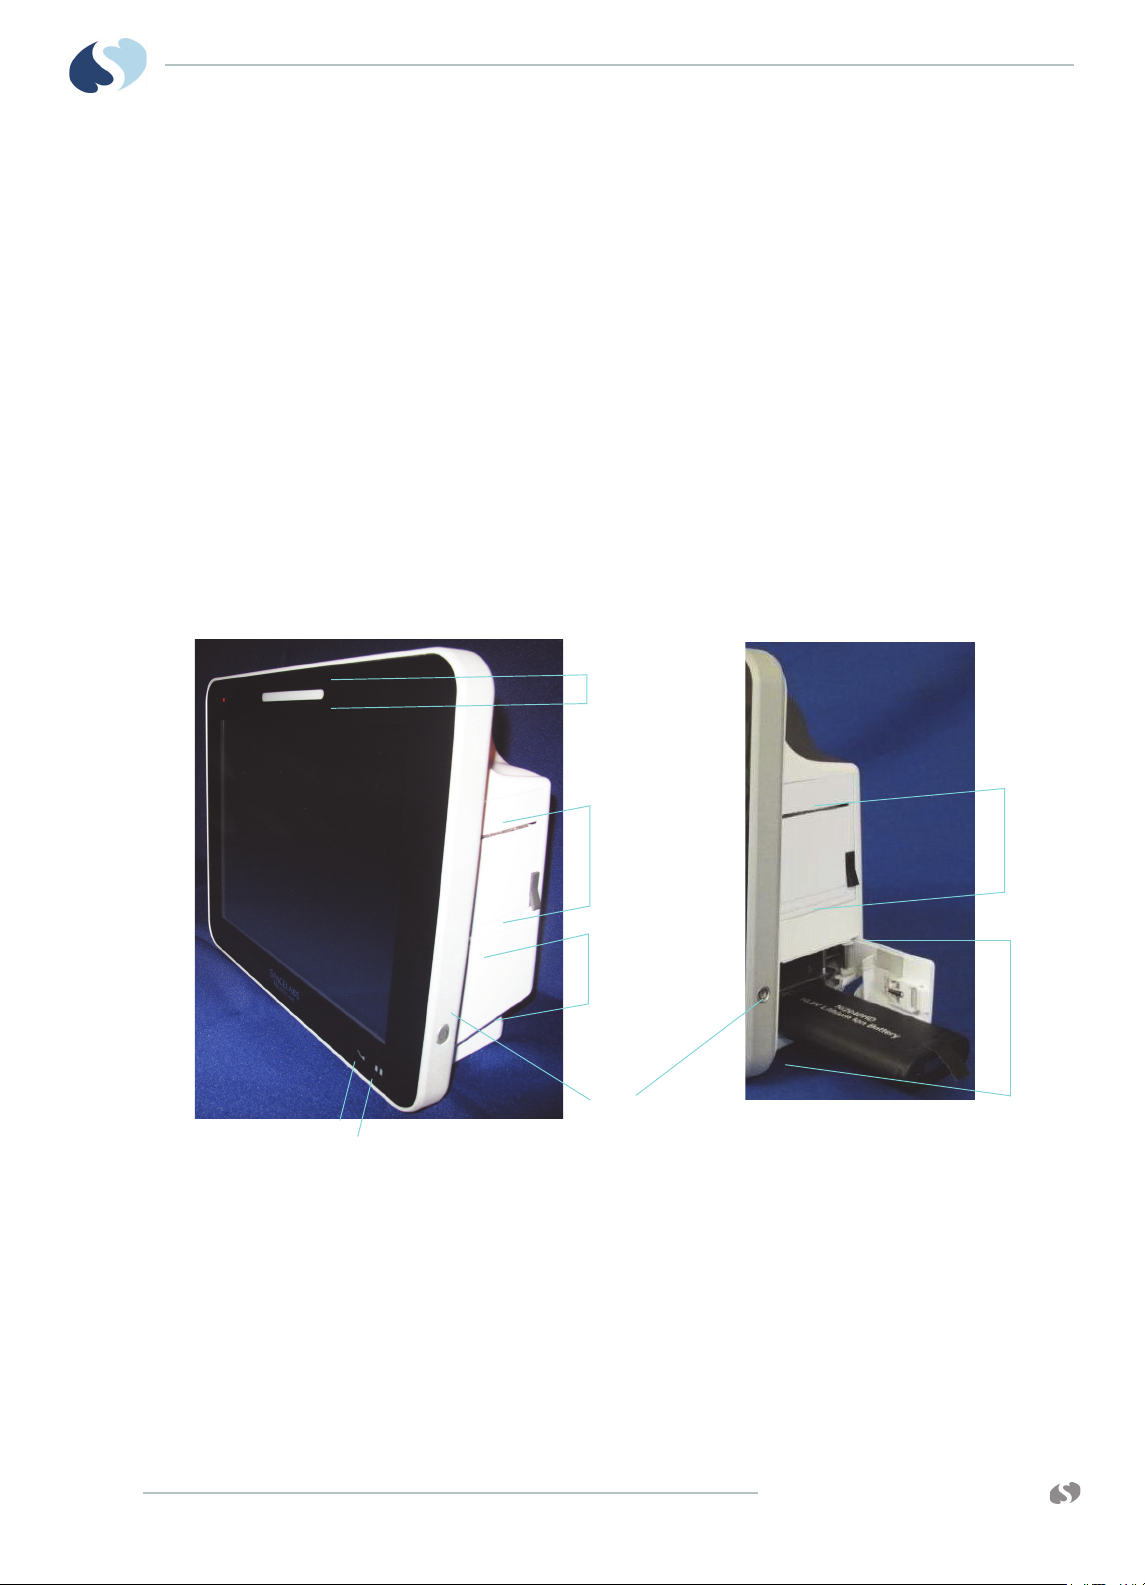
The connectors differ between the 94267-19 and the -L17, -L19, and -L15.
D ISPLAY OPTIONS
Refer to the Figures for the different connections for each display:
• Display connections for 94267-19 on page 4-7
• Display connections for 94267-L15, 94267-L17, and 94267-L19 on page 4-8.
Before connecting the cables to the flat panel display and Spacelabs
Healthcare monitor, be sure that all components are powered OFF.
Figure 4-3 Display connections for 94267-19
1 VGA analog in (not used)
2 DVI video in, analog or digital connector
www.spacelabshealthcare.com
3 Touchscreen serial port
4 Audio in and alarm lights (RJ50)
5 DC Power in (12 VDC)
4-7
Page 40

XPREZZON
1
2
34
5
O
Mounting
AND QUBE
PERATIONS MANUAL
D ISPLAY OPTIONS
Figure 4-4 Display connections for 94267-L15, 94267-L17, and 94267-L19
1 Touchscreen serial port
2 DVI video in, analog or digital connector
3 VGA analog in (not used)
4 Audio in, 3.5 mm standard, mini-stereo plug
5 DC Power
Your medical certified flat panel touchscreen display conforms to the VESA Flat
Panel Monitor Physical Mounting Interface (FPMPMI) standard. The FPMPMI
standard defines a physical mounting interface for flat panel touchscreen displays.
Your display conforms to the corresponding standards for flat panel display
mounting devices, such as for walls and table arms. The VESA mounting interface is
located on the back of your flat panel touchscreen display.
Your flat panel display can be mounted by using one of the following methods:
• Wall mounted, using the rear-mounting VESA interface (refer to wall mount
installation instructions).
• Mounted on the pedestal. Note that the pedestal (P/N 010-1835- 00) is
purchased separately.
Rear mounting interface diagrams are shown:
• Mounting for 94267-19 and 94267-L19 on page 4-9
• Mounting for the 94267-L17 display on page 4-9
• Mounting for the 94267-L15 on page 4-10
4-8
www.spacelabshealthcare.com
Page 41

XPREZZON AND QUBE
PERATIONS MANUAL
O
D ISPLAY OPTIONS
Figure 4-5 Mounting for 94267-19 and 94267-L19
Figure 4-6 Mounting for the 94267-L17 display
www.spacelabshealthcare.com
4-9
Page 42

XPREZZON
O
PERATIONS MANUAL
AND QUBE
D ISPLAY OPTIONS
Figure 4-7 Mounting for the 94267-L15
Never open the displays. For safety reasons, only qualified service personnel
are to open the equipment.
4-10
www.spacelabshealthcare.com
Page 43

XPREZZON AND QUBE
O
PERATIONS MANUAL
Basic Operations
The list of basic functions below are done from the monitor before, during, or after
monitoring patient vital signs:
• Home screen: refer to Home Screen and Taskbar Icons on page 5-2 for details.
The description includes the options for vital signs and waveforms.
• Admit, Discharge, and Edit: refer to Admit, Discharge, and Edit on page 5-4.
• Barcode Scan: refer to Admit, Discharge, and Edit on page 5-4.
• Alarms: refer to Alarms on page 5-6.
• Trends - view and print the patient’s vital signs: refer to Trends on page 5-6.
• Record patient data: refer to Recording/Printing on page 5-8.
• Setup and use the remote functions (such as Remote View, Alarm Watch, Full
Bed Review): refer to Remote Access on page 5-11.
• Activate and deactivate the screen saver: refer to Monitor Screen Saver on
page 5-12.
• Standby Mode: refer to Standby Mode on page 5-13.
• Perioperative Mode: refer to Perioperative on page 5-14.
• Drug Calculator: refer to Calculations on page 5-16.
• Transfer and retrieve patient data: refer to Data Shuttle on page 5-17.
www.spacelabshealthcare.com
5-1
Page 44
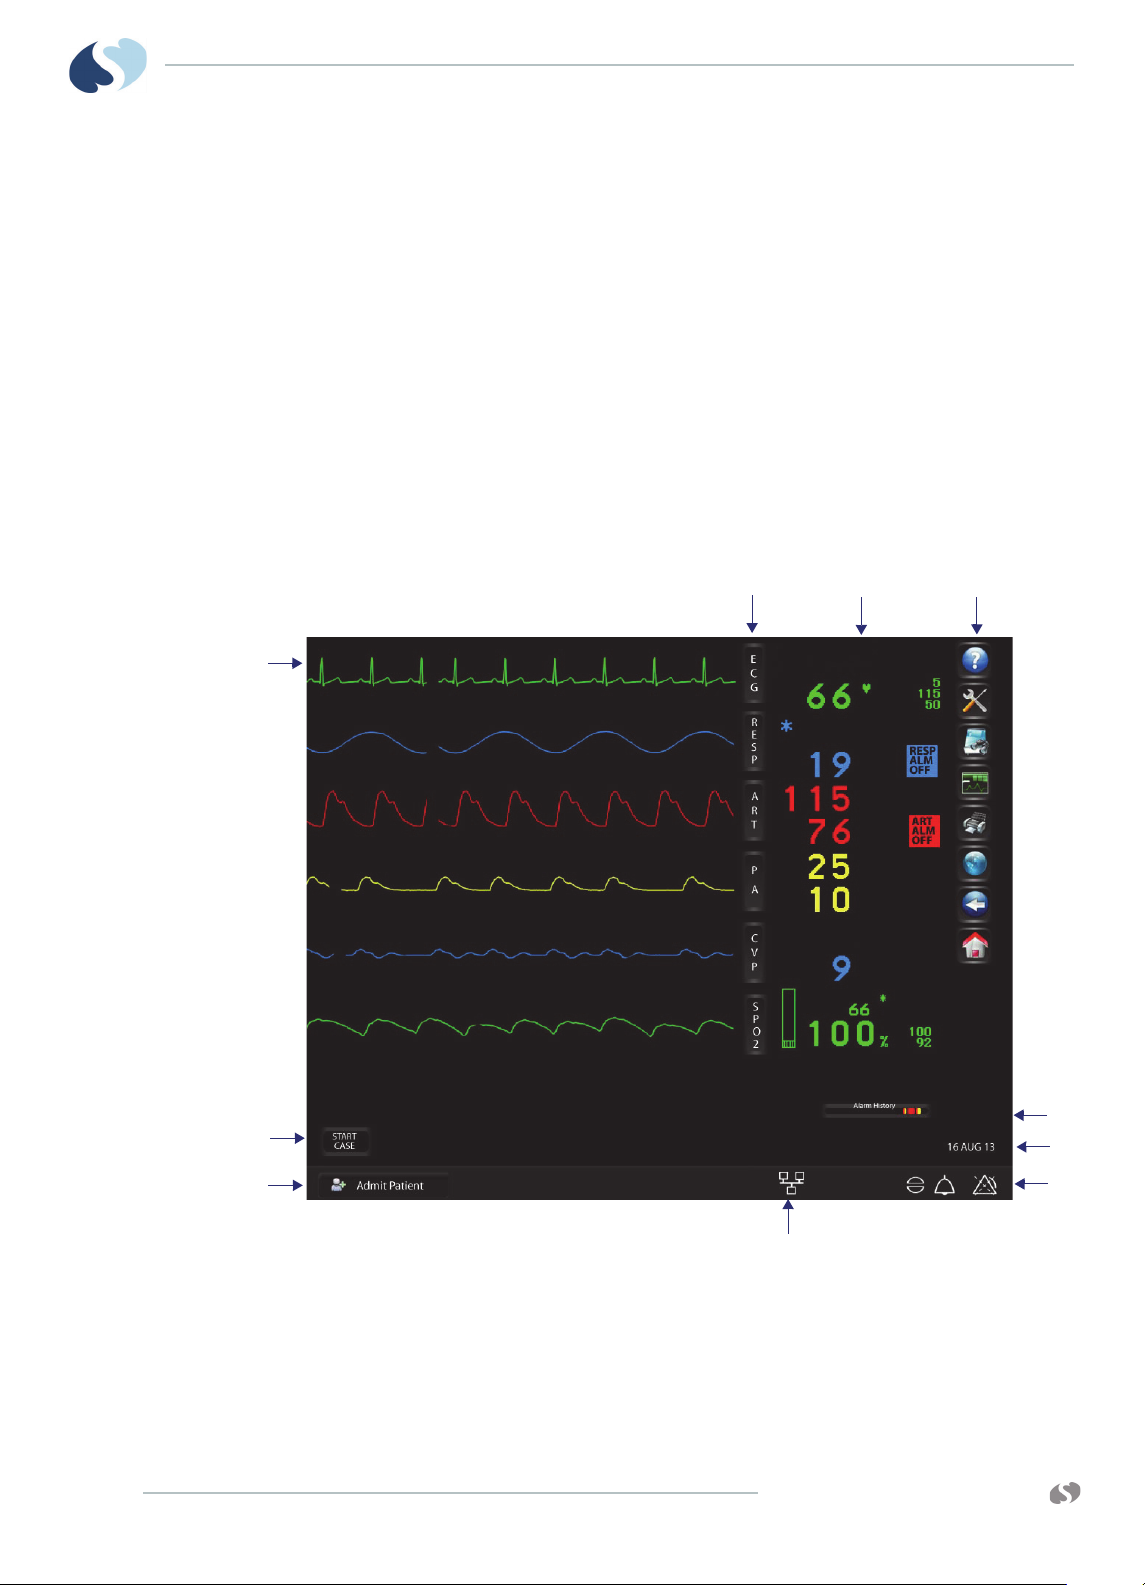
XPREZZON
1
23
4
5
6
7
8
9
10
O
PERATIONS MANUAL
AND QUBE
Home Screen and Taskbar Icons
The monitor has a touchscreen display. Use your fingers to touch or select the
features or items like buttons, tabs, or icons. If the large numerics are shown, you
can touch the numerical representation of the patient’s vital sign to see the
waveform.
Parameter modules that are inserted into the monitor itself or into a module
housing acquire patient data to display as waveforms and numerics. The bedside
monitor can (optionally) show four, six or eight parameter zones. Refer to the
XPREZZON™ and qube™ System Administration Manual for more details on
configuring the number of parameter zones. Refer to the Clinical Parameters
Operations Manual for details on using individual parameter modules, parameter
keys or menu keys.
Shown below is an example of a display and its components:
B ASIC OPERATIONS
Figure 5-1 Home screen
1 Parameter zones- shows parameter waveforms and messages when an
alarm occurs for that parameter. Refer to Alarms on page 7-1.
2 Parameter keys
3 Parameter information area and alarm status
5-2
www.spacelabshealthcare.com
Page 45

XPREZZON AND QUBE
PERATIONS MANUAL
O
Main Taskbar
B ASIC OPERATIONS
4 Main taskbar. Refer to Main Taskbar on page 5-3.
5 Standby, Start/End Case, and Printer Controls keys
6 Admit Patient. The patient’s name or other identification show here if
entered. Refer to Admit, Discharge, and Edit on page 5-4.
7 Alarm History. Refer to Alarm History on page 7-7.
8 Date and time
9 Alarms, Audio, and Alarms Acknowledge icons. Refer to Alarms on
page 7-1.
10 Wireless, Network, and Battery icons. Refer to page 3-7 and page 3-7.
You can access all monitor functions from the main taskbar: a set of
nine icons in a column along the right side of the display.
• Help: Shows helpful information for buttons, icons and keys, or
a window with information on current hardware, software, and
network connections. Refer to Help on page 5-18 for more
details.
• Monitor Setup: Shows the Monitor Setup window for
configuring the monitor and changing the default settings. Refer
to Monitor Setup on page 12-1.
• Remote: Shows the remote application window. Refer to
Remote Access on page 5-11 and Remote Access on page 6-1 for
more information.
• Trends: Shows the Trends application. Refer to Trends on
page 5-6 and Trends on page 9-1 for more information. Trends
are saved for 96 hours. For Calculations refer to Calculations on
page 5-16 and Calculations on page 10-1.
• Record or Printer: Prints patient data. For more information,
refer to Recording/Printing on page 5-8 and Recording/Printing
on page 8-1.
• DNA: Launches the Dynamic Network Access™ (DNA™)
application which let you access applications remotely. Refer to
Dynamic Network Access (DNA) on page 11-1 for more
information.
• Previous Menu: Moves back to the last menu level or window
that was previously shown.
• Home: Clears the screen of all menus and other display
windows.
www.spacelabshealthcare.com
5-3
Page 46

XPREZZON
O
PERATIONS MANUAL
AND QUBE
Large Numeric Displays
B ASIC OPERATIONS
Activate the large numerical displays for the vital signs in Monitor Setup. Refer to
Numerics on page 12-15. Appearance of the parameters in the large numerics are
user configurable. Below are the display options.
Note:
qube has two large numeric display formats and XPREZZON has three formats.
Depending on the format selected, a fewer number of waveforms are shown. The
following steps let you see the waveforms of the parameters that are shown in large
numerics.
To show a large numeric parameter’s waveform
1 Touch the specific numeric that is associated with the parameter.
The waveform of that numeric will show in the lower section of the screen.
To return to the normal display
1 Touch the Home icon to return to the display format configured
for this monitor.
Large numerics will not show when the Trends window is open but
will show after the Trends window is closed.
Admit, Discharge, and Edit
You use the Admit, Discharge, and Edit windows for all of the steps in these
processes:
Figure 5-2 Large Numeric display formats
5-4
www.spacelabshealthcare.com
Page 47

XPREZZON AND QUBE
PERATIONS MANUAL
O
B ASIC OPERATIONS
• Designate which process—admit, discharge, or edit data—you want to start.
• Enter new patient data or edit existing patient data.
To admit a patient
1 If necessary, touch Home to clear the screen.
The screen is cleared of all menus, and other display windows.
2 Touch Admit Patient, located in the lower-left corner of the
display (refer to Figure 5-1 on page 5-2).
The Admit, Discharge and Edit window shows.
Note:
If the prior patient’s data has not been purged, the Admit Patient key shows the
prior patient’s information.
3 Touch Admit.
A message asks if you want to clear patient data.
4 Touch Yes to clear the existing data for that bed.
The Admit, Discharge, and Edit window shows with the Identification tab
visible, and with fields cleared. (If you touch No in response to the Clear
patient data? dialog box, the Admit, Discharge and Edit window shows data
for the most recent patient.)
5 On the Identification tab, enter:
• Patient’s last name
• First name
• Middle name
• ID1
• ID2
Press the Tab or Enter key to move the cursor to the next field.
6 Touch the Patient Data tab to enter:
• Patient’s birthday (dd-mm-yyyy)
• Sex: Male or Female
• Height and Weight
The patient’s age is automatically calculated from the patient’s birthday and
shown on the display. The patient’s body surface area (BSA) and body mass
index (BMI) are automatically calculated from height and weight and shown
on the display.
7 Touch Save to save the data.
8 Touch the red X in the top right corner of the Admit window to close the
window.
www.spacelabshealthcare.com
To admit a patient (using barcode scanner)
1 Scan Patient ID1 information from an ID wrist band or ID card.
2 The Barcode Format Admit Confirmation dialog box shows the scanned ID1 in
red text above the current ID1, with the message Clear patient data?
3 Either:
•Touch Yes to admit the patient and purge the previous data.
•Touch No to admit the patient but keep the previous data.
5-5
Page 48

XPREZZON
O
PERATIONS MANUAL
AND QUBE
B ASIC OPERATIONS
•Touch Cancel to cancel patient admission.
To edit patient data
1 Touch the patient identifier area, located in the lower-left portion of the
screen.
The Admit, Discharge and Edit window shows with current patient data.
2 At the bottom of the screen, touch Edit.
3 Use the Identification and Patient Data tabs to find the patient data you want
to change. Use the on screen keyboard to enter new values.
4 Touch Save to save the new patient data.
5 Touch the red X in the top right corner of the Admit window to close the
window.
To discharge a patient
1 Touch the patient identifier area, located in the lower-left portion of the
screen.
The Admit, Discharge and Edit window shows.
2 Touch Discharge.
A message asks if you want to clear patient data.
3 Touch Yes to respond to the Clear patient data? dialog box.
The fields on the Admit, Discharge, and Edit window clear.
4 Touch the red X in the top right corner of the Admit window to close the
window.
Alarms
Trends
Note:
After the patient is discharged, the settings for ECG, RESP, SpO2, NIBP, IBP and
TEMP automatically return to the default patient type.
The monitor provides capabilities that let the user quickly review alarm settings,
identify recent alarm conditions, prevent nuisance alarms, control alarm indications
for persistent conditions and proactively manage audible alarm indications. For
details on setting and controlling alarms, refer to Alarms on page 7-1.
Warning:
To protect the patient’s safety, do not silence or suspend alarms without
providing continuous and direct observation of the patient.
Trends show numeric data collected for a patient over a 96-hour
period either in tabular or graphic format. Data is available until the
data is purged or the monitor is powered off. The Trends toolbar at the
top of the Trends page lets you:
5-6
www.spacelabshealthcare.com
Page 49

XPREZZON AND QUBE
PERATIONS MANUAL
O
B ASIC OPERATIONS
• change the size of the Trends window
• change the view
• show a list of intervals and durations
• turn the Flag cursor on or off
• refresh the shown data
•print
• access the Trends setup
• show the Calculations window.
Additional information can be found in Trends on page 9-1.
To view and print the patient’s vital signs
1 Touch Trends icon.
2 Touch the Printer icon at the top of the window to print the vital
signs display.
To change the Trend view
1 Touch Trends icon.
2 Touch the Binoculars icon in the Trends toolbar to access a list of
pre-defined views.
3 Select the preferred view from the list.
To view patient’s vital signs from different days or time periods
1 Touch Trends icon.
2 Touch the Clock icon at the bottom left of the window.
www.spacelabshealthcare.com
5-7
Page 50

XPREZZON
O
PERATIONS MANUAL
AND QUBE
Recording/Printing
B ASIC OPERATIONS
3 Touch an area on the time bar.
The time frame will show for graphical and
tabular views.
4 Touch OK to see those vitals.
Note:
Use the scrolling (arrow) buttons on the right
side to move up and down through the Tabular Trends.
The Print icon shows on the monitor’s taskbar. The monitor supports
several options for printing patient data:
• Record a preconfigured set of data from one or more monitors.
• Automatic recordings of any parameter in an alarm condition (if
configured in the Module Configuration Manager or the Alarm Parameters
function enabled for parameters without MCM control).
• Print patient demographic information, vital signs, waveform data, and
arrhythmia/ST segments.
Alarm Recordings
Waveform Recordings
• Print non-waveform data such as tabular trends and alarm limits.
Some parameters have a print button with the menu buttons, such as the ECG
parameter. Refer to the Clinical Parameters Operations Manual for details.
An alarm recording is a recording that initiates when an alarm condition occurs.
Depending on how your system is set up, an alarm recording can trigger to print
automatically whenever a parameter enters an alarm condition. Alarm recordings
begin with several seconds of pre-alarm waveform data and continue for as long as
the alarm condition exists (or a minimum of 12 seconds).
When you touch the Record or Print icon from the main taskbar, the waveform
parameter keys flash for up to two seconds. You must make your selection within
this two-second time period. After you make a selection, the parameter keys flash
for an additional two seconds, which lets you make an additional selection, up to
four total.
Note:
You can print parameters that show in a waveform zone.
5-8
To make a recording of selected patient parameters
1 From the main taskbar, touch the Printer icon once.
All parameter keys flash for two seconds.
2 Touch up to four flashing parameter keys.
The parameters you selected are sent to the printer.
www.spacelabshealthcare.com
Page 51

XPREZZON AND QUBE
PERATIONS MANUAL
O
B ASIC OPERATIONS
To make a recording of all currently shown patient parameters
1 From the main taskbar, touch the Printer icon twice.
The Recorder menu shows.
2 Touch Record All.
Eight seconds of the currently shown patient parameters are
sent to the printer.
To start a continuous recording
1 From the main taskbar, touch the Printer icon once.
The Continuous Record button shows in the lower left corner of
the display and all parameter keys flash for two seconds.
2 Touch Continuous Record. Touch up to four flashing parameter
keys.
The parameters you selected are sent to the printer.
To stop a continuous recording
Group Recordings
1 From the main taskbar, touch the Printer icon once.
When a recording is already in progress the Stop Continuous
Record button shows.
2 Touch Stop Continuous Record.
The recording stops.
How to load paper in the printer
1 Press the release button on the door of the printer.
2 Open the paper tray door.
3 Snap the new roll into place with the paper feeding from the bottom.
4 Pull out 6 to 12 inches of paper.
5 Close the paper tray door.
To identify the printer destination
1 From the main taskbar, touch the Help icon twice.
The Help window shows Recording Destinations. These are the
locations of the printer to which this monitor will print.
Network is the term used for the printer at the central monitor.
www.spacelabshealthcare.com
The monitor can be pre-configured to print two sets of recordings, A and B, that
consist of specific beds and patient parameters. These preselected recordings are
always eight seconds in duration. The monitor prints all of the requested
parameters for one patient before printing the parameters for the next patient.
5-9
Page 52

XPREZZON
O
PERATIONS MANUAL
AND QUBE
B ASIC OPERATIONS
To print a preconfigured recording set
1 From the main taskbar, touch the Printer icon twice.
The Recorder menu shows.
2 Touch either Record Preselected A or Record Preselected B.
The preselected set of parameters is sent to the printer.
5-10
www.spacelabshealthcare.com
Page 53

XPREZZON AND QUBE
PERATIONS MANUAL
O
Remote Access
B ASIC OPERATIONS
Use Remote Access to view or print vital signs of patients that are being monitored
on other Spacelabs Healthcare monitors. For additional information on
configuration of remote access, refer to Remote Access on page 6-1 or contact your
system administrator.
To use Alarm Watch to view remote alarms on
other beds on the network
1 From the main taskbar, touch the Remote icon.
2 Select Alarm Watch to view alarms from other monitors.
Note:
Remote View and Alarm Watch cannot be enabled at the same time. Touch On
or Off to enable or disable either option.
3 Touch On (this may already be selected).
Refer to Alarm Watch on page 6-5 for more details.
To use Remote View to view remote parameters on other beds on the network
1 From the main taskbar, touch the Remote icon.
2 Select Remote View.
3 Touch On (this may already be selected).
4 Under Select Subnet, touch the subnet that you want to view
remotely.
The Select Bed options shows.
5 Under Select Bed, touch the bed that you want to view remotely.
6 When you use Remote View, you must select the parameters you want to
view.
7 Under Select Parameters, touch the parameters that you want to view
remotely.
8 Touch the red X in the top right corner of the Remote window to close the
window.
The Remote window will time-out and close after 5 minutes.
Refer to Remote View on page 6-3 for more details.
www.spacelabshealthcare.com
5-11
Page 54

XPREZZON
O
PERATIONS MANUAL
AND QUBE
To use Full Bed Review (FBR)
Monitor Screen Saver
The monitor has a screen saver that can be enabled or disabled.
To activate the screensaver
B ASIC OPERATIONS
1 From the main taskbar, touch the Remote icon.
2 Select Remote View.
3 Touch On.
4 Under Select Subnet, touch the subnet that you want to view
remotely.
5 Under Select Bed, touch the bed that you want to view remotely.
6 Touch Full Bed Review button.
The Remote window automatically closes after you touch the Full Bed
Review button.
Refer to Full Bed Review on page 6-4 for more details.
1 From the main taskbar, touch Monitor Setup.
2 Touch Activate Screen Saver on the lower-right corner of the
window.
The screen saver shows.
To deactivate the screensaver
1 Touch the display, move the mouse, or press any key on the keyboard.
The standard display window shows.
Note:
The patient is still monitored when the screen saver activates. In Standby Mode,
the patient is not monitored. Refer to Standby Mode on page 5-13.
The screensaver is automatically deactivated by an incoming alarm condition.
5-12
www.spacelabshealthcare.com
Page 55

XPREZZON AND QUBE
PERATIONS MANUAL
O
Standby Mode
B ASIC OPERATIONS
If you need to temporarily stop patient monitoring, you can use the Standby Mode
feature. The Standby button is on the bottom left of the home screen (refer to
Figure 5-1 on page 5-2). When the monitor is in Standby Mode, all alarms and
monitoring is stopped.
To enable Standby Mode
1 If necessary, touch Home to clear the screen.
2 Touch Standby.
A dialog box shows Go to STANDBY MODE?
Yes/No.
3 Touch Yes.
A gray screen shows the message STANDBY MODE with a blue target and
the message MONITORING SUSPENDED TOUCH TO EXIT STANDBY.
To exit Standby Mode
1 On the gray Standby screen, touch the message MONITORING SUSPENDED
TOUCH TO EXIT STANDBY, or the blue target above the message to exit
Standby Mode.
A dialog box shows the message Resume monitoring current patient? Yes/
No/Cancel. The name of the current patient or the patient ID will show
under the message if previously entered.
2 Either:
•Touch Yes to resume monitoring of the current patient.
•Touch No to monitor a different patient.
•Touch Cancel to stay in Standby Mode.
Note:
• When you exit Standby Mode, monitoring resumes and alarms are enabled.
Prior alarm and data settings remain the same as before the monitor was
put into Standby Mode.
• If your monitor has Standby Mode turned on, the Perioperative option will
not be available.
www.spacelabshealthcare.com
5-13
Page 56

XPREZZON
O
PERATIONS MANUAL
Perioperative
AND QUBE
B ASIC OPERATIONS
Perioperative features include START CASE/END CASE and a configurable secondary
display (for XPREZZON only). Refer to Remote Config (XPREZZON only) on
page 12-17 for configuration details.
Warnings:
• Make sure that the case is complete before you touch END CASE.
• Ending a case will:
- Turn off NIBP auto readings
- Suspend the sampling of anesthetic agents
- Silence alarm tones
- Disable remote alarm notifications
- Retain patient information until next case is started or patient is
discharged.
• Before ending the case, make sure that the patient is being monitored by
other equipment or by a dedicated caregiver for a limited time (such as
when a patient is being transferred to a transport monitor).
• After a case is ended, ALARM PAUSE should only be used if no patient is
connected to the monitor.
• If you touch the ALARM PAUSE key when the case is ended, visual and
audible alarms will not be re-initialized until a new case is started or you
manually cancel ALARM PAUSE by touching the key again.
• ALARM PAUSE after END CASE disables all audible and visual alarm features
until START CASE is selected.
• Touch ALARM PAUSE again or touch START CASE to re-initialize visual
alarms. Individual parameters may treat an end case differently. Refer to
the appropriate parameter chapter for descriptions of end case
functionality, if applicable.
Perioperative features include:
5-14
- START CASE and END CASE keys - These keys control the operation of the
monitor and modules by case, and pause audible alarms when the alarms
are not needed. However, visual alarm indicators will continue to show
upon END CASE, unless Alarms Off is selected.
- Remote Configurable Display (XPREZZON only) - A secondary display that is
controlled from the monitor's Monitor Setup menu, using the SECONDARY
CONFIG. key, and from the menu line, using the SECONDARY CONTROL key.
The parameter attributes of the secondary display can be configured
differently than the primary display.
Note:
If your monitor has Standby Mode turned on, the Start Case/End Case keys will
not be available.
www.spacelabshealthcare.com
Page 57

XPREZZON AND QUBE
PERATIONS MANUAL
O
Start Case/End Case
B ASIC OPERATIONS
When enabled, the monitor shows a key labeled START CASE or END CASE along the
bottom of the monitor's display (refer to
change to the opposite state when touched and confirmed.
Figure 5-1 on page 5-2). The key will
To start a case
1 Touch START CASE to start a patient case.
The dialog box Is this a new patient? opens.
Note:
If you accidentally touch START CASE, you can touch Home to clear the dialog
box.
2 Either:
•Touch YES to clear all patient data and start a new case.
Depending on your setup, the Admit window can show.
•Touch NO to retain the current patient data and resume the
case.
To end a case
1 Touch the END CASE key.
The End Case? confirmation dialog box shows.
2 Touch END CASE in the End Case? dialog box to return to the monitoring
window.
The END CASE button changes to the START CASE button.
Caution:
- When a case is ended, alarm tones are automatically turned OFF, but
visual alarm indicators are shown. Remote alarm notification is
prevented.
-The START CASE button and messages continue to show until a new
case is started, using the START CASE button.
www.spacelabshealthcare.com
5-15
Page 58
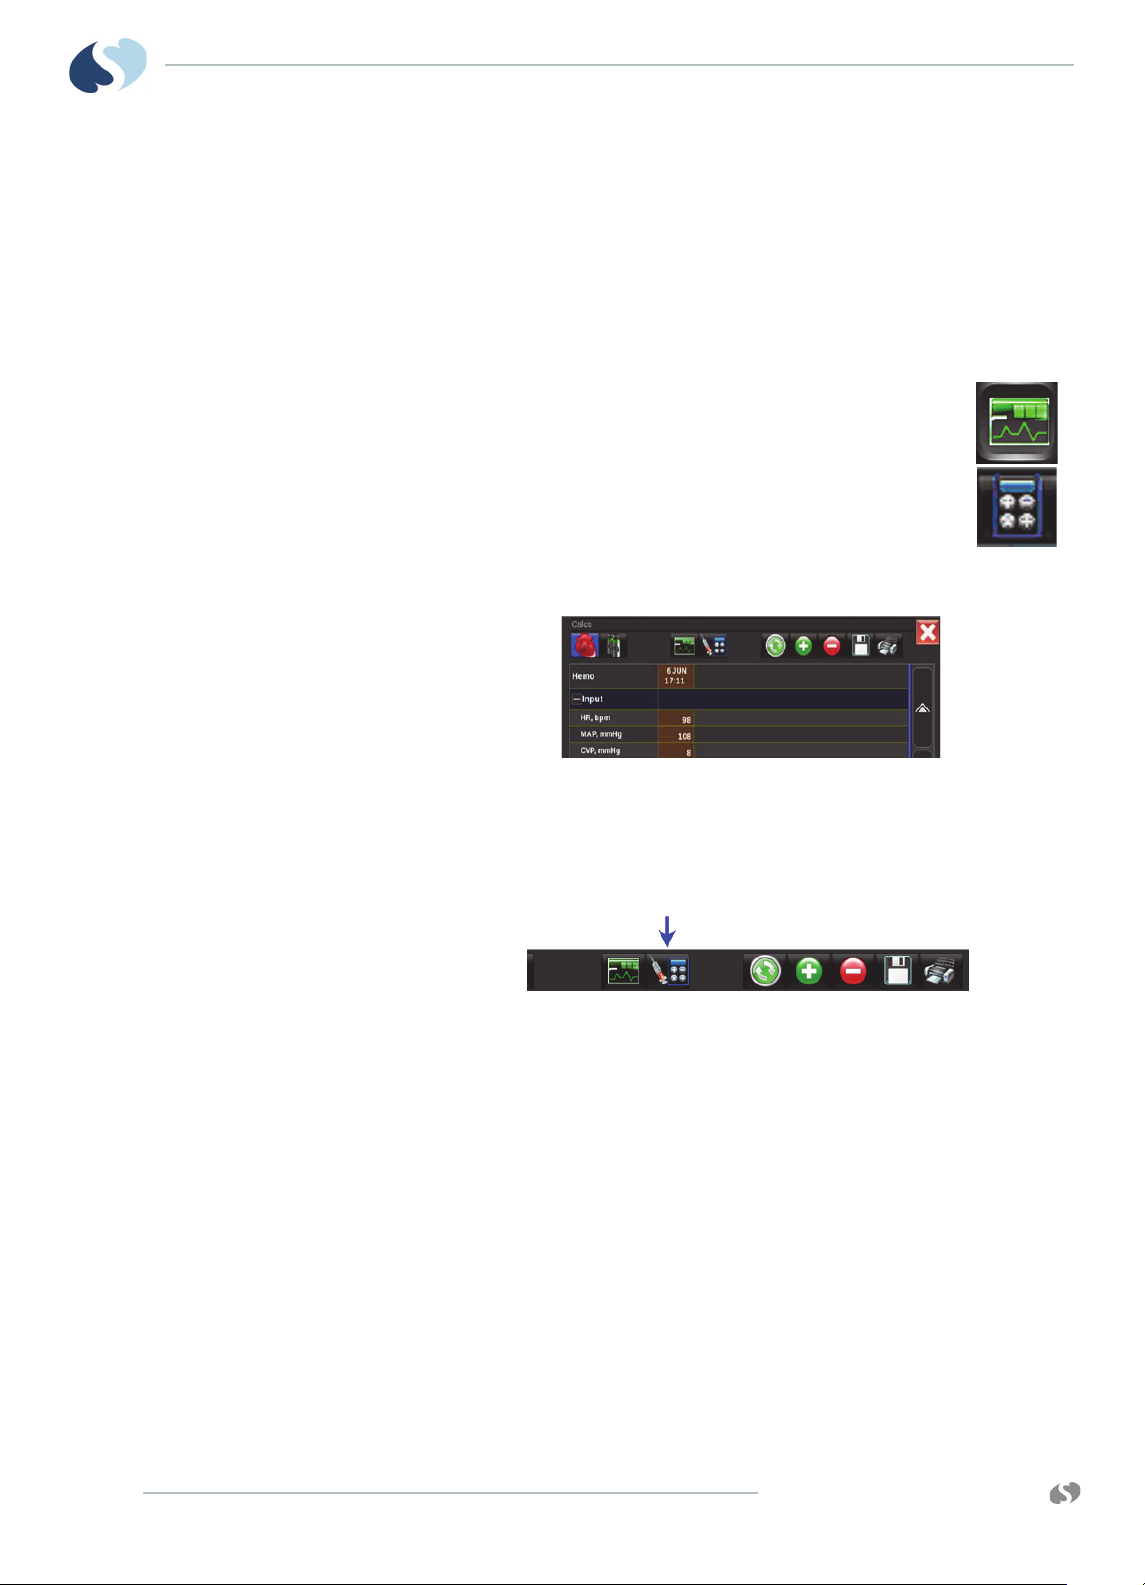
XPREZZON
O
PERATIONS MANUAL
Calculations
AND QUBE
B ASIC OPERATIONS
The Calculator icon on the Trends toolbar lets you access the Drug Calculator
window or Physiologic Calculations window. For more details on both types of
calculations, refer to Calculations on page 10-1.
To open the Calculations window
1 From the main taskbar, touch the Trends icon.
The Trends window shows.
2 Touch the Calculator icon at the top of the window in the Trends
toolbar.
The Calculations window shows on a monitor with the
Calculations option (shown below).
To access the Drug Calculator from the Calculations Window
1 From Calculations window’s taskbar, touch the Calculator icon.
The Drug Calculation window shows. Refer to Figure 10-2 on page 10-8.
5-16
www.spacelabshealthcare.com
Page 59

XPREZZON AND QUBE
PERATIONS MANUAL
O
Data Shuttle
Data Transfer
Data Retrieval
B ASIC OPERATIONS
Data Shuttle® is an option that you can use to transfer patient demographic data
(such as age, sex, name, and BSA) and vital signs data from one monitor to another.
Before you shuttle data from one monitor to another, you must first transfer the
data from the source monitor into a Command module and then proceed with the
transfer. Parameter information acquired between the time you transfer data and
the time you remove the module is lost. The monitor indicates this lost information
as a gap in the trends of the parameters involved when you retrieve the data. If time
elapses between data transfer into the module and module removal, you may wish
to update the transferred data before you remove the module. To update this data,
touch UPDATE TRANSFER. If the module stays out of the monitor for 10 or more
minutes, all data is lost.
When you insert the module into the destination monitor, the monitor sounds a
low priority alarm tone until you either cancel the data transfer or retrieve the data.
The monitor also shows the patient name associated with the data to be transferred
and, if applicable, the patient name associated with the data that currently resides
in the destination monitor.
To transfer patient data from a monitor to the Command module
1 Touch the ECG parameter key.
2 Touch the SET-UP button.
3 Touch TRANSFER DATA.
The message TRANSFERRING PATIENT DATA INTO MODULE shows. After
the data is completely transferred, the monitor sounds a tone and the
message DATA TRANSFER COMPLETED shows.
4 If there is a delay in completing the data transfer, update the transfer data
just before you remove the module from the monitor.
5 Remove the module from the monitor. Following removal of the module, the
patient will be automatically discharged and all patient data cleared.
To update transferred data before you remove module
1 From the ECG waveform zone, touch UPDATE TRANSFER.
The message TRANSFERRING PATIENT DATA INTO MODULE shows. After
the data is completely transferred, the monitor sounds a tone and the
message DATA TRANSFER COMPLETED shows.
2 Remove the module from the monitor.
www.spacelabshealthcare.com
5-17
Page 60

Help
XPREZZON
O
PERATIONS MANUAL
AND QUBE
B ASIC OPERATIONS
To retrieve patient data at the destination monitor
1 Insert the Command module into the destination monitor.
2 Make sure that the time and date set on both the source and destination
monitors is identical.
3 Touch RETRIEVE DATA.
The monitor shows YES and NO.
4 Touch YES.
The message TRANSFERRING PATIENT DATA INTO MONITOR shows. After
the data is completely transferred, the monitor sounds a tone and the
message DATA TRANSFER COMPLETED shows. Any data previously stored in
the destination monitor is purged.
Using Help
1 Touch the Help icon.
Select the key for which you need help shows.
2 Touch the button, icon, or key you want to have described.
A sentence describing the key you selected shows.
Note:
If the key you touched needs more explanation than what can be shown in one
sentence, you will be referred to this manual.
Touch the Help icon twice to open the Help window.
5-18
www.spacelabshealthcare.com
Page 61

XPREZZON AND QUBE
O
PERATIONS MANUAL
Remote Access
Spacelabs Healthcare networking features support seamless data
exchange across the medical enterprise, addressing the need for
continuous information management.
Overview
The Remote Access feature lets you view data or receive alarm notifications from
any bedside monitor, at any other bedside or central monitor.
Contact your system administrator for setup information for the Remote Access
features.
Notes:
• The Remote Trends and Remote Calculations windows time out after five
minutes. The other Remote Access windows time out after one minute.
• The Remote Access window will not resize and cannot be moved on the
monitor.
• The Remote Access window includes the Full Bed Review (FBR) option.
www.spacelabshealthcare.com
6-1
Page 62

XPREZZON
O
PERATIONS MANUAL
AND QUBE
R EMOTE ACCESS
Network Basics
Figure 6-1 Remote Access Window
Networking lets you communicate between beds in a single care unit or to review
information from another care unit.
Each care unit is defined on your networked system as a subnet. When you start any
of the remote functions, you first select the subnet and then select the particular
bed.
When you view clinical parameter information for a particular bed from another
bedside monitor, you can control those parameters just as if you were at that
remote bedside. Remotely viewed parameters occupy the lowest zone on the
bedside monitor display. Each patient’s data is separated from other zones by a
dividing line.
When a bedside monitor is set up to alarm watch another bedside, a one-second
advisory tone sounds at the onset of an alarm condition (if the remote alarm tone is
enabled).
To select a subnet and bed for remote functions
1 From the main taskbar, touch the Remote icon.
2 Touch the remote access function you want to use: Remote
View, Alarm Watch, Remote Trends, or Remote Calcs.
6-2
Note:
Remote View and Alarm Watch cannot be enabled at the same time. Touch On
or Off to enable or disable either option.
www.spacelabshealthcare.com
Page 63

XPREZZON AND QUBE
PERATIONS MANUAL
O
Remote View
R EMOTE ACCESS
3 Under Select Subnet, touch the subnet that you want to view remotely.
The Select Bed options shows.
4 Under Select Bed, touch the bed that you want to view remotely. If you are
using Alarm Watch, you can touch Select All to select all beds.
5 When you use Remote Trends or Remote Calcs, data for the selected subnet
and bed shows.
6 When you use Remote View, you must select the parameters you want to
view.
7 Under Select Parameters, touch the parameters that you want to view
remotely.
8 Touch the red X in the top right corner of the Remote window to close the
window.
The Remote window will time-out and close after 5 minutes.
You can view a single parameter or with the optional Full Bed Review (FBR) feature,
you can view multiple parameters for any monitored patient on the network.
Each patient’s data shows in a zone that is separated from other zones by a dividing
line. Menu keys, alarms, and recordings are also accessible. Arrhythmia and ST
segment data can be viewed from remote monitors if optional arrhythmia and ST
segment analysis software is part of your system. Parameters from bedside
monitors can be remotely viewed by up to 16 other monitors.
Touch the Remote View button to select the beds you want to view remotely.
To use Remote View to view remote parameters on other beds on the network
1 From the main taskbar, touch the Remote icon.
2 Select Remote View.
3 Touch On (this may already be selected).
4 Under Select Subnet, touch the subnet that you want to view
remotely.
The Select Bed options shows.
5 Under Select Bed, touch the bed that you want to view remotely.
6 When you use Remote View, you must select the parameters you want to
view.
7 Under Select Parameters, touch the parameters that you want to view
remotely.
8 Touch the red X in the top right corner of the Remote window to close the
window.
The Remote window will time-out and close after 5 minutes.
To turn off Remote View
www.spacelabshealthcare.com
1 From the main taskbar, touch the Remote icon.
2 Select Remote View.
3 Touch Off.
6-3
Page 64

XPREZZON
O
PERATIONS MANUAL
Full Bed Review
AND QUBE
R EMOTE ACCESS
4 Touch the red X in the top right corner of the Remote window to close the
window.
The optional Full Bed Review (FBR) feature lets you view multiple parameters at the
same time from a remote monitor.
The monitor where FBR is set up shows, within its capabilities, all available
parameters from the remote monitor. If more parameters are available from the
remote bedside than FBR can show, selecting any of these numeric keys causes the
selected parameter to replace the lowest parameter on the display.
Note:
Full Bed Review shows a single ECG lead if the remote bedside is configured to
show ECG data, using the full-view format or split-view format.
To use Full Bed Review (FBR)
1 From the main taskbar, touch the Remote icon.
2 Select Remote View.
3 Touch On.
4 Under Select Subnet, touch the subnet that you want to view
remotely.
5 Under Select Bed, touch the bed that you want to view remotely.
6 Touch Full Bed Review button.
The Remote window automatically closes after you touch the Full Bed
Review button.
To use Full Bed Review (FBR) when a remote
parameter is not shown
1 From the main taskbar, touch the Remote icon.
2 Under Select Subnet, touch the subnet that you want to view
remotely.
3 Under Select Bed, touch one bed that you want to view
remotely.
4 Under Select Parameters, touch one or more parameters that you want to
view remotely.
5 Touch Full Bed Review button to view all available parameters.
6-4
www.spacelabshealthcare.com
Page 65

XPREZZON AND QUBE
PERATIONS MANUAL
O
Alarm Watch
R EMOTE ACCESS
To turn off Full Bed Review (FBR)
1 Touch Home.
If your hospital protocol requires remote monitoring of all alarms, you can activate
Alarm Watch during the setup of your bedside monitor. Contact your system
administrator regarding this feature. Alarm Watch allows you to remotely watch
alarms from up to 32 networked monitors.
When a parameter from a monitor that is under Alarm Watch goes into alarm, a
message (for example, ALARM WATCH – BED 28 ECG CHANNEL IN ALARM) shows
on the message line of the alarm-watching monitor. The appropriate tone sounds at
the alarm-watching monitor. The corresponding parameter shows in the lowest
zone on the display of the alarm-watching monitor (unless another alarm-watched
parameter is in alarm and already occupies that zone at the watching monitor).
Note:
If the enhanced Vital Signs display feature is enabled, you can view SpO2,
respiration rate, noninvasive pressure, and/or invasive pressure in the ECG zone
within an Alarm Watch window. However, alarm status information for these
parameters does not show.
Warnings:
• Alarm Watch and Remote View Alarms will generate a single tone, one time
only, at a bedside monitor.
• Remote View and Alarm Watch are mutually exclusive features on bedside
monitors. When Remote View is active, NO Alarm Watch tones or messages
show at the bedside monitor.
• The Module Configuration Manager settings for individual parameter
alarms could show in an Alarm Watch. Refer to the Module Configuration
Manager System Administration Guide for more information.
• No more than ten remote alarms can be reported at the same time to any
monitor using the Alarm Watch feature.
• Alarm Watch Rotation settings can delay remote alarm presentation by up
to six minutes. Biomeds verify settings and satisfactory performance during
setup.
• The maximum number of monitors that can receive an alarm watch
notification is 16.
Caution:
When Remote View is active at a bedside monitor, no Alarm Watch alarms will
show at that bedside monitor. The Remote View alarm tone only sounds when
a remotely viewed parameter goes into alarm.
www.spacelabshealthcare.com
6-5
Page 66

XPREZZON
O
PERATIONS MANUAL
AND QUBE
R EMOTE ACCESS
To use Alarm Watch to view remote alarms on
other beds on the network
1 From the main taskbar, touch the Remote icon.
2 Select Alarm Watch to view alarms from other monitors.
Note:
Remote View and Alarm Watch cannot be enabled at the same
time. Touch On or Off to enable or disable either option.
3 Touch On (this may already be selected.)
To turn off Alarm Watch
1 From the main taskbar, touch the Remote icon.
2 Select Alarm Watch.
3 Touch Off.
4 Touch the red X in the top right corner of the Remote window to
close the window.
Remote Trends
Vital signs trending provides minute-by-minute logging of parameter data for
review and documentation in the patient record. You can view graphic or tabular
trend data for any patient on the network. On the Remote window, touch Remote
Trends to access trend data for another patient on the network.
Note:
Remote Trends window times out after five minutes of inactivity.
To view the Remote Trends window
1 From the main taskbar, touch the Remote icon.
2 Touch Remote Trends.
3 Under Select Subnet, touch the subnet that you want to view
remotely.
4 Under Select Bed, touch the bed that you want to view remotely.
This shows the Trends window for the remote bed. Refer to Trends View on
page 9-1 for using the Trends window. Some of the Trends window icons
may be unavailable because it is the remote view.
5 Touch the red X in the top right corner of the Remote Trends window to close
the window
Remote Calcs
6-6
Calculations can be accessed through the local bedside monitor or from a remote
monitor on the network, depending upon the options purchased. Contact your
system administrator for details if you are unable to access this function. The data
that shows in the calculations table is from the selected monitor.
www.spacelabshealthcare.com
Page 67

XPREZZON AND QUBE
PERATIONS MANUAL
O
R EMOTE ACCESS
You can view calculated hemodynamic and oxygenation data for any patient on the
network.
Note:
Remote Calcs window times out after five minutes of inactivity.
To access Remote Calculations window
1 From the main taskbar, touch the Remote icon.
2 Touch Remote Calcs.
3 Under Select Subnet, touch the subnet that you want to view
remotely.
4 Under Select Bed, touch the bed that you want to view remotely.
This shows the Calculations window for that remote bed. Refer to
Calculations on page 10-1 for using the Calculations window.
Some of the buttons in the Calculations window may be unavailable because
it is a remote view.
5 Touch the red X in the top right corner of the Remote Trends window to close
the window.
www.spacelabshealthcare.com
6-7
Page 68

XPREZZON
O
PERATIONS MANUAL
AND QUBE
R EMOTE ACCESS
6-8
www.spacelabshealthcare.com
Page 69

XPREZZON AND QUBE
O
PERATIONS MANUAL
Alarms
The list of alarm features below are described in this chapter:
• For alarm levels, refer to Alarm Levels on page 7-3.
• To set alarm limits, refer to Alarm Limits on page 7-3.
• To use Alarm History, refer to Alarm History on page 7-7.
• To use alarm icons, refer to Alarm Icons on page 7-5.
• To pause audio, refer to Audio Pause on page 7-6.
• To pause alarms, refer to Alarm Pause on page 7-7.
• To acknowledge an alarm, refer to Alarm Acknowledge on page 7-9.
• For the alarm acknowledge reminder, refer to Alarm Acknowledge Reminder
on page 7-10.
• To set alarm audio volumes, refer to Alarm Audio on page 7-11.
• To use audio off reminder, refer to Audio Off Reminder on page 7-12.
• To use alarm watch, refer to Alarm Watch on page 7-13.
• To specify parameters for automatic alarm recordings, refer to Alarm Recording
on page 7-14.
Note:
The bedside monitor is the primary monitoring and alarming device for
Spacelabs-monitored parameters.
When a parameter value on a bedside monitor exceeds an alarm limit, that monitor
initiates an alarm. User notification of an alarm has five possible characteristics:
visual, audible (tone), recording, alarm relay, and alarm watch.
www.spacelabshealthcare.com
Higher-priority alarms relate to changes in the patient’s condition. Lower-priority
alarms typically relate to changes in signal quality. Higher-priority alarms always
override lower-priority alarms.
7-1
Page 70

XPREZZON
O
PERATIONS MANUAL
AND QUBE
A LARMS
Warnings:
• Alarm conditions for which you want to be alerted must be set to ON or
enabled at the location where you want to be alerted — either bedside or
central. You can enable them from the local bedside monitor, remote
bedside monitor, or central monitor.
• To protect the patient’s safety, do not silence, suspend, or disable alarms
without providing continuous, direct observation of the patient.
• Custom alarm settings are not maintained beyond the battery capacity if
power is lost.
• Make sure alarm limits are appropriate for the age and condition of the
patient being monitored.
• Set alarm ranges appropriate to the patient:
- Setting alarm ranges too narrow may result in a high rate of nuisance
alarms and cause alarm fatigue.
- Setting alarm ranges too wide effectively disables the alarm function.
Cautions:
• Check that alarm settings are correct on the monitor once during each shift
and upon each patient admission to make sure that the alarm settings are
appropriate for the patient being monitored.
Notes:
• Within one second, the network is notified of an alarm condition.
• Central monitor alarms show within one second of a bedside alarm
condition.
7-2
www.spacelabshealthcare.com
Page 71

XPREZZON AND QUBE
PERATIONS MANUAL
O
Alarm Limits
A LARMS
Default alarm limit settings activate when the monitor is powered ON, a module is
inserted, or a parameter is enabled. You can modify the default alarm limit settings
to meet your own protocols.
Caution:
If the default alarm limit settings are selected, make sure that the alarm limit
settings are appropriate for the patient being monitored.
To set alarm limits
1 Touch a parameter key (such as ECG or Invasive Pressure).
2 Touch Alarm Limits.
3 Set alarms to ON.
4 Select HIGH =, LOW =, EXTREME HIGH =, or EXTREME LOW=.
5 Use the arrows to adjust.
Caution:
The extreme high (or low) limit automatically adjusts when you adjust the high
(or low) limit, based on the configured offset determined by your facility. For
example, if the extreme high offset is set to 20 bpm and the high limit is set to
120 bpm, the extreme high limit would be 140 bpm.
Refer to the Clinical Parameters Manual for additional details.
Alarm Levels
Notes:
• High and low limits show in the parameter zone.
• All alarm limits show in the Alarm Limit Review tab under Monitor Setup.
• Extreme alarms, if enabled, are available for ECG and Invasive pressures
only.
Alarm conditions are visually and audibly prioritized as high, medium, or low.
Notes:
• The display’s alarm light, if enabled, flashes red for high-priority alarms,
flashes yellow for medium-priority alarms, and shows (non-flashing) cyan
for low-priority alarms. If the alarm acknowledge feature is active and an
alarm is acknowledged, the display’s alarm light will turn off until a new
alarm occurs.
• Alarm priorities are set using the Module Configuration Manager. Refer to
the Module Configuration Manual, System Administration Guide for more
information.
www.spacelabshealthcare.com
7-3
Page 72

XPREZZON
O
PERATIONS MANUAL
Bedside Alarms
Priority Tone Type
AND QUBE
A LARMS
a
Tone D u rati o n Visual Flash Rates
High Two bursts of five tones every
15 seconds, or continuous
tone.
Medium Burst of three tones every 30
seconds, or intermittent tone
(one second ON, one second
OFF).
Low One tone every 30 seconds, or
intermittent tone (one second
ON, four seconds OFF).
a.
The repetition rate for the High, Medium, and Low alarm tones can be adjusted by your system administrator.
Until the alarm condition is
resolved, the alarm is
suspended, or the tone is
reset.
Until the alarm condition is
resolved, the alarm is
suspended, or the tone is
reset.
Until the alarm condition is
resolved, the alarm is
suspended, or the tone is
reset.
Alarm Watch and Remote View Alarms
Warning:
Alarm Watch and Remote View Alarms will generate a single tone, one time
only, at a bedside monitor. The tone will not be repeated, regardless of how
long the alarm condition exists.
Priority Tone Type To n e Dura t i on Visual Flash Rates
Red flashing alarm
lights and parameter
key flashes; message
shows in red.
Yellow flashing alarm
lights and parameter
key flashes; message
shows in yellow.
Cyan alarm lights and
parameter key flashes;
message shows in cyan.
.
312 ms ON/OFF
312 ms ON/OFF
Steady
Sound Pressure
Range at One
Meter
7-4
High One single tone. One second. Red flashing parameter
key; message shows in
red.
Medium One single tone. One second. Yellow flashing
parameter key;
message shows in
yellow.
Low One single tone. One second. Steady lit parameter
key; message shows in
yellow.
One second. 43 to 67 dB
One second. 32 to 63 dB
One second. 45 to 67 dB
www.spacelabshealthcare.com
Page 73

XPREZZON AND QUBE
1
23
4
5
6
7
8
9
10
PERATIONS MANUAL
O
Alarm Icons
A LARMS
The Alarms Pause, Audio, and Alarm Acknowledge icons show on the bottom right
corner of the home screen (refer to Figure 7-1 on page 7-5).
Figure 7-1 Home screen
1 Parameter zones- shows parameter waveforms and messages when an
alarm occurs for that parameter. Refer to Alarms on page 7-1.
2 Parameter keys
3 Parameter information area and alarm status
4 Main taskbar. Refer to Main Taskbar on page 5-3.
5 Standby, Start/End Case, and Printer Controls keys
6 Admit Patient. The patient’s name or other identification show here if
entered. Refer to Admit, Discharge, and Edit on page 5-4.
7 Alarm History. Refer to Alarm History on page 7-7.
8 Date and time
9 Alarms, Audio, and Alarms Acknowledge icons. Refer to Alarms on
page 7-1.
www.spacelabshealthcare.com
7-5
Page 74

XPREZZON
O
PERATIONS MANUAL
Audio Pause
AND QUBE
A LARMS
10 Wireless, Network, and Battery icons. Refer to page 3-7 and page 3-7.
Note:
Some of the options may not be available. Contact your system administrator
for details.
The current alarm state of the monitor determines the form of the alarm icons.
Depending on how your monitor is configured determines which symbols show on
the home screen.
Use this control to silence audio alarm tones for 45 seconds.
To pause the audio for an active alarm
1 Touch the Audio icon, shown on the right.
A dotted white X shows across the Audio icon and the
message Paused shows with a countdown timer (see below).
After 45 seconds, the Audio icon changes as shown on the
right.
Note:
• The Audio icon has no effect if an alarm is not active.
• Depending on the configuration of your monitor or module type, the Alarm
Acknowledge feature may not be active. If it is not active, touching the
Alarm Acknowledge icon has the same effect as touching the Audio icon.
7-6
www.spacelabshealthcare.com
Page 75
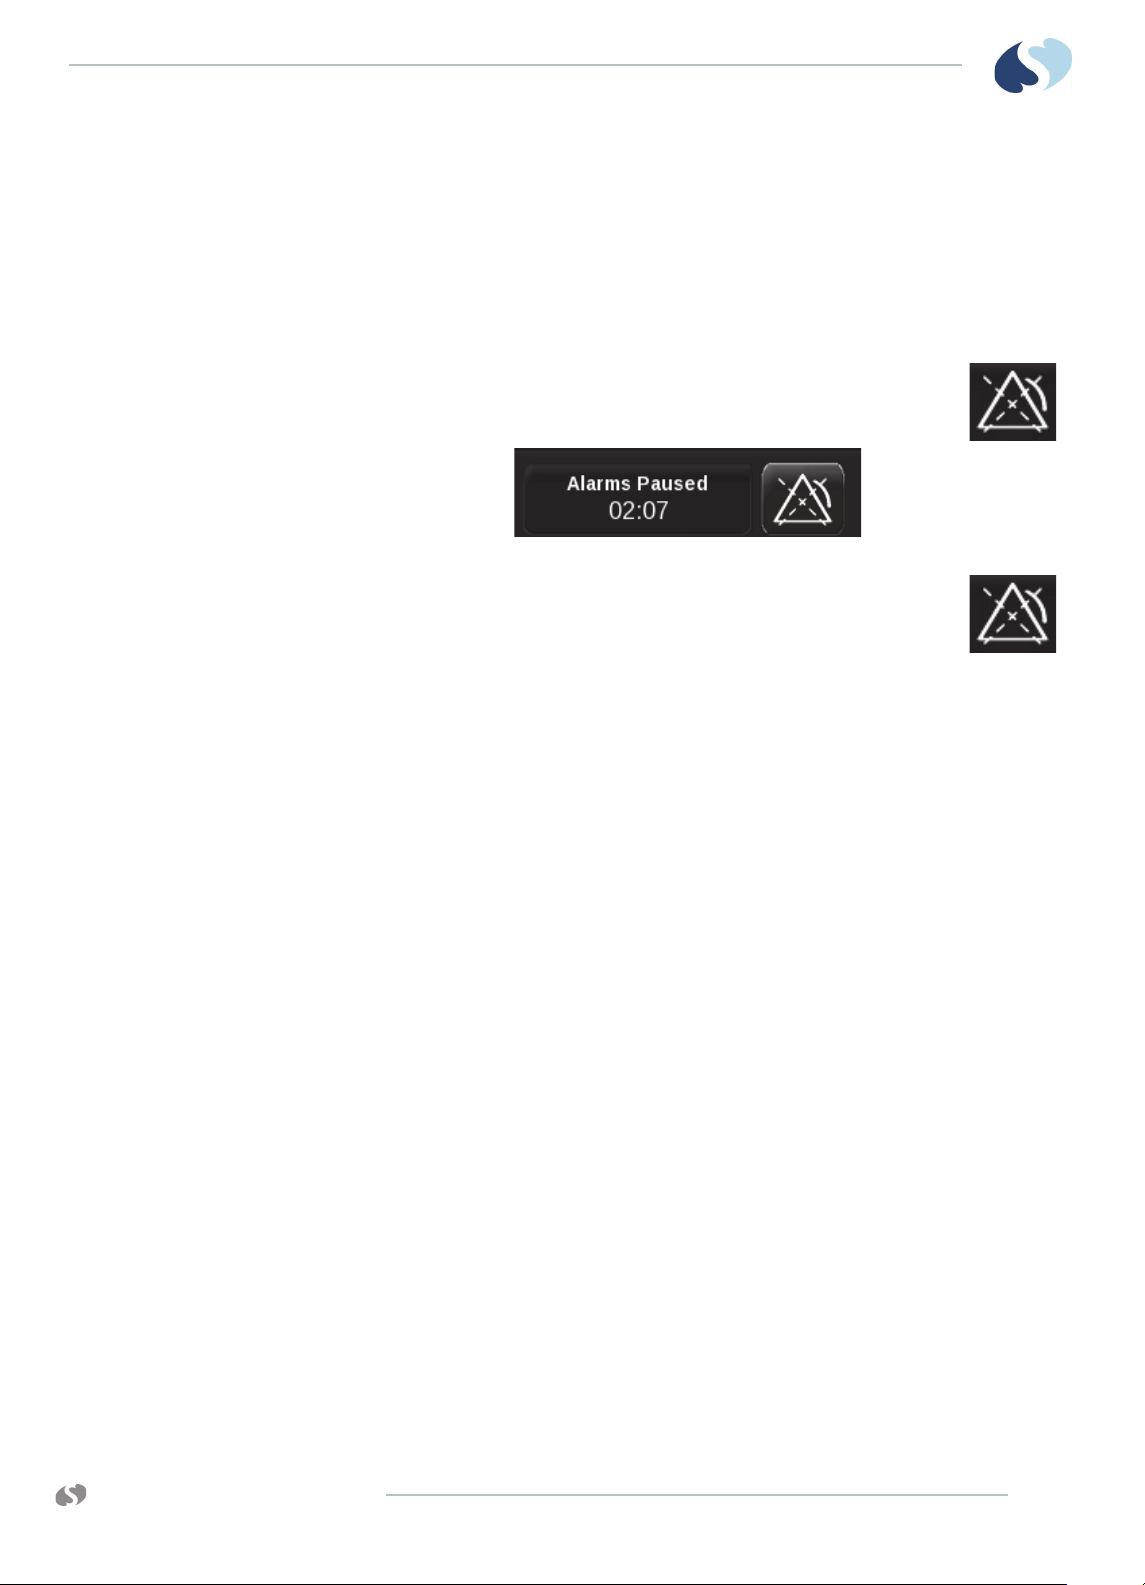
XPREZZON AND QUBE
PERATIONS MANUAL
O
Alarm Pause
A LARMS
Use this control to pause all alarms for a specified period of time. The alarms
paused period is determined by your system administrator.
To pause all alarms
1 Touch the Alarms Pause icon, shown on the right.
The message Alarms Paused shows with a countdown timer
(see below).
After the pause period ends, the Alarms Pause icon changes as
shown on the right.
Note:
While alarms are paused, the message XXX Alarms Paused
shows in the parameter waveform zones. This message is removed when the
alarms paused period ends.
Alarm History
The Alarm History bar is located on the lower right of the home screen (refer to
Figure 7-1 on page 7-5). It represents alarms (if any) that occurred over the last 60
minutes. The Alarm History bar shows one vertical bar for each minute of the last 60
minutes, with the most recent on the right. The color shown is for the highest
priority alarm that happened during that minute: red (high priority alarm), yellow
(medium priority alarm), or cyan (low priority alarm). If alarms for a patient
alternate between high and medium within the same minute, only a red high
priority bar shows.
When you touch the Alarm History bar, the Alarm History window opens to show:
1 alarm priority symbol
2 start time/end time
3 waveform icon
4 alarm description
www.spacelabshealthcare.com
7-7
Page 76

XPREZZON
O
PERATIONS MANUAL
AND QUBE
A LARMS
Figure 7-2 Alarm History window
To open the Alarm History window
1 Touch the Alarm History bar on the home screen.
The Alarm History window opens showing the most recent alarm on the top
of the list. When the window is full, vertical scroll buttons show on the right
side of the list and let you scroll to view alarms over the last 60 minutes.
To close the Alarm History window
1 Touch the red X at the top right of the Alarm History window.
The window times out after 60 seconds.
To refresh the Alarm History window
1 Touch the refresh icon at the top of the Alarm History window to see alarms
that have occurred since the window was opened.
To select alarms based on alarm priority
1 Touch one of the alarm priority icons at the top of the Alarm History window.
A white check mark indicates the selected alarm priority will be shown in the
Alarm History window. No check indicates the selected alarm priority will not
be shown.
7-8
Note:
High priority alarms are always shown.
www.spacelabshealthcare.com
Page 77

XPREZZON AND QUBE
PERATIONS MANUAL
O
Alarm Acknowledge
A LARMS
To view a waveform in the Alarm History window (for ECG and invasive pressure alarms only)
1 Touch an alarm event to show a compressed 30 second waveform with 3
second markers.
2 Touch the magnifying glass button to show an uncompressed 6 second view
of the same waveform with 1 second markers.
The slide arrows let you scroll back and forward within the alarm event.
3 Touch the up and down arrows to look forward or go back to previous
waveform events.
Note:
The 30-second waveform begins approximately 15 seconds before the monitor
received notice of the alarm.
If you are in a situation in which the visual and audible alarm notifications are
disruptive, you can use the alarm acknowledge feature to pause the audio and
some of the visual indicators. If an alarm can be acknowledged:
• the parameter key stops flashing but continues to show the color of the alarm
priority,
• the alarm limits flash,
• the alarm message in the waveform zone continues to flash in the color of the
alarm priority,
• the Audio Off icon shows in the parameter zone next to the alarm message.
Alarm acknowledge continues until:
• the original alarm condition resolves,
• a different alarm condition for the same parameter occurs (for example, an
ECG low rate alarm is acknowledged, then an asystole alarm occurs),
• an extreme alarm violation of the same alarm occurs (for example, an ECG high
rate alarm is acknowledged, then an ECG extreme rate alarm occurs),
Note:
Alarm acknowledge is different than Alarms Paused. If you touch the Alarms
Paused icon, no alarms show or sound for three minutes, depending on your
monitor configuration.
www.spacelabshealthcare.com
Figure 7-3 Alarm message in the waveform zone
7-9
Page 78
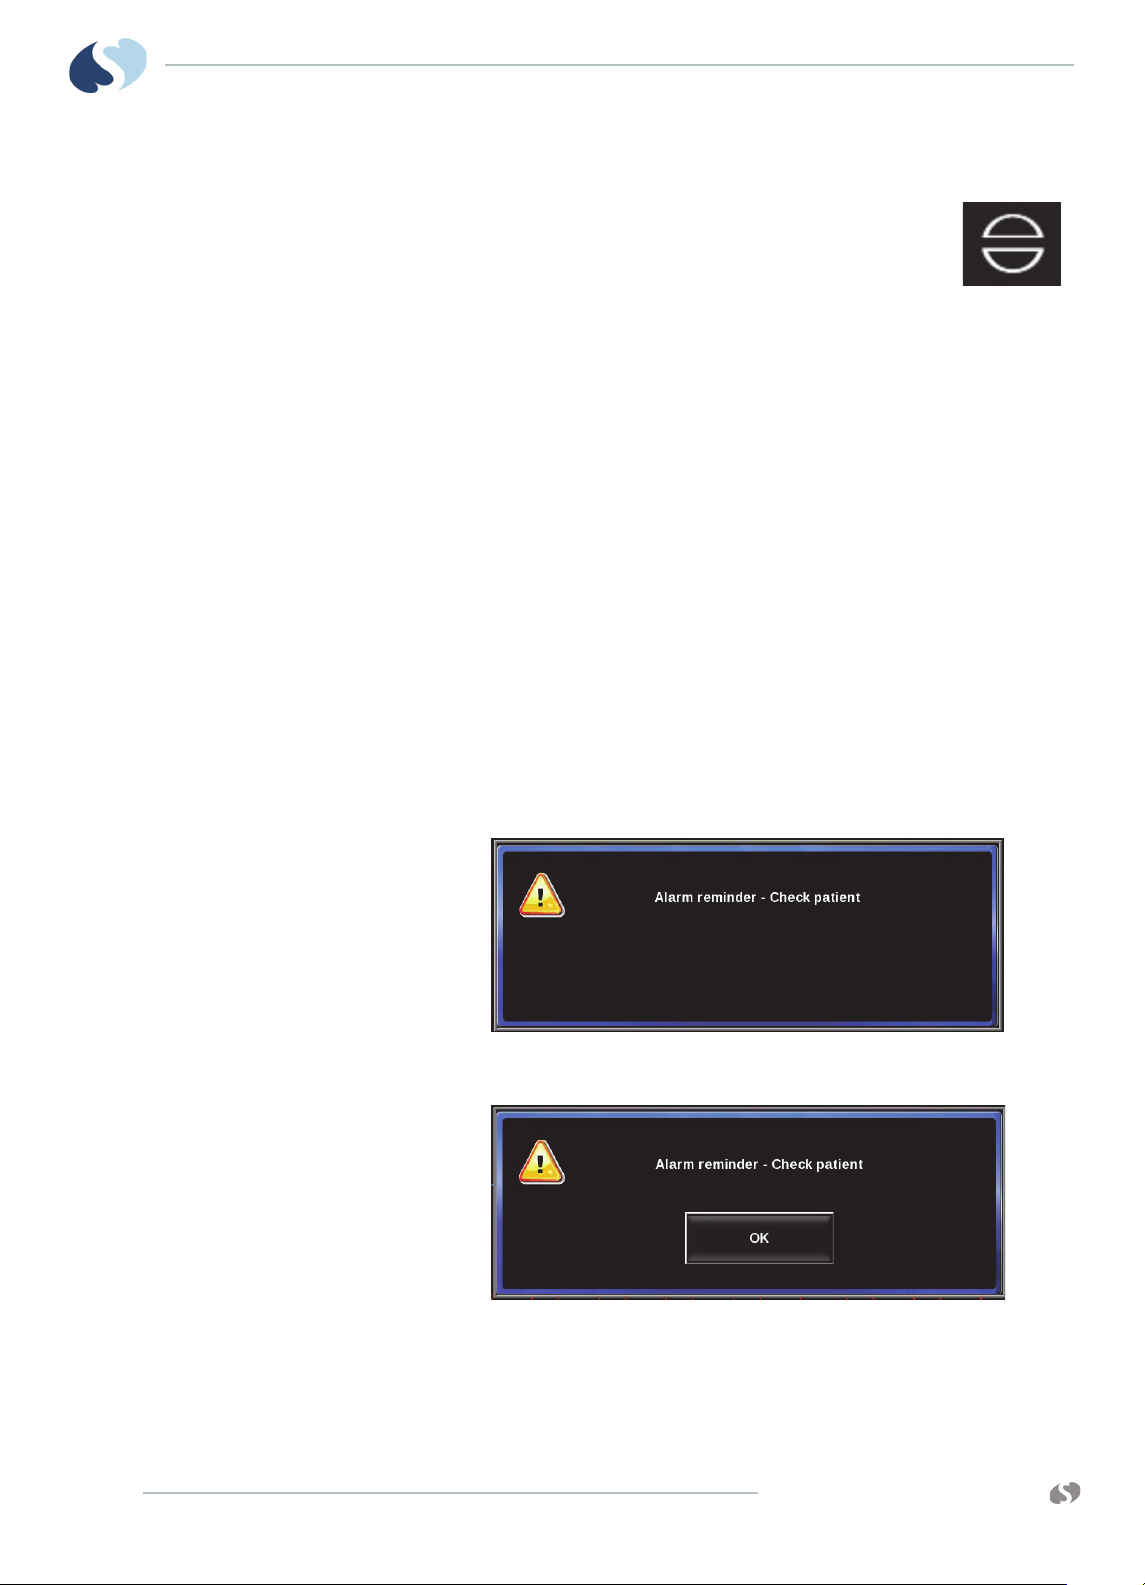
XPREZZON
O
PERATIONS MANUAL
AND QUBE
To acknowledge an alarm
1 Touch the Alarm Acknowledge icon, shown on the right.
The Audio Off icon shows in the parameter zone (refer to
Figure 7-3),
Note:
If an alarm is acknowledged, the Audio Off icon shows in the Alarm History
window in the first column to the left of the start time. The icon shows in the
color of the alarm priority.
Alarm Acknowledge can be enabled independently for different priority alarms.
To cancel an alarm acknowledge
1 Touch the Alarms Paused icon twice.
Alarm Acknowledge Reminder
After acknowledging an alarm, an alarm reminder tone and message may pop up on
the display. Until the alarm condition ends, a tone sounds and the dialog box opens
every 5 minutes for high priority alarms and every 15 minutes for medium and low
alarms.
A LARMS
There are two types of reminders (refer to Figure 7-4 below and Figure 7-5 on
page 7-10). If the OK button is present, then you can dismiss the reminder by
touching the button.
Figure 7-4 Alarm reminder message
Figure 7-5 Alarm reminder message with OK button
7-10
Caution:
If you touch the OK button, the reminder tone and message will be deactivated.
www.spacelabshealthcare.com
Page 79

XPREZZON AND QUBE
PERATIONS MANUAL
O
Alarm Audio
A LARMS
You can enable, disable, or adjust the volume for:
• High, Medium, and Low alarm audio: Tones that sound when a high, medium,
or low priority alarm occurs at the bedside monitor.
• Remote alarm audio: Tones that sound when an alarm initiates at a remote
monitor that is being viewed on this monitor.
• Alarm Watch audio: Tones that sound when this monitor receives an alarm
watch message from a remote monitor that this monitor is configured to
watch.
Warnings:
• Disabling alarm tones at a monitor eliminates alarm tones for all alarm
conditions at that monitor, even in the case of life-threatening events.
• Check alarm volumes periodically! Turning the volume off or too low may
defeat the audible alarm function. A minimum volume selection is described
in the XPREZZON™ and qube™ System Administration Manual.
• The two lowest volume settings produce less than 45 dBA at one meter from
the internal speaker.
www.spacelabshealthcare.com
7-11
Page 80

XPREZZON
O
PERATIONS MANUAL
AND QUBE
A LARMS
To adjust the volume levels for High, Medium, Low Priority Alarms, Remote Alarm, Alarm Watch, and Key tones
1 Touch Monitor Setup.
2 Touch the Audio tab.
3 Touch the tone that you want to set the volume for: High Alarm,
Medium Alarm, Low Alarm, Remote Alarm, Alarm Watch, or
Key.
4 Under Audio, touch On.
Note:
You may not be able to adjust the volume. Contact your system administrator
for more information.
5 Use the slide control to adjust the volume. For higher volume, move the slide
to the right, and for lower volume, move the slide to the left.
To disable an audio tone
1 Touch Monitor Setup.
2 Touch the Audio tab.
3 Touch the tone that you want to turn off: High Alarm, Medium
Alarm, Low Alarm, Remote Alarm, Alarm Watch, or Key.
4 Under Audio, touch Off.
Audio Off Reminder
By default, the control to turn off audio is not available to the clinician. Your system
administrator can select whether clinicians have access to turn off the audio. If
configured for access, you can turn on or off audio in the Audio tab.
If you have access to turning the audio on or off, the system administrator also has
the option to turn on or off an audio tone reminder. If enabled, a reminder tone
sounds every 60 seconds and a reminder message is displayed for 20 seconds.
There are two types of reminders (refer to Figure 7-6 and Figure 7-7 on page 7-13).
If the SILENCE button is present, then you can silence the reminder tone and close
the reminder window by touching the button.
Figure 7-6 “Audio Off” Reminder Message
7-12
www.spacelabshealthcare.com
Page 81

XPREZZON AND QUBE
PERATIONS MANUAL
O
Alarm Watch
A LARMS
Caution:
If you touch the SILENCE button, the reminder tone and message will
deactivate until the monitor is powered off/on or until the clinician turns the
high priority alarm tone on again.
Figure 7-7 “Audio Off” Reminder dialog box
With the network Alarm Watch feature, you can be notified at a local bedside or
central monitor of all alarms from a remote bed. The Alarm Watch feature defaults
to its last setting when the monitor is turned ON. The message ALARM WATCH ON
shows on the bedside and on the central monitor when the Alarm Watch feature for
a remote bed is active. The message AW OFF also shows on the central monitor for
each bed not selected for Alarm Watch. For more details on Alarm Watch Setup,
refer to the XPREZZON
™
and qube™ System Administration Manual.
Alarm Watch notifications distribute across wired or wireless ethernet networks.
Network power outage or other types of failures can cause a remote alarm to be
missed.
Warning:
Alarm Watch should not be used as a single source of alarms for critically ill
patients.
www.spacelabshealthcare.com
7-13
Page 82

XPREZZON
O
PERATIONS MANUAL
AND QUBE
Alarm Recording
A LARMS
An alarm recording prints the last 12 or 20 seconds (based on the Duration setting
found on the Monitor Setup Printer tab), or until the alarm ceases or is suspended,
whichever is greater.
An alarm recording for a parameter can be enabled or disabled in the Module
Configuration Manager (MCM). To enable or disable alarm recordings for those
parameters that are not available in the MCM, you will need to access the Clinical
Setup tab. For more information about Clinical Setup, refer to the XPREZZON™ and
qube™ System Administration Manual.
If alarm recordings are disabled for a parameter, no alarm recording produces on
either the bedside or the network printer if that parameter goes into an alarm
condition. However, the designated alarm tones still generate and the alarm
messages show.
Printing on a network printer is configuration dependent. Refer to the XPREZZON™
and qube™ System Administration Manual for details.
7-14
www.spacelabshealthcare.com
Page 83

XPREZZON AND QUBE
O
PERATIONS MANUAL
Recording/Printing
For basic recording (printing) operations: refer to Recording/Printing
on page 5-8. The icon shown to the right can be called Record or
Printer.
Printing Configurations
Configuration 1
The monitor supports the recording (printing) options listed below:
• Record a preconfigured set of data from one or more monitors.
• Automatic recordings of any parameter in an alarm condition (if configured in
the Module Configuration Manager).
• Print parameter data such as patient demographic information, vital signs,
waveform data, and arrhythmia/ST segments.
• Print non-waveform data such as tabular trends, hemodynamic and
oxygenation calculations, and alarm limits.
Each Spacelabs Healthcare, network-connected, patient monitor is capable of
sending recordings to either of two network printers. These can be configured in
several ways.
Two network printers share the printing load, and the monitor automatically
determines which printer is best for each type of recording. The monitor
determines the best printer to do the following:
• Generate the most timely output of high priority recordings.
www.spacelabshealthcare.com
• Make sure that subsequent recordings from one patient over a short time span
are processed by one printer.
• Use paper as efficiently as possible.
When the printing load is heavy, these objectives can conflict.
8-1
Page 84

XPREZZON
O
PERATIONS MANUAL
Configuration 2
AND QUBE
R ECORDING/PRINTING
Under high-load conditions, the following factors are taken into consideration when
a print request occurs:
• Are either of the printers outputting, holding in memory queue, or loading in
queue a print job from this monitor?
• Are either of the printers idle?
• Is this a high priority request (alarm vs. manual)?
• Are either of the printers currently printing a continuous recording?
• Are either of the printer’s queues full?
• Which of the printers is the preferred size for this request (2 or 4 channels)?
One printer is designated as the primary and the other printer is designated as the
backup. All recordings are sent to the primary printer, unless it is unable to print for
one or more of the following reasons:
• Off-line
• Out of paper
Configuration 3
• Disconnected from network
•Powered OFF
• Print queues are full
• Unable to accept recording type
If the primary printer is unable to print, the recordings are then sent to the backup
printer, unless it is also unable to print for a reason listed above.
Only one printer is available because the network is configured so that recordings
from a given monitor are directed to only one printer on the network. During times
when multiple beds produce alarms, the selection rules will not be applicable, and
print performance is affected.
8-2
www.spacelabshealthcare.com
Page 85

XPREZZON AND QUBE
PERATIONS MANUAL
O
Printing Priorities
R ECORDING/PRINTING
The following list defines printing priorities from the highest to lowest:
• Alarm recording or a manual recording request through a monitor
• RECORD ALL request through a bedside monitor
• RECORD ALL request through a central monitor
• Non-waveform recordings (for example, trends)
• All Arrhythmia/ST classes
In all network printing cases:
• High priority print jobs bump lower priority jobs. For instance, an alarm
recording will bump graphic trends to a lower position in the print queue.
• A high priority request erases as many lower priority requests as needed to
make room for the data it contains. For example, a fully loaded printer will
bump graphic trends out of the queue.
Note:
Recordings in the process of being printed cannot be interrupted or delayed by
additional print requests.
A status message does not show when a print request replacement occurs.
Recording Buffer and Printer Transitions
The printer modules have limited ability to store the waveform data for additional
printouts while actively printing. When the current printout ends and the next
queued printout begins, the printer outputs the stored waveform data, followed by
current waveform data.
A printer transition indicator shows on the printer strip between the end of the
stored waveform data and the beginning of the current waveform to mark a section
of missing waveform data. The width of the indicator is constant. It does not
indicate the amount of missing data, just that there is data missing. The printer
transition indicator is indicated on the printer strip by a downward line, followed by
a bottom flatline, then a rapid return to the waveform.
www.spacelabshealthcare.com
8-3
Page 86

XPREZZON
O
PERATIONS MANUAL
AND QUBE
Selecting Recording Duration
Waveform Data
In the absence of an alarm condition, the origin of a print request determines the
length of the waveform recording (ECG, ART, RESP, etc.). Recordings begin with a
few seconds of data right before the print request, followed by real-time data.
Recordings requested from the monitor are either 12 or 20 seconds in Duration
(seconds). To configure, refer to Printer on page 12-9 or the XPREZZON™ and qube™
System Administration Manual.
Selecting Recording Destination
The Recording Destination menu lets you direct:
• Alarm recordings to a bedside printer, a network printer, or both.
• Other recordings to a bedside printer or a network printer, but not both.
Note:
Twelve-lead ECG reports always print at the ICS printers, if available, regardless
of the recording destination settings.
Refer to To set the print destination for alarm recordings on page 12-10 to setup
printer destinations.
R ECORDING/PRINTING
Alarm Recordings
Continuous Recordings
An alarm recording is a recording that initiates when an alarm condition occurs.
Depending on how your system is set up, an alarm recording can to print
automatically whenever a parameter enters an alarm condition. Alarm recordings
begin with several seconds of pre-alarm waveform data and continue for as long as
the alarm condition exists (or a minimum of 12 seconds).
When you touch the Printer icon from the main taskbar, the Continuous Record
button shows in the lower left corner of the monitor screen and waveform
parameter keys flash for up to two seconds. You must make your selection within
this two-second time period. After you make a selection, the parameter keys flash
for an additional two seconds, which lets you make an additional selection, up to
four total.
Note:
You can print waveform data for parameters that show in a waveform.
To make a recording of selected patient parameters
1 From the main taskbar, touch the Printer icon once. All
parameter keys flash for two seconds.
2 Touch up to four flashing parameter keys.
The parameters you selected are sent to the printer.
8-4
www.spacelabshealthcare.com
Page 87

XPREZZON AND QUBE
PERATIONS MANUAL
O
R ECORDING/PRINTING
To make a recording of all currently shown patient parameters
1 From the main taskbar, touch the Printer icon twice.
The Recorder menu shows.
2 Touch Record All.
Eight seconds of the currently shown patient parameters are
sent to the printer.
To start a continuous recording
1 From the main taskbar, touch the Printer icon once.
The Continuous Record button shows in the lower left corner of
the display, and all parameter keys flash for two seconds.
2 Touch Continuous Record. Touch up to four flashing parameter
keys.
The parameters you selected are sent to the printer.
To stop a continuous recording
Group Recordings
1 From the main taskbar, touch the Printer icon once.
When a recording is already in progress, the Stop Continuous
Record button shows.
2 Touch Stop Continuous Record.
The recording stops.
To print Vital Signs
1 From the main taskbar, touch the Printer icon twice.
The Recorder menu shows.
2 Touch the Print Vital Signs button.
The report prints.
Refer to To setup Print Vital Signs on page 12-11.
The monitor can be pre-configured to print two sets of recordings, A and B, that
consist of specific beds and patient parameters. These preselected recordings are
always eight seconds in duration. The printer does not combine the parameters of
different patients onto the same printout. Instead, it prints all of the requested
parameters for one patient before printing the parameters for the next patient.
To print a preconfigured recording set
www.spacelabshealthcare.com
1 From the main taskbar, touch the Printer icon twice.
The Recorder menu shows.
2 Touch either Record Preselected A or Record Preselected B.
The preselected set of parameters is sent to the printer
8-5
Page 88

XPREZZON
O
PERATIONS MANUAL
AND QUBE
Printer Controls
Buttons Description
STOP RECORDING Touch this button to stop a recording that is in progress. The button is not available if
Continuous Touch this button to change a fixed length recording into a continuous recording. This
R ECORDING/PRINTING
If a printer is installed, the Printer Controls button shows in the lower left section of
the main window.
Touch the Printer Controls button to show the additional printing functions which
include Stop Recording, Continuous, Paper Advance, COMPRESSED - On/Off, and
PRINTER - On/Off. To close the Printer Controls window, touch the X in the upper
right corner of the window.
Note:
If the recorder is offline, the printer is out of paper, or there is a recorder error,
the Printer Controls key changes color to cyan.
Table 8-1 PRINTER CONTROLS buttons
the PRINTER is Off or no recording is printing.
button is available if the PRINTER is On, a recording is printing, and the current
recording is set to fixed length waveform recording.
Paper Advance Touch this button to move the paper an inch. This button is not available while the
printer is moving the paper.
COMPRESSED Selecting On sets the printer speed to 6.25 mm per second. Selecting Off sets the
printing speed at the original speed for the recorder.
This button is not available during the following:
• a recording is not in progress
• a bitmap or arrhythmia recording is in progress
• the printer is set to Off.
PRINTER Select either On or Off to use the printer. To use the printer, select On.
Note:
The Monitor Setup, Printer tab needs to be set for Local printer. Refer to
Printer on page 12-9 for details.
8-6
www.spacelabshealthcare.com
Page 89

XPREZZON AND QUBE
O
PERATIONS MANUAL
Trends
Trends provide clinicians with a tool to quickly assess the patient’s
current clinical status. Different trend views can be created to match a
specific clinical scenario or patient type.
Trends show numeric data collected for a patient over a 96-hour
period. Data is available until the data is purged or the monitor is powered off.
The monitor collects trend values every minute and collects episodic trend values as
they become available. The monitor maintains settings for trend displays (timebase,
parameters, window size, etc.) until you change them or until you view a new
patient's trend.
Trends can show in two formats:
• Tabular: Shows measurements in a tabular format, similar to a spreadsheet.
• Graphical: Shows measurements as points on a grid, connected by line
segments.
Notes:
• Trend data for ECG and RESP is not collected while ECG processing is
suspended.
• Trend data for SpO2 is not collected while SpO2 processing is suspended.
• Trend data for CO2 is not collected while CO2 sampling is suspended.
• Trend data for CO2, O2, N2O and anesthetic agents is not collected while
multigas sampling is suspended.
• The Trends window does not time out. To close the Trends window, touch
the X in the right upper corner of the window, or touch the Home icon.
Trends View
www.spacelabshealthcare.com
Views can have up to one tabular display and up to four graphical displays.
9-1
Page 90
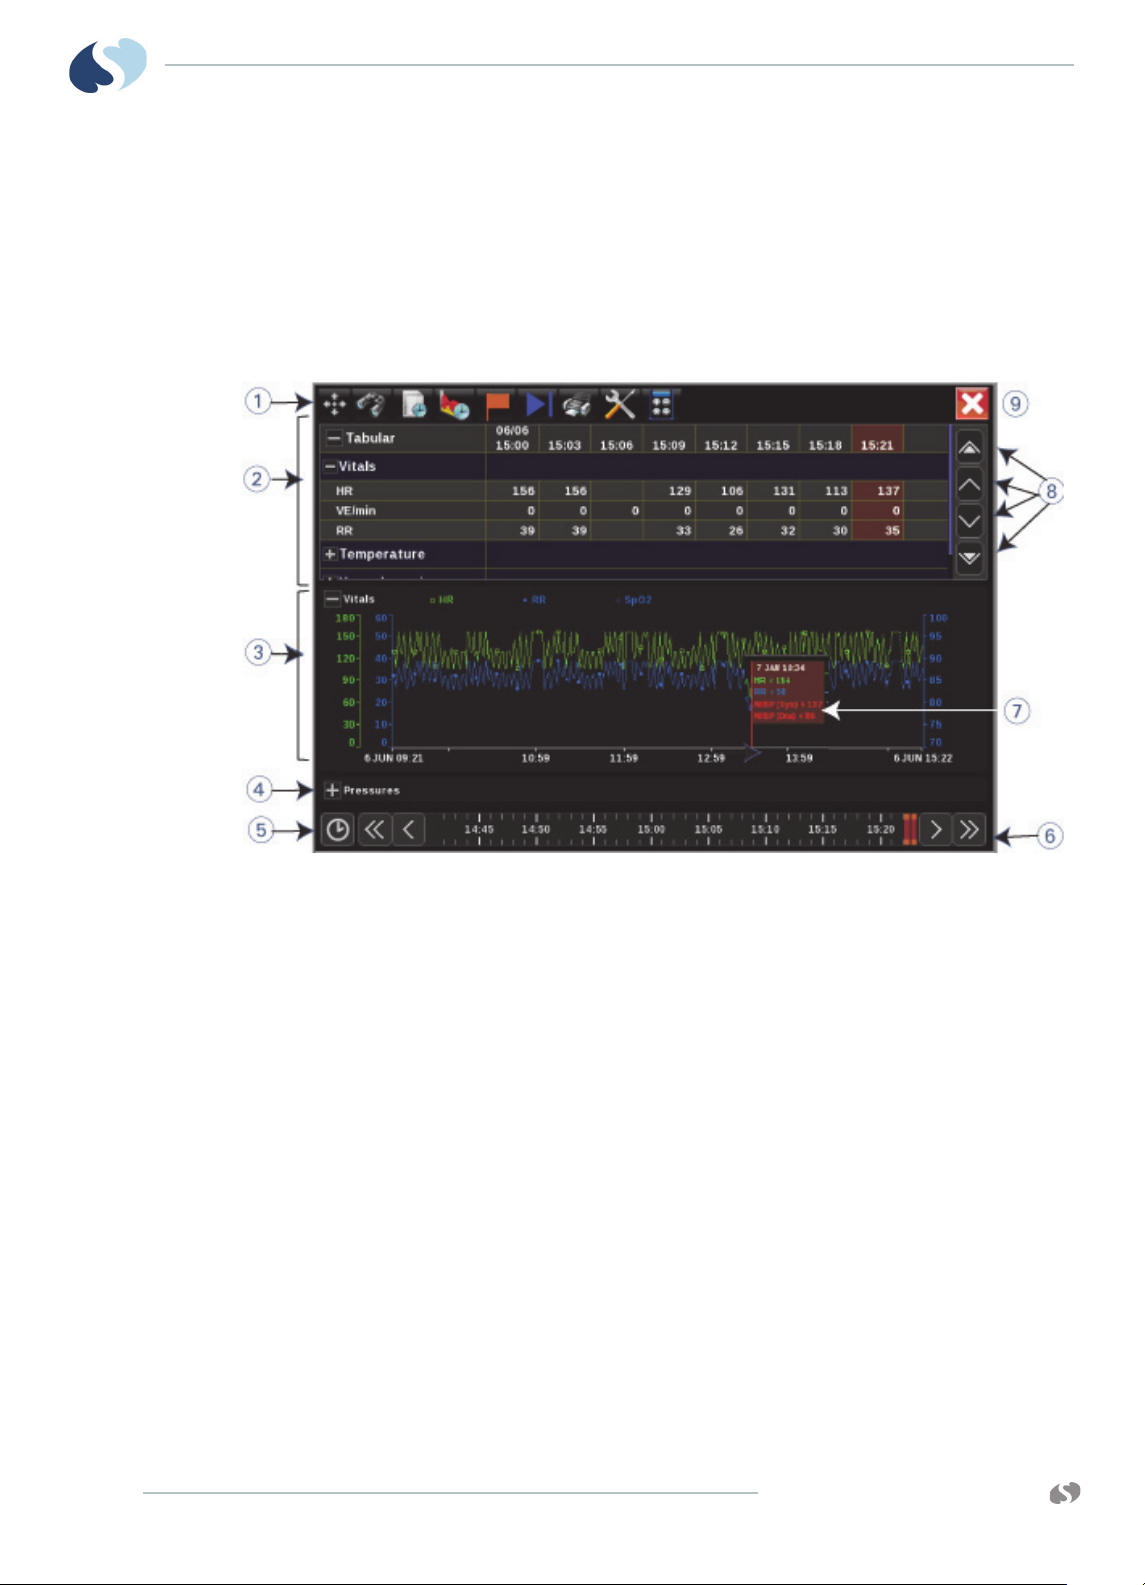
XPREZZON
O
PERATIONS MANUAL
AND QUBE
TRENDS
Measurement data can be grouped into categories. For example, a category named
Vitals might consist of the measurements HR, RR, and NIBP (Systolic/Diastolic/
Mean).
Touching either the far left or right of any graph places the cursor at that time in the
graph and shifts the graph to show more data between the cursor and the edge of
the graph. Repeated touches continue to scroll the graph in the selected direction.
A typical Trends view is shown below:
Figure 9-1 Trends window
1 Trends toolbar (refer to Trends toolbar on page 9-3).
2 Tabular trend—Measurement names show in the left-most column of
the table. The time that each measurement value was collected shows
in the top row of the table. Refer to
To set the interval for tabular
trends in the current view on page 9-5.
3 Graphical trend—Measurements and their units of measure, if
necessary, are listed along with the color used to display them. The xaxis shows a timeline, and the y-axis shows numeric values. Related
measurements can share a y-axis (for example, SYS, DIA, and MEAN
pressures). Refer to To set the duration for graphical trends in the
current view on page 9-5.
4 The trends can be expanded with the plus signs (+) and collapsed with
the minus signs (-).
5 Time Selector—Shows a window which lets users select the time range
represented by the graph. The duration is based on the currently
selected graph duration. The user can select a time range anywhere
within the last ninety-six (96) hours.
9-2
www.spacelabshealthcare.com
Page 91
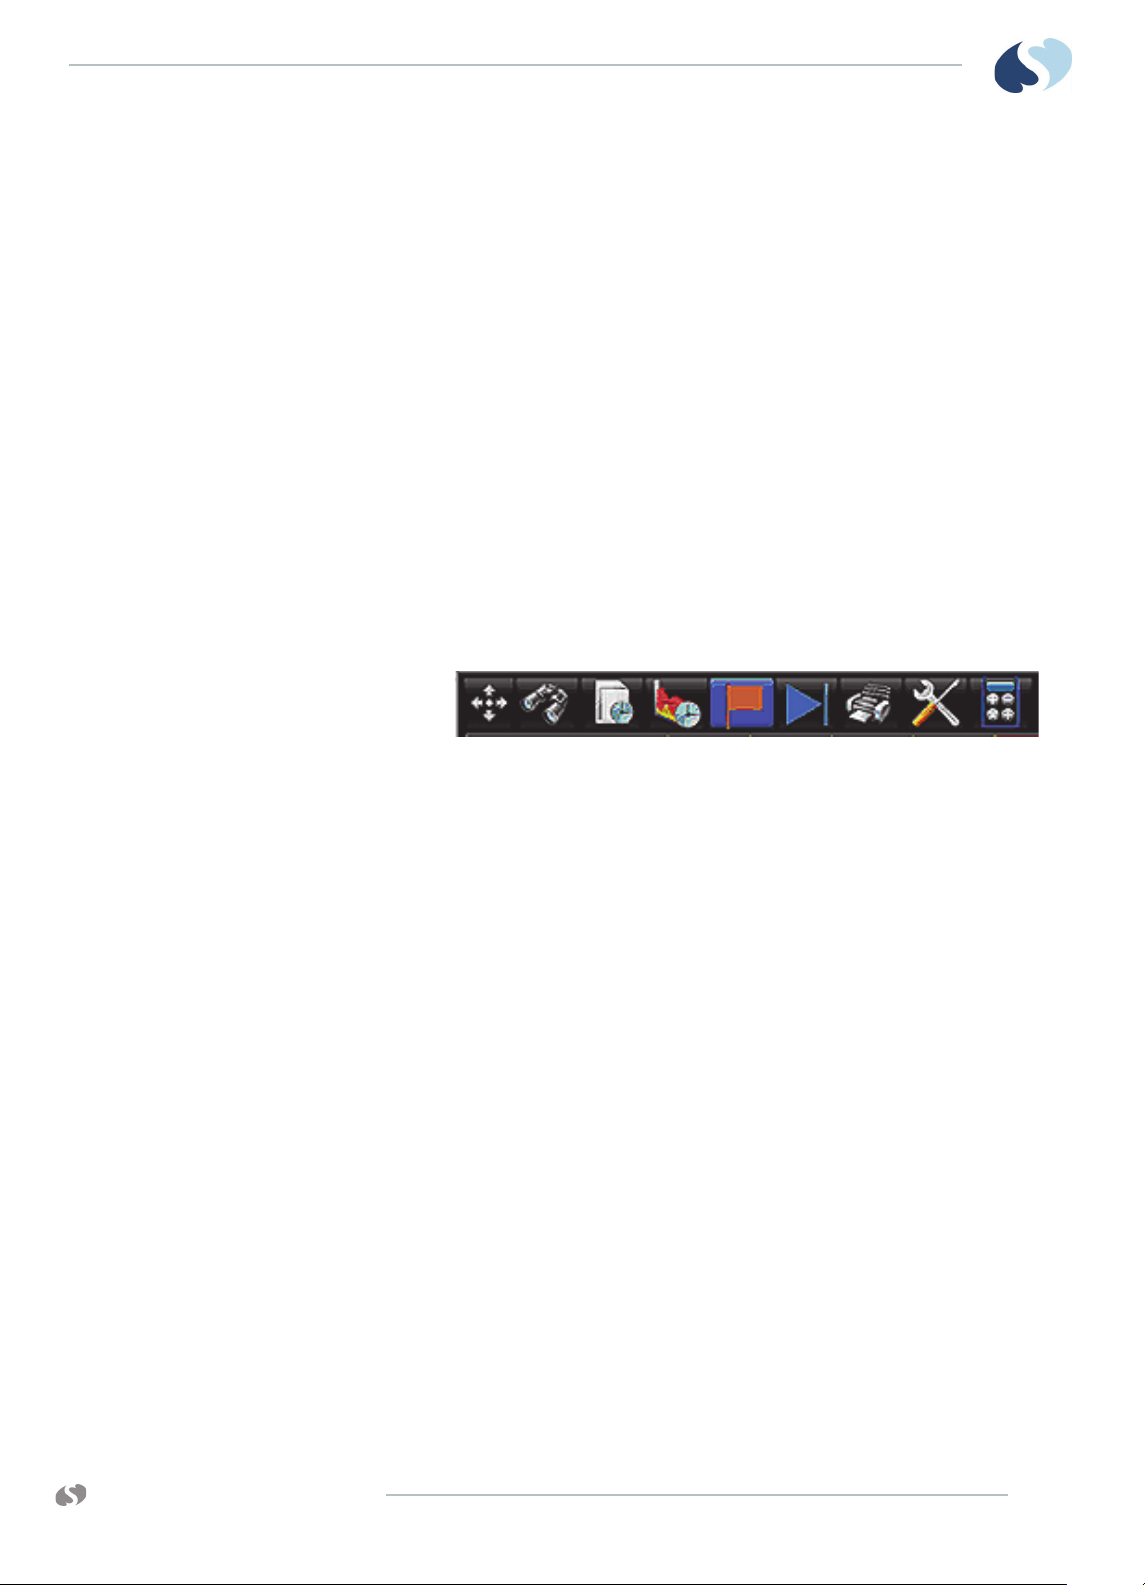
XPREZZON AND QUBE
134567892
PERATIONS MANUAL
O
Trends toolbar
TRENDS
6 Timeline—Used to access all of the data available for the current
patient. The time of the displayed data shows by the location of the
orange bar on the timeline. Use the inner arrow buttons to move the
display a few minutes forward or backward. Use the outer arrow
buttons to move the display page forward and backward.
7 Flag cursor—Shows data values at a specific point in time. To enable
and use the Flag cursor, refer
To show, move, or remove the Flag
cursor on page 9-5.
8 Scrolling buttons for the tabular trend section of the Trends window.
Use the inner two arrows to move a row up or down in the section. Use
the outer arrow buttons to move to the top or bottom of the tabular
section.
9 Close button.
A toolbar with of nine icons shows across the top of the Trends window. You use
these icons to navigate the Trends window and to configure how measurements are
shown.
Figure 9-2 Trends toolbar
The Trends toolbar consists of the following icons and their functions, from left to
right:
1 Size: Changes the size of the Trends window.
2 View: Shows a list of the trend views that are currently available.
3 Interval: Shows a list of interval selections. Applies to tabular format
only.
4 Duration: Shows a list of duration selections. Applies to graphical
format only.
5 Cursor: Changes the Flag cursor from on to off and back. The Flag
cursor, when enabled, automatically shows when a user touches the
graph. It shows the measurement data for the selected point in time.
6 Auto-Refresh: Touch to enable or disable auto refresh for trends data. If
enabled, data updates automatically every minute.
7 Print: Prints the currently shows trends.
8 Setup: Shows the Trends Setup window, which you can use to change
the data within a view.
9 Calcs: Accesses the Calculations window or the drug calculator. Refer to
Calculations on page 10-1 for more information.
www.spacelabshealthcare.com
9-3
Page 92

XPREZZON
O
PERATIONS MANUAL
AND QUBE
View Controls
TRENDS
To open the Trends window
1 From the main taskbar, touch Trends.
The Trends window shows.
To resize the Trends window
1 From the Trends toolbar, touch Size.
2 Drag your finger across the screen in the direction you want the window’s
border to change. For example, to make the window smaller drag your finger
from the window’s right border toward the left.
The border changes as you drag it.
A view is a display of measurement data presented in tabular and/or graphical
formats. Graphical trends always use the maximum available height to show data
and will resize based on the parameters you are viewing.
The Tabular Trends view will fit as many rows as possible on the screen. Use the up
and down arrows on the right side of the Tabular display, to move up or down
through the table by rows and categories. Refer to Figure 9-1 on page 9-2, item 8 in
the legend.
When you select a view, you can also change these settings to customize the display
of the current data:
• Duration: Length of time in a single view for graphical data.
• Interval: Time interval between columns in the tabular display.
To select a view to be shown
1 From the Trends toolbar, touch View.
A drop-down list of available views shows.
2 Touch a view from the list.
9-4
www.spacelabshealthcare.com
Page 93

XPREZZON AND QUBE
PERATIONS MANUAL
O
TRENDS
To set the interval for tabular trends in the current view
1 From the Trends toolbar, touch Interval.
A drop-down list of available intervals shows.
2 Touch one of the following options: 1 minute, 3 minutes, 5 minutes,
10 minutes, 15 minutes, 30 minutes, or 1 hour.
To set the duration for graphical trends in the current view
1 From the Trends toolbar, touch Duration.
A drop-down list of available durations shows.
2 Touch one of the following options: 1 hour, 2 hours, 6 hours, 12 hours, or
hours.
24
To expand and collapse tabular categories and measurement lists
• To expand all categories, click the plus sign next to the tabular label.
• To collapse all categories, click the minus sign next to the tabular label.
• To expand the measurement list within a category, click the plus sign next to
the category label.
• To collapse the measurement list within a category, click the minus sign next
to the category label.
To show, move, or remove the Flag cursor
• To show the flag cursor, touch anywhere on the graph. A flag shows with the
values associated with the graph at that point in time.
• To move the flag cursor, touch another location on the graph. To move the
flag by one minute, click the left half of the flag to move to the previous
minute, or the right half of the flag to move to the next minute.
• To remove the flag cursor, touch the Flag icon.
www.spacelabshealthcare.com
9-5
Page 94

XPREZZON
O
PERATIONS MANUAL
AND QUBE
Trends Setup
Trends Setup Window
TRENDS
Several options are available for customizing trends displays.
• Customize a set of preloaded views.
• Customize the tabular or graphical displays by adding, deleting, or changing the
measurements that are shown.
• Rename a graphical display.
• Change the color in which a measurement shows on a graphical display, along
with the scale and reference lines for a graph.
• Define whether the tabular or graphical displays are expanded when initially
shown.
Use the Trends Setup window to adjust settings for views, and the tabular and
graphical trends contained in views. The left side of the Trends Setup window
contains the list of views. The tabs contain the controls for the setup of tabular and
graphical trends within the currently selected view.
9-6
Figure 9-3 Trends Setup Window
1 List of views.
2 Tabs that correspond to the tabular trend and/or graphical trends for
the selected view.
3 Add icon adds a parameter.
4 Delete icon deletes a parameter.
5 Up arrow icon: moves the selected parameter to a higher position on
the list.
www.spacelabshealthcare.com
Page 95
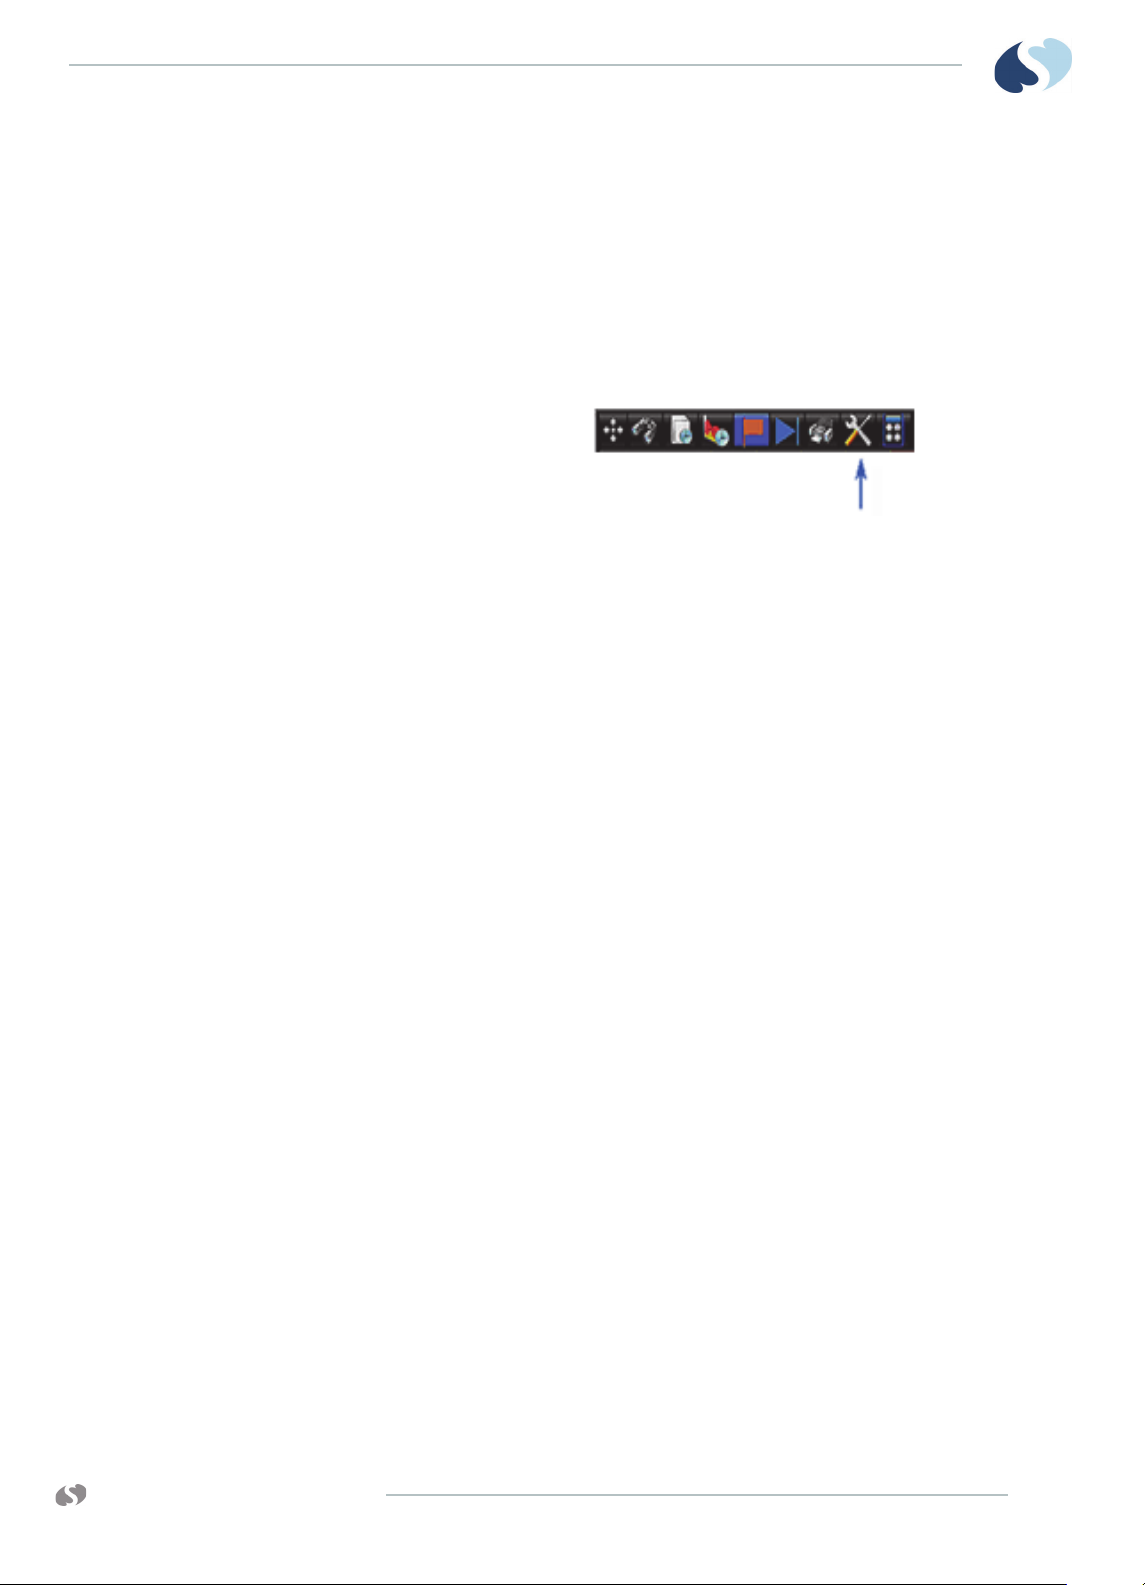
XPREZZON AND QUBE
PERATIONS MANUAL
O
TRENDS
6 Down arrow icon moves the selected parameter to a lower position on
the list.
7 Add Category icon lets you organize parameters into groups known as
categories.
8 Rename Category icon lets you change a category name.
To open the Trends Setup window
1 From the Trends toolbar, touch Setup.
The Trends Setup window shows.
www.spacelabshealthcare.com
9-7
Page 96

XPREZZON
O
PERATIONS MANUAL
AND QUBE
Tabular Trends Setup
TRENDS
You use the Tabular tab of the Trends Setup window:
• Add, delete, and rename categories for the tabular display.
• Add measurements to, or delete them from, categories.
• Move measurements and categories up or down in the list.
Note:
Adjusting the setup in the Trends menu is temporary: it is just for the current
patient. When the patient is discharged, the changes in the Setup menu are not
retained.
To add a category
1 From the Trends Setup window, touch the Tabular tab.
2 Touch Add Category on the lower-right side of the window.
The Add New Category dialog box shows.
3 Use the onscreen keyboard to enter a label and description for
the new category.
4 Touch Enter.
To rename a category
1 From the Trends Setup window, touch the Tabular tab.
2 Touch the category you want to rename in the listing under the Tabular tab.
3 Touch Rename Category on the lower-right side of the window.
4 Use the onscreen keyboard to enter a new name for the category.
5 Touch Enter.
To move a measurement or a category within the tabular list
1 From the Trends Setup window, touch the Tabular tab.
2 Touch the measurement or category that you want to move.
3 Touch the up or down arrow to move the selected item up or down in the list.
To delete a category or measurement
1 From the Trends Setup window, touch the Tabular tab.
2 Touch the category or measurement you want to delete in the listing under
the Tabular tab.
3 Touch Delete on the right side of the window.
9-8
www.spacelabshealthcare.com
Page 97

XPREZZON AND QUBE
PERATIONS MANUAL
O
Graphical Trends Setup
TRENDS
To add measurements to a category
1 From the Trends Setup window, touch the Tabular tab.
2 Expand the Vitals list by touching the plus sign.
The Measurement Selection list is displayed that shows a list of available
measurements.
3 Touch the category that you want to add measurements to.
If you want to select a different category, use the drop-down list at the top
of the window.
4 Touch Add on the upper-right side of the window.
5 Touch the Show Only Available check box if you want to restrict
the list to measurements that are available for the current
patient.
6 Touch the box in the Selected column for each measurement you want to add
to the category. To select all measurements in a category, select the check
box in the top category row.
7 After you have selected all measurements you want to add, touch OK.
With the graphical tabs of the Trends Setup window, you can:
• Define graphs.
• Add measurements to, or delete them from, the graph.
• Rename a graph.
• Change the color and scales for a measurement of a graph.
• Add reference lines for a measurement on a graph.
www.spacelabshealthcare.com
Figure 9-4 Graphical tabs in the Trends Setup window
9-9
Page 98

XPREZZON
O
PERATIONS MANUAL
AND QUBE
TRENDS
Note:
Adjusting the setup in the Trends menu is temporary: it is just for the current
patient. When the patient is discharged, the changes in the Setup menu are not
retained.
To rename a graph
1 From the Trends Setup window, touch the tab for the graph that you want to
adjust properties for.
2 Touch Rename on the right side of the window.
3 Use the onscreen keyboard to enter a new name for the graph.
4 Touch Enter.
To add measurements to a graph
1 From the Trends Setup window, touch the tab for the graph that you want to
adjust the properties for.
2 Touch Add on the upper-right side of the window.
The Measurement Selection dialog box shows.
3 Touch the Show Only Available check box if you want to restrict
the list to measurements that are available for the current
patient.
4 Touch the box in the Selected column for the measurements you want to add
to the category. To select all measurements in a category, select the check
box in the top category row.
5 After you have selected all measurements you want to add, touch OK.
Only four measurements are allowed on each graph.
To delete measurements from a graph
1 From the Trends Setup window, touch the tab for the graph that you want to
adjust properties for.
2 From the measurements list, touch the measurement that you want to
delete.
3 Touch Delete on the upper-right side of the window.
To change the color used to show a measurement
1 From the Trends Setup window, touch the tab for the graph that you want to
adjust properties for.
2 From the measurement list, touch the measurement that you want to change
the color for.
3 Under Color, in the lower portion of the graph setup tab, touch the panel that
shows the current color for the measurement.
A panel of six colors—magenta, blue, green, yellow, red, and white—shows.
4 Touch the color you want to use for the measurement.
9-10
www.spacelabshealthcare.com
Page 99

XPREZZON AND QUBE
PERATIONS MANUAL
O
TRENDS
To set the scale for a measurement
1 From the Trends Setup window, touch the tab for the graph that you want to
adjust the properties for.
2 From the measurement list, touch the measurement that you want to set the
scale for.
3 In the Scales box, touch the Min or Max text entry boxes.
A keypad shows where you enter the scale value.
To add reference lines for a measurement
1 From the Trends Setup window, touch the tab for the graph that you want to
adjust the properties for.
2 From the measurement list, touch the measurement that you want to add
reference lines to.
3 In the Reference Lines box, touch the Min or Max check boxes to enable the
minimum and maximum reference lines for the measurement.
4 In the Reference Lines box, touch the Min or Max text entry boxes to set the
position of the reference lines for the measurement.
A keypad shows where you enter the value of the Min or Max.
www.spacelabshealthcare.com
9-11
Page 100

XPREZZON
O
PERATIONS MANUAL
AND QUBE
TRENDS
9-12
www.spacelabshealthcare.com
 Loading...