

Page 1

Universal Clinical Workstation
®
(UCW ) and
®
Ultraview 1700 Monitors
90385, 90387
Service Manual
070-0470-02 Rev. E
Page 2

© 2004 Spacelabs Medical, Inc.
All rights reserved. Contents of this publication may not be reproduced in any form without the written permission of Spacelabs
Medical. Products of Spacelabs Medical are covered by U.S. and foreign patents and/or pending patents. Printed in U.S.A.
Specifications and price change privileges are reserved.
Spacelabs Medical considers itself responsible for the effects on safety, reliability and performance of the equipment only if:
• assembly operations, re-adjustments, modifications or repairs are carried out by persons authorized by Spacelabs
Medical, and
• the electrical installation of the relevant room complies with the requirements of the standard in force, and
• the equipment is used in accordance with the operations manual.
Spacelabs Medical will make available, on request, such circuit diagrams, component part lists, descriptions, calibration instructions
or other information which will assist appropriately qualified technical personnel to repair those parts of the equipment which are
classified by Spacelabs Medical as field repairable.
Spacelabs Medical is committed to providing comprehensive customer support beginning with your initial inquiry through purchase,
training, and service for the life of your Spacelabs Medical equipment.
CORPORATE OFFICES
U.S.A.
Spacelabs Medical, Inc.
5150 220th Ave SE
Issaquah, WA 98029
Telephone: 425-657-7200
Telephone: 800-522-7025
Fax: 425-657-7212
Authorized EC Representative
UNITED KINGDOM
Spacelabs Medical Ltd.
Basepoint Business Centre
Metcalf Way, Crawley
West Sussex RH11 7XX
Telephone: 44 (0) 845 6017224
Fax: 44 (0) 845 6017225
BirthNet, Data Shuttle, Flexport, Intesys Clinical Suite, Maternal Obstetrical Monitor, MOM, Mermaid, Multiview, PCIS, PCMS,
PrintMaster, Quicknet, Sensorwatch, TRU-CAP, TRU-CUFF, TRU-LINK, UCW, Ultralite, Ultraview, Ultraview Clinical Messenger,
Ultraview SL, Uni-Pouch, Universal Flexport, Varitrend and WinDNA are trademarks of Spacelabs Medical, Inc.
Other brands and product names are trademarks of their respective owners.
CAUTION:
US Federal law restricts the devices documented herein to sale by, or on the order
Rx
Only
of, a physician.
Page 3

Table of Contents
Chapter Page
Introduction
Overview . . . . . . . . . . . . . . . . . . . . . . . . . . . . . . . . . . . . . . . . . . . . . . . . . . . . . . . . . . . . . . . .1-1
Accessories . . . . . . . . . . . . . . . . . . . . . . . . . . . . . . . . . . . . . . . . . . . . . . . . . . . . . . . . . . . . . .1-4
Monitor Options . . . . . . . . . . . . . . . . . . . . . . . . . . . . . . . . . . . . . . . . . . . . . . . . . . . . . . .1-4
Equipment Illustrations — Rear. . . . . . . . . . . . . . . . . . . . . . . . . . . . . . . . . . . . . . . . . . . . . . .1-6
UCW (90385) . . . . . . . . . . . . . . . . . . . . . . . . . . . . . . . . . . . . . . . . . . . . . . . . . . . . . . . . . 1-6
Ultraview 1700 (90387) . . . . . . . . . . . . . . . . . . . . . . . . . . . . . . . . . . . . . . . . . . . . . . . . . 1-7
Setup
Specifications . . . . . . . . . . . . . . . . . . . . . . . . . . . . . . . . . . . . . . . . . . . . . . . . . . . . . . . . . . . .2-1
90385 . . . . . . . . . . . . . . . . . . . . . . . . . . . . . . . . . . . . . . . . . . . . . . . . . . . . . . . . . . . . . .2-1
90387 . . . . . . . . . . . . . . . . . . . . . . . . . . . . . . . . . . . . . . . . . . . . . . . . . . . . . . . . . . . . . .2-2
Inspection . . . . . . . . . . . . . . . . . . . . . . . . . . . . . . . . . . . . . . . . . . . . . . . . . . . . . . . . . . . . . . . 2-2
Pre-Installation Testing . . . . . . . . . . . . . . . . . . . . . . . . . . . . . . . . . . . . . . . . . . . . . . . . . . . . .2-3
Mounting . . . . . . . . . . . . . . . . . . . . . . . . . . . . . . . . . . . . . . . . . . . . . . . . . . . . . . . . . . . . . . . .2-3
Base Tension Adjustment (90385). . . . . . . . . . . . . . . . . . . . . . . . . . . . . . . . . . . . . . . . . 2-3
Wall Mounting . . . . . . . . . . . . . . . . . . . . . . . . . . . . . . . . . . . . . . . . . . . . . . . . . . . . . . . .2-4
Pedestal Mounting (90385) . . . . . . . . . . . . . . . . . . . . . . . . . . . . . . . . . . . . . . . . . . . . . . 2-5
Console Mounting (90387) . . . . . . . . . . . . . . . . . . . . . . . . . . . . . . . . . . . . . . . . . . . . . . .2-6
Installation . . . . . . . . . . . . . . . . . . . . . . . . . . . . . . . . . . . . . . . . . . . . . . . . . . . . . . . . . . . . . . .2-8
Cables (90385). . . . . . . . . . . . . . . . . . . . . . . . . . . . . . . . . . . . . . . . . . . . . . . . . . . . . . . .2-8
Cables (90387). . . . . . . . . . . . . . . . . . . . . . . . . . . . . . . . . . . . . . . . . . . . . . . . . . . . . . . .2-9
Ethernet LAN Cables . . . . . . . . . . . . . . . . . . . . . . . . . . . . . . . . . . . . . . . . . . . . . . . . . .2-11
SDLC Bus Connections . . . . . . . . . . . . . . . . . . . . . . . . . . . . . . . . . . . . . . . . . . . . . . . .2-12
Maximum Cable Lengths . . . . . . . . . . . . . . . . . . . . . . . . . . . . . . . . . . . . . . . . . . . . . . . 2-12
Network Configuration. . . . . . . . . . . . . . . . . . . . . . . . . . . . . . . . . . . . . . . . . . . . . . . . . . . . . 2-13
Ethernet LAN Installation . . . . . . . . . . . . . . . . . . . . . . . . . . . . . . . . . . . . . . . . . . . . . . . 2-14
System Configuration . . . . . . . . . . . . . . . . . . . . . . . . . . . . . . . . . . . . . . . . . . . . . . . . . . . . .2-14
Keyboard Menu . . . . . . . . . . . . . . . . . . . . . . . . . . . . . . . . . . . . . . . . . . . . . . . . . . . . . .2-19
Biomed Setup Menu . . . . . . . . . . . . . . . . . . . . . . . . . . . . . . . . . . . . . . . . . . . . . . . . . . . . . .2-20
Network Setup Menu . . . . . . . . . . . . . . . . . . . . . . . . . . . . . . . . . . . . . . . . . . . . . . . . . .2-20
Preselected Recordings Menu . . . . . . . . . . . . . . . . . . . . . . . . . . . . . . . . . . . . . . . . . . .2-22
Recorder Setup Menu . . . . . . . . . . . . . . . . . . . . . . . . . . . . . . . . . . . . . . . . . . . . . . . . .2-23
Serial Ports Menu. . . . . . . . . . . . . . . . . . . . . . . . . . . . . . . . . . . . . . . . . . . . . . . . . . . . . 2-24
Alarm Setup Menu . . . . . . . . . . . . . . . . . . . . . . . . . . . . . . . . . . . . . . . . . . . . . . . . . . . .2-25
User Access Menu . . . . . . . . . . . . . . . . . . . . . . . . . . . . . . . . . . . . . . . . . . . . . . . . . . . .2-27
UNITS OF MEASURE MENU Key. . . . . . . . . . . . . . . . . . . . . . . . . . . . . . . . . . . . . . . .2-27
Tone Configuration Menu. . . . . . . . . . . . . . . . . . . . . . . . . . . . . . . . . . . . . . . . . . . . . . .2-27
Service Functions Menu. . . . . . . . . . . . . . . . . . . . . . . . . . . . . . . . . . . . . . . . . . . . . . . .2-28
Theory
UCW (90385) . . . . . . . . . . . . . . . . . . . . . . . . . . . . . . . . . . . . . . . . . . . . . . . . . . . . . . . . . . . . 3-1
Monitor Power Supply . . . . . . . . . . . . . . . . . . . . . . . . . . . . . . . . . . . . . . . . . . . . . . . . . .3-2
CRT Display . . . . . . . . . . . . . . . . . . . . . . . . . . . . . . . . . . . . . . . . . . . . . . . . . . . . . . . . . . 3-2
Touchscreen Assembly . . . . . . . . . . . . . . . . . . . . . . . . . . . . . . . . . . . . . . . . . . . . . . . . . 3-2
Ultraview 1700 (90387) . . . . . . . . . . . . . . . . . . . . . . . . . . . . . . . . . . . . . . . . . . . . . . . . . . . . .3-3
Monitor Power Supply . . . . . . . . . . . . . . . . . . . . . . . . . . . . . . . . . . . . . . . . . . . . . . . . . .3-4
Display . . . . . . . . . . . . . . . . . . . . . . . . . . . . . . . . . . . . . . . . . . . . . . . . . . . . . . . . . . . . . . 3-4
Touchscreen Assembly . . . . . . . . . . . . . . . . . . . . . . . . . . . . . . . . . . . . . . . . . . . . . . . . . 3-4
i
Page 4

UCW and Ultraview 1700 Monitors
CPU PCBA . . . . . . . . . . . . . . . . . . . . . . . . . . . . . . . . . . . . . . . . . . . . . . . . . . . . . . . . . . . . . . 3-5
Main CPU . . . . . . . . . . . . . . . . . . . . . . . . . . . . . . . . . . . . . . . . . . . . . . . . . . . . . . . . . . . 3-6
Memory . . . . . . . . . . . . . . . . . . . . . . . . . . . . . . . . . . . . . . . . . . . . . . . . . . . . . . . . . . . . . 3-6
MPC860-PCI Bridge . . . . . . . . . . . . . . . . . . . . . . . . . . . . . . . . . . . . . . . . . . . . . . . . . . . 3-6
Video . . . . . . . . . . . . . . . . . . . . . . . . . . . . . . . . . . . . . . . . . . . . . . . . . . . . . . . . . . . . . . . 3-7
Ethernet. . . . . . . . . . . . . . . . . . . . . . . . . . . . . . . . . . . . . . . . . . . . . . . . . . . . . . . . . . . . . 3-7
ISA Bridge . . . . . . . . . . . . . . . . . . . . . . . . . . . . . . . . . . . . . . . . . . . . . . . . . . . . . . . . . . . 3-7
Audio . . . . . . . . . . . . . . . . . . . . . . . . . . . . . . . . . . . . . . . . . . . . . . . . . . . . . . . . . . . . . . . 3-7
Non-Volatile RAM/Real-Time Clock . . . . . . . . . . . . . . . . . . . . . . . . . . . . . . . . . . . . . . . 3-7
Keyboard/Mouse Interface . . . . . . . . . . . . . . . . . . . . . . . . . . . . . . . . . . . . . . . . . . . . . . 3-8
EPP Port . . . . . . . . . . . . . . . . . . . . . . . . . . . . . . . . . . . . . . . . . . . . . . . . . . . . . . . . . . . . 3-8
ISA I/O Buffers . . . . . . . . . . . . . . . . . . . . . . . . . . . . . . . . . . . . . . . . . . . . . . . . . . . . . . . 3-8
SDLC Interface . . . . . . . . . . . . . . . . . . . . . . . . . . . . . . . . . . . . . . . . . . . . . . . . . . . . . . . 3-8
Nurse Alarm Output. . . . . . . . . . . . . . . . . . . . . . . . . . . . . . . . . . . . . . . . . . . . . . . . . . . . 3-8
Clock Distribution . . . . . . . . . . . . . . . . . . . . . . . . . . . . . . . . . . . . . . . . . . . . . . . . . . . . . 3-8
Hardware Reset . . . . . . . . . . . . . . . . . . . . . . . . . . . . . . . . . . . . . . . . . . . . . . . . . . . . . . 3-9
Software Reset . . . . . . . . . . . . . . . . . . . . . . . . . . . . . . . . . . . . . . . . . . . . . . . . . . . . . . . 3-9
Power Failure Operation . . . . . . . . . . . . . . . . . . . . . . . . . . . . . . . . . . . . . . . . . . . . . . . 3-10
Hard Reset Configuration Word . . . . . . . . . . . . . . . . . . . . . . . . . . . . . . . . . . . . . . . . . 3-10
Interrupts . . . . . . . . . . . . . . . . . . . . . . . . . . . . . . . . . . . . . . . . . . . . . . . . . . . . . . . . . . . 3-10
Regulator for -5 Volts . . . . . . . . . . . . . . . . . . . . . . . . . . . . . . . . . . . . . . . . . . . . . . . . . 3-11
Regulator for -3.3 Volts . . . . . . . . . . . . . . . . . . . . . . . . . . . . . . . . . . . . . . . . . . . . . . . . 3-11
Power Supply Connector. . . . . . . . . . . . . . . . . . . . . . . . . . . . . . . . . . . . . . . . . . . . . . . 3-11
EMI Reduction. . . . . . . . . . . . . . . . . . . . . . . . . . . . . . . . . . . . . . . . . . . . . . . . . . . . . . . 3-12
Boot Sequence Overview . . . . . . . . . . . . . . . . . . . . . . . . . . . . . . . . . . . . . . . . . . . . . . 3-12
Normal Operation Overview . . . . . . . . . . . . . . . . . . . . . . . . . . . . . . . . . . . . . . . . . . . . 3-12
CPU External Connectors . . . . . . . . . . . . . . . . . . . . . . . . . . . . . . . . . . . . . . . . . . . . . . 3-14
I/O PCBA . . . . . . . . . . . . . . . . . . . . . . . . . . . . . . . . . . . . . . . . . . . . . . . . . . . . . . . . . . . . . . 3-15
IR Touchscreen Connector (90385 Only) . . . . . . . . . . . . . . . . . . . . . . . . . . . . . . . . . . 3-15
Video RGB Connector (90385 Only) . . . . . . . . . . . . . . . . . . . . . . . . . . . . . . . . . . . . . . 3-16
I/O External Connectors . . . . . . . . . . . . . . . . . . . . . . . . . . . . . . . . . . . . . . . . . . . . . . . 3-17
Interconnect PCBA . . . . . . . . . . . . . . . . . . . . . . . . . . . . . . . . . . . . . . . . . . . . . . . . . . . . . . . 3-18
Maintenance
Overview. . . . . . . . . . . . . . . . . . . . . . . . . . . . . . . . . . . . . . . . . . . . . . . . . . . . . . . . . . . . . . . . 4-1
Cleaning/Disinfecting . . . . . . . . . . . . . . . . . . . . . . . . . . . . . . . . . . . . . . . . . . . . . . . . . . . . . . 4-1
Filter and Fan (90385 Only) . . . . . . . . . . . . . . . . . . . . . . . . . . . . . . . . . . . . . . . . . . . . . 4-2
Touchscreen (90385 Only) . . . . . . . . . . . . . . . . . . . . . . . . . . . . . . . . . . . . . . . . . . . . . . 4-2
Preventive Maintenance (PM) Procedures. . . . . . . . . . . . . . . . . . . . . . . . . . . . . . . . . . . . . . 4-3
Test Equipment Required . . . . . . . . . . . . . . . . . . . . . . . . . . . . . . . . . . . . . . . . . . . . . . . 4-3
Mechanical Safety Check . . . . . . . . . . . . . . . . . . . . . . . . . . . . . . . . . . . . . . . . . . . . . . . 4-3
Electrical Safety Testing . . . . . . . . . . . . . . . . . . . . . . . . . . . . . . . . . . . . . . . . . . . . . . . . . . . . 4-3
Definitions. . . . . . . . . . . . . . . . . . . . . . . . . . . . . . . . . . . . . . . . . . . . . . . . . . . . . . . . . . . . . . . 4-3
Ground Resistance . . . . . . . . . . . . . . . . . . . . . . . . . . . . . . . . . . . . . . . . . . . . . . . . . . . . 4-4
Chassis Leakage Current Tests . . . . . . . . . . . . . . . . . . . . . . . . . . . . . . . . . . . . . . . . . . 4-5
Patient Lead Leakage Current Tests (Patient Modules) . . . . . . . . . . . . . . . . . . . . . . . . 4-5
Monitor Functional Tests . . . . . . . . . . . . . . . . . . . . . . . . . . . . . . . . . . . . . . . . . . . . . . . . 4-5
Error Log . . . . . . . . . . . . . . . . . . . . . . . . . . . . . . . . . . . . . . . . . . . . . . . . . . . . . . . . . . . . 4-7
Display Adjustments (90385) . . . . . . . . . . . . . . . . . . . . . . . . . . . . . . . . . . . . . . . . . . . . 4-7
Display Adjustments (90387) . . . . . . . . . . . . . . . . . . . . . . . . . . . . . . . . . . . . . . . . . . . 4-10
Disassembly Procedures (90385) . . . . . . . . . . . . . . . . . . . . . . . . . . . . . . . . . . . . . . . . . . . 4-11
Tools Required . . . . . . . . . . . . . . . . . . . . . . . . . . . . . . . . . . . . . . . . . . . . . . . . . . . . . . 4-11
Top Cover Removal . . . . . . . . . . . . . . . . . . . . . . . . . . . . . . . . . . . . . . . . . . . . . . . . . . 4-11
PCBA Drawer Removal/Replacement. . . . . . . . . . . . . . . . . . . . . . . . . . . . . . . . . . . . . 4-14
NVRAM Replacement . . . . . . . . . . . . . . . . . . . . . . . . . . . . . . . . . . . . . . . . . . . . . . . . . 4-15
CPU PCBA Replacement . . . . . . . . . . . . . . . . . . . . . . . . . . . . . . . . . . . . . . . . . . . . . . 4-15
ii
Page 5

Table of Contents
Interconnect PCBA Replacement . . . . . . . . . . . . . . . . . . . . . . . . . . . . . . . . . . . . . . . . 4-16
I/O PCBA Removal/Replacement . . . . . . . . . . . . . . . . . . . . . . . . . . . . . . . . . . . . . . . .4-17
Touchscreen Removal/Reassembly . . . . . . . . . . . . . . . . . . . . . . . . . . . . . . . . . . . . . . 4-18
Exhaust Fan Replacement. . . . . . . . . . . . . . . . . . . . . . . . . . . . . . . . . . . . . . . . . . . . . . 4-19
AC Switch Replacement (90385) . . . . . . . . . . . . . . . . . . . . . . . . . . . . . . . . . . . . . . . . . 4-20
Disassembly Procedures (90387) . . . . . . . . . . . . . . . . . . . . . . . . . . . . . . . . . . . . . . . . . . . .4-21
Tools Required. . . . . . . . . . . . . . . . . . . . . . . . . . . . . . . . . . . . . . . . . . . . . . . . . . . . . . . 4-21
Backup Battery Replacement . . . . . . . . . . . . . . . . . . . . . . . . . . . . . . . . . . . . . . . . . . .4-21
Divider Removal. . . . . . . . . . . . . . . . . . . . . . . . . . . . . . . . . . . . . . . . . . . . . . . . . . . . . . 4-21
Enclosure Removal . . . . . . . . . . . . . . . . . . . . . . . . . . . . . . . . . . . . . . . . . . . . . . . . . . .4-22
Bezel Removal . . . . . . . . . . . . . . . . . . . . . . . . . . . . . . . . . . . . . . . . . . . . . . . . . . . . . . .4-22
Rear Panel Removal . . . . . . . . . . . . . . . . . . . . . . . . . . . . . . . . . . . . . . . . . . . . . . . . . .4-22
Backplane PCBA Removal . . . . . . . . . . . . . . . . . . . . . . . . . . . . . . . . . . . . . . . . . . . . .4-22
PCBA Drawer Removal/Replacement . . . . . . . . . . . . . . . . . . . . . . . . . . . . . . . . . . . . .4-23
NVRAM Replacement . . . . . . . . . . . . . . . . . . . . . . . . . . . . . . . . . . . . . . . . . . . . . . . . . 4-24
CPU PCBA Replacement. . . . . . . . . . . . . . . . . . . . . . . . . . . . . . . . . . . . . . . . . . . . . . .4-24
Interconnect PCBA Replacement . . . . . . . . . . . . . . . . . . . . . . . . . . . . . . . . . . . . . . . . 4-25
I/O PCBA Removal/Replacement . . . . . . . . . . . . . . . . . . . . . . . . . . . . . . . . . . . . . . . .4-26
Power Interconnect PCBA Removal . . . . . . . . . . . . . . . . . . . . . . . . . . . . . . . . . . . . . .4-26
Troubleshooting
Overview . . . . . . . . . . . . . . . . . . . . . . . . . . . . . . . . . . . . . . . . . . . . . . . . . . . . . . . . . . . . . . . .5-1
Suggested Tools and Parts . . . . . . . . . . . . . . . . . . . . . . . . . . . . . . . . . . . . . . . . . . . . . . . . . . 5-1
Symptoms . . . . . . . . . . . . . . . . . . . . . . . . . . . . . . . . . . . . . . . . . . . . . . . . . . . . . . . . . . . . . . . 5-2
Monitor Has No Display . . . . . . . . . . . . . . . . . . . . . . . . . . . . . . . . . . . . . . . . . . . . . . . . .5-2
Monitor Operates but Fails System Functions . . . . . . . . . . . . . . . . . . . . . . . . . . . . . . . . 5-3
Monitor Diagnostics. . . . . . . . . . . . . . . . . . . . . . . . . . . . . . . . . . . . . . . . . . . . . . . . . . . . . . . . 5-4
Power-ON Diagnostics. . . . . . . . . . . . . . . . . . . . . . . . . . . . . . . . . . . . . . . . . . . . . . . . . . 5-4
Extended Diagnostics . . . . . . . . . . . . . . . . . . . . . . . . . . . . . . . . . . . . . . . . . . . . . . . . . . 5-5
Diagnostic LED . . . . . . . . . . . . . . . . . . . . . . . . . . . . . . . . . . . . . . . . . . . . . . . . . . . . . . .5-5
Monitor Fails Power-ON Diagnostics . . . . . . . . . . . . . . . . . . . . . . . . . . . . . . . . . . . . . . .5-5
System Startup . . . . . . . . . . . . . . . . . . . . . . . . . . . . . . . . . . . . . . . . . . . . . . . . . . . . . . . . . . . 5-9
Boot Menu . . . . . . . . . . . . . . . . . . . . . . . . . . . . . . . . . . . . . . . . . . . . . . . . . . . . . . . . . . . . . . 5-10
Diagnostic Menus . . . . . . . . . . . . . . . . . . . . . . . . . . . . . . . . . . . . . . . . . . . . . . . . . . . . . . . .5-12
Parts
Field-Replaceable Parts . . . . . . . . . . . . . . . . . . . . . . . . . . . . . . . . . . . . . . . . . . . . . . . . . . . . 6-1
9-pin and 26-pin SDLC. . . . . . . . . . . . . . . . . . . . . . . . . . . . . . . . . . . . . . . . . . . . . . . . . .6-1
Miscellaneous Cables . . . . . . . . . . . . . . . . . . . . . . . . . . . . . . . . . . . . . . . . . . . . . . . . . .6-1
PCBAs . . . . . . . . . . . . . . . . . . . . . . . . . . . . . . . . . . . . . . . . . . . . . . . . . . . . . . . . . . . . . .6-2
Miscellaneous Parts . . . . . . . . . . . . . . . . . . . . . . . . . . . . . . . . . . . . . . . . . . . . . . . . . . . . 6-2
Ethernet 10BaseT . . . . . . . . . . . . . . . . . . . . . . . . . . . . . . . . . . . . . . . . . . . . . . . . . . . . . 6-4
Assembly Drawings. . . . . . . . . . . . . . . . . . . . . . . . . . . . . . . . . . . . . . . . . . . . . . . . . . . . . . . .6-4
Appendix A — Electromagnetic Compatibility
Electromagnetic Emissions . . . . . . . . . . . . . . . . . . . . . . . . . . . . . . . . . . . . . . . . . . . . . . . . . .A-1
Electromagnetic Immunity . . . . . . . . . . . . . . . . . . . . . . . . . . . . . . . . . . . . . . . . . . . . . . . . . . .A-2
Frequency Separation Distances . . . . . . . . . . . . . . . . . . . . . . . . . . . . . . . . . . . . . . . . . . . . .A-3
Interference . . . . . . . . . . . . . . . . . . . . . . . . . . . . . . . . . . . . . . . . . . . . . . . . . . . . . . . . . .A-4
Mitigation . . . . . . . . . . . . . . . . . . . . . . . . . . . . . . . . . . . . . . . . . . . . . . . . . . . . . . . . . . . .A-4
Appendix B — Symbols
iii
Page 6

Page 7

Introduction
Contents
Overview. . . . . . . . . . . . . . . . . . . . . . . . . . . . . . . . . . . . . . . . . . . . . . . . . . . . . . . . . . . . . . . . . . . . . . 1
Accessories . . . . . . . . . . . . . . . . . . . . . . . . . . . . . . . . . . . . . . . . . . . . . . . . . . . . . . . . . . . . . . . . . . . 4
Equipment Illustrations — Rear . . . . . . . . . . . . . . . . . . . . . . . . . . . . . . . . . . . . . . . . . . . . . . . . . . . . 6
Overview
Spacelabs Medical’s products are designed and manufactured under good manufacturing practices
and in compliance with all applicable regulatory requirements. To ensure proper operation in
accordance with these guidelines, this product must be maintained by trained technicians using
Spacelabs Medical authorized replacement parts.
This manual applies to the 90385 Universal Clinical Workstation (UCW®) and the 90387 Ultraview®
1700 monitors. The 90385 UCW monitor is a fully Ultraview-compatible bedside or central monitor. It
features a 15-inch color display and an infrared touchscreen.
The 90387 Ultraview 1700 monitor combines the module-mounting capability of the 90491 module
housing, with the processing and display capabilities of the 90385 UCW. The right side of the
chassis is used to house the CPU and I/O PCBAs, while the left side provides two slots for module
plug-in. The Ultraview 1700 is capable of driving an external speaker (either amplified or
unamplified) or may stand alone, using the internal speaker. The result is a product that provides the
same Ultraview Care Network
in a single, compact unit, with a separate display. The Ultraview 1700 is primarily intended to
function as a compact, two-module bedside or central monitor.
™
capabilities as the UCW, but adds plug-in support for two modules
!
• This service manual is intended for use with 90385 monitors, serial numbers
385-3xxx and higher, and 90387 monitors, serial numbers 387-1xxx and higher.
1-1
Page 8
UCW and Ultraview 1700 Monitors — Service Manual
Refer to Theory on page 3-1 of this manual for a detailed description of each monitor and its
components.
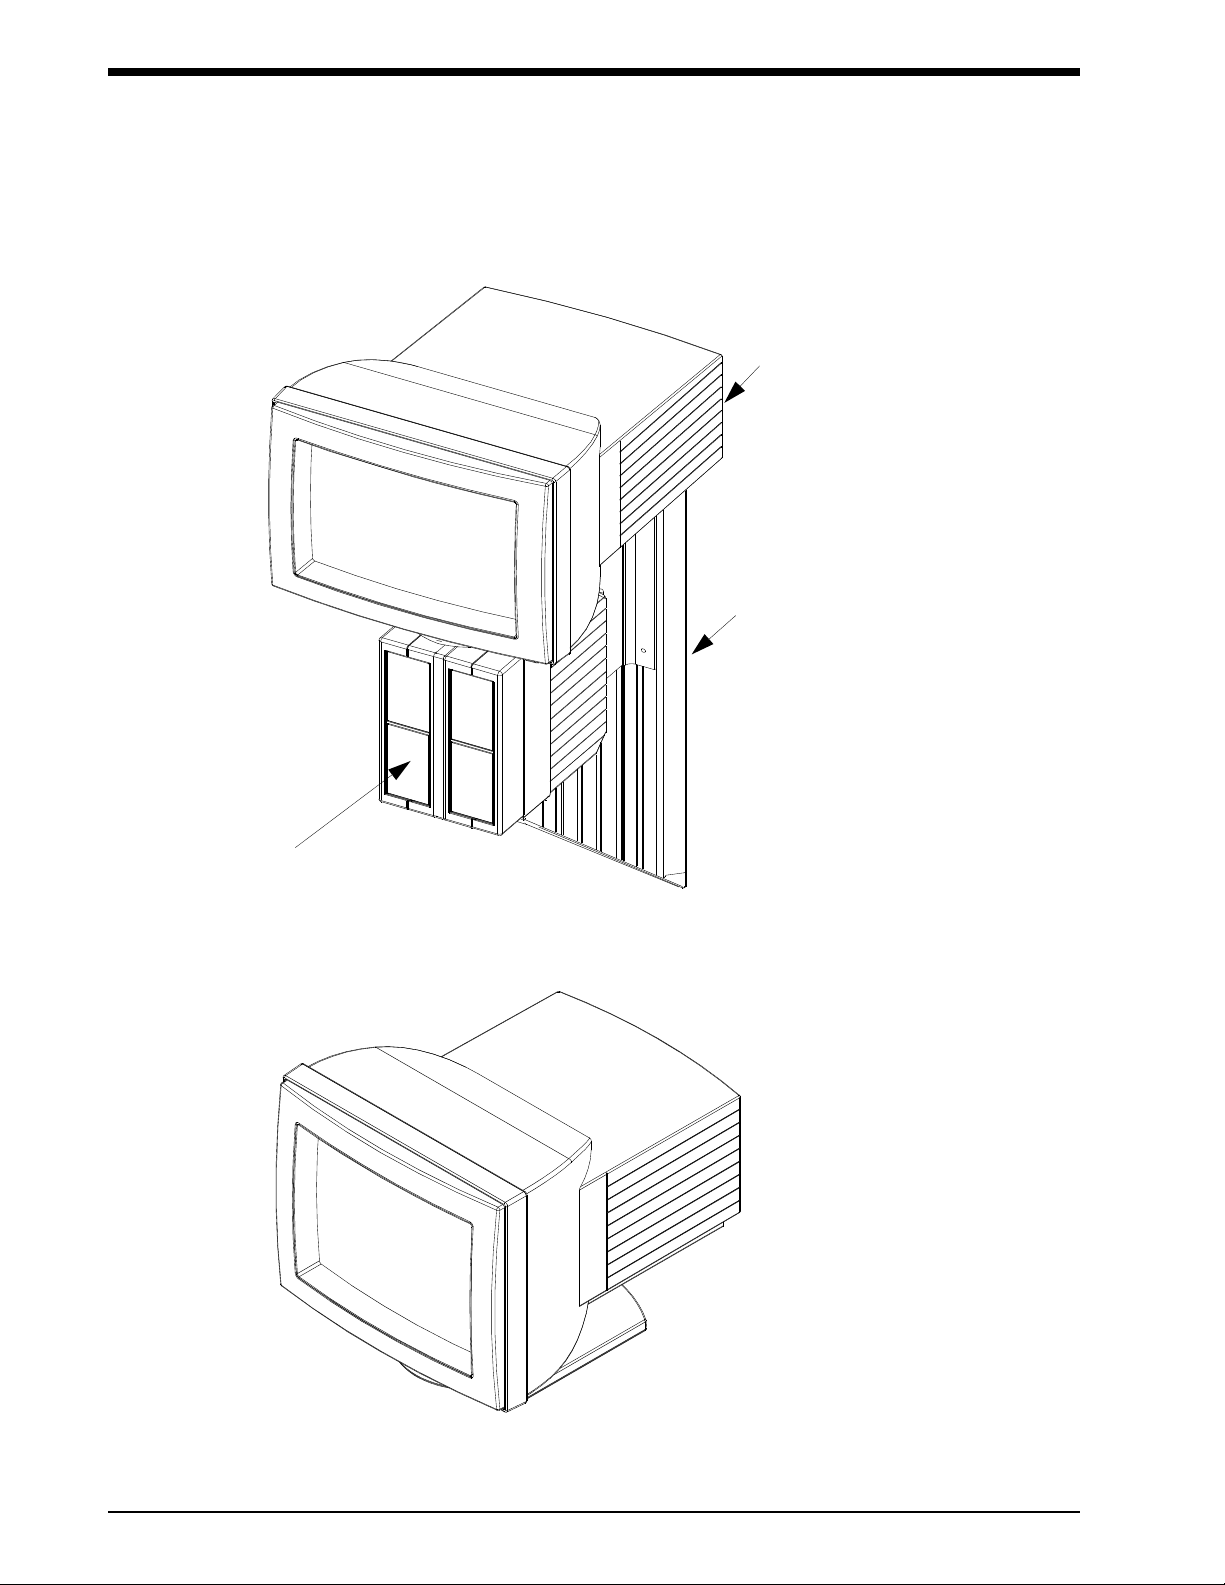
90385
wall track
90491
module housing
90385
Figure 1-1: UCW with wall mount
1-2
Figure 1-2: UCW with pedestal mount
Page 9

Introduction
Figure 1-3: Ultraview 1700 with external power supply
1-3
Page 10

UCW and Ultraview 1700 Monitors — Service Manual
Accessories
Monitor Options
Table 1: UCW and Ultraview 1700 Options
Option Definition
-A
-B
-F
-G
-H
-I
-J
-K
-L Sixteen Waveforms
-M Graphic and Tabular Trends
-N Vital Sign Calculations *†
-O Drug Dose Calculations *†
-P Interactive Network
-Q Data Shuttle
-R Patient Data Logger †
-S Dynamic Network Access (DNA) †
-T IR Remote Control *** **** †
-V Full View
-W Full Bed Review
-X 220–240 Volt Operation **
-01 English
-02 German
-03 French
-04 Italian
-05 Spanish
-06 Swedish
-07 Polish †
-09 Dutch
Central/Bedside *
Bedside
Four Waveforms
Five Waveforms
Six Waveforms
Seven Waveforms
Eight Waveforms
Twelve Waveform
1-4
* For central configurations (Option A): If Options N or O are selected, then option P must
be selected.
** Option X is only valid for the 90385 monitor.
*** 90360-01 and 90360-03 are required and must be purchased separately when used with
model 90387.
**** 90360-01 is required and must be purchased when used with model 90385.
† Option -07 is only valid for the 90387 monitor; options N, O, R, S, and T are not valid with this option.
Page 11

Introduction
Example:
A 90385-XFQ (where “X” represents the language designator) is an UCW equipped with:
• Q = Data Shuttle option
• F = Four waveform zones
Accessory devices supported by the UCW/1700 are as follows:
Modules — Supports all existing Ultraview modules except 90425, 90428, 90432, and 90410. Use
of modules in conjunction with the UCW requires a module housing(s) and DC power supply(s);
whereas, the Ultraview 1700 provides plug-in support for either two single-height modules or one
double-height module. Additional modules are supported by means of external module housings.
Flexport® system interfaces — Supports the use of all existing Spacelabs Medical Flexport
interfaces. Refer to Setup on page 2-1 for installation requirements.
Repeater Displays — Up to two repeater displays may be connected. The repeater displays serve
only to duplicate the information shown on the Ultraview monitor and does not accept user input.
Repeater displays may be located up to 100 feet from the Ultraview monitor.
Touchscreen — The Ultraview 1700 supports the ELO Touch brand touchscreens. The UCW uses
an integral infrared touchscreen.
Mouse — Supports the use of a PS/2-style mouse.
Keyboard — Supports the use of a PS/2-style keyboard.
Nurse Alert — Supports the use of a Spacelabs Medical nurse alert device. This device provides an
external indication that one of the parameters being monitored is in an alarm condition.
1-5
Page 12
UCW and Ultraview 1700 Monitors — Service Manual
Equipment Illustrations — Rear
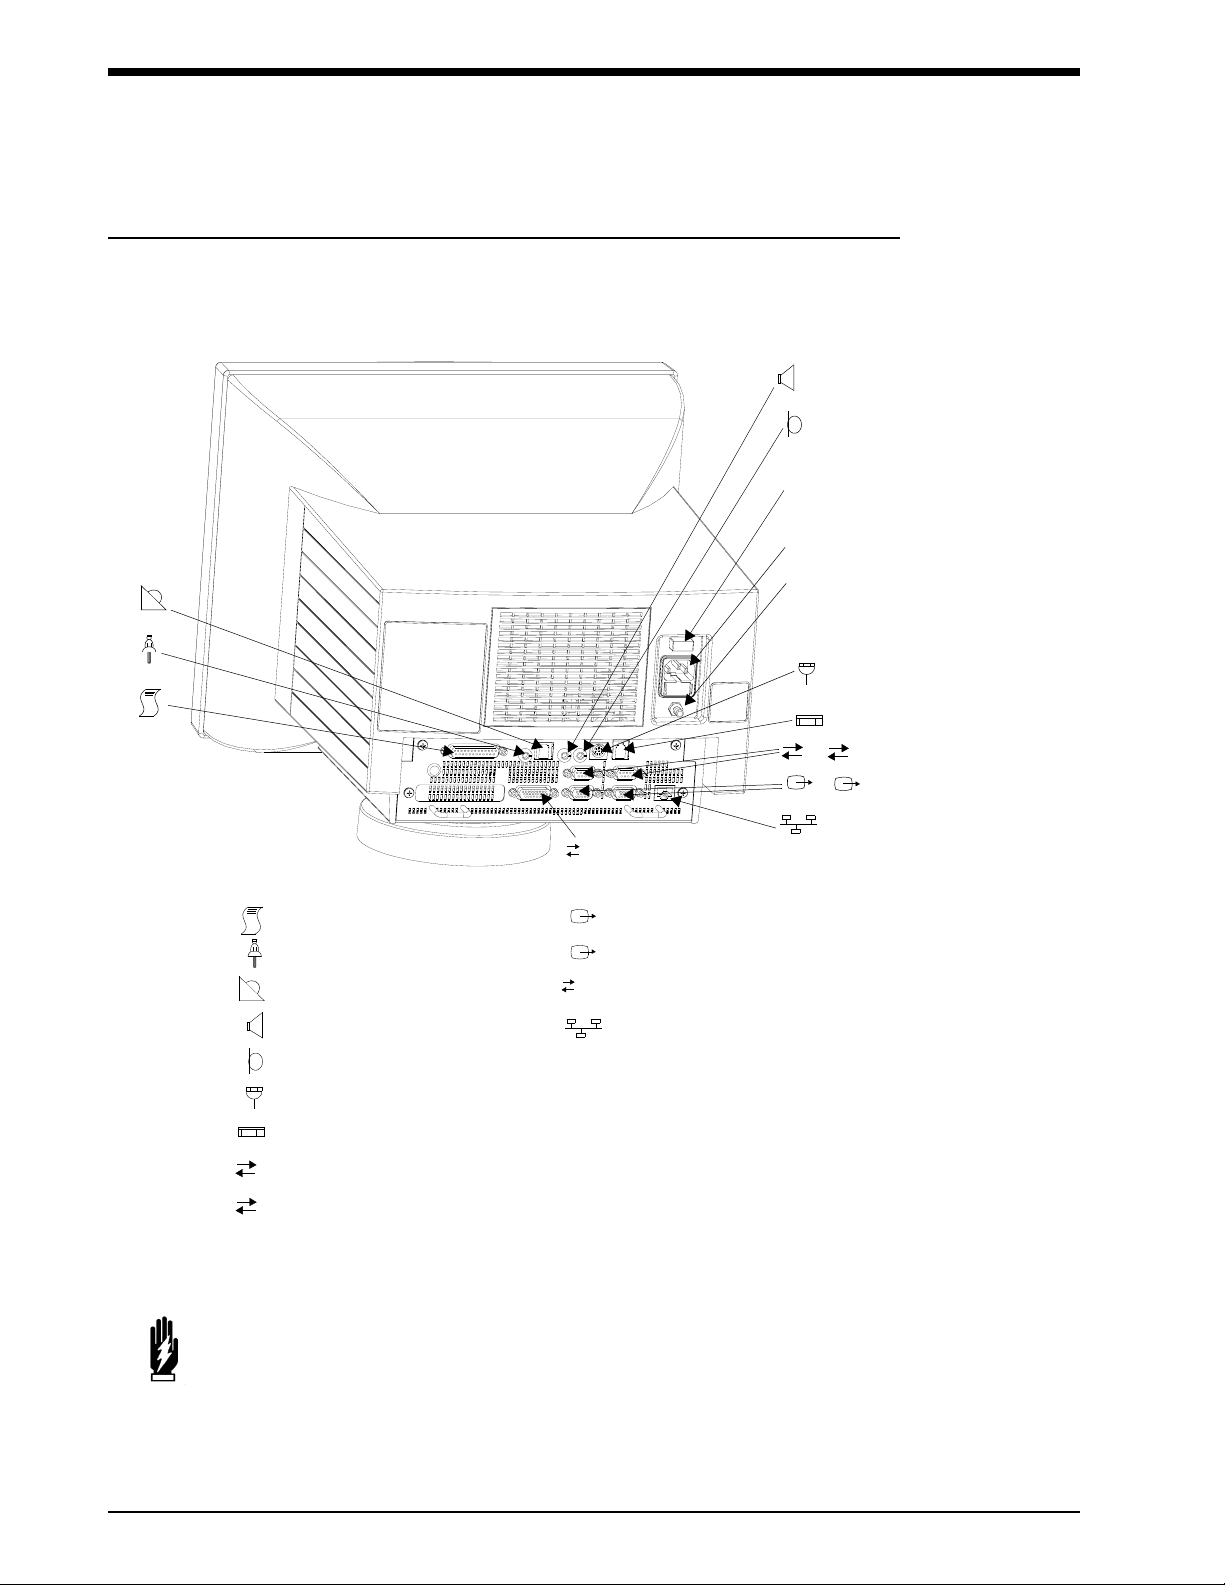
UCW (90385)
1
1
SDLC
unavailable
unavailable
nurse alert
speaker
unavailable
mouse port
keyboard
1
serial out 1
2
serial out 2
Figure 1-4: Rear view (90385)
WARNING:
• For safety, the power cord retainer hardware must always be used.
video out 1
video out 2
SDLC
SDLC
network connection
ON/OFF switch
power cord receptacle
ground lug
2
2
1-6
Page 13
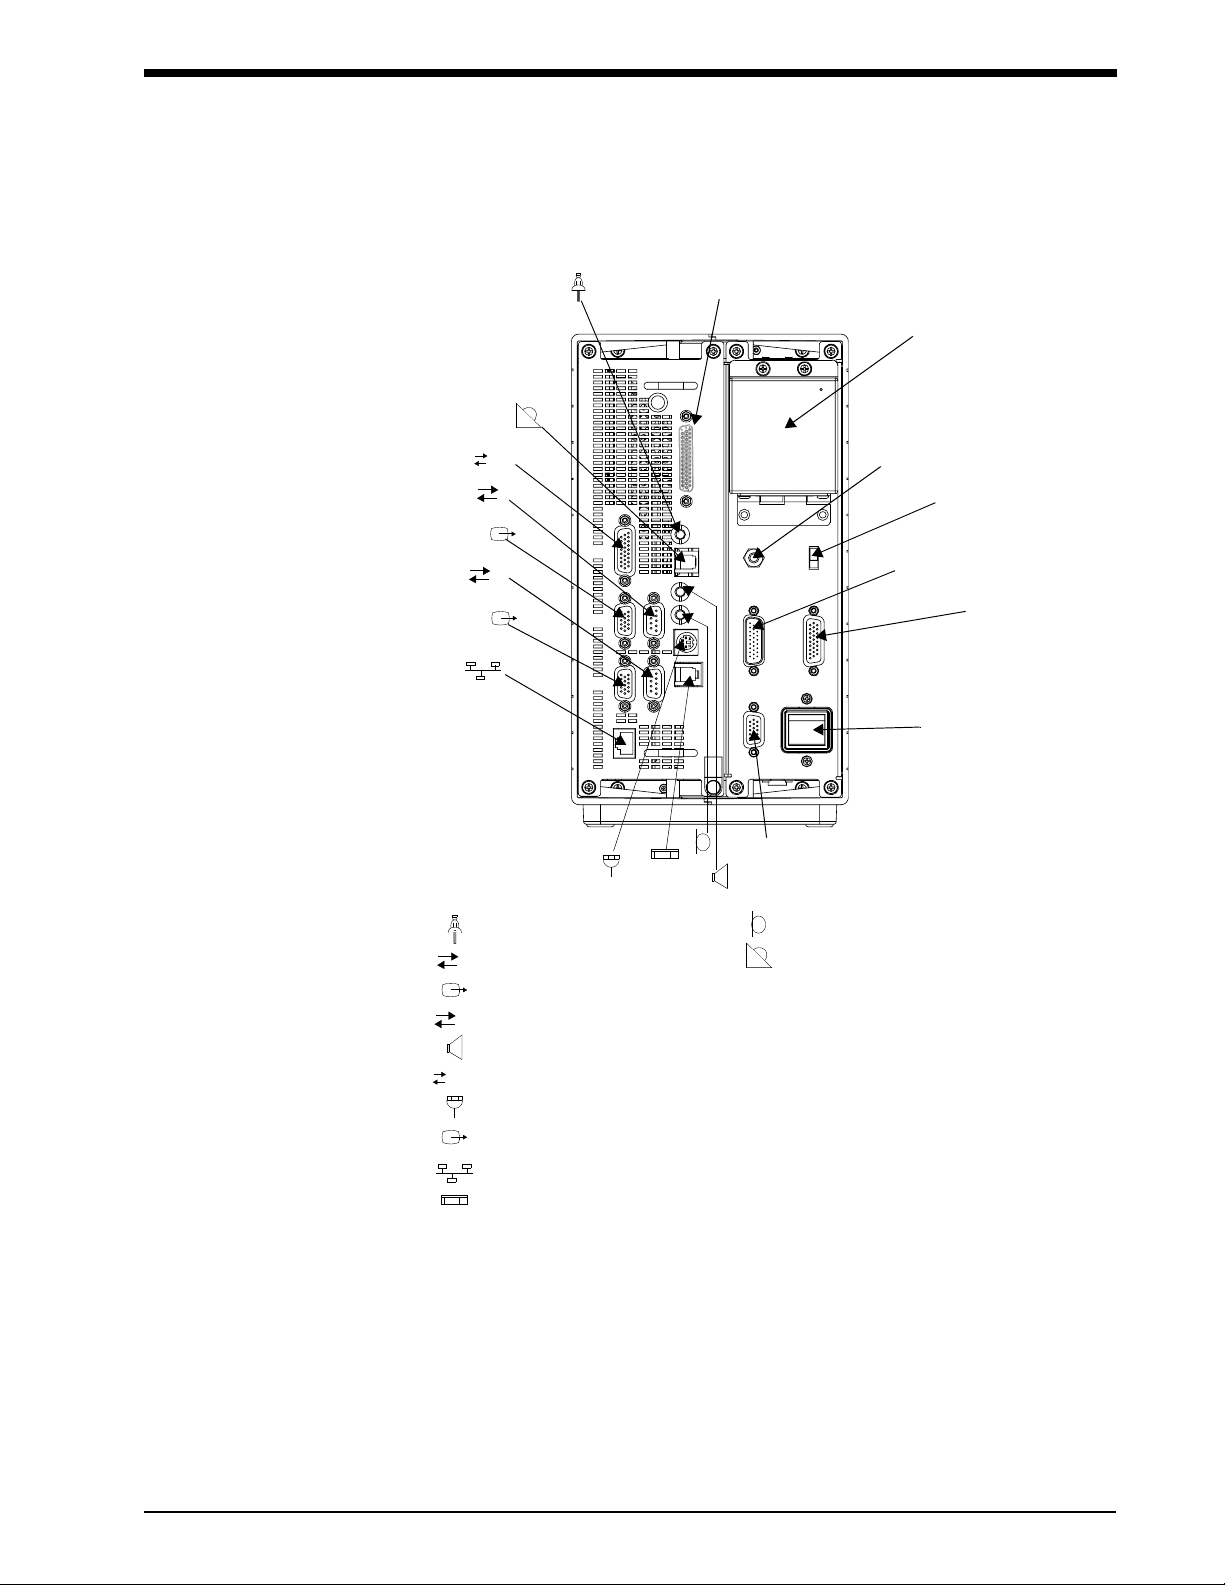
Ultraview 1700 (90387)
Introduction
SDLC
1
2
Unavailable
Serial port 1
1
Video port 1
2
Serial port 2 (Touchscreen)
Audio output
SDLC
SDLC/IO
Mouse
Video port 2
Ethernet (10BaseT)
External keyboard
Unavailable
Nurse alert
NiMH battery
Equipotential ground
SDLC terminator
SDLC/power input
SDLC/power output
Unit power switch
High level output
IRTS interface for 91416-B
Figure 1-5: Rear view (90387)
1-7
Page 14

Page 15

Setup
Contents
Specifications . . . . . . . . . . . . . . . . . . . . . . . . . . . . . . . . . . . . . . . . . . . . . . . . . . . . . . . . . . . . . . . . . . 1
Inspection . . . . . . . . . . . . . . . . . . . . . . . . . . . . . . . . . . . . . . . . . . . . . . . . . . . . . . . . . . . . . . . . . . . . . 2
Pre-Installation Testing. . . . . . . . . . . . . . . . . . . . . . . . . . . . . . . . . . . . . . . . . . . . . . . . . . . . . . . . . . . 3
Mounting. . . . . . . . . . . . . . . . . . . . . . . . . . . . . . . . . . . . . . . . . . . . . . . . . . . . . . . . . . . . . . . . . . . . . . 3
Installation . . . . . . . . . . . . . . . . . . . . . . . . . . . . . . . . . . . . . . . . . . . . . . . . . . . . . . . . . . . . . . . . . . . . 8
Network Configuration . . . . . . . . . . . . . . . . . . . . . . . . . . . . . . . . . . . . . . . . . . . . . . . . . . . . . . . . . . 13
System Configuration . . . . . . . . . . . . . . . . . . . . . . . . . . . . . . . . . . . . . . . . . . . . . . . . . . . . . . . . . . . 14
Biomed Setup Menu . . . . . . . . . . . . . . . . . . . . . . . . . . . . . . . . . . . . . . . . . . . . . . . . . . . . . . . . . . . . 20
Specifications
90385
Assembled weight of monitor: 36 lbs (16.4 kg)
Dimensions of monitor with pedestal at 0° tilt: 14 (H) × 14.5 (W) × 17.5 (D) in.
(35.6 × 36.8 × 44.5 cm)
Temperature (operating): +10° to 40° C (50° to 104° F)
Humidity (operating): 95% relative humidity, non-condensing
Total power dissipation: 180 watts; 615 BTU/hour
AC input voltage range: 100 to 120 V; 220 to 230 VAC
AC input current: 2.5 A @100 to120 VAC
3.15 A @ 220 to 230 VAC
AC input frequency range: 50 to 60 Hz
2-1
Page 16

UCW and Ultraview 1700 Monitors — Service Manual
90387
Assembled weight of monitor: 9.7 lbs (4.4 kg)
Assembled weight DC power supply: 1.8 lbs (0.8 kg)
Dimensions of monitor: 10.25 (H) × 6.0 (W) × 9.5 (D) in.
(26.0 × 15.2 × 24.1 cm)
Dimensions of DC power supply: 2.1 (H) × 4.0 (W) × 6.5 (D) in.
(5.3 × 10.2 × 16.5 cm)
AC input voltage range: 100 to 120 VAC, 200 to 230 VAC
AC input current: 1.5 A (maximum)
AC input frequency range: 50 to 60 Hz
Power supply output voltage: +18 VDC
Power supply output current: 4.25 A (maximum)
Temperature (operating): +10° to 40° C (50° to 104° F)
Humidity (operating): 95% relative humidity, non-condensing
Power dissipation: 100 watts, 342 BTU/hour
Inspection
Prior to installation of your patient monitor, conduct an equipment audit.
Upon receipt of the equipment, a detailed inventory must be taken to verify that the equipment
received matches your order. This inventory should include serial numbers, model numbers with
options, and cables. Carefully inspect these items for shipping damage. If damage is apparent,
notify the freight company and Spacelabs Medical immediately.
• When removing items from the shipping container, make sure you remove ALL
!
The monitors are typically shipped as follows:
UCW Monitor (90385) — Contains the monitor with installed I/O and CPU printed circuit board
assemblies (PCBAs), power cord, and AC cord retainer.
Ultraview 1700 Monitor (90387) — Contains the main assembly with installed I/O and CPU
printed circuit board assemblies (PCBAs), power cord, and AC cord retainer.
External Module Housing — The 90491 four-slot housing or the 90499 two-slot housing, DC
power supply, SDLC cables, and power cord.
Accessories — Contains the power cords and cable assemblies ordered.
Mounting Hardware — All ordered mounting hardware is supplied with appropriate instruction
sheets.
components from each container.
2-2
Page 17

Setup
Pre-Installation Testing
Before mounting the equipment, it is recommended that you first verify its operation as
follows:
1. Power ON the unit and let the power-on diagnostics run.
2. Look in the upper-left corner of the display for any diagnostic failures or other system errors.
The monitor will start up normally if no unacceptable diagnostic errors occur. Refer to
Troubleshooting on page 5-1 for more information on the diagnostics features if the monitor
does not start up normally.
3. Insert at least one parameter module for testing purposes.
4. Refer to Preventive Maintenance (PM) Procedures on page 4-3 and complete those
procedures.
Mounting
The monitor can be mounted in one of three ways:
Wall Mount — The unit is attached to an adjustable mounting arm that projects out from a wall
track. This mounting scheme is suitable for a bedside configuration.
Pedestal Mount — The unit is securely attached to a flat surface, such as a shelf or an
operating room cart.
Roll Stand — The unit can be easily rolled from one location to another.
The 90387 can also be operated unmounted in a free-standing, table-top configuration, or it can be
console-mounted.
For installation requirements of the module housing(s), refer to the Module Housings and Power
Supplies Service Manual (P/N 070-0680-xx, located on CD-ROM 084-0700-xx).
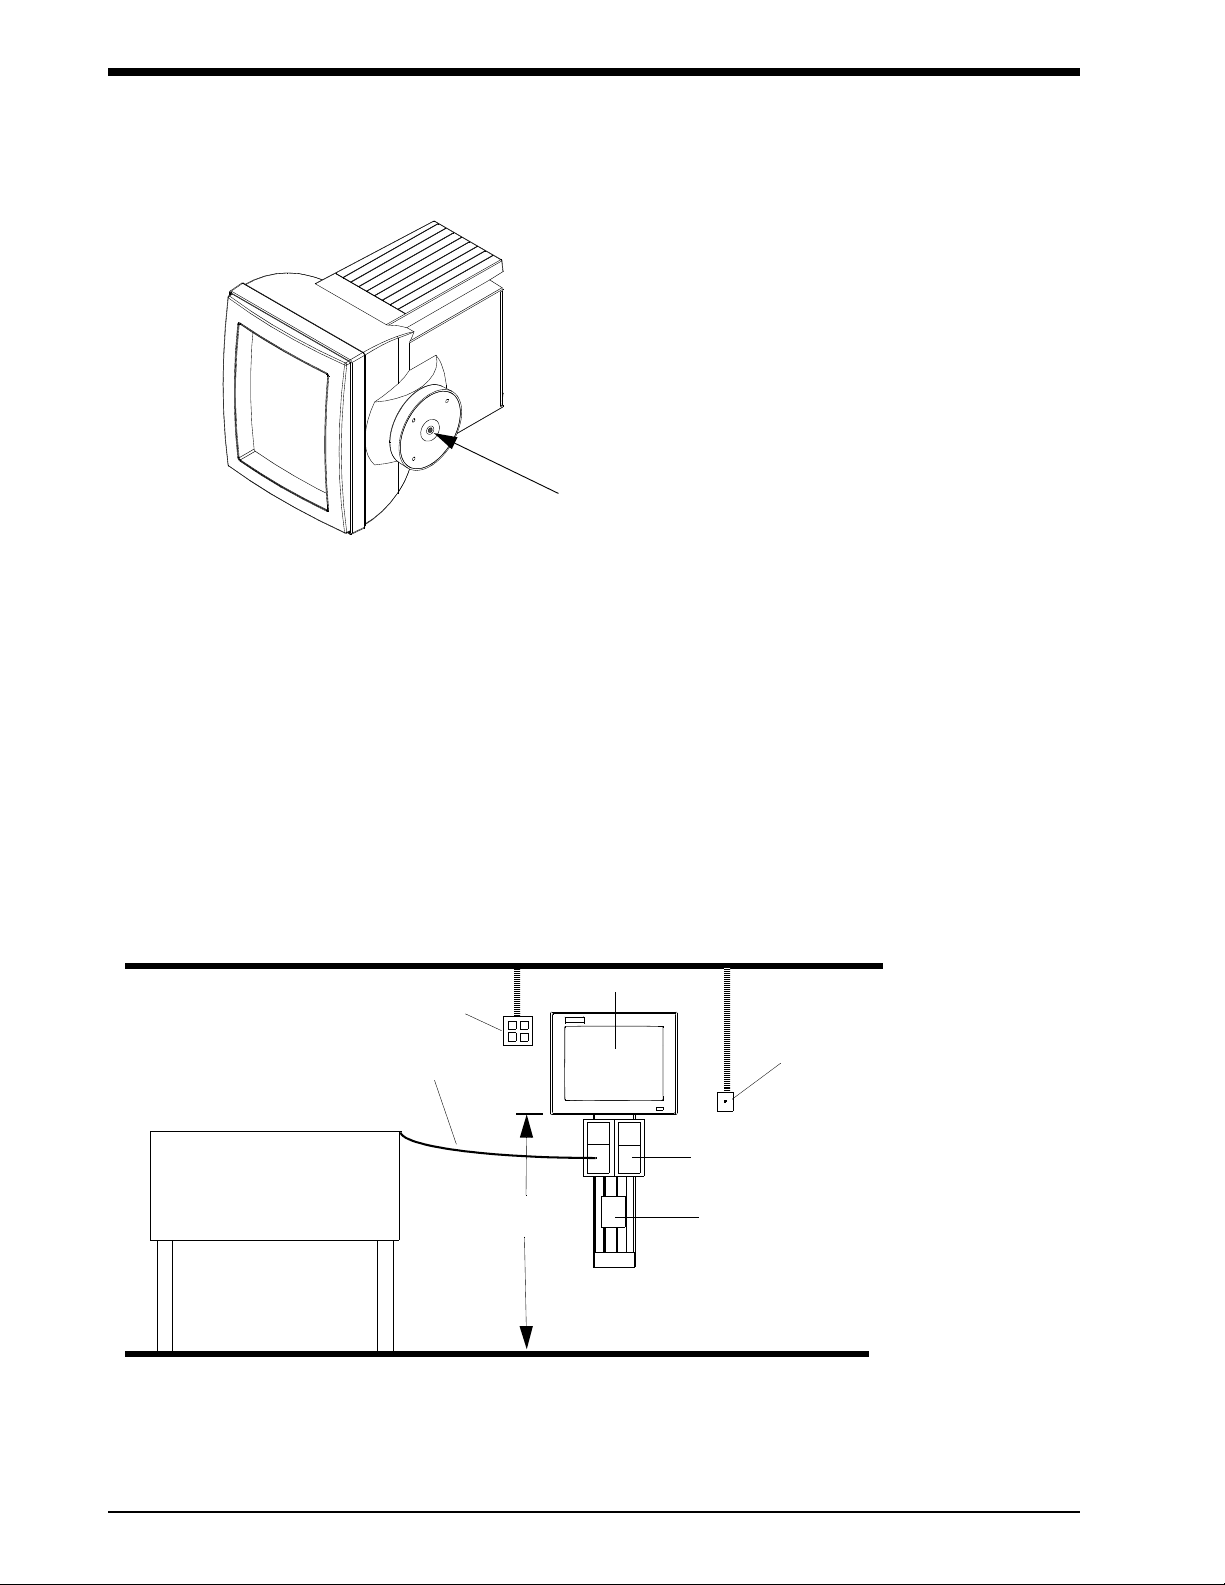
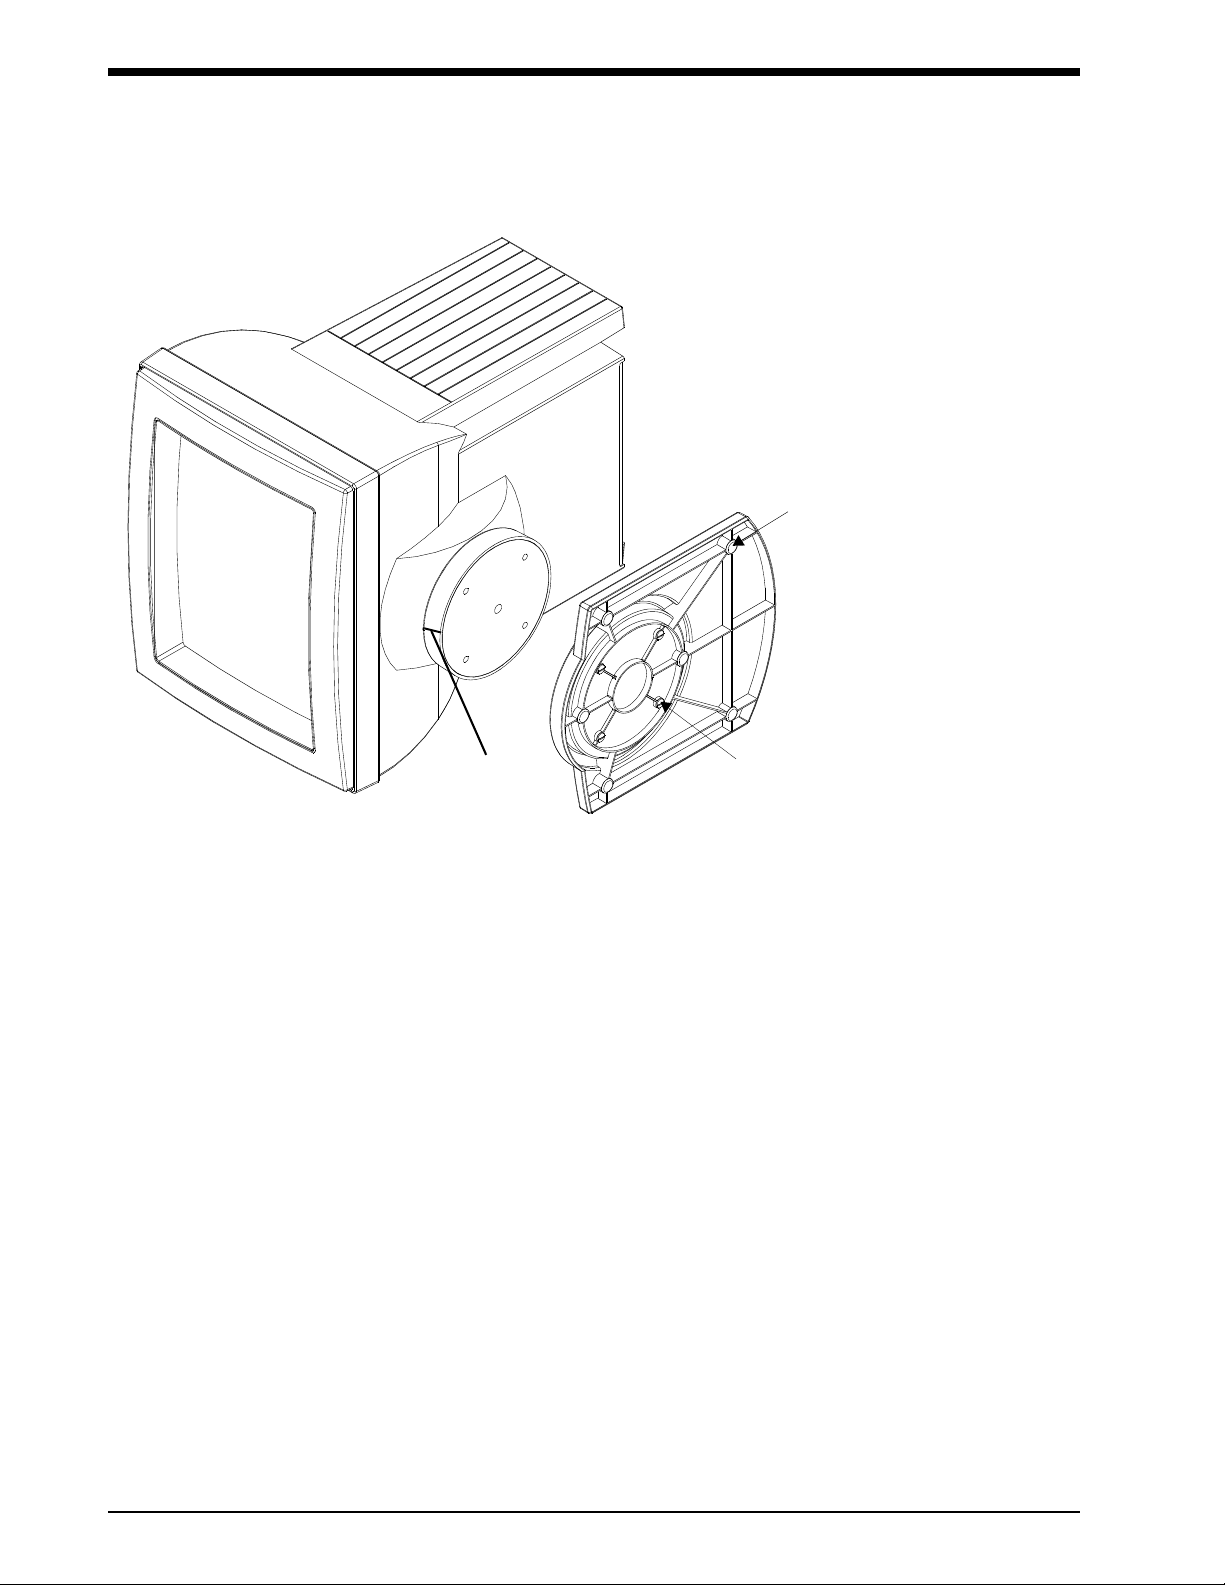
Base Tension Adjustment (90385)
The 90385 monitor’s base can be adjusted to increase or decrease the tension that allows tilting of
the monitor screen. Tension is factory-adjusted for optimum performance and further adjustment is
usually not necessary. If adjustment is necessary, turn the base screw clockwise (refer to
Figure 2-1) to increase base tension or counter clockwise to decrease tension. Set the tension
loosely enough to allow normal viewer adjustments, yet tightly enough to hold the adjusted position.
2-3
Page 18
UCW and Ultraview 1700 Monitors — Service Manual
base tension adjusting screw
Figure 2-1: 90385 base tension adjustment
• If necessary, base adjustment must be done prior to installing the monitor onto a
!
mount.
• Not all monitors will have the base tension adjustment described here.
Wall Mounting
• Specific wall requirements for the installation of wall mounts are not covered in
!
this manual and are the responsibility of each hospital. Refer to the Module
Housings and Power Supplies Service Manual (P/N 070-0680-xx, located on
CD-ROM 084-0700-xx) for detailed instructions.
patient bed
AC mains
10’ patient cable
minimum of 60”
from floor
90385, 91415, or 91418
Ethernet connector
90491 or 90387
power supply
route all power cables
inside the wall track
2-4
Figure 2-2: Bedside configuration
Page 19

Setup
The wall mounting hardware consists of:
Wall Track — The wall track is mounted vertically on the wall with the mounting arm installed in
the track. The mounting arm can be slid up and down in the wall track to the desired height. Wall
tracks are available in multiple lengths.
Wall Track End Caps — The wall track end caps are installed on the top and bottom of the wall
track to give the track a finished appearance and to prevent the equipment from sliding off the
end of the mounting track.
Mounting Arm — The mounting arm projects horizontally out from the wall track and holds the
display assembly and module housings. Two types of arms are available: one for a monitor-only
installation; the other for installation of the monitor and module housing(s).
Mounting Screws — Mounting screws are provided to install the end caps and to secure the
mounting arm at the desired vertical position.
Mounting Considerations
Power supply should be placed no closer than three inches (7.62 cm) to the remote housings to
allow sufficient air flow. Install a minimum of four AC outlets.
• The monitor, monitor wall plate, and AC outlet must be located on the same side
!
of the patient bed. The power cord has a standard length of 10 feet (3.05 m).
Pedestal Mounting (90385)
To attach the pedestal mount to the display assembly refer to Figure 2-3.
1. Verify that the pedestal’s six rubber feet and four retaining studs with retaining rings have
not been dislodged during shipping.
2. Carefully place the display on its side. A cushion should be used under the display to avoid
scratching the display case.
3. Rotate the display’s round base (if necessary) so that its tick mark points toward the front of
the unit.
4. Line up the four retaining studs on the pedestal with the four holes in the display’s round
base.
5. Push the pedestal onto the round base and secure it by turning each of the four retaining
studs 90 degrees clockwise with a straight blade screwdriver. The studs will lock in place
and can no longer be turned.
6. Carefully return the display to its normal upright position.
2-5
Page 20
UCW and Ultraview 1700 Monitors — Service Manual
rubber feet (6)
tick mark
Figure 2-3: Pedestal mount
retaining
studs (4)
Console Mounting (90387)
The physical layout and other console characteristics depend on the requirements of the hospital or
other institution. It is the responsibility of the institution to define its specific console needs and to
design and construct the console according to its specifications.
For this reason, Spacelabs Medical does not supply a pre-fabricated console assembly. Instead, this
section provides the information necessary to create a custom console design. In designing the
console, the following considerations must be kept in mind.
• Access
The rear of the console must be designed to allow for easy access. The dimensions of the rear
access door must allow the 90387 and display monitor to be easily installed and removed.
• Cooling
• The 90387 does not contain a fan.
!
The console cabinet must be designed to allow sufficient air flow for natural convection.
If the console cabinet is enclosed, one of two cooling methods can be used:
Central Air Conditioning — The console can be connected directly to an air conditioning
cooling duct. The maximum ambient air temperature should be limited to approximately
C, and vented from the console at the highest exit.
32°
2-6
Page 21
Setup
Forced Air Fan — Small, quiet muffin fans rated at 100 cubic feet per minute (CFM) or
equivalent (to be provided by the institution) can be installed. In this case, provide one fan
for every central station or two system printers/module recorders that are installed in the
console.
• If a network printer is to be installed in the console, the power dissipation and
!
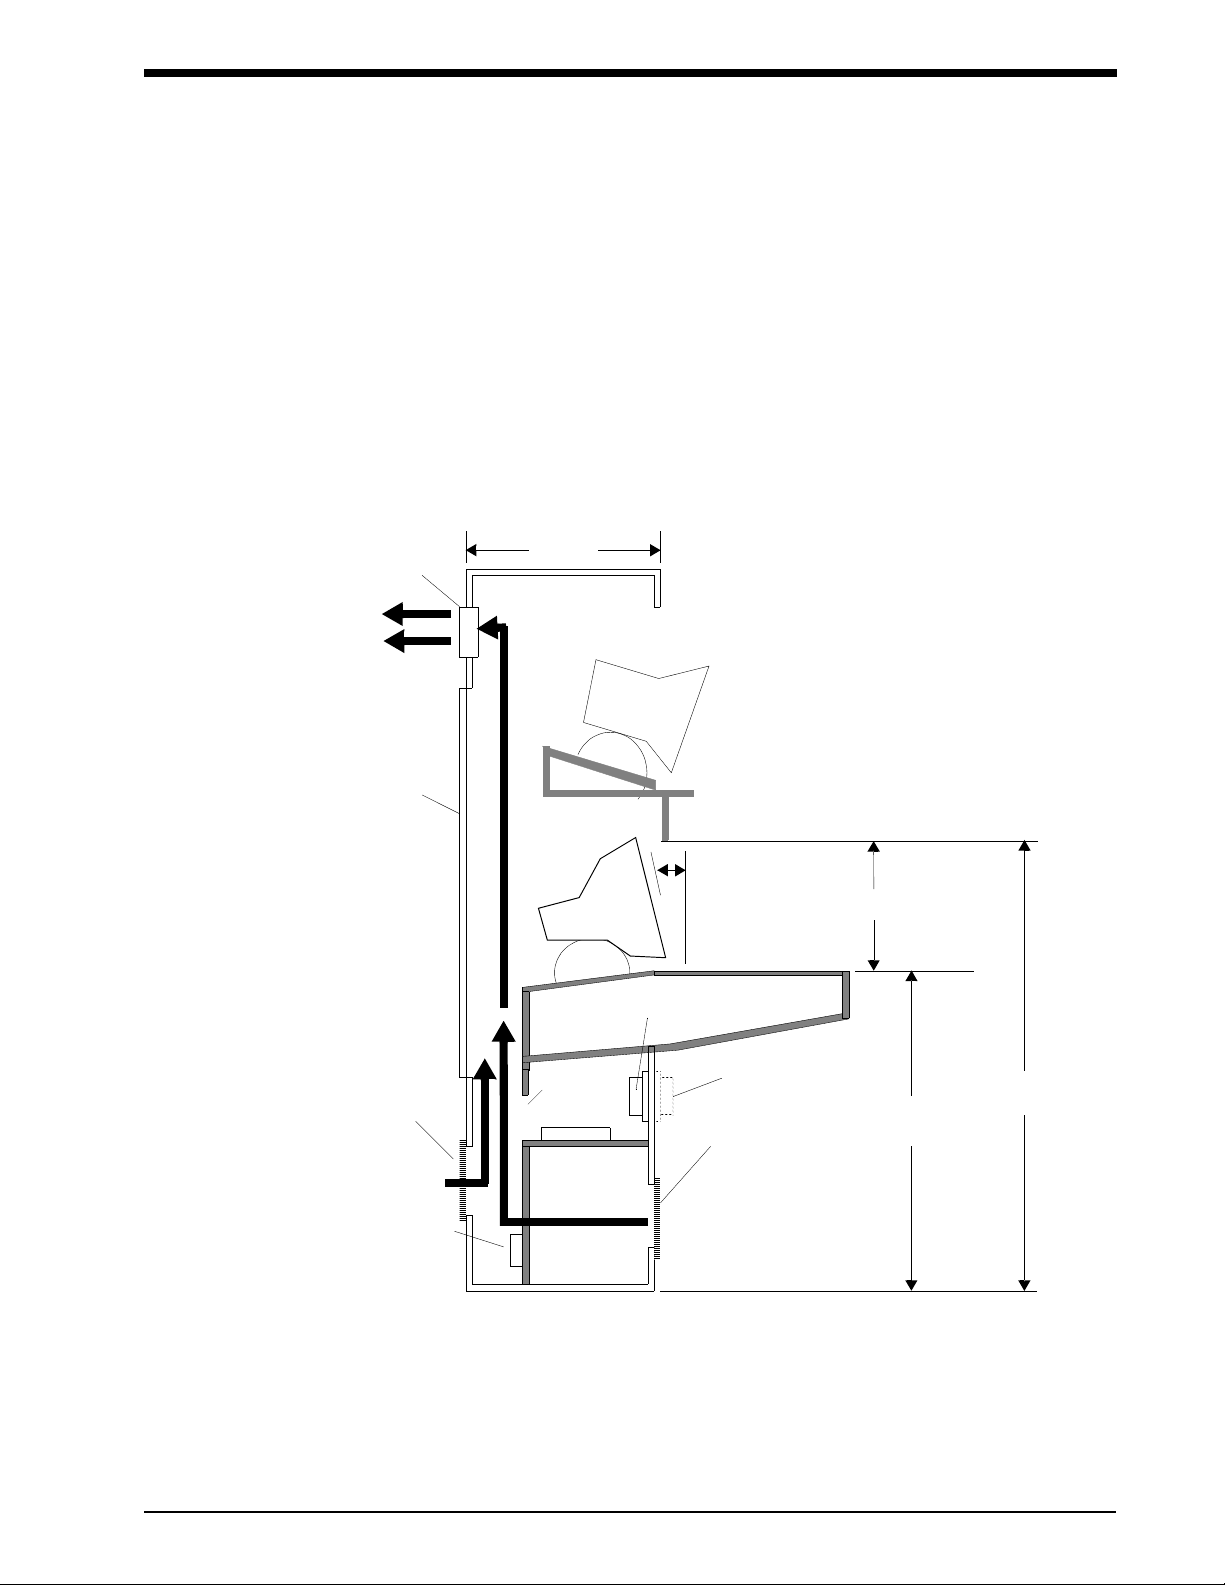
An example console design is shown in Figure 2-4. This figure shows the minimum dimensions
required to satisfy the above requirements.
dimensional requirements will be different. Refer to the printer specifications for
further information.
exhaust fan
with louvers
removable back
air inlet
26.5”
(67.3 cm)
cable access
hole
10×
DC power supply
optional DC power
supply mount using wall
mount
optional
air inlet
16.5”
(41.94 cm)
30”
(76.2 cm)
46.5”
(118.20 cm)
!
AC power
Figure 2-4: Minimum cavity sizes for console setup
• The dimensions shown in Figure 2-4 may not allow for appropriate clearance of
displays larger than 15 inches.
2-7
Page 22
UCW and Ultraview 1700 Monitors — Service Manual
Installation
Cables (90385)
The cables and adapters available for making interconnections to the 90385 and other components
are listed in Table 1 and Table 2 below. The use of these cables is illustrated schematically in
Figure 2-5 on page 2-9.
CAUTION:
• Spacelabs Medical has tested and approved the cables listed in Table 1 and
Table 2 for use with the 90385 monitor. For continued EMI radiation
compliance, use only these cables.
Table 1: Common Cables and Adapters
Cable/
Adapter
A 012-0182-00 Cable, Shielded RS-232, Display, Alarm
B 012-0391-xx Cable, Display Assembly to Module Housing
C 175-0951-xx Cable, Assembly, Ethernet, 10BaseT
E 012-0395-00 Cable, Serial Data, RS-232
Cable/
Adapter
F 012-0584-00 Cable, Display Assembly, male DB15 to RGB, 6 feet (1.8 m)
Refer to Parts on page 6-1 of this manual for additional cable part numbers.
P/N Description
Table 2: 90385 Cables and Adapters
P/N Description
2-8
Page 23

A
Setup
nurse alert
90385
monitor
SDLC
B, G
C
F
E
ferrite beads
Ethernet
Video
serial I/O
*
**
P1
DC
power
supply
90491/90499
module housing
Figure 2-5: 90385 cabling diagram
* Video output is a repeater display and is not configurable.
** Serial output may also be used for external touchscreen input in some external display applications.
Cables (90387)
The cables and adapters available for making interconnections to the 90387 and other components
are listed in Table 2 on page 2-8 and Table 3 below. The use of these cables is illustrated
schematically in Figure 2-6 on page 2-10.
CAUTION:
• Spacelabs Medical has tested and approved the cables listed in Table 3 for
use with the 90387. For continued EMI radiation compliance, use only these
cables.
Table 3: 90387 Cables and Adapters
Cable/
Adapter
G 012-0601-00 Cable, SDLC with Power Interface, 1 foot (0.305 m)
H 012-0593-00 Cable, Video
J 012-0555-00 Cable, Powered Flexport
K 012-0595-00 Cable, Audio
L 012-0620-00 Cable, Touchscreen/video Sync
Refer to Parts on page 6-1 for additional cable part numbers.
P/N Description
2-9
Page 24
UCW and Ultraview 1700 Monitors — Service Manual
G
**
generic
display with
touchscreen
and audio
**
91416-B
display
* The J9 COM port must be used to interface a serial touchscreen. Using J15 to interface the touchscreen is
not supported.
** Only one display with touchscreen can be attached to the 90387. A second display can only be driven for
video. Audio is not available.
J7
J9
H
E
K
serial I/O
L
J16 P1
J7
*
J9
J10
J19
90387
J2
Figure 2-6: 90387 cabling diagram
J14
J15
J18
DC power
supply
A
E
C
G
serial I/O
Ethernet
P1
90499
module
housing
J2
J
nurse
alert
terminator
Flexport
2-10
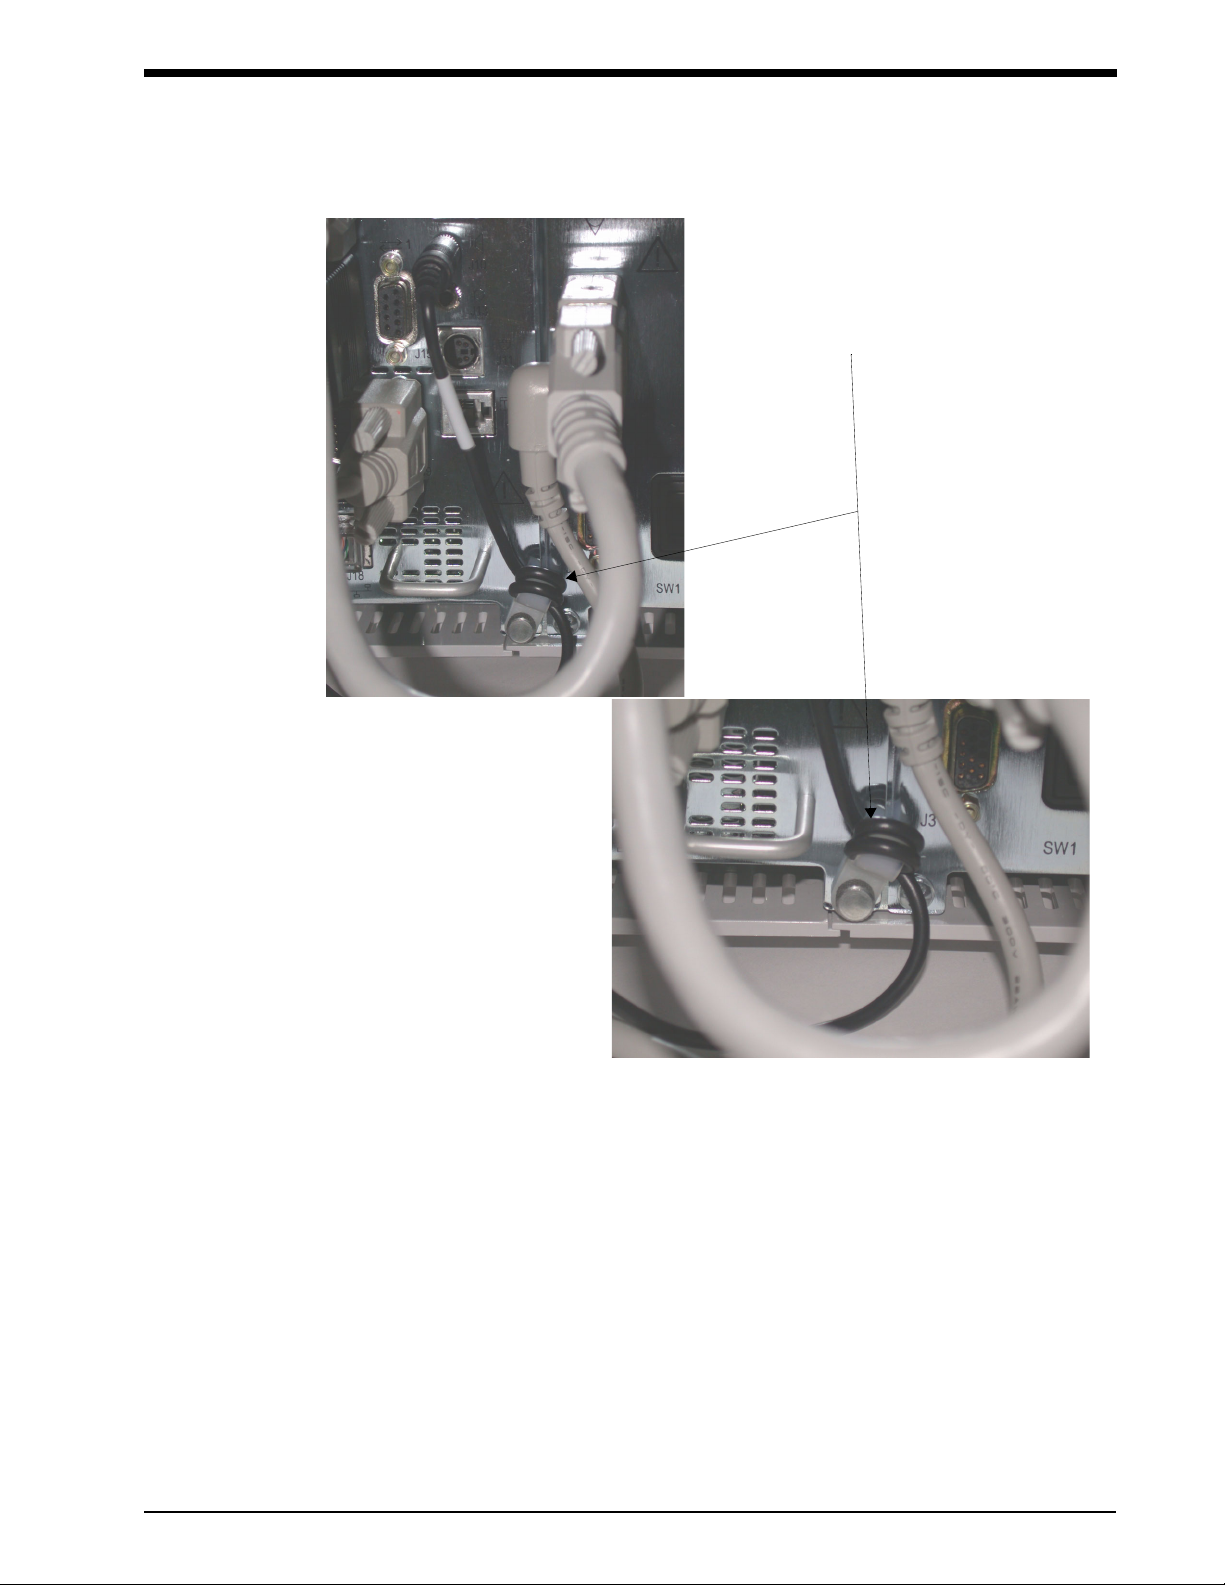
CAUTION:
• To prevent accidental removal of the audio output connector, loop the cable
at least two times around the supplied strain relief, which is located at the
rear bottom corner of the 90387. Refer to
• Examine any external display for strain relief capability and set it up per
manufacturer recommendations. Spacelabs 91415 and 91418 displays
incorporate the same strain relief indicated in
display incorporating audio must have cable secured at both ends to assure
reliable audio at both monitor and display.
Figure 2-7.
Figure 2-7. Any remote
Page 25
Setup
Examples of looping the audio output cable
around the supplied strain relief.
Figure 2-7: Looping the audio output cable around the supplied strain relief
Ethernet LAN Cables
• Pre-molded Cables — When connecting a monitor to the wall plate or in the construction of a
central station, use cables with both ends pre-molded. These cables have ferrite beads molded
into each end for EMI compliance and are available in multiple lengths.
• Bulk Cables — If desired, cables can be constructed from bulk 500-foot (152.4 m) spools. This
type of cable construction is preferable in cases where conduit lengths are unknown.
2-11
Page 26

UCW and Ultraview 1700 Monitors — Service Manual
SDLC Bus Connections
The 90387 has two integral module slots providing plug-in support for either two single-high modules
or one double-high module. If additional modules are required, these are installed in external module
housings and connected to the 90387 by the SDLC interface.
The 90385 requires an external module housing for parameter module support. Flexport devices are
also connected by the SDLC interface. External module housings or Flexport devices require that
the SDLC bus be configured correctly.
The 90385/90387 support the 90491 four-slot external module housing, or the 90485/90499 two-slot
external module housings.
Multiple module housings may be used. They are interfaced to the 90385/90387 by daisy-chaining
them together to create an extended SDLC bus.
Maximum Cable Lengths
The following cables are limited to the indicated maximum length:
Ethernet Cable (10Base5) — 10Base5 cables have a maximum length of 164 feet (50 m)
including the total cable length from the monitor to the wall plate and/or transceiver, and a
35-foot (10 m) propagation delay for any Multiport present.
Ethernet Cable (10BaseT) — 10BaseT cables have a maximum length of 328 feet (100 m).
SDLC Cable — SDLC cables have a maximum length of 40 feet (12.2 m), including the total
SDLC cable length from the monitor to last device on the SDLC bus.
Video Display Cable — Video display cables have a maximum length of 100 feet (30.5 m),
including the total length of cable from the monitor to the last repeater display.
91416-B Touchscreen Cable — 91416-B touchscreen cables have a maximum length of 6 feet
(1.83 m).
2-12
Page 27
Setup
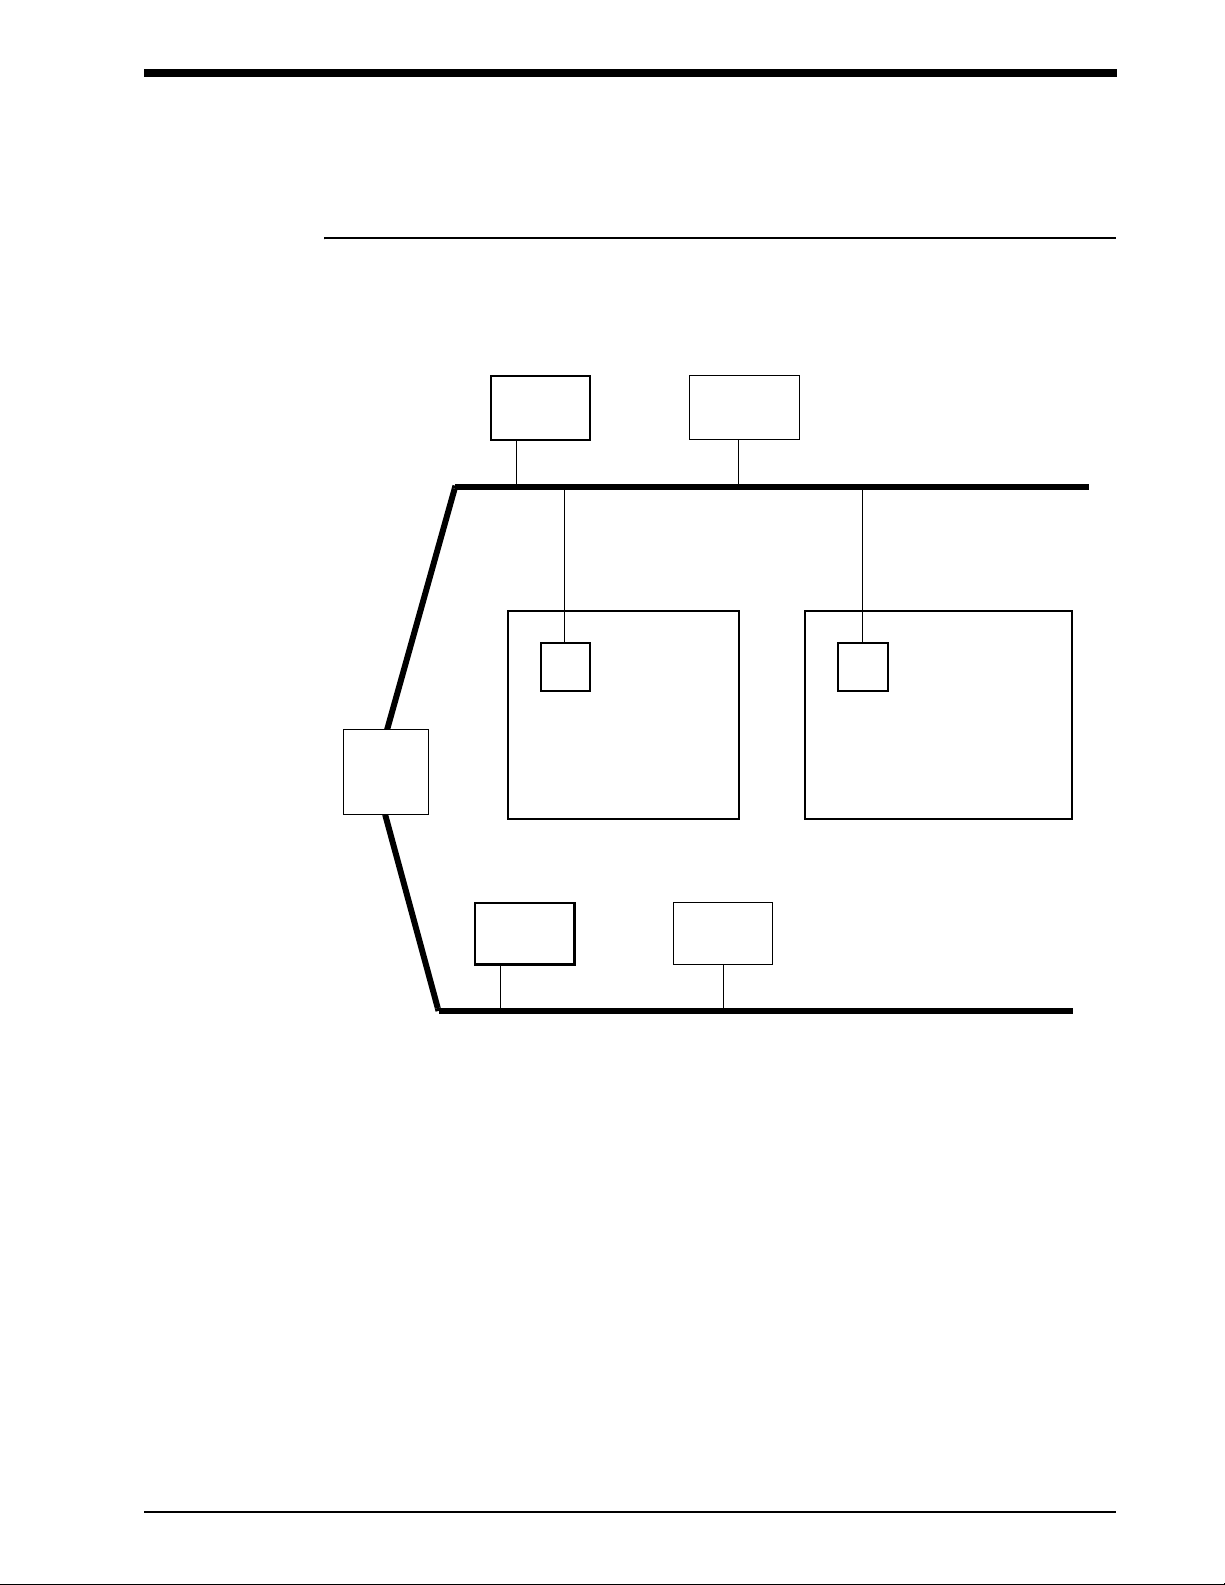
Network Configuration
Figure 2-8 illustrates a typical network system composed of bedside monitors, central monitors, and
a clinical information system.
router
Ultraview
Workstation
equip #192
164.90.254.192
Ultraview
Workstation
equip #192
Intesys
Clinical Suite
equip #100
164.90.254.100
subnet 254
(standard Spacelabs Medical
network)
164.90.254
164.90.254.10 164.90.254.11
monitor #10
Intesys
Clinical Suite
equip #100
monitor #11
Ethernet
164.90.250.192
164.90.250.100
Ethernet
Figure 2-8: Example of Spacelabs Medical network
For the example in Figure 2-8 on page 2-13, the Network Setup entries are as follows:
Monitor #10
• Monitor ID: 10
• IP Address: 164.90.254.10
Monitor #11
• Monitor ID: 11
• IP Address: 164.90.254.11
2-13
Page 28
UCW and Ultraview 1700 Monitors — Service Manual
Ethernet LAN Installation
• Detailed installation instructions for an Ethernet local area network (LAN) are
!
To install a 90385/90387 monitor onto an existing Spacelabs Medical Ethernet LAN, complete the
following (refer to
page 2-8, and Table 3 on page 2-9).
1. Power OFF the monitor.
2. Attach one end of a 10BaseT Ethernet cable (C) to of the monitor.
3. Power ON the monitor and refer to System Configuration on page 2-14 to set up the monitor
for network operation.
beyond the scope of this document.
CAUTION:
• Only qualified personnel should attempt to install a monitor onto an
Ethernet LAN.
Figure 2-5 on page 2-9, Figure 2-6 on page 2-10, Table 1 on page 2-8, Table 2 on
• Do not connect the monitor to an Ethernet LAN prior to configuring the network
!
4. Connect the other end of the Ethernet cable (C) from the monitor to the nearest network port.
parameters. If it is incorrectly configured for LAN access, other units on the
network may be interrupted.
WARNING:
• When 10Base5 hardware is used for the LAN, make sure the Ethernet wall
plate and the shield of the Ethernet connecting cable are bonded to the
hospital grounding system.
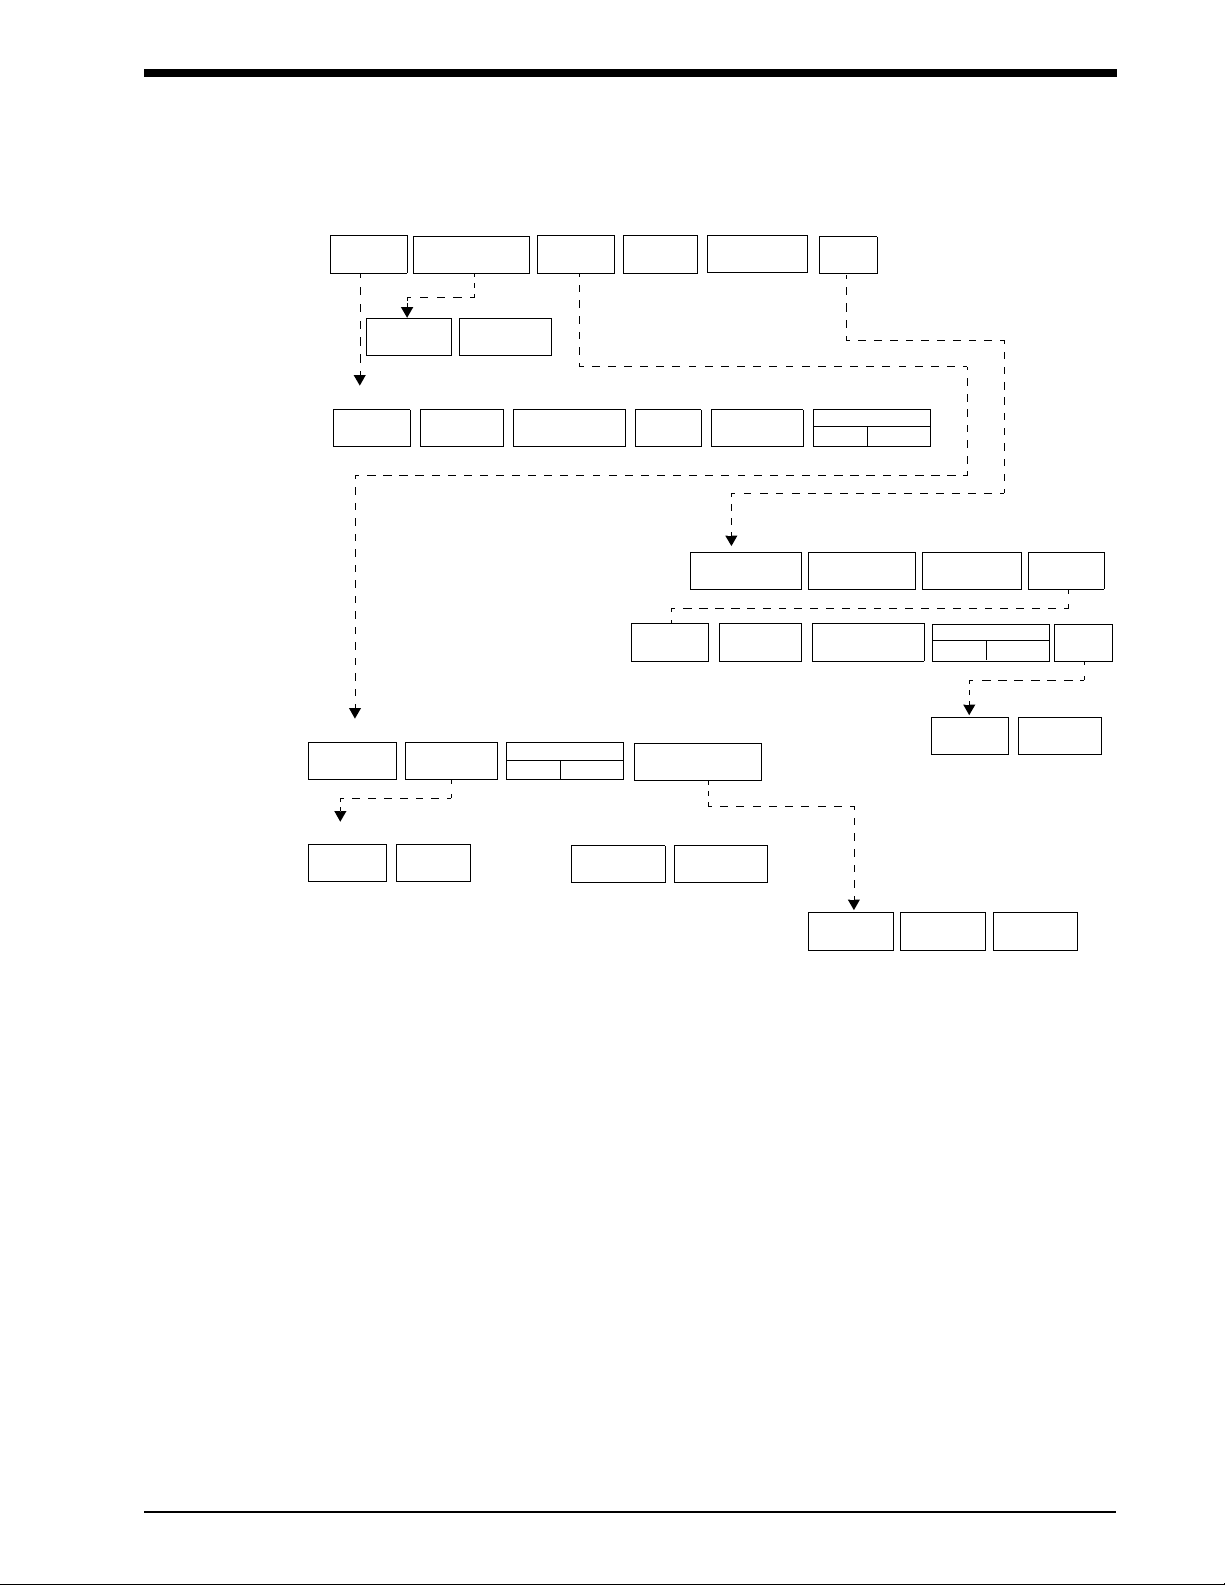
System Configuration
The Biomed menu enables an authorized service representative to set user defaults for monitor
operation.
To access the Biomed menu:
1. Touch MONITOR SETUP.
2. Touch PRIVILEGED ACCESS to display the Keyboard menu (refer to Keyboard Menu on
page 2-19).
3. Enter the correct password (case-sensitive) to display the Biomed Monitor Setup menu
(refer to
Figure 2-9).
2-14
• Based on your software version, your screen may differ from the following.
!
Page 29
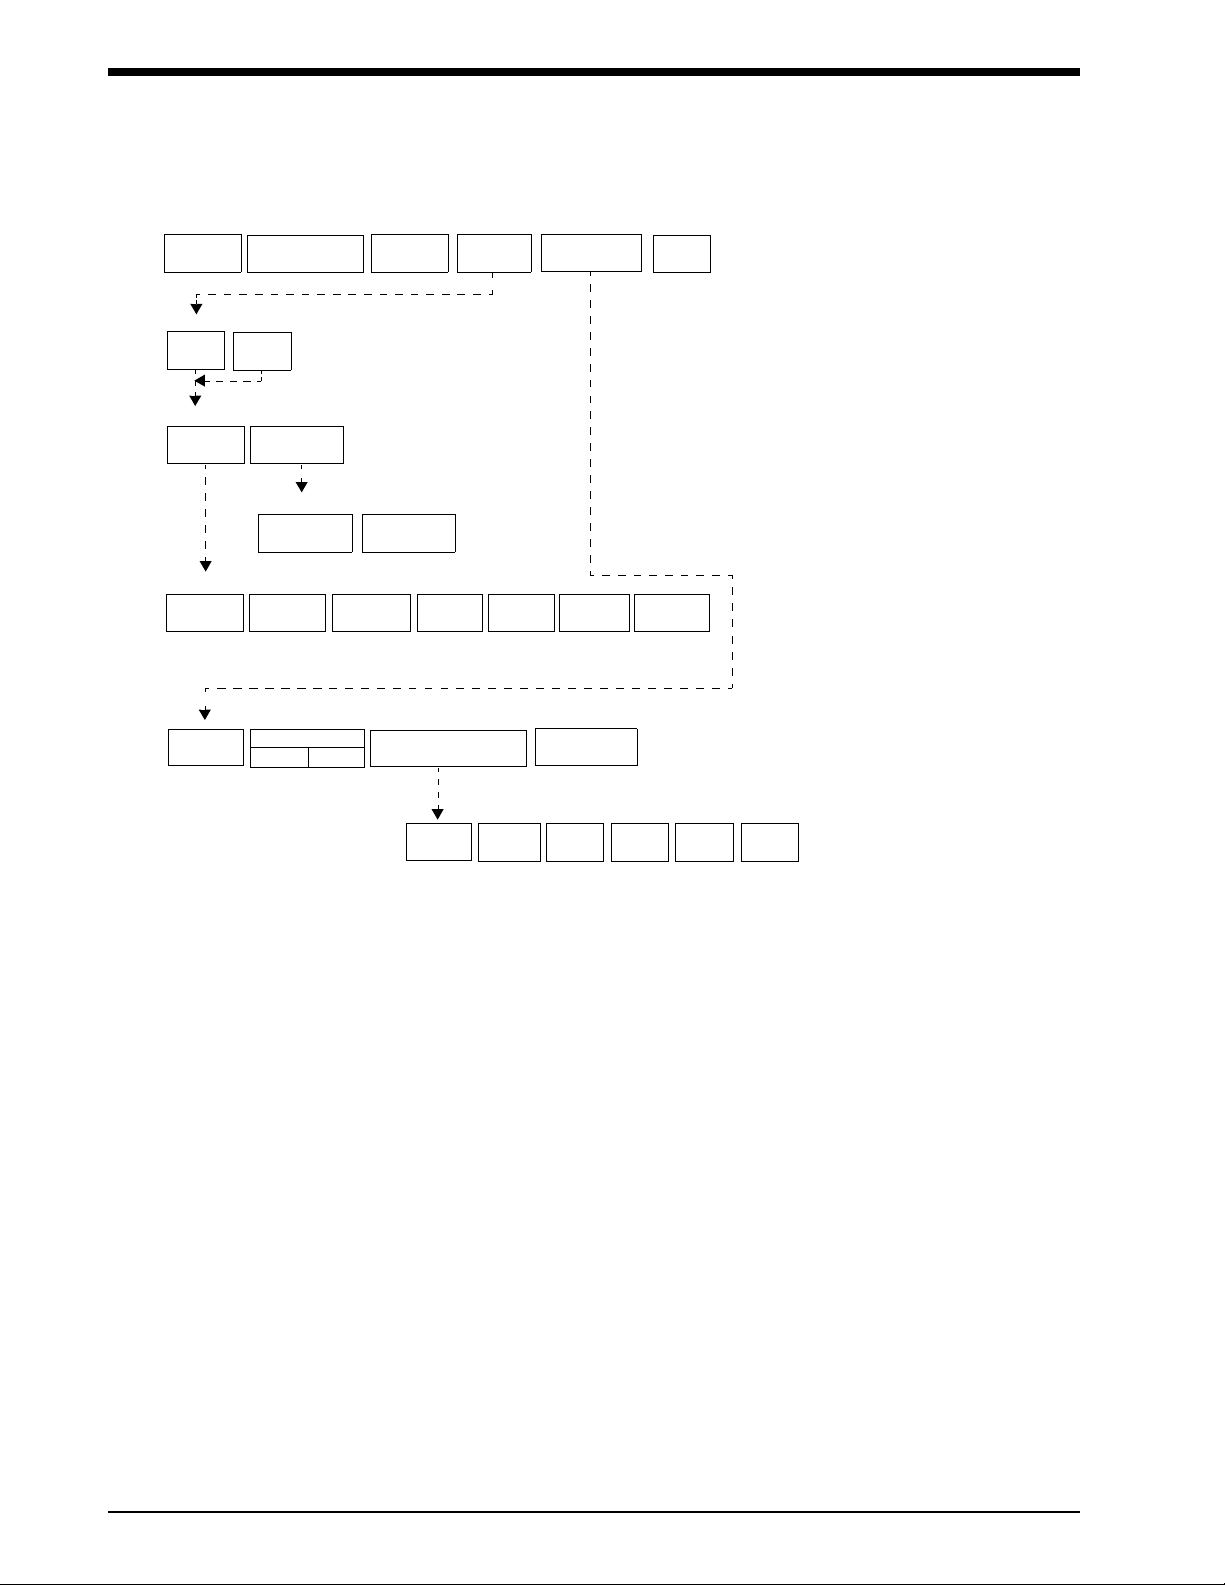
MONITOR SETUP - Select parameter
NETWORK MONITOR
SETUP
TELEMETRY
CONFIGURATION
RECORDER
SETUP
SERIAL
PORTS
CALIBRATION
Setup
MORE
TELEMETRY
BED NAMES RECORDERS
NETWORK SETUP - Restart monitor after entering changes
SUBNET
RECORDER SETUP - Select parameter
NAMES RECORDERS
(SELECTION BACKUP) or
PRIMARY
TELEMETRY
NODE NODE
ID NAME DIRECTORY
SELECTRECORDER
SELECT
RECORDERS
BACKUP
TCP/IP
SETUP
SELECTION
AUTO
BACKUP
RECORDER A
BED
CHANGE BIOMED
CENTRAL
BEDSIDE
ALARM EXTENDED
DURATION SETTING
(SELECTION = AUTO)
RECORDER B
PASSWORD
DATA COMM
WATCH
SUBNET ACCESS
ON
OFF
CLINCAL
MENU
EDIT
DRUG NAMES
TONE
CONFIGURATION
MINIMUM VOLUME
ON
OFF
SYSTEM
INFO
MORE
MORE
RESET
MONITOR
0 SECONDS 6 SECONDS 12 SECONDS
2-15
Page 30
UCW and Ultraview 1700 Monitors — Service Manual
MONITOR SETUP - Select parameter
NETWORK MONITOR
SETUP
Select serial port to assign owner to:
1
BIOMED LEVEL - Serial Port Configuration
SETTINGS
BIOMED LEVEL - Serial port settings: Changes committed on exit
DATA BITS
8
TELEMETRY
CONFIGURATION
2
2
ASSIGNMENT
Restart monitor after selecting owner for serial port
DIAGNOSTICS
PAR ITY
NONE
RECORDER
SETUP
LOGGER
STOP BITS
1
DATA
ECHO
NONE
SERIAL
PORTS
CR/LF XON/XOFF
NONE
CALIBRATION
DISABLE
MORE
BAUD RATE
9600
POSITION
SYNC ON GREENCRT
ON OFF
TOUCHSCREEN MARGIN
ADJUSTMENT
DEFAULT A B C D E
TOUCHSCREEN
CALIBRATION
2-16
Page 31

MONITOR SETUP - Select parameter
NETWORK
SETUP
MONITOR SETUP - Select parameter
CHANGE BIOMED
PAS SWO RD
TONE CONFIGURATION - Restart Monitor after selecting tone configuration
ISO STANDARD
ALARM TONES
TELEMETRY
CONFIGURATION
CLINICAL
MENU
CONFIGURABLE
ALARM TONES
RECORDER
SETUP
TONE
CONFIGURATION
ALARM TONES
SERIAL
PORTS
CONTINUOUS
MONITOR
CALIBRATION
MORE
MORE
MORE
Setup
CLINICAL CONFIGURATION
TIME/
DATE CONFIG
RECORDER
BEDSIDE
UNITS OF
MEASURE
DATA COMM
WATCH
COMM WATCH
ON
DRUG NAMES
OFF
USER
ACCESS
EDIT
CENTRAL
BEDSIDE
CENTRAL
PRESELECTED
RECORDINGS
Figure 2-9: Biomed Monitor Setup menus
ALARM
ON
ALARM
SETUP
MINIMUM
VOLUME
OFF
ALARM WATCH
SYSTEM INFO
ADMIT REQUIRED
ON
OFF
SETUP
MORE
RESET
MONITOR
2-17
Page 32

UCW and Ultraview 1700 Monitors — Service Manual
CLINICAL CONFIGURATION
RECORDER
TIME/
DATE CONFIG
SELECTION
AUTO
BACKUP
PRESELECTED
RECORDINGS
Restart monitor after selecting units of measure
ALARM EXTENDED
DURATION SETTINGS
0 SECONDS 6 SECONDS 12 SECONDS
mmHg
kPa
UNITS OF
MEASURE
inches
cm
USER
ACCESS
kg
ALARM
SETUP
lb
ALARM WATCH
SETUP
MORE
CHANGE CLINICAL
PASSWORD
MOUSE
CONTROL
RESET
MONITOR
TIME
DATE
PRESELECTED RECORDINGS - Select configuration to change
24
HOURS
AM
PM
HOURS
MINUTES
PRESELECTED A PRESELECTED B
Select option to change - x: current type and bed configuration (where x = A or B)
SELECT SELECT
TYPE BED
Select beds/subnets - x: current type configuration (where x = A or B)
ALL THIS
SUBNETS SUBNET
Select recording type - x: current bed configuration (where x = A or B)
ALL
BEDSIDE PARAM(S)
USER ACCESS - Enable user access to functions
PATIENT TYPE
ON OFF
PARAMETER CONFIG
ON OFF
THIS
MONITOR
RECORDING DURATION
ON OFF
CONFIGURED
PARAMETERS
SUBNET ACCESS
ON OFF
ENTER
2-18
REMOTE ACCESS
ON OFF
ALARM SUSPEND
ON OFF
TREND SUSPEND
ON OFF
ALARM
RELAY
ALARM RELAY SETUP - Select parameter
RELAY TIMEOUT
0 SEC 10 SEC
ALARM LEVEL - Select minimum alarm priority level to trigger relay activation
HIGH MEDIUM LOW
Figure 2-10: Clinical Monitor Setup menus
QRS/SPO2 TONE ENABLE
ALWAYS DURING ALARM
FLASHING
STEADY ON
ALARM WATCH TONE
SINGLE TRIPLE
ALARM
LEVEL
Page 33

Setup
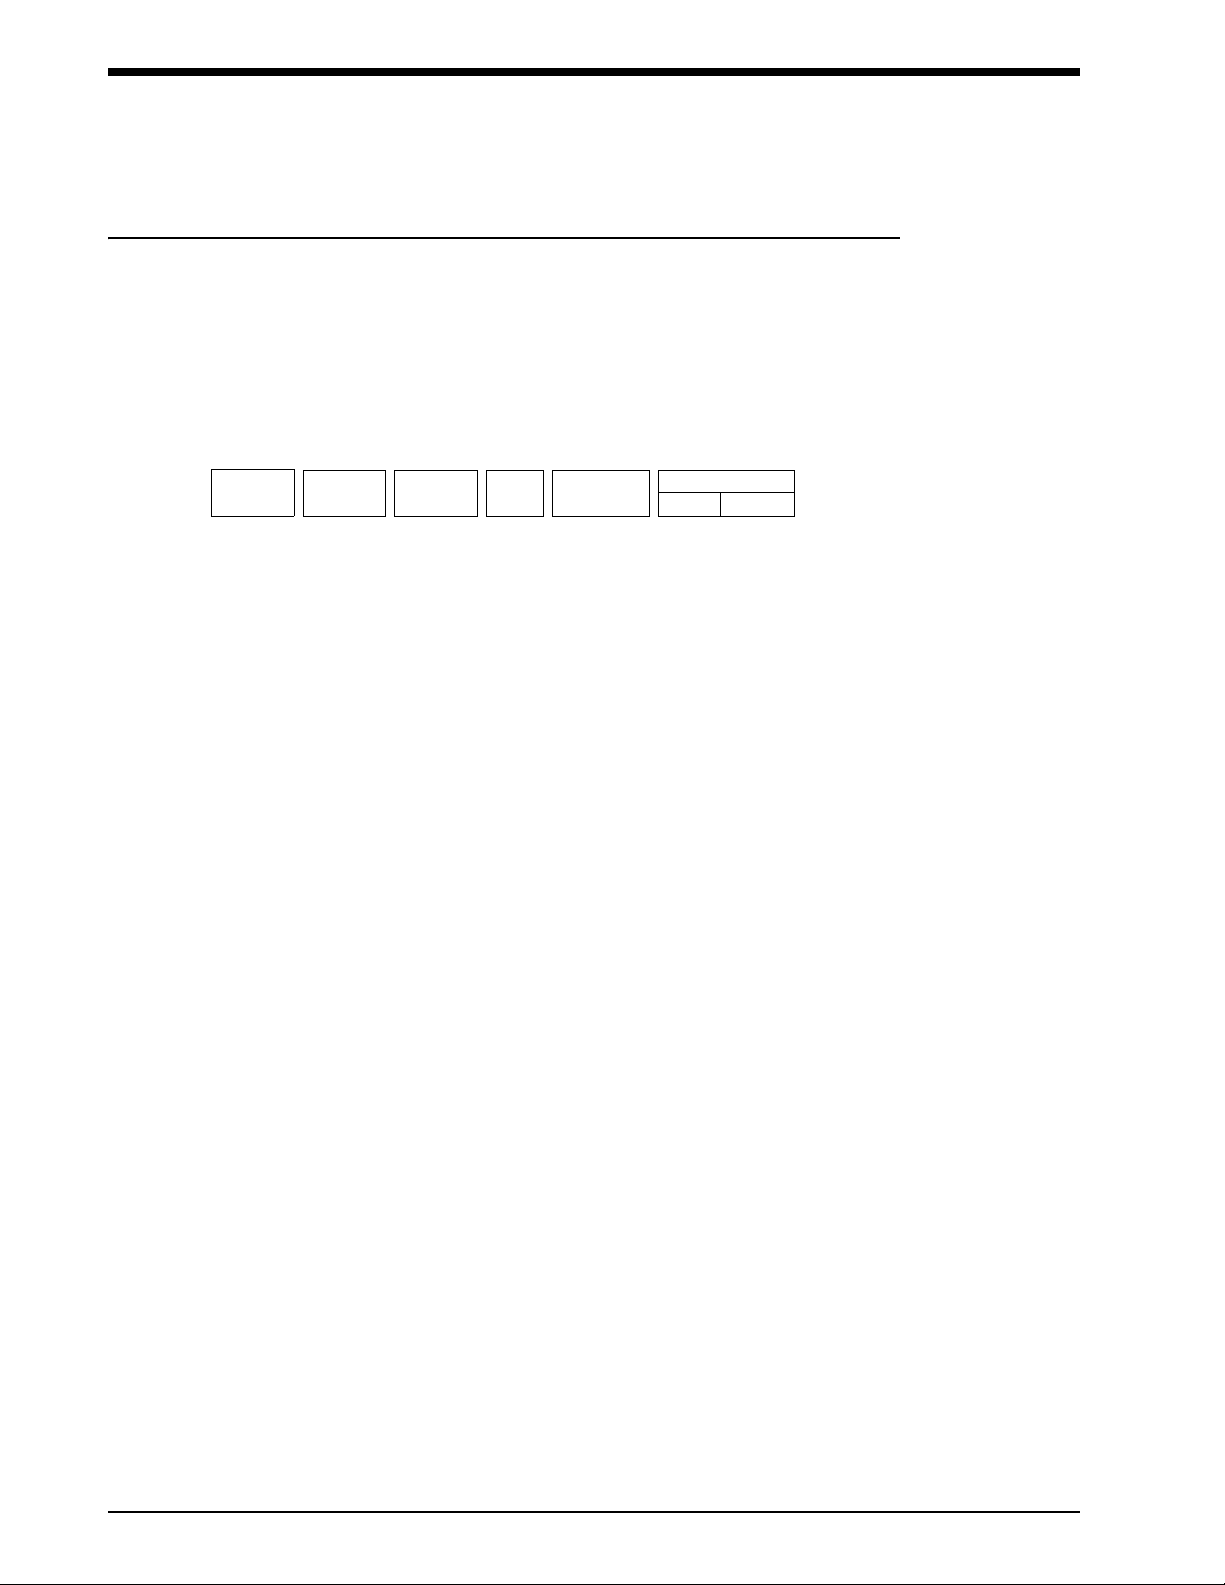
Keyboard Menu
The Keyboard menu appears whenever a menu is selected that requires entering alphanumeric
data. (A-Z, 0-9):
RESTART CLEAR
!
1
CAPS
SHIFT
<--- --->
When the keyboard first appears, the cursor is positioned at the first character in the input line and
moves through the input line as you touch the keys. Input changes are displayed on the prompt line
but are not displayed on the monitor until you touch ENTER.
When you touch a character key, the cursor is located at the last character in the name. The cursor
will remain in place but will type over the old character, replacing it with the new character.
Touch BACKSPACE to remove the character under the cursor and move the remaining characters
one position to the left.
Use the ← key to move the cursor one position to the left. If the cursor is at the first character in the
name, no change occurs.
Use the → key to move the cursor one position to the right. If the cursor is at the last character in
the line, no change occurs.
@
2
Q W E TR Y U I PO
A S D F G H J K L
#
3
Z X C BV N M
$
4
%
5
Figure 2-11: Keyboard menu
^
6
&
7
*
8
(
9
)
0
<
,
BACKSPACE
_
-
:
;
>
.
ENTER
“
‘
?
/
Touch RESTART to redisplay the last name recognized by the system. Any changes that have not
been stored in memory (before touching ENTER) are deleted.
Touch CLEAR to delete the displayed characters. This enables you to enter new characters.
2-19
Page 34
UCW and Ultraview 1700 Monitors — Service Manual
Biomed Setup Menu
Network Setup Menu
The Network Setup menu enables you to define a subnet name, node ID, and bed name; view the
active nodes on the network; and select an appropriate subnet access level.
Touch NETWORK SETUP to display the following menu:
NETWORK SETUP - Restart monitor after entering changes
SUBNET ACCESS
ON
OFF
!
SUBNET Key
SUB
NET
• Additional keys may be present. Refer to the corresponding sections of this
manual or to the Ultraview Care Network Operations Manual (P/N 070-1001-xx,
located on CD-ROM 084-1101-xx) for configuration.
NODE
ID
TCP/IP
SETUP
BED
NAME
NODE
DIRECTORY
Touch SUBNET to display the Keyboard menu, enabling you to type in a subnet name (refer to
Keyboard Menu on page 2-19 for instructions on usage). This name can contain up to five
characters, letters, or numbers.
To enter a subnet name:
1. Touch SUBNET.
2. Type in the subnet name.
3. When you have entered the name correctly, touch ENTER to store the name in memory.
4. Reset the monitor so that the network can recognize the new name.
NODE ID Key
Touch NODE ID to display the pop-up keypad.
Each monitor on the network must have a unique node ID. The default node ID for an uninitialized
monitor is 1. You may change this ID to allow the monitor to function properly on the network. After
changing the ID, you must reset the monitor to enable the system to recognize the new node ID. All
monitors on a network must have a unique node ID.
To enter a node ID:
1. Touch NODE ID.
2. Enter a number between 1 and 64 (between 1 and 250 with monitors that support the
expanded network feature).
3. Touch ENTER on the keypad to place it into memory.
2-20
Page 35

Setup
TCP/IP SETUP Key
To enter a TCP/IP address:
1. Touch TCP/IP SETUP to display the Keyboard menu.
2. Type in the TCP/IP address.
3. Touch ENTER to initiate error checking and verify that the address is in the proper
xxx.xx.xxx.xx format (for example, 164.90.254.xx, where xx is monitor node ID).
4. When you have entered the name correctly, touch ENTER to store the name in memory.
5. Reset the monitor to have the network recognize the new TCP/IP address.
Entering an invalid IP address (for example, 89.0.3.22x) sounds an error tone and displays the
following message:
IP address 89.0.3.22x is out of range or invalid.
• The TCP/IP settings are not currently used.
!
BED NAME Key
Touch BED NAME to display the Keyboard menu. Use the keys on the Keyboard menu to enter the
bed name assigned to the monitor. This bed name is also the monitor’s node name on the network
and is limited to five characters.
The message, Restart monitor after change in bed name: xxxxx, is displayed when
you touch BED NAME. The xxxxx is the node name currently recognized by the network. The name
you enter can contain from one to five alphanumeric characters but must be unique to the network.
Reset the monitor after you enter the bed name to allow the network to recognize the new name.
NODE DIRECTORY Key
The NODE DIRECTORY key enables you to view which nodes are active on the network. Touching
this key displays a set of node keys identifying the bed name (top) and the subnet where it belongs
(bottom):
Nodes active on the network
BED01
WARD1
(The above names are provided only as examples.)
BED02
WARD1
BED03
WARD1
BED01
WARD1
BED04
WARD1
BED05
WARD1
CEN01
ICU
2-21
Page 36

UCW and Ultraview 1700 Monitors — Service Manual
SUBNET ACCESS Key
The SUBNET ACCESS key limits the monitor’s accessibility to beds physically located on other
subnets. When Subnet Access is OFF, the monitor can access only those beds attached to its own
subnet. When Subnet Access is ON, the monitor can also access beds located on other subnets.
To set Subnet Access to OFF:
1. Touch the SUBNET ACCESS OFF key.
2. Power the monitor OFF and ON again to ensure that all alarm watches, zone assignments,
and remote views are cleared.
3. Set the remote views (bedside monitors) as desired.
4. Select Recorders using only the recorders on the local subnet and set Preselected
Recordings to access only the monitors in the local subnet.
5. Set alarm watches as desired.
Preselected Recordings Menu
The Preselected Recordings menu enables you to define which beds and parameters are
automatically recorded when the user touches the PRESELECTED A and PRESELECTED B keys
in the Recorder menu.
To define the PRESELECTED A and B keys:
1. Touch PRESELECTED RECORDINGS to display the keys:
Select configuration to change
PRESELECTED A
PRESELECTED B
2. Touch the key to be defined (A or B). The following keys appear:
Select option to change
SELECT
TYPE
SELECT
BED
SELECT TYPE enables you to choose which parameters for the selected bed(s) will be
recorded.
SELECT BED enables you to choose which bed(s) will have the selected parameter sent to
the recorder.
3. Touch SELECT TYPE to display the following menu:
Select recording type
ALL
BEDSIDE PARAM(S)
CONFIGURED
PARAMETERS
This menu enables you to choose to record either the first few parameters for the bed, all
the parameters on this bed, or only specified parameters.
4. Touch ALL BEDSIDE PARAM(S).
5. Use the ARROW keys to cycle through the parameter selections: ALL BEDSIDE PARAM(S)
or FIRST N BEDSIDE PARAM(S) (where n is 1, 2, 4, or 8).
2-22
Page 37

6. Touch CONFIGURED PARAMETERS to display a menu of parameter keys that can be
selected (ON or OFF) for recordings.
7. Touch PREVIOUS MENU to return to the SELECT TYPE and SELECT BED keys.
8. Touch SELECT BED to define which beds will be included in the preconfigured recordings.
The following keys appear:
Select beds/subnets
ALL
SUBNETS
THIS
SUBNET
THIS
MONITOR
ALL SUBNETS includes all the beds on all subnets.
THIS SUBNET includes all the beds on this subnet.
THIS MONITOR includes all the parameters on this monitor.
9. Touch the appropriate option.
10. Return to step 1 to define the remaining PRESELECTED (A or B) key.
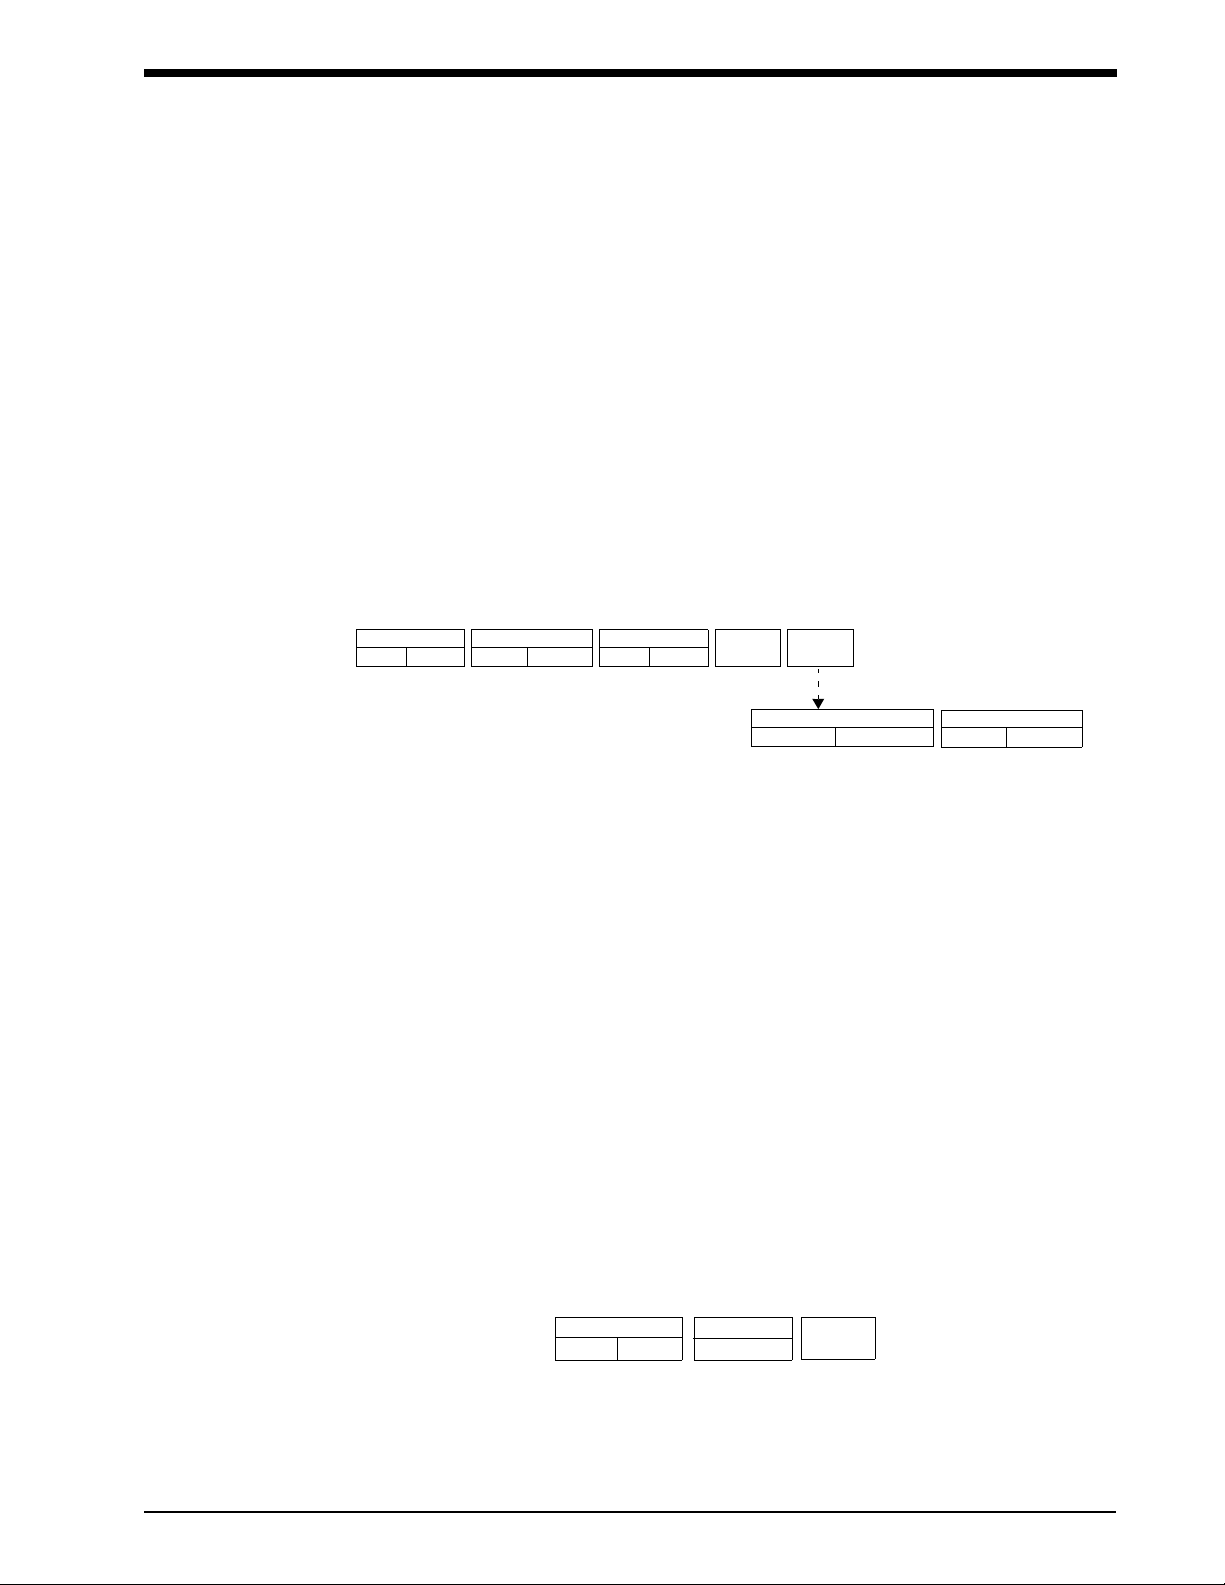
Recorder Setup Menu
Setup
Touching the RECORDER SETUP key displays the following menu:
RECORDER SETUP - Select parameter
RECORDER
NAMES
SELECT
RECORDERS
SELECTION
AUTO BACKUP
ALARM EXTENDED
DURATION SETTING
RECORDER NAMES Key
This key enables you to assign names to each recorder on the system.
Touching RECORDER NAMES displays the following information:
Select recorder name to change
REC01 REC01 CENT1 ICU02REC03REC02
ER
(The above names are provided only as examples.)
Touch the RECORDER key you want to change, or touch the blank key to add another recorder.
When touched, the Keyboard menu appears, enabling you to enter or change the name. Each
name can contain from one to five characters.
2-23
Page 38

UCW and Ultraview 1700 Monitors — Service Manual
SELECT RECORDERS Key
The SELECT RECORDERS key enables you to assign a priority to system recorders for each bed
(where nnnnn is the bedname).
Touching this key displays the following menu:
when the SELECTION key is set to BACKUP
Select priority of recorder to be assigned to nnnnn
PRIMARY
when the SELECTION key is set to AUTO
Select priority of recorder to be assigned to nnnnn
1. Touch one of the above keys to display a list of available system recorders.
2. Touch the recorder name key assigned to the bed as either primary or secondary
(depending upon your choice in step 1).
3. Touch PREVIOUS MENU to return to one of the Select Priority menus.
4. Repeat steps 1 through 3 to assign the remaining recorder(s).
• The Auto selection considers paper usage in determining the destination of the
!
recording. The Backup selection always selects the primary recorder, unless it is
either unavailable or unable to print the recording.
BACKUP
RECORDER BRECORDER A
Serial Ports Menu
Use this menu to define the communication parameters for the serial port and to assign it to a
specific application (Diagnostics or Data Logger option).
To set the serial port’s communication parameters:
1. From the Biomed menu, touch the SERIAL PORTS key.
2. Select a serial port key.
3. Verify that the SETTINGS and ASSIGNMENT keys appear.
4. Touch the SETTINGS key to display the following keys (factory defaults are in bold):
DATA BITS — Selects the number of data bits (6, 7, or 8).
PARITY — Defines the type of parity checking used (EVEN, ODD, or NONE).
STOP BITS — Defines the number of stop bits required (1, 1.5, or 2).
ECHO — Defines the echo mode to be used (NONE, FULL, LOCAL, REMOTE).
CR/LF — Defines the carriage return/line feed mode (INPUT, OUTPUT, FULL, NONE).
XON/XOFF — Sets the XON/XOFF controls (ENABLE or DISABLE).
BAUD RATE — Defines the baud rate setting (1200, 2400, 4800, 9600, 19,200, or 38,400).
5. Set each key in this menu to match your serial port’s communication requirements.
2-24
Page 39
To specify the serial port’s use:
1. From the Biomed menu, touch the SERIAL PORTS key.
2. Select a serial port key.
3. Verify that the SETTINGS and ASSIGNMENT keys appear.
4. Touch ASSIGNMENT and verify that the DIAGNOSTICS and DATA LOGGER keys appear.
5. Select the key that matches the application attached to this serial port (if diagnostic
messages are not desired during power-up, touch the DIAGNOSTICS key to disable ASCII
dumps to the serial port).
Alarm Setup Menu
The ALARM SETUP key enables you to configure the alarm features.
Touching this key displays the Alarm Setup menu:
Setup
ALARM SETUP - Select parameter to change
REMOTE ACCESS
ON OFF
ALARM SUSPEND
ON OFF
TREND SUSPEND
ON OFF
ALARM
RELAY
MORE
QRS/SPO2 TONE ENABLE
ALWAYS DURING ALARM
ALARM WATCH TONE
SINGLE TRIPLE
REMOTE ACCESS ON/OFF Key
The REMOTE ACCESS ON/OFF key enables (ON) or disables (OFF) a remote monitor’s access to
this monitor’s alarm limits.
ALARM SUSPEND ON/OFF Key
The ALARM SUSPEND ON/OFF key enables (ON) or disables (OFF) operation of the monitor’s
ALM Suspend function.
TREND SUSPEND ON/OFF Key
When the TREND SUSPEND ON/OFF key is set to ON, trending is disabled when alarms are
suspended using the ALARM SUSPEND hard key. When this key is set to OFF, trending operation
becomes independent of the ALARM SUSPEND hard key.
ALARM RELAY Key
Touching ALARM RELAY displays the Alarm Relay Setup menu:
ALARM RELAY SETUP - Select parameter
RELAY TIMEOUT
0 SEC 10 SEC
FLASHING
STEADY ON
ALARM
LEVEL
2-25
Page 40

UCW and Ultraview 1700 Monitors — Service Manual
RELAY TIMEOUT 0 SEC/10 SEC Key
The RELAY TIMEOUT key sets the number of seconds (0 or 10) that the alarm relay remains closed
following the end of an alarm condition.
FLASHING/STEADY ON Key
The FLASHING/STEADY ON key selects the mode of operation for the alarm relay. In Flashing
mode, the alarm relay contacts open and close according to the priority of the active alarm level. In
the Steady On mode, the relay contacts close if any alarms are active. They open only when all
alarm conditions cease.
ALARM LEVEL Key
The ALARM LEVEL key defines the level of alarms responded to by the monitor (activate alarm
relay): high, medium, or low.
Touching ALARM LEVEL displays the Alarm Level menu:
ALARM LEVEL - select minimum alarm priority level to trigger relay activation
HIGH
MEDIUM
LOW
Touch HIGH to initiate only high-priority alarms only.
Touch MEDIUM to initiate medium- and high-priority alarms.
Touch LOW to initiate all alarm priorities (high, medium, low).
MINIMUM VOLUME ON/OFF Key
The MINIMUM VOLUME ON/OFF key locks (ON) the current alarm tone volumes as the new
minimum volumes or unlocks (OFF) the tone volume controls.
QRS/SPO2 TONE ENABLE Key
The QRS/SPO2 TONE ENABLE key defines whether the QRS or SpO2 tones, when enabled within
the ECG or SPO2 menus, sound all the time (Always) or only when this monitor is in alarm (During
Alarm).
ALARM WATCH TONE Key
The ALARM WATCH TONE key defines whether the alarm watch notification tone sounds one to
three times whenever this monitor receives a new alarm watch multicast message.
2-26
Page 41
Setup
User Access Menu
The User Access menu provides privileged users access to enable certain functions for normal use.
USER ACCESS - Select user access-to functions
PATI E NT T YPE
ON OFF
PARAMETER CONFIGURATION
ON OFF
The highlighted option is the one that is currently active. Touching another key changes the
selection.
The PATIENT TYPE ON/OFF key enables Adult/Neonate selection in the Monitor Setup menu.
The PARAMETER CONFIGURATION ON/OFF key displays the PARAMETER CONFIGURATION
key in the Monitor Configuration menu.
The RECORDING DURATION ON/OFF key controls user access to the recording duration feature.
When set to ON, the RECORDING DURATION key is displayed in the Recorder Configuration
menu.
UNITS OF MEASURE MENU Key
RECORDING DURATION
ON
OFF
Touch the UNITS OF MEASURE key to select a unit of measure for the monitor:
Restart monitor after selecting units of measurement
mmHg
kPa
inches
cm
lb
Kg
The active option is highlighted. Touching another key changes the selection.
Tone Configuration Menu
The Tone Configuration menu enables the operator to configure the monitor’s alarm tones. The
active option is highlighted.
TONE CONFIGURATION - Restart the monitor after selecting tone configuration
ISO STANDARD
ALARM TONES
Touch CONFIGURABLE ALARM TONES to display the following menu.
Use the arrow keys to adjust the priority period of the selected alarm
HIGH
15s
This menu enables the operator to configure the monitor’s alarm tones to have different repetition
rates than are defined in the ISO standard.
CONFIGURABLE
ALARM TONES
MEDIUM
30s
LOW
30s
CONTINUOUS
ALARM TONES
FACTOR Y
DEFAULTS
2-27
Page 42

UCW and Ultraview 1700 Monitors — Service Manual
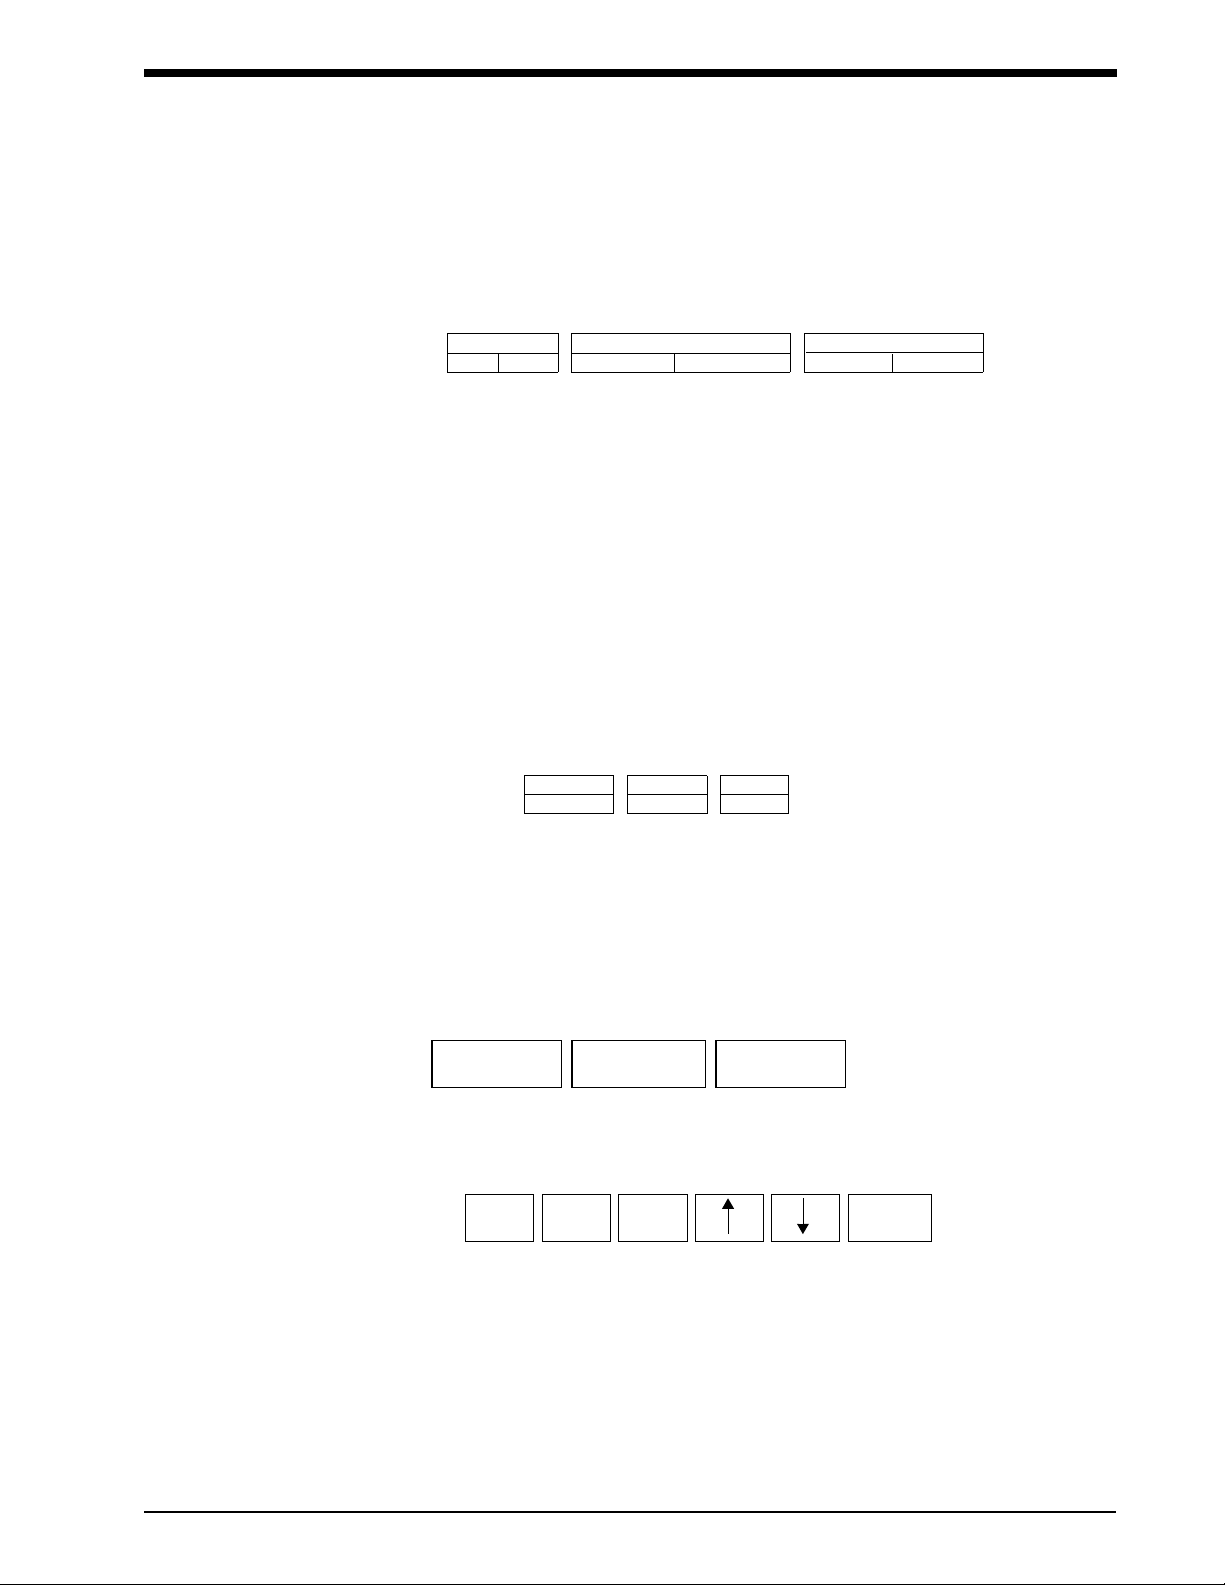
Service Functions Menu
The Service Functions menu provides the operator with the capability to review system information
and calibrate the monitor’s display subsystem.
BIOMED LEVEL - Service Functions
DISPLAY
ERROR LOG
DISPLAY ERROR LOG Key
The DISPLAY ERROR LOG key enables you to display the monitor’s logged errors. Keys in this
menu enable you to page backward or forward through the error log, display the most recent page of
logged errors, clear the log, and print the log’s currently displayed page.
• Error logs are intended for use by Spacelabs Medical service personnel only and
!
do not necessarily indicate a need for monitor service.
MONITOR
CALIBRATION
SYSTEM
INFO
CHANGE
PASSWORD
SYSGEN
RESET
MONITOR
MONITOR CALIBRATION Key (90385)
The MONITOR CALIBRATION key enables the Biomed to access the Monitor Calibration menu in
order to make horizontal and vertical adjustments of the CRT screen’s display and to calibrate the
infrared touchscreen.
• Touching SYNC ON GREEN for a monitor without that capacity may make the
!
screen unreadable. Be certain of the display capability before selecting this
option.
2-28
Page 43

BIOMED LEVEL - Calibrate Monitor Subsystems
CRT
POSITION
BIOMED LEVEL - CRT Position
BORDER
BIOMED LEVEL - Touchscreen Margin Settings
SYNC ON GREEN
ON
90385 only
OFF
TOUCHSCREEN
CALIBRATION
TOUCHSCREEN MARGIN
ADJUSTMENT
Setup
DEFAULT
B
CDEA
Figure 2-12: 90385 Monitor Calibration menu
The Touchscreen Margin Adjustment/Settings menu provides preset settings to enable the
Biomed to tune a particular ring PCBA, IR lens, and I/O PCBA for optimal performance.
WARNING:
• Normally, there should be no reason to adjust the factory defaults. Improper
adjustments or calibrations can SEVERELY degrade touchscreen
performance.
To adjust the CRT’s horizontal and vertical position (90385 only):
1. Touch the CRT POSITION key.
2. Verify that the CRT position adjustment keys appear (refer to Figure 2-12 on page 2-29).
3. Touch the adjustment keys as necessary to achieve the desired screen position and size.
The single arrow keys shift the raster in the indicated direction.
The double arrow keys expand (← →) or contract (→ ←) the raster image either horizontally or
vertically as indicated by the placement of the arrows (→ or ↑).
• If the display position is improperly set, the touchscreen will not align to the
!
display. If this condition occurs, shut off the monitor, enter two-finger diagnostics
(refer to
Extended Diagnostics on page 5-5) and set the screen position to mid-
range.
4. Touch the BORDER key to display a border around the display during adjustment.
2-29
Page 44
UCW and Ultraview 1700 Monitors — Service Manual
MONITOR CALIBRATION Key (90387)
The MONITOR CALIBRATION key enables the Biomed to access the Monitor Calibration menu to
make horizontal and vertical adjustments of the display. The position and size of the 90387 display is
a function of the external display device. The CRT POSITION key displays a border used to facilitate
the display adjustment.
BIOMED LEVEL - Calibrate Monitor Subsystems
CRT
POSITION
Figure 2-13: 90387 Monitor Calibration menu
SYSTEM INFO Key
The SYSTEM INFO key displays an informational screen. Horizontal dividing lines above and below
this display separate it from other information, and four sections of data are presented, including:
• PCBA Information
• System Information
• Diagnostics
• Software Information
SYNC ON GREEN
ON
OFF
SYSTEM INFO - DIGITAL
PRINT
Touch PRINT to print the information displayed.
CHANGE PASSWORD Key
The CHANGE PASSWORD key enables you to change the case-sensitive password that allows
access to the Privileged Access menus.
To set or change the password:
1. Touch CHANGE PASSWORD to display the on-screen keyboard and the password
prompts.
2. Type your new password (nine characters maximum) at the New Password prompt. Touch
ENTER.
3. Enter this new password a second time at the Verify Password prompt. Touch ENTER.
SYSGEN Key
• Monitor configuration using the Sysgen feature is only accomplished by
!
Spacelabs Medical field service engineers.
RESET MONITOR Key
Touch this key to reset the monitor after changing configuration settings, etc.
2-30
Page 45
Theory
Contents
UCW (90385) . . . . . . . . . . . . . . . . . . . . . . . . . . . . . . . . . . . . . . . . . . . . . . . . . . . . . . . . . . . . . . . . . . 1
Ultraview 1700 (90387) . . . . . . . . . . . . . . . . . . . . . . . . . . . . . . . . . . . . . . . . . . . . . . . . . . . . . . . . . . 3
CPU PCBA . . . . . . . . . . . . . . . . . . . . . . . . . . . . . . . . . . . . . . . . . . . . . . . . . . . . . . . . . . . . . . . . . . . . 5
I/O PCBA . . . . . . . . . . . . . . . . . . . . . . . . . . . . . . . . . . . . . . . . . . . . . . . . . . . . . . . . . . . . . . . . . . . . 15
Interconnect PCBA . . . . . . . . . . . . . . . . . . . . . . . . . . . . . . . . . . . . . . . . . . . . . . . . . . . . . . . . . . . . . 18
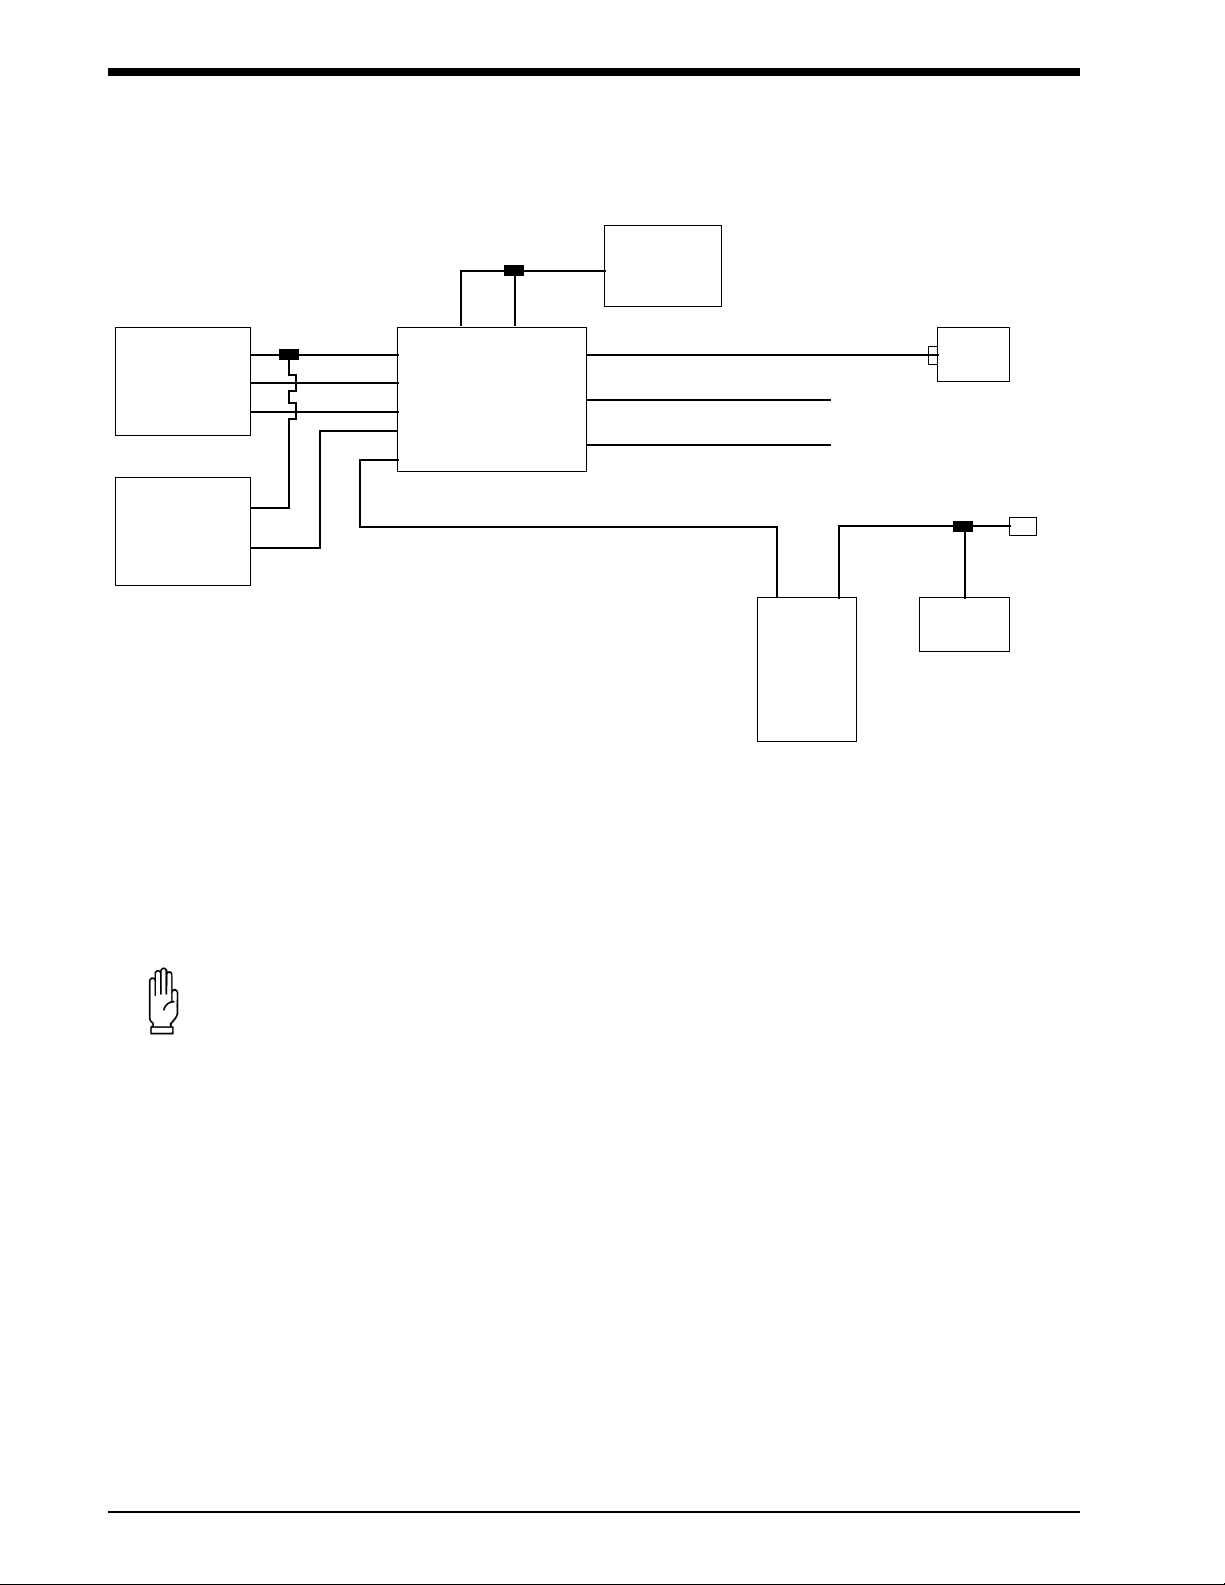
UCW (90385)
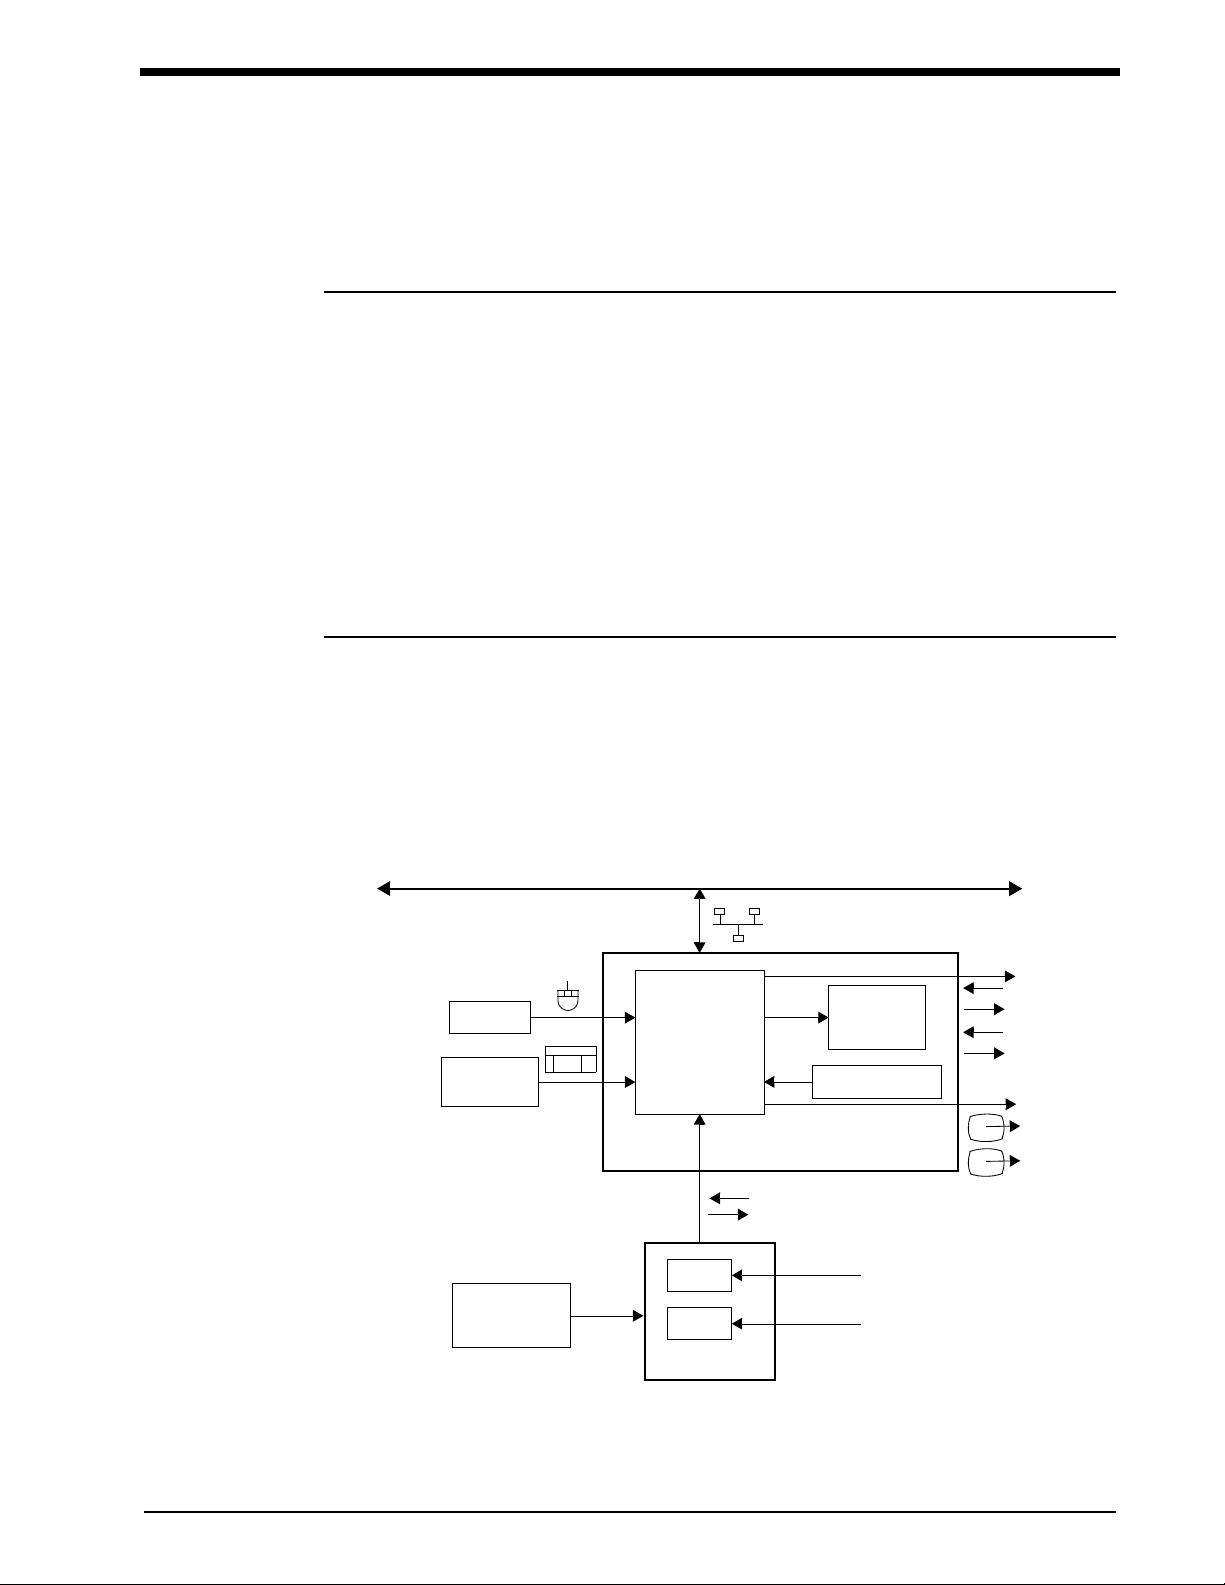
A typical 90385 system consists of these major components:
• 90385 monitor with integrated CRT display
• 90499 or 90491 module housing(s)
• DC power supply (one or more)
There may also be additional hardware devices present, such as a pointing device (mouse) and
keyboard.
network
serial (PDL)
1
2
repeater (2)
1
2
mouse
keyboard
DC power
supply
I/O and CPU
PCBAs
module
module
90499
SDLC
patient data
patient data
CRT
display
touchscreen
90385
Figure 3-1: Block diagram of a typical 90385 system
3-1
Page 46

UCW and Ultraview 1700 Monitors — Service Manual
The display is the most visible part of the system.
Inside its enclosure are the following assemblies:
• CRT display
• Touchscreen assembly
• CPU, I/O, and interconnect PCBAs
No internal adjustments should be performed on the monitor. Brightness, contrast, horizontal and
vertical size, and position of the display area are software-controlled through the touchscreen
interface.
Monitor Power Supply
The monitor chassis has an internal power supply that provides AC-to-DC conversion and DC
voltage for the CRT display, the touchscreen assembly, and the CPU PCBAs. The I/O and
Interconnect PCBAs do not require power.
CRT Display
The CRT display provides the visual interface to the system user.
CRT Specifications:
CRT type: non-interlaced, color CRT with analog RGB and TTL sync outputs
Diagonal size: 15 inches (350.5 mm)
Dot pitch: 0.28 mm triangular dot trios
Light transmittance: semi-tint glass; 57.2% transmissivity
Anti-reflective treatment: anti-static non-glare coating
Light output: 60 foot-lamberts
Display resolution: 1024 × 768 dpi
Vertical refresh rate: 64 Hz
Horizontal refresh rate: 51.584 kHz
Video dot rate: 68.5 MHz
Horizontal screen dimension: 10.5 inches (267 mm)
Vertical screen dimension: 7.8 inches (198 mm)
Touchscreen Assembly
The touchscreen consists of an array of infrared emitters and detectors that surround the CRT
screen and generate an array of horizontal and vertical infrared beams over the surface of the
screen. Whenever a beam is blocked by the presence of a finger or similar-sized object, the
touchscreen circuitry detects the interrupted beam and responds accordingly.
There are no external, manually operated controls associated with the touchscreen. The
touchscreen constantly calibrates itself.
3-2
!
• The monitor will still operate with an inoperable touchscreen. If the touchscreen is
significantly out of calibration and unusable, manual calibration must be
accomplished using a mouse or keyboard, or via the serial port (refer to Diagnostic
Menus on page 5-12).
Page 47

Theory
Touchscreen specifications:
• Minimum object detected: The touchscreen resolution is 0.28 × 0.28 in (7 × 7 mm). This is
the minimum size that can be detected.
• Maximum object detected: The maximum size that can be detected as a single object is
software programmable up to 4.1 × 4.1 in (105 × 105 mm). The
default is 1.7 × 1.7 in (42 × 42 mm). If a larger object touches
the screen, no action is taken.
• Ambient lighting: The touchscreen operates under lighting conditions ranging
from a dimly lit room to bright sunshine. Bright sunshine is
considered to be equivalent to a 75-watt standard incandescent
light bulb held 12 inches (30.45 cm) back from the center of the
touchscreen electronics.
Ultraview 1700 (90387)
A typical 90387 system consists of these major components:
• 90387 monitor
• Display
• 90499 or 90491 module housing(s)
• DC power supply (one or more)
There may also be additional hardware devices present, such as a pointing device (mouse) and
keyboard.
mouse
keyboard
DC power
supply
I/O and CPU
PCBAs
module
module
network
SDLC
patient data
patient data
SDLC
90387
serial
1
to touchscreen
to touchscreen
IR and
composite sync
repeater (2)
to display
2
module
module
generic
display
with
touchscreen
91416-B
display
with
IRTS
patient data
patient data
Figure 3-2: Block diagram of a typical 90387 system
90499
3-3
Page 48

UCW and Ultraview 1700 Monitors — Service Manual
The main enclosure is the most visible part of the system.
Inside are the following assemblies:
• CPU, I/O, and interconnect PCBAs
• Backpanel PCBA
• Module housing
No internal adjustments are possible on the monitor.
Monitor Power Supply
The main enclosure does not include an AC-to-DC power supply. AC-to-DC power conversion is
provided by an external DC supply. The external supply provides the monitor enclosure with
VDC. The 90387 includes internal DC-to-DC converters to generate appropriate operating
18
voltages from the 18-volt supply.
Display
The display provides the visual interface to the system user. The 90387 must be used with an
external display that is sold separately. Spacelabs Medical has medical-grade and non-medicalgrade displays available.
The 90387 can also be used with an external non-Spacelabs Medical display that conforms to
the following specifications:
• Resolution of 1024 × 768 dpi, minimum
• Vertical refresh rate of 64 Hz
• Horizontal refresh rate of 51.584 kHz
• Video dot rate of 68.5 MHz
• Standard XVGA
• H-sync and V-sync support or sync on green
• Audio support
Touchscreen Assembly
The 90387 only supports ELO-Touch brand touchscreens when using the serial port. When used
with the 91416-B, infrared touch is supported.
3-4
Page 49

Theory
CPU PCBA
The CPU PCBA consists of a CPU subsystem that runs the system software, updates the display,
and communicates with peripheral devices through the I/O PCBA. The CPU PCBA contains all the
major digital components and all the major analog components.
PCI
bus
33 MHz
32
6.25 MHz
32KX8
NVRAM
RT Clk
33 MHz
2-16M
flash
4-32M
DRAM
256k
GDS RAM
ISA/PCI
ISA
bus
e-net
860/PCI
bridge
16
irpt
cntr
dma
eide
32
K/M
CTRL
MPC
860
scc1
scc2
scc3
scc4
smc1
smc2
i2c
T/S
cpu
Xfmr
10baseT
nurse alert
sdlc
2 *RS-232
int t/s
keyboard
mouse
MM
CODEC
VGA
controller
Figure 3-3: CPU block diagram
Mono Int Spkr
st. line in
st. line out
display
1 &
2
3-5
Page 50

UCW and Ultraview 1700 Monitors — Service Manual
Main CPU
The UCW/1700 uses a 50-MHz version of the Motorola MPC860 processor.
The following are some of the special 860 features:
• PowerPC core processor unit
• 4 K instruction cache
• 4 K data cache
• Memory management unit with instruction and data TLBs
• Watchdog and event timers
• Interrupt controller
• Programmable chip selects and a DRAM controller for memory and peripheral support
• An internal shared memory and RISC engine, which together perform embedded peripheral
support functions and emulate DMA channels
• Six high-speed dedicated serial peripheral ports
• 64 programmable I/O ports
Memory
Flash, DRAM, and SRAM memory are all on the local 860 bus. NVRAM is on the ISA bus.
Flash Memory — Two banks of flash memory are connected to programmable chip selects
0 and 1. Flash memory is used for code storage and is fast enough so that code can be directly
executed out of flash. This memory may be in-circuit programmed. The flash is mounted on a
socketed DIMM. The DIMM can hold from 2 to 16 Megabytes, with 4 being typical.
DRAM Memory — Four banks of DRAM are connected to chip selects 2, 3, 4, and 5. All DRAM
is 3.3V EDO. The DRAM is mounted on two socketed DIMMs. From 4 to 32 MB of DRAM can
be installed, with 8 being typical. The application program is copied from flash to DRAM upon
boot up and is executed from DRAM.
SRAM (GDS) Memory — 256 KB of DRAM are connected to chip select 6. This SRAM holds
up the global data system (GDS) data. It is typically held up through power interruptions by a
super cap for more than one day.
NVRAM Memory — NVRAM is discussed in the ISA section.
MPC860-PCI Bridge
This is a Spacelabs Medical-designed Field-Programmable Gate Array (FPGA), which implements a
bus bridge between the MPC860 processor and the PCI bus. The 860 accesses all PCI and ISA
devices through this PCI bridge.
The main functions provided by the MPC860-PCI Bridge:
• Allow the 860 processor to access memory, I/O, and configuration address spaces on the PCI
bus.
• Allow PCI peripherals, via their bus mastering capability, to access DRAM and SRAM memory
installed on the 860 processor bus via the 860’s bus mastering capability.
• Support programmable chip selects similarly to the 860 CPU for PCI bus-initiated transactions.
• Convert big endian to little endian and vice versa. The PCI bus is little endian; the 860 bus is big
endian.
• Perform PCI bus central arbiter function.
• Perform 860 processor bus arbitration.
3-6
Page 51

Theory
Video
Video is implemented using Chops 69000 VGA controller with 4 MB of internal RAM that resides on
the PCI bus.
The RGB analog signals are buffered and fed to the CRT display and to two VGA connectors. The
Hsync and Vsync signals also go to the VGA connectors. The composite sync signal goes to the
display.
Ethernet
A Digital 21143 PCI-based Ethernet controller provides the network interface. It is able to support
both a 10-megabit and 100-megabit Ethernet; however, only a 10-megabit Ethernet is used at this
time. This chip directly attaches to the PCI bus and uses a transformer/filter and several passive
components to attach to 10BaseT Ethernet.
ISA Bridge
The ISA bridge connects the PCI bus to an ISA bus and to the components on the ISA bus.
The bridge chip (Intel 82371) also contains several useful support functions:
• Seven DMA channels usable by peripherals on the ISA bus
• Three counter/timers
• Three chip selects
• IDE controller
The bridge and ISA bus components are collectively referred to as the ISA subsystem. This
subsystem is used for less performance-critical peripherals, specifically, audio, wireless LAN,
NVRAM, real-time clock, keyboard, mouse, EPP port, and I/O buffers.
Audio
The audio subsystem is based on a Crystal Multimedia Codec. This chip is capable of supporting
simultaneous stereo in and out in a WAV-type format. It is programmable in terms of analog gain,
data formats, and data sample frequency. An audio amp is used for the internal speaker, and opamp buffers are used to drive the line-out connector.
Non-Volatile RAM/Real-Time Clock
The NVRAM and real-time clock reside on the ISA bus. Both functions are implemented with a
Dallas Semiconductor DS1644 Nonvolatile Timekeeping RAM.
The NVRAM chip contains the following functions:
• A 32 K × 8 static RAM.
• A time-of-day clock, which overlays the uppermost 8-RAM addresses.
• An integrated lithium battery with a 10- to 20-year lifetime.
• An integrated clock crystal with ±1 minute/month accuracy.
• Power-fail circuitry to protect the clock and RAM during power down.
The NVRAM is used to hold sysgen values, error logs, and other miscellaneous system data. The
real-time clock keeps track of time while the unit is ON or OFF. An enable bit in the ISA bridge chip
must be set to enable writing to the NVRAM. The device is socket-mounted for easy replacement.
3-7
Page 52

UCW and Ultraview 1700 Monitors — Service Manual
Keyboard/Mouse Interface
The keyboard and mouse interface is implemented with the Intel 82C42PE programmable interface
chip on the ISA bus. This device comes pre-programmed with a Phoenix keyboard/PS-2 mouse
BIOS.
EPP Port
A 78C36 device on the ISA bus implements an IEEE 1284, Level 1 electrically-compliant, bidirectional enhanced parallel port (EPP). The hardware includes a 16-byte deep FIFO and can use
ISA DMA for data transfers. The software is responsible for many functions of the port, including
mode negotiation, RLE compression (decompression can be done in hardware), as well as the
detailed implementation of several of the communication modes. Refer to the IEEE 1284-1994
standard for detailed requirements of the port. This function is not currently supported.
ISA I/O Buffers
These latches and buffers interface miscellaneous low-frequency status and control signals to the
ISA bus.
SDLC Interface
The SDLC interface is the communications interface to Spacelabs Medical modules, which supply
patient data to the system.
Ultraview monitors communicate with the external module devices via the SDLC connector:
• Power is not supplied from this connector. All module power is generated by the DC power supply
and is isolated from the monitor.
• The SDLC interface runs at a 1.892352-MHz frequency. This is divided down to generate a
448-Hz sampling rate. The SDLC communication task has a built-in program that retrieves the
data from the bus, assembles it into a packet format, and provides it to the CPU.
• The SDLC clock signals are sent by the SDLC interface and are used to drive the external SDLC
bus and modules. The SDLC data signals are bi-directional and can be used both to transmit and
receive data from the intelligent modules.
Nurse Alarm Output
When an alarm sounds, a relay that is connected to the nurse alarm connector is activated. When
this connector is connected to an external nurse alarm light/buzzer, the light/buzzer will activate
when an alarm occurs.
Clock Distribution
The clock distribution system is designed to provide low-skew clocks to the core hardware operating
off of the MPC860 and PCI busses. Additional, lower-tolerance clocks are needed in other
peripheral areas.
A Motorola PLL-based clock driver chip is used to provide a low-skew clock distribution system and
several optional operational configurations. This provides clocks to all of the PCI devices under
1.0 ns of skew, including wiring delay variation. The MPC860 and FPGA clock skew falls within this
specification also. The device can be pin-strap programmed for various clock frequencies including
25, 33, and/or 50 MHz.
3-8
Page 53
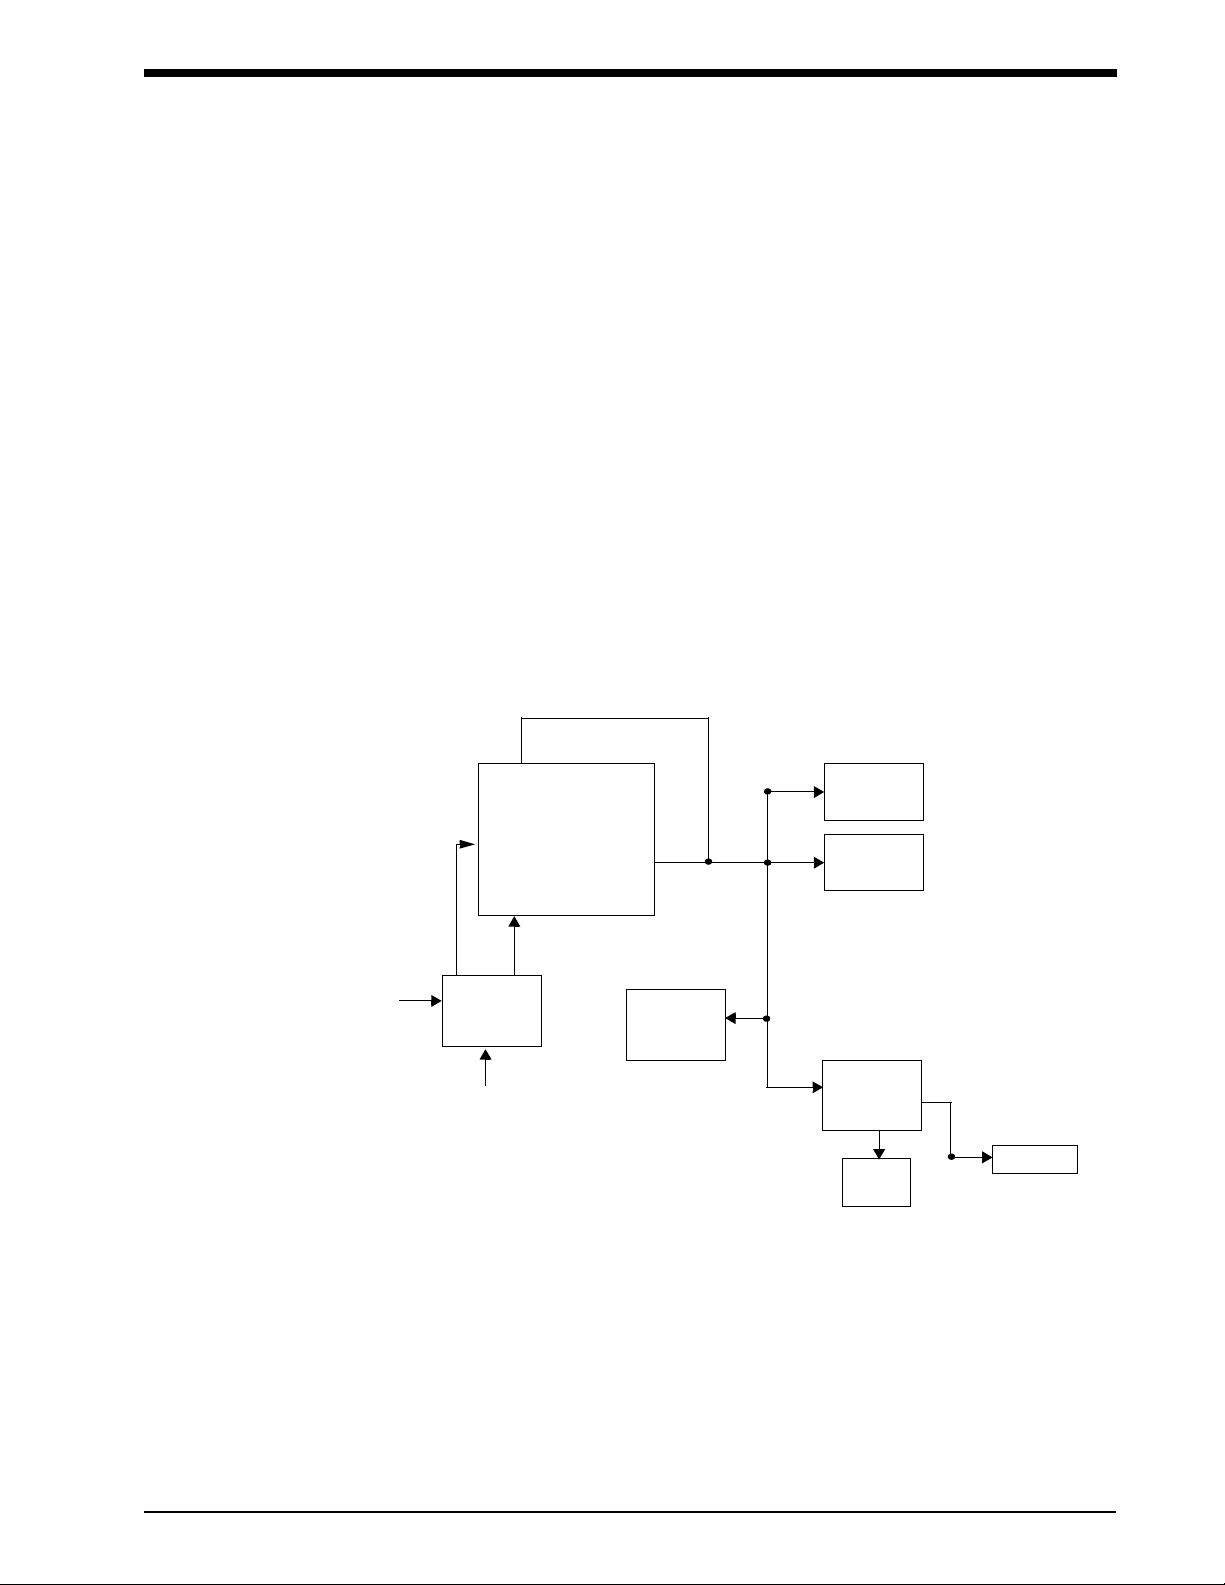
Theory
These clocks are used for specific peripherals and are generated at various locations on the PCBA.
• 20-MHz clock for Ethernet
• 24.6-MHz clock for audio codec
• 16.9-MHz clock for audio codec
• 12-MHz clock for keyboard/mouse controller
• 14.3-MHz clock for the PCI/ISA bridge and SVGA hardware
• 11.354-MHz clock divided to 1.89 MHz for SDLC
• 68.5-MHz and 34.25-MHz clock for the SVGA hardware
• 8.33-MHz clock for the PCI/ISA bridge and ISA bus
Hardware Reset
The hardware reset originates from the MAX695 power supervisor IC. The supervisor IC keeps the
860 PORESET input asserted (thereby keeping the CPU from running) when the system voltage is
less than 4.65 V. Once the system voltage exceeds 4.65 V for 200 ms, the supervisor IC releases
the 860 PORESET input, allowing the CPU to boot. The 860 generates two reset outputs, HRESET
and SRESET. HRESET is buffered and is used to reset all PCI devices and most other major
devices on the PCBA, including ISA devices. (ISA devices, however, can also be individually reset
under software control by writing to one of the ISA latches.)
SRST
Ethernet
MPC860
pfail
input
from
pfail
IRQ0
POreset
supervisor
IC chip
HRST
power ON/OFF reset
PCI bus reset
(output only)
PCI
bridge
video
controller
display
assembly
VCC
ISA bus
controller
audio
IRTS
reset
Figure 3-4: Reset signals
Software Reset
To cause a software reset, the 860 processor causes a unrecoverable situation by first disabling its
internal machine check interrupt and then forcing a machine check by accessing unmapped address
space, causing the CPU to reboot.
3-9
Page 54

UCW and Ultraview 1700 Monitors — Service Manual
Power Failure Operation
The power supply within the monitor chassis provides a digital PFAIL signal to the CPU PCBA to
indicate that a power failure condition is imminent. This signal is asserted by the power supply if its
AC input power fails for more than one cycle or if the monitor is switched OFF. This signal is
provided through a power supervisor IC to the MPC860 as an interrupt, causing the processor to
take immediate power failure action.
The power supply will continue to provide DC power to the CPU PCBA for a minimum of one
millisecond after the power failure condition is detected. The host processor must complete all
power failure actions during this time.
Hard Reset Configuration Word
At the rising edge of hard reset (HRESET), the 860 processor samples the rstconfg pin. The 860
processor has this pin tied low, which tells the 860 to read data bus bits 15-0 to determine its basic
post-reset configuration. Resistor pullups on the bus pull certain bits high; the others are pulled low
by weak internal pulldowns. The 860 is set to read the following:
Bits 15 – 0 = 0000 0110 1000 0010
If any of these bits are stuck in the wrong state at reset, the 860 will not properly boot. The detailed
meaning of each bit is explained in the MPC860 User’s Manual.
Interrupts
The MPC860 processor has two on-chip interrupt controllers, one in the System Interface Unit (SIU)
and a second controller within the Channel Processor Module (CPM). These handle interrupts on
specific input pins of the MPC860. Some interrupts are also routed through the interrupt controller in
the ISA bridge.
supervisor IC
sdlc rts
video drq
uart cts
uart cd
irts cts
uart dsr
C15
C14
C9
C8
C5
C4
MPC
860
c11
c10
860/PCI
bridge
e-net
keyboard
audio
mouse
3-10
ISA
controller
VGA
Figure 3-5: Interrupt connections
Page 55
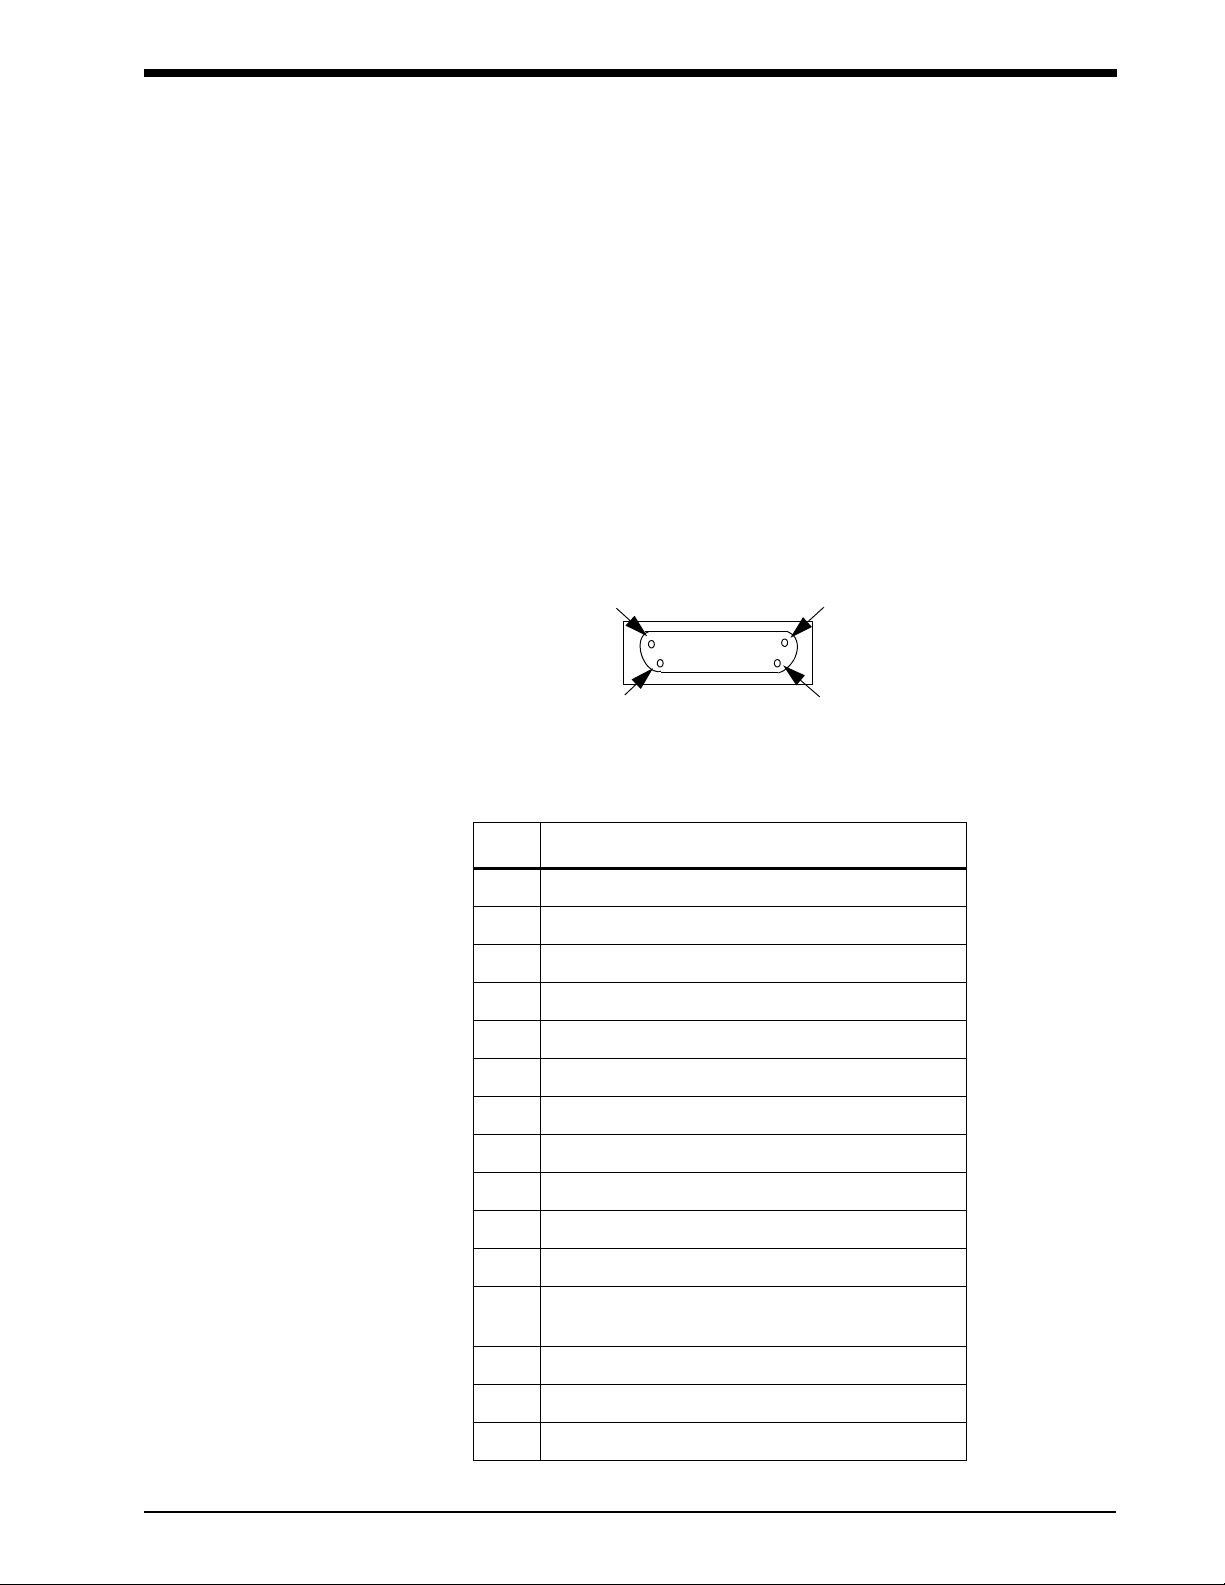
Theory
Regulator for -5 Volts
Certain analog components in the video section require a -5-volt supply. This is generated on-board
by a -5-volt switching regulator supplied by the +12-volt input.
Regulator for -3.3 Volts
Many digital devices on the CPU PCBA run on -3.3 volts. This is created from the +5-volt input by an
on-board switching regulator.
Power Supply Connector
Power arrives at the CPU PCBA via a single connector. The pin assignments for this connector on
the CPU PCBA are as follows:
18
15 9
Figure 3-6: Pin numbering for CPU PCBA connector
Table 1: Pin Assignments for Power Supply Connector
Pin Description
1 +5 V
2 +5 V
3 Ground
4 Ground
5 Remote sense line for the +5 V
6 +12 V
7 +12 V
8 PFAIL; power failure signal from the power supply
9 +5 V
10 +5 V UPS (Currently unused)
11 Ground
front view
12 Grounded when plugged into display chassis;
used to detect what chassis the CPU PCBA is in
13 Ground
14 Ground
15 Power switch position
3-11
Page 56

UCW and Ultraview 1700 Monitors — Service Manual
EMI Reduction
The CPU PCBA includes several design features intended to reduce EMI effects. The power supply
to the PCBA is segmented and heavily filtered to prevent noise propagation from one part of the
PCBA to another. All high-frequency signals are driven through series resistors to limit the rise and
fall times of these signals, reducing ringing and other EMI effects. The construction of the multi-layer
PCBA is such that noisy signals are shielded by power and ground planes.
Boot Sequence Overview
When power is applied, the unit begins the boot up sequence. The following is a highly-abbreviated
version of the sequence of events that occurs while the unit is booting.
1. Program execution starts at address 00000100 in flash memory.
2. Key internal and external devices and memories are mapped and enabled.
3. The boot-type value is read from super-cap-backed SRAM. This value is written to SRAM at
every power down or self-reboot. The value determines the kind of boot, either warm or cold.
Warm booting skips diagnostics and other steps in order to boot as quickly as possible.
4. Key areas of DRAM are tested (cold boot only).
5. The boot code is copied from flash memory to DRAM and program execution resumes in
DRAM.
6. More internal and external devices are initialized.
7. Other key memory and CPU tests are performed (cold boot only).
8. The VxWorks kernel is started.
9. Drivers needed for diagnostics and the boot console are installed.
10. Diagnostics are run (cold boot only).
11. Boot logo and the 3-2-1 countdown are displayed (cold boot only).
12. The application code is copied from flash memory to DRAM and executed in DRAM.
13. Much of the above initialization is repeated as part of the application code.
14. The main monitor task, MonitorInit, is spawned and normal monitor operation begins.
Normal Operation Overview
During normal operation, the software does the following:
• Once the unit is booted, it begins normal monitor operation, which involves high-level software
subsystem tasks running simultaneously. These tasks interface to other tasks, and all tasks
interface to hardware devices via device drivers. The VxWorks kernel is responsible for running
tasks based on their relative priority and on other system interrupts and events.
Main Subsystems and Tasks:
• The SDLC subsystem sends packets from the modules to the rest of the system, including
Ethernet and GDS, and sends packets to modules.
• The Interpreter subsystem provides modules and keys with “primitives” that are used via table
code to create and control the display and action of the various menus and keys. The Interpreter
subsystem processes key presses from the user and notifies the Keyboard Interpreter to execute
the appropriate table code program. That program uses the Key Display task to redraw the new
key state as feedback to the user.
3-12
Page 57

Theory
• The GDS is the patient database containing parameter data from the modules, including current,
general, trend, and waveform data.
• The Remote Interface System handles Ethernet connections to remote monitors and modules. It
broadcasts the existence and configuration of the network devices to each other. It enables the
user to view remote parameters and to remotely press keys across the network. The Remote
Interface System downloads the module table code to remote monitors to create the same human
interface on multiple monitors. In addition, it supports the alarm watch and remote view functions
and handles multicasted waveform data.
• The Recorder subsystem controls local recorders and network recorders.
• The Alarm subsystem handles alarms notification. Modules send alarm conditions over SLDC,
and in response, the alarm subsystem sends alarm messages to the tone, display, record, and
network tasks. The module receives messages from the network for alarm watch alarms and from
SDLC tasks for local module alarms.
Minor System Tasks and Device Drivers:
• The main subsystems communicate display information to the Display Manager (DM) task. The
DM receives display changes from these subsystems and issues the appropriate graphics
primitives to update the display through the video device driver.
• The subsystems interface to SDLC via Rx/Tx buffers in memory, driven by a 32-Hz interrupt.
• The Ethernet interface uses dynamic memory for receive and transmit. One Ethernet interrupt
occurs for both receive packets and command completes. An Ethernet write command is used for
transmitting packets. An “Ethernet-user” task maintains and uses a routing lookup table to switch
network packets to the appropriate network driver — the Ethernet device driver or the wireless
network card device driver.
• The Recorder subsystem uses these SDLC/Ethernet drivers directly.
• The touchscreen driver and the external keyboard and mouse drivers provide x-y coordinates to
the keyboard task for activating the on-screen keys.
• The Tone task is responsible for timing and prioritizing tones from the Alarm subsystem, the Keys
subsystem, and other system tasks. It receives commands to turn ON and OFF, to suspend, and
to change volume. It also looks up wavetable tones and sends them to the Mixer task.
• The Mixer task mixes the alarm sounds with information tones as needed. Both the Tone and
Mixer tasks talk to the audio hardware via the audio device driver.
3-13
Page 58

UCW and Ultraview 1700 Monitors — Service Manual
CPU External Connectors
The CPU PCBA has several connectors for communication with external devices. Additional
external connectors are mounted on the I/O PCBA (refer to I/O PCBA on page 3-15 for their
description).
Table 2: External Connectors on the CPU PCBA
Connectors Description
RS-232
connectors
1
2
Remote display
connectors
2
DB 9 style, female
1- CD
2- TX (should be RX)
3- RX (should be TX)
4- DTR
5- GND
6- DSR
7- RTS
8- CTS
9- RI (port 1 only)
HD 15-pin, female, D-Sub
1- Analog red
2- Analog green
3- Analog blue
4- N/C
5- N/C
6- GND (red)
7- GND (green)
8- GND (blue)
9- N/C
10- GND
11- N / C
12- DDC2B DATA (port 1 only)
13- HSYNC
14- VSYNC
15- DDC2B CLK (port 1 only)
15
96
front view
15
610
1115
front view
Ethernet
connector
3-14
10BaseT, RJ-45 style
1- TX+
2- TX3- RX+
4- N/C
5- N/C
6- RX7- N/C
8- N/C
1
front view
8
Page 59

Table 2: External Connectors on the CPU PCBA (continued)
Connectors Description
HD 26-pin, female, D-Sub
1- NC
2- GND
3- NC
4- GND
5- NC
6- GND
7- NC
8- NC
9- CLK+
External SDLC
connector
SDLC
10 - GND
11 - NC
12 - GND
13 - NC
14 - GND
15 - NC
16 - NC
17 - DATA+
18 - CLK19 - NC
20 - GND
21 - NC
22 - GND
23 - NC
24 - NC
25 - NC
26 - DATA-
18
Theory
19
10
1926
front view
I/O PCBA
The I/O PCBA holds those external connectors that cannot fit on the CPU PCBA and provides for
internal connections to the touchscreen and video connectors. The I/O PCBA contains active
components used for buffering touchscreen and C-Sync signals when the unit is attached to a
91416-B. The I/O PCBA also contains PCBA connectors, EMI filters, resistors, and capacitors.
IR Touchscreen Connector (90385 Only)
171
18 34
Figure 3-7: 90385 touchscreen connector pins
front view
3-15
Page 60
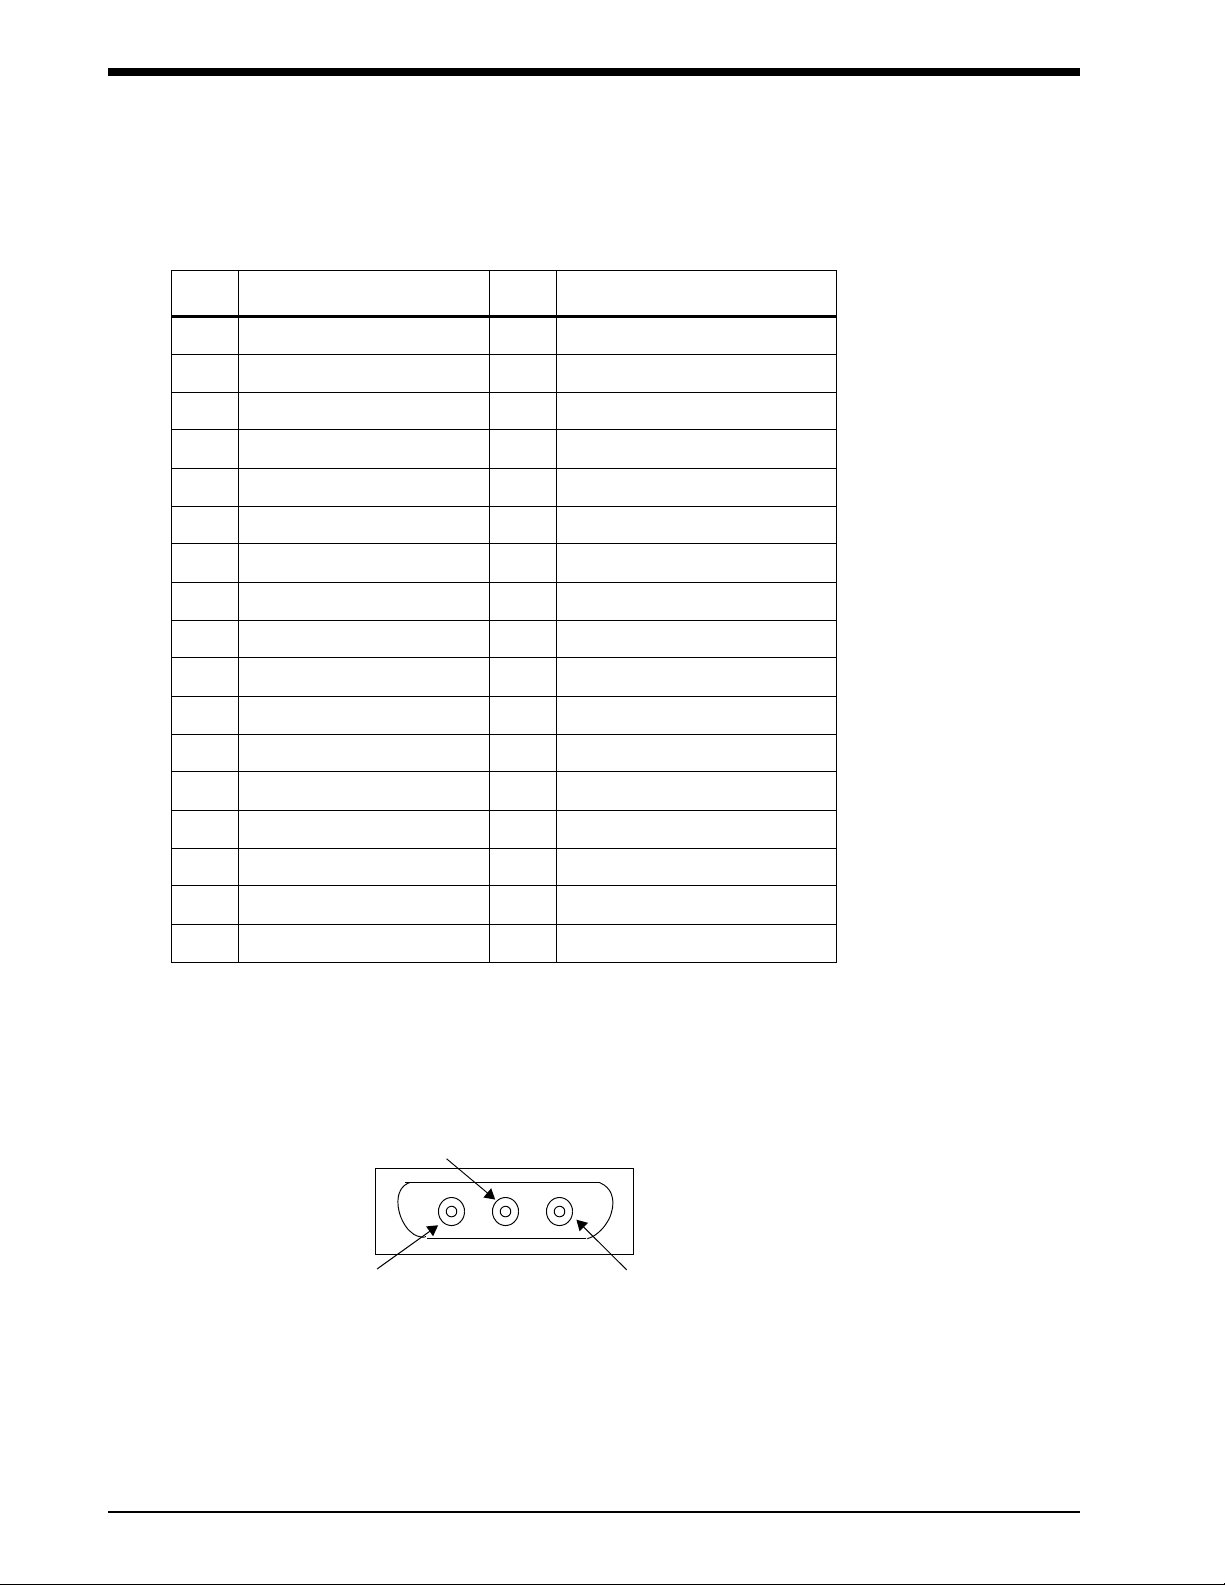
UCW and Ultraview 1700 Monitors — Service Manual
Table 3: Pin Assignments for the 90385 Touchscreen Connector
Pin Description Pin Description
1 GND 18 EMIT
2 SELECT6 19 GND
3 12V_BACKPLANE 20 IRSIG
4 SELECT5 21 KPDACT
5 GND 22 IRBIAS
6 SELECT4 23 GND
7 12V_BACKPLANE 24 ADREF
8 SELECT3 25 RKEY_IR
9 GND 26 TEMP
10 SELECT2 27 GND
11 12V_BACKPLANE 28 SDAT
12 SELECT1 29 GND
13 GND 30 SCLK
14 SELECT0 31 GND
15 GND 32 CSYNC
16 EMITCUR 33 SPKROUTN
17 GND 34 SPKROUTP
Video RGB Connector (90385 Only)
This connector connects analog video RGB signals to the CRT inside the chassis. It contains three
coax connections — red, green, and blue — each with their surrounding signal return shields.
Green
Blue
front view
Red
3-16
Figure 3-8: Coax connections
Page 61
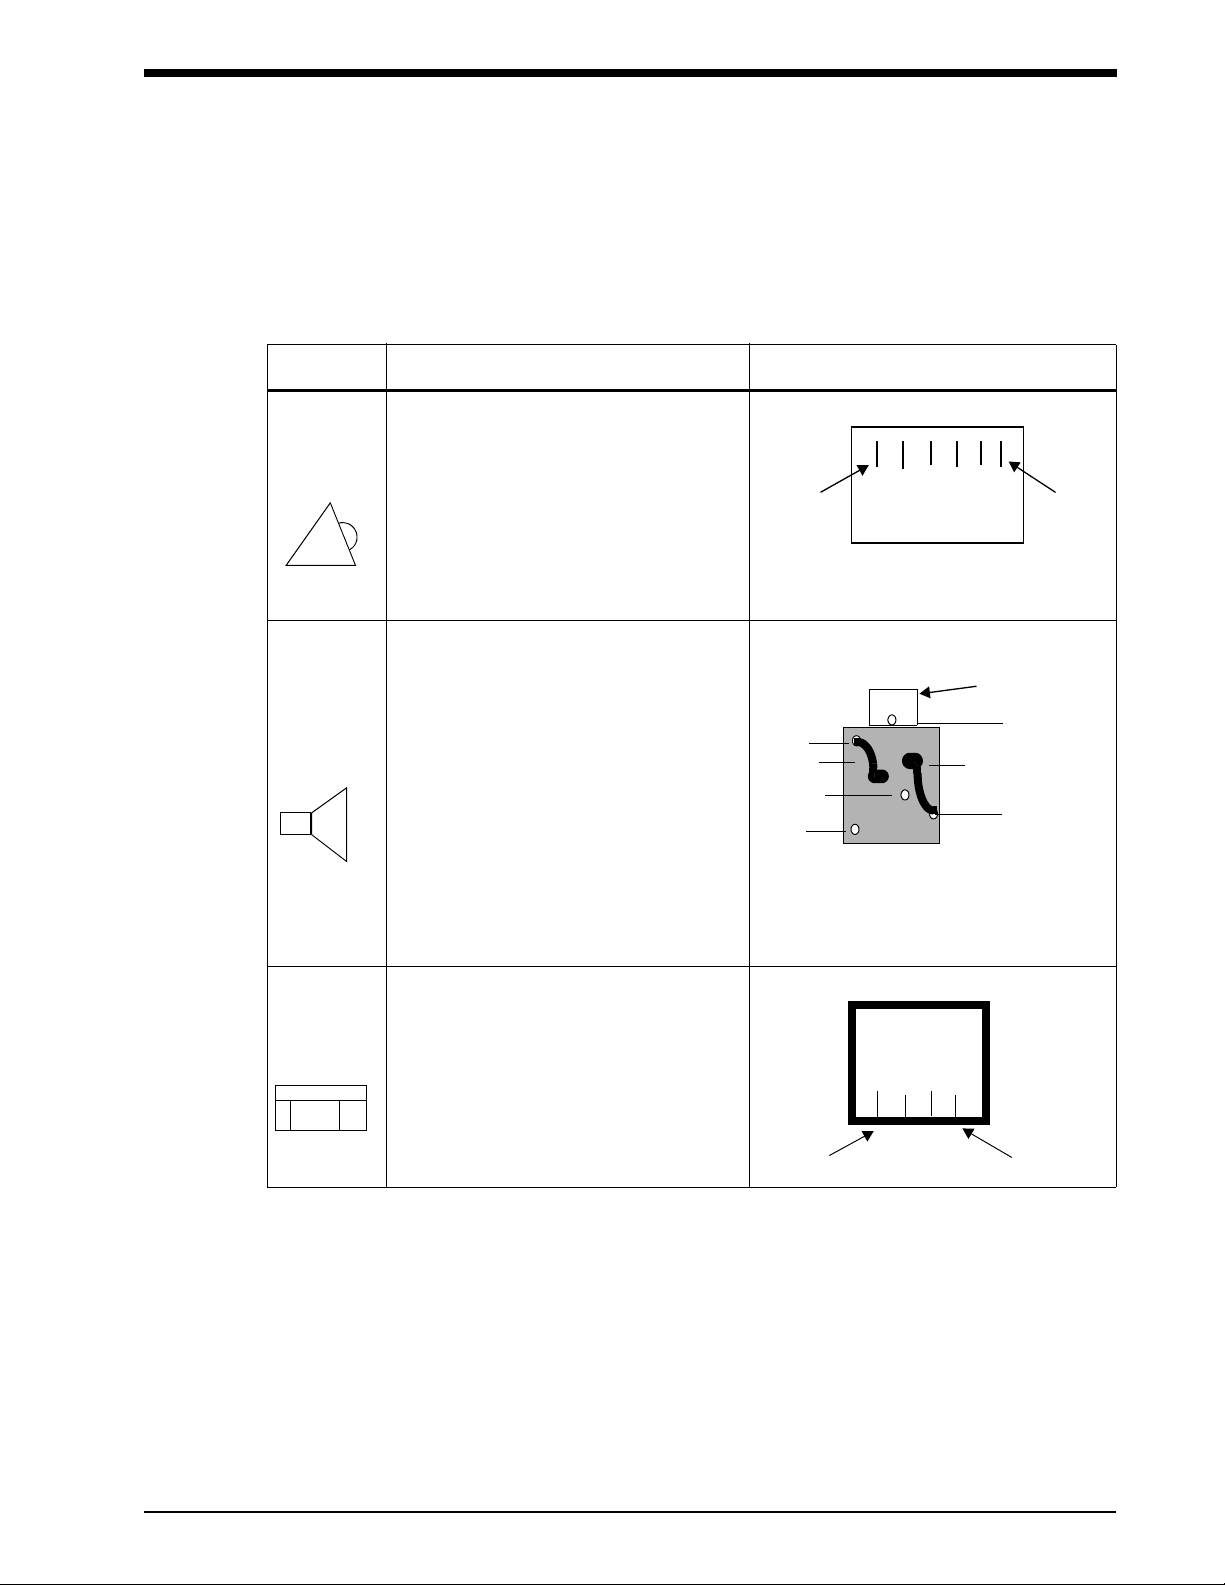
I/O External Connectors
The following external connectors are mounted on the I/O PCBA. Additional external connectors are
mounted on the CPU PCBA. Refer to CPU PCBA on page 3-5 for their descriptions.
Table 4: External Connectors on the I/O PCBA
Connectors Description
Theory
Alarm
connector
Audio
connectors
RJ-11 style, 6 pin
1- ALARM, COMMON
2- N/C
3- ALARM, NORM. OPEN
4- +12V
5- N/C
6- GND
3.5 mm size, stereo, female
IN
1- GND
2- Right
3- GND
4- GND
5- Left
OUT
1- GND
2- Right
3- NC
4- NC
5- Left
Left and Right inputs are grounded when no
plug is inserted
16
front view
female input
5
left
3
4
top view
1 - GND
right
2
Keyboard
connector
RJ-9 style, 4 pin
1- GND
2- CLK
3- +5V
4- DATA
front view
41
3-17
Page 62

UCW and Ultraview 1700 Monitors — Service Manual
Table 4: External Connectors on the I/O PCBA (continued)
Connectors Description
Mouse
connector
IR
touchscreen
connector
(90387 only)
DIN style, 6 pin
1- DATA
2- N/C
3- GND
5- +5V
6- CLK
8- N/C
gnd ring-
1- Select_IN0
2- Ground
3- Select_IN1
4- Ground
5- Select_IN2
6- Ground
7- Select_IN3
8- Ground
9- Select_IN4
10- Ground
11- Select_IN5
12- Ground
13- Select_IN6
14- Ground
15- Emit_In
16- Ground
17- Emitcur_In
18- Ground
19- Csync-In
20- Ground
21- SCLK-In
22- Ground
23-SDAT_In
24-Ground
25-Spkrp_In
26-Ground
27-Spkrn_In
28-Ground
29-Kpdact_In
30-Ground
31-Rkey_IR_Out
32-Ground
33-Remote_Pwr_Sense
34-Ground
35-N/C
36-N/C
37-Adref_Out
38-Ground
39-Temp_Out
40-Ground
41-Irbias_Out
42-Ground
43-Irsig_Out
44-Ground
8
5
2
top view
6
gnd
ring
3
1
Interconnect PCBA
The interconnect PCBA connects the CPU PCBA to the I/O PCBA. It contains only connectors and
does not require power.
3-18
Page 63

Maintenance
Contents
Preventive Maintenance (PM) Procedures. . . . . . . . . . . . . . . . . . . . . . . . . . . . . . . . . . . . . . . . . . . . 3
Electrical Safety Testing . . . . . . . . . . . . . . . . . . . . . . . . . . . . . . . . . . . . . . . . . . . . . . . . . . . . . . . . . . 3
Definitions. . . . . . . . . . . . . . . . . . . . . . . . . . . . . . . . . . . . . . . . . . . . . . . . . . . . . . . . . . . . . . . . . . . . . 3
Disassembly Procedures (90385) . . . . . . . . . . . . . . . . . . . . . . . . . . . . . . . . . . . . . . . . . . . . . . . . . 11
Disassembly Procedures (90387) . . . . . . . . . . . . . . . . . . . . . . . . . . . . . . . . . . . . . . . . . . . . . . . . . 21
Overview
CAUTION:
• Observe precautions for handling electrostatic-sensitive devices!
Never touch electrostatic-sensitive electronic components without following proper
!
anti-static procedures, including the use of an ESD wrist band and mat. An
electrostatic discharge from your fingers can permanently damage electronic
components.
All static-sensitive electronic components are packaged in static-shielding bags.
Retain the bag for repackaging the component, should you need to store it or
return it to Spacelabs Medical for any reason.
Cleaning, preventive maintenance, and safety checks should be performed
annually and following any product disassembly/assembly. Preventive
maintenance and safety checks must be performed by trained personnel only.
Cleaning/Disinfecting
WARNING:
• Use only recommended cleaning solutions, or you may void the
manufacturer’s warranty.
• Harsh chemical agents degrade plastics and will compromise the safety of
the device.
• Disconnect the equipment from the patient and the electrical supply before
cleaning.
• Do not allow liquid to enter the interior of the module or monitoring
equipment.
• Do not immerse the equipment or cables in water or cleaning solutions.
• Do not autoclave.
4-1
Page 64

UCW and Ultraview 1700 Monitors — Service Manual
To clean the exterior of monitors, modules, and cables:
• Prepare the cleaning solution according to the manufacturer’s instructions.
• Wet a clean cloth with the selected cleaning solution.
• Remove excess liquid from the cloth and squeeze dry.
• Wipe exposed surfaces of the equipment and cables.
• Remove any soap residue by gently wiping with a clean damp cloth.
• Wipe dry with a clean dry cloth.
Use only the following recommended cleaning solutions:
• Mild soap and water solution
• U.S. Pharmacopoeia (USP) green soap
• Sodium hypochlorite solution (1:10 dilution of household chlorine bleach in water)
• Phenolic germicidal detergent (1% aqueous solution)
• Glutaraldehyde (2.4%) (Cidex)
• Isopropyl alcohol (70% solution)
• Over time, repeated use of a chlorine bleach solution may cause some colors to
!
fade.
Tape adhesive can be removed with Spacelabs Medical adhesive tape remover pads
(P/N 392196-001).
Questions and concerns about cleaning issues should be directed to a Spacelabs Medical field
service engineer.
Filter and Fan (90385 Only)
• Depending upon the hospital environment, the air filter may need to be cleaned
!
To clean the fan and filter:
1. Remove the filter cover from the rear of the monitor using a small, flat head screwdriver to
gently pry off the cover.
2. Clean the filter by washing it with water and mild soap (or replace it).
3. Allow the filter to dry.
4. Reinstall the filter and the fan filter cover.
5. Verify that the fan is working properly and that it is drawing air into the display assembly.
more than once per year. It is recommended that, in the beginning, hospitals
inspect the air filter at monthly intervals until an appropriate cleaning cycle is
established.
Touchscreen (90385 Only)
The touchscreen does not have a separate shield over its face. Clean the screen with a soft cloth
moistened with either 70% alcohol or with soapy water.
• Do not allow liquid to enter the monitor.
!
4-2
Page 65

Maintenance
Preventive Maintenance (PM) Procedures
The following information describes the requirements and tests necessary for safety and
performance verification of Spacelabs Medical 90385 and 90387 systems. This procedure must be
performed yearly, and also following any product disassembly/assembly. This procedure must be
performed by trained personnel only.
• Cleaning, preventive maintenance, and safety checks should be performed
!
Test Equipment Required
Electrical Safety Analyzer — Dynatech Nevada 232D or Equivalent
Patient Simulator — Dynatech Nevada 215A or Equivalent
!
annually.
• Before testing, ensure that module housing(s) and one DC power supply have
their associated cables attached.
• Only use one power supply while performing safety tests.
• Ensure that the Ethernet cable and the AC power sources are removed.
• The AC line is auto detected; no user selection is necessary.
• Ensure that the leakage test equipment is calibrated.
Mechanical Safety Check
Verify that the unit is clean, the screws are tight, the connector pins are not damaged, the case is not
damaged, and that there are no frayed or pinched wires or cables. If the unit is mounted, check that
the mounting hardware is tight.
Electrical Safety Testing
Safety testing protects the patient from electrical shock, especially micro-shock. It has been
determined experimentally that current values in the microampere (µA) range may cause fatal
arrhythmias in electrically susceptible patients. A patient is deemed electrically susceptible when
connected to monitoring equipment.
Definitions
Classification — IEC/EN/UL 60601-1 Safety standard designation for the class of equipment and
type of patient applied parts that indicate the degree of protection provided against electrical shock.
Leakage Current — Current that is not functional. It includes patient leakage, ground leakage, and
enclosure (or chassis) leakage.
Patient Lead Leakage — Current that flows from the applied part of the patient lead to ground.
Chassis Leakage — Current flowing from the enclosure (or from conductive parts accessible to the
operator) through the ground conductor.
4-3
Page 66
UCW and Ultraview 1700 Monitors — Service Manual
Normal Condition — Condition in which all means provided for protection are intact. Includes
ground connections, insulation, creepage and clearance distances.
Single Fault Condition — Open ground, open neutral, line voltage on a patient connection, or any
single state other than normal condition that could compromise patient safety.
UUT — Unit Under Test
Spacelabs Medical does not endorse standards to the exclusion of others. BE SURE TO CHECK
YOUR LOCAL REQUIREMENTS TO ENSURE YOUR EQUIPMENT SAFETY TESTS COMPLY
WITH LOCAL STANDARDS. Generally accepted standards for medical monitoring equipment,
such as the Underwriters Laboratory (UL) and the National Fire Protection Association (NFPA)
standards, are summarized in
Table 1: Summary of standards for medical monitoring equipment
Table 1 below.
International Mains to
Chassis Leakage
100 µA - normal condition, ground
attached (AC connector to chassis)
500 µA - single fault condition,
open ground or reverse polarity
* Measured from the AC Power cord third wire ground to the most distant ground attachment
Equipment Required: Electrical Safety Analyzer, Fluke model 232D or equivalent
These tests should be performed according to the hospital’s scheduling requirements, at least
annually or after repair or modification.
• All tests must be performed according to the safety analyzer’s operations manual,
!
and any local requirements.
WARNING:
• Before starting safety tests, ensure that no patient is connected to the
device under test. If safety tests must be performed on equipment currently
monitoring a patient, obtain permission to disconnect the cables from the
monitor and patient.
US (120 V) Mains to
Chassis Leakage
300 µA - normal condition, ground
attached (AC connector to chassis)
300 µA - single fault condition,
open ground or reverse polarity
Mains Resistance
500 milliohms*
500 milliohms*
Ground Resistance
1. Attach the power cord to the monitor under test, then measure the resistance from the AC
power cord third wire ground to a chassis location, such as the equipotential post on the rear
of the monitor.
2. Verify that the resistance is less than 500 milliohms (0.5 ohms).
4-4
Page 67

Maintenance
Chassis Leakage Current Tests
1. Plug the leakage analyzers into mains power.
2. Plug the equipment into the analyzer’s AC receptacle.
3. Verify that the leakage current from the chassis to ground is less than the values in Table 2.
Table 2: Enclosure Leakage Test Conditions and Limits
Neutral
Condition
Closed neutral Closed ground Normal polarity 100 µA300 µA
Open neutral Open ground Normal polarity 500 µA300 µA
Closed neutral Open ground Normal polarity 500 µA300 µA
Ground
Condition
Polarity
International
Limit
Domestic
Limit
Patient Lead Leakage Current Tests (Patient Modules)
Before you can perform the Patient Lead Leakage Current Test, verify that the monitor passes the
ground resistance and chassis current leakage tests. It is recommended that the equipment be
operating for 30 minutes prior to the test to allow thermal stabilization. If a 12-lead patient cable is
used with the module being tested, perform the tests using the 12-lead cable.
1. Patient Leads Current Leakage — measure the leakage current between each of the patient
leadwires and the ground lug on the monitor back panel. Also, measure the leakage current
between all combinations of ECG leads and ground. The current must be less than 10
with the ground connected, and 50 µA with the ground open.
2. Leakage Current to Ground with 50/60 Hz — AC mains voltage applied to leads. Apply AC
mains voltage and measure the leakage current between each of the ECG leadwires and
the ground lug on the monitor back panel. The current must be less than 50 µA at any line
voltage.
µA
Monitor Functional Tests
This procedure verifies operation of the Ethernet port, patient data logger, remote alarm, and
external SDLC options. It assumes that a multi-parameter module, either 90470 or 90496, is
available for testing purposes. In the event that these modules are not available, similar modules
may be substituted for verifying specific parameters.
Required Tools/Test Equipment
• Waveform simulator and appropriate patient cable.
• If patient data logger option is to be tested: terminal or computer with VT100 emulator and
appropriate standard PC cable to connect it to the properly configured DB9 serial port on the
monitor.
• Module housing (for 90385).
4-5
Page 68

UCW and Ultraview 1700 Monitors — Service Manual
Verifying Monitor Functions
To verify that the monitor functions correctly with parameter modules:
1. Insert a module that includes ECG without the patient cables connected.
• Verify that the vertical ECG parameter key appears, a heart rate of ??? is displayed, and
the message LEADS OFF is in the waveform zone.
2. Connect a waveform simulator to the ECG input with a 5-lead patient cable, and set the
simulator to a known rate.
• Verify that the ECG rate and lead being monitored are displayed to the right of the ECG
parameter key.
• Verify that the ECG waveform is displayed.
3. Connect a waveform simulator to the pressure inputs.
4. Label and zero the channels.
• Verify that the numerics and waveforms are accurate.
• If the monitor is properly configured and installed on a network, perform the
!
following test as described. The recordings will be printed at the central printer.
5. Touch the RECORD key, then touch one of the flashing parameter keys.
• Verify that the recording is printed.
Optional Remote Alarm
If the monitor is configured to use the Remote Alarm interfaced into a nurse call station, plug the
cable into the Remote Alarm connector and initiate an alarm. The nurse call should respond.
Optional Wired Ethernet
If the monitor is configured to use the wired Ethernet, connect a 10BaseT cable from an active
Spacelabs Medical network into the rear panel connector. Press the SPECIAL FUNCTIONS key and
verify that other monitors appear in the Remote View submenu.
4-6
Page 69

Maintenance
Error Log
• Error logs are intended for use by Spacelabs Medical personnel only and do not
!
To clear the error log:
1. Power OFF the monitor for several seconds and then power ON again. Enter the Boot menu
when the 3-2-1 countdown appears on the System Startup screen (refer to
on page 5-1 for detailed instructions).
2. Clear errors by then selecting c.
!
3. The log can be printed as well as displayed and cleared via the Service Functions menu.
necessarily indicate monitor malfunction.
Troubleshooting
• Prior to clearing logged errors, always generate a printout of the CMOS error log
and attach it to the monitor’s PM record.
Display Adjustments (90385)
Brightness and Contrast
To adjust the brightness and contrast:
1. Power ON the monitor.
2. At the Main menu, touch the MONITOR SETUP key, MONITOR CONFIG key, and then the
BRIGHTNESS CONTRAST key.
3. Touch the brightness up and down arrow keys and the contrast up and down arrows to
adjust the display view.
CAUTION:
• Avoid dimming the keys to the point that they are invisible. If this happens,
before exiting the menu or powering OFF the unit, turn the brightness up by
touching the place where the brightness and contrast up arrows should be.
4-7
Page 70

UCW and Ultraview 1700 Monitors — Service Manual
Display Alignment
1. At the Main menu, touch MONITOR SETUP, and then touch PRIVILEGED ACCESS.
2. Enter the password using the on-screen keyboard and touch ENTER.
3. Touch MONITOR CALIBRATION.
4. Touch CRT POSITION.
The display will show the following:
BORDER
Figure 4-1: CRT positioning
These keys can be used to move the display up, down, left, and right as well as to stretch or
compress the display horizontally and vertically.
Touch the BORDER key for a border to appear around the screen perimeter. However, the current
screen adjustment may be such that portions of the border may be positioned off-screen. Adjust the
screen position and the size until the entire border is visible and is positioned as close to the edge of
the display as possible. This is the optimum screen position adjustment.
CAUTION:
• Repositioning the screen does not change where the IR touchscreen
expects each key to appear. If the screen size or position is severely altered,
significant misalignment of the key images and the true physical
touchscreen keys may occur.
4-8
Page 71

Maintenance
Display Color
• The display color can be inspected, but the monitor must be returned to
!
To inspect the color:
1. Power OFF the monitor for several seconds and then power ON again.
2. Enter the Boot menu when the 3-2-1 countdown appears on the System Startup screen
(refer to
3. At the Boot menu, touch D for diagnostics, then i for individual diagnostics, v for video
diagnostics, and i for the interactive video diagnostic. After displaying several messages, the
entire screen will cycle through the colors of red, green, blue, white, and black, pausing for
five seconds at each color.
4. Inspect the screen to verify that all the colors appear and that no portion of the display is
discolored or exhibits other undesirable visual flaws.
5. If discoloration or other flaws are evident, press v for video diagnostic. If the diagnostic
passes, return the entire monitor to Spacelabs Medical for service. If the diagnostic fails,
refer to Monitor Fails Power-ON Diagnostics on page 5-5 for suggested service action.
Spacelabs Medical for adjustment.
Troubleshooting on page 5-1 for detailed instructions).
Touchscreen Calibration
In the event the touchscreen becomes difficult to use or a replacement has been installed, you may
need to calibrate it. This can be performed by using the calibration function found under the Biomed
menu.
To perform the calibration, attach a mouse (in the event the touchscreen is unusable) and
perform the following:
1. Power ON the monitor.
2. Touch MONITOR SETUP and then touch PRIVILEGED ACCESS.
3. Enter the Biomed code (the factory default is Biomed).
4. Touch MONITOR CALIBRATION.
5. Touch TOUCHSCREEN CALIBRATION.
CAUTION:
• Do not interface with the monitor during automatic calibration.
6. Perform the touchscreen margin adjustment.
4-9
Page 72

UCW and Ultraview 1700 Monitors — Service Manual
Display Adjustments (90387)
Display Alignment
All display adjustments (e.g., brightness, contrast, position) for the 90387 are a function of the OEM
display purchased separately. Monitor controls have no effect. However, the monitor can provide a
border to ease the performance of display alignments.
To display a border:
1. At the Main menu, touch MONITOR SETUP, and then touch PRIVILEGED ACCESS.
2. Enter the password using the on-screen keyboard and touch ENTER.
3. Touch the MORE key.
4. Touch SERVICE FUNCTIONS.
5. Touch MONITOR CALIBRATION.
6. Touch CRT POSITION.
The display will have a border around the screen perimeter. The current screen adjustment may be
such that portions of the border may be positioned off the screen. Adjust the position and size until
the entire border is visible and is positioned as close to the edge of the display as possible for
optimum display position.
• If the 90387 is used in conjunction with a 91416-B, configuration is the same as
!
Touchscreen Calibration
Touchscreen calibration information is stored in the monitor’s NVRAM. If this information is missing
or has been changed, a calibration procedure must be performed on the 90387. A touchscreen
calibration may also be performed if the touchscreen is not properly responding when a display key
is touched.
A remote monitor with touchscreen capability, connected to a 90387, may be calibrated in one of
three ways.
1. Initial Installation — If the touchscreen calibration information is not stored in the NVRAM
and the presence of a touchscreen cable at the J9 port is sensed during power-up, the
90387 will automatically display a calibration screen. The calibration screen will prompt the
user to touch the upper-left, upper-right, and lower-right corners of the display for calibration.
After calibration, the unit reverts to normal operating mode.
2. Recalibration using the Biomed menu — In the event the touchscreen becomes difficult
to use, it may need to be calibrated. To perform the calibration, attach a mouse (in the event
the touchscreen is unusable) and perform the following steps.
a. Power ON the 90387.
b. Touch the MONITOR SETUP key and then touch the PRIVILEGED ACCESS key.
c. Enter the Biomed code (the factory default is biomed).
d. Touch the MONITOR CALIBRATION key.
for a 90385.
4-10
e. Touch the TOUCHSCREEN CALIBRATION key.
f. Touch the box displayed in the upper-left, upper-right, and lower-right corners of the
display.
Page 73

Maintenance
3. Recalibration using the Diagnostic Boot menu — A PS2 mouse or keyboard with RJ9
connector is required to perform a touchscreen calibration. Perform the following steps to
calibrate the touchscreen.
a. Power OFF the 90387 and connect either a PS2 mouse or keyboard.
b. Power ON the 90387 and enter the Diagnostic Boot menu. This menu may be
accessed using the mouse or keyboard.
• To access the Diagnostic Boot menu using a PS2 mouse, simultaneously click the
left and right mouse buttons during the “3-2-1” boot-up countdown. (The left and right
mouse click must be simultaneous with the “3” of the “3-2-1” countdown.)
• To access the Diagnostic Boot menu using a keyboard, press CTRL+D during the
“3-2-1” boot-up countdown. (The CTRL+D sequence must be simultaneous with the
“3” of the”3-2-1” countdown.)
c. Select v (set video characteristics) on the Diagnostic Boot menu.
d. Select a (1024 x 768, 60 Hz) on the Video menu.
e. Power OFF the 90387, then power ON again.
f. As part of the initialization routine, the unit will automatically display a calibration
screen. The calibration screen will prompt the user to touch the upper-left, upper-right,
and lower-right corners of the display for calibration.
4. Calibration is now complete.
Disassembly Procedures (90385)
Tools Required
• Static mat
• Static wrist strap
• #1 and #2 Phillips screwdrivers (#2 driver > 7.5 inches [19 cm] shaft)
• 13/16 inches (4.75 mm) nut driver
• Standard flat screwdriver
• Top cover removal tool (P/N 003-0085-00)
CAUTION:
• Before disassembly, switch the main power OFF and disconnect the AC
cord from the wall outlet.
Top Cover Removal
1. Remove the AC cord and retainer from the display assembly.
2. Refer to Figure 4-2 for the location of two screws on the bottom of the display.
3. Remove these two screws.
4. Using a soft cloth to protect the CRT face from scratching, lay the monitor on its face to
enable you to remove the two cover screws.
4-11
Page 74

UCW and Ultraview 1700 Monitors — Service Manual
bottom view
Figure 4-2: Location of screw
5. Return the monitor to its normal position.
6. Remove the CRT top cover using the top cover removal tool (P/N 003-0085-00).
a. Locate the two latches that hold the bezel and top cover together (refer to Figure 4-3 on
page 4-13).
b. Position the top cover removal tool next to the two latches (refer to Figure 4-3 on
page 4-13).
c. Firmly push down on the top of the rear cover near the bezel and insert the removal tool
between the bezel and top cover as far as possible.
d. Slide back the rear cover from the bezel by grasping the cover on both sides and
sharply pushing in and back.
4-12
Page 75

bezel
top cover
latches
insert tool between
bezel and top cover
as far as it can go
top view
Maintenance
top cover
removal tool
(P/N 003-0085-00)
Figure 4-3: Top cover removal
7. After clearing the retaining brackets, pull the cover straight back until it clears the base and
can be removed
.
CAUTION:
• When reinstalling the top cover, be careful that the beryllium/copper fingers
in the top corners are not damaged. Hold them in slightly while sliding the
top cover on.
8. To install the top cover, gently push the cover forward until a firm snap is heard, indicating
that the cover has contacted the base.
4-13
Page 76
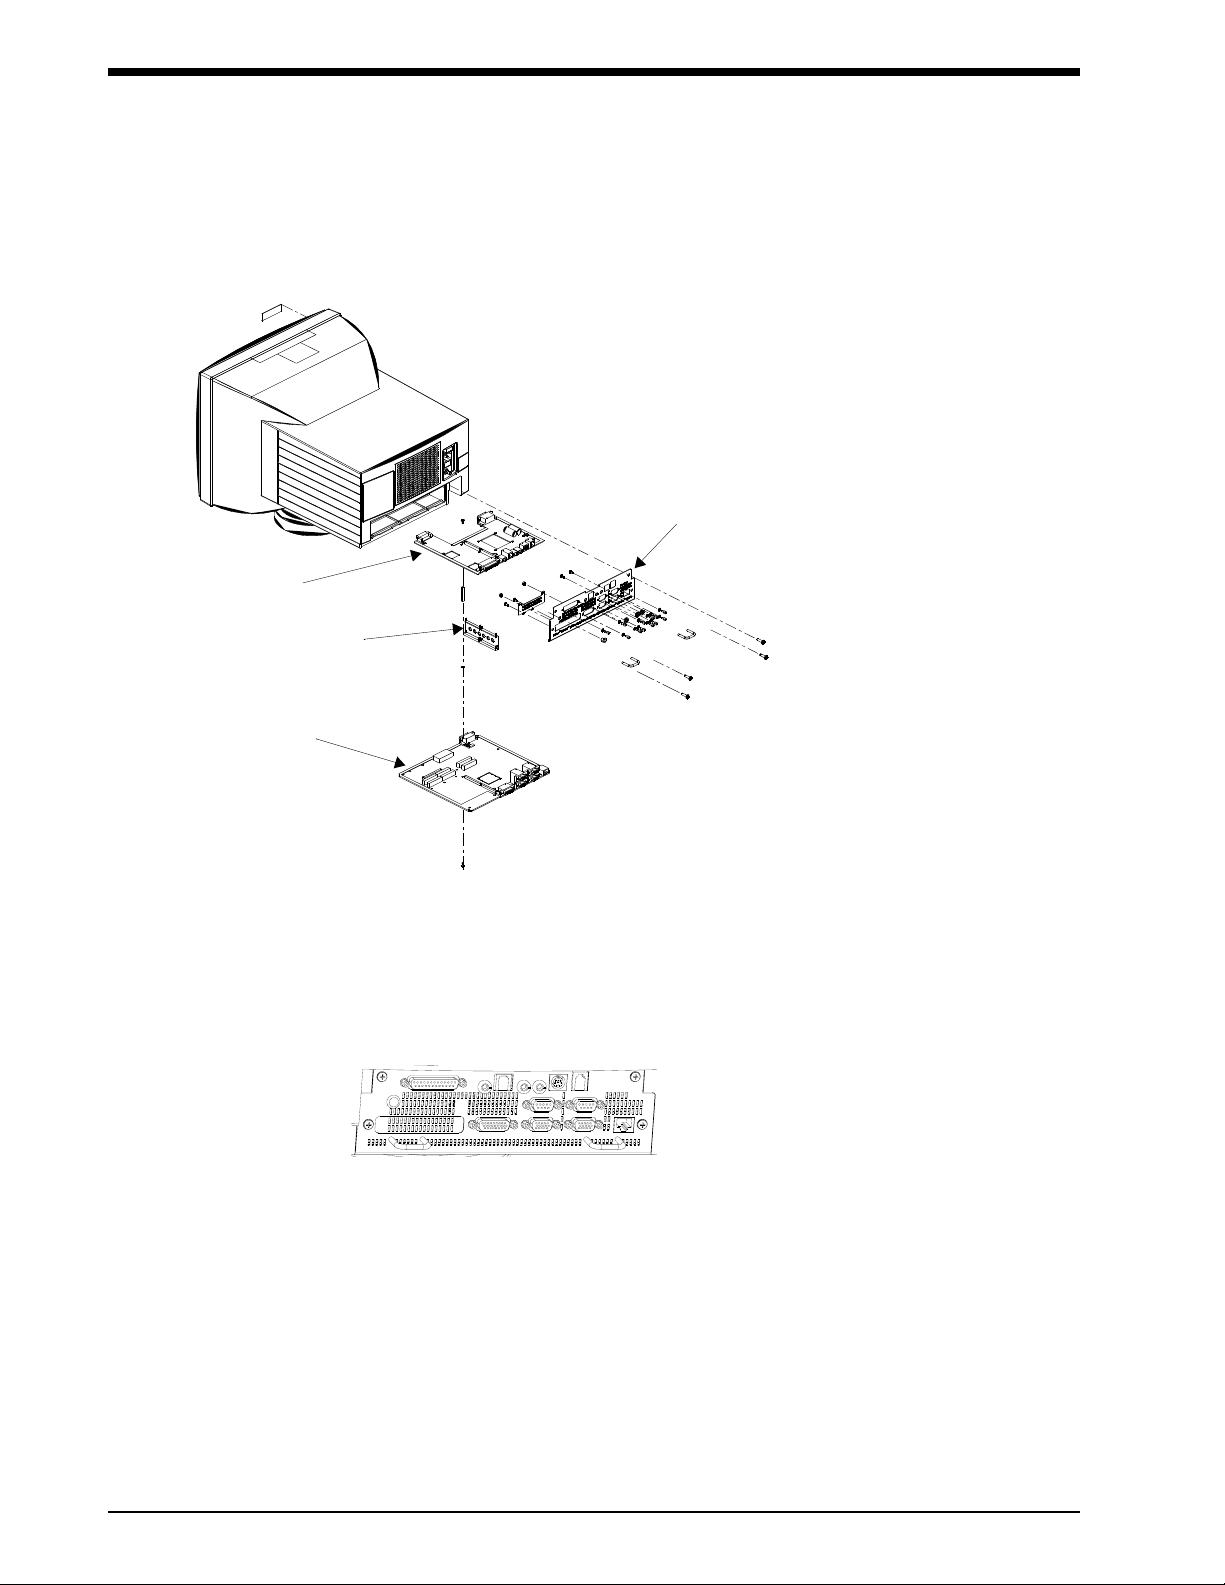
UCW and Ultraview 1700 Monitors — Service Manual
PCBA Drawer Removal/Replacement
Removal of the PCBA drawer requires that both the CPU and I/O PCBAs be removed as a unit.
panel, rear, primary
I/O PCBA
interconnect PCBA
CPU PCBA
Figure 4-4: PCBA drawer removal
To extract the PCBA drawer:
1. Remove all external cables from their connectors.
2. Remove the screws (refer to Figure 4-5 below) that attach the rear panel to the monitor.
Figure 4-5: Screw placement for drawer assembly
3. Pull the drawer assembly completely out of the monitor.
To reassemble the PCBA drawer:
1. Slowly reinsert the drawer assembly, being careful to align the PCBA sides with the slots
inside the monitor.
2. Push the drawer completely in to ensure that the connectors on the front of the PCBA
become fully inserted.
4-14
Page 77

Maintenance
3. Re-install the screws that secure the drawer to the monitor.
CAUTION:
• Replacement of ALL screws, hex nuts, and fasteners is required to maintain
Electrical Magnetic Interference (EMI) Emissions within acceptable limits.
Any removal or non-replacement of hardware can cause increased emission
levels and susceptibility to external noise sources.
NVRAM Replacement
• The NVRAM contains a battery with a lifetime of 10 to 20 years. In normal usage,
!
1. Follow the previous PCBA drawer removal instructions.
2. Use an IC extractor tool to remove the NVRAM located at U940 on the CPU PCBA.
3. Insert a new NVRAM into location U940 on the CPU PCBA, being careful to correctly orient
the device.
4. If the NVRAM was secured with a tie-wrap, install a new tie-wrap (P/N 344-05018-00). If the
NVRAM was secured with double adhesive tape, replace the tape (P/N 253-0052-00).
5. Reinstall the PCBA drawer assembly by following the PCBA drawer insertion procedures.
with the monitor on and in use, the NVRAM should be replaced every 10 years.
CPU PCBA Replacement
1. Follow the PCBA drawer removal and disassembly instructions above.
2. Replace the CPU PCBA.
• The NVRAM (U940) on the CPU PCBA contains all configuration information for
!
3. Mate the interconnect PCBA to the CPU PCBA, then mate the I/O PCBA to the interconnect
PCBA.
4. Replace the screw located in the center of the PCBA that secures the CPU and I/O PCBAs
to each other.
5. Reattach the rear panel and replace all the screw locks that secure the rear panel
connectors.
6. Reinstall the I/O and CPU drawer assembly into the monitor.
7. If NVRAM is suspected as the failure, order the CPU PCBA pre-configured or contact a
Spacelabs Medical field service engineer to configure your options (SYSGEN). Privileged
access and user configuration information can be updated by the technician from the on-site
network logs.
the monitor. To avoid having to reconfigure the new CPU PCBA, install the
NVRAM from the defective CPU PCBA onto the new CPU PCBA in place of the
new blank NVRAM. The blank NVRAM should be installed back into the defective
CPU PCBA.
4-15
Page 78

UCW and Ultraview 1700 Monitors — Service Manual
U940 (NVRAM)
Figure 4-6: CPU PCBA
Interconnect PCBA Replacement
1. Follow the PCBA drawer removal instructions.
2. Disassemble the drawer as in the CPU PCBA replacement instructions.
3. Replace the interconnect PCBA.
4. Reassemble the PCBA drawer.
5. Follow the PCBA drawer replacement instructions.
4-16
Page 79

Maintenance
I/O PCBA Removal/Replacement
1. Remove the I/O and CPU PCBAs as described in the PCBA drawer removal instructions.
2. Disconnect all internal cables from the I/O PCBA.
3. Remove the two screws that secure the I/O PCBA to the rear of the drawer panel, if
applicable.
4. Remove the one screw in the center of the I/O PCBA that secures it to the CPU PCBA.
5. Remove all screws and screw locks that hold the connectors to the drawer panel, and slide
the I/O PCBA and CPU PCBA away from the panel.
6. Separate the I/O PCBA from the interconnect/CPU PCBA.
7. Reverse the removal procedure to replace the I/O PCBA.
8. Re-insert the PCBA drawer as described in the PCBA drawer replacement instructions.
Figure 4-7: I/O PCBA
4-17
Page 80

UCW and Ultraview 1700 Monitors — Service Manual
Touchscreen Removal/Reassembly
Removal
1. Insert a blade screwdriver (or similar object) into each of the two slots, one at a time, located
on the underside of the bezel.
bottom view
Figure 4-8: Touchscreen removal
2. Gently pull the front bezel away, (with an upward pressure) from the display assembly and
tilt upward.
3. Pull the bottom of the touchscreen out just far enough to allow disconnection of the serial
interface cable leading to the I/O PCBA.
4. After disconnecting the serial cable, lift the touchscreen assembly up and away from the unit.
Reassembly
1. Reattach the bezel by inserting the three hooks located at the top of the front bezel into the
top slots of the secondary bezel. Tilt the front bezel downward, being careful not to damage
the ribbon cable.
2. Reattach the ribbon cable.
3. Push in on the assembly until the touchscreen locks into place.
4-18
Page 81
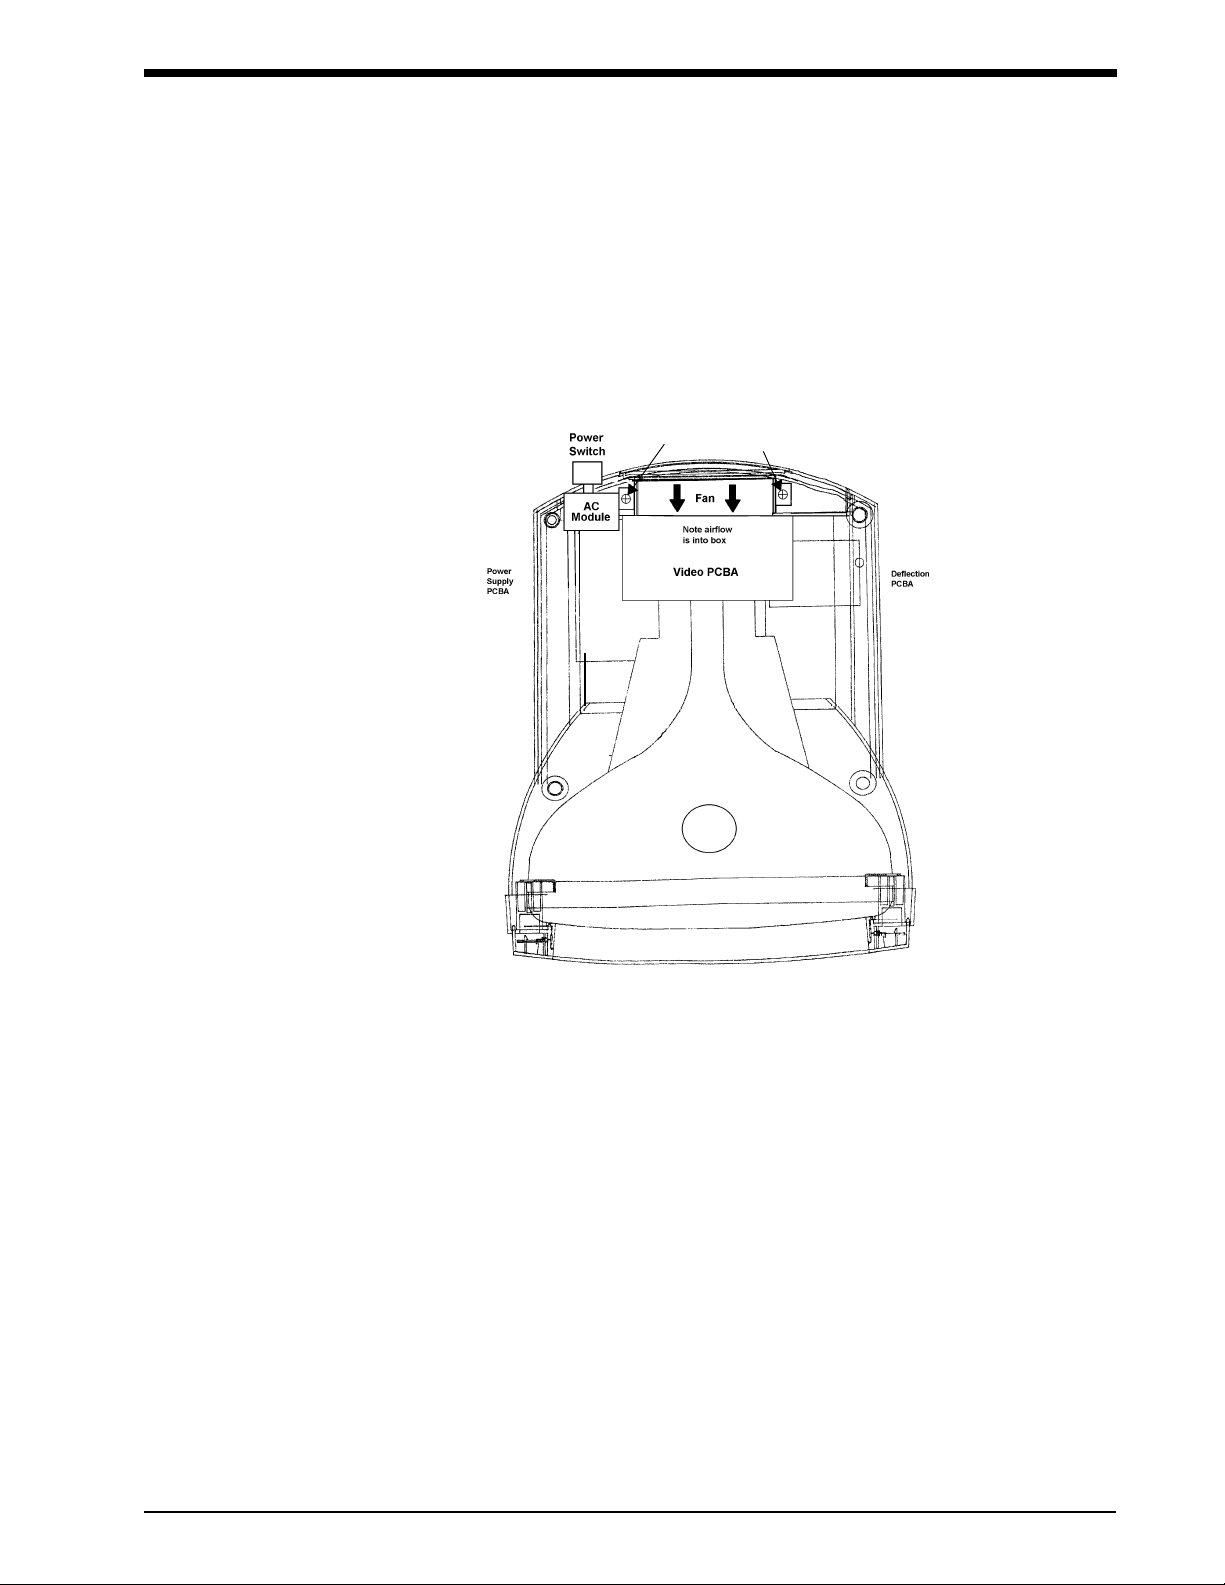
Maintenance
Exhaust Fan Replacement
1. Remove the top cover of the display assembly.
2. Remove the video PCBA and position it out of the way.
3. Locate the fan on the rear of the display assembly and remove the screw on each side of
the fan motor (refer to Figure 4-9 below).
fan removal screws
Figure 4-9: Fan location
4. Slide the bracket off of the fan assembly, being careful not to stress any connections on the
video PCBA while moving it aside.
5. Disconnect the power cable from the power supply.
6. Position the new fan in place, and reattach the DC power connector to the power supply.
7. Replace the fan retaining bracket, placing the tabs under the chassis tabs.
8. Replace the two screws removed in step 3, and replace the video PCBA.
9. Reinstall the top cover.
• When replacing the fan, make sure the air flow arrow printed on the fan is pointing
!
INWARD.
4-19
Page 82

UCW and Ultraview 1700 Monitors — Service Manual
AC Switch Replacement (90385)
1. Remove the top cover.
2. Remove the video driver PCBA and position it out of the way without disconnecting cables.
3. Remove the single screw from the right side of the fan (viewed from the rear).
4. Remove the single screw from the AC module (refer to Figure 4-10 below).
5. Lift the AC module upward to allow the AC input module cable to be disconnected.
6. Disconnect the AC wires from the AC module by depressing a release latch located on the
side of the connector. Also detach the fan and wire harness from the power supply, noting
their placement for reassembly.
step #4
step #3
fuses
to remove fuses
squeeze both tabs
and pull.
Figure 4-10: AC module
7. Remove the two screws securing the switch PCBA and shield to the AC module.
8. Reinstall the new AC switch assembly, and reattach the wires to their appropriate
connectors.
9. Replace the AC module, and reinstall the single screw onto the right side of the fan.
10. Reattach the video driver PCBA, and install the mylar shield and steel cover using the two
removed previously.
11. Reattach the top cover.
• Ensure that the fan connector has been reattached to the switch PCBA after
!
replacement.
4-20
Page 83

Disassembly Procedures (90387)
Tools Required
• Static mat
• Static wrist strap
• #1 and #2 Phillips screwdrivers (#2 driver > 7.5” shaft length)
• Standard flat screwdriver
CAUTION:
• Before beginning any disassembly procedures, power OFF the monitor and
disconnect the AC cord from the AC power receptacle.
• The external power supply is not designed for disassembly.
!
Maintenance
Backup Battery Replacement
• It is recommended that you change the battery yearly.
!
1. Locate the hinged cover on the rear of the unit.
2. Remove one (or two, if applicable) screw holding the battery case closed.
3. Remove and properly discard the old battery.
4. Position the new battery, taking care not to pinch the wires when closing the cover.
Divider Removal
1. Open the top and bottom module slot doors on the left side of the unit to expose the divider.
2. Press the snaps located at the front of the divider and pull the divider out of the module
housing cavity approximately one inch (2.54 cm).
3. With only the top door open, turn the outside edge of the divider toward the center of the
module housing until the divider is free from the chassis and can be removed from the
module housing cavity.
4. Reverse the removal procedure to re-install the divider, making sure the long front leg of the
divider points to the center of the module housing chassis.
4-21
Page 84

UCW and Ultraview 1700 Monitors — Service Manual
Enclosure Removal
1. Remove the four painted screws from the top of the unit.
2. Remove the four screws and two feet from the bottom of the unit.
3. Slide the right and left enclosure halves away from the bezel and off the unit chassis.
4. Reverse the removal procedure to reassemble the enclosure.
Bezel Removal
1. Remove the enclosure according to the enclosure removal procedure.
2. Remove the four screws that secure the bezel to the chassis.
3. From the right side of the unit, slide a flat blade screwdriver between the bezel and the
chassis and deflect the lower snap attached to the center web of the bezel.
4. From the left side of the unit, slide a flat blade screwdriver between the bezel and the chassis
and deflect the upper snap attached to the center web of the bezel.
5. Pull the bezel away from the chassis.
6. Reverse the removal procedure to reassemble the bezel.
Rear Panel Removal
1. Remove the battery and enclosure according to their respective removal procedures.
2. Remove the PCBA Drawer assembly according to its removal procedure.
3. Remove the six screws and six connector jackscrews from the rear panel.
4. Pull the rear panel away from the chassis.
5. Reverse the removal procedure to reassemble the rear panel.
Backplane PCBA Removal
1. Remove the enclosure, battery, and rear panel according to their respective removal
procedures.
2. Gently remove the output connector section of the PCBA from the plastic standoffs attached
to the main PCBA section and rotate away from the main PCBA.
3. Remove the power interconnect cable from the main PCBA.
4. Remove the six screws that secure the main PCBA to the chassis.
5. Pry the upper-left and lower-right corners of the main PCBA from the chassis snap-standoffs
and remove the PCBA.
6. Reverse the removal procedure to reassemble the backplane PCBA.
4-22
Page 85

Maintenance
PCBA Drawer Removal/Replacement
Removal of the PCBA drawer requires that both the CPU and I/O PCBAs be removed as a unit.
To extract the PCBA drawer:
1. Remove all external cables from their connectors.
2. Remove the screws (refer to Figure 4-11 below) that attach the rear panel to the 90387.
Figure 4-11: Screw placement for drawer assembly
3. Pull the drawer assembly completely out of the monitor.
To reassemble the PCBA drawer:
1. Slowly reinsert the drawer assembly, being careful to align the PCBA sides with the slots
inside the monitor.
2. Push the drawer completely in to ensure that the connectors on the front of the PCBA
become fully inserted.
3. Re-install the screws that secure the drawer to the monitor.
CAUTION:
• Replacement of ALL screws, hex nuts, and fasteners is required to maintain
Electrical Magnetic Interference (EMI) Emissions within acceptable limits.
Any removal or non-replacement of hardware can cause increased emission
levels and susceptibility to external noise sources.
4-23
Page 86

UCW and Ultraview 1700 Monitors — Service Manual
NVRAM Replacement
• The NVRAM contains a battery with a lifetime of 10 years. In normal usage, with
!
1. Follow the previous PCBA drawer removal instructions.
2. Use an IC extractor tool to remove the NVRAM located at U940 on the CPU PCBA.
3. Insert a new NVRAM into location U940 on the CPU PCBA being careful to correctly orient
the device.
4. If the NVRAM was secured with a tie-wrap, install a new tie-wrap (P/N 344-05018-00). If the
NVRAM was secured with double adhesive tape, replace the tape (P/N 253-0052-00).
5. Reinstall the PCBA drawer assembly by following the PCBA drawer insertion procedures.
CPU PCBA Replacement
1. Follow the PCBA drawer removal and disassembly instructions above.
2. Replace the CPU PCBA.
the monitor on and in use, the NVRAM should be replaced every 10 years.
• The NVRAM (U940) on the CPU PCBA contains all configuration information for
!
3. Mate the interconnect PCBA to the CPU PCBA, then mate the I/O PCBA to the interconnect
PCBA.
4. Replace the screw located in the center of the PCBA that secures the CPU and I/O PCBAs
to each other.
5. Reattach the rear panel and replace all the screw locks that secure the rear panel
connectors.
6. Reinstall the I/O and CPU drawer assembly into the monitor.
7. If NVRAM is suspected as the failure, order the CPU PCBA pre-configured or call Spacelabs
Medical service to configure your options (SYSGEN). Privileged access and user
configuration information can be updated by the technician from the onsite network logs.
the monitor. To avoid having to reconfigure the new CPU PCBA, install the
NVRAM from the defective CPU PCBA onto the new CPU PCBA in place of the
new blank NVRAM. The blank NVRAM should be installed back into the defective
CPU PCBA.
4-24
Page 87

U940 (NVRAM)
Maintenance
Figure 4-12: CPU PCBA
Interconnect PCBA Replacement
1. Follow the PCBA drawer removal instructions.
2. Disassemble the drawer as in the CPU PCBA replacement instructions.
3. Replace the interconnect PCBA.
4. Reassemble the PCBA drawer.
5. Follow the PCBA drawer replacement instructions.
4-25
Page 88

UCW and Ultraview 1700 Monitors — Service Manual
I/O PCBA Removal/Replacement
1. Remove the I/O and CPU PCBAs as described in the PCBA drawer removal instructions.
2. Disconnect all internal cables from the I/O PCBA.
3. Remove the two screws that secure the I/O PCBA to the rear of the drawer panel, if
applicable.
4. Remove the one screw in the center of the PCBA that secures the PCBA to the CPU PCBA
assembly.
5. Remove all screws and screw locks that hold the connectors to the drawer panel, and slide
the I/O PCBA and CPU PCBA away from the panel.
6. Separate the I/O PCBA from the interconnect/CPU PCBA.
7. Reverse the removal procedure to replace the I/O PCBA.
8. Re-insert the PCBA drawer as described in the PCBA drawer replacement instructions.
Figure 4-13: I/O PCBA
Power Interconnect PCBA Removal
1. Remove the enclosure and bezel according to their respective removal procedures.
2. Remove the two screws that hold the ESD shield against the power interconnect PCBA.
3. Remove the two screws that secure the power interconnect PCBA to the chassis.
4. Pry the upper-right and lower-left corners of the power interconnect PCBA from the chassis’
snap-standoffs and remove the PCBA.
5. Disconnect the power interconnect cable from the PCBA.
6. Reverse the removal procedure to reassemble the power interconnect PCBA.
4-26
Page 89

Troubleshooting
Contents
Overview. . . . . . . . . . . . . . . . . . . . . . . . . . . . . . . . . . . . . . . . . . . . . . . . . . . . . . . . . . . . . . . . . . . . . . 1
Suggested Tools and Parts . . . . . . . . . . . . . . . . . . . . . . . . . . . . . . . . . . . . . . . . . . . . . . . . . . . . . . . 1
Symptoms. . . . . . . . . . . . . . . . . . . . . . . . . . . . . . . . . . . . . . . . . . . . . . . . . . . . . . . . . . . . . . . . . . . . . 2
Monitor Diagnostics . . . . . . . . . . . . . . . . . . . . . . . . . . . . . . . . . . . . . . . . . . . . . . . . . . . . . . . . . . . . . 4
System Startup . . . . . . . . . . . . . . . . . . . . . . . . . . . . . . . . . . . . . . . . . . . . . . . . . . . . . . . . . . . . . . . . . 9
Boot Menu . . . . . . . . . . . . . . . . . . . . . . . . . . . . . . . . . . . . . . . . . . . . . . . . . . . . . . . . . . . . . . . . . . . 10
Diagnostic Menus . . . . . . . . . . . . . . . . . . . . . . . . . . . . . . . . . . . . . . . . . . . . . . . . . . . . . . . . . . . . . . 12
Overview
The troubleshooting procedures in this chapter isolate equipment problems to a field-replaceable
unit (FRU).
The following are field-replaceable units:
• Infrared touchscreen (IRTS) and bezel (90385 only)
• CPU board
• I/O board
• Interconnect board
• Display assembly, which includes the following as part of the replacement display (90385 only):
Video driver
Internal power supply
Deflection board
CRT
PCBA adapter (I/O to touchscreen)
• Backplane PCBA (90387 only)
• CPU power supply PCBA (90387 only)
Suggested Tools and Parts
These items are necessary for troubleshooting:
• Flathead screwdriver
• Phillips screwdriver #1 and #2
• 13/16 nut driver
• DIP removal tool
• Multimeter
• Monitor cover removal tool (90385 only)
• PS2 mouse
• Printed circuit board assemblies (PCBAs)
• Static mat
5-1
Page 90

UCW and Ultraview 1700 Monitors — Service Manual
Symptoms
Monitor Has No Display
Power
1. Check the AC line cord to ensure that it is properly plugged in and that the power source
voltage is present.
2. Verify that the main AC switch is ON.
3. Check the power LEDs on the CPU assembly by looking through the ventilation holes near
the 10BaseT jack (
case, not near the back panel. They indicate the presence of the +3, +5, +12, and -5 VDC
sources.
4. Check the mains fuses located in the back of the monitor in the AC module.
5. Unplug all the rear panel cables, because a short could cause the power supply to shut
down.
6. Remove the top cover and inspect all cables to verify that none are loose or disconnected.
) to verify that all four are lit. The LEDs are in a row, deep inside the
• If an overvoltage condition occurs, the monitor MUST be left in the power OFF
!
CPU and I/O Boards
1. Remove the PCBA drawer assembly.
2. Check that the DIMMs and other plug-in devices on the assemblies are fully seated.
3. Reinstall the PCBA drawer assembly.
4. Re-check the monitor to verify that it is still non-operational.
5. At this point, a terminal (or computer with software capable of VT100 emulation) with
settings of 9600 (N, 8, 1) may be required. Connect an appropriately wired cable to the
terminal or computer’s serial port and then to the monitor’s rear panel RS-232 connector
number one. During power-ON, verify that the monitor is passing data to the port and that
self tests are being performed and pass.
6. If the four power LEDs are ON and there is no output from the RS-232 port, replace the CPU
board assembly (refer to
7. If the RS-232 reports no failures, inspect the interconnect board. If it appears damaged,
order a new I/O board.
8. If there is still no display on the screen, replace the display assembly itself (90385 only).
condition for at least 5 minutes before re-applying power.
• To verify if an over-current condition exists, watch the LED’s while turning ON the
power. Check that they do not flash ON and then OFF again.
Maintenance on page 4-1).
5-2
Page 91

Troubleshooting
Monitor Operates but Fails System Functions
Modules and SDLC Link
1. Verify that the proper SDLC terminations are set and that the proper cables are being used
(refer to Installation on page 2-8 for information).
2. Check the software versions of all installed modules, Flexport interfaces, and other attached
SDLC equipment and verify that there are no incompatibilities.
3. For the 90387, verify that the DC power supply is producing +12, +5, and -12 VDC by
probing with a DVM at pins 11, 2, and 13, respectively, at the internal SDLC connectors, J4
and J5. If voltage faults are found, replace the backplane board.
• If the connector is difficult to reach, connect a 15-pin extender cable to the unused
!
Ethernet Functions
1. Check the Ethernet setup and verify that a proper monitor ID, monitor name, and subnet
name were entered. Cycle power to reconfigure the system if these are changed.
2. Check that the Ethernet cable is attached to a multiport that is ON and functional.
3. If the problem persists, replace the CPU board.
connector and use the unconnected cable end to probe for voltage levels.
External Alarm
1. Independently verify the operation of the nurse call box. Replace if it does not work correctly.
2. Verify that the alarm cable is installed correctly and that pin 4 on the connector has +12 V.
3. If the problem persists, inspect the I/O board and the interconnect board. If any connectors
or parts on either of these assemblies appear damaged, replace the damaged assembly.
4. If the problem persists, replace the CPU board.
Remote Display
1. Check the external monitor power and video cables for proper connections. Verify that the
display is set in the correct operating mode.
2. Verify that the external monitor brightness, vertical, and horizontal sync are set correctly.
3. Verify that the external monitor’s terminations are set for 75 ohms, if adjustable.
4. If the problem persists, replace the CPU board.
5. If used with a 91416-B display and there is no sync, verify that the 44-pin cable is not
damaged and is securely attached to the monitor and display.
6. If used with a 91416-B display and there is no touchscreen or audio, verify that the 44-pin
cable is not damaged and is securely attached to the monitor and display.
5-3
Page 92

UCW and Ultraview 1700 Monitors — Service Manual
Mouse or Keyboard Input
1. Try another mouse or keyboard (there is no setup for the mouse or keyboard, either
externally or internally). Cycle the power ON and OFF after changing the keyboard or mouse
to guarantee that they are seen by the monitor.
2. If this does not correct the problem, inspect the interconnect board and I/O boards. If any
connectors or parts on either of these assemblies appear damaged, replace the damaged
assembly.
3. If this does not correct the problem, replace the CPU board.
Audio Line Output (90387 Only)
1. Independently verify the operation of the equipment being connected to the audio line
output. Replace it if necessary.
2. If the external equipment is known to work correctly, enable key tones on the monitor and
press several touchscreen keys. If tones are not heard through the internal speaker, replace
the CPU board. If tones are heard, inspect the interconnect board and I/O boards. If any
connectors or parts on either of these assemblies appear damaged, replace the damaged
assembly.
3. If this does not correct the problem, replace the CPU board.
Monitor Diagnostics
System integrity and performance verification can be conducted by either automated or manual
diagnostics that assist in system troubleshooting. Automated “power-ON” diagnostics are performed
at each power-ON. If desired, extended diagnostic testing may be performed manually following
manual initiation during system power-ON. Some power-ON tests are not available in the extended
diagnostics and vice-versa.
Power-ON Diagnostics
Power-ON diagnostic tests verify system hardware integrity during each power-ON of a monitor.
Most of these tests may also be initiated using the extended diagnostic mode.
The diagnostics initiated at power-ON are:
• CPU (reads and writes control registers and does an internal wrap around of one serial
communication controller channel)
• DRAM Read/Write (reads and writes DRAM above 1 MB)
• Real time clock (verifies that the clock is running)
• GDS SRAM (reads and writes all of the SRAM, nondestructively)
• PCI bridge (reads and writes control registers)
• ISA bridge (reads and writes control registers)
• Video (tests the video memory, the video controller, hsync, and blue video signals)
• Ethernet (comprehensive internal wrap around)
• Flash checksum (checksums all of flash memory)
• Touchscreen (tests the touchscreen controller and the IR detector/emitter pairs)
• Keyboard and mouse controller (reads and writes control registers, runs a self test, and checks
on-card keyboard and mouse signals)
• Audio (reads and writes control registers in the codec)
5-4
Page 93

Troubleshooting
Power-ON diagnostics failures are reported in the upper-left corner window of the system startup
screen. Refer to System Startup on page 5-9 for more information.
Extended Diagnostics
Extended diagnostic tests can be manually initiated only during system startup. The kinds of tests
and features available in the extended diagnostics are:
•Power-ON tests.
• Interactive tests and read/write memory tests that are not appropriate during power-ON
diagnostics.
• Touchscreen calibration and data dump utilities.
• System data dump and system reset utilities.
The diagnostics menus allow most of these tests to be run individually or all at once. If Loop mode is
activated, a test(s) can be executed in a continuous loop. If Halt On Error mode is activated, then the
looping stops when a diagnostic failure is detected. To avoid false failures, do not use the
touchscreen, mouse, or keyboard while the diagnostics are executing.
For detailed information on the extended diagnostics and how to run them, refer to System Startup
on page 5-9, Boot Menu on page 5-10, and Diagnostic Menus on page 5-12.
Diagnostic LED
If during the boot process the CPU determines that it cannot continue to boot, the CPU will stop
booting and repeatedly flash an error code on a diagnostic LED. The diagnostic LED is located in the
center of the CPU board and is visible by looking through the ventilation holes above the SDLC
connector on the back of the unit.
During the boot process, the LED normally flashes on about once every four seconds to indicate that
it is working. If the CPU cannot boot, the LED flashes an hexidecimal error code with the most
significant character first. Leading zeros are not displayed. Each character is represented by a
series of short flashes that count up to the character value (for example, two flashes = 2 hex, fifteen
flashes = F hex, etc.). A zero character is indicated by a long flash. Each character is separated by a
short pause. After the error code is completed, the LED pauses for about four seconds before
repeating the error code. Error codes and their meanings are described in the following section.
Monitor Fails Power-ON Diagnostics
Troubleshooting Method 1: Using the Touchscreen
1. Display the Diagnostic menu.
The Diagnostic menu is activated using the mouse. Left-click followed by a right-click
during the “3-2-1” countdown.
2. Click the test parameter key that retests the previously-indicated failure.
Upon verification of the failure, a message provided by the monitor directs you to the field
replaceable unit that failed.
5-5
Page 94

UCW and Ultraview 1700 Monitors — Service Manual
Troubleshooting Method 2: Using the Remote Terminal
1. Activate a hyperterminal program on the remote terminal.
2. Attach the remote terminal (9600 baud, no parity, 8 bits, 1 stop bit) to the serial connector
J15 with a null modem cable.
3. Power ON the monitor.
4. Activate the Serial Diagnostic menu by touching ENTER during the “3-2-1” countdown at
system start-up.
5. Once the Serial Diagnostic menu is activated, you can enter a “?” to display a list of menu
options.
6. All power-ON tests can be performed to isolate the problem to a circuit board. The monitor
will guide you to the appropriate field-replaceable unit.
• The RS-232 diagnostic output may be inhibited if the unit’s serial port is configured
!
for TE mode, PDL, or modem (versus diagnostics), or if the serial port settings
(baud, data bits, parity) are not set properly. The serial port selection and settings
are configured using the Biomed menu (refer to
page 2-14).
System Configuration on
Troubleshooting Method 3
1. Verify the failure by powering the unit OFF and then ON again or by running the extended
diagnostics as described in Extended Diagnostics on page 5-5 and Diagnostic Menus on
page 5-12.
2. Upon verification of the failure, take troubleshooting action or replace FRUs based on the
following diagnostic failure messages.
Table 1: Diagnostic Failure Messages
Error Code Diagnostics Failure Message Suggested Action
01030000 “Diagnostics Passed” No action required.
Monitor functional but in need of
01030001 “Diagnostic(s) Failed; degraded performance”
01030002 “Critical Failure” Replace CPU board.
01030003 “Can’t diagnose at this boot stage” No information available.
01030100 “Diagnostics Port Test Failed” Replace CPU board.
01030200 “860 Test Failed” Replace CPU board.
01030201 “860 SCC Transmit Failed” Replace CPU board.
repair. Some features may not be
available. Replace CPU board.
01030202 “860 SCC configuration not recognized” Replace CPU board.
01030300 “DRAM Test Failed” Replace CPU board.
01030301 “DRAM Test can’t allocate memory”
01030400 “GDS RAM Test Failed” Replace CPU board.
5-6
Reboot and retest. If problem
persists, replace CPU board.
Page 95

Troubleshooting
Table 1: Diagnostic Failure Messages (continued)
Error Code Diagnostics Failure Message Suggested Action
01030500 “FLASH ROM Test Failed” Replace CPU board.
Reburn boot kernel software into
01030501
01030502
01030503 “FLASH ROM boot checksum error”
01030504 “FLASH ROM app checksum error”
“FLASH ROM boot checksum larger than
flash”
“FLASH ROM app checksum larger than
flash”
flash memory and retest. If
failure persists, replace CPU
board.
Reburn application software into
flash memory and retest. If
failure persists, replace CPU
board.
Reburn boot kernel software into
flash memory and retest. If
failure persists, replace CPU
board.
Reburn application software into
flash memory and retest. If
failure persists, replace CPU
board.
01030505 “FLASH ROM read/write memory test error” Replace CPU board.
01030600 “Power Subsystem Test Failed” Replace CPU board.
01030601 “A2D Converter failed to convert” Replace CPU board.
01030602 “Invalid Power Request” Replace CPU board.
01030603 “Temperature out of spec” Replace CPU board.
01030700 “PCI Bridge Test Failed” Replace CPU board.
01030701 “PCI Bridge configuration not recognized” Replace CPU board.
01030702 “PCI Bridge registers are not writable” Replace CPU board.
01030703 “PCI Bridge revision not valid for clinical use” Replace CPU board.
01030800 “Ethernet Test Failed” Replace CPU board.
01030801 “Ethernet Setup Failed” Replace CPU board.
01030802 “Ethernet Transmit Failed” Replace CPU board.
01030900 “ISA Bridge Test Failed” Replace CPU board.
01030A00 “Video Test Failed” Replace CPU board.
01030A01 “Invalid Display Type” Replace CPU board.
01030A02 “Invalid Display Size” Replace CPU board.
01030A03 “Video configuration not recognized” Replace CPU board.
01030A04 “Video DRAM failure” Replace CPU board.
01030A05 “Video could not detect hsync signal “ Replace CPU board.
5-7
Page 96

UCW and Ultraview 1700 Monitors — Service Manual
Table 1: Diagnostic Failure Messages (continued)
Error Code Diagnostics Failure Message Suggested Action
01030A06 “Video could not detect blue video signal” Replace CPU board.
01030B00 “Couldn’t open IRTS device driver”
01030B01 “IRTS interface failed” Replace CPU board.
01030B02 “IRTS ring board interface failed” Replace CPU board.
01030B03 “IRTS IR pair failed”
01030B04 “IRTS reset failed” Replace CPU board.
01030B05 “IRTS change mode failed” Replace CPU board.
01030B06 “IRTS uP RAM failed” Replace CPU board.
01030B07 “IRTS uP ROM failed” Replace CPU board.
01030B08 “IRTS data dump failure” Replace CPU board.
01030B09 “Interactive IRTS test failure” Replace CPU board.
01030B0A “IRTS ALU error” Replace CPU board.
01030B0B “IRTS Remote Keypad ALU error” Replace CPU board.
01030B0C “IRTS ALU warning status, please calibrate”
Reboot and retest. If problem
persists, replace CPU board.
Re-calibrate the touchscreen and
retest. If problem persists,
replace IRTS board/bezel.
Re-calibrate the touchscreen and
retest. If problem persists,
replace IRTS board/bezel.
01030C00 “OS error while diagnosing KBD”
01030C01 “Can’t access KBD device registers” Replace CPU board.
01030C02 “KBD didn’t respond to command” Replace CPU board.
01030C03 “KBD failed selftest” Replace CPU board.
01030C04 “KBD failed interface test” Replace CPU board.
01030D00 “Can’t access AUDIO device registers” Replace CPU board.
01030D01 “Could not open audio device”
01030D02 “Audio device didn’t respond correctly” Replace CPU board.
01030D03 “Audio Loopback test failed” Replace CPU board.
01030E00 “NVRAM Test Failed” Replace CPU board.
01030E01 “NVRAM Clock Not Running” Replace CPU board.
01030E02 “NVRAM Checksum error”
Reboot and retest. If problem
persists, replace CPU board.
Reboot and retest. If problem
persists, replace CPU board.
Zero the NVRAM and reboot. If
problem persists, replace CPU
board.
5-8
Page 97

Troubleshooting
Table 1: Diagnostic Failure Messages (continued)
Error Code Diagnostics Failure Message Suggested Action
01030E03 “NVRAM read/write memory test failed” Replace CPU board.
01030F00 “Wireless card diagnostic failed” Replace CPU board.
01031000 “EPP diagnostic failed” Replace CPU board.
System Startup
When the unit is first powered ON, the following three-window system startup screen is displayed.
This window displays any diagnostic
failures and other system errors
during the boot process.
This window is reserved for future use.
This window displays basic system configuration
and booting status during the boot process.
The Boot menu and Diagnostics menus are also shown here.
Figure 5-1: System Startup window
5-9
Page 98

UCW and Ultraview 1700 Monitors — Service Manual
Boot Menu
The Boot menu allows access to several basic configuration menus and functions of the monitor,
including extended diagnostics. The Boot menu is activated during system startup and can be
controlled using either the touchscreen, mouse, keyboard, or terminal (or a computer with terminal
emulation software) connected to the serial port. All text displayed on the screen is also output on
the serial port.
The Boot menu can be accessed in the following ways:
• With a touchscreen, place a finger into the two lower corners of the display during system startup
when you see the “3-2-1” countdown.
Figure 5-2: Finger placement to initiate boot menu using the touchscreen
• With a PS2-style mouse, simultaneously click the left and right mouse buttons on the “3” of the
“3-2-1” countdown.
• With the keyboard or terminal, press CTRL+D during the countdown (the terminal’s serial port
should be set to 9600 baud, no parity, 8 data bits, and one stop bit)
• Do not move the mouse or cause input through the keyboard during power ON
!
until the “3-2-1” countdown. Doing so will cause diagnostic arrows with the
keyboard or mouse controller.
5-10
Page 99
After initiation, the following main Boot menu appears.
? - help
@ - boot (load and go)
p - print boot params
c - change boot params
g - go to address
m - memory functions...
e - print fatal exception
N - set node id
D - run diagnostics...
z - zero NV ram
E - error log functions...
b - burn flash...
v - set video characteristics (90387 only)
T - Touchscreen calibration *
Troubleshooting
v
?@p c gm e ND z
->
Figure 5-3: Boot menu
These keys are presented in the main Boot menu:
? — Displays some explanation of this menu.
@ — Loads and runs an application file from the network. *
p — Prints the boot parameters.
c — Allows changing of the boot parameters.*
g — Begins execution at the address specified.*
m — Displays the memory submenu; this submenu allows the display, modification, copying,
and filling of any memory or address space accessible to the CPU; requires a data key
(Spacelabs personnel must be present).*
e — Prints the last fatal exception. *
N — Allows the node id to be changed.
D — Displays the Diagnostics Main menu; refer to the description of the Diagnostics menu.
z — Zeros and initializes the NVRAM; requires a data key (Spacelabs personnel must be
present).**
E — Displays the error log submenu; this submenu allows the error log to be cleared or dumped
to the screen and serial port.
E
v
b
T
b — Displays the burn flash submenu; this submenu allows new boot kernel or application
software to be loaded over the network and burned into flash memory.
v — Sets the video scanning frequency (90387 only).
T— Touchscreen calibration
5-11
Page 100

UCW and Ultraview 1700 Monitors — Service Manual
* The indicated parameters are ONLY to be used by Spacelabs Medical personnel and should not
be changed. In some cases, altering these parameters may disable the monitor and require a
service call to repair.
** If NVRAM is zeroed, all the configuration data will be lost. In the event this occurs, a Spacelabs
Medical service representative must be called to repair the monitor.
Diagnostic Menus
Touching the D key in the Boot menu displays this Main Diagnostic menu.
MAIN DIAGNOSTIC MENU
r - Return to boot menu
a - Run all diagnostics marked with “
i - Run an individual diagnostic...
l - Toggle “Loop Mode” ON/OFF
h - Toggle “Halt On Error Mode” ON/OFF
s - Show system info
R - Reset monitor (cold boot)
railhsR
->
Figure 5-4: Main Diagnostic menu
The following keys are available in this menu:
r — Returns to the Boot menu (previous screen).
a — Runs all the diagnostics that are marked with an asterisk in the Individual Diagnostic
menu. These tests are identical to the power-ON diagnostic tests. Alternate CPU and DRAM
tests are available in the submenus (refer to option i for details on those tests marked with an
asterisk).
i — Displays the Individual Diagnostic menu. Diagnostics marked with an asterisk indicate
tests run by touching the a key on the Main Diagnostic menu (refer to
page 5-13).
l — Toggles Loop mode ON or OFF. When Loop mode is ON, any test or tests that are selected
will run in a continuous loop until power is cycled.
h — Toggles Halt On Error mode ON or OFF. When ON, any failure that occurs while tests are
running in Loop mode immediately stops testing.
”
*
Figure 5-5 on
s — Shows system information, including details of address spaces and variables used in the
system.
R — Causes a cold boot reset just like cycling power.
5-12
 Loading...