

Page 1
USBPre 2
User Guide and Technical Information
Sound Devices, LLC
300 Wengel Drive • Reedsburg, WI • USA
+1 (608) 524-0625 • fax: +1 (608) 524-0655
Toll-Free: (800) 505-0625
www.sounddevices.com
support@sounddevices.com
Page 2
Table of Contents
Table of Contents . . . . . . . . . . . . . . . . . . . . . . . . . . . . . .1
Computer System Requirements . . . . . . . . . . . . . . . . .2
Quick Start Guide . . . . . . . . . . . . . . . . . . . . . . . . . . . . .3
Sound Card Connection . . . . . . . . . . . . . . . . . . . . . . . . . . . . . .3
Front Panel Descriptions . . . . . . . . . . . . . . . . . . . . . . .5
Input and Output Panel Descriptions . . . . . . . . . . . . .6
Back Panel Descriptions . . . . . . . . . . . . . . . . . . . . . . . .6
DIP Switch Options . . . . . . . . . . . . . . . . . . . . . . . . . . . .7
Mac OS Installation and Connection . . . . . . . . . . . . . .8
OS X Audio / MIDI Setup . . . . . . . . . . . . . . . . . . . . . . . . . . . . .8
Adjusting Sample Rate in OS X . . . . . . . . . . . . . . . . . . . . . . . .8
Windows Installation and Connection . . . . . . . . . . . . .9
Windows 7 and Vista Sound Control Panel . . . . . . . . . . . . . . .9
Adjusting Sample Rate in Windows 7 and Vista . . . . . . . . . . .10
Windows XP Sound Control Panel . . . . . . . . . . . . . . . . . . . . .11
ASIO Driver . . . . . . . . . . . . . . . . . . . . . . . . . . . . . . . . .12
ASIO Driver Installation . . . . . . . . . . . . . . . . . . . . . . . . . . . . .13
Linux Installation and Connection . . . . . . . . . . . . . . .14
Inputs . . . . . . . . . . . . . . . . . . . . . . . . . . . . . . . . . . . . . .15
Input Source Selection . . . . . . . . . . . . . . . . . . . . . . . . . . . . . .15
Microphone Inputs . . . . . . . . . . . . . . . . . . . . . . . . . . . . . . . . .15
Phantom Power . . . . . . . . . . . . . . . . . . . . . . . . . . . . . . . . . . .15
Low-Cut Filter . . . . . . . . . . . . . . . . . . . . . . . . . . . . . . . . . . ..15
Input Pad . . . . . . . . . . . . . . . . . . . . . . . . . . . . . . . . . . . . . . ..15
Input Limiters . . . . . . . . . . . . . . . . . . . . . . . . . . . . . . . . . . . . .15
Line Inputs . . . . . . . . . . . . . . . . . . . . . . . . . . . . . . . . . . . . . . .15
Aux Inputs . . . . . . . . . . . . . . . . . . . . . . . . . . . . . . . . . . . . . . .16
Digital Inputs . . . . . . . . . . . . . . . . . . . . . . . . . . . . . . . . . . . . .16
Input 2 Loop Source . . . . . . . . . . . . . . . . . . . . . . . . . . . . . . . .16
Outputs and Monitoring . . . . . . . . . . . . . . . . . . . . . . .16
Headphone Output . . . . . . . . . . . . . . . . . . . . . . . . . . . . . . . . .16
Main Outputs . . . . . . . . . . . . . . . . . . . . . . . . . . . . . . . . . . . . .17
Digital Outputs . . . . . . . . . . . . . . . . . . . . . . . . . . . . . . . . . . . .17
Metering . . . . . . . . . . . . . . . . . . . . . . . . . . . . . . . . . . . . . . . . .17
Stand-Alone Mode . . . . . . . . . . . . . . . . . . . . . . . . . . . .17
Sample Rate . . . . . . . . . . . . . . . . . . . . . . . . . . . . . . . . . . . . .18
Locking Sample Rate to External Sources . . . . . . . .18
Setup Examples . . . . . . . . . . . . . . . . . . . . . . . . . . . . . .18
Test and Measurement . . . . . . . . . . . . . . . . . . . . . . . . . . . . . .18
High Performance Playback . . . . . . . . . . . . . . . . . . . . . . . . . .19
Block Diagram . . . . . . . . . . . . . . . . . . . . . . . . . . . . . . .20
Specifi cations . . . . . . . . . . . . . . . . . . . . . . . . . . . . . . .21
Warranty and Technical Support . . . . . . . . . . . . . . . .22
CE Declaration of Conformity . . . . . . . . . . . . . . . . . . .23
USBPre 2 User Guide and Technical Information
1
Page 3

USBPre 2 User Guide and Technical Information
Copyright and Release
All rights reserved. No part of this publication may be reproduced, stored in a retrieval system, or transmitted in any form or by any
means, electronic, mechanical, photocopying, recording, or otherwise, without the expressed written permission of SOUND DEVICES,
LLC. SOUND DEVICES is not responsible for any use of this information.
SOUND DEVICES, LLC shall not be liable to the purchaser of this product or third parties for damages, losses, costs, or expenses
incurred by purchaser or third parties as a result of: accident, misuse, or abuse of this product or unauthorized modifi cations, repairs, or
alterations to this product, or failure to strictly comply with SOUND DEVICES, LLC’s operating and installation instructions.
Microsoft Windows is a registered trademark of Microsoft Corporation. Macintosh is a registered trademark of Apple, Inc. Other product
and company names mentioned herein may be the trademarks of their respective owners.
The sound waves logo is a registered trademark of Sound Devices, LLC.
Computer System Requirements
The requirements below outline the minimum confi gurations for systems using the USBPre 2. Software applications used with the USBPre 2 have their own requirements that may be in addition to
the requirements of the USBPre 2. Consult your software’s documentation.
Operating Systems
Windows XP (SP3), Windows Vista, Windows 7 (both 32 and 64 bit)
Macintosh OS 10.4 or greater
Linux Kernel 2.6.0 or greater (Requires standard ALSA snd-usb-audio module)
USB Audio Device Class
Windows, Linux and Mac OS versions below 10.5.8 utilize USB Audio Device Class 1.0 drivers
that will limit the USBPre 2 to sampling rates of 48 kHz and lower.
Mac OS 10.5.8 and greater utilizes USB Audio Device Class 2.0 drivers that will allow the full
range of sample rates that the USBPre 2 is capable of.
USB Connection
Full USB 1.1 or 2.0 compliance
For Notebook Computer users:
For proper operation of the USBPre, turn off all power management when using the USBPre for audio
recording. Power management reduces processor speed, system bus speed, spins down hard disks, shuts
down displays, or a combination of the above to reduce current consumption and extend battery run
time. The change in state from active to power-saving mode can disrupt data on the USB bus and cause
unintended dropouts.
Sound Devices cannot guarantee that a given computer can be used satisfactorily with the USBPre 2
based exclusively on the fact that it meets the above requirements.
2
Features and specifications are subject to change. Visit www.sounddevices.com for the latest documentation.
Page 4
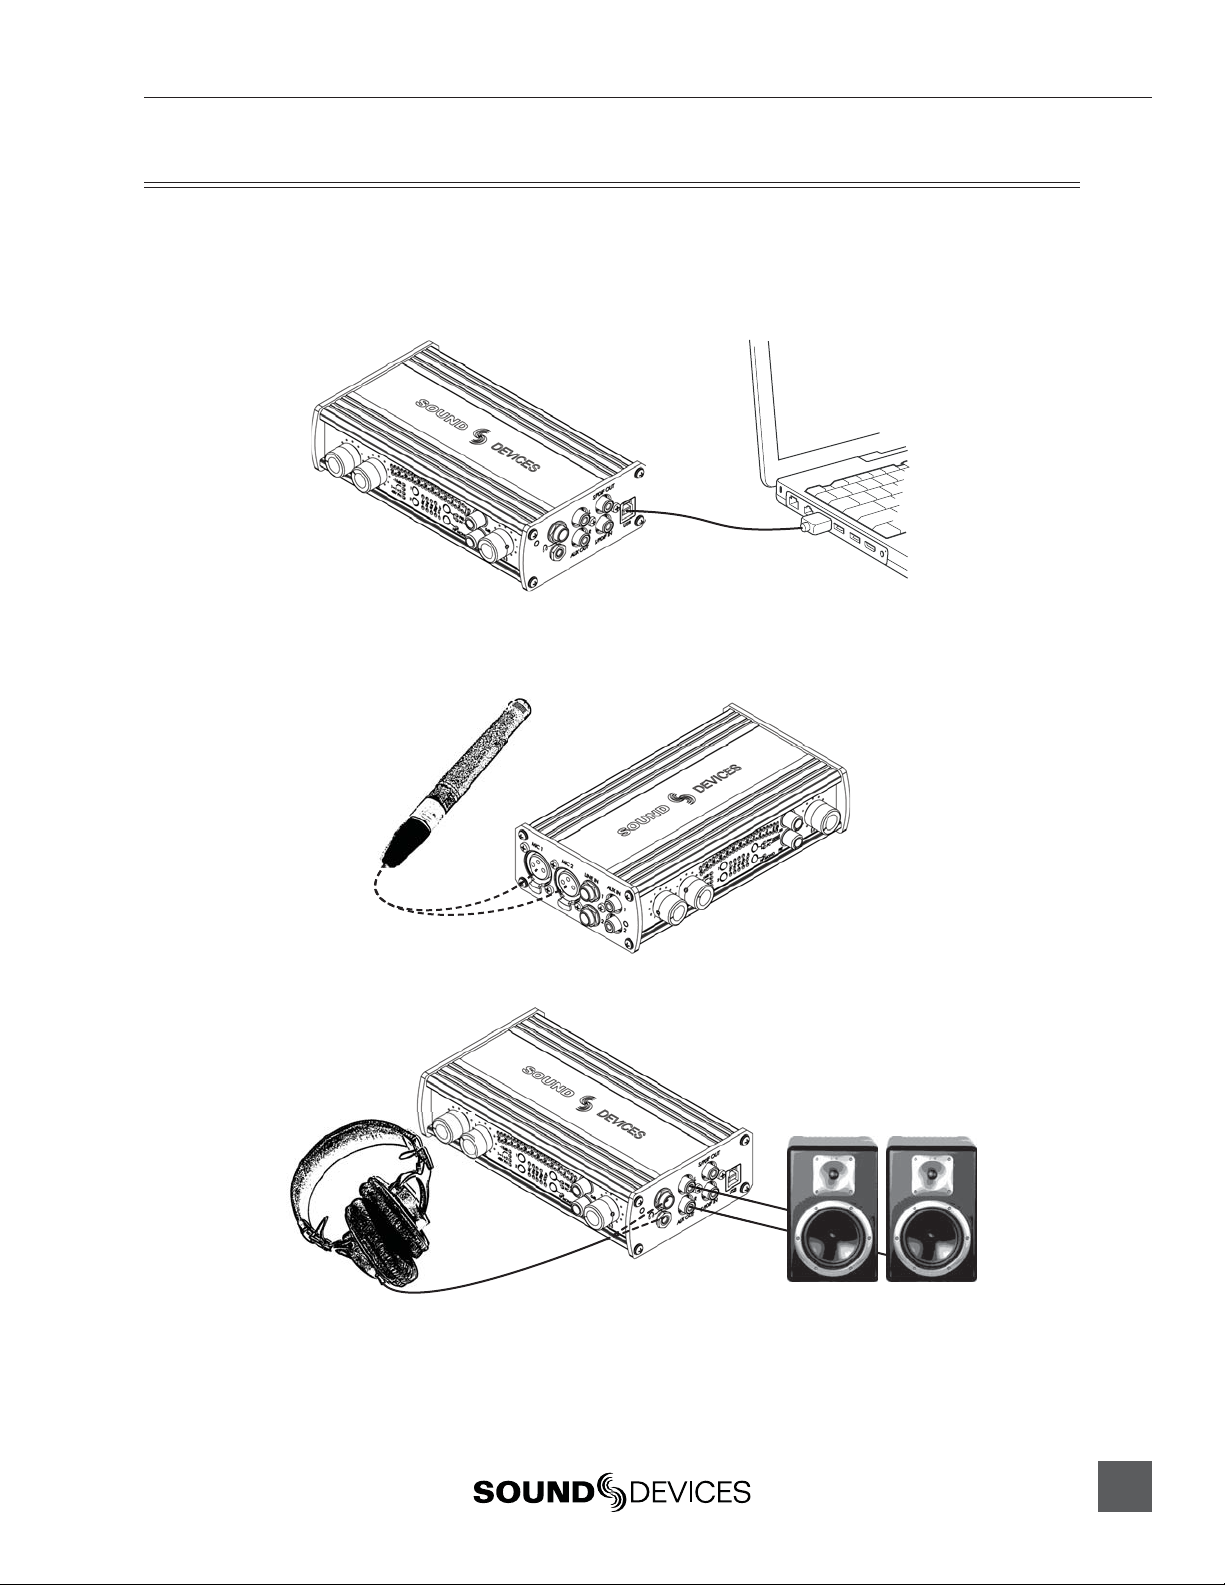
Quick Start Guide
Sound Card Connection
Attach the “A” plug of the (supplied) USB cable into an available “A” socket on the computer. Attach 1.
the “B” plug of the USB cable into the “B” socket on the USBPre 2. The USBPre 2’s meter LED’s will illuminate sequentially, indicating the USBPre 2 is connected and booting up properly.
Check to see that the operating system has recognized the USBPre 2 and designated the USBPre 2 as the 2.
default sound card. See Installation and Connection.
Connect an audio source. 3. See Inputs.
USBPre 2 User Guide and Technical Information
Connect headphones or other monitoring equipment.4.
Headphones
Powered monitors with balanced analog inputs can also be attached to
the XLR outputs on the back panel of the USBPre 2.
Press the Input Select button repeatedly until the proper Input Source LED is illuminated for the input 5.
you will be recording.
Powered Monitors
3
Page 5
USBPre 2 User Guide and Technical Information
Input 1 set to Mic (XLR)
Input 2 set to Line (1/4” TRS)
If the PRE Meter Source LED is not illuminated, press the Meter Source button to change the meter 6.
source to display input levels.
For analog input sources, adjust the Input Gain Control corresponding to the input being recorded. 7.
Input Gain Controls do not affect digital input levels. The meters will show the audio level of the input.
Launch an audio application on the computer. Make certain that the USBPre 2 is selected as the input 8.
and output device in the application’s preferences. Consult the applications documentation for further
information.
4
Features and specifications are subject to change. Visit www.sounddevices.com for the latest documentation.
Page 6
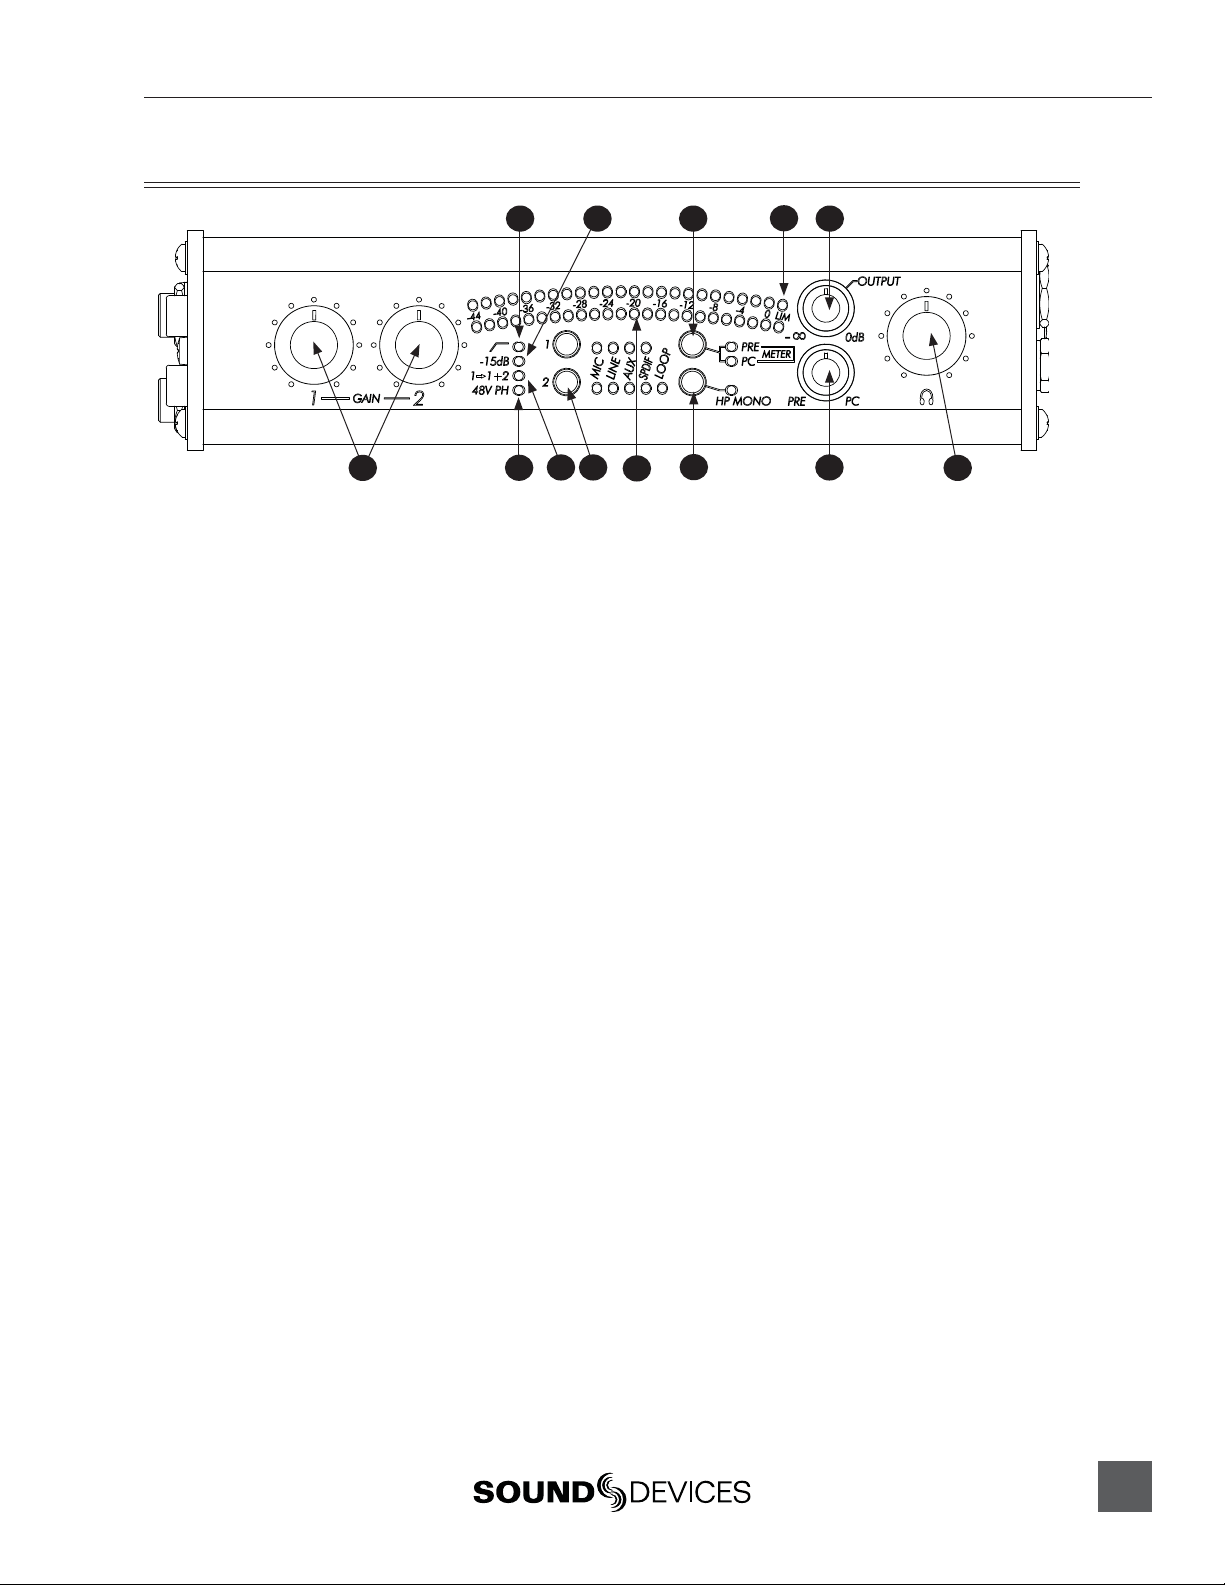
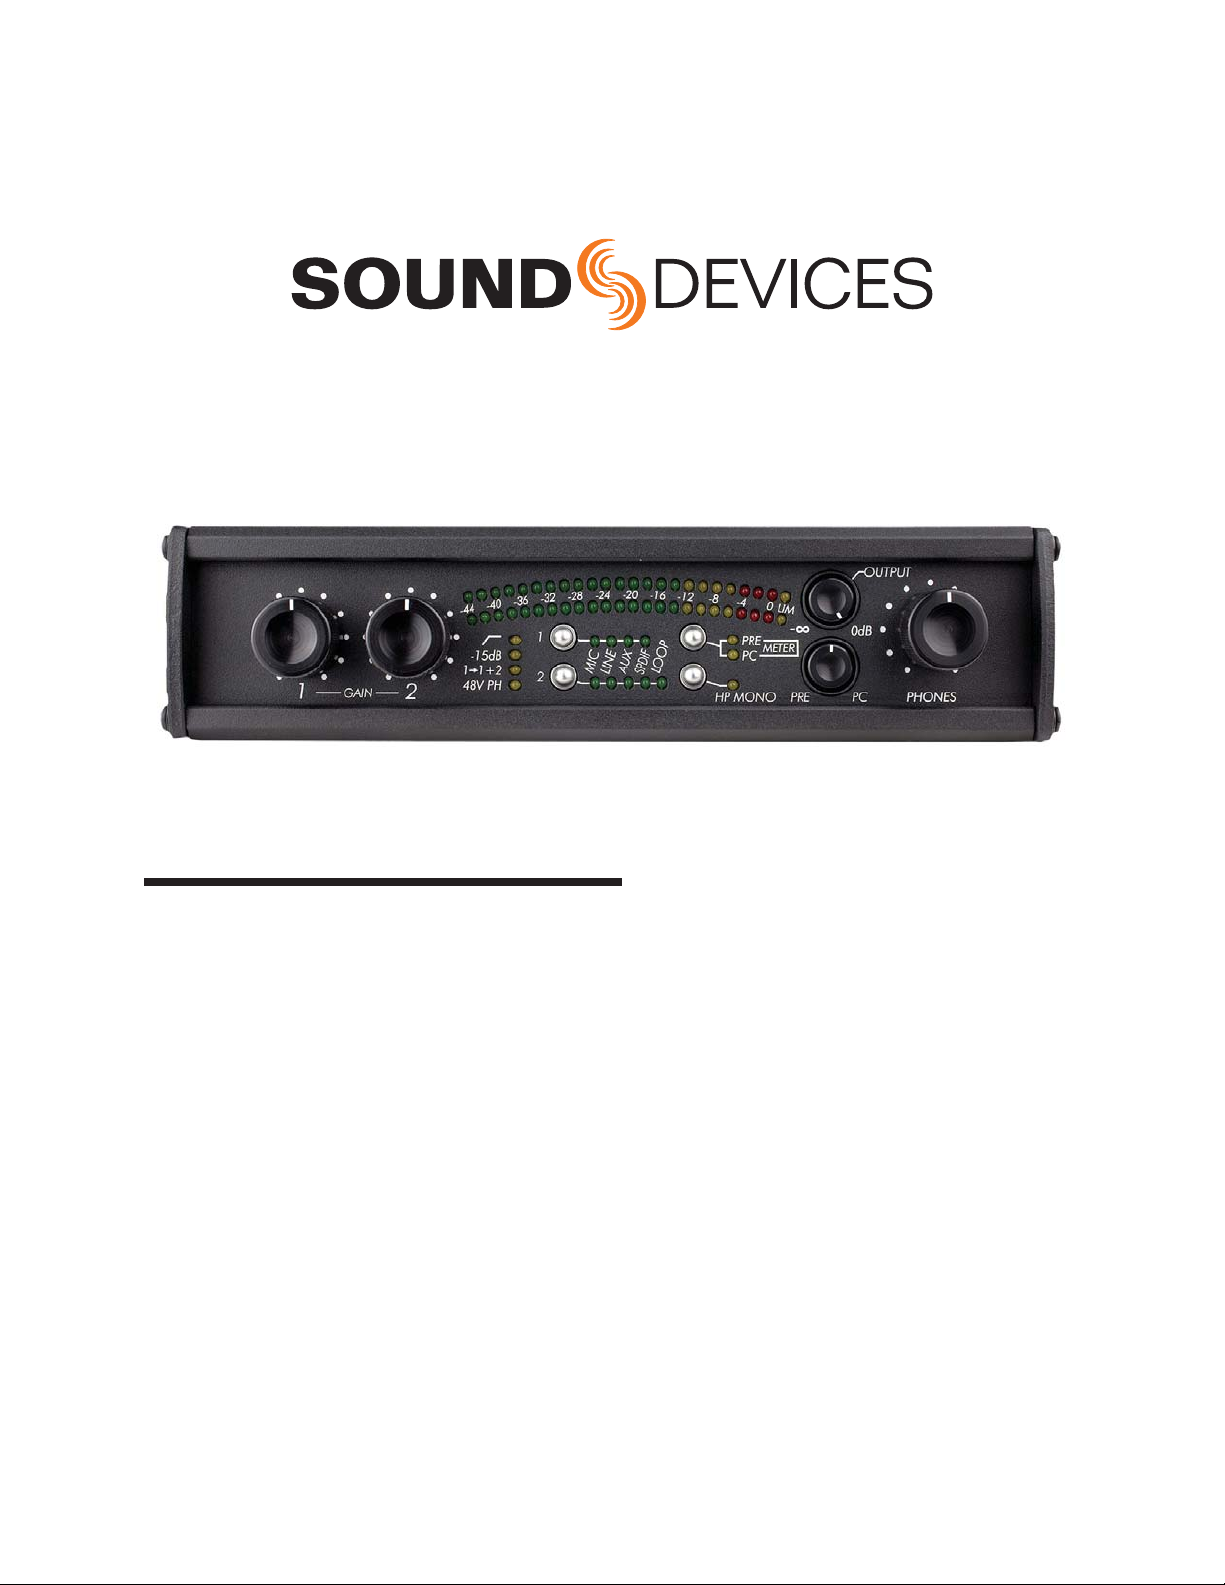
Front Panel Descriptions
USBPre 2 User Guide and Technical Information
2 3
1
4
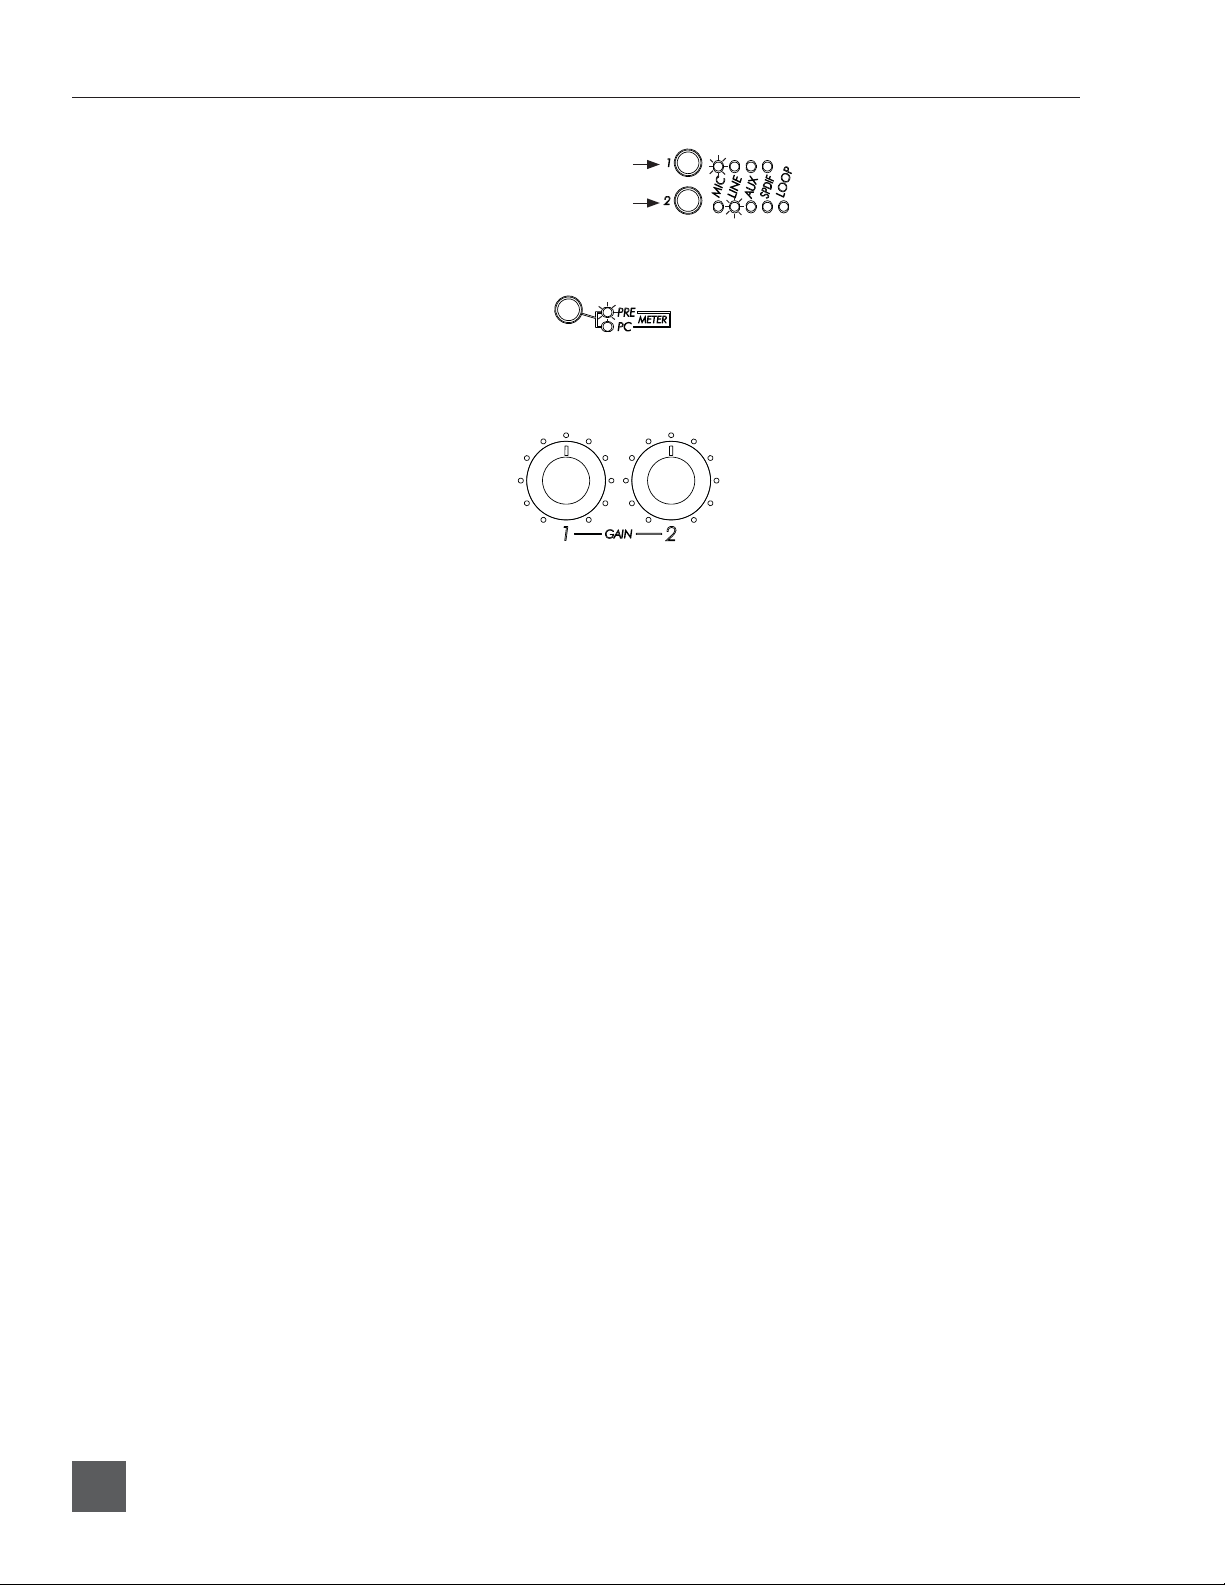
Input Gain Controls1)
Adjusts input gain. Gain is minimized
(not turned off) at full counter-clockwise
setting. Gain control only affects analog
input sources.
Low-Cut LED2)
Illuminates when low-cut fi lter is
engaged on either mic input. See DIP
Switch Options.
15 dB pad LED3)
Illuminates when 15 dB pad is engaged
on either mic input. See DIP Switch Op-
tions.
48V Phantom Power LED4)
Illuminates when phantom power is
engaged on either mic input. See DIP
Switch Options.
Input 1 Split LED5)
Illuminates when Input 1 Split is active.
See DIP Switch Options.
Input Select Buttons and Input Source 6)
LEDs
Selects between the available input
types. Input Source LED to the right will
illuminate to indicate which source is
currently active.
Meter7)
23-segment LED meter. Calibrated in
dBFS, with peak + VU ballistics.
Meter Source Button8)
Switches meter source between input or
output signal. LED illuminates to indicate current selection.
8
65
9
7
10
12
11
13
Headphone Mono Button and LED9)
Toggles between mono and stereo monitoring of analog input audio in headphones; especially useful when multitrack recording and recording from one
input. LED illuminates when Mono is
active. This function can be confi gured
to affect PC Audio as well. See DIP
Switch Options.
Limiter LEDs10)
Illuminates amber when limiting is occuring.
Monitor Mix Control11)
Selects the signal source to be monitored
in the headphones between analog
source audio (PRE) and computer audio
(PC). Listening to PRE audio allows
zero latency monitoring of analog input
sources. The center position mixes
monitoring of both source and computer
audio. The signal at the AUX Output
and balanced XLR Output is unaffected
by this control.
puts cannot be monitored in the headphones.
S/PDIF signal can only be monitored after
being processed by the computer.
NOTE: S/PDIF digital in-
Output Gain Control (Small Knob)12)
Adjusts gain of AUX Output and balanced XLR output. Can be confi gured to
adjust headphone gain. See DIP Switch
Options.
Headphone Volume Control (Big 13)
Knob)
Adjusts headphone gain. Can be confi gured to adjust XLR and AUX output
levels. See DIP Switch Options.
5
Page 7
USBPre 2 User Guide and Technical Information
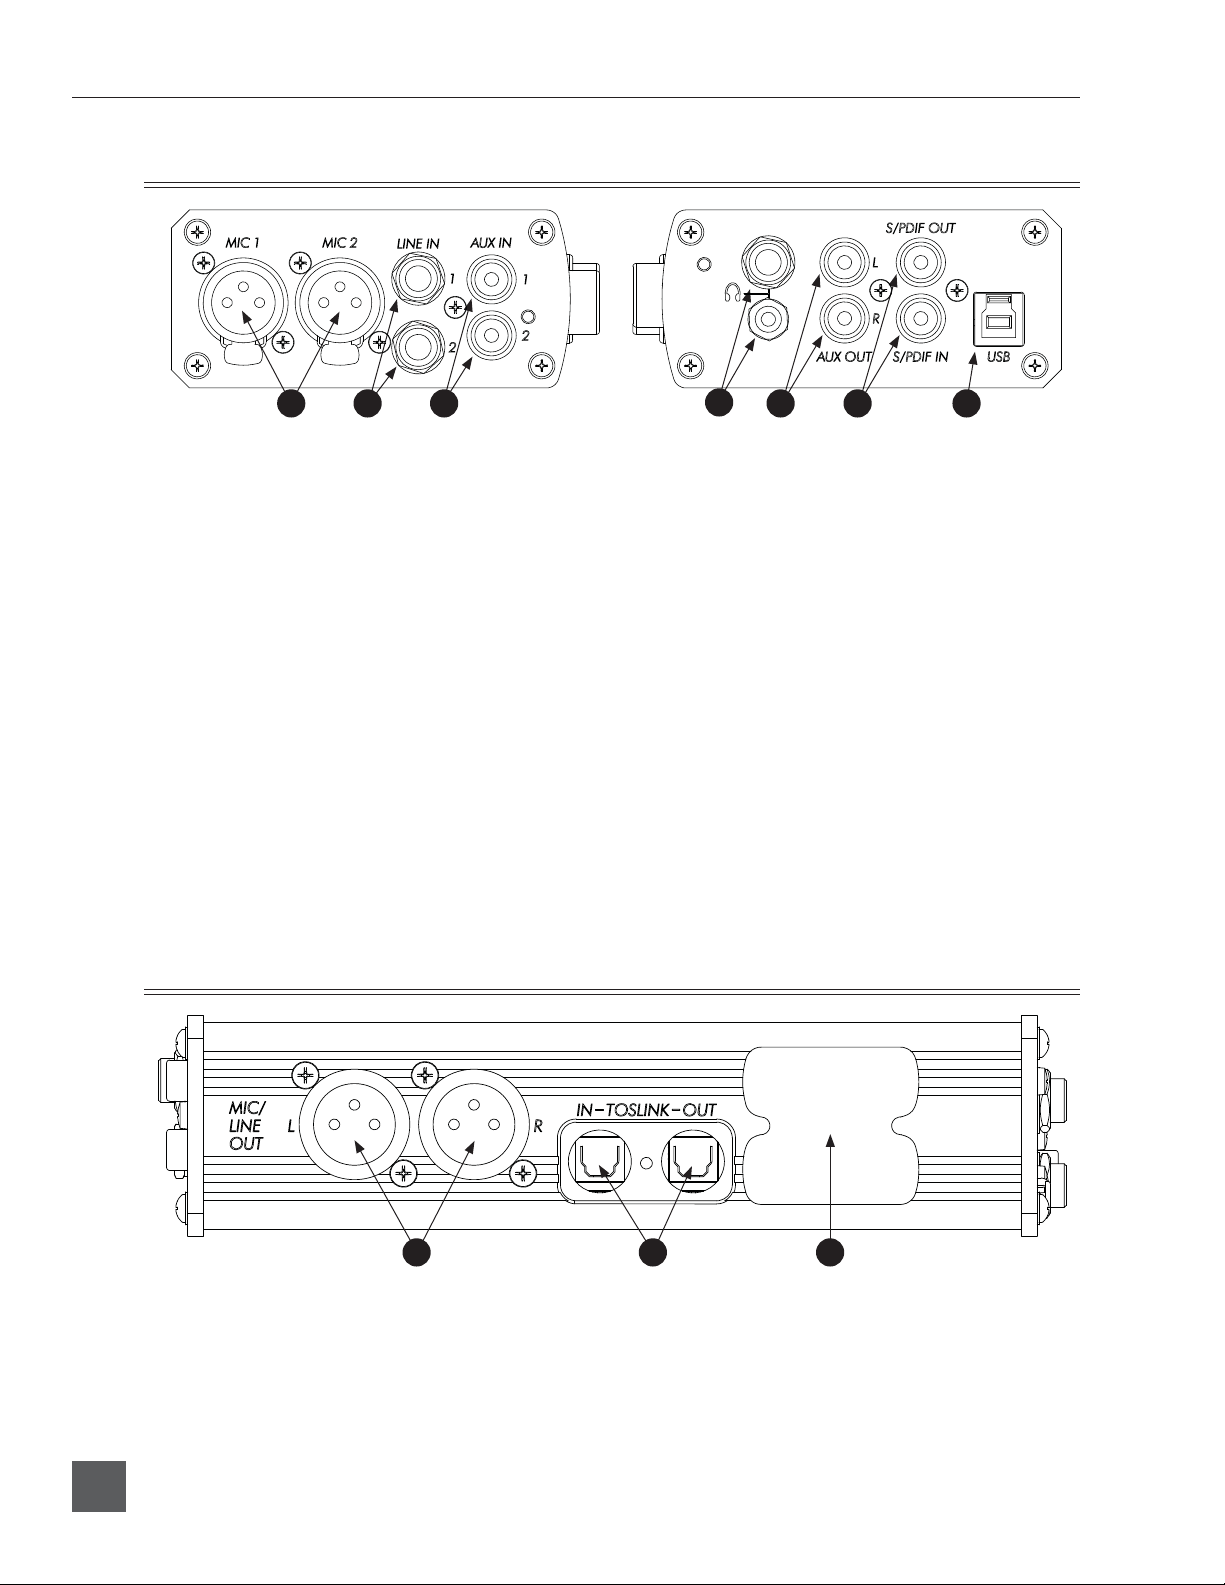
Input and Output Panel Descriptions
3
Mic Inputs 1)
Active-balanced XLR inputs accept lowimpedance microphone-level signals.
Line Inputs 2)
Accepts balanced line-level signals.
AUX Inputs 3)
Accepts consumer-level inputs such as
CD Players, Camcorders, Portable DVD
Players, and Mini-jack from computers
via RCA connectors.
Headphone Outputs 4)
3.5 mm and ¼-inch TRS stereo heaphone
outputs can drive low-impedance headphones. NOTE: The USBPre can drive
headphones to dangerously loud levels - take
caution when setting the headphone level.
Back Panel Descriptions
4
5 6 71 2
AUX Output 5)
Audio output to feed powered loudspeakers, CD Recorders, Camcorders, or
Portable DVD Recorders. RCA connectors. Computer audio only.
S/PDIF (Coaxial) Input and Output 6)
Coaxial digital input and output connectors. Input is selected via the front panel
input selection switch.
USB Port 7)
USB B-type connector for interconnection with the computer; provides all
data and power to the USBPre 2 via USB
bus powering. USB 1.1 and 2.0 compliant.
1 2 3
Balanced XLR Outputs1)
Active-balanced analog outputs. Mic /
Line switchable. See DIP Switch Options.
DIP Switches3)
DIP Switches to confi gure various aspects of the USBPre 2.
S/PDIF (Optical) Input and Output2)
Optical digital (TOSLINK) input and
output connectors.
6
Features and specifications are subject to change. Visit www.sounddevices.com for the latest documentation.
Page 8
USBPre 2 User Guide and Technical Information
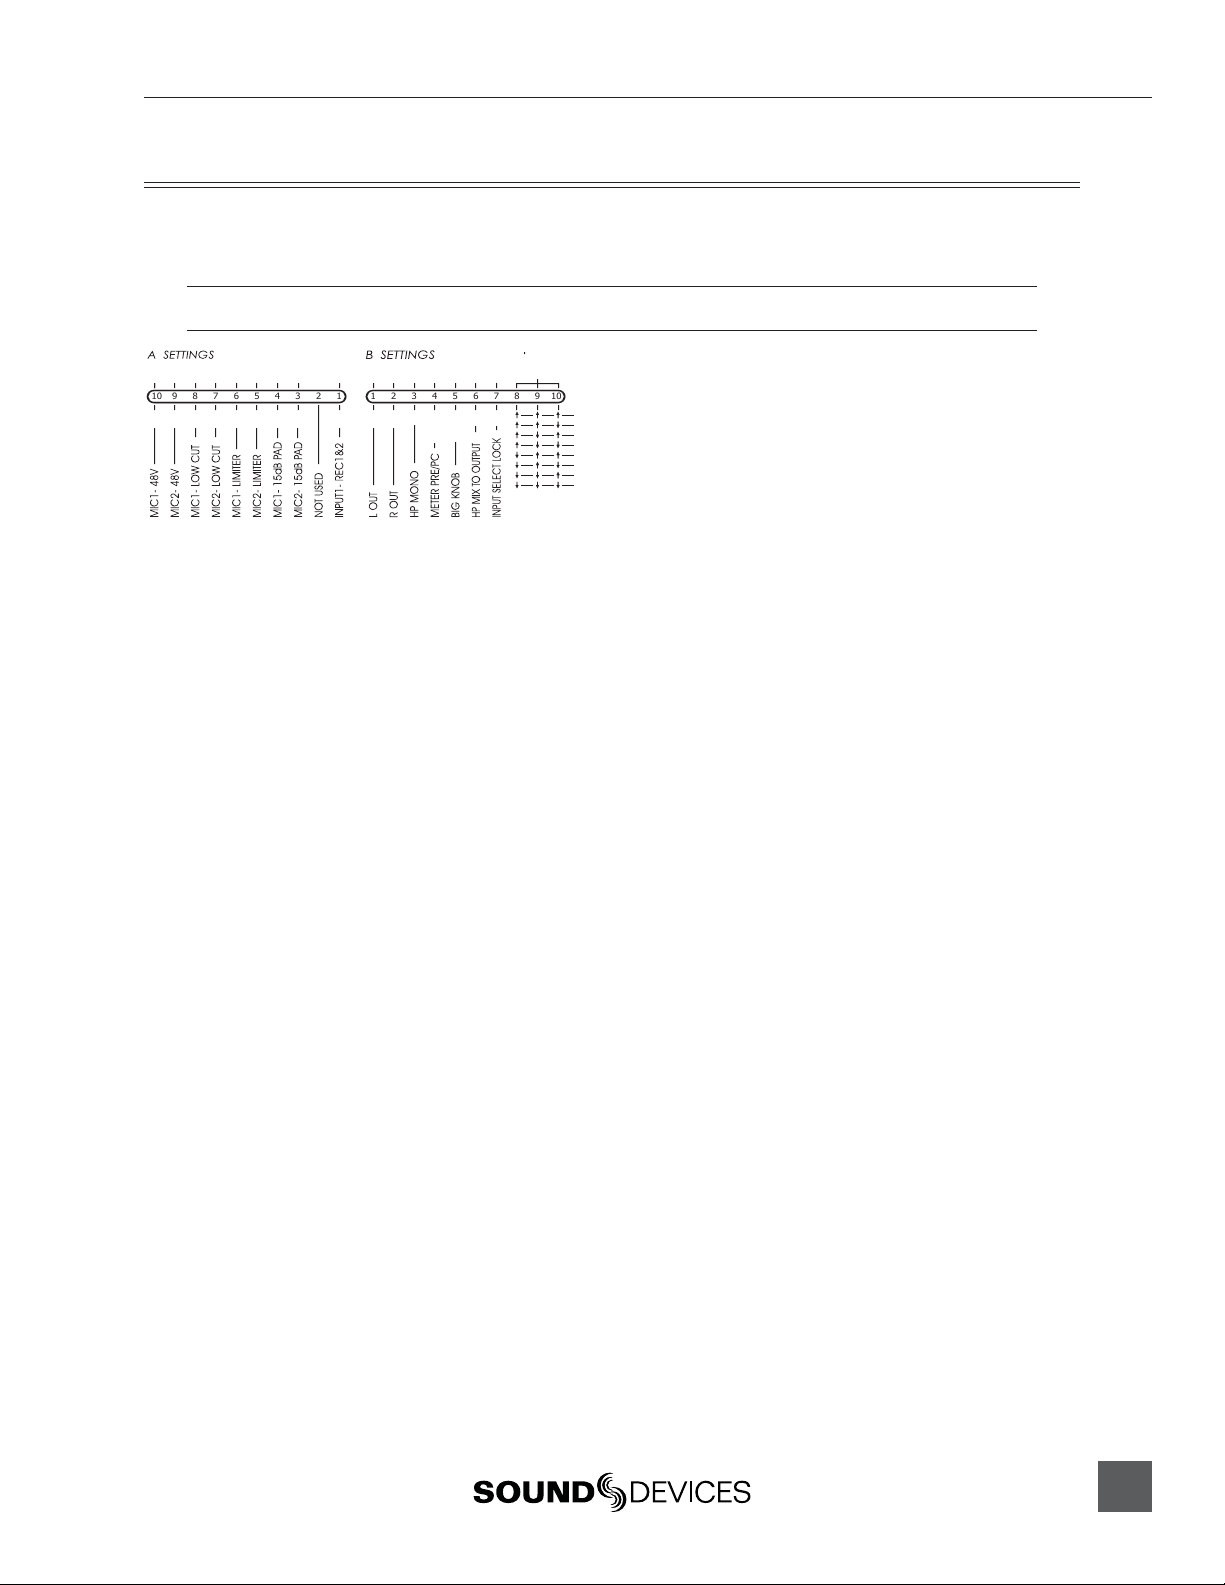
DIP Switch Options
The DIP switches on the back panel of the USBPre 2 can control various features. To adjust an individual switch, carefully move the switch with a slender tool.
In the following descriptions, “Up” refers to the direction opposite the numbering on the switch casings.
ON
ON
ON
10
OFF
ON
ON
ON
987654321
OFF
OFF
OFF
ON
OFF
OFF
OFF
TO
INPUT
PHONES
ONLY
AU
ALL
OUTPUT
MANUAL
LINE
ON
OFF
LINE
ON
12345678910
MIC
MIC
OFF
STAND
OFF
OFF
ON
ON
A Settings
48 Volt Phantom Power (9 and 10)•
Up position engages 48 Volt phantom power
on balanced microphone inputs. Required for
condenser microphones. See Inputs Section.
Low-Cut Filter (7 and 8)•
Up position engages low-cut fi lter on balanced
microphone inputs. -3 dB at 80 Hz. 12 dB per
octave. See Inputs Section.
Limiter (5 and 6)•
Up position engages limiters on balanced
microphone inputs. Attenuates signal above -4
dBFS. See Inputs Section.
15 dB Pad (3 and 4)•
Up position reduces gain by 15 dB on balanced
microphone inputs. Useful for sensitive microphones or very loud program material. See
Inputs Section.
Dual Mono (1)•
Up position disables input 2 and routes input 1
signal to both tracks.
ALONE
ATE
R
SAMPLE
48K
192K
176.4K
96K
88.2K
44.1K
32K
16K
B Settings
Balanced Output Level (1 and 2)•
Determines level of balanced XLR outputs. Up
position: Line level (0 dBu). Down position: Mic
level. (-40 dBu). See Outputs and Monitoring.
HP Mono Function (3)•
Adjusts what signals are summed when HP
MONO is active. Up position: Input signals
only. Down position: Input signals and output
audio from the computer. See Ouputs and Moni-
toring.
Meter PRE/PC (4)•
Adjusts whether or not the meter source
switches automatically to PC metering when
computer audio is present. Up position: Automatic. Down position: Manual. See Ouputs and
Monitoring.
HP / Output Knob (5)•
Adjusts which knob controls headphone gain
and which knob controls main output gain. Up
position: Big Knob controls headphone gain and
Small Knob controls main output gain. Down
position: Big Knob controls main output gain
and Small Knob controls headphone gain.
Headphone Signal to Outputs (6)•
Up position: Only computer audio is sent to
outputs. Down position: Main (analog) output
source is the same as headphone signal source
and affected by Monitor Mix Control. Note: In
Stand-alone mode, input signal is always routed to
the outputs and this setting has no effect.
Input Select Lock (7)•
Up position: Input Select Buttons function normally. Down position: Input Select Buttons are
disabled and input source selection is locked.
Stand-Alone Sample Rate (8, 9, and 10)•
Sets the operating sample rate when in StandAlone mode according to the associated
diagram. See Stand-Alone mode. In Soundcard
Mode, sample rate is determined by the computer. See Installation and Connection.
7
Page 9
USBPre 2 User Guide and Technical Information
Mac OS Installation and Connection
Before connecting the USBPre 2, quit all open applications that use audio. An application that is
running when the USBPre 2 is connected may not recognize the USBPre 2 until the application is
restarted.
When connecting the USBPre 2 to a computer with OS X 10.5 or earlier installed, hold down the
Input 1 Source Select button while pluggin in the USBPre 2. This will cause the USBPre 2 to initialize
in USB Fullspeed mode, which is required for OS X 10.5 and earlier.
Screen shots show Mac OS 10.6
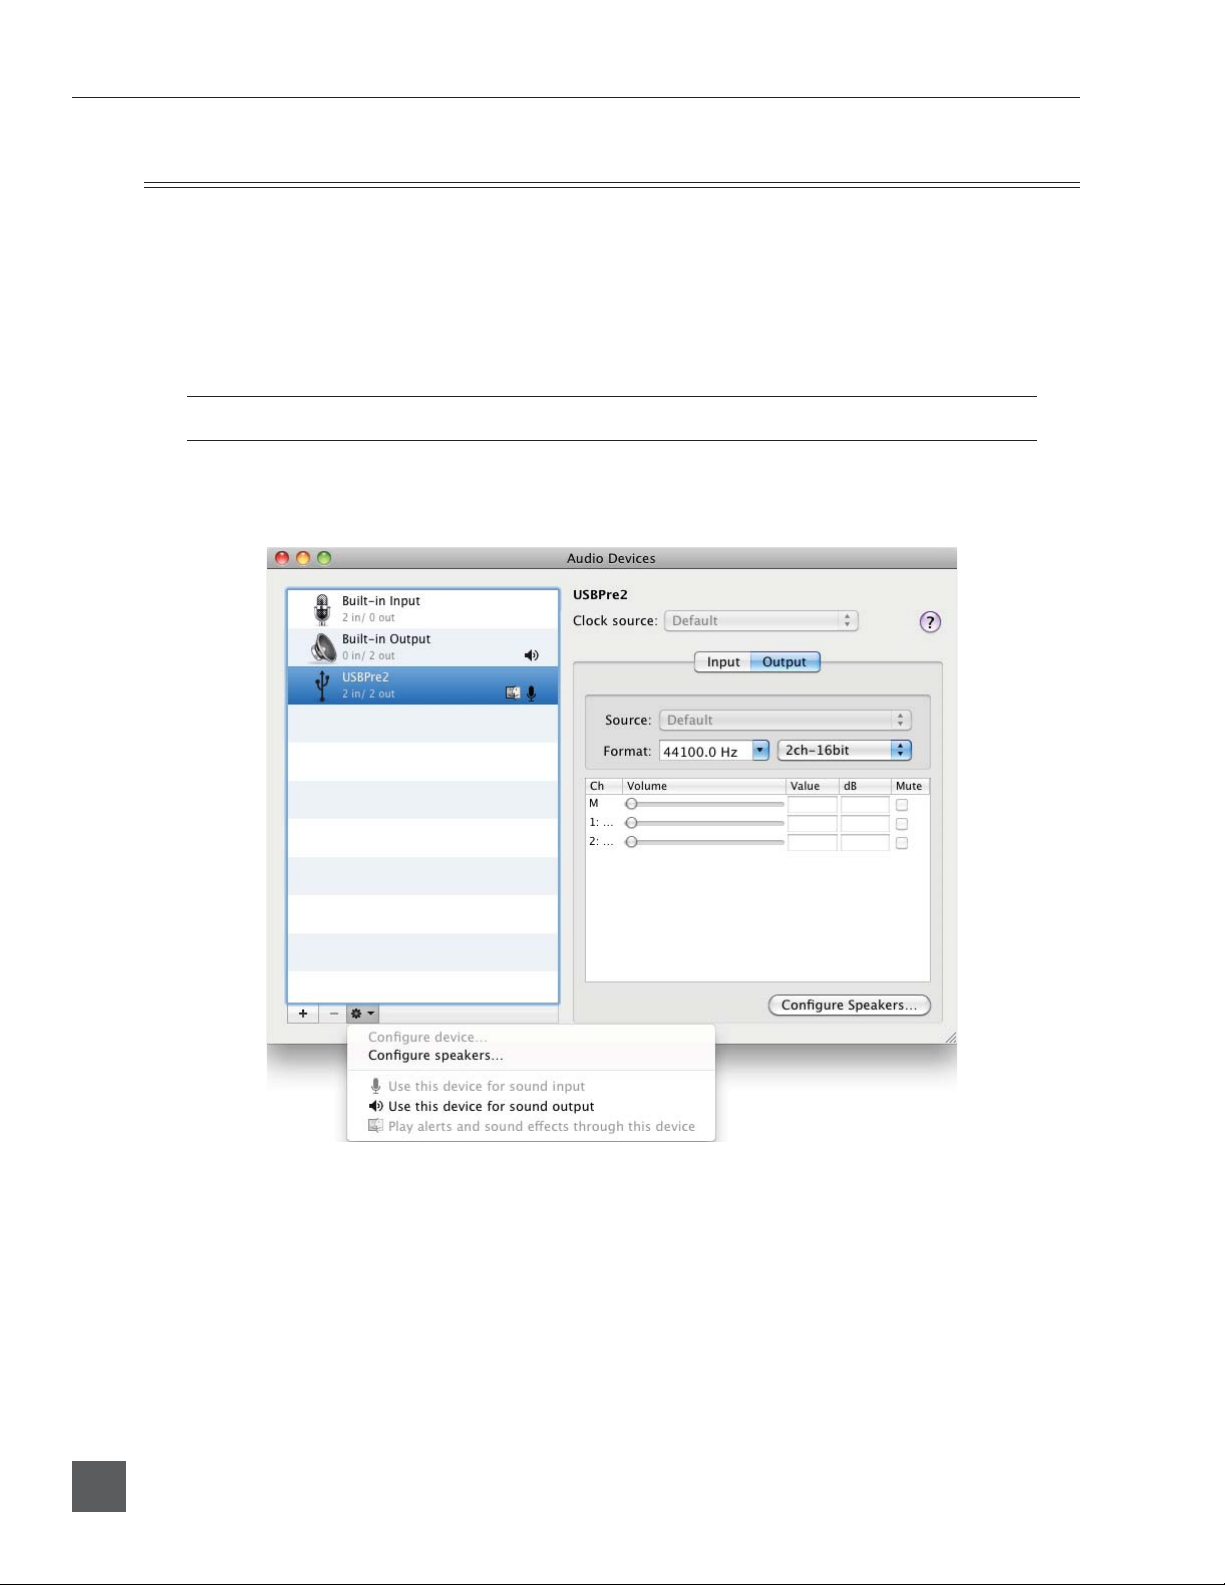
OS X Audio / MIDI Setup
Follow 1. Applications> Utilities> Audio MIDI Setup to open the Audio MIDI Setup dialog.
OS X 10.6 and later: Highlight the USBPre 2 item, click the button with the gear icon and select 2. Use this
device for sound output. Click the button with the gear icon again and select Use this device for sound
input.
OS X 10.5 and earlier: Ensure that the USBPre 2 is selected for both the Default Input dropdown menu
and the Default Output dropdown menu in the System Settings section.
Adjusting Sample Rate in OS X
Follow 1. Applications> Utilities> Audio MIDI Setup to open the Audio MIDI Setup dialog.
8
Features and specifications are subject to change. Visit www.sounddevices.com for the latest documentation.
Page 10

USBPre 2 User Guide and Technical Information
OS X 10.6 and later: Highlight the USBPre 2 item and adjust the sample rate and bit depth from the 2.
drop-down box labeled Format.
OS X 10.5 and earlier: Select the USBPre 2 from the Properties For dropdown menu, then set the sample
rate, channel count, and bit depth as desired from the dropdown menus in the Audio Input section and
the Audio Output section.
Windows Installation and Connection
The USBPre 2 is an Audio Device Class USB standard peripheral. No proprietary drivers are required to operate the USBPre 2 under Windows. The fi rst time the USBPre 2 is plugged in, Windows
will install standard USB Audio Device Class drivers automatically.
Before connecting the USBPre 2, quit all open applications that use audio. An application that is
running when the USBPre 2 is connected may not recognize the USBPre 2 until the application is
restarted.
Windows 7 and Vista Sound Control Panel
Follow 1. Start> Control Panel> Sound.
9
Page 11

USBPre 2 User Guide and Technical Information
Click the 2. Playback tab.
Click to select the item labeled “USBPre2” in the list of devices.3.
Click the 4. Set Default button. A green check mark icon will appear next the the USBPre 2 entry and the
phrase “Default Device” will appear below the entry, indicating that the USBPre 2 is now the default
playback device.
Click the 5. Recording tab and repeat and repeat steps 3 and 4 to make the USBPre 2 the default recording
device.
Adjusting Sample Rate in Windows 7 and Vista
Follow 1. Start> Control Panel> Sound.
Click the 2. Playback tab. Highlight (Single click) the entry labeled “USBPre2” and then Click the Proper-
ties button.
10
Features and specifications are subject to change. Visit www.sounddevices.com for the latest documentation.
Page 12

USBPre 2 User Guide and Technical Information
Click the 3. Advanced tab. Select the desired bit depth and sample rate from the dropdown menu.
Windows XP Sound Control Panel
Follow 1. Start> Control Panel. The control panel view will be be in either “Classic view” or “Category
view”.
If category view is enabled, click 2. Sounds, Speech, and Audio Devices, then click Sounds and Audio De-
vices. Skip to step number 4.
11
Page 13

USBPre 2 User Guide and Technical Information
If classic view is enabled, click 3. Sounds and Audio Devices.
Click the 4. Audio tab. Select the USBPre 2 from the Default device dropdown menu in the Sound play-
back section. Select the USBPre 2 from the Default device dropdown menu in the Sound recording
section.
ASIO Driver
The ASIO driver for the USBPre 2 allows for low-latency operation and sample rates up to 192 KHz
on Windows computers. The ASIO drivers include a WDM counterpart, so applications that use
standard WDM for playback and recording will still operate as normal after installation. After installation, the USBPre 2 will be available as an ASIO device in applications that utilize ASIO.
12
Features and specifications are subject to change. Visit www.sounddevices.com for the latest documentation.
Page 14

ASIO Driver Installation
Determine if your version of Windows is 32 or 64 bit by viewing the System information window. This 5.
window can be accessed by right-clicking Computer (located in the Start Menu or on the Desktop) and
selecting Properties. It can also be accessed by the shortcut Windows Key + Pause/Break key. The operating system type will be listed in the “System” section of this window.
USBPre 2 User Guide and Technical Information
Proceed to http://www.sounddevices/download/usbpre2-asio.htm and download the appropriate 6.
driver based on your system type.
Plug the USBPre 2 into the computer with a USB cable.7.
Locate the downloaded fi le and double-click it to run the installer program.8.
The welcome window will appear. Click 9. OK.
The WinZip self extractor window will appear. Click 10. Setup.
When the extractor is completed, the language selection window will appear. Select your prefered lan-11.
guage and click OK.
A window will appear offering the uption to install, uninstall, or exit. Click 12. Install the Driver.
13
Page 15

USBPre 2 User Guide and Technical Information
The installation process will begin. If the USBre 2 is not plugged in, the installer will request that you do 13.
so.
The fi nal window will appear. Click 14. Exit.
14
Unplug the USB cable from the USBPre 2.15.
Plug the USB cable back in to the USBPre 2.16.
Uninstalling ASIO Driver
Open the 1. Programs and Features section (Windows 7 and Vista) or Add / Remove Programs (Windows
XP) in the Control Panel (located in the Start menu).
Locate the item in the list that is titled 2. USBPre 2.0 USB ASIO Driver, highlight it, then click Uninstall.
This is all that is required to uninstall the driver from Windows XP and Vista. Further steps are required
to completely remove the driver from Windows 7. The following steps are for Windows 7 only.
Restart the computer.3.
Right-click 4. Computer (located in the Start Menu or on the Desktop) and select Properties.
Features and specifications are subject to change. Visit www.sounddevices.com for the latest documentation.
Page 16

USBPre 2 User Guide and Technical Information
On the left sidebar of the System window, click 5. Device Manager to open the Device Manager window.
Expand the 6. Sound, video, and game controllers section.
Right-click the entry in this section titled 7. USBPre 2.0 Audio 1.0.0 and select Uninstall.
Ensure that the checkbox titled 8. Delete the driver software for this device is checked, then click OK.
In the Device Manager, expand the section titled 9. Universal Serial Bus controllers and repeat steps 7 and
8 on the entry in this section titled USBPre 2.0 Audio 1.0.0.
15
Page 17

USBPre 2 User Guide and Technical Information
Linux Installation and Connection
The USBPre 2 is an Audio Device Class USB standard peripheral. No proprietary drivers are required to operate the USBPre 2 under Linux. The fi rst time the USBPre 2 is plugged in, Linux will
enable standard USB Audio Device Class drivers automatically (if necesarry).
Current Linux audio drivers only support USB audio devices at “Full speed” USB rates. The USBPre
2 must be forced into Full Speed mode by holding down the Input 1 Source button when plugging in
the USB cable to the USBPre 2.
Before connecting the USBPre 2, quit all open applications that use audio. An application that is
running when the USBPre 2 is connected may not recognize the USBPre 2 until the application is
restarted.
Inputs
Input Source Selection
The USBPre 2 has two available input channels. The source for each input is independently selected
using the Input Select Buttons on the front panel. The selected source is indicated by an illuminated
LED next to the respective Input Select Button. The Input Select Buttons can be locked to prevent accidental switching of the input sources. See DIP Switch Options.
Microphone Inputs
Phantom Power
The USBPre 2 provides 48-volt phantom power for condenser microphones connected to the XLR
inputs. Phantom power can be engaged independently for each input. See DIP Switch Options. Condenser microphones that can operate on phantom voltages from 11-52 volts will function properly
with 48-volt phantom.
Dynamic microphones typically do not require phantom power. A properly connected balanced,
dynamic microphone is not affected by the presence of phantom power nor will it draw any current.
However, it is good practice to turn phantom power off when not needed. Poor or incorrectly wired
microphone cable can cause audible artifacts in microphone signals. Some wireless receivers outputs
are adversely affected by the presence of phantom power, therefore, consult the wireless receiver
documentation.
Low-Cut Filter
The low-cut fi lter attenuates low frequency signals. This is useful in conditions where low frequency
signal is causing overload before the desired gain is reached (windy environments or handheld microphones, for example).
Input Pad
With some combinations of microphone sensitivity and sound pressure levels, the microphone input
of the USBPre 2 can become overloaded even when the input gain is at its lowest level. A 15 dB pad
can be engaged on the microphone input to reduce its sensitivity. See DIP Switch Options.
Input Limiters
In environments where high sound pressure levels may occur unexpectedly, input limiting prevents
distortion by attenuating signals that surpass the input threshold level. In normal operation with
properly set input levels, the threshold of an input limiter is rarely reached. Signals below the threshold are not affected by the limiter. Limiters can be engaged on each microphone input independently.
See DIP Switch Options. The amber LIM LED’s on the right side of the meters will illuminate to indi-
cate when limiting is occurring.
16
Features and specifications are subject to change. Visit www.sounddevices.com for the latest documentation.
Page 18

USBPre 2 User Guide and Technical Information
Line Inputs
The Line Inputs use balanced, quarter-inch connectors and accept +4 dBu analog signal (sometimes
referred to as “Professional” line level). Wiring is tip: signal (+), ring: signal (-), and sleeve: ground.
Aux Inputs
The Aux Inputs use unbalanced, RCA connectors and accept -10 dBu analog signal (sometimes
referred to as “Consumer” line level). This input is designed for signal from CD players, camcorders,
portable DVD players, and other similar devices.
Signal output from turntables without built-in phono preamplifi ers is too weak for the USBPre 2’s Aux
Inputs. A separate phono preamplifi er may be required depending on the design of the turntable.
Digital Inputs
Digital signal in the S/PDIF format can be input to either the coaxial RCA connector or the optical
TOSLINK connector. If signal is present at both the optical and coaxial input, the signal from the
optical input takes precedence.
Sample rates below 32 kHz are not supported on the digital connections. The optical connections do not
support the 192 kHz sampling rate.
Input 2 Loop Source
Input 2 has an additional source labeled LOOP. This input source does not correspond to any physical connections on the USBPre 2. When LOOP is selected, input 2’s source is derived from the left
channel of the computer audio signal (post digital-to-analog conversion). The input 2 Gain Control
affects signal The Output Gain Control does not affect the level of the signal going in to input 2.
The LOOP source is useful for test and measurement applications where a reference signal is required to be routed back to an input.
Outputs and Monitoring
Headphone Output
The USBPre 2 has a high current headphone amplifi er for monitoring analog input audio, computer
audio, or a mix of both. The Headphone Volume Control adjusts the level of the signal to the headphones. The Headphone Volume Control knob and the Output Gain Control knob can be swapped
with the back panel DIP Switches. See DIP Switch Options.
Caution: The USBPre 2 is capable of driving headphones to dangerously high levels. Be aware of headphone level controls at all times.
Use the Monitor Mix Control on the front panel to adjust the mix between direct audio from the inputs (fully counter-clockwise) and output audio from the computer (fully clockwise). The signal for
input audio is derived from the inputs before analog-to-digital conversion.
17
Page 19

USBPre 2 User Guide and Technical Information
Headphone Mono mode sums the input signals from both inputs into a mono mix for the headphones. To toggle Headphone Mono mode, push the Headphone Mono button on the front panel.
The Headphone Mono LED will illuminate when Headphone Mono mode is active. Optionally, the
stereo signal from the computer can also be summed when Headphone Mono mode is engaged. See
DIP Switch Options.
Main Outputs
Signal level at the balanced XLR outputs and unbalanced AUX outputs is adjusted with the Output
Gain Control. The signal source for the outputs is the output audio from the computer. This source
can be changed to the same source as the headphone output with the back panel DIP Switches. The
balanced XLR outputs are set to line level by default and can be set to mic level with the back panel
DIP switches. See DIP Switch Options.
The Windows Volume Control (controlled with the “speaker” icon in the system tray) and the Mac
volume control affect the level of the computer’s output audio before it reaches the USBPre. It is generally best practice to set the volume control to 100% and make adjustments to the output level with the
USBPre 2’s Output Gain Control.
Digital Outputs
When the USBPre 2 is used as a computer audio interface, the sample rate of the digital outputs
(Coaxial S/PDIF and optical TOSLINK) is determined by the application settings on the computer. In
Stand-alone mode, the sample rate is determined by the position of the back panel DIP switches.
Optical (TOSLINK) outputs are inoperable at 192 kHz sample rate.
Metering
The USBPre 2 features a 23-segment, 2 channel LED meter. The meter displays both the peak level
of source audio and average (VU) levels simultaneously. 0 dB on the meter is calibrated to 0 dBFS
signal coming from the computer.
The current source signal for the meter is indicated by an illuminated LED next the Meter Source
Button. The meter source can be toggled by pushing the Meter Source Button. When the meter
source is set to PC the meter displays the audio level for signal coming from the computer. In this
mode, the top row of the meter displays the left channel level and the bottom row displays the right
channel level. When the meter source is set to PRE, the meter displays the audio level for signal
at the active inputs.In this mode, the top row of the meter displays the level for the selected input
source on channel one and the bottom row displays the level for the selected input source on channel
2.
The meter source switches from PRE to PC automatically when signal is output from the computer.
This behavior can be defeated so that the source is switched manually. See DIP Switch Options.
Stand-Alone Mode
In Stand-Alone mode, the USBPre 2 operates as a microphone preamplifi er with both digital and
analog outputs. It can also accept digital signals and output analog audio. The USBPre 2 will automatically enter stand-alone mode when connected to a USB jack supplying USB power (5V, 500 mA
max) but is not associated with a running operating system (For example, a powered USB hub that is
18
Features and specifications are subject to change. Visit www.sounddevices.com for the latest documentation.
Page 20

USBPre 2 User Guide and Technical Information
not attached to a computer). The USBPre 2 can be forced into Stand-alone mode when connected to a
computer supplying USB power by holding down the Meter Source button when attaching the USB
cable.
In Stand-Alone mode all front panel controls perform the same functions as when the USBPre 2 is
in Interface mode, except that the Meter Source button is disabled and the meter mode is locked to
PRE. Since there is no reference clock from the computer, the operating sample rate is set using the
back panel DIP Switches. See DIP Switch Options.
Sample Rate
In Stand-alone mode, the sample clock is generated by the USBPre 2’s internal sample clock generator, and the Sample rate is set by adjusting the DIP switches on the back panel of the USBPre 2. See
DIP Switch Options. This will affect the internal sample rate of the USBPre 2 as well as the sample
rate output from the digital outputs.
Sample rates below 32 kHz are not supported on the coaxial or optical (TOSLINK) digital interconnections. 192 kHz sampling rate is not supported on the TOSLINK interconnections.
In Interface mode, the USBPre 2 operates at the sample rate set from the host operating system and
the DIP switches related to sample rate are ignored. It is further possible to change the sampling
rate of the USBPre 2 within some applications’ audio preferences. In Windows XP there is no global
sample setting, and the sample rate must be set by the application in use.
Locking Sample Rate to External Sources
The sample rate of the USBPre 2 can be locked to the sample rate of an external S/PDIF signal. When
a digital signal is connected to either the coaxial or optical input, the S/PDIF Input Source LED will
illuminate to indicate that the USBPre 2 is locked to the sample rate of the incoming digital signal.
The S/PDIF Input Source LED’s will fl ash for 30 seconds when the signal is removed or turned off.
To make a digital recording with the computer at a locked sample rate, be certain that the incoming
digital signal is valid (solid S/PDIF Input Source LED’s) and that the software driver is set to the
same sample rate as that of the incoming digital signal (See Installation and Connection section for your
operating system).
If the USBPre 2 senses a discrepency in the incoming digital signal such as a clocking error, the Meter
Source LED’s will fl ash until the Meter Source button is pushed.
Setup Examples
Test and Measurement
The high quality preamplifi ers and portability of the USBPre 2 make it a perfect interface for test and
measurement applications. A requirement for measuring a transfer function is the ability to monitor the output reference signal from the computer. The LOOP source of input 2 enables a copy of the
computer audio left channel to be internally routed to input 2. This allows reference signal to be sent
back into the measurement application without additional cabling.
The USBPre 2 supports native sample rates below 44.1 kHz to provide better FFT resolution for lowfrequency audio measurements.
19
Page 21

USBPre 2 User Guide and Technical Information
To PA
Input 1 set to Mic (XLR)
Input 2 set to Loop
High Performance Playback
The USBPre 2 can provide high-quality audio output from a computer to reference monitors in a
studio control room or a home stereo system. Depending on the connectivity of the monitors, the balanced XLR outputs, unbalanced RCA outputs, or digital S/PDIF outputs can be used to send computer audio to the monitors.
Monitors
LEFT
20
RIGHT
Power amplifier input
Power amplifier
Features and specifications are subject to change. Visit www.sounddevices.com for the latest documentation.
Page 22

Block Diagram
USBPre 2 User Guide and Technical Information
21
Page 23

USBPre 2 User Guide and Technical Information
Specifi cations
Frequency Response
(reference 1 kHz tone.
192 kHz sample rate)
THD+N
(22 Hz - 22 kHz measurement bandwidth)
E.I.N.
(MIC inputs)
Input Clipping Level
(1% THD)
Input Sensitivity
(typical, for 0 dBFS)
Input Impedance
(actual)
Input Limiter Threshold
Low Cut
Output Clipping Level
(1% THD, PC-controlled output levels
at max)
Output Impedance
S/PDIF Digital
A/D Converter
D/A Converter
Analog Gain
Sample Rates / Bit Depths
Master Clock
Metering
Phantom Power
Powering
Dimensions (unpackaged)
Weight
Certifications
Included Accessories
Any input to PC recording:
10 Hz - 40 kHz, +/- 0.5 dB•
-3 dB at 65 kHz•
0.05% max (any input to PC recording, gain control at min, input driven to -6 dBFS)•
0.009% max (AUX output, 0 dB V output, 100k ohm load)•
0.05% max (HEADPHONES output, 2 V rms output, 600 ohm load)•
-127 dBu min (22 Hz - 22 kHz bandwidth, 150 ohm source, gain control fully clock-•
wise, 15 dB pad out)
Mic: -10 dBu (0.25 V RMS)•
Mic (15 dB pad): +4 dBu (0.78 V RMS)•
Mic: -10 dBu min, -60 dBu max•
Mic (15 dB pad): +4 dBu min, -45 dBu •
max
Mic: 4k ohm, active-balanced• Line: 60k ohm, active-balanced•
Mic: -4 dBFS•
Mic: -3 dB at 80 Hz. 12 dB per octave•
Balanced XLR: +18 dBu with 100k ohm •
load
Aux: +8 dBu (2.0 V rms) with 100k ohm •
load
Balanced XLR (Line level): 500 ohms•
Balanced XLR (Mic level): 5 ohms•
24 or 16 bit input•
24-bit resolution. 114 dB typical dynamic range (22 Hz - 22 kHz bandwidth, A-weight-•
ed)
24-bit resolution. 112 dB typical dynamic range (22 Hz - 22 kHz bandwidth, A-weight-•
ed)
Mic: 80 dB max•
Mic (15 dB pad): 65 dB max•
Recording: 8, 16, or 24-bit at 8, 16, 32, •
44.1, 48, 96, or 192 kHz
Crystal based, low jitter•
2 x 23 segments, 44 dB total range, peak ballistics. 0 dB on meter = 0 dBFS (0 dB •
referenced to full scale digital)
48 V through 6.8k ohm resistors. Each mic input will supply 10 mA•
USB bus powered. 5 V (+/- 10%), 500 mA max current from USB port (USBPre 2 will •
not function if connected through a passive USB connection or hub)
4.3 cm x 18 cm x 10 cm (H x W x D)• 1.7 in. x 7.25 in. x 4.25 in. (H x W x D)•
0.5 kg• 1.13 lbs.•
Meets FCC Part 15 Class B• Complies with the Requirements of •
USB Cable• Rubber Feet•
PC source to AUX or XLR output:
10 Hz - 40 kHz, +/- 0.5 dB•
-3 dB at 65 kHz•
Line: +28 dBu (19.45 V rms)•
Aux: +9 dBu (2.18 V rms)•
Line: +29 dBu min, +10 dBu max•
Aux: +12 dBu min, -7 dBu max.•
Aux: 80k ohm•
Headphones: +11 dBu (2.75 V rms) with •
600 ohm load
Aux: 660 ohms•
Line: 30 dB max•
Aux: 13 dB max•
Playback: 24-bit at 8, 16, 32, 44.1, 48, •
96, or 192 kHz
European Directive 89/336/EEC
22
Features and specifications are subject to change. Visit www.sounddevices.com for the latest documentation.
Page 24

USBPre 2 User Guide and Technical Information
Warranty and Technical Support
Warranty & Service
Sound Devices, LLC warrants the USBPre 2 against defects in materials and workmanship for a
period of ONE (1) year from date of original retail purchase. This is a non-transferable warranty that
extends only to the original purchaser. Sound Devices, LLC will repair or replace the product at its
discretion at no charge. Warranty claims due to severe service conditions will be addressed on an individual basis. THE WARRANTY AND REMEDIES SET FORTH ABOVE ARE EXCLUSIVE. SOUND
DEVICES, LLC DISCLAIMS ALL OTHER WARRANTIES, EXPRESS OR IMPLIED, INCLUDING
WARRANTIES OF MERCHANTABILITY AND FITNESS FOR A PARTICULAR PURPOSE. SOUND
DEVICES, LLC IS NOT RESPONSIBLE FOR SPECIAL, INCIDENTAL, OR CONSEQUENTIAL
DAMAGES ARISING FROM ANY BREACH OF WARRANTY OR UNDER ANY OTHER LEGAL
THEORY. Because some jurisdictions do not permit the exclusion or limitations set forth above, they
may not apply in all cases.
For all service, including warranty repair, please contact Sound Devices for an RMA (return merchandise authorization) before sending your unit in for repair. Product returned without an RMA
number may experience delays in repair. When sending a unit for repair, please do not include accesso-
ries, including carry cases, cables, or adapters unless instructed by Sound Devices.
Sound Devices, LLC
Service Repair RMA #XXXXX
300 Wengel Drive
Reedsburg, WI 53959 USA
telephone: (608) 524-0625
Technical Support / Bug Reports
For technical support and bug reporting on all Sound Devices products contact:
Sound Devices, LLC
E-mail: support@sounddevices.com
web: www.sounddevices.com/support
Telephone: +1 (608) 524-0625 / Toll-Free in the U.S.A.: (800) 505-0625
Fax: +1 (608) 524-0655
23
Page 25

USBPre 2 User Guide and Technical Information
CE Declaration of Conformity
According to ISO/IEC Guide 22
Sound Devices, LLC
300 Wengel Drive
Reedsburg, WI 53959 USA
declares that the product, USBPre 2 Portable Computer Audio Interface is in conformity with and
passes:
EN55103-1, 1997 EMC-product family standard for audio, video, audio-visual and
entertainment lighting control apparatus for professional use.
Part 1: Emissions
EN55103-2, 1997 EMC-product family standard for audio, video, audio-visual and
entertainment lighting control apparatus for professional use.
Part 2: Immunity
EN55103-1 Phenomena 2, 3, 1997 Magnetic emissions at 1 meter 50 Hz – 50 kHz
EN55103-2 Phenomena 3, 1997 Magnetic immunity 50 Hz to 10 kHz
EN61000-4-2 (2001)/
IEC61000-4-2 (2001)
ESD, ±4 kV contact, ±8 kV air discharge
EN61000-4-3 (2001)/
IEC1000-4-3 (2001)
EN61000-4-4 (2001)/
IEC61000-4-4 (2001)
EN61000-4-4 (2001)/
IEC61000-4-4 (2001)
EN61000-4-5 (2001)/
IEC61000-4-5 (2001)
EN61000-4-6 (2001)/
IEC61000-4-6 (2001)
IEC61000-4-11(2001) Voltage dips and short interruptions at test voltage level: 0% V
Radiated RF immunity, 10 V/m, 80% 1 kHz amplitude modulation
AC power ports: EFT Burst, I/O lines, ±0.25 kV to ±1.0 kV,
power line ±0.5 kB – ±1 kV
EFT Burst, I/O lines, ±0.25 kV to ±1.0 kV, power line ±0.5 kB – ±1
kV
Surge ±1 kV differential mode (line-to-line), ±2 kV common
mode (line-to-ground)
Conducted RF immunity, 3 V, 80% @1 kHz amplitude
modulation
unominal @ 70% V unominal @ 25 period
Tested by L. S. Compliance, Inc. Cedarburg, Wisconsin
July 14, 2010
Matthew Anderson
Director of Engineering
Sound Devices, LLC
24
Features and specifications are subject to change. Visit www.sounddevices.com for the latest documentation.
Page 26

USBPre 2 User Guide and Technical Information
25
Page 27

USBPre 2 Rev. 1.0b - Printed in the U.S.A.
 Loading...