

Page 1

Virtual Si User Guide V3.0
All About Virtual Si
Virtual Si is an offline graphic system and editor for the Soundcraft Si Series. In addition, because
it looks and works like the real console, it can act as a fantastic training aid for anyone who has
either not had the chance to see a real Si, or who wants to brush up their Si knowledge.
These notes can also be accessed from the Windows Start Menu.
Minimum System Requirements
PC running Windows XP SP2 or later, or Windows Vista SP1 or later
1.8GHz Pentium M or similar processor
1GB RAM minimum (2GB recommended)
100MB free hard drive space for application installation
USB port (for transfer of Shows to/from console)
Display Resolution 1280x800
Virtual Si should also run on newer MACs with Leopard OS, running native Windows
XP SP2 or later.
Please note we can't guarantee operation on every possible combination of PC hardware
and Windows version, but if you find one that doesn't work and you have satisfied the
minimum requirements above, please let us know.
Installing the Application
To install the application once you have unpacked the ZIP file, double-click on setup.exe.
Double-click the application to start the installer and follow the on-screen instructions.
The installer will place shortcuts to Virtual Si1, Virtual Si2 and Virtual Si3 on your
desktop
and in your start menu.
Page 2
Introduction to V3.0
The new Virtual Si Editor offers the same enhancements as the V3.0 software for the
console in terms of patching and support for DSP enhancements however it also includes
a number of new features designed to speed-up operation and to enable the creation of
systems with ‘Virtual’ expansion cards:
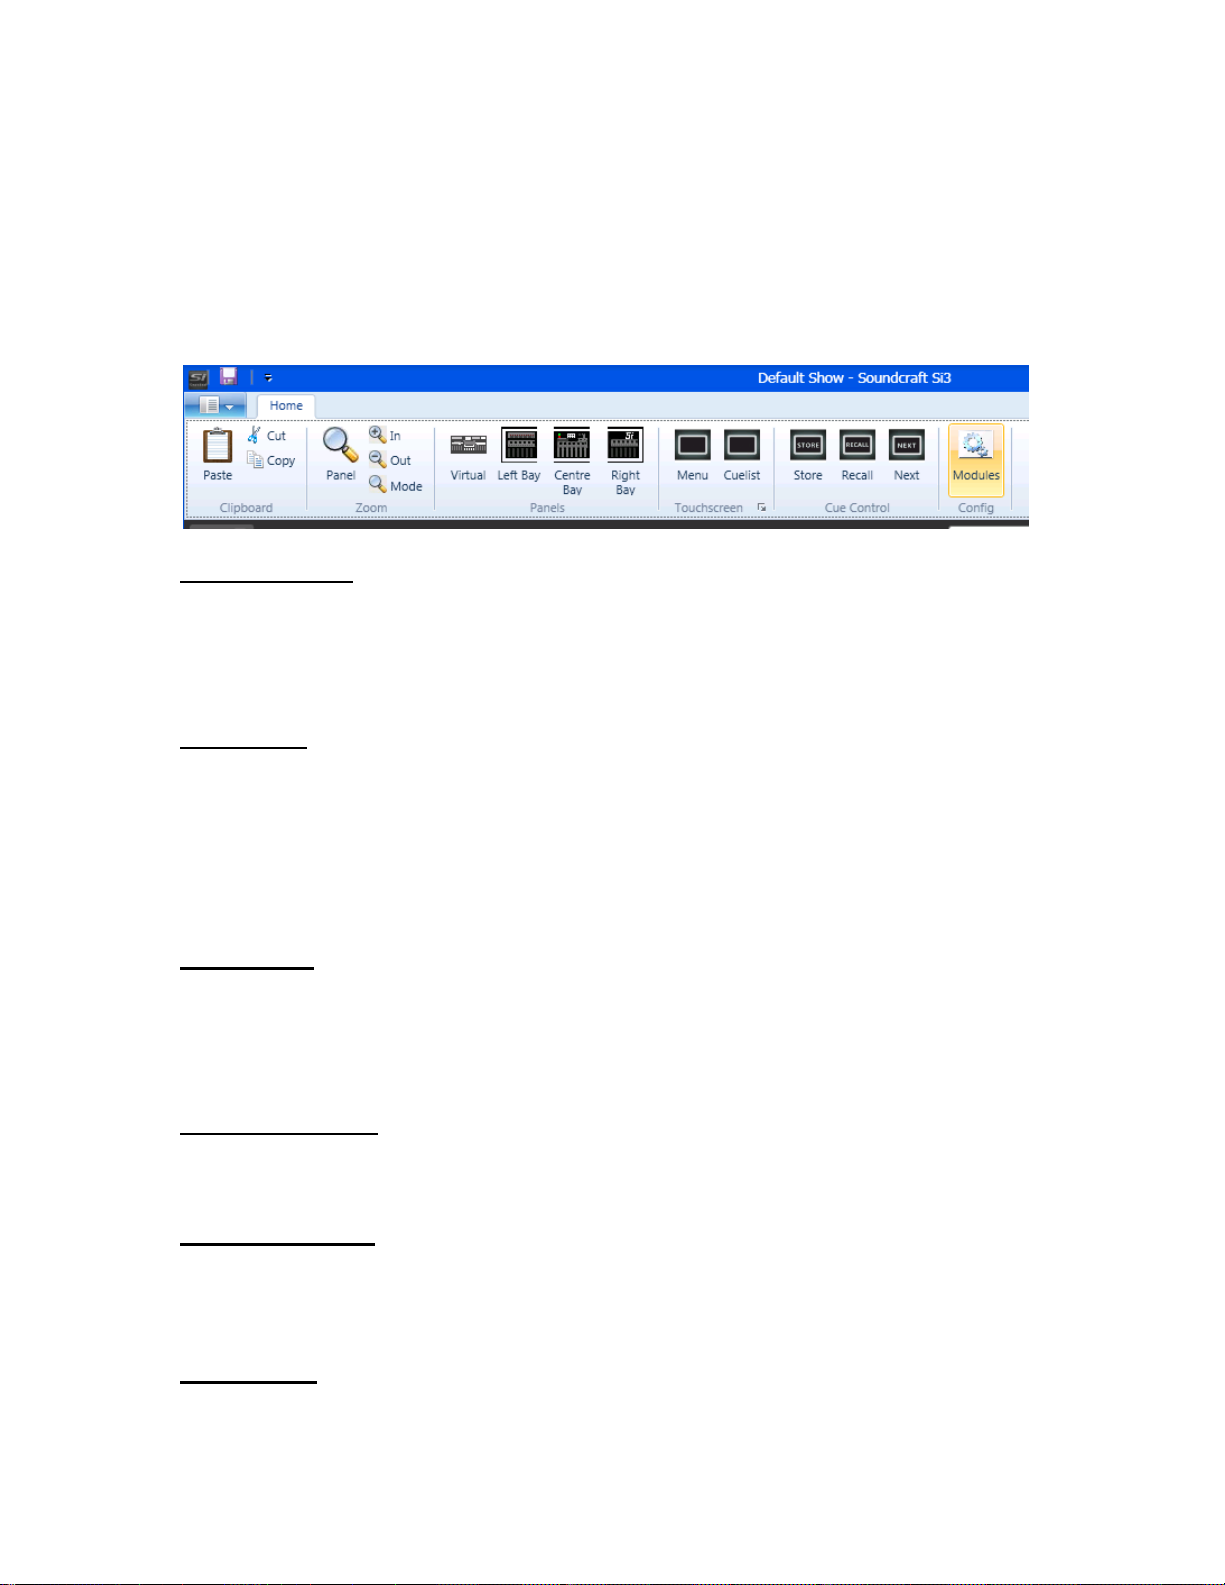
Additions to the Toolbar
Clipboard group
Paste - When editing a channel name on an Oled, click Paste to insert the contents of
the clipboard.
Cut - Click Cut to cut the currently selected text of the channel name to the clipboard.
Copy - The Copy button copies the currently selected text to the clipboard.
Zoom group
Panel - Click Panel to automatically scale the virtual panel to fit the main window.
In - Clicking In zooms in to the panel.
Out - Out zooms out from the panel.
Mode - Toggle Zoom Mode – When in zoom mode, the cursor changes to a magnifying
glass. Left click on the virtual panel to zoom in at the cursor, right click to zoom out.
Click Zoom Mode again to exit Zoom Mode.
Panels group
Virtual - Click Virtual to automatically scale the virtual panel to fit the main window.
Left - Click Left to zoom in to the left bay.
Centre - Centre zooms in to the centre (outputs) bay.
Right - In Si2 and Si3 virtual consoles, clicking Right zooms into the right bay.
Touchscreen group
Menu - Displays the touchscreen main menu panel.
Cue List - Displays the touchscreen cueist panel.
Cue Control group
Store - Stores a cue.
Recall - Recalls the current cue in the cue list.
Next - Recalls the next cue in the cue list.
Config group
Modules – Displays the I/O Module Configuration panel, allowing addition, editing and
deleting of I/O Modules.
Page 3
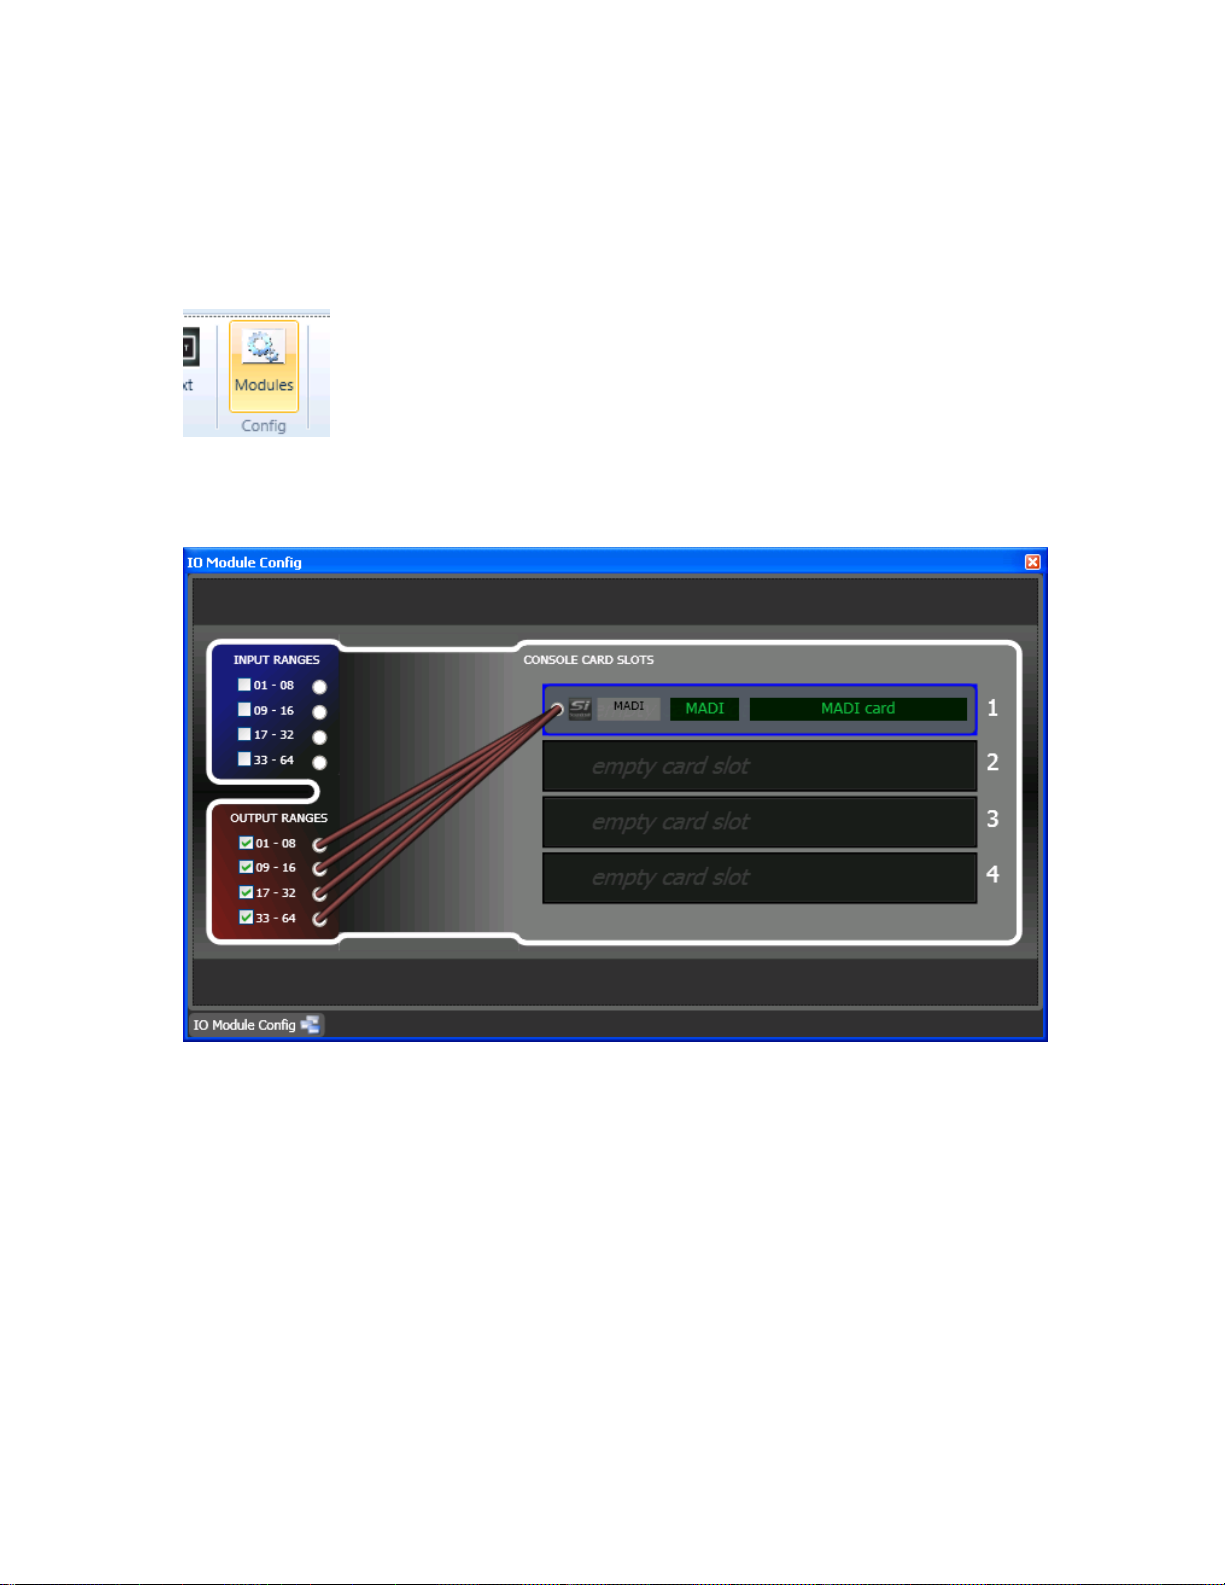
The CONFIG window allows the user to add and set-up ‘virtual’ cards that may be used
in a show.
Right click on the MODULES button to open the window:
Right Click on an empty slot to bring up a dialogue box allowing an option card to be
selected…
Cont…
Page 4

The names of the card (in green) can be edited to help give meaning to the card or
application. These names will then be used on the console touch screen.
Page 5

When a card is added, the system will patch all of the Output Slot Outputs to all cards
(enabling all cards to ‘listen’ to anything routed to the expansion slot) – these are outputs
from the SI System.
These outputs can be disabled by ‘clicking’ the output range box.
Inputs from the cards to the option slots are made in a similar manner – These are inputs
to the SI system.
Page 6

NOTE:
The Virtual Si1 illustrates four slots although the actual console has only two
physical positions accessible.
However owing to the way the option slot system works there is no need to choose
which slots you use, and there are no application issues should you create an Si1
project with more than two cards, other than the inability to create this in the ‘real
world’.
NOTE:
The system will not allow two option cards to ‘talk’ to the same ‘range’ of inputs
therefore is multiple cards are used connections will result in something similar to
the above.
NOTE:
It is required that the setting of the INPUT and OUTPUT routing switches on the
‘virtual’ system match any ‘physical’ cards installed in the console. Refer to the Si
Option Slot Description document for more information on this topic.
http://www.soundcraft.com/products/product.aspx?pid=152
Page 7

Docking Window
A new feature added to the Si Editor is the ability to dock Configuration windows; to
dock a window ‘LEFT-CLICK & DRAG’ the widow to the TOP/BOTTOM/LEFT or
RIGHT of the screen and the ‘DOCK’ arrows appear, drag the cursor onto an arrow to
dock it.
Once docked the window may pinned (to remain on the screen all the time) or un-pinned
when it will ‘Auto Hide’ once the cursor is moved off the window.
To un-dock- the window right-click’ in the window and select ‘FLOATING’
Other Documentation:
For instruction on how to operate the console please refer to the Si Series V3.0 User
Guide.
For editor specific instruction please see the release notes installed with the application,
nominally located in:
C:\Program Files\Harman Pro\Soundcraft\Virtual Si
and Appendix A
Page 8

Appendix A- Operation Principles & Special Keys
To switch functions in or out, use the mouse to click on the switches.
To adjust a rotary control, click and drag on the control, moving the mouse up to
increase, down to decrease.
It is possible to use the mouse within most touchscreen pages, including pages displaying
lists. To select an item, click on it once. If it is editable, click once again, and a dropdown list will appear. Click on the desired item to select it, and again to close the dropdown list. The item will be changed. Some pages do not yet support use of the mouse, in
these cases please use the ADJUST and SELECT buttons on the touchscreen panel.
It is also possible to use the keyboard within most touchscreen pages. On a page
containing a list, use the up and down cursor keys to move between items. Then, press
[F2] to edit that item. Use the [UP] and [DOWN] cursor keys to move within the popup
menu, then [F2] again to select. In a freeform text box such as the channel rename page,
simply type a channel name, then press [ENTER] to save.
Operation
Note: In the following list, virtual console keys are simply named e.g. 48V, whereas
physical PC keys and mouse buttons are denoted with square brackets e.g. [LEFT CTRL]
* To toggle an encoder:
Press [LEFT CTRL] + [LEFT MOUSE]
Note: Encoder ON light will light or extinguish as appropriate.
* To toggle an encoder bus send level:
Press [LEFT CTRL] + hold [LEFT MOUSE]
Note: When in Bus Send mode, toggles bus send level between -infinity and 0dB.
* To change an enc aux mode:
Press AUX PRE + [LEFT CTRL] + [LEFT MOUSE]
Note: Click the AUX PRE button so that it lights up, then hold down the left control key
and click on the encoder.
* To interrogate a function e.g. 48V:
Hold [LEFT MOUSE] + 48V
Note: SEL buttons on all channels that have 48V set will light.
Page 9

* To enter interrogate mode e.g. 48V:
Press [LEFT SHIFT] + [LEFT MOUSE] + 48V
Note: SEL buttons on all channels that have 48V set will light, clicking on other channel
SELs will toggle 48V on those channels.
* To reset a function e.g. 48V:
Press [LEFT SHIFT] + 48V + CLEAR
Note: 48V on all channels is cleared.
* To copy a channel:
[LEFT SHIFT] + ALT
Note: Press SEL on the source channel.
Press SEL on destination channels as required.
* To rename a channel on an OLED:
Press [ENTER] or [F2] or double-click.
Press [ENTER] or [F2] to finish editing.
* To pan the virtual console:
Press [RIGHT CTRL] + [RIGHT SHIFT] + [LEFT MOUSE]
Note: Moving the mouse will drag the panel (performance will depend on system and
zoom level).
* To zoom the virtual console in or out:
Press [RIGHT CTRL] + [RIGHT SHIFT] + [MOUSE WHEEL]
Note: Performance will depend on system and zoom level
Support
If these notes do not resolve any issues you may have, please contact Soundcraft
Customer Services:
Email: soundcraft.support@harman.com
Web: http://www.soundcraft.com/support/uk_support.aspx
Tel: Soundcraft Customer Services Manager +44 (0) 1707 668 298
 Loading...