

Page 1

SOUNDCRAFT
A Division of Harman International Industries Ltd
CRANBORNE HOUSE
CRANBORNE ROAD
POTTERS BAR
HERTS EN6 3JN
UK
Registered Office: Harman International Industries Limited, Cranborne House, Cranborne Road,
Potters Bar, Hertfordshire EN6 3JN. Company Registration 1485558
Virtual Si User Guide
Contents
Document Version: ............................................................................................................................................................ 2
Related Software Versions: ................................................................................................................................................ 2
About Virtual Si ................................................................................................................................................................. 2
Minimum System Requirements ........................................................................................................................................ 2
Installing the Application ................................................................................................................................................... 2
Starting Virtual Si ............................................................................................................................................................... 3
Introduction to V4.0 ........................................................................................................................................................... 3
The Toolbar ........................................................................................................................................................................ 3
Clipboard group .............................................................................................................................................................. 3
Zoom group .................................................................................................................................................................... 3
Panels group ................................................................................................................................................................... 4
Touchscreen group ......................................................................................................................................................... 4
Cue Control group .......................................................................................................................................................... 4
Config Group .................................................................................................................................................................. 4
Si Compact CONTROL zone ............................................................................................................................................. 4
Adding Modules & Stageboxes .......................................................................................................................................... 4
Adding Modules ............................................................................................................................................................. 4
Adding Stageboxes ................................................................................................ ................................ ......................... 5
Important Notes re. Stagebox Configurations: ................................................................................................................... 7
Docking Window ............................................................................................................................................................... 7
Other Documentation: ........................................................................................................................................................ 8
Appendix A- Operation Principles & Special Keys ........................................................................................................... 8
To toggle an encoder: ................................................................................................ ................................ ..................... 8
To toggle an encoder bus send level:.............................................................................................................................. 8
To change an encoder aux mode: ................................................................................................................................... 8
To interrogate a function e.g. 48V: ................................................................................................................................ 8
To enter interrogate mode e.g. 48V: ............................................................................................................................... 8
To reset a function e.g. 48V: .......................................................................................................................................... 9
To copy a channel: ......................................................................................................................................................... 9
To rename a channel on an OLED: ................................................................................................................................ 9
To pan the virtual console: ............................................................................................................................................. 9
To zoom the virtual console in or out: ............................................................................................................................ 9
To scroll across faders on Si Compact 24 & 32: ............................................................................................................ 9
Support ............................................................................................................................................................................... 9
Page 2

Document Version:
V1.0 – Original
V1.1 – Update following design review
V1.1.1 – For Release Review
V1.1.2 – Released
Related Software Versions:
Virtual Si V4.0
Si Series V4.0
Si Compact V1.0
About Virtual Si
Virtual Si is an offline graphic system and editor for the Soundcraft Si and Si Compact series of live sound mixing
consoles. A key benefit of Virtual Si is in its graphical presentation and operation; built as a facsimile of the real
console and employing the same mode of operation it can act as a fantastic training aid for anyone who has either not
had the chance to work on a console for real or who wants to brush up their Si or Si Compact knowledge.
Minimum System Requirements
PC running Windows XP SP2 or later, Windows Vista SP1 or later & Windows 7
1.8GHz Pentium M or similar processor
1GB RAM minimum (2GB recommended)
100MB free hard drive space for application installation
USB port (for transfer of Shows to/from console)
Display Resolution 1280x800
Virtual Si should also run on newer Mac with Leopard OS, running native Windows XP SP2 or later.
Please note we can't guarantee operation on every possible combination of PC hardware and Windows version, but if
you find one that doesn't work and you have satisfied the minimum requirements above, please let us know.
Installing the Application
To install the application once you have unpacked the ZIP file:
1. Uninstall any previous versions of Virtual Si.
2. Double-click the application to start the installer and follow the on-screen instructions.
3. The installer will place a shortcut to Virtual Si on your desktop and in your start menu.
Page 3
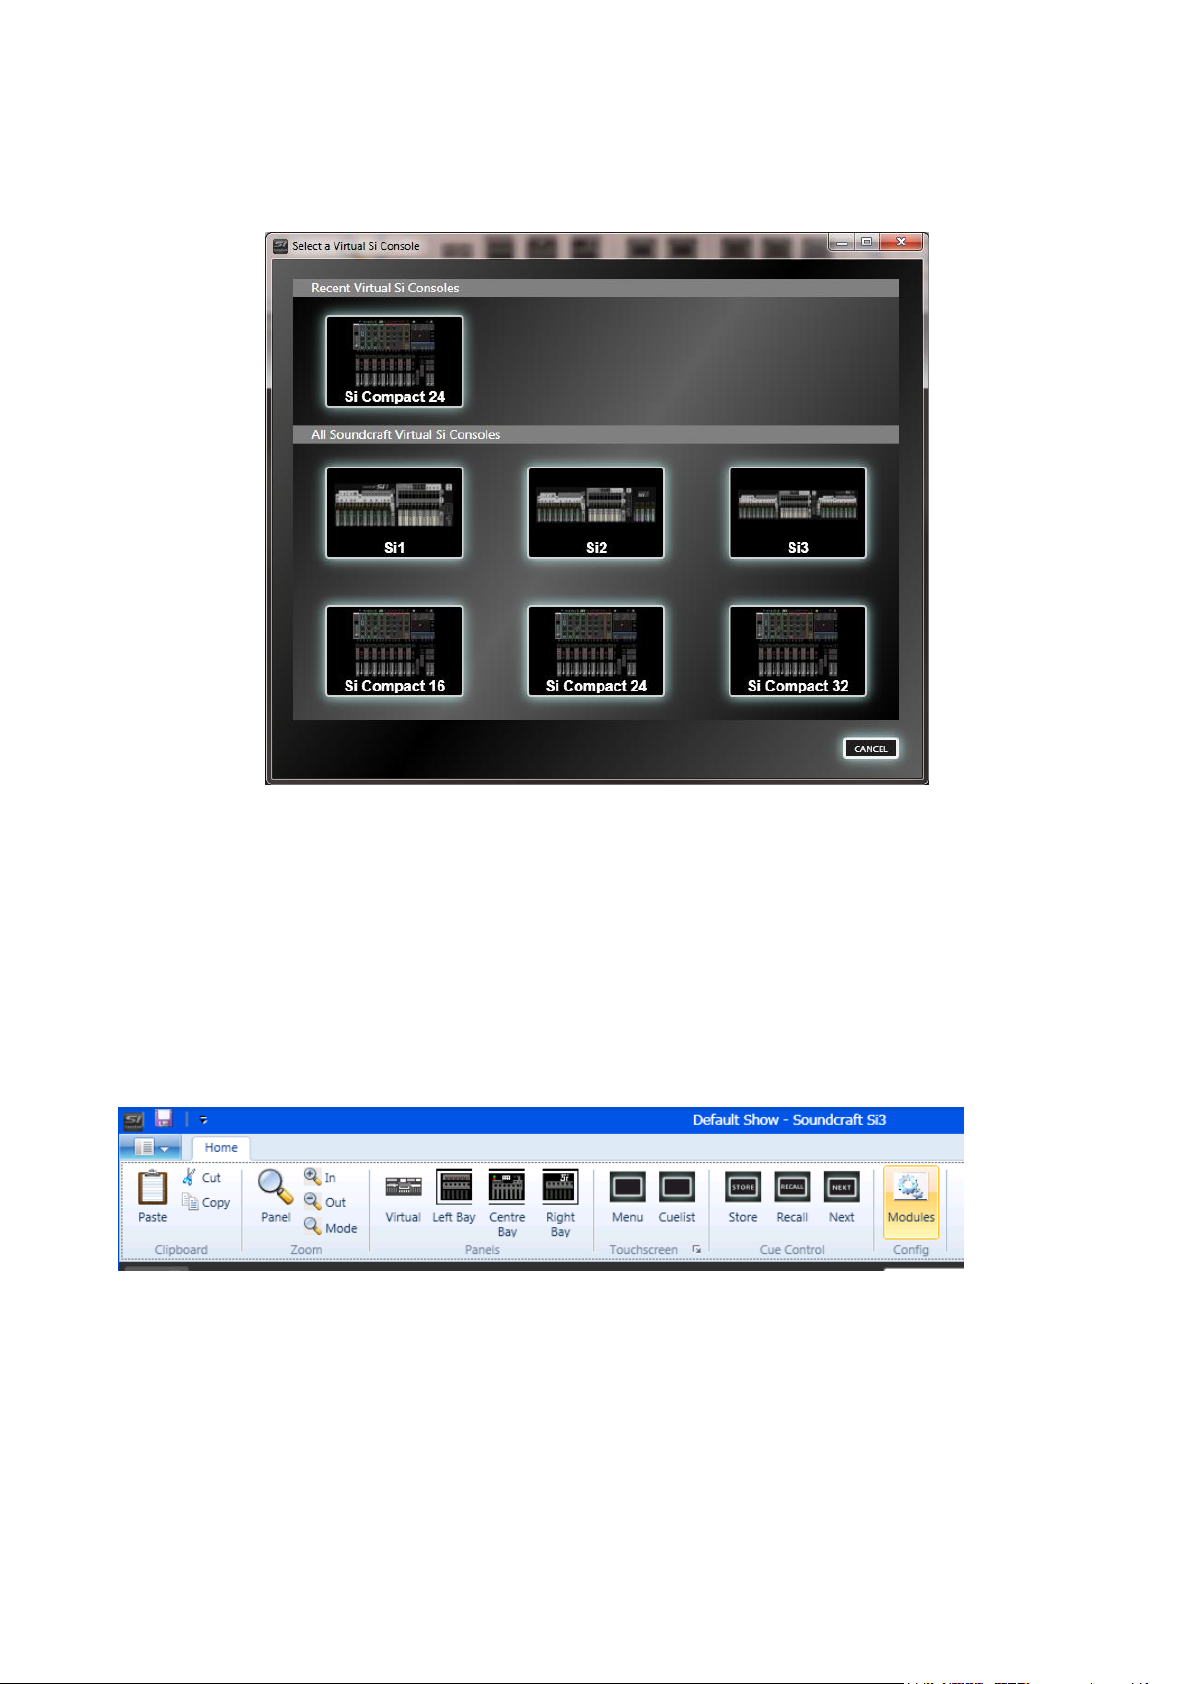
Starting Virtual Si
When starting Virtual Si you are presented with a screen depicting all console types available in Virtual Si and the
‘last’ console you used… To begin using Virtual Si simply click on the console type you wish to use/create.
Introduction to V4.0
The new Virtual Si Editor offers the user the facility to configure ‘virtual’ remote stage boxes in order to create shows
off-line that may then be configured and patched prior to arriving on-site; in all other respects the Virtual Si operates as
a ‘real’ console and details of the operation can be found in the appropriate user guide.
NOTE: It is important that any show created on the editor matches the hardware configuration of the system that you
intend to use else a ‘conflict’ will arise when the show is loaded and patch data may be lost or unusable.
The Toolbar
Virtual Soundcraft Si3 toolbar shown, others similar
Clipboard group
Paste - When editing a channel name on an OLED, click Paste to insert the contents of the clipboard.
Cut - Click Cut to cut the currently selected text of the channel name to the clipboard.
Copy - The Copy button copies the currently selected text to the clipboard.
Zoom group
Panel - Click to automatically scale the virtual panel to fit the main window.
In - Zooms in to the panel.
Out - Zooms out from the panel.
Mode - Toggle Zoom Mode – When in zoom mode, the cursor changes to a magnifying glass; click on the virtual
panel to zoom in at the cursor, right click to zoom out. Click Zoom Mode again to exit Zoom Mode.
Page 4

Panels group
Virtual - Click Virtual to automatically scale the virtual panel to fit the main window.
Left - Click to zoom in to the left bay.
Centre - Centre zooms in to the centre (outputs) bay.
Right - In Si2 and Si3 virtual consoles, clicking Right zooms into the right bay.
NOTE: Not applicable to Si Compact
Touchscreen group
Menu - Displays the touchscreen main menu panel.
Cue List - Displays the touchscreen cuelist panel.
Cue Control group
Store - Stores a cue.
Recall - Recalls the current cue in the cue list.
Next - Recalls the next cue in the cue list.
Config Group
See Adding Modules & Stageboxes
Si Compact CONTROL zone
Adding Modules & Stageboxes
The Virtual Si Compact features an additional
‘CONTROL’ zone; this replicates the fader, ON
and SOLO keys of the currently selected channel
or bus.
You may scroll through the channels on the
surface sequentially by clicking the lit left or
right arrows, this has the effect of moving the
active SELect (and thereby the channel on the
assignable channel section) up or down by 1
allowing you to easily configure channels or
buses in turn.
Adding Modules
Modules – Displays the I/O Module Configuration panel, allowing addition, editing and deleting of I/O Modules.
The CONFIG window allows the user to add and set-up ‘virtual’ cards and stageboxes that may be used in a show.
Click on the MODULES button to open the window:
Page 5

Right Click on an empty slot to bring up a context menu allowing an option card to be added…
The names of the card (in green) can be edited to help give meaning to the card or application. These names will then
be used on the console touch screen.
NOTE: When a card is added, the system will by default set all OUTPUT routing switches ‘ON’.
To enable the external inputs to the option card to be routed to the Si expansion bus, one or more of the input ranges
must be enabled, this is achieved by ‘clicking’ one of the four available input ranges; this action simulates the setting of
the physical DIP switches on the option card.
NOTE: For detailed information regarding DIP switch settings please see Option Slot & Option Card User Guide
available from the Si web page.
NOTE: Si Compact has only a single option card slot
Adding Stageboxes
If you are adding a MADI card a stagebox icon will appear beside the card prompting you that a stagebox may be
connected to this card:
Page 6

Access Help
document
Input MADI channel
positions & range
within the MADI
stream, similar for
outputs.
Colour code
identifies
inputs (blue)
or outputs
(red)
Click the grey stagebox icon to ‘connect’ the stagebox and begin configuring the modules…
To configure the stagebox ‘right click’ on any slot to remove a card or add a card. For help in understanding the various
configurations click on the ‘?’ icon to open a browser and download copy of the Soundcraft Studer I/O Racks manual
which describes the rules that govern legal card configurations.
This configuration shows both cards receiving signals from all channels of the Si expansion bus, but the AES card is
routed to expansion bus inputs 1-8 whilst the MADI card is routed to inputs 17 to 64.
It is possible to rename the stagebox short and long names in the same manner as for renaming option cards.
NOTE: Some D21m cards including MADI and CobraNet™ provide the facility to ‘shut-down’ channels in order that
they do not occupy all the MADI channels in the link back to the console. In these cases a ‘drop-down’ is provided
beside the MADI channel position indicator to allow this to be set; it is important this matches the switch setting of the
card in the stagebox else an I/O conflict may result.
NOTE: As MADI channels are allocated according to their position in a rack care must be taken when using multiple
stageboxes to ensure a valid configuration...
Example 1:
Page 7

Stagebox 1 is a Vi stagebox with 8x 8 channel mic cards in slots A-H and is using MADI card 1 with channels
1-32 enabled.
Stagebox 2 is a Compact Stagebox with 2x 16 channel mic cards in slots A/B and C/D. and is using MADI card
2 with channels 33-64 enabled.
In this example there would be no access to the audio from Stagebox 2 since the audio cards would be occupying MADI
channels 1-32 but the MADI card in the console is enabled for channels 33-64 (to avoid conflict).
To correct the situation swap the two stage boxes and use cards E-H on the Vi stagebox,
Important Notes re. Stagebox Configurations:
The Virtual Si1 illustrates four slots although the actual console has only two physical positions
accessible. However owing to the way the option slot system works there is no need to choose which slots
you use, and there are no application issues should you create an Si1 project with more than two cards,
other than the inability to create this in the ‘real world’.
The system will not allow two option cards to ‘talk’ to the same ‘range’ of inputs therefore if multiple
cards are used connections will result in something similar to the above.
The system requires that the setting of the INPUT and OUTPUT routing switches on the ‘virtual’
system match any ‘physical’ cards installed in the console. Refer to the Si Option Card User Guide for
more information on this topic.
The editor cannot prevent setting of ‘illegal’ configurations; details of possible configurations are
included in the Soundcraft Studer I/O Racks manual.
Docking Window
A new feature added to the Virtual Si is the ability to dock configuration windows; to dock a window ‘CLICK &
DRAG’ the window to the TOP/BOTTOM/LEFT or RIGHT of the screen and the ‘DOCK’ arrows appear, drag the
cursor onto an arrow to dock it.
Once docked the window may pinned (to remain on the screen all the time) or un-pinned when it will ‘Auto Hide’ once
the cursor is moved off the window.
To un-dock the window ‘right-click’ in the ‘window title bar’ and select ‘FLOATING’.
Page 8

Other Documentation:
For instructions on how to operate the console please refer to the appropriate console user guide.
For Virtual Si specific instructions please see the release notes installed with the application, nominally located in:
(START) > ALL PROGRAMS > HARMAN PRO > SOUNDCRAFT > VIRTUAL SI.
Additional documents available for download include:
Si Option Slot & Option Card User Guide
Soundcraft Studer I_O Racks
Studer D21m I/O System Components
Appendix A- Operation Principles & Special Keys
To switch functions in or out, use the mouse to click on the switches.
To adjust a rotary control, click and drag on the control, moving the mouse up to increase, down to decrease.
It is possible to use the mouse within most touchscreen pages, including pages displaying lists. To select an item, click
on it once. If it is editable, click once again, and a drop-down list will appear. Click on the desired item to select it, and
again to close the drop-down list. The item will be changed. Some pages do not yet support use of the mouse, in these
cases please use the ADJUST and SELECT buttons on the touchscreen panel.
It is also possible to use the keyboard within most touchscreen pages. On a page containing a list, use the up and down
cursor keys to move between items. Then, press [F2] to edit that item. Use the [UP] and [DOWN] cursor keys to move
within the popup menu, then [F2] again to select. In a freeform text box such as the channel rename page, simply type a
channel name, then press [ENTER] to save.
Note: In the following list, virtual console keys are simply named e.g. 48V, whereas physical PC keys and mouse
buttons are denoted with square brackets e.g. [LEFT CTRL].
To toggle an encoder:
Press [LEFT CTRL] + [LEFT MOUSE]
Note: Encoder ON light will light or extinguish as appropriate.
NOTE: Not applicable to Si Compact
To toggle an encoder bus send level:
Press [LEFT CTRL] + hold [LEFT MOUSE]
Note: When in Bus Send mode, toggles bus send level between -infinity and 0dB.
NOTE: Not applicable to Si Compact
To change an encoder aux mode:
Press AUX PRE + [LEFT CTRL] + [LEFT MOUSE]
Note: Click the AUX PRE button so that it lights up, then hold down the left control key and click on the encoder.
NOTE: Not applicable to Si Compact
To interrogate a function e.g. 48V:
Hold [LEFT MOUSE] + 48V
Note: SEL buttons on all channels that have 48V set will light.
To enter interrogate mode e.g. 48V:
Press [LEFT SHIFT] + [LEFT MOUSE] + 48V
Note: Interrogate is only active whilst [LEFT SHIFT} is held down
Note: SEL buttons on all channels that have 48V set will light, clicking on other channel SELs will toggle 48V on those
channels.
Page 9

To reset a function e.g. 48V:
Press [LEFT SHIFT] + 48V + CLEAR
Note: 48V on all channels is cleared.
NOTE: Not applicable to Si Compact
To copy a channel:
[LEFT SHIFT] + ALT
Note: Press SEL on the source channel.
Press SEL on destination channels as required.
To rename a channel on an OLED:
Press [ENTER] or [F2] or double-click.
Press [ENTER] or [F2] to finish editing.
NOTE: Not applicable to Si Compact
To pan the virtual console:
Press [RIGHT CTRL] + [RIGHT SHIFT] + [LEFT MOUSE]
Note: Moving the mouse will drag the panel (performance will depend on system and zoom level).
To zoom the virtual console in or out:
Press [RIGHT CTRL] + [RIGHT SHIFT] + [MOUSE WHEEL]
Note: Performance will depend on system and zoom level.
To scroll across faders on Si Compact 24 & 32:
Click to the far left or far right fader strip
Note: This changes the view but not the SELected channel
NOTE: Not applicable to Si 1, 2 or 3
Support
If these notes do not resolve any issues you may have, please contact Soundcraft Customer Services:
Email: soundcraft.support@harman.com
Web: http://www.soundcraft.com/support/uk_support.aspx
Tel: Soundcraft Customer Services Manager +44 (0) 1707 668 298
 Loading...