

Page 1
4-466-686-01(1)
Interchangeable Lens Digital HD
Video Camera
Recorder
ファームウェアアップ
デートのお知らせ
Firmware update GB
Mise à jour du
micrologiciel
Firmware-Update DE
Actualización de
firmware
Aggiornamento del
firmware
JP
FR
ES
CS
IT
NEX-EA50JH/EA50UH/EA50EH/EA50CH/EA50H/EA50CK/EA50K
Page 2

日本語
本機は、アップデートにより、新しい機能の追加に対応しております。ここでは、それらの機
能の紹介や使いかたについて説明します。
本機の「取扱説明書」もあわせてお読みください。
DV MODE(DV
本機では、ハイビジョン画質(
の
種類の画質・規格を選べますが、今回のファームウェアアップデートにより、標準画質
2
規格での記録・再生を追加いたしました。
に
DV
[REC SET]
メニューの
モード)
HD、MPEG-4 AVC/H.264
[DV MODE]
を選び、
)と標準画質(SD、
を選択すると、再起動してDVモードに
[YES]
MPEG-2 PS
切り換わります。
bご注意
モード時は、
•DV
モードに切り換えると、以下の項目が使用できなくなります。
DV
使用する場合は、
最後に撮影した映像を再生する(ラストシーンレビュー )
•
– ASSIGN
静止画再生
•
記録した動画・ 静止画を保護する(プロテクト)
•
–
動画を分割する
•
–
動画・ 静止画をコピーする
•
–
–
動画から静止画を作成する
•
•MODE
–
–
DV
ボタンに割り当てることはできますが、DVモードではお使いになれません。
メニューに
メニューに
外付けメディアへのコピーも含めて、DVファイルのコピーはできません。
メニューに
静止画モードへの移行はできません。
静止画の再生、静止画記録もできません。
[PROTECT]
[DIVIDE]
[COPY]
ボタン
モードで使用できないメニュー一覧
(
CAMERA SET
以上のSDカードをご使用ください 。
Class 6
モードを解除してください。
DV
は表示されません。
は表示されません。
は表示されません。
)
– GAIN/ISO SEL
– ISO SET*
– AUTO ISO LIMIT*
– FLASH SET
)
(
REC/OUT SET
– / SET
–REC FORMAT
– SIMULTANEOUS REC
– REC BUTTON SET
–WIDE REC
JP
2
)
Page 3
– IMAGE SIZE
– FILE NUMBER
– WIDE CONVERT
(
AUDIO SET
– AUDIO FORMAT
画面には表示されません。
*
bご注意
モード選択時は、
•DV
されません。
モードに設定したとき、以下の項目を使用することができます。
DV
(
REC/OUT SET
– SIMULTANEOUS REC
–WIDE REC
– CANCEL DV MODE
– WIDE CONVERT
bご注意
モード切り換えを行うと 、設定が初期化されます。
•
ファイルサイズが
として表示されます。
)
[ AUDIO FORMAT]はLPCM
)
で自動分割されますが、本機では自動分割されたファイルはまとめて1つの動画
2GB
固定になり、 画面にも
[LPCM]
の表示は
JP
CANCEL DV MODE(DV
[REC SET]
DV
DV
• GAIN/ISO SEL
• / SET
•REC FORMAT
• SIMULTANEOUS REC
• REC BUTTON SET
•WIDE REC
• MEDIA SELECT
• AUDIO FORMAT
メニューの
モードを解除することができます。
モードを解除すると、以下の設定は初期値に戻ります。
[CANCEL DV MODE]
モード解除)
を選び、
を選択すると、再起動して
[YES]
JP
3
Page 4
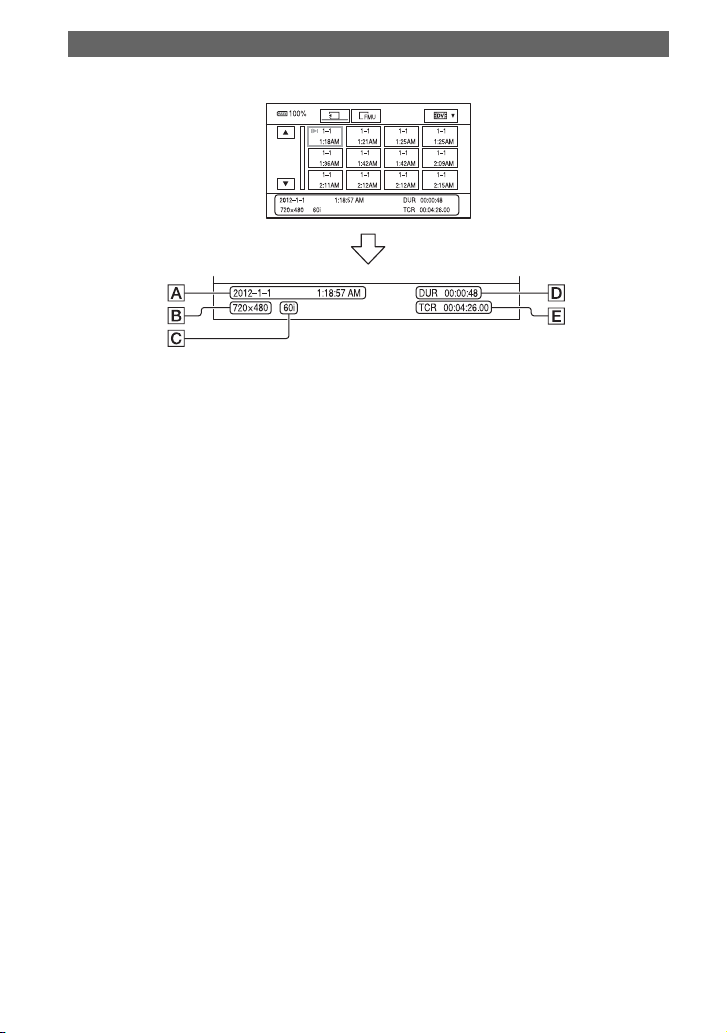
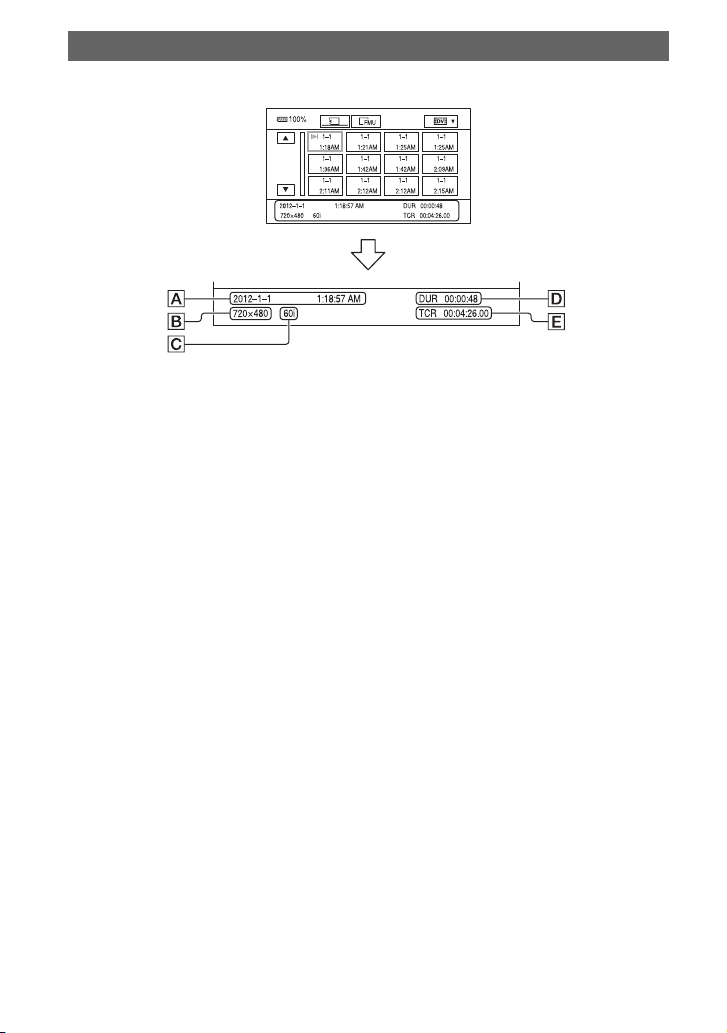
モード画面
DV
モードを設定しているときは、表示が以下のように変更になります。
DV
A 撮影開始日時
B 動画の解像度
C フレームレート
D 動画記録時間
E 記録開始タイムコード
タイムコードが記録されていない記録メディアや、本機が対応していない方式のタイムコードが
記録された記録メディアを再生すると、タイムコードが正常に表示されません。
zちょっと一言
• SCAN/SLOW
モードでは、 再生中の早送り 、早戻しは約5倍速で再生されます 。
•DV
本機以外の機器で撮影されたDVファイルを再生する場合 、F値は正しく表示されない場合がありま
•
す。
bご注意
モードは、 外付けメディアに対応していません。
•DV
モードでは、 静止画再生はできません。
•DV
は無効になります。
JP
4
Page 5
REC BUTTON SET
[REC SET]
ボタンで、それぞれ別の記録メディアの記録開始
お買い上げ時は、どちらのボタンもメモリーカードとフラッシュメモリーユニットの両方
に同時記録するように設定されています。
• REC BUTTON
• HANDLE REC BUTTON
設定を変えるには
MENU
→
[REC SET]→[ REC BUTTON SET]
REC BUTTON SET
REC BUTTON: [ ] [ ]
HANDLE REC BUTTON:
[] [ ]
REC BUTTON: [ ]
HANDLE REC BUTTON: [ ]
REC BUTTON: [ ]
HANDLE REC BUTTON: [ ]
メニューに
:
[] [ ]
ボタンを押す→
の設定 ボタンと記録メディア
[ REC BUTTON SET]
SEL/PUSH EXEC
( 録画ボタン設定)
:
[] [ ]
ダイヤルで、 (
を選択する。
どちらのボタンを押しても、メモリーカードとフラッ
シュメモリーユニットに同時に記録を開始
録画ボタンを押したときはメモリーカードに、ハンド
ル録画ボタンを押したときはフラッシュメモリーユ
ニットに、記録を開始
録画ボタンを押したときはフラッシュメモリーユニッ
トに、ハンドル録画ボタンを押したときはメモリー
カードに、記録を開始
が追加され、録画ボタンとハンドル録画
終了をすることができます。
/
REC/OUT SET
終了する。
/
終了する。
/
)メニュー
終了する。
/
[ REC BUTTON SET]
[ SIMULATANEOUS REC]が[ON]
[]、[]
zちょっと一言
本機能を使うと、 例えば 、録画ボタン操作による通常の撮影はメモリーカードに記録し 、容量の大き
•
いフラッシュメモリーユニットには撮影時間中すべて記録し続ける(撮影開始時にハンドル録画ボタ
ンにて記録、撮影時間中停止させない)ようなバックアップ記録を行うことができます。
フラッシュメモリーユニット記録中、 メモリーカードを使って個別に記録を開始する場合は、 本機で
•
あらかじめフォーマット記録可能な状態にしたメモリーカードをお使いください。
それぞれ別の記録メディアに記録中、 メモリーカードで記録エラーが発生し記録が停止した場合は、
•
フラッシュメモリーユニットの記録を停止させ、メモリーカードの修復を実行しないとメモリーカー
ドでの記録再開ができません。
• [ REC BUTTON SET]
、同時記録
が使用できるのは、(1)
のときです。
時は使用できません。
OFF
の設定値は、 ステータスチェックで確認できます。
[ / SET]が[]
かつ(2)
最後に撮影した映像を再生する(ラストシーンレビュー)
[ REC BUTTON SET]
ストシーンレビューの対象は
により、それぞれの記録メディアに個別に記録を行った場合、ラ
[MEDIA SELECT]
で選択されたメディアが優先されます。
JP
5
Page 6
SIMULTANEOUS REC
モードを設定しているときは、
DV
[ SIMULATANEOUS REC]
bご注意
同時記録中、一方の記録メディアが先に
•
ディアのコンテンツのサムネイルが作成できず、
( 同時記録)
[ SIMULATANEOUS REC]
になります。
MEDIA FULL
になった場合、
が表示されます。
[?]
は
MEDIA FULL
になった記録メ
GAIN/ISO SEL
モードに切り換えると
DV
FACE DETECTION
モードでも、
DV
ただし、優先顔枠(二重)は対応していません。
(ゲイン
GAIN
(顔認識)
[FACE DETECTION]の[ON]
切換)
/ISO
に設定されます。
に設定することはできません。
ISO
または
を選ぶことはできます。
[OFF]
GPS
本設定を
情報、自動時刻補正、自動エリア補正はお使いになれます。
GPS
リモコン
モードに設定しているときは、以下のボタンはお使いになれません。
DV
– SCAN/SLOW
bご注意
一時停止中のスロー再生は行えません。
•
再生中の早送り、早戻しは約
モードを設定しているときは、
DV
モードを設定しているときは、
DV
ります。
[ WIDE CONVERT]
にしても、規格上、DV動画に位置情報は記録できません。
[ON]
ボタン
倍速で再生されます。
5
WIDE REC
( ワイド記録)
[WIDE REC]は[WIDE REC]
WIDE CONVERT
( ワイド変換)
[ WIDE CONVERT]は[ WIDE CONVERT]
の動作は、
[ WIDE CONVERT]
と同じです。
になります。
にな
JP
6
Page 7
録画設定/画像サイズ
モードを設定している場合は、
DV
設定値
[REC FORMAT]
60i : 480/60i
50i : 576/50i
画サイズ
720x480 60i
x
720
576 50i
zちょっと一言
フレームレート:24p、30pでは記録できません 。
•
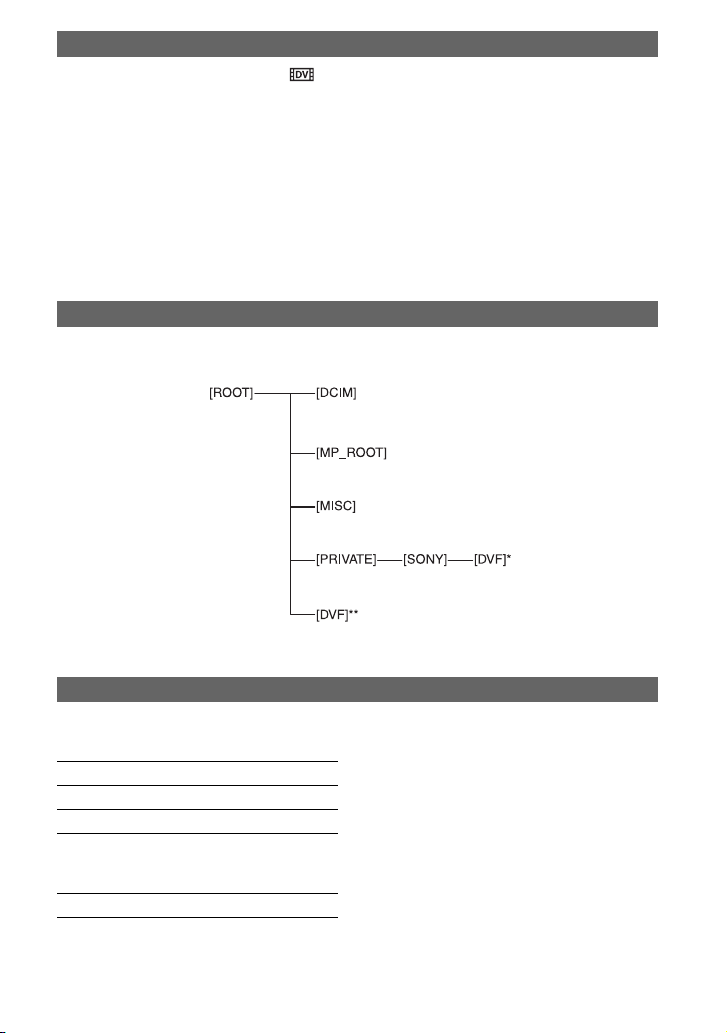
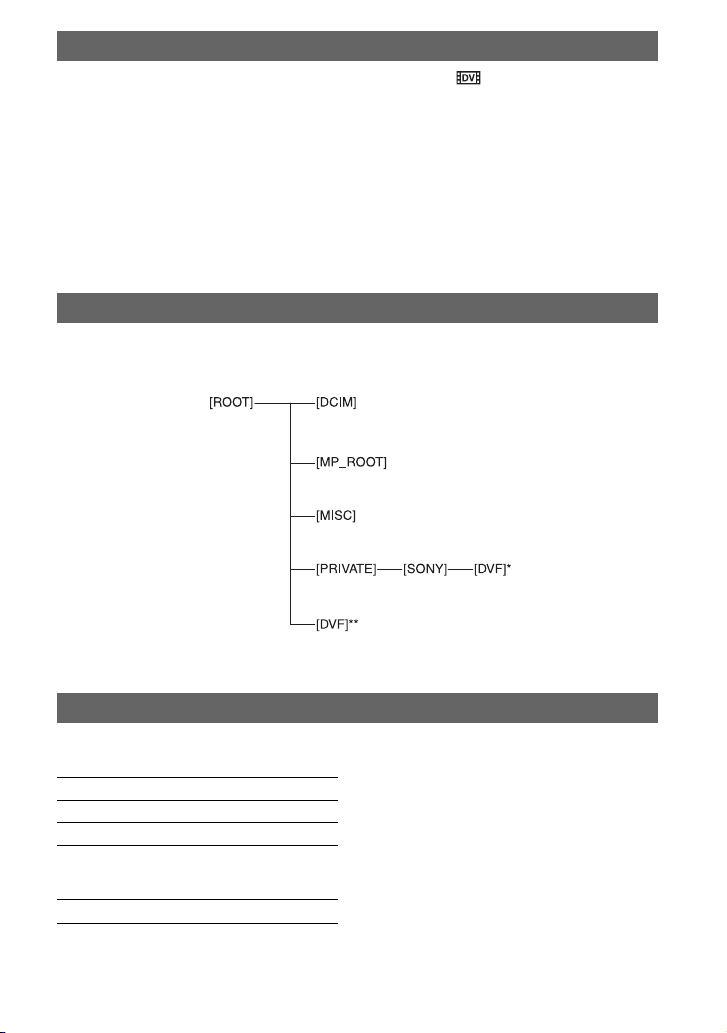
モードフォルダー構成
DV
モードのフォルダー構成は以下のとおりです。
DV
本機を使って撮影
再生する際は、通常、意識する必要はありません。
/
は以下の数値に固定されます。
メモリーカード、
* SD
メモリースティック
**
記録可能時間の目安
DV
メモリーカード
SDHC
PRO
16GB 70
32GB 140
64GB 280
フラッシュメモリーユニット
128GB 585
メモリーカード、
デュオ、フラッシュメモリーユニット
( 単 位:分 )
( 単 位:分 )
SDXC
メモリーカード
JP
7
Page 8

English
New functions have been added to your camcorder by the firmware update. The new functions
and their respective operations are described here.
Please refer to the Operating Guide of your camcorder.
DV MODE
In addition to the existing two types of image quality/format, high-definition (HD, MPEG-4
AVC/H.264) and standard (SD, MPEG-2 PS), the firmware update this time enabled
recording and playback of movies in standard image quality for DV format on this camcorder.
When you select [DV MODE] on the [REC SET] menu and press [YES], the camcorder
restarts in DV mode.
b Notes
• Use SD cards of Class 6 or faster in DV mode.
When the camcorder is set to DV mode, the following items cannot be used.
If you want to use these items, cancel DV mode.
• Reviewing the most recently recorded scene (Last Scene Review)
– You can assign this function to an ASSIGN button. However, it cannot be used in DV mode.
• Viewing still images
• Protecting recorded movies and still images (Protect)
– [PROTECT] is not displayed on the [EDIT] menu.
• Dividing a movie
– [DIVIDE] is not displayed on the [EDIT] menu.
• Copying movies and still images
– DV files cannot be copied, including copies onto external media.
– [COPY] is not displayed on the [EDIT] menu.
• Capturing still images from a movie
• MODE button
– You cannot switch to photo mode.
– You also cannot record or view photos.
Menu items which cannot be used in DV mode
(CAMERA SET)
– GAIN/ISO SEL
– ISO SET*
– AUTO ISO LIMIT*
– FLASH SET
(REC/OUT SET)
–/ SET
– REC FORMAT
– SIMULTANEOUS REC
– REC BUTTON SET
– WIDE REC
– IMAGE SIZE
– FILE NUMBER
– WIDE CONVERT
GB
2
Page 9
(AUDIO SET)
– AUDIO FORMAT
* Not displayed on the screen.
b Notes
• When you select DV mode, [ AUDIO FORMAT] is fixed to [LINEAR PCM], and [ LPCM] is
not displayed on the screen.
When the camcorder is set to DV mode, the following items can be used.
(REC/OUT SET)
– SIMULTANEOUS REC
– WIDE REC
– CANCEL DV MODE
– WIDE CONVERT
b Notes
• When you switch from DV mode to another, settings made in DV mode are initialized. If a movie file
exceeds 2 GB during recording, the camcorder divides the recording into separate files by creating a new
file(s) automatically. However, the divided files are displayed as a single movie on the screen of the
camcorder.
CANCEL DV MODE
When you select [CANCEL DV MODE] on the [REC SET] menu and press [YES], the
camcorder cancels DV mode and restarts.
When DV mode is canceled, the following settings return to the default.
• GAIN/ISO SEL
•/ SET
• REC FORMAT
• SIMULTANEOUS REC
• REC BUTTON SET
• WIDE REC
•MEDIA SELECT
• AUDIO FORMAT
GB
GB
3
Page 10
DV mode screen
When the camcorder is set to DV mode, the screen appears as follows.
A Date and time of recording started
B Resolution
C Frame rate
D Recording mode
E Time code of recording started
Time code will not be displayed correctly when you play back recording media with no time
code, or recording media with time code that your camcorder does not support.
z Tips
• SCAN/SLOW buttons are disabled.
• In DV mode, fast forward and fast reverse during playback are 5 times faster than normal playback speed.
• When you play back a DV file recorded with a camcorder other than this camcorder, the F value may not
be displayed correctly.
b Notes
• DV mode does not support external media.
• In DV mode, still images cannot be viewed.
GB
4
Page 11
REC BUTTON SET
[ REC BUTTON SET] is added to the [REC SET] menu, and you can start and stop
recording on different recording media at different times by operating the START/STOP
button or the handle START/STOP button.
In the default setting, movies are recorded on both the memory card and the flash memory unit
at the same time when either START/STOP button is pressed.
• REC BUTTON: [ ] [ ]
• HANDLE REC BUTTON: [ ] [ ]
To change the setting
Press MENU t select (REC/OUT SET) menu t [REC SET] t [ REC BUTTON
SET] with the SEL/PUSH EXEC dial.
The setting of REC BUTTON SET The recording media and button
REC BUTTON: [ ] [ ]
HANDLE REC BUTTON:
[] [ ]
REC BUTTON: [ ]
HANDLE REC BUTTON: [ ]
REC BUTTON: [ ]
HANDLE REC BUTTON: [ ]
You can use [ REC BUTTON SET] when (1) [ / SET] is set to [ ] and (2)
[ SIMULTANEOUS REC] is set to [ON].
When the camera is set to [ ] mode, when [ ] image quality is selected, or simultaneous
recording is set to off, [ REC BUTTON SET] cannot be used.
Recording on both the memory card and the flash
memory unit starts and stops at the same time when
either START/STOP button is pressed.
Recording on the memory card starts and stops when
the START/STOP button is pressed, and on the flash
memory unit when the handle START/STOP button is
pressed.
Recording on the flash memory unit starts and stops
when the START/STOP button is pressed, and on the
memory card when the handle START/STOP button is
pressed.
z Tips
• Using this function, you can, for example, perform usual recording to a memory card (using the START/
STOP button), while also recording non-stop to a backup high-capacity flash memory unit - started by the
handle START/STOP button - until the end of shooting.
• While recording on the flash memory unit, if you start a separate recording on a memory card, use a
memory card that has been formatted by this camcorder.
• While recordings on a flash unit and memory card are in progress, if a recording error occurs on the
memory card and recording stops, you cannot restart recording on the memory card unless you stop
recording on the flash memory unit and reformat the memory card.
• You can check the setting value of [ REC BUTTON SET] with the status check function.
Reviewing the most recently recorded scene (Last Scene Review)
When recording on both media separately by setting [ REC BUTTON SET], the last
scene recorded on the media selected in [MEDIA SELECT] will be played back.
GB
5
Page 12
SIMULTANEOUS REC
When the camcorder is set to DV mode, [ SIMULTANEOUS REC] appears as
[ SIMULTANEOUS REC].
b Notes
• If one of the recording media becomes full during simultaneous recording, thumbnails of contents on that
recording media cannot be created and [?] is displayed.
GAIN/ISO SEL
This setting is fixed to [GAIN] when the camcorder is set to DV mode.
ISO cannot be set.
FACE DETECTION
You can set [FACE DETECTION] to [ON] or [OFF] in DV mode.
However the priority face frame (double frame) is not enabled.
GPS
Even with this setting on, DV recording specifications do not provide for current location
information to be recorded on DV movies. However, functions using GPS such as [GPS
INFORMATION], [AUTO CLOCK ADJ] and [AUTO AREA ADJ] are available.
Remote Control
When the camcorder is set to DV mode, the following buttons cannot be used.
– SCAN/SLOW button
b Notes
• You cannot play back movies slowly during pause.
Fast forward and fast reverse during playback are 5 times faster than normal playback speed.
WIDE REC
When the camcorder is set to DV mode, [ WIDE REC] appears as [ WIDE REC].
WIDE CONVERT
When the camcorder is set to DV mode, [ WIDE CONVERT] appears as [ WIDE
CONVERT].
[ WIDE CONVERT] functions the same as [ WIDE CONVERT].
GB
6
Page 13
Changing the recording setting/image size
When the camcorder is set to DV mode, the setting values of [ REC FORMAT] are fixed
as follows.
Setting value
60i: 480/60i
50i: 576/50i
Image size
720 × 480 60i
720 × 576 50i
z Tips
• You cannot record movies in 24p or 30p frame rate.
DV mode folder structure
The DV mode folder structure is shown below.
You do not usually need to acknowledge the folder structure, when recording/playing back
movies and still images on the camcorder.
* SD memory card, SDHC memory card, SDXC memory card
** “Memory Stick PRO Duo” media, flash memory unit
Estimated recording time in DV mode
Memory card
(unit: minute)
16 GB 70
32 GB 140
64 GB 280
Flash memory unit
(unit: minute)
128 GB 585
GB
7
Page 14

Français
De nouvelles fonctions ont été ajoutées à votre caméscope par la mise à jour du micrologiciel.
Ces nouvelles fonctions et leurs opérations respectives sont décrites ici.
Veuillez vous reporter au Mode d’emploi/Mode d’emploi du caméscope de votre caméscope.
MODE DV
Outre les deux types de qualité/format d’image existants, à savoir la haute définition (HD,
MPEG-4 AVC/H.264) et le standard (SD, MPEG-2 PS), la mise à jour du micrologiciel a
activé l’enregistrement et la lecture de films en qualité d’image standard pour le format DV
sur ce caméscope.
Lorsque vous sélectionnez [MODE DV] sur le menu [RÉGLAGE ENREG.]/[REGLAGE
ENREG.], puis appuyez sur [OUI], le caméscope redémarre en mode DV.
b Remarques
• Utilisez des cartes SD de Classe 6 ou plus rapides en mode DV.
Lorsque le caméscope est en mode DV, les éléments suivants sont indisponibles.
Si vous souhaitez utiliser ces éléments, annulez le mode DV.
• Visualisation de la scène la plus récemment enregistrée (Visualisation de la dernière scène)
– Vous pouvez affecter cette fonction à une touche ASSIGN. Néanmoins, celle-ci est indisponible en
mode DV.
• Visualisation d’images fixes
• Protection des films et images fixes enregistrés (Protection)
– [PROTECTION] ne s’affiche pas dans le menu [MONT].
• Division d’un film
– [DIVISER] ne s’affiche pas dans le menu [MONT].
• Copie de films et d’images fixes
– Il est impossible de copier des fichiers DV, y compris d’effectuer des copies sur des supports externes.
– [COPIER] ne s’affiche pas dans le menu [MONT].
• Capture d’images fixes d’un film
• Touche MODE
– Vous ne pouvez pas passer en mode photo.
– Vous ne pouvez pas non plus enregistrer ou visualiser des photos.
Éléments de menu indisponibles en mode DV
(RÉGL. CAMÉS./REGL. CAMES.)
– SÉLECTION GAIN/ISO
– RÉGLAGE ISO*
– LIMITE ISO AUTO*
– RÉGLAGES FLASH
(RÉGLAGE ENR. /SORTIE / REGLAGE ENR. /SORTIE)
– RÉGLAGE / / REGLAGE /
– FORMAT ENREGISTR.
– ENREG. SIMULTANÉ
– TOUCHE ENR /TOUCHE ENR.
– ENR. GD ÉCRAN/ENR. 16/9-4/3
– TAILLE D’IMAGE/TAILLE IMAGE
FR
2
Page 15
– NUMÉROTAGE FICHIERS/NUMÉRO DE FICHIER
– CONVERTIR LARGE
(RÉGL. AUDIO/REGL. AUDIO)
– FORMAT SON
* Ne s’affiche pas à l’écran.
b Remarques
• Lorsque vous sélectionnez le mode DV, [FORMAT SON ] est fixé sur [LINEAR PCM] et
[ LPCM] ne s’affiche pas à l’écran.
Lorsque le caméscope est en mode DV, les éléments suivants sont disponibles.
(RÉGLAGE ENR. /SORTIE / REGLAGE ENR. /SORTIE)
– ENREG. SIMULTANÉ
– ENR. GD ÉCRAN/ENR. 16/9-4/3
– ANNULER LE MODE DV
– CONVERTIR LARGE
b Remarques
• Lorsque vous passez du mode DV à un autre mode, les réglages effectué en mode DV sont initialisés. Si le
fichier d’un film dépasse 2 Go pendant l’enregistrement, le caméscope divise l’enregistrement en fichiers
séparés, en créant automatiquement un ou plusieurs nouveaux fichiers. Cependant, les fichiers divisés
s’affichent en un seul film sur l’écran du caméscope.
ANNULER LE MODE DV
Lorsque vous sélectionnez [ANNULER LE MODE DV] dans le menu [RÉGLAGE
ENREG.]/[REGLAGE ENREG.], puis appuyez sur [OUI], le caméscope annule le mode DV,
puis redémarre.
Une fois le mode DV annulé, les réglages par défaut suivants sont rétablis.
• SÉLECTION GAIN/ISO
• RÉGLAGE / /REGLAGE /
• FORMAT ENREGISTR.
• ENREG. SIMULTANÉ
• TOUCHE ENR /TOUCHE ENR.
• ENR. GD ÉCRAN/ENR. 16/9-4/3
• SÉLECTION SUPPORT
• FORMAT SON
FR
FR
3
Page 16

Écran du mode DV
Lorsque le caméscope est en mode DV, l’écran apparaît comme suit.
A Heure et date du début de l’enregistrement
B Résolution
C Cadence d’images
D Mode d’enregistrement
E Code temporel du début de l’enregistrement
Le code temporel ne s’affichera pas correctement si vous lisez un support d’enregistrement
sans code temporel, ou un support d’enregistrement avec un code temporel que votre
caméscope ne prend pas en charge.
z Conseils
• Les touches SCAN/SLOW sont désactivées.
• En mode DV, le rembobinage et l’avance rapide sont 5 fois plus rapides que la vitesse normale de lecture.
• Lorsque vous lisez un fichier DV enregistré avec autre caméscope que celui-ci, la valeur de F peut ne pas
s’afficher correctement.
b Remarques
• Le mode DV ne prend pas en charge les supports externes.
• En mode DV, il est impossible de visualiser des images fixes.
FR
4
Page 17

TOUCHE ENR /TOUCHE ENR.
[TOUCHE ENR ]/[TOUCHE ENR. ] est ajouté au menu [RÉGLAGE ENREG.]/
[REGLAGE ENREG.] et vous pouvez démarrer et arrêter l’enregistrement sur différents
supports d’enregistrement à différents moments en actionnant la touche START/STOP ou la
touche START/STOP de la poignée.
Dans le réglage par défaut, les films sont enregistrés simultanément sur la carte mémoire et le
lecteur mémoire flash lorsque la touche START/STOP est enfoncée.
• TOUCHE ENR: [ ] [ ]/TOUCHE ENR.: [ ] [ ]
• TOUCHE ENR POIGNÉE: [ ] [ ]/TOUCH. ENR. POIGN.: [ ] [ ]
Pour modifier le réglage
Appuyez sur MENU t sélectionnez le menu (RÉGLAGE ENR. /SORTIE / REGLAGE
ENR. /SORTIE) t [RÉGLAGE ENREG.]/[REGLAGE ENREG.] t [TOUCHE ENR ]/
[TOUCHE ENR. ] avec la molette SEL/PUSH EXEC.
Réglage de TOUCHE ENR/TOUCHE ENR. Support d’enregistrement et touche
TOUCHE ENR: [ ] [ ]/
TOUCHE ENR.: [ ] [ ]
TOUCHE ENR POIGNÉE:
[] [ ]/
TOUCH. ENR. POIGN.: [ ] [ ]
TOUCHE ENR: [ ]/
TOUCHE ENR.: [ ]
TOUCHE ENR POIGNÉE: [ ]/
TOUCH. ENR. POIGN.: [ ]
TOUCHE ENR: [ ]/
TOUCHE ENR.: [ ]
TOUCHE ENR POIGNÉE: [ ]/
TOUCH. ENR. POIGN.: [ ]
Vous pouvez utiliser [TOUCHE ENR ]/[TOUCHE ENR. ] lorsque (1) [RÉGLAGE
/ ]/[REGLAGE / ] est réglé sur [ ] et (2) [ ENREG. SIMULTANÉ]
est réglé sur [MARCHE].
Lorsque la caméra est en mode [ ], lorsque la qualité d’image [ ] est sélectionnée ou
lorsque l’enregistrement simultané est désactivé, [TOUCHE ENR ]/[TOUCHE
ENR. ] est indisponible.
L’enregistrement sur la carte mémoire et le lecteur
mémoire flash démarre et s’arrête simultanément
lorsque la touche START/STOP est enfoncée.
L’enregistrement sur la carte mémoire démarre et
s’arrête lorsque la touche START/STOP est enfoncée,
puis sur le lecteur mémoire flash lorsque la touche
START/STOP de la poignée est enfoncée.
L’enregistrement sur le lecteur mémoire flash démarre
et s’arrête lorsque la touche START/STOP est
enfoncée, puis sur la carte mémoire lorsque la touche
START/STOP de la poignée est enfoncée.
z Conseils
• Grâce à cette fonction, vous pouvez par exemple effectuer un enregistrement normal sur une carte
mémoire (avec la touche START/STOP), en même temps qu’un enregistrement sans interruption sur un
lecteur mémoire flash de secours haute capacité – démarré par la touche START/STOP de la poignée –
jusqu’à la fin du tournage.
• Pendant l’enregistrement sur le lecteur mémoire flash, si vous démarrez un autre enregistrement sur une
carte mémoire, utilisez une carte mémoire ayant été formatée avec ce caméscope.
• Lorsque des enregistrements sur un lecteur mémoire flash et une carte mémoire sont en cours, si une
erreur d’enregistrement se produit sur la carte mémoire et que l’enregistrement s’arrête, vous ne pouvez
pas redémarrer l’enregistrement sur la carte mémoire à moins d’arrêter l’enregistrement sur le lecteur
mémoire flash et de reformater la carte mémoire.
• Vous pouvez vérifier la valeur de réglage de [TOUCHE ENR ]/[TOUCHE ENR. ] à l’aide de la
fonction de contrôle d’état.
FR
5
Page 18

Visualisation de la scène la plus récemment enregistrée (Visualisation
de la dernière scène)
Dans le cas d’un enregistrement sur deux supports séparés en sélectionnant [TOUCHE
ENR ]/[TOUCHE ENR. ], c’est la dernière scène enregistrée sur le support
sélectionné sous [SÉLECTION SUPPORT] qui sera lue.
ENREG. SIMULTANÉ
Lorsque le caméscope est en mode DV, [ ENREG. SIMULTANÉ] apparaît comme suit :
[ ENREG. SIMULTANÉ].
b Remarques
• Si la mémoire de l’un des supports d’enregistrement est saturée pendant l’enregistrement simultané, il est
impossible de créer les vignettes du contenu de ce support d’enregistrement et [?] s’affiche.
SÉLECTION GAIN/ISO
Ce réglage est fixé à [GAIN] lorsque le caméscope est en mode DV.
ISO est indisponible.
DÉTECTION DE VISAGE/DETECTION DE VISAGE
Vous pouvez régler [DÉTECTION DE VISAGE]/[DETECTION DE VISAGE] sur
[MARCHE] ou [ARRÊT]/[ARRET] en mode DV.
Le cadre du visage qui a la priorité (cadre double) n’est toutefois pas activé.
GPS
Même lorsque ce réglage est activé, les spécifications de l’enregistrement DV ne fournissent
pas les informations sur la localisation en cours à enregistrer sur les films DV. Cependant, les
fonctions utilisant le GPS, telles que [INFORMATION GPS], [RÉGL. HORL. AUTO]/
[REGL. HORL. AUTO] et [RÉGL. ZONE AUTO]/[REGL. ZONE AUTO], sont disponibles.
Télécommande
Lorsque le caméscope est en mode DV, les touches suivantes sont indisponibles.
– Touche SCAN/SLOW
b Remarques
• Il n’est pas possible de lire des films au ralenti en pause.
Pendant la lecture, le rembobinage et l’avance rapide sont 5 fois plus rapides que la vitesse normale de
lecture.
ENR. GD ÉCRAN/ENR. 16/9-4/3
Lorsque le caméscope est en mode DV, [ENR. GD ÉCRAN]/[ENR. 16/9-4/3 ]
apparaît comme suit : [ENR. GD ÉCRAN]/[ENR. 16/9-4/3 ].
FR
6
Page 19

CONVERTIR LARGE
Lorsque le caméscope est en mode DV, [ CONVERTIR LARGE] apparaît comme suit :
[ CONVERTIR LARGE].
[ CONVERTIR LARGE] fonctionne comme [ CONVERTIR LARGE].
Modification du réglage d’enregistrement/de la taille d’image
Lorsque le caméscope est en mode DV, les valeurs de réglage de [ FORMAT ENR.] sont
fixées comme suit :
Valeur de réglage
60i : 480/60i
50i : 576/50i
Taille d’image
720 × 480 60i
720 × 576 50i
z Conseils
• Vous ne pouvez pas enregistrer des films avec une cadence d’images de 24p ou 30p.
Arborescence des dossiers en mode DV
L’arborescence des dossiers en mode DV est illustrée ci-dessous.
En règle générale, vous ne devez pas valider l’arborescence lorsque vous enregistrez/regardez
des films et des images fixes sur le caméscope.
* Carte mémoire SD, carte mémoire SDHC, carte mémoire SDXC
** « Memory Stick PRO Duo », lecteur mémoire flash
FR
7
Page 20

Estimation de la durée d’enregistrement en mode DV
Carte mémoire
16 GB 70
32 GB 140
64 GB 280
Lecteur mémoire flash
128 GB 585
(unité : minute)
(unité : minute)
FR
8
Page 21

Deutsch
Durch das Firmware-Update wurde der Camcorder mit neuen Funktionen ausgestattet. Die
neuen Funktionen und ihre Verwendung werden im Folgenden erläutert.
Schlagen Sie bitte auch in der Bedienungsanleitung zum Camcorder nach.
DV-MODUS
Zusätzlich zu den vorhandenen zwei Bildqualitäts-/Bildformatvarianten, nämlich High
Definition (HD, MPEG-4 AVC/H.264) und Standard Definition (SD, MPEG-2 PS),
unterstützt der Camcorder nach dem Firmware-Update auch die Aufzeichnung und
Wiedergabe von Filmen in Standardbildqualität im DV-Format.
Wenn Sie im Menü [AUFNAHME EINSTELLEN] die Option [DV-MODUS] wählen und
[JA] drücken, wird der Camcorder im DV-Modus neu gestartet.
b Hinweise
• Verwenden Sie im DV-Modus SD-Karten der Klasse 6 oder schneller.
Wenn sich der Camcorder im DV-Modus befindet, können die folgenden Optionen nicht
verwendet werden.
Wenn Sie diese Optionen verwenden möchten, beenden Sie den DV-Modus.
• Überprüfen der zuletzt aufgenommenen Szene (Rückblick auf letzte Szene)
– Sie können diese Funktion einer ASSIGN-Taste zuweisen. Im DV-Modus kann sie jedoch nicht
verwendet werden.
• Anzeigen von Standbildern
• Schützen aufgezeichneter Filme und Standbilder (Schützen)
– [SCHUTZ] wird im Menü [EDIT] nicht angezeigt.
• Teilen eines Films
– [TEILEN] wird im Menü [EDIT] nicht angezeigt.
• Kopieren von Filmen und Standbildern
– DV-Dateien können nicht kopiert werden, und zwar auch nicht auf externe Medien.
– [KOPIEREN] wird im Menü [EDIT] nicht angezeigt.
• Aufzeichnen von Standbildern aus einem Film
• Taste MODE
– Das Umschalten in den Fotomodus ist nicht möglich.
– Das Aufnehmen oder Anzeigen von Fotos ist ebenfalls nicht möglich.
DE
Im DV-Modus nicht verwendbare Menüoptionen
(KAMERAEINST.)
– GAIN/ISO-AUSWAHL
– ISO-EINSTELLUNG*
– AUTOM. ISO-BEGRENZ.*
– BLITZEINSTELLUNG
(AUFN. /AUSGABE EINST.)
– / EINSTELLEN
– AUFNAHMEFORMAT
– SIMULTANE AUFN.
– AUFNAHMETASTE
– -BREITBILDAUFN.
DE
2
Page 22

– BILDGRÖSSE
– DATEINUMMER
– WEIT-KONVERTER
(TONEINST.)
– TONFORMAT
* Wird nicht auf dem Bildschirm angezeigt.
b Hinweise
• Wenn Sie den DV-Modus wählen, ist [ TONFORMAT] fest auf [LINEAR PCM] gesetzt und
[ LPCM] wird nicht auf dem Bildschirm angezeigt.
Wenn sich der Camcorder im DV-Modus befindet, können die folgenden Optionen verwendet
werden.
(AUFN. /AUSGABE EINST.)
– SIMULTANE AUFN.
– -BREITBILDAUFN.
– DV-MODUS ABBRECHEN
– WEIT-KONVERTER
b Hinweise
• Beim Umschalten vom DV-Modus in einen anderen Modus werden im DV-Modus vorgenommene
Einstellungen initialisiert. Sobald eine Filmdatei bei der Aufnahme eine Größe von 2 GB überschreitet,
erstellt der Camcorder automatisch eine neue Datei und verteilt so die Aufnahme auf mehrere Dateien.
Die geteilten Dateien werden auf dem Bildschirm des Camcorders jedoch wie ein einziger Film angezeigt.
DV-MODUS ABBRECHEN
Wenn Sie im Menü [AUFNAHME EINSTELLEN] die Option [DV-MODUS ABBRECHEN]
wählen und [JA] drücken, wird der DV-Modus beendet und der Camcorder wird neu gestartet.
Wenn Sie den DV-Modus beenden, werden die folgenden Einstellungen auf die
Standardwerte zurückgesetzt.
• GAIN/ISO-AUSWAHL
• / EINSTELLEN
• AUFNAHMEFORMAT
• SIMULTANE AUFN.
• AUFNAHMETASTE
• -BREITBILDAUFN.
• MEDIEN-AUSWAHL
• TONFORMAT
DE
3
Page 23

Bildschirm im DV-Modus
Wenn sich der Camcorder im DV-Modus befindet, wird der folgende Bildschirm angezeigt.
A Datum und Uhrzeit des Aufnahmebeginns
B Auflösung
C Bildfrequenz
D Aufnahmemodus
E Zeitcode des Aufnahmebeginns
Der Zeitcode wird nicht ordnungsgemäß angezeigt, wenn auf dem Aufnahmemedium kein
Zeitcode aufgezeichnet wurde oder wenn der Zeitcode auf dem Aufnahmemedium vom
Camcorder nicht unterstützt wird.
z Tipps
• Die Tasten SCAN/SLOW sind deaktiviert.
• Im DV-Modus erfolgt das Zurück- und Vorwärtsspulen während der Wiedergabe im Vergleich zur
normalen Wiedergabegeschwindigkeit 5-mal schneller.
• Bei der Wiedergabe einer mit einem anderen Camcorder aufgezeichneten DV-Datei wird der F-Wert
möglicherweise nicht richtig angezeigt.
b Hinweise
• Im DV-Modus werden keine externen Medien unterstützt.
• Im DV-Modus können keine Standbilder angezeigt werden.
DE
4
Page 24

AUFNAHMETASTE
[ AUFNAHMETASTE] wird zum Menü [AUFNAHME EINSTELLEN] hinzugefügt und
Sie können die Aufnahme auf verschiedenen Aufnahmemedien zu unterschiedlichen
Zeitpunkten starten bzw. stoppen, indem Sie die Taste START/STOP oder die Taste START/
STOP am Griff betätigen.
Standardmäßig werden Filme gleichzeitig auf der Speicherkarte und dem FlashSpeichermodul aufgenommen, wenn Sie eine der Tasten START/STOP drücken.
• AUFNAHMETASTE: [ ] [ ]
• GRIFF-AUFN. -TASTE: [ ] [ ]
So ändern Sie die Einstellung
Drücken Sie MENU t wählen Sie mit dem Regler SEL/PUSH EXEC das Menü
(AUFN. /AUSGABE EINST.) t [AUFNAHME EINSTELLEN] t
[ AUFNAHMETASTE].
Einstellung von AUFNAHMETASTE Aufnahmemedium und -taste
AUFNAHMETASTE: [ ] [ ]
GRIFF-AUFN. -TASTE:
[] [ ]
AUFNAHMETASTE: [ ]
GRIFF-AUFN. -TASTE: [ ]
AUFNAHMETASTE: [ ]
GRIFF-AUFN. -TASTE: [ ]
Sie können [ AUFNAHMETASTE] verwenden, wenn (1) [ / EINSTELLEN] auf
[ ] und (2) [ SIMULTANE AUFN.] auf [EIN] gesetzt ist.
Wenn an der Kamera der Modus [ ] eingestellt ist, wenn die Bildqualität auf [ ] gesetzt
ist oder wenn die gleichzeitige Aufnahme deaktiviert ist, können Sie
[ AUFNAHMETASTE] nicht verwenden.
Wenn Sie eine der Tasten START/STOP drücken, wird
die Aufnahme auf der Speicherkarte und dem FlashSpeichermodul gleichzeitig gestartet bzw. gestoppt.
Wenn Sie die Taste START/STOP drücken, wird die
Aufnahme auf der Speicherkarte gestartet bzw.
gestoppt, wenn Sie die Taste START/STOP am Griff
drücken, wird die Aufnahme auf dem FlashSpeichermodul gestartet bzw. gestoppt.
Wenn Sie die Taste START/STOP drücken, wird die
Aufnahme auf dem Flash-Speichermodul gestartet bzw.
gestoppt, wenn Sie die Taste START/STOP am Griff
drücken, wird die Aufnahme auf der Speicherkarte
gestartet bzw. gestoppt.
z Tipps
• Dank dieser Funktion können Sie beispielsweise wie üblich auf einer Speicherkarte aufnehmen (mit der
Taste START/STOP) und gleichzeitig mit der Taste START/STOP am Griff eine bis zum Ende der
Aufnahme unterbrechungsfreie Aufzeichnung einer Sicherungskopie auf einem Flash-Speichermodul
hoher Kapazität starten.
• Wenn Sie während der Aufnahme auf einem Flash-Speichermodul eine getrennte Aufnahme auf einer
Speicherkarte starten, müssen Sie eine mit diesem Camcorder formatierte Speicherkarte verwenden.
• Wenn während der Aufnahme auf einem Flash-Speichermodul und einer Speicherkarte auf der
Speicherkarte ein Aufnahmefehler auftritt und die Aufnahme stoppt, können Sie die Aufnahme auf der
Speicherkarte erst neu starten, nachdem Sie die Aufnahme auf dem Flash-Speichermodul gestoppt und die
Speicherkarte neu formatiert haben.
• Sie können den Einstellwert für [ AUFNAHMETASTE] mithilfe der Statusfunktion überprüfen.
DE
5
Page 25

Überprüfen der zuletzt aufgenommenen Szene (Rückblick auf letzte
Szene)
Bei der über [ AUFNAHMETASTE] eingestellten getrennten Aufnahme auf beide
Medien wird die letzte Szene auf dem Medium wiedergegeben, das unter [MEDIENAUSWAHL] ausgewählt ist.
SIMULTANE AUFN.
Wenn sich der Camcorder im DV-Modus befindet, wird [ SIMULTANE AUFN.] anstelle
von [ SIMULTANE AUFN.] angezeigt.
b Hinweise
• Wenn auf einem der Aufnahmemedien während der gleichzeitigen Aufnahme der Speicherplatz zur Neige
geht, können keine Miniaturbilder der Inhalte auf dem betreffenden Aufnahmemedium erstellt werden
und [?] wird angezeigt.
GAIN/ISO-AUSWAHL
Diese Einstellung ist fest auf [GAIN] gesetzt, wenn sich der Camcorder im DV-Modus befindet.
ISO kann nicht eingestellt werden.
GESICHTSERKENNUNG
Sie können [GESICHTSERKENNUNG] im DV-Modus auf [EIN] oder [AUS] setzen.
Der Rahmen für das vorrangige Gesicht (Doppelrahmen) wird jedoch nicht aktiviert.
GPS
Auch wenn Sie diese Einstellung aktivieren, ist aufgrund der DV-Aufnahmespezifikationen
keine Aufzeichnung der aktuellen Positionsdaten in DV-Filmen möglich. Funktionen, die
GPS nutzen, wie [GPS-INFORMATION], [UHR AUTO. EINST.] und [LAND AUTO.
EINST.], stehen jedoch zur Verfügung.
Fernbedienung
Wenn sich der Camcorder im DV-Modus befindet, können die folgenden Tasten nicht
verwendet werden.
– Taste SCAN/SLOW
b Hinweise
• Im Pausemodus können Sie Filme nicht langsam abspielen.
Das Zurück- und Vorwärtsspulen während der Wiedergabe erfolgt im Vergleich zur normalen
Wiedergabegeschwindigkeit 5-mal schneller.
-BREITBILDAUFN.
Wenn sich der Camcorder im DV-Modus befindet, wird [ -BREITBILDAUFN.] anstelle
von [ -BREITBILDAUFN.] angezeigt.
DE
6
Page 26

WEIT-KONVERTER
Wenn sich der Camcorder im DV-Modus befindet, wird [ WEIT-KONVERTER] anstelle
von [ WEIT-KONVERTER] angezeigt.
Die Funktionsweise von [ WEIT-KONVERTER] ist mit der von [ WEITKONVERTER] identisch.
Ändern der Aufnahmeeinstellung/Bildgröße
Wenn sich der Camcorder im DV-Modus befindet, gelten für [ AUFN. FORMAT] die
folgenden Festeinstellungen.
Einstellwert
60i: 480/60i
50i: 576/50i
Bildgröße
720 × 480 60i
720 × 576 50i
z Tipps
• Filmaufnahmen mit einer Bildfrequenz von 24p oder 30p sind nicht möglich.
Ordnerstruktur im DV-Modus
Die Ordnerstruktur im DV-Modus ist unten abgebildet.
Normalerweise brauchen Sie die Ordnerstruktur beim Aufnehmen/Wiedergeben von Filmen
und Standbildern auf dem Camcorder nicht zu beachten.
* SD-Speicherkarte, SDHC-Speicherkarte, SDXC-Speicherkarte
** „Memory Stick PRO Duo“, Flash-Speichermodul
DE
7
Page 27

Geschätzte Aufnahmedauer im DV-Modus
Speicherkarte
16 GB 70
32 GB 140
64 GB 280
Flash-Speichermodul
128 GB 585
(Einheit: Minuten)
(Einheit: Minuten)
DE
8
Page 28

Español
Se han añadido nuevas funciones a la videocámara mediante la actualización del firmware.
Las nuevas funciones y sus respectivas operaciones se describen a continuación.
Consulte el Manual de instrucciones de la videocámara.
MODO DV
Además de los dos tipos que ya existen de calidad y formato de imagen, alta definición (HD,
MPEG-4 AVC/H.264) y estándar (SD, MPEG-2 PS), la actualización del firmware permite
ahora grabar y reproducir películas en calidad de imagen estándar para formato DV con esta
videocámara.
Cuando seleccione [MODO DV] en el menú [AJUSTE GRABACIÓN] y pulse [SÍ], la
videocámara se reiniciará en el modo DV.
b Notas
• Utilice tarjetas SD de clase 6 o más rápidas en modo DV.
Cuando la videocámara se ajusta en el modo DV, los siguientes elementos no pueden
utilizarse.
Si desea utilizar estos elementos, cancele el modo DV.
• Revisión de la escena grabada más recientemente (Revisar última escena)
– Puede asignar esta función a un botón ASSIGN. Sin embargo, no se puede utilizar en el
modo DV.
• Visualización de imágenes fijas
• Protección de películas grabadas y de imágenes fijas (Proteger)
– [PROTEGER] no se muestra en el menú [EDIT].
• División de una película
– [DIVIDIR] no se muestra en el menú [EDIT].
• Copia de películas e imágenes fijas
– Los archivos DV no se pueden copiar, incluidas las copias a medios externos.
– [COPIAR] no se muestra en el menú [EDIT].
• Captura de imágenes fijas desde una película
• Botón MODE
– No puede cambiar a modo de fotografía.
– Tampoco puede grabar o visualizar fotografías.
Elementos del menú que no se pueden utilizar en el modo DV
(AJUSTE CÁM)
– SELECC. GANANCIA/ISO
–AJUSTE ISO*
– LÍMITE ISO AUTO*
–AJUSTES FLASH
ES
2
Page 29

(AJUSTE GRAB. /SALIDA)
–AJUSTE /
– FORMATO GRABAC.
– GRAB. SIMULTÁNEA
– BOTÓN GRABACIÓN
– GRABACIÓN PANOR.
– TAMAÑO DE LA IMAGEN
– NÚMERO ARCHIVO
– CONVERTIR ANCHO
(AJUSTE AUDIO)
– FORMATO AUDIO
* No se muestra en pantalla.
b Notas
• Cuando selecciona el modo DV, [FORMATO AUDIO ] se ajusta en [LINEAR PCM] y [ LPCM]
no se muestra en pantalla.
Cuando la videocámara se ajusta en el modo DV, se pueden utilizar los siguientes elementos.
(AJUSTE GRAB. /SALIDA)
– GRAB. SIMULTÁNEA
– GRABACIÓN PANOR.
– CANCELAR MODO DV
– CONVERTIR ANCHO
b Notas
• Cuando cambia del modo DV a otro, los ajustes establecidos en el modo DV se inicializan. Si durante la
grabación un archivo de película supera los 2 GB la videocámara dividirá la grabación en archivos
separados mediante la creación de un nuevo archivo (o varios) de manera automática. No obstante, los
archivos divididos se mostrarán como una única película en la pantalla de la videocámara.
ES
CANCELAR MODO DV
Cuando seleccione [CANCELAR MODO DV] en el menú [AJUSTE GRABACIÓN] y pulse
[SÍ], la videocámara cancelará el modo DV y se reiniciará.
Cuando se cancela el modo DV, los ajustes siguientes volverán al modo predeterminado.
• SELECC. GANANCIA/ISO
•AJUSTE /
• FORMATO GRABAC.
• GRAB. SIMULTÁNEA
• BOTÓN GRABACIÓN
• GRABACIÓN PANOR.
• SELECCIÓN SOPORTE
• FORMATO AUDIO
ES
3
Page 30

Pantalla en el modo DV
Cuando la videocámara se ajusta en el modo DV, la pantalla aparece de la siguiente manera.
A Fecha y hora de inicio de la grabación
B Resolución
C Velocidad de transferencia
D Modo de grabación
E Código de tiempo de inicio de la grabación
El código de tiempo no se mostrará correctamente al reproducir soportes de grabación que no
dispongan de esta opción o cuyo código no sea compatible con la videocámara.
z Consejos
• Los botones SCAN/SLOW están desactivados.
• En el modo DV, el avance rápido y el rebobinado rápido durante la reproducción son 5 veces más rápidos
que la velocidad de reproducción normal.
• Al reproducir un archivo DV que se haya grabado con una videocámara distinta a esta, el valor F podría
no mostrarse correctamente.
b Notas
• El modo DV no es compatible con soportes externos.
• En el modo DV, no se pueden visualizar las imágenes fijas.
ES
4
Page 31

BOTÓN GRABACIÓN
[BOTÓN GRABACIÓN ] se añade al menú [AJUSTE GRABACIÓN] y puede iniciar y
detener la grabación desde distintos soportes de grabación y en momentos diferentes con el
botón START/STOP o el botón START/STOP situado en el asa.
De forma predeterminada, las películas se graban al mismo tiempo en la tarjeta de memoria y
en la unidad de memoria flash cuando se pulsa el botón START/STOP.
• BOTÓN GRABACIÓN: [ ] [ ]
• BOTÓN GRAB. ASA: [ ] [ ]
Para cambiar este ajuste
Pulse MENU t seleccione el menú (AJUSTE GRAB. /SALIDA) t [AJUSTE
GRABACIÓN] t [BOTÓN GRABACIÓN ] con el selector SEL/PUSH EXEC.
Ajuste del BOTÓN GRABACIÓN El botón y los soportes de grabación
BOTÓN GRABACIÓN: [ ] [ ]
BOTÓN GRAB. ASA: [ ] [ ]
BOTÓN GRABACIÓN: [ ]
BOTÓN GRAB. ASA: [ ]
BOTÓN GRABACIÓN: [ ]
BOTÓN GRAB. ASA: [ ]
Puede utilizar [BOTÓN GRABACIÓN ] cuando (1) [AJUSTE / ] está ajustado en
[ ] y (2) [ GRAB. SIMULTÁNEA] está ajustado en [ACTIVADO].
Cuando la cámara está ajustada en el modo [ ], y la calidad de imagen [ ] esté
seleccionada o la grabación simultánea desactivada, no podrá utilizarse el [BOTÓN
GRABACIÓN ].
Al pulsar el botón START/STOP, la grabación se inicia
o se detiene tanto en la tarjeta de memoria como en la
unidad de memoria flash.
Al pulsar el botón START/STOP se inicia la grabación
y se detiene en la tarjeta de memoria; al hacer lo mismo
desde el botón START/STOP del asa, la grabación se
inicia y se detiene en la unidad de memoria flash.
Al pulsar el botón START/STOP se inicia la grabación
y se detiene en la unidad de memoria flash; al hacer lo
mismo desde el botón START/STOP del asa, la
grabación se inicia y se detiene en la tarjeta de
memoria.
z Consejos
• Gracias a esta función, podrá, por ejemplo, realizar grabaciones convencionales en una tarjeta de memoria
(con el botón START/STOP), a la vez que graba directamente en una unidad de memoria flash de copia
de seguridad de gran capacidad (que se inicia con el botón START/STOP del asa) hasta el final de la
grabación.
• Mientras graba en la unidad de memoria flash, si inicia una grabación separada en un tarjeta de memoria,
utilice una que se haya formateado con esta videocámara.
• Mientras realice grabaciones en una unidad flash y en una tarjeta de memoria, si se produce un error en la
tarjeta de memoria y la grabación se detiene, no podrá reiniciar la grabación en la tarjeta de memoria a
menos que detenga también la grabación en la unidad de memoria flash y reformatee la tarjeta.
• Puede comprobar el valor de ajuste de [BOTÓN GRABACIÓN ] con la función de comprobación de
estado.
ES
5
Page 32

Revisión de la escena grabada más recientemente (Revisar última
escena)
Cuando se ajuste el [BOTÓN GRABACIÓN ] para realizar grabaciones en los dos
soportes independientemente, se reproducirá la última escena grabada en el soporte
seleccionado en [SELECCIÓN SOPORTE].
GRAB. SIMULTÁNEA
Cuando la videocámara se ajuste en el modo DV, la [ GRAB. SIMULTÁNEA] aparecerá
como [ GRAB. SIMULTÁNEA].
b Notas
• Si uno de los soportes de grabación se llena durante la grabación simultánea, las imágenes en miniatura de
los contenidos en ese soporte de grabación no se podrán crear y se mostrará [?].
SELECC. GANANCIA/ISO
Este ajuste se establece en [GANANCIA] cuando la videocámara se ajuste en el modo DV.
La sensibilidad ISO no se puede ajustar.
DETECCIÓN DE CARA
Puede ajustar la [DETECCIÓN DE CARA] en [ACTIVADO] o [DESACTIV.] desde el modo
DV.
Sin embargo, el recuadro del rostro prioritario (recuadro doble) no estará activado.
GPS
Incluso si este ajuste está activado, las especificaciones de grabación DV no permiten que la
información de ubicación actual se grabe en las películas DV. No obstante, las funciones con
GPS como [INFORMACIÓN GPS], [AJUS. AUTO RELOJ] y [AJUS. AUTO ZONA]
estarán disponibles.
Control remoto
Cuando la videocámara se ajusta en el modo DV, los siguientes botones no se pueden utilizar.
– Botón SCAN/SLOW
b Notas
• No puede reproducir películas a cámara lenta durante una pausa.
El avance rápido y el retroceso rápido durante la reproducción son 5 veces más rápidos que la velocidad
de reproducción normal.
GRABACIÓN PANOR.
Cuando la videocámara se ajuste en el modo DV, la [GRABACIÓN PANOR. ] aparecerá
como [GRABACIÓN PANOR. ].
ES
6
Page 33

CONVERTIR ANCHO
Cuando la videocámara se ajuste en el modo DV, la [ CONVERTIR ANCHO] aparecerá
como [ CONVERTIR ANCHO].
Las funciones de [ CONVERTIR ANCHO] son las mismas que las de [ CONVERTIR
ANCHO].
Cambio del ajuste de grabación/tamaño de imagen
Cuando la videocámara está ajustada en el modo DV, los valores de ajuste del [ FORM.
GRAB.] se establecen de la siguiente manera.
Valor de ajuste
60i: 480/60i
50i: 576/50i
Tamaño de imagen
720 × 480 60i
720 × 576 50i
z Consejos
• No puede grabar películas a velocidades de transferencia de 24p o 30p.
Estructura de carpetas en el modo DV
A continuación se muestra la estructura de carpetas en el modo DV.
Normalmente no es necesario conocer la estructura de carpetas para reproducir/grabar
películas e imágenes fijas en la videocámara.
* Tarjeta de memoria SD, tarjeta de memoria SDHC, tarjeta de memoria SDXC
** “Memory Stick PRO Duo”, unidad de memoria flash
ES
7
Page 34

Tiempo de grabación estimado en el modo DV
Tarjeta de memoria
16 GB 70
32 GB 140
64 GB 280
Unidad de memoria flash
128 GB 585
(unidad: minuto)
(unidad: minuto)
ES
8
Page 35

Italiano
Con l’aggiornamento del firmware sono state aggiunte nuove funzioni alla videocamera. Di
seguito sono descritte le nuove funzioni e le rispettive operazioni.
Consultare il Manuale delle istruzioni della videocamera.
MODO DV
Oltre ai due tipi esistenti di formati e qualità dell’immagine, alta definizione (HD, MPEG-4
AVC/H.264) e standard (SD, MPEG-2 PS), questo aggiornamento del firmware introduce la
possibilità di registrare e riprodurre sulla presente videocamera filmati con qualità
dell’immagine standard per il formato DV.
Selezionando [MODO DV] nel menu [IMPOST. REGISTR.] e premendo [SÌ], la videocamera
viene riavviata nella modalità DV.
b Note
• Utilizzare schede SD con velocità classe 6 o superiore nella modalità DV.
Quando la videocamera è impostata sulla modalità DV, non è possibile utilizzare le voci
indicate di seguito.
Per utilizzare queste voci è necessario annullare la modalità DV.
• Revisione dell’ultima scena registrata (Revisione ultima scena)
– È possibile assegnare questa funzione a un tasto ASSIGN. La funzione non è utilizzabile nella modalità
DV.
• Visione di fermi immagine
• Protezione di filmati e fermi immagine registrati (Protezione)
– [PROTEGGI] non viene visualizzato nel menu [MDFC].
• Divisione di un filmato
– [DIVIDI] non viene visualizzato nel menu [MDFC].
• Copia di filmati e fermi immagine
– I file DV non possono essere copiati, nemmeno su supporti esterni.
– [COPIA] non viene visualizzato nel menu [MDFC].
• Acquisizione di fermi immagine da un filmato
• Tasto MODE
– Non è possibile passare alla modalità Foto.
– Non è possibile registrare o visualizzare le fotografie.
IT
Voci di menu non utilizzabili nella modalità DV
(IMPOST. GEN.)
– SELEZ. GUADAGNO/ISO
– IMPOSTAZIONE ISO*
– LIMITE ISO AUTOMATICO*
– IMPOSTAZIONI FLASH
(IMP. REG. /USCITA)
– IMPOSTAZIONE /
– FORMATO REG.
– REG. SIMULTANEA
– TASTO DI REG.
– FORMATO REG.
IT
2
Page 36

– DIMENSIONI IMMAGINE
– NUMERO DI FILE
– CONVERSIONE WIDE
(IMPOST. AUDIO)
– FORMATO AUDIO
* Non visualizzato sullo schermo.
b Note
• Selezionando la modalità DV, [FORMATO AUDIO ] viene impostato su [LINEAR PCM] e
[ LPCM] non viene visualizzato sullo schermo.
Quando la videocamera è impostata sulla modalità DV, è possibile utilizzare le voci indicate
di seguito.
(IMP. REG. /USCITA)
– REG. SIMULTANEA
– FORMATO REG.
– ANNULLA MODO DV
– CONVERSIONE WIDE
b Note
• Quando si passa dalla modalità DV a un’altra modalità, le impostazioni effettuate nella modalità DV
vengono inizializzate. Se le dimensioni di un file di filmato superano 2 GB durante la registrazione, la
videocamera divide la registrazione in file distinti creando automaticamente un nuovo file. In ogni caso, i
file divisi vengono visualizzati come un filmato singolo sullo schermo della videocamera.
ANNULLA MODO DV
Selezionando [ANNULLA MODO DV] nel menu [IMPOST. REGISTR.] e premendo [SÌ],
viene annullata la modalità DV e la videocamera viene riavviata.
Quando viene annullata la modalità DV, le impostazioni riportate di seguito assumono
nuovamente i valori predefiniti.
• SELEZ. GUADAGNO/ISO
• IMPOSTAZIONE /
•FORMATO REG.
• REG. SIMULTANEA
• TASTO DI REG.
•FORMATO REG.
• SELEZIONE SUPPORTO
• FORMATO AUDIO
IT
3
Page 37

Schermata della modalità DV
Quando la videocamera è impostata sulla modalità DV, la schermata appare come indicato di
seguito.
A Data e ora di inizio della registrazione
B Risoluzione
C Frequenza dei fotogrammi
D Modalità di registrazione
E Time code di inizio della registrazione
Il time code non sarà visualizzato correttamente durante la riproduzione di supporti di
registrazione privi di time code o di supporti di registrazione dotati di un time code non
supportato dalla videocamera.
z Suggerimenti
• I tasti SCAN/SLOW sono disabilitati.
• Nella modalità DV, il riavvolgimento o l’avanzamento veloce durante la riproduzione avvengono a una
velocità 5 volte superiore della normale velocità di riproduzione.
• Durante la riproduzione di un file DV registrato con un’altra videocamera, è possibile che il valore F non
sia visualizzato correttamente.
b Note
• La modalità DV non supporta i supporti esterni.
• Nella modalità DV non è possibile visualizzare i fermi immagine.
IT
4
Page 38

TASTO DI REG.
Al menu [IMPOST. REGISTR.] viene aggiunto [ TASTO DI REG.]; è così possibile
avviare e interrompere la registrazione su supporti di registrazione diversi in momenti diversi
utilizzando il tasto START/STOP oppure il tasto START/STOP sull’impugnatura.
Nell’impostazione predefinita, i filmati vengono registrati contemporaneamente sia sulla
scheda di memoria sia sull’unità di memoria flash quando viene premuto uno dei tasti
START/STOP.
• TASTO DI REG.: [ ] [ ]
• TASTO DI REG. IMP.: [ ] [ ]
Per cambiare l’impostazione
Premere MENU t selezionare menu (IMP. REG. /USCITA) t [IMPOST. REGISTR.]
t [ TASTO DI REG.] con il selettore SEL/PUSH EXEC.
Impostazione del TASTO DI REG. Supporto di registrazione e tasto
TASTO DI REG.: [ ] [ ]
TASTO DI REG. IMP.:
[] [ ]
TASTO DI REG.: [ ]
TASTO DI REG. IMP.: [ ]
TASTO DI REG.: [ ]
TASTO DI REG. IMP.: [ ]
È possibile utilizzare [ TASTO DI REG.] quando (1) [IMPOSTAZIONE / ] è
impostato su [ ] e (2) [ REG. SIMULTANEA] è impostato su [ATTIVATO].
Quando la fotocamera è impostata sulla modalità [ ], quando viene selezionata la qualità
dell’immagine [ ] o se la registrazione simultanea è disattivata, non è possibile utilizzare
[ TASTO DI REG.].
La registrazione sulla scheda di memoria e sull’unità di
memoria flash viene avviata e interrotta
contemporaneamente quando viene premuto uno dei
tasti START/STOP.
La registrazione sulla scheda di memoria viene avviata
e interrotta quando viene premuto il tasto START/
STOP, la registrazione sull’unità di memoria flash
quando viene premuto il tasto START/STOP
sull’impugnatura.
La registrazione sull’unità di memoria flash viene
avviata e interrotta quando viene premuto il tasto
START/STOP, la registrazione sulla scheda di
memoria quando viene premuto il tasto START/STOP
sull’impugnatura.
z Suggerimenti
• Utilizzando questa funzione è possibile, ad esempio, effettuare la normale registrazione su una scheda di
memoria (utilizzando il tasto START/STOP) e nello stesso tempo effettuare una registrazione ininterrotta
su un’unità di memoria flash ad alta capacità di riserva (avviata con il tasto START/STOP
dell’impugnatura) fino alla fine della ripresa.
• Durante la registrazione sull’unità di memoria flash, se si avvia una registrazione separata su una scheda
di memoria è necessario utilizzare una scheda di memoria formattata con questa videocamera.
• Mentre sono in corso le registrazioni su un’unità flash e una scheda di memoria, se si verifica un errore di
registrazione sulla scheda di memoria e la registrazione viene interrotta, non è possibile riavviare la
registrazione sulla scheda di memoria senza interrompere la registrazione sull’unità di memoria flash e
senza riformattare la scheda di memoria.
• È possibile controllare il valore impostato per il [ TASTO DI REG.] con lo stato della funzione di
verifica.
IT
5
Page 39

Revisione dell’ultima scena registrata (Revisione ultima scena)
Durante la registrazione separata su entrambi i supporti con l’impostazione [ TASTO DI
REG.], viene riprodotta l’ultima scena registrata sul supporto selezionato in [SELEZIONE
SUPPORTO].
REG. SIMULTANEA
Quando la videocamera è impostata sulla modalità DV, [ REG. SIMULTANEA] viene
visualizzato come [ REG. SIMULTANEA].
b Note
• Se si esaurisce lo spazio su uno dei supporti di registrazione durante la registrazione simultanea, diventa
impossibile creare le miniature del contenuto su tale supporto di registrazione e viene visualizzato [?].
SELEZ. GUADAGNO/ISO
L’impostazione è sempre [GUADAGNO] quando la videocamera è impostata sulla modalità
DV.
ISO non può essere impostato.
RILEVAMENTO VISI
È possibile impostare [RILEVAMENTO VISI] su [ATTIVATO] o [DISATTIV.] nella
modalità DV.
In ogni caso, l’inquadratura del viso con priorità (doppia inquadratura) non è abilitata.
GPS
Anche se l’impostazione è attivata, le specifiche di registrazione DV non forniscono
informazioni sulla posizione attuale da registrare nei filmati DV. Tuttavia, le funzioni che
utilizzano GPS, ad esempio [INFORMAZIONI GPS], [REG. OROL. AUTO] e [REG. AUTO
AREA], sono disponibili.
Telecomando
Quando la videocamera è impostata sulla modalità DV, non è possibile utilizzare i tasti
indicati di seguito.
– Tasto SCAN/SLOW
b Note
• Non è possibile riprodurre filmati lentamente nella modalità di pausa.
Il riavvolgimento o l’avanzamento veloce durante la riproduzione avvengono a una velocità 5 volte
superiore della normale velocità di riproduzione.
FORMATO REG.
Quando la videocamera è impostata sulla modalità DV, [FORMATO REG. ] viene
visualizzato come [FORMATO REG. ].
IT
6
Page 40

CONVERSIONE WIDE
Quando la videocamera è impostata sulla modalità DV, [ CONVERSIONE WIDE] viene
visualizzato come [ CONVERSIONE WIDE].
La [ CONVERSIONE WIDE] funziona allo stesso modo della [ CONVERSIONE
WIDE].
Modifica dell’impostazione di registrazione e delle dimensioni dell’immagine
Quando la videocamera è impostata sulla modalità DV, i valori dell’impostazione
[ FORMATO REG.] sono i seguenti.
Valore dell’impostazione
60i: 480/60i
50i: 576/50i
Dimensioni dell’immagine
720 × 480 60i
720 × 576 50i
z Suggerimenti
• Non è possibile registrare filmati con la frequenza dei fotogrammi 24p o 30p.
Struttura delle cartelle nella modalità DV
La struttura delle cartelle nella modalità DV è riportata di seguito.
Di solito non è necessario conoscere la struttura delle cartelle durante la registrazione o la
riproduzione di filmati e fermi immagine sulla videocamera.
* Scheda di memoria SD, scheda di memoria SDHC, scheda di memoria SDXC
** “Memory Stick PRO Duo”, unità di memoria flash
IT
7
Page 41

Tempo di registrazione stimato nella modalità DV
Scheda di memoria
16 GB 70
32 GB 140
64 GB 280
Unità di memoria flash
128 GB 585
(unità: minuti)
(unità: minuti)
IT
8
Page 42

中文 (简体字)
已通过固件更新将新功能添加至本机。以下为新功能及其相关操作说
明。
请参阅本机的操作指南。
DV模式
除了现有的两种图像质量/格式,即高解析度 (HD、MPEG-4 AVC/H.264)
和标准 (SD、MPEG-2 PS),此次固件更新可让您在本机上以DV格式的标
准图像质量录制和播放动画。
选择[拍摄设定]菜单上的[DV模式]并按[是]时,本机重启并进入DV模
式。
b 注意
• 在DV模式中使用级别6或更快的SD卡。
本机设定为DV模式时,以下项目不可用。
如果要使用这些项目,请取消DV模式。
• 查看最近拍摄的场景 (最后场景预览)
– 您可以指定此功能至ASSIGN按钮。但是,DV模式中此功能不可用。
• 查看静像
• 保护录制的动画和静像 (保护)
– [编辑]菜单上不显示[保护]。
• 分割动画
– [编辑]菜单上不显示[分割]。
• 复制动画和静像
– 无法复制DV文件,包括复制到外部媒体。
– [编辑]菜单上不显示[复制]。
• 从动画中捕获静像
• MODE按钮
– 无法切换到照片模式。
– 也无法拍摄或查看照片。
不能在DV模式中使用的菜单项目
(摄像机设定)
– 亮度增益/ISO选择
– ISO设定*
– 自动设定ISO限制*
– 闪光灯设定
CS
2
Page 43

(拍摄/输出设定)
– /设定
– 拍摄格式
– 同步拍摄
– 录制按钮设定
– 宽银幕录制
– 影像尺寸
– 文件序号
– 宽转换
(音频设定)
– 音频格式
* 屏幕上不显示。
b 注意
• 选择DV模式时,[ 音频格式]固定为[LINEAR PCM],并且屏幕上不显示
[ LPCM]。
本机设定为DV模式时,以下项目可用。
(拍摄/输出设定)
– 同步拍摄
– 宽银幕录制
– 取消DV模式
– 宽转换
CS
b 注意
• 从DV模式切换到其他模式时,将初始化DV模式中的设定。如果录制时动画
文件大小超过2 GB,本机会通过自动创建新文件将录制分割成几个单独的
文件。但是,分割文件在本机屏幕上仍显示为单个动画。
CS
3
Page 44

取消DV模式
选择[拍摄设定]菜单上的[取消DV模式]并按[是]时,本机取消DV模式并
重启。
取消DV模式后,以下设定恢复为默认。
• 亮度增益/ISO选择
• /设定
• 拍摄格式
• 同步拍摄
• 录制按钮设定
• 宽银幕录制
• 媒体选择
• 音频格式
DV模式画面
本机设定为DV模式时,屏幕上显示以下信息。
A 拍摄开始的日期和时间
B 分辨率
C 帧频
D 拍摄模式
E 拍摄开始的时间代码
播放不带时间代码或所带时间代码不受本机支持的录制媒体时,
时间代码将无法正确显示。
z 提示
• 禁用SCAN/SLOW按钮。
• 在DV模式中,播放期间的快进和快退比正常播放速度快5倍。
• 播放用本机以外的摄录一体机录制的DV文件时,F值可能无法正确显示。
CS
4
Page 45

b 注意
• DV模式不支持外部媒体。
• DV模式中,无法查看静像。
录制按钮设定
[ 录制按钮设定]被添加到[拍摄设定]菜单,您可以通过操作START/
STOP按钮或手柄START/STOP按钮在不同时间不同录制媒体上开始和停止
录制。
默认设定下,按任一START/STOP按钮时,同时在存储卡和闪存设备上录
制动画。
• 录制按钮: [ ] [ ]
• 手柄录制按钮: [ ] [ ]
更改设定
按MENU t用SEL/PUSH EXEC拨盘选择 (拍摄/输出设定)菜单t [拍
摄设定] t [ 录制按钮设定]。
录制按钮设定的设定 录制媒体和按钮
录制按钮: [ ] [ ]
手柄录制按钮: [ ]
[]
录制按钮: [ ]
手柄录制按钮: [ ]
录制按钮: [ ]
手柄录制按钮: [ ]
(1)[ / 设定]设定为[ ]且 (2)[ 同步拍摄]设定为[开]时,
[ 录制按钮设定]可用。
本机设定为[ ]模式、图像质量选择为[ ]或同步拍摄设定为关时,
[ 录制按钮设定]不可用。
按任一START/STOP按钮时,同时在存储
卡和闪存设备上开始和停止录制。
按START/STOP按钮时,在存储卡上开始
和停止录制;按手柄START/STOP按钮
时,则在闪存设备上开始和停止录制。
按START/STOP按钮时,在闪存设备上开
始和停止录制;按手柄START/STOP按钮
时,则在存储卡上开始和停止录制。
z 提示
• 您可以使用此功能,例如,在存储卡上执行一般录制 (使用START/STOP按
钮),同时不间断地录制到大容量备份闪存设备 - 通过手柄START/STOP按
钮启动 - 直到录制结束。
• 在闪存设备上录制时,如果在存储卡上另外开始录制,请使用已由本机格
式化的存储卡。
• 正在闪存设备和存储卡上进行录制时,如果存储卡上发生录制错误并停
止,则除非停止在闪存设备上录制并重新格式化存储卡,否则无法在存储
卡上重新开始录制。
• 可以用状态检查功能检查[ 录制按钮设定]的设定值。
CS
5
Page 46

查看最近拍摄的场景 (最后场景预览)
通过设定[ 录制按钮设定]在两个媒体上分别录制时,将播放[媒体选
择]中选择的媒体上最近拍摄的场景。
同步拍摄
本机设定为DV模式时,[ 同步拍摄]显示为[ 同步拍摄]。
b 注意
• 如果其中一个录制媒体在同步拍摄时已满,将无法创建该录制媒体上内容
的缩略图,并且会显示[?]。
亮度增益/ISO选择
本机设定为DV模式时,此设定固定为[亮度增益]。
无法设定ISO。
人脸检测
可以在DV模式将[人脸检测]设定为[开]或[关]。
但是不启用优先脸部框 (双边框)。
遥控
本机设定为DV模式时,以下按钮不可用。
– SCAN/SLOW按钮
b 注意
• 暂停期间无法缓慢播放动画。
播放期间的快进和快退比正常播放速度快5倍。
宽银幕录制
本机设定为DV模式时,[ 宽银幕录制]显示为[ 宽银幕录制]。
宽转换
本机设定为DV模式时,[ 宽转换]显示为[ 宽转换]。
[ 宽转换]功能与[ 宽转换]相同。
CS
6
Page 47

改变录制设定/图像尺寸
本机设定为DV模式时,[ 拍摄格式]设定固定为以下值。
设定值
60i: 480/60i
50i: 576/50i
图像尺寸
720
× 480 60i
× 576 50i
720
z 提示
• 无法录制24p或30p帧频的动画。
DV模式文件夹结构
DV模式文件夹结构如下。
在本机上录制/播放动画和静像时,一般不需要确认文件夹结构。
* SD存储卡、SDHC存储卡、SDXC存储卡
**“Memory Stick PRO Duo”、闪存设备
DV模式中预计的录制时间
存储卡
(单位:分钟)
16 GB 70
32 GB 140
64 GB 280
闪存设备
(单位:分钟)
128 GB 585
CS
7
Page 48

Printed in Japan© 2013 Sony Corporation
 Loading...