

Page 1
_
_
_
Portable MiniDisc Recorder MZ-B100
3-235-455-12(1)
Portable
MiniDisc Recorder
Operating Instructions _______________________
Manual de instrucciones _____________________
_______________
GB
ES
RU
MZ-B100
©2001 Sony Corporation
Page 2

Owner’s Record
The serial number is located at the rear of
the disc compartment lid and the model
number is located at the top and bottom.
Record the serial number in the space
provided below. Refer to them whenever
you call upon your Sony dealer regarding
this product.
Model No. MZ-B100
Serial No.
This equipment has been tested and found
to comply with the limits for a Class B
digital device, pursuant to Part 15 of the
FCC Rules. These limits are designed to
provide reasonable protection against
harmful interference in a residential
installation. This equipment generates,
uses, and can radiate radio frequency
energy and, if not installed and used in
accordance with the instructions, may
cause harmful interference to radio
communications. However, there is no
guarantee that interference will not occur
in a particular installation. If this
equipment does cause harmful
interference to radio or television
reception, which can be determined by
turning the equipment off and on, the user
is encouraged to try to correct the
interference by one or more of the
following measures:
— Reorient or relocate the receiving
antenna.
— Increase the separation between the
equipment and receiver.
— Connect the equipment into an outlet
on a circuit different from that to
which the receiver is connected.
— Consult the dealer or an experienced
radio/TV technician for help.
This device complies with Part 15 of the
FCC Rules. Operation is subject to the
following two conditions: (1) This device
may not cause harmful interference, and
(2) this device must accept any
interference received, including
interference that may cause undesired
operation.
You are cautioned that any changes or
modifications not expressly approved in
this manual could void your authority to
operate this equipment.
Caution
The use of optical instruments with this
product will increase eye hazard.
CAUTION — INVISIBLE LASER
RADIATION WHEN OPEN
AVOID EXPOSURE TO BEAM
Information
IN NO EVENT SHALL SELLER BE
LIABLE FOR ANY DIRECT,
INCIDENTAL OR
CONSEQUENTIAL DAMAGES OF
ANY NATURE, OR LOSSES OR
EXPENSES RESULTING FROM
ANY DEFECTIVE PRODUCT OR
THE USE OF ANY PRODUCT.
Certain countries may regulate disposal of
the battery used to power this product.
Please consult with your local authority.
2-GB
Page 3

Disposal of Old Electrical &
Electronic Equipment
(Applicable in the European
Union and other European
countries with separate
collection systems)
This symbol on the product
or on its packaging indicates
that this product shall not be
treated as household waste.
Instead it shall be handed
over to the applicable
collection point for the
recycling of electrical and electronic
equipment. By ensuring this product is
disposed of correctly, you will help
prevent potential negative consequences
for the environment and human health,
which could otherwise be caused by
inappropriate waste handling of this
product. The recycling of materials will
help to conserve natural resources. For
more detailed information about recycling
of this product, please contact your local
city office, your household waste disposal
service or the shop where you purchased
the product.
Applicable accessories: Remote control,
Headphones
GB
3-GB
Page 4

Table of contents
Looking at the controls ....................................6
Preparing a power source ................................9
Recording an MD right away! .........................11
Playing an MD right away! .............................. 14
Various ways of recording .............................. 16
Recording for long times ......................................................................16
VOR (Voice Operated Recording) .......................................................17
Recording from a microphone ..............................................................18
Recording from externally connected equipment .................................19
Recording with digital (optical) input (optical cable required) ......20
Recording with analog (line) input (line cable required) ...............21
Recording tracks using the Group Function (Group mode recording) .22
To activate the group mode (Group mode recording) ....................23
Recording a track into a new group ................................................23
Recording a track into an existing group ........................................23
To start/stop recording in sync with the source player
(Synchro-recording) ........................................................................24
Setting the clock to stamp the recorded time ........................................25
Checking the remaining time or the recording position .......................26
4-GB
Various ways of playback .............................. 27
Changing the sound setting ...................................................................27
Finding a point quickly (Easy Search) ..................................................28
Changing the playback speed (Speed Control) .....................................28
Playing tracks repeatedly ......................................................................29
Checking the remaining time or the playing position ...........................29
Using the Group Function (Group mode) .............................................30
Listening to tracks using the group mode (group mode playback) 30
Selecting and playing groups (Group skip mode) ..........................31
Page 5

Editing recorded tracks .................................. 32
Adding a track mark ............................................................................. 32
Track marking to divide a recording .............................................. 32
Track marking important points .................................................... 32
Erasing a track mark ............................................................................ 33
Labeling recordings .............................................................................. 34
Registering tracks or groups as a new group (Group setting) .............. 36
To release a group setting .................................................................... 37
Moving recorded tracks ....................................................................... 38
Moving a track to a different group ..................................................... 38
Changing the order of a group on a disc (Group move) ...................... 39
Erasing tracks ....................................................................................... 39
To erase a track .............................................................................. 39
To erase the whole disc .................................................................. 40
To erase a group ............................................................................. 40
Other operations ............................................. 41
Adjusting the contrast of the display window (Contrast adjustment) .. 41
Locking the controls (HOLD) .............................................................. 41
Power sources ................................................ 42
When to replace the batteries ............................................................... 42
Battery life ..................................................................................... 42
Using house current ............................................................................. 43
Additional information .................................... 44
Precautions ........................................................................................... 44
Troubleshooting ................................................................................... 46
System limitations ................................................................................ 49
Messages .............................................................................................. 50
Specifications ....................................................................................... 52
Explanations ......................................................................................... 53
5-GB
Page 6
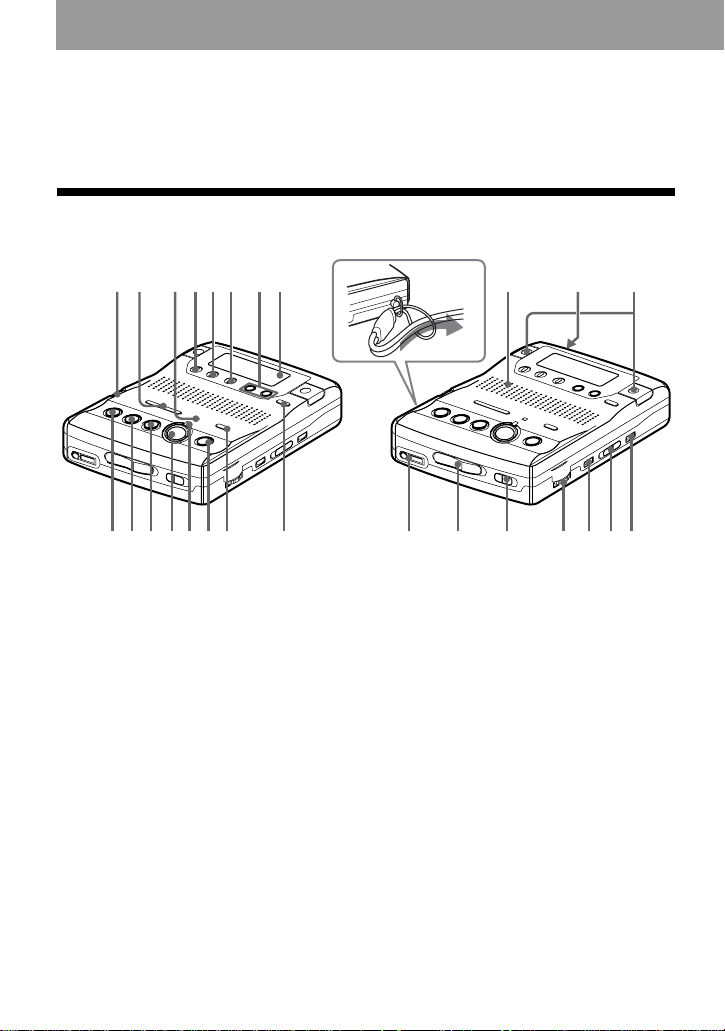
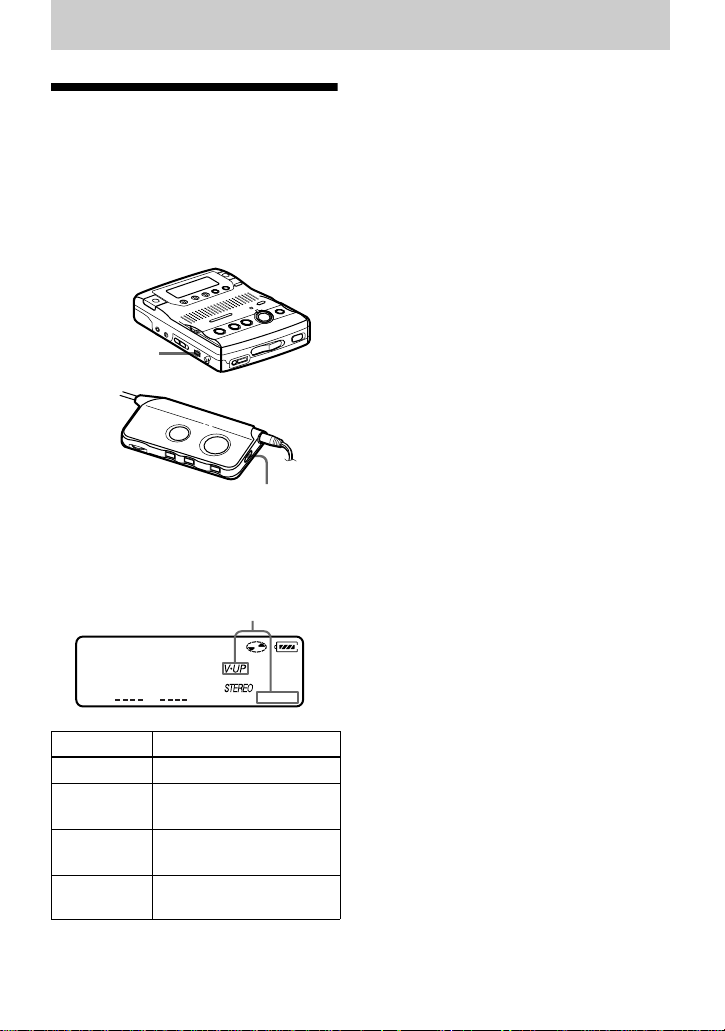
Looking at the controls
See pages in ( ) for more details.
Front of the recorder
How to attach the hand strap.
1
3456 78 qj qk ql
2
9q;qaqsqdqfqg qh w; wa ws wd wf wgwh
A SPEED CONTROL dial (28)
B .REVIEW/AMS/>CUE/AMS
(search /AMS) buttons (12) (15) (23)
(25) (31) (33) (34) (41)
C VOR indicator (17)
D DISPLAY button (26) (29) (35)
E PLAY MODE button (29) (35)
F EDIT/ENTER button (31) (34) (41)
G EASY SEARCH +/– buttons (28)
(35)
H Display window (24) (27) (33)
I xSTOP button (12) (14) (25) (35)
J NPLAY (play) button (12) (14) (25)
(34)
The NPLAY button has a tactile dot.
K XPAUSE button (13) (15) (33) (34)
L zREC button (12) (16)
M REC indicator (12) (26)
6-GB
N TRACK MARK button (32) (33)
O REC MODE switch (12) (16)
P GROUP button (23) (30) (37)
Q Speaker (14)
R DC IN 3V jack (43)
S Microphones (12) (17)
T i (headphones) jack (12) (14)
U OPEN switch (11) (14)
V HOLD switch (9) (41)
W VOL control (14)
The VOL control has a tactile dot.
X VOR button (17)
Y SYNCHRO REC ON/OFF switch
(24)
Z ERASE button (39)
Page 7
Back of the recorder
1
2
36
A Battery compartment (9)
B CLOCK SET button (25)
C SOUND button (27)
D LINE IN (OPTICAL) jack (20) (21)
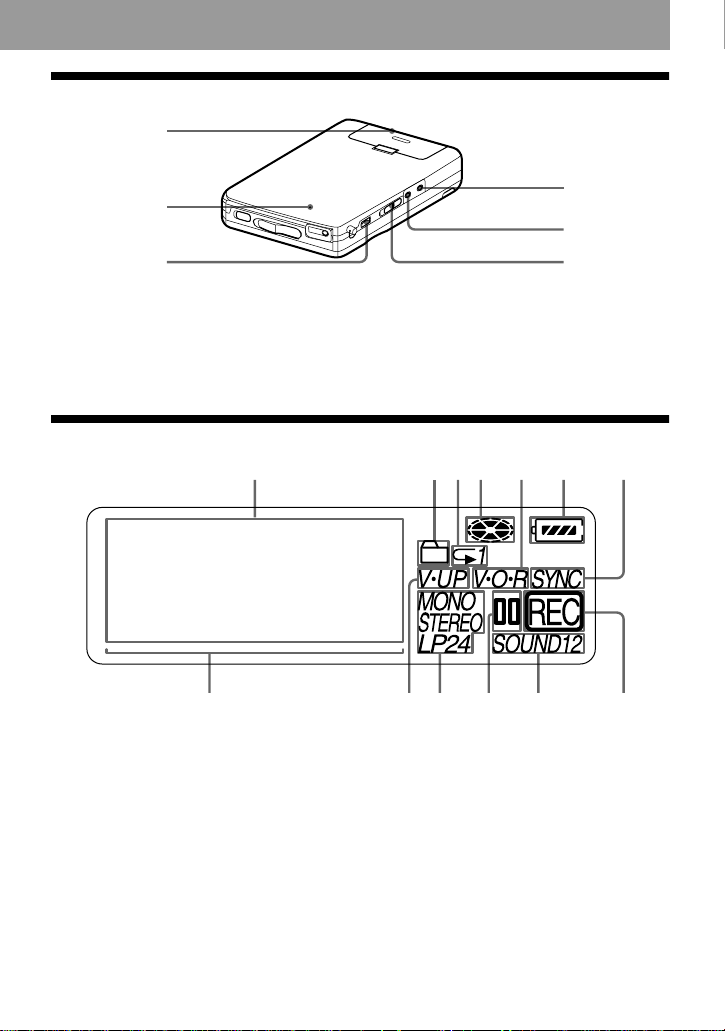
The display window
124567
A Character information display (16)
(27) (33)
Displays the disc and track names,
date, error messages, track numbers,
recording level, etc.
B Group indication (23) (30) (35)
C Play mode indication (29)
D Disc indication (16) (27) (33)
Shows that the disc is rotating for
recording, playing or editing an MD.
E VOR indication (17)
F Battery level indication (42)
4
5
E MIC (PLUG IN POWER) jack (18)
The MIC (PLUG IN POWER) jack
has a tactile dot.
F MIC SENS (H/L) switch (11) (17)
3
qdqsqaq;98
G SYNC (synchro-recording) indication
(24)
H Playback level meter (30) (33)
I V-UP indication (27)
J STEREO (stereo), LP2 (LP2 stereo),
LP4 (LP4 stereo), MONO (monaural)
indication (12) (16)
K Pause indication
L SOUND indication (27)
M REC indication (12)
7-GB
Page 8
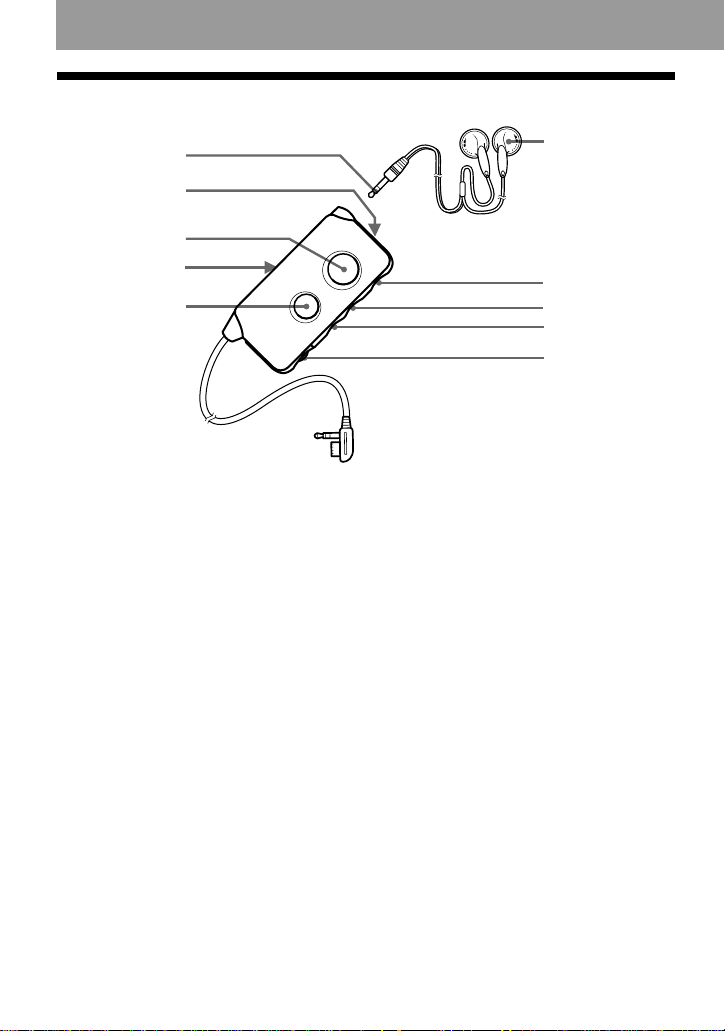
The remote control
A
B
C
D
E
A Stereo mini plug
B SOUND button (27)
C TRACK MARK button (32) (33)
D HOLD switch (9) (41)
Slide to lock the controls of the
remote control.
E X (pause) button (15)
F Headphones
G x (stop) button (14)
H >N buttons (15)
The >N button has a tactile dot.
I .REVIEW/AMS (15)
J VOL control (14)
The VOL control has a tactile dot.
F
G
H
I
J
8-GB
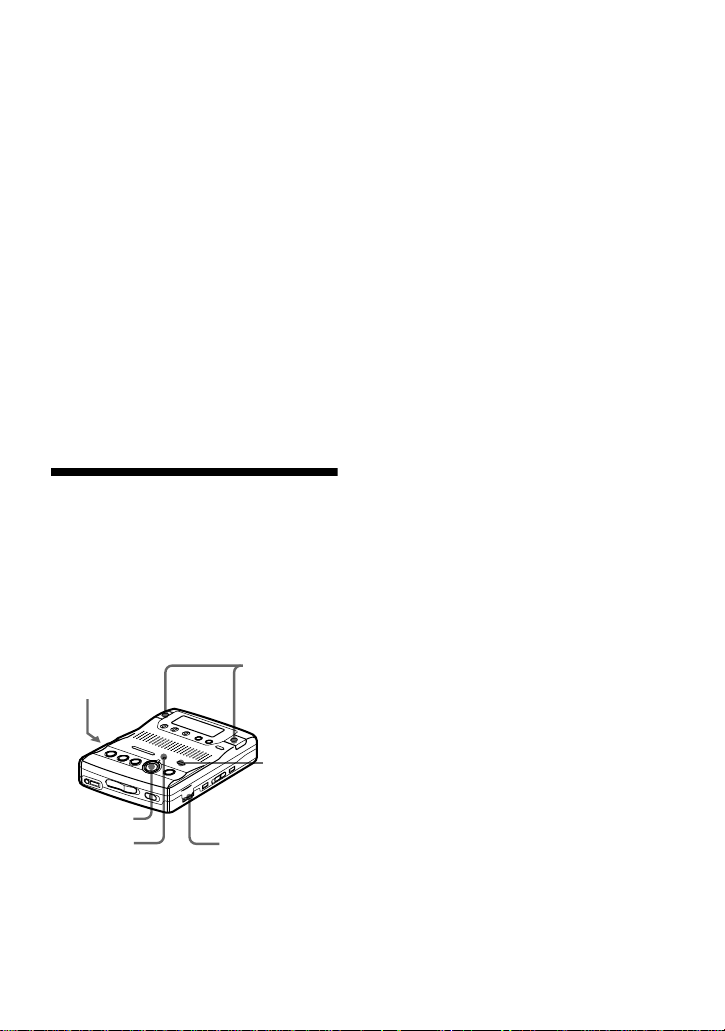
Page 9
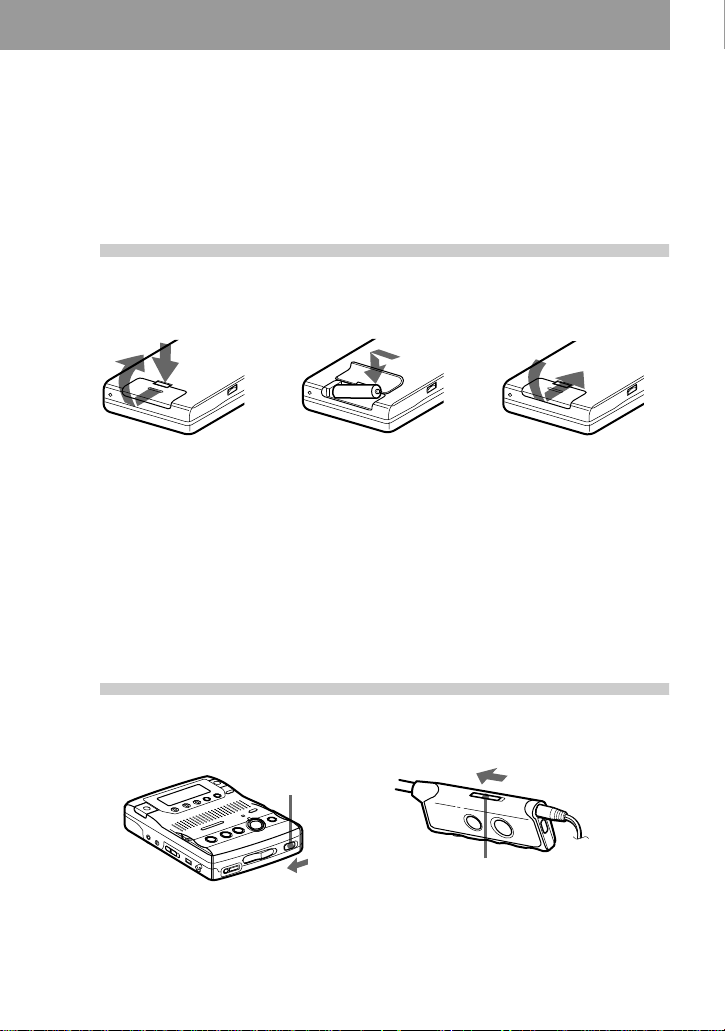
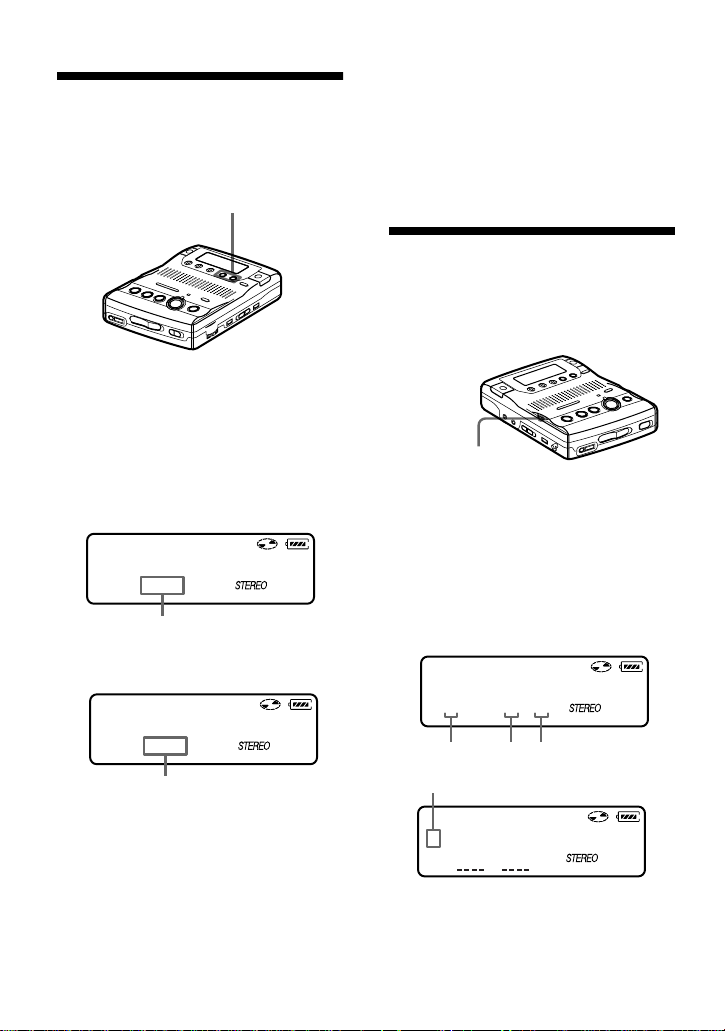
Preparing a power source
e
E
This section explains how to prepare the recorder for battery-powered
operation. For information on connecting the recorder to an AC power
outlet, see page 43.
1
2
Insert dry batteries.
Back of the recorder
Press and slide the battery
compartment lid as shown in
the illustration.
Notes
• Do not use manganese dry battery. If you do, recording may not be possible.
• Insert the e and E poles of the battery correctly as shown on the recorder.
Unlock the control.
Insert one LR6 (size AA)
alkaline dry battery
(supplied with the world
model only).
HOLD
Close the lid.
HOLD
Slide HOLD to the direction of the arrow in the illustration.
9-GB
Page 10

Charging the built-in battery for the clock
When you use the recorder for the first time or after a long period of disuse, charge the
built-in battery for the clock. After setting the clock, leave the dry batteries installed for
about more than two hours so that the built-in battery is automatically charged. You can use
the recorder while charging. When the built-in battery is charged, the settings, such as
clock, will remain for about one month after dry batteries are taken out. For details on
setting a clock, see page 25.
10-GB
Page 11
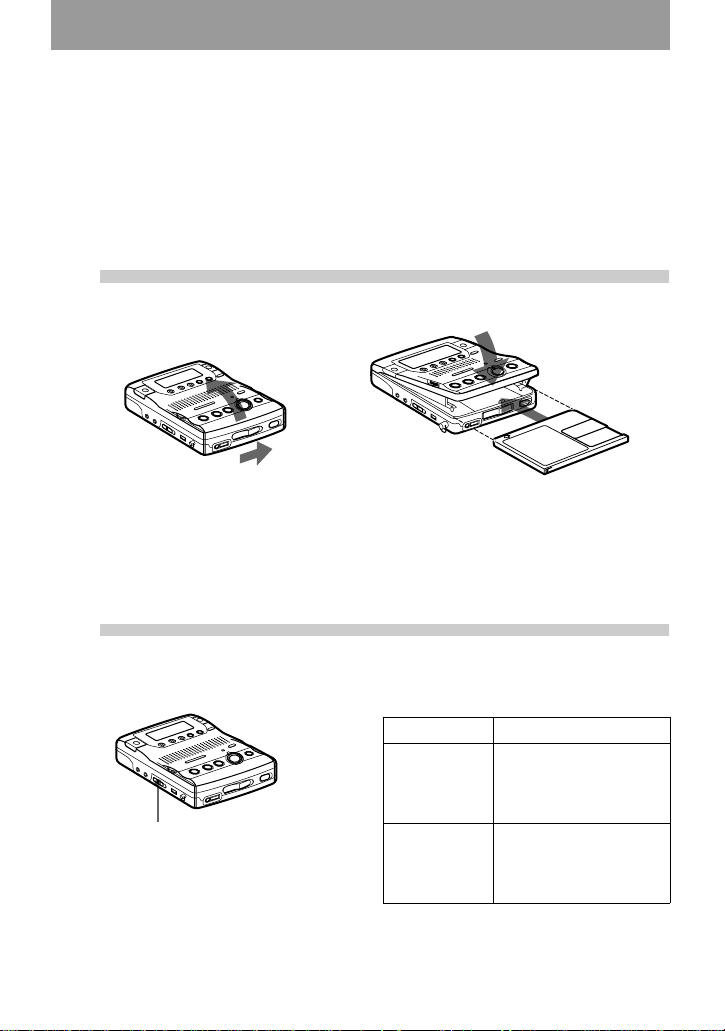
Recording an MD right away!
Use the built-in microphones to record in stereo. Make sure the
record-protect tab on the disc is closed (page 54). The use of new
alkaline dry battery is recommended. The recording may not be
possible if you use manganese dry battery.
1
1 Slide OPEN to open the lid. 2 Insert a recordable MD with the label
2
Insert a recordable MD.
side facing up, and press down on the
lid (at the center of the front edge as
shown above) to close it firmly.
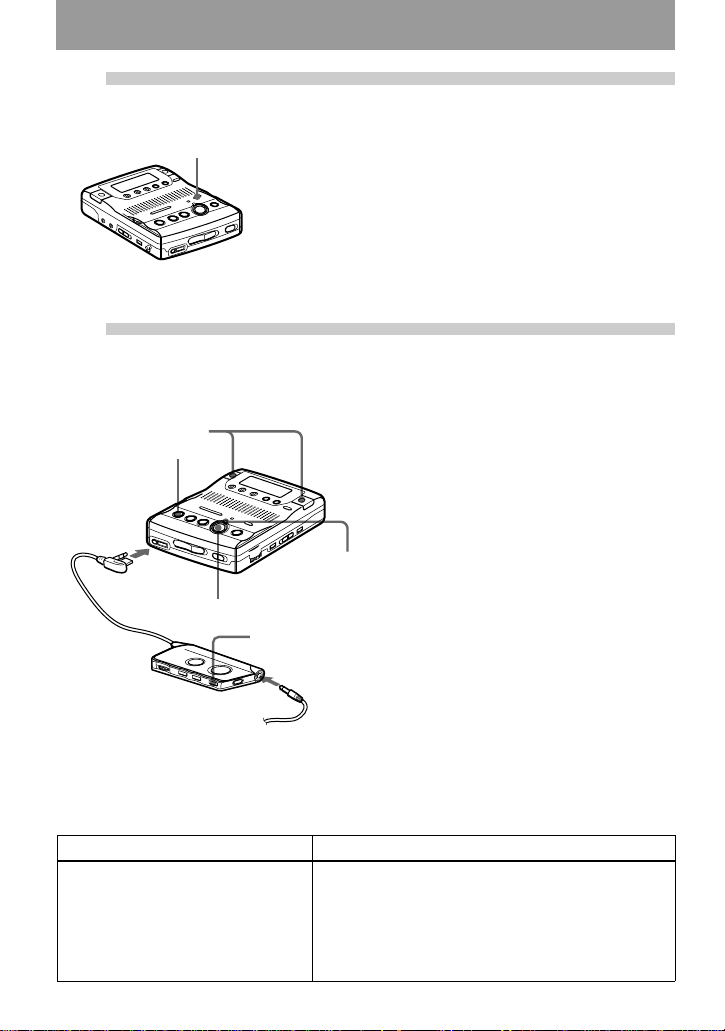
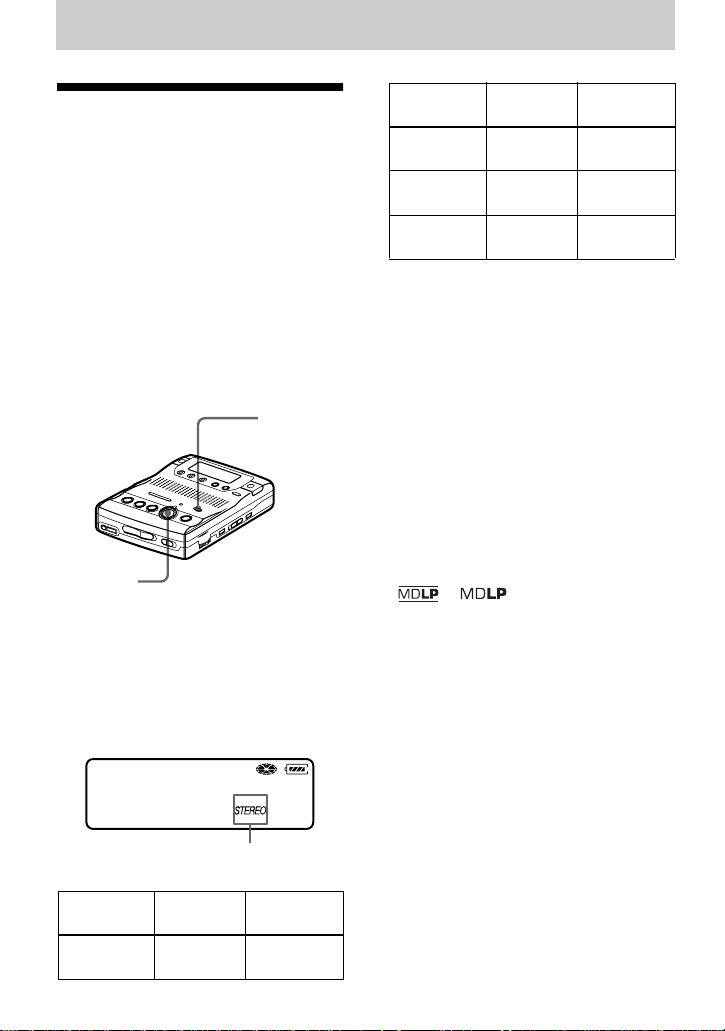
Select the microphone sensitivity.
1 Slide MIC SENS to H or L.
MIC SENS When
MIC SENS
H (high) recording a soft or a
L (low) recording a laud or a
sound in the distance
(e.g. to record a
meeting).
sound at close range
(e.g. to record a speech
through a microphone).
11-GB
Page 12
3
Select the recording mode.
REC MODE
1 Press REC MODE repeatedly until “STEREO” lights
up in the display.
You can select normal stereo, LP2 stereo, LP4 stereo,
or monaural as the recording mode. For details, see
“Recording for long times” (page 16). The factory
setting is normal stereo.
The recording mode cannot be changed when
recording is in progress.
4
firmly to i.
To monitor the sound during recording.
Connect the supplied headphones with remote control to the i jack. You can adjust the volume by
turning the VOL control. This adjustment does not affect the recording level since the level is adjusted
automatically.
To Operation
Record partway through the
previous recording
Record an MD.
built-in
microphones
xSTOP
Connect
zREC
x
Connect firmly to i
1 Press zREC.
“REC” appears, REC indicator lights
up, and then recording starts.
You can monitor the recording
conditions, such as the recording
position, through the display or the REC
indicator (page 26).
If the disc is blank, the recording
starts from the beginning. If the
disc is partially recorded, the
REC
indicator
Press NPLAY, >CUE/AMS or .REVIEW/
AMS to find the beginning of the material to be
recorded, and then press XPAU SE .
Press zREC so that the recorder changes to
recording pause.
Press XPAUSE again to start recording.
recording automatically starts
from the end of the existing
material.
To stop recording, press xSTOP.
After you press the xSTOP button to stop the
recorder, the recorder will automatically turn
off after about 10 seconds (when using an
alkaline dry battery) or 5 minutes (when using
the AC power adaptor).
12-GB
Page 13

To O pe rat io n
1)
Pause
Press XPAUSE while recording.
Press XPAUSE again to resume recording.
Remove the MD xSTOP to stop recording and open the lid. (Be sure
that “TOC Edit” has disappeared from the display
before opening the lid.)
1)
The REC indicator flashes during recording pause. Track marks are not added while recording with
microphones, even when the recorder is paused.
If the recording does not start
• Make sure the recorder is not locked (pages 9
and 41).
• Make sure the MD is not record-protected
(page 54).
• Premastered MDs cannot be recorded over.
• The built-in microphones do not operate
whenever an optical cable or a line cable is
connected into the LINE IN (OPTICAL) jack
on the recorder.
Notes
• For long recordings, it is recommended that
you power the recorder from a house current
using an optional AC power adaptor ACE30HG (page 43).
• Do not connect an optional AC power adaptor
during a recording operation if you are
operating the recorder on battery power. If you
do, the material recorded up to that point will
not be saved to the disc
• The lid will not open during recording or until
“TOC Edit” disappears from the display after
the recording has completed.
• If the power supply is disrupted (i.e. the
batteries are removed or becomes exhausted
or the optional AC power adaptor is
disconnected) during a recording operation, or
while “TOC Edit” appears in the display, then
it will not be possible to open the lid until
power is restored.
• “Data Save” or “TOC Edit” flashes while data
of the recording (the track’s start and end
points, etc.) is being recorded. Do not move or
jog the recorder or disconnect the power
source while the indication is flashing in the
display. If you do, the material recorded up to
that point will not be saved to the disc.
• When you record through the microphones,
the various sounds made by the recorder may
also be recorded.
• The built-in microphones do not operate
whenever an optional microphone is
connected into the MIC (PLUG IN POWER)
jack on the recorder.
13-GB
Page 14
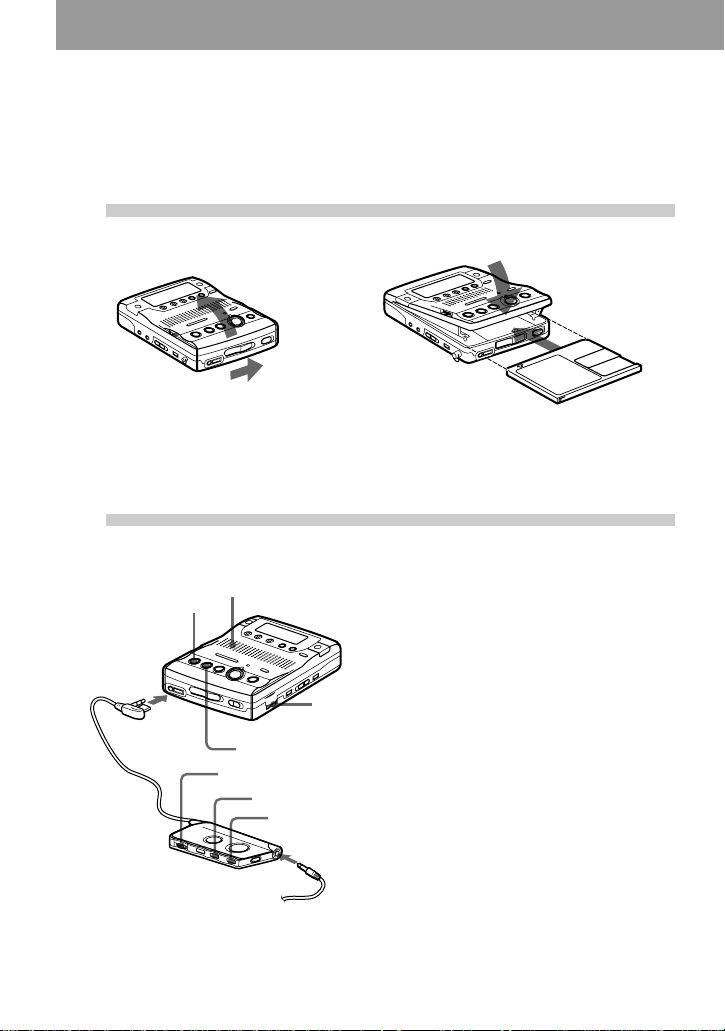
Playing an MD right away!
You can play recordable MDs or premastered MDs. Sound output
from the built-in speaker is monaural, but stereo listening is possible
through the supplied headphones with a remote control.
1
Insert an MD.
1 Slide OPEN to open the lid. 2 Insert an MD with the label side facing
up, and press down on the lid (at the
center of the front edge as shown
above) to close it firmly.
2
Play an MD.
xSTOP
speaker
1 Press NPLAY.
2 Turn VOL to adjust the volume.
Connect
firmly to i
VOL
NPLAY
VOL
>N
x
Connect firmly to i
The volume will be shown in the
display.
To stop play, press xSTOP.
Playback starts from the point you last stopped
playing. To start playback from the beginning
of the disc, press NPLAY for 2 seconds or
more on the recorder, or press >N for 2
seconds or more on the remote control.
After you press the
recorder, the recorder will automatically turn
off after about 10 seconds (when using an
alkaline dry battery), or 5 minutes (when using
the AC power adaptor).
On the remote control, use the >N button
to start playback, the xSTOP button to stop the
recorder, and the VOL control to adjust the
volume. If you are using the remote control,
you will hear short beeps whenever you press
the >N button, and a long beep whenever
you press the xSTOP button.
xSTOP button to stop the
14-GB
Page 15

To listen in stereo
Connect the supplied headphones with a remote control to the i jack on the recorder.
To Operation on the recorder Operation on the remote
control (Beeps in the
headphones)
Find the beginning of
the current track or a
previous track
1)
Press .REVIEW/AMS.
Press .REVIEW/AMS
repeatedly until you reach the
beginning of the desired track.
Find the beginning of
the next track
2)
Press >CUE/AMS. Press >N. (Two short
Pause Press XPAUS E . P re s s
XPAUSE again to resume
play.
Go backwards while
playing
Go forward while
playing
Remove the MD Press xSTOP and open the
1)
If you press .REVIEW/AMS during the first track of the disc, the recorder goes to the beginning
of the last track on the disc.
2)
If you press >CUE/AMS during the last track of the disc, the recorder goes to the beginning of the
first track on the disc.
3)
Once you open the lid, the point to start play will change to the beginning of the first track.
Press and hold .REVIEW/
AMS.
Press and hold >CUE/
AMS.
3)
lid.
Press .. (Three short beeps)
Press . repeatedly until you
reach the beginning of the
desired track.
beeps)
Press X on the remote control.
(Continuous short beeps) Press
X again to resume play.
Press and hold ..
Press and hold >N.
Press x. (One short beep)
If the play does not start
Make sure the recorder is not locked (pages 9
and 41).
To locate a point quickly
Use the EASY SEARCH +/– buttons (page 28).
z
Playback will switch automatically between
stereo and monaural according to the sound
source.
Notes
• The sound may skip during playback when the
recorder is exposed to continuous vibration,
such as while jogging.
• If the power supply is disrupted (i.e. the
batteries are removed or become exhausted or
the optional AC power adaptor is
disconnected) when the recorder is operating,
the lid may not open until the power is
restored.
15-GB
Page 16
Various ways of recording
Recording for long
times
Select each recording mode according to
the recording time that you want.
Stereo recording is possible at 2 times
(LP2) or 4 times (LP4) the normal
(stereo) recording time. Monaural
recording at 2 times normal recording
speed is also possible.
MDs recorded in monaural, LP2
stereo, or LP4 stereo mode can be
played back only on MD players or
recorders with monaural, LP2
stereo, or LP4 stereo playback
mode.
REC MODE
zREC
1 Insert a recordable disc.
2 Press REC MODE repeatedly until
desired recording mode lights up in
the display.
Each time you press the button, A
changes as follows.
Recording
mode
A Recording
1)
time
3)
LP2 stereo LP2 approx. 160
min.
LP4 stereo LP4 approx. 320
min.
Monaural
2)
MONO approx. 160
min.
1)
For better sound quality, record in normal
stereo or LP2 stereo mode.
2)
If you record a stereo source in monaural, the
sounds from left and right will be mixed.
3)
When using an 80-minute recordable MD
3 Press zREC.
For other operations on recording, see
“Recording an MD right away!”
(page 11).
To stop recording, press x.
The recorder switches back to stereo
recording when you record the next time.
z
• Audio components that support the LP2 stereo
or LP4 stereo modes are indicated by the
or logo marks.
• The recording mode can be changed during
recording pause. When you change the
recording mode, a track mark is automatically
added at that point.
007
30:03
Recording
mode
Stereo STEREO approx. 80
A Recording
1)
16-GB
A
time
min.
3)
Page 17
Notes
• “LP:” will be added at the beginning of the
track name of a track recorded in MDLP
mode.
• It is recommended that you use the supplied
AC power adaptor for long recordings.
• During monaural recording of a stereo sound
source connected through the digital (optical)
input jack, you can still monitor the recorded
sound in stereo by using headphones or
earphones connected to the i/LINE OUT
jack.
• When you record in LP4 mode, momentary
noise may be produced on very rare occasions
with certain sound sources. This is because of
the special digital audio compression
technology that enables a recording time 4
times longer than normal. If noise is produced,
it is recommended that you record in normal
stereo or LP2 mode to obtain better sound
quality.
VOR (Voice Operated
Recording)
VOR causes the recorder to automatically
record when there is sound, and to pause
when there is no sound. This allows you
to record without troublesome button
operations.
built-in
built-in
microphones
MIC SENS
zREC
VOR
indicator
microphones
REC
MODE
VOR
1 Insert a recordable disc and slide MIC
SENS to H (high) or L (low).
2 Press REC MODE repeatedly until
“STEREO”, “LP2”, “LP4”, or
“MONO” lights up in the display.
For details on the recording mode, see
“Recording for long times” (page 16).
3 Press zREC.
4 Press VOR.
VOR turns on.
“VOR” appears in the display and the
VOR indicator lights up when the
recorder is recording. Both “VOR”
and the VOR indicator flash when the
recorder is not recording.
To cancel VOR while recording
Press VOR again.
“VOR” and the VOR indicator goes off
and the recorder changes to normal
recording mode.
z
• VOR automatically turns off when you press
the xSTOP button to stop recording.
• You can change the recording mode when
VOR is on and the recorder is not recording
(while “VOR” and VOR indicator flash). A
track mark is added each time you press the
REC MODE button.
Notes
• You cannot record with the built-in
microphones while an optional microphone is
connected to the MIC (PLUG IN POWER)
jack or an optical cable (not supplied) is
connected to the LINE IN (OPTICAL) jack.
• VOR is sensitive to the surrounding sound
conditions. Set the MIC SENS switch to H or
L to suit the conditions. If you cannot get the
desired recording results, cancel VOR and
record in manual mode.
• Power from the batteries is consumed as long
as VOR is on, even when recording is not
taking place (i.e., when “VOR” and the VOR
indicator flash.)
17-GB
Page 18
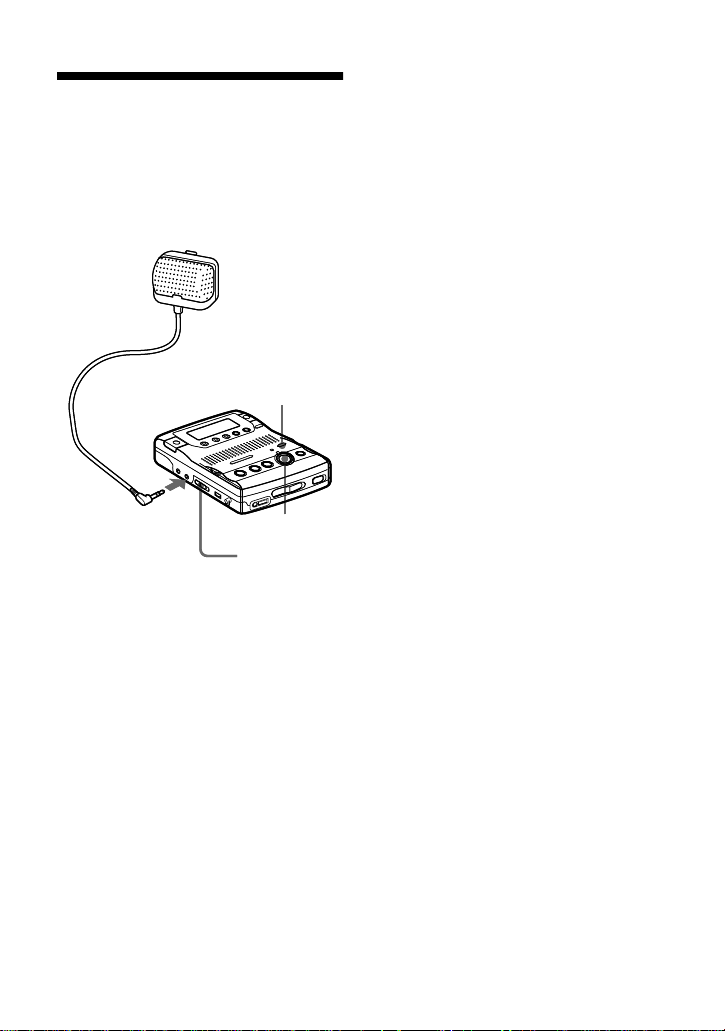
Recording from a
microphone
Connect a stereo microphone (ECM-717,
etc.; not supplied) to the MIC (PLUG IN
POWER) jack. The recorder input
automatically switches to the externally
connected microphone input.
Stereo
microphone
(not supplied)
REC MODE
to MIC (PLUG IN
POWER)
zREC
MIC SENS
1 Insert a recordable disc and slide MIC
SENS to H (high) or L (low).
2 Press REC MODE repeatedly until
“STEREO”, “LP2”, “LP4”, or
“MONO” lights up in the display.
For details on the recording mode, see
“Recording for long times” (page 16).
3 Press zREC.
For other operations on recording, see
“Recording an MD right away!”
(page 11).
z
When using a plug-in-power microphone, no
battery is needed for the microphone since
power is supplied by the recorder.
If you are using the optional stereo microphone
ECM-717, set the switch on the microphone to
OFF to allow the recorder to provide power to
the microphone. It is recommended that you set
the switch on the microphone to OFF during
use.
Notes
• You cannot record through the externally
connected microphone while an optical cable
is connected to the LINE IN (OPTICAL) jack.
The recorder automatically selects the
recorder input in the following order of
priority; optical input, externally connected
microphone input, analog (line) input, and
built-in microphones input.
• The microphone may pick up the operating
sound of the recorder itself (such as the sound
of the motor). Use the microphone away from
the recorder in such cases. Do not use a
microphone with a short connector, as this
may cause the operating sound of the recorder
to be picked up.
18-GB
Page 19

Recording from externally connected equipment
The input jack of this recorder works as both digital and analog input jacks. Connect the
recorder to a CD player or a cassette recorder using either digital (optical) input or analog
(line) input. To record, see “Recording with digital (optical) input (optical cable required)”
(page 20) to record using digital (optical) input and “Recording with analog (line) input
(line cable required)” (page 21) to record using analog (line) input.
LINE IN (OPTICAL) jack is for both digital and analog input.
The recorder automatically recognizes the type of line cable and switches to digital or analog input.
Difference between digital (optical) and analog (line) inputs
Difference Digital (optical) input Analog (line) input
Connectable
source
Usable cord Optical cable (with an optical or an
Signal from the
source
Recorded track
numbers
Recorded
sound level
Note
Track marks may be copied incorrectly:
• when you record from some CD players or multi disc players using digital (optical) input.
• when the source is in shuffle or program play mode while recording using digital (optical) input. In
this case, play the source in normal play mode.
• when recording BS or CS programs through digital (optical) input.
Equipment with an digital (optical)
output jack
Equipment with an analog
(line) output jack
Line cable (with 2 phono plugs
optical-mini plug)(page 20)
or a stereo-mini plug)(page 21)
Digital Analog
Even when a digital source
(such as a CD) is connected, the
signal sent to the recorder is
analog.
Marked (copied) automatically
• at the same positions as the source
(when the sound source is a CD or
an MD).
• after more than 2 seconds of blank
or low-level segment (with a sound
source other than a CD or an MD)
(page 53).
• when the recorder is paused while
Marked automatically
• after more than 2 seconds of
blank or low-level segment.
• when the recorder is paused
while recording.
You can erase unnecessary
marks after recording (“Erasing
a track mark”, page 33).
recording (the recorder pauses
automatically when it encounters a
section with no audio signal for 3
seconds or more) (page 53).
You can erase unnecessary marks
after recording. (“Erasing a track
mark”, page 33).
Same as the source. Adjusted automatically.
19-GB
Page 20
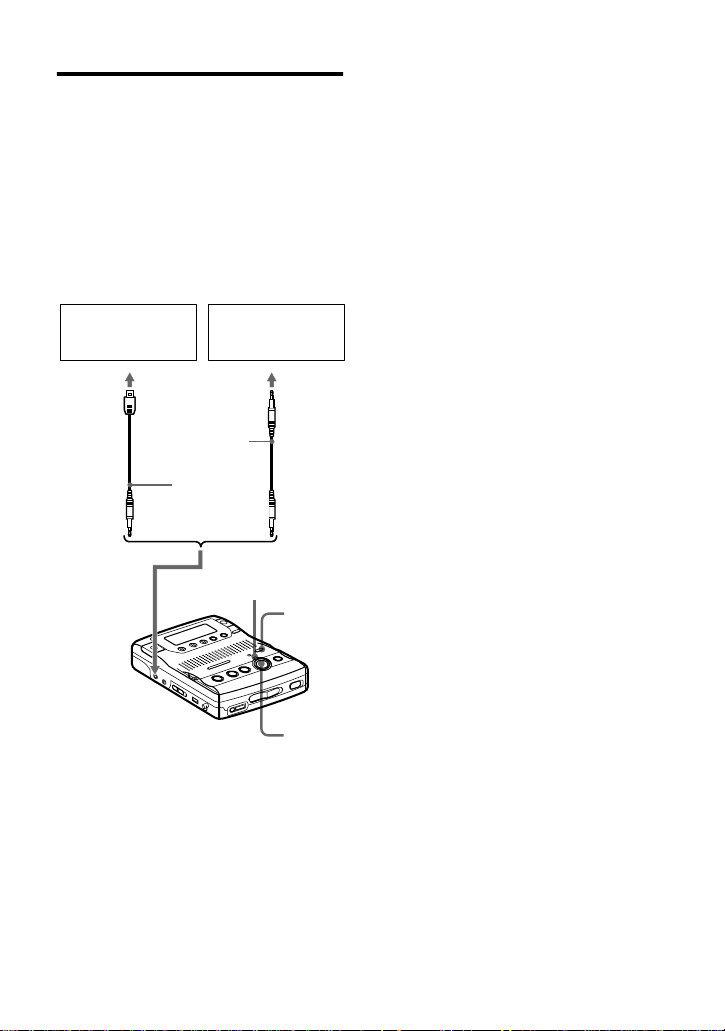
Recording with digital
(optical) input (optical cable
required)
Connect to a digital source using an
optical cable (not supplied) to make
digital recordings. Digital recording is
possible even from digital equipment with
different sampling rates, such as a DAT
deck or a BS tuner, using the built-in
sampling rate converter.
CD player, MD
player, digital
amplifier, etc.
Optical
plug
POC-15B etc.
(not supplied)
Portable CD
player, etc.
Optical
miniplug
POC-15AB etc.
(not supplied)
REC
indicator
REC
MODE
3 Press zREC.
“REC” appears in the display, the
REC indicator lights up, and the
recording starts.
4 Play the source sound.
For other operations on recording, see
“Recording an MD right away!”
(page 11).
z
When recording from digital media, track
marks in the original are copied automatically
to the MD.
Notes
• You can make a digital recording with an
optical cable only from an optical type output.
• When recording from a portable CD player,
play it on AC power and disable the anti-skip
function (such as ESP*).
• When recording from a portable CD player,
pause the CD player before doing the
recording procedure.
• Digital output may be disabled on some
portable CD players when the AC power
adaptor is not connected to the player.
• A track mark is added at the point where you
press the XPAUSE button again to resume
recording while pausing recording; thus the
remainder of the track will be counted as a
new track.
∗ Electronic Shock Protection
to LINE IN
(OPTICAL)
1 Insert a recordable disc.
2 Press REC MODE repeatedly until
“STEREO”, “LP2”, “LP4”, or
“MONO” lights up in the display.
For details on the recording mode, see
“Recording for long times” (page 16).
20-GB
zREC
Page 21

Recording with analog (line)
input (line cable required)
Connect the recorder with a line cable
(not supplied) to make analog recording.
The sound will be sent from the
connected equipment as analog signal but
will be sent recorded digitally on the disc.
CD player,
cassette recorder,
etc.(source)
to LINE OUT
L (white)
to LINE IN
(OPTICAL)
∗ Use the connecting cords without an
attenuator. To connect to a portable CD
player having a stereo mini-jack, use the
RK-G136HG connecting cord (not
supplied).
R (red)
Line cable (RK-G129HG,
not supplied)*
REC
indicator
REC
MODE
zREC
3 Press zREC.
“REC” appears in the display, the
REC indicator lights up, and the
recording starts.
4 Play the source sound.
For other operations on recording, see
“Recording an MD right away!”
(page 11).
Note
A track mark is added at the point where you
press the XPAUSE button again to resume
recording while pausing recording; thus the
remainder of the track will be counted as a new
track.
1 Insert a recordable disc.
2 Press REC MODE repeatedly until
“STEREO”, “LP2”, “LP4”, or
“MONO” lights up in the display.
For details on the recording mode, see
“Recording for long times” (page 16).
21-GB
Page 22
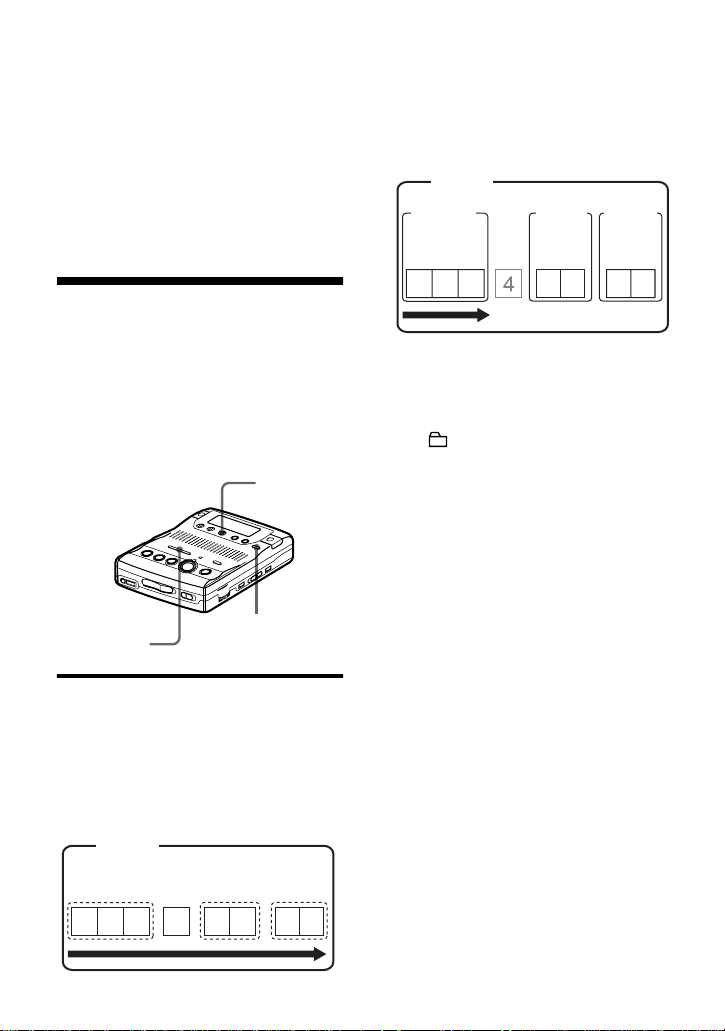
Recording tracks using
the Group Function
(Group mode recording)
GROUP
./>
zREC
What is the group function
(group mode)?
It is a function that allows you to separate
tracks on a disc into different groups for
playback, recording and editing.
When the Group mode is OFF.
Disc
Track number
123456789
When the Group mode is ON.
Disc
Group 1
Track
number
123
It is convenient for managing multiple
CD albums recorded in MDLP (LP2
stereo/LP4 stereo) mode onto a single
MD.
Group 2
Trac k
number
12
Group 3
Trac k
number
1234
How is group information
recorded?
When recording in group mode, the group
information is written to the disc name
recording area.
This information consists of text strings
that are written as shown in the following
example.
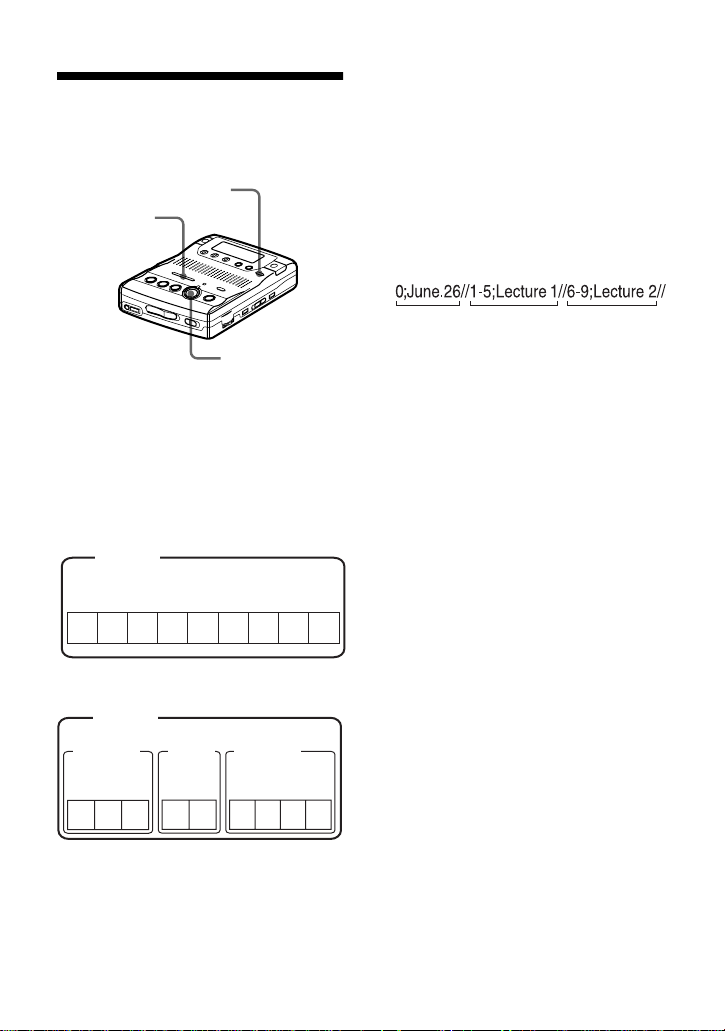
Disc name recording area
Example
123
1 Disc name: “June.26”
2 Group name for tracks 1 to 5:
“Lecture 1”
3 Group name for tracks 6 to 9:
“Lecture 2”
Therefore, the above character string is
displayed in its entirety as the disc name
if you load an MD recorded in group
mode into a system that does not support
group mode, or if you try to edit the
contents of a disc on this recorder with the
group mode turned off.
Note that if you perform the
procedure for “To relabel
recordings” of “Labeling
recordings” (page 35) and rewrite
this character string by mistake,
you may be unable to use the
group function of that MD.
Note
In group mode, the recorder treats all tracks
without group settings as belonging to the last
group on the disc. The last group is indicated in
the display window on the recorder as “Group -
-”. Within a group, the tracks appear in their
order on the disc, not their order within the
group.
22-GB
Page 23

To activate the group mode
(Group mode recording)
To record tracks in group mode, you must
first turn the group mode on before the
start of recording.
1 Press GROUP for 2 seconds or more.
“ ” lights up in the display and the
group mode turns on.
To cancel the group mode, press
GROUP for 2 seconds or more again.
Note
The group function setting will be canceled
when you eject the MD.
Recording a track into a new
group
1 While the recorder is stopped, press
GROUP for 2 seconds or more.
“ ” lights up in the display and the
group mode turns on.
2 Press zREC.
3 Play the source sound.
To stop recording, press x.
The material that was recorded up until x
was pressed is entered as a new group.
To record a track into another
new group.
Turn the group mode off, and then follow
steps 1 to 3
Recording a track into an
existing group
1 While the recorder is stopped, press
GROUP for 2 seconds or more.
“ ” lights up in the display and the
group mode turns on.
2 Press GROUP slightly.
“ ” flashes in the display and you
can select a group directly (group
skip mode) (page 31).
3 Within 5 seconds, press
.REVIEW/AMS or >CUE/
AMS repeatedly until the group you
want the track to belong to appears.
4 Press zREC.
5 Play the source sound.
Note
The group skip mode turns off automatically in
step 3 if nothing is done within 5 seconds. To
continue the procedure, do step 2 again.
z
• The track will be added at the end of the
group.
• For details on the group skip mode, see page
31.
• To add a track that is playing to a group, stop
playing the track first, and then do the
procedure from step 4.
• If you select “Group --” in step 2, the recorded
material will be automatically stored as
“Group01”.
23-GB
Page 24
To start/stop recording
in sync with the source
player
(Synchro-recording)
You can easily make digital recordings of
a digital source on an MD.
Before synchro-recording, make
connections to the digital source with a
digital cable, and insert a recordable MD.
CD players,
etc.
REC MODE
zREC
SYNCHRO REC
1 Press REC MODE repeatedly until
“STEREO”, “LP2”, “LP4”, or
“MONO” lights up in the display.
For details on the recording mode, see
“Recording for long times” (page 16).
2 Slide SYNCHRO REC to ON.
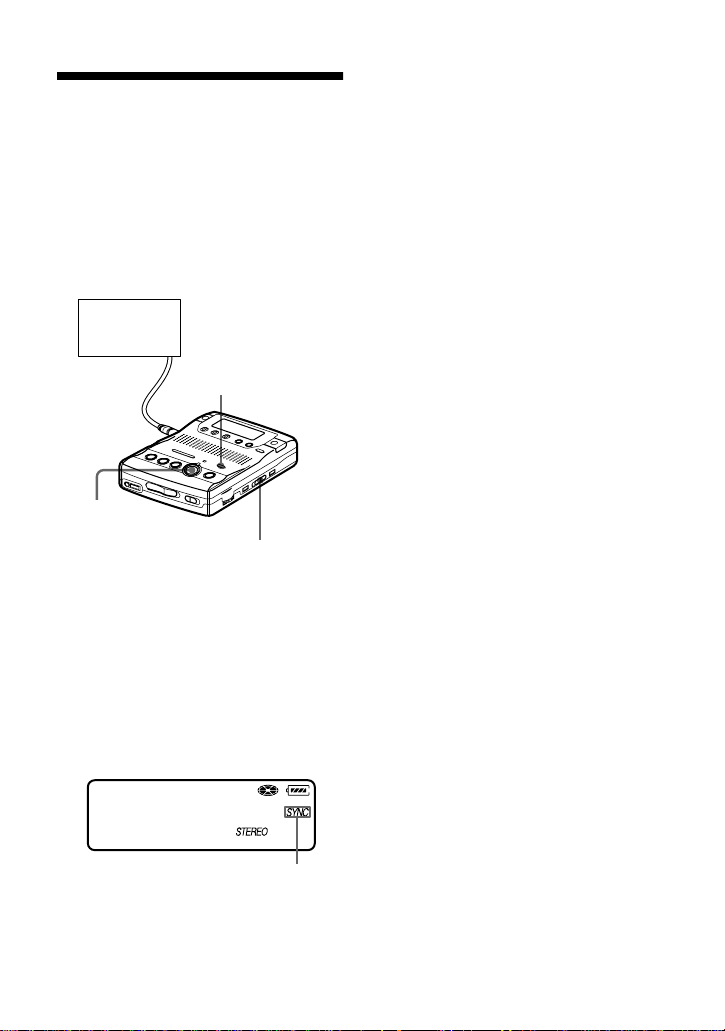
“SYNC” appears in the display.
007
30:03
Synchro-recording indication
3 Press zREC.
The recorder stands by for recording.
4 Play the source sound.
The recorder starts recording when it
receives the playing sound.
To stop recording
Press xSTOP.
z
• You cannot pause manually during synchrorecording.
• When there is no sound from the player for
more than 3 seconds during synchrorecording, the recorder goes into the standby
mode automatically (page 53). When the
sound comes from the player again, the
recorder resumes synchro-recording. If the
recorder is kept in the standby mode for 5
minutes or longer, the recorder stops
automatically.
Notes
• Do not switch the SYNCHRO REC switch
after step 3. Recording may not be done
properly.
• The recording mode setting (stereo, LP2
stereo, LP4 stereo, or monaural) cannot be
changed during synchro-recording.
• Even when there is no recorded sound on the
sound source (page 53), there may be cases
when recording does not pause automatically
during synchro-recording due to the noise
level emitted from the sound source.
• If a silent portion is encountered for 2 seconds
or more during synchro-recording, a new track
mark is automatically added at the point
where the silent portion ends (page 53).
• Synchro-recording cannot be done if the
connecting cord is not an optical cable, or if
the cable is connected to the MIC (PLUG IN
POWER) jack.
• You cannot change the recording mode during
recording.
24-GB
“SYNC” doesn’t appear if optical
cable is not connected to the LINE IN
(OPTICAL) jack on the recorder.
Page 25
Setting the clock to
stamp the recorded
time
To stamp the date and time on the MD
when you record, you first need to set the
clock.
./>
xSTOP
CLOCK SET
NPLAY
(bottom)
1 Press CLOCK SET at the button of
the recorder.
Use a pointed object.
The digits of the year flash.
01y 1m 1d
12:00am
Clock
If you make a mistake while
setting the clock
Press xSTOP, and set the clock again
from step 1. You can skip a step by
pressing NPLAY.
To display the current time
When the recorder is not operating or
while recording, press DISPLAY
repeatedly until the current time appears
in the display.
To display the time in the 24hour system
While setting the clock, press XPAU SE .
To display the time in the 12-hour system,
press XPAUSE again.
z
You can also use the SPEED CONTROL dial to
set the clock. Turn the dial instead of ./>
in step 2, and press the dial instead of NPLAY
in step 3.
Notes
• Make sure the time is correctly set if you want
the time stamp to be accurately recorded for
an important recording.
• Under normal conditions, the clock may vary
by about plus or minus 2 minutes per month.
2 Change the current year by pressing
. or >.
To change the digits rapidly, keep
pressing . or >.
3 Press NPLAY to enter the year.
The digit of the month flashes.
4 Repeat step 2 and 3 to enter the
current month, date, hour, and
minute.
When you press NPLAY to enter
the minute, the clock starts operating.
25-GB
Page 26
Checking the remaining
time or the recording
position
You can check the remaining time, track
number, etc. when recording or during
stop.
Items related to the group function appear
when you play and then stop a track with
group settings.
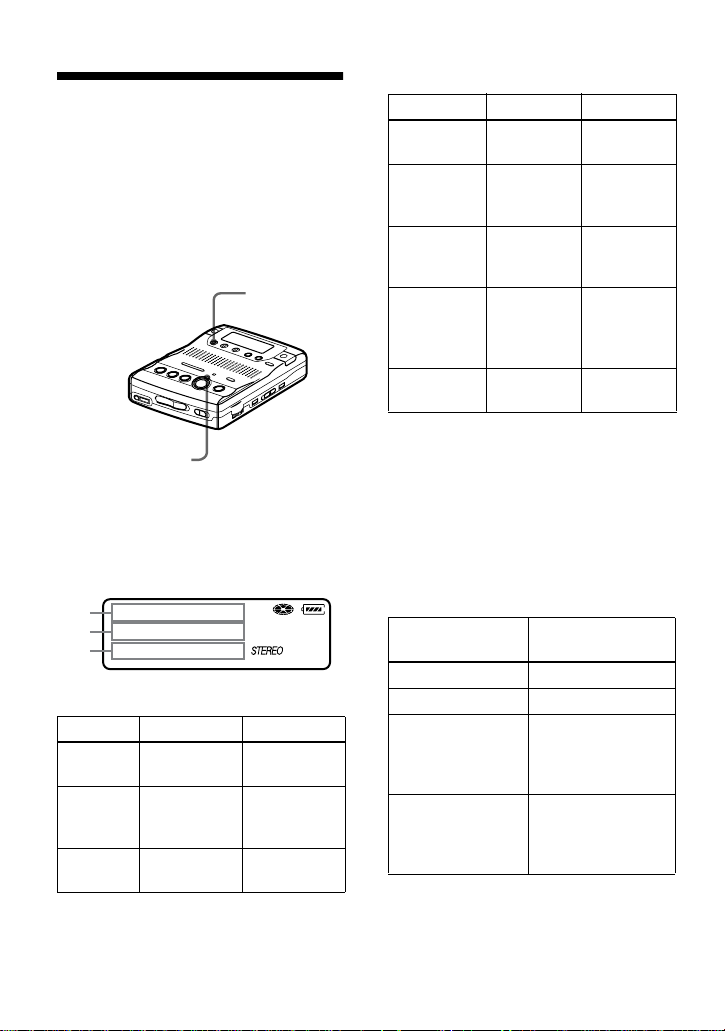
DISPLAY
REC indicator
1 Press DISPLAY while the recorder is
recording or stopped.
Each time you press the button, the
display changes as follows.
A
B
C
While recording
AB C
Track
number
Track
number
Current
date
Elapsed time —
Remaining
time for
recording
Current time Clock
RecRemain
In stop mode
ABC
Track
number
Track name Remaining
Group name Remaining
Disc name Remaining
Current date Current
Note
Items may appear differently or may not be
selectable, depending on the group mode’s on/
off status, the recorder’s operating status, or the
recorder settings.
To know the recording
condition
The REC indicator lights up or flashes
according to the recording condition.
Recording
condition
While recording lights up
Recording standby flashes
Less than 3
minutes’
recording time
available
A track mark has
been added (when
controlling by the
recorder only)
z
If you want to check the playing position or
track name while playing, see page 29.
Elapsed
time
time for
recording
time in the
group
time after
the current
location
time
REC indicator
flashes slowly
goes off
momentarily
—
RecRemain
GP Remain
AllRemain
Clock
26-GB
Page 27
Various ways of playback
Changing the sound
setting
You can select your desired sound when
playing.
This function is effective when
using the supplied headphones to
listen to stereo recordings.
SOUND
SOUND
1 Press SOUND repeatedly.
Each time you press the button, A
changes as follows.
A
1)
During stereo playback, the Voice Up function
emphasizes the left-right orientation of
individual voices, making them easier to
distinguish and hear. You cannot use the Voice
Up function when monaural recording.
To cancel the sound setting
Press SOUND repeatedly until nothing
appears in the display
Notes
• The use of the Voice Up function is not
recommended when playing a music disc.
• You cannot set the Voice Up function on
monaural recording.
• If sound distortion occurs when you turn the
volume up while “SOUND 1” or “SOUND 2”,
turn the volume down again or change the
play mode.
• The setting of “SOUND 1” or “SOUND 2”
does not affect the sound being recorded.
.
003
20:51
A Sound setting
— (none) Factory setting
SOUND 1 Strong bass
SOUND 2 Stronger bass
1)
V- UP
(Digital Mega Bass 1)
(Digital Mega Bass 2)
Enhancing voice clarity
(Voice Up function)
27-GB
Page 28
Finding a point quickly
)
(Easy Search)
Use the Easy Search function to find a
particular point quickly.
EASY SEARCH +/–
1 Press EASY SEARCH + or – while
the recorder is playing or stopped.
Each press of the + button moves the
playback point ahead by about one
minute. Each press of the – button
moves the playback point back about
one minute.
003
02:31
+01
When the + button was pressed once.
(Playback position moves one minute ahead.
003
00:31
-01
When the – button was pressed once.
(Playback position moves one minute
behind.)
z
• The + and – buttons can be pressed up to 20
times each.
28-GB
• If you reach the beginning of the disc while
using the Easy Search function, the recorder
will start playing automatically. If you reach
the end of the disc while using the Easy
Search function, “END” will appear in the
display. If this happens, press the xSTOP
button to stop the recorder.
Changing the playback
speed (Speed Control)
The playback speed can be adjusted in 7
steps (80%, 85%, ...100%, 105%, 110%).
SPEED CONTROL
1 Turn the SPEED CONTROL dial
while the recorder is playing.
Each turn changes the playback
speed. Select your desired speed
while listening. “S” appears in the
display when playback speed is
changed.
SPEED
CONTROL
S----+--F
80% 100% 110%
Fast Playback indication
002
S 03:40
To switch to normal playback
Press the SPEED CONTROL dial.
To change the playback speed again, turn
the dial.
Page 29
z
You can pause or find track marks pressing the
XPAU SE , .REVIEW/AMS or >CUE/
AMS button during Fast Playback.
Playing tracks
repeatedly
You can play tracks repeatedly in two
ways — all repeat and single repeat.
PLAY MODE
1 Press PLAY MODE while the
recorder is playing.
Each time you press the button, the
play mode indication changes as
follows.
Checking the remaining
time or the playing
position
You can check the track name, disc name,
etc. during playback.
Items related to the group function appear
only when the recorder is playing a track
with group settings.
DISPLAY
1 Press DISPLAY while the recorder is
playing.
Each time you press the button, the
display changes as follows.
A
B
C
Play mode indication
003
20:51
Indication Play mode
— All the tracks are
1
z
You can specify the playback mode for a
selected group when the group mode is on. To
activate the group mode, see “Selecting and
playing groups (Group skip mode)” (page 31).
played once.
All the tracks are
played repeatedly.
A single track is
played repeatedly.
AB C
Track
number
Track
name
Group
name
Disc
name
Recorded
date
1)
The recording mode (page 16) of the track
appears momentaly after “RecDate”
disappears from the display.
Elapsed time — (none)
Remaining
time of the
current track
Remaining
time after the
current location
in the group
Remaining
time after the
current location
Recorded time RecDate
1 Remain
GP
Remain
AllRemain
1)
29-GB
Page 30
Note
Items may appear differently or may not be
selectable, depending on the group mode’s on/
off status, the recorder’s operating status, or the
recorder settings.
z
If you want to check the remaining time or the
recording position while recording or in stop
mode, see page 26.
Playback when the group mode is on:
Playback of the selected group starts with
the first track in the group, and stops with
the last track in the group.
Disc
Group 1
Trac k
number
Group 2
Track
number
Group 3
Track
number
Using the Group
Function (Group mode)
The recorder can operate various
playback with a disc which has group
setting. For more information on the
group mode, see “Recording tracks using
the Group Function (Group mode
recording)” (page 22).
EDIT/ENTER
./>
Listening to tracks using the
group mode (group mode
playback)
Playback when the group mode is off:
Playback starts with the first track in the
disc, and stops with the last track in the
disc.
Disc
Track number
123
4
GROUP
56
78
123
12
12
1 Insert a disc which has group settings
into the recorder and play the disc.
2 Press GROUP for 2 seconds or more.
“ ” and “GROUP ON” light in the
display up and the group mode turns
on.
Playback stops at the end of the last
track in the selected group.
For details on selecting another
group, see “Selecting and playing
groups (Group skip mode)”
(page 31).
z
You can also play the tracks repeatedly in the
selected group. After the procedures here,
follow the steps of “Playing tracks repeatedly”
(page 29).
To turn off the Group function
Press GROUP for 2 seconds or more
again.
Note
In group mode, the recorder treats all tracks
without group settings as belonging to the last
group on the disc. The last group is indicated in
the display window on the recorder as “Group -
-”. Within a group, the tracks appear in their
order on the disc, not their order within the
group.
30-GB
Page 31

Selecting and playing groups
(Group skip mode)
When playing a disc with group settings,
the group skip mode allows you to jump
from the currently playing group to any
other group on the MD. The group skip
mode can be used at any time during
playback, regardless of whether the player
is in group mode on or not.
When the group mode is off:
Disc
Track number
z
The group skip mode operates regardless of
whether the group mode is on or off.
Notes
• If no operation is performed within 5 seconds
after step 1, the group skip mode will be
canceled and you will not be able to perform
step 2 thereafter. To continue with step 1 at
this point, repeat from the beginning of the
procedure.
• The group skip mode cannot be used with a
disc that has no group settings.
123
Skip
When the group mode is on:
Disc
Group 1
Track
number
123
Skip Skip Skip
56
Group 2
Track
number
12
78
Skip Skip
Group 3
Track
number
12
4
1 Insert a disc which has group settings
into the recorder and play the disc,
and then press GROUP slightly.
“ ” flashes in the display and the
group skip mode turns on.
2 Within 5 seconds, press
.REVIEW/AMS/>CUE/AMS
until your desired group appears, and
then press EDIT/ENTER.
The recorder starts playing from the
first track in the group.
31-GB
Page 32

Editing recorded tracks
You can edit your recordings by adding/
erasing track marks or labeling tracks and
MDs. Premastered MDs cannot be edited.
Notes on editing
• You cannot edit tracks on an MD that is
record-protected. Before editing tracks, close
the tab on the side of the MD (page 54).
• If you perform an editing operation while
playing, be sure not to turn the power off until
“TOC Edit” disappears in the display.
• Do not move or jog the recorder while “TOC
Edit”* is flashing in the display.
• The lid will not open until “TOC Edit”
disappears in the display after editing.
• When the group mode is on, editing can be
performed only for the tracks registered into
the selected group.
∗ TOC = Table of Contents
Adding a track mark
You can add two kinds of track marks:
regular track marks and special track
marks. A total of 254 track marks can be
added on one disc.
Track marking to divide a
recording
You can add track marks so that the part
after the new track mark is counted as a
new track.
The track numbers will increase as
follows.
1 3 42
Track marking
231 4 5
Track numbers increase
1 While recording, playing or pausing
an MD, press TRACK MARK at the
point you want to mark.
“MARK ON” appears in the display,
and a track mark is added. The track
number will increase by one.
Track marking important
points
While recording, not only can you add
regular track marks, you can also add
special track marks (“TT”), to mark the
position of important points.
32-GB
TRACK MARK
TRACK MARK
321 4 5678
Regular track
marks
Special track
marks
1 Press TRACK MARK on the remote
for 2 seconds or more at the desired
point while recording.
A special track mark is added and the
track number will increase by one.
“!MARK ON!” appears in the display
and “TT” is automatically added at
the beginning of a track name.
Page 33

Note
Make sure to press the TRACK MARK button
for 2 seconds or more, if not, a regular track
mark will be added.
To locate special track marks
during playback
While pressing down VOR, momentarily
press .REVIEW/AMS or >CUE/
AMS.
The track number appears after the
special track mark indication (“TT”).
002
00:40
:TT
Special track mark indication
Press .REVIEW/AMS repeatedly to
go to previous special track marks. Press
>CUE/AMS repeatedly to go to
succeeding special track marks.
To change a regular track
mark to a special track mark
After the completion of recording, add
“TT” at the beginning of the name of the
track you want to change.
To change a special track
mark to a regular track mark
After the completion of recording, erase
“TT” at the beginning of the track name
or change the name of the track.
Erasing a track mark
When you erase a regular track mark or a
special track mark, the track numbers will
change as follows.
Example
When combining track 2 and track 3
1 3 42
Erase a track mark
1 32
Track numbers decrease
.REVIEW/AMS
TRACK MARKXPAUSE
1 While playing the track with the track
mark you want to erase, press
XPAUSE to pause.
To erase the third track mark, play the
third track and press XPAU SE .
2 Find the track mark by pressing
.REVIEW/AMS slightly.
Find the beginning of the third track.
“00:00” appears in the display.
“MARK” appears in the display for 2
seconds.
3 Press TRACK MARK to erase the
mark.
“MARK OFF” appears in the display.
The track mark is erased and the two
tracks are combined.
33-GB
Page 34

z
When you erase a track mark, the date, time,
and name assigned to the mark are also erased.
Notes
• When you erase a track mark between the two
consecutive tracks that are registered to
different groups, the second track is reregistered into the group containing the first
track. In addition, if you combine a track that
is registered to a group with a track that is not
(consecutive tracks), the second track takes
the same registration setting as the first track.
For example, if the first track is registered to a
group, the second track will be registered to
the same group as the first track.
• You cannot erase track marks according to the
system limitations. For details, see “System
limitations” (page 49).
Labeling recordings
You can name tracks during playback,
discs during stop, and both during
recording. Each name can be as long as
200 letters.
Each disc can hold up to 1700
alphanumeric letters during playback or
stop.
You can enter about 500 alphanumeric
characters and symbols during the
recording of each track.
Available characters
• Capital and small letters of the English
alphabet
• Numbers 0 to 9
" # $ % & ( ) * . ; < = > ?
• !
@ _ ` + – ' , / : _ (space)
Notes
• “NAME FULL” appears when you try to enter
more than 1,700 characters on a disc. Enter a
shorter name for the track, group, or disc, or
delete “LP:” from the track name recorded in
MDLP mode.
34-GB
• When labeling a disc which has been recorded
using the group function, be sure to turn the
group function on to avoid misoverwrite the
group information.
• If you enter the symbol “//” between the
characters in disc names such as “abc//def”,
you may be unable to use the group function.
PLAY MODE
DISPLAY
./>
xSTOP
N
EDIT/
ENTER
EASY
SEARCH
+/–
TRACK MARK
X
Labeling a disc during stop
To label a disc that contains group
settings, you must turn the group mode on
before doing the labeling procedure
(page 23).
1 Insert a disc.
When a disc is already inserted, make
sure the recorder is stopped.
2 Press EDIT/ENTER.
“ : Name” flashes in the display.
3 Press EDIT/ENTER again.
The disc is ready to be labeled.
4 Press . or > repeatedly to
select a letter and press N to enter.
The selected letter stops flashing and
the cursor moves to the next input
position.
Press/Turn Functions
X To switch between
capital letters, small
letters, and marks /
numbers.
Page 35

Press/Turn Functions
./> To change the letter to
SPEED
CONTROL
EASY
SEARCH +/–
DISPLAY To insert a blank space
PLAY MODE To delete a letter and
xSTOP Cancel labeling.
the one before / next
one.
To move the cursor to
the right (Press
slightly)
To enter the phrase
(Press 1.5 seconds or
more)
To select a letter
(Turn)
To move the cursor to
the left or right.
to type in a new letter.
move back all
following letters to the
left.
5 Repeat step 4 and enter all characters
of the label name.
6 Press EDIT/ENTER.
The track or disc is labeled.
Labeling a track during
playback
1 To label a track, insert a disc and play
the track you want to label.
To label a group, insert a disc, turn the
group mode on, and play the group
you want to label (page 30).
2 Press EDIT/ENTER.
The recorder plays the selected track
repeatedly.
3 To label a track, press EDIT/ENTER
while “ : Name” is flashing.
To label a group, press . or >
repeatedly until “ : Name” flashes
in the display, and then press EDIT/
ENTER.
The track or group is ready to be
labeled.
4 Follow steps 4 to 6 of “Labeling a
disc during stop”.
Labeling a track or a disc
during recording
To label a group, you must first turn the
group mode on before the start of
recording (page 23).
1 While recording, press EDIT/
ENTER.
“ : Name” flashes in the display.
2 To label a track, press EDIT/ENTER
while “ : Name” is flashing.
To label a group, press . or >
repeatedly until “ : Name” flashes
in the display, then press EDIT/
ENTER.
To label a disc, press . or >
repeatedly until “ : Name”
flashes in the display, then press
EDIT/ENTER.
The track, group, or disc is ready to
be labeled.
3 Follow steps 4 to 6 of “Labeling a
disc during stop”.
To cancel labeling
Press xSTOP.
To relabel recordings
Follow the steps corresponding to the
labeling method until the track, group, or
disc is ready to be labeled. Enter a new
character over the one you want to
change, then press the EDIT/ENTER
button.
35-GB
Page 36

z
You can also use the SPEED CONTROL dial to
select and then enter the menu. Turn the dial
(instead of ./>) to show the menu items
one by one and press the dial (instead of EDIT/
ENTER) to enter the selected menu.
Notes
• “LP:” has been added at the beginning of the
track name of the track recorded in MDLP
mode.
• When the recording is stopped while labeling
a track or a disc during recording, or when the
playback moves on to the next track while
labeling a track, the input at that point is
entered automatically.
• When recording through the built-in
microphones, the sound of the recorder
operations, such as the pressing of buttons,
will also be recorded. To avoid this, it is
recommended to label a disc or a track after
completing the recording.
• You cannot relabel parametrized MDs or label
MDs that have not been recorded.
• The recorder is able to display, but cannot
label using Japanese “Katakana” characters.
• The recorder cannot rewrite a disc or track
name of more than 200 letters that was created
by another device.
Registering tracks or
groups as a new group
(Group setting)
Do the following procedure to register
tracks (or groups). A series of tracks (or
groups) can be registered by selecting the
starting and ending tracks (or groups).
The tracks (or groups) must, however, be
sequential. If the desired tracks (or
groups) are not consecutive, you must
move them to make them consecutive
before you can register them (“Moving
recorded tracks”, page 38). This function
can be used at any time, whether group
mode is on or off.
Group
Group
123456789
Making a new
group with
tracks 1 to 3.
Group
Making a new group
with 2 groups.
Group
123456789
• Registration of non-consecutive tracks
is not possible (for example, the 1, 3, 2,
4, 3, 5, 6, 6, 8 and then 9).
• Tracks always appear according to their
order on the disc, not their order within
the group (even when group mode is
on).
./>
EDIT/
ENTER
36-GB
1 While the recorder is stopped, press
EDIT/ENTER.
Page 37

2 Press . or > repeatedly until
“ : Set” flashes in the display, and
then press EDIT/ENTER.
“001” flashes in the display.
STR:001
END:001
:
3 Press . or > repeatedly until
the number or name of the desired
first track flashes in the display, and
then press EDIT/ENTER.
This selects the first track of the new
group.
Even when the group mode is on,
track numbers appear according to
their order on the disc, not their order
within the group.
4 Press . or > repeatedly until
the number or name of the desired
last track flashes in the display, and
then press EDIT/ENTER.
This selects the last track of the new
group.
5 Follow steps 4 to 6 of “Labeling
recordings” (page 34) to label a
group.
z
You can also use the SPEED CONTROL dial to
select and then enter the menu. Turn the dial
(instead of ./>) to show the menu items
one by one and press the dial (instead of EDIT/
ENTER) to enter the selected menu.
Notes
• In step 3, the first track must either be the first
track of an existing group or a track that does
not belong to a group.
• When selecting the last track in step 4, make
sure the track comes after the one selected in
step 3. The last track must either be the last
track of an existing group or a track that does
not belong to a group.
To release a group
setting
./>
xSTOP
GROUP
EDIT/ENTER
1 Press GROUP for 2 seconds or more.
“ ” lights up in the display and the
group mode turns on.
2 Follow steps 1 and 2 of “Selecting
and playing groups (Group skip
mode)” (page 31) and check the
contents of the group you want to
release. Then press xSTOP.
3 Press EDIT/ENTER.
4 Press . or > repeatedly until
“ : Release” flashes in the display,
and press EDIT/ENTER.
“Release?” appears and
“PushENTER” flashes in the display.
5 Press EDIT/ENTER.
The group setting of the selected
group is released.
z
You can also use the SPEED CONTROL dial to
select and then enter the menu. Turn the dial
(instead of ./>) to show the menu items
one by one and press the dial (instead of EDIT/
ENTER) to enter the selected menu.
37-GB
Page 38

Moving recorded tracks
You can change the order of the recorded
tracks.
Example
Move track C from the third to the second
track.
Before moving
A C DB
5 Press EDIT/ENTER again.
The track moves to the selected
destination track.
To cancel moving
Press xSTOP.
z
You can also use the SPEED CONTROL dial to
select and then enter the menu. Turn the dial
(instead of ./>) to show the menu items
one by one and press the dial (instead of EDIT/
ENTER) to enter the selected menu.
A B DC
After moving
./>
TRACK MARK
EDIT/ENTER
1 While playing the track you want to
move, press EDIT/ENTER.
The recorder plays the selected track
repeatedly.
2 Press . or > repeatedly until
“ : Move” flashes in the display.
3 Press EDIT/ENTER again.
The selected track number or name of
the group that the selected track
belongs (when the group mode is
turned on) flashes in the display.
4 Press . or > repeatedly to
select the destination track number.
For the example above, “MV 003 t
002” appears in the display.
Moving a track to a
different group
./>
GROUP
EDIT/ENTER
1 Press GROUP for 2 seconds or more.
“ ” lights up in the display the
group mode turns on.
2 While playing the track you want to
move, press EDIT/ENTER.
The recorder plays the selected track
repeatedly.
3 Press . or > repeatedly until
“ : Move” flashes in the display,
and then press EDIT/ENTER.
4 Press . or > repeatedly until
the destination group flashes in the
display, and then press EDIT/
ENTER.
38-GB
Page 39

5 Press . or > repeatedly until
the number of the destination track
within the group flashes in the
display, and then press EDIT/
ENTER.
z
You can also use the SPEED CONTROL dial to
select and then enter the menu. Turn the dial
(instead of ./>) to show the menu items
one by one and press the dial (instead of EDIT/
ENTER) to enter the selected menu.
Changing the order of a
group on a disc (Group
move)
./>
EDIT/ENTER
z
You can also use the SPEED CONTROL dial to
select and then enter the menu. Turn the dial
(instead of ./>) to show the menu items
one by one and press the dial (instead of EDIT/
ENTER) to enter the selected menu.
Erasing tracks
To erase a track
Note that once a recording has
been erased, you cannot retrieve it.
Be sure to verify the contents of
the track you want to erase.
EDIT/ENTER
GROUP
1 Press GROUP for 2 seconds or more.
“ ” lights up in the display and the
group mode turns on.
2 While playing a track within a group
whose order you want to change,
press EDIT/ENTER.
3 Press . or > repeatedly until
“ : Move” flashes in the display,
and then press EDIT/ENTER.
You can now move the selected
group.
4 Press . or > repeatedly to
select the destination point on the
disc, and then press EDIT/ENTER.
ERASE
1 While playing the track you want to
erase, press ERASE.
“Erase OK?” and “PushENTER”
appear alternately in the display and
the recorder plays the selected track
repeatedly.
2 Press EDIT/ENTER.
The track is erased and the next track
starts to play. All the tracks after the
one erased are automatically
renumbered.
To cancel erasing
Press xSTOP.
39-GB
Page 40

To erase a small section of a
track
Pause playback at the point where you
want to start erasing. Then do steps 1 and
2.
To erase a part of a track
Add track marks at the beginning and the
end of the part you want to erase, then
erase the part.
To erase the whole disc
Note that once a recording has
been erased, you cannot retrieve it.
Be sure to verify the contents of
the disc you want to erase.
1 Play the disc you want to erase, verify
its contents, and then press xSTOP.
2 While the recorder is stopped, press
ERASE.
“All Erase?” and “PushENTER”
appear alternately in the display.
3 Press . or > repeatedly until
“ : Erase” flashes in the display,
and then press EDIT/ENTER.
Track name and “All Erase?” light up
and “PushENTER” flashes in the
display.
4 Press EDIT/ENTER.
“TOC Edit” flashes in the display,
and all the tracks will be erased.
When erasing is complete,
“BLANKDISC” appears in the
display.
To erase a group
Note that once a recording has
been erased, you cannot retrieve it.
Be sure to check the contents of
the group before you erase it.
1 Press GROUP for 2 seconds or more.
“ ” lights up in the display and the
group mode turns on.
2 Follow steps 1 and 2 of the procedure
described in “Selecting and playing
groups (Group skip mode)” (page 31)
to check the contents of the group you
want to erase. Then press xSTOP.
3 While the recorder is stopped, press
EDIT/ENTER, press . or >
repeatedly until “EDIT” flashes in the
display, and then press EDIT/ENTER
again.
4 Press . or > repeatedly until
“ : Erase” flashes in the display,
and then press EDIT/ENTER.
The group name and “GP Erase?”
appear and “PushENTER” flashes in
the display. To cancel erasing, press
CANCEL.
5 Press EDIT/ENTER again.
The group is erased.
z
You can also use the SPEED CONTROL dial to
select and then enter the menu. Turn the dial
(instead of ./>) to show the menu items
one by one and press the dial (instead of EDIT/
ENTER) to enter the selected menu.
To cancel erasing,
Press xSTOP.
40-GB
Page 41

Other operations
Adjusting the contrast
of the display window
(Contrast adjustment)
You can adjust the contrast of the display
window on the recorder.
./>
EDIT/
ENTER
1 While the recorder is stopped, press
EDIT/ENTER.
2 Press . or > repeatedly until
“CONTRAST” flashes in the display,
and then press EDIT/ENTER.
3 Press . or > repeatedly to
adjust the contrast, and then press
EDIT/ENTER.
z
You can also use the SPEED CONTROL dial to
select and then enter the menu. Turn the dial
(instead of ./>) to show the menu items
one by one and press the dial (instead of EDIT/
ENTER) to enter the selected menu.
Locking the controls
(HOLD)
To prevent the buttons from being
accidentally operated when you carry the
recorder, use this function.
HOLD
HOLD
1 Slide HOLD to the direction of the
..
On the recorder, slide HOLD to lock
the controls of the recorder. On the
remote control, slide HOLD to lock
the controls of the remote control.
Slide HOLD in the opposite direction
of the arrow to unlock the controls.
41-GB
Page 42

Power sources
You can power the recorder not only with
alkaline dry battery (not supplied) but also
with house current. You cannot, however,
use manganese dry battery.
When to replace the
batteries
You can check the battery condition with
the battery indication which is displayed
while using the player. The battery
indicator changes as the table below due
to the battery condition.
The battery level indicator is approximate.
Battery
indicator
t Battery power decreasing.
r
(flashing)
e
(flashing)
Condition
Weak battery.
The battery has gone out.
“LOW BATT” flashes in
the display on the remote
control, and the power
goes off.
4)
Measured in accordance with the JEITA
(Japan Electronics and Information
Technology Industries Association) standard.
When playing
1)
(Unit: approx.hours)(JEITA2))
Recording
Speaker
3)
Headphones
mode
Stereo 25.5 34.5
LP2 Stereo 27 39.5
LP4 Stereo 30 43
MONO 30 43
1)
When using a Sony LR6 (SG) “STAMINA”
alkaline dry battery (produced in Japan).
2)
Measured in accordance with the JEITA
(Japan Electronics and Information
Technology Industries Association) standard.
3)
When played using the built-in speaker.
4)
When played using headphones.
Notes
• Stop the recorder before replacing batteries.
• An optional AC power adaptor is
recommended for long recording.
4)
Battery life
When recording
1)
2)3)
(Unit: approx.hours)(JEITA4))
Recording mode Approx. hours
Stereo 9
LP2 Stereo 12.5
LP4 Stereo 15
MONO 12
1)
The battery life may be shorter due to
operating conditions and the temperature of
the location.
2)
When using a Sony LR6 (SG) “STAMINA”
alkaline dry battery (produced in Japan).
Recording time may differ according to the
alkaline batteries.
3)
When recorded with the built-in microphones.
42-GB
Page 43

Using house current
1 Connect the AC power adaptor AC-
E30HG (not supplied) to DC IN 3V.
2 Connect the AC power adaptor (not
supplied) to the wall outlet.
to wall outlet
to DC IN 3V
AC power
adaptor (not
supplied)
Notes
• For use in your house: Use the AC power
adaptor AC-E30HG (not supplied). Do not use
any other AC power adaptor since it may
cause the recorder to malfunction.
Polarity of the
plug
• There are regional differences in AC-E30HG
specifications. For this reason, you should
verify that the power requirements and plug
configuration are appropriate for your area
before you purchase the recorder.
• Make sure to connect the AC power adaptor to
a wall outlet that is within easy reach, and
disconnect it quickly if an unusual condition
arises.
43-GB
Page 44

Additional information
Precautions
On safety
Do not put any foreign objects in the DC IN 3V
jack.
On power sources
• Use LR6 (size AA) batteries, house current, or
car battery.
• The recorder is not disconnected from the AC
power source (mains) as long as it is
connected to the wall outlet, even if the
recorder itself has been turned off.
• If you are not going to use this recorder for a
long time, be sure to disconnect the power
supply (an optional AC power adaptor, dry
batteries, or car battery cord). To remove the
AC power adaptor (not supplied) from the
wall outlet, grasp the adaptor plug itself; never
pull the cord.
On heat build-up
Heat may build up in the recorder if it is used
for an extended period of time. In this case,
leave the recorder turned off until it cools down.
On installation
• Never use the recorder where it will be
subjected to extremes of light, temperature,
moisture or vibration.
• Never wrap the recorder in anything when it is
being used with the AC power adaptor (not
supplied). Heat build-up in the recorder may
cause malfunction or damage.
• Never carry the recorder together with a hard
object within the supplied carrying pouch.
Friction with the object may cause flacking or
scratching on the recorder’s painted surface.
On the headphones
Road safety
Do not use the headphones while driving,
cycling, or operating any motorized vehicle. It
may create a traffic hazard and is illegal in
many areas. It can also be potentially dangerous
to play your recorder at high volume while
walking, especially at pedestrian crossings. You
should exercise extreme caution or discontinue
use in potentially hazardous situations.
Preventing hearing damage
Avoid using he headphones at high volume.
Hearing experts advise against continuous, loud
and extended play. If you experience a ringing
in your ears, reduce the volume or discontinue
use.
Caring for others
Keep the volume at a moderate level. This will
allow you to hear outside sounds and to be
considerate of the people around you.
On the MiniDisc cartridge
• When carrying or storing the MiniDisc, keep
it in its case.
• Do not break open the shutter.
• Do not place the cartridge where it will be
subject to light, extreme temperatures,
moisture or dust.
• Attach the supplied MD label only in the
space designated for it on the disc. Do not
stick it on any other disc surface.
On cleaning
• Clean the recorder casing with a soft cloth
slightly moistened with water or a mild
detergent solution. Do not use any type of
abrasive pad, scouring powder or solvent such
as alcohol or benzene as it may mar the finish
of the casing.
• Wipe the disc cartridge with a dry cloth to
remove dirt.
• Dust on the lens may prevent the unit from
operating properly. Be sure to close the disc
compartment lid after inserting or ejecting an
MD.
44-GB
Page 45

Notes on batteries
1
2
1
2
Incorrect battery usage may lead to leakage of
battery fluid or bursting batteries. To prevent
such accidents, observe the following
precautions:
• Insert the + and – poles of the batteries
correctly.
• Do not try to recharge dry batteries.
• When the recorder is not to be used for a long
time, be sure to remove the batteries.
• If a battery leak should develop, carefully and
thoroughly wipe away battery fluid from the
battery compartment before inserting new
ones.
Note on mechanical noise
The recorder gives off mechanical noise while
operating, which is caused by the power-saving
system of the recorder and it is not a problem.
Note on maintenance
Clean the terminals periodically with a cotton
swab or a soft cloth as illustrated.
On the battery compartment
lid
The battery compartment lid is designed to
detach from the recorder when it is handled
with great force. Do the following steps to
reattach the lid.
1 Insert the projections on the PUSH OPEN
tab firmly into the slots on the recorder one
at a time.
Slots
Terminals
If you have any questions or problems
concerning your recorder, please consult your
nearest Sony dealer. (If a trouble occurred when
the disc was in the recorder, we recommend that
the disc be left in the recorder when you consult
your Sony dealer so that the cause of trouble
may be better understood.)
Projections
2 Insert the projections on the lid firmly into
the slots on the PUSH OPEN tab one at a
time.
45-GB
Page 46

Troubleshooting
Should any problem persist after you have made these checks, consult your nearest Sony
dealer.
Symptom Cause/Solution
The recorder does
not work or works
poorly.
• Audio sources may not be securely connected.
, Disconnect the audio sources once and connect them again
(pages 20, 21).
• The HOLD function is turned on (“HOLD” appears in the display
when you press an operation button on the recorder).
, Disable HOLD by sliding the HOLD switch in the opposite
direction of the arrow (page 41).
• Moisture has condensed inside the recorder.
, Take the MD out and leave the recorder with the lid opened in a
warm place for several hours until the moisture evaporates.
• The dry battery is weak (r or “LOW BATT” flashes).
, Replace the dry battery (pages 9, 42).
• The dry battery have been inserted incorrectly.
, Insert the battery correctly (page 9).
• You pressed a button while the disc indication was rotating quickly.
, Wait until the indication becomes normal.
• When recording digitally from a portable CD player, you did not
use AC power or did not disable the anti-skip function such as ESP
(page 20).
, Use the portable CD player with AC power or disable the anti-
skip function such as ESP.
• The analog recording was made using a connecting cord with an
attenuator.
, Use a connecting cord without an attenuator (page 21).
• The AC power adaptor (not supplied) was unplugged during
recording or a power outage occurred.
• While operating, the recorder received a mechanical shock, too
much static, abnormal power voltage caused by lightning, etc.
, Restart the operation as follows.
1 Take out the batteries or disconnect all the power sources.
2 Leave the recorder for about 30 seconds.
3 Insert the batteries or connect the power source.
• The disc is damaged or does not contain proper recording or editing
data.
, Reinsert the disc. If this fails, rerecord.
• The lid is not firmly closed.
, Open the lid and close it again, pressing hard so that it closes
firmly.
• A disc with no track is inserted (“BLANKDISC” appears when
playing or editing).
, Replace to another disc.
• The record protect tab is opened.
, Slide the record protect tab closed.
46-GB
Page 47

Symptom Cause/Solution
The recorder does
not record or edit.
The zREC
button does not
come up. The lid
does not open.
No sound comes
through the
headphones.
An MD is not
played from the
first track.
The recorder does
not play normally.
Playback sound
skips.
Sound has a lot of
static.
Cannot find the
track marks.
The clock loses
time or the
display flashes.
The recording
date was not
stamped onto the
disc.
• The premastered MD is inserted.
, Replace to the recordable MD.
• The power source was disrupted during recording or editing.
, Rerecord or reedit again.
• The batteries have been exhausted or the power sources have been
disconnected during recording or editing.
, Replace the exhausted batteries with new ones or connect the
power source again.
• The headphones plug is not firmly connected.
, Plug in the plug of the headphones firmly to the remote control.
Plug in the plug of the remote control firmly to i.
• Volume is too low.
, Adjust the volume by turning VOL.
•Dirty plugs.
, Clean the plug on the end of the headphones cord and the plug
on the end of the remote control cord.
• Disc playing stopped before it came to the last track.
, Press .REVIEW/AMS repeatedly or open and close the lid
once to go back to the beginning of the disc, and restart playing
after checking the track number in the display.
• Repeat play is selected.
, Press PLAY MODE repeatedly until the indication
disappears from the display.
• The recorder is placed where it receives continuous vibration.
, Put the recorder on a stable place.
• A very short track may cause sound to skip.
, Try not to create tracks under one second long.
• Strong magnetism from a television or such device is interfering
with operation.
, Move the recorder away from the source of strong magnetism.
• You pressed XPAUSE after pressing .REVIEW/AMS or
>CUE/AMS.
, Press XPAUSE before pressing .REVIEW/AMS or
>CUE/AMS.
• The built-in battery for the clock is weak. Note that the clock may
gain or lose up to about 2 minutes per month under normal
condition.
, Insert new dry batteries and leave them for about more than two
hours to charge the built-in battery. After charging, set the clock
again (page 25).
• The clock is not set.
, Set the clock (page 25).
47-GB
Page 48

Symptom Cause/Solution
The disc cannot
edit on other
component.
Momentary noise
is heard.
The group
function (group
mode/group skip
mode) does not
operate.
The display
window is not
normal.
The recorder
skips tracks when
you press ./
>.
• The component does not support LP2 stereo or LP4 stereo.
, Edit on other component that support LP2 stereo or LP4 stereo.
• Due to the special digital audio compression technology used in
LP4 stereo mode, momentary noise may occur on very rare
occasions with certain sound sources.
, Record in normal stereo or LP2 stereo mode.
• While using a disc that has no group information, an attempt was
made to turn the group mode on (“No Group” appears).
, Use a disc with a group information.
• The recorder was disconnected from the power source.
, Let the recorder sit for a while, or disconnect the power source,
reconnect it, and then press any of the operating buttons.
• The group skip mode is on.
, The group skip mode automatically turns off if no operation is
made for 5 seconds.
48-GB
Page 49

System limitations
The recording system in your MiniDisc recorder is radically different from those used in
cassette and DAT decks and is characterized by the limitations described below. Note,
however, that these limitations are due to the inherent nature of the MD recording system
itself and not to mechanical causes.
Symptom Cause
“TR FULL” appears
even before the disc
has reached the
maximum recording
time (60, 74, or 80
minutes).
“TR FULL” appears
even before the disc
has reached the
maximum track
number or recording
time.
Track marks cannot be
erased.
The remaining
recording time does
not increase even after
erasing numerous short
tracks.
The total recorded time
and the remaining time
on the disc may not
total the maximum
recording time (60, 74,
or 80 minutes).
The edited tracks may
exhibit sound dropout
during search
operations.
When 254 tracks have been recorded on the disc, “TR FULL”
appears regardless of the total recorded time. More than 254
tracks cannot be recorded on the disc. To continue recording,
erase unnecessary tracks.
Repeated recording and erasing may cause fragmentation and
scattering of data. Although those scattered data can be read,
each fragment is counted as a track. In this case, the number of
tracks may reach 254 and further recording is not possible. To
continue recording, erase unnecessary tracks.
When the data of a track is fragmented, the track mark of a
fragment under 12 seconds long (recorded in stereo), 24 seconds
long (recorded in LP2 stereo mode or monaural mode), or 48
seconds long (recorded in LP4 stereo mode) cannot be erased.
You cannot combine a track recorded in stereo and a track
recorded in monaural; nor can you combine a track recorded
with digital connection and a track recorded with analog
connection.
Tracks of under 12 seconds, 24 seconds, 48 seconds in length
are not counted and so erasing them may not lead to an increase
in the recording time.
Normally, recording is done in minimum units of approximately
2 seconds (in stereo), 4 seconds (in LP2 stereo mode or
monaural mode), or 8 seconds (in LP4 stereo mode). When
recording is stopped, the last unit of recording always uses this
unit of 2 seconds, 4 seconds, or 8 seconds even if the actual
recording is shorter. Likewise, when recording is restarted after
the stop, the recorder will automatically insert a blank space
amounting to 2 seconds, 4 seconds, or 8 seconds before the next
recording. (This is to prevent accidental erasing of a previous
track whenever a new recording is started). Therefore, the actual
recording time will decrease whenever a recording is stopped; a
maximum of 6 seconds, 12 seconds, or 24 seconds compared to
the potential recording time for each stop.
The fragmentation of data may cause sound dropout while
searching because the tracks are played in higher speed than
normal playback.
49-GB
Page 50

Messages
If the following messages flash in the display window, check the chart below.
Error message Meaning/Remedy
BLANKDISC • An MD with no recording on it is inserted.
BUSY • You tried to operate the recorder while it was accessing the
Data Save • The MD player is recording information (sounds) from the
DISC ERR • The disc is damaged or does not contain proper recording or
DISC FULL • There is no more space to record on the disc (less than 12 seconds
EDITING • You pressed a key on the recorder while editing on the remote
Hi DC in • Voltage of the power supply is too high (The recommended AC
HOLD • The recorder is locked.
LOW BATT • Batteries are weak.
MEM OVER • You tried to record with the recorder placed where it receives
MENU • You pressed a key on the remote control while selecting a menu on
NAME FULL • You tried to enter more than 200 letters to label a single track or
, Insert a recorded MD.
recorded data.
, Wait until the message goes out (in rare cases, it may take 2–3
minutes).
memory to the disk.
, Wait until this process is completed. Do not expose the player
to any physical shock, nor disrupt power supply.
editing data.
, Reinsert the disc. If this fails, rerecord.
available).
, Replace the disc.
control.
power adaptor or the recommended car battery cord is not used).
, Use the recommended AC power adaptor (not supplied) or the
car battery cord (not supplied).
, Slide HOLD against the arrow to unlock the recorder
(page 41).
, Replace the dry batteries (pages 9, 42).
continuous vibration.
, Put the recorder on a stable place, and start recording again.
the recorder.
disc.
• You tried to enter a total of more than 1700 letters for track or disc
names during playback or stop.
, Enter a shorter name for the track, group, or disc (page 34), or
delete “LP:” from the track name recorded in MDLP mode.
50-GB
Page 51

Error message Meaning/Remedy
NO COPY • You tried to make a copy from a disc that is protected by the Serial
NO DISC • You tried to play or record with no disc in the recorder.
No Group • You tried to turn the group function on with a disc witch has no
NO SIGNAL • The recorder could not detect digital input signals.
P/B ONLY • You tried to record or edit on a premastered MD (P/B stands for
PROTECTED • You tried to record or edit on a MD with the tab in the record-
SORRY • You tried to erase the track mark at the beginning of the first track.
TEMP OVER • Heat has built up in the recorder.
TOC Edit • The MD player is recording information (track start and end
TR FULL • There is no more space for new data when you are editing the MD.
TrPROTECT • You tried to record or edit a write-protected track that was recorded
Copy Management System. You cannot make copies from a
digitally connected source which was itself recorded using digital
connection.
, Use analog connection instead (page 21).
, Insert an MD.
group information.
, Use a disc witch the group information has been recorded.
, Make sure that the source is connected firmly (page 20).
“playback”).
, Insert a recordable MD.
protect position (page 54).
, Slide the tab back.
• You tried to erase a track mark to combine tracks the recorder
cannot combine (a track recorded in stereo and in mono, for
example).
• You tried to press XPAUSE or TRACK MARK during synchrorecording.
• You tried to release the group for “Group --”.
, Let the recorder cool down.
position) from the memory to the disk.
, Wait until this process is completed. Do not expose the player
to physical shock, nor disrupt power supply.
, Erase unnecessary tracks (page 39).
on other device.
, Record or edit on other tracks.
51-GB
Page 52

Specifications
System
Audio playing system
MiniDisc digital audio system
Laser diode properties
Material: GaAlAs
Wavelength: λ = 790 nm
Emission duration: continuous
Laser output: less than 44.6 µW
(This output is the value measured at a distance
of 200 mm from the lens surface on the optical
pick-up block with 7 mm aperture.)
Recording and playback time
When using MDW-80
Maximum 160 min. in monaural.
Maximum 320 min. in stereo
Revolutions
350 rpm to 2,800 rpm (CLV)
Error correction
ACIRC (Advanced Cross Interleave Reed
Solomon Code)
Sampling frequency
44.1 kHz
Sampling rate converter
Input: 32 kHz/44.1 kHz/48 kHz
Coding
ATRAC (Adaptive TRansform Acoustic
Coding)
ATRAC3 — LP2/LP4
Modulation system
EFM (Eight to Fourteen Modulation)
Speaker
28 mm (11/8 in.) dia.
Frequency response (digital/analog
input)
20 to 20,000 Hz ± 3 dB
Wow and Flutter
Below measurable limit
Inputs
Microphone: stereo mini-jack
(minimum input level 0.25 mV)
1)
:
Line in
stereo mini-jack for analog input
(minimum input level 39 mV)
optical (digital) mini-jack for optical
(digital) input
52-GB
Outputs
i: stereo mini-jack (dedicated remote control
jack)
Maximum output (DC)
Headphones: 5 mW + 5 mW (16 ohm)
Speaker: 70 mW
2)
General
Power requirements
DC 3V
LR6 (size AA) alkaline dry battery (world
model only)
Battery operation time
See “Battery life” (page 42)
Dimensions
Approx. 105.7 × 80.0 × 24.9 mm (w/h/d)
(41/4 × 31/8 × 1 in.) not incl. projecting parts and
controls.
2)
Mass
Approx. 160 g (5.7 oz) (main unit only)
Supplied accessories
Remote control (1)
Headphones (1)
Carrying pouch (1)
Hand strap (1)
Sony LR6 (size AA) alkaline dry battery (world
model only) (1)
1)
The LINE IN (OPTICAL) jack is used to
connect either a digital (optical) cable or a line
(analog) cable.
2)
Measured in accordance with JEITA.
Optional accessories
AC power adaptor AC-E30HG
Optical Cable POC-15B, POC-15AB
Line Cable RK-G129HG, RK-G136HG
Stereo Microphones ECM-717
Recordable MDs MDW-series
Foot control unit FS-85B50
Headphones* MDR-EX70LP, MDR-E838LP
* When using optional headphones, use only
headphones with stereo mini plugs. You
cannot use headphones with micro plugs.
Your dealer may not handle some of the above
listed accessories. Please ask the dealer for
detailed information about the accessories in
your country.
US and foreign patents licensed from Dolby
Laboratories.
Design and specifications are subject to change
without notice.
Page 53

Explanations
What is the newly developed
DSP TYPE-R for ATRAC?
“TYPE-R” is a high-level Sony specification
used in the Digital Signal Processor (DSP),
which is heart of the MiniDisc sound. This
technology gives the MiniDisc recorder
twice the signal processing capability as
previous MiniDisc Walkman models,
producing a sound quality close to that of
MiniDisc decks.
How the MiniDisc got so small
The 2.5-inch MiniDisc, encased in a plastic
cartridge that looks like a 3.5-inch diskette
(see illustration on the left column), uses a
new digital audio compression technology
called ATRAC (Adaptive TRansform
Acoustic Coding). To store more sound in
less space, ATRAC extracts and encodes
only those frequency components actually
audible to the human ear.
Recordable MDs are manufactured with a
“User TOC Area” to contain the order of the
music. The TOC (Table of Contents) system
is similar to the “directory management
system” of floppy disks. In other words,
starting and ending addresses for all music
tracks recorded on the disc are stored in this
area. This lets you randomly access the
beginning of any track as soon as you enter
the track number (AMS), as well as label the
location with a track name as you would a
file on a diskette.
The meaning of “no sound”
“No sound” describes a recorder condition in
which the input level is about 4.8 mV during
analog input or less than –89 dB during
optical (digital) input (with 0 dB as full bit
(the maximum recordable level for a
MiniDisc)).
Quick Random Access
Like CDs, MDs offer instantaneous random
access to the beginning of any music track.
Premastered MDs are recorded with location
addresses corresponding to each music
selection.
User TOC Area
Contains the order and start/end
points of the music.
Music Data
Shock-Resistant Memory
One major drawback of optical read systems
is that they can skip or mute when subjected
to vibration. The MD system resolves this
problem by using a buffer memory that
stores audio data.
53-GB
Page 54

To protect a recorded MD
To record-protect an MD, slide open the tab at
the side of the MD. In this position, the MD
cannot be recorded. To record again, slide the
tab back so the tab is visible.
When the disc is record-protected
Tab
Microphone, record player, tuner, etc (with
analog output jacks).
Analog recording
Home-recorded MD
Back of the MD
Record-protect
Note on digital recording
This recorder uses the Serial Copy
Management System, which allows only firstgeneration digital copies to be made from
premastered software. You can only make
copies from a home-recorded MD by using the
analog (line out) connections.
Premastered software such as CDs or
MDs.
Digital recording
Homerecorded
MD
No
digital
recording
Recordable
MD
Digital recording
Recordable
MD
No
digital
Recordable
MD
recording
If you have any questions or problems
concerning your recorder, please consult your
nearest Sony dealer. (If a trouble occurred when
the disc was in the recorder, we recommend that
the disc be left in the recorder when you consult
your Sony dealer so that the cause of trouble
may be better understood.)
54-GB
Page 55

55-GB
Page 56

Grabador, Reproductor de
Minidisco portátil
POR FAVOR LEA
DETALLADAMENTE ESTE
MANUAL DE INSTRUCCIONES
ANTES DE CONECTAR Y OPERAR
ESTE EQUIPO.
RECUERDE QUE UN MAL USO DE
SU APARATO PODRÍA ANULAR
LA GARANTÍA.
Precaución
El uso de instrumentos ópticos con este
producto incrementa el riesgo de lesiones
oculares.
PRECAUCIÓN: RADIACIÓN LÁSER
INVISIBLE CUANDO LA UNIDAD
ESTÁ ABIERTA
EVITE LA EXPOSICIÓN AL HAZ
LÁSER
Información
EL VENDEDOR NO SERÁ
RESPONSABLE EN NINGÚN
CASO DE LOS DAÑOS DIRECTOS,
INCIDENTALES O
CONSECUENCIALES DE
CUALQUIER NATURALEZA, O DE
LAS PÉRDIDAS O GASTOS
RESULTANTES DE UN
PRODUCTO DEFECTUOSO O DEL
USO DE UN PRODUCTO.
Tratamiento de los equipos
eléctricos y electrónicos al
final de su vida útil (Aplicable
en la Unión Europea y en
países europeos con sistemas
de recogida selectiva de
residuos)
Este símbolo en su equipo
o su embalaje indica que el
presente producto no puede
ser tratado como residuos
domésticos normales, sino
que deben entregarse en el
correspondiente punto de
recogida de equipos eléctricos y
electrónicos. Asegurándose de que este
producto es desechado correctamente,
Ud. está ayudando a prevenir las
consecuencias negativas para el medio
ambiente y la salud humana que podrían
derivarse de la incorrecta manipulación de
este producto. El reciclaje de materiales
ayuda a conservar las reservas naturales.
Para recibir información detallada sobre
el reciclaje de este producto, por favor,
contacte con su ayuntamiento, su punto de
recogida más cercano o el distribuidor
donde adquirió el producto.
Accesorios a los que se aplica: Mando a
distancia, auriculares.
En algunos países se regula la eliminación
de las pilas como las que sirven para
suministrar energía a este producto.
Obtendrá más información de las
autoridades locales.
2-ES
Page 57

ES
3-ES
Page 58

Contenidos
Controles ........................................................... 6
Preparación de la fuente de alimentación ....... 9
Grabación de un MD ....................................... 11
Reproducción de un MD .................................. 14
Opciones de grabación ................................... 16
Grabación de larga duración .................................................................16
VOR (Grabación accionada por la voz) ................................................17
Grabación con un micrófono ...................................................................18
Grabación con un equipo conectado externamente .................................19
Grabación con entrada digital (óptica) (requiere cable óptico) ........20
Grabación con entrada analógica (línea) (requiere cable
de línea) .............................................................................21
Grabación de pistas con la función de grupo (grabación en modo
de grupo) ............................................................................................22
Para activar el modo de grupo (grabación en modo de grupo) .........23
Grabación de una pista en un grupo nuevo .......................................23
Grabación de una pista en un grupo existente ..................................23
Cómo iniciar y detener la grabación sincronizada con el
reproductor fuente (grabación sincronizada) .....................................24
Ajuste del reloj para incluir la hora de grabación ...................................25
Comprobación del tiempo restante o de la posición de grabación ..........26
4-ES
Opciones de reproducción ............................. 27
Cómo cambiar el ajuste de sonido ........................................................27
Cómo encontrar un punto concreto rápidamente (Easy Search) .............28
Cómo cambiar la velocidad de reproducción (control de velocidad) .....28
Reproducción de pistas de forma repetida ............................................29
Comprobación del tiempo restante o de la posición de reproducción ....29
Uso de la función de grupo (modo de grupo) .......................................30
Cómo escuchar pistas con el modo de grupo (reproducción
del modo de grupo) ...........................................................30
Selección y reproducción de grupos (función de salto de grupo) .....31
Page 59

Edición de pistas grabadas ............................ 32
Adición de una marca de pista ............................................................. 32
Marcas de pista para dividir una grabación ..................................... 32
Marcas de pista en puntos importantes ............................................ 32
Borrado de una marca de pista ............................................................... 33
Etiquetado de grabaciones ...................................................................... 34
Registro de pistas o grupos como un grupo nuevo (ajuste de grupo) ..... 36
Para cambiar el ajuste de grupo .............................................................. 37
Cambio de orden de pistas grabadas ...................................................... 38
Cambio de una pista a un grupo distinto .............................................. 38
Cambio de orden de un grupo en un disco (cambio de grupo) ............ 39
Borrado de pistas .................................................................................. 39
Cómo borrar una pista ...................................................................... 39
Cómo borrar todo el disco ................................................................ 40
Cómo borrar un grupo ...................................................................... 40
Otras operaciones .......................................... 41
Ajuste del contraste del visor (ajuste del contraste) ............................. 41
Bloqueo de los controles (HOLD) .......................................................... 41
Fuentes de alimentación ................................ 42
Cuándo hay que sustituir las pilas ........................................................ 42
Duración de la pila ........................................................................... 42
Uso de corriente de la red .................................................................... 43
Información adicional ..................................... 44
Precauciones ......................................................................................... 44
Solución de problemas ........................................................................... 46
Limitaciones del sistema ........................................................................ 49
Mensajes ................................................................................................. 50
Especificaciones ..................................................................................... 52
Explicaciones .......................................................................................... 53
5-ES
Page 60

Controles
Consulte las páginas indicadas entre paréntesis para obtener más
detalles.
Parte frontal de la grabadora
Cómo fijar la correa de mano.
1
3456 78 qj qk ql
2
9q;qaqsqdqfqg qh w; wa ws wd wf wgwh
A Mando SPEED CONTROL (28)
B Botones .REVIEW/AMS/
>CUE/AMS (búsqueda /AMS)
(12) (15) (23) (25) (31) (33) (34) (41)
C Indicador VOR (17)
D Botón DISPLAY (26) (29) (35)
E Botón PLAY MODE (29) (35)
F Botón EDIT/ENTER (31) (34) (41)
G Botones EASY SEARCH +/– (28)
(35)
H Visor (24) (27) (33)
I Botón xSTOP (12) (14) (25) (35)
J Botón NPLAY (reproducir) (12)
(14) (25) (34)
El botón NPLAY tiene un punto
tangible.
K Botón XPAUSE (13) (15) (33) (34)
L Botón zREC (12) (16)
6-ES
M Indicador REC (12) (26)
N Botón TRACK MARK (32) (33)
O Interruptor REC MODE (12) (16)
P Botón GROUP (23) (30) (37)
Q Altavoz (14)
R Toma DC IN 3V (43)
S Micrófonos (12) (17)
T Tom a i (auriculares) (12) (14)
U Interruptor OPEN (11) (14)
V Interruptor HOLD (9) (41)
W Control VOL (14)
El control VOL tiene un punto
tangible.
X Botón VOR (17)
Y Interruptor SYNCHRO REC ON/OFF
(24)
Z Botón ERASE (39)
Page 61

Parte posterior de la grabadora
1
2
36
A Compartimento de la pila (9)
B Botón CLOCK SET (25)
C Botón SOUND (27)
D Toma LINE IN (OPTICAL) (20) (21)
Visor
124567
A Pantalla de información de caracteres
(16) (27) (33)
Indica los nombres del disco y de la
pista, la fecha, los mensajes de error,
los números de pista, el nivel de
grabación, etc.
B Indicación de grupo (23) (30) (35)
C Indicación del modo de reproducción
(29)
D Indicación de disco (16) (27) (33)
Muestra que el disco está girando para
grabar, reproducir o editar un MD.
E Indicación VOR (17)
4
5
E Toma MIC (PLUG IN POWER) (18)
La toma MIC (PLUG IN POWER)
tiene un punto tangible.
F Interruptor MIC SENS (H/L) (11) (17)
3
qdqsqaq;98
F Indicación del nivel de la pila (42)
G Indicación SYNC (grabación
sincronizada) (24)
H Medidor de nivel de reproducción
(30) (33)
I Indicación V-UP (27)
J Indicación STEREO (estéreo), LP2
(LP2 estéreo), LP4 (LP4 estéreo),
MONO (monoaural) (12) (16)
K Indicación de pausa
L Indicación SOUND (27)
M Indicación REC (12)
7-ES
Page 62

Mando a distancia
A
B
C
D
E
A Minienchufe estéreo
B Botón SOUND (27)
C Botón TRACK MARK (32) (33)
D Interruptor HOLD (9) (41)
Deslícelo para bloquear los controles
del mando a distancia.
E Botón X (pausa) (15)
F Auriculares
G Botón x (stop) (14)
H >N Botones (15)
El botón >N tiene un punto
tangible.
I .REVIEW/AMS (15)
J Control VOL (14)
El control VOL tiene un punto
tangible.
F
G
H
I
J
8-ES
Page 63

Preparación de la fuente de
e
E
alimentación
En esta sección se explica cómo preparar la grabadora para el
funcionamiento con pilas. Para obtener información sobre la conexión
de la grabadora a una toma de ca, consulte la página 43.
1
2
Inserte las pilas secas.
Parte posterior de la grabadora
Presione y deslice la tapa
del compartimento de las
pilas como se muestra en la
ilustración.
Notas
• No utilice pilas de manganeso. Si lo hace, no podrá grabar.
• Inserte los polos e y E de la pila correctamente como se indica en la grabadora.
Desbloquee el control.
Inserte una pila seca
alcalina LR6 (tamaño AA)
(suministrada sólo con el
modelo universal).
HOLD
Cierre la tapa.
HOLD
Deslice HOLD en la dirección de la flecha que aparece en la ilustración.
9-ES
Page 64

Carga de la pila incorporada del reloj
Cuando utilice la grabadora por primera vez o después de un largo período sin utilizarla,
cargue la pila incorporada del reloj. Después de ajustar el reloj, deje instaladas las pilas
secas durante aproximadamente más de dos horas, para que la pila incorporada se cargue
de forma automática. Puede utilizar la grabadora mientras se realiza la carga. Cuando se
carga la pila, los ajustes que haya efectuado, por ejemplo en el reloj, se mantendrán
aproximadamente un mes después de que se hayan quitado las pilas. Para obtener más
detalles sobre el ajuste del reloj, consulte la página 25.
10-ES
Page 65

Grabación de un MD
Utilice los micrófonos incorporados para grabar en estéreo.
Compruebe que la lengüeta de protección contra grabación en el disco
está cerrada (página 54). Se recomienda el uso de pilas nuevas. Quizá
no pueda grabar si utiliza pilas de manganeso.
1
1 Deslice OPEN para abrir la tapa. 2 Inserte un MD grabable con la etiqueta
2
Inserte un MD grabable.
cara arriba y presione la tapa hacia
abajo (en el centro del borde frontal,
como se muestra arriba) para cerrarla
por completo.
Seleccione la sensibilidad del
micrófono.
1 Deslice MIC SENS a H o L.
MIC SENS Para
MIC SENS
H (alta) grabar a cierta distancia
L (baja) grabar de cerca o un
o un sonido suave (p.
ej., para grabar una
reunión).
sonido alto (p. ej., para
grabar un discurso por
medio de un
micrófono).
11-ES
Page 66

3
Seleccione el modo de grabación.
REC MODE
1 Pulse REC MODE varias veces hasta que “STEREO”
se ilumine en la pantalla.
Puede seleccionar el modo de grabación en estéreo
normal, LP2 estéreo, LP4 estéreo o monoaural. Para
más información, consulte “Grabación de larga
duración” (página 16). El ajuste de fábrica es estéreo
normal.
No se puede cambiar el modo de grabación mientras
ésta se está llevando a cabo.
4
Para supervisar el sonido durante la grabación.
Conecte los auriculares suministrados con mando a distancia a la toma i. Puede ajustar el volumen
girando el control VOL. Este ajuste no afecta al nivel de grabación, puesto que el nivel se ajusta
automáticamente.
Para Operación
Grabar parcialmente sobre la
grabación anterior
Grabe un MD.
micrófonos
incorporados
xSTOP
Conéctelo
bien a i
zREC
Conéctelo bien a i
x
1 Pulse zREC.
“REC” aparece, el indicador REC se
ilumina y, a continuación, empieza la
grabación.
Puede supervisar las condiciones de
grabación, como la posición de
grabación, a través de la pantalla o el
indicador REC (página 26).
Si el disco está en blanco, la
grabación se inicia desde el
Indicador
REC
Pulse NPLAY, >CUE/AMS o .REVIEW/
AMS para encontrar el principio del material que
va a grabar y, a continuación, pulse XPAU S E.
Pulse zREC para que la grabadora cambie a pausa
de grabación.
Vuelva a pulsar XPAUSE para iniciar la grabación.
principio. Si el disco está grabado
parcialmente, la grabación se
inicia automáticamente desde el
final del material existente.
Para detener la grabación, pulse
xSTOP.
Después de pulsar el botón xSTOP para
detenerla, la grabadora se apagará
automáticamente pasados unos 10 segundos
(cuando utilice una pila seca alcalina) o unos 5
minutos (si se utiliza el adaptador de
alimentación de ca).
12-ES
Page 67

Para Operación
Realizar una pausa
1)
Pulse XPAUSE durante la grabación.
Vuelva a pulsar XPAUSE para reanudar la
grabación.
Extraer el MD xSTOP para detener la grabación y abrir la tapa.
(Asegúrese de que “
TOC Edit” ha desaparecido del
visor antes de abrir la tapa.)
1)
El indicador REC parpadea durante la pausa de grabación. Las marcas de pista no se añaden mientras
se graba con micrófonos, aunque se haga una pausa en la grabación.
Si la grabación no se inicia
• Compruebe que la grabadora no está
bloqueada (páginas 9 y 41).
• Compruebe que el MD no está protegido
contra grabación (página 54).
• Los MD comerciales pregrabados no se
pueden grabar.
Notas
• Para grabaciones de larga duración, se
recomienda que conecte la grabadora a la
toma de red mediante un adaptador de
alimentación de ca opcional AC-E30HG
(página 43).
• No conecte un adaptador de alimentación de
ca opcional durante una operación de
grabación si hace funcionar la grabadora con
corriente de las pilas. Si lo hace, el material
grabado hasta ese momento no se guardará en
el disco.
• La tapa no se podrá abrir durante la grabación
ni hasta que “TOC Edit” desaparezca del visor
después de haberse completado la grabación.
• Si se interrumpe la alimentación eléctrica (es
decir, se retiran o se agotan las pilas, o se
desconecta el adaptador de alimentación de ca
opcional) durante la grabación o mientras
“TOC Edit” aparece en el visor, no se podrá
abrir la tapa hasta que se reanude la
alimentación eléctrica.
• “Data Save” o “TOC Edit” parpadean
mientras se graban datos de la grabación (los
puntos inicial y final de la pista, etc.). No
mueva ni sacuda la grabadora ni desconecte la
fuente de alimentación mientras la indicación
parpadee en el visor. Si lo hace, el material
grabado hasta ese momento no se guardará en
el disco.
• Si graba a través de los micrófonos, también
pueden quedar grabados los distintos sonidos
que emite la grabadora.
• Los micrófonos incorporados no funcionan
cuando se conecta un micrófono opcional a la
toma MIC (PLUG IN POWER) de la
grabadora.
• Los micrófonos incorporados no funcionan
cuando se conecta un cable óptico o un cable
de línea a la toma LINE IN (OPTICAL) de la
grabadora.
13-ES
Page 68

Reproducción de un MD
Puede reproducir MD grabables o minidiscos comerciales pregrabados.
Aunque la salida de sonido desde el altavoz incorporado es
monofónica, la escucha en estéreo es posible mediante los auriculares
con mando a distancia suministrados.
1
Inserte un MD.
1 Deslice OPEN para abrir la tapa. 2 Inserte un MD con la etiqueta cara
arriba y presione la tapa hacia abajo
(en el centro del borde frontal, como se
muestra arriba) para cerrarla por
completo.
2
Reproduzca un MD.
xSTOP
Conéctelo
bien a i
Conéctelo bien a i
altavoz
VOL
NPLAY
VOL
>N
x
1 Pulse NPLAY.
2 Gire VOL para ajustar el volumen.
El volumen se mostrará en el visor.
Para detener la reproducción, pulse
xSTOP.
La reproducción se inicia desde el punto en que se
detuvo. Para iniciar la reproducción desde el
comienzo del disco, pulse N durante dos o más
segundos en la grabadora, o pulse
dos o más segundos en el mando a distancia.
Después de pulsar el botón xSTOP para
detenerla, la grabadora se apagará
automáticamente pasados unos 10 segundos
(cuando utilice una pila seca alcalina) o unos 5
minutos (si se utiliza el adaptador de alimentación
de ca).
En el mando a distancia, utilice el botón
para iniciar la reproducción, el botón xSTOP para
detener la grabadora y el control VOL para ajustar
el volumen. Cuando utilice el mando a distancia,
escuchará pitidos cortos si pulsa el botón
y un pitido prolongado si pulsa el botón xSTOP.
N>
durante
>N
>N
14-ES
Page 69

Para escuchar en estéreo
Conecte los auriculares con mando a distancia suministrados a la toma i de la grabadora.
Para Funcionamiento de la
grabadora
Funcionamiento del mando
a distancia (pitidos en los
auriculares)
Localizar el inicio de
la pista actual o de
una pista anterior
Pulse .REVIEW/AMS.
Pulse .REVIEW/AMS
1)
varias veces hasta llegar al
inicio de la pista que busca.
Localizar el principio
de la pista siguiente
Pulse >CUE/AMS. Pulse >N. (Dos pitidos
2)
Realizar una pausa Pulse XPAUS E . P ul s e
XPAUSE otra vez para
reanudar la reproducción.
Pulse .. (Tres pitidos cortos)
Pulse . varias veces hasta
llegar al inicio de la pista que
busca.
cortos)
Pulse X en el mando a distancia.
(Pitidos cortos continuos)
Vuelva a pulsar X para reanudar
la reproducción.
Retroceder durante la
reproducción
Avanzar durante la
reproducción
Extraer el MD Pulse xSTOP y abra la tapa.
1)
Si pulsa .REVIEW/AMS durante la primera pista del disco, la grabadora se sitúa al comienzo de
la última pista del disco.
2)
Si pulsa >CUE/AMS durante la última pista del disco, la grabadora se sitúa al comienzo de la
primera pista del disco.
3)
Si abre la tapa, el punto de inicio de la reproducción pasará al principio de la primera pista.
Si la reproducción no se inicia
Compruebe que la grabadora no está bloqueada
(páginas 9 y 41).
Para localizar un punto rápidamente
Utilice los botones EASY SEARCH +/–
(página 28).
Pulse y mantenga en esa
posición .REVIEW/AMS.
Pulse y mantenga en esa
posición >CUE/AMS.
• Si se interrumpe la alimentación (es decir, si
se retiran o se agotan las pilas o si se
desconecta el adaptador de alimentación de ca
opcional) mientras la grabadora está
funcionando, no se podrá abrir la tapa hasta
que se restaure la alimentación.
Pulse y mantenga en esa
posición ..
Pulse y mantenga en esa
posición >N.
3)
Pulse x. (Un pitido corto)
z
La reproducción cambiará automáticamente de
estéreo a monofónica según la fuente de sonido.
Notas
• El sonido puede saltar durante la reproducción
si se expone la grabadora a una vibración
continua, por ejemplo, mientras se practica
ejercicio físico.
15-ES
Page 70

Opciones de grabación
Grabación de larga
duración
Seleccione los modos de grabación en
función del tiempo de grabación que
necesite.
Es posible grabar en estéreo duplicando
(LP2) o cuadruplicando (LP4) el tiempo
normal de grabación (estéreo). También
se puede grabar en modo monoaural
duplicando la velocidad de grabación
normal.
Los MD grabados en modo
monoaural, LP2 estéreo o LP4
estéreo sólo se pueden reproducir
en reproductores o grabadoras de
MD con modo de reproducción
monoaural, LP2 estéreo o LP4
estéreo.
REC MODE
zREC
1 Inserte un disco grabable.
2 Pulse REC MODE varias veces hasta
que el modo de grabación deseado se
ilumine en la pantalla.
Cada vez que pulse el botón, A
cambiará de la manera siguiente.
007
30:03
Modo de
grabación
Estéreo STEREO aprox.
LP2 estéreo LP2 aprox.
LP4 estéreo LP4 aprox.
Monoaural
1)
Para obtener mejor calidad de sonido, grabe
en modo estéreo normal o en modo LP2
estéreo.
2)
Si graba una fuente estéreo en monoaural, se
mezclarán los sonidos de los canales
izquierdo y derecho.
3)
Si se utiliza un MD grabable de 80 minutos.
A Tiempo de
1)
2)
MONO aprox.
grabación
80 min
160 min
320 min
160 min
3 Pulse zREC.
Para otras opciones de grabación,
consulte “Grabación de un MD”
(página 11).
Para detener la grabación,
pulse x.
La grabadora cambiará a grabación
estéreo la próxima vez que vaya a grabar.
z
• Los componentes audio que admiten los
modos LP2 estéreo o LP4 estéreo llevan las
marcas de los logotipos o .
• El modo de grabación se puede cambiar
durante la pausa de grabación. Cuando cambie
el modo de grabación, se añadirá
automáticamente una marca de pista en ese
punto.
3)
16-ES
A
Page 71

Notas
• “LP:” se añadirá al principio del nombre de la
pista grabada en modo MDLP.
• Para grabaciones de larga duración, se
recomienda que utilice el adaptador de
alimentación de ca suministrado.
• Durante la grabación monoaural de una fuente
de sonido estéreo conectada a una toma de
entrada digital (óptica), aún puede supervisar
el sonido grabado en estéreo con los
auriculares o cascos conectados a la toma i/
LINE OUT.
• Cuando se graba en modo LP4, en muy raras
ocasiones y con algunas fuentes de sonido se
puede producir un ruido momentáneamente.
Esto se debe a la especial tecnología de
compresión de audio digital, que permite
cuadruplicar el tiempo normal de grabación.
Si se produce ruido, se recomienda la
grabación en los modos estéreo normal o LP2
para conseguir una mejor calidad de sonido.
VOR (Grabación
accionada por la voz)
VOR hace que la grabadora grabe
automáticamente cuando hay sonido y
que realice una pausa cuando no lo hay.
Esto permite grabar sin complicadas
operaciones con botones.
micrófonos
micrófonos
incorporados
MIC SENS
zREC
Indicador
VOR
incorporados
REC
MODE
VOR
1 Inserte un disco grabable y deslice
MIC SENS a H (alta) o L (baja).
2 Pulse REC MODE varias veces hasta
que “STEREO”, “LP2”, “LP4” o
“MONO” se ilumine en la pantalla.
Para obtener información sobre el
modo de grabación, consulte
“Grabación de larga duración”
(página 16).
3 Pulse zREC.
4 Pulse VOR.
VOR se enciende.
“VOR” aparece en el visor y el
indicador VOR se ilumina cuando la
grabadora está grabando. Tanto
“VOR” como el indicador VOR
parpadean cuando la grabadora no
está grabando.
Para cancelar VOR mientras
está grabando
Vuelva a pulsar VOR.
“VOR” y el indicador VOR se apagan y la
grabadora cambia a modo de grabación
normal.
z
• VOR se apaga automáticamente cuando pulsa
el botón xSTOP para detener la grabación.
• Puede cambiar el modo de grabación cuando
VOR esté activado y la grabadora no esté
grabando (cuando “VOR” y el indicador VOR
parpadean). Cada vez que pulsa el botón REC
MODE se añade una marca de pista.
Notas
• No se puede grabar con los micrófonos
incorporados si se ha conectado un micrófono
opcional a la toma MIC (PLUG IN POWER)
o si se ha conectado un cable óptico (no
suministrado) a la toma LINE IN (OPTICAL).
• VOR es sensible a las condiciones acústicas
ambientales. Ajuste el interruptor MIC SENS
a H o L para adecuarlo a las condiciones. Si
no puede conseguir los resultados de
grabación deseados, cancele VOR y grabe en
modo manual.
• Las pilas consumen alimentación cuando
VOR está activado, incluso cuando no está
grabando (es decir, cuando VOR y el
indicador VOR parpadean).
17-ES
Page 72

Grabación con un
micrófono
Conecte un micrófono estéreo (ECM-717,
etc.; no suministrado) a la toma MIC
(PLUG IN POWER). La entrada de la
grabadora cambia automáticamente a la
entrada del micrófono conectada
externamente.
Micrófono
estéreo (no
suministrado)
REC MODE
a MIC (PLUG IN
POWER)
zREC
MIC SENS
1 Inserte un disco grabable y deslice
MIC SENS a H (alta) o L (baja).
2 Pulse REC MODE varias veces hasta
que “STEREO”, “LP2”, “LP4” o
“MONO” se ilumine en la pantalla.
Para obtener información sobre el
modo de grabación, consulte
“Grabación de larga duración”
(página 16).
3 Pulse zREC.
Para otras opciones de grabación,
consulte “Grabación de un MD”
(página 11).
z
Cuando utilice un micrófono con clavija, no
necesita pilas ya que la grabadora proporciona
la alimentación necesaria.
Si utiliza el micrófono estéreo ECM-717
opcional, ajuste el interruptor del micrófono en
OFF para que la grabadora le suministre
alimentación. Se recomienda que ajuste el
interruptor del micrófono a OFF si se utiliza.
Notas
• No se puede grabar mediante el micrófono
conectado externamente si se ha conectado un
cable óptico a la toma LINE IN (OPTICAL).
La grabadora selecciona automáticamente la
entrada de la grabadora en el orden de
prioridad siguiente: entrada óptica, entrada del
micrófono conectado externamente, entrada
analógica (línea) y entrada de los micrófonos
incorporados.
• El micrófono puede captar el sonido del
funcionamiento de la propia grabadora (por
ejemplo, el sonido del motor). En ese caso,
separe el micrófono de la grabadora. No
utilice el micrófono con un conector corto, ya
que puede captarse el sonido del
funcionamiento de la grabadora.
18-ES
Page 73

Grabación con un equipo conectado externamente
La toma de entrada de esta grabadora funciona como toma analógica y digital. Conecte la
grabadora a un reproductor de CD o a una grabadora de cassette mediante una entrada
digital (óptica) o una entrada analógica (línea). Consulte “Grabación con entrada digital
(óptica) (requiere cable óptico)” (página 20) para grabar mediante entrada digital (óptica) y
“Grabación con entrada analógica (línea) (requiere cable de línea)” (página 21) para grabar
con una entrada analógica (línea).
La toma LINE IN (OPTICAL) es para entrada analógica y digital.
La grabadora reconoce automáticamente el tipo de cable de línea y cambia a entrada analógica o digital.
Diferencias entre las entradas digital (óptica) y analógica (línea)
Diferencia Entrada digital (óptica) Entrada analógica (línea)
Fuente
conectable
Cable que
utiliza
Señal de la
fuente
Números de
pista grabados
Nivel del sonido
grabado
Nota
Las marcas de pista se pueden copiar de forma incorrecta:
• si graba desde algunos reproductores de CD o reproductores multidisco con una entrada digital
(óptica).
• si la fuente está en modo de reproducción aleatoria o programada mientras se graba con una entrada
digital (óptica). En este caso, reproduzca la fuente en el modo de reproducción normal.
• si graba programas BS o CS a través de una entrada digital (óptica).
Equipo con toma de salida digital
(óptica)
Cable óptico (con un enchufe o
minienchufe óptico) (página 20)
Equipo con toma de salida
analógica (línea)
Cable de línea (con dos enchufes
fonográficos o un minienchufe
estéreo) (página 21)
Digital Analógica
Aunque se conecte a una fuente
digital (como un CD), la señal
que se envía a la grabadora es
analógica.
Marcado (copiado) automático
• en las mismas posiciones que la fuente
(cuando la fuente de sonido es un CD o
un MD).
• después de más de 2 segundos de
segmento vacío o con bajo nivel (con
una fuente de sonido que no es un CD
o un MD) (página 53).
• si se realiza una pausa durante la
grabación (la grabadora cambia
automáticamente a pausa si encuentra
Marcado automático
• después de más de 2 segundos
de un segmento vacío o con
bajo nivel.
• si se realiza una pausa durante
la grabación.
Puede borrar las marcas
innecesarias después de la
grabación (“Borrado de una
marca de pista”, página 33).
una sección sin señal de audio de 3 o
más segundos) (página 53).
Puede borrar las marcas innecesarias
después de la grabación (“Borrado de
una marca de pista”, página 33).
El mismo que el de la fuente. Se ajusta automáticamente.
19-ES
Page 74

Grabación con entrada digital
(óptica) (requiere cable
óptico)
Para realizar grabaciones digitales,
efectúe la conexión a una fuente digital
por medio de un cable óptico (no
suministrado). El convertidor de
frecuencia de muestreo incorporado
permite la grabación digital incluso desde
equipos digitales con diferentes
frecuencias de muestreo, como una
platina DAT o un sintonizador BS.
Reproductor de CD,
reproductor de MD,
amplificador
Enchufe
óptico
POC-15B, etc.
(no suministrado)
a LINE IN
(OPTICAL)
Reproductor
portátil de CD, etc.
Minienchufe
óptico
POC-15AB,
etc. (no
suministrado)
Indicador
REC
REC
MODE
zREC
3 Pulse zREC.
“REC” aparece en el visor, el
indicador REC se ilumina y se inicia
la grabación.
4 Reproduzca el sonido de la fuente.
Para otras opciones de grabación,
consulte “Grabación de un MD”
(página 11).
z
Al grabar desde medios digitales, las marcas de
pista del original se copian automáticamente en
el MD.
Notas
• Sólo se puede realizar una grabación digital
con un cable óptico desde una salida de tipo
óptico.
• Cuando grabe desde un reproductor portátil de
CD, reproduzca con el equipo conectado a la
alimentación de ca y desactive la función
contra saltos de sonido (como ESP*).
• Cuando grabe desde un reproductor de CD
portátil, realice una pausa en el reproductor de
CD antes de llevar a cabo el procedimiento de
grabación.
• La salida digital puede estar desactivada en
algunos reproductores portátiles de CD
cuando el adaptador de ca no está conectado al
reproductor.
• Se añadirá una marca de pista en el punto en el
que pulsa el botón XPAUSE de nuevo para
reanudar la grabación mientras está en pausa,
es decir, el resto de la pista se contará como
una nueva.
∗ Electronic Shock Protection (Protección
electrónica antichoque)
1 Inserte un disco grabable.
2 Pulse REC MODE varias veces hasta
que “STEREO”, “LP2”, “LP4”, o
“MONO” se ilumine en la pantalla.
Para obtener información sobre el
modo de grabación, consulte
“Grabación de larga duración”
(página 16).
20-ES
Page 75

Grabación con entrada
analógica (línea) (requiere
cable de línea)
Conecte la grabadora con un cable de
línea (no suministrado) para realizar una
grabación analógica. El sonido se enviará
desde el equipo conectado como una
señal analógica, pero se enviará grabado
digitalmente en el disco.
Reproductor de CD,
grabadora de cassette,
etc. (fuente)
a LINE OUT
L (blanco)
R (rojo)
Cable de línea
(RK-G129HG, no
suministrado)*
Indicador
REC
REC
MODE
2 Pulse REC MODE varias veces hasta
que “STEREO”, “LP2”, “LP4”, o
“MONO” se ilumine en la pantalla.
Para obtener información sobre el
modo de grabación, consulte
“Grabación de larga duración”
(página 16).
3 Pulse zREC.
“REC” aparece en el visor, el
indicador REC se ilumina y se inicia
la grabación.
4 Reproduzca el sonido de la fuente.
Para otras opciones de grabación,
consulte “Grabación de un MD”
(página 11).
Nota
Se añadirá una marca de pista en el punto en el
que pulsa el botón XPAUSE de nuevo para
reanudar la grabación mientras está en pausa, es
decir, el resto de la pista se contará como una
nueva.
a LINE IN
(OPTICAL)
zREC
∗ Utilice cables de conexión sin atenuador.
Para conectar a un reproductor de CD
portátil que disponga de minitoma
estéreo, utilice el cable de conexión
RK-G136HG (no suministrado).
1 Inserte un disco grabable.
21-ES
Page 76

Grabación de pistas
con la función de grupo
(grabación en modo de
grupo)
GROUP
./>
zREC
La función de grupo (modo de
grupo)
Se trata de una función que permite
separar las pistas de un disco en grupos
diferentes para la reproducción, grabación
y edición.
Cuando el modo de grupo está DESACTIVADO.
Disco
Número de pista
123456789
Cuando el modo de grupo está ACTIVADO.
Disco
Grupo 1
Número
de pista
123
Es apropiada para gestionar múltiples
álbumes de CD grabados en modo MDLP
(LP2 estéreo/LP4 estéreo) en un único
MD.
22-ES
Grupo 2
Número
de pista
12
Grupo 3
Número
de pista
1234
Para grabar la información de
grupos
Cuando se graba en modo de grupo, la
información de grupos se escribe en el
área de grabación del nombre del disco.
Esta información se compone de cadenas
de texto que se escriben como se muestra
en el ejemplo siguiente:
Área de grabación del nombre del disco
Ejemplo
123
1 Nombre del disco: “26 de junio”
2 Nombre del grupo para las pistas 1 a
5: “Lectura 1”
3 Nombre del grupo para las pistas 6 a
9: “Lectura 2”
Por lo tanto, si carga un MD grabado en
modo de grupo en un sistema que no
admita dicho modo o si intenta editar el
contenido de un disco en esta grabadora
con el modo de grupo desactivado, la
anterior cadena completa de caracteres
aparecerá como nombre del disco.
Observe que, si realiza el
procedimiento para “Para volver a
etiquetar grabaciones” de
“Etiquetado de grabaciones”
(página 36) y vuelve a escribir esta
cadena de caracteres por error,
quizá la función de grupo de ese
MD no vuelva a estar operativa.
Nota
En modo de grupo, la grabadora considera
todas las pistas sin ajustes de grupo como si
pertenecieran al último grupo del disco. El
último grupo aparece como “Group --” en el
visor de la grabadora. Dentro del grupo, las
pistas aparecen en el orden que tienen en el
disco, no en el orden del grupo.
Page 77

Para activar el modo de grupo
(grabación en modo de
grupo)
Para grabar pistas en modo de grupo,
antes de comenzar la grabación debe
activar dicho modo.
1 Pulse GROUP al menos durante 2
segundos.
“ ” se ilumina en la pantalla y se
activa el modo de grupo.
Para cancelar el modo de grupo, pulse
GROUP de nuevo durante 2 segundos
como mínimo.
Nota
El ajuste de la función de grupo se cancelará
cuando extraiga el MD.
Grabación de una pista en un
grupo nuevo
1 Mientras la grabadora está parada,
pulse GROUP durante 2 o más
segundos.
“ ” se ilumina en la pantalla y se
activa el modo de grupo.
2 Pulse zREC.
3 Reproduzca el sonido de la fuente.
Para detener la grabación,
pulse x.
El material grabado desde que se pulsó x
se añade como un grupo nuevo.
Para grabar una pista en un
grupo nuevo.
Desactive el modo de grupo y, a
continuación, siga los pasos 1 a 3.
Grabación de una pista en un
grupo existente
1 Mientras la grabadora está parada,
pulse GROUP durante 2 o más
segundos.
“ ” se ilumina en la pantalla y se
activa el modo de grupo.
2 Pulse GROUP ligeramente.
“ ” parpadea en el visor y puede
seleccionar un grupo directamente
(modo de salto de grupo) (página 31).
3 Antes de que transcurran 5 segundos,
pulse .REVIEW/AMS o
>CUE/AMS repetidamente hasta
que aparezca el grupo donde desea
incorporar la pista.
4 Pulse zREC.
5 Reproduzca el sonido de la fuente.
Nota
Si, durante 5 segundos, no se realiza ninguna
operación, el modo de salto de grupo se
desactiva automáticamente en el paso 3. Para
continuar con el procedimiento, siga el paso 2
de nuevo.
z
• Se añadirá la pista al final del grupo.
• Para obtener más información sobre el modo
de salto de grupo, consulte la página 31.
• Para agregar una pista que se está
reproduciendo a un grupo, primero detenga la
reproducción de dicha pista y, a continuación,
siga el procedimiento desde el paso 4.
• Si selecciona “Group --” en el paso 2, el
material grabado se almacenará
automáticamente como “Group01”.
23-ES
Page 78

Cómo iniciar y detener la
grabación sincronizada
con el reproductor fuente
(grabación sincronizada)
En un MD puede realizar fácilmente
grabaciones digitales de una fuente
digital.
Antes de efectuar la grabación
sincronizada, realice las conexiones con
la fuente digital mediante un cable digital,
e inserte un MD grabable.
Reproductores
de CD, etc.
REC MODE
zREC
SYNCHRO REC
1 Pulse REC MODE varias veces hasta
que “STEREO”, “LP2”, “LP4”, o
“MONO” se ilumine en la pantalla.
Para obtener información sobre el
modo de grabación, consulte
“Grabación de larga duración”
(página 16).
2 Deslice SYNCHRO REC a ON.
“SYNC” aparece en el visor.
007
30:03
Indicación de grabación sincronizada
“SYNC” no aparecerá si el cable
óptico no está conectado a la toma
LINE IN (OPTICAL) de la grabadora.
24-ES
3 Pulse zREC.
La grabadora está en modo de espera
para iniciar la grabación.
4 Reproduzca el sonido de la fuente.
La grabadora inicia la grabación
cuando recibe el sonido de la
reproducción.
Para detener la grabación
Pulse xSTOP.
z
• No se puede hacer una pausa manual durante
la grabación sincronizada.
• En la grabación sincronizada, si la fuente no
emite sonido durante más de 3 segundos, la
grabadora cambia automáticamente a modo de
espera (página 53). Cuando vuelve a recibir
sonido del reproductor, la grabadora reanuda
la grabación sincronizada. Si la grabadora
permanece en modo de espera durante 5
minutos o más, se detiene automáticamente.
Notas
• No cambie de posición el interruptor
SYNCHRO REC después del paso 3. La
grabación no se realizaría correctamente.
• El ajuste del modo de grabación (estéreo, LP2
estéreo, LP4 estéreo o monoaural) no se puede
cambiar durante la grabación sincronizada.
• Aunque no haya sonido grabado en la fuente
de sonido (página 53), pueden darse casos en
los que la grabación no entre en modo de
pausa automáticamente durante la grabación
sincronizada debido al nivel de ruido emitido
por la fuente de sonido.
• Si se encuentra un silencio durante 2 o más
segundos en el transcurso de una grabación
sincronizada, se añadirá automáticamente una
marca de pista en el punto en que termine el
silencio (página 53).
• La grabación sincronizada no se puede
efectuar si el cable de conexión no es un cable
óptico o si el cable está conectado a la toma
MIC (PLUG IN POWER).
• No se puede cambiar el modo de grabación
mientras se graba.
Page 79

Ajuste del reloj para
incluir la hora de
grabación
Para incluir la fecha y la hora en el MD
cuando se grabe, primero hay que ajustar
el reloj.
./>
xSTOP
CLOCK SET
NPLAY
(parte inferior)
1 Pulse CLOCK SET en la parte
inferior de la grabadora.
Utilice un objeto puntiagudo.
Los dígitos del año parpadean.
01y 1m 1d
12:00am
Clock
Si se equivoca mientras ajusta
el reloj
Pulse xSTOP y vuelva a ajustar el reloj
desde el paso 1. Puede saltarse un paso
pulsando NPLAY.
Para ver la hora actual
Cuando la grabadora no está funcionando
o mientras graba, pulse DISPLAY de
forma repetida hasta que aparezca la hora
actual en el visor.
Para ver la hora con el sistema
de 24 horas
Mientras ajusta el reloj, pulse XPAU SE .
Para ver la hora en el sistema de 12 horas,
vuelva a pulsar XPAU SE .
z
También puede utilizar el mando SPEED
CONTROL para ajustar el reloj. Gire el mando
en lugar de ./> en el paso 2, y pulse el
mando en lugar de NPLAY en el paso 3.
Notas
• Compruebe que la hora esté correctamente
ajustada si quiere que se grabe de forma
exacta en una grabación importante.
• En condiciones normales, el reloj puede
atrasarse o adelantarse 2 minutos por mes.
2 Cambie el año actual pulsando . o
>.
Para cambiar los dígitos rápidamente,
siga pulsando . o >.
3 Pulse NPLAY para introducir el
año.
Los dígitos del mes parpadean.
4 Repita los pasos 2 y 3 para introducir
el mes, el día, la hora y los minutos.
Cuando pulse NPLAY para
introducir los minutos, el reloj
empezará a funcionar.
25-ES
Page 80

Comprobación del
tiempo restante o de la
posición de grabación
Puede comprobar el tiempo restante, el
número de pista, etc., durante la grabación
o cuando la grabadora está parada.
Las opciones relacionadas con la función
de grupo aparecen cuando se reproduce y
después se detiene una pista con ajustes
de grupo.
DISPLAY
Indicador REC
1 Pulse DISPLAY mientras la
grabadora esté grabando o parada.
Cada vez que pulse el botón, el visor
cambiará de la manera siguiente.
A
B
C
Durante la grabación
AB C
Número
de pista
Número
de pista
Fecha
actual
Tiempo
transcurrido
Tiempo
restante de
grabación
Hora actual Clock
—
RecRemain
En el modo de parada
ABC
Número de
pista
Nombre de
la pista
Nombre del
grupo
Nombre del
disco
Fecha actual Hora actual Clock
Nota
Dependiendo del estado activado/desactivado
del modo de grupo, del estado de
funcionamiento de la grabadora o de los ajustes
de la grabadora, quizá las opciones aparezcan
de forma diferente o no puedan seleccionarse.
Para saber el estado de la
grabación
El indicador REC se ilumina o parpadea
en función del estado de la grabación.
Estado de la
grabación
Durante la
grabación
Grabación en
espera
Menos de 3
minutos de tiempo
de grabación
disponible
Se ha añadido una
marca de pista (sólo
cuando se controla
desde la grabadora)
z
Si desea comprobar la posición o el nombre de la
pista durante la reproducción, vea la página 29.
Tiempo
transcurrido
Tiempo
restante de
grabación
Tiempo
restante en
el grupo
Tiempo
restante a
partir de la
posición
actual
REC Indicador
se ilumina
parpadea
parpadea lentamente
se apaga
momentáneamente
—
RecRemain
GP Remain
AllRemain
26-ES
Page 81

Opciones de reproducción
Cómo cambiar el ajuste
de sonido
Puede seleccionar un sonido concreto al
reproducirlo.
Esta función es eficaz cuando
utiliza los auriculares
suministrados para escuchar
grabaciones en estéreo.
SOUND
SOUND
1 Pulse SOUND varias veces.
Cada vez que pulse el botón, A
cambiará de la manera siguiente.
A
1)
Durante la reproducción en estéreo, la función
Voice Up enfatiza la orientación izquierdaderecha de cada una de las voces, lo que
permite que sea más fácil oírlas y distinguirlas.
No puede utilizar la función Voice Up cuando
grabe en mono.
Para cancelar el ajuste de
sonido
Pulse SOUND repetidamente hasta que el
visor se quede vacío
Notas
• No se recomienda el uso de la función Voice
Up al reproducir un disco de música.
• No puede activar la función Voice Up cuando
grabe en mono.
• Si se produce distorsión del sonido cuando
sube el volumen mientras “SOUND 1” o
“SOUND 2”, baje el volumen o cambie el
modo de reproducción.
• El ajuste de “SOUND 1” o “SOUND 2” no
afecta al sonido que se está grabando.
.
003
20:51
A Ajuste de sonido
— (nada) Ajuste de fábrica
SOUND 1 Graves acentuados
(Mega Bass 1 digital)
SOUND 2 Graves aún más
1)
V- UP
acentuados
(Mega Bass 2 digital)
Mejora de la claridad de
la voz (función Voice Up)
27-ES
Page 82

Cómo encontrar un punto
concreto rápidamente
(Easy Search)
Utilice la función Easy Search para
encontrar rápidamente un punto concreto.
EASY SEARCH +/–
1 Pulse EASY SEARCH + o – mientras
la grabadora esté en reproducción o
parada.
Cada pulsación del botón + hace
avanzar el punto de reproducción un
minuto aproximadamente. Cada
pulsación del botón – hace retroceder
el punto de reproducción un minuto
aproximadamente.
003
02:31
+01
Cuando se pulsa una vez el botón +. (La
posición de reproducción avanza un minuto.)
• Si llega al principio del disco mientras está
utilizando la función de búsqueda fácil, la
grabadora comenzará la reproducción
automáticamente. Si llega al final del disco
mientras está utilizando la función de
búsqueda fácil, aparecerá “END” en el visor.
Si esto ocurre, pulse el botón xSTOP para
detener la grabadora.
Cómo cambiar la
velocidad de reproducción
(control de velocidad)
La velocidad de reproducción se puede
ajustar en 7 pasos (80%, 85%, ...100%,
105%, 110%).
SPEED CONTROL
1 Presione el mando SPEED
CONTROL durante la reproducción.
Cada vez que acciona el mando,
cambia la velocidad de reproducción.
Seleccione la velocidad que desee
mientras efectúa la audición. “S”
aparece en la pantalla cuando cambia
la velocidad de reproducción.
SPEED
CONTROL
S----+--F
003
00:31
-01
Cuando se pulsa una vez el botón –. (La
posición de reproducción retrocede un
minuto.)
z
• Los botones + y – se pueden pulsar hasta 20
veces cada uno.
28-ES
80% 100% 110%
Indicación de Fast Playback
002
S 03:40
Para cambiar a reproducción normal
Pulse el mando SPEED CONTROL.
Para cambiar de nuevo la velocidad de
reproducción, gire el mando.
Page 83

z
Puede realizar una pausa o encontrar marcas de
pista pulsando el botón XPAUS E,
.REVIEW/AMS o >CUE/AMS durante
Fast Playback.
Reproducción de pistas
de forma repetida
Puede reproducir pistas de forma repetida
de dos maneras: repetición de todos los
temas y repetición de un tema.
PLAY MODE
1 Pulse PLAY MODE mientras la
grabadora está en reproducción.
Cada vez que pulse el botón, la
indicación del modo de reproducción
cambiará de la manera siguiente.
Indicación del modo de reproducción
003
20:51
Indicación Modo de reproducción
— Todas las pistas se
1
z
Puede especificar el modo de reproducción para
un grupo seleccionado cuando está activado el
modo de grupo. Para activar el modo de grupo,
vea “Selección y reproducción de grupos
(función de salto de grupo)” (página 31).
reproducen una vez.
Todas las pistas se
reproducen de forma
repetida.
Una sola pista se reproduce
de forma repetida.
Comprobación del
tiempo restante o de la
posición de reproducción
Durante la reproducción, puede
comprobar el nombre de la pista, el
nombre del disco, etc.
Las opciones relacionadas con la función
de grupo se muestran sólo cuando la
grabadora reproduce una pista con ajustes
de grupo.
DISPLAY
1 Pulse DISPLAY mientras la
grabadora está en reproducción.
Cada vez que pulse el botón, el visor
cambiará de la manera siguiente.
A
B
C
AB C
Número
de pista
Nombre
de la
pista
Nombre
del grupo
Nombre
del disco
Fecha de
grabación
1)
El modo de grabación (página 16) de la pista
aparece de forma momentánea después de que
“RecDate” desaparezca del visor.
Tiempo
transcurrido
Tiempo restante
de la pista actual
Tiempo restante
a partir de la
posición actual
en el grupo
Tiempo restante
a partir de la
posición actual
Tiempo
registrado
— (nada)
1 Remain
GP Remain
AllRemain
1)
RecDate
29-ES
Page 84

Nota
Dependiendo del estado activado/desactivado
del modo de grupo, del estado de
funcionamiento de la grabadora o de los ajustes
de la grabadora, quizá las opciones aparezcan
de forma diferente.
z
Si durante la grabación o en el modo de parada
desea comprobar el tiempo restante o la
posición de grabación, consulte la página 26.
Uso de la función de
grupo (modo de grupo)
La grabadora puede hacer funcionar
varias reproducciones con un disco que
disponga de ajuste de grupo. Para más
información sobre el modo de grupo,
consulte “Grabación de pistas con la
función de grupo (grabación en modo de
grupo)” (página 22).
./>
GROUP
Cómo escuchar pistas con el
modo de grupo (reproducción
del modo de grupo)
Reproducción cuando el modo de grupo
está desactivado:
La reproducción empieza con la primera
pista del disco y se detiene con la última.
Disco
Número de pista
56
123
4
30-ES
EDIT/ENTER
78
Reproducción cuando el modo de grupo
está activado:
La reproducción del grupo seleccionado
comienza con la primera pista del grupo y
termina con la última pista del grupo.
Disco
Grupo 1
Número
de pista
123
Grupo 2
Número
de pista
12
Grupo 3
Número
de pista
12
1 Inserte un disco que disponga de
ajuste de grupo en la grabadora y
reproduzca el disco.
2 Pulse GROUP al menos durante 2
segundos.
“ ” y “GROUP ON” se iluminan
en la pantalla y se activa el modo de
grupo.
La reproducción finaliza al final de la
última pista del grupo seleccionado.
Para más información sobre la
selección de otro grupo, vea “Selección
y reproducción de grupos (función de
salto de grupo)” (página 31).
z
También puede reproducir las pistas varias
veces en el grupo seleccionado. Después de
estos procedimientos, siga los pasos de
“Reproducción de pistas de forma repetida”
(página 29).
Para desactivar la función de grupo
Pulse de nuevo GROUP durante 2
segundos como mínimo.
Nota
En modo de grupo, la grabadora considera
todas las pistas sin ajustes de grupo como si
pertenecieran al último grupo del disco. El
último grupo aparece como “Group --” en el
visor de la grabadora. Dentro del grupo, las
pistas aparecen en el orden que tienen en el
disco, no en el orden del grupo.
Page 85

Selección y reproducción de
grupos (función de salto de
grupo)
Cuando reproduce un disco con ajustes de
grupo, el modo de salto de grupo le
permite saltar del grupo que se está
reproduciendo en esos momentos a
cualquier otro grupo del MD. El modo de
salto de grupo se puede utilizar en
cualquier momento durante la
reproducción, independientemente de que
el reproductor esté en modo de grupo o
no.
Cuando el modo de grupo está desactivado:
Disco
Número de pista
123
56
78
4
2 Antes de que pasen 5 segundos, pulse
.REVIEW/AMS/>CUE/AMS
hasta que aparezca el grupo que desea
y, a continuación, pulse EDIT/
ENTER.
La grabadora comienza a reproducir
desde la primera pista del grupo.
z
El modo de salto de grupo funciona
independientemente de que el modo de grupo
esté activado o no.
Notas
• Si no se realiza ninguna operación dentro de
los 5 segundos que siguen al paso 1, se
cancelará el modo de salto de grupo y no
podrá realizar el paso 2. Para continuar con el
paso 1 en este punto, repita el procedimiento
desde el comienzo.
• El modo de salto de grupo no se puede utilizar
con un disco que no disponga de ajustes de
grupo.
Salto
Cuando el modo de grupo está activado:
Disco
Grupo 1
Número
de pista
123
Salto Salto Salto
Salto Salto
Grupo 2
Número
de pista
12
Grupo 3
Número
de pista
12
1 Inserte un disco que disponga de
ajuste de grupo en la grabadora y
reproduzca el disco y, a continuación,
pulse GROUP ligeramente.
“ ” parpadea en la pantalla y se
activa el modo de salto de grupo.
31-ES
Page 86

Edición de pistas grabadas
Puede editar sus grabaciones para añadir
o borrar marcas de pista o etiquetar pistas
y MD. Los MD comerciales pregrabados
no se pueden editar.
Notas sobre la edición
• No se pueden editar pistas en un MD
protegido contra grabación. Antes de editar
pistas, cierre la lengüeta lateral del MD
(página 54).
• Si durante la reproducción efectúa una
operación de edición, no desconecte la
alimentación hasta que “TOC Edit”
desaparezca del visor.
• No mueva ni sacuda la grabadora mientras
“TOC Edit”* parpadea en el visor.
• La tapa no se puede abrir hasta que “TOC
Edit” desaparezca del visor después de la
edición.
• Con el modo de grupo activado, sólo se
pueden editar las pistas registradas en el grupo
seleccionado.
∗ TOC = Table of Contents (Tabla de
contenido)
Adición de una marca
de pista
Puede añadir dos tipos de marcas de pista:
marcas de pista normales y marcas de
pista especiales. Se puede añadir un total
de 254 marcas de pista en un disco.
Marcas de pista para dividir
una grabación
Puede añadir marcas de pista de manera
que la parte que sigue a la nueva marca se
contabilice como una pista nueva.
Los números de pista se incrementarán de
la forma siguiente:
1 3 42
Marcado de pistas
231 4 5
Los números de pista se incrementan
1 Mientras graba, reproduce o realiza
una pausa en un MD, pulse TRACK
MARK en el punto donde desee
insertar la marca.
“MARK ON” aparece en el visor y se
añade una marca de pista. El número
de pista aumentará en una unidad.
Marcas de pista en puntos
importantes
Durante la grabación, puede añadir,
además de marcas de pista normales,
marcas de pista especiales (“TT”) para
marcar la posición de puntos importantes.
321 4 5678
32-ES
TRACK MARK
TRACK MARK
Marcas de pista
normales
Marcas de pista
especiales
1 Durante la grabación, pulse TRACK
MARK en el mando a distancia durante
2 o más segundos en el punto adecuado.
Se añade una marca de pista especial y
el número de pista aumentará en uno.
“!MARK ON!” aparece en la pantalla
y “TT” se añade automáticamente al
principio del nombre de la pista.
Page 87

Nota
Asegúrese de que pulsa el botón TRACK
MARK durante 2 segundos como mínimo; si no
es así, se añadirá una marca de pista normal.
Para localizar marcas de pista
especiales durante la
reproducción
Mientras mantiene pulsado VOR, pulse
momentáneamente .REVIEW/AMS
o >CUE/AMS.
El número de pista aparece después de la
indicación de marca de pista especial
(“TT”).
002
00:40
:TT
Indicación de marca de pista especial
Pulse .REVIEW/AMS de forma
repetida para ir a las marcas de pista
especiales anteriores. Pulse >CUE/
AMS de forma repetida para ir a las
marcas de pista especiales siguientes.
Para cambiar una marca de
pista normal por una marca de
pista especial
Después de haber terminado de grabar,
añada “TT” al principio del nombre de la
pista que quiere cambiar.
Para cambiar una marca de
pista especial por una marca
de pista normal
Después de haber terminado de grabar,
borre “TT” al principio del nombre de la
pista o cambie el nombre de la pista.
Borrado de una marca
de pista
Cuando borra una marca de pista normal o
una marca de pista especial, los números
de pista cambiarán del siguiente modo:
Ejemplo
Al combinar la pista 2 y la pista 3
1 3 42
Borrado de una marca de pista
1 32
Los números de pista disminuyen
.REVIEW/AMS
TRACK MARKXPAUSE
1 Mientras reproduce la pista que
contiene la marca de pista que desea
borrar, pulse XPAUSE para realizar
una pausa.
Para borrar la tercera marca de pista,
reproduzca la tercera pista y pulse
XPAU S E.
2 Busque la marca de pista pulsando
ligeramente .REVIEW/AMS.
Localice el principio de la tercera
pista. “00:00” aparece en el visor.
“MARK” aparecerá en el visor
durante 2 segundos.
3 Pulse TRACK MARK para borrar la
marca.
“MARK OFF” aparece en el visor. La
marca de pista se borra y las dos
pistas se combinan.
33-ES
Page 88

z
Cuando se borra una marca de pista, también se
borran la fecha, la hora y el nombre asignados a
la marca.
Notas
• Cuando se borra una marca de pista entre dos
pistas consecutivas registradas en grupos
distintos, la segunda pista se vuelve a registrar
en el grupo que contiene la primera. Además,
si combina una pista registrada en un grupo
con otra que no lo esté (pistas consecutivas),
la segunda pista adopta el mismo ajuste de
grupo que la primera. Por ejemplo, si la
primera pista se registra en un grupo, la
segunda pista se registrará en el mismo grupo
como primera pista.
• No puede borrar marcas de pistas según las
limitaciones del sistema. Para más
información, consulte “Limitaciones del
sistema” (página 49).
Etiquetado de
grabaciones
Puede dar nombre a las pistas durante la
reproducción, a los discos durante la
parada y a ambos durante la grabación.
Cada nombre puede tener 200 caracteres
como máximo.
Cada disco puede contener hasta
1 700 caracteres alfanuméricos durante la
reproducción o la parada.
Puede introducir aproximadamente
500 caracteres alfanuméricos y símbolos
durante la grabación de cada pista.
Caracteres disponibles
• Letras mayúsculas y minúsculas del
alfabeto inglés
• Números del 0 al 9
" # $ % & ( ) * . ; < = > ?
• !
@ _ ` + – ' , / : _ (espacio)
Notas
• “NAME FULL” aparece cuando intenta
escribir más de 1 700 caracteres en un disco.
Escriba un nombre más corto para la pista,
grupo o disco, o borre “LP:” del nombre de
pista grabada en modo MDLP.
34-ES
• Si etiqueta un disco grabado con la función de
grupo, asegúrese de activar dicha función para
no borrar la información de grupo.
• Si escribe el símbolo “//” entre los caracteres
de los nombres de los discos, como “abc//
def”, puede que la función de grupo no
funcione correctamente.
PLAY MODE
DISPLAY
./>
xSTOP
N
EDIT/
ENTER
EASY
SEARCH
+/–
TRACK MARK
X
Etiquetado de un disco con la
grabadora parada
Para etiquetar un disco que contiene
ajustes de grupo, debe activar el modo de
grupo antes de realizar el etiquetado
(página 23).
1 Inserte un disco.
Cuando el disco ya está insertado,
compruebe que la grabadora está
parada.
2 Pulse EDIT/ENTER.
“ : Name” parpadea en el visor.
3 Vuelva a pulsar EDIT/ENTER.
Ya se puede etiquetar el disco.
4 Pulse . o > varias veces para
seleccionar un carácter y pulse N
para introducirlo.
La letra seleccionada deja de
parpadear y el cursor se desplaza a la
siguiente posición de entrada.
Pulse/Gire Para
X
Cambiar entre letras
mayúsculas, minúsculas,
marcas o números.
Page 89

Pulse/Gire Para
./> Cambiar la letra por la
SPEED
CONTROL
EASY
SEARCH +/–
DISPLAY Insertar un espacio en
PLAY MODE Borrar una letra y
xSTOP Cancelar el etiquetado.
anterior o la siguiente.
Desplazar el cursor a la
derecha (pulse
ligeramente)
Introducir un nombre
(pulse durante 1,5
segundos como
mínimo)
Seleccionar un carácter
(girar)
Desplazar el cursor a la
derecha o a la
izquierda.
blanco y escribir una
nueva letra.
desplazar hacia la
izquierda las letras
siguientes.
5 Repita el paso 4 e introduzca todos
los caracteres del nombre de la
etiqueta.
6 Pulse EDIT/ENTER.
La pista o el disco quedan
etiquetados.
Etiquetado de una pista
durante la reproducción
1 Para etiquetar una pista, inserte un
disco y reproduzca la pista que desea
etiquetar.
Para etiquetar un grupo, inserte un
disco, active el modo de grupo y
reproduzca el grupo que desea
etiquetar (página 30).
2 Pulse EDIT/ENTER.
La grabadora reproduce la pista
seleccionada varias veces.
3 Para etiquetar una pista, pulse EDIT/
ENTER mientras “ : Name”
parpadea.
Para etiquetar un grupo, pulse . o
> varias veces hasta que
“ : Name” parpadee en la pantalla y,
a continuación, pulse EDIT/ENTER.
La pista o el grupo ya se puede
etiquetar.
4 Siga los pasos 4 a 6 de “Etiquetado de
un disco con la grabadora parada”.
Etiquetado de un disco o de
una pista durante la grabación
Para etiquetar un grupo, debe activar el
modo de grupo antes de comenzar la
grabación (página 23).
1 Durante la grabación, pulse EDIT/
ENTER.
“ : Name” parpadea en el visor.
2 Para etiquetar una pista, pulse EDIT/
ENTER mientras “ : Name”
parpadea.
Para etiquetar un grupo, pulse . o
> varias veces hasta que
“ : Name” parpadee en la
pantalla; a continuación, pulse EDIT/
ENTER.
Para etiquetar un disco, pulse . o
> varias veces hasta que
“ : Name” parpadee en la
pantalla; a continuación, pulse EDIT/
ENTER.
La pista, el grupo o el disco ya se
puede etiquetar.
3 Siga los pasos 4 a 6 de “Etiquetado de
un disco con la grabadora parada”.
Para cancelar el etiquetado
Pulse xSTOP.
35-ES
Page 90

Para volver a etiquetar
grabaciones
Siga los pasos correspondientes al método
de etiquetado hasta que la pista, el grupo o
el disco estén preparados para ser
etiquetados. Introduzca un nuevo carácter
sobre el que desea cambiar y, a
continuación, pulse el botón EDIT/
ENTER.
z
También puede utilizar el mando SPEED
CONTROL para seleccionar y, a continuación,
introducir el menú. Gire el mando (en lugar de
./>) para mostrar las opciones de menú
de una en una y pulse el mando (en lugar de
EDIT/ENTER) para introducir el menú
seleccionado.
Notas
• “LP:” se ha añadido al principio del nombre
de la pista grabada en modo MDLP.
• Si la grabación se interrumpe mientras se
etiqueta un disco o una pista, o si la
reproducción pasa a la pista siguiente mientras
se etiqueta una pista, la entrada en ese punto
se introduce automáticamente.
• Cuando grabe a través de los micrófonos
incorporados, también se grabará el sonido de
las operaciones que realice con la grabadora,
como la pulsación de los botones. Para
evitarlo, se recomienda que etiquete un disco
o una pista después de completar la grabación.
• No se pueden volver a etiquetar MD
parametrizados y no se pueden etiquetar MD
que no estén grabados.
• La grabadora puede mostrar, pero no puede
etiquetar, caracteres “Katakana” japoneses.
• La grabadora no puede reescribir un nombre
de pista o de disco de más de 200 letras creado
por otro dispositivo.
Registro de pistas o
grupos como un grupo
nuevo (ajuste de grupo)
Siga este procedimiento para registrar
pistas (o grupos). Se puede registrar una
serie de pistas (o grupos) seleccionando
las pistas (o grupos) de inicio y de fin. No
obstante, las pistas (o grupos) deben estar
ordenadas secuencialmente. Si las pistas
(o grupos) que quiere registrar no están
ordenadas de forma consecutiva, deberá
ordenarlas de esta forma antes de
registrarlas (“Cambio de orden de pistas
grabadas”, página 38). Esta función se
puede utilizar en cualquier momento,
independiente de que el modo de grupo
esté activado o no.
Grupo
Grupo
123456789
Creación de un
grupo nuevo
con las pistas
1a 3.
Grupo
Creación de un
grupo nuevo con 2
grupos.
Grupo
123456789
• No es posible el registro de pistas no
consecutivas (por ejemplo, la 1, 3, 2, 4,
3, 5, 6, 6, 8 y 9).
• Las pistas siempre aparecen según su
orden en el disco, no según su orden en
el grupo (aunque se haya activado el
modo de grupo).
./>
EDIT/
ENTER
36-ES
1 Con la grabadora parada, pulse EDIT/
ENTER.
Page 91

2 Pulse . o > varias veces hasta
que “ : Set” parpadee en la
pantalla y, a continuación, pulse
EDIT/ENTER.
“001” parpadea en el visor.
STR:001
END:001
:
3 Pulse . o > varias veces hasta
que el número o el nombre de la
primera pista que desee parpadee en
la pantalla y, a continuación, pulse
EDIT/ENTER.
De esta forma se selecciona la
primera pista del nuevo grupo.
Aunque el modo de grupo esté
activado, los números de las pistas
aparecen según su orden en el disco,
no según su orden en el grupo.
4 Pulse . o > varias veces hasta
que el número o el nombre de la
última pista que desee parpadee en la
pantalla y, a continuación, pulse
EDIT/ENTER.
De esta forma se selecciona la última
pista del nuevo grupo.
5 Siga los pasos 4 a 6 de “Etiquetado de
grabaciones” (página 34) para
etiquetar un grupo.
z
También puede utilizar el mando SPEED
CONTROL para seleccionar y, a continuación,
introducir el menú. Gire el mando (en lugar de
./>) para mostrar las opciones de menú
de una en una y pulse el mando (en lugar de
EDIT/ENTER) para introducir el menú
seleccionado.
Notas
• En el paso 3, la primera pista debe ser la
primera de un grupo existente o una pista que
no pertenezca a un grupo.
• Al seleccionar la última pista en el paso 4,
asegúrese de que dicha pista viene después de
la seleccionada en el paso 3. La última pista
debe ser la última de un grupo existente o una
pista que no pertenezca a un grupo.
Para cambiar el ajuste
de grupo
./>
xSTOP
GROUP
EDIT/ENTER
1 Pulse GROUP al menos durante 2
segundos.
“ ” se ilumina en la pantalla y se
activa el modo de grupo.
2 Siga los pasos 1 y 2 de “Selección y
reproducción de grupos (función de
salto de grupo)” (página 31) y
compruebe el contenido del grupo
cuya configuración desea cambiar. A
continuación, pulse xSTOP.
3 Pulse EDIT/ENTER.
4 Pulse . o > varias veces hasta
que “ : Release” parpadee en la
pantalla y pulse EDIT/ENTER.
“Release?” aparece y “PushENTER”
parpadea en el visor.
5 Pulse EDIT/ENTER.
El ajuste de grupo del grupo
seleccionado queda liberado.
z
También puede utilizar el mando SPEED
CONTROL para seleccionar y, a continuación,
introducir el menú. Gire el mando (en lugar de
./>) para mostrar las opciones de menú
de una en una y pulse el mando (en lugar de
EDIT/ENTER) para introducir el menú
seleccionado.
37-ES
Page 92

Cambio de orden de
pistas grabadas
Puede cambiar el orden de las pistas
grabadas.
Ejemplo
Mover la pista C de la tercera a la segunda
pista.
Antes del cambio
A C DB
A B DC
Después del cambio
./>
TRACK MARK
EDIT/ENTER
1 Mientras reproduce la pista que
quiere mover, pulse EDIT/ENTER.
La grabadora reproduce la pista
seleccionada varias veces.
2 Pulse . o > varias veces hasta
que “ : Move” parpadee en la
pantalla.
3 Vuelva a pulsar EDIT/ENTER.
El número o nombre de pista
seleccionado del grupo al que
pertenece la pista seleccionada
(cuando el modo de grupo está
activado) parpadea en el visor.
38-ES
4 Pulse . o > varias veces para
seleccionar el número de la pista de
destino.
En el ejemplo anterior, “MV 003 t
002” aparece en el visor.
5 Vuelva a pulsar EDIT/ENTER.
La pista se mueve a la pista destino
seleccionada.
Para cancelar el cambio de orden
Pulse xSTOP.
z
También puede utilizar el mando SPEED
CONTROL para seleccionar y, a continuación,
introducir el menú. Gire el mando (en lugar de
./>) para mostrar las opciones de menú
de una en una y pulse el mando (en lugar de
EDIT/ENTER) para introducir el menú
seleccionado.
Cambio de una pista a
un grupo distinto
./>
GROUP
EDIT/ENTER
1 Pulse GROUP al menos durante 2
segundos.
“ ” se ilumina en la pantalla y se
activa el modo de grupo.
2 Mientras reproduce la pista que
quiere mover, pulse EDIT/ENTER.
La grabadora reproduce la pista
seleccionada varias veces.
3 Pulse . o > varias veces hasta
que “ : Move” parpadee en la
pantalla y, a continuación, pulse
EDIT/ENTER.
Page 93

4 Pulse . o > varias veces hasta
que el grupo de destino parpadee en
la pantalla y, a continuación, pulse
EDIT/ENTER.
5 Pulse . o > varias veces hasta
que el número de la pista de destino
en el grupo parpadee en el visor y, a
continuación, pulse EDIT/ENTER.
z
También puede utilizar el mando SPEED
CONTROL para seleccionar y, a continuación,
introducir el menú. Gire el mando (en lugar de
./>) para mostrar las opciones de menú
de una en una y pulse el mando (en lugar de
EDIT/ENTER) para introducir el menú
seleccionado.
Cambio de orden de un
grupo en un disco
(cambio de grupo)
./>
EDIT/ENTER
4 Pulse . o > varias veces para
seleccionar el punto de destino en el
disco y, a continuación, pulse EDIT/
ENTER.
z
También puede utilizar el mando SPEED
CONTROL para seleccionar y, a continuación,
introducir el menú. Gire el mando (en lugar de
./>) para mostrar las opciones de menú
de una en una y pulse el mando (en lugar de
EDIT/ENTER) para introducir el menú
seleccionado.
Borrado de pistas
Cómo borrar una pista
Recuerde que cuando borre una
grabación ya no podrá recuperarla.
Compruebe el contenido de la pista
que va a borrar.
EDIT/ENTER
GROUP
1 Pulse GROUP al menos durante 2
segundos.
“ ” se ilumina en la pantalla y se
activa el modo de grupo.
2 Mientras se reproduce una pista de un
grupo cuyo orden quiere cambiar,
pulse EDIT/ENTER.
3 Pulse . o > varias veces hasta
que “ : Move” parpadee en la
pantalla y, a continuación, pulse
EDIT/ENTER.
Ahora ya puede cambiar el grupo
seleccionado.
ERASE
1 Mientras se esté reproduciendo la
pista que va a borrar, pulse ERASE.
“Erase OK?” y “PushENTER”
aparecen alternativamente en el visor
y la grabadora reproduce la pista
seleccionada varias veces.
2 Pulse EDIT/ENTER.
La pista se borra y comienza la
reproducción de la pista siguiente.
Todas las pistas que siguen a la que se
ha borrado se renumeran
automáticamente.
Para anular el borrado
Pulse xSTOP.
39-ES
Page 94

Cómo borrar una pequeña
sección de una pista
Realice una pausa durante la reproducción
en el punto en el que desea iniciar el
borrado. A continuación, efectúe los
pasos 1 y 2.
Cómo borrar un grupo
Recuerde que cuando borre una
grabación ya no podrá recuperarla.
Compruebe el contenido del grupo
que va a borrar.
Para borrar parte de una pista
Añada marcas de pista al inicio y al final
de la parte que quiere borrar y borre esa
parte.
Cómo borrar todo el disco
Recuerde que cuando borre una
grabación ya no podrá recuperarla.
Compruebe el contenido del disco
que va a borrar.
1 Reproduzca el disco que quiere borrar
para comprobar el contenido y, a
continuación, pulse xSTOP.
2 Con la grabadora parada, pulse
ERASE.
“All Erase?” y “PushENTER”
aparecen alternativamente en la
pantalla.
3 Pulse . o > varias veces hasta
que “ : Erase” parpadee en la
pantalla y, a continuación, pulse
EDIT/ENTER.
El nombre de la pista y “All Erase? ”
se iluminan y “PushENTER”
parpadea en la pantalla.
4 Pulse EDIT/ENTER.
“TOC Edit” parpadeará en el visor y
se borrarán todas las pistas.
Cuando el borrado termina, en el
visor aparece “BLANKDISC”.
Para anular el borrado,
Pulse xSTOP.
1 Pulse GROUP al menos durante 2
segundos.
“ ” se ilumina en la pantalla y se
activa el modo de grupo.
2 Siga los pasos 1 y 2 del
procedimiento descrito en “Selección
y reproducción de grupos (función de
salto de grupo)” (página 31) para
comprobar el contenido del grupo que
va a borrar. A continuación, pulse
xSTOP.
3 Con la grabadora parada, pulse EDIT/
ENTER, pulse . o > varias
veces hasta que EDIT parpadee en la
pantalla y, a continuación, pulse
EDIT/ENTER de nuevo.
4 Pulse . o > varias veces hasta
que “ : Erase” parpadee en la
pantalla y, a continuación, pulse
EDIT/ENTER.
En el visor, aparecen el nombre del
grupo y “GP Erase?”, y
“PushENTER” parpadea. Para
cancelar el borrado, pulse CANCEL.
5 Vuelva a pulsar EDIT/ENTER.
Se ha borrado el grupo.
z
También puede utilizar el mando SPEED
CONTROL para seleccionar y, a continuación,
introducir el menú. Gire el mando (en lugar de
./>) para mostrar las opciones de menú
de una en una y pulse el mando (en lugar de
EDIT/ENTER) para introducir el menú
seleccionado.
40-ES
Page 95

Otras operaciones
Ajuste del contraste del
visor (ajuste del
contraste)
Puede ajustar el contraste del visor de la
grabadora.
./>
EDIT/
ENTER
1 Con la grabadora parada, pulse EDIT/
ENTER.
2 Pulse . o > varias veces hasta
que “CONTRAST” parpadee en la
pantalla y, a continuación, pulse
EDIT/ENTER.
3 Pulse . o > varias veces para
ajustar el contraste y, a continuación,
pulse EDIT/ENTER.
z
También puede utilizar el mando SPEED
CONTROL para seleccionar y, a continuación,
introducir el menú. Gire el mando (en lugar de
./>) para mostrar las opciones de menú
de una en una y pulse el mando (en lugar de
EDIT/ENTER) para introducir el menú
seleccionado.
Bloqueo de los
controles (HOLD)
Use esta función para evitar el
accionamiento involuntario de los botones
mientras transporta la grabadora.
HOLD
HOLD
1 Deslice HOLD en la dirección
indicada por ..
En la grabadora, deslice HOLD para
bloquear los controles. En el mando a
distancia, deslice HOLD para
bloquear los controles.
Deslice HOLD en la dirección
opuesta a la de la flecha para
desbloquear los controles.
41-ES
Page 96

Fuentes de alimentación
La grabadora puede funcionar, además de
con una pila seca alcalina (no
suministrada), mediante una toma
conectada a la red. Sin embargo, no puede
utilizar pilas de manganeso.
Cuándo hay que
sustituir las pilas
Puede comprobar el estado de las pilas
con la indicación de la pila que se
visualiza mientras utiliza el reproductor.
El indicador de las pilas cambia como se
indica en la tabla siguiente, en función del
estado de las pilas.
Las señales del indicador de nivel de pila
son aproximadas.
Indicador
de las pilas
t Disminución de la
r
(parpadeando)
e
(parpadeando)
Estado
potencia de la pila.
Pila gastada.
La pila se ha agotado.
“LOW BATT” parpadea
en el visor del mando a
distancia y la
alimentación se
interrumpe.
2)
Si se utiliza una pila seca alcalina Sony LR6
(SG) “STAMINA” (fabricada en Japón). El
tiempo de grabación puede variar en función
del tipo de pilas alcalinas.
3)
Cuando se graba a través de los micrófonos
incorporados.
4)
Medido según el estándar de JEITA (Japan
Electronics and Information Technology
Industries Association).
Reproducción
1)
(Unidad: horas aproximadas)(JEITA2))
Modo de
grabación
Estéreo
LP2 estéreo
LP4 estéreo
Altavoces
3)
Auriculares
4)
25,5 34,5
27 39,5
30 43
MONOAURAL 30 43
1)
Si se utiliza una pila seca alcalina Sony LR6
(SG) “STAMINA” (fabricada en Japón).
2)
Medido según el estándar de JEITA (Japan
Electronics and Information Technology
Industries Association).
3)
Cuando se reproduce con el altavoz
incorporado.
4)
Cuando se reproduce con auriculares.
Notas
• Detenga la grabadora antes de sustituir las
pilas.
• Se recomienda el uso de un adaptador de ca
opcional para una grabación de larga
duración.
Duración de la pila
Grabación
2)3)
1)
(Unidad: horas aproximadas)(JEITA4))
Modo de grabación Horas aprox.
Estéreo 9
LP2 estéreo 12,5
LP4 estéreo 15
MONOAURAL 12
1)
La duración de la pila puede acortarse en
función de las condiciones de funcionamiento
y de la temperatura ambiente.
42-ES
Page 97

Uso de corriente de la
red
1 Conecte el adaptador de alimentación
de ca AC-E30HG (no suministrado) a
DC IN 3V.
2 Conecte el adaptador de alimentación
de ca (no suministrado) a una toma
mural.
a la toma mural
a DC IN 3V
Adaptador de
alimentación
de ca (no
suministrado)
Notas
• En el hogar, utilice el adaptador de
alimentación de ca AC-E30HG (no
suministrado). No use ningún otro adaptador
de alimentación de ca: la grabadora se podría
averiar.
Polaridad del
enchufe
• Existen diferencias regionales en las
especificaciones AC-E30HG. Por este motivo,
antes de comprar la grabadora, debe
comprobar que los requisitos de alimentación
y la configuración de los enchufes son los
adecuados para su zona.
• Conecte el adaptador de ca a una toma de
pared cercana y desconéctelo rápidamente si
se produce alguna situación anómala.
43-ES
Page 98

Información adicional
Precauciones
Seguridad
No ponga objetos extraños en la toma DC IN
3V.
Fuentes de alimentación
• Utilice pilas LR6 (tamaño AA), corriente de la
red o la batería de un automóvil.
• Incluso aunque la grabadora se haya apagado,
recibe corriente eléctrica mientras está
conectada a la toma de red de la pared.
• Si no va a utilizar la grabadora durante un
período prolongado, compruebe que
desconecta la alimentación (adaptador de
alimentación de ca opcional, pilas secas o
cable de batería de automóvil). Para extraer el
adaptador de alimentación de ca (no
suministrado) de la toma mural, sujete
siempre el enchufe: nunca tire del cable.
Acumulación de calor
La grabadora se puede calentar si se utiliza
durante un período prolongado de tiempo. En
ese caso, apáguela hasta que se enfríe.
Instalación
• Nunca use la grabadora en lugares expuestos a
condiciones extremas de luz, temperatura,
humedad o vibraciones.
• Nunca envuelva la grabadora en ningún
material mientras esté en funcionamiento con
el adaptador de alimentación de ca (no
suministrado). El calor acumulado en la
grabadora podría hacer que no funcionara bien
o causar una avería.
• Nunca lleve la grabadora junto con un objeto
pesado en la bolsa de transporte que se
suministra. La fricción que se produciría al
entrar en contacto con el otro objeto podría
hacer que la superficie pintada de la grabadora
saltase o se rayase.
En los auriculares
Seguridad en carretera
No utilice los auriculares mientras conduce, va
en bicicleta o con un vehículo motorizado. En
muchos países es ilegal y puede provocar un
accidente de tráfico. También puede ser
potencialmente peligroso escuchar la
reproducción a un volumen muy alto mientras
pasea, especialmente en los pasos de peatones.
Debería extremar las precauciones o dejar de
utilizar la grabadora en situaciones
potencialmente peligrosas.
Prevención de lesiones auditivas
Evite utilizar los auriculares a un volumen
excesivo. Los expertos en audición
desaconsejan la escucha continua y prolongada
a volumen alto. Si nota pitidos o zumbidos en
los oídos, reduzca el volumen o interrumpa la
audición.
Respeto a los demás
Mantenga el volumen a un nivel moderado. Le
permitirá escuchar los sonidos exteriores y
mostrará su consideración hacia las personas
que se encuentren cerca de usted.
El cartucho MiniDisc
• Cuando transporte o guarde el MiniDisc,
póngalo en el estuche.
• No abra la ventana deslizante.
• No coloque el cartucho en lugares sometidos a
condiciones extremas de luz, temperatura,
humedad o polvo.
• Pegue la etiqueta del MD suministrada en el
espacio designado para ella. No lo haga en
ninguna otra parte del disco.
Limpieza
• Limpie el estuche de la grabadora con un paño
suave ligeramente humedecido con agua o con
una solución de detergente neutro. No use
ningún tipo de almohadilla abrasiva,
pulimentos o disolventes, como alcohol o
benceno, ya que podría deteriorar el acabado
del estuche.
• Limpie el cartucho del disco con un paño seco
para eliminar la suciedad.
44-ES
Page 99

• El polvo depositado en la lente puede impedir
1
2
1
2
que la unidad funcione de forma correcta.
Compruebe que la tapa del compartimento del
disco está bien cerrada después de insertar o
extraer un MD.
Notas sobre las pilas
Un uso incorrecto de las pilas puede producir la
pérdida de fluido o su combustión. Para evitar
esos accidentes, observe las precauciones
siguientes:
• Respete la polaridad + y – de las pilas.
• No intente recargar las pilas secas.
• Cuando no vaya a utilizar la grabadora durante
un período prolongado de tiempo, extraiga las
pilas.
• Si se produjera una fuga en una pila, limpie
cuidadosa y completamente el líquido vertido
en el compartimento de las pilas antes de
introducir otras nuevas.
Nota sobre ruido mecánico
Mientras está en funcionamiento, la grabadora
produce un ruido mecánico causado por el
sistema de ahorro de energía que no es ningún
problema de funcionamiento.
En la tapa del compartimento
de la pila
La tapa del compartimento de la pila está
diseñada para separarse de la grabadora si se
manipula con fuerza. Efectúe los siguientes
pasos para volver a colocar la tapa.
1 Inserte los salientes de la lengüeta PUSH
OPEN en las ranuras de la grabadora de
uno en uno.
Nota sobre el mantenimiento
Limpie los terminales de forma periódica con
un algodón o un paño suave como muestra la
ilustración.
Terminales
Si tiene problemas o dudas sobre la grabadora,
póngase en contacto con el proveedor Sony más
cercano. (Si se ha producido un problema
mientras el disco estaba en la grabadora,
recomendamos que deje el disco en ella cuando
vaya a consultar al proveedor de Sony, de forma
que éste pueda entender mejor la causa del
problema.)
Ranuras
Salientes
2 Inserte los salientes de la tapa firmemente
en las ranuras de la lengüeta PUSH OPEN
de uno en uno.
45-ES
Page 100

Solución de problemas
Si el problema persiste después de haber realizado estas comprobaciones, póngase en
contacto con el proveedor Sony más próximo.
Síntoma Causa/Solución
La grabadora no
funciona o lo hace
deficientemente.
• Puede que no estén bien conectadas las fuentes de audio.
, Desconecte las fuentes de audio y vuelva a conectarlas (páginas
20, 21).
• La función HOLD está activada (“HOLD” aparece en el visor cuando
se pulsa un botón de la grabadora).
, Desactive HOLD deslizando el interruptor HOLD en la dirección
opuesta a la de la flecha (página 41).
• Se ha condensado humedad dentro de la grabadora.
, Extraiga el MD y deje la grabadora en un lugar cálido con la tapa
abierta durante varias horas hasta que se evapore la humedad.
• La pila está casi descargada (r o “LOW BATT” parpadean).
, Sustituya la pila seca (páginas 9, 42).
• La pila se insertado incorrectamente.
, Inserte la pila correctamente (página 9).
• Ha pulsado un botón mientras la indicación del disco giraba
rápidamente.
, Espere hasta que la indicación vuelva a ser la normal.
• Al grabar digitalmente desde un reproductor portátil de CD, no ha
usado la alimentación de ca o no ha desactivado la función contra
saltos de sonido como ESP (página 20).
, Utilice el reproductor de CD portátil con alimentación de ca o
desactive la función contra saltos de sonido como ESP.
• La grabación analógica se efectuó con un cable de conexión con
atenuador.
, Use un cable de conexión sin atenuador (página 21).
• El adaptador de alimentación de ca (no suministrado) se desenchufó
durante la grabación o se produjo una interrupción de la corriente
eléctrica.
• Durante el funcionamiento, la grabadora recibió un golpe mecánico,
estática excesiva, una tensión de alimentación anormal causada por un
rayo, etc.
, Reinicie el funcionamiento de la forma siguiente:
1
Extraiga las pilas o desconecte todas las fuentes de alimentación.
2 Deje la grabadora desconectada unos 30 segundos.
3 Inserte las pilas o conecte la fuente de alimentación.
• El disco está dañado o no contiene datos de edición o de grabación
correctos.
, Vuelva a insertar el disco. Si esto falla, vuelva a grabar.
• La tapa no está firmemente cerrada.
, Abra la tapa y vuelva a cerrarla, presionando con firmeza para que
quede bien cerrada.
• Se ha insertado un disco sin pistas (“BLANKDISC” aparece cuando
se reproduce o edita).
, Cámbielo por otro disco.
• La lengüeta de protección contra grabación está abierta.
, Deslice la lengüeta de protección contra grabación de forma que
quede cerrada.
46-ES
 Loading...