

roubleshooting
T
GPRS/Wireless LAN PC Card GC79

Screenshots may look slightly different in different operating systems.
ork top down in this trouble shooting guide and verify the things mentioned.
W
Introduction......................................................................................................................... 3
1
1.1 Quick Trouble Shooting Guide ..................................................................................... 3
1.
2 References ................................................................................................................... 3
2 s
Sy tem requirement for installing GC79 ............................................................................ 4
2.1 Check that your laptop fulfills system requirement for installing GC79........................ 4
2.
2 Laptop related problem................................................................................................. 4
3 s
In tallation .......................................................................................................................... 5
3.1 Check that three GC79 PS-SW components are installed........................................... 5
3.
2 Check that operating system recognize GC79 PC card when inserted ....................... 6
3.3 Check that three hardware drivers are properly installed............................................. 7
3
3. .1 Check Sony Ericsson GC79 Wireless Modem and run diagnostic test............... 8
3
3. .2 Check Sony Ericsson Wireless WAN Adapter................................................... 12
3.3.3 Check Sony Ericsson 802.11b Wireless LAN Adapter...................................... 14
3. ree
4 Th ways to open the window Sony Ericsson Wireless Configuration Utility ......... 17
3. gn
5 Dia ostic test of Sony Ericsson 802.11b Wireless LAN Adapter ............................. 18
3.6 Use HyperTerminal to test AT-command ................................................................... 19
4
GPRS and CSD/HSCSD connection ............................................................................... 20
4.1 Check GPRS and CSD/HSCSD network subscription............................................... 20
4.
2 Setup the Local Area Connection icon ....................................................................... 20
4.3 Can you connect to GPRS or CSD/HSCSD?............................................................. 21
4.4 Why can’t I send/receive SMS?.................................................................................. 24
4.5 Why can’t I send/receive Fax? ................................................................................... 25
5 ir
W eless LAN connection ................................................................................................. 26
5.1 What do I need to access corporate wireless LAN?................................................... 26
5.
2 Clear the box Use Windows to configure my wireless network settings .................... 26
5.3 Can you connect to Wireless LAN?............................................................................ 28
5.4 Connectivity statistics for Sony Ericsson 802.11b Wireless LAN Adapter ................. 30
5.5 Check the link status between the GC79 and wireless network ................................ 31
5.6 Where can I set LEAP for the GC79 PC Card?.......................................................... 31
6
Generally connectivity problem and solution.................................................................... 32
6.1 Generally GSM, GPRS and CSD/HSCSD problem ................................................... 32
6.
2 Generally Wireless LAN problem ............................................................................... 33
6.3 Suggested actions for improving signal strength........................................................ 34
6.4 GC79 Manager status log........................................................................................... 36
6.5 Why can’t I use Internet browser? .............................................................................. 37
6.6 Fault code table .......................................................................................................... 39
7 fo
In rmation about software and hardware version........................................................... 42
7.1 Check Firmware, Modem, Program and Driver version ............................................. 42
7.
2 Check MAC-address, WLAN PC software- and WLAN Driver version ...................... 42
8 d
In ex ................................................................................................................................. 43
2
1 Introduction
1.1 Quick Trouble S
hooting Guide
PC card icon in system tray bar
, , Wireless LAN icon in system tray bar
1.2 References
When troubleshooting, please also see the documentation in the table below and
b site: http://www.sonyericsson.com Sony Ericsson we
support area..
D ocumentation Where to find it
GC79 User Guide In Windows environment locate the path
GC79 Quick Start Guide Comes with the GC79 PC-card
P
GC79 PC Card Help
In select Help | Help
Topics or Help | Help For This
Window
and follow the link Global
to:
C:\Progr
GC79 Manager
Or
W
your CD driver.
ackage
GC79 Manager
am Files \ Sony Ericsson \
:\Documents D
here C: are your hard driver and D: is
3

2 System requirement for i C79
nstalling G
2.1 Check that your laptop fulfills system requirement for
installing GC79
• Before installing, make sure that your laptop is newly booted and no other
programs are running. To restart your laptop, select in Windows environm
Start | Shutdow
• Check that you don’t have Ericsson Communications Suite GC75 (below
2.0.0) software installed on your laptop. In Windows environment select Start
| Control Panel | Add/Remov
ecessary to shut down these applications and uninstall the programs from
n
your laptop before the GC79 Manager can be installed.
• install
Card slot
30 MB ram
Check that your laptop has at least the system requirements needed to
and use GC79 PC Card. In Windows environment select My Computer |
right click | click Properties in the menu. In the Gener
System, Processor and Ram memory according to the following system
requirements:
Pentium processor
Windows 98SE, 2000 (SP2), XP or ME
32 bit type II PC
n | Restart.
e Programs. If it can be seen there, it is
al tab, check the
ent
L ptop
2.2 a related problem
The user perceived perform
• Applications and processes
Many applications you insta
starts. If you allow these applications to take control, you can end up with a
situation where (unless you have sufficient memory installed) every other
program slows down to be unusabl
•
Hardware (3V 5V slots supported)
•
Old BIOS, sometimes needs upgrade
•
Supported Operating System
• fering, overhead)
Application robustness (time-outs, buf
• Firewall is not setup in correct way
• When connecting to CSD/HSCSD som
from the radio waves dependin
can sometimes also be seen if a mobile phone is close t
ance depends on the performance of your laptop such as:
ll decide that they should start-up when Windows
e.
e laptop models can show disturbance
g upon their construction, the same problem
o the laptop.
4
3 Installation
.1 Check that three GC79 PS-SW components are installed
3
In Windows environment select Start | Control Panel | Add or Remove
Programs to
open the window Add or Remove Programs, see below.
Read the following PC software components:
• Sony Ericsson 802.11b Wireless LAN Adapter
• Sony Ericsson GC79 Manager
• Sony Ericsson GC79 Wireless Modem Driver
Note: The installation of GC79 PC software wi
install the necessary PC software components.
ll be done three times to
5
3.2 Check that operating system recognize GC79 PC card
when inserted
First ma e sure that GC79 PC software is installed, see below header 3.1
Check that three GC79 PC-SW components are installed.
When GC79 PC Card is fully inserted into the PC card slot, see pictur
below, in usual Windows, a sound is heard indicating that the PC has
recognized th
k
e new hardware.
e
If it is the first time that GC79 PC card is inserted into the PC card slot since
the installation of GC79 Manager then after a few seconds a New Hardware
dialog opens and the three hardware drivers for the GC79 are installed. If the
hardware wizard asks for path to the drivers, simple select Browse and locate
e path to the GC79 CD, see the table below.
th
Component GC79 CD-ROM Location
GPRS (GC75, GC75Net) driver on
Win98
GPRS (GC75, GC75Net) driver on
Win ME
GPRS (GC75, GC75Net) driver on D:\Driver\Dri
Win2000/XP
Wireless LAN (bcmwl5.Inf) driver
on Win2000/XP/ME
Wireless LAN (bcmwl5a.Inf) driver
on Win2000/XP/ME
fe er
In the above table D is re rred as your CD-driv
D:\Driver\Driver98
D:\Driver\DriverME
ver2k
D:\Wlan
D:\Wlan
Note: H iver installation is required for each PC-card slot. If you’re
PC has t th ke place the first time the card
is inser .
ardware dr
more than one PC-card slo
ted into each slot
is will ta
6
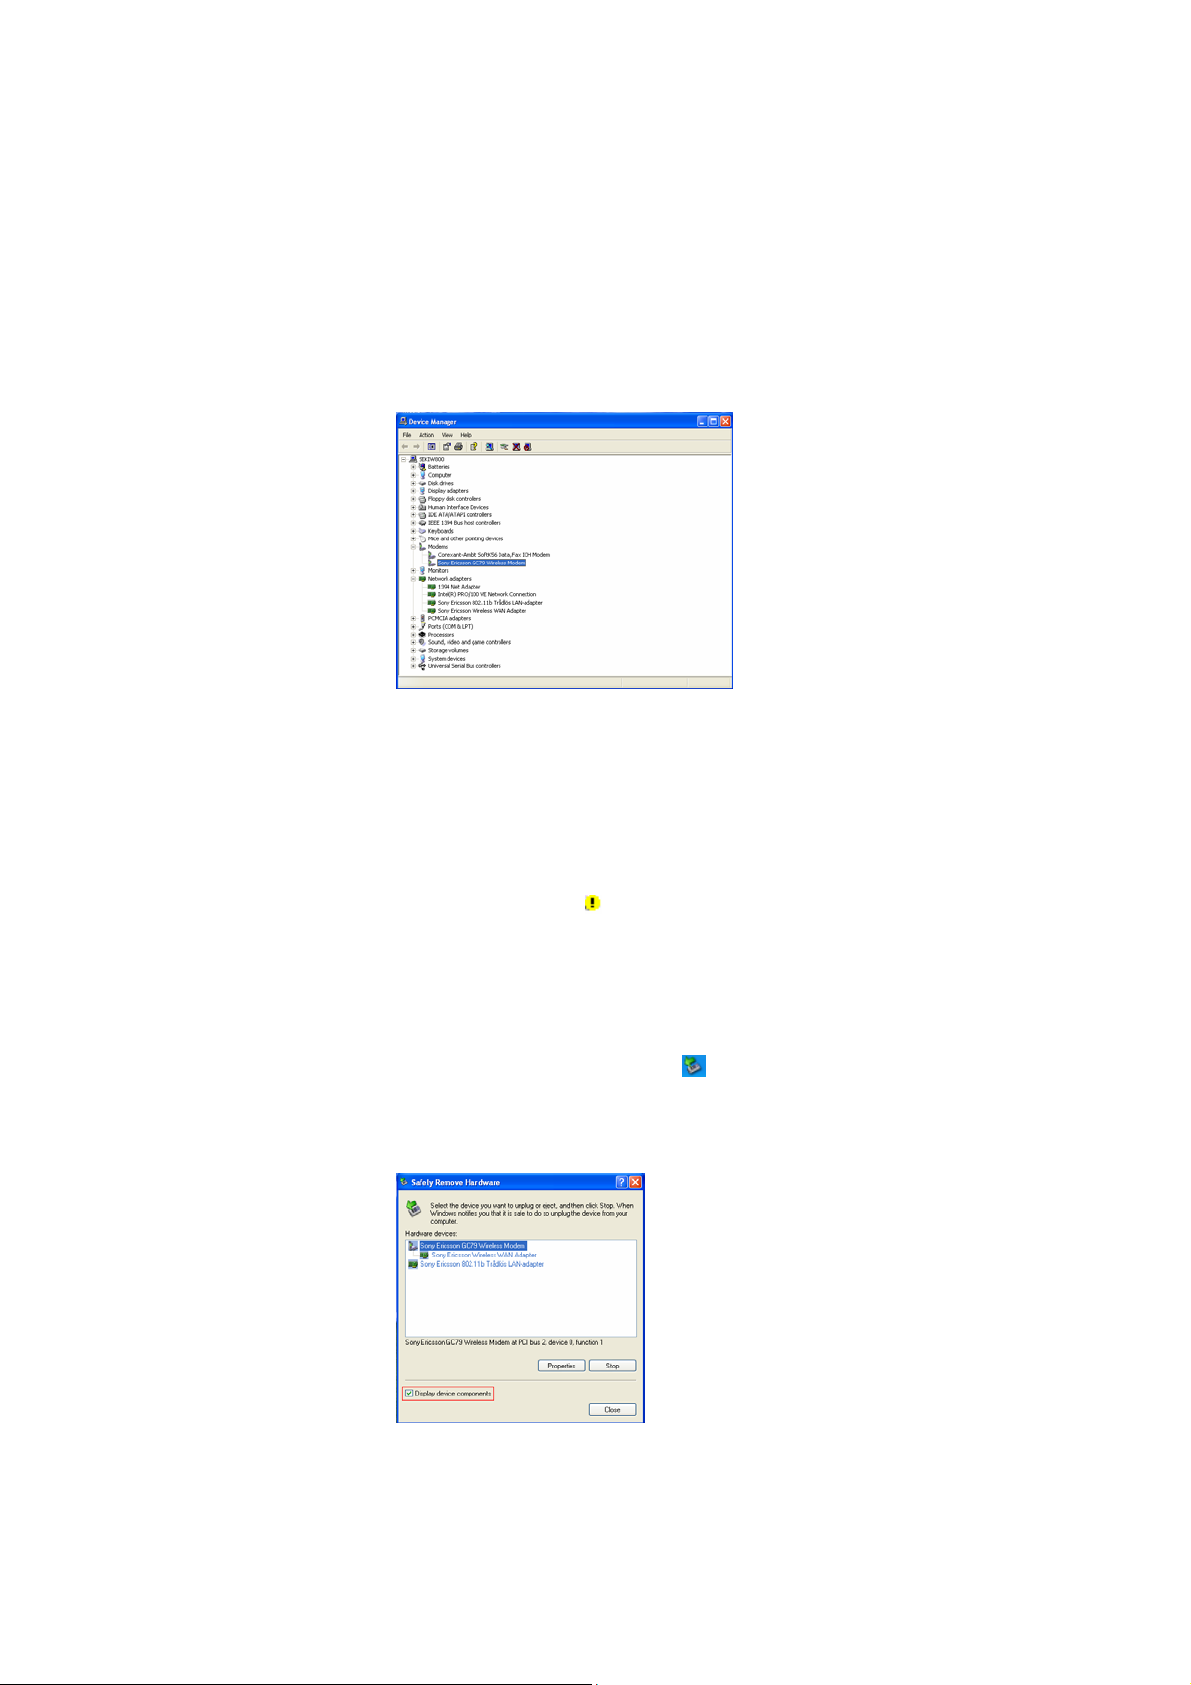
3.3 Check that three hardware drivers are properly installed
irst make sure that GC79 PC card is fully inserted into the slot and that the
F
C has recognised it, see below header 3.2 Check that operating system
P
cognize GC79 PC card when inserted.
re
o verify that the hardware drivers are properly installed there are two ways
T
to check this:
1: In Windows environment select Start | Control Panel | System |
Hardware Tab | Device Manager to open the window Device
Manager, see below.
Click on header Modems and read the following Hardware Device:
Sony Ericsson GC79 Wireless Modem
Click on header Network adapters and read the following Hardware
Devices:
te
If exclamations mark
st
Adapter
Adapter
diagnostic te
2 Put the cursor over the PC-card
:
corner of the screen, right-click, select Safely R
window Safely Remove Hardware opens, make sure that Displa
enabled, see below.
device components is
Sony Ericsson Wireless WAN Adap r
Sony Ericsson 802.11b Wireless LAN Adapter
in front of the Hard
header and what actions to take in Driver tab:
1.5 Check Sony Ericsson GC79 Wireless Modem and run
1.6 Check Sony Ericsson Wireless WAN
1.7 Check Sony Ericsson 802.11b Wireless LAN
ware Device see below
icon on system bar in the right
emove Hardware and
y
Read the following Hardware Devices:
Sony Ericsson GC79 Wireless Modem
Sony Ericsson Wireless WAN Adapter
Sony Ericsson 802.11b Wireless LAN Adapter
7
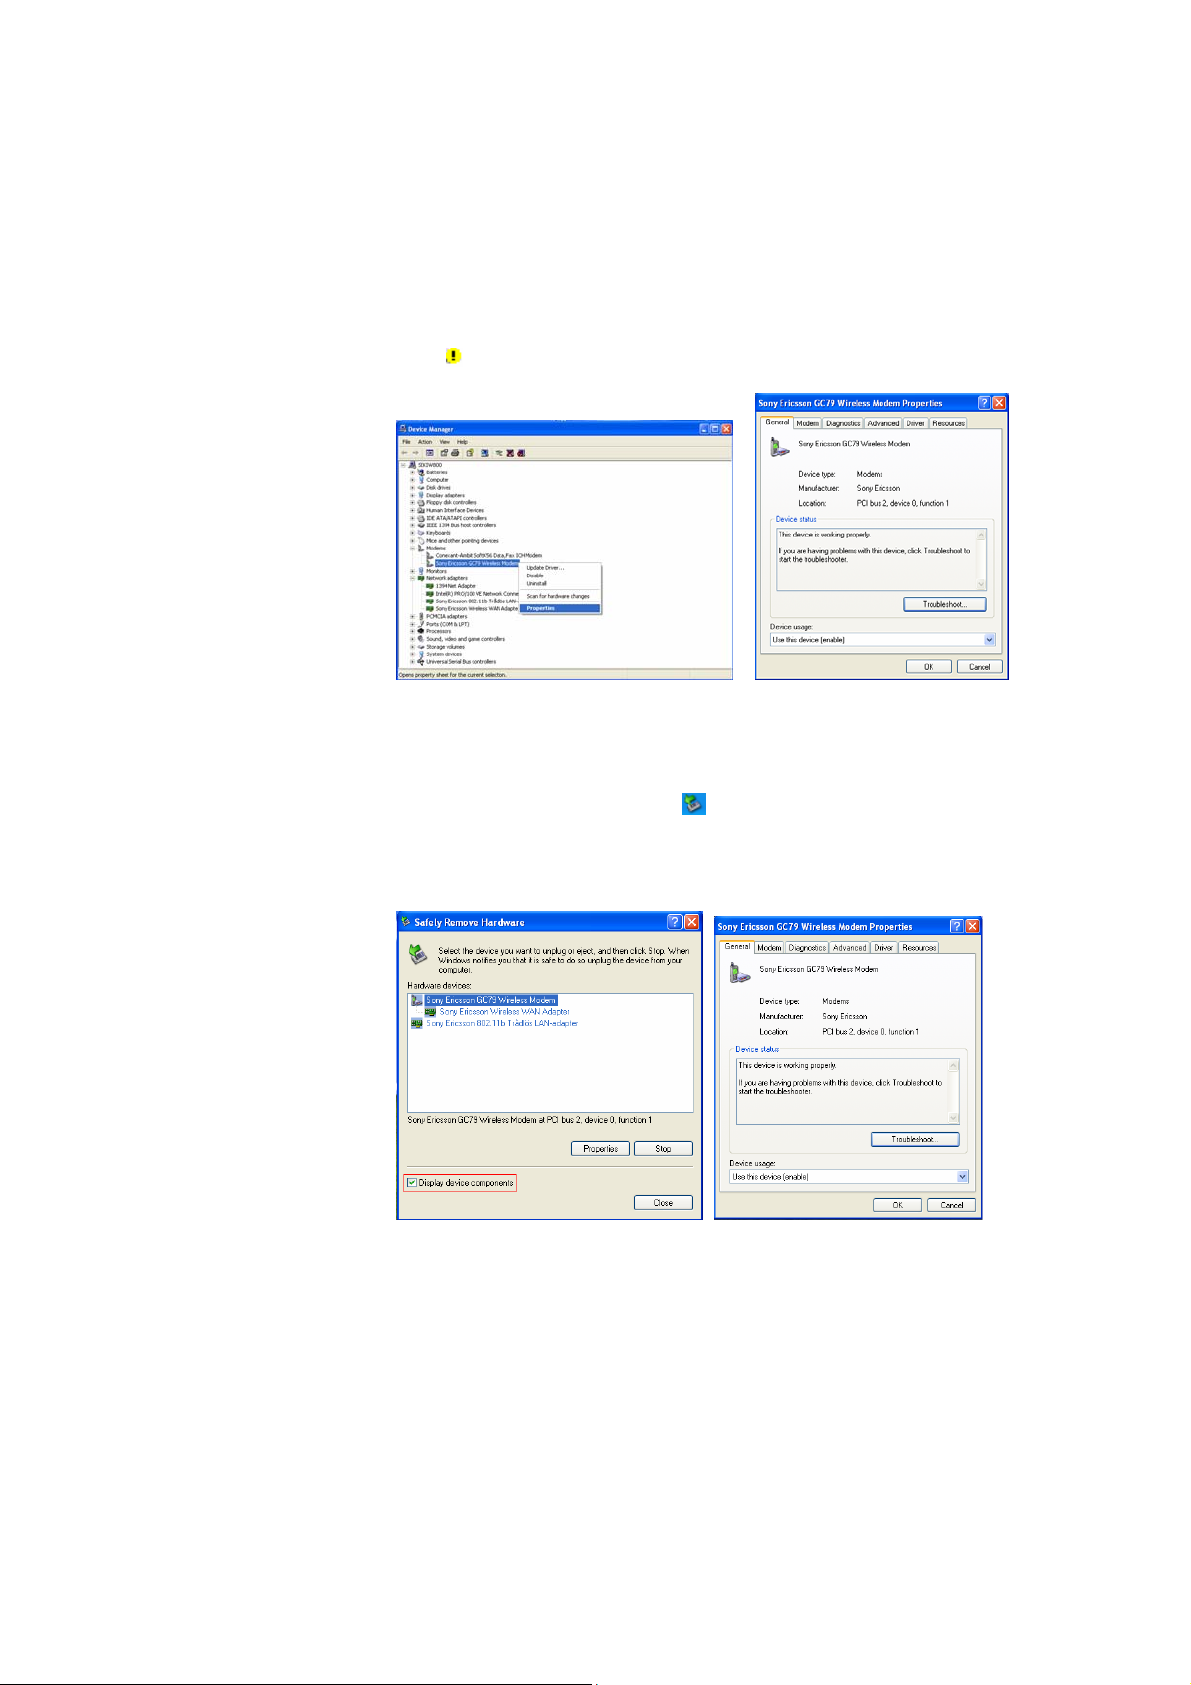
3.3.1 Check Sony Ericsson GC79 Wireless Modem and run
diagnostic test
To get information of the installed hardware driver Sony Ericsson GC79
Wireless Modem there are three ways to open the window Sony Ericsson
GC79 Wireless Modem Properties.
1: In the window Device Manager, below header Modems, Sony
Ericsson GC79 Wireless Modem should be present. If exclamations
mark
actions to do.
in front of the Hardware Device see below Driver tab what
Mark Sony Ericsson GC79 Wireless Modem, right-click and select
2: Put the cursor over the PC-card
corner of the screen, right-click, select Safely Remove Hardware and
window Safely Remove Hardware opens, make sure that Display
device components is enabled, see below.
Properties to open Sony Ericsson GC79 Wireless Modem
Properties.
Properties to open window Sony Ericsson GC79 Wireless Modem
Properties, see above.
Mark Sony Ericsson GC79 Wireless Mod
icon on system bar in the right
em and then click
8
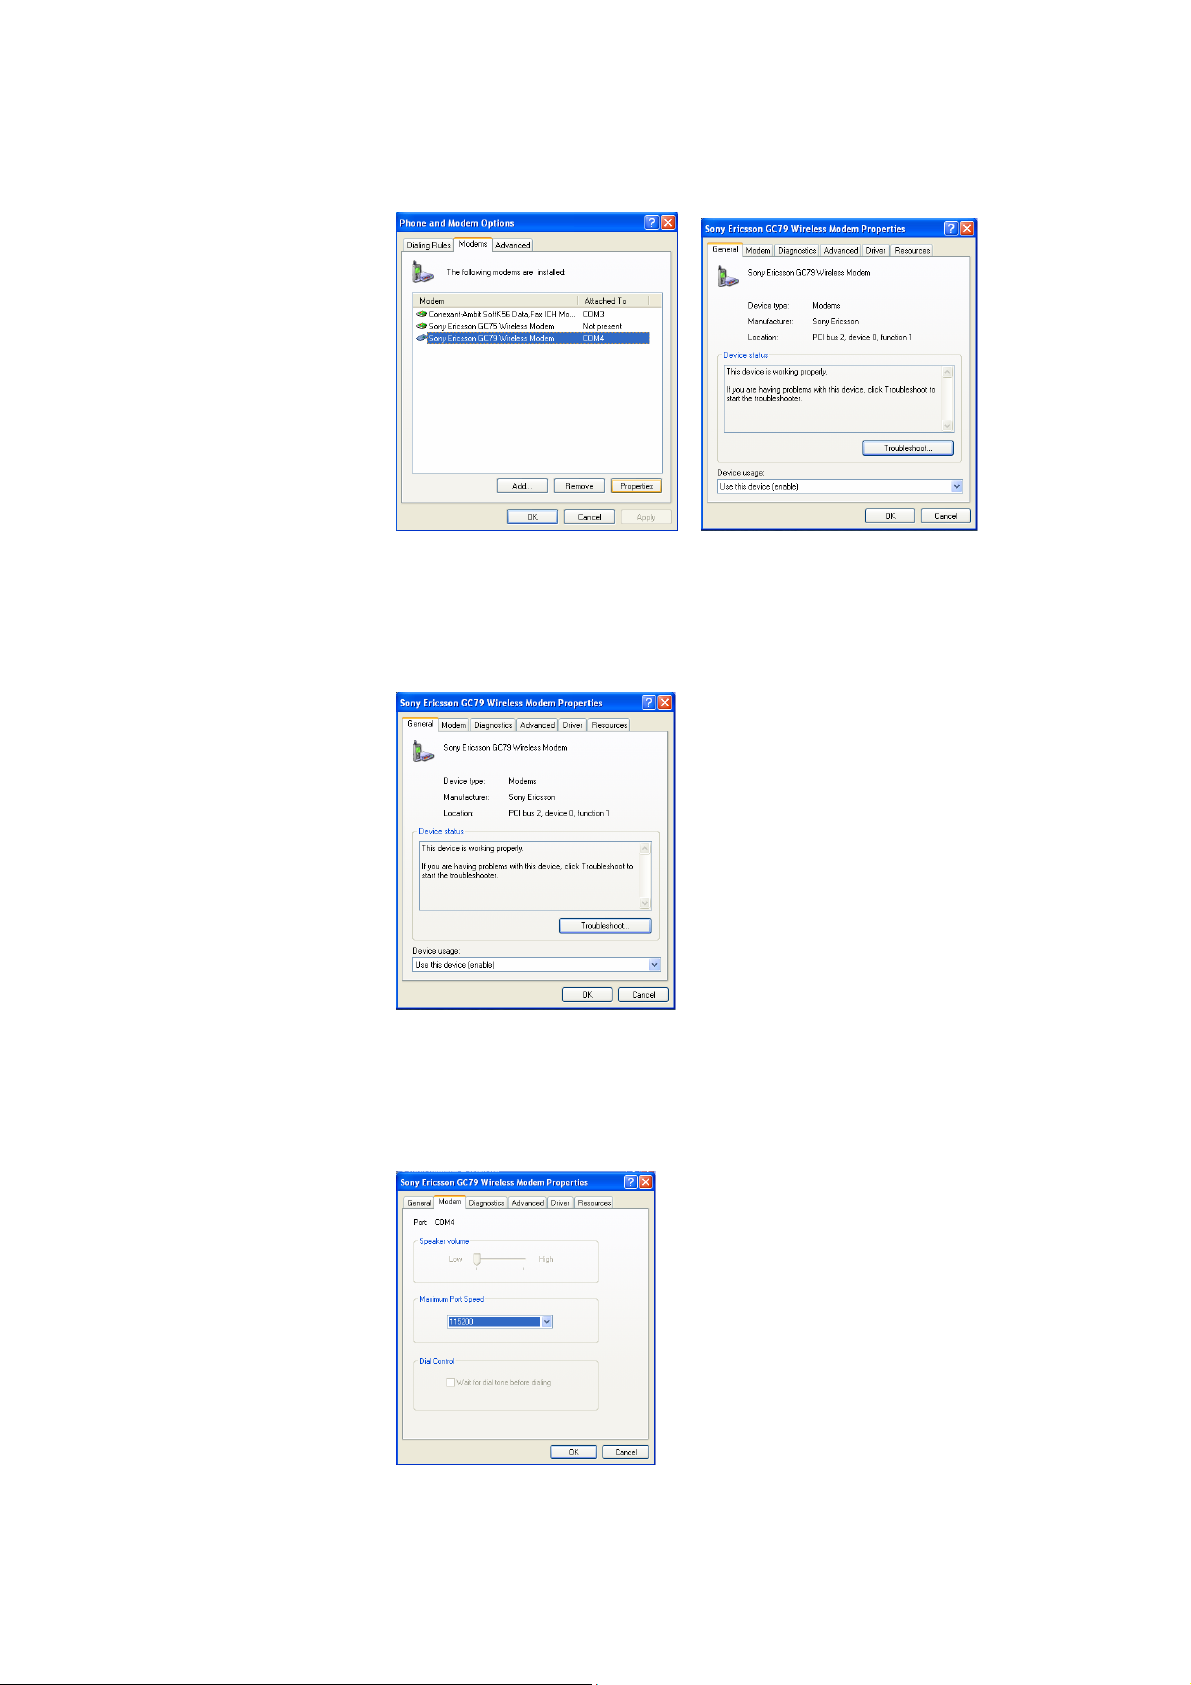
3: Select Start | Control panel | Phone and Modem Options to open
the window Phone and Modem Options.
hen select Modem tab, mark Sony Ericsson GC79 Wireless
T
odem and click Properties to open Sony Ericsson GC79 Wireless
M
odem Properties.
M
• In General tab verify following:
- Device Status, read: This device is working properly, if not, select
button Troubleshoot…
- Device Usage, read: Use this device (enable), if not, select Enable.
•
In Modem tab verify following:
- Maximum Port Speed is set to 115200 in the drop down list.
9
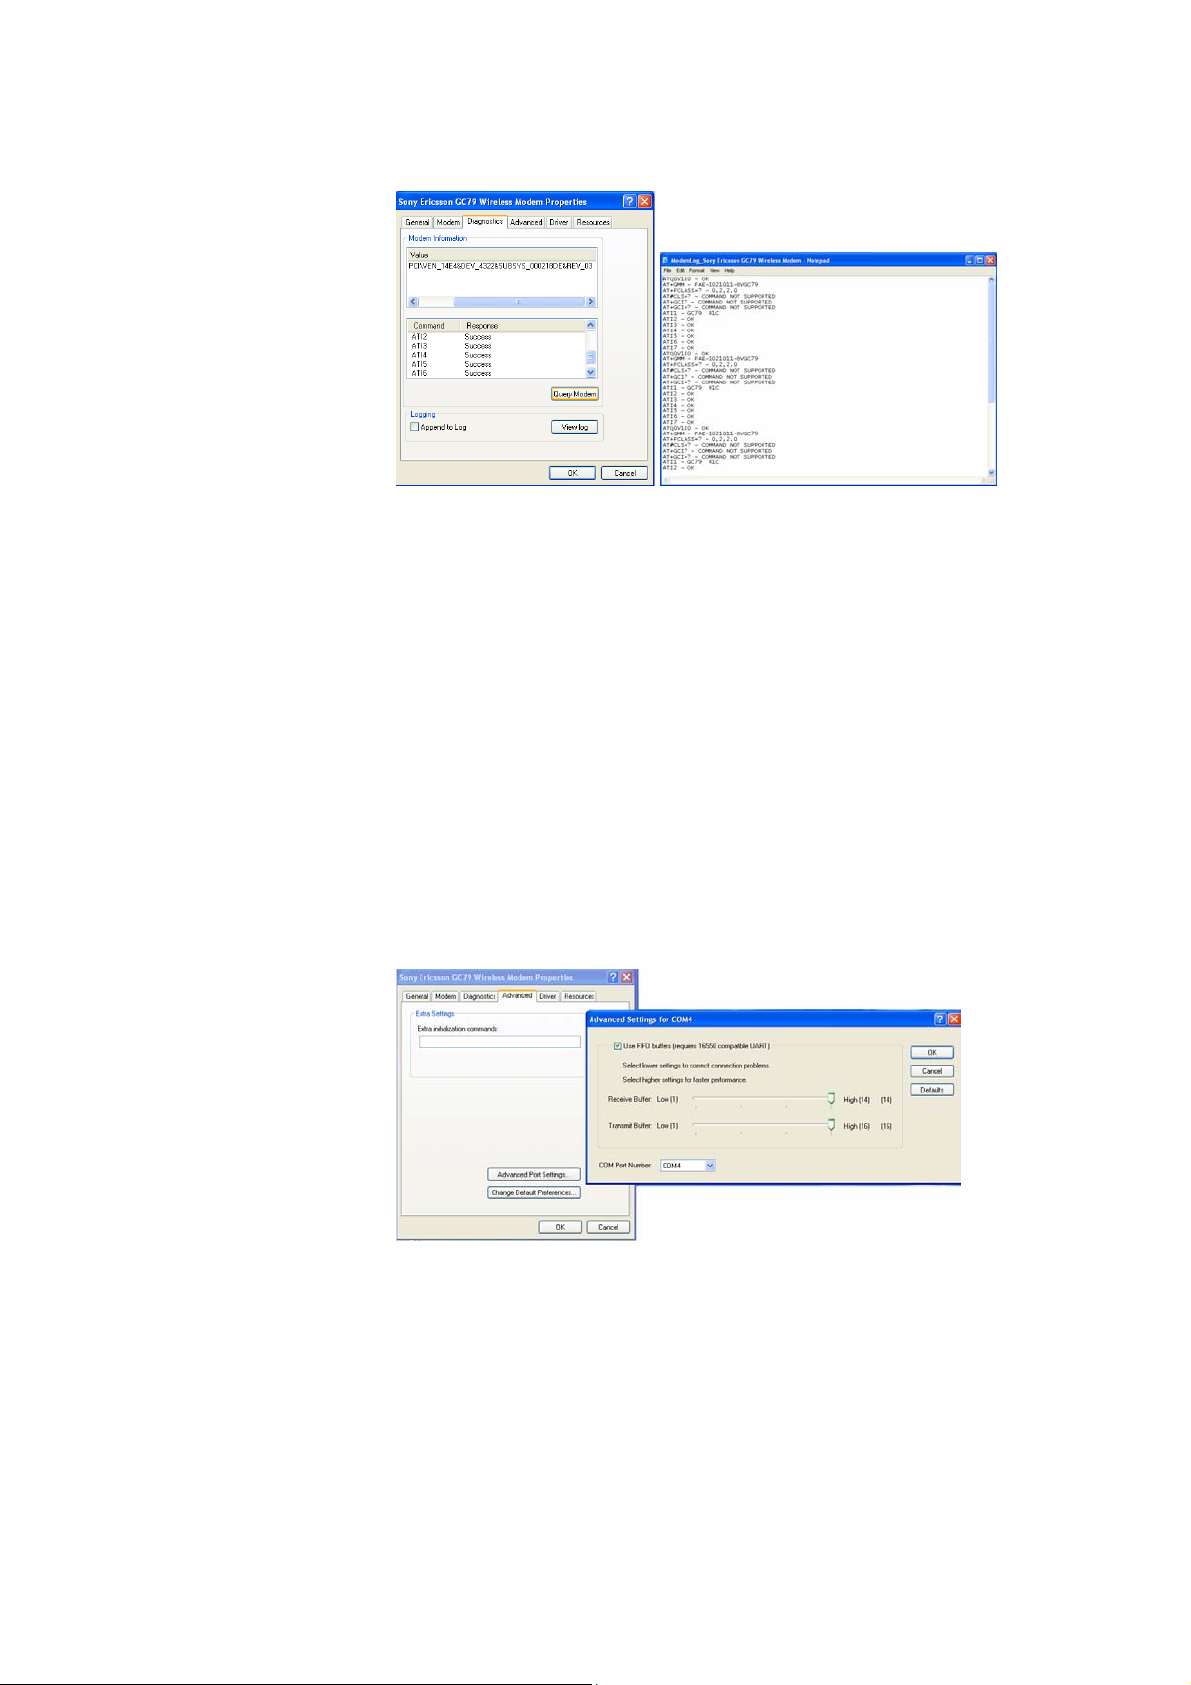
• In Diagnostics tab verify following:
m, read:
- Click button Query Mode
Command Response
ATQ0V1E0 Success
ATI1 GC79 Rxx
: :
ATI2 Success
ATI3 Success
ATI4 Success
ATI5 Success
ATI6 Success
ATI7 Success
The result of diagnostic test can also be found in a log file with name
ModemLog_Sony Ericsson GC79 Wireless Modem Text
Document. The file can be located if double-clicking on My computer
icon at desktop and locating the path to C:\WINDOWS.
• I
n Advanced tab select Advanced Port Settings… and verify
following:
- Enable Use FIFO buffers (requires 16550 compatible UART)
- Receive Buffer, start with low and work upwards.
- Trans
mit Buffer, start with low and work upwards.
- COM Port Number, verify that drop down list have the same COM
em tab besides the line Port. Port Number as can be read in Mod
10
• In r tab selec er Details… Drive t Driv and verify following:
- Below Driver Files read:
C:\WINDOWS\System32\DRIVERS\GC75.sys
C:\WINDOWS\System32\drivers\Modem.sys
- If GC75.sys can not be found then select Update Driver…. The
Hardware Update Wizard dialog opens, select Install the
software automatically (Recommended) or Install from a list or
specific location (Advanced), click Next. Enable Don’t search. I
will choose the driver to install, click Next. Select Have Disk…
Browse locate the path to the location on the CD,
below.
C
omponent GC79 CD-ROM Location
GPRS (GC75, GC75Net) driver on
Win98
GPRS (GC75, GC75Net) driver on
Win ME
GPRS (GC75, GC75Net) driver on
Win2000/XP
Wireless LAN (bcmwl5.Inf) driver D:\Wlan
on Win2000/XP/ME
Wireless LAN (bcmwl5a.Inf) driver D:\Wlan
on Win2000/XP/ME
In the above table D is referred as your CD-driver
D:\Driver\Driver98
D:\Driver\DriverME
D:\Driver\Driver2k
- If the problem remains select Uninstall and then Update Driver… in
Driver tab.
• In Resources tab verify following:
|
see the table
- Conflicting device list, read: No conflicts.
11
3.3.2 Check Sony
Wireless WAN Adapter there are two ways to open the window
sson Wireless WA s.
1: ge Modems, Sony
Ericsson Wireless WAN Adapter
To get information of the installed hardware driver Sony Ericsson
Sony Eric N Adapter Propertie
In the window Device Mana r, below header
Ericsson Wireless WAN A
exclam
Driver tab what actions to do
ations mark
d present. If
apter should be
in front of the Hardware Device see below
.
Mark Sony Ericsson Wireless WAN Adapter, right-click and
select Properties to open window Sony Ericsson Wireless WAN
Adapter Properties, see above.
2: Put the cursor over the PC-card
corner of the screen, right-click, select Safely Remove Hardware and
window Safely Remove Hardware opens, make sure that Display
device components is enabled, see below.
Mark Sony Ericsson Wireless WAN Adapter and then click
Properties to open Sony Ericsson Wireless WAN Adapter
Properties.
icon on system bar in the right
12
• In General tab verify following:
- Device Status, read: This device is working properly, if not, select
button Troubleshoot…
- Device Usage, read: Use this device (enable), if not, select
Enable.
• In
Driver tab verify following:
Select Driver Details.., below Driver Files read:
C:\WINDOWS\System32\DRIVERS\GC75Net.sys
- If GC75Net.sys can not be found then select Update Driver…. The
Hardware Update Wizard dialog opens, select Install the software
automatically (Recommended) or Install from a list or specific
location (Advanced), click Next. Enable Don’t search. I will choose
the driver to install, click Next. Select Have Disk… | Browse locate
the path to the location on the CD, see the table below.
Component GC79 CD-ROM Location
GPRS (GC75, GC75Net) driver on
Win98
GPRS (GC75, GC75Net) driver on
Win ME
GWPRS (GC75, GC75Net) driver on D:\Driver\Driver2k
in2000/XP
ireless LAN (bcmwl5.Inf) driver W
o
n Win2000/XP/ME
Wireless LAN (bcmwl5a.Inf) driver
ed as your CD-driver
In the above table D is referr
on Win2000/XP/ME
D:\Driver\Driver98
D
:\Driver\DriverME
D:\Wlan
D:\Wlan
- If the problem remains select Uninstall and then Update Driver… in
Driver tab.
13

3.3.3 Check Sony Ericsson 802.11b Wireless LAN Adapter
To get information of the installed hardware driver Sony Ericsson
802.11b Wireless LAN Adapter there are two ways to open the
window Sony Ericsson 802.11b Wireless LAN Adapter
Properties.
1: In the window Device Manager, below header Modems, Sony
Ericsson 802.11b Wireless LAN Adapter should be present. If
exclamations mark
Driver tab what actions to do.
in front of the Hardware Device see below
Mark Son
and select
Wireless LAN Adapter Pro erties, see abov
2: cursor over the PC-card
lic e Hardware and
fely Remove Hardware opens, make sure that Display
le elow.
on 802.11b Wireless LAN Adapter
Put the
corner of the screen, right-c
window Sa
device components is enab d, see b
Mark Sony Ericsson 802.11b Wireless LAN Adapter and then c
Properties to open Sony Ericss
Properties.
y Ericsson 802.11b ter, right-click
Properties to open n 802.11b
Wireless LAN Adap
window Sony Ericsso
p e.
k, select Safely Remov
icon on system bar in the right
lick
14

• In General tab verify following:
• In Advanced tab verify following below header Property:
• In Driver tab select Driver Details… and verify following:
- Device Status, read: This device is working properly, if not, select
button Troubleshoot…
- Device Usage, read: Use this device (ena
ble), if not, select Enable.
- Below Driver Files read:
C:\WINDOWS\System32\DRIVERS\BCMWL5.sys
- If BCMWL5.sys can not be found then select Update Driver…. The
Hardware Update Wizard dialog opens, select Install the software
automatically (Recommended) or Install from a list or specific
15

location (Advanced), click Next. Enable Don’t search. I will choose
the driver to install, click Next. Select Have Disk… | Browse
locate the path to the location on the CD, see the table
below.
Component GC79 CD-ROM Location
GPRS (GC75, GC75Net) driver on
Win98
GPRS (GC75, GC75Net) driver on
Win ME
GPRS (GC75, GC75Net) driver on
Win2000/XP
Wireless LAN (bcmwl5.Inf) driver
on Win2000/XP/ME
Wonireless LAN (bcmwl5a.Inf) driver
Win2000/XP/ME
In the above table D is referred as your CD-driver
- If the problem remains select Unin
D:\Driver\Driver98
D:\Driver\DriverME
D:\Driver\Driver2k
D:\Wlan
D:\Wlan
stall and then Update Driver… in
Driver tab.
• In Resources tab verify following:
- Conflicting device list, read: No conflicts.
16

3.4 Three ways to open the window Sony Ericsson Wireless
Configuration Utility
1: At syst in the right corner, em tray bar select one of those ,
right-cli m en the window Sony
Ericsson Wireless Configuration Utility.
Sony Er
ck and select Open Utility fro the menu to op
icsson Wireless Configuration Utility
, icons,
3: In GC79 Manager Select the Telephony Settings
select Telephony Settings, the GC79 Manager window will then look like
below:
2: In Windows environment select Start | Control Panel | Sony Ericsson
Wireless Utility icon to open the window Sony Ericsson Wireless
Configuration Utility.
icon or in View menu
Below header Wireless mark 802.11and click the button Launch the
Wireless Control Panel and the window Sony Ericsson Wireless
Configuration Utility will open.
17

3.5 Diagnostic test of Sony Ericsson 802.11b Wireless LAN
Adapter
See below header 3.4 Three ways to open the window ony Ericsson
Wireless Configuration Utility.
In the window Sony Ericsson Wireless Configuration Utility below the
Diagnostics tab a simple diagnostic test
LAN Adapter can be done by clicking the Run button, if the test is successful
all parts should get Passed.
of Sony Ericsson 802.11b Wireless
S
Note: Your Network connection is lost when you run the diagnostics. When
the test run is o ver, your network connection is automatically re-established.
18

3.6 Use HyperTerminal to test AT-command
Open Hyper Terminal by selecting:
tart | AS ll Programs | Accessories | Communications |
w in point 1 below.
indow
HyperTerminal, se
e
1:
Write the name of your test, click OK. Select the COM-port that Sony
Ericsson GC79 Wireless Modem is
connected to. To get the COM-port
number, see below header
3.3.1 Check Sony Ericsson GC79
Wireless Modem and run
diagnostic test in Modem tab.
:
3
Select 115200 kbps in drop menu. Verify that all settings are the same as
above, then click Apply and OK.
2:
4:
:
5
Type your AT-command. In this case Press enter to execute the at “At+cgmr” is typed to verify GC79 command.
firmware.
6:
19

4 GPRS and CSD/HSCSD connection
4.1 C ub
heck GPRS and CSD/HSCSD network s scription
Contact your Netw
for the services you wish to use GSM/GPRS, CSD/HSCSD and SMS.
Note: Some GPRS subscriptions are only enabled for GPRS WAP, which will
not be adequate. You must be GPRS internet enabled. For international use,
you will also need to check the GPRS roaming agreement with your
Operator.
Also make sure that you are having correct parameters for connecting to the
Network Operator, following parameters you need:
For GSM/GPRS:
- APN (Access Point Name) address
DNS (Domain ame S rver) a
- N e ddress, if required (in most networks this is
server ssigned)
a
User ID and password, if requir
- ed (these are often left blank)
- Quality of service parameters, if required (in most networks you do not ne
to cha ge thes )
n e
For CSD/HSCSD:
- Dial-in telephone number
- User ID and password
- IP and DNS numbers (in most networks these are assigned automatically)
- Preferred connection speed for HSCSD. If in doubt, start at 9600 and work
upwards.
- Connection method: Analogue, ISDN, V110 or ISDN V120
ork Operator and make sure your subscription is enabled
ed
4.2 Setup the Local Area Connection icon
The Local Area Connection con in system tray bar can be enabled to be
le e he ne During data transmission the Local Area
ft in th tray w n con cted.
Connection icon will look like this
icon to be left in the tray, select Start | Control Panel | Network
Connections to open the window Network Connections, mark Sony
Ericsson Wireless WAN Adapter or Sony Ericsson 802.11b Wireless
LAN Adapter, see below.
Right-click, to open the menu, select Properties to open the window Local
Area Connection Properties and enable Show icon in notification area when
connected and click OK.
i
icon. To enable Local Area Connection
20

4.3 Can you connect to GPRS or CSD/HSCSD?
To verify your connectivity select: Start | All Programs | Sony Ericsson |
GC79 Manager or simple click on the GC79 Manager icon
desktop if it is present, (that options could be enabled during installation of
GC79 Manager).
To test the Network connectivity the radio could be turned on and off, by
selecting File | Turn GSM/GPRS Radio Off or File | Turn GSM/GPRS
Radio On.
he GC79 MT anager Status screen will show similar to those pictures:
1: In File menu verify that the radio is turned on by reading Turn
dio is turned on the
ard will start searching for GSM and GPRS networks:
GC79 PC c
GSM/GPRS Radio Off in the menu. When ra
GC79 Manager Status view
at the
ted
79 has
2: After a few seconds, it attaches to the GSM network that’s suppor
by your subscription, the signal strength is showed as green bars. As
the green triangle above the signal strength is still missing GC
not yet verified if GPRS internet subscription is enabled:
System tray bar view
GC79 Manage
r Status view
System tray bar view
21

3: After another few seconds, if GPRS internet is en
subscription, GC79 finally attaches to GPRS netw
seen as the green triangle above the signal strength.
abled in your GPRS
ork, which can be
GC79 Manager Status view
For inte
nt with your operator. A connection has not yet been made
agreeme
rnational use, you will also need to check the GPRS roaming
and therefore the Local Area Connection
crossed out.
4: When clicking the Connect button the GC79 Manager starts to
Initializing the opdown menu, as can
selected connection from the dr
be seen below.
GC79 Manager Status view
System tray bar view
icon at system bar is
System tray bar view
22

5: When connected the Local Area Connection icon
disappears as can be seen below.
GC79 Manager Status view
at system bar
To set up the Local Area Connection
icon in system tray to be left
in the tray when connected so it will look like
transmission, see below header 4.2 Setup the Local Area
Connection icon.
ee also below head er:
S
6 Generally connectivity problem and solution
System tray bar view
icon this during data
23

4.4 Why c t I
In GC79 s Menu Service Centre Phone
number r Telep
SMS Service Centre and verify with your Network Operator that you have
typed correct SMS service centre number in the white box (see picture), click
Apply.
an’ send/receive SMS?
Manager select from the Message
o hony Settings icon
, below header Phone Numbers, mark
l
strength
See also below header:
6 Gener lly connectivity problem and solution
To send and receive SMS the GC79 icon at system bar must indicate signa
to GSM network and look like similar to those two icons:
The GC79 has GSM service and indicates signal strength of
5 out of
5 bars. SMS may b
ubscription. GPRS is not yet available. s
The GC79 has GSM and GPRS service and indicates signal strength
f 5 out of 5 bars. SMS may be used, provided this is supported by
o
e subscription.
th
a
e used, provided this is supported by the
24

4.5 Why can’t I send/receive Fax?
Verify in GC79 Manager – Status screen in the left side that you are not
connected to CSD/HSCSD, as fax protocol requires an own dedicated line.
for Fax are setu
Verify that the settings below header Divert Calls for Fax and Restrict Calls
p in correct way, see below.
See also below header:
6 Generally connectivity problem and solution
Instruction for setting up a fax and send it:
1.
Select Start | Settings | Control panel | Fax
In Dialog box “Fax properties” and in User Information fill in at least your full
nam a
e nd fax number that the copy should be sent to. Under Advanced
options sfully
shows, Fax properties.
2. ake sure that GC79 manger is running with out CSD/HSCSD session
M
connect
3. In t e to
fax Sele
the fax hen press ok.
4. Send Fax Wizard open, s
and fax number select NEXT-> NEXT -> NEXT ->FI
sent to fax.
To send and receive fax the GC79 icon at system bar must indicate a signal
•
strength to GSM network and look like similar to those two icons:
select Add a fax. The text The fax printer was created succes
press button ok. Finish with pressing ok in
ed.
h ol that you are working into with the document that should be sent to
ct File -> Print. At Printer name use the head up display too select
that was defined. T
elect next. At To, fill in the name on the recipient
The GC79 has GSM service and indicates signal strength of 5 out of
5 bars. Fax may be used, but not with CSD/HSCSD connected.
GPRS is not yet available.
The GC79 has GSM and GPRS service and indicates signal strength
of 5 out of 5 bars. Fax may be used, but not with CSD/HSCSD
connected.
icon
NISH. The copy is now
25

5 Wireless LAN connection
5.1 What d
To access a corporate wireless LAN, you must have the appropriate access
and log on rights.
o I need to access corporate wireless LAN?
5.2 Clear the box Use Windows to configure my wireless
network settings
The reason for clearing the box Use Windows to configure my wireless
network settings is to simplify and to give a better overview of the Wireless
Networks settings and to make the window Sony Ericsson Wireless
Configuration Utility to control all settings that can be associated to
Wireless Networks.
This operation can be done both in the window Sony Ericsson Wireless
Configuration Utility and in the Windows environment in the window
Wireless Network Connections Properties. Both ways are describing
below.
1: See below header 3.4 Three ways to o
Ericsson Wireless Configuration Utility.
pen the window Sony
Clear the box Use Windows to configure my wireless network
settings and click Apply. After clicking Apply the Wireless Network
tab will change view to look like as the window above, then click OK.
26

2: In Windows environment
Connections to open win
select Start | Control Panel | Network
dow Network Connections.
Mark the con
nection icon
or with name
Sony Ericsson
802.11b Wireless LAN-Adapter, right click, select Properties from
the menu. The window Wireless Network Connections Propert
opens and look like as below.
Select the Wireless Networks tab and clear the box Use Windows to
configure my wireless network settings, and then click OK
ies
27

5.3 C n yo con
a u nect to Wireless LAN?
To verify your connectivity select:
GC79 Manager or simple click on the GC79 Manager icon
desktop, if it is present, (that options could be enabled during installation of
GC79 Manager).
The GC79 Manager Status screen will show similar to those pictures:
1: When wireless radio is disabled the GC79 Manager Status screen
in the right side will look like this:
Start | All Programs | Sony Ericsson |
GC79 Manager Status view
at the
System tray bar view
2: The radio could be turned off / on, by selecting File | Turn 802.11
Radio Off / File | Turn 802.11 Radio On or Disable / Enable in the
right side of GC79 Manager Status screen or right click the
and selecting Disable Radio / Enable Radio.
The GC79 will then trying to establish an initial connection
the wireless network, see .
to below
GC79 Manager Status view
icon
System tray bar view
28

3: Before connecting to the wireless LA
3.4 Three ways to open the windo
N network, see below header
w Sony Ericsson Wireless
Configuration Utility and below the header 5.2 Clear the box Use
Windows to configure my wireless network settin s.
g
In the Wire
the window Advanced and then select the preferred Network to
access (2), click button Close. Click the button Refresh (3).
less Networks tab (1) select the button Advanced to open
1
:
2:
3:
le Networks list in
Sony Ericsson Wireless Configuration Utility window bel
If access points or other laptops with wireless LAN are nearby your
laptop following figures will appear in the Availab
ow
Wireless tab:
Access point nearby your laptop.
Other laptop or your own laptop nearby your laptop with
WLAN.
To connect to the preferred wireless network, simple double-click on
icon in the system tray bar to open Connect to Wireless Network
window, mark the preferred network and click button Connect, see
below.
There might be two different figures showing the connectivity
depending if access point or other laptop are nearby your laptop:
Your laptop connected to access point.
Your laptop connected to other laptop or your own with
WLAN.
29

4: When GC79 attaches to the wireless network the wireless
ar.
mproving
signal strength.
.
turn to green in GC79 Manger Status screen and in system tray b
The degree to which this icon is green indicates the signal strength;
see below and below header 6.3 Suggested actions for i
GC79 Manager Status view
icon w
ill
To set up the Local Area Connection
in the tray when connected so it will look like
transmission, see below header 4.2 Setup the Local Area
Connection icon.
See also below header:
Gene
icon in system tray to be left
6 rally connectivity problem and solution
System tray bar view
icon this during data
5.4 Connectivity statistics for Sony Ericsson 802.11b
W Ad
ireless LAN apter
See below header 3.4 Three way
b and total accumulated packets.
Wireless Configuration Utility. Below the Statistics tab, Current activity can
e read
s to open the window Sony Ericsson
30

5 h th nk status between the GC79 and wireless
.5 C eck e li
network
See below header 3.4 Three ways to open the window Sony Ericsson
Wireless Configuration Utility. Below the Lin
connected to is indicated by the horizonta
In Site monitor tab the signal strength and channel also can be read.
connection (signal strength and noise) of the particular network you are
k Status tab, the quality of the
l bars and the decibel level values.
The signal strength is also indicated by the appearance of the
s tray.
5.6 Where an I
Wireless Configuration
ystem
c set LEAP for the GC79 PC Card?
See below header 3.4 Three ways to open the window Sony Ericsson
icon in the
Utility. Below the LEAP tab, LEAP can be set.
31

6 Generally connectivity problem and solution
6.1 G ner
Generally GPRS problem
Connection method: Analogue, ISDN V110 or ISDN V120 (if in doubt start
with Analogue and connection speed 9600 and work upwards)
e ally GSM, GPRS and CSD/HSCSD problem
Generally GSM problem
m,
In places where lot of people are present in a small area e.g. in a traffic ja
shopping centre in city and so forth there are probably many assigned time slots to p
with
number of assigned time-slots may vary depending on the network load
result that it is difficult to make connection to the network at the moment or
the maximum performance might not be reached.
The connection can also be lost when you are out of coverage of your
subscribed network, e.g. passing trough a tunnel, in basement, other
obstacles that affect the radio wave propagation between your laptop and
radio base station or your operator doesn’t have roaming agreement with the
operators that is nearby you. Suggested operation is to move to a place to
get better signal strength or check with your operator about the roaming
agreement.
The APN is normally ente cally when selecting your operator in
the GC79 DUN Wizard. If is does not work you need to eck the valid APN
with your service provider. Error 734 is often related to this.
GPRS covera
that you really have a GPRS enabled subscription and that
GPRS coverage zone.
The number of assigned time-slots may vary depending on the network lo
GPRS is a best-effort service.
Generally CSD/HSCSD problem
The CSD/HSCSD is not enabled in your subscription or your operator does
not provide that service.
The phone number/Username/Password is typed wrong in GC79
Connection Wizard.
acket data and voice users under the same GSM cell. Therefore the
red automati
th ch
ge should be shown by the GC79 Manager icon. If not check
you are in a
ad.
32

6.2 Generally Wireless LAN problem
Data transfer is sometimes very slow:
Microwave opens and some cordless phones operate at the sam
frequency as GC79 Wireless LAN Adapter. When the microwave
interferes with the wireless network.
icon and then select enable radio.
cordless phone is in use, it
uctures. The steel in such
buildings may interfere with your network’s radio signals, thus causing a slow
ent
properties settings are correct; see Create a Wireless LAN
Help | Help Topics.
of my wireless
ection?
an active Ethernet port
condition occurs if you dock your system into a docking station that has
is is because Windows must now handle two
active network connections.
radio on your GC79.
less LAN radio, right click the
s.
To enabl
Therefore, check for possible sources of interference in the path between the
GC79 and the network access point (AP).
Data transfer is always very slow
Some homes and most offices are steel-framed str
down in the data transmission rate. Try moving your computers to differ
locations in the building to see if performance improves.
Computer is not communicating with the network
If your network had a wireless LAN Access point, check all cables and make
sure the power LED on the front of the AP is green. Verify that all of the
wireless network
connection in the PC-card HELP, can be found in GC79 Manager below
Also make sure that your computer is receiving a good signal from the
access point; see in this document; where can I read status
conn
Network performance is really slow when the system is docked to a
docking station that has
This
an active Ethernet port while your GC79 is still active and connected to a
wireless LAN Access Point. Th
You must either disconnect the Ethernet cable from your docking station or
disable the wireless LAN
To disable the GC79 wire
isable Radio. select D
Note: The radio is not automatically enabled when your computer next start
e the radio, right-click the
e radio
oven or
icon and then
33

6.3 Suggested actions for improving signal strength
GC79 Manager Status-screen and in system tray, (in
computer screen), shows the GC79 connectivity to GSM/GPRS,
CSD/HSCSD and Wireless LAN network, by indicating different signal
strength.
GC79 Manager Status screen
the right corner of the
The description of the signal strength appears when you hover the curs
over the icon in system tray. The table below shows the signal strength and
suggested action for
displayed. If the signal strength indications are anything other than very good
or excellent, you should take the appropriate suggested action:
GC79 Manager is running in the background or GC79 is not inserted.
Suggested action:
Please insert GC79 into the PC card slot.
GSM/GPRS radio is set to off or the GC79 Manager has
Suggested action:
Right-click the icon and select Turn GSM/GPRS Radio On.
The GSM/GPRS radio is switched on, but there is no GSM or GPRS
Probable causes:
1: The computer is trying to establish an initial connection but
2: You may have moved out of the GSM cell coverage or your
operator doesn’t have roaming agreement.
Suggested actions:
1: Wait.
2: Move your laptop to get better signal strength or check with
your operator.
System tray bar view
improving the signal for each icon that may be
disconnected the GC79 PC Card.
service available yet or the received signal is too weak.
has not yet succeeded.
or
34

The GC79 has GSM service and indicates signal strength of 5 out of
5 bars. CSD, HSCSD, SMS and fax may be used, provided these ar
supported by the subscription.
Probable causes:
1: T
he computer is trying to establish a GPRS connection.
2: GPRS service is not available.
Suggested actions:
1: Wait.
2: Conta network operator for more details, following
ct your
que n be asked:
stions ca
Is GPRS internet enabl
ed in your subscription?
Are you trying to roam on a network for which no GPRS
roaming agreement exists?
Is there a temporary fault o
n the network?
The GC79 has GSM and GPRS service and indicates signal strength
provided these are supported by the subscription.
e
d, of 5 out of 5 bars. GPRS, CSD, HSCSD, SMS and fax may be use
Wireless LAN radio is disabled and there is no radio connection.
Suggested action:
Enable the WLAN radio by clicking Enable in the GC79 Manager
e
Status screen on the right side or selecting File | Turn 802.11 Radio
on or right-clicking th
icon and then selecting Enable Radio.
stablish an initial connection but
ded.
The wireless LAN radio transmitter is enabled, but there is no
network available and no signal is being received.
Probable causes:
r is trying to e 1: The compute
has not yet succee
2: You may have moved out of range to the access point.
Suggested actions:
1: Wait.
2: Move closer to the access point.
The 79 has made a wireless LAN network connection. A fully
g on indicates that the signal strength is very g
GC
reen ic ood or excellent.
ree to which this icon is green indicates the signal strength. The deg
A partially green icon indicates that the signal strength is good or low
.
Suggested action:
Move closer to the access point.
35

6.4 GC79 Ma
The GC79 Man
Windows temp ger runs. If the file is already
present t is ove
To locate the file in Windows environment select Start | Run to open the window Run
(1), type emp ollow e temp folder opens, find the
file GC79 Manager_Log.txt and open it (2). In the GC79 Manager_Log.txt some
useful informatio stomer Support and field diagnostic assistance.
, i rwritten.
%t % f ed by clicking the OK button. Th
nager status log
ager creates a status log, called GC79 Manager_Log.txt in the
folder, each time the GC79 Mana
n can be found for Cu
1:
2:
36

6.5 Why can’t I use Internet browser?
In Internet Explorer select Tools | Internet Options…, open Connections tab an
check the settings.
ote that you need to disable the WLAN radio if you want to browse via GPRS or
N
CSD/HSCSD. To disable WLAN radio click Disable in the GC79 Manager status
screen on the right side or select File | Turn 802.11 Radio off or select
right-click and select Disable Radio.
d
, icon,
For GPRS and CSD/HSCSD connection:
In Windows environment select Start | Control Panel | Network Connections (1),
mark Sony Ericsson Wireless WAN adapter, right-click, select Properties to open
the window Local Area Connection Properties (2), in General tab mark Internet
Protocol (TCP/IP), click the button Properties, verify the settings in the General tab
(3) and Alternate Configuration tab (4).
1:
2:
3:
See also below header:
4 GPRS and CSD/HSCSD connection
4:
37

For Wireless LAN connection:
In Windows environment select Start | Control Panel | Network Connections (1),
mark Sony Ericsson 802.11b Wireless LAN adapter, right-click, select Properties
open the window Local Area Co
rotocol (TCP/IP), click the button Properties, verify the settings in the General tab
P
nnection Properties (2), in General tab mark Internet
(3) and Alternate Configuration tab (4).
to
1:
3:
See also below header:
5 Wireless LAN connection
2:
4:
38

6.6 F
Modem not responding Check the radio is turned on, see below
Dial-Up Fails Try to connect again
ault code table
GC79 Manager, General Solution
Grey menu A grey menu option in the software
applications indicates a function that is
temporarily unavailable, for example due to
subscription or due to a certain setting which
has not been turned on.
header 3.3.1 Check Sony Ericsson GC79
Wireless Modem and run diagnostic test
SIM CARD Errors Solution
Codes do not match n you want to change a secu ty code (for
PIN blocked/PIN2 blocked You have entered your PIN or PIN2
PUK blocked – Contact operator You have entered your personal unblocking
ireless LAN error messages Solution
Wrong PIN/PIN2 You have entered your PIN or PIN2
W
Medium cable disconnected A number of possible causes:
.
Windows Error codes: Solution
Win98
Error 619:
The port is disconnected
Error 629:
The port was disconnected by the remote
machine during dial-up
Error 630:
The port was disconnected due to hardware
failure during dial-up
incorrectly. Enter the correct PIN or PIN2 and
click ok. See below header 1.2 References to
find the requested information.
See below header 1.2 References to
See below header 1.2 References to
key code (PUK) incorrectly 10 times in
succession. Contact your network operator or
service provider.
The network transmission has been
interrupted. Contact the Network
Administrator.
Whe ri
ple your PIN) you have to c
exam onfirm the
new code by entering it again. This error
occurs when the two codes, which you have
entered, do not match.
find the requested information.
incorrectly three times in succession. To
Unblock see GC79 User Guide.
find the requested information.
You have moved out of range of the wireless
LAN signal. Move back closer to the hotspot.
The reless LAN is switched off. Right-click
wi
icon and select Enable Radio.
the
An ISDN mode (V110 or V120) has been
selected when creating a connection, but is not
supported by the network. Select Analogue
mode when creating the connection in
connection wizard.
Telephony settings are set to pulse dialing,
change to tone dialing.
Check the dialing settings for the current
location:
(In Control Panel | Phone and Modem Option |
Dialing Rules | Location | Edit) and change the
Dial using setting to tone, or (if pulse is
necessity), create a new location called GC79
anywhere and set the dialing to Tone. GC79
anywhere location should then be used
whenever you use the GC79.
A dial-up networking connection is already
connected. Close the connected dial-up and
try again.
39

Error 645:
GPRS, HS
Internal authentication error during dial-up
See below header 1.2 References to
Error 650:
The Remote A
uring dial-up
d
ECrror 678:
omputer you are dialing is not responding
during dial-up
Error 720:
No PPP control protocols configured during
dial-up
Win2000:
Error 619:
The port is disconnected tion, but is not
Error 678:
omputer you are dialing is not responding
C
uring dial-up
d
Error 691:
Access denied user name and password
incorrect on the domain during dial-up
Error 718:
The card was unable t
remote ser
All windows operating system:
Error 734:
The PPP link control protocol was terminated
during dial-up
Error 678:
Computer you are dialing is not responding
during dial-up
ccess server is not responding
o dial during dial-up
Incorrect APN or CID selected for Network.
Modify your dial-up connection, see Create a
that the APN file contains the name
access point your network operator is us
See the support section on
www.SonyEricsson.com
network operator APN:s.
find the requested information.
Incorrect User ID and/or password. Re enters
correctly.
Either service is not supported by SIM (usually
for CSD/HSCSD) or the computer is not
answering.
1: Check SIM settings with your servic
provider if necessary.
2: Make sure that the server you are dialing is
OK.
3: Make sure that Analogue mode has not
been selected with 57.6 kbps data rate
(V110 or V120 mode must be selected a
supported by the network)
The service is not suppor
usually appears when you are trying to
connect to GPRS internet. Conta
provider to enable GPRS Internet acc
SIM card.
An ISDN mode (V110 or V120) has been
selected when creating a connec
supported by the network. Select Analogue
mode when creating the connection in
connection wizard.
Either service is no
for CSD/HSCSD) or the computer is not
answering.
1: Check S
provider if necessary.
2: Make sure that the server you are dialing is
OK.
: Make sure that Analogue mode has not
3
been selected with 57.6 kbps data rate
(V110 or V120 mode must be selec
supported by the network)
The domain name entry is incorrect.
Correct the domain name entry or delete if n
required.
This error indicates a PPP conversation
started, but it was terminated because the
appropriate time. This can be caused by poor
line quality or a problem with the server (ISP).
This error can occur when your modem ha
connected to the ISP and has sent a
username and password, but there is no
response from the server. Wait a few mi
and try again.
The APN entry is incorre
r the connection is lost whilst dialing.
o
See the support section on
www.Sony
Network Operator APN.
Either service is not supported by SIM (usually
for CSD/HSCSD) or the computer is not
answering.
1: Check SIM settings with your service
provider if necessary.
2: Make sure that the server yo
OK.
3: Make sure that Analogue mode has not
been sel
(V110 or V120 mode must be selected and
CSD or CSD connection. Make sure
site for a full list of
ted by the SIM,
t supported by SIM (usually
IM settings with your service
ver did not respond within
ct, the signal is weak
Ericsson.com
ected with 57.6 kbps data rate
site for a list of
of the
ing.
e
nd
ct service
ess in
ted and
ot
s
nutes
u are dialing is
40

Generally problem that makes the connectio
Invalid APN
Invalid User name or password on in the
Invalid profile
Connection failed or disconnected from the
etwork problem
Temporary network problem
Access to network not allowed or
Service not supported
SIM is invalid for GPRS service and request the
rvice provider to get your
network / N
Roaming not allowed Contact your se
supported by the network)
n to fail:
The APN entry is incorrect, the signal is weak
or the connection is lost whilst dialing. See the
support section on www.SonyEricsson.com
site for a list of network operator APN:s or
contact your service provider.
Choose to modify your connecti
Connection Wizard. Go to the User ID screen
and re ent
given to you by your service provider. If you
were not supplied with user Name and
Password leave the field blank. If the prob
remains con
Your service provider doesn’t recognize you.
Check the setting you have enter
your connection. If you still get the error
contact your service provider and check that
subscription and the setting you should ente
to create a connection.
You couldn’t connect to the ne
have been disconnected from the network
Wait a few minutes and try again. If the
problem persists contact your service provide
This error indicates a PPP conversation
tarted, buts
re
appropriate time. This can be caused by po
line quality or a problem with the server (ISP).
This error can occur when your modem has
connected to the ISP and has sent user
and password, but th
the server. Wait a few minutes and try again.
If the problem continues please contact y
service prov
Your service provider is not allowing you to
access their network. Che
have entered in the wizard to create the
connect
your service provider and check that you have
the required subscription activated for your
SIM.
Contact your service provider
GPRS internet subscription is activate
your SIM.
roaming activated.
er the User Name and Password
lem
tact again your service provider.
ed to create
twork or you
.
it was terminated because the
mote server did not respond within an
name
ere is no response from
our
ider.
ck the setting you
ion. If you still get the error contact
d for
uyou have the GPRS internet enabled on yo
r
r
r.
or
41

7 Information about software and hardware version
7.1 Check Fi m and Driver version
In GC79 Manager:
1: Select: Help | About GC79 Man
Manager, read the requested in
2: Select: View | GC79 Manager I
Manager Information, read the r
1:
rmware, Modem, Progra
ager to open window About GC79
formation.
nformation to open window GC79
equested information.
2:
7.2 Check MAC-address, WLAN PC s
Driver version
See below header 1.8 Three ways to o
Wireless Configuration Utility. In the
information.
Note: The MAC-address is individual for
oftware- and WLAN
pen the window Sony Ericsson
Information tab, read the requested
the GC79 PC-card.
42

8 Index
Access point, 29, 33
Access Point Name, 20
All windows operating system, 40
APN, 20, 32, 40, 4
AT-comm
BCMWL5.sys, 15
CSD/HSCSD, 4, 20, 21, 25, 32, 34, 37, 40
Diagnos
Disable, 28, 33, 37
Disable Radio, 28, 33, 37
DNS, 20
Domain Name Server, 20
Driver tab, 7, 8, 11, 12, 13, 14, 15, 16
Enable, 9, 10, 11, 13, 15, 16, 28, 35, 39
Enable Radio, 35, 39
Fax, 25
GC75.sys, 11
GC75Net.sys, 13
GC79 Manager, 3, 4, 6, 17, 21, 22, 23, 24, 25, 28, 30, 32, 33, 34, 35, 37, 39, 42
GC79 Manager icon, 21, 28
GC79 Manager_Log.txt, 36
GC79 PC Card Help, 3
GC79 Quick Start Guide, 3
GC79 User Guide, 3, 39
GPRS, 1, 6, 11, 13, 16, 20, 21, 22, 24, 25, 28, 32, 34, 35, 37, 40, 41
GPRS internet, 20
Hardware Device, 7, 8, 12, 14
Hyper Te
Internet
ISDN, 20, 32, 39, 40
Local Area Connection, 20, 22, 23, 30, 37, 38
Modem.sys, 11
passw
Quick Tr ble Shooting Guide, 2, 3
Safely Remove H
Show icon in notif
signal strength, 21
SIM CAR
SMS, 20, 24, 35
SMS ser ce cent
Sony Ericsson Wireless Configuration Utility, 17, 26
Sony Ericsson 802.11b Wireless LAN Adapter, 5, 7, 14, 18, 30
Sony Ericsson GC79 Manager, 5
Sony Ericsson GC79 Wireless Modem, 5, 7, 8, 9, 10, 39
Sony Ericsson GC79 Wireless Modem Driver, 5
Sony Ericsson GC79 Wireless WAN Adapter, 12
Sony Ericsson Wireless Configuration Utility, 17, 18, 26, 29
Sony Ericsson Wireless WAN Adapter, 7, 12
status log, 36
TCP/IP, 37, 38
Telephony Settings, 17, 24
Turn 802.11 Radio on, 35
Turn 802.11 Radio off, 37
Turn 802.11 Radio On, 28
Turn GSM/GPRS Radio On, 21, 28
User ID,
Win2000 6, 11, 13, 16, 40
Win98, 6
Windows onment, 3, 4, 5, 7, 17, 26, 27, 37, 38
Window , 39
Wireless LAN error messages, 39
Wireless Networks tab, 27, 29
wireless radio, 28
Wizard, 11, 13, 15, 25, 32, 41
and, 2, 19
tics tab, 10, 18
rminal, 19
Explorer, 37
ord, 20, 40, 41
ou
D Errors, 39
vi re number, 24
20, 40, 41
,
, 11, 13, 16, 39
envir
s Error codes
1
ardware, 7, 8, 12, 14
ication area when, 20
, 22, 23, 24, 25, 30, 31, 32, 34, 35, 36, 38
43
 Loading...