

Page 1

Compact Disc
OPERATING INSTRUCTIONS
En (English)
Stereo System
XR-MG9
U
For assistance and information
(United States and Puerto Rico)
8B-CLR-903-01
010601AYK-H-B
MANUAL DE INSTRUCCIONES
MODE D'EMPLOI
E (Español)
F (Français)
Page 2
PRECAUTIONS
WARNING
To reduce the risk of fire or electric shock, do not expose
this appliance to rain or moisture.
CAUTION
RISK OF ELECTRIC SHOCK
En
“CAUTION:TO REDUCE THE RISK OF
DO NOT REMOVE COVER (OR BACK).
NO USER-SERVICEABLE PARTS INSIDE.
REFER SERVICING TO QUALIFIED
Explanation of Graphical Symbols:
2
DO NOT OPEN
ELECTRIC SHOCK,
SERVICE PERSONNEL.”
The lightning flash with arrowhead
symbol, within an equilateral triangle, is
intended to alert the user to the presence
of uninsulated "dangerous voltage" within
the product’s enclosure that may be of
sufficient magnitude to constitute a risk
of electric shock to persons.
The exclamation point within an
equilateral triangle is intended to alert the
user to the presence of important
operating and maintenance (servicing)
instructions in the literature
accompanying the appliance.
Read these Operating Instructions carefully and completely
before operating the unit. All precautions in this booklet and
on the unit should be strictly followed.
Keep the Operating Instructions for future reference.
Installation
1Water and moisture — Do not use this unit near water,
such as near a bathtub, washbowl, swimming pool, or the
like.
2Heat — Do not use this unit near sources of heat, including
heating vents, stoves, or other appliances that generate heat.
It also should not be placed in temperatures less than 5°C
(41°F) or greater than 35°C (95°F).
3Mounting surface — Place the unit on a flat, even surface.
4Ventilation — The unit should be situated with adequate
space around it so that proper heat ventilation is assured.
Allow 10 cm (4 in.) Clearance from the rear and the top of
the unit, and 5 cm (2 in.) from each side.
- Do not place the unit on a bed, rug, or similar surface that
may block the ventilation openings.
- Do not install the unit in a bookcase, cabinet, or airtight
rack where ventilation may be impeded.
5Objects and liquid entry — Make sure that objects or
liquids do not get inside the unit through the ventilation
openings.
6 Carts and stands — When placed or
mounted on a stand or cart, the unit should
be moved with care. Quick stops, excessive
force, and uneven surfaces may cause the
unit or cart to overturn or fall.
7Condensation — Moisture may form on the CD pickup
lens when:
- The unit is moved from a cold spot to a warm spot
- The heating system has just been turned on
- The unit is used in a very humid room
- The unit is cooled by an air conditioner
When this unit has condensation inside, it may not function
normally. Should this occur, leave the unit for a few hours,
then try to operate again.
8Wall or ceiling mounting — The unit should not be
mounted on a wall or ceiling, unless specified in the
Operating Instructions.
Electric Power
1 Power sources — Connect this unit only to power sources
specified in the Operating Instructions, and as marked on
the unit.
2Polarization — As a safety feature, some units are
equipped with polarized AC power plugs which can only be
inserted one way into a power outlet. If it is difficult or
impossible to insert the AC power plug into an outlet, turn
the plug over and try again. If it still does not easily insert
into the outlet, please call a qualified service technician to
service or replace the outlet. To avoid defeating the safety
feature of the polarized plug, do not force it into a power
outlet.
3AC power cord
- When disconnecting the AC power cord, pull it out by the
AC power plug. Do not pull the cord itself.
- Never handle the AC power plug with wet hands, as this
could result in fire or shock.
- Power cords should be firmly secured to avoid being
severely bent, pinched, or walked upon. Pay particular
attention to the cord from the unit to the AC outlet.
- Avoid overloading AC outlets and extension cords beyond
their capacity, as this could result in fire or shock.
4Extension cord — To help prevent electric shock, do not
use a polarized AC power plug with an extension cord,
receptacle, or other outlet unless the polarized plug can be
completely inserted to prevent exposure of the blades of the
plug.
5When not in use — Unplug the AC power cord from the
AC outlet if the unit will not be used for several months or
more. When the cord is plugged in, a small amount of current
continues to flow to the unit, even when the power is turned
off.
Page 3

Outdoor Antenna
1 Power lines — When connecting an outdoor antenna,
make sure it is located away from power lines.
2 Outdoor antenna grounding — Be sure the antenna
system is properly grounded to provide protection against
unexpected voltage surges or static electricity build-up.
Article 810 of the National Electrical Code, ANSI/NFPA 70,
provides information on proper grounding of the mast,
supporting structure, and the lead-in wire to the antenna
discharge unit, as well as the size of the grounding unit,
connection to grounding terminals, and requirements for
grounding terminals themselves.
Antenna Grounding According
to the National Electrical Code
GROUND CLAMP
ELECTRIC
SERVICE
EQUIPMENT
POWER SERVICE
GROUNDING
ELECTRODE SYSTEM
(NEC ART 250 PART H)
NEC-NATIONAL ELECTRICAL CODE
ANTENNA
LEAD IN
WIRE
ANTENNA
DISCHARGE
UNIT
(NEC SECTION
810-20)
GROUNDING
CONDUCTORS
(NEC SECTION
810-21)
GROUND CLAMPS
Maintenance
Clean the unit only as recommended in the Operating
Instructions.
Damage Requiring Service
Have the unit serviced by a qualified service technician if:
- The AC power cord or plug has been damaged
- Foreign objects or liquid have gotten inside the unit
- The unit has been exposed to rain or water
- The unit does not seem to operate normally
- The unit exhibits a marked change in performance
- The unit has been dropped, or the cabinet has been damaged
DO NOT ATTEMPT TO SERVICE THE UNIT YOURSELF.
OWNER'S RECORD
Record the model number and serial number of your set
(found at the rear of your set) below. Refer to them when
contacting your Aiwa dealer.
Model No. _____________________________
TABLE OF CONTENTS
PRECAUTIONS .................................... 2
PREPARATIONS ................................... 4
PARTS AND CONTROLS ......................... 5
ADJUSTMENTS BEFORE OPERATION.......... 8
SOUND ADJUSTMENTS.......................... 9
CD OPERATIONS................................ 10
RADIO OPERATIONS ........................... 12
TIMER OPERATIONS ........................... 13
REFERENCE ..................................... 14
System and accessories
Main unit CX-LMG9
Speakers SX-LMG9
Speakers cords
Remote control
Lithium battery (CR2025)
FM antenna
AM antenna
En
Serial No. _____________________________
3
Page 4
PREPARATIONS
Connection
Plug in the AC power cord to the AC outlet after all other
connections are made.
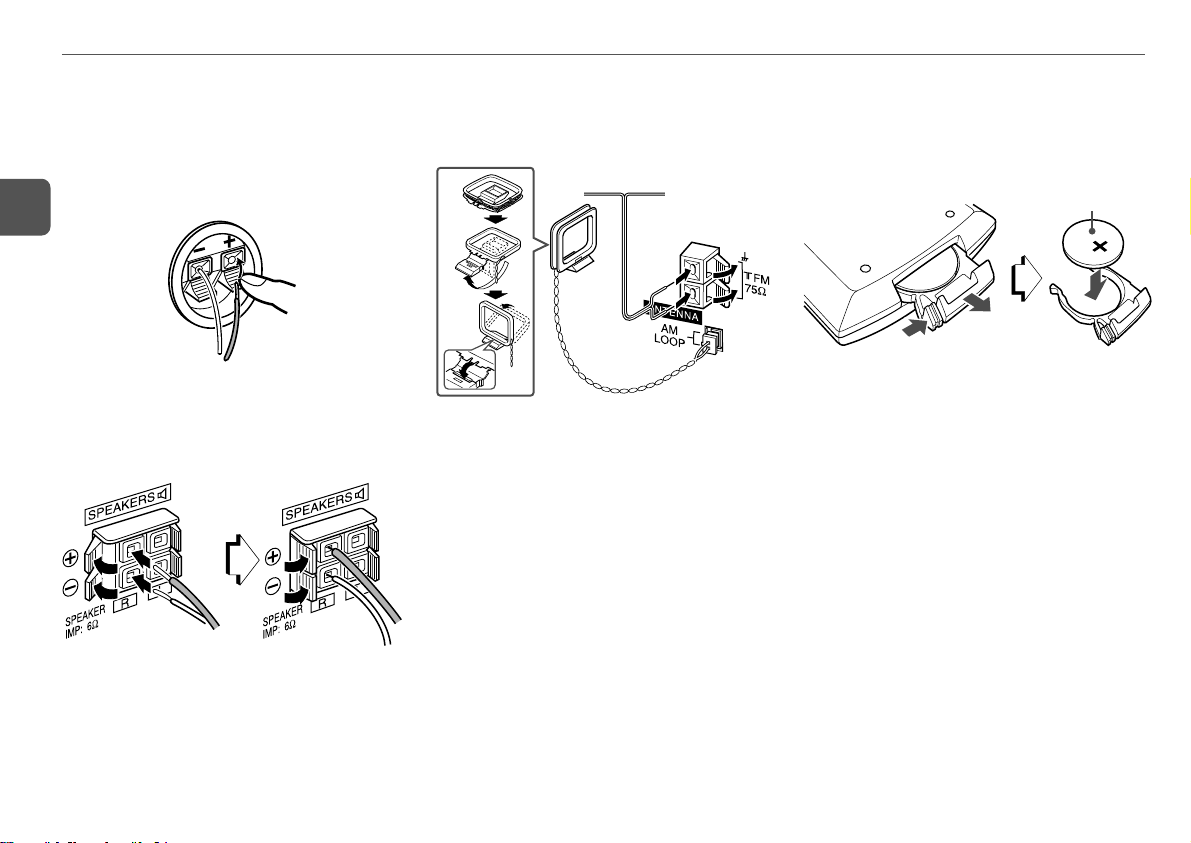
1
Connect the speaker cords to the speakers.
Connect the amber cords to the + terminals and the silver
En
cords to the – terminals.
2
Connect the speakers to the main unit.
Connect the right speaker to the SPEAKERS R terminals
and the left to the SPEAKERS L terminals. The amber
speaker cords go to the ) terminals.
4
3
Connect the supplied antennas.
Connect the FM antenna to the FM 75 Ω terminals and
the AM antenna to the AM LOOP jack.
AM antenna
FM antenna
4
Connect the AC power cord to an AC outlet.
When the AC power cord is connected to an AC power
outlet for the first time, DEMO appears on the display.
To deactivate the DEMO, press DEMO/ECO and the clock
will flash on the display. For setting the clock, see page 9.
Speakers
•Do not short-circuit the ) and ( speaker cord leads.
•Do not leave objects generating magnetism or objects
affected by magnetism near the speakers.
Antennas
Keep antennas away from metallic objects, electrical
equipment and cords.
FM antenna: Extend fully in a T-shape. If reception is poor,
connect an optional outdoor antenna to the FM 75 Ω terminals.
Be sure to connect the shield braid of the antenna to the 2
terminal.
AM antenna: Rotate to find the best reception.
Remote control
While sliding the latch, pull out the battery holder from the
bottom of the remote control. Place the supplied battery on
the battery holder with correct polarity. Finally , insert the holder
back into position.
CR2025
•Replace the battery with new one when the operational
distance between the remote control and main unit becomes
shorter.
•Remove the battery if the unit is not going to be used for an
extended period of time.
•The remote control may not operate if it is used under intense
sunlight or if its line of sight is obstructed.
Caution!
•Do not keep the battery near metallic objects such as rings,
bracelets, and keys. It may cause the battery to short circuit.
•After removing the battery, be sure to keep it out of reach of
children. In case it is swallowed, consult a doctor
immediately.
Page 5
PARTS AND CONTROLS
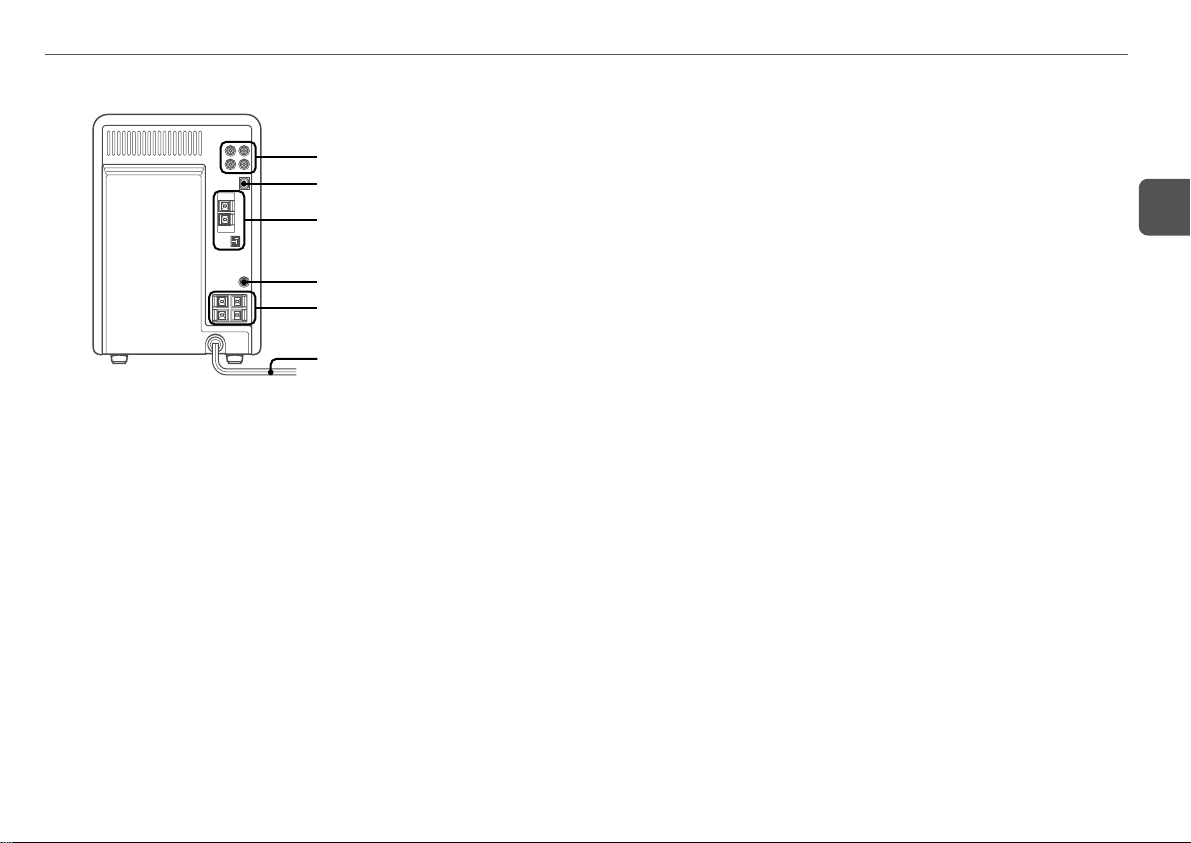
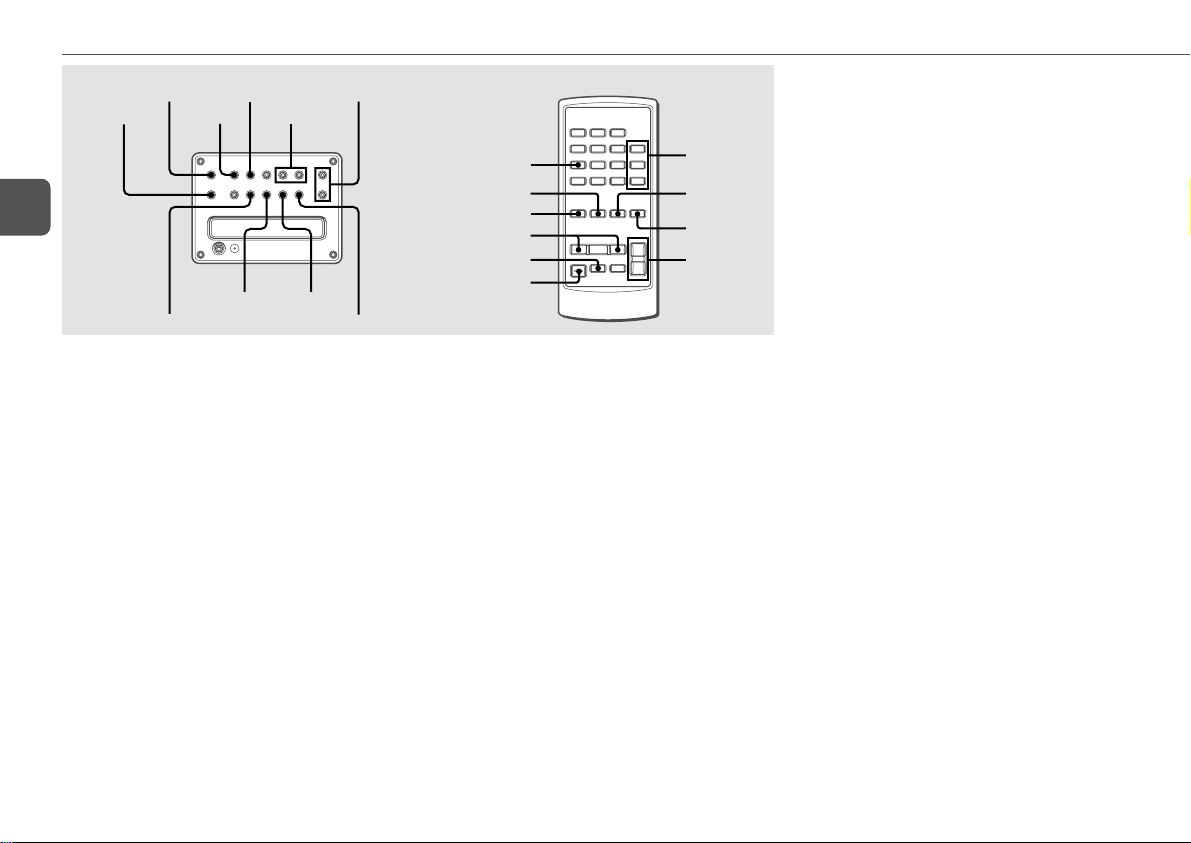
Main unit: rear
1 LINE OUT jacks
Analog sound signals for CD or radio can be output
through these jacks. Use a cable with RCA phono plugs
to connect audio equipment.
Connect the red plug to the R jack, and the white plug to
the L jack.
Signals input through the AUX/VIDEO IN jacks are not
output from the LINE OUT jacks.
1
2
3
4
5
6
AUX/VIDEO IN jacks
Accept analog sound signals from external equipment.
Connect external equipment using an optional connecting
cable with RCA phono plugs (red plug to the R jack, white
plug to the L jack). Refer also to the operating instructions
for your equipment.
To switch function to external input, press FUNCTION
repeatedly to select the AUX (VIDEO or TV) function.
Tip:
T o change a source name in the display, hold down g
and press POWER while the power is on.
AUX → VIDEO → TV
2 DIGITAL OUT (OPTICAL) jack
CD digital sound signals can be output through this jack.
Use an optical cable to connect digital audio equipment.
Remove the dust cap from the DIGITAL OUT (OPTICAL)
jack. Then connect an optical cable plug to the DIGITAL
OUT (OPTICAL) jack.
When you record the sound signals of this unit with digital
audio equipment (MD recorder, CD recorder, etc.)
connected to this jack, the beginning of the first track
may not be recorded.
3 AM LOOP jack and FM 75 Ω terminals
Plug in the supplied AM and FM antennas.
4 SUPER WOOFER3 jack
Connect an optional powered sub woofer with a built-in
amplifier to this jack.
5 SPEAKERS3 terminals
Connect the supplied speakers using the supplied
speaker cords.
6 AC power cord
En
5
Page 6

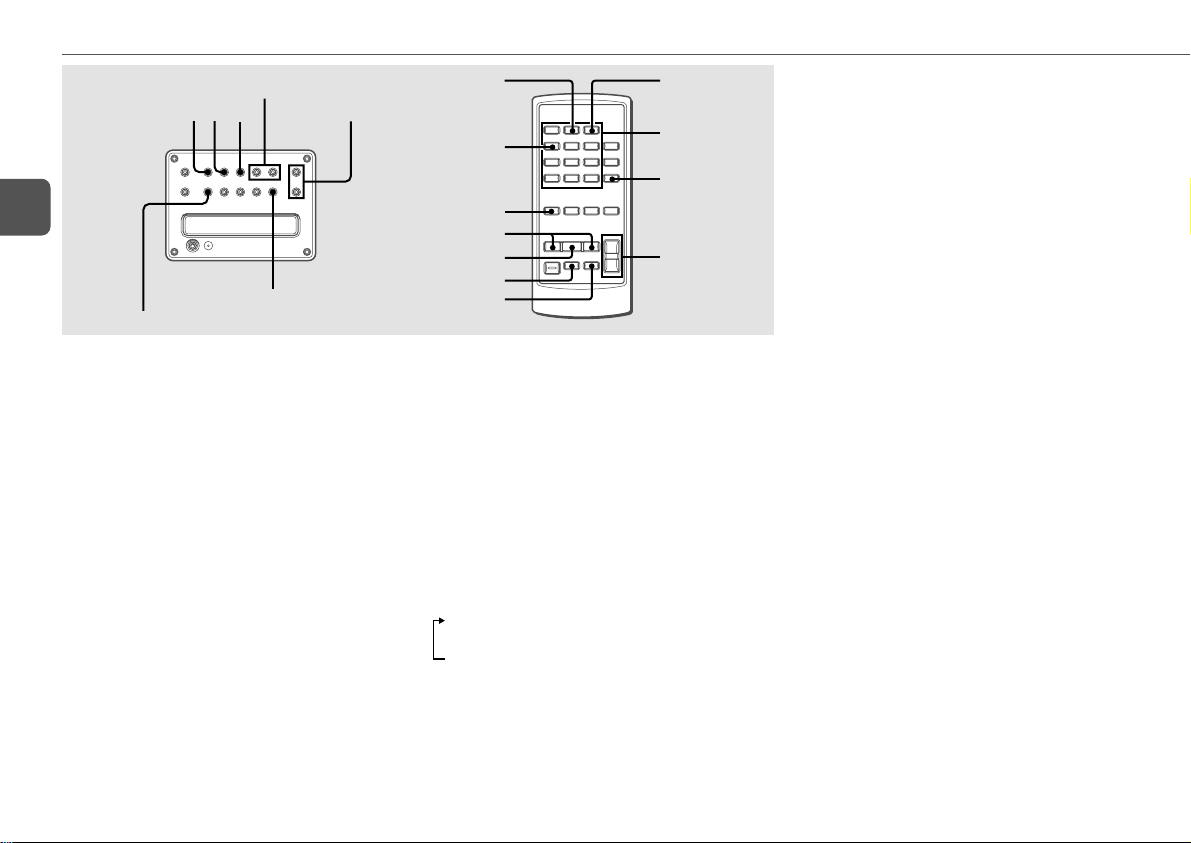
Main unit: front
En
1
2
3
4
1 POWER 6STANDBY/ON
Switches the unit on and off (standby).
2 a/SET
CD: pauses playback.
Radio: stores the received station to preset.
s/CLEAR
CD: stops playback.
Radio: clears a preset station.
c/PRESET
CD: starts playback.
Radio: tunes in a preset station.
r/f/–, +/g/t ( TUNING)
CD: skips to a previous or a succeeding track when
pressed, searches a track in fast forward or reverse
playback when held down.
Radio: manually tunes up or down within the band.
5
6
3 DEMO/ECO
When the unit is turned off: selects DEMO mode or
displays the clock (when ECO mode is deactivated).
When the unit is turned on: selects ECO mode on and
off.
4 PHONES jack
Plug in optional headphones set with a stereo mini plug
(ø3.5 mm,
5 VOLUME UP, DOWN
Adjusts the volume.
6 FUNCTION
Switches the active function among FM/AM, AUX (VIDEO
or TV) and CD.
TUNER/BAND
Selects radio function and the radio band.
T-BASS
Emphasizes low frequency sound.
EQ
Selects a sound equalization curve.
zOPEN/CLOSE
Opens or closes the disc compartment.
1
/8 in.). Speaker output is canceled.
6
Page 7
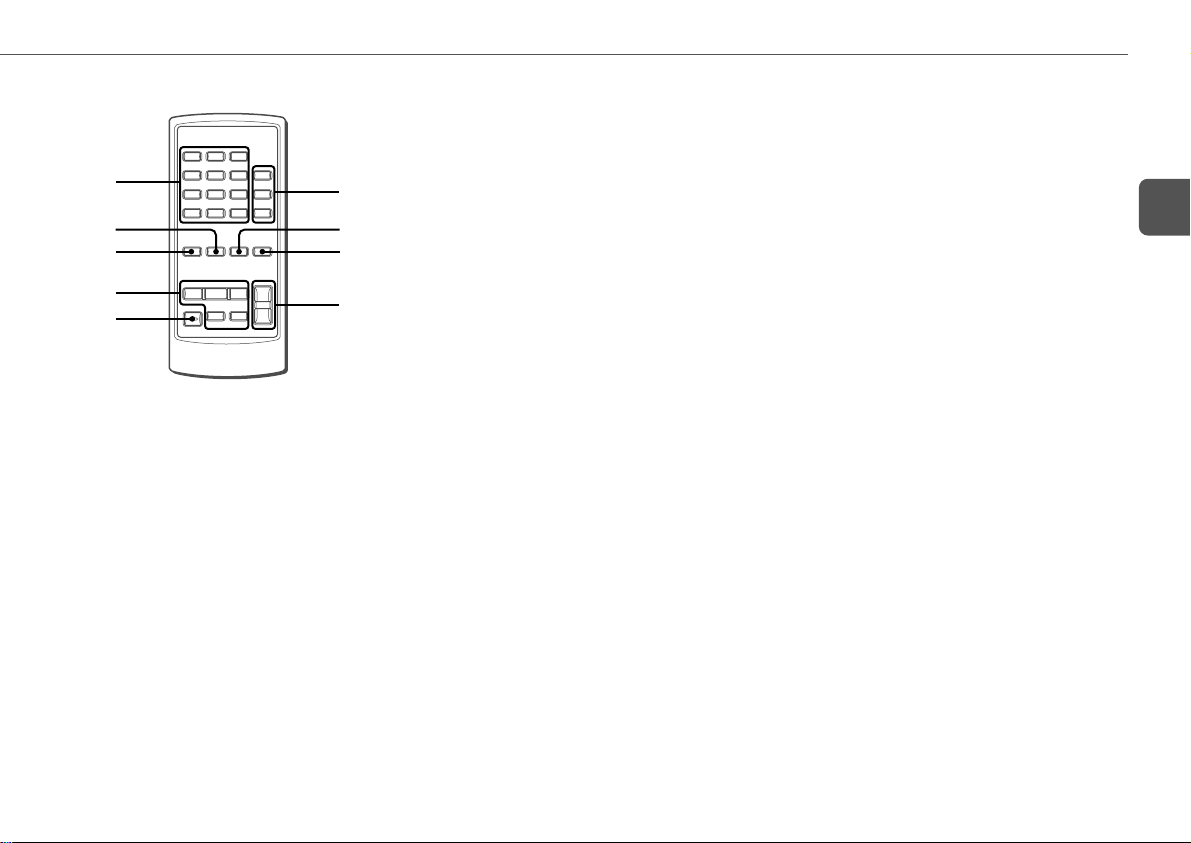
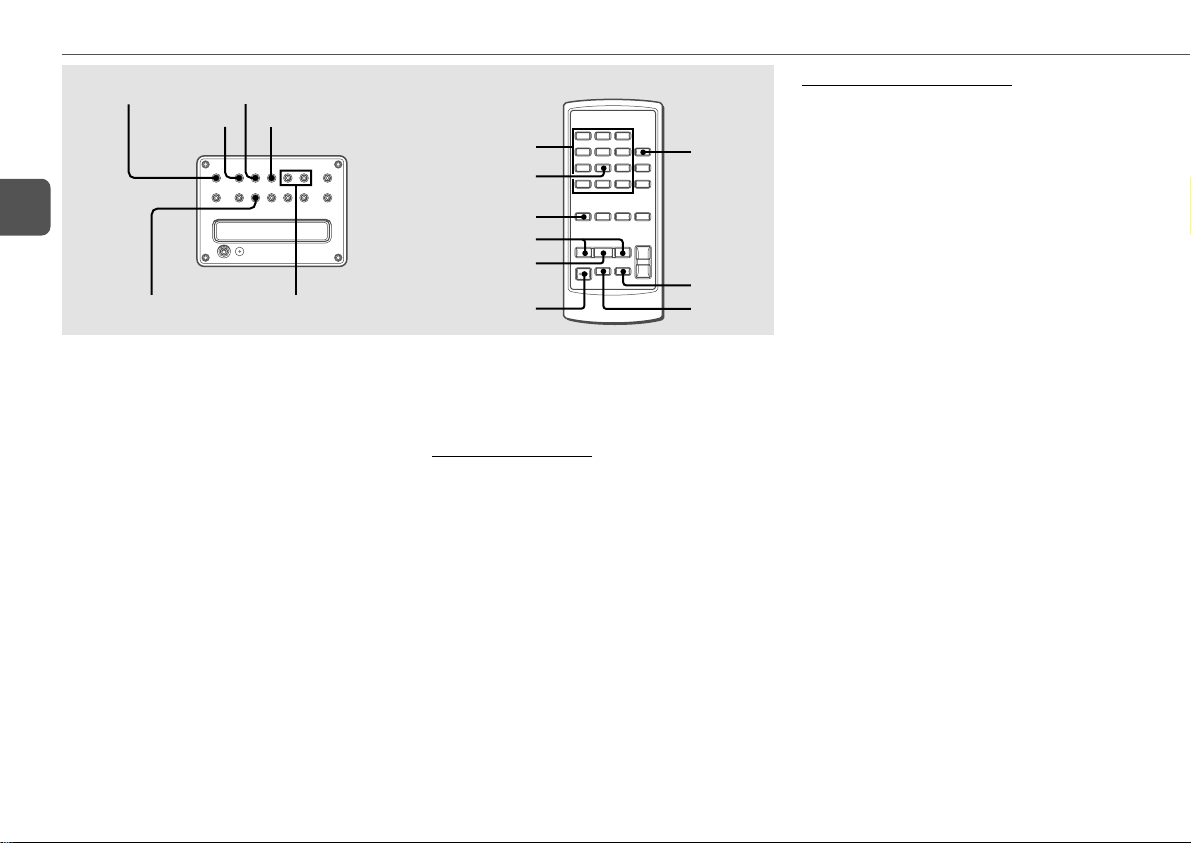
Remote control
1,2
3
4
5
6
Buttons with the same or similar names on the main unit
basically have the same function.
1 0–10, +10
CD: selects a track of the specified number.
Radio: tunes in the station with the specified preset
number.
7
8
9
0
2
The numbered buttons take on these functions when pressed with
SHIFT held down
RANDOM/REPEAT
Selects random or repeat CD playback mode.
PROGRAM
Selects programmed CD playback mode.
DISPLAY
CD: displays the track number being played, remaining
time of play and current volume level.
Radio: displays the frequency of the tuned station and
current volume level.
TIMER
Selects timer playback setting mode.
SLEEP
Selects sleep-timer setting mode.
CLOCK
Selects clock setting mode.
TUNER MONO
Switches between stereo or monaural FM reception.
3 T-BASS
4 SHIFT
Hold down when pressing a numbered button to change
its function to that printed above the number.
5 cPRESET
r/f, g/t (TUNING DO WN/UP)
aSET
sCLEAR
:
6 POWER
7 TUNER/BAND
Selects radio function and the radio band.
AUX
Selects the function of external equipment connected to
the AUX/VIDEO IN jacks.
CD
Selects CD function.
8 EQ/QSURROUND
EQ: selects a sound equalization curve.
QSURROUND: turns Q SURROUND on and off.
9 ENTER
Determines the mode and the time (clock and timer).
0 VOLUME (N,M)
En
7
Page 8
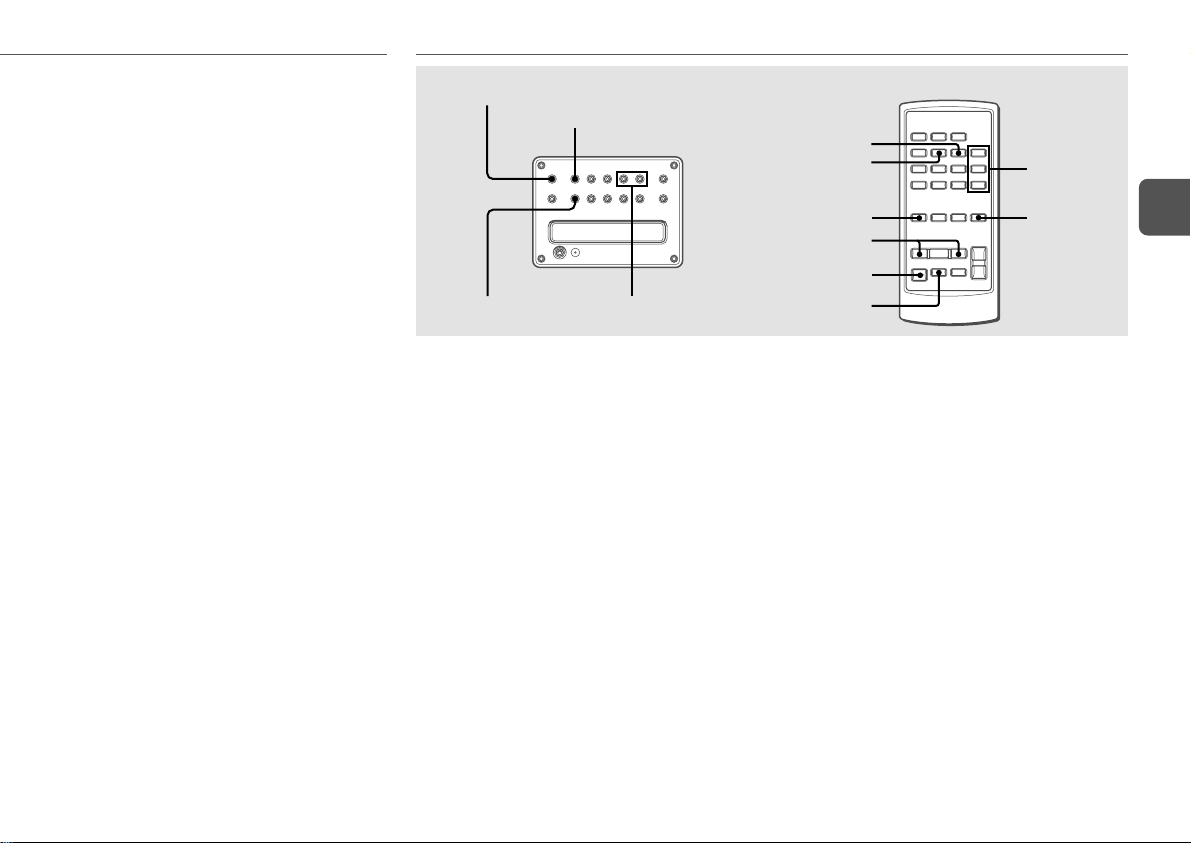
ADJUSTMENTS BEFORE OPERATION
En
POWER
6STANDBY/ON
DEMO/ECO
TUNER/BAND
s
a
T-BASS
f,g
VOLUME UP/
DOWN
f,g
EQ
zOPEN/CLOSE
CLOCK
T-BASS
SHIFT
aSET
POWER
TUNER/BAND,
AUX, CD
EQ/
QSURROUND
ENTER
VOLUME
(N,M)
When the power economizing mode is activated
"GOOD-BYE" is displayed for 4 seconds, and everything
on the display clears.
Only the red indicator on the POWER button lights to show
that power is being supplied to the unit.
Standby power consumption
When the power economizing mode is activated: 1.0 W
When the power economizing mode is deactivated: 12.0 W
Power
Turning the unit on
Press POWER 6 STANDBY/ON (POWER on the remote
control).
Alternatively, press TUNER/BAND (AUX or CD on the remote
control). Playback will start automatically if a disc is inserted.
Turning the unit off
Press POWER 6STANDBY/ON again.
The unit goes into standby.
Volume
Press VOLUME (UP or DOWN) (VOLUME (N,M)
on the remote control).
Adjust from 0 (minimum) to 30 and MAX (maximum).
Tip:
Volume level setting is retained during power-off standby. If
the unit is turned off with the volume set to 17 or more, it is
automatically turned down to 16 the next time the unit is turned
on.
8
DEMO
If the clock has not been set, a DEMO appears on the display
when the unit is turned off.
To deactivate the DEMO
Press DEMO/ECO. The clock flashes. For setting the clock,
see page 9.
ECO mode
Reduces power consumption with the following operations.
After clock is set, this unit allows you to regulate its power
consumption by displaying nothing on the display while the
power is off. This is called the power economizing
mode.
Press DEMO/ECO while the unit is turned on.
Each press of this button changes the display status as follows:
1 ECO ON: power economizing mode is activated.
2 ECO OFF: power economizing mode is deactivated.
Page 9

SOUND ADJUSTMENTS
Setting the clock
1
Hold down SHIFT and press CLOCK on the remote
control.
When the unit is turned off, you can also press a or
ENTER.
2
Press f or g to set the time.
Each press changes the time in 1-minute steps.
Holding these buttons down will vary the time in 10-minute
units.
If f or g is not pressed within 4 seconds, setting
is canceled.
3
Press a or ENTER.
The time display stops flashing and the clock starts from
00 seconds.
To display the time while the power is on
Hold down SHIFT and press CLOCK on the remote control.
The time will be displayed for 4 seconds.
To switch to the 24-hour standard
Display the time and press s within 4 seconds.
With each press, the clock alternates between 12- and 24hour standard time.
Tip:
In the 12-hour standard, "AM12:00" indicates midnight and
"PM12:00" noon.
If the clock display flashes when the unit is turned
off
There has been a power interruption. Reset the clock.
Equalizer
Selects a sound equalization curve to match the music type.
Press EQ (EQ/QSURROUND on the remote control)
repeatedly to select one of the three equalization
curves.
- ROCK: Powerful sound emphasizing treble and bass
- POP: More presence in the vocals and midrange
- JAZZ: Accented lower frequencies for jazz-type music
- EQ OFF: Equalizer effect is canceled.
T-BASS
Emphasizes low frequencies for a powerful sound.
Press T-BASS repeatedly to select one of the three
emphasis levels or the off position.
•If the sound becomes distorted with the T -BASS effect, cancel
the effect.
Q SURROUND system
The Q SURROUND system built into this unit uses only two
speakers at the left and right to create an atmosphere that
sounds as if you are surrounded by two front speakers and
two rear speakers.
Hold down SHIFT and press EQ/QSURROUND on the
remote control.
“ON QSURROUND” will flow from right to left.
To cancel the Q SURROUND effect
“OFF QSURROUND” flows from right to left and the
“QSURROUND” indicator goes off.
Tips:
•The Q SURROUND system does not work in monaural
mode.
•When the Q SURROUND system is on, the sound may be
distorted at higher volumes. If this happens, turn the
volume down.
En
9
Page 10
CD OPERATIONS
f,g
c
s
a
En
zOPEN/CLOSE
FUNCTION
This unit plays back finalized CD-R/RW discs as well as audio
CDs.
Playback
1
Press FUNCTION repeatedly (CD on the remote
control) to select the CD function.
2
Press z OPEN/CLOSE to open the disc
compartment.
Place a disc with the label side up.
Then close the disc compartment by pressing zOPEN/
CLOSE.
3
Press c to start play.
To stop playback
Press s.
To pause playback
Press a. Press again to resume playback.
To skip to the beginning of the current/preceding/
succeeding track
VOLUME UP/
DOWN
RANDOM/
REPEAT
DISPLAY
SHIFT
f,g
cPRESET
aSET
sCLEAR
Press f or g repeatedly.
To search (playback in fast forward or reverse)
Hold down f or g. Release at the desired point.
To select a track with the remote control (Direct play)
Press the numbered buttons to select a track.
- To select track 25, press +10, +10 and 5.
- To select track 10, press 10.
To change the display in the playback mode
Hold down SHIFT and press DISPLAY on the remote control
during playback.
The display changes in the following order:
1 Track number being played and elapsed playing time
2 Track number being played and remaining time of play
3 Current volume level
•Remaining playback time cannot be displayed during
random playback or programmed playback.
PROGRAM
0-10,+10
CD
VOLUME
(N,M)
Random/Repeat playback
Random playback plays all the tracks in random order. Repeat
playback plays all the tracks or the track being played repeatedly.
You can select random and repeat all playback at the same
time.
1
Hold down SHIFT and press RANDOM/REPEAT
on the remote control repeatedly to select one of
the following modes:
Repeat 1 playback: "" 1"
Repeat all playback: """
Random playback: "RANDOM"
Random/Repeat all playback: "RANDOM ""
2
Press c to start play.
To cancel random/repeat playback
Hold down SHIFT and press RANDOM/REPEAT on the remote
control repeatedly until "RANDOM", "" 1" or """
disappears.
Direct selection of the tracks with the numbered buttons
cancels the random mode.
To repeat a selected set of tracks
First select the tracks with programmed playback.
Then selects repeat playback. (See "Programmed playback"
on page 11.)
10
Page 11

Programmed playback
Plays back up to 30 selected tracks in programmed order.
1
Hold down SHIFT and press PROGRAM on the
remote control in stop mode.
"PRGM" flashes on the display.
2
Press the numbered buttons on the remote
control to program a track.
-To select the 25th track, press +10, +10 and 5.
-To select the 10th track, press 10.
The selected track number lights up on the display.
3
Repeat step 2 to program other tracks.
The total number of selected tracks and total playing time
will be displayed.
4
Press c to start play.
The track number for the current track flashes on the
display.
•During programmed playback, you cannot select a track with
the numbered buttons. "Can’t USE" is displayed when
you try to select a track .
•It is impossible to play a selected set of tracks in random
order.
•If the total playback time of the program exceeds 99 minutes
and 59 seconds, or if a track with a track number exceeding
30 is programmed, the playing time is displayed as
"- -:- -".
•You cannot program more than 30 tracks. "FULL" is
displayed.
To check the program
Press f or g repeatedly in stop mode. The track
number and program number are displayed in succession.
To clear the program
Press s in stop mode. "PRGM" disappears on the display .
To add tracks to the program
Repeat step 2 before starting playback. The tracks are added
to the end of the program.
To change the programmed tracks
Clear the program and repeat all the steps again.
Notes on CDs
•Do not place more than one disc.
•Do not tilt the unit with a disc inserted.
•The unit may not play CD-R/RW discs recorded on personal
computers or certain kinds of CD-R/RW recorders.
•Do not attach adhesive label to either side of CD-R/RW discs,
as doing so may cause malfunction.
•Do not load an unrecorded CD-R/RW disc. The disc may be
damaged.
•Do not use irregular-shaped CDs.
En
11
Page 12
RADIO OPERATIONS
POWER
6STANDBY/ON
s/CLEAR
a/SET
c/PRESET
En
TUNER/BAND
f,gTUNING
(–,+)
Manual tuning
1
Press TUNER/BAND repeatedly to select a band.
The unit switches to the radio from any other function
and alternates between FM and AM.
2
Press f or g repeatedly to tune in a station.
"TUNE" is displayed when a station is tuned in.
"1" lights up for FM stereo reception.
To search for a station automatically (Auto search)
Hold down f or g.
The unit searches for a station and stops at reception.
To stop the search manually, press for g.
•Auto search may not stop at stations with weak signals.
0-10,+10
TUNER MONO
SHIFT
f,g
cPRESET
POWER
TUNER/
BAND
sCLEAR
aSET
Preset tuning
Preset up to 32 of your favorite stations and tune them in
directly.
Presetting stations
1
Tune in the desired station.
2
Press a to store the station.
The preset number, beginning from "1", appears on the
display.
3
Repeat steps 1 and 2 to preset other stations.
•You cannot store more than 32 preset stations.
"FULL" is displayed.
•If power is interrupted for more than approximately 12 hours,
all settings stored in memory after purchase need to be reset.
Tuning in preset stations
1
Select the band.
2
Press c repeatedly.
With each press, the station with the succeeding preset
number is tuned in.
You can tune in the desired preset station directly by
pressing the numbered buttons on the remote control.
- To select preset number 10, press 10.
- To select preset number 15, press +10 and 5.
To clear a preset station
1 Tune in the station by preset tuning.
2 Press s, then press a within 4 seconds.
Preset station numbers in the band which are higher than
the cleared number decrease by one.
12
Page 13
TIMER OPERATIONS
Adjustments
To switch to monaural FM reception
Hold down SHIFT and press TUNER MONO on the remote
control so that "MONO" is displayed.
To cancel, press again to display "STEREO."
Tip:
When FM stereo reception is poor, switching to monaural
reduces noise.
To switch the AM tuning interval
The default setting of the AM tuning interval is 10 kHz/step. If
you use this unit in an area where the frequency allocation
system is 9 kHz/step, change the tuning interval.
Hold down c and press POWER.
Tip:
When the AM tuning interval is changed, all preset stations
are cleared.
POWER
6STANDBY/ON
a/SET
FUNCTION
f,g
Sleep timer
Turns off the unit automatically after a specified time.
1
Hold down SHIFT and press SLEEP on the remote
control.
"SLEEP" is displayed.
2
Press f or g repeatedly to set the sleep
timer duration.
With each press, the timer duration changes in 5-minute
steps between 5 to 240 minutes. If there is no button input
for 4 seconds, the current setting is entered automatically.
The unit turns off after the selected time.
To check the remaining time until the unit turns off
Hold down SHIFT and press SLEEP on the remote control.
The remaining time is displayed for 4 seconds.
To cancel the sleep timer
Hold down SHIFT and press SLEEP repeatedly on the remote
control until "SLEEPoFF" is displayed.
SLEEP
TIMER
SHIFT
f,g
POWER
aSET
TUNER/BAND,
AUX, CD
ENTER
Timer playback
Turns on the unit at a specified time for the specified duration.
Make sure the clock is set correctly.
1
Press FUNCTION repeatedly to select the desired
playback source.
2
Hold down SHIFT and press TIMER.
"5" indicator lights up and "5 PLAY" appears on the
display. Then, the timer-on time and the source name
appear alternately on the display.
3
Within 7 seconds, press ENTER or a.
The timer-on time and the source name appear alternately
on the display.
4
Press f or g to set the timer -on time, then
press ENTER or a.
En
13
Page 14

5
Press f or g to set the timer-activated
duration, then press ENTER or a.
With each press, the timer-activated duration changes in
5-minute steps between 5 to 240 minutes.
If there is no button input for 4 seconds, the current setting
is entered automatically.
6
En
Adjust the volume and tone for timer playback.
If the volume level is set to 17 or higher, it is automatically
turned down to 16 when the unit is turned on by the timer.
7
Prepare the source.
To play CD, insert a disc.
To play the radio, select the band and tune in the desired
station.
To play external equipment connected to the AUX/VIDEO
IN jacks, set an external timer for the equipment so that
its playback begins at the same time.
8
Press POWER 6STANDBY/ON to turn the unit
off.
"5" remains on the display to indicate the timer standby
mode (when the ECO mode is deactivated).
At timer-on time, the unit turns on and plays the selected
source. After the specified timer-activated duration, the
unit turns off again.
•Timer playback will not begin unless the unit is turned off
first.
•Connected equipment cannot be turned on or off by the builtin timer of this unit. Use an external timer.
To check the timer setting
Hold down SHIFT and press TIMER.
The timer-on time, the source and the timer-activated duration
are displayed for 4 seconds.
To change the timer setting
Reset the timer again.
To cancel the timer
Hold down SHIFT and press TIMER on the remote control
repeatedly until "5 OFF" is displayed. "5" disappears from
the display.
Tip:
Your timer setting is retained even if the timer is canceled.
Next time the timer is activated, you can change your previous
setting, or simply use the same setting again.
REFERENCE
Care and maintenance
Occasional care and maintenance of the unit and the software
are needed to optimize the performance of your unit.
To clean the cabinet
Use a soft and dry cloth. If the unit surfaces are extremely
dirty, use a soft cloth lightly moistened with mild detergent
solution. Do not use strong solvents such as alcohol, benzene
or thinner.
Care of CDs
When a CD becomes dirty, wipe it from the center out with a
cleaning cloth. After playing a CD, store it in its case. Do not
keep it in hot or humid places.
Troubleshooting
If your unit fails to perform properly, check the following guide
and the relevant sections of this manual.
There is no sound
•Are the speakers and AC power cord connected properly?
The unit shut off suddenly
•Possibly a short circuit in the speaker terminals. Disconnect
the AC power cord from the AC outlet and reconnect the
speaker cords correctly.
All the display lights turn off when the power is off
•Is ECO mode set to on?
Erroneous display
•Reset the unit.
14
Page 15

Poor radio reception
•Check antenna connection. Adjust the antenna to find the
best reception.
•Move unit and antenna away from other electric appliances
and cords.
The CD player works poorly
•Is the disc correctly inserted?
•Is the disc dirty?
•Is the lens affected by condensation? If so, wait
approximately one hour and try again.
Resetting the unit
If an unusual condition occurs in the display window, reset
the unit as follows:
1 Press POWER to turn off the power.
If the power cannot be turned off, disconnect the AC power
cord, then plug it in again.
2 Hold down s and press POWER.
Everything stored in memory after purchase is cleared.
Specifications
MAIN UNIT CX-LMG9
TUNER
FM tuning range 87.5 MHz to 108 MHz
FM usable sensitivity (IHF) 13.2 dBf
FM antenna terminals 75 ohms (unbalanced)
AM tuning range 530 kHz to 1710 kHz (10 kHz step)
531 kHz to 1602 kHz (9 kHz step)
AM usable sensitivity 350 µV/m
AM antenna Loop antenna
AMPLIFIER
Power output 50 W + 50 W (40 Hz - 20 kHz, THD
less than 1%, 6 ohms)
62 W + 62 W (1 kHz, THD 10%, 6
ohms)
Total harmonic distortion 0.15% (5 W, 1 kHz, 6 ohms, DIN
AUDIO)
Input AUX/VIDEO IN: 500 mV
Outputs SPEAKERS: 6 ohms or more
PHONES: 32 ohms or more
SUPER WOOFER 1.7 V
DIGITAL OUT (OPTICAL) jack
LINE OUT jack
CD PLAYER
Laser Semiconductor laser (λ = 780 nm)
D/A converter 1 bit dual
Signal-to-noise ratio 85 dB (1 kHz, 0 dB)
Harmonic distortion 0.08% (1 kHz, 0 dB)
Wow and flutter unmeasurable
GENERAL
Power requirements 120 V AC, 60 Hz
Power consumption 60 W
Power consumption With ECO mode on: 1.0 W
in standby mode With ECO mode off: 12.0 W
Dimensions (W × H × D) 176.6 × 256 × 348.7 mm
(7 × 10 1/8 × 13 3/4 in.)
Weight 4.9 kg (10 lbs 14 oz)
SPEAKER SYSTEM SX-LMG9
Speaker system 2 way, bass reflex (magnetic
shielded)
Speaker units Woofer: 120 mm (47/8 in.) cone
Tweeter: 25 mm (11/16 in.) dome
Impedance 6 ohms
Dimensions (W × H × D) 160 × 256 × 230 mm
(63/8 × 101/8 × 91/8 in.)
Weight 3.2 kg (7 lbs 1 oz)
Specifications and external appearance are subject to change
without notice.
15
En
Page 16

PRECAUCIONES
ADVERTENCIA
Para reducir el riesgo de incendios o sacudidas eléctricas,
no exponga este aparato a la lluvia ni a la humedad.
CAUTION
RISK OF ELECTRIC SHOCK
DO NOT OPEN
"PRECAUCIÓN: PARA REDUCIR EL RIESGO DE
DESCARGAS ELÉCTRICAS, NO QUITE LA
CUBIERTA (O PARTE TRASERA). NO HAY PIEZAS
REPARABLES POR EL USUARIO EN EL INTERIOR.
REFIERA TODO SERVICIO A PERSONAL DE
E
Explicación de símbolos gráficos:
16
SERVICIO CUALIFICADO."
El símbolo del rayo dentro de un triángulo
equilátero está concebido para alertar al
usuario de la presencia de una "tensión
peligrosa" no aislada dentro del
receptáculo del producto que podría ser
de suficiente magnitud como para
constituir un riesgo de descarga eléctrica
para las personas.
El signo de exclamación dentro de un
triángulo equilátero está concebido para
alertar al usuario de la presencia de
instrucciones importantes de
funcionamiento y mantenimiento
(reparaciones) en la documentación que
acompaña al aparato.
Lea cuidadosamente y en su totalidad el Manual de
Instrucciones antes de utilizar la unidad. Deberán observarse
estrictamente todas las precauciones de este manual y de la
unidad.
Guarde el Manual de Instrucciones para referencia futura.
Instalación
1 Agua y humedad — No utilice esta unidad cerca del agua,
como al lado de una bañera, lavabo, una piscina, o similar.
2 Calor
—
No utilice esta unidad cerca de fuentes de calor,
incluyendo salidas de aire caliente, estufas u otros aparatos
que generen calor. Tampoco deberá someterse a temperaturas
inferiores a 5˚C ni superiores a 35˚C.
3 Superficie de montaje
superficie plana y nivelada.
4 Ventilación
cual exista suficiente holgura a su alrededor para poder
garantizar una ventilación adecuada. Deje una holgura de 10
cm desde la parte posterior y superior de la unidad y 5 cm
desde cada lado a cualquier otro objeto.
- No ponga la unidad sobre una cama, una alfombra o
superficies similares que puedan obstruir las aberturas de
ventilación.
- No instale la unidad en una librería, mueble o estantería
cerrada herméticamente donde la ventilación no sea la
adecuada.
5 Entrada de objetos y líquidos
objetos y líquidos no entren en la unidad a través de las
aberturas de ventilación.
6 Estantes fijos y con ruedas
coloque o monte la unidad en un estante fijo
o con ruedas, tenga mucho cuidado al
moverla a otro lugar. Las paradas repentinas,
la fuerza excesiva y las superficies irregulares
pueden hacer que la unidad o el estante con
ruedas vuelque o se caiga.
7 Condensación
del fonocaptor del reproductor de discos compactos cuando:
- La unidad pase de un lugar frío a uno caliente
- El sistema de calefacción se acabe de encender
—
La unidad deberá situarse en un lugar en el
—
—
Sitúe la unidad sobre una
—
T enga cuidado de que
—
Cuando
Puede formarse condensación en la lente
- La unidad se utilice en una habitación muy húmeda
- La unidad se enfríe mediante aire acondicionado
Esta unidad puede no funcionar debidamente cuando se forme
condensación en su interior. En este caso, deje en reposo la
unidad unas pocas horas y repita de nuevo la operación.
8 Montaje en pared o techo
en una pared ni en el techo, a menos que se especifique lo
contrario en el Manual de Instrucciones.
—
No ha de montarse la unidad
Alimentación
1 Fuentes de alimentación — Conecte esta unidad
solamente a las fuentes de alimentación especificadas en el
Manual de Instrucciones y según está marcado en la unidad.
2 Polarización — Como medida de seguridad algunas
unidades van equipadas con enchufes de alimentación de
CA polarizados que sólo pueden introducirse en un sentido
en la toma de corriente. Si es difícil o imposible introducir
el enchufe de alimentación de CA en una toma, dé la vuelta
al enchufe e inténtelo de nuevo. Si todavía no se introduce
fácilmente en la toma, llame a un técnico cualificado en
reparaciones para modificar o cambiar la toma. Para no
anular la característica de seguridad del enchufe polarizado,
no fuerce su entrada en la toma de corriente.
3Cable de alimentación de CA
- Cuando desconecte el cable de alimentación de CA, tire
del enchufe. No tire del propio cable.
- Nunca manipule el enchufe con las manos mojadas ya
que podría producirse un incendio o una descarga
eléctrica.
- Los cables de alimentación deberán colocarse de forma
que no queden muy doblados, prensados y que nadie
pueda pisarlos. Preste especial atención al cable que va
de la unidad a la toma de CA.
- Evite sobrecargar los enchufes de CA y los cables de
extensión más allá de su capacidad porque ello podría
causar un incendio o una descarga eléctrica.
4 Cable de extensión — Para ayudar a evitar una descarga
eléctrica, no utilice un enchufe de alimentación polarizado
con un cable de extensión, receptáculo u otra toma a menos
que el enchufe polarizado pueda introducirse totalmente para
evitar que las clavijas del enchufe queden expuestas.
Page 17

5 Periodos de no utilización — Desconecte el cable de
Puesta a tierra de la antena según el
Codigo Eléctrico Nacional
ABRAZADERA DE
TOMA A TIERRA
ABRAZADERAS DE
TOMA A TIERRA
UNIDAD DE
DESCARGA
DE LA ANTENA
(NEC,SECCIÓN
810-20)
CONDUCTORES
DE TOMA A
TIERRA (NEC,
SECCIÓN 810-21)
EQUIPO DEL
SERVICIO
ELECTRICO
CABLE DE
BAJADA
DE LA ANTENA
SISTEMA DE ELECTRODO DE
TOMA A TIERRA DEL
SERVICIO ELÉCTRICO
(NEC,ARTÍCULO 250,PARTE H)
NEC (CÓDIGO ELÉCTRICO NACIONAL)
alimentación de CA de la toma si la unidad no va a ser
utilizada durante varios meses o más. Cuando el cable de
alimentación esté conectado, por la unidad continuará
circulando una pequeña cantidad de corriente, aunque la
alimentación esté desconectada.
Antena exterior
1 Líneas del tendido eléctrico — Al conectar una antena
exterior, asegúrese de que se sitúa alejada de las líneas del
tendido eléctrico.
2 Toma a tierra de la antena exterior — Asegúrese de
que el sistema de la antena se conecta a tierra correctamente
para proteger contra picos de tensión inesperados o
acumulación de electricidad estática. El Artículo 810 del
Código Eléctrico Nacional (NEC), ANSI/NFPA 70, ofrece
información sobre la puesta a tierra correcta del mástil,
estructura de soporte y cable de bajada de antena a la unidad
de descarga de la antena, así como sobre el tamaño de la
unidad de puesta a tierra, la conexión a los terminales de
tierra y los requerimientos de los terminales de tierra en sí
mismos.
Daños que necesitan ser reparados
Solicite que un técnico cualificado en reparaciones revise las
unidades si:
- El cable de alimentación de CA o su enchufe han resultado
dañados
- Objetos extraños o líquido han entrado en la unidad
- La unidad ha estado expuesta a lluvia o al agua
- La unidad no parece funcionar normalmente
- La unidad presenta un cambio considerable en su
funcionamiento
- La unidad se ha caído o la caja se ha estropeado
NO TRATE DE REPARAR LA UNIDAD USTED MISMO.
ÍNDICE
PRECAUCIONES ................................ 16
PREPARACIONES ............................... 18
PARTES Y CONTROLES ........................ 19
AJUSTES ANTES DEL FUNCIONAMIENTO... 22
AJUSTES DE SONIDO .......................... 23
FUNCIONAMIENTO DEL REPRODUCTOR
DE DISCOS COMPACTOS ...................... 24
FUNCIONAMIENTO DEL SINTONIZADOR .... 26
FUNCIONAMIENTO DEL TEMPORIZADOR... 27
REFERENCIA .................................... 28
Sistema y accesorios
Unidad principal CX-LMG9
Altavoces SX-LMG9
Cables de los altavoces
Mando a distancia
Pila de litio (CR2025)
Antena de FM
Antena de AM
E
Mantenimiento
Limpie la unidad sólo como se recomienda en el Manual de
Instrucciones.
FICHA DEL PROPIETARIO
Anote a continuación el número de modelo y el número
de serie de su aparato (que se encuentran en la parte
posterior de su aparato). Cuando se ponga en contacto
con su distribuidor Aiwa comuníquele estos números.
Nº de modelo _____________________________
Nº de serie _______________________________
17
Page 18

PREPARACIONES
Conexión
Conecte el cable de alimentación de CA a la toma de CA después
de haber realizado todas las demás conexiones.
1
Conecte los cables de los altavoces a los
altavoces.
Conecte los cables de color ámbar a los terminales + y
los cables de color plateado a los terminales –.
E
2
Conecte los altavoces a la unidad principal.
Conecte el altavoz derecho a los terminales SPEAKERS R
y el izquierdo a los terminales SPEAKERS L. Los cables
de color ámbar de los altavoces van a los terminales ).
18
3
Conecte las antenas suministradas.
Conecte la antena FM a los terminales FM 75 Ω y la antena
AM a la toma AM LOOP.
Antena de AM
Antena de FM
4
Conecte el cable de alimentación de CA a una
toma de CA.
Cuando el cable de alimentación de CA se conecte a una
toma de CA por vez primera, DEMO aparecerá en pantalla.
Para desactivar la DEMO, pulse DEMO/ECO y el reloj
parpadeará en la pantalla. Para ajustar el reloj, consulte
la página 23.
Altavoces
•No cortocircuite los cables ) y ( de los altavoces.
•No deje objetos que generen magnetismo ni objetos a los
que les afecte el magnetismo cerca de los altavoces.
Antenas
Mantenga las antenas alejadas de objetos metálicos,
equipamiento eléctrico y cables.
Antena de FM: Extiéndala en su totalidad en forma de T . Si
la recepción es mala, conecte una antena exterior opcional al
terminal FM 75 Ω. Asegúrese de conectar la trenza de la antena
al terminal 2.
Antena de AM: Gire para encontrar la mejor recepción.
Mando a distancia
Mientras desliza la leva de enganche, saque el portapilas de
la parte inferior del mando a distancia. Ponga la pila
suministrada en el portapilas, prestando atención a que la
polaridad es la correcta. Finalmente, inserte el portapilas de
nuevo en su posición.
CR2025
•Cambie la pila por otra nueva cuando se acorte la distancia
operacional entre el mando a distancia y la unidad principal.
•Quite las pila si la unidad no va a utilizarse durante un
periodo de tiempo prolongado.
•El mando a distancia puede no funcionar si se utiliza bajo
una luz solar intensa o si se obstruye su línea de visión.
¡Precaución!
•No deje la pila cerca de objetos magnéticos, como anillos,
brazaletes o llaves. Puede provocar un corto circuito.
•Una vez sacada la pila, asegúrese de mantenerla lejos del
alcance de los niños. En caso de que alguien se la trague,
consulte con un doctor inmediatamente.
Page 19

PARTES Y CONTROLES
Unidad principal: parte posterior
1 Tomas LINE OUT
A través de estas tomas pueden obtenerse señales de
sonido analógicas de disco compacto o de la radio.
Utilice un cable con clavijas fonográficas RCA para
conectar el equipo de audio.
Conecte la clavija roja a la toma R y la clavija blanca a la
toma L.
Las señales que se introduzcan a través de las tomas
VIDEO/AUX no tendrán salida por las tomas LINE OUT.
1
2
3
4
5
6
Tomas AUX/VIDEO IN
Acepta señales de sonido analógicas provenientes de
equipo externo. Conecte equipo externo utilizando un
cable de conexión opcional con clavijas fonográficas RCA
(clavija roja a la toma R, clavija blanca a la toma L).
Consulte también el manual de instrucciones de su
equipo.
Para cambiar la función a toma externa, pulse FUNCTION
repetidamente para seleccionar la función AUX (VIDEO
o TV).
Consejo:
Para cambiar el nombre de una fuente en pantalla,
mantenga pulsado g y pulse POWER con el equipo
encendido.
AUX → VIDEO → TV
2 Toma DIGITAL OUT (OPTICAL)
A través de esta toma pueden obtenerse señales de
sonido digital con calidad de disco compacto. Utilice un
cable óptico para conectar el equipo de audio digital.
Saque la tapa para polvo de la toma DIGITAL OUT
(OPTICAL). A continuación, conecte un enchufe de cable
óptico en la toma DIGITAL OUT (OPTICAL).
Cuando grabe las señales de sonido de esta unidad con
equipo de audio digital (grabadora de minidiscos,
grabadora de discos compactos, etc.) conectado a esta
toma, tal vez no se grabe el principio de la primera pista.
3 Toma AM LOOP y terminales FM 75 Ω
Conecte las antenas de AM y FM suministradas.
4 Toma SUPER WOOFER3
Conecte un altavoz realzador de graves opcional con un
amplificador integrado en esta toma.
5 Terminales SPEAKERS3
Conecte los altavoces suministrados utilizando los cables
de los altavoces que se suministran.
6 Cable de alimentación de CA
E
19
Page 20

Unidad principal: parte delantera
1
2
3
E
4
1 POWER 6STANDBY/ON
Enciende y apaga la unidad (en espera).
2 a/SET
Disco compacto: pausa en la reproducción.
Radio: guarda la emisora recibida en una presintonía.
s/CLEAR
Disco compacto: detiene la reproducción.
Radio: borra una emisora presintonizada.
c/PRESET
Disco compacto: comienza la reproducción.
Radio: sintoniza una emisora presintonizada.
r/f/–, +/g/t ( TUNING)
Disco compacto: salta a una pista anterior o posterior
cuando se pulsa, busca una pista en avance o retroceso
rápido cuando se mantiene pulsado.
Radio: sintoniza manualmente hacia abajo o arriba en la
banda.
5
6
3 DEMO/ECO
Cuando la unidad está apagada: selecciona el modo
DEMO o muestra el reloj (cuando el modo ECO está
desactivado).
Cuando la unidad está encendida: activa o desactiva el
modo ECO.
4 Toma PHONES
Conecta un juego de auriculares opcional con una
miniclavija estéreo (ø3,5 mm). La salida por altavoces
se cancela.
5 VOLUME UP, DOWN
Ajusta el volumen.
6 FUNCTION
Cambia la función activa entre FM/AM, AUX (VIDEO o
TV) y CD.
TUNER/BAND
Selecciona la función de radio y la banda de radio.
T-BASS
Enfatiza el sonido de baja frecuencia.
EQ
Selecciona una curva de ecualización de sonido.
zOPEN/CLOSE
Abre o cierra el compartimento del disco.
20
Page 21

Mando a distancia
1,2
3
4
5
6
Los botones con nombres similares o idénticos en la unidad
principal realizan básicamente las mismas funciones.
1 0–10, +10
Disco compacto: selecciona una pista con el número
especificado.
Radio: sintoniza una emisora con el número de
presintonía especificado.
7
8
9
0
2
Los botones numerados asumen estas funciones cuando se pulsan
con SHIFT pulsado:
RANDOM/REPEAT
Selecciona el modo de reproducción de discos
compactos aleatorio o repetido.
PROGRAM
Selecciona el modo de reproducción de discos
compactos programado.
DISPLAY
CD: muestra el número de pista que se está
reproduciendo, el tiempo restante de reproducción y el
nivel de volumen actual.
Radio: muestra la frecuencia de la estación sintonizada
y el nivel de volumen actual.
TIMER
Selecciona el modo de configuración de la reproducción
con temporizador.
SLEEP
Selecciona el modo de ajuste del temporizador de
apagado.
CLOCK
Selecciona el modo de ajuste del reloj.
TUNER MONO
Cambia entre recepción FM estéreo o monoaural.
3 T-BASS
4 SHIFT
Mantenga pulsado al pulsar un botón numerado para
cambiar su función a la que está impresa sobre el
número.
5 cPRESET
r/f, g/t (TUNING DOWN/UP)
aSET
sCLEAR
6 POWER
7 TUNER/BAND
Selecciona la función de radio y la banda de radio.
AUX
Selecciona la función de equipo externo conectado a las
tomas AUX/VIDEO IN.
CD
Selecciona la función de disco compacto.
8 EQ/QSURROUND
EQ: selecciona una curva de ecualización.
QSURROUND: activa o desaciva el Q SURROUND.
9 ENTER
Determina el modo y la hora (reloj y temporizador).
0 VOLUME (N,M)
E
21
Page 22

AJUSTES ANTES DEL FUNCIONAMIENTO
E
POWER
6STANDBY/ON
DEMO/ECO
TUNER/BAND
s
a
T-BASS
f,g
VOLUME UP/
DOWN
CLOCK
T-BASS
SHIFT
f,g
aSET
POWER
EQ
zOPEN/CLOSE
TUNER/BAND,
AUX, CD
EQ/
QSURROUND
ENTER
VOLUME
(N,M)
Cuando el modo economizador está activado
"GOOD-BYE" se visualiza durante 4 segundos y luego
desaparece todo de la pantalla.
Sólo el indicador rojo del botón POWER queda iluminado
para mostrar que la unidad está recibiendo alimentación.
Consumo de energía en espera
Cuando está activado el modo de economización de energía:
1,0 W
Cuando esta desactivado el modo de economización de
energía: 12,0 W
Encendido
Encendido de la unidad
Pulse POWER 6STANDBY/ON (POWER en el mando a
distancia).
Alternativamente, pulse TUNER/BAND (AUX o CD en el mando
a distancia). La reproducción comenzará automáticamente si
se carga un disco.
Apagado de la unidad
Pulse POWER 6STANDBY/ON otra vez.
La unidad pasa al modo de espera.
Volumen
Pulse VOLUME (UP o DOWN) (VOLUME (N,M)
en el mando a distancia).
Ajuste desde 0 (mínimo) a 30 y MAX (máximo).
Consejo:
El valor del nivel de volumen queda retenido mientras está
apagado en modo de espera. Si la unidad se apaga con el
volumen ajustado a 17 o más, éste sólo estará en el nivel 16
la próxima vez que se encienda la unidad.
22
DEMO
Si no se ha ajustado el reloj, aparece una DEMO en pantalla
cuando se apaga la unidad.
Para desactivar y activar la DEMO
Pulse DEMO/ECO. El reloj parpadea. Para ajustar el reloj,
consulte la página 23.
Modo ECO
Reduce el consumo de energía con las siguientes operaciones.
Una vez configurado el reloj, esta unidad le permite regular
su consumo de energía no mostrando nada en pantalla cuando
se apaga la alimentación. Esto se conoce como modo
economizador de energía.
Pulse DEMO/ECO mientras la unidad esté encendida.
Cada pulsación de este botón cambia el estado de la pantalla
como sigue:
1 ECO ON: activado el modo de economización de energía.
2 ECO OFF: desactivado el modo de economización de
energía.
Page 23

AJUSTES DE SONIDO
Ajuste del reloj
1
Mantenga pulsado SHIFT y pulse CLOCK en el
mando a distancia.
Cuando la unidad está apagada, también puede pulsar
a o ENTER.
2
Pulse f o g para ajustar la hora.
Cada pulsación cambia la hora en intervalos de 1 minuto.
Mantener estos botones pulsados hará que cambie la hora
en intervalos de 10 minutos.
Si f o g no se pulsan antes de 4 segundos, se
cancela el ajuste.
3
Pulse a o ENTER.
La pantalla de la hora deja de parpadear y el reloj comienza
desde 00 segundos.
Para ver la hora mientras la unidad está encendida
Mantenga pulsado SHIFT y pulse CLOCK en el mando a
distancia. Se verá la hora durante 4 segundos.
Para cambiar al estándar horario de 24 horas
Haga visualizar la hora y pulse s antes de 4 segundos.
Con cada pulsación, el reloj cambia entre el estándar horario
de 12 y de 24 horas.
Consejo:
En el estándar de 12 horas, "AM12:00" indica medianoche
y "PM12:00" mediodía.
Si la pantalla del reloj parpadea cuando se apaga la
unidad
Se ha dado un corte eléctrico. Vuelva a ajustar el reloj.
Ecualizador
Selecciona una curva de ecualización de sonido que coincida
con el tipo de música.
Pulse EQ (EQ/QSURROUND en el mando a distancia)
repetidamente para seleccionar una de las tres curvas
de ecualización.
- ROCK: Potente sonido resaltando agudos y bajos
- POP: Mas presencia en la gama media y voces
- JAZZ: Se acentúan las bajas frecuencias para música de
tipo jazz
- EQ OFF: Se cancela el efecto ecualizador
T-BASS
Enfatiza las bajas frecuencias para obtener un potente sonido.
Pulse T-BASS repetidamente para seleccionar uno de
los tres niveles de énfasis o la posición desactivada.
•Si el sonido se distorsiona con el efecto T -BASS, cancélelo.
Sistema Q SURROUND
El sistema Q SURROUND integrado en esta unidad utiliza sólo
dos altavoces a izquierda y derecha para crear un ambiente
que suena como si estuviera rodeado por dos altavoces
delanteros y dos traseros.
Mantenga pulsado SHIFT y pulse EQ/QSURROUND en
el mando a distancia.
Verá desplazarse "ON QSURROUND" de derecha a
izquierda.
Para cancelar el efecto Q SURROUND
Verá desplazarse "OFF QSURROUND" de derecha a
izquierda y el indicador "QSURROUND" desaparecerá.
Consejos:
•El sistema Q SURROUND no funciona en modo monoaural.
•Cuando se active el sistema Q SURROUND, el sonido puede
distorsionarse en volúmenes altos. Si sucede esto, baje el
volumen.
E
23
Page 24

FUNCIONAMIENTO DEL REPRODUCTOR DE DISCOS COMPACTOS
f,g
c
s
a
zOPEN/CLOSE
E
FUNCTION
Esta unidad reproduce discos CD-R/RW finalizados así como
discos compactos de audio.
Reproducción
1
Pulse FUNCTION repetidamente (CD en el mando
a distancia) para seleccionar la función de discos
compactos.
2
Pulse z OPEN/CLOSE para abrir el
compartimento de discos.
Cargue un disco con la cara de la etiqueta hacia arriba.
A continuación, cierre el compartimento de discos
pulsando zOPEN /CLOSE.
3
Pulse c para comenzar la reproducción.
Para detener la reproducción
Pulse s.
Para hacer una pausa en la reproducción
Pulse a. Pulse de nuevo para reanudar la reproducción.
VOLUME UP/
DOWN
RANDOM/
REPEAT
DISPLAY
SHIFT
f,g
cPRESET
aSET
sCLEAR
Para saltar al comienzo de la pista actual/anterior/
siguiente
Pulse f o g repetidamente.
Para buscar (reproducción rápida hacia adelante o
hacia atrás)
Mantenga pulsado f o g. Suelte en el punto deseado.
Para seleccionar una pista con el mando a distancia
(reproducción directa)
Pulse los botones numerados para seleccionar una pista.
- Para seleccionar la pista 25, pulse +10, +10 y 5.
- Para seleccionar la pista 10, pulse 10.
Para cambiar la pantalla en el modo de reproducción
Mantenga pulsado SHIFT y pulse DISPLAY en el mando a
distancia durante la reproducción.
La pantalla cambia en el orden siguiente:
1 Número de pista que se está reproduciendo y tiempo
transcurrido de reproducción
2 Número de pista que se está reproduciendo y tiempo
restante de reproducción
3 Nivel actual de volumen
PROGRAM
0-10,+10
CD
VOLUME
(N,M)
•El tiempo restante de reproducción no puede mostrarse
durante la reproducción aleatoria ni reproducción
programada.
Reproducción aleatoria/repetida
La reproducción aleatoria reproduce todas las pistas en orden
aleatorio. La reproducción repetida reproduce repetidamente
todas las pistas o la pista que se está reproduciendo. Puede
seleccionar reproducción aleatoria y repetida de todas las pistas
al mismo tiempo.
1
Mantenga pulsado SHIFT y pulse RANDOM/
REPEAT repetidamente para seleccionar uno de
los modos siguientes:
Reproducción repetida de 1 pista: "" 1"
Reproducción repetida de todas las pistas: """
Reproducción aleatoria: "RANDOM"
Reproducción aleatoria/repetida de todas las pistas:
"RANDOM ""
2
Pulse c para comenzar la reproducción.
Para cancelar la reproducción aleatoria/repetida
Mantenga pulsado SHIFT y pulse RANDOM/REPEAT
repetidamente hasta que "RANDOM", "" 1" o """
desaparezcan.
La selección directa de las pistas con los botones numerados
cancela el modo aleatorio.
Para repetir un grupo seleccionado de pistas
Primero seleccione las pistas con reproducción programada.
A continuación, seleccione la reproducción repetida. (Véase
"Reproducción programada" en la página 25.)
24
Page 25

Reproducción programada
Reproduce hasta 30 pistas seleccionadas en el orden
programado.
1
Mantenga pulsado SHIFT y pulse PROGRAM en
el mando a distancia en modo de parada.
"PRGM" parpadeará en pantalla.
2
Pulse los botones numerados en el mando a
distancia para programar una pista.
- Para seleccionar la pista 25, pulse +10, +10 y 5.
- Para seleccionar la pista 10, pulse 10.
El número de pista seleccionado se iluminará en pantalla.
3
Repita el paso 2 para programar otras pistas.
Aparecerán en pantalla el número total de las pistas
seleccionadas y el tiempo total de reproducción.
4
Pulse c para comenzar la reproducción.
El número de pista de la pista actual parpadeará en
pantalla.
•Durante la reproducción programada, no puede seleccionar
una pista con los botones numerados. Si intenta seleccionar
una pista "Can’t USE" aparecerá en pantalla.
•Es imposible reproducir un grupo de pistas seleccionado
en orden aleatorio.
•Si el tiempo total de reproducción del programa supera los
99 minutos y 59 segundos, o si se programa una pista con
número de pista superior a 30, el tiempo de reproducción
aparecerá como "- -:- -".
•No puede programar más de 30 pistas. Si lo hace aparecerá
"FULL" en pantalla.
Para comprobar el programa
Pulse f o g repetidamente en modo de parada. El
número de pista y el número de programa aparecerán en
pantalla en sucesión.
Para borrar el programa
Pulse s en modo de parada. "PRGM" desaparecerá de la
pantalla.
Para añadir pistas al programa
Repita el paso 2 antes de comenzar la reproducción. Las pistas
se añadirán al final del programa.
Para cambiar las pistas programadas
Borre el programa y repita de nuevo todos los pasos.
Notas sobre discos compactos
•No cargue más de un disco.
•No incline la unidad con un disco dentro.
•La unidad puede no reproducir discos CD-R/RW grabados
en computadoras personales o ciertos tipos de grabadoras
de CD-R/RW.
•No pegue ninguna etiqueta adhesiva a ninguna cara de los
discos CD-R/RW , ya que ello podría ocasionar que la unidad
funcione mal.
•No cargue un disco CD-R/RW virgen. Podría dañarse el
disco.
•No utilice discos compactos con formas irregulares.
E
25
Page 26

FUNCIONAMIENTO DEL SINTONIZADOR
POWER
6STANDBY/ON
TUNER/BAND
E
s/CLEAR
a/SET
c/PRESET
f,gTUNING
(–,+)
Sintonización manual
1
Pulse TUNER/BAND repetidamente para
seleccionar una banda.
La unidad cambiará al sintonizador desde cualquier otra
función y alternará entre FM y AM.
2
Pulse f o g repetidamente para sintonizar
una emisora.
"TUNE" aparecerá en pantalla cuando se sintonice una
emisora.
"1" se iluminará si hay recepción de FM estéreo.
Para buscar una emisora automáticamente
(búsqueda automática)
Mantenga pulsado f o g.
La unidad buscará una emisora y se detendrá cuando haya
recepción.
Para detener la búsqueda manualmente, pulse f o g.
•La búsqueda automática puede no detenerse en emisoras
con señales débiles.
0-10,+10
TUNER MONO
SHIFT
f,g
cPRESET
POWER
TUNER/
BAND
sCLEAR
aSET
Sintonización de presintonías
Presintonice hasta 32 de sus emisoras favoritas y sintonícelas
directamente.
Presintonización de emisoras
1
Sintonice la emisora deseada.
2
Pulse a para guardar la emisora.
El número de presintonización, comenzando por "1",
aparecerá en pantalla.
3
Repita los pasos 1 y 2 para presintonizar otras
emisoras.
•No puede guardar más de 32 presintonías. Si lo hace
aparecerá "FULL" en pantalla.
•Si se corta el suministro eléctrico durante más de unas 12
horas, necesitará configurar de nuevo todos los ajustes
guardados en memoria después de la compra.
Sintonización de emisoras
presintonizadas
1
Seleccione la banda.
2
Pulse c repetidamente.
Con cada pulsación, se sintonizará la emisora con el
número de presintonización siguiente.
Puede sintonizar la presintonía deseada directamente
pulsando los botones numerados del mando a distancia.
- Para seleccionar el número de presintonización 10,
pulse 10.
- Para seleccionar el número de presintonización 15,
pulse +10 y 5.
Para borrar una emisora presintonizada
1 Sintonice la emisora sintonizando con la presintonía.
2 Pulse s, y luego pulse a antes de 4 segundos.
Los números de las presintonías de la banda que sean más
altos que el borrado disminuirán en un dígito.
26
Page 27

FUNCIONAMIENTO DEL TEMPORIZADOR
Ajustes
Para cambiar a recepción FM monoaural
Mantenga pulsado SHIFT y pulse TUNER MONO en el mando
a distancia de forma que aparezca "MONO" en pantalla.
Para cancelar, pulse de nuevo para que aparezca
"STEREO" en pantalla.
Consejo:
Cuando la recepción FM estéreo sea de mala calidad, el
cambio a monoaural reducirá el ruido.
Para cambiar el intervalo de sintonización de AM
El valor por defecto del intervalo de sintonización de AM es
de 10 kHz/intervalo. Si utiliza esta unidad en un área donde el
sistema de asignación de frecuencias sea de 9 kHz/intervalo,
cambie el intervalo de sintonización.
Mantenga pulsado c y pulse POWER.
Consejo:
Cuando se cambia el intervalo de sintonización de AM se
borran todas las emisoras presintonizadas.
POWER
6STANDBY/ON
a/SET
FUNCTION
f,g
Temporizador de apagado
Apaga la unidad automáticamente después de un tiempo
especificado.
1
Mantenga pulsado SHIFT y pulse SLEEP en el
mando a distancia.
"SLEEP" aparecerá en pantalla.
2
Pulse f o g repetidamente para ajustar la
duración del temporizador de apagado.
Con cada pulsación, la duración del temporizador cambia
en intervalos de 5 minutos entre 5 y 240 minutos. Si no
se pulsa ningún botón en 4 segundos, el valor de ese
momento se acepta automáticamente. La unidad se
apagará después del tiempo seleccionado.
Para comprobar el tiempo restante hasta que la
unidad se apague
Mantenga pulsado SHIFT y pulse SLEEP en el mando a
distancia. El tiempo restante aparecerá en pantalla durante 4
segundos.
Para cancelar el temporizador de apagado
Mantenga la tecla SHIFT pulsada y pulse SLEEP repetidamente
en el mando a distancia hasta que "SLEEPoFF" aparezca
en pantalla.
SLEEP
TIMER
SHIFT
f,g
POWER
aSET
TUNER/BAND,
AUX, CD
ENTER
Reproducción temporizada
Enciende la unidad a una hora especificada durante el periodo
especificado. Verifique que el reloj está correctamente ajustado.
1
Pulse FUNCTION repetidamente para seleccionar
la fuente de reproducción deseada.
2
Mantenga pulsado SHIFT y pulse TIMER.
El indicador "5" se iluminará y "5 PLAY" aparecerá
en pantalla. A continuación, la hora de activación del
temporizador y el nombre de la fuente aparecerán
alternadamente en pantalla.
3
Antes de que pasen 7 segundos, pulse ENTER o
a.
Tanto la hora de activación del temporizador como el
nombre de la fuente aparecerán alternadamente en
pantalla.
4
Pulse f o g para ajustar la hora de
activación del temporizador y a continuación
pulse ENTER o a.
27
E
Page 28

5
Pulse f o g para ajustar la duración del
tiempo activado por temporizador y, a
continuación pulse ENTER o a.
Con cada pulsación la duración del tiempo activado por
temporizador cambia en intervalos de 5 minutos entre 5 y
240 minutos.
Si no se pulsa ningún botón en 4 segundos, el valor de
ese momento se acepta automáticamente.
6
Ajuste el volumen y el tono para la reproducción
temporizada.
Si el nivel de volumen se ajusta a 17 o más, cuando el
temporizador enciende la unidad se baja automáticamente
E
a 16.
7
Prepare la fuente.
Para reproducir un disco compacto, introduzca un disco.
Para escuchar la radio, seleccione la banda y sintonice la
emisora deseada.
Para reproducir un equipo externo conectado a las tomas
AUX/VIDEO IN, ajuste un temporizador externo para el
equipo de modo que su reproducción comience al mismo
tiempo.
8
Pulse POWER 6STANDBY/ON para apagar la
unidad.
"5" seguirá en pantalla para indicar el modo de espera
con temporizador (cuando el modo ECO está desactivado).
A la hora de activación por temporizador, la unidad se
encenderá y reproducirá la fuente seleccionada. Después
del tiempo especificado activado por temporizador, la
unidad se apagará otra vez.
•La reproducción por temporizador no comenzará a menos
que la unidad se apague primero.
•El equipo conectado no puede encenderse y apagarse con
el temporizador incorporado de esta unidad. Utilice un
temporizador externo.
Para comprobar el ajuste del temporizador
Mantenga pulsado SHIFT y pulse TIMER.
La hora de activación por temporizador , la fuente y la duración
del tiempo activado por temporizador aparecerán en pantalla
durante 4 segundos.
Para cambiar el ajuste del temporizador
Ajuste el temporizador de nuevo.
Para cancelar el temporizador
Mantenga pulsado SHIFT y pulse TIMER en el mando a
distancia repetidamente hasta que "5 OFF" aparezca en
pantalla. "5" desaparecerá de la pantalla.
Consejo:
El ajuste del temporizador se retiene incluso si se cancela el
temporizador. La próxima vez que se active el temporizador,
podrá cambiar su ajuste previo o sencillamente utilizar el
mismo ajuste otra vez.
REFERENCIA
Cuidados y mantenimiento
Es necesario un cuidado y mantenimiento ocasionales de la
unidad y del software para un óptimo funcionamiento de su
sistema.
Para limpiar el mueble
Utilice un paño suave y seco. Si las superficies están muy
sucias, utilice un paño suave ligeramente humedecido en una
solución detergente neutra. No utilice disolventes fuertes tales
como alcohol, bencina o diluyente de pintura.
Cuidado de los discos compactos
Cuando se ensucie un disco, límpielo desde el centro hacia
afuera con un paño de limpieza. Después de utilizar un disco
compacto, guárdelo en su caja. No lo deje en lugares calientes
o húmedos.
Guía para la solución de problemas
Si su unidad no funciona correctamente, compruebe la siguiente
guía y las secciones relevantes de este manual.
No hay sonido
•¿Están correctamente conectados los altavoces y el cable
de alimentación de CA?
La unidad se desactiva repentinamente
•Posiblemente un cortocircuito en los terminales de los
altavoces. Desconecte el cable de alimentación de CA de la
toma de CA y vuelva a conectar los cables de los altavoces
correctamente.
Todas las luces de la pantalla se apagan cuando se
apaga la alimentación
•¿Está activado el modo ECO?
Pantalla errónea
•Ajuste de nuevo la unidad.
28
Page 29

Mala recepción de radio
•Compruebe la conexión de la antena. Ajuste la antena para
encontrar la mejor recepción.
•Aleje la unidad y la antena de otros aparatos y cables
eléctricos.
El reproductor de discos compactos no funciona
óptimamente
•¿Está bien introducido el disco?
•¿Está sucio el disco?
•¿Está la lente afectada por condensación? Si es así, espere
aproximadamente una hora y vuelva a intentarlo.
Reajuste de la unidad
Si se da una condición no habitual en la pantalla, reajuste la
unidad del modo siguiente:
1 Pulse POWER para apagar la alimentación.
Si no puede apagarse la alimentación, desconecte el cable
de alimentación de CA y vuelva a enchufarlo.
2 Mantenga pulsado s y pulse POWER.
Se borrará todo lo que se haya guardado en memoria
después de la compra.
Especificaciones
UNIDAD PRINCIPAL CX-LMG9
SINTONIZADOR
Gama de sintonización de FM
87,5 MHz a 108 MHz
Sensibilidad utilizable de FM (IHF)
13,2 dBf
Terminales de antena FM 75 ohmios (desequilibrado)
Gama de sintonización de AM
530 kHz a 1710 kHz (incrementos
de 10 kHz)
531 kHz a 1602 kHz (incrementos
de 9 kHz)
Sensibilidad utilizable de AM
350 µV/m
Antena de AM Antena de cuadro
AMPLIFICADOR
Salida de potencia 50 W + 50 W (40 Hz - 20 kHz,
D.A.T. inferior al 1%, 6 ohmios)
62 W + 62 W (1 kHz, D.A.T.
10%, 6 ohmios)
Distorsión armónica total 0,15% (5 W, 1 kHz, 6 ohmios, DIN
AUDIO)
Entrada AUX/VIDEO IN: 500 mV
Salidas SPEAKERS: 6 ohmios o más
PHONES: 32 ohmios o más
SUPER WOOFER 1,7 V
Toma DIGITAL OUT (OPTICAL)
Toma LINE OUT
REPRODUCTOR DE DISCOS COMPACTOS
Láser Láser semiconductor (λ= 780 nm)
Convertidor D/A 1 bit doble
Relación de señal a ruido 85 dB (1 kHz, 0 dB)
Distorsión armónica 0,08% (1 kHz, 0 dB)
Variación de velocidad No medible
GENERAL
Requisitos eléctricos CA de 120 V, 60 Hz
Consumo eléctrico 60 W
Consumo eléctrico en modo de espera
Con modo ECO activado: 1,0 W
Con modo ECO desactivado:
12,0 W
Dimensiones (An. × Al. × Prof.)
176,6 × 256 × 348,7 mm
Peso 4,9 kg
SISTEMA DE ALTAVOCES SX-LMG9
Sistema de altavoces 2 vías, reflejo de graves
(protección magnética)
Unidades de altavoces Graves: 120 mm cono
Agudos: 25 mm dome
Impedancia 6 ohmios
Dimensiones (An. × Al. × Prof.)
160 × 256 × 230 mm
Peso 3,2 kg
Las especificaciones y aspecto exterior están sujetos a
cambios sin previo aviso.
29
E
Page 30

PRÉCAUTIONS
AVERTISSEMENT
Pour réduire le risque d'incendie ou de charge électrique,
ne pas exposer cet appareil à la pluie ou à l'humidité.
CAUTION
RISK OF ELECTRIC SHOCK
DO NOT OPEN
"ATTENTION: POUR RÉDUIRE LE RISQUE DE
DÉCHARGE ÉLECTRIQUE, NE PAS ENLEVER LE
COUVERCLE (NI LE DOS). CET APPAREIL NE
CONTIENT PAS DE PIÈCES RÉPARABLES PAR
L'UTILISATEUR. POUR TOUTE RÉPARATION,
S'ADRESSER À UNE PERSONNE QUALIFIÉE."
Explication des symboles graphiques:
F
30
Le flash lumineux avec le symbole de
pointe de la flèche à l'intérieur d'un
triangle équilatéral a pour but d'alerter
l'utilisateur d'un "voltage dangereux"
significatif dans le contenu du produit qui
peut avoir la magnitude suffisante pour
constituer un risque de charge électrique
pour des personnes.
Le point d'exclamation à l'intérieur d'un
triangle équilatéral a pour but d'alerter
l'utilisateur de la présence d'importantes
instructions de fonctionnement et de
maintenance (entretien) sur la notice
accompagnant l'appareil.
Lisez attentivement et entièrement ce Mode d'emploi avant de
faire fonctionner l'appareil. Toutes les précautions dans le mode
d'emploi et sur l'appareil doivent être suivies à la lettre. Conservez
le Mode de emploi pour toute référence ultérieure.
Installation
1 Eau et humidité — N'utilisez pas cet appareil près de l'eau,
par exemple près d'une baignoire, d'un lavabo, d'une piscine
ou similaire.
2 Chaleur — N'utilisez pas cet appareil près d'une source de
chaleur, comme la sortie d'un appar eil de chauffage, un poêle,
ou d'autres appareils générateurs de chaleur. Cet appareil ne
doit pas être soumis à des températures inférieures à 5°C ou
supérieures à 35°C.
3 Surface de montage — Placez cet appareil sur une surface
plate et uniforme.
4 Ventilation — Aménagez un espace suffisant autour de
l'appareil pour assurer une bonne ventilation. Laissez
10 cm à l'arrière et sur le dessus de l'appareil, et 5 cm de
chaque côté.
- N'installez pas l'appareil sur un lit, un tapis, ou une surface
similaire qui pourrait bloquer les orifices de ventilation.
- N'installez pas l'appareil sur une étagère, une armoire ou un
meuble complètement fermé où l'aération serait insuffisante.
5 Pénétration d'objets et de liquide — Évitez la pénétration
de tout objet ou liquide dans l'appareil par les ouvertures de
ventilation.
6 Chariots et supports — Quand l'appareil
est placé sur un support ou un chariot, il doit
être déplacé avec soin. Des arrêts brutaux, une
force excessive et des surfaces inégales
peuvent provoquer le renversement ou la chute
de l'appareil.
7 Condensation — De l'humidité peut se former sur la lentille
de lecture du CD quand:
- L'appareil est déplacé d'un endroit froid à un endroit chaud
- Le chauffage vient juste d'être allumé
- L'appareil est utilisé dans une pièce humide
- L'appareil est refroidi par un climatiseur
Quand il y a condensation dans l'appareil, il ne fonctionne pas
normalement. Dans ce cas, laissez l'appareil tel quel quelques
heures avant d'essayer à nouveau de le faire fonctionner.
8 Montage mural ou au plafond — Cet appareil ne doit pas
être monté au mur ou au plafond, sauf indication contraire dans
le Mode d'emploi.
Alimentation
1 Sources d'alimentation — Raccordez cet appareil à une
des sources électriques spécifiées dans le Mode d'emploi, et
comme indiqué sur l'appareil.
2 Polarisation — Comme mesure de sécurité, certains
appareils sont équipés de prises d'alimentation secteur
polarisées qui peuvent uniquement être introduites dans un
sens dans une prise d'alimentation, s'il est difficile ou
impossible d'introduire la prise d'alimentation secteur dans
une prise, retournez la prise et essayez à nouveau. Si elle
s'introduit toujours difficilement dans la prise, veuillez appeler
un technicien d'entretien qualifié ou remplacer la prise. Pour
éviter que toute défaillance de la mesure de sécurité de la prise
polarisée, ne l'introduisez pas dans la prise en forçant.
3 Cordon d'alimentation secteur
- En déconnectant le cordon d'alimentation secteur, saisissez
la fiche. Ne tirez pas sur le cordon lui-même.
- Ne saisissez jamais la fiche d'alimentation secteur avec des
mains mouillées, cela pourrait provoquer un incendie ou une
décharge électrique.
- Les cordons d'alimentation doivent être acheminés de manière
à éviter qu'ils soient pliés, pincés ou piétinés. Faites très
attention au cordon allant de l'appareil à la prise secteur.
- Évitez de surcharger les prises d'alimentation et les rallonges,
cela pourrait provoquer un incendie ou une décharge
électrique.
4 Cordon d'extension — Afin d'aider la prévention
d'électrocution, utilisez une prise d'alimentation secteur
polarisée avec un cordon d'extension, un réceptacle, ou une
autre prise, sauf si la prise polarisée peut être complètement
introduite pour éviter l'exposition des brins de la prise.
5 Lorsque l'appareil n'est pas utilisé — Débranchez le
cordon d'alimentation secteur de la prise d'alimentation si
l'appareil ne va pas être utilisé pendant plusieurs mois ou plus.
Lorsque le cordon est branché, une petite quantité de courant
continue à passer dans l'appareil, même si l'alimentation est
coupée.
Page 31

Antenne extérieure
Mise à la terre d'une antenne
selon le code national
d'électricité (NEC)
COLLIER DE MISE
A LA TERRE
COLLIERS DE MISE À LA TERRE
UNITÉ DE
DÉCHARGE
D'ANTENNE
(NEC SECTION
810-20)
CONDUCTEURS DE
MISE À LA
TERRE(NEC
SECTION 810-21)
APPAREILLAGE
D'AMENEE DE
COURANT
FIL DE
DÉSCENTE
D'ANTENNE
ÉLECTRODE DE MISE À LA
TERRE DE LA LIGNE
D'AMENÉE DE COURANT
(NEC ARTICLE 250 PARTIE H)
NEC: CODE NATIONAL D'ÉLECTRICITÉ
1Câbles d'alimentation — Lorsque vous connectez une
antenne extérieure, assurez-vous qu'elle soit située à l'écart
des câbles d'alimentation.
2Mise à terre de l'antenne extérieure — Assurez-vous
que le système d'antenne soit correctement mis à la terre
afin de fournir une protection contre des pics de tension
inattendus ou l'accumulation d'électricité statique. L'article
810 du Code Electrique National (NEC), ANSI/NFPA 70,
fournit des renseignements sur la mise à la terre correcte
du mât, la structure de soutien, et le câble d'entrée de courant
à l'unité de décharge de l'antenne, la connexion aux bornes
de terre, et les conditions des bornes de terre elles-mêmes.
Dommages nécessitant réparation
Faites réparer l'appareil par un technicien qualifié si:
- Le câble d'alimentation secteur ou sa prise sont
endommagés
- Des objets étrangers ou du liquide sont entrés à l'intérieur
de l'appareil
- L'appareil a été exposé à la pluie ou à l'eau
- L'appareil ne semble pas fonctionner normalement
- L'appareil présente un changement considérable dans son
fonctionnement
- L'appareil est tombé ou le boîtier a été endommagé
N'ESSAYEZ PAS DE RÉPARER L'APPAREIL VOUS-MÊME.
TABLE DES MATIÈRES
PRÉCAUTIONS .................................. 30
PRÉPARATIONS ................................. 32
PARTIES ET CONTRÔLES...................... 33
RÉGLAGES AVANT LE
FONCTIONNEMENT............................. 36
RÉGLAGES DU SON ............................ 37
OPÉRATIONS CD................................ 38
OPÉRATIONS RADIO ........................... 40
OPÉRATIONS MINUTERIE ..................... 41
RÉFÉRENCE ..................................... 42
Systèmes et accessoires
Unité principale CX-LMG9
Enceintes SX-LMG9
Cordons d'enceinte
Télécommande
Pile au lithium (CR2025)
Antenne FM
Antenne AM
F
Maintenance
Nettoyez l'appareil uniquement tel qu'il est recommandé dans
le Mode d'emploi.
ENREGISTREMENT DE PROPRIÉTAIRE
Enregistrez ci-dessous le numéro du modèle et le numéro
de série de votre appareil (situés à l'arrière de votre
appareil). Lorsque vous faites appel à votre distributeur
Aiwa, donnez-lui ces numéros.
Numéro du modèle ________________________
Numéro de série _________________________
31
Page 32

PRÉPARATIONS
Raccordement
Branchez le cordon d'alimentation secteur à la prise
d'alimentation secteur une fois que tous les autres
raccordements ont été effectués.
1
Raccordez les cordons de l'enceinte aux
enceintes.
Raccordez les cordons ambrés aux bornes + et les cordons
argentés aux bornes –.
F
2
Raccordez les enceintes à l'unité principale.
Raccordez l’enceinte droite aux bornes SPEAKERS R et
celle de gauche aux bornes SPEAKERS L. Les cordons
d’enceinte ambrés vont sur les bornes ).
32
3
Raccordez les antennes fournies.
Raccordez l'antenne FM aux bornes FM 75 Ω et l'antenne
AM à la prise AM LOOP.
Antenne AM
Antenne FM
4
Raccordez le cordon d'alimentation secteur à une
prise secteur.
Lorsque le cordon d'alimentation secteur est raccordé à
une prise secteur pour la première fois, DEMO apparaît
sur l'affichage.
Pour désactiver la DEMO, appuyez sur DEMO/ECO et
l'horloge se met à clignoter sur l'affichage. Pour régler
l'horloge, voir page 37.
Enceintes
•Ne pas court-circuiter les fils des cordons des enceintes
) et ( .
•Ne pas approcher des enceintes d'objets créant du
magnétisme ni d'objets sensibles au magnétisme.
Antennes
Tenez les antennes éloignées d'objets métalliques, d'appareils
électriques et de cordons.
Antenne FM : Etendez-la complètement en formant un T. Si
la réception est faible, raccordez une antenne extérieure
optionnelle à la borne FM 75 Ω. Vérifiez de raccorder le r uban
de l’antenne à la borne 2.
Antenne AM : Tournez-la afin de trouver la meilleure
réception.
Télécommande
Tout en faisant glisser le couvercle, tirez du logement à pile
du bas de la télécommande. Placez la pile fournie dans le
logement à pile avec la polarité correcte. Finalement, insérez
de nouveau le logement dans sa position.
CR2025
•Remplacez la pile par une pile nouvelle lorsque la distance
de fonctionnement entre la télécommande et l'unité
principale diminue.
•Enlevez les piles si l'appareil ne va pas être utilisé durant
une longue période.
•La télécommande peut ne pas fonctionner si elle est exposée
à une lumière intense, par exemple en plein soleil, ou s'il y
a un obstacle dans sa ligne de vision.
Attention!
•Ne gardez pas la pile près d'objets métaliques tels que des
bagues, des bracelets ou des clés. La pile risque de
provoquer un court-circuit.
•Après avoir retiré la pile, vérifiez de la garder hors de la
portée des enfants. En cas d'avalement, consultez
immédiatement un médecin.
Page 33

PARTIES ET CONTRÔLES
Unité principale : arrière
1 Prises LINE OUT
Les signaux sonores analogiques pour CD et la radio
peuvent sortir par ces prises. Utilisez un câble avec des
prises phono RCA pour raccorder l'appareil audio.
Raccordez la prise rouge à la prise R, et la prise blanche
à la prise L.
Les signaux entrés à travers les prises AUX/VIDEO IN ne
sont pas fournis par les prises LINE OUT.
1
2
3
4
5
6
Prises AUX/VIDEO IN
Acceptent les signaux sonores analogiques provenant
d'appareils externes. Raccordez les appareils externes
en utilisant un câble de connexion optionnel avec des
fiches phono RCA (fiche rouge sur prise R, fiche blanche
sur prise L). Reportez-vous également aux instructions
de mise en fonctionnement de votre appareil.
Pour commuter la fonction sur une entrée externe,
appuyez plusieurs fois sur FUNCTION pour sélectionner
la fonction AUX (VIDEO ou TV).
Conseil:
Pour changer le nom d'une source sur l'affichage, tenez
enfoncé a g et appuyez sur POWER pendant que
l'appareil est allumé.
AUX → VIDEO → TV
2 Prise DIGITAL OUT (OPTICAL)
À travers cette prise, des signaux sonores numériques
qualité CD peuvent s’obtenir. Utilisez un câble optique
pour raccorder l’appareil audionumérique. Enlevez le
cache contre la poussière de la prise DIGITAL OUT
(OPTICAL). Raccordez ensuite une fiche de ce câble
optique à la prise DIGITAL OUT (OPTICAL).
Si vous enregistrez les signaux sonores de cette unité
avec un appareil audionumérique (un enregistreur MD,
un enregistreur CD, etc.) raccordé à cette prise, il se peut
que le début de cette piste ne soit pas enregistré.
3 Prise AM LOOP et bornes FM 75 Ω
Branchez les antennes AM et FM fournies.
4 Prise SUPER WOOFER3
Raccordez un sub woofer alimenté optionnel à une
enceinte intégrée sur cette prise.
5 Bornes SPEAKERS3
Raccordez les enceintes fournies en utilisant les cordons
d'enceinte fournis.
6 Cordon d'alimentation secteur
F
33
Page 34

Unité principale : avant
1
2
3
4
1 POWER 6STANDBY/ON
F
Allume et éteint l'appareil (standby).
2 a/SET
CD : met la lecture en pause.
Radio : garde la station reçue à mémoriser.
s/CLEAR
CD : interrompt la lecture.
Radio : efface une station mémorisée.
c/PRESET
CD : démarre la lecture.
Radio : règle une station mémorisée.
r/f/–, +/g/t ( TUNING)
CD : passe à la piste suivante ou précédente si la touche
est appuyée, recherche sur une piste en avance rapide
ou retour rapide si la touche est maintenue enfoncée.
Radio: accorde manuellement vers le bas ou vers le haut
sur la bande.
5
6
3 DEMO/ECO
Lorsque l’appareil est éteint : sélectionne le mode DEMO
ou affiche l’horloge (quand le mode ECO est désactivé).
Lorsque l’appareil est allumé : sélectionne l'activation et
désactivation du mode ECO.
4 Prise PHONES
Branchez sur un casque optionnel avec une mini prise
stéréo (ø3,5 mm). La sortie par les enceintes est annulée.
5 VOLUME UP, DOWN
Règle le volume.
6 FUNCTION
Met en marche la fonction active, parmi FM/AM, AUX
(VIDEO ou TV), et CD.
TUNER/BAND
Sélectionne la fonction radio et la bande radio.
T-BASS
Accentue le son basse fréquence.
EQ
Sélectionne une courbe d'égalisation sonore.
zOPEN/CLOSE
Ouvre ou ferme le compartiment à disques.
34
Page 35

Télécommande
1,2
3
4
5
6
Les touches ayant le même nom ou un nom similaire à ceux de
l'unité principale ont principalement les mêmes fonctions.
1 0–10, +10
CD : sélectionne une piste avec le numéro spécifié.
Radio: règle la station au numéro de mémorisation
spécifié.
7
8
9
0
2
Les touches numérotées prennent les fonctions suivantes lorsque
vous appuyez sur la touche tout en appuyant sur SHIFT :
RANDOM/REPEAT
Sélectionne le mode lecture aléatoire ou répétée de CD.
PROGRAM
Sélectionne le mode lecture programmée de CD.
DISPLAY
CD : affiche le numéro de la piste en cours de lecture, la
durée restante de lecture et le niveau du volume actuel.
Radio : affiche la fréquence de la station reçue et le niveau
du volume actuel.
TIMER
Sélectionne le mode réglage de lecture temporisée.
SLEEP
Sélectionne le mode réglage de sommeil-minuterie.
CLOCK
Sélectionne le mode réglage de l'horloge.
TUNER MONO
Passe de la réception FM stéréo à monophonique.
3 T-BASS
4 SHIFT
Maintenez cette touche enfoncée lorsque vous appuyez
sur une touche numérotée pour changer sa fonction à
celle imprimée au-dessus du numéro.
5 cPRESET
r/f, g/t (TUNING DO WN/UP)
aSET
sCLEAR
6 POWER
7 TUNER/BAND
Sélectionne la fonction radio et la bande radio.
AUX
Sélectionne la fonction de l'appareil externe raccordé aux
prises AUX/VIDEO IN.
CD
Sélectionne la fonction CD.
8 EQ/QSURROUND
EQ : sélectionne une courbe d’égalisation sonore.
QSURROUND : active et désactive Q SURROUND.
9 ENTER
Détermine le mode et l’heure (horloge et minuterie).
0 VOLUME (N,M)
F
35
Page 36

RÉGLAGES AVANT LE FONCTIONNEMENT
POWER
6STANDBY/ON
DEMO/ECO
TUNER/BAND
s
a
T-BASS
f,g
VOLUME UP/
DOWN
CLOCK
T-BASS
SHIFT
f,g
aSET
POWER
EQ
zOPEN/CLOSE
TUNER/BAND,
AUX, CD
EQ/
QSURROUND
ENTER
VOLUME
(N,M)
Lorsque le mode d'économie d'énergie est activé
"GOOD-BYE" est affiché pendant 4 secondes, puis tout
l'affichage s'efface.
Seul l’indicateur rouge qui se trouve sur la touche POWER
s’allume pour indiquer que l’énergie est fournie à l’appareil.
Consommation d'énergie en attente
Quand le mode d'économie d'énergie est activé : 1,0 W
Quand le mode économie d’énergie est désactivé : 12,0 W
Alimentation
Allumer l'appareil
Appuyez sur POWER 6 STANDBY/ON (POWER sur la
F
télécommande).
Vous pouvez aussi appuyer sur TUNER/BAND (AUX ou CD
sur la télécommande). La lecture commencera
automatiquement si un disque est introduit.
Eteindre l'appareil
Appuyez sur POWER 6STANDBY/ON à nouveau.
L'appareil se met en attente.
Volume
Appuyez sur VOLUME (UP ou DOWN) (VOLUME
(N,M) de la télécommande).
Réglez de 0 (minimum) à 30 et MAX (maximum).
Conseil:
Le réglage du niveau de volume est maintenu lorsque l'appareil
est éteint. Si vous éteignez l'appareil alors que le volume est
réglé sur 17 ou plus, il sera automatiquement baissé à 16 la
prochaine fois que l'appareil sera allumée.
36
DEMO
Si l'horloge n'a pas été réglée, DEMO apparaît sur l'affichage
lorsque l'appareil s'éteint.
Pour désactiver et activer DEMO
Appuyez sur DEMO/ECO. L'horloge clignote. Pour régler
l'horloge, voir page 37.
ECO mode
Diminue la consommation d'énergie en appliquant les opérations
suivantes.
Après le réglage de l'horloge, l'appareil vous permet de régler
la consommation d'énergie en ne rien affichant sur l'affichage
lorsque l'alimentation est coupée. Cela est appelé le mode
d'économie d'énergie.
Appuyez sur DEMO/ECO lorsque l’appareil est allumé.
Chaque pression sur cette touche change l'état de l'affichage
comme suit :
1 ECO ON : le mode économie d’énergie est activé.
2 ECO OFF : le mode économie d’énergie est désactivé.
Page 37

RÉGLAGES DU SON
Réglage de l'horloge
1
Maintenez enfoncé SHIFT et appuyez sur CLOCK
sur la télécommande.
Lorsque l'appareil est éteint, vous pouvez aussi appuyer
sur a ou sur ENTER.
2
Appuyez sur f ou sur g pour régler l'heure.
Chaque pression change l'heure par étape d'une minute.
Si vous maintenez appuyées ces touches l'heure variera
par étape de 10 minutes.
Si f ou g n'est pas pressé dans les 4 secondes,
le réglage s'annule.
3
Appuyez sur a ou ENTER.
L'affichage de l'heure cesse de clignoter et l'horloge
commence à 00 secondes.
Pour afficher l'heure avec l'appareil sous tension
Maintenez appuyé SHIFT et appuyez sur CLOCK sur la
télécommande.
L'heure sera affichée pendant 4 secondes.
Pour passer au système 24 heures
Affichez l'heure et appuyez sur s dans les 4 secondes.
A chaque pression, l'horloge alterne entre le système 12 heures
et le système 24 heures.
Conseil:
Dans le système 12 heures, "AM12:00" indique minuit et
"PM12:00" indique midi.
Si l'affichage de l'horloge clignote lorsque l'appareil
est éteint
Il y a eu une coupure de courant. Réglez l'horloge à nouveau.
Egaliseur
Sélectionne une courbe d'égalisation sonore correspondant au
type de musique.
Appuyez plusieurs fois sur EQ (EQ/QSURROUND sur
le télécommande) pour sélectionner l'une des trois
courbes d'égalisation.
- ROCK : Son puissant accentuant les aigus et les graves
- POP : Plus grande présence des voix et des demi-tons
- JAZZ : Basses fréquences accentuées pour la musique de
type jazz
- EQ OFF : L’effet d’égalisation est annulé.
T-BASS
Augmente les basses fréquences afin d'obtenir un son puissant.
Appuyez sur T-BASS à plusieurs reprises pour
sélectionner l'un des trois niveaux ou la position off.
•Si l'effet T-BASS commence à altérer le son, annulez-le.
Système Q SURROUND
Le système Q SURROUND intégré à cette appareil utilise
seulement deux enceintes à droite et à gauche pour créer une
atmosphère qui vous donne l'impression d'être entouré de deux
enceintes avant et deux enceintes arrière.
Maintenez enfoncé SHIFT et appuyez sur EQ/
QSURROUND sur la télécommande.
"ON QSURROUND" défilera de droite à gauche.
Pour annuler l'effet Q SURROUND
"OFF QSURROUND" défile de droite à gauche et
l’indicateur "QSURROUND" s’éteigne.
Conseils:
•Le système Q SURROUND ne fonctionne pas en mode
monaural.
•Lorsque le système Q SURROUND est activé, le son peut
être altéré à un volume plus élevé. Si cela arrive, baissez le
volume.
F
37
Page 38

OPÉRATIONS CD
f,g
c
s
a
zOPEN/CLOSE
FUNCTION
Cet appareil lit des disques CD-R/RW finalisés ainsi que des CD
audio.
Lecture
F
1
Appuyez sur FUNCTION à plusieurs reprises (CD
sur la télécommande) pour sélectionner la
fonction CD.
2
Appuyez sur z OPEN/CLOSE pour ouvrir le
compartiment à disques.
Placez un disque avec l’étiquette dirigée vers le haut.
Puis refermez le compartiment à disques en appuyant sur
zOPEN/CLOSE.
3
Appuyez sur c pour démarrer la lecture.
Pour arrêter la lecture
Appuyez sur s.
Pour mettre la lecture en pause
Appuyez sur a. Appuyez à nouveau pour reprendre la lecture.
Pour passer au début de la piste actuelle/précédente/
suivante
VOLUME UP/
DOWN
RANDOM/
REPEAT
DISPLAY
SHIFT
f,g
cPRESET
aSET
sCLEAR
Appuyez sur f ou sur g à plusieurs reprises.
Pour rechercher (lecture en avance rapide ou retour
rapide)
Maintenez enfoncé f ou g . Lâchez sur le point
souhaité.
Pour sélectionner une piste avec la télécommande
(Lecture directe)
Appuyez sur les touches numérotées pour sélectionner une
piste.
- Pour sélectionner la piste 25, appuyez sur +10, +10, et 5.
- Pour sélectionner la piste 10, appuyez sur 10.
Pour changer l'affichage en mode lecture
Maintenez appuyé SHIFT et appuyez sur DISPLAY sur la
télécommande pendant la lecture.
L'affichage change dans l'ordre suivant :
1 Numéro de la piste en cours de lecture et durée de
lecture écoulée
2 Numéro de la piste en cours de lecture et durée de
lecture restante
3 Niveau du volume actuel
PROGRAM
0-10,+10
CD
VOLUME
(N,M)
•La durée de lecture restante ne peut pas être affichée durant
la lecture aléatoire ou la lecture programmée.
Lecture Aléatoire/Répétée
La lecture aléatoire lit toutes les pistes dans un ordre aléatoire.
La lecture répétée lit toutes les pistes ou la piste en cours de
lecture de façon répétée. Vous pouvez sélectionner lecture
aléatoire et répétée en même temps.
1
Maintenez enfoncée SHIFT et appuyez à plusieurs
reprises sur RANDOM/REPEAT sur la
télécommande pour sélectionner l’un des modes
suivants :
Lecture répétée d'une piste : "" 1"
Lecture répétée de toutes les pistes : """
Lecture aléatoire : "RANDOM"
Lecture aléatoire/répétée de toutes les pistes :
"RANDOM ""
2
Appuyez sur c pour démarrer la lecture.
Pour annuler la lecture aléatoire/répétée
Maintenez enfoncée SHIFT et appuyez à plusieurs reprises
sur RANDOM/REPEAT sur la télécommande jusqu’à ce que
"RANDOM", "" 1" ou """ disparaisse.
La sélection directe des pistes par les touches numérotées
annule le mode aléatoire.
Pour répéter une programmation sélectionnée de
pistes
Sélectionnez d'abord les pistes à lecture programmée.
Puis sélectionnez la lecture répétée. (Voir "Lecture
programmée" à la page 39.)
38
Page 39

Lecture programmée
Lit jusqu'à 30 pistes sélectionnées dans un ordre programmé.
1
Maintenez enfoncé SHIFT et appuyez sur
PROGRAM sur la télécommande en mode arrêt.
"PRGM" clignote sur l'affichage.
2
Appuyez sur les touches numérotées de la
télécommande pour programmer une piste.
- Pour sélectionner la 25˚ piste, appuyez sur +10, +10 et
5.
- Pour sélectionner la 10˚ piste, appuyez sur 10.
Le numéro de la piste sélectionnée clignote sur l'affichage.
3
Répétez l'étape 2 pour programmer d'autres
pistes.
Le nombre total de pistes sélectionnées et le temps total
de lecture seront affichés.
4
Appuyez sur c pour démarrer la lecture.
Le numéro de la piste actuelle clignote sur l'affichage.
•Pendant la lecture programmée, vous ne pouvez pas
sélectionner de piste avec les touches numérotées. "Can't
USE" s'affiche lorsque vous essayez de sélectionner une
piste.
•Il est impossible de lire une programmation de pistes
sélectionnées dans un ordre aléatoire.
•Si la durée totale de lecture du programme dépasse 99
minutes et 59 secondes, ou si un nombre de pistes supérieur
à 30 est programmé, la durée de lecture est affichée ainsi
"- -:- -".
•Vous ne pouvez pas programmer plus de 30 pistes.
"FULL" s'affiche.
Pour vérifier le programme
Appuyez sur f ou sur g à plusieurs reprises en mode
arrêt. Le numéro de pistes et le numéro de programmes
s'affichent successivement.
Pour effacer le programme
Appuyez deux fois sur s en mode arrêt. "PRGM" disparaît
de l'affichage.
Pour ajouter des pistes au programme
Répétez l'étape 2 avant de démarrer la lecture. Les pistes sont
ajoutées à la fin du programme.
Pour changer les pistes programmées
Effacez le programme et répétez toutes les étapes.
Remarques sur les CD
•N'introduisez pas plus d'un disque.
•Ne soulevez pas l'appareil si un disque y est introduit.
•L'appareil ne doit pas lire de disques CD-R/RW enregistrés
sur un ordinateur personnel ou sur certain type
d'enregistreur de CD-R/RW.
•Ne collez d'étiquette adhésive sur aucun des côtés des
disques CD-R/RW, car cela pourrait entraîner un mauvais
fonctionnement.
•N'introduisez pas de disque vierge CD-R/RW. Le disque
pourrait s'endommager.
•N'utilisez pas de CD avec des formes irrégulières.
F
39
Page 40

OPÉRATIONS RADIO
POWER
6STANDBY/ON
TUNER/BAND
s/CLEAR
a/SET
c/PRESET
f,gTUNING
(–,+)
Réception manuelle
1
Appuyez sur TUNER/BAND à plusieurs reprises
F
pour sélectionner une bande.
L'appareil passe de toute autre fonction à la fonction radio
et alterne entre FM et AM.
2
Appuyez sur f ou sur g à plusieurs
reprises pour régler une station.
"TUNE" s'affiche lorsqu'une station est réglée.
"1" s'allume s'il s'agit d'une réception FM stéréo.
Pour rechercher une station automatiquement
(Recherche automatique)
Maintenez enfoncé f
L'appareil recherche une station et s'arrête lorsqu'il la trouve.
Pour arrêter la recherche manuellement, appuyez sur f
ou sur g.
•La recherche automatique peut ne pas s'arrêter sur des
stations à faible signal.
ou g.
0-10,+10
TUNER MONO
SHIFT
f,g
cPRESET
POWER
TUNER/
BAND
sCLEAR
aSET
Réception par préréglage
Présélectionnez jusqu'à 32 de vos stations favorites et trouvezles directement.
Prérégler des stations
1
Accordez la station souhaitée.
2
Appuyez sur a pour mémoriser la station.
Le numéro de préréglage, commençant par " 1 ", apparaît
sur l'affichage.
3
Répétez les étapes 1 et 2 pour prérégler d'autres
stations.
•Vous ne pouvez pas mémoriser plus de 32 stations. "FULL"
s'affiche.
•Si l'alimentation est interrompue pendant plus de 12 heures,
tous les réglages mémorisés après l'achat doivent être réglés
à nouveau.
Réception des stations préréglées
1
Sélectionnez la bande.
2
Appuyez sur c à plusieurs reprises.
A chaque pression, la station du numéro de préréglage
suivant est reçue.
Vous pouvez accorder directement la station de préréglage
souhaitée en appuyant sur les touches numérotées de la
télécommande.
- Pour sélectionner le numéro préréglé 10, appuyez sur
10.
- Pour sélectionner le numéro préréglé 15, appuyez sur
+10 et 5.
Pour effacer une station préréglée
1 Mettez la station par réception préréglée.
2 Appuyez sur s, puis appuyez sur a dans les 4 secondes.
Les numéros de préréglage de la bande ayant un numéro
supérieur au numéro supprimé diminueront d'une unité.
40
Page 41

OPÉRATIONS MINUTERIE
Réglages
Pour passer à une réception FM monophonique
Maintenez enfoncé SHIFT et appuyez sur TUNER MONO sur
la télécommande, afin que "MONO" soit affiché.
Pour annuler, appuyez à nouveau pour afficher "STEREO".
Conseil:
Lorsque la réception FM stéréo est faible, le passage à
monophonique réduit les bruits.
Pour passer à l'intervalle d'accord AM
Le réglage par défaut de l'intervalle de réception AM est de
10 kHz/pas. Si vous utilisez cet appareil dans une zone où le
système d'allocation de fréquences est de 9 kHz/pas, changez
l'intervalle d'accord.
Maintenez enfoncé c et appuyez sur POWER.
Conseil:
Lorsque l'intervalle d'accord AM est changé, toutes les stations
préréglées sont annulées.
POWER
6STANDBY/ON
a/SET
FUNCTION
f,g
Minuterie de sommeil
Eteint automatiquement l'appareil au bout d'une durée spécifiée.
1
Maintenez enfoncé SHIFT et appuyez sur SLEEP
sur la télécommande.
"SLEEP" s'affiche.
2
Appuyez sur f ou sur g à plusieurs
reprises pour régler la durée de la minuterie de
sommeil.
A chaque pression, la durée de la minuterie change par
étapes de 5 minutes, entre 5 et 240 minutes. S'il n'y a pas
de pression de touche pendant 4 secondes, le réglage
actuel est saisi automatiquement. L'appareil s'éteint à la
fin de la durée sélectionnée.
Pour vérifier la durée restante avant que l'appareil
s'éteigne
Maintenez enfoncé SHIFT et appuyez sur SLEEP sur la
télécommande. La duré restante est affichée pendant 4
secondes.
Pour annuler la minuterie de sommeil
Maintenez enfoncé SHIFT et appuyez plusieurs fois sur SLEEP
sur la télécommande jusqu'à ce que "SLEEPoFF" s'affiche.
SLEEP
TIMER
SHIFT
f,g
POWER
aSET
TUNER/BAND,
AUX, CD
ENTER
Lecture temporisée
Allume l'appareil à une heure spécifiée pour la fonction spécifiée.
Assurez-vous que l'horloge est correctement réglée.
1
Appuyez plusieurs fois sur FUNCTION pour
sélectionner la source de lecture souhaitée.
2
Maintenez enfoncé SHIFT et appuyez sur TIMER.
L'indicateur "5" s'allume et "5 PLAY" apparaît sur
l'affichage. Puis, l'heure de mise en marche de la minuterie
et le nom de la source apparaissent alternativement sur
l'affichage.
3
Dans les 7 secondes, appuyez sur ENTER ou a.
L'heure de mise en marche de minuterie et le nom de la
source apparaissent simultanément sur l'affichage.
4
Appuyez sur f ou sur g pour régler l'heure
de mise en marche de la minuterie, puis appuyez
sur ENTER ou a.
F
41
Page 42

5
Appuyez sur f ou sur g pour régler la duré
d'activité de la minuterie, puis appuyez sur ENTER
ou a.
A chaque pression, la durée d'activité de la minuterie
change par étapes de 5 minutes entre 5 et 240 minutes.
S'il n'y a pas de pression de touche pendant 4 secondes,
le réglage actuel est saisi automatiquement.
6
Ajustez le volume et la tonalité de la lecture
temporisée.
Si le niveau de volume est réglé à 17 ou plus, il sera
automatiquement baissé à 16 lorsque l'appareil sera
allumé par la minuterie.
7
Préparez la source.
Pour lire un CD, introduisez un disque.
Pour lire la radio, sélectionnez la bande et la station
souhaitée.
Pour lire un appareil externe raccordé aux prises AUX/
F
VIDEO IN, réglez une minuterie externe pour l'appareil
afin que sa lecture commence à la même heure.
8
Appuyez sur POWER 6 STANDBY/ON pour
éteindre l'appareil.
"5" reste sur l'affichage pour indiquer le mode de
minuterie en attente (quand le mode ECO est désactivé).
A l'heure de mise en marche de la minuterie, l'appareil
s'allume et lit la source sélectionnée. Après la durée
spécifiée d'activité de la minuterie, l'appareil s'éteint à
nouveau.
•La lecture temporisée ne commencera pas si l'appareil n'a
pas d'abord été éteint.
•L'appareil raccordé ne peut pas être allumé ou éteint par la
minuterie intégrée de cet appareil. Utilisez une minuterie
externe.
Pour vérifier le réglage de la minuterie
Maintenez enfoncé SHIFT et appuyez sur TIMER.
L'heure de mise en marche de la minuterie, la source et la
durée d'activité de la minuterie sont affichées pendant 4
secondes.
Pour changer le réglage de la minuterie
Réglez la minuterie à nouveau.
Pour annuler la minuterie
Maintenez enfoncée SHIFT et appuyez à plusieurs reprises
sur TIMER sur la télécommande jusqu’à ce que "5 OFF"
s’affiche. "5" disparaît de l’affichage.
Conseil:
Votre réglage de minuterie est conservé même si la minuterie
est annulée. La prochaine fois que la minuterie sera activée,
vous pouvez changer votre réglage précédent, ou simplement
réutiliser le même réglage.
RÉFÉRENCE
Soin et maintenance
Un soin et une maintenance occasionnels de l'appareil et du
logiciel sont nécessaire afin d'optimisr la performance de votre
appareil.
Pour nettoyer le meuble
Utilisez un chiffon doux et sec. Si les surfaces de l'appareil
sont extrêmement sales, utilisez un chiffon doux légèrement
imbibé d'une solution nettoyante. N'utilisez pas de solvants
forts tels que l'alcool, le benzène ou le white-spirit.
Soin des CD
Lorsqu'un CD devient sale, essuyez-le du centre vers
l'extérieur avec un chiffon de nettoyage. Après avoir lu un
CD, rangez-le dans son boîtier. Ne le placez pas dans un
endroit chaud ou humide.
Solution de problèmes
Si votre appareil cesse de fonctionner correctement, suivez le
guide suivant et les sections appropriées de ce Mode d'emploi.
Il n'y a pas de son
•Les enceintes et l'alimentation secteur sont-elles connectées
correctement?
L'appareil s'est éteint soudainement
•Il y a possiblement un court-circuit sur les bornes des
enceintes. Débranchez le cordon d'alimentation secteur de
la prise secteur et reconnecter les cordons des enceintes
correctement.
Toutes les lumièr es de l'affichage s'éteignent lorsque
l'appareil est éteint
•Le mode ECO est-il réglé?
Affichage erroné
• Réglez l'appareil à nouveau.
42
Page 43

Faible réception radio
•Vérifiez la connexion de l'antenne. Ajustez l'antenne pour
trouver la meilleure réception.
•Placez l'appareil et l'antenne à l'écart d'autres appareils
électriques et de cordons.
Le lecteur CD marche mal
•Le disque est-il correctement introduit ?
•Le disque est-il sale ?
•La lentille est-elle affectée par la condensation ? Si c'est le
cas, attendez approximativement une heure et essayez à
nouveau.
Régler l'appareil à nouveau
Si un problème inhabituel arrive sur la fenêtre d'affichage,
réglez à nouveau l'appareil comme suit:
1 Appuyez sur POWER pour couper l'alimentation.
Si l'alimentation ne peut pas être coupée, débranchez le
cordon d'alimentation secteur, puis rebranchez-le.
2 Maintenez enfoncé s et appuyez sur POWER.
Tout ce qui a été mémorisé après l'achat est effacé.
Spécifications
UNITÉ PRINCIPALE CX-LMG9
TUNER
Plage d'accord FM 87,5 MHz à 108 MHz
Sensibilité utilisable FM (IHF)13,2 dBf
Bornes d'antenne FM 75 ohms (déséquilibré)
Plage d'accord AM 530 kHz à 1710 kHz (étapes de
10 kHz)
531 kHz à 1602 kHz (étapes de
9 kHz)
Sensibilité utilisable AM 350 µV/m
Antenne AM Antenne cadre
AMPLIFICATEUR
Sortie de puissance 50 W + 50 W (40 Hz - 20 kHz, THD
moins de 1%, 6 ohms)
62 W + 62 W (1 kHz, THD 10%,
6 ohms)
Distorsion harmonique totale 0,15% (5 W, 1 kHz, 6 ohms, DIN
AUDIO)
Entrée AUX/VIDEO IN: 500 mV
Sorties SPEAKERS: accepte des enceintes
de 6 ohms ou plus
PHONES: accepte des écouteurs de
32 ohms ou plus
SUPER WOOFER: 1,7 V
Prises DIGITAL OUT (OPTICAL)
Prise LINE OUT
LECTEUR CD
Laser Laser Semi-conducteur
(λ = 780 nm)
Convertisseur N-A 1 bit double
Rapport signal/circuit 85 dB (1 kHz, 0 dB)
Distorsion harmonique 0,08% (1 kHz, 0 dB)
Pleurage et scintillement Non mesurable
GÉNÉRALITÉS
Alimentation secteur 120 V secteur, 60 Hz
Consommation 60 W
Consommation en mode d'attente
Avec le mode ECO activé : 1,0 W
Avec le mode ECO désactivé :
12,0 W
Dimensions (L × H × P) 176,6 × 256 × 348,7 mm
Poids de l'unité principale 4,9 kg
SYSTÈME ENCEINTE SX-LMG9
Système d'enceintes 2 voies, bass reflex (protégé
magnétiquement)
Appareils d'enceintes Enceinte de basses: cône de 120 mm
Enceinte d'aigus: cône de 25 mm
Impédance 6 ohms
Dimensions (L × H × P) 160 × 256 × 230 mm
Poids 3,2 kg
Les spécifications et l’apparence externe sont sujettes aux
changements sans notice.
43
F
Page 44

NOTE
This equipment has been tested and found to comply with the
limits for a Class B digital device, pursuant to Part 15 of the
FCC Rules. These limits are designed to provide reasonable
protection against harmful interference in a residential
installation.
This equipment generates, uses, and can radiate radio frequency
energy and, if not installed and used in accordance with the
instructions, may cause harmful interference to radio
communications. However, there is no guarantee that
interference will not occur in a particular installation. If this
equipment does cause harmful interference to radio or television
reception, which can be determined by turning the equipment
off and on, the user is encouraged to try to correct the
interference by one or more of the following measures:
- Reorient or relocate the receiving antenna.
- Increase the separation between the equipment and receiver.
- Connect the equipment into an outlet on circuit different from
that to which the receiver is connected.
- Consult the dealer or an experienced radio/TV technician for
help.
CAUTION
Modifications or adjustments to this product, which are not
expressly approved by the manufacturer, may void the user’s
right or authority to operate this product.
For assistance and information
Printed in China
(United States and Puerto Rico)
 Loading...