

Sony XAV-A1 User Manual [es]
2-597-469-23(1)
AV Center
AV Center
Centro AV
Operating Instructions
Manual de instrucciones
操作說明
GB
ES
CT
Sony Corporation Printed in Japan
2RR6P10A50001A
POR FAVOR LEA DETALLADAMENTE ESTE MANUAL
DE INSTRUCCIONES ANTES DE CONECTAR Y
OPERAR ESTE EQUIPO.
RECUERDE QUE UN MAL USO DE SU APARATO
PODRÍA ANULAR LA GARANTÍA.
For installation and connections, see the supplied Installation/Connections
manual.
Para obtener información sobre la instalación y las conexiones, consulte el manual
de Instalación/Conexiones suministrado.
有關安裝和連接,請參見附帶的安裝∕連接手冊。
XAV-A1
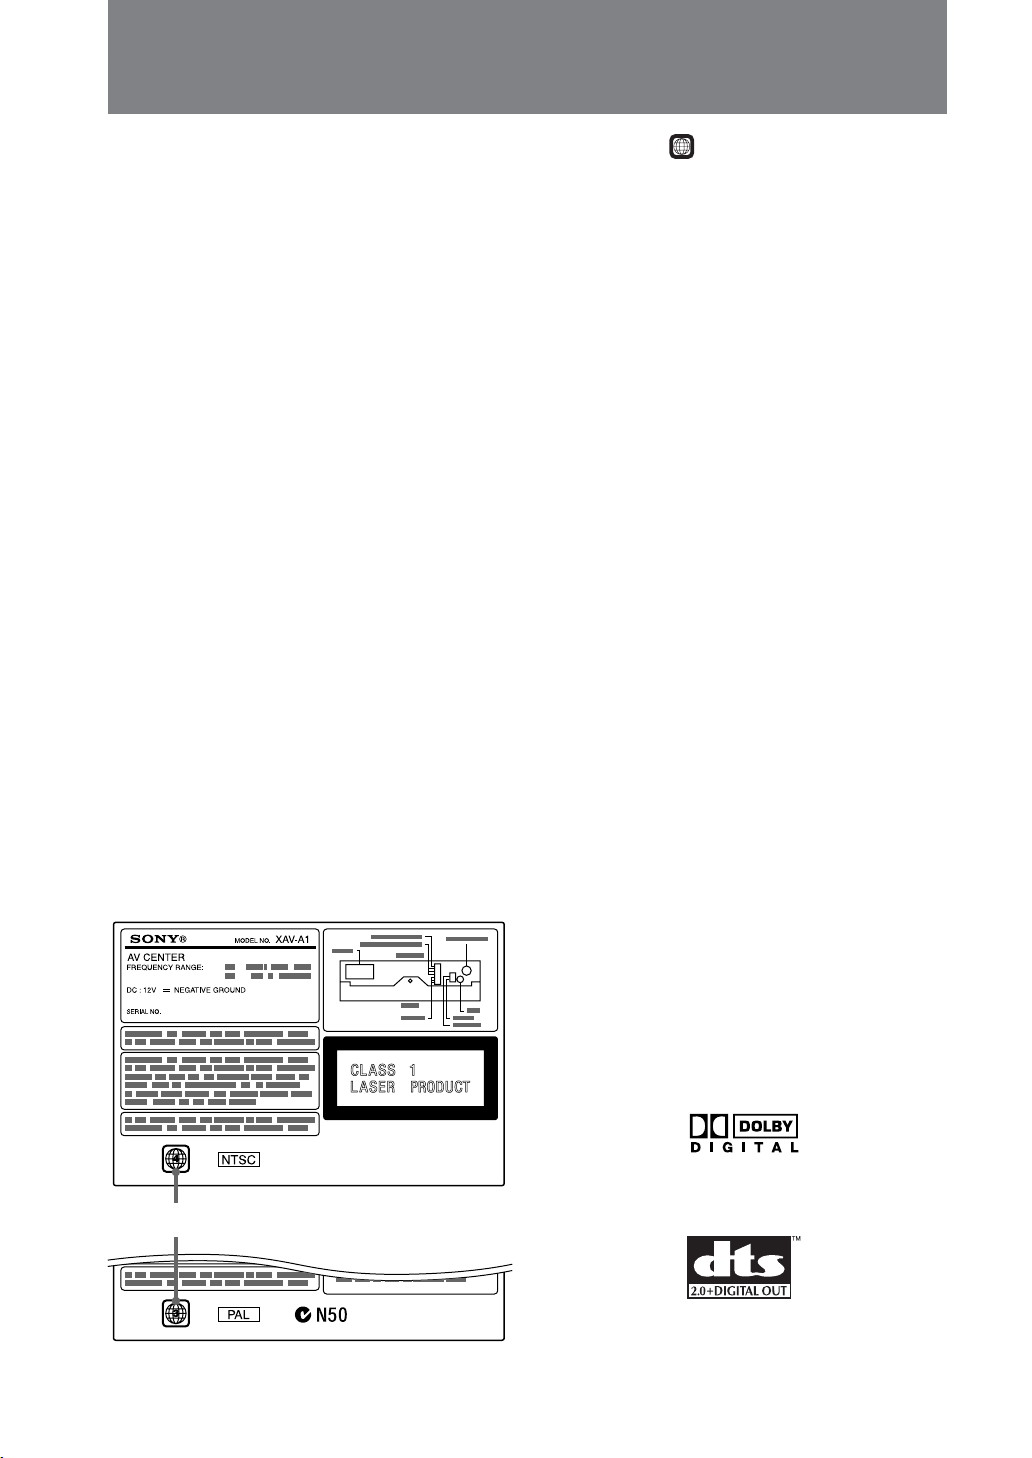
© 2005 Sony Corporation

This label is located on the bottom of the
chassis.
2

Table of Contents
Features ............................................................... 4
Precautions..........................................................5
Getting Started
Preparations ........................................................ 9
Detaching the front panel ................................................9
Resetting the unit ............................................................. 9
Opening up the monitor .................................................. 9
Setting the clock ..............................................................12
Attaching the front panel .............................................. 12
Location of Controls .........................................13
Main unit ......................................................................... 13
Card remote commander RM-X706 .............................14
Settings and Adjustments
Using the System Menu ...................................34
Monitor settings — MONITOR ....................................34
Display settings — DSPL .............................................. 34
Sound settings — SOUND ............................................35
Other settings — OTHER ..............................................36
TV color system setting — TV SYSTEM ..................... 36
Using the DVD Setup Menu ............................. 37
Language settings for DVD playback — Language ..37
Settings for digital audio output — Audio ................. 38
Display settings for the player — Display ..................38
Settings for the parental control — Lock .................... 38
Setting for the downmix signal — Downmix ............ 38
Locking discs — Lock .................................................... 39
Basic Operation
Playing a Disc ....................................................15
Playing DVD/Video CD/Audio CD/MP3/JPEG .... 15
Watching TV/Listening to the Radio ...............17
Watching TV or listening to radio ................................ 17
Watching/listening to other video/audio
components .................................................................17
Player
About the Source Menu ................................... 18
Display items on the CD/MP3 playback ....................18
Using the Source Menu .................................... 19
Playback order of MP3 files .......................................... 19
Setting the screen — Wallpaper/Screen Effect .......... 20
Setting the Play mode — Play Mode ...........................20
Setting for the Display — Display ............................... 21
Setting the sound quality — Equalizer ....................... 23
Resuming Playback — Resume Play ................25
Searching a Specific Point on a Disc
— Scan ........................................................... 26
Using the Menus on DVDs ...............................27
Using PBC Functions — PBC (Playback
control)........................................................... 28
Starting Playback from a Selected Point
— Search Play ................................................29
Various DVD Operations
Changing the Audio Channels ......................... 30
Adjusting the Audio Output Level
— DVD Level Adjustment .............................31
Changing the Angles ........................................ 32
Displaying the Subtitles ...................................33
TV/Radio/Other Components
Storing Channels/Radio Stations..................... 42
Storing automatically — BTM ...................................... 42
Storing manually ............................................................ 42
Receiving the stored stations ........................................ 42
Using the Local seek mode in tuner function ............ 43
Switching FM reception to monaural ..........................43
Auxiliary Audio/Video Equipment .................. 44
Setting for the auxiliary equipment .............................44
Displaying the image of the back camera ...................45
Switching the Front/Rear Output — Zone x
Zone ............................................................... 46
Other Features
Additional Information .................................... 47
Card remote commander precautions......................... 47
About the liquid crystal display (LCD) panel ............47
Replacing the lithium battery ....................................... 47
Removing the unit ..........................................................48
Troubleshooting ................................................ 50
General .............................................................................50
Picture .............................................................................. 50
Sound ............................................................................... 51
Operation .........................................................................51
Radio reception ...............................................................53
Messages ..........................................................................53
Specifications ....................................................54
Glossary ............................................................. 55
Language Code List .......................................... 57
3

Features
Welcome!
Thank you for purchasing this Sony AV Center. Before operating the unit, please read this
manual thoroughly and retain it for future reference.
7-inch in-dash motorized TFT monitor
Innovative in-dash monitor design allows the unit to be mounted in a single DIN slot. At
the touch of a button, a 7-inch wide-aspect-ratio screen slides out, for comfortable TV or
DVD viewing. (Sony TV tuner is optionally available.)
•High brightness and wide viewing angle monitor.
•Touch panel and graphic user interface.
DVD, CD, VCD playback compatibility
• Compatible with various disc formats, such as DVD-R/-RW, DVD+R/+RW, etc.
DVD-RW: compatible with video mode and VR mode (various editing available)
DVD+RW: compatible with video mode and +VR mode (various editing available)
• Plays back up to 1,000 tracks* recorded on DVD-R/-RW or DVD+R/+RW in MP3 file
format
* Depends on track length
2 video/audio inputs, 1 video input, 1 video/audio output (rear), and 1 digital output
provided
Zone × Zone
You can simultaneously listen to a separate sound source in this unit and auxiliary audio
equipment in the rear.
DVD level adjustment
Balances the output level differences between PCM, Dolby Digital and DTS, and the
volume level differences between disc and source.
EQ7
You can select an equalizer curve for 7 music types.
4

Precautions
To avoid the risk of injury or accident, read
the following precautions before installing
and operating the unit.
On safety
Comply with your local traffic rules and
regulations.
•While driving
–You must not watch or operate the
monitor. It may lead to distraction and
cause an accident.
Park your car in a safe place to watch the
monitor and operate the unit.
•While operating
– Do not insert your hands, fingers or
foreign object into the unit while the
monitor is functioning. It may cause
injury or damage to the unit.
– Keep small articles out of the reach of
children.
• Do not touch the TV aerial and monitor at
the same time during storms. You may get
an electric shock.
• If your car was parked in direct sunlight
resulting in a considerable rise in
temperature inside the car, allow the unit to
cool off before operating it.
•When backing up you car, be sure to look
back for your safety.
On installation
•We recommend this unit should be
installed by a qualified technician or service
personnel
– If you try to install this unit by yourself,
refer to the supplied “Installation/
Connections” manual and read it
carefully. Make sure to install this unit
properly.
–Improper installation may cause battery
drain or a short circuit.
• If the unit does not work properly, check
the connections first (refer to the supplied
“Installation/Connections” manual). If
everything in order, check the fuse.
• Replacing the fuse
–When replacing the fuse, be sure to use
only a fuse of the same rating (ampere
rating).
Fuse (10 A)
Preventing accidents
The TV/video pictures appear only after
you park the car and set the parking brake.
When the car starts moving, the TV/video
pictures automatically disappear for safety
reasons, after displaying the following
caution.
Picture off for your safety!
Do not operate equipment connected to
the TV tuner unit or watch the monitor
while driving. You may cause a traffic
accident if your attention is distracted by
the monitor.
• Do not use the Set Up feature while
driving, or perform any other function
which could divert your attention from the
road.
•When you connect the back camera:
–When you drive, watch the surroundings
carefully for your safety. Do not depend
on the back camera exclusively.
– Using a different fuse or bridging the
contacts with wire is highly dangerous
and can lead to serious damage.
•Protect unit surface from damage
– Do not expose the unit surface to
chemicals such as insecticide, hair spray,
insect repellent, etc.
– Do not leave rubber or plastic materials
in contact with the unit for a long time.
Otherwise the finish of the unit may be
impaired, or deformation may occur.
•When installing, be sure to turn the ignition
key to the off position. Installing the unit
while the ignition is on may cause battery
drain or short circuit.
•When installing, be sure not to damage any
car parts such as pipes, tubes, fuel tank or
wiring by using a drill. It can cause a fire
or an accident.
5
Precautions
Installing location
• Do not install this unit where:
– the driver’s view will be obstructed when
the monitor is in either open or close
position.
– the operation of the car or the airbag
system will be obstructed.
– It will obstruct the operation of the
vehicle, especially the steering wheel,
shift lever or brake pedal.
If you have any questions or problems
concerning your unit, please consult your
nearest Sony dealer.
About this manual
• Instructions in this manual describe the
controls on the card remote commander.
You can also use the controls on the unit if
they have the same or similar names to
those on the card remote commander.
• In this manual, “DVD” is used as the
general term for DVD-R/-RW and
DVD+R/+RW.
• The meaning of the icons used in this
manual is described below:
Precautions
• Do not use the custom functions while
driving, or perform any other function
which could divert your attention from the
road.
• The power aerial will extend automatically
while the unit is operating.
Moisture condensation
On a rainy day or in a very damp area,
moisture condensation may occur inside the
lenses and display of the unit. Should this
occur, the unit will not operate properly. In
such a case, remove the disc and wait for
about an hour until the moisture has
evaporated.
To maintain high sound quality
Be careful not to splash juice or other soft
drinks onto the unit or discs.
Icon Meaning
Functions available for DVD VIDEOs,
DVD-Rs/DVD-RWs, or DVD+Rs/
DVD+RWs in video mode
Functions available for Video CDs or
CD-Rs/CD-RWs in video CD format
Functions available for music CDs or
CD-Rs/CD-RWs in music CD format
Functions available for files in MP3 format
stored on CD-ROMs/CD-Rs/CD-RWs/
DVD-Rs/DVD-RWs/DVD+Rs/
DVD+RWs
Functions available for files in JPEG
format stored on CD-ROMs/CD-Rs/
CD-RWs/DVD-Rs/DVD-RWs/DVD+Rs/
DVD+RWs
6
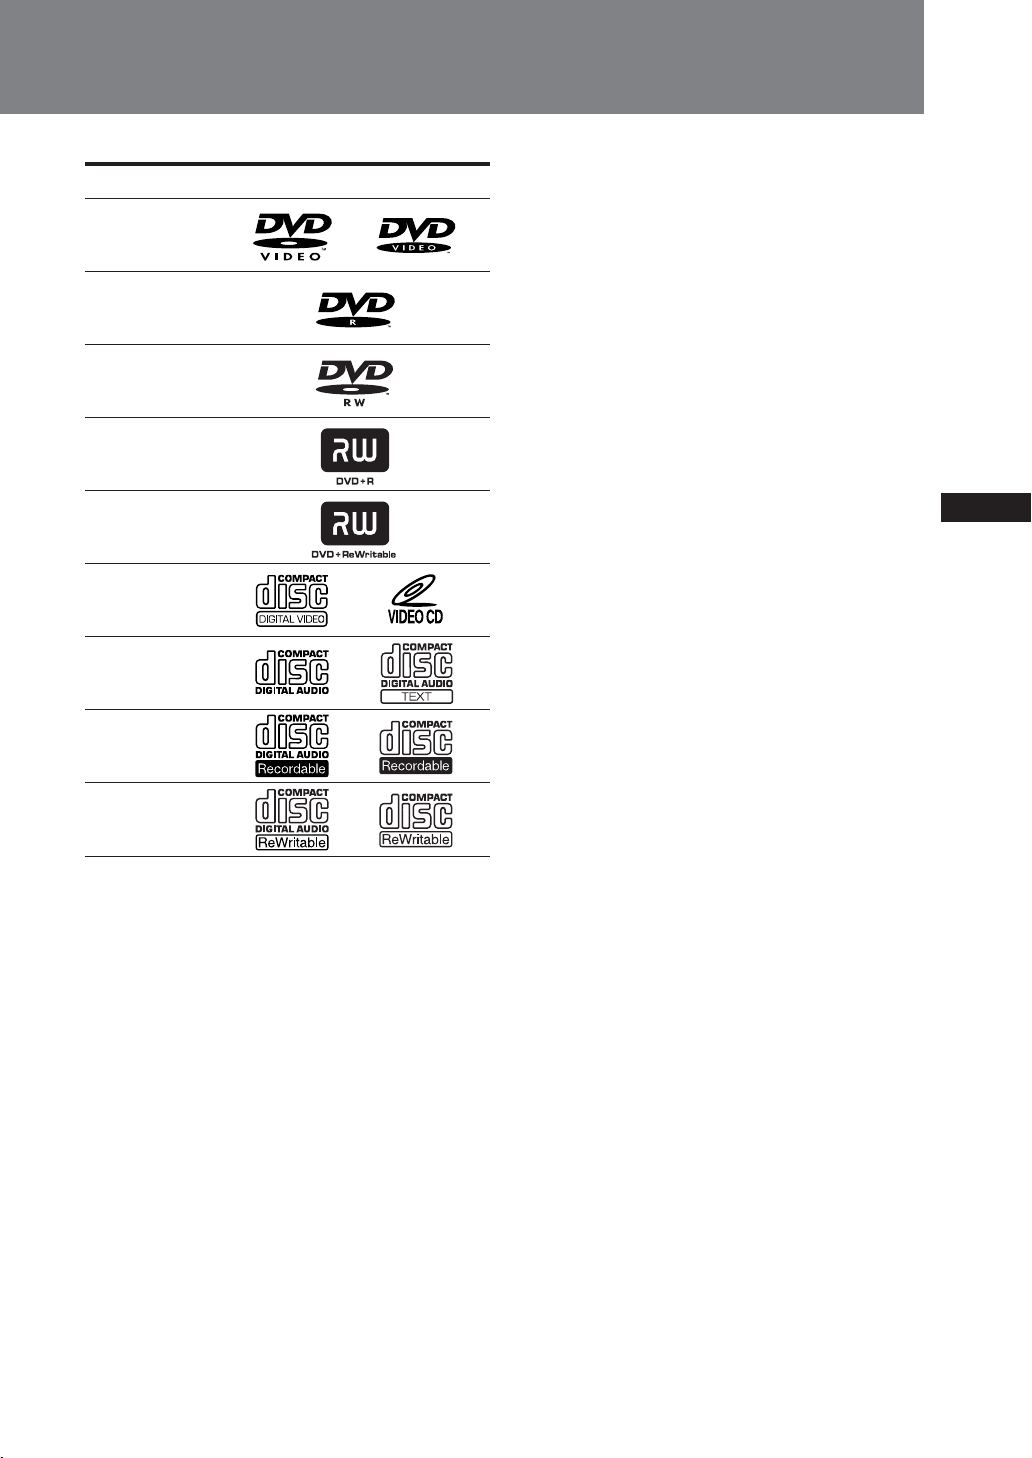
Playable discs
Format of discs
DVD VIDEO
Video CD (VCD)
A Video CD can contain both audio and
visual data on a disc with the same size as a
regular Audio CD. The playing time is 74
minutes for a standard 12-cm CD.
DVD-R*
DVD-RW*
DVD+R*
DVD+RW*
Video CD
Audio CD
CD-R*
CD-RW*
* Discs that are not finalized cannot be played.
“DVD VIDEO”, “DVD-R”, “DVD-RW”, “DVD+R”,
and “DVD+RW” are trademarks.
DVD
A DVD contains both audio and visual data.
A 12-cm disc can hold 7 times the amount of
data contained in a CD-ROM, which equals
to 4 consecutive hours of playing time (8
hours for double-sided discs). DVDs are
divided into 4 types: single sided single layer,
single sided double layer, double sided single
layer, and double sided double layer.
Audio CD
An Audio CD containing audio data. The
playing time is 74 minutes for a standard 12cm CD.
CD-Recordable (CD-R)
With a CD-R, you can edit audio data. You
can write information on a CD-R only once.
CD-Rewritable (CD-RW)
With a CD-RW, you can edit audio data. You
can write information on a CD-RW again and
again.
CD-Extra
A CD-Extra has two sections (sessions) for
audio and data respectively. You can only
play the section of audio on this unit.
Notes
• You can play DVD-Rs/DVD-RWs, DVD+Rs/
DVD+RWs and CD-Rs/CD-RWs designed for audio
with this unit. However, depending on the recorded
conditions, you cannot play some discs.
• You cannot play CD-Rs/CD-RWs, DVD-Rs/DVD-
RWs or DVD+Rs/DVD+RWs that are not finalized.
• Discs created in Packet Write format cannot be played.
• The discs listed below cannot be played on this unit:
– 8-cm discs
– CD-ROM (the data other than the MP3 or JPEG files)
– CD-G
– Photo-CD
– VSD (Video single disc)
– DVD-ROM (the data other than the MP3 or JPEG
files)
– DVD-RAM
– DVD-Audio
– CPRM
– Active-Audio (Data)
– CD-Extra (Data)
– Mixed CD
– SVCD (Super Video CD)
– CDV
– CD-F
– SACD (Super Audio CD)
7
Precautions
Note on DualDiscs
A DualDisc is a two sided disc product which
mates DVD recorded material on one side
with digital audio material on the other side.
However, since the audio material side does
not conform to the Compact Disc (CD)
standard, playback on this product is not
guaranteed.
Note on transparent discs
12-cm discs containing of only an inner 8 cm
data portion (the rest is transparent) cannot
be played on this unit.
Music discs encoded with
copyright protection
This unit is designed to play back discs that
conform to the Compact Disc (CD) standard.
Recently, various music discs encoded with
copyright protection are marketed by some
record companies. Please be aware that
among those discs, there are some that do not
conform to the CD standard and may not be
playable and recordable by this product.
Region code
This system is used to protect software
copyrights.
The region code is located on the bottom of
the unit, and only DVDs labeled with an
identical region code can be played on this
unit.
DVDs labeled
unit.
If you try to play any other DVD, the
message “Can not play” will appear on the
monitor screen. Depending on the DVD, no
region code may be labeled even though
playing the DVD is prohibited by area
restrictions.
ALL
can be also played on this
Note on playback operations of
DVDs and VCDs
Some playback operations of DVDs and
VCDs may be intentionally set by software
producers.
Since this unit plays DVDs and VCDs
according to the disc contents the software
producers designed, some playback features
may not be available. Also, refer to the
instructions supplied with the DVDs or
VCDs.
Copyrights
This product incorporates copyright
protection technology that is protected by
method claims of certain U.S. patents, other
intellectual property rights owned by
Macrovision Corporation, and other rights
owners. Use of this copyright protection
technology must be authorized by
Macrovision Corporation, and is intended for
home and other limited viewing uses only
unless otherwise authorized by Macrovision
Corporation. Reverse engineering or
disassembly is prohibited.
Manufactured under license from Dolby
Laboratories.
“Dolby”, “Pro Logic”, and the double-D
symbol are trademarks of Dolby
Laboratories.
“DTS” and “DTS 2.0 + Digital Out” are
Region code
trademarks of Digital Theater Systems, Inc.
8
Getting Started
Preparations
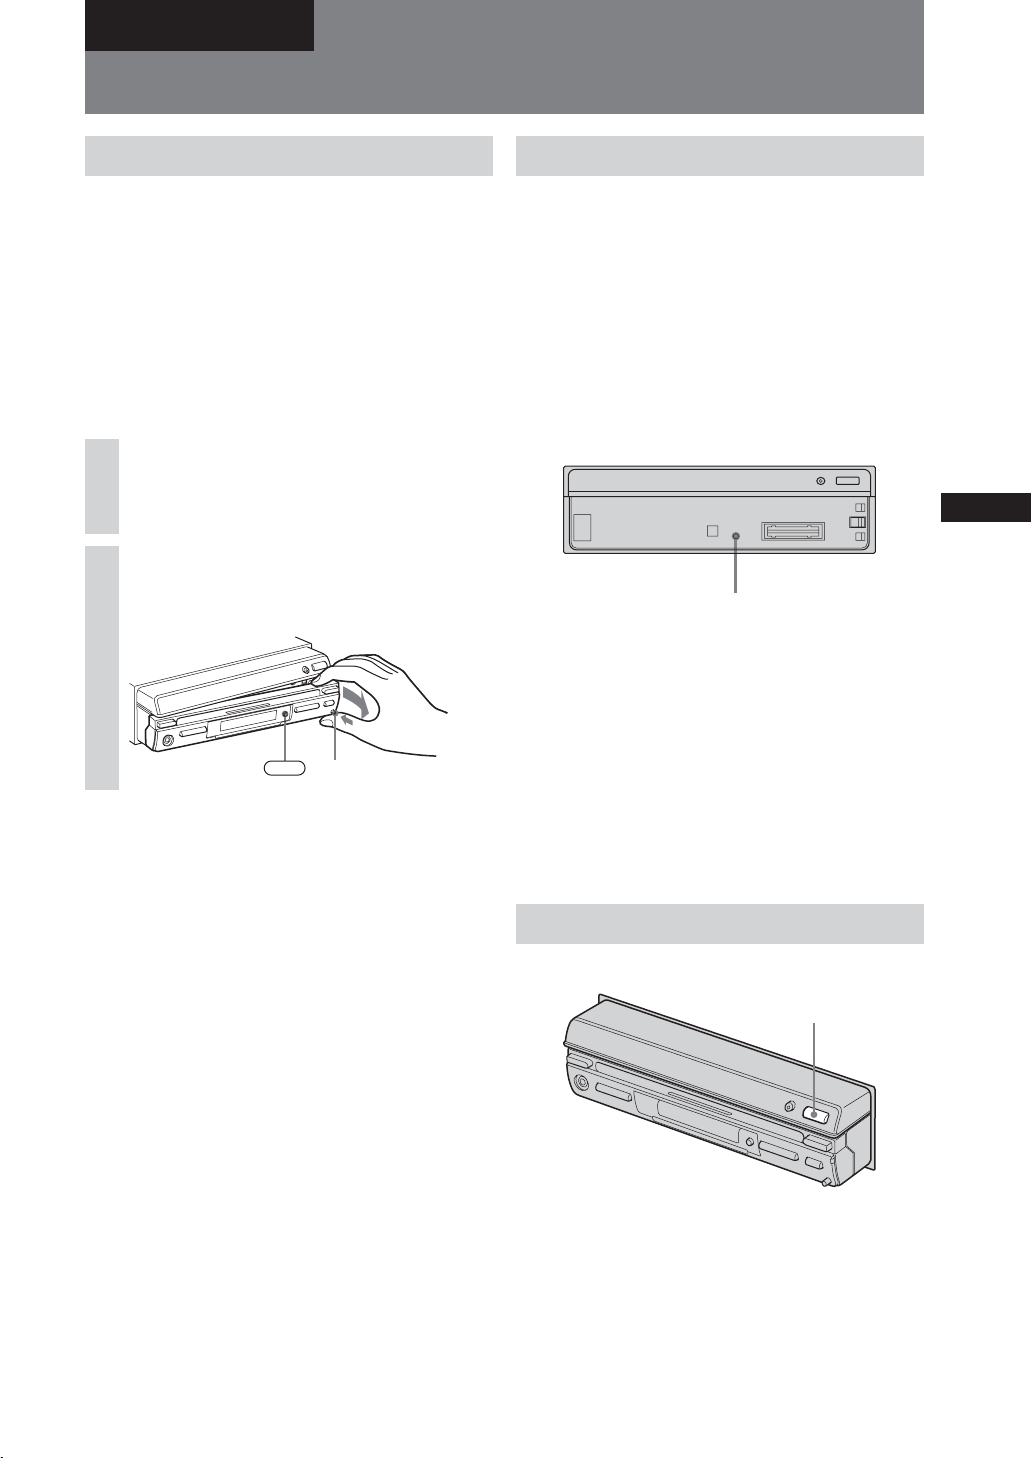
Detaching the front panel
You can detach the front panel of this unit to
prevent theft.
Caution alarm
If you turn the ignition switch to the OFF
position without detaching the front panel,
the caution alarm will sound for a few
seconds.
The alarm will only sound if the built-in
amplifier is used.
Press (OFF).
1
The unit is turned off.
Press (RELEASE), then pull it off
2
towards you.
OFF
(RELEASE)
Notes
• Do not drop the front panel and display window or put
excessive pressure on them.
• Do not subject the front panel to heat/high
temperature or moisture. Avoid leaving it in a parked
car or on a dashboard/rear tray.
Tip
When carrying the front panel, use the supplied front
panel case.
Resetting the unit
Before operating the unit for the first time, or
after replacing the car battery or changing the
connections, you must reset the unit.
Detach the front panel by pressing RELEASE
and pull it off towards you.
Use a pointed object such as a mechanical
pencil to push the Reset button. To avoid the
possibility of damage, you should not use a
needle or push the button too strongly.
Push Reset.
OPEN/CLOSE
TILT
Reset button
Notes
• When the Reset button is pushed, the time and all
stored settings are lost and will have to be
reprogrammed.
• The reset procedure takes about 10 seconds after the
Reset button is pushed.
• When the reset procedure is completed, press OPEN/
CLOSE and verify that the monitor opens up properly.
• If you reset the unit while the monitor is open, close
the monitor once. Otherwise, it may not operate
properly.
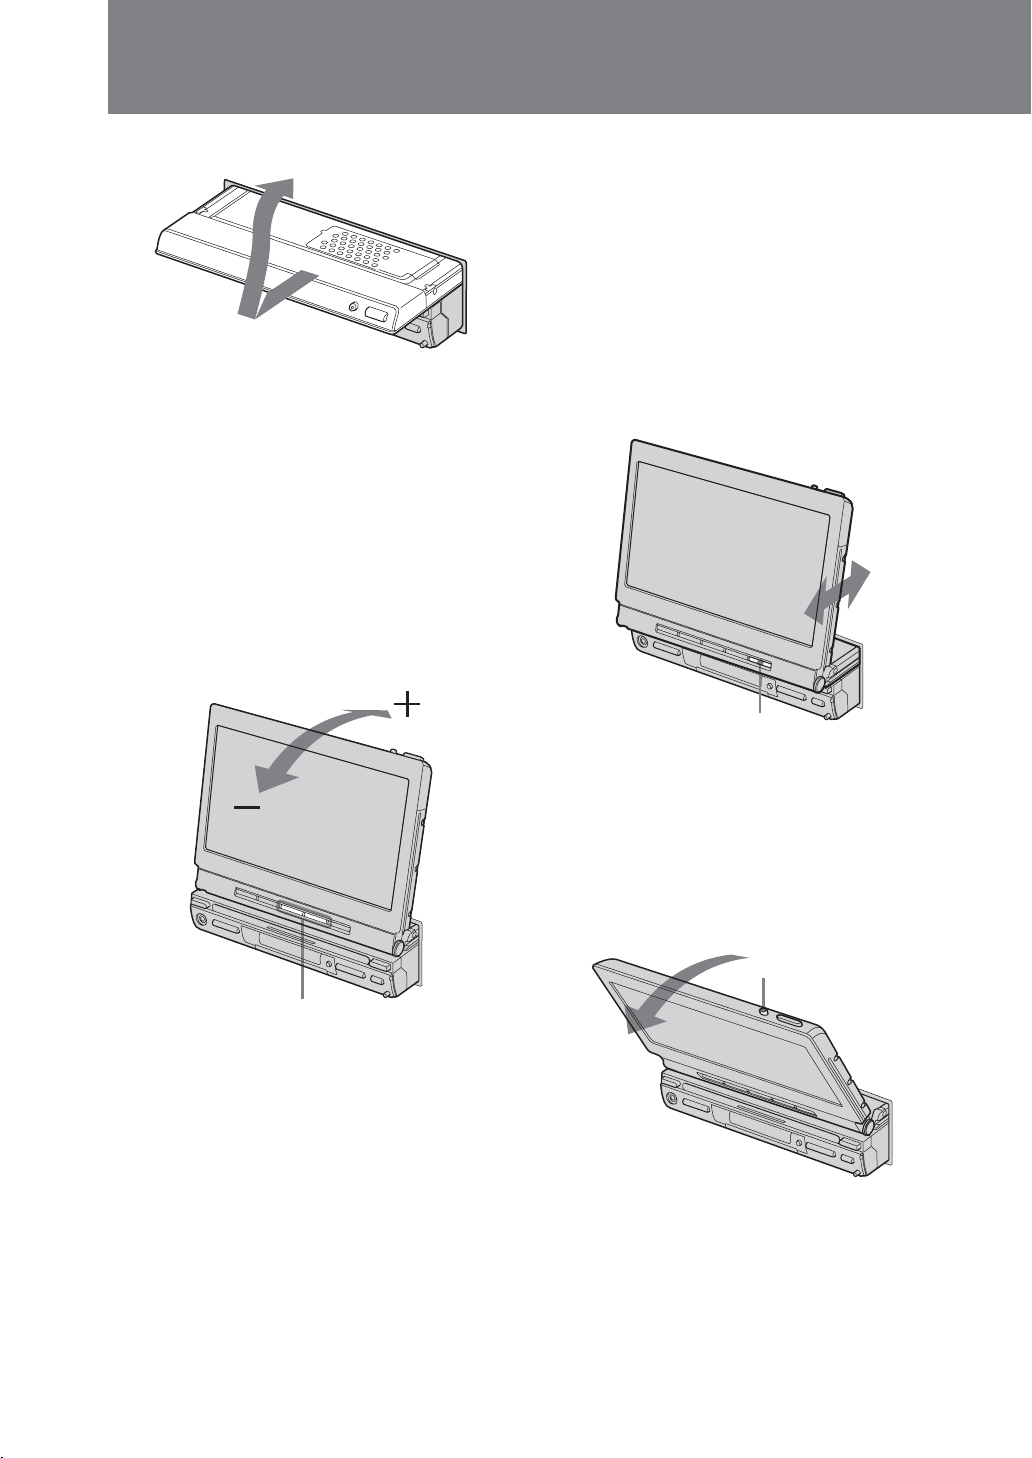
Opening up the monitor
Press OPEN/CLOSE on the monitor.
OPEN/CLOSE
9
Preparations
The monitor slides out of the main unit.
Notes
• The card remote commander cannot be used for
opening up or closing the monitor.
• If movement of the monitor during opening or closing
has been impeded by the gear shift lever or another
obstacle, press OPEN/CLOSE again.
Adjusting the monitor angle
You can adjust the angle of the monitor for
best viewing.
Press ANGLE –/+ repeatedly.
The buttons adjust monitor position in
discrete steps.
Adjusting the monitor position
You can adjust the monitor position by sliding
it forward or backward while pressing SLIDE.
When the monitor cannot slide any more, the
monitor begins to slide in the opposite
direction. Press and hold SLIDE for 2 seconds
to slide the monitor back to the other
direction when the monitor is in halfway
through.
The adjustment is memorized, and the
monitor will automatically move to the same
position when it is opened up again.
SLIDE
ANGLE –/+
+ button: Monitor is tilted backward.
– button: Monitor is tilted forward.
The adjustment is memorized, and the
monitor will move to the same angle the next
time it is opened up again after having been
closed.
Notes
• Do not move the monitor by hand.
• If OPEN/CLOSE was pressed while the monitor was
opening or closing, the monitor may not stop at the
original angle. In such a case, press ANGLE –/+ to
adjust the angle.
Tilting the monitor ahead
In order to operate the button on the
dashboard easily, the monitor can be tilted
ahead.
Press TILT.
TILT
The monitor will be tilted ahead.
To return to the original position, press TILT
again.
Tip
If no operation is made for about 25 seconds, the monitor
will return to the original position.
10
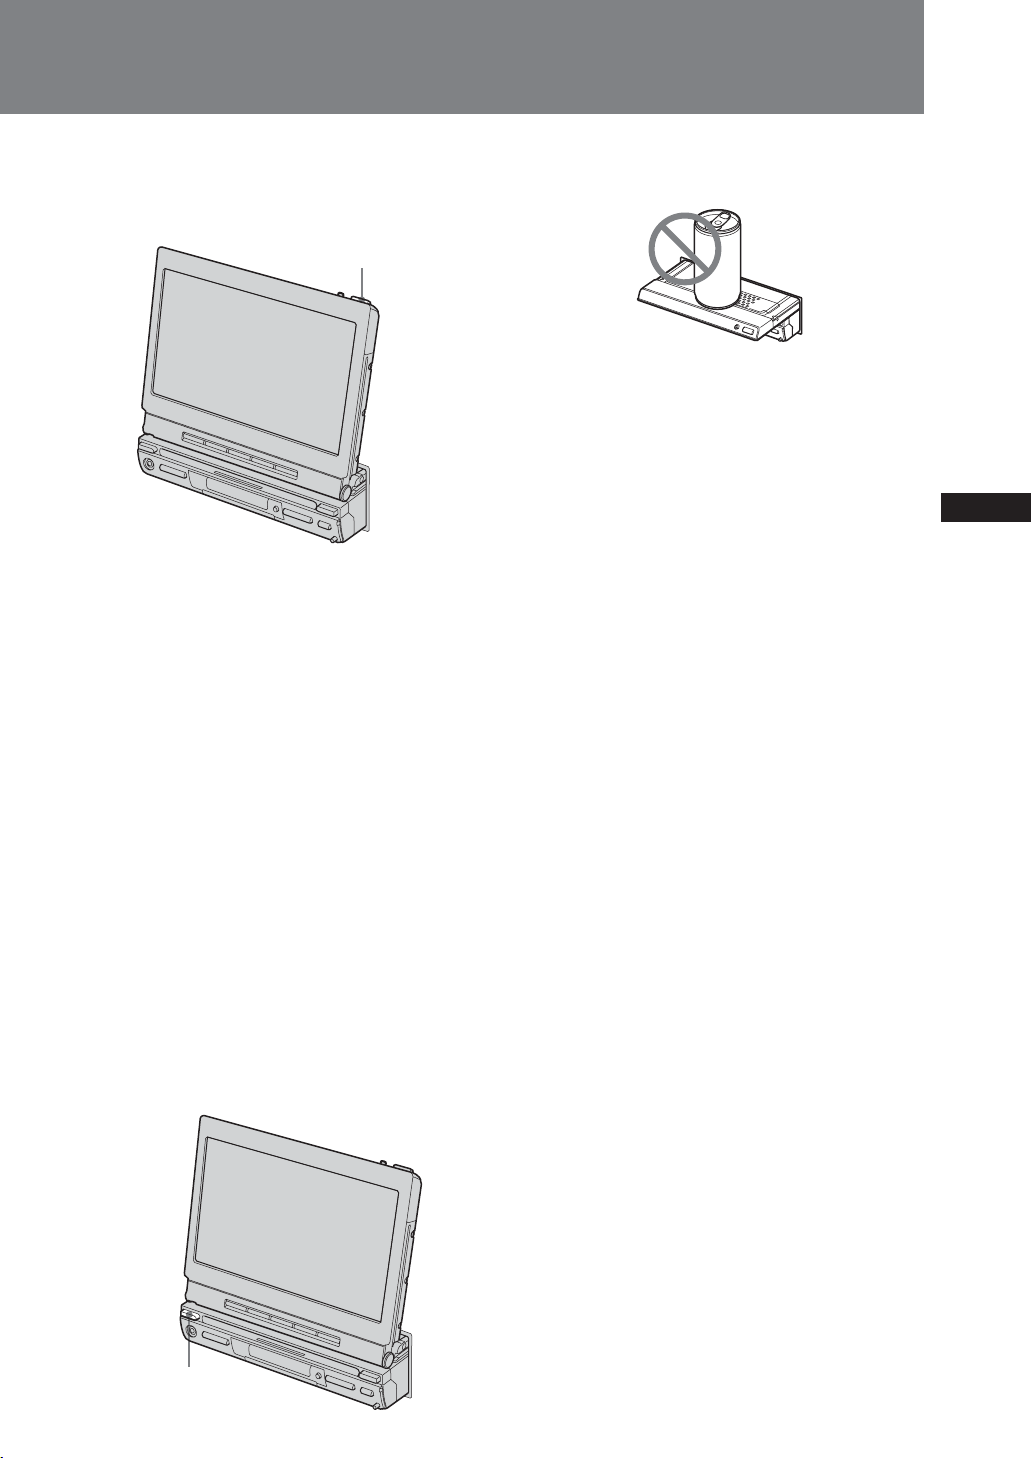
Closing the monitor
Press OPEN/CLOSE.
The monitor retracts into the unit, and you
can use only the audio functions of the unit.
OPEN/CLOSE
Shutting down
• If you press OFF on the card remote
commander while the monitor is opened
up, the sound is turned off, and the unit
switches to the standby mode, in which
only the clock indication is shown.
• If you set the ignition key of the car to OFF,
power to the unit is automatically turned
off.*
Note
Do not place any articles, such as cans or bottles, on the
monitor. It may cause a malfunction.
Tip
If you have pressed OFF when opening up the monitor,
you can touch the monitor or press SOURCE to turn the
picture on again.
*Warning when installing in a car without an ACC
(accessory) position on the ignition key
After turning off the ignition, be sure to press OFF on
the unit for 2 seconds to turn off the clock display.
Otherwise, the clock display does not turn off and this
causes battery drain.
To turn on the unit when it is turned off, press
SOURCE on the unit. (You cannot turn on the unit with
the card remote commander.)
SOURCE
11
Preparations
Setting the clock
The clock uses a 12-hour digital indication.
On the monitor
Touch SOURCE LIST.
1
Touch MENU.
2
Touch CLOCK.
3
The clock adjust display appears.
Enter
SOURCE LIST
Touch V/v to set the hour and
4
minute.
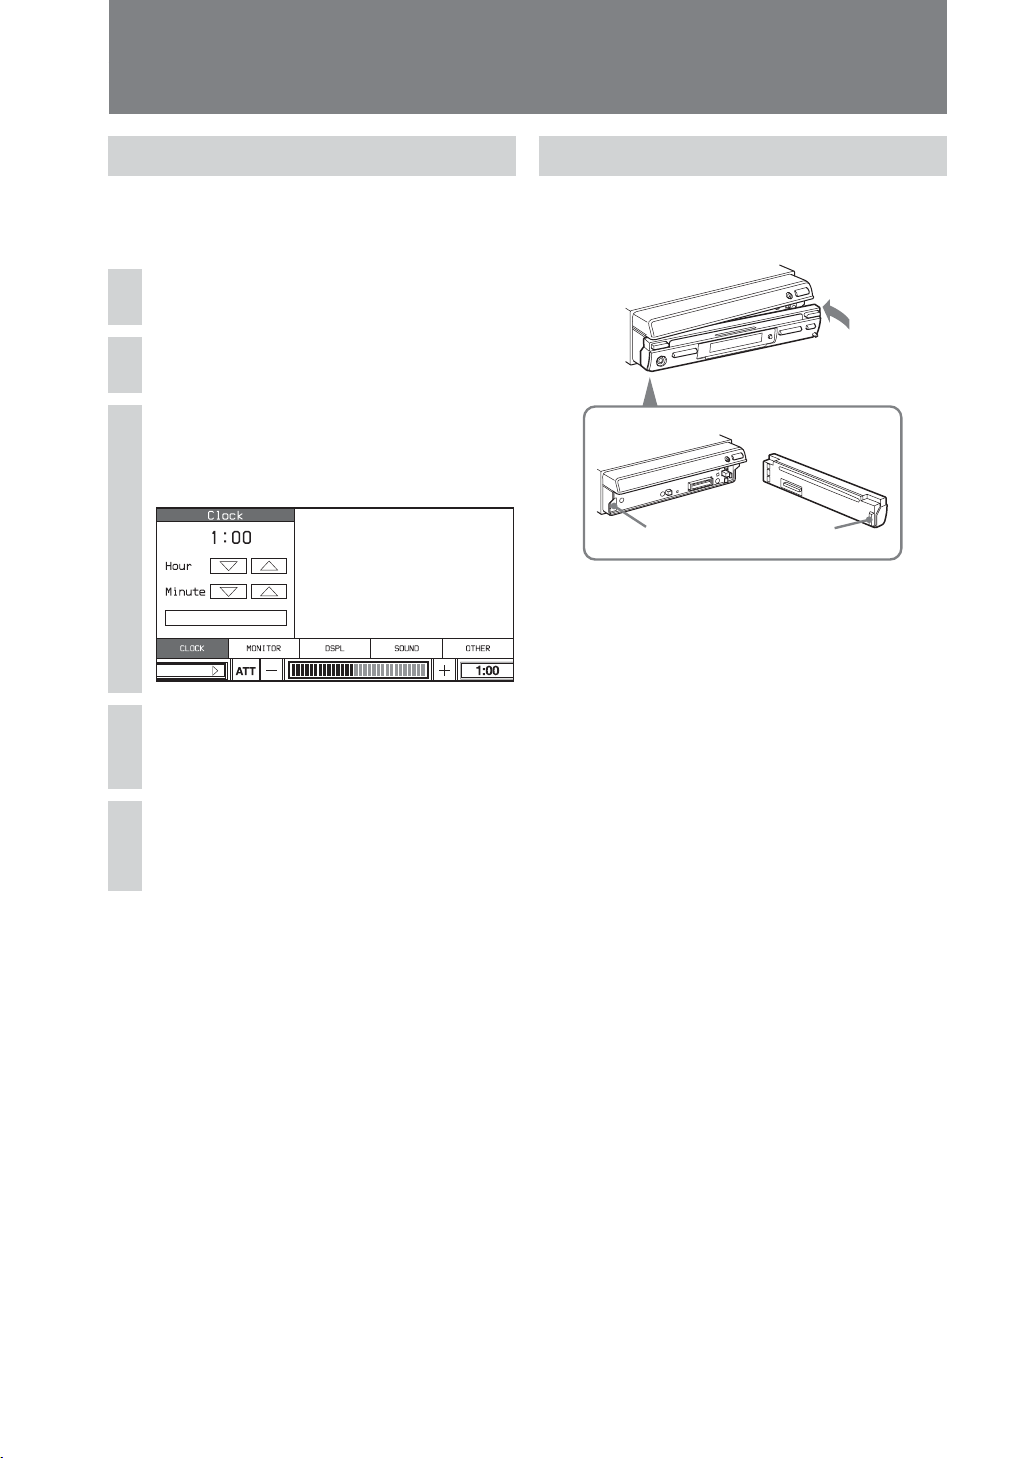
Attaching the front panel
Engage part A of the front panel with part B
of the unit, as illustrated, and push the right
side into position until it clicks.
B
Note
Do not put anything on the inner surface of the front
panel.
A
Touch Enter.
5
The clock starts from 00 seconds.
12
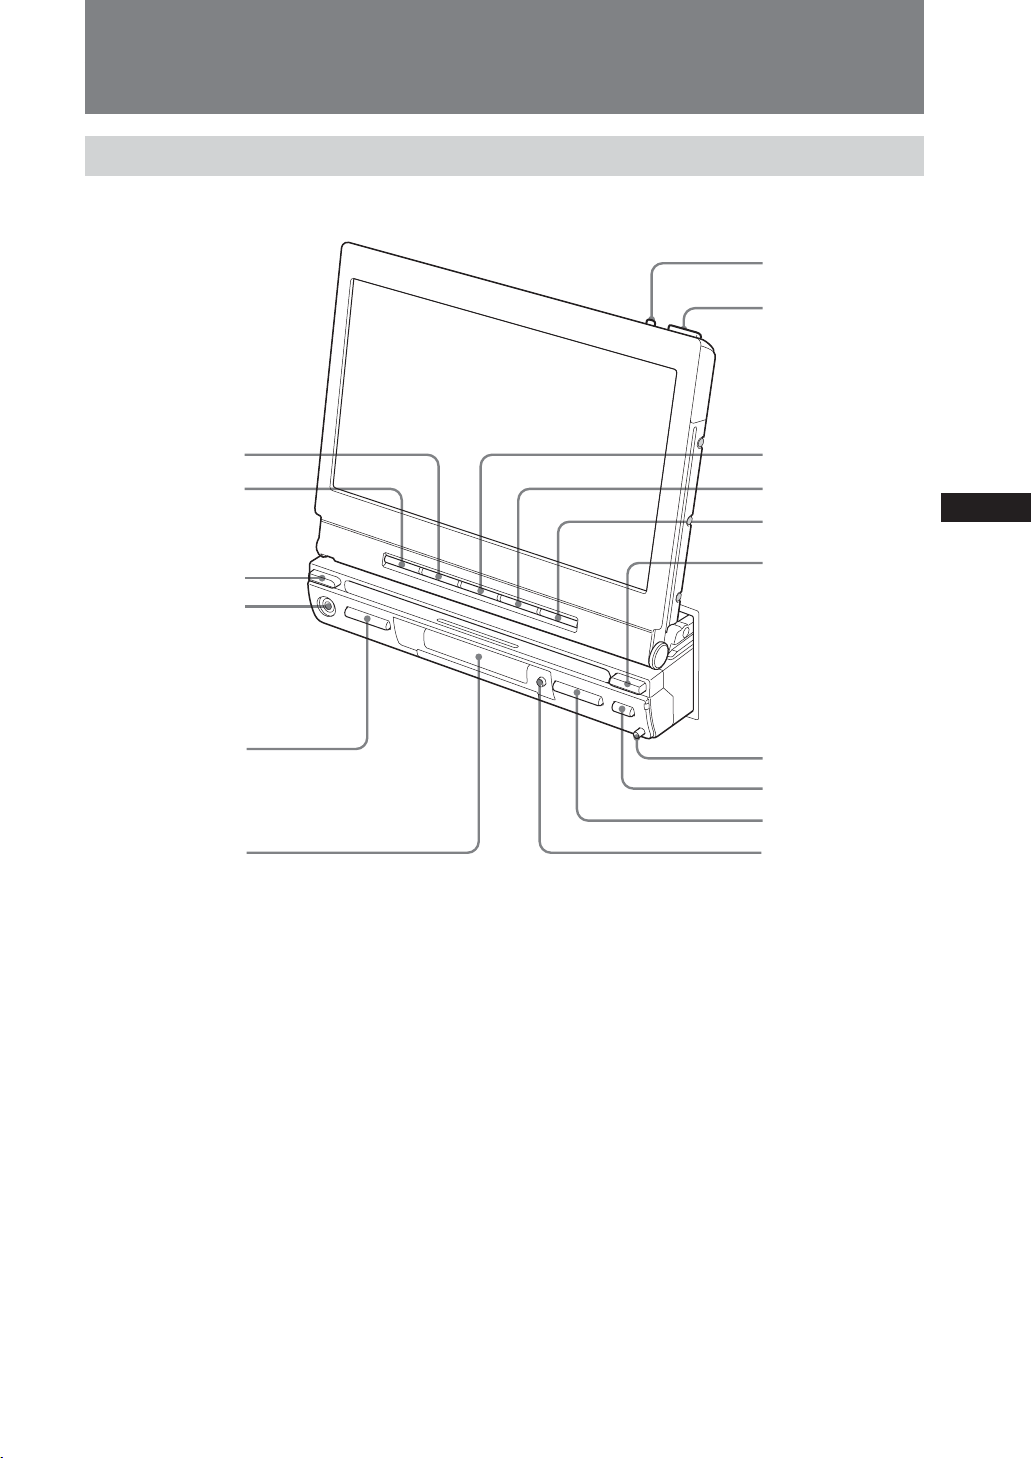
Location of Controls
Main unit
Monitor Open
7
8
1
2
3
4
5
6
Refer to the pages listed for details.
1 ZxZ button 46
2 SOURCE button 11, 17
3 SOURCE button 11, 17
4 A/V IN jack
5 VOL –/+ button
6 Display window
7 TILT button 10
8 OPEN/CLOSE button 9, 10, 11
9
0
qa
qs
qd
qf
qg
qh
9 ANGLE – button 10
0 ANGLE + button 10
qa SLIDE button 10
qs MODE button
qd RELEASE button 9
qf Z (eject) button
qg SEEK –/+ ./> button 26
qh OFF button 9, 11
* Warning when installing in a car without an ACC (accessory) position on the ignition key
After turning off the ignition, be sure to press OFF on the unit for 2 seconds to turn off the clock display.
Otherwise, the clock display does not turn off and this causes battery drain.
13
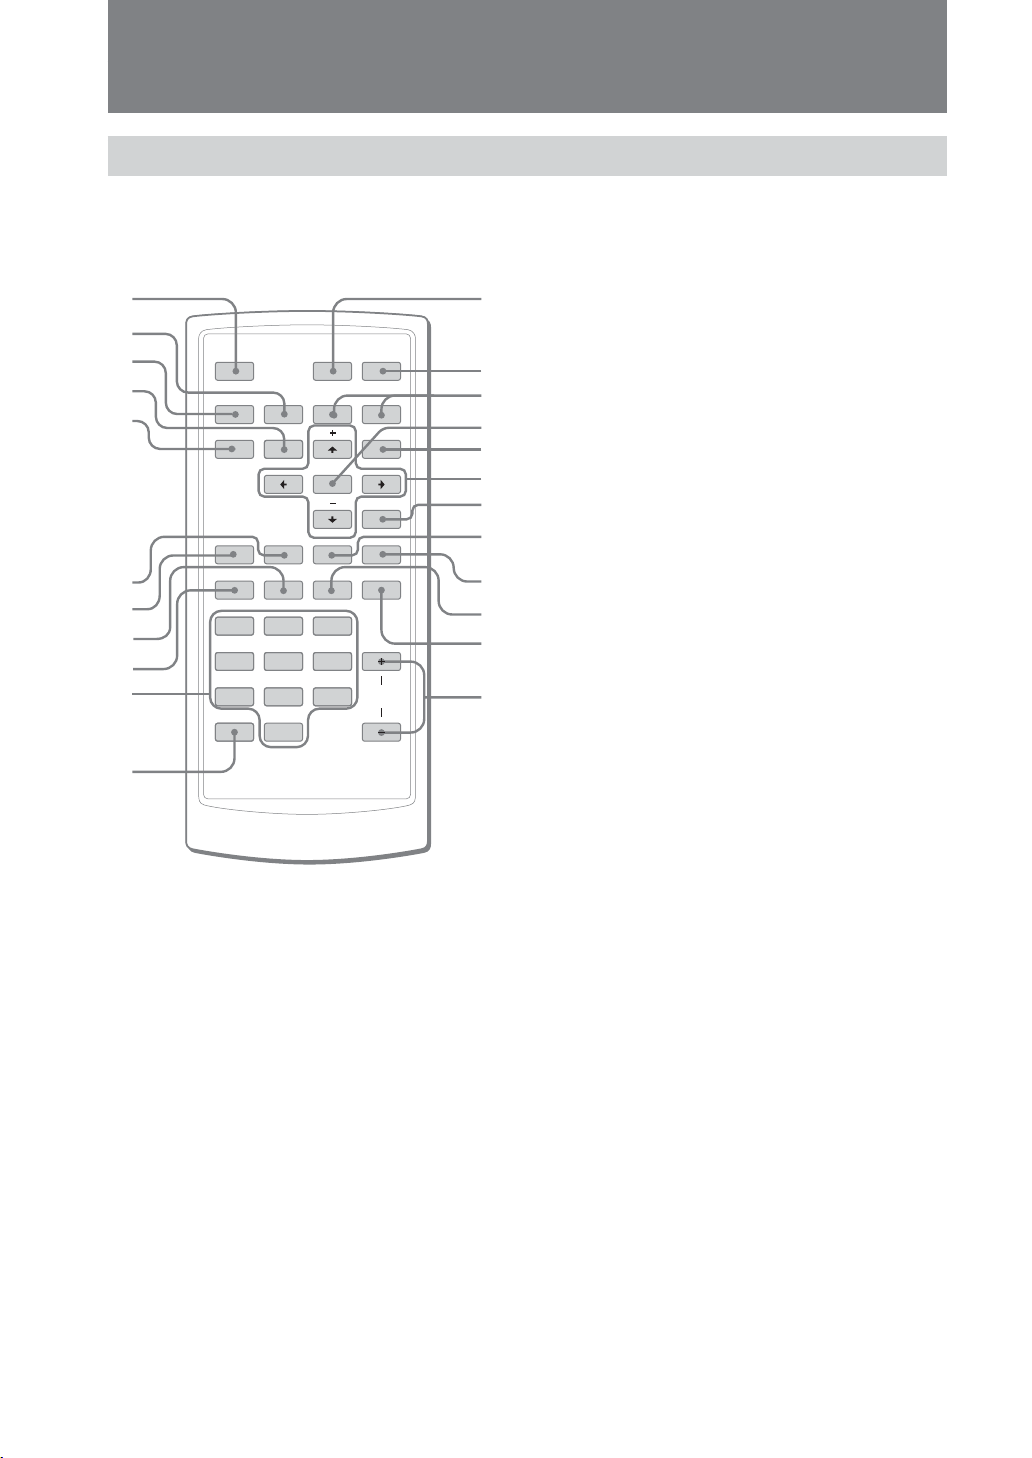
Location of Controls
q
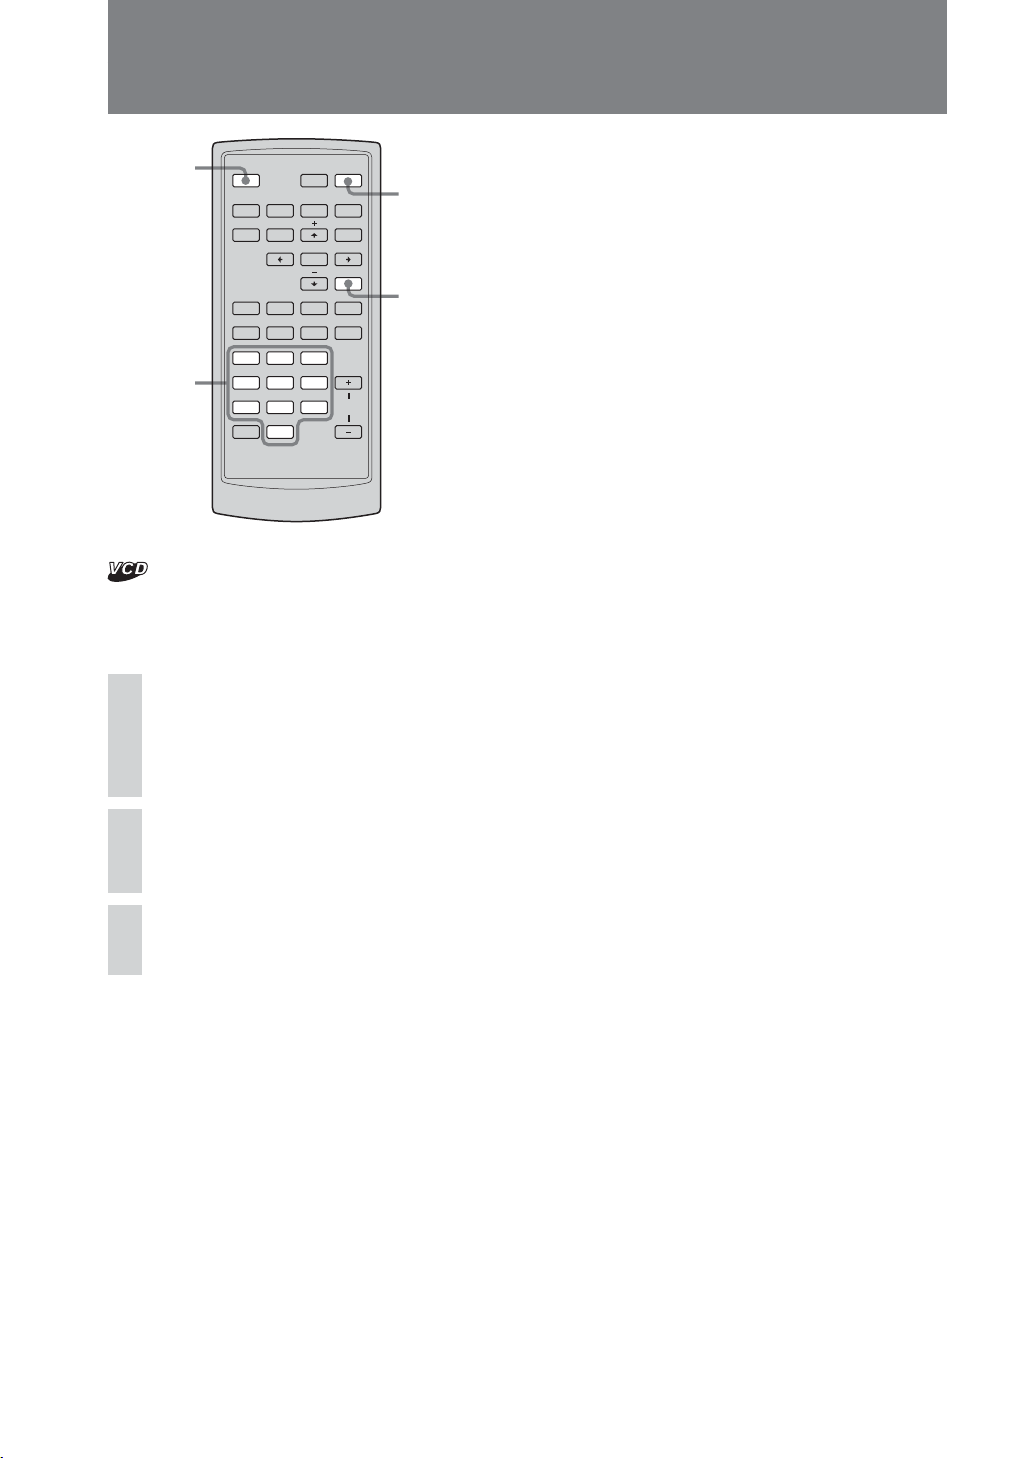
Card remote commander RM-X706
The unit can be operated with the card remote commander. For safety, stop the car before
using the card remote commander, or have a passenger operate it.
qs ATT button
1
2
DVD
3
OFF
ATT
BX
4
5
6
7
8
9
q;
SRC
x
TOP MENU
MODE
SHUF
REP
SEARCH
AUDI O
12
456
789
CLEAR
0
>.
MENU
ENTER
O
EQ7 ZxZ
SUBTITLE ANGLE
3
VOL
qa
Refer to the pages listed for details.
1 OFF button 15, 28
To power off the source.
2 x button 15, 25
To stop the source (VCD/DVD).
3 SRC (SOURCE) button 15, 17, 44
To power on/change the source (CD/DVD/TUNER/
AUX/TV*1).
4 TOP MENU button 27
To display the top menu on a DVD.
5 MODE button 17, 44
To select the radio band (FM/AM)/select AUX/select
TV/select the unit.
6 SHUF button 21
7 REP button 21
8 AUDIO button 30
To change the audio output (VCD/DVD).
9 SEARCH button (VCD*2/DVD) 29
0 Number buttons 27, 28, 29
qa CLEAR button 29
To cancel entered numbers.
s
qd
qf
qg
qh
qj
qk
ql
w;
wa
ws
wd
To attenuate the sound. To cancel, press again.
Turning off the sound temporarily.
When you press the button, the sound is turned off
and “ATT” appears on the display.
To restore the sound, press the button again
(or VOL +/–).
qd DVDu button 15, 25
To start/pause playback.
qf ./> buttons 15, 26
qg ENTER button 27, 28, 29
To complete a setting.
qh MENU button 27
To display a menu on a DVD.
qj </M/m/, buttons 27, 29
To move the cursor, or turn the pages.
qk O (Return) button 28
To return to the previous display, or previous
operation.
ql EQ7 button 23
To select an equalizer type (Xplod, Vocal, Club, Jazz,
New Age, Rock, Custom or Off).
w; ZxZ (Zone x Zone) button 46
To switch the front/rear output.
wa SUBTITLE button 33
To change the subtitle language (DVD).
ws ANGLE button 32
To change the viewing angle (DVD).
wd VOL +/– buttons
To adjust the volume.
*1Only when an optional device is connected.
*2Only when PBC is Off.
Note
If the unit is turned off by pressing OFF for 2 seconds, it
cannot be operated with the card remote commander
unless SOURCE on the unit (3 on page 13) is pressed to
activate the unit first.
Tip
See “Replacing the lithium battery” for details on how to
replace the battery (page 47).
14
Basic Operation
Playing a Disc
Playing DVD/Video CD/Audio CD/MP3/JPEG
Note
Depending on the disc, some operations may be different
or restricted.
Refer to the operating instructions supplied with your
disc.
Open up the monitor (page 9).
1
Insert a disc.
2
Playback starts automatically. (Depending on
the disc, press DVD u to start playback.)
A menu may appear on the screen when a
DVD is inserted.
For details on these menus, see page 27.
To switch from the other sources
1Touch “SOURCE LIST”.
2Touch “CD/DVD”.
On the remote, press (SRC) repeatedly.
Notes
• If a large-size image is rotated, it may take longer to
display.
•A JPEG file is designed to be optimally displayed at 640
x 480 pixels. A file in another size may not be displayed
correctly, or picture shift (to the left or right) may occur.
•Progressive JPEG files cannot be displayed.
When the disc is inserted
Press DVDu on the remote to start
playback.
Tip
When PBC is On, DVD u on the remote may not
function to playback VCD. In such a case, press (ENTER).
To stop playback
Touch x on the monitor (or press x on the
remote).
To turn off the unit
Press OFF on the main unit or remote.
Tip
You cannot insert a disc while the unit is turned off (if
you turn the ignition switch to the off position).
Other operations
To
Pause
Resume play after
pause
Go to the next
chapter, track, or
scene in
continuous play
mode
Go back to the
previous chapter,
track, or scene in
continuous play
mode
Operation on
the monitor
Touch X.
Touch N.
Touch >.
Touch ..
Operation on
the remote
Press DVD u.
Press DVD u.
Press >.
Press ..
15
MP3
Playing a Disc
JPG
To select the track directly
You can select the track directly from the
album/track list on the display.
Touch LIST.
1
The album/track list appears.
Example for MP3
MP3
MP3
SOURCE LIST
Touch the desired track name (or
2
number).
Other operations
To
Go to the next page
Go to the previous page
Go to the next album*
Go to the previous album*
Go to the previous tree*
*1Available only when MP3 tracks are played.
*2Available only when MP3/JPEG files are played.
1
2
Operation on
the monitor
Touch .
Touch .
Touch .
1
Touch .
Touch .
To playback a JPEG disc
Insert a JPEG disc.
1
Touch LIST.
2
Touch the desired file name.
3
Album Root
JPG
JPG
To
Turn the image 90
degree to the left
Turn the image 90
degree to the right
Go to the next image
Go to the previous
image
To set the duration of the slide
show
Touch SLIDE.
1
Operation on
the monitor
Touch .
Touch .
Touch IMAGE+.
Touch IMAGE–.
Operation on
the remote
Press <.
Press ,.
Press >.
Press ..
16
Touch the duration you desire.
2
If you select Off, the slide show is set to off.
Touch SLIDE to close the screen.
3
Watching TV/Listening to the Radio
Watching TV or listening to radio
Preparation: To view TV programmes on this unit, an
optional Sony TV tuner unit XT-V70 must be connected.
Open up the monitor (page 9).
1
Press (SOURCE) or touch the
2
screen.
Select TV or radio function.
3
To select the TV function:
1 Touch “SOURCE LIST”.
To select the desired mode
1Touch the Mode menu box.
2Touch the desired mode.
Watching/listening to other video/audio components
Preparation: Connect other component to this unit.
Open up the monitor (page 9).
1
Press (SOURCE) or touch the
2
screen.
2 Touch “TV”.
To select the radio function:
1 Touch “SOURCE LIST”.
2 Touch “TUNER”.
3 Touch “FM” or “AM”.
On the remote, press (SRC) repeatedly to
select the TV or radio function.
Select a channel.
4
Using auto tuning
Touch SEEK +/– lightly until the desired
channel is received.
If you store the TV channels or radio stations,
see “Storing channels, Radio stations” on
page 42.
Select “AUX”.
3
1 Touch “SOURCE LIST”.
2 Touch “AUX” on the monitor.
On the remote, press (SRC) repeatedly.
To select the connected device
Touch the Mode menu box.
1
Touch the desired mode.
2
Select the desired mode depending on the
connected devices.
On the remote, press (MODE) repeatedly.
17

Player
MP3
About the Source Menu
Use the source menus of this unit to adjust
the various functions and settings for
playback.
The displayed menu differs depending on the
status of the unit. To adjust each setting, see
page 20.
Screen Effect menu (page 20)
SOURCE LIST
Play mode menu (DVD/CD/MP3)
(page 20)
Display menu (page 21)
SOURCE LIST
Note
The items on the source menu, and the operation
procedures differ depending on the disc.
Display items on the CD/MP3 playback
D
B
SOURCE LIST
Equalizer menu (page 23)
SOURCE LIST
MP3
MP3
SOURCE LIST
C
A Elapsed playback time
B Album name*1/Disc name
C Track name
*3
D ID3 tag information
*1 Appears only when MP3 files are played.
*2 CD TEXT only.
*3 MP3/CD TEXT only.
*2
*1
A
18

Using the Source Menu
To scroll the text information
Touch the desired information (B, C or D).
When “A. Scroll” is set to “On”, the text
information scrolls automatically (page 22).
Note
“∗” appears in place of the letters other than the
alphabet and numbers.
Playback order of MP3 files
Root
1
Notes
• The playback order may differ depending on the
writing software.
• The unit can play up to 1,000 tracks and 256 albums.
Tracks beyond the first 1,000 and albums beyond the
first 256 cannot be recognized.
1
2
24
5
3
3
4
5
6
Tips
• If you add numbers (01, 02, 03, etc.) to the front of the
track names, the tracks in each album will be played in
numerical order.
• Since a disc with many trees takes longer to start
playback, it is recommended that you create albums of
no more than two tree levels.
• For details on MP3 files, see “About MP3 files” on
page 49.
19
Using the Source Menu
Use the source menus of this unit to adjust
the various functions and settings for
playback.
The displayed menu differs depending on the
status of the unit.
Screen example
For DVDs:
Repeat Off
SOURCE LIST
Setting the screen
— Wallpaper/Screen Effect
You can set the wallpaper and screen effect.
The following setting options are available.
To close the Screen Effect menu
Touch .
♦Wallpaper
You can select the background picture from
“Wallpaper 1”, “Wallpaper 2”, “Wallpaper 3”
or “Off”. When you select “Off”, the
wallpaper is not set.
•You can set a different wallpaper for each
function.
♦Effect Type
You can select the screen effect from “Type
1”, “Type 2”, “Type 3” or “Off”. When you
select “Off”, the screen effect is not set.
•You can set a different effect type for each
function.
Setting the Play mode
— Play Mode
You can set the Repeat play/Shuffle play.
The following setting options are available.
Wallpaper: select the wallpaper.
Effect Type: select the display effect
combined with wallpaper.
Basic operation
On the monitor
During playback, touch the Screen
1
Effect menu box (
The Screen Effect menu appears.
SOURCE LIST
Touch the desired setting.
2
).
Repeat: repeat a title, chapter, album or track
after the item being played reaches the end.
Shuffle: play tracks in random order.
Repeat Off: play all tracks in the disc
repeatedly (normal play).
Tip
The repeat options differ depending on the disc.
Notes
• The selected play mode is cancelled when the disc
being played is ejected.
• When playing a VCD with the PBC function on,
Repeat/Shuffle play is not available.
• Shuffle play is not available on DVDs.
20
Basic operation
On the monitor
Touch the Play mode menu box.
1
SOURCE LIST
Play mode menu box
The Play mode menu appears.
Touch the desired option.
2
To close the Play mode menu
Touch the Play mode menu box.
VCD (with PBC Off)/Audio CD:
Repeat repeats the current track.
Shuffle to play tracks in random order.
Off normal play.
Tip
The default settings are underlined.
Setting for the Display
— Display
The following setting options are available.
A.(Auto) Scroll: scroll long displayed items
automatically when the track is changed.
Dimmer: adjust the display brightness.
Wide Mode: besides the normal mode (4:3)
the screen can also be set to the full, wide
screen, zoom and cinema mode.
Picture Mode: adjust the picture
characteristics according to the programme
type, picture tone or personal preference.
On the remote
Press (REP) or (SHUF) repeatedly to select
the desired option.
♦Repeat/Shuffle
The unit can repeat a title, chapter, or track
after the item being played reaches the end,
or play titles, chapters or tracks in random
order.
DVD:
Title Repeat repeats the current title.
Chapter Repeat repeats the current chapter.
Off normal play.
MP3:
Repeat repeats the current track.
Shuffle to play tracks in the album in random
order.
Album Repeat repeats the tracks in the current
album.
Off normal play.
Basic operation
On the monitor
During playback, touch DSPL.
1
SOURCE LIST
DSPL
The Display mode menu appears.
Touch the desired item.
2
Touch the desired setting.
3
21
Using the Source Menu
To r eturn to the previous screen
Touch Back on the monitor.
To close the Display mode menu
Touch DSPL.
♦A. Scroll
You can scroll long displayed items
automatically when the track is changed.
A. Scroll On scrolls long displayed items
A. Scroll Off until touch the album/track, never
automatically when the track is
changed.
scroll long displayed items.
Up to 31 characters are displayed.
♦Dimmer
You can adjust the display brightness.
According to the programme type, picture
tone or personal preference.
The following setting options are available.
Dimmer On the display always has the same
Dimmer Auto the display dims according to the
Adjusting the dimmer level
You can store your own settings of the
dimmer level.
On the monitor
During playback, touch DSPL.
1
SOURCE LIST
The Display mode menu appears.
brightness.
illumination lamp of the car.
DSPL
Touch Dimmer.
2
Adjust the level while touching the
3
– or +.
DISC Repeat
SOURCE LIST
,
♦Wide Mode (available with visual
sources)
Besides the normal mode (4:3) the screen can
also be set to full, wide screen, zoom and
cinema mode.
Normal an image with an
Wide an image with an
Zoom an image with an
Cinema an image with an
Full an image with an
aspect ratio of 4 to 3
(regular images).
aspect ratio of 16 to 9.
aspect ratio of 4 to 3
enlarged to the left
and right edges of the
screen, with the
overflowing parts of
the top and bottom
cut off to fill the
screen.
aspect ratio of 4 to 3,
with only the left and
right sides of the
image being enlarged
to fill the screen.
aspect ratio of 4 to 3
enlarged to the left
and right edges of the
screen.
22
♦Picture Mode
You can adjust the picture characteristics
according to the programme type, picture
tone or personal preference.
Standard standard picture and function setting.
Cinema provides a clear picture with a clear
black and white definition.
Dynamic provides beautiful images with
bright, clear colors.
User you can adjust the picture
characteristics and store the setting.
Tip
The default settings are underlined.
Adjusting the custom settings
You can store your own user-adjustable
settings for different picture tones.
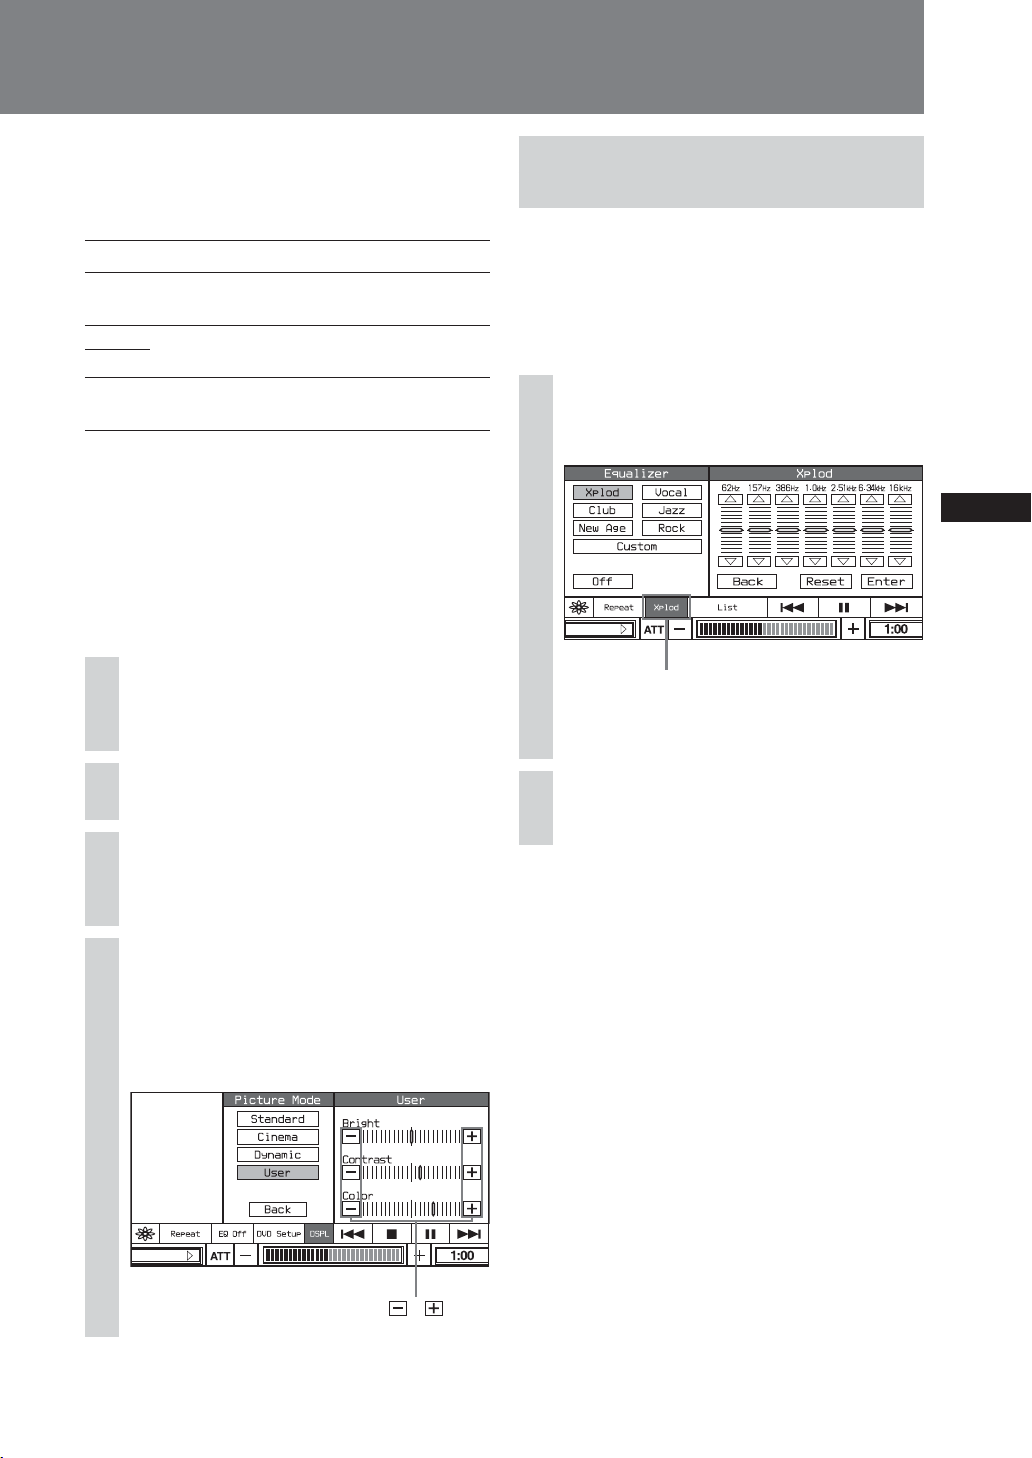
Setting the sound quality
— Equalizer
You can select the sound quality for each
source. Also you can adjust the sound
characteristics and store the setting.
Selecting the sound quality
On the monitor
During playback, touch the
1
Equalizer menu box.
On the monitor
During playback, touch DSPL.
1
The Display mode menu appears.
Touch Picture Mode.
2
Touch User.
3
The setting items appear.
Adjust the level while touching the
4
– or +.
You can also adjust the level by touching the
setting bar.
SOURCE LIST
Equalizer menu box
The Equalizer menu appears.
Touch the desired setting.
2
To close the Equalizer menu
Touch the Equalizer menu box.
Adjusting the custom settings
You can store your own user-adjustable
settings for different sound quality.
On the remote
During playback, press (EQ7)
repeatedly.
Each time you press the button, the Equalizer
changes cyclically.
SOURCE LIST
,
Note
”Color” cannot be set when DVD is selected as a source.
23
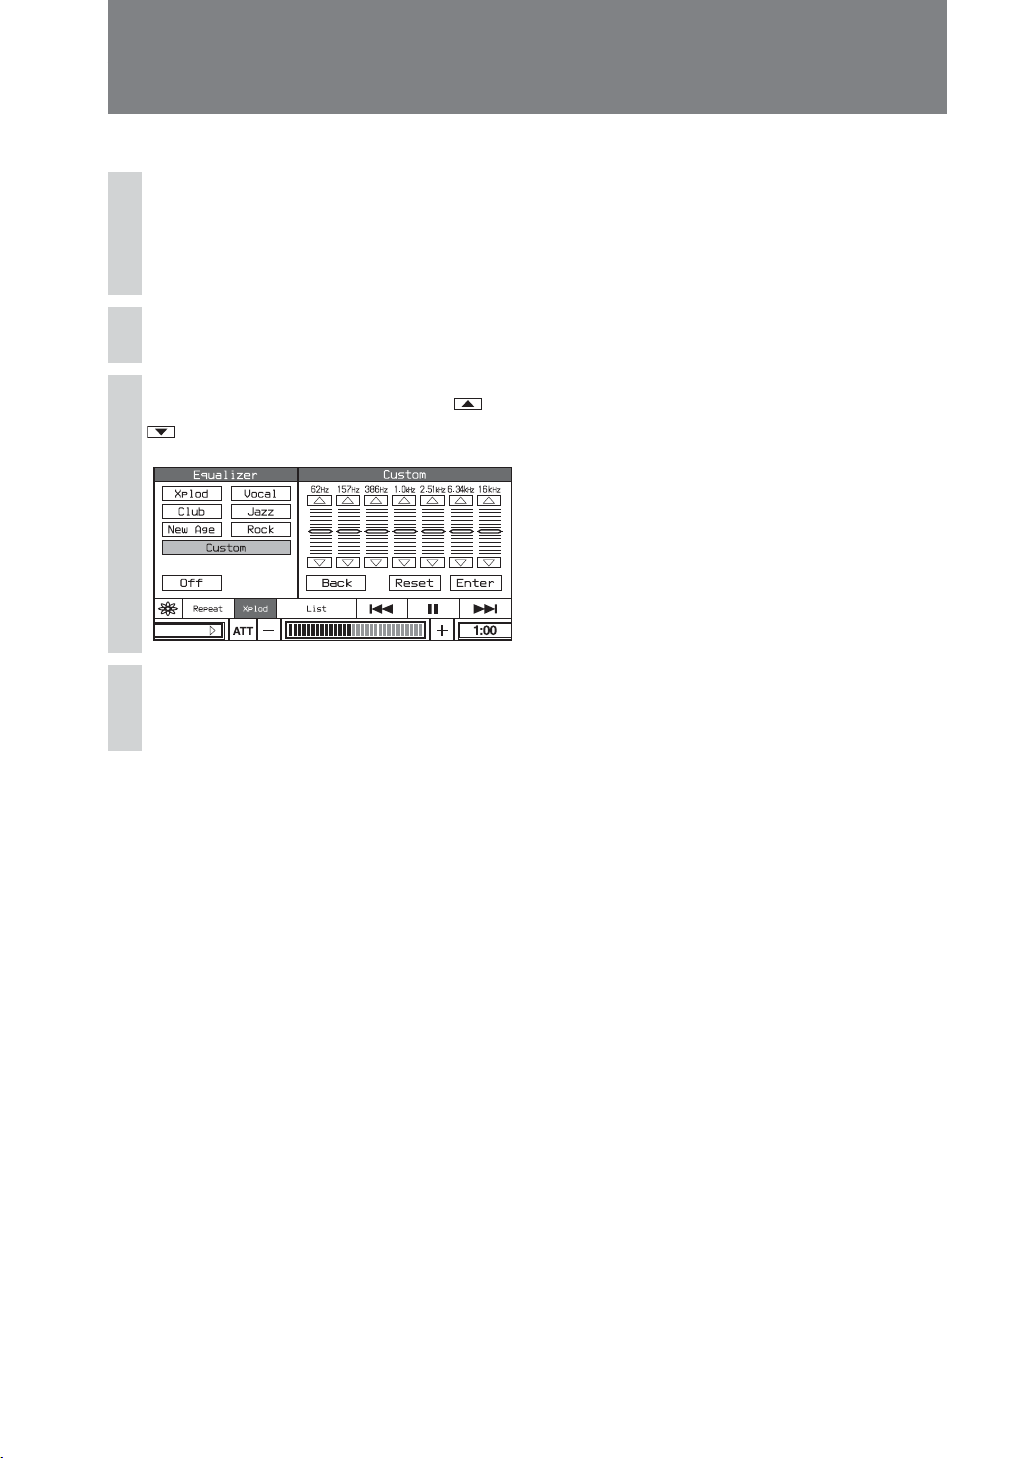
Using the Source Menu
On the monitor
During playback, touch the
1
Equalizer menu box.
The Equalizer menu appears.
Touch the desired setting.
2
Adjust the level touching the or
3
.
SOURCE LIST
Press (ENTER).
4
To reset the setting, touch Reset.
24

Resuming Playback — Resume Play
The unit stores the point where you stopped
playback for up to 10 discs, and starts
Resume playback even after the unit is
turned off, or the disc being played is ejected.
To play from the point you
previously stopped
On the monitor
Touch x during playback.
1
X x appears and playback stops.
Touch N to resume playback.
2
Playback starts from the point you stopped.
On the remote
Press x during playback.
1
X x appears and playback stops.
Press DVD u to resume playback.
2
To play from the beginning
Touch x (press x on the remote) again in
step 1, x appears and the resume playback is
now released. Next time you start playback,
the playback starts from the beginning of the
DVD.
Or, select the desired chapter on the DVD
menu or the Top menu depending on the
disc.
Notes
• Resume play is available only for DVDs.
• When storing a resume point for the 11th disc, the
stored resume point for the 1st disc is cleared
automatically.
• Resume play is cancelled when the setting for the
parental controls is changed.
• Depending on the disc or scene, you cannot use the
resume play.
• If parental control is applied, the resume play will not
work. In this case, playback starts from the beginning
of the disc when it is inserted.
25
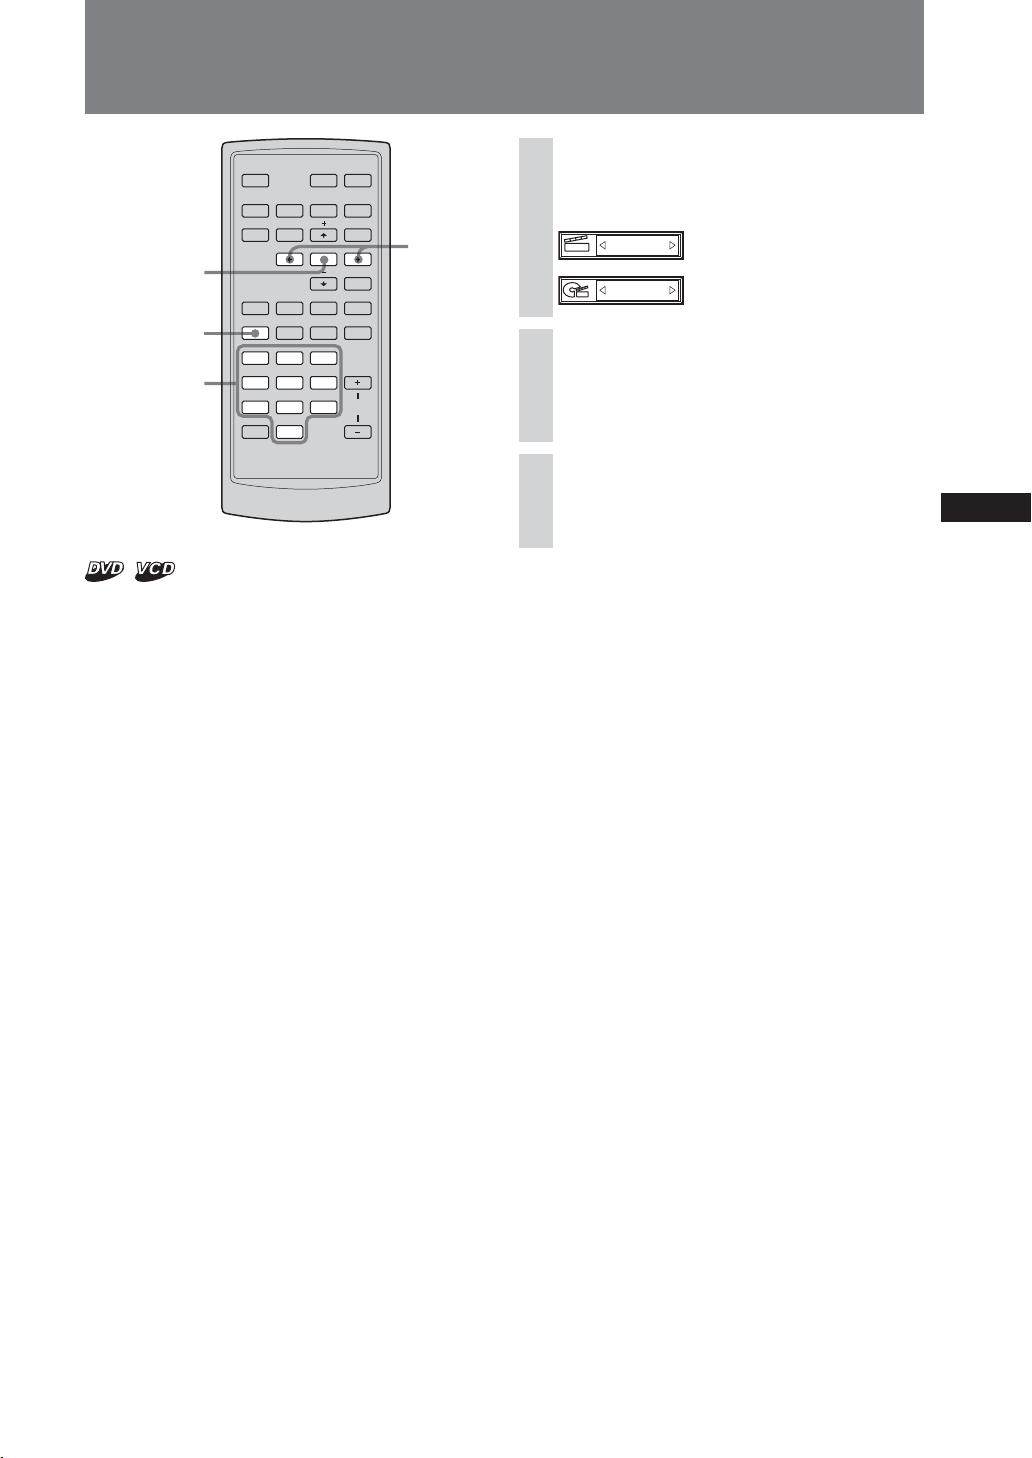
Searching a Specific Point on a Disc — Scan
DVD
x
TOP MENU
ATT
ENTER
BX
>.
MENU
./>
O
OFF
SRC
MODE
SHUF
AUDIO
0
EQ7 ZxZ
SUBTITLE ANGLE
3
VOL
REP
SEARCH
12
456
789
CLEAR
You can quickly locate a specific point on a
disc with monitoring the picture.
During playback, touch and hold ./>
on the monitor (or press and hold ./>
on the remote), and release at the desired
point.
Note
While searching, audio is not output, and subtitles are
not displayed.
26
Using the Menus on DVDs
DVD
TOP MENU
Number
buttons
OFF
SRC
MODE
REP
SEARCH
12
456
789
CLEAR
TOP MENU
SHUF
AUDIO
x
0
ATT
MENU
ENTER
EQ7 ZxZ
SUBTITLE ANGLE
3
BX
>.
VOL
MENU
B/V/v/b
O
ENTER
With some DVDs, you can use their original
menu(s), such as the Top menu or DVD
menu.
If the DVD contains several titles of tracks
and scenes, you can use the Top menu to
select the desired title, and start playing.
If the DVD contains more comprehensive
menu items, such as audio and subtitle
languages, titles, chapters, etc., you can use
the DVD menu to select the desired item, and
start playing.
On the remote
During DVD playback, press
1
(TOP MENU) or (MENU).
Press M/m/</,, or the number
2
buttons to select the desired item,
then press (ENTER).
Note
The items on the menu, and the operation procedures
differ depending on the DVD.
On the monitor
During playback, touch TOP MENU
1
or MENU.
The DVD menu or Top menu appears.
The contents of the menu differ depending on
the DVD.
Touch CURSOR.
2
The cursor box appears.
Touch v/V/b/B to select the
3
desired item, then touch Enter.
To move the position of the cursor box, touch
the position where you want to move the
cursor.
To close the cursor box, touch CLOSE.
27
Using PBC Functions — PBC (Playback control)
Notes
DVD
TOP MENU
SHUF
AUDIO
x
0
ATT
MENU
ENTER
EQ7 ZxZ
SUBTITLE ANGLE
3
BX
>.
DVD BX
O
O
VOL
OFF
Number
buttons
OFF
SRC
MODE
REP
SEARCH
12
456
789
CLEAR
The PBC menu assists your operation
interactively while a PBC compatible VCD is
played.
• The items on the menu, and the operation procedures
differ depending on the disc.
• During PBC playback, the track number, playback
time, etc., are not displayed.
• Repeat play and Shuffle play are not available during
PBC playback.
Tip
To resume PBC playback, stop playback by pressing
(OFF), then press DVD u. PBC playback starts.
Start playing a PBC compatible
1
VCD.
The PBC menu appears.
Press the number buttons to select
2
the desired item.
Follow the instructions in the
3
menu for interactive operations.
To return to the previous menu
Press O.
28
Starting Playback from a Selected Point
— Search Play
DVD
x
TOP MENU
SHUF
AUDIO
0
ATT
BX
>.
MENU
ENTER
EQ7 ZxZ
SUBTITLE ANGLE
3
VOL
B/b
O
ENTER
SEARCH
Number
buttons
OFF
SRC
MODE
REP
SEARCH
12
456
789
CLEAR
(with PBC Off)
You can quickly locate a desired point by
specifying the title, chapter or track.
The following search options are available
depending on the disc:
DVD:
•Title: starts playing from the selected title.
• Chapter: starts playing from the selected
chapter.
During playback, press (SEARCH)
1
repeatedly on the remote.
3/12
: Chapter search
1/2
: Title search
Press < or ,, or the number
2
buttons to select the desired
chapter or title.
Press (ENTER).
3
Playback starts from the selected point.
To turn off the Play mode menu
Press (SEARCH).
29
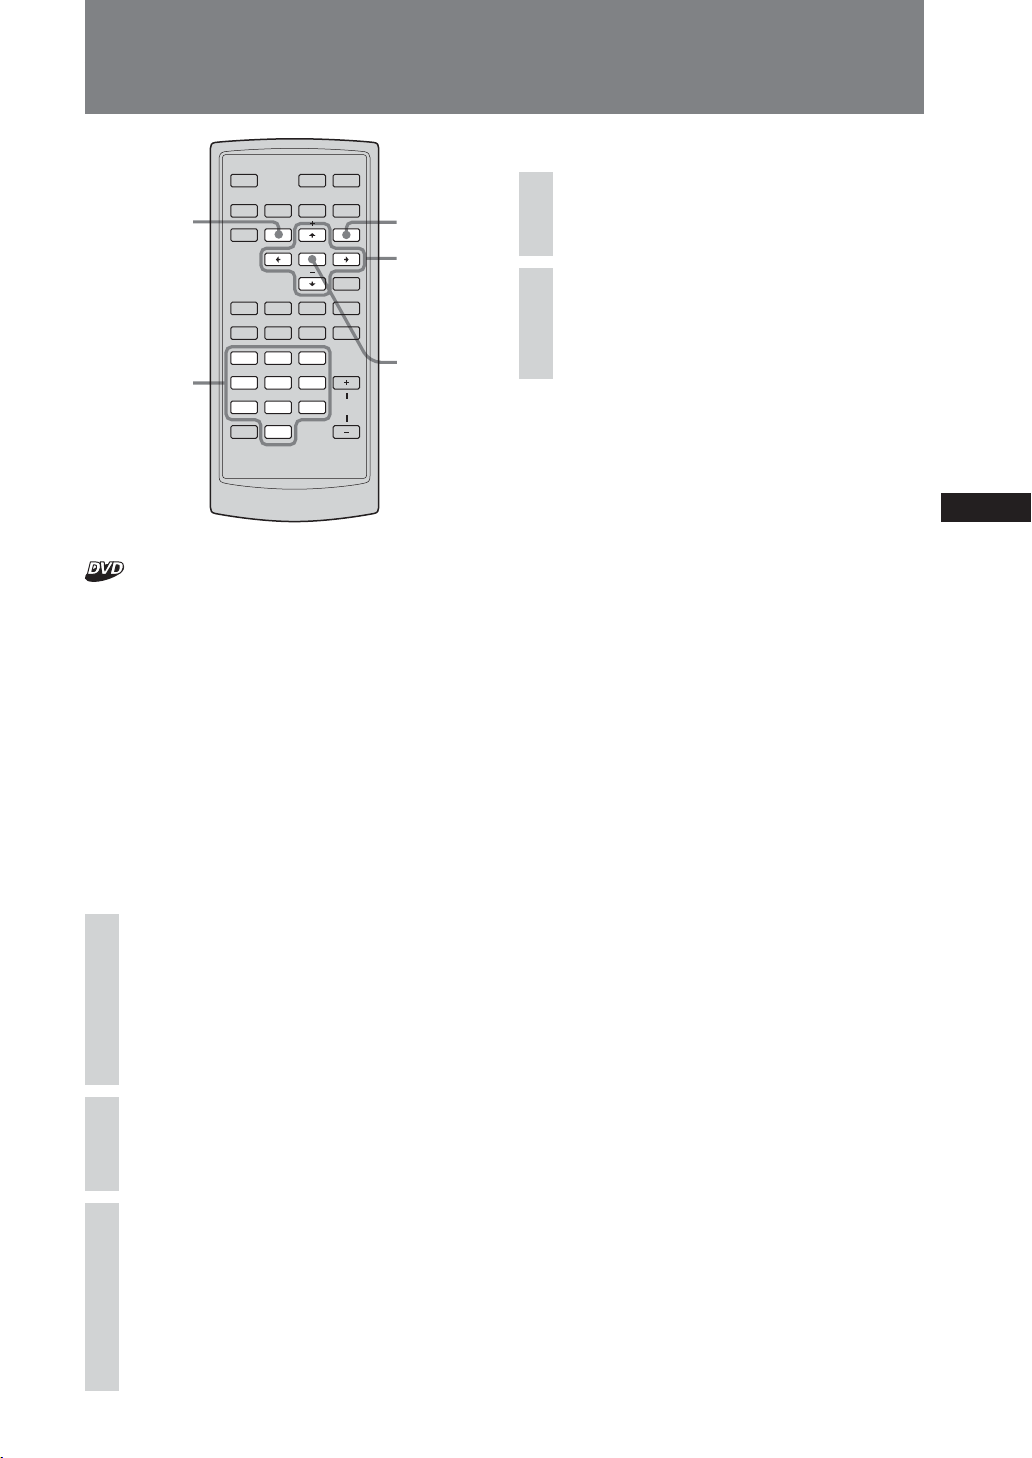
Various DVD Operations
Changing the Audio Channels
DVD
x
TOP MENU
SHUF
AUDIO
0
ATT
MENU
ENTER
EQ7 ZxZ
SUBTITLE ANGLE
3
BX
>.
O
VOL
AUDIO
OFF
SRC
MODE
REP
SEARCH
12
456
789
CLEAR
When playing a DVD recorded in multiple
audio formats (PCM, Dolby Digital, or DTS),
you can change the audio format. If the DVD
is recorded with multilingual tracks, you can
also change the language.
With VCDs, you can select sound from the
right or left channel and listen to the sound of
the selected channel through both the right
and left speakers. For example, when playing
a disc containing a song with the vocals on
the right channel and the instruments on the
left channel, you can hear the instruments
from both speakers by selecting the left
channel.
On the monitor
DVD:
The audio language switches among the
available languages.
When 4 digits appear, input the language
code corresponding to the desired language
(page 57).
When the same language is displayed two or
more times, the DVD is recorded in multiple
audio formats.
VCD:
During playback, touch the Audio
1
channel box.
The audio channel menu appears.
Stereo/MONO
MONO/L
MONO/R
Stereo
SOURCE LIST
Touch the desired item.
2
MONO/L: Left channel sound (monaural)
MONO/R: Right channel sound (monaural)
Stereo*: Standard stereo sound
* The default setting
To turn off the Audio channel
menu
Touch the Audio channel box.
30
During playback, touch AUDIO
1
repeatedly.
The audio channel menu appears.
If the disc does not contain multiple audio
formats,
appears.
On the remote
During playback, press (AUDIO) repeatedly
to select the desired audio channels.
Tip
You can also change the settings by selecting “AUDIO”
on the display.
 Loading...