

Page 1
Changer Control
Audio Master
Operating Instructions
Owner’s Record
The model and serial numbers are located on the bottom of the unit.
Record the serial number in the space provided below.
Refer to these numbers whenever you call upon your Sony dealer
regarding this product.
Model No. WX-C55 Serial No.
For installation and connections, see the supplied installation/connections
manual.
US
WX-C55
1999 by Sony Corporation
Page 2

Warning
Welcome !
This equipment has been tested and found to
comply with the limits for a Class B digital
device, pursuant to Part 15 of the FCC Rules.
These limits are designed to provide
reasonable protection against harmful
interference in a residential installation. This
equipment generates, uses, and can radiate
radio frequency energy and, if not installed
and used in accordance with the instructions,
may cause harmful interference to radio
communications. However, there is no
guarantee that interference will not occur in a
particular installation. If this equipment does
cause harmful interference to radio or
television reception, which can be determined
by turning the equipment off and on, the user
is encouraged to try to correct the interference
by one or more of the following measures:
− Reorient or relocate the receiving antenna.
− Increase the separation between the
equipment and receiver.
− Connect the equipment into an outlet on a
circuit different from that to which the
receiver is connected.
− Consult the dealer or an experienced radio/
TV technician for help.
You are cautioned that any changes or
modifications not expressly approved in this
manual could void your authority to operate
this equipment.
Thank you for purchasing the Sony Changer
Control Audio Master. This unit lets you enjoy
a variety of features as well as an optional
rotary commander.
In addition to the CD playback, tape playback
and radio operations, you can expand your
system by connecting an optional MD/CD
unit*.
* You can connect a CD changer, an MD changer, a
CD player and an MD player.
CAUTION
The use of optical instruments with this
product will increase eye hazard.
2
Page 3

Table of Contents
This Unit Only
Location of controls ................................................. 4
Getting Started
Resetting the unit ................................................ 6
Using the dummy cover .................................... 6
Setting the clock .................................................. 6
CD Player
Listening to a CD ................................................ 7
Playing a CD in various modes ........................ 8
Cassette Player
Listening to a tape ............................................... 8
Playing a tape in various modes ....................... 9
Radio
Memorizing stations automatically
— Best Tuning Memory (BTM) ................. 10
Memorizing only the desired stations ........... 10
Receiving the memorized stations ................. 10
Other Functions
The rotary commander labels ......................... 11
Using the rotary commander .......................... 12
Adjusting the sound characteristics ............... 13
Changing the sound and beep tone ............... 14
Selecting the spectrum analyzer ..................... 14
With Optional Equipment
CD/MD unit
Playing a CD or MD ......................................... 15
Playing tracks repeatedly
— Repeat Play .............................................. 15
Playing tracks in random order
— Shuffle Play ............................................. 16
Additional Information
Precautions......................................................... 16
Maintenance....................................................... 18
Specifications ..................................................... 19
Troubleshooting guide ..................................... 20
3
Page 4
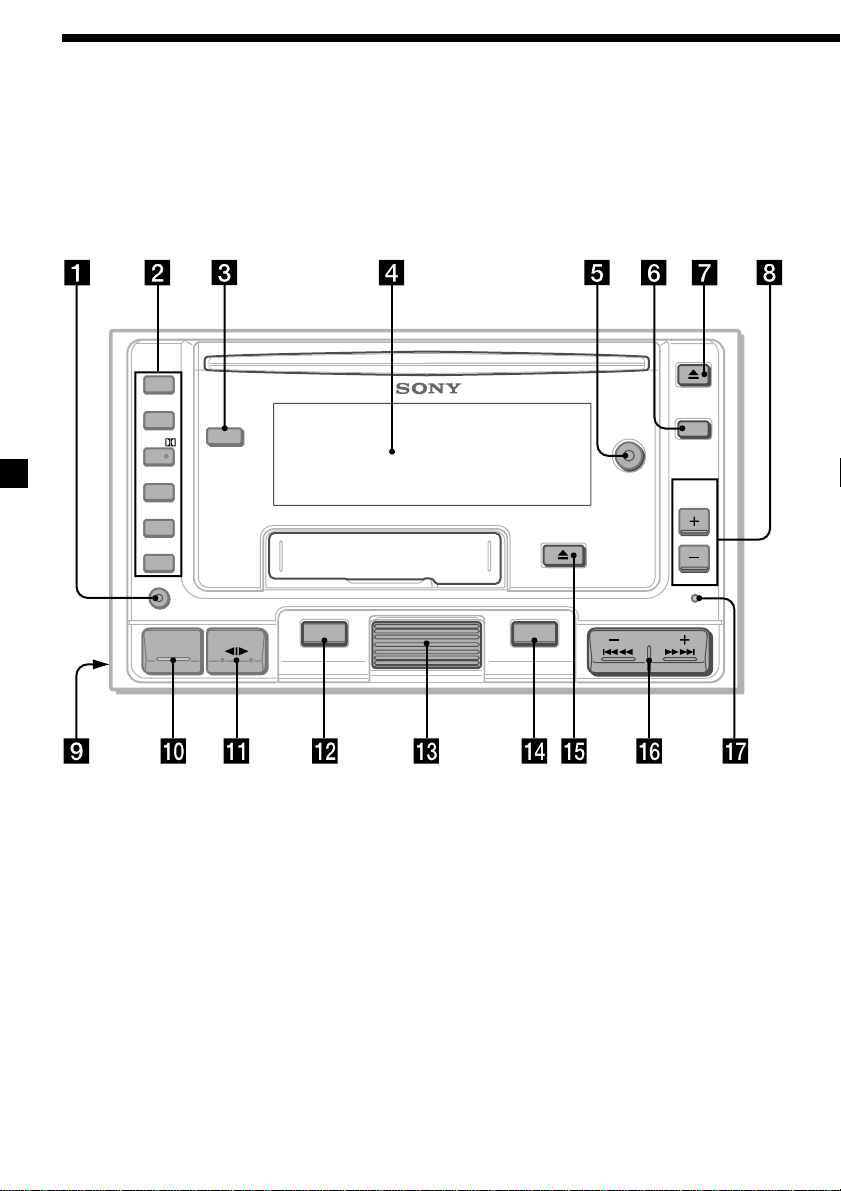
Location of controls
1
REPEAT
2
SHUF/
3
METAL
4
ATA
5
BL SKIP
6
SENS
BTM
SOURCE
SA
MODE
DSPL
SOUND
TAPE
D-BASS
SEEK/AMS
CD
OFF
PRESET/
DISC
4
Page 5

Refer to the pages for details.
1 SENS/BTM (sensitivity adjust/best
tuning memory) button 10, 11
2 During tuner reception:
Preset number buttons 10
During tape/CD/MD playback:
(2) REPEAT button 8, 9, 15
(3) SHUF/; (Shuffle/Dolby) button
8, 9, 16
(4) METAL button 9
(5) ATA (Automatic Tuner Activation)
button 9
(6) BL SKIP (Blank Skip) button 9
3 SA (Spectrum Analyzer) button 14
4 Display window
5 D-BASS button 14
6 OFF button 7, 8
7 CD Z (eject) button 7
8 PRESET/DISC button
During radio reception:
Preset station search 11
During CD/MD playback:
Disc select 15
9 POWER SELECT switch (located on the
left side of the unit)
See “POWER SELECT Switch” in the
Installation/Connections manual.
0 SOURCE (source select) button 7, 8, 10,
15
qa MODE/o (band/unit select/tape
transport direction change) button
8, 10, 15
qs DSPL (display mode change) button
6, 7, 9, 11, 15
qd Jog roller (volume/bass/treble/balance/
fader) 6, 13
Jog roller usually functions as a volume
control except in some adjusting modes.
qf SOUND button 6, 13
qg TAPE Z (eject) button 8
qh SEEK/AMS (seek/Automatic Music
Sensor/manual search) button 8, 9, 10,
11, 15
qj Reset button 6
When the positions of switch 9 has been
changed, be sure to press the reset button after
connecting power.
5
Page 6

Getting Started
Resetting the unit
Before operating the unit for the first time or
after replacing the car battery, you must reset
the unit.
Press the reset button with a pointed object,
such as a ball-point pen.
SEEK/AMS
CD
OFFD-BASS
PRESET/
DISC
SHUF/
BL SKIP
REPEAT
METAL
SENS
BTM
1
2
3
4
ATA
5
6
SOURCE
SA
TAPE
DSPL
MODE
SOUND
Setting the clock
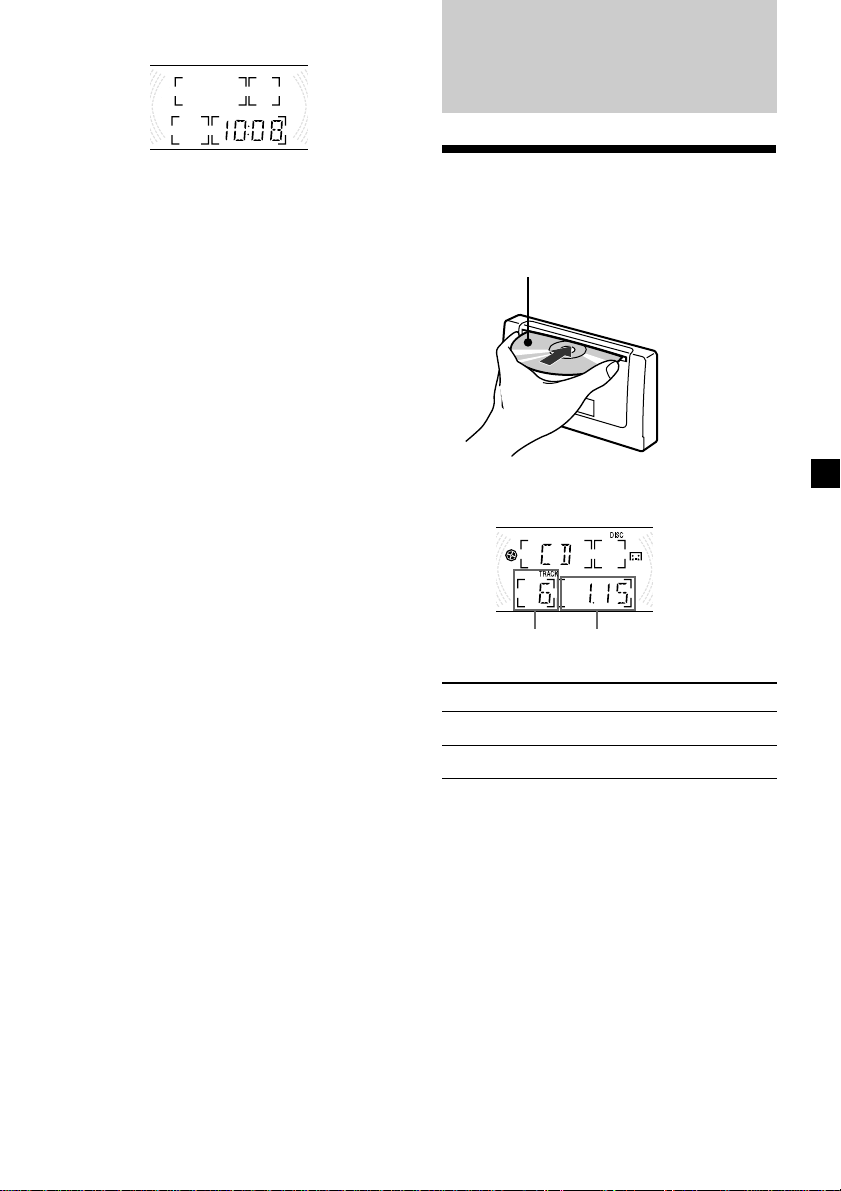
The clock uses a 12-hour digital indication.
Example: Set the clock to 10:08
1 Press (DSPL) for two seconds.
The hour digit flashes.
1 Set the hour.
To go forward
To go backward
Notes
Reset button
• Pressing the reset button will erase the clock and
some memorized functions.
• When you connect the power supply cord to the
unit or reset the unit, wait for about 10 seconds
before you insert a disc. If you insert a disc
within these 10 seconds, the unit will not be
reset, and you will have to press the reset button
again.
Using the dummy cover
To deter theft of this unit, use the dummy
ashtray cover when not using your car.
Note
If the unit does not extend 6 mm (
dashboard, you may not be able to use the decoy
cover.
1
/4 in.) from the
2 Press (SOUND).
The minutes digits flash.
3 Set the minute.
To go forward
To go backward
6
Page 7
2 Press (DSPL).
CD Player
The clock starts.
Note
If the POWER SELECT switch on the left side of the
unit is set to the B position, turn the power on
first by pressing (SOURCE), then set the clock.
Listening to a CD
Simply insert the CD.
Playback starts automatically.
Labelled side up
If a CD is already inserted, press (SOURCE)
repeatedly until “CD” appears.
Track number
To Press
Stop playback (OFF)
Elapsed playing
time
Eject the CD CD Z
Note
If you leave the disc in the insertion slot for more
than 15 seconds after pressing CD Z, the disc will
reinsert automatically to protect the disc.
Changing the display item
Each time you press (DSPL), the item changes
as follows:
Track number/Elapsed playing time y Clock
7
Page 8
Locating a specific track
— Automatic Music Sensor (AMS)
During playback, press either side of
(SEEK/AMS) momentarily.
SEEK/AMS
To locate preceding
tracks
To locate succeeding
tracks
Locating a specific point in a track
— Manual Search
During playback, press and hold either
side of (SEEK/AMS). Release the button
when you have found the desired point.
SEEK/AMS
To search forwardTo search backward
Note
If “
that means you have reached the beginning or the
end of the disc and you cannot go any further.
” or “ ” appears in the display,
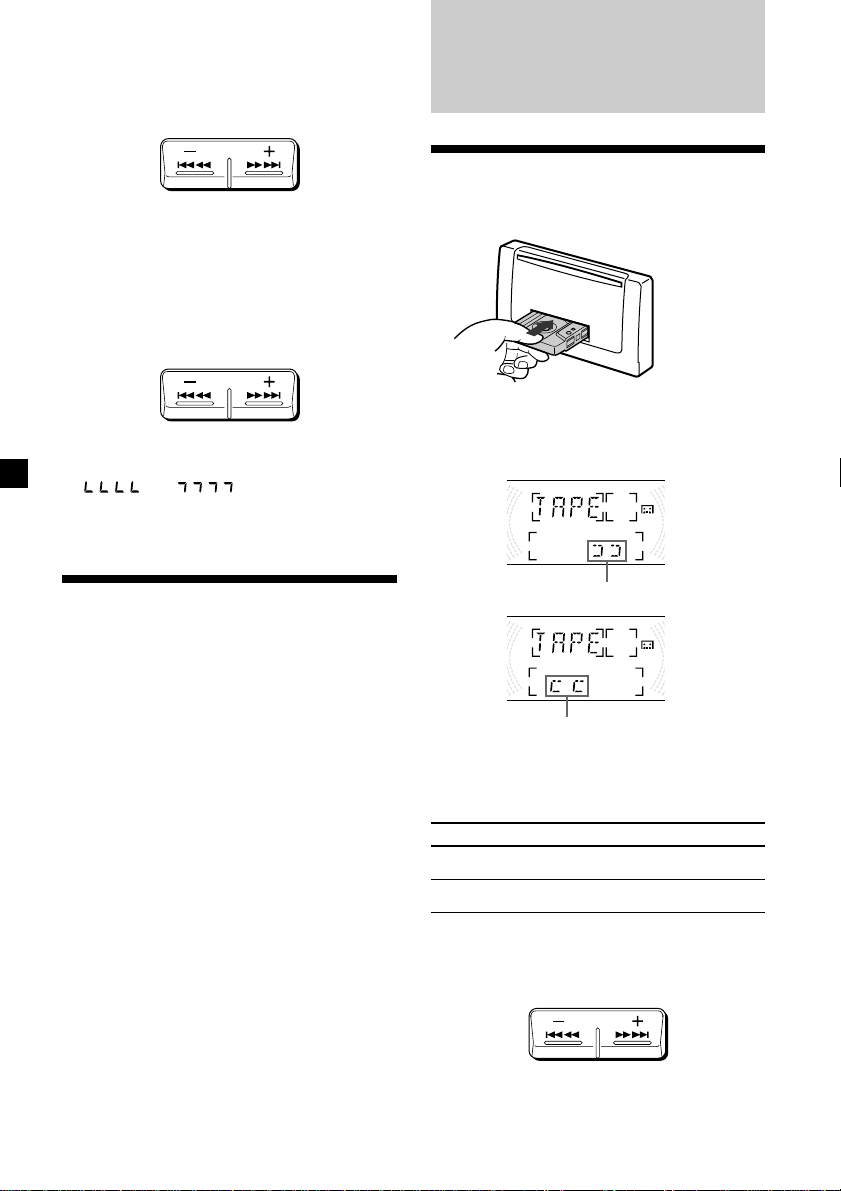
Cassette Player
Listening to a tape
Insert a cassette.
Playback starts automatically.
If a cassette is already inserted, press
(SOURCE) until “TAPE” appears.
Playing a CD in various
modes
You can play CDs in various modes:
•REP (Repeat Play) repeats the current track.
•SHUF (Shuffle Play) plays all the tracks in
random order.
Playing tracks repeatedly
— Repeat Play
Press (2) (REPEAT) during playback.
“REP 1” appears on the display and repeat
play starts.
To return to the normal playback mode, press
(2) (REPEAT) again.
Playing tracks in random order
— Shuffle Play
Press (3) (SHUF/;) during playback.
“SHUF 1” appears on the display and
shuffle play starts.
To return to the normal playback mode, press
(3) (SHUF/;) again.
8
The side facing up is played.
The side facing down is played.
Tip
To change the tape transport direction, press
(MODE) (o) during tape playback.
To Press
Stop playback (OFF)
Eject the cassette TAPE Z
Fast-winding the tape
During playback, press and hold either
side of (SEEK/AMS) for two seconds.
SEEK/AMS
Fast-forwardRewind
To start playback during fast-forwarding or
rewinding, press (MODE) (o).
Page 9

Locating the beginning of a track
— Automatic Music Sensor (AMS)
During playback, press either side of
(SEEK/AMS) momentarily.
SEEK/AMS
Playing a track repeatedly
— Repeat play
Press (2) (REPEAT) during playback.
“REP” appears on the display and repeat
play starts.
To return to the normal playback mode, press
(2) (REPEAT) again.
To locate
preceding tracks
Note
The AMS function may not work when :
— the blanks between tracks are shorter than four
seconds.
— there is noise between tracks.
— there are long sections of low volume or quiet
sections.
To locate
succeeding tracks
Changing the displayed items
Each time you press (DSPL) during tape
playback, the display changes as follows:
B Tape playback B Clock B Frequency*
* While the ATA function is activated.
Playing a tape in various
modes
You can play the tape in various modes:
•REPEAT (Repeat Play) repeats the current
track.
•; (Dolby NR) lets you select the Dolby* NR
B system.
•METAL plays CrO2 or metal tape.
•ATA (Automatic Tuner Activation) turns on
the tuner automatically while fast-winding
the tape.
•BL SKIP (Blank Skip) skips blanks longer
than eight seconds.
* Dolby noise reduction manufactured under
license from Dolby Laboratories Licensing
Corporation. “DOLBY” and the double-D symbol
; are trademarks of Dolby Laboratories
Licensing Corporation.
Playing a tape recorded in the
Dolby B NR system
Press (3) (SHUF/;) during playback.
“;” appears on the display.
To return to the normal playback mode, press
(3) (SHUF/;) again.
Playing a CrO2 or metal tape
Press (4) (METAL) during playback.
“MTL” appears on the display.
To return to the normal playback mode, press
(4) (METAL) again.
Switching to the radio while fastwinding a tape
— Automatic Tuner Activation (ATA)
Press (5) (ATA) during playback.
“ATA” appears on the display.
To return to the normal playback mode, press
(5) (ATA) again.
Skipping blanks during tape
playback — Blank skip
Press (6) (BL SKIP) during playback.
“BL SKIP” appears on the display.
To return to the normal playback mode, press
(6) (BL SKIP) again.
9
Page 10

Radio
Memorizing stations
automatically
— Best Tuning Memory (BTM)
The unit selects the stations with the strongest
signals and memorizes them in the order of
their frequencies. You can store up to 6 stations
on each band (FM1, FM2, AM1, and AM2).
Caution
When tuning in stations while driving, use
Best Tuning Memory to prevent accidents.
1 Press (SOURCE) repeatedly to select the
tuner.
Each time you press (SOURCE), the source
changes as follows:
B CD B TAPE B TUNER
2 Press (MODE) repeatedly to select the
band.
Each time you press (MODE), the band
changes as follows:
B FM1 B FM2 B AM1 B AM2
Memorizing only the
desired stations
You can store up to 6 stations on each band in
the order of your choice.
1 Press (SOURCE) repeatedly to select the
tuner.
2 Press (MODE) repeatedly to select the
band (FM1, FM2, AM1, or AM2).
3 Press either side of (SEEK/AMS) to tune
in the station you want to store on the
number button.
4 Press and hold the desired number
button ((1) to (6)) until “PRESET”
appears.
The number button indication appears in
the display.
Note
If you try to store another station on the same
number button, the previously stored station will
be erased.
Receiving the memorized
stations
3 Press (SENS/BTM) for two seconds.
The unit stores stations in the order of their
frequencies on the number buttons.
A beep sounds when the setting is stored.
Notes
• The unit does not store stations with weak
signals. If only a few stations are received, some
number buttons will retain their former setting.
• When a number is indicated in the display, the
unit starts storing stations from the one currently
displayed.
10
1 Press (SOURCE) repeatedly to select the
tuner.
2 Press (MODE) repeatedly to select the
band (FM1, FM2, AM1, or AM2).
3 Press the number button ((1) to (6))
momentarily where the desired station is
stored.
If you cannot tune in a preset
station
Press either side of (SEEK/AMS)
momentarily to search for the station
(automatic tuning).
Scanning stops when the unit receives a
station. Press either side of (SEEK/AMS)
repeatedly until the desired station is
received.
Page 11

Note
If the automatic tuning stops too frequently, press
(SENS/BTM) to light up “LCL” on the display (local
seek mode). Only the stations with relatively
strong signals will be tuned in.
Tips
• If you know the frequency of the station you
want to listen to, press and hold either side of
(SEEK/AMS) until the desired frequency appears
(manual tuning).
• You can also select the preset stations by
pressing PRESET/DISC
or .
If FM stereo reception is poor
— Monaural Mode
Press (SENS/BTM) repeatedly until
“MONO” appears.
The sound improves, but becomes
monaural (“ST” disappears).
To return to the normal mode, press
(SENS/BTM) again until “MONO” disappears.
Other Functions
The rotary commander
labels
You can control this unit with the optional
rotary commander (RM-X4S).
Some labels are supplied with the rotary
commander. Attach labels to match the
functions of the master unit according to the
position of the rotary commander.
When you mount the rotary commander,
attach the label as in the illustration below.
Changing the display item
Each time you press (DSPL), the items changes
as follows:
Frequency y Clock
MODE
SOUND
DSPL
ND
U
O
S
E
D
O
M
SPL
D
11
Page 12

Using the rotary
commander
The rotary commander works by pressing
buttons and/or rotating controls.
You can control an optional CD/MD unit by
the rotary commander.
By pressing buttons (the SOURCE
and the MODE buttons)
(SOURCE)
(MODE)
Every time you press (SOURCE), the
source changes as follows:
B TUNER B CD B MD B TAPE
Pressing (MODE) changes the operation
in the following ways:
• Tuner: FM1 t FM2 t AM1 t AM2
• CD unit: CD1 t CD2 t ...
• MD unit: MD1 t MD2 t ...
• Tape: tape transport direction
Tip
You can turn on this unit by pressing (SOURCE) on
the rotary commander.
By rotating the control (the SEEK/
AMS control)
Rotate the control momentarily and
release it to:
•Locate the beginnings of tracks on the
tape. Rotate and hold the control, then
release it to fast-wind the tape.
•Locate a specific track on a disc. Rotate
and hold the control until you locate the
specific point in a track, then release it to
start playback.
•Tune in stations automatically. Rotate
and hold the control to tune in a specific
station.
By pushing in and rotating the
control (the PRESET/DISC control)
Push in and rotate the control to:
•Receive the stations memorized on the
preset buttons.
•Change the disc.
12
Page 13

Other operations
Rotate the VOL control
to adjust the volume.
Press (ATT) to
attenuate the
sound.
OFF
Press (OFF) to
turn off the unit.
Press (SOUND)
to select the
volume and
adjust the sound
characteristics.
Press (DSPL) to change
the display items.
Changing the operative direction
The operative direction of controls is factoryset as in the illustration below.
To increase
Adjusting the sound
characteristics
1 Select the item you want to adjust by
pressing (SOUND) repeatedly.
Each time you press (SOUND), the item
changes as follows:
B VOL B BAS B TRE
(volume) (bass) (treble)
FAD b BAL b
(front-rear) (left-right)
2 Adjust the selected item by rotating the
jog roller.
Adjust within three seconds after selecting.
(After three seconds the jog roller will again
serve as the volume control.)
To decrease
If you need to mount the rotary commander on
the right side of the steering column, you can
reverse the control’s operative direction.
Press (SOUND) for two seconds while
pushing in the VOL control.
13
Page 14

Changing the sound and
beep tone
Selecting the spectrum
analyzer
Boosting the bass sound — D-Bass
You can enjoy clear and powerful bass sounds.
The D-bass function boosts the low frequency
signal with a sharper curve than conventional
bass boost.
You can hear the bass line more clearly even if
the vocal sound is the same volume. You can
emphasize and adjust the bass sound easily.
D-BASS 3
Level
0dB
D-BASS 2
D-BASS 1
Frequency (Hz)
Adjusting the bass curve
Press (D-BASS) repeatedly to select the
desired bass curve.
Each time you press (D-BASS), the bass
curve changes as follows:
B D-BASS 1 B D-BASS 2 B D-BASS 3
No display (Cancel) b
As the D-BASS number increases so does
the effect.
To cancel the effect, press (D-BASS)
repeatedly until “D-BASS” disappears.
The sound signal level is displayed on a
spectrum analyzer. You can select from 8
display patterns .
During playback, press (SA) to select a
desired setting.
Each time you press (SA), the setting
changes as follows:
B SA–1 B SA–2 B SA–3
SA* b SA–8 b … b
* Patterns SA-1to SA-8 appear for 10 seconds
each in sequence.
Adjusting the spectrum analyzer
level
You can select from three spectrum analyzer
levels.
During playback, press (SA) for two
seconds.
Each time you press and hold (SA) for two
seconds, the displayed item changes as
follows:
B L–1 B L–2* B L–3
* Factory pre-setting
Note
The bass sound may distort at same volume. If the
bass sound distorts, select less effective bass curve.
Turning off the beep tone
Press (6) while pressing (SOUND).
To obtain the beep tone again, press these
buttons once more.
14
Page 15

With Optional Equipment
CD/MD unit
You can control two CD or MD units with this
unit.
Locating a specific point in a track
— Manual Search
During playback, press and hold either
side of (SEEK/AMS). Release the button
when you have found the desired point.
SEEK/AMS
Playing a CD or MD
1 Press (SOURCE) repeatedly until “CD” or
“MD” appears.
2 Press (MODE) repeatedly to select the
desired CD/MD changer.
CD/MD playback starts.
When a CD/MD unit is connected, all the
tracks play from the beginning.
Switching to other discs
During playback, press PRESET/DISC
or .
PRESET/
DISC
To advance to the next disc
To return to the previous disc
Changing the display item
Each time you press (DSPL) during CD or MD
playback, the item changes as follows:
Track number/Elapsed playing time
Disc number/
Y
Clock
To search forwardTo search backward
Playing tracks repeatedly
— Repeat Play
You can select:
•REP 1 to repeat a track.
•REP 2 to repeat a disc.
•REP 3 to repeat all the discs in the current
unit.
During playback, press (2) (REPEAT)
repeatedly until the desired setting
appears.
B REP 1 B REP 2* B REP 3*
No display (Cancel) b
Repeat Play starts.
* “REP 2” and “REP 3” are only available when
you connect one or more optional CD units,
or when you connect two or more optional
MD units.
To return to the normal playback mode,
press (2) (REPEAT) repeatedly until “REP”
desappears.
Note
When you play back a CD on this unit, Repeat 3
has the same function as Repeat 2.
Locating a specific track
— Automatic Music Sensor (AMS)
During playback, press either side of
(SEEK/AMS) once for each track you want
to skip.
SEEK/AMS
To locate
preceding tracks
To locate
succeeding tracks
15
Page 16

Playing tracks in random
order — Shuffle Play
You can select:
•SHUF 1 to play the tracks on the current disc
in random order.
•SHUF 2 to play the tracks in the current
changer in random order.
•SHUF All to play all the tracks in random
order.
During playback, press (3) (SHUF/;)
repeatedly until the desired setting
appears.
B SHUF 1 B SHUF 2 B SHUF All*
No display (Cancel) b
Shuffle Play starts.
* “Shuf All” is only available when you connect
one or more optional CD units, or when you
connect two or more optional MD units.
To return to the normal playback mode,
press (3) (SHUF/;) repeatedly until
“SHUF” desappears.
Additional
Information
Precautions
• If your car was parked in direct sunlight
resulting in a considerable rise in
temperature inside the car, allow the unit to
cool off before operating it.
• If no power is being supplied to the unit,
check the connections first. If everything is in
order, check the fuse.
• If no sound comes from the speakers of
two-speaker systems, set the fader control to
the center position.
•If your car is equipped with a power aerial, it
will extend automatically while the unit is
operating.
If you have any questions or problems
concerning your unit that are not covered in
this manual, please consult your nearest Sony
dealer.
Notes on handling CDs
A dirty or defective disc may cause sound
dropouts while playing. To enjoy optimum
sound, handle the disc as follows.
Handle the disc by its edge. To keep the disc
clean, do not touch the surface.
16
Do not stick paper or tape on the labelled
surface.
Page 17

Do not expose the discs to direct sunlight or
heat sources such as hot air-ducts, or leave
them in a car parked in direct sunlight where
there can be a considerable rise in the
temperature inside the car.
Before playing, clean the discs with an optional
cleaning cloth. Wipe each disc from the center
out.
Do not use solvents such as benzine, thinner,
commercially available cleaners or antistatic
spray intended for analog discs.
Notes on moisture condensation
On a rainy day or in a very damp area,
moisture may condense on the lenses inside
the CD player. Should this occur, the unit will
not operate properly. In this case, remove the
disc and wait for about an hour until the
moisture evaporates.
To maintain high quality sound
If you have drink holders near your audio
equipment, be careful not to splash juice or
other soft drinks onto the car audio. Sugary
residues on this unit or cassette tapes may
contaminate the playback heads, reduce the
sound quality, or prevent sound reproduction
altogether.
Cassette cleaning kits cannot remove sugar
from the tape heads.
Notes on Cassettes
Cassette care
• Do not touch the tape surface of a cassette, as
any dirt or dust will contaminate the heads.
• Keep cassettes away from equipment with
built-in magnets such as speakers and
amplifiers, as erasure or distortion on the
recorded tape could occur.
• Do not expose cassettes to direct sunlight,
extremely cold temperatures or moisture.
• Slack in the tape may cause the tape to be
caught in the machine. Before you insert the
tape, use a pencil or similar object to turn the
reel and take up any slack.
Slack
• Distorted cassettes and loose labels can cause
problems when inserting or ejecting tapes.
Remove or replace loose labels.
•The sound may become distorted while
playing the cassette. The cassette player head
should be cleaned after each 50 hours of use.
17
Page 18

Cassettes longer than 90 minutes
The use of cassettes longer than 90 minutes is
not recommended except for long continuous
play. The tapes used for these cassettes are
very thin and tend to be stretched easily.
Frequent playing and stopping of these tapes
may cause them to be pulled into the cassette
deck mechanism.
Maintenance
Fuse replacement
When replacing the fuse, be sure to use one
that matches the amperage described on the
fuse. If the fuse blows, check the power
connection and replace the fuse. If the fuse
blows again after replacement, there may be an
internal malfunction. In such a case, consult
your nearest Sony dealer.
Fuse (10 A)
Warning
Never use a fuse with an amperage rating
exceeding the one supplied with the unit as
this could damage the unit.
18
Page 19

Specifications
AUDIO POWER SPECIFICATIONS
POWER OUTPUT AND TOTAL HARMONIC DISTORTION
13 watts per channel minimum continuous average power into
4 ohms, 4 channels driven from 20 Hz to 20 kHz with no more
than 1% total harmonic distortion.
Other specifications
CD player section
Signal-to-noise ratio 94 dB
Frequency response 5 – 20,000 Hz
Wow and flutter Below measurable limit
Laser Diode Properties
Material GaAlAs
Wavelength 780 nm
Emission Duration Continuous
Laser output power Less than 44.6 µW*
* This output is the value measured at a distance
of 200 mm from the objecive lens surface on the
Optional Pick-up Block
Cassette player section
Tape track 4-track 2-channel stereo
Wow and flutter 0.08 % (WRMS)
Frequency response 30 – 20,000 Hz
Signal-to-noise ratio
Cassette type Dolby B NR Dolby NR off
TYPE II, IV 67 dB 58 dB
TYPE I 64 dB 55 dB
Tuner section
FM
Tuning range 87.5 – 107.9 MHz
Antenna terminal External antenna connector
Intermediate frequency 10.7 MHz
Usable sensitivity 9 dBf
Selectivity 75 dB at 400 kHz
Signal-to-noise ratio 65 dB (stereo),
Harmonic distortion at 1 kHz
Separation 35 dB at 1 kHz
Frequency response 30 – 15,000 Hz
AM
Tuning range 530 – 1,710 kHz
Antenna terminal External antenna connector
Intermediate frequency 10.71 MHz/450 kHz
Sensitivity 30 µV
68 dB (mono)
0.7% (stereo),
0.4% (mono)
Power amplifier section
Outputs Speaker outputs
Speaker impedance 4 – 8 ohms
Maximum power output 35 W × 4 (at 4 ohms)
(sure seal connectors)
General
Outputs Audio outputs (2)
Power requirements 12 V DC car battery
Dimensions Approx. 178 × 100 × 181 mm
Mounting dimensions Approx. 178 × 100 × 160 mm
Mass Approx. 2.2 kg
Supplied accessories Parts for installation and
Optional accessories Rotary commander
Optional equipment CD changer (10 discs)
Design and specifications are subject to change
without notice.
Power antenna relay
control lead
Power amplifier control
lead
(negative ground)
1
/8 × 4 × 7 1/4 in.)
(7
(w/h/d)
1
/8 × 4 × 6 3/8 in.)
(7
(w/h/d)
(4 lb. 13.6 oz.)
connections (1 set)
Dummy cover (1)
RM-X4S
BUS cable (supplied with
an RCA pin cord)
RC-61 (1 m), RC-62 (2 m)
RCA pin cord
CDX-828, CDX-727
MD changer (6 discs)
MDX-65
Other CD/MD changers
with the Sony-BUS system
Source selector
XA-C30
19
Page 20

Troubleshooting guide
The following checklist will help you remedy the problems you may encounter with your unit.
Before going through the checklist below, check the connection and operating procedures.
General
Problem
No sound.
The contents of the memory
have been erased.
No beep tone.
CD/MD playback
Problem
A disc cannot be loaded.
Playback does not begin.
A disc is automatically ejected.
The operation buttons do not
function.
The sound skips due to
vibration.
Cause/Solution
•Cancel the ATT function.
•Set the fader control to the center position for two-speaker
systems.
•Rotate the jog roller upward to adjust the volume.
•The power cord or battery has been disconnected.
•The reset button has been pressed.
t Store again into the memory.
•An optional power amplifier is connected and you are not
using the built-in amplifier.
•The beep tone is muted.
Cause/Solution
•Another CD is already loaded.
•The CD is forcibly inserted upside down or in the wrong way
(MD).
Defective MD or dusty CD.
The ambient temperature exceeds 50°C (122°F).
Press the reset button.
•The unit is installed at an angle of more than 20°.
•The unit is not installed in a sturdy part of the car.
Tape playback
Problem
Playback sound is distorted.
The AMS does not operate
correctly.
20
Cause/Solution
The tape head is contaminated.
t Clean the head with a commercially available dry-type
cleaning cassette.
•There is noise in the space between tracks.
•A blank space is too short (less than four seconds).
•> on (SEEK/AMS) is pressed immediately before the
following track.
•. on (SEEK/AMS) is pressed immediately after the track
starts.
•A long pause, or a passage of low frequencies or very low
sound level is treated as a blank space.
Page 21

Radio reception
Problem
Preset tuning is not possible.
Automatic tuning is not
possible.
The stations cannot be
received.
The sound is hampered by
noises.
The “ST” indication flashes.
Cause/Solution
•Memorize the correct frequency.
•The broadcast signal is too weak.
The broadcast signal is too weak.
t Use manual tuning.
Connect a power antenna control lead (blue) to the power
supply lead of a car’s antenna booster.
(When your car has built-in FM/AM antenna in the rear/side
glass only.)
•Tune in the frequency accurately.
•The broadcast signal is too weak.
t Press (SENS/BTM) to enter Monaural mode (page 11).
Error displays (when an optional CD/MD unit is connected)
The following indications will flash for about five seconds, and an alarm sound will be heard.
Display Cause
The disc magazine is not inserted in
the CD/MD unit.
No disc is inserted in the disc
magazine.
The disc is dirty.
Solution
Insert the disc magazine with discs
into the CD/MD unit.
Take out the magazine and insert a
disc.
Clean the disc.
The disc is inserted upside down.
The ambient temperature is more than
50°C (122°F).
If the above-mentioned solutions do not help to improve the situation, consult your nearest Sony
dealer.
Insert the disc correctly.
Wait until the temperature goes
below 50°C (122°F).
21
Page 22

22
Page 23

23
Page 24

Sony Corporation Printed in Japan
*I-3-866-713-11*(1)
 Loading...