

Page 1

VPL-PX15/FX50/FE110J/FE110U/FE110M
LCD Data Projector
4-080-676-32(1)
取扱説明書(ネットワーク編)
Operating Instructions for Networking
Instructions en cas de mise en réseau
Manual de instrucciones de red
Bedienungsanleitung für das Arbeiten im Netzwerk
Manuale di rete
お買い上げいただきありがとうございます。
ソフトウェア製品は、安全のための注意事項を守らな
いと、健康を害することがあります。
この取扱説明書には、健康を守るための重要な注意事項と製品の取り扱
いかたを示してあります。この取扱説明書をよくお読みのうえ、製品を
お使いください。お読みになったあとは、いつでも見られるところに必
ず保管してください。
JP
GB
FR
ES
DE
IT
CS
VPL-PX15
VPL-FX50
VPL-FE110J/110U/110M
© 2001 Sony Corporation
Page 2
安全のために
ソフトウェア製品は、まちがった使いかたをすると、健康を害するおそれがありま
す。
健康を守るために次のことを必ずお守りください。
安全のための注意事項を守る
下記の注意事項をよくお読みください 。製品全般の注意事項が記されています。
警告表示の意味
マニュアルおよび製品では、次
のような表示をしています。表
示の内容をよく理解してから本
文をお読みください。
この表示の注意事項を守らない
と、健康を害するおそれがあり
ます。
行為を禁止する記号
下記の注意を守らないと、
健康を害するおそれがあります。
ディスプレイ画面を長時間継続して見ない
ディスプレイなどの画面を長時間継続して見続
けると、目が 疲 れ たり、視力が 低 下 するお そ れ
があります。ディスプレイ画面を見続けて体の一
部に不快感や痛みを感じたときは、すぐにコン
ピューター の 使 用をや め て 休 息し てください。万
一、休息しても不快感や痛みがとれないときは、
医師の診断を受けてください。
..................................................................................................................................................................................................................................
Microsoft、WindowsおよびPowerPointは、米国MicrosoftCorporationの米国およびその他の国における登録商標です。
•
NetscapeNavigatorは、米国およびその他の諸国の NetscapeCommunicationsCorporation社の登録商標です。
•
その他記載された商品名、会社名などは、各社の商標または登録商標です。
•
キーボードを使いすぎない
キーボードやマウスなどを長時間継続して使用
すると、腕や手首が痛くなったりすることがありま
す。キーボードやマウスなどを使用中、体の一
部に不快感や痛みを感じたときは、すぐにコン
ピューターの使用をやめて休息してください。万
一、休息しても不快感や痛みがとれないときは、
医師の診断を受けてください。
2 (JP)
Page 3

目次
お使いになる前に
準備
警告..................................................................................
本機の特長 ............................................................................
使用上のご注意 ....................................................................
このマニュアルについて ......................................................
ネットワーク機能を使うための準備 ....................................
システム構成 ............................................................................... 6(JP)
PCカードを使う .......................................................................... 7(JP)
ネットワーク機能を使うための設定 ....................................... 7(JP)
リモートコマンダー、またはマウス、キーボードを使う ... 7(JP)
プロジェクターのセットアップ ...........................................
プロジェクターからセットアップする ................................... 8(JP)
コンピューターからセットアップする ................................. 12(JP)
基本操作の流れ .................................................................
コンピューターで操作する ..................................................... 14(JP)
プロジェクターで操作する ..................................................... 16(JP)
2 (JP)
4 (JP)
5 (JP)
5 (JP)
6 (JP)
8 (JP)
14 (JP)
JP
操作
その他
コンピューターで操作する ...............................................
はじめに ..................................................................................... 19(JP)
SlideViewer(スライドビューワー)で
プレゼンテーションを行う ............................................... 20(JP)
WorksheetViewer(ワークシートビューワ−)で
Excelのファイルを投影する ............................................. 23(JP)
ImageViewer(イメージビューワー)で画像を
プロジェクターに投影する ............................................... 23(JP)
FileManager(ファイルマネージャー)を使う .................... 26(JP)
プロジェクターをコントロールする ..................................... 27(JP)
プロジェクターのインジケーターを確認する ..................... 28(JP)
プロジェクターで操作する ...............................................
はじめに ..................................................................................... 29(JP)
SlideViewerでプレゼンテーションを行う ............................ 30(JP)
WorksheetViewerでExcelのファイルを投影する ................ 31(JP)
ImageViewerでスライドショーを行う ................................. 33(JP)
インターネットに接続する ..................................................... 35(JP)
トラブル時の対処 ..............................................................
19 (JP)
29 (JP)
36 (JP)
3 (JP)
Page 4

本機の特長
本機は、WindowsCEを搭載したネットワーク対応 のプロジェクター
です。LAN(LocalAreaNetwork)に接続することにより、同一会
議 室 のコンピューターからはもとより、LAN上の離れた所にあるコン
ピューターからのファイルの入手、ファイルの投影、プレゼンテ−
ションの実行が可能です。さらに、インターネットへ の 接 続もできま
す。
また、コンピューターの Web ブラウザから、プレゼンテーションを
行 ったり、プロジェクターを コントロール することができます。
への接続
LAN
ETHER(イ−サ−)端子(VPL-PX15、VPL-FX50 のみ)、PCカー
ドスロットを装備、LANケーブルまたはLANPCカードでLANに接
続できます。また、ワイヤレスLANPCカードを装着することにより
ワイヤレスでLANに接続することもできます。
カードスロット搭載
PC
PCカードスロットに P C メモリーカードの挿入が可能です。データの
入ったメモリーカードを 挿 入 すると、コンピューターを使わ ず に 本 機
のみで簡単にプレゼンテーションを 行えます 。
ブラウザ機能
Web
InternetExplorer4.0相当を搭載、プロジェクター単体でインター
ネットに接続できます。
メモリー機能
コンピューター上にあるファイルまたはメモリーカードのファイルをプ
ロジェクターのストレージに保存することができます。また 、保存の
際にパスワードを設定するセキュリティー機能も付いています。
Presentation Viewer
(プレゼンテ−ション
ビューワー)機能
Microsoft PowerPointとMicrosoft Excel の簡易ビュ−ワ−、
SlideViewer(スライドビュ−ワ−)とWorksheetViewer(ワーク
シートビューワー)を搭載。ファイルの変換操作なしでPowerPoint
のスライドショーを 実 行 し たり、Excelファイルの投影ができます。
Image Viewer
画像のビューワー機能を搭載。JPEG、BMP、GIF、PNG形式の画
像ファイルを見るほか、スライドショーの設定および実行が可能で
す。
File Manager
プロジェクターのストレージへ のファイルの追加、ストレージからの
ファイルの削除がコンピューターのWebブラウザからも可能です。
(イメージビューワー)機能
(ファイルマネージャー)機能
4 (JP)
Page 5

使用上のご注意
ご注意
電源を切る、またはリモートコマンダーでリセットするときは、必
ずすべてのアプリケーションを 終 了させ て から行ってください。
アプリケーションを立ち上げたまま行うとシステムが壊れて再起
動できなくなる可能性があります。
• 本機を使用するための推奨動作環境は以下のとおりです。
− MicrosoftWindows98、MicrosoftWindows98SE、
MicrosoftWindows2000、MicrosoftWindowsMe
• 本機に装着するLANPCカード、ワイヤレスLANPCカード、メモ
リー カードおよびワイヤレスLANアクセスポイント、コンピューター
に装着するワイヤレスLANPCカードは指定/推奨のものをお使
いください。指定/推奨以外の機器をご使用の場合、正しく動作
しないことがあります。
このマニュアルについて
このマニュアルは、LCDデータプロジェクターVPL-PX15、VPL-
FX50またはVPL-FE110Jをネットワークを介してご使用になる場合
の操作について説明しています。
操作方法は、画面上のヘルプでもご覧になれます。コンピューター
でプロジェクターの Web サーバーにアクセスしたときのヘルプは、
各操作画面で操作項目にポインタを合わせると画面の下に表示さ
れます。
プロジェクターのWindowsCEの画面上では、[スタート]メニ ューか
ら[ヘルプ]を選択すると、WindowsCEのヘルプをご覧になれま
す。ただし、一部サポートしていない機能もあります。また、「Slide
Viewer」(スライドビューワー)、「ImageViewer」(イメージビュー
ワー)および「WorksheetViewer」(ワークシートビューワー )の画
面では、ツールバーの
プが 表 示されます。
ボタンをクリックすると、それぞれのヘル
お
使
い
に
な
る
前
に
◆ 指定/推奨する機器については、付属の「指定/推奨PCカード、ワイ
ヤレスLANアクセスポイント一覧」をご覧ください。
• データの損失を防ぐため、データは 頻 繁 に バックアップを 取るよう
にし て 下さい 。万一、データが損失した場合、当社は一切その責
任を負いかねます。
• 本機のソフトウェアの仕様は、改良のため予告なく変更することが
ありますが、ご了承ください。
• アプリケーションソフトウェアは 、この取扱説明書の画面と一部異
なる場 合があります。
◆ プロジェクターの通常の操作については、別冊の取扱説明書をご覧くだ
さい。
5 (JP)
Page 6
ネットワーク機能を使うための準備
ここでは、LANに接続して本機のネットワーク機能を使うために必
要な準備について説明します。
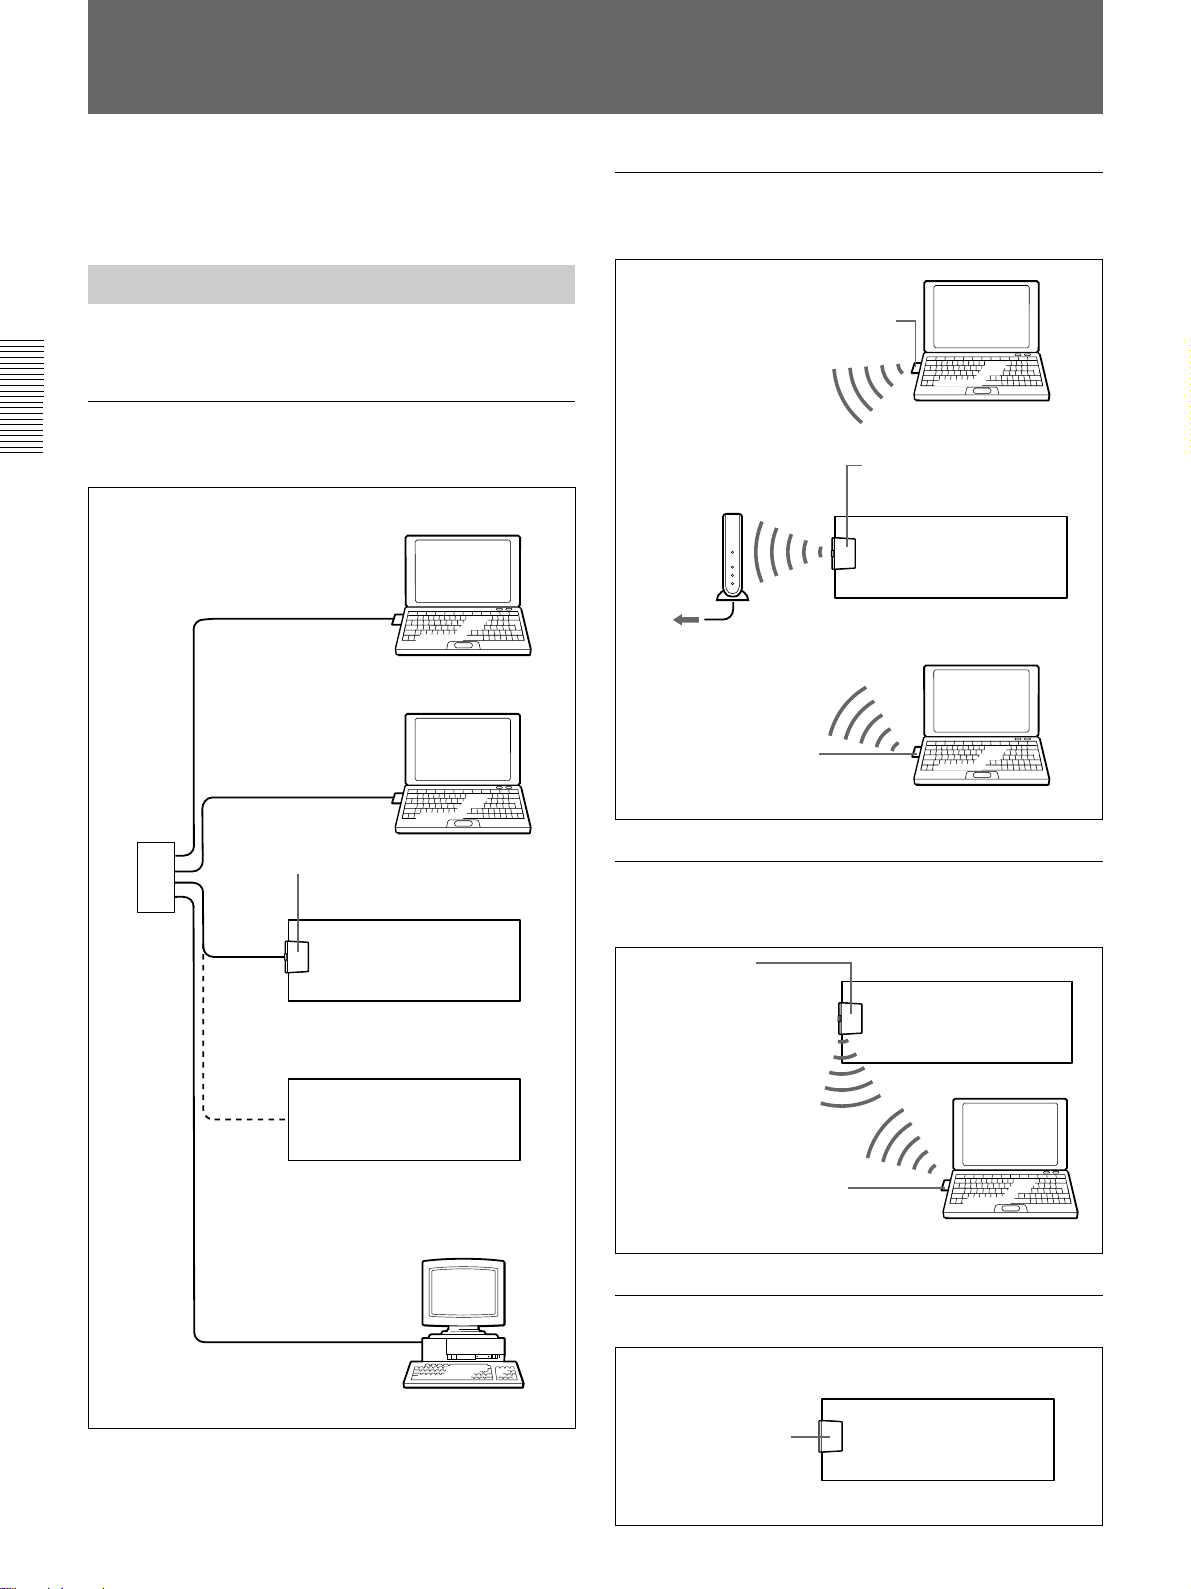
システム構成
◆ 接続について詳しくは、本機の取扱説明書をご覧ください 。
ケーブルまたは
LAN
続する場合
ハブ/
ルーターへ
ケーブル
LAN
ケーブル
LAN
LAN PC
(
NE2000
LAN
ケーブル
PC CARD
LAN
ケーブル
LAN PC
カード (推奨)
互換)
スロット
カードで
コンピューター
コンピューター
VPL-FE110J
VPL-PX15
VPL-FX50
左側面
後面
前面
LAN
に接
アクセスポイントを使用してワイヤレス
LAN
接続する場合
ワイヤレス
(推奨)(
ワイヤレス
アクセスポイント(推奨)
(
IEEE802.11b
ハブ/
ルーターへ
ワイヤレス
カード(推奨)
(
IEEE802.11b
LAN PC
IEEE802.11b
LAN
準拠)
LAN PC
PC CARD
準拠)
カード
準拠)
ワイヤレス
(指定)(
スロット
コンピューター
LAN PC
カード
IEEE802.11b
本機
コンピューター
アクセスポイントを使用せずにワイヤレス
に接続する場合(
ワイヤレス
PC
(
IEEE802.11b
LAN
カード(指定)
準拠)
PC CARD
スロット
Peer to Peer
モード)
本機
に
準拠)
LAN
6 (JP)
ETHER
端子
ケーブル
LAN
コンピューター
ワイヤレス
カード(推奨)
(
IEEE802.11b
LAN PC
準拠)
メモリーカードを使う場合
スロット
メモリーカード
PC
(
Type
PC CARD
II)
コンピューター
本機
Page 7

カードを使う
PC
本機のINPUTB(VPL-PX15)またはINPUTC(VPL-FX50、VPLFE110J)PCCARDスロットは 、PCMCIATypeIIに準拠したPC
カードを1枚挿入できるスロットで す 。LANに接続するためには、指
定/推奨のワイヤレスLANPCカードまたはLANPCカード(VPLFE110Jのみ)を装着します。
また、このスロットに推奨のPCメモリーカードを挿入することもでき
ます。メモリーカードに、MicrosoftPowerPoint や Excelで作成し
たプレゼンテーションファイル や 画 像 ファイル を 保 存し てこの スロッ
トに装着すると、コンピューターを使わず本機から、ファイル の 表 示
やプレゼンテーションを実行することができます。
ご注意
• PCカードのデータ書き込み中や読み込み中は、電源を切ったり
再起動したりしないでください。
• LANPCカード、ワイヤレスLANPCカード、P C メモリーカードは す
べて指定/推奨のものをお使いください。指定/推奨するPC
カードについては、付属の「指定/推奨PCカード、ワイヤレス
LANアクセスポイント一覧」をご覧ください。
• 指定/推奨するPCカードのドライバーソフトは 、工場出荷時に本
機にインストールされ ています。ドライバーソフトを別途インストー ル
する必要はありません。また、あらた にドライバーソフトをインストー
ルすることはできません。
リモートコマンダー、またはマウス、 キーボードを使う
■
VPL-PX15、VPL-FX50
プロジェクターのセットアップ や スライド ショーを 行 うときは、付属の
リモートコマンダーで操作します。操作するときは、リモ ートコマン
ダーのPJ /NETWORK 切り換えスイッチをNETWORK 側に切り
換えてください。
マウスやキーボードはご使 用になれません。
■
VPL-FE110J
本 機を操 作し て プ ロジェクターの セットアップをし たり、プレゼンテー
ションを行うには、別売りのリモートコマンダーRM-PJM610または
市販のPS/2用のマウスとキーボードが必要です。
ご注意
マウスおよび キーボードをご使用の場合は、あらかじめマウス、
キーボードを接続してから本機の電源コードを接続してください 。
◆ マウスとキーボードの接続については、本機の取扱説明書をご覧くださ
い。
◆別売りのリモートコマンダーRM-PJM610の操作については、リモ ートコ
マンダーの取扱説明書をご覧ください。
の場合
の場合
準
備
◆PCカードの取り付けかたについては、本機の取扱説明書をご覧くださ
い。
ネットワーク機能を使うための設定
本機のネットワーク機能を使うには、次の設定が必要です。
■
VPL-PX15
設置設定メニューの「入力 B 機能」を「 オン 」に設定します。
◆ 設定のしかたは、本機の取扱説明書をご覧ください。
■
VPL-FX50
設置設定メニューの「入力 C 機能」を「 オン 」に設定します。
◆ 設定のしかたは、本機の取扱説明書をご覧ください。
■
VPL-FE110J
本機後面のINPUTC / RS-232C/ RS-422A 切り換えスイッチを
「INPUTC」の位置に設定します。
の場合
の場合
の場合
7 (JP)
Page 8
プロジェクターのセットアップ
プロジェクターのセットアップ
本機のネットワーク機能を使うためには 、IPアドレス、ワイヤレス
LANの設定など、各種の設定をしておく必要があります。
これらの設定は、本機から、またはLAN 上のコンピューターからも
行なえます。
設定の前に
■
VPL-PX15、VPL-FX50
・付属のリモートコマンダーまたはコントロールパネルの?/1キーを
押して本機の電源を入れます。
・設置設定メニューの「入力 B 機能」(VPL-PX15)または、「入力
C機能」(VPL-FX50)が「オン」に 設 定され て い ることを 確 認し て
ください。
・リモ ートコマンダーまたはコントロールパネルのINPUTキーを押し
て入力を「入力B」(VPL-PX15)または、「入力 C」(VPL-FX50)
に 設 定してください。「NetworkProjector」画面が表示されます。
・リモートコマンダーの PJ / NETWORK 切り換えスイッチを
NETWORK側に切り換えてください。
・プロジェクターからセットアップ す る 場 合 は 、プロジェクターのスク
リーンにスクリーンキーボードを表示させ、付属のリモートコ マ ン
ダーで操作します。
の場合
プロジェクターからセットアップする
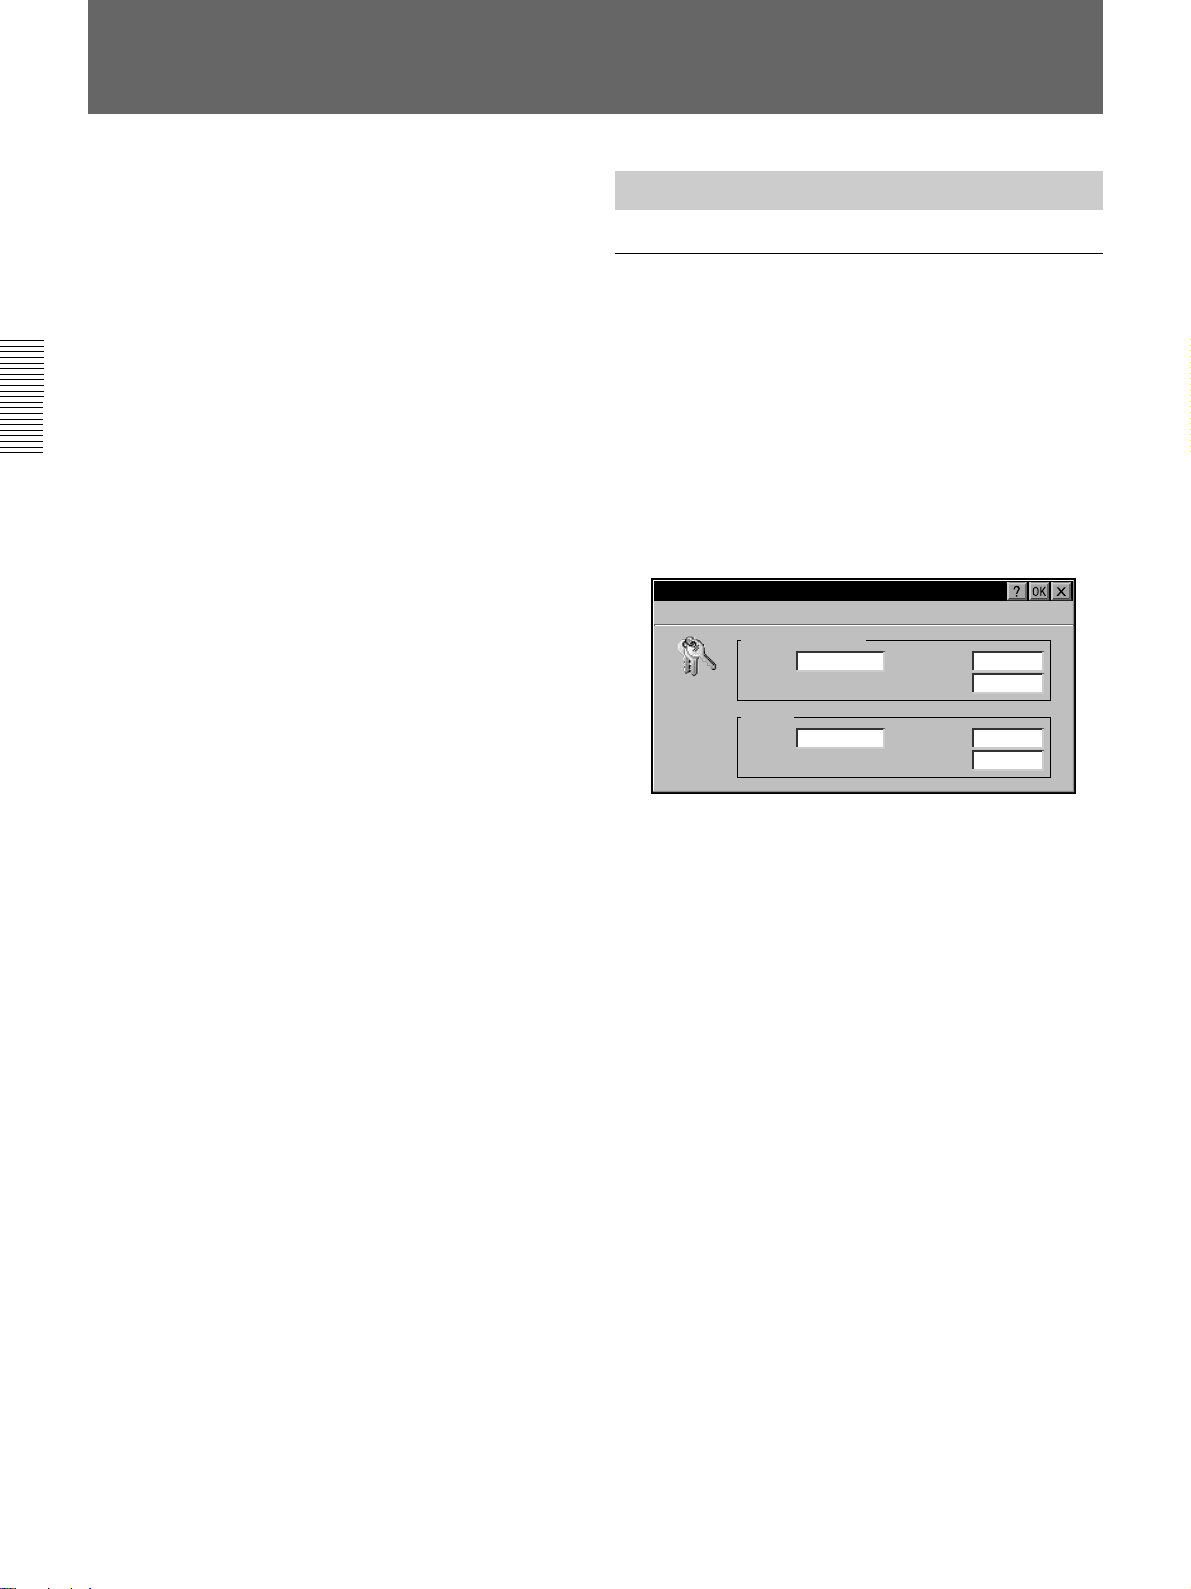
パスワードを設定する
コンピューターからのアクセスを制 限したい場合、パスワードの設定
ができます。
1 「NetworkProjector」画面で、[スタート]メニューから[コン
トロールパネル]をクリックする。
2 [パスワード]アイコンをダブルクリックする。
「パスワードの設定」ダイアログボックスが表 示されます。
パスワードの設定
アドミニストレーター
名前:_root
ユーザー
名前:
_
パスワード:_I
パスワードの確認:
_
パスワード:
_
パスワードの確認:
_
◆ スクリーンキーボードについて詳しくは、29(JP)ページをご覧ください。
・コンピューターからセットアップする場合は、コンピューターの電源
を入れてください。
■
VPL-FE110J
・本機後面のINPUTC/RS-232C/RS-422A切り換えスイッチが
「INPUTC」に設定されていることを確認してください。
・リモ ートコマンダーRM-PJM610、本機のリモートコマンダーまたは
コントロールパネルのONキーを押して本機の電源を入れます。
・RM-PJM610のINPUTキー、本機のリモートコマンダーまた はコ
ントロールパネルの INPUT SELECTキーを押して入力を
「INPUTC」に設定してください 。「NetworkProjector」画面が
表 示されます。
・プロジェクターからセットアップ する場 合 は 、プロジェクターのスク
リーンに スクリーンキーボードを表 示させ 、RM-PJM610または接続
したマウスとキーボードで操作してください。
◆ スクリーンキーボードについて詳しくは、29(JP)ページをご覧ください。
・コンピ ューター からセットアップ す る場 合 は 、コンピューターの電源
を入れてください。
の場合
3 [アドミニストレ−タ−]の[パスワード]を入力し、[パスワード
の確認]にポインタを合わせ、もう一 度 同じ パ スワードを入 力
する。
アドミニ ストレ−タ−の[名前]は、工場出荷時「root」に設定
されており、変更できません。
4 [ユーザー]の[名前]と[パスワード]を入力し、[パスワード
の確認]にポインタを合わせ、もう一 度 同じ パ スワードを入 力
する。
LAN上のコンピューターから本機を操作する際、アドミニストレー
ターまたはユーザーの「パスワード入力」のダイアログボックスが表
示されたときは、ここで設定した名前とパスワードを入 力します。
8 (JP)
Page 9
ネットワークの設定をする
本機をLANに接続する場合はIPアドレスなど、ネットワーク環境の
設定が必要です。本機のIPアドレスは 、「NetworkProjector」画
面のタスクバーに表示されます。
ネットワークの設定は 、システムの使用環境が変わった場合再度設
定し 直し てください。
'Wireless Ethernet Driver' の設定
IP
アドレス
ネーム サーバー
IP
アドレス
はDHCP
サーバー
て自動的にこの
てられます。
にIP
アドレス
ネットワーク
は、
せてから、
アドレス
さい。
によっ
デバイス
に割り当
ネットワーク
が自動的
を割り当てない場合
管理者に問い合わ
を入力してくだ
IP
IP
IP
アドレス
サブネットマスク
既定の
アドレス
を DHCP
アドレス
を指定(S)
(A):
_
(U):
_
ゲートウェイ
サーバー
_
192.168. 0 . 1
255.255. 0 . 0
(G):
_
から取得(O)
. . .
_
下記の具体的な設定については、ネットワーク管理者にお問い合
わせください。
1 「NetworkProjector」画面で[スタート]メニューから[コント
ロールパネル]をクリックする。
2 [ネットワーク]アイコンをダブルクリックする。
「ネットワーク構 成」ダイアログ ボックスが表示されます。
ネットワーク構成
アダプタ
オーナー
情報
デバイスにインストール
ネットワークドライバ
い。
ドライバ
設定を変更するには、該当
の
ドライバ
[
プロパティ]をタップ
されている
を入力してくださ
を選択してから
してください。
オンボードLAN
*
NE2000 Compatible Ethernet Driver
Wireless Ethernet Driver
On-board LAN
プロパティ
(R)
_
*[ オンボ ードLAN]タブはVPL-PX15、VPL-FX50の場合に
表 示されます。
3 ネットワークのタイプに応じてドライバー名を選び、[プロパティ]
をクリックする。
次のドライバー名のいずれかを選びます。
[NE2000CompatibleEthernetDriver]:推奨のNE2000互
換LANPCカードをご使用の場合
[WirelessEthernetDriver]:指定のワイヤレスLANPCカー
ドをご使用の場合
[On-board LAN]:ETHER端子をご使 用の場合(VPL-
PX15、VPL-FX50の場合に表示されます。)
選択したドライバ ー の「設定」ダイアログボックスが表示されま
す。
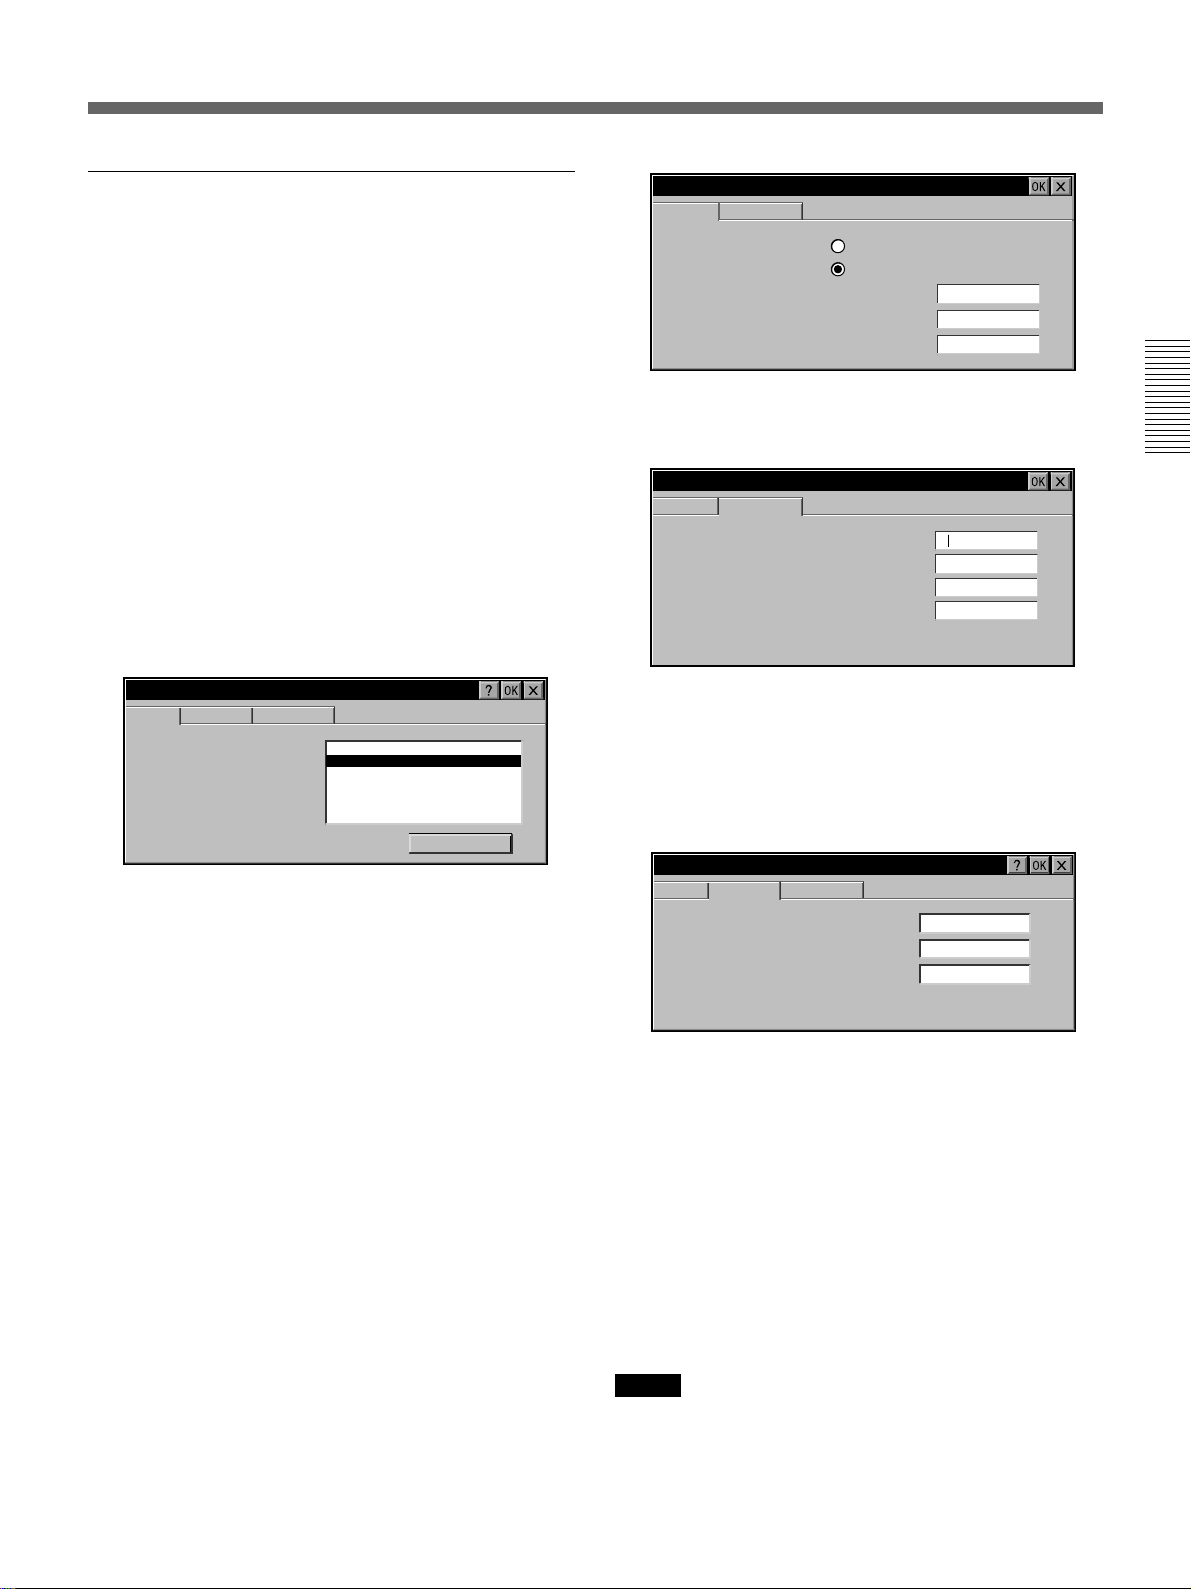
4 [IPアドレスを 指 定 ]ボタンが選択されていることを確認して、
必要な項目を設定する。
工場出荷時[IPアドレス]は「192.168.0.1」に、[サブネットマ
スク]は「255.255.0.0.」に設定されています。
5 [ネームサーバー]タブをクリックして、ネームサーバーのダイア
ログ ボックスを表 示し、必要な項 目を設 定 する。
'Wireless Ethernet Driver' の設定
IP
アドレス
ネーム サーバー
ネームサーバーアドレス
この
アダプタ
動的に割り当てられます。与えら
れた
スペース
の追加もできます。
は、DHCP が
で使用可能な場合は自
内に、WINS や DNS
プライマリ
セカンダリ
プライマリ
セカンダリ
DNS(D):
_
DNS(N):
_
WINS(W):
WINS( I ):
. . .
. . .
_
. . .
. . .
_
6 [OK]ボタンをクリックする。
手順2 の画面に戻ります。
7 必要に応じて、[オーナー情報]タブをクリックし、必要な項目
を設定する。
ネットワーク構成
アダプタ
オーナー
この情報を使用して
リソースにアクセス
理者から与えられた
パスワード、ドメイン
い。
オンボードLAN
情報
ネットワーク
します。
ネットワーク
ユーザー
名、
を入力してくださ
ユーザー
名(U):
_
(O):
(P):
_
_
netpj
********
projector
の
管
パスワード
ドメイン
8 [OK]ボタンをクリックする。
VPL-PX15、VPL-FX50
でワイヤレス
LAN PC
使用になるときは
3で[WirelessEthernetDirver]を選択した場合は、手順
手順
6のあとに次の操作を行ってください。
[オンボードLAN]タブをクリック す る。
1
[オンボードLANを有効にする]のチェックをはずす。
2
[OK]ボタンをクリックする。
3
2の画面に戻ります。
手順
ご注意
いったんオンボードLANを無効にすると、アダプターのドライバ ー
一覧より[On-boardLAN]表示は消えます。オンボードLANを使
用する場合は、[オンボードLANを有効にする]をチェックし、[OnboardLAN]を表示させてから設定してください。
カードをご
9 (JP)
Page 10
プロジェクターのセットアップ
ワイヤレス
ワイヤレスLANPCカードをご使用の場合は、さらに以下の設定が
必要です。
アクセスポイントを使用する場合
接 続 するアクセスポ イントの設定をします。
の設定をする
LAN
1 「NetworkProjector」画面で、[スタート]メニューから[コント
ロールパネル]をクリックする。
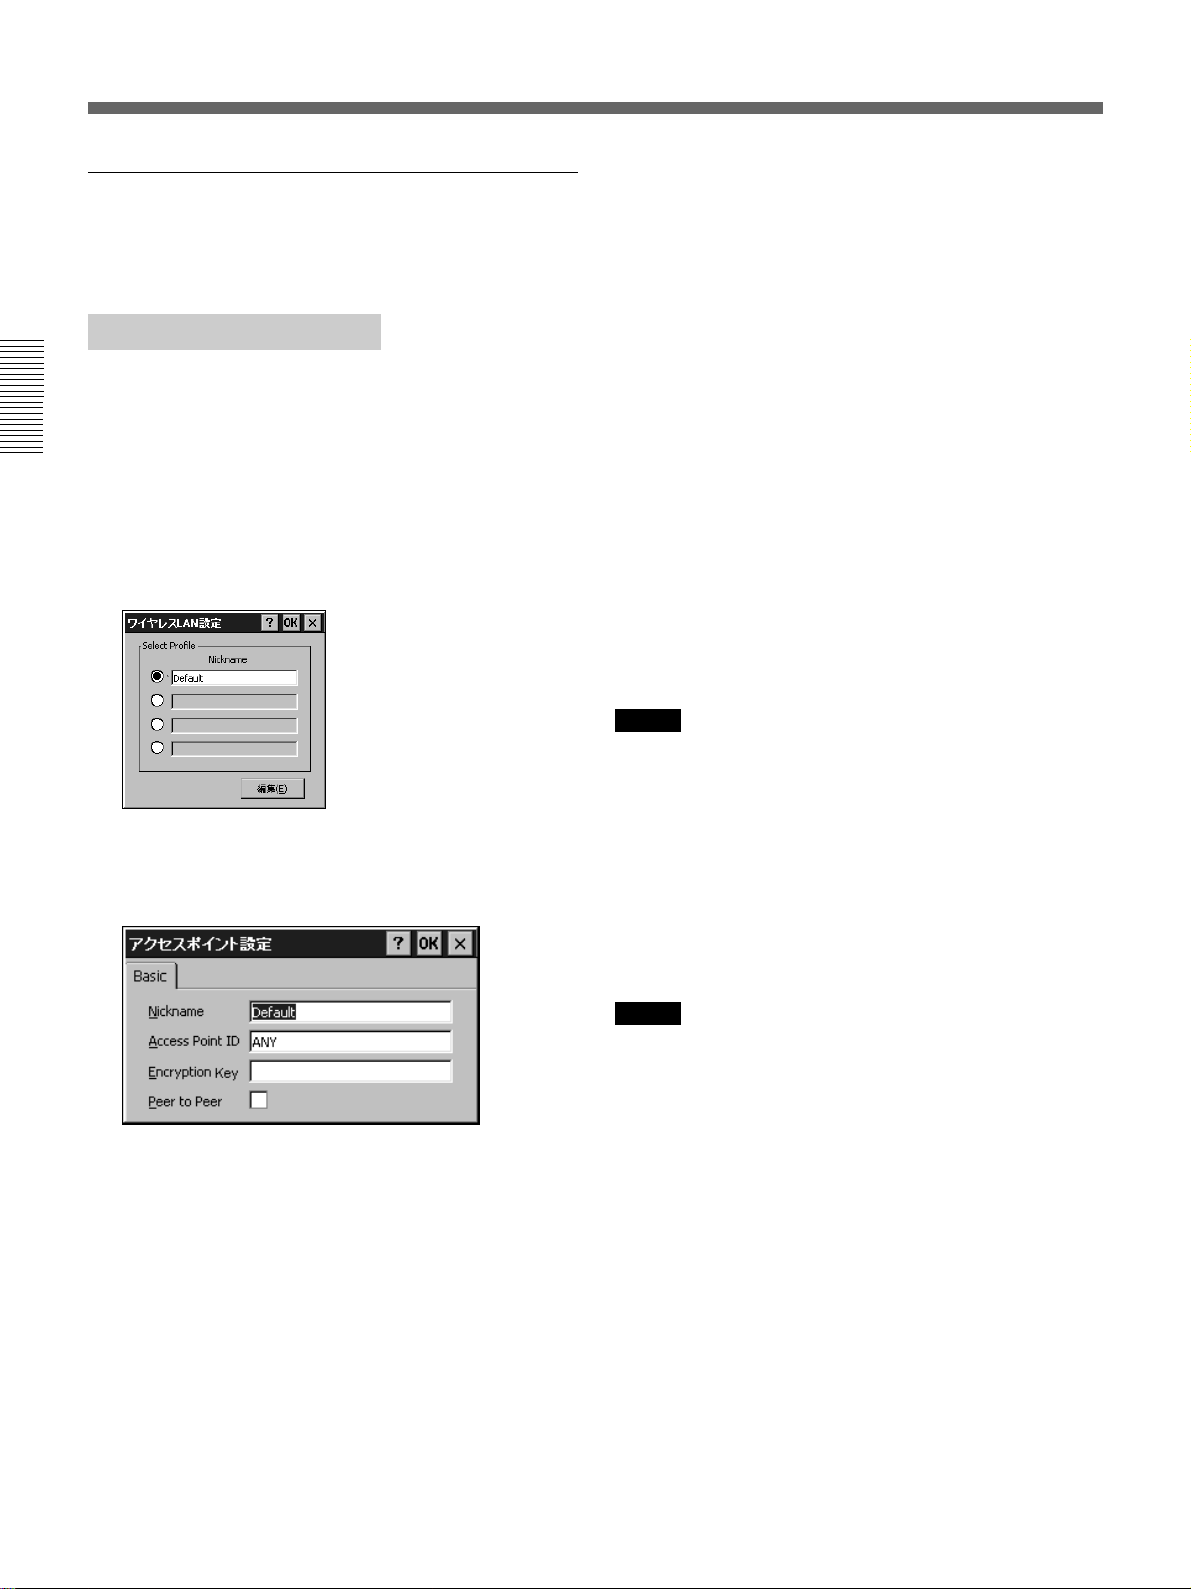
2 [ワイヤレスLAN]アイコンをダブルクリックする。
「ワイヤレスLAN 設定」ダイアログ ボックスが表示されます。
3 [編集]ボタンをクリックする。
「アクセスポイント設定」ダイアログボックスが表 示されます 。
6 [EncryptionKey](無線暗号キー)を入力する。
アクセスポイントでEncryptionKey(無線暗号キー)を設定し、
アクティブにしてある場合、入 力します。
7 [OK]ボタンをクリック す る。
「ワイヤレスL AN 設定」ダイアログボックスに戻ります。
8 接 続 するアクセスポイントのNicknameを選び、[OK]ボタンをク
リックする。
選択したアクセスポイントに接 続されます。
設定してあるアクセスポイントに接続するときは
本機では、アクセスポイントが複数ある場合、異なるニックネームを
4個まで設定しておくことが で きま す 。す で に 設 定してあるアクセス
ポイントに接続する場合は、「ワイヤレスLAN設定」ダイアログボッ
クスで該当のニックネームのラジオボタンを選び、[OK]ボタンをク
リックします。選択したアクセスポイントに接続されます。
ご注意
プロジェクターに使用するワイヤレスL A N カードとアクセスポ イントが
同じメーカーではない場合、[EncryptionKey]の入力のしかたが異
なることがあります。無線暗号キーが16進数表示となる場合は、16
進数のほうを入力してください。
に接続できないときは
LAN
アクセスポイントのチャンネルが 1 2 〜 1 4 に設定されて いる場合は
1〜11のいずれかのチャンネルに設定し直してください。
4 [Nickname](ニックネーム)を設定する。
ニックネームはアクセスポ イントを区別するための名称です。
半角英数字と記号(ASCII文字)で、最大32文字を入力でき
ます。アクセスポイントが複数ある場合は、他のアクセスポイン
トとは異なる名称にしてください。
5 [AccessPointID](アクセスポイントID)を入力する。
接 続 するアクセスポ イントI Dを入力します。
10 (JP)
ご注意
・指定/推奨のソニーのワイヤレスLANPCカードを使用して不具
合が生じた場合は、お買い上げ店またはソニーのサービス窓口
にご相談ください。
・ワイヤレスLANPCカードとアクセスポ イントのメーカー が 異 なる場
合、暗 号 化をすると正しく動作しな いことがあります。
Page 11
Peer to Peer
(アドホック)モードの場合
アクセスポイントとの接続状態を確認する
アクセスポイントを使用せずに、本機とコンピューターのみ で ワイヤ
レスLANに接続するときは、本機にのみ下記の設定を行います。
1 「アクセスポイントを使用する場合」の手順 1〜 4を行い、「ア
クセスポイント設定」ダイアログボックスでこのモードの
Nickname(ニックネーム)を設定する。
2 [PeertoPeer](ピアトゥピ ア )をチェックして選ぶ。
3 [AccessPointID](アクセスポイントID)を入力する。
任意のIDを入力します。半角英数字で最大32文字まで入力
できます。
4 必要に応じて、[EncryptionKey](無線暗号キー)を入力す
る。
5 [OK]ボタンをクリックする。
「ワイヤレスLAN 設定」ダイアログボックスに戻ります。
6 手順1で設定したNicknameを選び、[OK]ボタンをクリック す
る。
PeertoPeerモードになります。
接続するコンピューターにも同じAccessPointIDとEncryption
Key、任意のNicknameを設定する必要があります。詳しくは、コ
ンピューターに挿入しているワイヤレスLANPCカードの取扱説明
書をご覧ください。
ご注意
・本機とコンピューターに挿入するワイヤレスLANPCカードは、同
じメーカーのものをご使用ください。
・接続するコンピューター側ですでにPeertoPeer(アドホック)の
設定がされている場合は、上記手順
ピューターと同じAccessPointIDとEncryptionKey、任意の
Nicknameを設定してください。
・PeertoPeer(アドホック)は 、本機とコンピューター のうち 1 台に
のみ設定を行ってください。
・PeertoPeer(アドホック)モードの場合は、本 機とコンピューター
それぞれに別途IPアドレス、サブネットマスクの設定が必要です。
1、3 〜 6を行ってコン
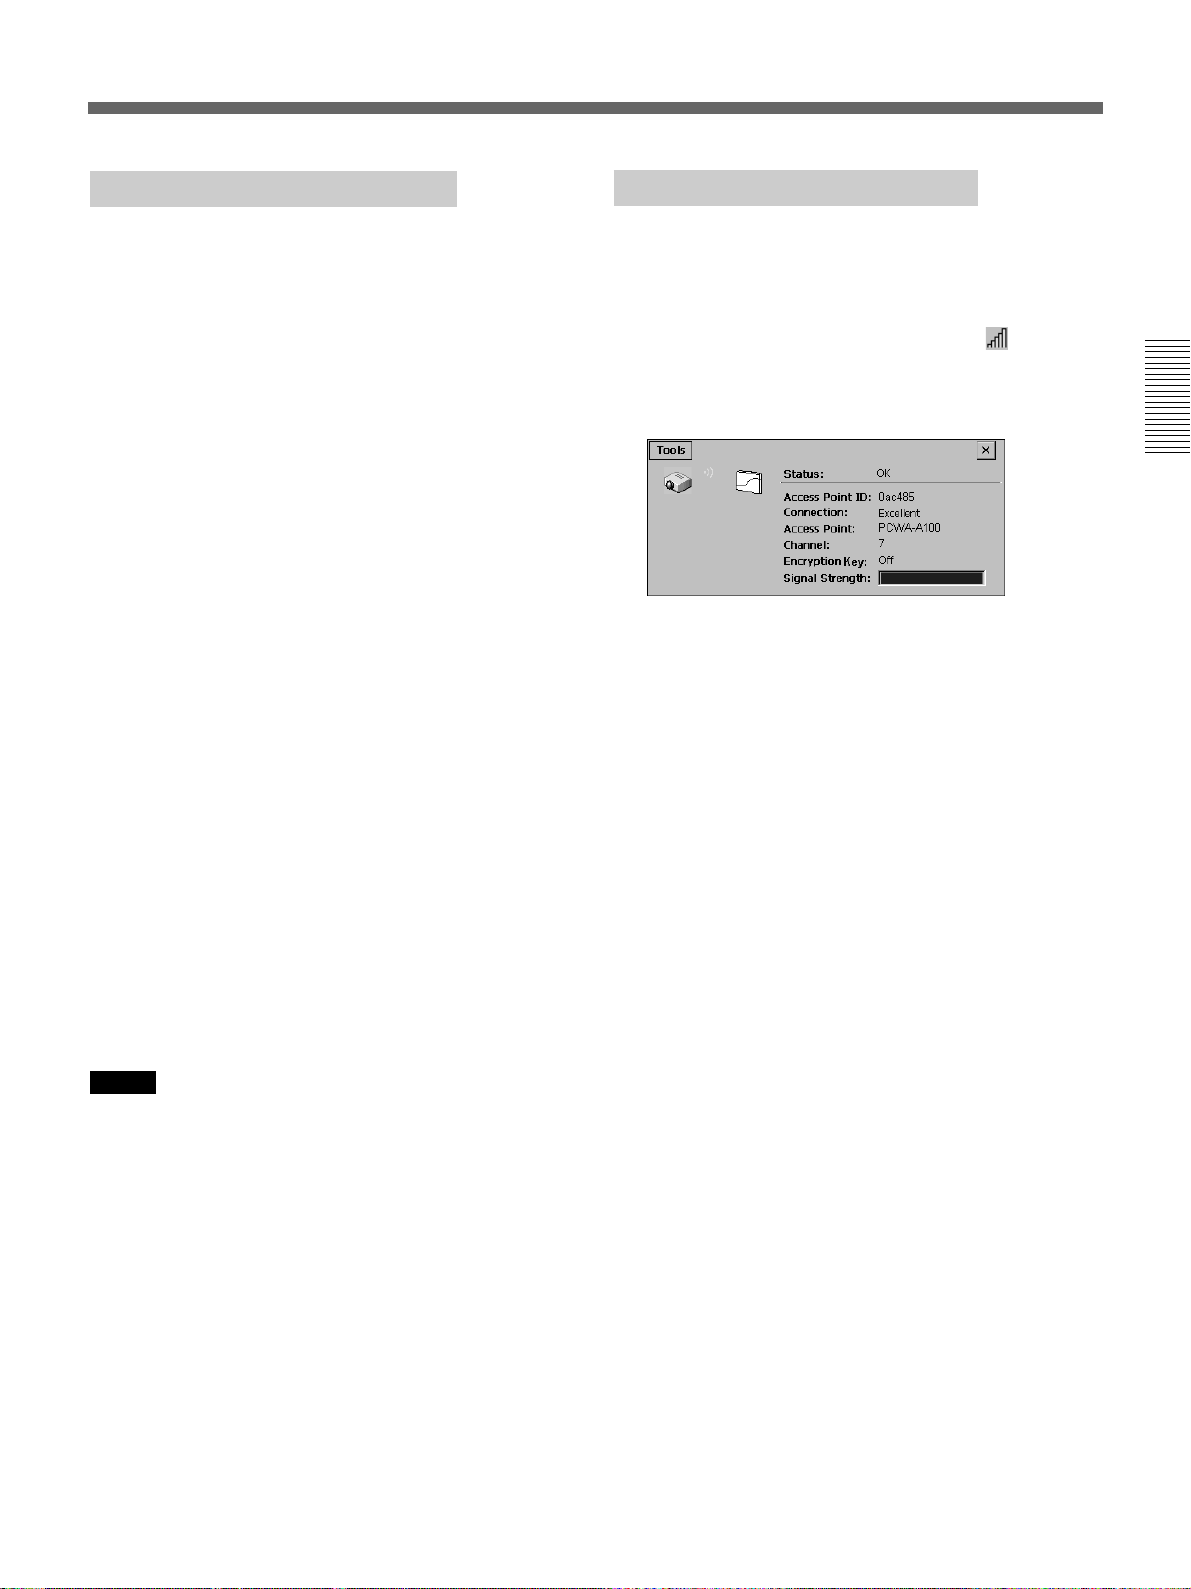
本 機とアクセスポイントが正しく接続されているか確認することがで
きます。
1 「NetworkProjector」画面のタスクバー上の (受信レベル
表示)アイコンをダブルクリックする。
アクセスポイントとの接続状態を表示する画面が出ます。
2 次の項目を確認する。
・Status:本機がワイヤレスLANPCカードを正しく認識してい
る場合は[OK]と表示されます。
・AccessPointID:アクセスポイントID 名
・Connection:アクセスポイントとの接続の状態
・AccessPoint:接続しているアクセスポイントの 情 報
・Channel:使用しているチャンネル
・EncryptionKey:アクセスポイントで設定した無線暗号キー
の有無
・SignalStrength:本機とアクセスポイントとの通信レベル
Access Point IDが「searching
きは
Nickname、AccessPointIDまたはEncryptionKeyが正しいか確
認してください。
[Tools](ツール)メニューから[設 定 ]を選ぶと「ワイヤレスLAN 設
定」ダイアログボックスが表 示されます 。正しくない場合は、「ワイヤ
レスLA N の 設定をする」(10(JP)ページ)の手順
正しく設定してください。
」(検索中)と表示されたと
3〜 8に従って
11 (JP)
Page 12
プロジェクターのセットアップ
日付、時刻の設定をする
プロジェクターの「NetworkProjector」画面のタスクバーに表示さ
れる時計の設定をします。
1 「NetworkProjector」画面で[スタート]メニューから[コント
ロールパネル]をクリックする。
2 [日付/時刻]アイコンをダブルクリックする。
3 日付と時刻の設定をする。
リモートコマンダーの
ケーションを登録する(
FX50
付属のリモートコマンダーのFUNCTION(ファンクション)1、2キー
にあらかじめ お 好きなアプリケーションを 登 録しておくと、これらの
キーを押すだけで、アプリケーションを起 動させることができます。
FUNCTION3キーには、工場出荷時スクリーンキーボードが登録さ
れています。登録を変更したり、取り消すことはできません。
◆ スクリーンキーボードについて詳しくは、29(JP)ページをご覧ください。
)
FUNCTION
VPL-PX15、VPL-
キーにアプリ
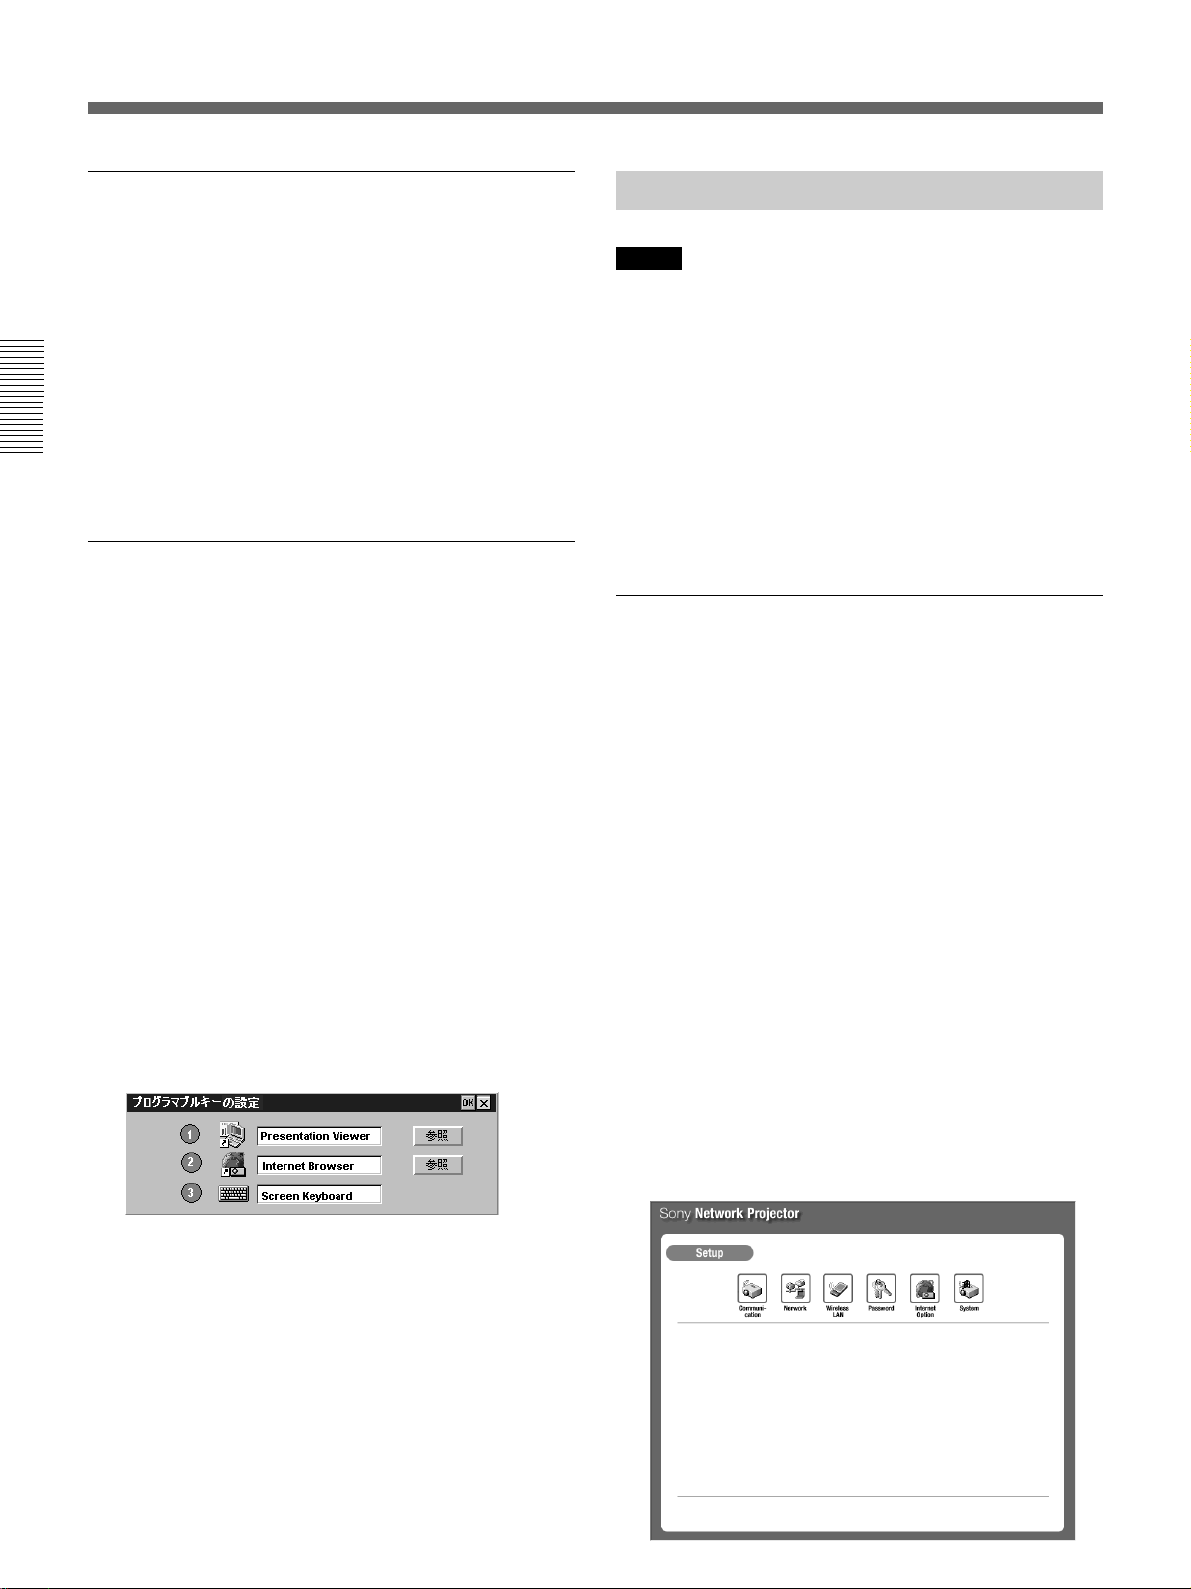
1 「NetworkProjector」画面で[スタート]メニューから[コント
ロールパネル]をクリックする。
2 [プログラマブルキー]アイコンをダブルクリックする。
「プログラマブルキーの設定」ダイアログボックスが表示されま
す。
コンピューターからセットアップする
ご注意
・IPアドレスが工場出荷時のままの場合、コンピューター で プロジェ
クター の セットアップ を 行 うときは 、設 定を行うコンピューターだけ
が本機と接続されている環境で行ってください。
・コンピューターからプロジェクターにアクセスする際、ブラウザの
設定が「プロキシサーバーを使用する」になっている場合は、プ
ロジェクターの I P アドレスを「プロキシサーバーを使用しない」に
設定してください。
・ブラウザのバージョンによっては、パスワードを受け付けないこと
があります。その場合は、ブラウザを起動し直してください。
セットアップの画面を表示する
1 コンピューター の ブ ラウ ザ(InternetExplorer4.0以上または
NetscapeNavigator4.5x、4.7x)を起動する。
2 ブラウザのアドレ スを「http://xxx.xxx.xxx.xxx(プロジェクター
のIPアドレス)/setup」と入力する。
IPアドレスを工場出荷時のまま変更していない場合は、
「http://192.168.0.1/setup」(LANPCカードご使用の場合)
または「http://192.168.0.2/setup」(ETHER 端子ご使用の
場合)を入力してください 。
IPアドレスが 0 で 始 まる 場 合 は 、0 をとっ て 入 力し てください。
例:192.168.000.001→192.168.0.1
[パスワード入力]のダイアログボックスが表 示されます。
3 Administrator(アドミニ ストレーター)の[Name](名前)と
[Password](パスワード)を入力する。
パスワードの設定を工場出荷時のまま変更していない場合は、
[Name]に[root]と入 力してください。
「Setup」(セットアップ )画面が表示されます。
3 登録したいキー(1または2)の[参照]ボタンをクリックし、ア
プリケーション一覧から好きなアプリケーションをクリックする。
4 もう一方のキーにも登録したい場合は、手順 3を繰り返 す。
5 OKボタンをクリックする。
12 (JP)
Page 13
パスワードを設定する
ワイヤレス
LAN
の設定
1 「Setup」(セットアッ プ )画面で[Password](パスワード)アイ
コンをクリックする。
パスワード設定のダイアログボックスが表 示されます。
設定のしかたは、プロジェクターから設定する場 合と同じで
す。
◆「パスワードを設 定 する」(8(JP)ページ)をご 覧ください。
2 [APPLY](適用)ボタンをクリックする。
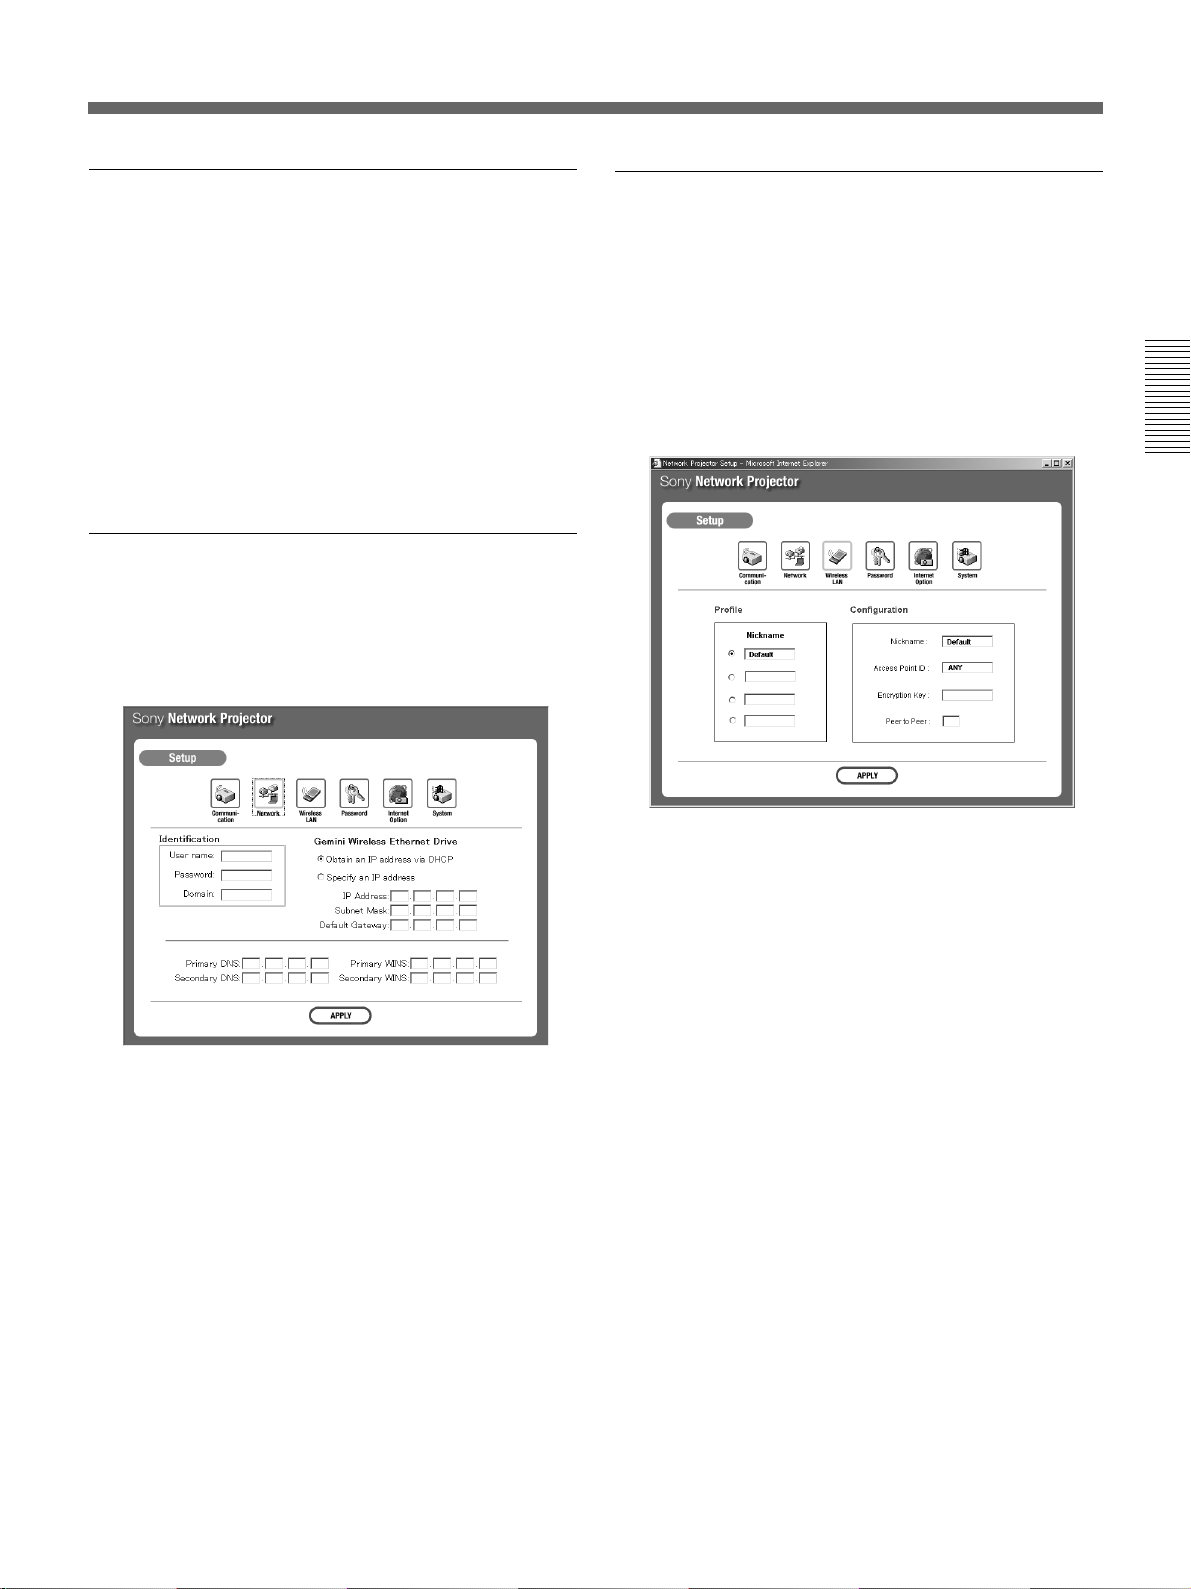
ネットワークの設定をする
1 「Setup」(セットアップ )画面で[Network](ネットワーク)アイ
コンをクリックする。
ネットワーク設定のダイアログボックスが表 示されます。
1 「Setup」(セットアップ)画面で[WirelessLAN](ワイヤレス
LAN)アイコンをクリックする。
Nickname(ニックネーム)、AccessPointID(アクセスポイン
トID)、EncryptionKey(無線暗号キー)およびPeertoPeer
(ピアトゥピア)を設定するダイアログ ボックスが表示されます 。
設定のしかたは、プロジェクターから設定する場 合と同じで
す。
このダイアログボックスで、9(JP)ページの「ネットワークの 設
定をする」の手順
◆詳しくは、「ネットワークの設定を する」(9(JP)ページ)をご覧くだ
さい。
4〜 7 の項目を設定できます。
2 [APPLY](適用)ボタンをクリックする。
リスタート(再起動)の画面が出ます。
3 [RESTART](再起動)ボタンをクリックする。
プロジェクターの電源が入っていて、「NetworkProjector」画
面が出ていた場合は約10秒間画面が消え、その後再起動し
ます。
再起動を行わないとネットワークの設定が本機の動作に反映さ
れません。
◆「ワイヤレスLAN の設定をする−アクセスポイントを使用する場合
/PeertoPeer(アドホック)モードの場合」(10(JP)、11(JP)ペー
ジ)をご 覧ください。
2 [APPLY](適用)ボタンをクリックする。
13 (JP)
Page 14
プロジェクターのセットアップ
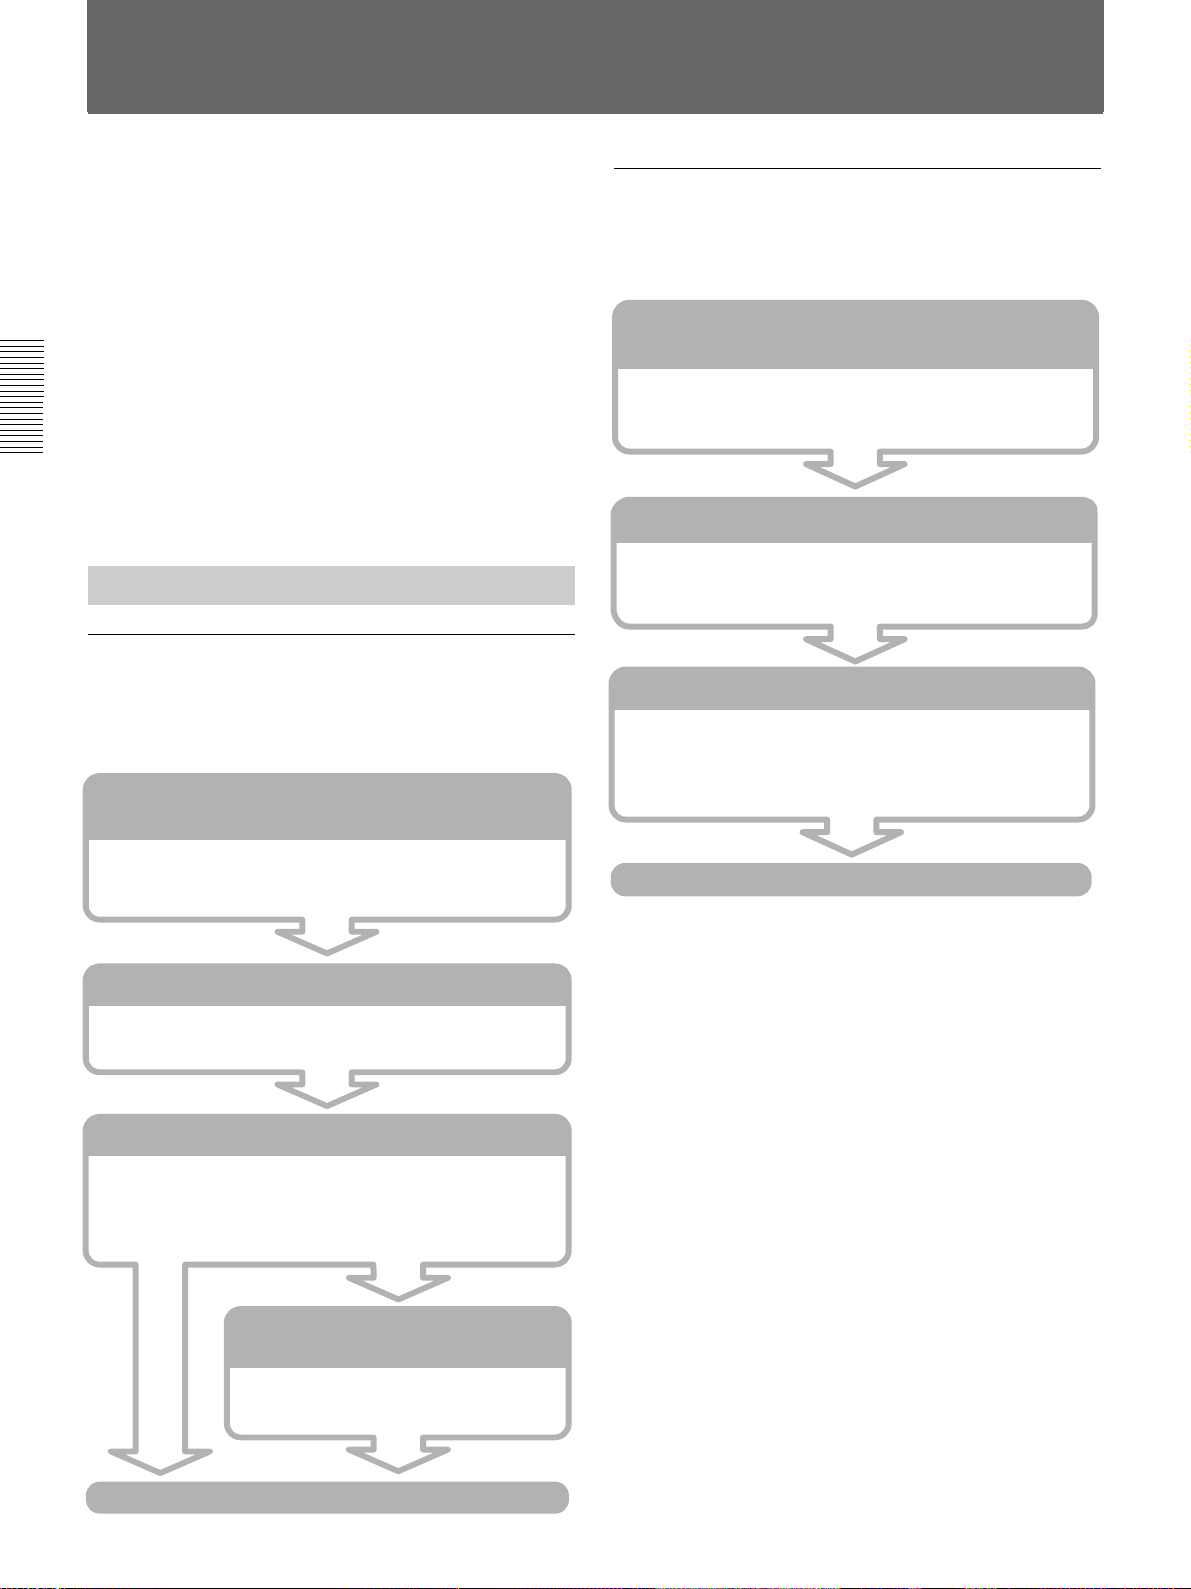
基本操作の流れ
ここで は 、ネットワークを介して行う操作や 本 機に 搭 載され て いる
ネットワークの機能を使った操作の流れを簡単に説明します。これ
らの操作には、大きく分けて、コンピューター で 行う操 作と、本機で
行う操作の2つの流れがあります。詳しくは、( )内 のページをご
覧ください。
操作の条件
LANに接続されている。
•
プロジェクターとコンピューターの電源が入っている。
•
設置設定メニューの「入力B機能」(VPL-PX15)または「入力C
•
機能」(VPL-FX50)が「オン」に設定されている。
INPUTC/RS-232C/RS-422A切り換えスイッチが「INPUTC」
•
に設定されている。(VPL-FE110J)
本機の入力が「INPUTB」(入力B)(VPL-PX15)また は「INPUT
•
C」(入力 C)(VPL-FX50、VPL-FE110J)になっている。
コンピューターで操作する
PowerPoint
実行する
PowerPointのファイルを使ったプレゼンテーションをコンピ ューター
の操作で行います。
コンピューターのブラウザを起動し、プロジェクターに
アクセスする (19ページ)
のファイルでプレゼンテーションを
Excel
コンピューターを操作してExcelのファイルをプロジェクターに投影
できます。
のファイルをプロジェクターに投影する
コンピューターのブラウザを起動し、プロジェクターに
アクセスする (
InternetExplorer4.0 以上または NetscapeNavigator4.5x、
4.7xを起動し、プロジェクターのIPアドレ スを 入 力しま す 。
PRESENTATION VIEWER
「アプリケーション選択」画面で[PRESENTATION
VIEWER]のアイコンを 選 択します。
投影するファイルを選ぶ
目 的 のファイル の ある場 所( コンピ ューター か プ ロジェクター
か)を選んでから、目的の Excelファイルを選びます。
WorksheetViewerが起動します。
を選ぶ
(23
19
(23
ページ)
ページ)
ページ)
InternetExplorer4.0 以上またはNetscapeNavigator4.5x、
4.7xを起動し、プロジェクターのIPアドレ スを 入 力しま す 。
PRESENTATION VIEWER
「アプリケーション選択」画面で[PRESENTATION
VIEWER]のアイコンを 選 択します。
プレゼンテーションを行うファイルを選ぶ
目 的 のファイル の ある 場 所( コンピューターか プ ロジェクター
か)を選んでから、目的の PowerPointファイルを選びます。
SlideViewerが起動します。
スライドショーの設定をする(21ページ)
表示するスライドの範囲や切り替えかたを
指定します。
を選ぶ (20ページ)
ページ)
(20
ファイルの投影
14 (JP)
スライドショーの実行
Page 15
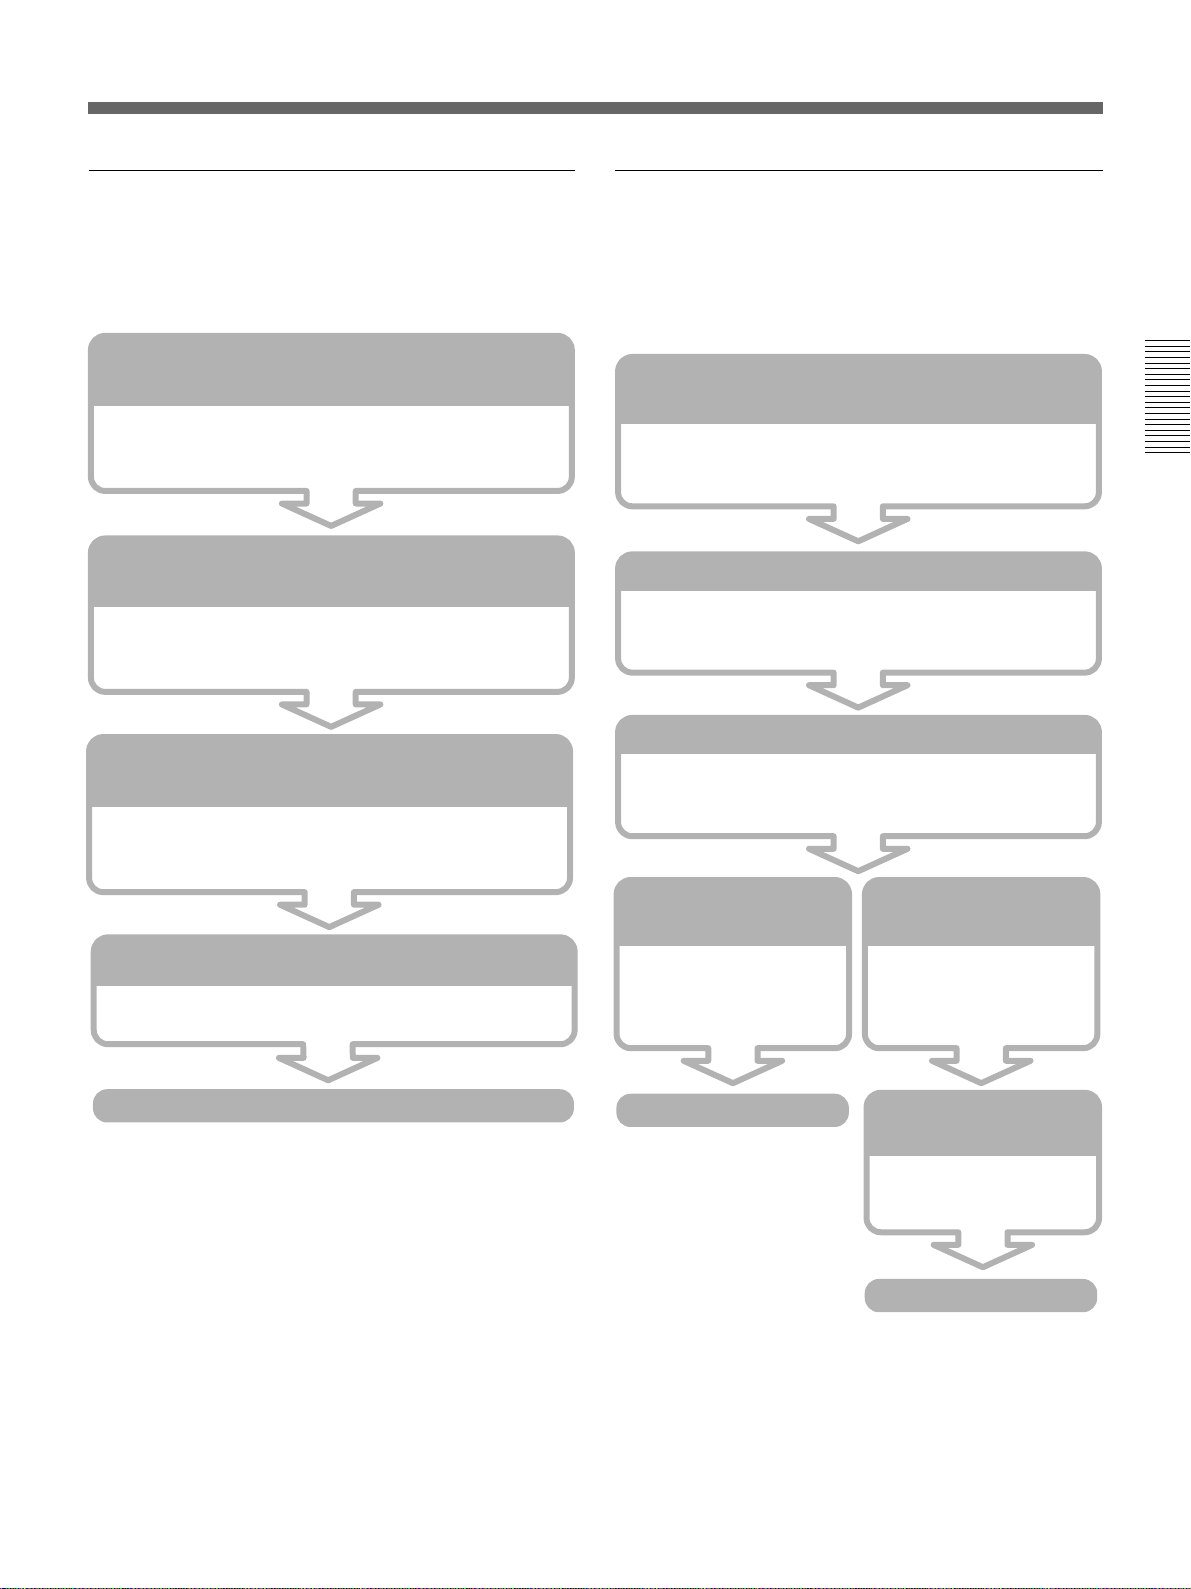
コンピューターに保存されている画像ファイルを
プロジェクターに投影する
プロジェクターに保存されている画像ファイルで
スライドショーを実行する
コンピューターを操作し て 画 像ファイルをプ ロジェクターに 投 影 でき
ます。
コンピューターのブラウザを起動し、プロジェクターに
アクセスする (
InternetExplorer4.0 以上またはNetscapeNavigator4.5x、
4.7xを起動し、プロジェクターのIPアドレ スを 入 力しま す 。
プロジェクターの
「アプリケーション選択」画面で[IMAGEVIEWER]のアイコ
ンを選 択します。
投影するファイルのある場所を選ぶ
「ファイルの場所」画面で「COMPUTER」(コンピューター)を
選択します。ImageViewerが起動します。
投影するファイルを選ぶ
[参照 ...]から目的の画像ファイルを選びます。
Image Viewer
を選ぶ (23ページ)
(23
(24
ページ)
19
ページ)
ページ)
コンピューターの操 作 で 、プロジェクターに保存されて いる画 像ファ
イルの投影や、本機 であらかじ め 設 定し て あるファイル(.SHOファ
イル )の スライド ショーを 実 行しま す 。
コンピューターのブラウザを起動し、プロジェクターに
アクセスする (
InternetExplorer4.0 以上またはNetscapeNavigator4.5x、
4.7xを起動し、プロジェクターのIPアドレ スを 入 力しま す 。
プロジェクターの
「アプリケーション選択」画面で[IMAGEVIEWER]のアイコ
ンを選 択します。
投影するファイルのある場所を選ぶ
「ファイルの場所」画面で「PROJECTOR」(プロジェクター)を
選択します。ImageViewerが起動します。
投影するフォルダーを選ぶ
「フォルダー/.SHOファイル
選択」画面でフォルダーを
選びます。
Image Viewer
ページ)
(
25
を選ぶ
(25
(25
スライドショーを行うファイ
ルを選ぶ (
「フォルダー /.SHOファイル
選択」画面でSHOファイルを
選びます。
ページ)
19
ページ)
ページ)
ページ)
25
画像の投影
画像の投影
スライドショーの設定を
する (
表示するスライドの切り替えか
たを指 定します。
スライドショーの実行
ページ)
25
15 (JP)
Page 16

プロジェクターのセットアップ
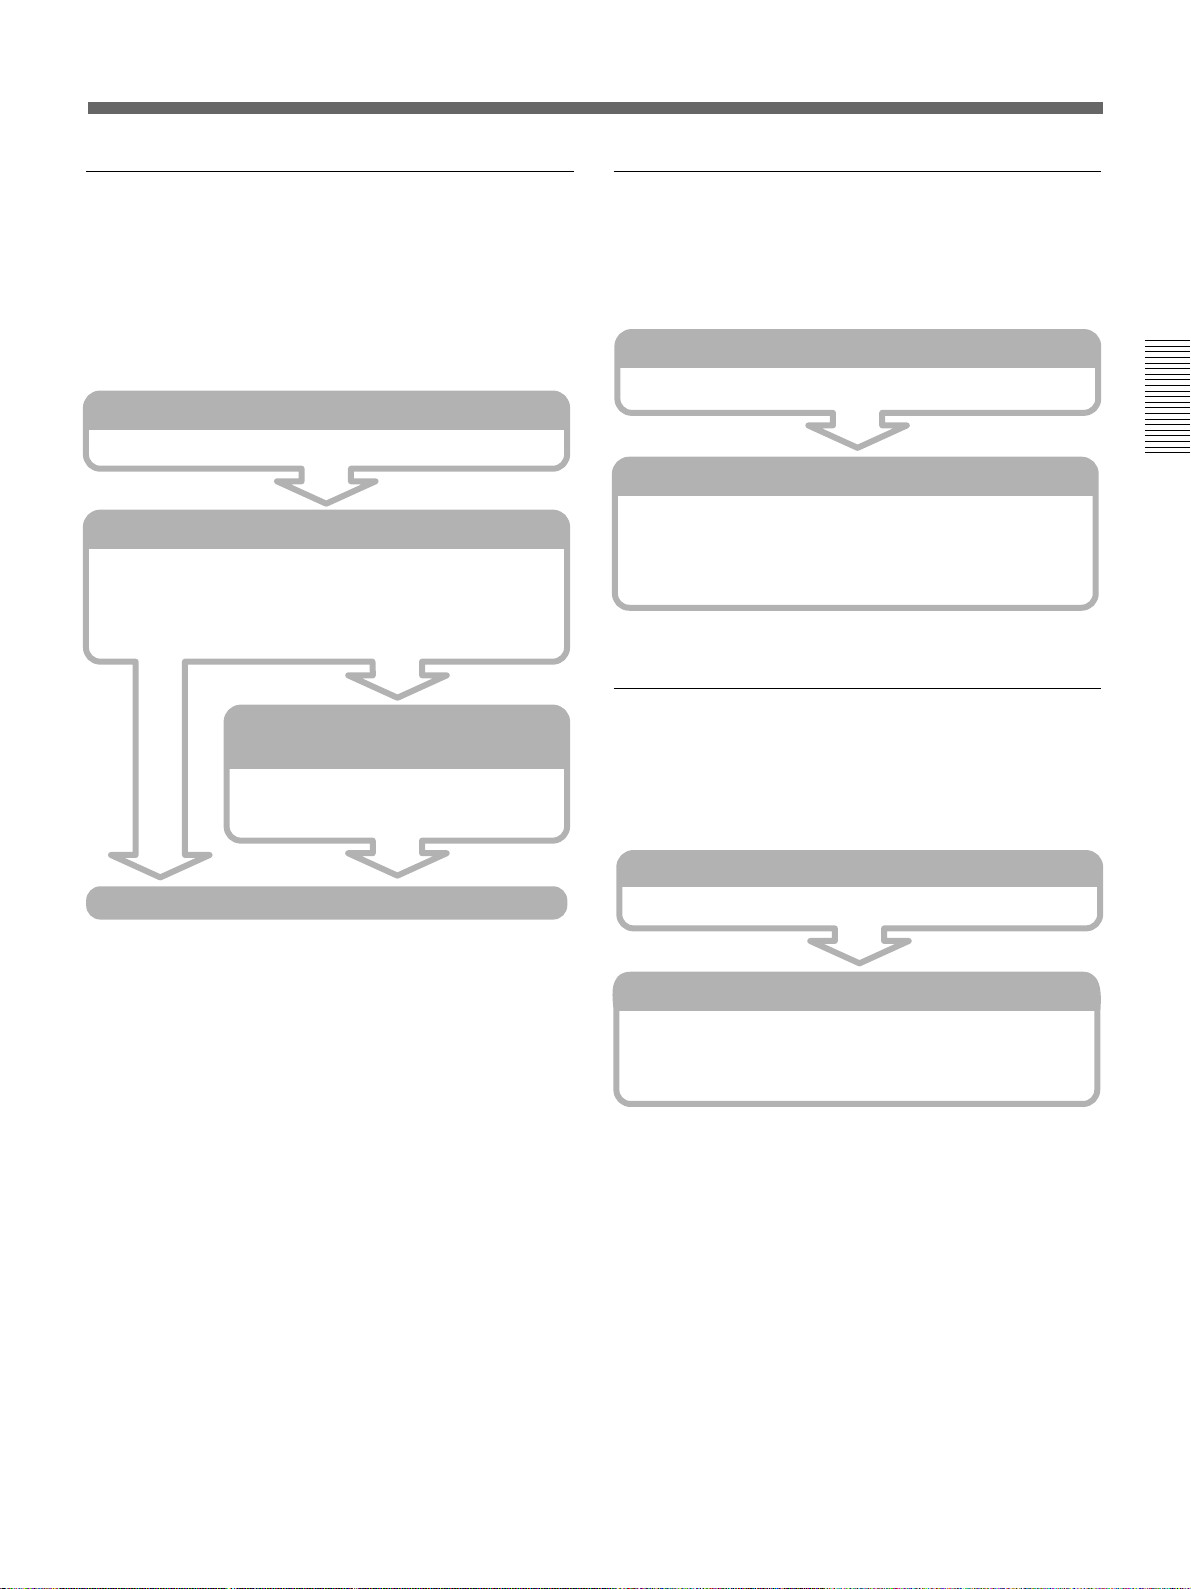
基本操作の流れ
File Manager
(ファイルマネージャー)でファ
イルを管理する
プロジェクターのストレージへのファイルの 追 加または 削 除を行いま
す。
コンピューターのブラウザを起動し、プロジェクターにアクセス
する (
InternetExplorer4.0 以上またはNetscapeNavigator4.5x、
4.7xを起動し、プロジェクターのIP アドレスを 入 力します 。
File Manager
「アプリケーション選択」画面で[FILEMANAGER]のアイコ
ンを選 択します。
ファイルを追加する
追加したいファイルをコン
ピューターから選 びます 。
を起動する (26ページ)
ファイルを削除する
(
ページ)
26
(26ページ)
プロジ ェクターの ストレージ
から削除したいファイルを
選びます。
ページ)
19
プロジェクターで操作する
コンピュータ−に保存されている
PowerPoint
ファイルでプレゼンテーションを実行する
LAN上のコンピューターに保存されているファイルを、プロジェク
ターを 操 作し て 呼 び 出し、プレゼンテーションを 実 行します。
マイプロジェクターを起動する (
[マイプロジェクター]のアイコンをダブルクリックします。
プレゼンテーションを行うファイルを選ぶ (31ページ)
目的のファイルのあるLAN上のコンピューター名を入力し、
PowerPointのファイルを選びます。SlideViewer が起動し、
選んだファイルがスライド表 示されます。
スライドショーの設定をする
表示するスライドの範囲や切り替えかたを
指定します。
(
31
31
の
ページ)
ページ)
追加を実行
削除を実行
プロジェクターをコントロールする
プロジェクターの各種調整や設定を行います。
コンピューターのブラウザを起動し、プロジェクターにアクセス
する (19ページ)
InternetExplorer4.0 以上またはNetscapeNavigator4.5x、
4.7xを起動し、プロジェクターのIP アドレスを 入 力します 。
コントロール画面を表示する (27ページ)
[MORE...]ボタンをクリックしま す 。
プロジェクターの各種調整、設定を行う
スライドショーの実行
16 (JP)
Page 17
プロジェクターまたはメモリーカードに保存され
ている
PowerPoint
のファイルでプレゼンテー
ションを実行する
プロジェクターのストレージまたは メモリーカードに 保 存され た
PowerPointのファイルを、プロジェクターを操作して呼び出し、プ
レゼンテーションを 実 行します。
Presentation Viewer
[PresentationViewer]のアイコンをダブルクリックします。
を起動する (31ページ)
コンピュータ−に保存されている
Excel
のファイ
ルを投影する
LAN上のコンピューターに保存されているExcelのファイルを、プ
ロジェクターを操作して呼び出し、プロジェクターに投影できます。
マイプロジェクターを起動する (
[マイプロジェクター]のアイコンをダブルクリックします。
投影したいファイルを選ぶ
(32
ページ)
32
ページ)
プレゼンテーションを行うファイルを選ぶ (
「ファイルを開く」ダイアログボックスから目的のPowerPointの
ファイル を 選 び ま す 。SlideViewerが起動し、選んだファイル
がスライド表示されます。
スライドショーの設定をする
表示するスライドの範囲や切り替えかたを
指定します。
スライドショーの実行
31
(
ページ)
ページ)
31
目的のファイルのあるLAN上のコンピューター名を入力し、
Excelのファイルを選びます。WorksheetViewerが起動し、
選んだファイルがプロジェクターに表示されます。
プロジェクターまたはメモリーカードに保存され
ている
プロジェクターのストレージまたはメモリーカードに保 存されて いる
Excelのファイルを投影できます。
Excel
Presentation Viewer
[PresentationViewer]のアイコンをダブルクリックします。
投影したいファイルを選ぶ
「ファイルを開く」ダイアログボックスから目的のExcelのファイ
ルを選 びます。WorksheetViewerが起動し、選んだファイル
がプロジェクターに表 示されます。
のファイルを投影する
を起動する
(32
(32
ページ)
ページ)
17 (JP)
Page 18
プロジェクターのセットアップ
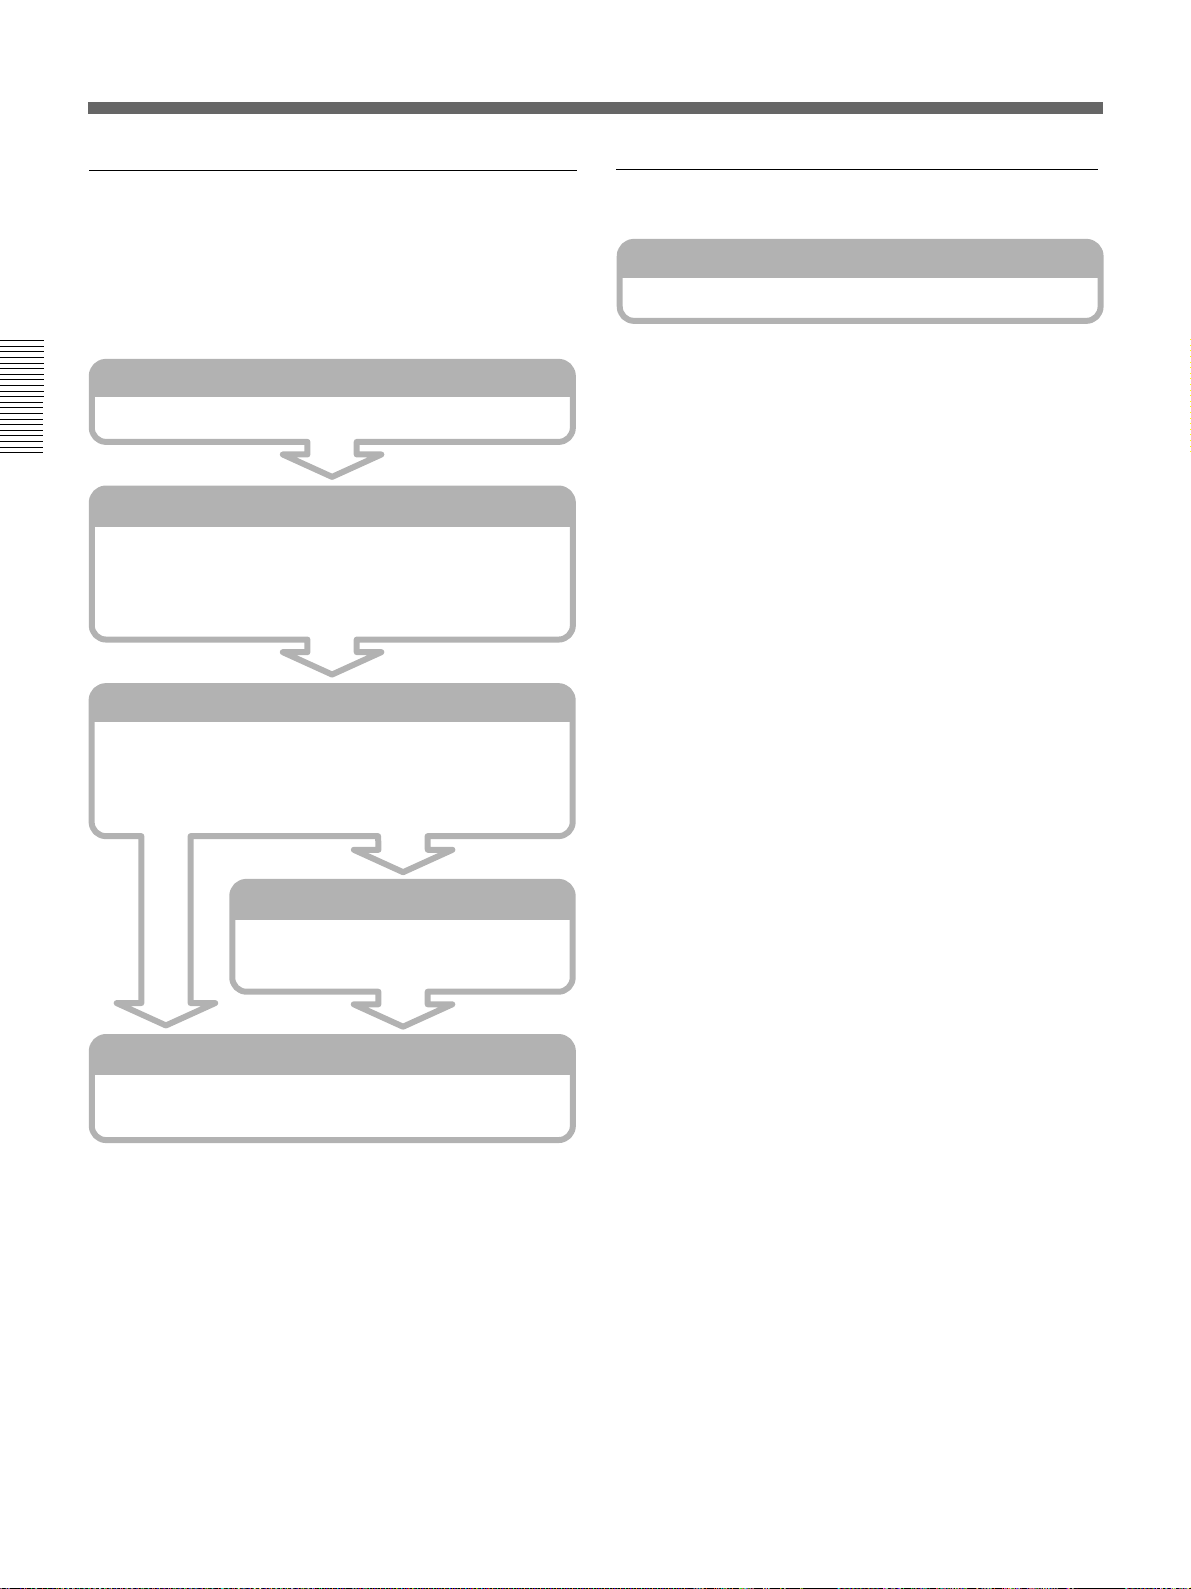
基本操作の流れ
プロジェクターまたはメモリーカードに保存され
ている画像ファイルでスライドショーを実行する
プロジェクターのストレージまたはメモリーカードに 保 存されている画
像ファイルを、プロジェクターの操作で呼び出し、スライドショーを実
行します。
Image Viewer
[ImageViewer]のアイコンをダブルクリックします。
スライドショーを行うファイルを選ぶ (33ページ)
スクリーンの左側のフォルダー一覧から、目的のファイルのある
フォルダーをクリックします。フォルダー内にあるスライドが一覧
表 示されます。
表示したいスライドを選ぶ (
表示したいスライドをすべて選びます。一覧表示されているス
ライドすべてを選択するときは、[スライドショー]メニューの
[すべて選択]をクリックします。
を起動する (33ページ)
ページ)
34
インターネットに接続する
Internet Browser
[InternetBrowser]のアイコンをダブルクリックします。
を起動する (35ページ)
スライドの設定をする (
表示する1枚1 枚のスライドについてズー
ムや 回 転などの 設 定をします。
スライドショーの実行
自動または手動で切り換えるかを選び、スライドショーを実行し
ます。
ページ)
34
18 (JP)
Page 19
コンピューターで操作する
はじめに
操作の前に
■
VPL-PX15
設置設定メニューの「入力B機能」が「オン」に設定されているこ
とを確認してください。
■
VPL-FX50
設置設定メニューの「入力C機能」が「オン」に設定されているこ
とを確認してください。
■
VPL-FE110J
本機後面のINPUT C/RS-232C/RS-422A 切り換えスイッチが
「INPUTC」の位置に設定されているか確認してください。
の場合
の場合
の場合
ご注意
・複数台のコンピューターから本機に同時にアクセスしないでくださ
い。
・コンピューターからプロジェクターにアクセスす る際、ブラウザの設
定が「プロキシサーバーを使用する」になっている場合は、プロ
ジェクターのIPアドレ スを「プロキシサーバーを使用しない」に設
定してください。
・ブラウザのバージョンによっては、パスワードを受け付けないこと
があります。その場合は、ブラウザを起動し直してください。
・アプリケーションを終了する前にコンピューターのブラウザを閉じ
た 場 合 、30秒 後 に プ ロジェクターは 自 動 的 に「Network
Projector」画面に戻ります。再度ブラウザを起動し直してくださ
い。
画面各部の名前と機能
操
作
ブラウザを起動して本機にアクセスする
コンピューターから本機を操作するには、まずコンピューターのブラ
ウザ(InternetExplorer4.0以上またはNetscapeNavigator4.5x、
4.7x)を起動して本機にアクセスします。
1 本機の電源を入れる。
2 入力を「INPUTB」(VPL-PX15)または「INPUTC」(VPL-
FX50、VPL-FE110J)にする。
3 コンピューターの電源を入れる。
4 コンピューターのブラウザを起動する。
5 本機の IPアドレ スを 入 力 する。
「http://xxx.xxx.xxx.xxx(プロジェクターのIPアドレス)」と
入力します。
IPアドレ スは、本機の「NetworkProjector」(ネットワークプロ
ジェクター)画面のタスクバーに表示されています。
「アプリケーション選択」画面が表示されます。
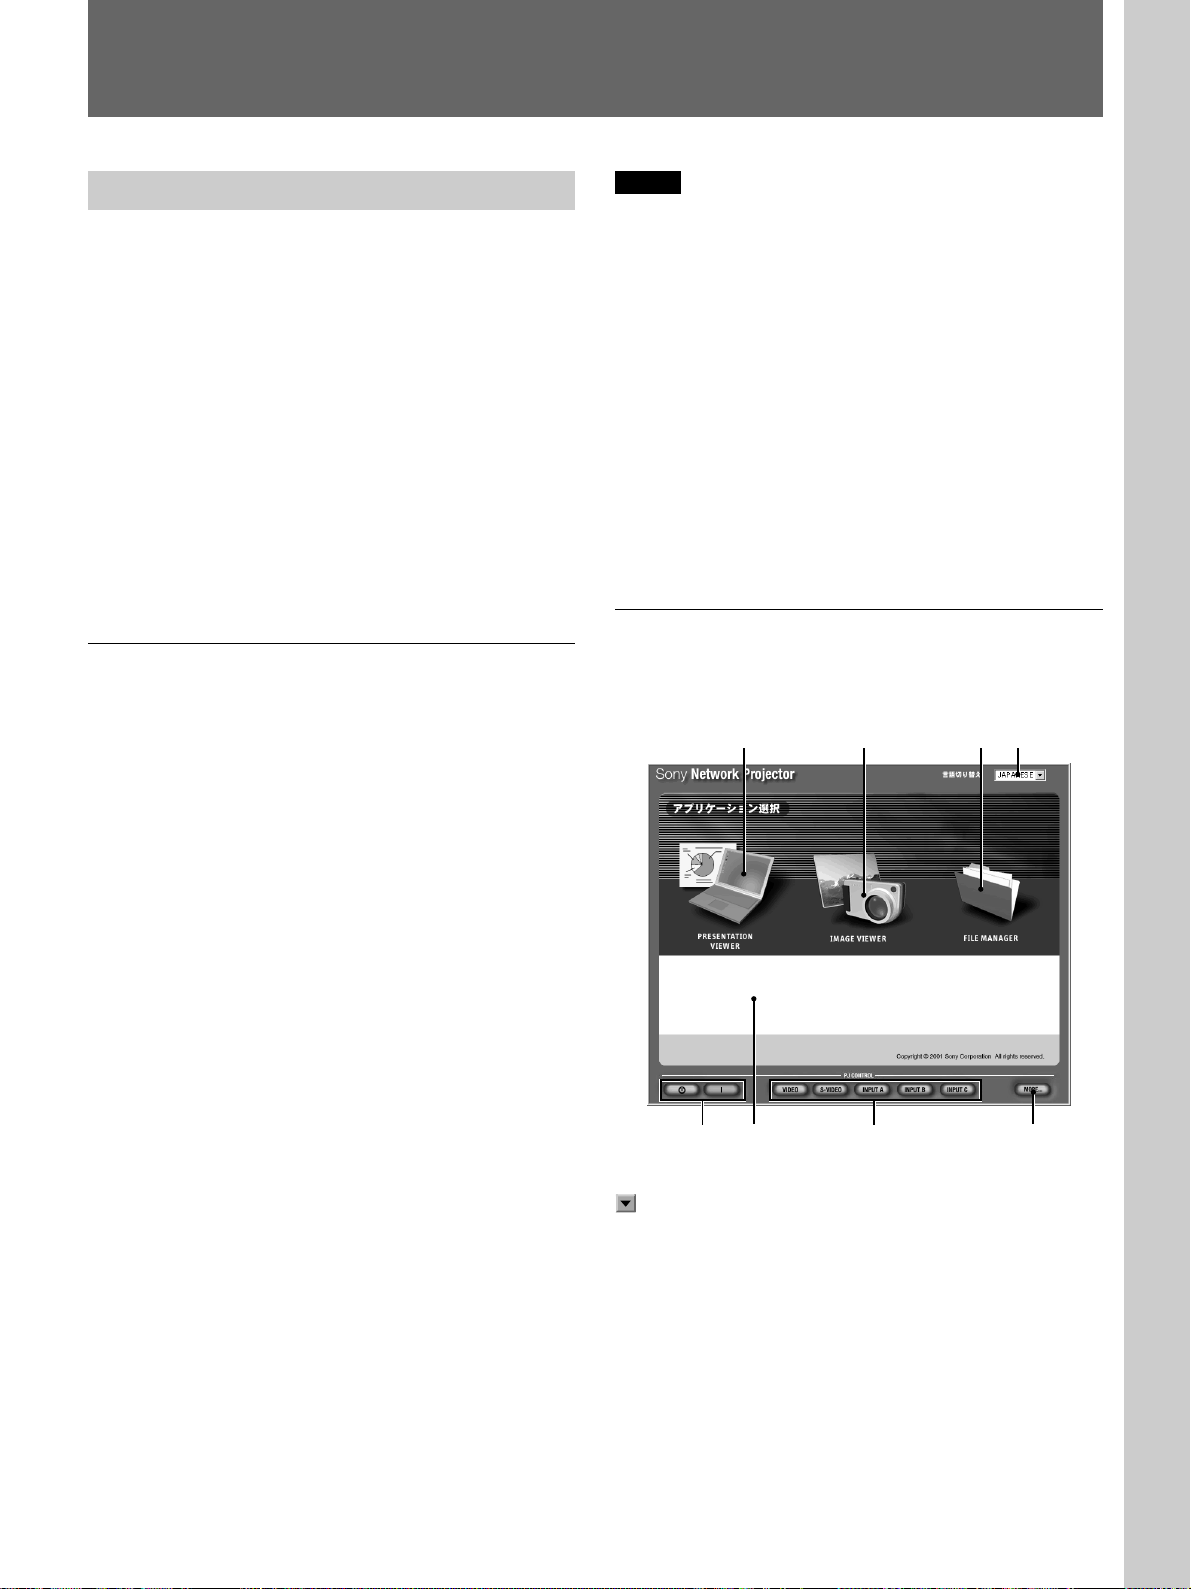
プロジェクターにアクセスすると「アプリケーション選択」画面が開
きます。画面の各部の名前と機能は以下のとおりです。
423
56
1 言語選択ボタン
をクリックすると言語一覧のドロップダ ウンリストが表示されます。
各画面下に表示されるヘルプの言語を、日本語、英語、フランス
語、ドイツ語、スペイン語、イタリア語から選べます。
1
87
本機にパスワードを設定してある場合、パスワード入力画 面が
表示されます。ユーザーの[名前]と[パスワード]を入力します。
◆「アプリケーション選択」画面については、「画面各部の名前と機
能」をご覧ください。
このあとの操 作は、20(JP)〜 28(JP)ページをご覧ください。
2
FILE MANAGER
プロジェクター内のファイル管理を行うFileManagerを起動しま
す。
3
IMAGE VIEWER
ImageViewerを起動し画像ファイルを投影するための画面を表示
します。
(ファイルマネージャー)アイコン
(イメージビューワー)アイコン
(続く)
19 (JP)
Page 20
コンピューターで操作する
4
PRESENTATION VIEWER
ビューワー)アイコン
PowerPointファイルのビューワー(SlideViewer)またはExcelファ
イルのビューワー(WorksheetViewer)を起動するための選択画
面を表示します。
1(電源オン/スタンバイ)ボタン
5 I
/
プロジ ェクター の 電 源 を 入 れ たり、スタン バ イ状 態 にします。
ヘルプ
6
各選択項目にポインタを合わせるとその機能説明が表示されます。
この あとの 画 面 でも、この場所に表示されるヘルプをご覧になると
簡単に操作できます。
7 入力選択ボタン
プロジェクターの入 力を 切り換えます。
INPUTCボタンはVPL-PX15にはありません。
8
MORE...
プロジェクターの各種設定ができます。
(詳細)ボタン
(プレゼンテーション
• 日本語のフォントはすべてゴシック体になります。
• アルファベットは、以下のフォントが サ ポ ートされ て います。
Arial、BookmanOldStyle、ComicSansMS、Impact、Symbol、
Tahoma、TimesNewRoman、Wingdings
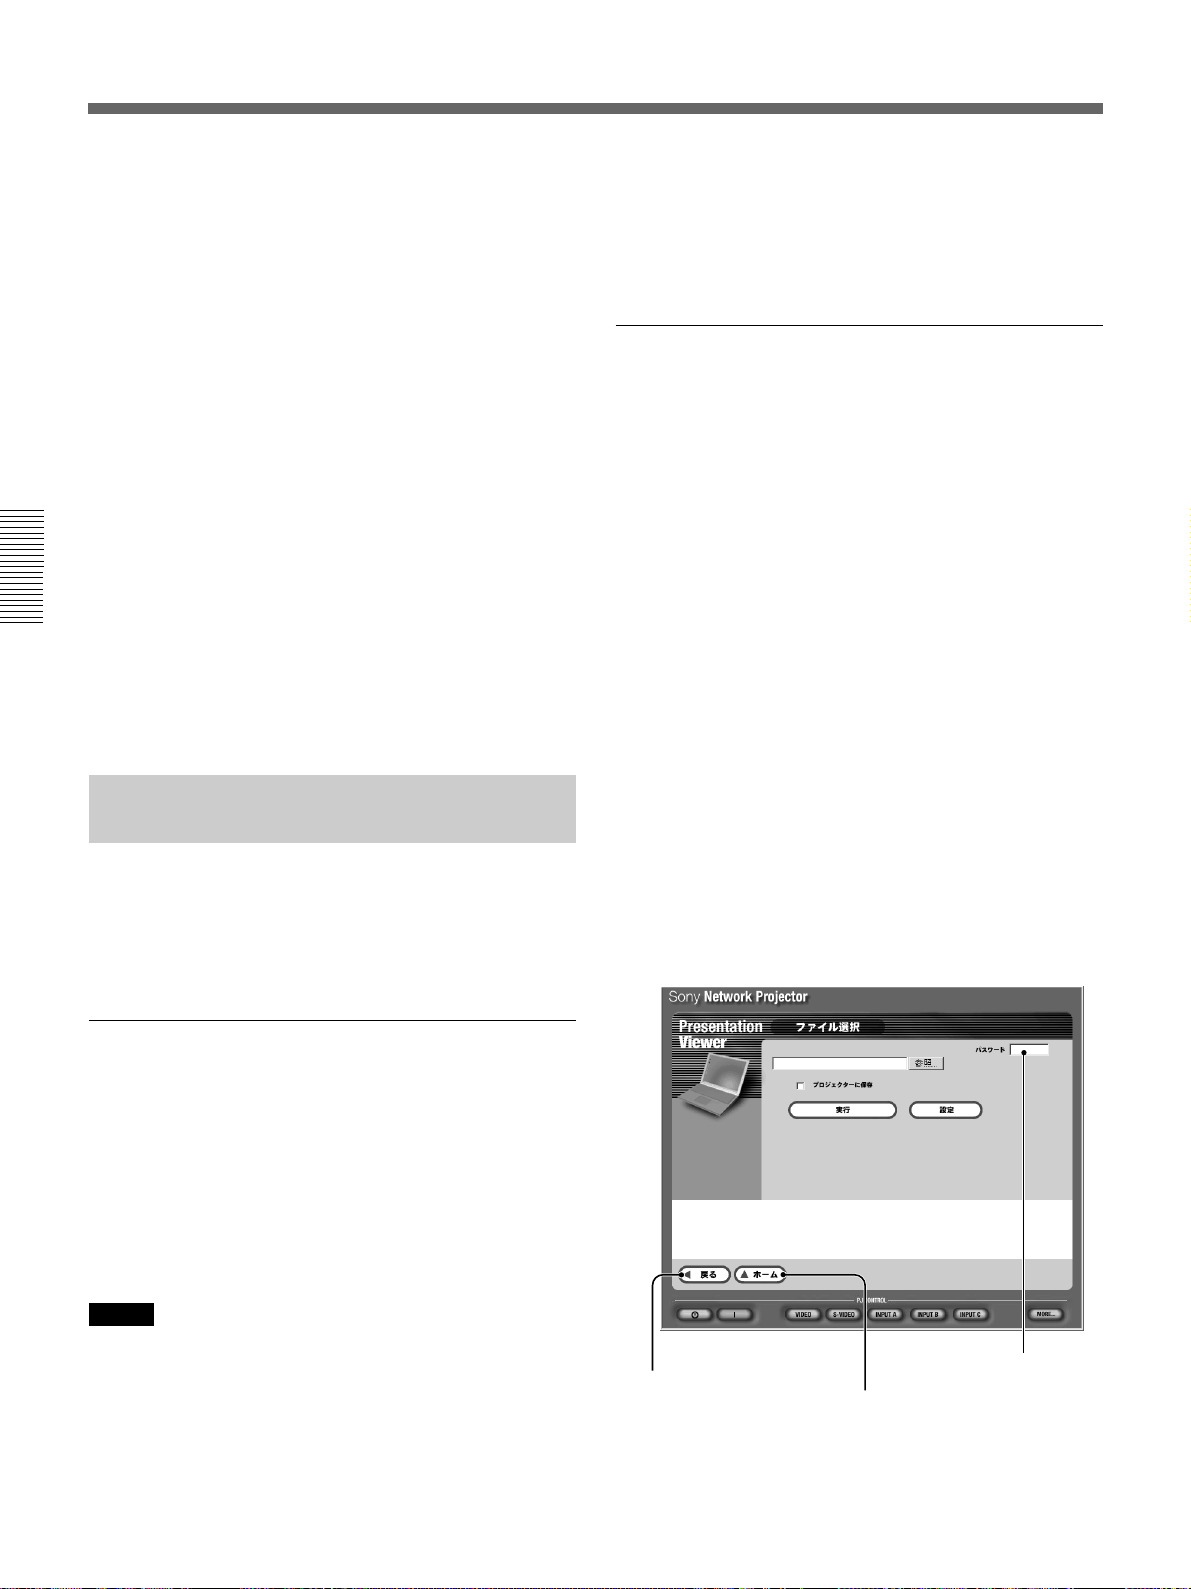
プレゼンテーションを実行する
1 「 ア プリケ ー ション 選 択 」画 面 で[ PRESENTATION
VIEWER]のアイコンをクリックする。
「ファイルの場所」画面が表示されます。
2 プレゼンテーションを 行 い た い ファイル の ある場 所 を クリックし
て選ぶ。
[COMPUTER](コンピューター):コンピューターに 保 存され
ているファイル
[PROJECTOR](プロジェクター):プ ロジェクターに 保 存され
ているファイル
「ファイル選択」画面が表示されます。
3 プレゼンテーションを行いたいファイルを選ぶ。
Slide Viewer
(スライドビューワー)で
プレゼンテーションを行う
会議室などのプロジェクターでPowerPointのファイルを表示して
プレゼンテーションを 行うとき、会議室内でスライドショーを見なが
ら、または出 席 者 からは 見えな い 場 所 でコンピューターを操 作し て、
プレゼンテーションをコントロール することができます。
Slide Viewer
• PowerPoint のファイルのスライド ショーを 実 行 で きま す 。
• 目的別スライドショーの表示ができます。
• 発表者用のノートの表示/非表示を選択できます。
• スライドの表示/非表示を選択できます。
• スライドの切り替えのタイミングを選 べます。自動的に何秒間隔で
切り替えるか、またはマウスをクリックして切り替えるかを選びま
す。
ご注意
• ネットワークの環境によってファイルの転送などに時間がかかるこ
とがあります。
• 本機のSlideViewerは簡易ビューワ−機能のため、PowerPoint
の機能のうち一部サポートされないものもあります。プレゼンテー
ションを始 める前に、実 際にプロジェクターに 投 影し て 確 認 するこ
とをおすすめします。
でできること
手順
2で[COMPUTER
[参照...]をクリックします 。ファイル選択の画面が表示される
ので、プレゼンテーションを行いたい PowerPointファイル
(.pptまたは.ppsファイル)をクリックして 選 びます。テ キ スト
ボックスにファイル名を入 力しても選 択できます 。選んだファイ
ル名がテキストボックスに表 示されます 。
[戻る] ボタン
クリックするとひとつ
前の画面に戻ります。
]を選んだとき
[パスワード]設定ボックス
[ホーム]ボタン
クリックすると「アプリケーション
選択」画面に戻ります。
20 (JP)
Page 21
選んだファイルをプロジェクターに保存したい場合は
[プロジェクターに保存]にチェックを 付 け ます 。
このとき、必要に応じてこのファイルにパスワードを設定するこ
とができます。[パスワード]テキストボックスに パ スワ ードを設
定します 。設定すると、以降このパスワードを入 力しないとファ
イルを 開くことができなくなります 。
ファイル の 保 存 は 、[実行]ボタンまたは[設定]ボタンを押し
たときに行われます。
ご注意
FileManager でファイルを削除するときは、ファイルにパス
ワードを 設 定し て い ても、パ スワードの入力なしで削除できま
す。
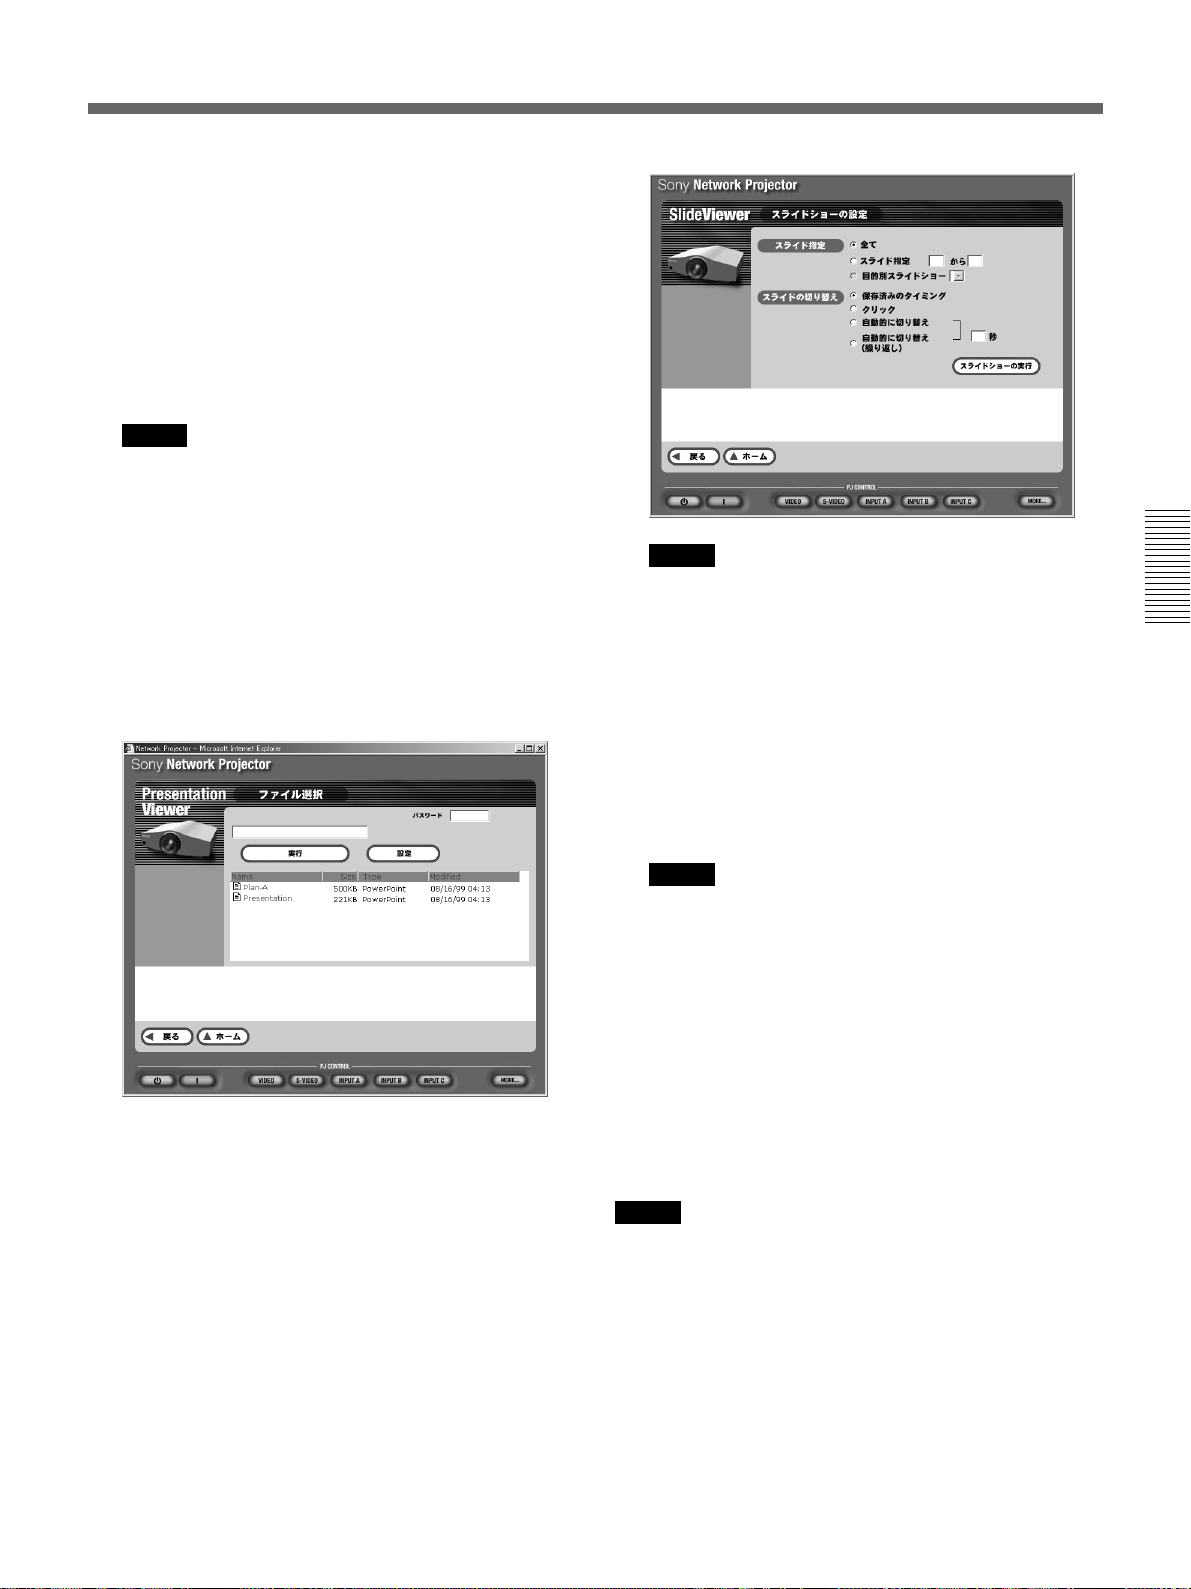
手順2で[
プロジェクターのストレージまたはメモリーカード(VPL-PX15、
VPL-FX50)のファイルの一覧リストが 表 示されます。プレゼン
テーションを行いたいPowerPointのファイルをクリックし て 選
びます。選んだファイル名がテキストボックスに表示されます。
PROJECTOR
]を選んだとき
ご注意
コンピューター上のファイル で プレゼンテーションを行う場合、
[設定]をクリックするとファイルが プロジェクターに 転 送されま
す。「スライドショーの設定」画面が出るまでに多少時間がかか
りま す 。転送にかかる時間はファイルの容量により異なります。
転送中はプロジェクターの画面にメッセージが 表 示されます。
4 必 要 に 応じて 、スライド ショー の 設 定 を す る 。
「ファイル選択」画面で[設定]をクリックしま す 。
「スライド ショー の 設 定 」画面が表示され、スライドショー を 実 行
するときの オ プ ション設定や、選択したスライドの切り替え方 法
を選 ぶことができます。それぞれの項目にポインタを合わせる
と、その項目の説明が画面下に表示されます。
5 「ファイル選択」画面の[実行]ボタン、または「スライド ショー
の設定」画面の[スライド ショー の 実 行 ]ボタンをクリックする。
プレゼンテーションがスタートします。
ご注意
コンピューター上のファイル で プレゼンテーションを行う場合、
[実行]ボタンをクリックすると、ファイルが プロジェクターに 転
送されます。このためプロジェクターにスライドが表示されるま
でに多少時間がかかります。転送にかかる時間はファイルの
容量により異なります。転送中は画面にメッセージが表示され
ます。
スライドショーを中止するには
[スライド ショー の 終 了 ]ボタンをクリックする。(22(JP)ページ参照)
「ファイル選択」画面に戻ります。
ご注意
[実行]ボタンまたは[設定]ボタンを押したとき、「プロジェクター
のメモリーがいっぱいです。」の表示が出たら、FileManager(ファ
イル マ ネージ ャー)で プ ロジェクター 内 のファイル を 削 除し て から
(26(JP)ページ)、再 度 スライドショーを 実 行してください。また、
「ファイル が 大きすぎます。」の表示が出たら、ファイル の 容 量 を 減
らして再度実行してください。
メモ:
PowerPointの[ツール]メニューから、[オプション]−[保存]の
[高速保存]のチェックをは ずし ても容 量 を 減らせることがあります 。
21 (JP)
Page 22
コンピューターで操作する
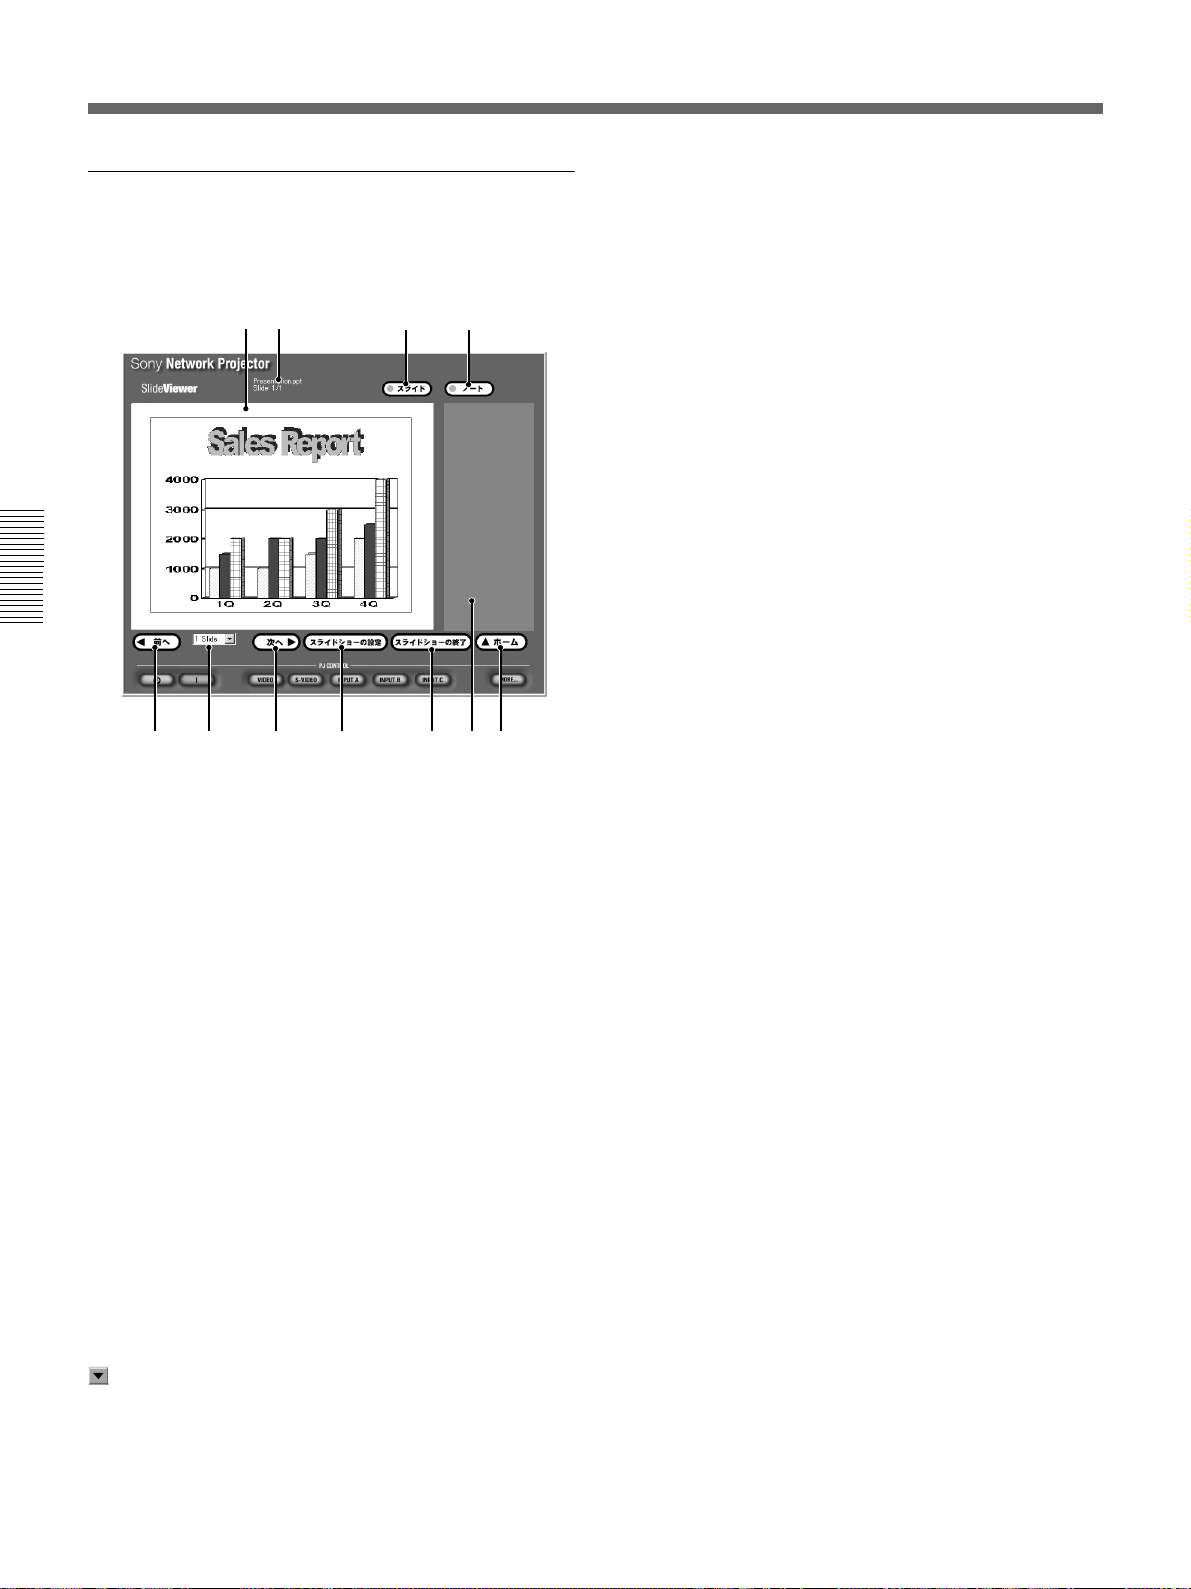
プレゼンテーション実行中の画面について
プレゼンテーション実行中は次の画面がコンピューター上に表示さ
れます。
423
65789qa0
1
7 [次へ]ボタン
プレゼンテーション実行中に、すぐに次のスライドまた はアニメー
ションを表 示し た いときクリックします。
8 [スライドショーの設定]ボタン
スライドショーの設定画面に戻ります。
9 [スライドショーの終了]ボタン
実行中のスライドショーを終了または中断して、「ファイル選択」画
面に戻ります。
0 ノート
発表者用のノート表 示 が できます。このノートは プ ロ ジ ェクター の ス
クリーンには 表 示されません。
qa [ホーム]ボタン
「アプリケーション選択」画面に戻ります。
1 [ノート]ボタン
発表者用のノートの表示/非表示を選択できます。
2 [スライド]ボタン
プロジ ェクター で 表 示し て い るスライドショー の コンピ ュ ーター 画 面
上への表示/非表示を選択します。
3 ファイル名/スライド番号
ファイル名と、何枚目のスライドが表示されているかを示します。
4 スライド
現在実行中のスライドを表 示します。プロジェクターのスクリーン に
はこのスライドだけが 表示されます。
5 [前へ]ボタン
プレゼンテーション実行 中に、ひとつ前のスライドまたはアニメー
ション設定に戻りたいときクリックします。
6 スライドテキストボックス
ボタンをクリック す ると、スライド一覧のドロップダウンリストが 表 示
され ます 。スライド名を選択すると、すぐにそのスライドを表示でき
ます。
22 (JP)
Page 23
Worksheet Viewer
ワ−)で
コンピューターの操作で Excel のファイルをプロジェクターのスク
リーンに投影することができます。
Excel
のファイルを投影する
(ワークシートビュー
ご注意
・コンピューターに 表 示される部 分とプロジェクターに 投 影される部
分は異なります。
・コンピューターの画 面 で セ ル を 選 ん だとき、プ ロジェクターの 投 影
範囲内のセルの場合はそのセルが選ばれます。投影範囲外のセ
ルを選んだ場合は、そのセルを中心とした範囲が投影されます。
Worksheet Viewer
・Excelのワークシートをプロジェクターのスクリーンいっぱいに投影
できます。
・プロジェクターに投 影し たワークシートの表示範囲を変えることが
できます。
・ワークシートを拡大、縮小して表示できます。
ご注意
本機のWorksheetViewerは簡易ビューワ−機能のため、分割機
能など一部サポートされないものもあります。
Excel
のファイルをプロジェクターに投影する
でできること
1 「SlideViewer(スライドビューワ− )でプレゼンテーションを行
う−プレゼンテーションを実行する」(20(JP)ページ)の手順
〜3を行い、手順3でExcelのファイル(.xlsファイル)を選択
する。
2 [実行]ボタンをクリックする。
WorksheetViewerが起動します。
選 ん だファイル の ワ ークシ ートがプロジェクターに表 示されます。
Image Viewer
(イメージビューワー)
で画像をプロジェクターに投影する
LAN上のコンピューターにある画像ファイルや、プロジェクターのス
トレージや本機に装着したメモリーカード内の画像ファイルをコン
ピューターの 操 作 でプロジェクターに表示させることができます。ま
た、すでにプロジェクターで設定してあるスライドショー設定ファイル
(.SHOファイル)を使ってプレゼンテーションを実行することができ
ます。
コンピューター上にある画像ファイルをプロジェ
クターに投影する
1
1 「アプリケーション選択」画面で[IMAGEVIEWER]のアイコ
ンをクリックする。
「ファイルの場所」画面が表示されます。
2 [COMPUTER](コンピューター)をクリックする。
本機のImageViewerが起動し、「ImageViewer」画面が表
示されます。
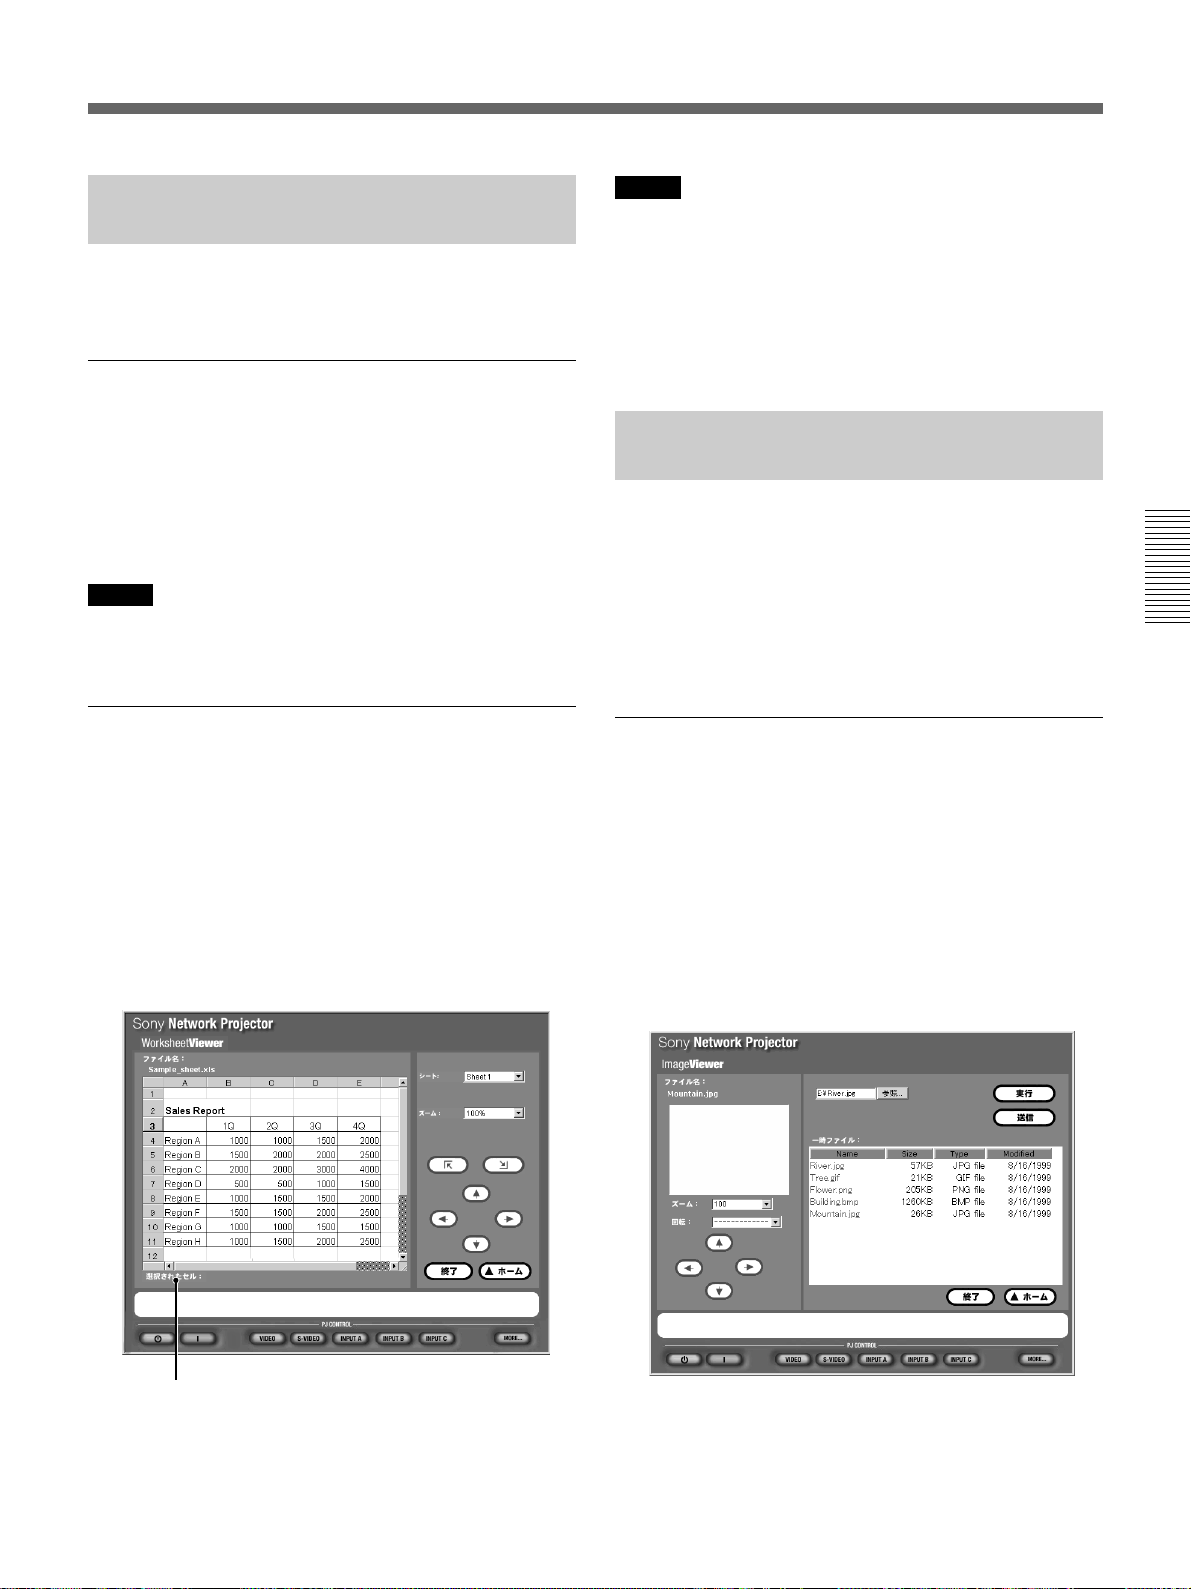
現在選択しているセル
画面右のボタンで投影中のワークシートを拡大、縮小したり、
プロジェクターに表示される画面をスクロールしたり、表示範囲
を変えることができます。それぞれのボタンや項目にポインタを
合わせると、その説明が画面下に表示されます。
それぞれの項目にポインタを合わせると、その項目の説明が
画面下に表示されます。
(続く)
23 (JP)
Page 24
コンピューターで操作する
3 投影したい画像ファイルを選ぶ。
[参照...]をクリックし 、表示したいファイルをダブルクリックし
て選びます。選んだファイル名がテキストボックスに表 示され
ます。
4 [実行]ボタンをクリックする。
選んだ画像がプロジェクターに全画面表示されます。
ご注意
UXGAなどサイズの大きい画像の場合、メモリーの制約から
開けないことがあります。その場合は、縮少するなどしてサイ
ズを小さくしてください。
プロジェクターへの転送時間をセーブするには
[実行]ボタンをクリックすると、ファイルがプロジェクターに 転 送さ
れます。このためプロジェクターに画像が表示されるまでに多少時
間がかかります。
ボタンをクリックしてすぐに表示させる場合は、あらかじめ、表示し
たい画像ファイルをプロジェクターに送信しておきます。
1 「画像をプロジェクターに投影する」の手順3のあと、[送信]
ボタンをクリックする。
「一時ファイル」一覧に選んだファイル名が表示され、ファイル
がプロジェクターに転 送されます。
この 手 順を繰り返し、表示したい画像ファイルをすべて「一時
ファイル 」に表示させます。
2 「一時ファイル」一覧のファイル名をダブルクリック す る。
選んだ画像がプロジェクターに全画面表示されます。
Image Viewer
2
3 5
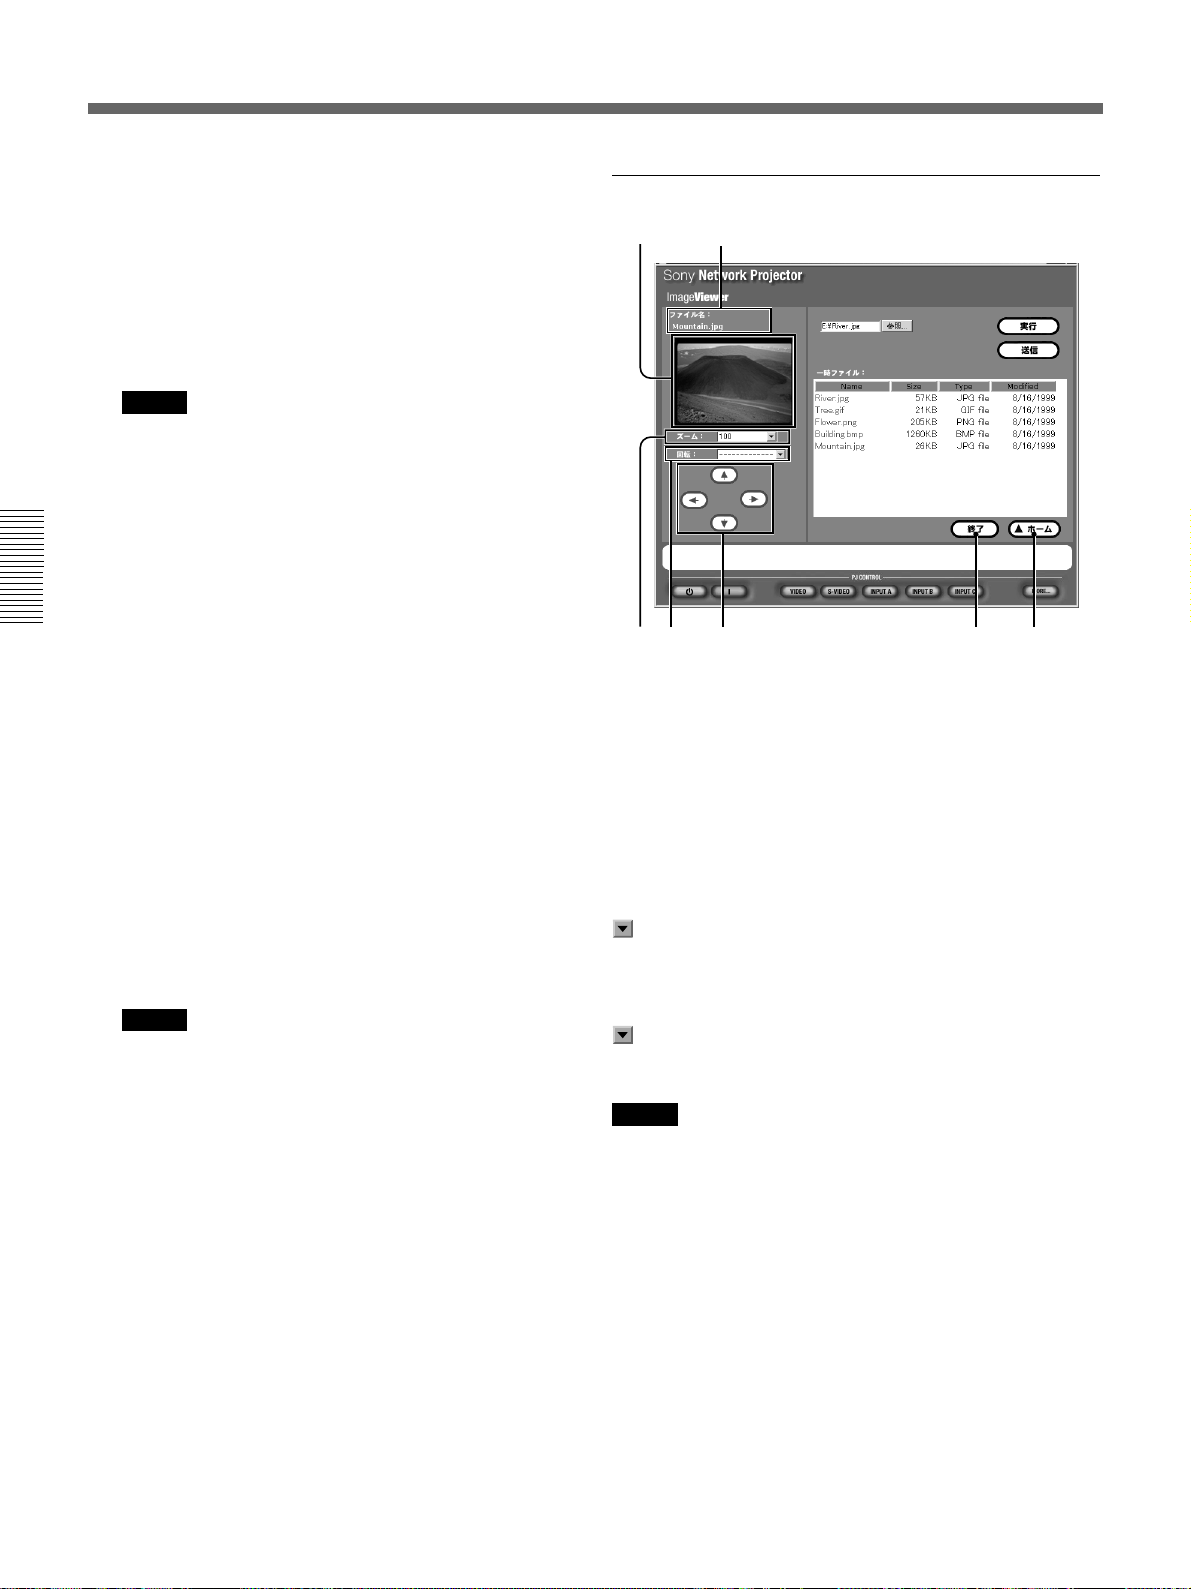
1 ファイル名
プロジェクターに投影されて いる画 像ファイル名が表示されます。
2 スライド
[実行]ボタンをクリックするか「一時ファイル」のファイル名をダブ
ルクリック す ると、現在プロジェクターに投影されている画像が表示
されます。
3 [ズーム]テキストボックス
ボタンをクリックして、ドロップダウンリストから表示中の画像の拡
大、縮小率を選びます。
実行中の画面について
1
6
74
ご注意
「一時ファイル」のメモリーがいっぱいになると、自動的に最
初に 送ったファイルから消去されます。
24 (JP)
4 [回転] テキストボックス
ボタンをクリックして、ドロップ ダ ウンリストから表示中の画像を回
転させる角度を 選 びます。
ご注意
UXGAなどサイズの大きい画像の場合、メモリーの制約から回転さ
せられな いことがあります。その場合は、縮 少 するなどしてサイズ
を小さくしてください。
5 スクロールボタン
表示中の画像を拡大して画面に入りきらない場合など、上下左右
にスクロールさせて表示範囲を変えることができます。
6 [終了]ボタン
全画面表示を終了または中断して「ファイルの場所」画面に戻りま
す。
7 [ホーム]ボタン
「アプリケーション選択」画面に戻ります。
Page 25
ご注意
[終了]ボタンまたは[ホーム]ボタンをクリックしてこの画面を抜け
ると、「一時ファイル」に表示されているファイルは自動的に消去さ
れます。プロジェクターに保存する場 合は、FileManager(ファイル
マネージャー)(26(JP)ページ)でファイルの追加を行ってください。
プロジェクターに保存された画像ファイルでプレ
ゼンテーションを実行する
1「アプリケーション選択」画面で[IMAGEVIEWER]のアイコ
ンをクリックする。
「ファイルの場所」画面が表示されます。
2[PROJECTOR](プロジェクター)をクリックする。
本機のImageViewerが起動し、「フォルダー/.SHOファイル
選択」画面が表示されます。
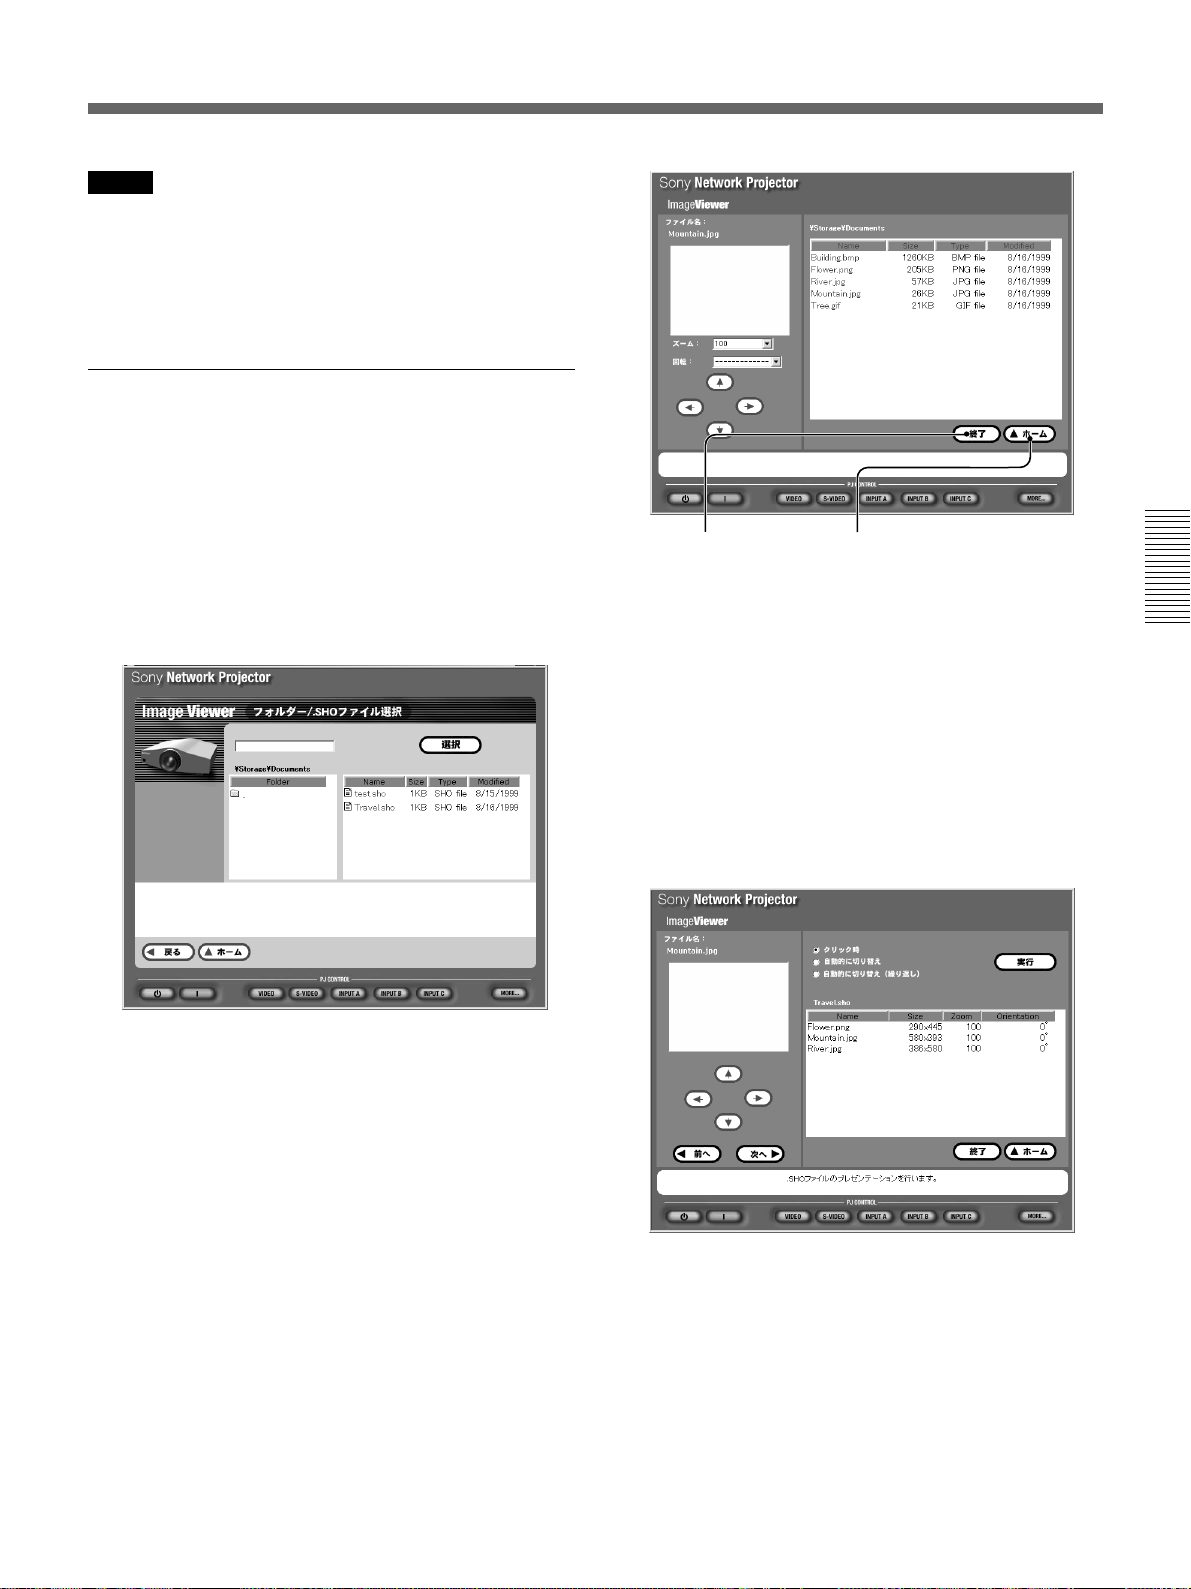
[終了] ボタン
全画面表示を終了して
「ファイルの場所」画面
に戻ります。
投影したい画像をクリックすると、画像がプロジェクターのスク
リーンに投影されます。
画面左のそれぞれの項目にポインタを 合 わ せると、その 説 明
が画面下に表示されます。
[ホーム]ボタン
「アプリケーション選択」画面に
戻ります。
3画面左のフォルダー一覧から目的のフォルダーまたはスライド
ショー設定ファイル(.SHOファイル)のあるフォルダーをクリッ
クする。
画面右に選択したフォルダー内の内容が一覧表示されます。
◆ .SHOファイルについて詳しくは、34(JP)ページの「スライド ショー の
設定を保存する」をご 覧ください。
4目的のフォルダーまたは.SHOファイルを選び、[選択]ボタンを
クリックする。
「ImageViewer」画面が表示されます。
5 投影したいファイルを選ぶ。
手順
4で.SHO
選択した.SHOファイルが画面右に表示されます。
表示するスライドの切り替えかたを選び、[実行]ボタンをクリック
します。スライドショーが実行されます。
画面のそれぞれの項目にポインタを 合 わ せ ると、その 説 明 が
画面下に表示されます。
ファイルを 選 ん だ 場 合
でフォルダーを選んだ場合
手順
4
選択したフォルダー内の画像ファイル名が画面右に一覧表示
されます。
25 (JP)
Page 26
コンピューターで操作する
Image Viewer
コンピューター上にある画像ファイルを表示するときの「Image
Viewer実行中の画面について」(24(JP)ページ)と同じです。
.SHOファイルを選択したときの画面に出る[次へ]ボタンは、スライ
ドショー実行中にクリックするとすぐに次 のスライドを表 示します 。[前
へ]ボタンはひとつ 前 のスライドに 戻ります。
File Manager
実行中の画面について
(ファイルマネージャー)
を使う
本機に保存されている不要なファイルを削除したり、LAN上のコン
ピューター内のファイルを本機に追加するなど、プロジェクター内の
ファイル管理をコンピューターから簡単に行なえます。
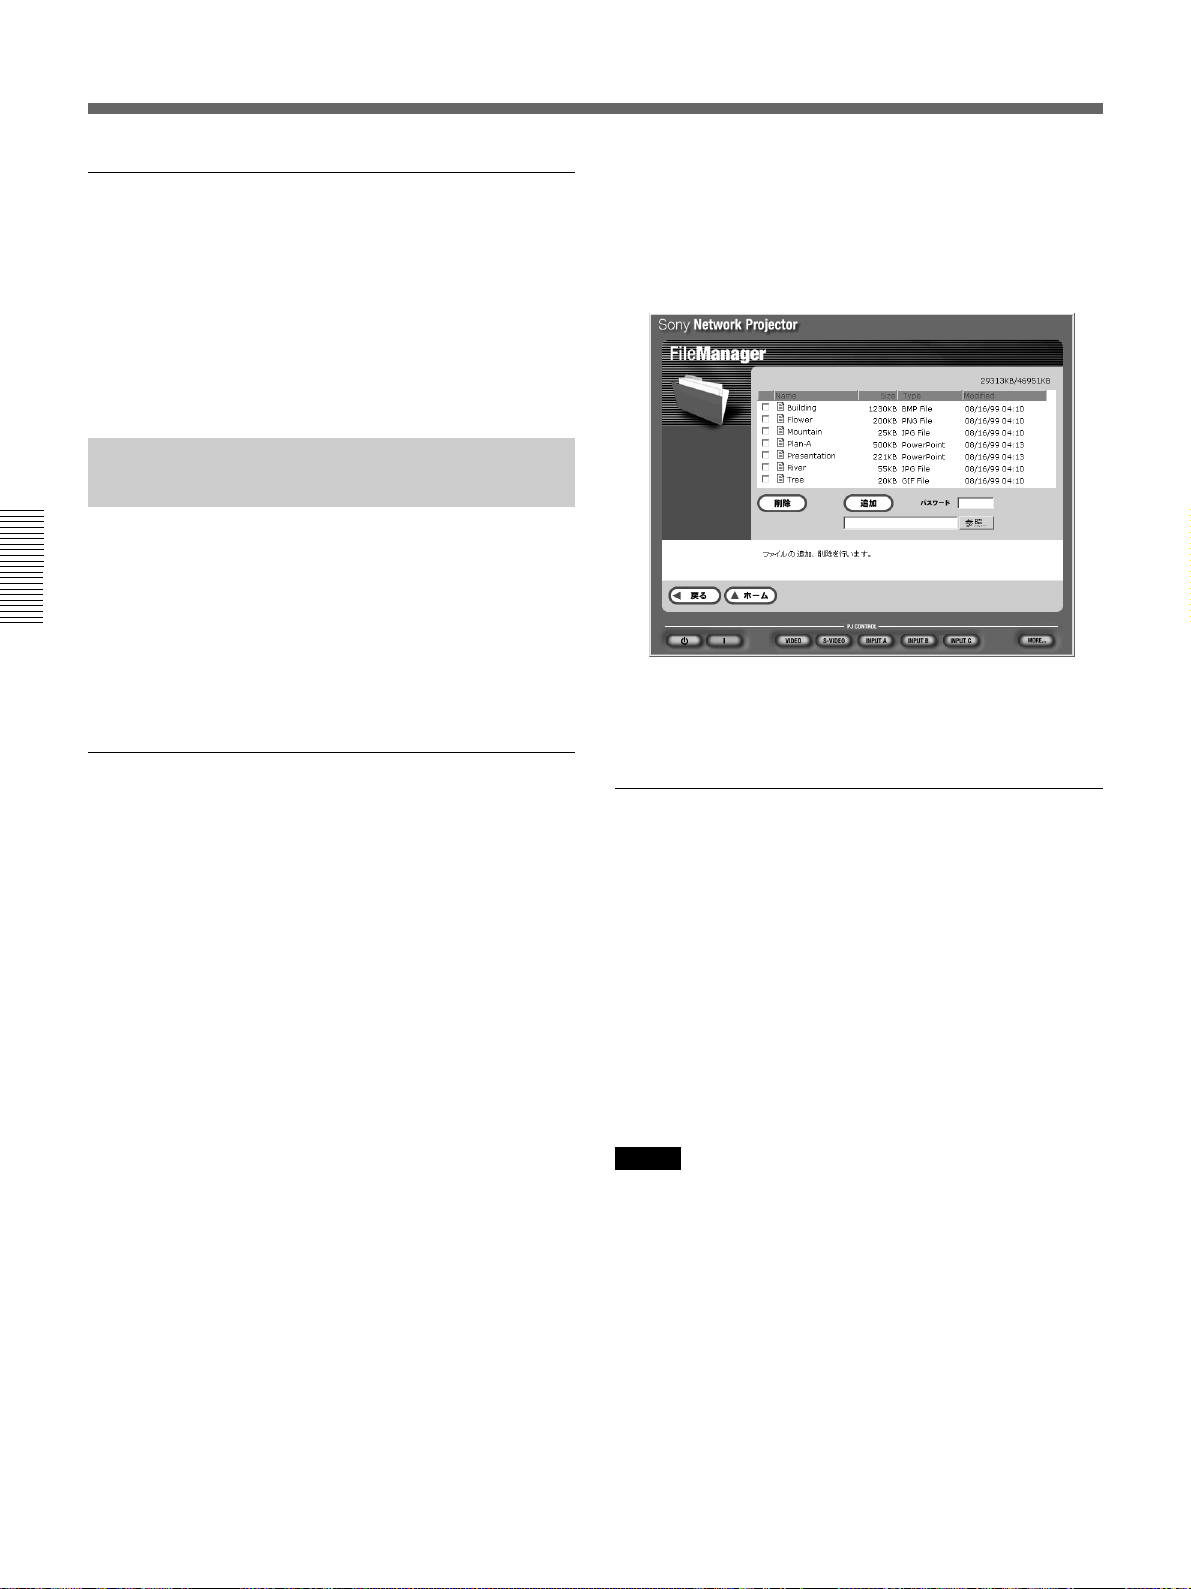
画面上に、現在使用しているメモリー容量/使用できるメモリー容
量が 表 示されます の で 、これを見ながら追加、削除を行ってくださ
い。
ここで 、選択したファイルにパスワードを設定することができま
す。[パスワード]テキストボックスに パ スワ ードを入 力します。
設定すると、以 降このパスワードを入力しないと、ファイル を 開
くことができなくなります 。
3 [追加]ボタンをクリックする。
選んだファイルがプロジェクターに保存されます。
File Manager
を使ってファイルを追加する
1 「アプリケーション選択」画面で[FILEMANAGER]のアイコ
ンをクリックする。
「FileManager」画面が表示されます。
2 追加したいファイルをコンピューターから選ぶ。
「ファイル追加」の[参照...]ボタンをクリックします。コンピ ュー
ターのファイル選択の画面が表示され、追加したいファイルを
選びます。テキストボックスに ファイル 名 を 入 力し ても選 択 でき
ます。
File Manager
を使ってファイルを削除する
1 「アプリケーション選択」画面で[FILEMANAGER]のアイコ
ンをクリックする。
「FileManager」画面が表示され、プロジェクターに保存され
ているファイル一覧が表示されます。
2 削除したいファイルを選ぶ。
削除したいファイルにはすべてチェックを付けます。
3 [削除]ボタンをクリックする。
選んだファイルがファイル一覧から削除されます。
ご注意
パスワードを設定してあるファイルも削除できます。
26 (JP)
Page 27

プロジェクターをコントロールする
コンピューターの画面上でプロジェクターの各種設定ができます。
プロジェクターコントロール画面は、機能別に「GENERAL」画面、
「PICTURECTRL」画面、「SETTINGS」画面の3画面を表示でき
ます。
各画面のボタンの働きは、本機に付属のリモートコマンダーの同名
のボタンと同じです。
◆ ボタンの働きについて詳しくは、本機の取扱説明書をご覧ください 。
下記のイラストはすべてVPL-PX15の画面です。
1 PJCONTROL(プロジェクターコントロール)の[MORE...]
(詳細)ボタンをクリックする。
「GENERAL」画面が表示されます。
2 画面上部の機能タブをクリックして表示したい画面を選ぶ。
GENERAL
画面
PICTURE CTRL
■
VPL-PX15
COLORTEMP(HIGH、LOW)ボタンはメニュー画面で設
定できる機能と同じです。
画面
(
VPL-PX15
)
(
VPL-PX15
■
VPL-FE110J
SWITCHERボタンでスイッチャー 番 号を 指 定します 。また、
GROUPボタンでグループインデックス番号を、INDEXボタン
でデバイスインデックス番号を指定します。
それぞれ
トから選択します。
ボタンをクリックして表示されるドロップ ダ ウンリス
)
■
VPL-FX50
DDE(OFF、PROGRESSIVE、FILM)ボタン、RGB
ENHANCER+/−ボタンは、メニュー画面で設定できる機
能と同じで す。
◆詳しくは、本機の取扱説明書をご覧ください。
(続く)
27 (JP)
Page 28
コンピューターで操作する
SETTINGS
■
VPL-PX15
STATUS(ON、OFF)ボタン、ASPECT(4:3、16:9)ボタンは、
メニュー画面で設定できる機能と同じです。
画面
(
VPL-PX15
)
3 アドミニ ストレ−タ−の[名前]と[パスワード]を入力する。
「Information」(インフォメ−ション)画面が表示されます。
下記のイラストは VPL-PX15 の画面です。
2
34
1
5
■
VPL-FX50
ASPECT(4:3、16:9)ボタン、LAMPMODE(STANDARD、
LOW)ボタンは、メニュー画面で設定できる機能と同じです。
◆詳しくは、本機の取扱説明書をご覧ください。
3 ボタンをクリックして操作する。
プロジェクターのインジケーターを確認 する
プロジェクターのコントロールパネルに 表 示されるインジケーターの
現在の状態などをコンピューター上で確認できます。
1 コンピューターのブラウザ(InternetExplorer4.0以上または
NetscapeNavigator4.5x、4.7x)を起動する。
2 URLを「http://xxx.xxx.xxx.xxx(プロジェクターのIPアドレ
ス)/info」と入 力します。
IPアドレスを工場出荷時のまま変更していない場合は、
「http://192.168.0.1/info」(LANPCカードご使用の場合)ま
たは「http://192.168.0.2/info」(ETHER端子ご使用の場合)
を入 力し てください。
パスワードが 設 定されて いる場 合は、パスワード入 力のダイアロ
グボックスが表示されます。
28 (JP)
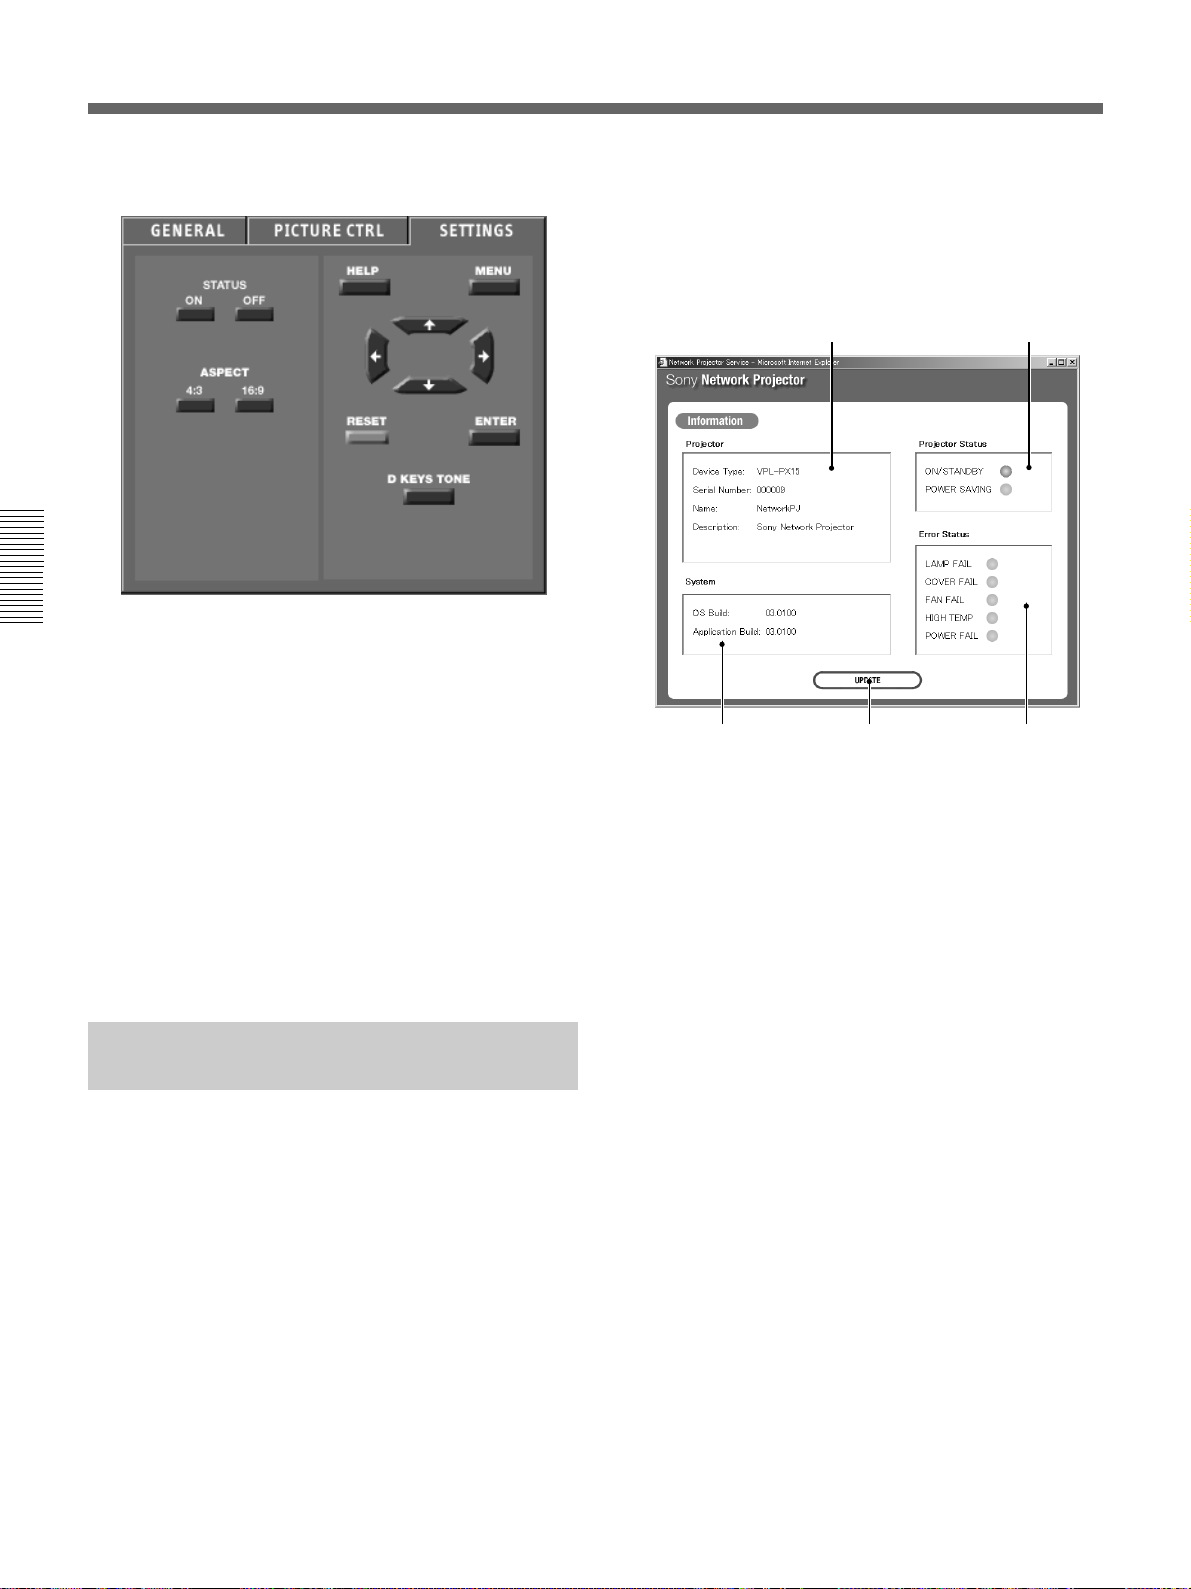
1
Projector Status
プロジェクターの状 態を表 示します。
2
Projector
プロジェクターについての情報が表示されます。
3
System
本機のWindowsCEとアプリケーションのバージョンが表示さ
れます。
4
UPDATE
クリックすると、最新の情報が得られます。
5
Error Status
プロジェクター の コントロールパネルにあるインジケーター の 状
態を表示します。
◆ それぞれのインジケータ−に つ い て 詳しくは、取扱説明書をご覧
(プロジェクター)
(システム)
(アップデート)ボタン
ください。
(プロジェクターステータス)
(エラーステータス)
Page 29

プロジェクターで操作する
はじめに
操作の前に
■
VPL-PX15、VPL-FX50
• 設置設定メニューの「入力B 機能」(VPL-PX15)または「入力C
機能」(VPL-FX50)が「オン」に設定されていることを確認して
ください。
• 付属のリモートコマンダーのPJ/NETWORK切り換えスイッチを
NETWORK側に切り換えてください。
■
VPL-FE110J
• 本機後面のINPUT C/RS-232C/RS-422A 切り換えスイッチ が
「INPUTC」の位置に設定されているか確認してください。
• 操作には別売りのリモートコマンダーRM-PJM610またはマウスと
キーボードが必要です。マウスとキーボードは 、本機の電源コード
を接 続 する前に 接続してください。
「
Network Projector
プロジェクター単体で操作するには、まず「NetworkProjector」画
面を表示させます。
の場合
の場合
」画面を表示する
1[マイプロジェクター]アイコン
プ ロジェクター の 中 の 項 目 を 見 ることが で きま す 。ダブルクリック す
ると、[メモリーカード]などのアイコンが表示されます。
[
2
Internet Browser
インターネットに 接 続 し ま す 。
3
[
Presentation Viewer
アイコン
PowerPointファイルでプレゼンテーションを実行したり、Excelファ
イルを 投 影 す るとき選 び ま す 。
4[
Image Viewer
プロジェクターのストレージやメモリーカードに保存した画像ファイル
でスライド ショー を 行 うとき、ImageViewerを起動します。
5[スタート]メニュー
6IPアドレス
設定したプロジェクターのIPアドレ スを 表 示します。コンピ ューター
からIPアドレスを 入 力 するとき、ここで確認できます。
](インターネットブラウザ)アイコン
](プレゼンテーションビューワ−)
](イメージビューワ−)アイコン
1 本機の電源を入れる。
2 本機の入力を「INPUTB」(入力 B)(VPL-PX15)または
「INPUTC」(入力 C)(VPL-FX50、VPL-FE110J)にする。
「NetworkProjector」画面が表示されます。
「
Network Projector
1
2
3
4
」画面の各部の名前と機能
7 受信レベル表示アイコン
本機のPCCARDスロットにワイヤレスLANPCカードが挿入され、
正しく認識されると、アイコンがタスクバー上に表 示されます。ダブ
ルクリックすると、アクセスポイントとの接続状態を表示する画面が
現れます。
8 スクリーンキーボードアイコン
クリックすると画 面 に スクリーンキーボードが表示されます。付属の
リモ ートコマンダ −(VPL-PX15、VPL-FX50の場合)または別売りの
リモ ートコマンダーRM-PJM610(VPL-FE110J の場合)を使って
セットアップや URL の入力ができます。スクリーンキーボードは 2
ページあります。ページを切り換えるには、キーボードの[Shift](シ
フト)キーをクリックしま す 。なお、¥を表示するには[\]キーをクリッ
クします。
(続く)
5 6 7 8 9
q;
29 (JP)
Page 30
プロジェクターで操作する
■
VPL-PX15、VPL-FX50
に付属のリモートコマンダ − に つ い
て
• 付属のリモートコマンダーのPJ/NETWORK切り換えスイッチを
NETWORK側にすると、TAB、ESCAPE、ENTER および矢印
キーがキーボードと同じ働きをします。
• スクリーンキーボードアイコン上で、付属のリモートコマンダーのR
CLICKキーを押すとサブメニューが表示されます。[リモコン]を
クリックし、[オン]をクリックすると、リモ ートコ マ ン ダ ー の 矢 印
キーを画面上のキーボードの矢印キーとして使用でき、キーの 選
択に使えます。
9 時計表示
q; デスクトップアイコン
Slide Viewer
でプレゼンテーションを
行う
同一会議室または離れた場所にあるLAN上のコンピューターにあ
るPowerPointファイルを本機を操作してプレゼンテーションを 行う
ことが できま す 。
また、コンピューターが 接 続され て い なくても、本機のストレージに
保存してあるPowerPointファイルや PCCARDスロットに 挿 入 し た
メモリーカード内 のファイルを使って、プロジェクター単体でプレゼ
ンテーションを 行 なうこともで きま す 。
1 メニューバー
メニュー
ファイル
表示
スライドショー
2
(スライド表示)ボタン
コマンド
開く
最近使ったファ
イル
閉じる
バージョン
スライド表示
ノート表 示
スライドショー
実行
スライド ショー の
設定
機能
本機内にあるファイルを開きます。
サブ メニ ューにある、最 近 使 ったファ
イル を 開 きます 。
現在開いているファイルを閉じます。
このプログラムのバージョン情報を表
示します 。
スライド表示モードで 表示します。
ノート表示モードで表示します。
スライド ショーを 実 行 し ま す 。
スライド ショーを 実 行 し ま す 。
スライドの指定やスライドの切り替え
方法を設定します。
スライドを表示します。
3 (ノート表示)ボタン
スライドと発表者用のノートを表 示します。
4 (スライドショー)ボタン
スライドショーを 実 行 し ま す 。
5 スライド移動ボタン
(前へ)ボタンをクリック す ると、1つ前のスライドが 表示されます。
(次へ)ボタンをクリックすると、次のスライドが 表 示されます。
Slide Viewer
いて
12345 6
8
30 (JP)
(スライドビューワ−)の画面につ
7
6 スライド番号ボックス
をクリックして表示したいスライド番号を選 択します。
7
(ヘルプ)ボタン
クリックすると、SlideViewerのヘルプが表示されます。
8 ファイル名
ファイル名が表 示されます。
Page 31

プレゼンテーションを実行する
上のコンピューターからファイルを選ぶ場合
LAN
3 「LAN上のコンピューターからファイルを選ぶ場合」の手順
4、5を行う。
1 「NetworkProjector」画面で[マイプロジェクター]アイコン
をダブルクリックする。
2 アドレス欄に「¥¥xxxx(アクセスしたいコンピューター名)」
を入力し、[Enter](確定)キーをクリックする。
選択したコンピューターの共有設定されているフォルダが表示
されます。
ご注意
「ネットワーク構 成」ダイアログボックスの[オーナー情報]の設
定(9(JP)ページ)と、アクセスするコンピューターとのファイ
ルの共有設定が必要です。
3 実行したいPowerPointファイル(.pptまたは.ppsファイル)の
あるフォルダを選び、ファイルをダブルクリックする。
コンピ ュ ーターに パ スワードが設 定されている場 合は、パス
ワードを 入 力します 。
SlideViewerが起動します。
4 スライドショーを実 行 するときのスライドの指定やスライドの切り
替え方法などを設定する場合は、[スライドショー ]メニューの
[スライド ショー の 設 定 ]をクリックする。
「スライド ショー の 設 定 」ダイアログ ボックスが表示されます。
スライドショーの設定について詳しくは、SlideViewer のヘル
プをご覧ください。
画面表示モードを切り替える
SlideViewerには3つのタイプの画面(スライド ショー 、スライド表示
およびノート表 示 )を表 示 できます 。切り替えるには 、[表示]メ
ニューからそれぞれのモードを 選 ぶか、ツールバーのそれぞれのボ
タンをクリックします。
Slide Viewer
詳しい操作のしかたは、SlideViewer のヘルプをご覧ください。
SlideViewer画面のツールバーにある
ルプが表 示されます。
Worksheet ViewerでExcel
のヘルプについて
ボタンをクリックするとヘ
のファイ
ルを投影する
LAN上のコンピューターにあるExcelのファイルをプロジェクターの
操作でスクリーンに投影できます。
また、本機のストレージに保存してあるExcel のファイルやメモリー
カード内 のファイルをプロジェクター単体でスクリーンに投影できま
す。
Worksheet Viewer
の画面について
(ワークシートビューワ−)
5 スライドショーを 実 行 す るに は 、[スライド ショー ]メニューの[実
行]をクリックする。
本機のストレージまたはメモリーカードからファイルを選
ぶ場合
1 「NetworkProjector」画面の[PresentationViewer]アイコ
ンをダ ブ ル クリックす る。
PresentationViewerが起動し、「ファイルを開く」ダイアログ
ボックスが 表 示されます。
2 プレゼンテーションを行いたいPowerPointのファイルを選び、
[OK]ボタンをクリックする。
SlideViewerが起動し、選んだファイルがスライド表 示されま
す。
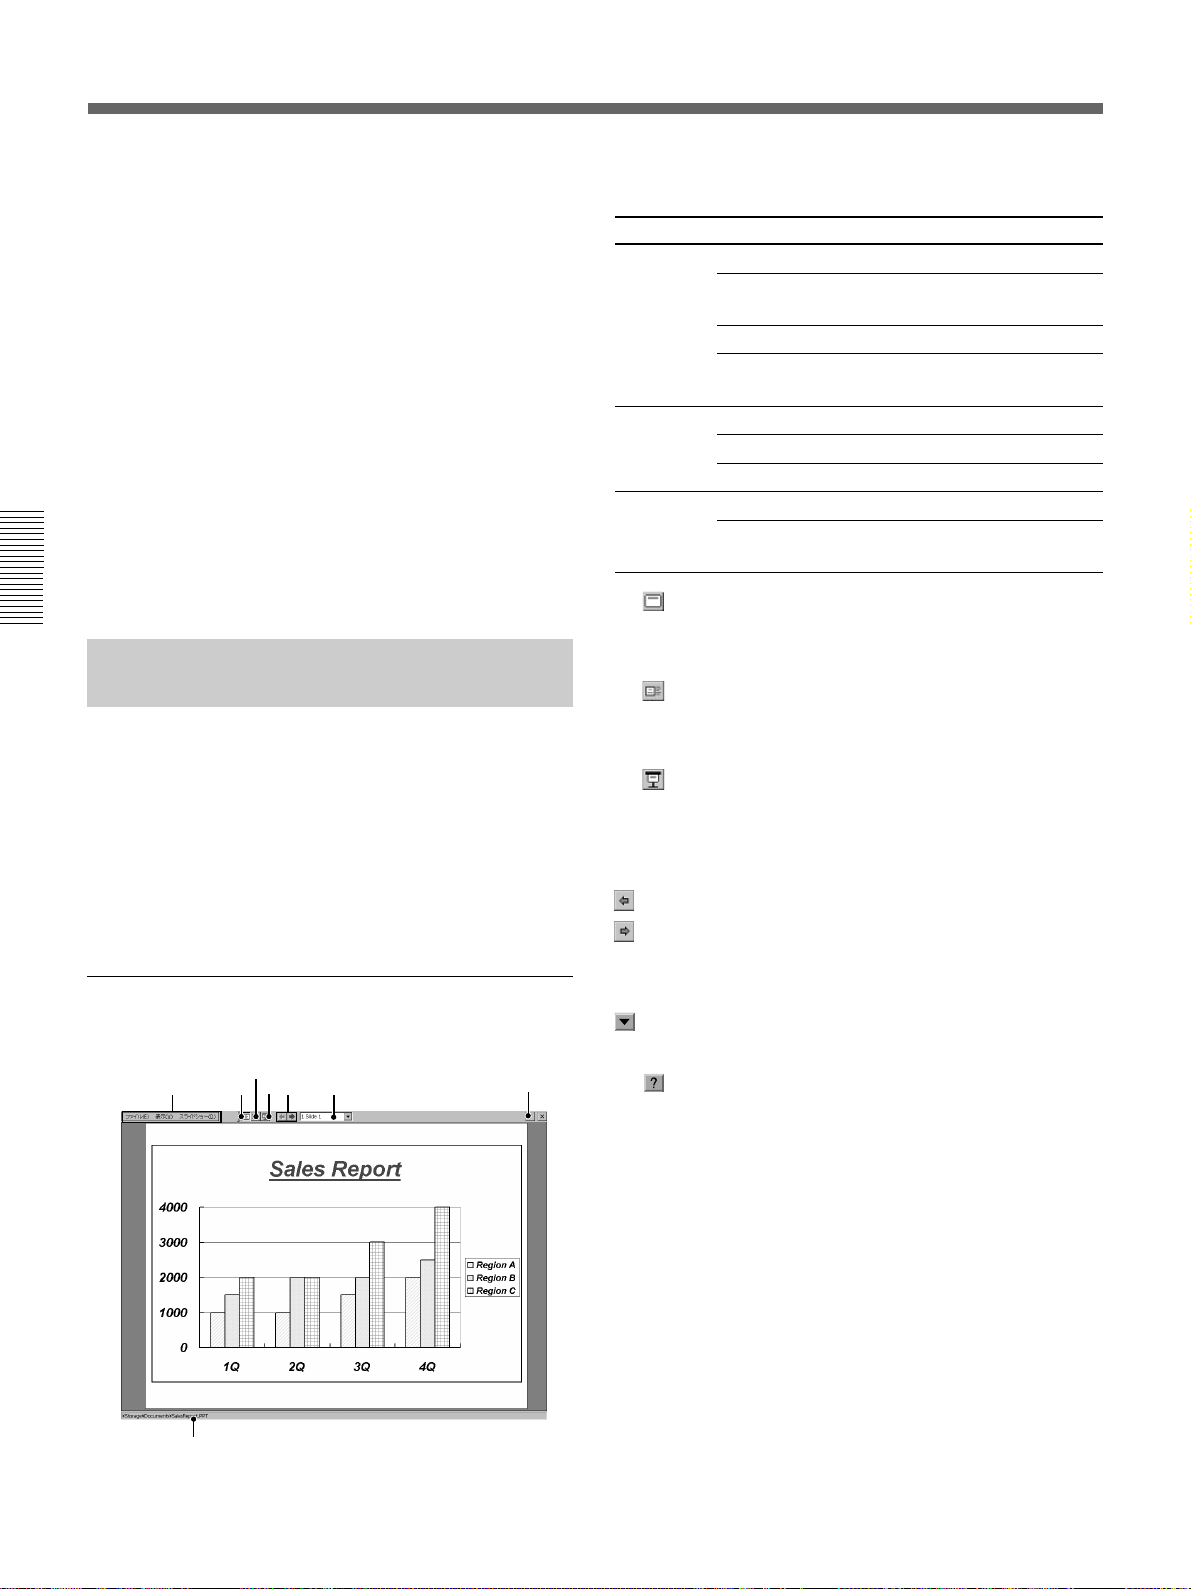
1
2
3
4
5
7
6
89
(続く)
31 (JP)
Page 32

プロジェクターで操作する
1 名前ボックス
選択しているセルの名前を表示します。
2 メニューバー
メニュー
ファイル
表示
3 シート見出し
表示 中 のワークブックに含まれるワークシートの名前が表示されま
す。クリックすると、そのワークシートが画面に表示されます。
4 ズームボックス
表示中のワークシートを拡大または縮小します。
5 数式バー
選択しているセルで使われている定数や数式を表示します。
コマンド
開く
閉じる
バージョン
ズーム
機能
本機内にあるファイルを開きます。
現在開いているファイルを閉じます。
このプログラムのバージョン情報を表
示します 。
表示を拡大、縮小する「ズーム」ダイ
アログボックスを開きます。
Excel
LAN
のワークシートを投影する
上のコンピューターからファイルを選ぶ場合
1「プレゼンテーションを実 行する− LAN 上のコンピューターか
らファイルを選ぶ場合」(31(JP)ページ)の手順
1、2を行う。
2 表示したいExcel のファイルのあるフォルダーを選び、ファイ
ルをダブ ルクリックする。
コンピューターに パ スワードが設定されている場合は、パス
ワードを 入 力します 。
WorksheetViewerが起動し、Excelのワークシートが 投 影さ
れます。
本機のストレージまたはメモリーカードからファイルを選
ぶ場合
1 「NetworkProjector」画面の[PresentationViewer]アイコン
をダブルクリックする。
PresentationViewerが起動し、「ファイルを開く」ダイアログ
ボックスが 表 示されます。
(ヘルプ)ボタン
6
クリックすると、WorksheetViewerのヘルプが表示されます。
7
シート見 出しをスクロー ルします 。スクロールしたい方向の矢印をク
リックしま す 。
8
表示画面を上下にスクロールします。スクロールさせるには、スク
ロール バ ーのボックスをドラッグするか矢印をクリックします。
9
表示画面を左右にスクロールします。スクロールさせるには、スク
ロール バ ーのボックスをドラッグするか矢印をクリックします。
(シート見出しスクロール)ボタン
/
(上下)スクロールバー
/
(左右)スクロールバー
/
2 投影したいExcel のファイルを選び、[OK]ボタンをクリックす
る。
WorksheetViewerが起動し、選択したファイルのワークシー
トが プ ロジェクター の スクリーンにに投影されます。
ファイルの表示サイズや表示範囲を変えるには
スクリーンに投影したワークシートを 拡 大 、縮 小し たり、プ ロジェク
ターに表示する範囲を変えることができます。詳しくは、Worksheet
Viewerのヘルプをご覧ください。
Worksheet Viewer
詳しい操作のしかたは、WorksheetViewerのヘルプをご覧くださ
い。WorksheetViewer画面のツールバーにある
クするとヘルプが表示されます。
のヘルプについて
ボタンをクリッ
32 (JP)
Page 33

Image Viewer
プロジェクターのストレージや本機に装着したメモリーカードに保存
した画像ファイルを一覧表示させ、必要なファイルを使ってスライド
ショーを 行 なうことが で きま す 。
本機の ImageViewerを起動し、表示したいフォルダーを選ぶと
ImageViewerのメイン画面が表示されます。
Image Viewer
でスライドショーを行う
(イメージビューワ−)のメイン
画面について
7 4835 12
6
7 メニューバー
メニュー コマンド 機能
ファイル
表示
スライド
ショー
閉じる
バージョン情報
全画面表示
画像の情報
スライドの並べ
替え
実行
スライド ショー の
設定
すべて選択
す べ て クリア
読み込み
保存
現在開いているファイルを閉じます。
このプログラムのバージョン情報を表
示します 。
選択した画像だけを全画面表示しま
す。
選択した画像の情報を表示します。
フォルダー内のスライドを指定 の 順 に
並べ替えます。
サブ メニ ューにあるスライドの切り替
え方法 でスライドショーを実行します。
スライド ショー の 詳 細 な 設 定 を 行 い ま
す。
一 覧 表 示され て いるスライドすべてを
選択します。
一 覧 表 示され て いるスライドの選択を
すべて 解 除します。
あらかじめ本機に 保 存され て いるスラ
イド ショー 設 定 ファイルを 読 み 込 み ま
す。
現在のスライドショーの設 定を 設 定
ファイル(拡張子 .SHO)とし て 保 存
します。
9
1
クリックすると、ImageViewerのヘルプが表示されます。
2 スライド
クリックすると緑色の枠が出て、その画像(スライド)が 選 択されま
す。
3
「スライド ショー の 設 定 」ダイアログボックスを表 示し、ズームや回転
などの各種設定ができます。
4
クリックすると、スライドの切り替え方法のサブメニューが表示され
ます。いずれかを選んでスライド ショー を 実 行しま す 。
5
選択した画像の情報を表示します。
6
選択した画像だけを大きく一枚表示します。
ヘルプ)ボタン
(
スライドショーの設定)ボタン
(
ボタン
(実行)
画像の情報)ボタン
(
全画面表示)ボタン
(
8 フォルダー一覧
本機のストレージや装着しているメモリーカードのフォルダーが一覧
表 示されます。
9 表示エリア
選択したフォルダー内の画像ファイルが一覧表示されます。
スライドを1枚表示する
メイン画面に一覧表示されたスライドから好きなスライドを1枚 選 ん
で、プロジェクターのスクリーンに全面表示することができます。
1 「NetworkProjector」画面の[ImageViwer]アイコンをダ ブ
ルクリックする。
ImageViewerが起動します。
2 画面左のフォルダー一覧から表示したい画像ファイルのある
フォルダーを選ぶ。
本機のストレージまたは本機に装着したメモリーカードに保存さ
れているファイルを選ぶことができます。
メイン画面が表示され、選択したフォルダー内の画像が一覧
表 示されます。
(続く)
33 (JP)
Page 34

プロジェクターで操作する
3 一覧表示されたスライドから、表示し た いスライドをクリックす
る。
4 スライドを右クリックしてショートカットメニューを表示させ、[全
画面表示]をクリックする、または「表示」メニューの「全画面
表示」をクリックするか、ツールバーの
ンをクリックする。
スライドが、プロジェクターのスクリーンい っぱ い に 表 示されま
す。
(全画面表示)ボタ
スライドショーを実行する
1 「スライドを1枚表示する」の手順1、2を行う。
2 スライドショーで表示したい画像を選ぶ。
一覧表示された画像から、表示したい画像の[スライド
•
ショー ]チェックボックスに チ ェックを 付 けます 。スライド ショー
で表示したい画像はすべてチェックします 。
フォルダー内のすべての画像を使いたい場合は、[スライド
•
ショー ]メニューから[すべて選択]を選びます。
スライドショー設定ファイルを保存してある場合は、[スライド
•
ショー ]メニューの[読み込み]をクリックし て「スライドショー
設定ファイルの読み込み」ダイアログボックスを表示させ、目
的 の ファイル を 選 び ま す 。
◆スライドショー設定ファイルについては、「スライドショーの 設 定を
保存する」をご覧ください。
3 ズームや回転など、画像の設定をしたい場合は、[スライド
ショー ]メニューの[スライドショーの設定]をクリックす る か 、
ツール バーの
「スライド ショー の 設 定 」ダイアログボックスが表 示されます 。
(スライド ショー の 設 定 )ボタンをクリックする。
4 [スライド ショー ]メニューの[実行]をクリックするか、ツール
バーの
スライドの 切り替え方 法 のサブメニューが 表 示されます。いず
れかをクリックするとスライドショーが 実 行されます 。
スライドショーの設定を保存する
スライドショーのファイルを設定ファイル(.SHOファイル)として本
機に保 存し、繰り返しスライドショーで表示することができます。ま
た、保存した設定ファイルの各種設定を変更することもできます。
保存するには
(スライドショーの実行)ボタンをクリックする。
1 [スライド ショー ]メニューの[保存]をクリックする。
「スライドショー設定ファイルの保存」ダイアログボックスが表示
されます。
2 ファイル 名を 入 力 し 、[OK]ボタンをクリックする。
保存したファイルは「スライドショー設定ファイルの読み込み」
ダイアログボックスに一覧表示されます。
設定を変えて保存するときは
[スライドショー]メニューの[スライドショーの設定]をクリックし、
「スライド ショー の 設 定 」ダイアログボックスを表示させ、各種設定
をしま す 。
「スライド ショー の 設 定 」ダイアログボックスの[保存]ボタンをクリッ
クし、「スライドショー設定ファイルの保存」ダイアログ ボックスを表
示させ、手順
2を行います。
設定を行ったら、[OK]または[保存]ボタンをクリックする。
ご注意
UXGAなどサイズの大きい画像の場合、メモリーの制約から開
けなかったり、回 転させられな いことがあります。その場合は、
縮少するなどしてサイズを小さくしてください。
34 (JP)
Page 35

保存した設定ファイルを変更するには
インターネットに接続する
1 [スライド ショー ]メニューの[スライドショー の 設 定 ]をクリック
する。
「スライド ショー の 設 定 」ダイアログ ボックスが表示されます。
2 [読み込み]をクリックする。
「スライドショー設定ファイルの読み込み」ダイアログボックス
が 表 示されます。
3 変更したいファイルを選択し、[OK]ボタンを押す。
選んだファイルの「スライド ショー の 設 定 」ダイアログボックス
が 表 示されます。
1 「NetworkProjector」画面で[InternetBrowser](インター
ネットブラウザ)のアイコンをダブルクリック す る。
「InternetBrowser」画面が表示されます。
2 「NetworkProjector」画 面 のタスクバ ーにあるスクリーン キ ー
ボードアイコンをクリックし て キ ーボ ードを表示させ、見た い
ホームページのアドレスを 入 力 する。
4 設定を変更し、[保存]ボタンをクリックする。
メイン画面で設定を変更するときは
1 [スライド ショー ]メニューの[読み込み]をクリックする。
「スライドショー設定ファイルの読み込み」ダイアログボックス
が 表 示されます。
2 変更したいファイルを選択し、[OK]ボタンを押す。
メイン画面が表示されます。
3 [スライドショー]チェックボックスのチェックの 変 更 などをする。
Image Viewer
詳しい操作のしかたは、ImageViewerのヘルプをご覧ください。
ImageViewer画面のツールバーにある
ヘルプが表示されます。
のヘルプについて
ボタンをクリック す ると
35 (JP)
Page 36

トラブル時の対処
トラブル時の対処
サービス窓口にご相談になる前に下記の項目をもう一度チェックしてみてください。それで
も具合の悪いときは、ソニーのサービス窓口にご相談ください。
症状 原因/対処
ネットワークに接続 できない。
プロジェクターに接 続 できない。
画面がフリーズして動かない。
・PCカードがプロジェクターのPCCARDスロットに 正しく取り付 けられ て い な い 。
t カードの向きが正しいか確認し、カードを 奥 までし っかり差し 込 ん でください。
・ ETHER端子にケーブルが正しく接続されていない。(VPL-PX15、VPL-FX50)
t ケーブルを奥までしっかり差し込んでください。
・ 指定/推奨のLANPCカード、ワイヤレスLANPCカード、アクセスポイントを使用していない。
t 指定/推奨以外のカードなどをご使用の場合、正しく動作しないことがあります。指定/推
奨のものをご使用ください。指定/推奨のカードについては、「指定/推奨 PCカード、ワイヤ
レスLANアクセスポイント一覧」をご 覧ください。
・ネットワークの設定が 正しくない。
t プロジェクターの「ネットワークの設定」を確 認してください 。(9(JP)、13(JP)ページ)
t コンピューターの Webブラウザから操作している場合は、コンピューターのネットワーク設 定も
確 認してください。
・ ワイヤレスLANPCカードをご使用の場合、[オンボード L ANを有効にする]がチェックされている。
( VPL-PX15、VPL-FX50)
t チ ェックをは ずし てください 。
・ ワイヤレスLANPCカードをご使用の場合、プロジェクターのワイヤレスLANの設定が正しくない。
t「接続状態表示」画面のアクセスポイントIDとEncryptionkey(無線暗号キー)が接続先のア
クセスポ イントと合っているか確認してください。
・ PeertoPeerモードの設定が正しくない。
t ワイヤレスLANに接続するプロジェクター、コンピューターのうち1 台にのみPeertoPeerを
設 定してください。(11(JP)ページ)
・ アクセスポイントのチャンネル設定が 12〜14に設定されている。
t アクセスポイントのチャンネルを 1 〜 1 1 に 設 定し直してください。
・ 上記を確認してもLANPCカード、ワイヤレスLANPCカード、メモリーカード、アクセスポイントが
正しく動作しな い 。
t ご使用のPCカードメーカー、アクセスポイントメーカーにお 問い合わせください 。
指定のソニーのワイヤレスLANPCカードを使 用し て い てプロジェクターが 正しく動 作しない
場合は、「ソニー業務用製品ご相談窓口のご案内」にある窓口にお問い合わせください。
・ 設置設定メニューの「入力B機能」(VPL-PX15)または「入力C 機能」(VPL-FX50)の設定が
正しくない。
t「 オン」に設定してください。
・ INPUTC/RS-232C/RS-422Aの切り換えスイッチの位置が正しくない。(VPL-FE110J)
t「INPUTC」に設定してください 。
・ ブラウザの設 定が「プロキシサーバーを使用する」になっている。
t プロジェクターのIPアドレスを「プロキシサーバーを使用しない」に設定してください。
・プロジェクターのIPアドレスの先頭に0を付けて入力している。
t 0で 始まる IP アドレスの 場 合 、0をとって 入 力し てください。
例:192.168.000.001の場合、192.168.0.1と入力する。
WindowsCEがフリーズした。
t 設置設定メニューの「入力 B 機能」(VPL-PX15)または「入力 C 機能」(VPL-FX50)をいっ
たん「オフ」にしてから「オン」に設 定し直してください。
t 付属のリモートコマンダーRM-PJ1001 の FUNCTIONキーを押し、続けて5秒以内にRESET
キーを押して再起動してください。(VPL-FE110J)
36 (JP)
Page 37

症状 原因/対処
PowerPointやExcelのファイルのフォントやスタ
イル が 変 わ っ てしまう。
本機のSlideViewer、WorksheetViewerでサポートしてないフォントやスタイルが使われている。
t サポートし て い るフォントは 以 下 の 通りで す。その 他 のフォントは 、 以 下 の フォントに置き換わり
ます。この場合、タブや改行の設定によっては段落などがずれることがあります。
ゴシック体(日本語のみ)、Arial、BookmanOldStyle、ComicSansMS、Impact、Symbol、
Tahoma、TimesNewRoman、Wingdings
また、サポートしていないスタイルは他のスタイルに置き換わります。
そ
の
他
PowerPointやExcelのファイルで文字などが表
示されな い 。
PowerPointファイルやExcelファイルのアニメー
ションやオートシェイプなどが変わってしまう、ま
たは表示されない。
スライドショー が 実 行 できな い 。「プロジェクター
のメモリーが一杯です。File Managerで
ファイルの整理をしてから再度実行してくだ
さい。」の メッセージが 出る。
スライドショーが実行できない。「ファイルが大き
すぎます。ファイルを分割するなどして再度実行
してください。」の メッセージ が 出る。
プロジェクターのInternet Browser が起動で
きない。
「このファイルは パスワードが 設 定され ています 。
パスワードを入 力し てください。」のメッセージ が
出る。
「パスワードが違います。正しいパスワードを
設 定してください 。」のメッセージが出る。
本機のSlideViewer、WorksheetViewerでは、中国語などサポートしていない文字は表示できませ
ん。
t サポートし て い る 文 字 は 、 英 語 、フラン ス 語 、ス ペ イン語、ドイツ語、イタリア語、日本語です。
これらの言 語のファイルをご使 用ください。
本機のSlideViewer、WorksheetViewerでサポートされていない機能が使われている。
t 他の、サポートされているものに置き換わります。表示されない部分は、サポートされ ているも
のに書き換えてください 。
プロジェクターに 保 存 され て いるファイルが 一 杯 で 、これ以上ファイルを保存できません。
t「FileManager」でファイルを削除し、空き容量が使用したいファイルの容量より多くなるよう
にしてください。
ファイルの容量が、プロジェクターに送れるファイルの容 量を越えて いる。
t「FileManager」で空き容量を確認し、ファイルを分割するなどして、その容量内に収めてく
ださい。
t PowerPoint の「ツール」メニューから、「 オプション」−「保存」を選び、「高速保存」の
チェックをはずしてみてください 。
プロジェクターが L AN に接続されていない。
t「ネットワークの設定」、「ワイヤレスLAN の設定 」を確 認してください 。(9(JP)〜 13(JP)ペー
ジ)
プロジェクターまたは 選 択したファイルにパ スワードが設定されている。
t パスワードを入 力してください。IP アドレスが工場出荷時のまま変更していない場合は、
Administratorの[Name]にrootと入力してください。
入力したパスワードが違っている。
t 正し い パ スワードを入 力し 直し てください。
37 (JP)
Page 38

2 (GB)
Page 39

Table of Contents
Before Using
Preparation
Features..................................................................... 4 (GB)
Precautions ............................................................... 5 (GB)
About This Manual.................................................... 5 (GB)
Preparations for Using the Networking Function.. 6 (GB)
System Configuration ................................................... 6 (GB)
Using the PC Card......................................................... 7 (GB)
Setting for Networking Function .................................. 7 (GB)
Using the Remote Commander or a Mouse and
Keyboard.................................................................. 7 (GB)
Setting Up the Projector .......................................... 8 (GB)
Setting Up from the Projector ....................................... 8 (GB)
Setting Up from a Computer....................................... 12 (GB)
Basic Operation Flowcharts .................................. 14 (GB)
Operations from a Computer....................................... 14 (GB)
Operations from the Projector..................................... 16 (GB)
GB
Operation
Others
Operations from a Computer................................. 19 (GB)
Preparations................................................................. 19 (GB)
Running a Presentation Using the Slide Viewer ......... 20 (GB)
Projecting an Excel File Using the Worksheet
Viewer.................................................................... 23 (GB)
Projecting an Image Using the Image Viewer............. 23 (GB)
Using File Manager..................................................... 26 (GB)
Controlling the Projector from a Computer ................ 27 (GB)
Checking the Indicators on the Projector .................... 28 (GB)
Operations from the Projector............................... 29 (GB)
Preparations................................................................. 29 (GB)
Running a Presentation Using the Slide Viewer ......... 30 (GB)
Projecting an Excel File Using the Worksheet
Viewer.................................................................... 31 (GB)
Running a Slide Show Using the Image Viewer......... 33 (GB)
Connecting to the Internet........................................... 35 (GB)
Troubleshooting...................................................... 36 (GB)
...........................................................................................................................................................................................................
• Microsoft, Windows and PowerPoint are the registered trademarks of Microsoft Corporation in the United States and/or
other countries.
• Netscape Navigator is a trademark of Netscape Communications Corporation in the United States and/or other countries.
• All other product and company names mentioned herein are trademarks or registered trademarks of their respective owners.
3 (GB)
Page 40

Features
The projector has built-in Windows CE and is
compatible with networking. Connecting to a Local
Area Network (LAN) allows you to run a presentation
using a file stored in a computer connected by the
same LAN. You can open the file from a computer
located far away from the projector as well as one in
the same conference room. Connecting to the Internet
only with the projector is also available.
When you have access to the projector by using the
Web browser of a computer, you can control the
projector from that computer.
Connection to a LAN
The projector is equipped with the ETHER connector
(VPL-PX15 and VPL-FX50) and a PC card slot, which
allows you to connect the projector to LAN by using
the LAN cables or the specified/recommended LAN
PC card. Installing a wireless LAN PC card to the PC
card slot enables wireless LAN connection.
File Manager Function
Use of a computer’s Web browser enables you to add
files stored in the computer to the projector or delete
files stored in the projector by operating the computer.
Web browser built-in
The Internet Explorer 4.0 and its equivalent is built
into the projector, allowing you to connect to the
Internet.
Memory function
The projector can store a file imported from a
computer or a memory card.
When you store the file, you can create a password to
prevent unauthorized people from opening it.
PC card slot incorporated
The projector is equipped with a PC card slot.
Inserting the PC memory card, in which data are
stored, into this slot allows you to run a presentation
easily without using a computer.
Presentation Viewer Function
The projector has built-in simple Microsoft
PowerPoint and Microsoft Excel viewer funtions,
named Slide Viewer and Worksheet Viewer,
respectively. The functions allow you to run a slide
show using a PowerPoint file or to project an Excel
file without any conversion.
Image Viewer Function
The projector has built-in Image Viewer function,
allowing you to view images created in the JPEG,
BMP, GIF or PNG format, to set up a slide show, and
to run a slide show using the images.
4 (GB)
Page 41

Precautions
About This Manual
Before Using
Caution
Before you turn off the projector or reset it by
using the supplied Remote Commander, make sure
to exit any application software which is running.
Otherwise, system damage may occur and you may
not be able to restart the projector.
•Recommended system requirements for the projector
are as follows:
– Microsoft Windows 98, Microsoft Windows 98 SE,
Microsoft Windows 2000, Microsoft Windows Me
•Make sure to use the specified/recommended LAN
PC card, wireless LAN PC card, PC memory card
and wireless LAN access point. Also use the
specified/recommended wireless LAN PC card to
install into the connected computers.
Using a device not specified/recommended may
cause incorrect operations.
For the specified/recommended devices, see the supplied
“Specified/recommended PC Card/Wireless LAN Access
Point.”
This manual explains networking operations of the
VPL-PX15, VPL-FX50 and VPL-FE110U/M LCD
Data Projector.
On-line Help files are also available. When you access
the Web server of the projector, a Help sentence will
appear on a computer when you rest the pointer over
each item.
In the Windows CE window of the projector you can
open the help file by clicking Help from the Start
menu. The Windows CE of the projector does not
support some functions. The Help file for Slide
Viewer, Worksheet Viewer or Image Viewer opens
when you click the
respective application window.
Refer to the Operating Instructions of this model for
operations other than networking.
button on the tool bar of the
•To prevent data loss, make backup of data frequently.
In no event will Sony be liable for any loss of data.
• Please note that the software specifications are
subject to change without notice.
• Some of the illustrations in this manual may differ
from the actual application software.
5 (GB)
Page 42

Preparations for Using the Networking Function
This section describes the tasks that are required for
using the networking function of the projector.
System Configuration
For details on connections, refer to the Operating
Instructions of the projector.
Connecting to LAN using the LAN cables
or LAN PC card
Computer
LAN cable
Computer
LAN cable
to
Hub/router
LAN PC card (recommended)
(NE2000 compatible)
Rear of the VPL-FE110U/M
LAN
cable
PC CARD
slot
Connecting to wireless LAN using the
wireless LAN access point
Wireless LAN PC card
(recommended)
(IEEE802.11b compliant)
Wireless LAN access
point (recommended)
(IEEE802.11b compliant)
to Hub/router
Wireless LAN PC
card (recommended)
(IEEE802.11b
compliant)
Wireless LAN PC card
(specified)
(IEEE802.11b compliant)
PC CARD slot
Computer
Projector
Computer
Connecting to wireless LAN without using
the wireless LAN access point (Peer to
Peer mode)
Wireless LAN PC
card (specified)
(IEEE802.11b
compliant)
PC CARD slot
Projector
6 (GB)
LAN
cable
ETHER
connector
Left side of the VPL-PX15
Front of the VPL-FX50
LAN cable
Computer
Wireless LAN PC
card (recommended)
(IEEE802.11b
compliant)
Using the memory card
PC CARD slot
PC memory
card (Type II)
Computer
Projector
Page 43

Preparation
Using the PC Card
The PC CARD slot of INPUT B (VPL-PX15) or
INPUT C (VPL-FX50 and VPL-FE110U/M) on the
projector accepts one PCMCIA Type II PC card. To
connect to a LAN, it is required to insert the specified/
recommended LAN PC card (VPL-FE110U/M only)
or wireless LAN PC card into this slot.
You can also insert the recommended PC memory card
into this slot. Storing the file created with Microsoft
PowerPoint or Excel, or the image file in a memory
card enables you to project a file or run a presentation
without connecting to a computer.
Notes
• Do not turn off the projector or restart Windows CE
of the projector while the PC card is writing or
reading.
• Make sure to use the specified/recommended LAN
PC card, wireless LAN PC card or PC memory card.
For the specified/recommended cards, see the
supplied “Specified/recommended PC Card/Wireless
LAN Access Point.”
• The driver software for the specified/recommended
PC cards is installed into the projector at the factory.
Installing any other driver software is not required
and cannot be done.
For inserting and removing the PC card, refer to the
Operating Instructions of the projector.
Using the Remote Commander or a Mouse and Keyboard
x For VPL-PX15 and VPL-FX50
When you operate the projector for setting up the
projector, running a slide show, etc., use the supplied
Remote Commander. Before operation, set the PJ/
NETWORK select switch on the Remote Commander
to NETWORK.
You cannot connect a mouse and keyboard to the
projector.
x For VPL-FE110U/M
When you operate the projector for setting up the
projector, running a presentation, etc., use of the RMPJM610 remote commander (not supplied) or
commercially available PS/2 mouse and keyboard is
required.
Note
Connect the mouse and keyboard to the projector
before connecting the power cord of the projector to
the AC outlet.
For connections of the mouse and keyboard, refer to the
Operating Instructions of the projector.
For operation of the RM-PJM610 remote commander (not
supplied), refer to the Operating Instructions of the remote
commander.
Setting for Networking Function
To activate the networking function of the projector,
do the following setup.
x For VPL-PX15
Set INPUT-B FUNC. in the INSTALL SETTING
menu to ON.
For detailed information, see the Operating Instructions of
the projector.
x For VPL-FX50
Set INPUT-C FUNC. in the INSTALL SETTING
menu to ON.
For detailed information, see the Operating Instructions of
the projector.
x For VPL-FE110U/M
Set the INPUT C/RS-232C/RS-422A select switch on
the rear panel to INPUT C.
7 (GB)
Page 44

Setting Up the Projector
Basic setups such as IP address and wireless LAN
settings are necessary for networking operations of the
projector. You can set them up either from the
projector or a computer connected to the same LAN.
Before setting up
x For VPL-PX15 and VPL-FX50
• Turn on the projector with the #/ 1 key on the
supplied Remote Commander or control panel of the
projector.
• Confirm that INPUT-B FUNC. (VPL-PX15) or
INPUT-C FUNC. (VPL-FX50) in the INSTALL
SETTING menu is set to ON.
• Press the INPUT key on the supplied Remote
Commander or control panel of the projector to select
INPUT B (VPL-PX15) or INPUT C (VPL-FX50).
The Network Projector window opens.
• Set the PJ/NETWORK select switch on the Remote
Commander to NETWORK.
•When you set up from the projector, display the
screen keyboard on the projector and operate with the
supplied Remote Commander.
For information on the screen keyboard, see page 29 (GB).
• Turn on the computer from which you set up the
projector.
x For VPL-FE110U/M
•Confirm that the INPUT C/RS-232C/RS-422A select
switch is set to INPUT C.
•Turn on the projector with the ON key on the RM-
PJM610 remote commander, supplied Remote
Commander or control panel of the projector.
•Press the INPUT key on the RM-PJM610 or the
INPUT SELECT key on the supplied Remote
Commander or control panel of the projector to select
INPUT C. The Network Projector window opens.
•When you set up from the projector, display the
screen keyboard on the projector and operate with the
connected mouse and keyboard, or the RM-PJM610
remote commander.
For information on the screen keyboard, see page 29 (GB).
•Turn on the computer from which you set up the
projector.
Setting Up from the Projector
Setting the password
You can set a password for protection against access
from remote network users.
1 From the Start menu, click Control Panel in the
Network Projector window.
2 Double-click the Password icon.
The Password Properties dialog box appears.
Password Properties
Administrator
Name:_ root
User
Name:_
Password:_I
Confirm password:_
Password:_
Confirm password:_
3 Specify the Password for Administrator, then enter
the same password again in the Confirm password
text box for Administrator.
The Name of Administrator is preset as “root” at
the factory. It cannot be changed.
4 Specify the Name and Password for User, then
enter the same password in the Confirm password
text box for User.
When you are required to enter the password for
Administrator or User while you are operating the
projector from a computer, enter the Name and
Password which you set in steps 3 and 4.
8 (GB)
Page 45

Setting up the network configuration
Setting up the network configuration, such as IP
address setting, is necessary for building a LAN
connection. The IP address of the projector will be
displayed on the task bar of the Network Projector
window of the projector.
If the connection environment is changed, you need to
set up the network configuration again.
For details, contact your network administrator.
5 Click the Name Servers tab to display the Name
Servers dialog box, then set the necessary items.
'Wireless Ethernet Driver' settings
IP Address
Name Servers
Name server addresses may be
automatically assigned if DHCP
is enabled on this adapter.
You can specify additional
WINS or DNS resolvers in the
space provided.
_
Primary DNS:
_
Secondary DNS:
_
Primary WINS:
_
Secondary WINS:
. . .
. . .
. . .
. . .
1 From the Start menu, click Control Panel in the
Network Projector window.
2 Double-click the Network icon.
The Network Configuration dialog box appears.
Network Configuration
Adapters
Identification
Lists the network drivers
installed on your device.
To change driver settings,
select the driver and then the
Properties button.
On-board LAN
*
NE2000 Compatible Ethernet Driver
Wireless Ethernet Driver
On-board LAN
Properties
_
* The On-board LAN tab is displayed for the VPL-PX15 and
VPL-FX50.
3 Select the driver name according to the network
connection type.
You can select one of the following driver names.
NE2000 Compatible Ethernet Driver: When
using the recommended NE2000 compatible PC
LAN card.
Wireless Ethernet Driver: When using the
specified wireless LAN PC card.
On-board LAN: When using the ETHER
connector to connect to LAN (displayed for the
VPL-PX15 and VPL-FX50)
The selected driver’s setting dialog box appears.
6 Click the OK button.
The Network Configuration dialog box reappears.
7 According to your requirements, click the
Identification tab and set the necessary items.
Network Configuration
Adapters
Identification On-board LAN
The system uses these
credentials to access remote
network resources. If these
credentials fail you will be
prompted for a new set of
credentials to access the
network resource.
User Name:_
__Password:
Domain:
netpj
********
projector
8 Click the OK button.
When you use a wireless LAN PC card with the
VPL-PX15 or the VPL-FX50
If you select Wireless Ethernet Driver in step 3, follow
the steps below after performing step 6.
1 Click the On-board LAN tab.
2 Remove the check from the “Enable On-board
LAN” checkbox.
3 Click the OK button.
The window in step 2 reappears.
4 Confirm that the “Specify an IP address” radio
button is selected, and set the necessary items.
The IP Address is initially set to “192.168.0.1,”
and the Subnet Mask is set to “255.255.0.0” at the
factory.
'Wireless Ethernet Driver' settings
IP Address
Name Servers
An IP address can be
automatically assigned to this
computer. If your network
does not automatically assign
IP addresses, ask your network
administrator for an address,
and then type it in the space
provided.
Obtain an IP address via DHCP
_
Specify an IP address
_
IP Address:
_
Subnet Mask:
_
Default Gateway:
_
192.168. 0 . 1
255.255. 0 . 0
. . .
Note
Once the On-board LAN was deactivated, it is not
shown in the driver names of the Network
Configuration dialog box. If you want to select Onboard LAN, check the Enable On-board LAN
checkbox, then repeat from step 2 in “Setting up the
network configuration.”
9 (GB)
Page 46

Setting Up the Projector
Setting up a wireless LAN environment
When you are using a wireless LAN PC card, it is also
necessary to set up the projector following the steps
below.
Using a wireless LAN access point
Set up the access point you are connecting to as
follows.
1 From the Start menu, click Control Panel in the
Network Projector window.
2 Double-click the Wireless LAN icon.
The Wireless LAN settings dialog box appears.
3 Click the Edit button.
The Access Point settings dialog box appears.
6 Enter the Encryption Key.
Type the encryption key, if it is set and is active on
the access point.
7 Click the OK button.
The Wireless LAN settings dialog box reappears.
8 Click the radio button of the Nickname you want
to use, and click the OK button.
Connection is made to the selected access point.
To connect to an access point which is
already configured
If multiple access points exist, you can assign up to
four Nicknames for them. If you want to connect to an
access point which is already configured, select a radio
button next to the relevant Nickname then click the
OK button in the Wireless LAN settings window.
Connection is made to the selected access point.
Note
When the manufacturer of the wireless LAN card
inserted into the projector and that of the wireless
LAN access point are not the same, how to enter the
encryption key may differ. If the encryption key
appears in hexadecimal values, enter the hexadecimal
values for Encryption Key.
When no communication is taking place
between the access point and the projector
If the channel for the access point is set to 12–14, set it
to any channel between 1 and 11.
4 Enter a Nickname.
The Nickname identifies the access point. Enter up
to 32 characters for the Nickname using
alphanumeric characters and symbols (ASCII
characters). If multiple access points exist, make
sure to assign a different name to each one.
5 Enter the Access Point ID.
Type the ID specified for the access point you are
connecting to.
10 (GB)
Notes
•Contact qualified Sony personnel if any trouble
occurs when you are using the specified/
recommended Sony wireless LAN PC card.
• If the manufacturer of the wireless LAN card and
that of the wireless LAN access point are not the
same, communication by enabled encryption does not
take place correctly.
Page 47

Peer to Peer (Ad-hoc) mode
Checking connection with the access point
To connect to a wireless LAN between the projector
and computers without using the wireless LAN access
point, follow the steps below on the projector only.
1 Follow steps 1 to 4 in “Using the wireless LAN
access point.” In the Access Point settings dialog
box, set the Nickname of this mode.
2 Click the checkbox next to Peer to Peer.
3 Enter an optional Access Point ID.
You can type up to 32 alphanumeric characters for
the ID.
4 Enter the Encryption Key if you want to make it
active.
5 Click the OK button.
The Wireless LAN settings dialog box reappears.
6 Click the radio button of the Nickname you
entered in step 1.
The Peer to Peer mode takes effect.
For the computers connected it is required to enter the
same Access Point ID and Encryption Key as those
entered in the procedure above and an optional
Nickname. For details, refer to the Operating
Instructions of the wireless LAN PC card inserted into
the computers.
Notes
•Use wireless LAN PC cards of the same
manufacturer both for the projector and the computer.
•If Peer to Peer (Ad-hoc) is configured on one of the
connected computers, perform step 1, then steps 3 to
6 above to enter the same Access Point ID and
Encryption Key as those of the computer and an
optional Nickname on the projector.
•Select Peer to Peer (Ad-hoc) only for one of the
projector and computers on the same LAN.
•When you use Peer to Peer (Ad-hoc) mode, you need
to set a dedicated IP address and Subnet Mask for this
mode on the projector and the computer.
You can check if the projector is correctly connected
to the access point.
1 Double-click the (reception level indicator) icon
on the task bar of the Network Projector window.
The window that indicates the connection status
between the projector and the access point appears.
2 Check the following.
• Status: Shows OK if the projector has a correct
recognition of the wireless LAN PC card.
• Access Point ID
• Connection: Connection status with the access
point
• Access Point: Information about the connected
access point
• Channel: Assigned channel
• Encryption Key: Encryption enabled or disabled
on the connected access point
• Signal Strength: Signal level for communication
between the projector and the access point
When Access Point ID shows “searching”
Verify if the Nickname, Access Point ID and
Encryption Key are correct. Selecting Edit wireless
Profiles... from the Tools menu opens the Wireless
LAN settings window. If any of the items is not
correct, correct it following steps 3 through 8 on page
10 (GB).
11 (GB)
Page 48

Setting Up the Projector
Setting the date and clock
The clock is displayed on the task bar of the Network
Projector window. To set the date and time, follow the
steps below.
1 From the Start menu of the Network Projector
window, click Control Panel.
2 Double-click the Date/Time icon.
3 Set the date and time.
Assigning an application software to the
FUNCTION key on the Remote
Commander (for VPL-PX15 and VPL-FX50)
If you assigned an application to the FUNCTION 1 or
2 key on the supplied Remote Commander, a touch of
the key enables you to start that application. The
screen keyboard is assigned to the FUNCTION 3 key
at the factory, and you cannot reassign or cancel that
assignment.
For detailed information about the screen keyboard, see
page 29 (GB).
1 From the Start menu of the Network Projector
window, click Control Panel.
2 Double-click the Launch Keys icon.
The Launch Keys Settings dialog box appears.
Setting Up from a Computer
Notes
•Connect a single computer you are using for setups to
the projector if the IP address of the projector is not
changed from the factory-preset one.
•If the browser of your computer is set to “Access the
Internet using a proxy server,” enter the IP address of
the projector in the box “Access the Internet without
using a proxy server” when you have access to the
projector from your computer.
•The computer may not accept the password for the
projector, depending on the version of the browser. In
this case, restart the browser.
Opening the setup window
1 Start the computer’s browser software (Internet
Explorer 4.0 or later versions, or Netscape
Navigator 4.5x or 4.7x version).
2 Type “http://xxx.xxx.xxx.xxx (for the IP address of
the projector)/setup”.
If the IP address is not changed from the factorypreset one, type “http://192.168.0.1/setup” (when
using a LAN PC card) or “http://192.168.0.2/
setup” (when using the ETHER connector).
If the number of the IP address starts from 0 (zero),
enter the number without 0.
Example: 192.168.000.001 c 192.168.0.1
The Password dialog box appears.
3 Click Browse for the key (1 or 2) to which you
want to assign an application software, then click
the application you want from the application list.
4 Repeat step 3 if you want to assign an application
to the other key.
5 Click the OK button.
12 (GB)
3 Enter the Name and Password for Administrator.
If the Password setting is not changed from the
factory-preset one, enter “root” in the Name text
box.
The Setup window appears.
Page 49

Setting the password
Setting up the wireless LAN environment
1 Click the Password icon in the Setup window.
The password setting dialog box appears.
Setup procedure is the same as that operated by the
projector.
For details, see “Setting the password” on page 8 (GB).
2 Click the APPLY button.
Setting up the network configuration
1 Click the Network icon in the Setup window.
The Network configuration window appears.
1 Click the Wireless LAN icon in the Setup window.
The dialog box for setting the Nickname, Access
Point ID, Encryption Key and Peer to Peer appears.
Setup procedure is the same as that operated by the
projector.
For details, see “Setting up a wireless LAN
environment–Using a wireless LAN access point/Peer to
Peer (Ad-hoc) mode” on pages 10 (GB) and 11 (GB).
In this window you can set the items described in
steps 4 to 7 in “Setting up the network
configuration” on page 9 (GB).
For details, see “Setting up the network configuration”
on page 9 (GB).
2 Click the APPLY button.
The window for restart appears.
3 Click the RESTART button.
If the projector is turned on and the Network
Projector window is open, the projector’s screen is
turned off for about 10 seconds, then the projector
restarts.
The network setting does not take effect until you
restart the projector.
2 Click the APPLY button.
13 (GB)
Page 50

Operations from a Computer
Basic Operation Flowcharts
This section describes the operation flowchart for
using the projector via a network or for using the builtin network function of the projector. There are two
types of flowcharts; for operations from a computer
and for those from the projector. For details, see the
pages in parenthesis.
Required conditions
•The projector and computer are connected to the
same LAN.
•The projector and computer are turned on.
•The INPUT-B FUNC. (VPL-PX15) or INPUT-C
FUNC. (VPL-FX50) is set to ON in the INSTALL
SETTING menu.
•The INPUT C/RS-232C/RS-422A select switch is set
to INPUT C. (VPL-FE110U/M)
• The input of the projector is set to INPUT B (VPLPX15) or INPUT C (VPL-FX50 and VPL-FE110U/M).
Operations from a Computer
Running a presentation using a file
created with PowerPoint
Projecting an Excel file onto the projector
You can display an Excel file on the projector by
operating from a computer.
Starting a Web browser of a computer to access the
projector (page 19)
Start the Internet Explorer 4.0 or later versions, or
Netscape Navigator 4.5x or 4.7x version, and then enter
the projector’s IP address.
Selecting PRESENTATION VIEWER (page 23)
Select the PRESENTATION VIEWER icon in the
Application Select window.
Finding a file you want to project on the projector
(page 23)
You can control a presentation using a file created with
PowerPoint from a computer.
Starting a Web browser of a computer to access the
projector (page 19)
Start the Internet Explorer 4.0 or later versions, or
Netscape Navigator 4.5x or 4.7x version, and then enter
the projector’s IP address.
Selecting PRESENTATION VIEWER (page 20)
Select the PRESENTATION VIEWER icon in the
Application Select window.
Finding a file you want to use for your presentation
(page 20)
Select where the file is stored, the computer or projector,
then select the PowerPoint file you want. The Slide
Viewer starts.
Select where the file is stored, the computer or projector,
then select the Excel file you want. The Worksheet
Viewer starts.
Projecting an Excel file
14 (GB)
Setting up a slide show (page 21)
Set which slides to use and how to
advance a slide in a slide show.
Running a slide show
Page 51

Projecting an image onto the projector
using a file stored in a computer
You can project an image onto the projector by
operating from a computer.
Starting a Web browser of a computer to access the
projector (page 19)
Projecting an image or running a slide
show onto the projector using a file stored
in the projector
By using an image file stored in the projector or in the
PC memory card you can project it on the projector by
operating a computer. You can also run a slide show
using the slide show setting file preset on the projector.
Start the Internet Explorer 4.0 or later versions, or
Netscape Navigator 4.5x or 4.7x version, and then enter
the projector’s IP address.
Selecting the Image Viewer of the projector
(page 23)
Select the IMAGE VIEWER icon in the Application
Select window.
Selecting where the file is stored
(page 23)
Select COMPUTER in the Look In window. The Image
Viewer starts.
Finding a file you want to project on the projector
(page 24)
Select the image file you want by clicking the Browse
button.
Starting a Web browser of a computer to access the
projector (page 19)
Start the Internet Explorer 4.0 or later versions, or
Netscape Navigator 4.5x or 4.7x version, and then enter
the projector’s IP address.
Selecting the image Viewer of the projector
(page 25)
Select the IMAGE VIEWER icon in the Application
Select window.
Selecting where the file is stored
(page 25)
Select PROJECTOR in the Look In window. The Image
Viewer starts.
Selecting a folder to
project
(page 25)
Selecting the setting
file to run a slide show
(page 25)
Projecting an image
Select a folder you want
in the Folder/.SHO File
Select window.
Projecting an image
Select the .SHO file you
want in the Folder/.SHO
File Select window.
Setting up a slide show
(page 25)
Set how to advance a
slide in a slide show.
Running a slide show
15 (GB)
Page 52

Operations from a Computer
Basic Operation Flowcharts
Managing files with File Manager
You can add files stored in a computer to the
projector’s storage or delete files stored in the
projector.
Starting a Web browser of a computer to access the
projector (page 19)
Start the Internet Explorer 4.0 or later versions, or
Netscape Navigator 4.5x or 4.7x version, and then enter
the projector’s IP address.
Starting File Manager (page 26)
Select the FILE MANAGER icon in the Application Select
window.
Adding files (page 26)
Deleting files (page 26)
Operations from the Projector
Running a presentation using a file stored
in the computer
Immediately after you open a file created with
PowerPoint stored in a computer, you can start a
presentation by operating the projector.
Starting My Projector (page 31)
Double-click the My Projector icon.
Selecting a file you want to use for your presentation
(page 31)
Enter the name of a computer that stores the file to use,
and select the PowerPoint file. Slide Viewer starts and
the selected file appears in slide view.
Select a file in a computer
you want to add to the
projector’s storage.
Running an addition
Select a file in the
projector you want to
delete.
Running a deletion
Controlling the projector
You can perform various adjustments and settings of
the projector from a computer.
Starting a Web browser of a computer to access the
projector (page 19)
Start the Internet Explorer 4.0 or later versions, or
Netscape Navigator 4.5x or 4.7x version, and then enter
the projector’s IP address.
Displaying the control window (page 27)
Setting up a slide show (page 31)
Set which slides to use and how to
advance a slide in a slide show.
Running a slide show
Click the MORE... button.
Adjusting or setting the projector
16 (GB)
Page 53

Running a presentation using a file stored
in the projector or memory card
Projecting an Excel file stored in a
computer
By using a PowerPoint file stored in the projector or in
the PC memory card, you can run a presentation by
operating the projector only.
Starting the Presentation Viewer (page 31)
Double-click the Presentation Viewer icon.
Selecting a file you want to use for your presentation
(page 31)
Select the PowerPoint file you want in the Open File
dialog box. The Slide Viewer starts, and the selected file
appears in slide view.
Setting up a slide show (page 31)
Set which slides to use and how to
advance a slide in a slide show.
Running a slide show
You can project an Excel file stored in a computer on
the same LAN by operating the projector.
Starting My Projector (page 32)
Double-click the My Projector icon.
Selecting a file you want to project
(page 32)
Enter the name of a computer that stores the file to use,
and select an Excel file. Worksheet Viewer starts, and
the selected file is displayed on the projector.
Projecting an Excel file stored in the
projector or memory card
You can project an Excel file stored in the projector or
memory card onto the projector.
Starting the Presentation Viewer (page 32)
Double-click the Presentation Viewer icon.
Selecting a file you want to project
(page 32)
Select the Excel file in the Open File dialog box. The
Worksheet Viewer starts, and the selected file is
projected on the projector.
17 (GB)
Page 54

Basic Operation Flowcharts
Operations from a Computer
Running a slide show using an image file
stored in the projector or memory card
You can run a slide show using an image file stored in
the projector or memory card by operating the
projector only.
Starting the Image Viewer (page 33)
Double-click the Image Viewer icon.
Selecting the files you want to use for your slide
show (page 33)
Click the folder which contains the files you want. All the
slides contained in the folder are displayed in thumbnail
windows.
Selecting the slides you want to use for a slide show
(page 34)
Select the slides you want to use. If you want to select all
the slides displayed in thumbnail windows, click Select
all from the Slide Show menu.
Connecting to the Internet
Starting the Internet Browser (page 35)
Double-click the Internet Browser icon.
Setting up an image (page 34)
Zooming or rotating a slide.
Running a slide show
Select how to advance a slide. A slide show starts.
18 (GB)
Page 55

Operations from a Computer
Operation
Preparations
Before starting
x For VPL-PX15
Confirm that the INPUT-B FUNC. is set to ON in the
INSTALL SETTING menu.
x For VPL-FX50
Confirm that the INPUT-C FUNC. is set to ON in the
INSTALL SETTING menu.
x For VPL-FE110U/M
Confirm that the INPUT C/RS-232C/RS-422A select
switch is set to INPUT C.
Starting the browser to have access to the
projector
In order to control the projector from a computer, you
have to access the projector by starting the browser on
the computer. Suitable browsers are Internet Explorer
4.0 or later versions, and Netscape Navigator 4.5x or
4.7x version.
Notes
•Do not have access to the projector from two or
more computers simultaneously.
•If the browser of your computer is set to “Access the
Internet using a proxy server,” enter the IP address of
the projector in the box “Access the Internet without
using a proxy server” when you have access to the
projector from your computer.
•The computer may not accept the password for the
projector, depending on the version of the browser. In
this case, restart the browser.
•If the browser on a computer exits without closing the
application, the projector automatically returns to the
initial Network Projector window after about 30
seconds. In this case, restart the browser.
Names and functions of the Application
Select window
Having access to the projector opens the Application
Select window. The following shows the names and
functions of the icons and buttons in the window.
423
1
1 Turn on the projector.
2 Set the input to the projector to INPUT B (VPL-
PX15) or INPUT C (VPL-FX50 and VPLFE110U/M)
3 Switch on the computer.
4 Start the browser on the computer.
5 Enter the IP address of the projector.
Type “http://xxx.xxx.xxx.xxx (for the IP address of
the projector).”
You can verify the IP address as it is displayed on
the task bar in the Network Projector window.
The Application Select window appears.
When the password is set for the projector, the
password setting dialog box appears. Enter the
Name and Password for User.
For information on the Application Select window, see
“Names and functions of the Application Select
window.”
Operations that follow the above steps are shown
on pages 20 (GB) to 28 (GB).
56
1 Language select button
Clicking
Each window has help sentences shown on the lower
part of the window. You can display them in English,
French, German, Spanish, Italian or Japanese.
2 FILE MANAGER icon
Starts the File Manager to manage the files stored in
the projector.
3 IMAGE VIEWER icon
Opens the setup window for projecting image files.
opens the language select drop-down list.
87
(continued)
19 (GB)
Page 56

Operations from a Computer
4 PRESENTATION VIEWER icon
Opens the select window for starting the PowerPoint
viewer (Slide Viewer) or Excel viewer (Worksheet
Viewer).
5#/1 (on/standby) button
Turns the projector on or sets it to standby mode.
6 Help
Resting the pointer over each item displays the
instructions for the item. This makes your operations
easier in each window.
7 Input select buttons
Select the input to the projector.
The INPUT C button does not exist in the window for
the VPL-PX15.
8 MORE... button
Opens the control window for the projector.
Running a Presentation Using the Slide Viewer
When you intend to run a presentation with
PowerPoint in a conference room, you can control the
presentation by operating your computer in the same
room or in the location far away from the projector.
Running a presentation
1 Click the PRESENTATION VIEWER icon in the
Application Select window.
The Look In window appears.
2 Click to select where to search for the file you
want to use for your presentation.
COMPUTER: To select a file stored in a
computer
PROJECTOR: To select a file stored in the
projector
The File Select window appears.
3 Select the file you want to use for your
presentation.
When you select COMPUTER in step 2
Clicking Browse opens the file select window on a
computer. Click the PowerPoint file (.ppt or .pps
file) you want. You can also select the file by
entering the file name in the Browse text box. The
selected file name is displayed in the Browse text
box.
What you can do with the Slide Viewer
You can
•run a slide show using the file created with
PowerPoint.
•show a custom slide show if created.
•show a speaker’s note or hide it.
•show a slide or hide it.
•set timings to advance a slide during a slide show.
You can select an automatic or manual slide show.
Notes
•It may take time to display the file depending on your
network configuration.
•As the Slide Viewer is a basic PowerPoint viewer
function, it does not support some features of
PowerPoint. We recommend you should project the
file you are using for your presentation on the
projector before starting the presentation.
• The following fonts are available for the Presentation
Viewer; Arial, Bookman Old Style, Comic Sans MS,
Impact, Symbol, Tahoma, Times New Roman and
Wingdings.
BACK button
Click to return to the
previous window.
Password setting box
HOME button
Click to return to the
Application Select window.
20 (GB)
Page 57

To store the selected file into the projector
Click to check the “save in projector” checkbox.
You can set the password for the file, if necessary.
Specify the password in the “password” text box.
This disables the file to open from now on unless
you enter the password.
The file will be stored when you click the Set Up
or View button.
Note
When you delete a file using File Manager,
entering the password is not required even if the
password is set for the file.
When you select PROJECTOR in step 2
The file list showing the files stored in the
projector or a memory card (VPL-PX15 and VPLFX50) appears. Click the PowerPoint file you
want. The selected file name is displayed in the
text box.
Note
If you are running a presentation using the file
stored in a computer, the file is transferred to the
projector at the time you click the Set Up button. It
will take a little time to display the Set Up Show
window on the computer. How long it takes
depends on the file size. During this time a
message will appear.
4 Set up your slide show, if necessary. Click the Set
Up button in the File Select window.
The Set Up Show window appears. You can
specify slides you want to use for your slide show
and set how to advance a slide in the slide show.
Resting the mouse pointer over each item shows its
instruction on the lower part of the window.
5 Click the View button in the File Select window or
click the View Show button in the Set Up Show
window.
The slide show starts.
Note
If you are running a presentation using the file
stored in a computer, the file is transferred to the
projector at the time you click the View button. It
will take a little time to display a slide show on the
projector screen. How long it takes depends on the
file size. During this time a message will appear.
To end the slide show
Click the End Show button. (See page 22 (GB).)
The File Select window returns.
(continued)
21 (GB)
Page 58

Operations from a Computer
Note
If the message “Projector’s memory is full” appears
when clicking the View or Set Up button, delete
unnecessary files stored in the projector using the File
Manager (page 26 (GB)), then try to run the slide show
again. If the message “File size is too large.” appears,
reduce the file size, then try to run the slide show
again.
Tips :
You may make it smaller by clicking Option, then
Save from the Tools menu, and unchecking Save Fast
in the PowerPoint application.
About the window displayed while the
presentation is running
The following window is displayed during a
presentation.
423
1
4 Slide
Shows the currently displayed slide in the slide show.
The projector’s screen displays only this slide.
5 PREVIOUS button
Returns to the previous slide or Animation setting
during the slide show.
6 Slide text box
Clicking
opens the slide name drop-down list.
When you select a specific slide from the list, it will be
shown.
7 NEXT button
Advances to the next slide or Animation setting
immediately.
8 Set Up Show button
Returns to the Set Up Show window.
9 End Show button
Ends or suspends the slide show to return to the File
Select window.
65789qa0
1 NOTES button
Selects to display/remove a speaker’s note.
2 SLIDE button
Selects to display/remove a slide show on/from a
computer’s display.
3 File name/slide number
Shows the name of a file and which slide is displayed.
q; Note
Displays a speaker’s note. It is not displayed on the
projector screen.
qa HOME button
Returns to the Application Select window.
22 (GB)
Page 59

Projecting an Excel File Using the W orksheet Viewer
You can project an Excel file on the projector by
operating a computer.
What you can do with the Worksheet
Viewer
You can
•display Excel worksheets to fill the projector screen.
•change the area of a worksheet in view on the
projector screen.
•zoom in or out the projected worksheet.
Note
As the Worksheet Viewer is a simple Excel viewer
function, it does not support some Excel features such
as a split feature.
Projecting an Excel file
1 Follow steps 1 to 3 in “Running a Presentation
Using the Slide Viewer — Running a presentation”
on page 20 (GB). Make sure to select an Excel file
(.xls file) in step 3.
2 Click the View button.
The Worksheet Viewer starts.
A worksheet of the selected file is displayed on the
projector.
Notes
•The range of the displayed area of a worksheet on a
computer and that of the projected area on the
projector is not the same.
•When you click a cell on a computer, the cell
becomes active if the selected cell is within the area
displayed on the projector. If the selected cell is
outside the displayed area, the area with the selected
cell is centered on the projector’s display.
Projecting an Image Using the Image Viewer
You can project an image file stored in any computer
on the same LAN or stored in the projector’s storage
or in the memory card installed in the projector. You
can also run a slide show using the slide show setting
file (.SHO file) preset in the projector.
Projecting an image stored in a computer
on the projector
1 Click the IMAGE VIEWER icon in the
Application Select window.
The Look In window appears.
2 Click COMPUTER.
The Image Viewer of the projector starts, and the
Image Viewer window opens.
Currently selected cell
You can zoom in or out the worksheet projected on the
screen, and change the area of the worksheet in view on
the projector by using the buttons on the right window.
When you rest the mouse pointer over each button or
item, its instructions will appear on the bottom of the
window.
Resting the mouse pointer over each item shows its
instruction on the lower part of the window.
(continued)
23 (GB)
Page 60

Operations from a Computer
1
6
7
4
2
3 5
3 Select an image file to display.
Click Browse to open the file select window on a
computer. Double-click the file you want.
The selected file name is displayed in the Browse
text box.
4 Click the SHOW button.
A full-screen image of the selected file is displayed
on the projector.
Note
When projecting a large size image file such as those
in UXGA format, it cannot be opened due to lack of
memory. In this case, reduce the image to obtain a
smaller file size.
To save time taken for transferring data
When clicking the SHOW button, the file is transferred
to the projector. It will take a little time to display an
image on the projector’s screen. To display the image
immediately, transfer all the files you want to use to
the projector before starting your presentation.
About the window displayed while the
Image Viewer is running
1 File name
Shows the file name of the currently displayed image.
1 After step 3 in “Projecting an image stored in a
computer on the projector,” click the SEND
button.
The selected file name appears in the Temporary
File list and the file is transferred to the projector.
Repeat this step until all the files you want are
shown in the Temporary File dialog box.
2 Double-click the file name listed in the Temporary
File dialog box.
A full-screen image of the selected file is displayed
on the projector.
Note
If the memory of the Temporary File list is full, the
data transferred earlier will be erased.
2 Slide
Shows the currently displayed image on the projector’s
screen.
3 Zoom text box
Clicking
of enlargement or reduction for the image.
4 Rotate text box
Clicking
angle of rotation for the image.
Note
When projecting a large size image file such as those
in UXGA format, it cannot be rotated due to lack of
momory. In this case, reduce the image to obtain a
smaller file size.
5 Scroll buttons
Clicking the arrows changes the display area of the
image on the screen, if the enlarged image does not fit
the screen.
6 END button
Ends or suspends the full-screen display to return to
the File Select window.
opens the drop-down list to select the ratio
opens the drop-down list to select the
24 (GB)
7 HOME button
Returns to the Application Select window.
Page 61

Note
When you exit the Image Viewer window by clicking
the END or HOME button, the files listed in the
Temporary File will be automatically erased. To store
the files, add them to the projector using the File
Manager function.
For details, see “Using File Manager” on page 26 (GB).
Running a presentation using an image
file stored in the projector
1 Click the IMAGE VIEWER icon in the
Application Select window.
The Look In window appears.
2 Click PROJECTOR.
The Image Viewer of the projector starts, and the
Folder/.SHO File Select window opens.
END button
Ends or suspends the
display to return to the
File Select window.
Click the file you want.
A full-screen image of the selected file is projected
on the projector.
Resting the mouse pointer over each item on the
left of the window shows its instructions on the
lower part.
HOME button
Returns to the Application
Select window.
3 Click the folder you want or the folder that
contains the slide show setting file (.SHO file) in
the Folder list on the left of the window.
The contents of the selected folder are listed on the
right.
For details on .SHO files, see “Saving the slide show
setting” on page 34 (GB).
4 Select a folder or .SHO file you want to use, then
click the SELECT button.
The Image Viewer window appears.
5 Select an image file you want to project on the
projector.
When you select an .SHO file in step 4
The selected .SHO file appears on the right.
Select how to advance slides, and click the SHOW
button. The slide show starts.
Resting the mouse pointer over each item on the
window shows its instructions on the lower part.
When you select a folder in step 4
Image files contained in the selected folder are
listed on the right.
25 (GB)
Page 62

Operations from a Computer
About the window displayed while the
Image Viewer is running
The same window as that in “About the window
displayed while the Image Viewer is running” on page
24 appears.
The NEXT button on the .SHO file select window is to
advance to the next slide immediately during the slide
show. The PREVIOUS button is to go back to the
previous slide.
Using File Manager
You can manage the files stored in the projector from a
computer by a simple operation. The File Manager
function enables you to delete unnecessary files stored
in the projector or to add files stored in a computer to
the projector’s storage.
Use File Manager while checking the currently used
memory and largest unused memory of the projector
displayed in the File Manager window.
You can set the password for the selected file in
this step. Specify the password in the “password”
text box. Setting the password disables you to open
the file from now on unless you enter the
password.
3 Click the Add button.
The selected file is stored in the projector.
Adding files to the projector using File
Manager
1 Click the FILE MANAGER icon in the
Application Select window.
The File Manager window appears.
2 Search for the file stored in a computer you want to
add to the projector.
Click the Browse... button in the Add File section
to open the file select window on the computer.
Select the file you want. You can also select the
file by entering the file name in the Browse... text
box.
Deleting files from the projector using File
Manager
1 Click the FILE MANAGER icon in the
Application Select window.
The File Manager window appears and the list of
files stored in the projector pops up.
2 Select the file you want to delete.
You can check all the files you want to delete.
3 Click the Delete button.
All the files you have checked are removed from
the file list.
Note
You can delete a file even if the password is set for
the file.
26 (GB)
Page 63

Controlling the Projector from a Computer
You can perform various adjustments and settings of
the projector on a computer’s display. Three control
windows are available; GENERAL, PICTURE CTRL
and SETTINGS windows, each with different
functions.
The functions of the buttons in the windows are the
same as those on the Remote Commander supplied
with the projector.
For details on the buttons, see the Operating Instructions of
the projector.
The illustrations shown in the steps below are for the
VPL-PX15.
1 Click the MORE... button in the PJ CONTROL
section.
The GENERAL window appears.
2 Click the function tab to select the window you
want.
GENERAL window
PICTURE CTRL window
(VPL-PX15)
x For VPL-PX15
The COLOR TEMP (HIGH, LOW) buttons
function the same as the settings in the menu.
x For VPL-FX50
The DDE (OFF, PROGRESSIVE, FILM) and RGB
ENHANCER +/– buttons function the same as the
settings in the menus.
For details, see the Operating Instructions of the
projector.
(VPL-PX15)
x For VPL-FE110U/M
Specify the switcher number with the SWITCHER
button. Use the GROUP button to specify the
group index numbers and the INDEX button to
specify the device index numbers. Click
the drop-down list, then select the number.
to open
(continued)
27 (GB)
Page 64

Operations from a Computer
SETTINGS window
(VPL-PX15)
x For VPL-PX15
The ASPECT (4:3, 16:9) and STATUS (ON, OFF)
buttons function the same as the settings in the
menu.
x For VPL-FX50
The ASPECT (4:3, 16:9) and LAMP MODE
(STANDARD, LOW) buttons function the
same as the settings in the menus.
For details, see the Operating Instructions of the
projector.
3 Click the button to adjust or set.
3 Enter the name and password of the Administrator.
The Information window appears.
The illustration below is for the VPL-PX15.
2
34
1 Projector Status
Shows the present status of the projector.
2 Projector
Shows the information on the projector.
3 System
Shows the versions of the Windows CE and
application currently used.
1
5
Checking the Indicators on the Projector
You can check the present status of the indicators on
the control panel of the projector on a computer
display.
1 Start Internet Explorer 4.0 or later versions, or
Netscape Navigator 4.5x or 4.7x version on the
computer.
2 Type “http://xxx.xxx.xxx.xxx (for the IP address of
the projector)/info” as a URL.
If you do not change the factory-set IP address,
type “http://192.168.0.1/info” (when using a LAN
PC card) or “http://192.168.0.2/info” (when using
the ETHER connector).
If the password is set, the password setting dialog
box appears.
28 (GB)
4 UPDATE button
Click to update the latest information.
5 Error Status
Shows the present status of the indicators on the
control panel of the projector.
For information on the indicators, see the Operating
Instructions.
Page 65

Operations from the Projector
Preparations
Before starting
x For VPL-PX15 and VPL-FX50
•Confirm that INPUT-B FUNC. (VPL-PX15) or
INPUT-C FUNC. (VPL-FX50) in the INSTALL
SETTING menu is set to ON.
•Switch the PJ/NETWORK select switch to
NETWORK.
x For VPL-FE110U/M
•Confirm that the INPUT C/RS-232C/RS-422A select
switch on the rear of the projector is set to INPUT C.
•To operate the projector, use the RM-PJM610 remote
commander or mouse and keyboard (not supplied).
Connect the mouse and keyboard to the projector
before connecting the power cord of the projector to
the AC outlet.
Opening the Network Projector window
To perform networking operations without connecting
to a computer, display the Network Projector window
on the projector.
1 Turn on the projector.
2 Set the input to the projector to INPUT B (VPL-
PX15) or INPUT C (VPL-FX50 and VPLFE110U/M).
The Network Projector window appears.
Names and functions of the Network
Projector window
1
2
3
4
1 My Projector icon
Browses the folders in the projector.
Double-clicking the icon shows the Memory card icon,
etc.
2 Internet Browser icon
Double-clicking the icon connects to the Internet.
3 Presentation Viewer icon
Select when you want to run a presentation using the
file created with PowerPoint or you want to project an
Excel file on the projector.
4 Image Viewer icon
Double-clicking the icon starts Image Viewer for
running a slide show using image files stored in the
projector or memory card.
5 Start menu
6 IP address
Shows the IP address of the projector. You can verify
it when you are accessing the projector from a
computer.
7 Reception level indicator icon
When the projector correctly recognizes the wireless
LAN PC card you insert into the PC CARD slot, the
icon appears on the task bar. Double-clicking the icon
opens the window indicating the connection status
between the projector and the access point.
8 Screen keyboard icon
Clicking the icon displays the screen keyboard on the
projector screen. You can operate the projector for
setups or enter a URL by using the supplied Remote
Commander (for the VPL-PX15 and VPL-FX50) or
the RM-PJM610 remote commander (not supplied, for
the VPL-FE110U/M). The screen keyboard has two
pages. Clicking the Shift key changes the page.
5 6 7 8 9
(continued)
q;
29 (GB)
Page 66

Operations from the Projector
x For VPL-PX15 and VPL-FX50
•When the PJ/NETWORK select switch on the
supplied Remote Commander is set to NETWORK,
the TAB, ESCAPE, ENTER and arrow keys on the
Commander function the same as those on the
keyboard.
•Pressing the R CLICK key on the supplied Remote
Commander on the screen keyboard icon opens the
sub menu. Clicking Remote, then On enables you to
use the arrow keys on the Remote Commander as
those on the screen keyboard and to select the keys.
9 Clock
q; Desktop icon
Running a Presentation Using the Slide Viewer
You can run a presentation by using a file with
PowerPoint stored in a computer located in the same
conference room or far from the projector.
Even when a computer is not connected to the
projector, you can also start the presentation using a
file stored in the projector’s storage or in the memory
card installed into the PC CARD slot.
1 Menu bar
Menu Command Function
File
View
View Show
2
Open
Recent Files
Close
Version
Slide View
Note View
Slide Show
Run
Set Up Show
(Slide View) button
Opens files stored in the
projector.
Opens the recently used files
which are shown in the
submenu.
Closes the currently displayed
file.
Indicates version information
on the program.
Shows a slide in Slide View
mode.
Shows a slide in Note View
mode.
Runs a slide show.
Runs a slide show.
Sets up the slide show.
Shows a slide.
(Note View) button
3
Shows a slide and speaker’s note.
(Slide Show) button
4
Runs a slide show.
About the Slide Viewer window
3
12
4
56 7
8
5 Slide transition buttons
Click the
Click the
button to display the previous slide.
button to display the next slide.
6 Slide list box
Click
to open the drop-down list and select the
number of the slide you want to display.
(Help) button
7
Click to display the Help topic for the Slide Viewer.
8 File name
The name of a file is displayed.
30 (GB)
Page 67

Running a presentation
Using a file stored in a computer connected to
the LAN
1 Double-click the My Projector icon in the Network
Projector window.
Switching the slide view mode
Slide Viewer has three view modes; Slide Show, Slide
View and Note View, each of which gives you a
different way of showing a slide. Display a view by
clicking its corresponding command from the View
menu. Clicking its button on the tool bar also switches
the view.
2 Enter “\\ xxxx (name of a computer you want to
access)” in the address column, then click the
Enter button.
The shared folders for the computer are displayed.
Note
You have to set the items for Identification in the
Network Configuration dialog box (page 9 (GB)),
and have to set share files with a computer you
want to access.
3 Select the folder which contains the PowerPoint
file (.ppt or .pps file) you want to run a
presentation, then double-click that file.
If the password is set for the selected computer,
enter the password.
The Slide Viewer starts.
4 When you want to set up the slide show, click Set
Up Show from the View Show menu.
The Set Up Show dialog box opens.
For details, see Help for Slide Viewer.
About Help for the Slide Viewer
For details on operations with the Slide Viewer, see
Help. Clicking the
Help topic.
button on the tool bar opens the
Projecting an Excel File Using the W orksheet Viewer
You can project Excel files stored in a computer on the
same LAN. You can also project those stored in the
projector or in the memory card without connecting a
computer.
About the Worksheet Viewer window
1
2
3
4
5
6
7
5 Click Run from the View Show menu to run the
slide show.
Using a file stored in the projector or in the
memory card
1 Double-click the Presentation Viewer icon in the
Network Projector window.
The Presentation Viewer starts, and the Open File
dialog box appears.
2 Select the PowerPoint file you want, and click the
OK button.
The Slide Viewer starts, and the selected file
appears in slide view.
3 Perform steps 4 and 5 in “Using a file stored in a
computer connected to the LAN.”
89
(continued)
31 (GB)
Page 68

Operations from the Projector
1 Name box
Identifies the currently selected cell.
2 Menu bar
Menu Command Function
File
View
3 Sheet tabs
Displays the names of sheets. Click the sheet tab to
make a sheet active.
4 Zoom box
Click
enlarge the display of an active worksheet.
5 Cell contents bar
Displays the result or constant value of the active cell.
Open
Close
About
Zoom
to select the magnification to reduce or
Opens files stored in the
projector.
Closes the currently displayed
file.
Indicates version information
on the program.
Opens the Zoom dialog box to
enlarge or reduce the display.
Projecting an Excel file
Using a file stored in a computer connected to
the LAN
1 Follow steps 1 and 2 in “Running a presentation
— Using a file stored in a computer connected to
the LAN” on page 31 (GB).
2 Select the folder which contains the Excel file you
want to project on the projector, then double-click
that file.
If the password is set for the selected computer,
enter the password.
The Worksheet Viewer starts and a worksheet in
the selected Excel file appears on the projector.
Using a file stored in the projector or in the
memory card
1 Double-click the Presentation Viewer icon in the
Network Projector window.
The Presentation Viewer starts, and the Open File
dialog box appears.
(Help) button
6
Displays the Help topic for the Worksheet Viewer.
/ buttons
7
Use to scroll through the sheet tabs. Click an arrow of
the direction to which you want to scroll.
8
/ (up/down) scroll bar
Use to scroll the display up or down. To scroll, drag
the box or click the arrow.
9
/ (left/right) scroll bar
Use to scroll the display left or right. To scroll, drag
the box or click the arrow.
2 Select the Excel file you want to project, and click
the OK button.
The Worksheet Viewer starts, and a worksheet in
the selected file appears on the projector.
Changing the size or display area of the
projected worksheet
When you want to zoom in or out the projected
worksheet or change the area of the worksheet in view,
see Help for Worksheet Viewer.
About Help for Worksheet Viewer
For details on operation with Worksheet Viewer, see
Help. Clicking the button on the tool bar opens the
Help topic.
32 (GB)
Page 69

Running a Slide Show Using the Image Viewer
You can display thumbnail images of the files stored in
the projector or a memory card installed in the
projector, then run a slide show by selecting the
images you want.
When you start the Image Viewer of the projector and
select the folder which contains the files you want, the
main window opens.
About the main window of the Image
Viewer
7 4835 12
6
6
(Full screen) button
Displays the full-screen window of a slide you choose.
7 Menu bar
Menu Command Function
File
View
Slide Show
Close
About
Full Screen
Information
Sort slides
View Show
Slide Show
Setting
Select all
Clear all
Load...
Save...
Closes the currently displayed
file.
Indicates version information
on the program.
Displays the full-screen window
of an image you choose.
Opens the information dialog
box of the selected image.
Sorts the slides in a folder by
specified order.
Runs a slide show by
advancing a slide selected in
the sub menu.
Sets up the slide show in detail.
Selects all the slides included
in the thumbnail window.
Cancels any selection of slides
in thumbnail images.
Loads the slide show setting
file stored.
Stores the current slide show
setting as a setting file
(Extension is “.SHO.”)
`
9
1 (Help) button
Click to display the Help topic for the Image Viewer.
2 Slide
Clicking a slide displays a green frame around the
slide. This indicates that the slide is selected.
(Slide Show Setting) button
3
Opens the Slide Show Setting dialog box for zooming,
rotating, etc.
(View Show) button
4
Clicking the button opens the sub menu for advancing
a slide.
(Information) button
5
Opens the information dialog box of the selected slide.
8 Folder dialog box
Browses the folders stored in the projector or a
memory card installed in the projector.
9 Slide display area
Displays thumbnail images of the slides included in
the folder you select.
Displaying a full-screen image
You can display a full-screen image of an thumbnail
image selected from the main window.
1 Double-click the Image Viewer icon in the
Network Projector window.
The Image Viewer starts.
2 Select the folder which contains the image files
you want to display from the folder dialog box.
You can choose the folder stored in the projector
or a memory card installed in the projector.
The main window opens, showing thumbnail
images of the slides contained in the selected
folder.
(continued)
33 (GB)
Page 70

Operations from the Projector
3 Select a slide you want to display by clicking a
thumbnail slide.
The green frame appears on the selected slide.
4 Right-click the slide to select Full Screen, click
Full Screen from the View menu, or click the
button on the tool bar.
The slide is displayed to fit the projector screen.
Running a slide show
1 Follow steps 1 and 2 in “Displaying a full-screen
image.”
2 Select slides you want to use for your slide show.
• Check the Slide Show check box on each slide
you want to use. Check all the slides you are
using.
• To use all of the slides in the selected folder,
click Select all from the Slide Show menu.
• If you have already stored the slide show setting
files, click Load... from the Slide Show menu to
display the Load Slide show setting file dialog
box. Select the file you want.
For details on the Slide show setting files, see “Saving
the slide show setting.”
3 When you want to set up the slide, such as
zooming or rotating of an image, click Slide Show
Setting from the Slide Show menu or click the
button on the tool bar.
The Slide Show Setting dialog box appears.
4 Click View Show from the Slide Show menu, or
click the
The sub menu for choosing how to advance a slide
opens. Clicking one of the options starts a slide
show.
Saving the slide show setting
You can run a slide show repeatedly by using the files
stored as the slide show setting files (.SHO files). You
can also change the settings of the stored setting files.
To save the file
button on the tool bar.
1 Click Save... from the Slide Show menu.
The Save Slide show setting file dialog box opens.
2 Enter the file name, then click the OK button.
The saved files are shown in the Load Slide show
setting file dialog box.
To save after changing the settings
Click Slide Show Setting from the Slide Show menu
to open the Slide Show Setting dialog box, and change
the settings. Click the Save button to open the Save
Slide show setting file dialog box. Follow step 2.
Change the settings and click the OK or Save
button.
Note
When projecting a large size image file such as
those in UXGA format, it may not be opened or
rotated due to lack of memory. In this case, reduce
the image to obtain a smaller file size.
34 (GB)
Page 71

To change the settings after saving
1 Click Slide Show Setting from the Slide Show
menu.
The Slide Show Setting dialog box opens.
2 Click Load.
The Load Slide show setting file dialog box opens.
3 Select the file for which you want to change the
settings, and click the OK button.
The Slide Show Setting dialog box opens.
4 Change the settings, then click the Save button.
Connecting to the Internet
1 Double-click the Internet Browser icon in the
Network Projector window.
The Internet Browser window appears.
2 Click the software keyboard icon on the task bar to
display the screen keyboard, then enter the address
for the homepage you want.
To change the setting in the main window
1 Click Load... from the Slide Show menu.
The Load Slide show setting file dialog box opens.
2 Select the file you want to change, and click the
OK button.
The main window opens.
3 Change the checks in the Slide Show check boxes
of the slides.
About Help for Image Viewer
For details on operations with Image Viewer, see
Help. Clicking the
Help topic.
button on the tool bar opens the
35 (GB)
Page 72

Troubleshooting
Troubleshooting
If the projector appears to be operating erratically, try to diagnose and
correct the problem, using the following guide. If the problem still persists,
consult with qualified Sony personnel.
Symptom
A connection to the network is not
established.
The computer cannot access to the
projector.
Causes and remedies
• The PC card is not properly inserted into the PC CARD slot.
t Check that the card is facing correctly, then push the card into the slot until
it is firmly seated.
• The cable is not properly connected to the ETHER connector. (VPL-PX15,
VPL-FX50)
t Insert the plug of the cable to the connector firmly.
• The LAN PC card, wireless LAN PC card and wireless LAN access point you
are using are not the specified/recommended ones.
t Use the specified/recommended devices. Use of those not specified/
recommended may cause incorrect operation.
For information on the specified/recommended cards, etc., see the
attached “Specified/recommended PC Card/Wireless LAN Access Point.”
• The network environment is not properly set up.
t Check the network configuration settings of the projector. (pages 9 (GB)
and 13 (GB))
t When you control the projector by using the computer’s Web browser,
check the network settings on the computer as well.
• When you use a wireless LAN PC card, Enable On-board LAN is selected.
(VPL-PX15, VPL-FX50)
t Remove the check mark from the Enable On-board LAN checkbox.
• When you are using the wireless LAN PC card, the wireless LAN is not
properly set up.
t Check that the Access Point ID and Encryption Key in the Connecting
Status dialog box are set to the same numbers as those of the connected
access point (page 11 (GB)).
• When you are using the wireless LAN PC card, Peer to Peer mode is not
properly set up.
t Select Peer to Peer only on a piece of equipment connected to the same
wireless LAN (page 11 (GB)).
• The channel of the access point is set to 12–14.
t Set the channel of the access point to 1–11.
• The LAN PC card, wireless LAN PC card, memory card or access point still
does not operate properly after checking the above.
t Consult with the manufacturer of the card or access point you use. When
you are using the specified Sony wireless LAN PC card,
consult with the qualified Sony personnel.
• The setting of INPUT-B FUNC. (VPL-PX15) or INPUT-C FUNC. (VPL-FX50) in
the INSTALL SETTING menu is not correct.
t Set it to ON.
• The INPUT C/RS-232C/RS-422A select switch is not correctly set. (VPLFE110U/M)
t Set it to INPUT C.
• The browser of your computer is set to “Access the Internet using a proxy
server.”
t Enter the IP address of the projector in the box “Access the Internet without
using a proxy server.”
• You entered the projector’s IP address started with 0 (zero).
t Do not enter 0 at the beggining of the number.
Example: 192.168.000.001 c192.168.0.1
36 (GB)
Page 73

Others
Symptom
The projector screen freezes.
Fonts or styles change in a PowerPoint or
Excel file.
Some characters are not displayed in a
PowerPoint or Excel file.
Some features of a PowerPoint or Excel
file are not properly displayed or such
effects are not displayed at all.
A slide show cannot be run. The message
“Projector’s memory is full. Arrange the
files stored in the projector with File
Manager, then try to restart the slide
show.” appears.
A slide show cannot be run. The message
“File size is too large. Decrease file size in
any way; for example, by dividing it into
smaller files, then try to restart the slide
show.” appears.
Internet Browser for the projector cannot
be started.
The message “Password is set for the file.
Enter password.” appears.
The message “You might have entered
the wrong password. Enter it again.”
appears.
Causes and remedies
The Windows CE software is frozen.
t Once you set INPUT-B FUNC. (VPL-PX15) or INPUT-C FUNC. (VPL-
FX50) in the INSTALL SETTING menu to OFF, then reset it to ON.
t Restart Windows CE by pressing the RESET key within 5 seconds after
pressing the FUNCTION key on the supplied RM-PJ1001 Remote
Commander. (VPL-FE110U/M)
In the text of the file, fonts or styles not supported by the Slide Viewer or
Worksheet Viewer are used.
t Only the following fonts are available for the Slide Viewer. Other fonts will
be replaced with these fonts; Arial, Bookman Old Style, Comic Sans MS,
Impact, Symbol, Tahoma, Times New Roman, Wingdings. If replaced, an
end of paragraph may change according to tab or pharagraph settings.
Styles not supported by the Slide Viewer will be replaced with supported
styles.
You cannot display characters that the Slide Viewer or Worksheet Viewer does
not support, such as Chinese.
t Use the file created in English, French, Spanish, German or Italian which
are supported by the Slide Viewer.
The file is using the features that are not supported by the Slide Viewer or
Worksheet Viewer of the projector.
t The features will be replaced with those that are supported. Apply effects
that are supported if nothing is displayed.
The memory of the projector is full.
t Delete unnecessary files stored in the projector using File Manager to
increase memory capacity.
File size exceeds the capacity for transition to the projector.
t Check empty memory capacity in the File Manager window, then decrease
the file’s capacity by dividing it into smaller files.
t Click Option then Save from the Tool menu on the PowerPoint, then
remove the check from Save Fast.
The projector is not connected to the LAN.
t Check the setups for the network configuration and wireless LAN
environment. (pages 9 (GB)–13 (GB))
The password is set for the projector or the file.
t Enter the password. When the IP address is not changed from the factory-
preset one, enter “root” in the Name text box for Administrator.
The password you entered is not correct.
t Enter the correct password.
© 1999 - 2001 WESTTEK LLC. All Rights Reserved. WESTTEK and the WT Logo are registered
trademarks of WESTTEK, LLC.
The SONY VPL-Series projector contains materials owned by Sony and Sony suppliers, including
WESTTEK, LLC. Your purchase of the SONY VPL-Series projector gives you a limited right to use these
materials, solely as a part of the SONY VPL-Series projector and only as necessary to use the SONY VPLSeries projector in the manner described in the accompanying documentation. Your purchase of the SONY
VPL-Series projector does not transfer any ownership in these materials to you and you are forbidden to use
them for any purpose other than as part of the SONY VPL-Series projector. These materials are protected by
copyright law and international treaties. Any unauthorized use, reproduction or distribution of such materials,
or any portion of them, may result in severe civil and criminal penalties, and will be prosecuted to the
maximum extent permissible under law.
37 (GB)
Page 74

2 (FR)
Page 75

Table des matières
Avant l’utilisation
Préparatifs
Caractéristiques ........................................................ 4 (FR)
Précautions ................................................................ 5 (FR)
A propos de ce manuel ............................................. 5 (FR)
Préparation à l’utilisation de la fonction de
gestion de réseaux ............................................... 6 (FR)
Configuration système ................................................... 6 (FR)
Utilisation de la carte PC ............................................... 7 (FR)
Configuration de la fonction de gestion de réseaux....... 7 (FR)
Utilisation de la télécommande ou d’une souris et d’un
clavier........................................................................ 7 (FR)
Configuration du projecteur ..................................... 8 (FR)
Configuration à partir du projecteur............................... 8 (FR)
Configuration à partir d’un ordinateur ......................... 12 (FR)
Organigrammes de fonctionnement de base........ 14 (FR)
Opérations à partir d’un ordinateur.............................. 14 (FR)
Opérations à partir du projecteur ................................. 16 (FR)
FR
Opération
Informations complémentaires
Opérations à partir d’un ordinateur ....................... 19 (FR)
Préparatifs .................................................................... 19 (FR)
Exécution d’une présentation à l’aide du visualiseur
de diapositives......................................................... 20 (FR)
Projection d’un fichier Excel à l’aide du visualiseur
feuille de travail ...................................................... 23 (FR)
Projection d’une image à l’aide de la visionneuse....... 23 (FR)
Utilisation du Gestionnaire de fichiers......................... 26 (FR)
Contrôle du projecteur à partir d’un ordinateur ........... 27 (FR)
Vérification des indicateurs sur le projecteur .............. 28 (FR)
Opérations à partir du projecteur .......................... 29 (FR)
Préparatifs .................................................................... 29 (FR)
Exécution d’une présentation à l’aide du visualiseur
de diapositives......................................................... 30 (FR)
Projection d’un fichier Excel à l’aide du visualiseur
feuille de travail ...................................................... 31 (FR)
Lancement d’un diaporama à l’aide de la
visionneuse.............................................................. 33 (FR)
Connexion à Internet.................................................... 35 (FR)
Guide de dépannage ............................................... 36 (FR)
...........................................................................................................................................................................................................
• Microsoft, Windows et PowerPoint sont des marques déposées de Microsoft Corporation aux Etats-Unis et/ou dans d’autres
pays.
• Netscape Navigator est une marque commerciale de Netscape Communications Corporation aux Etats-Unis et/ou dans
d’autres pays.
• Tous les autres noms de produits et de sociétés mentionnés dans le présent manuel sont des marques commerciales ou des
marques déposées de leurs propriétaires respectifs.
3 (FR)
Page 76

Caractéristiques
Le projecteur dispose de Windows CE intégré et est
compatible avec la gestion de réseaux. La connexion à
un réseau local (réseau LAN, Local Area Network)
vous permet d’exécuter une présentation en utilisant un
fichier stocké dans un ordinateur connecté via ce
même réseau local. Vous pouvez ouvrir un fichier
enregistré sur un ordinateur, que ce dernier soit éloigné
du projecteur ou qu’il se situe dans la même salle de
conférence. La connexion à Internet à l’aide du
projecteur uniquement est une fonction également
disponible.
Lorsque vous accédez au projecteur à l’aide du
navigateur Web d’un ordinateur, vous pouvez
contrôler le projecteur à partir de cet ordinateur.
Connexion à un réseau local (LAN)
Le projecteur est équipé du connecteur ETHER
(modèle VPL-PX15 et VPL-FX50) et d’un
emplacement pour carte PC vous permettant de
connecter le projecteur à un réseau local à l’aide des
câbles LAN ou de la carte PC LAN spécifiée/
recommandée. L’installation d’une carte PC LAN sans
fil dans l’emplacement pour carte PC permet une
connexion à un réseau local sans fil.
Emplacement carte PC intégré
Le projecteur est doté d’un emplacement réservé à
l’insertion d’une carte PC. L’insertion d’une carte
mémoire PC, dans laquelle sont stockées les données,
vous permet d’exécuter facilement une présentation
sans l’aide d’un ordinateur.
Fonction Visionneuse
Le projecteur dispose d’une fonction de visionneuse
intégrée vous permettant d’afficher des images créées
au format JPEG, BMP, GIF ou PNG, de mettre au
point un diaporama et de lancer la lecture d’un
diaporama à l’aide d’images.
Fonction Gestionnaire de fichiers
L’utilisation du navigateur Web d’un ordinateur vous
permet d’ajouter des fichiers stockés dans l’ordinateur
au projecteur ou de supprimer des fichiers stockés sur
le projecteur, en se servant de l’ordinateur.
Navigateur Web intégré
Internet Explorer 4.0 et son équivalent est intégré au
projecteur, ce qui vous permet de vous connecter à
Internet.
Fonction de mémoire
Le projecteur peut stocker un fichier importé à partir
d’un ordinateur ou d’une carte mémoire.
Lorsque vous stockez le fichier, vous pouvez créer un
mot de passe afin d’empêcher les personnes non
autorisées de l’ouvrir.
Fonction Visualiseur de présentation
Le projecteur possède des fonctions élémentaires
Microsoft PowerPoint et Microsoft Excel intégrées,
appelées respectivement visualiseur de diapositives et
visualiseur feuille de travail. Ces fonctions vous
permettent d’exécuter un diaporama à partir d’un
fichier PowerPoint ou de projeter un fichier Excel sans
conversion.
4 (FR)
Page 77

Précautions
A propos de ce manuel
Avant l’utilisation
Avertissement
Avant de mettre le projecteur hors tension ou de le
réinitialiser à l’aide de la télécommande fournie,
assurez-vous que vous avez quitté toutes vos
applications. Dans le cas contraire, une erreur
système risque de survenir et vous ne pourrez peut-
être pas redémarrer le projecteur.
•La configuration système recommandée pour le
projecteur est la suivante :
– Microsoft Windows 98, Microsoft Windows 98 SE,
Microsoft Windows 2000, Miscrosoft Windows Me
• Assurez-vous que vous utilisez la carte PC LAN
spécifiée/recommandée, la carte PC LAN sans fil, la
carte mémoire PC et le point d’accès LAN sans fil.
Utilisez également la carte PC LAN sans fil spécifiée/
recommandée sur les ordinateurs connectés.
L’utilisation d’un dispositif non spécifié/recommandé
risque de provoquer des dysfonctionnements.
Pour connaître les dispositifs spécifiés/recommandés,
reportez-vous au manuel “Carte PC/point d’accès LAN sans
fil spécifié/recommandé” fourni.
Ce manuel explique les opérations de gestion de
réseaux du projecteur de données à affichage à cristaux
liquides VPL-PX15, VPL-FX50 et VPL-FE110U/M.
Des fichiers d’aide en ligne sont également
disponibles. Lorsque vous accédez au serveur Web du
projecteur, une aide contextuelle s’affiche sur un
ordinateur lorsque vous placez le curseur sur chaque
élément.
Dans la fenêtre Windows CE du projecteur, vous
pouvez cliquer sur Help (aide) à partir du menu Start
(démarrer) pour ouvrir le fichier d’aide. Le Windows
CE du projecteur ne prend pas en charge certaines
fonctions. Le fichier d’aide du visualiseur de
diapositives, du visualiseur feuille de travail ou de la
visionneuse apparaît lorsque vous cliquez sur le bouton
situé dans la barre d’outils de la fenêtre de
l’application correspondante.
Reportez-vous au mode d’emploi du présent modèle pour les
opérations autres que la gestion de réseaux.
• Afin d’éviter toute perte de données, effectuez
fréquemment des sauvegardes de données. En aucun
cas, la société Sony ne sera responsable de toute perte
de données.
•Notez que les spécifications du logiciel sont sujettes à
modifications sans préavis.
•Certaines illustrations du présent manuel peuvent être
légèrement différentes de ce qui apparaît réellement
dans le logiciel.
5 (FR)
Page 78

Préparation à l’utilisation de la fonction de gestion de réseaux
Cette section décrit les tâches requises pour utiliser la
fonction de gestion de réseaux du projecteur.
Configuration système
Pour obtenir des détails sur les raccordements, reportezvous au mode d’emploi du projecteur.
Connexion à un réseau local à l’aide des
câbles LAN ou de la carte PC LAN
Ordinateur
Câble LAN
Ordinateur
Câble LAN
vers le hub/
routeur
Carte PC LAN (recommandée)
(compatible NE2000)
Arrière du VPL-FE110U/M
Câble
LAN
Emplacement
pour PC
CARD
Côté gauche du VPL-PX15
Câble
LAN
Vue avant du VPL-FX50
Connexion à un réseau LAN sans fil à
l’aide d’un point d’accès LAN sans fil
Ordinateur
Carte PC LAN sans fil
(recommandée) (conforme
à la norme IEEE802.11b)
Point d’accès LAN sans fil
(recommandée)
(conforme à la norme
IEEE802.11b)
vers le hub/routeur
Carte PC LAN sans fil
(recommandée)
(conforme à la norme
IEEE802.11b)
Carte PC LAN sans fil
(spécifiée) (conforme à la
norme IEEE802.11b)
Projecteur
Emplacement pour PC CARD
Ordinateur
Connexion à un réseau LAN sans fil sans
utiliser le point d’accès LAN sans fil
(mode poste à poste)
Emplacement pour PC CARD
Carte PC LAN
sans fil (spécifiée)
(conforme à la norme
IEEE802.11b)
Projecteur
Ordinateur
6 (FR)
Connecteur
ETHER
Câble LAN
Ordinateur
Carte PC LAN sans fil
(recommandée) (conforme
à la norme IEEE802.11b)
Utilisation d’une carte mémoire
Emplacement
pour PC CARD
Carte mémoire
PC (Type II)
Projecteur
Page 79

Préparatifs
Utilisation de la carte PC
L’emplacement pour PC CARD de INPUT B (VPLPX15) ou INPUT C (VPL-FX50 et VPL-FE110U/M)
situé sur le panneau arrière du projecteur accepte une
seule carte PC au format PCMCIA Type II. Pour
connecter l’appareil à un réseau local, il est nécessaire
d’insérer la carte PC LAN spécifiée/recommandée
(modèle VPL-FE110U/M uniquement) ou la carte PC
LAN sans fil dans cet emplacement.
Vous pouvez également insérer la carte mémoire PC
recommandée dans cet emplacement. Le stockage d’un
fichier créé à l’aide de l’application Microsoft
PowerPoint ou Excel, ou d’un fichier image dans une
carte mémoire vous permet de projeter un fichier ou
d’exécuter une présentation sans vous connecter à un
ordinateur.
Remarques
•Ne mettez pas le projecteur hors tension et ne
redémarrez pas Windows CE sur le projecteur
pendant l’écriture ou la lecture de la carte PC.
•Assurez-vous que vous utilisez la carte PC LAN
spécifiée/recommandée, la carte PC LAN sans fil ou
la carte mémoire PC. Pour connaître les cartes
spécifiées/recommandées, reportez-vous au manuel
“Carte PC/point d’accès LAN sans fil spécifié/
recommandé” fourni.
•Le pilote des cartes PC spécifiées/recommandées est
installé en usine sur le projecteur. L’installation d’un
autre pilote n’est pas nécessaire et s’avère impossible.
Pour insérer et retirer la carte PC, reportez-vous au mode
d’emploi du projecteur.
x Pour le modèle VPL-FX50
Dans le menu REGL. INSTAL., définissez FONCT
ENTREE-C sur ON.
Pour obtenir des informations détaillées, reportez-vous au
mode d’emploi du projecteur.
x Pour le modèle VPL-FE110U/M
Réglez le commutateur de sélection INPUT C/RS232C/RS-422A du panneau arrière sur INPUT C.
Utilisation de la télécommande ou d’une souris et d’un clavier
x Pour le modèle VPL-PX15 et VPL-FX50
Lorsque vous utilisez le projecteur pour effectuer la
configuration, pour lancer la lecture d’un diaporama,
etc., utilisez la télécommande fournie. Auparavant,
réglez le commutateur de sélection PJ/NETWORK de
la télécommande sur NETWORK.
Il est impossible de raccorder une souris et un clavier
au projecteur.
x Pour le modèle VPL-FE110U/M
Pour configurer le projecteur, exécuter une
présentation, etc., l’utilisation de la télécommande
RM-PJM610 (non fournie) ou d’une souris et d’un
clavier PS/2 disponibles dans le commerce est requise.
Remarque
Raccordez la souris et le clavier au projecteur avant de
connecter le cordon d’alimentation du projecteur à la
prise secteur.
Configuration de la fonction de gestion de réseaux
Pour activer la fonction de gestion de réseaux du
projecteur, procédez comme suit.
x Pour le modèle VPL-PX15
Dans le menu REGL. INSTAL., définissez FONCT
ENTREE-B sur ON.
Pour plus d’informations, reportez-vous au mode d’emploi
du projecteur.
Pour les raccordements de la souris et du clavier, reportezvous au mode d’emploi du projecteur.
Pour le fonctionnement de la télécommande RM-PJM610
(non fournie), reportez-vous au mode d’emploi de la
télécommande.
7 (FR)
Page 80

Configuration du projecteur
Des configurations élémentaires telles que celles des
paramètres de l’adresse IP et du réseau local sans fil
sont nécessaires pour le fonctionnement en réseau du
projecteur. Vous pouvez effectuer les configurations
soit à partir du projecteur, soit à partir d’un ordinateur
connecté au même réseau local.
Avant la configuration
x Pour le modèle VPL-PX15 et VPL-FX50
• Mettez le projecteur sous tension avec la touche #/ 1
de la télécommande fournie ou du panneau de
commande du projecteur.
• Dans le menu REGL. INSTAL., vérifiez que FONCT
ENTREE-B (VPL-PX15) ou FONCT ENTREE-C
(VPL-FX50) est défini sur ON.
• Appuyez sur la touche INPUT de la télécommande
fournie ou du panneau de commande du projecteur
pour sélectionner INPUT B (VPL-PX15) ou INPUT
C (VPL-FX50). La fenêtre Network Projector
apparaît.
• Réglez le commutateur de sélection PJ/NETWORK
de la télécommande sur NETWORK.
• Lorsque vous procédez à la configuration à partir du
projecteur, affichez le clavier d’écran sur le
projecteur et utilisez la télécommande fournie.
Pour obtenir des informations sur le clavier d’écran,
reportez-vous à la page 29 (FR).
• Mettez l’ordinateur à partir duquel vous configurez le
projecteur sous tension.
x Pour le modèle VPL-FE110U/M
•Vérifiez que le commutateur de sélection INPUT C/
RS-232C/RS-422A est réglé sur INPUT C.
•Mettez le projecteur sous tension à l’aide de la touche
ON située sur la télécommande RM-PJM610, la
télécommande fournie ou le panneau de commande
du projecteur.
•Appuyez sur la touche INPUT de la télécommande
RM-PJM610 ou sur la touche INPUT SELECT de la
télécommande fournie ou du panneau de commande
du projecteur pour sélectionner INPUT C. La fenêtre
Network Projector apparaît.
• Lorsque vous procédez à la configuration à partir du
projecteur, affichez le clavier d’écran sur le
projecteur et utilisez la souris et le clavier raccordés
ou la télécommande RM-PJM610.
Pour obtenir des informations sur le clavier d’écran,
reportez-vous à la page 29 (FR).
•Mettez l’ordinateur à partir duquel vous configurez le
projecteur sous tension.
Configuration à partir du projecteur
Configuration du mot de passe
Vous pouvez définir un mot de passe afin d’empêcher
l’accès aux utilisateurs du réseau à distance.
1 A partir du menu Start (démarrer), dans la fenêtre
Network Projector, cliquez sur Control Panel
(panneau de configuration).
2 Cliquez deux fois sur l’icône Password (mot de
passe).
La boîte de dialogue Password Properties
(Propriétés du mot de passe) s’affiche.
Password Properties
Administrator
Name:_ root
User
Name:_
Password:_I
Confirm password:_
Password:_
Confirm password:_
3 Spécifiez le mot de passe (Password) de
l’administrateur (Administrator), puis entrez le
même mot de passe une nouvelle fois dans la zone
de texte Confirm password (confirmer le mot de
passe).
Le nom (Name) de l’administrateur (Administrator)
est prédéfini sur “root” en usine. Il est impossible
de le modifier.
4 Spécifiez le nom et le mot de passe de l’utilisateur
(User), puis entrez le même mot de passe dans la
zone de texte Confirm password (Confirmer le mot
de passe).
Lorsque le mot de passe de l’administrateur ou de
l’utilisateur vous est demandé lors de l’utilisation du
projecteur à partir d’un ordinateur, entrez le nom et le
mot de passe que vous avez définis à l’étape 3 et 4.
Définition de la configuration du réseau
Il est nécessaire de définir la configuration du réseau,
telle que l’adresse IP, pour établir une connexion de
réseau local. L’adresse IP du projecteur s’affiche sur la
barre des tâches de la fenêtre Network Projector du
projecteur.
Si l’environnement de connexion change, vous devez
redéfinir la configuration du réseau.
8 (FR)
Pour obtenir plus d’informations, consultez votre
administrateur réseau.
Page 81

1 A partir du menu Start (démarrer), dans la fenêtre
Network Projector, cliquez sur Control Panel
(panneau de configuration).
2 Cliquez deux fois sur l’icône Network (réseau).
La boîte de dialogue Network Configuration
(configuration du réseau) apparaît.
Network Configuration
Adapters
Identification
Lists the network drivers
installed on your device.
To change driver settings,
select the driver and then the
Properties button.
On-board LAN
*
NE2000 Compatible Ethernet Driver
Wireless Ethernet Driver
On-board LAN
Properties
_
* L’onglet On-board LAN (LAN intégré) est affiché pour les
modèles VPL-PX15 et VPL-FX50.
3 Sélectionnez le nom du pilote en fonction du type
de connexion réseau.
Vous pouvez sélectionner l’un des pilotes suivants.
NE2000 Compatible Ethernet Driver : lorsque
vous utilisez la carte PC LAN compatible
NE2000 recommandée.
Wireless Ethernet Driver : lorsque vous utilisez
la carte PC LAN sans fil spécifiée/
recommandée.
On-board LAN (LAN intégré) : lorsque vous
utilisez le connecteur ETHER pour raccorder le
projecteur à un réseau local (affiché pour le
VPL-PX15 et VPL-FX50).
La boîte de dialogue de configuration du pilote
sélectionné s’affiche.
'Wireless Ethernet Driver' settings
IP Address
Name Servers
Name server addresses may be
automatically assigned if DHCP
is enabled on this adapter.
You can specify additional
WINS or DNS resolvers in the
space provided.
_
Primary DNS:
_
Secondary DNS:
_
Primary WINS:
_
Secondary WINS:
. . .
. . .
. . .
. . .
6 Cliquez sur le bouton OK.
La boîte de dialogue Network Configuration
s’affiche de nouveau.
7 En fonction de vos besoins, cliquez sur l’onglet
Identification et définissez les éléments
nécessaires.
Network Configuration
Adapters
Identification On-board LAN
The system uses these
credentials to access remote
network resources. If these
credentials fail you will be
prompted for a new set of
credentials to access the
network resource.
User Name:_
__Password:
Domain:
netpj
********
projector
8 Cliquez sur le bouton OK.
Lorsque vous utilisez une carte PC LAN sans
fil avec le VPL-PX15 ou le VPL-FX50
Si vous sélectionnez un pilote Ethernet sans fil à
l’étape 3, suivez les instructions ci-dessous après avoir
effectué l’étape 6.
4 Assurez-vous que le bouton radio “Specify an IP
address” (Spécifier une adresse IP) est sélectionné
et définissez les éléments nécessaires.
IP Address (adresse IP) est initialement réglée sur
“192.168.0.1” et Subnet Mask (masque de sousréseau) sur “255.255.0.0” en usine.
'Wireless Ethernet Driver' settings
IP Address
Name Servers
An IP address can be
automatically assigned to this
computer. If your network
does not automatically assign
IP addresses, ask your network
administrator for an address,
and then type it in the space
provided.
Obtain an IP address via DHCP
_
Specify an IP address
_
IP Address:
_
Subnet Mask:
_
Default Gateway:
_
192.168. 0 . 1
255.255. 0 . 0
. . .
5 Cliquez sur l’onglet Name Servers (serveurs de
noms) pour afficher la boîte de dialogue Name
Servers, puis définissez les éléments nécessaires.
1 Cliquez sur l’onglet On-board LAN (LAN intégré).
2 Décochez la case “Enable On-board LAN” (activer
LAN intégré).
3 Cliquez sur OK.
La fenêtre de l’étape 2 réapparaît.
Remarque
Lorsque la case “On-board LAN” est désactivée,
ce pilote n’apparaît plus dans la liste de la boîte de
dialogue Network Configuration (configuration du
réseau). Si vous souhaitez sélectionner On-board
LAN, cochez la case Enable On-board LAN, puis
reprenez la procédure à partir de l’étape 2 de la
section “Définition de la configuration du réseau”.
9 (FR)
Page 82

Configuration du projecteur
Configuration d’un environnement de
réseau sans fil
Lorsque vous utilisez une carte PC LAN sans fil, il est
également nécessaire de configurer le projecteur en
suivant la procédure ci-dessous.
Utilisation d’un point d’accès LAN sans fil
Configurez le point d’accès sur lequel vous vous
connectez, comme suit.
1 A partir du menu Start (démarrer) de la fenêtre
Network Projector, cliquez sur Control Panel
(panneau de configuration).
2 Cliquez deux fois sur l’icône Wireless LAN
(réseau LAN sans fil).
La boîte de dialogue Wireless LAN setting
(Paramètres LAN sans fil) apparaît.
6 Entrez la clé de cryptage (Encryption Key).
Saisissez la clé de cryptage si elle est définie et
activée pour le point d’accès.
7 Cliquez sur le bouton OK.
La boîte de dialogue Wireless LAN settings
apparaît à nouveau.
8 Cliquez sur le bouton radio du nom que vous
souhaitez utiliser puis cliquez sur le bouton OK.
La connexion est établie au niveau du point
d’accès sélectionné.
Pour se connecter à un point d’accès déjà
configuré
S’il existe plusieurs points d’accès, vous pouvez leur
attribuer au maximum quatre noms. Si vous souhaitez
vous connecter au point d’accès déjà configuré,
sélectionnez bouton radio à côté du nom correspondant
puis cliquez sur le bouton OK de la fenêtre Wireless
LAN settings (Paramètres LAN sans fil). La connexion
au point d’accès sélectionné est alors réalisée.
3 Cliquez sur le bouton Edit (Edition).
La boîte de dialogue Access Point setting
(Paramètres du point d’accès) apparaît.
4 Entrez un nom (Nickname).
Le nom saisi identifie le point d’accès. Saisissez un
maximum de 32 caractères pour le nom, en
utilisant des caractères alphanumériques et des
symboles (caractères ASCII). S’il existe plusieurs
points d’accès, assurez-vous que chacun d’entre
eux porte un nom différent.
Remarque
Lorsque le fabricant de la carte LAN sans fil insérée
dans le projecteur et celui du point d’accès LAN sans
fil sont différents, le mode de saisie de la clé de
cryptage peut varier. Si la clé de cryptage apparaît en
valeurs hexadécimales, entrez les valeurs
hexadécimales dans la boîte de dialogue Encryption
Key.
Lorsqu’ancune communication ne s’établit
entre le point d’accès et le projecteur
Si le canal du point d’accès est réglé sur 12-14, réglez-
le sur un canal quelconque entre 1 et 11.
Remarques
•Contactez un personnel Sony qualifié si vous
rencontrez des problèmes lors de l’utilisation de la
carte PC LAN sans fil Sony spécifiée/recommandée.
•Lorsque le fabricant de la carte LAN sans fil et celui
du point d’accès LAN sans fil sont différents, la
communication par cryptage activé ne s’effectue pas
correctement.
5 Entrez l’identification du point d’accès (Access
Point ID).
Saisissez l’identification spécifiée pour le point
d’accès auquel vous vous connectez.
10 (FR)
Page 83

Mode poste à poste (Ad-hoc)
Pour procéder à un raccordement à un réseau LAN
sans fil entre le projecteur et les ordinateurs sans
utiliser le point d’accès LAN sans fil, suivez la
procédure ci-dessous sur le projecteur uniquement.
1 Suivez les étapes 1 à 4 de “Utilisation du point
d’accès LAN sans fil”. Définissez un nom
(Nickname) pour ce mode dans la boîte de
dialogue Access Point settings (Paramètres du
point d’accès).
2 Cliquez sur la case qui se trouve à côté de Peer to
Peer (poste à poste).
3 Entrez une identification du point d’accès
facultative.
Vous pouvez saisir un maximum de 32 caractères
alphanumériques pour l’identification.
4 Saisissez la Encryption Key (clé de cryptage) si
vous souhaitez l’activer.
•Lorsque vous utilisez le mode poste à poste (Ad-
hoc), il est nécessaire de définir une adresse IP et un
masque de sous-réseau dédiés à ce mode sur le
projecteur et l’ordinateur.
Vérification de la connexion avec le point
d’accès
Vous pouvez vérifier si le projecteur est bien connecté
au point d’accès.
1 Cliquez deux fois sur l’icône (indicateur du
niveau de réception) de la barre des tâches dans la
fenêtre Network Projector.
La fenêtre indiquant l’état de connexion entre le
projecteur et le point d’accès s’affiche.
5 Cliquez sur le bouton OK.
La boîte de dialogue Wireless LAN settings
(Paramètres LAN sans fil) apparaît de nouveau.
6 Cliquez sur le bouton radio du Nickname (nom)
saisi à l’étape 1.
Le mode Peer to Peer est activé.
Pour les ordinateurs connectés, il est nécessaire de
saisir la même identification du point d’accès et la
même clé de cryptage que celles saisies dans le cadre
de la procédure ci-dessus, ainsi qu’un nom facultatif.
Pour plus d’informations, veuillez vous référer au
mode d’emploi de la carte PC LAN sans fil installée
sur les ordinateurs.
Remarques
•Utilisez des cartes PC LAN sans fil du même
constructeur pour le projecteur et l’ordinateur.
•Si le mode poste à poste (Ad-hoc) est configuré sur
l’un des ordinateurs connectés, suivez l’étape 1 puis
les étapes 3 à 6 ci-dessus pour saisir la même
identification du point d’accès et la même clé de
cryptage que celles de l’ordinateur ainsi qu’un nom
facultatif pour le projecteur.
•Sélectionner le mode poste à poste (Ad-hoc)
uniquement pour l’un des projecteurs et ordinateurs
du même LAN.
2 Vérifiez les points suivants.
• Status : OK est affiché si le projecteur reconnaît
correctement la carte PC LAN sans fil.
• Access Point ID : Identification du point d’accès
• Connection : statut de la connexion avec le point
d’accès
• Access Point : informations concernant le point
d’accès connecté
• Channel : canal affecté
• Encryption Key : cryptage activé ou désactivé
pour le point d’accès connecté
• Signal Strength : niveau de signal pour la
communication entre le projecteur et le point
d’accès
Lorsque l’identification du point d’accès
indique “searching” (recherche en cours)
Vérifiez si le nom, l’identification du point d’accès et
la clé de cryptage entrés sont bien affichés dans la
fenêtre.
La sélection de Edit wireless Profiles... à partir du
menu Tools (Outils) ouvre la fenêtre Wireless LAN
settings (Paramètres LAN sans fil). Si l’un de ces
éléments n’est pas correct, corrigez-le en suivant les
étapes 3 à 8 de la page 10 (FR).
11 (FR)
Page 84

Configuration du projecteur
Réglage de la date et de l’heure
L’heure s’affiche sur la barre des tâches de la fenêtre
Network Projector. Pour régler la date et l’heure,
suivez les étapes ci-dessous.
1 A partir du menu Start (démarrer) de la fenêtre
Network Projector, cliquez sur Control Panel
(panneau de configuration).
2 Cliquez deux fois sur l’icône Date/Time (date/
heure).
3 Réglez la date et l’heure.
Association d’une application à la touche
FUNCTION de la télécommande (pour les
modèles VPL-PX15 et VPL-FX50)
Si vous avez associé une application à la touche
FUNCTION 1 ou 2 de la télécommande fournie, une
simple pression sur cette touche vous permet de lancer
cette application. Le clavier d’écran est associé à la
touche FUNCTION 3 par défaut et vous ne pouvez pas
modifier ni supprimer ce réglage.
Pour obtenir davantage de détails sur le clavier d’écran,
reportez-vous à la page 29 (FR).
1 A partir du menu Start (démarrer) de la fenêtre
Network Projector, cliquez sur Control Panel
(panneau de configuration).
2 Cliquez deux fois sur l’icône Launch Keys
(Touches de lancement).
La boîte de dialogue Launch Keys Settings
(Réglages des touches de lancement) apparaît.
Configuration à partir d’un ordinateur
Remarques
•Connectez un seul ordinateur, que vous utilisez pour
les configurations, au projecteur si l’adresse IP du
projecteur reste celle qui est prédéfinie en usine.
•Si le navigateur de votre ordinateur est réglé sur
“Accéder à Internet avec un serveur proxy”, entrez
l’adresse IP du projecteur dans la zone “Accéder à
Internet sans serveur proxy” si vous avez accès au
projecteur à partir de votre ordinateur.
•Il se peut, en fonction de la version du navigateur,
que l’ordinateur rejette le mot de passe contrôlant
l’accès au projecteur. Dans ce cas, redémarrez le
navigateur.
Ouverture de la fenêtre de configuration
1 Démarrez le navigateur de l’ordinateur (Internet
Explorer version 4.0 ou ultérieure ou Netscape
Navigator version 4.5x ou 4.7x).
2 Tapez “http://xxx.xxx.xxx.xxx (correspondant à
l’adresse IP du projecteur)/setup”.
Si l’adresse IP prédéfinie en usine n’a pas été
modifiée, tapez “http://192.168.0.1/setup” (lorsque
vous utilisez une carte PC LAN) ou “http://
192.168.0.2/setup” (lorsque vous utilisez le
connecteur ETHER).
Si l’adresse IP commence par 0 (zéro), entrez le
numéro sans le 0.
Exemple : 192.168.000.001 c 192.168.0.1
La boîte de dialogue Password (mot de passe)
apparaît.
3 Entrez le nom (Name) et le mot de passe
(Password) de l’administrateur (Administrator).
Si le mot de passe prédéfinie en usine n’a pas été
modifiée, saisissez “root” dans la zone de texte
Name (nom).
La fenêtre Setup (configuration) s’affiche.
3 Cliquez sur Browse (parcourir) pour sélectionner la
touche (1 ou 2) à laquelle vous souhaitez associer
une application, puis cliquez sur l’application
concernée dans la liste.
4 Répétez l’étape 3 si vous souhaitez associer une
application à l’autre touche.
5 Cliquez sur OK.
12 (FR)
Page 85

Configuration du mot de passe
1 Cliquez sur l’icône Password (mot de passe) de la
fenêtre Setup (configuration).
La boîte de dialogue de définition du mot de passe
s’affiche.
La procédure de configuration est la même que
celle utilisée à partir du projecteur.
3 Cliquez sur le bouton RESTART (redémarrer).
Si le projecteur est sous tension et si la fenêtre
Network Projector est ouverte, l’écran du
projecteur s’éteint pendant environ 10 secondes,
puis le projecteur redémarre.
Le paramétrage du réseau n’est pas activé tant que
vous n’avez pas redémarré le projecteur.
Pour obtenir plus d’informations, reportez-vous à la
section “Configuration du mot de passe” page 8 (FR).
2 Cliquez sur le bouton APPLY (appliquer).
Définition de la configuration du réseau
1 Cliquez sur l’icône Network (réseau) dans la
fenêtre de configuration.
La fenêtre Network Configuration (configuration
du réseau) s’affiche.
Configuration de l’environnement du
réseau local (LAN) sans fil
1 Cliquez sur l’icône Wireless LAN (réseau local
sans fil) dans la fenêtre Setup (configuration).
La boîte de dialogue de définition du nom
(Nickname), de l’ID du point d’accès (Access
Point ID), de la clé de cryptage (Encryption Key)
et du type de connexion (mode poste à poste) (Peer
to Peer) s’affiche.
La procédure de configuration est identique à celle
suivie par le projecteur.
Dans cette fenêtre, vous pouvez définir les
éléments décrits dans les étapes 4 à 7 de la section
“Définition de la configuration du réseau” page 9
(FR).
Pour obtenir plus d’informations, reportez-vous à la
section “Définition de la configuration du réseau” page
8 (FR).
2 Cliquez sur le bouton APPLY (appliquer).
La fenêtre de redémarrage apparaît.
Pour obtenir plus d’informations, reportez-vous à la
section “Configuration d’un environnement de réseau
sans fil – Utilisation d’un point d’accès LAN sans fil /
Mode poste à poste (Ad-hoc)” pages 10 (FR) et 11
(FR).
2 Cliquez sur le bouton APPLY (appliquer).
13 (FR)
Page 86

Organigrammes de fonctionnement de base
Organigrammes de fonctionnement de base
Cette section décrit l’organigramme de fonctionnement
relatif à l’utilisation du projecteur via un réseau ou à
l’utilisation de la fonction de réseau intégrée du
projecteur. Deux types d’organigramme sont présentés;
le premier concerne les opérations effectuées à partir
d’un ordinateur et l’autre concerne celles effectuées à
partir du projecteur. Pour plus de détails, reportez-vous
aux pages indiquées entre parenthèses.
Conditions requises
• Le projecteur et l’ordinateur sont connectés au même
réseau local.
• Le projecteur et l’ordinateur sont mis sous tension.
• Dans le menu REGL. INSTAL, FONCT ENTREE-B
(VPL-PX15) ou FONCT ENTREE-C (VPL-FX50) est
défini sur ON.
• Le commutateur de sélection INPUT C/RS-232C/RS-
422A est réglé sur INPUT C. (VPL-FE110U/M)
• L’entrée du projecteur est réglée sur INPUT B (VPL-
PX15) ou INPUT C (VPL-FX50 et VPL-FE110U/M).
Opérations à partir d’un ordinateur
Exécution d’une présentation en utilisant
un fichier créé à l’aide de PowerPoint
Vous pouvez contrôler une présentation en utilisant un
fichier créé à l’aide de PowerPoint à partir d’un
ordinateur.
Démarrage du navigateur Web d’un ordinateur pour
accéder au projecteur (page 19)
Démarrez Internet Explorer versions 4.0 ou ultérieure ou
Netscape Navigator versions 4.5x ou 4.7x, puis entrez
l’adresse IP du projecteur.
Projection d’un fichier Excel sur le
projecteur
Vous pouvez afficher un fichier Excel sur le projecteur
à partir d’un ordinateur.
Démarrage du navigateur Web d’un ordinateur pour
accéder au projecteur (page 19)
Démarrez Internet Explorer versions 4.0 ou ultérieure ou
Netscape Navigator versions 4.5x ou 4.7x, puis entrez
l’adresse IP du projecteur.
Sélection de Visualiseur de présentation
(page 23)
Sélectionnez l’icône Visualiseur de présentation dans la
fenêtre Sélection de l’application.
Recherche d’un fichier à projeter
(page 23)
Sélectionnez l’appareil où est stocké le fichier, sur
l’ordinateur ou le projecteur, puis sélectionnez le fichier
Excel souhaité. Le visualiseur feuille de travail démarre.
Projection d’un fichier Excel
Sélection de Visualiseur de présentation
(page 20)
Sélectionnez l’icône Visualiseur de présentation dans la
fenêtre Sélection de l’application.
Recherche d’un fichier que vous souhaitez utiliser
pour votre présentation (page 20)
Sélectionnez l’appareil où est stocké le fichier, sur
l’ordinateur ou le projecteur, puis sélectionnez le fichier
PowerPoint souhaité. Le visualiseur de diapositives
démarre.
Configuration d’un diaporama
(page 21)
Définissez les diapositives à utiliser et le
mode de défilement des diapositives au
cours du diaporama.
Exécution d’un diaporama
14 (FR)
Page 87

Projection d’une image sur le projecteur à
l’aide d’un fichier stocké sur un
ordinateur.
Projection d’une image ou exécution d’un
diaporama sur le projecteur en utilisant un
fichier stocké dans le projecteur
Vous pouvez projeter une image sur le projecteur à
partir d’un ordinateur.
Démarrage du navigateur Web d’un ordinateur pour
accéder au projecteur (page 19)
Démarrez Internet Explorer versions 4.0 ou ulterieure ou
Netscape Navigator versions 4.5x ou 4.7x, puis entrez
l’adresse IP du projecteur.
Sélection de Visionneuse
(page 23)
Sélectionnez l’icône Visionneuse dans la fenêtre
Sélection de l’application.
Sélection de l’appareil où est stocké le fichier
(page 23)
Sélectionnez Ordinateur dans la fenêtre Regarder Dans.
La visionneuse démarre.
A l’aide d’un fichier image stocké dans le projecteur
ou dans la carte mémoire PC, vous pouvez effectuer
cette projection à partir d’un ordinateur. Vous pouvez
également lancer la lecture d’un diaporama en utilisant
la présélection du fichier de définition du diaporama
sur le projecteur.
Démarrage du navigateur Web d’un ordinateur pour
accéder au projecteur (page 19)
Démarrez Internet Explorer versions 4.0 ou ulterieure ou
Netscape Navigator versions 4.5x ou 4.7x, puis entrez
l’adresse IP du projecteur.
Sélection de Visionneuse
(page 25)
Sélectionnez l’icône Visionneuse dans la fenêtre
Sélection de l’application.
Sélection de l’appareil où est stocké le fichier
(page 25)
Recherche du fichier que vous souhaitez projeter à
l’aide du projecteur (page 24)
Sélectionnez le fichier image souhaité en cliquant sur le
bouton Parcourir.
Projection d’une image
Sélectionnez Projecteur dans la fenêtre Regarder Dans.
La visionneuse démarre.
Sélection d’un
répertoire à projeter
(page 25)
Sélectionnez un
répertoire souhaité dans
la fenêtre Sélect.
Dossier/Fichier. SHO.
Projection d’une image
Sélection du fichier de définition
pour lancer la lecture d’un
diaporama (page 25)
Sélectionnez le fichier
.SHO souhaité dans la
fenêtre Sélect. Dossier/
Fichier. SHO.
Réglage d’un
diaporama (page 25)
Définissez le mode de
défilement des
diapositives.
Lancement d’un
diaporama
15 (FR)
Page 88

Organigrammes de fonctionnement de base
Gestion de fichiers à l’aide du
Gestionnaire de fichiers
Vous pouvez ajouter des fichiers stockés dans un
ordinateur à la mémoire du projecteur ou supprimer
des fichiers mémorisés dans le projecteur.
Démarrage du navigateur Web d’un ordinateur pour
accéder au projecteur (page 19)
Démarrez Internet Explorer version 4.0 ou ultérieure ou
Netscape Navigator version 4.5x ou 4.7x, puis entrez
l’adresse IP du projecteur.
Démarrage du Gestionnaire de fichiers (page 26)
Sélectionnez l’icône Gestionnaire de fichiers dans la
fenêtre Sélection de l’application.
Ajout de fichiers
(page 26)
Suppression de fichiers
(page 26)
Opérations à partir du projecteur
Exécution d’une présentation en utilisant
un fichier stocké dans l’ordinateur
Immédiatement après avoir ouvert un fichier créé sous
Powerpoint et stocké dans un ordinateur, vous pouvez
démarrer une présentation en utilisant le projecteur.
Démarrage de My Projector (page 31)
Cliquez deux fois sur l’icône de My Projector.
Sélection d’un fichier que vous souhaitez utiliser
pour votre présentation (page 31)
Saisissez le nom d’un ordinateur qui stocke le fichier à
utiliser, puis sélectionnez le fichier PowerPoint. Le
visualiseur de diapositives démarre et le fichier
sélectionné apparaît sous forme de diapositive.
Sélectionnez un fichier,
situé sur l’ordinateur, à
ajouter à la mémoire du
projecteur.
Exécution d’un ajout
Sélectionnez un fichier à
supprimer du projecteur.
Exécution d’une
suppression
Contrôle du projecteur
Vous pouvez effectuer divers réglages et paramétrages
du projecteur à partir d’un ordinateur.
Démarrage du navigateur Web d’un ordinateur pour
accéder au projecteur (page 19)
Démarrez Internet Explorer version 4.0 ou ultérieure ou
Netscape Navigator version 4.5x ou 4.7x, puis entrez
l’adresse IP du projecteur.
Configuration d’un diaporama (page 31)
Définissez les diapositives à utiliser et
le mode de défilement des
diapositives au cours du diaporama.
Exécution d’un diaporama
Affichage de la fenêtre de commandes (page 27)
Cliquez sur le bouton MORE... .
Réglage ou configuration du projecteur
16 (FR)
Page 89

Exécution d’une présentation en utilisant
un fichier stocké dans le projecteur ou la
carte mémoire
Utilisez un fichier PowerPoint stocké sur le projecteur
ou sur la carte mémoire PC pour exécuter une
présentation à l’aide du projecteur uniquement.
Projection d’un fichier Excel stocké dans
un ordinateur
Vous pouvez projeter un fichier Excel stocké dans un
ordinateur sur le même réseau en utilisant uniquement
le projecteur.
Démarrage du Visualiseur de présentation (page 31)
Cliquez deux fois sur l’icône Presentation Viewer.
Sélection d’un fichier que vous souhaitez utiliser
pour votre présentation (page 31)
Sélectionnez le fichier PowerPoint souhaité dans la
boîte de dialogue Open File (Ouvrir). Le visualiseur de
diapositives démarre et le fichier sélectionné apparaît
sous forme de diapositive.
Configuration d’un diaporama (page 31)
Définissez les diapositives à utiliser et
le mode de défilement des diapositives
au cours du diaporama.
Exécution d’un diaporama
Démarrage de My Projector (mon projecteur)
(page 32)
Cliquez deux fois sur l’icône My Projector (mon
projecteur).
Sélection d’un fichier à projeter (page 32)
Saisissez le nom d’un ordinateur où se trouve le fichier à
utiliser, puis sélectionnez un fichier Excel. Le visualiseur
feuille de travail démarre et le fichier sélectionné
apparaît sur le projecteur.
Projection d’un fichier Excel stocké dans
le projecteur ou sur la carte mémoire
Vous pouvez afficher des feuilles de calcul Excel
stockées dans le projecteur ou dans la carte mémoire
sur le projecteur.
Démarrage du Visualiseur de Présentation
(page 32)
Cliquez deux fois sur l’icône Presentation Viewer.
Sélection d’un fichier à projeter (page 32)
Sélectionnez le fichier Excel dans la boîte de dialogue
Open File (Ouvrir). Le visualiseur feuille de travail
démarre et le fichier sélectionné est projeté sur le
projecteur.
17 (FR)
Page 90

Organigrammes de fonctionnement de base
Lancement d’un diaporama à l’aide d’un
fichier image stocké dans le projecteur ou
la carte mémoire
Vous pouvez lancer la lecture d’un diaporama à l’aide
d’un fichier image stocké dans le projecteur ou la carte
mémoire en utilisant uniquement le projecteur.
Sélection de Visionneuse (page 33)
Cliquez deux fois sur l’icône Image Viewer.
Sélection des fichiers à utiliser pour votre diaporama
(page 33)
Cliquez sur le dossier contenant les fichiers souhaités.
Tous les fichiers contenus dans le dossier sont affichés
sous forme de miniatures.
Sélection des diapositives à utiliser pour un
diaporama (page 34)
Connexion à Internet
Démarrage de Internet Browser (page 35)
Cliquez deux fois sur l’icône Internet Browser.
Sélectionnez les diapositives à utiliser. Si vous souhaitez
sélectionner toutes les diapositives affichées dans les
miniatures, cliquez sur Select all (sélectionner tout) dans
le menu Slide Show (diaporama).
Configuration d’une image
(page 34)
Effectuez un zoom ou une rotation sur
une diapositive.
Lancement d’un diaporama
Définissez le mode de défilement des diapositives. Le
diaporama commence.
18 (FR)
Page 91

Opérations à partir d’un ordinateur
Opération
Préparatifs
Avant de commencer
x Pour le modèle VPL-PX15
Dans le menu REGL.INSTAL., vérifiez que FONCT
ENTREE-B est réglé sur ON.
x Pour le modèle VPL-FX50
Dans le menu REGL. INSTAL, vérifiez que FONCT
ENTREE-C est réglé sur ON.
x Pour le modèle VPL-FE110U/M
Vérifiez que le commutateur de sélection INPUT C/
RS-232C/RS-422A est réglé sur INPUT C.
Démarrage du navigateur pour accéder au
projecteur
Afin de contrôler le projecteur et d’y accéder à partir
d’un ordinateur, vous devez démarrer le navigateur sur
l’ordinateur. Les navigateurs appropriés sont Internet
Explorer version 4.0 ou ultérieure et Netscape
Navigator version 4.5x ou 4.7x.
Remarques
• N’accédez pas simultanément au projecteur depuis deux
ordinateurs ou plus.
• Si le navigateur de votre ordinateur est réglé sur
“Accéder à Internet avec un serveur proxy”, entrez
l’adresse IP du projecteur dans la zone “Accéder à
Internet sans serveur proxy” si vous avez accès au
projecteur à partir de votre ordinateur.
• Il se peut, en fonction de la version du navigateur, que
l'ordinateur rejette le mot de passe contrôlant l'accès au
projecteur. Dans ce cas, redémarrez le navigateur.
Si le navigateur d’un ordinateur s’interrompt sans que
•
l’application ne se ferme, le projecteur revient
automatiquement à la fenêtre Network Projector
initiale après environ 30 secondes. Dans ce cas,
redémarrez le navigateur.
Noms et fonctions de la fenêtre Sélection
de l’application
L’accès au projecteur ouvre la fenêtre Sélection de
l’application. Les noms et les fonctions des icônes et
des boutons de cette fenêtre sont indiqués ci-après.
423
1
1 Mettez le projecteur sous tension.
2 Réglez l’entrée du projecteur sur INPUT B (VPL-
PX15) ou INPUT C (VPL-FX50 et VPL-FE110U/
M)
3 Allumez votre ordinateur.
4 Démarrez le navigateur sur l’ordinateur.
5 Entrez l’adresse IP du projecteur.
Tapez “http://xxx.xxx.xxx.xxx (correspondant à
l’adresse IP du projecteur)”.
Vous pouvez vérifier l’adresse IP étant donné
qu’elle s’affiche sur la barre des tâches de la
fenêtre Network Projector.
La fenêtre Sélection de l’application s’affiche.
Lorsque le mot de passe est réglé pour le
projecteur, la boîte de dialogue de définition du
mot de passe s’affiche. Entrez le nom (Name) et le
mot de passe (Password) de l’utilisateur (User).
Pour obtenir des informations sur la fenêtre Sélection
de l’application, reportez-vous à la section “ Noms et
fonctions de la fenêtre Sélection de l’application “.
Les opérations décrites dans les étapes ci-dessus
sont illustrées aux pages 20 (FR) à 28 (FR).
56
1 Bouton Sélection de la langue
Le fait de cliquer sur
la langue. Chaque fenêtre comprend une aide
contextuelle qui s’affiche dans la partie inférieure de la
fenêtre. Vous pouvez l’afficher en anglais, français,
allemand, espagnol, italien ou japonais.
2 Icône du Gestionnaire de fichiers
Démarre le Gestionnaire de fichiers afin de gérer les
fichiers stockés sur le projecteur.
3 Icône Visionneuse
Ouvre la fenêtre de configuration pour la projection
d’images.
ouvre la liste de sélection de
87
(suite)
19 (FR)
Page 92

Opérations à partir d’un ordinateur
4 Icône du Visualiseur de présentation
Ouvre la fenêtre de sélection pour démarrer le
visualiseur PowerPoint (Visualiseur de diapositives) ou
le visualiseur Excel (visualiseur feuille de calcul).
5 Bouton #/1 (marche/veille)
Met le projecteur sous ou hors tension ou en mode de
veille.
6 Aide
Maintenez le pointeur sur un élément pour afficher les
instructions qui s’y rapportent. Vos actions sont ainsi
facilitées dans chaque fenêtre.
7 Touches de sélection d’entrée
Sélectionnez l’entrée du projecteur.
Le bouton INPUT C n’existe pas dans la fenêtre du
VPL-PX15.
8 Bouton MORE... (plus...)
Ouvre la fenêtre de commandes du projecteur.
Exécution d’une présentation à
•Les polices suivantes sont disponibles pour le
visualiseur de présentation : Arial, Bookman Old
Style, Comic Sans MS, Impact, Symbol, Tahoma,
Times New Roman et Wingdings.
Exécution d’une présentation
1 Cliquez sur l’icône du visualiseur de présentation
dans la fenêtre Sélection de l’application.
La fenêtre Regarder Dans s’affiche.
2 Cliquez pour sélectionner l’endroit où rechercher
le fichier à utiliser pour votre présentation.
Ordinateur : Pour sélectionner un fichier stocké
dans un ordinateur.
Projecteur : Pour sélectionner un fichier
stocké dans le projecteur.
La fenêtre Sélection Fichiers s’affiche.
3 Sélectionnez le fichier que vous souhaitez utiliser
pour votre présentation.
l’aide du visualiseur de diapositives
Lorsque vous envisagez d’exécuter une présentation à
l’aide de PowerPoint dans une salle de conférence, il
est possible d’utiliser votre ordinateur dans cette même
salle ou dans un endroit éloigné du projecteur pour
contrôler cette présentation.
Ce que vous pouvez faire avec le
visualiseur de diapositives
Vous pouvez :
•exécuter un diaporama en utilisant le fichier créé sous
PowerPoint.
•afficher un diaporama personnalisé, si vous en avez
créé un.
•afficher un commentaire de l’orateur ou le masquer.
• afficher une diapositive ou la cacher.
•définir des délais de passage à la diapositive suivante
lors d’un diaporama. Vous pouvez sélectionner un
diaporama automatique ou manuel.
Remarques
•L’affichage du fichier peut prendre plus ou moins de
temps selon votre configuration réseau.
• Etant donné que le visualiseur de diapositives est une
fonction de visualisation PowerPoint élémentaire, elle
ne prend pas en charge l’ensemble des fonctionnalités
de PowerPoint. Nous vous recommandons d’essayer
de projeter le fichier utilisé pour votre présentation à
partir du projecteur avant d’exécuter la présentation.
Lorsque vous sélectionnez Ordinateur à l’étape 2
Cliquez sur Parcourir pour ouvrir la fenêtre
Sélection Fichiers sur l’ordinateur. Cliquez sur le
fichier PowerPoint (fichier .ppt ou .pps) souhaité.
Vous pouvez également sélectionner le fichier en
entrant son nom dans la zone de texte Parcourir.
Le nom du fichier sélectionné s’affiche dans la
zone de texte Parcourir.
Bouton Précédent
Cliquez pour revenir à
la fenêtre précédente.
Bouton Accueil
Cliquez pour revenir à la
fenêtre Sélection de
l’application.
Zone de
définition du
Mot de passe
20 (FR)
Page 93

Pour stocker le fichier sélectionné sur le
projecteur
Cliquez pour cocher la case “enregistrer dans
projecteur”. Vous pouvez définir un mot de passe
pour le fichier, si nécessaire. Spécifiez le mot de
passe dans la zone de texte Mot de passe. A partir
de maintenant, il est impossible d’ouvrir ce fichier
sans entrer son mot de passe.
Le fichier est stocké dès que vous cliquez sur le
bouton Paramétrer ou Visionner.
Remarque
Lorsque vous supprimez un fichier à l’aide du
Gestionnaire de fichiers, le mot de passe n’est pas
demandé, même si un mot de passe est défini pour
ce fichier.
Lorsque vous sélectionnez Projecteur à
l’étape 2
La liste des fichiers stockés sur le projecteur ou la
carte mémoire (VPL-PX15 et VPL-FX50) s’affiche.
Cliquez sur le fichier PowerPoint souhaité. Le nom
du fichier sélectionné apparaît dans la zone de texte.
Remarque
Si vous exécutez une présentation à l’aide du
fichier stocké dans un ordinateur, celui-ci est
transféré vers le projecteur lorsque vous cliquez
sur le bouton Paramétrer. Un court délai d’attente
est nécessaire pour afficher la fenêtre Paramètres
du diaporama sur l’ordinateur. Sa durée dépend de
la taille du fichier. Pendant cette attente, un
message s’affiche.
4 Réglez votre diaporama, si nécessaire. Cliquez sur
le bouton Paramètres dans la fenêtre Sélection
Fichiers.
La fenêtre Paramétres du diaporama s’affiche. Vous
pouvez spécifier les diapositives à utiliser pour le
diaporama et définir le mode de défilement des
diapositives pendant le diaporama. Maintenez le
pointeur de la souris sur un élément pour afficher
les instructions qui s’y rapportent dans la partie
inférieure de la fenêtre.
5 Cliquez sur le bouton Visionner de la fenêtre
Sélection Fichiers ou cliquez sur le bouton
Visionner le diaporama de la fenêtre Paramètres du
diaporama.
Le diaporama démarre.
Remarque
Si vous exécutez une présentation à l’aide du
fichier stocké dans un ordinateur, celui-ci est
transféré vers le projecteur lorsque vous cliquez
sur le bouton Visionner. Un court délai d’attente
est nécessaire pour afficher le diaporama sur
l’écran du projecteur. Sa durée dépend de la taille
du fichier. Pendant cette attente, un message
s’affiche.
Pour mettre fin au diaporama
Cliquez sur le bouton Mettre fin au diaporama. (Voir
page 22 (FR). )
La fenêtre Sélection Fichiers s’affiche à nouveau.
(suite)
21 (FR)
Page 94

Opérations à partir d’un ordinateur
Remarque
Si le message “La mémoire du projecteur est saturée”
apparaît lorsque vous cliquez sur le bouton Visionner
ou Paramétrer, supprimez les fichiers inutiles stockés
dans le projecteur à l’aide du Gestionnaire de fichiers
(page 26 (FR)), puis essayez d’exécuter de nouveau le
diaporama. Si le message “La taille du fichier est trop
importante.” s’affiche, réduisez la taille du fichier, puis
essayez d’exécuter le diaporama à nouveau.
Conseils :
Vous pouvez réduire la taille du fichier en cliquant sur
Option, à partir du menu Outils de l’application
PowerPoint, puis cliquez sur Enregistrement et
décochez la case Enregistrement rapide.
A propos de la fenêtre affichée pendant
l’exécution de la présentation
La fenêtre suivante s’affiche pendant une présentation.
423
1
3 Nom du fichier/numéro de la diapositive
Indique le nom d’un fichier ainsi que la diapositive
affichée.
4 Diapositive
Indique la diapositive en cours d’affichage par rapport
au diaporama. L’écran du projecteur affiche
uniquement cette diapositive.
5 Bouton Précédent
Revient à la diapositive ou au paramètre d’animation
précédent(e) pendant le diaporama.
6 Zone du numéro de Diapositive
Cliquez sur
pour ouvrir la liste déroulante des noms
de diapositives. Lorsque vous sélectionnez une
diapositive spécifique dans cette liste, celle-ci
s’affiche.
7 Bouton Suivant
Passe immédiatement à la diapositive suivante ou au
paramètre d’animation suivant.
65789qa0
1 Bouton Commentaire
Sélectionnez ce bouton pour afficher/supprimer un
commentaire de l’orateur.
2 Bouton Diapositive
Sélectionnez ce bouton pour afficher/supprimer un
diaporama de l’écran de l’ordinateur.
8 Bouton Paramètres du diaporama
Rétablit la fenêtre Paramètres du diaporama.
9 Bouton Mettre fin au diaporama
Met fin au diaporama ou le suspend pour rétablir la
fenêtre Sélection Fichiers.
q; Commentaire
Affiche un commentaire de l’orateur. Il n’apparaît pas
sur l’écran du projecteur.
qa Bouton Accueil
Rétablit la fenêtre Sélection de l’application.
22 (FR)
Page 95

Projection d’un fichier Excel à l’aide du visualiseur feuille de travail
Vous pouvez afficher un fichier Excel sur le projecteur
à partir d’un ordinateur.
Ce que vous pouvez faire avec le
visualiseur feuille de travail
Vous pouvez :
•afficher des feuilles de travail Excel sur l’écran du
projecteur ;
•modifier la disposition d’une feuille de travail
visualisée à l’écran ;
•réduire ou agrandir la feuille de travail projetée.
Remarque
Le visualiseur feuille de travail n’étant qu’une simple
fonction de visualisation Excel, il ne prend pas en
charge certaines fonctions Excel, telles que la fonction
de fractionnement.
Projection d’un fichier Excel
1 Suivez les étapes 1 à 3 présentées dans “Exécution
d’une présentation à l’aide du visualiseur de
diapositives — Exécution d’une présentation” page
20 (FR). Assurez-vous d’avoir sélectionné un
fichier Excel (fichier .xls) à l’étape 3.
2 Cliquez sur le bouton Visionner.
Le visualiseur feuille de travail démarre.
Une feuille de travail du fichier sélectionné apparaît
sur le projecteur.
Lorsque vous pointez la souris sur un bouton ou un
élément, ses instructions apparaissent en bas de la
fenêtre.
Remarques
• L’étendue de la zone d’une feuille de travail affichée
sur un ordinateur et celle de la zone projetée sur le
projecteur sont différentes.
• Lorsque vous cliquez sur une cellule, sur
l’ordinateur, celle-ci est activée si elle se trouve dans
la zone affichée sur le projecteur. Si la cellule
sélectionnée est en-dehors de la zone affichée, la zone
entourant la cellule sélectionnée est affichée sur le
projecteur, avec la cellule centrée.
Projection d’une image à l’aide de la visionneuse
Vous pouvez projeter un fichier image enregistré sur
n’importe quel ordinateur du même réseau LAN ou
dans la mémoire du projecteur, ou encore sur la carte
mémoire installée dans le projecteur. Vous pouvez
également lancer la lecture d’un diaporama en utilisant
la présélection du fichier de paramétrage du diaporama
(fichier .SHO) sur le projecteur.
Projection d’une image stockée dans un
ordinateur sur le projecteur
1 Cliquez sur l’icône Visionneuse de la fenêtre
Sélection de l’application.
La fenêtre Regarder Dans apparaît.
2 Cliquez sur Ordinateur.
La visionneuse du projecteur démarre et la fenêtre
Visionneuse apparaît.
Cellule sélectionnée
Vous pouvez réduire ou agrandir la feuille de travail
projetée à l’écran et modifier la disposition de cette
feuille sur le projecteur à l’aide des boutons situés dans
la fenêtre de droite.
Maintenez le pointeur de la souris sur chaque
élément pour afficher les instructions s’y
rapportant dans la partie inférieure de la fenêtre.
(suite)
23 (FR)
Page 96

Opérations à partir d’un ordinateur
3 Sélectionnez le fichier image à afficher.
Cliquez sur Parcourir pour ouvrir la fenêtre de
sélection de fichiers d’un ordinateur. Cliquez deux
fois sur le fichier souhaité.
Le nom du fichier sélectionné est affiché dans la
zone de texte Parcourir.
4 Cliquez sur le bouton Affichage.
Une image plein écran du fichier sélectionné est
affichée sur le projecteur.
Remarque
Lorsque vous projetez un fichier image de taille
importante, comme les fichiers au format UXGA, il est
impossible de l’ouvrir car la mémoire est insuffisante.
Dans ce cas, réduisez l’image pour obtenir un fichier
plus petit.
Pour gagner du temps lors des transferts de
données
Lorsque vous cliquez sur le bouton Affichage, le fichier
est transféré vers le projecteur. L’affichage d’une image
sur l’écran du projecteur peut prendre quelques instants.
Pour afficher l’image immédiatement, transférez tous
les fichiers à utiliser vers le projecteur avant de
commencer votre présentation.
1 Après l’étape 3 de la section “Projection d’une
image sur le projecteur”, cliquez sur le bouton
Envoyer.
Le nom du fichier sélectionné apparaît dans la liste
Fichier temporaire et le fichier est transféré vers le
projecteur.
Répétez cette étape jusqu’à ce que tous les fichiers
souhaités soient affichés dans la boîte de dialogue
Fichier temporaire.
2 Cliquez deux fois sur le nom du fichier apparaissant
dans la boîte de dialogue Fichier temporaire.
Une image plein écran du fichier sélectionné est
affichée sur le projecteur.
Remarque
Si la mémoire de la liste Fichier Temporaire est pleine,
les données transférées précédemment sont effacées.
A propos de la fenêtre affichée pendant la
présentation
2
3 5
1 Nom du fichier
Affiche le nom de fichier de l’image affichée.
2 Diapositive
Affiche l’image sur l’écran du projecteur.
3 Zone de texte Zoom
Si vous cliquez sur
pourcentages d’agrandissement ou de réduction de
l’image apparaît.
4 Zone de texte Rotation
Si vous cliquez sur
rotation de l’image apparaît.
Remarque
Lorsque vous projetez un fichier image de taille
importante, comme les fichiers au format UXGA, il est
impossible d’effectuer une rotation de l’image car la
mémoire est insuffisante. Dans ce cas, réduisez l’image
afin d’obtenir un fichier plus petit.
5 Boutons Scroll (défilement)
Si vous cliquez sur les flèches, la zone d’affichage de
l’image sur l’écran change si l’écran n’est pas
suffisamment grand.
6 Bouton Fin
Met fin à l’affichage plein écran ou suspend l’affichage
plein écran pour revenir à la fenêtre Sélection Fichiers.
1
6
, la liste déroulante des
, la liste déroulante des angles de
74
24 (FR)
7 Bouton Accueil
Revient à la fenêtre Sélection de l’application.
Page 97

Remarque
Lorsque vous quittez la fenêtre Visionneuse en
cliquant sur le bouton Fin ou Accueil, les fichiers
répertoriés dans la liste Fichier temporaire sont
automatiquement supprimés. Pour les enregistrer,
transférez-les vers le projecteur à l’aide de la fonction
Gestionnaire de fichiers.
Pour obtenir plus d’informations, reportez-vous à la section
“Utilisation du gestionnaire de fichier” page 26 (FR).
Exécution d’une présentation à l’aide d’un
fichier image stocké dans le projecteur.
1 Cliquez sur l’icône Visionneuse dans la fenêtre
Sélection de l’application.
La fenêtre Regarder Dans apparaît.
2 Cliquez sur Projecteur.
La visionneuse du projecteur démarre et la fenêtre
Select. Dossier/Fichier .SHO apparaît.
Lorsque vous sélectionnez un répertoire à
l’étape 4
Les fichiers image contenus dans le répertoire
sélectionné sont répertoriés sur la droite.
Bouton Fin
Ferme ou interrompt
l’affichage et revient à la
fenêtre Sélection fichiers.
Bouton Accueil
Revient à la fenêtre
Sélection de l’application.
3 Cliquez sur le répertoire souhaité ou sur le
répertoire qui contient le fichier des paramètres
diaporama (fichier .SHO) dans la liste des
répertoires située à gauche de la fenêtre.
Le contenu du répertoire sélectionné est répertorié
sur la droite.
Pour obtenir plus de détails sur les fichiers .SHO,
reportez-vous à la section “Sauvegarde des paramètres
d’un diaporama” page 35 (FR).
Cliquez sur le fichier souhaité.Une image du
fichier sélectionné est projetée en plein écran.
Lorsque vous pointez la souris sur un élément situé
à gauche de la fenêtre, ses instructions apparaissent
en bas de la fenêtre.
Lorsque vous sélectionnez un fichier .SHO à
l’étape 4
Le fichier .SHO sélectionné apparaît sur la droite.
4 Sélectionnez un répertoire ou un fichier .SHO, puis
cliquez sur le bouton SELECTION.
La fenêtre Visionneuse apparaît.
5 Sélectionnez un fichier image à projeter.
Sélectionnez le mode de défilement des
diapositives, puis cliquez sur le bouton Affichage.
Le diaporama démarre.
Lorsque vous pointez la souris sur un élément de la
fenêtre, ses instructions apparaissent en bas de la
fenêtre.
25 (FR)
Page 98

Opérations à partir d’un ordinateur
A propos de la fenêtre affichée lors de
l’exécution de la visionneuse
La même fenêtre que celle de “A propos de la fenêtre
affichée pendant la présentation” page 24 apparaît.
Le bouton Suivant situé dans la fenêtre de sélection du
fichier .SHO sert à passer à la diapositive suivante
immédiatement pendant le diaporama. Le bouton
Précédent sert à revenir à la diapositive précédente.
Utilisation du Gestionnaire de fichiers
Vous pouvez gérer des fichiers stockés dans le
projecteur à partir d’un ordinateur en suivant une
procédure simple. La fonction Gestionnaire de fichiers
vous permet de supprimer des fichiers inutiles stockés
sur le projecteur ou d’ajouter des fichiers stockés dans
un ordinateur dans la mémoire du projecteur.
Utilisez le Gestionnaire de fichiers pour vérifier la
mémoire actuellement utilisée et la mémoire restante
disponible du projecteur (elles sont affichées dans la
fenêtre Gestionnaire de fichiers).
Ajout de fichiers au projecteur à l’aide du
Gestionnaire de fichiers
1 Cliquez sur l’icône du Gestionnaire de fichiers dans
la fenêtre Sélection de l’application.
La fenêtre Gestionnaire de fichiers s’affiche.
2 Recherchez le fichier, stocké dans l’ordinateur, que
vous souhaitez ajouter au projecteur.
Cliquez sur le bouton Parcourir dans la section
Ajout de fichier pour ouvrir la fenêtre Sélection
Fichiers de l’ordinateur. Sélectionnez le fichier de
votre choix. Vous pouvez également sélectionner
le fichier en entrant son nom dans la zone de texte
Parcourir.
Vous pouvez définir un mot de passe pour le
fichier sélectionné lors de cette étape. Spécifiez le
mot de passe dans la zone de texte Mot de passe. A
partir de maintenant, il est impossible d’ouvrir ce
fichier sans entrer son mot de passe.
3 Cliquez sur le bouton Ajout.
Le fichier sélectionné est stocké sur le projecteur.
Suppression de fichiers à partir du
projecteur à l’aide du Gestionnaire de
fichiers
1 Cliquez sur l’icône du Gestionnaire de fichiers dans
la fenêtre Sélection de l’application.
La fenêtre Gestionnaire de fichiers s’affiche et la
liste des fichiers stockés sur le projecteur apparaît.
2 Sélectionnez le fichier que vous souhaitez
supprimer.
Vous pouvez sélectionner tous les fichiers que
vous souhaitez supprimer.
3 Cliquez sur le bouton Suppression.
Tous les fichiers sélectionnés sont supprimés de la
liste de fichiers.
Remarque
Vous pouvez supprimer un fichier même s’il possède
un mot de passe.
26 (FR)
Page 99

Contrôle du projecteur à partir d’un ordinateur
Vous pouvez effectuer divers réglages et paramétrages
du projecteur sur un écran d’ordinateur. Les trois
fenêtres de commandes suivantes sont disponibles :
GENERAL, PICTURE CTRL et SETTINGS,
comportant chacune des fonctions différentes.
Les fonctions des boutons qui apparaissent dans les
fenêtres sont les mêmes que celles des boutons de la
télécommande fournie avec le projecteur.
Pour obtenir plus d’informations sur les boutons, reportezvous au mode d’emploi du projecteur.
Fenêtre PICTURE CTRL
Les illustrations ci-dessous concernent le modèle VPLPX15.
1 Cliquez sur le bouton MORE... (plus...) dans la
section PJ CONTROL (contrôle PJ).
La fenêtre GENERAL s’affiche.
2 Cliquez sur l’onglet correspondant pour
sélectionner la fenêtre souhaitée.
Fenêtre GENERAL
(VPL-PX15)
x Pour le modèle VPL-PX15
Les boutons COLOR TEMP (HIGH, LOW)
fonctionnent de la même manière que dans le
menu.
x Pour le modèle VPL-FX50
Les boutons DDE (OFF, PROGRESSIVE, FILM)
et RGB ENHANCER +/– fonctionnent de la même
manière que dans les menus.
Pour obtenir plus d’informations, reportez-vous au
mode d’emploi du projecteur.
(suite)
(VPL-PX15)
x Pour le modèle VPL-FE110U/M
Utilisez la touche SWITCHER pour spécifier le
périphérique. Utilisez la touche GROUP pour
spécifier les numéros d’index de groupes et la
touche INDEX pour spécifier les numéros d’index
de périphériques. Cliquez sur
liste déroulante, puis sélectionnez le numéro.
pour ouvrir la
27 (FR)
Page 100

Opérations à partir d’un ordinateur
Fenêtre SETTINGS
(VPL-PX15)
x Pour le modèle VPL-PX15
Les boutons ASPECT (4:3, 16:9) et STATUS (ON,
OFF) fonctionnent de la même manière que dans le
menu.
x Pour le modèle VPL-FX50
Les boutons ASPECT (4:3, 16:9) et LAMP MODE
(STANDARD, LOW) fonctionnent de la même
manière que dans les menus.
3 Entrez le nom et le mot de passe de
l’administrateur (Administrator).
La fenêtre Information (informations) s’affiche.
L’illustration ci-dessous concerne le modèle VPLPX15.
2
34
1 Projector Status (état du projecteur)
Affiche l’état en cours du projecteur.
1
5
Pour obtenir plus d’informations, reportez-vous au
mode d’emploi du projecteur définition approprié.
3 Cliquez sur le bouton de réglage ou de définition.
Vérification des indicateurs sur le projecteur
Vous pouvez vérifier l’état en cours des indicateurs
situés sur le panneau de commande du projecteur sur
l’écran d’un ordinateur.
1 Démarrez Internet Explorer version 4.0 ou
ultérieure ou Netscape Navigator version 4.5x ou
4.7x sur l’ordinateur.
2 Tapez l’URL “http://xxx.xxx.xxx.xxx
(correspondant à l’adresse IP du projecteur)/info”.
Si vous n’avez pas modifié l’adresse IP définie en
usine, tapez “http://192.168.0.1/info” (lorsque vous
utilisez une carte PC LAN) ou “http://192.168.0.2/
info” (lorsque vous utilisez le connecteur ETHER).
Si le mot de passe est défini, la boîte de dialogue
Définition du mot de passe apparaît.
2 Projector (projecteur)
Affiche les informations sur le projecteur.
3 System (système)
Affiche les versions de Windows CE et des
applications en cours d’utilisation.
4 Bouton UPDATE (mise à jour)
Cliquez sur ce bouton pour mettre à jour les dernières
informations.
5 Error Status (Etat d’erreur)
Affiche l’état en cours des indicateurs du panneau de
commandes du projecteur.
Pour obtenir des informations sur les indicateurs, reportezvous au mode d’emploi.
28 (FR)
 Loading...