

Sony VPL-GTZ380 User manual
Help Guide
Data Projector
VPL-GTZ380
This manual is for those who encounter issues or have questions when using the Data Projector.
Before Use
Risk Group 3 Safety for the Customers in the U.S.A.
Checking the Supplied Accessories
Inserting the Batteries into the Remote Control
Connecting the AC Power Cord
Parts and Controls
Parts and Controls (Main Unit)
Parts and Controls (Remote Control)
Installation and Connections
Installing the Projector
Selecting the Menu Language
Adjusting the Position of the Projected Image
1
Precautions When Connecting
Connecting to Video Equipment
Connecting to a Workstation
Connecting to a Computer
Connecting to a 3D Sync Transmitter
Projecting
Projecting Images
Using the Picture Position
Selecting an Aspect Ratio According to an Image
Viewing 3D Images
Projecting a High Resolution Image (V Split Display)
Adjustment and Setting Menus
Navigating Menus
Picture Menu
Menu Operation: Calib. Preset
Menu Operation: Reset
Menu Operation: Reality Creation
Menu Operation: Cinema Black Pro > Laser Light Setting
Menu Operation: Cinema Black Pro > Dynamic HDR Enhancer
Menu Operation: Cinema Black Pro > D.Contrast Optimizer
Menu Operation: Motionflow
Menu Operation: Contrast
Menu Operation: Brightness
Menu Operation: Color
Menu Operation: Hue
Menu Operation: Color Temp.
Menu Operation: Sharpness
Menu Operation: Expert Setting > NR (Noise Reduction)
Menu Operation: Expert Setting > Smooth Gradation
2
Menu Operation: Expert Setting > Gamma Correction
Menu Operation: Expert Setting > Color Correction
Menu Operation: Expert Setting > HDR
Menu Operation: Expert Setting > Color Space
Menu Operation: Expert Setting > Input Lag Reduction
Screen Menu
Menu Operation: Picture Position
Menu Operation: Aspect
Menu Operation: Blanking
Setup Menu
Menu Operation: Status
Menu Operation: Language
Menu Operation: Menu Position
Menu Operation: High Altitude Mode
Menu Operation: Remote Start
Menu Operation: Network Management
Menu Operation: Power Saving
Menu Operation: All Reset
Function Menu
Menu Operation: 3D Settings > 2D-3D Display Sel.
Menu Operation: Dynamic Range
Menu Operation: HDMI Signal Format
Menu Operation: Test Pattern
Menu Operation: Settings Lock
Installation Menu
Menu Operation: Image Flip
Menu Operation: Lens Control
Menu Operation: Anamorphic Lens
Menu Operation: Trigger Select
Menu Operation: IR Receiver
3
Menu Operation: ID Mode
Menu Operation: Panel Alignment
Menu Operation: Network Setting
Menu Operation: License Management
Information Menu
Viewing the Projector Information
Using Network Features
Uses for Network Features
Displaying the Control Window of a Projector with a Web Browser
Operating the Control Window
Notes on Installation and Usage
Unsuitable Installation
Unsuitable Conditions
Precautions
On Inspection of Light Source Related Parts
On Heat Dissipation
On LCD Projector
On condensation
Notes on Security
Do not place this product close to medical devices
Specifications
Specifications
Preset Signals
Input Signals and Setting/Adjustment Items
Compatible 3D Signals
Aspect Mode
Storage Conditions of Setting/Adjustment Items
Projection Distance
Projection Distance and Lens Shift Range
4

5-023-481-12(1) Copyright 2020 Sony Corporation
When Projecting in 1.90:1 (Native Full Display 17:9) Format
When Projecting in 1.78:1 (16:9) Format
When Projecting in 2.35:1 Format
Error Handling
Reading the Indicator
Message Lists
Troubleshooting
Power is not turned on.
Power is suddenly turned off.
No image is displayed.
Double images (ghosts) appear.
Light or dark area of the image appears too light or too dark.
Projected images are too dark.
Blurry screen
Color of characters or images is not appropriate.
Image retention occurs on the screen.
On-screen display does not appear.
Remote control does not work.
Projected images do not seem to be 3D.
Loud fan noise
Lens shift cannot be adjusted.
Others
Updating the Software
NOTICES AND LICENSES FOR SOFTWARE USED IN THIS PRODUCT
Trademark Information
5
Help Guide
Data Projector
VPL-GTZ380
Risk Group 3 Safety for the Customers in the U.S.A.
WARNING
To reduce the risk of fire or electric shock, do not expose this apparatus to rain or moisture.
To avoid electrical shock and hazardous radiation exposure, do not open the cabinet. Refer servicing to
qualified personnel only.
WARNING
This apparatus must be earthed.
WARNING
When installing the unit, incorporate a readily accessible disconnect device in the fixed wiring, or connect the power plug
to an easily accessible socket-outlet near the unit. If a fault should occur during operation of the unit, operate the
disconnect device to switch the power supply off, or disconnect the power plug.
CAUTION
For safety, do not connect the connector for peripheral device wiring that might have excessive voltage to the following
port:
LAN
WARNING
1. Use the approved Power Cord (3-core mains lead) / Appliance Connector / Plug with earthing-contacts that conforms
to the safety regulations of each country/region if applicable.
2. Use the Power Cord (3-core mains lead) / Appliance Connector / Plug conforming to the proper ratings (Voltage,
Ampere).
If you have questions on the use of the above Power Cord / Appliance Connector / Plug, please consult a qualified
service personnel.
CAUTION
- Danger of explosion if battery is incorrectly replaced. Replace only with the same or equivalent type recommended by
the manufacturer.
- When you dispose of the battery or the product, you must obey the law in the corresponding area or country. Do not
dispose of the battery or the product in a fire or a hot oven, or mechanically crush or cut the battery. It may explode or
cause a fire. Do not subject the battery to extremely low air pressure that may result in an explosion or the leakage of
flammable liquid or gas.
- Do not place the battery in a high temperature place, such as under direct sunlight or near fire. It may ignite, explode,
or cause a fire. Do not immerse or wet the battery in water or seawater. This may cause an electric shock.
CAUTION
The following size and number of batteries are required for the remote control.
Size: AA (R6)
Number of battery(ies): Two pieces
To avoid risk of explosion, use only the following type of battery.
Manganese or alkaline batteries
This equipment has been tested and found to comply with the limits for a Class B digital device, pursuant to part 15 of
the FCC Rules. These limits are designed to provide reasonable protection against harmful interference in a residential
6
installation. This equipment generates, uses and can radiate radio frequency energy and, if not installed and used in
accordance with the instructions, may cause harmful interference to radio communications. However, there is no
guarantee that interference will not occur in a particular installation. If this equipment does cause harmful interference to
radio or television reception, which can be determined by turning the equipment off and on, the user is encouraged to try
to correct the interference by one or more of the following measures:
- Reorient or relocate the receiving antenna.
- Increase the separation between the equipment and receiver.
- Connect the equipment into an outlet on a circuit different from that to which the receiver is connected.
- Consult the dealer or an experienced radio/TV technician for help.
You are cautioned that any changes or modifications not expressly approved in this manual could void your authority to
operate this equipment.
All interface cables used to connect the equipment to peripherals must be shielded type to comply with EMC standard(s)
and to prevent undesired operation due to radiated emissions. When cables are supplied, always use them for this
purpose.
If you have any questions about this product, you may call:
Sony Customer Information Service Center 1-800-222-7669 or
http://www.sony.com/
US Requirements for Risk Group 3 (RG3) Laser Illuminated Projectors
US owners of RG3 laser projectors must obtain a permit (called a ‘variance’) at time of purchase to possess and use
this product. Sony or the Sony distributor will assist purchaser in procuring the variance. Contact a Sony sales
representative for additional data.
The requirement for a variance also applies to RG3 laser projector dealers, distributors and resellers.
US laser product regulations require specific mounting and accessibility considerations during installation and use.
See included data.
Operators of RG3 laser projectors shall be legal employees of the variance holder.
Certain requirements for training, record keeping and reporting apply. Refer to Sony RG3 laser projector user training
materials.
Users must review the use terms specified on the variance and follow these conditions at all times under US federal
regulations. These regulations are administered by the US Food and Drug Administration’s Center for Devices and
Radiological Health (F.D.A. CDRH). Failure to follow the terms of use specified in the variance can result in fines and
revocation of permit to use RG3 projectors.
RG3 laser projectors may only be transferred, sold or rented to other personnel or entities in the US if they possess
an RG3 projector or laser light show variance.
When installed by a certified installer in accordance with the installation instructions, this product can be used in
private screening room.
Precautions
On safety
Check that the operating voltage of your unit is identical with the voltage of your local power supply.
Should any liquid or solid object fall into the cabinet, unplug the unit and have it checked by qualified personnel
before operating it further.
Unplug the unit from the wall outlet if it is not to be used for several days.
To disconnect the cord, pull it out by the plug. Never pull the cord itself.
The wall outlet should be near the unit and easily accessible.
The unit is not disconnected to the AC power source (mains) as long as it is connected to the wall outlet, even if the
unit itself has been turned off.
Do not look into the lens while in use.
Do not place your hand or objects near the ventilation holes. The air coming out is hot.
Removing or changing the lens shall only be performed by qualified Sony personnel
On preventing internal heat build-up
After you turn off the power with the
/ (On/Standby) button, do not disconnect the unit from the wall outlet while the
cooling fan is still running.
Caution
This unit is equipped with ventilation holes (intake/exhaust). Do not block or place anything near these holes, or internal
heat build-up may occur, causing picture degradation or damage to the unit.
7

On repacking
Save the original shipping carton and packing material; they will come in handy if you ever have to ship your unit. For
maximum protection, repack your unit as it was originally packed at the factory.
On watching 3D video images
Safety precautions
If you observe flickering or flashing, turn off the lighting in the room.
Not for use by children without proper adult supervision.
On inspection of light source related parts
To avoid hazardous laser radiation exposure, do not open the cabinet. Projector contains Class 4 levels of laser radiation
which can cause instant blindness, skin burns and fire. Refer servicing to qualified personnel only.
CAUTION
Use of controls or adjustments or performance of procedures other than those specified herein may result in hazardous
radiation exposure.
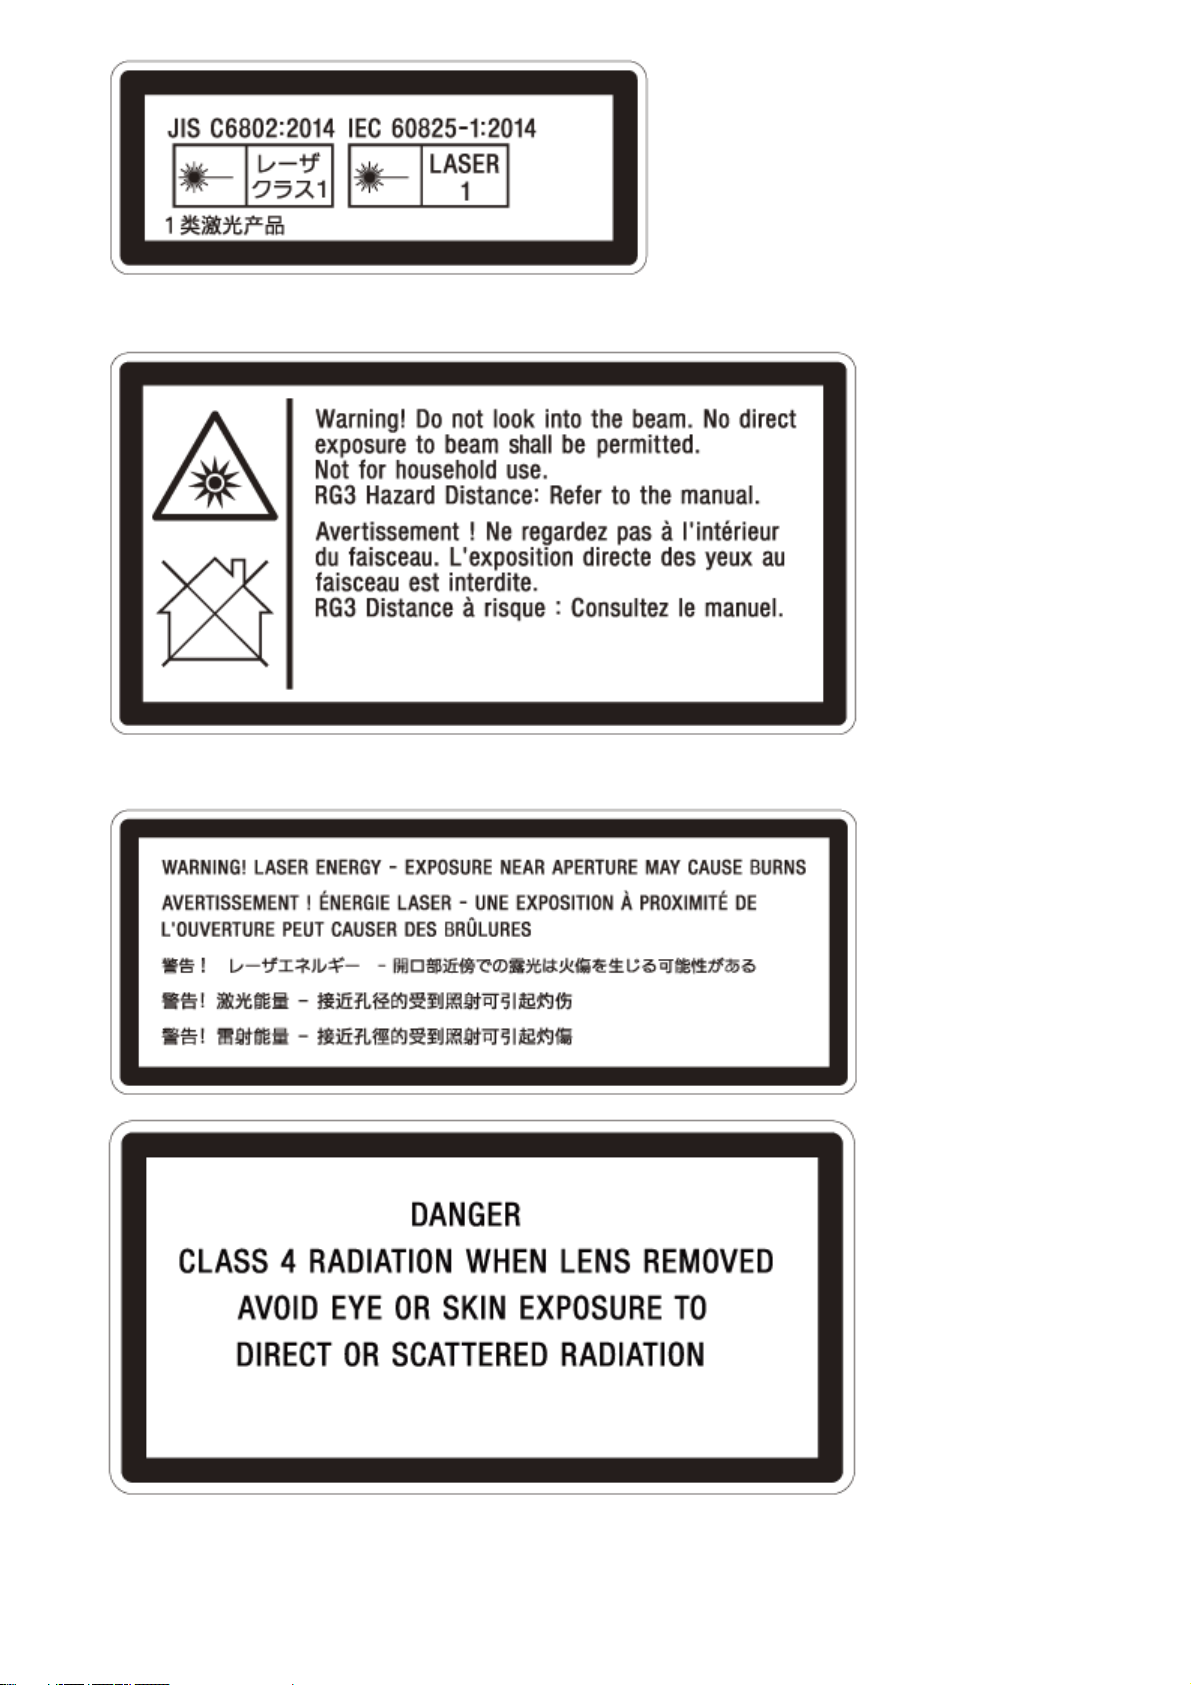
IEC 60825-1:2014
CLASS 1 / RG3 LASER PRODUCT
This product according to the IEC 62471-5:2015 becomes Risk Group 3 (RG3).
WARNING
No direct exposure to the beam shall be permitted.
Operators shall control access to the beam within the hazard distance or install the product at the height that will
prevent spectators’ eyes from being in the hazard distance.
This RG3 projector intended for professional use only and not for consumer use.
WARNING
LASER ENERGY
EXPOSURE NEAR APERTURE MAY CAUSE BURNS
CAUTION
Do not look into the lens while in use.
CAUTION
The use of optical instruments with this product will increase eye hazard.
Projector Operation
All RG3 laser projector operators shall be adequately trained and authorized employees of an approved Laser
Display Product User Variance holder.
Prior to projector activation ensure the hazard zone is free of obstructions, personnel, reflective or flammable objects,
etc.
If a potential exposure hazard arrises within the hazard zone, immediately terminate projector emissions to avoid eye
injuries, until hazard is cleared.
Projector emission terminated by pressing the on/standby button located on the projector’s side panel or standby
button on the remote control. See ‘Turning off the projector’ in the Help Guide.
Projector Maintenance
For safety, all maintenance procedures to be performed with the projector off and the power cord disconnected. To
prevent potential hazardous laser light exposure, do not attempt any maintenance procedures with projector
powered. Avoid eye and skin exposure to projector emissions.
Maintenance of this product is limited to cleaning the output surface of the lens and air filter cleaning.
8
Lens is not removable for maintenance procedures.
Lens requires cleaning when foreign materials visibly accumulate on the lens.
Air filters are to be cleaned or replaced at regular intervals as dust accumulates.
For Lens cleaning or filter maintenance first power off the equipment, remove power cord and allow the projector to
cool prior to performing maintenance.
Using approved high quality lens cleaning products, gently wipe the lens to remove foreign materials.
To replace air filter remove panel retaining screw and lift panel. Clean or replace filter and reattach retaining panel
with retaining hardware.
Reattach power cord and test projector output.
If maintenance procedures are not followed there is a potential for hazardous exposure to RG3 levels of light at the
lens ‘Warning, No direct exposure to the beam shall be permitted’, or Class 2 laser light at the air filter panels.
‘Caution -Class 2 laser light when open. Do not stare into the beam’.
Projector Service
Only personnel authorized by Sony are allowed to service this product. To avoid hazardous Class 4 laser light exposure
do not open the cabinet. For details, consult with your local Sony Authorized Dealer or qualified Sony personnel.
Projector Installation
The product shall be installed only by professionals authorized by Sony.
The product shall be installed in a manner to prevent direct access by unauthorized personnel to the projector or the
projector emissions within the Hazard Zone.
A Hazard Zone is the region of space where the projection light from the projector is above Emission Limits for RG2.
For installations other than in cinema theaters, the projector shall be installed at a height vertically above the floor
such that the bottom plane of the Hazard Zone shall be no lower than 3 meters above the floor. Horizontal clearance
to the hazard zone shall be 2.5 meters. Any human access horizontally to the Hazard Zone, if applicable, shall be
restricted by barriers. If human access is possible in an unsupervised environment, the horizontal or vertical
clearances shall be increased to prevent exposure to the RG3 hazard zone.
Permanent show installations shall be installed by the Sony or by Sony-authorized and trained installers. Show
installations must be performed in accordance with Sony’s instructions. The projection system shall be securely
mounted or immobilized to prevent unintended movement or misalignment of the projections.
Temporary show installations may be installed by Sony or sold or leased only to valid laser light show variance
holders (laser light show manufacturers) for image projection applications. Such manufacturers may currently hold a
valid variance for production of Class 3B and 4 laser light shows and/or for incorporation of the RG3 projector into
their shows. This requirement applies also dealers and distributors of these RG3 projectors. For show installations
including customer or trade show demonstrations, responsible Firm shall assure that:
a) The projectors are located so that all propagating beam paths within the Hazard Zone, and the audience can be
directly observed at all times;
b) Communication be maintained with other personnel assisting in surveillance of the LIP projection;
c) In the event of any unsafe condition, immediately terminates (or designate the termination) of LIP projection light;
d) Provide one or more readily accessible controls to immediately terminate LIP projection light.
Safety precautions for installing the unit on a ceiling
Never mount the projector on the ceiling or move it by yourself. Be sure to consult with qualified Sony personnel
(charged).
When installing the unit on a ceiling, be sure to use a safety wire, etc., to prevent the unit from falling. Entrust the
installation to an experienced contractor or installer.
For dealers
When the projector is mounted on the ceiling, a Sony bracket or recommended equivalent must be used for
installation.
Be sure to secure the cabinet cover firmly when installing to the ceiling firmly.
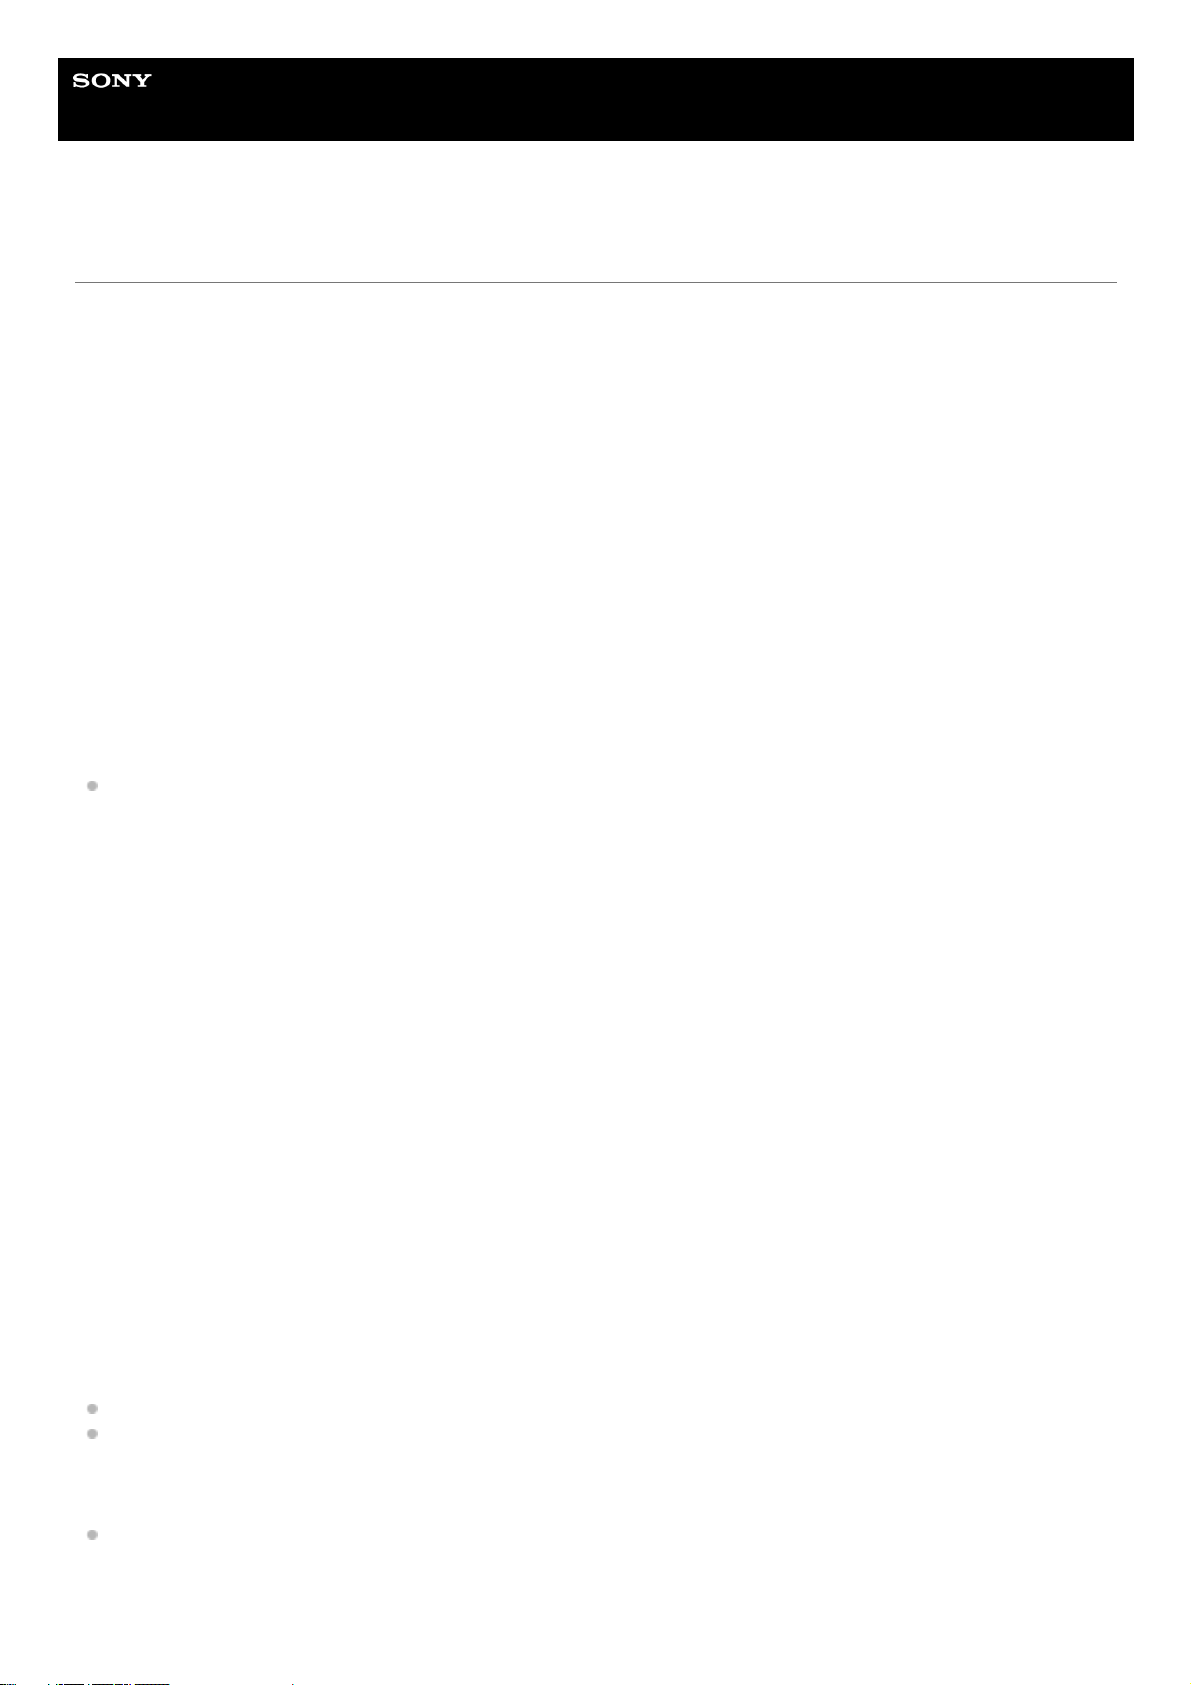
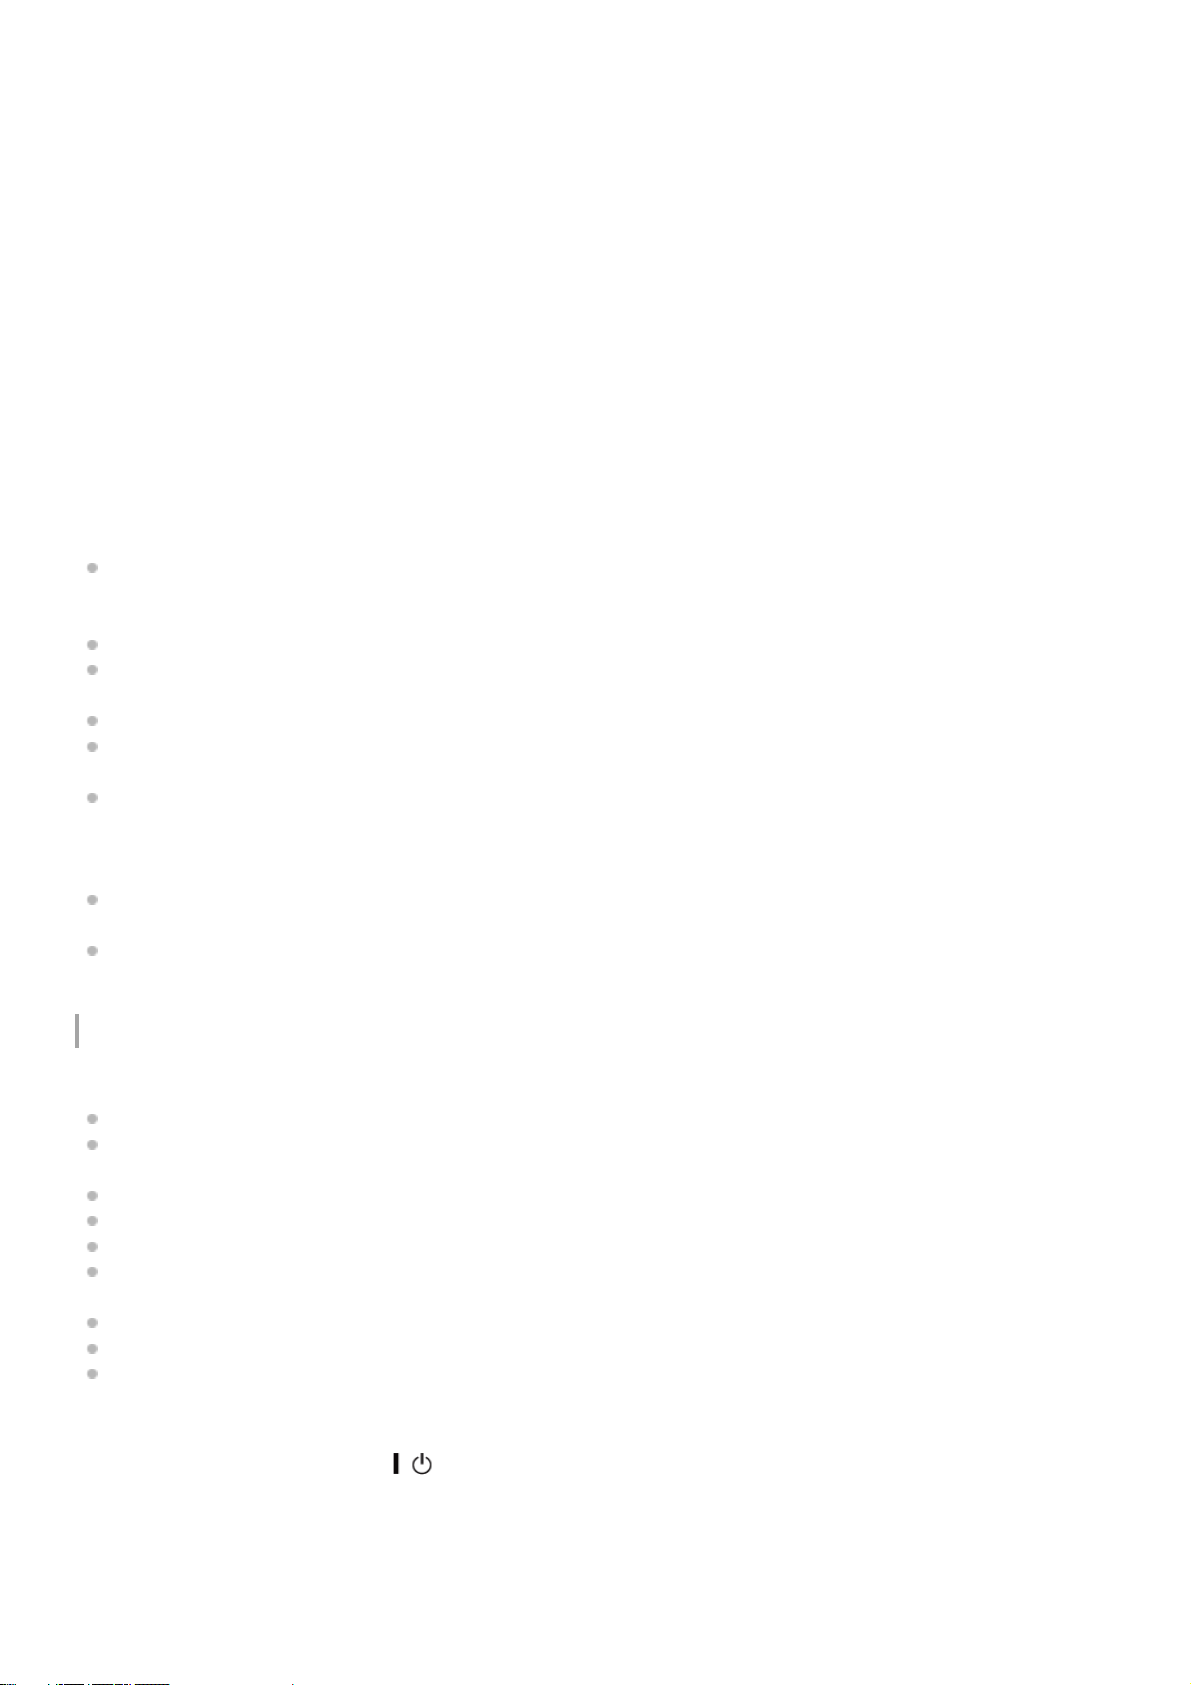
Hazard Distance and Area
Top view
9
A: Hazard Distance
B: Hazard Area
C: Hazard Distance
D: Hazard Area
E: ≥ 3.0 METERS
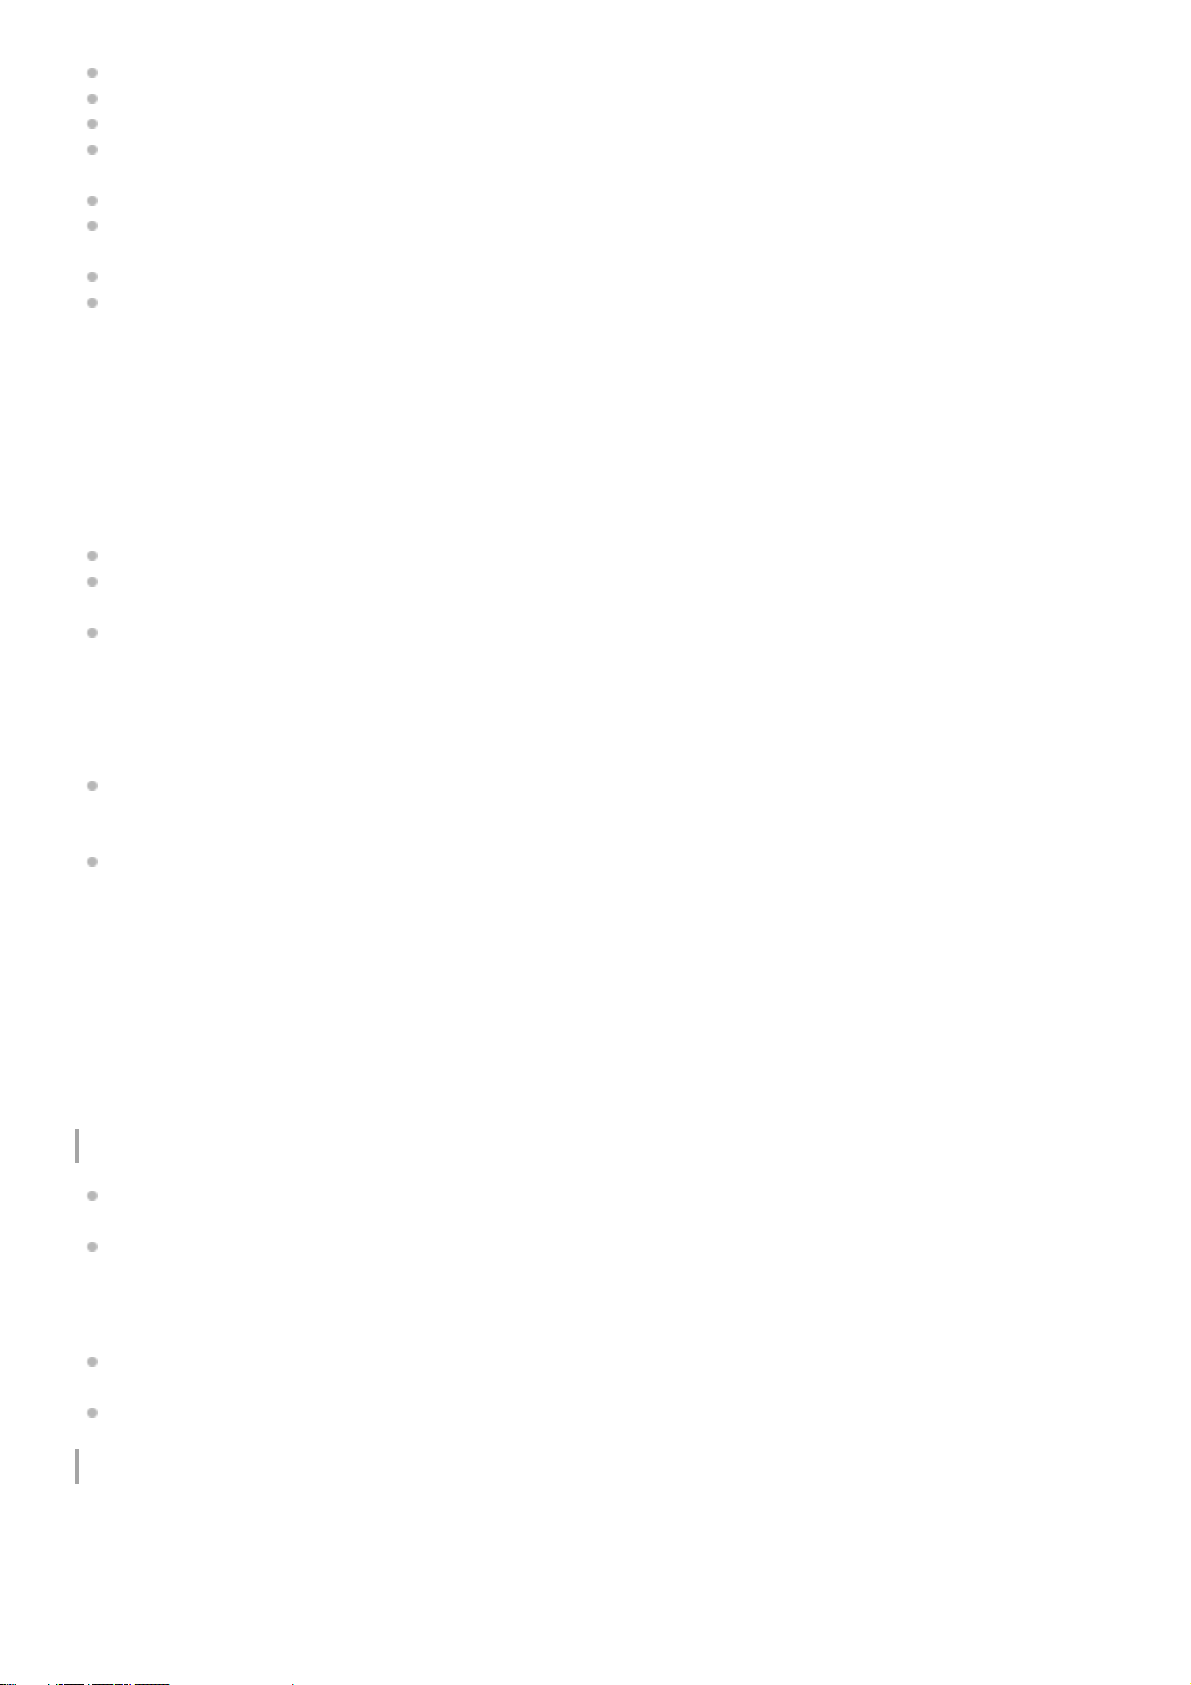
Hazard Distance values of each interchangeable lens for the VPL-GTZ380 projector
US Region
The lens type is marked on the front or side of the lens.
Lens
Throw Ratio
*1
Hazard Distance RG
VPLL-Z8008 0.8-1.02 Not available RG2
VPLL-Z8014 1.4 1.7 (66 15/16") RG3
VPLL-Z8014 1.4-1.6 1.8 (70 7/8") RG3
VPLL-Z8014 1.6-1.8 1.9 (74 13/16") RG3
VPLL-Z8014 1.8-2.2 2.0 (78 3/4") RG3
VPLL-Z8014 2.2-2.73 2.1 (82 11/16") RG3
Value dividing screen size (H) by projection distance
The throw ratio is determined depending on the projector with which each lens is used.
*1
10
Light source specifications
5.2 W laser diodes × 96 (Wavelength: 449 - 461 nm)
4.2 W laser diodes × 24 (Wavelength: 459 - 471 nm)
1.8 W laser diodes × 48 (Wavelength: 635 - 647 nm)
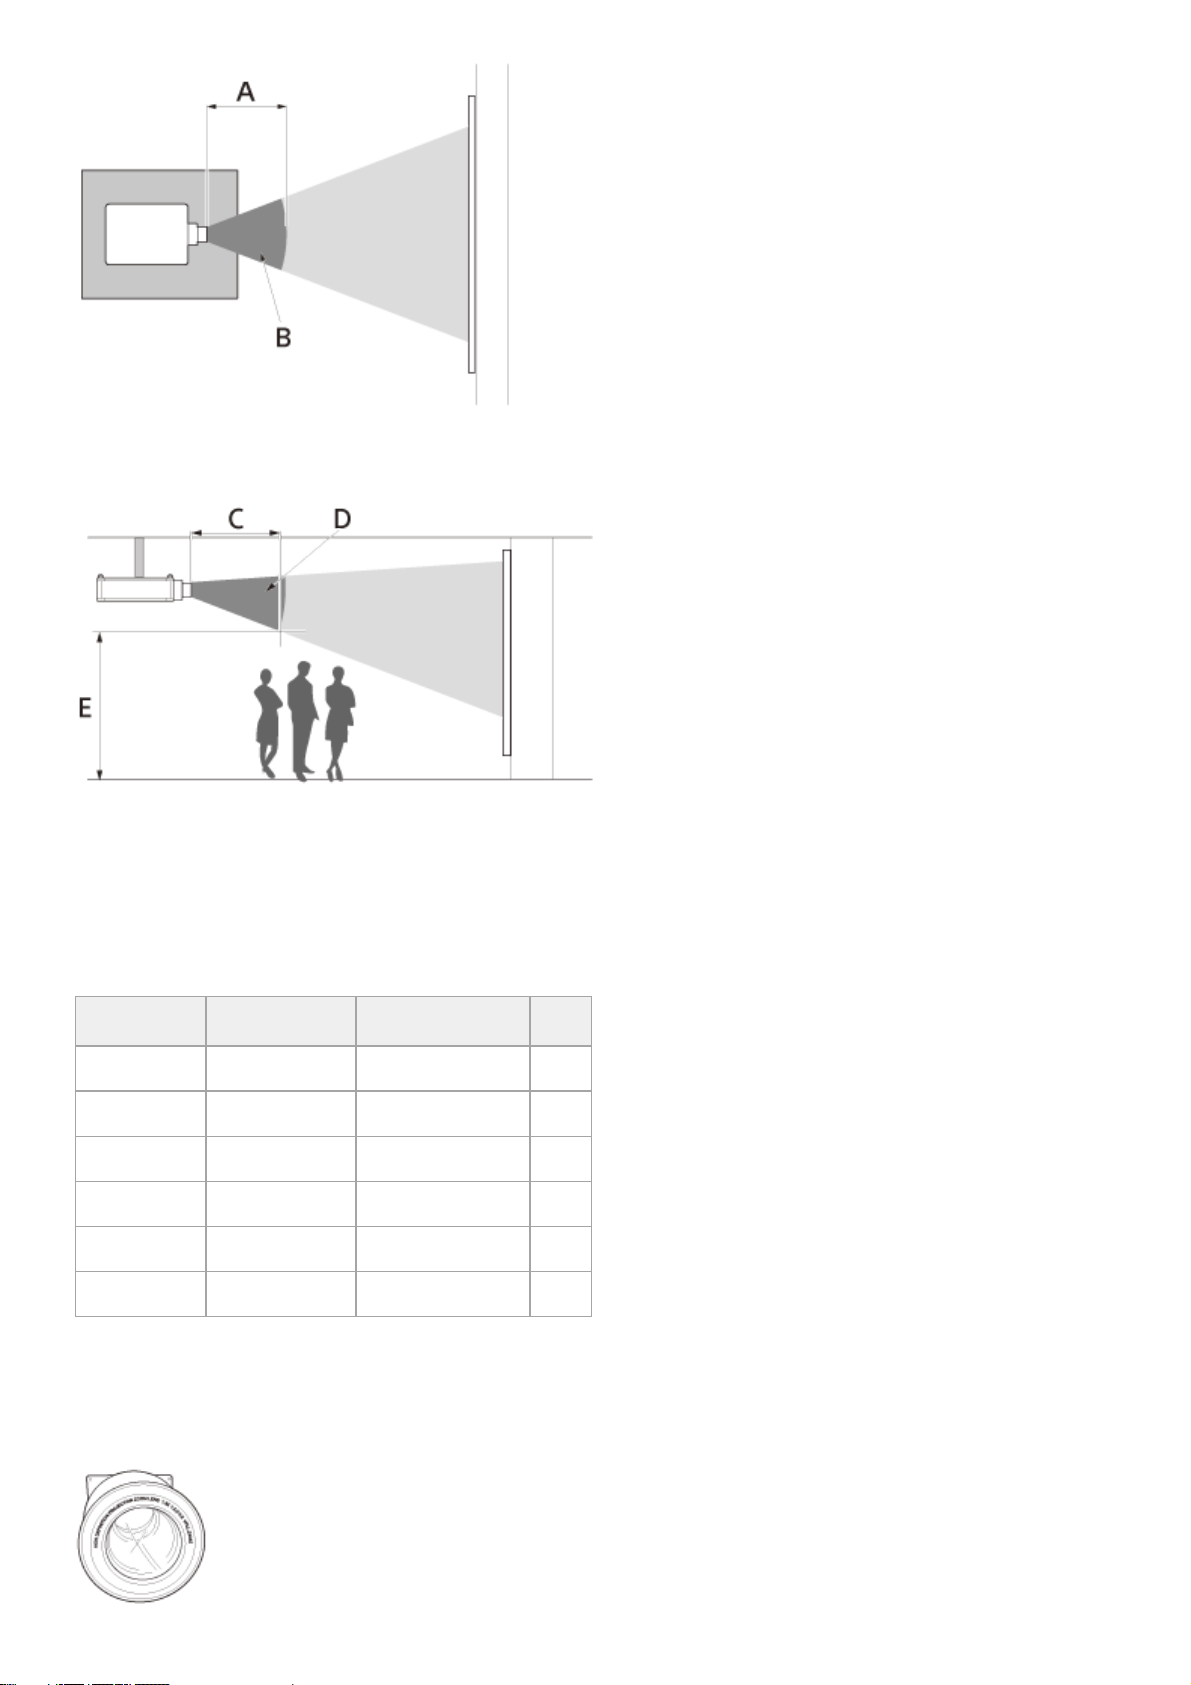
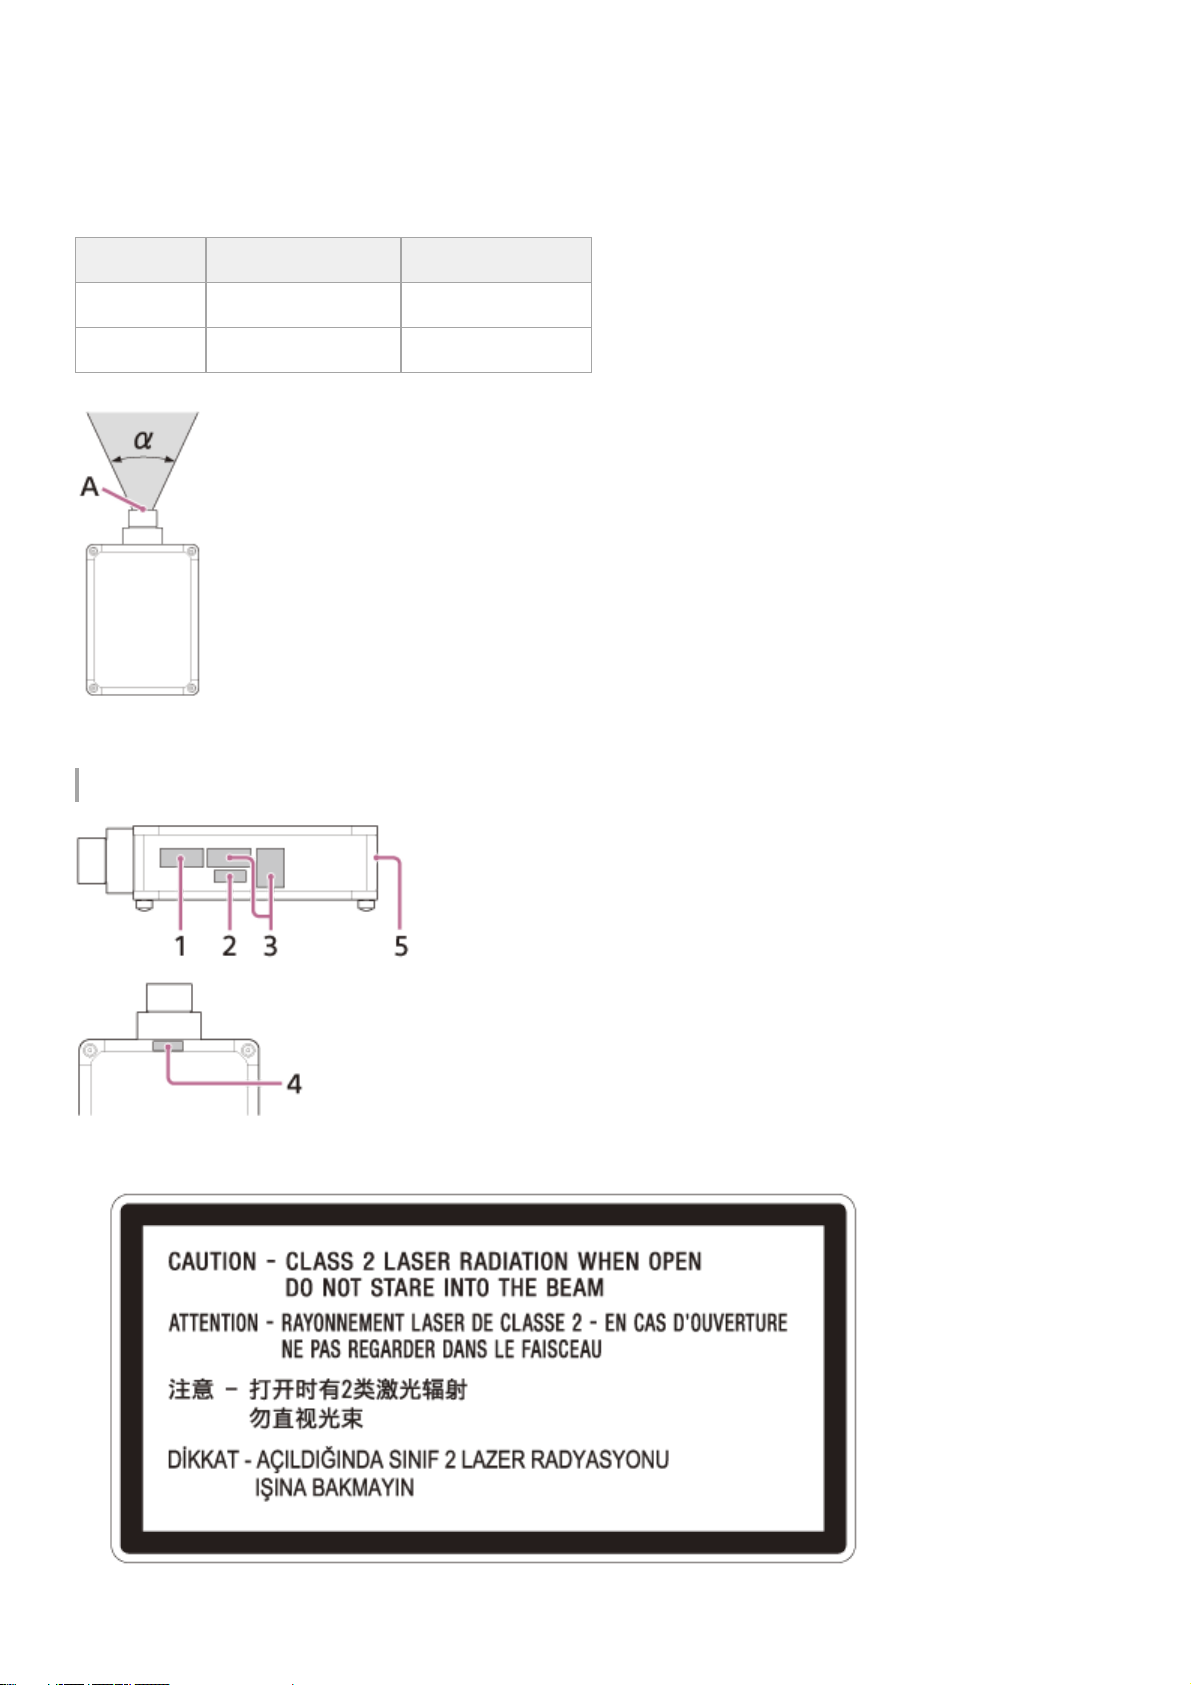
Beam divergence angle from lens of this unit
A: Laser emission port
Location information of the labels
Lens Zoom maximum: α Zoom minimum: α
VPLL-Z8008 64° 52°
VPLL-Z8014 39° 21°
Non Interlocked Protective Housing
*
1.
Class 1 alternate identification*
2.
11
Combined Optical Hazard Warning symbol, Not for Household Use symbol, RG 3 warnings*
3.
Skin Hazard Warning* (IEC 60825-1 section 7.13) & Non Interlocked Protective Housing*
4.
Combined Manufacturers Identification and Certification 5.
12

Related Topic
Projecting Images
5-023-481-12(1) Copyright 2020 Sony Corporation
Black borders and text on yellow background
*
13
Help Guide
Data Projector
VPL-GTZ380
Checking the Supplied Accessories
Check that the following components are included. The () indicates the quantity of the component.
Remote control RM-PJ29 (1)
Size AA (R6) manganese batteries (2)
AC power cord (1)
Plug holder (1)
Safety Regulations (1)
5-023-481-12(1) Copyright 2020 Sony Corporation
14
Help Guide
Data Projector
VPL-GTZ380
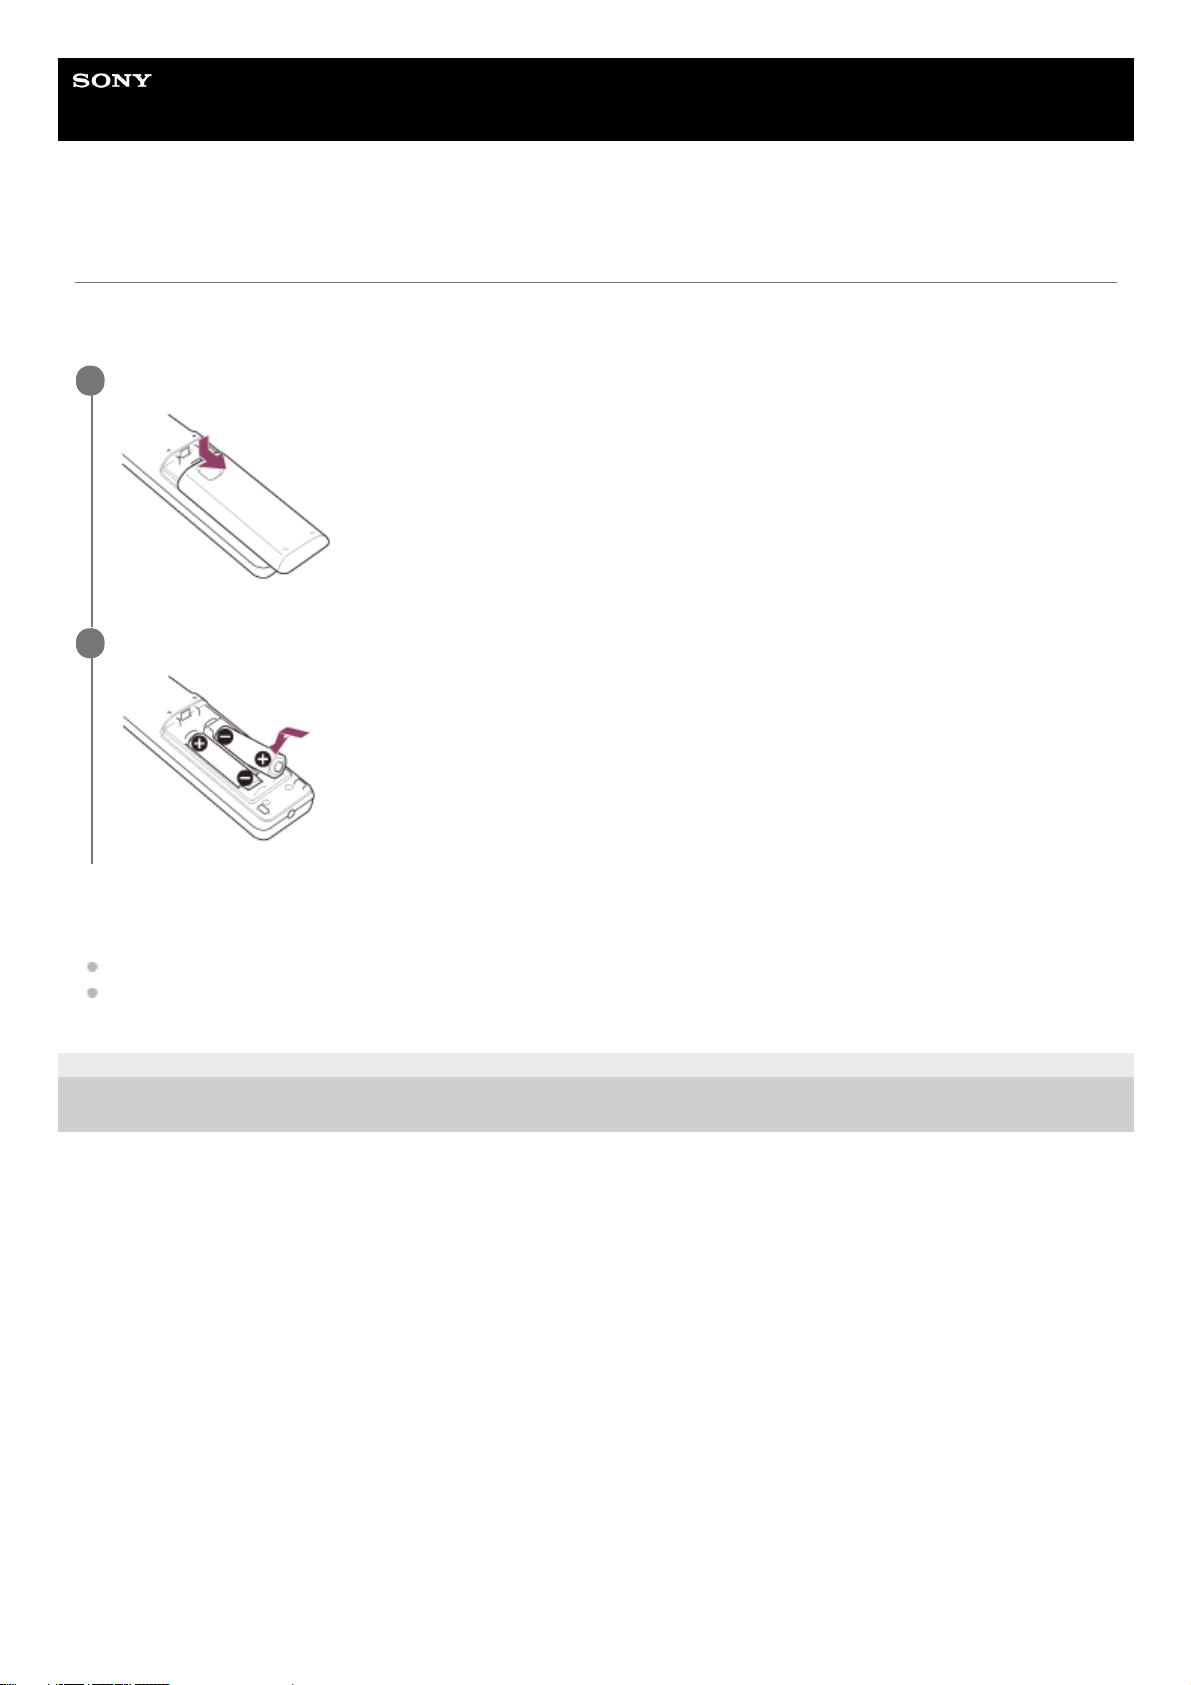
Inserting the Batteries into the Remote Control
Insert two size-AA (R6) batteries (supplied) into the remote control as follows.
If you cannot operate the unit with the remote control, replace both batteries with new ones.
Caution when handling the remote control
Handle the remote control with care. Do not drop it, and/or do not step on or spill liquids on it.
Do not place the remote control in a location near a heat source, a place subject to direct sunlight, or a damp room.
5-023-481-12(1) Copyright 2020 Sony Corporation
Slide the lid on the back of the remote control while pressing it down.
1
Insert the batteries from the negative side.
2
15
Help Guide
Data Projector
VPL-GTZ380
Connecting the AC Power Cord
5-023-481-12(1) Copyright 2020 Sony Corporation
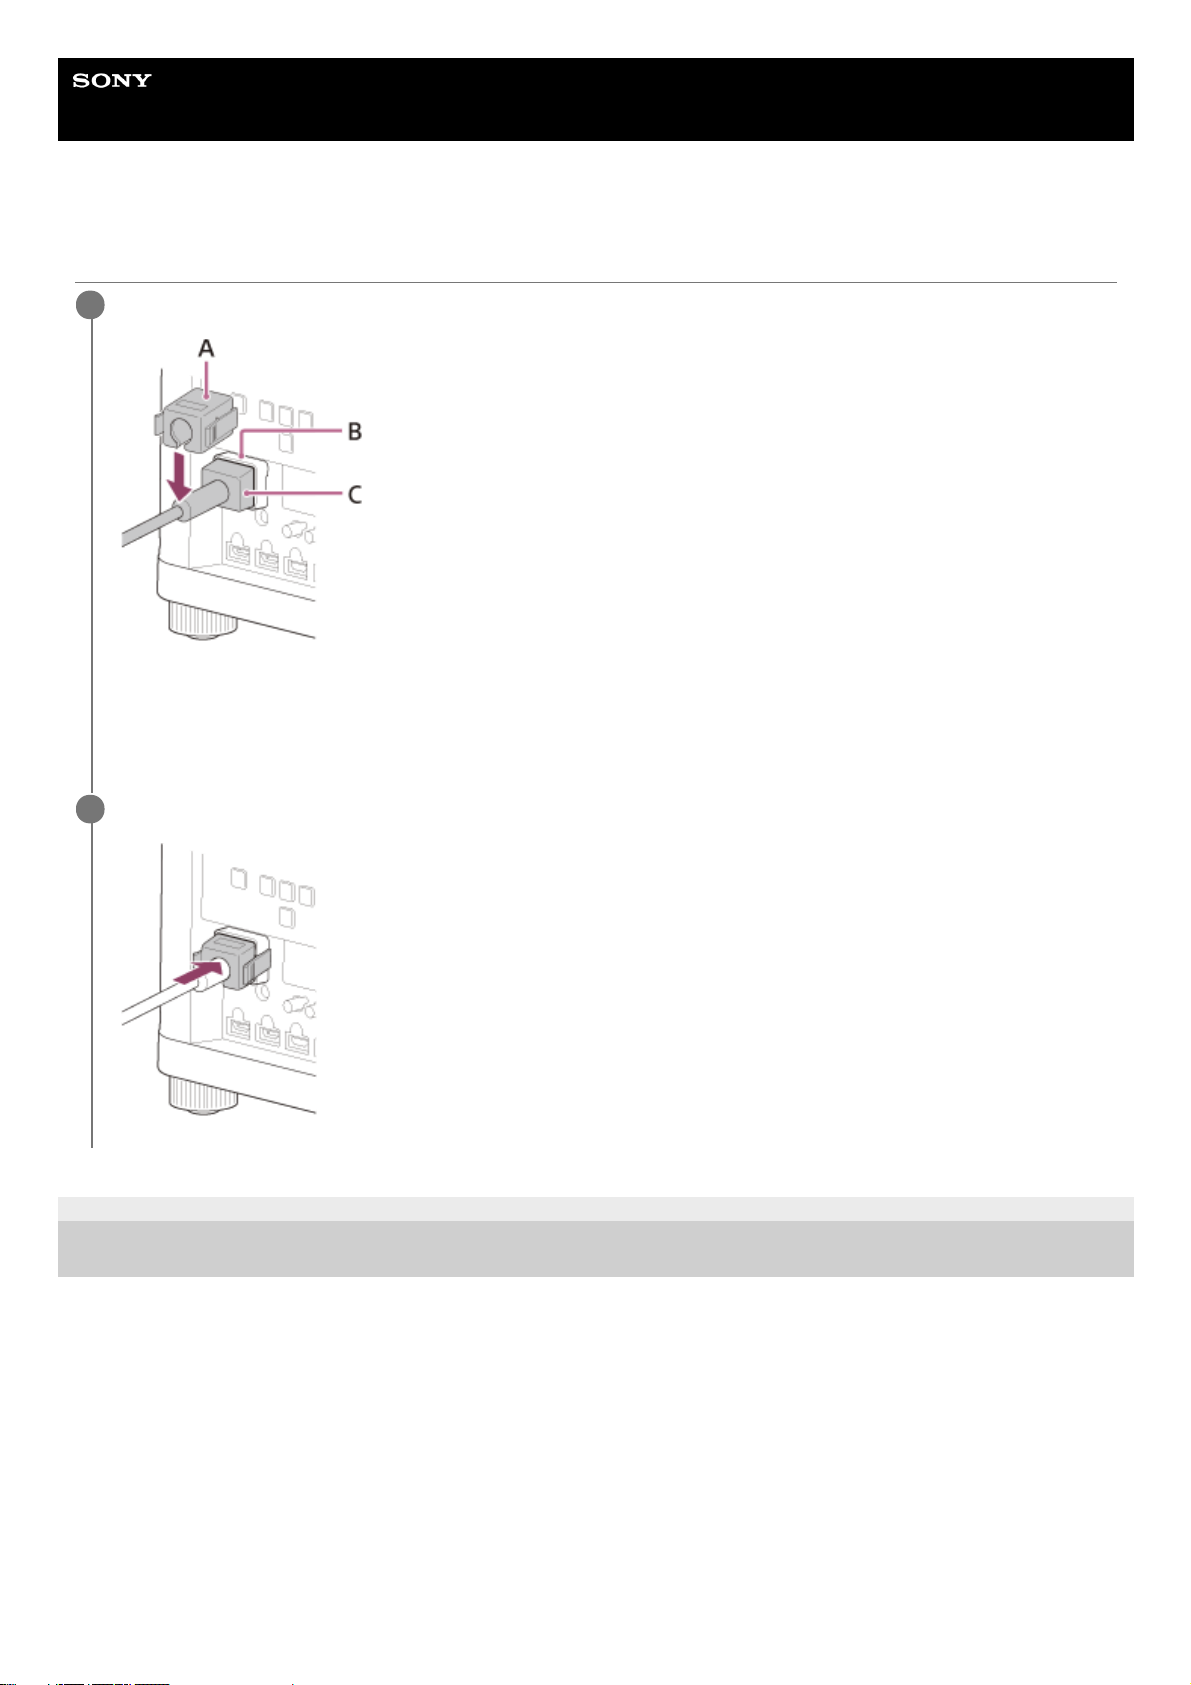
Plug the AC power cord (C) into the AC IN socket (B), then attach the plug holder (A) to the AC power cord.
A: Plug holder (supplied)
B: AC IN socket
C: AC power cord (supplied)
1
Slide the plug holder over the AC power cord to fix to the unit.
2
16
Help Guide
Data Projector
VPL-GTZ380
Parts and Controls (Main Unit)
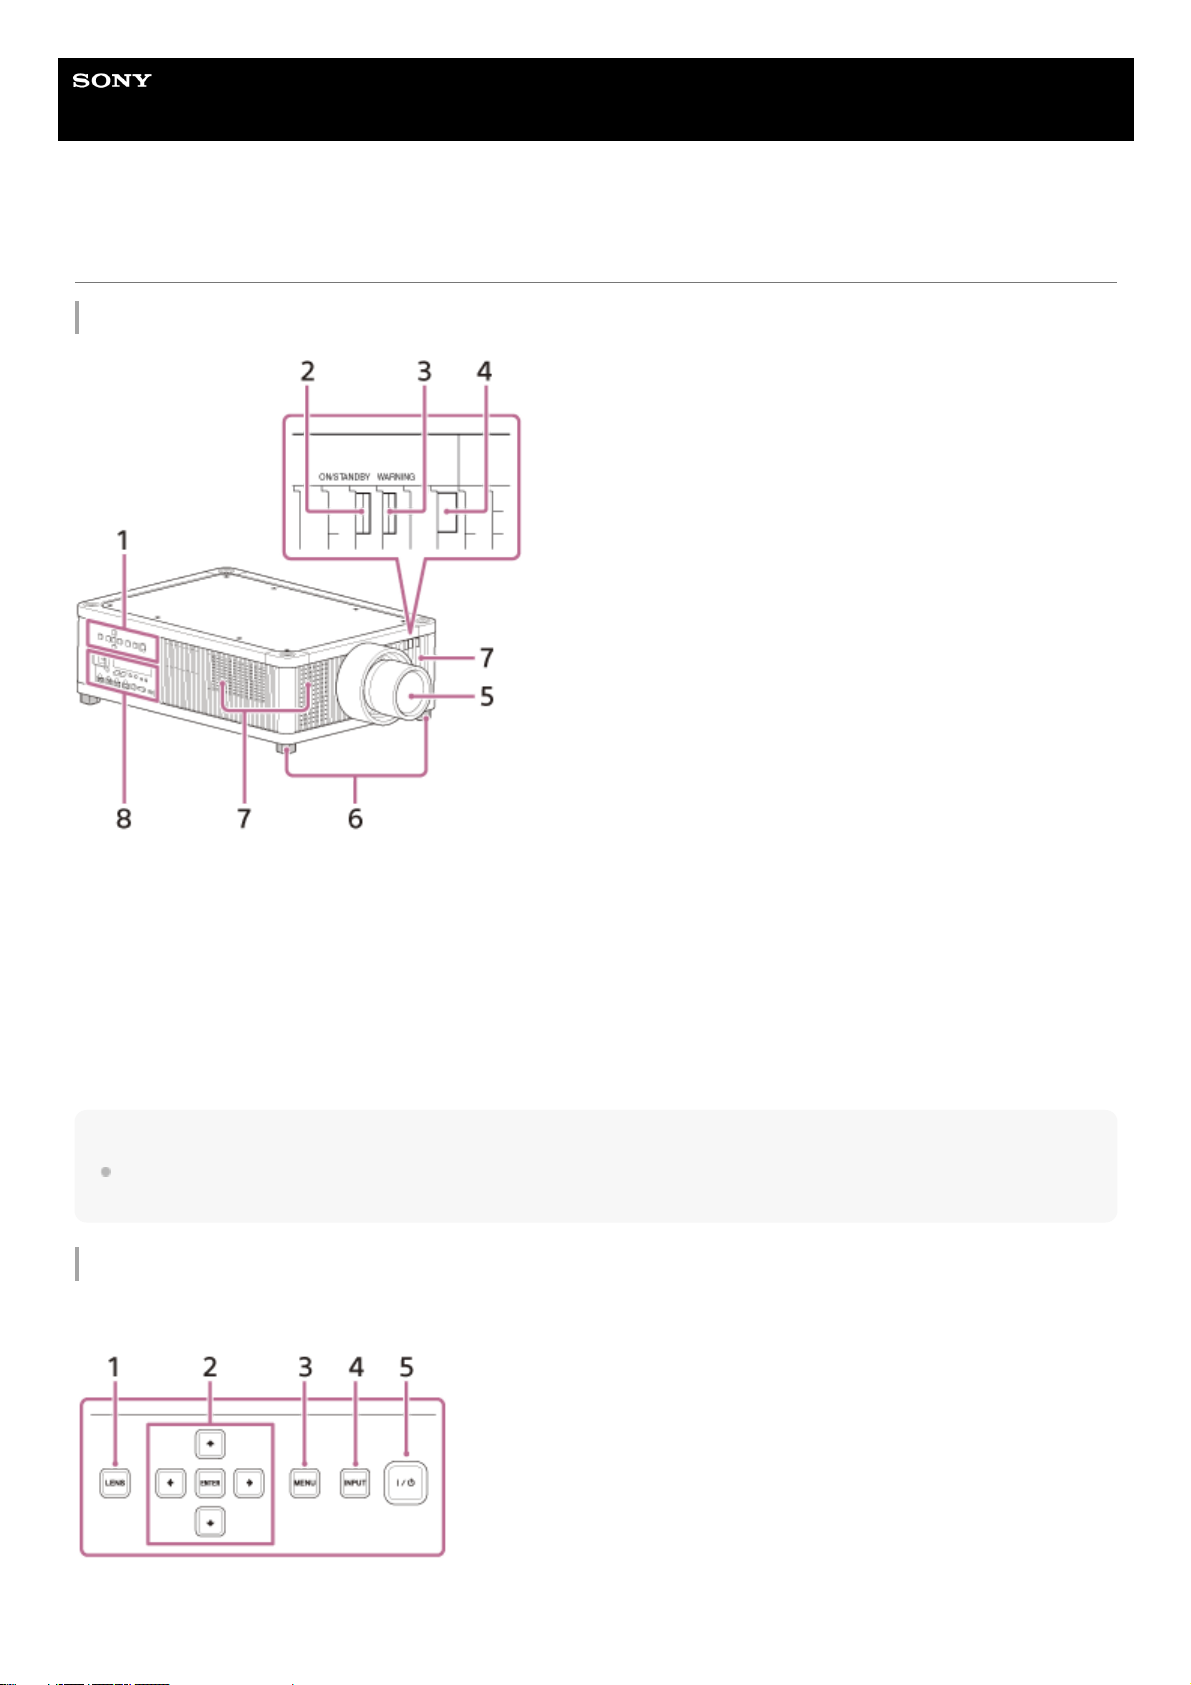
Front/Right Side
Note
If you look through the projection lens while the unit is projecting, the light may damage your eyes. Take special caution when
using the unit around children.
Control panel and terminals
Control panel
Control panel1.
ON/STANDBY indicator2.
WARNING indicator3.
Remote control detector4.
Projection lens (not supplied)5.
Feet (adjustable)6.
Ventilation holes (intake)7.
Terminals8.
LENS button1.
17
Hint
The buttons on the control panel of the main unit function in the same way as those on the remote control.
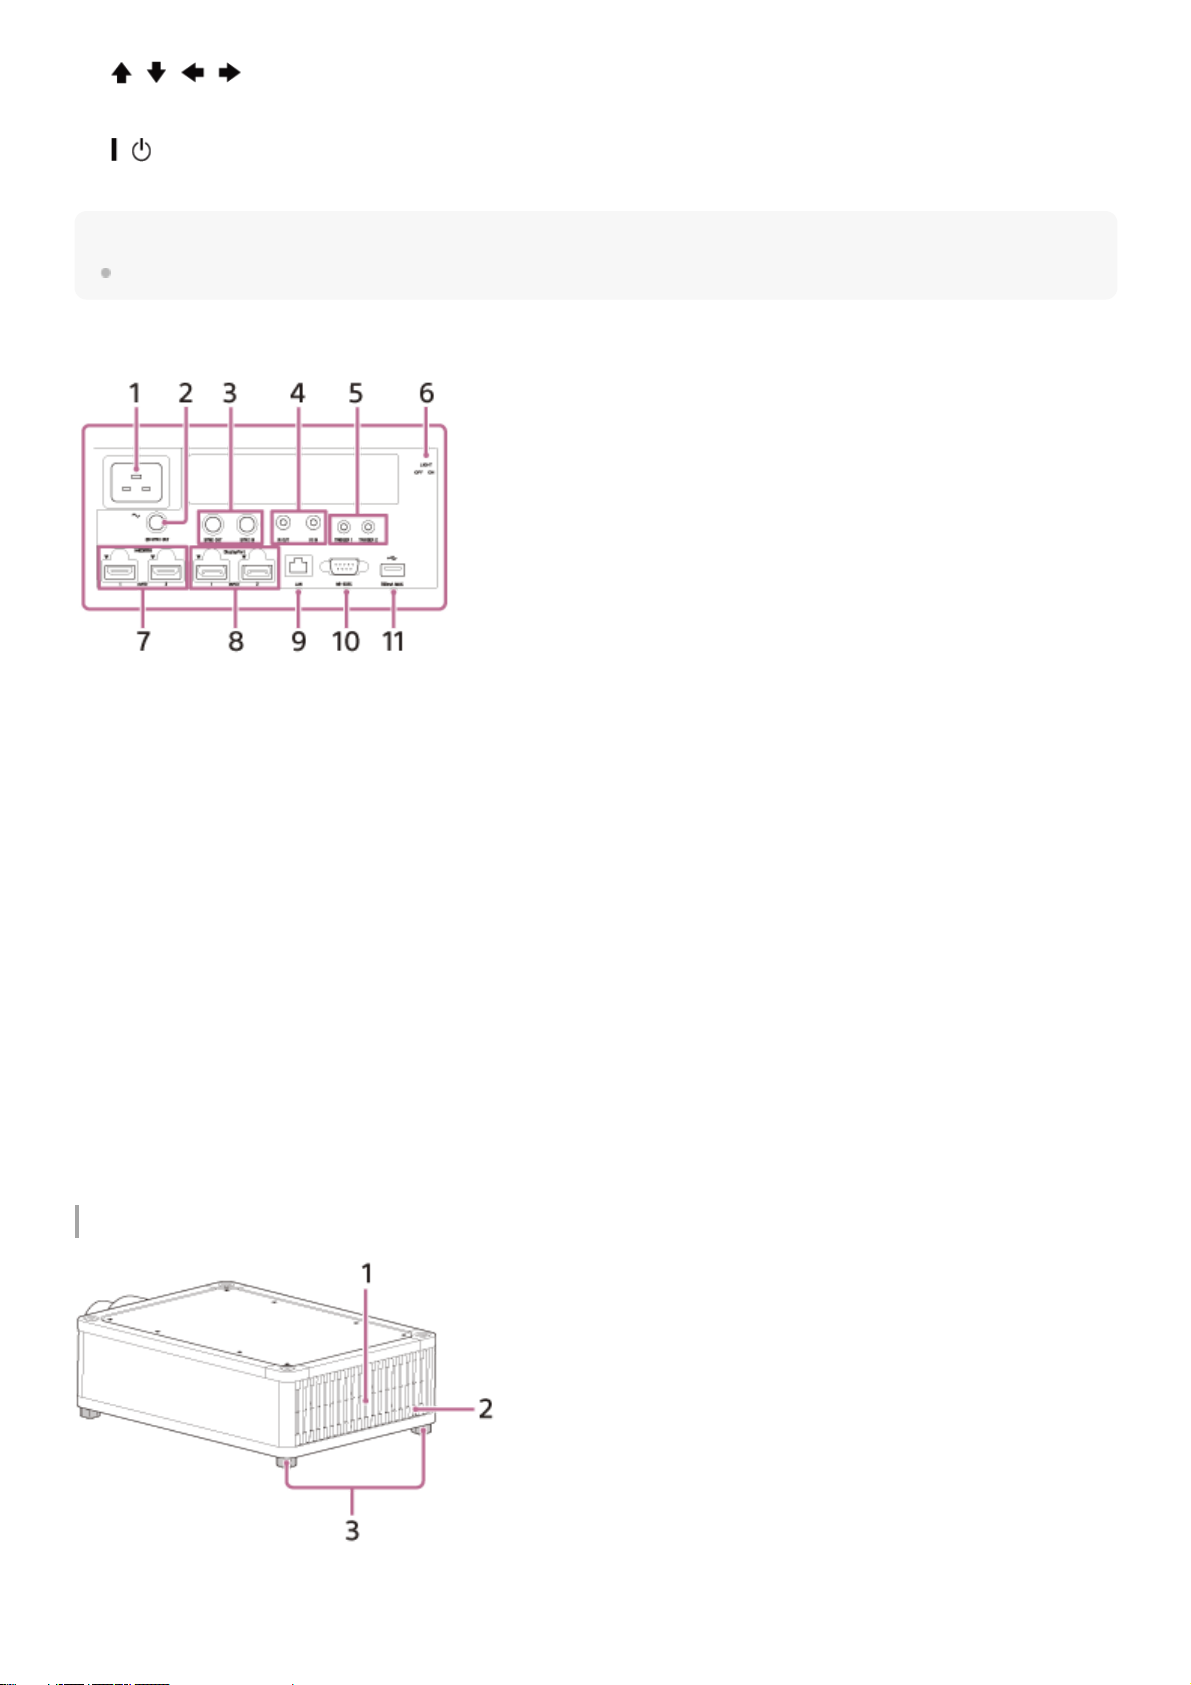
Terminals
Rear/Bottom
/ / / (Up/Down/Left/Right)/ENTER (Enter) button2.
MENU button3.
INPUT button4.
/ (On/Standby) button5.
AC IN socket1.
3D SYNC OUT terminal
Connects a 3D sync transmitter (not supplied).
2.
SYNC IN/SYNC OUT terminal
Not available for this unit.
3.
IR IN/IR OUT terminal
IR IN: Inputs signals to control the projector. When connecting to the terminal, the remote control detector does not
work with the remote control.
IR OUT: Outputs the control signals received at the projector to the connected devices. When operating the projector
with the remote control, the connected devices can also be operated simultaneously.
4.
TRIGGER 1/TRIGGER 2 terminal5.
Terminal light switch
Turns on/off the terminal light.
6.
HDMI 1/HDMI 2 terminal7.
DisplayPort 1/DisplayPort 2 terminal8.
LAN terminal9.
REMOTE terminal
Connects to a control system such as a computer for remote control.
10.
USB terminal
Terminal for software update.
11.
Ventilation holes (exhaust)1.
Remote control detector2.
18

Related Topic
Parts and Controls (Remote Control)
Reading the Indicator
5-023-481-12(1) Copyright 2020 Sony Corporation
Feet (adjustable)3.
19
Help Guide
Data Projector
VPL-GTZ380
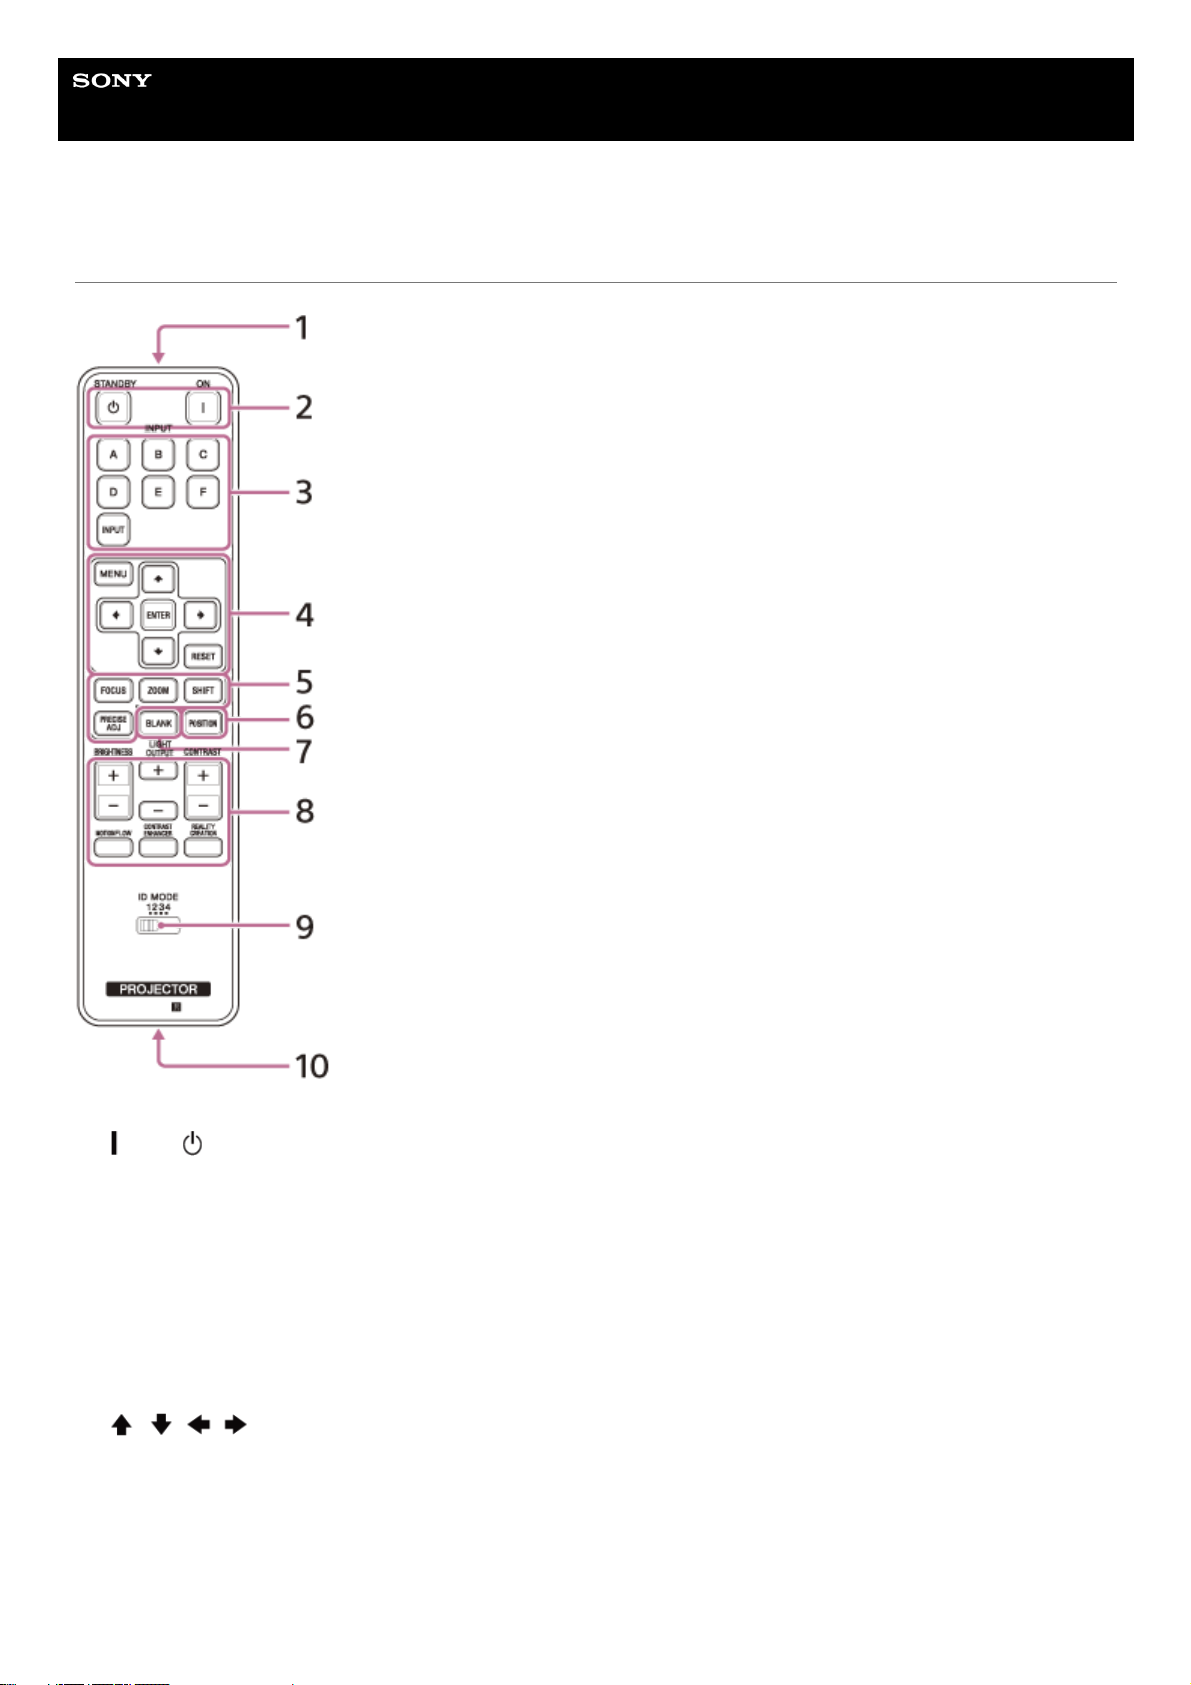
Parts and Controls (Remote Control)
Infrared transmitter1.
(On)/ (Standby) button
Turns on the power and goes to standby.
2.
INPUT (Input selection) buttons
Changes the input terminal.
A: HDMI 1
B: HDMI 2
C: DisplayPort 1
D: DisplayPort 2
E: DisplayPort 1/2
F: Not available for this unit.
INPUT: Every time you press the button, the input terminal changes in order from A to E.
3.
/ / / (Up/Down/Left/Right)/ENTER (Enter) button
MENU button
RESET button
Used for menu operations, etc.
4.
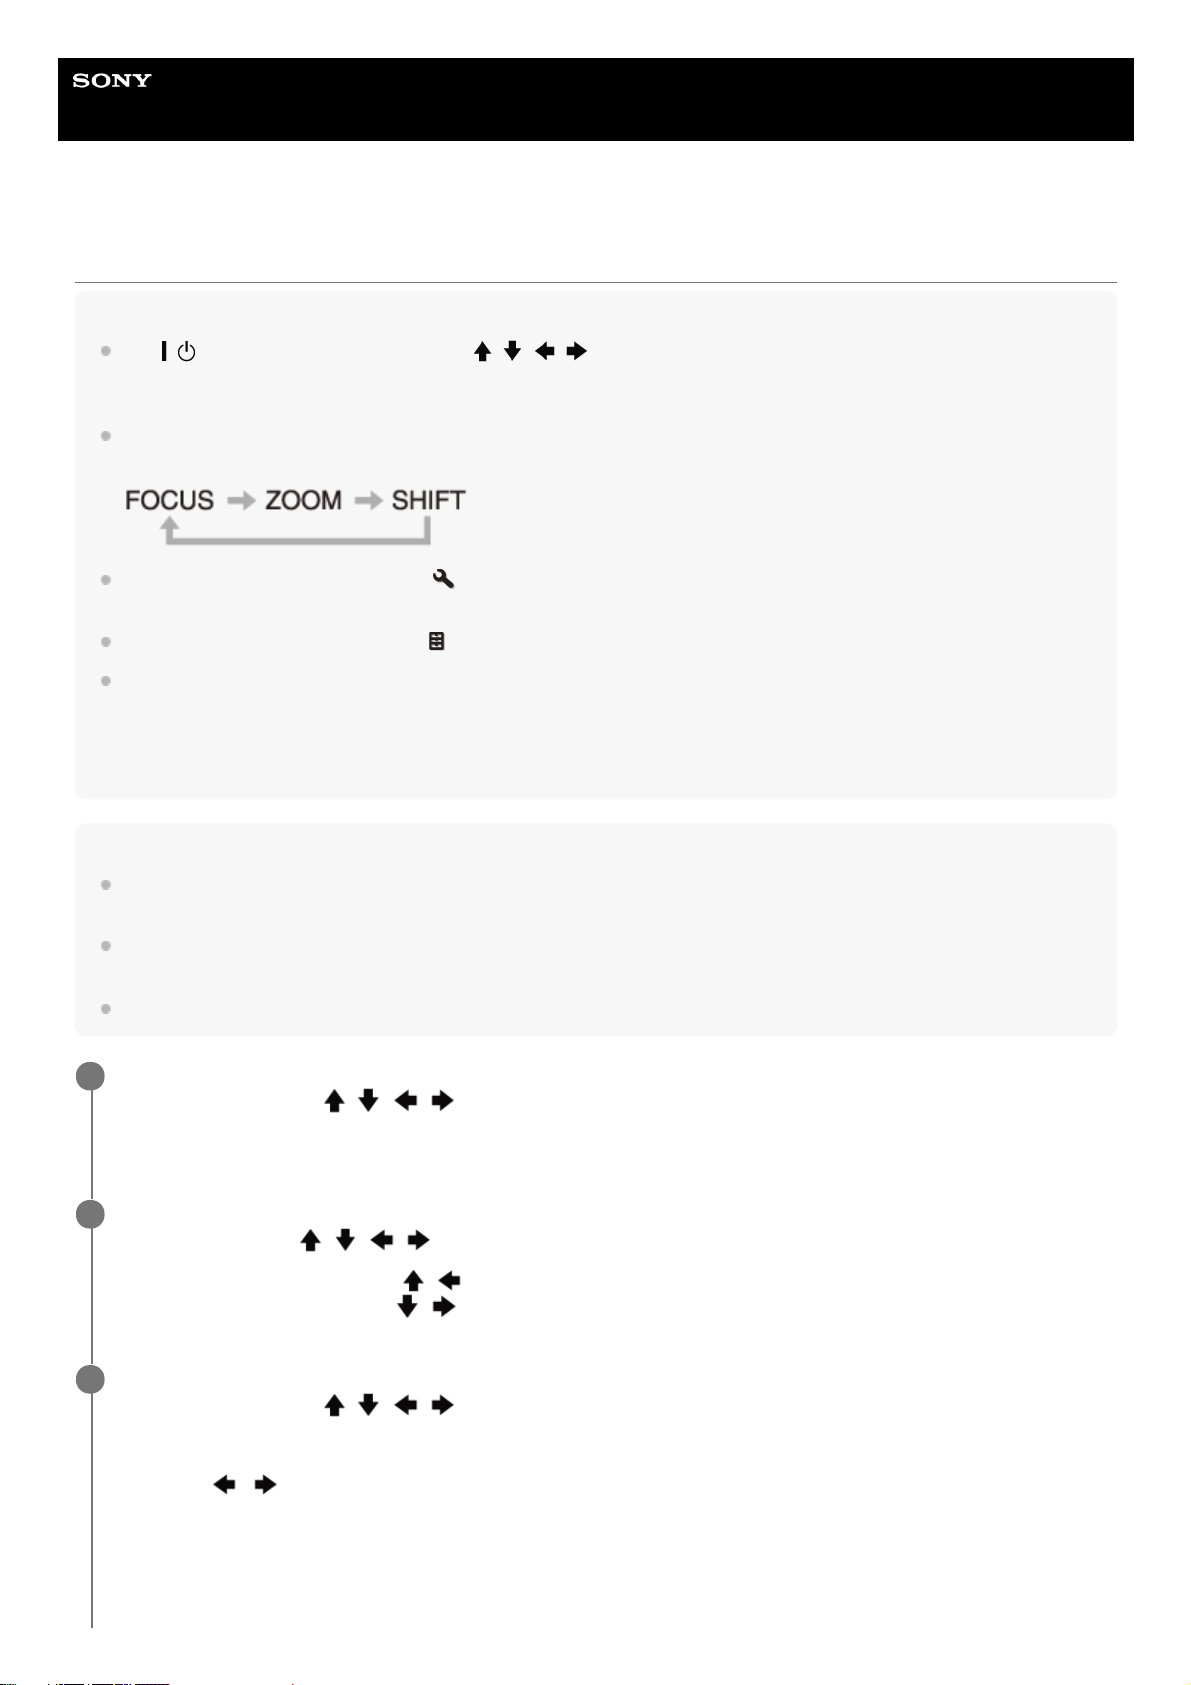
FOCUS/ZOOM/SHIFT button
Adjusts the lens focus, lens zoom, or lens shift.
The PRECISE ADJ button is not available for this unit.
5.
20
Related Topic
Projecting Images
Adjusting the Position of the Projected Image
Using the Picture Position
Navigating Menus
5-023-481-12(1) Copyright 2020 Sony Corporation
POSITION button
Stores and recalls lens settings.
6.
BLANK button
Temporarily turns off an image. Press again to release.
7.
BRIGHTNESS button
Adjusts the brightness of images.
LIGHT OUTPUT button
Adjusts the laser output from the light source.
CONTRAST button
Adjusts the contrast of images.
MOTIONFLOW button
Smoothly reproduces fast-moving images.
CONTRAST ENHANCER button
Automatically corrects images to optimize the contrast according to a scene.
REALITY CREATION button
Adjusts the definition of images and reduces the noise of images.
8.
ID MODE switch
Sets the ID mode of the remote control. If a different ID mode is assigned to each projector when multiple projectors
are used, you can operate only the projector with the same ID mode as that of the remote control.
9.
IR output terminal
Used as a wired remote control by connecting to the IR IN terminal on the unit with a cable (stereo mini plug (not
supplied)). You do not need to install batteries in the remote control.
10.
21
Help Guide
Data Projector
VPL-GTZ380
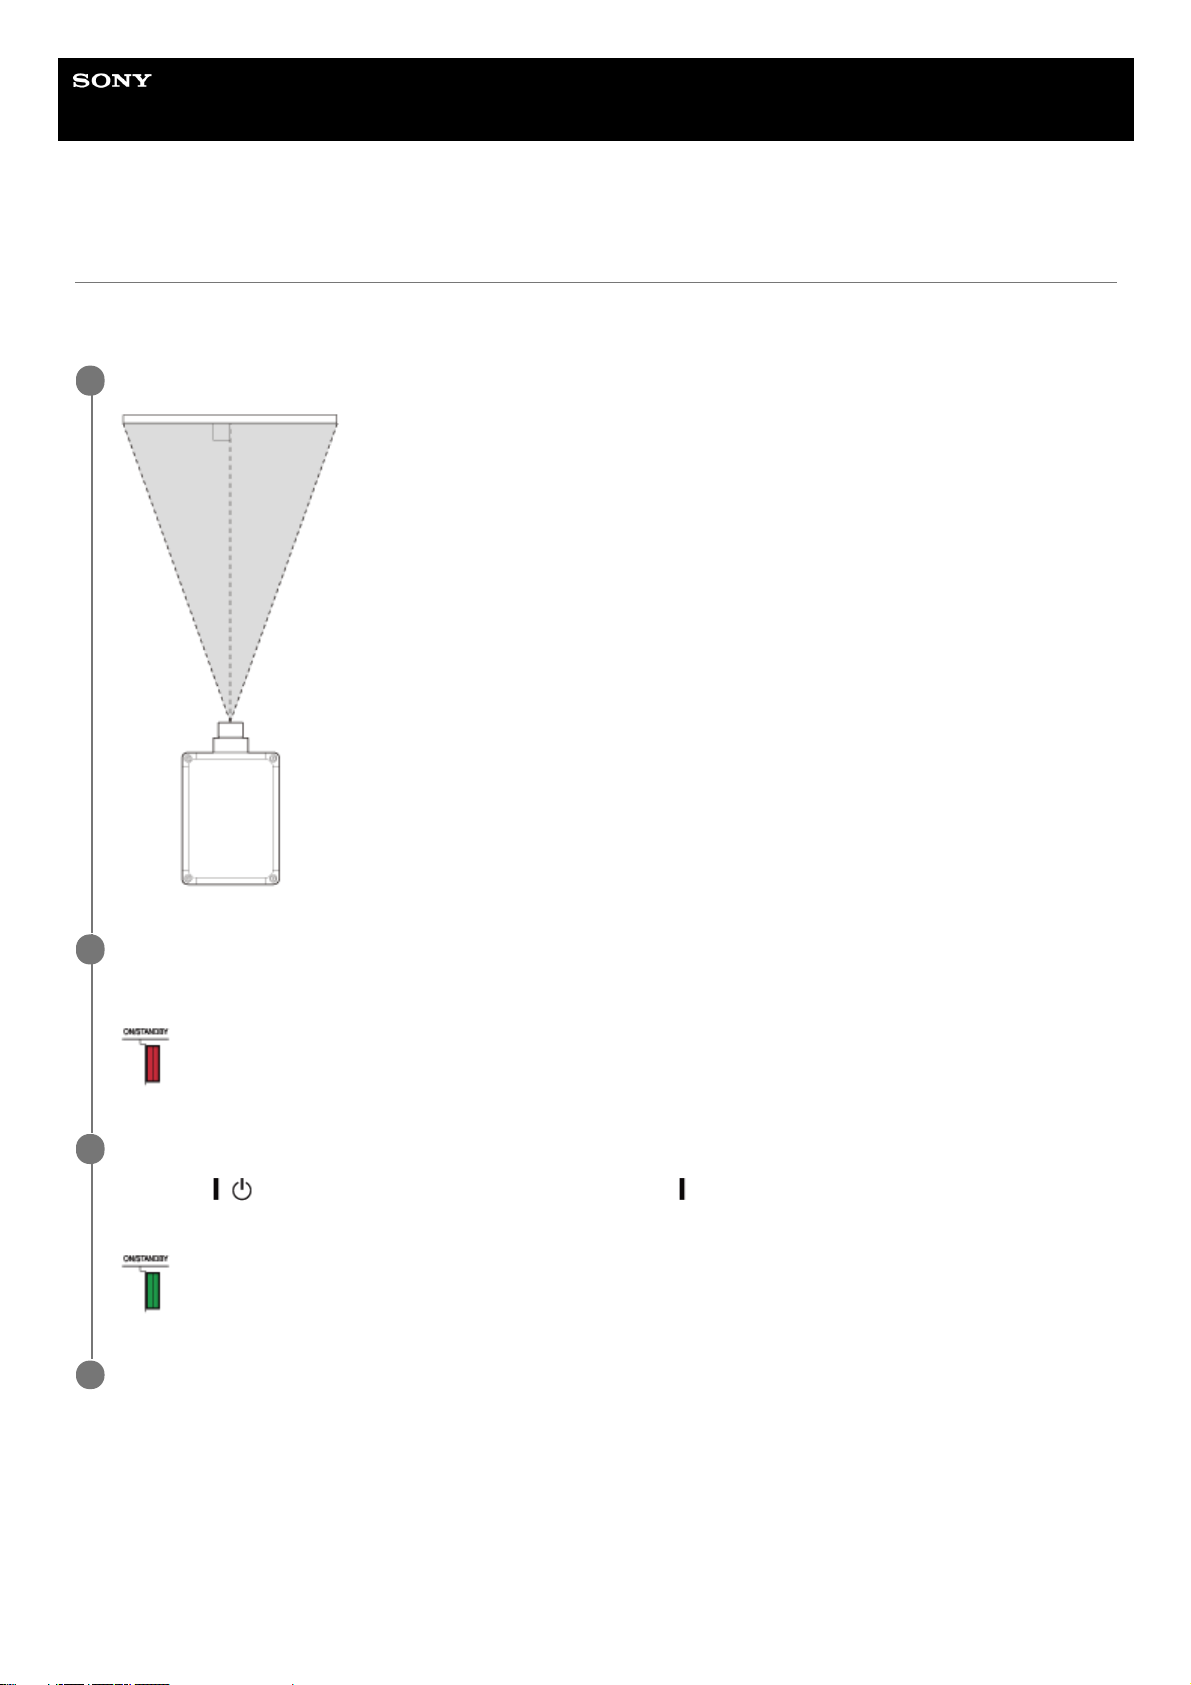
Installing the Projector
The installation distance between the projector and a screen varies depending on the screen size (projection size) and
whether or not you use the lens shift feature. Install the projector according to the screen size.
To adjust the projector placed on an uneven surface
If the projector is placed on an uneven surface, adjust the tilt angle by rotating the feet (adjustable).
Place the projector so that the lens is parallel to the screen.
1
Connect the AC power cord to the projector before plugging into a wall outlet.
The ON/STANDBY indicator lights in red and the projector goes into standby.
2
Turn on the projector.
Press the
/ (On/Standby) button on the control panel or the (On) button on the remote control.
The ON/STANDBY indicator flashes in green, then it lights in green.
3
Project an image on the screen to adjust the image position so that it fits the screen.
4
22
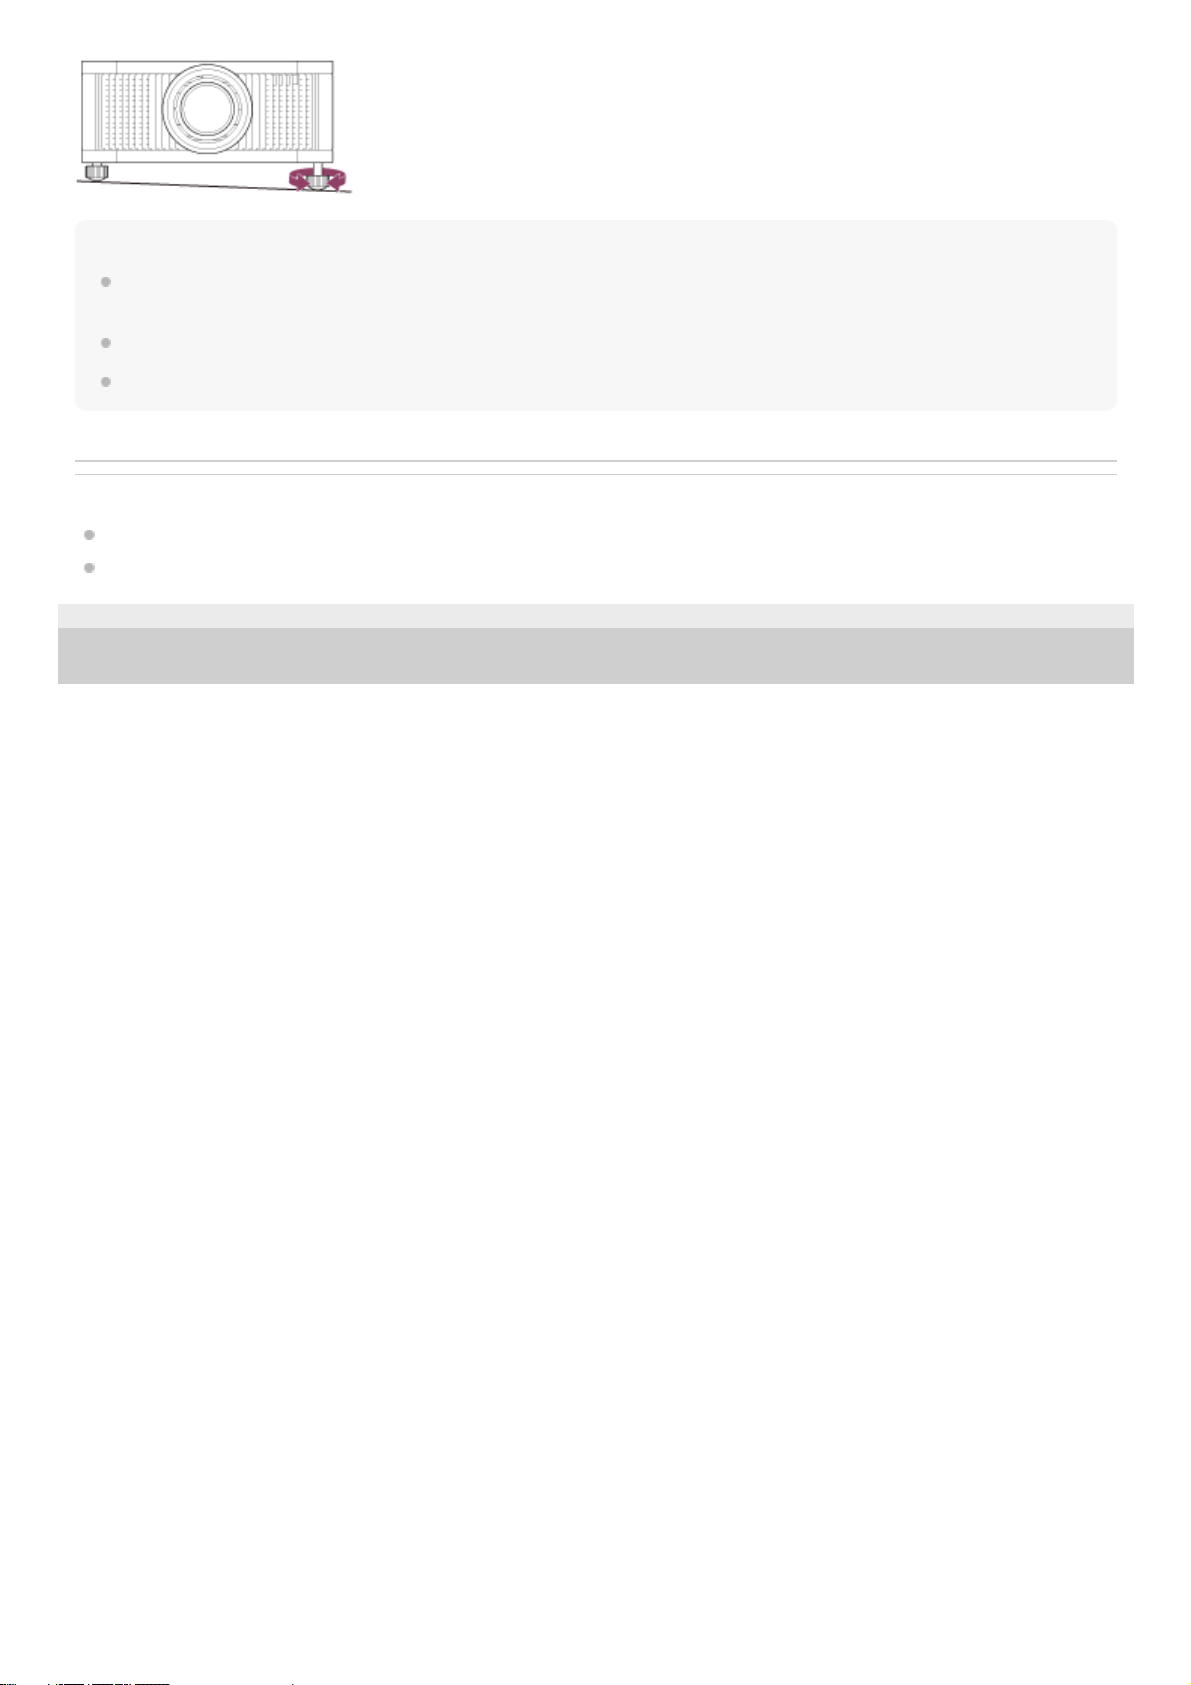
Note
If using a screen with an uneven surface, stripe patterns may rarely appear on the screen depending on the distance between the
projector and screen and/or the zoom magnification. This does not indicate a malfunction.
Note that if the unit is tilted up or down, the projected image will be distorted in a trapezoidal shape.
Be careful not to pinch your fingers when rotating the feet (adjustable).
Related Topic
Projection Distance and Lens Shift Range
Adjusting the Position of the Projected Image
5-023-481-12(1) Copyright 2020 Sony Corporation
23
Help Guide
Data Projector
VPL-GTZ380
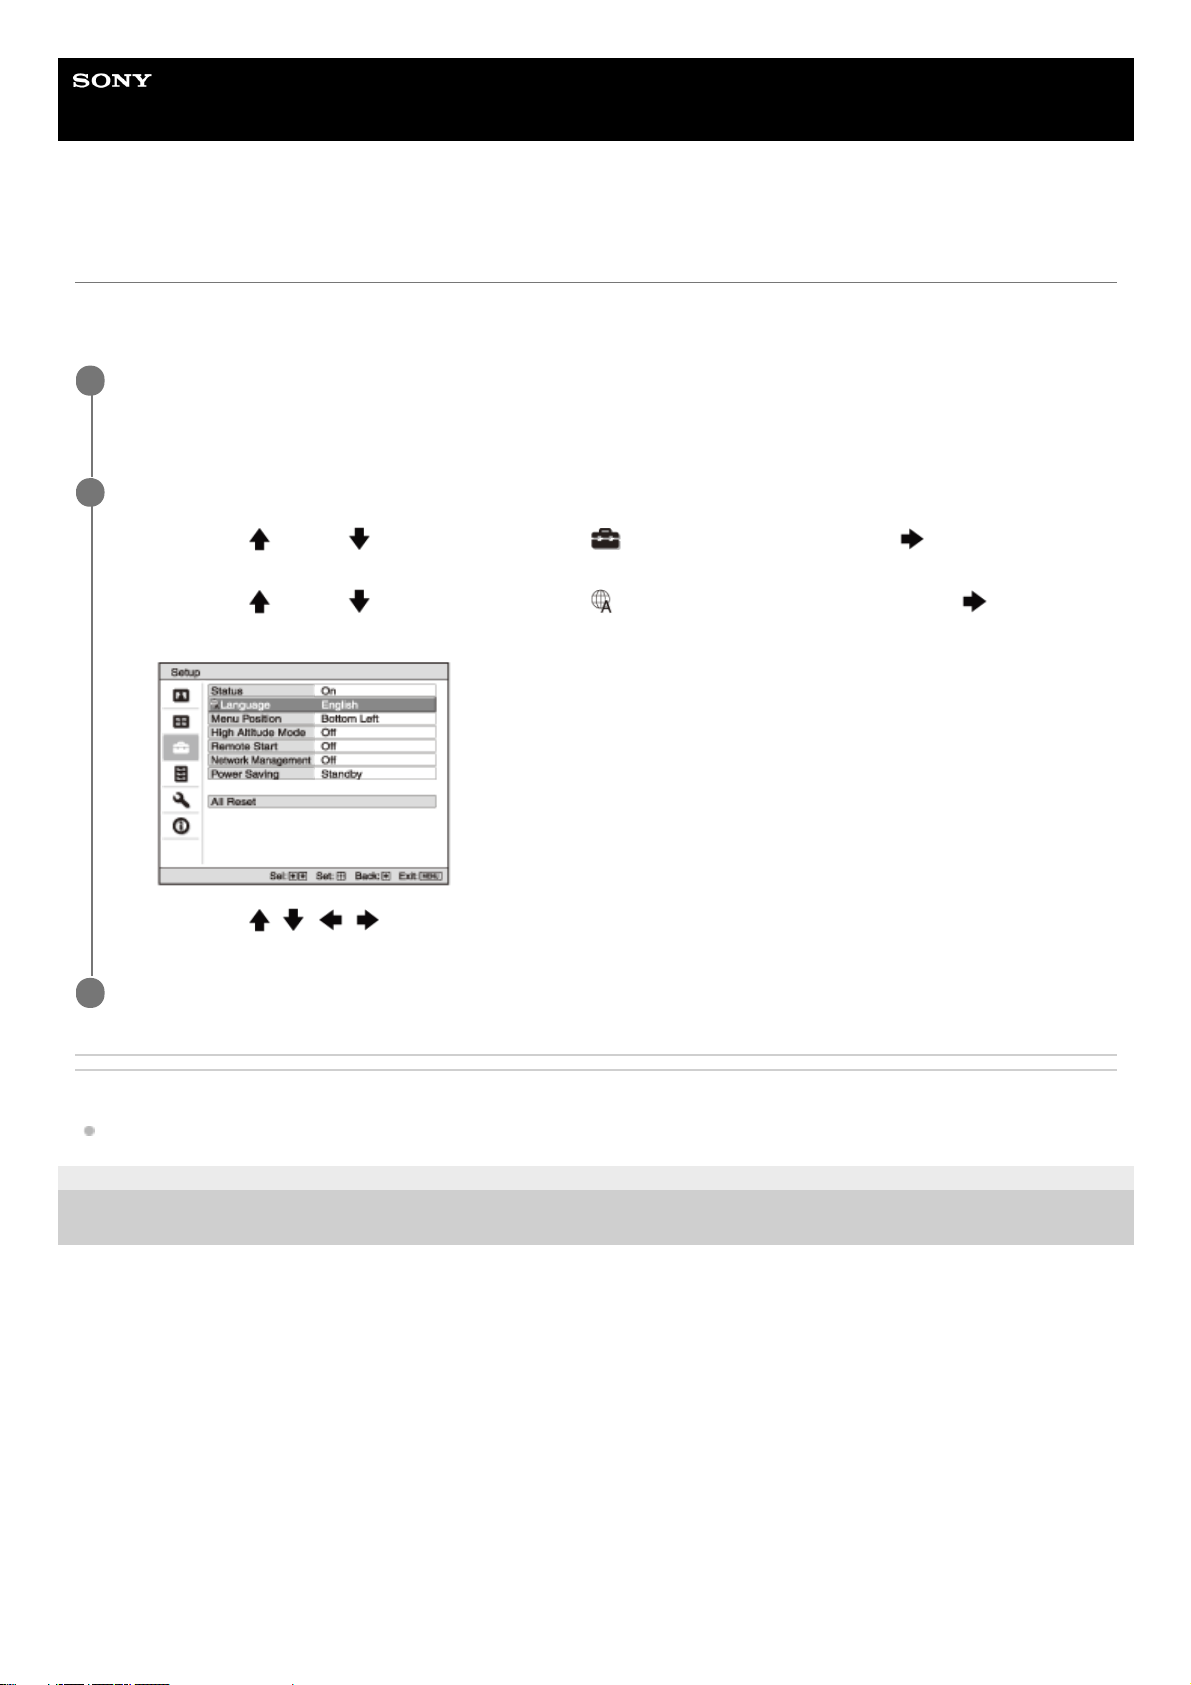
Selecting the Menu Language
English is set as the default language for the menus and messages. To change the display language, proceed as
follows.
Related Topic
Menu Operation: Language
5-023-481-12(1) Copyright 2020 Sony Corporation
Press the MENU button to display the menu window.
If the display cannot be properly seen, adjust the focus, size, and position of the projected image.
1
Change the display language.
2
Press the
(Up) or (Down) button to select [Setup] (Setup), then press the (Right) or ENTER
button.
1.
Press the
(Up) or (Down) button to select [Language] (Language), then press the (Right) or
ENTER button.
2.
Press the
/ / / (Up/Down/Left/Right) button to select a language, then press the ENTER button.
3.
Press the MENU button to turn off the menu window.
3
24
Help Guide
Data Projector
VPL-GTZ380
Adjusting the Position of the Projected Image
Hint
The
/ (On/Standby), INPUT, MENU, and / / / (Up/Down/Left/Right)/ENTER buttons on the control panel of the
main unit function in the same way as those on the remote control. The LENS button functions in the same way as the FOCUS,
ZOOM, and SHIFT buttons on the remote control.
When adjusting the lens on the control panel, each time you press the LENS button on the main unit, the lens adjustment
function switches in the order of FOCUS, ZOOM, and SHIFT.
When [Lens Control] is set to [Off] in the [Installation] menu, you cannot make adjustments with the FOCUS, ZOOM, or
SHIFT button.
When [Test Pattern] is set to [Off] in the
[Function] menu, the test pattern is not displayed.
Focus adjustment
The projection lens of the high brightness projector is thermally affected by the light from the light source. Therefore, the focus is
not stable immediately after turning on the power. To adjust the focus more precisely, it is recommended to adjust the focus after
30 minutes or more have elapsed since the projector has been turned on, and after the Lens focus adjustment window (test
pattern) has been displayed for 2 minutes or more.
Note
Depending on the installation location of the projector, you may not be able to control it with the remote control. In that case, use
the remote control by pointing it towards the remote control detector on the projector or towards the screen.
Adjust the lens with the control panel on the main unit or with the remote control. Do not adjust the lens by turning the lens
directly with your hands. Doing so may cause damage or malfunction.
Do not touch the lens when you adjust the image position. Your fingers may be pinched when the lens extends/retracts.
Press the FOCUS button to display the Lens focus adjustment window (test pattern). Then, adjust the focus
of the image with the
/ / / (Up/Down/Left/Right) button.
To turn off the test pattern, press the ENTER button.
1
Press the ZOOM button to display the Lens zoom adjustment window (test pattern). Then, adjust the size of
the image with the
/ / / (Up/Down/Left/Right) button.
To enlarge the image, press the
/ (Up/Left) button.
To reduce the image, press the
/ (Down/Right) button.
2
Press the SHIFT button to display the Lens shift adjustment window (test pattern). Then, adjust the position
of the image with the
/ / / (Up/Down/Left/Right) button.
To adjust the horizontal position
Press the
/ (Left/Right) button to move the projected image horizontally from the center of the lens.
Top view
3
25

To return the lens position
Press the RESET button on the remote control while the Lens shift adjustment window is displayed. The lens returns to
the center (factory default position). (The zoom and focus settings are not changed.)
Range of movement on the projected image
You can move the projected image only within the octagon area shown in the figure below. The movable range depends
on the lens or the aspect ratio of the projected image.
A: One screen width
: Image position when moving the image fully to the left
: Image position when moving the image fully to the right
To adjust the vertical position
Press the
/ (Up/Down) button to move the projected image vertically from the center of the lens.
Side view
A: One screen width
: Image position when moving the image fully upward
: Image position when moving the image fully downward
26
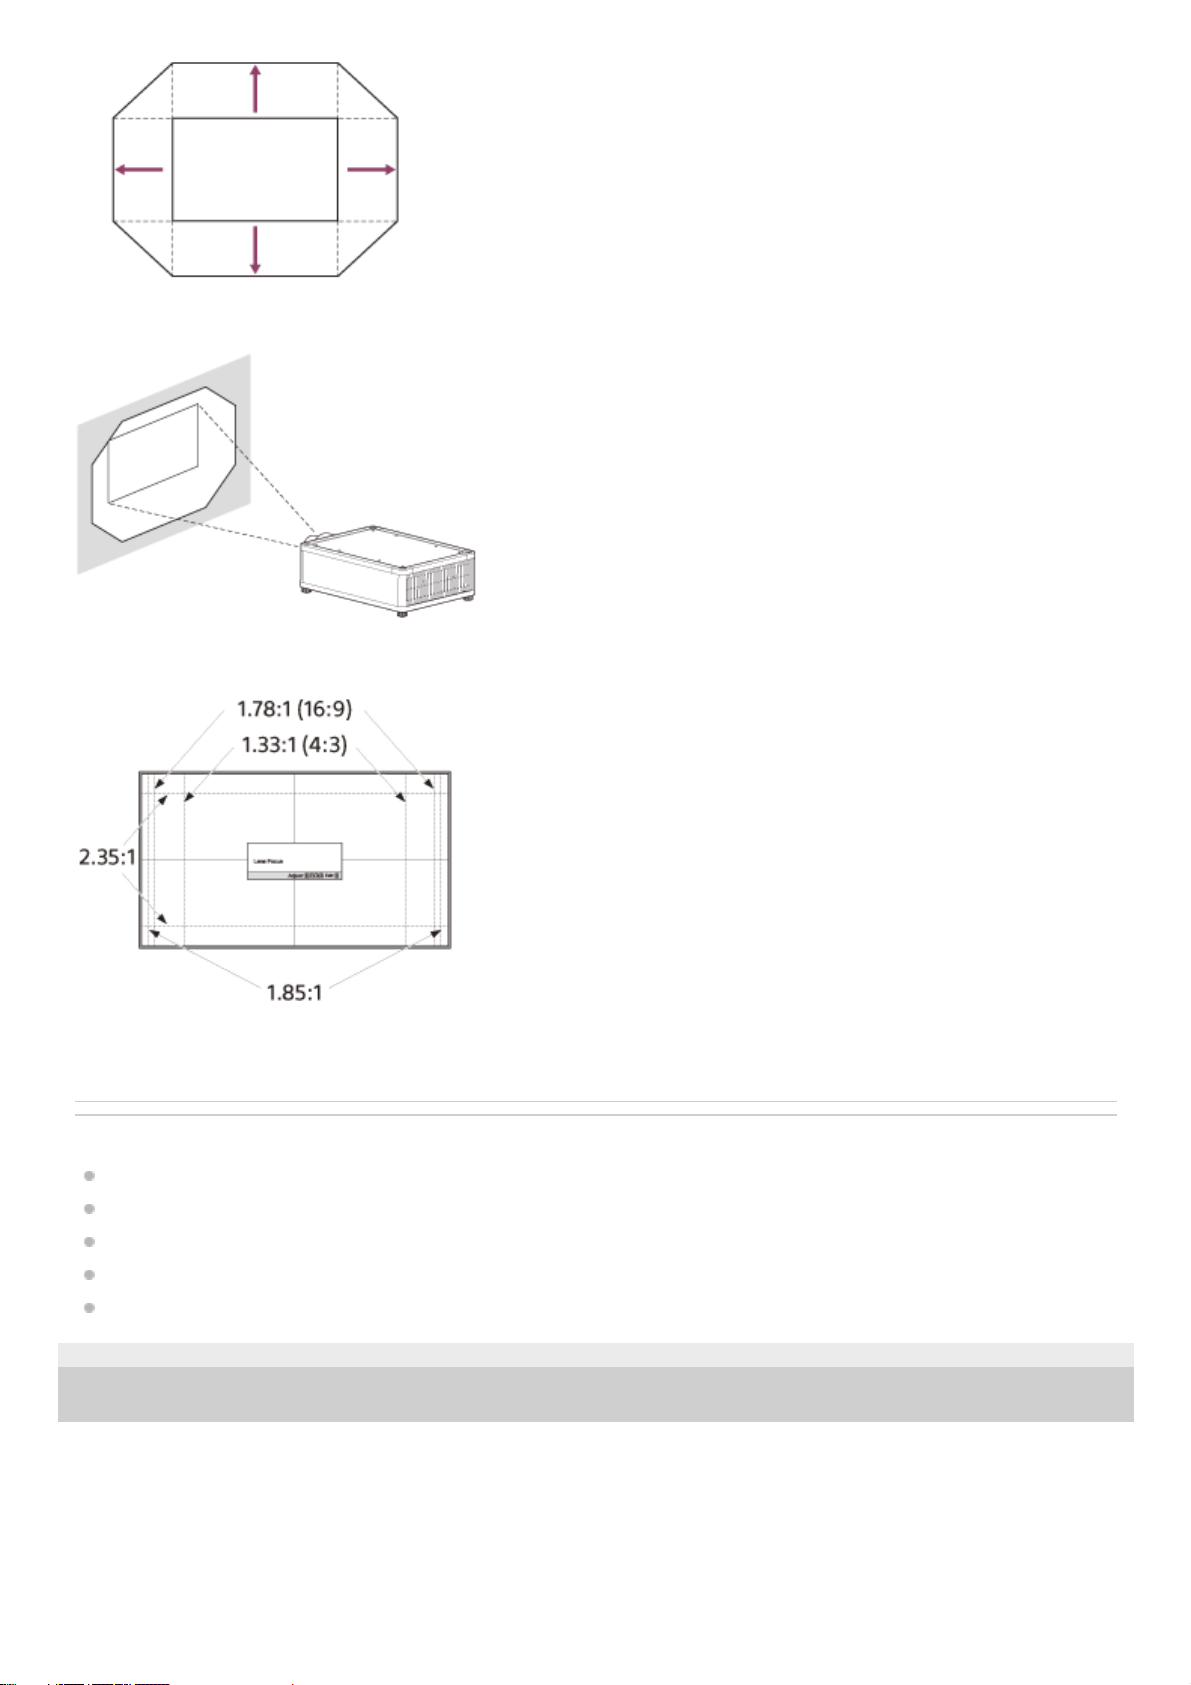
Lens adjustment window (test pattern)
The dashed lines show the angle of view of each aspect ratio.
Related Topic
Parts and Controls (Main Unit)
Parts and Controls (Remote Control)
Menu Operation: Lens Control
Menu Operation: Test Pattern
Projection Distance and Lens Shift Range
5-023-481-12(1) Copyright 2020 Sony Corporation
27
Help Guide
Data Projector
VPL-GTZ380
Precautions When Connecting
Turn off all devices before making any connections.
Use the proper cables for each connection.
Firmly insert the cable plugs. Loose connections may cause a malfunction and/or degradation of image quality. When
unplugging a cable, be sure to grip the plug, not the cable itself.
Refer to the operating instructions of the device to be connected.
5-023-481-12(1) Copyright 2020 Sony Corporation
28
Help Guide
Data Projector
VPL-GTZ380
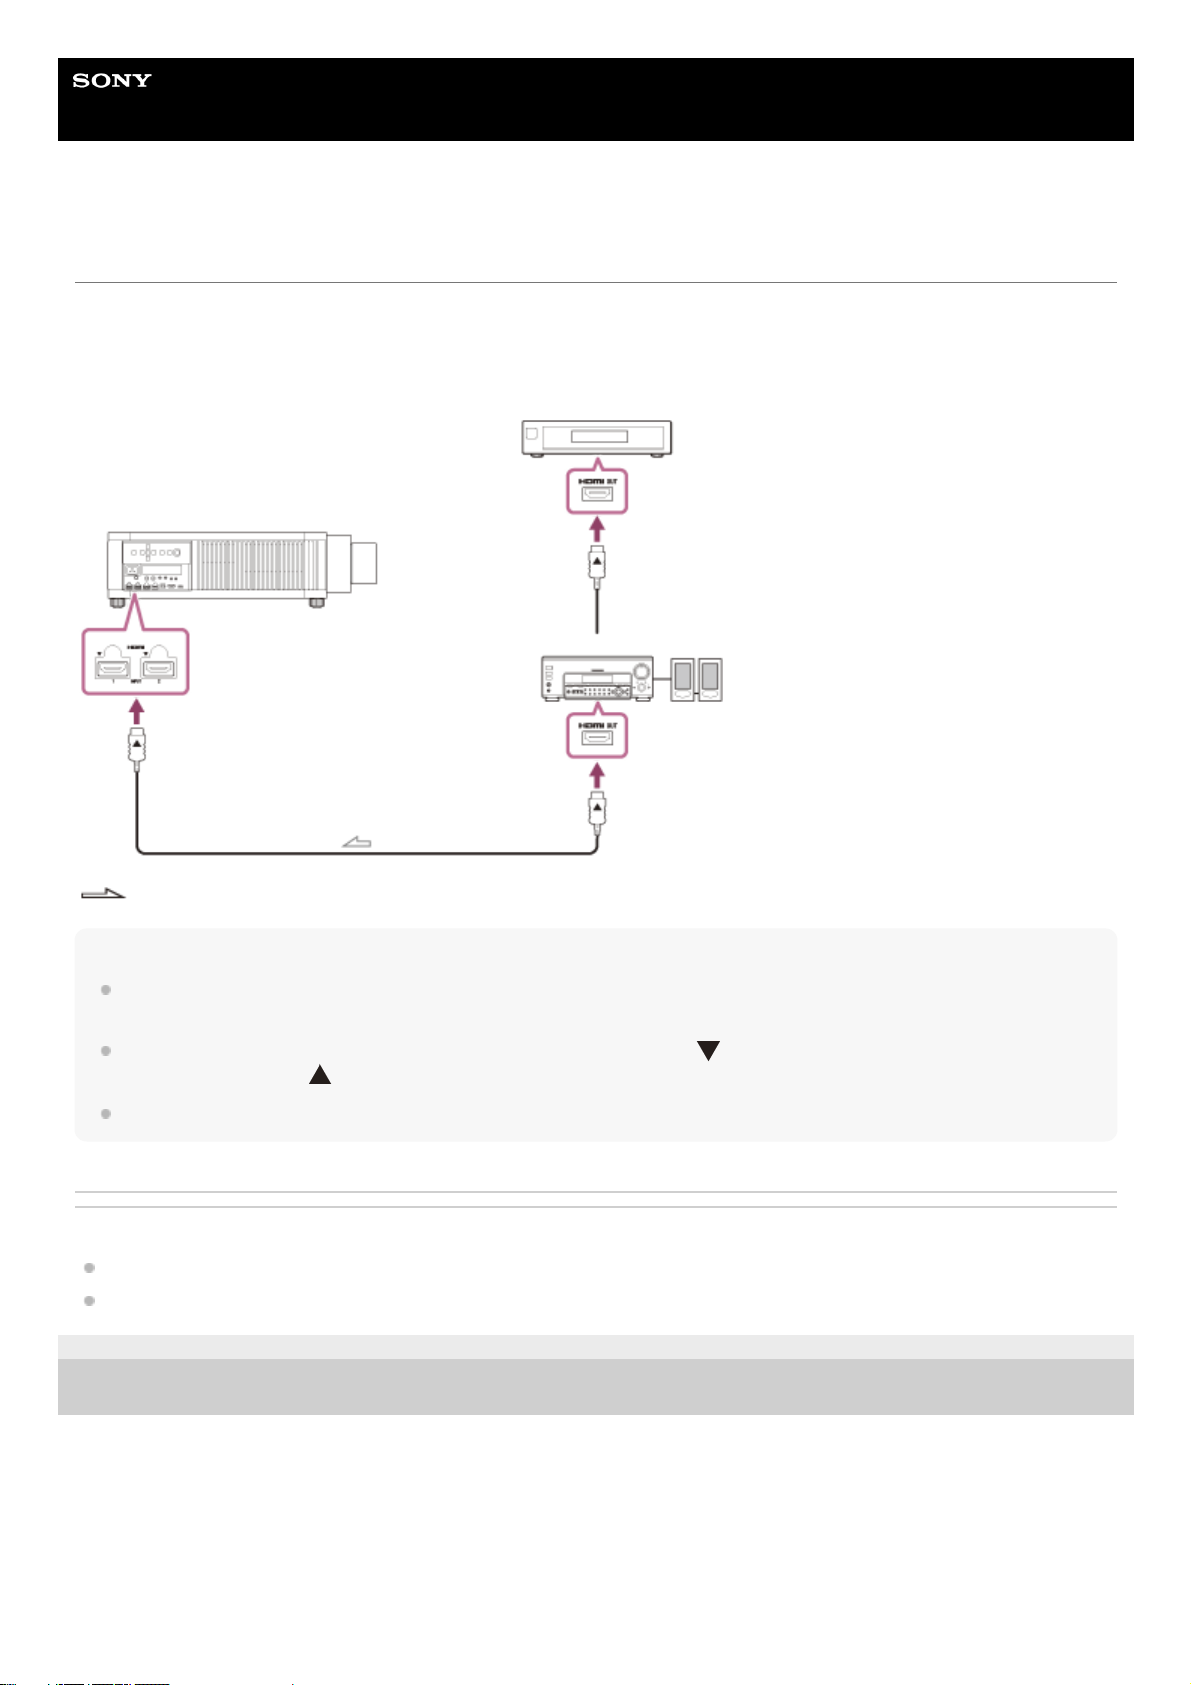
Connecting to Video Equipment
You can enjoy high picture quality by connecting a device, such as DVD player/recorder, Blu-ray Disc player/recorder, or
PlayStation®, equipped with the HDMI output to the HDMI input on the projector.
Connect the HDMI input on the projector to the HDMI output on the audio amplifier with an HDMI cable (not supplied).
Connect the audio amplifier to the HDMI output on video equipment.
: Signal flow
Note
Use a “Premium High Speed” HDMI cable on which the cable type logo is specified. If using a cable other than a Premium High
Speed cable, 4K images may not be displayed correctly.
When connecting an HDMI cable to the projector, make sure that the mark (
) on the upper side of the HDMI terminal on the
projector and the mark (
) on the connector of the cable are facing each other.
If an image from a device connected with an HDMI cable is not displayed correctly, check the settings of the connected device.
Related Topic
Parts and Controls (Main Unit)
Precautions When Connecting
5-023-481-12(1) Copyright 2020 Sony Corporation
29
Help Guide
Data Projector
VPL-GTZ380
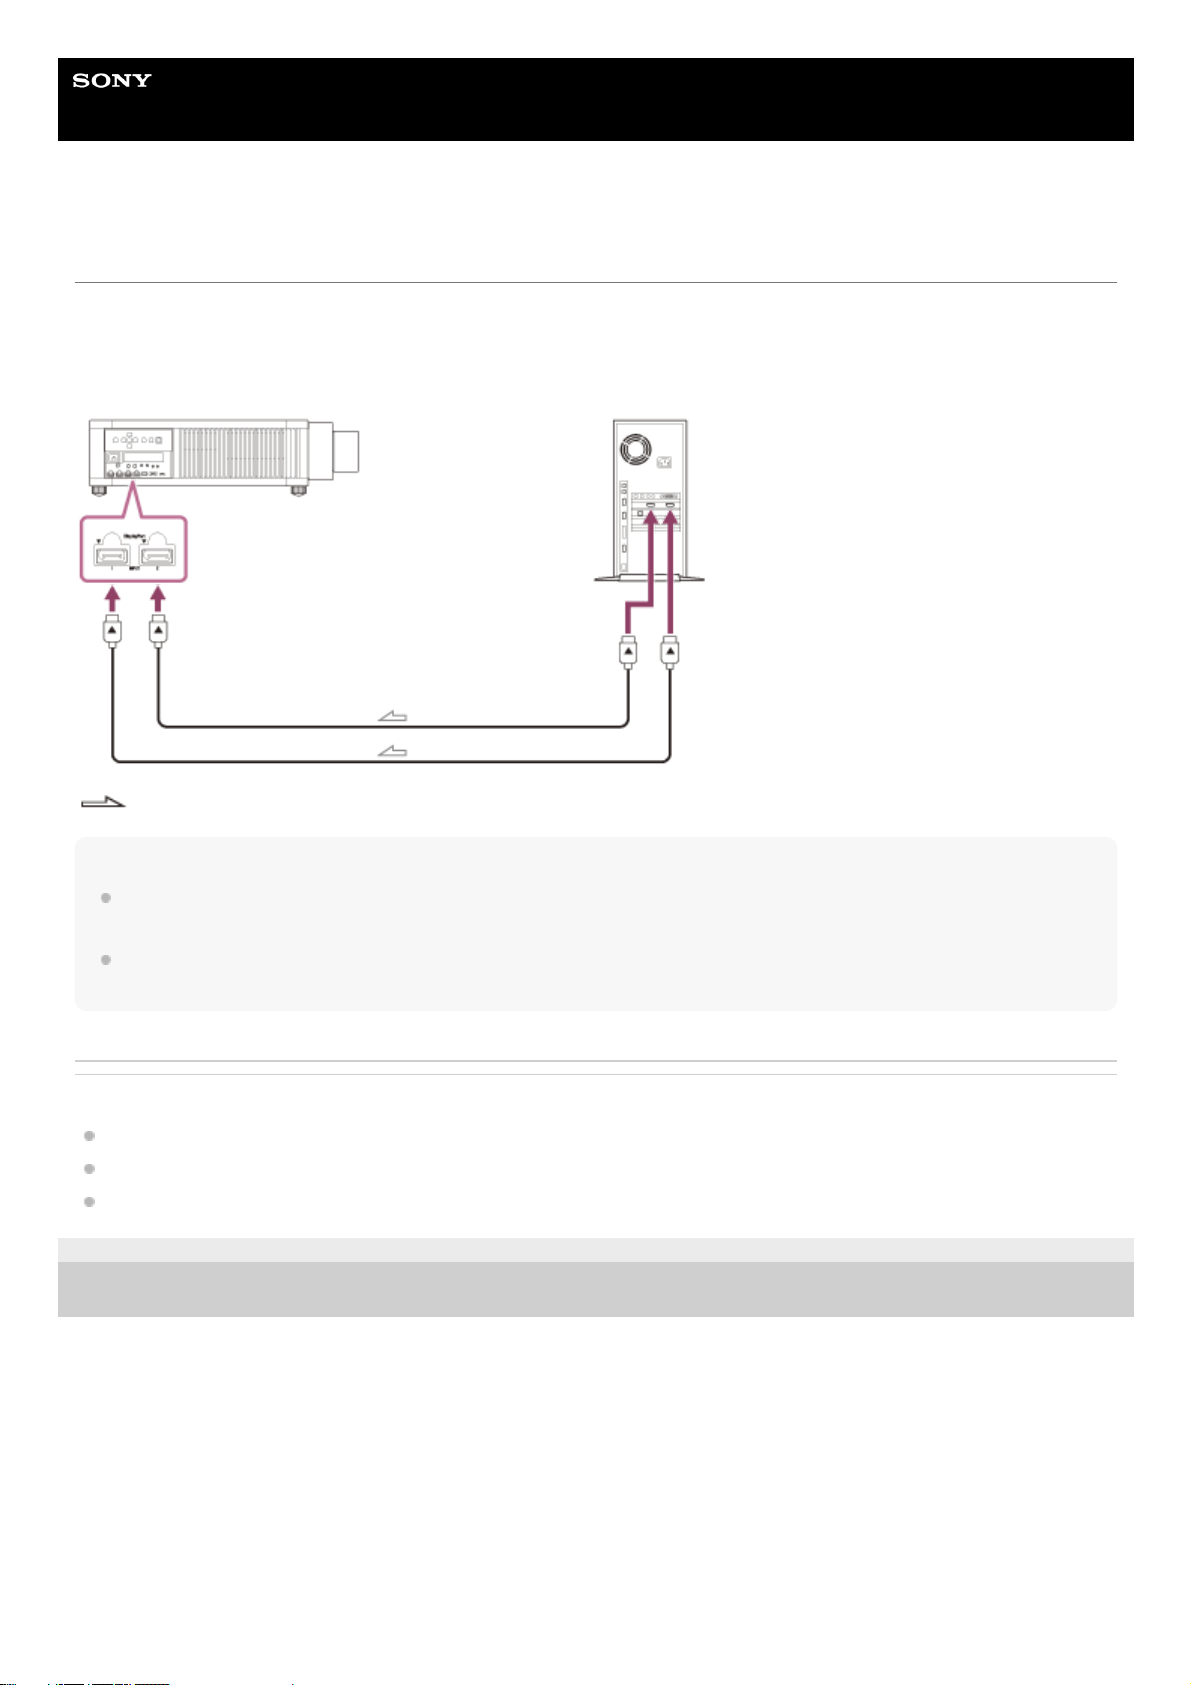
Connecting to a Workstation
You can display a “4096 × 2160” or “3840 × 2160” high resolution image by connecting the projector and workstation with
one or two DisplayPort cables (not supplied). When making the V Split display connection with two DisplayPort cables,
connect the DisplayPort 1 input and DisplayPort 2 input on the projector to the DisplayPort 1 output and DisplayPort 2
output on the workstation respectively.
: Signal flow
Note
Use a “HBR3 (High Bit Rate 3)” DisplayPort cable. If using a cable other than a HBR3 (High Bit Rate 3) DisplayPort cable, 4K
images may not be displayed correctly.
If an image from a workstation connected with a DisplayPort cable is not displayed, check the settings of the connected
workstation and graphic board.
Related Topic
Parts and Controls (Main Unit)
Precautions When Connecting
Projecting a High Resolution Image (V Split Display)
5-023-481-12(1) Copyright 2020 Sony Corporation
30
 Loading...