

Page 1
2-655-764-01 (1)
Data Projector
特約店様用設置説明書 3〜8、31〜50 ページ、裏表紙
この特約店様用設置説明書には、レンズ の 交換方法、別売のレンズ使用時や天井吊りの場合の設置寸法など、
製品の設置時に必要な情報を記載しています。
お客様へ
この設置説明書は、特約店様用に書かれたものです。
お客様が設置説明書に記載された設置を行うと、事故などにより死亡や大けがにつながることがありま す 。お
客様自身では絶対に設置をしないでください。設置については必ずお買い上げ店またはソニーテクニカルイン
フォメー ションセンターにご相談ください。
特約店の方は、設置を安全に行うために、必ずこの説明書をよくお読みください。
Installation Manual for Dealers Pages 3, 9 to 11, 31 to 50, and back cover
This installation Manual for Dealers explains how to install the projector. For example, it explains lens
replacement, installation measurements when using the optional lens and hanging the projector from the ceiling.
Warning
This Installation Manual is for Dealers.
Manuel d’installation pour les revendeurs Pages 3, 12 à 15, 31 à 50, et couverture dos
Le manuel d’installation pour les revendeurs explique comment installer le projecteur. Par exemple, il
explique la procédure de remplacement de l’objectif, les dimensions d’installation lorsque vous
employez l’objectif en option et comment suspendre le projecteur au plafond.
Avertissement
Ce manuel d’installation est destiné aux revendeurs.
Manual de instalación para proveedores Páginas 3, 16 a 19, 31 a 50, y cubierta
posterior
En este manual de instalación para proveedores se describe cómo instalar el proyector. Por ejemplo, se
describe cómo sustituir el objetivo, las medidas de instalación cuando se utiliza el objetivo opcional y
cómo colgar el proyector en el techo.
Advertencia
Este manual de instalación es para los proveedores.
Installationsanleitung für Händler Seite 3, 20 bis 23, 31 bis 50, und Hintere
Umschlagseite
In dieser Installationsanleitung für Händler wird erläutert, wie Sie den Projektor installieren.
Beispielsweise werden das Austauschen des Objektivs, die Installationsabmessungen beim Verwenden
des gesondert erhältlichen Objektivs und das Installieren des Projektors an der Decke beschrieben.
Achtung
Diese Installationsanleitung richtet sich an Händler.
Manuale d’installazione per i rivenditori Pagine 3, 24 a 27, 31 a 50, e piatto posteriore
Il presente manuale contiene le istruzioni relative all’installazione del proiettore. Vengono riportate ad
esempio le istruzioni su come sostituire l’obiettivo, le misure di installazione quando si utilizza
l’obiettivo opzionale e le procedure dell’installazione al soffitto.
Avvertenza
Il presente manuale d’installazione è destinato ai rivenditori.
VPL-FX52/FX52L
2005 Sony Corporation
1
Page 2

安全のために
ソニー製品は安全に充分配慮して設計されています。しかし、電気製品は、
まちがった使いかたをすると、火災や感電などにより死亡や大けがなど人身
事故につながることがあり、危険です。
事故を防ぐために次のことを必ずお守りください。
安全のための注意事項を守る
4〜5ページの注意事項をよくお読みください。
警告表示の意味
取扱説明書および製品では、次
のような表示をしています。表
示の内容をよく理解してから本
文をお読みください。
定期点検をする
5年に1度は、内部の点検を、お買い上げ店またはテクニカルインフォメー
ションセンターにご依頼ください(有料)。
故障したら使わない
すぐに、お買い上げ店またはテクニカルインフォメーションセンターにご連
絡ください。
万一、異常が起きたら
・煙が出たら
・異常な音、におい
がしたら
・内部に水、異物が
入ったら
・製品を落としたり
キャビネットを破
損したときは
1 電源を切る。
2 電源コードや接続コードを抜く。
,
3 お買い上げ店またはテクニカルイン
フォメーションセンターに連絡する。
この表示の注意事項を守らない
と、火災や感電などにより死亡
や大けがなど人身事故につなが
ることがあります。
この表示の注意事項を守らない
と、感電やその他の事故により
けがをしたり周辺の物品に損害
を与えたりすることがありま
す。
注意を促す記号
この装置は、情報処理装置等電波障害自主規制協議会(VCCI)の基準に基づくクラス
A情報技術装置です。この装置を家庭環境で使用すると電波妨害を引き起こすことがあ
ります 。この場合には使用者が適切な対策を講ずるよう要求されることがあります。
2
行為を禁止する記号
行為を指示する記号
Page 3

日本語
目次
警告 ...............................................................................
注意 ...............................................................................
電池についての安全上のご注意 ...........................................
本機の性能を保持するために ...............................................
概要 .....................................................................................
レンズ交換のしかた .............................................................
設置寸法 ............................................................................
床置き ................................................................................................ 31
天井つり ............................................................................................. 35
プロジェクターサスペンションサポートPSS-620の取り付けかた ....... 39
床置き、ツインスタック ....................................................................... 41
寸法図 ................................................................................
English
Table of Contents
31
48
Diagrama de instalación ............................................ 32
Instalación en el suelo ........................................................... 32
Instalación en el techo ........................................................... 36
Instalación del soporte de suspensión del proyector
PSS-620 ............................................................................. 40
4
4
Instalación en el suelo para apilamiento doble ..................... 41
Dimensiones ............................................................... 48
5
6
Deutsch
6
7
Inhalt
Sicherheitsmaßnahmen............................................. 20
Übersicht..................................................................... 21
Austauschen des Objektivs ...................................... 22
Installationsdiagramm ............................................... 32
Installation am Boden ........................................................... 32
Installation an der Decke ....................................................... 36
Anbringen der Projektoraufhängung PSS-620 ...................... 40
Installation am Boden für die Doppelprojektion ................... 42
Abmessungen ............................................................ 48
Precautions................................................................... 9
Overview ..................................................................... 10
Replacing the Lens .................................................... 10
Installation Diagram ................................................... 31
Floor Installation ................................................................... 31
Ceiling Installation ................................................................ 35
Attaching the projector suspension support PSS-620 ........... 39
Floor installation for twin-stacking ....................................... 41
Dimensions ................................................................. 48
Français
Table des matières
Précautions................................................................. 12
Aperçu ......................................................................... 13
Remplacement de l’objectif....................................... 13
Schéma d’installation ................................................ 32
Installation au sol .................................................................. 32
Installation au plafond ........................................................... 36
Fixation du support de suspension de projecteur PSS-620 ... 40
Installation au sol en double empilage .................................. 41
Dimensions ................................................................. 48
Italiano
Indice
Precauzioni ................................................................. 24
Presentazione ............................................................. 25
Sostituzione dell’obiettivo......................................... 25
Diagramma di installazione ....................................... 32
Installazione sul pavimento ................................................... 32
Installazione sul soffitto ........................................................ 36
Applicazione del supporto di sospensione del proiettore
PSS-620 ............................................................................. 40
Installazione al pavimento per impilazione........................... 42
Dimensioni .................................................................. 48
Español
Indice
Precauciones .............................................................. 16
Introducción ............................................................... 17
Sustitución del objetivo............................................. 17
3
Page 4

下記の注意を守らないと、
火災や感電により死亡や大けがに
つながることがあります。
通風孔をふさぐような場所に設置しない
容量の低い電源延長コードを使用しない
容量の低い延長コードを使うと、ショートし
たり火災や感電の原因となることがありま
す。
電源コードのプラグおよびコネクターは突き
あたるまで差し込む
通風孔をふさぐと内部に熱がこもり、火災や
故障の原因となることがあります。風通しを
よくするために次の項目をお守りください。
壁から 50cm 以上離して設置する。
•
密閉された狭い場所に押し込めない。
•
毛足の長い敷物(じゅうたんや布団など)
•
の上に設置しない。
布などで包まない。
•
天井への取り付けには細心の注意をはらう
天井への取り付け強度が不十分だと、落下
•
により死亡や大けがにつながることがあり
ます。必ずソニー製のプロジェクターサス
ペンションサポート PSS-620 を使用してく
ださい。
取り付けを安全に行うために、本書、取扱
•
説明書、および PSS-620 の取付説明書の注
意事項をお読みください。
取り付けは、PSS-620 の取付説明書の手順
•
に従い確実に行ってください。取り付けが
不完全な場合、落下する可能性がありま
す。
また、取り付け時には手をすべらせてプロ
ジェクターを落下させ、けがをすることの
ないようご注意ください。
不安定な場所に設置しない
ぐらついた台の上や傾いたところに設置する
と、地震などで倒れたり落ちたりしてけがの
原因となります。また、設置・取り付け場所
の強度を十分にお確かめください。
まっすぐに突きあたるまで差し込まないと、
火災や感電の原因となります。
下記の注意を守らないと、
けがをしたり周辺の物品に損害を与えるこ
とがあります。
レンズをのぞかない
投影中にプロジェクターのレンズをのぞくと
光が目に入り、目に悪影響を与えるおそれが
あります。
運搬するときは必ず左右側面を両手で持つ
運搬するときは、必ず左右側面を両手で
•
持ってください。他の部分を持つとプロ
ジェクタ−が壊れたり、落としてけがをす
ることがあります。
床置きのプロジェクターを移動させると
•
き、本体と設置面との間に指を挟まないよ
うにご注意ください。
キャビネットのカバーを開けたまま、電源
•
を切らずに移動させないでください。感電
の原因となることがあります。
調整用工具を内部に入れない
調整中などに、工具を誤って内部に落とすと
火災や感電の原因となることがあります。
万一、落とした場合は、すぐに電源を切り、
電源コードを抜いてください。
4
Page 5
アジャスター調整時、手を挟まないよう注意
する
アジャスターを回しすぎるとアジャスターが
はずれ、手を挟むことがありますのでご注意
ください。
電池についての安全上の
ご注意
ここでは、本機での使用が可能なソニー製乾電池についての
注意事項を記載しています。
コード類は正しく配置する
電源コードや接続コードを足に引っかけると
転倒したり、プロジェクターの落下によりけ
がの原因となることがあります。十分注意し
て接続・配置してください。
低い天井に天吊りしない
頭などをぶつけてけがをすることがありま
す。
キャビネットのカバー類はしっかり固定する
天吊りの場合、カバー類が固定されていない
と落下して、けがの原因となることがありま
す。
安全アースを接続する
安全アースを接続しないと、感電の原因とな
ることがあります。プラグから出ている緑色
のアースを、建物に備えられているアース端
子に接続してください。
万一、異常が起きたら
すぐにきれ いな水で洗い、ただ
電池の液が目に入っ
たら
煙が出たら
電池の液が皮膚や
衣服に付いたら
バッテリー収 納部内
で液が漏れたら
亡や大けがなどの人身事故になることがあります。
乾電池は充電しない。
•
火の中に入れない。ショートさせたり、分
•
解、加熱しない。
指定された種類の電池を使用する。
•
,
ちに医師の治療を受ける。
お買い上げ店またはテクニカ
,
ルインフォメーションセン
ターに連絡する。
すぐにきれ いな水 で 洗 い 流す。
,
よくふき取 っ て か ら、新しい 電
,
池を入 れる。
下記の注意事項を守らないと、
破裂・発熱・液漏れにより、死
不明な点はお買い上げ店またはテクニカルインフォ
メーションセンターにご相談ください。
下記の注意事項を守らないと、破
裂・液漏れにより、けがをしたり周
辺の物品に損害を与えたりすることがあります。
投げつけない。
•
使用推奨期限内(乾電池に記載)の乾電池
•
を使用する。
3 と # の向きを正しく入れる。
•
電池を入れたまま長期間放置しない。
•
新しい電池と使用した電池は混ぜて使わな
•
い。
種類の違う電池を混ぜて使わない。
•
水や海水につけたり濡らしたりしない。
•
使用済み乾電池は、取扱説明書または地域のルー
ルに従って処分してください。
5
Page 6

日本語
本機の性能を保持するた
めに
設置場所について
底面の吸気口および前面の排気口は、内部の温度上昇を防ぐ
•
ためのものです。風通しの悪い場所を避け、吸気口および排気
口をふさがないように設置してください。
温度・湿度が非常に高い場所や温度が著しく低い場所、ほこり
•
の多い場所での使用は避けてください 。
床置きおよび天井つり以外の設置でお使いになると、色むらや
•
ランプ 寿 命の劣化などの問題が起こることがありますので避けて
ください 。
ファンの音について
プロジェクターの内部には温度上昇を防ぐためにファンが取り付け
られており、電源を入れると多少音を生じます。これらは液晶プロ
ジェクターの構 造によるもので、故障ではありません。しかし、異
常音が発生した場合にはお買い上げ店にご相談ください。
概要
この説明書は、ソニーデータプロジェクターVPL-FX52/FX52L の
設置に関する説明書です。レン ズ交換のしかたや設置寸法等が
記され て います。レンズ交換をする場合は、取扱説明書もあわせ
てよくお読みください。
部屋の照明について
直射日光や室内灯などで直接スクリーン を 照 らさな い でください。
美しく見や す い画像にするために、以下の点を参考にしてくださ
い。
集光形のダウンライトに す る。
•
蛍光灯のような散光照明にはメッシ ュを 使用する。
•
太陽の差し込む窓はカーテンやブラインドでさえぎる。
•
光を反 射 する床や壁はカーペットや壁紙でおおう。
•
お手入れについて
キャビネットや パ ネ ル の 汚 れは、柔らか い 布で軽くふき取ってくだ
•
さい。汚れがひどいときには、水でうすめた中性洗剤に柔らかい
布をひたし、固くしぼってから汚れをふき取り、乾いた布で仕上
げてください。なお、お手入れの際は必ず電源コードをコンセン
トから 抜 いてください。
レンズに 手 を 触 れたり、固いもので傷を つけたりしないようにご
•
注意ください。
定期的にフィルターのクリー ニ ングをしてください。
•
結露について
プロジェクターの設置してある室内の急激な温度変化は結露を引
き起こし 、 故障の原因となりますので冷暖房にご注意ください。
結露とは、寒いところから急に暖かい場所へ持ち込んだとき、本
体の内部に水滴がつくこと で す 。結 露 が 起きたときは、電 源を 入
れたまま本機をそのまま約 2 時間放置しておいてください。
6
Page 7
レンズ交換のしかた
次の種類の別売のレンズを取り付けることができます。
• 長焦点ズームレンズVPLL-ZM101
• 短焦点ズームレンズVPLL-ZM31
• 短焦点固定レンズVPLL-FM21
ご注意
別売アクセサリーの短焦点固定レンズVPLL-FM21をご使用にな
る場合は、製品コードをご確認のうえお使いください。
• 製品の入っている箱の右上部のシールに製品コード「P93817601」と記載されていること。
製品コード「P-93817600」のレンズはご使用になれません。
• レン ズ本体のシールに製品コード「P-93817601」と記 載されてい
ること。
シールに製品コードが記載されていないレンズ はご使用になれま
せん。
レンズを 交換するときは、それぞれ以下の手順で行ってください 。
VPL-FX52(標準レンズ付き):手順 1 〜7、9〜14
VPL-FX52L(レンズ別売):手順 1、2、3、6、8〜10、13〜14
◆レンズを交 換するときは、それぞれのレンズの取扱説明書もご覧くださ
い。
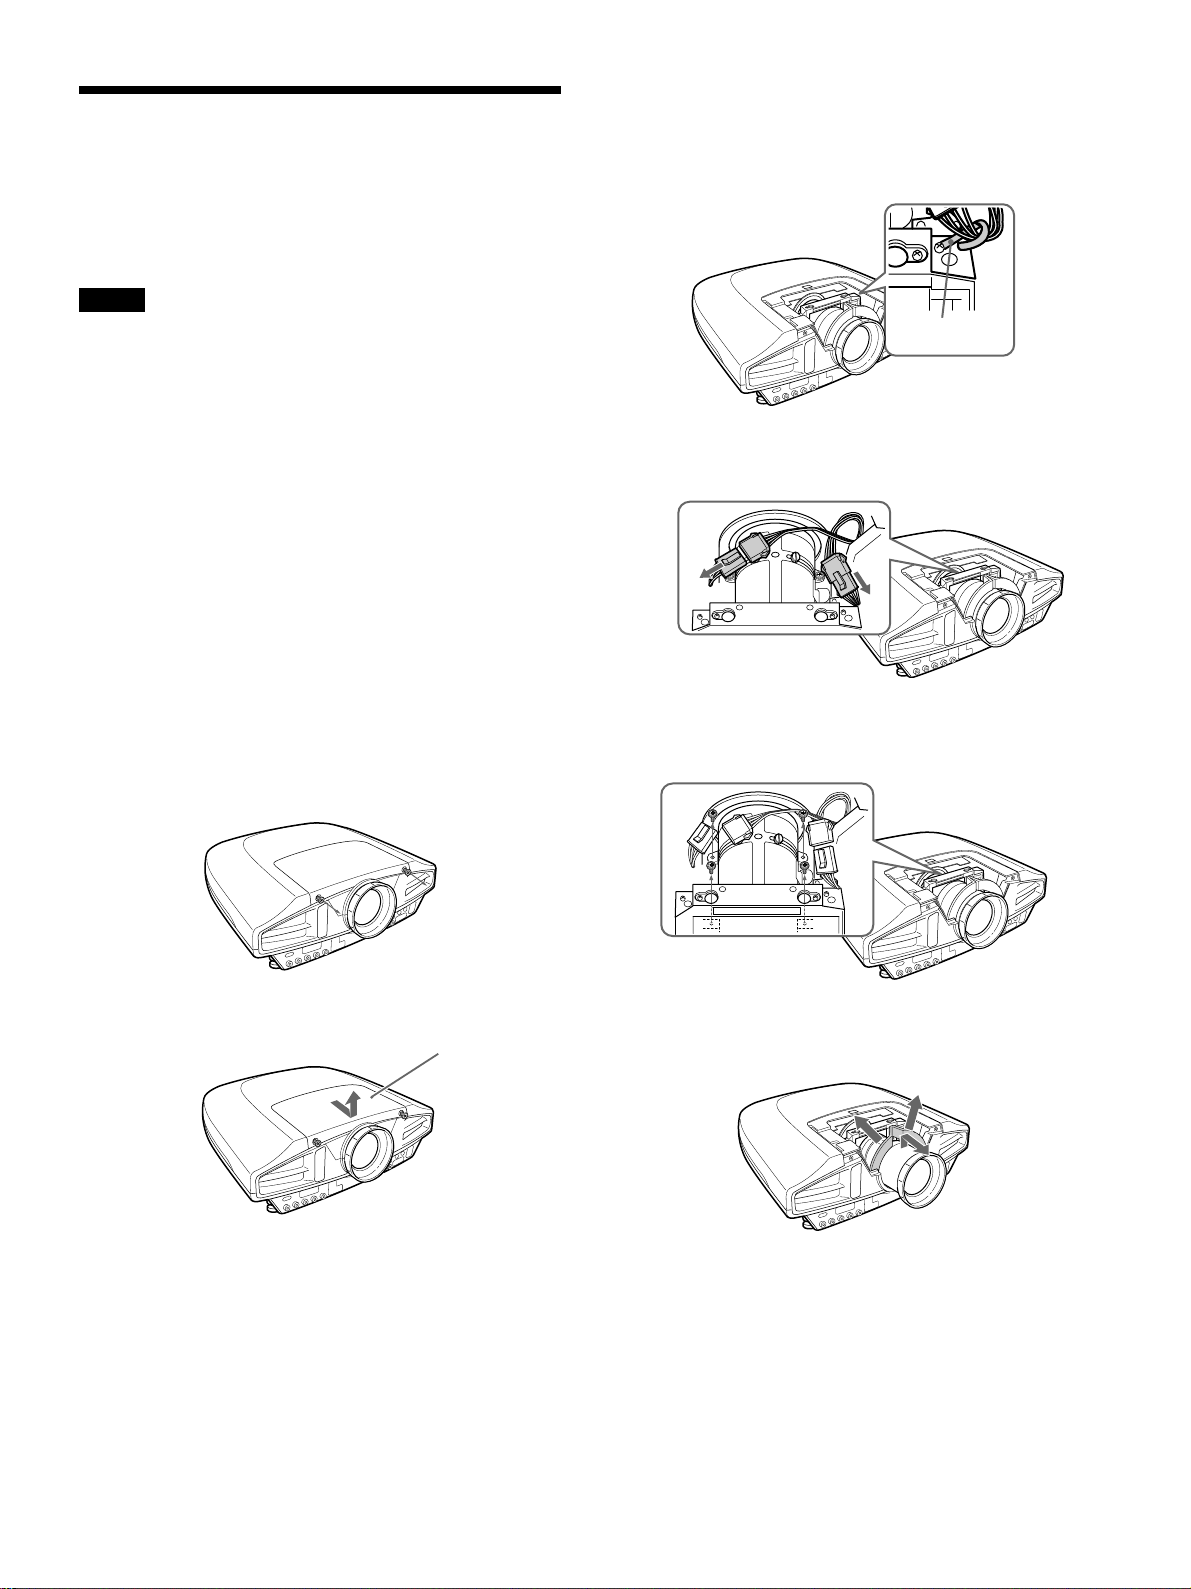
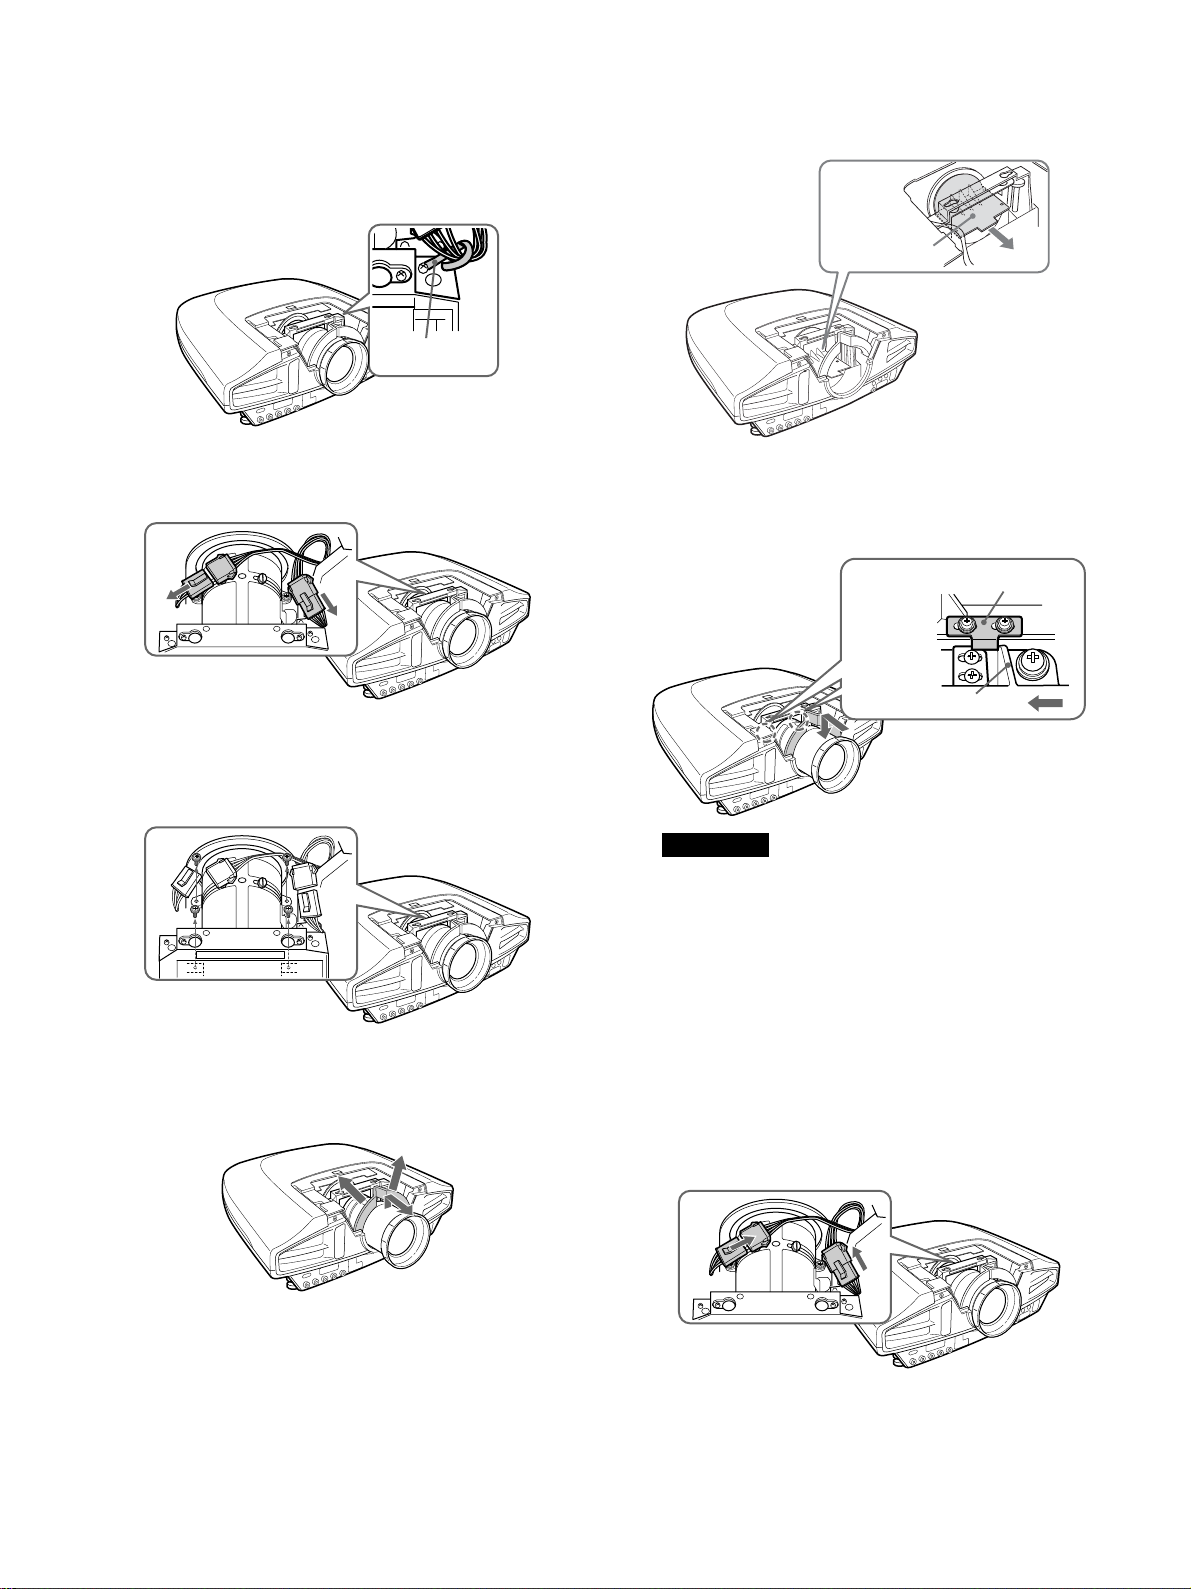
4 ケーブル留めを開いて、コネクタ−ケ −ブ ルをケーブル留め
からはずす。
標準レンズ以外のレンズを取りはずすときは、この手 順と手順
5は必要ありません。
ケーブル留め
5 本体とレンズのコネクター(2 か所)をはずす。
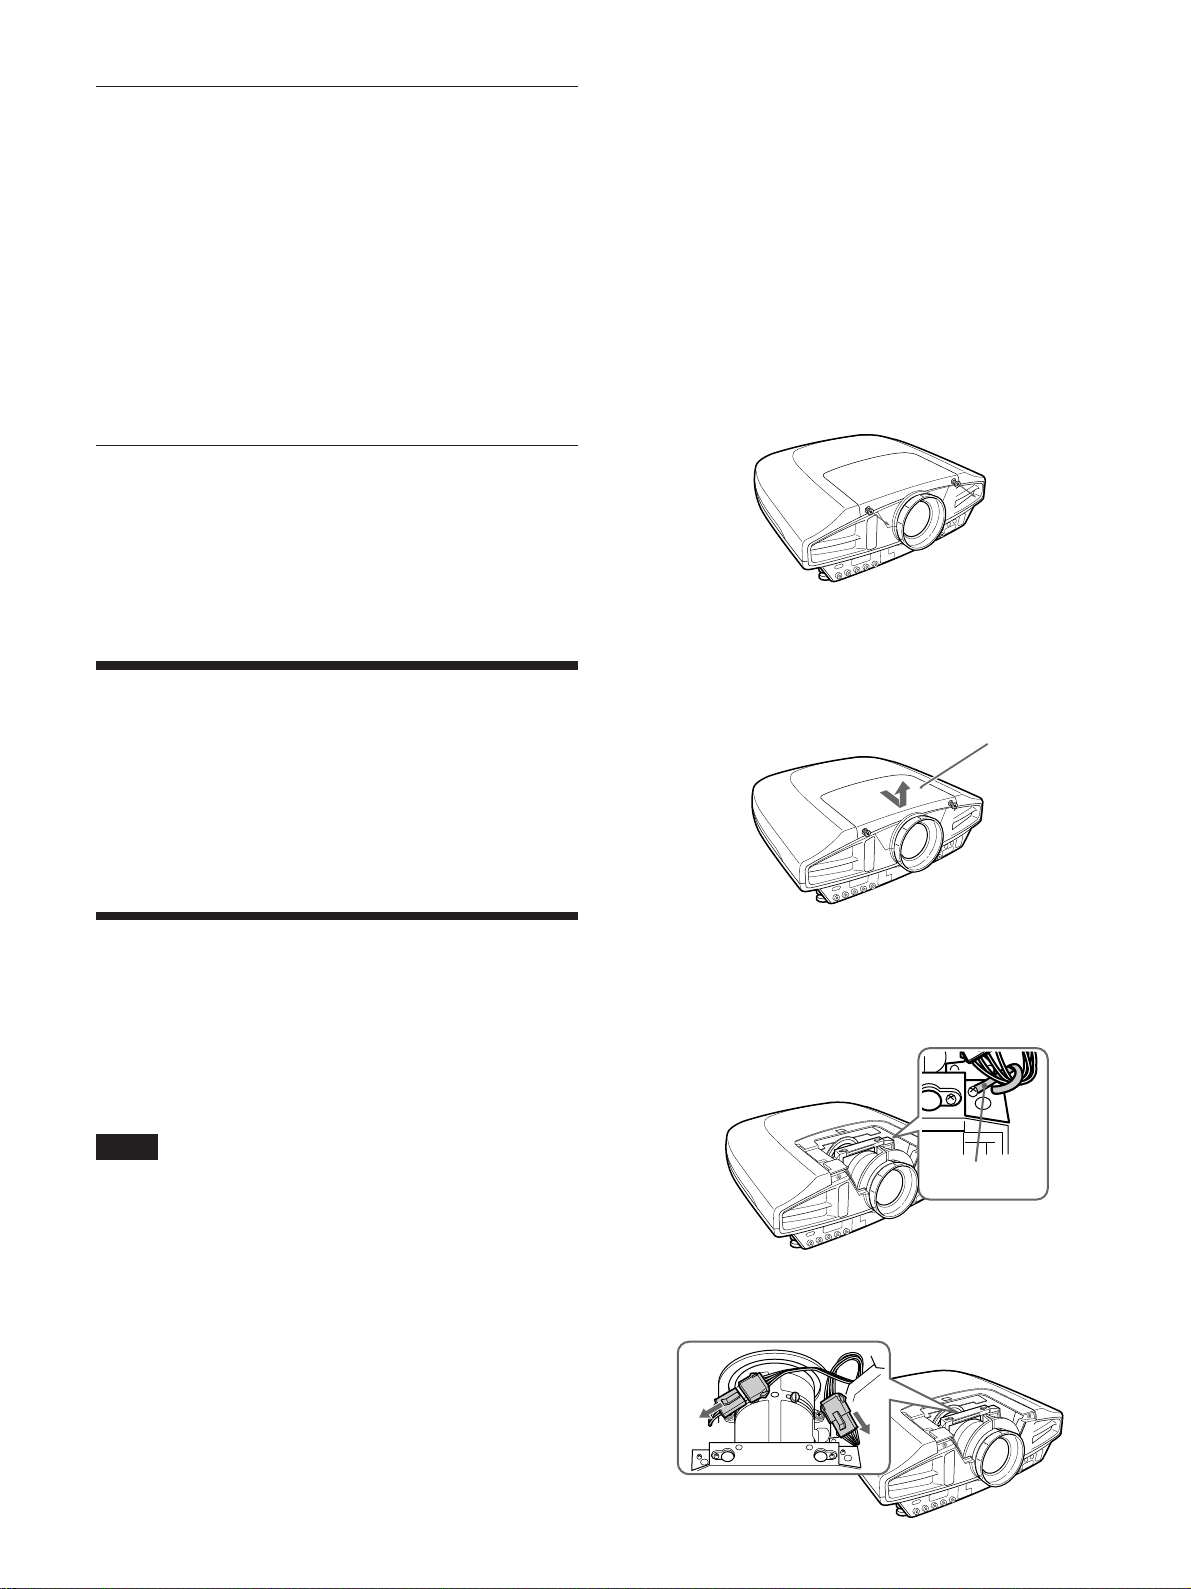
1 電源を切り、電源コードを抜く。
2 レンズカバーを固定している2 本のネジをゆるめる。
3 レンズカバーを前側へスライドさせ 、持ち上げてはずす。
レンズカバー
6 図のように4本(M4×12,ワッシャー付)のネジをプラスドライ
バーではずす。
7 レンズを少し 持ち上げ、レンズクッションを 引き伸 ばし な がら、
レンズを 前 側にスライドさせ て はずす。
7
Page 8
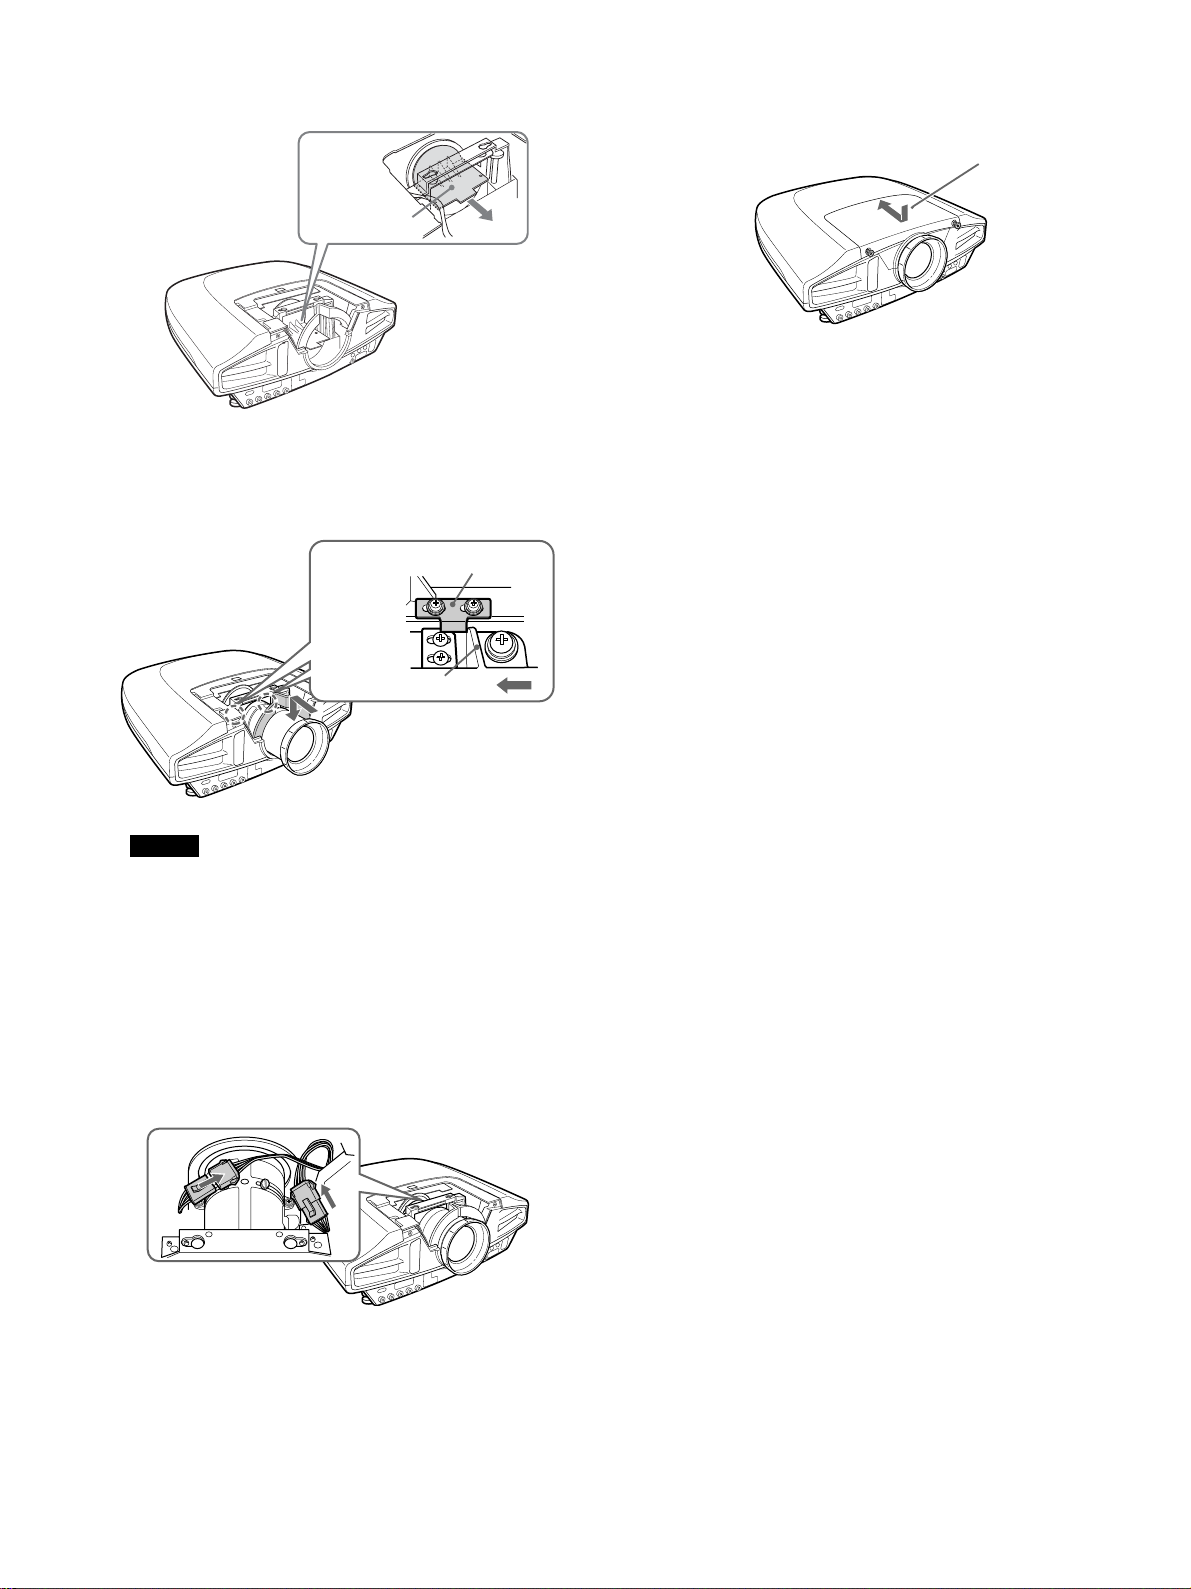
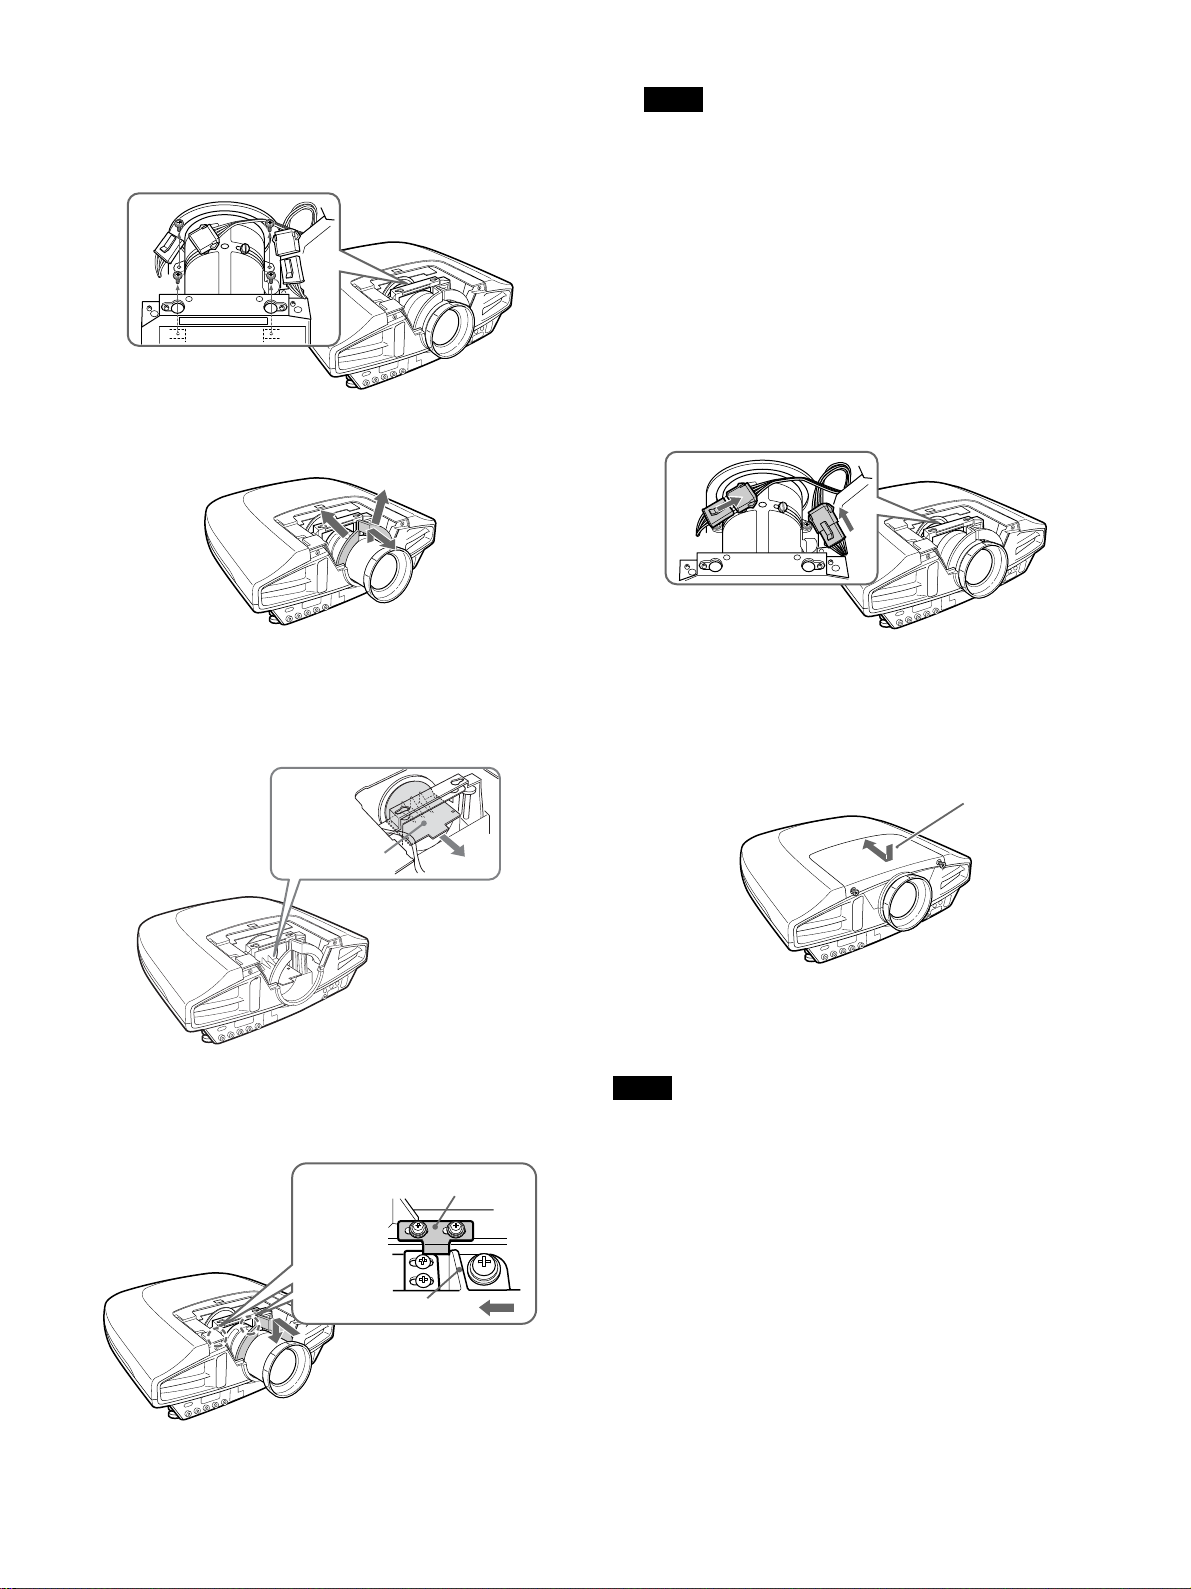
8 光学ブロックプロテクターを矢印の方向に引き出す。
光学ブロック
プロテクター
13 レンズカバーを前側から奥へ、スライドさ せて閉める。
レンズカバー
14 2本のネジをしめ、レンズ カバーを固定する。
9 レンズクッションを 引き伸 ばし な がらレンズを 通し 、交換するレ
ンズ側とプロジェクター側のストッパ ーで位置を合わせてレン
ズを組み込む。
ストッパー(本体側)
ストッパー(レンズ側)
ご注意
コネクターをはさまないようご注意ください。
•
レンズに貼られたラベルが上から見えるようにしてください。
•
10 4本 のネジをしめ、交換レンズをしっかりと固定する。
レンズ交換の際のご注意
• 取りはずしたレンズまたは 取り付けるレンズを置くときは 、しっか
りした水平な台の上に静かに置いてください。レン ズ 面は傷つき
やすいので取り扱いには充分注意してください。
• レン ズ 面 には 手を 触 れな い ようにしてください 。
11 コネクターを交 換レンズに 接 続 する。
標準レンズ以外のレンズを取り付けるときは、この手 順と手
順12は必要ありません。
12 手順 4 ではずしたコネクタ−ケ−ブルをケーブル留めで固
定する。
8
Page 9
English
Precautions
On safety
•Check that the operating voltage of your unit is
identical with the voltage of your local power
supply. If voltage adaptation is required, consult with
qualified Sony personnel.
• Should any liquid or solid object fall into the cabinet,
unplug the unit and have it checked by qualified
Sony personnel before operating it further.
•Unplug the unit from the wall outlet if it is not to be
used for several days.
• To disconnect the cord, pull it out by the plug. Never
pull the cord itself.
• The wall outlet should be near the unit and easily
accessible.
• The unit is not disconnected from the AC power
source (mains) as long as it is connected to the wall
outlet, even if the unit itself has been turned off.
•Do not look into the lens while the lamp is on.
•Do not place your hand or objects near the
ventilation holes — the air coming out is hot.
•Avoid using an extension cord with a low voltage
limited since it may cause the short-circuit and
physical incidents.
• To carry the projector, be sure to hold the both sides
of it tightly. Do not hold other parts of the projector,
especially the lens, nor catch your finger between the
floor and the projector.
•Do not catch your finger between the unit and
surface of the floor when moving the projector
installed on the floor.
•Be careful not to catch your finger in the cooling fan.
•Do not carry the projector with the cabinet on and
with its cover open.
excessive.
• Install the projector on the floor or ceiling. Any other
installation causes a mulfunction such as color
irregularity or shortening lamp life.
•Do not install the unit in a location near heat sources
such as radiators or air ducts, or in a place subject to
direct sunlight, excessive dust or humidity,
mechanical vibration or shock.
• To avoid moisture condensation, do not install the
unit in a location where the temperature may rise
rapidly.
•Be sure to secure the cabinet cover firmly when
installing to the ceiling firmly.
On illumination
• To obtain the best picture, the front of the screen
should not be exposed to direct lighting or sunlight.
•Ceiling-mounted spot lighting is recommended. Use
a cover over fluorescent lamps to avoid lowering the
contrast ratio.
•Cover any windows that face the screen with opaque
draperies.
• It is desirable to install the projector in a room where
floor and walls are not of light-reflecting material. If
the floor and walls are of reflecting material, it is
recommended that the carpet and wall paper be
changed to a dark color.
On preventing internal heat build-up
•After you turn off the power with the I / 1 key on
the control panel or on the Remote Commander, do
not disconnect the unit from the wall outlet while the
cooling fan is still running.
•Do not disconnect the AC power cord from the wall
outlet while the fan is still running.
On installation
•When the projector is mounted on the ceiling, the
Sony PSS-620 Projector Suspension Support must be
used for installation.
•Allow adequate air circulation to prevent internal
heat build-up. Do not place the unit on surfaces
(rugs, blankets, etc.) or near materials (curtains,
draperies) that may block the ventilation holes.
Leave space of more than 50 cm (19
between the wall and the projector. Be aware that
room heat rises to the ceiling; check that the
temperature near the installation location is not
3
/4 inches)
Caution
The projector is equipped with ventilation holes
(intake) at the bottom and ventilation holes (exhaust)
at the front. Do not block or place anything near these
holes, or internal heat build-up may occur, causing
picture degradation or damage to the projector.
9
Page 10
On cleaning
• To keep the cabinet looking new, periodically clean
it with a soft cloth. Stubborn stains may be removed
with a cloth lightly dampened with a mild detergent
solution. Never use strong solvents, such as thinner,
benzene, or abrasive cleansers, since these will
damage the cabinet.
•Avoid touching the lens. To remove dust on the lens,
use a soft dry cloth. Do not use a damp cloth,
detergent solution, or thinner.
•Clean the filter at regular intervals.
On repacking
Save the original shipping carton and packing
material; they will come in handy if you ever have to
ship your unit. For maximum protection, repack your
unit as it was originally packed at the factory.
Overview
Follow the steps below to replace the lens.
For VPL-FX52 (with standard lens): Perform the
operations in steps 1 to 7 and 9 to 14.
For VPL-FX52L (Lens are not supplied.): Perform
the operations in steps 1,2,3,6,8-10,13-14.
For details on replacing the lens, also refer to the
installation manual supplied with the lens.
1 Turn off the power and disconnect the power
cable.
2 Loosen the two screws on the lens cover using a
Phillips screwdriver.
3 Remove the lens cover by sliding it forward, then
lifting it.
This manual describes how to install the Sony Data
Projector VPL-FX52/FX52L, how to replace the lens
and installation diagrams. When you replace the lens,
also refer to the Operating Instructions.
Replacing the Lens
You can install the following three types of lenses in
the projector.
•VPLL-ZM101 Long Focus Zoom Lens
•VPLL-ZM31 Short Focus Zoom Lens
•VPLL-FM21 Fixed Short Focus Lens
Notes
When you are going to use the optional VPLL-FM21
fixed short focus lens, check that:
• the product code mentioned on the seal located on
the upper right of the package is “P-93817601.”
If the product code is “P-93817600,” the lens cannot
be used with this projector.
• the product code mentioned on the seal located on
your lens is “P-93817601.”
If no product code is mentioned on the lens, the lens
cannot be used with this projector.
Lens cover
4 Release the connector cables from the cable binder
by opening it.
Skip this step and the next when replacing a lens
other than the standard one.
Cable binder
5 Disconnect the two connectors on the lens from
those on the projector.
10
Page 11
6 By using a Phillips screwdriver, remove the four
screws (M4 × 12, with washers) as shown in the
illustration below.
7 Remove the lens by lifting it slightly, widening the
lens cushion and sliding it forward.
8 Pull out the optical block protector in the direction
of the arrow.
Notes
•Be sure not to catch the connectors when
installing the lens.
• For ease of identification when you install the
lens, make sure that the label on the lens is facing
up.
10 Tighten the four screws to secure the replacement
lens firmly.
11 Connect the two connectors.
Skip this step and the next when installing a lens
other than the standard one.
12 Fasten the connector cables you released in step 4
with the cable binder.
13 Install the lens cover by sliding it from front to
back.
Optical block
protector
9 Widen the lens cushion and install the lens so that
the lens stopper and the projector stopper meet at
their edges.
Stopper (Projector)
Stopper (Lens)
Lens cover
14 Tighten the two screws to secure the lens cover
firmly.
Notes
• The lens scratches easily, so when handling it,
always place it gently on a stable and level surface in
a horizontal position.
•Avoid touching the lens surface.
11
Page 12

Français
Précautions
Sécurité
•Vérifiez si la tension de service de votre appareil est
identique à la tension secteur locale. Si une
adaptation de la tension s’avère nécessaire, consultez
votre revendeur Sony ou un personnel qualifié.
• Si des liquides ou des solides pénètrent dans le
châssis, débranchez l’appareil et faites-le vérifier par
un personnel Sony qualifié avant de le remettre en
service.
•Débranchez l’appareil de la prise murale si vous
prévoyez de ne pas l’utiliser pendant plusieurs jours.
• Pour débrancher le cordon, saisissez-le par la fiche.
Ne tirez jamais sur le cordon proprement dit.
• La prise d’alimentation doit se trouver à proximité
du moniteur et être aisément accessible.
•Cet appareil n’est pas déconnecté de la source
d’alimentation (secteur) aussi longtemps qu’il reste
branché sur la prise murale, même si l’appareil
proprement dit a été mis hors tension.
•Ne regardez pas dans l’objectif lorsque la lampe est
allumée.
•Ne placez pas les mains ou des objets à proximité
des orifices de ventilation — l’air expulsé est chaud.
• Evitez d’utiliser une rallonge affichant une tension
basse limitée car cela pourrait provoquer un courtcircuit et des accidents physiques.
• Pour porter le projecteur, prenez-le par les deux
côtés en le maintenant bien. Ne saisissez pas d’autres
parties du projecteur, en particulier l’objectif et
veillez à ne pas vous coincer les doigts entre le sol et
le projecteur.
•Ne vous coincez pas les doigts entre l’appareil et le
sol lorsque vous déplacez le projecteur installé au
sol.
•Veillez à ne pas vous coincer les doigts dans le
ventilateur.
•Ne transportez pas le projecteur par le châssis
installé et avec le couvercle ouvert.
Installation
• Si vous installez le projecteur au plafond, vous devez
utiliser le support de suspension pour projecteur
Sony PSS-620.
•Assurez une circulation d’air adéquate afin d’éviter
toute surchauffe interne. Ne placez pas l’appareil sur
des surfaces textiles (tapis, couvertures, etc.) ni à
proximité de tissus (rideaux, draperies) qui risquent
d’obstruer les orifices de ventilation. Laissez un
espace d’au moins 50 cm (19
et le projecteur. N’oubliez pas que la chaleur dans
une pièce monte; vérifiez donc si la température au
niveau du lieu d’installation n’est pas excessive.
• Installez le projecteur au sol ou au plafond. Toute
autre installation provoquera un dysfonctionnement
(irrégularité des couleurs ou réduction de la durée de
vie de la lampe).
•N’installez pas l’appareil à proximité de sources de
chaleur telles que des radiateurs ou des conduits d’air
chaud et ne l’exposez pas au rayonnement direct du
soleil, à de la poussière ou à de l’humidité en excès,
ni à des vibrations mécaniques ou à des chocs.
• Pour éviter la condensation d’humidité, n’installez
pas l’appareil là où la température risque
d’augmenter rapidement.
•Veillez à fixer le couvercle du châssis
convenablement lorsque vous l’installez au plafond.
3
/4 pouces) entre le mur
Eclairage
• Pour obtenir la meilleure qualité d’image possible,
l’avant de l’écran ne doit pas être directement exposé
à la source d’éclairage ni au rayonnement solaire.
•Nous préconisons un éclairage au moyen de spots
fixés au plafond. Placez un écran sur les lampes
fluorescentes de façon à éviter une altération du
niveau de contraste.
•Occultez les fenêtres qui font face à l’écran au
moyen de draperies opaques.
• Il est préférable d’installer le projecteur dans une
pièce où le sol et les murs ne sont pas revêtus d’un
matériau réfléchissant la lumière. Si le sol et les murs
réfléchissent la lumière, nous vous conseillons de
remplacer le revêtement du sol et des murs par une
couleur sombre.
12
Page 13

Comment éviter l’accumulation de
chaleur à l’intérieur du projecteur
Remplacement de
•Après avoir mis l’appareil hors tension à l’aide de la
touche I / 1 du panneau de commande ou de la
télécommande, ne déconnectez pas l’appareil de la
prise murale tant que le ventilateur de
refroidissement fonctionne.
•Ne débranchez pas le cordon d’alimentation de la
prise murale aussi longtemps que le ventilateur
tourne.
Attention
Le projecteur est équipé d’orifices de ventilation
(prise d’air) sur le dessous et d’orifices de ventilation
(sortie d’air) à l’avant. N’obstruez pas et ne placez
rien à proximité de ces orifices, faute de quoi vous
risquez de provoquer une surchauffe interne
susceptible d’entraîner une altération de l’image et
une détérioration du projecteur.
Entretien
• Pour conserver au châssis l’éclat du neuf, nettoyez-le
régulièrement à l’aide d’un chiffon doux. Les taches
tenaces s’éliminent en frottant avec un chiffon doux
légèrement imprégné d’une solution détergente
douce. N’utilisez en aucun cas des solvants puissants
tels que du diluant ou du benzène ni de nettoyants
abrasifs qui risqueraient d’altérer le fini du châssis.
•Ne touchez pas l’objectif. Pour éliminer la poussière
de l’objectif, utilisez un chiffon doux et sec.
N’utilisez pas de chiffon humide, de solution
détergente ni de diluant.
•Nettoyez l’objectif à intervalles réguliers.
Remballage
l’objectif
Vous pouvez installer ces trois types d’objectifs sur le
projecteur :
• Zoom à focale longue VPLL-ZM101
• Zoom à focale courte VPLL-ZM31
• Fixe à focale courte VPLL-FM21
Remarques
Avant d’utiliser l’objectif à focale courte fixe VPLLFM21 en option, vérifiez que :
• Le code produit mentionné sur le tampon situé en
haut, à droite sur l’emballage correspond bien à “P-
93817601.”
Si le code produit est “P-93817600,” vous ne pouvez
pas utiliser cet objectif avec ce projecteur.
• Le code produit mentionné sur le tampon situé sur
votre objectif correspond bien à “P-93817601.”
Si aucun code produit n’est mentionné sur l’objectif,
celui-ci ne peut pas être utilisé avec ce projecteur.
Pour remplacer l’objectif, procédez comme suit.
Pour le VPL-FX52 (avec objectif standard) :
exécutez les opérations des étapes 1 à 7 et 9 à 14.
Pour le VPL-FX52L (Les objectifs ne sont pas
fournis.) : exécutez les opérations des étapes 1, 2,
3, 6, 8 à 10 et 13 à 14.
Pour plus de détails sur le remplacement de l’objectif,
consultez également le manuel d’installation fourni avec
l’objectif.
1 Mettez le projecteur hors tension et débranchez le
cordon d’alimentation.
2 Desserrez les deux vis situées sur le couvercle de
l’objectif à l’aide d’un tournevis Phillips.
Conservez le carton d’emballage et les matériaux de
conditionnement, car ils constituent une protection
idéale en vue du transport de l’appareil. Pour une
protection maximale, remballez votre appareil comme
il a été emballé à l’origine en usine.
Aperçu
Le présent mode d’emploi décrit comment installer le
projecteur de données Sony VPL-FX52/FX52L,
comment remplacer l’objectif et comporte également
des plans d’installation. Lors du remplacement de
l’objectif, reportez-vous également au mode d’emploi.
3 Retirez le couvercle de l’objectif en le faisant
coulisser vers l’avant, puis en le soulevant.
Couvercle de
l’objectif
13
Page 14
4 Retirez les câbles des connecteurs de la bride
d’attache en ouvrant celle-ci.
Passez directement à l’étape 6 si vous installez un
objectif qui n’est pas standard.
Bride d’attache
5 Débranchez les deux connecteurs de l’objectif de
ceux du projecteur.
8 Retirez la protection du bloc optique dans le sens
de la flèche.
Protection du
bloc optique
8 Ecartez la butée de l’objectif, puis installez
l’objectif de sorte que la butée de l’objectif et la
butée du projecteur soient côte à côte.
Butée (Projecteur)
6 Retirez les quatre vis (M4 × 12, avec les rondelles)
à l’aide d’un tournevis Phillips comme illustré cidessous.
7 Retirez l’objectif en le soulevant légèrement, en
écartant la butée de l’objectif et en le faisant
glisser vers l’avant.
Butée (Objectif)
Remarques
• Prenez garde de ne pas coincer les connecteurs
en installant l’objectif.
• Pour simplifier l’identification de l’objectif,
veillez au moment de l’installation à ce que
l’étiquette apposée sur l’objectif soit orientée
vers le haut, au moment de l’installation.
10 Serrez les quatre vis pour immobiliser l’objectif.
11 Branchez les deux connecteurs.
Passez directement à l’étape 12 si vous installez
un objectif qui n’est pas standard.
14
12 Immobilisez les câbles des connecteurs que vous
avez retirés à l’étape 4 à l’aide de la bride
d’attache prévue à cet effet.
Page 15
13 Installez le couvercle de l’objectif en le faisant
coulisser de l’avant vers l’arrière.
Couvercle de
l’objectif
14 Resserrez les deux vis pour fixer le couvercle de
l’objectif.
Remarques
• Etant donné que l’objectif est très sensible aux
rayures, manipulez-le avec précautions et placez-le
toujours délicatement sur une surface stable et plane,
en position horizontale.
• Evitez de toucher la surface de l’objectif.
15
Page 16
Español
Precauciones
Seguridad
•Asegúrese de que la tensión de funcionamiento de la
unidad coincide con la del suministro eléctrico local.
Si es necesario adaptar la tensión, consulte con
personal Sony especializado.
• Si se introduce algún objeto sólido o líquido en la
unidad, desenchúfela y haga que sea examinada por
personal Sony especializado antes de volver a
utilizarla.
•Desenchufe la unidad de la toma de red si no va a
utilizarla durante varios días.
• Para desconectar el cable, tire del enchufe, nunca del
propio cable.
• La toma de red debe estar situada cerca de la unidad
y ser de fácil acceso.
• La unidad no estará desconectada de la fuente de
alimentación de CA (toma de corriente) mientras
esté conectada a la toma de red, aunque la haya
apagado.
•No mire al objetivo mientras la lámpara esté
encendida.
•No acerque la mano ni objetos a los orificios de
ventilación, ya que el aire que sale es caliente.
• Evite el uso de cables prolongadores de baja tensión
limitada, ya que pueden producirse cortocircuitos y
daños físicos.
•Cuando transporte el proyector, asegúrese de
agarrarlo firmemente por sus dos lados. No agarre
otras partes del proyector, en especial el objetivo, ni
se pille los dedos entre el suelo y dicho proyector.
• Tenga cuidado de no pillarse los dedos entre la
unidad y el suelo cuando mueva el proyector
instalado en el suelo.
• Tenga cuidado de no pillarse los dedos con el
ventilador de enfriamiento.
•No transporte el proyector con la cubierta puesta ni
abierta.
Instalación
• Si instala el proyector en el techo, debe emplearse el
soporte de suspensión para proyector PSS-620 de
Sony.
•Con el fin de evitar el recalentamiento interno de la
unidad, permita que ésta reciba una ventilación
adecuada. No sitúe la unidad sobre superficies
(mantas, alfombras, etc.) ni cerca de materiales
(cortinas, tapices) que puedan bloquear los orificios
de ventilación. Deje un espacio superior a 50 cm
3
(19
/4 pulgadas) entre la pared y el proyector. Tenga
en cuenta que el calor del ambiente se eleva hacia el
techo (compruebe que la temperatura en el lugar de
instalación no sea excesiva).
• Instale el proyector en el suelo o en el techo.
Cualquier otro tipo de instalación provocará fallos de
funcionamiento, como irregularidades del color o la
reducción de la vida útil de la lámpara.
•No instale la unidad en lugares próximos a fuentes
térmicas, como radiadores o conductos de aire
caliente, ni en lugares expuestos a la luz solar
directa, polvo excesivo o humedad, ni vibraciones o
golpes mecánicos.
• Para evitar la condensación de humedad, no instale
la unidad en lugares donde la temperatura pueda
aumentar rápidamente.
•Asegúrese de fijar firmemente la cubierta al realizar
la instalación en el techo.
Iluminación
• Para obtener la mejor calidad de imagen posible, no
exponga la parte frontal de la pantalla a iluminación
o luz solar directas.
• Se recomienda instalar una lámpara proyectora en el
techo. Cubra las lámparas fluorescentes para evitar la
disminución de la relación de contraste.
•Cubra con telas opacas las ventanas que estén
orientadas hacia la pantalla.
• Es preferible instalar el proyector en una sala cuyo
suelo y paredes no se compongan de materiales que
reflejen la luz. Si el suelo y las paredes se componen
de dicho tipo de materiales, se recomienda cambiar
el color de la alfombra y del papel pintado de la
pared por otro oscuro.
16
Page 17

Prevención del recalentamiento interno
• Tras desactivar la alimentación con la tecla I / 1 del
panel de control o del mando a distancia, no
desconecte la unidad de la toma de red hasta que se
detenga el ventilador de enfriamiento.
•No desconecte el cable de alimentación de CA de la
toma de red mientras sigue funcionando el
ventilador.
Precaución
El proyector va equipado con orificios de ventilación
de aspiración en la parte inferior y de exhaustación en
la parte frontal. No bloquee estos orificios ni coloque
nada cerca de los mismos, ya que puede producirse
recalentamiento interno, causando deterioro de la
imagen o daños al proyector.
Limpieza
Sustitución del objetivo
Es posible instalar estos tres tipos de objetivo en el
proyector.
•Objetivo zoom de enfoque largo VPLL-ZM101
•Objetivo zoom de enfoque corto VPLL-ZM31
•Objetivo fijo de enfoque corto VPLL-FM21
Notas
Cuando vaya a utilizar el objetivo fijo de enfoque
corto VPLL-FM21 opcional, compruebe que:
• el código de producto mencionado en la etiqueta
situada en la parte superior derecha del paquete es
“P-93817601”.
Si el código de producto es “P-93817600”, el
objetivo no podrá utilizarse con este proyector.
• el código de producto mencionado en la etiqueta del
objetivo es “P-93817601”.
Si no se especifica ningún código de producto en el
objetivo, éste no podrá utilizarse con este proyector.
• Para mantener el exterior de la unidad nuevo,
límpielo periódicamente con un paño suave. Para
eliminar las manchas persistentes, utilice un paño
ligeramente humedecido con una solución detergente
poco concentrada. No emplee nunca disolventes
concentrados, como diluyentes, bencina o productos
de limpieza abrasivos, ya que pueden dañar el
acabado.
• Evite tocar el objetivo. Para eliminar el polvo de
éste, emplee un paño seco y suave. No utilice un
paño húmedo, soluciones detergentes ni diluyentes.
• Limpie el filtro con regularidad.
Embalaje
Conserve la caja original de embalaje, ya que le
resultará útil cuando vaya a transportar la unidad. Para
obtener la máxima protección posible, embale la
unidad como la recibió de fábrica.
Siga estos pasos para sustituir el objetivo.
Para VPL-FX52 (con objetivo estándar): siga las
indicaciones que se dan en los pasos del 1 al 7 y
del 9 al 14.
Para VPL-FX52L (El objetivo no se suministra.):
siga las indicaciones que se dan en los pasos
1,2,3,6,8-10,13-14.
Para obtener información más detallada sobre cómo
sustituir el objetivo, también puede consultar el manual de
instalación suministrado con el objetivo.
1 Apague la unidad y desconecte el cable de
alimentación.
2 Afloje los dos tornillos de la cubierta del objetivo
utilizando un destornillador Phillips.
Introducción
En este manual se describen los procedimientos para
instalar el proyector de datos de Sony, modelo VPLFX52/FX52L, sustituir el objetivo y se ofrecen
diagramas de instalación. Al sustituir el objetivo,
consulte las instrucciones de uso.
17
Page 18

3 Extraiga la cubierta del objetivo deslizándola
hacia delante y elevándola.
Cubierta del
objetivo
4 Libere los cables de los conectores de la
abrazadera de cables abriéndola.
Omita este paso y el siguiente cuando instale un
objetivo diferente al estándar.
Abrazadera de
cables
7 Extraiga el objetivo elevándolo ligeramente,
extendiendo la almohadilla del objetivo y
desplazándolo hacia delante.
8 Tire del protector del bloque óptico en la dirección
de la flecha.
Protector del
bloque óptico
5 Desconecte los dos conectores del objetivo de los
del proyector.
6 Utilice un destornillador Philips para extraer los
cuatro tornillos (M4 × 12 con arandela), tal y
como se muestra en la ilustración siguiente.
9 Extienda la almohadilla del objetivo e instale éste
de forma que el tope del mismo y el del proyector
se junten en sus bordes.
Tope (Proyector)
Tope (Objetivo)
Notas
•Asegúrese de que los conectores no quedan
atrapados cuando instale el objetivo.
• Para facilitar la identificación del objetivo al
instalarlo, asegúrese de que la etiqueta de éste se
encuentra en la parte superior.
18
Page 19

10 Apriete los cuatro tornillos para asegurar con
firmeza el objetivo nuevo.
11 Conecte los dos conectores.
Omita este paso y el siguiente cuando instale un
objetivo diferente al estándar.
12 Apriete con la abrazadera de cables los cables de
los conectores que aflojó en el paso 4.
13 Instale la cubierta del objetivo deslizándola de
adelante a atrás.
Cubierta del
objetivo
14Apriete los dos tornillos para fijar la cubierta del
objetivo firmemente.
Notas
• El objetivo se raya fácilmente. Por tanto, al
manipularlo es conveniente colocarlo suavemente
sobre una superficie estable y nivelada en posición
horizontal.
• Procure no tocar la superficie del objetivo.
19
Page 20

Deutsch
Sicherheitsmaßnahmen
Sicherheit
•Achten Sie darauf, daß die Betriebsspannung des
Geräts der lokalen Stromversorgung entspricht.
Wenn die Betriebsspannung angepaßt werden muß,
wenden Sie sich bitte an qualifiziertes Fachpersonal
von Sony.
• Sollten Fremdkörper oder Flüssigkeiten in das Gerät
gelangen, trennen Sie es von der Netzsteckdose.
Lassen Sie das Gerät von qualifiziertem
Fachpersonal von Sony überprüfen, bevor Sie es
wieder benutzen.
•Wollen Sie das Gerät einige Tage nicht benutzen,
ziehen Sie den Netzstecker aus der Steckdose.
• Ziehen Sie zum Lösen des Netzsteckers immer am
Stecker, niemals am Kabel.
•Die Netzsteckdose sollte sich in der Nähe des Geräts
befinden und leicht zugänglich sein.
•Das Gerät bleibt auch in ausgeschaltetem Zustand
mit dem Stromnetz verbunden, solange das
Netzkabel mit der Netzsteckdose verbunden ist.
• Schauen Sie nicht in das Objektiv, während die
Birne eingeschaltet ist.
• Stellen Sie keine Gegenstände in die Nähe der
Lüftungsöffnungen, und halten Sie auch Ihre Hände
davon fern — die ausströmende Luft ist heiß!
•Verwenden Sie kein Verlängerungskabel, das nur für
geringe Spannungen ausgelegt ist. Ein solches Kabel
könnte zu Kurzschlüssen und sonstigen Unfällen
führen.
•Halten Sie den Projektor beim Tragen unbedingt fest
an beiden Seiten. Fassen Sie den Projektor, um ihn
zu tragen, nicht an anderen Stellen, vor allem nicht
am Objektiv. Achten Sie auch darauf, sich die Hände
nicht zwischen Fußboden und Projektor
einzuklemmen.
•Wenn Sie einen am Boden installierten Projektor
bewegen, achten Sie darauf, die Hände nicht
zwischen Fußboden und Projektor einzuklemmen.
•Greifen Sie auf keinen Fall in den Ventilator.
• Tragen Sie einen in einen Ständer eingebauten
Projektor nicht mit geöffneter Abdeckung.
Aufstellung
•Mit Hilfe der Projektoraufhängung PSS-620 von
Sony können Sie den Projektor an der Decke
installieren.
•Achten Sie auf ausreichende Luftzufuhr, damit sich
im Gerät kein Wärmestau bildet. Stellen Sie das
Gerät nicht auf Oberflächen wie Teppichen oder
Decken oder in der Nähe von Materialien wie
Gardinen und Wandbehängen auf, die die
Lüftungsöffnungen blockieren könnten. Achten Sie
auf einen Mindestabstand von 50 cm zwischen der
Wand und dem Projektor. Denken Sie bei
Deckeninstallationen daran, daß Wärme zur Decke
aufsteigt. Achten Sie darauf, daß die Temperatur am
Installationsort nicht zu hoch ist.
• Installieren Sie den Projektor am Boden oder an der
Decke. Bei Installation in einer anderen Position
kann es zu Fehlfunktionen wie Farbstörungen
kommen, und die Lebensdauer der Birne ist
möglicherweise verkürzt.
• Stellen Sie das Gerät nicht in der Nähe von
Wärmequellen wie Heizkörpern oder
Warmluftauslässen oder an Orten auf, an denen es
direktem Sonnenlicht, außergewöhnlich viel Staub
oder Feuchtigkeit, mechanischen Vibrationen oder
Stößen ausgesetzt ist.
• Installieren Sie das Gerät nicht an einem Ort, an dem
die Temperatur sehr schnell ansteigen und zu
Feuchtigkeitskondensation führen könnte.
•Achten Sie darauf, die Abdeckung sicher zu
befestigen, wenn Sie das Gerät an der Decke
installieren.
Beleuchtung
• Um eine optimale Bildqualität zu erzielen, achten Sie
darauf, daß kein Licht direkt auf die Vorderseite des
Projektionsschirms fällt.
•Empfohlen wird eine Spotbeleuchtung an der Decke.
Leuchtstoffröhren sollten Sie abdecken, um eine
Verminderung des Kontrasts zu verhindern.
•Verhängen Sie Fenster, die dem Projektionsschirm
direkt gegenüber liegen.
• Sie sollten den Projektor in einem Raum installieren,
in dem Boden und Wände mit einem Material
verkleidet sind, das kein Licht reflektiert. Ist dies
nicht möglich, sollten Sie für Bodenbelag und
Wandverkleidung ein dunkles Material wählen.
20
Page 21

Vermeiden eines internen Hitzestaus
•Nachdem Sie das Gerät mit der Taste I / 1 auf dem
Bedienfeld oder mit der Fernbedienung ausgeschaltet
haben, trennen Sie es nicht von der Netzsteckdose,
solange der Ventilator noch läuft.
• Lösen Sie nicht das Netzkabel von der
Netzsteckdose, solange der Ventilator noch läuft.
Achtung
Der Projektor ist an der Unterseite mit
Ansaugöffnungen und an der Vorderseite mit
Auslaßöffnungen ausgestattet. Blockieren Sie diese
Öffnungen nicht, und stellen Sie keine Gegenstände in
die Nähe der Öffnungen. Andernfalls kann es zu
einem Wärmestau kommen, der zu einer Verringerung
der Bildqualität oder Schäden am Projektor führen
kann.
Reinigung
•Damit das Gehäuse immer wie neu aussieht, reinigen
Sie es regelmäßig mit einem weichen Tuch.
Hartnäckige Verschmutzungen können Sie mit
einem Tuch entfernen, das Sie leicht mit einem
milden Reinigungsmittel angefeuchtet haben.
Verwenden Sie keine starken Lösungsmittel wie
Verdünner oder Benzin und keine Scheuermittel, da
diese die Gehäuseoberfläche angreifen.
•Berühren Sie das Objektiv nicht. Mit einem weichen,
trockenen Tuch können Sie Staub vom Objektiv
entfernen. Feuchten Sie das Tuch nicht an, und
benutzen Sie weder eine Reinigungsflüssigkeit noch
Verdünner.
•Reinigen Sie den Filter in regelmäßigen Abständen.
Übersicht
In dieser Anleitung wird beschrieben, wie Sie den
Datenprojektor VPL-FX52/FX52L von Sony
installieren und das Objektiv austauschen. Außerdem
sind Installationsdiagramme abgebildet. Schlagen Sie
bitte auch in der Bedienungsanleitung nach, wenn Sie
das Objektiv austauschen wollen.
Verpacken
Bewahren Sie Originalkarton und
Verpackungsmaterialien gut auf für den Fall, daß Sie
das Gerät später einmal transportieren müssen. Am
besten geschützt ist das Gerät beim Transport, wenn
Sie es wieder so verpacken, wie es geliefert wurde.
21
Page 22

Austauschen des
Objektivs
Die folgenden drei Objektivtypen können im
Projektor installiert werden:
• Zoom-Objektiv VPLL-ZM101 mit langer
Brennweite
• Zoom-Objektiv VPLL-ZM31 mit kurzer Brennweite
•Objektiv VPLL-FM21 mit festgelegter kurzer
Brennweite
Hinweise
Wenn Sie das gesondert erhältliche Objektiv VPLLFM21 mit festgelegter kurzer Brennweite einsetzen,
überprüfen Sie bitte folgendes:
•Der Produktcode auf dem Aufkleber oben rechts an
der Verpackung muß “P-93817601” lauten.
Wenn der Produktcode “P-93817600” lautet, können
Sie das Objektiv bei diesem Projektor nicht
einsetzen.
•Der Produktcode auf dem Aufkleber am Objektiv
muß “P-93817601” lauten.
Wenn auf dem Objektiv kein Produktcode
angegeben ist, können Sie das Objektiv bei diesem
Projektor nicht einsetzen.
3 Entfernen Sie die Objektivabdeckung, indem Sie
sie leicht nach vorne schieben und dann anheben.
Objektivabdeckung
4 Lösen Sie die Verbindungskabel aus dem
Kabelband, indem Sie es öffnen.
Lassen Sie diesen und den nächsten Schritt aus,
wenn Sie nicht das Standardobjektiv, sondern ein
anderes Objektiv installieren.
Kabelband
5 Lösen Sie die beiden Anschlüsse am Objektiv von
denen am Projektor.
Tauschen Sie das Objektiv wie im folgenden
beschrieben aus.
Beim VPL-FX52 (mit Standardobjektiv): Gehen
Sie nach den Anweisungen in Schritt 1 bis 7 sowie
9 bis 14 vor.
Beim VPL-FX52L (Das Objektiv ist nicht
mitgeliefert.): Gehen Sie nach den Anweisungen in
Schritt 1, 2, 3, 6, 8-10 und 13-14 vor.
Näheres zum Austauschen des Objektivs finden Sie in der
Installationsanleitung zum Objektiv.
1 Schalten Sie das Gerät aus, und lösen Sie das
Netzkabel.
2 Lösen Sie mit einem Kreuzschlitzschraubenzieher
die beiden Schrauben an der Objektivabdeckung.
6 Entfernen Sie die vier Schrauben (M4 × 12, mit
Unterlegscheiben) mit einem
Kreuzschlitzschraubenzieher, wie in der
Abbildung unten gezeigt.
22
Page 23

7 Entfernen Sie das Objektiv, indem Sie es leicht
anheben, das Objektivpolster weiten und das
Objektiv dann nach vorne schieben.
8 Ziehen Sie den Schutz für den optischen Block in
Pfeilrichtung heraus.
Schutz für den
optischen Block
10 Ziehen Sie die vier Schrauben an, um das
Ersatzobjektiv sicher zu befestigen.
11 Schließen Sie die beiden Anschlüsse an.
Lassen Sie diesen und den nächsten Schritt aus,
wenn Sie nicht das Standardobjektiv, sondern ein
anderes Objektiv installieren.
12 Sichern Sie die in Schritt 4 gelösten
Verbindungskabel mit dem Kabelband.
13 Bringen Sie die Objektivabdeckung wieder an,
indem Sie sie von vorn nach hinten schieben.
Objektivabdeckung
9 Weiten Sie das Objektivpolster, und bringen Sie
das Objektiv so an, daß die Kanten des Stoppers
am Objektiv und am Projektor aufeinandertreffen.
Stopper (Projektor)
Stopper (Objektiv)
Hinweise
•Achten Sie darauf, beim Installieren des
Objektivs die Anschlüsse nicht einzuklemmen.
•Damit Sie das Objektiv später problemlos
identifizieren können, sollte der Aufkleber am
Objektiv nach oben weisen.
14 Ziehen Sie die beiden Schrauben an, um die
Objektivabdeckung sicher zu befestigen.
Hinweise
•Objektive zerkratzen sehr leicht. Legen Sie
Objektive deshalb immer vorsichtig in horizontaler
Position auf einer stabilen und waagerechten
Oberfläche ab.
•Berühren Sie bei einem Objektiv nicht die
Oberfläche der Linse.
23
Page 24

Italiano
Precauzioni
Sicurezza
•Verificare che la tensione operativa dell’apparecchio
corrisponda a quella dell’alimentazione locale. Se
fosse necessario un adattatore di tensione, contattare
il personale qualificato Sony.
• Se dovessero penetrare corpi liquidi o solidi
all’interno dell’apparecchio, scollegarlo e farlo
controllare da personale qualificato Sony prima di
riutilizzarlo.
• Scollegare l’apparecchio dalla presa di rete se non si
intende utilizzarlo per diversi giorni.
• Per scollegare il cavo, tirare afferrando la spina e mai
il cavo stesso.
• La presa di rete deve trovarsi vicino all’apparecchio
ed essere facilmente accessibile.
• L’apparecchio non è scollegato dalla sorgente di
alimentazione CA (di rete) fino a che resta collegato
alla presa a muro, anche se l’interruttore è stato
spento.
•Non guardare dentro l’obiettivo quando la lampada è
accesa.
•Non avvicinare la mano o alcun oggetto alle prese di
ventilazione — l’aria che ne fuoriesce ha una
temperatura elevata.
• Evitare l’uso di una prolunga con un basso voltaggio
in quanto potrebbe provocare cortocircuiti e danni
fisici.
• Per trasportare il proiettore, assicurarsi di tenerlo
saldamente da entrambi i lati. Non afferrare altre
parti del proiettore, in particolar modo l’obiettivo ed
evitare che le dita rimangano bloccate tra il
pavimento e il proiettore.
•Non infilare le dita tra l’apparecchio e la superficie
del pavimento quando si sposta il proiettore
installato sul pavimento.
• Fare attenzione a non infilare le dita nella ventola di
raffreddamento.
•Non trasportare il proiettore con sopra gli accessori e
il coperchio aperto.
Installazione
• Se il proiettore viene installato al soffitto, è
necessario utilizzare il supporto di sospensione Sony
PSS-620.
•Consentire una buona circolazione d’aria all’interno
dell’apparecchio per evitarne il surriscaldamento.
Non collocare l’apparecchio su superfici come
tappeti, coperte, ecc., o vicino a materiali come tende
e drappeggi che potrebbero bloccare le prese di
ventilazione. Lasciare uno spazio di almeno 50 cm
fra la parete e il proiettore. Dal momento che il
calore si propaga verso l’alto, verificare che la
temperatura circostante il luogo d’installazione non
sia troppo elevata.
• Installare il proiettore al pavimento o al soffitto.
Ogni altro tipo di installazione può causare problemi
di funzionamento come ad esempio un’irregolarità
del colore o una durata della lampada più breve.
•Non installare l’apparecchio nei pressi di fonti di
calore come radiatori o condotti d’aria calda, né in
luoghi esposti alla luce diretta del sole, polvere
eccessiva, umidità, vibrazioni o urti meccanici.
• Per evitare la formazione di condensa, non installare
l’apparecchio in un ambiente soggetto ad aumenti di
temperatura repentini.
•Assicurarsi che il coperchio del rivestimento sia ben
saldo quando viene effettuata l’installazione al
soffitto.
Illuminazione
• Per ottenere un’immagine ottimale, la parte anteriore
dello schermo non deve essere esposta a
illuminazione diretta o alla luce diretta del sole.
• Si consiglia un’illuminazione costituita da faretti
installati al soffitto. Per evitare di abbassare il
rapporto del contrasto, schermare le lampade
fluorescenti vicine al proiettore.
•Coprire con tende opache eventuali finestre poste di
fronte allo schermo.
• Si consiglia di installare l’apparecchio in una stanza
dove pavimento e pareti non siano in materiale che
riflette la luce. Diversamente, si consiglia di
applicare materiali di rivestimento di colore scuro
per prevenire il surriscaldamento interno.
24
Page 25

Prevenzione del surriscaldamento interno
•Dopo aver disattivato l’alimentazione con il tasto
I / 1 sul pannello di controllo o sul telecomando,
non scollegare l’apparecchio dalla presa di rete
mentre la ventola è ancora in funzione.
•Non scollegare il cavo di alimentazione CA dalla
presa di rete mentre la ventola è ancora in funzione.
Attenzione
Il proiettore è dotato di prese di ventilazione
(aspirazione) sul fondo e di prese di ventilazione
(scarico) sulla parte anteriore. Non ostruire o non
collocare nulla vicino alle prese per evitare un
surriscaldamento interno che potrebbe deteriorare
l’immagine o danneggiare il proiettore.
Pulizia
• Per mantenere l’apparecchio sempre come nuovo,
pulirlo regolarmente con un panno morbido. Per
eliminare le macchie ostinate, usare un panno
leggermente inumidito con un detergente neutro.
Non usare mai solventi potenti, tipo acquaragia,
benzene o detergenti abrasivi che potrebbero
danneggiare le finiture esterne del rivestimento.
• Evitare di toccare l’obiettivo. Per rimuovere la
polvere dall’obiettivo, usare un panno morbido e
asciutto. Non utilizzare mai un panno bagnato, né
detergenti o solventi.
• Pulire il filtro regolarmente.
Imballaggio
Sostituzione
dell’obiettivo
Nel proiettore è possibile installare i tre tipi di
obiettivo riportati di seguito.
•Obiettivo con messa a fuoco lunga VPLL-ZM101
•Obiettivo zoom con messa a fuoco breve VPLLZM31
•Obiettivo con messa a fuoco breve fisso VPLLFM21
Note
Quando viene utilizzato l’obiettivo fisso con messa a
fuoco breve VPLL-FM21 opzionale, verificare che:
• il codice del prodotto riportato nel sigillo di garanzia
situato nella parte superiore destra della confezione
sia “P-93817601.”
Se il codice del prodotto è “P-93817600,” non sarà
possibile utilizzare l’obiettivo con il presente
proiettore.
• il codice del prodotto riportato nel sigillo di garanzia
dell’obiettivo sia “P-93817601.”
Se il codice non è riportato sull’obiettivo, non sarà
possibile utilizzare quest’ultimo con il presente
proiettore.
Seguire le procedure indicate per sostituire l’obiettivo.
Per VPL-FX52 (con obiettivo standard): eseguire
le operazioni descritte ai punti da 1 a 7 e da 9 a 14.
Per VPL-FX52L (Gli obiettivi non sono in
dotazione.): eseguire le operazioni descritte ai
punti 1,2,3,6,8-10,13-14.
Per informazioni dettagliate su come sostituire l’obiettivo,
fare riferimento al manuale in dotazione con l’obiettivo.
Conservare lo scatolone e il materiale di imballaggio
originali, perché potrebbero rivelarsi utili per
trasportare l’apparecchio in futuro. Per una protezione
ottimale durante il trasporto, imballare l’apparecchio
così come lo si è ricevuto dal fabbricante.
Presentazione
Nel presente manuale vengono descritte le modalità di
installazione del proiettore di dati Sony VPL-FX52/
FX52L, di sostituzione dell’obiettivo, nonché i
diagrammi di installazione. Per sostituire l’obiettivo,
fare riferimento alle istruzioni per l’uso.
1 Disattivare l’alimentazione e scollegare il cavo di
alimentazione.
2 Allentare le due viti del copriobiettivo utilizzando
un cacciavite Phillips.
25
Page 26

3 Rimuovere il copriobiettivo facendolo scorrere in
avanti, quindi sollevandolo.
Copriobiettivo
4 Rilasciare i cavi del connettore aprendo il
fermacavo.
Saltare questo punto e quello successivo se si
sostituisce un obiettivo diverso da quello standard.
Fermacavo
7 Rimuovere l’obiettivo sollevandolo delicatamente,
allargando il cuscinetto dell’obiettivo e facendolo
scorrere in avanti.
8 Estrarre la protezione del blocco ottico in
direzione della freccia.
Protezione del
blocco ottico
5 Scollegare i due connettori dell’obiettivo da quelli
del proiettore.
6 Rimuovere le quattro viti (M4 × 12, con rondelle)
utilizzando un cacciavite Phillips, come mostrato
nell’illustrazione.
9 Allentare il cuscinetto dell’obiettivo, quindi
inserire l’obiettivo in modo che i bordi del fermo
dell’obiettivo si congiungano con quelli del fermo
del proiettore
Fermo (Proiettore)
Fermo (Obiettivo)
Note
•Assicurarsi che i connettori non rimangano
incastrati durante l’installazione dell’obiettivo.
• Per facilitarne il riconoscimento, quando si
installa l’obiettivo, assicurarsi che la relativa
etichetta sia rivolta verso l’alto.
26
Page 27

10 Stringere le quattro viti per assicurare saldamente
l’obiettivo sostituito.
11 Collegare i due connettori.
Saltare questo punto e quello successivo se si
installa un obiettivo diverso da quello standard.
12 Bloccare con il fermacavo i cavi del connettore
rilasciati al punto 4.
13 Installare il copriobiettivo facendolo scorrere
dalla parte anteriore verso quella posteriore.
Copriobiettivo
14 Stringere le due viti per fissare saldamente il
copriobiettivo.
Note
• L’obiettivo si graffia facilmente, quindi, nel
maneggiarlo, assicurarsi sempre di appoggiarlo
delicatamente su un piano stabile e liscio in
posizione orizzontale.
• Evitare di toccare la superficie dell’obiettivo.
27
Page 28

282930
Page 29

Page 30

Page 31

A
壁
Wall
Mur
Pared
Wand
Parete
x
キャビネットの前面からレンズ中心までの距離
Distance between the front of the cabinet and
the center of the lens
Distance entre l’avant du châssis et le centre
de l’objectif
Distancia entre la parte frontal de la unidad y
el centro del objetivo
Abstand zwischen der Gehäusevorderseite
und der Objektivmitte
Distanza tra la parte anteriore
dell’apparecchio e il centro dell’obiettivo
スクリーンの中心
Center of the screen
Centre de l’écran
Centro de la pantalla
Mitte des Projektionsschirms
Centro dello schermo
標準 / Standard / : 30.5 (1 1/4)
VPLL-ZM101: 66.3 (2 5/8)
VPLL-ZM31: 89.0 (3
VPLL-FM21: 71.7 (2
レンズの中心
Centro del objetivo / Mitte des Objektivs / Centro
dell’obiettivo /
/ Center of the lens / Centre de l’objectif /
5
/8)
7
/8)
b
c
a
単位: mm(インチ)/ Unit: mm (inches) / Unité: mm (pouces) / Unidad: mm (pulgadas) /
Einheit: mm (Zoll) / Unità: mm (pollici)/
日本語
設置寸法
床置き
プロジェクターを 机など の 上に置いて設置する場合の設置例を示しま
す。A
設置寸法については、33 ページの表をご覧ください。
標準レンズの場合は、取扱説明書をご覧ください 。
English
Installation Diagram
Floor Installation
This section describes the examples for installing the
projector on the desk, etc. A
See the charts on page 33 concerning the installation
measurements.
When using the standard lens, refer to the operating
イラスト中 の ア ルファベットは、以 下 の 距 離を 示しま す 。
a:レンズの中心からスクリーンま での距離
b: 床からレンズの中心までの距離
c: 床からプロジェクターの脚まで の 距 離
x: 任意
instructions.
The alphabetical letters in the illustration indicate the
distances below.
a : distance between the screen and the center of the lens
b : distance between the floor and the center of the lens
c : distance between the floor and the bottom of the
adjusters of the projector
x : free
床 / Floor / Sol / Suelo /
Boden / Pavimento /
31
Page 32

Français
Schéma d’installation
Installation au sol
Cette section décrit des exemples d’installation du projecteur
sur un bureau, etc. A
Die Buchstaben in der Abbildung beziehen sich auf die
unten beschriebenen Abstände.
a : Abstand zwischen dem Projektionsschirm und der Mitte
des Objektivs
b : Abstand zwischen dem Boden und der Mitte des
Objektivs
c : Abstand zwischen dem Boden und der Unterseite der
Ausgleichsfüße des Projektors
x : frei
Reportez-vous aux tableaux de la page 33 sur les mesures
d’installation.
Lorsque vous utilisez un objectif standard, consultez le
mode d’emploi.
Les caractères alphabétiques dans l’illustration indiquent les
distances ci-dessous.
a : distance entre l’écran et le centre de l’objectif
b : distance entre le sol et le centre de l’objectif
c : distance entre le sol et la base des pieds réglables du
projecteur
x : libre
Español
Diagrama de instalación
Instalación en el suelo
En esta sección se muestran ejemplos para instalar el
proyector sobre una mesa, etc. A
Consulte las tablas de la página 33 en relación con las
medidas de instalación.
Cuando utilice el objetivo estándar, consulte el manual de
instrucciones.
Italiano
Diagramma di
installazione
Installazione sul pavimento
Questa sezione descrive gli esempi di installazione del
proiettore su una superficie piana. A
Vedere i diagrammi da pagina 33 relativi alle misure di
installazione.
Se si utilizza un obiettivo standard fare riferimento alle
istruzioni per l’uso.
Le lettere nell’illustrazione indicano le distanze descritte di
seguito.
a : distanza fra lo schermo e il centro dell’obiettivo
b : distanza tra il pavimento e il centro dell’obiettivo
c : distanza fra il pavimento e la base dei dispositivi di
regolazione del proiettore
x : libero
Las letras alfabéticas de la ilustración indican las distancias
mostradas a continuación.
a : distancia entre la pantalla y el centro del objetivo
b : distancia entre el suelo y el centro del objetivo
c : distancia entre el suelo y la base de los ajustadores del
proyector
x : libre
Deutsch
Installationsdiagramm
Installation am Boden
In diesem Abschnitt finden Sie Beispiele für das Installieren
des Projektors auf einem Tisch usw. A
In den Tabellen auf Seite 33 finden Sie die
Installationsabmessungen.
Wenn Sie das Standardobjektiv benutzen, schlagen Sie bitte
in der Bedienungsanleitung nach.
32
Page 33

単位:mm(インチ)/ Unit: mm (inches) / Unité: mm (pouces) / Unidad: mm (pulgadas) /
■
VPLL-ZM101
SS 40 60 80 100 120 150 180 200 250 300
2600 4000 5410 6810 8220 10330 12430 13840 17350 20870
N
a
M
N
b
Mx
N
c
M x-102 (x-4 1/8)
3
(102
/8) (157 1/2) (213 1/8) (268 1/4) (323 3/4) (406 3/4) (489 1/2) (545) (683 1/4)(821 7/8)
3890 5940 7980 10030 12080 15150 18220 20270 25380 30500
(153 1/4) (234) (314 1/4) (394 15/16) (475 3/4) (596 5/8) (717 1/2)(798 1/4)(999 3/8) (1201)
x-305 x-457 x-610 x-762 x-914 x-1143 x-1372 x-1524 x-1905 x-2286
(x-12 1/8) (x-18) (x-24 1/8) (x-30) (x-36) (x-45) (x-54 1/8) (x-60) (x-75 1/8) (x-90 1/8)
x-417 x-569 x-722 x-874 x-1026 x-1255 x-1484 x-1636 x-2017 x-2398
(x-16 1/2) (x-22 1/2) (x-28 1/2) (x-34 1/2) (x-40 1/2) (x-49 1/2) (x-58 1/2) (x-64 1/2) (x-79 7/16) (x-94 1/2)
Einheit: mm (Zoll) / Unità: mm (pollici) /
a (N) = {(SS × 89.822/1.3102) – 209.3} × 1.025
a (M) = {(SS × 137.560/1.3102) – 211.6} × 0.975
b (N) = x – (SS/1.3102 × 9.984)
c (N) = x – (SS/1.3102 × 9.984 +112)
■
VPLL-ZM31
SS 40 60 80 100 120 150 180 200 250 300
1190 1840 2490 3150 3800 4780 5760 6410 8050 9680
N
a (46 7/8) (72 1/2) (98 1/8) (124 1/8) (149 5/8) (188 1/4)(226 7/8)(252 1/2) (317) (381 1/4)
b
c
1250 1940 2620 3300 3980 5000 6030 6710 8410 10120
M
(49 1/4) (76 1/2)(103 1/4) (130) (156 3/4) (196 7/8) (237 7/16)(264 1/4) (331 1/4) (398 1/2)
x-305 x-457 x-610 x-762 x-914 x-1143 x-1372 x-1524 x-1905 x-2286
N
(x-12 1/8) (x-18) (x-24 1/8) (x-30) (x-36) (x-45) (x-54 1/8) (x-60) (x-75 1/8) (x-90 1/8)
Mx
x-417 x-569 x-722 x-874 x-1026 x-1255 x-1484 x-1636 x-2017 x-2398
N
(x-16 1/2) (x-22 1/2) (x-28 1/2) (x-34 1/2) (x-40 1/2) (x-49 1/2) (x-58 1/2) (x-64 1/2) (x-79 7/16) (x-94 1/2)
M x-102 (x-4 1/8)
a (N) = {(SS × 41.750/1.3102) – 116.3} × 1.025
a (M) = {(SS × 45.821/1.3102) – 112.9} × 0.975
b (N) = x – (SS/1.3102 × 9.984)
c (N) = x – (SS/1.3102 × 9.984 +112)
■
VPLL-FM21
SS 40 60 80 100 120 150 180 200 250 300
a
bx
c x-102 (x-4 1/8)
690 1080 1460 1850 2240 2820 3400 3780 4750 5720
(27 1/4) (42 5/8) (57 1/2) (72 7/8) (88 1/4) (111 1/8 ) (133 7/8)(148 7/8)(187 1/8)(225 1/4)
a = {(SS × 24.711/1.3102) – 81.9} × 1.025
b = x
c = x – 102
日本語
設置寸法
床置き
各レンズの設 置寸法と計算方法を上記に示します。
English
Installation Diagram
Floor Installation
The installation measurements and their calculation method
for each lens are shown above.
表および計算式のアルファベットは 以下の意味を示します。
SS : スクリー ン サ イズ 対 角( インチ)
a:レンズの中心からスクリーンま での距離
b:床からレンズの中心までの距離
c:床からプロジェクターの 脚まで の 距 離
x:任意
N:最小値
M:最大値
VPLL-FM21をご使用の場合はレンズの中心とスクリーンの 中 心 の 高さ
が同じになるように設置し て 下さい 。
The alphabetical letters in the charts and calculation
methods indicate the following.
SS : screen size measured diagonally (inches)
a:distance between the screen and the center of the lens
b:distance between the floor and the center of the lens
c:distance between the floor and the bottom of the
adjusters of the projector
x:free
N:minimum
M:maximum
When using the VPLL-FM21, make sure that the center of
the lens is aligned with the vertical center of the screen.
33
Page 34

Français
Schéma d’installation
Installation au sol
Les mesures de l'installation et leur méthode de calcul pour
chaque objectif sont indiquées sur la page de gauche.
Les caractères alphabétiques dans l’illustration indiquent ce
qui suit.
SS : dimension de l’écran en diagonale (pouces)
a:distance entre l’écran et le centre de l’objectif
b:distance entre le sol et le centre de l’objectif
c:distance entre le sol et la base des pieds réglables du
projecteur
x:libre
N:minimum
M:maximum
Lorsque vous employez le VPLL-FM21, assurez-vous que
l’axe de l’objectif est aligné sur l’axe vertical de l’écran.
a:Abstand zwischen dem Projektionsschirm und der
Mitte des Objektivs
b:Abstand zwischen dem Boden und der Mitte des
Objektivs
c:Abstand zwischen dem Boden und der Unterseite der
Ausgleichsfüße des Projektors
x:frei
N:Mindestens
M:Höchstenss
Wenn Sie das VPLL-FM21 benutzen, achten Sie darauf, daß
die Objektivmitte an der vertikalen Mitte des
Projektionsschirms ausgerichtet ist.
Italiano
Diagramma di installazione
Installazione sul pavimento
Le misure di installazione e il loro metodo di calcolo per
ogni obiettivo sono riportate nella pagina a sinistra.
Español
Diagrama de instalación
Instalación en el suelo
Las medidas de instalación y su método de cálculo para cada
objetivo se muestran en la página izquierda.
Las letras alfabéticas de las tablas y los métodos de cálculo
indican lo siguiente.
SS : tamaño de pantalla medida diagonalmente (pulgadas)
a:distancia entre la pantalla y el centro del objetivo
b:distancia entre el suelo y el centro del objetivo
c:distancia entre el suelo y la base de los ajustadores del
proyector
x:libre
N:mínimo
M:máximo
Si utiliza la unidad VPLL-FM21, compruebe que el centro
del objetivo quede alineado con el centro vertical de la
pantalla.
Deutsch
Le lettere nei diagrammi e i metodi di calcolo indicano
quanto segue.
SS : dimensione schermo misurata diagonalmente (pollici)
a:distanza fra lo schermo e il centro dell’obiettivo
b:distanza tra il pavimento e il centro dell’obiettivo
c:distanza fra il pavimento e la base dei dispositivi di
regolazione del proiettore
x:libero
N:minima
M:massima
Quando si utilizza il proiettore VPLL-FM21, accertarsi che
il centro dell’obiettivo sia allineato con il centro verticale
dello schermo.
Installationsdiagramm
Installation am Boden
Die Installationsabmessungen und das jeweilige
Berechnungsverfahren für die einzelnen Objektive sind links
angegeben.
Die Buchstaben in den Tabellen und den
Berechnungsverfahren haben folgende Bedeutung:
SS : Projektionsschirmgröße in Zoll, diagonal gemessen
34
Page 35

B
x
スクリーンの中心
Center of the screen
Centre de l’écran
Centro de la pantalla
Mitte des Projektionsschirms
Centro dello schermo
プロジェクターサスペンションサポート
PSS-620 Projector Suspension Support (not supplied)
Support de suspension pour projecteur PSS-620 (non fourni)
Soporte de suspensión para proyector PSS-620 (no suministrado)
Projektoraufhängung PSS-620 (nicht mitgeliefert)
Supporto di sospensione del proiettore PSS-620 (non in dotazione)
PSS-620
PSS-620
a
b
(別売)
c
天井
Ceiling
Plafond
Techo
Decke
Soffitto
レンズの中心
l’objectif / Centro del objetivo / Mitte des Objektivs /
Centro dell’obiettivo /
キャビネットの前面からレンズ中心までの距離
Distance between the front of the cabinet and
the center of the lens
Distance entre l’avant du châssis et le centre
de l’objectif
Distancia entre la parte frontal de la unidad y el
壁
Wall
Mur
Pared
Wand
Parete
単位: mm(インチ)/ Unit: mm (inches) / Unité: mm (pouces) / Unidad: mm (pulgadas) /
Einheit: mm (Zoll) / Unità: mm (pollici) /
日本語
天井つり
centro del objetivo
Abstand zwischen der Gehäusevorderseite und
der Objektivmitte
Distanza tra la parte anteriore dell’apparecchio
e il centro dell’obiettivo
English
Ceiling Installation
標準 / Standard /
VPLL-ZM101: 66.3 (2 5/8)
VPLL-ZM31: 89.0 (3 5/8)
/ Center of the lens / Centre de
プロジェクターを天井からつり下げて設置する場合の設置例を示しま
す。B
天井つりの場合は、プロジェクターサスペンションサポートPSS-620をご
使用ください。
設置は、代理店またはソニーサービスにおまかせください 。
設置寸法については、37 ページの表をご覧ください。
イラスト中 の ア ルファベットは、以 下 の 距 離を 示しま す 。
a:レンズの中心からスクリーンま での距離
b: 天井からレンズ の 中心までの距離
c: 天井からサスペンションサポートの 取り付け 面まで の 距 離
x: 天井からスクリーン の 中 心 ま で の 距 離
This section describes the examples for installing the
projector on the ceiling. B
When installing the projector on the ceiling, use the PSS620 Projector Suspension Support.
For ceiling installation, ask for qualified Sony personnel
only.
See the charts on page 37 concerning the installation
measurements.
The alphabetical letters in the illustration indicate the
distances below.
a : distance between the screen and the center of the lens
b : distance between the ceiling and the center of the lens
c : distance between the ceiling and the surface of the
mounting bracket
x : distance between the ceiling and the center of the screen
35
Page 36

Français
Installation au plafond
Cette section décrit des exemples d’installation du
projecteur au plafond. B
Lorsque vous installez le projecteur au plafond, utilisez le
support de suspension pour projecteur PSS-620.
Pour une installation au plafond, adressez-vous uniquement
à un personnel qualifié Sony.
Die Buchstaben in der Abbildung beziehen sich auf die
unten beschriebenen Abstände.
a : Abstand zwischen dem Projektionsschirm und der Mitte
des Objektivs
b : Abstand zwischen der Decke und der Mitte des
Objektivs
c : Abstand zwischen der Decke und der Oberfäche der
Halterung
x : Abstand zwischen der Decke und der Mitte des
Projektionsschirms
Reportez-vous aux tableaux de la page 37 sur les mesures
d’installation.
Les caractères alphabétiques dans l’illustration indiquent les
distances ci-dessous.
a : distance entre l’écran et le centre de l’objectif
b : distance entre le plafond et le centre de l’objectif
c : distance entre le plafond et la surface du support de
montage
x : distance entre le plafond et le centre de l’écran
Español
Instalación en el techo
En esta sección se muestran ejemplos para instalar el
proyector en el techo. B
Para instalar el proyector en el techo, utilice el soporte de
suspensión para proyector PSS-620.
Para realizar la instalación en el techo, solicite asistencia
técnica únicamente a personal especializado de Sony.
Consulte las tablas de la página 37 en relación con las
medidas de instalación.
Italiano
I
nstallazione sul soffitto
Questa sezione descrive gli esempi di installazione al
soffitto del proiettore. B
Quando viene installato il proiettore sul soffitto utilizzare il
supporto di sospensione del proiettore PSS-620.
Per l’installazione al soffitto, rivolgersi esclusivamente a
personale qualificato Sony.
Vedere i diagrammi da pagina 37 relative alle misure di
installazione.
Le lettere nell'illustrazione indicano le distanze descritte di
seguito.
a : distanza tra lo schermo e il centro dell’obiettivo
b : distanza tra il soffitto e il centro dell’obiettivo
c : distanza fra il soffitto e la superficie della staffa di
montaggio
x : distanza tra il soffitto e il centro dello schermo
Las letras alfabéticas de la ilustración indican las distancias
mostradas a continuación.
a : distancia entre la pantalla y el centro del objetivo
b : distancia entre el techo y el centro del objetivo
c : Distancia entre el techo y la superficie del soporte de
montaje
x : distancia entre el techo y el centro de la pantalla
Deutsch
Installation an der Decke
In diesem Abschnitt finden Sie Beispiele für das Installieren
des Projektors an der Decke. B
Zur Installation des Projektors an der Decke benötigen Sie
die Projektoraufhängung PSS-620.
Wenn Sie das Gerät an der Decke montieren wollen,
wenden Sie sich bitte an qualifiziertes Sony-Personal.
In den Tabellen auf Seite 37 finden Sie die
Installationsabmessungen.
36
Page 37

単位:mm(インチ)/ Unit: mm (inches) / Unité: mm (pouces) / Unidad: mm (pulgadas) /
Einheit: mm (Zoll) / Unità: mm (pollici) /
■ 標準レンズ
/ Standard lens / Objectif standard / Objetivo estándar / Standardobjektiv / Uso
Obiettivo standard /
SS 40 60 80 100 120 150 180 200 250 300
1490 2280 3060 3850 4630 5810 6980 7770 9730 11690
N
a (58 3/4) (89 7/8)(120 1/2) (151 5/8) (182 3/8) (228 7/8)(274 7/8) (306) (383 1/8) (460 3/8)
b
x
a (N) = {(SS × 50.127/1.3102) – 73.9} × 1.025
a (M) = {(SS × 64.519/1.3102) – 107.9} × 0.975
x (M) = c + (SS/1.3102 × 9.984 + 101)
■
VPLL-ZM101
SS 40 60 80 100 120 150 180 200 250 300
a (102 3/8) (157 1/2) (213 1/8) (268 1/4) (323 3/4) (406 3/4) (489 1/2) (545) (683 1/4)(821 7/8)
b
x
a (N) = {(SS × 89.822/1.3102) – 209.3} × 1.025
a (M) = {(SS × 137.560/1.3102) – 211.6} × 0.975
x (M) = c + (SS/1.3102 × 9.984 + 101)
1820 2780 3740 4700 5660 7100 8540 9500 11900 14300
M
(71 3/4) (109 1/2)(147 3/8) (185 1/8) (222 7/8) (279 5/8)(336 3/8)(374 1/8) (468 5/8) (563 1/8)
N c+91.4 (c+3 5/8)
M c+101.4 (c+4)
N c+100 (c+4)
c+406 c+558 c+711 c+863 c+1015 c+1244 c+1473 c+1625 c+2006 c+2387
M
(c+16) (c+22) (c+28) (c+34) (c+40) (c+49) (c+58) (c+64) (c+79) (c+94)
2600 4000 5410 6810 8220 10330 12430 13840 17350 20870
N
3890 5940 7980 10030 12080 15150 18220 20270 25380 30500
M
(153 1/4) (234) (314 1/4) (394 15/16) (475 3/4) (596 5/8) (717 1/2)(798 1/4)(999 3/8) (1201)
N c+91.4 (c+3 5/8)
M c+101.4 (c+4)
N c+100 (c+4)
c+406 c+558 c+711 c+863 c+1015 c+1244 c+1473 c+1625 c+2006 c+2387
M
(c+16) (c+22) (c+28) (c+34) (c+40) (c+49) (c+58) (c+64) (c+79) (c+94)
■
VPLL-ZM31
SS 40 60 80 100 120 150 180 200 250 300
1190 1840 2490 3150 3800 4780 5760 6410 8050 9680
N
a (46 7/8) (72 1/2) (98 1/8) (124 1/8) (149 5/8) (188 1/4) (226 7/8) (252 1/2) (317) (381 1/4)
b
x
1250 1940 2620 3300 3980 5000 6030 6710 8410 10120
M
(49 1/4 ) (76 1/2) (103 1/4) (130) (156 3/4) (196 7/8) (237 7/16) (264 1/4) (331 1/4)(398 1/2)
N c+91.4 (c+3 5/8)
M c+101.4 (c+4)
N c+100 (c+4)
c+406 c+558 c+711 c+863 c+1015 c+1244 c+1473 c+1625 c+2006 c+2387
M
(c+16) (c+22) (c+ 28) (c+ 34) (c+40) (c+49) (c+58) (c+64) (c+79) (c+ 94)
a (N) = {(SS × 41.750/1.3102) – 116.3} × 1.025
a (M) = {(SS × 45.821/1.3102) – 112.9} × 0.975
x (M) = c + (SS/1.3102 × 9.984 + 101)
日本語
天井つり
各レンズの設 置寸法と計算方法を上記に示します。
English
Ceiling Installation
The installation measurements and their calculation method
for each lens are shown above.
表および計算式のアルファベットは 以下の意味を示します。
SS : スクリーン サ イズ 対 角( インチ)
a:レンズの中心からスクリーンま での距離
b:天井からレン ズ の 中心までの距離
c:PSS-620 使 用 時 、183/208/233/283/308/335 mmで
調整可能
x:天井からスクリー ン の 中 心 ま で の 距 離
N:最小値
M:最大値
The alphabetical letters in the charts and calculation
methods indicate the following.
SS : screen size measured diagonally (inches)
a:distance between the screen and the center of the lens
b:distance between the ceiling and the center of the lens
c:183/208/233/283/308/335 mm (7 1/4, 8 1/4, 9 1/4, 11 1/4,
12 1/4, 13 1/8 inches) adjustable when using PSS-620
x:distance between the ceiling and the center of the
screen
N:minimum
M:maximum
37
Page 38

Français
Italiano
Installation au plafond
Les mesures de l'installation et leur méthode de calcul pour
chaque objectif sont indiquées sur la page de gauche.
Les caractères alphabétiques dans l’illustration et leurs
méthodes de calcul indiquent ce qui suit.
SS : dimension de l’écran en diagonale (pouces)
a: distance entre l’écran et le centre de l’objectif
b: distance entre le plafond et le centre de l’objectif
c:si vous utilisez le PSS-620, la hauteur peut être réglée à
183/208/233/283/308/335 mm (7 1/4, 8 1/4, 9 1/4, 11 1/4,
12 1/4, 13 1/8 pouces)
x: distance entre le plafond et le centre de l’écran
N:minimum
M:maximum
Español
Instalación en el techo
Las medidas de instalación y su método de cálculo para
cada objetivo se muestran en la página izquierda.
Las letras alfabéticas de las tablas y los métodos de cálculo
indican lo siguiente.
SS : tamaño de pantalla medida diagonalmente (pulgadas)
a: distancia entre la pantalla y el centro del objetivo
b: distancia entre el techo y el centro del objetivo
c:Si utiliza la unidad PSS-620, la altura podrá ajustarse
en 183/208/233/283/308/335 mm (7 1/4, 8 1/4, 9 1/4,
11 1/4, 12 1/4, 13 1/8 pulgadas).
x: distancia entre el techo y el centro de la pantalla
N:mínimo
M:máximo
Installazione sul soffitto
Le misure di installazione e il loro metodo di calcolo per
ogni obiettivo sono riportate nella pagina a sinistra.
Le lettere nei diagrammi e i metodi di calcolo indicano
quanto segue.
SS : dimensione schermo misurata diagonalmente (pollici)
a:distanza tra lo schermo e il centro dell’obiettivo
b:distanza tra il soffitto e il centro dell’obiettivo
c:Quando si usa il PSS-620, l’altezza può essere regolata
su 183/208/233/283/308/335 mm.
x:distanza tra il soffitto e il centro dello schermo
N:minima
M:massima
Deutsch
Installation an der Decke
Die Installationsabmessungen und das jeweilige
Berechnungsverfahren für die einzelnen Objektive sind
links angegeben.
Die Buchstaben in den Tabellen und den
Berechnungsverfahren haben folgende Bedeutung:
SS : Projektionsschirmgröße in Zoll, diagonal gemessen
a:Abstand zwischen dem Projektionsschirm und der
Mitte des Objektivs
b:Abstand zwischen der Decke und der Mitte des Objektivs
c:Wenn Sie die PSS-620 verwenden, kann die Höhe auf
die folgenden Zahlenwerte eingestellt werden: 183/
208/233/283/308/335 mm.
x:Abstand zwischen der Decke und der Mitte des
Projektionsschirms
N:Mindestens
M:Höchstens
38
Page 39

C
180 (7 1/8)
a
2
216.6
5
(8
/8)
/2)
1
239.8 (9
1
30.5 (1
4
1
/4)
8
250 (9 7/8)
D
125 (5)
5
7
4
6
)
4
/
1
157.3
(6
VPL-FX52
When using the standard lens equipped with the VPL-FX52
Si vous utilisez l’objectif standard qui équipe le VPL-FX52
Installation mit dem Standardobjektiv des VPL-FX52
Al emplear el objetivo estándar equipado con el VPL-FX52
Quando si utilizza l’obiettivo standard in dotazione con il VPL-FX52
本体標準レンズ使用時
E
2
8
3
138.4
(5 1/2)
180 (7
210.5 (8 3/8)
216.6
(8 5/8)
1
/8)
284.1 (11 1/4)
単位: mm(インチ)/ Unit: mm (inches) /
Unité: mm (pouces) / Unidad: mm
(pulgadas) / Einheit: mm (Zoll) /
Unità: mm (pollici)/
日本語
プロジェクターサスペンション
サポート
天井への設置に関して詳しくは、PSS-620 の取付説明書をご覧くださ
い。ここ では、本 機をPSS-620を使って天井に取り付けた場合の寸法
について説明します。
上から見た図 C
プロジェクターのレンズ の中心とスクリーンの 中 心 が 合うように 設 置し て
ください 。
前から見た図 D
横から見た図
a: レンズの中心からスクリー ン ま で の 距 離
1 スクリーン 中 心
2 キャビネット前 面
3 天井用マウントブ ラ ケット
4 本体・レンズ・支柱の中心
5 天井
6 プロジェクターマウントブ ラケット取り付 け 面
7 天井からプロジェクターマウントブラケット取り付け 面まで の距離
アジャストメントパイプ (b)を使った場合:183/208/233mm
アジャストメントパイプ (c)を使った場合:283/308/333mm
8 レン ズ中心
PSS-620
E
の取り付けかた
English
Attaching the projector suspension
support PSS-620
For more details on the ceiling installation, refer to the
Installation manual for Dealers of the PSS-620. The
installation measurements are shown above when you install
the projector on the ceiling.
Top view C
Align the center of the lens with the center of the screen.
Front view D
Side view E
a : distance between the screen and the center of the lens
1 Center of the screen
2 Front of the cabinet
3 Upper ceiling mount bracket
4 Center of the unit, lens, and supporting pole
5 Ceiling
6 The bottom surface of the mounting bracket
7 Distance between the ceiling and the surface of the
mounting bracket
Using adjustment pipe (b): 183/208/233 mm (7 1/4/8 1/4/
9 1/4 inches)
Using adjustment pipe (c): 283/308/333 mm (11 1/4 /
12 1/4 /13 1/8 inches)
8 Center of the lens
39
Page 40

Français
Fixation du support de suspension
de projecteur PSS-620
Pour plus de détails sur l’installation au plafond, reportez-vous au
manuel d'installation pour les revendeurs du PSS-620. Les mesures
d’installation pour le montage au plafond sont indiquées sur la page de
gauche.
Vue du dessus C
Alignez l’axe de l’objectif sur l’axe vertical de l’écran.
Vue frontal D
Vue latérale E
a : Distance entre l’écran et le centre de l’objectif
1 Centre de l’écran
2 Avant du meuble
3 Support de montage de plafond supérieur
4 Centre de l’appareil, objectif et support
5 Plafond
6 Dessous du support de montage
7 Distance entre le plafond et la surface du support de montage
Utilisation du tube de réglage (b): 183/208/233 mm (7
pouces)
Utilisation du tube de réglage (c): 283/308/333 mm
1
(11
/4 /12 1/4 /13 1/8 pouces)
8 Centre de l’objectif
1
/4/8 1/4/9 1/4
Español
Instalación del soporte de
suspensión del proyector PSS-620
Para más información sobre la instalación en el techo, consulte el
manual de instalación para proveedores de la unidad PSS-620. Las
medidas de instalación se muestran en la página izquierda para cuando
instale el proyector en el techo.
Vista superior C
Alinee el centro del objetivo con el centro de la pantalla.
Vista frontal D
Vista lateral E
a : Distancia entre la pantalla y el centro del objetivo
1 Centro de la pantalla
2 Parte frontal de la caja
3 Soporte de montaje superior para techo
4 Centro de la unidad, objetivo y polo de apoyo
5 Techo
6 La base de la superficie del soporte de montaje
7 Distancia entre el techo y la superficie del soporte de montaje
Uso del tubo de ajuste (b):183/208/233 mm (7
pulgadas)
Uso del tubo de ajuste (c): 283/308/333 mm (11
pulgadas)
8 Centro del objetivo
1
/4 /8 1/4 /9 1/4
1
/4 /12 1/4 /13 1/8
Draufsicht C
Richten Sie die Mitte des Objektivs an der Mitte des
Projektionsschirms aus.
Vorderansicht D
Seitenansicht E
a : Abstand zwischen dem Projektionsschirm und der Mitte des
Objektivs
1 Mitte des Projektionsschirms
2 Vorderseite des Gehäuses
3 Deckenmontagehalterung
4 Mitte des Geräts, Objektiv und Tragestange
5 Decke
6 Die Unterseite der Halterung
7 Abstand zwischen der Decke und der Oberfäche der Halterung
Mit Einstellrohr (b): 183/208/233 mm
Mit Einstellrohr (c): 283/308/333 mm
8 Mitte des Objektivs
Italiano
Applicazione del supporto di
sospensione del proiettore PSS-620
Per ulteriori informazioni sull'installazione al soffitto, fare riferimento
al manuale di installazione per rivenditori relativo al supporto di
sospensione PSS-620. Le misure di installazione per l'installazione al
soffitto sono riportate nella pagina a sinistra.
Vista dall’alto C
Allineare il centro della lente con il centro dello schermo.
Vista frontale D
Vista laterale E
a : distanza fra lo schermo e il centro dell’obiettivo
1 Centro dello schermo
2 Parte anteriore dell’apparecchio
3 Staffa di montaggio al soffitto
4 Centro dell’apparecchio, obiettivo e dispositivo di supporto
5 Soffitto
6 La superficie inferiore della staffa di montaggio
7 Distanza fra il soffitto e la superficie della staffa di montaggio
Utilizzando il tubo di regolazione (b): 183/208/233 mm
Utilizzando il tubo di regolazione (c): 283/308/333 mm
8 Centro della lente
Deutsch
Anbringen der Projektoraufhängung
PSS-620
Näheres zur Deckenmontage finden Sie in der Installationsanleitung zur
PSS-620 für Händler. Die Installationsabmessungen für das Montieren
des Projektors an der Decke sind links angegeben.
40
Page 41

日本語
Français
床置き、ツインスタック
スタックが可能なスクリーンサイズ
80インチから300インチのスクリーンがご使用になれます。
ご注意
安全にお使いになるため、またメンテナンスのために、設置する
際は壁からの距離を左右後方各50cm以上離して設置してくださ
い。
スタックをする際のご注意
2台のプロジェクターの画像を正しく重ね合わせるためにレンズの
ズームが可変範囲の中心になるように設置してください。
スタックの 設 置 例 の a 値 に 従 っ て プ ロジェクターを 設 置 す る。
1
ズームを使って上下のプロジェクターからの画像がスクリーン い っ
2
ぱいに映るように画像サイズを調整する。
English
Floor installation for twin stacking
Available screen size for stacking
80 to 300-inches screens are available for twin stack
installation.
Installation au sol en double
empilage
Format d’écran disponible pour la
superposition
Des écrans de 80 à 300 pouces sont disponibles pour une
installation en double superposition.
Remarque
Pour des raisons de sécurité et d’entretien, installez les
projecteurs à l’écart du mur. Laissez un espace de 50 cm (19
3
/4 pouces) au minimum sur les côtés et à l’arrière de
l’appareil.
Remarque sur la superposition
Pour aligner correctement l’image des deux projecteurs,
réglez le zoom au centre de la plage de réglage.
1 Installez le projecteur conformément à la valeur “a” de
l’exemple de superposition.
2 Utilisez le zoom pour aligner les images du premier et du
second projecteur de façon à ce qu’elles remplissent
l’écran.
Español
Note
For safety and maintenance purposes, install the projectors
away from the wall. Leave a minimum space of 50 cm
(19 3/4 inches) from both sides and the rear.
Note on stacking
To properly align the pictures from both projectors, set the
zoom to the center of the adjustment range.
1 Install the projector following the “a” value in the
stacking example.
2 Use the zoom to align the pictures from the first and
second projectors so that they fill the screen.
Instalación en el suelo para
apilamiento doble
Tamaño de pantalla disponible para
apilamiento
Hay disponibles pantallas de 80 a 300 pulgadas para
apilamientos de dos proyectores.
Nota
Por motivos de seguridad y mantenimiento, instale los
proyectores separados de la pared. Deje un espacio mínimo
de 50 cm (19 3/4 pulgadas) a ambos lados y en la parte
trasera.
Nota sobre el apilamiento
Para alinear correctamente las imágenes de ambos
proyectores, coloque el zoom en la posición central de la
gama de ajustes.
1 Instale el proyector según el valor “a” indicado en el
ejemplo.
2 Utilice el zoom para alinear las imágenes de ambos
proyectores de forma que cubran completamente la
pantalla.
41
Page 42

Deutsch
Installation am Boden für die
Doppelprojektion
Geeignete Projektionsschirmgrößen beim
Stapeln von Projektoren
80- bis 300-Zoll-Projektionsschirme stehen für eine
Installation für Doppelprojektion zur Verfügung.
Hinweis
Aus Sicherheitsgründen und zu Wartungszwecken
installieren Sie die Projektoren bitte nicht zu nah an einer
Wand. Lassen Sie an den beiden Seiten und der Rückseite
mindestens 50 cm frei.
Hinweis zur Doppelprojektion
Damit die Bilder der beiden Projektoren einander genau
überlagern, stellen Sie den Zoom auf die Mitte des
Einstellbereichs ein.
1 Stellen Sie die Projektoren so auf, wie durch den Wert
“a” im Beispiel unten angegeben.
2 Stellen Sie den Zoom so ein, daß die Bilder der beiden
Projektoren den ganzen Projektionsschirm füllen.
Italiano
Installazione al pavimento per
impilazione
Dimensioni dello schermo disponibili per
l’impilazione
Sono disponibili schermi da 80 a 300 pollici per
l’installazione con impilazione doppia.
Nota
Per la sicurezza e la manutenzione, installare i proiettori
scostati dal muro. Lasciare uno spazio minimo di 50 cm
attorno ai due lati e alla parte posteriore.
Nota sull’impilazione
Per allineare in modo adeguato le immagini da entrambi i
proiettori, impostare lo zoom sul centro della gamma di
regolazione.
1 Installare il proiettore seguendo il valore “a”
nell’esempio di impilazione.
2 Usare lo zoom per allineare le immagini dal primo e dal
secondo proiettore in modo che riempiano lo schermo.
42
Page 43

F
壁
Wall
Mur
Pared
Wand
Parete
スクリーンの中 心
Center of the screen
Centre de l’écran
Centro de la pantalla
Mitte des Projektionsschirms
Centro dello schermo
台目のプロジェクター
2
2nd projector
2e projecteur
Segundo proyector
2. Projektor
Secondo proiettore
台目のプロジェクター
1
x
レンズの中心
Centre de l’objectif / Centro del
objetivo / Mitte des Objektivs /
Centro dell’obiettivo /
/ Center of the lens /
b c'b' c
1st projector
1er projecteur
Primer proyector
1. Projektor
Primo proiettore
a
単位: mm(インチ)/ Unit: mm (inches) / Unité: mm (pouces) / Unidad: mm (pulgadas) /
Einheit: mm (Zoll) / Unità: mm (pollici) /
日本語
床置き、ツインスタック
プロジェクターを机などの上でツインスタックにして設置する場
合の設置例を示します。F
イラスト中のアルファベットは、以下の距離を示します。
a:レンズの中心からスクリーンまでの距離
b:床から1台目のプロジェクターのレンズ中心までの距離
b: 床から2台目のプロジェクターのレンズ中心までの距離
c:床から1台目のプロジェクターの脚までの距離
c: 床から2台目のプロジェクターの脚までの距離
x:任意
English
Floor installation for twin-stacking
This section describes the examples for installing two
projectors on the desk using twin-stacking. F
The alphabetical letters in the illustration indicate the
distances below.
a : distance between the screen and the center of the lens
b : distance between the floor and the center of the lens of
the 1st projector
b’ :distance between the floor and the center of the lens of
the 2nd projector
c : distance between the floor and the adjusters of the 1st
projector
c’ :distance between the floor and the adjusters of the 2st
projector
x : free
床 / Floor / Sol / Suelo /
Boden / Pavimento /
43
Page 44

Français
Installation au sol en double empilage
Cette section décrit des exemples d’installation de deux
projecteurs sur un bureau en double superposition. F
Les caractères alphabétiques dans l’illustration indiquent les
distances ci-dessous.
a : distance entre l’écran et le centre de l’objectif
b : distance entre le sol et le centre de l’objectif du premier
projecteur
b’: distance entre le sol et le centre de l’objectif du second
projecteur
c : distance entre le sol et les pieds réglables du premier
projecteur
c’: distance entre le sol et les pieds réglables du second
projecteur
x : libre
Español
Instalación en el suelo para apilamiento doble
En esta sección se muestran ejemplos para instalar dos
proyectores sobre una mesa utilizando apilamiento doble.
F
c: Abstand zwischen dem Boden und den Ausgleichsfüßen
des ersten Projektors
c’: Abstand zwischen dem Boden und den Ausgleichsfüßen
des zweiten Projektors
x : frei
Italiano
Installazione al pavimento per impilazione
Questa sezione descrive gli esempi di installazione per
impilazione di due proiettori su una superficie piana. F
Le lettere nell’illustrazione indicano le distanze descritte di
seguito.
a : distanza tra lo schermo e il centro dell’obiettivo
b: distanza tra il pavimento e il centro dell’obiettivo del
primo proiettore
b’: distanza tra il pavimento e il centro dell’obiettivo del
secondo proiettore
c: distanza tra il pavimento e i dispositivi di regolazione del
primo proiettore
c’: distanza tra il pavimento e i dispositivi di regolazione del
secondo proiettore
x : libero
Las letras alfabéticas de la ilustración indican las distancias
mostradas a continuación.
a : distancia de la pantalla al centro del objetivo
b: distancia entre el suelo y el centro del objetivo del 1er
proyector
b’: distancia entre el suelo y el centro del objetivo del 2º
proyector
c: distancia entre el suelo y los ajustadores del 1er
proyector
c’: distancia entre el suelo y los ajustadores del 2º proyector
x : libre
Deutsch
Installation am Boden für die
Doppelprojektion
In diesem Abschnitt finden Sie Beispiele für das Installieren
von zwei Projektoren auf einem Tisch für die
Doppelprojektion. F
Die Buchstaben in der Abbildung beziehen sich auf die
unten beschriebenen Abstände.
a : Abstand zwischen dem Projektionsschirm und der Mitte
des Objektivs
b: Abstand zwischen dem Boden und der Objektivmitte des
ersten Projektors
b’: Abstand zwischen dem Boden und der Objektivmitte des
zweiten Projektors
44
Page 45

単位:mm(インチ)/ Unit: mm (inches) / Unité: mm (pouces) / Unidad: mm (pulgadas) /
Einheit: mm (Zoll) / Unità: mm (pollici) /
■ 標準レンズ
/ Standard lens / Objectif standard / Objetivo estándar / Standardobjektiv / Uso
Obiettivo standard /
SS 80 100 120 150 180 200 250 300
a
b
b’ b+212 (b+8 3/8)
c (b-x) / SS × 1.3102+b-102 ((b-x) / SS × 1.3102+b-4 1/8)
c’ (b’-x) / SS × 1.3102+b’-102 ((b’-x) / SS × 1.3102+b’-4 1/8)
a =(SS ×61.770/1.3102) – 48.8
b (N)= x – (SS/1.3102 × 9.984 )
■
VPLL-ZM101
SS 80 100 120 150 180 200 250 300
a
b
b’ b+212 (b+8 3/8)
c (b-x) / SS × 1.3102+b-102 ((b-x) / SS × 1.3102+b-4 1/8)
c’ (b’-x) / SS × 1.3102+b’-102 ((b’-x) / SS × 1.3102+b’-4 1/8)
a = (SS ×112.072/1.3102) – 188.7
b(N) = x – (SS/1.3102 × 9.984 )
3720 4670 5610 7020 8440 9380 11740 14090
(146 1/2) (184) (221) (276 7/16) (332 3/8) (369 3/8) (462 3/8) (554 7/8)
x-610 x-762 x-914 x-1143 x-1372 x-1524 x-1905 x-2286
N
(x-24 1/8) (x-30) (x-36) (x-45) (x-54 1/8) (x-60) (x-75 1/8) (x-90 1/8)
M x-212 (x-8 3/8)
6650 8360 10080 12640 15210 16920 21200 25470
(261 7/8) (329 1/4) (397) (497 3/4) (599) (666 1/4) (834 3/4) (1003)
x-610 x-762 x-914 x-1143 x-1372 x-1524 x-1905 x-2286
N
(24 1/8) (30) (36) (45) (54 1/8) (60) (75 1/8) (90 1/8)
M x-212 (x-8 3/8)
■
VPLL-ZM31
SS 80 100 120 150 180 200 250 300
a
b (24 1/8) (30) (36) (45) (54 1/8) (60) (75 1/8) (90 1/8)
b’ b+212 (b+8 3/8)
c (b-x) / SS × 1.3102+b-102 ((b-x) / SS × 1.3102+b-4 1/8)
c’ (b’-x) / SS × 1.3102+b’-102 ((b’-x) / SS × 1.3102+b’-4 1/8)
2620 3300 3980 5000 6030 6710 8410 10120
(103 1/4) (130) (156 3/4) (196 7/8) (237 7/16) (264 1/4) (331 1/4) (398 1/2)
x-610 x-762 x-914 x-1143 x-1372 x-1524 x-1905 x-2286
N
M x-212 (x-8 3/8)
a = (SS × 44.676/1.3102) – 110.2
b (N) = x – (SS/1.3102 × 9.984 )
日本語
床置き、ツインスタック
各レンズの設置寸法と計算方法を上記に示します。
c:床から1台目のプロジェクターの脚までの距離
c: 床から2台目のプロジェクターの脚までの距離
x:任意
表および計算式のアルファベットは以下の意味を示します。
SS : スクリーン サ イズ 対 角( インチ)
N:最小値
M:最大値
a:レンズの中心からスクリーンま での距離
b:床から1台目のプロジェクターのレンズ中心までの距離
b: 床から2台目のプロジェクターのレンズ中心までの距離
45
Page 46

English
Español
Floor installation for twin-stacking
The installation measurements and their calculation method
for each lens are shown on the left page.
The alphabetical letters in the charts and calculation
methods indicate the following.
SS: screen size measured diagonally (inches)
a:distance between the screen and the center of the lens
b:distance between the floor and the center of the lens of
the 1st projector
b’ : distance between the floor and the center of the lens of
the 2nd projector
c:distance between the floor and the adjusters of the 1st
projector
c’ : distance between the floor and the adjusters of the 2st
projector
x:free
N:minimum
M: maximum
Français
Installation au sol en double empilage
Les mesures de l'installation et leur méthode de calcul pour
chaque objectif sont indiquées sur la page de gauche.
Les caractères alphabétiques dans l’illustration et leurs
méthodes de calcul indiquent ce qui suit.
SS: dimension de l’écran en diagonale (pouces)
a:distance entre l’écran et le centre de l’objectif
b:distance entre le sol et le centre de l’objectif du premier
projecteur
b’ : distance entre le sol et le centre de l’objectif du second
projecteur
c:distance entre le sol et les pieds réglables du premier
projecteur
c’ : distance entre le sol et les pieds réglables du second
projecteur
x:libre
N:minimum
M: maximum
Instalación en el suelo para apilamiento doble
Las medidas de instalación y su método de cálculo para cada
objetivo se muestran en la página izquierda.
Las letras alfabéticas de las tablas y los métodos de cálculo
indican lo siguiente.
SS : tamaño de pantalla medida diagonalmente (pulgadas)
a:distancia de la pantalla al centro del objetivo
b:distancia entre el suelo y el centro del objetivo del 1er
proyector
b’ : distancia entre el suelo y el centro del objetivo del 2º
proyector
c:distancia entre el suelo y los ajustadores del 1er
proyector
c’ : distancia entre el suelo y los ajustadores del 2º
proyector
x:libre
N:mínimo
M:máximo
Deutsch
Installation am Boden für die
Doppelprojektion
Die Installationsabmessungen und das jeweilige
Berechnungsverfahren für die einzelnen Objektive sind links
angegeben.
Die Buchstaben in den Tabellen und den
Berechnungsverfahren haben folgende Bedeutung:
SS : Projektionsschirmgröße in Zoll, diagonal gemessen
a:Abstand zwischen dem Projektionsschirm und der Mitte
des Objektivs
b:Abstand zwischen dem Boden und der Objektivmitte
des ersten Projektors
b’ : Abstand zwischen dem Boden und der Objektivmitte
des zweiten Projektors
c:Abstand zwischen dem Boden und den
Ausgleichsfüßen des ersten Projektors
c’ : Abstand zwischen dem Boden und den
Ausgleichsfüßen des zweiten Projektors
x:frei
N:Mindestens
M:Höchstens
46
Page 47

Italiano
Installazione al pavimento per impilazione
Le misure di installazione e il loro metodo di calcolo per
ogni obiettivo sono riportate nella pagina 42.
Le lettere nei diagrammi e i metodi di calcolo indicano
quanto segue.
SS : dimensione schermo misurata diagonalmente (pollici)
a:distanza tra lo schermo e il centro dell’obiettivo
b:distanza tra il pavimento e il centro dell’obiettivo del
primo proiettore
b’ : distanza tra il pavimento e il centro dell’obiettivo del
secondo proiettore
c:distanza tra il pavimento e i dispositivi di regolazione
del primo proiettore
c’ : distanza tra il pavimento e i dispositivi di regolazione
del secondo proiettore
x:libero
N:minima
M:massima
47
Page 48

寸法図
)
/ Dimensions / Dimensions / Dimensiones /
Abmessungen / Dimensioni /
■
VPL-FX52
(標準レンズ付き)の場合 / For VPL-FX52 (with standard lens) / Pour le VPL-FX52 (avec
objectif standard) / Para VPL-FX52 (con objetivo estándar) / Beim VPL-FX52 (mit Standardobjektiv) / Per
VPL-FX52 (con obiettivo standard) /
前面 / Front / Avant / Parte frontal / Vorderseite / Vista anteriore /
169.3 (6 3/4) 131.3 (5 1/4) 88.4 (3 1/2)
219.7 (8 3/4)21 (27/32)
/8)75.3 (3)
3
59.5 (2
1
358 (14
/8)
本体中心
Center of the projector
Centre de l’appareil
Centro de la unidad
Mitte des Geräts
Centro dell’apparecchio
/4)
3
/16)
7
168.4 (6
11.1 (
/8)
1
53.7 (2
側面 / Side / Côté / Parte lateral / Seitenansicht / Vista laterale /
重心
/ Center of gravity / Centre de gravité / Centro de gravedad /
Schwerpunkt / Centro di gravità /
)
4
/
1
80
(3
257.1 (10 7/8)
180 (7 1/8)
418 (16 1/
単位: mm(インチ)/ Unit: mm (inches) / Unité: mm (pouces) / Unidad: mm (pulgadas) /
2
Einheit: mm (Zoll) / Unità: mm (pollici) /
48
)
8
/
3
110 (4
)
4
/
3
168.4 (6
Page 49

寸法図
/ Dimensions / Dimensions / Dimensiones / Abmessungen /
Dimensioni /
上面 / Top / Dessus / Parte superior / Draufsicht / Vista dall’alto /
)
8
/
3
(18
464
レンズ 中 心
Center of the lens
Centre de l'objectif
Mitte des Objektivs
Centro del objetivo
Parte centrale
dell'obiettivo
)
8
/
1
(7
178.3
)
4
/
1
(1
30.5
110 (4 3/8)
249 (9 7/8)
479.5 (19)
キャビネット前 面
Front of the cabinet
Avant du châssis
Vorderseite des
Gehäuses
Parte frontal del exterior
Parte anteriore
dell'apparecchio
レンズフード前面
)
2
/
Front of the lens hood
1
Avant du pare-soleil
(1
Vorderseite der
38
Objektivabdeckung
Parte frontal de la
capucha del objetivo
Parte anteriore del
copriobiettivo
単位: mm(インチ)/ Unit: mm (inches) / Unité: mm (pouces) / Unidad: mm (pulgadas) /
Einheit: mm (Zoll) / Unità: mm (pollici) /
49
Page 50

底面 / Bottom / Dessous / Parte inferior / Unterseite / Vista dal basso /
358 (14
1/
8)
1
58
104 (4
7/
8)
/8)
242.2 (9 5/8)
1
88.6 (3
3
/8)
/2)
89.8 (3
5
/8)
74.3 (3)
ø28 (1
70 (2
(2
1
/8)
/2)
1
37.3 (1
/8)276.4 (11)
5
58
/8)
1
406.6 (16
/8)
1
204 (8
/8)
3
(2
/8)
3
261 (10
28
/8)
1
(1
1
/2)
214.9 (8
55.5
(2 1/4)
145 (5
3
/4)
85.5 (3 3/8)
136.5 (5
3
/8)
304 (12)
55.5
(2
75.5 (3)
/8)
1
74.1(3)
142.1 (5
27.6 (1
/4)
/16)
7
35 (1
1
131.5 (5
/32)
19
15 (
1
/4)
50
本体中心
/ Center of the projector / Centre de l’appareil / Centro de la unidad / Mitte des
Geräts / Centro dell’apparecchio /
単位: mm(インチ)/ Unit: mm (inches) / Unité: mm (pouces) / Unidad: mm (pulgadas) /
Einheit: mm (Zoll) / Unità: mm (pollici) /
Page 51

寸法図
/ Dimensions / Dimensions / Dimensiones / Abmessungen /
Dimensioni /
底面 / Bottom / Dessous / Parte inferior / Unterseite / Vista dal basso /
60.8 (2 1/2)
200 (7
単位: mm(インチ)/ Unit: mm (inches) / Unité: mm
(pouces) / Unidad: mm (pulgadas) / Einheit: mm
7
/8)
(Zoll) / Unità: mm (pollici) /
140.2 (5 5/8)
73.6 (3)
)
16
/
1
)
16
/
13
(
20.5
)
16
/
1
)252.2 (10)
4
/
1
157 (6
)55.5 (2
4
/
1
156.2 (6
)
4
/
1
本体中心
194.7 (7 3/4) 188 (7 1/2) 21.2 (27/32)
/ Center of the projector / Centre de l’appareil / Centro de la unidad / Mitte des
Geräts / Centro dell’apparecchio /
) 26.4 (1
2
/
1
88.9 (3
199.9 (7 7/8) 17.8 (23/32)
製品ご相談窓口のご案内
プロジェクターの技術相談窓口
[
テクニカルインフォメーションセンター
電話番号:
受付時間:月〜金曜日 午前
0586-25-6170
(電話のおかけ間違いにご注意ください )
時〜午後8時
9
土、日、祝日 午前
時〜午後5時
9
]
) 25.7 ( 1
4
/
1
132.2 (5
製品の品質には万全を期しておりますが、万一本機のご使用中に、正常に動作しないなどの不具合が生じた場合は、上記の「テクニカ
ルインフォメーションセンター」までご連絡ください。
修理に関するご案内をさせていただきます。
 Loading...