

Sony VPL ES4 - SVGA LCD Projector, VPL-EX4, VPL-ES4 Quick Reference Manual

Data Projector
3-100-207-01 (1)
簡易説明書
Quick Reference Manual _____________________
Guide de référence rapide ____________________
Manual de referencia rápida ___________________
Kurzreferenz _______________________________
Guida rapida all’uso _________________________
_____________________________
お買い上げいただきありがとうございます。
電気製品は安全のための注意事項を守らないと、
火災や人身事故になることがあります。
この簡易説明書と別冊の「安全のために」および付属の CD-ROM
に入っている取扱説明書をよくお読みのうえ、製品を安全にお使い
ください。お読みになったあとは、いつでも見られるところに必ず
保管してください。
JP
GB
FR
ES
DE
IT
CS
VPL-ES4
VPL-EX4
© 2007 Sony Corporation

この説明書について
この説明書では、本機を接続してから
映すまでの簡単な操作方法を説明して
います。
また使用上のご注意やメンテナンスの
際に必要な情報が記載されています。
操作方法について詳しくは、付属の
CD-ROM に収録されている取扱説明書
をご覧ください。
また安全のための注意事項は、別冊の
「安全のために」をご覧ください。
CD-ROM 取扱説明
書の見かた
付属の CD-ROM には、ReadMe および
取扱説明書が収録されています(日本
語、英語、フランス語、スペイン語、
ドイツ語、イタリア語、中国語)。まず
最初に ReadMe をご覧ください。
準備
付属の CD-ROM に収録されている取扱
説明書を読むためには、Adobe
AcrobatReader5.0 以降が必要です。
AdobeAcrobatReaderがインストール
されていない場合は、アドビシステム
ズ社のホームページからダウンロード
してください。(無料)
取扱説明書を読むには
付属の CD-ROM を、コンピュータの
CD-ROM ドライブにセットしてくださ
い。しばらくすると、CD-ROM が自動
的に起動します。読みたい取扱説明書
を選んでください。取扱説明書のファ
イルは、CD-ROM の中に収録されてい
ます。
お使いのコンピュータによっては、
CD-ROM が自動的に起動しない場合が
あります。
以下の手順で、取扱説明書のファイル
を直接開いてください。
(Windows の場合)
1「マイコンピュータ」を開く。
2「CD-ROM」のアイコンを右クリッ
クして「エクスプローラ」を選ぶ。
3 ウィンドウの中で「index.htm」
ファイルをダブルクリックして読み
たい取扱説明書を選ぶ。
(Macintosh の場合)
1 デスクトップの「CD-ROM」アイコ
ンをダブルクリックする。
2「index.htm」ファイルをダブルク
リックして読みたい取扱説明書を選
ぶ。
ご注意
「index.htm」ファイルが開かない場合は、
「OperatingInstructions」フォルダから
読みたい取扱説明書を選んでダブルク
リックしてください。
商標について
・ Windows は、米国 Microsoft
Corporation の米国及びその他の国に
おける登録商標です。
・ Macintosh は AppleComputerInc. の
米国及びその他の国における登録商
標です。
・ Adobe および Acrobat は、Adobe
SystemsIncorporated(アドビシステ
ム社)の米国及び各国での登録商標
です。
JP
この説明書について/CD-ROM 取扱説明書の見かた
2
使用上のご注意
1
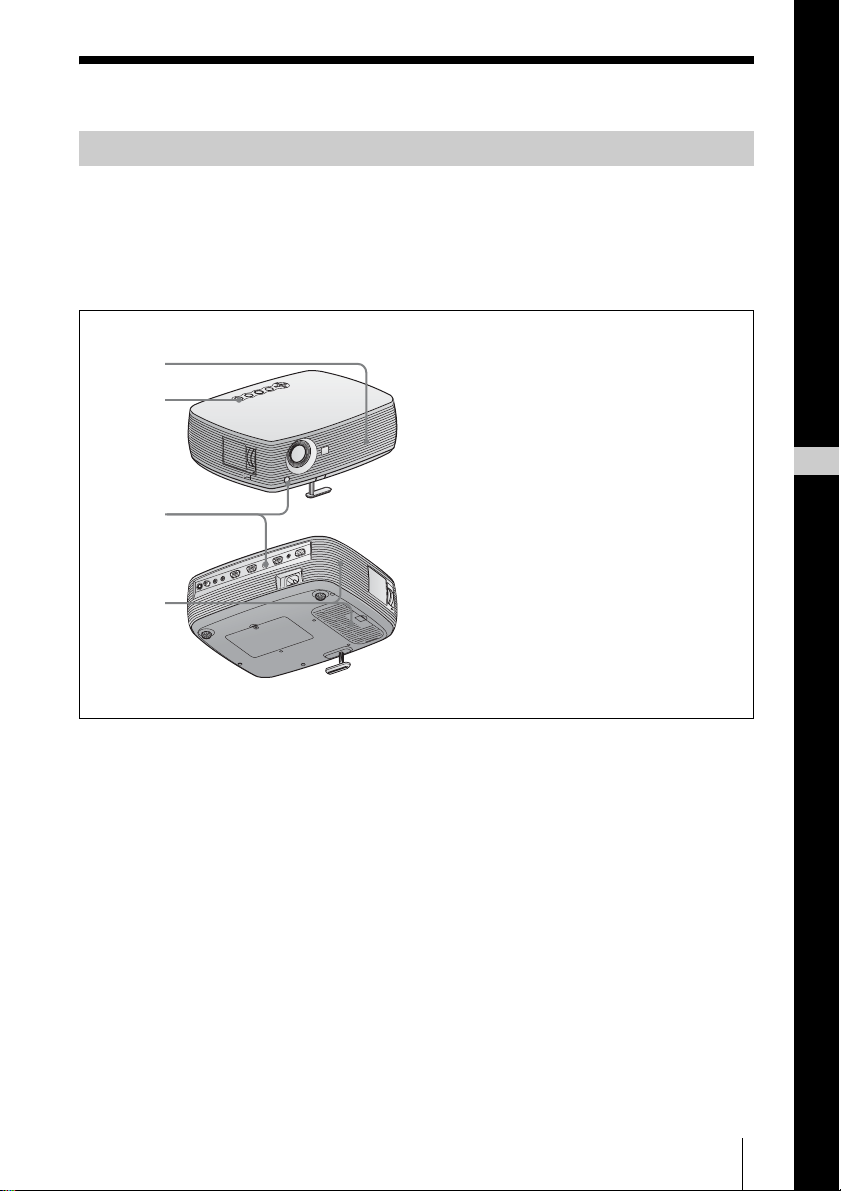
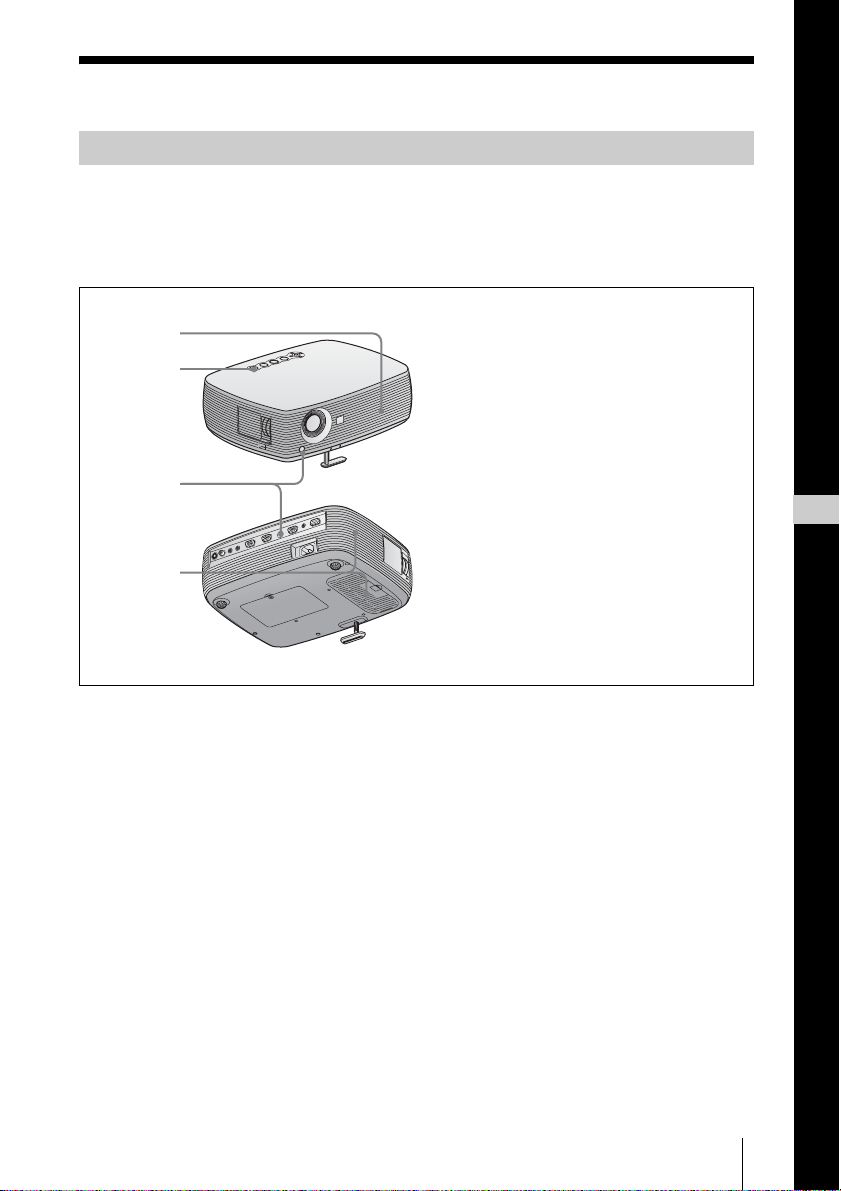
吸気・排気口についてのご注意
吸気・排気口をふさがないでください。吸気・排気口をふさぐと内部に熱がこも
り、火災や故障の原因となることがあります。以下イラストにて吸気・排気口の位
置をご確認ください。
その他注意事項については、別冊の「安全のために」をよくお読みください。
2
3
4
1 排気口
2 インジケーター
3 リモコン受光部
4 吸気口
JP
日
本
語
使用上のご注意
JP
3

画像を映す
VIDEO
AUDIO
AUDIO
INPUT A/B
INPUT A
INPUT
接続する
接続するときは
・ 接続する機器の電源は切った状態で接続してください。
・ 接続ケーブルは、それぞれの端子にあった形状の正しい物を選んでください。
・ プラグはしっかり差し込んでください。抜くときは、必ずプラグを持って抜いて
ください。
接続するコンピューターの取扱説明書もあわせてご覧ください。
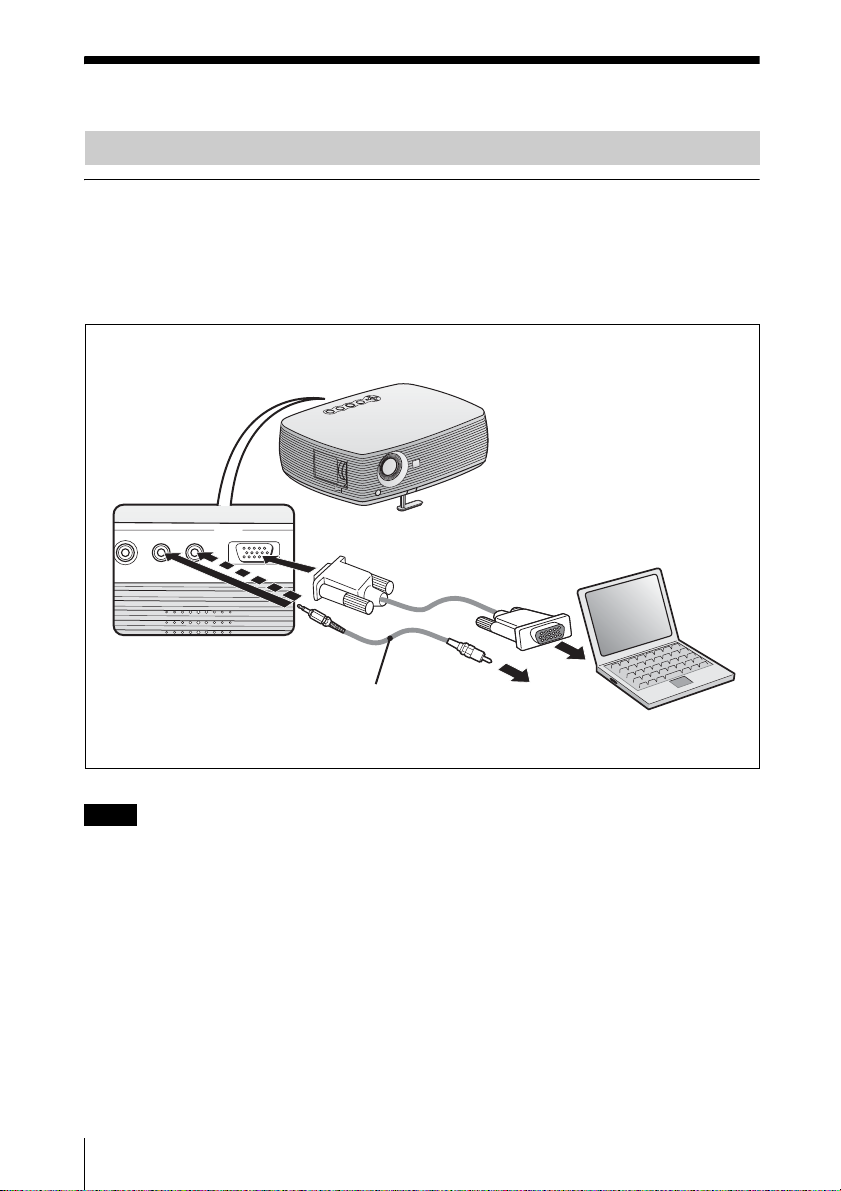
コンピューターとの接続
映像信号入力
HDD-sub15 ピンケーブル(付属)
音声(ステレオオーディオケーブル(別売り))
抵抗無しのケーブルをお使いください。
ご注意
オーディオ接続ケーブルは、VPL-ES4 の場合は AUDIO 端子に、VPL-EX4 の場合
は AUDIOINPUTA/B 端子に接続します。
JP
4
画像を映す
S VIDEO VIDEO AUDIO
AUDIO
INPUT A/B
INPUT A
INPUT
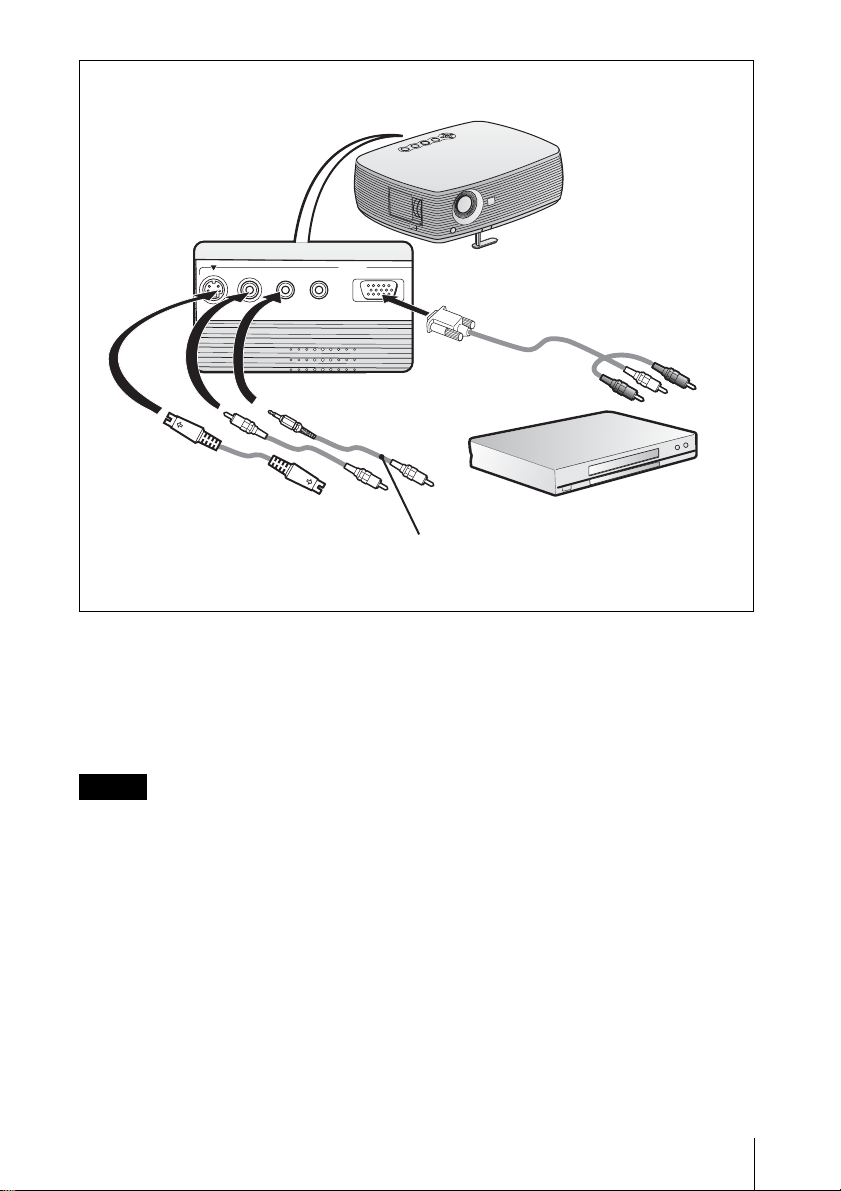
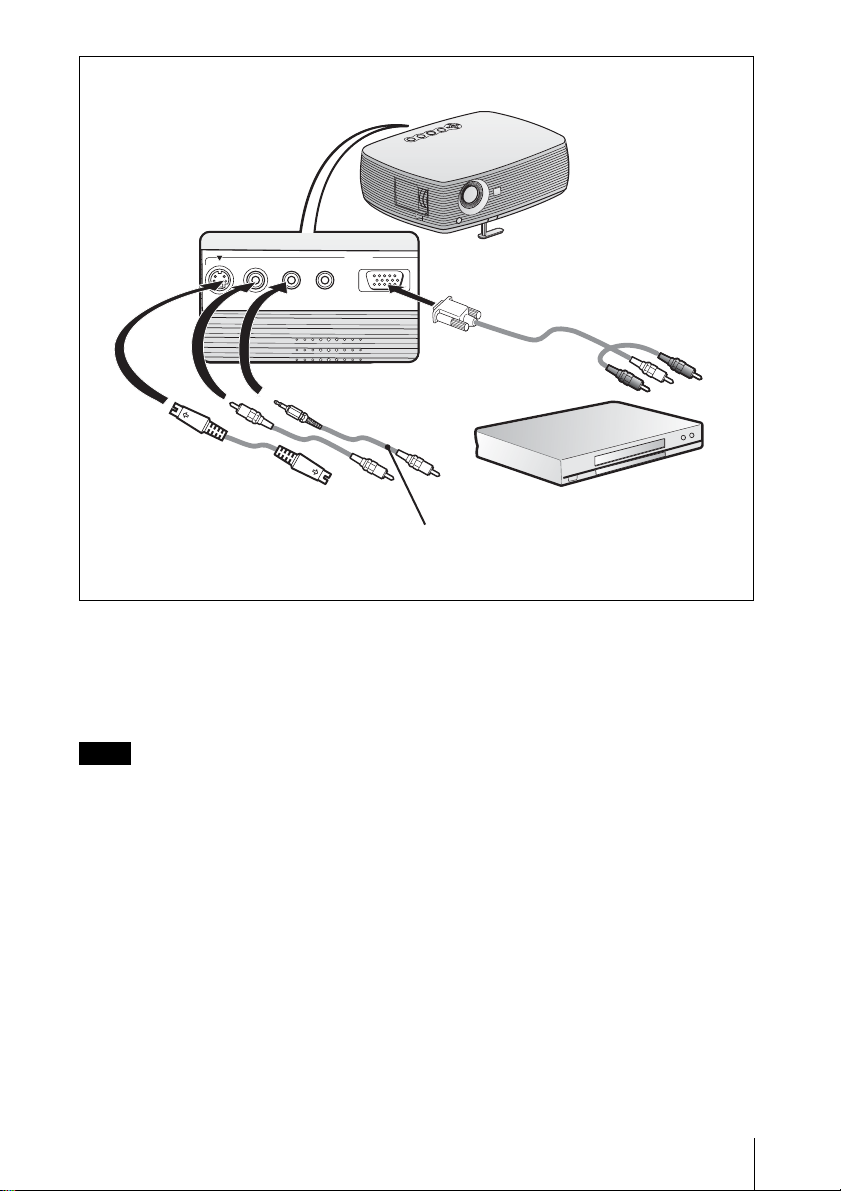
ビデオ・DVD 機器との接続
3
1
音声(ステレオオーディオケーブル(別売り))
抵抗無しのケーブルをお使いください。
2
以下の 3 通りの方法があります。
1 S ビデオ(MiniDIN4-pin)* ケーブル(別売り)
2 コンポジットビデオ(ピンジャック)* ケーブル(別売り)
3 コンポーネント(D-sub15-pinyピンジャック× 3)* ケーブル(別売り)
ご注意
VPL-EX4 を使って 3 で接続する場合、オーディオ接続ケーブルは AUDIOINPUT
A/B 端子に接続します。
3 で接続した場合、メニューで「入力 A 信号種別」の設定が必要な場合があります。
詳しくは CD-ROM 内の取扱説明書をご覧ください。
画像を映す
JP
5
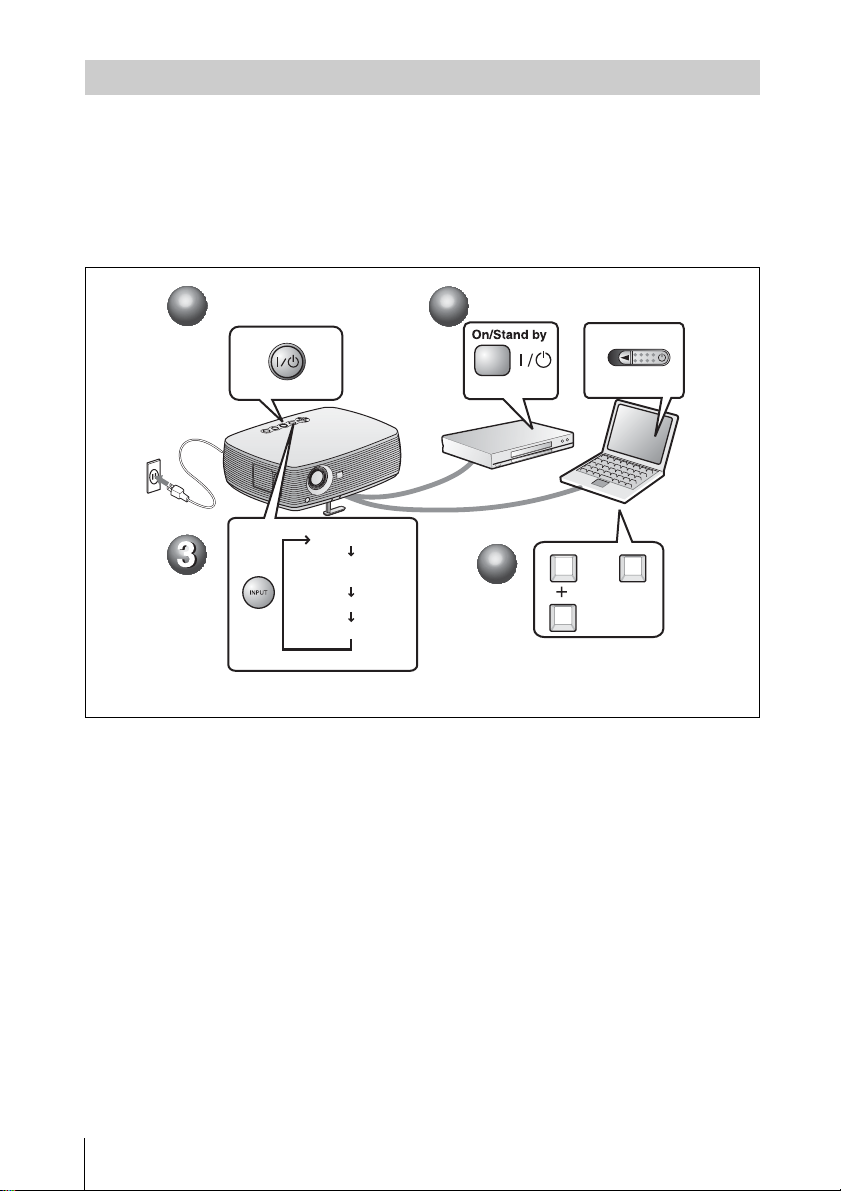
映す
各機器の接続をする前に電源コードをコンセントに差し込んでください。
1 ?/1( オン / スタンバイ)キーを押す。
2 接続している機器の電源を入れる。
3 INPUT キーを押して、映したい画像を選ぶ。
4 コンピューターの接続時には映像信号の出力先を切り換える。
2
1
1
入力 A
入力 B
(VPL-EX4 のみ)
ビデオ
S ビデオ
2
4
4
Power
FxF7
または
Fn
JP
6
画像を映す

調整する
1 画像の位置を調整する。
2 画像の大きさを調整する。
3 画像のフォーカスを調整する。
画質モードを選べる画質設定メニューや、最適な画面のアスペクト比(横縦比)を
選べる信号設定メニューがあります。詳しくは CD-ROM 内の取扱説明書をご覧く
ださい。
2
2
3
3
1
1
画像を映す
JP
7
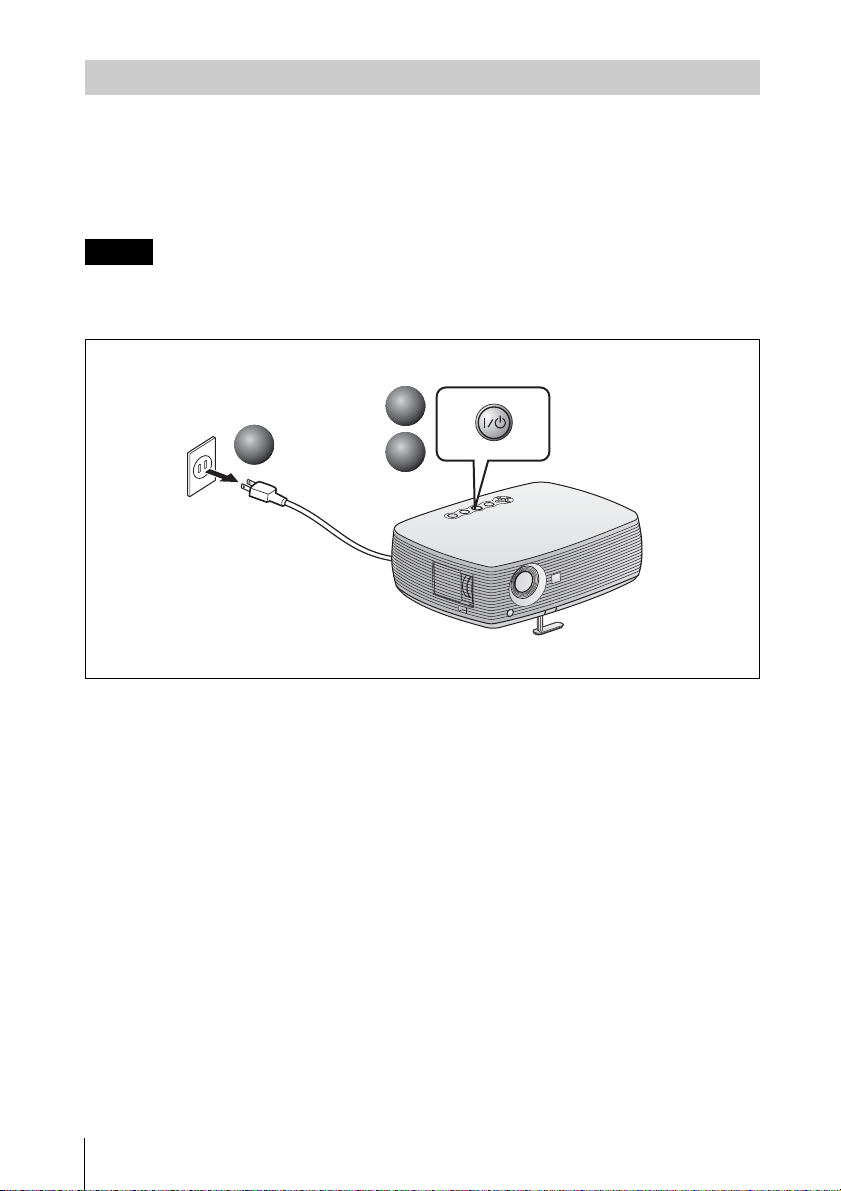
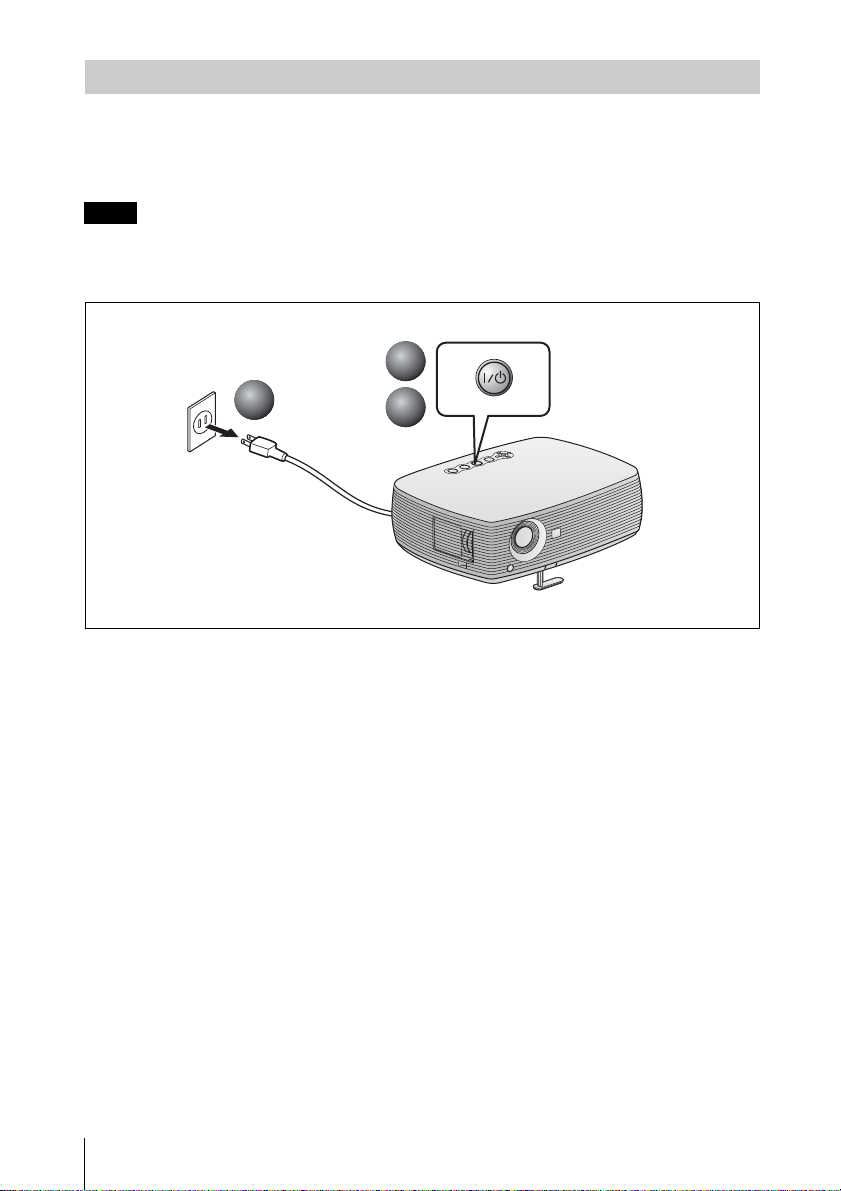
電源を切る
1 ?/1(オン/スタンバイ)キーを押す。
2 メッセージが表示されたらもう一度 ?/1(オン/スタンバイ)キーを押す。
3 ファンが止まり、オン/スタンバイインジケーターが赤く点灯したら、電源コー
ドを抜く。
ご注意
ファンが回っている間は、電源コードを抜かないでください。故障の原因となることが
あります。持ち運ぶときや、収納時は、アジャスターを本体に収納してください。
1
1
3
3
2
2
JP
8
画像を映す

ランプを交換する
光源として使用されているランプは消
耗品ですので、次のような場合は新し
いランプと交換してください。
・ 光源のランプが切れたとき
・ 光源のランプが暗くなったとき
・ 「ランプを交換してください。」とい
うメッセージが表示されたとき
・ LAMP/COVER インジケーターが点
灯したとき(3 回点滅のくり返し)
ランプ交換時期はその使用条件によっ
て変わってきます。
交換ランプは、別売りのプロジェク
ターランプ LMP-C162 をお使いくださ
い。
それ以外のものをお使いになると故障
の原因になります。
ランプを傾けて持つと、万一ランプが
破損した場合に、ランプの破片が飛び
出し、けがの原因となることがありま
す。
・ メッセージを消す場合は、リモートコ
マンダーまたはコントロールパネル
キーのいずれかのキーを押してくださ
い。
1 本機の電源を切り、電源コードを
コンセントから抜く。
ご注意
本機を使用した後にランプを交換する
場合は、ランプを冷やすため、1 時間
以上たってからランプを交換してくだ
さい。
2 本機や机に傷がつかないよう布な
どを敷き、その上で本機を裏返
す。
?/1 キーで電源を切った直後はランプが
高温になっており、さわるとやけどの原
因となることがあります。ランプを充分
に冷やすため、ランプ交換は、本機の電
源を切ってから 1 時間以上たってから
行ってください。
・ ランプが破損している場合は、お買い
上げ店またはテクニカルインフォメー
ションセンターにご相談ください。
・ ランプを取り出すときは、必ず取り出
し用のハンドルを持って引き出してく
ださい。他の部分を持って引き出すと、
けがややけどの原因となることがあり
ます。
・ ランプを取り出すときは、ランプを水
平に持ち上げ、傾けないでください。
ご注意
プロジェクターを、しっかりと安定さ
せてください。
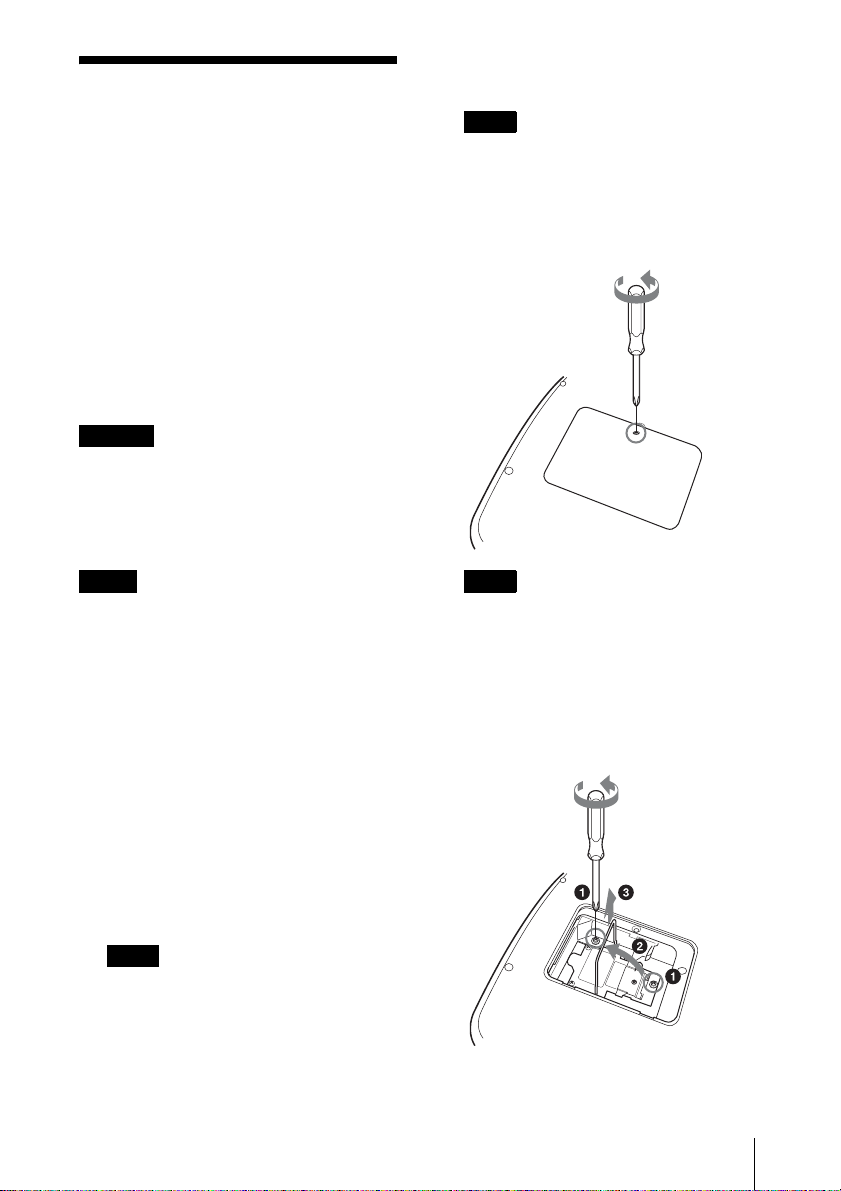
3 ランプカバーのネジ(1 本)をプ
ラスドライバーでゆるめ、ランプ
カバーを開く。
ランプを交換する
JP
9
ご注意
安全のため、他のネジは絶対にはずさ
ないでください。
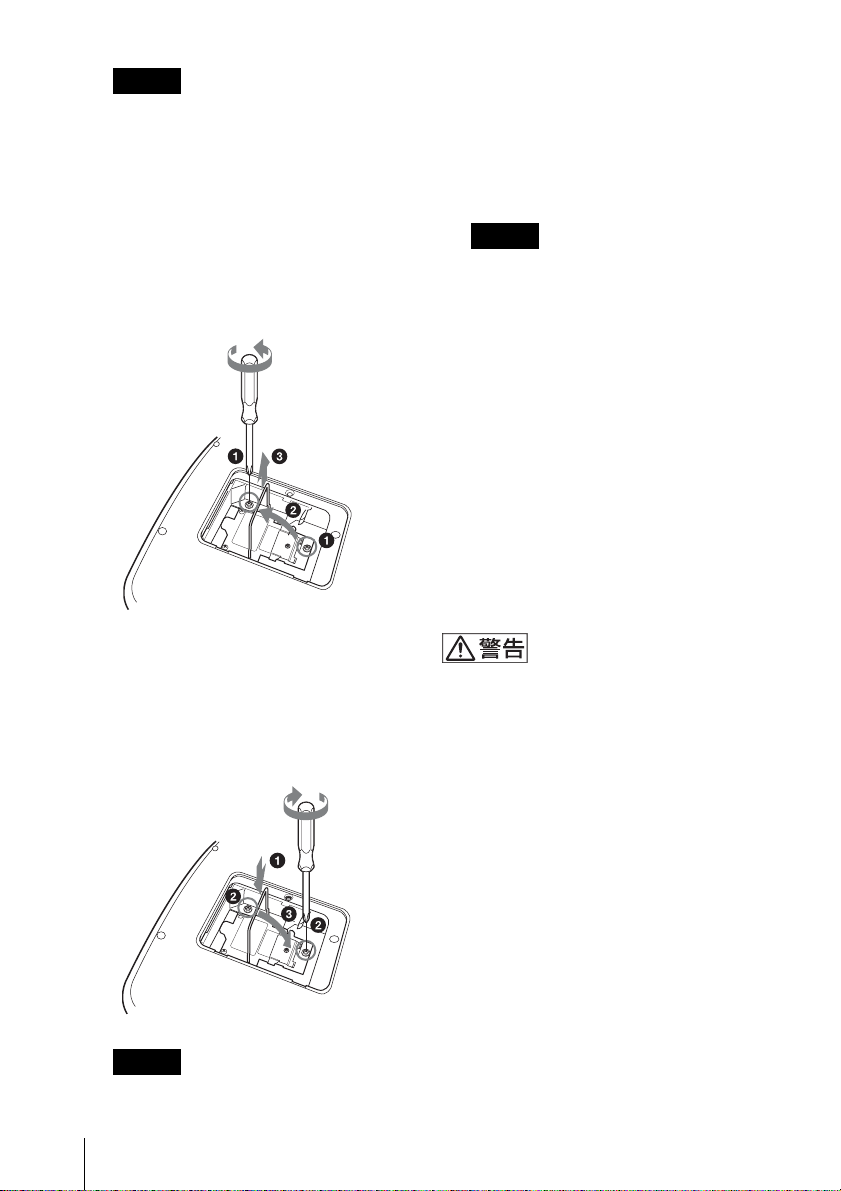
4 ランプのネジ (2 本 ) をプラスドラ
イバーでゆるめ(1)、取り出し
用ハンドルを起こし(2)ハンド
ルを持ってランプを引き出す
(3)。
ハンドル
ご注意ください。
・ ランプが確実に装着されていない
と、電源が入りません。
6 ランプカバーを閉め、ネジ(1
本)を締める。
ご注意
ランプカバーはしっかりと取り付けて
ください。きちんと取り付けられてい
ないと、電源が入りません。
7 本機の向きを元にもどす。
8 電源コードを接続する。
?/1 キー周囲の ON/STANDBY イ
ンジケーターが赤色に点灯します。
9 リモートコマンダーのキーを
RESET キー、b キー、B キー、
ENTER キーの順に、それぞれ 5
秒以内に押す。
JP
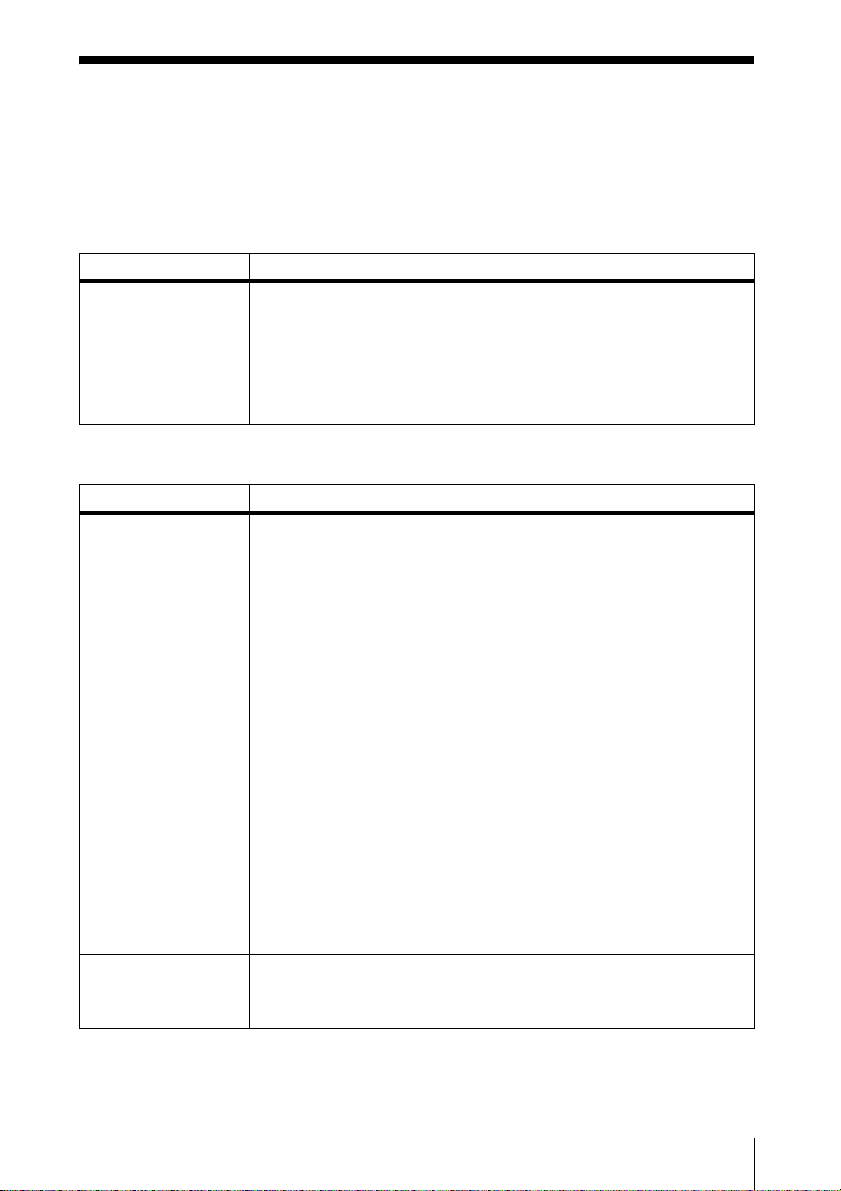
5 新しいランプを確実に奥まで押し
込み(1)、ネジ(2 本)を締め
(2)、取り出し用ハンドルを倒し
て元に戻す(3)。
ご注意
・ ランプのガラス面には触れないよう
ランプを交換する
10
ランプをはずした後のランプの収納部に
金属類や燃えやすい物などの異物を入れ
ないでください。火災や感電の原因とな
ります。また、やけどの危険があります
ので手を入れないでください。

エアーフィルターを
クリーニングする
約 500 時間ごとにエアーフィルターの
クリーニングが必要です。吸気口の外
側から掃除機で掃除してください。
500 時間は目安です。使用環境や使い
方によって異なります。
掃除機で掃除しても汚れが取れにくい
ときは、フィルターをはずして洗って
ください。
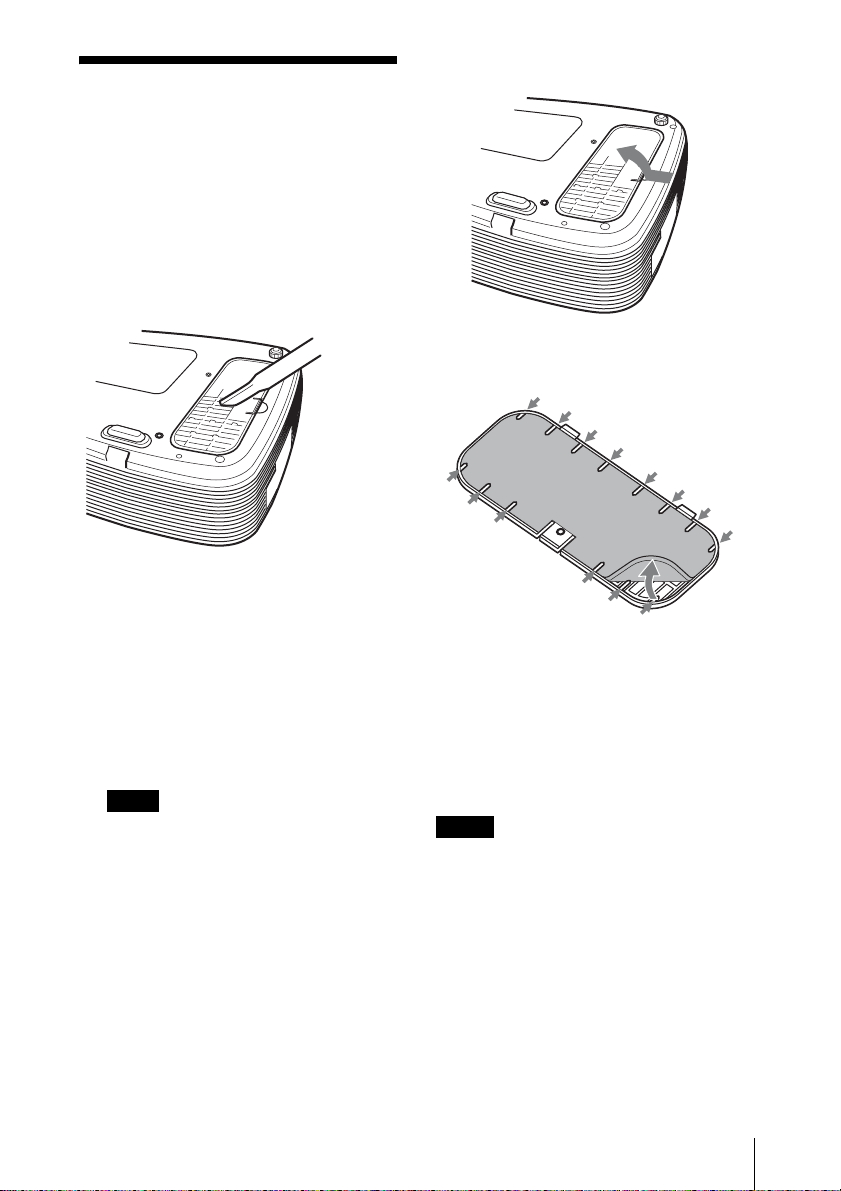
3 エアーフィルターカバーをはず
す。
4 エアーフィルターをはずす。
つめ
1 電源を切り、電源コードを抜く。
2 本機や机に傷がつかないように布
などを敷き、その上で本機を裏返
す。
ご注意
プロジェクターを、しっかりと安定さ
せてください。
5 中性洗剤を薄めた液で洗ったあと
日陰で乾かす。
6 エアーフィルターをエアーフィル
ターカバーのつめ (14ヶ所 ) には
めて、エアーフィルターカバーを
本機に取り付ける。
ご注意
・ エアーフィルターのクリーニングを怠
ると、ゴミがたまり、内部に熱がこ
もって、故障・火災の原因となること
があります。
・ エアーフィルターカバーはしっかり取
り付けてください。きちんと取り付け
られていないと、電源が入りません。
エアーフィルターをクリーニングする
11
JP

・ エアーフィルターには表裏があります。
フィルターを入れるときは、フィル
ターカバーの切り欠きのある部分に合
わせて入れてください。
・ メッセージを消す場合は、リモートコ
マンダーキー、または、コントロール
パネルキーのいずれかのキーを押して
ください。
JP
エアーフィルターをクリーニングする
12
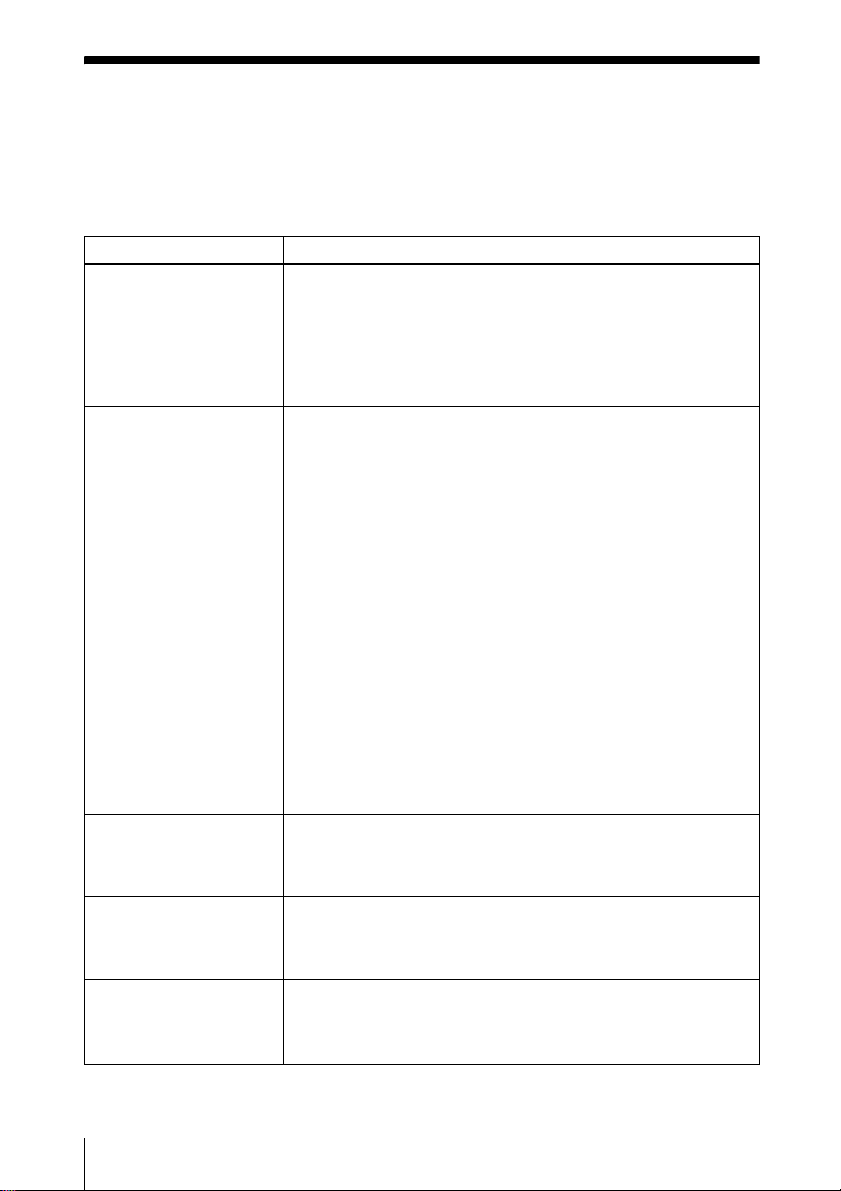
故障かな?と思ったら
修理に出す前に、もう一度次の点検をしてください。以下の対処を行っても直らな
い場合は、お買い上げ店にお問い合わせください。症状について詳しくは、CDROM 内の取扱説明書をご覧ください。
電源に関する項目
症状 原因と対処
電源が入らない。 ・ ?/1 キーで電源を切った後すぐに電源を入れた。
c 約 45 秒たってから電源を入れてください。
・ ランプカバーがはずれている。
c ランプカバーをしっかりとはめてください。
・ エアーフィルターカバーがはずれている。
c エアーフィルターカバーをしっかりとはめてください。
映像に関する項目
症状 原因と対処
映像が映らない。 ・ ケーブルがはずれている。または正しく接続されていない。
c 接続を確認してください。
・ 接続手順が正しくない。
・ 本機は DDC2B(DisplayDataChannel2B)に対応しています。
お使いのコンピューターが DDC に対応している場合は、1. 本機
とコンピューターを接続し、2. 本機の電源を入れ、3. コンピュー
ターを起動してください。
・ 入力切り換えが正しくない。
c INPUT キーで正しく選んでください。
・ 出力信号がコンピューターの外部モニターに出力されるように設
定されていない。あるいは外部モニターとコンピューターの液晶
ディスプレイの両方に出力するように設定されている。
c 出力信号をコンピューターの外部モニターのみに出力するように
設定してください。
c ノートタイプや液晶一体型のコンピューターを接続したときに
は、キーや設定によって映像の出力先を切り換える必要がありま
す。
詳しくは、お使いのコンピューターの取扱説明書をご覧くださ
い。
画面にノイズが出る。 入力信号のドット数と LCD パネルの画素数の関係により、特定の画
面の背景にノイズが出ることがある。
c お使いの機器のデスクトップパターンを変えてください。
故障かな?と思ったら
13
JP
症状 原因と対処
INPUTA 端子から入
力している映像の色
がおかしい。
画面がぼやける。 ・ フォーカスが合っていない。
画像がスクリーンか
らはみでている。
画面がちらつく。 信号設定メニューの「ドットフェーズ」の設定が合っていない。
初期設定メニューの「入力 A 信号種別」の設定が入力信号と合って
いない。
c 入力信号に合わせて初期設定メニューの「入力 A 信号種別」で「コ
ンピューター」、「ビデオ GBR」、「コンポーネント」の設定を正し
く合わせてください。
c フォーカスを合わせてください。
・ 結露が生じた。
c 電源を入れたまま約 2 時間そのままにしておいてください。
画像のまわりに黒い部分が残っている状態で APA キーを押した。
c スクリーンいっぱいに画像を映してから APA キーを押してくださ
い。
c 信号設定メニューの「シフト」で正しく調整してください。
c 信号設定メニューの「ドットフェーズ」の数値を設定しなおしてく
ださい。
インジケーターに関する項目
症状 原因と対処
LAMP/COVER イン
ジケーターがオレン
ジ色点滅する。(2 回
点滅パターンの繰り
返し)
LAMP/COVER イン
ジケーターがオレン
ジ色点滅する。(3 回
点滅パターンの繰り
返し)
ON/STANDBY イン
ジケーターが赤色点
滅する。(2 回点滅パ
ターンの繰り返し)
ON/STANDBY イン
ジケーターが赤色点
滅する。(4 回点滅パ
ターンの繰り返し)
・ ランプカバーまたはエアーフィルターカバーがはずれている。
c カバーをしっかりはめてください。
・ ランプの交換時期がきた。
c ランプを交換してください。
・ ランプが高温になっている。
c 60 秒以上たって、ランプが冷えてから、もう一度電源を入れてく
ださい。
・ 内部が高温になっている。
c 排気口、吸気口がふさがれていないか確認してください。
・ 標高が高い場所で使用されている。
c 高地モードが「入」に設定されているか確認してください。
・ ファンが故障している。
c お買い上げ店またはテクニカルインフォメーションセンターにご
相談ください。
JP
故障かな?と思ったら
14

症状 原因と対処
ON/STANDBY イ
ンジケーターが赤色
点滅する。(6 回点滅
パターンの繰り返
し)
電源コードを抜いて、ON/STANDBY インジケーターが消える
のを確認してから、電源コードをコンセントに差し込み、もう
一度電源を入れる。症状が再発する場合は、電気系統が故障し
ている。
c お買い上げ店またはテクニカルインフォメーションセンターに
ご相談ください。
故障かな?と思ったら
15
JP
主な仕様
投影方式 3LCD パネル、1 レンズ、
3 原色液晶シャッター投写方
式
LCDパネル VPL-ES4:0.63インチSVGAパネ
ル、約 144 万画素(480,000 ×
3)
VPL-EX4:0.63 インチ XGA パネ
ル、約 236 万画素(786,432 ×
3)
レンズ 1.2倍ズームレンズ
ランプ 165W高圧水銀ランプ
投影画面サイズ
40 インチ〜 300 インチ
光出力 2100lm
1)
出荷時における本製品全体の平均的な値を示し
ており、JISX6911:2003 データプロジェクター
の仕様書様式に則って記載しています。
測定方法、測定条件については附属書 2 に基づ
いています。
(ランプモード高のとき)
1)
DTV(480/60i、575/50i、
480/60p、575/50p、720/60p、
720/50p、1080/60i、1080/
50i)、コンポジットビデオ、
Y/C ビデオ
外形寸法 308 × 98 × 267mm(幅/高さ/
奥行き)(突起部含まず)
質量 約 3.1kg
電源 AC100V、2.2A、50/60Hz
消費電力 最大 220W
スタンバイ時 :5W
付属品 リモートコマンダー(1)
リチウム電池 CR2025(1)
HDD-sub15 ピンケーブル
(1.8m)(1)(1-832-428-11,
SONY)
キャリングケース(1)
電源コード(1)
取扱説明書(CD-ROM)(1)
簡易説明書(1)
安全のために(1)
保証書(1)
セキュリティラベル(1)
JP
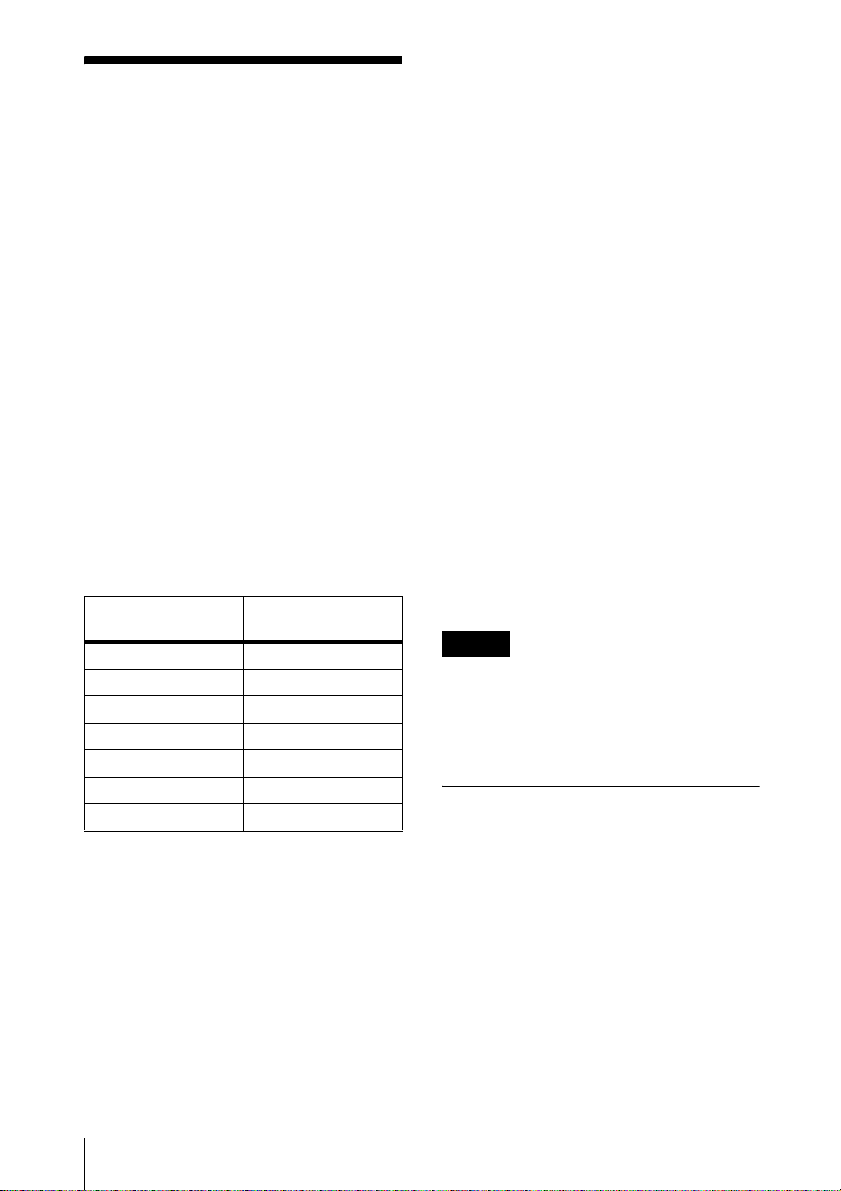
投影距離(床置き)
スクリーンサイズ
(インチ)
40 1.2 〜 1.4
80 2.3 〜 2.8
100 2.9〜3.6
150 4.4〜5.4
200 5.9〜7.2
250 7.3〜9.0
300 8.8〜10.7
(設計値のため多少の誤差あり)
カラー方式 NTSC3.58、PAL、SECAM、
対応コンピューター信号
fH:19 〜 92kHz、fV:48 〜 92Hz
(最高入力解像度信号:SXGA+
対応ビデオ信号
15kRGB/ コンポーネント
16
主な仕様
距離(m)
NTSC4.43、PAL-M、PAL-N、
PAL60
1400 × 1050、fV:60Hz)
50/60Hz、プログレッシブコ
ンポーネント 50/60Hz、
本機の仕様および外観は改良のため予告なく変
更することがありますが、ご了承ください。
ご注意
お使いになる前に、必ず動作確認を行ってくだ
さい。故障その他に伴う営業上の機会損失等は
保証期間中および保証期間経過後にかかわら
ず、補償はいたしかねますのでご了承くださ
い。
別売りアクセサリー
プロジェクターランプLMP-C162(交換用)


About the Quick
Reference Manual
This Quick Reference Manual explains the
connections and basic operations of this unit,
and gives notes on operations and
information required for maintenance.
For details on the operations, refer to the
Operating Instructions contained in the
supplied CD-ROM.
For safety precautions, refer to the separate
“Safety Regulations.”
Using the CD-ROM
Manuals
The supplied CD-ROM contains Operating
Instructions and ReadMe file in Japanese,
English, French, Spanish, German, Italian
and Chinese. First, refer to the ReadMe file.
Preparations
To read the Operating Instructions in the
CD-ROM, Adobe Acrobat Reader 5.0 or
later is required. If the Adobe Acrobat
Reader is not installed in your computer, you
can download free Acrobat Reader software
from URL of Adobe Systems.
(In case of Macintosh)
1 Double-click the CD-ROM icon on the
desk top.
2 Double-click “index.htm” file and select
the Operating Instructions you want to
read.
Note
If you cannot open “index.htm” file, doubleclick on the Operating Instructions you want to
read from among those in
“Operating_Instructions” folder.
On trademarks
• Windows is a registered trademark of
Microsoft Corporation in the United States
and/or other countries.
• Macintosh is a registered trademark of
Apple Computer, Inc. in the United States
and/or other countries.
• Adobe and Acrobat Reader is a registered
trademark of Adobe Systems Incorporated
in the United States and/or other countries.
To read the Operating Instructions
The Operating Instructions are contained in
the supplied CD-ROM. Insert the supplied
CD-ROM into the CD-ROM drive of your
computer, and the CD-ROM will start
automatically after a while. Select the
Operating Instructions you want to read.
The CD-ROM may not start automatically
depending on the computer. In this case,
open the Operating Instructions file as
follows:
(In case of Windows)
1 Open “My Computer.”
2 Right-click the CD-ROM icon and select
“Explorer.”
3 Double-click “index.htm” file and select
the Operating Instructions you want to
read.
GB
2
About the Quick Reference Manual / Using the CD-ROM Manuals
Notes on Use
1
Note on the Ventilation Holes
Do not block ventilation holes (exhaust/intake). If they are blocked, internal heat may build up
and cause fire or damage to the unit.
Check the positions of the ventilation holes shown in the following illustrations.
For other precautions, read the separate “Safety Regulations” carefully.
2
1 Ventilation holes (exhaust)
2 Indicators
3
4
3 Remote control detector
4 Ventilation holes (intake)
GB
English
Notes on Use
GB
3
Projecting
VIDEO
AUDIO
AUDIO
INPUT A/B
INPUT A
INPUT
Connecting the Projector
When you connect the projector, make sure to:
• Turn off all equipment before making any connections.
• Use the proper cables for each connection.
• Insert the cable plugs firmly. When pulling out a cable, be sure to pull it out from the plug,
not the cable itself.
Refer also to the instruction manual of the computer to be connected.
Connecting with a computer
video input
HD D-sub 15 pin cable (supplied)
stereo audio connecting cable (not supplied)
Use a no-resistance cable.
Note
For stereo audio connection, connect the stereo audio connecting cable to the AUDIO
connector for VPL-ES4, or to the AUDIO INPUT A/B connector for VPL-EX4.
GB
4
Projecting
S VIDEO VIDEO AUDIO
AUDIO
INPUT A/B
INPUT A
INPUT
Connecting with a VCR/DVD player
3
1
2
stereo audio connecting cable (not supplied)
Use a no-resistance cable.
For video signal connections, the following three connecting options are
available:
1 S video (Mini DIN 4-pin)* cable (not supplied)
2 Composite video (phono plug)* cable (not supplied)
3 Component (D-sub 15-pin y 3 × phono plug)* cable (not supplied)
Note
If connection 3 is made with VPL-EX4, connect the stereo audio connecting cable to the
AUDIO INPUT A/B connector.
If connection 3 is made, you may have to select the input signal with the “Input-A Signal Sel.”
in the SET SETTING menu. For details, see the Operating Instructions contained in the CDROM.
Projecting
GB
5
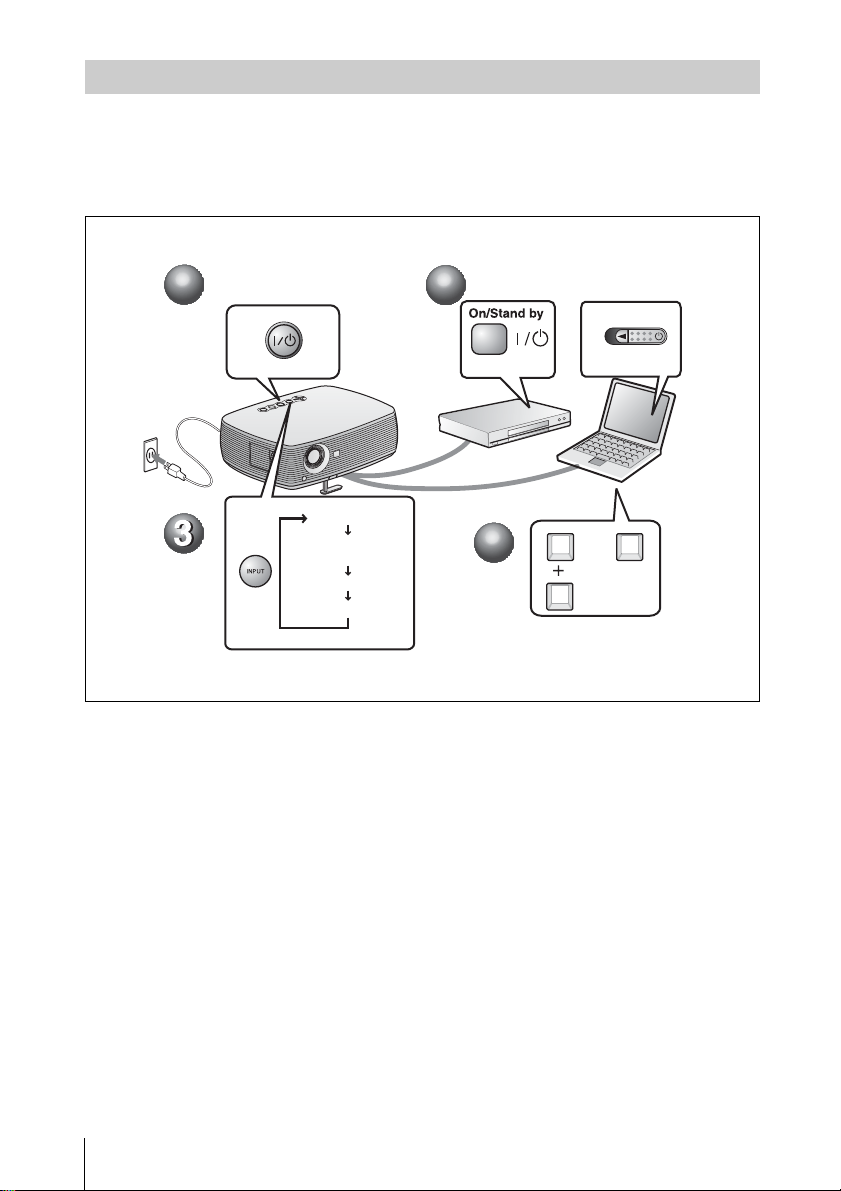
Projecting
Before connecting the equipments, plug the AC power cord into a wall outlet.
1 Press the ?/1 (on/standby) key.
2 Turn on the equipment connected to the projector.
3 Press the INPUT key to select the input source.
4 When the computer is connected, set it to output the signal to only the external monitor.
Connecting with a computer
2
1
1
INPUT A
INPUT B
(VPL-EX4 only)
VIDEO
S VIDEO
2
4
4
Power
FxF7
or
Fn
GB
6
Projecting

Adjusting the Projector
1 Adjust the position of the picture.
2 Adjust the size of the picture.
3 Adjust the focus.
The projector is equipped with the PICTURE SETTING menu to select the picture mode,
and the INPUT SETTING menu to select the appropriate aspect ratio of the picture. For
details, see the Operating Instructions contained in the CD-ROM.
2
2
3
3
1
1
Projecting
GB
7
Turning off the Power
1 Press the ?/1 (on/standby) key.
2 When a message appears, press the ?/1 (on/standby) key again.
3 Unplug the AC power cord from the wall outlet after the fan has stopped running and the
ON/STANDBY indicator has lit in red.
Note
Do not unplug the AC cord while the fan is still running; otherwise, the fan will stop even though
the internal heat is still high, which could result in a breakdown of the projector. When transporting
or storing the projector, put away the adjuster in the projector.
1
1
3
3
2
2
GB
8
Projecting
Replacing the Lamp
The lamp used as a light source is
consumable product. Thus, replace the lamp
with a new one in the following cases.
• When the lamp has burnt out or dims
• “Please replace the Lamp.” appears on the
screen
• The LAMP/COVER indicator lights up
(repeats flashing three times)
The lamp life varies depending on
conditions of use.
Use an LMP-C162 Projector Lamp as the
replacement lamp.
Use of any other lamps than the LMP-C162
may cause damage to the projector.
Caution
The lamp remains not after the projector is
turned off with the ?/1 key. If you touch the
lamp, you may burn your finger. When you
replace the lamp, wait for at least an hour
for the lamp to cool.
projector over so you can see its
underside.
Note
Be sure that the projector is stable after
turning it over.
3 Open the lamp cover by loosening the
screw with a Phillips screwdriver.
Notes
• If the lamp breaks, consult with qualified
Sony personnel.
• Pull out the lamp by holding the handle. If
you touch the lamp, you may be burned or
injured.
• When removing the lamp, make sure it
remains horizontal, then pull straight up. Do
not tilt the lamp. If you pull out the lamp
while it is tilted and if the lamp breaks, the
pieces may scatter, causing injury.
• When canceling the message, press one of
the key on the remote commander or on the
control panel.
1 Turn off the projector, and disconnect
the AC power cord from the AC outlet.
Note
When replacing the lamp after using the
projector, wait for at least an hour for the
lamp to cool.
2 Place a protective sheet (cloth)
beneath the projector. Turn the
Note
For safety reasons, do not loosen any other
screws.
4 Loosen the two screws on the lamp
unit with the Phillips screwdriver (1).
Fold out the handle (2), then pull out
the lamp unit by the handle (3).
Handle
Replacing the Lamp
GB
9

5 Insert the new lamp all the way in until
it is securely in place (
two screws (
2). Fold down the
handle to replace it (
Notes
• Be careful not to touch the glass surface
of the lamp.
• The power will not turn on if the lamp is
not secured properly.
1). Tighten the
3).
6 Close the lamp cover and tighten the
screw.
Note
Be sure to attach the lamp cover securely
as it was. If not, the projector cannot be
turned on.
Caution
Do not put your hands into the lamp
replacement slot, and do not allow any liquid or
other objects into the slot to avoid electrical
shock or fire.
Disposal of the used lamp
For the customers in the USA
This product contains mercury. Disposal of
this product may be regulated if sold in the
United States. For disposal or recycling
information, please contact your local
authorities or the Electronics Industries
Alliance (http://www.eiae.org).
GB
7 Turn the projector back over.
8 Connect the power cord.
The ON/STANDBY indicator around
the ?/1 key lights in red.
9 Press the following keys on the
Remote Commander in the following
order for less than five seconds each:
RESET, b, B, ENTER.
10
Replacing the Lamp
Cleaning the Air
Filter
The air filter should be cleaned every 500
hours.
Remove dust from the outside of the
ventilation holes with a vacuum cleaner.
500 hours are approximate. This value varies
depending on the environment or how the
projector is used.
When it becomes difficult to remove the dust
from the filter with a vacuum cleaner,
remove the air filter and wash it.
3 Remove the air filter cover.
4 Remove the air filter.
Claws
1 Turn the power off and unplug the
power cord.
2 Place a protective sheet (cloth)
beneath the projector and turn the
projector over.
Note
Be sure that the projector is stable after
turning it over.
5 Wash the air filter with a mild
detergent solution and dry it in a
shaded place.
6 Attach the air filter so that it fits into
the each claws (14 positions) on the air
filter covers and replace the cover.
Notes
• If you neglect to clean the air filter, dust
may accumulate, clogging it. As a result,
the temperature may rise inside the unit,
leading to a possible malfunction or fire.
• Be sure to attach the air filter cover firmly;
the power can not be turned on if it is not
closed securely.
• The air filter has a face and a reverse side.
Place the air filter so that it fits in a notch on
the air filter cover.
• To erase a message, press any key on the
control panel of the projector or on the
remote commander.
Cleaning the Air Filter
11
GB
Troubleshooting
If the projector appears to be operating erratically, try to diagnose and correct the problem using
the following instructions. If the problem persists, consult with qualified Sony personnel.
For details on the symptoms, see the Operating Instructions contained in the CD-ROM.
Power/Picture
Symptom Cause and Remedy
The power is not turned on. • The power has been turned off and on with the ?/1 key at a short
No picture. • A cable is disconnected or the connections are wrong.
The picture is noisy. Noise may appear on the background depending on the combination
The picture from the
INPUT A connector is
colored strangely.
The picture is not clear. • The picture is out of focus.
interval.
c Wait for about 45 seconds before turning on the power .
• The lamp cover is not secured.
c Close the lamp cover securely.
• The air filter cover is detached.
c Attach the air filter cover securely.
c Check that the proper connections have been made.
• The connections are wrong.
c This projector is compatible with DDC2B (Digital Data
Channel 2B). If your computer is compatible with DDC, turn
the projector on according to the following procedures.
1 Connect the projector to the computer.
2 Turn the projector on.
3 Start the computer.
• Input selection is incorrect.
c Select the input source correctly using the INPUT key.
• The computer signal is not set to output to an external monitor or
set to output both to an external monitor and a LCD monitor of a
computer.
c Set the computer signal to output only to an external monitor.
c Depending on the type of your computer, for example a
notebook, or an all-in-one LCD type, you may have to switch
the computer to output to the projector by pressing certain keys
or by changing your computer’s settings.
For details, refer to the computer’s operating instructions
supplied with your computer.
of the number of dots input from the connector and the numbers of
pixels on the LCD panel.
c Change the desktop pattern on the connected computer.
The setting of “Input-A Signal Sel.” on the SET SETTING menu is
incorrect.
c Selects “Computer”, “Video GBR” or “Component” correctly
according to the input signal.
c Adjust the focus.
• Condensation has accumulated on the lens.
c Leave the projector for about two hours with the power on.
GB
12
Troubleshooting
Symptom Cause and Remedy
The image extends beyond
the screen.
The picture flickers. “Dot Phase” on the INPUT SETTING menu has not been adjusted
The APA key has been pressed even though there are black edges
around the image.
c Display the full image on the screen and press the APA key.
c Adjust “Shift” on the INPUT SETTING menu properly.
properly.
c Adjust “Dot Phase” on the INPUT SETTING menu properly.
Indicators
Indicators Status and Remedy
The LAMP/COVER
indicator flashes in orange.
(Repetition rate of 2
flashes)
The LAMP/COVER
indicator flashes in orange.
(Repetition rate of 3
flashes)
ON/STANDBY flashes in
red. (Repetition rate of 2
flashes)
ON/STANDBY flashes in
red. (Repetition rate of 4
flashes)
ON/STANDBY flashes in
red. (Repetition rate of 6
flashes)
• The lamp cover or the air filter cover is detached.
c Attach the cover securely.
• The lamp has reached the end of its life.
c Replace the lamp.
• The lamp has reached a high temperature.
c Wait for 60 seconds to cool the lamp and then turn on the power
again.
• The internal temperature is unusually high.
c Check to see that nothing is blocking the ventilation holes.
• The projector is being used at a high altitude.
c Ensure that “High Altitude Mode” in the Setup menu is set to
“On.”
The fan is broken.
c Consult with qualified Sony personnel.
Unplug the AC power cord from the wall outlet after the ON/
STANDBY indicator goes out, plug the power cord to the wall
outlet, and then turn the projector on again. If the ON/STANDBY
flashes in red and the problem persists, the electrical system has
failed.
c Consult with qualified Sony personnel.
Troubleshooting
13
GB

Specifications
Projection system
LCD panel VPL-ES4: 0.63-inch SVGA panel,
Lens 1.2 times zoom lens
Lamp 165 W Ultra high pressure lamp
Projected picture size
Light output 2100 lm
Throwing distance (When placed on the floor.)
There may be a slight difference between the
actual value and the design value shown above.
Color system NTSC
Acceptable computer signals
Applicable video signals
Dimensions 308 × 98 × 267 mm (12
3 LCD panels, 1 lens, projection
system
1,440,000 pixels (480,000
pixels × 3)
VPL-EX4: 0.63-inch XGA panel,
2,360,000 pixels (786,432
pixels × 3)
f 18.8 to 22.6 mm/F1.6 to 1.94
40 to 300 inches (measured
diagonally)
(When the Lamp Mode is set to
“High.”)
40-inch: 1.2 to 1.4 m
(3.9 to 4.6 feet)
80-inch: 2.3 to 2.8 m
(7.5 to 9.2 feet)
100-inch: 2.9 to 3.6 m
(9.5 to 11.8 feet)
150-inch: 4.4 to 5.4 m
(14.4 to 17.7 feet)
200-inch: 5.9 to 7.2 m
(19.4 to 23.6 feet)
250-inch: 7.3 to 9.0 m
(24 to 29.5 feet)
300-inch: 8.8 to 10.7 m
(28.9 to 35.1 feet)
3.58/PAL/SECAM/
4.43/PAL-M/PAL-N/
NTSC
PAL60 system
fH: 19 to 92 kHz
fV: 48 to 92 Hz
(Maximum input signal resolu tion:
SXGA+ 1400 × 1050
fV: 60 Hz)
15 k RGB 50/60 Hz, Progressive
component 50/60 Hz, DTV
(480/60i, 575/50i, 480/60p,
575/50p, 720/60p, 720/50p,
1080/60i, 1080/50i), Com posite
video, Y/C video
5
/8 inches) (w/h/d)
× 10
(without projecting parts)
1
/4 × 3 7/8
Mass Approx. 3.1 kg (6 lb 13 oz)
Power requirements
AC 100 to 240 V, 2.2 to 1.0 A, 50/
60 Hz
Power consumption
Max. 220 W
in standby: 5 W
Supplied accessories
Remote Commander (1)
Lithium battery CR2025 (1)
HD D-sub 15 pin cable (1.8 m) (1)
(1-832-428-11, SONY)
Carrying case (1)
AC power cord (1)
Operating instructions (CD-ROM)
(1)
Quick Reference Manual (1)
Safety Regulations (1)
Security Label (1)
Design and specifications are subject to change
without notice.
Note
Always verify that the unit is operating properly
before use. SONY WILL NOT BE LIABLE FOR
DAMAGES OF ANY KIND INCLUDING, BUT
NOT LIMITED TO, COMPENSATION OR
REIMBURSEMENT ON ACCOUNT OF THE
LOSS OF PRESENT OR PROSPECTIVE
PROFITS DUE TO FAILURE OF THIS UNIT,
EITHER DURING THE WARRANTY PERIOD
OR AFTER EXPIRATION OF THE
WARRANTY, OR FOR ANY OTHER REASON
WHATSOEVER.
Optional accessories
Projector Lamp
LMP-C162 (for replacement)
Some of the items may not be available in
some areas. For details, please consult your
nearest Sony dealer.
GB
14
Specifications
 Loading...