

Sony VPL-CX6 Operating Manual
Data Projector
4-095-441-11(1)
Operating Instructions for Memory Stick
Mode d’emploi du Memory Stick
Manual de instrucciones de Memory Stick
VPL-CX6
GB
FR
ES
2003 Sony Corporation

GB
2

Table of Contents
Overview
Features...............................................4
Precautions .........................................4
About This Manual............................. 4
About a Memory Stick ................. 5
Setting Up
Using the Memory Stick ............... 8
Operating the MS Home.....................9
Viewing the Slide
Sliding Material for a Presentation
— Presentation Viewer .................10
Switching the File Display Mode12
Repeating the Slide Show ...........12
Executing the Slide Show
Promptly ..........................12
Sliding a Picture File — Picture
Viewer ...........................................13
Displaying a picture file on the full
screen ...............................16
Executing the Slide Show
Promptly ..........................17
Playing Back a Movie File..........17
Executing the Slide Show
Promptly ..........................19
Rotating a Picture File ................23
Registering a File as the Startup
Picture.............................. 23
Deleting a Picture File ................23
Showing/Hiding the Picture File
Information ......................23
Switching the Sound of a Movie
File ...................................24
Sorting the Picture Files..............24
Displaying Still Picture Files or
Movie Files Only .............25
GB
Useful Settings
Displaying the Picture Files Recorded
by a Digital Camera Only .............26
Starting a Presentation Automatically
— Autorun ....................................27
Projecting a Selected File When the
Power is Turned on — Startup.....28
Operating Memory Stick
Displaying the Memory Stick
Information....................................29
Formatting a Memory Stick .........30
Other
Troubleshooting................................31
Setting/Displaying the
Picture File
Operating the Picture File.................20
Protecting an Important File .......23
GB
3

B
Overview
Features
When you memorize presentation material
converted by the Projector Station for
Presentation (supplied software) or the
picture file recorded by a digital camera in
the Memory Stick, you can easily make
effective presentations without a computer.
Presentation Viewer
After you have converted Microsoft
PowerPoint files by the Projector Station
for Presentation to the file which offers the
most advantages for projection on the
projector, you can make a slide show.
Picture Viewer
You can make the slide show or display on
the screen by using a JPEG still picture file
1)
-compatible) recorded by a digital
(DCF
camera and a MPEG1 movie file recorded
by the Sony MPEG MOVIE etc. You can
set the effect of the slide when it is
displayed, and the way (automatic or
manual) the slide is exchanged.
Usable MPEG1 files: MPEG MOVIE,
MPEG MOVIE AD, MPEG MOVIE EX,
MPEG MOVIE HQ, MPEG MOVIE HQX,
MPEG MOVIE CV, MPEG1 of VAIO
Giga pocket (equivalent to a Video CD)
1)DCF: Design rules for Camera File
systems
the slide show starts.
Startup
When the power is turned on, the selected
picture file is projected for about 30
seconds. You can adjust the focus and
zoom without a signal from other
equipment.
You can also select the original picture or
the registered picture file in the Memory
Stick.
Precautions
• To prevent data loss, make backups of
data frequently. In no event will Sony be
liable for any loss of data.
• Unauthorized recording may be contrary
to the provisions of copyright law.
• The Memory Stick application software
may be modified or changed by Sony
without prior notice.
About This Manual
This manual explains the operations to
view the picture files stored in the
Memory Stick.
For details on making the presentation
material, see the Operating Instructions of
the Projector Station for Presentation (CDROM, supplied).
Digital Camera Mode
The unit can choose and display the JPEG
and MPEG1 picture files recorded by a
digital camera (DCF-compatible) only from
among picture files stored in a Memory
Stick.
Autorun
When the Memory Stick with the picture
file for which the Autorun function is set by
the Projector Station for Presentation is
inserted in the Memory Stick Slot, the
input is automatically switched to MS and
GB
4
Features/Precautions/About This Manual
For operations other than by the
, see the supplied Operating
Stick
Instructions.
......................................................................
• Microsoft and PowerPoint are registered
trademarks and trademarks of the Microsoft
Corporation in the United States and/or
other countries.
• Adobe and Photoshop are either registered
trademarks or trademarks of Adobe Systems
Incorporated in the United States and /or
other countries.
Memory
About a Memory
Stick
select switch on the back of the Memory
Stick.
You cannot use all the available memory
at the same time and/or continuously.
On Memory Sticks
Memory Stick is a new compact, portable
and versatile IC recording medium with a
data capacity that exceeds a floppy disk.
Memory Stick is specially designed for
exchanging and sharing digital data among
Memory Stick compatible products.
Because it is removable, Memory Stick
can also be used for external data storage.
Memory Stick is available in two sizes:
standard size and compact Memory Stick
Duo size. Once attached to a Memory
Stick Duo adapter, Memory Stick Duo
turns to the same size as standard Memory
Stick and thus can be used with products
compliant with standard Memory Stick.
Types of Memory Sticks
Memory Stick is available in the
following five types to meet various
requirements in functions.
• Memory Stick PRO
Equipped with the MagicGate copyright
protection technology and can be used
only with Memory Stick PRO
compliant products.
• Memory Stick
Memory Stick stores any type of data
except copyright-protected data that
requires the MagicGate copyright
protection technology.
• MagicGate Memory Stick
Equipped with the MagicGate copyright
protection technology.
• Memory Stick-ROM
Memory Stick-ROM stores prerecorded, read-only data. You cannot
record on Memory Stick-ROM or erase
the pre-recorded data.
• Memory Stick (with memory select
function)
This is a Memory Stick that has
(128MB) plural memory in it.
You can select memory to use for
whatever purposes through the memory
Available types of Memory Stick
for the projector
Memory Stick Media Compatibility
Chart
Recording/Playback
Memory Stick
Memory Stick
(with memory select
function)
Memory Stick Duo
Memory Stick-ROM
MagicGate Memory
Stick
MagicGate Memory
Stick Duo
Memory Stick PRO
*1: Data recording/playback that requires
MagicGate functions cannot be
performed.
playback only
a
*1
a
*1
a
• When using a Memory Stick Duo in
the projector, always insert the Memory
Stick Duo into the sold separately
Memory Stick Duo adapter. If you
insert a Memory Stick Duo without the
Memory Stick Duo adapter, you may
be unable to remove the Memory Stick
Duo.
• Not all types of Memory Stick media
are guaranteed to operate.
Note on memory capacity of
Memory Stick PRO
Memory Stick PRO features vary by and
are dependent upon the design of host
hardware devices.
Memory Stick PRO Media slot:
• does not support high speed data transfer;
• does not support MagicGate copyright
protection technology;
• does not support access control security
function.
Overview
About a Memory Stick
GB
5

This device has been demonstrated the
operation with up to 1GB Memory Stick.
Operation is not guaranteed for Memory
Stick PRO beyond this capacity.
Note on Memory Stick Duo
• To use a Memory Stick Duo with this
device, attach it to a Memory Stick
Duo adapter before inserting it into the
device.
If you insert a Memory Stick Duo
without the Memory Stick Duo
adapter, you may be unable to remove the
Memory Stick Duo.
• Make sure to attach a Memory Stick
Duo to the adapter in the right direction.
• Make sure to insert a Memory Stick
Duo adapter in the right direction.
Otherwise, the unit may be damaged.
• Do not insert a Memory Stick Duo
adapter without a Memory Stick Duo
attached. Doing so may result in
malfunction of the unit.
Note on data read/write speed
Data read/write speed may vary depending
on the combination of the Memory Stick
and Memory Stick compliant product you
use.
Note on Access Control
This unit cannot read Memory Stick that
has been Access Control with other units.
To read/write data on the Access Control
Memory Stick, unlock the Memory
Stick with the unit that has locked it.
Note on Memory Stick (with
memory select function)
• You cannot use all the available memory
at the same time and/or continuously.
• Do not use the memory select switch
while the Memory Stick is connected to
any of the compatible device that is
compatible for use with this feature, as
this may cause a malfunction. If you use
the memory select function while the
Memory Stick is connected to any
compatible device and there is a
malfunction, we will not honor the
GB
6
About a Memory Stick
guarantee.
• When using the memory select switch,
make sure to firmly move the switch to
the end. If you do not switch it
completely, it may cause a problem or
malfunction.
• Check your memory selection on the
Memory Stick before inserting it into
the Memory Stick slot of the
compatible device.
• When you use Memory Stick with
memory select function, you can choose
the type of memory by switching the
memory select switch. As the compatible
device will only access the memory
selected by you, note the following:
– A formatting (initializing) process
is executed for the selected
memory only.
– Remaining memory display reflects
only selected memory information.
– Error display reflects only selected
memory information.
Each memory is handled
individually by selecting it.
On MagicGate
MagicGate is copyright protection
technology that uses encryption technology.
Format to save a file
Material for a presentation converted by the
Projector Station for Presentation is saved
in the following file formats in the
Memory Stick.
• Image files (DCF-compatible)
compressed in the JPEG (Joint
Photographic Experts Group) format
(extension .jpg).
• The Sony Projector Presentation file (SPP
file), which is an original file format of
Sony. This file integrates information
such as the destination and the setting
information of the image file, etc.
Before using a Memory Stick
Terminal
Writeprotect
tab
Labeling
position
• When you set the Memory Stick erasure
prevention switch to Lock, data cannot
be recorded, edited, or erased.
• Use a sharp object, such as a ballpoint
pen, to move the Memory Stick Duo
erasure prevention switch.
• Data may be damaged if:
– You remove the Memory Stick or
turn off the unit while it is reading
or writing data.
– You use the Memory Stick in a
location subject to the effects of
static electricity or electric noise.
• We recommend that you make a backup
copy of important data that you record on
the Memory Stick.
Notes
• Do not attach anything other than the
supplied label to the Memory Stick
labeling position.
• Attach the label so that it does not stick
out beyond the labeling position.
• Do not write forcefully on the Memory
Stick Duo memo area.
• Carry and store the Memory Stick in its
case.
• Do not touch the connector of the
Memory Stick with anything, including
your finger or metallic objects.
• Does not strike, bend, or drop the
Memory Stick.
• Do not disassemble or modify the
Memory Stick.
• Do not allow the Memory Stick to get
wet.
• Do not use or store the Memory Stick in
a location that is:
– Extremely hot, such as in a car
parked in the sun
– Under direct sunlight
– Very humid or subject to corrosive
substances
About formatting Memory Sticks
When Memory Sticks are shipped from
the factory, they are already formatted to a
special standard. When you format
Memory Sticks, we recommend
formatting them on this unit.
Caution when formatting Memory
Sticks on a personal computer
Pay attention to the following points when
formatting Memory Sticks on a personal
computer.
Operation of Memory Sticks formatted
on a personal computer is not guaranteed
on this unit. To use a Memory Stick that
has been formatted on a personal
computer, the Memory Stick must be
reformatted on this unit. If it is not
reformatted, all data stored on the
Memory Stick will be lost.
Notes on image data compatibility
Image data files saved to a Memory Stick
by using the software conform to the
Design Rules for Camera File Systems
universal standard established by JEITA
(Japan Electronics and Information
Technology Industries Association).
JPEG files converted by Adobe Photoshop,
etc. must be converted to JPEG format
(DCF-compatible) again by the Projector
Station for Presentation.
Access Lamp
If the access lamp is turned on or is
flashing, data is being read from or written
to the Memory Stick. At this time, do not
shake the computer or projector or subject
them to shock. Do not turn off the power
of the computer and projector, disconnect
the USB cable or remove the Memory
Stick. This may damage the data.
......................................................................
• Memory Stick and are trademarks
of Sony Corporation.
• Memory Stick Duo and
are trademarks of Sony
Corporation.
• Memory Stick PRO and
are trademarks of Sony
Corporation.
• Memory Stick-ROM and
are trademarks of
Sony Corporation.
• MagicGate Memory Stick and
are trademarks of Sony
Corporation.
Overview
About a Memory Stick
GB
7
B
Setting Up
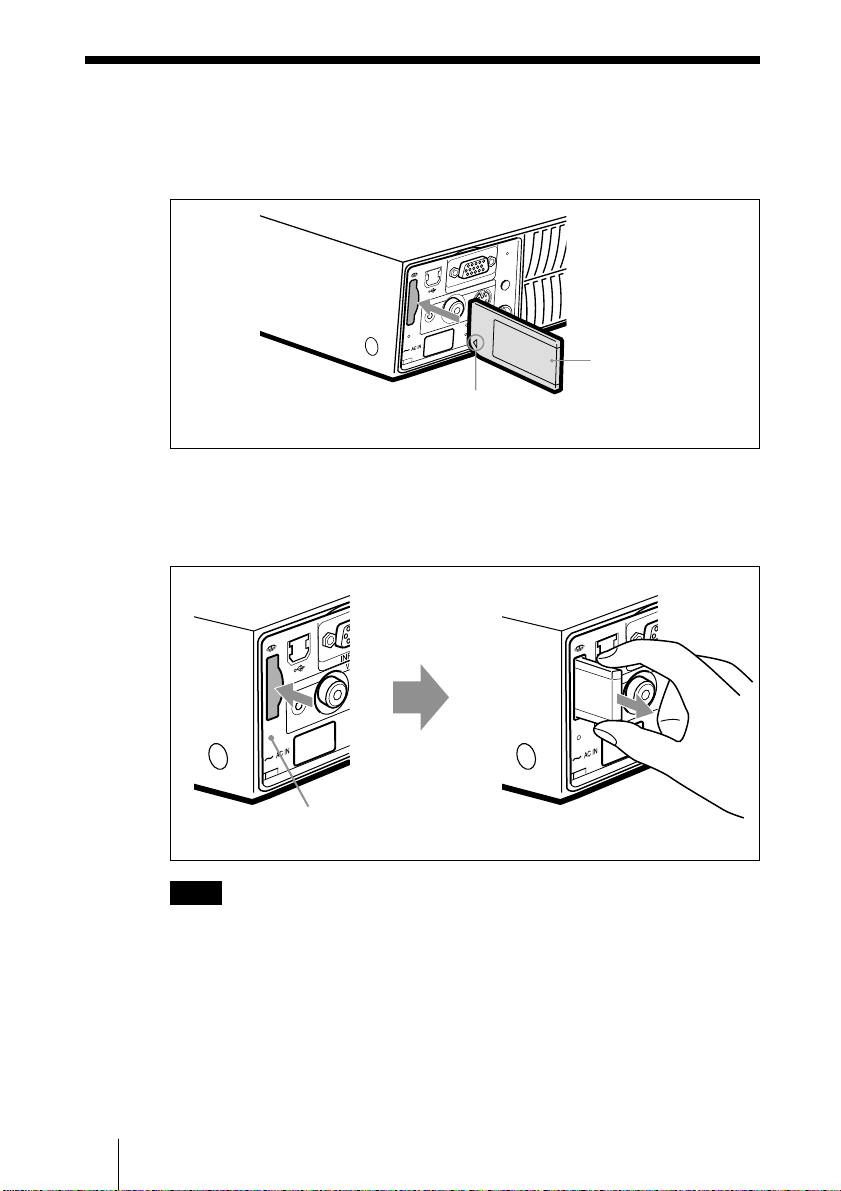
Using the Memory Stick
Insert the Memory Stick into the Memory Stick slot on the side of the
projector.
INPUT A
IO VIDEO
D
U
A
TEMP/FAN
O
R
P
AC
Insert the Memory Stick in the direction of
the arrow until it clicks.
To remove the Memory Stick
When the access lamp is turned off, press the Memory Stick and remove
your hand. As the lock is released, remove the Memory Stick.
LAMP/COV
S
ES
C
S VIDEO
POWER
G
SAVIN
MENU
PUSH
ENTER
R
E
Memory Stick
Note
Insert the Memory Stick with the arrow mark pointing toward the
Memory Stick slot.
GB
8
Using the Memory Stick
O
R
P
S
S
E
C
AC
IO
D
U
A
Access lamp
IO
D
U
A
RO
P
S
S
E
C
AC
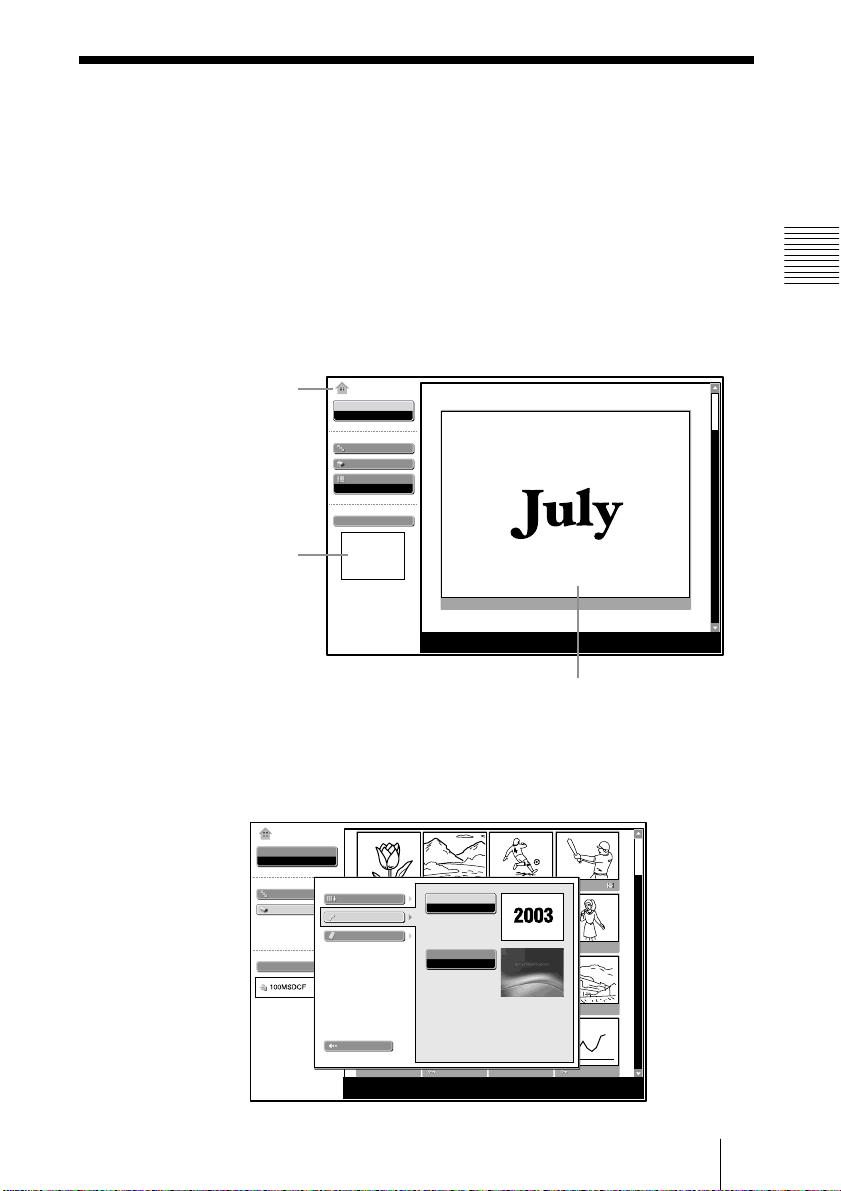
Operating the MS Home
The initial display for MS input is the MS Home. The MS Home is used for
setting and executing an event (e.g., selecting the viewer), setting the
Autorun and Startup and formatting the Memory Stick. The guide for the
key operation is displayed at the bottom of the MS Home display. Use the
Remote Commander or the control panel for setting. The selected item is
displayed in yellow.
For details on each operation, see the relevant page.
1 Press the INPUT key to select MS.
The MS Home appears.
Setting Up
MS Home mark
Title or folder
MS Home
Select
Presentation Viewer
Slide Show
Option
Index Display
Normal
Select Contents
Presentation1
name for the
selected contents
No.: 1/1234
Size: 1024x768
First picture file of the selected content
2 Use the M or m key to select the desired item, then press the ENTER key.
3 Use the M or m key to make the setting for an item, then press the
ENTER key.
MS Home
Select
Picture Viewer
Slide Show
Option
Select Contents
File
MS Home
Setting
Memory Stick
MS Home
Autorun
On
Startup
Original
Close
No.: 1/1234
Size: 1024x768
File: SPJP0001.JPG
Date: 2003.JUL.15 12:34PM
Operating the MS Home
GB
9
B
Viewing the Slide
Sliding Material for a Presentation
— Presentation Viewer
After you have converted Microsoft PowerPoint files by the Projector Station
for Presentation to the file which offers the most advantages for projection
on the projector, you can make a slide show.
For details on making the presentation material, see the Operating Instructions of the
Projector Station for Presentation (CD-ROM, supplied).
1 Press the INPUT key to select MS.
The MS Home appears.
MS Home
Select
Presentation Viewer
Slide Show
Option
Index Display
Normal
Select Contents
Presentation1
GB
No.: 1/1234
Size: 1024x768
2 Select “Select”, then press the ENTER key.
A drop-down list appears.
MS Home
Select
Presentation Viewer
Presentation Viewer
Picture Viewer
Slide Show
Option
Index Display
Normal
Select Contents
Presentation1
No.: 1/1234
Size: 1024x768
10
Sliding Material for a Presentation — Presentation Viewer
3 Select “Presentation Viewer”, then press the ENTER key.
4 Select “Select Contents”, then press the ENTER key.
The Select Contents menu appears.
MS Home
Select
Presentation Viewer
Slide Show
Option
Index Display
Normal
Select Contents
Presentation1
Presentation1
Presentation2
Presentation3
No.: 1/1234
Size: 1024x768
The Presentation Viewer can select the “contents” in units of a folder in
which multiple JPEG files are contained. In the above illustration, there are
three lots of contents of presentation material: Presentation 1, Presentation 2
and Presentation 3.
To select the contents which are not displayed, press the , key to select the
slider in the Select Contents menu and press the m or M key. The next three
lots of contents appear.
5 Select the contents for the presentation, then press the ENTER key.
The title name of the selected presentation material and the first picture file is
displayed.
MS Home
Select
Presentation Viewer
Slide Show
Option
Index Display
Normal
Select Contents
Presentation2
No.: 1/1234
Size: 1024x768
Viewing the Slide
6 Select “Slide Show”, then press the ENTER key.
7 Select “Execute”, then press the ENTER key.
Sliding Material for a Presentation — Presentation Viewer
11
GB

Switching the File Display Mode
You can display one picture file only (Normal mode) or thumbnails of
picture files (Thumbnail mode).
1 Select “Index Display” in the MS Home, then press the ENTER key.
2 Select the setting, then press the ENTER key.
Normal: to display a picture file
Thumbnail: to display thumbnails of the picture files contained in the
selected contents.
Repeating the Slide Show
1 Select “Slide Show” in the MS Home, then press the ENTER key.
2 Select “Repeat,” then press the ENTER key.
On: set to execute the slide show repeatedly
Off: set to execute the slide show one time only
To execute the slide show
When the slide show setting is set to “Auto” by the Projector Station for
Presentation, the slide show is executed according to the settings made by the
Projector Station for Presentation. When you want to end the slide show,
press the MS SLIDE or ENTER key. When the slide show setting is set to
“Manual”, press the following keys for the slide show.
,: to display the next slide
<: to display the previous slide
MS SLIDE: to end the slide show
To return to the MS Home before executing the slide show
Select “Close” to return to the MS Home before executing the slide show in
Step 6 of “Sliding Material for a Presentation.”
Executing the Slide Show Promptly
As the settings are memorized even if you change the input after the setting
of steps 1 to 5 of “Sliding Material for a Presentation — Presentation
Viewer”, press the MS SLIDE key on the Remote Commander just as you
start the presentation. The input is changed to MS and the slide show starts
promptly. To end the slide show, press the MS SLIDE or ENTER key when
the slide show setting is “Auto”, or press the MS SLIDE key when the slide
show setting is “Manual”.
GB
Sliding Material for a Presentation — Presentation Viewer
12
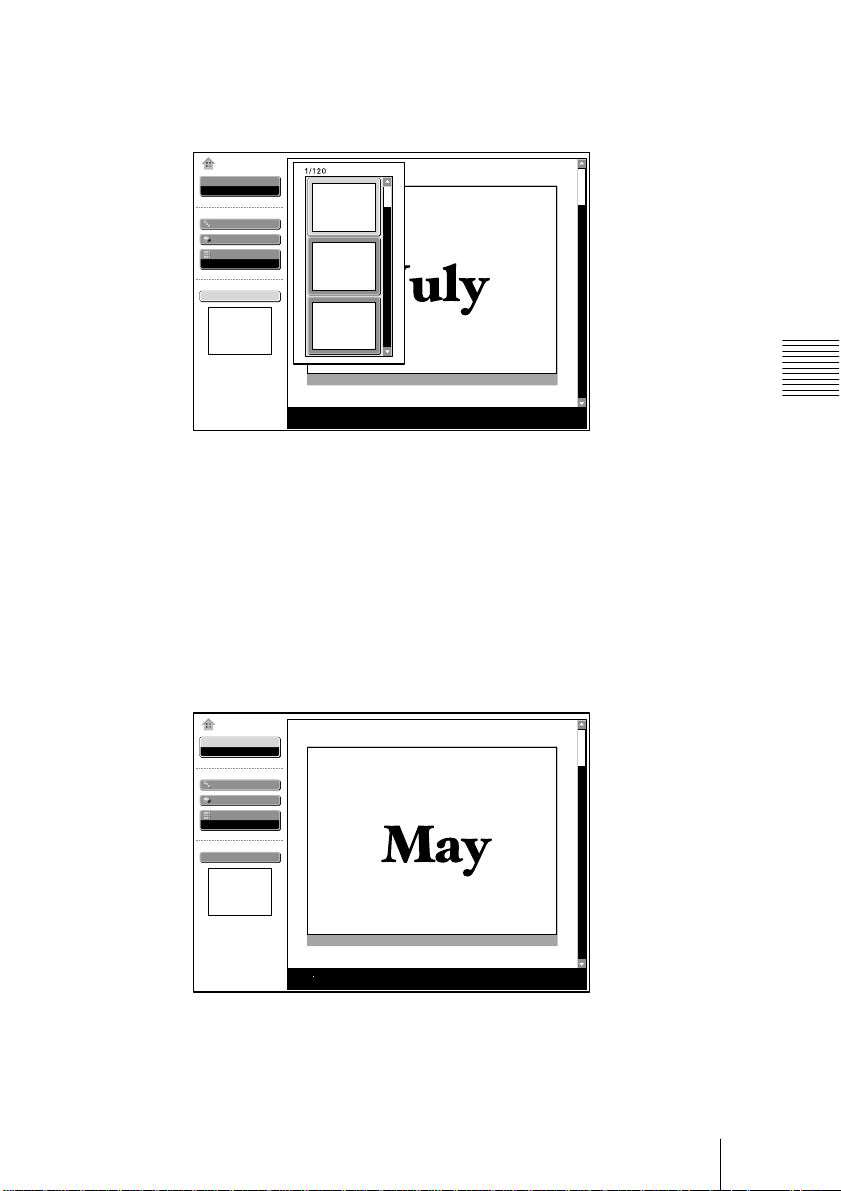
Sliding a Picture File — Picture Viewer
You can make the slide show by using still picture files (DCF-compatible) in
the JPEG format recorded by a digital camera or movie picture files in the
MPEG1 format recorded by the Sony MPEG MOVIE etc.
For details on the operations regarding the picture files, see “Operating the Picture
File” on page 20.
1 Press the INPUT key to select MS.
The MS Home appears.
MS Home
Select
Presentation Viewer
Slide Show
Option
Index Display
Normal
Select Contents
Presentation1
No.: 1/1234
Size: 1024x768
2 Select “Select”, then press the ENTER key.
A drop-down list appears.
Viewing the Slide
MS Home
Select
Presentation Viewer
Presentation Viewer
Picture Viewer
Slide Show
Option
Index Display
Normal
Select Contents
Presentation1
No.: 1/1234
Size: 1024x768
(Continued)
Sliding a Picture File — Picture Viewer
13
GB
3 Select “Picture Viewer”, then press the ENTER key.
Thumbnails of the picture files contained in the selected folder appear.
MS Home
Select
Picture Viewer
Picture viewer
Slide Show
Option
Index display
Normal
Select Contents
100MSDCF
No.: 1/1234
Size: 1024x768
File: SPJP0001.JPG
Date: 2003.JUL.15 12:34PM
: Appears when a file is protected.
: Appears when a startup file is set.
: Movie icon
4 Select “Select Contents”, then press the ENTER key.
The Select Contents menu appears.
Current folder
MS Home
Select
Picture Viewer
Slide Show
Option
Select Contents
DCIM
To upper stage
Off
No.: 1/1234
Size: 1024x768
File: SPJP0001.JPG
Date: 2003.JUL.15 12:34PM
First picture file in the current folder
Folders included in
the current folder
GB
14
Sliding a Picture File — Picture Viewer
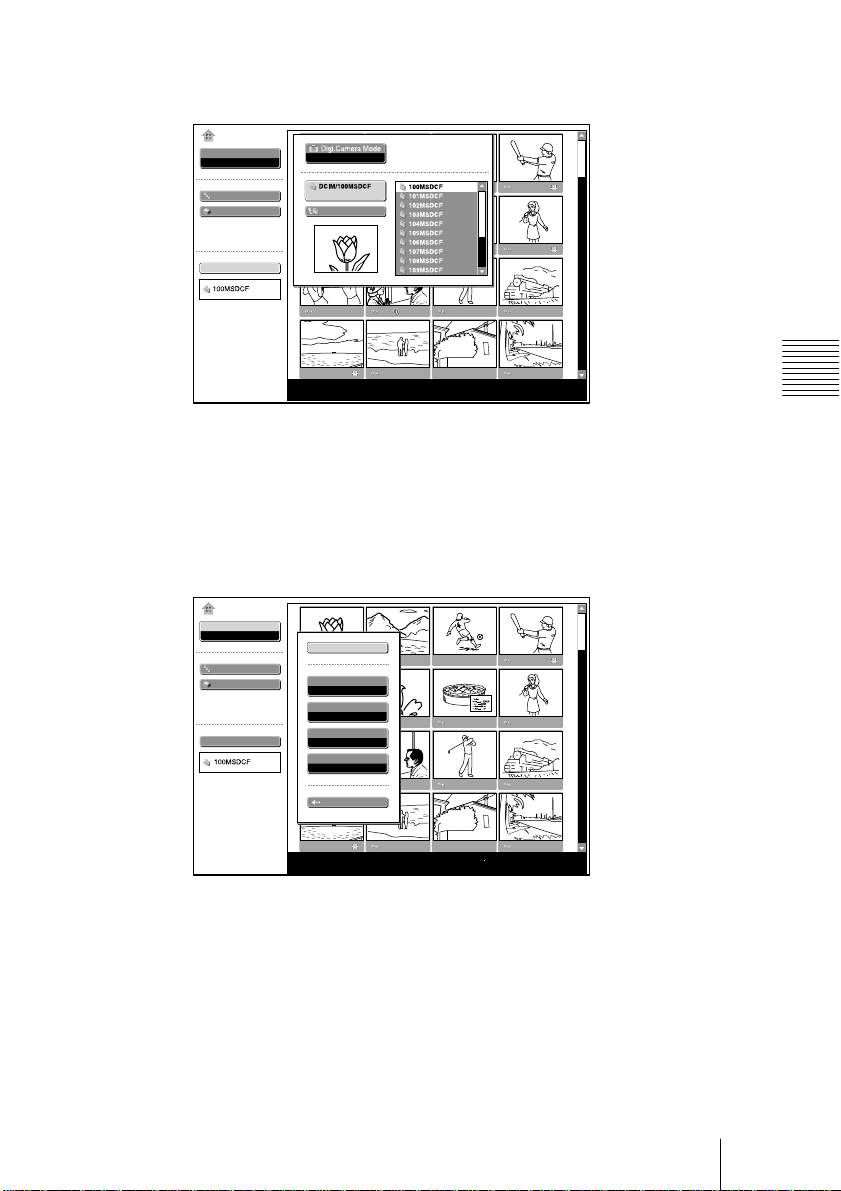
5 Select the current folder using the m or M key, then press the , key to
select the Select Folders menu.
MS Home
Select
Picture Viewer
Slide Show
Option
Select Contents
Off
No.: 1/1234
Size: 1024x768
File: SPJP0001.JPG
Date: 2003.JUL.15 12:34PM
6 Select the folder for your presentation, then press the ENTER key.
The title name and the first picture file of the selected folder are displayed.
To select the folders which are not displayed, press the , key to select the
slider in the Select Folders menu and press the m or M key. The next 10
folders appear.
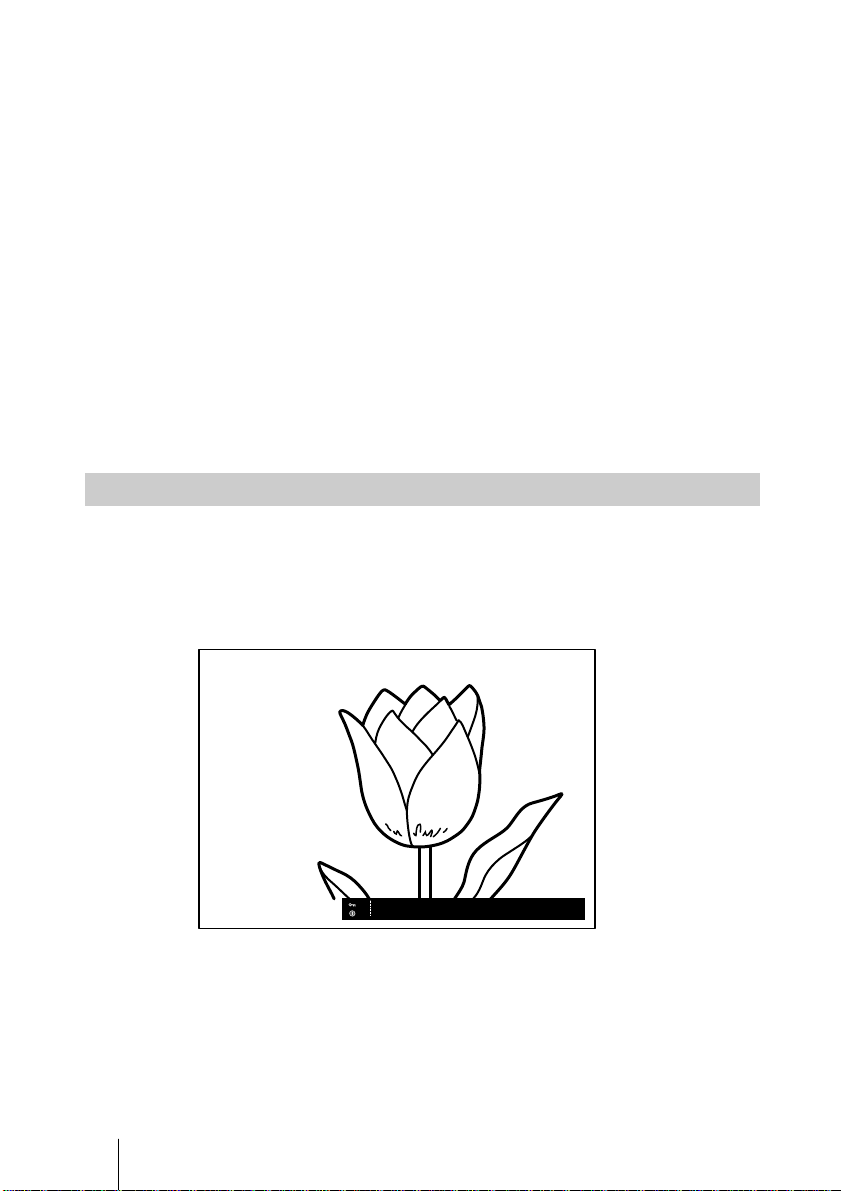
7 Select “Slide Show” in the MS Home, then press the ENTER key.
MS Home
Select
Picture Viewer
Slide Show
Option
Select Contents
Effect: set the effect when the slide is displayed
Advan. Slds.: set the automatic or manual slide
Interval: set the period for which one slide is displayed. The time is
approximate. When “Advan. Slds.” is set to “Manual”, it does not work.
Repeat: set to execute the slide show repeatedly or one time only.
Execute
Effect
Off
Advan. Slds.
Auto
Interval
5sec
Repeat
On
Close
No.: 1/1234
Size: 1024x768
File: SPJP0001.JPG
Date: 2003.JUL.15 12:34PM
Viewing the Slide
8 Select each item, then press the ENTER key.
9 Set each item, then press the ENTER key.
10Select “Execute”, then press the ENTER key.
Sliding a Picture File — Picture Viewer
15
GB
To execute the slide show
When “Advan. Slds.” in the slide show setting is set to “Auto”, the slides
change automatically. When a movie file is selected, the movie plays back
automatically, and after playback the next slide is displayed automatically.
When you want to end the slide show, press the MS SLIDE or ENTER key.
When it is set to “Manual”, press the following keys for the slide show.
,: to display the next slide
<: to display the previous slide
MS SLIDE: to end the slide show
When “Advan. Slds.” is set to “Manual”, the movie is not played back and the
first picture is displayed for a movie file. By pressing the , key the next slide is
displayed. To play back the movie, see “Playing Back a Movie File” on page 17.
To return to the MS Home before executing the slide show
Select “Close” to return to the MS Home before executing the slide show in
Step 9 of “Sliding a Picture File - Picture Viewer”.
Displaying a picture file on the full screen
1 Select a picture file in the thumbnail display, then press the ENTER key.
2 Select “Full Screen”, then press the ENTER key.
The selected picture file is enlarged on the full screen.
GB
To execute the slide show with the picture on the full screen, press the
following keys.
,: to display slides forward. (The slide show ends at the last picture file.)
<: to display slides backward. (The slide show ends at the first picture
file.)
MS SLIDE: to return to the MS Home
Sliding a Picture File — Picture Viewer
16
No.: 1/1234
Size: 1024x768
File: SPJP0001.JPG
Date: 2003.JUL.15 12:34PM
Executing the Slide Show Promptly
As the settings are memorized even if you change the input after the setting
of steps 1 to 9 of “Sliding a Picture File — Picture Viewer”, press the MS
SLIDE key on the Remote Commander just as you start the presentation.
The input is changed to MS and the slide show starts promptly. To end the
slide show, press the MS SLIDE or ENTER key when “Advan. Slds.” is set
to “Auto”, or press the MS SLIDE key when “Advan. Slds.” is set to
“Manual”.
Playing Back a Movie File
You can play back a movie using the Movie Player displayed on the screen
when “Advan. Slds.” is set to “Manual”. You can also start movie playback
by selecting a movie file in the thumbnail display mode.
Notes
• The Movie Player cannot be displayed when “Advan. Slds.” is set to
“Auto”.
• The unit can play back a MPEG1 movie file recorded by the Sony MPEG
MOVIE, etc. (Movies may occasionally skip when you watch them.)
Usable MPEG1 files: MPEG MOVIE AD/EX/HQ/HQX/CV, MPEG1 of
VAIO Giga pocket (equivalent to a video CD).
1 Follow steps 1 to 7 of “Sliding a Picture File — Picture Viewer”.
2 Set “Advan. Slds.” to “Manual” in the Slide Show setting menu.
MS Home
Select
Picture Viewer
Slide Show
Option
Select Contents
Execute
Effect
Off
Advan. Slds.
Manual
Interval
5sec
Repeat
On
Close
Viewing the Slide
3 Press the ENTER key.
4 Select “Execute”, then press the ENTER key.
To execute the slide show
Press the following keys.
,: to display the next slide
<: to display the previous slide
MS SLIDE: to end the slide show
No.: 1/1234
Size: 1024x768
File: SPJP0001.JPG
Date: 2003.JUL.15 12:34PM
Sliding a Picture File — Picture Viewer
(Continued)
17
GB
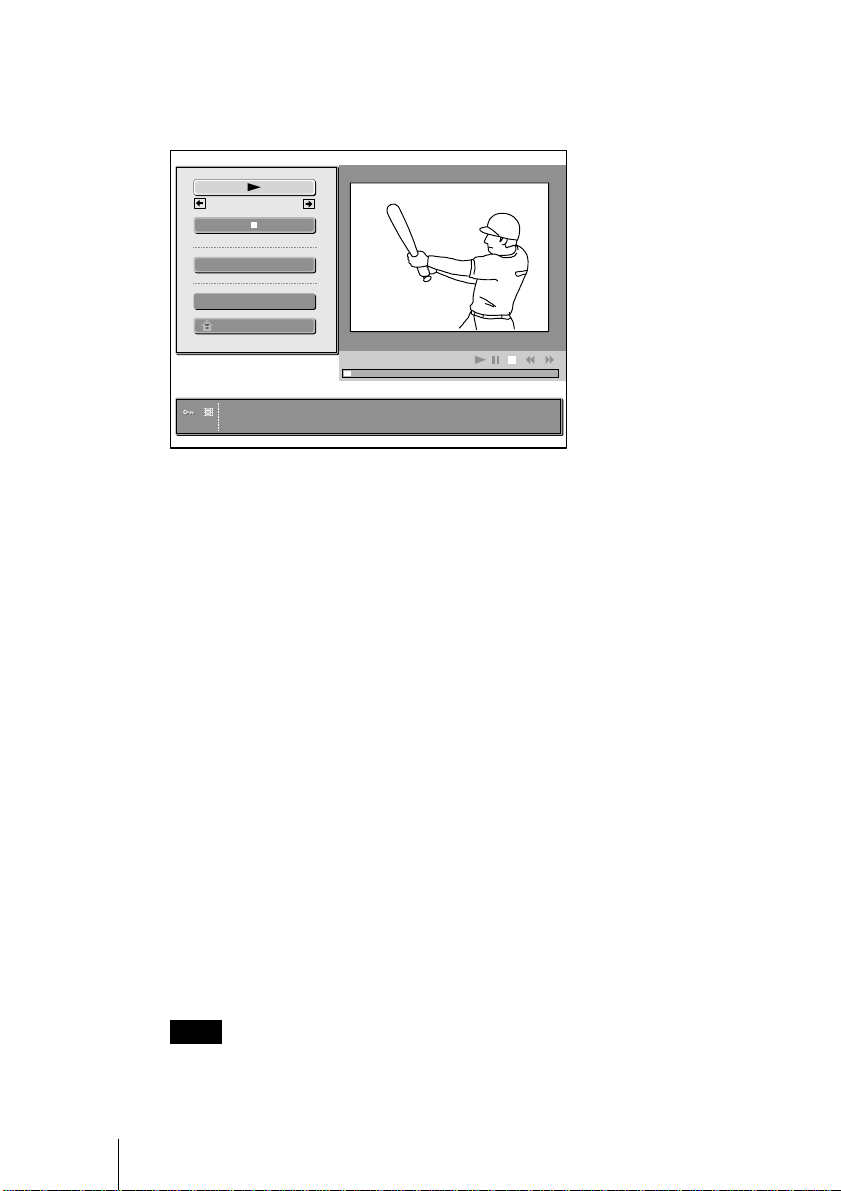
When a movie file is selected by pressing the < or , key, the Movie
Player appears on the screen. Operate the Movie Player as follows:
[Movie Player]
Prev.
Full Screen
Menu
MS Home
No.: 1/1234
Size: 320x240
N (play/pause): to play back. During playback, the button display is
changed to the X (pause) button.
x (stop): to stop playback
Full Screen: to play back on the full screen
Menu: to display the index screen
[Guide display]
< Prev.: to display the previous slide in the movie pause mode. During
playback, the guide display is changed to < Rew (rewind).
,Next: to display the next slide in the movie pause mode. During
playback, the guide display is changed to , FF (fast forward).
To play back a movie
Press N.
Playback starts. When the playback is finished, playback stops with the first
picture of the movie file displayed.
To stop the playback momentarily, press the m key to select x, then press
the ENTER key.
Next
File: BASEBALL.MPG
Date: 2003.JUL.15 12:34PM
To play back on the full screen
Select “Full Screen”, then press the ENTER key.
The picture is enlarged on the full screen and playback starts.
When you press the M, m, <, , or ENTER key during playback, the
Movie Player reappears on the screen.
Note
When the picture size is small, it is not enlarged on the full screen if you
select “Full Screen”.
GB
Sliding a Picture File — Picture Viewer
18

To return to the MS Home without executing the movie play
Select “MS Home”.
Executing the Slide Show Promptly
As the settings are memorized even if you change the input after the setting
of steps 1 to 3 of “Playing Back a Movie File”, press the MS SLIDE key on
the Remote Commander just as you start the presentation. The input is
changed to MS and the slide show starts promptly. To end the slide show,
press the MS SLIDE key.
To start full-screen playback when the thumbnails are displayed
1 Select a movie file, then press the ENTER key.
The index screen appears (see page 21.)
2 Select “Movie Player”, then press the ENTER key.
The Movie Player appears.
3 Select “Full Screen”, then press the ENTER key.
Playback starts automatically.
Operating the movie file
Select “Menu” in the Movie Player, then press the ENTER key.
The index screen is displayed. Using the index screen, you can show or
hide the movie file information, switch the sound, protect important movie
files, or delete unnecessary movie files.
For details on the operations of the index screen, see “Operating the Picture
File” on page 20.
Viewing the Slide
Sliding a Picture File — Picture Viewer
19
GB

B
Setting/Displaying the Picture File
Operating the Picture File
To operate the picture file, display the index screen (see pages 21 and 22. )
When the Presentation Viewer is displayed
To display the index screen, select the contents in the normal or thumbnail
display mode, then press the ENTER key.
You can enlarge a picture file on the full screen using the menu on the index
screen. If you press the ENTER key when a full-screen picture is displayed,
you can show or hide the picture file information.
When the Picture Viewer is displayed
The possible operations depend on the type of the picture file to be selected
(still picture/movie).
When “Thumbnail” is selected for “Index Display”
To display the index screen, select a thumbnail, then press the ENTER key.
You can perform the following operations using the menu on the index
screen: displaying a picture file on the full screen, protecting an important
picture file, rotating a picture file (still picture only), registering the startup
picture file (still picture only) and deleting a picture file.
When a full-screen still picture file is selected
To display the index screen, press the ENTER key when the picture is
displayed on the full screen.
You can perform the following operations using the menu on the index
screen: showing/hiding the picture file information, protecting an important
picture file, rotating a picture file, registering the startup picture file and
deleting a picture file.
GB
When a movie file (Movie Player) is selected
To display the index screen, select “Menu” on the Movie Player.
You can perform the following operations using the menu on the index
screen: showing/hiding the movie file information, switching the sound,
protecting an important movie file and deleting a movie file.
For details on the use of the index screen, see the relevant page.
Operating the Picture File
20
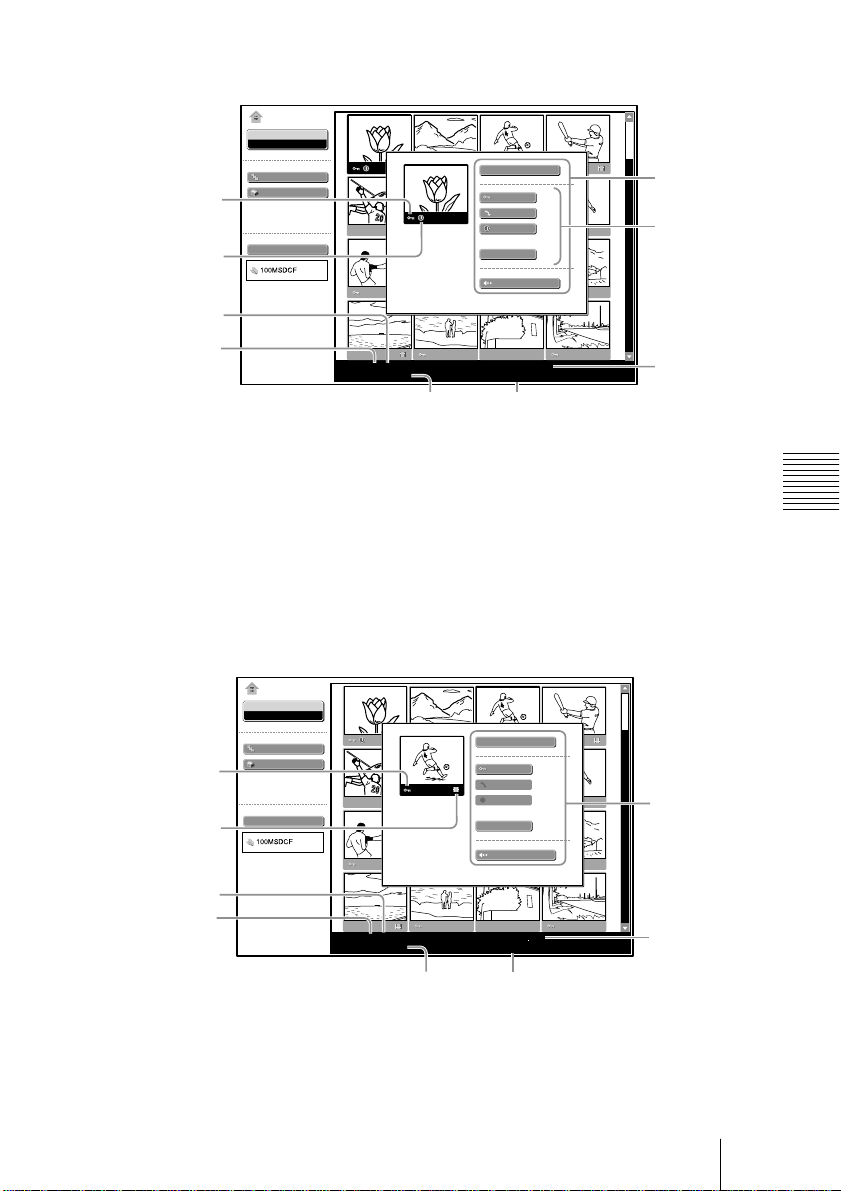
Index screen of a still picture file
MS Home
Select
Picture Viewer
Slide Show
Appears when a
Option
file is protected
Appears when a
Select Contents
startup file is set
Total number of
picture files in the
current content
Order in the
current content
No.: 1/1234
Size: 1024x768
To select a picture file in the thumbnail display mode, press the M/m/</,
key.
If you want to display other picture files when more than 16 picture files are
contained in the current content, select a picture file displayed in the bottom
row and press the m key, or select a picture file displayed on the right-most
column, press the , key to select the slider, then press the m key.
To start the slide show, press the MS SLIDE key in the index screen. The
slide show begins from the selected picture file.
Index screen of a movie file
Full Screen
Protect
Rotate
Startup
Delete
Close
File: SPJP0001.JPG
Date: 2003.JUL.15 12:34PM
DateResolution
Index screen
Appears when
the Picture
Viewer is
displayed
File name and
file format
Setting/Displaying the Picture File
Appears when a
file is protected
Appears for a
movie picture
Total number of picture
files in the current
content
Order in the current
content
MS Home
Select
Picture Viewer
Slide Show
Option
Select Contents
No.: 1/1234
Size: 1024x768
Movie Player
Protect
Rotate
Startup
Delete
Close
File: SPJP0001.JPG
Date: 2003.JUL.15 12:34PM
DateResolution
Operating the Picture File
Index screen
File name and
file format
21
GB
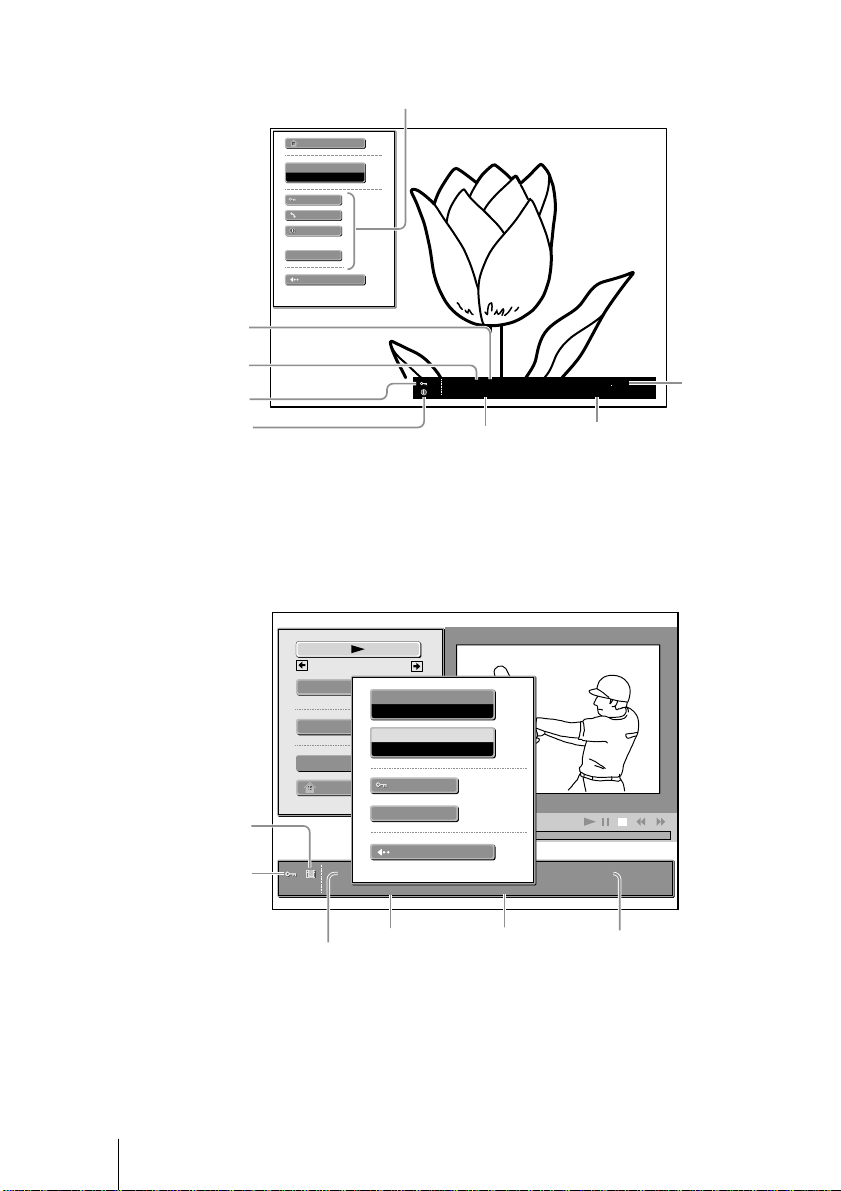
Index screen of a full-screen still picture file
Appears when the Picture Viewer is displayed
MS Home
Information
On
Protect
Protect
Rotate
Startup
Delete
Close
Total number of picture
files in the current content
Order in the current
content
Appears when a file
is protected
Appears when a startup
file is set
If you want to display another picture file when multiple picture files are
contained in the current content, press the , key.
To return to the MS Home, press the MS SLIDE key in the index full screen.
Movie Player
No.: 1/1234
Size: 1024x768
Resolution
File: SPJP0001.JPG
Date: 2003.JUL.15 12:34PM
Date
File name and
file format
GB
Movie icon
Appears when a
file is protected
Operating the Picture File
22
Prev.
Full Screen
Menu
MS Home
Next
Information
On
Audio Select
L/R
Delete
No.: 1/1234
Size: 320x240
Resolution Date
Order in the current content/
Total number of picture files in
the current content
Protect
Close
File: BASEBALL.MPG
Date: 2003.JUL.15 12:34PM
File name and
file format

Protecting an Important File
After selecting the file you want to protect, set “Protect” to “On” or “All
On”. When a file is protected, the protect mark is displayed.
Rotating a Picture File
After selecting the file you want to rotate, set “Rotate”. The picture rotates
90° on every pressing of the ENTER key.
Note
A protected file cannot be rotated.
Registering a File as the Startup Picture
You can register a picture file in the Memory Stick as the startup picture
file which is displayed when the power is turned on.
Set “Startup” to “Entry”. When the file is registered, the startup mark is
displayed.
When you want to use the registered picture file as the startup file, set
“Startup” of the Setting screen to “Custom” (see page 28.)
Note
As the setting of “Custom” is memorized in the Memory Stick, when you
want to use the registered picture file as the startup file, insert the Memory
Stick in the projector before turning on the projector.
Setting/Displaying the Picture File
Deleting a Picture File
You can delete the selected picture file or all picture files of the selected
contents.
1 Select “Delete”, then press the ENTER key.
2 Select an item. When “Selected file deleted” or “All files deleted” is
displayed, select “Yes”, then press the ENTER key.
All Img.: delete all picture files of the selected contents
Sel. Img.: delete the selected picture file
Close: when you do not want to delete the file
Note
A protected file cannot be deleted.
Showing/Hiding the Picture File Information
Select a picture file, select “Information” in “Menu” on the index screen of
the full-screen still picture or on the Movie Player, then press the ENTER
key. When you want to display the picture file information, select “On”.
The information is displayed at the bottom of the screen. If you do not want
to display the information, select “Off”.
Operating the Picture File
23
GB

When the Presentation Viewer is displayed, the number and size (resolution)
of the picture file are displayed. When the Picture Viewer is displayed, the
number, size (resolution), file format and recorded date of the picture file are
displayed.
Note
For a picture file processed on a computer, the renewal date may be
displayed instead of the recorded date.
Switching the Sound of a Movie File
1 Select a movie file, then press the ENTER key.
2 Select “Movie Player,” then press the ENTER key.
3 Select “Menu,” then press the ENTER key.
4 Select “Audio Select,” then press the ENTER key.
L/R: to hear the left and right sounds.
L: to hear the left sound.
R: to hear the right sound.
Notes
You cannot switch the sound of a Movie File in the following cases:
• When the audio sampling rate is incompatible.
• When the audio recording mode is monaural.
• When the audio recording mode is incompatible.
Sorting the Picture Files
You can sort the picture files in a folder by name or by the renewal date in
ascending/descending order.
1 Select “Option” in the MS Home, then press the ENTER key.
2 Select “File”, then press the , or ENTER key.
3 Select “Sort”, then press the ENTER key.
4 Select the item you want to set, then press the ENTER key.
Note
For a picture file processed on a computer, the displayed data may be
different from the renewal date.
GB
Operating the Picture File
24

Displaying Still Picture Files or Movie Files Only
You can filter all picture files contained in a folder to display the still picture
files or the movie files only.
1 Select “Option” in the MS Home, then press the ENTER key.
2 Select “File”, then press the , or ENTER key.
3 Select “Filter”, then press the ENTER key.
4 Select the item you want to set, then press the ENTER key.
Still: to display still pictures only
Movie: to display movie files only
Off: to display all files without filtering
Note
When the filter is set, the current filter name (Still or Movie) is displayed at
the right bottom of the MS Home.
Setting/Displaying the Picture File
Operating the Picture File
25
GB

B
Useful Settings
Displaying the Picture Files Recorded
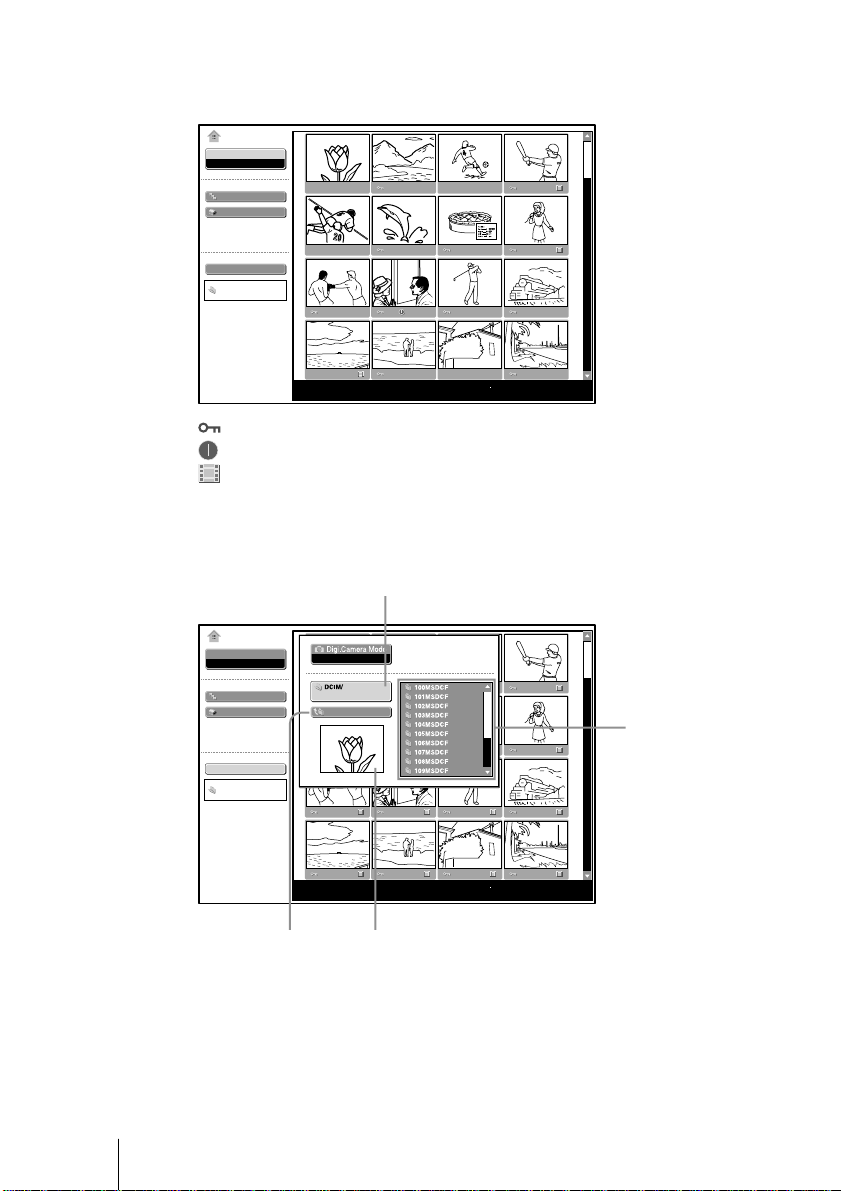
by a Digital Camera Only
The unit can choose and display the JPEG and MPEG1 picture files recorded
by a digital camera (DCF-compatible) only from among picture files stored
in a Memory Stick.
1 Select “Select Contents” in the MS Home, then press the ENTER key.
2 Select “Digi. Camera Mode”, then press the ENTER key.
MS Home
Select
Picture Viewer
Slide Show
Option
Select Contents
Off
On
Off
GB
No.: 1/1234
Size: 1024x768
File: SPJP0001.JPG
Date: 2003.JUL.15 12:34PM
3 Select “On”, then press the ENTER key.
MS Home
Select
Picture Viewer
Slide Show
Option
Select Contents
No.: 1/1234
Size: 1024x768
(Relative file mark): Appears if another file with the same name in the last
four figures is stored in the Memory Stick.
Notes
• This function does not work if more than 2000 picture files recorded by a
digital camera are stored in a Memory Stick.
• For a picture file recorded with theVoice Memo function of the Sony
digital camera, the still picture file is displayed only.
• If you delete a picture file with the relative file mark (
picture file will also be deleted.
Displaying the Picture Files Recorded by a Digital Camera Only
26
File: SPJP0001.JPG
Date: 2003.JUL.15 12:34PM
), its relative
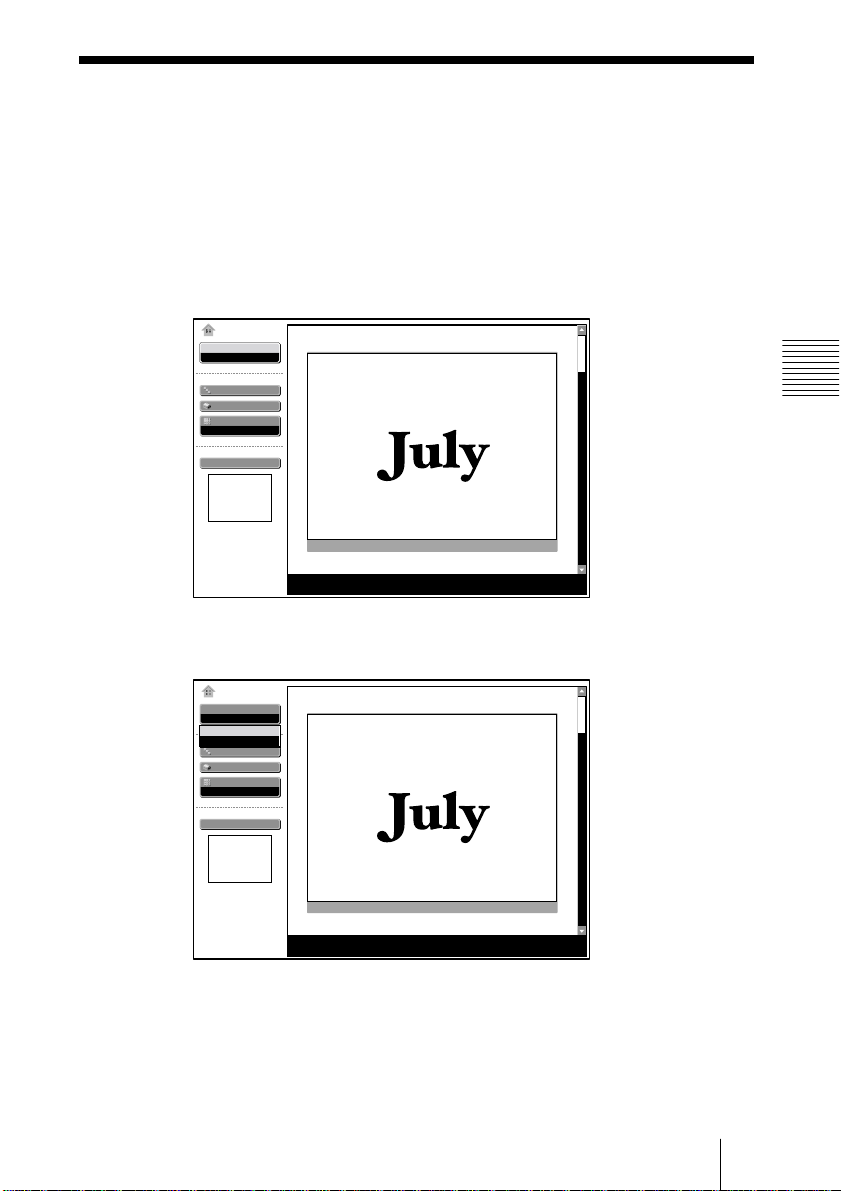
Starting a Presentation Automatically
— Autorun
When the Memory Stick with the picture file for which the Autorun
function is set by the Projector Station for Presentation is inserted in the
Memory Stick slot, the input is automatically switched to MS and the slide
show starts.
Setting the Autorun function
1 Select “Option” in the MS Home, then press the ENTER key.
2 Select “Setting”, then press the ENTER key.
3 Select “Autorun”, then press the ENTER key.
MS Home
Select
Presentation Viewer
Slide Show
Option
Index Display
Thumbnail
Select Contents
File
Setting
Memory Stick
Autorun
On
On
Off
Startup
Original
Useful Settings
Close
No.: 1/1234
Size: 1024x768
4 Select “On”, then press the ENTER key.
When you do not want to use the autorun function
Set “Autorun” to “Off”.
Notes
• When the autorun is not set to “On” by the Projector Station for
Presentation, you can not use the autorun function to start the slide show
even if you set “Autorun” to “On” in the MS Home.
• When you want to use the autorun function for a picture file in the JPEG
format, make the presentation material by the Projector Station for
Presentation and set the autorun function to “On”.
Starting a Presentation Automatically — Autorun
27
GB
Projecting a Selected File When the
Power is Turned on — Startup
When the power is turned on, the selected picture file is projected for about
30 seconds.
When you want to use the registered picture file as the startup file, you must register a
picture file as the startup file in the index screen (see page 23.)
1 Select “Option” in the MS Home, then press the ENTER key.
2 Select “Setting”, then press the ENTER key.
3 Select “Startup”, then press the ENTER key.
MS Home
Select
Picture Viewer
Slide Show
Option
Select Contents
File
Setting
Memory Stick
Close
Autorun
On
Startup
Original
Original
Custom
Off
GB
No.: 1/1234
Size: 1024x768
File: SPJP0001.JPG
Date: 2003.JUL.15 12:34PM
4 Select the item, then press the ENTER key.
Original: select the original picture memorized in the projector
Custom: select the picture file registered in the index screen which is saved
Off: when you do not want to set the startup
Notes
• When you want to clear the startup screen while displaying it, press the M/
m/</, or ENTER key.
• When you want to use the registered file with the custom setting, insert the
Memory Stick where the registered file is saved in the projector, then
turn on the power.
• You can register one startup file per one Memory Stick.
28
Projecting a Selected File When the Power is Turned on — Startup
The original picture cannot be changed.
in the Memory Stick
B
Operating Memory Stick
Displaying the Memory Stick
Information
You can display the type and the used and remaining capacity of the
Memory Stick in use. The remaining capacity of the Memory Stick is
also displayed at the right bottom of the MS Home.
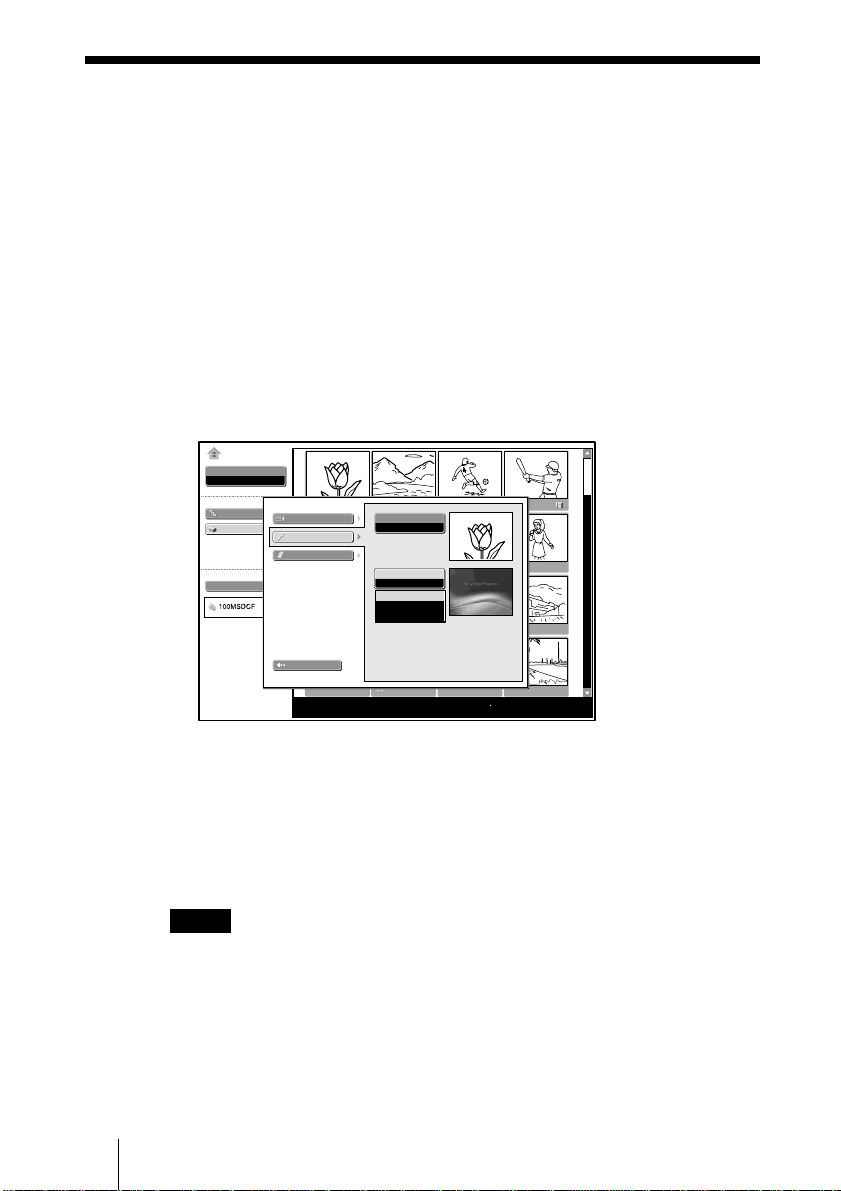
1 Select “Option” in the MS Home, then press the ENTER key.
2 Select “Memory Stick”.
The information of the Memory Stick in use is displayed.
MS Home
Select
Picture Viewer
Slide Show
Option
Select Contents
File
Setting
Memory Stick
Close
No.: 1/1234
Size: 1024x768
Type: MEMORYSTICK 128M
Format
Capacity: 123.3MB
Used: 30.8MB
Remaining: 92.5MB
File: SPJP0001.JPG
Date: 2003.JUL.15 12:34PM
Useful Settings
To return to the MS Home
Select “Close”.
Displaying the Memory Stick Information
29
GB
Operating Memory Stick
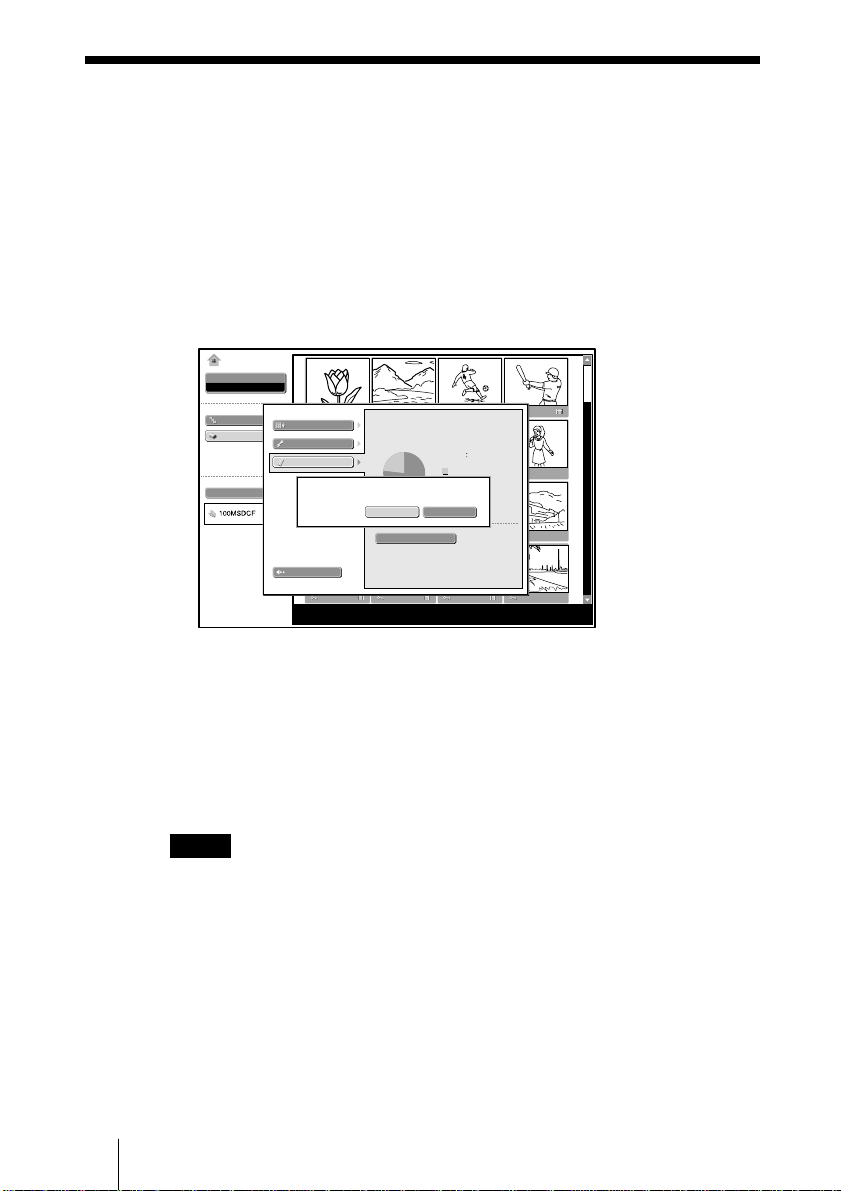
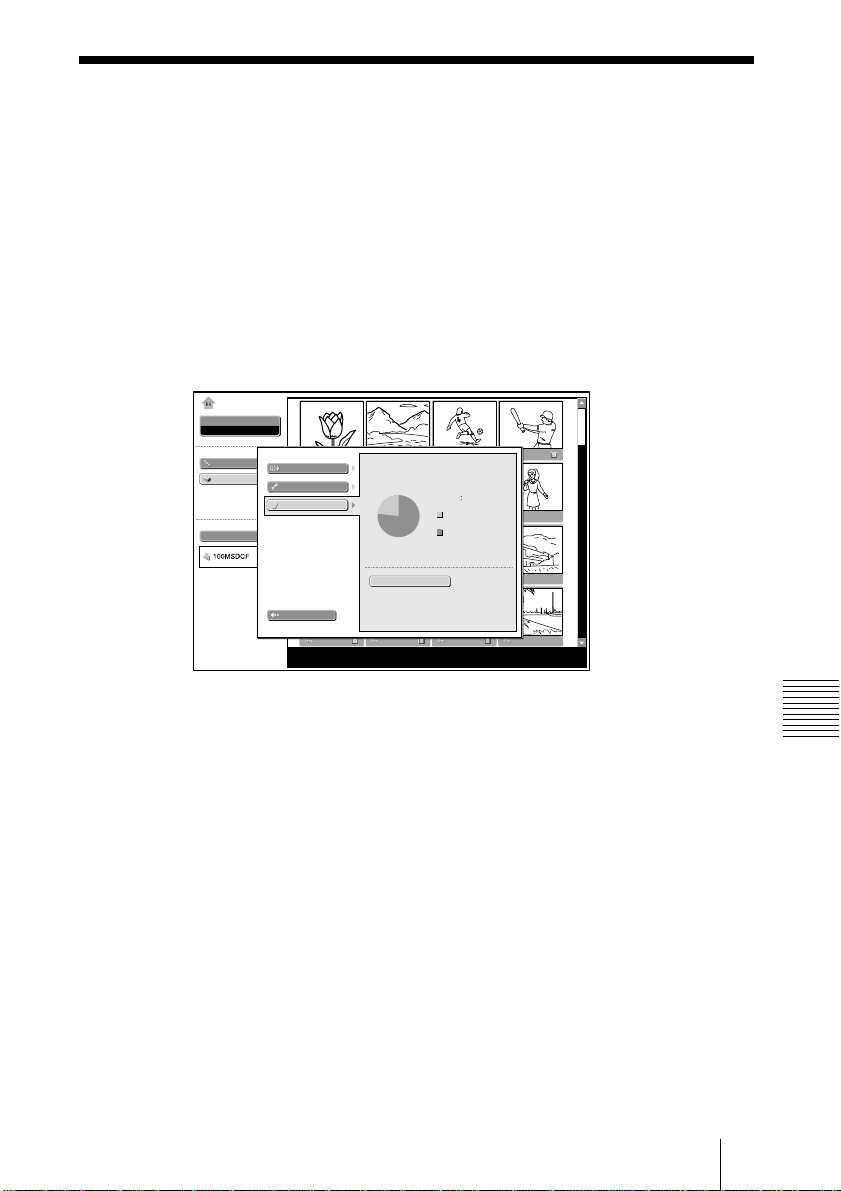
Formatting a Memory Stick
When a Memory Stick cannot be used, format it by the projector.
When a Memory Stick is formatted, its data is cleared.
1 Select “Option” in the MS Home, then press the ENTER key.
2 Select “Memory Stick”, then press the , or ENTER key.
3 Press the ENTER key again.
MS Home
Select
Picture Viewer
Slide Show
Option
Select Contents
File
Setting
Memory Stick
All files deleted
Close
Type: MEMORYSTICK 128M
No
Yes
Format
Capacity: 123.3MB
Used: 30.8MB
Remaining: 92.5MB
GB
4 When “All files deleted” is displayed, select “Yes”, then press the
ENTER key.
Formatting starts.
When you want to return to the MS Home before formatting the
Memory Stick
Select “Close”.
Notes
• When the Memory Stick is formatted, the protected picture file is also
cleared.
• When the Memory Stick with the write-protect tab set to LOCK is to be
formatted, the “Memory Stick locked” is displayed.
• While formatting the Memory Stick, the operations for the Memory
Stick of the Projector Station for Presentation and the key operation in the
MS Home cannot be performed.
30
Formatting a Memory Stick
No.: 1/1234
Size: 1024x768
File: SPJP0001.JPG
Date: 2003.JUL.15 12:34PM
 Loading...