

Sony VID-P50 Operating Instructions Manual

Operation
Specifications
3-861-299-21(1)
Changing the Camera Direction
This unit allows you to flip up the camera through 90
degrees. You can shoot materials pasted on the wall or
even yourself. If you have removed the closeup lens,
the lens and the object must be 80 cm (31
more apart.
Closeup lens
1
/2 inches) or
Shooting a three-dimensional object
To shoot and display a three-dimensional object, let
down the camera stand. You can also shoot it from one
angle or from the top.
Let down the camera stand.
Shoot the object
from the top.
Color system PAL color system
Pickup device 1/3” interline transfer method, CCD
(Charge Coupled Device)
Resolution Horizontal: 450 lines
Vertical: 400 lines
Picture elements 437,000, 752 × 582 (H/V)
Filming range 300 × 225 mm (at wide-angle)
25 × 19 mm (at telephoto)
Lens ×12 power zoom optical lens
Focus Auto
Iris Auto
White balance Auto
Light Arm light: 4W fluorescent lamp (1)
Output connector VIDEO OUT (Phono connector) (1)
1 Vp-p, 75 Ω, sync negative
S VIDEO OUT (4-pin mini DIN)
(1)
Y: 1 Vp-p, 75 Ω
C: Burst 0.3 Vp-p, 75 Ω
Power requirements
230 V AC 50/60 Hz
Power consumption
10 W
Dimensions After set up: Approximately
335 × 525 × 355 mm (w/h/d)
1
/4 × 20 3/4 × 14 inches)
(13
After collapsed: Approximately
335 × 70 × 550 mm (w/h/d)
1
/4 × 2 7/8 × 21 3/4 inches)
(13
Mass. Approximately 4.1 kg (9 lb 1 oz)
Supplied accessories
AC power cord 2 m (6.6 ft)
Operating Instructions (1)
Video Presentation
Stand
Operating Instructions
Before operating the unit, please read this manual
thoroughly and retain it for future reference.
Shoot the object
from one angle.
Note
The auto-focus may not function properly for objects
that have many small characters or little shading and
gradation. Zoom the object using the Zoom switch.
Sony Corporation Printed in Japan
The design and specifications are subject to change
without notice.
VID-P50
1997 by Sony Corporation
Location and Function
Warning
Owner’s Record
The model and serial numbers are located on the
bottom of the unit. Record the serial number in the
space provided below. Refer to them whenever you
call upon your Sony dealer regarding this product.
Model No. VID-P50 Serial No.
WARNING
To prevent fire or shock hazard, do not
expose the unit to rain or moisture.
This symbol is intended to alert the
user to the presence of uninsulated
“dangerous voltage” within the
product’s enclosure that may be of
sufficient magnitude to constitute a risk
of electric shock to persons.
This symbol is intended to alert the
user to the presence of important
operating and maintenance (servicing)
instructions in the literature
accompanying the appliance.
* The graphical symbols are on the bottom enclosure.
Für Kunden in Deutschland
Dieses Produkt kann im kommerziellen und in
begrenztem Maße auch im industriellen Bereich
eingesetzt werden. Dies ist eine Einrichtung, welche
die Funk-Entstörung nach Klasse B besitzt.
VORSICHT
Um Feuergefahr und die Gefahr eines elektrischen
Schlages zu vermeiden, darf das Gerät weder Regen
noch Peuchtigkeit ausgesetzt werden.
Precautions
•Unplug this unit from the wall outlet when it is not
being used for a long period of time.
To disconnect the cord, pull it out by grasping the
plug. Never pull it out by the cord itself.
•The fluorescent lamps can get hot during operation.
Do not touch the lamps during operation and when
collapsing this unit.
•Clean the lens with an air spray or soft dry cloth,
taking care not to scratch it.
•Clean the cabinet with a soft cloth lightly moistened
with a mild detergent solution. Never use any type of
solvent such as alcohol or benzine, which might
damage the finish.
•When the fluorescent lamp flashes or gets
darkened, purchase a 4-watt fluorescent lamp
from your authorized Sony dealer.
Features
The VID-P50 Video Presentation Stand is compactly
designed. It provides a high quality, high performance
display with very easy operation. It has the following
features.
•Built-in power zoom optical lens (×12)
•Focus, iris and white balance are adjusted
automatically after power on.
•By flipping the camera upwards through 90 degrees,
you can shoot materials pasted on the wall or even
yourself.
•Turning the power on/off automatically turns the
light on/off.
•Composite video output and S video output
•Both landscape and portrait A4 documents can be
placed on the stage.
•The unit can be collapsed so easily and weights so
little (4.1 kg (9 lb 1 oz)) that it can be carried with no
trouble.
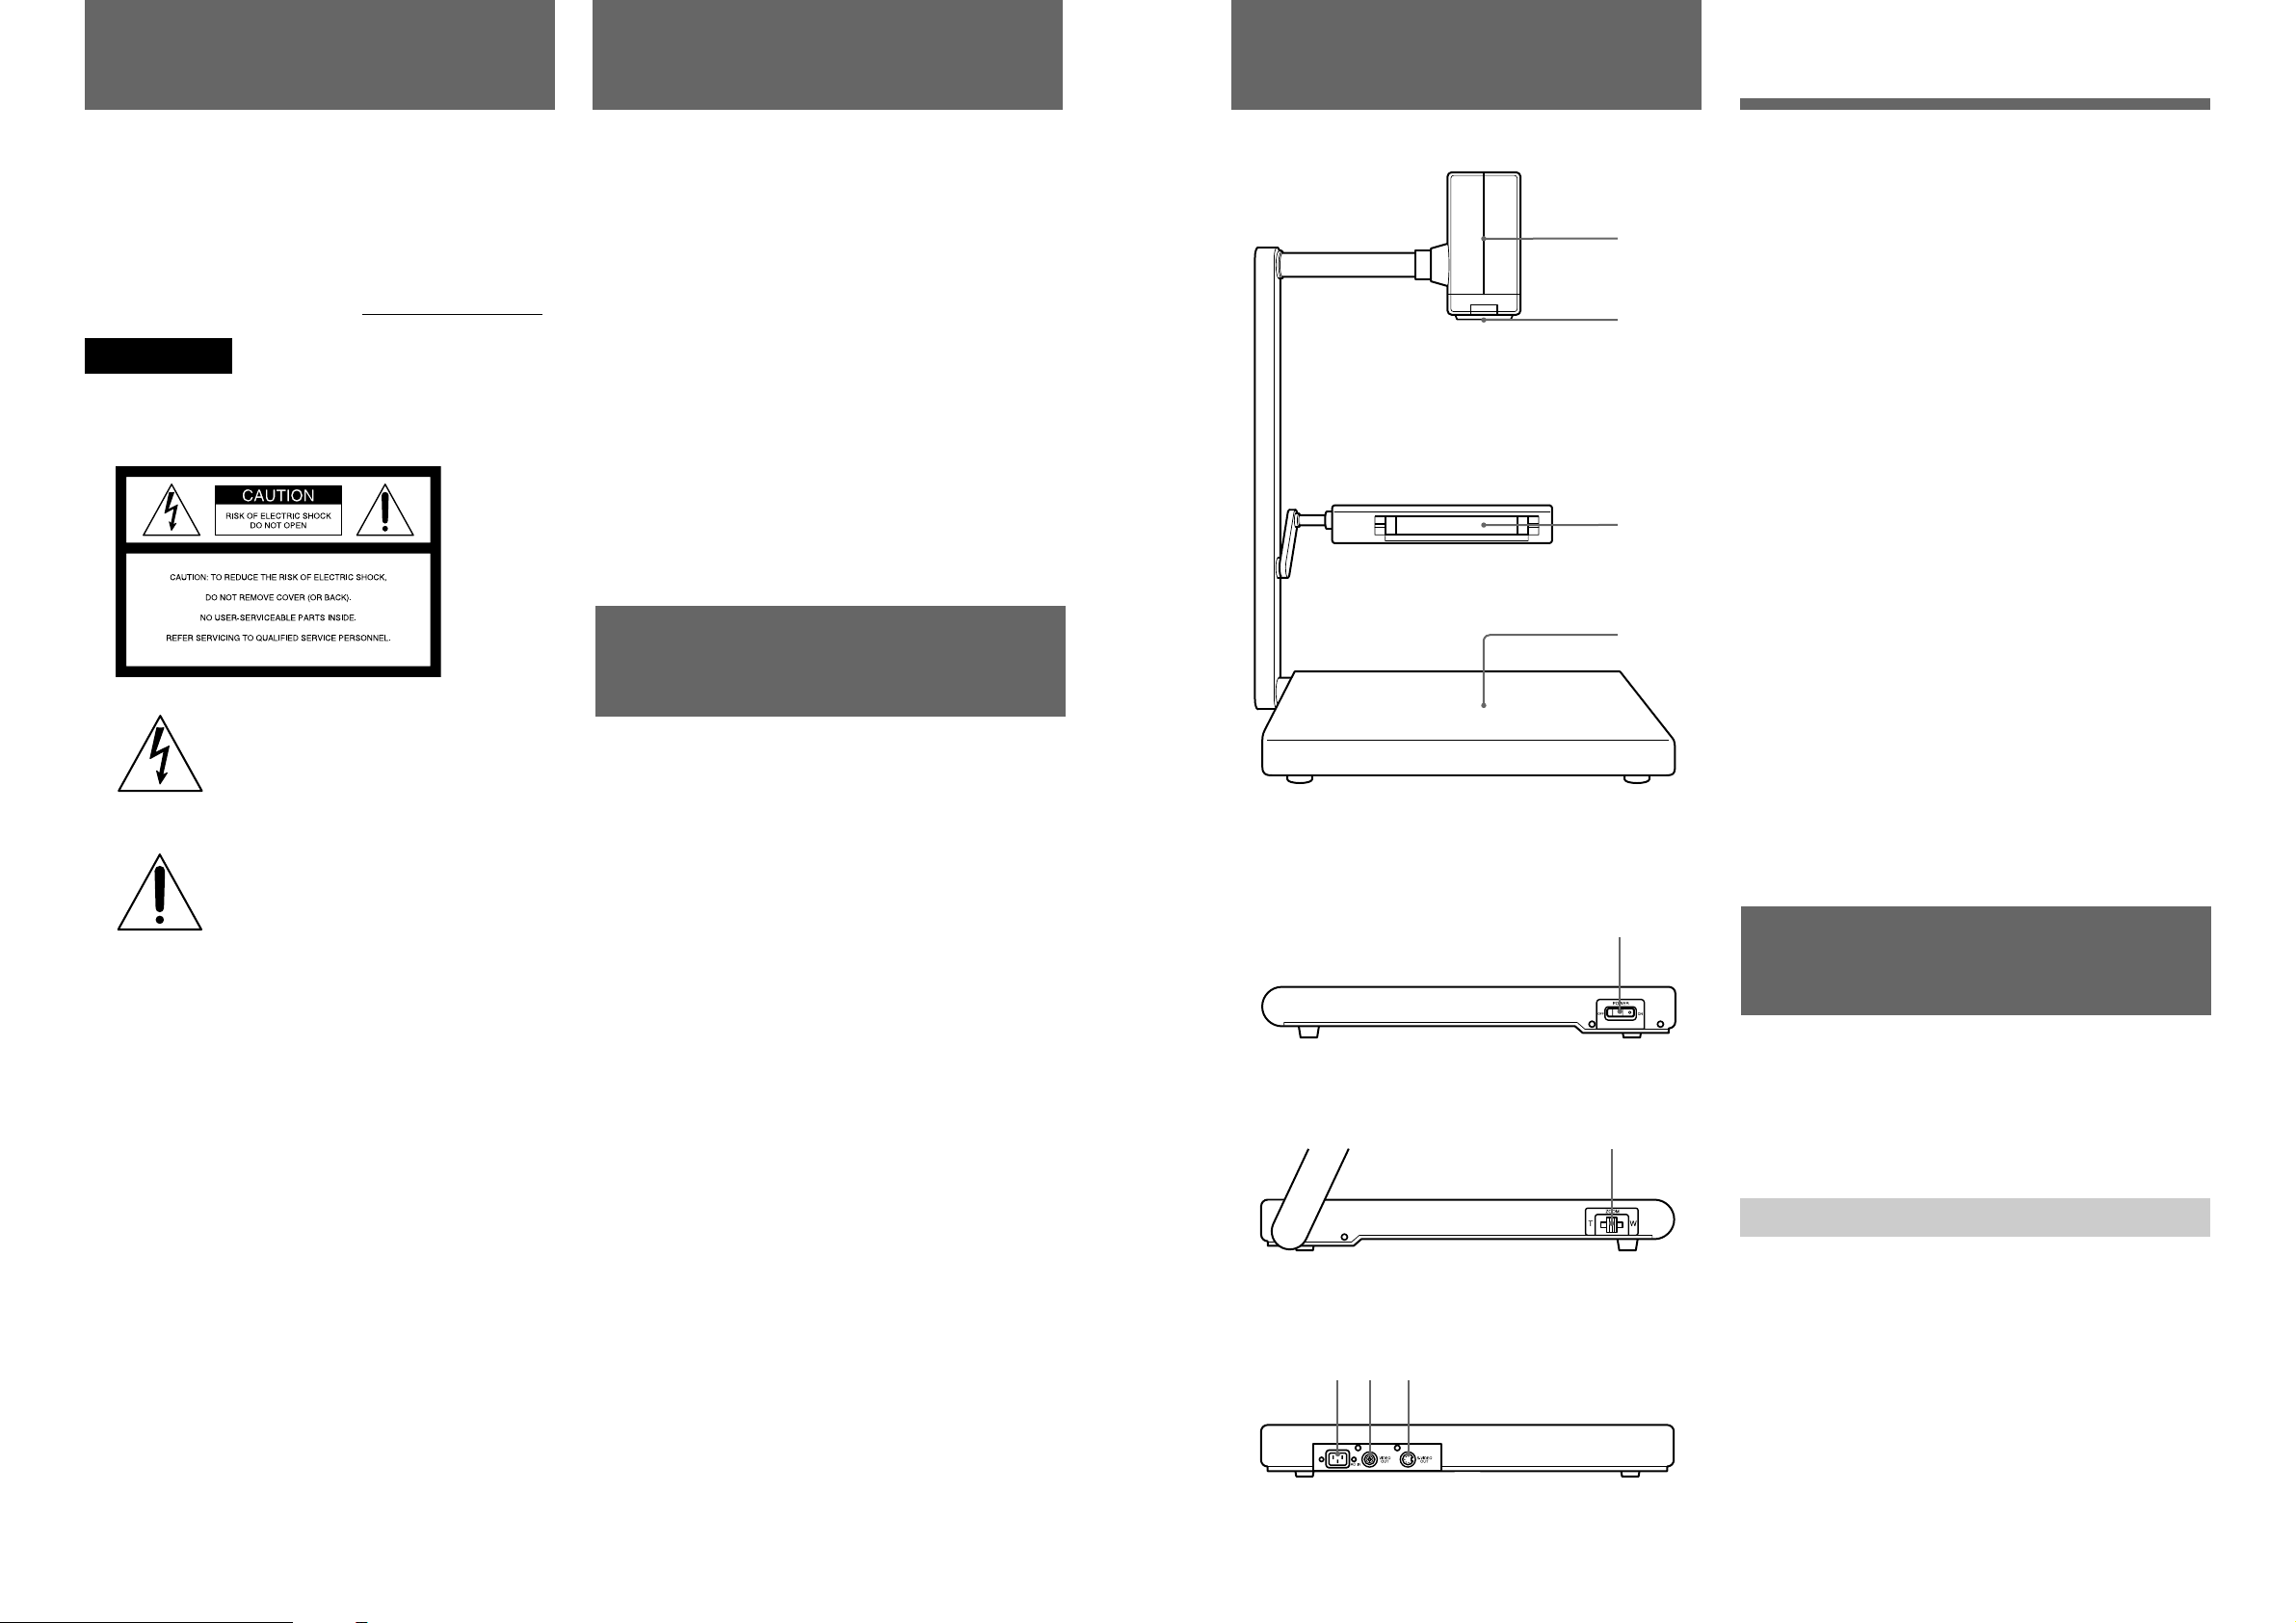
of Controls
■ Right-side Panel
■ Left-side Panel
■ Rear Panel
798
6
1
2
3
4
5
1 Camera
The camera can flip upwards as much as 90 degrees.
2 Lens
The closeup lens is attached to the lens. To remove the
closeup lens, pull the knob (green) of the closeup lens.
3 Arm light
At power on, arm light automatically turns on.
4 Stage
Place the object on here. (Landscape/portrait A4/Letter
size document)
5 Power switch
6 Zoom switch
Sliding the switch to the end activates high speed
zooming and sliding the switch a short distance
activates slower zooming.
7 AC inlet
8 Composite video out connector (VIDEO OUT)
This connector supplies a 1.0 Vp-p, 75 Ω composite
video signal to a color monitor, projector or VCR.
9 S video output connector (S VIDEO OUT)
This connector supplies a 1.0 Vp-p, 75 Ω S video
signal to a color monitor, projector or VCR which has
an S video input connector.
Operation
At power on, this unit automatically turns on the arm
light, adjusts the focus, iris (brightness), and white
balance. The only thing to do now is to zoom the
image on the screen to display a normal document.
Zooming the Image on the Screen
To zoom into or out from the image on the screen, use
the Zoom switch on the left-side panel. This unit offers
two levels of speed zooming. Slide the switch to the
end for high speed zooming and a shorter distance for
slower zooming.
To zoom out from the image for panoramic long shots,
slide the switch to the W (wide angle) side. To zoom
into the image for close-ups, slide the switch to the T
(telephoto) side.
 Loading...